
KX-TCD580 - Phone PANASONIC - Free user manual and instructions
Find the device manual for free KX-TCD580 PANASONIC in PDF.


User questions about KX-TCD580 PANASONIC
0 question about this device. Answer the ones you know or ask your own.
Ask a new question about this device
Download the instructions for your Phone in PDF format for free! Find your manual KX-TCD580 - PANASONIC and take your electronic device back in hand. On this page are published all the documents necessary for the use of your device. KX-TCD580 by PANASONIC.
USER MANUAL KX-TCD580 PANASONIC
natural_image
Illustration of a desktop computer tower and a mobile phone on a stand (no text or symbols)SIMS
Operating Instructions
Digital Cordless Phone
Model No. KX-TCD560E
Digital Cordless Answering System
Model No. KX-TCD580E

natural_image
Black-and-white interior photo of a modern meeting room with a round table, chairs, and large windows (no visible text or symbols)This unit is compatible with Caller ID and SMS. To use these features, you must subscribe to the appropriate service of your service provider.
Charge the battery for about 5.5 hours before initial use.
Please read these operating instructions before using the unit and save them for future reference.
Preparation
Accessory information ....3
Important information .... 5
Controls and displays....6
Connections 9
Battery installation .....10
Battery charge 10
Battery replacement....11
Turning the power on/off 11
Setting the date and time ..... 11
Telephone
Making calls 13
Answering calls .....15
Handset phonebook....16
Base unit phonebook (KX-TCD580 only)20
Useful Telephone Settings
Guide to handset settings .....23
Handset settings .....25
Guide to base unit settings.....30
Base unit settings.....31
Optional Telephone Services
Caller ID service....34
SMS (Short Message Service).....36
Sending a message .....36
Receiving a message....37
Guide to SMS settings .....38
Character entry for SMS .....40
Answering System Features (KX-TCD580 only)
Answering system .....42
Turning the answering system on/off . . .42
Greeting message .....42
Listening to messages .....43
Recording a voice memo .....43
Memory capacity .....44
Using direct commands .....44
Remote operation....45
Guide to answering system settings ...46
Multi-unit Operation
Operating additional units 48
Registering a handset to a base unit . . . 48
Intercom between handsets.....49
Copying handset phonebook entries to other handsets 49
Transferring calls between handsets, conference calls....50
Walkie-Talkie 51
Useful Information
Wall mounting 53
Using the belt clip 55
Using an optional headset .... 55
Character entry 56
Troubleshooting 58
Technical information 61
Conditions of guarantee....62
Index
Index 63
Accessory information
Thank you for purchasing a new Panasonic digital cordless phone.
Sales and support information
Customer Care Centre
●For UK customers: 08700 100 076
●For Republic of Ireland customers: 01289 8333
- Visit our website for product information: www.panasonic.co.uk
• E-mail: customer.care@panasonic.co.uk
Direct Sales at Panasonic UK
- Order accessory and consumable items for your product with ease and confidence by phoning our Customer Care Centre Monday - Friday, 9:00 am - 5:30 pm. (Excluding public holidays)
- Or go on line through our Internet Accessory ordering application at www.panasonic.co.uk
- Most major credit and debit cards accepted.
- All enquiries transactions and distribution facilities are provided directly by Panasonic UK Ltd.
- It couldn't be simpler!
- Also available through our Internet is direct shopping for a wide range of finished products, take a browse on our website for further details.
Additional/replacement accessories
| Model No. Description | |
| N4HHGMB00007 or HHR-P103 | Rechargeable nickel metal hydride (Ni-MH) battery |
| KX-TCA158E Additional handset | |
| KX-TCA89EX Headset | |
Included parts
| Base unit AC adaptor (for base unit) | Order No. PQLV19EZ(PQLV19E) | Telephone line cordOrder No. PQJA87S (for UK) |
 | 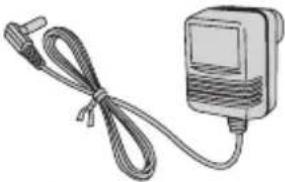 Important:•Use only the included6 V/500 mA AC adaptorwhen connecting thebase unit. Important:•Use only the included6 V/500 mA AC adaptorwhen connecting thebase unit. |  |
| Handset Battery | Order No.N4HHGMB00007 | Battery coverOrder No. PSKK1047Z2 |
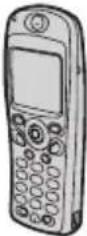 |  |  |
| Belt clipOrder No. PSKE1070Z2 | Charger unitCharger: Order No. PQLV30027ZSAC adaptor (for charger): Order No. KX-TCA1E-1 | |
 | 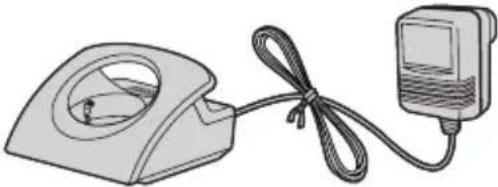 Important:•Use only the included 9 V/350 mA AC adaptor whenconnecting the charger. Important:•Use only the included 9 V/350 mA AC adaptor whenconnecting the charger. | |
| Operating instructions Quick guide SMS guide | ||
 |  |  |
Important information
General
- Use only the AC adaptors included with this product, noted on page 4.
- Connect the base unit AC adaptor to a 220–240 V AC outlet only.
- Connect the charger AC adaptor to a 230–240 V AC outlet only.
● This product is unable to make calls when: - The portable handset battery needs recharging or has failed.
- There is a power failure.
- The key lock feature is turned on.
- The direct call feature is turned on (only the phone number stored in the unit as the direct call number can be called).
- The call bar feature is turned on (only phone numbers stored in the unit as emergency numbers can be called).
- Do not open the base unit, charger, or handset (other than to replace the battery).
● This product should not be used near emergency/intensive care medical equipment and should not be used by people with pacemakers.
- Care should be taken that objects do not fall onto, and liquids are not spilled into, the unit. Do not subject this product to excessive smoke, dust, mechanical vibration or shock.
Environment
- Do not use this product near water.
- This product should be kept away from heat sources such as radiators, cookers, etc. It should also not be placed in rooms where the temperature is less than 5 °C or greater than 40 °C.
●The AC adaptors are used as the main disconnect devices. Ensure that the AC
outlets are located/installed near the unit and are easily accessible.
Warning:
- To prevent the risk of electrical shock, do not expose this product to rain or any other type of moisture.
Location
- For maximum distance and noise-free operation, place your base unit:
– Away from electrical appliances such as TVs, radios, personal computers or other phones. - In a convenient, high and central location.
- You can increase the range of the base unit by using a DECT repeater. Consult your Panasonic dealer for details. Before registering the repeater to this base unit, you must change the base unit PIN to a number between 9000 and 9999 (page 32), then disconnect the base unit AC adaptor and connect it again.
Battery caution
- We recommend using the battery noted on page 3. Use only a rechargeable battery.
- Do not dispose the battery in a fire, as they may explode. Check local waste management codes for special disposal instructions.
- Do not open or mutilate the battery. Released electrolyte from the battery is corrosive and may cause burns or injury to the eyes or skin. The electrolyte may be toxic if swallowed.
- Exercise care when handling the battery. Do not allow conductive materials such as rings, bracelets or keys to touch the battery, otherwise a short circuit may cause the battery and/or the conductive material to overheat and cause burns.
- Charge the battery in accordance with the information provided in these operating instructions.
Controls and displays
Controls
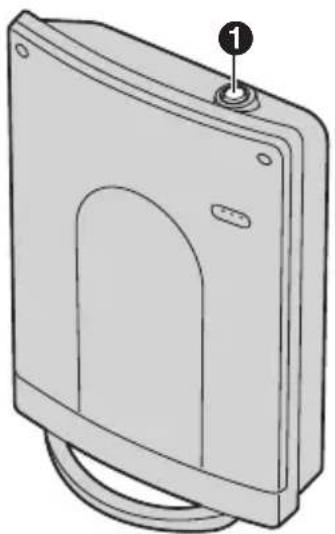
Base unit
natural_image
Illustration of a rectangular electronic device with a mounting bracket and cable (no text or symbols)①[•••] (Page)
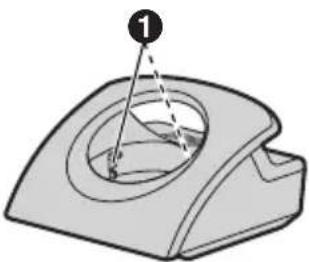
Charger
natural_image
Technical diagram of a mechanical component with a circular feature and numbered callout (no text or symbols)①Charge contacts
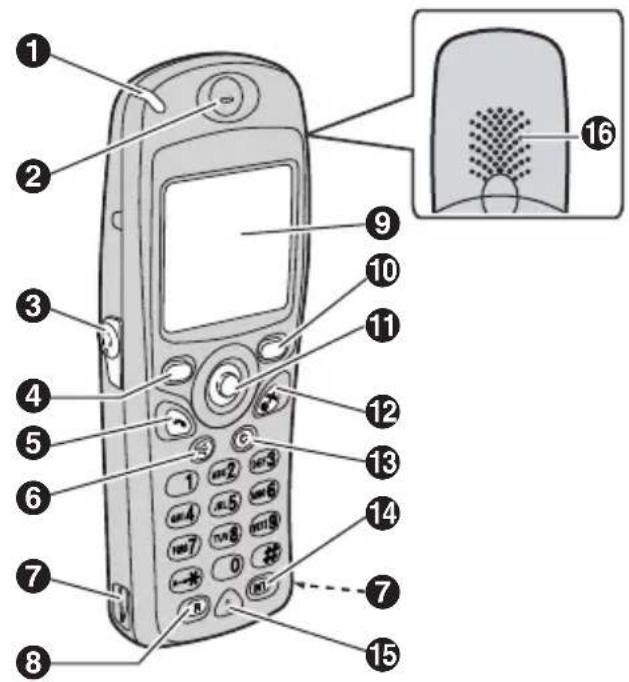
Handset
text_image
Labeled diagram of a mobile phone with numbered parts and an inset showing a textured cover or device.①Ringer indicator/Charge indicator
②Receiver
③Headset socket
④ Left soft key
⑤【→】(Talk)
⑥【◀】(Speakerphone)
⑦Charge contacts
⑧[R] (Recall)
⑨Display
⑩Right soft key
⑪Joystick
⑫【×①】(Off/Power)
⑬[C] (Clear)
⑭【INT】(Intercom)
⑮Microphone
⑯Speaker
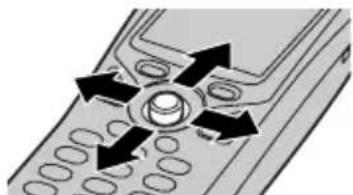
Using the joystick
The handset joystick can be used to navigate through menus and to select items shown on the display, by pushing it up, down, left, or right.
natural_image
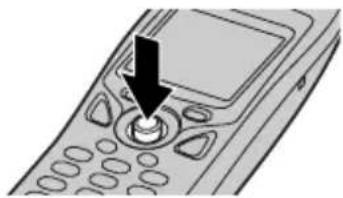
Diagram of a mobile phone with four directional arrows indicating rotation or movement (no text or symbols)It can also be used to select the centre soft key icon, by pressing down on the centre of the joystick.
natural_image
Illustration of a mobile phone's control panel with a black arrow pointing to the button (no text or symbols present)Note:
- Up to 5 menu items can be displayed at a time. To select a menu item not shown on the current page, scroll up or down by pushing the joystick up or down, respectively.
Displays
Display icons
Various icons appear on the handset display to indicate the current status of the unit.
| Display icon | Meaning |
| Within range of a base unitWhen flashing: No base unit (out of range of base unit, handset is not registered to base unit, no power on base unit) | |
| Handset is accessing base unit (intercom, paging, changing base unit settings, etc.) | |
| Handset is on an outside call | |
| Call bar is on (page 27) | |
| Missed call (Caller ID subscribers only; page 34) | |
| Phonebook is being accessed | |
| Display icon | Meaning |
| Answering system is on(page 42) and/or new messages have been recorded (page 43) (KX-TCD580 only) | |
| Battery strength | |
| Ringer volume is off (page 25) | |
| Direct call is on (page 27) | |
| H/set 1 | Handset number or name(page 26) |
| Vibration is on (page 25) | |
| New SMS message received (SMS users only; page 37) | |
| IN USE | |
| Phone book entry has a voice tag (page 18) |
Menu icons
When in standby mode, pressing the joystick reveals the handset's main menu. From here you can access various features and settings.
| Menu icon | Menu/feature |
| ID list | |
| (Short Message Service) | |
| options (KX-TCD560 only) | |
| Answering system (KX-TCD580 only) | |
| Handset settings | |
| unit settings | |
| Walkie-Talkie |
Soft keys
The handset features two soft keys and a joystick. By pressing a soft key, or by pressing the centre of the joystick, you can select the feature or operation indicated by the soft key icon shown directly above it.
- Pressing the left or right soft key selects the leftmost or rightmost soft key icon respectively.
- Pressing the centre of the joystick selects the centre soft key icon.
●The icons shown will vary depending on how you are using the unit.
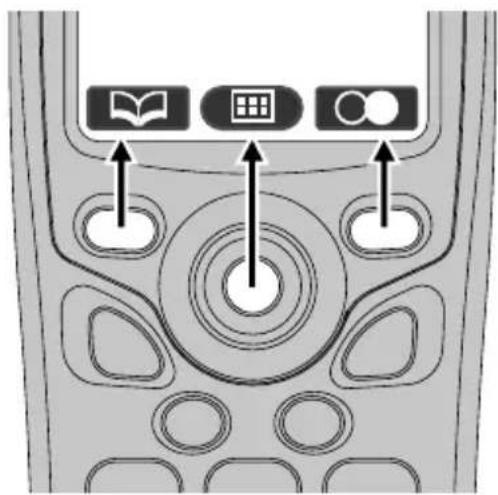
text_image
Diagram of a mobile phone control panel with three function buttons labeled in English: 'Book', 'Grid', and 'Circle'.Soft key icons
| Soft key icon | Action |
| Returns to the previous screen | |
| Displays the main menu | |
| Displays the appropriate sub-menu | |
| Accepts the current selection | |
| Displays a previously dialled phone number | |
| Opens a phonebook | |
| Creates a new phonebook entry | |
| Displays the phonebook search menu |
| Soft key icon | Action |
| Turns the key lock feature off(page 14) | |
| 12/24 | Switches between AM, PM,and 24-hour time entry |
| Stops recording or playback(KX-TCD580 only) | |
| Displayed when LetterWise ® character entry is selected.Press to select another entry mode. | |
| ABC | Displayed when alphabet character entry is selected.Press to select another entry mode. |
| 0-9 | Displayed when numeric character entry is selected.Press to select another entry mode. |
| ABΓ | Displayed when Greek character entry is selected.Press to select another entry mode. |
| AÄÄ | Displayed when extended 1 character entry is selected.Press to select another entry mode. |
| SŠŠ | Displayed when extended 2 character entry is selected.Press to select another entry mode. |
| AБВ | Displayed when Cyrillic character entry is selected.Press to select another entry mode. |
| Places a check mark next to the menu item | |
| P | Inserts a dialling pause (page 14) |
| KG25]Turns the mute feature on/off during a conversation (page 14) | |
 Erases the selected item Erases the selected item | |
| GT5W]Turns the ringer off temporarily (page 15) | |
 Displayed when the soft key has no function Displayed when the soft key has no function | |
Connections
Base unit
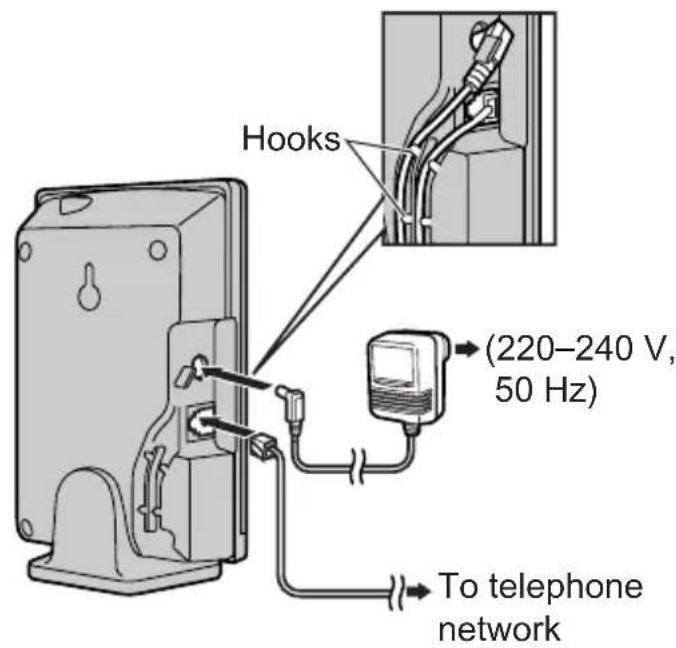
text_image
Hooks (220-240 V, 50 Hz) To telephone networkCharger
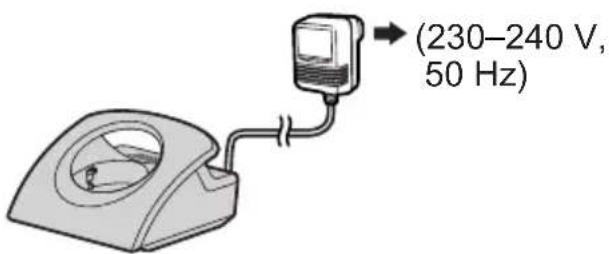
text_image
(230-240 V, 50 Hz)Important:
- Use only the included 6 V/500 mA AC adaptor when connecting the base unit.
- Use only the included 9 V/350 mA AC adaptor when connecting the charger.
Note:
- If the AC outlet is connected to a switch, make sure the switch is on.
- If the handset is not charged, you cannot make or answer calls.
- Never install telephone wiring during a lightning storm.
●The AC adaptors must remain connected at all times. (It is normal for the adaptors to feel warm during use.)
- The unit will not work during a power failure. We therefore recommend you also connect a standard telephone to the same telephone line using a T-adaptor. Your Panasonic sales shop can offer you more information about connection possibilities.
Battery installation
1 Insert the battery as shown. Insert the and end of the battery first.
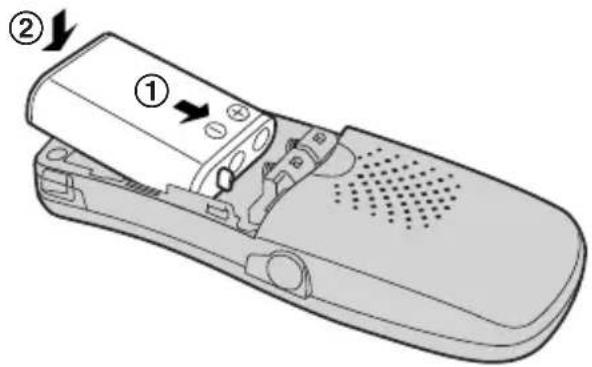
text_image
Diagram of a remote control device with labeled parts and directional arrows indicating movement or change.2 Close the battery cover.
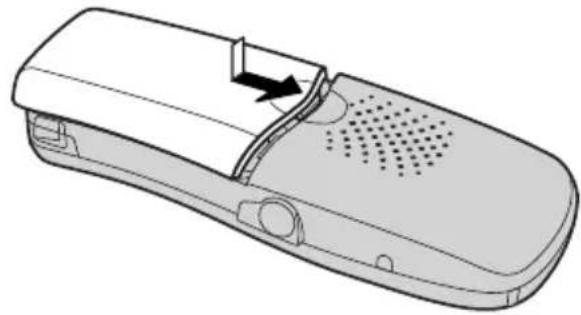
natural_image
Diagram of a mobile phone receiver with ventilation slots and a scroll wheel (no text or symbols)Note:
- Use only a rechargeable battery (page 3).
Battery charge
Place the handset on the charger for about 5.5 hours before initial use.
The charge indicator turns red while the battery is charging, and turns green when the battery is fully charged.
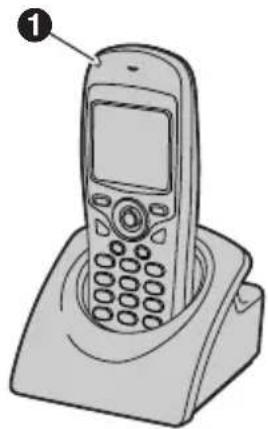
natural_image
Illustration of a mobile phone on a base (no text or symbols visible)① Charge indicator
Note:
- Clean the charge contacts (page 6) of the handset and charger with a soft, dry cloth once a month, otherwise the battery may not charge properly. Clean more often if the unit is exposed to grease, dust or high humidity.
Battery strength
When charging, the battery icon is shown as follows.
| Battery icons Battery strength | |
 | |
 | |
 | When flashing: Needs to be charged |
Note:
- If the handset is turned off, it will be turned on automatically when it is placed on the charger.
Battery life
After your Panasonic battery is fully charged, you can expect the following performance:
| Operation Operating time | |
| While in use (talking) | 17 hours max. |
| While not in use (standby) | 270 hours max. |
Note:
- Actual battery performance depends on a combination of how often the handset is in use (talking) and how often it is not in use (standby).
● Battery operating time may be shortened over time depending on usage conditions and ambient temperature.
Battery replacement
If ■ flashes even when the handset battery has been fully charged, the battery must be replaced.
Important:
- Please use only the Panasonic battery noted on page 3.
- Use only a rechargeable battery. If you install a non-rechargeable battery and start charging, the battery may leak electrolyte.
1 Press the notch on the cover firmly and slide it in the direction of the arrow.
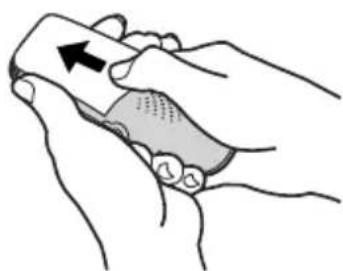
natural_image
Illustration of two hands holding a card with an arrow indicating upward motion (no text or symbols)2 Remove the old battery and install the new one. See page 10 for battery installation.
Turning the power on/off
Power on
Press [✗①] for about 1 second.
●The display will change to the standby mode.
Power off
Press [✗①] for about 2 seconds.
●The display will go blank.
Setting the date and time
Important:
- Confirm that the AC adaptors are connected.
- Ensure that Y is not flashing.
1 Press (centre of joystick).
2 Select 📋, then press OK 2 times.
3 Enter the current day, month and year by selecting 2 digits for each.
Example: 17 May, 2004
Press [1][7] [0][5] [0][4].
- If you make a mistake, use the joystick to move the cursor, then make the correction.
4 Enter the current hour and minute by selecting 2 digits for each.
5 Press 12/24 repeatedly to select 12- or 24-hour time entry.
- 24-hour time entry is selected when neither “AM” nor “PM” are displayed.
Example: 3:30 PM
Press [0][3][3][0], then press 12/24 repeatedly until "03:30 PM" is displayed.
6 Press OK.
7 Press [✗①].
Note:
- If a power failure occurs, set the date and time again.
Making calls
1 Lift the handset and dial the phone number.
- To correct a digit, press [C], then enter the correct number.
2 Press [\~].
3 When finished talking, press [✗①] or place the handset on the charger.
Speakerphone
The handset features a digital speakerphone, which allows you to have hands-free conversations. Press 【✿】 to turn on the speakerphone during a conversation. Press 【✿】 to switch back to the receiver.
- "Speaker Phone" is displayed while the speakerphone is turned on.
- For best performance, please note the following:
- Use the speakerphone in a quiet environment.
- Speak alternately with the caller.
- If you or the other party have difficulty hearing each other, push the joystick up or down repeatedly to adjust the speaker volume as necessary.
To adjust the receiver or speaker volume
Push the joystick up or down while talking. 3 volume levels are available for the receiver. 6 levels are available for the speaker.
Redial feature
Previously dialled phone numbers (each 24 digits max.) can be redialled.
To redial the last number dialled
Press Ⓐ (soft key), then press [◀] or [◀].
To redial automatically
Redial by pressing [◀] then Ⓐ (soft key) if you want the unit to redial the phone number again automatically if the other party's line is engaged. The unit will redial up to 12 times. While the handset is waiting to redial, the ringer indicator will flash. While the handset is redialling, mute is automatically turned on.
Note:
- If mute does not turn off after the line is connected, press 📄.
To make a call using the redial list
The last 10 phone numbers dialled are stored in the redial list.
1 Press (soft key).
●The last number dialled will be displayed.
2 Push the joystick up or down repeatedly to select the desired number.
- To exit the list, press [✗①].
3 Press [→] or [←].
To edit a number in the redial list before calling it
1 Press (soft key).
2 Push the joystick up or down repeatedly to select the desired number, then press
3 Select "Edit for Call", then press OK.
●The first digit of the number will flash.
4 Use the joystick to move the cursor, then edit the number.
- Place the cursor on the number you wish to erase, then press [C].
- Place the cursor to the right of where you want to insert a number, then press the appropriate dial key.
5 Press [→], [←], or OK to call.
To erase numbers in the redial list
1 Press (soft key).
2 Push the joystick up or down repeatedly to select the desired number, then press
3 Select "Delete", then press OK.
- If you want to erase all numbers in the list, select "Delete All", then press OK.
4 Select "Yes", then press OK.
5 Press [✗①].
To store a number from the redial list into the handset phonebook
1 Press (soft key).
2 Push the joystick up or down repeatedly to select the desired number, then press
3 Select "Save Phonebook", then press OK.
4 Enter a name (16 characters max.; see page 56 for character entry), then press OK.
5 Edit the phone number if necessary, then press OK.
6 Select the desired category (page 34), then press OK 2 times.
7 Press [✗①].
Other features
Mute
You can mute your voice during a conversation. While mute is turned on you will be able to hear the other party, but the other party will not be able to hear you.
To mute your voice, press 📋 (soft key). To return to the conversation, press 📋 again.
Key lock
The handset can be locked so that no calls or settings can be made. Incoming calls can be answered, but all other functions are disabled while key lock is on.
To turn key lock on, press 📄 (centre of joystick) for about 2 seconds.
• R0 will be displayed.
To turn key lock off, press ☐0 for about 2 seconds.
Note:
●Emergency calls (page 31) cannot be made until key lock is turned off.
● Key lock is turned off when the handset is turned off.
R button (to use the recall feature)
[R] is used to access optional telephone services. Contact your service provider for details.
If your unit is connected to a PBX (private branch exchange), pressing [R] can allow you to access certain features of your host PBX such as transferring an extension call.
Pause button (for PBX/long distance service users)
A pause is sometimes required when making calls using a PBX or long distance service.
Example: If you have to dial [0] before dialling outside numbers manually, you will probably pause after dialling [0] until you hear a dial tone.
1 Press [0].
2 Press P (soft key).
3 Dial the phone number, then press [◀] or [◀].
Note:
- Pressing P 1 time creates 1 pause. Press P repeatedly to create longer pauses. To change pause length, see page 31.
Recording a telephone conversation (KX-TCD580 only)
You can record your conversation while on an outside call.
Important:
● Before recording a conversation, you should inform the other party that the conversation will be recorded.
1 Press (centre of joystick) during a conversation.
2 Press OK.
●A beep is heard and recording starts.
●A beep sounds every 15 seconds and can be heard by the other party, but is not recorded.
3 To stop recording, press □.
Note:
- Recorded conversations are treated as new messages.
- To listen to the recorded conversation, see page 43.
- If message memory becomes full, "Full" is displayed and recording stops. Erase unnecessary messages (page 43).
Answering calls
1 Lift the handset and press [◀] or [◀] when the unit rings.
- You can also answer a call by pressing any dial key from [0] to [9], [∗], [#], or [INT]. (Any key talk feature)
2 When finished talking, press [✗①] or place the handset on the charger.
Vibration feature
When this feature is turned on (page 25), the handset will vibrate to indicate an incoming call.
Auto talk feature
You can answer calls simply by lifting the handset off the charger. You do not need to press [→]. To turn this feature on, see page 28.
To turn the handset ringer off temporarily
When an outside call comes in, press or [✗①].
Note:
● This feature will not work for intercom calls or when the handset is on the charger.
Handset locator
Using this feature, you can locate the handset if it has been misplaced.
1 Press [●●●] on the top of the base unit.
●The base unit will page the handset for about 1 minute.
- If the vibration feature is turned on (page 25), the handset will vibrate to indicate an incoming page.
2 To stop paging, press [•••] on the base unit or press [✗①] on the handset.
Handset phonebook
The handset phonebook allows you to make calls without having to dial manually. You can add 200 names and phone numbers to the handset phonebook and search for phonebook entries by name, category, or by performing a voice search.
Adding entries to the handset phonebook
1 KX-TCD560:
Press (soft key), then press.
KX-TCD580:
Press (soft key), then press OK.
●The display shows the number of available entries in the phonebook.
2 Enter the party's name (16 characters max.; see page 56 for character entry), then press OK.
3 Enter the party's phone number (24 digits max.), then press OK.
4 Select a category for the entry, or select "Off".
- You can search for handset phonebook entries by category (page 17).
- You can change the category names (page 27).
- Caller ID subscribers can use additional private category features (page 34).
5 To save the entry, press OK 2 times.
6 Press [✗①].
Note:
- If there is no space to store new entries, "Memory Full" will be displayed. Erase unnecessary entries (page 19).
To edit/correct a mistake
Use the joystick to place the cursor on the number or character you wish to erase, then press [C]. Place the cursor to the right of where you want to insert a number or character, then press the appropriate dial key.
Note:
- Press and hold [C] to erase all numbers or characters.
Finding and calling a handset phonebook entry
Handset phonebook entries can be searched for alphabetically, by first character, by category, by voice tag, or by scrolling through all phonebook entries. Once you have found the desired entry, press [icon] or [triangle] to dial the phone number.
Scrolling through all entries
1 Press (soft key).
2 Push the joystick up or down repeatedly to display the desired entry.
Searching alphabetically
This method is useful when you are searching for an entry which starts with a letter of the alphabet.
1 Press (soft key).
2 Press the dial key ([0] to [9]) which corresponds to the letter you are searching for (page 56).
- Press the same dial key repeatedly to display the first entry corresponding to each letter located on that dial key.
- If there is no entry corresponding to the letter you selected, the next entry will be displayed.
3 Push the joystick up or down repeatedly to scroll through the phonebook if necessary.
Searching by first character (index search)
This method is useful when you are searching for an entry which does not start with a letter in the alphabet.
1 Press (soft key), , then press OK.
2 Press the right soft key repeatedly to select the character entry mode that contains the character you are searching for.
3 Press the dial key ([0] to [9]) which contains the character you are searching for.
- Press the same dial key repeatedly to select the character you are searching for.
4 Press OK.
● The first entry beginning with the character you selected is displayed. If there is no such entry, the next entry will be displayed.
5 Push the joystick up or down repeatedly to scroll through the phonebook if necessary.
Searching by category
1 Press (soft key), then press
2 Select "Category", then press OK.
3 Select the category you want to search, then press OK.
● The first entry in that category is displayed.
- If "Memory Empty" is displayed, the category you selected has no entries.
4 Push the joystick up or down repeatedly to scroll through the phonebook if necessary.
Searching by voice (voice search feature)
Before using this feature you must add voice tags to phonebook entries you want to search for by voice (page 18).
1 Press and hold (soft key).
2 When "Speak Now" is displayed, say the name of the phonebook entry.
- If key tones are turned on (page 26), speak after the beep.
- Hold the handset about 20 cm away and speak clearly into the microphone.
Note:
● The voice search feature performs best when used by the same person who recorded the voice tag.
- When the auto voice dial feature is turned on (page 28), handset phonebook entries will be dialled immediately after being searched for by voice.
- “No Match Please Try Again” is displayed if the unit could not find a matching voice tag.
- “Timeout Please Try Again” is displayed if you do not speak for 10 seconds.
- If you cannot find the desired entry by voice, find the entry using another method, then re-record its voice tag.
Searching for entries with a voice tag
1 Press (soft key), then press
2 Select "Voice Tag", then press OK.
3 Push the joystick up or down repeatedly to scroll through all entries which have a voice tag.
Editing/adding to handset phonebook entries
Phonebook entries can be edited after you have saved them. You can change the name, phone number, and category, as well as add a voice tag (page 18) or hot key registration (page 19).
Changing a name, phone number, category
1 Find the desired entry (page 16).
2 Press (centre of joystick), then press OK.
3 Edit the name if necessary (16 characters max.; see page 56 for character entry), then press OK.
4 Edit the phone number if necessary (24 digits max.), then press OK.
5 Select the desired category, then press OK 2 times.
6 Press [✗①].
Adding a voice tag
You can record voice tags for up to 20 handset phonebook entries and then find the entries by speaking the voice tag (voice search feature).
1 Find the desired entry (page 16), then press 📄 (centre of joystick).
2 Select "Voice Tag", then press OK 2 times.
3 When "Voice Tag Record" is displayed, say the name of the phonebook entry.
- If key tones are turned on (page 26), speak after the beep.
- Hold the handset about 20 cm away and speak clearly into the microphone.
● Voice tags can be up to 2 seconds long.
4 When "Voice Tag Please Repeat" is displayed, repeat the voice tag.
5 Press [✗①].
Note:
- Phonebook entries which have a voice tag are indicated by 😊.
- "Timeout Please Try Again" is displayed if you do not speak for 10 seconds.
- "Too Long Please Try Again" is displayed if the voice tag you recorded was over 2 seconds long.
- “Too Different Please Try Again” is displayed if the 2nd voice tag is too different from the first or if background noise exists. Please record the voice tag in a quiet environment.
- "Already Exists Please Try Again" is displayed if the voice tag is too similar to another entry's voice tag.
Playing a voice tag
You can play back a voice tag for reference.
1 Find the desired entry (page 16), then press 📄 (centre of joystick).
2 Select "Voice Tag", then press OK.
3 Select "Play", then press OK.
• The voice tag is played back.
4 Press [✗①].
Erasing a voice tag
1 Find the desired entry (page 16), then press Ⓞ (centre of joystick).
2 Select "Voice Tag", then press OK.
3 Select "Delete", then press OK.
4 Select "Yes", then press OK
5 Press [✗①].
Hot key (quick dial)
Registering an entry in the handset phonebook to a hot key
Dial keys [1] to [9] can each be used as a "hot key", allowing you to dial a number from the phonebook by simply pressing a dial key.
1 Find the desired entry (page 16), then press 📄 (centre of joystick).
2 Select "Reg. to Hot Key", then press OK.
3 Push the joystick up or down to select the desired dial key number.
- Dial keys which have been registered as a hot key already will have a √ next to them. You can overwrite previous hot keys if desired.
4 Press OK 2 times.
5 Press [✗①].
Making a call using a hot key
1 Press and hold the desired hot key ([1] to [9]).
- You can view other hot key registrations by pushing the joystick up or down.
2 Press [◀] or [◀].
Erasing a hot key
1 Press and hold the desired hot key ([1] to [9]).
2 Press (centre of joystick), then press OK.
3 Select "Yes", then press OK.
Note:
- Only the hot key is erased. The corresponding phonebook entry is not erased.
Erasing an entry in the handset phonebook
1 Find the desired entry (page 16), then press 🔒 (centre of joystick).
2 Select "Delete", then press OK.
3 Select "Yes", then press OK.
4 Press [✗①].
Chain dial
This feature allows you to dial phone numbers in the handset phonebook while you are on a call. This feature can be used, for example, to dial a calling card access number or bank account PIN that you have stored in the phonebook, without having to dial manually.
1 KX-TCD560:
While on a call, press 📁 (centre of joystick).
KX-TCD580:
While on a call, press 📄 (centre of joystick), then press 🎯.
2 Push the joystick up or down repeatedly to select the desired entry.
- To search by first character (index search), category, or to search entries which have a voice tag, press 🔒, select the desired search method, then press OK.
3 Press OK to dial the number.
Copying handset phonebook entries to the base unit phonebook (KX-TCD580 only)
1 Press [INT], then press 📄 (centre of joystick).
2 Press OK.
3 Select the desired phonebook entry, then press OK.
Note:
- If you have another compatible Panasonic handset, you can copy phonebook entries between handsets (page 49).
Base unit phonebook (KX-TCD580 only)
The base unit phonebook allows you to make calls without having to dial manually. You can add 20 names and phone numbers to the base unit phonebook and search for phonebook entries by name. Additional handset users (page 48) can also make calls using the base unit phonebook. If you subscribe to Caller ID service, you can use the base unit's audible call feature (page 34).
Adding entries to the base unit phonebook
1 Press (soft key), then
2 Select "Base Phonebook", then press OK.
●The display shows the number of available entries in the phonebook.
3 Enter the party's name (16 characters max.; see page 56 for character entry), then press OK.
4 Enter the party's phone number (24 digits max.), then press OK.
5 To record an audible call announcement, press OK, otherwise select "Skip Recording", press OK, then go to step 8.
● Audible call (page 34) is useful for Caller ID subscribers only.
- If "Memory Full" is displayed, erase any unnecessary answering system messages (page 43).
6 When "Recording" is displayed, speak into the microphone.
●Maximum recording time is 1 minute.
7 Press □ to end recording.
- The recording is played back. Press to return to step 5.
8 Press OK to save the phonebook entry.
9 Press [✗①].
Note:
- "Error" is displayed if the recording is less than 1 second long. Repeat step 5.
To edit/correct a mistake
Use the joystick to place the cursor on the number or character you wish to erase, then press [C]. Place the cursor to the right of where you want to insert a number or character, then press the appropriate dial key.
Note:
- Press and hold [C] to erase all numbers or characters.
Finding and calling a base unit phonebook entry
Base unit phonebook entries can be searched for by first character (index search) or by scrolling through all phonebook entries.
Once you have found the desired entry, press [◀] or [◀] to dial the phone number.
Scrolling through all entries
1 Press (soft key), then press again.
2 Push the joystick up or down repeatedly until the desired entry is displayed.
Searching by first character (index search)
This method is useful when you are searching for an entry which does not start with a letter of the alphabet.
1 Press (soft key), then press again.
2 Press
3 Press the right soft key repeatedly to select the character entry mode that
contains the character you are searching for.
4 Press the dial key ([0] to [9]) which contains the character you are searching for.
- Press the same dial key repeatedly to select the character you are searching for.
5 Press OK.
- The first entry beginning with the character you selected is displayed. If there is no such entry, the next entry will be displayed.
6 Push the joystick up or down repeatedly to scroll through the phonebook if necessary.
Changing a name, phone number, audible call
1 Find the desired entry (page 21).
2 Press (centre of joystick), then press OK.
3 Edit the name if necessary (16 characters max.; see page 56 for character entry), then press OK.
4 Edit the phone number if necessary (24 digits max.), then press OK.
5 Record, skip, or erase an audible call recording.
- To record the audible call announcement, continue from step 5, "Adding entries to the base unit phonebook", page 20.
- To skip recording or erasing, select "Skip Recording" and press OK.
- To erase the audible call announcement, select "Delete" and press OK.
6 Press OK to save the phonebook entry.
7 Press [✗①].
Playing back an audible call announcement
1 Find the desired entry (page 21).
2 Press (centre of joystick), select "Audible Call", then press OK.
●The audible call announcement is played back.
3 Press [✗①].
Erasing an entry from the base unit phonebook
1 Find the desired entry (page 21).
2 Press (centre of joystick), select "Delete", then press OK.
3 Select "Yes", then press OK.
4 Press [✗①].
Guide to handset settings
For your reference, a chart of all items which can be customised for the handset is printed below. Details of each item can be found on the corresponding pages.
- When customising the handset, the current item or setting is indicated by ▶.
| Handset settings menu | Sub-menu Default setting Page | ||
| Set Date/Time — page 11 | |||
| Memo Alarm Alarm 1 | Off page 25 | ||
| Alarm 2 Off page 25 | |||
| Alarm 3 Off page 25 | |||
| Ringer Option Ringer | Volume Maximum page | 25 | |
| Vibration | Off page 25 | ||
| EXT Ringer Type (External ringer type) | Ringer 1 page 26 | ||
| INT Ringer Type (Internal ringer type) | Ringer 1 page 26 | ||
| Paging Tone | Ringer 1 page 26 | ||
| Private Ring | Ringer 1^*1 | page 26 | |
| Tone Option | Key Tone | On | page 26 |
| Display Option | Standby Display | Handset Name | page 26 |
| Talk Display | Talk Time | page 26 | |
| Select Language | English | page 27 | |
| Private Colour | Green^*1 | page 27 | |
| Category Name Category (No.) *1 | page 27 | ||
| Call Option | Call Bar | Off page 27 | |
| Direct Call No. (Direct call number) | — page 27 | ||
| Direct On/Off Off page 28 | |||
| Registration | Register H/set (Register handset) | — page 48 | |
| Select Base | — | Auto | page 48 |
| Other Option | Change H/S PIN (Change handset PIN) | 0000 | page 28 |
| Change H/S Name (Change handset name) | Handset (No.) | page 28 | |
| Auto Talk | Off page 28 | ||
| Auto Voice Dial | Off page 28 | ||
| LetterWise English | page 29 | ||
| Reset Handset | — page 29 | ||
*1 Each category (1-9) has its own setting.
Note:
- Up to 5 menu items can be displayed at a time. To select a menu item not shown on the current page, scroll up or down by pushing the joystick up or down, respectively.
Handset settings
Memo alarm
An alarm will sound for 3 minutes at the set time once or daily. 3 different alarms can be set. A text memo can also be displayed. Set the date and time beforehand (page 11).
1 Press (centre of joystick).
2 Select ☐, then press OK.
3 Select "Memo Alarm", then press OK.
4 Push the joystick up or down repeatedly to select an alarm (1 to 3), then press OK.
- Times and memos for previously set alarms will be displayed.
5 Select an alarm mode, then press OK. "Off": Turns the alarm off. Press OK, then press [✗①] to finish.
"Once": The alarm will sound once at the set time. Enter the desired day and month by selecting 2 digits for each. "Daily": An alarm will sound daily at the set time.
6 Enter the desired hour and minute by selecting 2 digits for each.
7 Press 12/24 repeatedly to select "AM", "PM", or 24-hour time entry, then press OK.
8 Enter a text memo (32 characters max., page 56) and/or press OK.
9 Select the ringer that will sound at the set time, then press OK 2 times.
10 Press [✗①].
Note:
●To stop the alarm, press any dial key.
- When in talk or intercom mode, the alarm will not sound until the call has ended.
● The alarm will sound at the set time even when the ringer is turned off.
- If you select "Once", the setting will be changed to "Off" after the alarm sounds.
Ringer options
Ringer volume
1 Press (centre of joystick).
2 Select 📋, then press OK.
3 Select "Ringer Option", then press OK.
4 Select "Ringer Volume", then press OK.
5 Push the joystick up or down repeatedly to select the desired volume.
6 Press OK.
7 Press [✗①].
Note:
- When the ringer volume is set to off, 📄 is displayed.
- When the ringer volume is set to off, the handset will ring at the lowest volume for intercom calls and when paged.
Vibration feature
If the vibration feature is turned on, the handset will vibrate whenever a call is received, the unit is paged, or when an alarm sounds.
"On": The handset will vibrate while ringing. "Vib→Ring": The handset will vibrate 4 times, then ring.
"Off": Turns this feature off.
1 Press (centre of joystick).
2 Select 📋, then press OK.
3 Select "Ringer Option", then press OK.
4 Select "Vibration", then press OK.
5 Select the desired setting, then press OK.
- is displayed while the vibration feature is turned on.
6 Press [✗①].
Note:
●The handset will not vibrate while on the charger.
Changing ringer types
You can change the ringer type used by the handset.
"EXT Ringer Type": Selects the ringer for outside calls.
"INT Ringer Type": Selects the ringer for intercom calls.
"Paging Tone": Selects the ringer heard when the base unit pages the handset.
"Private Ring": Allows you to set a different ringer for each private category (for Caller ID subscribers only).
1 Press (centre of joystick).
2 Select 📋, then press OK.
3 Select "Ringer Option", then press OK.
4 Select the desired item, then press OK.
●The ringer sounds using the current ringer type.
5 Select the desired ringer type, then press OK.
6 Press [✗①].
Note:
- If you select one of the melody ringer types, the ringer will continue to sound for several seconds if the caller hangs up before you answer. You may hear a dial tone or no one on the line when you answer a call.
●The preset melodies in this product are used with permission of M-ZoNE Co., Ltd.
Tone options
Turning key tones on/off
Key tones are tones heard when keys are pressed. Includes confirmation tones and error tones.
1 Press (centre of joystick).
2 Select 📋, then press OK.
3 Select "Tone Option", then press OK 2 times.
4 Select "On" or "Off", then press OK.
5 Press [✗①].
Display options
Selecting the standby mode display
"Base Number": The current base unit number is displayed.
"Handset Name": The name of the handset is displayed.
"Off": Only the current date and time are displayed.
1 Press (centre of joystick).
2 Select ☐, then press OK.
3 Select "Display Option", then press OK 2 times.
4 Select the desired setting, then press OK.
5 Press [✗①].
Selecting the talk mode display
You can change what is shown on the display when you make a call.
"Talk Time": The length of the current call will be displayed.
"Phone Number": The phone number you dialled will be displayed.
1 Press (centre of joystick).
2 Select ☐, then press OK.
3 Select "Display Option", then press OK.
4 Select "Talk Display", then press OK.
5 Select the desired setting, then press OK.
6 Press [✗①].
Changing the display language
1 Press 📄 (centre of joystick).
2 Select 📋, then press OK.
3 Select "Display Option", then press OK.
4 Select "Select Language", then press OK.
5 Select the desired language, then press OK.
6 Press [✗①].
Note:
- If you select a language you cannot read, press [✗①], 📄, push joystick down, press OK, push joystick down 4 times, press OK, push joystick down 2 times, press OK, select the desired language, then press OK.
Changing category private colours
You can select the ringer indicator colour used when calls are received from parties assigned to a category in the handset phonebook. (Caller ID subscribers only)
1 Press (centre of joystick).
2 Select 📋, then press OK.
3 Select "Display Option", then press OK.
4 Select "Private Colour", then press OK.
5 Select a category, then press OK.
6 Select a ringer indicator colour, then press OK.
● The ringer indicator flashes using the selected colour as a reference.
7 Press [✗①].
Changing category names
You can change the names of categories ("Family", "Friends", etc.) used by the handset phonebook.
1 Press (centre of joystick).
2 Select ☐, then press OK.
3 Select "Display Option", then press OK.
4 Select "Category Name", then press OK.
5 Select a category, then press OK.
6 Edit the name (10 characters max., page 56), then press OK.
7 Press [✗①].
Call options
Turning call bar on/off
This feature prohibits making outside calls. When call bar is turned on, only intercom calls and emergency calls can be made. To store emergency numbers, see page 31.
1 Press (centre of joystick).
2 Select ☐, then press OK.
3 Select "Call Option", then press OK 2 times.
4 Enter "0000" (default handset PIN).
- If you changed the PIN, enter it (page 28).
5 Select "On" or "Off", then press OK.
6 Press [✗①].
Note:
- When call bar is turned on, ✉ is displayed.
Storing the direct call number
This feature prohibits making outside calls except to the phone number you store here. The number will be dialled automatically when [ ] or [ ] is pressed.
1 Press 📄 (centre of joystick).
2 Select 📋, then press OK.
3 Select "Call Option", then press OK.
4 Select "Direct Call No.", then press OK.
5 Enter the phone number (24 digits max.), then press OK 2 times.
6 Turn this feature on or off by selecting "On" or "Off", then press OK.
7 Press [✗①].
Note:
- When direct call is turned on, 🔔 is displayed when in standby mode.
Turning direct call on/off
1 Press (centre of joystick).
2 Select 📋, then press OK.
3 Select "Call Option", then press OK.
4 Select "Direct On/Off", then press OK.
5 Select "On" or "Off", then press OK.
6 Press [✗①].
Note:
- If there is no direct call number stored when you turn direct call on, you will be prompted to enter a phone number.
Other options
Changing the handset PIN (personal identification number)
For security, the handset PIN must be entered when changing certain settings. The default PIN is "0000".
Important:
- If you change the PIN, please make note of your new PIN. The unit will not reveal the PIN to you. If you forget your PIN, consult your nearest Panasonic service centre.
1 Press (centre of joystick).
2 Select 📋, then press OK.
3 Select "Other Option", then press OK.
4 Select "Change H/S PIN", then press OK.
5 Enter the current 4-digit handset PIN.
6 Enter the new 4-digit handset PIN.
7 Enter the new 4-digit handset PIN again.
8 Press [✗①].
Changing the handset name
The handset can be given a customised name ("BOB", "KITCHEN", etc.), useful when you have multiple handsets.
1 Press (centre of joystick).
2 Select 📋, then press OK.
3 Select "Other Option", then press OK.
4 Select "Change H/S Name", then press OK.
5 Edit the name (10 characters max., page 56), then press OK.
6 Press [✗①].
Turning auto talk on/off
When this feature is turned on, you can answer calls simply by lifting the handset off the charger. You do not need to press any buttons.
1 Press (centre of joystick).
2 Select 📋, then press OK.
3 Select "Other Option", then press OK.
4 Select "Auto Talk", then press OK.
5 Select "On" or "Off", then press OK.
6 Press [✗①].
Turning auto voice dial on/off
When this feature is turned on, handset phonebook entries will be dialled immediately after being searched for by
voice using the voice search feature (page 17).
1 Press 📋 (centre of joystick).
2 Select ☐, then press OK.
3 Select "Other Option", then press OK.
4 Select "Auto Voice Dial", then press OK.
5 Select "On" or "Off", then press OK.
6 Press [✗①].
Changing the LetterWise language
You can change which language is used for LetterWise character entry (page 40, 56).
1 Press (centre of joystick).
2 Select 📋, then press OK.
3 Select "Other Option", then press OK.
4 Select "LetterWise", then press OK.
5 Select the desired language, then press OK.
6 Press [✗①].
Resetting the handset to its default settings
1 Press 📋 (centre of joystick).
2 Select ☐, then press OK.
3 Select "Other Option", then press OK.
4 Select "Reset Handset", then press OK.
5 Enter "0000" (default handset PIN).
- If you changed the PIN, enter it (page 28).
6 Select "Yes", then press OK.
7 Press [✗①].
Note:
- The following items will be deleted or reset to their default settings:
– Settings listed on page 23
- Redial list
- Walkie-Talkie mode, group ID and group handset no. (page 51)
●The following items will be retained:
- Phonebook entries
- Voice tags
- Date and time
- Handset name
- Category names
Guide to base unit settings
For your reference, a chart of all items which can be customised for the base unit is printed below. Details of each item can be found on the corresponding pages.
- When customising the base unit, the current setting is indicated by ▶.
| Base unit settings menu | Sub-menu Default setting Page | |
| Ringer Option Ringer Volume Medium page 31 | ||
| Call Option Recall Flash page 31 | ||
| Pause Time Short page 31 | ||
| Emergency Call 112 and 999 page 31 | ||
| Call Restricted — page 32 | ||
| Other Option | Change Base PIN 0000 | page 32 |
| Reset Base — | page 32 | |
Note:
- Up to 5 menu items can be displayed at a time. To select a menu item not shown on the current page, scroll up or down by pushing the joystick up or down, respectively.
Base unit settings
Adjusting ringer volume
1 Press (centre of joystick).
2 Select 📄, then press OK.
3 Enter "0000" (default base unit PIN).
- If you changed the PIN, enter it (page 32).
4 Press OK 2 times.
5 Push the joystick up or down repeatedly to select the desired volume.
6 Press OK.
7 Press [✗①].
Call Options
Changing the recall mode
Change the recall mode, if necessary, depending on the requirements of your service provider or PBX.
Important:
- If this unit is connected to a PBX, an optional earth relay may need to be installed. Please consult our Panasonic Customer Care Helpline for more information. After installation you may select flash or earth mode to suit the requirements of your PBX or service provider.
1 Press (centre of joystick).
2 Select 📄, then press OK.
3 Enter "0000" (default base unit PIN). - If you changed the PIN, enter it (page 32).
4 Select "Call Option", then press OK 2 times.
5 Select the desired setting, then press OK. If "Flash" is selected, next select flash type 1, 2, or 3, then press OK
“Type 1”: 700 ms
"Type 2": 80 ms
"Type 3": 400 ms
6 Press [✗①].
Setting pause length
Change the pause length, if necessary, depending on the requirements of your service provider or PBX.
"Short": 3 sec.
"Long": 5 sec.
1 Press (centre of joystick).
2 Select 📋, then press OK.
3 Enter "0000" (default base unit PIN).
- If you changed the PIN, enter it (page 32).
4 Select "Call Option", then press OK.
5 Select "Pause Time", then press OK.
6 Select the desired setting, then press OK.
7 Press [✗①].
Storing/changing emergency numbers
These settings determine which phone numbers can be dialled while the call bar feature is on (page 27).
1 Press (centre of joystick).
2 Select 📄, then press OK.
3 Enter "0000" (default base unit PIN).
- If you changed the PIN, enter it (page 32).
4 Select "Call Option", then press OK.
5 Select "Emergency Call", then press OK.
6 Select a memory location, then press OK.
- If the memory location already contains an emergency number, the number is displayed.
7 Enter/edit the number, then press OK.
8 Press [✗①].
Setting call restriction
You can restrict selected handsets from dialling certain numbers. You can assign up to 6 phone numbers to be restricted, and select which handsets will be restricted. Storing area codes here will prevent the restricted handsets from dialling any phone number in that area code. If a restricted number is dialled, the call will not be connected and the restricted number will flash on the display.
1 Press 📄 (centre of joystick).
2 Select 📄, then press OK.
3 Enter "0000" (default base unit PIN).
- If you changed the PIN, enter it (page 32).
4 Select "Call Option", then press OK.
5 Select "Call Restricted", then press OK.
6 Set which handsets will be restricted by selecting the handset then pressing √.
- Restricted handsets have a √ next to them.
- To turn call restriction off for a handset, select the restricted handset, then press √.
7 Press OK.
8 Select a memory location, then press OK.
- Previously stored phone numbers are displayed.
9 Enter the phone number or area code to be restricted (8 digits max.), then press OK.
- To erase a restricted number, press [C].
10 Press [✗①].
Other options
Changing the base unit PIN (personal identification number)
For security, the base unit PIN must be entered when changing certain settings. The default PIN is "0000".
Important:
- If you change the PIN, please make note of your new PIN. The unit will not reveal the PIN to you. If you forget your PIN, consult your nearest Panasonic service centre.
1 Press (centre of joystick).
2 Select 📋, then press OK.
3 Enter "0000" (default base unit PIN).
- If you changed the PIN, enter it.
4 Select "Other Option", then press OK 2 times.
5 Enter the new 4-digit base unit PIN.
6 Enter the new 4-digit base unit PIN again.
7 Press [✗①].
Resetting the base unit to its default settings
1 Press (centre of joystick).
2 Select 📄, then press OK.
3 Enter "0000" (default base unit PIN).
- If you changed the PIN, enter it (page 32).
4 Select "Other Option", then press OK.
5 Select "Reset Base", then press OK.
6 Select "Yes", then press OK.
7 Press [✗①].
Note:
- The following items will be deleted or reset to their default settings:
– Settings listed on page 30, 38, 46
- All SMS messages
- Date and time
- Caller ID list
●The following items will be retained:
- Phonebook entries
- Recordings (KX-TCD580 only), including your greeting message, caller messages, voice memos, audible call announcements, and recorded conversations
Caller ID service
Important:
- This unit is Caller ID compatible. To use Caller ID features (such as displaying caller phone numbers), you must subscribe to Caller ID service. Consult your service provider for details.
Caller ID features
When an outside call is received, the caller's phone number can be displayed.
● Phone numbers of the last 50 callers will be logged in the Caller ID list.
●While listening to a message recorded by the answering system, you can call back the caller without having to dial the phone number (KX-TCD580 only).
- When Caller ID information is received and it matches a phone number stored in the unit's phonebook:
- The stored name will be displayed and logged in the Caller ID list.
- The handset will use the ringer indicator colour and pattern assigned to the caller's category.
- The handset will announce the audible call recording you made (KX-TCD580 only).
- If the unit is connected to a PBX system, you may not receive the caller information.
- When the caller dialled from an area which does not provide Caller ID service, "Out of Area" will be displayed.
- When the caller requested not to send caller information, either no information or "Private Caller" will be displayed.
Missed calls
If a call is not answered, the unit treats the call as a missed call. and the number of missed calls are shown on the display. This lets you know if you should view the Caller ID list to see who called while you were out.
Private category
Private categories can help you identify who is calling by using different ringer indicator colours and ringer types for different categories of callers.
You can assign entries in the handset phonebook to a category (page 16), change the category names (“Friends”, “Family”, etc., page 27), and search for phonebook entries by category (page 17). When a call is received from a caller assigned to a category, the ringer indicator colour (page 27) and ringer type (page 26) you select is used.
Visual call waiting (Call Waiting ID) service
This is a service of your service provider and will only operate if you have subscribed to this service. When you hear a call waiting tone during a conversation, the display will show the second caller's information. You can answer the second call, keeping the first call on hold. Please consult your service provider for details of this service.
Audible call (KX-TCD580 only)
Audible call allows you to know who is calling without looking at the display. If you record an audible call announcement for a base unit phonebook entry (page 20), the audible call recording will be announced when you receive a call from that person.
Note:
- If the ringer volume is turned off, audible call announcements will not be heard.
Viewing the Caller ID list and calling back
Phone numbers of the last 50 different callers will be logged in the Caller ID list. You can use this list to return missed calls.
1 Press (centre of joystick).
2 Select →, then press OK.
● The most recent call is displayed.
3 Push the joystick down repeatedly to search from the most recent call, or up to search from the oldest call.
- A √ is displayed next to items which have already been viewed or answered, even if they were viewed or answered using another handset.
4 Press [◀] or [◀] to call back the displayed party.
Editing a caller's phone number before calling back
1 Press 📄 (centre of joystick).
2 Select →), then press OK.
3 Push the joystick up or down repeatedly to display the desired entry, then press 📄.
4 Select "Edit for Call", then press OK.
5 Use the joystick to move the cursor, then edit the number.
- Place the cursor on the number you wish to erase, then press [C].
- Place the cursor to the right of where you want to insert a number, then press the appropriate dial key.
6 Press [→], [←], or OK to call.
Note:
●The edited phone number will not be saved in the Caller ID list.
Erasing caller information
1 Press (centre of joystick).
2 Select →, then press OK.
3 Push the joystick up or down repeatedly to display the desired entry, then press
4 To erase the selected entry, select "Delete", then press OK. To erase all
entries, select "Delete All", then press OK.
5 Select "Yes", then press OK.
6 Press [✗①].
Storing caller information into the handset phonebook
1 Press (centre of joystick).
2 Select →, then press OK.
3 Push the joystick up or down repeatedly to display the desired entry, press 📄, then press OK.
4 Continue from step 2, "Adding entries to the handset phonebook", page 16.
SMS (Short Message Service)
SMS allows you to send and receive text messages between other fixed-line and mobile phones that support compatible SMS networks and features.
Important:
- SMS features are available only after subscribing to Caller ID service. Consult your service provider for details and availability.
Note:
● A total of 69 messages (at 80 characters/message) can be saved.
- If the unit is connected to a PBX system, you may not be able to use SMS features.
Sending a message
Writing and sending a new message
1 Press (centre of joystick).
2 Select 📧, then press OK.
3 Select "Create", then press OK.
- To use the text from the last message you created, push the joystick up when “▲ Use Last Text?” is displayed.
4 Enter the message (page 40), then press OK.
5 Enter the destination phone number (20 digits max.), then press OK.
- To send the message to a party saved in the handset phonebook, press 📄, select the phonebook entry, then press OK 2 times.
● To send the message to a party logged in the Caller ID list, push the joystick
up or down repeatedly to select the party, then press OK 2 times.
- To send the message to a phone number logged in the redial list, press repeatedly to select the phone number, then press OK 2 times.
6 To save the message, select "Yes", then press OK.
- To send the message without saving it, select "No", then press OK.
7 To send the message, select "Send", then press OK.
- To cancel sending, press [✗①].
Note:
- An SMS message may contain up to 160 characters. Consult your SMS service provider for more information.
- "Invalid Number" is displayed if you try to send a message to a phone number saved in the handset phonebook, Caller ID list, or redial list that is over 20 digits long.
- When sending a message, "Sending Message" is displayed momentarily, then "Transferring Message" is displayed.
- If your phone is connected to a PBX, store the PBX line access number (page 39).
Sending a saved message
1 Press (centre of joystick).
2 Select 📧, then press OK.
3 Select "Send List", then press OK.
4 To read a saved message, push the joystick up or down repeatedly to select the message, then press OK.
- Messages are displayed in chronological order and by destination phone number.
5 To send the message, press ☐, select "Send", press OK, then continue from step 5, "Writing and sending a new message", page 36.
Editing a saved message
1 Press (centre of joystick).
2 Select ☒, then press OK.
3 Select "Send List", then press OK.
4 Push the joystick up or down repeatedly to select the message, then press OK.
●The text message is displayed.
5 Press ☐, select "Edit Message", press OK, then continue from step 4, "Writing and sending a new message", page 36.
Erasing a saved message
1 Press (centre of joystick).
2 Select 📧, then press OK.
3 Select "Send List", then press OK.
4 Push the joystick up or down repeatedly to select the message, then press OK.
●The text message is displayed.
5 Press ☐, select "Delete", then press OK.
6 Select "Yes", then press OK.
7 Press [✗①].
Receiving a message
When an SMS message is received, the display will show "Receiving New SMS", then the date and time the message was received. The ☒ icon is displayed next to the number of new messages.
Reading a received message
1 Press (centre of joystick).
2 Select 📧, then press OK 2 times.
● The number of new messages and the total number of messages are displayed.
3 Push the joystick up or down repeatedly to select a message.
●The date, time, and phone number of the sender are displayed.
- Messages which have already been read are indicated by a √, even if they were read using another handset.
- To erase a message, press X, select "Yes", then press OK.
4 Press OK to read the message content.
Note:
- To call the message sender, press [→] or [←].
- If you receive a message from a party saved in the phonebook, the stored name is displayed.
- Some SMS service providers attach a 1-digit number to the message sender's phone number, and sender names stored in the phonebook may not be displayed as a result.
- New SMS messages cannot be received while the memory is full.
Replying to a message
1 While reading a received message, press 🔒 (centre of joystick).
2 Select "Reply", then press OK.
3 Enter a message (page 40), then press OK.
4 Edit the destination phone number and/or press OK, then continue from step 6, "Writing and sending a new message", page 36.
Editing/forwarding a message
1 While reading a received message, press 📄 (centre of joystick).
2 Select "Edit Message", then press OK, then continue from step 4,
"Writing and sending a new message", page 36.
Erasing a received message
1 While reading a received message, press 📄 (centre of joystick).
2 Select "Delete", then press OK.
3 Select "Yes", then press OK.
4 Press [✗①].
Storing the sender's number in the handset phonebook
1 While reading a received message, press 📄 (centre of joystick).
2 Select "Save Phonebook", then press OK.
3 Continue from step 2, "Adding entries to the handset phonebook", page 16.
Editing the sender's number before calling back
1 While reading a received message, press 📄 (centre of joystick).
2 Select "Edit for Call", then press OK.
3 Edit the number, then press [→], [→], or OK to call.
Guide to SMS settings
If the base unit is reset to its default settings (page 32), the following SMS-related settings will be reset.
| SMS settings | Default setting | Page |
| SMS on/off On | page 38 | |
| Message Centre 1 | 1470PP17094009 | page 39 |
| Message Centre 2 | 0800587529 | page 39 |
| PBX line access number | Off page 39 | |
Note:
- If the base unit is reset to its default settings, the contents of the receive and send lists will be erased.
Turning SMS on/off
1 Press (centre of joystick).
2 Select 📧, then press OK.
3 Select "Parameters", then press OK.
4 Enter "0000" (default base unit PIN).
- If you changed the PIN, enter it (page 32).
5 Select "SMS On/Off", then press OK.
6 Select "On" or "Off", then press OK.
7 Press [✗①].
Note:
- If you try to send a message while SMS is turned off, a tone sounds and the message is placed in the receive list with "FD" attached to it.
- If someone tries to send you a message while SMS is turned off, the message will not be received and the message centre number will be logged in the Caller ID list.
Changing SMS message centre numbers
SMS message centre telephone numbers must be stored in order to send and receive SMS messages.
The following numbers (used for SMS services provided by BT Text) are preprogrammed in this unit. You can change them if necessary.
- Message Centre 1: 1470PP17094009 ("P" indicates a dialling pause.)
– Message Centre 2: 0800587529
Message Centre 1 is used for sending SMS messages, and Message Centre 2 is used for receiving messages.
- Consult your service provider for more information.
1 Press (centre of joystick).
2 Select 📧, then press OK.
3 Select "Parameters", then press OK.
4 Enter "0000" (default base unit PIN).
- If you changed the PIN, enter it (page 32).
5 Select "Message Centre1" or "Message Centre2", then press OK.
6 Edit the number as necessary, then press OK 2 times.
7 Press [✗①].
Note:
- If your phone is connected to a PBX, you need to add the PBX line access number and a dialling pause to the beginning of the Message Centre 1 phone number.
Storing the PBX line access number (for PBX users only)
Store your PBX line access number (4 digits max.) so that SMS messages are sent properly. When sending SMS messages to entries in the phonebook, Caller ID list, or
redial list, the PBX line access number will be deleted.
1 Press (centre of joystick).
2 Select ☒, then press OK.
3 Select "Parameters", then press OK.
4 Enter "0000" (default base unit PIN).
- If you changed the PIN, enter it (page 32).
5 Select "PBX Prefix", then press OK.
6 Select "On", then press OK.
7 Enter your PBX line access code and a dialling pause, if necessary, then press OK 2 times.
8 Press [✗①].
Character entry for SMS
The dial keys are used to enter characters and numbers. Each dial key has multiple characters assigned to it. When in ABC, ABΓ, or AÄÄ character entry modes, you can select which character is entered by pressing a dial key repeatedly.
- Move the joystick to move the cursor.
- Press dial keys to enter characters and numbers.
- Press [C] to erase the character or number highlighted by the cursor. Press and hold [C] to erase all characters or numbers.
- Press [] to switch between uppercase and lowercase.
- To enter another character located on the same dial key, push the joystick right to move the cursor to the next space, then press the appropriate dial key. (This is not necessary when entering text in LetterWise mode.)
Character entry modes
Several character entry modes are available by pressing the right soft key.
Note:
- The following character entry modes are available when entering text for SMS messages. For other character entry modes, see page 56.
LetterWise character table (for English)
LetterWise is a simplified text entry system which suggests the most likely letter to follow the previously entered text. Each time you press a dial key, the most likely character is displayed. If the suggested character is incorrect, press [#] repeatedly to display the desired character. You can change the language which LetterWise uses to base its suggestions on (page 29).
| 0 | 1 | ABC2 | DEF3 | GHI4 | JKL5 | MNO6 | PQRS7 | TUV8 | WXYZ9 |
| Space 0 | Space . @ / : ; * # + - 1 " ' , ! i ?i _ € £ $¥ ( ) [ ] { }& % \ ^ ~ |< > = a § | A B C 2 | D E F 3 | G H I 4 | J K L 5 | M N O 6 | P Q R S 7 | T U V 8 | W X Y Z 9 |
| a b c 2 | d e f 3 | g h i 4 | j k l 5 | m n o 6 | p q r s 7 | t u v 8 | w x y z 9 |
ABC Alphabet character table
| 0 | 1 | ABC2 | DEF3 | GHI4 | JKL5 | MNO6 | PQRS7 | TUV8 | WXYZ9 |
| Space 0 | Space . @ / : ; * # + - 1 " ' , ! i ?i _ € £ $¥ ( ) [ ] { }& % \ ^ ~ |< > = a § | A B C 2 | D E F 3 | G H I 4 | J K L 5 | M N O 6 | P Q R S 7 | T U V 8 | W X Y Z 9 |
| a b c 2 | d e f 3 | g h i 4 | j k l 5 | m n o 6 | p q r s 7 | t u v 8 | w x y z 9 |
0-9 Numeric entry table
| 0 | 1 | ABC2 | DEF3 | GHI4 | JKL5 | MNO6 | PQRS7 | TUV8 | WXYZ9 |
| 0 | 1 | 2 | 3 | 4 | 5 | 6 | 7 | 8 | 9 |
ABΓ Greek character table
| 0 | 1 | ABC2 | DEF3 | GHI4 | JKL5 | MNO6 | PQRS7 | TUV8 | WXYZ9 |
| Space 0 | Space . @ / : ; * # + - 1 " ' , ! i ?i _ € £ $¥ ( ) [ ] { }& % \ ^ ~ |< > = □ § | A B Γ 2 | Δ E Z 3 | H Θ I 4 | K ∧ M 5 | N Ξ O 6 | Π P Σ 7 | T Y Φ 8 | X Ψ Ω 9 |
AAA Extended character table
| 0 | 1 | ABC2 | DEF3 | GHI4 | JKL5 | MNO6 | PQRS7 | TUV8 | WXYZ9 | |||
| Space 0 | Space . @ / : ; * # + - 1 " ' , ! i ?i _ € £ ¥ ( ) [ ] & % ^ ~ |< > = α § | AÀÁÂÄÄÄÆBCÇ2 | DEÈÉÊËF3 | GĞHIìíîîîîîîîîîîîîîîîîîîîîîîîîîîîîîîîîîîîîîîîîîîîîîîîîîîîîîîîîîîîîîîîîîîîîîîîîîîîîîîîîîîîîîîîîîîîîîîîîîîîîûûûûûûûûûûûûûûûûûûûûûûûûûûûûûûûûûûûûûûûûûûûûûûûûûûûûûûûûûûûûûûûûûûûûûûûûûûûûûûûûûûûûûûûûûûûûûûûûûûûûùûûûûûûûûûûûûûûûûûûûûûûûûûûûûûûûûûûûûûûûûûûûûûûûûûûûûûûûûûûûûûûûûûûûûûûûûûûûûûûûûûûûûûûûûûûûûûûûûûûûúûûûûûûûûûûûûûûûûûûûûûûûûûûûûûûûûûûûûûûûûûûûûûûûûûûûûûûûûûûûûûûûûûûûûûûûûûûûûûûûûûûûûûûûûûûûûûûûûûûû ûûûûûûûûûûûûûûûûûûûûûûûûûûûûûûûûûûûûûûûûûûûûûûûûûûûûûûûûûûûûûûûûûûûûûûûûûûûûûûûûûûûûûûûûûûûûûûûûûûûûÛûûûûûûûûûûûûûûûûûûûûûûûûûûûûûûûûûûûûûûûûûûûûûûûûûûûûûûûûûûûûûûûûûûûûûûûûûûûûûûûûûûûûûûûûûûûûûûûûûûûêûûûûûûûûûûûûûûûûûûûûûûûûûûûûûûûûûûûûûûûûûûûûûûûûûûûûûûûûûûûûûûûûûûûûûûûûûûûûûûûûûûûûûûûûûûûûûûûûûûûôûûûûûûûûûûûûûûûûûûûûûûûûûûûûûûûûûûûûûûûûûûûûûûûûûûûûûûûûûûûûûûûûûûûûûûûûûûûûûûûûûûûûûûûûûûûûûûûûûûû în ð ð ð ð ð ð ð ð ð ð ð ð ð ð ð ð ð ð ð ð ð ð ð ð ð ð ð ð ð ð ð ð ð ð ð ð ð ð ð ð ð ð ð ð ð ð ð ð ð ð Ä ð ð ð ð ð ð ð ð ð ð ð ð ð ð ð ð ð ð ð ð ð ð ð ð ð ð ð ð ð ð ð ð ð ð ð ð ð ð ð ð ð ð ð ð ð ð ð ð ð ñ ð ð ð ð ð ð ð ð ð ð ð ð ð ð ð ð ð ð ð ð ð ð ð ð ð ð ð ð ð ð ð ð ð ð ð ð ð ð ð ð ð ð ð ð ð ð ð ð ð ï ð ð ð ð ð ð ð ð ð ð ð ð ð ð ð ð ð ð ð ð ð ð ð ð ð ð ð ð ð ð ð ð ð ð ð ð ð ð ð ð ð ð ð ð ð ð ð ð ð Ì ð ð ð ð ð ð ð ð ð ð ð ð ð ð ð ð ð ð ð ð ð ð ð ð ð ð ð ð ð ð ð ð ð ð ð ð ð ð ð ð ð ð ð ð ð ð ð ð ð î ð ð ð ð ð ð ð ð ð ð ð ð ð ð ð ð ð ð ð ð ð ð ð ð ð ð ð ð ð ð ð ð ð ð ð ð ð ð ð ð ð ð ð ð ð ð ð ð ð ó ð ð ð ð ð ð ð ð ð ð ð ð ð ð ð ð ð ð ð ð ð ð ð ð ð ð ð ð ð ð ð ð ð ð ð ð ð ð ð ð ð ð ð ð ð ð ð ð ð ô ð ð ð ð ð ð ð ð ð ð ð ð ð ð ð ð ð ð ð ð ð ð ð ð ð ð ð ð ð ð ð ð ð ð ð ð ð ð ð ð ð ð ð ð ð ð ð ð ð Í ð ð ð ð ð ð ð ð ð ð ð ð ð ð ð ð ð ð ð ð ð ð ð ð ð ð ð ð ð ð ð ð ð ð ð ð ð ð ð ð ð ð ð ð ð ð ð ð ð Ë ð ð ð ð ð ð ð ð ð ð ð ð ð ð ð ð ð ð ð ð ð ð ð ð ð ð ð ð ð ð ð ð ð ð ð ð ð ð ð ð ð ð ð ð ð ð ð ð ð ò ð ð ð ð ð ð ð ð ð ð ð ð ð ð ð ð ð ð ð ð ð ð ð ð ð ð ð ð ð ð ð ð ð ð ð ð ð ð ð ð ð ð ð ð ð ð ð ð ð ÷ ð ð ð ð ð ð ð ð ð ð ð ð ð ð ð ð ð ð ð ð ð ð ð ð ð ð ð ð ð ð ð ð ð ð ð ð ð ð ð ð ð ð ð ð ð ð ð ð ð é ð ð ð ð ð ð ð ð ð ð ð ð ð ð ð ð ð ð ð ð ð ð ð ð ð ð ð ð ð ð ð ð ð ð ð ð ð ð ð ð ð ð ð ð ð ð ð ð ð ø ð ð ð ð ð ð ð ð ð ð ð ð ð ð ð ð ð ð ð ð ð ð ð ð ð ð ð ð ð ð ð ð ð ð ð ð ð ð ð ð ð ð ð ð ð ð ð ð ð õ ð ð ð ð ð ð ð ð ð ð ð ð ð ð ð ð ð ð ð ð ð ð ð ð ð ð ð ð ð ð ð ð ð ð ð ð ð ð ð ð ð ð ð ð ð ð ð ð ð æ ð ð ð ð ð ð ð ð ð ð ð ð ð ð ð ð ð ð ð ð ð ð ð ð ð ð ð ð ð ð ð ð ð ð ð ð ð ð ð ð ð ð ð ð ð ð ð ð ð Æ ð ð ð ð ð ð ð ð ð ð ð ð ð ð ð ð ð ð ð ð ð ð ð ð ð ð ð ð ð ð ð ð ð ð ð ð ð ð ð ð ð ð ð ð ð ð ð ð ð ö ð ð ð ð ð ð ð ð ð ð ð ð ð ð ð ð ð ð ð ð ð ð ð ð ð ð ð ð ð ð ð ð ð ð ð ð ð ð ð ð ð ð ð ð ð ð ð ð ð Þ ð ð ð ð ð ð ð ð ð ð ð ð ð ð ð ð ð ð ð ð ð ð ð ð ð ð ð ð ð ð ð ð ð ð ð ð ð ð ð ð ð ð ð ð ð ð ð ð ð ã ð ð ð ð ð ð ð ð ð ð ð ð ð ð ð ð ð ð ð ð ð ð ð ð ð ð ð ð ð ð ð ð ð ð ð ð ð ð ð ð ð ð ð ð ð ð ð ð ð à ð ð ð ð ð ð ð ð ð ð ð ð ð ð ð ð ð ð ð ð ð ð ð ð ð ð ð ð ð ð ð ð ð ð ð ð ð ð ∪' / : ; * # + -1" ' , ! i ?i _ € £¥ () [ ] { }& % \wedge ~ |< > = α § | A À ÁÂÄÄÄÄBFC 2 | D E ÈÉÊ É F 3 | G ğHÍÍÍÍÍÍÍÍÍÍÍÍÍÍÍÍÍÍÍÍÍÍÍÍÍÍÍÍÍÍÍÍÍÍÍÍÍÍÍÍÍÍÍÍÍÍÍÍÍÍÍÍÍÍÍÍÍÍÍÍÍÍÍÍÍÍÍÍÍÍÍÍÍÍÍÍÍÍÍÍÍÍÍÍÍÍÍÍÍÍÍÍÍÍÍÍÍÍÍÍíÍíÍíÍíÍíÍíÍíÍíÍíÍíííííííííííííííííííííííííííííííííííííííííííííííííííííííííííííííííííííííííííííííííííííííííííííííííííí í 4 | J K L5 | M NÑOÒÓÔÔÔÔÔÔÔÔÔÔÔÔÔÔÔÔÔÔÔÔÔÔÔÔÔÔÔÔÔÔÔÔÔÔÔÔÔÔÔÔÔÔÔÔÔÔÔÔÔÔÔÔÔÔÔÔÔÔÔÔÔÔÔÔÔÔÔÔÔÔÔÔÔÔÔÔÔÔÔÔÔÔÔÔÔÔÔÔÔÔÔÔÔÔÔÔÔÔÔÔôÔÔÔÔÔÔÔÔÔÔÔÔÔÔÔÔÔÔÔÔÔÔÔÔÔÔÔÔÔÔÔÔÔÔÔÔÔÔÔÔÔÔÔÔÔÔÔÔÔÔÔÔÔÔÔÔÔÔÔÔÔÔÔÔÔÔÔÔÔÔÔÔÔÔÔÔÔÔÔÔÔÔÔÔÔÔÔÔÔÔÔÔÔÔÔÔÔÔÔ ÔUÜÜÜÜV 8 | P Q R S§ B 7 | T UÙÚÜÜÜÜÜV 8 | W X Y Z9 |
| a à ááãããæb cç 2 | d e èéêëëf 3 | g ğ hÍÍÍÍÍÍÍÍÍÍÍÍÍÍÍÍÍÍÍÍÍÍÍÍÍÍÍÍÍÍÍÍÍÍÍÍÍÍÍÍÍÍÍÍÍÍÍÍÍÍÍÍÍÍÍÍÍÍÍÍÍÍÍÍÍÍÍÍÍÍÍÍÍÍÍÍÍÍÍÍÍíÍííííííííííííííííííííííííííííííííííííííííííííííííííííííííííííííííííííííííííííííííííííííííííííííííi 4 | j k l 5 | m nñoòóôôôôôôôôôôôôôôôôôôôôôôôôôôôôôôôôôôôôôôôôôôôôôôôôôôôôôôôôôôôôôôôôôôôôôôôôôôôôôôôôôôôôôôôôôôôôôôôôôôôôóôôôôôôôôôôôôôôôôôôôôôôôôôôôôôôôôôôôôôôôôôôôôôôôôôôôôôôôôôôôôôôôôôôôôôôôôôôôôôôôôôôôôôôôôôôôôôôôôôôâúúúúúúúúúúúúúúúúúúúúúúúúúúúúúúúúúúúúúúúúúúúúúúúúúúúúúúúúúúúúúúúúúúúúúúúúúúúúúúúúúúúúúúúúúúúúúúúúúúúúu 8 | p q r s§B 7 | t u úúúúúúúúúúúúúúúúúúúúúúúúúúúúúúúúúúúúúúúúúúúúúúúúúúúúúúúúúúúúúúúúúúúúúúúúúúúúúúúúúúúúúúúúúúúúúúúúúúúú úu 8 | w x y z9 |
●The following are used for both uppercase and lowercase:
∅ S
Answering system
The KX-TCD580 base unit contains an answering system which can answer and record calls for you when you are unavailable to answer the phone. You can also record your own voice memos (page 43) and phone conversations (page 15). For details about memory capacity, see page 44.
Important:
- Only 1 handset can access the answering system (listen to messages, record a greeting message, etc.) at a time.
- When callers leave messages, the unit records the day and time of each message. Make sure the date and time have been set (page 11).
Turning the answering system on/off
1 Press (centre of joystick).
2 Select ☐, then press OK.
3 Select "Answer On" or "Answer Off", then press OK.
4 Press [✗①].
Note:
- When the answering system is turned on, is displayed next to the battery icon.
- When the answering system is turned off, disappears. The unit will not answer calls.
Greeting message
When the unit answers a call, callers are greeted by a greeting message. You can record your own greeting message or use a prerecorded greeting message.
Recording a greeting message
You can record your own greeting message (2 minutes and 30 seconds max.).
1 Press (centre of joystick).
2 Select ☐, then press OK.
3 Select "Record", then press OK.
4 Select "Record OGM", then press OK.
●Hold the handset about 20 cm away and speak clearly into the microphone.
5 Press □ to stop recording.
●The greeting message is played back.
6 Press [✗①].
Note:
●To erase the greeting message, press
X during playback, select "Yes", then press OK.
- "Error" is displayed if the greeting message is less than 1 second long.
Using a prerecorded greeting message
If you erase or do not record your own greeting message, the unit can play a prerecorded greeting message for callers and ask them to leave messages. If the message recording time (page 47) is set to "Greeting Only", caller messages will not be recorded and the unit will play a different prerecorded greeting message asking callers to call again.
Playing back the greeting message
1 Press (centre of joystick).
2 Select 📄, then press OK.
3 Select "Play OGM", then press OK.
4 Press [✗①].
Erasing the greeting message
1 Press (centre of joystick).
2 Select 📋, then press OK.
3 Select "Delete Message", then press OK.
4 Select "Delete OGM", then press OK.
5 Select "Yes", then press OK.
6 Press [✗①].
Note:
- If you erase your own greeting message, the unit will play a prerecorded greeting message for callers.
Listening to messages
Messages are stored and played back chronologically, from oldest message to newest.
Listening to new/all messages
When you have messages, 📄 is displayed next to the number of new messages.
1 Press (centre of joystick).
2 Select ☐, then press OK.
3 Select "Play New Msg." or "Play All Msg.", then press OK.
Note:
● To adjust the speaker volume during playback, push the joystick up or down repeatedly.
- While listening to messages, you can switch between the receiver and speaker by pressing [◀] or [◀].
Repeating, skipping, stopping, erasing a message during playback
- To repeat a message during playback, push the joystick left. If pushed within the first 5 seconds of a message, the previous message will be played.
- To skip a message during playback, push the joystick right.
- To stop a message during playback, press (soft key).
- To erase a message during playback, press ✗, select "Yes", then press OK.
Erasing all messages
1 Press (centre of joystick).
2 Select 📄, then press OK.
3 Select "Delete Message", then press OK.
4 Select "Delete All", then press OK.
5 Select "Yes", then press OK.
6 Press [✗①].
Note:
●The greeting message is not erased.
Calling back (Caller ID subscribers only) If Caller ID information was received for the call, you can call the caller back while listening to a message.
1 Press (centre of joystick) during playback.
2 Select "Call Back", then press OK.
Note:
- To edit the number before calling back, select "Edit for Call", press OK, edit the number, then press OK.
Recording a voice memo
To leave a private message for yourself or someone else, you can record a voice memo. This memo can be played back later, either directly or remotely.
1 Press (centre of joystick).
2 Select ☐, then press OK.
3 Select "Record", then press OK.
4 Select "Record Memo", then press OK.
- Hold the handset about 20 cm away and speak clearly into the microphone.
5 Press □ to stop recording.
6 Press [✗①].
Note:
● Voice memos are treated as new messages.
Memory capacity
The total recording capacity (including your greeting message, caller messages, voice memos, audible call announcements, and recorded conversations) is about 30 minutes. A maximum of 64 messages can be recorded.
- If message memory becomes full, "Full" is displayed. To record additional messages, you will need to erase unnecessary messages.
- Messages are retained even if a power failure occurs.
Using direct commands
You can operate the answering system by pressing dial keys, rather than navigating through the menus. To use the following commands, press 📄 (centre of joystick), select 📄, then press OK.
| Key Direct commands | |
| [1]Repeat message (during playback) ^*1 | |
| [2]Skip message (during playback) | |
| [3] | Enter the “Setting TAM” menu |
| [4]Play new messages | |
| [5]Play all messages | |
| [6]Play greeting message | |
| [7][4] | Record memo message |
| [7][6] | Record greeting message |
| [8]Turn answering system on | |
| [9]Stop (recording, playback) | |
| [0]Turn answering system off | |
| [★][4] | Erase this message (during playback) |
| [★][5]Erase all messages | |
| [★][6]Erase greeting message | |
*1 If pressed within the first 5 seconds of a message, the previous message will be played.
Remote operation
Using a touch tone phone, you can call your phone number from outside and access the unit to listen to messages or change answering system settings. The unit's voice guidance will prompt you to press certain dial keys to perform different operations.
Important:
- In order to operate the answering system remotely, you must first turn on remote operation by setting a remote access code. This code must be entered each time you operate the answering system remotely.
Turning remote operation on/off
A 3-digit remote access code must be entered when operating the answering system remotely. This code prevents unauthorised parties from listening to your messages remotely. After you store your remote access code, remote operation is possible.
1 Press (centre of joystick).
2 Select 📋, then press OK.
3 Select "Setting TAM", then press OK 2 times.
4 To turn on remote operation, enter a 3-digit remote access code.
- To turn off remote operation, press 【*】.
5 Press OK.
6 Press [✗①].
Using the answering system remotely
1 Dial your phone number from a touch tone phone.
- If the number of rings is set to "Auto", (page 46), the number of rings you
hear will indicate whether or not you have new messages.
2 After the greeting message starts, enter your remote access code.
● The unit will announce the number of new messages.
● After 3 seconds, voice guidance starts.
3 Follow the voice guidance prompts as necessary.
Note:
- You can hang up at any time.
- You can ignore the voice guidance and control the unit using remote commands (page 46).
Voice guidance
During remote operation, the unit's voice guidance will prompt you to press [1] to perform a specific operation, or press [2] to listen to more available operations.
Operations are presented by voice guidance in the following order:
- Play back all messages
- Play back new messages
- Record a message
– Erase all messages
– Record your greeting message
Note:
- If less than 5 minutes of recording time is available, the unit will announce the remaining recording time after the last message is played back.
- If message memory is full, erase unnecessary messages.
Remote commands
You can press dial keys to access certain answering system functions without waiting for the voice guidance to prompt you.
| Key Remote command | |
| 【1】Repeat message (during playback) ^*1 | |
| 【2】Skip message (during playback) | |
| 【4】Play new messages | |
| 【5】Play all messages | |
| 【6】Play greeting message | |
| 【7】Record greeting message | |
| 【9】Stop (recording, playback) | |
| 【0】Turn answering system off | |
| 【*】【4】 | Erase this message (during playback) |
| 【*】【5】Erase all messages | |
| 【*】【6】Erase greeting message (during greeting message playback) | |
| 【*】【#】 | End remote operation (or hang up) |
*1 If pushed within the first 5 seconds of a message, the previous message will be played.
Turning on the answering system remotely
If the answering system is off, you can turn it on remotely.
1 Dial your phone number from a touch tone phone.
2 Let the phone ring 20 times.
●A long beep will be heard.
3 Enter your remote access code within 10 seconds of the long beep.
●The greeting message is played back.
- You can hang up, or enter your remote access code again and begin remote operation (page 46).
Guide to answering system settings
If the base unit is reset to its default settings (page 32), the following answering system-related settings will be reset.
| Answering system setting | Default setting | Page |
| Answering system on/off | Answer On | page 42 |
| Remote access code | — page 45 | |
| Number of rings 4 | page 46 | |
| Caller's recording time | No Limit | page 47 |
| Greeting monitor On | page 47 | |
Changing the number of rings
You can change the number of times the phone rings before the unit answers calls. "Auto": The unit answers after 2 or 3 rings when new messages have been recorded, and after 5 or 6 rings when there are no new messages. If you call your phone from outside to listen to new messages (page 45), you will know that there are no messages when the phone rings for the 4th time. You can then hang up without being charged for the call.
1 Press (centre of joystick).
2 Select ☐, then press OK.
3 Push the joystick up or down repeatedly to select "Setting TAM", then press OK.
4 Select "Number of Rings", then press OK.
5 Select the desired setting, then press OK.
6 Press [✗①].
Selecting the caller's recording time
You can change the maximum message recording time allotted to each caller, or set the unit to greet callers but not record messages.
"1 Minute": Caller messages are limited to 1 minute.
“No Limit”: Caller messages are limited only by the amount of total recording time available in the answering system.
"Greeting Only": The unit plays the greeting message but does not record caller messages.
1 Press (centre of joystick).
2 Select ☐, then press OK.
3 Select "Setting TAM", then press OK.
4 Select "Msg Rec Time", then press OK.
5 Select the desired setting, then press OK.
6 Press [✗①].
Turning the greeting monitor on/off
You can select whether the greeting message is heard through the unit's speaker when the unit answers a call.
1 Press (centre of joystick).
2 Select ☐, then press OK.
3 Select "Setting TAM", then press OK.
4 Select "Greet Monitor", then press OK.
5 Select "On" or "Off", then press OK.
6 Press [✗①].
Note:
- If set to "Off", only the caller message will be heard through the speaker.
Operating additional units
Additional handsets
Up to 6 handsets can be registered to a single base unit. Additional handsets will give you the freedom to, for example, have an intercom call with another handset while a third handset is on an outside call. See page 3 for information on ordering additional handsets.
Additional base units
Handsets can be registered to up to 4 base units, allowing you to add additional base units and extend the area in which your handset(s) can be used. If a handset moves out of range of its base unit when "Auto" is selected on base unit selection (page 48), it will look for another base unit to make or receive calls. A base unit and the handsets it communicates with is called a "radio cell".
Note:
- Calls will be disconnected when the handset moves from one radio cell to another.
- Intercom calls and call transfers are only possible between handsets in the same radio cell.
Registering a handset to a base unit
You can register a handset to a base unit using the following method.
1 Press (centre of joystick).
2 Select 📋, then press OK.
3 Select "Registration", then press OK 2 times.
4 Select a base number, then press OK.
● This number is used by the handset as a reference only.
5 Press and hold [•••] on the top of the base unit for about 5 seconds, until the registration tone sounds.
- If all registered handsets start ringing, press [•••] to stop, then repeat this step.
- After pressing [••••], the rest of this procedure must be completed within 1 minute.
6 Wait until "Enter Base PIN" is displayed, then enter "0000" (default base unit PIN), then press OK.
- If you changed the PIN, enter it (page 32).
Note:
- When the handset has been registered successfully, Y will stop flashing. If key tones are turned on (page 26), a confirmation tone will be heard.
Selecting a base unit
When "Auto" is selected, the handset will automatically use any available base unit it is registered to. When a specific base unit is selected, the handset will make and receive calls using that base unit only. If the handset is out of range of that base unit, no calls can be made.
1 Press (centre of joystick).
2 Select 📋, then press OK.
3 Select "Select Base", then press OK.
4 Select the desired base unit number, or "Auto", then press OK.
●The handset starts searching for the base unit.
Cancelling a handset
A maximum of 6 handsets can be registered to a base unit. A handset can cancel its own registration (or the registration of another handset) that is stored in the base unit. This
will allow the base unit to "forget" the handset.
1 Press (centre of joystick).
2 Select 📄, then press OK.
3 Enter "0000" (default base unit PIN).
- If you changed the PIN, enter it (page 32).
4 Enter "226235".
5 Select "Cancel Handset", then press OK.
● The names of all handsets registered to the base unit are displayed.
6 Select the handset(s) you want to cancel, press √, then press OK.
Cancelling a base unit
A handset can be registered to a maximum of 4 base units. A handset can cancel a base unit that it is registered to. This allows the handset to "forget" the base unit.
1 Press (centre of joystick).
2 Select ☐, then press OK.
3 Select "Registration", then press OK.
4 Enter "226235".
5 Select "Cancel Base", then press OK.
6 Enter "0000" (default handset PIN).
- If you changed the PIN, enter it (page 28).
7 Select the base unit(s) you want to cancel, press √, then press OK.
8 Select "Yes", then press OK.
9 Press [✗①].
Note:
- To register the handset to another base unit or to the same base unit again, see page 48.
Intercom between handsets
Example: When handset 1 calls handset 2
1 Handset 1: Press [INT] and [2] (desired handset number).
2 Handset 2: Press [◀] or [◀] to answer.
3 When finished talking, press [✗①].
Note:
- Intercom calls can be made between handsets in the same radio cell, but not between handsets in different radio cells.
Copying handset phonebook entries to other handsets
Phonebook entries (page 16) can be copied from the handset to the phonebook of a compatible Panasonic handset.
Example: When handset 1 is sending phonebook entries to handset 2
1 Establish an intercom call (page 49).
2 Handset 2:
Press ☐ (centre of joystick), select "Recv Phonebook", then press OK.
3 Handset 1:
Press 📄, select "Send Phonebook", then press OK.
4 Handset 1:
Push the joystick up or down repeatedly to select the desired entry and/or press OK.
5 Handset 1:
Select "Copy One Item" or "Copy All Items", then press OK.
Note:
- If handset 2 (the receiver) did not prepare for copying, "Copy Failure" will be displayed on handset 1 (the sender).
- If phonebook memory is full on handset 2 (the receiver), "Copy Incomplete" will be displayed on handset 1 (the sender).
Transferring calls between handsets, conference calls
Outside calls can be transferred between 2 handsets in the same radio cell. 2 handsets in the same radio cell can have a conference call with an outside party.
Example: When handset 1 transfers a call to handset 2
1 Handset 1:
During an outside call, press [INT] and [2] (desired handset number).
- If there is no answer, press [INT] to return to the outside call.
2 Handset 2:
Press [◀] or [◀] to answer the page.
●Handset 2 can talk with handset 1.
●The outside call will be put on hold.
3 Handset 1:
To complete the call transfer, press [✗①].
To establish a conference call, press [3].
Transferring a call without speaking to the other handset user
1 During an outside call, press [INT], then press the desired handset number.
- The other handset rings if it is within range of the base unit and turned on.
2 Press [✗①].
●The outside call rings at the other handset.
Note:
- flashes to indicate the outside call is on hold.
- If the other handset user does not answer the call within 1 minute, the call will ring at your handset again.
Walkie-Talkie
This feature allows compatible handsets to communicate with each other directly when they are in range of the same base unit (common mode, group mode) and even when outside the range of the base unit (group mode only).
Important:
- The maximum distance possible between 2 cordless handsets using Walkie-Talkie is 50 metres indoors and 300 metres outdoors. Actual performance will vary depending on usage conditions.
- When using Walkie-Talkie, talk time is about 14 hours; standby time is about 14 hours. To improve battery performance, turn off the handsets when not talking.
- Outside calls cannot be received while in Walkie-Talkie mode.
Changing the Walkie-Talkie mode
To ensure privacy, there are two Walkie-Talkie modes, common and group. Common mode allows Walkie-Talkie conversations between handsets registered to, and within range of, the same base unit. Group mode allows Walkie-Talkie conversations between handsets set to the same 3-digit group ID. The default setting is group.
Note:
- When in common mode, handsets set to "Auto" base unit selection (page 48) cannot have Walkie-Talkie conversations. Either select a base unit number, or change the Walkie-Talkie mode to "Group".
1 Press (centre of joystick).
2 Select 📋, then press OK.
3 Select "Setting", then press OK.
4 Select the desired mode, then press OK.
- If "Common" is selected, the setting is saved and the following steps can be skipped.
5 If "Group" is selected, next enter a 3-digit group ID, then press OK.
6 Assign a handset number (1-9) to be used during Walkie-Talkie conversations, then press OK 2 times.
- This number is displayed by the handset only when using Walkie-Talkie. It does not affect other operations.
Note:
- To set the Walkie-Talkie mode to common mode, the handset must be within range of a base unit.
Turning Walkie-Talkie on
1 Press (centre of joystick).
2 Select , then press OK.
3 Select "On", then press OK.
- The display changes to the Walkie-Talkie display, and the handset's Walkie-Talkie number is displayed.
Note:
- If a handset is outside the range of a base unit and the Walkie-Talkie mode is set to common mode, Walkie-Talkie cannot be turned on.
● This feature is turned off when the handset is turned off.
Turning Walkie-Talkie off
Press ☐, select "Off", then press OK.
Starting Walkie-Talkie conversations
Both your handset and the handset you want to have a Walkie-Talkie conversation with must turn Walkie-Talkie on beforehand.
1 Press [→], [←], or [INT], then the other handset's handset number.
● The other handset will ring if it is within range.
2 The other handset user can answer the call by pressing [→], [←], [INT], or any dial key.
3 When finished talking, press [✗①].
Wall mounting
Wall mounting the base unit
1 Remove the stand as shown.
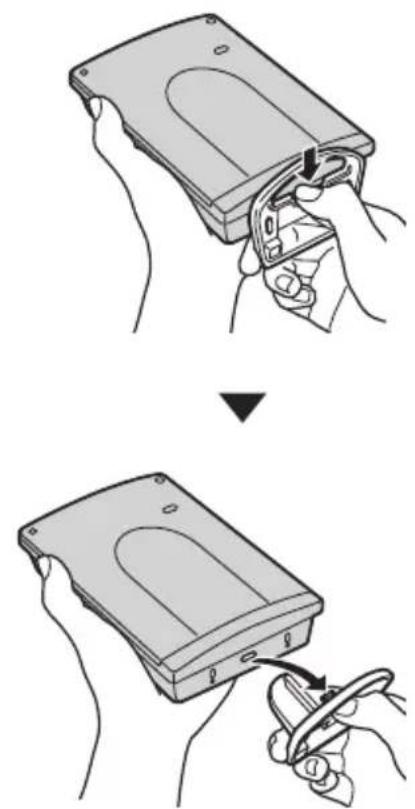
natural_image
Illustration showing two steps of inserting a device into a case, with no visible text or symbols.2 Connect the AC adaptor. Drive the screws into the wall using the wall template as a guide, then mount the base unit securely on the screws.
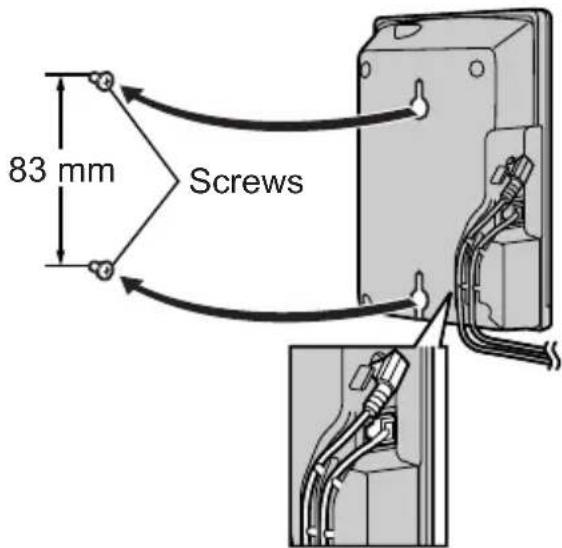
text_image
83 mm ScrewsNote:
● Make sure the screws are securely fastened to the wall.
Wall template for base unit
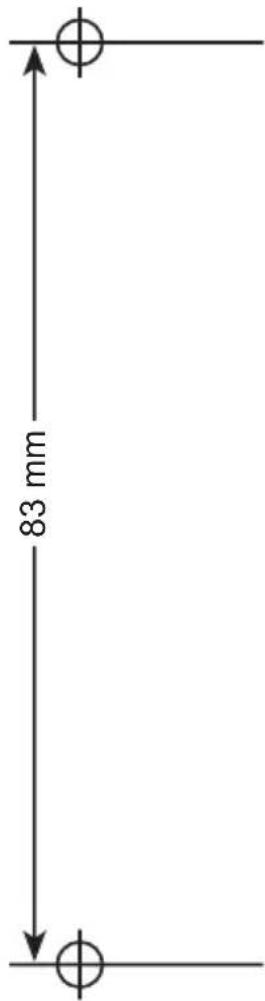
text_image
83 mmWall mounting the charger
1 Connect the AC adaptor.
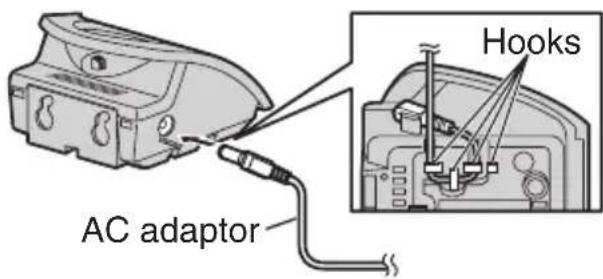
text_image
AC adaptor Hooks2 Drive the screws into the wall using the wall template as a guide, then mount the charger securely on the screws.
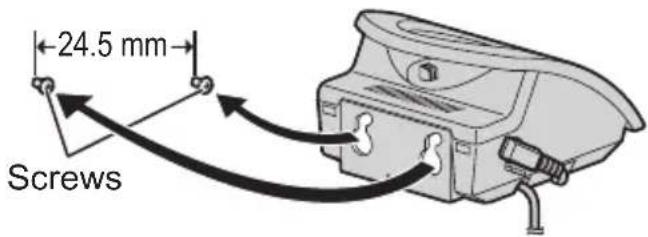
text_image
24.5 mm ScrewsNote:
● Make sure the screws are securely fastened to the wall.
Wall template for charger
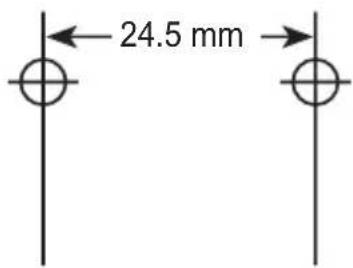
text_image
24.5 mmUsing the belt clip
You can hang the handset on your belt or pocket using the belt clip.
Attaching the belt clip
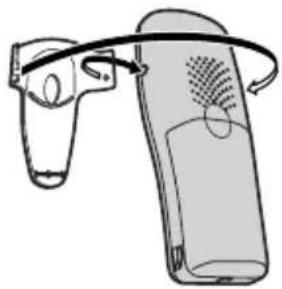
natural_image
Line drawing of a handheld device with a curved handle and ventilation grille (no text or symbols)Removing the belt clip
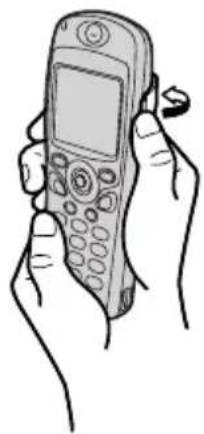
natural_image
Line drawing of a hand holding a vintage mobile phone (no text or symbols visible)Using an optional headset
Plugging an optional headset into the handset allows hands-free phone conversations. Please use only the Panasonic headset noted on page 3. The speakerphone is not available while a headset is plugged into the handset. To switch to speakerphone, disconnect the headset.
Connecting an optional headset
Open the headset socket cover and plug the optional headset into the headset socket as shown.
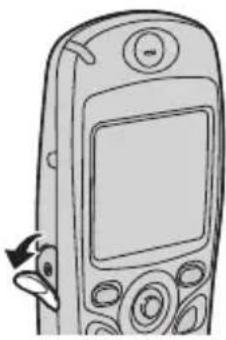
natural_image
Line drawing of a mobile phone with a scroll wheel and control panel (no text or symbols)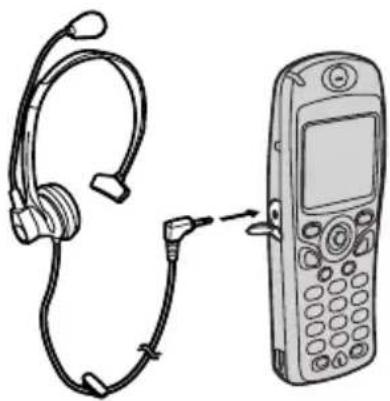
natural_image
Line drawing of a portable phone connected to an earphone (no text or symbols present)Note:
- Insert the connector plug into the headset socket firmly.
Character entry
The dial keys are used to enter characters and numbers. Each dial key has multiple characters assigned to it. When in ABC, ABΓ, AÄÄ, SSS, or AßB character entry modes, you can select which character is entered by pressing a dial key repeatedly.
- Move the joystick to move the cursor.
- Press dial keys to enter characters and numbers.
- Press [C] to erase the character or number highlighted by the cursor. Press and hold [C] to erase all characters or numbers.
- Press [] to switch between uppercase and lowercase.
- To enter another character located on the same dial key, push the joystick right to move the cursor to the next space, then press the appropriate dial key. (This is not necessary when entering text in LetterWise mode.)
Character entry modes
Several character entry modes are available by pressing the right soft key.
Note:
- For character entry when writing SMS messages, see page 40.
LetterWise character table (for English)
LetterWise is a simplified text entry system which suggests the most likely letter to follow the previously entered text. Each time you press a dial key, the most likely character is displayed. If the suggested character is incorrect, press [#] repeatedly to display the desired character. You can change the language which LetterWise uses to base its suggestions on (page 29).
| 0 | 1 | ABC2 | DEF3 | GHI4 | JKL5 | MNO6 | PQRS7 | TUV8 | WXYZ9 |
| Space 0 | Space # &'( ) * , - . / 1 | A B C 2 | D E F 3 | G H I 4 | J K L 5 | M N O 6 | P Q R S 7 | T U V 8 | W X Y Z 9 |
| a b c 2 | d e f 3 | g h i 4 | j k l 5 | m n o 6 | p q r s 7 | t u v 8 | w x y z 9 |
ABC Alphabet character table
| 0 | 1 | ABC2 | DEF3 | GHI4 | JKL5 | MNO6 | PQRS7 | TUV8 | WXYZ9 |
| Space 0 | Space # & ' () * , - . / 1 | A B C 2 | D E F 3 | G H I 4 | J K L 5 | M N O 6 | P Q R S 7 | T U V 8 | W X Y Z 9 |
| a b c 2 | d e f 3 | g h i 4 | j k l 5 | m n o 6 | p q r s 7 | t u v 8 | w x y z 9 |
0-9 Numeric entry table
| 0 | 1 | ABC2 | DEF3 | GHI4 | JKL5 | MNO6 | PQRS7 | TUV8 | WXYZ9 |
| 0 | 1 | 2 | 3 | 4 | 5 | 6 | 7 | 8 | 9 |
ABΓ Greek character table
| 0 | 1 | ABC2 | DEF3 | GHI4 | JKL5 | MNO6 | PQRS7 | TUV8 | WXYZ9 |
| Space 0 | Space # & ' () * , - . / 1 | A B Γ 2 | Δ E Z 3 | H Θ I 4 | K ∧ M 5 | N Ξ O 6 | Π P Σ 7 | ΤΥΦ 8 | ΧΨΩΧ 9 |
AAA Extended 1 character table
| 0 | 1 | ABC2 | DEF3 | GHI4 | JKL5 | MNO6 | PQRS7 | TUV8 | WXYZ9 |
| Space 0 | Space # & ' () * , - . / 1 | AÀÁÄÄÄÄÄEBCÇ2 | DEÈÉÊËF3 | GĞHììíìīīiǐ4 | JKL5 | MNÑOÒÓÔÕÖø6 | PQRS§B7 | TUÙÚÙÜÜV8 | WWX YŷZ9 |
| aàáääääæbcç2 | deèéêëf3 | gğhììííìīiǐ4 | jkl5 | mnñoòóôõöø6 | pqrs§B7 | tuùúûüüv8 | wWx yŷz9 |
●The following are used for both uppercase and lowercase:
$$ \varnothing \mathbb {S} \hat {W} \hat {y} $$
ssš Extended 2 character table
| 0 | 1 | ABC2 | DEF3 | GHI4 | JKL5 | MNO6 | PQRS7 | TUV8 | WXYZ9 |
| Space 0 | Space # & ' () * , - . / 1 | A Á Ä A B C C Č 2 | D D E É E Œ F 3 | G H IÍ 4 | J K L Ł L L 5 | M N Ñ Ñ OÓ Ö 6 | P Q R R Ř S S Š 7 | T Ţ U Ú Ù Û û V 8 | W X Y ŷ Ÿ Z Ž Ž 9 |
| a á ä A b c Č Č 2 | d d e é E ě f 3 | g h i í 4 | j k l Ł L L 5 | m n Ñ Ñ o ó ö 6 | p q r R ř s S Š 7 | t Ţ u ú ü ù ù v 8 | w x y ŷ Ÿ z Ž Ž 9 |
●The following are used for both uppercase and lowercase:
$$ A C \check {C} E \xi L L ^ {\prime} N R S \check {S} \check {u} \check {y} Z \check {Z} \check {Z} $$
AБВ Cyrillic character table
If you still have difficulties after following the instructions in this section, disconnect the AC adaptors and turn off the handset, then reconnect the AC adaptors and turn on the handset.
Telephone
Y is flashing.
●The handset is not registered to the base unit. Register it (page 48).
● The handset is too far from the base unit. Move closer.
●The base unit AC adaptor is not connected. Check the connections.
I cannot make or receive calls.
● The base unit AC adaptor or telephone line cord is not connected. Check the connections.
- If you are using a splitter to connect the unit, remove the splitter and connect the unit to the wall socket directly. If the unit operates properly, check the splitter.
- Disconnect the base unit from the telephone line and connect the line to a known working telephone. If the working telephone operates properly, contact our service personnel to have the unit repaired. If the working telephone does not operate properly, contact your service provider.
● The call bar feature is turned on. Turn it off (page 27).
- You dialled a call restricted number (page 32).
● The key lock feature is on. Turn it off (page 14).
The unit does not ring.
● The ringer volume is turned off. Adjust the handset ringer volume (page 25) and the base unit ringer volume (page 31).
The handset does not vibrate for incoming calls.
●The vibration feature is turned off. Turn it on (page 25).
The handset display is blank.
●The handset is not turned on. Turn the power on (page 11).
The handset will not turn on.
● Make sure that the battery is installed correctly (page 10).
● Fully charge the battery (page 10).
- Clean the charge contacts and charge again (page 10).
The battery should be charging but the battery icon does not change.
- Clean the charge contacts and charge again (page 10).
●The charger AC adaptor is disconnected. Plug in the AC adaptor.
A busy tone is heard when [→] is pressed.
●The handset is too far from the base unit. Move closer and try again.
- Another handset is on an outside call. Wait for the other user to complete the call.
Static, sound cuts in/out, fades. Interference from other electrical units.
- Locate the handset and the base unit away from other electrical appliances.
- Move closer to the base unit.
The speaker cuts in/out while listening to recorded announcements with the speakerphone.
- Use the speakerphone in a quiet environment, or turn the mute on while listening to recorded announcements with the speakerphone.
The handset stops working while being used.
- Disconnect the base unit AC adaptor and turn off the handset. Connect the AC adaptor, turn on the handset and try again.
While storing an entry in the phonebook or assigning a hot key, the handset starts to ring.
- A call is being received. To answer the call, press [→]. Programming will be cancelled. Start again.
Pressing Ⓒ does not display/dial the last number dialled.
- If the redialled number was more than 24 digits long, the number will not be redialled. Redial the number manually.
The handset beeps intermittently and/or flashes.
● Fully charge the battery (page 10).
I fully charged the battery, but still flashes.
- Clean the charge contacts and charge again (page 10).
- It is time to replace the battery (page 11).
Caller information is not displayed.
- You must subscribe to Caller ID service.
While viewing caller information, the display returns to standby mode.
- Do not pause for over 1 minute while searching.
Audible call sounds late. (KX-TCD580 only)
●The audible call announcement is too long. Record a shorter announcement (page 20).
When searching the handset phonebook by voice, the wrong entry is displayed.
●The voice tag is too similar to another voice tag. Record a different voice tag for one of the entries (page 18).
I cannot register a handset to a base unit.
- The maximum number of base units (4) are already registered to the handset. Cancel unused base unit registrations from the handset (page 49).
- The maximum number of handsets (6) are already registered to the base unit. Cancel unused handset registrations from the base unit (page 48).
- You entered the wrong PIN number. If you forget your PIN, consult your nearest Panasonic service centre.
- Locate the handset and the base unit away from other electrical appliances.
Answering system (KX-TCD580 only)
The answering system is turned on, but caller messages are not recorded.
- The recording time is set to "Greeting Only". Select "1 Minute" or "No Limit" (page 47).
- Message memory is full. Erase unnecessary messages (page 43).
I cannot operate the answering system with the handset.
- Another handset user is using the answering system, SMS features, accessing the Caller ID list or changing base unit settings. Wait for the other user to finish.
●A caller is leaving a message. Wait for the caller to finish.
●The handset is too far from the base unit. Move closer.
I cannot operate the answering system remotely.
- You are entering the wrong remote access code. Turn remote operation on using the handset and select a new code (page 45).
- You are pressing the dial keys too quickly. Press each key firmly.
● The answering system is turned off. Turn it on (page 46). - You are using a pulse telephone. Try again using a touch tone phone.
While recording a greeting message or listening to messages, the unit rings and recording stops.
●A call is being received. Answer the call and try again later.
SMS
I cannot send or receive SMS messages.
- You have not subscribed to the appropriate service. Consult your service provider.
● The SMS message centre number(s) are not stored or are incorrect. Store the correct numbers (page 39). - Message transmission was interrupted. Wait until the message has been sent before using other telephone functions.
- SMS message memory is full. Erase unnecessary message in the receive and send lists (page 37, 38).
“FD” is displayed.
- The unit could not connect to the SMS message centre. Confirm that the correct SMS message centre numbers are stored (page 39). Confirm that SMS is turned on (page 38).
"FE" is displayed.
- An error occurred while sending the message. Try again.
“EO” is displayed.
- Your phone number is permanently withheld or you have not subscribed to the appropriate service. Consult your service provider.
Technical information
Standard: DECT (Digital Enhanced Cordless Telecommunications), GAP (Generic Access Profile)
Number of channels: 120 Duplex Channels
Frequency range: 1.88 GHz to 1.9 GHz
Duplex procedure: TDMA (Time Division Multiple Access)
Channel spacing: 1728 kHz
Bit rate: 1152 kbit/s
Modulation: GFSK (Gaussian Frequency Shift Keying)
RF transmission power: Approx. 250 mW
Voice coding: ADPCM 32 kbit/s
Power source, Base unit: 220–240 V, 50 Hz
Power source, Charger: 230–240 V, 50 Hz
Power consumption, Base unit: Approx. 12 W
Power consumption, Charger: Approx. 12 W
Operating conditions: 5 °C–40 °C, 20 %–80 % relative air humidity (dry)
Dimensions, Base unit: Approx. 144 mm × 102 mm × 37 mm
Dimensions, Charger: Approx. 78 mm × 78 mm × 59 mm
Dimensions, Handset: Approx. 120 mm × 45 mm × 22 mm
Mass (weight), Base unit: Approx. 220 g
Mass (weight), Charger: Approx. 110 g
Mass (weight), Handset: Approx. 110 g
Note:
- Specifications are subject to change.
● The illustrations used in these operating instructions may differ slightly from the actual product.
Trademarks:
- Eatoni and LetterWise are trademarks of Eatoni Ergonomics, Inc.
Conditions of guarantee
This guarantee is in addition to and does not in any way affect any statutory or other rights of consumer purchasers. If within the applicable guarantee period, the appliance proves to be defective by reason of faulty design, workmanship or materials, we undertake subject to the following conditions to have the defective appliance (or any part or parts there of) repaired or replaced free of charge.
- The appliance shall have been purchased and used solely within either the UK or ROI and in accordance with standard operating instructions and the technical and/or Safety Standards required in the UK.
- The appliance should be returned together with this guarantee and proof of date of purchase promptly on being found defective at the purchaser's risk and expense to the authorised dealer from whom the appliance was purchased or to the nearest authorised dealer. All enquires must be through such dealers.
- This guarantee shall not apply to damage caused through fire, accident, lightning, misuse, wear and tear, neglect, incorrect adjustment or repair, to damage caused through installation, adaption, modification or use in an improper manner or inconsistent with the technical and/or safety standards required in the country where this appliance is used, or to damage occurred during transit to or from the purchaser.
- If at any time during the guarantee period any part or parts of the appliance are replaced with a part or parts not supplied or approved by us or of an objective quality safe and suitable for the appliance, or the appliance has been dismantled or repaired by any person not authorised by us, we shall have the right to terminate this guarantee in whole or in part immediately without further notice.
- The purchaser's sole and exclusive remedy under this guarantee against us is for the repair or replacement of the appliance or any defective part or parts and no other remedy, including, but not limited to, incidental or consequential damage or loss of whatsoever nature shall be available to the purchaser.
- This guarantee shall not apply to batteries and any other items of limited natural life.
- Our decision on all matters relating to complaints shall be final. Any appliance or defective part which has been replaced shall become our property.
- The guarantee period applicable to this product shall be 12 months.
Please keep these operating instructions with your receipt.
Panasonic Business Systems U.K.
Receipt No. Date of purchase
Model No. Serial No.
Index
A Additional base units: 48
Additional handsets: 48
Answering calls: 15
Answering system: 42
Listening to messages: 43
Remote operation: 45
Turning on/off: 42
Audible call: 20, 22, 34
Auto talk: 15, 28
Auto voice dial: 28
B Base unit
Guide to settings: 30
PIN: 32
Resetting: 32
Selecting: 48
Base unit phonebook: 20
Editing: 21
Erasing: 22
Making calls: 21
Storing: 20
Battery
Charge: 10
Installation: 10
Life: 10
Replacement: 11
Strength: 10
Belt clip: 55
C Call bar: 27
Caller ID: 34
Call restriction: 32
Call transfer: 50
Chain dial: 19
Character entry: 56
Character entry for SMS: 40
Conference calls: 50
Connections: 9
D Date and time: 11
Direct call: 27, 28
Display
Icons: 7
Language: 27
Standby mode: 26
Talk mode: 26
E Emergency call: 31
H Handset
Changing name: 28
Guide to settings: 23
Locator: 15
PIN: 28
Power on/off: 11
Registration: 48
Resetting: 29
Handset phonebook: 16
Editing: 18
Erasing: 19
Making calls: 16
Storing: 16
Headset (optional): 55
Hot key (quick dial): 19
I Intercom: 49
K Key lock: 14
Key tone: 26
L LetterWise: 29, 40, 56
M Making calls: 13
Memo alarm: 25
Missed calls: 34
Mute: 14
P Pause: 14
Pause length: 31
Phonebook copy
Handset to base unit: 19
Handset to handset: 49
Phonebooks
Base unit: 20
Handset: 16
PIN
Base unit: 32
Handset: 28
Power on/off (Handset): 11
Private category: 34
R Recall: 14, 31
Recording
Audible call: 21
Greeting message: 42
Telephone conversations: 15
Voice memo: 43
Voice tag: 18
Redialling: 13
Redial list: 13
Ringer type: 26
Index
S SMS feature: 36
Speakerphone: 13
T Temporary ringer off: 15
V Vibration: 15, 25
Voice search: 17
Voice tag: 18
Volume
Receiver: 13
Ringer (Base unit): 31
Ringer (Handset): 25
Speakerphone: 13
W Walkie-Talkie: 51
Wall mounting: 53
Dear purchaser,
You have acquired a product made in compliance with the Digital Enhanced Cordless Telecommunications (DECT) standard. DECT technology is characterized by high-security protection against interceptions as well as high-quality digital transmission. This telephone was designed for a wide range of applications.
For your future reference
Attach or keep original receipt to assist with any repair under warranty.
Serial No. (found on the back of the base unit)
Date of purchase
Name and address of dealer
Note:
- This equipment is designed for use on the UK and Republic of Ireland analogue telephone network.
- In the event of problems, you should contact your equipment supplier in the first instance.
Declaration of conformity
Hereby, Panasonic Communications Company (U.K.) Ltd. declares that this DECT Cordless Telephone is in compliance with the essential requirements and other relevant provisions of Directive 1999/5/EC.
A copy of the manufacturer's declaration of conformity to the essential requirements of the R&TTE Directive is available at the following web address:
http://doc.panasonic.de
Customer Care Helpline Tel. No.: U.K. 08700 100 076 / R.O.I. 01289 8333
C€0436
1999/5/EC
Sales Department:
Panasonic Business Systems U.K.
Panasonic House, Willoughby Road, Bracknell, Berkshire, RG12 8FP
Manufacturer:
Panasonic Communications Company (U.K.) Ltd.
Pencarn Way, Duffryn, Newport, South Wales, NP10 8YE, United Kingdom
© 2004 Panasonic Communications Co., Ltd. All Rights Reserved.