
Conexis L1 - Home Automation Yale - Free user manual and instructions
Find the device manual for free Conexis L1 Yale in PDF.


User questions about Conexis L1 Yale
0 question about this device. Answer the ones you know or ask your own.
Ask a new question about this device
Download the instructions for your Home Automation in PDF format for free! Find your manual Conexis L1 - Yale and take your electronic device back in hand. On this page are published all the documents necessary for the use of your device. Conexis L1 by Yale.
USER MANUAL Conexis L1 Yale
text_image
Conexis® L Manual. The Secure, Keyl Smart Door LockConexis® L1 Manual.
The Secure, Keyless Smart Door Lock
Introduction.
Contents
Installation Videos 3
Conexis® L1 Smart Door Lock 4
Inside The Box 5
Removing Existing Handle and Cylinder 6
Measuring Your Door 7
Installing The Actuator 8
Installing Handles 9
Handing The Lock 15
Pairing Master Key Card 16
Locking The Conexis ^® L1 17
Pairing Master Phone To App 21
Adding Additional Key Cards/Tags 22
Unlocking Using App 24
Sharing Virtual Keys 25
Pairing To A Smart Home Controller 26
Adding Remote Fobs 27
Battery Indicator 28
Factory Reset 29
Frequently Asked Questions 30
Hereby, ASSA ABLOY Ltd declares that the Conexis® L1 Smart Door Lock is in compliance with Directive 2014/53/EU. The full text of the EU declaration of conformity is available at the following internet address:
www.yale.co.uk/declaration-of-conformity
Installation Videos.
Please watch the installation videos on the Yale website or YouTube channel and read this manual before installation.

YouTube
How to install a Conexis® L1 Smart Door Lock


smart Living
How to install a Conexis L1® Smart Door Lock.

text_image
QR code image containing encoded data, no visible human-readable textThe smarter way to protect your home.

smart Living
Pairing your smart phone with the Conexis® L1 Smart Door Lock
The smarter way to protect your home

smart Living
How to add a card or tag via the Conexis L1® Smart Door Lock App
The smarter way to protect your home.

smart Living
Sending Virtual Keys via the Conexis® L1 Smart Door Lock App
The smarter way to protect your home

smart Living
How to remove a Conexis® L1 Smart Door Lock
The smarter way to protect your home.
For more information on this product and the Yale Smart Living Range visit: www.yale.co.uk/smart-living
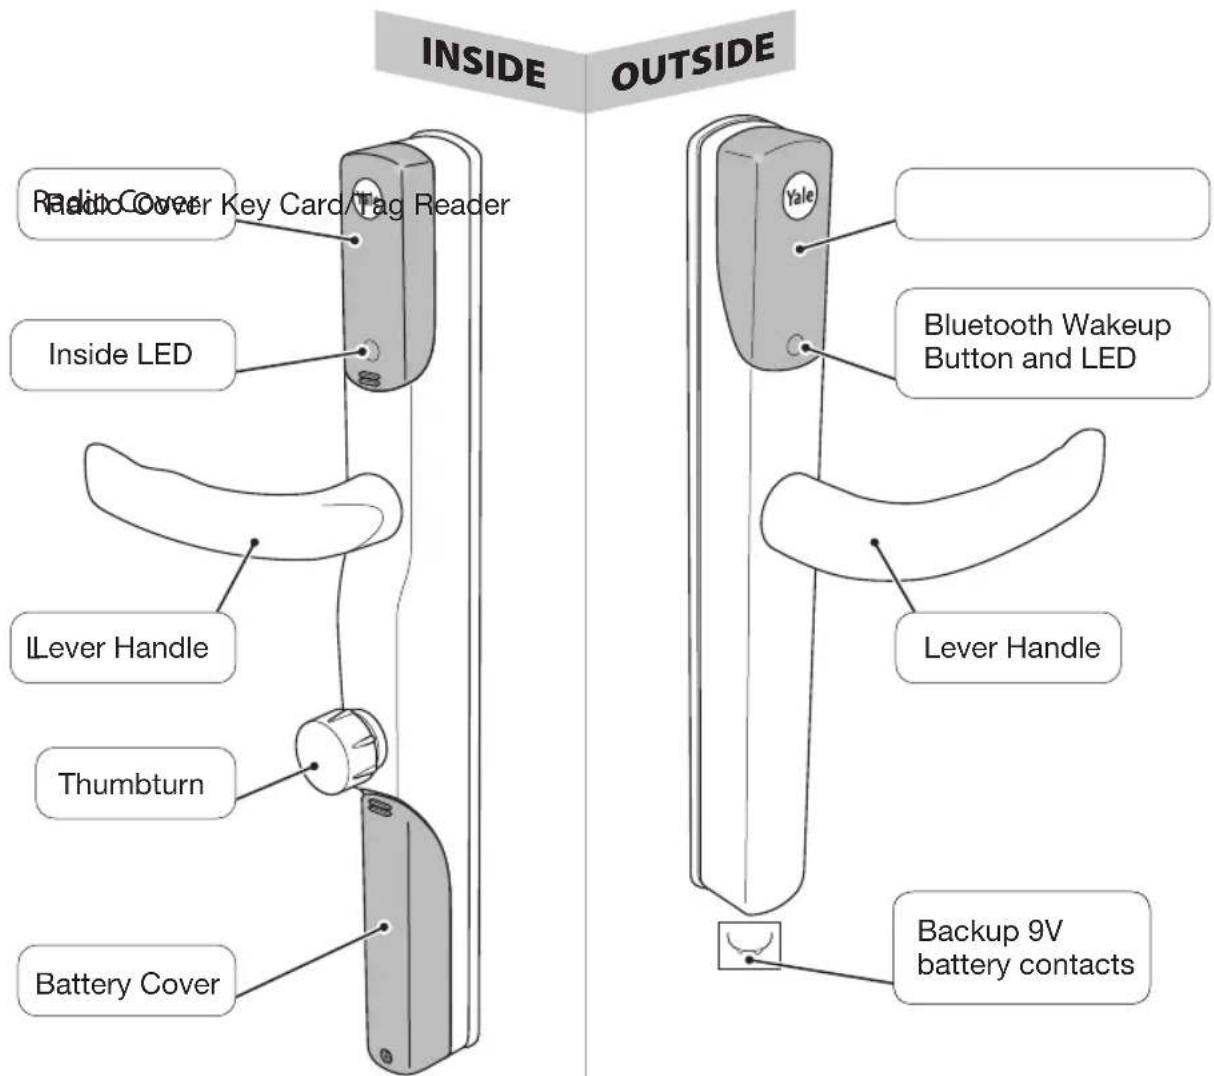
Conexis® L1 Smart Door Lock.
text_image
INSIDE OUTSIDE Radio Cover Key Card/Tag Reader Inside LED Lever Handle Thumbturn Battery Cover Yale Bluetooth Wakeup Button and LED Lever Handle Backup 9V battery contactsTools Required*
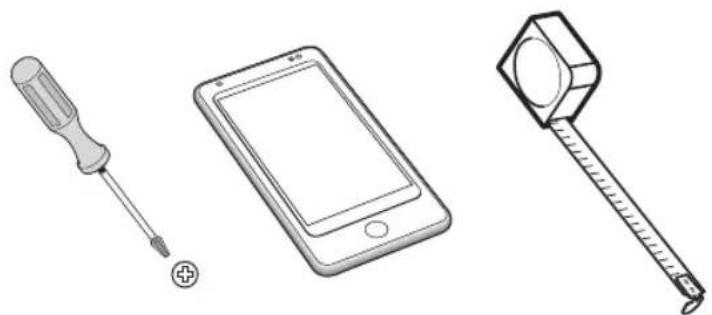
natural_image
Line drawings of three different tools: a screwdriver, a smartphone, and a measuring tool (no text or symbols present)*Additional tools may be required to remove your existing handles
Inside The Box.
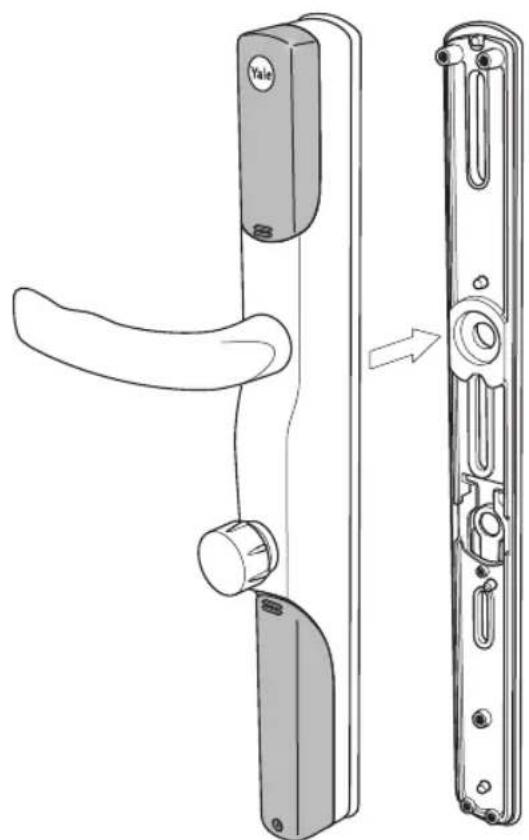
natural_image
Technical line drawing of a door handle assembly showing left and right views (no text or symbols)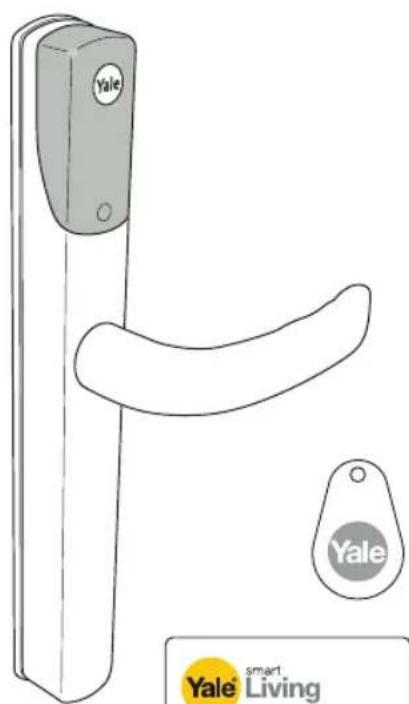
text_image
Yale Yale smart Living
text_image
Yale smart Living The smart way to protect your home.x 1
x 1
text_image
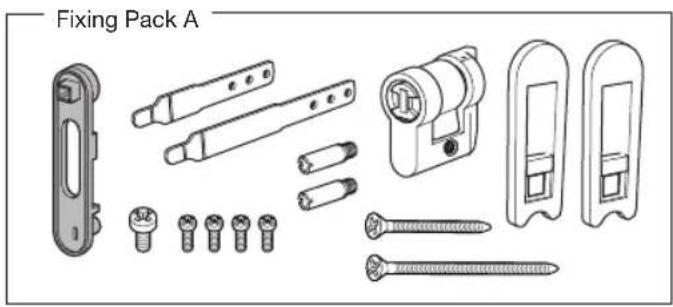
Fixing Pack A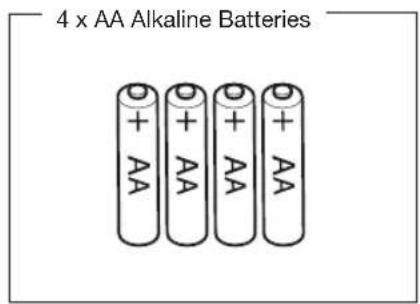
text_image
4 x AA Alkaline Batteries + AA + AA + AA + AA
text_image
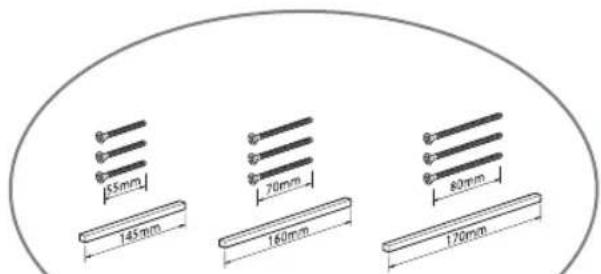
Fixing Pack B 55mm 145mm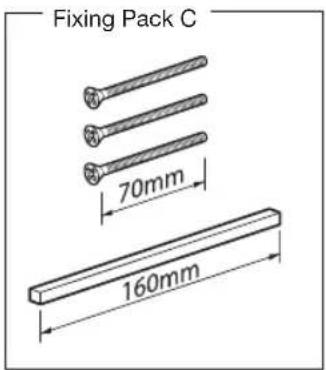
text_image
Fixing Pack C 70mm 160mm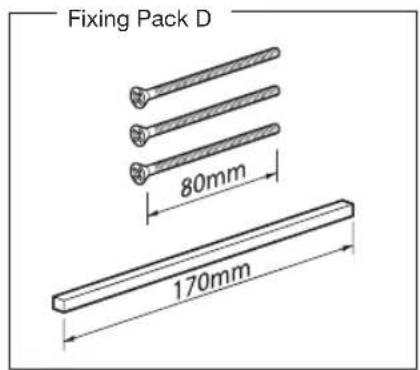
text_image
Fixing Pack D 80mm 170mmRemoving Existing Handle And Cylinder.

Do not close door until installation is complete
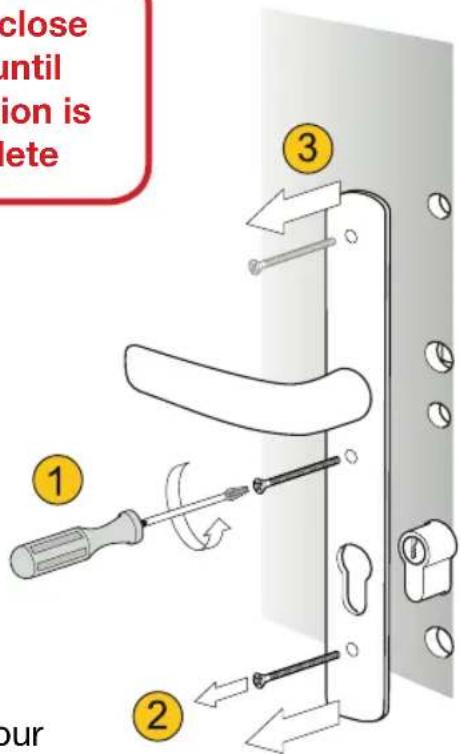
text_image
close until ion is ete ① ② ③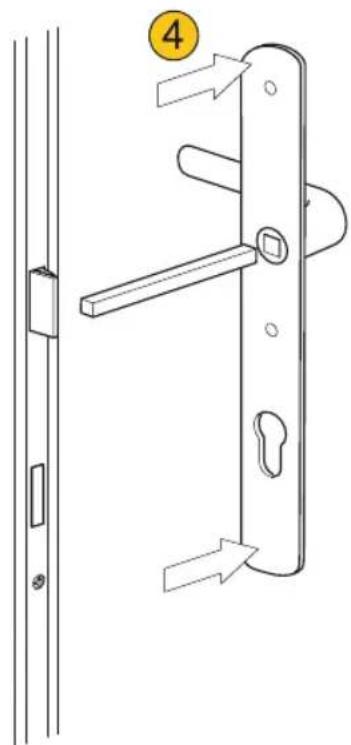
text_image
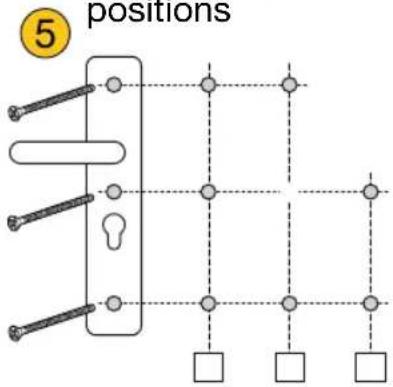
Technical diagram showing a door handle mechanism with labeled component 4 and directional arrows indicating movement.Make note of your current fixing screw positions
text_image
5 positions 5 6 7 8 9 10 11 12 13 14 15 16 17 18 19 20 21 22 23 24 25 26 27 28 29 30 31 32 33 34 35 36 37 38 39 40 41 42 43 44 45 46 47 48 49 50
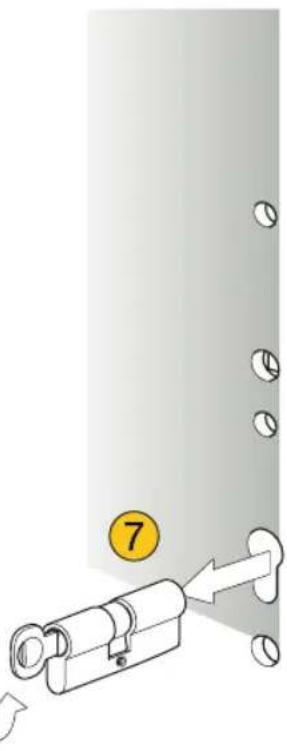
natural_image
Mechanical assembly diagram showing a lock mechanism with a numbered component (7), no text or symbols present.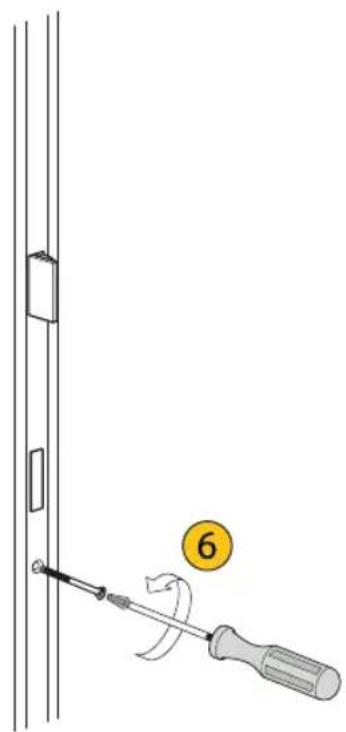
text_image
Diagram showing a screwdriver with a numbered callout indicating step 6, suggesting a repair or repair operation.Measuring Your Door.
1 Measure the thickness of the door to select the correct fixing pack.
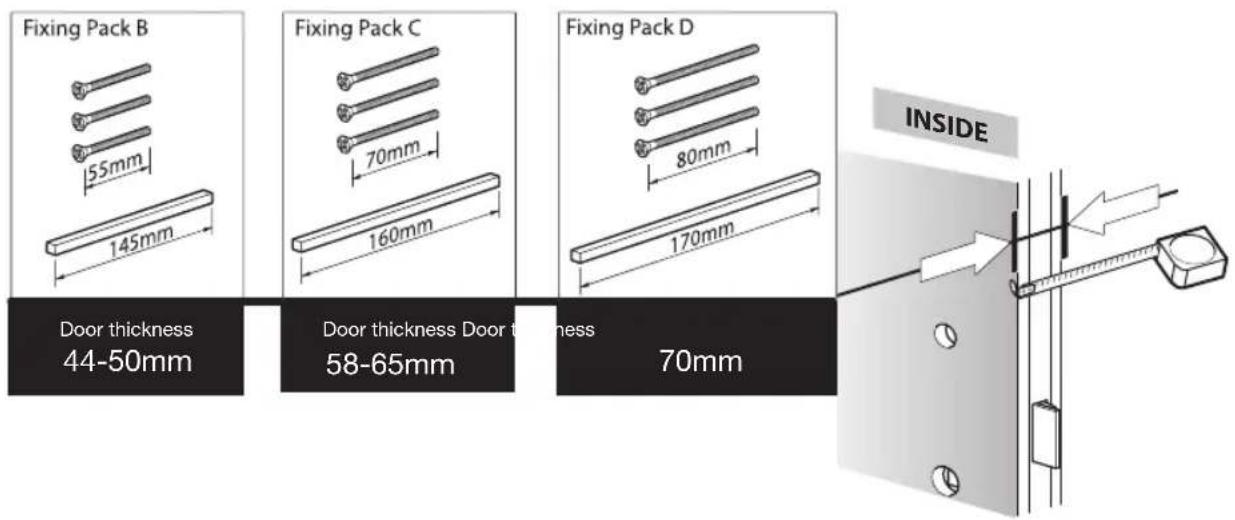
text_image
Fixing Pack B 55mm 145mm Door thickness 44-50mm Fixing Pack C 70mm 160mm Door thickness Door thickness 58-65mm Fixing Pack D 80mm 170mm 70mm INSIDE② Measure the distance between the centre of the lock and the inside of the door to select the correct tailbar.
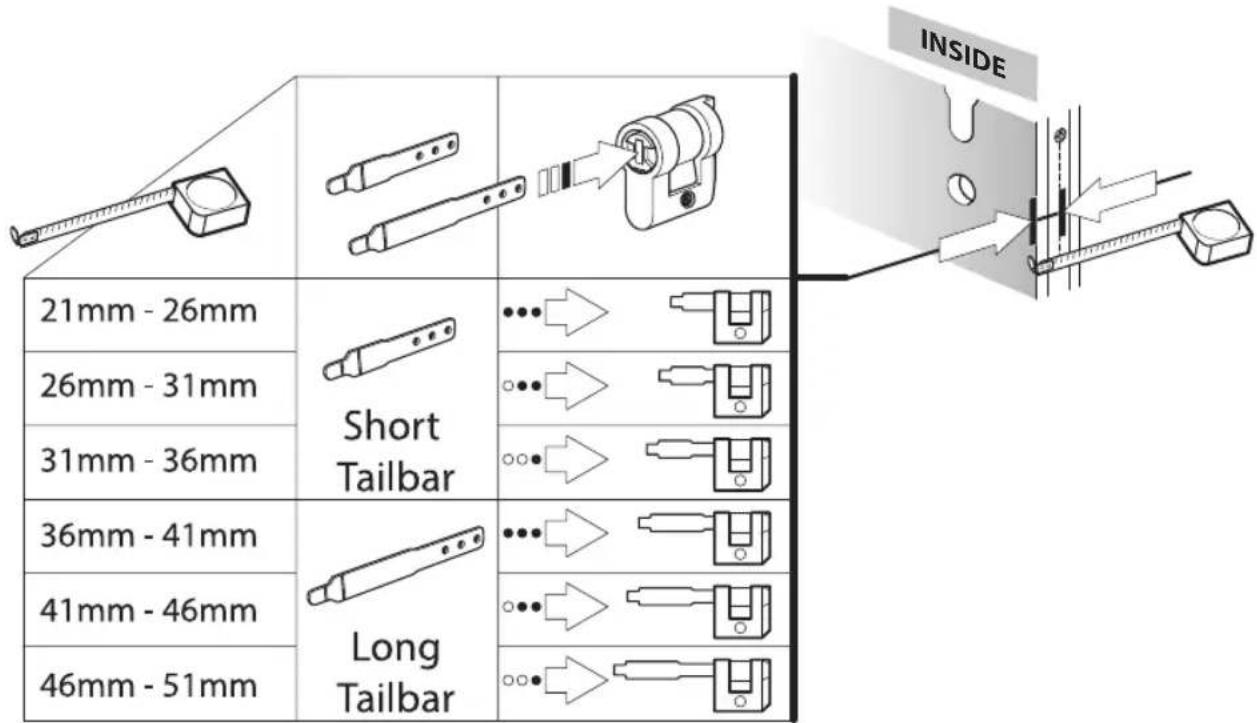
text_image
INSIDE 21mm - 26mm 26mm - 31mm 31mm - 36mm 36mm - 41mm 41mm - 46mm 46mm - 51mm Short Tailbar Long TailbarInstalling The Actuator.
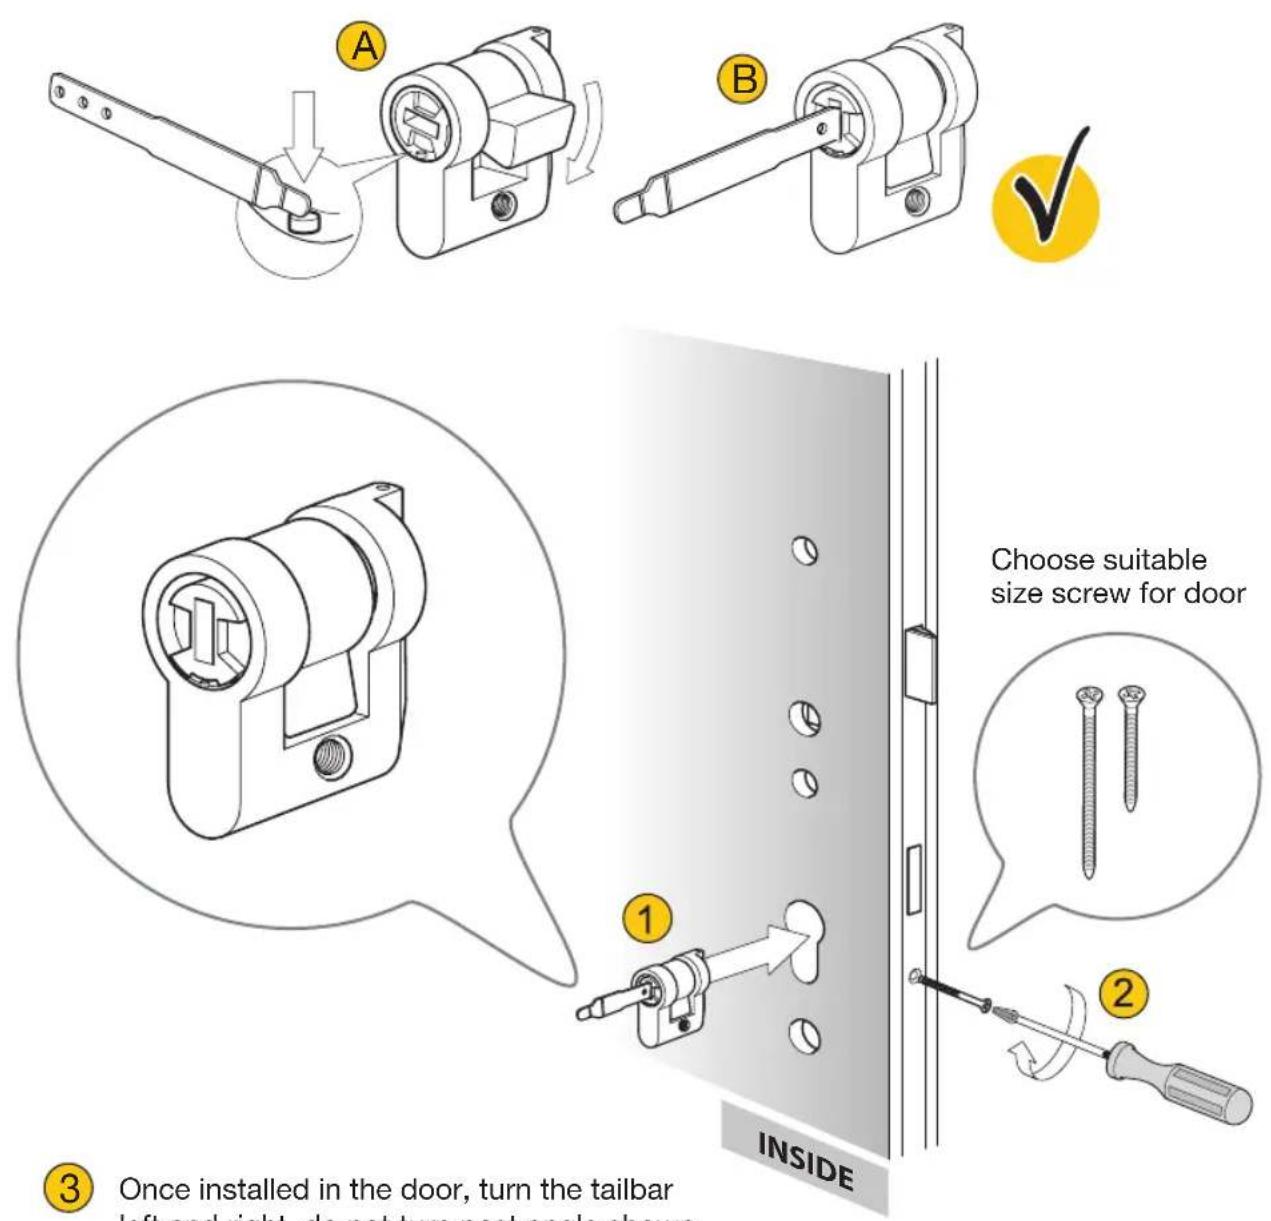
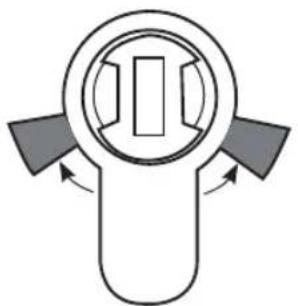
Once installed in the door, turn the tailbar left and right, do not turn past angle shown on diagram. Does it move freely?
Yes, if it moves freely, please proceed.
No, remove the actuator from door and realign until it moves freely.
Tip: You may need to reset the actuator so that the tailbar is in the vertical position before continuing.
natural_image
Simple line drawing of a mechanical component with no text or symbolsInstalling External Handle.
text_image
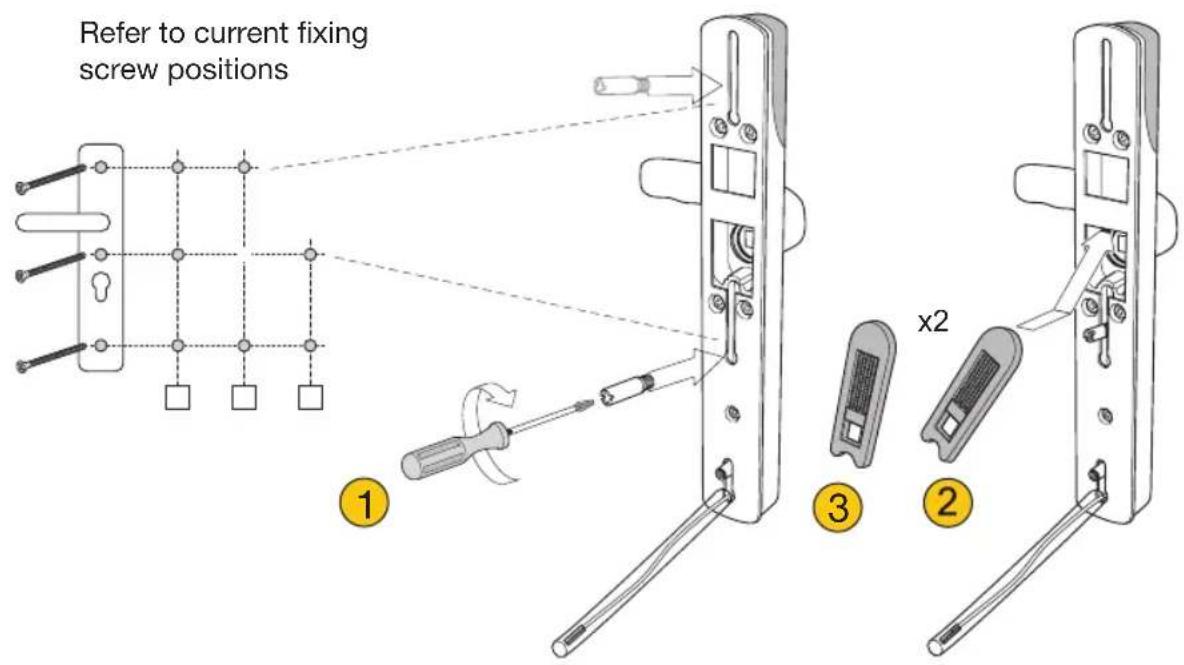
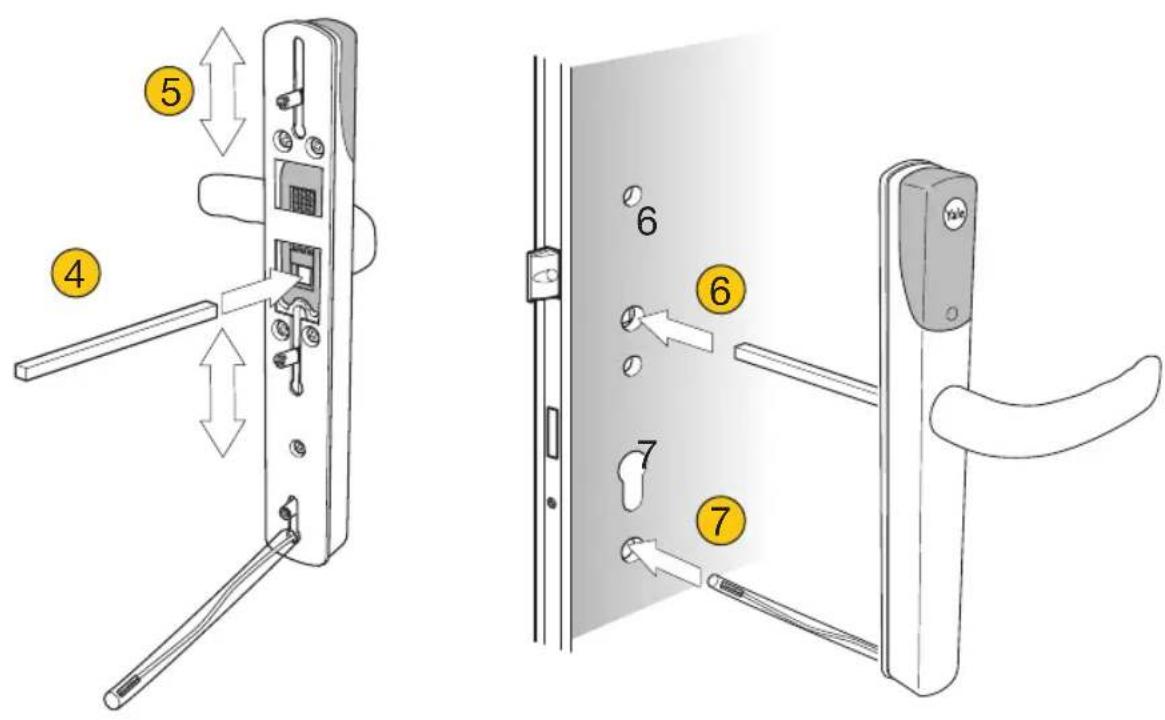
Refer to current fixing screw positions ① ③ ② x2You may need to screw in an additional lug from fixing pack A.
text_image
Diagram showing two views of a door lock with numbered parts and directional arrows indicating movement or assembly.Installing Internal Fixing Plate.

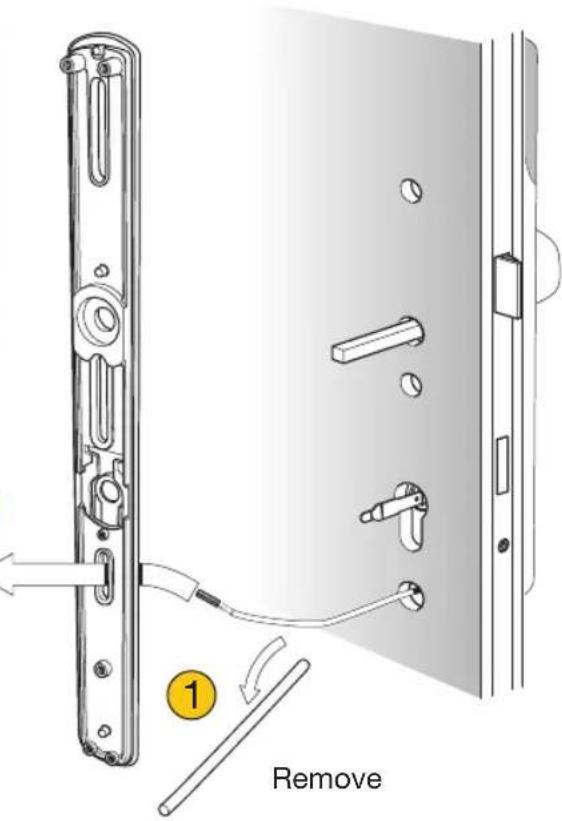
Ensure correct fixing pack is used for width of door. Do not fully tighten as the handle needs to be aligned in the next step.
text_image
145mm 160mm 170mmFixing pack B, C or D screws.
2
text_image
Remove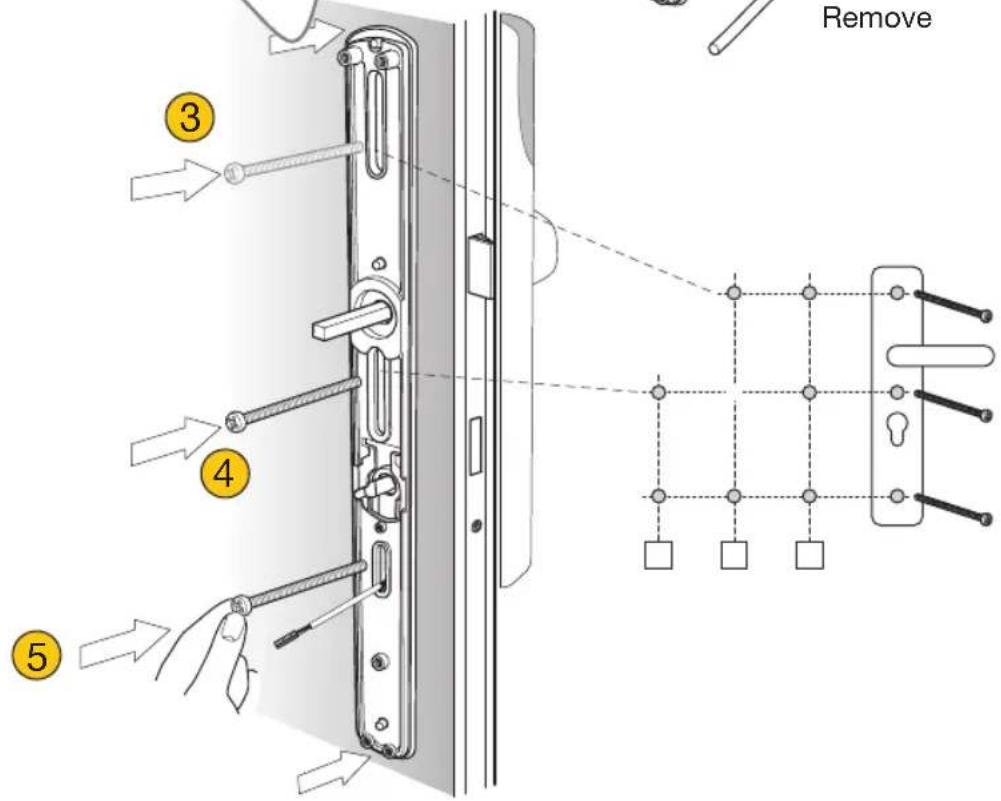
text_image
Remove ③ ④ ⑤Aligning Handle.
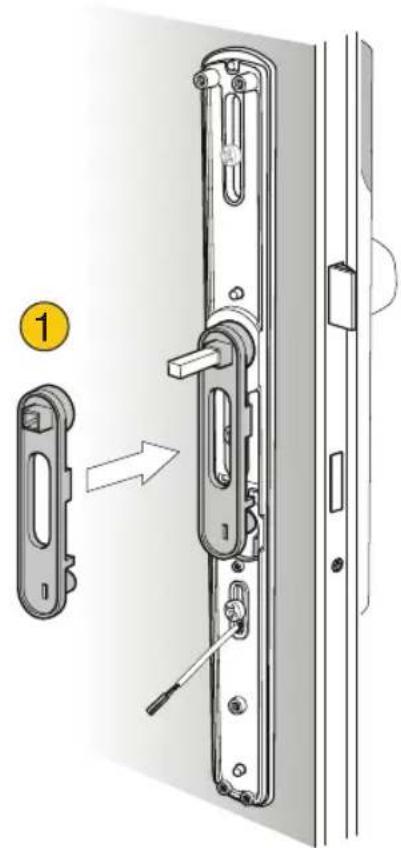
text_image
Diagram showing a door lock mechanism with labeled component 1 and directional arrow indicating movementEnsure exterior handle and fixing plate are parallel before finally tightening screws.
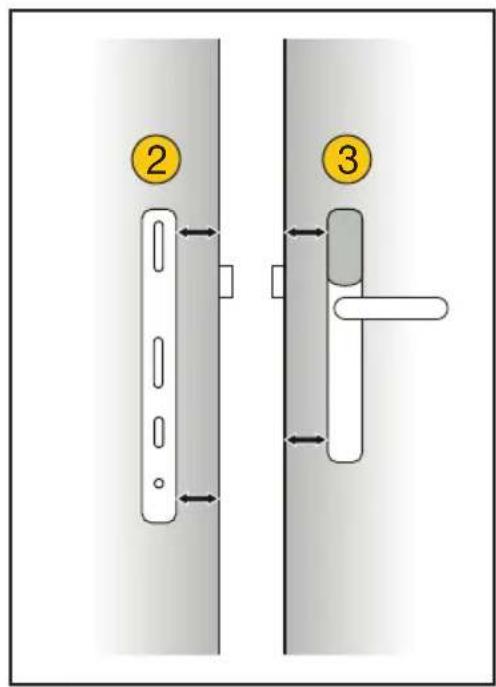
text_image
Diagram showing two door lock positions labeled 2 and 3 with directional arrows indicating movement or movement.Please ensure that alignment tool is flat against the door as screws are tightened. This ensures the motor is aligned correctly.
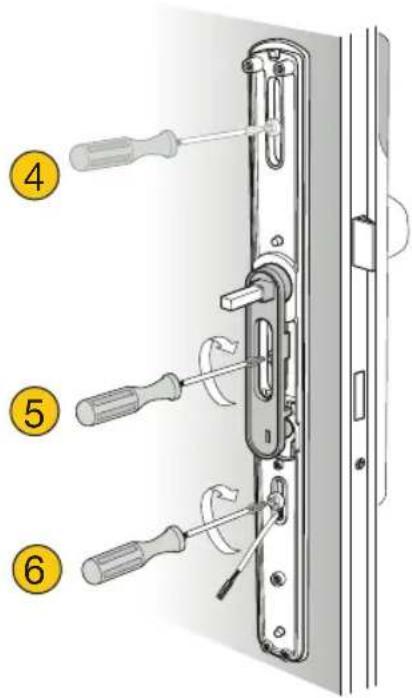
text_image
Diagram showing a door lock mechanism with numbered parts and screwdriver placement instructionsInstalling Internal Handle.

Do not turn thumbturn until installation is complete
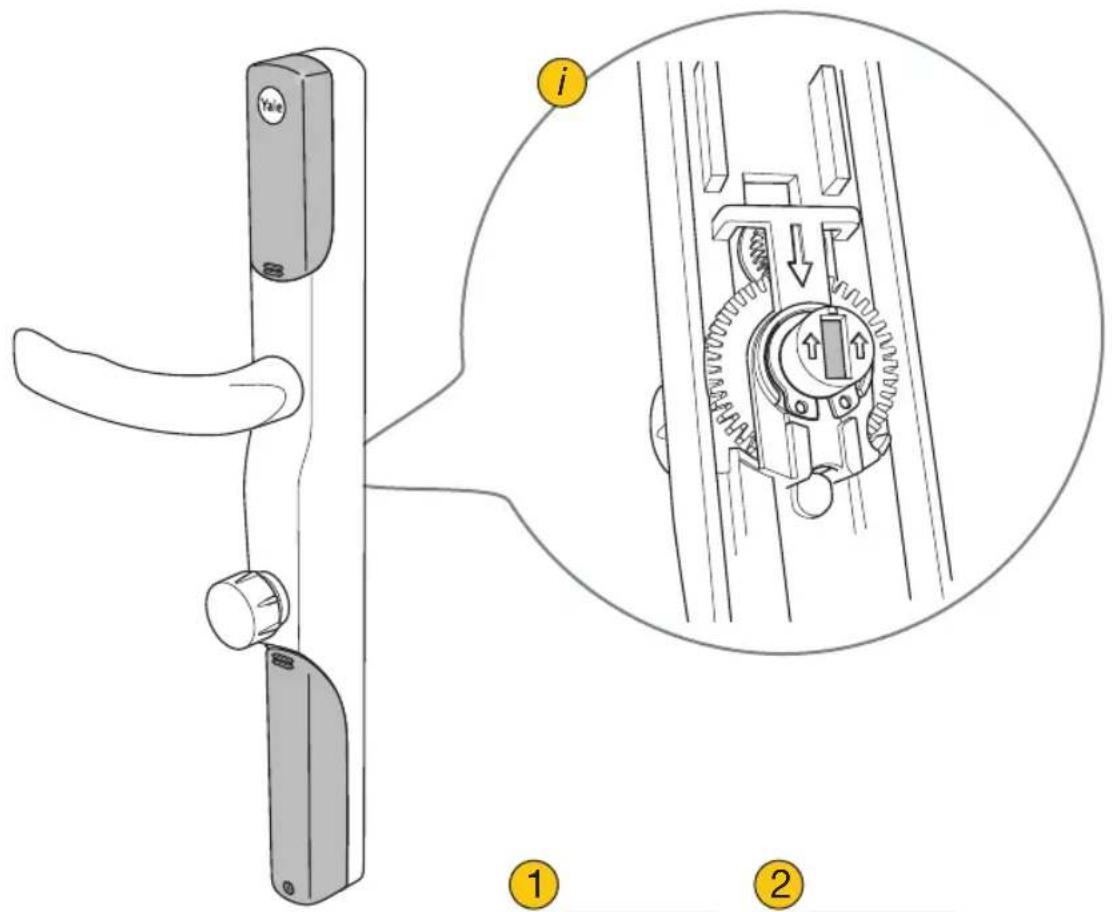
text_image
Technical diagram of a door handle with labeled parts and a magnified inset showing internal mechanism details.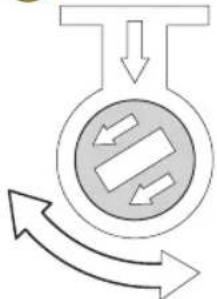
flowchart
graph TD
    A["Input"] --> B["Processing"]
    B --> C["Output"]
    style B fill:#f9f,stroke:#333
    style C fill:#ccf,stroke:#333
natural_image
Pure diagram of a T-shaped container with internal flow arrows, no text or symbols present
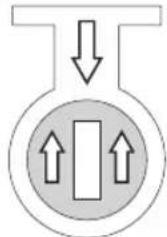
Turn until arrows are facing each other
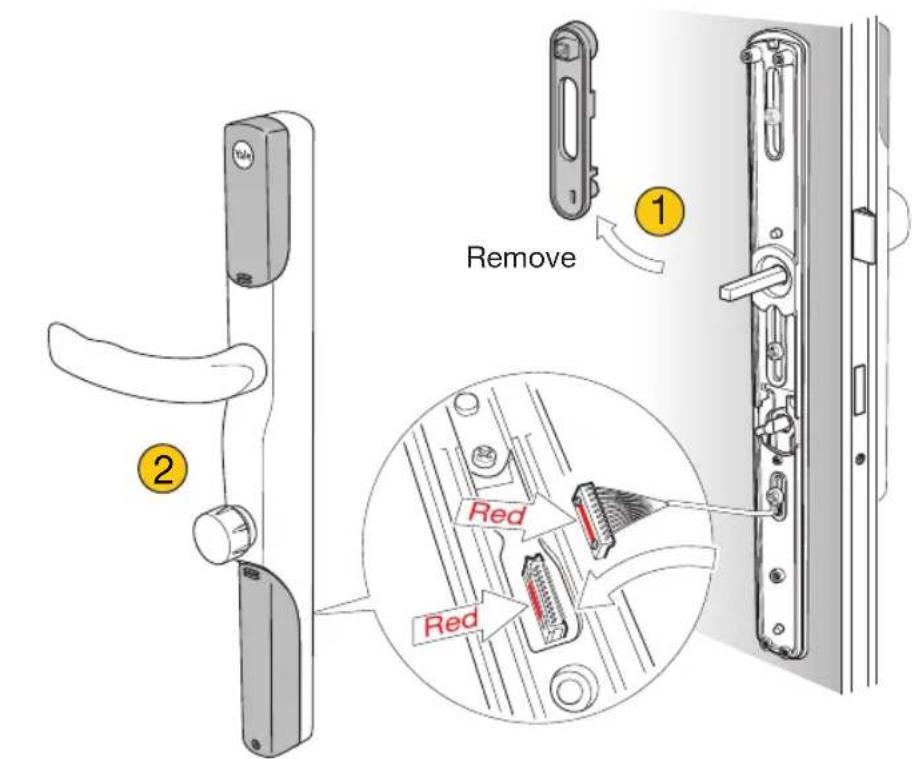
Installing Internal Handle.
text_image
Remove Red Red
Take care when removing cable if adjustments are needed
text_image
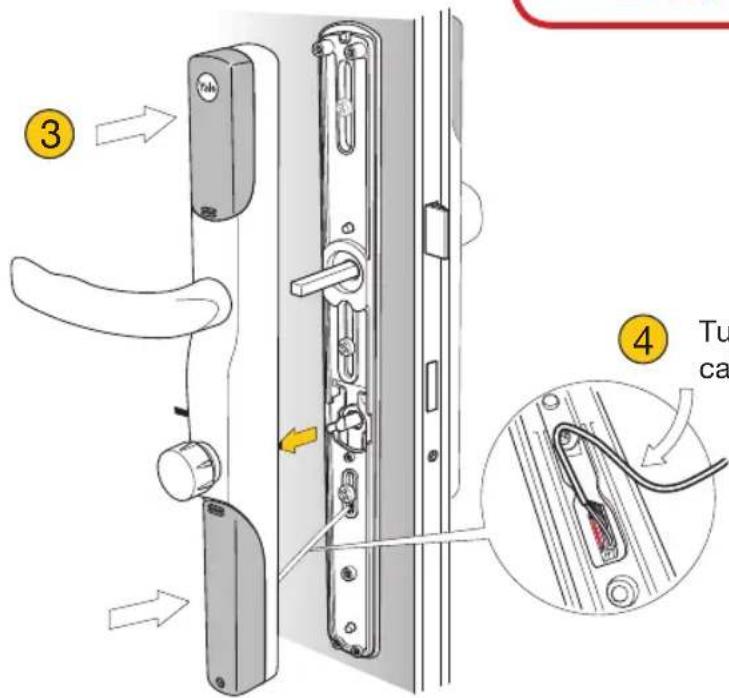
Diagram of a door handle assembly with numbered parts and a close-up view of the internal component labeled 'Tu ca'.
Tuck excess cable into slot

Do not trap cable!
Installing Internal Handle.
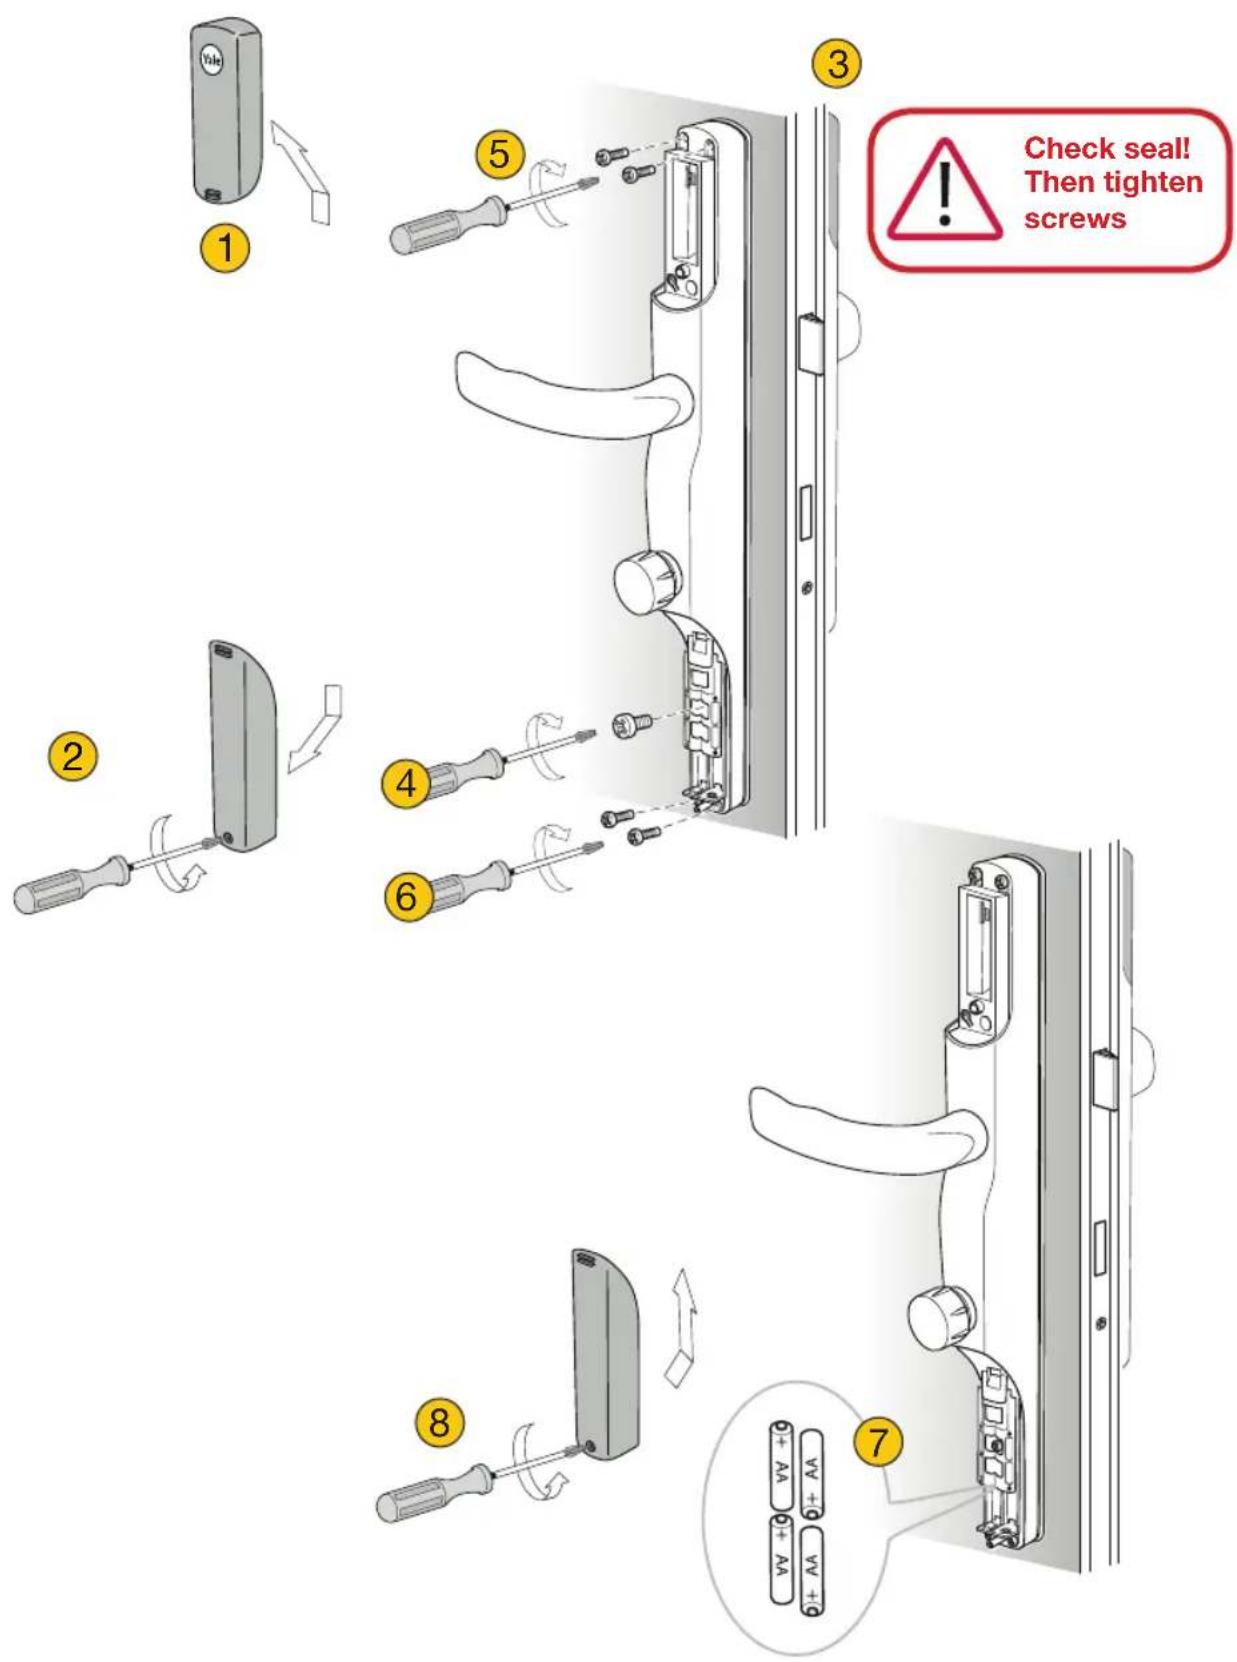
text_image
Check seal! Then tighten screwsHanding The Lock.

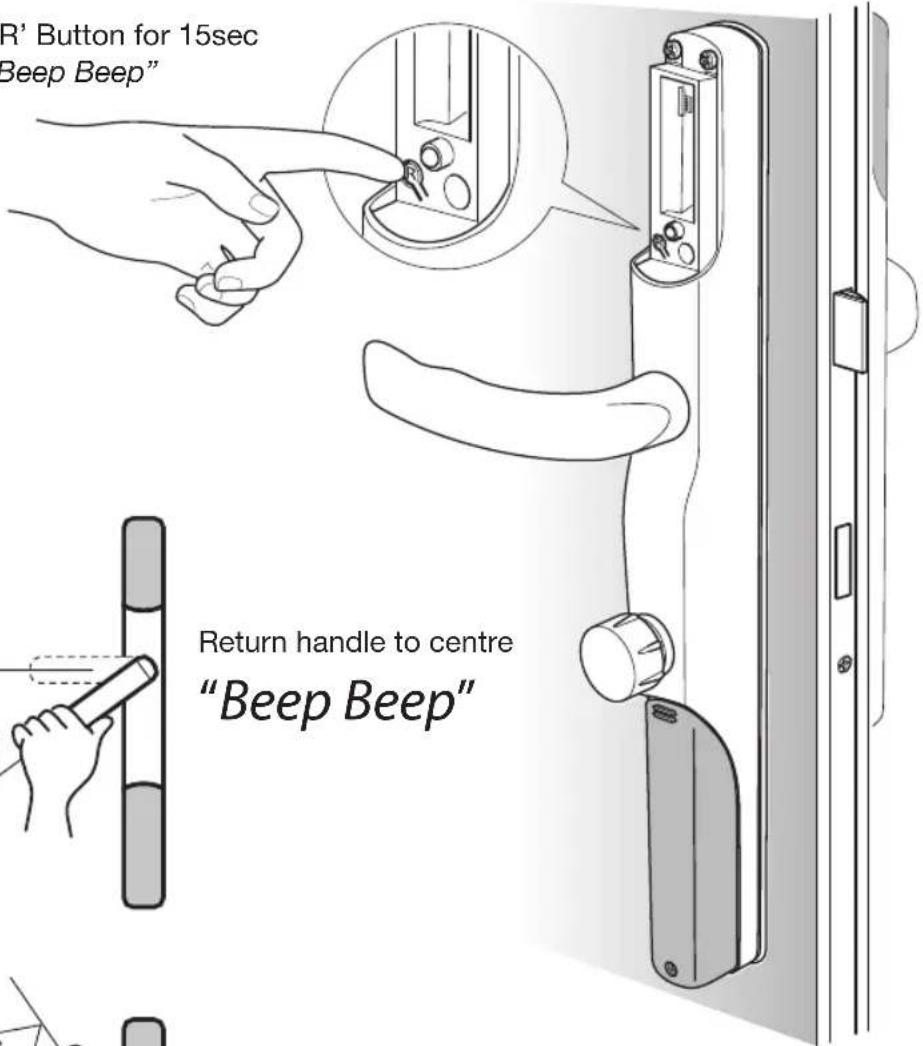
If these steps are not completed the door will not lock. If the lock sounds like it is struggling to lock, check actuator installation shown on page 8
Hold 'R' Button for 15sec until "Beep Beep"
1
text_image
R' Button for 15sec Beep Beep" Return handle to centre "Beep Beep"2
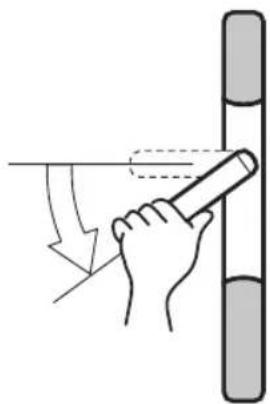
natural_image
Illustration of a hand using a tool to mark a vertical object with a dashed line indicating a reference point (no text or symbols present)Return handle to centre "Beep Beep"
3
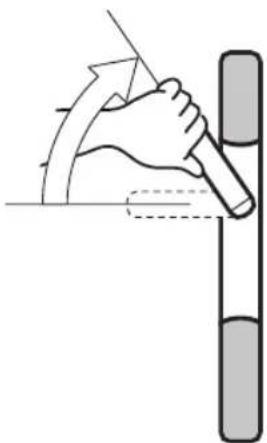
natural_image
Illustration of a hand using a tool to cut or mark a vertical object, no text or symbols presentReturn handle to centre. The lock will now configure itself by locking and unlocking.
"Beep Beep Beep"

If after completing this step you get 8 related beeps and a red light it indicates there is an issue with alignment. To fix this please uninstall the unit & go back to page 8
Pairing Master Key Card.

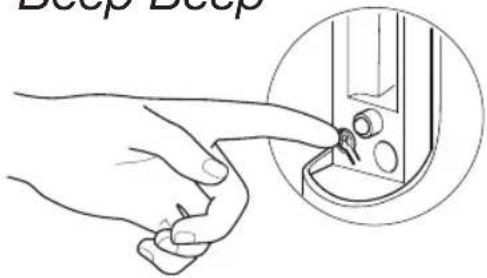
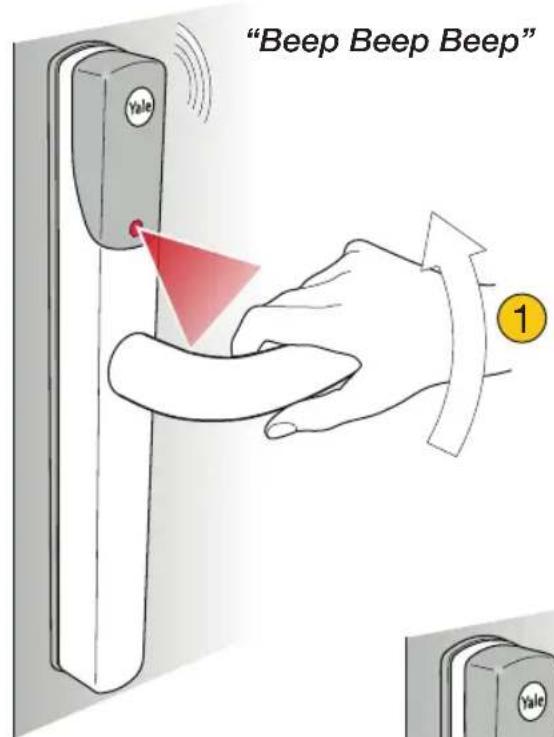
This process adds the master key card to the lock to enable access before pairing a phone. Once a phone is paired, all other key cards / tags will need to be added via the app
1 Press 'R' button on internal handle to turn the light on the external handle purple
"Beep Beep"
text_image
Deep Deep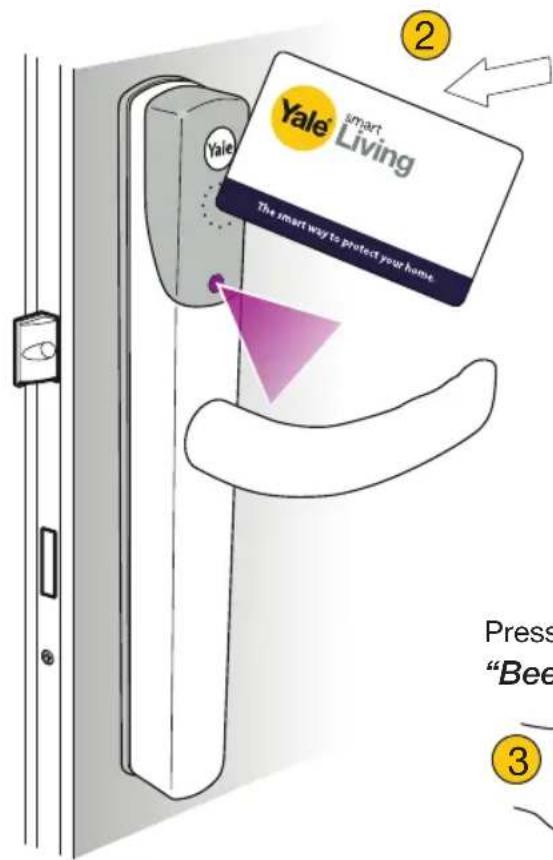
text_image
Yale smart Living The smart way to protect your home. Press "Bee ② ③Touch card below the Yale logo on the external handle so that the light turns green, then purple.
"Beep"
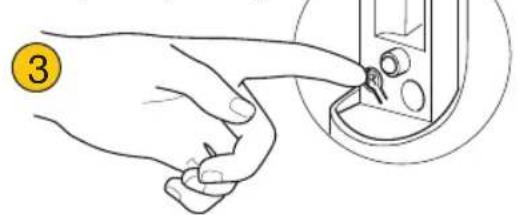
Press 'R' to finish.
"Beep Beep Beep"
natural_image
Line drawing of a hand pressing a button on a mechanical component (no text or symbols)Locking The Conexis® L1.

Please make sure your door remains open
text_image
"Beep Beep Beep" Yale 1 Yale
natural_image
Simple pink padlock icon with no text or symbols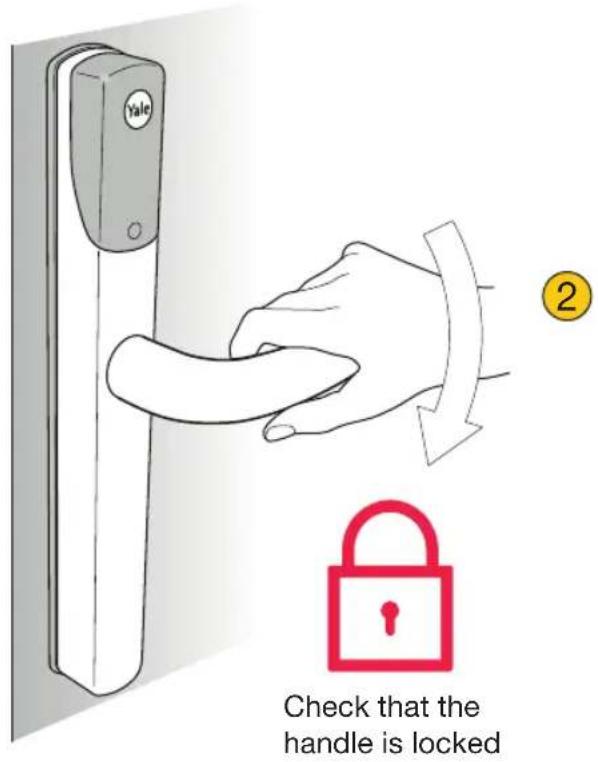
text_image
Check that the handle is lockedUnlocking With Master Key Card.
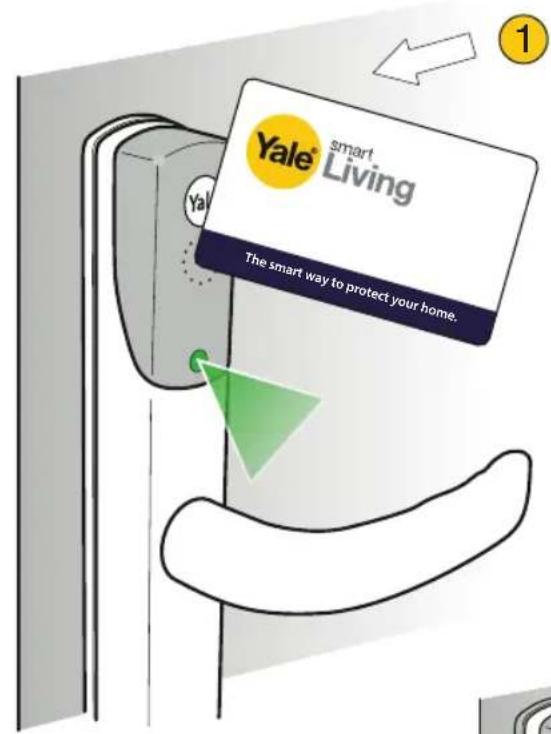
text_image
Yale® smart Living The smart way to protect your home.
natural_image
Green padlock icon with open shackle, no text or symbols present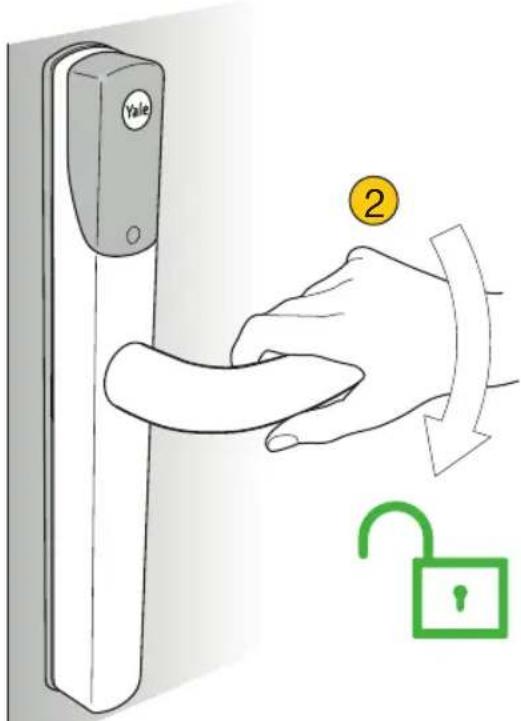
text_image
Yale ②"Beep Beep Beep"
Installation Checklist.
Before shutting your door in the frame, please test the following things...
1 While the door is open, lift the lever handle to lock. Make sure the motor operates smoothly.

② Test to make sure the lever handle cannot be pushed down.

3 Push the thumbturn in on the inside handle and turn 180 degrees to unlock the door.

4 Push the lever handle down and make sure it returns by itself.

5 Lift the lever handle to lock again.

6 Tap the paired card on the outside handle under the Yale logo. Make sure it unlocks and the lever can be pushed down.

Please proceed to setup the Conexis L1® app
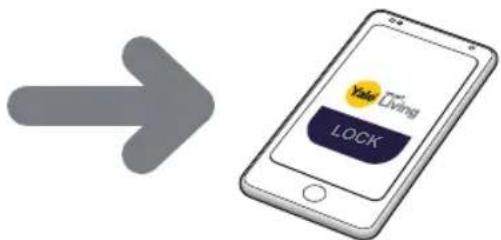
text_image
Yale Living LOCKConexis® L1 App.
1 Download the Conexis® L1 app
text_image
Yale Living LOCK
text_image
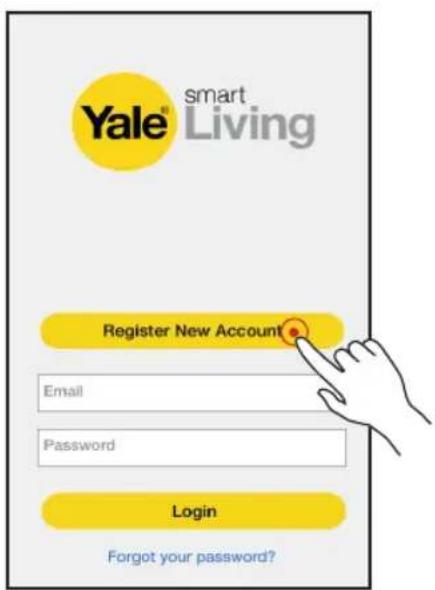
Available on the App Store ANDROID APP ON Google play② Register Account
text_image
Yale® smart Living Register New Account Email Password Login Forgot your password?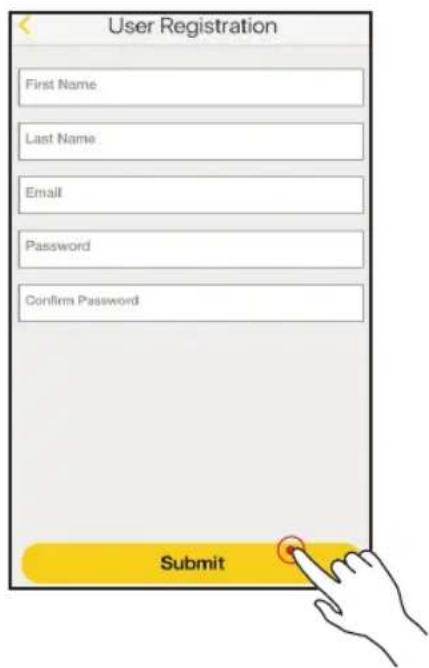
text_image
User Registration First Name Last Name Email Password Confirm Password Submit③ Verify account by clicking link sent to your email
You will now be credited with 5 Virtual Key credits. Additional key credits can be purchased through the app.
Pairing Master Phone To App.
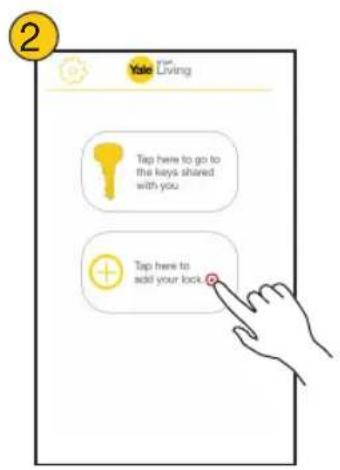
1 Make sure Bluetooth on your phone is switched on and it has an internet connection
text_image
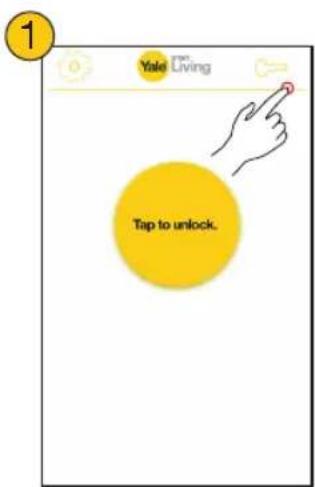
Yale Living Tap here to go to the keys shared with you Tap here to add your lock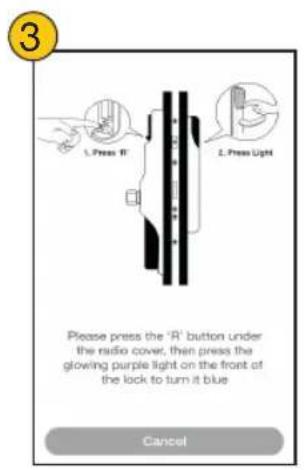
text_image
3 L. Press IT L. Press Light Please press the 'R' button under the radio cover, then press the glowing purple light on the front of the lock to turn it blue Cancel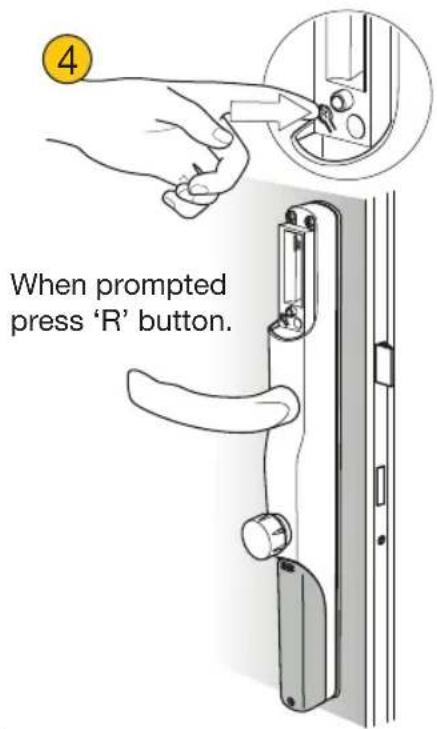
text_image
When prompted press 'R' button.If the app has changed from what is shown on this manual please download the latest version from www.yale.co.uk/help

text_image
OUTSIDE 5 Press purple light to activate Bluetooth Yale Yale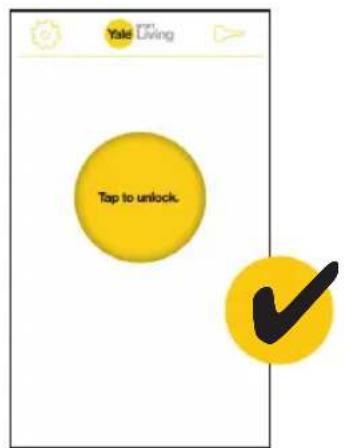
text_image
Yale Giving Tap to unlock.Please note that pairing the lock to your phone will use 1 of your 5 key credits
Adding Additional Key Cards/Tags.

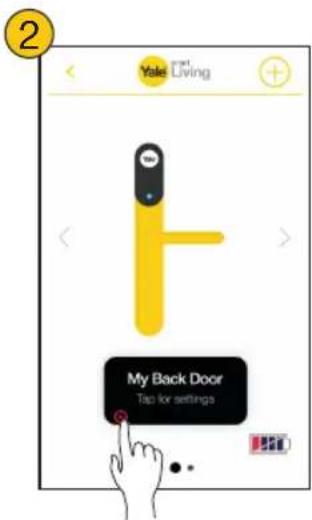
All additional key cards/tags must be added through the app
text_image
Yale C# 0 Tap to unlock.Press the key in the top right corner & select my lock
text_image
Yale Living My Back Door Tap for settings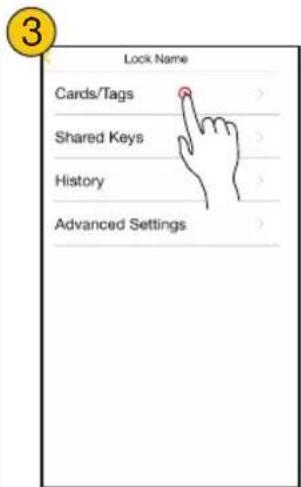
text_image
Lock Name Cards/Tags Shared Keys History Advanced Settings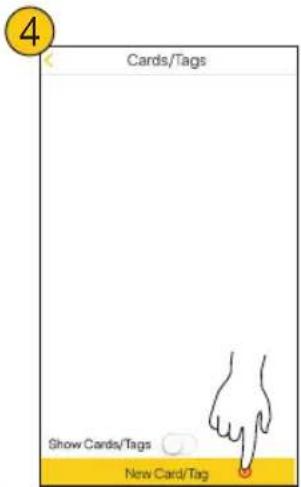
text_image
4 Cards/Tags Show Cards/Tags New Card/Tag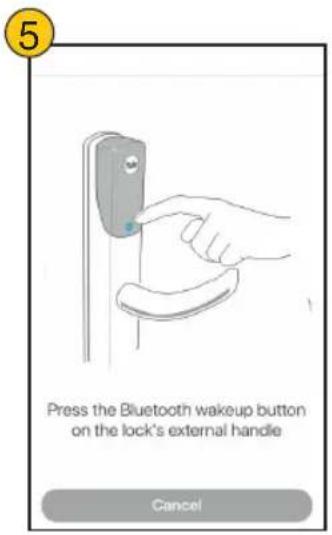
text_image
5 Press the Bluetooth wakeup button on the lock's external handle Cancel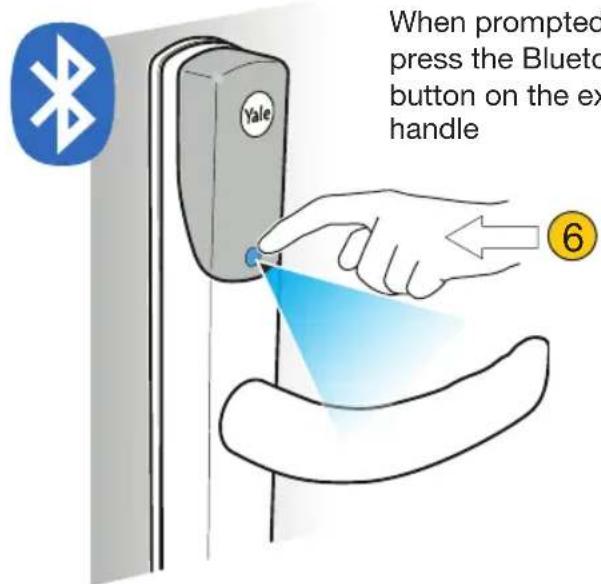
text_image
When prompted press the Bluetooth button on the ex handleWhen prompted, press the Bluetooth button on the exterior handle
Adding Additional Key Cards/Tags.
text_image
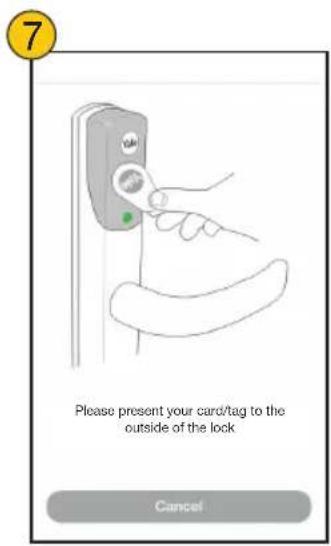
7 Please present your card/tag to the outside of the lock Cancel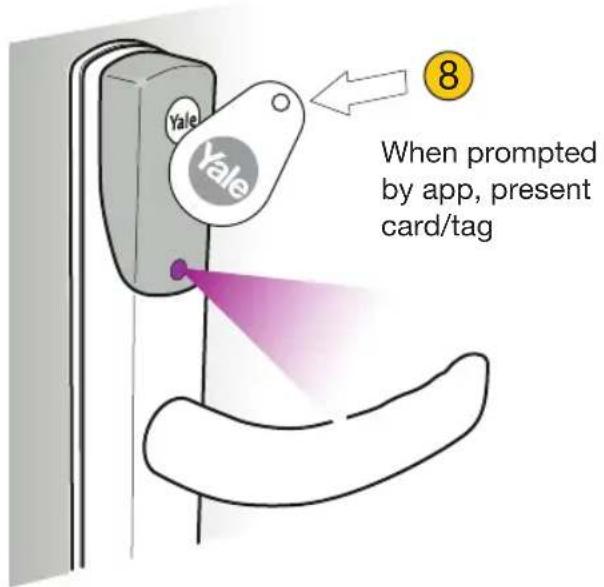
text_image
8 When prompted by app, present card/tag
text_image
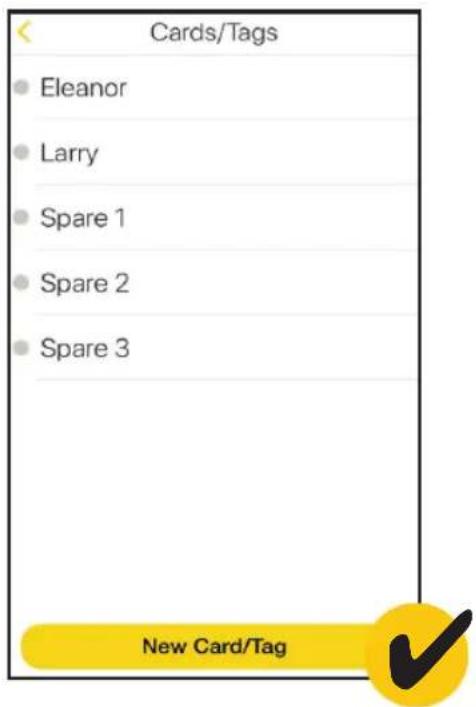
Cards/Tags Eleanor Larry Spare 1 Spare 2 Spare 3 New Card/TagWhen an additional key card/tag has been added, 'User 1' will appear in the list. This is the master key card previously added.

Having difficulty? Please check out our video guides on YouTube
Unlocking Using App.
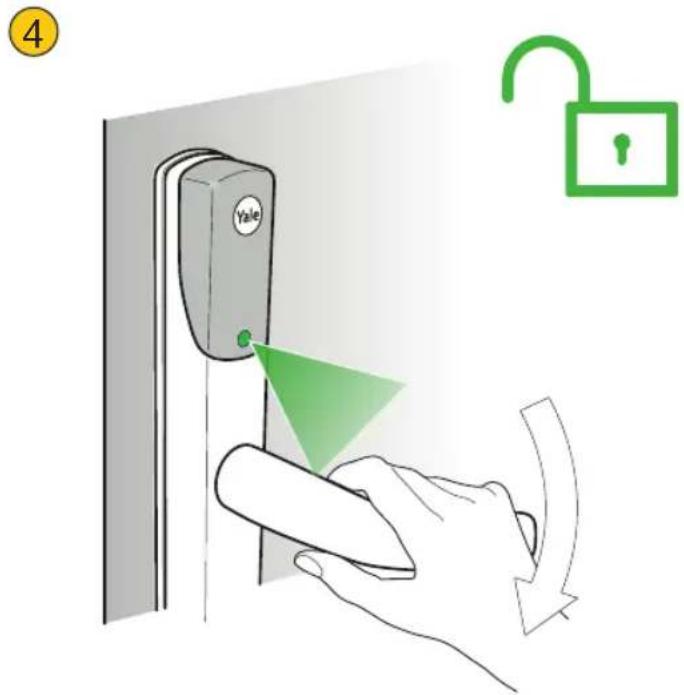
1 Make sure Bluetooth is active on your smartphone
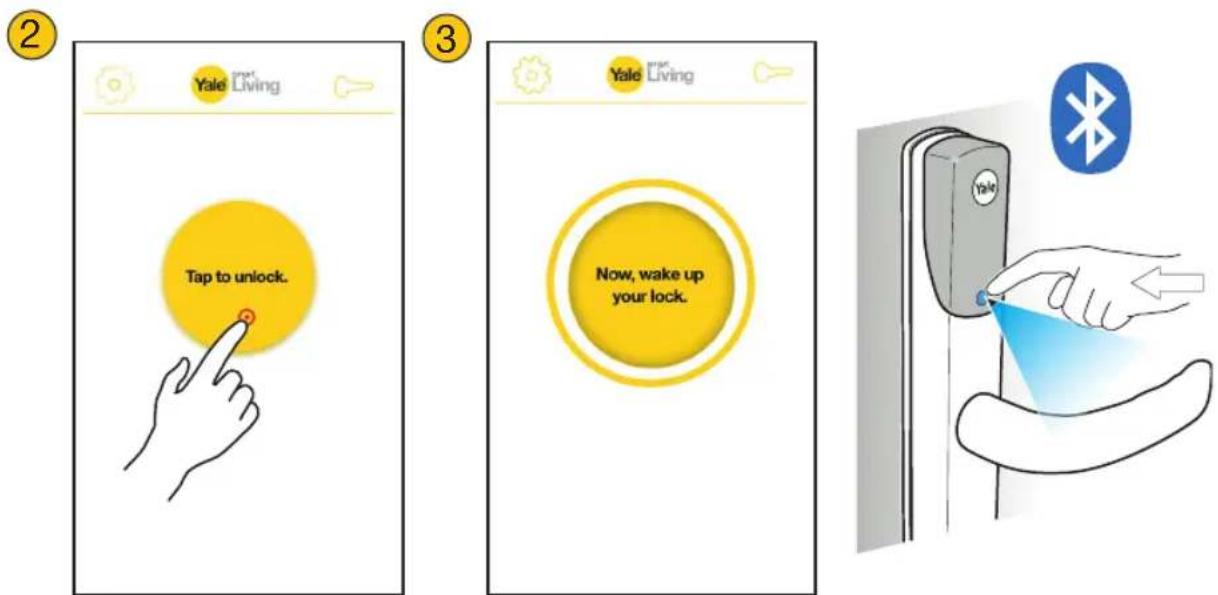
The timer shows the amount of time you have to wake up the Bluetooth on the lock
text_image
4 YaleSharing Virtual Keys.

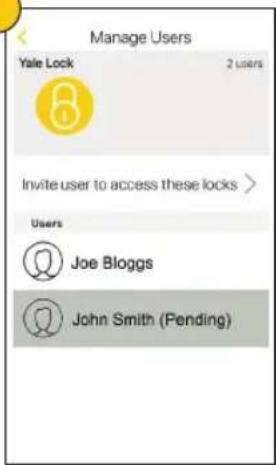
You can give people access to your lock by sharing a virtual key. Please note, 5 virtual key credits are included with the app. Additional key credits can be purchased through the app.
1
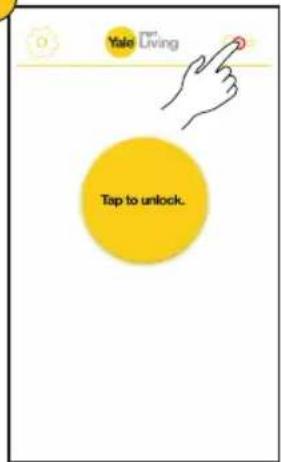
text_image
Yale Living Tap to unlock.2
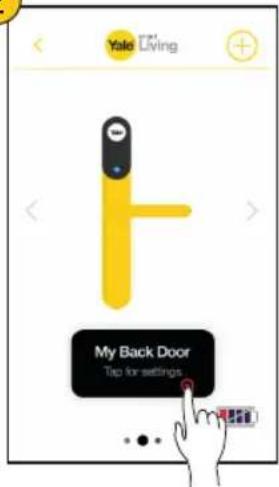
text_image
Yolo LIVING My Back Door Tap for settings3
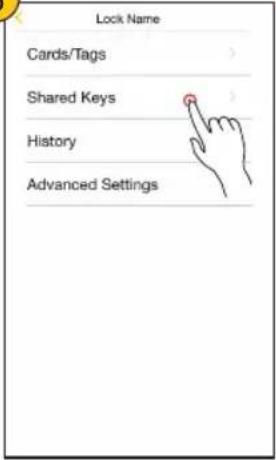
text_image
Lock Name Cards/Tags Shared Keys History Advanced Settings4
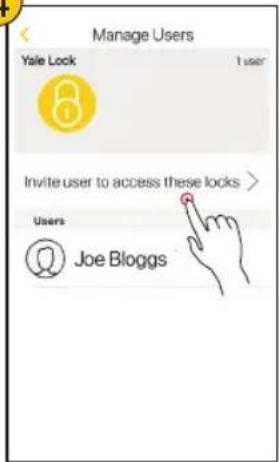
text_image
Manage Users Yale Lock 1 user Invite user to access these locks > Users Joe BloggsPress the key in the top right corner & select my locks
5
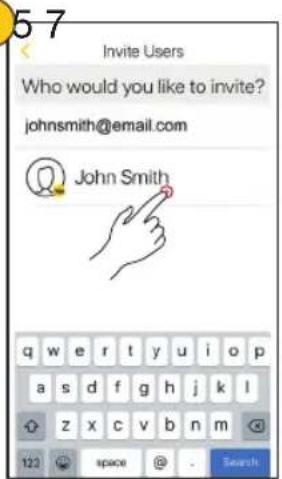
text_image
57 Invite Users Who would you like to invite? johnsmith@email.com John Smith[Non-Text]
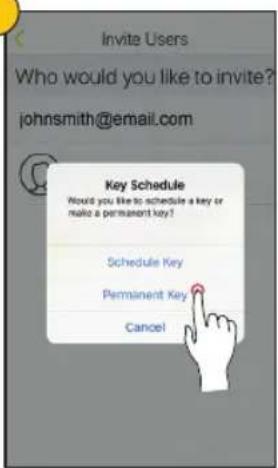
text_image
Invite Users Who would you like to invite? johnsmith@email.com Key Schedule Would you like to schedule a key or make a permanent key? Schedule Key Permanent Key Cancel[Non-Text]
text_image
Manage Users Yale Lock 2 users Invite user to access these locks > Users Joe Bloggs John Smith (Pending)The user will have to download the Conexis® L1 App and register an account to be able to use the Virtual Key. The Virtual Key has to be accepted by the user by tapping on the key for it to work. Please note that the app may need to be refreshed for the key to appear on the guest's phone.
Pairing To A Smart Home Controller.
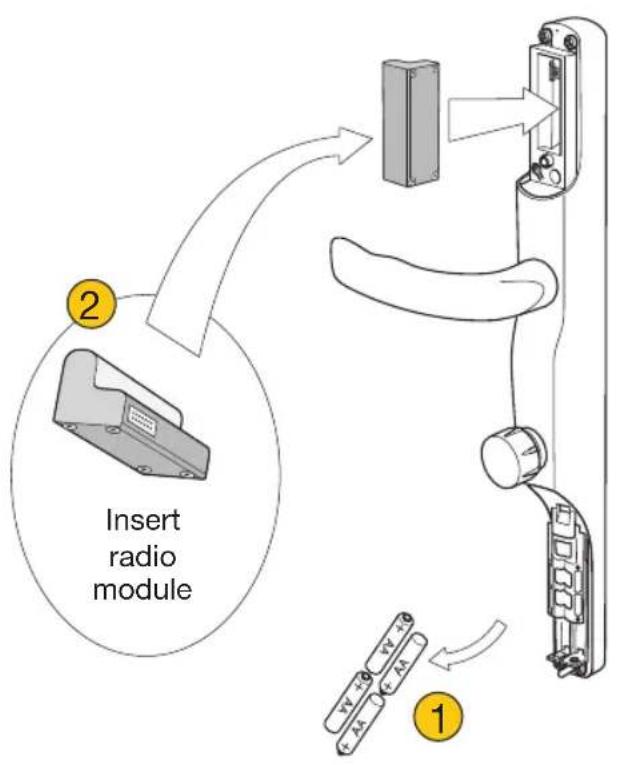
flowchart
graph TD
    A["Insert radio module"] --> B["Device with cable"]
    B --> C["Device with cable inside panel"]
    C --> D["Device with cable inside panel with connectors"]
    D --> E["Device with cable inside panel with connectors"]
text_image
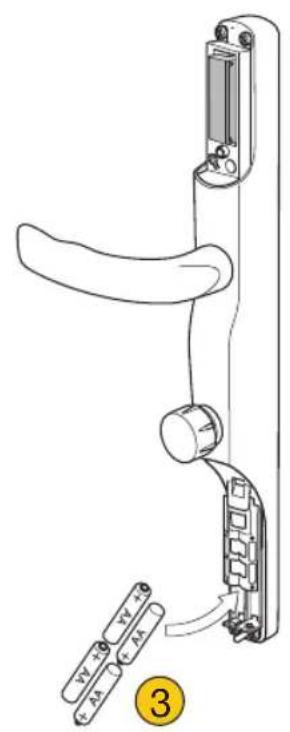
Diagram of a handheld device with labeled components and battery terminals, showing a handle mechanism and pin connections.4 Pairing is a two way process, your smart home controller may need to be in ‘Device Inclusion Mode’
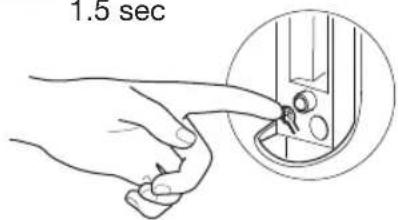
5 Press 'R' button 3 times within 1.5 sec
text_image
1.5 secRemove From Controller
The lock may need to be removed from a home automation system before being added to a new system. To do this, please carry out the following:
- Put the existing system into the 'Device Exclusion Mode'
- Press 'R' button 3 times within 1.5 seconds

Having difficulty? Please check out our video guides on YouTube
Adding Remote Fobs.

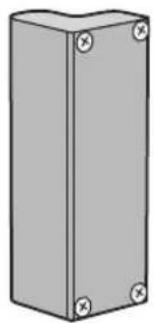
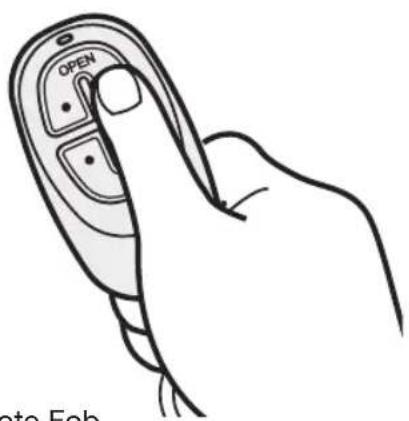
All remote fobs you wish to add need to be added at the same time in step 4 (maximum of 5)
Parts Required
natural_image
Simple 3D illustration of a rectangular block with four corner marks (no text or symbols)Remote Fob Module Remote Fob
text_image
OPEN Date Feb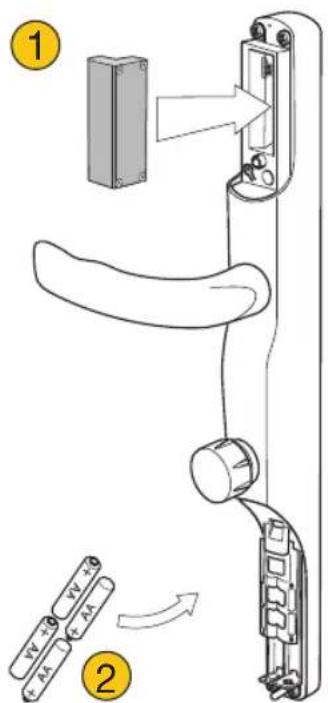
text_image
Diagram showing a door handle assembly with labeled parts and directional arrows indicating movement or assembly.③ Press ‘R’ button
text_image
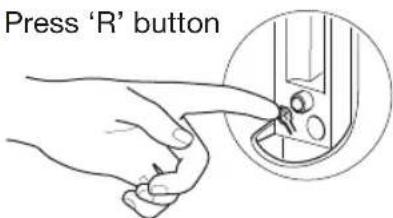
Press 'R' button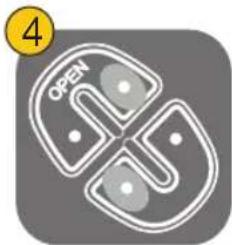
natural_image
Abstract geometric logo with four quadrants and dots, no readable text or symbolsPress and hold top right and bottom left buttons until a solid red light appears on the fob. The lock will then beep once. Release buttons.
5 Press 'R' button

text_image
Press 'R' buttonBattery Indicator.
Low Battery
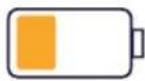
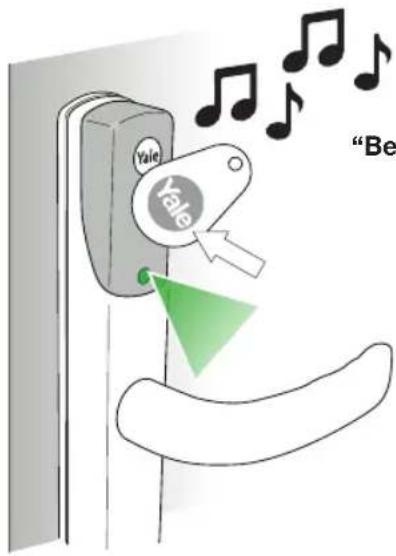
text_image
Yale Yale "Be"Beep beep beep, Beep beep beep, be be be be be"
No Battery
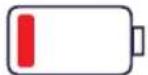
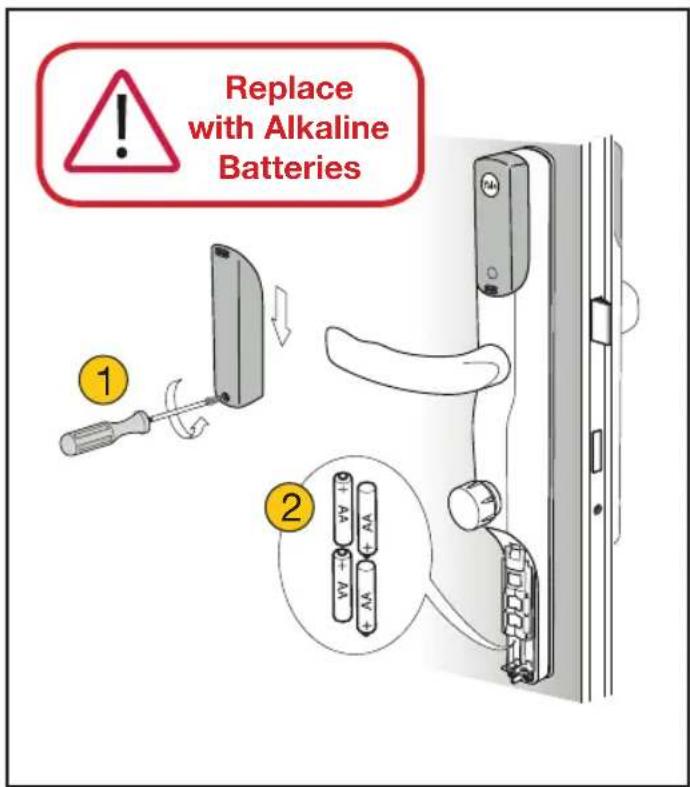
text_image
Replace with Alkaline Batteries ① ②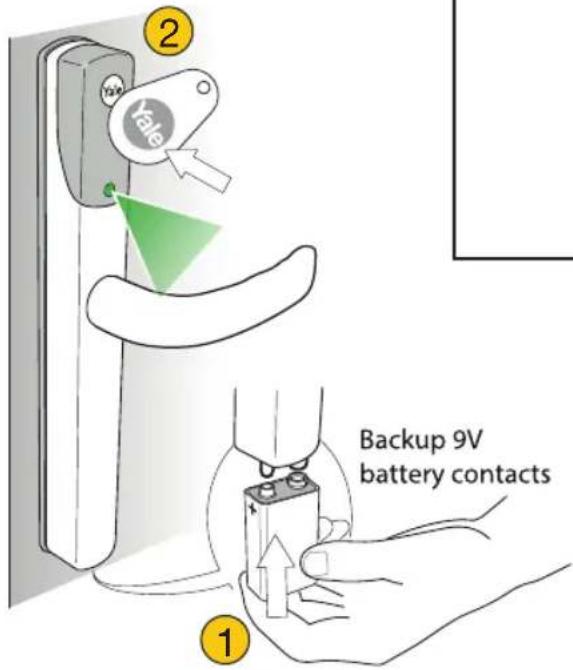
text_image
2 Yale Backup 9V battery contacts 1Factory Reset.
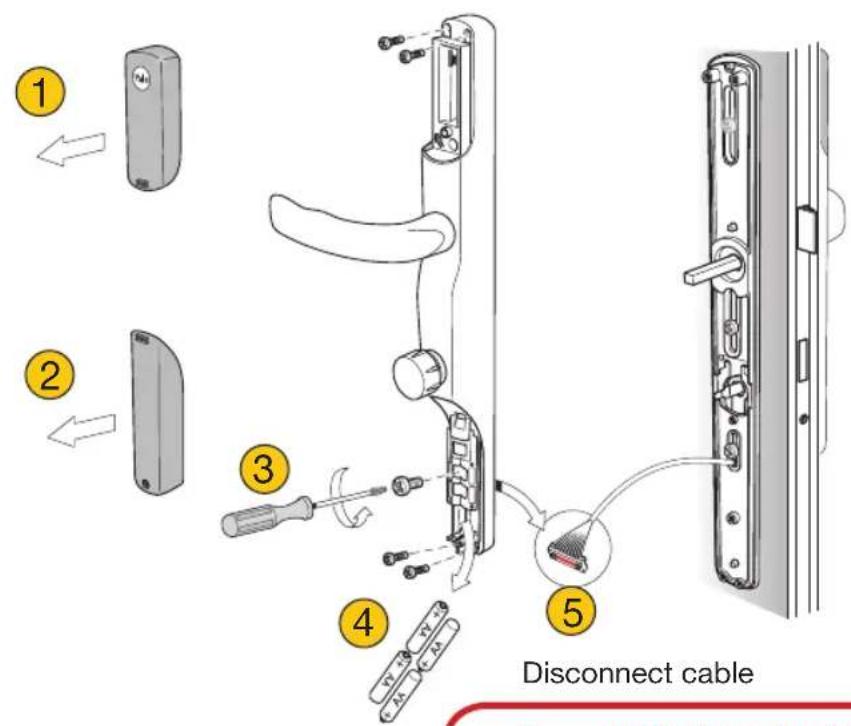
text_image
① ② ③ ④ ⑤ Disconnect cable
Do not pull cable. To prevent damage, pull at base of connector
6 Press and hold 'R' button
Insert batteries while pressing 'R' button. Hold until continuous "beeping"
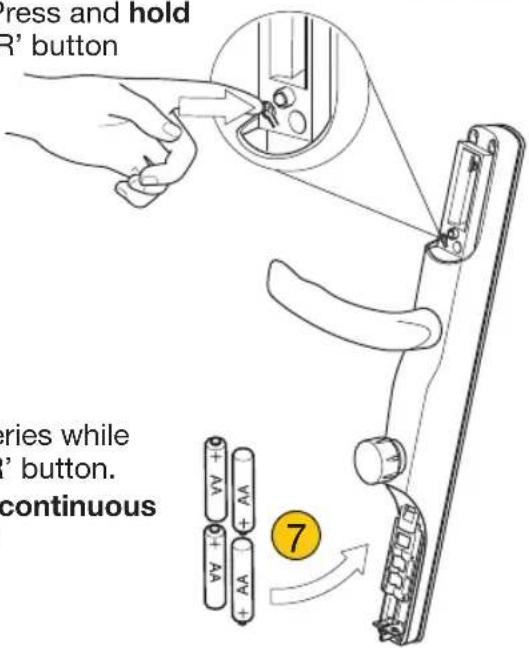
text_image
Press and hold R' button Series while " button. continuous 78 Remove batteries and install following installation instructions


Having difficulty? Please check out our video guides on YouTube
Frequently Asked Questions
FAQ's
Can I pair more than one phone with the same Conexis® L1 Smart Door Lock?
No, only 1 phone needs be paired with the Conexis® L1 Smart Door Lock. You can then give an unlimited number of people access via sharing Virtual Keys with them. Please note, 5 Virtual Keys are included with the app, additional Virtual Keys can be purchased in the app.
My Conexis® L1 Smart Door Lock is making an unusual sound?
If a series of beeps are made by Conexis® L1, this means the handle has not been lifted into the correct position and it is not locked. If it is playing a series of notes (i.e. a tune) this is the low battery warning.
Conexis® L1 Smart Door Lock will not pair with the app?
Please ensure that your smartphone's Bluetooth and internet connection is switched on and that you have paired a Key Card/Tag/Phone Tag to the lock. Without either of these steps being completed the lock will not be able to pair with the app.
Conexis® L1 is not locking or unlocking?
To prevent a lock out during the installation, the Conexis ^® L1 will not lock until the master key card has been added and the lock has been handed as per page 15 of the manual. If the Conexis ^® L1 is attempting to lock but a whirring noise can be heard, this means that the actuator is not aligned as per page 8 or the arrows on page 12 were not facing the correct direction.
My Key Card/Key Tag/Phone Tag or Virtual Key is not working?
There should be only 1 Virtual Key for each Conexis® L1 Smart Door Lock displayed in the app. If you have multiple keys, please remove from the app and re-add the lock to the app until you only have 1 key. Only 1 Key Card/Tag/Phone Tag can be registered to the lock during installation. By registering another Key Card/Tag/Phone Tag, this will delete the previous. Additional Key Cards/ Tags/Phone Tags must be added via the Conexis® L1 app.
An alarm on the Conexis® L1 is going off?
This is the Conexis® L1 tamper alarm. This would be a result of someone tampering with the lock or cable connecting the exterior handle to the internal handle during installation. This can be turned off by holding the 'R' button as the batteries are inserted. When the lock powers up, release the 'R' button. Check connections and cabling.
If you have issues with any of the above, please visit www.yale.co.uk/help and view our YouTube videos covering installation and app setup.
Notes.
THE YALE BRAND, with its unparalleled global reach and range of products, reassures more people in more countries than any other consumer locking solution.
THE ASSA ABLOY GROUP is the world's leading manufacturer and supplier of locking solutions, dedicated to satisfying end-user needs for security, safety and convenience