
Touch Phone - Mobile Phone HTC - Free user manual and instructions
Find the device manual for free Touch Phone HTC in PDF.


| Product Type | Mobile Phone |
| Brand | HTC |
| Model | Touch Phone |
| Dimensions | 102 x 53 x 15 mm (4.02 x 2.09 x 0.59 in) |
| Weight | 112 g (3.95 oz) |
| Battery | Removable Li-Ion 1100 mAh |
| Standby Time | Up to 200 h |
| Talk Time | Up to 5 h |
| Operating System | Windows Mobile 6.0 Professional |
| Display | 2.8 inches TFT resistive touchscreen, 240 x 320 pixels |
| Processor | TI OMAP 850 200 MHz |
| RAM | 256 MB SDRAM |
| Storage | 256 MB ROM, microSD slot |
| Main Camera | 2.0 MP, LED flash |
| Connectivity | Bluetooth 2.0, Wi-Fi 802.11 b/g, USB 2.0 |
| Sensors | Touch-sensitive navigation, accelerometer |
| Maintenance | Clean with a soft, dry cloth. Avoid liquids. |
| Safety | Avoid exposure to moisture and high temperatures. |
| Spare Parts | Battery and stylus are replaceable. |
| Manual Availability | Free download in PDF format from notice-facile.com. |
Frequently Asked Questions - Touch Phone HTC
User questions about Touch Phone HTC
0 question about this device. Answer the ones you know or ask your own.
Ask a new question about this device
Download the instructions for your Mobile Phone in PDF format for free! Find your manual Touch Phone - HTC and take your electronic device back in hand. On this page are published all the documents necessary for the use of your device. Touch Phone by HTC.
USER MANUAL Touch Phone HTC
Please Read Before Proceeding
THE BATTERY IS NOT CHARGED WHEN YOU TAKE IT OUT OF THE BOX.
DO NOT REMOVE THE BATTERY PACK WHEN THE DEVICE IS CHARGING.
YOUR WARRANTY IS INVALIDATED IF YOU OPEN OR TAMPER WITH THE DEVICE'S OUTER CASING.
PRIVACY RESTRICTIONS
Some countries require full disclosure of recorded telephone conversations, and stipulate that you must inform the person with whom you are speaking that the conversation is being recorded. Always obey the relevant laws and regulations of your country when using the recording feature of your device.
INTELLECTUAL PROPERTY RIGHT INFORMATION
Copyright © 2007 High Tech Computer Corp. All Rights Reserved.
htc, , Ext USB, HTC Touch, Touch Dual, TouchFLO, and HTC Care are trademarks and/or service marks of High Tech Computer Corp.
Microsoft, MS-DOS, Windows, Windows NT, Windows Server, Windows Mobile, Windows XP, Windows Vista, ActiveSync, Windows Mobile Device Center, Internet Explorer, Windows Live, MSN, Hotmail, Outlook, Excel, PowerPoint, Word, and Windows Media are either registered trademarks or trademarks of Microsoft Corporation in the United States and/or other countries.
Bluetooth and the Bluetooth logo are trademarks owned by Bluetooth SIG, Inc. microSD is a trademark of SD Card Association.
Java, J2ME and all other Java-based marks are trademarks or registered trademarks of Sun Microsystems, Inc. in the United States and other countries.
Copyright © 2007, Adobe Systems Incorporated.
Copyright © 2007, Macromedia Netherlands, B.V.
Macromedia, Flash, Macromedia Flash, Macromedia Flash Lite and Reader are trademarks and/or registered trademarks of Macromedia Netherlands, B.V. or Adobe Systems Incorporated.
Copyright © 2007, JATAAYU SOFTWARE (P) LTD. All Rights Reserved.
Copyright © 2007, Dilithium Networks, Inc. All Rights Reserved.
Copyright © 2007, Aplx Corporation. All Rights Reserved.
ArcSoft MMS Composer™ Copyright © 2003-2007, ArcSoft, Inc. and its licensors. All Rights Reserved. ArcSoft and the ArcSoft logo are registered trademarks of ArcSoft, Inc. in the United States and/or other countries.
| Licensed by QUALCOMM Incorporated under one or more of the following patents: | |||||
| 4,901,307 | 5,490,165 | 5,056,109 | 5,504,773 | 5,101,501 | 5,778,338 |
| 5,506,865 | 5,109,390 | 5,511,073 | 5,228,054 | 5,535,239 | 5,710,784 |
| 5,267,261 | 5,544,196 | 5,267,262 | 5,568,483 | 5,337,338 | 5,659,569 |
| 5,600,754 | 5,414,796 | 5,657,420 | 5,416,797 | ||
This device is licensed under patented keyboard technology of Research In Motion Limited including the following US Patents and foreign counterparts: 6,278,442; 6,396,482; 6,452,588; 6,489,950; 6,611,254; 6,611,255; 6,876,763; 6,873,317; 6,891,529; 6,919,879; 7,056,043; 7,073,964; 7,106,306; 7,113,111; 7,153,049; 7,158,120; 7,227,536; 6,891,529; 7,083,342; 7,096,036; 7,106,306; 7109973; and 7,220,069.
All other company, product and service names mentioned herein are trademarks, registered trademarks or service marks of their respective owners.
HTC shall not be liable for technical or editorial errors or omissions contained herein, nor for incidental or consequential damages resulting from furnishing this material. The information is provided "as is" without warranty of any kind and is subject to change without notice. HTC also reserves the right to revise the content of this document at any time without prior notice.
No part of this document may be reproduced or transmitted in any form or by any means, electronic or mechanical, including photocopying, recording or storing in a retrieval system, or translated into any language in any form without prior written permission of HTC.
Disclaimers
THE WEATHER INFORMATION, DATA AND DOCUMENTATION ARE PROVIDED "AS IS" AND WITHOUT WARRANTY OR TECHNICAL SUPPORT OF ANY KIND FROM HTC. TO THE MAXIMUM EXTENT PERMITTED BY APPLICABLE LAW, HTC AND ITS AFFILIATES expressly disclaim any and all representations and warranties, express or implied, arising by law or otherwise, regarding the Weather Information, Data, Documentation, or any other Products and services, including without limitation any express or implied warranty of merchantability, express or implied warranty of fitness for a particular purpose, non-infringement, quality, accuracy, completeness, effectiveness, reliability, usefulness, that the Weather Information, Data and/or Documentation will be error-free, or implied warranties arising from course of dealing or course of performance.
Without limiting the foregoing, it is further understood that HTC and its Providers are not responsible for Your use or misuse of the Weather
Information, Data and/or Documentation or the results from such use. HTC and its Providers make no express or implied warranties, guarantees or affirmations that weather information will occur or has occurred as the reports, forecasts, data, or information state, represent or depict and it shall have no responsibility or liability whatsoever to any person or entity, parties and non-parties alike, for any inconsistency, inaccuracy, or omission for weather or events predicted or depicted, reported, occurring or occurred. WITHOUT LIMITING THE GENERALITY OF THE FOREGOING, YOU ACKNOWLEDGE THAT THE WEATHER INFORMATION, DATA AND/OR DOCUMENTATION MAY INCLUDE INACCURACIES AND YOU WILL USE COMMON SENSE AND FOLLOW STANDARD SAFETY PRECAUTIONS IN CONNECTION WITH THE USE OF THE WEATHER INFORMATION, DATA OR DOCUMENTATION.
Limitation of Damages
TO THE MAXIMUM EXTENT PERMITTED BY APPLICABLE LAW, IN NO EVENT SHALL HTC OR ITS PROVIDERS BE LIABLE TO USER OR ANY THIRD PARTY FOR ANY INDIRECT, SPECIAL, CONSEQUENTIAL, INCIDENTAL OR PUNITIVE DAMAGES OF ANY KIND, IN CONTRACT OR TORT, INCLUDING, BUT NOT LIMITED TO, INJURY, LOSS OF REVENUE, LOSS OF GOODWILL, LOSS OF BUSINESS OPPORTUNITY, LOSS OF DATA, AND/OR LOSS OF PROFITS ARISING OUT OF, OR RELATED TO, IN ANY MANNER, OR THE DELIVERY, PERFORMANCE OR NONPERFORMANCE OF OBLIGATIONS, OR USE OF THE WEATHER INFORMATION, DATA OR DOCUMENTATION HEREUNDER REGARDLESS OF THE FORESEEABILITY THEREOF.
Important Health Information and Safety Precautions
When using this product, the safety precautions below must be taken to avoid possible legal liabilities and damages.
Retain and follow all product safety and operating instructions. Observe all warnings in the operating instructions on the product.
To reduce the risk of bodily injury, electric shock, fire, and damage to the equipment, observe the following precautions.
ELECTRICAL SAFETY
This product is intended for use when supplied with power from the designated battery or power supply unit. Other usage may be dangerous and will invalidate any approval given to this product.
SAFETY PRECAUTIONS FOR PROPER GROUNDING INSTALLATION
CAUTION: Connecting to an improperly grounded equipment can result in an electric shock to your device.
This product is equipped with a USB cable for connecting the product to a desktop or notebook computer. Be sure your computer is properly grounded (earthed) before connecting the product to the computer. The power supply cord of a desktop or notebook computer has an equipment-grounding conductor and a grounding plug. The plug must be plugged into an appropriate outlet which is properly installed and grounded in accordance with all local codes and ordinances.
SAFETY PRECAUTIONS FOR POWER SUPPLY UNIT
- Use the correct external power source
A product should be operated only from the type of power source indicated on the electrical ratings label. If you are not sure of the type of power source required, consult your authorized service provider or local power company. For a product that operates from battery power or other sources, refer to the operating instructions that are included with the product.
- Handle battery packs carefully
This product contains a Li-ion battery. There is a risk of fire and burns if the battery pack is handled improperly. Do not attempt to open or service the battery pack. Do not disassemble, crush, puncture, short external contacts or circuits, dispose of in fire or water, or expose a battery pack to temperatures higher than 60^ C ( 140^ F).

WARNING: Danger of explosion if battery is incorrectly replaced. To reduce risk of fire or burns, do not disassemble, crush, puncture, short external contacts, expose to temperature above 60^ C ( 140^ F), or dispose of in fire or water. Replace only with specified batteries. Recycle or dispose of used batteries according to the local regulations or reference guide supplied with your product.


• Take extra precautions
- Keep the battery or device dry and away from water or any liquid as it may cause a short circuit.
- Keep metal objects away so they don't come in contact with the battery or its connectors as it may lead to short circuit during operation.
- Do not use a battery that appears damaged, deformed, or discolored, or the one that has any rust on its casing, overheats, or emits a foul odor.
- Always keep the battery out of the reach of babies and small children, to avoid swallowing of the battery. Consult the doctor immediately if the battery is swallowed.
-
If the battery leaks:
-
Do not allow the leaking fluid to come in contact with skin or clothing. If already in contact, flush the affected area immediately with clean water and seek medical advice.
- Do not allow the leaking fluid to come in contact with eyes. If already in contact, DO NOT rub; rinse with clean water immediately and seek medical advice.
- Take extra precautions to keep a leaking battery away from fire as there is a danger of ignition or explosion.
- Communicate the appropriate steps immediately in case a hazard occurs.
SAFETY PRECAUTIONS FOR DIRECT SUNLIGHT
Keep this product away from excessive moisture and extreme temperatures. Do not leave the product or its battery inside a vehicle or in places where the temperature may exceed 60^ C ( 140^ F), such as on a car dashboard, window sill, or behind a glass that is exposed to direct sunlight or strong ultraviolet light for extended periods of time. This may damage the product, overheat the battery, or pose a risk to the vehicle.
PREVENTION OF HEARING LOSS
CAUTION: Permanent hearing loss may occur if earphones or headphones are used at high volume for prolonged periods of time.
SAFETY IN AIRCRAFTS
Due to the possible interference caused by this product to an aircraft's navigation system and its communications network, using this device's phone function on board an aeroplane is against the law in most countries. If you want to use this device when on board an aircraft, remember to turn off the phone by switching to Airplane Mode.
ENVIRONMENT RESTRICTIONS
Do not use this product in gas stations, fuel depots, chemical plants or where blasting operations are in progress, or in potentially explosive atmospheres such as fueling areas, fuel storehouses, below deck on boats, fuel or chemical transfer or storage facilities, and areas where the air contains chemicals or particles, such as grain, dust, or metal powders. Please be aware that sparks in such areas could cause an explosion or fire resulting in bodily injury or even death.
EXPLOSIVE ATMOSPHERES
When in any area with a potentially explosive atmosphere or where flammable materials exist, the product should be turned off and the user should obey all signs and instructions. Sparks in such areas could cause an explosion or fire resulting in bodily injury or even death. Users are advised not to use the equipment at refueling points such as service or gas stations, and are reminded of the need to observe restrictions on the use of radio equipment in fuel depots, chemical plants, or where blasting operations are in progress. Areas with a potentially explosive atmosphere are often, but not always, clearly marked. These include fueling areas, below deck on boats, fuel or chemical transfer or storage facilities, and areas where the air contains chemicals or particles, such as grain, dust, or metal powders.
ROAD SAFETY
Vehicle drivers in motion are not permitted to use telephony services with handheld devices, except in the case of emergency. In some countries, using hands-free devices as an alternative is allowed.
SAFETY PRECAUTIONS FOR RF EXPOSURE
- Avoid using your device near metal structures (for example, the steel frame of a building).
- Avoid using your device near strong electromagnetic sources, such as microwave ovens, sound speakers, TV and radio.
- Use only original manufacturer-approved accessories, or accessories that do not contain any metal.
- Use of non-original manufacturer-approved accessories may violate your local RF exposure guidelines and should be avoided.
INTERFERENCE WITH MEDICAL EQUIPMENT FUNCTIONS
This product may cause medical equipment to malfunction. The use of this device is forbidden in most hospitals and medical clinics.
If you use any other personal medical device, consult the manufacturer of your device to determine if it is adequately shielded from external RF energy. Your physician may be able to assist you in obtaining this information.
Turn the phone OFF in health care facilities when any regulations posted in these areas instruct you to do so. Hospitals or health care facilities may be using equipment that could be sensitive to external RF energy.
HEARING AIDS
Some digital wireless phones may interfere with some hearing aids. In the event of such interference, you may want to consult your service provider, or call the customer service line to discuss alternatives.
NONIONIZING RADIATION
Your device has an internal antenna. This product should be operated in its normal-use position to ensure the radiative performance and safety of the interference. As with other mobile radio transmitting equipment, users are advised that for satisfactory operation of the equipment and for the safety of personnel, it is recommended that no part of the human body be allowed to come too close to the antenna during operation of the equipment.
Use only the supplied integral antenna. Use of unauthorized or modified antennas may impair call quality and damage the phone, causing loss of performance and SAR levels exceeding the recommended limits as well as result in non-compliance with local regulatory requirements in your country.
Internal antenna location
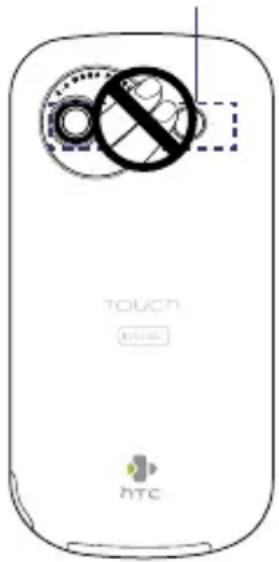
To assure optimal phone performance and ensure human exposure to RF energy is within the guidelines set forth in the relevant standards, always use your device only in its normal-use position. Do not touch or hold the antenna area unnecessarily when placing or receiving a phone call. Contact with the antenna area may impair call quality and cause your device to operate at a higher power level than needed. Avoiding contact with the antenna area when the phone is IN USE optimizes the antenna performance and the battery life.
General Precautions
- Avoid applying excessive pressure to the device
Do not put heavy objects or apply excessive pressure on the device to prevent damaging the device or distorting the touch screen display. Also avoid carrying the device inside your pocket for extensive lengths of time.
- Heed service markings
Except as explained elsewhere in the Operating or Service documentation, do not service any product yourself. Service needed on components inside these compartments should be done by an authorized service technician or provider.
• Damage requiring service
Unplug the product from the electrical outlet and refer servicing to an authorized service technician or provider under the following conditions:
- Liquid has been spilled or an object has fallen into the product.
- The product has been exposed to rain or water.
- The product has been dropped or damaged.
- There are noticeable signs of overheating.
- The product does not operate normally when you follow the operating instructions.
- Avoid hot areas
The product should be placed away from heat sources such as radiators, heat registers, stoves, or other products (including, but limited to, amplifiers) that produce heat.
- Avoid wet areas
Never use the product in a wet location.
- Avoid using your device after a dramatic change in temperature
When you move your device between environments with very different temperature and/or humidity ranges, condensation may form on or within the device. To avoid damaging the device, allow sufficient time for the moisture to evaporate before using the device.
NOTICE: When taking the device from low-temperature conditions into a warmer environment or from high-temperature conditions into a cooler environment, allow the device to acclimate to room temperature before turning on power.
- Avoid pushing objects into product
Never push objects of any kind into cabinet slots or other openings in the product. Slots and openings are provided for ventilation. These openings must not be blocked or covered.
- Mounting accessories
Do not use the product on an unstable table, cart, stand, tripod, or bracket. Any mounting of the product should follow the manufacturer's instructions, and should use a mounting accessory recommended by the manufacturer.
- Avoid unstable mounting
Do not place the product with an unstable base.
- Use product with approved equipment
This product should be used only with personal computers and options identified as suitable for use with your equipment.
- Adjust the volume
Turn down the volume before using headphones or other audio devices.
- Cleaning
Unplug the product from the wall outlet before cleaning. Do not use liquid cleaners or aerosol cleaners. Use a damp cloth for cleaning, but NEVER use water to clean the LCD screen.
Contents
Chapter 1 Getting Started 15
1.1 Getting to Know Your Device and Accessories 16
1.2 Installing the USIM/SIM Card, Battery, and Storage Card ....20
1.3 Starting Up 23
1.4 The Today Screen 25
1.5 The Start Menu 26
1.6 Quick Menu 27
1.7 QuickTasks 28
1.8 HTC Home™ 28
1.9 TouchFLO™ 33
1.10 Status Icons ....40
1.11 Programs 42
1.12 Settings 45
Chapter 2 Entering and Searching Information 49
2.1 Entering Information ....50
2.2 Using the 20-key QWERTY Hardware Keyboard ....52
2.3 Using the Onscreen Keyboard ....54
2.4 Using Touch Keyboard ....54
2.5 Using Touch Keypad 55
2.6 Using Symbol Pad ....56
2.7 Using Letter Recognizer ....57
2.8 Using Block Recognizer ....58
2.9 Using Transcriber 58
2.10 Searching Information 60
Chapter 3 Using Phone Features 61
3.1 Using the Phone 62
3.2 Making a Call 64
3.3 Receiving a Call 67
3.4 Smart Dial ....70
3.5 Additional Dialing Information ....71
Chapter 4 Setting Up Your Device 73
4.1 Basic Settings ....74
4.2 Personalizing the Today Screen 77
4.3 Protecting Your Device ....79
Chapter 5 Synchronizing Information With Your Computer 81
5.1 About Synchronization ....82
5.2 Setting Up Windows Mobile ^® Device Center on Windows Vista ^® ....83
5.3 Setting Up ActiveSync® on Windows XP® 85
5.4 Synchronizing With Your Computer 86
5.5 Synchronizing via Bluetooth 87
5.6 Synchronizing Music and Video 88
Chapter 6 Organizing Contacts, Appointments, Tasks, and Other Information 89
6.1 Contacts....90
6.2 SIM Manager 94
6.3 Calendar 96
6.4 Tasks 99
6.5 Notes 101
6.6 Voice Recorder 103
Chapter 7 Exchanging Messages 105
7.1 Messaging ....106
7.2 Text Messages ....107
7.3 MMS 111
7.4 Types of E-mail Accounts 115
7.5 E-mail Setup Wizard 115
7.6 Using E-mail 118
Chapter 8 Working With Company E-mails and Meeting Appointments 125
8.1 Synchronizing Your Device with the Exchange Server ......126
8.2 Working With Company E-mails ......127
8.3 Managing Meeting Requests 131
8.4 Finding Contacts in the Company Directory ....133
Chapter 9 Working With Documents and Files 135
9.1 Microsoft® Office Mobile 136
9.2 Adobe ^® Reader ^® LE 137
9.3 Copying and Managing Files 138
9.4 ZIP 139
Chapter 10 Getting Connected 141
10.1 Comm Manager 142
10.2 Connection Setup ....143
10.3 Ways of Connecting to the Internet 144
10.4 GPRS/3G 144
10.5 Dial-up ....145
10.6 Starting a Data Connection ....146
10.7 Internet Explorer® Mobile 146
10.8 Windows Live™ 148
10.9 Using Your Device as a Modem (Internet Sharing) ......152
10.10 Bluetooth 154
Chapter 11 Experiencing Multimedia 163
11.1 Camera 164
11.2 Camera Album ....176
11.3 Pictures & Videos ....180
11.4 Windows Media® Player Mobile 182
11.5 Streaming Media 187
11.6 Audio Booster 189
Chapter 12 Managing Your Device 193
12.1 Adding and Removing Programs ....194
12.2 Using Task Manager ....194
12.3 Resetting Your Device ....196
12.4 Managing Memory 198
12.5 Windows Update ....199
12.6 Battery Saving Tips ....200
Chapter 13 Using Other Applications 201
13.1 Voice Command 202
13.2 Using Java 204
Appendix 209
A.1 Specifications 210
A.2 Regulatory Notices ......213
Index 217
Chapter 1
Getting Started
1.1 Getting to Know Your Device and Accessories
1.2 Installing the USIM/SIM Card, Battery,
and Storage Card
1.3 Starting Up
1.4 The Today Screen
1.5 The Start Menu
1.6 Quick Menu
1.7 QuickTasks
1.8 HTC Home™
1.9 TouchFLO™
1.10 Status Icons
1.11 Programs
1.12 Settings
1.1 Getting to Know Your Device and Accessories
Front panel
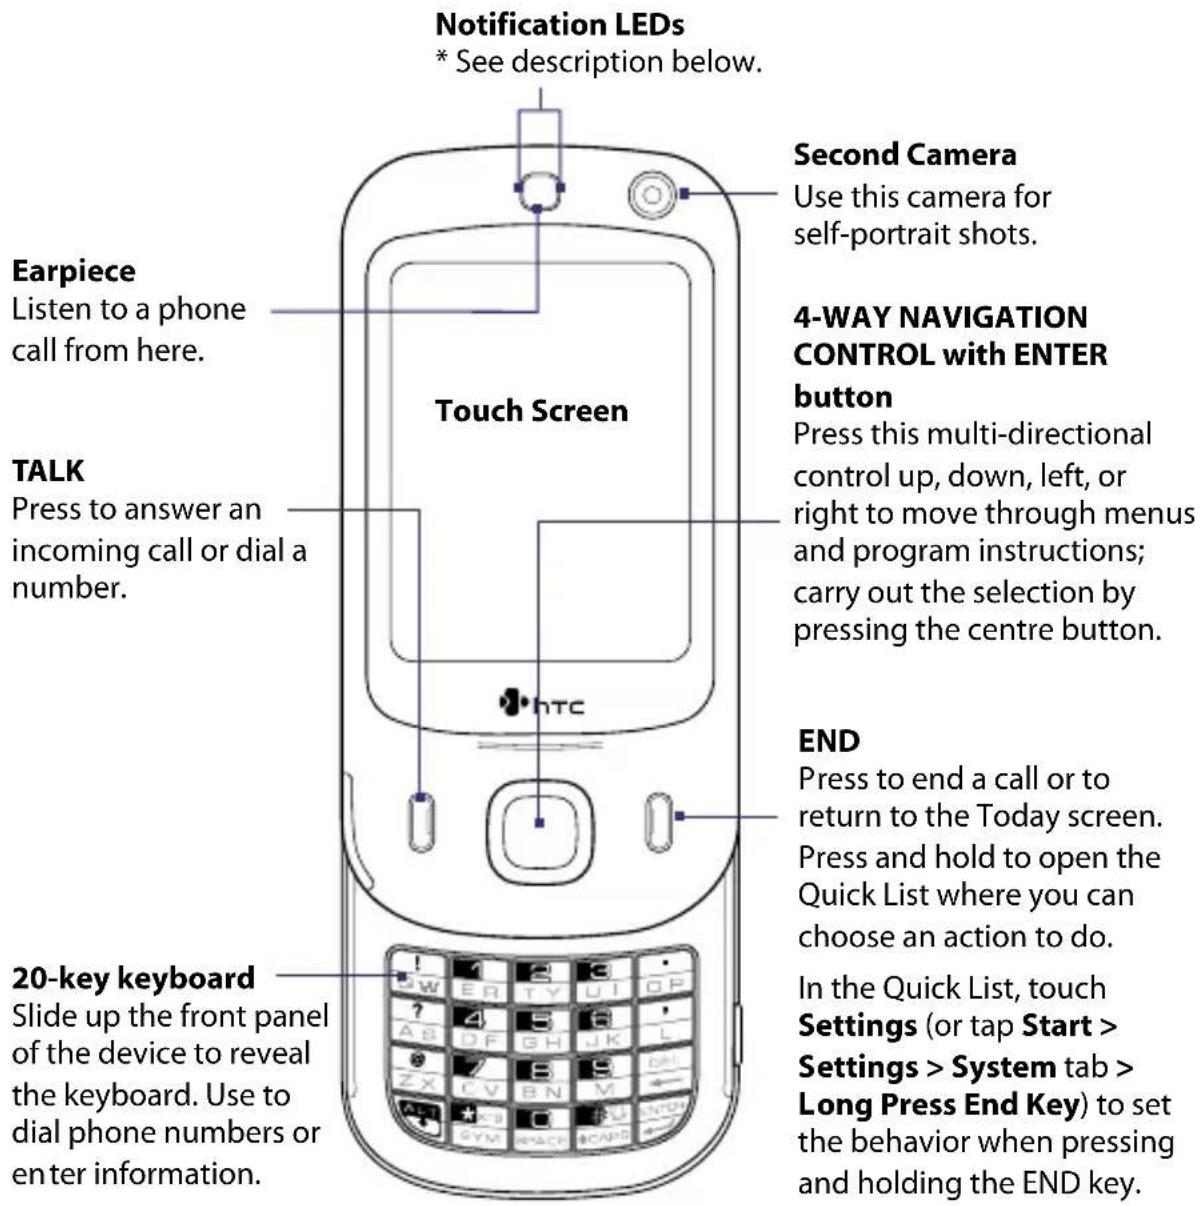
* Right LED: Shows Green and Amber lights for HSDPA/WCDMA/GSM/GPRS/EDGE standby, message, and network status as well as for notification and battery charging status. Shows a flashing red light when the battery level reaches 5% or lower.
Left LED: Shows a flashing Blue light when the Bluetooth system is powered up and ready to transmit Bluetooth radio signal.
Left panel Right panel
Volume Up Button
- Press to increase the speaker volume (or the earpiece volume during a call).
- Press and hold to launch the Voice Command feature.
Volume Down Button
- Press to decrease the speaker volume (or the earpiece volume during a call).
- Press and hold to start the Voice Notes recorder.
microSD Slot
See "Installing a Storage Card" for details.
Lanyard/Strap holder

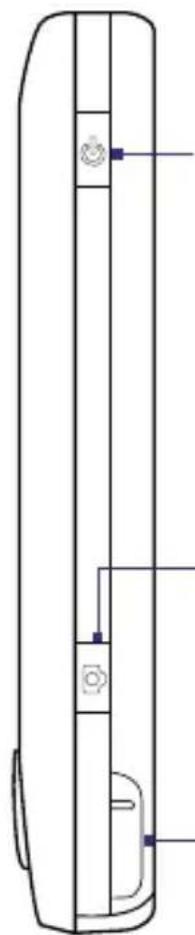
natural_image
Technical line drawing of a vertical electronic device with ports and connectors (no text or symbols)POWER
Press to turn off the display temporarily. To turn off the power, press and hold for about 5 seconds. For more information, see "Starting Up" in this chapter.
CAMERA
Press to launch the Camera. See Chapter 11 for details.
Stylus
Back panel
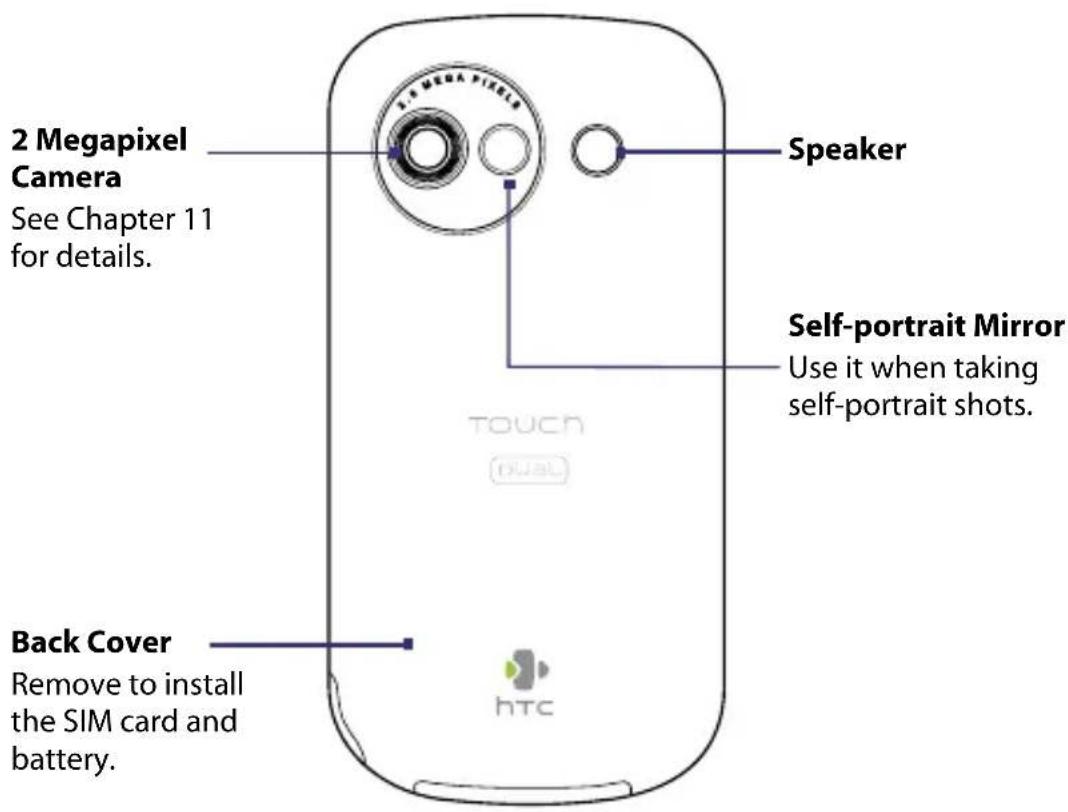
Bottom panel
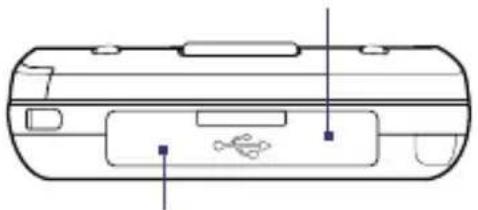
RESET
Open the rubber cover to access the RESET button. With the stylus, press the RESET button to soft-reset your device.
natural_image
Technical line drawing of a cylindrical electronic device with internal components and mounting holes (no text or symbols)Sync Connector/Earphone Jack/AC adapter connector
Open the rubber cover to connect the supplied USB cable to synchronize information or plug in the AC adapter to recharge the battery. You can also connect the supplied USB stereo headset for hands-free conversation or for listening to audio media.
Accessories
1
4
7
2
5
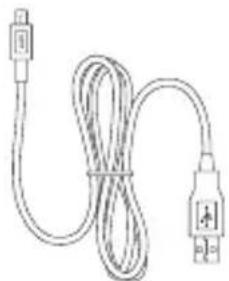
natural_image
Line drawing of a cable with two connectors (no text or symbols)8
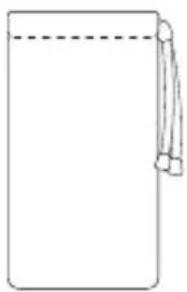
natural_image
Simple line drawing of a rectangular object with a dashed horizontal line and a hanging handle (no text or symbols)3
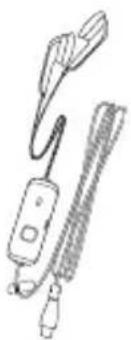
natural_image
Line drawing of a handheld electronic device with two cables (no text or symbols)6

9

No. Accessory Function
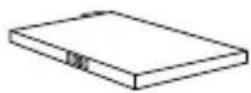
1 Battery Insert into the device before turning it on.
2 Screen protector Stick on the touch screen to prevent scratches.
3 Stereo headset Provides a volume control slider and a Send/End button.
Press the Send/End button to pick up a call or put a call on hold; press and hold the button to end the call.
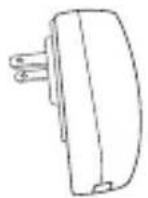
4 AC adapter Recharges the battery. Connect the AC adapter to your
device using the USB sync cable, then plug the AC adapter to an electrical outlet to charge the battery.
5 USB sync cable Connects your device to a PC and synchronizes data.
6 Stylus Use to tap items onscreen.
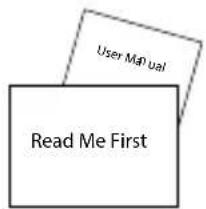
7 User manual and Use a reference when using your device.
ReadMeFirst
8 Pouch Acts as a protective carrying case for your device.
9 Getting Started Source for additional tools and programs.
Disc
1.2 Installing the USIM/SIM Card, Battery, and Storage Card
Always turn off your device before installing or removing the USIM/SIM card or battery.
The USIM/SIM card contains your phone number, service details, and phonebook/message memory. Your device supports both 1.8V and 3V SIM cards. Some legacy SIM cards will not function with your device. You should consult with your service provider for a replacement SIM card. There may be fees for this service.
Your device contains a rechargeable Li-ion battery. It is designed to use only manufacturer-specified original batteries and accessories. Battery performance depends on many factors, including network configuration, signal strength, the temperature of the environment in which you operate your device, the features and/or settings you select and use, items attached to connecting ports, and your voice, data, and other program usage patterns.
Battery life estimates (approximations):
• Standby time: Up to 361 hours for GSM
Up to 325 hours for WCDMA
(Subject to network and phone usage)
• Talk time: Up to 410 minutes for GSM
Up to 268 minutes for WCDMA
(Subject to network and phone usage)
• Media playback time: Up to 8 hours for WMV
Up to 12 hours for WMA
Warning! To reduce risk of fire or burns:
- Do not attempt to open, disassemble, or service the battery pack.
- Do not crush, puncture, short external contacts, or dispose of in fire or water.
- Do not expose to temperatures above 60^ (140°F).
- Replace only with the battery pack designated for this product.
- Recycle or dispose of used battery as stipulated by local regulation.
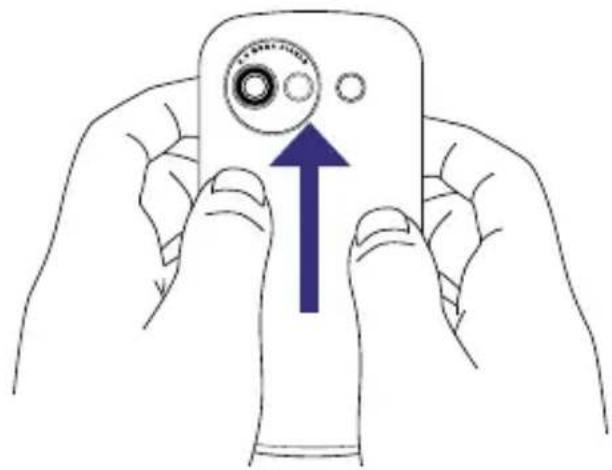
To remove the back cover
Before installing the USIM/SIM card or battery, you have to remove the back cover.
- Make sure your device is turned off.
- Slide the back cover upward as shown in the following illustration.
natural_image
Illustration of hands holding a handheld device with a circular dial and an upward arrow indicating motion (no text or symbols)To install the USIM/SIM card
-
Use your thumb or finger to pry open the cover that houses the SIM card slot. To open the slot cover easier, pry it open from both ends.
-
Hold open the slot cover with one hand.
-
Insert the USIM/SIM card with its gold contacts facing down and its cut-off corner facing toward the inside of the slot.
-
Close the slot cover.
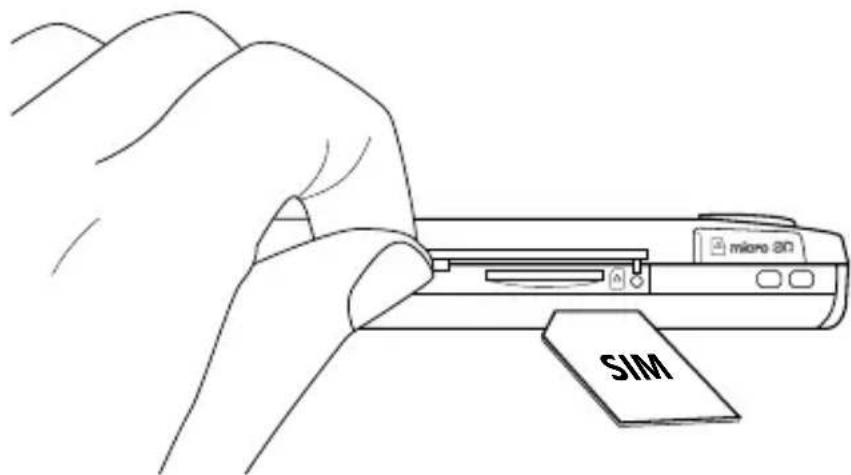
Note To remove the USIM/SIM card, press it to pop it out of the slot.
22 Getting Started
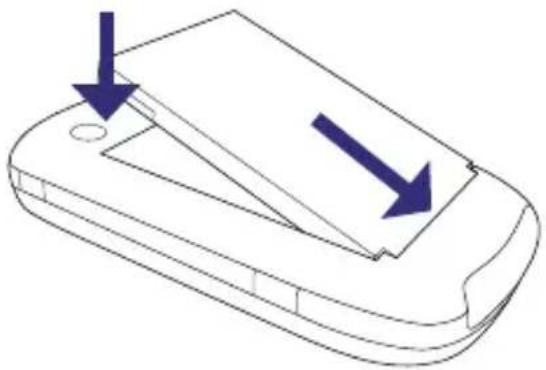
To install the battery
Install the battery by inserting it with its exposed copper part aligned with the protruding copper conductor on the lower-left side of the battery compartment.
Insert the bottom side of the battery first, then gently push the battery into place.
natural_image
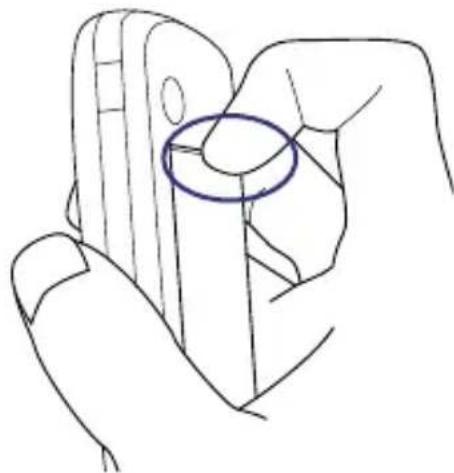
Diagram of a smartphone with two arrows indicating downward motion, showing a folded paper or sheet (no text or symbols present)To remove the battery
- Make sure your device is turned off.
- Remove the back cover.
- To remove the battery, lift it up from the top end of the battery.
natural_image
Line drawing of a hand holding a small object, with no visible text or symbolsTo install the microSD™ card
- Pry open the rubber cover at the bottom-left side of the device.
- Insert the microSD card with the gold contacts facing up.
- Close the rubber cover.
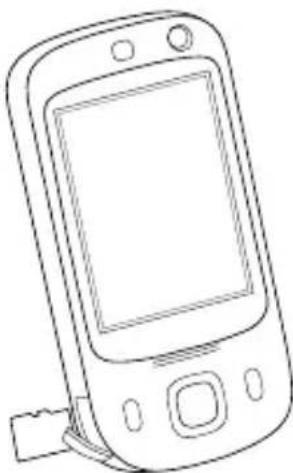
natural_image
Line drawing of a mobile phone with a blank screen and attached cable (no text or symbols)Tip Press the microSD card to pop it out of the slot.
1.3 Starting Up
After inserting your USIM/SIM card and battery, you can now power on and start using your device.
Turn your device on and off
To turn on the power
Press and hold the POWER button for a few seconds.
When you turn on your device for the first time, a Quick Start Wizard will guide you through the calibration process and the setup of regional settings, date and time, and password. For more information about touch screen calibration, see "Calibrate the device".
To turn off the power
- Press and hold the POWER button for a few seconds. A message will then be displayed, prompting you whether or not to turn off the device completely.
Charge the battery
New batteries are shipped partially charged. Before you start using your device, it is recommended that you charge the battery. Some batteries perform best after several full charge/discharge cycles.
- Connect one end of the USB sync cable to the sync connector on your device.
- Connect the other end of the USB sync cable to the USB port of the AC adapter.
- Plug in the AC adapter to an electrical outlet to start charging the battery.
Note Only the AC adapter and USB cable provided with your device should be used to charge the device.
Charging is indicated by a solid amber light on the right LED indicator. As the battery is being charged while the device's power is on, a charging icon ( 📄 will be shown on the title bar of the Today screen. After the battery has been fully charged, the right LED becomes green and a full battery icon ( 📄 appears on the Today screen's title bar.
Warning!
- Do not remove the battery from the device while you are charging it using the AC or car adapter.
- As a safety precaution, the battery stops charging when it overheats.
Calibrate the device
Calibrating the touch screen involves tapping the centre of a cross with the stylus as the cross moves around the screen. This process ensures that when you tap the screen with your stylus, the tapped item is activated.
If your device does not accurately respond to screen taps, follow these steps to re-calibrate it:
- Tap Start > Settings > System tab > Screen.
- On the General tab, tap Align Screen, then follow the onscreen instructions to complete the calibration.
Manage screen settings
The device's display has the following orientation modes: Portrait and Landscape. To change the orientation, tap Start > Settings > System tab > Screen, and select the orientation you want.
Tip To quickly change the screen orientation, you can also tap the Rotate Screen icon in HTC Home's Launcher. See "HTC Home" later in this chapter for details.
To smooth the edges of screen fonts for many programs, on the ClearType tab, select the Enable ClearType check box.
To increase the readability or to see more content on the screen, on the Text Size tab, adjust the text size by moving the slider.
Switch your device to Sleep mode
Quickly pressing the POWER button turns off the display temporarily and switches your device to Sleep mode. Sleep mode suspends your device to a low power state while the display is off in order to save battery power.
Your device also automatically goes into Sleep mode when you leave the device idle after a certain amount of time.
To specify the timeout period before your device goes into Sleep mode
- Tap Start > Settings > System tab > Power > Advanced tab.
- Under On battery power, make sure the Turn off device if not used for check box is selected.
- Select the battery timeout period, then tap OK.
You will still be able to receive messages and calls while your device is in Sleep mode. Pressing the POWER button again or new incoming calls/messages will wake up your device.
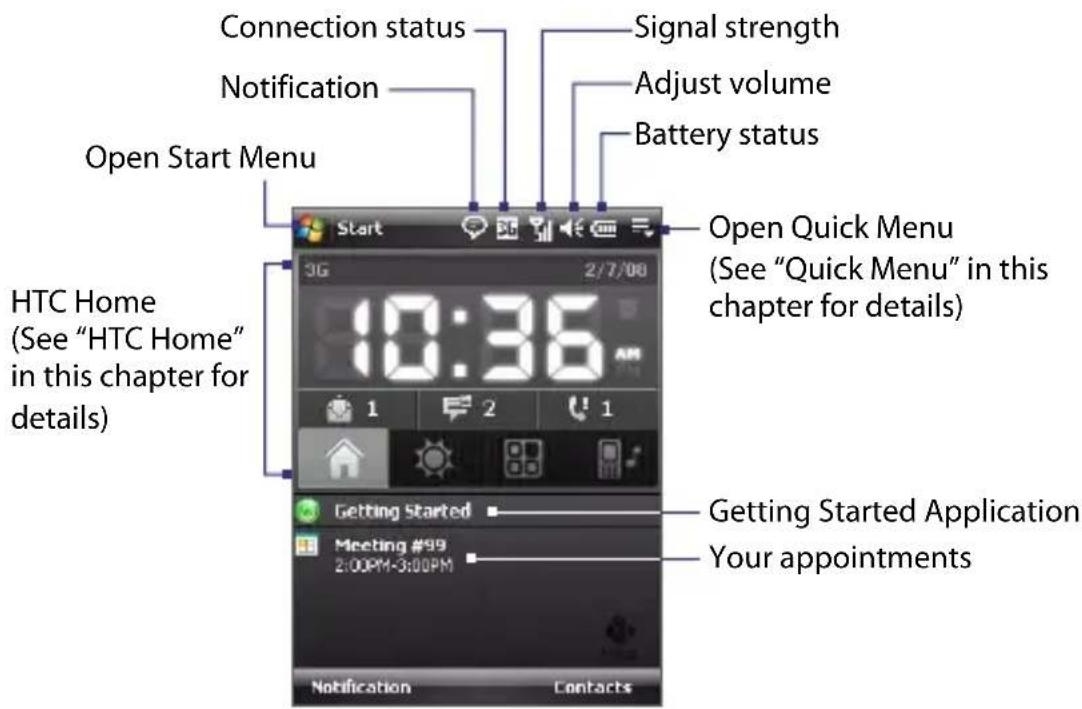
1.4 The Today Screen
The Today screen displays important information, such as upcoming appointments and status indicators. You can touch or tap a section on the screen to open the associated program.
• To access the Today screen, tap Start > Today.
- To customize the Today screen display, including the background image, tap Start > Settings > Personal tab > Today.
For more information about customizing the Today screen, see Chapter 4.
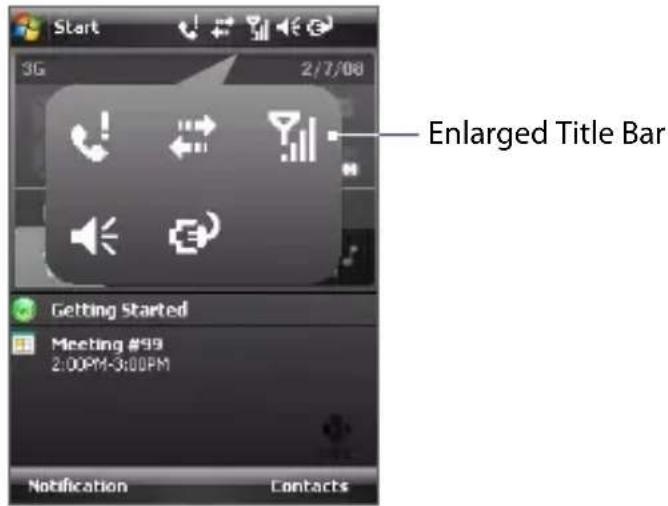
Enlarged Title Bar
Touch the area in the Title bar where the icons are to show the enlarged title bar. In the enlarged Title bar, touch the item to activate it. The enlarged Title bar is available in all screens.
1.5 The Start Menu
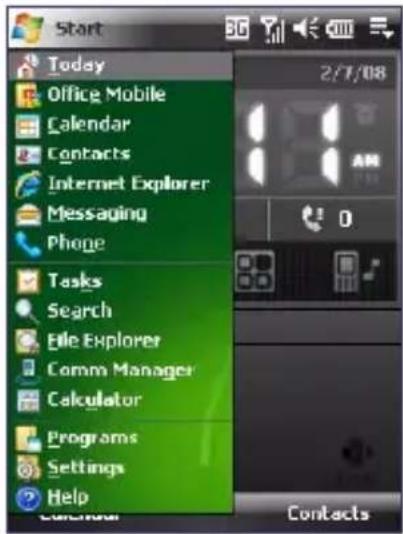
The Start menu, located at the top left corner of the Today screen, displays a list of programs. You can start a program by scrolling through the programs list and then pressing ENTER, or by tapping a program with the stylus.
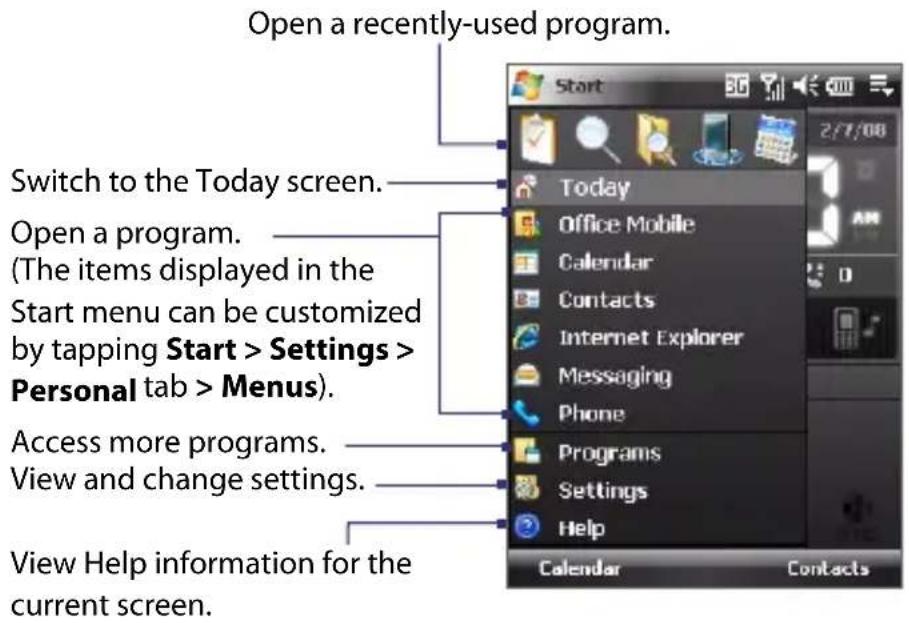
Disable Large Start Menu
By default, the Start menu is set to Large. You can choose to set the Start menu size to normal.
To disable the large Start Menu
- Tap Start > Settings > Personal tab > Large Start Menu.
- Clear the Enable large Start menu check box.
- Tap OK.
1.6 Quick Menu
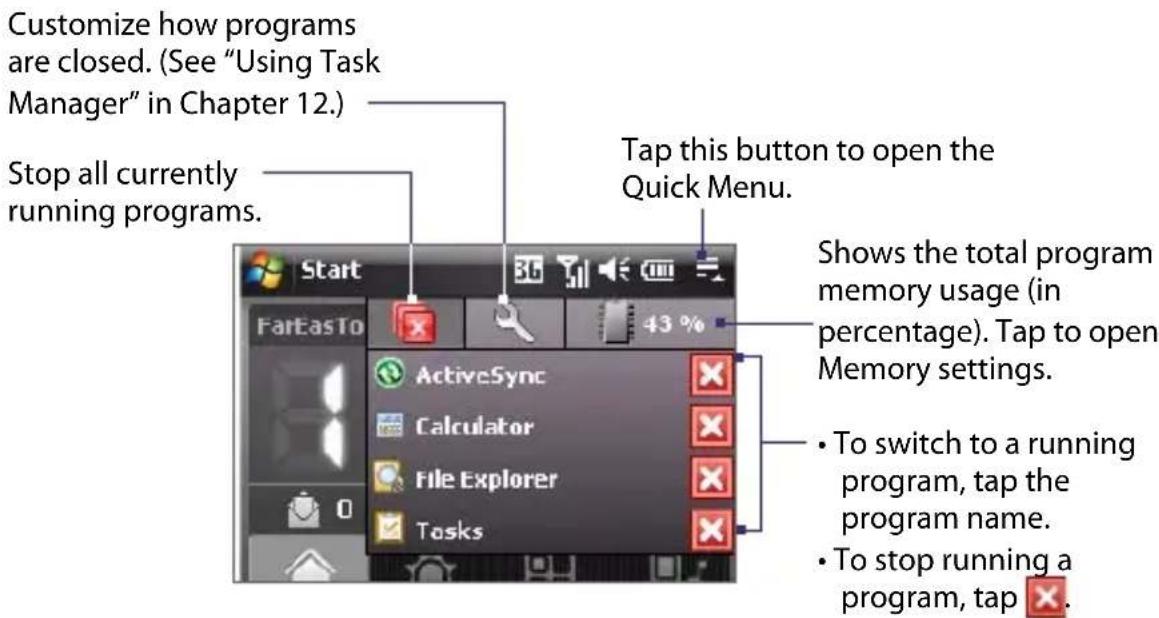
The Quick Menu, located at the top right corner of the Today screen, shows the currently running programs. You can quickly switch between running programs, stop programs, and see how much program memory is being used.
1.7 QuickTasks
QuickTasks lets you quickly access frequently-used tasks by simply opening the front panel of the device.
The QuickTasks only opens when you open the keyboard while on the Today screen.
You can disable the Quick Tasks by tapping Start > Settings > System tab > Keypad QuickTasks and clearing the Enable QuickTasks when keypad is opened check box.
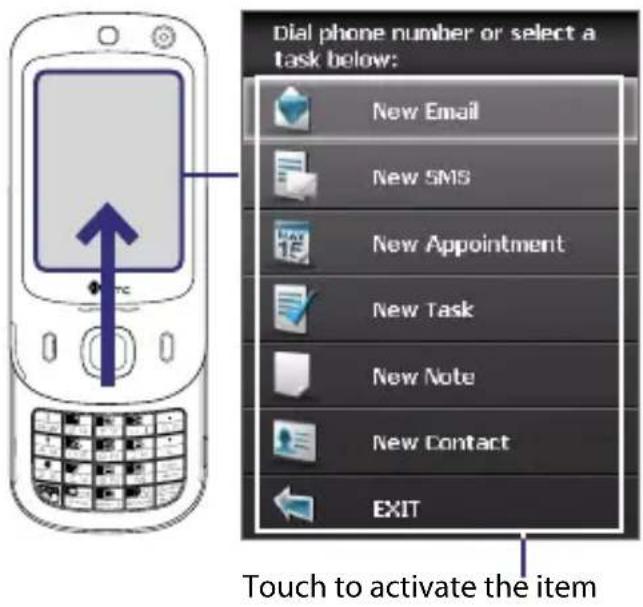
Note QuickTasks will not open when the screen orientation is in Landscape mode.
1.8 HTC Home™
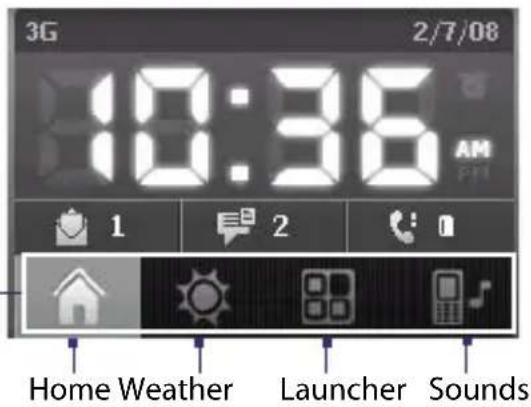
HTC Home™ is a Today screen plug-in that gives you up-to-date local information at a glance, such as time, day and weather information, and shows new messages and missed calls. It also has a customizable launcher where you can add your favorite applications for one-touch access and a Profile selector where you can quickly change the profile or ring tone of your device.
HTC Home has four components:
Home, Weather, Launcher and Sounds. At the bottom of HTC Home, there is a toolbar that allows you to switch between these components.
HTC Home Toolbar
To switch between the different components of HTC Home
Do any of the following:
- Touch the tabs in the toolbar using your finger.
- Tap the tabs in the toolbar using the stylus.
- Use the NAVIGATION CONTROL. If the toolbar is not selected, press NAVIGATION up/down first to select the toolbar. Press NAVIGATION left/right to select a tab and then press ENTER.
Home
Home displays the current day, date and local time. When you have new incoming messages and calls, it shows you the number of new e-mails, SMS/MMS messages, and missed calls. If you have set up the alarm, it also shows the Alarm icon.
Time display.
Touch this display area when you want to change the date or time, or to enable the alarm.
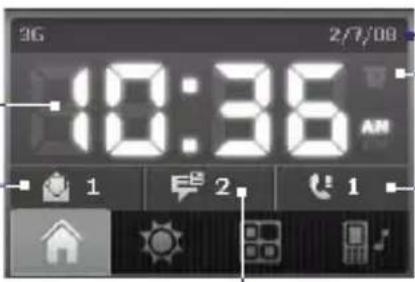
Current day and date Alarm icon
Number of missed calls. Touch this icon to view the Call History.
Number of new e-mails.
Touch this icon to view your e-mails.
Number of new SMS/MMS messages.
Touch this icon to view your SMS and MMS messages.
Weather
Weather shows you the current weather as well as weather information of the next four days of the week. The first time you use this feature, you need to select your city first to get the weather information of your city.
To select your city
- Select the Weather tab (

- Tap the area that shows Select your city here.
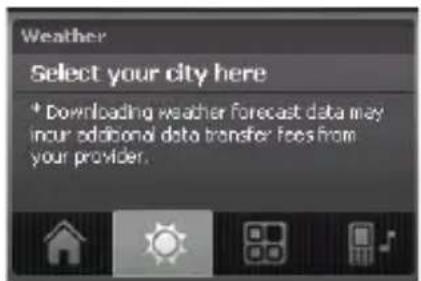
- On the Select City screen, type in the city name whose weather information you want to track, then tap 🔒.
You can also browse through the list of cities to choose your city.
- Select the city on the list and tap Select.
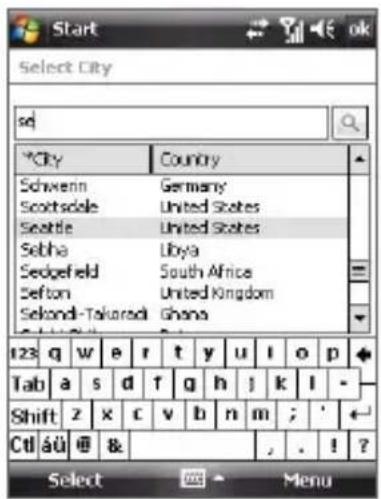
To view weather information
After selecting your city, your device automatically connects to the Internet via GPRS/3G and downloads weather information of the current day and the next four days of the week. The current temperature, the highest and lowest temperatures, and a visual indicator of the climate (showing if it's a cloudy or rainy day, etc.) will be displayed in the Weather tab.
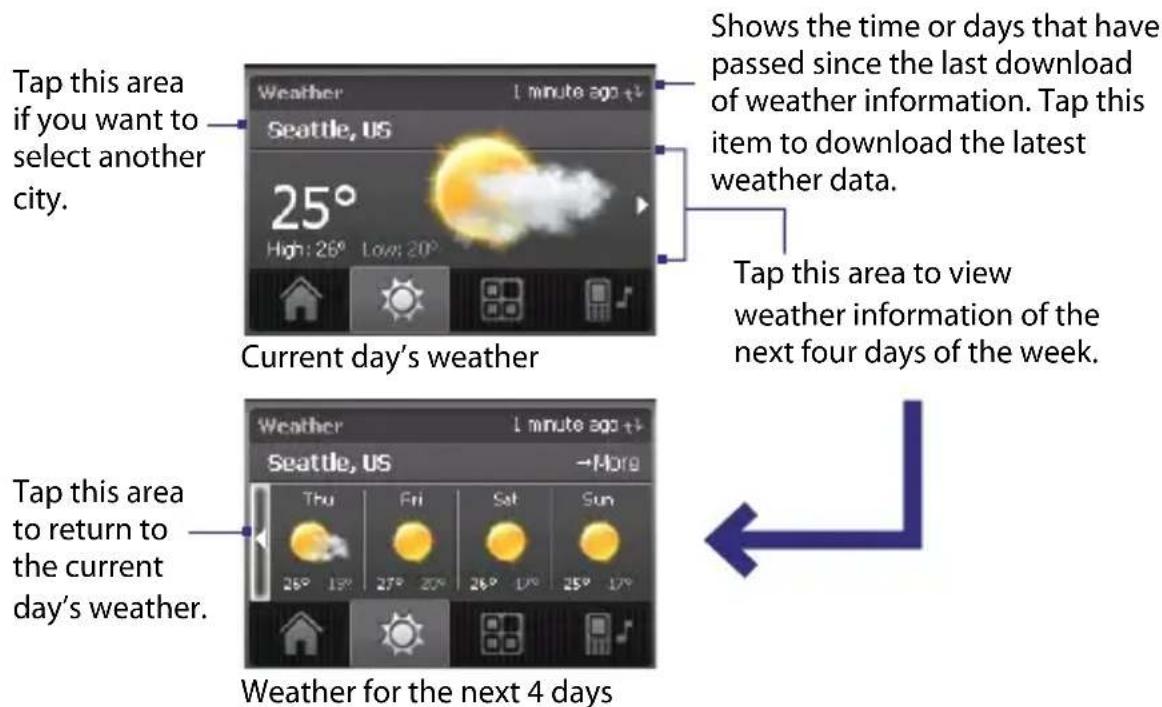
Note If you have not connected to the Internet and downloaded weather information for five days, the following error message will be displayed: "Unable to retrieve data for selected city. Select here to retry." Use GPRS/3G to connect your device to the Internet, then tap the area that shows the error message to download weather data.
To customize weather settings
- Tap the area that shows the city name.
- On the Select City screen, select Menu > Weather Options.
- You can enable or disable the following options:
- Download weather data automatically.
When this check box is selected, weather information will automatically be downloaded from the AccuWeather Web site whenever you select the Weather tab, if the data has not been updated within the last three hours. Weather data will also be downloaded every time an ActiveSync connection occurs (through over-the-air or USB connection).
Clear this check box if you prefer to manually download weather information.
- Download when roaming.
Select this check box only if you want to allow automatic download of weather data when roaming. This may incur additional costs.
• Temperature Scale.
Choose whether to display temperature in Celsius or Fahrenheit.
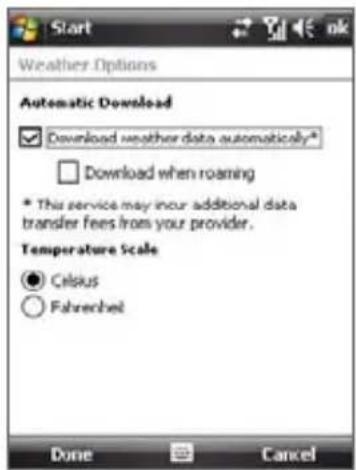
Tip To check for more detailed weather information on the AccuWeather Web site, select Menu > About Weather on the Select City screen and then tap the link that shows AccuWeather.com. Internet Explorer Mobile then opens and brings you to the AccuWeather Web site.
Launcher
Launcher allows you to add quick shortcuts to your favorite programs and settings for one-touch access. Quick settings such as Adjust Backlight, Rotate Screen and Lock Device, and a few program shortcuts are added by default. They can be replaced with your preferred settings and programs.
32 Getting Started
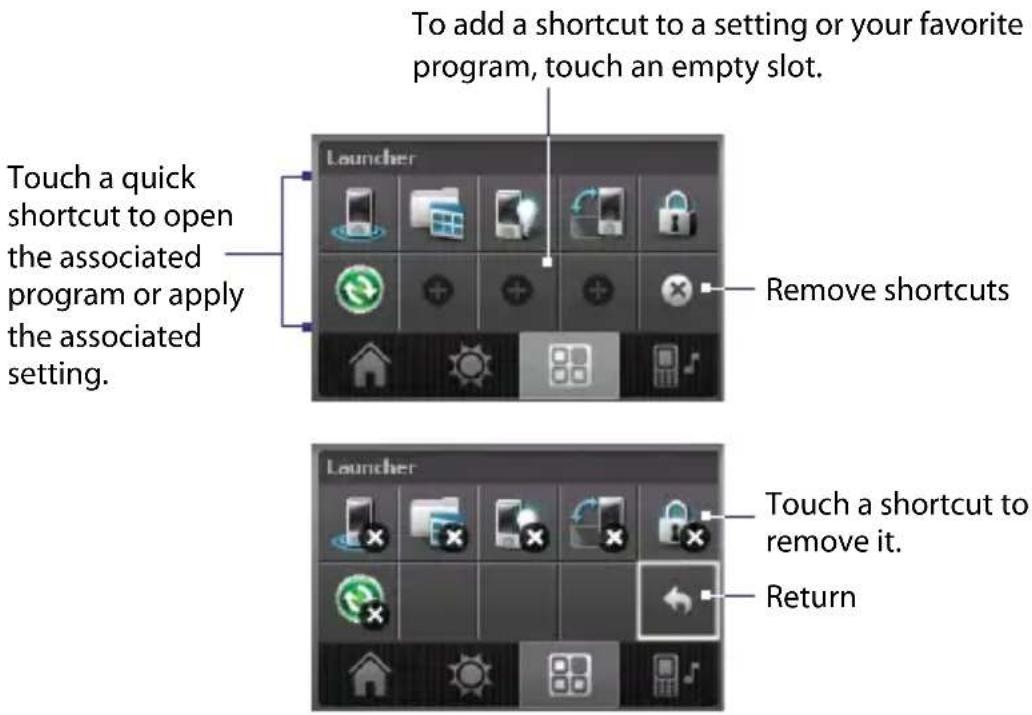
Note To replace a shortcut, you need to delete it first and then add a shortcut to your favorite program or setting.
Sound
Sound lets you quickly set the device volume and change the ring tone of your device.
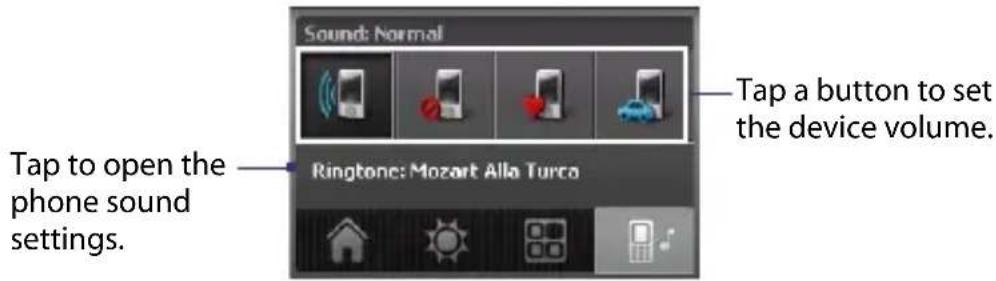
Note To learn more about setting device volume, see Chapter 3.
1.9 TouchFLO™
TouchFLO™ is a special feature that gives you better touch panel experience on your device. With TouchFLO, you can simply use your finger to scroll and pan the screen.
TouchFLO also features the Touch Cube where you can launch messaging programs, Internet Explorer® Mobile, and more. You can also add your favorite contacts, play music, and access your pictures and videos.
Note Touch Cube is displayed in portrait view only. To be able to open Touch Cube, make sure your display is set to portrait mode.
Touch Cube
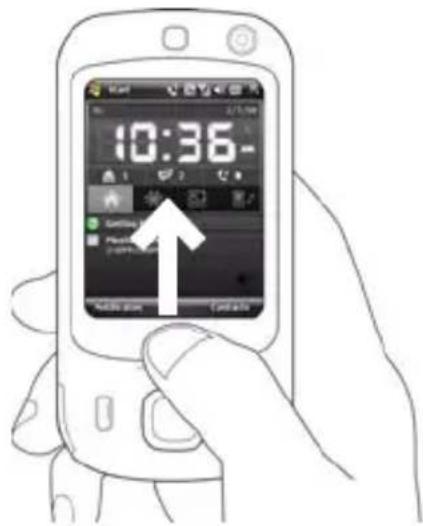
To open the Touch Cube
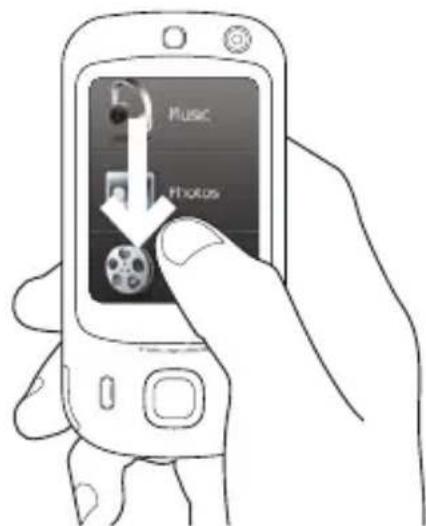
- Slide your finger upward, starting from the bottom of the touch screen where it shows a logo image.
To close the Touch Cube
- To close the Touch Cube and return to the screen prior to opening the Touch Cube, slide your finger downward on the touch screen.
To navigate the Touch Cube
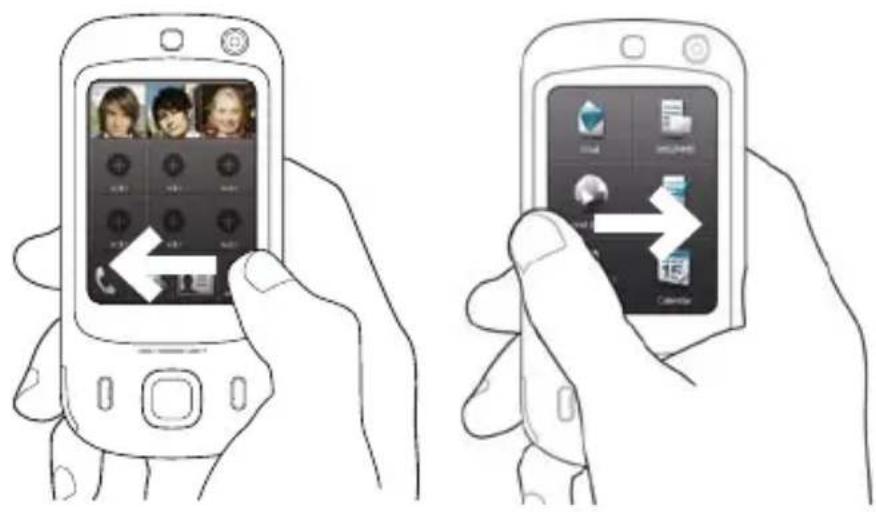
The Touch Cube is a three-dimensional, cubic user interface. To flip the interface from one side to another, slide your finger left or right on the touch screen.
Touch Cube screens
There are three sides to the Touch Cube interface:
- On the first side of the interface, you can add up to nine favorite contacts. If you make calls or send messages to certain people frequently, you can add them as favorite contacts for quicker access.
Note You should already have contacts with phone numbers stored on your device or USIM/SIM card before you can add them as favorite contacts.
For more information about creating contacts, see Chapter 6.
For more information about synchronizing contacts and other information between your device and PC, see Chapter 5.
For information about synchronizing your device with the Exchange Server, see Chapter 8.
When you have different phone numbers assigned to the same contact, an icon appears on the top left corner of the contact square to tell you which number is assigned to the particular square.
Tap to call the number associated with the contact.
Open the Phone program. (See Chapter 3 for details.)
Open Call History. (See Chapter 3 for details.)
When you add a favorite contact and there is no photo associated to that contact, the contact's first name (or last name) will be displayed.
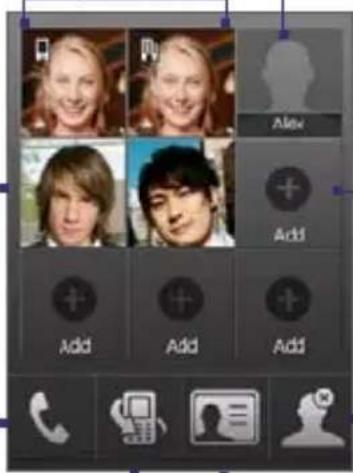
Select an empty slot to add a favorite contact. If the contact has more than one contact number, select the number to call when you touch the contact.
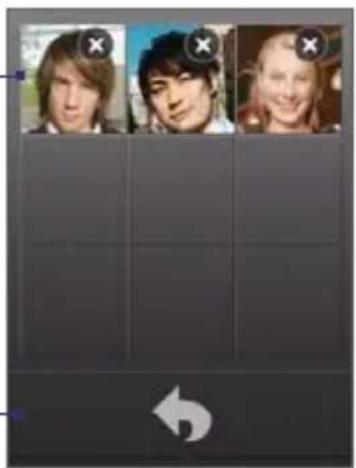
Delete favorite contacts.
Open Contacts. (See Chapter 6 for details)
Select a favorite contact to remove it.
Return to your list of favorite contacts.
natural_image
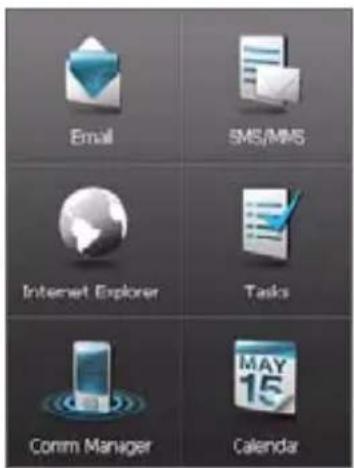
Three portrait photos of young people on a dark grid background, with a white directional arrow icon at the bottom (no text or symbols on the figures themselves)- The second side of the interface provides quick shortcuts to your e-mail messages, text and MMS messages, Tasks, and other applications.
Simply touch the icons on the screen to open the corresponding program.
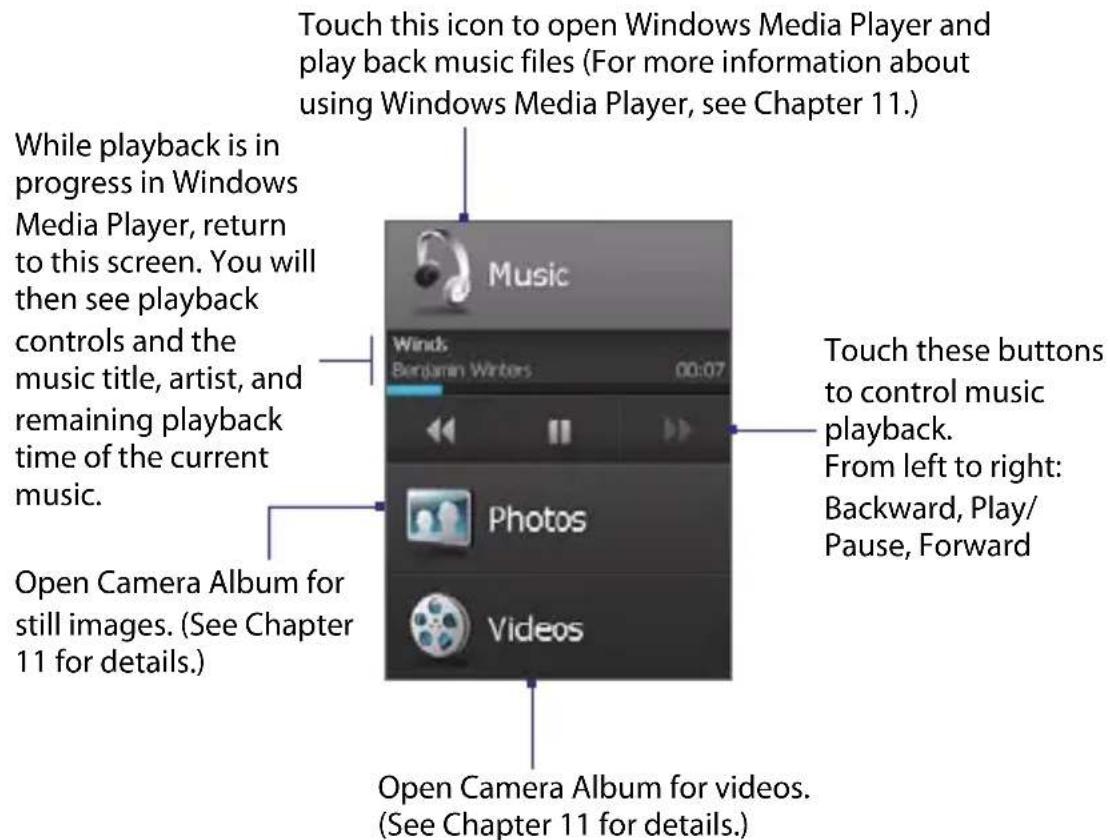
- On the third side of the interface, you can play back music and access the images and video files on your device.
Finger scrolling and finger panning
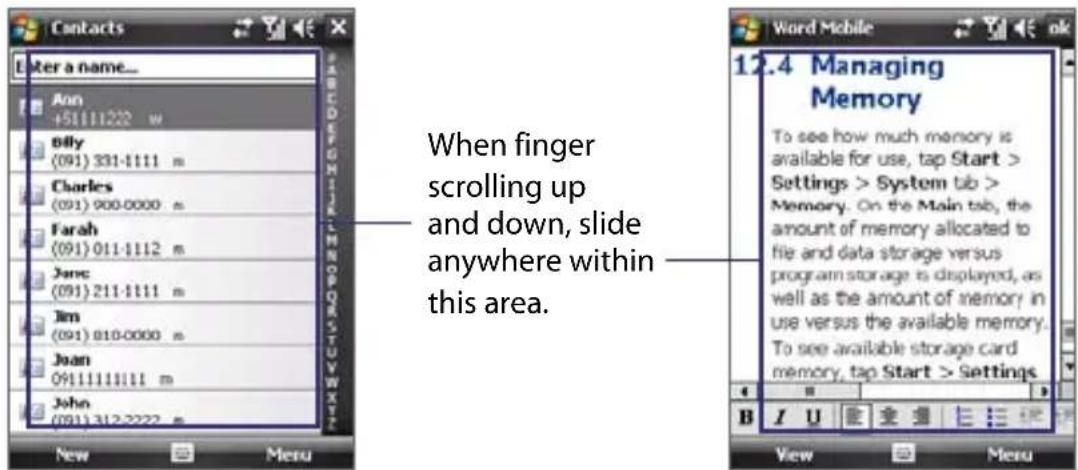
With TouchFLO, you can use finger scrolling and finger panning when viewing content that cannot be fit entirely on the screen, such as Web pages, documents, and messages. Finger scrolling can also be used to scroll up and down lists such as the contacts list, file list, message list, calendar appointments list, and more.
Note Finger scrolling and panning works in both portrait and landscape modes.
To use finger scrolling
- Slide your finger downward to scroll up the screen.
- Slide your finger upward to scroll down the screen.
• To scroll towards the left, slide your finger to the right.
• To scroll towards the right, slide your finger to the left.
- While the screen is scrolling, you can stop the scrolling by pressing your finger on the touch screen.
Note Scrollbars shown on the screen indicate that there are more content that cannot be fit on the screen. You can finger-scroll up and down only when there's a vertical scrollbar shown on the screen. Likewise, you can finger-scroll left and right only when there's a horizontal scrollbar.
To use finger panning
- To pan downward, touch and hold on the touch screen then drag your finger upward.
- To pan upward, touch and hold on the touch screen then drag your finger downward.
- To pan towards the right, touch and hold on the touch screen then drag your finger to the left.
- To pan towards the left, touch and hold on the touch screen then drag your finger to the right.
• You can also pan diagonally.
Note Scrollbars shown on the screen indicate that there are more content that cannot be fit on the screen. You can use finger panning only when there are scrollbars shown on the screen.
To continuously pan
- Drag your finger towards the boundary and hold. The Web page, document, or message that you are viewing then continuously pans.
Left and right boundaries
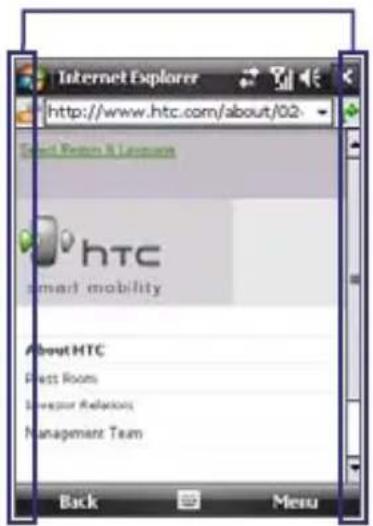
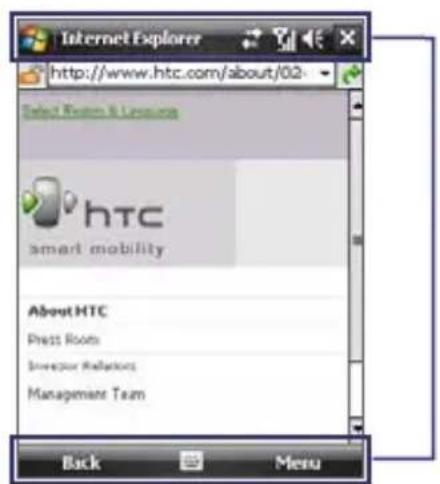
Top and bottom boundaries
- Release your finger to stop panning.
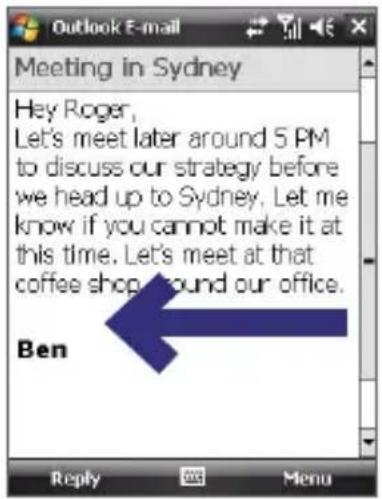
To go to the next or previous message
While reading a message, you can slide your finger across the screen to go to the next or previous message.
To go to the next message, slide your finger from right to left on the screen; To go to the previous message, slide your finger from left to right on the screen.
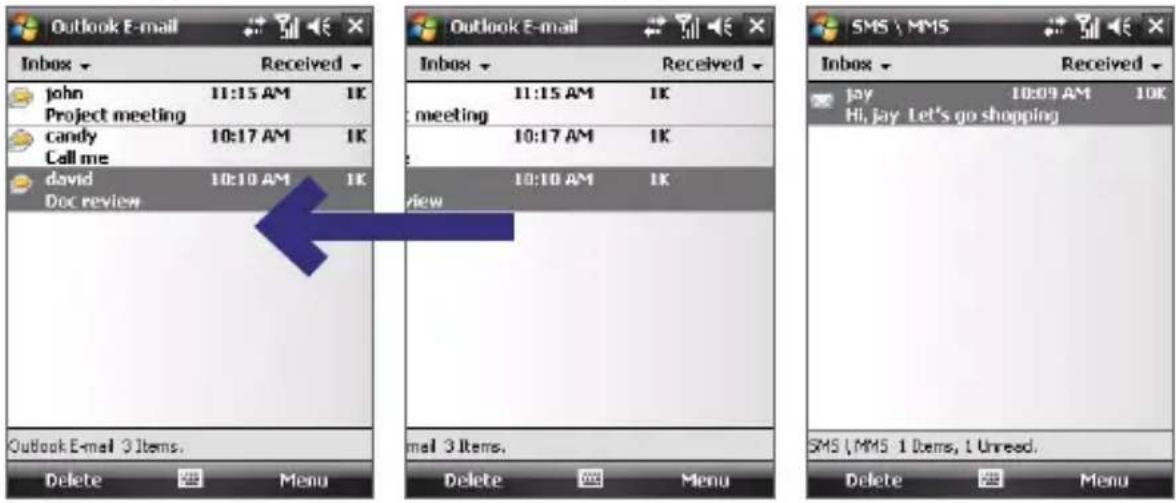
To go to the next or previous messaging account
While on a messaging account screen, you can slide your finger across the screen to go to next or previous messaging account.
TouchFLO settings
You can enable or mute the finger scrolling and panning sound. Tap Start > Settings > System tab > TouchFLO then select or clear the Enable sound when finger scrolling and panning check box.
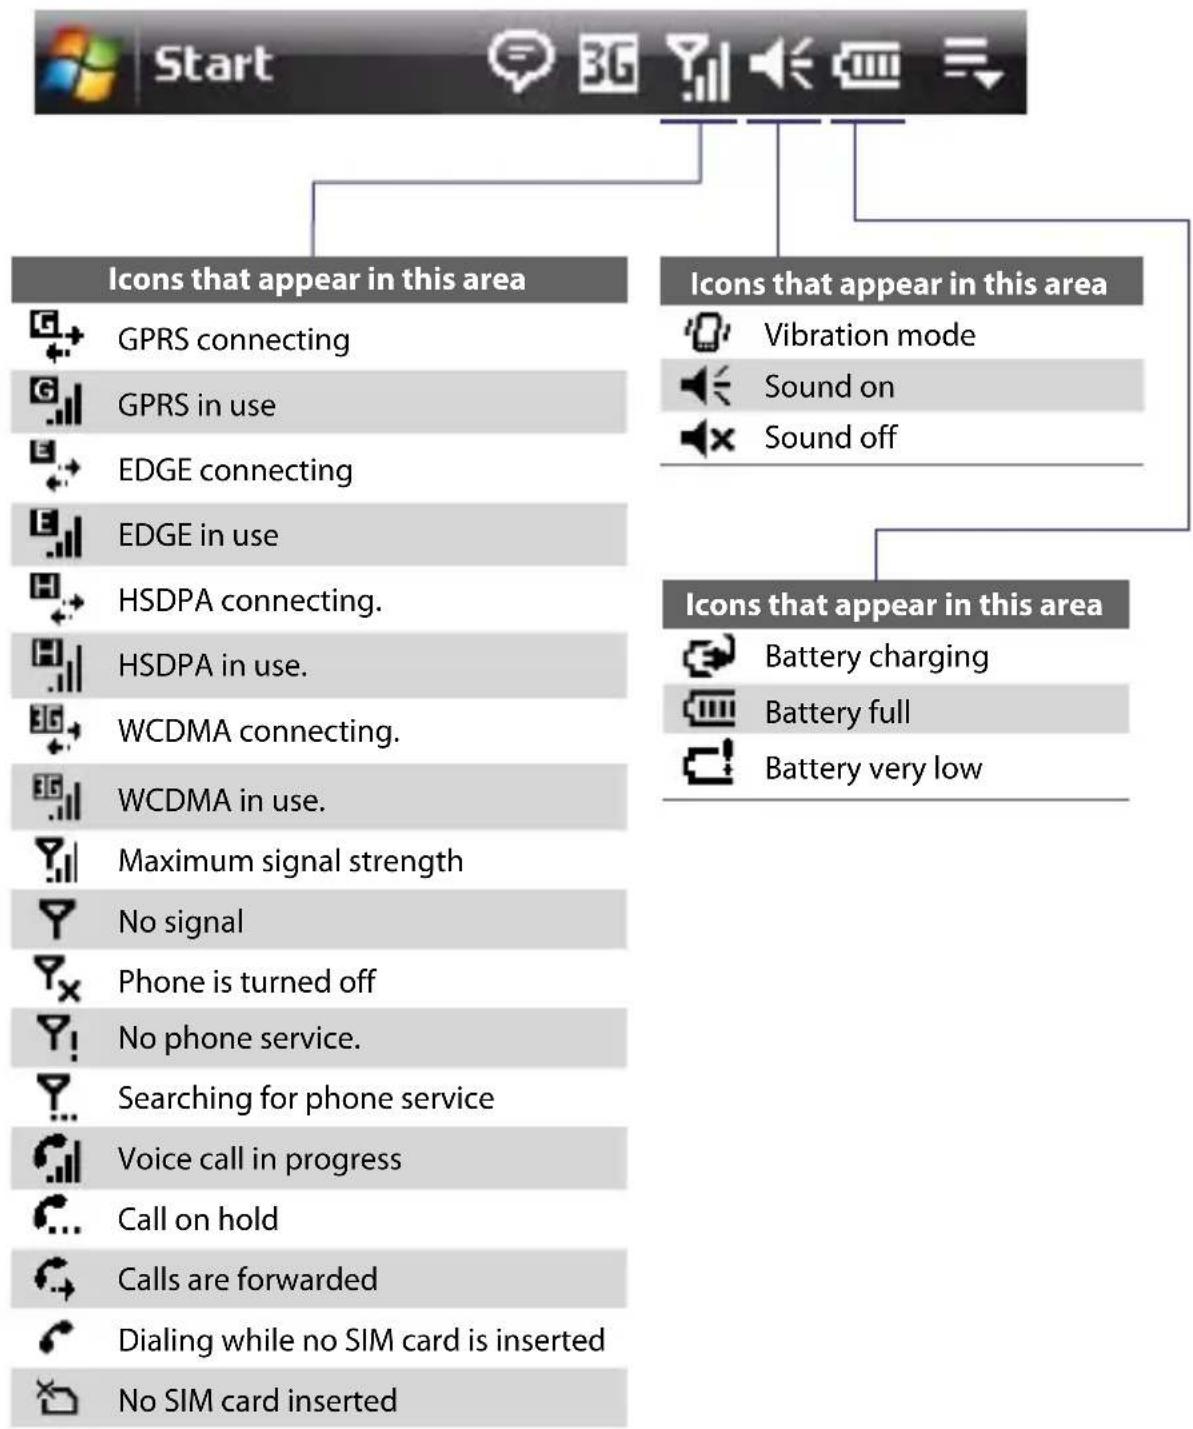
1.10 Status Icons
The following are some of the status icons that you may see on the device.

Icons that appear in this area

Connection Setup

There are more notifications. In the enlarged Title bar, tap to view all

New text messages; SMS notification of voice mail.

Receiving MMS message

New MMS message received

Sending MMS message

MMS message sent

Cannot send MMS message

New instant message from Live Messenger

Missed call

Speakerphone on

Roaming

Alarm

Bluetooth stereo headset detected

ActiveSync notification

Synchronization error.
Icons that appear in this area

GPRS available

EDGE available

HSDPA available.

WCDMA available.

Connection is active

Connection is not active

Synchronization in progress
1.11 Programs
The following are programs that are preinstalled on your device.
Programs in the Start Menu
Icon Description

Office Mobile Use the complete suite of Microsoft® Office applications for your mobile device.

Excel Mobile Create new workbooks or view and edit Microsoft® Office Excel® workbooks.

PowerPoint Mobile View Microsoft® Office PowerPoint® slides and presentations.

Word Mobile Create, view, and edit Microsoft® Office Word documents.

OneNote Mobile Create OneNote files on your device and then synchronize them with your PC.

Calendar Keep track of your appointments and create meeting requests.

Contacts Keep track of your friends and colleagues.

Internet Explorer Mobile Browse Web and WAP sites as well as download new programs and files from the Internet.

Messaging Send and receive e-mail, MMS, and text messages.

Phone Make and receive calls, switch between calls, and set up conference calling.

Help See Help topics for the current screen or program.
Programs screen
Icon Description

Games Play two pre-installed games: Bubble Breaker and Solitaire.

ActiveSync Synchronize information between your device and a PC or the Exchange Server.

Adobe Reader LE View PDF (Portable Document Format) files on your device.

Audio Booster Enhances your music experience by providing you with controls for adjusting equalizer, 3D sound, treble, and bass settings.

Bluetooth Explorer Search for other Bluetooth devices that have file sharing enabled and access their Bluetooth shared folder.

Calculator Perform basic arithmetic and calculations, such as addition, subtraction, multiplication, and division.

Camera Take photos or shoots video clips with accompanying audio.

Camera Album View photos that you captured using the device's camera.

Comm Manager Manage your device's connections (including GPRS/3G, Bluetooth, and ActiveSync), turn the phone on or off, switch to ringer/vibration mode, enable or disable the Direct Push function, and more.

File Explorer Organize and manage files on your device.

Getting Started Provide a list of "how to's" that you can reference to learn basic features and settings of your device. Tap one of the items onscreen to learn how to do the task.

Internet Sharing Connect your computer to the Internet using your device's data connection.

Java Download and install Java applications, such as games and tools, on your device.

Messenger Use this mobile version of Windows Live Messenger to send and receive instant messages on your device.

Notes Create handwritten or typed notes, drawings, and voice recordings.
Icon Description

Pictures & Videos View, organize, and sort pictures, animated GIFs, and video files on your device or a storage card.

Search Search contacts, data, and other information on your device.

SIM Manager Manage the contacts that are stored on your SIM card. You can also use this program to copy SIM contents to Contacts on your device.

STK (SIM Tool Kit) Service Access information and other services offered by your wireless service provider.

Streaming Media Stream live or on-demand video.

Tasks Keep track of your tasks.

Voice Recorder Record your voice, play it back, then send it via e-mail, MMS or beaming. You can also set the recorded voice as your ring tone.

Windows Live Use this mobile version of Windows Live™ to find information on the Web. It also lets you sign into your Windows Live account so that you can access your Live Mail messages and send/receive instant messages in Live Messenger.

Windows Media Player Mobile Play back audio and video files.

ZIP Save memory and free up storage space on your device by compressing files in the conventional ZIP format.
1.12 Settings
You can adjust the device settings to suit the way you work. To see all available settings, tap Start > Settings, then tap the Personal, System, and Connections tabs located at the bottom of the screen.
Personal tab
| Icon Description | |
 | Buttons Assign a program or function to a hardware button. |
 | Input Set options for each of the input methods. |
 | Keyboard Sliding Sound Select a slide-in and slide-out sound for the hardware keyboard. |
 | Large Start Menu Enable or disable the large Start menu. |
 | Lock Set a password for your device. |
 | Menus Set what programs will appear in the Start menu. |
 | Owner Information Enter your personal information on your device. |
 | Phone Customize phone settings such as ring tone, set a PIN number for your SIM card, and more. |
 | Sounds & Notifications Enable sounds for events, notifications, and more, and set the type of notification for different events. |
 | Today Customize the appearance and the information to be displayed on the Today screen. |
| [B7KX] | Voice Command Choose which functions you want to access by speaking out voice commands. See Chapter 13 for details. |
System tab
| Icon Description | |
 | About This is where you can see basic information such as the Windows Mobile® version and type of processor used on your device. You can also specify a name for your device. |
 | Backlight Set the backlight timeout and adjust brightness. |
 | Certificates See information about certificates that are installed on your device. |
 | Clear Storage Tap this icon only when you need to remove all your data and files from the memory and reset your device to factory default settings. |
 | Clock & Alarms Set the device clock to the date and time of your locale or to a visiting time zone when you're traveling. Alarms can also be set at specified days and times of a week. |
 | Customer Feedback Send feedback to the Customer Experience Improvement Program of Microsoft. |
 | Device Information See information about the firmware version, hardware, identity, and the duration of calls made on your device. |
 | Encryption Allow files on your storage card to be encrypted.Encrypted files will be readable only on your device. |
 | Error Reporting Enable or disable the device's error reporting function.When this function is enabled and a program error occurs, technical data about the state of the program and your computer will be logged in a text file and delivered to Microsoft's technical support if you choose to send it. |
 | External GPS Set the appropriate GPS communication ports, if required.You may need to do this when there are programs on your device that access GPS data or you have connected a GPS receiver to your device. See Help for details. |
| [HCBX] | Key Lock Lock the buttons on your device except for the POWER button when the device is in Sleep mode. This ensures you will not switch the device on by accident and consume unnecessary power. |
 | Keypad QuickTasks Enable or disable the QuickTasks screen when you open the front panel of the device. |
 | Long Press End Key Lets you set the behavior when you press and hold the END key. |
Icon Description

Managed Programs Download and install applications that are deployed by the System Center Mobile Device Manager. Managed Programs also lets you view programs that were installed from the System Center Mobile Device Manager.

Memory Check the device memory allocation status and memory card information. You can also stop currently running programs.

Microphone AGC Adjust the volume of your voice automatically when you are recording.

Power Check the remaining battery power. You can also set the timeout for turning off the display (switching device to Sleep mode) to conserve battery power.

Regional Settings Set the regional configuration to use, including the format for displaying numbers, currency, date, and time on your device.

Remove Programs Remove programs that you installed on your device.

Screen Change the screen orientation, re-calibrate the screen, and change the screen text size.

Task Manager Stop running programs and set the Exit button ( ) to end programs immediately when you tap the button. For more information, see "Task Manager" in Chapter 12.

TouchFLO You can enable or mute the finger scrolling and panning sound. See "TouchFLO settings" in this chapter for details.

Windows Update Update Windows Mobile® on your device with the latest updates, security patches or fixes, if they are available.
Connections tab
Icon Description

Beam Set your device to receive incoming Bluetooth beams.

Bluetooth Turn Bluetooth on, set your device to visible mode, and scan for other Bluetooth devices.

Comm Manager Manage your device's connections (including GPRS/3G, Bluetooth, and ActiveSync), turn the phone on or off, switch to ringer/vibration mode, enable or disable the Direct Push function, and more.
| Icon Description | |
 | Connection Setup Configure your device's data connections, such as GPRS, WAP, and MMS, based on the detected or selected network operator. See Chapter 10 for details. |
 | Connections Set up one or more types of modem connections for your device, such as phone dial-up, GPRS, and more, so that your device can connect to the Internet or a private local network. |
 | CSD Line Type Set the line type to use when making a circuit switch data (CSD) connection. Normally, you do not need to change the setting unless you encounter a problem on establishing a connection. |
 | Domain Enroll Enable the System Center Mobile Device Manager to manage your device by enrolling the device in your company's domain. |
 | GPRS Setting Set the GPRS authentication method. |
 | HSDPA Turn High Speed Data Packet Access (HSDPA) on or off. HSDPA is a 3.5G digital data service that provides high-speed downstream data rates. In order for your device to attain the high connection speed of HSDPA, your wireless service provider must support this feature and you must be within the coverage area of your service provider's HSDPA network. |
 | Network Cards Set up your device's network card. |
 | SMS Service Set your device to send SMS text messages via a data connection, such as GPRS or a circuit-switched connection. |
 | USB to PC Set a USB serial connection between your device and PC when there are problems connecting ActiveSync. |
Chapter 2
Entering and Searching Information
2.1 Entering Information
2.2 Using the 20-key QWERTY Hardware Keyboard
2.3 Using the Onscreen Keyboard
2.4 Using Touch Keyboard
2.5 Using Touch Keypad
2.6 Using Symbol Pad
2.7 Using Letter Recognizer
2.8 Using Block Recognizer
2.9 Using Transcriber
2.10 Searching Information
2.1 Entering Information
When you start a program or select a field that requires text or numbers, you can either use the 20-key QWERTY hardware keyboard or one of the onscreen input methods to enter information.
20-key QWERTY hardware keyboard
To reveal the 20-key QWERTY keyboard, slide up the front panel of the device.
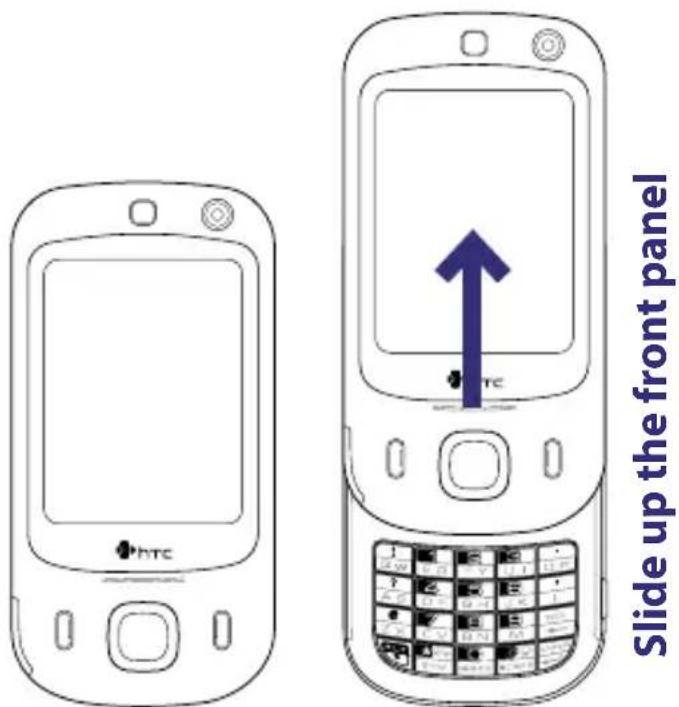
Tip When dialing phone numbers, use the 20-key QWERTY keyboard.
Onscreen input methods
When you start a program or select a field that requires text or numbers, the Input Panel icon becomes available on the menu bar.
Tap the Input Selector arrow (that appears next to the Input Panel icon) to open a menu where you can select a text input method and customize input options. After selecting a text input method, the corresponding Input Panel is then displayed and you can use it to enter text.
To toggle between showing and hiding the Input Panel, simply tap the Input Panel icon.
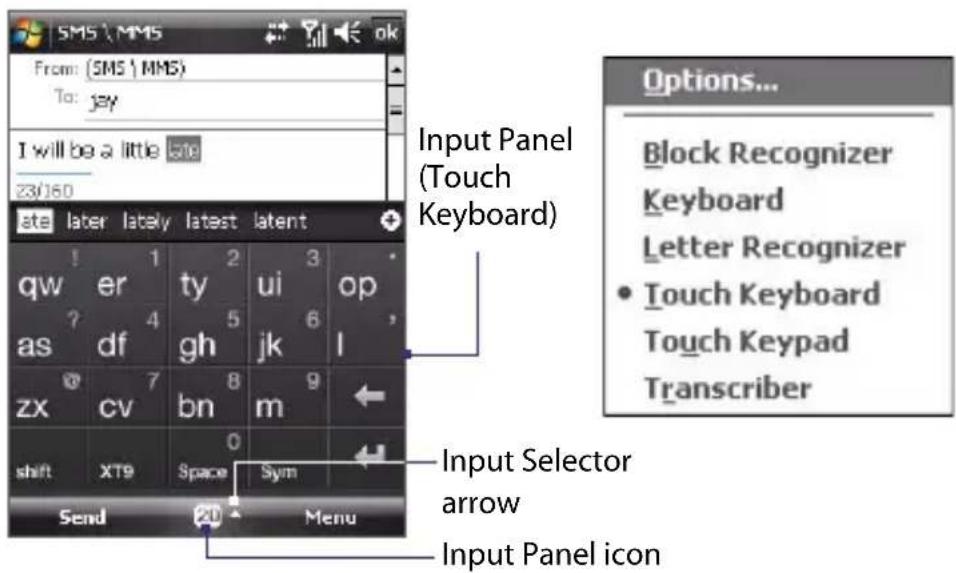
Icon Input method

Onscreen Keyboard

Touch Keyboard

Touch Keypad

Letter Recognizer or Block Recognizer

Transcriber
Note Some text input methods may not be available in certain language versions of the device.
2.2 Using the 20-key QWERTY Hardware Keyboard
You can enter text, numbers, and symbols by using the 20-key QWERTY keyboard. When you select a field that requires entering text or numbers, the phone automatically selects the appropriate input mode.
To change the input method, press and hold and select the input method you want to use on the menu.
You can do the following with the 20-key QWERTY keyboard:
- To use all uppercase letters, press twice. To change back to all lowercase letters, press again.
- To use a single uppercase letter, press and then press the corresponding key.
• To enter a number or symbol (labeled in white color), press and then press the corresponding key.
- Press to open the Symbol pad.
- Press to insert a hard return. Press to delete the previous character.
- Press and hold to access your voicemail.
- Press and hold to toggle between Vibrate and Ringer modes.
Multipress mode
In Multipress mode, you enter a character by pressing the key on which the character appears.
To enter text in Multipress mode
• To enter the first character, press once. To enter the second character, press twice, and so on.
• To enter characters that are on the same key, wait for the highlight on the character to disappear before you press the key again.
XT9 mode
To form a word in XT9 mode, press the keys that contain the letters you want. As you enter letters, XT9 analyses your keypresses and attempts to complete the word. XT9 also tries to predict your next word based on previous sentences you have type.
To enter text in XT9 mode
- Press and hold the
- On the menu, select XT9 English.

To change XT9 settings, press and hold and on the menu, select XT9 Settings.
Tip To type in all uppercase letters, press the key twice.
While typing, words will appear at the bottom of the screen. Use the NAVIGATION CONTROL to choose the word you want to insert and press ENTER.
Numeric mode
Input numbers by changing the input method to Numeric mode.
To enter numbers
- Press and hold the key and select 123 on the menu.
- On the keyboard, enter the number(s) you want.
2.3 Using the Onscreen Keyboard
The onscreen Keyboard is available when text entry is possible. You can enter text by tapping keys on the keyboard that are displayed on the screen.
To enter text using the onscreen Keyboard
- In a program, tap the Input Selector arrow, and tap Keyboard.
- Enter text by tapping keys on the onscreen Keyboard.
To enlarge the onscreen Keyboard
- Tap the Input Selector arrow, then tap Options.
- In the Input method list, select Keyboard.
- Tap Large keys.
2.4 Using Touch Keyboard
The Touch Keyboard is an onscreen keyboard layout similar to the 20-key hardware keyboard of your device. With the enlarged keys and input enhancement, you can type faster and more accurately using the Touch Keyboard.
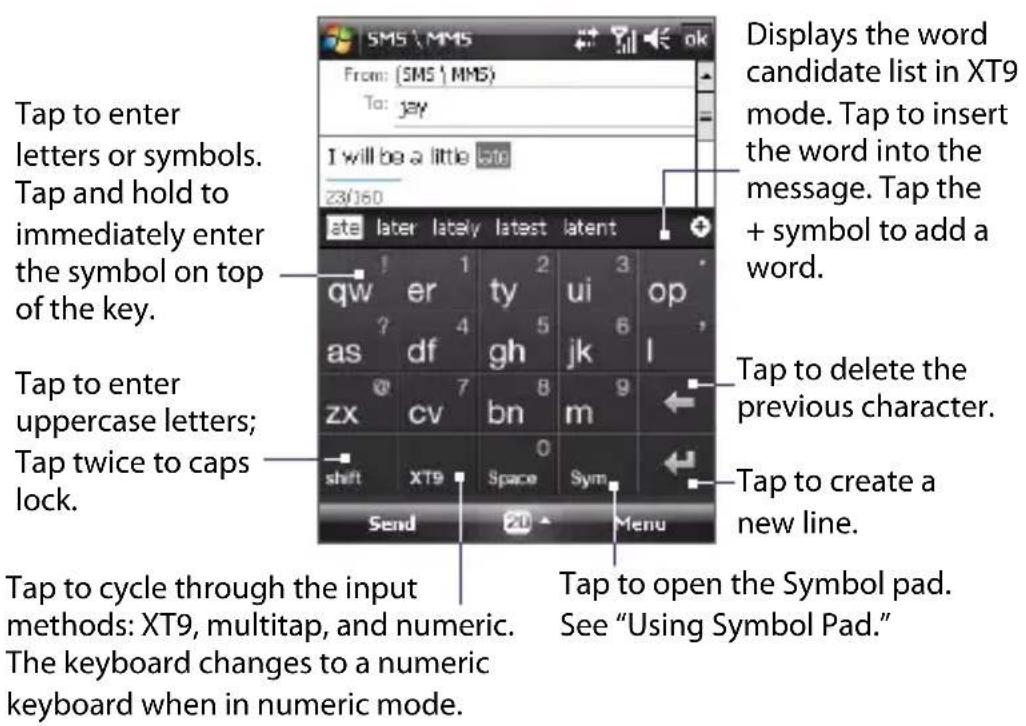
To use the Touch Keyboard
- Start a program that accepts user input, such as Word Mobile.
- Tap the Input Selector arrow, and tap Touch Keyboard.
- Enter text by tapping keys on the onscreen Keyboard. The way you enter characters using the Touch Keyboard is similar to using the 20-key keyboard; please see "Using the 20-key Hardware Keyboard" earlier in this chapter for details.
To change Touch Keyboard and XT9 settings
- Tap the Input Selector arrow, and tap Options.
- In the Input Method tab, select Touch Keyboard in Input method and tap Options.
You can change the keyboard layout by changing the Language. - Tap XT9 Settings. On the XT9 Settings screen, select the options you want and tap Done.
2.5 Using Touch Keypad
The Touch Keypad is an onscreen keypad layout similar to a 12-key keypad with some additional keys. With the enlarged keys and input enhancement, you can input text faster and more accurately using the Touch Keypad.
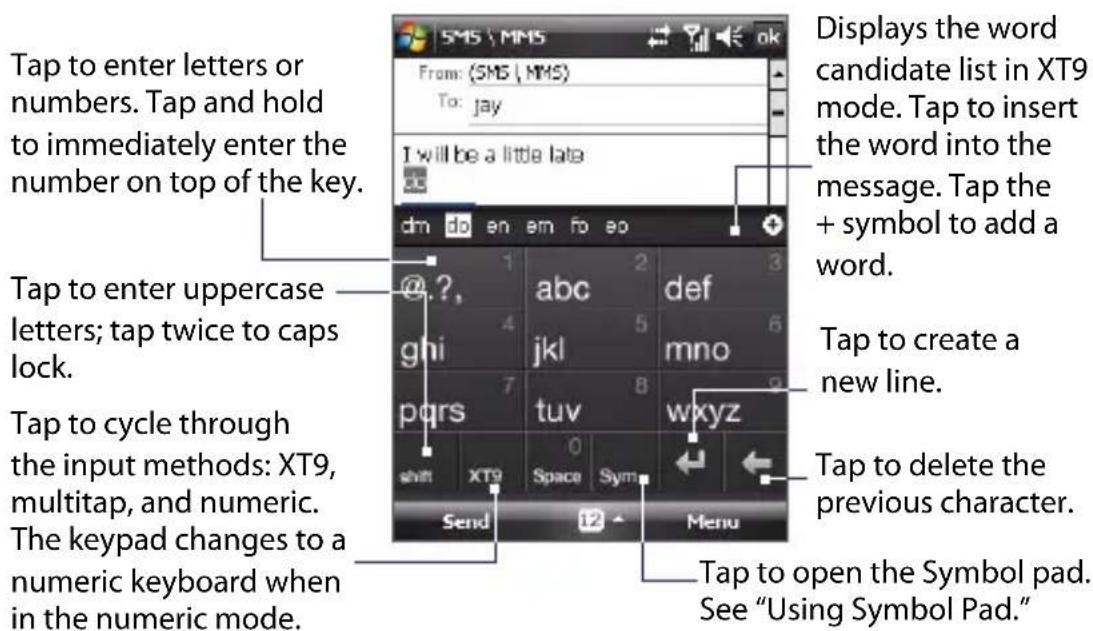
To use the Touch Keypad
- Start a program that accepts user input, such as Word Mobile.
- Tap the Input Selector arrow, and tap Touch Keypad.
- Enter text by tapping keys on the onscreen keypad. See "Multipress mode", "XT9 mode", and "Numeric mode" to learn how to enter characters.
To change Touch Keypad and XT9 settings
Refer to "To change Touch Keyboard and XT9 settings." Select Touch Keypad instead of Touch Keyboard in Input method.
2.6 Using Symbol Pad
Symbol Pad provides a comprehensive list of common symbols such as parentheses, braces, currency signs, and more, as well as punctuation marks and special characters. The Symbol pad is available for both Touch Keyboard and Touch Keypad.
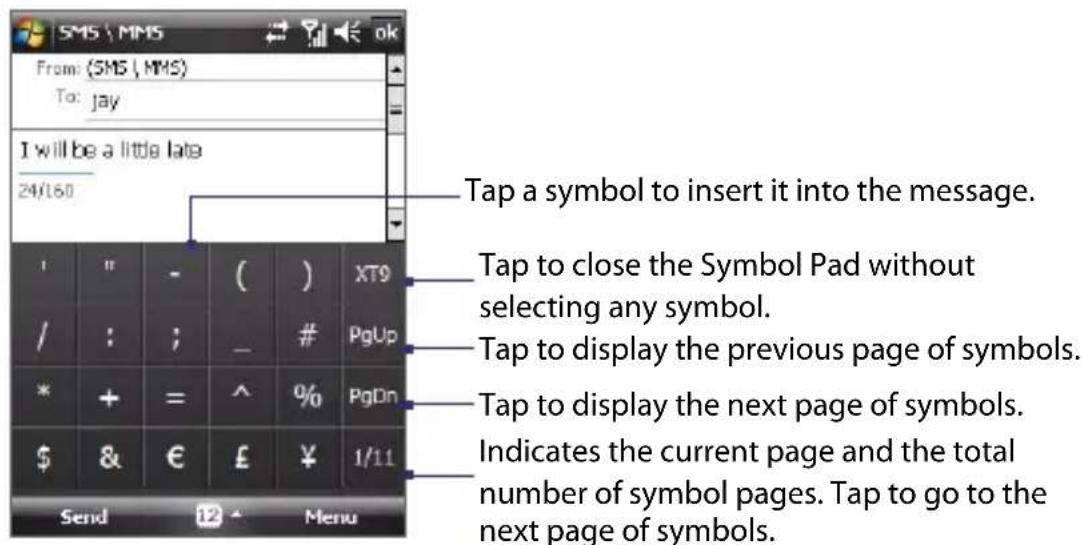
To open the Symbol Pad
• While using Touch Keyboard or Touch Keypad, tap

To change Symbol Pad settings
- Tap the Input Selector arrow, and tap Options.
- In the Input Method tab, select Touch Keyboard in Input method and tap Options.
- Select the Turn on one-touch symbol entry check box to select only one symbol at a time and immediately close the Symbol Pad after your selection. To be able to input several symbols at a time, clear this check box.
2.7 Using Letter Recognizer
With Letter Recognizer, you can write individual letters, numbers, and punctuation, which are then converted into typed text.
Note Letter Recognizer is available when text entry is possible.
To use Letter Recognizer
- From a program, tap the Input Selector arrow, and tap Letter Recognizer.
-
Write characters, numbers, and symbols in the designated writing area.
-
Enter uppercase letters by writing in the ABC (left) area of the box.
- Enter lowercase letters by writing in the abc (middle) area of the box.
- Enter numbers by writing in the 123 (right) area of the box.
- Enter punctuation and symbols by tapping in either area of the box and then writing the desired character.
Tip For help with writing characters, tap the question mark near the writing area.
2.8 Using Block Recognizer
With Block Recognizer, you use a single stroke to write letters, numbers, symbols, and punctuation, which are then converted into typed text.
Note Block Recognizer is available when text entry is possible.
To use Block Recognizer
- From a program, tap the Input Selector arrow, and tap Block Recognizer.
- Write characters, numbers, and symbols in the designated writing area.
- Enter letters by writing in the abc (left) area of the box.
- Enter numbers by writing in the 123 (right) area of the box.
- Enter symbols and punctuation by tapping in either area of the box and then writing the desired character.
Tip For help with writing characters with Block Recognizer, tap the question mark near the writing area.
2.9 Using Transcriber
Transcriber is a handwriting recognition program that allows you to write in cursive, print, or a combination of both.
To write using Transcriber
- Start a program that accepts user input, such as Word Mobile.
- Tap the Input Selector arrow, and tap Transcriber. The Transcriber introductory screen appears.
- Position the cursor where you want text to appear.
- Use the stylus to write anywhere on the screen. The handwriting will be converted to text shortly after you lift the stylus from the screen.
To enter punctuation and symbols
Transcriber comes with an onscreen keyboard that provides an easy way to add punctuation or a special symbol to existing text. To use this onscreen keyboard, tap on the Transcriber toolbar.
The keyboard remains visible until you tap the button again.
Tips
- To reposition the keyboard, tap and hold the title bar, then drag to the desired location.
- When no text is selected, you can also open the keyboard by doing the gesture. For more information about using Transcriber gestures, see Help on your device.
To edit text
- In a program, draw a line from left to right across the text you want to edit.
- After you lift the stylus from the screen, the line will disappear and the selected text will be highlighted.
-
Do either of the following:
-
Rewrite the text.
- Use gestures to capitalize letters, insert a space, and so on. For information about using Transcriber gestures, see Help on your device.
2.10 Searching Information
You can search for files and other items stored in My Documents folder or on an installed storage card of your device. You can search by file name or by words located in the item. For example, you can search in e-mail messages, notes, appointments, contacts, and tasks, as well as in online Help.
To search for a file or an item
- Tap Start > Programs > Search.
-
In the Search for field, you can:
-
Enter the file name, word, or other information you want to search for.
-
Tap the down arrow icon ( ), and from the list, select an item that you have looked for before.
-
In the Type field, you can tap the down arrow icon (▼) and select a data type from the list to help narrow your search.
- Tap Search. The system then starts searching the matched files in the My Documents folder and subfolders.
- In the Results list, tap the item you want to open.
Note
The storage card symbol ( ) is displayed next to the names of files saved on a storage card.
Chapter 3
Using Phone Features
3.1 Using the Phone
3.2 Making a Call
3.3 Receiving a Call
3.4 Smart Dial
3.5 Additional Dialing Information
3.1 Using the Phone
Like a standard mobile phone, you can use your device to make, receive, and keep track of calls and send messages. You can also dial directly from Contacts, and easily copy phonebook entries from your SIM card to Contacts on your device.
The Phone screen
From the Phone screen, you can access Call History, Speed Dial, and Phone settings. To open the Phone screen, do one of the following:
- Tap Start > Phone.
- Press the TALK button.
- While on the Today screen, open the keyboard and then press a numeric key.
Enter your PIN
Most SIM cards are preset with a PIN (personal identification number) that is provided by your wireless service provider.
- Enter the preset PIN assigned by your wireless service provider.
- Tap Enter.
Note If your PIN is entered incorrectly three times, the SIM card will be blocked. If this happens, you can unblock it with the PUK (PIN Unblocking Key) obtained from your wireless service provider.
Turn the phone function on and off
In many countries, you are required by law to turn off the phone while on board an aircraft.
To enable or disable the phone function
- Tap Start > Settings > Connections tab > Comm Manager.
- On the Comm Manager screen, tap the Phone button to enable or disable the phone function. When enabled, the ON indicator is activated.
Airplane Mode
Another way to turn off the phone function is to switch your device to Airplane Mode.
To enable or disable Airplane Mode
When you enable Airplane Mode, it turns off all wireless radios on your device, which include the phone function and Bluetooth. When you disable Airplane Mode, it turns the phone function back on. This also restores the previous state of Bluetooth.
-
Tap Start > Settings > Connections tab > Comm Manager.
-
On the Comm Manager screen, tap the Airplane Mode button to enable or disable Airplane Mode. When enabled, the ON indicator is activated.
Adjust the device volume
-
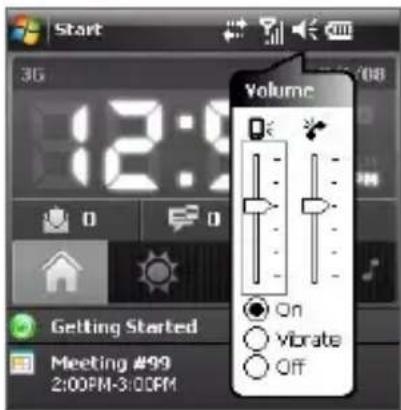
Tap the Speaker icon ( ) and then in the enlarged Title bar, tap the speaker icon again.
-
Under Volume, do the following:
- Adjust the phone volume ( 🎨 ) or device volume ( 📄 by moving the slider to the desired volume level.
- Tap On, Vibrate, or Off to change both the system and ringer volume settings.
Notes
- To adjust the conversation phone volume, you must do it during a call. Adjusting the volume at another time will affect the ring, notification, and MP3 sound levels.
- When you activate Vibrate mode, sound will automatically be muted and your device will vibrate when an incoming call is received. The Vibrate icon ( 📋) will appear in the title bar to indicate that Vibrate mode is activated.
Tip You can also use the VOLUME BUTTONS on the left side of the device to adjust the device volume or the volume during a call.
3.2 Making a Call
With your device, you can make a call from Phone, Contacts, TouchFLO, Speed Dial, Call History, and SIM Manager.
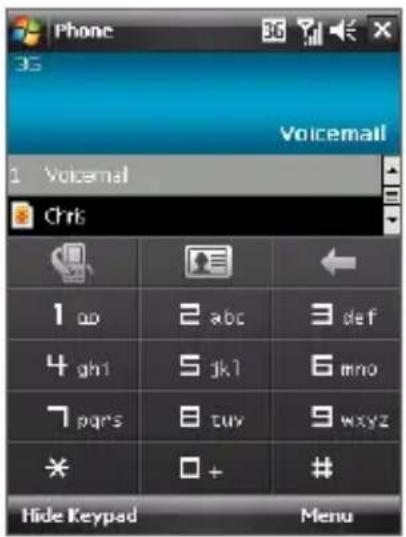
Make a call from Phone
- While on the Today screen, open the keyboard of the device.
- Start pressing the numeric keys on the keyboard to enter the phone number.
- Press the TALK button on your device to place the call.
Tip If you press a wrong number, press
Make a call from Contacts
Tap Contacts on the Today screen or tap Start > Contacts, then do one of the following:
- Press NAVIGATION up or down to select a contact, and press TALK.
- Tap the desired contact in the contacts list, and tap the phone number that you want to call.
- Tap and hold the desired contact, and on the shortcut menu, tap Call Work, Call Home, or Call Mobile.
To choose one of the numbers of a contact to dial
By default, the mobile phone number (m) of a contact is dialed when you make a call from Contacts. However, you can specify that a different phone number is dialed instead.
- Tap Start > Contacts.
- Press NAVIGATION up or down to select the contact.
- Press NAVIGATION left or right. The letters representing the number will change as you scroll through them.
Make a call from TouchFLO
To place a call to a favorite contact that you added to TouchFLO's Touch Cube, follow these steps:
- Open the Touch Cube by sliding your finger upward, starting from the bottom of the touch screen where it shows a logo image. (See Chapter 1 for detailed instructions.)
- Slide your finger left or right to rotate the cube and navigate to the screen where it shows your favorite contacts.
- Touch the photo or name of the contact whom you want to call.
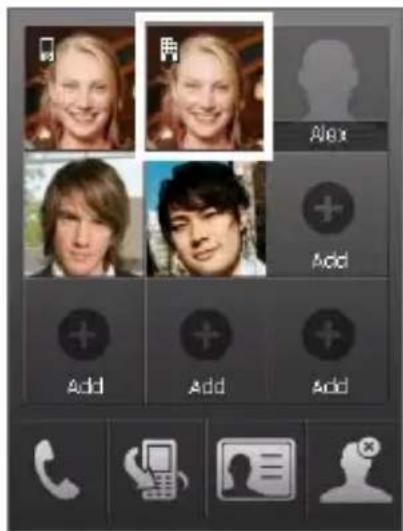
Tip Touch and hold the contact to open the contact's summary.
Make a call from Call History
- On the Phone screen, tap the Call History button (
- Touch the tab where you want to look. The tabs represent the different types of calls on the device. The tabs are arranged by (from left to right): Outgoing calls, Incoming calls, Missed calls, and All calls.
- Finger-scroll to the desired contact or phone number, and press TALK.

One-touch Speed Dial
Use Speed Dial to call frequently-used numbers with a single press. For example, if you assign a contact to the location 4 in Speed Dial, you can simply press and hold the 4 key on the keyboard to dial the contact's number. Before you can create a Speed Dial entry, the number must already exist in Contacts.
To create a Speed Dial entry
- On the Phone screen, tap Menu > Speed Dial.
- Tap Menu > New.
- Tap a contact. Select the phone number that you want to add to be assigned with a speed dial key.
- In the Location box, select an available key to use as the speed dial key.
Note If you want to place a phone number in a position that is already occupied, the new number will replace the number that is already there.
Tips
- To create a Speed Dial entry from Contacts or SIM card contacts, tap the contact, select the number you want to add to Speed Dial and then tap Menu > Add to Speed Dial.
- To delete a Speed Dial entry, in the Speed Dial list, tap and hold the desired entry, and tap Delete.
To call voicemail
The number 1 key is generally reserved for your voicemail. Tap and hold this button on the Phone screen or press and hold on the hardware keyboard to call voicemail.
Make a call from SIM Manager
SIM Manager allows you to view the contents of your SIM card, transfer SIM phonebook entries to Contacts on your device, and make a call from your SIM card.
To call a SIM contact
- Tap Start > Programs > SIM Manager. Wait for your SIM card contents to load.
- Tap and hold the name or phone number of the person you want to call, and tap Call.
For more information about SIM Manager, see Chapter 6.
3.3 Receiving a Call
When you receive a phone call, a message will appear, giving you the option to either answer or ignore the incoming call.
To answer or reject an incoming call
• To answer the call, tap Answer, or press TALK on the device.
- To reject the call, tap Ignore, or press END on the device.
- Open the keyboard.
Note For you to be able to answer calls by opening the keyboard, the Slide keypad to answer call check box must be selected. To check, tap Start > Settings > Personal tab > Phone > Advanced tab.
To reject a call and send a text message
When you reject a call, you can choose to automatically send a text message to the caller.
- On the Phone screen, tap Menu > Options > Advanced tab.
- Select the Reject call with text message check box. Change the default message if needed.
After enabling Reject call with text message, you can:
- Tap Send Text when you receive a call to reject the call and send a text message to the caller.
- Tap Silence when you receive a call to mute the ringing sound without rejecting the call.
Note When the Reject call with text message option is selected, you need to press the TALK button on the device to answer calls.
To end a call
Once an incoming or outgoing call is in progress, you can tap End or press END on the device to hang up.
To add a new phone number to your Contacts list after a call
If the number of the person who called is not in your Contacts list, you can choose to save the number after you hang up. To enable this feature, tap
Start > Settings > Personal tab > Phone > Advanced tab and select the Add new phone number to Contacts at end of call check box. Selecting the checkbox will pop up a message after a phone call ends to let you add the number to your Contacts list.
To check a missed call
You will see the icon on top of the screen when you missed a call. To check who the caller is:
- Tap the iron, then tap View.
- On the Phone screen, tap the Call History button ( ). You can view missed calls as well as incoming and outgoing calls in Call History.
To set a reminder for missed calls
You can set the device to make a beeping sound every 2 minutes to remind you of a missed call.
-
On the Phone screen, tap Menu > Options > Advanced tab.
-
Select the Enable missed call reminder sound check box
To put a call on hold
Your device notifies you when you have another incoming call, and gives you the choice of rejecting or accepting the call. If you are already on a call and accept the new call, you can choose to switch between the two callers, or set up a conference call between all three parties.
-
Tap Answer to take the second call, and put the first one on hold.
-
To end the second call and return to the first call, tap End or press END on the device.
To switch between two calls
- Tap Swap.
To set up a conference call
- Either put a call on hold, and dial a second number; or, accept a second incoming call when you already have one in progress.
- Tap Menu > Conference.
Note Not all service providers support conference calling. Contact your service provider for details.
To turn on and off the Speakerphone
The built-in Speakerphone on your device allows you to talk hands-free or lets other people listen to the conversation.
- During a call, tap Speaker On, or press and hold TALK until the speakerphone turns on. The speakerphone icon (💡) appears in the title bar.
- To turn off the speakerphone, tap Speaker Off, or press and hold TALK again until the speakerphone turns off.
Warning! To avoid damage to your hearing, do not hold your device against your ear when the Speakerphone is turned on.
To mute a call
You can turn off the microphone during a call, so that you can hear the caller but the caller cannot hear you.
• During a call, tap Mute.
- When the microphone is turned off, the mute icon ( 📄 ×) appears on the screen. Tap Unmute to turn on the microphone again.
3.4 Smart Dial
Smart Dial makes it easy for you to dial a phone number. When you start entering a phone number or contact name, Smart Dial will automatically search and sort the contact entries on the SIM card, in Contacts, and the phone numbers in Call History (including incoming, outgoing, and missed calls). You can then select the desired number or contact from the filtered list to dial.
Smart Dial panel
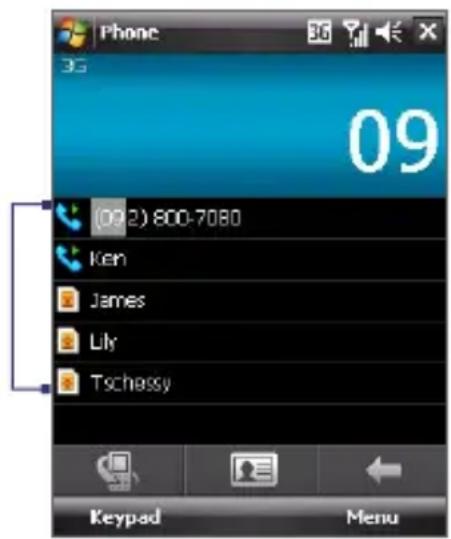
To find a contact name or number
You can just enter the first letter of the name or number of a contact. Smart Dial will search for contact phone numbers and the first character of a contact name as well as from the character that appears after a space, dash, or underscore in a contact name. For example, if you tap number "2" on the onscreen phone keypad, which is associated with [a, b, and c] on the Phone keypad, contact names such as the following will be considered matches: "Ben Miller", "George Adams", "John-Carter", "Carter, Ellen", "Dixon, Allan", "Thomas_Clark", "JaneCampbell".
If the matching list is long and you want to narrow down the search further, enter another letter. Using the same example above, if you continue to tap "3" which is associated with [d, e, f], the matching list will be narrowed down to the following names: "Ben Miller", "George Adams", "Carter, Ellen", "Dixon, Allan".
Tip You can also use the hardware keyboard to enter the name or number of the contact. Please note that the letters assigned to numeric keys on the hardware keyboard is different from the onscreen keypad.
Make a call or send a text message using Smart Dial
-
Press the TALK button on your device to open the Phone screen.
-
Begin entering the first few numbers or characters.
When you start entering a number or letter, the Smart Dial panel will display matches found.
-
In the Smart Dial panel, browse the list by sliding your finger or the stylus up or down or by pressing NAVIGATION up or down.
-
You can do one of the following:
-
When the desired contact is selected, press the TALK button to place a call.
- To send a text message to the selected contact, tap Menu > Send Text Message.
- To call a different phone number associated with the selected contact, tap the contact, select the phone number you want to call, and then press TALK.
3.5 Additional Dialing Information
Make an emergency call
Enter the international emergency number for your locale, and press the TALK button on your device.
Tip Additional emergency numbers may be included in your SIM card. Contact your service provider for details.
Make an international call
-
Press and hold on the hardware keyboard (or tap and hold the number 0 key on the phone screen) until the + sign appears.
The + replaces the international prefix of the country that you are calling. -
Enter the full phone number you want to dial and press the TALK button on your device. The full phone number includes country code, area code (without the leading zero, if any) and phone number.
72 Using Phone Features
Chapter 4
Setting Up Your Device
4.1 Basic Settings
4.2 Personalizing the Today Screen
4.3 Protecting Your Device
4.1 Basic Settings
Time and date
To set the time and date
- Tap Start > Settings > System tab > Clock & Alarms > Time tab.
- Select the correct time zone and change the date or time.
Note During synchronization, the time on your device is updated with the time on your PC.
To set the time and date for a different location
If you visit or communicate with someone in a particular time zone often, you can select it as your visiting time zone.
- Tap Start > Settings > System tab > Clock & Alarms > Time tab.
- Tap Visiting.
- Select the correct time zone and change the time or date.
Regional settings
The style in which numbers, currency, dates, and times are displayed is specified in regional settings.
- Tap Start > Settings > System tab > Regional Settings.
- On the Region tab, select your region from the list. This does not change the Operating System language of your device.
- The region you select determines which options will be available on the other tabs.
- To customize settings further, tap the appropriate tabs and select the desired options.
Display settings
To adjust screen brightness
- Tap Start > Settings > System tab > Backlight > Brightness tab.
- Move the slider to adjust the brightness.
To set the backlight to dim after a time delay
- Tap Start > Settings > System tab > Backlight.
- Tap the Battery power tab, or the External power tab.
- Select the Turn off backlight if device is not used for check box, and specify the time delay.
To increase or decrease the size of text on the screen
- Tap Start > Settings > System tab > Screen > Text Size tab.
- Move the slider to increase or decrease the text size.
Device name
The device name is used to identify your device in the following situations:
- Synchronizing with a PC
- Connecting to a network
• Restoring information from a backup
Note If you synchronize multiple devices with the same PC, each device must have a unique name.
To change the device name
- Tap Start > Settings > System tab > About.
- Tap the Device ID tab.
- Enter a name.
Note The device name must begin with a letter, consist of letters from A to Z, numbers from 0 to 9, and cannot contain spaces. Use the underscore character to separate words.
Ringer settings
To change the ring type and ring tone
- On the Phone screen, tap Menu > Options > Phone tab.
- In the Ring type list, choose whether to be notified of incoming calls by a ring, a vibration, or a combination of both.
- In the Ring tone list, tap the sound you want to use.
Tip
You can use *.wav, *.mid, *.mp3, *.wma, or other types of sound files that you downloaded from the Internet or copied from your PC as ring tones. For a complete list of supported audio file formats for ring tones, see "Specifications" in the Appendix.
To use your sound files as ring tones, copy them first to the /My Documents/ My Ringtones folder on your device, then select the sound from the Ring tone list of your device. For more information about copying files, see Chapter 9.
Alarms and notifications
To set an alarm
- Tap Start > Settings > System tab > Clock & Alarms > Alarms tab.
- Tap
and enter a name for the alarm. - Tap the day of the week for the alarm. You can select multiple days by tapping each desired day.
- Tap the time to open a clock and set the time for the alarm.
- Tap the alarm icon ( ) to specify the type of alarm you want. You can choose a flashing light, a single sound, a repeating sound, or vibration.
- If you choose to play a sound, tap the list next to the Play sound check box and tap the sound you want.
To choose how to be notified about events or actions
- Tap Start > Settings > Personal tab > Sounds & Notifications.
- On the Sounds tab, choose how you want to be notified by selecting the appropriate check boxes.
- On the Notifications tab, in Event, tap an event name and choose how you want to be notified by selecting the appropriate check boxes. You can choose from several options, such as a special sound, a message, or a flashing light.
Tip
Turning off sounds and the flashing light helps conserve battery power.
Phone services
Your device can directly link to the mobile phone network, and allow you to access and change the settings of various phone services for your device. Phone services may include Call Forwarding, Call Waiting, Voicemail, and more. Contact your wireless service provider to find out about the availability of phone services for your device.
To access and change settings of phone services
- Tap Start > Settings > Personal tab > Phone > Services tab.
- Select the service you want to use, then tap Get Settings.
- Choose your desired options, then tap OK.
For more information about customizing settings of phone services, see Help on your device.
4.2 Personalizing the Today Screen
The Today screen shows your upcoming appointments, active tasks, and information about incoming messages. You can customize what to display on the Today screen.
To customize the Today screen
- Tap Start > Settings > Personal tab > Today.
- On the Appearance tab, select the desired theme for the background of the Today screen.
- On the Items tab, select the items you want to appear on the Today screen.
To use a custom background image
You can use one of your own pictures as the background image on the Today screen.
- Tap Start > Settings > Personal tab > Today.
- Select the Use this picture as the background check box, and tap Browse to view a list of your picture files.
- Tap the file name of the picture you want to use.
- Tap OK.
To display owner information
Having owner information displayed on the Today screen makes it easier for someone to return your device to you if it is lost.
- Tap Start > Settings > Personal tab > Owner Information.
- On the Identification tab, enter your personal information.
Tips If you don't see owner information on the Today screen, tap Start > Settings > Personal tab > Today. On the Items tab, select the Owner Info check box.
- You can set your device to display the 'my info' screen when your device is turned on. This screen shows your complete personal information. To display the 'my info' screen, tap Start > Settings > Personal tab > Owner Information > Options tab then select the Identification information check box.
To set options for displaying appointments on the Today screen
If you have a large number of appointments, you may want to specify the kind of appointments that are displayed on the Today screen.
- Tap Start > Settings > Personal tab > Today.
- Tap the Items tab.
- Select Calendar and tap Options.
- Do any of the following:
- Select Next appointment to show only the next appointment in your schedule, or Upcoming appointments to show multiple appointments.
- Clear the Display all day events check box if you do not want to display all-day events.
For more information about using Calendar, see Chapters 6 and 8.
To set options for displaying tasks on the Today screen
If you have a large number of tasks, you may want to specify the kind of tasks that are displayed on the Today screen.
- Tap Start > Settings > Personal tab > Today.
- Tap the Items tab.
-
Select Tasks and tap Options.
-
Do any of the following:
-
Under Display number of, select the type of tasks you want to appear on the Today screen.
- In the Category list, select whether to display only tasks assigned to a specific category or to display all tasks.
For more information about creating tasks on your device, see Chapter 6.
Customize the Start menu
You can choose which items appear in the Start menu.
- Tap Start > Settings > Personal tab > Menus.
- Select the check boxes of the items you want to appear in the Start menu. You can select up to seven items.
Tip You can also create folders and shortcuts to appear on the Programs menu. Using Windows Explorer on your PC, navigate to the /Windows/Start Menu folder of your device, then create the folders and shortcuts that you want.
4.3 Protecting Your Device
Protect your SIM card with a PIN
You can protect your SIM card from unauthorized use by assigning a PIN (personal identification number). The default PIN will be given to you by your wireless service provider.
To change the PIN
- On the Phone screen, tap Menu > Options > Security tab.
- Select the Require PIN when phone is used check box.
- To change the PIN at any time, tap Change PIN.
Tip Emergency calls can be placed at any time, without requiring a PIN.
Protect your device with a password
You can help keep your data more secure by requiring a password every time the device is turned on
To set a device password
- Tap Start > Settings > Personal tab > Lock.
- Select the Prompt if device unused for check box, and in the box to the right, select how long your device must be idle before a password is required.
- In the Password type box, select the type of password you would like to use. If your device is configured to connect to a network, use an alphanumeric password for increased security for your device.
- Enter the password in both the Password and Confirm boxes.
- Tap OK. The next time the device is turned on, you will be prompted to enter your password.
Notes • To ensure you can always make emergency calls, do not begin your password with the digits of your local emergency number.
- If you entered a hint, the hint will be displayed after the wrong password is entered five times.
• Each time a wrong password is entered, the device response time gets longer until the device appears to be not responding.
- If you forget your password, you can hard reset or clear the device memory. Before you do this, make sure you back up your data and files so that you can restore them back to your device. For more information about hard resetting the device and clearing the memory, see Chapter 12.
Encrypt files on your storage card
You can set your device to encrypt files as they are saved on the storage card.
- Tap Start > Settings > System tab > Encryption.
- Select Encrypt files placed on storage cards.
Notes • Encrypted files can be read only on the device that encrypted them.
- Encrypted files are opened just like other files, provided you are using the device that encrypted them. There is no separate step for you to take to read these files.
Chapter 5
Synchronizing Information With Your Computer
5.1 About Synchronization
5.2 Setting Up Windows Mobile® Device Center on Windows Vista®
5.3 Setting Up ActiveSync® on Windows XP®
5.4 Synchronizing With Your Computer
5.5 Synchronizing via Bluetooth
5.6 Synchronizing Music and Video
5.1 About Synchronization
You can take information from your computer wherever you go by synchronizing them to your device. The following types of information can be synchronized between your computer and your device:
- Microsoft Outlook® information, which include Outlook e-mail, contacts, calendar, tasks, and notes
• Media, such as pictures, music and video
• Favorites, which are the bookmarked links to your favorite web sites - Files, such as documents and other files
Before you can synchronize, you need to install and set up first the synchronization software on your computer. For more information, see "Setting Up Windows Mobile Device Center on Windows Vista®" and "Setting Up ActiveSync® on Windows XP®".
Ways to synchronize
After you have installed the synchronization software to your computer, connect and synchronize your device with your computer by using one of the following methods:
- Connect and synchronize using the supplied USB sync cable.
Upon connecting the sync cable to your device and your computer, the synchronization process starts automatically.
- Connect and synchronize using Bluetooth.
You must first set up a Bluetooth partnership between your device and your computer before you can synchronize information between them using Bluetooth. For more information about setting up a Bluetooth partnership, see Chapter 10. For information about synchronizing through Bluetooth, see “Synchronizing via Bluetooth” later in this chapter.
Try to synchronize frequently in order to keep information up-to-date in both your device and your computer.
Note You can also synchronize Outlook e-mail, contacts, calendar, and tasks on your device with the Exchange Server at your work. For more information about setting up your device to synchronize with the Exchange Server, see Chapter 8.
5.2 Setting Up Windows Mobile® Device Center on Windows Vista®
Microsoft Windows Mobile ^® Device Center is the replacement for Microsoft ^® ActiveSync ^® on Windows Vista ^® .
Note Some versions of Windows Vista come with Windows Mobile Device Center already installed. If Windows Mobile Device Center is not available on your Windows Vista, you can install it from the Getting Started Disc that came with your device.
Set up synchronization in Windows Mobile Device Center
When you connect your device to your PC and start Windows Mobile Device Center for the first time, you are asked to create a Windows Mobile partnership with your device. Follow the steps below to create a partnership.
- Connect your device to your PC. Windows Mobile Device Center configures itself and then opens.
- On the licence agreement screen, click Accept.
- On the Windows Mobile Device Center's Home screen, click Set up your device.
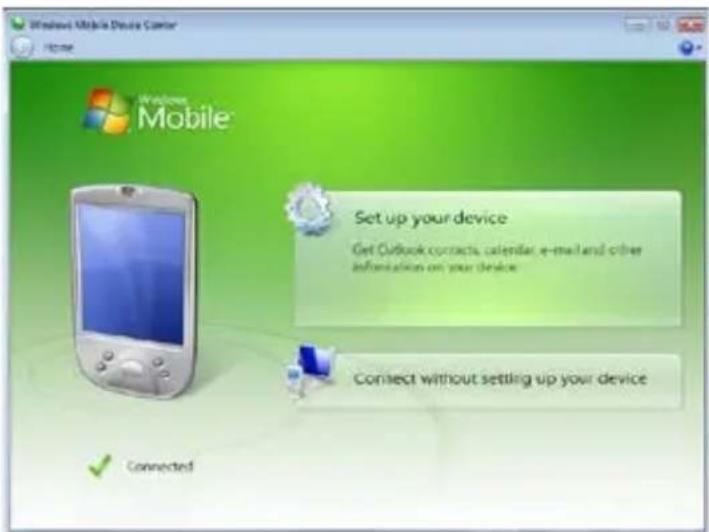
Note Choose Connect without setting up your device if you only want to transfer media files, check for updates, and explore your device but not sync Outlook information.
- Select the items you want to synchronize, then click Next.
- Enter a device name and click Set Up.
When you finish the setup wizard, Windows Mobile Device Center synchronizes your device automatically. Notice that Outlook e-mails and other information will appear on your device after synchronization.
Use Windows Mobile Device Center
To open Windows Mobile Device Center, click Start > All Programs > Windows Mobile Device Center on your Windows Vista computer.
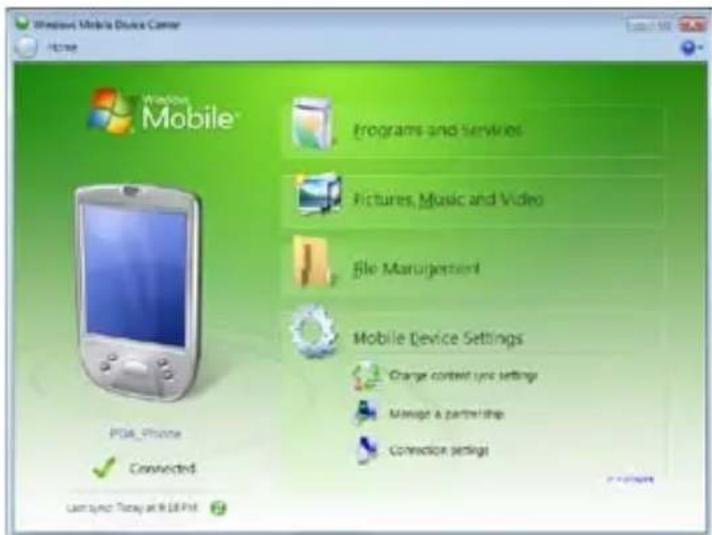
On Windows Mobile Device Center, you can do the following:
- Click Mobile Device Settings to change synchronization settings.
- When you click Pictures, Music and Video > ____ new pictures/video clips are available for import, a wizard guides you to tag and transfer photos from your device to the Photo Gallery on your Windows Vista PC.
- Click Pictures, Music and Video > Add media to your device from Windows Media Player to synchronize music and video files using Windows Media™ Player. For more information, see "Windows Media® Player Mobile" in Chapter 11.
- Click File Management > Browse the contents of your device to view documents and files from your device.
Note See Windows Mobile Device Center Help for more information.
5.3 Setting Up ActiveSync® on Windows XP®
The Getting Started Disc that comes with your device contains Microsoft ActiveSync 4.5 or later. Follow the steps in this section to install and set up ActiveSync on Windows XP or other compatible Windows systems.
Note For a list of compatible Windows systems, please go to http://www.microsoft.com/windowsmobile/activesync/activesync45.mspx.
Install ActiveSync
- Insert the Getting Started Disc into the disc drive on your PC.
- Click Setup and Installation.
- Select the ActiveSync check box and click Install.
- Read the licence terms and click Accept.
- When installation is complete, click Done.
- On the Getting Started with Windows Mobile screen, click Close.
Set up synchronization in ActiveSync
Follow the steps below to set up a synchronization partnership.
- Connect your device to your PC. The Synchronization Setup Wizard automatically starts and guides you to create a synchronization partnership. Click Next to proceed.
- To synchronize your device with your PC, clear the Synchronize directly with a server running Microsoft Exchange check box then click Next.
- Select the information types that you want to synchronize then click Next.
- Select or clear the Allow wireless data connections check box according to your preference.
- Click Finish.
When you finish the wizard, ActiveSync synchronizes your device automatically. Notice that Outlook e-mails and other information will appear on your device after synchronization.
5.4 Synchronizing With Your Computer
Connect and synchronize your device with your PC using the USB cable or Bluetooth connection.
Start and stop synchronization
You can manually synchronize either from your device or PC.
From your device
- Tap Start > Programs > ActiveSync., then tap Sync.
To end synchronization before it completes, tap Stop.
Tip To delete a partnership with one PC completely, disconnect your device from that PC first. In ActiveSync on your device, tap Menu > Options, tap the computer name, then tap Delete.
From Windows Mobile Device Center
- Click Start > All Programs > Windows Mobile Device Center.
- Click at the lower left of the Windows Mobile Device Center.
To end synchronization before it completes, click

From ActiveSync on your PC
When you connect your device to your PC, ActiveSync automatically opens on your PC and synchronizes.
- To manually start synchronization, click .
- To end synchronization before it completes, click

Change which information is synchronized
You can change the information types and the amount of information to synchronize for each type either on your device or your PC. Follow the steps below to change synchronization settings on your device.
Note Before changing synchronization settings on your device, disconnect it from your PC.
- In ActiveSync on your device, tap Menu > Options.
-
Select the check box for any items you want to synchronize. If you cannot select a check box, you might have to clear the check box for the same information type elsewhere in the list.
-
To change synchronization settings for an information type, for instance, E-mail, select it and tap Settings.
You can then set the download size limit, specify the time period of information to download, and more.
Notes
- Some information types such as Favorites, Files and Media cannot be selected in ActiveSync Options on your device. You can only select or clear these items from your PC's Windows Mobile Device Center or ActiveSync.
- A PC can have sync partnerships with many different Windows Mobile powered devices, but a device can have sync partnerships with at most two PCs only. To ensure that your device will synchronize properly with both PCs, set up the second PC using the same synchronization settings you used on the first PC.
- Outlook e-mail can be synchronized with only one computer.
Troubleshoot sync connection problem
When the PC is connected to the Internet or a local network, in some cases, the PC may disconnect the connection with your device in favor of the Internet or network connection.
If this happens, tap Start > Settings > Connections tab > USB to PC, then clear the Enable advanced network functionality check box. This makes your PC utilize a serial USB connection with your device.
The USB to PC ( - ) icon appears on the Today Screen when serial USB connection is used.
5.5 Synchronizing via Bluetooth
You can connect and synchronize your device with the PC using Bluetooth.
To synchronize with a computer via Bluetooth
-
Set up Windows Mobile Device Center or ActiveSync on your PC to synchronize through Bluetooth. See the program's Help for instructions.
-
On your device, tap Start > Programs > ActiveSync.
-
Make sure that Bluetooth on both your device and the computer are turned on and set to visible mode. For more information, see "Bluetooth" in Chapter 10.
-
Tap Menu > Connect via Bluetooth. Make sure the Bluetooth function of both your device and the computer are turned on and set to visible mode.
-
If this is the first time you have connected to this computer via Bluetooth, you must first complete the Bluetooth wizard on your device and set up a Bluetooth partnership between your device and the computer. For more information about creating a Bluetooth partnership, see "Bluetooth partnerships" in Chapter 10.
Notes • To preserve battery power, turn off Bluetooth when not in use.
- To connect and synchronize your device with a computer via Bluetooth, your computer must have built-in Bluetooth or installed with a Bluetooth adapter or dongle.
5.6 Synchronizing Music and Video
If you want to carry your music or other digital media along with you while you travel, set up Microsoft® Windows Media® Player on your computer to synchronize music and video with your device.
Other than selecting the Media information type to be synchronized, all media synchronization settings must be set in Windows Media Player.
Before media can be synchronized, you must do the following:
• Install Windows Media Player Version 11 on the PC. (Windows Media Player 11 works only in Windows XP or later versions).
- Connect your device to the PC with a USB cable. If your device is currently connected using Bluetooth, you must end that connection before media can be synchronized.
- Set up a sync partnership between your device and your PC's Windows Media® Player.
For more information about using Windows Media® Player Mobile, see Chapter 11.
Chapter 6
Organizing Contacts, Appointments, Tasks, and Other Information
6.1 Contacts
6.2 SIM Manager
6.3 Calendar
6.4 Tasks
6.5 Notes
6.6 Voice Recorder
6.1 Contacts
Contacts is your address book and information storage for the people and businesses you communicate with. You can create the following types of contacts on your device:
- Outlook contacts. Contacts that are stored on your device, which can be created on your device or synchronized with your PC or the Exchange Server.
- SIM contacts. Contacts that are stored on the SIM card. Only the name and a phone number can be stored for each entry.
- Windows Live contacts. Contacts that you communicate with using Windows Live Messenger or MSN. Just like Outlook contacts, you can also enter complete information for a Windows Live contact. For more information, see "Add Windows Live contacts" in Chapter 10.
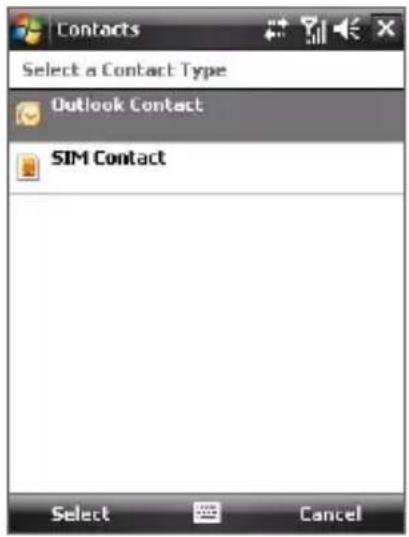
Note You can only add Windows Live contacts after you have set up Windows Live on your device.
Add new contacts
To add a contact on your device
- Tap Start > Contacts.
- Tap New, select Outlook Contact, and enter the contact information.
- In the File as field, choose how you want the contact name to appear in the contact list.
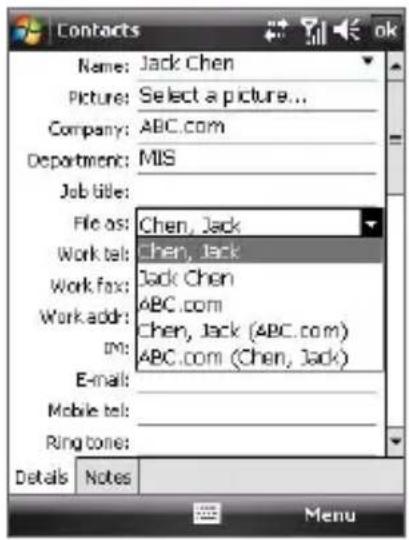
-
To add a photo of the contact, tap Select a picture, then select the picture file or tap Camera to take a photo of the contact. This photo appears on the Phone screen when you receive a call from the contact.
-
To assign a ring tone to the contact, tap the Ring tone field, scroll through the list of tones, then select a desired tone.
-
When finished, tap OK.
Tips • If someone who is not in your list of contacts calls you, create a contact from Call History by tapping and holding a phone number and then tapping Save to Contacts from the shortcut menu.
- To save a phone number that is contained in a message, tap the phone number, then tap Menu > Save to Contacts.
- To edit contact information, tap the contact name then tap Menu > Edit.
To add a contact to your SIM card
-
Tap Start > Contacts.
-
Tap New then select SIM Contact.
-
Enter a contact name and phone number.
-
Tap OK.
Tip You can also use the SIM Manager to add and edit contacts on your SIM card. For more information, see "SIM Manager" later in this chapter.
View, organize and search
To view contact information
-
Tap Start > Contacts.
-
Slide your finger upward on the touch screen to scroll down the contact list.
To scroll up the contact list, slide your finger downward on the touch screen.
Note For detailed instructions on how to use finger scrolling, see "Finger scrolling and finger panning" in Chapter 1.
92 Organizing Contacts, Appointments, Tasks, and Other Information
- Touch the name of a contact to open his or her contact card.
- On the contact card, you will see the last outgoing or incoming call as well as detailed information such as phone numbers of the contact, e-mail address, and more.
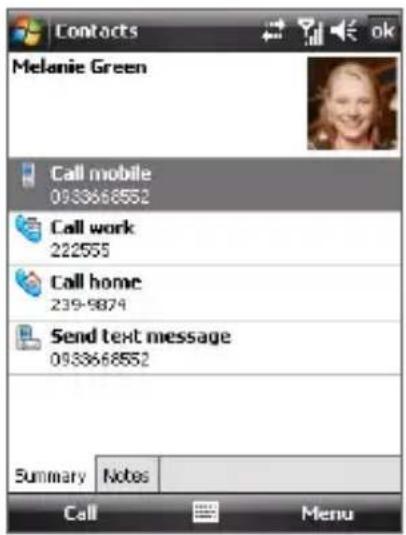
To group similar contacts
You can group similar contacts for easier management by assigning them to categories.
- Create a new Outlook contact or edit an existing Outlook contact.
- Tap Categories.
- Select a preset category such as Business or Personal, or tap New to create your own category.
- When finished, tap OK.
To view contacts by category
- Tap Menu > Filter then select the desired category.
To find a contact on your device
There are several ways to find a contact when your contact list is long.
- Tap Start > Contacts.
- Do one of the following:
- On the Quick Scroll bar on the right of the screen (black vertical bar), scroll to or touch a letter to go directly to the part of the Contacts list where contact names start with that letter.
Note You can disable the Quick Scroll bar by tapping Menu > Options and selecting the Show alphabetical index check box. This will show the alphabetical index on top of the Contacts list.
- Begin entering a contact name in the provided text box until the contact you want is displayed.
- Filter the list by categories. In the contact list, tap Menu > Filter, then tap a category you've assigned to a contact. To show all contacts again, select All Contacts.
Share contact information
To beam a contact's details
You can quickly send contact information to another mobile phone or device through Bluetooth beaming.
- Tap Start > Contacts, then select a contact.
- Tap Menu > Send Contact > Beam then select a device where to beam the contact to.
Note Before you can beam, make sure Bluetooth is turned on and set to visible mode on your device and the target mobile device. You can also beam contact information to your PC. See "Bluetooth" in Chapter 10 for details.
To send contact information via text messaging
- Tap Start > Contacts, then select a contact.
- Tap Menu > Send Contact > SMS \ MMS.
- Select the contact information you want to send, then tap Done.
- In the new text message, enter the mobile phone number of the recipient, then tap Send.
To send contact information as a vCard
A vCard (virtual business card) is a standard file format used for exchanging contact information. vCard files can be exported to Outlook on the PC. From your device, you can send a vCard containing contact information as a file attachment in an MMS message.
- Tap Start > Contacts, then select a contact.
- Tap Menu > Send as vCard.
- A new MMS message is created with the vcard file attached. Enter the mobile phone number or e-mail address of the recipient then tap Send.
6.2 SIM Manager
SIM Manager allows you to view the contents of your SIM card, transfer contacts from your SIM card to your device or vice versa, and make a call to a SIM contact.
To create a contact on your SIM card
- Tap Start > Programs > SIM Manager.
- Tap New and enter a contact name and phone number.
- Tap Save to save the information on your SIM card.
Tip To change contact information on your SIM card, tap a SIM contact and edit it. After modifying, tap Save.
To copy SIM contacts to your device
If you have saved contacts on your SIM card, you can copy them into Contacts on your device.
- Tap Start > Programs > SIM Manager.
- Select the desired item, or select all SIM contacts by tapping Menu > Select All.
- Tap Menu > Save to Contacts.
To copy contacts to the SIM card
Only one phone number per contact name can be stored on a SIM card. When you copy a contact that has several phone numbers to your SIM card, SIM Manager saves each number under a separate name.
To save each number under a different contact name on the SIM card, SIM Manager appends an indicator at the end of each name. By default, /M, /W and /H are appended to indicate mobile, work and home phone numbers respectively. You can edit this indicator first before you start copying contacts to your SIM card. Indicators of the other types of phone numbers are left empty for you to define them.
-
Tap Start > Programs > SIM Manager, then tap Menu > Tools > Options.
-
Select the check boxes of the types of phone numbers that you want to be added to the SIM card.
-
Under the Mark column, you can change the indicator that will be appended to the SIM contact names for each phone number type. To do so, select a phone type, tap Edit, enter your desired indicator, then tap Save.
- After modifying, tap OK.
- Tap Menu > Contacts to SIM.
- Select the check boxes of the contact's phone numbers that you want to copy to your SIM card, then tap Save.
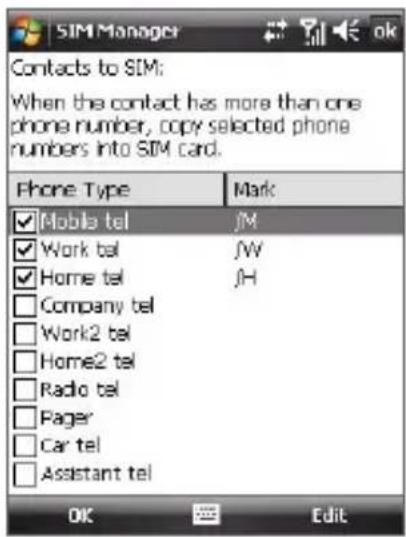
To store your SIM card's phone number
- On the SIM Manager screen, tap Menu > Tools > List of Own Numbers.
- Tap [Voice Line 1].
- Change the name, if desired, then enter your mobile phone number.
- Tap Save.
When your phone number is stored on the SIM card, it will appear on the SIM Manager screen.
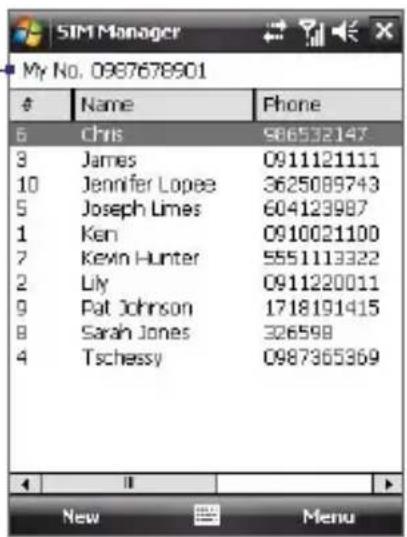
6.3 Calendar
Use Calendar to create appointments, including meetings and other events. You can also synchronize Calendar appointments between your device and PC.
Create appointments
To schedule an appointment
- Tap Start > Calendar.
- Tap Menu > New Appointment.
- Enter a name for the appointment.
-
Do one of the following:
-
If it is a special occasion such as a birthday or a whole-day event, set the All Day option to Yes.
-
If there is a time frame for the appointment, select the start and end dates and time.
-
Specify the type of category for your appointment, so that it can be grouped with other related appointments. Tap Categories, then select a preset category (Business, Holiday, Personal, or Seasonal), or tap New to create your own category.
-
When finished, tap OK to return to the calendar.
Notes • All-day events do not occupy blocks of time in Calendar; instead, they appear in banners at the top of the calendar.
- To cancel an appointment, tap Menu > Delete Appointment.
Tip To have the time entered automatically in Day view, tap the time slot for the new appointment, and tap Menu > New Appointment.
To set a default reminder for all new appointments
You can have a reminder automatically turned on for all new appointments you schedule.
- Tap Start > Calendar.
- Tap Menu > Tools > Options > Appointments tab.
-
Select the Set reminders for new items check box.
-
Set the time when you want the reminder to alert you.
- Tap OK to return to the calendar.
View appointments
By default, Calendar displays appointments in Agenda view. You can also look at your appointments in Day, Week, Month, and Year views.
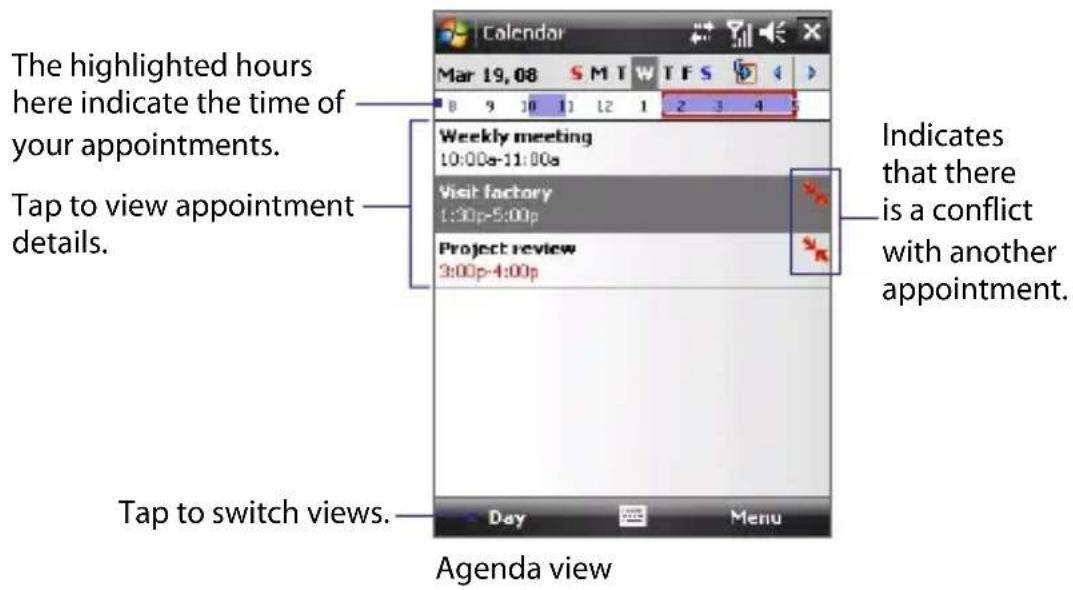
- To see detailed appointment information in any view, tap the appointment.
- To view appointments by category, tap Menu > Filter then select the desired category.
- To change the default view that Calendar uses to display appointments, tap Menu > Tools > Options > General tab. Tap the Start in box then choose the calendar view.
- When in Month view, you will see the following indicators:
Morning appointment
Afternoon or evening appointment
Both morning and afternoon/evening appointments
All-day event
Send appointments
To send a meeting request
Use Calendar to schedule meetings via e-mail with contacts who use Outlook or Outlook Mobile.
- Tap Start > Calendar.
- Schedule a new appointment, or open an existing one and tap Menu > Edit.
- Tap Attendees, then tap Add Required Attendee or Add Optional Attendee and add the contacts whom you want to invite.
Note You can specify if an attendee is required or optional only if your device is connected to a Microsoft Exchange 2007 server. Otherwise, all attendees are designated as required. For more information, see Chapter 8.
-
When you have finished adding attendees, tap Done.
-
Tap OK to send.
Tip To choose the e-mail account to use for sending meeting requests, tap Menu > Tools > Options > Appointments tab. Tap the Send meeting requests via box and choose to send via your Outlook E-mail, POP3/IMAP4 or Windows Live account.
Notes • If you're sending the meeting request using your Outlook E-mail account, it will be sent to the attendees the next time you synchronize your device with your PC or Exchange Server.
- When attendees accept your meeting request, the meeting is automatically added to their schedules. When their response is sent back to you, your calendar is updated as well.
To send appointment details as a vCalendar
A vCalendar is a standard file format used for exchanging scheduling and task information. vCalendar files can be exported to Outlook on the PC.
Tap Menu > Send as vCalendar to send a vCalendar containing appointment details as a file attachment in an MMS message. For more information, see "MMS" in Chapter 7.
6.4 Tasks
Use Tasks to keep track of things you need to do. A task can occur once or repeatedly (recurring). You can set reminders for your tasks and you can organize them using categories.
Your tasks are displayed in a task list. Overdue tasks are displayed in red.
To create a task
- Tap Start > Programs > Tasks.
- Tap Menu > New Task, enter a subject for the task, and fill in information such as start and due dates, priority, and so on.
- Specify the type of category for your task, so that it can be grouped with other related tasks. Tap Categories, then select a preset category (Business, Holiday, Personal, or Seasonal), or tap New to create your own category.
- When finished, tap OK.
Tip You can easily create a short, to-do type task. Simply tap the Tap here to add a new task box, enter a subject, and tap the Enter button on the onscreen keyboard. If the task entry box is not available, tap Menu > Options and select the Show Tasks entry bar check box.
To change the priority of a task
Before you can sort tasks by priority, you need to specify a priority level for each task.
- Tap Start > Programs > Tasks.
- Tap the task you want to change the priority for.
- Tap Edit, and in the Priority box, tap a priority level.
- Tap OK to return to the task list.
Note All new tasks are assigned a Normal priority by default.
To set the default reminder for all new tasks
- Tap Start > Programs > Tasks.
- Tap Menu > Options.
- Select the Set reminders for new items check box.
- Tap OK to return to the task list.
Note The new tasks must have due dates set in order for the reminder to take effect.
To show start and due dates in the task list
- Tap Start > Programs > Tasks.
- Tap Menu > Options.
- Select the Show start and due dates check box.
- Tap OK.
To locate a task
When your list of tasks is long, you can display a subset of the tasks or sort the list to quickly find a specific task.
- Tap Start > Programs > Tasks.
- In the task list, do one of the following:
- Sort the list. Tap Menu > Sort By, and tap a sort option.
- Filter the list by category. Tap Menu > Filter, and tap the category you want displayed.
Tip To filter your tasks further, tap Menu > Filter > Active Tasks or Completed Tasks.
To send task information as a vCalendar
Tap Menu > Send as vCalendar to send a vCalendar containing task details as a file attachment in an MMS message. For more information, see "MMS" in Chapter 7.
6.5 Notes
Using Notes, you can create handwritten and typed notes, record voice notes, convert handwritten notes to text for easy readability, and more.
To create a note
- Tap Start > Programs > Notes. In the note list, tap New.
- Tap the Input Selector arrow next to the Input Method icon on the menu bar, tap the input method you want, and enter your text.
- If the Input Selector arrow is not displayed, tap the Input Method icon.
- When finished, tap OK to return to the note list.
Notes To select handwritten text, tap and hold next to the writing. As soon as dots appear, and before they form a complete circle, quickly drag across the writing.
- If a letter crosses three ruled lines, it is treated as a drawing rather than text.
To draw in a note
- Tap Start > Programs > Notes.
- In the note list, tap New.
- To draw on the screen, use the stylus like a pen.
- A selection box appears around your drawing.
- When finished, tap OK to return to the note list.
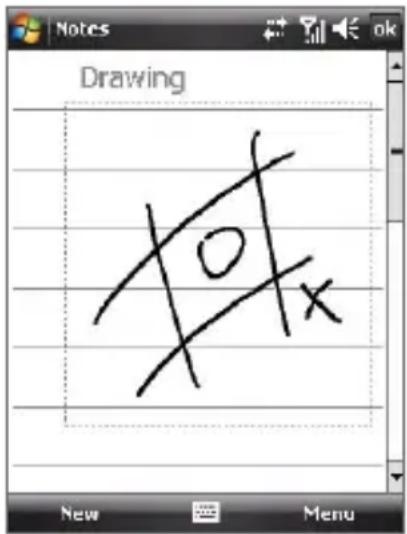
Note To select a drawing (for example, to copy or delete it), tap and hold the drawing briefly. When you lift the stylus, the drawing is selected.
102 Organizing Contacts, Appointments, Tasks, and Other Information
To record a voice note
You can create a stand-alone recording (voice note) or you can add a recording to a note.
- Tap Start > Programs > Notes.
- If you do not see the Recording toolbar, tap Menu > View Recording Toolbar.
- Do one of the following:
• To create a stand-alone recording, record from the note list. -
To add a recording to a note, create or open a note.
-
Tap the Record icon (☐) to begin recording your voice. Tap the Stop icon (☐) when finished recording.
To change recording formats
- Tap Start > Settings > Personal tab > Input.
- Tap the Options tab, and select the desired format you want in the Voice recording format list.
- Tap OK.
Note You can also change recording formats from within Notes. In the note list, tap Menu > Options > Global Input Options link (at the bottom of the page), then tap the Options tab.
6.6 Voice Recorder
Voice Recorder lets you record your voice and then quickly send it in an MMS or e-mail, beam it, or set the recorded voice as your ring tone.
Note Voice Recorder saves voice recordings in AMR-NB (Adaptive Multi-Rate Narrowband) format only. This is a common speech audio format used in mobile devices.
To record your voice
- Tap Start > Programs > Voice Recorder.
- Hold the device's microphone near your mouth.
- Tap Record or 📍 to start recording a voice clip. Tap Stop or 📍 to end the recording.
All recordings are saved in the My Voices folder by default. You can choose another folder to save voice recordings by tapping beside the folder name on the top-left of the screen and then in the menu, choose the folder where to save future recordings.
To play back a voice recording
On the Voice Recorder screen, select a voice recording then tap .
Tips Tap + to increase the volume; tap - to decrease the volume.
- Tap to toggle between muting and unmuting the volume.
To send the voice recording through MMS
Select a voice recording then tap Menu > Send via MMS. A new MMS message is then created with the voice recording automatically inserted as an audio clip.
See "MMS" in Chapter 7 to learn how to compose and send MMS messages.
To send the voice recording via e-mail
Select a voice recording then tap Menu > Send > Outlook E-mail. This creates a new Outlook e-mail message with the voice recording inserted as a file attachment.
See "Using E-mail" in Chapter 7 to learn how to send e-mail.
To beam the voice recording
- Select the voice recording(s) you want to beam then tap Menu > Beam File.
To select multiple files, tap and drag over the desired files or tap Menu > Select All.
- Tap the device you want to send the voice recording(s) to.
- On the other device, accept the file transfer to receive the file.
To set the voice recording as a ring tone
Select the desired voice recording then tap Menu > Set as Ringtone.
To rename or move a recording
- Select the voice recording(s), then tap Menu > Rename/Move.
- Enter the new Name for the voice recording.
- To move the voice recording, select the new destination Folder and Location.
- Tap OK.
Chapter 7
Exchanging Messages
7.1 Messaging
7.2 Text Messages
7.3 MMS
7.4 Types of E-mail Accounts
7.5 E-mail Setup Wizard
7.6 Using E-mail
7.1 Messaging
Messaging is where your text messages (SMS), multimedia messages (MMS), and e-mails are located. When you receive new messages, you can open them from the Today screen. Simply tap the type of message that you want to open.
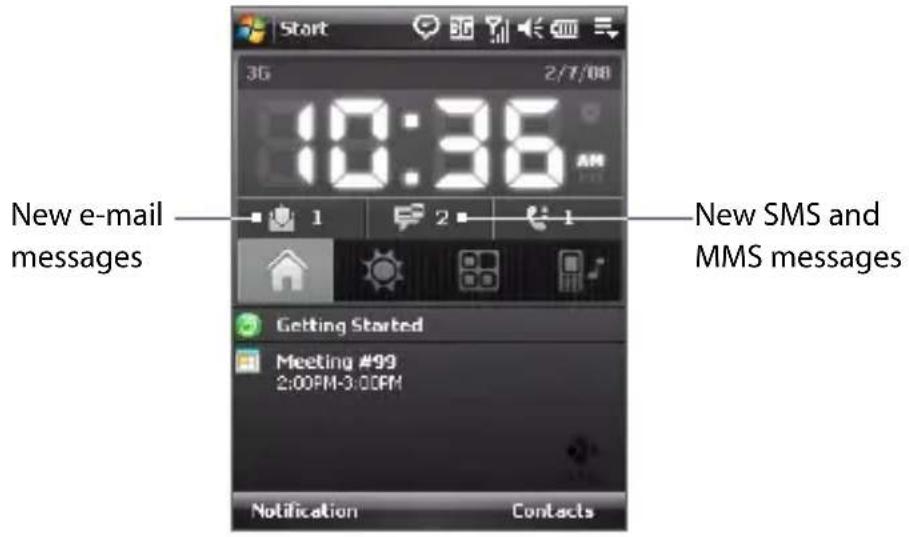
To select a messaging account
Do one of the following:
- Tap Start > Messaging. The Account Picker screen then appears where you can select an account.
- While you are in a message list of a certain account, for example SMS \MMS, tap Menu > Go To to switch to other types of messaging accounts.
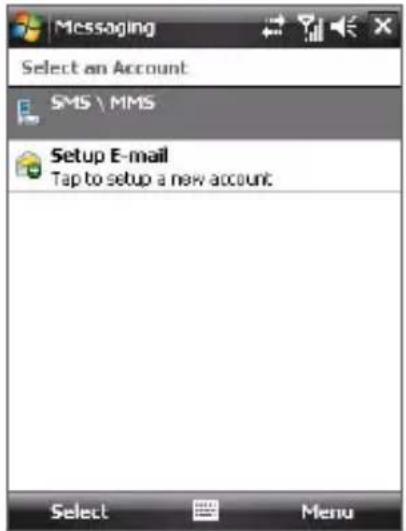
Account Picker screen
To configure message account settings
- Tap Menu > Options on the Account Picker screen.
- Tap Menu > Tools > Options while you're in a message list.
To automatically add a signature in outgoing messages
You can automatically add your name and other information as your signature in outgoing SMS, MMS and e-mail messages by following these steps:
Tip You need to specify your signature for each type of messaging account.
- Tap Start > Messaging, then tap Menu > Options.
- Tap Signatures.
- Select a type of messaging account in which to add a signature.
- Select the Use signature with this account check box.
- In the provided text box, enter the information that will be displayed as your signature.
- If you want the signature to be added whenever you reply or forward messages, select the Use when replying and forwarding check box.
- Repeat steps 3 to 6 to add a signature to the other types of messaging accounts.
7.2 Text Messages
Send short text messages (SMS) up to 160 characters long to other mobile phones.
Send text messages
To compose and send a text message
- Tap Start > Contacts.
- Slide your finger upward on the touch screen to scroll down the contact list. See "Finger scrolling and finger panning" in Chapter 1 for more details on finger scrolling.
- Tap and hold the contact's name to open his or her contact card.
-
On the contact card, touch the item that shows Send text message.
-
A new text message is then created.
To add more recipients, enter their mobile phone numbers in the To field, separating them with a semicolon. You can also tap To if you want to add mobile phone numbers from Contacts.
- Enter your message.
- To quickly add common messages, tap Menu > My Text and tap a desired message.
• To check the spelling, tap Menu > Spell Check.
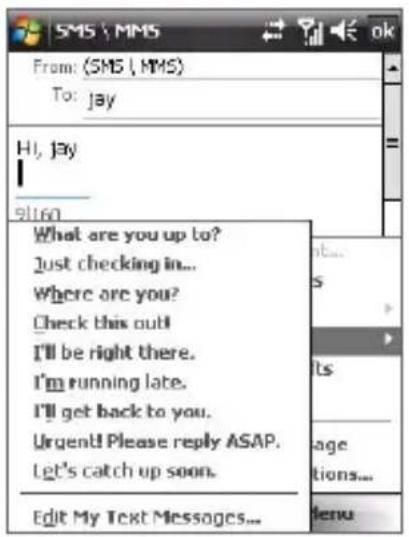
- Tap Send.
Tips • The auto-complete feature for message recipients allows you to add recipients easily. Simply enter the first letter of the contact's name (or e-mail address while composing e-mail) and Messaging will show a box with a list of possible contacts to choose from. Tap the contact name (or e-mail address) to enter it in the To field.
- To enter symbols, tap 123 using the onscreen keyboard and then tap a symbol. For more information about entering text and symbols, see Chapter 2.
- If you want to know when a text message is received, before sending the message that you are composing, tap Menu >Message Options then select the Request message delivery notification check box.
To always receive a delivery notification, tap Menu > Tools > Options in the text message list, tap SMS \ MMS, then select the Request delivery notifications check box.
Copy text messages from and to the SIM card
- Tap Start > Messaging > SMS \ MMS.
- In the message list, select the text message you want to copy.
- Do one of the following:
• To copy a text message to the SIM card, tap Menu > Copy to SIM.
- To copy a text message from the SIM card to your device, tap Menu > Copy to Phone.
Note Text messages stored on your SIM card are automatically displayed in the Inbox folder. Copying them to your device results in duplicate messages in the Inbox folder when your SIM card is in use.
Threaded SMS
Threaded SMS lets you see exchanged messages (similar to a chat program) with a contact on the screen.
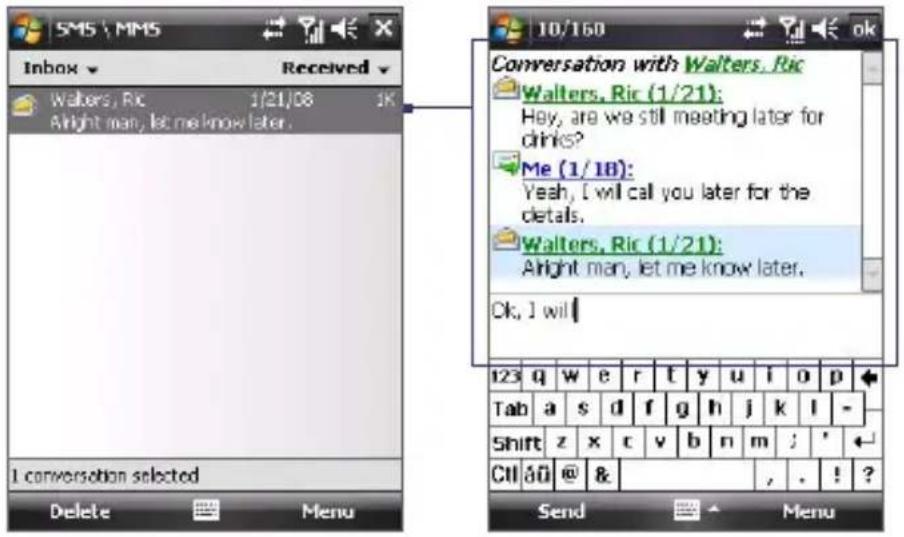
Note A single thread per contact (or number) is maintained in the SMS \ MMS inbox.
To respond to a message
- In the SMS \ MMS inbox, tap the message to open it.
- At the bottom of the screen, type your message and then tap Send.
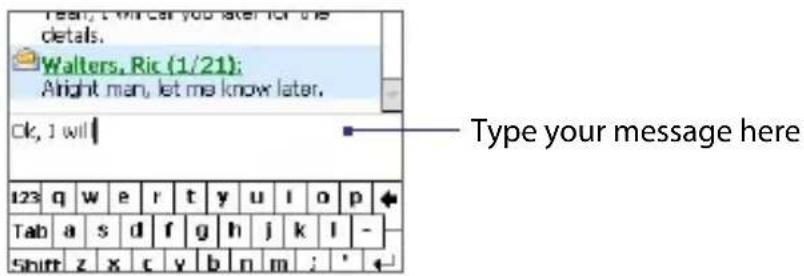
To copy a message in the thread to the SIM card
- In the SMS \ MMS inbox, tap the message to open it.
- Press NAVIGATION up or down to select the message in the thread you want to copy to the SIM card.
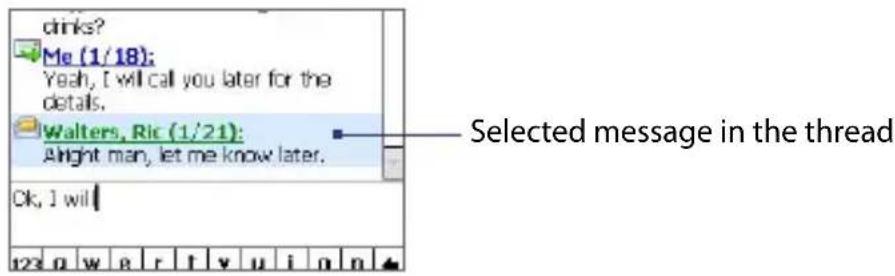
Note You cannot copy an outgoing message to the SIM card.
- Tap Menu > Copy to SIM.
To delete a message in the thread
- In the SMS \ MMS inbox, tap the message to open it.
- Select the message in the thread you want to delete.
- Tap Menu > Delete.
To reply to a text message with an MMS message
You can reply to a text message in a thread or to a SIM text message using an MMS message.
- In the SMS \ MMS inbox, tap a message thread to open it.
- Tap Menu > Insert, and then in the menu, select the item you want to insert: Picture/Video, Audio or Attachment.
- Tap Send.
Tips • You can also insert a vCard or vCalendar in your MMS message.
- To compose an MMS message complete with text, emoticons, media and attachments, tap Menu > Advanced Composer.
7.3 MMS
Sending multimedia messages (MMS) to your friends and family is fun and easy. You can include pictures, videos, or audio clips in a multimedia message.
Notes
- Please note that multimedia messaging is a charged service and has to be provisioned on your mobile account. Please contact your wireless service provider to have MMS provisioned as part of your calling plan.
- Please make sure the size of MMS messages that you send is within the limits allowed by your wireless service provider.
Change MMS settings
Check your device to see if it is configured with your wireless service provider's MMS settings. If the MMS settings are not yet configured on your device, you can add the settings while composing an MMS message.
To configure MMS message settings
-
Tap Start > Messaging > SMS \ MMS.
-
Tap Menu > MMS Options. The Settings screen then appears.
-
In the Preferences tab, select or clear the provided check boxes according to your needs.
-
Tap the Servers tab and check if your device is preset with MMS server settings.
If there are no preset settings, tap New and enter the following information, which you can get from your other wireless service provider:
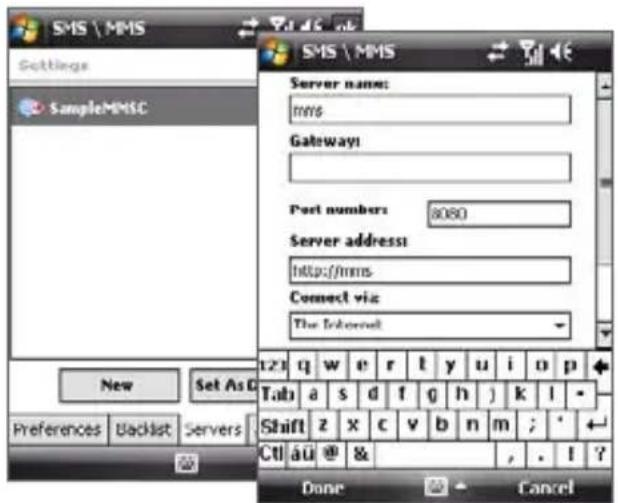
• Gateway. Location of the MMS server, which is usually in the form of an IP address.
- Port number. HTTP port number used for connecting to the MMS server and for file transfer.
112 Exchanging Messages
- Server address. URL address of the server where MMS messages are stored.
- Connect via. Select the connection that your device uses for MMS messages.
- Send limit. Select the maximum MMS message size allowed by your wireless service provider.
- WAP version. Select either WAP 1.2 or WAP 2.0, depending on which one is being used by your other wireless service provider.
5. Tap Done.
Notes • If your device already has preset MMS settings, it is recommended that you do not change these settings. If you change the preset settings, your device may not be able to send and receive MMS messages.
- If you add several MMS message service providers to the Settings screen, you can choose one as your default provider. Select the provider's name in the list then tap Set As Default.
Create and send MMS messages
You can compose MMS messages in a combination of slides, where each slide can consist of a photo, video or audio clip, and/or text.
To compose an MMS message
- Tap Start > Messaging > SMS \ MMS, then tap Menu > New > MMS.
- When you see the Choose a MMS screen, tap a preset template, or tap Custom to open a blank MMS message.
If you prefer to always create a blank MMS message, select the Always choose custom check box.
- In To, enter the recipient's phone number or e-mail address directly, or tap To, Cc, or Bcc to choose a phone number or an e-mail address from Contacts.
Scroll up to see the Cc and Bcc fields.
-
Enter a subject for your message.
-
Tap the Insert icon ( ) to select and insert a photo or video clip. When selecting a photo or video clip, you can:
-
Tap Select to insert the selected photo or video clip into the MMS message you are composing.
- Tap to take a photo and insert it into the MMS message.
- Tap 📁 to record MMS video and insert it into the MMS message.
-
Tap Exit ( ) to quit selection and return to the MMS message.
-
Enter text and insert audio clips by tapping the respective areas. See "To add text to an MMS message" and "To add an audio clip to an MMS message" for details.
- To add more slides, tap ▶ or tap Menu > Slides > Insert Slide. Repeat steps 5 and 6 to insert photos/videos, text, and audio onto your slides.
- Tap Send to send the MMS message.
Tip You can also send an MMS message from the Pictures & Videos, Camera program, or Camera Album.
To add text to an MMS message
When you tap Insert text here on your MMS message, an empty screen appears where you can enter your text. You can insert the following types of information:
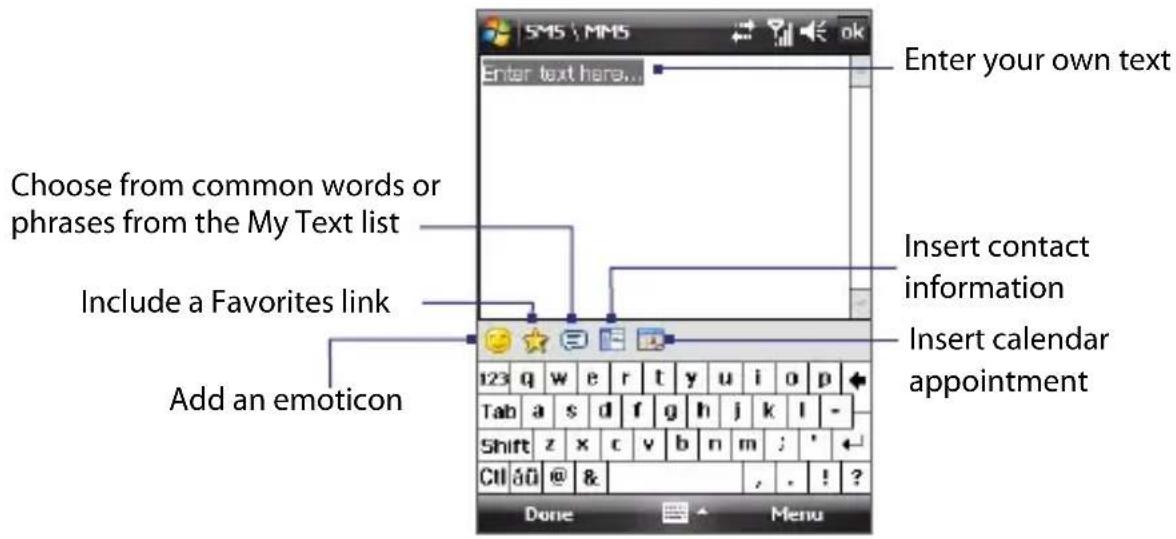
Tip To edit or delete a phrase on the My Text list, tap and hold a string, then tap Edit or Delete from the shortcut menu. To add a new phrase, tap New.
To add an audio clip to an MMS message
You can add one audio clip per slide in your MMS message.
1. Tap Insert audio.
By default, My Documents will be shown. Tap My Music or another folder that contains audio files. When navigating folders, tap the Down arrow (▼) to return to the upper folder.
-
Select an audio file. When selected, you can:
-
Tap to play the audio clip, to pause, or to stop playback.
- Tap Select to insert it into your MMS message.
- Tap Exit ( ✗ ) to quit selection and return to your MMS message.
- To record a new audio clip and add it to your MMS message, tap 📄. The Record pop-up window then opens. Tap Record to start recording, and Stop to end the recording. Tap Play to listen to the recorded audio clip, then tap Add. The new audio clip is then inserted into your MMS message.
View and reply to MMS messages
To view an MMS message
- Use the playback controls

- Tap Contents to see a list of files included in the message. On the Message Contents screen, you can do the following:
- To save a file, select it, and tap Menu > Save.
- To save the contents of a text file to the My Text list, tap Menu > Save into My Text.
- To associate a photo to one of your contacts, tap Menu > Assign to Contact.
To reply to an MMS message
On the message list, select an MMS message and do one of the following:
- Tap Menu > Reply to reply to the sender of the message.
- Tap Menu > Reply All to reply to all persons listed in To, Cc, and Bcc of the message.
To block a phone number from sending you MMS messages
If you do not want to receive MMS messages from a particular sender, you can add the sender's phone number to the MMS Blacklist.
- When you receive a new MMS message, open and view the message.
- To avoid receiving MMS messages from this sender next time, tap Menu > Show > Message Detail.
- On the MMS Detail screen, tap Menu > Show Contact Details.
- Tap Menu > Save to Blacklist.
- Tap Done.
Tips To view the Blacklist tab, on the SMS \ MMS screen, tap Menu > MMS Options > Blacklist tab.
- To unblock a phone number and allow the sender to send you MMS messages, remove the number from the Blacklist. Tap and hold the phone number in the Blacklist then tap Delete.
7.4 Types of E-mail Accounts
You can set up the following types of e-mail accounts on your device:
- Outlook e-mail that you sync with your PC or the Exchange Server.
- E-mail account that you have from an Internet Service Provider (ISP).
- Web-based e-mail accounts such as Yahoo!® Mail, AOL®, etc.
• Work account that you access using a VPN connection.
7.5 E-mail Setup Wizard
Windows Mobile's E-mail Setup Wizard lets you easily set up your personal and work e-mail accounts. You can add an e-mail account from an Internet Service Provider (ISP) or other e-mail provider as well as web-based accounts such as Gmail®, Yahoo!® Mail Plus, AOL®, etc.
Note For more information about setting up your company Outlook e-mail account, see Chapter 8.
Set up your device to synchronize Outlook e-mail with the computer
If you have installed the synchronization software on your PC and created a partnership with your device, then your device is ready to send and receive Outlook e-mail.
If you have not yet installed the synchronization software nor created a partnership, please do so by following the procedures in Chapter 5.
Tip To set up your company e-mail account so that you can access Outlook e-mail messages wirelessly, you must set up your device to synchronize via an over-the-air connection with your company's Exchange Server. For more information about synchronizing with your company e-mail server, see Chapter 8.
Set up a POP3 or IMAP4 e-mail account
Set up a POP3 or IMAP4 e-mail account on your device if you have an e-mail account from an Internet service provider (ISP) or other e-mail provider, or a web-based account such as Gmail, Yahoo! Mail Plus, etc. You can also add a work account that you access using a VPN server connection as a POP3/IMAP4 account.
- Tap Start > Messaging > Setup E-mail.
- Enter the E-mail address and Password for the e-mail account and select the Save password option. Tap Next.
- Tap Next. E-mail Setup searches your device for preloaded e-mail configuration settings. If the device cannot find the server settings for the specified e-mail account, your device needs to connect to the Internet and try to download the settings. If it cannot find the settings online, you need to enter the settings manually.
- Enter Your name and the Account display name and then tap Next.
- In the Automatic Send/Receive list, choose how frequent you want e-mail messages to be automatically sent and downloaded on your device. Tap Finish.
Tip When you are using an e-mail domain name but hosted by a different e-mail provider (For example, the e-mail account "benjamin@startup.com" is hosted by "email.com"), choose the Custom Domain option in the E-mail Setup wizard to manually set up the e-mail account.
To specify e-mail server settings
If Auto Setup is unsuccessful, contact your ISP or e-mail provider for the Incoming mail server and outgoing mail server settings so you can enter them on your device.
Other options that you can select include the following:
- Select the Outgoing server requires authentication check box, if required by your provider.
- If the outgoing e-mail server requires a different user name and password for sending e-mail, clear the Use the same user name and password for sending e-mail check box. You will be prompted to enter this information.
- Tap Advanced Server Settings, then select the Require SSL check boxes if your e-mail provider uses an SSL connection for more secured e-mail. From the Network connection list, select the data connection that you use for connecting to the Internet.
To customize download and format settings
Before you tap Finish when setting up your POP3 or IMAP4 e-mail account, you can tap Review all download settings to choose download options, message format, and other settings.
| Options Description | |
| Automatic Send/Receive | You can select a time interval for connecting to the Internet automatically to send and receive messages. |
| Download messages | Set the number of days of messages that you want to be downloaded to your device. |
| Advanced Settings | Send/receive when I click Send: By default, messages are immediately delivered when you tap Send. If you prefer to save outgoing messages to the Outbox folder first, clear the check box. (In this case, you will need to manually send messages by tapping Menu > Send/Receive).Use automatic send/receive schedule when roaming:This allows your device to data roam when there is a set time interval for connecting to the Internet automatically. Since this may result in higher connection costs, you may want to leave the check box cleared.When deleting messages: Choose whether to delete messages from the mail server when you delete them on your device. |
| Message format Select HTML or Plain Text. | |
| Message download limit | Select the e-mail download size. If you have large volumes of e-mail, use a lower size or select to download headers only. |
7.6 Using E-mail
After setting up e-mail accounts on your device, you can start sending and receiving e-mail messages.
Create and send messages
To compose and send a message
- Tap Start > Contacts.
- Slide your finger upward on the touch screen to scroll down the contact list. See "Finger scrolling and finger panning" in Chapter 1 for more details on finger scrolling.
- Tap and hold the contact's name to open his or her contact card.
- On the contact card, touch the item that shows Send e-mail.
- If you have several e-mail accounts, the Account Picker screen will appear. Select an e-mail account that you want to use.
- A new e-mail message is then created.
To add more recipients, enter their e-mail addresses, separating them with a semicolon. You can also tap To if you want to add e-mail addresses stored in Contacts. - Enter a subject and compose your message. To quickly add common messages, tap Menu > My Text and tap a desired message.
- To check the spelling, tap Menu > Spell Check.
- Tap Send.
Tips • To set the priority, tap Menu > Message Options.
- If you are working offline, e-mail messages are moved to the Outbox folder and will be sent the next time you connect.
To add an attachment to a message
- In the message that you are composing, tap Menu > Insert and tap the item you want to attach: Picture, Voice Note, or File.
- Select the file you want to attach, or record a voice note.
To automatically add a signature in outgoing messages
You can automatically add your name and other information as your signature in outgoing SMS, MMS and e-mail messages by following these steps:
Tip You need to specify your signature for each type of messaging accounts.
- Tap Start > Messaging, then tap Menu > Options.
- Tap Signatures.
- Select a type of messaging account in which to add a signature.
- Select the Use signature with this account check box.
If you want the signature to be added whenever you reply or forward messages, select the Use when replying and forwarding check box.
-
In the provided text box, enter the information that will be displayed as your signature.
-
Repeat steps 3 to 5 to add a signature to the other types of messaging accounts.
Fetch Mail for POP3/IMAP4 e-mail accounts
The Fetch Mail feature downloads an entire e-mail immediately without the need for you to perform a full Send/Receive action. This limits the download to just the e-mail message that you want and helps save data cost.
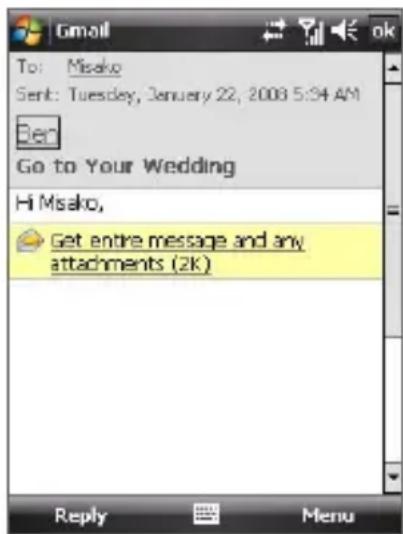
Filter the Inbox message list
When the Inbox on your device is full of messages, it may be hard to browse and locate a desired message. You can filter your Inbox to only display the messages that contain a particular sender or subject you are searching for.
Enter the sender name or e-mail subject you want to look for using the onscreen keyboard. As you tap keys, the message list narrows down to the conditions you have set.
For example, tapping "S", then "A" narrows the list to only the e-mails that contain sender names and e-mail subjects that start with "SA."
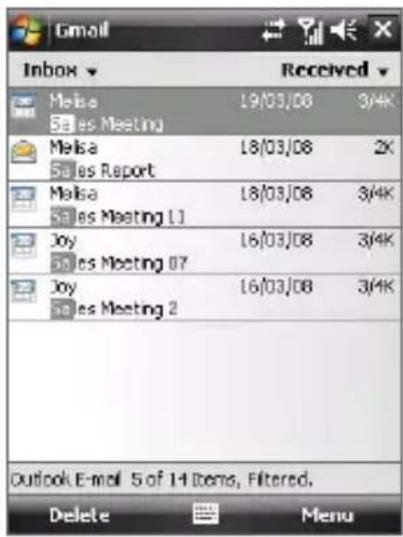
View and reply to messages
To read an incoming message
By default, only the first few kilobytes of a message are shown when you open an incoming message. To read the whole message:
- Finger-scroll to the end of the message and tap Get the rest of this message.
- Tap Menu > Download Message.
The message will be downloaded the next time you tap Menu > Send/Receive to send and receive e-mail.
Note If your company is running Microsoft Exchange Server 2007, the message downloads immediately, without waiting until the next time you synchronize. For more information about working with company e-mails, see Chapter 8.
To download an attachment
An attachment appears below the subject of the message. Tapping the attachment opens the attachment if it has been fully downloaded or marks it for download the next time you send and receive e-mail.
Notes • If there are multiple attachments in the message, all attachments are downloaded.
- For information about setting your device to automatically download file attachments, see "Customize e-mail settings".
- If your company is running Microsoft Exchange Server 2007, the attachment downloads immediately, without waiting until the next time you synchronize. For more information about working with company e-mails, see Chapter 8.
To reply to or forward a message
- Open the message and tap Menu > Reply, Menu > Reply All, or Menu > Forward.
- Enter your response then tap Send.
Tip Whenever you reply to all the recipients of an Outlook e-mail, your own e-mail address will also be added to the recipient list. You can customize ActiveSync so that your e-mail address will be excluded. To do so, tap Menu > Options in ActiveSync, select the E-mail item, tap Settings, then tap Advanced. In the My e-mail addresses text box, enter your e-mail address(es). If you want to enter more than one e-mail address, separate the e-mail addresses with a semi-colon.
To view and reply to HTML e-mails
You can receive, view and reply to HTML e-mails from any type of e-mail account. The HTML format is retained, without layout shifting or resizing.
Note HTML e-mail support in Outlook Mobile is available only if your company is using Microsoft Exchange Server 2007.
- Set the message format to HTML. To find out how to set the message format, see "Customize e-mail settings".
- Tap Start > Messaging, select your e-mail account, and open an HTML e-mail that you received.
- Tap the Tap to scroll right option to be able to scroll sideways and get a complete horizontal view of the message.
- Tap Get the rest of this message that's shown at the bottom of the message to download and view the whole message.
- If the e-mail does not download immediately, tap Menu > Send/Receive.
122 Exchanging Messages
- If images do not immediately appear on the message, tap Internet pictures blocked then tap Download Internet pictures.
- Tap Menu and choose whether to reply or forward the message.
- Enter your response then tap Send.
Tip E-mail can contain hyperlinks to web pages.
Download messages
The manner in which you download messages depends on the type of e-mail account you have.
To send and receive e-mail for an Outlook account
-
Connect your device to your PC using the USB cable or Bluetooth.
Otherwise, connect wirelessly if you are synchronizing Outlook e-mail with the Exchange Server. For more information, see Chapter 8. -
Synchronization automatically begins, and your device sends and receives Outlook e-mail.
Tip You can also manually synchronize anytime by tapping Sync in ActiveSync or Menu > Send/Receive in Outlook Mobile.
To send and receive e-mail for a POP3/IMAP4 account
If you have an e-mail account with an ISP or a work account that you access using a VPN server connection, you send and receive messages through a remote e-mail server. Before sending and downloading messages, you need to connect to the Internet or your corporate network.
-
Tap Start > Messaging and tap your POP3 or IMAP4 e-mail account.
-
Tap Menu > Send/Receive. Messages on your device and e-mail server are synchronized: new messages are downloaded to the device Inbox folder, messages in the Outbox folder are sent, and messages deleted from the server are removed from the device Inbox.
Customize e-mail settings
To change the download size and format for Outlook e-mail
- Disconnect your device from the computer.
- Tap Start > Programs > ActiveSync.
-
Tap Menu > Options, select E-mail, then tap Settings.
-
On the E-mail Sync Options screen:
-
Under Download size limit, select the desired e-mail size.
-
Under Message format, select HTML or Plain text.
-
Close ActiveSync and reconnect your device to the computer.
To change the download size and format for POP3/IMAP4 e-mail
-
Tap Menu > Options on the Account Picker screen, or tap Menu > Tools > Options while you're in a message list.
-
Tap your e-mail account.
-
Keep tapping Next until you see Message format and Message download limit on the screen.
-
Under Message format, select HTML or Plain text.
-
Under Download size limit, select the desired e-mail size.
-
Tap Finish.
To automatically receive attachments on Outlook e-mails
-
Tap Start > Programs > ActiveSync.
-
Tap Menu > Options.
-
Tap E-mail > Settings, then select Include file attachments.
To automatically receive attachments on IMAP4 e-mails
-
Tap Start > Messaging.
-
Tap Menu > Options.
-
Tap the name of your IMAP4 account.
-
Keep tapping Next until you see the Download attachments item on the screen.
-
Select a download size from the Download attachments list box.
-
Tap Finish.
To store attachments on a storage card
-
Tap Start > Messaging.
-
Tap Menu > Options > Storage tab.
-
Select the When available, use the storage card to store attachments check box.
124 Exchanging Messages
Chapter 8
Working With Company E-mails and Meeting Appointments
8.1 Synchronizing Your Device with the Exchange Server
8.2 Working With Company E-mails 8.3 Managing Meeting Requests
8.4 Finding Contacts in the Company Directory
8.1 Synchronizing Your Device with the Exchange Server
To keep up-to-date with your company e-mails and meeting schedules while you're out of the office, you can connect your device to the Internet wirelessly and synchronize with your company's Exchange Server.
Set up an Exchange Server connection
Before you can synchronize or access information on the Exchange Server, you need to set up an Exchange Server connection on your device. You need to get the following information from your network administrator and enter them on your device:
- Exchange Server name (must be the Outlook Web Access server name)
- Domain name
- User name and password that you use at work
If you have not synchronized your device with your PC, follow these steps to set up an Exchange Server connection.
- Tap Start > Messaging > Setup E-mail.
- Enter the E-mail address and Password for the e-mail account and select the Save password option. Tap Next.
- Clear the Try to get e-mail settings automatically from the Internet option and tap Next.
- In Your e-mail provider, select Exchange server and tap Next.
- Tap Next again.
- Select the Attempt to detect Exchange Server Settings automatically option and tap Next.
- Enter the Domain name and tap Next.
- In Server address, enter the Exchange Server address and tap Next.
- Select the items that you want to sync with the Exchange Server and tap Finish.
Note If you synchronized e-mails with your PC before, open ActiveSync on your device and tap Menu > Add Server Source to set up an Exchange Server connection. When you're prompted to select information types for synchronization, you need to clear the E-mail check box under the Windows PC item first before you can select E-mail under Exchange Server.
Tip To change Exchange Server settings, open ActiveSync then tap Menu > Configure Server.
Start synchronization
Before you start synchronizing with the Exchange Server, make sure your device has been set up with a data connection to the Internet so that you can synchronize wirelessly. For more information about connections, see Chapter 10.
After you finish setting up an Exchange Server connection, your device automatically starts synchronization.
You can manually start synchronization anytime by tapping Sync in ActiveSync.
Note If you connect your device to your office computer via a USB or Bluetooth connection, you can use this connection to the PC to "pass through" to the network and download Outlook e-mails and other information to your device.
8.2 Working With Company E-mails
Your device gives you instant access to your company e-mails and lets you manage your messages easier. Direct Push, Fetch Mail, Remote e-mail search, and e-mail flags are just some of the tools you can use to manage your e-mails.
Note Some messaging features depend on the Microsoft Exchange Server version used in your company. Please check with your network administrator for the availability of these features.
Automatic synchronization through Direct Push
Direct Push technology (push e-mail feature) enables you to receive new e-mails on your device as soon as they arrive in your Inbox on the Exchange Server. With this feature, items such as contacts, calendar and tasks are also immediately updated onto your device when these items have been changed or new entries have been added on the Exchange Server. To make Direct Push work, you need to have a GPRS connection on your device.
You need to perform a full synchronization between your device and the Exchange Server first before Direct Push can be enabled.
Requirement The Direct Push feature works for your device only if your company is using Microsoft Exchange Server 2003 Service Pack 2 (SP2) with Exchange ActiveSync or higher version.
To enable Direct Push via Comm Manager
- Tap Start > Settings > Connections tab > Comm Manager.
- On the Comm Manager screen, tap the Microsoft Direct Push button to enable or disable the Direct Push function. When enabled, the ON indicator is activated.
To enable Direct Push via ActiveSync
- In ActiveSync on your device, tap Menu > Schedule.
- Select As items arrive in the Peak times and Off-peak times boxes.
Scheduled synchronization
If you do not want to use Direct Push, you can set a regular schedule for synchronizing Outlook e-mail and information.
- In ActiveSync on your device, tap Menu > Schedule.
- Select a shorter time interval in the Peak times box for you to be able to receive e-mails more frequently. (Peak times which usually refer to your working hours when e-mail volume is high).
- Select a longer interval in the Off-peak times box.
Tip To set the days and hours that make up your peak and off-peak times, tap Adjust peak times to fit your schedule.
Instant download through Fetch Mail
The Fetch Mail feature downloads an entire e-mail immediately without the need for you to perform a full Send/Receive action. This limits the download to just the e-mail message that you want and helps save data cost.
Requirement Fetch Mail works for your device only if your company is using Microsoft Exchange Server 2007 or higher.
- Tap Start > Messaging > Outlook E-mail.
- Tap an e-mail message to open it.
- By default, only the first few kilobytes of the message is shown. To download the whole e-mail, finger-scroll to the end of the message then tap Get the rest of this message.
- A "Downloading message" status appears. Wait for the remainder of the message body to be downloaded.
Tip For information about changing e-mail sync options such as the initial download size limit for e-mail, see "Customize e-mail settings" in Chapter 7.
Note When you receive an e-mail that contains a link to a document such as a PDF or Microsoft Office document located on SharePoint or an internal file server, you can tap the link to view the document on your device. You can view the document only if you have a Microsoft Outlook account that synchronizes with Microsoft Exchange Server 2007 or later. Exchange Server must also be set up to allow access to SharePoint document libraries or internal file servers.
Search for e-mails on the Exchange Server
You can access messages that are not available on your device by searching your Microsoft Exchange Server mailbox. The search results will be downloaded and displayed in a Search Results folder.
Requirement Your company must be using Microsoft Exchange Server 2007 or higher.
- Tap Start > Messaging > Outlook E-mail.
- Tap Menu > Tools > Search Server.
- In the Look for text box, enter the search keyword.
- Choose the date range of messages to search from.
130 Working With Company E-mails and Meeting Appointments
- From the Look in list, choose whether to search from your inbox or outbox only or to search all folders.
- Tap Search.
Flag your messages
Flags serve as a reminder for you to follow-up on important issues or requests contained in the e-mail messages. Flagging messages, which has been a useful feature on desktop Outlook E-mail, can also be done in Outlook Mobile on your device. You can flag received e-mail messages on your device.
Requirement Flags are enabled only if e-mails are synchronized with Microsoft Exchange Server 2007 or higher. Flags are disabled or hidden if e-mails are synchronized with earlier versions of Microsoft Exchange Server.
To flag or unflag a message
- Tap Start > Messaging > Outlook E-mail.
- Select a message or open a message.
-
Tap Menu > Follow Up and select one of the following options:
-
Set Flag Mark the message with a red flag to indicate that it needs follow up.
- Complete Flag Mark the message with a check mark to indicate that the issue or request in the e-mail is already completed.
- Clear Flag Remove the flag to unmark the message.
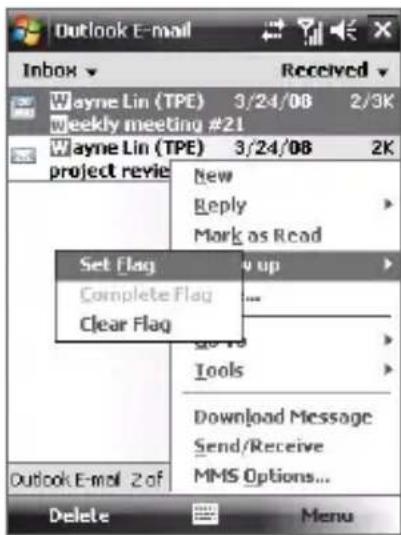
Note E-mail message reminders are displayed on your device if the messages are flagged with reminders and synchronized from the Exchange Server.
Out-of-office auto-reply
Outlook Mobile allows you to retrieve and change your out-of-office status. Just like desktop Outlook E-mail, Outlook Mobile automatically sends an auto-reply message when you're not available.
Requirement Out-of-office auto-reply works for your device only if your company is using Microsoft Exchange Server 2007 or higher.
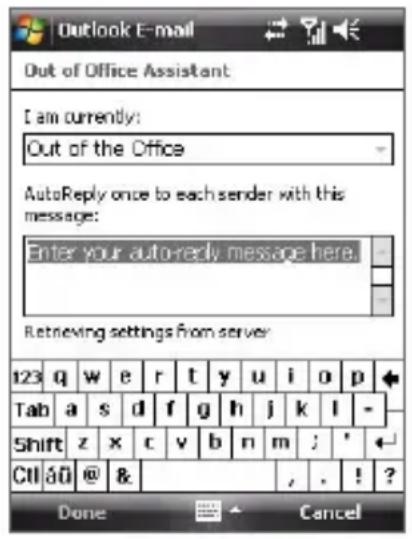
To send out-of-office auto-reply messages
- Tap Start > Messaging > Outlook E-mail.
- Tap Menu > Tools > Out of Office.
- From the I am currently list, select Out of the Office.
- Enter your auto-reply message then tap Done.
8.3 Managing Meeting Requests
When you schedule and send meeting requests from your device, you can invite attendees to your meeting and check their status to know about their availability.
When you receive a meeting request, you can reply by accepting or declining the request. The meeting request also clearly indicates whether or not there are conflicting or adjacent meetings.
Requirement Your company must be using Microsoft Exchange Server 2007 or higher.
To reply to a meeting request
- When you receive a meeting request e-mail, a notification will be displayed on the Today screen. Open the e-mail.
132 Working With Company E-mails and Meeting Appointments
- Tap Accept to reply and accept the meeting request, or tap Menu > Decline if you cannot attend the meeting.
Tips • Before responding, you can check your availability during the time of the requested meeting by tapping View your calendar.
- If the time of the meeting conflicts with your other appointments, a "Scheduling Conflict" status appears on top of the e-mail.
- Choose whether or not to edit your response e-mail before sending then tap OK:
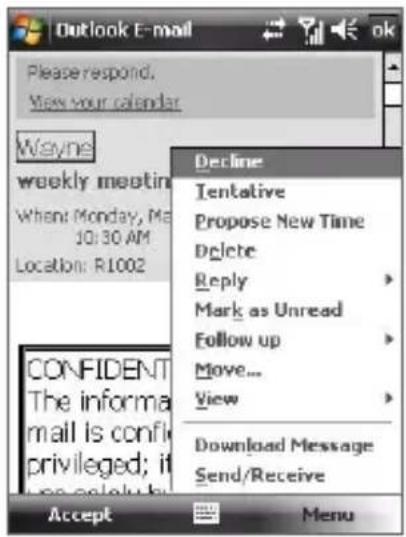
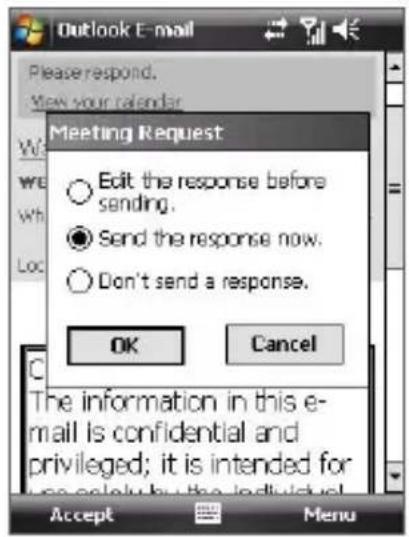
- If you accepted the meeting request, it will automatically be added as an appointment in Calendar on your device.
To view the list of meeting participants
-
Tap Start > Calendar.
-
Tap a meeting request that you previously sent, then tap Attendees. The list of required and optional attendees will be listed.
Notes • For information about creating a meeting request, see "To send a meeting request" in Chapter 6.
- If you select a meeting that you have organized, the list shows who has accepted or declined the meeting.
- To view an attendee's contact information, tap the attendee's name. If the attendee is included in your contacts list, you will see the contact information immediately. If the attendee is not in your contacts list, tap Company Directory to view the contact information.
8.4 Finding Contacts in the Company Directory
In addition to having contacts on your device, you can access contact information from your organization's Company Directory. By having over-the-air access to the Company Directory, you can easily send e-mail messages and meeting requests to anyone in your company.
Requirement Access to the Company Directory is available only if your organization is running Microsoft Exchange Server 2003 SP2 or higher, and you have completed your first synchronization with the Exchange Server.
-
Synchronize with Exchange Server if you have never done so.
-
Do any of the following:
• In Contacts, tap Menu > Company Directory.
- In a new e-mail message, tap the To box (or tap Menu > Add Recipient) then tap Company Directory.
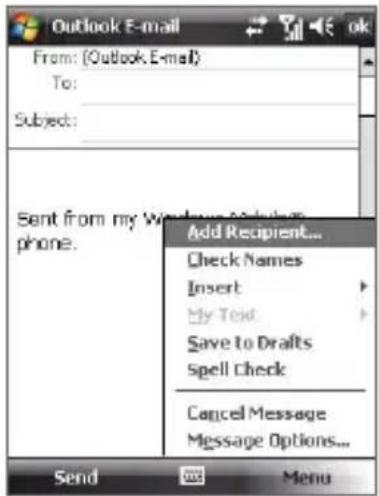
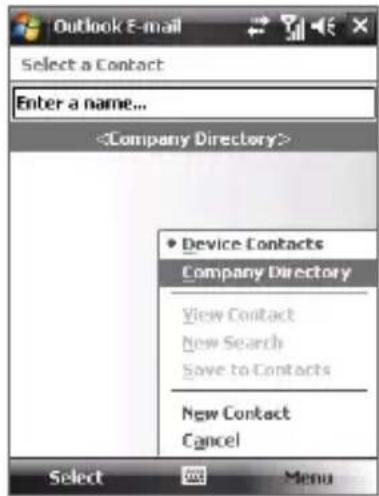
- In a new meeting request using Calendar, tap Attendees and then tap Company Directory at the top of the list.
- Enter the part or full contact name and tap Search. In the search results list, tap a contact to select it.
134 Working With Company E-mails and Meeting Appointments
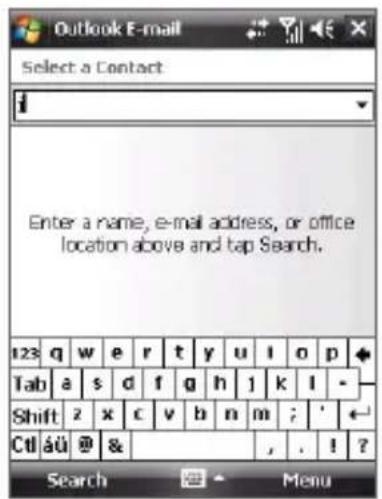
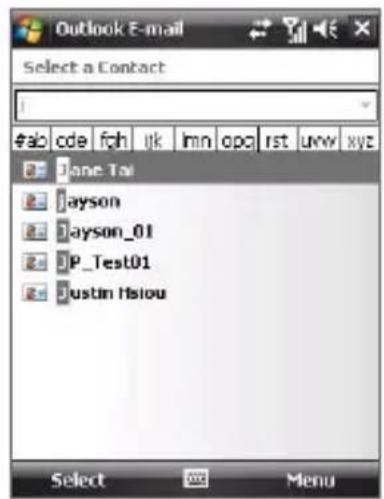
Notes • You can save a contact from the Company Directory to your device by selecting the contact then tapping Menu > Save to Contacts.
- You can search on the following information as long as that information is included in the Company Directory: First name, Last name, E-mail name, Display name, E-mail address, or Office location.
Chapter 9
Working With Documents and Files
9.1 Microsoft® Office Mobile
9.2 Adobe ^® Reader ^® LE
9.3 Copying and Managing Files
9.4 ZIP
9.1 Microsoft® Office Mobile
Microsoft® Office Mobile consists of the following applications:
- Microsoft® Office Word Mobile lets you create and edit documents and templates in Word Mobile and save them as *.doc, *.rtf, *.txt, and *.dot files.
- Microsoft® Office Excel® Mobile lets you create and edit Excel workbooks and templates on your device.
- Microsoft® Office PowerPoint® Mobile allows you to view (not create) slide show presentations in *.ppt and *.pps formats.
- Microsoft® Office OneNote® Mobile lets you easily create notes with audio and images.
To use Microsoft Office Mobile
-
Tap Start > Office Mobile.
-
Tap the Office Mobile application that you want to use.
Notes
- Word Mobile does not fully support some features of Microsoft® Office Word such as revision marks and password protection. Some data and formatting may be lost when you save on your device a Word document that was created in Office Word on the PC. To see a complete list of features that are not supported in Word Mobile, see Help on your device.
- Excel Mobile does not fully support some features such as formulas and cell comments. Some data and formatting may be lost when you save on your device an Excel workbook that was created in Office Excel on the PC. To see a complete list of features that are not supported in Excel Mobile, see Help on your device.
- You need Microsoft Office OneNote 2007 or later installed on your computer to be able to synchronize OneNote files in your device and computer.
9.2 Adobe ^® Reader ^® LE
Adobe® Reader® LE is an application for viewing PDF (Portable Document Format) documents on your device. It supports a subset of the features found in the PC versions of Adobe Reader.
To open Adobe Reader LE
Tap Start > Programs > Adobe Reader LE.
To open a PDF file on your device
Do one of the following:
- Open a PDF file in Adobe Reader LE.
- Open File Explorer and find the desired PDF file, then tap the file to open it.
To navigate through a PDF document
When you are viewing a PDF document, you can do any of the following:
- Use the vertical and horizontal scroll bars (including the Up, Down, Right and Left arrow keys on the bars) to move to the desired direction of the page.
- Press NAVIGATION up/down/right/left to move to the desired direction of the page.
- Tap to move to the previous page; tap to move to the next page. Tap to jump to the first page; tap to jump to the last page.
- Tap Tools > Go To to select the desired page to view.
To search for text in the document
- Tap Tools > Find > Text or tap on the toolbar.
- Type in the text to be searched, then tap Find.
- The matched text in the document will be highlighted.
- To search for the next occurrence of the text, tap Tools > Find > Next.
Tips
- Adobe Reader LE displays a bookmark pane for the PDF files that contain bookmarks. Tap the bookmarks to go to a specific section/page within the file.
- Adobe Reader LE supports password-protected PDF files with up to 128-bit encryption. When you open a password-protected PDF file, you will be prompted to enter the password before the file can be opened.
9.3 Copying and Managing Files
You can copy files between your device and PC, or copy files to a storage card that is inserted on your device. You can also efficiently manage your files and folders using File Explorer.
To copy files using Windows Mobile Device Center or ActiveSync
- Connect your device to the PC.
- Click File Management > Browse the contents of your device in Windows Mobile Device Center or click Explore in ActiveSync on your PC. This opens Windows Explorer on your PC and displays the contents of your device.
- To copy a file from your device to your PC:
a. Browse the contents of your device, right-click the file you want to copy, then click Copy.
b. Right-click a folder in your PC, then click Paste.
- To copy a file from your PC to your device:
a. Browse the folders on your PC, right-click the file you want to copy, then click Copy.
b. Right-click a folder on your device, then click Paste.
To manage files on your device using File Explorer
File Explorer lets you browse and manage the contents of your device. The root folder on the device is named My Device, and contains the following folders: My Documents, Program Files, Windows, and more.
- Tap Start > Programs > File Explorer.
- Tap a folder or file to open it.
- To return to an upper level folder, tap the Down arrow (▼) and select the folder.
- To delete, rename, or copy a file quickly, tap and hold the file then choose the desired operation from the shortcut menu. To select multiple files, tap and drag over the desired files.
To copy files to a storage card
- Make sure the storage card is properly inserted into your device.
- Tap Start > Programs > File Explorer and navigate to the appropriate folder.
- Tap and hold the file you want to copy, and tap Copy.
- Tap the Down arrow (▼) then tap Storage Card from the list.
- Tap Menu > Edit > Paste.
Tip You can configure programs such as Word Mobile and Excel Mobile to directly save edited files on your storage card. In the program's file list, tap Menu > Options then select the storage card in the Save to box.
9.4 ZIP
The ZIP program increases the storage capacity of your device by allowing you to compress files in the conventional ZIP format. It also allows you to extract files from a zip file.
To start ZIP on your device
Tap Start > Programs > ZIP.
Each time you start ZIP, it searches for files that have the .zip file extension, and displays these files on the Archive List screen.
To open a ZIP file and extract files
-
Open a zip file by doing one of the following:
-
Select a file and tap File > Open Archive.
- Tap and hold a file and tap Open Archive.
- Double-tap a file.
Note You cannot select multiple ZIP files.
-
From the zip file, select files by doing one of the following:
-
Tap to select a file.
- To select several files, tap Menu > Action and make sure MultiSelect Mode is selected. Select files by tapping each file. (Tap a selected file to deselect it).
-
To select all files, tap Menu > Action > Select All.
-
Tap Menu > Action > Extract.
- Choose a folder in which files will be extracted to, then tap Extract.
To create a zip archive
- Tap File > New Archive.
- On the Save As screen, enter a zip file name and choose a folder in which to save the zip file. You can also choose whether the zip file will be saved on the device's main memory or a storage card.
- Tap Save.
- Tap Menu > Action > Add.
- Double-tap the folder that contains the files you want to archive.
-
Select files by doing one of the following:
-
Tap to select a file.
-
To select several files, tap and hold on the screen, then select Multi-Select Mode. Select files by tapping each file. (Tap a selected file to deselect it).
• To select all files, tap and hold on the screen, then tap Select All. -
Tap Add.
-
Tap Menu > File > Close Archive.
Chapter 10
Getting Connected
10.1 Comm Manager
10.2 Connection Setup
10.3 Ways of Connecting to the Internet
10.4 GPRS/3G
10.5 Dial-up
10.6 Starting a Data Connection
10.7 Internet Explorer® Mobile
10.8 Windows Live™
10.9 Using Your Device as a Modem
(Internet Sharing)
10.10 Bluetooth
10.1 Comm Manager
Comm Manager acts like a central switch that lets you enable or disable phone features as well as manage your data connections easily.
To open Comm Manager
Tap Start > Settings > Connections tab > Comm Manager.
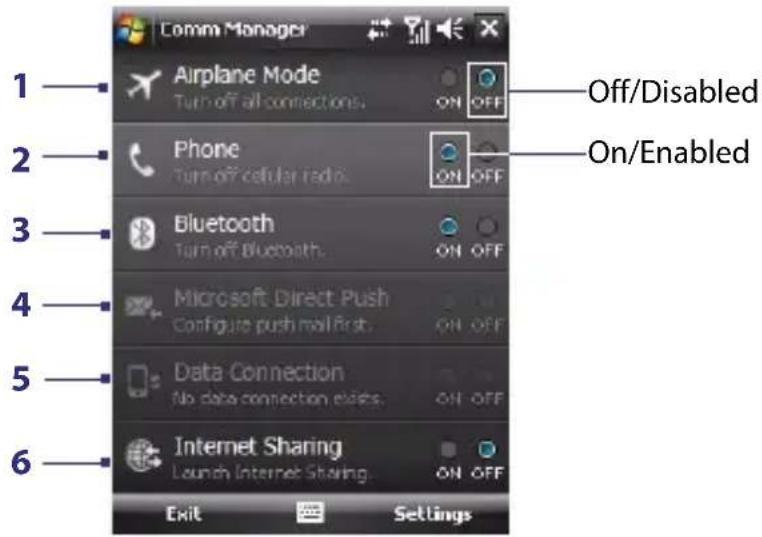
1 Tap to switch Airplane mode on or off. Turning on Airplane mode turns off the phone and Bluetooth functions. For more information, see "Airplane Mode" in Chapter 3.
2 Tap to switch the phone on or off. Tap Settings > Phone to set the ring tone and other phone settings. See Chapter 4 for details.
3 Tap to switch Bluetooth on or off. Tap Settings > Bluetooth to configure Bluetooth on your device. See "Bluetooth" in this chapter for details.
4 Tap to switch between automatically receiving (as items arrive) or manually retrieving Outlook e-mails. See Chapter 8 for details.
5 Tap to disconnect active data connections (e.g. 3G). You cannot reconnect a data connection in Comm Manager.
6 Tap to open Internet Sharing. See "Using Your Device as a Modem (Internet Sharing)" in this chapter for details.
10.2 Connection Setup
Connection Setup configures your device's data connections, such as GPRS, WAP, and MMS, for you so that you do not need to enter the settings manually onto your device. All you need to do is to select your network operator, then Connection Setup does all the configuration for you.
To automatically detect the network operator
The first time you power on your device, or when you insert a new SIM card and then power on your device, Connection Setup will display a notification message to inform you that it will automatically configure your device.
- Tap Yes on the notification message.
- If your SIM card supports multiple network operator profiles, the next message that appears will display network profile choices. Select the profile you want to use and tap OK.
- Next, you will be asked if you want to automatically configure your device to the proper network settings. Tap Yes.
Connection Setup then starts to configure your device's data connection settings.
- After the Connection Setup completes the configuration, tap Restart.
To manually select the network operator
You can also manually select your network operator from Connection Setup's settings screen. Connection Setup will then reconfigure your device's data connections settings based on the operator that you selected.
-
Tap Start > Settings > Connections tab > Connection Setup.
-
Select the network country and operator you want to use and tap OK. If you choose a Country and/or Operator that is different from the installed SIM card network operator, you may not be able to access network services.
-
The next message that appears prompts you to confirm whether you want to configure the data connection settings based on the selected network. Tap Yes. Connection Setup then starts to configure the data connection settings.
-
After the Connection Setup completes the configuration, tap Restart.
10.3 Ways of Connecting to the Internet
Your device's networking capabilities allow you to access the Internet or your corporate network at work through wireless and conventional connections. You can connect to the Internet through one of the following connections:
• GPRS, EDGE or 3G
- Dial-up
Note You can also add and set up the following connections:
- VPN: A VPN connection is used to access your corporate network by using an existing Internet connection.
- Proxy: A Proxy connection is used to access the Internet using an existing connection to your corporate or WAP network.
10.4 GPRS/3G
Use GPRS/3G (or EDGE, if available) to connect to the Internet and to send and receive picture messages on your device. You will need a data plan to use your wireless service provider's GPRS/3G network. Check with your wireless service provider to find out about GPRS/3G rates.
GPRS/3G settings are already preconfigured on your device, and your device is ready to use your wireless service provider's GPRS/3G services. Do not change the settings as this may cause services to stop working.
To add a new GPRS/3G connection
In times when you need to add another GPRS/3G connection on your device, obtain the Access point name from your wireless service provider. Also, check if a user name and password are required.
- Tap Start > Settings > Connections tab > Connections.
- Under My ISP, tap Add a new modem connection.
- On the Make New Connection screen, enter a name for the connection.
- In the Select a modem list, select Cellular Line (GPRS, 3G), then tap Next.
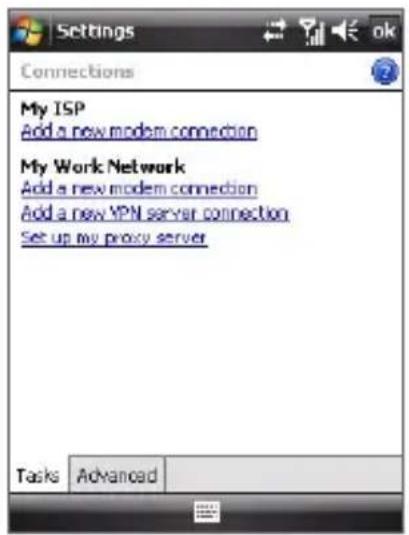
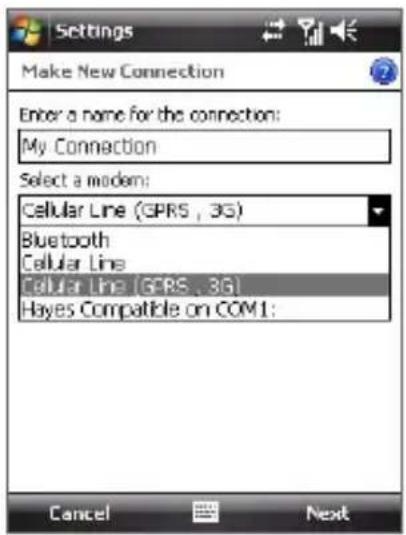
- Enter the Access point name, then tap Next.
- Enter the user name and password, only if required.
- Tap Finish.
Notes
• To view help information for any screen, tap the help icon ( ? ).
- To modify your connection settings, tap Manage existing connections on the Connections screen, and complete the connection wizard.
10.5 Dial-up
To set up a dial-up connection to your Internet Service Provider (ISP) on your device, you need the same settings that you normally use when you dial up from your computer. This includes the ISP server phone number, your user name and password.
- Tap Start > Settings > Connections tab > Connections.
- Under My ISP, tap Add a new modem connection.
- On the Make New Connection screen, enter a name for the connection.
- In the Select a modem list, select Cellular Line, then tap Next.
- Enter the ISP server phone number, then tap Next.
- Enter your user name, password, and any other information required by your ISP.
- Tap Finish.
10.6 Starting a Data Connection
After setting up a data connection such as GPRS or ISP dial-up on your device, you can now connect your device to the Internet. The connection is started automatically when you begin using a program that accesses the Internet such as Internet Explorer® Mobile.
To manually start a data connection
If you have set up multiple types of data connections on your device, you can manually start a connection.
- Tap Start > Settings > Connections tab > Connections.
- Tap Manage existing connections.
- Tap and hold the name of the desired connection, then tap Connect.
To disconnect active data connections
- Tap Start > Settings > Connections tab > Comm Manager.
- Tap the Data Connection button.
10.7 Internet Explorer® Mobile
Internet Explorer® Mobile is a full-featured Internet browser, optimized for use on your device.
To open Internet Explorer® Mobile
Tap Start > Internet Explorer.
To go to a Web site
Enter the Web site address in the Address Bar, then tap

To view a Web page using finger scrolling and panning
- Slide your finger upward to scroll down the Web page, or slide your finger downward to scroll up the Web page.
-
To pan downward, touch and hold on the touch screen then drag your finger upward. To pan upward, touch and hold on the touch screen then drag your finger downward.
-
To pan towards the right, touch and hold on the touch screen then drag your finger to the left. To pan towards the left, touch and hold on the touch screen then drag your finger to the right.
- To pan freely around a Web page, touch and hold on the touch screen then drag your finger in the desired direction.
For more information about finger scrolling and panning, see Chapter 1.
Internet Explorer® menu
While browsing the Web, tap Menu to choose from a list of options, such as saving Favorites, changing the viewing size, and more. You can also tap and hold on a Web page to choose options from the shortcut menu.
Note For more information about using Internet Explorer® Mobile, please go to: http://www.microsoft.com/windowsmobile/help/pocketpc/browseinternet.mspx
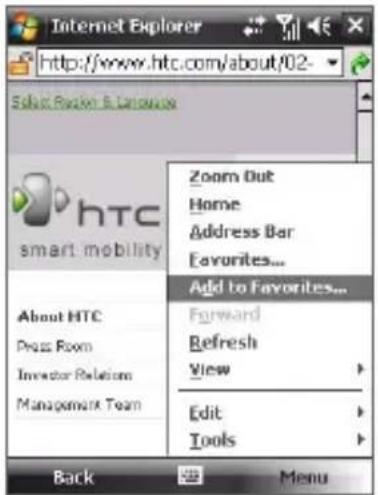
Tap Menu > Add to Favorites to save the current Web page in your Favorites folder.
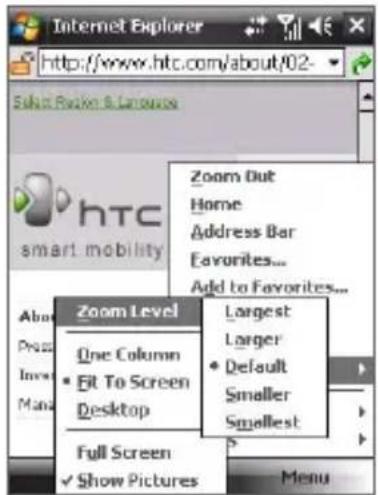
Tap Menu > View > Zoom Level to select the select a zoom level.
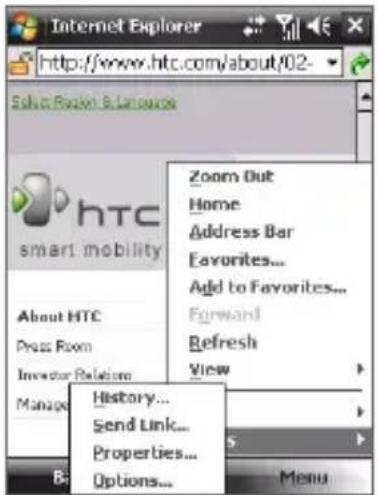
Tap Menu > Tools and choose to send the current Web page link, view the page's properties, or set preferences.
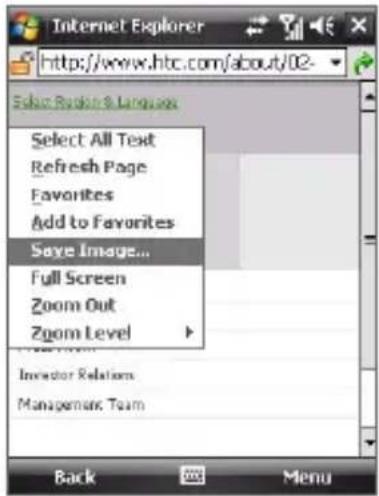
To save an image from a Web page to your device, tap and hold the image then tap Save Image.
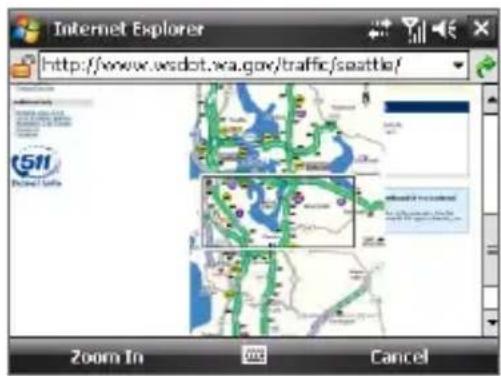
To navigating large-sized Web pages, tap Menu > Zoom Out. Use the NAVIGATION CONTROL to move the box to the area of the Web page you want to view, and then tap Zoom In or press ENTER.
10.8 Windows Live™
Windows Live™ gives you full Internet experience on your device. It helps you to find information, pursue your interests, and get in touch with friends and family on the Internet easier.
Windows Live™ offers the following key features:
• Live Search Bar, which lets you search for information on the Web.
• Live Messenger, the next generation of MSN Messenger Mobile.
• Live Mail, the next generation of Hotmail.
• Live Contacts, your address book for storing Live Mail, Live Messenger and Hotmail contacts.
Set up Windows Live™
The first time you use Windows Live™, sign in by using your Windows Live ID, which is your Windows Live Mail or Hotmail address, and password.
To set up Windows Live for the first time
-
Tap Start > Programs > Windows Live.
-
Tap Sign in to Windows Live.
-
On the next screen, tap the links to read the Windows Live™ Term of Use and the Microsoft Privacy Statement. After reviewing them, tap Accept.
-
Enter your Windows Live™ Mail or Hotmail address and password, select the Save password checkbox, then tap Next.
-
Choose whether or not to show the Windows Live™ search bar and applications on the Today screen then tap Next.
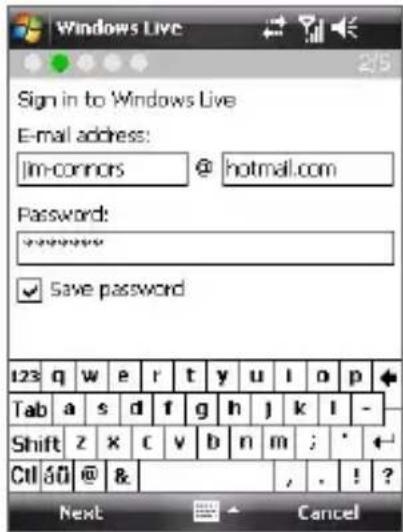
- Choose what information you want to sync online with your device.
If you select Store Windows Live contacts in your mobile phone's contact list, your Windows Live contacts will be added to the contact list and to Live Messenger on your device.
If you select Sync e-mail, your Windows Live Mail or Hotmail inbox messages will be downloaded to your device.
-
Tap Next.
-
After synchronization is complete, tap Done.
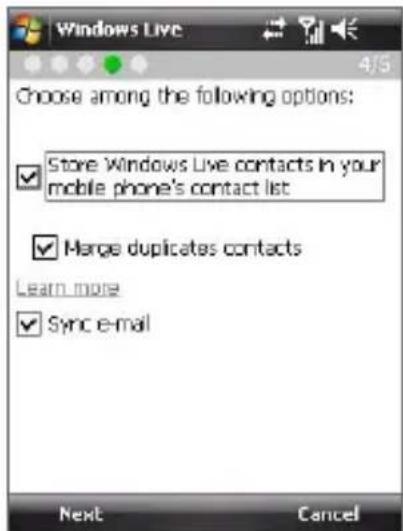
The Windows Live™ interface
On the main interface of Windows Live™, you will see a search bar, navigation bar, and an area where you can customize to show your picture.
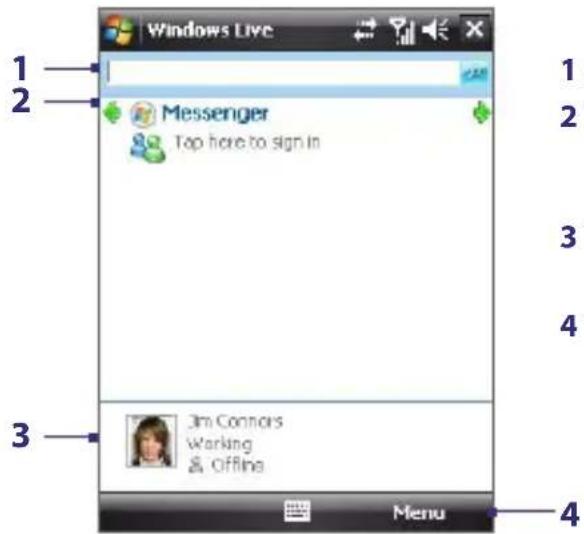
1 Live Search Bar
2 Tap the Left or Right arrow to switch between Windows Live Messenger, Live Mail, and Sync status.
3 Tap to access Windows Live Messenger settings.
4 Tap Menu to access and change settings.
Tip If you chose to display the search bar and Windows Live™ applications on the Today screen when you were setting up Windows Live, you'll also see them on the Today screen. To show or hide them from the Today screen, open Windows Live and tap Menu > Options > Today screen options.
Windows Live Messenger
With this mobile version of Windows Live Messenger, you enjoy many of the same cool features that you get from the desktop version, which include the following:
- Instant messaging via text and voice
• Multiple conversations - Add emoticons
- Contact list with presence
- Send and receive files including photos
- Change status/display name
• View contacts by online status, groups, and more - Send messages even when a contact is offline
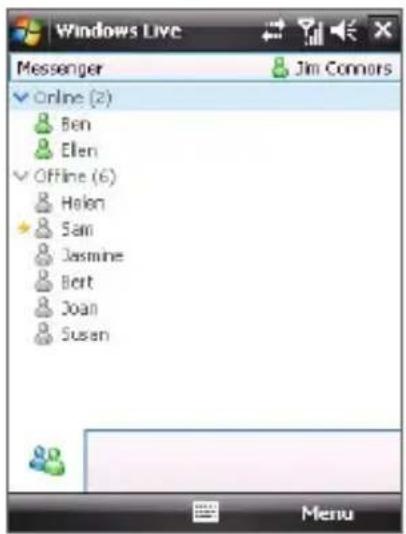
Note Before you can use Windows Live Messenger, your device must be connected to the Internet. For information about setting up an Internet connection, see "Ways of Connecting to the Internet" in this chapter.
Launch the messenger and sign in
To open Windows Live Messenger
- Tap Start > Programs > Messenger.
- On Windows Live™ or the Today screen, tap the Left or Right arrow until you see Messenger, then tap it.
To sign in and out
- Tap Sign in on the messenger screen.
- If this is your first time to sign in, a message appears to inform you that your messenger contacts will be added to the contact list on your device. Tap OK to add them.
Signing in may take several minutes, depending on your connection speed. - To sign out, tap Menu > Sign Out.
To start and end conversations
- In the contact list, select a contact then tap Send IM to open a message screen.
- Enter your text message in the text entry area of the message screen.
- To add an emoticon, tap Menu > Add emoticon then tap an icon from the list of emoticons.
- Tap Send.
- To end a conversation with the current contact, tap Menu > End conversation.
Tips
- To send a file, tap Menu > Send. You can choose to send a picture, voice clip or any file.
- To invite one or more contacts to the conversation, tap Menu > Options > Add participant.
- To send a voice message, tap Voice Clip on a message screen then start talking. After you have spoken a message, tap Send.
Add Windows Live contacts
You can add new Windows Live contacts in Live Messenger or in Contacts.
To add a Windows Live contact in Live Messenger
- Tap Menu > Add new contact.
- Enter the e-mail address of the contact, then tap OK.
To add a Windows Live contact in Contacts
- Tap Start > Contacts.
- Tap New then tap Windows Live.
-
In the IM box, enter the e-mail address of the contact, which can be a Windows Live ID or any other e-mail address.
You can fill in other information about the contact, if desired. This is not absolutely necessary if you will communicate with the contact only through Windows Live Messenger or Live Mail. -
Tap OK.
- Follow the remaining instructions to add the new contact to your Windows Live contact list.
10.9 Using Your Device as a Modem (Internet Sharing)
Internet Sharing connects your PC or notebook computer to the Internet by using your device's data connection (GPRS or 3G, for instance). You can choose to connect via USB or Bluetooth.
Notes
- Make sure your device has a SIM card installed, and your device has a GPRS or phone dial-up modem connection. If your device has not been set up with a data connection yet, tap Menu > Connection Settings on the Internet Sharing screen. For more information about setting up these connections, see "GPRS/3G" and "Dial-up" in this chapter.
- If you want to use a USB cable connection, you must first install Windows Mobile Device Center or Microsoft ActiveSync version 4.5 or later on the computer.
- If want to use a Bluetooth connection, make sure your computer has built-in Bluetooth capability. If your computer does not have Bluetooth, you can connect and use a Bluetooth adapter or dongle on your computer.
- Before using Internet Sharing, disconnect from Windows Mobile Device Center or ActiveSync on your computer.
To set up your device as a USB modem
- On your device, tap Start > Programs > Internet Sharing.
- In the PC Connection list, select USB.
- In the Network Connection list, select the name of the connection that your device uses to connect to the Internet.
- Plug in the USB cable between your device and the computer.
- Tap Connect.
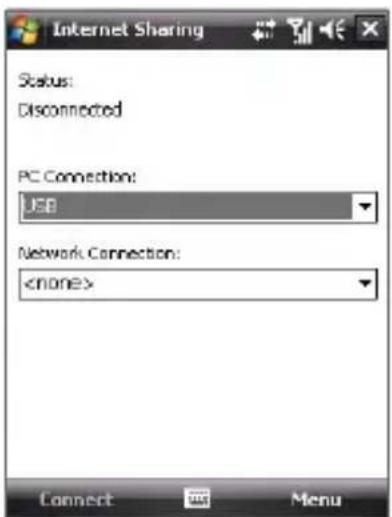
To use your device as a Bluetooth modem
For the computer to use the Internet connection of your device, activate Internet Sharing on your device, then set up a Bluetooth Personal Area Network (PAN) between the computer and your device.
-
On your device, turn on Bluetooth and set it to visible mode by following the steps in "To turn Bluetooth on and make your device visible".
-
Initiate a Bluetooth partnership from your device by following the steps in "To create a Bluetooth partnership."
-
Tap Start > Programs > Internet Sharing.
-
Select Bluetooth PAN as the PC Connection.
-
From the Network Connection list, select the name of the connection that your device uses to connect to the Internet.
-
Tap Connect.
-
On your computer, set up a Bluetooth Personal Area Network (PAN) with your device:
- For Windows Vista:
a. Click Start > Control Panel > Network and Internet > Network and Sharing Center.
b. Click Manage network connections and then under Personal Area Network, double-click Bluetooth Network Connection.
c. In the Bluetooth Personal Area Network Devices dialog box, select your phone, then click Connect.
- For Windows XP:
a. Tap Start > Control Panel > Network Connections.
b. Under Personal Area Network, click the Bluetooth Network Connection icon.
c. Under Network Tasks, click View Bluetooth network devices.
d. In the Bluetooth Personal Area Network Devices dialog box, select your device, then click Connect.
Note If the Bluetooth adapter or dongle on your computer was installed using a third-party provided driver, open the Bluetooth software that came with the Bluetooth adapter/dongle and enable the adapter/dongle to be discovered by other devices. Refer to the Bluetooth adapter's documentation for more information.
- On the Internet Sharing screen on your device, check if a connected status is displayed, which indicates that your computer has been successfully connected to the Internet using your device as a Bluetooth modem.
To end the Internet connection
- On the Internet Sharing screen, tap Disconnect.
10.10 Bluetooth
Bluetooth is a short-range wireless communications technology. Devices with Bluetooth capabilities can exchange information over a distance of about eight metres without requiring a physical connection.
Bluetooth modes
Bluetooth on your device operates in three different modes:
- On. Bluetooth is turned on. Your device can detect other Bluetooth-enabled devices, but not vice versa.
- Off. Bluetooth is turned off. In this mode, you can neither send nor receive information using Bluetooth. Turn off Bluetooth when not in use to conserve battery power, or in places where using a wireless device is prohibited, such as on board an aircraft and in hospitals.
- Visible. Bluetooth is turned on, and all other Bluetooth-enabled devices can detect your device.
Note By default, Bluetooth is turned off. If you turn it on, then turn off your device, Bluetooth also turns off. When you turn on your device again, Bluetooth automatically turns on.
To turn Bluetooth on and make your device visible
- On your device, tap Start > Settings > Connections tab > Bluetooth > Mode tab.
- Select the Turn on Bluetooth and Make this device visible to other devices check boxes. Tap OK.
Bluetooth partnerships
A Bluetooth partnership is a relationship that you create between your device and another Bluetooth-enabled device in order to exchange information in a secure manner.
To create a Bluetooth partnership
- On your device, tap Start > Settings > Connections tab > Bluetooth.
- On the Devices tab, tap Add new device. Your device searches for other Bluetooth devices and displays them in the box.
- Tap the desired device name in the box, then tap Next.
- Specify a passcode to establish a secure connection. The passcode can be 1 up to 16 characters.
- Tap Next.
- Wait for the paired device to accept the partnership. The receiving party needs to enter the same passcode that you specified.
- The name of the paired device is then displayed. You may edit and enter a new name for that device.
- Select the check boxes of services that you want to use from the paired device.
- Tap Finish.
Note Creating a Bluetooth partnership between two devices is a one-time process. Once a partnership is created, the devices can recognize the partnership and exchange information without entering a passcode again.
To accept a Bluetooth partnership
- Ensure that Bluetooth is turned on and in visible mode.
- Tap Yes when prompted to establish a partnership with the other device.
-
Enter a passcode (the same passcode that is entered on the device requesting the partnership) to establish a secure connection. The passcode must be between 1 and 16 characters.
-
Tap Next.
-
Tap Finish. You can now exchange information with the paired device.
Tips To rename a Bluetooth partnership, tap and hold the partnership's name on the Devices tab of the Bluetooth Settings screen, then tap Edit.
- To delete a Bluetooth partnership, tap and hold the partnership's name on the Devices tab, then tap Delete.
Connect a Bluetooth hands-free or stereo headset
For hands-free phone conversations, you can use a Bluetooth hands-free headset such as a car kit with your device. Your device also supports A2DP (Advanced Audio Distribution Profile) which allows you to use a Bluetooth stereo headset for hands-free phone conversations and for listening to stereo music.
To connect a Bluetooth hands-free or stereo headset
-
Make sure that both your device and the Bluetooth headset are turned on and within close range, and that the headset is visible. Refer to the manufacturer's documentation to find out how to set the headset in visible mode.
-
Tap Start > Settings > Connections tab.
-
Tap Bluetooth > Devices tab > Add new device. Your device searches for other Bluetooth-enabled devices and displays them.
-
Tap the name of the Bluetooth headset, then tap Next. The device will automatically pair the device with the Bluetooth headset.
Windows Mobile will automatically try one of the preconfigured passcodes (0000, 1111, 8888, 1234) to pair the Bluetooth headset with the device. If this fails, you have to enter the passcode delivered with your headset manually.
- Tap Done. While the Bluetooth stereo headset is connected, the Headset icon (☐) will appear on the title bar.
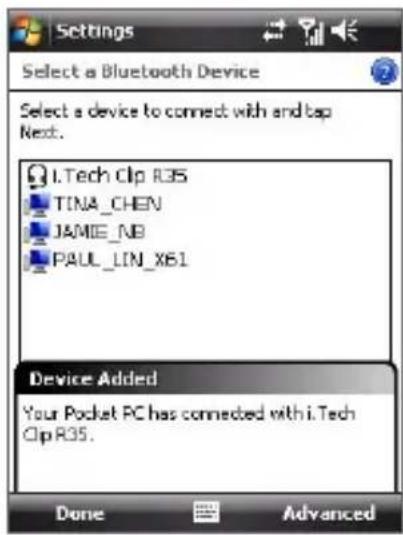
Note If the Bluetooth stereo headset becomes disconnected, turn the headset on and repeat steps 1 to 3 above. Tap and hold the name of the Bluetooth stereo headset and tap Set as Wireless Stereo.
Beam information using Bluetooth
You can beam information, such as contacts, calendar items, and tasks, as well as files from your device to your computer or to another Bluetooth-enabled device.
Note If your computer does not have built-in Bluetooth capability, you need to connect and use a Bluetooth adapter or dongle on your computer.
To beam information from your device to a computer
- Turn on Bluetooth on your device, and make your device visible. For information about this, see "To turn Bluetooth on and make your device visible".
- Next, set Bluetooth on your computer to visible mode, create a Bluetooth partnership, then enable your computer to receive Bluetooth beams.
Note If the Bluetooth adapter or dongle on your computer was installed using a third-party provided driver, open the Bluetooth software that came with the Bluetooth adapter/dongle and enable the adapter/dongle to be discovered by other devices. Refer to the Bluetooth adapter's documentation for more information.
If your computer has Windows Vista or Windows XP SP2 and your computer's Bluetooth adapter is supported by your Windows version, do the following steps:
a. On your computer, open Bluetooth Devices from the Control Panel then click the Options tab.
b. For Windows Vista, select Allow Bluetooth devices to find this computer.
For Windows XP, select Turn discovery on and Allow Bluetooth devices to connect to this computer.
c. Create a Bluetooth partnership between your device and computer. For information about creating a partnership, see "Bluetooth partnerships".
d. In the Options tab of Bluetooth Devices, select Show the Bluetooth icon in the notification area.
e. To enable your computer to receive Bluetooth beams, right-click the Bluetooth icon at the bottom-right of your computer screen and select Receive a File.
- Now you are ready to beam. On your device, select an item to beam. The item can be an appointment in your calendar, a task, a contact card, or a file.
- To beam a contact, tap Menu > Send Contact > Beam.
To beam other types of information, tap Menu > Beam [type of item].
- Tap the device name to which you want to send the beam.
- If you beamed a calendar, task, or contact item to your computer and it is not automatically added to Outlook, select File > Import and Export in Outlook to import it.
To beam information to a Bluetooth-enabled device such as another Windows Mobile powered device, follow steps 1 to 5 in the above procedure.
Tips
- The default folder on your computer where beamed items are stored may be C:\Documents and Settings\your_username\My Documents in Windows XP or C:\Users\your_username\My Documents in Windows Vista.
- For your device to receive Bluetooth beams, tap Start > Settings > Connections tab > Beam and make sure the Receive all incoming beams check box is selected.
Bluetooth Explorer and Bluetooth file sharing
Bluetooth Explorer searches for other Bluetooth devices that have file sharing enabled and lets you access their Bluetooth shared folder. You can copy files from and to their shared folder, and create subfolders in it. When you enable Bluetooth file sharing on your device, other Bluetooth-enabled devices will also be able to access your Bluetooth shared folder.
To enable Bluetooth Explorer and Bluetooth file sharing on your device
-
Tap Start > Settings > Connections tab > Bluetooth > FTP tab.
-
Select the Enable Bluetooth Explorer check box. This makes the \Bluetooth device folder visible in the File Explorer.
-
Select the Enable File Sharing check box.
You can use the default Bluetooth shared folder, or tap Browse to use another folder as your shared folder.
To use Bluetooth Explorer
-
Bluetooth Explorer is integrated with the File Explorer program. You can open it by tapping Start > Programs > Bluetooth Explorer or by tapping Down arrow (▼ on the upper left of File Explorer then tapping Bluetooth.
-
Bluetooth Explorer then scans for other Bluetooth devices that have file sharing enabled. From the list, tap to select a Bluetooth device you want to connect to. You may need to enter a passcode in order for you to connect to the selected device.
-
If there are files contained in the Bluetooth shared folder on the other device, you will be able to see them on the Bluetooth Explorer screen.
Select one or more files, then tap Menu > Edit and choose to cut or copy the files.
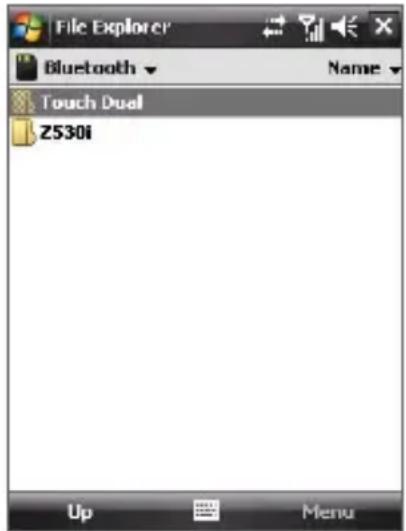
-
Tap Up twice.
-
Navigate to the folder where you want to paste the files on your device, then tap Menu > Edit > Paste.
Print files via Bluetooth
Connect your device to a Bluetooth printer to print contact information, appointment details, messages, and other file types.
Note You can print files in the .txt, .jpg, .xhtml, .vcf, .vcs file formats.
Before you start printing, make sure to turn on the Bluetooth printer and to turn on Bluetooth on your device. To turn on Bluetooth, tap Start > Settings > Connections tab > Comm Manager and then tap the Bluetooth button. When enabled, the ON indicator is activated.
To print contact information
- Tap Start > Contacts and then select the contact whose information you want to print.
- Tap Menu > Print via Bluetooth.
- Tap Menu > Search Device. Your device starts to search for Bluetooth devices.
- Select the Bluetooth printer and tap Menu > Send File.
- Set the printing options you want and then tap Print.
To print a calendar appointment
- Tap Start > Calendar and then select the appointment whose details you want to print.
- Follow steps 2 to 5 in the "To print contact information" procedure.
To print a message
- Tap Start > Messaging and then select the messaging account where the message you want to print is located.
- Select the message you want to print.
- Follow steps 2 to 5 in the "To print contact information" procedure.
To print a JPEG file
-
Do one of the following:
-
In Pictures & Videos, select the JPEG file and then tap Menu > Print via Bluetooth.
-
In File Explorer, tap and hold the JPEG file and then on the menu, tap Print via Bluetooth.
-
Follow steps 3 to 5 in the "To print contact information" procedure:
162 Getting Connected
Chapter 11
Experiencing Multimedia
11.1 Camera
11.2 Camera Album
11.3 Pictures & Videos
11.4 Windows Media® Player Mobile
11.5 Streaming Media
11.6 Audio Booster
11.1 Camera
Taking photos and recording video clips along with audio are easy with your device's built-in camera.
To open the Camera screen
Do one of the following:
- Press the CAMERA button all the way on your device.
- Tap Start > Programs > Camera.
The screen orientation automatically switches to landscape mode when you open Camera.
To exit the Camera
- Tap the Exit icon ( ) on the Camera screen.
CAMERA button
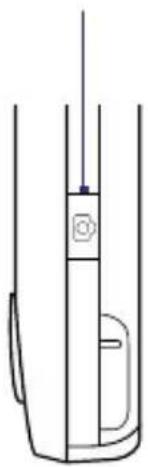
natural_image
Pure technical line drawing of a vertical mechanical component without any text, numbers, or symbolsCapture modes
The camera on your device allows you to capture pictures and video clips by using various built-in modes with flexibility. The Camera mode is set to the Photo capture mode by default. The upper left corner of the screen displays the active capture mode.
To change the capture mode
Tap to change the capture mode.
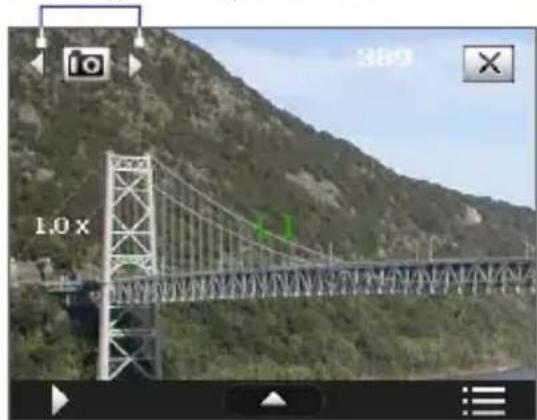
natural_image
Exterior view of a suspension bridge spanning a mountainous landscape with green slopes (no signage or text)You can also press NAVIGATION right or left to change the capture mode.
The available capture modes of the camera are as follows:
Icon Capture Mode

Photo: Captures standard still images.

Video: Captures video clips, with or without accompanying audio.

MMS Video: Captures video clips suitable for sending with MMS messages.

Contacts Picture: Captures a still image and gives you the option to immediately assign it as a Photo ID for a contact.

Picture Theme: Captures still images and places them within frames.

Panorama: Captures a sequence of still images continuously in one direction, and allows stitching of all the images to create a panoramic view of a scenery.

Sports: Captures consecutive photo shots (3, 5, 7, or 10).

Burst: Captures a sequence of still images (maximum 30) as long as the CAMERA button on the device or the ENTER button on the NAVIGATION CONTROL is kept pressed.
Note When using the 2nd camera to capture, you can only use Photo, Video, MMS Video, Contacts Picture, and Picture Theme modes.
File formats supported
Using the available capture modes, the camera in your device captures files in the following formats:
Capture type Format
Still image / Contacts Picture / JPEG
Panorama / Sports / Burst
Video / MMS Video H.263 (.3gp) ; MPEG-4 (.mp4)
Camera controls
The camera comes with an auto-focus function to let you capture sharp and crisp photos and videos of your subjects. Depending on the option you have chosen in Shoot Option, you will need to either press the CAMERA button half-way or all the way to take a photo or to start capturing video.
When you press the CAMERA or ENTER button, the Camera starts to focus on the subject, indicated by a flashing bracket ( [ ] when focus is set, the bracket changes to a steady green bracket ( [ ]
Note The Shoot Option only applies to the CAMERA button. Pressing the ENTER button automatically takes the shot.
- Press CAMERA or ENTER to take a photo or contacts picture.
- Press CAMERA or ENTER to start recording video; press it again to stop recording.
- Press CAMERA or ENTER each time when taking photos for a picture theme or panorama.
- To take consecutive shots in Sports mode, press CAMERA or ENTER, then move your device to follow the movement of your subject.
- Press and hold the CAMERA button or the ENTER button when taking consecutive shots in Burst mode.
Note For Sports and Burst modes, auto-focus is only applied to the first shot.
Onscreen controls and indicators
The onscreen controls and indicators disappear after about 3 seconds. To make the controls and indicators reappear, touch or tap the screen.
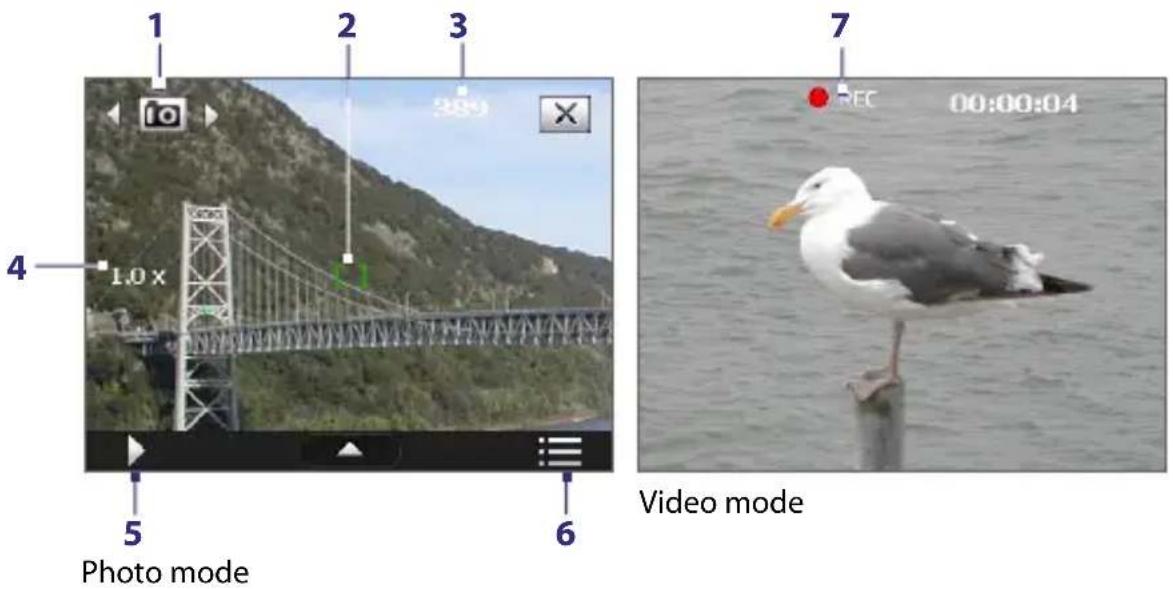
1 Mode Switching control. Tapping the left/right arrow ( / ) on the screen allows you to switch the capture mode.
2 Auto-focus indicator. Displays a flashing bracket ( ) when focusing. When focus is set, the flashing bracket changes to a steady green bracket ( )
3 Remaining information indicator. In Photo, Contacts Picture, Picture Theme, Sports, and Burst modes, this shows the remaining, available shots of pictures based on current settings. In Video and MMS Video modes, this shows the remaining duration that can be recorded. While recording video, this shows the recorded duration.
4 Zoom control. Tapping ☐ on the screen allows you to zoom in or zoom out.
Note This control only appears when zooming is supported by the Resolution you have selected.
5 Album. Tap to open Camera Album. See "Camera Album" for details.
6 Menu. Tap to open the Camera Settings screen.
7 Recording indicator. This shows a red, flashing indicator while video recording is in progress.
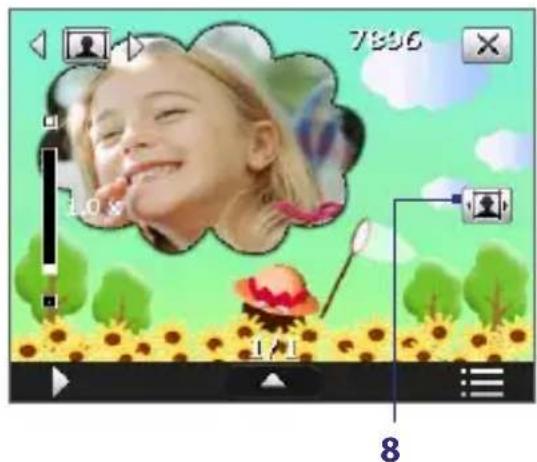
Picture Theme mode
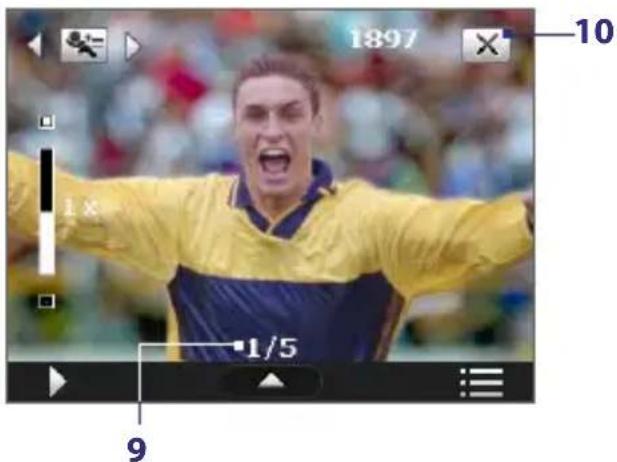
Sports mode
8 Template Selector icon. In Picture Theme mode, tap to toggle among the different templates.
9 Progress indicator. In Picture Theme, Sports and Burst modes, this shows the number of consecutive shots.
10 Exit. Tap to exit the Camera program.
Zooming
Before capturing a still image or a video clip, you can zoom in to make the object in focus move closer or zoom out to make the object move farther away.
Note The zoom control only appears onscreen when zooming is supported by the Resolution you have selected.
To zoom in
- Press NAVIGATION up or tap

To zoom out
- Press NAVIGATION down or tap

The camera zoom range for a picture or a video clip depends on the capture mode and capture size. The following table is a summary.
| Capture mode Capture size setting Zoom range | ||
| Photo | 2M (1600 x 1200) No zooming available | |
| 1M (1280 x 960) 1.0x to 2.0x | ||
| Large (640 x 480) 1.0x to 2.0x | ||
| Medium (320 x 240) 1.0x to 4.0x | ||
| Small (160 x 120) 1.0x to 8.0x | ||
| Video | CIF (352 x 288) 1x and 2x | |
| Large (320 x 240) 1x and 2x | ||
| Medium (176 x 144) 1x and 2x | ||
| Small (128 x 96) 1x and 2x | ||
| MMS Video | Medium (176 x 144) 1x and 2x | |
| Small (128 x 96) 1x and 2x | ||
| Contacts Picture | Large (640 x 480) 1.0x to 2.0x | |
| Medium (320 x 240) 1.0x to 4.0x | ||
| Picture Theme | Determined by the current template | Depends on the size of the template currently loaded |
| Panorama | Large (640 x 480) 1x and 2x | |
| Medium (320 x 240) 1x, 2x and 4x | ||
| Sports | Large (640 x 480) 1x and 2x | |
| Medium (320 x 240) 1x, 2x and 4x | ||
| Burst | Large (640 x 480) 1x and 2x | |
| Medium (320 x 240) 1x, 2x and 4x | ||
Tip For capture size settings and zoom ranges when using the 2nd camera, please refer to the online help.
Quick Settings Panel
The Quick Settings Panel provides a quick way of adjusting the most common camera settings. Tap on the screen to open the Quick Settings Panel. Keep tapping a button on the panel, for instance, Resolution, to cycle through the available settings.
Note The available settings on the menu depend on the Capture mode selected.
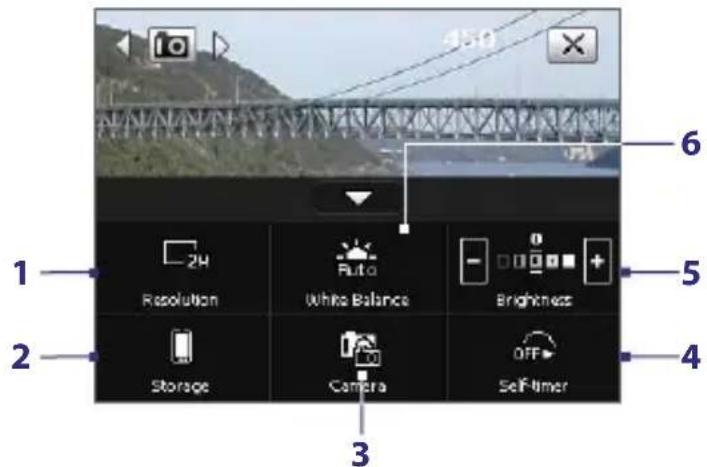
1 Resolution. Available resolutions include: ☐S ☐M ☐L ☐1M ☐2M See the table in the previous page for the detailed capture sizes.
2 Storage. Tap to toggle between saving captured photos or video clips on the device memory ( ) or on the storage card ( ).
3 Camera. The camera icon (7) indicates the current camera being used. Tap to cycle through the different cameras.
4 Self-timer. Tap to set the Self-timer to 2 seconds, 10 seconds, or Off when in the Photo or Contacts Picture mode. When you press the CAMERA or ENTER button to capture a still image, it starts to count down, and then captures a still image after the assigned time.
5 Brightness. Tapping the minus/plus icon ( - ) decreases or increases the brightness level.
6 White Balance. White balance settings include: Auto (Daylight), Light (), Incandescent (), and Fluorescent ().
The Review screen

natural_image
Scenic view of a suspension bridge over green hills with no visible text or symbolsAfter taking a still image or recording a video clip, you can view the image or video clip on the Review screen.
Review screen
You can also tap the following icons at the bottom of the Review screen:
Icon Function

Back Go back to the live Camera screen.

Delete Remove the captured image or video.

Send Send via e-mail or MMS.

View
View the image in the Camera Album program, or play the captured video in Windows Media® Player.

Assign to Contacts Associate the photo to a selected contact.

Browse
After capturing in Sports or Burst mode, the total number of consecutive shots is shown in the top right corner of the Review screen. Tap the up/down arrow to browse through the sequence of photos.
Tip You can set the Review screen duration by tapping on the Camera screen and then tapping Advanced tab > Review Duration.
Camera settings
Tap the Menu icon ( ) to open the Camera Settings screen. The Camera Settings screen allows you to configure capture and camera settings.
The Camera settings consist of two tabs: Capture Settings and Advanced. Use the Capture Settings tab to adjust options for your selected capture mode. Use the Advanced tab to set the Camera program preferences.
You can either tap onscreen or press the Navigation Control buttons to navigate the Camera Settings screen.
Capture Settings tab
The available options in this tab depend on the capture mode selected.
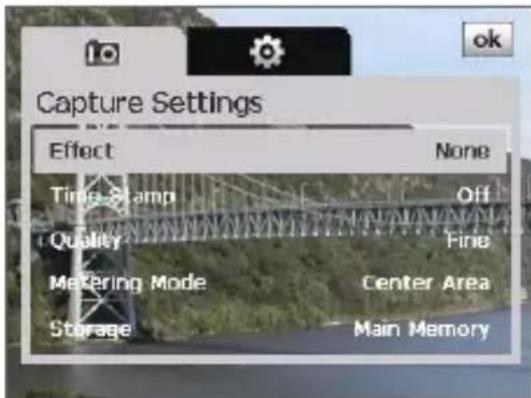
- Effect. Choose a special effect such as Grayscale, Sepia, etc., to apply to your photos or video clips.
- Time Stamp (Photo, Sports and Burst modes). Choose whether or not to include the shooting date and time on captured photos.
- Template (Picture Theme mode). Select a template.
- Capture Speed (Burst and Sports modes). This determines the interval between shots. Fast captures consecutive shots at the shortest interval.
- Snapshots (Sports mode). Select the number of consecutive shots to capture.
- Direction (Panorama mode). Choose in what direction images will be stitched in a panorama.
- Stitch Count (Panorama mode). Select the number of snapshots to be taken and stitched into a panorama.
• Quality. Select the JPEG image quality level for all captured still images. Choose from Basic, Normal, Fine, and Super Fine.
- Metering Mode. Select a metering mode to allow the camera to measure the amount of light and calculate the best-fit exposure value before capturing. Choose either Center Area to measure light using the centre area of the image or Average to measure light using the area all around the image.
- Storage. Select where you want to save your files. You can either save the files to the main memory or to a storage card.
Advanced tab
The available options in this tab depend on the capture mode selected.
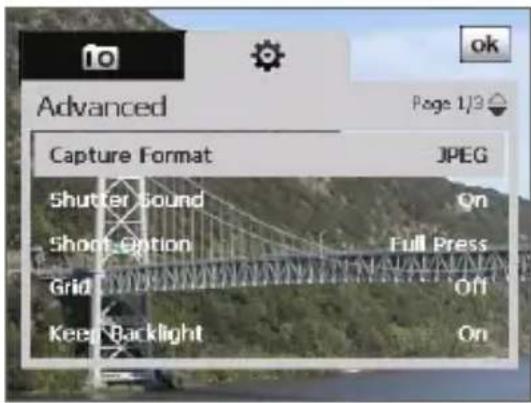
• Capture Format. Select the desired file format.
- Shutter Sound. Choose whether or not you want the camera to make a shutter sound when you press the ENTER or CAMERA button.
- Shoot Option. The camera comes with an auto-focus feature that is activated when the CAMERA or ENTER button is pressed. Selecting Full Press requires you to press the CAMERA button all the way to take the shot after auto-focus is set. Selecting Half Press automatically takes the shot after auto-focus is set.
This option only applies to the CAMERA button. Pressing the ENTER button automatically takes the shot.
- Grid (Photo mode only). Choose whether or not to show a grid on the Camera screen. Showing a grid helps you frame and centre your subject more easily and accurately.
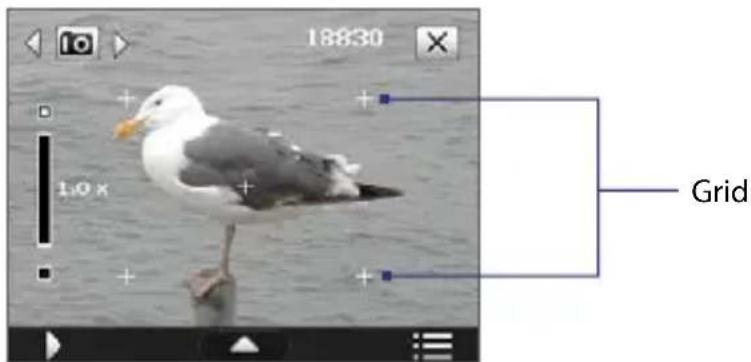
- Keep Backlight. Turn the backlight on or off. This overrides your device backlight settings while you are using the camera.
- Review Duration. Set a time length for displaying the captured image/video on the Review screen. Select No Limit if you do not want to impose a time limit. Select No Review to immediately return to the live Camera screen after capturing and saving.
- Flicker Adjustment. When taking indoor shots, flicker on the camera screen may be caused by inconsistencies between the vertical scan rate of the camera display and the flicker frequency of fluorescent lighting. To reduce flicker, you can change the flicker adjustment setting to Auto or to the proper frequency (50Hz or 60Hz) of the country where your device is being used.
- Record with Audio (Video and MMS video modes only). Select On to record audio with the captured video clips, or select Off to capture video without audio.
- Prefix. When Default is selected as the prefix, the file name of each new captured file is set to "IMAGE" or "VIDEO" followed by a sequential number, for example: IMAGE_001.jpg. You may also choose to name files using either the current Date or Date & Time as the prefix.
If you set the Camera to save captured photos to a storage card, the prefix cannot be selected. Captured photos will be named using the convention IMAGnnnn.jpg (where 'nnnn' is the counter) which is the DCIM (Digital Camera Images) naming standard, and will be saved to the \DCIM\100MEDIA folder on the storage card.
• Counter. To reset the file naming counter back to 1, tap Reset.
- Recording Limit (Video mode only). Set the duration or file size for recording video.
- Template Folder (Picture Theme mode only). By default, templates are stored in the \My Documents\Templates folder on the device's Main Memory. If you transferred some templates to a storage card (via File Explorer), set this option to Main + Card to specify that templates are located in both the main memory and the storage card.
- Image Properties. This option allows you to adjust the camera display properties, such as Contrast, Saturation, Hue, and Sharpness.
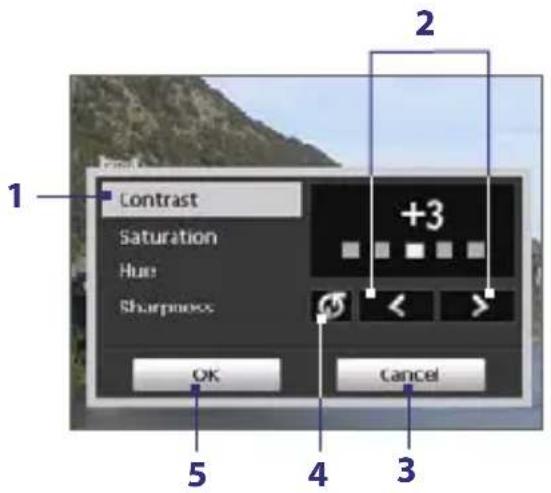
1 Tap a property to adjust.
2 Tap the left/right arrow icon or press NAVIGATION left/right to increase/decrease the value.
3 Tap to close the submenu without applying and saving the changes.
4 Tap to reset all properties to their default values.
5 Tap to save the settings.
- Show Reminder (Contacts Picture mode). Select On if you want the Camera to always display a message that confirms whether or not to assign the captured picture to a contact.
• Help. Tap to open the Camera program help file. - About. Tap to view information about the Camera program.
11.2 Camera Album
View your images and videos that you captured using the Camera program in Camera Album. Camera Album offers a host of features that let you rotate images, view your images as a slide show, use images as contact pictures, and more.
Note Only files supported by the Camera program are displayed in Camera Album. To know which file formats are supported, see "File formats supported" in the Camera section.
To open Camera Album
Do one of the following:
- Tap Start > Programs > Camera Album.
• In the Touch Cube, touch Photos or Videos. - In the Camera program, tap . Depending on the capture mode you are in, Camera Album will either show still images or video files in your device. For example, if you are in Photo mode, only still images will be shown in Camera Album. To view video files, switch first to Video or MMS Video mode before tapping
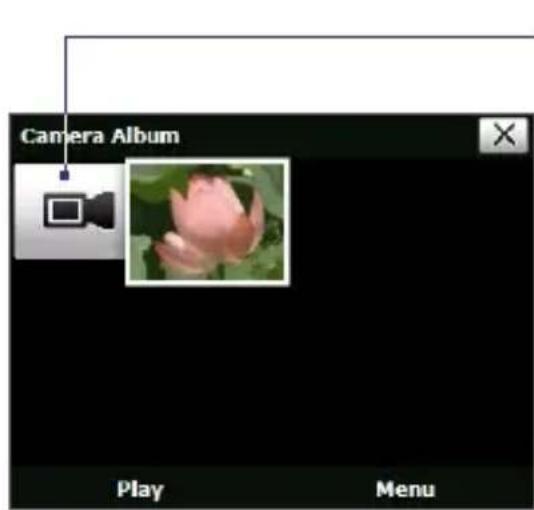
Opened from a video capture mode
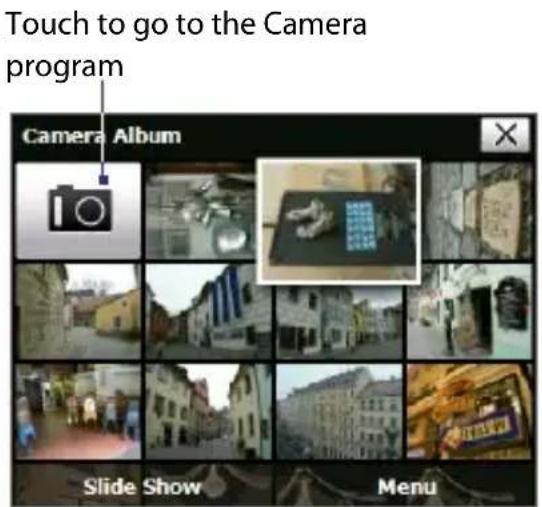
Opened from a still image capture mode
Tip If you have a lot of images in your device, scroll up or down by sliding your finger upward or downward the screen.
To view an image
On the main Camera Album screen, touch the thumbnail of the image you want to view. While viewing the image, you can zoom in or rotate the image. To learn how to zoom and rotate the image, see the succeeding procedures.
While viewing an image, touch the screen to pop up the onscreen menu.
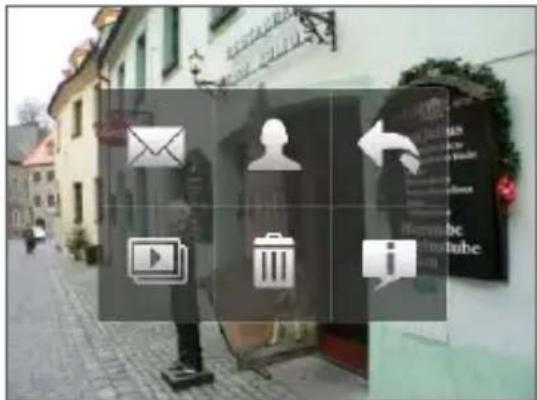
| Icon | Function | Icon | Function |
 | Touch to send the image via one of your Messaging accounts. |  | Touch to start the slide show. |
 | Touch to assign the image as a contact picture. |  | Touch to delete the image. |
 | Touch to return to the main Camera Album screen. |  | Touch to show you how to use gestures when viewing photos. |
To go to the next image
- Go to the next image by sliding your finger across the screen from right to left.
- Go back to the previous image by sliding your finger from left to right.
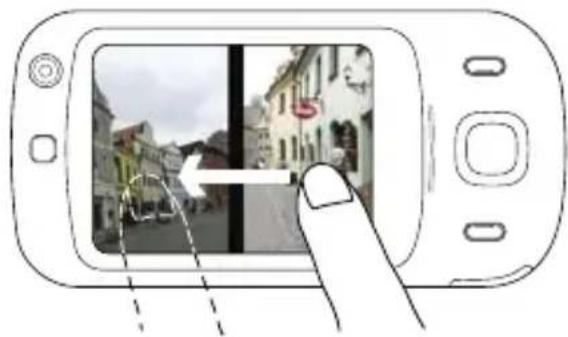
natural_image
Illustration of a smartphone displaying a street scene with buildings and a hand pointing to it (no text or symbols visible)To rotate the image
- View the image you want to rotate.
- With your finger, make a half-circle motion on the screen.
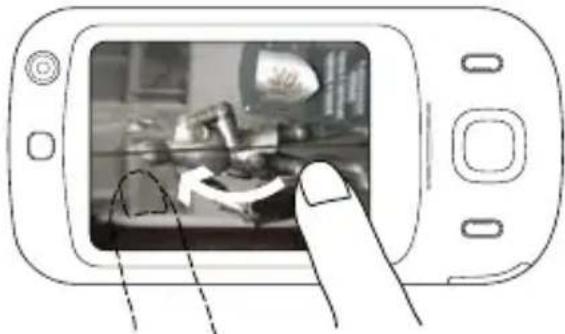
natural_image
Illustration of a hand pointing at a smartphone displaying a grayscale image with motion arrows (no text or symbols)Slide your finger clockwise to rotate the image 90 degrees clockwise.
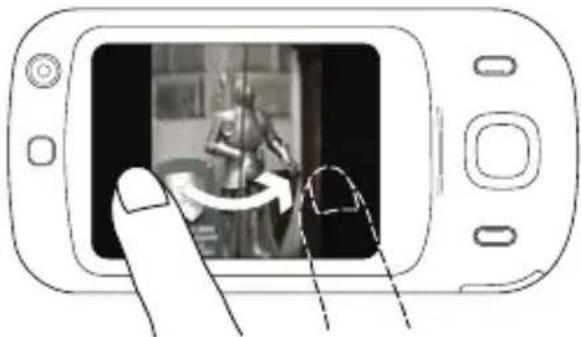
natural_image
Line drawing of a hand pointing at a digital camera screen displaying a scene with an arrow (no text or symbols)Slide your finger counter-clockwise to rotate the image 90 degrees counterclockwise.
To zoom in or out of an image
- While viewing an image, make a full circle motion on the screen with your finger.
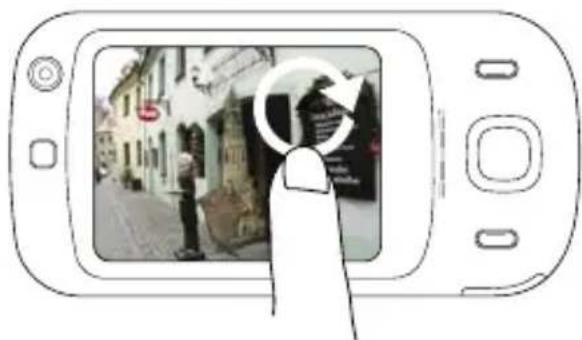
natural_image
Hand pointing at a smartphone displaying a street scene with buildings and pedestrians (no visible text or symbols)Slide your finger clockwise on an area to zoom in on that area.
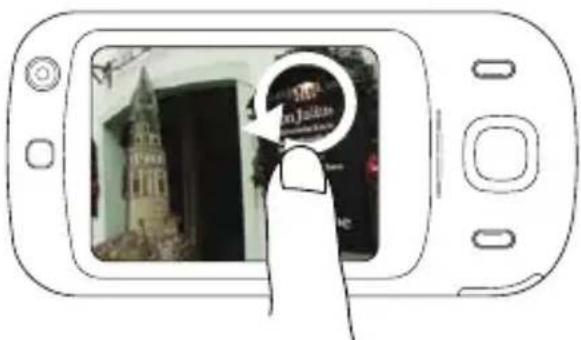
Slide your finger counter-clockwise to zoom out.
Tips
- When you zoom in on an image, you can double tap the screen to automatically zoom out and fit the image to the screen.
- When you zoom in on an image, touch and hold the screen so you can pan the image.
To view the images as a slide show
On the Camera Album screen, touch Slide Show. While viewing the slide show, touch the screen to show playback controls.
Touch to open the slide show options where you can set the transition effect to use, time per slide, and orientation of the images.

natural_image
Street view of a stone building with yellow houses and red roofs, no visible text or signageTouch to return to the main Camera Album screen.
Touch to go back to the previous image.
Touch to play or pause slideshow playback.
Touch to go to the next image.
To play back video files
On the main Camera Album screen, touch the thumbnail of the video file you want to play back. Windows Media Player then plays back the file.
Tip
You can also select the video file and tap Play to play back the file in Windows Media Player.
To close Camera Album and go to the Camera program
Go back to the main Camera Album screen and touch
To close Camera Album
When you open Camera Album from Start > Programs, you can close Camera Album by going back to the main Camera Album screen and tapping ✗
Note When you open Camera Album from the Camera program, tapping takes you back to the Camera program.

11.3 Pictures & Videos
Pictures & Videos allows you to manage the following types of media files on your device:
File Type File Extensions
Image *.bmp, *.jpg, *.gif, *.png
GIF animation *.gif
Video *.avi, *.wmv, *.mp4, *.3gp, *.3g2
Audio *.wma
To open Pictures & Videos
Tap Start > Programs > Pictures & Videos.
To copy media files to your device
- Copy pictures and GIF animation files from your PC or a storage card to the My Pictures folder on your device.
• Copy video files to the My Videos folder.
For more information about copying and managing files on your device, see Chapter 9.
To view pictures
- The images in the My Pictures folder appear as thumbnails by default.
- Select a picture and tap View. If you cannot find a picture in the default My Pictures folder, go to another folder by tapping the Down arrow (▼).
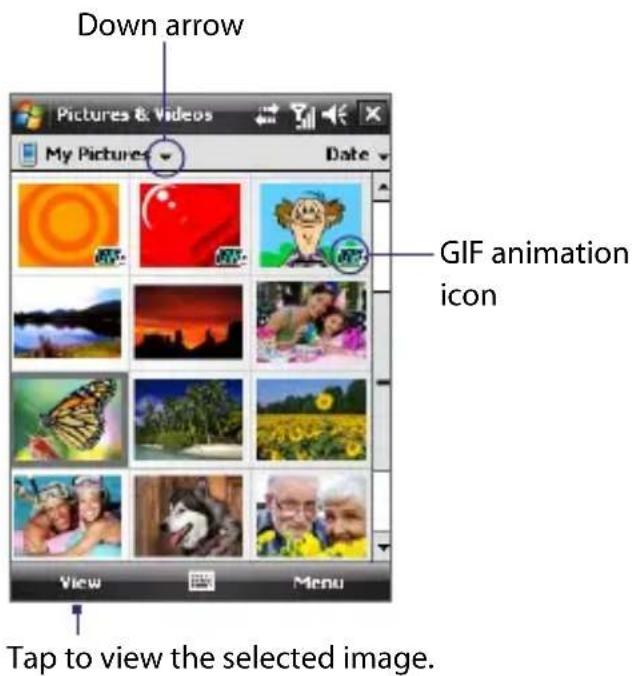
To play GIF animation files
- Select a GIF animation file (marked with a GIF icon) and tap View.
- The GIF Animation program then opens and plays the animation.
To play videos
- By default, the contents of the My Pictures folder will be shown.
- To find the video clips that you captured, tap the down arrow ( ) next to the My Pictures folder and tap My Documents > My Videos. Video clips are displayed as thumbnails by default, which appear with a media icon ( ).
- Tap to select a video and play it in Windows Media® Player Mobile.
Pictures & Videos menu
Select a media file and then tap Menu to choose from a list of options that you can do with the selected media file.
You can send the selected media file via one of your messaging accounts or beam it to another device. If you selected a picture, you can associate it to a contact, set it as your Today screen background, send it to your Windows Live Space account, and more. You can also view the images in the My Pictures folder as a slide show.
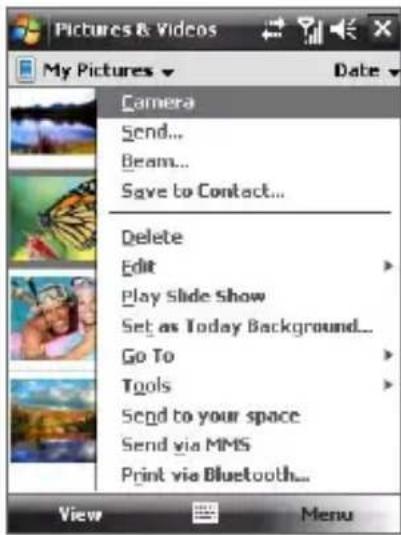
Note The available menu options depend on the selected media file.
To edit a picture
You can rotate, crop, and adjust the brightness and color contrast of your pictures.
-
On the Pictures & Videos screen, tap the picture you want to edit.
-
Tap Menu > Edit, and do any of the following:
• To rotate a picture 90 degrees clockwise, tap Rotate.
- To crop a picture, tap Menu > Crop. Next, tap and drag to select the area to crop. Tap inside the box to crop, or tap outside the box to cancel cropping.
- To adjust the brightness and contrast levels of a picture, tap Menu > Auto Correct.
Note To undo an edit, tap Menu > Undo. To cancel all unsaved edits you made to the picture, tap Revert to Saved.
11.4 Windows Media® Player Mobile
You can use Windows Media® Player Mobile to play digital audio and video files that are stored on your device or on a network, such as on a Web site.
Video File Formats Supported File Extensions
| Windows Media Video | .wmv, .asf |
| MPEG4 Simple Profile | .mp4 |
| H.263 | .3gp, .3g2 |
| H.264 | .mp4, .3gp, .3g2, .m4v |
| Motion JPEG | .avi |
Audio File Formats Supported File Extensions
| Windows Media Audio | .wma |
| WAV | .wav |
| MP3 | .mp3 |
| MIDI | .mid, .midi, .rmi |
| AMR Narrow Band | .amr |
| AMR Wide Band | .awb |
| AAC, AAC+ and eAAC+ | .aac, .mp4, .m4a |
| MPEG4 audio | .mp4, .m4a |
| QCELP | .qcp |
To open Windows Media® Player Mobile
- Tap Start > Programs > Windows Media.
About the controls
The following are available controls on the Windows Media® Player Mobile.
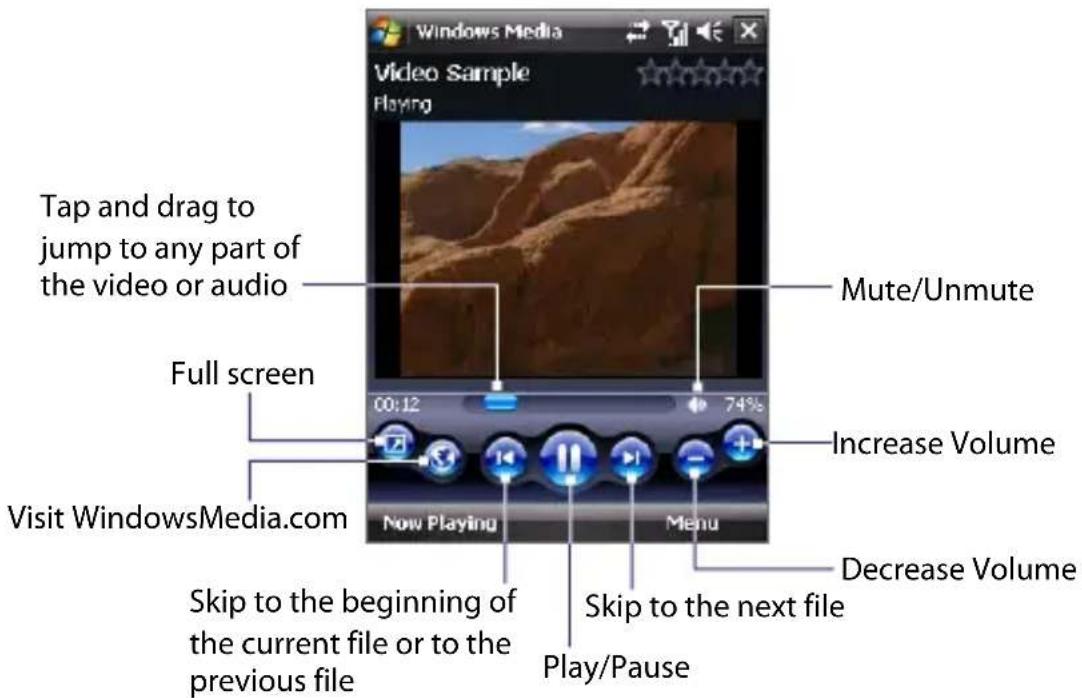
About the screens and menus
Windows Media® Player Mobile has three primary screens:
- Playback screen . The screen that displays the playback controls (such as Play, Pause, Next, Previous, and Volume) and the video window. You can change the appearance of this screen by choosing a different skin.
- Now Playing screen . The screen that displays the Now Playing playlist. This special playlist indicates the current file being played and any files that are “queued up” to play next.
- Library screen . The screen that lets you quickly find your audio files, video files, and playlists. It contains categories such as My Music, My Videos, My TV, and My Playlists.
At the bottom of each screen, you can open a Menu. The commands on this menu vary, depending upon which screen you are viewing. For more information about the commands in these menus, see Help on your device.
Synchronize video and audio files
Use the latest version of Windows Media® Player on your PC to synchronize digital media files from your PC to your device. This ensures that protected files and album art (for skins) are copied to your device correctly.
To synchronize content to your device automatically
- On your PC, start Windows Media® Player and then connect your device to your PC.
-
In the Device Setup Wizard, select Yes, search my computer now.
If you have previously opened Windows Media® Player and searched for media on your computer, you will not be prompted to search your computer. -
You will then see the name of your device (or "Storage Card" if you have inserted one on your device). Click Finish.
-
On the left panel of Windows Media® Player, right-click the name of your device then click Set Up Sync.
To set up media synchronization on a storage card, right-click Storage Card in the left panel of Windows Media® Player, then click Set Up Sync.
-
On the Device Setup dialog box, select Sync this device automatically.
-
Select the playlist(s) that you want to sync between your PC and device, then click Add.
-
Click Finish.
The files begin synchronizing to your device. The next time you connect your device to your PC while Windows Media® Player is running, synchronization will start automatically.
To synchronize content manually to your device
-
If you have not set up media synchronization between your device and PC, follow steps 1 to 3 in "To synchronize content to your device automatically".
-
Click the Sync tab on the Windows Media® Player of your PC. Select a Playlist or a Library on the left panel of the Windows Media® Player.
-
From the Content List, drag the media files that you want to sync to your device and drop them to the Sync List.
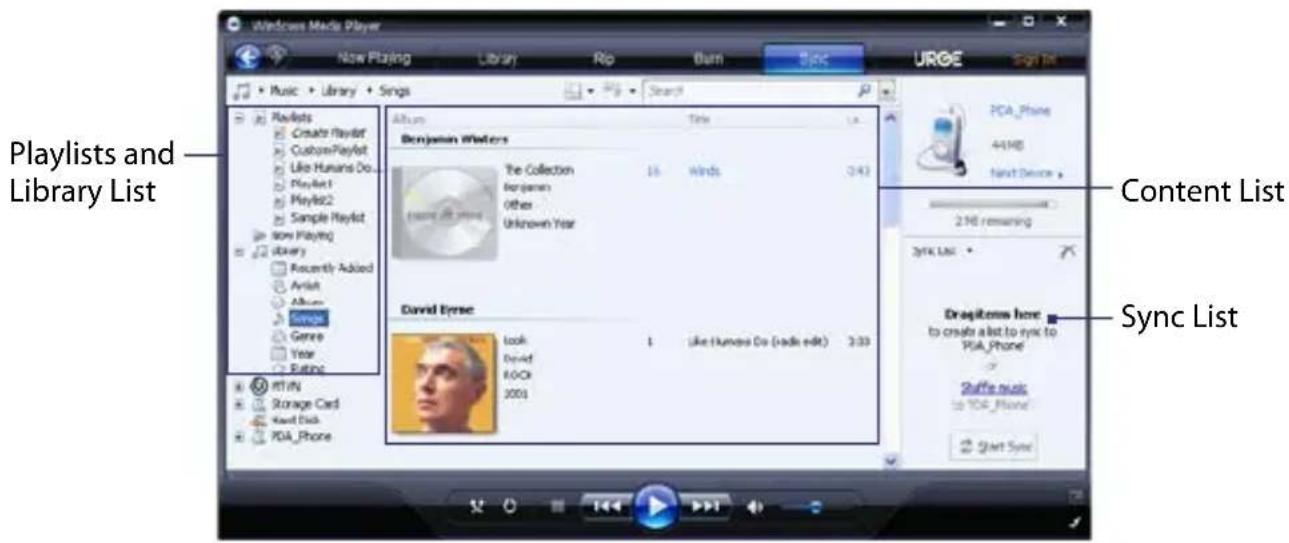
- Click Start Sync to start synchronizing the selected files to your device.
Notes
- Use Windows Media® Player 11 or higher on your PC to synchronize media files to your device.
- Audio files copy faster if Windows Media® Player is configured to automatically set the quality level for audio files copied to your device. For more information, see the Windows Media® Player Help.
Play media
Use the Library to find and play songs, videos, and playlists that are stored on your device or removable storage card.
To update the Library
- If you are not on the Library screen, tap Menu > Library.
- On the Library screen, tap the Library arrow (near the top of the screen), then tap the media storage that you want use, for example, Storage Card.
- In most cases, Windows Media® Player Mobile automatically updates the library. However, you can manually update the library to ensure that it contains new files that you recently copied to your device or storage card. Tap Menu > Update Library to manually update the library list.
To play video and audio files on your device
- Select a category (for example, My Music or My Playlists).
- Tap and hold the item that you want to play (such as a song, album, or artist name), then tap Play.
Tips
- To play a media file that is stored on your device but is not in a library, on the Library screen, tap Menu > Open File. Tap and hold the item that you want to play (such as a file or a folder), then tap Play.
- To play a media file from the Internet or a network server, tap Menu > Library then tap Menu > Open URL.
Playlists
In Windows Media® Player Mobile, you can create a new playlist by saving the current Now Playing playlist and giving it a new name.
To save a new playlist
- If you are not on the Library screen, tap Menu > Library.
- Tap to select a category (for example, My Music or My Playlists).
- Select a media file that you want, then tap Menu > Queue Up. This adds the file to the Now Playing list.
Repeat this step until you have added all desired media files to the Now Playing list. Please note that you cannot select multiple files simultaneously.
-
After adding the media files, tap Menu > Now Playing.
-
On the Now Playing screen, tap Menu > Save Playlist.
-
Enter the playlist name then tap Done.
-
To play back the playlist you created, tap My Playlists in the Library, select your playlist, then tap Play.
Troubleshooting
If you encounter a problem while using the Windows Media® Player Mobile, a number of resources are available to help you troubleshoot the issue.
For more information, see the Troubleshooting Windows Media® Player Mobile page at the Microsoft Web site (http://www.microsoft.com/windows/windowsmedia/player/windowsmobile/troubleshooting.aspx).
11.5 Streaming Media
Streaming Media lets you stream live broadcasts or on-demand media content from the Web. The media is sent in a continuous stream to your device and is played as it arrives, along with the audio.
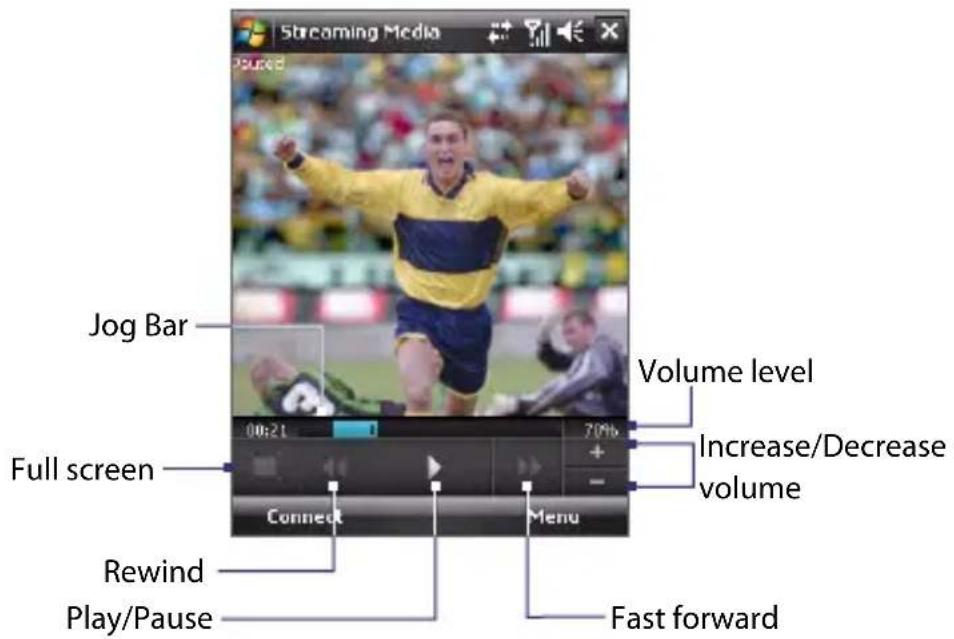
The Streaming Media program allows you to play 3GP and MPEG-4 files. It also supports playback of SDP (Session Description Protocol) files.
To access streaming content via Internet Explorer
In Internet Explorer, you can open a Web page containing RTSP (Real Time Streaming Protocol) links to streaming media content then play the content in the Streaming Media program.
- Tap Start > Internet Explorer.
- In the address bar, enter the URL address of the Web page that contains the RTSP link to the desired *.3gp, *.mp4, or *.sdp file.
- On the Web page, tap the RTSP link.
- Streaming Media then automatically opens and starts playing the file. During playback, use the button controls to play/pause, zoom in or out, adjust the sound volume, and more.
To stream media files directly on the Streaming Media Player
Streaming Media only supports RTSP links when you stream *.3gp and *.mp4 files directly on the program.
Note Before you launch the Streaming Media program, make sure that you are connected to the Internet.
- Tap Start > Programs > Streaming Media.
- From the program, tap Connect.
- Enter the URL for the Web site (rtsp://) and the file name.
- Tap Connect.
- Streaming Media then starts playing the file. During playback, use the button controls to play/pause, fast forward/rewind, zoom in or out, adjust the sound volume, and more.
To view streaming video information
You can view the properties and general information of a streaming video clip, such as video codec, audio codec, dimension, frames, and duration of the video.
Tap Menu > Properties from the program.
To configure streaming video connection settings
Tap Menu > Options to configure the following settings:
Playback tab
• Media Buffer. Allocate memory space (in terms of duration) to store the audio and video data while streaming a media file.
- Do not show 'Connect to internet' message. Select to automatically connect to the Internet without asking when you open a streaming media file.
Networks tab
- Connect via. Choose whether you want to connect to the Internet or corporate network (intranet) to locate a streaming media clip.
- UDP port range. Specify a range of port numbers to use for streaming.
Video tab
- Use Landscape mode when watching in full screen. Screen will be always in landscape mode if you are viewing media clips in full screen.
11.6 Audio Booster
Audio Booster enhances your music experience by providing you with controls for adjusting sound settings while you are listening to music. It adds 3D sound, treble and bass effects, and provides controls for adjusting them. It even has an equalizer with presets as well as a control panel for fine tuning sound.
To access Audio Booster
- Tap Start > Programs > Audio Booster.
Note You need to connect a headset to the device to open Audio Booster.
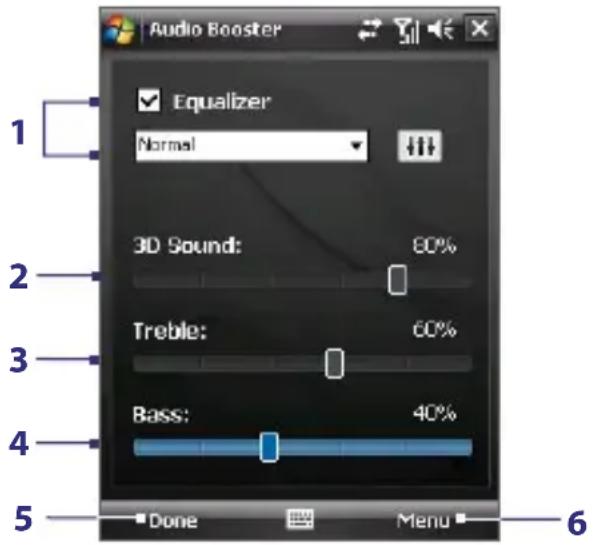
This control Does this
| 1 | Equalizer | Enables or disables the equalizer. Select the check box to enable the equalizer and to fine tune its settings, if desired. See "Equalizer" for more information. |
| 2 | 3D Sound Adds a three-dimensional effect to sound. Drag the slider to increase or decrease the effect. To disable the 3D effect, adjust the setting to 0%. | |
| 3 | Treble | Adds a treble effect to increase the high tones in sound. Drag the slider to increase or decrease the effect. To disable the treble effect, adjust the setting to 0%. |
This control Does this
4 Bass Adds a bass effect to increase the low tones in sound. Drag the slider to increase or decrease the effect. To disable the bass effect, adjust the setting to 0%.
5 Done Tap to apply the modified settings.
6 Menu - Tap Menu > Cancel to exit Audio Booster without applying the modified settings: - Tap Menu > Reset to change back to the default settings.
Equalizer
The Equalizer optimizes sound for a better listening experience. It provides preset moods, such as hip hop, jazz, rock, etc., and several enhancement presets that suit different types of music. It also has a 10-band graphic equalizer that lets you adjust the loudness of sound by frequency.
To apply a preset
- Select the Equalizer check box to enable the equalizer.
- Tap the Equalizer drop-down menu, then select a desired preset.
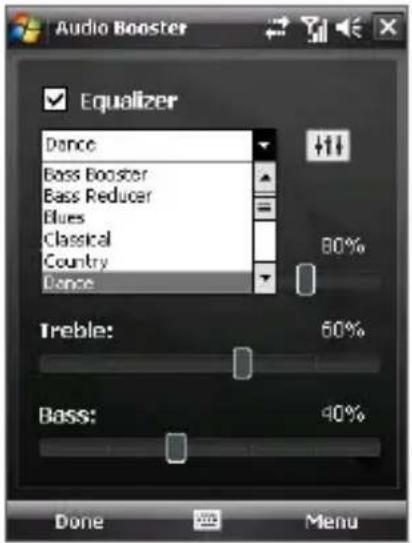
To create a custom equalizer preset
- Select the Equalizer check box to enable the equalizer.
- Tap
- Adjust the frequency bands to your desired values by dragging the equalizer controls. The selected values are indicated on top of the sliders.
- Save your equalizer settings as a preset by tapping Menu > Save as Preset.
- Enter a preset name then tap Done.
The preset you created will be added to the list box.
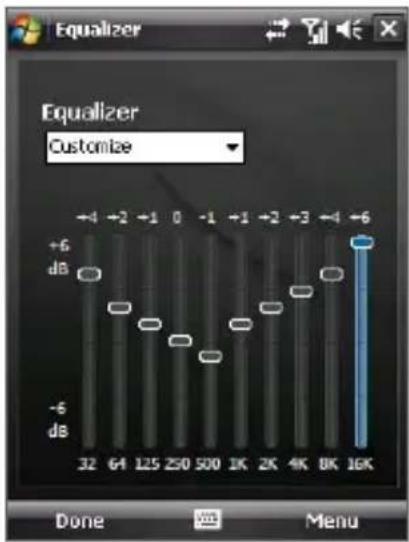
To delete a custom equalizer preset
- Select the Equalizer check box then tap .++
- Tap the Equalizer drop-down menu, then select the preset you want to delete.
- Tap Menu > Delete Preset.
Note You can only delete custom equalizer presets. Equalizer presets that are pre-installed cannot be deleted.
192 Experiencing Multimedia
Chapter 12
Managing Your Device
12.1 Adding and Removing Programs
12.2 Using Task Manager
12.3 Resetting Your Device
12.4 Managing Memory
12.5 Windows Update
12.6 Battery Saving Tips
12.1 Adding and Removing Programs
Before you purchase additional programs for your device, make sure that they are compatible with your device.
To add programs
- Download the program to your PC (or insert the CD or disk that contains the program into your PC). You may see a single *.exe file, a *.zip file, a Setup.exe file, or several versions of files for different device types and processors. Be sure to select a program designed for your device and processor type.
- Read any installation instructions or documentation that comes with the program. Many programs provide special installation instructions.
- Connect your device to the PC.
- Double-click the *.exe file.
To remove programs
- Tap Start > Settings > System tab > Remove Programs.
- In the Programs in storage memory list, select the program you want to remove, and tap Remove.
12.2 Using Task Manager
Task Manager lets you view and stop running programs, configure the button, and enable the Quick Menu on the Today screen.

To open Task Manager
Do one of the following:
- Tap the Quick Menu button on the top right corner of the Today screen to open the Quick Menu, then tap
- Tap Start > Settings > System tab > Task Manager.
To switch back to a running program
Do one of the following:
- Tap the program name in the Quick Menu.
- On the Task Manager screen, tap and hold the program name in the Running tab, then tap Activate.
To configure the Exit ( ) button
You can configure the Exit button to shut down running programs when the button is tapped, or to just temporarily close the program screen but keep the program running.
- On the Task Manager screen, tap the Button tab.
-
Select the Enable the "X" button to end running programs check box.
When the Enable the "X" button to end running programs check box is not selected, tapping the Exit button will only close a program screen. The program is not ended and continues to run in the background. -
Choose the action for shutting down programs (by tapping the button, tapping and holding the button, or both).

- Tap OK.
To close running programs from the Task Manager
-
Tap the Running tab.
-
Do one of the following:
-
Select the check box of the programs that you want to close, and then tap Stop Selected to close them.
- Tap Stop All to close all programs in the list.
- Tap Menu > Stop All but Selected to close all programs except for those whose check boxes are selected.
Tip You can also close running programs from the Quick Menu on the Today screen. See "Quick Menu" in Chapter 1 for details.
To add a running program to the exclusive list
If you add a running program to the Exclusive Programs List, it will not be closed when you tap Stop Selected or Stop All and will not be listed in the Quick Menu on the Today Screen.
- On the Task Manager screen, tap the Running tab.
- Tap and hold the program name in the list, then tap Add Exclusive.
Tip To remove a program from the exclusive list, tap the Exclusive tab, select the check box of that program, then tap Remove.
To set the sorting preference for running programs in the Quick Menu
- On the Task Manager screen, tap the Advanced tab.
- Choose whether to sort according to Program name or Memory usage. The list will be sorted in ascending order.
12.3 Resetting Your Device
Soft reset
Occasionally, you may need to reset your device. A soft (or normal) reset of your device clears all active program memory and shuts down all active programs. This can be useful when your device is running slower than normal, or a program is not performing properly. A soft reset is also necessary after the installation of some programs. If a soft reset is performed when programs are running, unsaved work will be lost.
To perform a soft reset
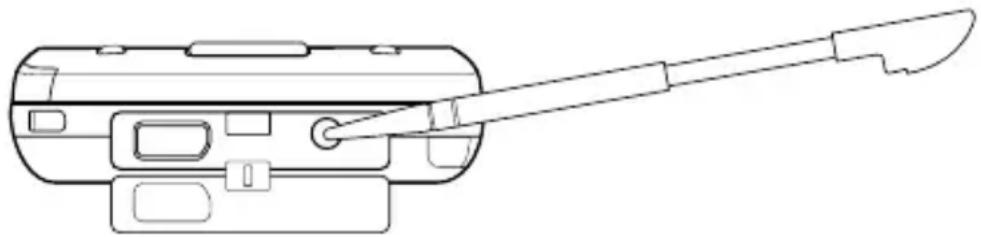
natural_image
Line drawing of a mechanical device with a lever and handle (no text or symbols)Open the rubber cover at the bottom of the device and then with the stylus, press the RESET button. Your device restarts and displays the Today screen.
Hard reset
You can also perform a hard reset (also known as a full reset). A hard reset should be performed only if a normal reset does not solve a system problem. After a hard reset, the device is restored to its default settings -- the way it was when you first purchased it and turned it on. Any programs you installed, data you entered, and settings you customized on your device will be lost. Only Windows Mobile® software and other pre-installed programs will remain.
To perform a hard reset
- Press and hold the TALK and END buttons, and at the same time, use the stylus to press the RESET button at the bottom of your device.
- Release the stylus, but continue pressing the TALK and END buttons until you see the following message on the screen:
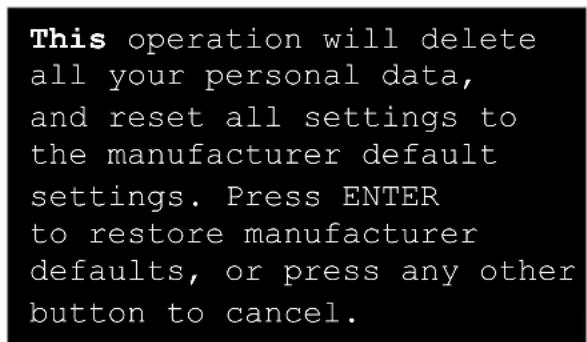
- Release the TALK and END buttons, and then press ENTER on your device.
Warning! Your device will be set back to factory default settings. Please ensure any additional installed programs and/or user data have been backed up before a hard reset is performed.
Important If Encrypt files placed on storage cards is or was enabled before, then backup all files from the storage card before using Clear Storage, hard reset or updating the ROM system software. Otherwise you will no longer be able to access the encrypted files on the storage card. Use ActiveSync or Windows Mobile Device Center to transfer files between your storage card and computer. After the procedure, copy your files back to the storage card.
Clear Storage
Another way of clearing the device storage and reset all settings back to factory default settings is to use the Clear Storage feature. You will lose all your data and files on the device storage when you use Clear Storage, so make sure to do a backup first.
- Tap Start > Settings > System tab > Clear Storage.
- Enter "1234" then tap Yes.
12.4 Managing Memory
To see how much memory is available for use, tap Start > Settings > System tab > Memory. On the Main tab, the amount of memory allocated to file and data storage versus program storage is displayed, as well as the amount of memory in use versus the available memory.
To see available storage card memory, tap Start > Settings > System tab > Memory > Storage Card tab.
If your device is running low on memory, try the following to free memory on your device:
- Close programs you are not currently using.
- Move e-mail attachments to a storage card.
- Move files to a storage card. Tap Start > Programs > File Explorer. Tap and hold the file, and tap Cut. Browse to the storage card folder and tap Menu > Edit > Paste.
- Delete unnecessary files. Tap Start > Programs > File Explorer. Tap and hold the file, and tap Delete.
- Delete large files. To find your largest files, tap Start > Programs > Search. In the Type list, tap Larger than 64 KB, and tap Search.
- In Internet Explorer Mobile, delete temporary Internet files and clear history information. For more information, see "Internet Explorer® Mobile" in Chapter 10.
- Remove programs you no longer use.
- Reset your device.
12.5 Windows Update
You can update Windows Mobile ^® on your device with the latest updates, security patches or fixes, if they are available.
To set up Windows Update
The first time you run Windows Update, you need to set up how you want Windows Update to check for patches on the Microsoft Web site.
- Tap Start > Settings > Systems tab > Windows Update.
- On the Update Setup screen, tap Next.
-
Select how you want to check for updates, Manual or Automatic, then tap Next.
If you select Automatic, you will be asked if you want to use your current data plan to check for updates. Select or clear the Use my data plan to check for and download updates check box and tap Next. -
Tap Finish.
To check for updates
-
Tap Start > Settings > Systems tab > Windows Update.
-
Tap Check Now.
Note Windows Mobile® updates may not be available at all times. You can check the Windows Mobile® Web site for update information.
To change Windows Update options
- Tap Start > Settings > Systems tab > Windows Update.
- Tap Menu and select the option you want to change.
- Tap Connections to change how the device connects to the Internet when checking for updates.
- Tap Change Schedule to change how Windows Update checks for Windows Mobile® updates.
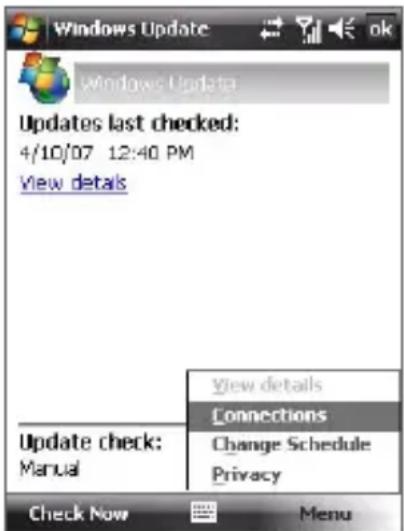
12.6 Battery Saving Tips
How long your battery power lasts depends on battery type and how you use your device. Try the following to help preserve battery life:
- When the device is not in use, press POWER to switch off the display.
- Tap Start > Settings > System tab > Power to open the Power settings screen. On the Advanced tab of the Power settings screen, you can specify when your device automatically turns off the display to conserve battery power. For optimum conservation, specify 3 minutes or less.
- Use the AC adapter to plug your device into external power whenever possible, especially when using a storage card or when using a modem or other peripherals.
- Adjust the backlight settings. For more information, see "To set the backlight to dim after a time delay" in Chapter 4.
- Turn Bluetooth off when you are not using it. Make your device visible to other devices only when you are trying to establish a Bluetooth partnership. For more information about Bluetooth, see Chapter 10.
- Lower the volume.
- Close battery-intensive programs, such as the Camera, when you are done using them. Make sure the programs are ended and are not continuously running in the background.
Chapter 13
Using Other Applications
13.1 Voice Command 13.2 Using Java

13.1 Voice Command
Voice Command lets you make phone calls, open programs, play back music, get calendar information, and more, just by using your voice. It only responds to a set of predefined commands and does not allow you to record your own commands.
This section gives a few examples on how to use Voice Command. For more information, see Voice Command Help on the device. To access the Help, tap Start > Settings > Personal tab > Voice Command then tap Start > Help.
To use Voice Command
- Hold your device a few inches away from your mouth.
- Press and hold the Volume Up button that is located on the upper left side of your device.
You will then hear a sound, and you will see a Microphone icon ( 📄 on the title bar.
Press and hold to launch Voice Command
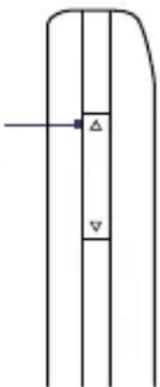
-
In a clear voice, say a command. For example, say "Help" to ask for information about using Voice Command.
-
Voice Command then asks you a question. Speak out your answer.
To place a call
You can call contacts that are stored on your device or SIM card, dial a phone number, redial, and place a return call.
-
Press and hold the Volume Up button until the Microphone icon (💡) appears on the title bar.
-
In a clear voice, say one of the following commands:
-
"Call [contact name]" to call a device contact or SIM contact.
- "Dial [number]" to dial a phone number.
- "Redial" to repeat the last call made.
- "Callback" to return the last call received.

- "Call [contact name] at [location]" to call a contact at a specific number. For example, say:
"Call Ann at mobile"
"Call Ann at home"
"Call Ann at work"
- Voice Command will then confirm with you the contact or number to call. Say "Yes" or "Correct."
If Voice Command is wrong about the contact or number to call, say "No" or "Incorrect" to try again.
- Your device starts to call the contact or number.
To open a program
-
Press and hold the Volume Up button until the Microphone icon (图标) appears on the title bar.
-
In a clear voice, say "Start", "Open", or "Show" then the program name.
To request information from your calendar
-
Press and hold the Volume Up button until the Microphone icon (图标) appears on the title bar.
-
In a clear voice, ask for the information you want to retrieve. For example, say:
"What's my next appointment?"
"What's my next meeting?"
"What's my schedule tomorrow?"
To request for date and time
-
Press and hold the Volume Up button until the Microphone icon (图标) appears on the title bar.
-
In a clear voice, say "What date is it?" Voice Command then tells you the current date.
-
Press and hold the Volume Up button again, and then say "What time is it?"
-
Voice Command then tells you the current time.
13.2 Using Java
MIDlets are Java applications such as games and tools that can run on mobile devices, while a MIDlet suite is a collection of one or more MIDlets. The Java program lets you download, install and manage MIDlets or MIDlet suites on your device. Your device supports Java 2 Micro Edition, J2ME.
To open the Java program
- Tap Start > Programs > Java.
Install and launch MIDlets/MIDlet suites
There are two ways to install a MIDlet/MIDlet suite.
To download and install via Internet Explorer Mobile
- On the Java screen, tap Menu > Install > Browser to open Internet Explorer Mobile.
- Locate the MIDlet/MIDlet suite while connected to the Internet.
- Select the MIDlet/MIDlet suite to download.
- Information about the MIDlet/MIDlet suite is then displayed. Tap Continue.
- Confirm to start downloading.
- Select
or a folder where to install the MIDlet suite to, then tap OK.
To install from your device
You can copy MIDlets/MIDlet suites from the PC to your device using the USB sync cable, infrared, or Bluetooth connection. Copy them to the root folder or any subfolder on your device.
- On the Java screen, tap Menu > Install > Local Files. The program then searches for MIDlets/MIDlet suites on your device and displays them in a list.
- From the list, tap the MIDlet/MIDlet suite that you want to install.
- Confirm to start the installation.
- Select
or a folder where to install the MIDlet suite to, then tap OK.
To run a MIDlet/MIDlet suite
Do one of the following:
• After installation of the MIDlet/MIDlet suite is complete, tap Yes.
- On the Java screen, open the folder that contains the MIDlet/MIDlet suite. Select the MIDlet/MIDlet suite then tap Launch.
To stop running a MIDlet/MIDlet suite
- Tap Exit or Quit if presented on the MIDlet/MIDlet suite's screen or menu.
Manage MIDlets/MIDlet suites
You can organize MIDlets/MIDlet suites into folders for easy identification, move them from one folder to another, rename or update them, and more. If the device memory is full, uninstall some MIDlets/MIDlet suites to free up memory space.
To create folders
- Tap Menu > New Folder.
- Enter a folder name then tap Create.
To move a MIDlet to another folder
- Tap and hold a MIDlet/MIDlet suite then tap Move. Alternatively, you can tap Menu >Actions >Move.
- Tap the destination folder.
To rename a MIDlet or folder
- Tap and hold a MIDlet/MIDlet suite then tap Rename. Alternatively, you can tap Menu >Actions >Rename.
- Enter a new name, then tap Save.
To update a MIDlet/MIDlet suite
- Tap and hold a MIDlet/MIDlet suite then tap Update. Alternatively, you can tap Menu >Actions >Update. Java will search for updates for the selected MIDlet/MIDlet suite where it was installed from before.
To view information about a MIDlet/MIDlet suite
- Tap Menu >Actions >Info.
- If the MIDlet/MIDlet suite is protected by DRM (Digital Rights Management), tap Menu >Actions >Protection to view status and usage rights.
To uninstall MIDlets
Before you uninstall a MIDlet, make sure that it is not running.
- Tap and hold the MIDlet, and tap Uninstall.
- Tap OK to confirm.
Note To uninstall all MIDlets and folders from the current folder, tap Menu > Uninstall All.
To set MIDlet permission settings
For each MIDlet already installed, Java allows you to individually set permission options to perform certain actions. A MIDlet can be enabled to perform these actions:
| Action Description | |
| Local connection Enables a MIDlet to access device connections such as via Bluetooth. | |
| Location information access | Determines whether a MIDlet can access location related information. |
| Recording Enables a MIDlet to record audio and images. | |
| Messaging Enables a MIDlet to send and/or receive SMS/MMS. This uses airtime and may incur costs. | |
| Net access Enables a MIDlet to access the Internet. This uses airtime and may incur costs. | |
| Auto start Enables a MIDlet to be started automatically to handle an incoming event. If there is another MIDlet running, it may be interrupted. | |
| Read user data Allows a MIDlet to read data on the device memory or storage card. | |
Note Some actions may not be available for certain MIDlets.
You can set permission options for performing each action by following these steps:
-
Tap and hold a MIDlet then tap Security. Alternatively, you can tap Menu >Actions >Security.
-
For each action, choose one of the following permission options:
-
Always. Enables a MIDlet to perform the action.
- Never. Prohibits a MIDlet to perform the action.
- Prompt. Asks for your confirmation whenever a MIDlet attempts to perform the action.
3. Tap Save.
Note Changes to permission settings for a MIDlet in a multi-MIDlet suite will affect the settings for the whole suite.
208 Using Other Applications
Appendix
A.1 Specifications
A.2 Regulatory Notices
A.1 Specifications
System Information
| Processor Qualcomm® MSM 7201TM 400 MHz |
| Memory - ROM : 256 MB- RAM : 128 MB DDR(Figures are the total ROM and RAM memory available for use and storage.Since the memory is shared by the Operating System, applications, and data,the actual available memory is less than what is written). |
Operating System Windows Mobile® 6.1 Professional
Power
| Battery Rechargeable Li-Polymer battery, 1350 mAh | |
| Charging Time 3.5 hours | |
| Battery Life (estimates) | Standby time: GSM: Up to 361 hoursWCDMA: Up to 325 hours(Subject to network and phone usage) |
| Talk time: GSM: Up to 410 minutesWCDMA: Up to 268 minutes(Subject to network and phone usage) | |
| Media playback timeUp to 8 hours (WMV)Up to 12 hours (WMA) | |
AC Adapter Voltage range/frequency: 100 - 240V AC, 50/60 Hz
DC output: 5V and 1A
Phone
| Network HSDPA/WCDMA: Dual-band (850 and 1900 MHz)HSDPA: Up to 384kbps for upload and 3.6Mbps for download;WCDMA: Up to 384kbps for upload and downloadGSM/GPRS/EDGE: Quad-band (850, 900, 1800, and 1900 Mhz)(The device will operate on frequencies available from the cellular network) |
Internal Antenna Yes
Display
LCD Type 2.6" TFT-LCD with backlight LEDs, touch-sensitive screen
Resolution 240 x 320 with 65,536 colors
Orientation Portrait and Landscape
Physical
Dimensions 107 mm (L) x 55 mm (W) x 17.05 mm (T)
Weight 120 g (with battery)
Camera Module
Type Main Camera: 2 megapixel color CMOS camera with auto focus
Second Camera: CIF CMOS
Resolution Photo: 1600 x1200 (UXGA), 1280 x 960 (SXGA),
640 x 480 (VGA), 320 x 240 (QVGA), 160 x 120 (QQVGA)
Video: 176 x 144 (QCIF), 128 x 96
Digital Zoom Up to 8X
Connections
I/O Port HTC ExtUSB ™: 11-pin mini-USB and audio jack in one
Hi-speed USB 2.0
Wireless
Bluetooth 2.0
Connections
Car Antenna
External connector for GSM/EDGE
Connector
Audio
Audio Controller AGC
Ring tone Formats AAC, AAC+, eAAC+, MP3, WMA, WAV, QCELP, MPEG4, AMR-NB,
AMR-WB
40 polyphonic and Standard MIDI format 0 and 1 (SMF) / SP MIDI
212 Appendix
Controls and Lights
Device Control • HTC TouchFLO™
- 4-way NAVIGATION CONTROL with ENTER button
- Two phone functions : TALK and END
• Volume Buttons - CAMERA button
- POWER button
- RESET button
Hardware Keyboard
20-key QWERTY keyboard
LEDs The right LED shows Green and Amber lights for HSDPA/WCDMA/
GSM/GPRS/EDGE standby, message, and network status as well as for notification and battery charging status. Shows a flashing red light when the battery level reaches 5% or lower.
The left LED shows a flashing Blue light when the Bluetooth system is powered up and ready to transmit/receive Bluetooth radio signals.
Expansion Slots
Card Slot microSD™ (SD 2.0 compatible)
A.2 Regulatory Notices
Regulatory Agency Identifications
For regulatory identification purposes, your product is assigned a model number of NEON300.
To ensure continued reliable and safe operation of your device, use only the accessories listed below with your NEON300.
The Battery Pack has been assigned a model number of NEON161.
Note This product is intended for use with a certified Class 2 Limited Power Source, rated 5 Volts DC, maximum 1 Amp power supply unit.
Federal Communications Commission Notice
This device complies with part 15 of the FCC Rules. Operation is subject to the following two conditions: (1) This device may not cause harmful interference, and (2) this device must accept any interference received, including interference that may cause undesired operation.
This equipment has been tested and found to comply with the limits for a Class B digital device, pursuant to Part 15 of the FCC Rules. These limits are designed to provide reasonable protection against harmful interference in a residential installation. This equipment generates, uses, and can radiate radio frequency energy and, if not installed and used in accordance with the instructions, may cause harmful interference to radio communications. However, there is no guarantee that interference will not occur in a particular installation. If this equipment does cause harmful interference to radio or TV reception, which can be determined by turning the equipment on and off, the user is encouraged to try to correct the interference by one or more of the following measures:
- Reorient or relocate the receiving antenna.
- Increase the separation between the equipment and receiver.
- Connect the equipment into an outlet on a circuit different from that to which the receiver is connected.
- Consult the dealer or an experienced radio or television technician for help.
Safety precautions for RF exposure
- Use only original manufacturer-approved accessories, or accessories that do not contain any metal.
- Use of non-original manufacturer-approved accessories may violate your local RF exposure guidelines and should be avoided.
Exposure to Radio Frequency (RF) Signals
Your device contains a radio transmitter and receiver. The radiated output power is far below the international radio frequency exposure limits. These limits are part of comprehensive guidelines and establish permitted levels of RF energy for the general population. The guidelines are based on the safety standards previously set by international standards bodies:
• American National Standards Institute (ANSI) IEEE. C95.1-1992
• National Council on Radiation Protection and Measurement (NCRP). Report 86.1986
• International Commission on Non-Ionizing Radiation Protection (ICNIRP) 1996
- Ministry of Health (Canada), Safety Code 6. The standards include a substantial safety margin designed to assure the safety of all persons, regardless of age and health.
The exposure standard for wireless mobile phones employs a unit of measurement known as the Specific Absorption Rate, or SAR. The standard incorporates a substantial margin of safety to give additional protection for the public and to account for any variations in usage.
As with other mobile radio transmitting equipment, users are advised that for satisfactory operation of the equipment and for the safety of personnel, it is recommended that no part of the human body be allowed to come too close to the antenna during operation of the equipment.
Your device has an internal antenna. Use only the supplied integral antenna. Use of unauthorized or modified antennas may impair call quality and damage the phone, causing loss of performance and SAR levels exceeding the recommended limits as well as result in non-compliance with local regulatory requirements in your country.
To assure optimal phone performance and ensure human exposure to RF energy is within the guidelines set forth in the relevant standards; always use your device only in its normal-use position. Do not touch or hold the antenna area unnecessarily when placing or receiving a phone call. Contact with the antenna area may impair call quality and cause your device to operate at a higher power level than needed. Avoiding contact with the antenna area when the phone is IN USE optimizes the antenna performance and the battery life.
Tests for SAR are conducted using standard operating positions specified by the FCC with the phone transmitting at its highest certified power level in all tested frequency bands. Although the SAR is determined at the highest certified power level, the actual SAR level of the phone while operation can be well below the maximum value. This is because the phone is designed to operate at multiple power levels so as to use only the power required to reach the network. In general, the closer you are to a wireless base station antenna, the lower the power output. Before a phone model is available for sale to the public, it must be tested and certified to the FCC that it does not exceed
the limit established by the government-adopted requirement for safe exposure. The tests are performed in positions and locations (for example, at the ear and worn on the body) as required by the FCC for each model. Body-worn measurements were tested for typical body-worn operations with the back of the device kept 1.5 cm from the body.
SAR Information
xxx W/Kg @ 1g (FCC)
Telecommunications & Internet Association (TIA) safety information
Pacemakers
The Health Industry Manufacturers Association recommends that a minimum separation of six inches be maintained between a handheld wireless phone and a pacemaker to avoid potential interference with the pacemaker. These recommendations are consistent with the independent research by and recommendations of Wireless Technology Research. Persons with pacemakers:
- Should ALWAYS keep the phone more than six inches from their pacemaker when the phone is turned ON.
- Should not carry the phone in a breast pocket.
- Should use the ear opposite the pacemaker to minimize the potential for interference. If you have any reason to suspect that interference is taking place, turn the phone OFF immediately.
Hearing Aids
Some digital wireless phones may interfere with some hearing aids. In the event of such interference, you may want to consult your service provider, or call the customer service line to discuss alternatives.
Other Medical Devices
If you use any other personal medical device, consult the manufacturer of your device to determine if they are adequately shielded from external RF energy. Your physician may be able to assist you in obtaining this information.
Turn the phone OFF in health care facilities when any regulations posted in these areas instruct you to do so. Hospitals or health care facilities may be using equipment that could be sensitive to external RF energy.
WEEE Notice
The Directive on Waste Electrical and Electronic Equipment (WEEE), which entered into force as European law on 13th February 2003, resulted in a major change in the treatment of electrical equipment at end-of-life.
The purpose of this Directive is, as a first priority, the prevention of WEEE, and in addition, to promote the reuse, recycling and other forms of recovery of such wastes so as to reduce disposal.

The WEEE logo (shown at the left) on the product or on its box indicates that this product must not be disposed of or dumped with your other household waste. You are liable to dispose of all your electronic or electrical waste equipment by relocating over to the specified collection point for recycling of such hazardous waste. Isolated collection and proper recovery of your electronic and electrical waste equipment at the time of disposal will allow us to help conserving natural resources. Moreover, proper recycling of the electronic and electrical waste equipment will ensure safety of human health and environment. For more information about electronic and electrical waste equipment disposal, recovery, and collection points, please contact your local city centre, household waste disposal service, shop from where you purchased the equipment, or manufacturer of the equipment.
RoHS Compliance
This product is in compliance with Directive 2002/95/EC of the European Parliament and of the Council of 27 January 2003, on the restriction of the use of certain hazardous substances in electrical and electronic equipment (RoHS) and its amendments.
Index
218 Index
Symbols
3D sound 189
3G 144
A
A2DP 156
ActiveSync
- overview 43
- set up 85
- synchronize 86, 127
Add and remove programs 194
Adobe Reader LE 43, 137
Airplane mode 142
Alarm 76
Answer/end a call 67
Appointment search 60
Attachment
- add to e-mail 119
- download 120
Audio Booster 43, 189
B
Backlight 74, 75
Basic settings 74
Bass effects 189, 190
Battery
- battery information 20
- charge battery 23
- save battery power 200
Beam
- via Bluetooth 157
Block Recognizer 58
Bluetooth
- Bluetooth Explorer 43, 159
- Bluetooth file sharing 159
- Bluetooth shared folder 159
-
hands-free headset 156
-
modem 153
- modes 154
- overview 154
- partnership (pairing) 155
- stereo headset 156
- synchronize 87
- turn on and off 142
- visible 155
Burst capture mode 165
C
Calculator 43
Calendar 42, 96
Calendar search 60
Calibration 24
Camera
- capture modes 164, 165
- controls 166
- file formats 165
- icons 166
- overview 43
- Quick Settings Panel 170
- settings 170
- specifications 211
Camera Album 43, 176
Clear Storage 198
Clock & Alarms 46, 74
Comm Manager 43, 47, 142
Company Directory 133
Conference call 69
Connection Setup 143
Connect device to Internet
- Dial-up 145
- GPRS 144
- start a connection 146
- ways of connection 144
Contacts 42, 90
Contacts Picture capture mode 165
Contacts search 60
Copy
- contacts to SIM card 94
- copy and manage files 138
- media files from PC to device 184
- SIM contacts to device 94
Customize
- Start menu 79
- Today screen 77
D
Device ID 75
Device name 75
Dial-up 145
Dimensions and weight 211
Direct Push 128, 142
Disconnect data connection 142
Download e-mail 122
Draw 101
E
- IMAP4 116
- mail server settings 117
- POP3 116
- search 60
- send 118
- settings (POP3/IMAP4) 117
- setup wizard 115
- types of e-mail accounts 115
EDGE 144
Edit picture 181
Emergency call 71
Emoticon 113
Equalizer 189, 190
Excel Mobile 42, 136
Exchange Server 126
F
Favorite contacts 34
File Explorer 43, 138
Find contact
- Company Directory 133
- on device 92
Finger panning 37
Finger scrolling 37
Forward e-mail 121
G
Games 43
GIF animation 181
GPRS/3G 144
H
Hard reset 197
Help 42
Help search 60
Home 29
HSDPA 48
HTC Home 28
|
IMAP4 116
Input methods
- Block Recognizer 58
- Keyboard 54
- Letter Recognizer 57
- Symbol Pad 56
- Transcriber 58
Input Panel 50
International call 71
Internet 144
Internet Explorer Mobile 42, 146
Internet Sharing 43, 152
220 Index
K
Keyboard
- on-screen 54
L
Landscape 24
Launcher 31, 36
Letter Recognizer 57
Library screen (Windows Media Player Mobile) 183
Live Messenger 150
M
Mail search 60
Make call
- from Call History 65
- from Contacts 64
- from Phone program 64
- from SIM Manager 66
- from Speed Dial 65
- from TouchFLO 65
Memory 198, 210
Messaging
- about 42, 106
- e-mail 115, 118
- multimedia (MMS) 111
- text (SMS) 107
Messenger 43, 150
microSD card 22
Microsoft Office Mobile 42, 136
MMS 111
- add audio clip 114
- add photo/video 112
- add text 113
- blacklist 115
- create MMS message 112
- MMS settings 111
- reply message 114
- view message 114
MMS Video capture mode 165
Modem
- Bluetooth 153
- USB 153
Multimedia 36, 111, 182
Multipress mode 52
Music playback
- TouchFLO 36
- Windows Media Player Mobile 185
Mute 69
N
Notes 43, 101
Notes search 60
Now Playing screen (Windows Media Player Mobile) 183
Numeric mode 53
0
Office Mobile 42, 136
OneNote Mobile 42
Onscreen input methods 50
Open PDF file 137
Owner information 78
P
Panning
- finger panning 37
Panorama capture mode 165
Password 80
Phone 42, 62, 64
Phone services 77
Photo capture mode 165
Pictures & Videos
- edit picture 181
- file formats 180
- overview 44
- play GIF animation 181
- play videos 181
- view pictures 180
Picture Theme capture mode 165
PIN 62,79
Playback screen (Windows Media Player Mobile) 183
Playlists
- Windows Media Player Mobile 186
Play GIF animation 181
Play media 185
Play music
- Touch Cube (TouchFLO) 36
- Windows Media Player Mobile 185
Play videos 181
Plug-in
- HTC Home 28
POP3 116
Portrait 24
PowerPoint Mobile 42, 136
Programs
- Audio Booster 189
Put call on hold 68
Q
QuickTasks 28
Quick menu 27
QWERTY keyboard 50, 52
R
Receive call 67
Record
- voice note 102
- voice recording 103
Regional settings 74
Regulatory notices 213
Reply
- e-mail 121
- MMS 114
Reset
- clear storage 198
- hard reset 196
- soft reset 196
Review screen (Camera) 171
Ring tone 75
Ring type 75
S
Screen text size 75
Scrolling
- finger scrolling 37
Search 44,60
Send
- e-mail 118
- MMS message 112
- text message (SMS) 107
Settings 45, 74
- camera 170
Settings (Connections tab)
- Beam 47
- Bluetooth 47, 154
- Comm Manager 43, 47, 142
- Connections 48, 144, 145
- CSD Line Type 48
- GPRS Setting 48
- HSDPA 48
- Network Cards 48
- SMS Service 48
- USB to PC 48, 87
Settings (Personal tab)
- Buttons 45
- Input 45
- Keyboard Sliding Sound 45
- Large Start Menu 45
- Lock 45,80
222 Index
- Menus 45, 79
- Owner Information 45,78
- Phone 45, 75, 77
- Sounds & Notifications 45, 76
- Today 45,77
- Voice Commander 45
Settings (System tab)
- About 46,75
- Backlight 46, 74, 75
- Certificates 46
- Clear Storage 46, 198
- Clock & Alarms 46, 74, 76
- Device Information 46
- Encryption 46,80
- Error Reporting 46
- External GPS 46
- Keypad QuickTasks 46
- Key Lock 46
- Long Press End Key 46
- Memory 47, 198
- Microphone AGC 47
- Power 25, 47, 200
- Regional Settings 47, 74
- Remove Programs 47, 194
- Screen 24, 47, 75
- Task Manager 47, 194
- TouchFLO 39,47
Shortcuts 31, 36
SIM card 20
SIM Manager 94
- copy contacts to SIM card 94
- copy SIM contacts to device 94
- create SIM contact 94
- make call 66
- overview 44
Smart Dial 70
SMS 107,118
Soft reset 196
Sounds & Notifications 76
Speakerphone 69
Specifications 210
Speed Dial 65
Sports capture mode 165
Start menu 26,79
Status icons 40
STK (SIM Tool Kit) Service 44
Storage card 20
- check available space 198
- copy files 139
- encrypt 80
Streaming Media 44, 187
Swap/switch calls 68
Synchronize
- ActiveSync 86
- change information types 86
- via Bluetooth 87
- Windows Media Player 88, 184
- with computer 86
- with Exchange Server 126
System information 210
T
Tasks 44, 99
Tasks search 60
Task Manager 194
Text messages
- copy from and to SIM card 108
- send 107
Text size (screen) 75
Threaded SMS 109
Today screen 25,77
TouchFLO 33, 47, 65
Touch Cube (TouchFLO) 33
Touch Keyboard 54
Touch Keypad 55
Transcriber 58
Treble effects 189
Troubleshoot
- sync connection 87
- Windows Media Player Mobile 186
Turn device on and off 23
Turn phone function on and off 62, 142
U
USB modem 153
USB to PC 87
Using Java 204
V
Vibrate 63
Vibration 75
Video capture mode 165
View
- MMS 114
- pictures 180
View Web page 146
Voicemail 66
Voice call 64
Voice Command 202
Voice Recorder 44, 102, 103
Volume 63
W
Weather 29
Windows Live 44, 148
Windows Live Messenger 43, 150
Windows Media Player Mobile
- file formats 182
- menus 183
- overview 44
- playlists 186
- troubleshoot 186
Windows Mobile Device Center 83
Windows Update 47, 199
Word Mobile 42, 136
X
xT9 mode 53
Z
ZIP
- create archive 140
- open zip file and extract files 139
- overview 44, 139
Zoom (Camera) 168
224 Index

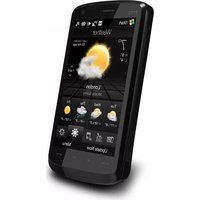
- Please Read Before Proceeding
- PRIVACY RESTRICTIONS
- INTELLECTUAL PROPERTY RIGHT INFORMATION
- Disclaimers
- Limitation of Damages
- Important Health Information and Safety Precautions
- ELECTRICAL SAFETY
- SAFETY PRECAUTIONS FOR PROPER GROUNDING INSTALLATION
- SAFETY PRECAUTIONS FOR POWER SUPPLY UNIT
- - Use the correct external power source
- - Handle battery packs carefully
- • Take extra precautions
- SAFETY PRECAUTIONS FOR DIRECT SUNLIGHT
- PREVENTION OF HEARING LOSS
- SAFETY IN AIRCRAFTS
- ENVIRONMENT RESTRICTIONS
- EXPLOSIVE ATMOSPHERES
- ROAD SAFETY
- SAFETY PRECAUTIONS FOR RF EXPOSURE
- INTERFERENCE WITH MEDICAL EQUIPMENT FUNCTIONS
- HEARING AIDS
- NONIONIZING RADIATION
- General Precautions
- - Avoid applying excessive pressure to the device
- - Heed service markings
- • Damage requiring service
- - Avoid hot areas
- - Avoid wet areas
- - Avoid using your device after a dramatic change in temperature
- - Avoid pushing objects into product
- - Mounting accessories
- - Avoid unstable mounting
- - Use product with approved equipment
- - Adjust the volume
- - Cleaning
- Contents
- Chapter 1 Getting Started 15
- Chapter 2 Entering and Searching Information 49
- Chapter 3 Using Phone Features 61
- Chapter 4 Setting Up Your Device 73
- Chapter 5 Synchronizing Information With Your Computer 81
- Chapter 6 Organizing Contacts, Appointments, Tasks, and Other Information 89
- Chapter 7 Exchanging Messages 105
- Chapter 8 Working With Company E-mails and Meeting Appointments 125
- Chapter 9 Working With Documents and Files 135
- Chapter 10 Getting Connected 141
- Chapter 11 Experiencing Multimedia 163
- Chapter 12 Managing Your Device 193
- Chapter 13 Using Other Applications 201
- Appendix 209
- Index 217
- Chapter 1
- Getting Started
- Getting to Know Your Device and Accessories
- Installing the USIM/SIM Card, Battery,
- The Today Screen
- The Start Menu
- Status Icons
- Front panel
- Left panel Right panel
- Volume Up Button
- Volume Down Button
- microSD Slot
- Lanyard/Strap holder
- POWER
- CAMERA
- Stylus
- Back panel
- Bottom panel
- RESET
- Sync Connector/Earphone Jack/AC adapter connector
- Accessories
- No. Accessory Function
- ReadMeFirst
- Disc
- Installing the USIM/SIM Card, Battery, and Storage Card
- To remove the back cover
- To install the USIM/SIM card
- Getting Started
- To install the battery
- To remove the battery
- To install the microSD™ card
- Starting Up
- Turn your device on and off
- To turn on the power
- To turn off the power
- Charge the battery
- Warning!
- Calibrate the device
- Manage screen settings
- Switch your device to Sleep mode
- To specify the timeout period before your device goes into Sleep mode
- Enlarged Title Bar
- Disable Large Start Menu
- To disable the large Start Menu
- Quick Menu
- QuickTasks
- HTC Home™
- To switch between the different components of HTC Home
- Home
- Weather
- To select your city
- To view weather information
- To customize weather settings
- Launcher
- Getting Started
- Sound
- TouchFLO™
- Touch Cube
- To open the Touch Cube
- To close the Touch Cube
- To navigate the Touch Cube
- Touch Cube screens
- Finger scrolling and finger panning
- To use finger scrolling
- To use finger panning
- To continuously pan
- To go to the next or previous message
- To go to the next or previous messaging account
- TouchFLO settings
- Icons that appear in this area
- Programs
- Programs in the Start Menu
- Icon Description
- Programs screen
- Settings
- Connections tab
- Chapter 2
- Entering and Searching Information
- Entering Information
- 20-key QWERTY hardware keyboard
- Onscreen input methods
- Icon Input method
- Using the 20-key QWERTY Hardware Keyboard
- Multipress mode
- To enter text in Multipress mode
- XT9 mode
- To enter text in XT9 mode
- Numeric mode
- To enter numbers
- Using the Onscreen Keyboard
- To enter text using the onscreen Keyboard
- To enlarge the onscreen Keyboard
- Using Touch Keyboard
- To use the Touch Keyboard
- To change Touch Keyboard and XT9 settings
- Using Touch Keypad
- To use the Touch Keypad
- To change Touch Keypad and XT9 settings
- Using Symbol Pad
- To open the Symbol Pad
- To change Symbol Pad settings
- Using Letter Recognizer
- To use Letter Recognizer
- Using Block Recognizer
- To use Block Recognizer
- Using Transcriber
- To write using Transcriber
- To enter punctuation and symbols
- Tips
- To edit text
- Searching Information
- To search for a file or an item
- Note
- Chapter 3
- Using Phone Features
- Using the Phone
- The Phone screen
- Enter your PIN
- Turn the phone function on and off
- To enable or disable the phone function
- Airplane Mode
- To enable or disable Airplane Mode
- Adjust the device volume
- Notes
- Making a Call
- Make a call from Phone
- Make a call from Contacts
- To choose one of the numbers of a contact to dial
- Make a call from TouchFLO
- Make a call from Call History
- One-touch Speed Dial
- To create a Speed Dial entry
- To call voicemail
- Make a call from SIM Manager
- To call a SIM contact
- Receiving a Call
- To answer or reject an incoming call
- To reject a call and send a text message
- To end a call
- To add a new phone number to your Contacts list after a call
- To check a missed call
- To set a reminder for missed calls
- To put a call on hold
- To switch between two calls
- To set up a conference call
- To turn on and off the Speakerphone
- To mute a call
- Smart Dial
- To find a contact name or number
- Make a call or send a text message using Smart Dial
- Additional Dialing Information
- Make an emergency call
- Make an international call
- Chapter 4
- Setting Up Your Device
- Basic Settings
- Time and date
- To set the time and date
- To set the time and date for a different location
- Regional settings
- Display settings
- To adjust screen brightness
- To set the backlight to dim after a time delay
- To increase or decrease the size of text on the screen
- Device name
- To change the device name
- Ringer settings
- To change the ring type and ring tone
- Tip
- Alarms and notifications
- To set an alarm
- To choose how to be notified about events or actions
- Phone services
- To access and change settings of phone services
- Personalizing the Today Screen
- To customize the Today screen
- To use a custom background image
- To display owner information
- To set options for displaying appointments on the Today screen
- To set options for displaying tasks on the Today screen
- Customize the Start menu
- Protecting Your Device
- Protect your SIM card with a PIN
- To change the PIN
- Protect your device with a password
- To set a device password
- Encrypt files on your storage card
- Chapter 5
- Synchronizing Information With Your Computer
- About Synchronization
- Setting Up Windows Mobile® Device Center on Windows Vista®
- Setting Up ActiveSync® on Windows XP®
- Synchronizing With Your Computer
- Synchronizing via Bluetooth
- Synchronizing Music and Video
- Ways to synchronize
- Set up synchronization in Windows Mobile Device Center
- Use Windows Mobile Device Center
- Install ActiveSync
- Set up synchronization in ActiveSync
- Start and stop synchronization
- From your device
- From Windows Mobile Device Center
- From ActiveSync on your PC
- Change which information is synchronized
- Troubleshoot sync connection problem
- To synchronize with a computer via Bluetooth
- Chapter 6
- Organizing Contacts, Appointments, Tasks, and Other Information
- Contacts
- Add new contacts
- To add a contact on your device
- To add a contact to your SIM card
- View, organize and search
- To view contact information
- Organizing Contacts, Appointments, Tasks, and Other Information
- To group similar contacts
- To view contacts by category
- To find a contact on your device
- Share contact information
- To beam a contact's details
- To send contact information via text messaging
- To send contact information as a vCard
- SIM Manager
- To create a contact on your SIM card
- To copy SIM contacts to your device
- To copy contacts to the SIM card
- To store your SIM card's phone number
- Name Phone
- Calendar
- Create appointments
- To schedule an appointment
- To set a default reminder for all new appointments
- View appointments
- Send appointments
- To send a meeting request
- To send appointment details as a vCalendar
- Tasks
- To create a task
- To change the priority of a task
- To set the default reminder for all new tasks
- To show start and due dates in the task list
- To locate a task
- To send task information as a vCalendar
- Notes
- To create a note
- To draw in a note
- Organizing Contacts, Appointments, Tasks, and Other Information
- To record a voice note
- To change recording formats
- Voice Recorder
- To record your voice
- To play back a voice recording
- To send the voice recording through MMS
- To send the voice recording via e-mail
- To beam the voice recording
- To set the voice recording as a ring tone
- To rename or move a recording
- Chapter 7
- Exchanging Messages
- Messaging
- To select a messaging account
- To configure message account settings
- To automatically add a signature in outgoing messages
- Text Messages
- Send text messages
- To compose and send a text message
- Copy text messages from and to the SIM card
- Threaded SMS
- To respond to a message
- To copy a message in the thread to the SIM card
- To delete a message in the thread
- To reply to a text message with an MMS message
- MMS
- Change MMS settings
- To configure MMS message settings
- Exchanging Messages
- Tap Done.
- Create and send MMS messages
- To compose an MMS message
- To add text to an MMS message
- To add an audio clip to an MMS message
- Tap Insert audio.
- View and reply to MMS messages
- To view an MMS message
- To reply to an MMS message
- To block a phone number from sending you MMS messages
- Types of E-mail Accounts
- E-mail Setup Wizard
- Set up your device to synchronize Outlook e-mail with the computer
- Set up a POP3 or IMAP4 e-mail account
- To specify e-mail server settings
- To customize download and format settings
- Using E-mail
- Create and send messages
- To compose and send a message
- To add an attachment to a message
- Fetch Mail for POP3/IMAP4 e-mail accounts
- Filter the Inbox message list
- View and reply to messages
- To read an incoming message
- To download an attachment
- To reply to or forward a message
- To view and reply to HTML e-mails
- Exchanging Messages
- Download messages
- To send and receive e-mail for an Outlook account
- To send and receive e-mail for a POP3/IMAP4 account
- Customize e-mail settings
- To change the download size and format for Outlook e-mail
- To change the download size and format for POP3/IMAP4 e-mail
- To automatically receive attachments on Outlook e-mails
- To automatically receive attachments on IMAP4 e-mails
- To store attachments on a storage card
- Chapter 8
- Working With Company E-mails and Meeting Appointments
- Synchronizing Your Device with the Exchange Server
- Set up an Exchange Server connection
- Start synchronization
- Working With Company E-mails
- Automatic synchronization through Direct Push
- To enable Direct Push via Comm Manager
- To enable Direct Push via ActiveSync
- Scheduled synchronization
- Instant download through Fetch Mail
- Search for e-mails on the Exchange Server
- Working With Company E-mails and Meeting Appointments
- Flag your messages
- To flag or unflag a message
- Out-of-office auto-reply
- To send out-of-office auto-reply messages
- Managing Meeting Requests
- To reply to a meeting request
- Working With Company E-mails and Meeting Appointments
- To view the list of meeting participants
- Finding Contacts in the Company Directory
- Working With Company E-mails and Meeting Appointments
- Chapter 9
- Working With Documents and Files
- Microsoft® Office Mobile
- To use Microsoft Office Mobile
- Adobe ® Reader ® LE
- To open Adobe Reader LE
- To open a PDF file on your device
- To navigate through a PDF document
- To search for text in the document
- Copying and Managing Files
- To copy files using Windows Mobile Device Center or ActiveSync
- To manage files on your device using File Explorer
- To copy files to a storage card
- ZIP
- To start ZIP on your device
- To open a ZIP file and extract files
- To create a zip archive
- Chapter 10
- Getting Connected
- Comm Manager
- To open Comm Manager
- Connection Setup
- To automatically detect the network operator
- To manually select the network operator
- Ways of Connecting to the Internet
- GPRS/3G
- To add a new GPRS/3G connection
- Dial-up
- Starting a Data Connection
- To manually start a data connection
- To disconnect active data connections
- Internet Explorer® Mobile
- To open Internet Explorer® Mobile
- To go to a Web site
- To view a Web page using finger scrolling and panning
- Internet Explorer® menu
- Windows Live™
- Set up Windows Live™
- To set up Windows Live for the first time
- The Windows Live™ interface
- Windows Live Messenger
- Launch the messenger and sign in
- To open Windows Live Messenger
- To sign in and out
- To start and end conversations
- Add Windows Live contacts
- To add a Windows Live contact in Live Messenger
- To add a Windows Live contact in Contacts
- Using Your Device as a Modem (Internet Sharing)
- To set up your device as a USB modem
- To use your device as a Bluetooth modem
- - For Windows XP:
- To end the Internet connection
- Bluetooth
- Bluetooth modes
- To turn Bluetooth on and make your device visible
- Bluetooth partnerships
- To create a Bluetooth partnership
- To accept a Bluetooth partnership
- Connect a Bluetooth hands-free or stereo headset
- To connect a Bluetooth hands-free or stereo headset
- Beam information using Bluetooth
- To beam information from your device to a computer
- Bluetooth Explorer and Bluetooth file sharing
- To enable Bluetooth Explorer and Bluetooth file sharing on your device
- To use Bluetooth Explorer
- Print files via Bluetooth
- To print contact information
- To print a calendar appointment
- To print a message
- To print a JPEG file
- Chapter 11
- Experiencing Multimedia
- Camera
- To open the Camera screen
- To exit the Camera
- Capture modes
- To change the capture mode
- Icon Capture Mode
- File formats supported
- Capture type Format
- Camera controls
- Onscreen controls and indicators
- Zooming
- To zoom in
- To zoom out
- Quick Settings Panel
- The Review screen
- Icon Function
- Camera settings
- Capture Settings tab
- Advanced tab
- Camera Album
- To open Camera Album
- To view an image
- To go to the next image
- To rotate the image
- To zoom in or out of an image
- To view the images as a slide show
- To play back video files
- To close Camera Album and go to the Camera program
- To close Camera Album
- Pictures & Videos
- File Type File Extensions
- To open Pictures & Videos
- To copy media files to your device
- To view pictures
- To play GIF animation files
- To play videos
- Pictures & Videos menu
- To edit a picture
- Windows Media® Player Mobile
- To open Windows Media® Player Mobile
- About the controls
- About the screens and menus
- Synchronize video and audio files
- To synchronize content to your device automatically
- To synchronize content manually to your device
- Play media
- To update the Library
- To play video and audio files on your device
- Playlists
- To save a new playlist
- Troubleshooting
- Streaming Media
- To access streaming content via Internet Explorer
- To stream media files directly on the Streaming Media Player
- To view streaming video information
- To configure streaming video connection settings
- Playback tab
- Networks tab
- Video tab
- Audio Booster
- To access Audio Booster
- This control Does this
- Equalizer
- To apply a preset
- To create a custom equalizer preset
- To delete a custom equalizer preset
- Chapter 12
- Managing Your Device
- Adding and Removing Programs
- To add programs
- To remove programs
- Using Task Manager
- To open Task Manager
- To switch back to a running program
- To configure the Exit ( ) button
- To close running programs from the Task Manager
- To add a running program to the exclusive list
- To set the sorting preference for running programs in the Quick Menu
- Resetting Your Device
- Soft reset
- To perform a soft reset
- Hard reset
- To perform a hard reset
- Clear Storage
- Managing Memory
- Windows Update
- To set up Windows Update
- To check for updates
- To change Windows Update options
- Battery Saving Tips
- Chapter 13
- Using Other Applications
- Voice Command
- To use Voice Command
- To place a call
- To open a program
- To request information from your calendar
- To request for date and time
- Using Java
- To open the Java program
- Install and launch MIDlets/MIDlet suites
- To download and install via Internet Explorer Mobile
- To install from your device
- To run a MIDlet/MIDlet suite
- To stop running a MIDlet/MIDlet suite
- Manage MIDlets/MIDlet suites
- To create folders
- To move a MIDlet to another folder
- To rename a MIDlet or folder
- To update a MIDlet/MIDlet suite
- To view information about a MIDlet/MIDlet suite
- To uninstall MIDlets
- To set MIDlet permission settings
- Tap Save.
- Appendix
- A.1 Specifications
- Display
- Physical
- Camera Module
- Connections
- Audio
- Appendix
- Controls and Lights
- Device Control • HTC TouchFLO™
- Hardware Keyboard
- Expansion Slots
- A.2 Regulatory Notices
- Regulatory Agency Identifications
- Federal Communications Commission Notice
- Exposure to Radio Frequency (RF) Signals
- SAR Information
- Telecommunications & Internet Association (TIA) safety information
- Pacemakers
- Other Medical Devices
- WEEE Notice
- RoHS Compliance
- Index
- Index
- Symbols
- A
- B
- C
- D
- E
- F
- G
- H
- |
- Index
- K
- L
- M
- N
- 0
- P
- Q
- R
- S
- Index
- Settings (System tab)
- Shortcuts 31, 36
- SIM card 20
- SIM Manager 94
- Smart Dial 70
- SMS 107,118
- Soft reset 196
- Sounds & Notifications 76
- Speakerphone 69
- Specifications 210
- Speed Dial 65
- Sports capture mode 165
- Start menu 26,79
- Status icons 40
- STK (SIM Tool Kit) Service 44
- Storage card 20
- Streaming Media 44, 187
- Swap/switch calls 68
- Synchronize
- System information 210
- T
- Tasks 44, 99
- Tasks search 60
- Task Manager 194
- Text messages
- Text size (screen) 75
- Threaded SMS 109
- Today screen 25,77
- TouchFLO 33, 47, 65
- Touch Cube (TouchFLO) 33
- Touch Keyboard 54
- Touch Keypad 55
- Transcriber 58
- Treble effects 189
- Troubleshoot
- U
- V
- W
- X
- Z
Brand : HTC
Model : Touch Phone
Category : Mobile Phone