
DP-C322 - Fax PANASONIC - Free user manual and instructions
Find the device manual for free DP-C322 PANASONIC in PDF.


User questions about DP-C322 PANASONIC
0 question about this device. Answer the ones you know or ask your own.
Ask a new question about this device
Download the instructions for your Fax in PDF format for free! Find your manual DP-C322 - PANASONIC and take your electronic device back in hand. On this page are published all the documents necessary for the use of your device. DP-C322 by PANASONIC.
USER MANUAL DP-C322 PANASONIC
natural_image
Exterior view of a white electronic printer with multiple paper sheets and a digital display (no visible text or symbols)Panasonic®
Digital Colour Imaging Systems
Operating Instructions
(For Facsimile and Internet Fax)
Model No.
DP-C262/C322

Copying

Printing
Scanning


Facsimile
Internet Fax

WORKIO™
Before operating this machine, please read this manual completely and keep this manual for future reference.
(Illustration shows optional accessories that may not be installed on your machine.)
DP-C262/C322 Operating Instructions
The following Operating Instruction manuals are included with this machine. Please refer to the appropriate manual and keep all manuals for future reference. If you lose the manual, contact the authorized Panasonic dealer.

natural_image
Illustration of a computer monitor with a CD icon on the screen (no text or symbols)Accessories


Operating Instructions (For Setting Up)
This manual contains essential information for setting up the machine.
Operating Instructions (For Basic Operations)
This manual contains essential information for proper operation of the machine.
It describes basic Copy, Print, Facsimile/Internet Fax, Scan/Email, and other functions.
For a more detailed explanation of each function, please refer to the Operating Instruction manuals included on two CD-ROM as illustrated below.
Operating Instructions CD
Contains manuals with detailed information for Copy, Facsimile/Internet Fax, Scan/Email Functions and Function Parameters.

Document Management System CD
Contains the PDMS Application Software, and manuals with detailed information for the Print function, and PDMS Application software.
Operating Instructions CD Document Management System CD

Copy Function
Describes how to make a Colour Copy with creative features.

Print Function
Describes how to print with colour, change default printer settings, or describes the course of action to take when a problem message appears, etc.

Facsimile and Internet Fax Function
(When the optional G3 Fax Board/Internet Fax Module is installed.)
Describes how to send/receive a
Facsimile/Internet Fax, or describes the course of action to take when a trouble message appears, etc

Scan and Email Function
(When the optional Network Scanner/Email Module is installed.)
Describes how to scan, send an Email.
Function Parameters
Describes how to change the default settings of each function using the Control Panel of the machine.
Application Software
Describes how to use the application software.
Ex: Web Device Monitor, Panafax Desktop, Document Manager/Viewer, Client Device Monitor, Network Config/ Add Editor, Network Setup Tool, Embedded Web Launcher
Conventions
Icons
The following icons are used in this manual.
| Icon Description | |
| ATTENTION | Indicated important information that must be read in detail. |
| NOTE | Indicates reference Information. |
Notation
The following notations are used in this manual.
| Notation Description | |
| For Keys and Buttons | Hard buttons on the Control Panel are depicted as **** key, soft buttons on the Touch Panel display are shown as “xxx”.Ex:Press the Start key and select “More Menus”. |
Table of Contents
Chapter 1 Getting to Know Your Machine
Menu Map.... 10
Chapter 2 Basic Fax Transmission
Fax Transmission Procedure.... 14
Entering a Destination 16
Manual Dialling.... 16
Using the Address Book.... 18
Searching for a Destination......“Search” 20
Redialling ....“Redial” 23
Transmission with Destination Monitoring......“Monitor” 24
Talking to the Remote Party Before Transmission 25
Setting Original Quality......“Quality Adj.” 26
Setting the Original Size...... "Original Size" 30
Transmitting 2-Sided Originals ...... "2-Sided Original" 32
Verification Stamp .... "Verification Stamp" 34
Transmitting a Document Stored in Memory......“Memory” 36
Direct Transmission.....“Direct” 38
Verifying Communication Status ......"Comm. Status" 40
Rotated Transmission.... 42
Batch Transmission.... 43
Getting an Outside Line Using PIN Code Access 44
Using Program Keys...."Program/Group" 45
Cancelling a Communication.... 46
To Cancel Memory Transmission: 46
To Cancel Direct Transmission: 47
Chapter 3 Convenient Fax Features
Time Controlled Communication (Deferred) 48
Deferred Transmission......“Transmit” 48
Deferred Polling ......"Polling" 50
Polling.... 52
Polling ....“Polling” 52
Storing Documents to Be Polled .... "Polled" 54
Using a Mailbox (Confidential Communication).... 56
What is Confidential Communication?......“Mail Box” 56
Confidential Transmission 57
Confidential Polling....58
Storing Documents for Confidential Polling 59
Printing a Received Confidential Document 60
Deleting a Confidential Document 62
Sub-Address Communication......“Sub Address Transmit” 64
What is Sub-Addressing? 64
Sub-Addressed Transmission Using Address Book 65
Sub-Addressed Transmission Using Manual Dialling.... 67
Password Communication......"Password XMT" 68
What is Password Communication? 68
Password Transmission 69
Setting Password-Protected Transmission.... 70
Printing Communication Journal...... "Comm. Journal" 72
Transmitting a Document with a Cover Sheet ......"Cover Sheet" 74
Chapter 4 Fax Reception
Receiving Documents.... 76
Automatic Reception 76
Manual Reception.... 77
Print Reduction and Duplex Recording.... 78
Print Reduction 78
Duplex Recording 79
Substitute Memory Reception.... 80
Convenient Reception Features 81
Selective Reception....81
Fax Forwarding.... 82
Password-Reception 83
Receive to Memory......“Receive to Memory” 84
What is Memory Reception? 84
Programming Memory Reception 85
Printing a Document Received in Memory 86
Chapter 5 Internet Fax
What is Internet Fax? 88
What is Internet Fax? 88
Using the Internet Fax Feature.... 89
What Internet Fax Can Do 90
Sending Email 90
Receiving Email....91
Inbound Routing 91
Relay Transmission....92
Message Delivery Notice (MDN).... 93
Direct Internet Fax Transmission (Using Direct SMTP) 94
Tips for Internet Fax 96
Preparing to Use Internet Fax 98
Program Network Parameters.... 98
Sending an Email Procedure.... 100
Entering an Email Address.... 102
Using the Onscreen Keyboard 103
Using the Address Book.... 104
Searching for Destinations 106
Using Cc, Bcc and From.... 110
Setting Cc and Bcc.... 111
Setting From field 112
Setting Subject 113
Confirming the Destination.... 113
Setting a File Type and a Filename...... "File Type and Name" 114
Emailing an A3-Sized Document......“A3 Email XMT” 116
Setting Message Delivery Notice (MDN)......“Delivery Notice” 118
When Email Transmission Fails 120
Using a Completion Notice......“Completion Notice” 121
Receiving an Email......“Get Email” 122
Configure to Receive Email.... 122
Receiving Email Automatically 122
Receiving Email Manually 123
Receiving Email with the Program Key 124
Receiving an Email on a Computer 126
Receiving Email on Your Computer 126
Opening Email.... 127
Inbound Routing 128
What is Inbound Routing? 128
Routing Setup Flow 129
Settings for Inbound Routing.... 130
Programming the Address Book for Inbound Routing.... 131
Using the Relay Feature.... 134
What is the Relay Feature? 134
Setting up a Relayed Transmission Network 136
Example of a Relayed Transmission Network 137
Sample Entries in Address Book.... 138
Function Parameters for Relay Stations 140
Settings for Initial Sending Station 141
Adding End Receiving Stations for Relayed Transmission 142
Relayed Transmission from Internet Fax...... "Lan Relay XMT" 144
Relayed Transmission from PC 146
Requesting a Relayed Transmission from a Computer.... 147
Convenient Application Software.... 148
Result of Relayed Transmission 150
Useful Terms to Remember.... 152
DHCP (Dynamic Host Configuration Protocol) 152
SMTP Authentication.... 152
Chapter 6 Handling Communication Reservation Files
Editing a Communication Reservation File...... "File List" 154
Displaying a Communication Reservation File List 154
Reading the Reservation Report 155
Editing Communication Reservations...... "Change Time/Stn" 156
Deleting a Communication Reservation File ......"Delete File" 158
Printing a Communication Reservation File .... "Print File" 159
Adding Documents to a Communication Reservation File .... "Add Document" 160
Resending an Incomplete Document ...... “Retry Incomp. File” 161
Chapter 7 Program Destinations/Program Keys
Address Book 162
What is Address Book? 162
Items Allowed for Entry in the Address Book 162
Adding a Fax Number into the Address Book ...... "01 Add Telephone Number" 163
Adding an Email Address to Address Book......“02 Add Email Address” 165
Editing Address Book "03 Modify Station" 167
Deleting a Destination from Address Book......“04 Delete Station” 168
Printing the Address Book List ...."00 Print Address Book List" 169
Program Keys 170
What is Program Keys? 170
Programmable Items 170
Setting for Program Dialling......“02 Program Dial” 171
Setting for Group Dialling .... "01 Group Dial" 173
Editing a Group Dialling......“03 Modify Group Dial” 175
Deleting the Program Key setting...... "04 Delete Program/GRP" 178
Printing the Program List......“01 Print Program List” 179
Programming Email Manual Reception on Program Keys ...... "05 Manual POP RCV" 180
Chapter 8 Reading Reports/Lists
Transaction Journal .... "Journal" 182
Printing Transaction Journal.... 182
Viewing Communication Results on Touch-Panel Display 183
Reading Transaction Journal.... 184
Communication Journal......“Comm. Journal” 186
Address Book List......"Address Book List" 190
Printing Address Book List 190
Reading Address Book List.... 191
Program List......“Program List” 192
Printing Program List.... 192
Reading Program List 193
Fax Parameter List......“Fax Parameter List” 194
Printing Fax Parameter List.... 194
Reading Fax Parameter List 195
Individual XMT Journal......“IND. XMT Journal” 196
Printing Individual XMT Journal 196
Reading Individual XMT Journal 197
Chapter 9 Solving Problems
Tips for Solving Problems.... 198
Information Codes 200
Power Failure 205
Checking the Telephone Line.... 206
Chapter 10 Appendix
Replacing the Verification Stamp 208
Glossary 210
Memo
Menu Map
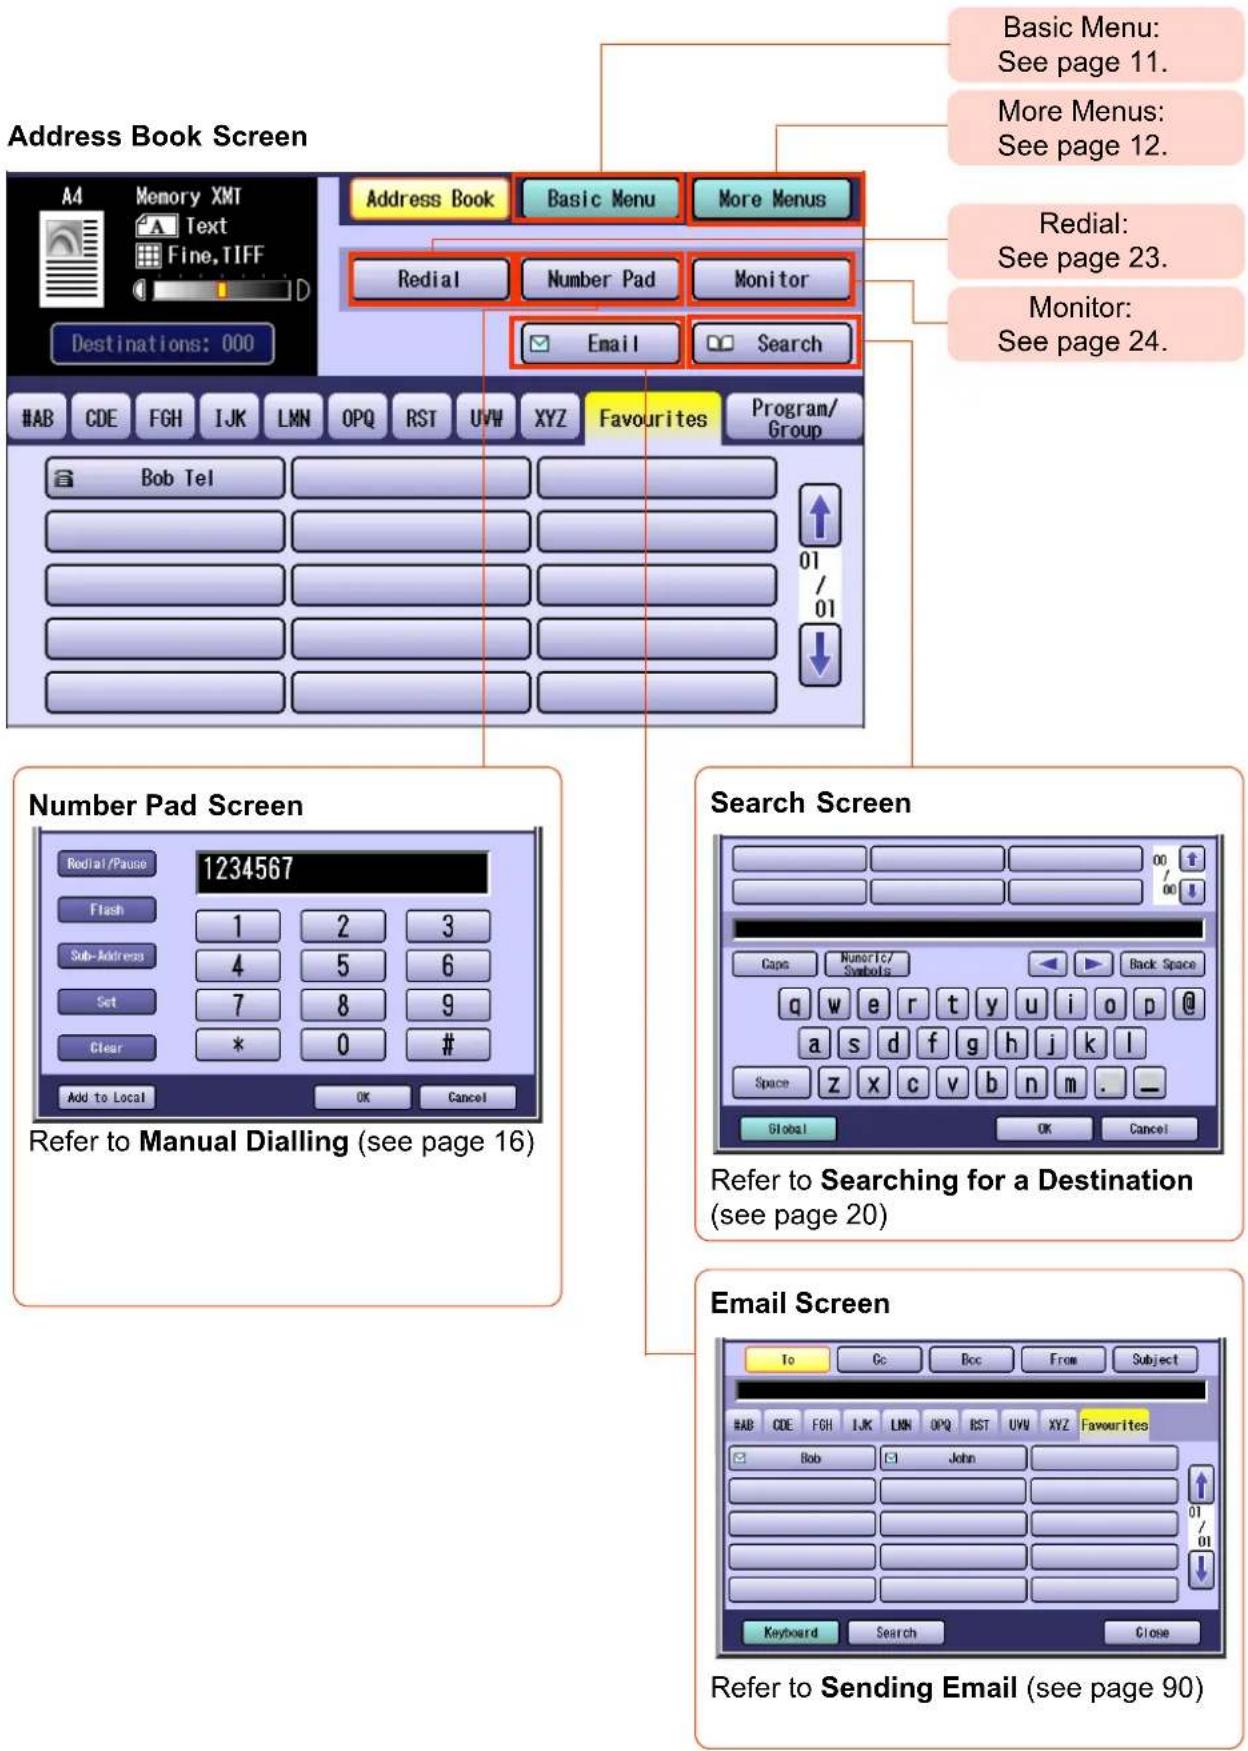
The main screen and menu of the fax feature are as follows:
text_image
Address Book Screen A4 Memory XMT Text Fine.TIFF Destinations: 000 #AB CDE FGH IJK LMN OPQ RST UVW XYZ Favourites Program/Group Bob Tel 01 / 01 Number Pad Screen Redial/Pause 1234567 Flash 1 2 3 Sub-Address 4 5 6 Set 7 8 9 Clear * 0 # Add to Local OK Cancel Refer to Manual Dialling (see page 16) Search Screen Caps Numeric Symbols Back Space q w e r t y u i o p @ a s d f g h j k l Space z x c v b n m . _ Global OK Cancel Refer to Searching for a Destination (see page 20) Email Screen To Gc Doc From Subject #AB CDE FGH IJK LMN OPQ RST UVW XYZ Favourites Bob John Keyboard Search Close Refer to Sending Email (see page 90)Basic Menu Screen
text_image
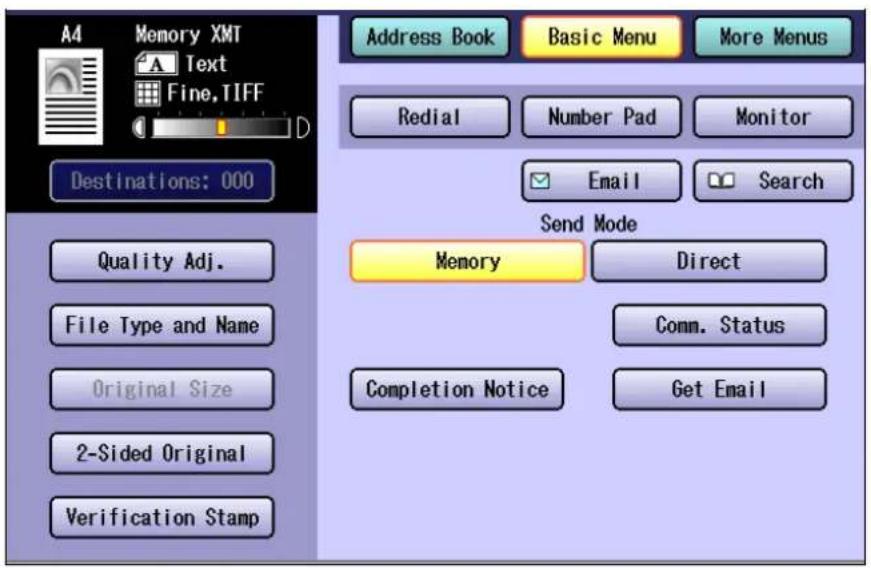
A4 Memory XMT Text Fine, TIFF Destinations: 000 Quality Adj. File Type and Name Original Size 2-Sided Original Verification Stamp Address Book Basic Menu More Menus Redial Number Pad Monitor Email Search Send Mode Memory Direct Comm. Status Completion Notice Get Email• Quality Adj. (Setting Original Quality: See page 26)
- File Type and Name (Setting a File Type and a Filename: See page 114)
• Original Size (Setting the Original Size: See page 30)
• 2-Sided Original (Transmitting 2-Sided Originals: See page 32)
• Verification Stamp (Verification Stamp: See page 34)
• Memory (Transmitting a Document Stored in Memory: See page 36)
- Direct (Direct Transmission: See page 38)
• Comm. Status (Verifying Communication Status: See page 40)
• Completion Notice (Using a Completion Notice: See page 121)
• Get Email (Receiving an Email: See page 122)
More Menus > Advanced Comm. Screen
text_image
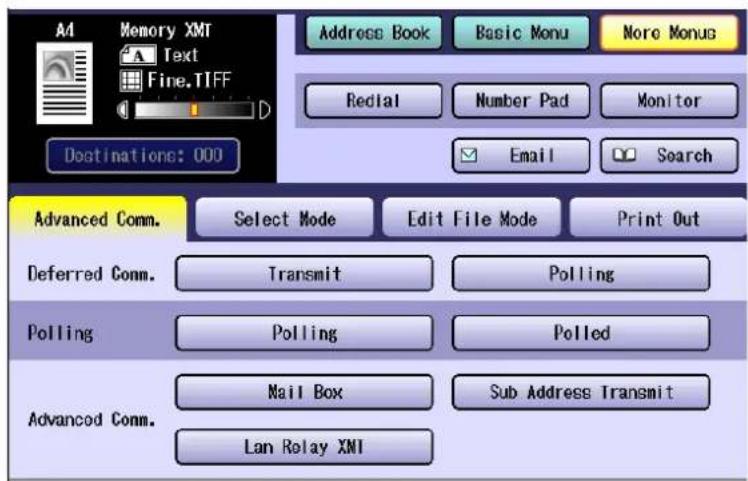
A4 Memory XMT Text Fine.TIFF Address Book Basic Monu More Monus Redial Number Pad Monitor Email Search Destinations: 000 Advanced Comm. Select Mode Edit File Mode Print Out Deferred Comm. Transmit Polling Polling Polling Polled Advanced Comm. Mail Box Sub Address Transmit Lan Relay XMI• Deferred Comm. Transmit (Deferred Transmission: See page 48)
Polling (Deferred Polling: See page 50)
- Polling Polling (Polling: See page 52)
Polled (Storing Documents to Be Polled: See page 54)
• Advanced Comm. Mail Box
(Using a Mailbox (Confidential Communication): See page 56)
Sub Address Transmit (Sub-Address Communication: See page 64)
Lan Relay XMT (Relay Transmission: See page 92)
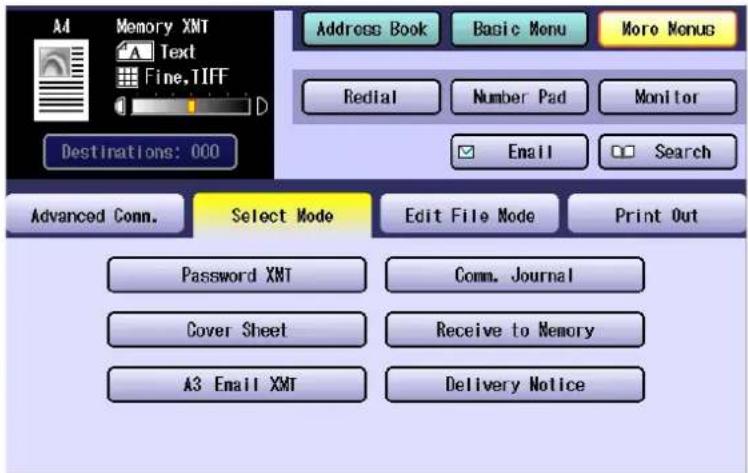
More Menus > Select Mode Screen
text_image
A4 Memory XNT Text Fine, TIFF D Address Book Basic Menu More Menus Redial Number Pad Monitor Email Search Destinations: 000 Advanced Conn. Select Mode Edit File Mode Print Out Password XNT Comm. Journal Cover Sheet Receive to Memory A3 Email XMT Delivery Notice- Password XMT (Password Transmission: See page 69)
• Cover Sheet (Transmitting a Document with a Cover Sheet: See page 74)
• A3 Email XMT (Emailing an A3-Sized Document: See page 116)
• Comm. Journal (Communication Journal: See page 186) - Receive to Memory (Receive to Memory: See page 84)
• Delivery Notice (Setting Message Delivery Notice (MDN): See page 118)
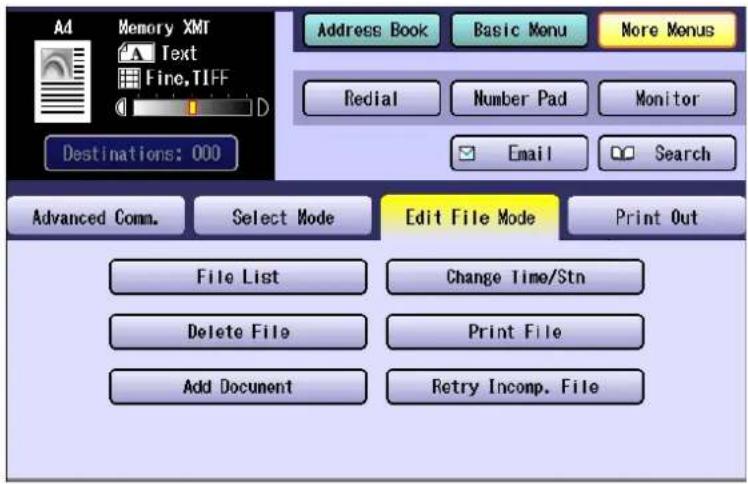
More Menus > Edit File Mode Screen
text_image
Memory XMT Text Fine,TIFF Address Book Basic Menu More Menus Redial Number Pad Monitor Email Search Destinations: 000 Advanced Comm. Select Mode Edit File Mode Print Out File List Change Time/Strn Delete File Print File Add Document Retry Incomp. File- File List (Displaying a Communication Reservation File List: See page 154)
- Delete File (Deleting a Communication Reservation File: See page 158)
- Add Document
(Adding Documents to a Communication Reservation File: See page 160) - Change Time/Stn (Editing Communication Reservations: See page 156)
- Print File (Printing a Communication Reservation File: See page 159)
- Retry Incomp. File (Resending an Incomplete Document: See page 161)
More Menus > Print Out Screen

text_image
Ad Memory XMT A Text Fine,TIFF D Address Book Basic Menu More Menus Redial Number Pad Monitor Email Search Destinations: 000 Advanced Comm. Select Mode Edit File Mode Print Out Journal Address Book List Program List Fax Parameter List IND. XMT Journal• Journal (Transaction Journal: See page 182)
• Program List (Program List: See page 192)
• XMT Journal (Individual XMT Journal: See page 196)
- Address Book List (Address Book List: See page 190)
• Fax Parameter List (Fax Parameter List: See page 194)
Fax Transmission Procedure
The basic procedure of transmitting a fax on this machine is as follows:
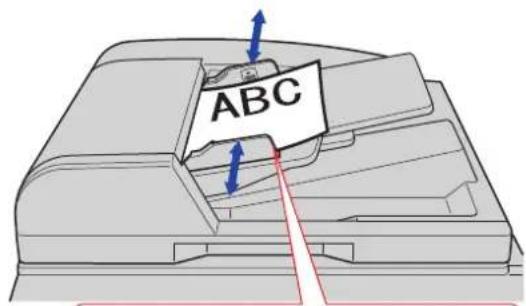
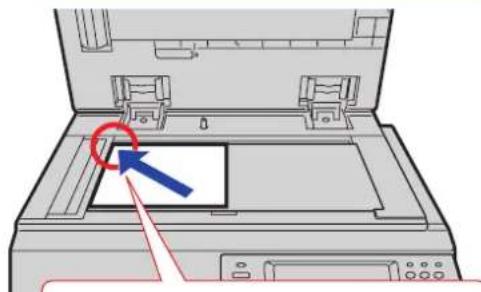
1 Place original(s).
text_image
ABCFace Up. Up to 70 sheets (80 g/m ^2 ).
natural_image
Diagram of a printer with an open lid and a blue arrow pointing to the screen area (no text or symbols present)Face Down. Align with the top left corner. Close ADF.
- Refer to Placing Originals (Facsimile/Internet Fax) in the Operating Instructions (For Basic Operations) of provided booklet.
- If the available memory is not sufficient, Memory transmission may not be possible. If this happens, use direct transmission instead.
Refer to Direct Transmission. (See page 38).
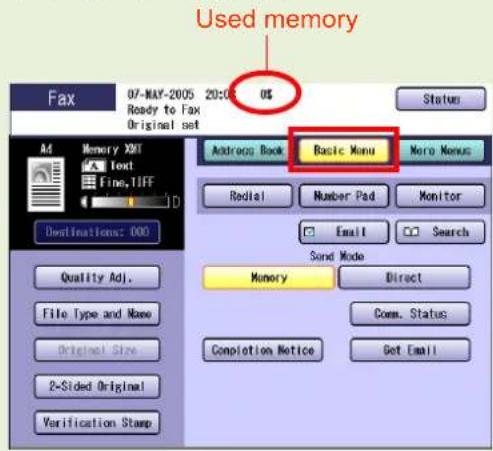
2 Press the Fax key to open the Fax screen.

text_image
Start Time Start Time Start Time End Time End TimeSelect "Basic Menu" if additional settings are required.
text_image
Used memory Fax 07-MAY-2005 20:00 US Ready to Fax Original set Address Book Basic Menu Mero Menu Redial Number Pad Monitor Email Search Send Mode Memory Direct Com. Status Completion Notice Get Email Quality Adj. File Type and Menu Original Size 2-Sided Original Verification Stamp- Setting Original Quality. (See page 26).
- Setting the Original Size. (See page 30).
● Transmitting 2-Sided Originals. (See page 32).
Verification Stamp. (See page 34).
● Transmitting a Document Stored in Memory. (See page 36). - Direct Transmission. (See page 38).
- Verifying Communication Status. (See page 40).
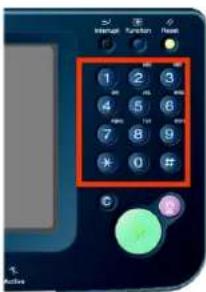
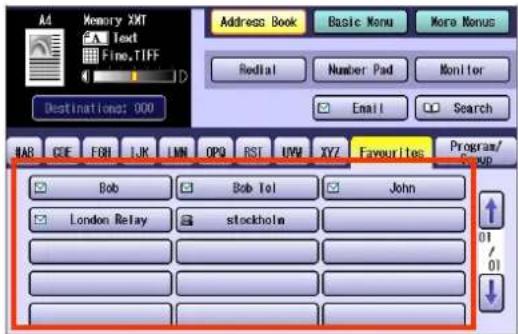
3 Enter the fax number from the keypad or select a destination.
text_image
1 2 3 4 5 6 7 8 9 * 0 # C R + - + - + - + - + - + - + - + - + - + - + - + - + - + - + - + - + - + - + - + - + - + - + - + - + - + - + - + - + - + - + - + - + - + - + - + - + - + - + - + - + - + - + - + - + - + - + - + - + - + - + -or
text_image
Memory XXT Text Fine.TIFF Address Book Basic Menu More Nonus Redtail Number Pad Monitor Email Search Destinations: 000 BAB CDE FOR UK LMN OP9 RST UWV XYZ Favourites Program/ Sup Bob Bob lot John London Relay stockholm 01 01● Refer to Entering a Destination. (See page 16).
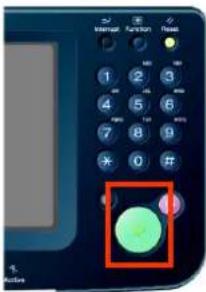
4 Press the Start key.
text_image
Digital device control panel with function buttons and a green circular display showing signal inputThe original(s) are stored into memory with a file number. Then starts dialling the telephone number.
NOTE
- For instructions on how to cancel a transmission, refer to Cancelling a Communication. (See page 46).
- When copying from the Platen Glass, place the next original and follow the instructions displayed on the touch panel display.
- A communication journal is printed if the transmission fails (Ex: Remote station is busy).
- Press Reset key to return the machine to the initial screen of the current active mode.
- If the line is busy, the number is automatically redialed. The call waiting message appears on the display while in auto-dialling.
Entering a Destination
Stations can be entered by using the following methods or a combination of these:
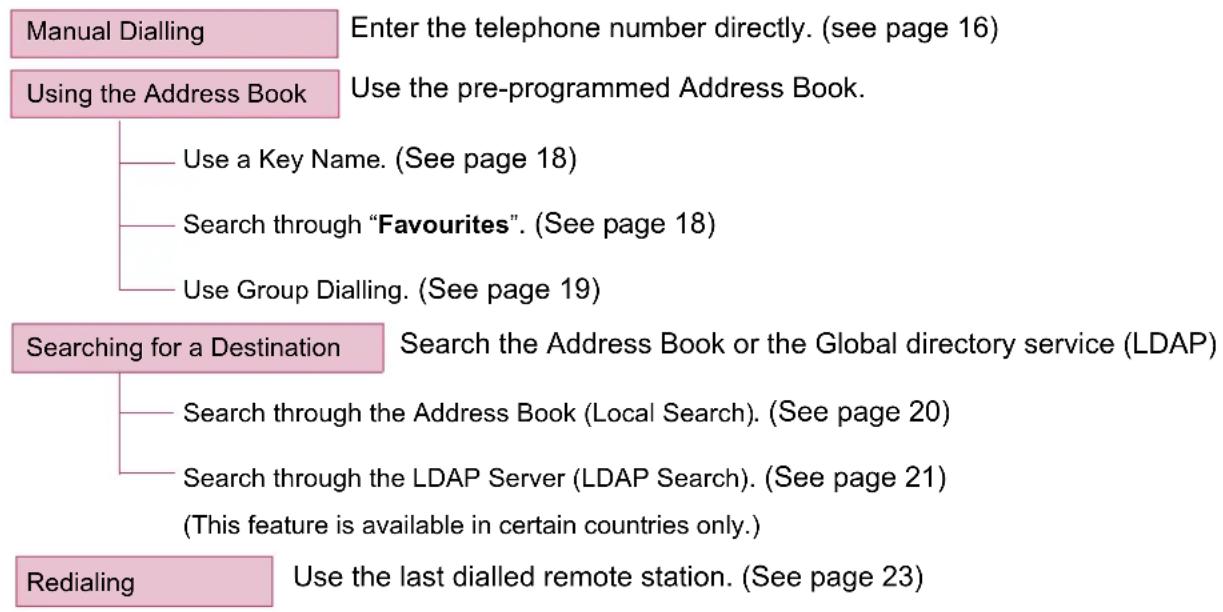
flowchart
graph TD
    A["Manual Dialling"] --> B["Enter the telephone number directly. (see page 16)"]
    C["Using the Address Book"] --> D["Use the pre-programmed Address Book."]
    D --> E["Use a Key Name. (See page 18)"]
    D --> F["Search through "Favourites". (See page 18)"]
    D --> G["Use Group Dialling. (See page 19)"]
    H["Searching for a Destination"] --> I["Search the Address Book or the Global directory service (LDAP)"]
    I --> J["Search through the Address Book (Local Search). (See page 20)"]
    I --> K["Search through the LDAP Server (LDAP Search). (See page 21)"]
    K --> L["(This feature is available in certain countries only.)"]
    M["Redialing"] --> N["Use the last dialled remote station. (See page 23)"]
Manual Dialling
To enter a destination telephone number, follow the steps below:
1 Follow the step 1 and 2 on page 14.
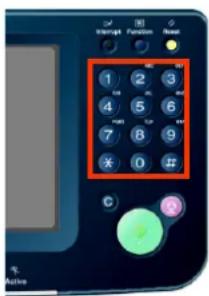
2 Enter the fax number from the keypad.
text_image
1 2 3 4 5 6 7 8 9 ¥ 0 #The Number Pad screen opens automatically.
- Telephone number field is limited to 36-digit in length.
- For transmission to additional destinations, enter their fax numbers, and then select "Set" after each destination. When you finish entering the last destination's fax number, select "OK". (Do not select "Set" at this time.)
- Select "Destinations:###" to confirm your designated destinations.
- If you make an entry error, press Clear key to delete one digit at a time.
- Fax number entry is also possible from the "Number Pad" in the Address Book screen, instead of the control panel keypad.
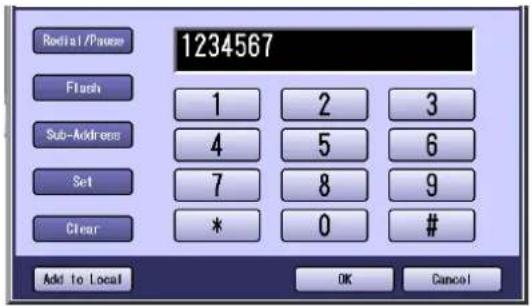
☐ Number Pad Screen
text_image
Radial / Place 1234567 Flush 1 2 3 Sub-Address 4 5 6 Set 7 8 9 Clear * 0 # Add to Local OK Cancel| Redial/Pause | Inserts a pause each time it is selected. The pause is represented by a "-" symbol. |
| Flash | Used to access some features of your PBX. |
| Sub-Address | Select when entering a sub-address number.The sub-address is represented by an "s" symbol. |
| Set | Select when entering additional destinations.Do not select "Set" for single destination. |
| Clear | Select "Clear" to delete an erroneous entry, one digit at a time. |
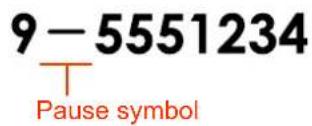
□ Using "Pause"
- If you are using a PBX, enter the external access number first, and then select "Pause" before entering the fax number.
Ex:
Enter 9 for the outside access number, select "Pause", and then enter the fax number.
□ Using "\*"
- Change dialling method from pulse to tone dialling at a desired dialling moment. Switching to tone dialling is represented by a “/” symbol.
Ex:
After entering 9, select “*” to switch to tone dialling.
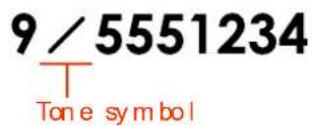
□ Using "Sub-Address"
- Select "Sub-Address" to enter a sub-address destination after the fax number. Refer to Sub-Address Communication. (See page 64).
Ex:
After entering 4, select "Sub-Address", and enter the Sub-Address.
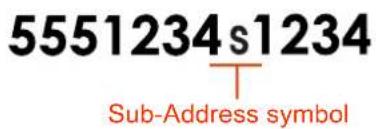
text_image
5551234s1234 T Sub-Address symbol3 Press the Start key.
- The original(s) are stored into memory with a file number. Then starts dialing the telephone number.
Using the Address Book
Use a Key Name
If a destination is registered in the address book, it can be selected by using a Key Name.
ATTENTION
- The fax numbers must be pre-programmed into the address book. Refer to Adding a Fax Number into the Address Book. (See page 163).
1 Follow the step 1 and 2 on page 14.
2 Select the Key Name tab.
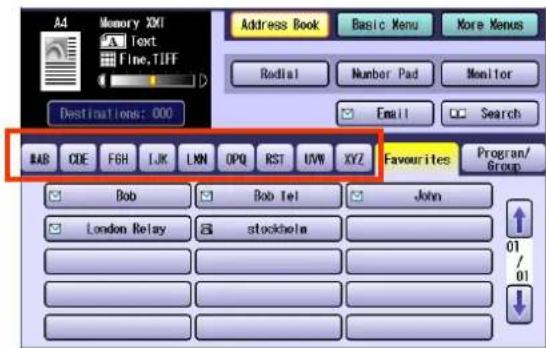
text_image
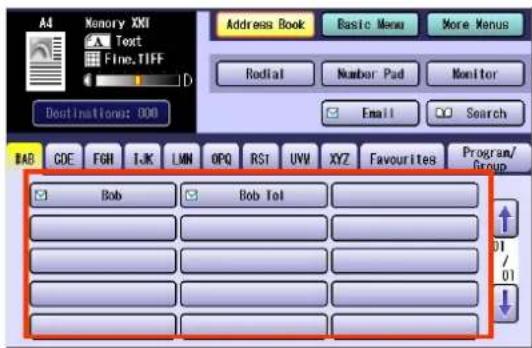
A4 Memory XXI Text Fine.TIFF Address Book Basic Menu More Menus Radial Number Pad Monitor Email Search Destinations: 000 BAB CDE FGH IJK LKN OPQ RST UVW XYZ Favourites Program/ Bob Bob Tel John London Relay stockholm 01 013 Select the desired destination.
text_image
A4 Memory XXI Text Fine.TIFF Address Book Basic Menu More Menus Rodial Number Pad Monitor Email Search Destinations: 000 BAB CDE FGH IJK LMN OPQ RSI UVV XYZ Favourites Program/ Group Bob Bob Tel 01 01- To cancel the choice, select the same destination again.
- To enter additional destinations, repeat Steps 2 and 3.
- Select "Destinations:###" to confirm your designated destinations.
4 Press the Start key.
- The original(s) are stored into memory with a file number. Then starts dialing the telephone number.
■ Search through the "Favourites"
If a destination is registered as a Favourite when in the address book, it can be selected using the "Favourites" tab.
ATTENTION
The fax numbers must be pre-programmed into the address book. Refer to Adding a Fax Number into the Address Book. (See page 163).
1 Follow the step 1 and 2 on page 14.
2 Select "Favourites" to display the Favourites screen.
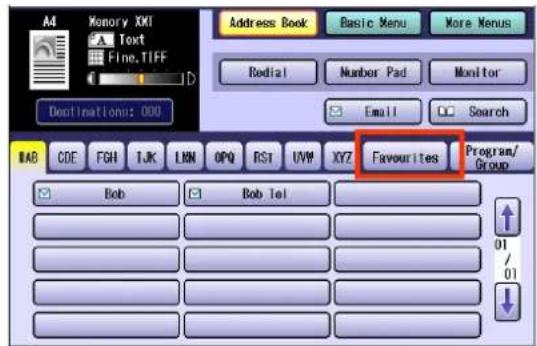
text_image
A4 Memory XXI Text Fine.TIFF Address Book Basic Menu More Menus Rodial Number Pad Monitor Email Search Destination: 000 BAB CODE FGH TJK LNN OPQ RSI UVW XYZ Favourites Program/Group Bob Bob Tel 01 / 013 Select the desired destination.
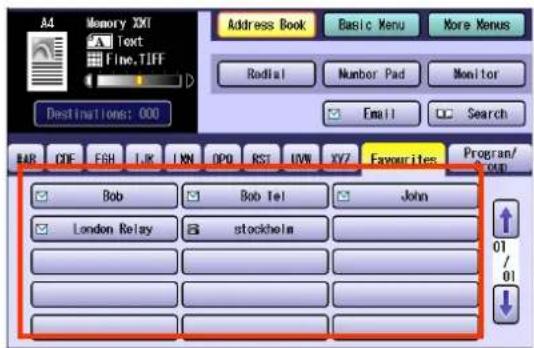
text_image
A4 Memory 201 Text Fine.TIFF Address Book Basic Menu More Menus Radial Number Pad Monitor Email Search BAR CDF EFH LK LKN OPQ RST UVW XY7 Favourites Program/ Bob Bob tel John London Relay stockhelm 01 01- To cancel the choice, select the same destination again.
- For transmission to additional destinations, continue pressing the relevant keys.
- Select "Destinations:###" to confirm your designated destinations.
4 Press the Start key.
- The original(s) are stored into memory with a file number. Then starts dialing the telephone number.
■ Use Group Dialling
For transmission to multiple destinations using group dialling, follow the steps below:
ATTENTION
- The group dialling button must be pre-programmed. Refer to Setting for Group Dialling. (See page 173).
1 Follow the step 1 and 2 on page 14.
2 Select "Program/Group".
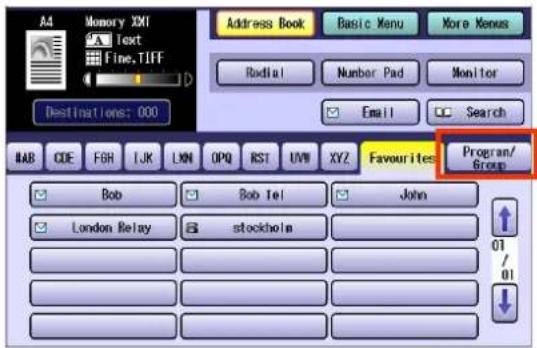
text_image
Address Book Basic Menu More Menus Radial Number Pad Monitor Email Search Destinations: 000 BAB CODE FGR LJK LMN OPQ RST UVW XYZ Favourites Program/ Group Bob Bob tel John London Relay stockholm 01 / 013 Select the button for the desired destination group.
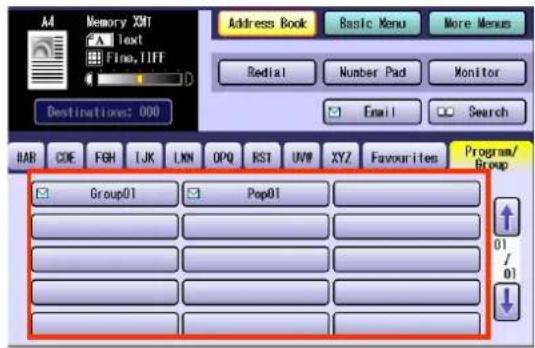
text_image
Memory 201 Text Fino, TIFF Address Book Basic Menu More Menus Redial Number Pad Monitor Email Search BAB CIE FGH IJK LNN OPQ RSI UWV XYZ Favourites Program/ Group01 Pop01 01 / 01 / 01- To cancel the choice, select the same destination again.
4 Press the Start key.
- The original(s) are stored into memory with a file number. Then starts dialing the telephone number.
Searching for a Destination
■ Search through the Address Book (Local Search)
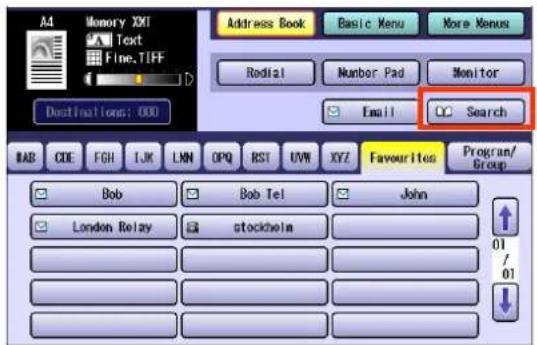
Select "Search" to look through the address book for the desired destination by the entry name.
NOTE
- Select "Global" to search fax numbers or Email addresses in the LDAP Server. (See Next Page)
This feature is available in certain countries only.
1 Follow the step 1 and 2 on page 14.
2 Select "Search".
text_image
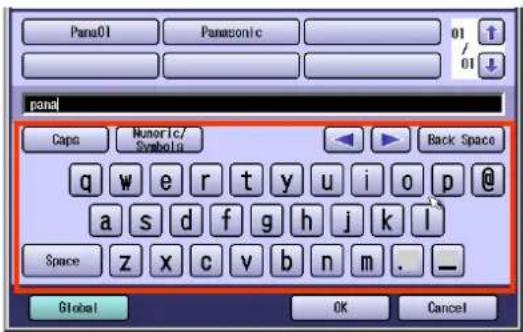
Address Book Basic Menu More Menus Rodial Number Pad Monitor Email Search BAB CODE FGH IJK LNN OPQ RST UWR XYZ Favourites Program/Group Bob Bob Tel John London Relay stockholm 01 / 013 Enter the first letter you want to search for.
The search result appears.
text_image
Pana01 Panasonic 01 / 01 pana Caps Numeric/ Symbols Back Space q w e r t y u i o p @ a s d f g h j k l Space z x c v b n m . _ Global OK Cancel- For using the onscreen keyboard, refer to Before Starting in the Operating Instructions (For Function Parameters) on the provided CD-ROM.
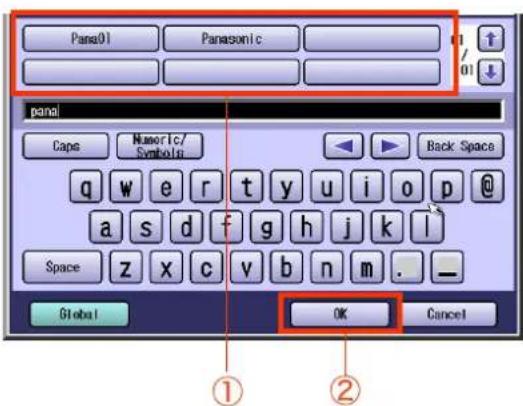
4 Choose a destination, and then select "OK".
text_image
Pana01 Panasonic pana Caps Numeric/ Symbols Back Space q w e r t y u i o p @ a s d f g h j k l Space z x c v b n m . _ Global OK Cancel ① ②- Select or to scroll the search results.
- Multiple destinations cannot be selected at a time.
5 Press the Start key.
- The original(s) are stored into memory with a file number. Then starts dialing the telephone number.
■ Search through the LDAP Server (LDAP Search)
LDAP search is a feature that searches through the address book of an LDAP server on the network for fax numbers or Email addresses.
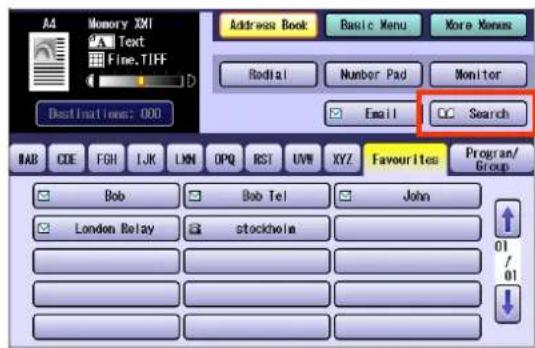
Select "Global" on the displayed screen to use the LDAP search feature.
Contact your network administrator to check whether the LDAP search feature is available in your particular environment.
NOTE
The LDAP server must be configured before its use. For more details, refer to Fax/Email Settings in the Operating Instructions (For Function Parameters) on the provided CD-ROM.
1 Follow the step 1 and 2 on page 14.
2 Select "Search".
text_image
A4 Memory XVI Text Fine.TIFF Address Book Basic Menu More Menus Radial Number Pad Monitor Email Search BAB CDE FGH IJK LNN OPQ RST UVW XYZ Favourites Program/ Bob Bob Tel John London Relay stockholm 01 013 Select "Global".
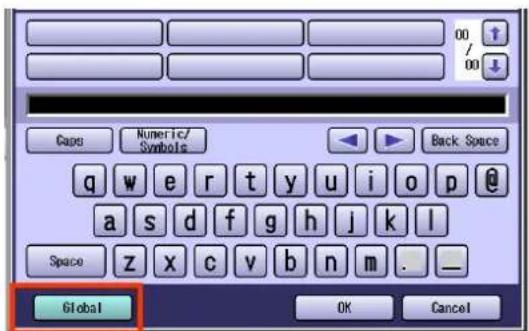
text_image
00 / 00 Caps Numeric/ Symbols Back Space q w e r t y u i o p @ a s d f g h j k l Space z x c v b n m . _ Global OK Cancel4 Enter a search letter, and then select "Search".
The search result appears.
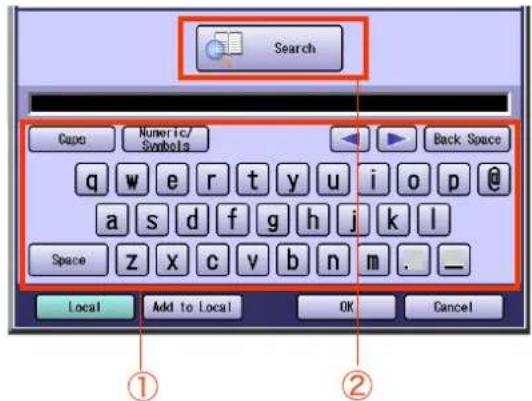
text_image
Search Capes Numeric/ Symbols Back Space q w e r t y u i o p @ a s d f g h j k l Space z x c v b n m . _ Local Add to Local OK Cancel- You can search for the Station names, Email addresses and Fax numbers.
- For using the onscreen keyboard, refer to Before Starting in the Operating Instructions (For Function Parameters) on the provided CD-ROM.
- Select "Local" to exit to the LDAP search screen.
- To add the found destination to the address book, select "Add to Local" on the displayed screen, enter an entry name, and then select "OK". (If you are using PBX, you need to register a telephone number with the dial reflex.)
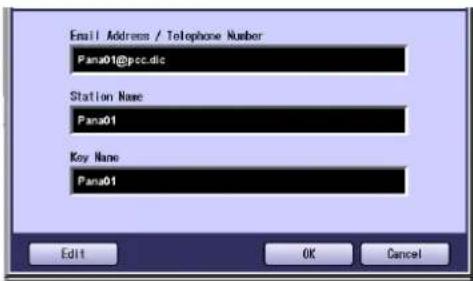
text_image
Email Address / Telephone Number Pana01@pcc.dlc Station Name: Pana01 Key Name: Pana01 Edit OK Cancel5 Select "Fax Number" to display a list of destinations.
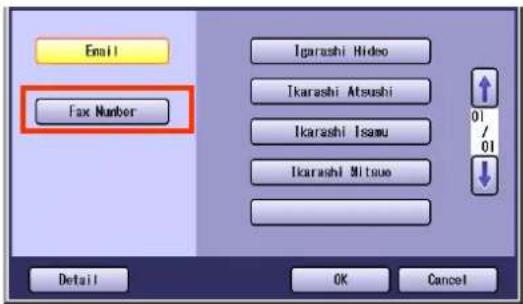
text_image
Email Fax Number Igarashi Hideo Ikarashi Atsushi Ikarashi Tsamu Ikarashi Mitsue Detail OK Cancel6 Choose a destination, and then select "OK".

text_image
Email Fax Number Igarashi Hideo Ikarashi Atsushi Ikarashi Isamu Ikarashi Mituo Detail OK Cancel ① ②- Only one destination can be selected.
- You can change the entry screen by selecting "Email" or "Fax Number".
- Select or to scroll the search results.
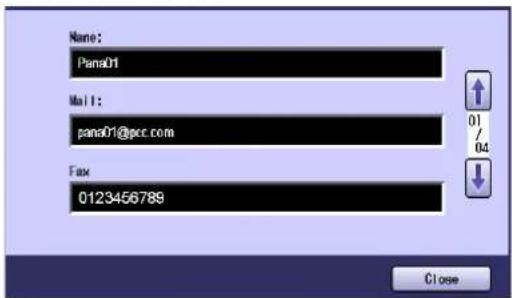
- Select "Detail" to open a more detailed information screen.
text_image
Name: Pana01 Mail 1: pana01@pcr.com Fax 0123456789 CloseSelect "Close" to exit to the failed information screen.
- To cancel the search operation, select "Cancel".
- If there are more than 100 matches, a dialog box prompts for confirmation whether to continue searching.
Select "Yes" to continue searching. To abort the search with 100 matches, select "No".
- A message appears if an error occurs during the search.
7 Press the Start key.
Redialling
To redial the most recently dialled number, follow the steps below:
1 Follow the step 1 and 2 on page 14.
2 Select "Redial".
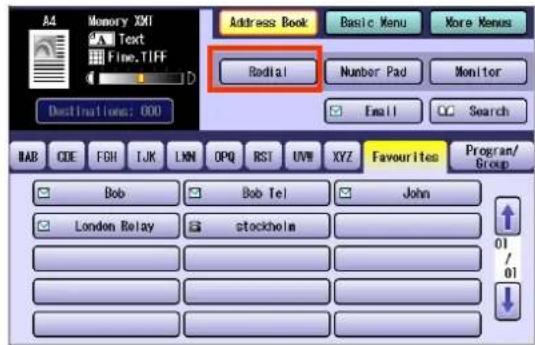
text_image
Address Book Basic Menu More Menus Redtail Number Pad Monitor Email Search BAB CODE FGH IJK LNN OPQ RST UVW XYZ Favourites Program/Group Bob Bob Tel John London Relay stockholm 01/013 Confirm that this is the fax number that you want to send to, and then select "OK".

text_image
1234567 Redial/Pause Flash Sub-Address Set Clear 1 2 3 4 5 6 7 8 9 * 0 # Add to Local OK Cancel4 Press the Start key.
- The original(s) are stored into memory with a file number. Then starts dialing the telephone number.
Transmission with Destination Monitoring
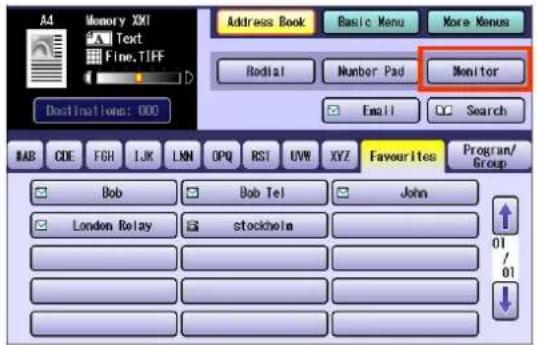
Select "Monitor" on the touch-panel screen to obtain a dial tone. This feature is called "on-hook dialling."
To monitor the status of a remote station, follow the steps below:
1 Place Original(s).
- If the platen is used, only one page can be transmitted at a time.
Refer tPlacing Originals (Facsimile/Internet Fax) in the Operating Instructions (For Basic Operations) of provided booklet.
2 Press the Fax key.
3 Select "Monitor".
text_image
A4 Memory XVI Text Fine.TIFF Address Book Basic Menu More Menus Radial Number Pad Monitor Email Search Destinations: 000 BAB CDE FGH IJK LNN OPQ RST UVW XYZ Favourites Program/ Bob Bob Tel John London Relay stockholm 01 / 01 ↓The monitor screen appears and you will hear a dialling tone through the monitor speaker.
4 Enter the fax number of the destination.

text_image
Rodial/Pause Flash Sub-Address Volume 1 2 3 4 5 6 7 8 9 * 0 # Address Book Close| Raises the monitor volume. | |
| Lowers the monitor volume. | |
| Redial/Pause | Select once to recall the last dialled fax number.Select twice to insert a pause (dialling interval). |
5 When you hear a beep, press the Start key.
The original(s) are stored into memory with a file number. Then starts dialling the telephone number.
- For instructions on how to cancel transmission, refer to Cancelling a Communication. (See page 46).
- Press Reset key to return the machine to the initial screen of the current active mode.
Talking to the Remote Party Before Transmission
If an external telephone is connected to your machine, you can send a fax after talking to the remote party on the phone. Follow the steps below:
1 Place Original(s).
- If the platen is used, only one page can be transmitted at a time.
- Refer to Placing Originals (Facsimile/Internet Fax) in the Operating Instructions (For Basic Operations) of provided booklet.
2 Press the Fax key.
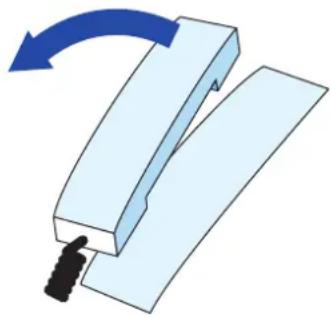
3 Lift the handset of the external telephone.
natural_image
Diagram of a mechanical component with a blue arrow indicating rotation, showing a curved arrow and a black tool inserted (no text or symbols)4 Dial the telephone number using the keypad.
5 Talk to the remote party, and then tell the other party to get ready for receiving fax.
6 When a beep is heard, press the Start key, and then place the handset back on the cradle.
Transmission starts.
- For instructions on how to cancel transmission, refer to Cancelling a Communication. (See page 46).
Setting Original Quality
Original Type
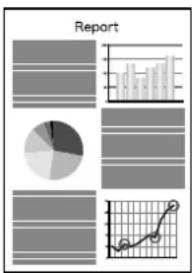
Original type can be specified to suit your needs, you can select from, text-only original, photo-only original or original in which text and photos are mixed.
Select "Text/Photo" when text and photos are mixed on a single page or are mixed on multiple pages to be sent.
Text-only original Photo-only original

text_image
Report
natural_image
Microscopic view of crystalline structures with no visible text or symbolsOriginal in which text and photos are mixed
natural_image
Black-and-white photo of a large rock arch carved into the desert landscape, with horizontal lines below indicating horizontal stripes (no text or symbols)Density
Choose a density to suit your originals.


Lighter Darker
Resolution
Choose the resolution to suit your originals.
Ordinary original

text_image
LetterOriginal containing small characters or graphics
text_image
ReportFineStd
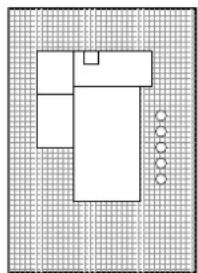
Original containing detailed drawings or text
natural_image
Simple line drawing of a room layout with furniture and circular elements on a grid background (no text or symbols)Fine, S-Fine, or 600dpi
NOTE
The standard setting can be changed by the setting "03 Original (HOME)", "01 Density (HOME)", "02 Resolution (HOME)" in Function Parameters (Fax/Email Settings> Fax Parameters).
For instructions on how to change the setting, refer to Fax/Email Settings in the Operating Instructions (For Function Parameters) on the provided CD-ROM.
1 Place Original(s).
- Refer #Clacing Originals (Facsimile/Internet Fax) in the Operating Instructions (For Basic Operations) of provided booklet.
2 Press the Fax key.
3 Select "Basic Menu".
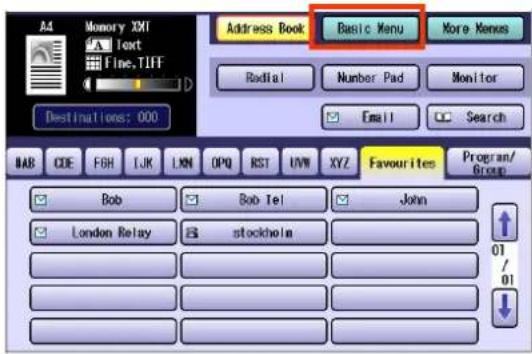
text_image
Address Book Basic Menu More Menus Radial Number Pad Monitor Email Search Destinations: 000 BAB CODE FGH IJK LKN OPQ RST UVN XYZ Favourites Program/Group Bob Bob Tel John London Relay stockholm 01/ 014 Select "Quality Adj.".
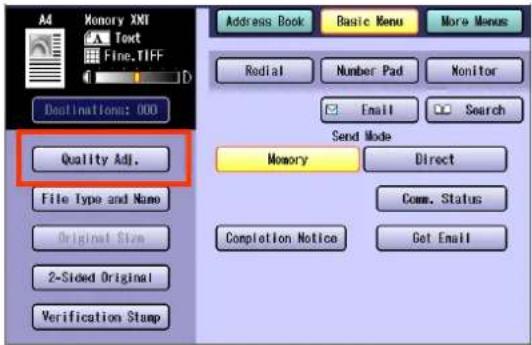
text_image
A4 Memory XXI Text Fine.TIFF Destinations: 000 Quality Adj. File Type and Name Original Size 2-Sided Original Verification Stamp Address Book Basic Menu More Menus Redial Number Pad Monitor Email Search Send Mode Memory Direct Comm. Status Completion Notice Get Email5 Adjust the original quality, and then select "OK".
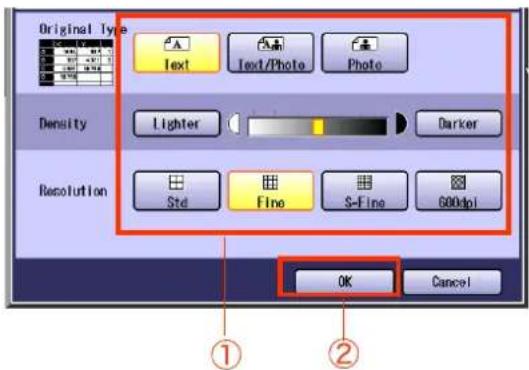
text_image
Original Type Text Text/Photo Photo Density Lighter Darker Resolution Std Fine S-Fine 600dpi OK Cancel ① ②Original Type
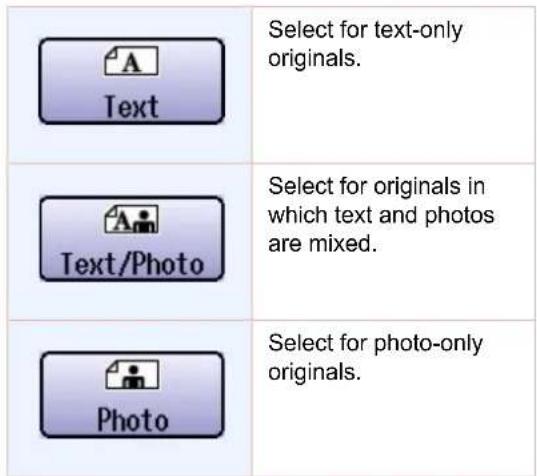
text_image
Select for text-only originals. Text Select for originals in which text and photos are mixed. Text/Photo Select for photo-only originals. Photo- If a photo original is scanned in "Text" Mode, the scanned image can be indistinguishable in the halftone area.
□ Density
| Lighter | If you wish to scan a original with lighter contrast, select the button to reduce the contrast level. Each time the button is selected, the original will be scanned lighter. |
| Darker | If you wish to scan a original with darker contrast, select the button to increase the contrast level. Each time the button is selected, the original will be scanned darker. |
Resolution
| Std | Select for ordinary originals. |
| Fine | Select for originals containing small characters or graphics. |
| S-Fine | Select for fine originals containing detailed drawings or text. |
| 600dpi |
- The finer a original to be scanned, the more information needs to be transmitted, thus, requiring a longer communication time.
- If "S-Fine" or "600dpi" is selected, and the receiving station does not support these resolutions, originals will be transmitted with resolution of the receiver's capability.
6 Select a destination.
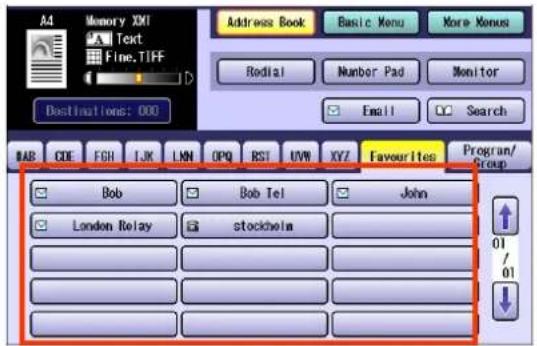
text_image
Address Book Basic Menu More Menus Rodial Number Pad Monitor Email Search Destinations: 000 BAB CODE FGR IJK LKN OPQ RST UVW XYZ Favourites Program/ Bob Bob Tel John London Relay stockholm 01 /01● Refer to Entering a Destination. (See page 16).
7 Press the Start key.
The original(s) are stored into memory with a file number. Then starts dialling the telephone number.
Memo
Setting the Original Size
The Original Size is usually detected automatically when an original is placed on the platen.
If the size is not detected automatically, or you would like to change the detected size, you can set the original size manually by following the procedure below.
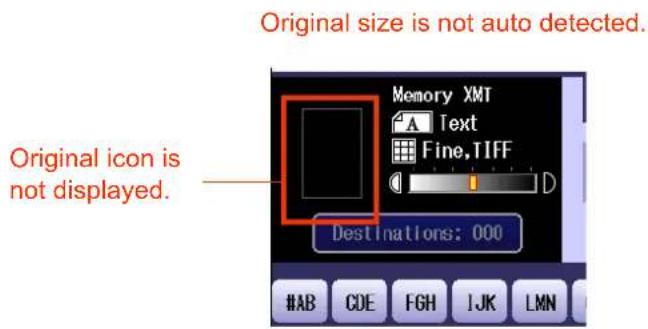
text_image
Original size is not auto detected. Original icon is not displayed. Memory XMT A Text Fine, TIFF D Destinations: 000 #AB CDE FGH IJK LMNOriginal size is not detected correctly.
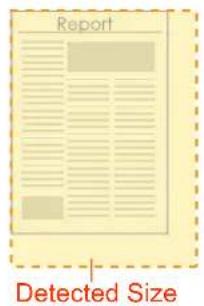
text_image
Report Detected SizeNOTE
This feature does not work when a original is loaded on the ADF.
1 Place original(s) on the platen.
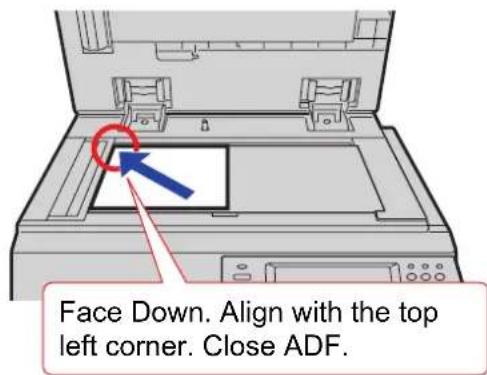
text_image
Face Down. Align with the top left corner. Close ADF.- Refer tPlacing Originals (Facsimile/Internet Fax) in the Operating Instructions (For Basic Operations) of provided booklet.
2 Press the Fax key.
3 Select "Basic Menu".
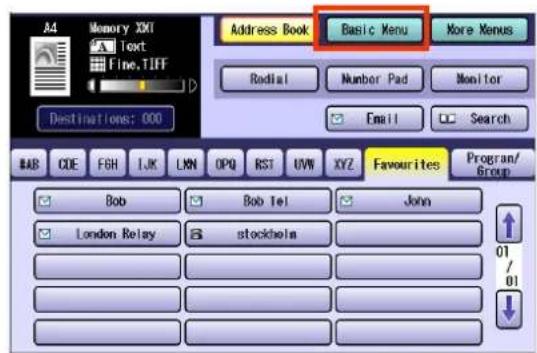
text_image
A4 Memory XML Text Fine.TIFF Address Book Basic Menu More Menus Radial Number Pad Monitor Email Search Destinations: 000 BAB CDE FGH IJK LWN OPQ RST UVN XYZ Favourites Program/ Group Bob Bob tel John London Relay stockholm 01 /01 ↓4 Select "Original Size".
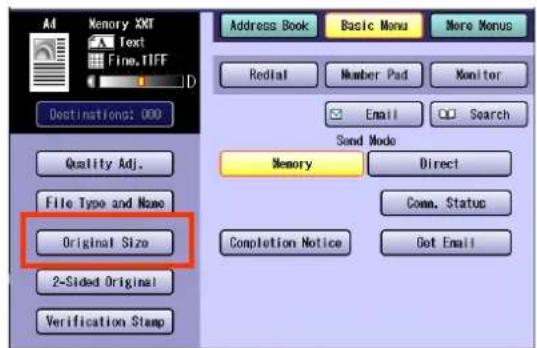
text_image
Memory XXT Text Fine.TIFF Destinations: 000 Quality Adj. File Type and Name Original Size 2-Sided Original Verification Stamp Address Book Basic Menu More Menus Redial Number Pad Monitor Email Search Send Mode Memory Direct Come. Status Completion Notice Got Email5 Choose the original size, and then select "OK".
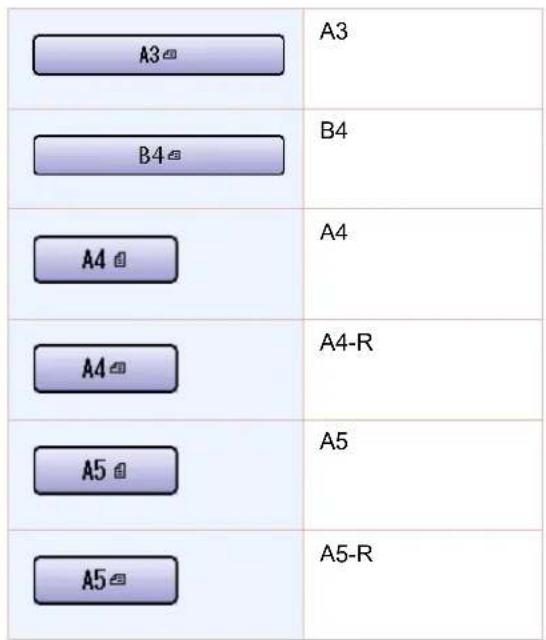
text_image
A3 B4 A4 A4-R A5 A5-R6 Set "Quality Adj." as required.
● Refer to Setting Original Quality. (See page 26).
7 Select a destination.
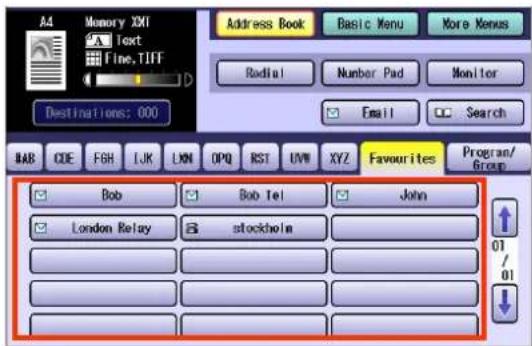
text_image
A4 Memory XXI Text Fine, TIFF Address Book Basic Menu More Menus Radial Number Pad Monitor Email Search BAB CDE FGH IJK LKN OPQ RST UVW XYZ Favourites Program/ Bob Bob Tel John London Relay stockholm 01 / 01● Refer to Entering a Destination. (See page 16).
8 Press the Start key.
The original(s) are stored into memory with a file number. Then starts dialling the telephone number.
Transmitting 2-Sided Originals
2-sided originals loaded in the ADF are scanned automatically with a specified bidding edge position and transmitted.
Two binding edge selections are available:
- Long Edge: 2-sided scanning is aligned to the long edge of the original.
- Short Edge: 2-sided scanning is aligned to the short edge of the original.
natural_image
Two technical line drawings of a folded document or paper sheet, showing front and side views with no text or symbols.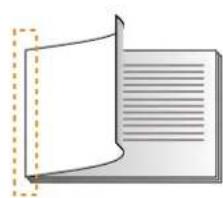
natural_image
Illustration of a closed book with visible page lines and cover (no text or symbols)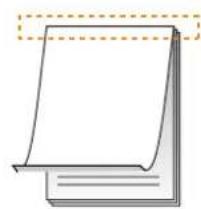
natural_image
Simple line drawing of a folded paper or document with no text, numbers, or symbolsNOTE
This feature works only when originals loaded in the ADF.
The verification stamp feature does not work when a 2-sided scanning is selected.
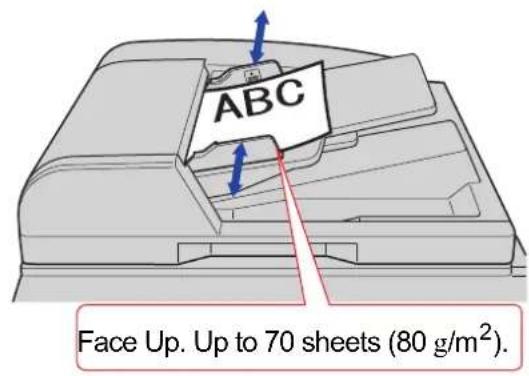
1 Place Original(s).
text_image
ABC Face Up. Up to 70 sheets (80 g/m²).- Refer tPlacing Originals (Facsimile/Internet Fax) in the Operating Instructions (For Basic Operations) of provided booklet.
2 Press the Fax key.
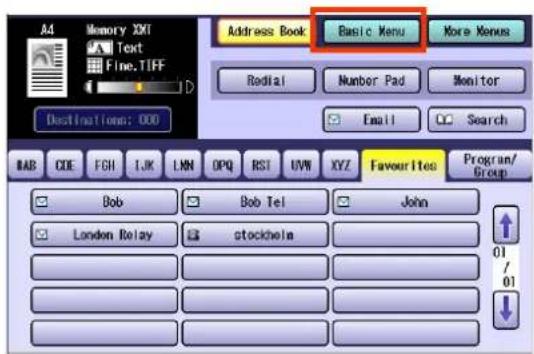
3 Select "Basic Menu".
text_image
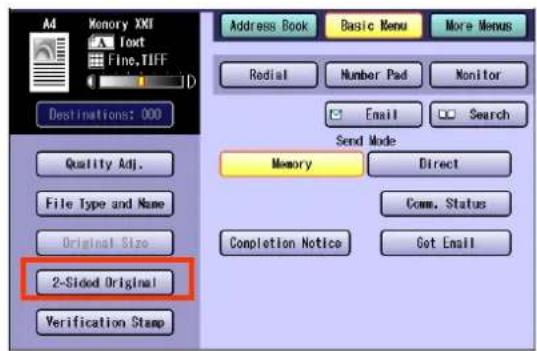
Address Book Basic Menu More Menus Radial Number Pad Monitor Email Search Destinations: 000 BAB CODE FGH LJK LNN OPQ RST UVN XYZ Favourites Program/Group Bob Bob Tel John London Relay stockholm 01 / 01 ↓4 Select "2-Sided Original".
text_image
Memory XXI Text Fine, TIFF Destinations: 000 Quality Adj. File Type and Name Original Size 2-Sided Original Verification Stamp Address Book Basic Menu More Menus Redial Number Pad Monitor Email Search Send Mode Memory Direct Comm. Status Completion Notice Get Email5 Select a binding position, and then select "OK".
| Long Edge | Select when the binding position is on the long side of the original. |
| Short Edge | Select when the binding position is on the short side of the original. |
6 Set "Quality Adj." as required.
● Refer to Setting Original Quality. (See page 26).
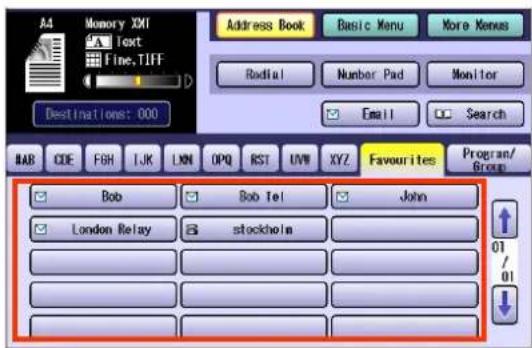
7 Select a destination.
text_image
A4 Memory XVI Text Fine.TIFF Address Book Basic Menu More Menus Radial Number Pad Monitor Email Search BAB CDE FGH TJK LKN OPQ RST UVW XYZ Favourites Program/ Program/Group Bob Bob Tel John London Relay stockholm 01 01 Destinations: 000● Refer to Entering a Destination. (See page 16).
8 Press the Start key.
The original(s) are stored into memory with a file number. Then starts dialling the telephone number.
Verification Stamp
This function confirms successful transmission or storage into the memory by stamping at the bottom of each successfully transmitted original(s) with a small "x" mark.
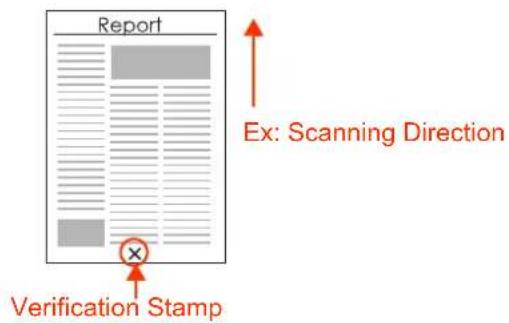
text_image
Report Ex: Scanning Direction Verification StampNOTE
- The setting of the verification stamp can be changed with "04 Stamp (HOME)" in Function Parameters (Fax/Email Settings> Fax Parameters). For instructions on how to change the standard setting, refer to Fax/Email Settings in the Operating Instructions (For Function Parameters) on the provided CD-ROM.
- The machine can be configured not to stamp the documents stored in the memory by changing the setting "28 Stamp at Memory XMT" in Function Parameters (Fax/Email Settings> Fax Parameters). For instructions on how to configure the verification stamp, refer to Fax/Email Settings in the Operating Instructions (For Function Parameters) on the provided CD-ROM.
Verification Stamp function is only available when scanned with the ADF.
1 Place Original(s).
- Refer tPlacing Originals (Facsimile/Internet Fax) in the Operating Instructions (For Basic Operations) of provided booklet.
2 Press the Fax key.
3 Select "Basic Menu".
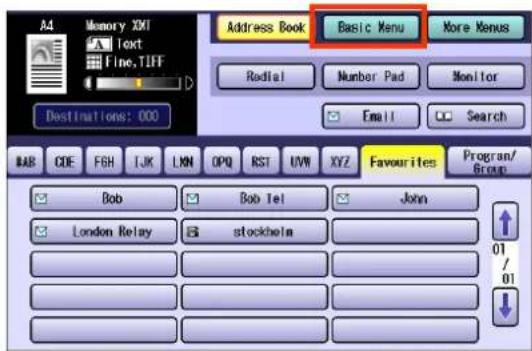
text_image
A4 Memory XML Text Fine, TIFF Address Book Basic Menu More Menus Radial Number Pad Monitor Email Search Destinations: 000 BAB CODE FGH TJK LNN OPQ RST UVN XYZ Favourites Program/ Group Bob Bob tel John London Relay stockholm 01 /014 Select "Verification Stamp".
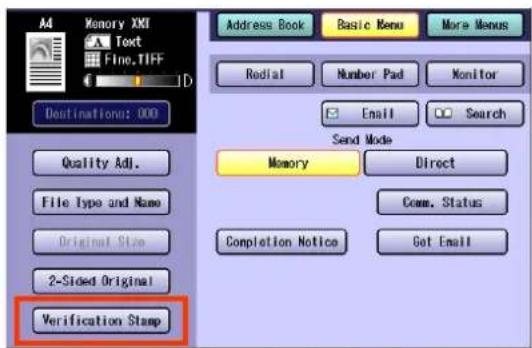
text_image
Memory XXI Text Fine.TIFF ID Destination: 000 Quality Adj. File Type and Name Original Size 2-Sided Original Verification Stamp Address Book Basic Menu More Menus Redial Number Pad Monitor Email Search Send Mode Memory Direct Comm. Status Completion Notice Get Email5 Set "Quality Adj." as required.
● Refer to Setting Original Quality. (See page 26).
6 Select a destination.
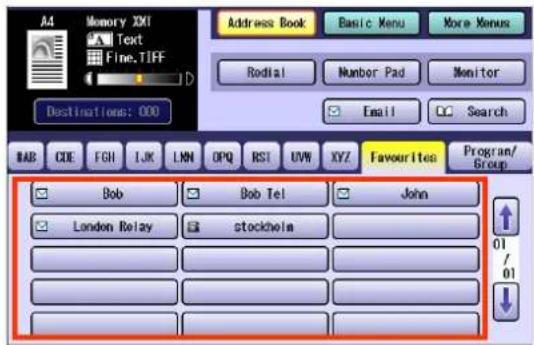
text_image
A4 Memory XXI Text Fine.TIFF Address Book Basic Menu More Menus Rodial Number Pad Monitor Email Search BABB CODE FGH IJK LNN OPQ RST UVW XYZ Favourites Program/ Bob Bob Tel John London Relay stockchelm 01/01● Refer to Entering a Destination. (See page 16).
7 Press the Start key.
The original(s) are stored into memory with a file number. Then starts dialling the telephone number.
- Setting of "Verification Stamp" is returned to Off after finished transmission.
Memo
Transmitting a Document Stored in Memory
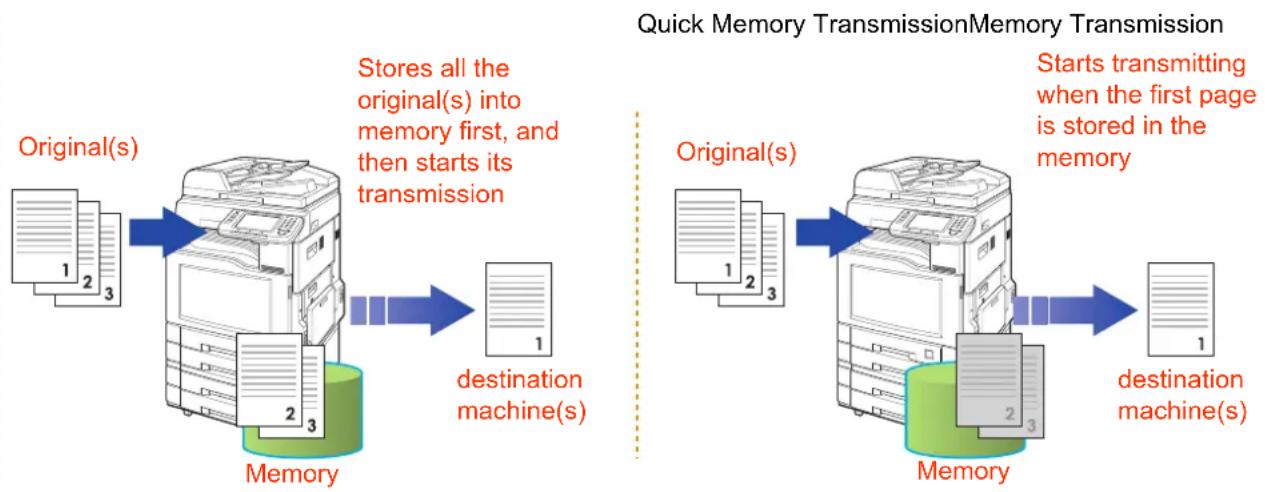
Documents can be quickly scanned and stored in the memory before transmission.
This feature allows you to send the documents to multiple destinations without having to scan the same documents over again. It also allows you to retrieve your original(s) immediately without having to wait for the fax transmission to complete.
In addition to the memory transmission, the machine supports the direct transmission feature. In direct transmission, a document is transmitted without storing it into the memory.
flowchart
graph LR
    A["Original(s)"] --> B["Memory"]
    B --> C["destination machine(s)"]
    D["Stores all the original(s) into memory first, and then starts its transmission"] --> E["Original(s)"]
    F["Starts transmitting when the first page is stored in the memory"] --> G["Destination machine(s)"]
NOTE
- If the memory overflows while document(s) are being scanned for transmission to a single destination, the machine will operate in the following manner:
☐ If the quick memory transmission feature is set to "Valid" in Function Parameters
The document is transmitted up to the portion that was stored into the memory, and an error message Memory size over code = "870" is displayed.
☐ If the quick memory transmission feature is set to "Invalid" in Function Parameters
The document is transmitted up to the portion that was stored in the memory, and then switches to direct transmission and transmits the remaining document(s) in the ADF during the same phone call.
- If the memory overflows while document(s) are being scanned for transmission to multiple destinations, a message appears asking whether to transmit the successfully stored documents in memory or to cancel the transmission. Select "Yes" to start transmitting, or "No" to cancel. If no action is taken within 10 seconds, the machine will start transmitting the stored documents.
- The transmission of a document terminates if memory overflows when the first page is transmitted.
- The standard setting of Memory Transmission can be changed with "05 Memory (HOME)" in Function Parameters (Fax/Email Settings> Fax Parameters). For instructions on how to change the standard setting, refer to Fax/Email Settings in the Operating Instructions (For Function Parameters) on the provided CD-ROM.
- This Function Parameters, (Fax/Email Settings> Fax Parameters) "82 Quick Memory XMT" can be configured to start transmitting a document when the first page is stored. This transmission mode is called "quick memory transmission." For instructions on how to change the standard setting, refer to Fax/Email Settings in the Operating Instructions (For Function Parameters) on the provided CD-ROM.
- Your machine is preset to transmit all documents from memory.
To send documents using memory transmission, follow the steps below. (This is an example when the direct transmission is set as default in the Function Parameters.)
1 Place Original(s).
- Refer Placing Originals (Facsimile/Internet Fax) in the Operating Instructions (For Basic Operations) of provided booklet.
2 Press the Fax key.
3 Select "Basic Menu".
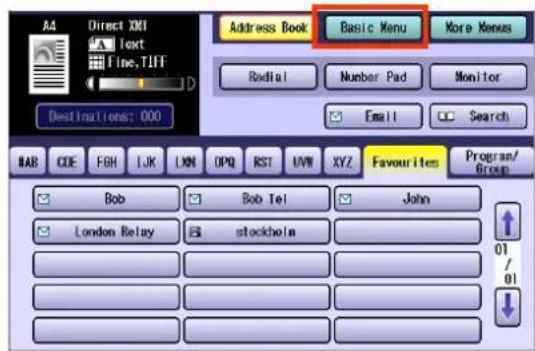
text_image
Address Book Basic Menu More Nenus Redial Number Pad Monitor Email Search Destinations: 000 BAB CDE FGH LJK LNN OPQ RST UVH XYZ Favourites Program/Group Bob Bob Tel John London Relay stockholm 01/ 01 ↓4 Select "Memory".
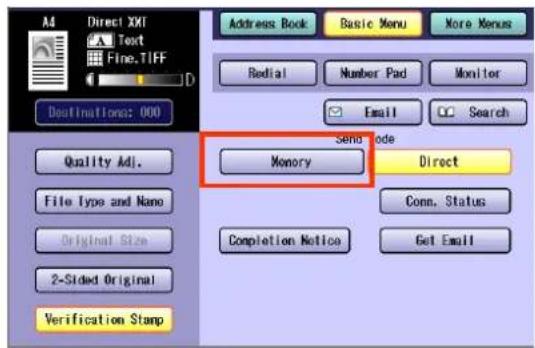
text_image
Address Book Basic Menu More Menus Redial Number Pad Monitor Email Search Send Code Memory Direct File Type and Nano Original Size 2-Sided Original Verification Stamp Conn. Status Completion Notice Get Email5 Set "Quality Adj." as required.
● Refer to Setting Original Quality. (See page 26).
6 Select a destination.
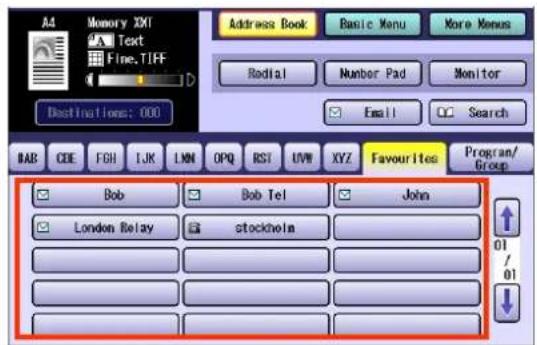
text_image
Address Book Basic Menu More Menus Text Fine.TIFF Radial Number Pad Monitor Send to: Email: Search Destinations: 000 BAB CDE FGH IJK LMN OPQ RST UVW XYZ Favourites Program/Group Bob Bob Tel John London Relay stockholm 01/ 01● Refer to Entering a Destination. (See page 16).
7 Press the Start key.
The original(s) are stored into memory with a file number. Then starts dialling the telephone number.
- For instructions on how to cancel transmission, refer to Cancelling a Communication. (See page 46).
Direct Transmission
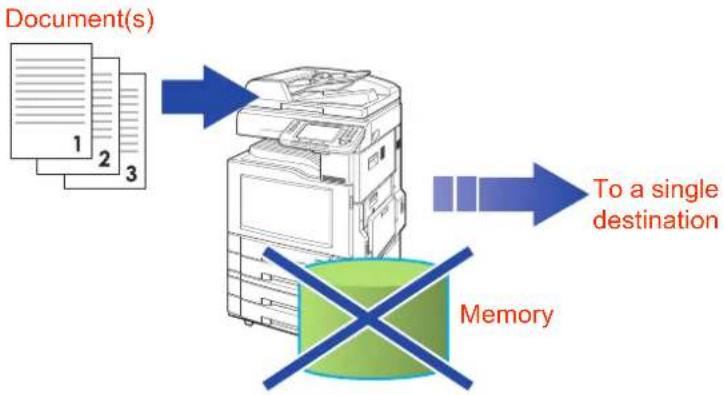
Documents can be transmitted immediately on scanning without storing into memory. Direct transmission is more convenient in situations as shown below:
☐ When you want to send the documents right away.
☐ When you want to send a large amount of documents.
flowchart
graph TD
    A["Document(s)"] --> B["Printer"]
    B --> C["Memory"]
    C --> D["To a single destination"]
NOTE
- Direct transmission cannot be used to send documents to multiple destinations.
● Memory transmission may be automatically switched to direct transmission when memory overflow occurs while scanning documents.
● Memory transmission is the default setting on the machine, however, it can be changed to direct transmission with the setting "05 Memory (HOME)". For instructions on how to change the standard setting, refer to Fax/Email Settings in the Operating Instructions (For Function Parameters) on the provided CD-ROM.
1 Place Original(s).
- Refer tBlacing Originals (Facsimile/Internet Fax) in the Operating Instructions (For Basic Operations) of provided booklet.
2 Press the Fax key.
3 Select "Basic Menu".
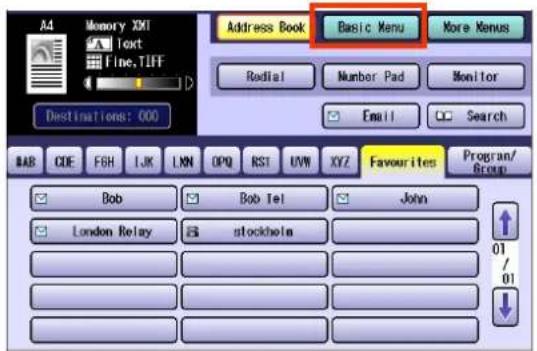
text_image
Address Book Basic Menu More Menus Radial Number Pad Monitor Email Search Destinations: 000 BAB CODE FISH IJK LNN OPQ RST UVW XYZ Favourites Program/Group Bob Bob Tel John London Relay Stockholm 01/ 014 Select "Direct".
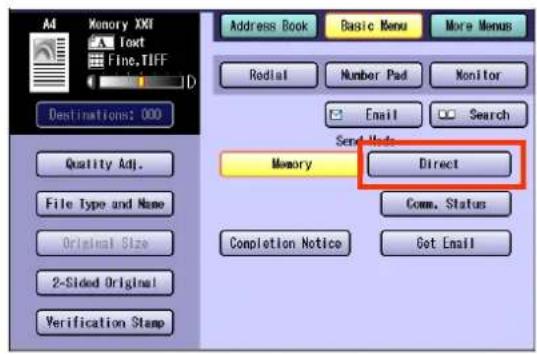
text_image
Memory XXI Text Fine.TIFF Destinations: 000 Quality Adj. File Type and Name Original Size 2-Sided Original Verification Stamp Address Book Basic Menu More Menus Redial Number Pad Monitor Email Search Send Mode Memory Direct Comm. Status Completion Notice Get Email5 Set "Quality Adj." as required.
- Refer to Setting Original Quality. (See page 26).
6 Select a destination.
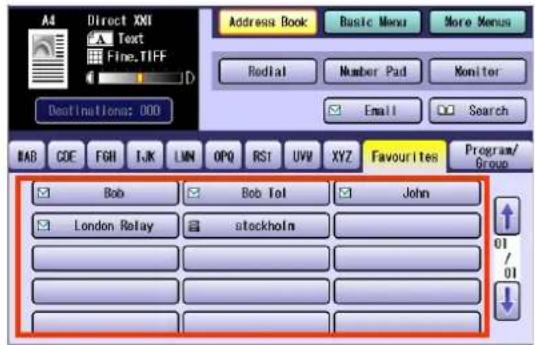
text_image
Address Book Basic Menu More Menus Redtail Number Pad Monitor Email Search BIB COE FGH IJK LUN OPQ RST UVV XYZ Favourites Program/Group Bob Bob Tol John London Relay stockholm 01/ 01● Refer to Entering a Destination. (See page 16).
7 Press the Start key.
Transmission starts immediately on scanning.
- For instructions on how to cancel transmission, refer to Cancelling a Communication. (See page 46).
Verifying Communication Status
To verify the communication status, follow the steps below:
1 Press the Fax key.
2 Select "Basic Menu".
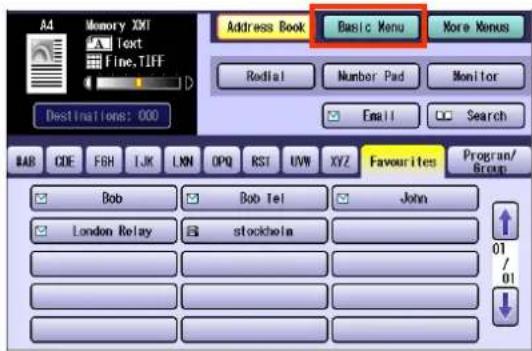
text_image
A4 Memory XXI Text Fine.TIFF Address Book Basic Menu More Manus Redial Number Pad Monitor Email Search Destinations: 000 BAB CODE FBH IJK LNN OPQ RST UVW XYZ Favourites Program/ Bob Bob tel John London Relay stockholm 01 /01 ↓3 Select "Comm. Status" while the call session is in progress.
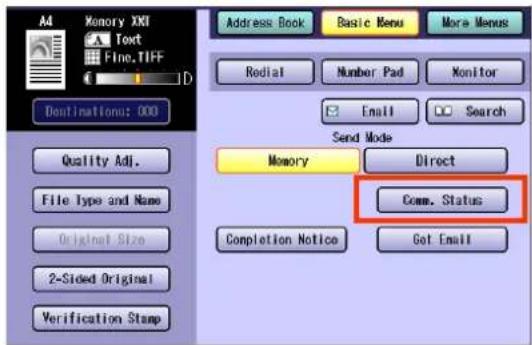
text_image
Memory XXI Text Fine.TIFF Dolinationu: 000 Quality Adj. File Type and Name Original Size 2-Sided Original Verification Stamp Address Book Basic Menu More Menus Redial Number Pad Monitor Email Search Send Mode Memory Direct Comm. Status Completion Notice Get Email4 Verify the communication status.
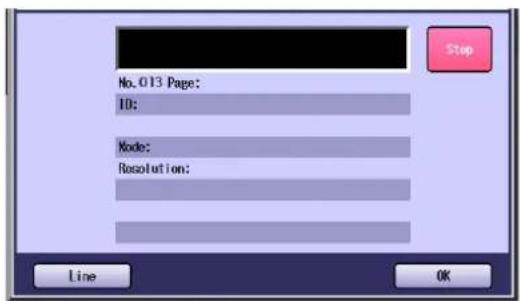
text_image
No. 013 Page: ID: Mode: Resolution: Step Line OK5 When the verification is completed, select "OK".
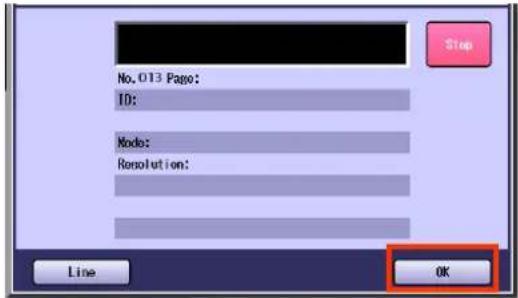
text_image
No. 013 Page: ID: Mode: Resolution: Step Line OKMemo
Rotated Transmission
If an A4/Letter-sized document is loaded in a portrait position, it could be interpreted as an A3/Ledger size on the receiving station. To avoid this misinterpretation, the machine is configured to support rotated transmission.
Set "78 Rotation XMT" to "Valid" in Function Parameters (Fax/Email Settings> Fax Parameters). This allows an A4/Letter-size document to be rotated by 90 degrees automatically when it is loaded in a portrait position, so that it is transmitted in the same orientation as it would have been loaded in landscape position.
NOTE
- The standard setting of "78 Rotation XMT" is set to "Valid". For instructions on how to change the standard setting, refer to Fax/Email Settings in the Operating Instructions (For Function Parameters) on the provided CD-ROM.
● The rotated transmission feature only works with memory transmissions, and not with direct transmissions.
Rotation XMT set to "Valid"
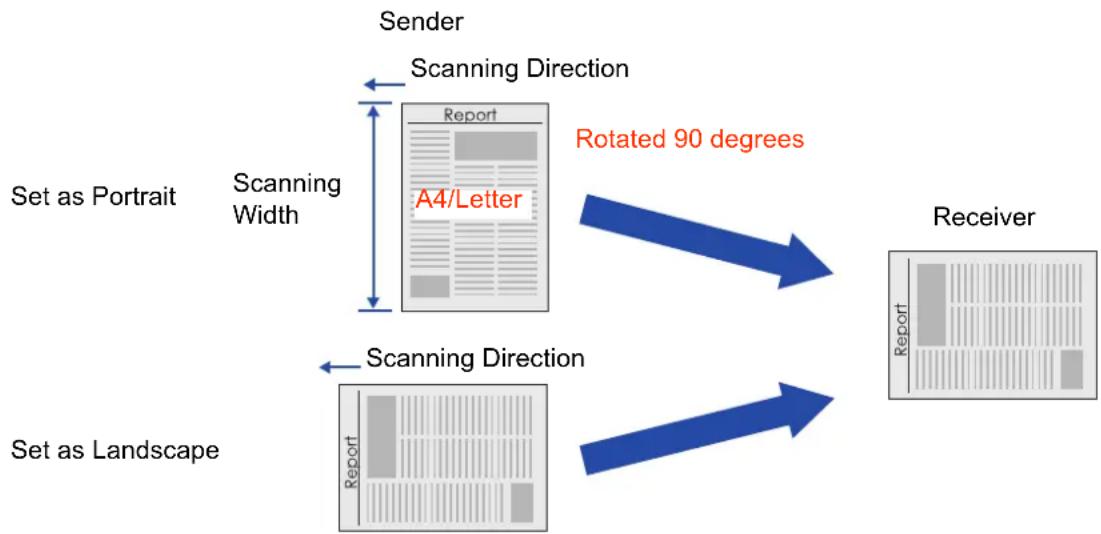
flowchart
graph TD
    A["Sender"] --> B["Scanning Direction"]
    B --> C["Report"]
    B --> D["A4/Letter"]
    E["Set as Portrait"] --> F["Scanning Width"]
    F --> G["Rotated 90 degrees"]
    H["Set as Landscape"] --> I["Scanning Direction"]
    I --> J["Report"]
    I --> K["A4/Letter"]
    L["Receiver"] --> M["Report"]
    L --> N["A4/Letter"]
■ Rotation XMT set to "Invalid"
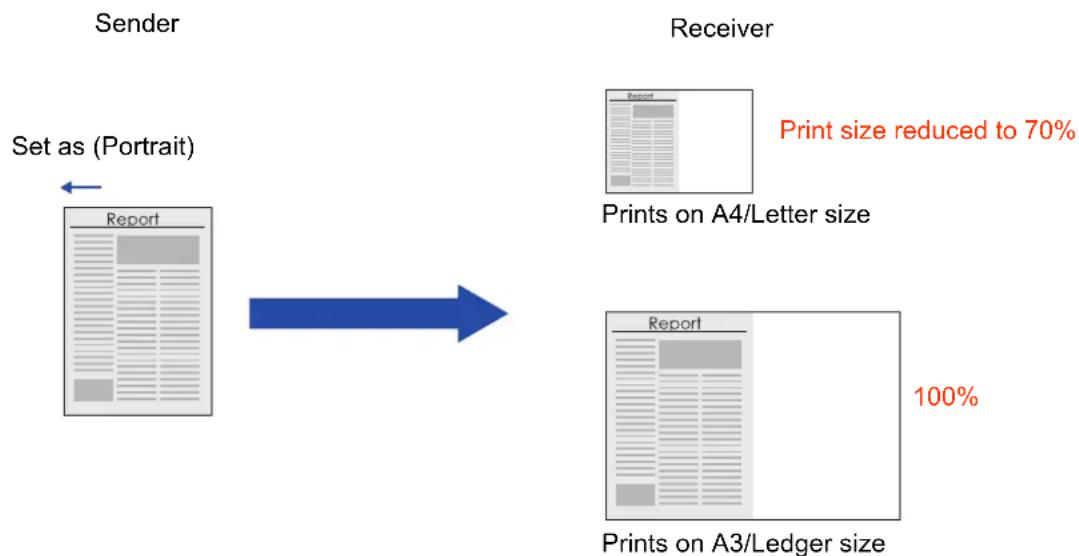
flowchart
graph LR
    A["Sender"] --> B["Set as (Portrait)"]
    B --> C["Receiver"]
    C --> D["Prints on A4/Letter size: Print size reduced to 70%"]
    C --> E["Prints on A3/Ledger size: 100%"]
Batch Transmission
The batch transmission feature is useful in controlling the reduction of transmission time and telephone costs. In a batch transmission job, the machine sorts documents bound for the same destination(s), and collectively handles them as one reserved document (file) to be transmitted in a single call.
There are two types of batch transmissions available:
• Real Time Batch Transmission:
During the memory transmission, your machine searches its memory for reserved files (up to 4 files) to transmit to the same destination, and automatically batches, and then transmits them in a single call.
NOTE
- The machine cannot batch a file(s) that is/are waiting for redialling, or are currently being sent, but will batch files that are pending to be dialled.
- Delayed Batch Transmission:
This feature requires the scheduling of the time for the batch transmission into a Program key in advance. All transmission(s) using this Program key are batched and transmitted at the registered time.
Ex. Real Time Batch Transmission
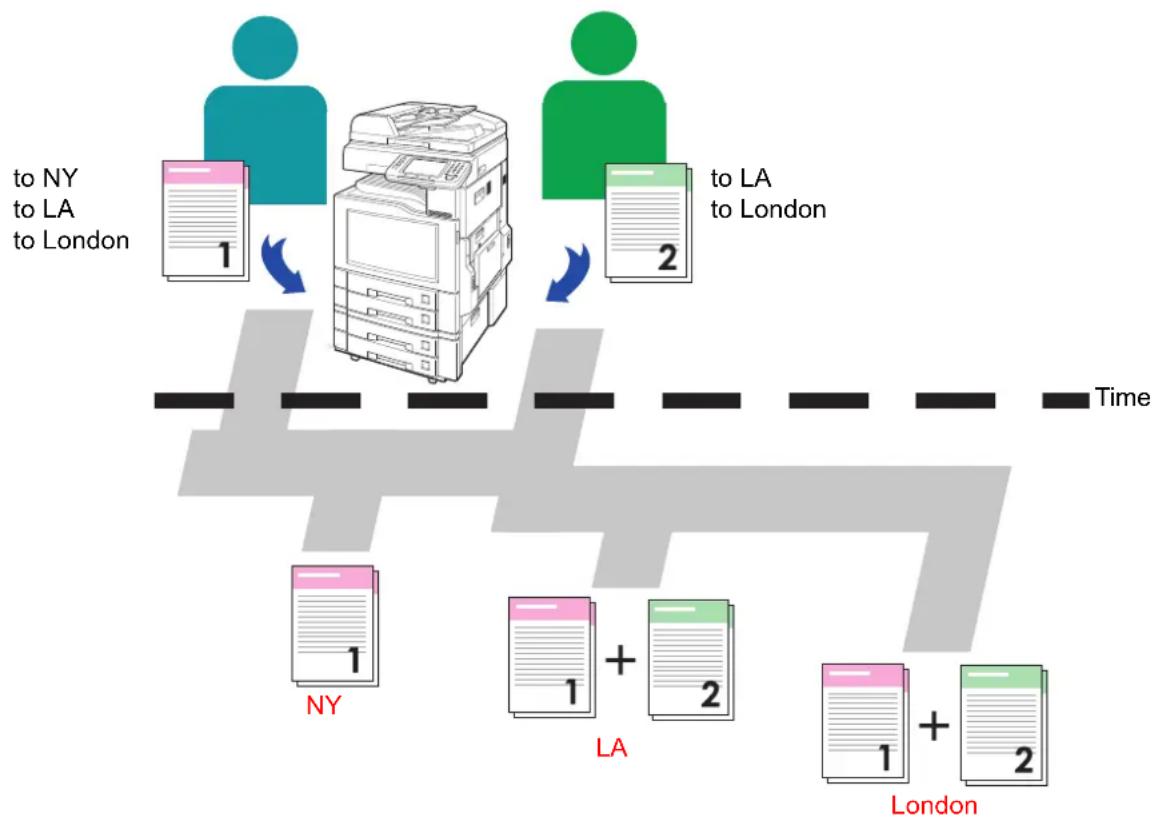
flowchart
graph TD
    A["NY"] --> B["Document 1"]
    C["LA"] --> D["Document 2"]
    E["London"] --> F["Document 1 + 2"]
    G["To LA to London"] --> H["Document 2"]
    style A fill:#f9f,stroke:#333
    style C fill:#f9f,stroke:#333
    style E fill:#f9f,stroke:#333
    style G fill:#f9f,stroke:#333
Getting an Outside Line Using PIN Code Access
If your PBX requires a PIN (Personal Identification Number) Code to access an external line, your machine can be set to prompt the user to enter the PIN Code before dialling.
This function is available when "39 PIN Code Access" in Fax/Email Settings> Fax Parameters is set to "Suffix" or "Prefix".
When "39 PIN Code Access" is set to "Prefix", the dialling procedure is as follows. (Available for some countries only.)
NOTE
- This feature is available in certain countries only.
● This feature is not available when dialling from a connected external telephone. - The standard setting of "39 PIN Code Access" is set to "None". For instructions on how to change the standard setting, refer to Fax/Email Settings in the Operating Instructions (For Function Parameters) on the provided CD-ROM.
1 Place Original(s).
- Refer tBlacing Originals (Facsimile/Internet Fax) in the Operating Instructions (For Basic Operations) of provided booklet.
2 Press the Fax Key.
3 Set "Quality Adj." as required.
● Refer to Setting Original Quality. (See page 26).
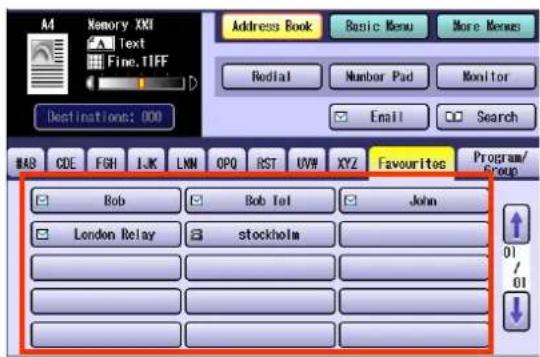
4 Select a destination.
text_image
M4 Memory XXI Text Fine.TIFF Address Book Basic Menu More Menus Redial Number Pad Monitor Send Search Destinations: 000 WAB CDE FGH LJK LNN OPQ RST UVW XYZ Favourites Program/ Group Bob Bob Tel John London Relay stockholm 01 01● Refer to Entering a Destination. (See page 16).
5 Press the Start key.
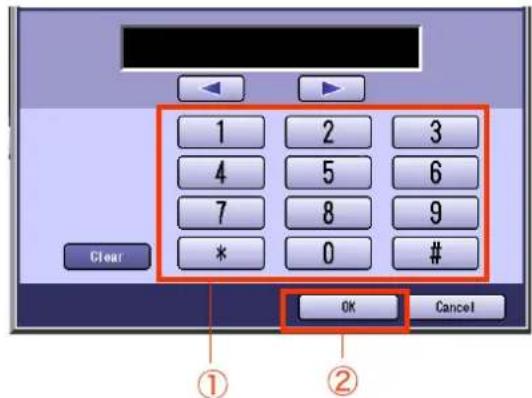
6 Enter a PIN Code, and then select "OK". (Up to 36 digits).
text_image
1 2 3 4 5 6 7 8 9 * 0 # Clear OK CancelThe original(s) are stored into memory with a file number. Then starts dialling the telephone number.
Using Program Keys
If frequently used communication tasks are pre-programmed onto a respective program dialling button, the programmed operating sequence can be recalled by simply selecting the assigned button.
Program dialling does not only simplify repetitive or complex operational sequences but also prevent operator errors.
To use a program key, follow the steps below:
NOTE
- To use this feature, the operating sequence must be programmed onto the button in advance. Refer to Setting for Program Dialling. (See page 171).
- To check what operation was pre-programmed onto a program button, confirm by printing the program list. Refer to Printing the Program List. (See page 179).
1 Place Original(s).
- Refer #Clacing Originals (Facsimile/Internet Fax) in the Operating Instructions (For Basic Operations) of provided booklet.
2 Press the Fax key.
3 Select "Program/Group".
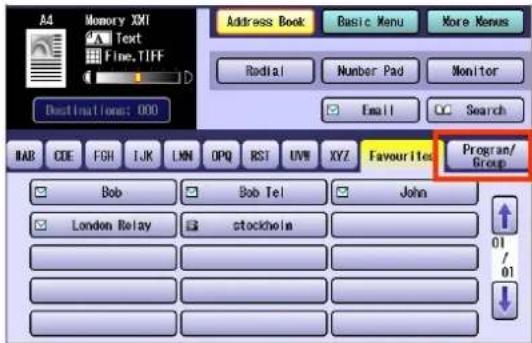
text_image
Address Book Basic Menu More Menus Radial Number Pad Monitor Email Search Destinations: 000 BAB CODE FGH IJK LMN OPQ RST UVB XYZ Favourites Program/ Group Bob Bob Tel John London Relay stockholm 01 / 014 Select the program key.
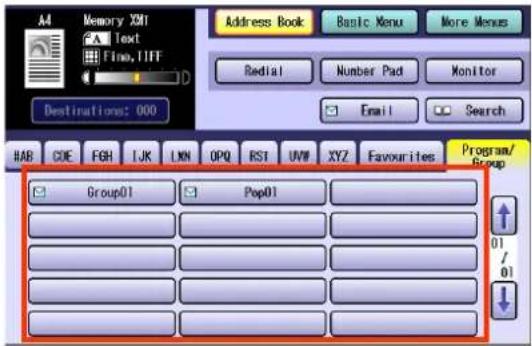
text_image
Memory X31 Text Fine, TIFF Address Book Basic Menu More Menus Redial Number Pad Monitor Email Search HAB CDE FGH IJK LNN OPQ RSI UVW XYZ Favourites Program/ Group01 Pop01 01 / 01Communication starts or stores original(s) into memory.
Cancelling a Communication
To cancel a communication, follow the steps below:
To Cancel Memory Transmission:
1 Press the Fax key.
2 Press the Stop key while the communication is in progress.
3 Select "Yes" to stop a communication.
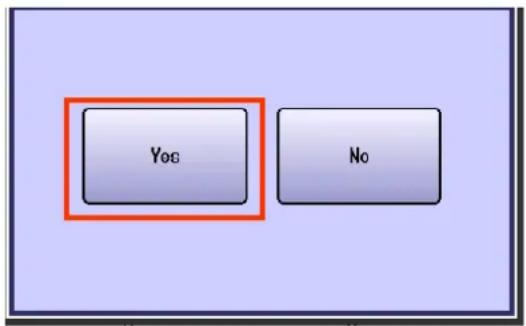
text_image
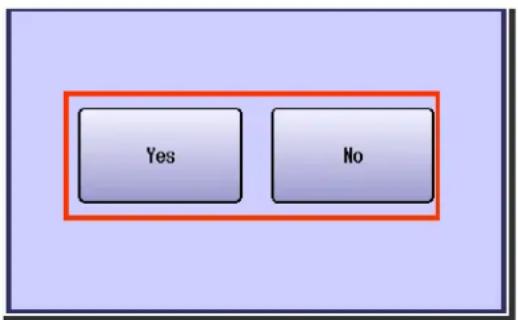
Yes No4 Select "Yes" to print a communication journal or "No" if a communication journal is not desired.
text_image
Yes NoTo Cancel Direct Transmission:
1 Press the Stop key while the communication is in progress.
2 Select "Yes" to stop a communication.
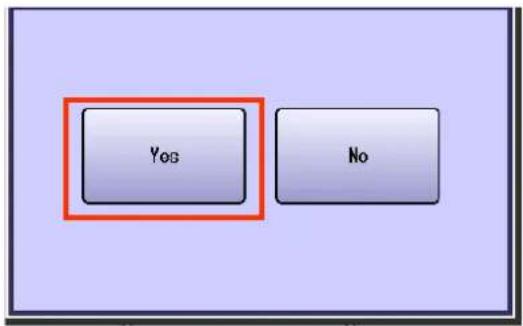
text_image
YOG No3 Remove the document.
Time Controlled Communication (Deferred)
Deferred Transmission
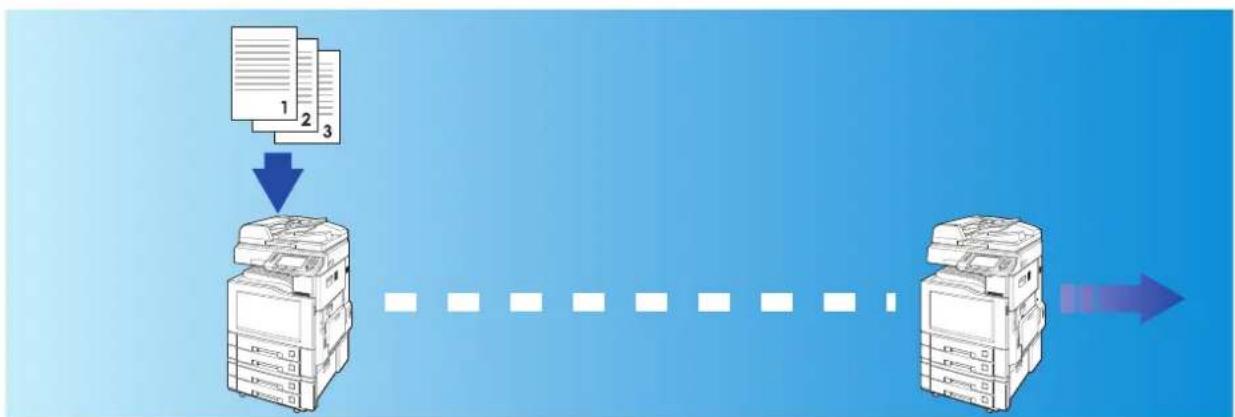
Time must be pre-programmed in advance to send document(s) to one or multiple destinations at a deferred time within the next 24 hours.
The document is scanned, and stored as a reserved document in memory until the pre-programmed time. It will start transmission at the pre-programmed time.
11:0021:00
flowchart
graph TD
    A["Document 1"] --> B["Printer"]
    C["Document 2"] --> B
    D["Document 3"] --> B
    B --> E["Server"]
    style A fill:#f9f,stroke:#333
    style C fill:#f9f,stroke:#333
    style D fill:#f9f,stroke:#333
    style B fill:#ccf,stroke:#333
    style E fill:#ccf,stroke:#333
Programmed to transmit at 21:00
Transmitted
NOTE
Up to 50 built-in timers can be set for deferred communication.
1 Place Original(s).
- Refer tPlacing Originals (Facsimile/Internet Fax) in the Operating Instructions (For Basic Operations) of provided booklet.
2 Press the Fax key.
3 Select "More Menus".
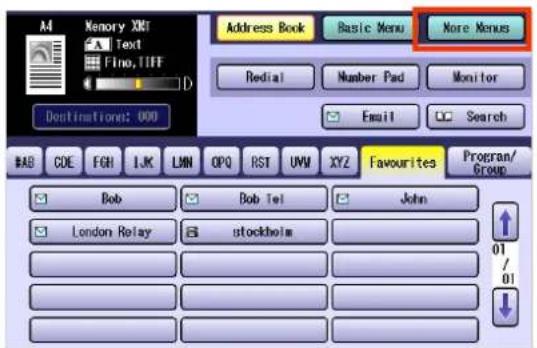
text_image
Memory XOMI Text Fino, TIFF Address Book Basic Menu More Menus Redial Number Pad Monitor Email Search Destinations: 000 BAB COE FGH IJK LMN OPQ RST UVW XYZ Favourites Program/Group Bob Bob Tel John London Relay stockholm 01/ 014 Select "Transmit".
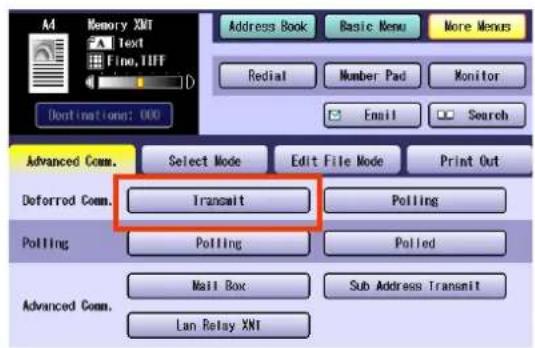
text_image
Memory XMT Text Fine, TIFF Options: 000 Address Book Basic Menu More Menus Redial Number Pad Monitor Email Search Advanced Comm. Select Mode Edit File Mode Print Out Deferred Comm. Transmit Polling Polling Advanced Comm. Mail Box Sub Address Transmit Lan Relay XMT5 Set the deferred time, and then select "OK".
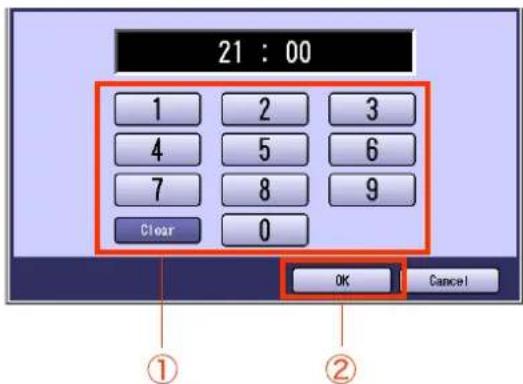
text_image
21 : 00 1 2 3 4 5 6 7 8 9 Clear 0 OK Cancel ① ②- Set the time in a 24-hour format. (Ex:) 21:00
- If you make a mistake, select "Clear" to delete entries one digit at a time.
6 Set "Quality Adj." as required.
● Refer to Setting Original Quality. (See page 26)
7 Select a destination.
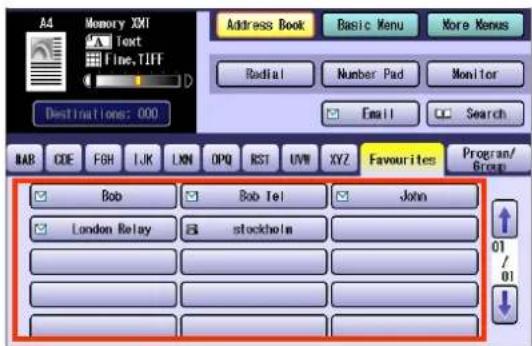
text_image
A4 Memory XXI Text Fine, TIFF Address Book Basic Menu More Venus Radial Number Pad Monitor Email Search Destinations: 000 BAB CODE FGH IJK LNN OPQ RST UVW XYZ Favourites Program/ Program/Group Bob Bob tel John London Relay stockholm 01 01● Refer to Entering a Destination. (See page 16)
8 Press the Start key.
Document(s) are stored into memory.
- The programmed deferred communication time can be modified.
For instructions on how to modify the communication time, refer to Editing Communication Reservations. (See page 156) - It you need to delete a reserved communication file or to cancel a timer-controlled communication, refer to Deleting a Communication Reservation File. (See page 158)
A communication journal is printed if the transmission fails for any reason (Ex: Remote station was busy).
Refer to Communication Journal. (See page 186)
- Press Reset key to return the machine to the initial screen of the current active mode.
Deferred Polling
If Polling is requested with a deferred time, it will start Polling at the pre-programmed time.
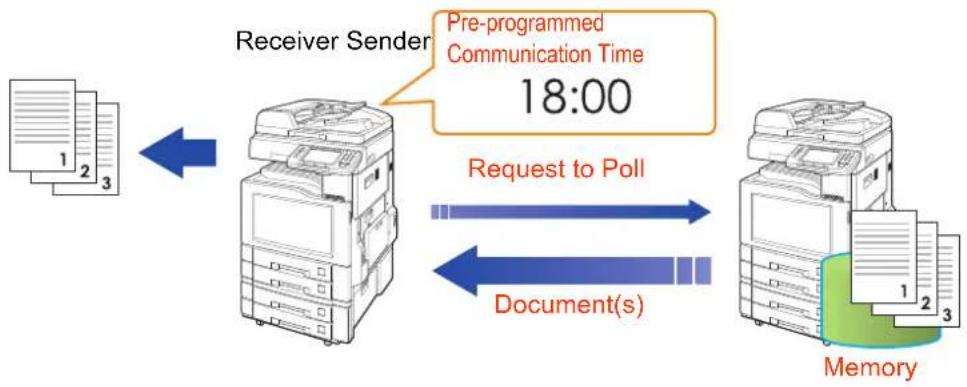
flowchart
graph LR
    A["Pre-programm Communication Time 18:00"] --> B["Receiver Sender"]
    B --> C["Request to Poll"]
    C --> D["Document(s)"]
    D --> E["Memory"]
NOTE
- Up to 50 built-in timers can be set for deferred communication.
- For instructions on how to use polling without a pre-programmed time, refer to Polling. (See page 52)
1 Press the Fax key.
2 Select "More Menus".
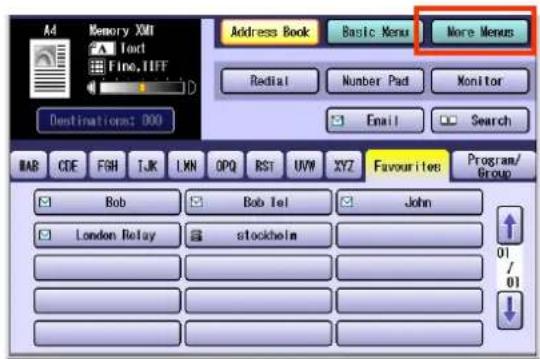
text_image
A4 Memory XII Text Fine.IIFF Address Book Basic Menu More Menus Redtail Number Pad Monitor Email Search BAS CDE FGH TJK LKN OPQ BST UVW XYZ Favourites Program/ Group Bob Bob Tel John London Relay stockholm 01 / 01 /013 Select "Polling" in "Deferred Comm."
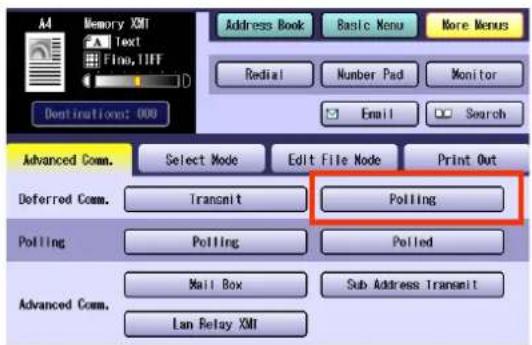
text_image
Memory XMI Text Flo, TIFF Address Book Basic Menu More Menus Redial Number Pad Monitor Email Search Dostinations: 000 Advanced Comm. Select Mode Edit File Mode Print Out Deferred Comm. Transmit Polling Polling Pollled Advanced Comm. Mail Box Sub Address Transmit Lan Relay XMI4 Enter a communication time, and then select "OK".
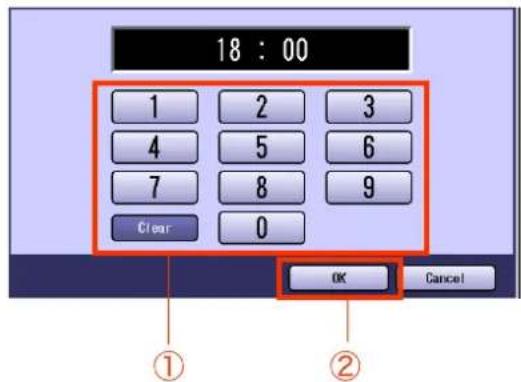
text_image
18 : 00 1 2 3 4 5 6 7 8 9 Clear 0 OK Cancel ① ②- Enter the time in a 24-hour format. Ex: 18:00
- If you make a mistake, select "Clear" to delete entries one digit at a time.
5 If a password is required, enter the password, and then select "OK".
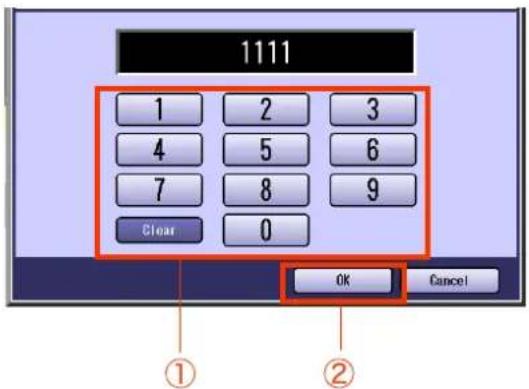
text_image
1111 1 2 3 4 5 6 7 8 9 Clear 0 OK Cancel ① ②- If you have set the polling password in "26 Polling Password" in Function Parameters (Fax/Email Settings> Fax Parameters), the password will appear on the display. You can still change the password temporarily by overwriting it with a new one.
6 Select a destination.
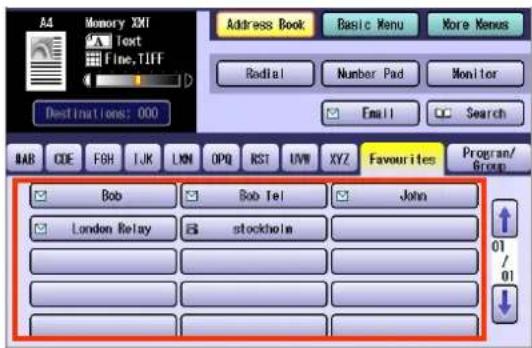
text_image
Address Book Basic Menu More Menus Rodital Number Pad Monitor Email Search BABB CODE FGH IJK LYNN OPQ RST UVW XYZ Favourites Program/Group Bob Bob Tel John London Relay stockholm 01/ 01● Refer to Entering a Destination. (See page 16)
7 Press the Start key.
Polling starts when the pre-programmed time is reached.
It you need to delete a reserved communication file, or cancel a timer controlled communication, refer to Deleting a Communication Reservation File. (See page 158)
- The programmed deferred communication time can be modified.
For instructions on how to modify the communication time, refer to Editing Communication Reservations. (See page 156)
Polling
Polling
Polling is a process of calling the other station(s) for document(s) retrieval. The other station must know in advance that you will be calling, and must prepare document(s) by storing them into the memory. To ensure security, establish a polling password that is shared by the other station ahead of time.
The receiving station initiates the call, therefore, it pays for the communication charges.
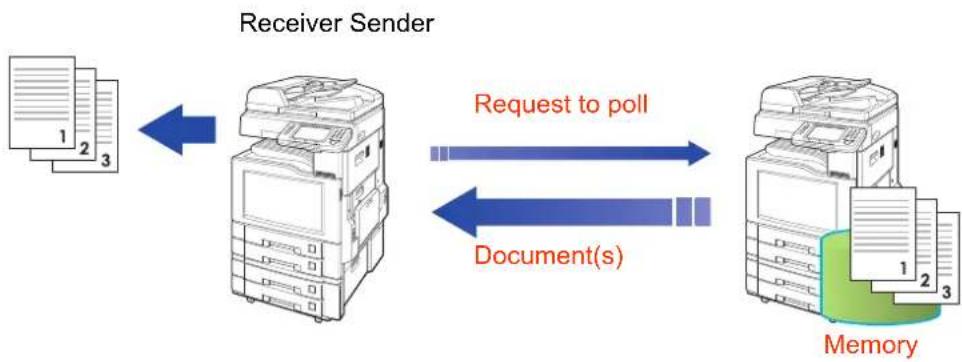
flowchart
graph LR
    A["Receiver Sender"] -->|Request to poll| B["Document(s)"]
    B --> C["Memory"]
1 Press the Fax key.
2 Select "More Menus".
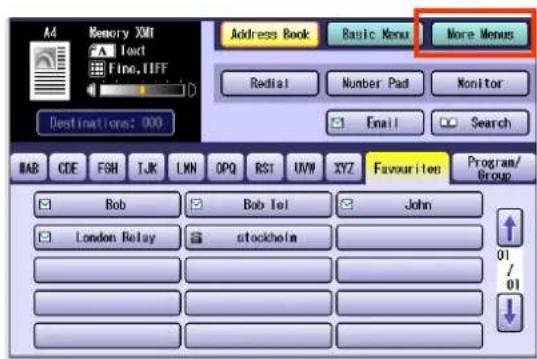
text_image
Memory XML Text Fine, TIFF Address Book Basic Menu More Menus Redial Number Pad Monitor Email Search Destinations: 000 BAB CDE FSH TJK LWN OPQ RST UVW XYZ Favourites Program/ Group Bob Bob Tel John London Relay stockholm 01 / 01 ↓3 Select "Polling" in "Polling".
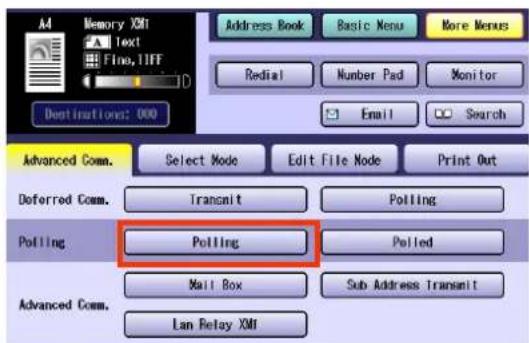
text_image
Memory XMI Text Fino, TIFF Address Book Basic Menu More Menus Redial Number Pad Monitor Email Search Destinations: 000 Advanced Comm. Select Mode Edit File Mode Print Out Deferred Comm. Transmit Polling Polling Polling Advanced Comm. Mail Box Sub Address Transmit Lan Relay XMI4 If a password is required, enter the password, and then select "OK".
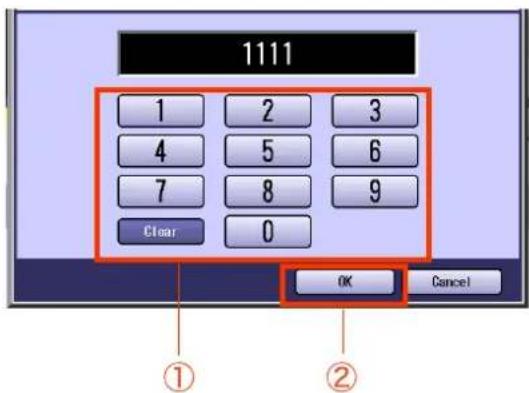
text_image
1111 1 2 3 4 5 6 7 8 9 Clear 0 OK Cancel ① ②- If you have set the polling password in "26 Polling Password" in Function Parameters (Fax/Email Settings> Fax Parameters), the password will appear on the display. You can still change the password temporarily by overwriting it with a new one.
5 Select a destination.
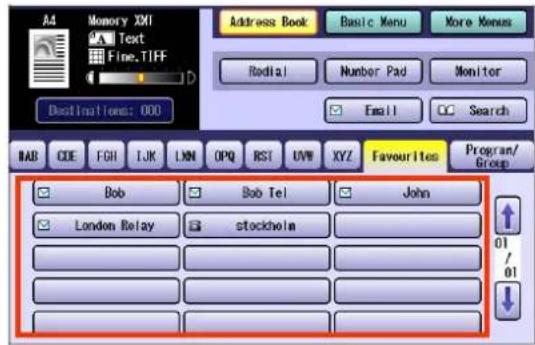
text_image
A4 Memory XVI Text Fine.TIFF Address Book Basic Menu More Menus Radial Number Pad Monitor Email Search BAB CDE FGH IJK LYN OPQ RST UVW XYZ Favourites Program/ Group Bob Bob Tel John London Relay stockholm 01/01● Refer to Entering a Destination. (See page 16)
6 Press the Start key.
Polling starts.
Storing Documents to Be Polled
Polled is the process of automatically transmitting document(s) upon receiving the polling request from the receiving station.
First, you must prepare your machine by storing document(s) into memory ahead of time.
To ensure security, set the polling password that is shared with the receiving station.
The receiving station initiates the call, therefore, it pays for the communication charges.
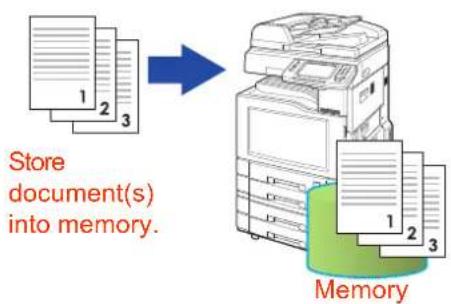
flowchart
graph TD
    A["Document 1"] --> B["Memory"]
    C["Document 2"] --> B
    D["Document 3"] --> B
    E["Store document(s) into memory."] --> B
    B --> F["Output"]
Sender (Waiting for Polling request)
1 Place Original(s).
- Refer tBlacing Originals (Facsimile/Internet Fax) in the Operating Instructions (For Basic Operations) of provided booklet.
2 Press the Fax key.
3 Select "More Menus".
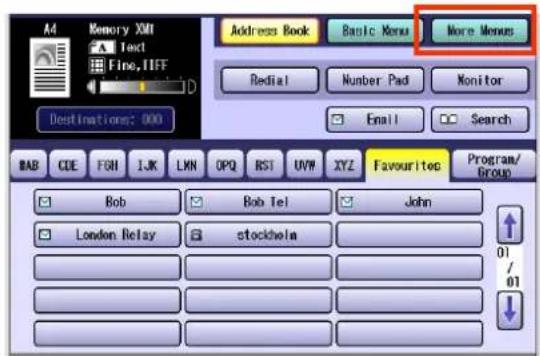
text_image
Memory XML Text Fine, IFF Address Book Basic Menu More Menus Redial Number Pad Monitor Email Search Destinations: 000 BAB CDE FGN IJK LWN OPQ RST UVW XYZ Favourite Program/Group Bob Bob Tel John London Relay stockholn 01 / 014 Select "Polled" in "Polling".
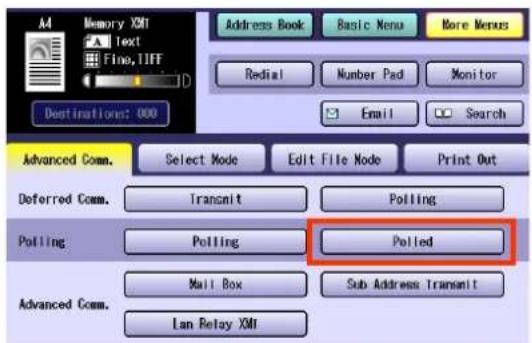
text_image
Memory XMT Text Fino, TIFF Address Book Basic Menu More Menus Redial Number Pad Monitor Email Search Destinations: 000 Advanced Comm. Select Mode Edit File Mode Print Out Deferred Comm. Transmit Polling Polling Pollled Polling Mall Box Sub Address Transmit Advanced Comm. Lan Relay XMT5 If a password is required, enter the password, and then select "OK".
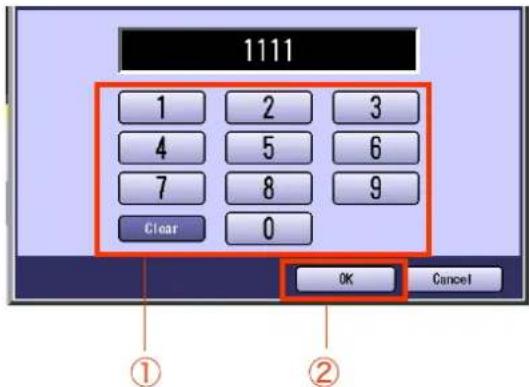
text_image
1111 1 2 3 4 5 6 7 8 9 Clear 0 OK Cancel ① ②The scanned document is stored in the memory as a polled file ready for transmission upon receiving a polling request.
- You can still send or receive documents even when the machine is setup to be polled.
- To delete a polled file, refer to Deleting a Communication Reservation File. (See page 158)
- Only 1 polled file can be stored in memory. If you need to add document(s) into the same polled file, refer to Adding Documents to a Communication Reservation File. (See page 160)
- If you have set the polling password in "26 Polling Password" in Function Parameters (Fax/Email Settings> Fax Parameters), the password will appear on the display. You can still change the password temporarily by overwriting it with a new one.
- After being polled, the documents stored in the memory will be erased automatically. To retain the documents in memory so that they can be polled repeatedly change by setting "27 POLLED FILE SAVE" to "Valid" in Function Parameters (Fax/Email settings> Fax Parameters).
Using a Mailbox (Confidential Communication)
What is Confidential Communication?
The confidential mailbox allows communication with other compatible models using a 4-digit confidential code. The Confidential Mailbox feature receives document(s) with a confidential code in the memory. These documents can only be printed by the person who has the correct confidential code.
- A confidential reception report is printed whenever confidential documents are received on the machine.
- Up to 20 mailboxes are available on the machine.
- Mailbox passwords are 4-digit.
This section explains how to transmit, poll, store, delete, and print confidential documents.
Confidential polling and confidential polled transmission can be performed using mailboxes. For instructions on how to use these, refer to Confidential Polling (see page 58), Storing Documents for Confidential Polling. (See page 59)
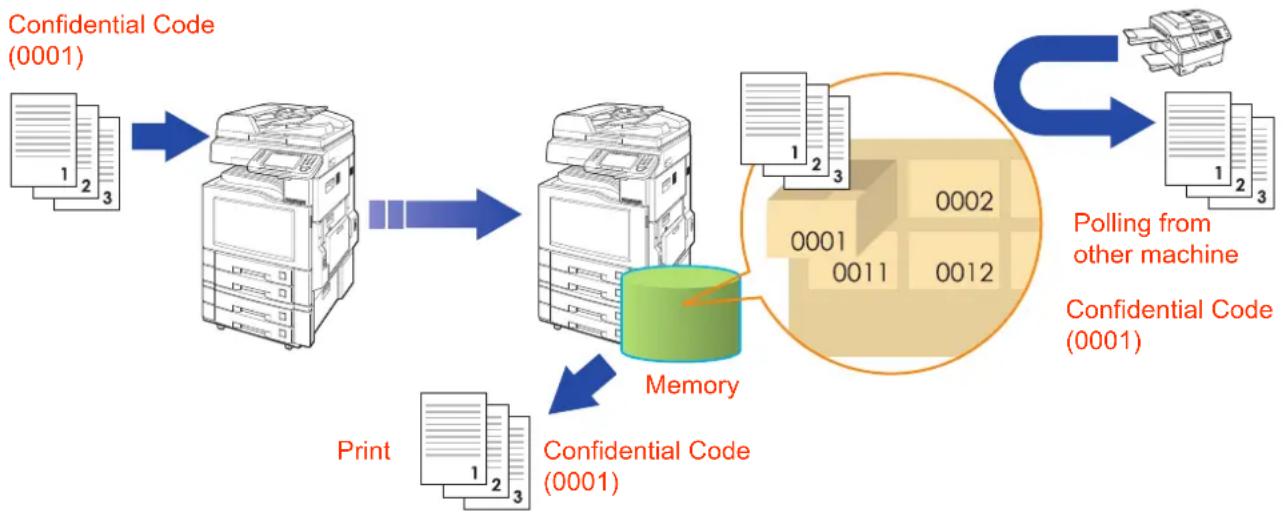
flowchart
graph TD
    A["Print"] --> B["Confidential Code (0001)"]
    B --> C["Confidential Code (0001)"]
    C --> D["Confidential Code (0001)"]
    D --> E["Confidential Code (0001)"]
    E --> F["Polling from other machine"]
    F --> G["Confidential Code (0001)"]
    G --> H["Confidential Code (0001)"]
    H --> I["Confidential Code (0001)"]
    I --> J["Confidential Code (0001)"]
    J --> K["Confidential Code (0001)"]
    K --> L["Confidential Code (0001)"]
    L --> M["Confidential Code (0001)"]
    M --> N["Confidential Code (0001)"]
    N --> O["Confidential Code (0001)"]
    O --> P["Confidential Code (0001)"]
    P --> Q["Confidential Code (0001)"]
    Q --> R["Confidential Code (0001)"]
    R --> S["Confidential Code (0001)"]
    S --> T["Confidential Code (0001)"]
    T --> U["Confidential Code (0001)"]
    U --> V["Confidential Code (0001)"]
    V --> W["Confidential Code (0001)"]
    W --> X["Confidential Code (0001)"]
    X --> Y["Confidential Code (0001)"]
    Y --> Z["Confidential Code (0001)"]
ATTENTION
This feature works only if the remote station is any one of the following compatible models:
DF-1100 DP-180 DP-190 DP-1810F DP-1820F DP-1820E DP-2000 DP-2310
DP-2330 DP-2500 DP-3000 DP-3010 DP-3030 DP-3510 DP-3520 DP-3530
DP-4510 DP-4520 DP-4530 DP-6010 DP-6020 DP-6030 DP-C262 DP-C322
DX-600 DX-800 UF-280M UF-312 UF-322 UF-332 UF-333 UF-342
UF-344 UF-550 UF-560 UF-585 UF-590 UF-595 UF-733 UF-744
UF-745 UF-755 UF-755e UF-766 UF-770 UF-780 UF-788 UF-790
UF-880 UF-885 UF-890 UF-895 UF-990 UF-9000
NOTE
Confidential reception requires establishing the password (4-digit) between the sender and receiver before receiving.
Confidential Transmission
To transmit a confidential document, follow the steps below:
NOTE
You must have a mailbox password (4-digit) setup and shared with the receiving machine.
1 Place Original(s).
- Refer Placing Originals (Facsimile/Internet Fax) in the Operating Instructions (For Basic Operations) of provided booklet.
2 Press the Fax key.
3 Select "More Menus".

text_image
Memory XMT Text Fino,TIFF Address Book Basic Menu More Menus Redial Number Pad Monitor Email Search Destinations: 000 BAB COE FGH IJK LMN OPQ RST UWI XYZ Favourites Program/Group Bob Bob Tel John London Relay stockholm 01/ 014 Select "Mail Box".
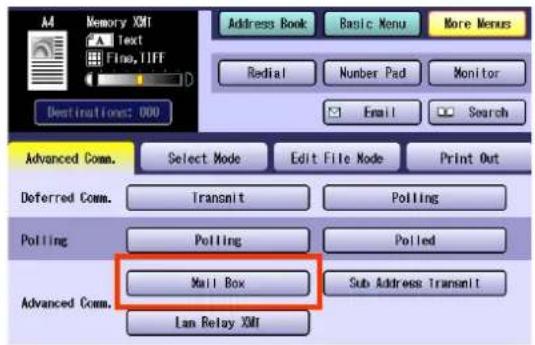
text_image
M4 Memory XMT Text Fino, TIFF Address Book Basic Menu More Menus Redial Number Pad Monitor Email Search Destinations: 000 Advanced Comm. Select Mode Edit File Mode Print Out Deferred Comm. Transmit Polling Polling Polling Polled Advanced Comm. Mail Box Sub Address Transmit Lan Relay XMT5 Select "Transmit".
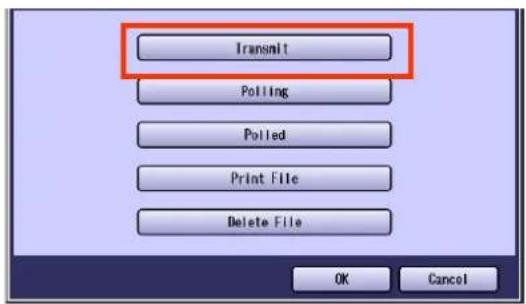
text_image
Transmit Polling Polled Print File Delete File OK Cancel6 Enter the mailbox password (4-digit), and then select "OK".
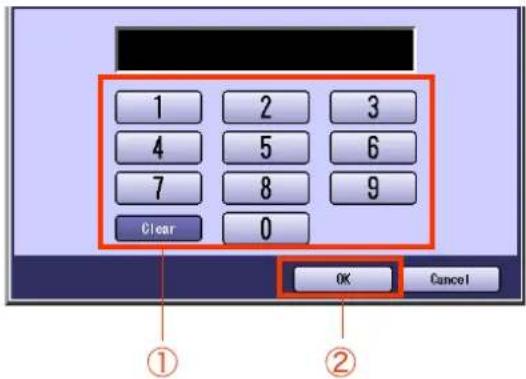
text_image
1 2 3 4 5 6 7 8 9 Clear 0 OK Cancel ① ②If you make a mistake, press Clear key to delete entries one digit at a time.
7 Set "Quality Adj." as required.
● Refer to Setting Original Quality. (See page 26)
8 Select a destination.
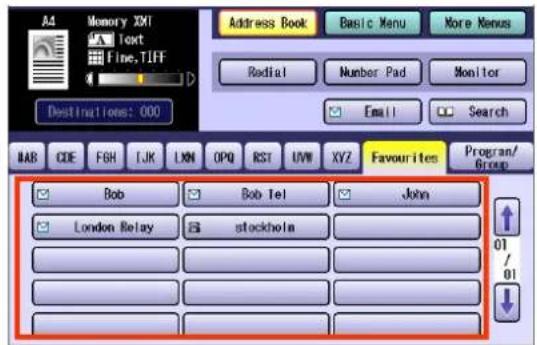
text_image
Address Book Basic Menu More Menus Radial Number Pad Monitor Email Search Destinations: 000 BAB CODE FGH IJK LXM OPQ RST UVN XYZ Favourites Program/Group Bob Bob tel John London Relay stockholm 01/ 01● Refer to Entering a Destination. (See page 16)
- Choose the address except registered for Relayed Transmission.
9 Press the Start key.
The original(s) are stored into memory with a file number. And then starts dialling the telephone number.
Confidential Polling
1 Press the Fax key.
2 Select "More Menus".
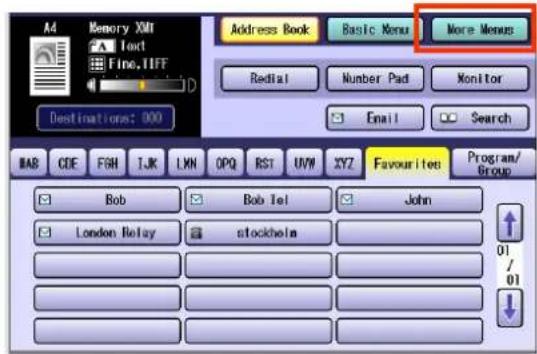
text_image
A4 Memory XML Text Fine.TIFF Address Book Basic Menu More Menus Redial Number Pad Monitor Email Search Destinations: 000 BAB CDF FGH TJK LWN OPQ RST UVW XYZ Favourite Program/ Group Bob Bob Tel John London Relay stockholn 01 /013 Select "Mail Box".
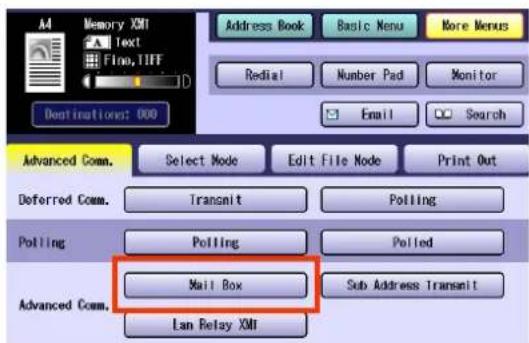
text_image
Memory XMI Text Fino, TIFF Address Book Basic Menu More Menus Redial Number Pad Monitor Email Search Destinations: 000 Advanced Comm. Select Mode Edit File Mode Print Out Deferred Comm. Transmit Polling Polling Polled Advanced Comm. Mail Box Sub Address Transmit Lan Relay XMI4 Select "Polling".
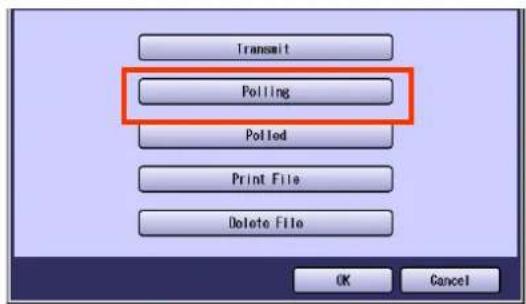
text_image
Transait Polling Polled Print File Delete File OK Cancel5 Enter the mailbox password (4-digit), and then select "OK".
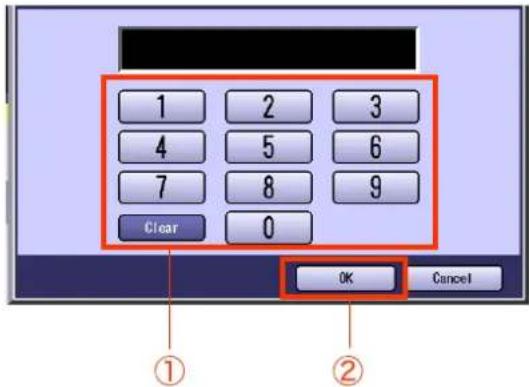
text_image
1 2 3 4 5 6 7 8 9 Clear 0 OK Cancel ① ②- If you make a mistake, press Clear key to delete entries one digit at a time.
6 Select a destination.
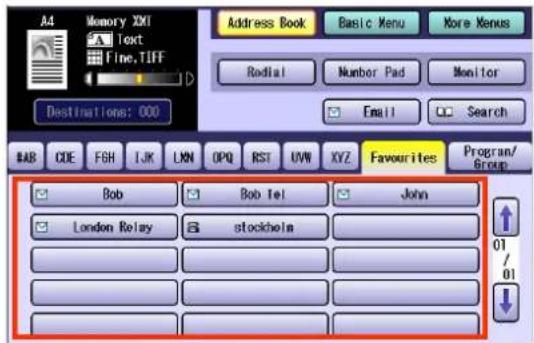
text_image
A4 Memory XXT Text Fine, TIFF Address Book Basic Menu More Menus Radial Number Pad Monitor Email Search BAB CODE FGH IJK LNN OPQ RST UVN XYZ Favourites Program/ Bob Bob tel John London Relay stockholm 01 01● Refer to Entering a Destination. (See page 16)
- Choose the address except registered for Relayed Transmission.
7 Press the Start key.
Confidential mailbox polling starts.
- For instructions on how to cancel confidential mailbox polling, refer to Cancelling a Communication. (See page 46)
Storing Documents for Confidential Polling
1 Place Original(s).
- Refer to Placing Originals (Facsimile/Internet Fax) in the Operating Instructions (For Basic Operations) of provided booklet.
2 Press the Fax key.
3 Select "More Menus".
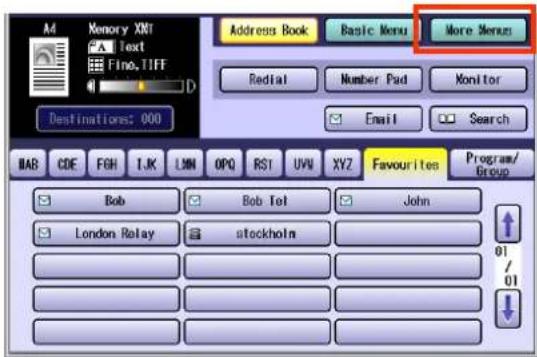
text_image
Memory XNT Text Fine.TIFF Address Book Basic Menu More Menus Redlat Number Pad Monitor Email Search Destinations: 000 BAB CDE FGH I.K LMN OPQ RST UVN XYZ Favourites Program/ Group Bob Bob Jet John London Relay stockholn 01 /014 Select "Mail Box".
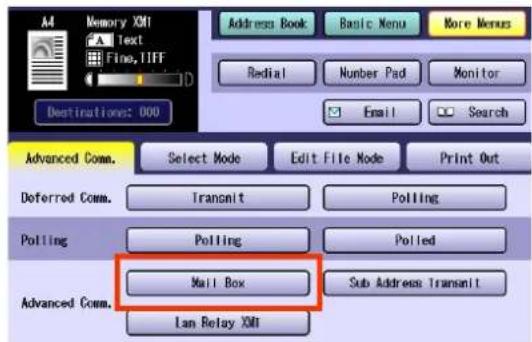
text_image
Memory XMI Text Fine, TIFF Address Book Basic Menu More Menus Redial Number Pad Monitor Email Search Destination: 000 Advanced Comm. Select Mode Edit File Mode Print Out Deferred Comm. Transmit Polling Polling Polling Advanced Comm. Mail Box Sub Address: Transmit Lan Relay XMI5 Select "Polled".
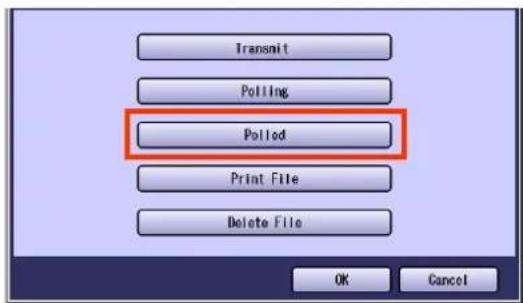
text_image
Transmit Polling Polled Print File Delete File OK Cancel6 Enter the mailbox password (4-digit), and then select "OK".
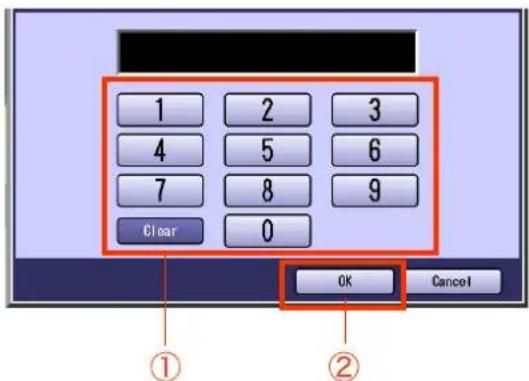
text_image
1 2 3 4 5 6 7 8 9 Clear 0 OK Cancel ① ②The documents are stored in the mailbox and will be transmitted upon receiving the confidential polling request.
- For instructions on how to delete a confidential document polled for transmission, refer to Deleting a Confidential Document. (See page 62)
- If you make a mistake, press Clear key to delete digit by digit.
Printing a Received Confidential Document
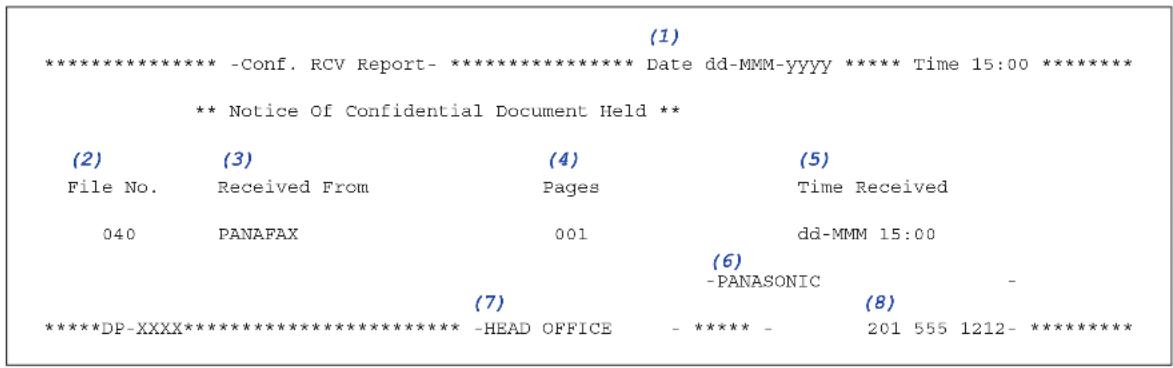
When confidential documents are received, a confidential reception report is printed. This section explains how to read a confidential reception report and print the received confidential documents.
NOTE
● After a received confidential document is printed, it is deleted from the mailbox.
- If the machine receives documents having the same password, they are stored into the same mailbox.
- Up to 20 mailboxes are available.
■ Confidential Reception Report
text_image
***************** -Conf. RCV Report-***************** Date dd-MMM-yyyy ***** Time 15:00 ***************** ** Notice Of Confidential Document Held ** (2) (3) (4) (5) File No. Received From Pages Time Received 040 PANAFAX 001 dd-MMM 15:00 (6) - ********DP-XXXX***************** -HEAD OFFICE - ***** - (8) (7) (8)| No. Item Explanation | ||
| (1) Date/Time The date and time at which the confidential reception report is printed. | ||
| (2) | File No. | The number automatically assigned to a confidential document in the order of its reception (001 to 999). |
| (3) Sender ID Transmitting station's ID | ||
| (4) Page(s) Total number of pages of the confidential document. | ||
| (5) Receive Time Date and time at which the confidential document was received. | ||
| (6) Logo Logo (up to 25 characters). | ||
| (7) Character ID Character ID (up to 16 characters). | ||
| (8) Numeric ID | Numeric ID (up to 20 digits). | |
■ Printing a Received Confidential Document
To print a received confidential document, follow the steps below:
NOTE
- After a received confidential document is printed, it is deleted from the mailbox.
1 Press the Fax key.
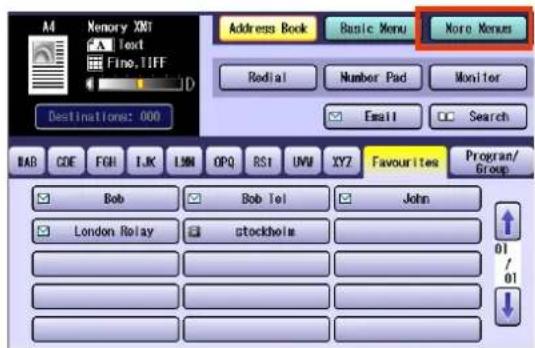
2 Select "More Menus".
text_image
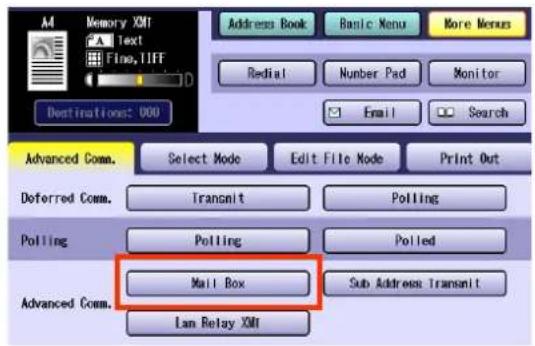
M4 Memory XMT Text Fine.TIFF D Address Book Basic Menu Noro Norum Rodial Number Pad Monitor Email Search Destinations: 000 BAB COE FGH IJK LMN OPQ RSI UVM XYZ Favourites Program/ Group Bob Bob Tel John London Relay stockholm 01 / 013 Select "Mail Box".
text_image
Memory XMI Text Fino, TIFF Destinations: 000 Address Book Basic Menu More Menus Redial Number Pad Monitor Email Search Advanced Comm. Select Mode Edit File Mode Print Out Deferred Comm. Transmit Polling Polling Pollled Polling Mail Box Sub Address Transit Advanced Comm. Lam Relay XMI4 Select "Print File".
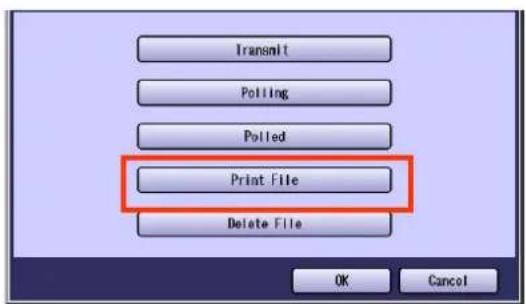
text_image
Transmit Polling Polled Print File Delete File OK Cancel5 Enter the mailbox password (4-digit), and then select "OK".
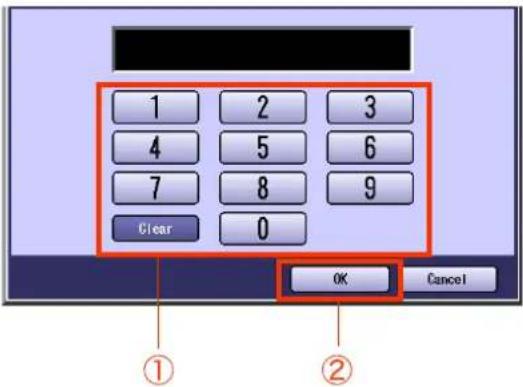
text_image
1 2 3 4 5 6 7 8 9 Clear 0 OK Cancel ① ②The document is printed and deleted from the mailbox.
- If you make a mistake, select "Clear" to delete entries one digit at a time.
- To delete confidential documents from a mailbox, refer to Deleting a Confidential Document. (See page 62)
Deleting a Confidential Document
To delete a confidential document in a mailbox, follow the steps below:
1 Press the Fax key.
2 Select "More Menus".
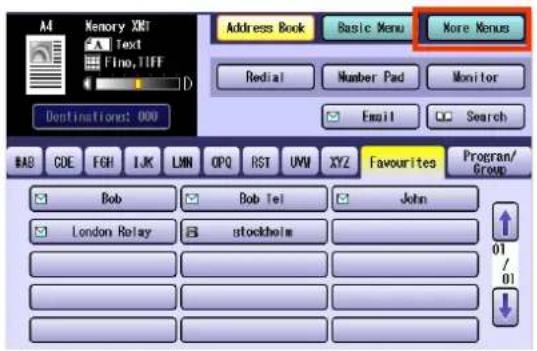
text_image
A4 Memory XMT Text Fino,TIFF Address Book Basic Menu More Menus Redial Number Pad Monitor Email Search Destinations: 000 BAB CDE FGH IJK LMN OPQ RST UVM XYZ Favourites Program/ Group Bob Bob Tel John London Relay B stockholm 01 /01 ↓3 Select "Mail Box".
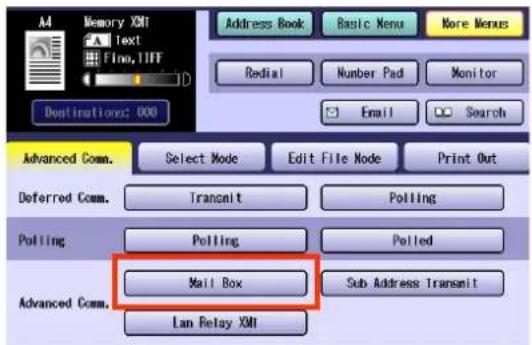
text_image
Memory XMI Text Info, TIFF Address Book Basic Menu More Menus Redial Number Pad Monitor Email Search Dostinations: 000 Advanced Comm. Select Mode Edit File Node Print Out Deferred Comm. Transmit Polling Polling Polled Advanced Comm. Mail Box Sub Address Transmit Lan Relay XMI4 Select "Delete File".

text_image
Transmit Polling Polled Print File Delete File OK Cancel5 Enter the mailbox (4-digit) password, and then select "OK".
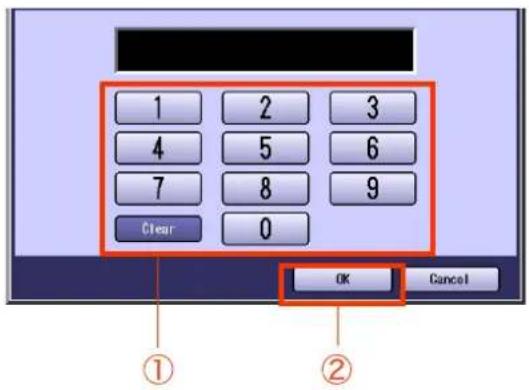
text_image
1 2 3 4 5 6 7 8 9 Clear 0 OK Cancel ① ②Documents in the mailbox are deleted.
- If you make a mistake, press Clear key to delete entries one digit at a time.
Memo
Sub-Address Communication
The Sub-Addressing function allows you further routing, forwarding or relaying of document(s) to the desired destinations when used in combination with Internet Fax.
What is Sub-Addressing?
Sub-Addressing is a T.30 communications protocol recommended by ITU-T.
- A centre machine supporting a memory feature is required on the fax network to implement sub-addressed communications. For more details, contact your local authorized Panasonic dealer.
- In a sub-addressed communication, the sub-addressing information must be checked between the sender and the receiver beforehand (sub-address is limited up to 20 digit).
- On this machine, select “Sub Address Transmit” from the “More Menus” to initiate sub-addressed communication.
- Sub-Addressing allows documents received by the Centre Machine to be forwarded to computers on the network, to Internet fax, or to other fax stations. Refer to Inbound Routing. (See page 128)
NOTE
●ITU-T : International Telecommunication Union-Telecommunication Standardization Sector
T.30 : Telecommunications standard
■ Example of a Network Using Sub-Addressing
| Sender 1 | |
| Telephone number | 2013331234 |
| Sub-Address | 2222 |
| Sender 2 | |
| Telephone number | 2013331234 |
| Sub-Address | 0001 |
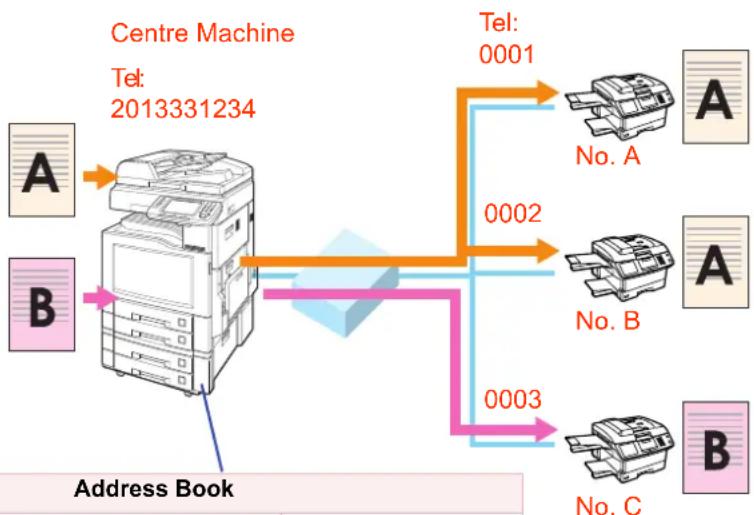
flowchart
graph TD
    A["Address Book"] --> B["Centre Machine"]
    B --> C["Tel: 2013331234"]
    B --> D["No. A"]
    B --> E["No. B"]
    B --> F["No. C"]
    B --> G["Tel: 0001"]
    B --> H["0002"]
    B --> I["0003"]
| Address Book | ||
| Telephone number Sub-Address | ||
| G3 FAX No. A 0001 | 2222 | |
| G3 FAX No. B 0002 | 2222 | |
| G3 FAX No. C 0003 | 0001 | |
Sub-Addressed Transmission Using Address Book
To transmit a document by sub-addressing, follow the steps below:
NOTE
- This feature can not be used when dialling from the external telephone. Refer to Talking to the Remote Party Before Transmission. (See page 25)
1 Place Original(s).
- Refer Placing Originals (Facsimile/Internet Fax) in the Operating Instructions (For Basic Operations) of provided booklet.
2 Press the Fax key.
3 Select "More Menus".
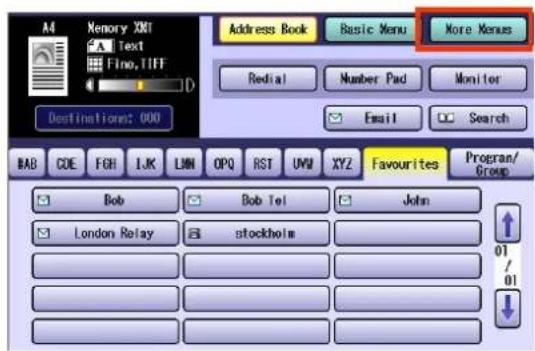
text_image
Memory XMT Text Fine, TIFF Destination: 000 Address Book Basic Menu More Menus Redial Number Pad Monitor Email Search BAB CODE FGH IJK LMN OPQ RST UWI XYZ Favourites Program/Group Bob Bob Tel John London Relay stockholm 01/ 014 Select "Sub Address Transmit".
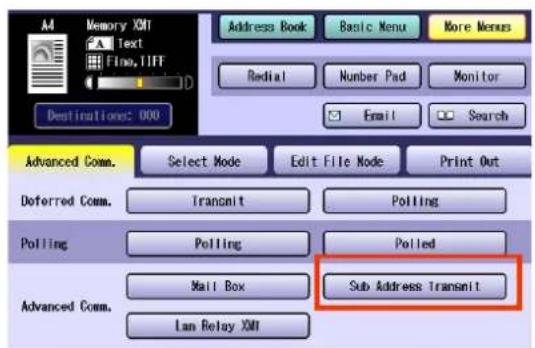
text_image
Memory XMT Text Fino, TIFF Address Book Basic Menu More Menus Redial Number Pad Monitor Email Search Destinations: 000 Advanced Comm. Select Mode Edit File Mode Print Out Deferred Comm. Transmit Polling Polling Polling Sub Address Transmit Advanced Comm. Mail Box Lan Relay XMT5 Enter a sub-address, and then select "OK".
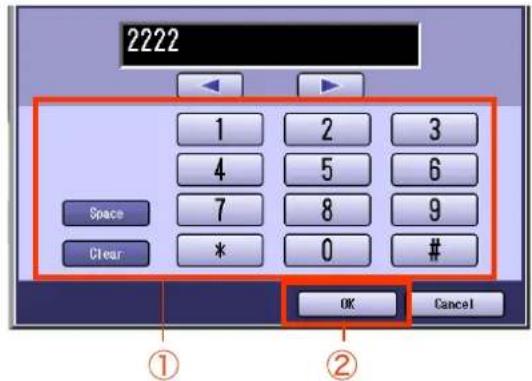
text_image
2222 1 2 3 4 5 6 7 8 9 * 0 # Space Clear OK Cancel ① ②The sub-address can be up to 20 digits.
- If you make a mistake, select Clear to delete entries one digit at a time.
6 Enter the password, and then select "OK".
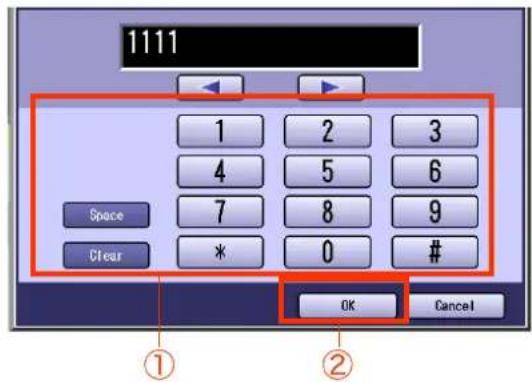
text_image
1111 1 2 3 4 5 6 7 8 9 Clear * 0 # OK Cancel ① ②The password can be up to 20 digits.
- If you make a mistake, select Clear to delete entries one digit at a time.
7 Set "Quality Adj." as required.
● Refer to Setting Original Quality. (See page 26)
8 Select a destination.
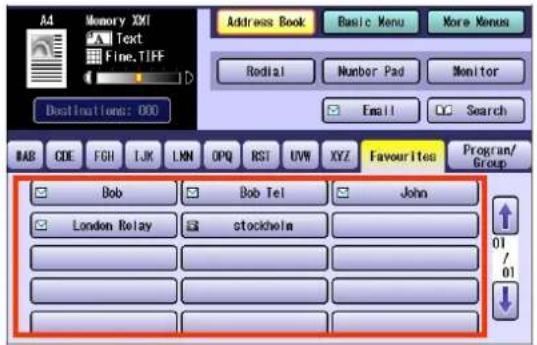
text_image
A4 Memory: 2001 Text Fine.TIFF Address Book Basic Menu More Menus Radial Number Pad Monitor Email Search BAB CDE FGH IJK LNN OPQ RST UVW XYZ Favourites Program/Group Bob Bob Tel John London Relay stockholm 01 / 01 ↓● Refer to Entering a Destination. (See page 16)
- Choose the address except registered for Relayed Transmission.
9 Press the Start key.
Sub-Addressed transmission starts.
Sub-Addressed Transmission Using Manual Dialling
To enter a sub-address directly from the keypad, follow the steps below:
NOTE
- This feature does not work when dialling from the external telephone. Refer to Talking to the Remote Party Before Transmission. (See page 25)
- If you use sub-addressed transmission frequently, the sub-address can be pre-programmed into the address book to facilitate future communications. For additional details, refer to Adding a Fax Number into the Address Book. (See page 163)
1 Place Original(s).
- Refer Placing Originals (Facsimile/Internet Fax) in the Operating Instructions (For Basic Operations) of provided booklet.
2 Press the Fax key.
3 Set "Quality Adj." as required.
- Refer to Setting Original Quality. (See page 26)
4 Enter the fax number from the keypad.
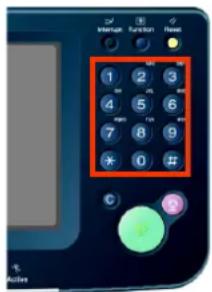
text_image
1 2 3 4 5 6 7 8 9 * 0 # C ② Active- The Number Pad screen opens automatically.
- If you make a mistake, press Clear key to delete entries one digit at a time.
5 Select "Sub-Address".
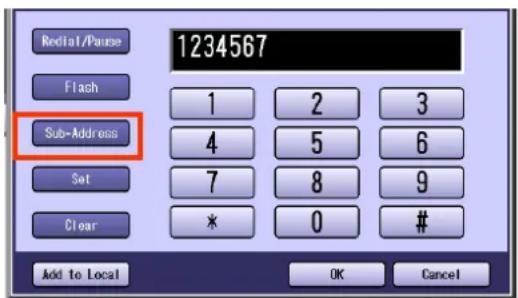
text_image
Redial/Pause 1234567 Flash Sub-Address 1 2 3 4 5 6 Set 7 8 9 Clear * 0 # Add to Local OK Cancel- The letter "s" appears on the display.
6 Enter a sub-address.
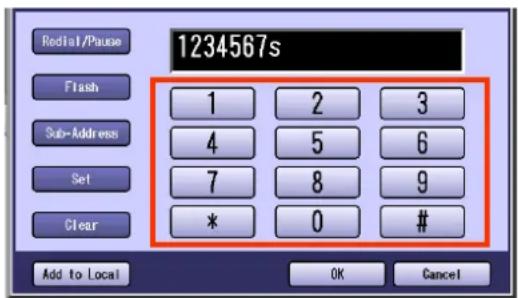
text_image
1234567s 1 2 3 4 5 6 7 8 9 * 0 # Add to Local OK Cancel- The telephone number and sub-address field can be up to 36 digits in length. However, the sub-address itself is limited to 20 digits.
- If you need to enter a sub-address containing a blank space (Ex: 123 456), input the sub-address from “Advanced Comm.” > “Sub-Address Transmit”. (See page 65)
- If you make a mistake, select "Clear" to delete entries one digit at a time.
7 Press the Start key.
Sub-Addressed transmission starts.
Password Communication
What is Password Communication?
Password Communications, including Password Transmission and Password Reception prevents your machine from sending a fax to a wrong station or receiving a fax from an unauthorized station. You can set Password Transmission and Password Reception independently, or both together.
To use Password Transmission, you must set a 4-digit transmission password in advance. The password must be shared with the other compatible Panasonic machine(s). If the transmission password in your machine does not match the Transmission password in other compatible Panasonic machine(s), the transmission will fail.
The standard setting of "43 Password-Transmit" is set to "Off" in Function Parameters (Fax/Email Settings> Fax Parameters). To utilize Password XMT, change the default setting to "On". For instructions on how to change the standard setting, refer to Setting Password-Protected Transmission. (See page 70)
Ex : Password Transmission
Sender Receiver
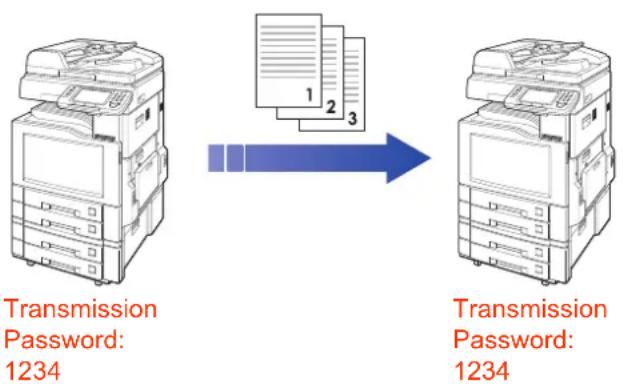
ATTENTION
This feature works only if the remote station is any one of the following models.
DF-1100 DP-180 DP-190 DP-1810F DP-1820E DP-1820F DP-2000 DP-2310
DP-2330 DP-2500 DP-3000 DP-3010 DP-3030 DP-3510 DP-3520 DP-3530
DP-4510 DP-4520 DP-4530 DP-6010 DP-6020 DP-6030 DP-C262 DP-C322
DX-600 DX-800 FP-D250F FP-D350F UF-160 UF-160M UF-170 UF-180
UF-190 UF-260 UF-270 UF-270M UF-280M UF-300 UF-312 UF-322
UF-550 UF-560 UF-585 UF-590 UF-595 UF-650 UF-733 UF-745
UF-750 UF-750D UF-755 UF-755e UF-766 UF-770 UF-780 UF-788
UF-790 UF-880 UF-885 UF-890 UF-895 UF-990 UF-9000 UF-M500
Password Transmission
To utilize the password-protected transmission feature, follow the steps below:
ATTENTION
- You must set the password (4-digit) in the "43 Password-Transmit" setting in advance, in Function Parameters (Fax/Email Settings> Fax Parameters).
1 Place Original(s).
- Refer to Placing Originals (Facsimile/Internet Fax) in the Operating Instructions (For Basic Operations) of provided booklet.
2 Press the Fax key.
3 Select "More Menus".
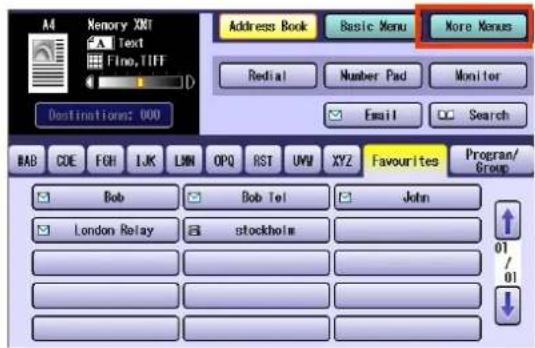
text_image
Memory XMT Text Fino, TIFF Address Book Basic Menu More Menus Redial Number Pad Monitor Email Search Destinations: 000 BAB COE FGH IJK LMN OPQ RST UWI XYZ Favourites Program/Group Bob Bob Tel John London Relay stockholm 01/ 014 Select "Select Mode".
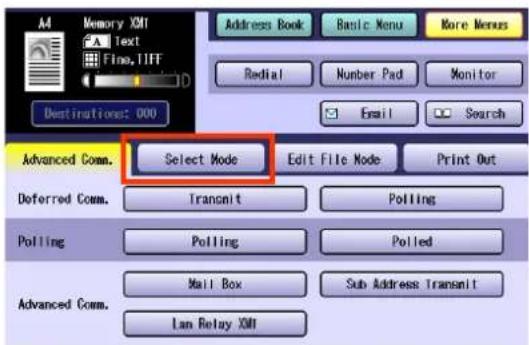
text_image
Memory XMT Text Fine, TIFF Address Book Basic Menu More Menus Redial Number Pad Monitor Email Search Destinations: 000 Advanced Comm. Select Mode Edit File Mode Print Out Deferred Comm. Transmit Polling Polling Polling Mall Box Sub Address Transmit Advanced Comm. Lan Relay XMT5 Select "Password XMT".
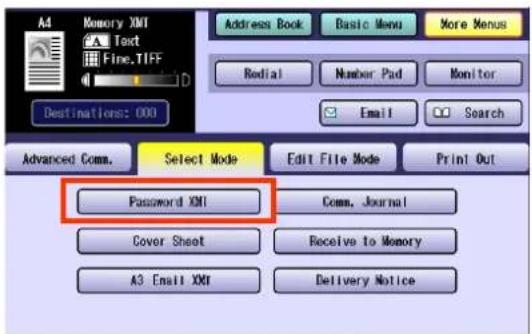
text_image
A4 Memory XML Text Fine.TIFF Address Book Basic Menu More Menus Redial Number Pad Monitor Email Search Advanced Comm. Select Mode Edit File Mode Print Out Password XML Comm. Journal Cover Sheet Receive to Memory A3 Email XML Delivery Notice6 Select "On", and then select "OK".
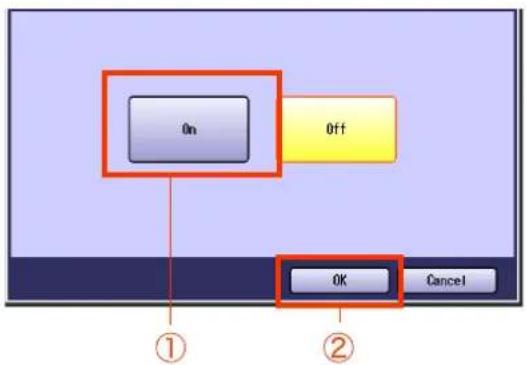
text_image
On Off OK Cancel ① ②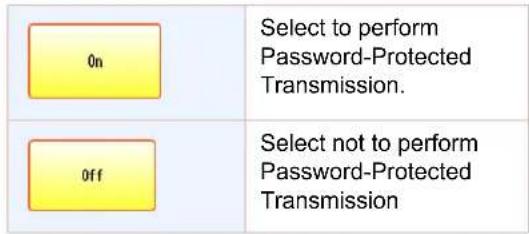
text_image
0n Select to perform Password-Protected Transmission. 0ff Select not to perform Password-Protected Transmission7 Set "Quality Adj." as required.
● Refer to Setting Original Quality. (See page 26)
8 Select a destination.
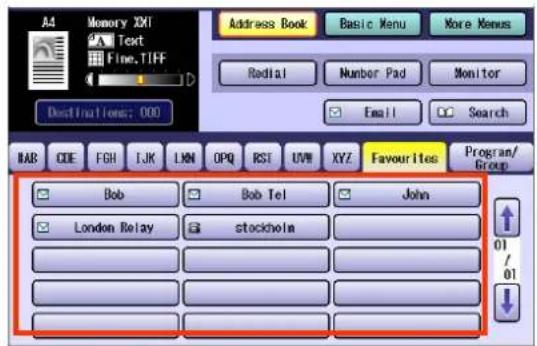
text_image
A4 Memory: XXI Text Fine.TIFF Address Book Basic Menu More Menus Radial Number Pad Monitor Email Search BAS CODE FGH IJK LKN OPQ RST UVH XYZ Favourites Program/ Bob Bob Tel John London Relay stockholm 01 / 01 / / / / / / / / / / / / / / / / / / / / / / / / / / / / / / / / / / / / / / / / / / / / / / / / / / / / / / / / / / / / / / / / / / / / / / / / / / / / / / / / / / / / / / / / / / / / / / / / / / / / / 01 / 01● Refer to Entering a Destination. (See page 16)
- Choose the address except registered for Relayed Transmission.
9 Press the Start key.
Password-protected transmission starts.
- The transmission fails if the password of both units does not match.
Setting Password-Protected Transmission
To always utilize password-protected transmissions, follow the steps below:
NOTE
- You must program a password (4-digit) in advance.
1 Press the Function key to open the Function Parameters screen.
2 Select "Fax/Email Settings".
3 Select "04 Key Operator Mode".
text_image
0 - 4 00 Address Book 01 Program Keys 02 03 04 Key Operator Node Close4 Enter the key operator mode Password, and then select "OK".

text_image
1 2 3 4 5 6 7 8 9 Clear 0 OK Cancel ① ②- If you make a mistake, press Clear key to delete.
5 Select "01 Fax Parameters".
text_image
00 User Parameters 01 Fax Parameters 02 03 04 Close6 Select "40-79".
text_image
0 - 39 40 - 79 80 - 119 120- 159 160- 184 00 Print FaxParameterList 01 Density (HONE) 0 02 Resolution (HONE) Fine 03 Original (HONE) Text 04 Stamp (HOME) Off Close7 Select "43 Password-Transmit".
text_image
0 - 39 40 - 79 80 - 119 120- 159 160- 184 40 41 42 Conf. File Save Invalid 43 Password-Transmit 0000 44 Password-Receive Close8 Enter the password (4-digit), and then select "OK".
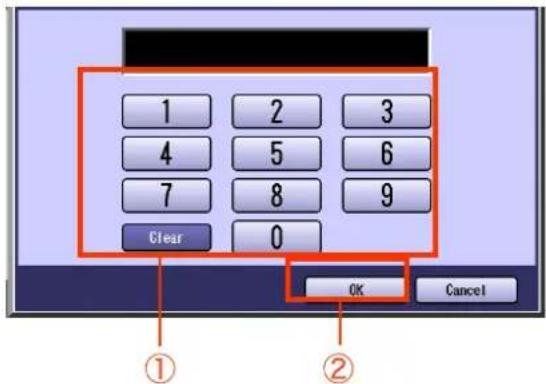
text_image
1 2 3 4 5 6 7 8 9 Clear 0 OK Cancel ① ②- If you make a mistake, select "Clear" to delete entries one digit at a time.
9 Select "On" or "Off", and select "OK".
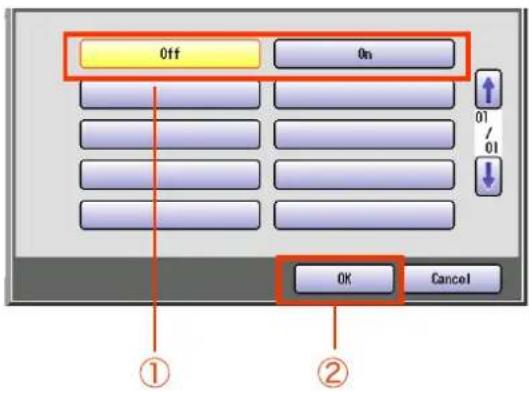
text_image
Off On ↑ 01 / 01 ↓ OK Cancel ① ②- Press Reset key to return the machine to the initial screen of the current active mode.
- You can change the setting temporarily by using the "Password XMT" in the "more menu" for each transmission. (See page 69)
Printing Communication Journal
The communication journal can be printed at the end of each transmission communication.
- If the “Comm. Journal” is set to “On” in the “More Menus”, a communication journal is printed at the end of each transmission communication.
- For instructions on how to read the communication journal, refer to Communication Journal. (See page 186)
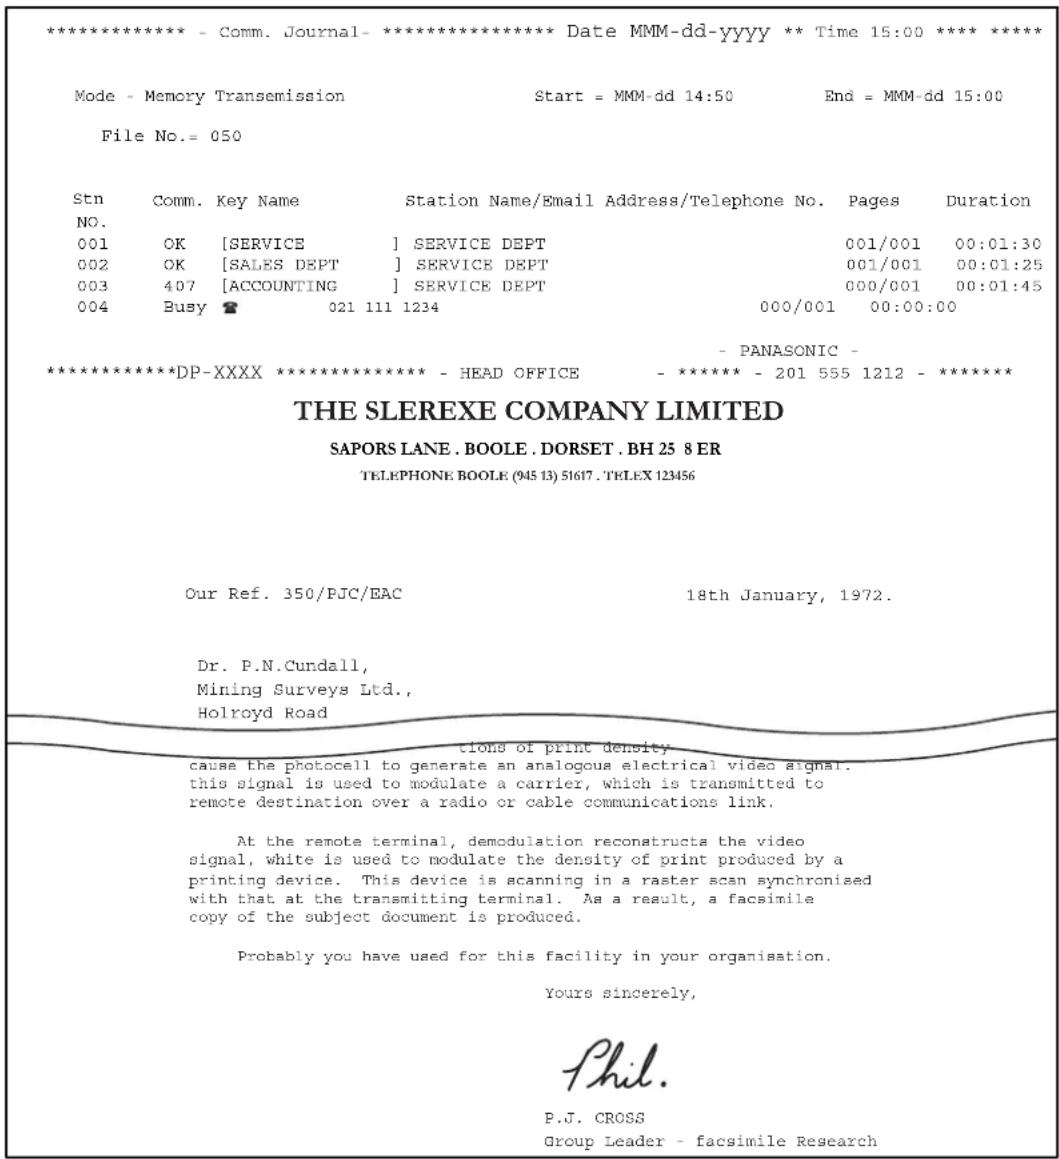
text_image
**************** - Comm. Journal-**************** Date MMM-dd-yyyy ** Time 15:00 **** * * * * Mode - Memory Transemission Start = MMM-dd 14:50 End = MMM-dd 15:00 File No.= 050 Stn Comm. Key Name Station Name/Email Address/Telephone No. Pages Duration NO. 001 OK [SERVICE ] SERVICE DEPT 001/001 00:01:30 002 OK [SALES DEPT ] SERVICE DEPT 001/001 00:01:25 003 407 [ACCOUNTING ] SERVICE DEPT 000/001 00:01:45 004 Busy 921 111 1234 000/001 00:00:00 - PANASONIC - ****************DP-XXXX ****************** - HEAD OFFICE - ******** - 201 555 1212 - * * * * * THE SLEREXE COMPANY LIMITED SAPORS LANE . BOOLE . DORSET . BH 25 8 ER TELEPHONE BOOLE (945 13) 51617 . TELEX 123456 Our Ref. 350/PJC/EAC 18th January, 1972. Dr. P.N.Cundall, Mining Surveys Ltd., Holroyd Road tions of print density cause the photocell to generate an analogous electrical video signal. this signal is used to modulate a carrier, which is transmitted to remote destination over a radio or cable communications link. At the remote terminal, demodulation reconstructs the video signal, white is used to modulate the density of print produced by a printing device. This device is scanning in a raster scan synchronised with that at the transmitting terminal. As a result, a facsimile copy of the subject document is produced. Probably you have used for this facility in your organisation. Yours sincerely, Phil. P.J. CROSS Group Leader - facsimile ResearchNOTE
- Your machine is preset to print the communication journal only when transmission is failed. Refer to Fax/Email Settings in the Operating Instructions (For Function Parameters) on the provided CD-ROM.
● The document image for the direct transmissions are not printed in the communication journal.
1 Place Original(s).
- Refer #Clacing Originals (Facsimile/Internet Fax) in the Operating Instructions (For Basic Operations) of provided booklet.
2 Press the Fax key.
3 Select "More Menus".
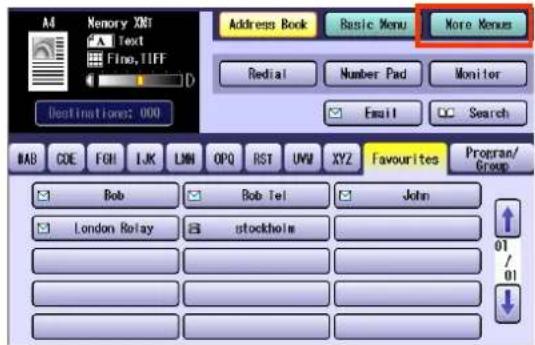
text_image
Memory XDT Text Flo, TIFF Address Book Basic Menu More Menus Redial Number Pad Monitor Email Search Destinations: 000 BAB COE FGH IJK LMN OPQ RST UWI XYZ Favourites Program/Group Bob Bob Tel John London Relay stockholm 01/ 014 Select "Select Mode"
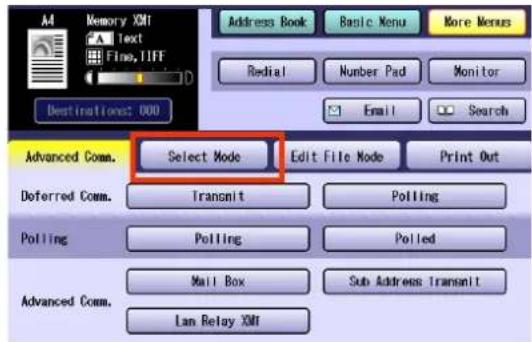
text_image
Memory XMT Text Fino, TIFF Address Book Basic Menu More Menus Radial Number Pad Monitor Email Search Destinations: 000 Advanced Comm. Select Mode Edit File Mode Print Out Deferred Comm. Transmit Polling Polling Pollled Advanced Comm. Mail Box Sub Address Transmit Lan Relay XMT5 Select "Comm. Journal".
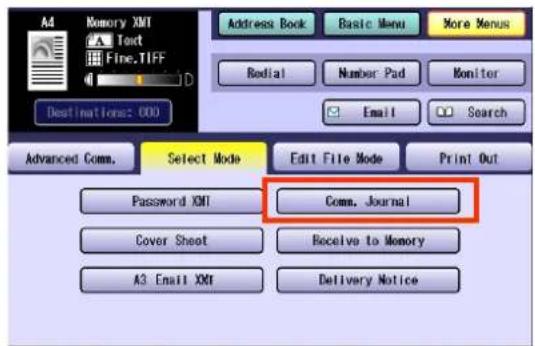
text_image
A4 Memory XMT Text Fine.TIFF Address Book Basic Menu More Menus Radial Number Pad Monitor Email Search Advanced Comm. Select Mode Edit File Mode Print Out Password XMT Comm. Journal Cover Sheet Receive to Memory A3 Email XMT Delivery Notice6 Select "On", "Off", or "Inc Only", and then select "OK".
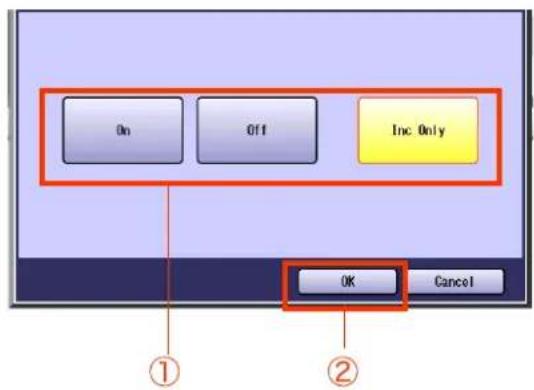
text_image
On Off Inc. Only OK Cancel ① ②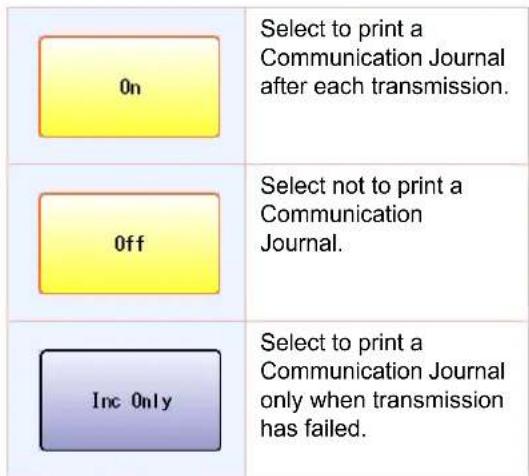
text_image
0n Select to print a Communication Journal after each transmission. Off Select not to print a Communication Journal. Inc Only Select to print a Communication Journal only when transmission has failed.7 Set "Quality Adj." as required.
● Refer to Setting Original Quality. (See page 26)
8 Select a destination.
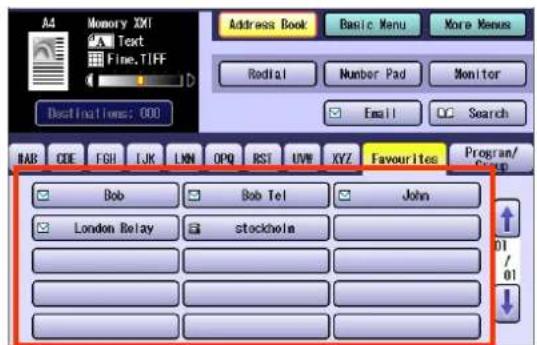
text_image
A4 Memory XXI Text Fine, TIFF Address Book Basic Menu More Menus Radial Number Pad Monitor Email Search Destinations: 000 BAB CODE FGH IJK LWN OPQ BST UVW XYZ Favourites Program/ Bob Bob Tel John London Relay stockholm 01 /01● Refer to Entering a Destination. (See page 16)
9 Press the Start key.
Transmitting a Document with a Cover Sheet
Documents can be transmitted with a cover sheet stating the date and time of the transmission, destination station name, and total number of pages.
Sample Fax Cover Sheet
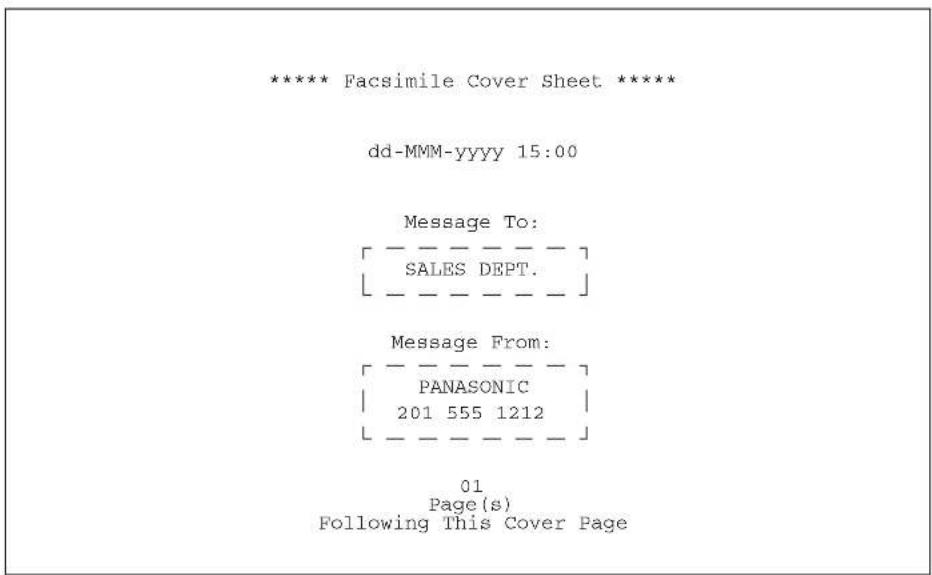
text_image
***** Facsimile Cover Sheet ***** dd-MMM-yyyy 15:00 Message To: [ ----] SALES DEPT. Message From: [ ----] PANASONIC 201 555 1212 01 Page(s) Following This Cover PageNOTE
The cover sheet is excluded from the total page count in the transaction journal.
- The default setting of cover sheet can be changed with "56 Cover Sheet (HOME)" in Function Parameters (Fax/Email Settings > Fax Parameters). To modify the default setting, refer to Fax/Email Settings in the Operating Instructions (For Function Parameters) on the provided CD-ROM.
1 Place Original(s).
- Refer tBlacing Originals (Facsimile/Internet Fax) in the Operating Instructions (For Basic Operations) of provided booklet.
2 Press the Fax key.
3 Select "More Menus".
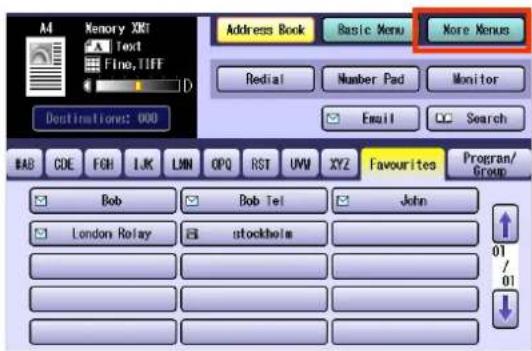
text_image
Memory XRT Text Fine, TIFF Address Book Basic Menu More Menus Redial Number Pad Monitor Email Search Destination: 000 BAB CDE FGN IJK LWN OPQ RST UVM XYZ Favourites Program/Group Bob Bob Tel John London Relay stockholm 01 / 014 Select "Select Mode".
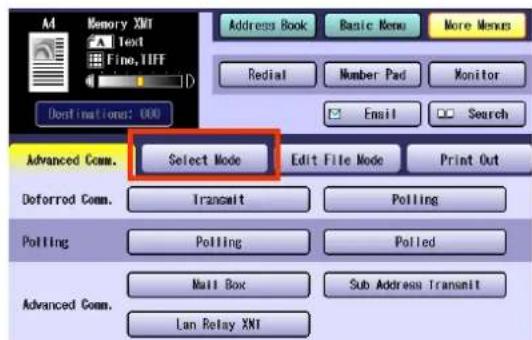
text_image
Memory XMI Text Fine, TIFF Destinations: 000 Address Book Basic Menu More Menus Redial Number Pad Monitor Email Search Advanced Comm. Select Mode Edit File Mode Print Out Deferred Comm. Transmitt Polling Polling Polling Advanced Comm. Mail Box Sub Address Transit Lan Relay XMI5 Select "Cover Sheet".
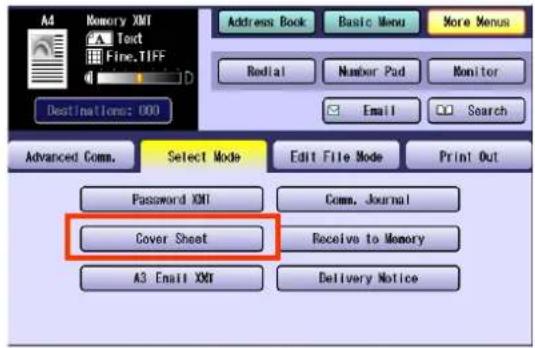
text_image
Memory XNT Text Fine.TIFF Address Book Basic Menu More Menu Redial Number Pad Monitor Email Search Destinations: 000 Advanced Comm. Select Mode Edit File Mode Print Out Password XNT Comm. Journal Cover Sheet Receive to Memory A3 Email XNT Delivery Notice6 Select "On", and then select "OK".
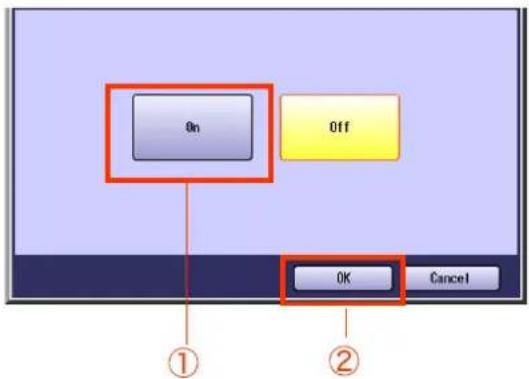
text_image
On Off OK Cancel ① ②| 0n | Select to attach a cover sheet. |
| 0ff | Select not to attach a cover sheet. |
7 Set "Quality Adj." as required.
● Refer to Setting Original Quality. (See page 26)
8 Select a destination.
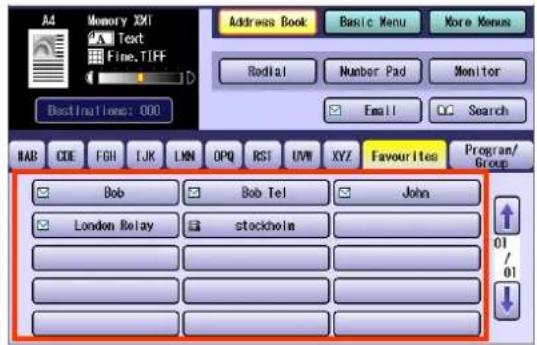
text_image
A4 Memory: TXT Text Fine, TIFF Address Book Basic Menu More Menus Radial Number Pad Monitor Email Search Destinations: 000 BAB CODE FGH IJK LMN OPQ RST UVW XYZ Favourites Program/ Group Bob Bob Tel John London Relay stockholm 01 / 01● Refer to Entering a Destination. (See page 16)
9 Press the Start key.
The transmission of the document with a cover sheet starts.
Receiving Documents
There are two ways to receive fax calls on this machine.
Automatic Reception
The machine receives documents automatically. The machine answers all incoming calls (including voice calls).
Manual Reception
When your telephone rings, lift the handset of the external telephone. If you hear a beep from the phone, it means someone wants to originate a fax call. Or, if the caller answers and says he/she wants to originate a fax call, press the Start key and then hang up the handset. Refer to Manual Reception. (See page 77)
Automatic Reception
This mode is recommended when the telephone line is used only for fax.
- Set "17 Receive Mode" to "Auto" in Function Parameters (Fax/Email Settings> Fax Parameters).
- When an incoming call is received, the machine starts receiving it automatically.
Manual Reception
When your machine is set to this mode, it will not receive documents automatically. After you answered the call, you can receive a fax.
- Set "17 Receive Mode" to "Manual" in Function Parameters. Parameters (Fax/Email Settings > Fax Parameters).
- When an incoming call is received, lift the external telephone handset. If you hear a beep press from the phone, press the Start key and hang up the handset to start receiving the incoming fax.
1 When your telephone rings, lift the external telephone handset.
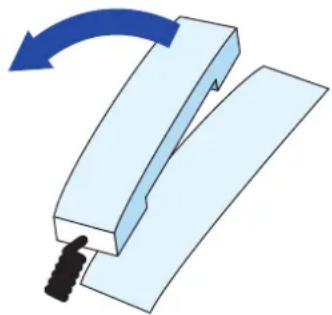
natural_image
Diagram of a mechanical component with a blue arrow indicating rotation, showing a curved arrow and a black tool inserted (no text or symbols)2 If a document is loaded on the ADF, remove it.
3 When you hear a beep, press the Start key.
4 Hang up the phone.
- If you hang up the phone before pressing the Start key, the telephone connection will be terminated.
Print Reduction and Duplex Recording
Print Reduction
This machine can use Letter, Legal, A4, B4 or A3 size plain paper for recording. Sometimes, oversized documents sent to you by the other parties cannot be printed within a single page. If this happens, the document will be divided into separate pages.
This machine is equipped with a Print Reduction function to solve this problem. You may select the most appropriate setting described below.
■ When Print Reduction is set to "Auto"
If "24 Print Reduction" is set to "Auto" in Function Parameters (Fax/Email Settings> Fax Parameters), it prints incoming documents reduced in size from 70 to 100% (in increments of 1% ) to fit them within the preset paper size according to the length.
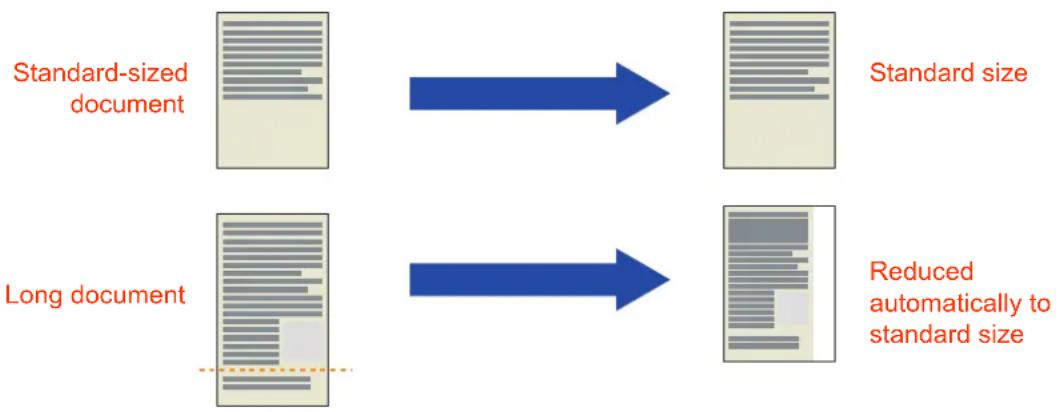
flowchart
graph LR
    A["Standard-sized document"] --> B["Standard size"]
    C["Long document"] --> D["Reduced automatically to standard size"]
NOTE
- The standard setting of "24 Print Reduction" is set to "Auto". For instructions on how to change the standard setting, refer to Fax/Email Settings in the Operating Instructions (For Function Parameters) on the provided CD-ROM.
- When the machine receives a long document (longer than the paper size by 39% or more), it prints the document in multiple pages with the 10-mm (0.39 in) of the bottom margin of the first page overlapping the 10-mm (0.39 in) top margin of the next page.
■ When Print Reduction is Set to "Fixed"
With “24 Print Reduction” set to “Fixed” in Function Parameters (Fax/Email Settings> Fax Parameters), the machine prints all incoming documents reduced at the reduction ratio pre-programmed in the “25 Reduction Ratio” in Function Parameters (Fax/Email Settings> Fax Parameters). The fixed reduction ratio can be programmed between 70 and 100% (in increments of 1%).
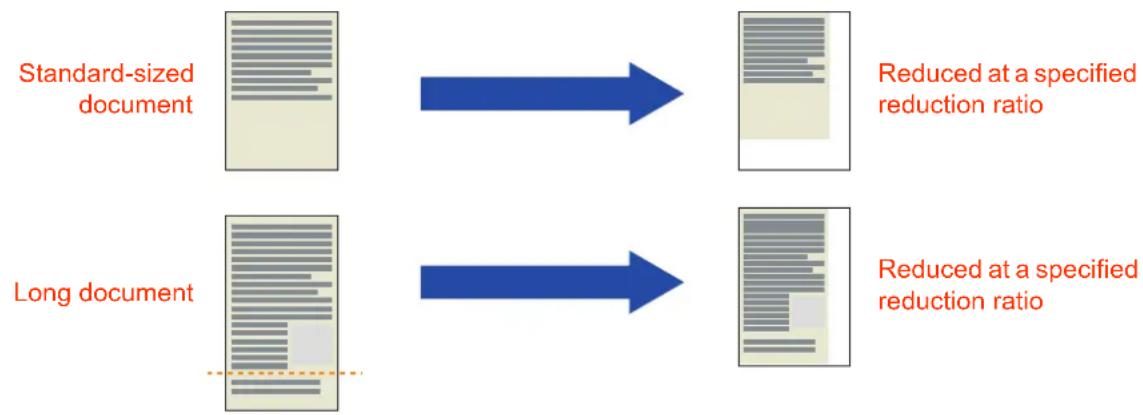
flowchart
graph LR
    A["Standard-sized document"] --> B["Reduced at a specified reduction ratio"]
    C["Long document"] --> D["Reduced at a specified reduction ratio"]
NOTE
- The standard setting of "25 Reduction Ratio" is set to "100%".
- For instructions on how to change the standard setting, refer to Fax/Email Settings in the Operating Instructions (For Function Parameters) on the provided CD-ROM.
Duplex Recording
When "95 Duplex Print" in Fax/Email Settings > FAX Parameters is set to "Valid", the received multi document transmissions are printed on both sides of paper.
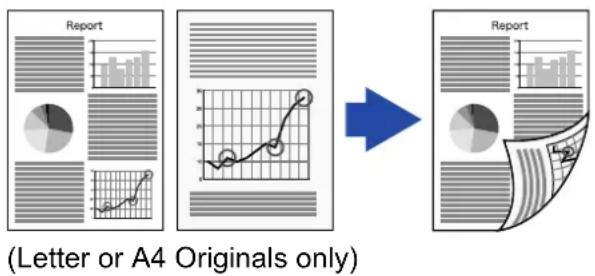
flowchart
graph LR
    A["Report"] --> B["Chart with bar chart and pie chart"]
    B --> C["Graph with line graph and dots"]
    C --> D["Output: Graph with bar chart and pie chart"]
    style A fill:#f9f,stroke:#333
    style D fill:#bbf,stroke:#333
NOTE
The standard setting of "95 Duplex Print" is set to "Invalid". When changing the setting, refer to Fax/Email Setting in Function Parameters.
Substitute Memory Reception
When your machine cannot print an incoming document for some reasons, such as when it runs out of paper/toner, or paper has jammed, the received document is saved in memory automatically. This feature is called “substitute memory reception”.
When a received document is saved in memory as substitute memory reception, the message "Message in Memory" appears on the touch panel display.
The saved documents will print automatically when you replenish paper, toner, or clear the jammed paper.
If a document has been saved in memory due to substitute memory reception
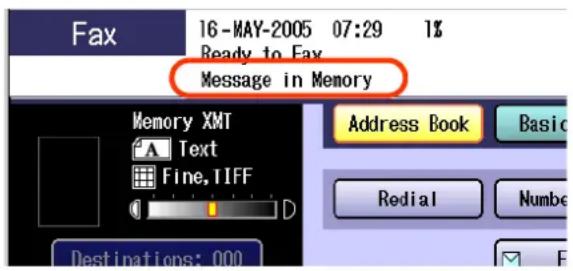
text_image
Fax 16-MAY-2005 07:29 1% Ready to Fax Message in Memory Memory XMT Text Fine, IFF D Address Book Basic Redial Number Destinations: 000NOTE
- The available memory size is limited. Replenish the paper, toner, or clear the jammed paper before the memory becomes full.
- The standard setting of “22 Substitute RCV” is set to “Valid” in Function Parameters (Fax/Email Settings> Fax Parameters).
For instructions on how to change the standard setting, refer to Fax/Email Settings in the Operating Instructions (For Function Parameters) on the provided CD-ROM.
Convenient Reception Features
This machine supports certain convenient-to-use reception features. Program these features as required.
Selective Reception
Your machine has a special feature, Selective Reception, which can prevent receiving of unnecessary documents, (i.e. junk fax, direct mail, etc.).
Before receiving the document, the last 4 digits of the ID Number received from the sending machine will be compared with the last 4 digits of the telephone number programmed in each Address Book station. When a match is found, your machine will start receiving the document. If a match is not found, your machine will cancel the reception.
Receiver Sender A (ID No: xxxx1234)
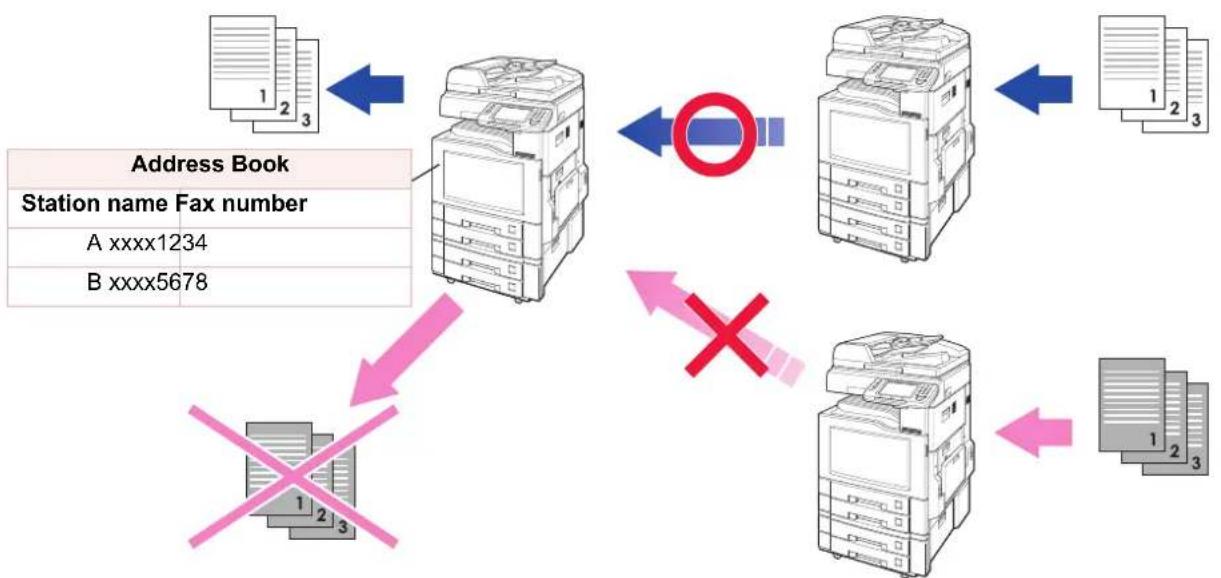
flowchart
graph TD
    A["Address Book\nStation name Fax number\nA xxxx1234\nB xxxx5678"] --> B["Printer 1"]
    A --> C["Printer 2"]
    A --> D["Printer 3"]
    B --> E["Printer 1"]
    B --> F["Printer 2"]
    B --> G["Printer 3"]
    C --> H["Printer 1"]
    C --> I["Printer 2"]
    C --> J["Printer 3"]
    D --> K["Printer 1"]
    D --> L["Printer 2"]
    D --> M["Printer 3"]
    E --> N["Warning Symbol"]
    F --> N
    G --> N
    H --> N
    I --> N
    J --> N
    K --> N
    L --> N
    M --> N
Sender B (ID No: xxxx4321)
NOTE
- The standard setting of "46 Select Receive" is set to "Invalid" in Function Parameters (Fax/Email Settings> Fax Parameters). For instructions on how to enable the selective reception feature, refer to Fax/Email Settings in the Operating Instructions (For Function Parameters) on the provided CD-ROM.
- This feature requires the registration of all possible sending stations in your address book. Refer to Adding a Fax Number into the Address Book. (See page 163)
- Selective reception will not work if the fax number is not set in the sender's numeric ID, or the sender's numeric ID is not programmed at all. You need to advice to include the fax number (fax telephone number) in the Numeric ID to the sender who you want to receive faxes from.
● The remote machines to which you send faxes may also have the selective reception feature pre-programmed.
Fax Forwarding
This feature allows all incoming faxes to be forwarded to the station registered in the address book. It is convenient when you want to receive fax calls at a location away from your office (such as your home) at night, or during holidays.
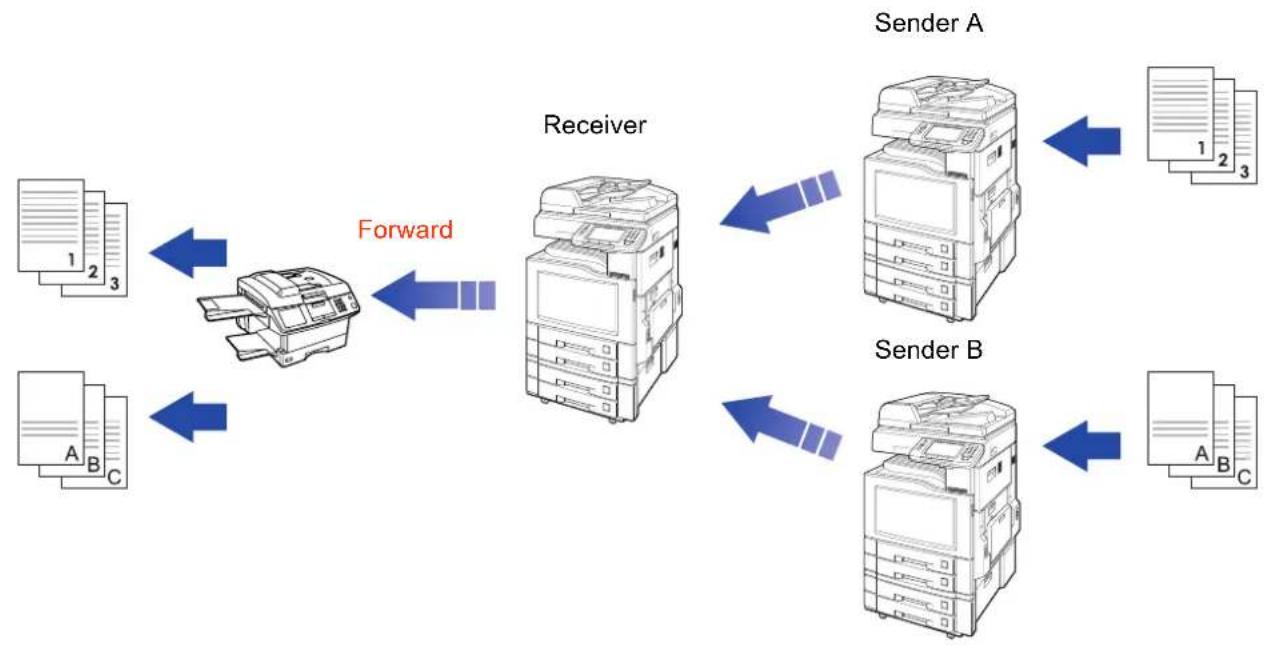
flowchart
graph TD
    A["Input File 1-3"] --> B["Printer"]
    C["Input File A-B-C"] --> B
    B --> D["Receiver"]
    D --> E["Sender A"]
    D --> F["Sender B"]
    E --> G["Output 1-3"]
    F --> H["Output A-B-C"]
    style A fill:#f9f,stroke:#333
    style C fill:#f9f,stroke:#333
    style B fill:#ccf,stroke:#333
    style D fill:#cfc,stroke:#333
    style E fill:#fcc,stroke:#333
    style F fill:#fcc,stroke:#333
    style G fill:#cff,stroke:#333
NOTE
- The standard setting of "54 Fax Forward" is set to "Invalid" in Function Parameters (Fax/Email Settings> Fax Parameters). For instructions on how to enable the fax forwarding feature, refer to Fax/Email Settings in the Operating Instructions (For Function Parameters) on the provided CD-ROM.
-
When the Fax Forward feature is set, the station programmed in the address book is restricted from editing. To change a programmed destination, follow the steps below:
-
Set "54 Fax Forward" to "Invalid" in Function Parameters (Fax/Email Settings> Fax Parameters).
- Change the station entered in an address book or pre-programmed in the program dialling.
-
Reset "54 Fax Forward" to "Valid" in Function Parameters (Fax/Email Settings> Fax Parameters).
-
When Fax Forwarding fails, for example, calling a busy station, the received document will print and is deleted from the memory.
● Fax Forwarding will be disabled if the machine has 5% or less of memory remaining.
Password-Reception
Password reception will prevent receiving fax from unauthorized stations.
To use Password Reception, you must set a 4-digit receiving password in advance. The password must be shared with the other compatible Panasonic machine(s). If the password in your machine does not match the receiving password in the other compatible Panasonic machine(s), the reception will fail.
- Password reception can be enabled by programming "44 Password-Receive" in Function Parameters (Fax/Email Settings> Fax Parameters). Refer to Fax/Email Settings in the Operating Instructions (For Function Parameters) on the provided CD-ROM.
Receiver
natural_image
Line drawing of a multi-tiered electronic device with no visible text or symbolsReception
Password:
1234
text_image
1 2 3Sender
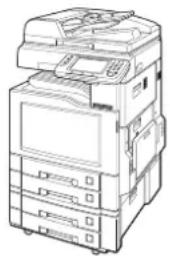
natural_image
Line drawing of a multi-tiered electronic device with no visible text or symbolsReception
Password:
1234
ATTENTION
This feature works only if the remote station is any one of the following models:
DF-1100 DP-180 DP-190 DP-1810F DP-1820E DP-1820F DP-2000 DP-2310
DP-2330 DP-2500 DP-3000 DP-3010 DP-3030 DP-3510 DP-3520 DP-3530
DP-4510 DP-4520 DP-4530 DP-6010 DP-6020 DP-6030 DP-C262 DP-C322
DX-600 DX-800 FP-D250F FP-D350F UF-160 UF-160M UF-170 UF-180
UF-190 UF-260 UF-270 UF-270M UF-280M UF-300 UF-312 UF-322
UF-550 UF-560 UF-585 UF-590 UF-595 UF-650 UF-733 UF-745
UF-750 UF-750D UF-755 UF-755e UF-766 UF-770 UF-780 UF-788
UF-790 UF-880 UF-885 UF-890 UF-895 UF-990 UF-9000 UF-M500
NOTE
- The standard setting of "44 Password-Receive" is set to "Off" in Function Parameters (Fax/Email Settings> Fax Parameters). For instructions on how to enable the Password reception feature, refer to Fax/Email Settings in the Operating Instructions (For Function Parameters) on the provided CD-ROM.
Receive to Memory
What is Memory Reception?
Memory reception allows all incoming documents to be stored in memory, instead of printing them onto the output tray.
- If the memory reception feature has been set to "On" in Function Parameters, the message Receive to Memory appears on the touch-panel display.
- Documents received in memory are printed when the pre-programmed password is entered. The received documents are deleted from memory when their printing completes.
This section explains how to program memory reception, and print documents received into the memory.
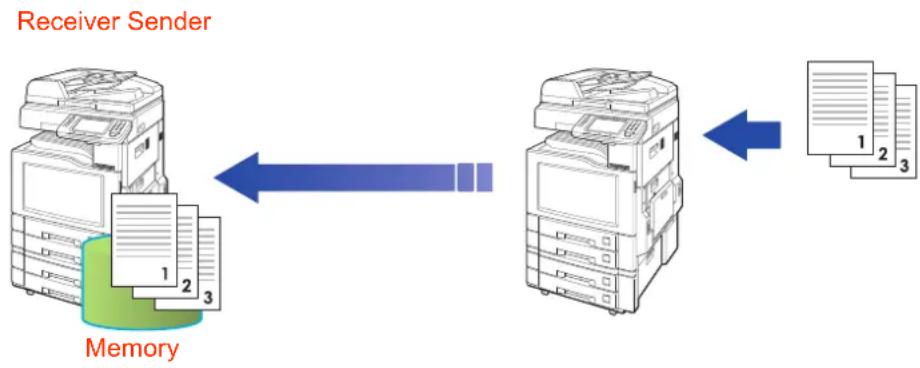
flowchart
graph LR
    A["Receiver Sender"] --> B["Memory"]
    B --> C["Output File"]
    style A fill:#f9f,stroke:#333
    style B fill:#ccf,stroke:#333
    style C fill:#cfc,stroke:#333
NOTE
- The standard setting of "Receive to Memory" is set to "Off" in "More Menus".
- You can set the password in Function Parameters (Fax/Email Settings> Fax Parameters).
- When memory becomes full, the memory reception is aborted and the communication is cancelled. Pages already received in memory can be printed.
- Once memory is full, incoming documents can no longer be received into memory.
-
If the memory reception feature has been set to "On", the memory reception password cannot be changed in Function Parameters. To change the password, follow the steps below:
-
Set the memory reception feature in "More Menus" to "Off".
- Change the password of "37 Receive to Memory" in Function Parameters (Fax/Email Settings> Fax Parameters).
- Set the memory reception feature to "On" in "More Menus".
Programming Memory Reception
To enable memory reception, follow the steps below:
1 Press the Fax key.
2 Select "More Menus".
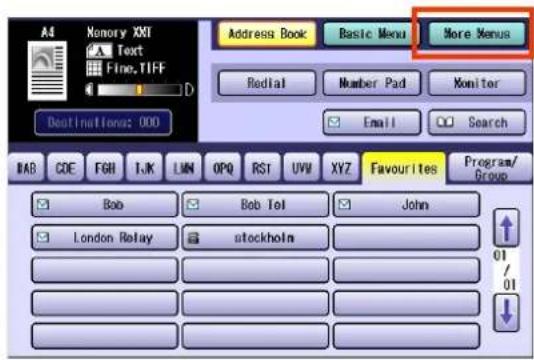
text_image
A4 Memory XMI Text Fine.TIFF Address Book Basic Menu More Menus Redlat Number Pad Monitor Email Search Destination: 000 BAB CDE FGH TJK LINN OPQ RST UVW XYZ Favourites Program/ Group Bob Bob Tel John London Relay stockholm 01 / 01 ↓3 Select "Select Mode".
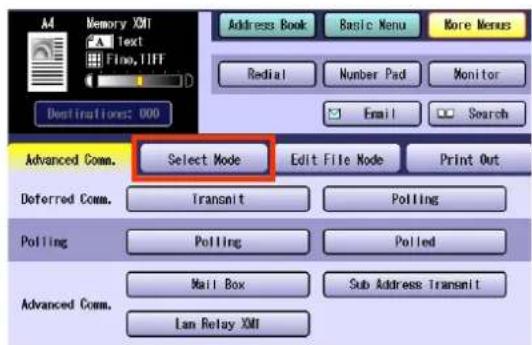
text_image
Memory XMT Text Flow, TIFF Address Book Basic Menu More Menus Redial Number Pad Monitor Email Search Destinations: 000 Advanced Comm. Select Mode Edit File Mode Print Out Deferred Comm. Transmit Polling Polling Polling Advanced Comm. Mail Box Sub Address Transmit Lam Relay XMT4 Select "Receive to Memory".
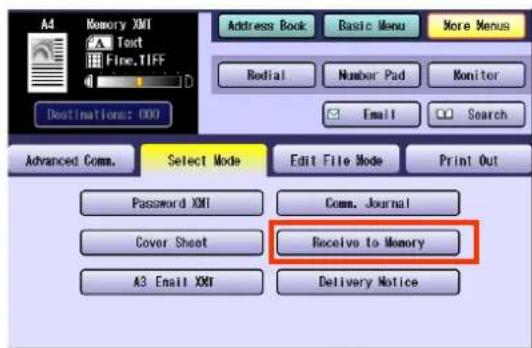
text_image
A4 Memory XMT Text Fine.TIFF Address Book Basic Menu More Menus Redial Number Pad Monitor Email Search Destinations: 000 Advanced Comm. Select Mode Edit File Mode Print Out Password XMT Comm. Journal Cover Sheet Receive to Memory A3 Email XMT Delivery Notice5 Select "On", and then "OK". Memory reception is programmed.
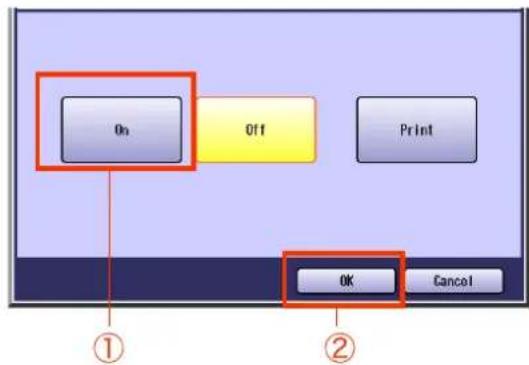
text_image
On Off Print OK Cancel ① ②| On | Select to enable memory reception. |
| Off | Select to cancel memory reception. |
| Select to print a document received in memory. |
Printing a Document Received in Memory
When a document is received in memory, a message is displayed.
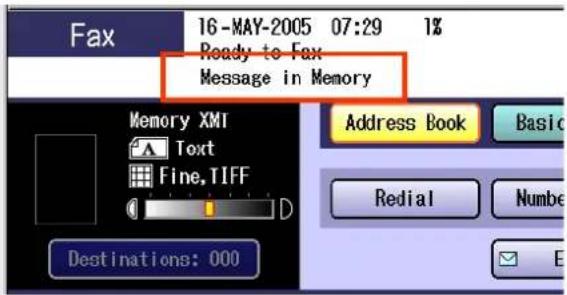
text_image
16-MAY-2005 07:29 1% Ready to Fax Message in Memory Memory XMT Text Fine, IFF D Destinations: 000 Address Book Basic Redial NumberTo print a document received in memory, follow the steps below:
1 Press the Fax key.
2 Select "More Menus".
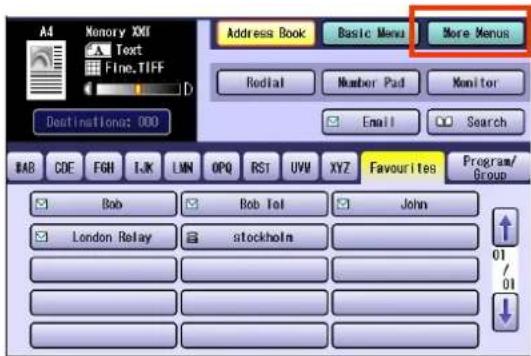
text_image
A4 Memory XXI Text Fine.TIFF Address Book Basic Menu More Menus Redlat Number Pad Monitor Email Search Destination: 000 BAB COE FGH IJK LMN OPQ RST UVW XYZ Favourites Program/ Group Bob Bob Tel John London Relay stockholm 01/ 013 Select "Select Mode".
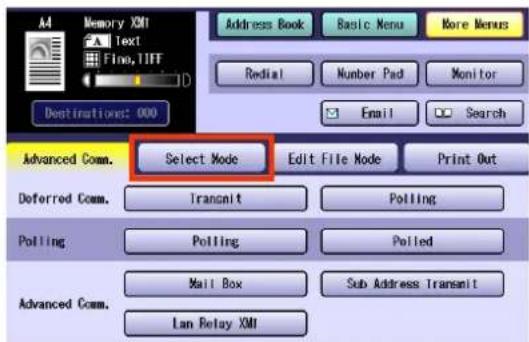
text_image
Memory XMI Text Fino, TIFF Address Book Basic Menu More Menus Redial Number Pad Monitor Email Search Destinations: 000 Advanced Comm. Select Mode Edit File Mode Print Out Deferred Comm. Transmit Polling Polling Polling Advanced Comm. Mail Box Sub Address Transmit Lan Relay XMI4 Select "Receive to Memory".
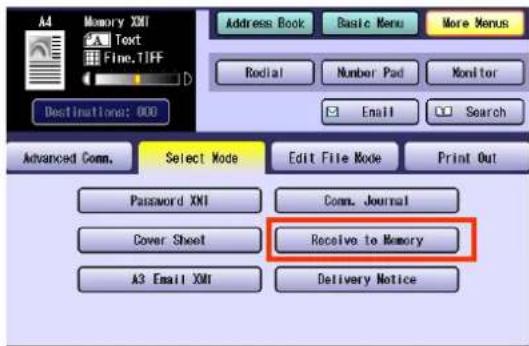
text_image
Address Book Basic Menu More Menus Text Fine.TIFF Rodial Number Pad Monitor Email Search Advanced Comm. Select Mode Edit File Mode Print Out Password XMI Comm. Journal Cover Sheet Receive to Memory A3 Email XMI Delivery Notice5 Select "Print", and then "OK".
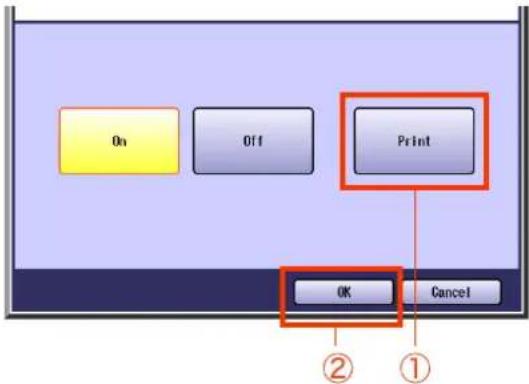
text_image
On Off Print OK Cancel ② ①| On | Select to enable memory reception. |
| Off | Select to disable memory reception. |
| Select to print a document received in memory. |
6 If a password is pre-programmed, enter the password (4-digit), and then select "OK".
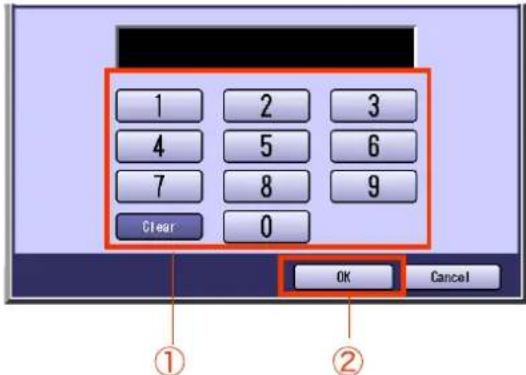
text_image
1 2 3 4 5 6 7 8 9 Clear 0 OK Cancel- This screen appears when the password is set in "37 Receive to Memory" in Function Parameters (Fax/Email Settings).
- If you make a mistake, press Clear key to delete entries one digit at a time.
What is Internet Fax?
What is Internet Fax?
It is a feature whereby scanned documents are transmitted to Internet Fax or to computers as Email. Internet Fax communicates via an Intranet, or the Internet without using the telephone line.
This machine can be connected to 10Base-T/100Base-TX Ethernet LAN (local area network).
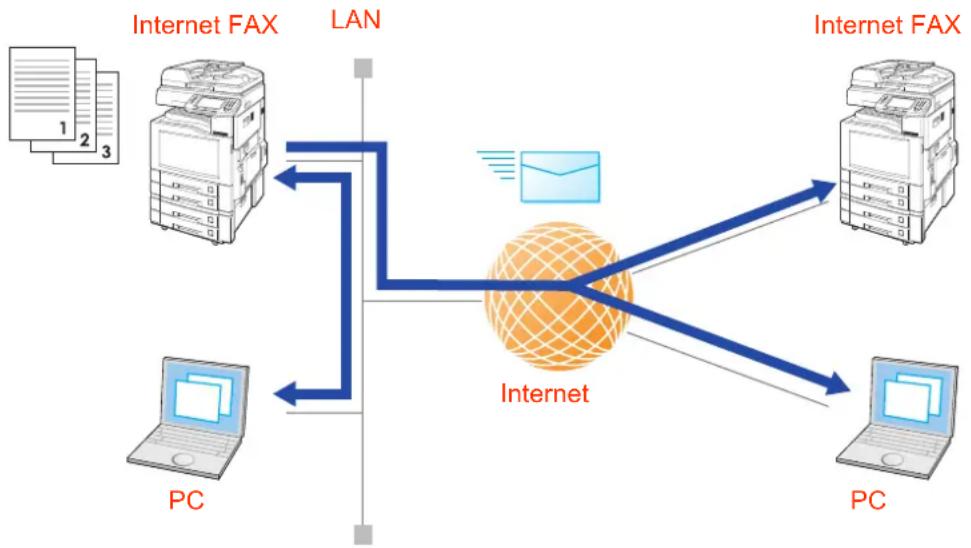
flowchart
graph TD
    A["PC"] --> B["Internet"]
    C["Internet FAX"] --> D["LAN"]
    E["Internet FAX"] --> D
    B --> F["Internet"]
    D --> F
    F --> G["PC"]
    style F fill:#f9f,stroke:#333
Sending Email
Scanned documents can be transmitted to an Internet Fax, or to a remote computer as files attached to the Email.
NOTE
● Refer to Sending Email. (See page 90)
- Scanned documents can be transmitted only as attached files in TIFF or PDF format.
The PDF format can be used only for transmitting documents from the Internet Fax to computers.
- The remote PC must support MIME to receive file attachment in TIFF or PDF format.
■ Receiving Email
When Email is received from an Internet Fax or from a computer, the Email message prints automatically with the image of the attached file.
NOTE
● Refer to Receiving Email. (See page 91)
Routing
You can forward fax documents or Email to an Internet Fax or networked computers.
NOTE
● Refer to Inbound Routing. (See page 91)
■ Transmitting to a Fax via a Relay Station (Relay Transmission)
Email can be transmitted as normal fax documents via a relay station. Email may also be broadcasted.
NOTE
● Refer to Relay Transmission. (See page 92)
Using the Internet Fax Feature
To use the Internet Fax feature, a network cable must be connected to the machine and the network environment must be properly configured in Function Parameters.
For setup instructions, refer to Preparing to Use Internet Fax. (See page 98)
What Internet Fax Can Do
This section introduces the functions of the Internet Fax feature.
The Internet Fax features does not only offer sending and receiving Email but forwarding fax documents via a telephone line or broadcasting them via a relay station.
Sending Email
A scanned document can be transmitted to an Internet Fax or to a remote computer as an Email file attachment. Attached files must be in either of the following formats:
•Internet Fax : TIFF format (TIFF-F)
- Computer : Choose either TIFF (TIFF-F) format or PDF format.
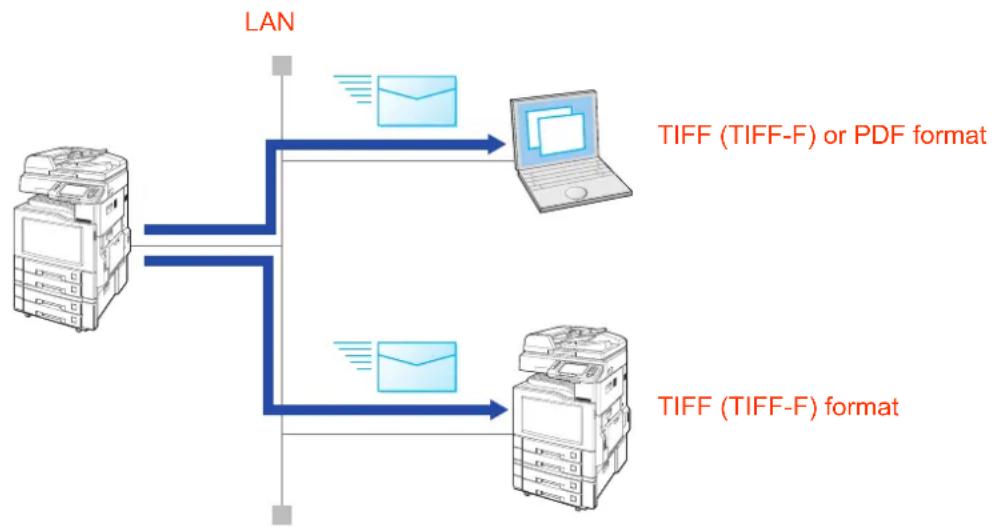
flowchart
graph TD
    A["LAN"] --> B["TIFF (TIFF-F) or PDF format"]
    A --> C["TIFF (TIFF-F) format"]
    B --> D["Laptop"]
    C --> E["Laptop"]
    D --> F["Email"]
    E --> G["Email"]
NOTE
- For more details on sending Email, refer to Sending an Email Procedure. (See page 100)
Receiving Email
When this machine receives Email from an Internet Fax or from a computer, it starts printing the Email automatically. If the Email has an attached file in a format that is not supported by the machine, an error message is printed to alert you that the machine cannot print the Email.
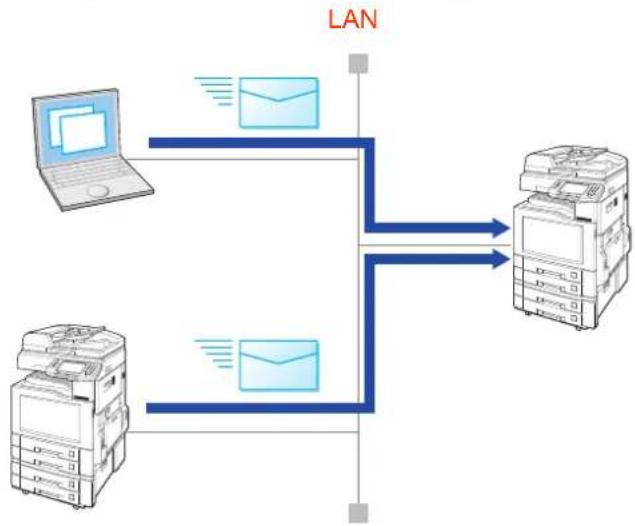
flowchart
graph TD
    A["LAN"] --> B["Laptop"]
    A --> C["Printer"]
    A --> D["Email"]
    B --> E["Envelope"]
    C --> F["Envelope"]
    D --> G["Envelope"]
NOTE
- For instructions on how to receive Email, refer to Receiving an Email. (See page 122)
Inbound Routing
A document received from a G3 fax station via a telephone line can be forwarded to a remote computer on the network or to an Internet Fax. The forwarding destination can be specified by sub-addressing or the numeric ID of a fax station.
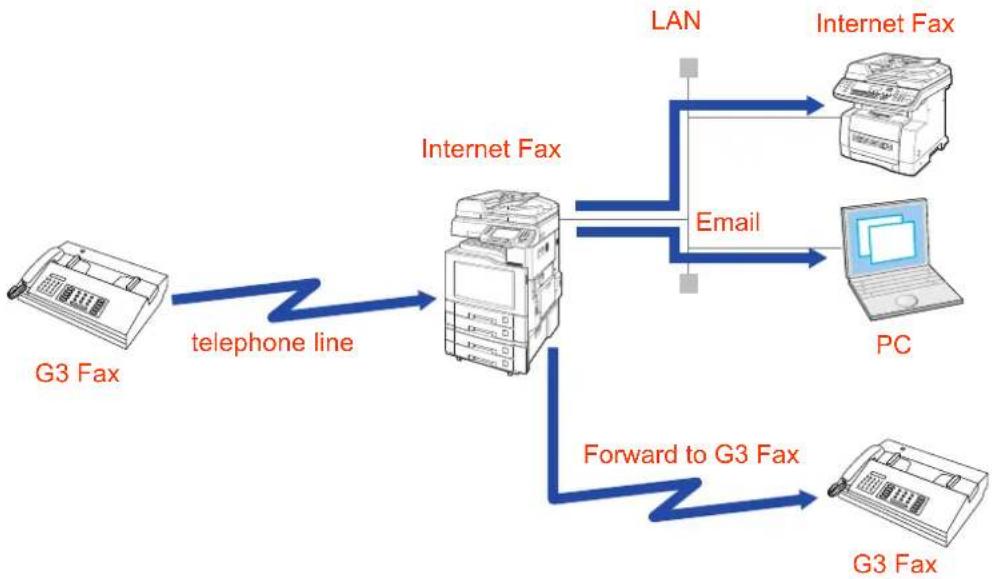
flowchart
graph TD
    A["G3 Fax"] -->|telephone line| B["Internet Fax"]
    B -->|Email| C["Internet Fax"]
    C --> D["PC"]
    B -->|Forward to G3 Fax| E["G3 Fax"]
    C -->|LAN| F["Computer"]
NOTE
- For more details about routing, refer to Inbound Routing. (See page 128)
Relay Transmission
The Internet Relayed Transmission Feature can save your time and transmission costs if you need to send the same documents to multiple G3 fax machines. This is especially true if the transmissions are long distance.
You can send documents to any G3 fax machine by using the Internet via a LAN from your machine to another Relay Station. You can also send an Email with attached TIFF-F file(s) to any G3 fax machine from your PC using your current Email application trough a Relay Station.
To convert applications, such as spread sheet, into a TIFF-F format file, however, requires you to first download the software (TIFF Converter) from the web site listed below.
http://panasonic.co.jp/pcc/en/
Ex. Internet Relay Transmission
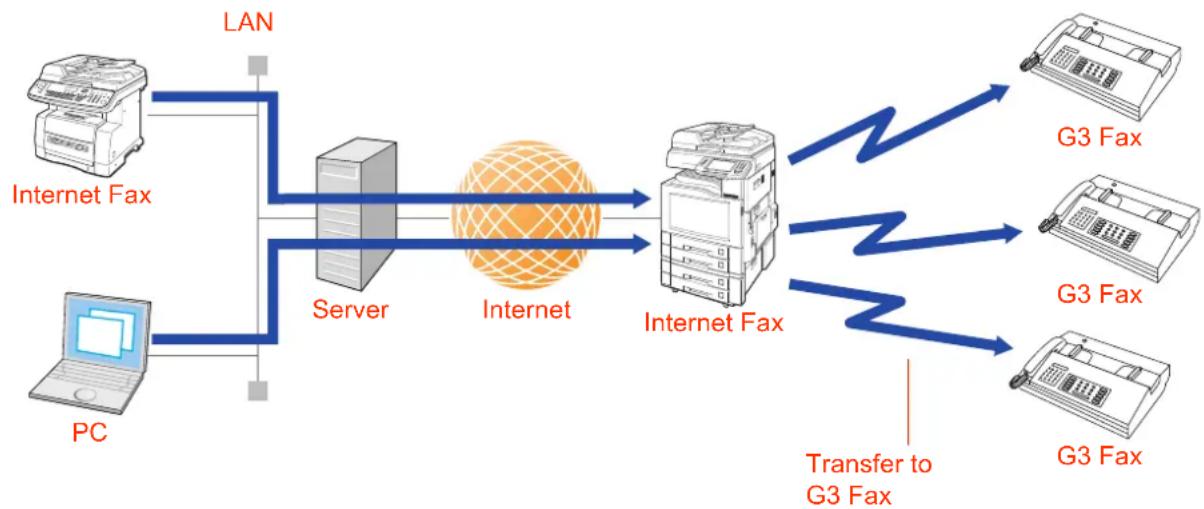
flowchart
graph LR
    PC["PC"] -->|LAN| Server["Server"]
    Server --> Internet["Internet"]
    Internet --> G3Fax1["G3 Fax"]
    Internet --> G3Fax2["G3 Fax"]
    Internet --> G3FaxG3["Fax"]
    G3Fax1 -->|Transfer to G3 Fax| G3FaxG3
    G3Fax2 -->|Transfer to G3 Fax| G3FaxG3
ATTENTION
- When requesting Relay Transmission from a computer, it is necessary to transmit the file in the TIFF-F format.
- An application software is available from the download site. Refer to Convenient Application Software. (See page 148)
NOTE
- For more details on the Relay Transmission feature, refer to Using the Relay Feature. (See page 134)
Message Delivery Notice (MDN)
If the sender (Internet Fax) desires a processing confirmation, it must request a Message Delivery Notice when sending the message itself to a device supporting this notification function.
Several Email applications such as Eudora and Outlook Express support and are able to respond to the delivery confirmation notification sent from the Internet Fax. As well as sending a request for notification to the Internet Fax by Email applications that support MDN (Message Delivery Notice) function.
If the receiving station is an Internet Fax station
A Message Delivery Notice (MDN) with communication capability notice is returned to the sender.
If the receiving station is a computer
An MDN response Email message is transmitted to the sender.
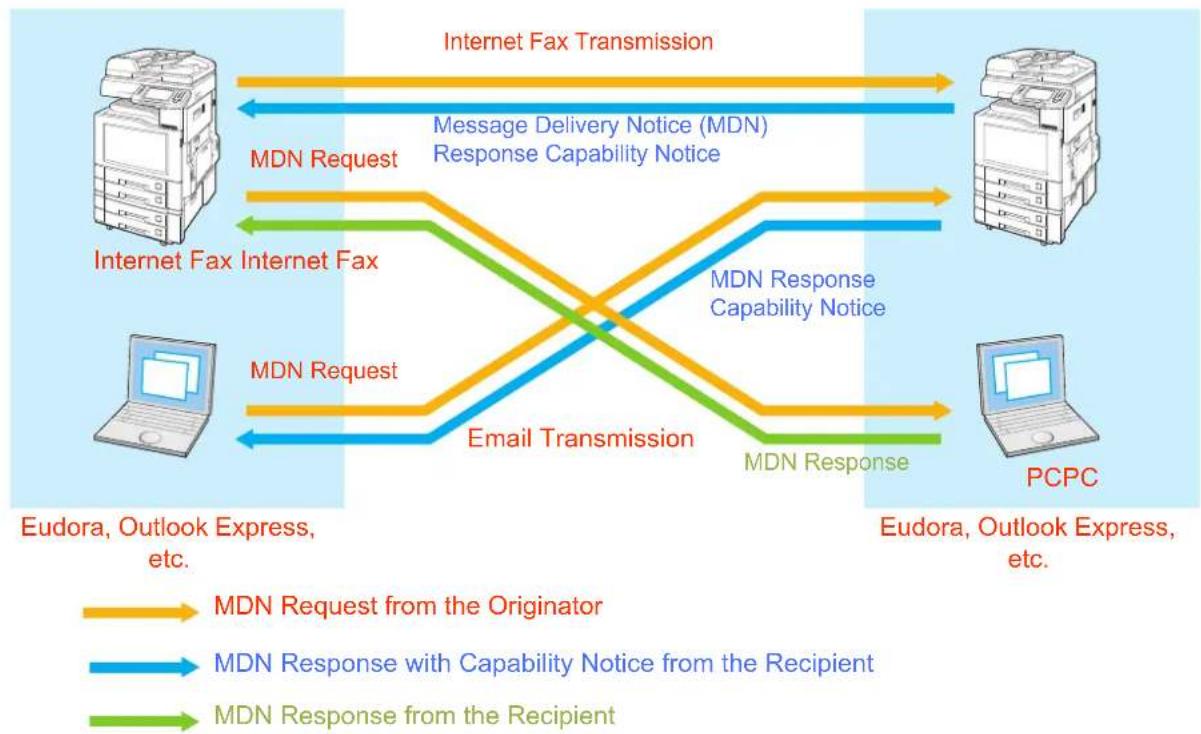
flowchart
graph LR
    A["Internet Fax Transmission"] --> B["MDN Request"]
    A --> C["Message Delivery Notice (MDN) Response Capability Notice"]
    B --> D["Internet Fax Internet Fax"]
    C --> E["MDN Response Capability Notice"]
    D --> F["MDN Request"]
    D --> G["Email Transmission"]
    E --> H["MDN Response"]
    F --> I["Eudora, Outlook Express, etc."]
    G --> J["PCPC"]
    style A fill:#f9f,stroke:#333
    style B fill:#f9f,stroke:#333
    style C fill:#f9f,stroke:#333
    style D fill:#f9f,stroke:#333
    style E fill:#f9f,stroke:#333
    style F fill:#f9f,stroke:#333
    style G fill:#f9f,stroke:#333
    style H fill:#f9f,stroke:#333
    style I fill:#f9f,stroke:#333
NOTE
● This feature can be used when the receiving station supports the Message Delivery Notice (MDN) feature.
● To enable this feature, refer to Setting Message Delivery Notice (MDN). (See page 118)
Direct Internet Fax Transmission (Using Direct SMTP)
Email is normally distributed by an SMTP mail server using Simple Mail Transfer Protocol (SMTP). In common cases only Email and web service from the Internet are permitted into the corporate intranet, and corporate network administrators are extremely unwilling to open the firewall for other incoming services, since each opened path represents additional potential security threats.
The direct Internet Fax feature enables documents to be directly exchanged between Internet Fax stations without the intervention of an SMTP mail server. This will reduce workload of SMTP mail server.
Use of this feature requires that IP addresses always have to be kept unique. Certain information, such as the domain name of this machine, also needs to be properly pre-programmed in the DNS server.
To use the direct Internet Fax feature, have "172 Direct IFax XMT" set to "Valid" in Function Parameters (Fax/Email Settings> Fax Parameters).
NOTE
- For more details about network configuration, contact your network administrator.

flowchart
graph TD
    A["Internet Fax"] -->|LAN| B["SMTP Server"]
    C["Internet Fax"] -->|LAN| B["SMTP Server"]
    B -->|Direct SMTP| A
Memo
Tips for Internet Fax
Your machine uses the same communication protocols as Email: the Simple Mail Transfer Protocol (SMTP).
The differences from a standard G3 fax communication using the Public Switched Telephone Network (PSTN) are as follows.
■ Differences between Internet Fax and Fax Stations on the Telephone Line
Fax stations connected to the telephone line transmit data over a telephone line at their own expenses.
Internet Fax, on the other hand, breaks down image data into packets and transmits them from a LAN to the Internet or an Intranet without using a telephone line, thus the telephone bills on long-distance calls can be saved.
■ When Email Transmission Fails
- Your machine does not directly connect to the final destination, but rather connects to a Mail Server via LAN. Therefore, if a document cannot be correctly transmitted due to an error, the erroneous mail may be returned from the Mail Server to your machine.
- Error mail may take a long time to return (20 to 30 minutes normally) depending on the location of the remote stations, the degree of line congestion on the Internet, or the network configuration and so on.
- Depending on the Mail Server, it is possible that erroneous mail is not returned at all. Therefore, when transmitting important or time sensitive documents, it is recommended that you follow up with a telephone call to confirm reception.
- Documents may not be able to transmitted to a remote station correctly if the remote station's mailer does not support MIME. Error mail may be returned depending on the type of the remote mail server.
- Documents consisting of multiple pages or including a large amount of image data may not be transmitted.
NOTE
- If "172 Direct IFax XMT" has been set to "Valid" in Function Parameters (Fax/Email Settings> Fax Parameters), documents are directly transmitted to Email addresses pre-programmed in the address book.
- This machine supports the Message Delivery Notice (MDN) feature. Program this feature when you want to make sure whether the Email you sent has reached the receiving station successfully. For more details, refer to Message Delivery Notice (MDN). (See page 93)
■ Telephone Calls Cannot Be Made via LAN
- Your machine can only make a phone call using a regular telephone line. (if an external telephone is connected to your machine)
- Fax communication cannot be performed using Voice Over IP network communication.
Dual Port Communication
Your machine has dual port capability allowing simultaneous G3 Fax Communication over a telephone line (PSTN) and LAN Communication.
■ Transmission Resolution
In view of PC transmission, the standard setting of the resolution is set to "Fine" mode. If required, this setting can be changed to "Std". (see page 26)
■ Receive Internet Email Messages
- Your machine can receive text Email from a PC and print ANSI characters. It will print a “■” symbol if an unrecognized character is received.
- Received Email font and character size are fixed and cannot be changed.
- Text Email will be printed at about 72 lines per page. It is recommended that you use A4 size recording paper.
- Documents cannot be transmitted correctly if the destinations Mail Server does not support the MIME protocol. Erroneous mail may not be returned depending on the Mail Server.
■ Sending a Document to a PC via LAN
When transmitting a document to an email address, the following instructions are sent as text message in addition to the TIFF-F formatted image file.
Image data in TIFF-F format has been attached to this email. You can download the TIFF-F Image Viewer from the following URL addresses:
http://panasonic.co.jp/pcc/en/:
- If the document(s) being sent in the PDF format, the following message is shown instead. "Image data in PDF format has been attached to this email."
Relay Transmission
To prevent unauthorized stations from getting access to your Relay Station for Internet Relayed Transmission, you must set up your Network security. Enter the Relay Station Name, which is concealed from the final destinations and a Manager's Email Address for notification of all Internet Relayed Transmissions.
■ Transmitted File Type Setting
PDF can be selected from "File Type and Name" in "Basic Menu" as the attached file type.
The PDF format can be chosen when sending scanned documents as an Email to a remote computer.
If a document is transmitted to an Internet Fax in PDF format, the receiving Internet Fax station would not be able to print the attached file, resulting in an error.
Preparing to Use Internet Fax
To use the Internet Fax feature, your machine needs to be set up properly on your network. Please contact your network administrator for actual network setup.
Copy the Important Information form found at the end of Operating Instructions (For Setting Up) and ask your network administrator to complete the information on the form.
Program Network Parameters
The following network parameters need to be programmed on your machine by referring Operating Instructions (For Setting Up) of provided booklet, and important information received from your network administrator.
Network Parameters
- TCP/IP Address of your machine
- TCP/IP Subnet Mask of your machine
- TCP/IP Address of the Default Gateway
- Host Name
- Email Address of your machine (see Note)
- TCP/IP Address of the DNS Server (if not available, see Note)
- Name or IP Address of the Default SMTP Mail Server
- SMTP Authentication Name (when the authentication with the SMTP server is required)
- SMTP Authentication Password (when the authentication with the SMTP server is required)
To program the above items, refer to Fax/Email Settings in the Operating Instructions (For Function Parameters) on the provided CD-ROM as well.
NOTE
- The Email address format can be same as your regular Email address. If your Email address is popuser001@panasonic.com, your machine's Email address can be Internet_Fax@panasonic.com.
-
By default the machine requires the IP Address of the DNS Server and prompts you to enter the SMTP Server Name.
-
Sending Email (This machine -> Other Internet Fax machine or PC)
This machine -> Other Internet Fax machine or PC
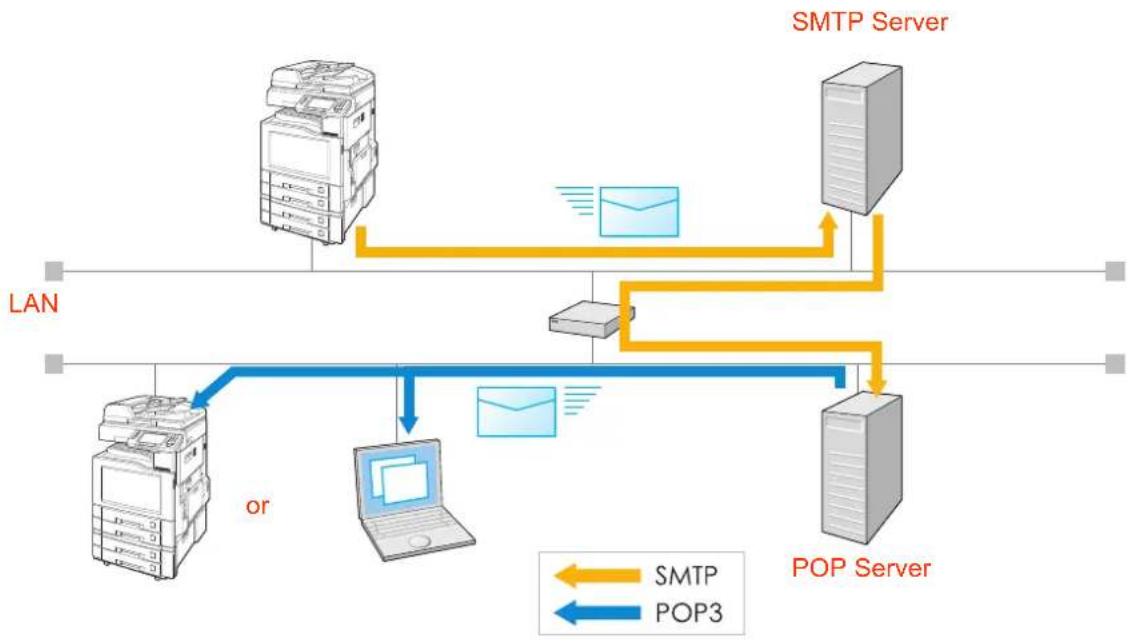
flowchart
graph TD
    LAN -->|SMTP Server| SMTP
    LAN -->|POP Server| POP3
    LAN -->|or| Device1
    Device1 -->|SMTP| Device2
    Device2 -->|POP3| Device3
    Device3 -->|SMTP| Device4
    Device4 -->|POP3| Device5
    Device5 -->|SMTP| Device6
    Device6 -->|POP3| Device7
    Device7 -->|SMTP| Device8
    Device8 -->|POP3| Device9
    Device9 -->|SMTP| Device10
    Device10 -->|POP3| Device11
    Device11 -->|SMTP| Device12
    Device12 -->|POP3| Device13
    Device13 -->|SMTP| Device14
    Device14 -->|POP3| Device15
    Device15 -->|SMTP| Device16
    Device16 -->|POP3| Device17
    Device17 -->|SMTP| Device18
    Device18 -->|POP3| Device19
    Device19 -->|SMTP| Device20
    Device20 -->|POP3| Device21
    Device21 -->|SMTP| Device22
    Device22 -->|POP3| Device23
    Device23 -->|SMTP| Device24
    Device24 -->|POP3| Device25
    Device25 -->|SMTP| Device26
    Device26 -->|POP3| Device27
    Device27 -->|SMTP| Device28
    Device28 -->|POP3| Device29
    Device29 -->|SMTP| Device30
    Device30 -->|POP3| Device31
    Device31 -->|SMTP| Device32
    Device32 -->|POP3| Device33
    Device33 -->|SMTP| Device34
    device34 -->|POP3| device35
Sending an Email Procedure
The basic operation to send an Email is as follows:
NOTE
- Email Addresses and Fax Stations can be mixed while entering the destinations. Email would be transmitted to an Email address destination, while normal fax documents would be transmitted to a fax destination.
1 Place original(s).
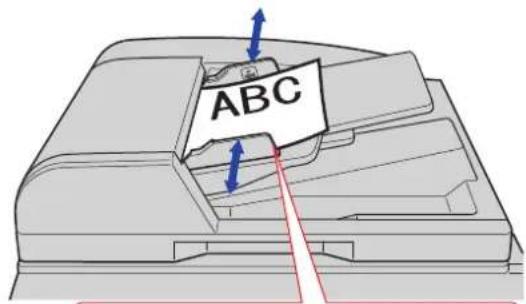
text_image
ABCFace Up. Up to 70 sheets (80 g/m ^2 ).
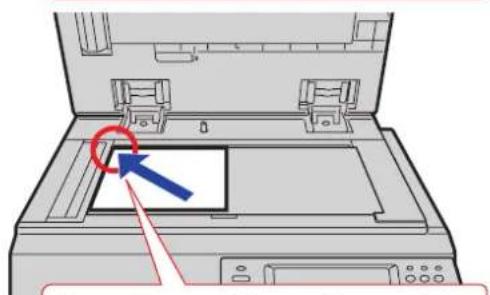
natural_image
Diagram of a printer with an open lid and a blue arrow pointing to the screen area (no text or symbols present)Face Down. Align with top left corner. Close ADF.
- Refer tPlacing Originals (Facsimile/Internet Fax) in the Operating Instructions (For Basic Operations) of provided booklet.
2 Press the Fax key to open the Fax screen.
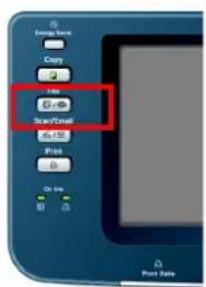
text_image
Copy Paste Save/Reset On/Reset Print On Buy Print DateSelect "Basic Menu" if additional settings are required.
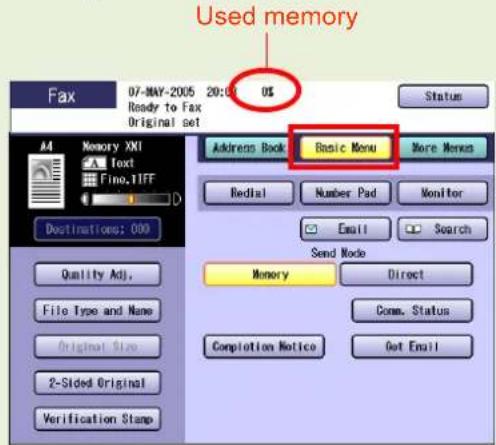
text_image
Used memory Fax 07-MAY-2005 20:00 US Ready to Fax Original set Address Book Basic Menu More Names Redial Number Pad Monitor Email Search Send Mode Memory Direct File Type and Name Conn. Status Original Size 2-Sided Original Get Email Verification Stamp- Setting Original Quality. (See page 26)
- Setting a File Type and a Filename. (See page 114)
The PDF format can be used only for transmitting Email to remote computers.
Send Email in TIFF format to an Internet Fax. - Setting Message Delivery Notice (MDN). (See page 118)
Select "More Menus" if additional settings are required.
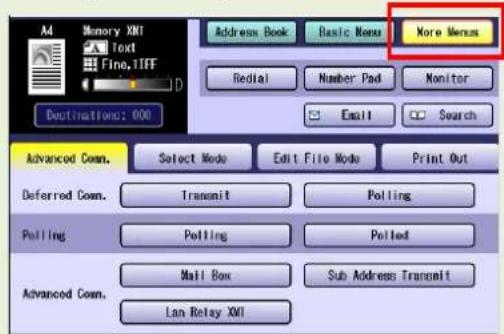
text_image
Memory XMI Text Fine, TIFF D Address Book Basic Menu More Menu Redial Number Pad Monitor Email Search Destinations: 000 Advanced Comn. Select Mode Edit File Mode Print Out Deferred Comn. Transmit Polling Polling Polled Mall Box Sub Address Transmit Advanced Comn. Lan Relay XMI3. Select "Email".
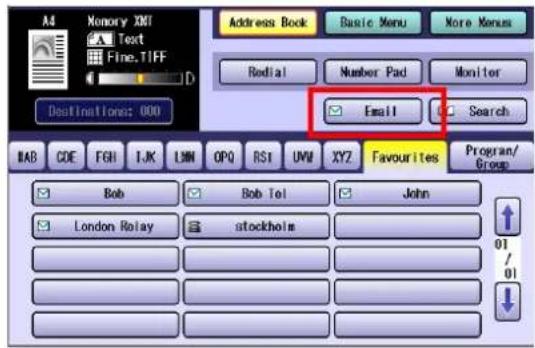
text_image
Address Book Basic Menu More Menus Redial Number Pad Monitor Email Search IAB CDE FGH IJK LMN OPQ RST UMU XYZ Favourites Program/ Bob Bob Tel John London Relay stockholm 01 014. Enter an Email address by selecting "Keyboard" or select a pre-programmed Email address.
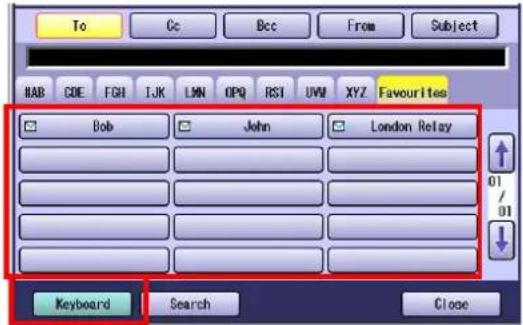
text_image
To Cc Bcc From Subject HAB CDE FGH IJK LMN OPQ RST UVW XYZ Favourites Bob John London Relay Keyboard Search Close● Refer to Entering an Email Address. (See page 102)
● Refer to Using Cc, Bcc and From. (See page 110)
5. Press the Start key.
text_image
Close-up of a digital phone control panel with a green circular button highlighting it, surrounded by buttons and a red square overlay.The original(s) are stored into memory with a file number. Then starts Email transmission.
- If the transmission fails, an error response is delivered from the mail server and printed on this machine.
The error mail including an error message and an image of the first page of the transmitted document is received.
Refer to When Email Transmission Fails. (See page 120)
- For instructions on how to cancel transmission, refer to Cancelling a Communication. (See page 46)
- When sending from the Platen Glass, place the next original and follow the instructions described on the touch panel display.
- Press Reset key to return the machine to the initial screen of the current active mode.
Entering an Email Address
Email addresses can be entered by any of the following methods:
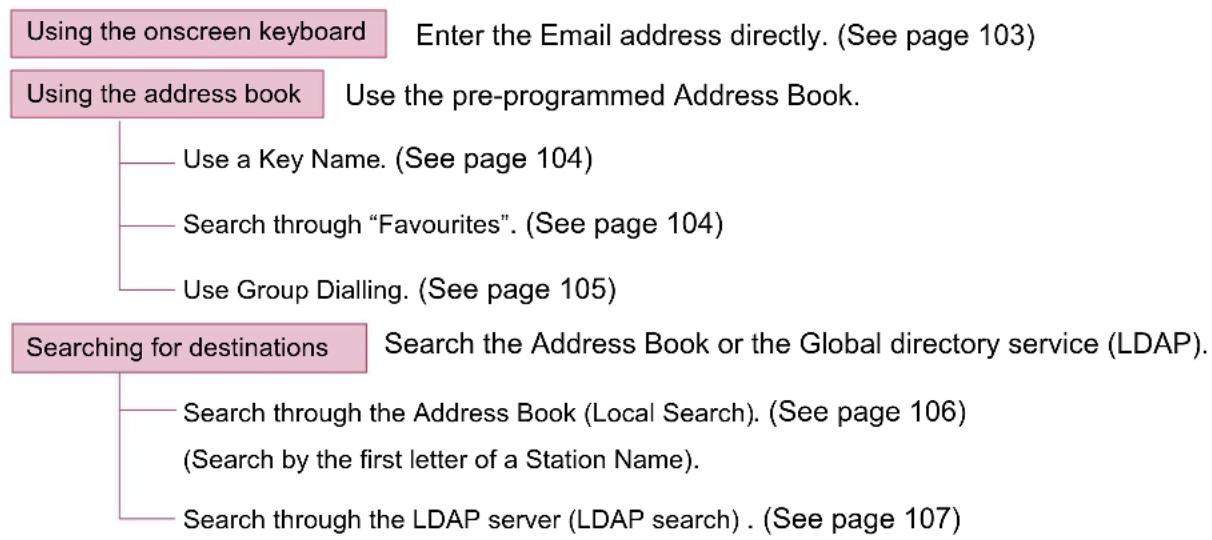
flowchart
graph TD
    A["Using the onscreen keyboard"] --> B["Enter the Email address directly. (See page 103)"]
    C["Using the address book"] --> D["Use the pre-programmed Address Book."]
    D --> E["Use a Key Name. (See page 104)"]
    D --> F["Search through "Favourites". (See page 104)"]
    D --> G["Use Group Dialling. (See page 105)"]
    H["Searching for destinations"] --> I["Search the Address Book or the Global directory service (LDAP)."]
    I --> J["Search through the Address Book (Local Search). (See page 106)<br>(Search by the first letter of a Station Name)."]
    I --> K["Search through the LDAP server (LDAP search) . (See page 107)"]
Using the Onscreen Keyboard
To enter an Email address directly from the onscreen keyboard, follow the steps below:
1 Follow the step 1 and 2 on page 100.
2 Select "Email".
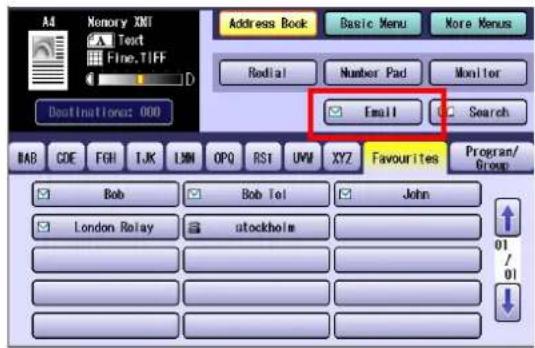
text_image
All Memory XMT Text Fine.TIFF D Address Book Basic Menu More Menus Radial Number Pad Monitor Destination: 000 Email Search IAB COE FGH TJK LMN OPQ RSI UMM XYZ Favourites Program/ Group Bob Bob Tel John London Relay utockholm 01/ 013 On the Email screen, select "Keyboard".
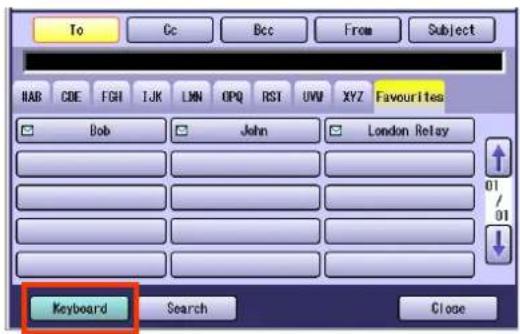
text_image
To Cc Bcc From Subject HAB COE FGH IJK LMN OPQ RST UVW XYZ Favourites Bob John London Relay Keyboard Search Close4 Enter an Email address, and then select "OK".
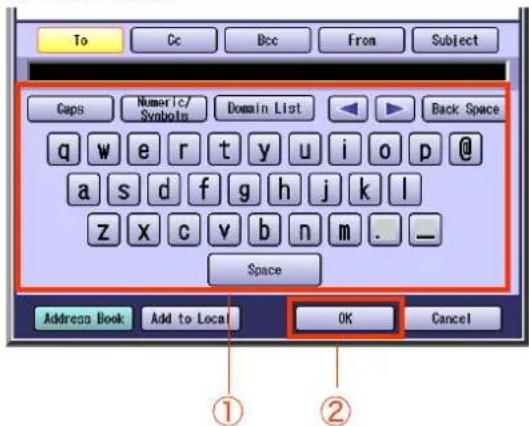
text_image
To Cc Bcc From Subject Caps Numeric/ Symbols Domain List Back Space q w e r t y u i o p @ a s d f g h j k l z x c v b n m . _ Space Address Book Add to Local OK Cancel ① ②• Each Email address can be up to 60 characters long.
- For using the onscreen keyboard, refer to Before Starting in the Operating Instructions (For Function Parameters) on the provided CD-ROM.
- To set multiple Email addresses, follow the steps below:
①Enter the first Email address, and then select "OK".
②Enter the next Email address, and then select "OK".
③Repeat the steps above until you finish entering all Email addresses.
- If you make a mistake, select "Back Space" to delete one digit at a time, or move the cursor to the beginning of the field, and then press Clear key to delete the entire entry.
There are three ways to enter Email addresses:
☐ Enter an Email address Directly Enter an entire Email address from the onscreen keyboard.
☐ Use the Default Domain When you enter an Email address, you can use the Default Domain if the Default Domain is pre-programmed in the machine beforehand. Refer to Fax/Email Settings in the Operating Instructions (For Function Parameters) on the provided CD-ROM.
①Enter the part of the Email address to the left of @, and then select "OK". The default domain is automatically added to the Email address when the Email is sent.
Ex: Input characters: abc Sending Email address: abc@panasonic.com
☐ Use the Domain List When you enter an Email address, you can use the Domain List if you pre-programmed the domain name you wish to enter. Refer to Fax/Email Settings in the Operating Instructions (For Function Parameters) on the provided CD-ROM.
①Enter the Email address up to @, and then select "Domain List".
②Select a domain name from the pre-programmed domain list.
Ex: Input character string: abc@ Selected from the domain list: abc@panasonic.com
5 Press the Start key.
The original(s) are stored into memory with a file number. Then starts Email transmission.
Using the Address Book
Use a Key Name
If an Email address is pre-programmed in the address book, it can be selected by using a Key Name.
NOTE
To use the address book, it is necessary to have Email addresses added to the address book in Function Parameters. Refer to Adding an Email Address to Address Book. (See page 165)
1 Follow the step 1 and 2 on page 100.
2 Select a Key Name tab.
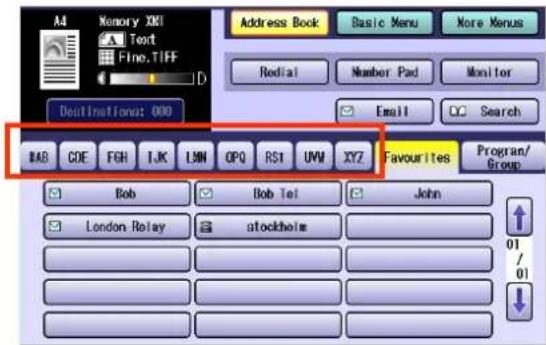
text_image
A4 Memory XXI Text Fine.TIFF Address Book Basic Menu More Menus Redial Number Pad Monitor Email Search BABB GDE FGH IJK LMN OPQ RST UNM XYZ Favourites Program/ Bob Bob Tel John London Relay stockholm 01 013 Select the Email address you want to send.
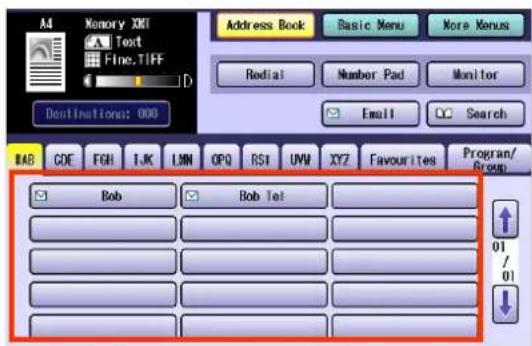
text_image
A4 Memory XNT Text Fine.TIFF Address Book Basic Menu More Venus Redial Number Pad Monitor Email Search BAB CDE FGH IJK LMN OPQ RSI UVM XYZ Favourites Program/ Bob Bob Tel 01 01- Select the same destination to cancel the choice.
- To enter additional Email addresses, repeat Step 2 and 3.
4 Press the Start key.
The original(s) are stored into memory with a file number. Then starts Email transmission.
■ Search through "Favourites"
If an Email address is pre-programmed in the "Favourites", it can be selected from "Favourites".
NOTE
To use the address book, it is necessary to have Email addresses added to the address book in Function Parameters. Refer to Adding an Email Address to Address Book. (See page 165)
- If there are any Email addresses added in the "Favourites", the address book opens the "Favourites" tab first.
1 Follow the step 1 and 2 on page 100.
2 Select "Favourites".
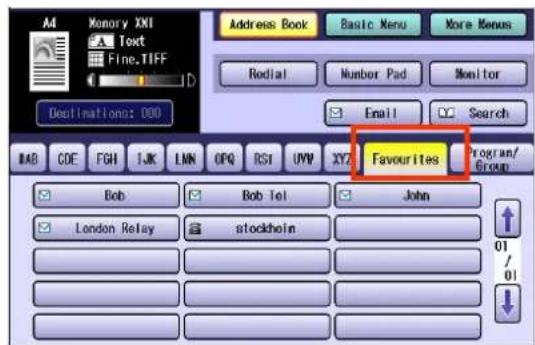
text_image
Memory XXI Text Fine.TIFF Declinations: 000 Address Book Basic Menu More Menus Rodial Number Pad Monitor Email Search Favourites Program/Group Bob Bob let John London Relay stockholm 01 / 013 Select the Email address you want to send.
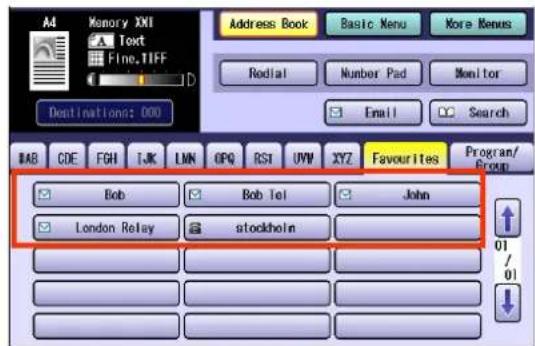
text_image
Memory XXI Text Fine.TIFF Address Book Basic Menu More Menus Rodial Number Pad Monitor Email Search Destinations: 000 BAB CDE FGH IJK LMN OPQ RSI UVM XYZ Favourites Program/ Bob Bob tel John London Relay stockhoin 01/01- Select the same destination to cancel the choice.
- To set more Email addresses, select other addresses.
4 Press the Start key.
The original(s) are stored into memory with a file number. Then starts Email transmission.
■ Use Group Dialling
For transmission to multiple destinations with group dialling, follow the steps below.
NOTE
- To use a Group button, group dialling needs to be programmed in Function Parameters. Refer to Setting for Group Dialling. (See page 173)
1 Follow the step 1 and 2 on page 100.
2 Select "Program/Group".
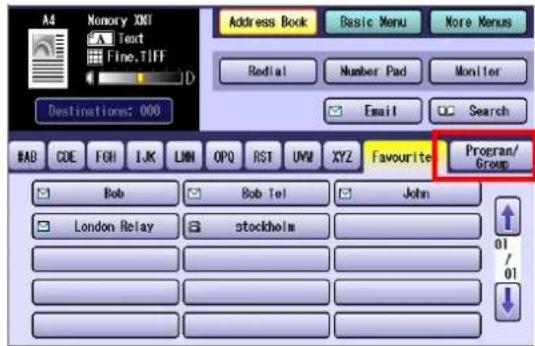
text_image
A4 Memory XNT Text Fine.TIFF Address Book Basic Menu More Menus Redial Number Pad Monitor Email Search Destinations: 000 BAB CDE FGH LK LMN OPQ RST UMU XYZ Favourite Program/ Group Bob Bob Tel John London Relay stockholm 01 / 013 Select the Group you want to send.
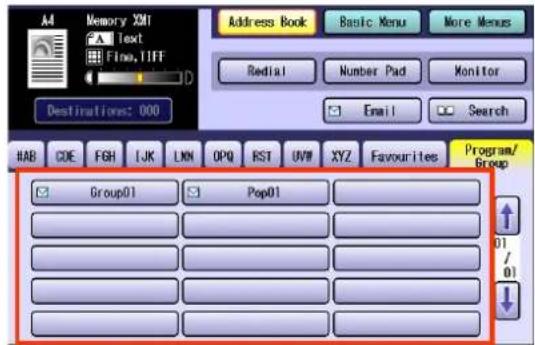
text_image
Memory XML Text Fine, TIFF Address Book Basic Menu More Menus Redial Number Pad Monitor Email Search HAB CDE FGH IJK LWN OPQ RST UVW XYZ Favourites Program/ Group01 Pop01 01 / 01- Select the same destination again to cancel the choice.
4 Press the Start key.
The original(s) are stored into memory with a file number. Then starts Email transmission.
Searching for Destinations
■ Search through the Address Book (Local Search)
The Email address of a remote station programmed in the address book can be searched by its entry name.
1 Follow the step 1 and 2 on page 100.
2 Select "Search".
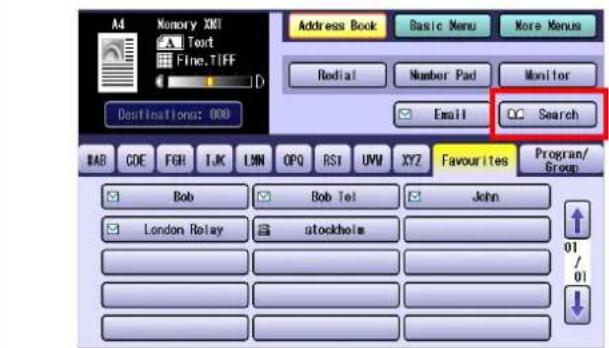
text_image
Address Book Basic Menu More Menus Rodial Number Pad Monitor Email Search Destination: 000 BAB COE FGH TJK LMN OPQ RST UVW XYZ Favourites Program/Group Bob Bob Tel John London Relay stockholm 01/ 013 Enter the character string you want to search for.
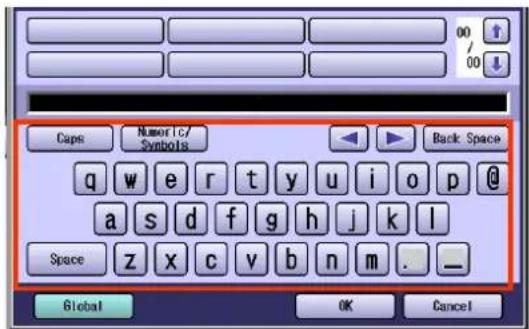
text_image
Caps Numeric/ Symbols Back Space q w e r t y u i o p @ a s d f g h j k l Space z x c v b n m . _ Global OK Cancel- For using the onscreen keyboard, refer to Before Starting in the Operating Instructions (For Function Parameters) on the provided CD-ROM.
The Email addresses that match the character string are displayed.
4 Select the destination to which you want to send, and then select "OK".
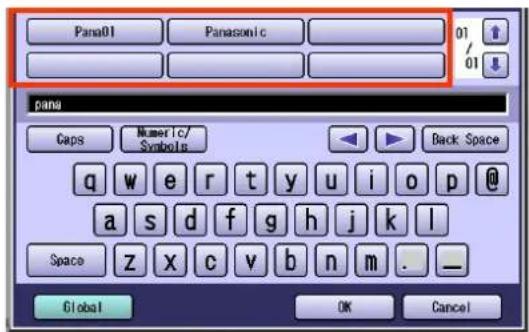
text_image
Pana01 Panasonic 01 / 01 pana Caps Numeric/ Symbols Back Space q w e r t y u i o p @ a s d f g h j k l Space z x c v b n m . _ Global OK Cancel- Select or to scroll through the search results.
5 Press the Start key.
The original(s) are stored into memory with a file number. Then starts Email transmission.
■ Search through the LDAP server (LDAP Search)
LDAP search is a feature that searches through the address book on an LDAP Server on a network for fax numbers or Email addresses.
To find out whether the LDAP search feature works in your particular environment, contact your network administrator.
NOTE
- An LDAP Server must be configured before the LDAP search facility can be used. For more details, refer to Fax/Email Settings in the Operating Instructions (For Function Parameters) on the provided CD-ROM.
● This feature is available in certain countries only.
1 Follow the step 1 and 2 on page 100.
2 Select "Search".
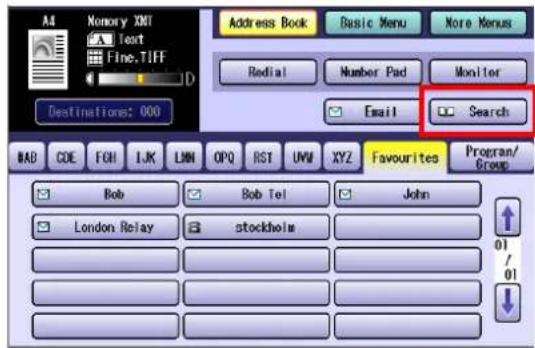
text_image
All Memory XMT Text Fine.TIFF D Address Book Basic Menu More Menus Radial Number Pad Monitor Email Search Destinations: 000 BAB COE FGH IJK LNN OPQ RST UMW XYZ Favourites Propran/ Group Bob Bob Tel John London Relay stockholm 01 / 013 Select "Global".
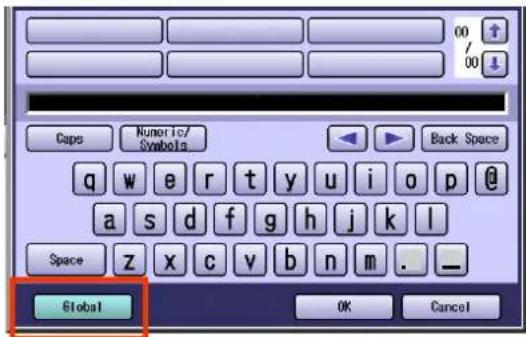
text_image
00 / 00 Caps Numeric/ Symbols Back Space q w e r t y u i o p @ a s d f g h j k l Space z x c v b n m . _ Global OK Cancel4 Enter a name or characters to search, and then select "Search".
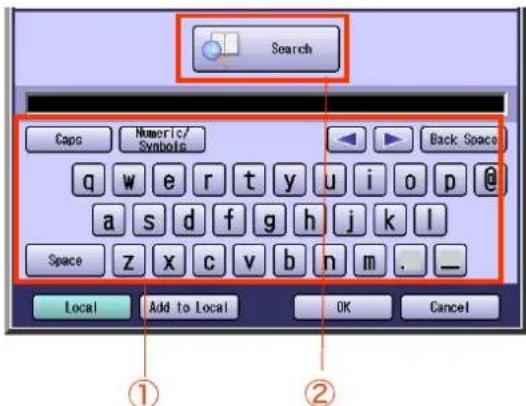
text_image
Search Caps Numeric/ Symbols Back Space q w e r t y u i o p @ a s d f g h j k l Space z x c v b n m . _ Local Add to Local OK Cancel ① ②The search result appears.
NOTE
- Email addresses and fax numbers can be searched.
- Select "Local" to return to the address book search screen.
- If there are more than 100 matches, a dialog box opens asking you if you want to continue new search. Select "Yes" to continue searching. To abort the search with 100 matches, select "No".
- A message appears if an error occurs while searching.
- To add the found Email address into the address book, select "Add to Local". Enter the entry name, and then select "OK".
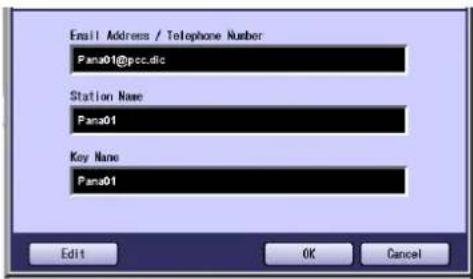
text_image
Email Address / Telephone Number Pana01@pcc.dlc Station Name Pana01 Key Name Pana01 Edit OK Cancel5 Select "Email".
6 Choose a destination, and then select "OK".
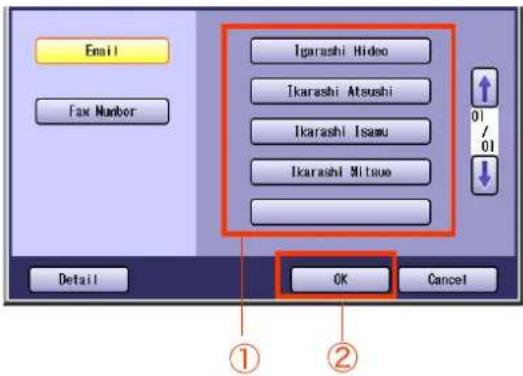
text_image
Email Fax Number Igarashi Hideo Ikarashi Atsushi Ikarashi Isamu Ikarashi Mitsuo Detail OK Cancel ① ②- Only one Email address can be selected at a time.
- You can switch between the Email addresses and fax numbers list by selecting "Email" or "Fax Number" button on the screen.
- Select or to scroll through the search results.
- Select "Detail" to open the screen shown below offering you more detailed information. Select "Close" to exit to the information screen.
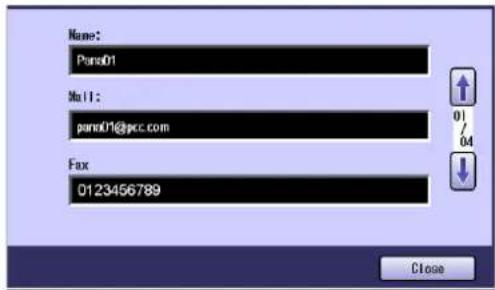
text_image
Name: Pars01 Mail : pars01@psc.com Fax 0123456789 Close- To cancel the search, select "Cancel".
7 Press the Start key.
The original(s) are stored into memory with a file number. Then starts Email transmission.
Memo
Using Cc, Bcc and From
When creating an Email, you have the option of setting Cc and Bcc as its destinations and entering a subject.
If the use of From has been enabled in Function Parameters, the machine can transmit an Email with Email addresses entered in From other than its own Email address.
NOTE
- Cc .... Carbon Copy
Bcc ...... Blind Carbon Copy - If the Message Delivery Notice feature is set to On, all the Emails are sent as To even they are preprogrammed as CC/BCC. Cc and Bcc. For more details on the Message Delivery Notice feature, refer to Setting Message Delivery Notice (MDN). (See page 118)
An example of the receiving station
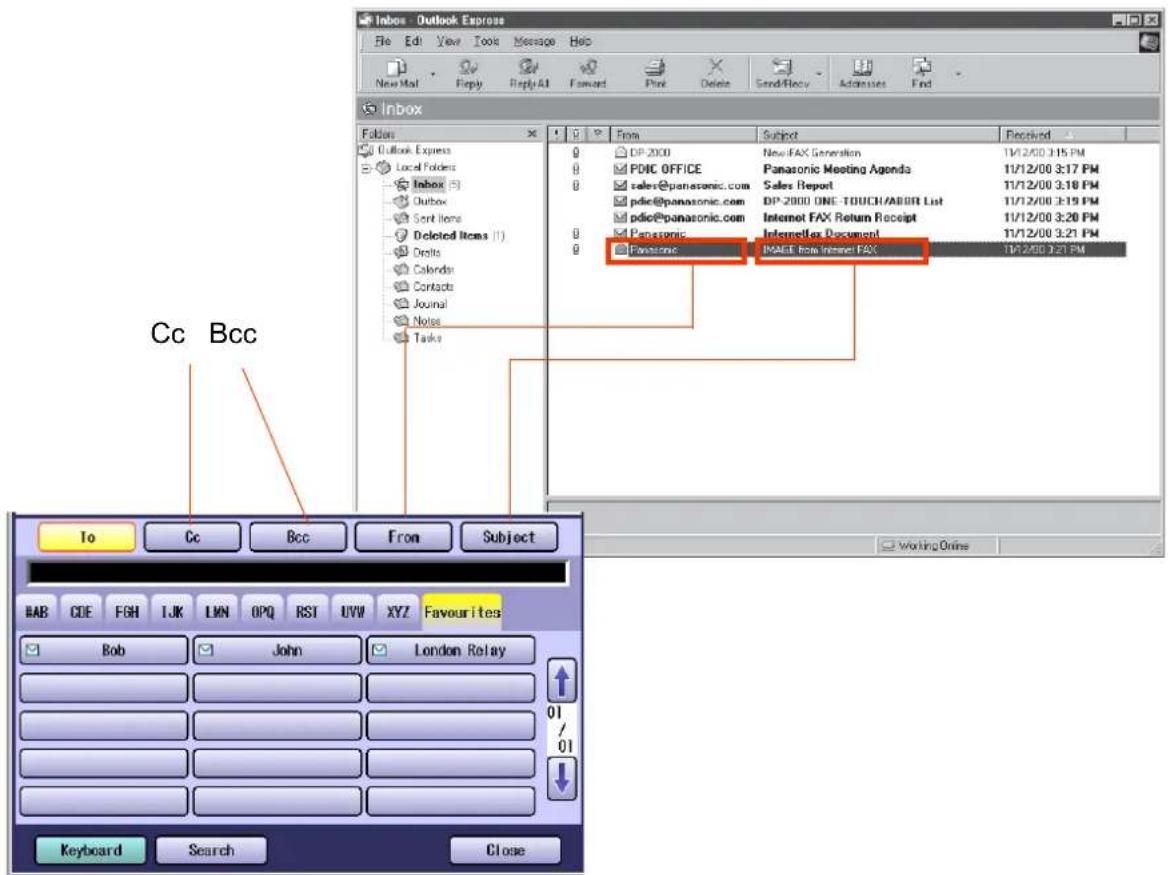
text_image
Inbox - Outlook Express File Edit View Tools Message Help New Mail Reply Reply All Forward Print Delete Send/Recy Advanced End Inbox Folders Outlook Express Local Folders Inbox (5) Outbox Send Items Deleted Items (1) Drafts Calendar Contacts Journal Notes Tasks From Subject Received DP-2000 New FAX Generation 11/12/00 3:15 PM PDIC OFFICE Panasonic Meeting Agenda 11/12/00 3:17 PM sales@panasonic.com Sales Report 11/12/00 3:18 PM pdic@panasonic.com DP-2000 ONE TOUCH/ABBR List 11/12/00 3:19 PM pdic@panasonic.com Internet FAX Return Receipt 11/12/00 3:20 PM Panasonic Internet Fax Document 11/12/00 3:21 PM Panasonic IMAGE from Internet FAX 11/12/00 3:21 PM To Cc Bcc From Subject Working Online BAB CDE FGH IJK LYN OPQ RST UVW XYZ Favourites Bob John London Relay 01 / 01 Keyboard Search CloseSetting Cc and Bcc
To set Cc and Bcc as Email destinations, follow the steps below:
1 On the Email screen, select "Cc" or "Bcc". (see pages 101 and page 110)
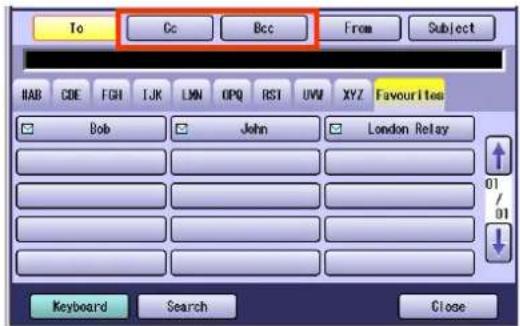
text_image
To Cc Bcc From Subject HAB CDE FGH IJK LMN OPQ RST UVW XYZ Favourite Item Bob John London Relay 01/01 Keyboard Search Close2 Select an Email address, and then select "Close".
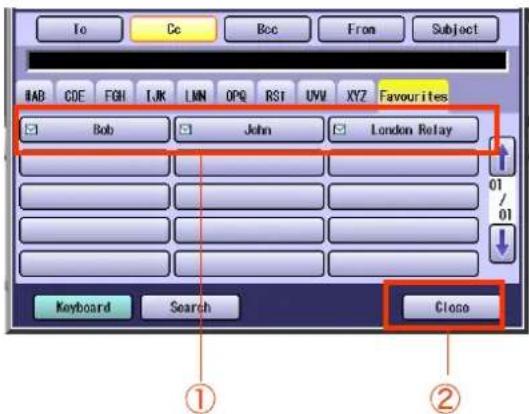
text_image
To Ce Bcc From Subject BAB COE FGN IJK LMN OPQ RST UVV XYZ Favourites Bob John London Relay 01/01 Keyboard Search Close ① ②- For instructions on how to set an Email address, refer to Entering an Email Address. (See page 102)
3 Press the Start key.
The original(s) are stored into memory with a file number. Then starts Email transmission.
Setting From field
The From field is preset in the Machine, you can change the From field by selecting "From" on the Email screen. To set From field, follow the steps below:
NOTE
If "145 Sender Selection" is set to "Valid", you can preset up to 25 sender names. You can select from the sender list when sending an Email. However, if you select "From" on the Email screen, the sender list will not be displayed.
For more details on this setting, refer to Fax/Email Settings in the Operating Instructions (For Function Parameters) on the provided CD-ROM.
1 On the Email screen, select "From". (see page 101 and page 110)
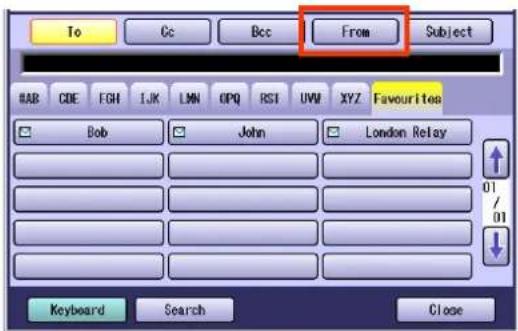
text_image
To Cc Bcc From Subject HAB CDE FGH 1JK LMN OPQ RST UVM XYZ Favourites Bob John London Relay 01 / 01 Keyboard Search Close2 Enter a sender name, or select sender Email address, and then select "Close".
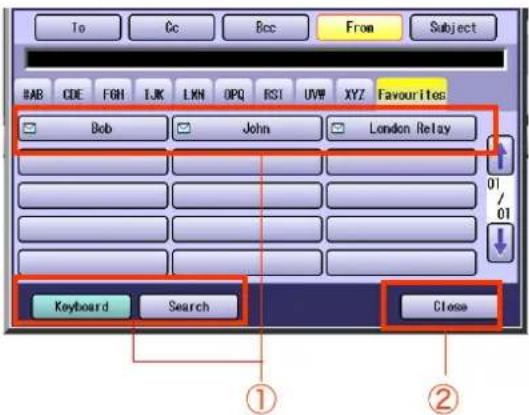
text_image
To Cc Bcc From Subject BAB CDE FGH IJK LKN OPQ RSI UVF XYZ Favourites Bob John London Relay Keyboard Search Close ① ②3 Press the Start key.
The original(s) are stored into memory with a file number. Then starts Email transmission.
- When "145 Sender Selection" is set to "Valid", and if you do not select "From", the Sender Selection List will be displayed after pressing the Start key. Select a Sender, and then select "OK".
Setting Subject
Every time you send Email, you can enter its subject manually. To enter a subject, follow the steps below:
NOTE
- Default Subject is preset if "21 Default Subject" has been set in Function Parameters (Fax/Email Settings> User Parameter). For programming instructions, refer to Fax/Email Settings in the Operating Instructions (For Function Parameters) on the provided CD-ROM.
1 On the Email screen, select "Subject". (see pages 101 and 110)
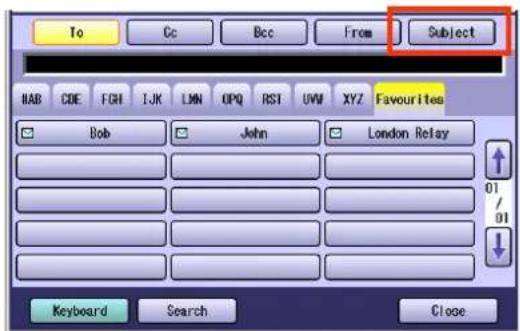
text_image
To Cc Bcc From Subject HAB CODE FGN IJK LMN OPQ RST UVW XYZ Favourites Bob John London Relay 01 01 Keyboard Search Close2 Enter a subject, and then select "OK".
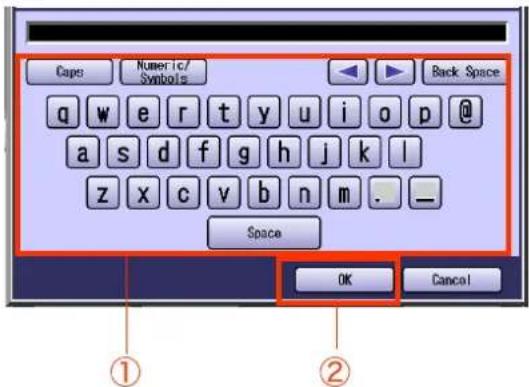
text_image
Caps Numeric/ Symbols Back Space q w e r t y u i o p @ a s d f g h j k l z x c v b n m . _ Space OK Cancel ① ②- The subject field is up to 40 characters in length.
- For using the onscreen keyboard, refer to Before Starting in the Operating Instructions (For Function Parameters) on the provided CD-ROM.
- If you make a mistake, select "Back Space" to delete one character at a time, or move the cursor to the beginning of the field, and then press Clear key to delete the entire entry.
3 Press the Start key.
The original(s) are stored into memory with a file number. Then starts Email transmission.
Confirming the Destination
You can confirm the entered destinations.
1 Select ““Destinations:###”.
(###: Number of selected addresses)
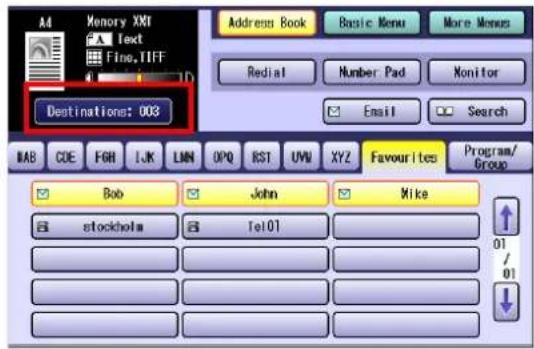
text_image
A4 Memory XXT Text Fine.TIFF Address Book Basic Menu More Menus Redial Number Pad Monitor Email Search Destinations: 003 BAB CDE FGR IJK LMN DPO RST UVU XYZ Favourites Program/ Group Bob John Mike stockholm Tel01 01 01 ↓2 Select desired field button and confirm destinations.

text_image
Fax To Cc Bcc Bob Bob@pcc.com John John@pcc.com Mike niko@pcc.com Keyboard Delete OK- To delete a destination, select a destination, and then select "Delete" and "Yes".
Setting a File Type and a Filename
Documents can be scanned into a PDF or TIFF format, and renamed as well.
NOTE
- Internet Fax does not support the PDF format. If a document is transmitted to Internet Fax with the PDF format, the Internet Fax at the receiving station would be unable to print the images, resulting an error.
- The file is automatically named "Image.tif" unless you rename the attached file.
1 Place Original(s).
- Refer tBlacing Originals (Facsimile/Internet Fax) in the Operating Instructions (For Basic Operations) of provided booklet.
2 Press the Fax key.
3 Select "Basic Menu".
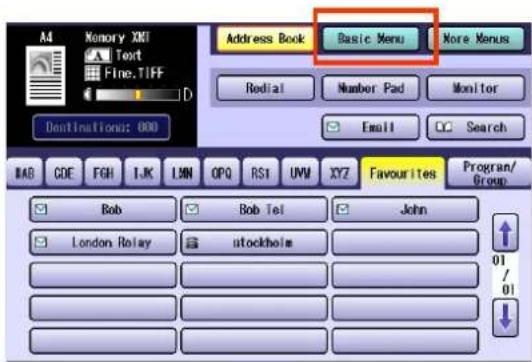
text_image
Address Book Basic Menu More Menus Redial Number Pad Monitor Email Search BAB CDE FGH I.K LMN OPQ RST UVM XYZ Favourites Program/Group Bob Bob Tel John London Relay stockholm 01/ 014 Select "File Type and Name".
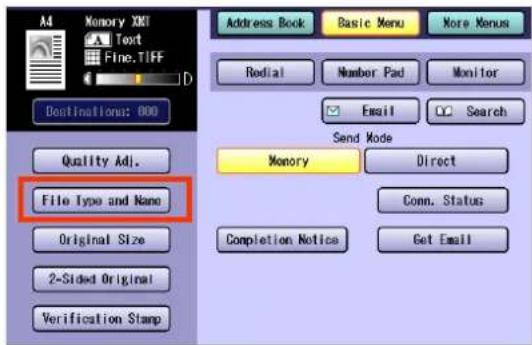
text_image
Memory XNT Text Fine.TIFF Dostinations: 000 Quality Adj. File Type and Name Original Size 2-Sided Original Verification Stamp Address Book Basic Menu More Menus Redial Number Pad Monitor Email Search Send Mode Memory Direct Conn. Status Completion Notice Get Email5 Select a file type.
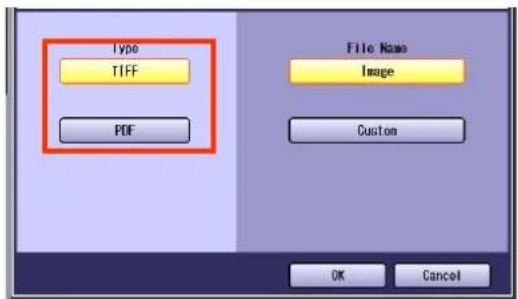
text_image
Type TIFF PDF File Name Image Custom OK Cancel| TIFF Select to transmit in the TIFF format. |
| PDF Select to transmit in the PDF format (monochrome).Can be used only if the receiving station is a computer. |
6 To rename the file, select "Custom".
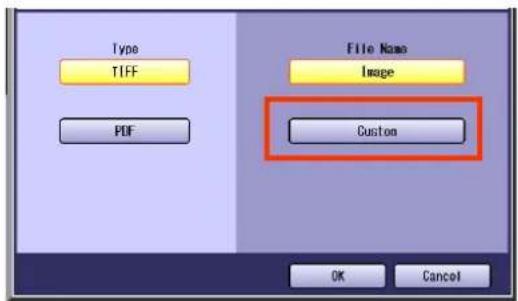
text_image
Type TIFF PDF File Name Image Custom OK Cancel| Image Select to transmit byusing the standardname of image.tif orimage.pdf. |
| Custom Select to rename thefile. |
7 Enter a filename, and then select "OK".
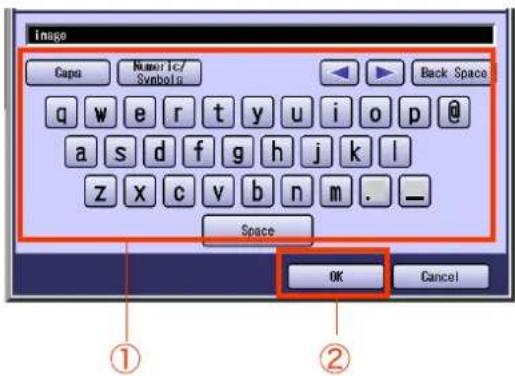
text_image
Image Caps Numeric/ Symbols Back Space q w e r t y u i o p @ a s d f g h j k l z x c v b n m . _ Space OK Cancel ① ②- The filename can be up to 20 characters long.
- For using the onscreen keyboard, refer to Before Starting in the Operating Instructions (For Function Parameters) on the provided CD-ROM.
- If you make a mistake, select "Back Space" to delete one character at a time, or move the cursor to the beginning of the field, and then select Clear key to delete the entire entry.
8 Set an Email address.
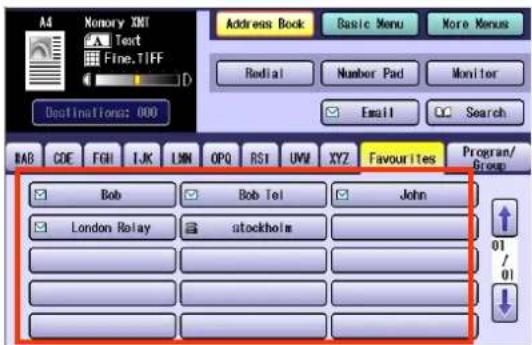
text_image
A4 Memory XNT Text Fine.TIFF Address Book Basic Menu More Menus Radial Number Pad Monitor Email Search Destinations: 000 BAB GDE FGH IJK LMN OPQ RST UMW XYZ Favourites Program/ Group Bob Bob Tel John London Relay stockholm 01 01● Refer to Entering an Email Address. (See page 102)
9 Press the Start key.
The original(s) are stored into memory with a file number. Then starts Email transmission.
Emailing an A3-Sized Document
Receiving stations may not receive large documents depending on their recording capability (paper size).
If you want to transmit a document larger than A4, such as a ledger size, by using the Internet Fax feature, check the paper size capability of the receiving station before transmission. If the receiving station is capable of receiving an A3-sized document, you can send the document without reducing its size.
NOTE
- When "A3 Email XMT" is not set to "On", the document will be reduced according to the setting of "141 LAN XMT Reduce" in Function Parameters (Fax/Email Settings>Fax Parameters). For more details on document size reduction, refer below.
- For information about programming LAN XMT Reduce in Function Parameters, refer to Fax/Email Settings in the Operating Instructions (For Function Parameters) on the provided CD-ROM.
■ Document Sizes and Transmitted/Received Document Sizes
When a document is larger than A4, such as an A3 size, is transmitted by Internet Fax, it is reduced in size as described in the table below. Whether the document is reduced or not depends on the setting of A3 Email XMT and the Function Parameters.
| Document size | Transmitted/Received document size | ||
| “A3 Email XMT” has been set to “On” | “A3 Email XMT” has been set to “Off” | ||
| “141 LAN XMT Reduce” has been set to “Invalid” in Function Parameters | “141 LAN XMT Reduce” has been set to “Valid” in Function Parameters | ||
| A3 A3 B4 A4 | |||
| B4 B4 B4 A4 | |||
| A4 A4 A4 A4 | |||
1 Place Original(s).
- Refer tBlacing Originals (Facsimile/Internet Fax) in the Operating Instructions (For Basic Operations) of provided booklet.
2 Press the Fax key.
3 Select "More Menus".
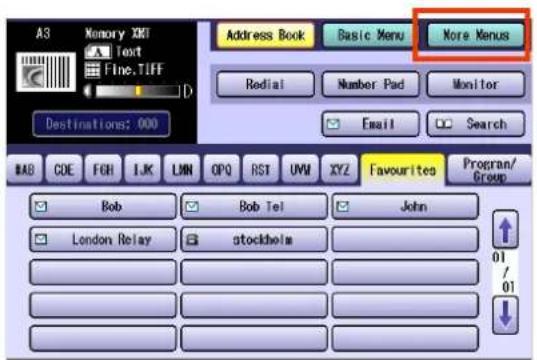
text_image
A3 Memory XMT Text Fine.TIFF D Address Book Basic Menu More Menus Redial Number Pad Monitor Email Search Destinations: 000 BAB COE FGH IJK LWN OPQ RST UWI XYZ Favourites Program/ Group Bob Bob Tel John London Relay stockholm 01 /01 ↓4 Select "Select Mode".
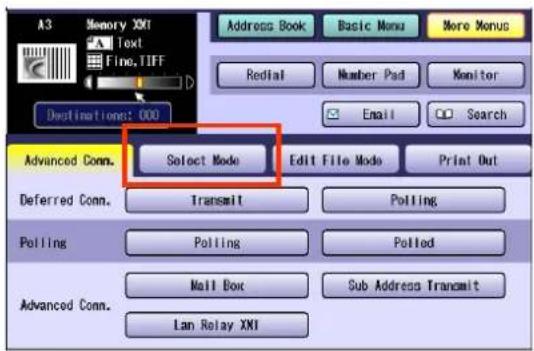
text_image
A3 Memory XXI Text Fine, TIFF Address Book Basic Menu More Menu Redtail Number Pad Monitor Email Search Destinations: 000 Advanced Conn. Select Mode Edit File Mode Print Out Deferred Conn. Transmit Polling Polling Polling Advanced Conn. Mail Box Sub Address Transmit Lan Relay XXI5 Select "A3 Email XMT".
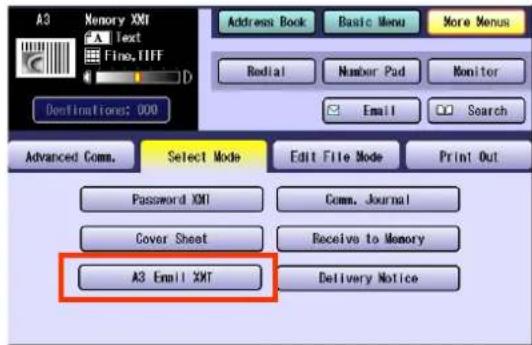
text_image
A3 Memory XMT Text Fine, TIFF D Address Book Basic Menu More Menus Redial Number Pad Monitor Email Search Advanced Comm. Select Mode Edit File Mode Print Out Password XMT Comm. Journal Cover Sheet Receive to Memory A3 Email XMT Delivery Notice6 Select "On", and then select "OK".
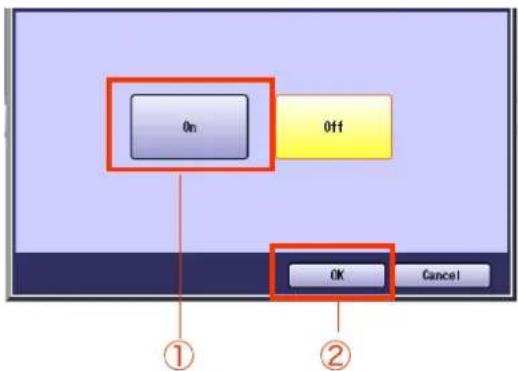
text_image
On Off OK Cancel ① ②| 0n | The document is transmitted at the same ratio scale as it has been scanned. |
| 0ff | The document is transmitted, reduced in size according to the setting of "141 LAN XMT Reduce" pre-programmed in Function Parameters (Fax/Email Settings> Fax Parameters). |
7 Set an Email address.
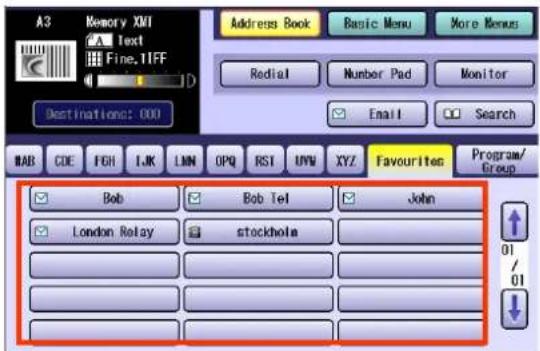
text_image
A3 Memory XMI Text Fine.TIFF Destinations: 000 Address Book Basic Menu More Menus Redial Number Pad Monitor Email Search BAB CDE FGH IJK LNN OPQ RST UNV XYZ Favourites Program/ Bob Bob tel John London Relay stockhola 01 01● Refer to Entering an Email Address. (See page 102)
8 Press the Start key.
The original(s) are stored into memory with a file number. Then starts Email transmission.
Setting Message Delivery Notice (MDN)
To enable Message Delivery Notice feature, follow the procedures below.
NOTE
- Standard setting of "173 Delivery Notice" can be changed in Function Parameters (Fax/Email Settings> Fax Parameters). For instructions on how to change the standard setting, refer to Fax/Email Settings in the Operating Instructions (For Function Parameters) on the provided CD-ROM.
1 Place Original(s).
- Refer tPlacing Originals (Facsimile/Internet Fax) in the Operating Instructions (For Basic Operations) of provided booklet.
2 Press the Fax key.
3 Select "More Menus".

text_image
A4 Memory XXI Text Fine.TIFF Address Book Basic Menu More Menus Redial Number Pad Monitor Email Search BAB CDE FGH I.K LWN OPQ RS1 UVM XYZ Favourites Program/ Group Bob Bob Tel John London Relay stockbelm 01 /01 ↓4 Select "Select Mode".
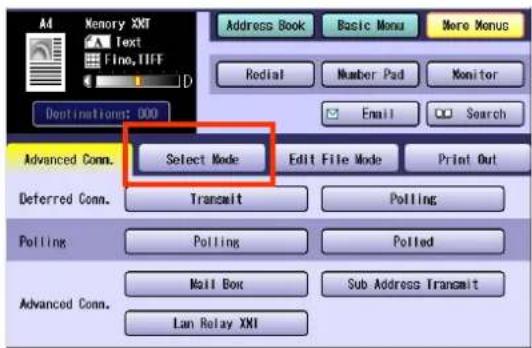
text_image
Memory XXT Text Fino, TIFF Dolnirations: 000 Address Book Basic Menu More Menu Redial Number Pad Monitor Email Search Advanced Conn. Select Mode Edit File Mode Print Out Deferred Conn. Transmitt Polling Polling Polled Mall Box Sub Address Transmit Advanced Conn. Lan Relay XMI5 Select "Delivery Notice".
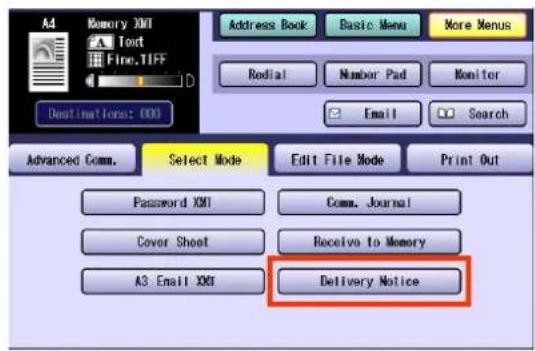
text_image
A4 Memory XMI Tort Fine.TIFF Address Book Basic Menu More Menus Rodial Number Pad Monitor Email Search Advanced Comm. Select Mode Edit File Mode Print Out Password XMI Comm. Journal Cover Sheet Receive to Memory A3 Email XMI Delivery Notice6 Select "On", and then select "OK".
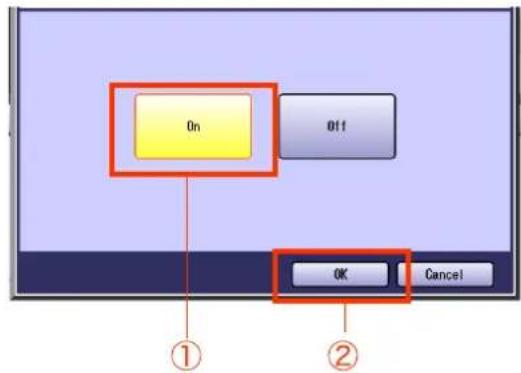
text_image
On Off OK Cancel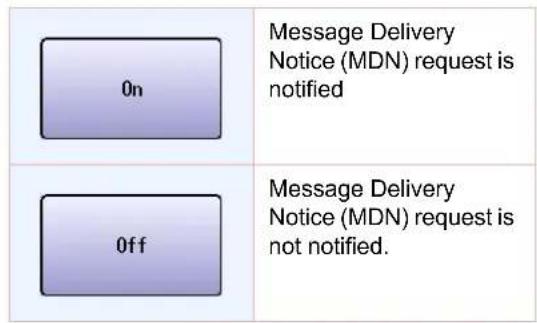
text_image
0n Message Delivery Notice (MDN) request is notified 0ff Message Delivery Notice (MDN) request is not notified.7 Set an Email address.
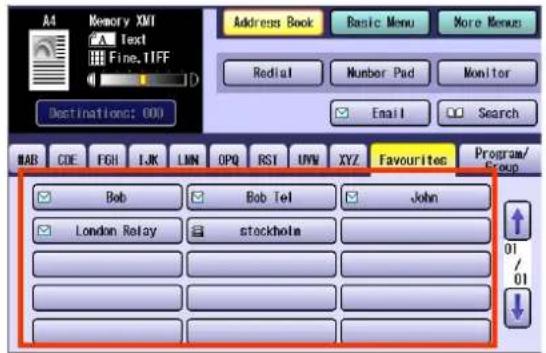
text_image
Memory XMI Text Fine.1IFF Destinations: 000 Address Book Basic Menu More Menu Redial Number Pad Monitor Email Search MAB CDE FGH IJK LMN OPQ RST UVM XYZ Favourites Program/Group Bob Bob Tel John London Relay stockholm 01/01● Refer to Entering an Email Address. (See page 102)
8 Press the Start key.
The original(s) are stored into memory with a file number. Then starts Email transmission.
When the Email is opened at the receiving station, a delivery notice will be Emailed automatically.
When Email Transmission Fails
If the Email fails to reach its destination, an error mail is returned from the mail server and is printed on the machine. The error mail includes an error message and the image of the first page of the transmitted document to alert the sender the conditions of the failure.
Failure Report Sample (Unknown User)
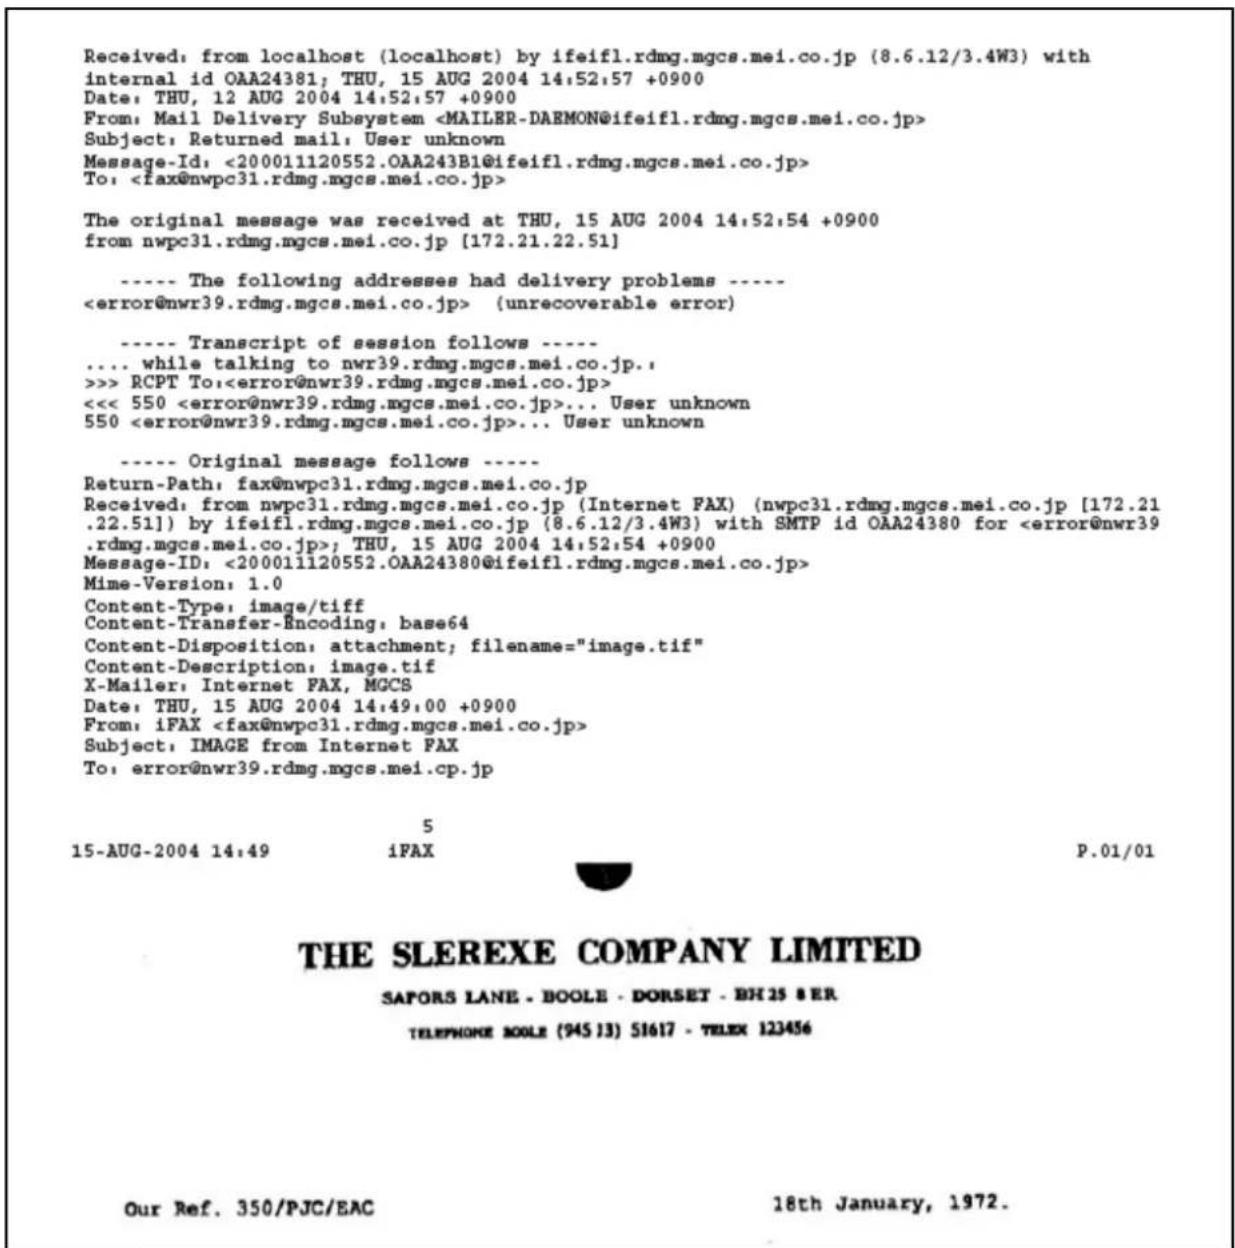
text_image
Received: from localhost (localhost) by ifeif1.rdmg.mgcs.mei.co.jp (8.6.12/3.4W3) with internal id OAA24381; THU, 15 AUG 2004 14:52:57 +0900 Date: THU, 12 AUG 2004 14:52:57 +0900 From: Mail Delivery SubsystemUsing a Completion Notice
Using Completion Notice feature, completion of sending Email or fax transmission is informed to your computer.
ATTENTION
- Before using this function, install the Panasonic Document Management System and PCL Printer Driver, and then set up the each software.
- Refer to Completion Notice of the Operating Instructions (For Setting Up) of provided CD-ROM.
1 Place Original(s).
- Refer to Placing Originals (Facsimile/Internet Fax) in the Operating Instructions (For Basic Operations) of provided booklet.
2 Press the Fax key.
3 Select "Basic Menu".
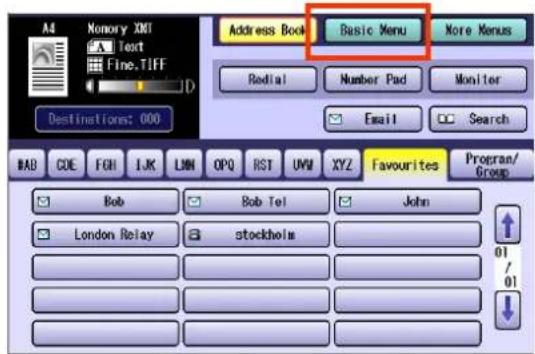
text_image
Address Book Basic Menu More Menus Redial Number Pad Monitor Email Search Destinations: 000 BAB COE FGH IJK LMN OPQ RST UWI XYZ Favourites Program/Group Bob Bob Tel John London Relay stockholm 01/014 Select "Completion Notice".
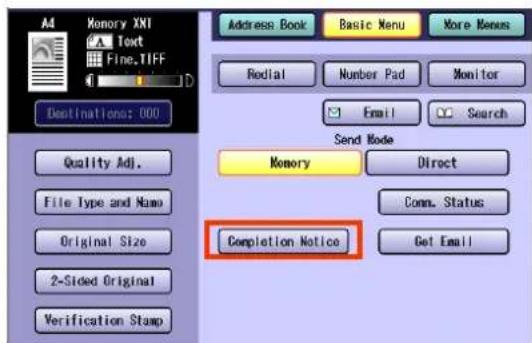
text_image
Memory XNT Text Fine.TIFF Destinations: 000 Quality Adj. File Type and Name Original Size 2-Sided Original Verification Stamp Address Book Basic Menu More Menus Redial Number Pad Monitor Email Search Send Mode Memory Direct Comm. Status Get Email Completion Notice5 Select a computer to be informed, and then select "OK".
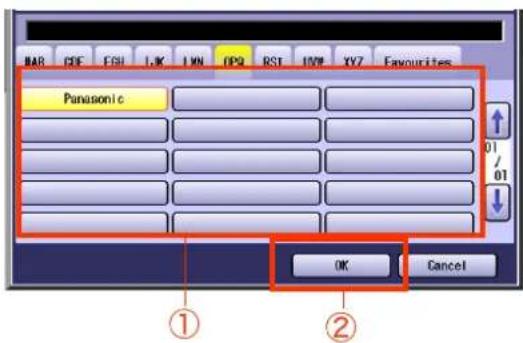
text_image
BAR CDF ESH LJK LWN GPS BST 100V XYZ Favourites Panasonic OK Cancel ① ②6 Select "Email"
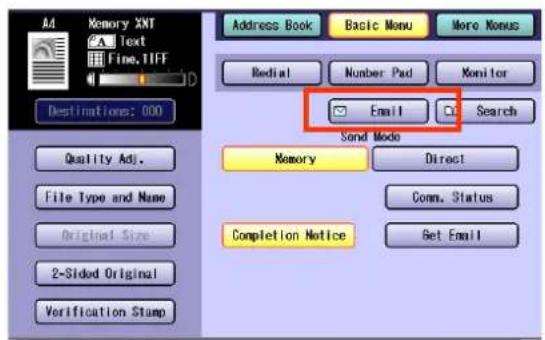
text_image
Add Memory XNT Text Fine, TIFF Destinations: 000 Quality Adj. File Type and Name Original Size 2-Sided Original Verification Stamp Address Book Basic Menu More Nonus Redial Number Pad Monitor Email Search Sound Mode Memory Direct Comm. Status Completion Notice Get Email7 Set an Email address.
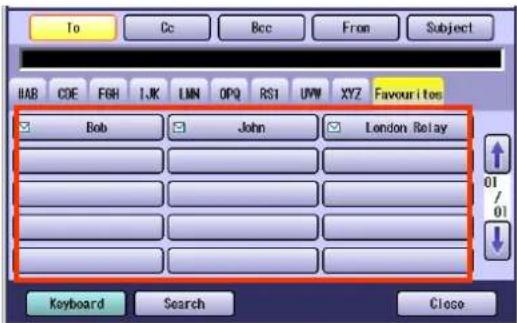
text_image
To Cc Bcc From Subject IAB COE FGH IJK LMN OPQ RS1 UVW XYZ Favourites Bob John London Relay 01 / 01 Keyboard Search Close- Refer to Entering an Email Address. (See page 102)
8 Press the Start key.
The original(s) are stored into memory with a file number. Then starts Email transmission. When the Email is sent, completion notice is also sent to the computer.
Receiving an Email
If the machine connects to a network as a POP Client, it can receive Email either automatically or manually. The Email reception method from a POP Server varies depending on the POP settings programmed in Function Parameters.
Configure to Receive Email
Program the following parameters in Function Parameters (Fax/Email Settings> Fax Parameters) to receive Email:
| Item Name Setting | |
| “146 POP Timer” | Set the time interval for checking the Email on POP Server.· Set an interval between 0 and 60 minutes.· An interval setting of 0 minutes would not retrieve Email automatically. |
| “147 Auto POP Receive” | Set whether to send queries to the POP Server periodically.· If there is Email, it is retrieved and printed.· If this parameter is set to “Invalid”, only the number of the incoming Email messages on the POP Server appears on the display. |
| “148 Del POP Receive Mail” | Set whether to delete the Email from the server after it has been retrieved. |
| “149 Del POP Error Mail” | Set whether to delete Email from the server when the attached file is in a format that cannot be printed. |
NOTE
- For instructions on how to configure the POP Server, refer to Fax/Email Settings in the Operating Instructions (For Function Parameters) on the provided CD-ROM.
- With POP manual reception pre-programmed on a program key, POP Email can be retrieved by a user name other than the one pre-programmed as local station information.
Receiving Email Automatically
With "147 Auto POP Receive" set to "Valid" and POP acquisition interval set between 1 and 60 minutes in Function Parameters (Fax/Email Settings> Fax Parameters), queries are transmitted to the POP Server periodically to check for new mail.
If there is Email on the POP Server when a query is transmitted, it is retrieved and printed automatically.
Receiving Email Manually
With "147 Auto POP Receive" set to "Invalid" in Function Parameters (Fax/Email Settings> Fax Parameters), Email is received manually.
NOTE
- With POP acquisition interval set between 1 and 60 minutes, queries are transmitted to the POP Server periodically to check for new mail and the number of the incoming Email messages on the server appears on the display.
1 Press the Fax key.
2 Check for incoming mail(s).
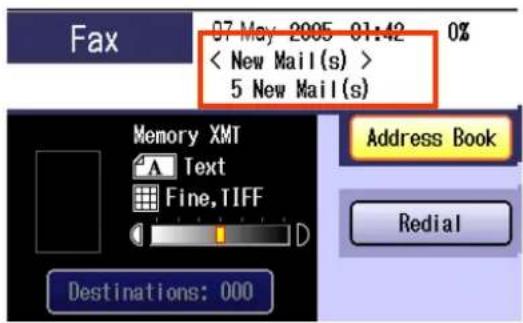
text_image
Fax 07 May 2005 01:42 0% < New Mail(s) > 5 New Mail(s) Memory XMT Text Fine,TIFF D Destinations: 000 Address Book Redial3 Select "Basic Menu".
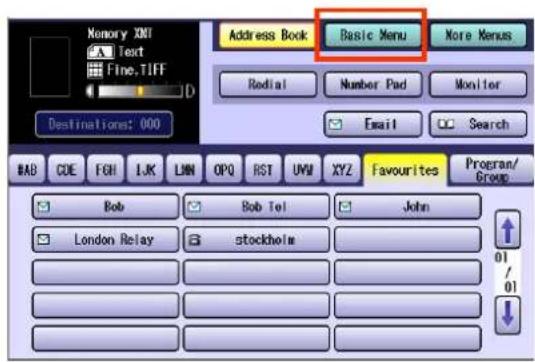
text_image
Memory XMT Text Fine.TIFF D Address Book Basic Menu More Menus Radial Number Pad Monitor Email Search Destinations: 000 BAB CDE FGH LJK LMN OPQ RST UWI XYZ Favourites Progran/ Group Bob Bob Tel John London Relay stockholm 01 / 01 ↓4 Select "Get Email".
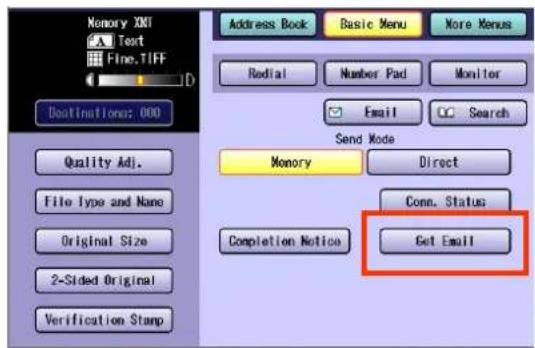
text_image
Memory XNT Text Fine.TIFF D Address Book Basic Menu More Menus Redial Number Pad Monitor Email Search Send Mode Memory Direct File Type and None Conn. Status Original Size Completion Notice Get Email 2-Sided Original Verification StampThe retrieved Email is printed.
Receiving Email with the Program Key
This function allows others to share your machine to retrieve their Emails from the POP Server by pre-programming their POP User Names and POP Passwords into the Program Keys. They will be able to retrieve their Emails by simply pressing the associated Program Key.
NOTE
- If security is of a great concern and it is necessary to prevent unauthorized personnel from retrieving your Email from the POP Server, leave the POP Password field blank when programming the Program Key. By leaving it blank, the machine will prompt you to enter the POP Password when the Program Key is pressed to retrieve mail.
- For instructions on how to program POP reception on program key, refer to Programming Email Manual Reception on Program Keys. (See page 180)
1 Press the Fax key.
2 Select "Program/Group".
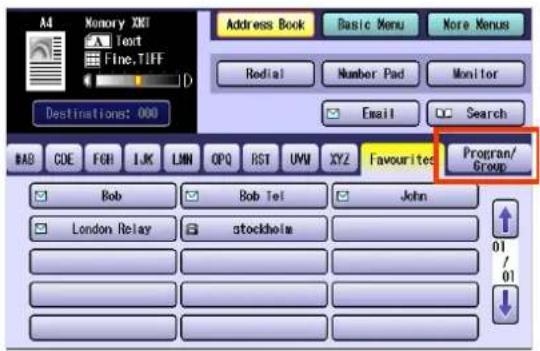
text_image
Memory XNT Text Fine,TIFF Address Book Basic Menu More Menus Redial Number Pad Monitor Email Search Destinations: 000 BAB COE FGH LJK LMN OPQ RST UMV XYZ Favourites Program/ Group Bob Bob Tel John London Relay stockholm 01 / 013 Select the program key on which POP reception is pre-programmed.
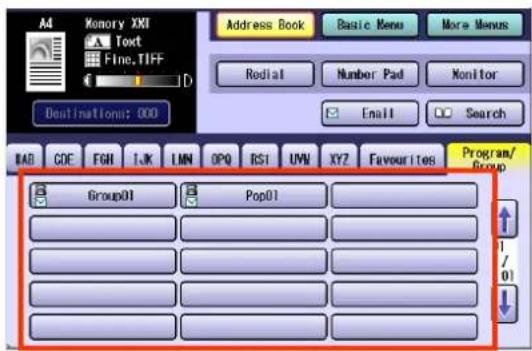
text_image
Memory XXI Text Fine.TIFF Address Book Basic Menu More Menus Rodial Number Pad Monitor Email Search Destinations: 000 BAR GDE FGN LJK LMN OPQ RS1 UVN XYZ Favourites Program/ Group01 Pop01 1 / 0When the POP Account name entry prompt window opens, enter the POP Account name and then enter the password.
The retrieved Email is printed.
Memo
Receiving an Email on a Computer
This section explains how to receive Emails transmitted from the machine to a computer, and also explains the Emails forwarded from the machine to a computer.
Receiving Email on Your Computer
A sample screen shot of a mailer that has received Email from Internet Fax is shown below.
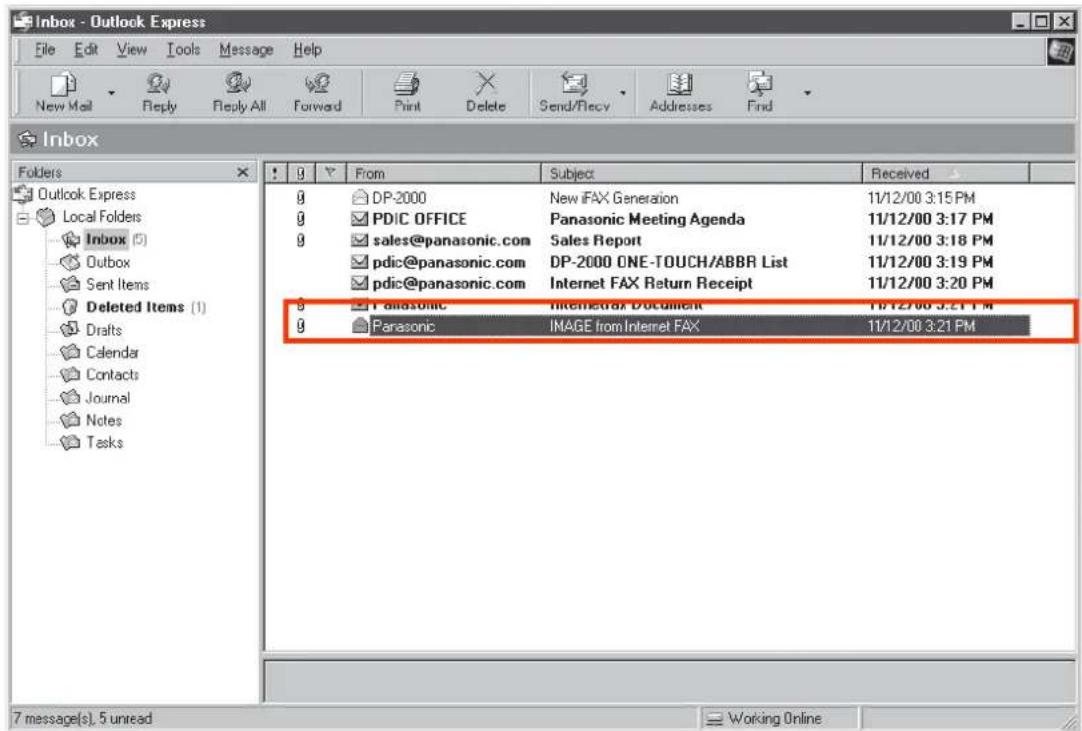
text_image
Inbox - Outlook Express File Edit View Tools Message Help New Mail Reply Reply All Forward Print Delete Send/Recy Addresses Find Inbox Folders Outlook Express Local Folders Inbox (5) Outbox Sent Items Deleted Items (1) Drafts Calendar Contacts Journal Notes Tasks 9 From Subject Received g DP-2000 New iFAX Generation 11/12/00 3:15 PM g PDIC OFFICE Panasonic Meeting Agenda 11/12/00 3:17 PM g sales@panasonic.com Sales Report 11/12/00 3:18 PM pdic@panasonic.com DP-2000 ONE-TOUCH/ABBR List 11/12/00 3:19 PM pdic@panasonic.com Internet FAX Return Receipt 11/12/00 3:20 PM g Panasonic Internet Fax Document 11/12/00 3:21 PM g Panasonic IMAGE from Internet FAX 11/12/00 3:21 PM 7 message(s), 5 unread Working OnlineFor your reference, the above example is from Outlook Express Inbox running under Microsoft® Windows. If you are using a different Email application software, please refer to your application's User Manual.
NOTE
- For more details on how to view Email on your computer, refer to the User Manual for your mailer or viewer.
- In the screen shot above, the Email transmitted from Internet Fax has the subject "IMAGE from Internet Fax". Email title can be modified if required.
Opening Email
When you open an Email received from Internet Fax, the screen as shown below is displayed.
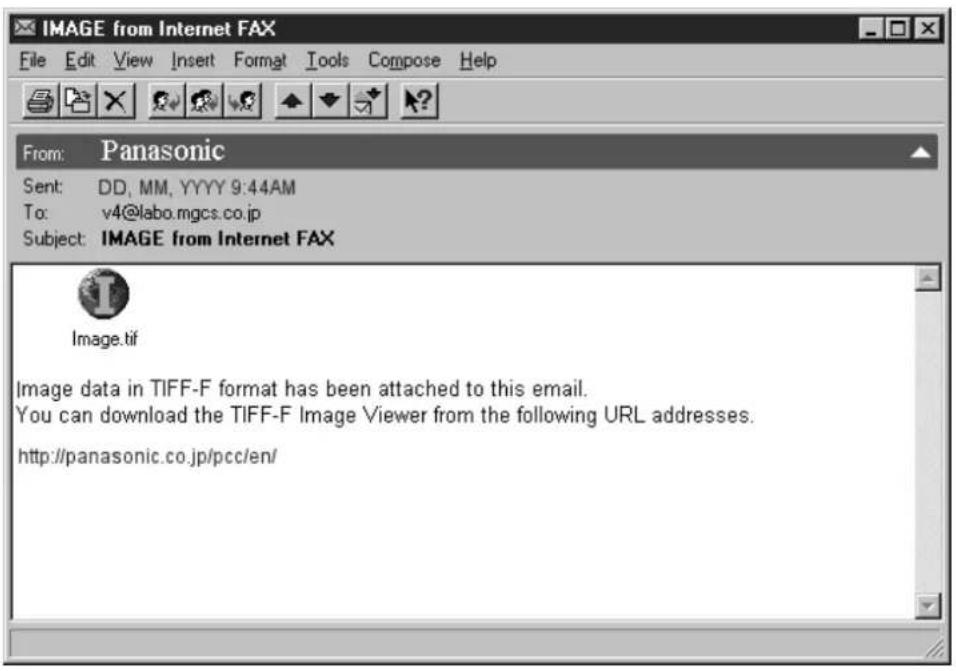
text_image
Image from Internet FAX File Edit View Insert Format Tools Compose Help From: Panasonic Sent: DD, MM, YYYY 9:44AM To: v4@labo.mgcs.co.jp Subject: IMAGE from Internet FAX Image.tif Image data in TIFF-F format has been attached to this email. You can download the TIFF-F Image Viewer from the following URL addresses. http://panasonic.co.jp/pcc/en/- For your reference, the above example is from Windows Messaging running under Microsoft® Windows.
To run the Viewer, please refer to your application's User Manual. The attached file is composed of TIFF-F (Tagged Image File Format with Modified Hoffman coded image). TIFF Viewers come in many flavors, a majority of TIFF Viewers will open and view this file, however, a handful of Viewers may not support this format. - You can download the TIFF-F Image Viewer into your PC from the following URL address;
http://panasonic.co.jp/pcc/en/
License agreement of Panasonic's TIFF-F Image Viewer application
You must carefully read the license agreement before installing the TIFF-F Viewer application on your PC. If you do not agree to all the terms of this agreement, do not use the software and destroy all of the copies thereof.
You must assume full responsibility for selection of the software and its operation/non-operation and results obtained therefrom.
- If you receive an Email (Internet Fax) with a PDF file formatted attachment, the following text message is shown in the Email body.
"Image data in PDF format has been attached to this email."
Inbound Routing
What is Inbound Routing?
Using the Inbound Routing feature, your machine can route documents received from a G3 fax machine to Email address(s) or to Internet Fax machine(s) connected to a LAN as an Email, as well as to other G3 Fax machine(s) over the telephone line.
NOTE
- For more details on the types of fax that work with routing, contact your local authorized Panasonic dealer.
- If no sub-address is specified, and then your machine tries to match the originating fax machine's Numeric ID (TSI) with the TSI routing within its auto dialler and will route the documents to the corresponding stations Email address(s) and/or telephone number(s).
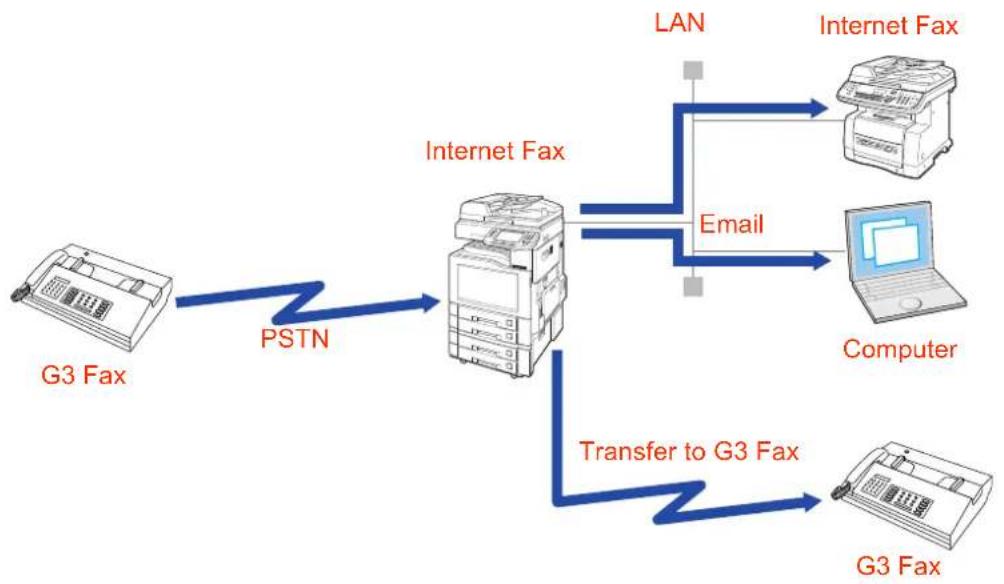
flowchart
graph TD
    A["G3 Fax"] -->|PSTN| B["Internet Fax"]
    B -->|Email| C["Computer"]
    B -->|Transfer to G3 Fax| D["G3 Fax"]
    C --> E["Internet Fax"]
    D --> F["Internet Fax"]
    E --> G["Computer"]
    F --> G
    style B fill:#f9f,stroke:#333
    style C fill:#ccf,stroke:#333
    style D fill:#cfc,stroke:#333
Routing Setup Flow
Before the inbound routing feature can be used, the Function Parameters and address book programming is required.
Configure your machine for Internet Fax (see page 98)
Set required parameters to "Valid" in Function Parameters
To use sub-addressing....Set "152 Sub-Addr Routing" to "Valid" in Function Parameters (Fax/Email Settings > Fax Parameters)
To use a numeric ID....Set "153 TSI Routing" to "Valid" in Function Parameters (Fax/Email Settings > Fax Parameters)
NOTE
● Refer to Settings for Inbound Routing. (See page 130)
Program the transferring station in the address book
Program Internet Fax or a remote computer as a transferring destination (Program the Email address of the transferring destination in the address book)
Program a G3 Fax station as a transferring destination (Program the fax number of the transferring destination in the address book)
NOTE
● Refer to Programming the Address Book for Inbound Routing. (See page 131)
Settings for Inbound Routing
To use the inbound routing feature, program the following parameters to meet the type of routing in Function Parameters (Fax/Email Settings):
| Routing type Explanation Function Parameters | ||
| Routing by sub-addressing | Set this parameter to perform an ITU-T sub-address query within its auto dialler and to route the received document(s) to corresponding stations Email address(s) or telephone number(s). | Set “152 Sub-Addr Routing” to “Valid” |
| Routing by the numeric ID of a sending fax station | Set this parameter to perform a Numeric ID (TSI frame information) query within its auto dialler and to route the received document(s) to the corresponding stations Email address(s) or telephone number(s). | Set “153 TSI Routing” to “Valid” |
| To set the From field Use this parameter to select the type if Email header to be included in the “From” field of each routed faxes.Originator (Origi):The originating fax machine’s TSI will appear in the “From” field of the routed Email.Relay Station (Rly Stn):The routing station’s Email address will appear in the “From” field of the routed Email. | Program “154 Route Header FMT” | |
| To program printout of received documents | Select whether to print all documents received on this machine (Always) or print them only if inbound routing fails (Inc Only). | Program “155 Print Routed Doc” |
NOTE
- For more operational details, refer to Fax/Email Settings in the Operating Instructions (For Function Parameters) on the provided CD-ROM.
Programming the Address Book for Inbound Routing
To use the inbound routing feature, program the transferring destination in the address book.
NOTE
- For instructions on how to register the address book, refer to Address Book. (See page 162)
1 Press the Function key.
2 Select "Fax/Email Settings".
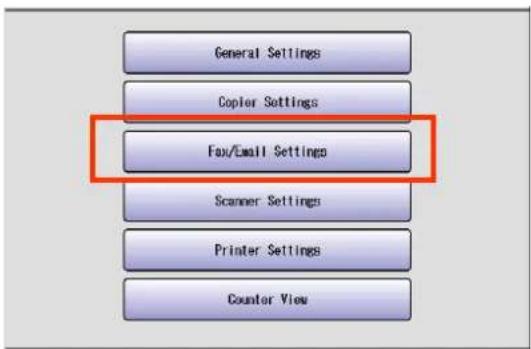
text_image
General Settings Copier Settings Fax/Email Settings Scanner Settings Printer Settings Counter View3 Select "00 Address Book".
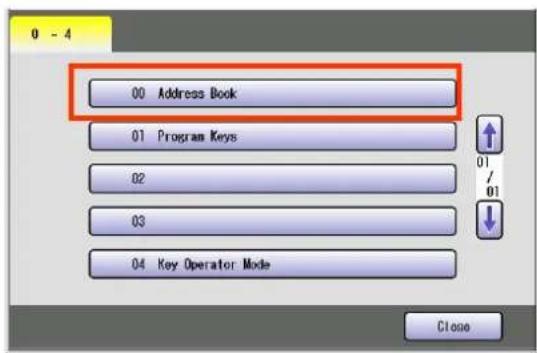
text_image
00 Address Book 01 Program Keys 02 03 04 Key Operator Mode Close4 Select "02 Add Email Address".
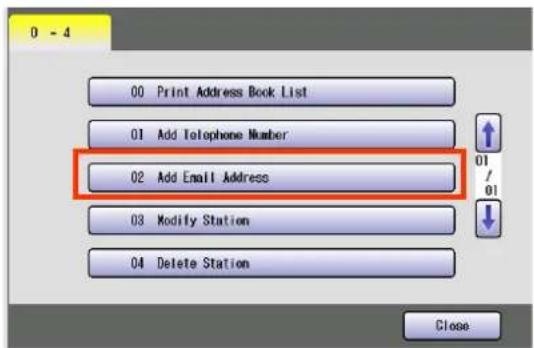
text_image
0 - 4 00 Print Address Book List 01 Add Telephone Number 02 Add Email Address 03 Modify Station 04 Delete Station Close5 Enter an Email address, and then select "OK".
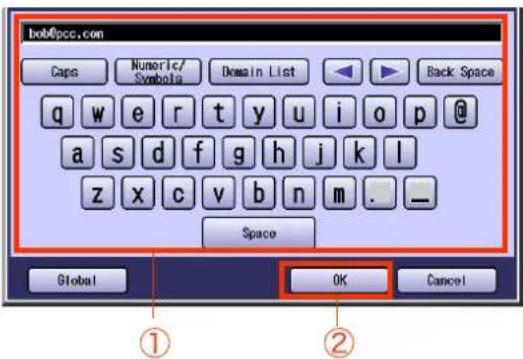
text_image
box@pcc.com Caps Numeric/ Symbols Domain List Back Space q w e r t y u i o p @ a s d f g h j k l z x c v b n m . _ Space Global OK Cancel ① ②- For instructions on how to enter Email addresses, refer to Entering an Email Address. (See page 102)
- Enter an Email address up to 60 characters.
6 Enter a station name, and then select "OK".
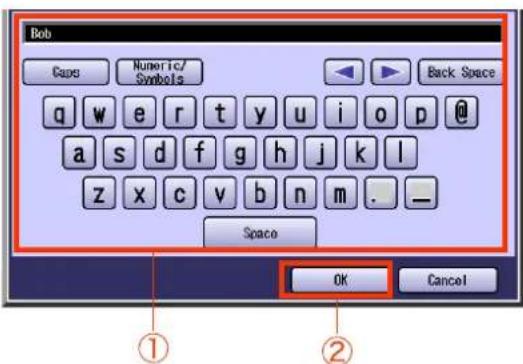
text_image
Bob Caps Numeric/ Symbols Back Space q w e r t y u i o p @ a s d f g h j k l z x c v b n m . _ Space OK Cancel ① ②- Enter a station name up to 15 characters.
- For using the onscreen keyboard, refer to Before Starting in the Operating Instructions (For Function Parameters) on the provided CD-ROM.
7 Enter a key name, and then select "OK".
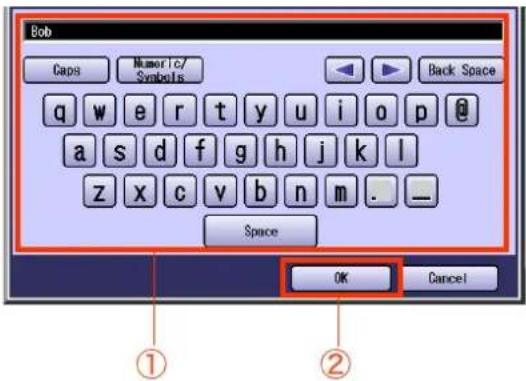
text_image
Bob Caps Numeric/ Symbols Back Space q w e r t y u i o p @ a s d f g h j k l z x c v b n m . _ Space OK Cancel ① ②● Key names are used to select the destinations on the touch-panel display.
For using the onscreen keyboard, refer to Before Starting in the Operating Instructions (For Function Parameters) on the provided CD-ROM.
8 Select "IFax", and then select "OK".
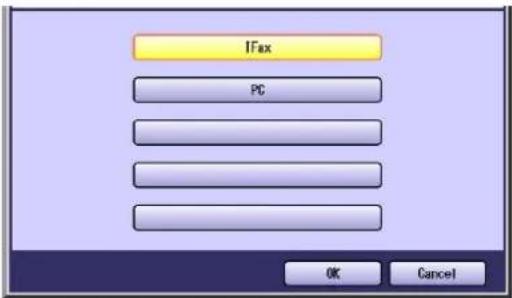
text_image
IFax PC OK Cancel- If you wish to use it in the Email Address Book of Scan/Email mode and Fax mode both, select "PC".
9 Select whether to add the Email address to "Favourites".
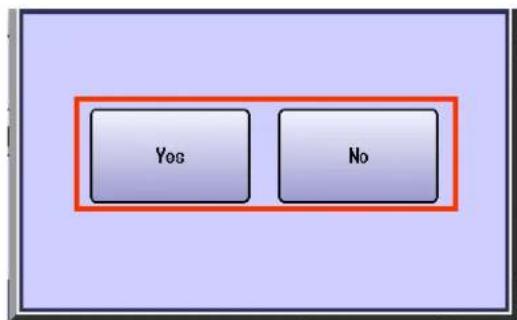
text_image
Yog No| Yes | Select to display the station in "Favourites". |
| No | Select not to display the station in "Favourites". |
10 To enable sub-addressed routing, enter a sub-address, and then select "OK".
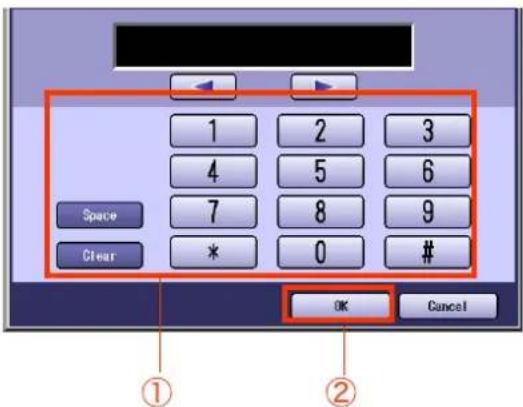
text_image
1 2 3 4 5 6 Space 7 8 9 Clear * 0 # OK Cancel- This screen appears when "152 Sub-Addr Routing" has been set to "Valid" in Function Parameters (Fax/Email Settings>Fax Parameters).
11 To enable routing by a numeric ID, enter a numeric ID, and then select "OK".
text_image
1 2 3 4 5 6 7 8 9 Space Clear * 0 OK CancelThis screen appears when "153 TSI Routing" has been set to "Valid" in Function Parameters (Fax/Email Settings>Fax Parameters).
- Press Reset key to return the machine to the initial screen of the current active mode.
The Email address is added to the address book.
Using the Relay Feature
What is the Relay Feature?
From your PC or your machine, you can send documents to the End Receiving Station(s) via an Internet Relay Station.
After the Relay Station completes its transmission to the End Receiving Station, your PC or your machine receives a COMM. Journal from the Relay Station. This COMM. Journal confirms whether the Internet or Intranet Relayed Transmission was successful.
■ Example 1: Internet Relay Network
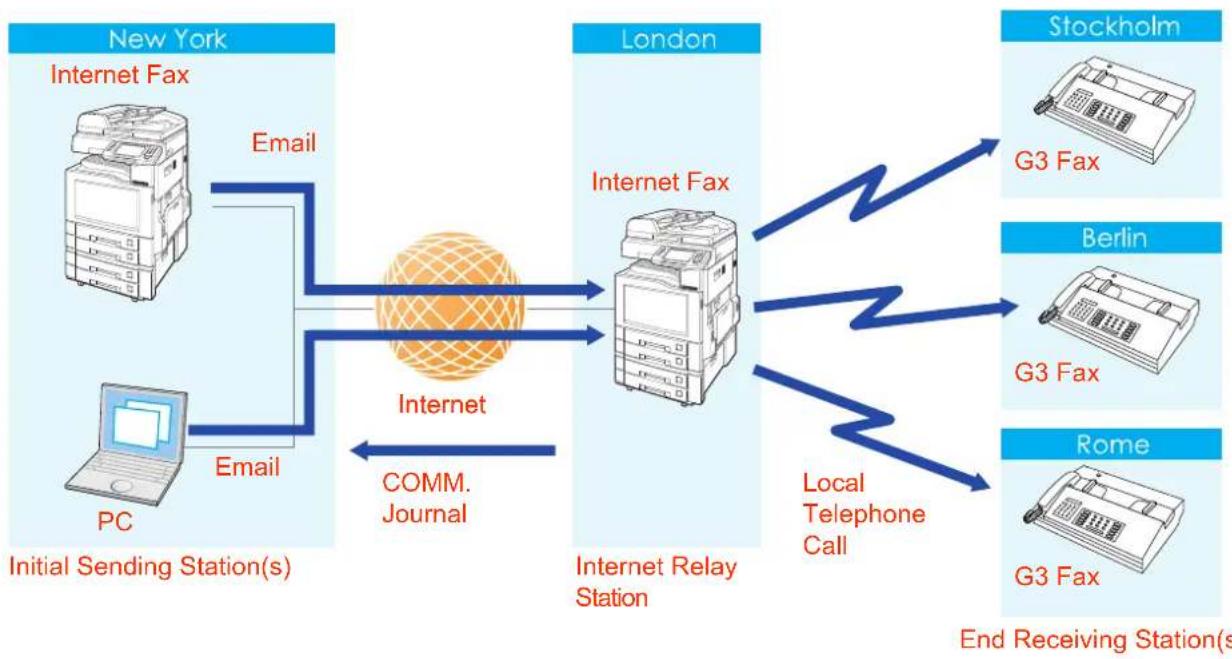
flowchart
graph LR
    subgraph New York
        A["Internet Fax"] -->|Email| B["Internet"]
        C["PC"] -->|Email| B
        B --> D["COMM. Journal"]
    end

    subgraph London
        E["Internet Fax"] --> F["Internet Relay Station"]
        G["Local Telephone Call"] --> F
    end

    H["Stockholm"]
    I["Berlin"]
    J["Rome"]
    K["G3 Fax"] --> F
    L["G3 Fax"] --> F
    M["G3 Fax"] --> F
    N["G3 Fax"] --> F
    O["End Receiving Station(s)"] --> F
Initial Sending Station (s)
- Send Email to a relay station (Internet Fax supporting the relay feature) using the Internet Fax feature to request a relayed transmission.
NOTE
- The LAN relayed transmissions request can be made easier by having the relay station pre-programmed in the address book.
- TIFF image files can be attached to the Email when it is transmitted from a computer.
- For more details on the Relayed Transmission Report (Communication Journal) and the Fax Relay Log, refer to Result of Relayed Transmission. (See page 150)
Relay Station
- Sends Email received from the initial sending station to an end receiving station (a fax station connected to the telephone line: Ex: Stockholm/Berlin/Rome) as a fax document. If multiple end receiving stations are specified, the Email is broadcasted to them.
• Each time a relay station completes a transmission, it transmits a Relayed Transmission Report (Communication Journal) to the initial sending station to designate its relayed transmission request and Emails a Fax Relay Log to the administrator's computer at the relay station.
End Receiving Station(s)
- On receiving a fax document from the relay station, the mail header and mail text will be printed on the first page, and the file attachment (TIFF) on the next and subsequent pages.
■ Example 2: Intranet Relaying Network
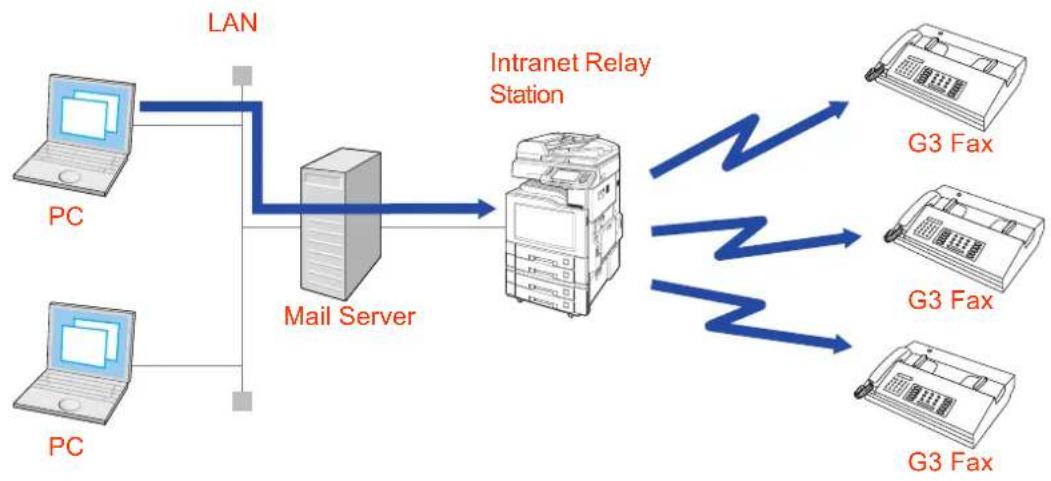
flowchart
graph LR
    A["PC"] -->|LAN| B["Mail Server"]
    C["PC"] -->|LAN| B
    B --> D["Intranet Relay Station"]
    D --> E["G3 Fax"]
    D --> F["G3 Fax"]
    D --> G["G3 Fax"]
Computer (PC)
- Send Emails to Intranet Relay Station via Mail Server.
NOTE
- For operating instructions on how to request relayed transmission from a computer, refer to Relayed Transmission from PC. (See page 146)
Mail Server
- Forwards Email to the Intranet Relay Station.
Setting up a Relayed Transmission Network
This section explains how to set up a relayed broadcasting network.
■ What is the Hardware Configuration?
A relay network needs the following kinds of equipment:
- Internet Fax or computer (Initial Sending Station)
- Internet Fax supporting the relayed transmission feature (Relay Station)
• G3 fax station connected to the telephone line (End Receiving Station)
■ What is the Communication Charge?
- Email is transmitted from the initial sending station to the relay station via Internet, saving both the time and charges on long-distance calls.
- A telephone charge accrues on the fax transmission from the relay station to the end receiving station.
How can I confirm the completion of a transmission?
- When the relay station completes a transmission to the receiving station, it transmits a Relayed Transmission Report (Communication Journal) to the initial sending station to report the completion of a fax transmission.
- The relay station also Emails a Fax Relay Log to the administrator's computer at the relay station.
How to Program?
- Program required network parameters in your machine. (see page 98)
- To use the relayed transmission feature, program the required function parameters in Function Parameters for Relay Stations. (See page 140) and Settings for Initial Sending Station. (See page 141)
A sample network is shown on the next page. - Add Relay Station and End Receiving Station to Address Book by referring Sample Entries in Address Book (see page 138 and page 139) and Adding End Receiving Stations for Relayed Transmission (see page 142 and page 143). To set up relayed transmission network properly, consult authorized Panasonic dealer.
Example of a Relayed Transmission Network
An example of a relayed transmission network using relay stations at two locations is shown below.
- This network has an initial sending station (New York) connected to relay stations (London and Singapore).
- Documents are transmitted from the relay stations (London/Singapore) to end receiving stations (Stockholm, Rome, Tokyo, Hong Kong, Sydney and others) via the telephone lines.
• This network uses relay stations at two locations.
- A single relayed transmission request made from the initial sending station (New York) allows a document to be transmitted to the end receiving stations (Stockholm, Rome, Tokyo, Hong Kong, Sydney and others) via the relay stations (London, Singapore).
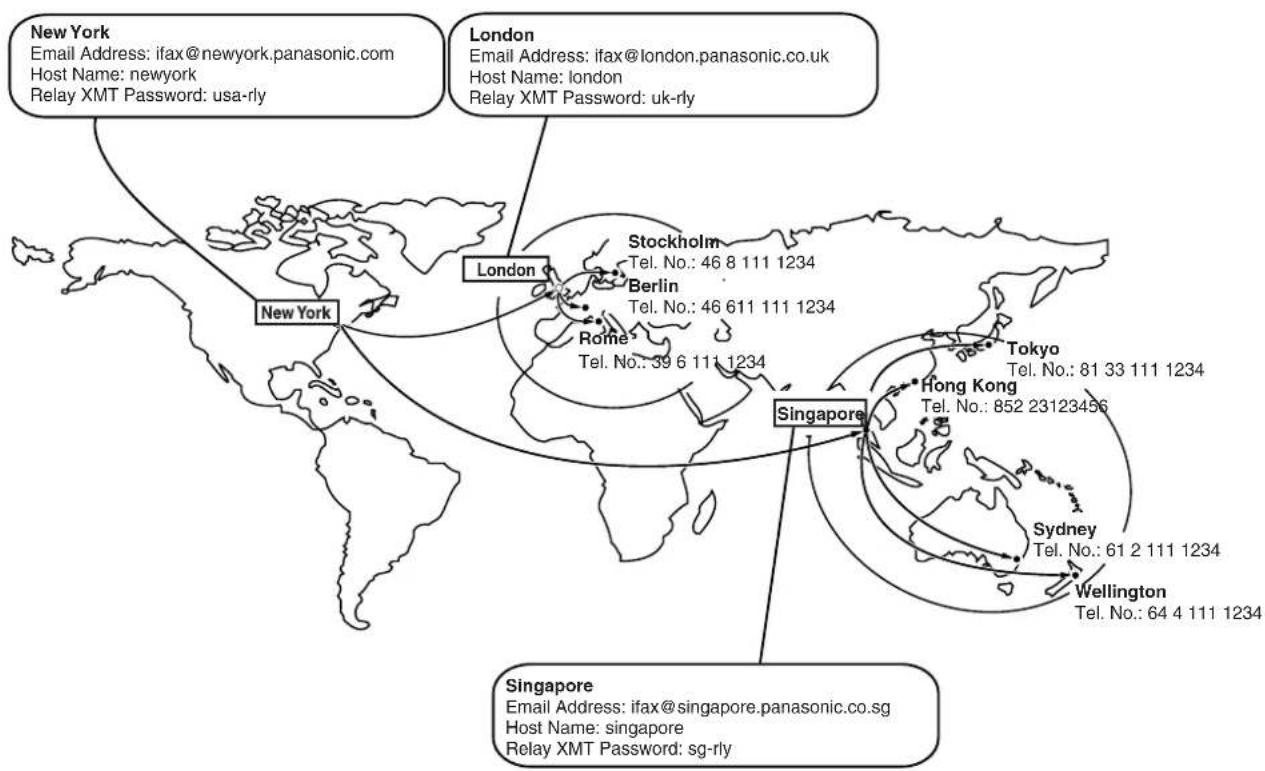
text_image
New York Email Address: ifax@newyork.panasonic.com Host Name: newyork Relay XMT Password: usa-ry London Email Address: ifax@london.panasonic.co.uk Host Name: london Relay XMT Password: uk-ry London New York London Stockholm Tel. No.: 46 8 111 1234 Berlin Tel. No.: 46 611 111 1234 Rome Tel. No.: 39 6 111 1234 Singapore Tokyo Tel. No.: 81 33 111 1234 Hong Kong Tel. No.: 852 23123456 Sydney Tel. No.: 61 2 111 1234 Wellington Tel. No.: 64 4 111 1234 Singapore Email Address: ifax@singapore.panasonic.co.sg Host Name: singapore Relay XMT Password: sg-rySample Entries in Address Book
Table 1: Initial Sending Station (New York)
●Telephone number : 212 111 1234
- Email address (SMTP) : ifax@newyork.panasonic.com
- Host name : newyork
- Relay XMT password : usa-rly
| Station Name Email Address/Telephone Number Relay Station | Address | |
| London ifax@london.panasonic.co.uk | ____ | |
| Stockholm 46 8 111 1234 “London Relay” | ||
| Singapore ifax@singapore.panasonic.co.sg | ____ | |
| Tokyo 81 33 111 1234 | “Singapore Relay” | |
| London Relay uk-rly@london.panasonic.co.uk | ____ | |
| Singapore Relay | sg-rly@singapore.panasonic.co.sg | ____ |
| Rome 39 6 111 1234 “London Relay” | ||
| Hong Kong | 852 23123456 | “Singapore Relay” |
| Sydney 61 2 111 1234 | “Singapore Relay” | |
Table 2: Relay Station (London)
●Telephone number : 71 111 1234
- Email Address (SMTP) : ifax@london.panasonic.co.uk
- Host name : london
- Relay XMT password : uk-rly
| Station Name Email Address/Telephone Number Relay Station | Address | |
| New York | ifax@newyork.panasonic.com | ____ |
| Stockholm 46 8 111 1234 | “London Relay” | |
| Singapore ifax@singapore.panasonic.co.sg | ____ | |
| Tokyo | 81 33 111 1234 | “Singapore Relay” |
| Singapore Relay | sg-rly@singapore.panasonic.co.sg | ____ |
| Rome 39 6 111 1234 | “London Relay” | |
| Hong Kong | 852 23123456 | “Singapore Relay” |
| Sydney 61 2 111 1234 “Singapore Relay” | ||
| London Relay uk-rly@london.panasonic.co.uk | ____ | |
Table 3: Relay Station (Singapore)
●Telephone number : 65 111 1234
- Email Address (SMTP) : ifax@singapore.panasonic.co.sg
- Host name : singapore
- Relay XMT password : sg-rly
| Station Name Email Address/Telephone Number Relay Station | Address | |
| London ifax@london.panasonic.co.uk | ____ | |
| Stockholm 46 8 111 1234 “London Relay” | ||
| New York ifax@newyork.panasonic.com | ____ | |
| Tokyo 81 33 111 1234 | “Singapore Relay” | |
| London Relay uk-rly@london.panasonic.co.uk | ____ | |
| Rome | 39 6 111 1234 “London Relay” | |
| Hong Kong | 852 23123456 | “Singapore Relay” |
| Sydney 61 2 111 1234 | “Singapore Relay” | |
| Singapore Relay | sg-rly@singapore.panasonic.co.sg | ____ |
Function Parameters for Relay Stations
Program the following parameters to use this machine as a relay station in Function Parameters:
| Item Required function Parameters Explanation | |
| 1 Fax Parameters“142 Relay XMT” | Selecting whether the machine will accept and perform G3 relayed transmission.·In v a l idMachine will not accept a Relay XMT request.·V a l idMachine will accept a Relay XMT request. |
| 2 Fax Parameters“143 Relay XMT Report” | Selecting how the COMM. Journal for relayed transmission is sent to the originator.·OffDo not send.·A l w a y sThe COMM. Journal is always sent after a Relay Communication is completed or has failed.·Inc OnlyThe COMM. Journal is sent if the Relay Communication to the destination has failed. |
| 3 User Parameters“36 Relay XMT Password” | Enter a Relay XMT Password (up to 10 characters) to be used for the protection against unauthorized (outside) stations from accessing your machine to relay messages to a G3 fax machine via PSTN. This password should be given out to authorized people only.NOTEProgram “Relay XMT Password” to enable this machine to work as a relay station.As the relay password is transmitted in the header of Email, it should be differentiated from the Email address as used by Email or Internet Fax. A relay password pre-programmed in this way would be easy to identify when Internet Fax is received. |
| 4 User Parameters40 to 49“Relay Domain (01)” to “Relay Domain (10)” | Register up to 10 Domain Names (up to 30 characters) that your machine will accept Relayed Transmission.Requests to relay a message to another G3 fax machine via PSTN.Ex: Registered Domain Names(01): panasonic.co.jp(02): abc.iFax.com(03): panasonic.comNOTETo increase network security by protecting from third party access to the relay station. Enter a relay-permitted domain name and an administrator Email address for every relay station.If the whole domain name is left blank, Internet Fax will receive relayed transmission requests from all the domain names. |
| 5 User Parameters“37 Manager’s Email Addr” | Register the Department Manager’s Email Address for supervising and cost control purposes. Once registered, the machine will send an Email notification to the Email address for each Relayed XMT Request received from a remote station. The following information is sent.(From: The Email address of the originating station.) (To : The telephone number of the destination G3 fax machine.) |
NOTE
For more Function Parameters details, refer to Fax/Email Settings in the Operating Instructions (For Function Parameters) on the provided CD-ROM.
Settings for Initial Sending Station
To use the machine as an initial sending station, program the following parameters in Function Parameters:
| Item Required function Parameters Explanation | |
| 1 Fax Parameters“140 LAN RLY XMT Request” | Select “Valid” to use this machine as an initial sending station.· In v a l i dSelect to disable relayed transmission.· ValidSelect to enable relayed transmission. |
Adding End Receiving Stations for Relayed Transmission
You can add end receiving stations to the Address Book by the following procedure.
NOTE
- If broadcasting to multiple end receiving stations is required, use group dialling. (see page 173)
- "140 LAN RLY XMT Request" must have been set to "Valid" in Function Parameters (Fax/Emai Settings> Fax Parameters) to have a LAN relayed transmission request pre-programmed in the address book. For more operational details, refer to Fax/Email Settings in the Operating Instructions (For Function Parameters) on the provided CD-ROM.
- For instructions on registration in the address book, refer to Address Book. (See page 162)
- You cannot use the address registered for Relayed Transmission for Confidential Communication, Sub-Address Communication and Password Transmission. Register an address with out a relayed station. (see page 163)
1 Press the Function key.
2 Select "Fax/Email Settings".
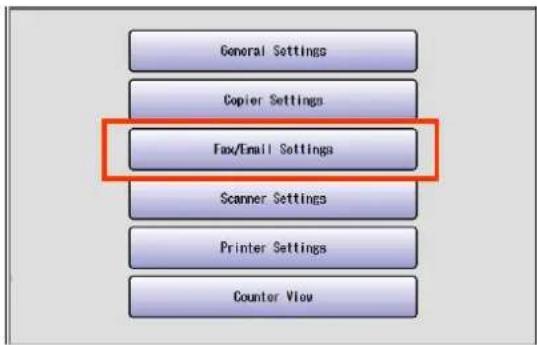
text_image
General Settings Copier Settings Fax/Email Settings Scanner Settings Printer Settings Counter View3 Select "00 Address Book".
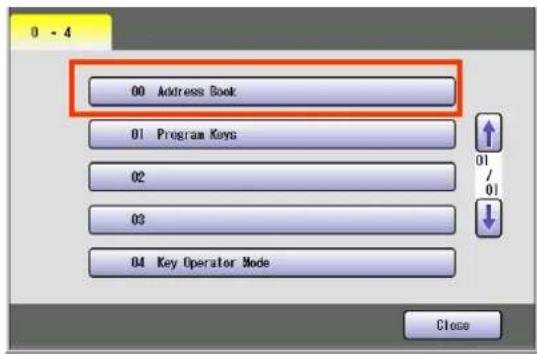
text_image
0 - 4 00 Address Book 01 Program Keys 02 03 04 Key Operator Mode Close4 Select "01 Add Telephone Number".
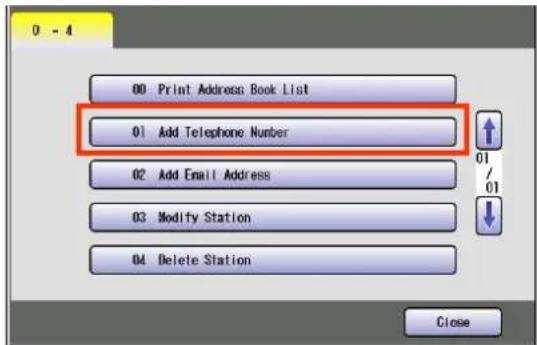
text_image
0 - 4 00 Print Address: Book List 01 Add Telephone Number 02 Add Email Address 03 Modify Station 04 Delete Station Close5 Enter a fax number, and then select "OK".
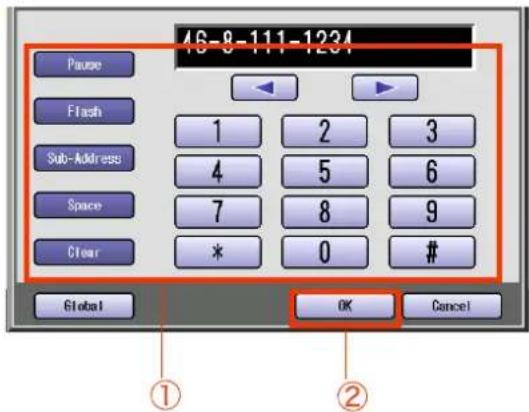
text_image
46-8-111-1234 Pause Flash Sub-Address Space Clear * 0 # Global OK Cancel ① ②- Select "Clear" to delete the fax number one digit at a time.
- For using the onscreen keyboard, refer to Manual Dialling. (See page 16)
6 Enter a station name, and then select "OK".
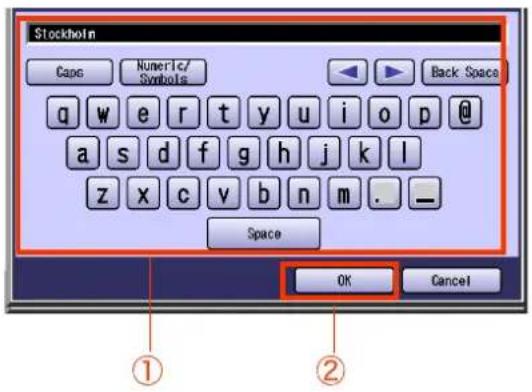
text_image
Stockholm Caps Numeric/ Symbols Back Space q w e r t y u i o p @ a s d f g h j k l z x c v b n m . _ Space OK Cancel ① ②- Enter a station name up to 15 characters.
- For using the onscreen keyboard, refer to Before Starting in the Operating Instructions (For Function Parameters) on the provided CD-ROM.
7 Enter a key name, and then select "OK".
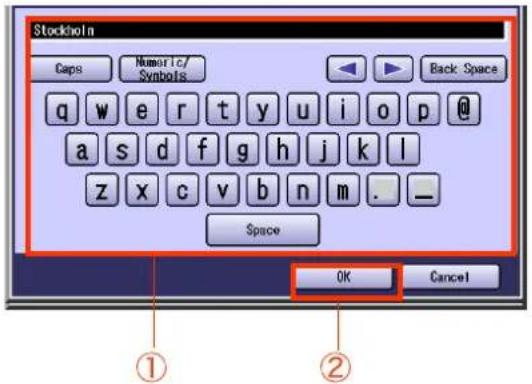
text_image
Stockholm Caps Numeric/ Symbols Back Space q w e r t y u i o p @ a s d f g h j k l z x c v b n m . _ Space OK Cancel ① ②● Key names are displayed on the touch-panel display to select destinations.
- For using the onscreen keyboard, refer to Before Starting in the Operating Instructions (For Function Parameters) on the provided CD-ROM.
8 Select whether to add a station to "Favourites".
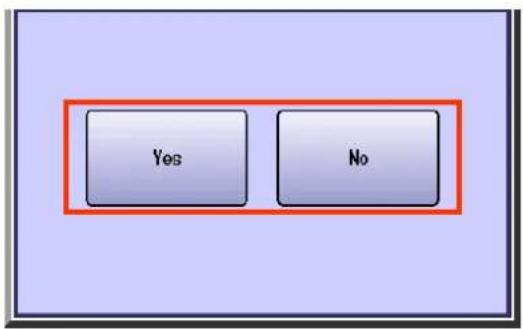
text_image
Yes No
text_image
Yes Select to show the station in "Favourites". No Select not to show the station in "Favourites".9 Select a relay station or enter the Email address of a relay station, and then select "OK".
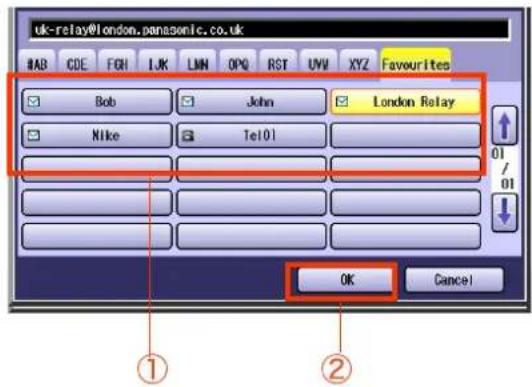
text_image
uk-relay@london.panasonic.co.uk #AB CDE FGH IJK LMN OPQ RST UVV XYZ Favourites Bob John London Relay Nike Tel01 OK Cancel ① ②This screen appears when "140 LAN RLY XMT Request" has been set to "Valid" in Function Parameters (Fax/Email Settings> Fax Parameters).
- Only one destination can be programmed as a relay station.
- Press Reset key to return the machine to the initial screen of the current active mode.
Relayed Transmission from Internet Fax
Documents can be transmitted to fax stations on the telephone line via Internet Fax relay stations.
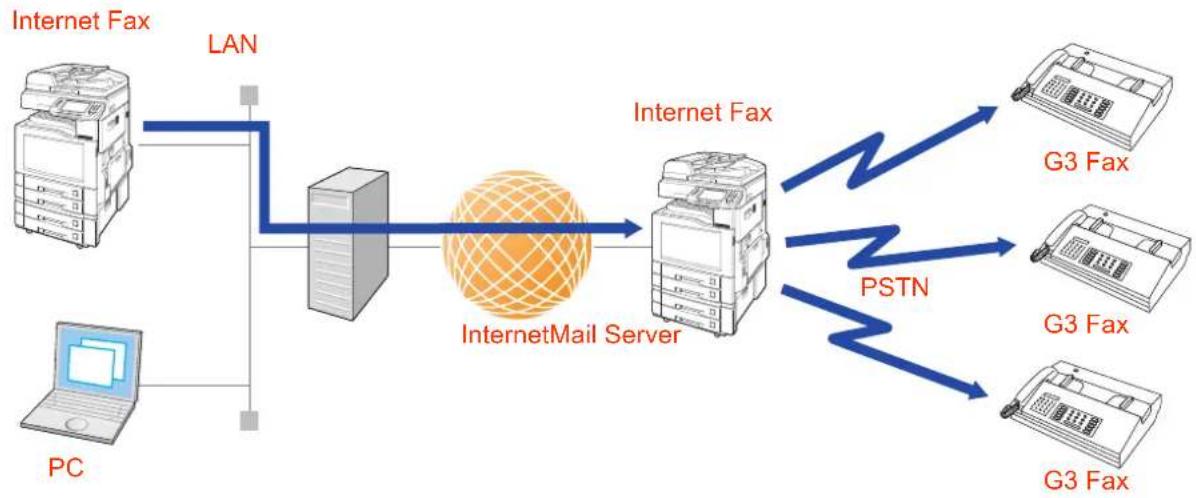
flowchart
graph LR
    A["Internet Fax"] -->|LAN| B["Internet Mail Server"]
    C["PC"] -->|LAN| B
    B --> D["Internet Fax"]
    D --> E["G3 Fax"]
    D --> F["G3 Fax"]
    D --> G["G3 Fax"]
    style B fill:#f9f,stroke:#333
    style D fill:#ccf,stroke:#333
    style E fill:#cfc,stroke:#333
    style F fill:#cfc,stroke:#333
    style G fill:#cfc,stroke:#333
1 Place Original(s).
- Refer tBlacing Originals (Facsimile/Internet Fax) in the Operating Instructions (For Basic Operations) of provided booklet.
2 Press the Fax key.
3 Select "More Menus".
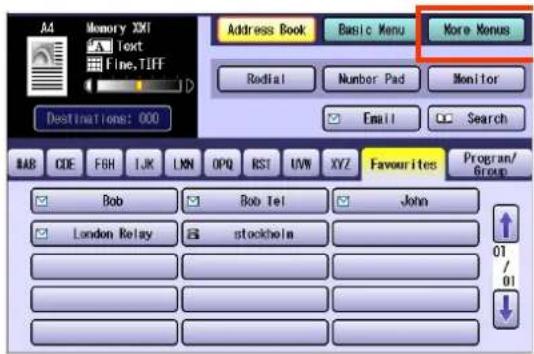
text_image
A4 Memory XMI Text Fine.TIFF Address Book Basic Menu More Menus Radial Number Pad Monitor Email Search Destinations: 000 BAB CDE FGH IJK LNN OPQ RST UVW XYZ Favourites Program/ Group Bob Bob tel John London Relay stockholm 01 /014 Select "Lan Relay XMT".
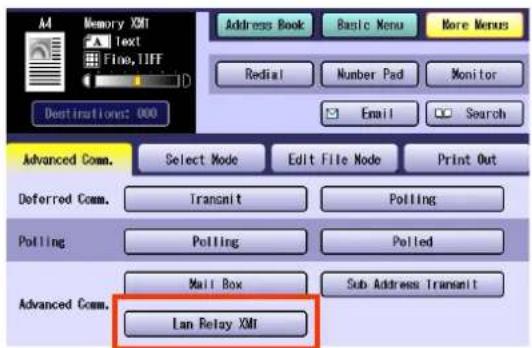
text_image
Memory XMI Text Flo, IFF Destirations: 000 Address Book Basic Menu More Menus Redial Number Pad Monitor Email Search Advanced Comm. Select Mode Edit File Mode Print Out Deferred Comm. Transmit Polling Polling Polling Advanced Comm. Mail Box Sub Address Transmit Lan Relay XMI5 Select a Relay Station or enter the Email address of the relay station.
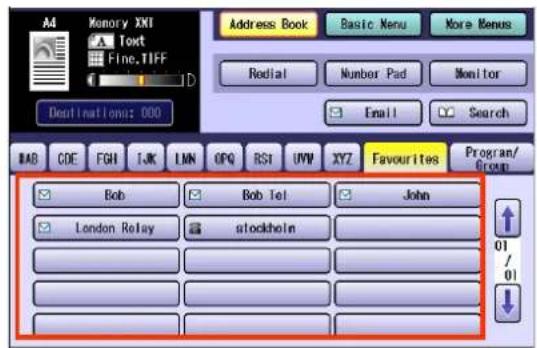
text_image
A4 Memory XXI Text Fine.TIFF Address Book Basic Menu More Menus Rodial Number Pad Monitor Email Search Destinations: 000 BAB CODE FGH LJK LMN OPQ RSI UWV XYZ Favourites Program/ Group Bob Bob Tel John London Relay stockholm 01 /01- Only one destination can be programmed as a relay station.
- For instructions on how to enter destinations, refer to Entering an Email Address. (See page 102)
6 Press the Start key.
7 Select an end receiving station to which the relay station relays.
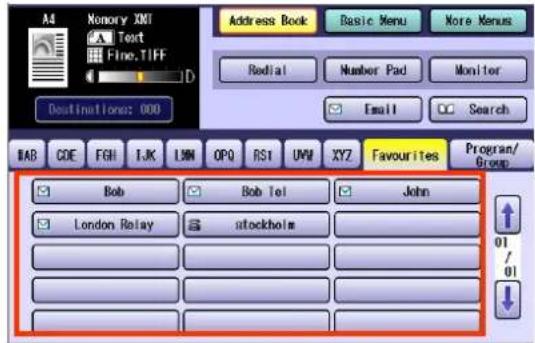
text_image
A4 Xonory XNT Text Fine.TIFF D Address Book Basic Menu More Menus Radial Number Pad Monitor Email Search Destinations: 000 IAB CDE FGH IJK LWN OPQ RST UWI XYZ Favourites Program/ Group Bob Bob Tel John London Relay stockholm 01 01- For instructions on how to enter destinations, refer to Entering a Destination. (See page 16)
- Multiple stations can be programmed as end receiving stations.
8 Press the Start key.
Email is sent to the relay station, together with the fax number of the end receiving station.
When the relay station completes the transmission to the end receiving station, a communication journal is delivered.
- If the transmission fails, an error response is delivered from the mail server and is printed on this machine.
The error response contains an error message and a copy of the first page of the document to alert you of the transmission failure.
For more details, refer to When Email Transmission Fails. (See page 120)
NOTE
- Relayed transmission requests can be pre-programmed in the address book beforehand to ease later operational complexities. Refer to Adding End Receiving Stations for Relayed Transmission. (See page 142)
Relayed Transmission from PC
Using your Email application, you can send any document(s) from your PC as a TIFF-F attachment to one or multiple G3 Fax machines automatically through the Internet Relay Station.
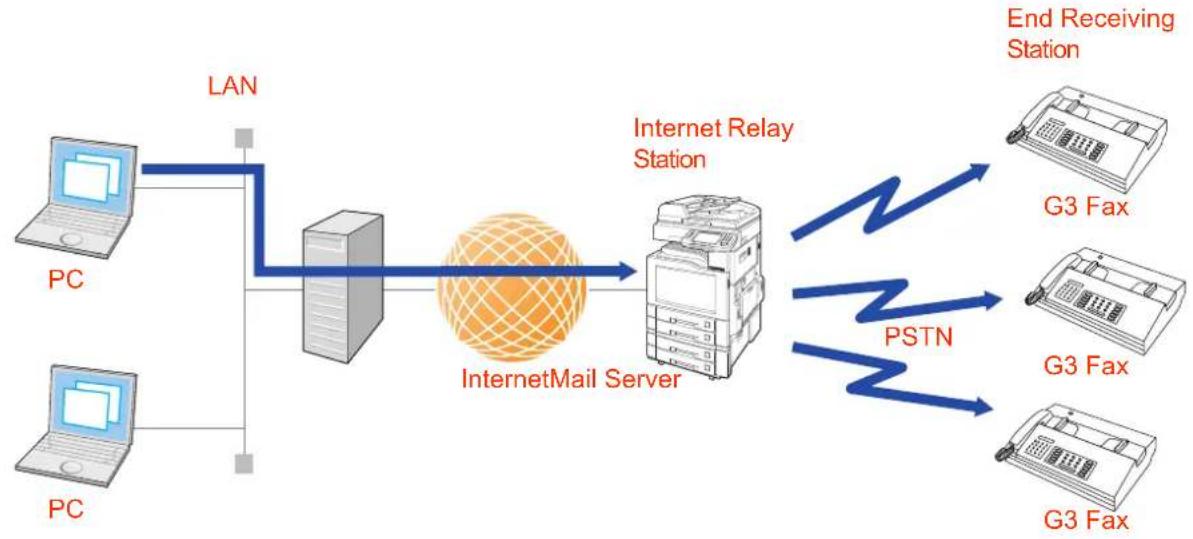
flowchart
graph LR
    A["PC"] -->|LAN| B["InternetMail Server"]
    C["PC"] -->|LAN| B
    B --> D["Internet Relay Station"]
    D --> E["G3 Fax"]
    D --> F["G3 Fax"]
    D --> G["G3 Fax"]
    D --> H["PSTN"]
    H --> I["End Receiving Station"]
The Internet Relay Station (your machine) must be properly setup with all the required parameters.
Requesting a Relayed Transmission from a Computer
Requesting a relayed transmission, fill the field in your mailer that corresponds to the destination (To) in the following manner:
Sample entry:
sg-rly#8133111234@singapore.panasonic.co.sg
| Entry example Explanation | |
| sg-rly Enter the Relay XMT Password. (It must match the Relay XMT Password preprogrammed in the relay station.) | |
| #8133111234 Enter the telephone number of the fax station.In addition to the telephone number, address book information may be entered between # to @.If a pause is required in dialling an outside line from an extension by using a PBX (exchange) or similar equipment, enter a hyphen (-) in place of the fax number. | |
| After @ The host and domain names registered with the DNS server. |
NOTE
- When relayed transmission completes, a communication journal is Emailed to the initial sending station, and a fax relay log is emailed to the administrator computer that is preprogrammed in "37 Manager's Email Addr" of the relay station.
Convenient Application Software
TIFF Converter
The TIFF converter is an application that converts files created in another application to the Internet Fax-ready TIFF format.
Files created by MS-Word or Excel (*.doc and *.xls) cannot be transmitted to Internet Fax as Email attachments in their original form.
To transmit files created by MS-Word or Excel from a computer to Internet Fax, it is necessary to have them converted to the Internet Fax-ready TIFF format using the TIFF converter.
NOTE
- Normally, select 200 dpi as a resolution at conversion. When you are sending a detailed graphic documents to a Panasonic Internet Fax, you can specify 600dpi resolution for better clarity.
TIFF Converter Mail Linking Program
An TIFF Converter Mail Linking Program is an add-in program for the TIFF Converter that links the Email client for MAPI to the TIFF converter for the Internet FAX.
Before sending a printed image as Email from the application to the Internet FAX, you have to convert the file into the format that the Internet FAX is allowed to receive and print as an Email using the TIFF file creation function. You also have to send that file to the Internet FAX as an attached document.
TIFF Converter Mail Linking Program allows you to automatically create TIFF files by pressing one button from the TIFF Converter for the Internet FAX.
You can download the Panasonic's TIFF Converter and TIFF Converter Mail Linking Program and their respective User's Guide from the following URL. Click IFAXVIW (TIFF Viewer) and download required software.
http://panasonic.co.jp/pcc/en/
Memo
Result of Relayed Transmission
When the relayed transmission feature is used, two reports as described below are transmitted from the relay station to the initial sending station and administrator's computer confirming the results of a relayed transmission.
■ Relayed Transmission Report (communication journal)
When a relay station completes a relayed transmission, it transmits a Relayed Transmission Report (Communication Journal) to the initial sending station to report the relay result.
The Relayed Transmission Report (Communication Journal) is transmitted when “143 Relay XMT Report” has been set to “Always” or “Inc Only” in Function Parameters.
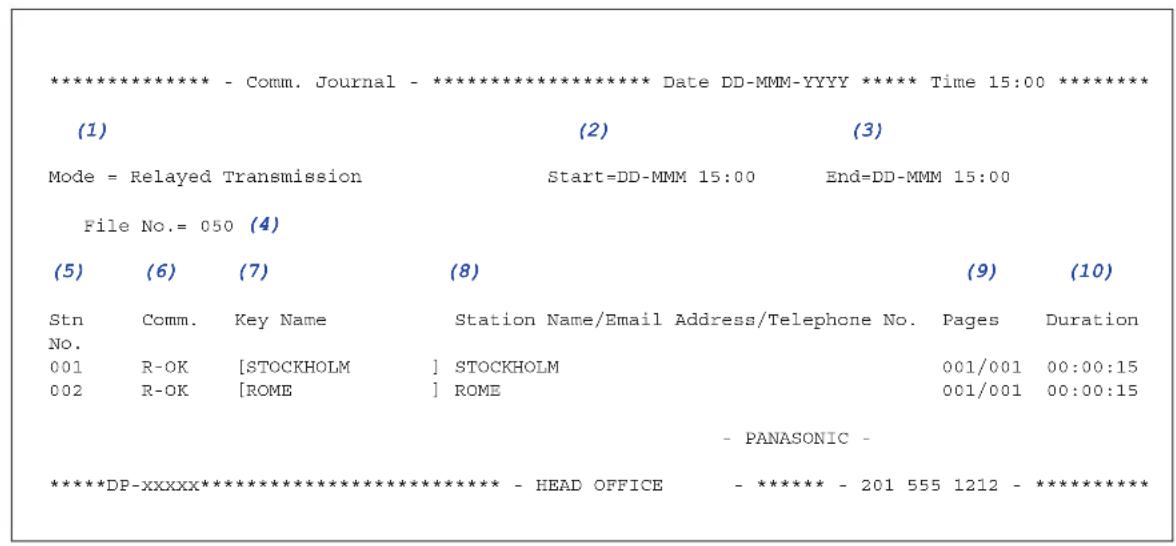
text_image
**************** - Comm. Journal - ********************** Date DD-MMM-YYYY ***** Time 15:00 ****************** (1) (2) (3) Mode = Relayed Transmission Start=DD-MMM 15:00 End=DD-MMM 15:00 File No.= 050 (4) (5) (6) (7) (8) (9) (10) Stn Comm. Key Name Station Name/Email Address/Telephone No. Pages Duration No. 001 R-OK [STOCKHOLM ] STOCKHOLM 001/001 00:00:15 002 R-OK [ROME] ROME 001/001 00:00:15 - PANASONIC - ****************-DP-xxxxx****************- HEAD OFFICE - ******** - 201 555 1212 - *****************| No. Item Explanation | |
| (1) Indication of communication mode | Indication of communication mode. |
| (2) Start time of communication | Start time of communication. |
| (3) End time of communication | End time of communication. |
| (4) File number 001 to 999 (When the communication is stored into the memory, a file number is assigned for each communication.) | |
| (5) Station number Sequential number of the Stations. | |
| (6) Communication result Communication result• “R-OK” indicates that the Relayed XMT Request was successful.• “3-digit Info Code” indicates that the communication has failed. | |
| (7) Key name or “#” mark | “#” mark indicates dialling by direct number dialling. |
| (8) Recorded name in the of provided booklet, direct dialling number, or Email address | Recorded name in the of provided booklet, direct dialling number, or Email address. |
| (9) Number of pages transmitted or received | The 3-digit number is the number of pages successfully transmitted or received.When the documents are stored into the memory, two 3-digit numbers will appear.The first 3-digit number represents the number of pages successfully transmitted.The second 3-digit number represents the total number of pages that were attempted to be transmitted. |
| (10) Duration of Communication | Duration of Communication. |
Fax Relay Log Email
Each time a relay station completes a transmission, it Emails a Fax Relay Log to the administrator computer that is preprogrammed in "37 Manager's Email Addr".
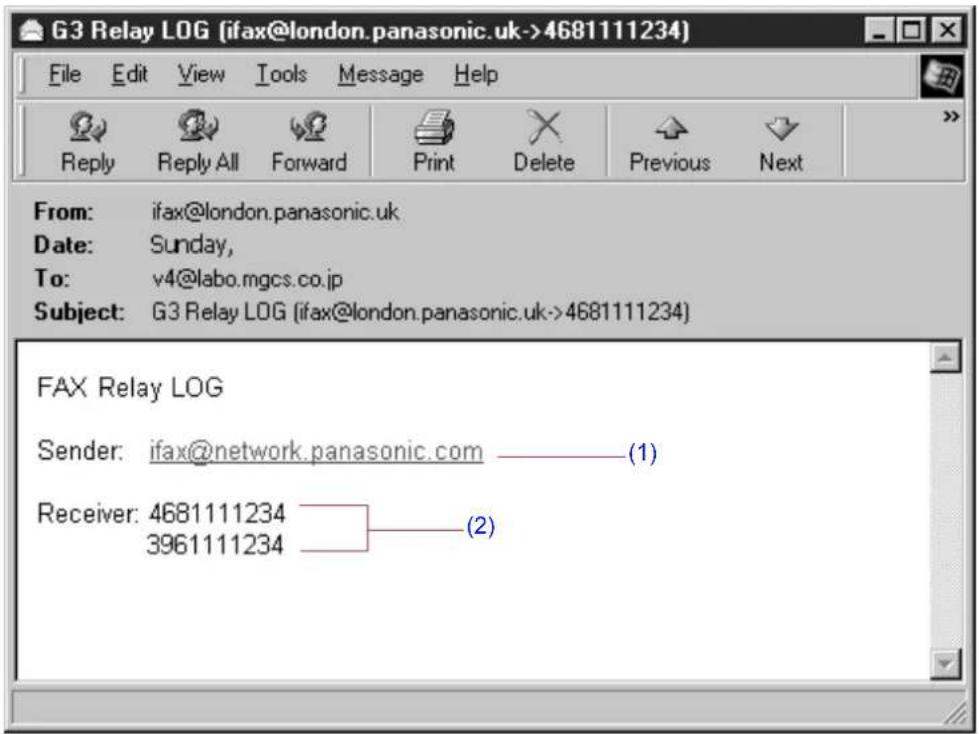
text_image
G3 Relay LOG (ifax@london.panasonic.uk->4681111234) File Edit View Tools Message Help Reply Reply All Forward Print Delete Previous Next From: ifax@london.panasonic.uk Date: Sunday, To: v4@labo.mgcs.co.jp Subject: G3 Relay LOG (ifax@london.panasonic.uk->4681111234) FAX Relay LOG Sender: ifax@network.panasonic.com ————(1) Receiver: 4681111234 ————(2) 3961111234| No. Explanation |
| (1) Email address of the sender's Internet Fax or PC. |
| (2) Fax telephone number of the end receiving station. |
Useful Terms to Remember
DHCP (Dynamic Host Configuration Protocol)
DHCP is a protocol for dynamically assigning IP addresses to Internet Fax and client PCs. With DHCP, an Internet Fax can automatically acquire a unique IP address each time it connects to a network making IP address management an easier task for network administrators. When an Internet Fax logs on to the network, the DHCP server selects an IP address from a master list and assigns it to the system.
If you wish to enable the Direct Internet Fax Transmission on your Internet Fax, a static (reserved by a Network Administrator) IP address and configurations must be used instead of the DHCP operation, contact Authorized Panasonic dealer. (see pages 94)
SMTP Authentication
Since the Internet debuted as an electronic infrastructure of global dimensions, the communications equipment market has been growing at a phenomenal rate. Yet, technologies help enhance Internet security are yet to come. There are some reasons.
- Internet mail is a multi-hop (multi-protocol, multi-device) structure, so transmission line-based security is typically difficult to implement.
- No exclusive technologies recommended by the Internet Fax standards are available.
- Encryption-based authentication systems are presently available as standard solutions that drive system enhancement and integrity. Such an authentication entry has been embedded in a authentication feature, such as SASL (Simple Authentication and Security Layer).
Many Internet service providers (ISPs) support authentication methods in one form or another. The authentication options provided by this machine are as follows:
- SMTP Authentication Extension Service (SMTP AUTH) - while sending When users log on, they are authenticated by their user name and password, thereby preventing unauthorized users from sending or relaying faxes.
- APOP authentication service (APOP) - while receiving A scheme of password encryption used for receiving Email.
- POP before SMTP To allow prior access to a POP3 server specified before the start of transmission to grant the permission to use the SMTP server.
Memo
Editing a Communication Reservation File
Your machine has a document image memory which enables you to reserve memory transmission, memory deferred transmission, memory polling and so on.
After reserving the communications in memory, you may need to change the settings of the communication(s) while it is still in memory. This section describes how to use the file editing features.
Displaying a Communication Reservation File List
To display a communication reservation file list, follow the steps below:
1 Press the Fax key.
2 Select "More Menus".
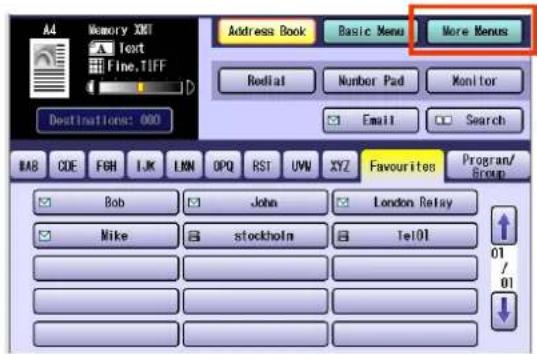
text_image
Memory XNT Text Fine.TIFF Address Book Basic Menu More Menus Rodial Number Pad Monitor Email Search Destinations: 000 BAB CODE FGH LJK LNN OPQ RST UVN XYZ Favourites Program/Group Bob John London Relay Mike stockholm Tel01 01/013 Select "Edit File Mode".
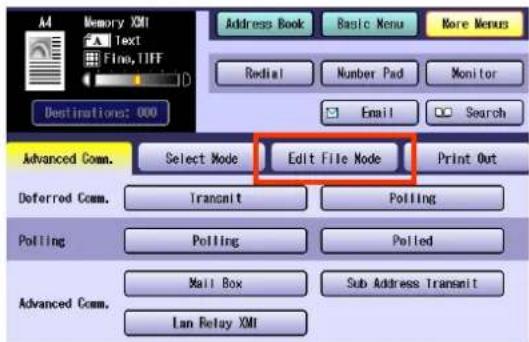
text_image
Memory XMI Text Fine, TIFF Address Book Basic Menu More Menus Radial Number Pad Monitor Email Search Destinations: 000 Advanced Comm. Select Mode Edit File Mode Print Out Deferred Comm. Transmit Polling Polling Polling Advanced Comm. Mail Box Sub Address Transmit Lan Relay XMI4 Select "File List".
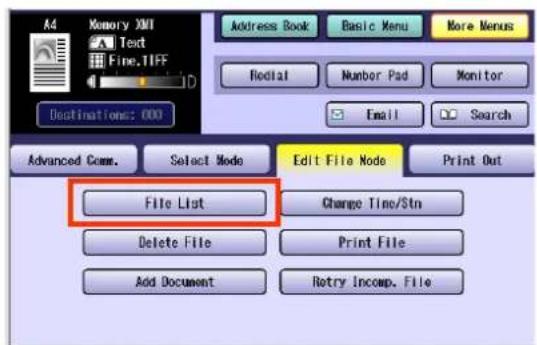
text_image
Memory XMT Text Fine.TIFF Address Book Basic Menu More Menus Redial Number Pad Monitor Email Search Advanced Comm. Select Mode Edit File Mode Print Out File List Change Time/$tn Delete File Print File Add Document Retry Incomp. File5 Select ↑ or ↓ to display the communication reservation file.
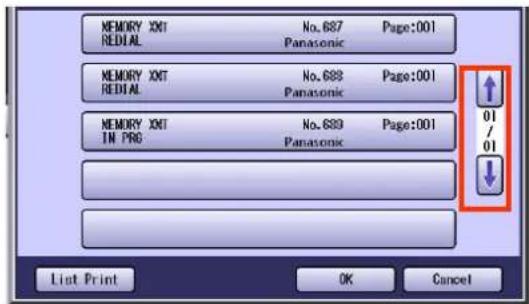
text_image
MEMORY XVI REDIAL No. 687 Page:001 MEMORY XVI REDIAL No. 688 Page:001 MEMORY XVI IN PRG No. 689 Page:001 Panasonic 01 / 01 List Print OK Cancel6 To print the communication reservation report, select "List Print".
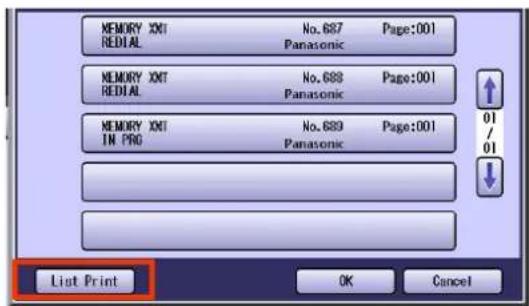
text_image
MEMORY XNT No.687 Page:001 REDIAL Panasonic MEMORY XNT No.688 Page:001 REDIAL Panasonic MEMORY XNT No.689 Page:001 IN PRO Panasonic List Print OK Cancel7 When the verification has completed, select "OK".
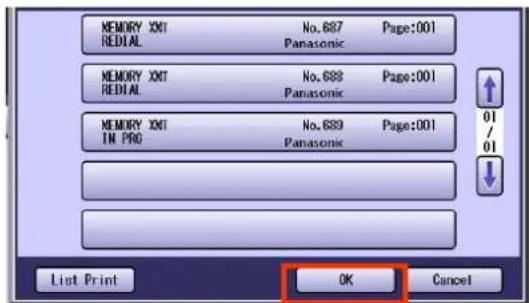
text_image
MEMORY XNT No. 687 Page:001 REDIAL Panasonic MEMORY XNT No. 688 Page:001 REDIAL Panasonic MEMORY XNT No. 689 Page:001 IN PRO Panasonic List Print OK Cancel8 To return to standby, press the Reset key.
Reading the Reservation Report
Items covered in the reservation report are as follows:
| ********** -File List-********** Date DD-MMM-YYYY ***** Time 09:11 ********** | ||||||
| (1) (2) (3) (4) (5) (6) | ||||||
| File No. | Comm. Type | Created Time | Start Time | Page(s) | Destination(S) | |
| 020 | Memory XMT | dd-MMM 19:54 | 10:50 | 001 | [pana03] | |
| 021 | Memory XMT | dd-MMM 19:56 | 10:30 | 001 | [pana01] [pana03] | |
| *038 | Memory XMT | dd-MMM 09:02 | 005 | [pana_Lanrelay] | ||
| - PANASONIC | - | |||||
| ***** DP-xxxx ********** - HEAD OFFICE | - ***** - 201 555 1212 - ********** | |||||
| No. Item Explanation | |
| (1) File Number If the file is now being executed, an “*” is indicated on the left of the file number. | |
| (2) Communication Type Communication type (for example, polled transmission, polling reception and memory transmission). | |
| (3) Created Time Date/time that these files were stored. | |
| (4) Start time If the file is a Timer Controlled Communication, the start time is printed in this column. If the file is an incomplete file, “Incomp” is printed in this column. | |
| (5) Page(s) The number of stored page(s). | |
| (6) Destination Key name(s)/Manual dialling location(s). | |
Editing Communication Reservations
To change the start time and/or stations in a communication file, follow the steps below.
NOTE
● Communication reservations for the documents being transmitted cannot be modified.
1 Press the Fax key.
2 Select "More Menus".
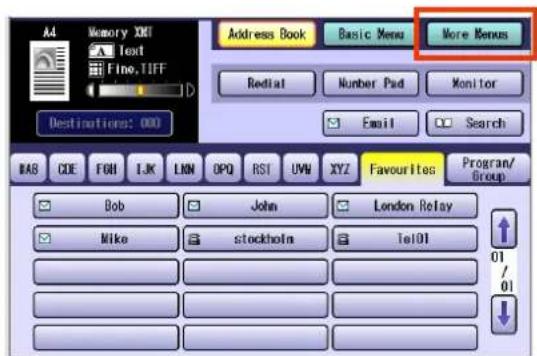
text_image
A4 Memory XMI Text Fine.TIFF Address Book Basic Menu More Menus Redtail Number Pad Monitor Email Search BAS CDE FOH I.K LNN OPQ RST UVW XYZ Favourites Program/Group Bob John London Relay Mike stockholm Tel01 01 / 013 Select "Edit File Mode".
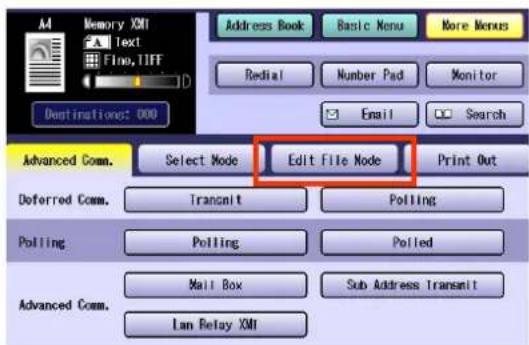
text_image
Memory XMI Text Fino, TIFF Address Book Basic Menu More Menus Redial Number Pad Monitor Email Search Destinations: 000 Advanced Comm. Select Mode Edit File Mode Print Out Deferred Comm. Transmit Polling Polling Polling Mall Box Sub Address Transmit Advanced Comm. Lan Relay XMI4 Select "Change Time/Stn".
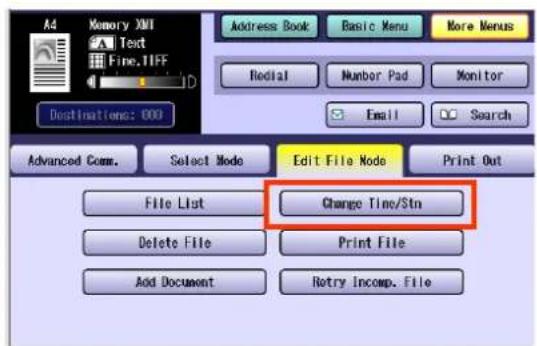
text_image
Memory XMT Text Fine.IIFF Address Book Basic Menu More Menus Redial Number Pad Monitor Email Search Advanced Comm. Select Mode Edit File Mode Print Out File List Change Time/Stn Delete File Print File Add Document Retry Incomp. File5 Select a communication reservation file to be edited, and then select "OK".
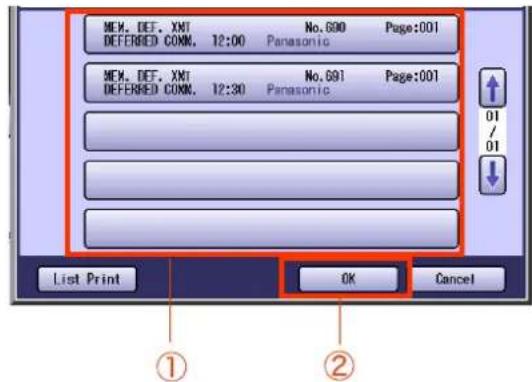
text_image
MCH. DEF. XMT DEFERRED COMM. 12:00 No.600 Panasonic Page:001 MCH. DEF. XMT DEFERRED COMM. 12:30 No.691 Panasonic Page:001 List Print OK Cancel ① ②- If you do not need to program a timer controlled communication, go to step 7.
6 Edit the communication time, and then select "OK".
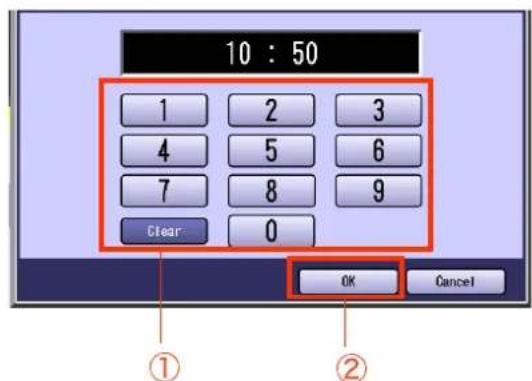
text_image
10 : 50 1 2 3 4 5 6 7 8 9 Clear 0 OK Cancel ① ②- To leave the communication time unchanged, select "Cancel".
- Press the Clear key to delete the input time, one digit at a time.
7 Edit the destination.
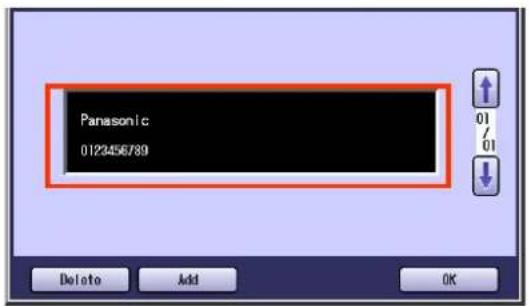
text_image
Panasonic 0123456789 Delete Add OK- To delete a destination(s), select "Delete", and then go to step 9.
- To add destination(s), select "Add", and then go to step 8.
8 Select the destination, and then select "OK".
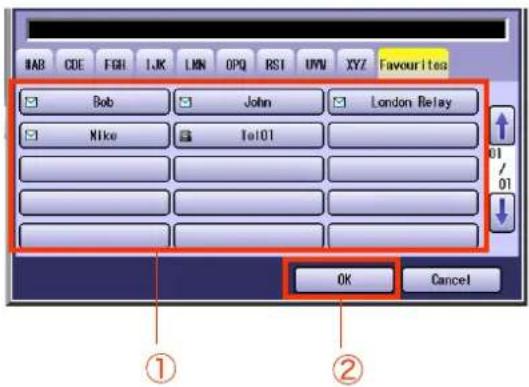
text_image
BAB CDE FGN I.K LMN OPQ RSI UVM XYZ Favourites Bob John London Relay Nike Tel01 OK Cancel ① ②9 When the change completes, select "OK".
10 To return to standby, press the Reset key.
Deleting a Communication Reservation File
To delete the file in memory, follow the steps below.
NOTE
- Your machine cannot delete the file while it is being sent.
1 Press the Fax key.
2 Select "More Menus".
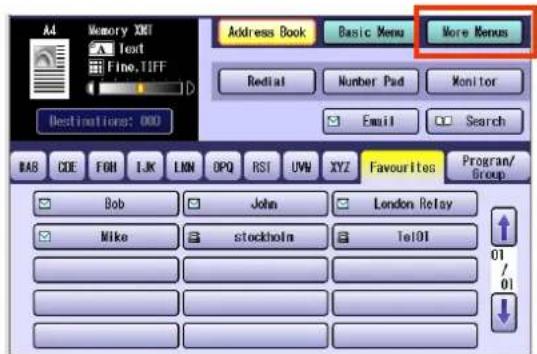
text_image
Address Book Basic Menu More Menus Redtail Number Pad Monitor Email Search Destinations: 000 BAS COE FOX LJK LNN OPQ RST UVW XYZ Favourites Program/Group Bob John London Relay Mike stockholm Tel01 01/013 Select "Edit File Mode".
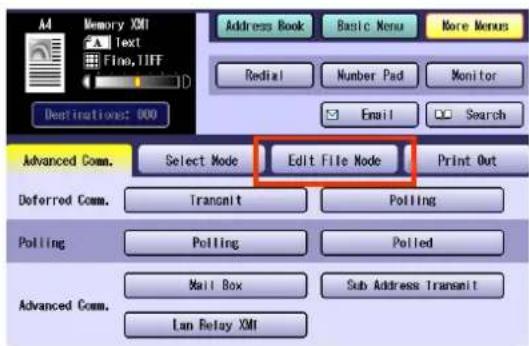
text_image
Memory XMI Text Fine, TIFF Address Book Basic Menu More Merus Redial Number Pad Monitor Email Search Destinations: 000 Advanced Comm. Select Mode Edit File Mode Print Out Deferred Comm. Trancit Polling Polling Polling Advanced Comm. Mail Box Sub Address Transmit Lan Relay XMI4 Select "Delete File".
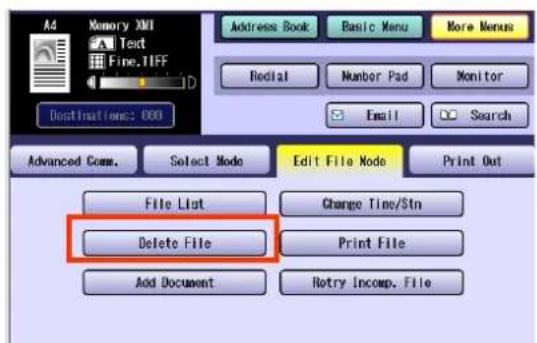
text_image
Memory XMM Text Fine.TIFF Address Book Basic Menu More Menus Redial Number Pad Monitor Email Search Advanced Comm. Select Mode Edit File Mode Print Out File List Change Time/Stn Delete File Print File Add Document Retry Incomp. File5 Select a communication reservation file to be deleted, and then select "OK".
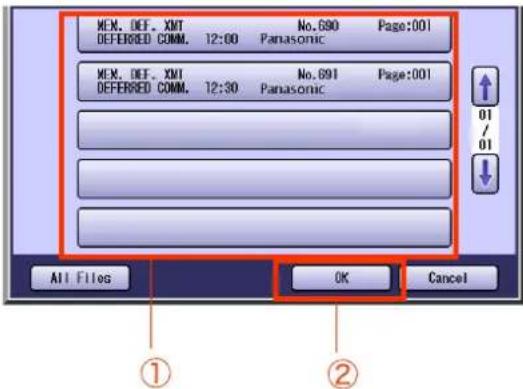
text_image
MEX. DEF. XMT DEFERRED COMM. 12:00 No.690 Panasonic Page:001 MEX. DEF. XMT DEFERRED COMM. 12:30 No.891 Panasonic Page:001 All Files OK Cancel ① ②- Select "All Files" to select all communication reservation files.
- To cancel the deletion, select "Cancel".
6 Select "Yes".
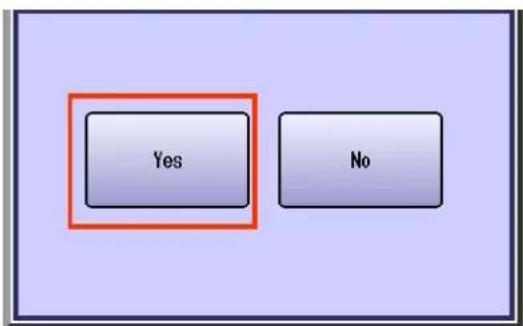
text_image
Yes No- To cancel the deletion, select "No".
7 To return to standby, press the Reset key.
Printing a Communication Reservation File
Communication reservation files stored in memory can be printed.
NOTE
- Your machine cannot print the document while it is being sent.
1 Press the Fax key.
2 Select "More Menus".
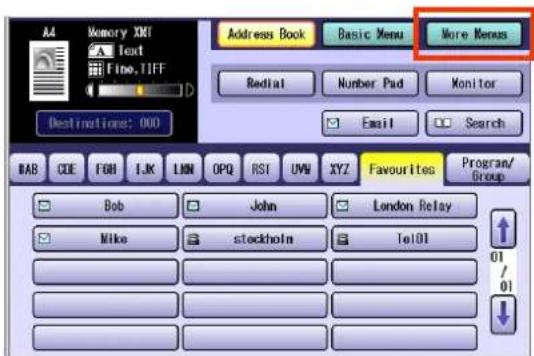
text_image
Address Book Basic Menu More Menu Redlat Number Pad Monitor Email Search BAB CODE FOM LJK LMN OPQ RST UMW XYZ Favourites Program/Group Bob John London Relay Mike stockholm Tel01 01 / 01 / 013 Select "Edit File Mode".
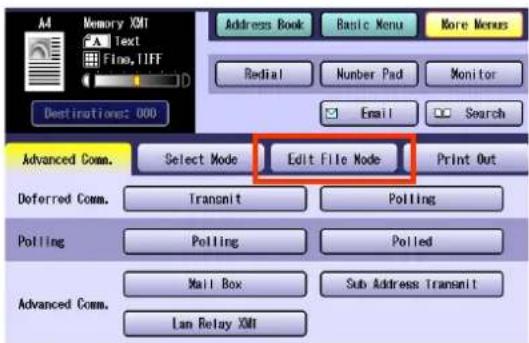
text_image
Memory XMT Text Fine, TIFF Address Book Basic Menu More Menus Redial Number Pad Monitor Email Search Destination: 000 Advanced Comm. Select Mode Edit File Mode Print Out Deferred Comm. Transmit Polling Polling Polling Advanced Comm. Mail Box Sub Address Transmit Lan Relay XMT4 Select "Print File".
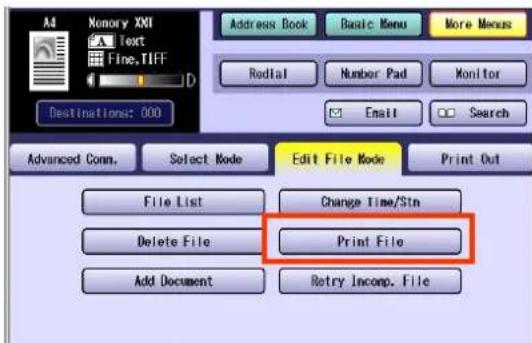
text_image
Memory XMI Text Fine.TIFF Destinations: 000 Address Book Basic Menu More Menus Redial Number Pad Monitor Email Search Advanced Conn. Select Mode Edit File Mode Print Out File List Change Time/Strn Delete File Print File Add Document Retry Incomp. File5 Select ↑ or ↓ to display the communication reservation file you want to print.
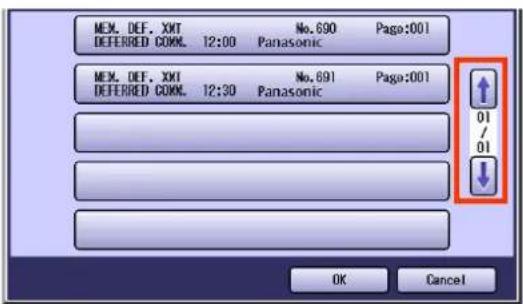
text_image
MEM. DEF. XMT DEFERRED COMM. 12:00 No. 690 Panasonic Page:001 MEM. DEF. XMT DEFERRED COMM. 12:30 No. 891 Panasonic Page:001 ↑ 01 / 01 ↓ OK Cancel6 Select a communication reservation file to be printed, and then select "OK".
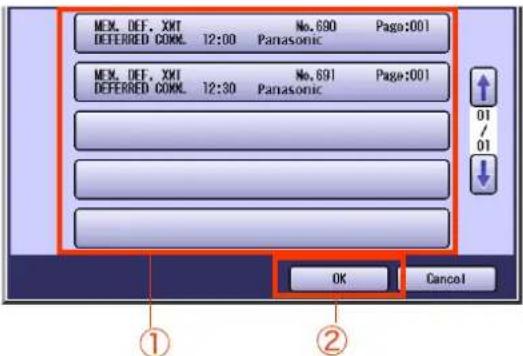
text_image
MEM. DEF. XMT DEFERRED COKL. 12:00 No. 690 Panasonic Page:001 MEM. DEF. XMT DEFERRED COKL. 12:30 No. 691 Panasonic Page:001 OK Cancel ① ②- To cancel the print, select "Cancel".
7 Selected communication reservation file is printed.
8 To return to standby, press Reset key.
Adding Documents to a Communication Reservation File
Documents can be added to a communication reservation file stored in memory.
NOTE
- Your machine can not add document into the file while it is being sent, waiting to redial, or trying to send the incomplete file.
1 Place the additional Document.
- Refer to Placing Originals (Facsimile/Internet Fax) in the Operating Instructions (For Basic Operations) of provided booklet.
2 Press the Fax key.
3 Select "More Menus".
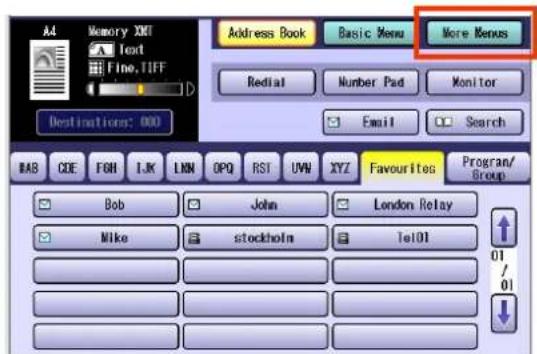
text_image
A4 Memory XMT Text Fine, TIFF Address Book Basic Menu More Menus Redial Number Pad Monitor Email Search BAB CDE FGH I.K LNN OPQ RST UVW XYZ Favourites Program/ Bob John London Relay Mike stockholn le101 01 / 014 Select "Edit File Mode".
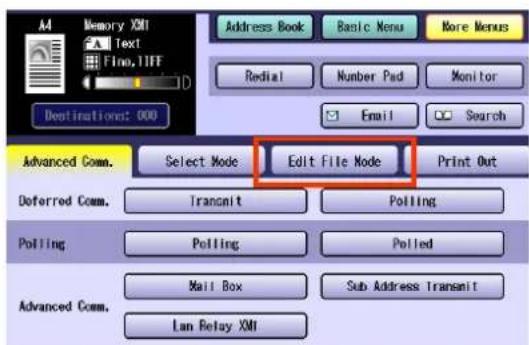
text_image
Memory XMI Text Fino, TIFF Address Book Basic Menu More Menus Redial Number Pad Monitor Email Search Destination: 000 Advanced Comm. Select Mode Edit File Mode Print Out Deferred Comm. Transmit Polling Polling Polling Advanced Comm. Mail Box Sub Address Transmit Lan Relay XMI5 Select "Add Document".
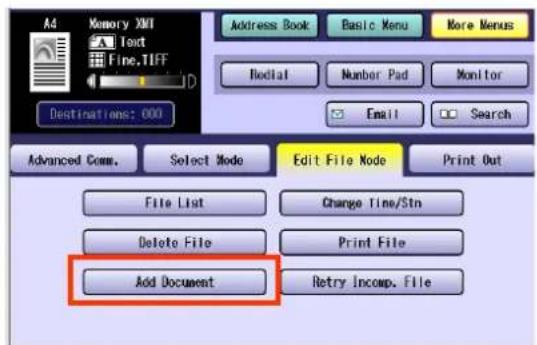
text_image
Memory XMT Text Fine.TIFF Address Book Basic Menu More Menus Rodial Number Pad Monitor Email Search Destinations: 000 Advanced Comm. Select Mode Edit File Node Print Out File List Change Time/Str Delete File Print File Add Document Retry Incomp. File6 Select ↑ or ↓ to display the communication reservation file to which you want to add documents.
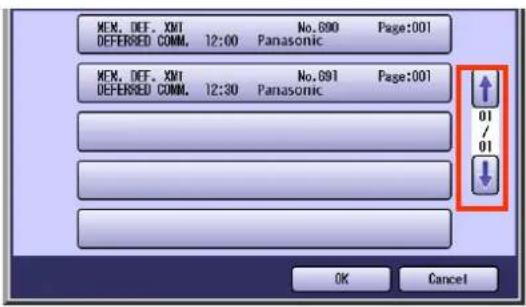
text_image
MEM. DEF. XMI DEFERSED COMM. 12:00 No.690 Page:001 MEM. DEF. XMI DEFERSED COMM. 12:30 No.691 Page:001 Panasonic OK Cancel7 Select a communication reservation file to which pages are added, and then select "OK".
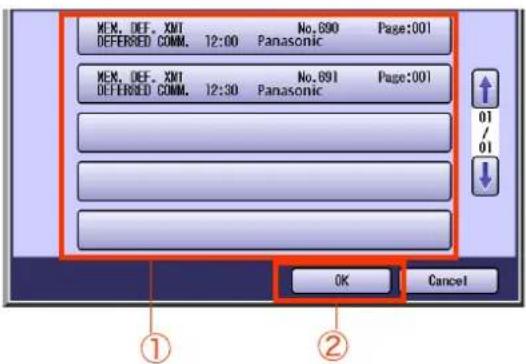
text_image
MEM, DEF. XMT DEFERRED COMM. 12:00 No.690 Page:001 MEM, DEF. XMT DEFERRED COMM. 12:30 No.691 Page:001 OK Cancel- To cancel the page addition, select "Cancel".
8 Your machine stores the documents.
Resending an Incomplete Document
With "31 Incomplete File Save" set to "Valid" in Function Parameters (Fax/Email Settings> Fax Parameters), documents that could not be transmitted due to a communication error (such as the remote station busy or not responding) can be stored in memory as incomplete files.
This section explains how to resend incomplete files stored in memory.
NOTE
- The standard setting of "31 Incomplete File Save" is set to "Invalid". For instructions on how to modify the standard setting, refer to Fax/Email Settings in the Operating Instructions (For Function Parameters) on the provided CD-ROM.
- If "31 Incomplete File Save" is set to "Valid" in Function Parameters (Fax/Email Settings> Fax Parameters), all incomplete files remains in the memory each time a communication error occurs. To avoid memory overflow, retry to send incomplete file from time to time.
1 Press the Fax key.
2 Select "More Menus".
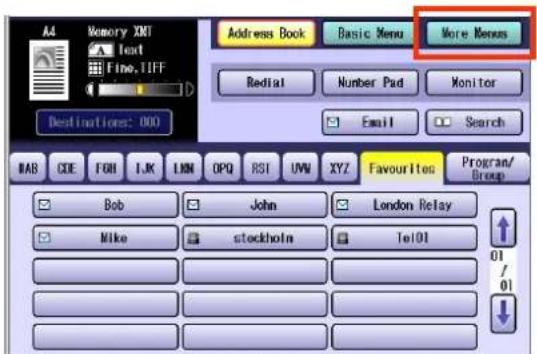
text_image
Memory XNT Text Fine, TIFF Address Book Basic Menu More Menus Redial Number Pad Monitor Email Search Destinations: 000 BAB GDE FOR I.K LKN OPQ RST UVW XYZ Favourites Program/Group Bob John London Relay Mike stockholm Tel01 01/013 Select "Edit File Mode".
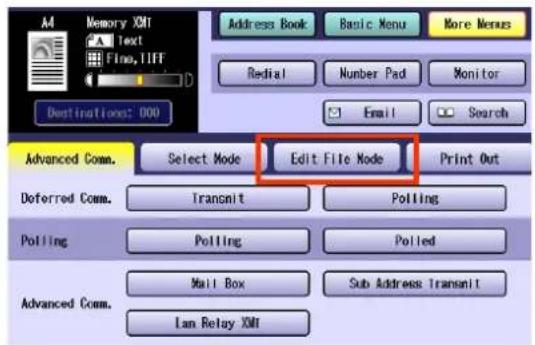
text_image
Memory XMT Text Fino, IIFF Address Book Basic Menu More Menus Redial Number Pad Monitor Email Search Destinations: 000 Advanced Comm. Select Mode Edit File Mode Print Out Deferred Comm. Transmit Polling Polling Polling Mall Box Sub Address Transmit Advanced Comm. Ian Relay XMT4 Select "Retry Incomp. File".
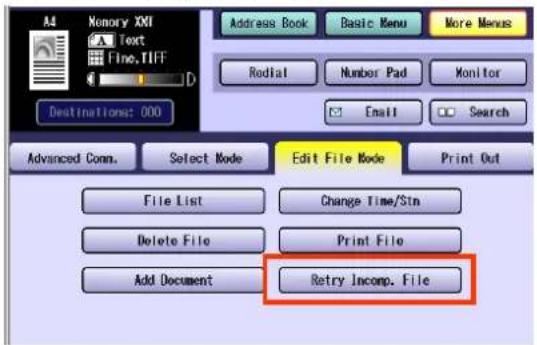
text_image
Memory XMI Text Fine, TIFF Address Book Basic Menu More Menus Rodial Number Pad Monitor Email Search Advanced Conn. Select Mode Edit File Mode Print Out File List Change Time/Strn Delete File Print File Add Document Retry Incomp. File5 Select ↑ or ↓ to find the incomplete file that you want to resend.
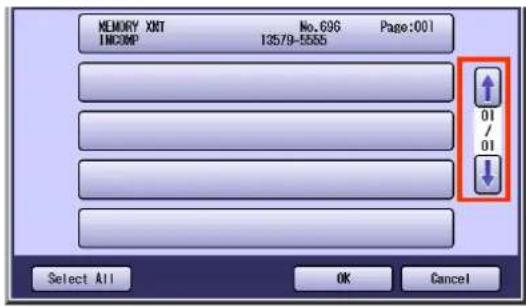
text_image
MEMORY XNT INCOMP No.696 13579-5555 Page:001 01 / 01 Select All OK Cancel- To send all incomplete files, select "Select All".
6 Select the incomplete file that you want to resend, and then select "OK". The communication error file is resent.
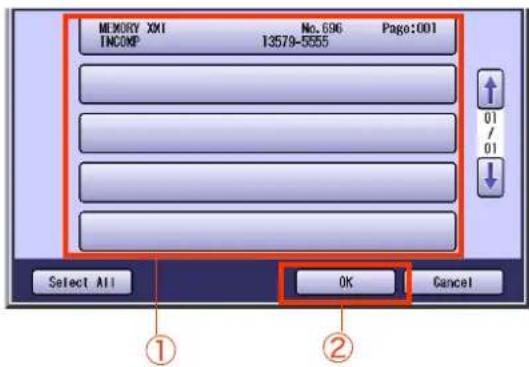
text_image
MEMORY XXI INCOMP No.696 13579-5555 Page:001 01 / 01 Select All OK Cancel- To cancel the resend, select "Cancel".
Address Book
What is Address Book?
With the fax numbers or Email addresses of remote stations programmed in the address book, the stations can be selected with a single operation on their button appearing on the touch-panel display.
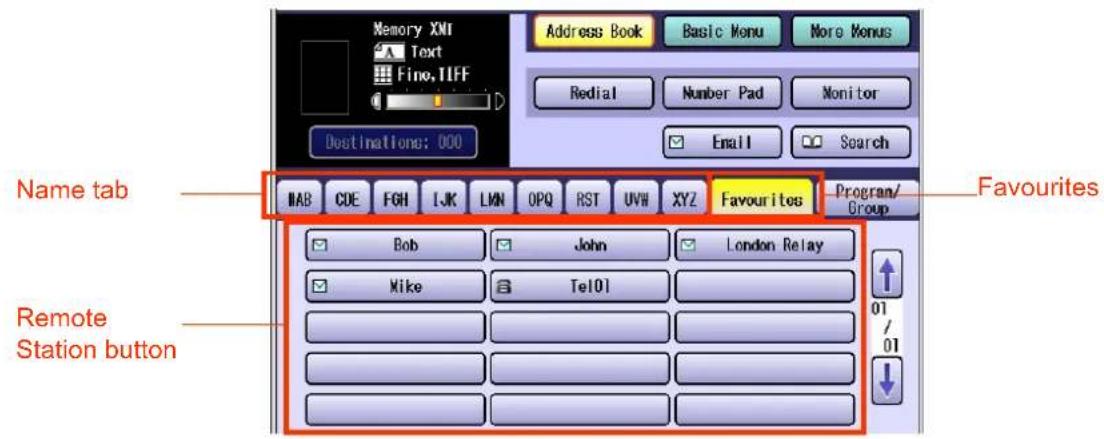
text_image
Memory XMI Text Fine, TIFF Address Book Basic Menu More Menus Redial Number Pad Monitor Destinations: 000 Email Search Name tab IAB CDE FGH IJK LMN OPQ RST UVW XYZ Favourites Program/ Group Favourites Bob John London Relay Mike Tel01 01 01 Remote Station buttonNOTE
For instructions on how to set fax numbers or Email addresses using the address book, refer to Entering a Destination (see page 16), Entering an Email Address. (See page 102)
Items Allowed for Entry in the Address Book
| No. Item Explanation | ||
| 1 Fax number Set a fax number in the address book. Up to 36 characters. | ||
| 2 Email address Set an Email address in the address book. Up to 60 characters. | ||
| 3 Station name Remote station name. Up to 15 characters. | ||
| 4 Key Name Set a key name to display on the touch-panel display for selecting destination. | ||
| 5 Favourites | Select to show a programmed destination in touch-panel “Favourites”. | |
| 6 Relay Station Set the Email address of a relay station. Displays if the | feature has been programmed in Function Parameters (Fax/Email Settings). | |
| 7 Sub-Address Program sub-address for Inbound Routing. | ||
| 8 TSI Program ID number for Inbound Routing. | ||
Adding a Fax Number into the Address Book
To add a fax number to the address book, follow the steps below:
NOTE
- For instructions on how to edit the station in the address book, refer to Editing Address Book. (See page 167)
- For instructions on how to delete the station from the address book, refer to Deleting a Destination from Address Book. (See page 168)
1 Press the Function key.
2 Select "Fax/Email Settings".
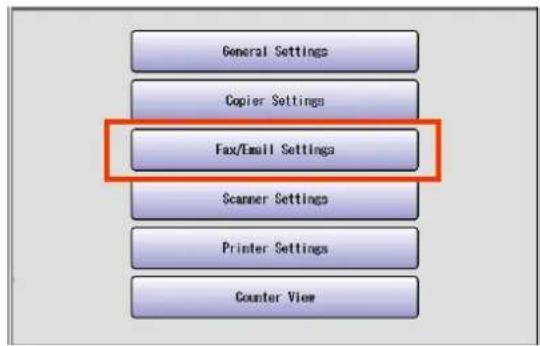
text_image
General Settings Copier Settings Fax/Email Settings Scanner Settings Printer Settings Counter View3 Select "00 Address Book".
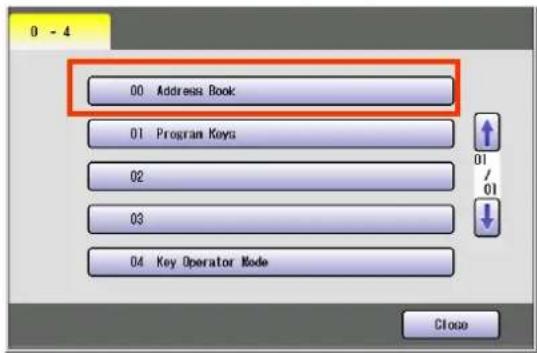
text_image
00 Address Book 01 Program Keys 02 03 04 Key Operator Mode Close4 Select "01 Add Telephone Number".
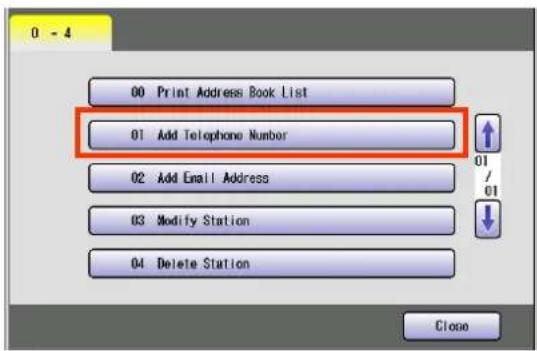
text_image
0 - 4 00 Print Address Book List 01 Add Telephone Number 02 Add Email Address 03 Modify Station 04 Delete Station Close5 Enter a fax number, and then select "OK".
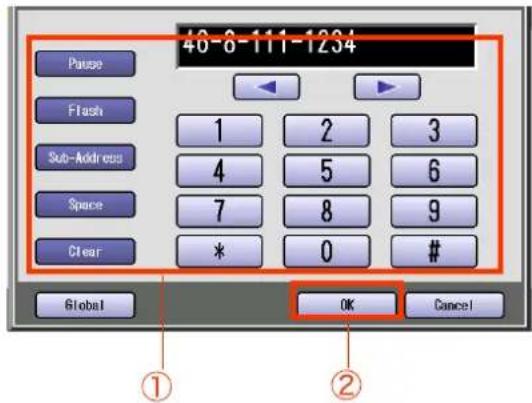
text_image
46-6-111-1234 Pause Flash Sub-Address Space Clear 1 2 3 4 5 6 7 8 9 * 0 # Global OK Cancel ① ②- Select "Clear" to delete the fax number one digit at a time.
- For instructions on how to enter fax numbers, refer to Manual Dialling. (See page 16)
6 Enter a station name, and then select "OK".
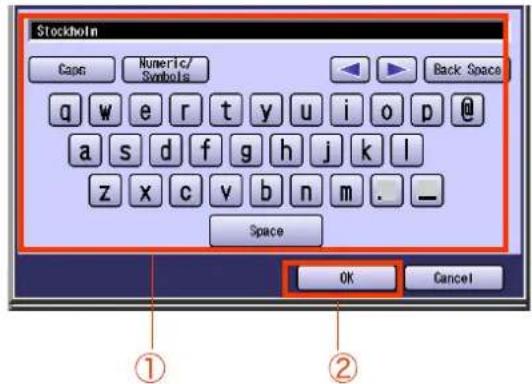
text_image
Stockholm Caps Numeric/ Symbols Back Space q w e r t y u i o p @ a s d f g h j k l z x c v b n m . _ Space OK Cancel ① ②- Enter a station name up to 15 characters.
- For using the onscreen keyboard, refer to Before Starting in the Operating Instructions (For Function Parameters) on the provided CD-ROM.
7 Enter key name, and then select "OK".
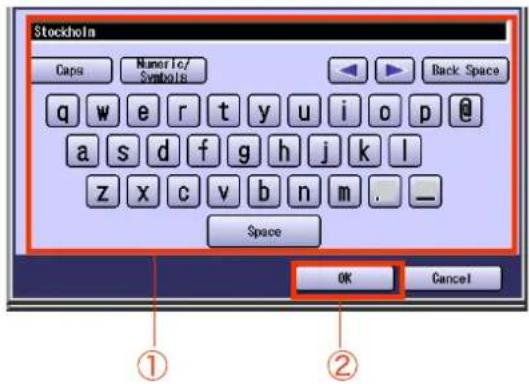
text_image
Stockholm Caps Numeric/ Symbols Back Space q w e r t y u i o p @ a s d f g h j k l z x c v b n m . _ Space OK Cancel ① ②● Key names are used to select destinations on the touch-panel display.
- For using the onscreen keyboard, refer to Before Starting in the Operating Instructions (For Function Parameters) on the provided CD-ROM.
8 Select whether to add the station to "Favourites".
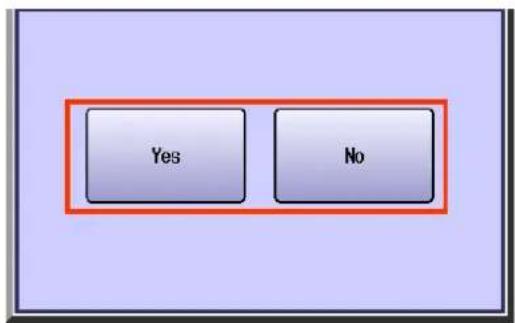
text_image
Yes No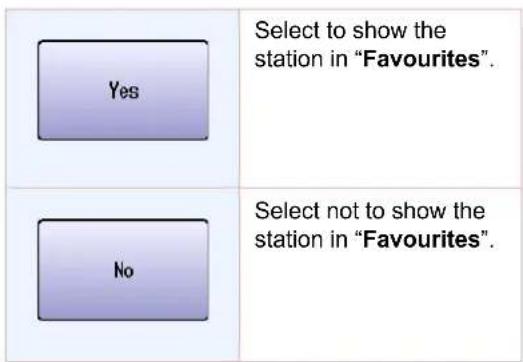
text_image
Select to show the station in "Favourites". Yes No Select not to show the station in "Favourites".9 Set the Email address of a relay station, and then select "OK".
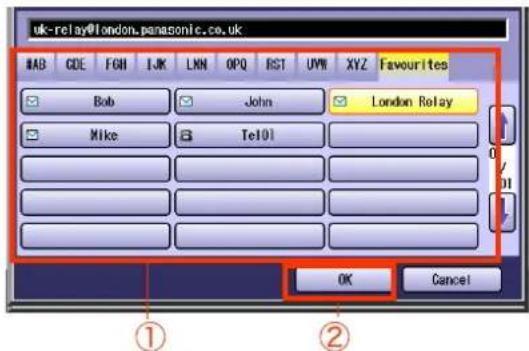
text_image
uk-relay@london.panasonic.co.uk #AB GDE FGN IJK LKN OPQ RST UWV XYZ Favourites Bob John London Relay Mike Tel01 OK Cancel- This screen appears when "140 LAN RLY XMT Request" has been set to "Valid" in Function Parameters (Fax/Email Settings> Fax Parameters).
10 To enable sub-addressed routing, enter a sub-address, and then select "OK".
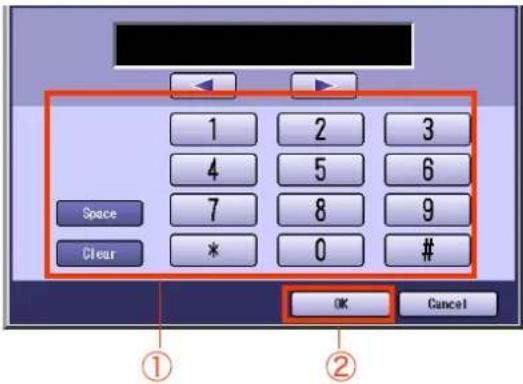
text_image
1 2 3 4 5 6 7 8 9 Clear * 0 # OK Cancel- This screen appears when "152 Sub-Addr Routing" has been set to "Valid" in Function Parameters (Fax/Email Settings> Fax Parameters).
11 To enable routing by the sender's numeric ID, enter the numeric ID, and then select "OK".
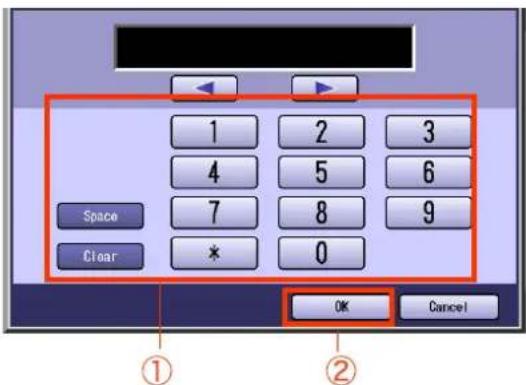
text_image
1 2 3 4 5 6 7 8 9 Clear * 0 OK Cancel- This screen appears when "153 TSI Routing" has been set to "Valid" in Function Parameters (Fax/Email Settings> Fax Parameters).
- Press Reset key to return the machine to the initial screen of the current active mode.
Adding an Email Address to Address Book
To add an Email address to the address book, follow the steps below:
NOTE
- For instructions on how to edit the station in the address book, refer to Editing Address Book. (See page 167)
- For instructions on how to delete the station from the address book, refer to Deleting a Destination from Address Book. (See page 168)
1 Press the Function key.
2 Select "Fax/Email Settings".

text_image
General Settings Copier Settings Fax/Email Settings Scanner Settings Printer Settings Counter View3 Select "00 Address Book".
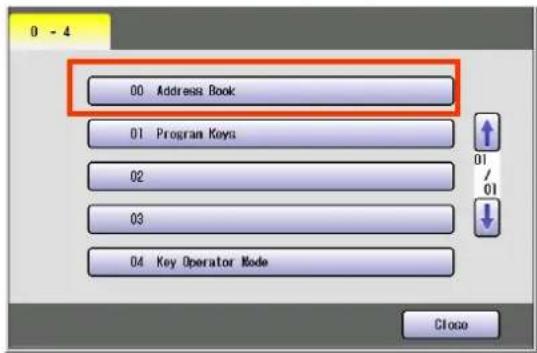
text_image
00 Address Book 01 Program Keys 02 03 04 Key Operator Mode Close4 Select "02 Add Email Address".
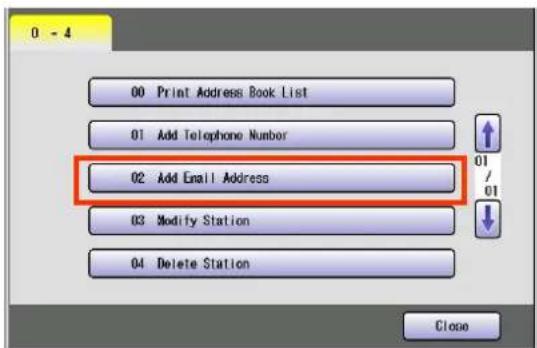
text_image
0 - 4 00 Print Address Book List 01 Add Telephone Number 02 Add Email Address 03 Modify Station 04 Delete Station Close5 Enter an Email address and select "OK".

text_image
box@pcc.com Caps Numeric/ Symbols Domain List Back Space q w e r t y u i o p @ a s d f g h j k l z x c v b n m . _ Space Global OK Cancel ① ②- For instructions on how to enter Email addresses, refer to Entering an Email Address. (See page 102)
- Enter an Email address up to 60 characters.
- For using the onscreen keyboard, refer to Before Starting in the Operating Instructions (For Function Parameters) on the provided CD-ROM.
6 Enter a station name, and then select "OK".
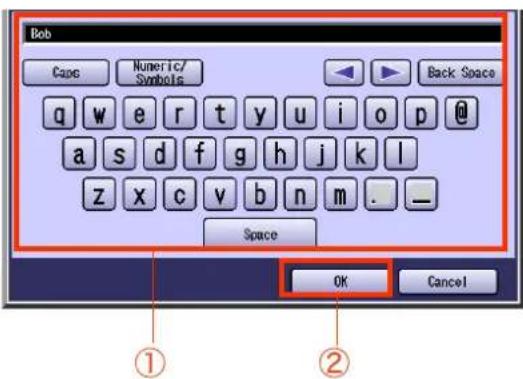
text_image
Bob Caps Numeric/ Symbols Back Space q w e r t y u i o p @ a s d f g h j k l z x c v b n m . _ Space OK Cancel ① ②- Enter a station name up to 15 characters.
- For using the onscreen keyboard, refer to Before Starting in the Operating Instructions (For Function Parameters) on the provided CD-ROM.
7 Enter a key name, and then select "OK".
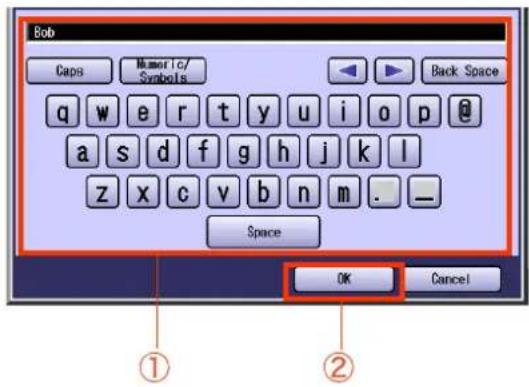
text_image
Bob Caps Numeric/ Symbols Back Space q w e r t y u i o p @ a s d f g h j k l z x c v b n m . _ Space OK Cancel ① ②● Key names are used to select destinations on the touch-panel display.
- For using the onscreen keyboard, refer to Before Starting in the Operating Instructions (For Function Parameters) on the provided CD-ROM.
8 Select "IFax", and then select "OK".
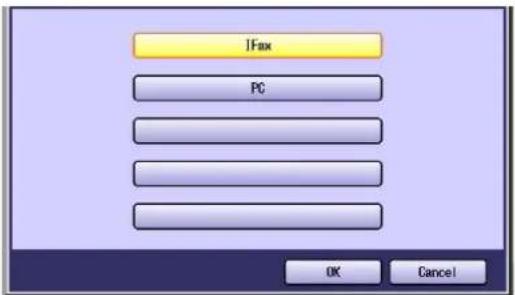
text_image
IFax PC OK Cancel- If you wish to use it in the Email Address Book of Scan/Email mode and Fax mode both, select "PC".
9 Select whether to add the station to "Favourites".
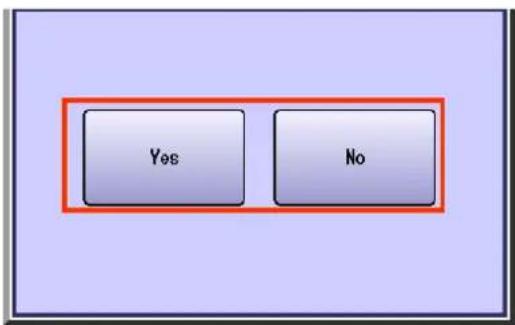
text_image
Yes No| Yes | Select to display the station in "Favourites". |
| No | Select not to display the station in "Favourites". |
10 To enable sub-addressed routing, enter a sub-address, and then select "OK".
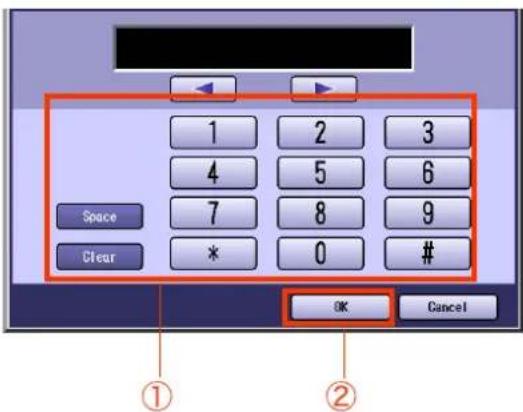
text_image
1 2 3 4 5 6 7 8 9 Space Clear * 0 # OK CancelThis screen appears when "152 Sub-Addr Routing" has been set to "Valid" in Function Parameters (Fax/Email Settings> Fax Parameters).
11 To enable routing by the sender's numeric ID, enter the numeric ID, and then select "OK".
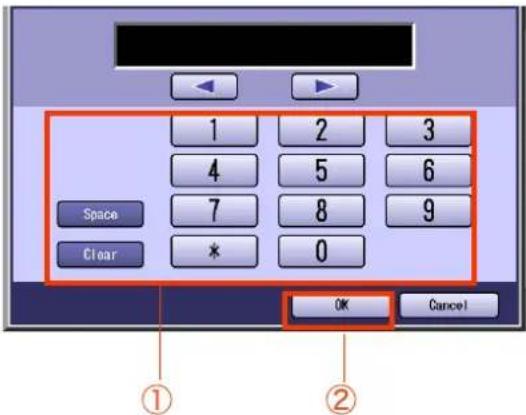
text_image
1 2 3 4 5 6 Space 7 8 9 Clear * 0 OK Cancel ① ②- This screen appears when "153 TSI Routing" has been set to "Valid" in Function Parameters (Fax/Email Settings> Fax Parameters).
- Press Reset key to return the machine to the initial screen of the current active mode.
Editing Address Book
To edit the station in the address book, follow the steps below:
1 Press the Function key.
2 Select "Fax/Email Settings".
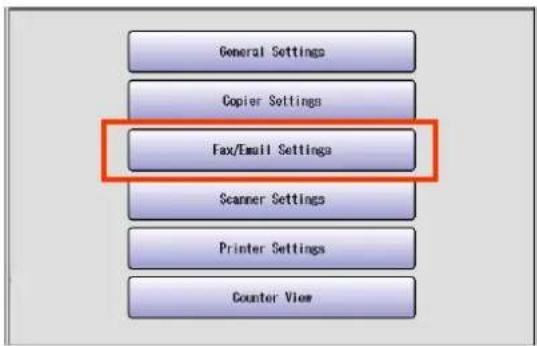
text_image
General Settings Copier Settings Fax/Email Settings Scanner Settings Printer Settings Counter View3 Select "00 Address Book".
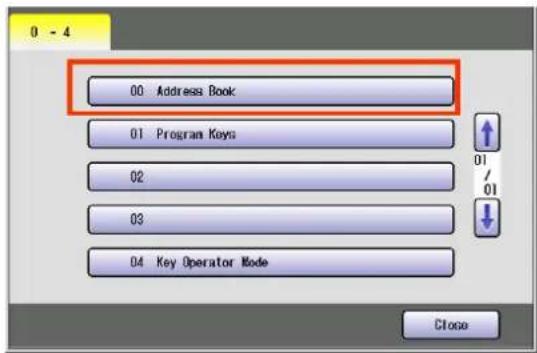
text_image
0 - 4 00 Address Book 01 Program Keys 02 03 04 Key Operator Mode Close4 Select "03 Modify Station".
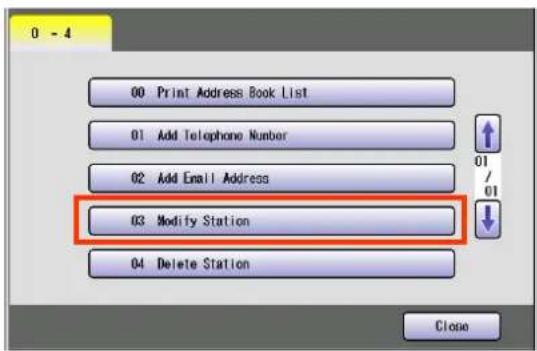
text_image
0 - 4 00 Print Address: Book List 01 Add Telephone Number 02 Add Email Address 03 Modify Station 04 Delete Station Close5 Select the station you want to edit, and then select "OK".
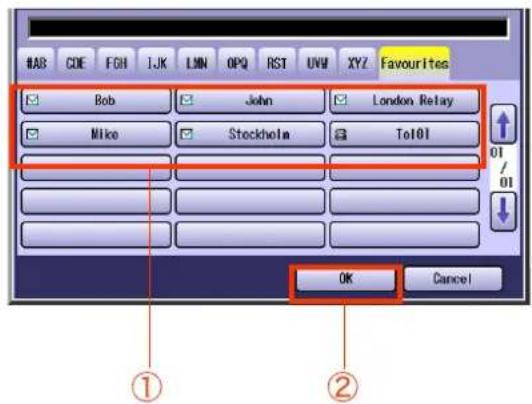
text_image
#AB CDE FGH IJK LMN OPQ RST UVW XYZ Favourites Bob John London Relay Mike Stockholm To101 OK Cancel ① ②- Select the same button again to cancel the choice.
6 Edit the station.
- For more information, refer to Adding a Fax Number into the Address Book. (See page 163) and Adding an Email Address to Address Book. (See page 165)
- Press Reset key to return the machine to the initial screen of the current active mode.
Deleting a Destination from Address Book
To delete a remote station from the address book, follow the steps below:
1 Press the Function key.
2 Select "Fax/Email Settings".
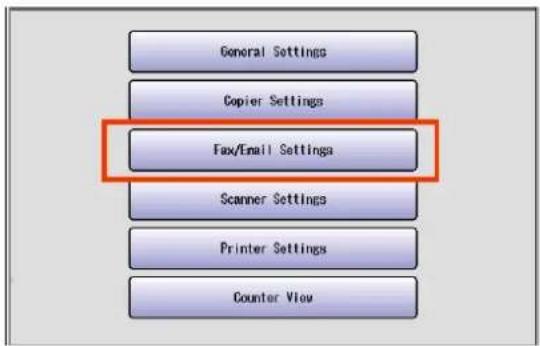
text_image
General Settings Copier Settings Fax/Email Settings Scanner Settings Printer Settings Counter View3 Select "00 Address Book".
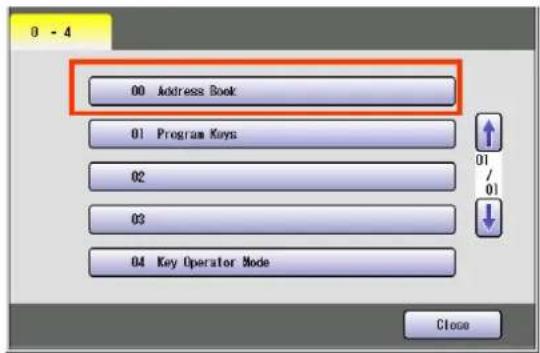
text_image
00 Address Book 01 Program Keys 02 03 04 Key Operator Mode Close4 Select "04 Delete Station".
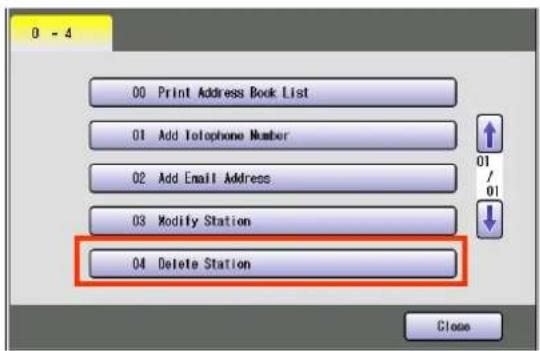
text_image
0 - 4 00 Print Address Book List 01 Add Telephone Number 02 Add Email Address 03 Modify Station 04 Delete Station Close5 Select the station you want to delete from the address book, and then select "OK".
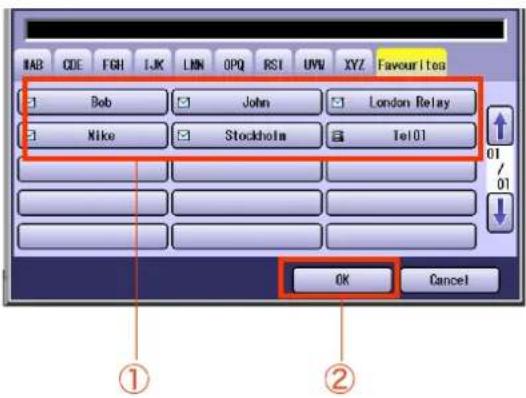
text_image
HAB CDE FGH IJK LNN OPQ RSI UVW XYZ Favourite tea Bob John London Relay Mike Stockholm Tel01 OK Cancel ① ②- Select the same button again to cancel the choice.
6 Select "Yes".
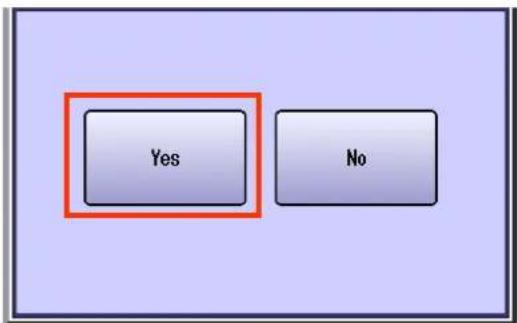
text_image
Yes No| Yes | Select to delete the selected station. |
| No | Select to cancel the deletion. |
- Press Reset key to return the machine to the initial screen of the current active mode.
Printing the Address Book List
To print the address book list, follow the steps below:
NOTE
● The address book list can also be printed by selecting "Print Out" in "More Menus". (See page 190)
- For more details about items in the address book list, refer to Reading Address Book List. (See page 191)
1 Press the Function key.
2 Select "Fax/Email Settings".
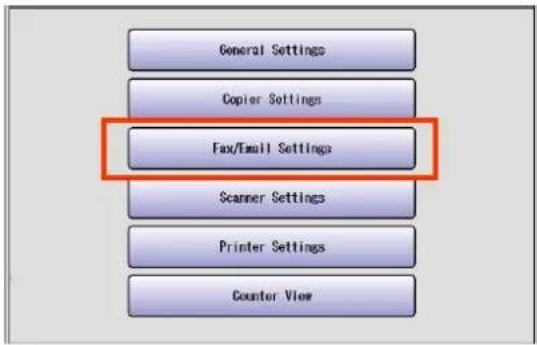
text_image
General Settings Copier Settings Fax/Email Settings Scanner Settings Printer Settings Counter View3 Select "00 Address Book".
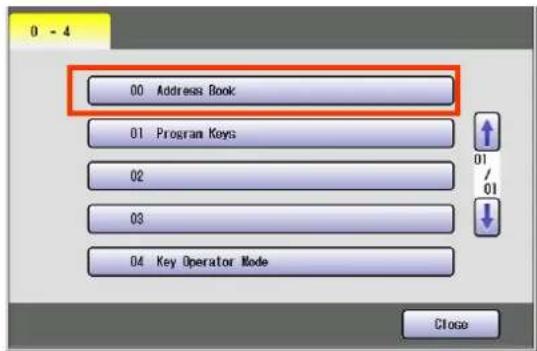
text_image
0 - 4 00 Address Book 01 Program Keys 02 03 04 Key Operator Mode Close4 Select "00 Print Address Book List".
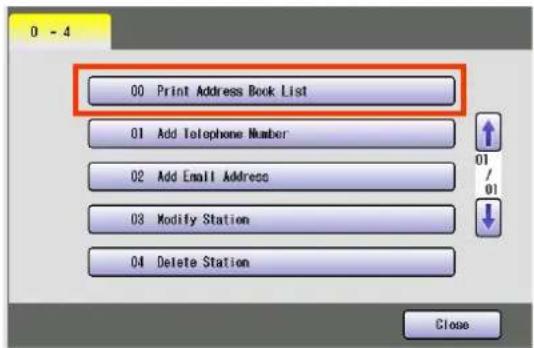
text_image
00 Print Address Book List 01 Add Telephone Number 02 Add Email Address 03 Modify Station 04 Delete Station Close5 Select "Start", and then select "OK".
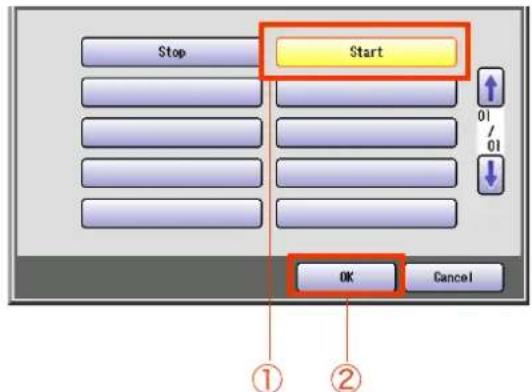
text_image
Stop Start OK Cancel ① ②The address book list is printed.
- Press Reset key to return the machine to the initial screen of the current active mode.
Program Keys
What is Program Keys?
There are three ways to use program key as follows:
■ Using for Program Dialling
You can set communication sequences or destinations which you often use.
■ Using for Group Dialling
Multiple destinations can be selected from the address book and pre-programmed on a single program key for group dialling.
■ Using as Email reception Key
This function allows others to share your machine to retrieve their Emails from the POP Server by pre-programming their POP User Names and POP Passwords into the Program Keys. They will be able to retrieve their Emails simply pressing the associated Program Key.
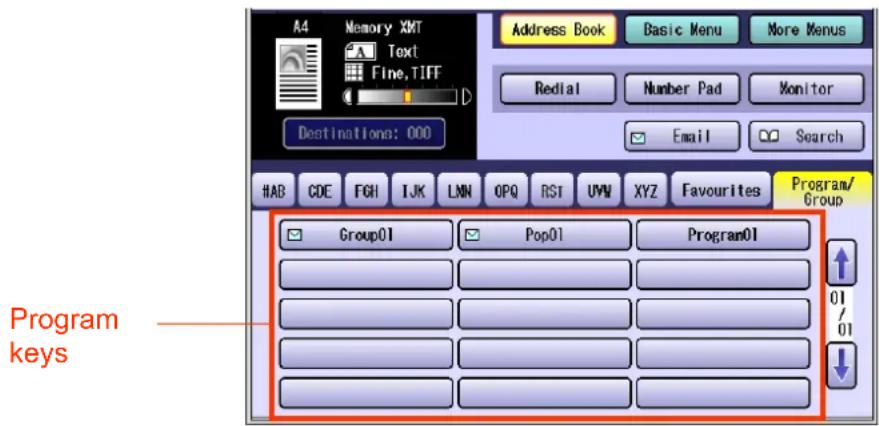
text_image
A4 Memory XMT Text Fine,TIFF D Address Book Basic Menu More Menus Redial Number Pad Monitor Email Search Destinations: 000 #AB CDE FGH IJK LMN OPQ RST UMV XYZ Favourites Program/ Group01 Pop01 Program01 Program keys 01 01 ↓NOTE
- For instructions on how to use program keys, refer to Using Program Keys. (See page 45)
Programmable Items
The following items can be programmed on program key:
| No. Item Explanation | |
| 1 Key name Name of a program. | |
| 2 Communication feature Program communication features and destinations on program dialling. | |
Setting for Program Dialling
To program a communication feature on program key, follow the steps below:
NOTE
- For instructions on how to edit pre-programmed station, refer to Editing Address Book. (See page 167)
- For instructions on how to delete pre-programmed station, refer to Deleting a Destination from Address Book. (See page 168)
- For instruction how to print the program list, refer to Printing the Program List. (See page 179).
1 Press the Function key.
2 Select "Fax/Email Settings".
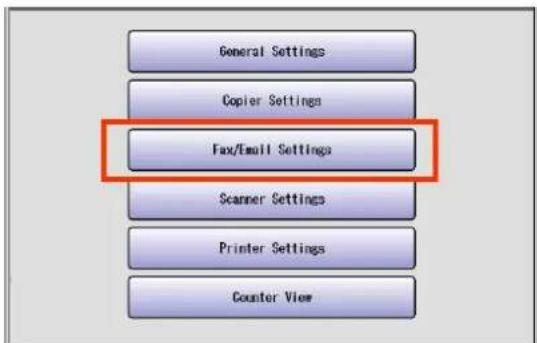
text_image
General Settings Copier Settings Fax/Email Settings Scanner Settings Printer Settings Counter View3 Select "01 Program Keys".
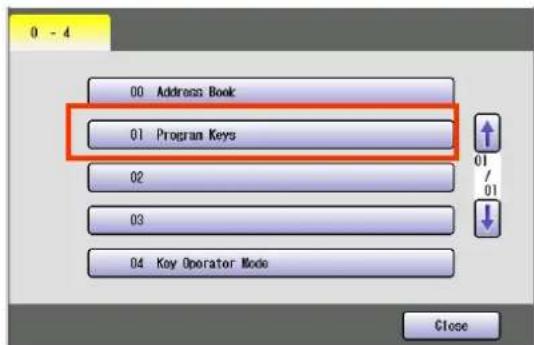
text_image
0 - 4 00 Address Book 01 Program Keys 02 03 04 Key Operator Mode Close4 Select "02 Program Dial".
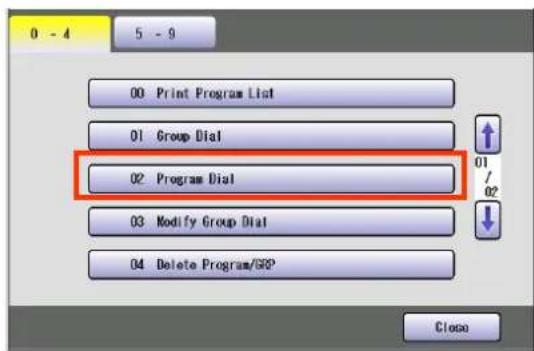
text_image
0 - 4 5 - 9 00 Print Program List 01 Group Dial 02 Program Dial 03 Modify Group Dial 04 Delete Program/GRP Close5 Enter a program dial name, and then select "OK".
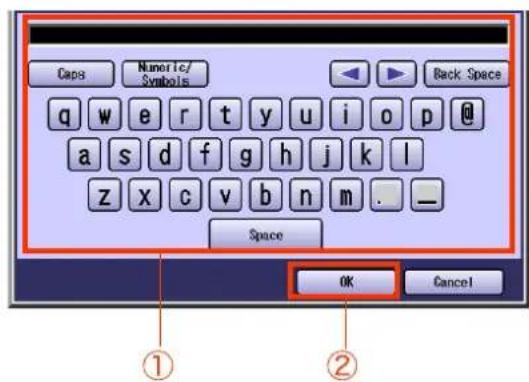
text_image
Caps Numeric/ Symbols Back Space q w e r t y u i o p @ a s d f g h j k l z x c v b n m . _ Space OK Cancel ① ②- Enter a name up to 15 characters.
- For using the onscreen keyboard, refer to Before Starting in the Operating Instructions (For Function Parameters) on the provided CD-ROM.
6 Enter a key name, and then select "OK".
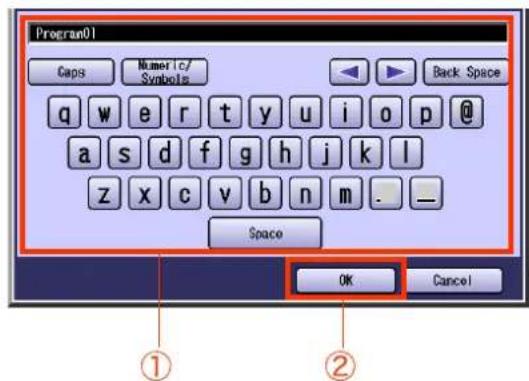
text_image
Program01 Caps Numeric/ Symbols Back Space q w e r t y u i o p @ a s d f g h j k l z x c v b n m . _ Space OK Cancel ① ②7 Program each desired feature.
● Deferred Communication Transmit (see page 48)
Polling (see page 50)
- Polling (see page 52)
- Advanced Communication
MailBox (see page 56)
Sub Address Transmit (see page 64)
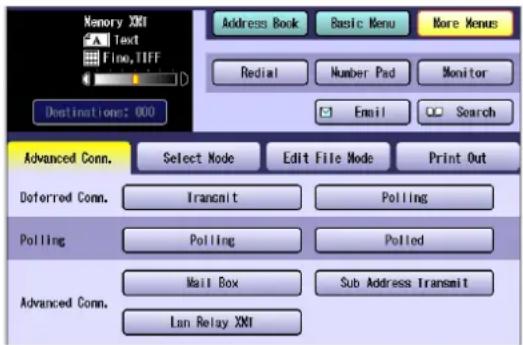
text_image
Memory XXI Text Fine, TIFF Destination: 000 Address Book Basic Menu More Menus Redial Number Pad Monitor Email Search Advanced Conn. Select Mode Edit File Mode Print Out Deferred Conn. Transmit Polling Polling Polling Advanced Conn. Mail Box Sub Address Transmit Lan Relay XXI8 Press the Start key.
The program dial is programmed.
- Press Reset key to return the machine to the initial screen of the current active mode.
Setting for Group Dialling
To program multiple destinations on program key, follow the steps below:
NOTE
For instructions on how to edit pre-programmed station, refer to Editing Address Book. (See page 167)
- For instructions on how to delete pre-programmed station, refer to Deleting a Destination from Address Book. (See page 168)
- For instruction how to print the program list, refer to Printing the Program List. (See page 179)
- To program multiple destinations, each destination must be programmed in advance.
1 Press the Function key.
2 Select "Fax/Email Settings".
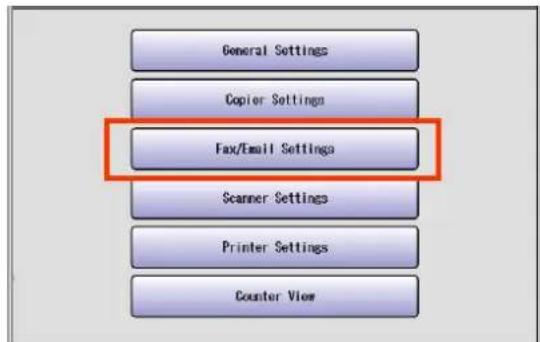
text_image
General Settings Copier Settings Fax/Email Settings Scanner Settings Printer Settings Counter View3 Select "01 Program Keys".
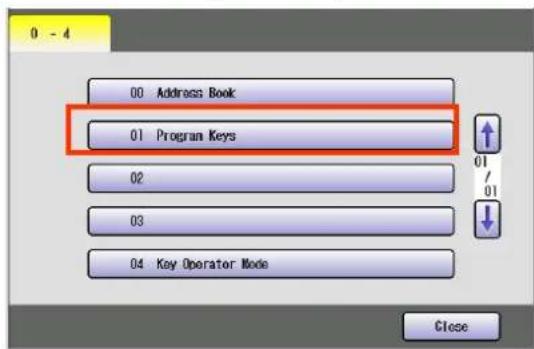
text_image
0 - 4 00 Address Book 01 Program Keys 02 03 04 Key Operator Mode Close4 Select "01 Group Dial".
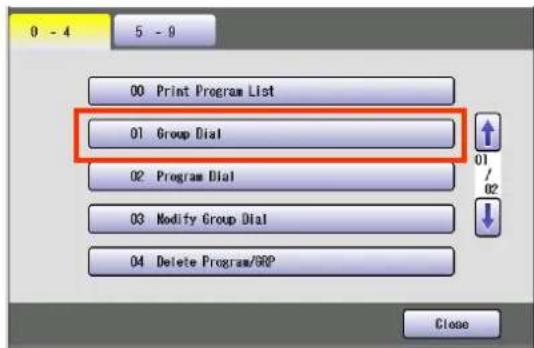
text_image
0 - 4 5 - 9 00 Print Program List 01 Group Dial 02 Program Dial 03 Modify Group Dial 04 Delete Program/GRP Close5 Enter a group dialling name, and then select "OK".
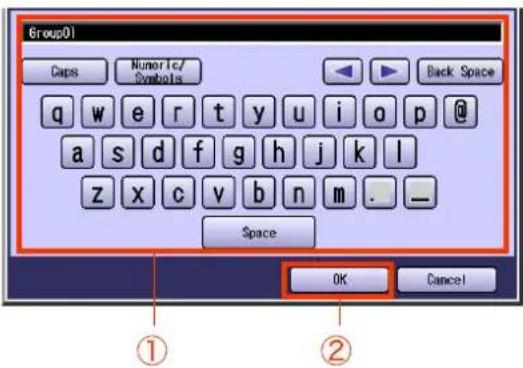
text_image
Group01 Caps Numeric/ Symbols Back Space q w e r t y u i o p @ a s d f g h j k l z x c v b n m . _ Space OK Cancel ① ②- Enter a name up to 15 characters.
- For using the onscreen keyboard, refer to Before Starting in the Operating Instructions (For Function Parameters) on the provided CD-ROM.
6 Enter key name, and then select "OK".
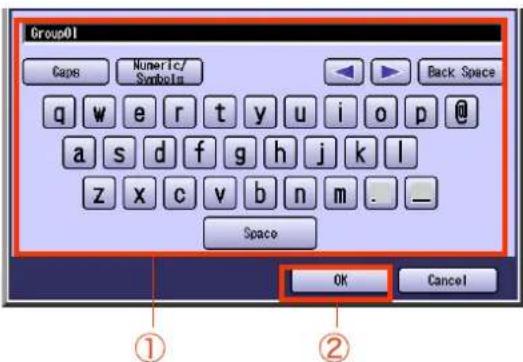
text_image
Group01 Caps Numeric/ Symbols Back Space q w e r t y u i o p @ a s d f g h j k l z x c v b n m . _ Space OK Cancel ① ②7 Select the destinations to be programmed, and then select "OK".
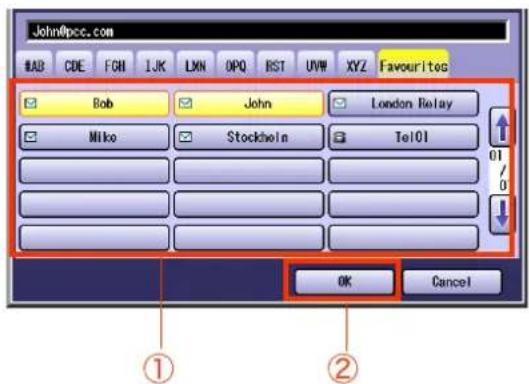
text_image
John@pcc.com #AB CDE FGM IJK LMN OPQ RST UVW XYZ Favourites Bob John London Relay Mike Stockholn Tel01 OK Cancel ① ②The group dialling is programmed.
- Press Reset key to return the machine to the initial screen of the current active mode.
Editing a Group Dialling
To edit a group dialling, follow the steps below:
1 Press the Function key.
2 Select "Fax/Email Settings".

text_image
General Settings Copier Settings Fax/Email Settings Scanner Settings Printer Settings Counter View3 Select "01 Program Keys".
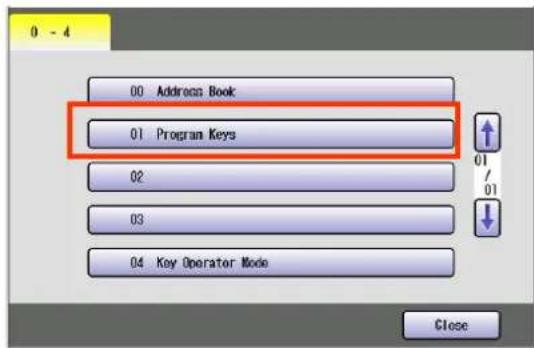
text_image
0 - 4 00 Address Book 01 Program Keys 02 03 04 Key Operator Mode Close4 Select "03 Modify Group Dial".
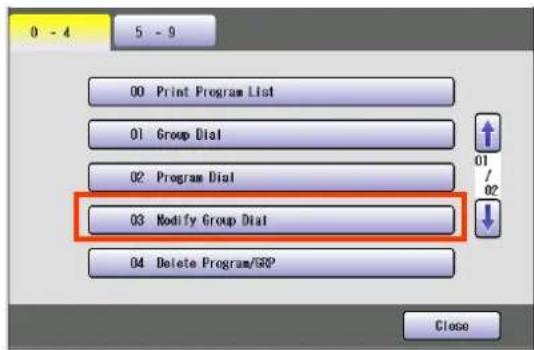
text_image
0 - 4 5 - 9 00 Print Program List 01 Group Dial 02 Program Dial 03 Modify Group Dial 04 Delete Program/GRP Close5 Select the Group Dial button you want to edit, and then select "OK".
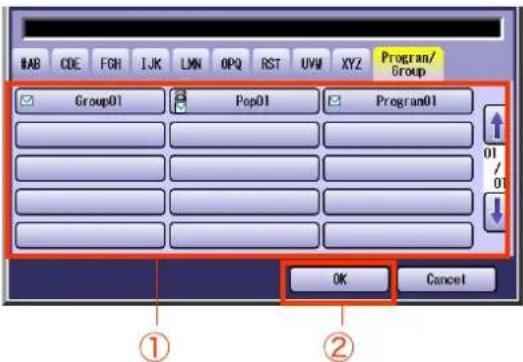
text_image
HAB CDE FGH IJK LMN OPQ RST UVW XYZ Program/Group Group01 Pop01 Program01 OK Cancel ① ②- Select the same button again to cancel the choice.
6 To rename a group dial name, enter a new name, and then select "OK".
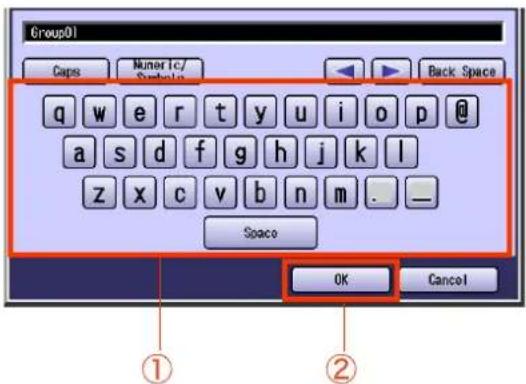
text_image
Group01 Caps Numeric/ Symbol Back Space q w e r t y u i o p @ a s d f g h j k l z x c v b n m . _ Space OK Cancel ① ②7 To rename a group dial key name, enter a new name, and then select "OK".
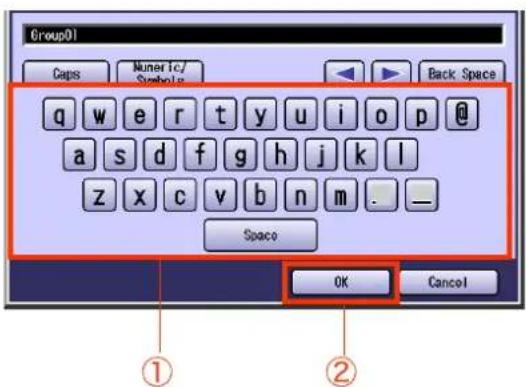
text_image
Group01 Caps Numeric/ Symbols Back Space q w e r t y u i o p @ a s d f g h j k l z x c v b n m . _ Space OK Cancel ① ②8 Select the destination to be programmed, and then select "OK".
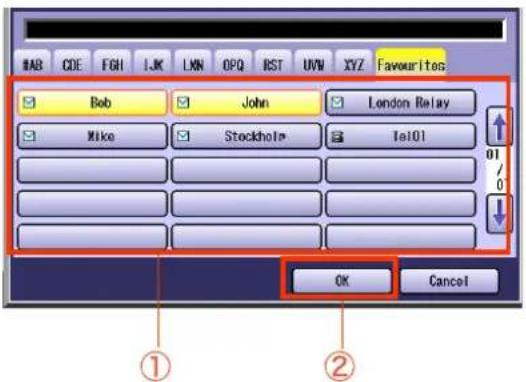
text_image
#AB CDE FGH IJK LKN OPQ RST UVW XYZ Favourites Bob John London Relay Mike Stockholp Tel01 OK Cancel ① ②- Press Reset key to return the machine to the initial screen of the current active mode.
Memo
Deleting the Program Key setting
To delete a program dialling or group dialling destination, follow the steps below:
1 Press the Function key.
2 Select "Fax/Email Settings".
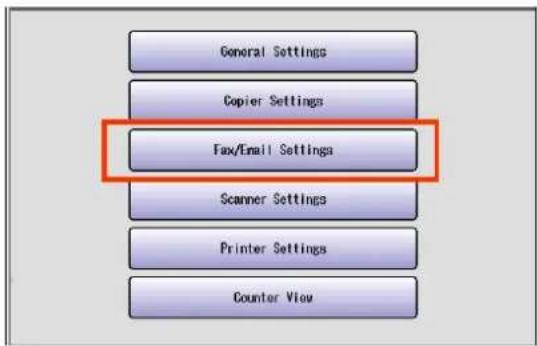
text_image
General Settings Copier Settings Fax/Email Settings Scanner Settings Printer Settings Counter View3 Select "01 Program Keys".
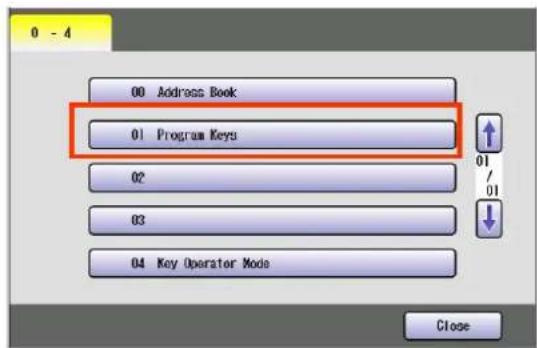
text_image
0 - 4 00 Address Book 01 Program Keys 02 03 04 Key Operator Mods Close4 Select "04 Delete Program/GRP".
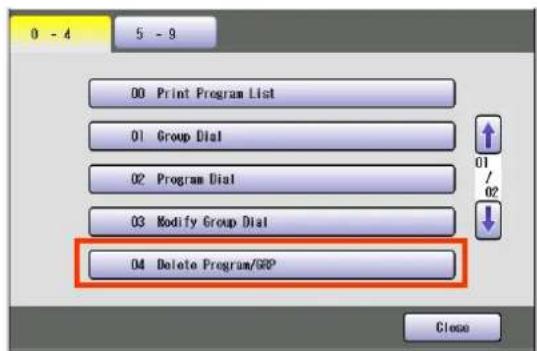
text_image
0 - 4 5 - 9 00 Print Program List 01 Group Dial 02 Program Dial 03 Modify Group Dial 04 Delete Program/GRP Close5 Select a program key, and then select "OK".
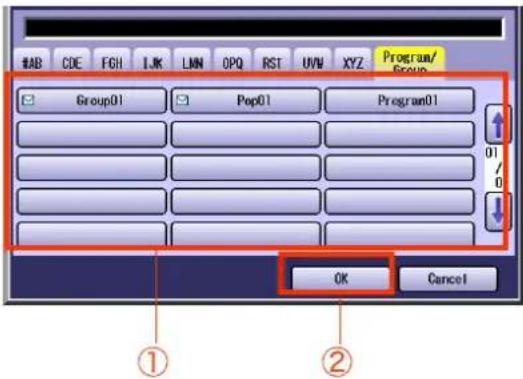
text_image
TAB CDE FCH IJK LMN OPQ RST UVW XYZ Program/Group Group01 Pep01 Program01 01 0 OK Cancel- Select the same button again to cancel the choice.
6 Select "Yes".
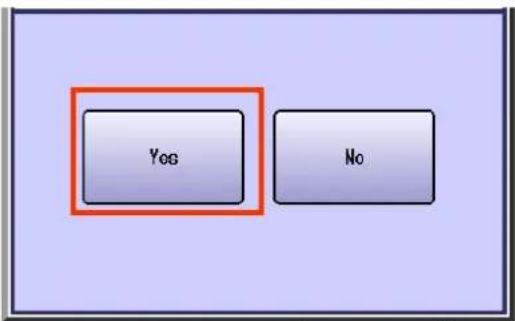
text_image
Yog No
text_image
Yes Select to delete the program key No Select to cancel the deletion.- Press Reset key to return the machine to the initial screen of the current active mode.
Printing the Program List
To print the program list, follow the steps below:
NOTE
- The program list can also be printed by selecting "Print Out" in "More Menus". (See page 192)
- For more details about the items in the program list, refer to Reading Program List. (See page 193)
1 Press the Function key.
2 Select "Fax/Email Settings".
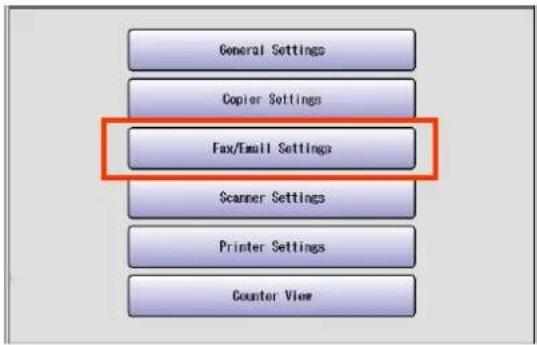
text_image
General Settings Copier Settings Fax/Email Settings Scanner Settings Printer Settings Counter View3 Select "01 Program Keys".
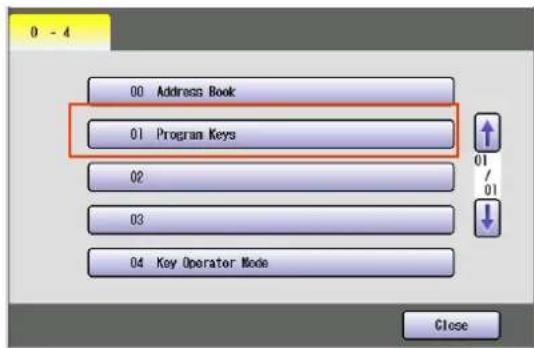
text_image
0 - 4 00 Address Book 01 Program Keys 02 03 04 Key Operator Mode Close4 Select "00 Print Program List".
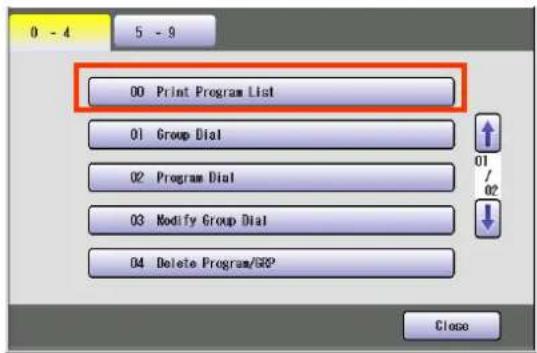
text_image
0 - 4 5 - 9 00 Print Program List 01 Group Dial 02 Program Dial 03 Modify Group Dial 04 Delete Program/GRP Close5 Select "Start", and then select "OK".
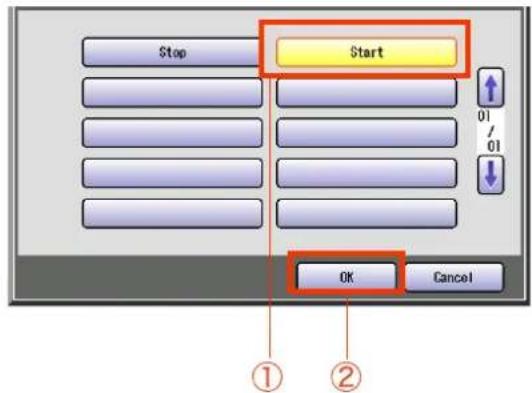
text_image
Stop Start 01 / 01 ↓ OK Cancel ① ②The program list is printed.
- Press Reset key to return the machine to the initial screen of the current active mode.
Programming Email Manual Reception on Program Keys
When this machine is connected to a POP Server, POP Account name and password other than the machine's one can be programmed for a program key to receive Emails.
To enter an Email address and a password, follow the steps below:
NOTE
- If you leave a password blank in Step 8, a password prompt window will appear upon POP reception. In order to strengthen the security, you are advised to leave a password blank.
- For instruction how to print the program list, refer to Printing the Program List. (See page 179).
- To program multiple destinations, each destination must be programmed in advance.
1 Press the Function key.
2 Select "Fax/Email Settings".
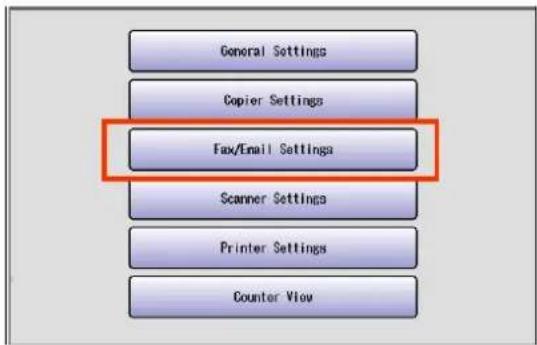
text_image
General Settings Copier Settings Fax/Email Settings Scanner Settings Printer Settings Counter View3 Select "01 Program Keys".
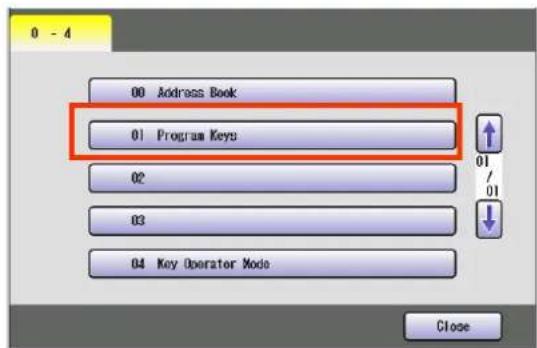
text_image
0 - 4 00 Address Book 01 Program Keys 02 03 04 Key Operator Mode Close4 Select "5-9".
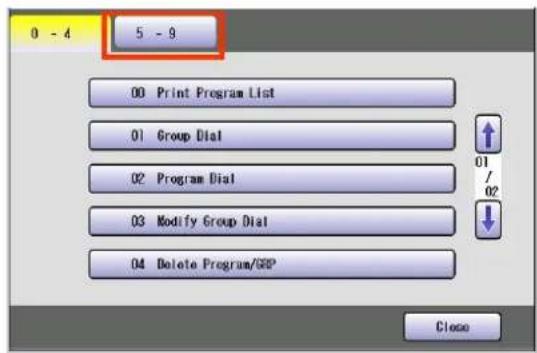
text_image
0 - 4 5 - 9 00 Print Program List 01 Group Dial 02 Program Dial 03 Modify Group Dial 04 Delete Program/GRP Close5 Select "05 Manual POP RCV".
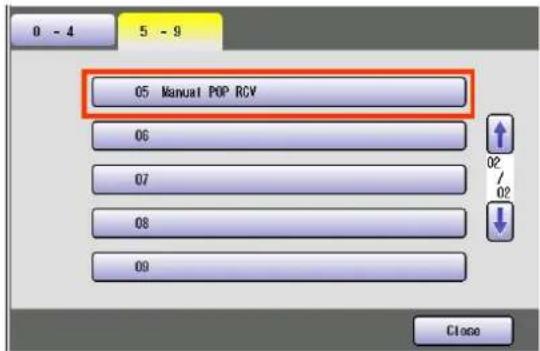
text_image
05 Manual POP RCV 06 07 08 09 Close6 Enter a POP Account name, and then select "OK".
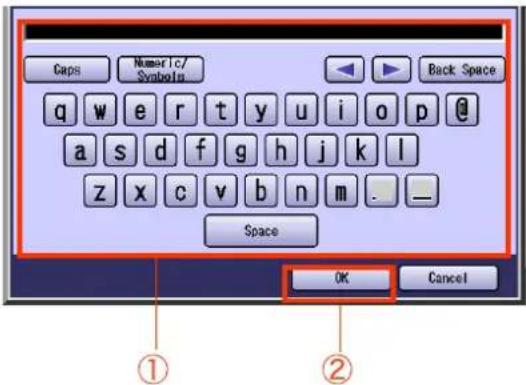
text_image
Caps Numeric/ Symbols Back Space q w e r t y u i o p @ a s d f g h j k l z x c v b n m . _ Space OK Cancel ① ②7 Enter a key name (program button name), and then select "OK".
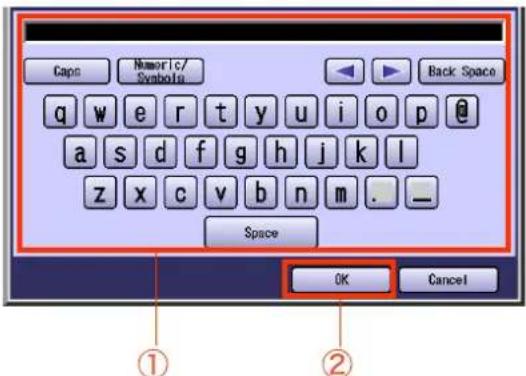
text_image
Caps Numeric/ Symbols Back Space q w e r t y u i o p @ a s d f g h j k l z x c v b n m . _ Space OK Cancel ① ②8 Enter the password, and then select "OK".
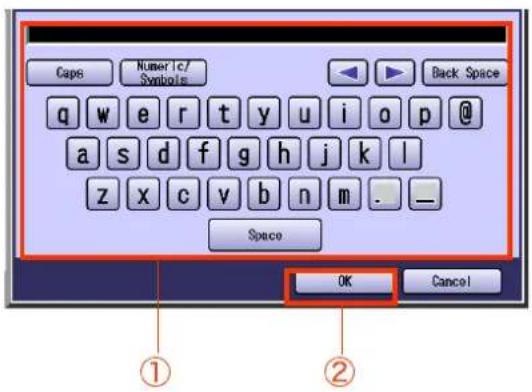
text_image
Caps Numeric/ Symbols Back Space q w e r t y u i o p @ a s d f g h j k l z x c v b n m . _ Space OK Cancel ① ②9 Select "Invalid" or "Valid", and then select "OK".
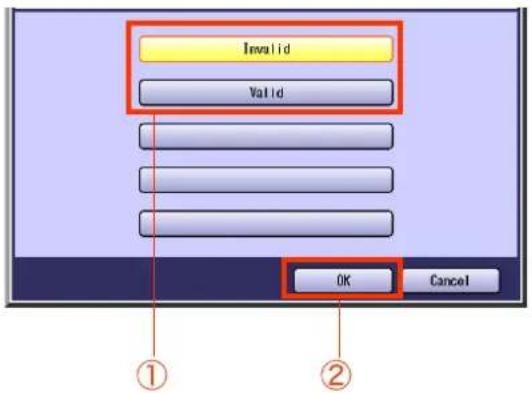
text_image
Invalid Valid OK Cancel| Invalid Select to leave Email on the POP Server after it has been received. | |
| Valid Select to delete Email from the POP Server after it has been received. |
The POP reception feature is programmed.
- Press Reset key to return the machine to the initial screen of the current active mode.
Transaction Journal
The “Journal” is a record of the last 200 transactions (a transaction is recorded each time you send or receive a document). It is printed out automatically after every 200 transactions or you can print or view it manually by using the following procedure.
- Regardless of the "13 Auto Print JRNL" setting in Function Parameters, a transaction journal can be printed by selecting "Journal" from "More Menus".
- Select "XMT Only (View)" or "All (View)" in the "Journal" from "More Menus" to verify the transaction result on the touch-panel display.
This section explains how to print manually, view and read the transaction journal on the touch-panel display.
NOTE
- The standard setting of "13 Auto Print JRNL" is "Valid". For instructions on how to modify. Journal feature, refer to Fax/Email Settings in the Operating Instructions (For Function Parameters) on provided CD-ROM.
Printing Transaction Journal
To print the transaction journal, follow the steps below:
1 Press the Fax key.
2 Select "More Menus".
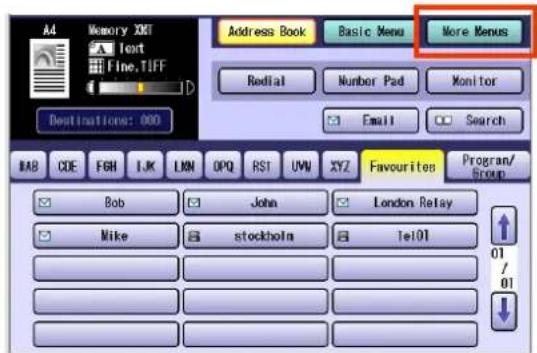
text_image
A4 Memory XMT Text Fine.TIFF Address Book Basic Menu More Menus Redtail Number Pad Monitor Email Search Destinations: 000 BAB CDE FGH IJK LWN OPQ RST UVN XYZ Favourites Program/ Group Bob John London Relay Mike stockholn 1e101 01 /01 ↓3 Select "Print Out".
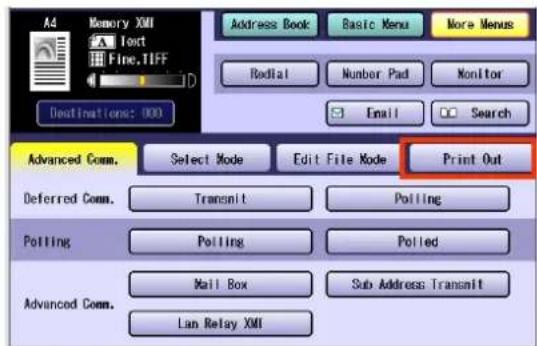
text_image
Address Book Basic Menu More Menus Radial Number Pad Monitor Email Search Destinations: 000 Advanced Comm. Select Mode Edit File Mode Print Out Deferred Comm. Transmit Potting Potting Potted Advanced Comm. Mail Box Sub Address: Transmit Lan Relay XMI4 Select "Journal".
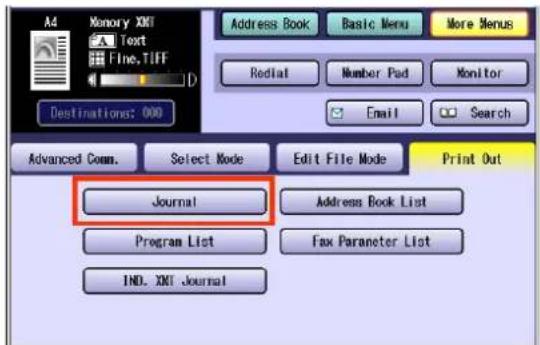
text_image
Memory XMT Text Fine, TIFF D Address Book Basic Menu More Menus Redlat Number Pad Monitor Email Search Advanced Conn. Select Mode Edit File Mode Print Out Journal Address Book List Program List Fax Parameter List IND. XMT Journal5 Select "List Print".
The transaction journal will be printed.
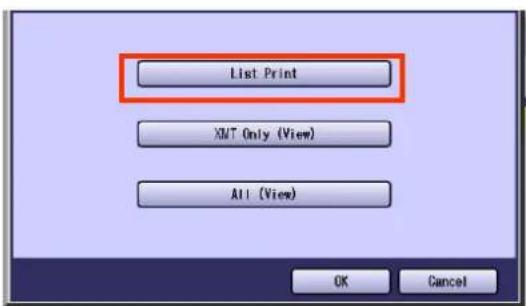
text_image
List Print XML Only (View) All (View) OK Cancel- Press Reset key to return the machine to the initial screen of the current active mode.
Viewing Communication Results on Touch-Panel Display
To view the communication results on the touch-panel display, follow the steps below:
1 Press the Fax key.
2 Select "More Menus".
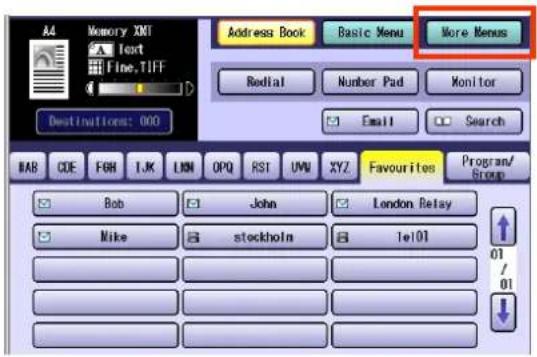
text_image
Memory XMT Text Fine.TIFF Address Book Basic Menu More Menus Redial Number Pad Monitor Email Search Destinations: 000 BAB CODE FOR 1.K LNN OPQ RST UMU XYZ Favourites Program/Group Bob John London Relay Mike stockholm 1e101 01 / 01 ↓3 Select "Print Out".
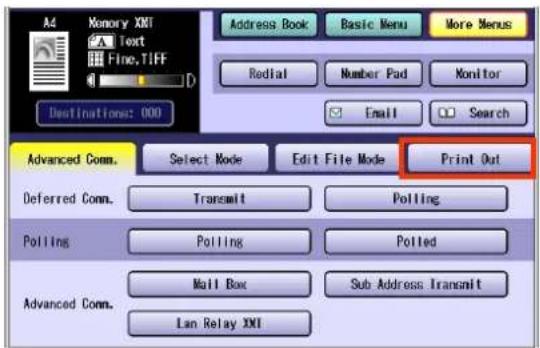
text_image
Ad Memory XMT Text Fine, TIFF Address Book Basic Menu More Menus Redial Number Pad Monitor Email Search Destination: 000 Advanced Comm. Select Mode Edit File Mode Print Out Deferred Comm. Transmit Polling Polling Polling Advanced Comm. Mail Box Sub Address Transmit Lan Relay XMT4 Select "Journal".
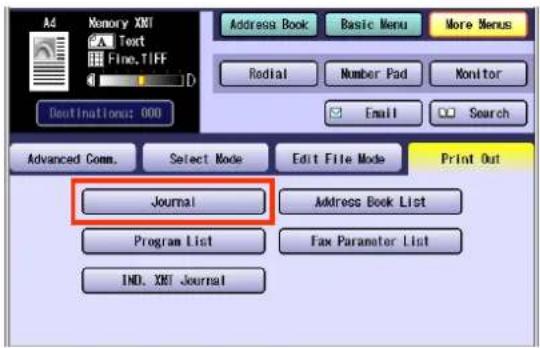
text_image
Ad Memory XMT Text Fine.TIFF D Address Book Basic Menu More Menus Radial Number Pad Monitor Email Search Deformations: 000 Advanced Comm. Select Mode Edit File Mode Print Out Journal Address Book List Program List Fax Parameter List IND. XMJ Journal5 Select "XMT Only (View)" or "All (View)".
Communication results will be displayed.
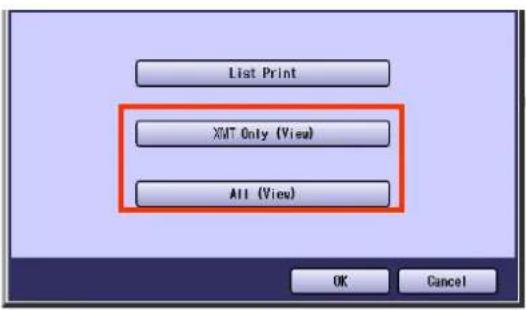
text_image
List Print XMT Only (View) All (View) OK Cancel| XMT Only (View) | Select to view only the transmission result. |
| All (View) Select to view both the transmission and reception results. | |
6 When the verification completes, select "OK".
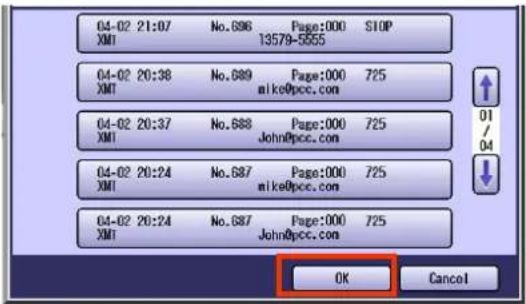
text_image
04-02 21:07 No.696 Page:000 STOP XMI 13579-5555 04-02 20:38 No.689 Page:000 725 XMI mike@pcc.com 04-02 20:37 No.688 Page:000 725 XMI John@pcc.com 04-02 20:24 No.687 Page:000 725 XMI mike@pcc.com 04-02 20:24 No.687 Page:000 725 XMI John@pcc.com OK Cancel- Press Reset key to return the machine to the initial screen of the current active mode.
Reading Transaction Journal
Items in the transaction journal are listed below.
| (1) (2)********** -Journal-********** Date DD-MMM-YYYY **** Time 15:00 ***** P.01 | |||||||||
| (3) | (4) | (5) | (6) | (7) | (8) | (9) | (10) | (11) | (12) |
| No. | Comm. | Pages | File | Duration | X/R | Identification | Date | Time | Diagnostic |
| 001 | OK | 001/002 | 149 | 00:00:52 | XMT | 215 | 15-AUG | 20:04 | C8444B0577000 |
| 002 | -- | 001/001 | 151 | 00:00:02 | XMT | TEST | 15-AUG | 20:07 | 001STN(S) LAN |
| 003 | -- | 003/003 | 153 | 00:00:20 | XMT | fax@nwfax1 | 15-AUG | 20:09 | 001STN(S) LAN |
| 004 | OK | 003/003 | 154 | 00:00:21 | RCV | fax@nwfax1.rdmg.mgcs | 15-AUG | 20:10 | LAN |
| 005 | OK | 001 | 155 | 00:00:19 | XMT | 215 | 15-AUG | 20:11 | C0542B0577000 |
| 006 | 634 | 000/003 | 156 | 00:00:00 | XMT | 215 | 15-AUG | 20:14 | 0800420000000 |
| 007 | 408 | *003 | 00:02:14 | XMT | 215 | 15-AUG | 21:17 | 0040440A30080 | |
| 049 | OK | 000/001 | 159 | 00:00:07 | XMT | TEL XMT | 15-AUG | 20:14 | 0800420000000 |
| 050 | OK | 001/001 | 160 | 00:00:16 | XMT | TEL XMT | 15-AUG | 20:19 | CB444BG577000 |
| << Continue >> | |||||||||
| (13) | |||||||||
| -PANASONIC | - | ||||||||
| ********** DP-XXXX********** -HEAD OFFICE -***** - | 201 555 1212-********** | ||||||||
| (14) | |||||||||
| No. Item Explanation | |
| (1) Printout date The date and time at which the Transaction Journal printed. | |
| (2) Printout time Printout time. | |
| (3) Journal number Journal number. | |
| (4) Communication result “OK” indicates that the communication was successful.“Busy” indicates that the communication has failed because of busy line.“Stop” indicates that STOP was pressed during communication.“P-OK” indicates that memory overflow occurred while storing the documents into the memory for transmission but successfully stored document(s) was sent.“R-OK” indicates that the Relayed XMT was successful.“B-OK” indicates that the Batch Transmission was successful.“M-OK” indicates that the memory reception/ substitute reception was successful.“- -” indicates LAN transmission.“3-digit Info Code” indicates that the communication has failed.Refer to Information Codes. (See page 200) | |
| No. | Item | Explanation |
| (5) | Pages Number of pages transmitted or received. The 3-digit number is the number of pages successfully transmitted or received.When the documents are stored into the memory, two 3-digit numbers will appear.The first 3-digit number represents the number of pages successfully transmitted.The second 3-digit number represents the total number of pages that were attempted to be transmitted.Asterisk “*” indicates that the quality of some received copies was poor. | |
| (6) | File number 001 to 999 (When the communication is stored into the memory, a file number is assigned for each communication.) | |
| (7) | Duration of communication | Duration of communication. |
| (8) | Type of communication “XMT” means Transmission“RCV” means Reception“POL” means Polling“PLD” means Polled“FWD” means Fax Forward | |
| (9) | Remote station identification | Name: Recorded name in the of provided booklet or remote station's Character ID.number: Dialled telephone number. (PIN code will not be shown)Number: Remote station's ID number.Email address |
| (10) | Communication date Communication date. | |
| (11) | Communication Start time Communication Start time. | |
| (12) | Diagnostic For service personnel only | |
| (13) | Own LOGO Up to 25 characters | |
| (14) | Own ID number Up to 20 digits | |
| (15) | Own Character ID Up to 16 characters |
Communication Journal
This is a report that is printed at the end of each transaction to keep a record of the communication result.
- A communication journal is printed when the “12 Comm. Journal (HOME)” has been set to “Always” or “Inc Only” in Function Parameters (Fax/Email Settings> Fax Parameters)..
If set to "Always"
A communication journal will be printed when a transaction completes or fails.
If set to "Inc Only"
A communication journal will be printed only when a transaction has failed, for example, due to a communication error.
- Even with the communication journal is set to "Off" in More menus/Select Mode, you may also configure the machine to print a communication journal individually. For more operational details, refer to Printing Transaction Journal. (See page 182)
- If a memory transmission has failed, for example, due to a communication error, an image of the first page of the document transmitted is covered in the communication journal, but not for direct transmissions.
This section explains how to read the communication journal.
NOTE
The standard setting of "12 Comm. Journal (HOME)" is "Inc Only" in Function Parameters (Fax/Email Settings> Fax Parameters). For instructions on how to enable the COMM. Journal feature, refer to Fax/Email Settings in the Operating Instructions (For Function Parameters) on the provided CD-ROM.
Items that are covered in the communication journal are listed below.
| ********** -Comm. Journal- ******* Date DD-MMM-YYYY ** Time 15:00 ******* | |||||
| (1) Mode= Memory Transmission (2) Start = DD-MMM 14:50 (3) End = DD-MMM 15:00 File No.= 050 (4) | |||||
| (5) Stn No. | (6) Comm. | (7) Key Name | (8) Station Name/Email Address/Telephone No. | (9) Pages | (10) Duration |
| 001 | OK | [SERVICE] | SERVICE DEPT | 001/001 | 00:01:30 |
| 002 | OK | [SALES DEPT] | SERVICE DEPT | 001/001 | 00:01:25 |
| 003 | 407 | [ACCOUNTING] | SERVICE DEPT | 000/001 | 00:01:45 |
| 004 | Busy | 021 111 1234 | 000/001 | 00:00:00 | |
| No. Item Explanation | |
| (1) Indication of communication mode | Indication of communication mode. |
| (2) Start time of communication | Start time of communication. |
| (3) End time of communication | End time of communication. |
| (4) File number 001 to 999 (When the communication is stored into the memory, a file number is assigned for each communication.) | |
| (5) Station number Sequential number of the Stations. | |
| (6) Communication result “OK” indicates that the communication was successful.“Busy” indicates that the communication has failed because of busy line.“Stop” indicates that STOP was pressed during communication.“P-OK” indicates that memory overflow occurred while storing the documents into the memory for transmission but successfully stored document(s) was sent.“R-OK” indicates that the Relayed XMT was successful.“B-OK” indicates that the Batch Transmission was successful.“M-OK” indicates that the memory reception/ substitute reception was successful.“- - ” indicates LAN transmission.“3-digit Info Code” indicates that the communication has failed.Refer to Information Codes. (See page 200)In this case, the machine will print the attached report with first page of your document as shown on the previous page. | |
| (7) Key name or mark | mark indicates dialling by direct number dialling. |
| (8) Recorded name in the of provided booklet, direct dialling number, or Email address | Recorded name in the of provided booklet, direct dialling number, or Email address. |
| (9) Number of pages transmitted or received | The 3-digit number is the number of pages successfully transmitted or received.When the documents are stored into the memory, two 3-digit numbers will appear.The first 3-digit number represents the number of pages successfully transmitted.The second 3-digit number represents the total number of pages that were attempted to be transmitted. |
| (10) Duration of Communication | Duration of Communication. |
Memo
Address Book List
This section explains how to print and read the address book list.
Printing Address Book List
To print an address book list, follow the steps below:
NOTE
The address book list can also be printed by programming "Fax/Email Settings> Fax Parameters" in Function Parameters.
1 Press the Fax key.
2 Select "More Menus"
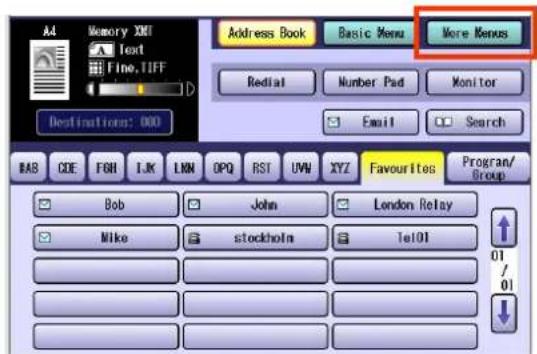
text_image
A4 Memory XMI Text Fine, TIFF Address Book Basic Menu More Menus Redial Number Pad Monitor Email Search Destinations: 000 BAB CDE FGH I.K LNN OPQ RST UVW XYZ Favourites Program/ Group Bob John London Relay Mike stockholn tel01 01 /01 ↓3 Select "Print Out".
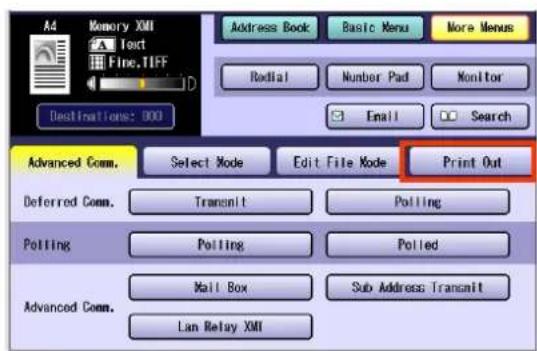
text_image
Ad Memory XMI Text Fine.TIFF Address Book Basic Menu More Menus Radial Number Pad Monitor Email Search Destinations: 000 Advanced Comm. Select Mode Edit File Mode Print Out Deferred Comm. Transmit Potting Potting Polled Advanced Comm. Mail Box Sub Address Transmit Lan Relay XMI4 Select "Address Book List".
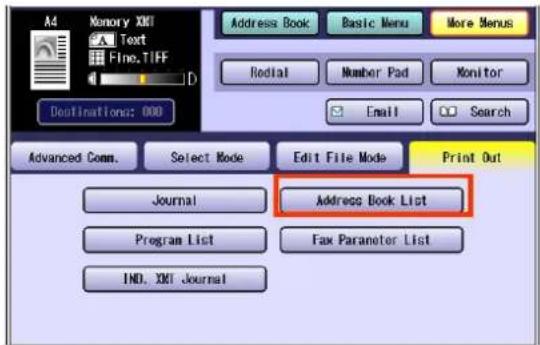
text_image
A4 Memory XMT Text Fine.TIFF D Address Book Basic Menu More Menus Rodial Number Pad Monitor Email Search Destinations: 000 Advanced Comm. Select Mode Edit File Mode Print Out Journal Address Book List Program List Fax Parameter List IND. XMT JournalThe address book list will be printed.
- Press Reset key to return the machine to the initial screen of the current active mode.
Reading Address Book List
Items in the address book list are listed below.
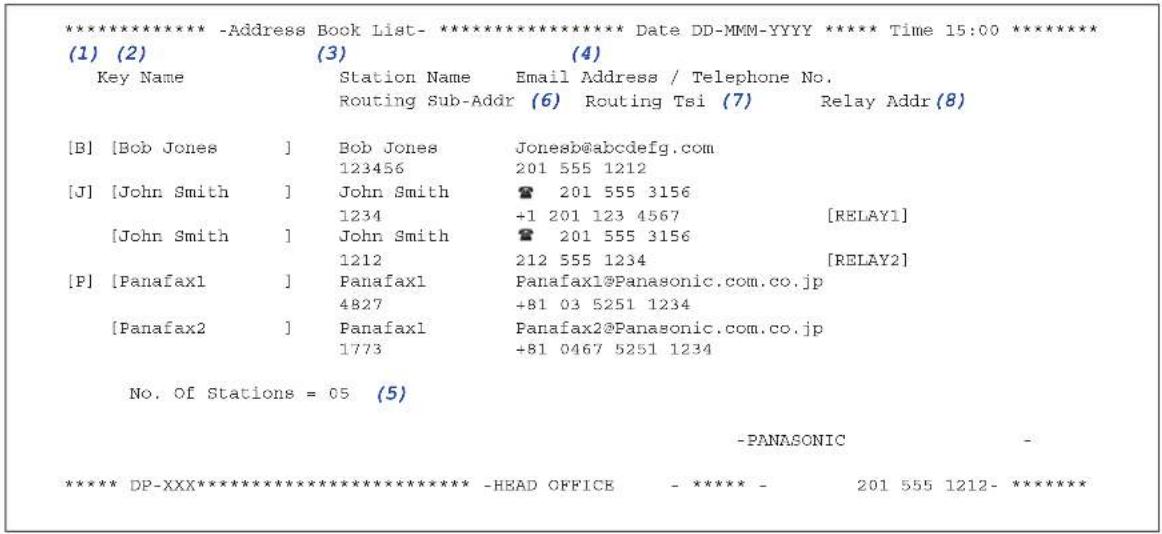
text_image
********** -Address Book List- ************ Date DD-MMM-YYYY ***** Time 15:00 ******* (1) (2) (3) (4) Key Name Station Name Email Address / Telephone No. Routing Sub-Addr (6) Routing Tsi (7) Relay Addr (8) [B] [Bob Jones ] Bob Jones Jonesb@abcdefg.com 123456 201 555 1212 [J] [John Smith ] John Smith 📞 201 555 3156 1234 +1 201 123 4567 [RELAY1] [John Smith ] John Smith 📞 201 555 3156 1212 212 555 1234 [RELAY2] [P] [Panafax1 ] Panafax1 Panafax1@Panasonic.com.co.jp 4827 +81 03 5251 1234 [Panafax2 ] Panafax1 Panafax2@Panasonic.com.co.jp 1773 +81 0467 5251 1234 No. Of Stations = 05 (5) -PANASONIC ******* DP-XXX*************** -HEAD OFFICE - ***** - 201 555 1212- *******| No. Item Explanation | |
| (1) The first letter of station name recorded in your machine | The first letter of station name recorded in your machine. |
| (2) Key name recorded in the machine | Up to 15 characters |
| (3) Station name recorded in the machine | Up to 15 characters |
| (4) Email address recorded in the machine | Up to 60 characters (Email address) |
| Telephone number recorded in the machine | Up to 36 digits (Telephone number) |
| (5) Number of recorded Address Book stations | Telephone Number/Email Address programmed for the Address Book |
| (6) Routing Sub-Address Up to 20 digits | |
| (7) Routing TSI Up to 20 digits | |
| (8) Relay Address Relay Address |
Program List
This section explains how to print and read the program list.
Printing Program List
To print the program list, follow the steps below:
NOTE
The program list can also be printed by programming "Fax/Email Settings> Fax Parameters" in the Function Parameters.
1 Press the Fax key.
2 Select "More Menus".
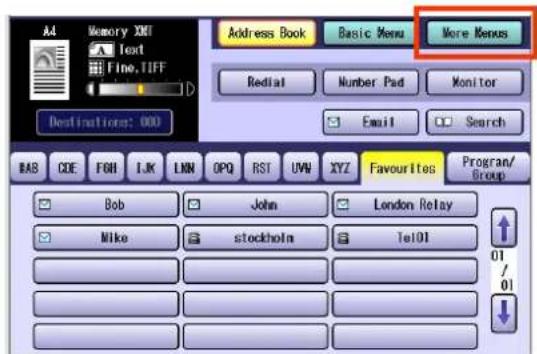
text_image
A4 Memory XMI Text Fine.IFF Address Book Basic Menu More Menus Redtail Number Pad Monitor Email Search BAS CDE FGH I.K LNN OPQ RST UVW XYZ Favourites Program/ Group Bob John London Relay Mike stockholm Tel01 01 /01 Destination: 0003 Select "Print Out".
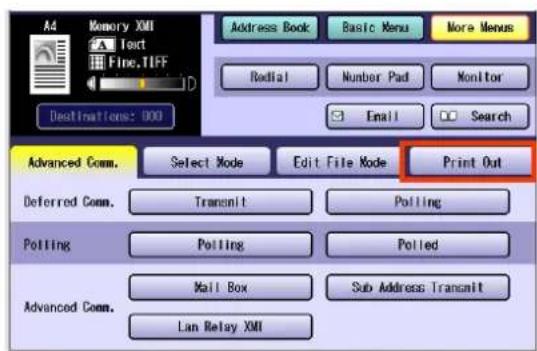
text_image
Ad Memory XMI Text Fine.TIFF Address Book Basic Menu More Menus Redial Number Pad Monitor Email Search Destinations: 000 Advanced Comm. Select Mode Edit File Mode Print Out Deferred Comm. Transmit Polling Polling Polling Advanced Comm. Mail Box Sub Address Transmit Lan Relay XMI4 Select "Program List".
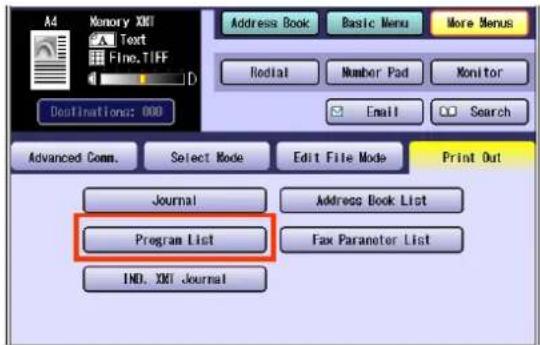
text_image
Memory XMT Text Fine.TIFF D Address Book Basic Menu More Menus Rodial Number Pad Monitor Email Search Advanced Comm. Select Mode Edit File Mode Print Out Journal Address Book List Program List Fax Parameter List IND. XMT JournalThe program list will be printed.
- Press Reset key to return the machine to the initial screen of the current active mode.
Reading Program List
Items in the program list are listed below.
| ********** -Program List- ******* Date DD-MMM-YYYY ***** Time 15:00 ******* | |||||
| (1) Key Name | (2) Program Name | (3) Type | Timer | (4) Destination(S) | |
| [TEST] | TEST | Group | ---- | [PANAFAX] | [SALE DEPT] |
| [ACCOUNT] | ACCOUNT | POP | ---- | Delete Email: | Invalid (5) |
| [ACC] | ACC | POP | ---- | Delete Email: | Valid |
| [PROG.B] | PROG.B | Group | ---- | [PANAFAX] | [PANASONIC] |
| -PANASONIC | |||||
| ******* DP-XXXX******* -HEAD OFFICE -***** - 201 555 12121 ******* | |||||
| No. Item Explanation | ||
| (1) Key name Key name. | ||
| (2) Program name Up to 15 characters | ||
| (3) | Type of communication | “Group” indicates that the Program key is programmed as a group key.“POP” indicates that the Program key is programmed as a Email Manual Reception key.“XMT” indicates that the Program key is programmed as a Deferred Transmit key or Sub Address Transmit key.“Poll” indicates that the Program key is programmed as a Deferred Polling key or Polling key.“Conf. Poll” indicates that the Program key is programmed as a Confidential Polling key.“Conf. XMT” indicates that the Program key is programmed as a Confidential Transmit key. |
| (4) Destinations Destinations programmed into the Program key. | ||
| (5) Deletion of received Email | “Valid” means that the received Email will be deleted.“Invalid” means that the received Email will be retained. | |
Fax Parameter List
This section explains how to print and read the fax parameter list.
Printing Fax Parameter List
To print the fax parameter list, follow the steps below:
1 Press the Fax key.
2 Select "More Menus".
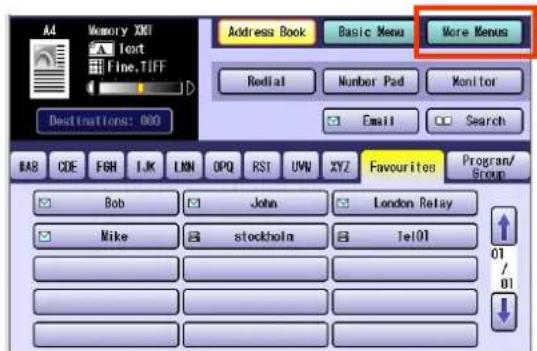
text_image
A4 Memory XMT Text Fine.TIFF Address Book Basic Menu More Menus Redial Number Pad Monitor Email Search Destinations: 000 BAB CDE FGR I.K LNN OPQ RST UVV XYZ Favourites Program/ Group Bob John London Relay Mike stockholm 1e101 01 /01 ↓3 Select "Print Out".
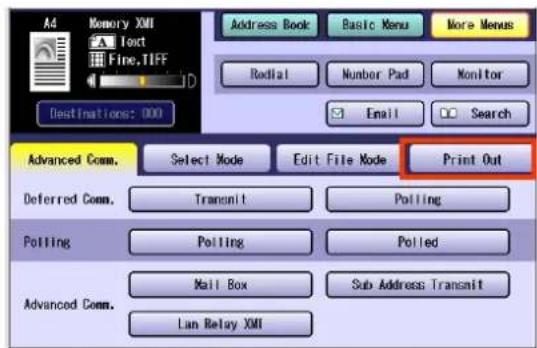
text_image
Memory XMI Text Fine,TIFF Address Book Basic Menu More Menus Redial Number Pad Monitor Email Search Destinations: 000 Advanced Comm. Select Mode Edit File Mode Print Out Deferred Comm. Transmit Polling Polling Polling Advanced Comm. Mail Box Sub Address Transmit Lan Relay XMI4 Select "Fax Parameter List".
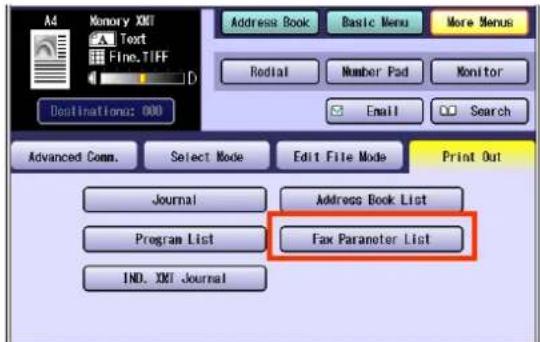
text_image
Memory XMT Text Fine.TIFF D Address Book Basic Menu More Menus Rodial Number Pad Monitor Email Search Advanced Comm. Select Mode Edit File Mode Print Out Journal Address Book List Program List Fax Parameter List IND. XMT JournalThe fax parameter list will be printed.
- Press Reset key to return the machine to the initial screen of the current active mode.
Reading Fax Parameter List
Items in the fax parameter list are listed below.
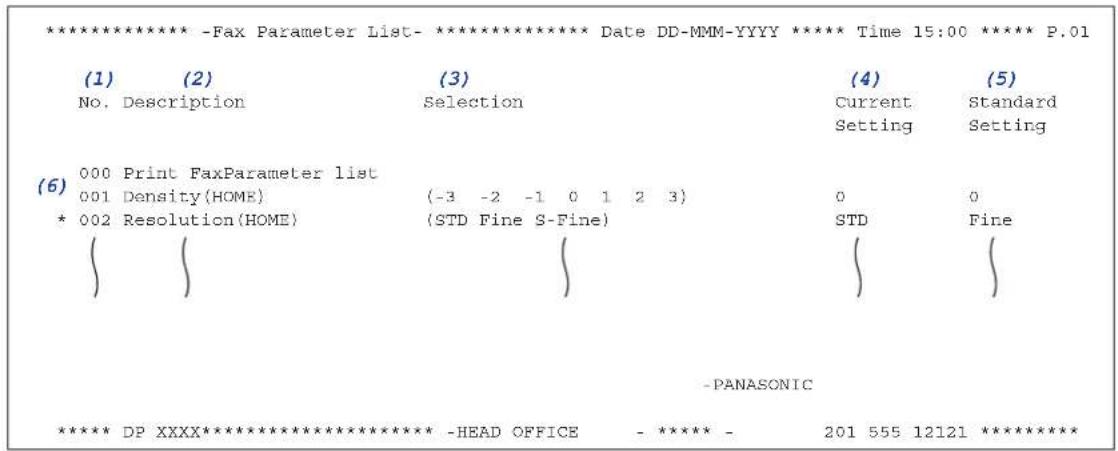
text_image
****************-Fax Parameter List-**************** Date DD-MMM-YYYY ***** Time 15:00 ***** P.01 (1) (2) No. Description Selection (3) Current Setting (4) Standard Setting (5) 000 Print FaxParameter list 001 Density(HOME) * 002 Resolution(HOME) (-3 -2 -1 0 1 2 3) (STD Fine S-Fine) 0 STD Fine - -PANASONIC **************** DP XXXX**************** -HEAD OFFICE - ***** - 201 555 12121 ******************| No. Items Explanation | |
| (1) Parameter number Parameter number. | |
| (2) Description “(HOME)” means home position setting. | |
| (3) Selection Selection. | |
| (4) Current setting “----” indicates the code or password is not set. When the code or password is set, it is shown by asterisk (*). | |
| (5) Standard setting Factory preset standard setting | |
| (6) Changed setting “*” indicates that the Factory preset setting was changed. | |
Individual XMT Journal
This section explains how to print and read the individual XMT journal.
Printing Individual XMT Journal
To print the individual XMT journal, follow the steps below:
1 Press the Fax key.
2 Select "More Menus".
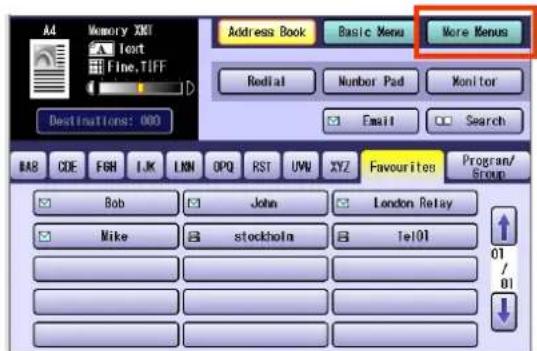
text_image
A4 Memory XMT Text Fine.TIFF Address Book Basic Menu More Menus Redial Number Pad Monitor Email Search Destinations: 000 BAR CDE FGR I.K LNN OPQ RST UVU XYZ Favourites Program/ Group Bob John London Relay Mike stockholn 1e101 01 / 01 ↓3 Select "Print Out".
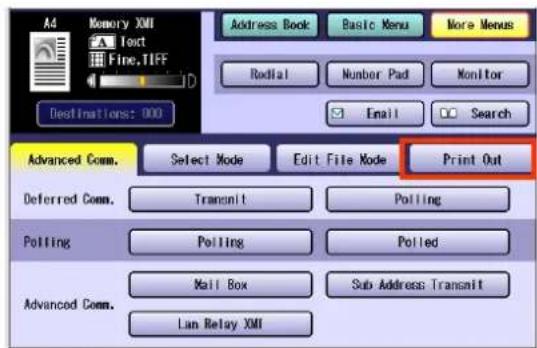
text_image
Memory XMI Text Fine,TIFF Address Book Basic Menu More Menus Radial Number Pad Monitor Email Search Destinations: 000 Advanced Comm. Select Mode Edit File Mode Print Out Deferred Comm. Transmit Polling Polling Polling Advanced Comm. Mail Box Sub Address Transit Lan Relay XMI4 Select "IND. XMT Journal".
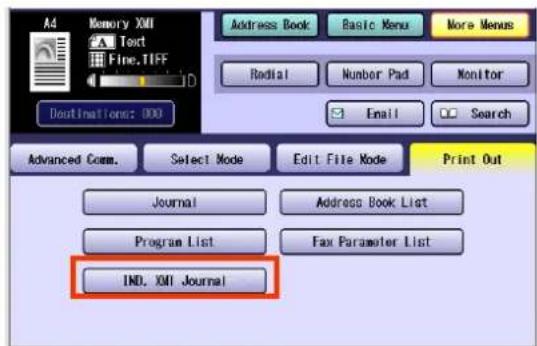
text_image
Memory XMI Text Fine.TIFF Destinations: 000 Address Book Basic Menu More Menus Radial Number Pad Monitor Email Search Advanced Comm. Select Mode Edit File Mode Print Out Journal Address Book List Program List Fax Parameter List IND. XMI JournalThe individual XMT journal will be printed.
- Press Reset key to return the machine to the initial screen of the current active mode.
Reading Individual XMT Journal
Items in the individual XMT journal are listed below.
********** -Ind. XMT Journal- ************ Date DD-MMM-YYYY ***** Time 15:00 **********
(1) Date/Time = DD-MMM-YYYY 00:02
(2) Journal No. = 035
(3) Comm. Result = OK
(4) Page(S) = 001
(5) Duration = 09:00:01
(6) File No. = 053
(7) Mode = Memory Transmission
(8) Destination = 0123456789
(9) Received ID = 0001
(10) Resolution = Std
- PANASONIC
********DP-XXXX ************** - HEAD OFFICE - ***** - 201 555 1212 - **************
| No. Item Explanation | |
| (1) Date/Time The date and time when the individual XMT journal is printed. | |
| (2) Journal No. Journal number. | |
| (3) Comm. Result Communication result. | |
| (4) Page (s) Number of pages transmitted. | |
| (5) Duration Duration of the communication. | |
| (6) File no. File number. | |
| (7) Mode Communication mode. | |
| (8) Destination Email address or fax number of the remote station. | |
| (9) Received ID Received ID of the fax. | |
| (10) Resolution | Resolution that the fax was transmitted. |
Tips for Solving Problems
If you encounter the problems, please check following items.
| Problem Symptom Action Refer to | |||
| While sending | A document does not feed, or multiple pages are fed at the same time. | ·Check that the document does not have staples or clips attached to it and that it is not smeared or broken. ·Check if the document is loaded properly. | —— |
| Does not stamp. | Verify the settings of "04 Stamp (HOME)" and "28 Stamp at Memory XMT" in Function Parameters> Fax/Email Settings> Fax Parameters. | Operating Instructions (For Function Parameters) | |
| The verification stamp image appears too light. | Replace the verification stamp. Replacing the | Verification Stamp (See page 208) | |
| Vertical lines appear in a transmitted document. | Make a copy on this machine and check its image quality. If the copy is OK, notify the receiving station at fault. If copy is NG, clean the document scanning surface area. | —— | |
| Document is transmitted as blank paper. | ·Check if the document is loaded properly. ·Make a copy on this machine and check its image quality. If the copy is OK, notify the receiving station at fault. If copy is NG, clean the document scanning surface area. | —— | |
| While receiving | Paper out An error massage will appear on the display if the machine has run out of the paper while receiving a document. Load paper. | —— | |
| Paper jam If paper jam occurs, an error code is displayed. Remove the jammed paper. | Operating Instructions (For Basic Operations) | ||
| Paper does not feed. Check if the paper tray is loaded with paper. Load paper as directed by relevant instructions. | Operating Instructions (For Basic Operations) | ||
| Paper is not exited at the end of a print job. | Check to see if the paper has not jammed in the machine. | Operating Instructions (For Basic Operations) | |
| The automatic print reduction feature does not work. | Check the setting of "24 Print Reduction" in Function Parameters> Fax/Email Settings> Fax Parameters. | Operating Instructions (For Function Parameters) | |
| Communicating | No dial tone heard • Check the telephone line connection.• Check the telephone line. | Checking the Telephone Line (see page 206) | |
| The machine won’t receive automatically | • Check the telephone line connection.• Check the receive mode settings.• If “13 Auto Print JRNL” set to “Valid” in Function Parameters>Fax Parameter, and the machine is printing the received document(s) from memory, which also happens to be the 200th transaction, the machine will not auto answer until the Transaction Journal completes printing. | Operating Instructions (For Function Parameters) | |
| Cannot send or receive An error code appears on the display. See the error code table and identify the problem. | Information Codes (See page 200) | ||
| Operation Operation rejected Switch off the machine for seconds, and then turn it on again. | ____ | ||
Information Codes
In the event of communication failures, Information Codes appear in the transmission result or in the transaction journal.
When an Information Code is displayed, take necessary action as recommended in the table below. For definitions of the Information Code not found here, refer to the User (U)/Jam (J)/Machine (E) Error Codes in the Operating Instructions (For Basic Operations) of provided booklet.
| Info. code Problem Action Refer to | |||||
| 030 Document is misfeeding. Reload the document properly.Remove the document jam.Adjust Original Guide. | —— | ||||
| 031 | Document is too long or jammed.Document length exceeds 2 metres in "STD" and "Fine" mode only. The length limitation for "Super Fine" and "600 dpi" mode, is subject to the available Memory size. | Reload the document properly.Remove the document jam.Add SD Memory Card in the machine. | Operating Instructions (For Basic Operations) | ||
| Super Fine(Max.Length) | 600 dpi(Max.Length) | ||||
| A4/LetterWidth | 1400 mm 600 | mm | |||
| A3/LedgerWidth | 990 mm 430 | mm | |||
| 061 ADF Cover is open. Close the ADF Cover. | —— | ||||
| 400 During initial handshake,receiving station did not respond or communication error occurred. | Check with the other party.Reload the document and send again. | —— | |||
| 401 Remote station required aReceiving Password to receive the document. Remote station does not have Confidential Mailbox. | Check the remote station. | —— | |||
| 402 During initial handshake,communication error occurred. | Reload the document and send again. | —— | |||
| 403 No polling capability at the remote side. | Ask remote side to set to be polled. | —— | |||
| 404/405 During initial handshake,communication error occurred. | Reload the document and send again. | —— | |||
| 406 Transmission Password does not match.Receiving Password does not match.Received from an unauthorized station in Selective Reception mode. | Check the password or the telephone number in Address Book. | Adding a Fax Number into the Address Book(See page 163) | |||
| 407 No confirmation from the receiving station for the previous page sent. | Wait a few minutes and send again. | ____ | |||
| 408/409 Remote side confirmation of previous page is illegible. | Wait a few minutes and send again. | ____ | |||
| 410 Communication aborted by the transmitting side. | Check with the other party. | ____ | |||
| 411 Polling password does not match. | Check the polling password. Polling (See page 52) | 52) | |||
| 412 No data from the transmitting side. | Check with the other party. | ____ | |||
| 414 Polling password does not match. | Check the polling password. Polling (See page 52) | 52) | |||
| 415 Polling transmission error. Check the polling password. Storing | Documents to Be Polled (See page 54) | ||||
| 416/417/418/419 | Received data has too many errors. | Check with the other party. | |||
| 420/421 Machine goes to receiving mode, but receives no command from the transmitting side. | Remote side misdial.Check with the other party. | ____ | |||
| 422/427 Interface is incompatible. Check with the other party. | ____ | ||||
| 430/434 Communication error occurred while receiving. | Check with the other party. | ____ | |||
| 436/490 Received data has too many errors. | Check with the other party. | ____ | |||
| 456 Unit received a confidential document or was requested to be polled of a confidential document under any of following conditions.1. Not enough space in memory to receive the confidential document.2. Confidential Mailbox is full.3. While printing received document.Unit was requested to relay a document. | Print a confidential document.Wait until unit finishes printing. | Printing a Received Confidential Document (See page 60) | |||
| 492/493/494 Communication error occurred while receiving. | Check with the other party. | ____ | |||
| 495 Telephone line disconnected. Check with the other party. | ____ | ||||
| 501/502/503/504 | Communication error occurred using the internal V.34 Modem. | Check with the other party. | |||
| Info. code Problem Action Refer to | |||
| 540/541/542/543/544 | Communication error occurred while transmitting. | Reload the document and send again.Check with the other party. | —— |
| 550 Telephone line disconnected. Check with the other party. | —— | ||
| 552/553/554/555 | Communication error occurred while receiving. | Check with the other party. | —— |
| 580 Sub-address transmission to a unit that has no Subaddress function. | Check the remote station. | —— | |
| 581 Sub-address Password transmission to a unit that has no Password Sub-address function. | Check the remote station. | —— | |
| 623 No document is loaded in the ADF. | Resend the documents. | —— | |
| 630 Redial was not successful due to a busy line. | Reload the document and send again. | —— | |
| 631/700 During dialling, STOP was pressed. | Reload the document and send again. | —— | |
| 634 Redial was not successful due to no response from the called station or wrong number dialled. If a dial tone is not detected, the machine does not transmit.Note: If busy tone was not detected, the machine will only redial once. | Check the telephone number and send again. Change the setting of “68 Dial Tone Check” is set to “Off” in Function Parameters (Fax/Email Settings> Fax Parameters). | Operating Instructions(For Function Parameters) | |
| 638 Power failure occurred during the communication. | Check the power cord and plug. | —— | |
| 711 Incorrect LDAP settings. Check the LDAP | Server Name, LDAP Log in Name, LDAP password, LDAP Search Base. | Operating Instructions(For Function Parameters) | |
| 712 Incorrect Email address. Check the registered Email address. | Check the IP Address of the SMTP Server with the Network Administrator. | Operating Instructions (For Setting Up) | |
| 714 Cannot log on to the LAN. Check the 10Base-T/100Base-TX cable connection. An unexpected LAN problem occurred. Contact the Network Administrator. | Operating Instructions (For Setting Up) | ||
| 715 TCP/IP connection timed out. Check the Internet Fax parameter settings. | Operating Instructions (For Setting Up) | ||
| 716 Cannot logon to the designated SMTP Server. | Check the SMTP Server IP Address setting. Contact the Network Administrator. | Operating Instructions (For Setting Up) | |
| Info. code | Problem Action Refer to | ||
| 717 | Incomplete SMTP Protocol transmission. SMTP Server's hard disk may be full. | SMTP Server is defective.Contact the Network Administrator. | —— |
| 718 | Page Memory Overflow occurred while receiving printing data. The paper size selected within your application to print is larger than the paper size loaded in the cassette(s). | Check the document size and resolution.Ask originator to resend in a supported size and resolution. | —— |
| 719 | Received data via LAN is in a format that is not supported. | Ask the originator to resend with a supported file attachment format:* In a TIFF-F format.* Image data conforming to recording paper size. | —— |
| 720 | Cannot connect to the POP Server. (Incorrect POP Server IP Address) POP Server is down. | Check the POP Server IP Address.Contact the Network Administrator. | Operating Instructions (For Setting Up) |
| 721 | Cannot connect to the POP Server. (User Name or Password error) | Check the POP User Name and Password or the APOP settings.Contact the Network Administrator. | Operating Instructions (For Setting Up) |
| 722 | Failed to obtain IP address from the DHCP server. | Check the 10Base-T/100Base-TX cable connection.Confirm that the Internet Parameter and the DHCP server are correctly configured before turning on or turning off the power.Contact the Network Administrator. | Operating Instructions (For Setting Up) |
| 725 | DNS Server connection timed out. DNS Server is down. | Check the DNS Server IP Address.Contact the Network Administrator. | Operating Instructions (For Setting Up) |
| 726 | Received an error response from the DNS Server. | Check the POP Server Name.Check the SMTP Server Name. | Operating Instructions (For Setting Up) |
| 728 | The document was sent to the Internet Fax in an incompatible file format (PDF).Note: PDF file format is only used when sending an Internet Fax to a PC (Network Scanning). | Change the XMT File Format (Fax Parameter "177 XMT File Type") to "TIFF". | Setting a File Type and a Filename (See page 114) |
| 729 | Failed to authenticate (SMTP Authentication) when connecting with the SMTP server. | Check the SMTP Authentication. User Name and Password.Contact the Network Administrator. | Operating Instructions (For Function Parameters) |
| 730 | Cannot retrieve the Journal nor program the Internet Parameters and the Auto Dialer remotely via Email from a PC. | Check that the Fax Parameter "158 PC Remote Update" is set to "Valid". | Operating Instructions (For Function Parameters) |
| 731 | The dialler buffer for manual dialling was full (70 stations) when the Relay Transmission Request was received. | Request the originator to resend the Relay Transmission Request after the reserved communication is finished. | —— |
| Info. code Problem Action Refer to | |||
| 800/814/816/825 | Unit was requested to relay a document or Confidential Communication but has no capability. | Check with the other party. | —— |
| 815 Mailbox is full. Delete confidential documents. Deleting a | Confidential Document (See page 62) | ||
| 826 The received sub-address is not pre-programmed in the address book. | Check entries in the address book.Check the entry of the sub-address of the remote station. | Address Book (See page 162) | |
| 870 Memory overflow occurred while storing documents into memory for transmission. | Transmit documents without storing into memory.Add SD Memory Card in the machine. | Direct Transmission (See page 38)Operating Instructions (For Basic Operations) | |
Power Failure
Power Failure
The fax display remains off for the duration of a power failure, and you cannot send or receive documents.
| Problem Condition | |||
| FAX • When a power failure occurs• While a power failure persists | Send a fax. • The fax transmission is aborted. Resend when power recovers.• You cannot send a fax. | ||
| Receive a fax. • The fax reception is aborted. Ask the remote party to resend when power recovers.• You cannot receive a fax. | |||
| When power recovers Send a fax. The fax transmission is start again when power recovers, if there is transmission data in memory. | |||
| Memory content. Transmission and transmission data stored in memory is preserved intact. | |||
| Data pre-programmed or preset on your machine. | Data pre-programmed or preset in the address book and on program dialling, Function Parameters are preserved through the power failure. | ||
| When External Telephone is connected | • When a power failure occurs• While a power failure persists | • You are talking to a remote party.• Make phone calls. Receiving phone calls. | Please confirm the specification of your external telephone. |
NOTE
- If a power failure occurs while scanning a document, the scan is cancelled. Rescan the document when power recovers. If a power failure occurs while sending a document from memory, the fax or document will be resent immediately upon recovery.
- The notice above only applies when the machine is connected to the Public Telephone Network. Please check the specification of PBX, if it is connected to it.
Checking the Telephone Line
If you do not hear a dial tone when the "Monitor" is selected after pressing Fax key, or the incoming call does not ring on your machine (No automatic receive), please check telephone line by procedure in below.
1 Unplug the Telephone Line Cable from the telephone jack that was supplied by the telephone company.
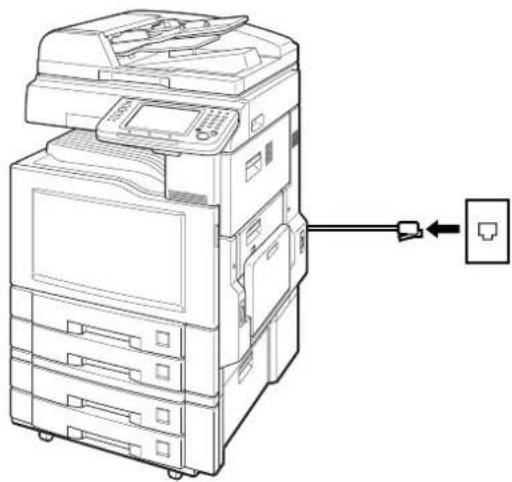
natural_image
Line drawing of a multi-layered printer with an attached USB port (no text or symbols)2 Plug a different regular telephone into the same telephone jack.
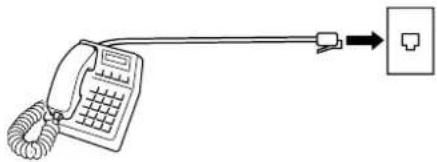
natural_image
Line drawing of a telephone handset connected to a device via cable (no text or symbols)3 Check for dial tone through the handset. If there is still no dial tone, report it to your local telephone company. or Call from another telephone to this number. If the telephone does not ring, report it to your local telephone company.
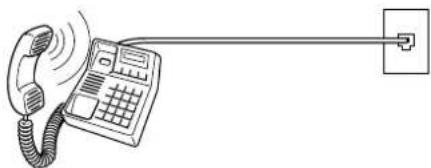
natural_image
Line drawing of a telephone handset connected to a wall-mounted power outlet (no text or symbols)Memo
Replacing the Verification Stamp
To replace the verification stamp, follow the steps below:
• DZHT000027 (for USA and Canada)
• DZHT000004 (for other countries)
1 Open the ADF Cover.
4 Open the Exit Guide while holding the green-labeled tab.
2 Open the Inner Cover with holding the green-labeled tab.
5 Remove by pulling the Stamp Assembly upward.
6 Remove the Stamp. Replace the stamp with a new one or refill the stamp with a few drops of the specified ink onto the back of the stamp.
3 Lift up the ADF Tray.
7 Reinstall the Stamp Assembly.
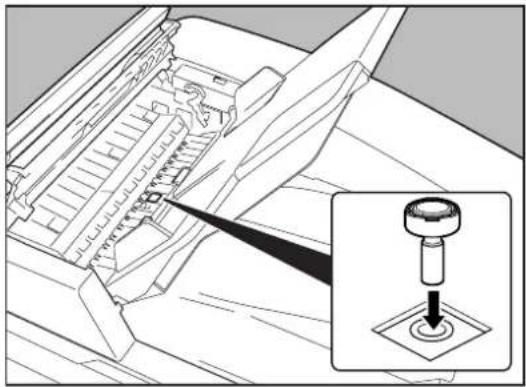
natural_image
Technical line drawing of a mechanical assembly with an inset showing a disassembled component (no text or symbols present)Glossary
| Term Meaning | |
| 10Base-T/100Base-TX | An Ethernet standard for cable.The 10/100 refers to its 10/100 Mbps bandwidth, the base to single baseband, and the T to the Twisted pair. The cable uses two pairs of unshielded twisted wires. |
| Address Book | The Address Book is a convenient directory that stores contact Telephone Numbers and Email Addresses for easy retrieval at a future time. |
| Address Book Dialling | A dialler that enables you to dial an entire Telephone Number/Email Address by pressing one key. |
| ADF (Automatic Document Feeder) | The mechanism that delivers a stack of document pages to the scanner one page at a time. |
| Automatic print reduction | The method of automatically reducing a received document so that it can be printed onto a standard size piece of plain paper. For example, your machine will reduce an incoming legal size page to 75% of its original size so it could fit on a letter size page. |
| Automatic Reception | The mode that allows you to receive fax documents without user intervention. |
| BPS (Bits Per Second) | The amount of data that is transmitted over the phone line. Your machine can start at each Max. Modem speed and automatically steps down to suitable speed depending on the phone line condition and the receiving machines capabilities. |
| CD-ROM | CD-ROM media is read-only media that holds about 650 MB of data. It's generally accepted as the easiest way to distribute software. CD-ROM drives can also read audio CDs even though they are in a different format than standard CD-ROM media. |
| Client | Clients are computers that run software programs used to contact and obtain data from Server software program on another computer, often across a great distance. |
| Coding method | The data compression method used by machines. Your machine utilizes Modified Huffman (MH), Modified Read (MR) and Modified Modified Read (MMR) and Joint Bi-level Experts Group (JBIG) coding methods. |
| DDS (Document Distribution System) | The Document Distribution System automatically distributes received data (Scanner data, data received via FAX, and data received via Internet Fax) to specified recipients via a predefined delivery mechanism. The system administrator uses the system to specify the delivery mechanisms and the recipients. |
| Density | Signifies the scanning sensitivity in terms of lightness and darkness of your original pages. The degree of colour or darkness of an image or photograph. |
| Dept. Code (Department Code) | This operation, require the user to input a preset number of digits (Department Code) before being given access to a function of the machine, such as transmission for example. The Department Name of selected Department Code is printed on the Header of each page sent, Cover Sheet, Comm. Journal and Individual Transmission Journal. |
| DHCP | Dynamic Host Configuration Protocol - a standard method for assigning IP addresses automatically to the devices on a TCP/IP network. As a new device connects, the DHCP server assigns an IP address from a list of available addresses. The device retains this IP address for the duration of the session - once the device disconnects the IP address becomes available for use again. |
| Direct Dialling | The method of dialling where you enter the entire telephone number or Email address through the keypad. |
| Direct SMTP | Allows iFax machines to communicate directly with each other within the Firewall (Intranet) without going through the Mail Server, thus alleviating the burden on the mail server. |
| Disk Drive | A peripheral storage device that holds, spins, reads and writes magnetic or optical disks. It may be a receptacle for disk cartridges, disk packs or floppy disks, or it may contain non-removable disk platters like most hard disks. |
| Domain Name | A unique name that identifies an Internet site.Domain Names always have 2 or more parts, separated by dots.The part on the left is the most specific, and the part on the right is the most general. |
| dpi | Abbreviation of dots per inch, which indicates the resolution of images. The more dots per inch, the higher the resolution. A common resolution for laser printers is 600 dots per inch. This means 600 dots across and 600 dots down, so there are 360,000 dots per square inch. |
| Drum | Along with the laser, this is one of the basic components of a laser printer. A light-sensitive drum on which the image is generated by the laser beam as the pattern of an electric charge. The toner particles adhere to this pattern after the drum has brushed against the developing roller. (a.k.a. OPC Drum) |
| DTMF (Dual Tone Multi Frequency) | Dialling method that sends a different set of frequencies for each digit of the telephone keypad. Commonly refers to touch tone dialling. |
| ECM (Error Correction Mode) | The ability to correct transmission errors as detected during the transmitting phone call. |
| Email Address | The address for sending and receiving data by Email. It consists of User name, Sub-domain name and Domain name. |
| Ethernet A very common method of networking computers and equipment in a LAN.Ethernet can handle up to 100Mbps and can be used with almost any kind of computer. | |
| Fax Board | In a multi-functional device, this is a Fax capability built onto a printed circuit board which can send and receive facsimiles. The multi-functional device is normally able to scan in a document and transmit it over a phone line to another fax machine. Also, it can receive faxes from other machines and print them out. |
| Fax Forward | The ability to forward all incoming faxes to the registered stations in the specified ABBR No. |
| Fax Parameter List | The list that contains the home fax parameters settings that you have programmed into your machine. |
| File | A task that has been stored into the memory of your unit. Examples are deferred transactions. |
| Fixed Reduction | The method that allows you to determine one reduction rate, such as 75%, for all incoming documents. |
| FTP | Short for File Transfer Protocol, the protocol for exchanging files over the Internet.FTP works in the same way as HTTP for transferring Web pages from a server to a user's browser and SMTP for transferring electronic mail across the Internet in that, like these technologies, FTP uses the Internet's TCP/IP protocols to enable data transfer.FTP is most commonly used to download a file from a server using the Internet or to upload a file to a server (e.g., uploading a Web page file to a server). |
| Function Keys | The key that will be utilized to begin an operation or configuration of a feature. |
| G3 (Group 3) | Refers to the standards and transmission capabilities of the current generation of facsimile machines. |
| Group Dialling | The ability to program many telephone numbers into a single station so that many locations can be dialled in sequence utilizing a single keystroke. |
| Halftone A scanning technique to distinguish levels of grey from black and white. | |
| Handshaking | The exchange of a group of control signals that communicate between the transmitter and receiver. These signals determine the condition at which communication can occur. |
| Hard Disk | This is commonly the slang term for a hard drive is closed and the disks are hard (usually metal). The closed system gives the possibility of A device that physically stores data in your multi-functional machine/computer. It's much like a floppy disk, but the system more precision, so the drive is much faster and can hold much more data. |
| HDD (Hard Disk Drive) | The physical component of a PC which performs the basic operations on the hard disk-including rotating the disk & reading/writing data to the disk. |
| Header | A row of information that is transmitted by the sending machine and printed on the top of each page by the receiving unit. This identifies the transmitting unit and information about the transmission, such as time and date. |
| Homepage | The page that your Browser displays when it starts up or main web page for a business, organization, etc. |
| Host | Any computer on a network that is repository for services available to other computers on the network.A Host must have a unique Host name within a domain.The host is the first (left most) section of the Fully Qualified Domain Name (FQDN).The reminder of the FQDN is the domain and often tells you something about where your machine is located (i.e., at Panasonic)Ex:Your machine's Email address is: Fax@fax01.panasonic.comIn the example above "fax01" is the host and "panasonic.com" is the domain. |
| Image Memory Size | This signifies the amount of memory available in your unit capable of storing pages of documents. All page units of measure are based on the ITU-T Image No.1. |
| Install | To add hardware or load a software application onto your multi-functional machine/computer. |
| Internet | The Internet is a vast collection of inter-connected networks that all use the TCP/IP protocols, on which you can send an electronic Email, chat to people electronically or search for information on almost any subject you care to think of. Quite simply it is a "network of computer networks". |
| Internet FAX | The Internet fax uses the Internet to send faxes. The transmission and reception take place via store-and-forward mode on the Internet using Internet Email.In store-and-forward mode the facsimile protocol "stops" at the gateway to the Internet and is reestablished at the gateway leaving the Internet. |
| Intranet | A private network inside a company or organization that uses the same kinds of software that you would find on the public internet, but that is only for internal use. |
| IP Address A unique number used to identify equipment or host computers on the Internet. | |
| ISP(Internet Service Provider) | An institution that provides access to the Internet in some form, usually for money. |
| ITU-T(C.C.I.T.T.) | International Telecommunication Union - Telecommunication, formerly known as C.C.I.T.T |
| Tem Meaning | |
| ITU-TImage No.1 | An Industry standard document that allows comparisons of the transmission speeds and capabilities of machines. |
| JPEG Short for Joint Photographic Experts Group, and pronounced jay-peg. JPEG is a lossy compression technique for colour images. Although it can reduce files sizes to about 5% of their normal size, some detail is lost in the compression. JPEG is a graphical format that is widely used in WWW pages. | |
| Key Name | An alternate to the station name that can be programmed for each Address Book dialling key. |
| Keypad A group of numeric keys located on your Control Panel. | |
| LAN (Local Area Network) | A Local Area Network is a computer network system and printer limited to an immediate area, such as an Office, Factory, and University used to integrate and exchange data. |
| LCD Liquid Crystal Display. The display area of your machine. | |
| MACAddress | It is the hardware address, often referred to as MAC (Media Access Control) address that is assigned to the equipment. MAC address is hard-coded and is not configurable.The MAC address consists of 6 hexadecimal numbers separated by colons.Ex:00:00:c0:34:f1:50 |
| Mail Gateway IP Address | The Address of the Mail Server.The Internet Fax communicates with your existing Mail Server for all communication traffic. |
| Mailing List | A system that allows people to send an Email to one address, whereupon their message is conveyed to multiple subscribers on the Mailing List. |
| Manual Reception | A mode that requires operator intervention to receive an incoming document. |
| MAPI (Messaging Application Program Interface) | Acronym for Message Application Programming Interface.A standard Windows interface for messaging that enables different mail programs and other mail-aware applications like word processors and spreadsheets to exchange messages and attachments with each other. |
| MDN (Message Delivery Notice) | This Message Delivery Notice (MDN) is the requested by the sender for a delivery processing confirmation indicating that the message (Email) was read. |
| Memory | The term memory identifies data storage that comes in the form of chips, which holds information that your machine needs to use. The word storage is used for memory that exists on disks. |
| Memory Transmission | The documents are scanned into memory before actual connection to the phone line for transmission. |
| MIME (Multipurpose Internet Mail Extension) | A standard used for attaching non-text (image) files to Internet Email messages. |
| Modem | A device that converts signals from your fax machine into signals that can be transmitted over telephone lines. |
| Module | A self-contained hardware or software component that interacts with a larger system.Hardware modules are often made to plug into a main system. Program modules are designed to handle a specific task within a larger program. |
| Term Meaning | |
| Network Any time you connect 2 or more computers together so that they can share resources, you have a computer network. Connect 2 or more networks together and you have an internet. | |
| Overlap Print | Documents too long to be reduced are automatically printed on two pages with 10 mm overlap. |
| Panasonic Super-Smoothing | An electronic image enhancement (Panasonic Super Smoothing) that will create a particular pattern for the improvement of copy quality. |
| PC The Personal Computer - Quite Simply a computer designed to be used by one person at a time. | |
| PC Card A credit card sized removable module for portable computers. PC Cards are used to attach modems, network adapters, sound cards, radio transceivers, solid state disks and hard disks to a portable computer. | |
| PCL (Printer Control Language) | The page description language, which has become a de facto standard used in many printers and typesetters. PCL Level 6 streamlines the graphics and font commands, reducing the amount of information that has to be sent to the printer. |
| Adobe® Portable Document Format (PDF) is a universal file format that preserves all the fonts, formatting, graphics, and colour of any source document, regardless of the application and platform used to create it. | |
| Polling The ability to retrieve a document from another machine. | |
| Polling Password | A 4-digit programmed code that enables the security of a document being polled. |
| POP (Post Office Protocol) | POP refers to the way Email software such as Eudora or your machine gets Email from a mail server. You must always have a POP account that you tell your Email software to use to retrieve your mail. |
| Print Reduction Mode | The methods used to determine how an incoming document will be reduced to print onto the paper loaded in your machine. |
| Protocol | A standard process, a set of rules & conditions that perform a particular function. A word which is very common in PC & Internet Terminology.Ex: FTP (File Transmission Protocol), IP Address (Internet Protocol Address), TCP/IP (Transmission Control Protocol Internet Protocol), POP (Post Office Protocol) |
| PSTN (Public Switched Telephone Network) | Public Switched Telephone Network. Network of interconnected switching equipment and transmission facilities. |
| Receiver Password | A 4-digit password that is checked before a document is received. |
| Relay Address | A 3-digit code that identifies your machine is programmed in a relay network. |
| Relay Network | A group of machines that communicate via a relay station. |
| Resolution | This relates to the quality of a viewed image either on the PC Screen or printed output. For printed images the resolutions is measured in dots per inch or DPI. The higher the DPI the better the resolution and better image quality. |
| Router (Gateway) | A special purpose computer ( or software package) that handles the connection between 2 or more networks.Gateways act like traffic cops, they spend their time looking at the destination addresses of the packets passing through them and deciding which route to send them on. |
| SD Card (Secure Digital Memory Card) | A flash memory card that provides secure storage for your machine, which is also popular with handheld devices such as digital cameras, cell-phones, and PDAs. |
| Selective Reception | A function that can be set so that your unit will receive from only those machines programmed into your dialler. |
| Server | A computer, or a software package, that provides a specific kind of service to client software running on other computers.A single server machine could have several different server software packages running on it, thus providing many different servers to clients on the network. |
| Sleep Mode | The lowest power state that the machine enters after the specified time without actually turning off. |
| SMTP (Simple Mail Transfer Protocol) | An accepted standard used extensively on the Internet for transferring Email messages between computers. The standard defines exactly how the message will be sent, any controls, format of the message etc. |
| Software | Software is basically a series of instructions that causes the PC to do something.The Operating System such as DOS is known as Systems Software. Application Programs such as a Word Processor or Spreadsheet perform the main tasks for which we use the PC. |
| Station Name | Alphanumeric ID which can be programmed for each phone number or Email address location in the Address Book. |
| Stored Document | Documents that have been scanned and now are saved in your machine's memory. |
| Sub-Address | ITU-T recommendation for further routing, forwarding or relaying of incoming faxes. |
| Sub-Addressing Password | ITU-T recommendation for additional security that corresponds to the Sub-Address. |
| Subnet Mask | A mask bit used to manage sub-segments of the network which is defined with network IDs. |
| Substitute Memory Reception | Your machine's ability to save an incoming document into its memory, when it runs out of recording paper or toner. |
| TCP/IP | TCP/IP stands for Transmission Control Protocol/Internet Protocol & is quite simply a standard set of protocols that govern the basic workings of the Internet that was implemented in 1982.The TCP part is all about ensuring that data is transmitted correctly between 2 computers. If any errors occur these are detected & the data is retransmitted. The data transmitted is split up into small portions called Data packets. The IP part of TCP/IP is how these data packets are moved from one point to another. Each computer on the internet has a unique IP address & the data packets are moved from the source to the destination through many different computers & this is controlled via TCP/IP. This protocol is used on the Internet & also by computers which are part of a LAN. |
| Thumbnails | A miniature display of a page or an image. Thumbnails enable you to see the layout of many pages/images on the screen at once. Generally, thumbnails are too small to show the actual text/image. |
| TIFF | Tagged Image File Format. One of the many different types of File Format used on PC's. An image file format for attachments of graphic data for smooth transmission between different units.The coding method of this format supports the same coding as Modified Huffman (MH) and multiple-page image data. |
| TIFF Image Viewer | An application software to view the contents of TIFF-F File.Some TIFF Image Viewers may not display the data properly. |
| Time Zone | By setting the Time Zone of your area on the device's Control Panel, email will be displayed in correct order regardless the time difference of the sender's area.Time Zone, where you are correctly in, can be checked from the “Date/Time Properties” on your Computer. For more details, consult with your system administrator. |
| Toner | A special type of ink used by copy machines and laser printers. Toner consists of a dry, powdery substance that is electrically charged so that it adheres to an invisible image that has been charged onto a drum, plate, or piece of paper with the opposite polarity. |
| Transmission Reservation | The ability to preset a telephone number so that you may reserve a transmission while your unit is performing another function. |
| Verification Stamp | A user selectable transmission verification stamp which can be placed on scanned documents that are successfully transmitted or stored in memory. |
| View mode - File List | Allows you to view the brief contents of the memory files through the LCD display without having to print the Memory File List. |
| View mode - Journal | Allows you to view the brief contents of the journal through the LCD display without having to print the journal. |
Memo
The following trademarks and registered trademarks are used throughout this manual:
Microsoft, Windows, Windows NT, Windows Server, Outlook & Windows logo are either registered trademarks or trademarks of Microsoft Corporation in the USA and other countries.
Adobe, Acrobat Reader & Adobe logo are either registered trademarks or trademarks of Adobe Systems Incorporated.
All other trademarks identified herein are the property of their respective owners.
PEERLESSPage ^TM is a trademark of the PEERLESS Systems Corporation; and, PEERLESSPrint ^TM and Memory Reduction Technology ^® are registered trademarks PEERLESS Systems Corporation; and, COPYRIGHT © 2002 PEERLESS Systems Corporation
Universal Font Scaling Technology (UFST) and all typefaces have been licensed from Agfa Monotype
Agfa ^® and the Agfa rhombus are registered trademarks of Agfa-Gevaert N.V. registered in the U.S. Patent and Trademark Office and may be registered in other jurisdictions. Monotype ^® is a registered trademark of AMT registered in the U.S. Patent and Trademark Office and may be registered in other jurisdictions. ColorTune ^® is a registered trademark of Agfa-Gevaert N.V. registered in the U.S. Patent and Trademark Office and may be registered in other jurisdictions. Profile Tool Kit ^TM , Profile Studio ^TM and Profile Optimizer ^TM are trademarks of AMT and may be registered in certain jurisdictions.
Novell and NetWare are registered trademarks of Novell, Inc. in the United States and other countries.
PCL is either trademark or registered trademark of Hewlett-Packard Company and/or its subsidiaries.
Adobe, PostScript and PostScript 3 are either registered trademarks or trademark of Adobe Systems Incorporated in the United States and/or other countries.
This equipment contains a number of programs licensed under the terms of the GNU General Public License/GNU Lesser General Public License and other open software. For more details and applicable license terms thereof, please refer to the relevant information in the CD attached herewith.
© 2005 Panasonic Communications Co., Ltd. All Rights Reserved.
Unauthorized copying and distribution is a violation of law.
The contents of these Operating Instructions are subject to change without notice.
For Service, Call: