
CNA100 - Uncategorized ZYXEL - Free user manual and instructions
Find the device manual for free CNA100 ZYXEL in PDF.


| Product Type | Cloud Network Agent |
| Model | CNA100 |
| Firmware Version | 1.2.1 (as per manual) |
| Management Port | 1x Ethernet (Service Port) |
| Default Management IP | https://169.254.1.3 |
| Default Username | admin |
| Default Password | 1234 |
| Reset Method | Press and hold RESET button for 10 seconds |
| Network Management | Cloud Network Center (CNC) integration |
| Device Discovery | Supports ZyXEL device discovery via IP range |
| Firmware Upgrade | Scheduled or immediate upgrade via CNC |
| Configuration Backup/Restore | Automatic daily backup and manual restore via CNC |
| Monitoring | CPU utilization, interface traffic, ICMP response |
| Notifications | Email alerts for interface down events |
| Account Management | Full and read-only operator privileges |
| Auto Restore | Automatically restore configuration and firmware on replacement devices |
| Power Supply | DC adapter (12V, typical, not explicitly stated) |
| Dimensions | Approx. 130 x 90 x 30 mm (estimated) |
| Weight | Approx. 200 g (estimated) |
| Operating Temperature | 0°C to 40°C (typical for such devices) |
| Humidity | 10% to 90% non-condensing |
Frequently Asked Questions - CNA100 ZYXEL
User questions about CNA100 ZYXEL
0 question about this device. Answer the ones you know or ask your own.
Ask a new question about this device
Download the instructions for your Uncategorized in PDF format for free! Find your manual CNA100 - ZYXEL and take your electronic device back in hand. On this page are published all the documents necessary for the use of your device. CNA100 by ZYXEL.
USER MANUAL CNA100 ZYXEL
Cloud Network Center/Cloud Network Agent
CNC
CNA100
Cloud Center
Firmware Version 1.2.1
Edition 1, 6/2016
Handbook
Default Login Details
| Service Port IP Address | https://169.254.1.3 |
| User Name | admin |
| Password | 1234 |
This handbook is a series of tutorials that guides you through various applications of the ZyXEL Cloud Network Center. The purpose of the handbook is to show you how to proceed through an application rather than explain the meaning of GUI features.
Note: IP addresses, port numbers, and object names are just examples used in these tutorials, so you must replace them with the corresponding information from your own network environment when implementing a tutorial.
Bold text indicates the name of a GUI menu, field or field choice.
The handbook is for a series of products. Not all products support all firmware features. Screenshots and graphics in this handbook may differ slightly from your product due to differences in your product firmware or your computer operating system. Every effort has been made to ensure that the information in this handbook is accurate at the time of writing.
Table of Contents
1 How to Deploy and Install the Cloud Network Agent....4
1.1 Initial Cloud Network Agent Configuration....5
1.2 Verify that the CNA is Online ....7
1.3 What Can Go Wrong?......7
2 How to Share or Transfer CNA Account Management....9
2.1 Managing Organization Operators....9
2.2 Verify that Accounts are Granted Privilege....11
2.3 What Can Go Wrong?......11
3 How to Provide Value Added Service using CNC....12
3.1 Discover ZyXEL Devices in the Local Network 12
3.2 Schedule Firmware Upgrade....14
3.3 Interpreting Graphs and Node Performance ....16
3.4 Receiving Email Notifications and Alerts during Link Failures 18
3.5 Backing-Up and Restoring Device Configurations....19
3.6 What Can Go Wrong? 22
4 How to Replace and Recover Failed Devices....24
4.1 Replacing Devices through Centralized Management....24
4.2 Replacing Devices through Remote Site Management....26
4.3 What Can Go Wrong? 30
1 How to Deploy and Install the Cloud Network Agent
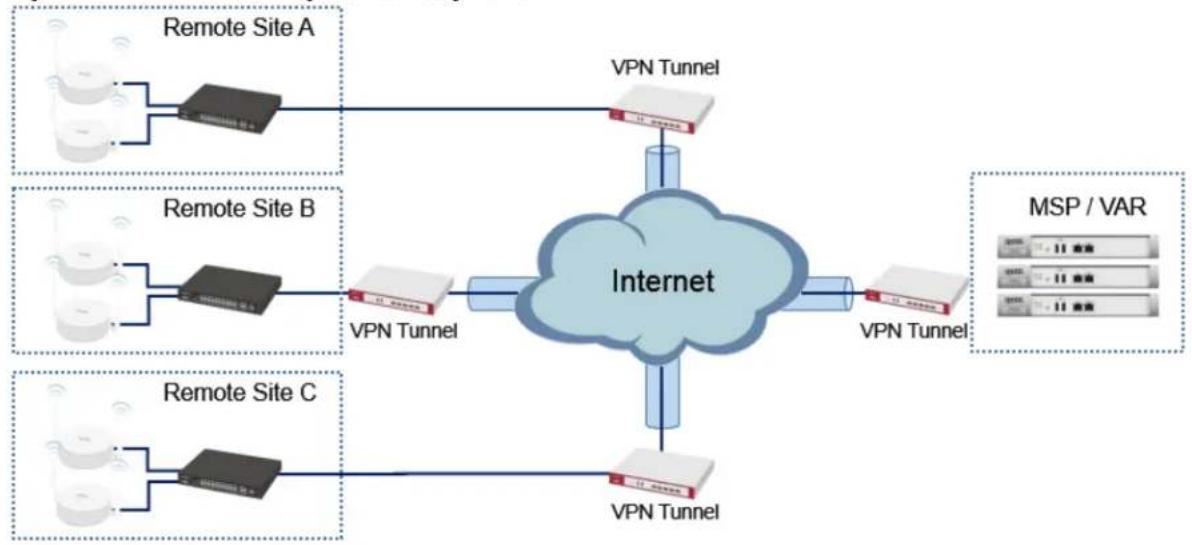
This example shows a centralized management architecture. In this architecture, service providers have already established VPN access to their client remote sites. Cloud Network Agents (CNA) are installed on the Managed Services Provider's (MSP) offices. Value Added Resellers (VAR) can monitor and maintain site devices anywhere with Internet access.
Figure 1 Centralized Management through CNC
flowchart
graph TD
    A["Remote Site A"] --> B["VPN Tunnel"]
    C["Remote Site B"] --> D["VPN Tunnel"]
    E["Remote Site C"] --> F["VPN Tunnel"]
    B --> G["Internet"]
    D --> G
    F --> G
    G --> H["MSP / VAR"]
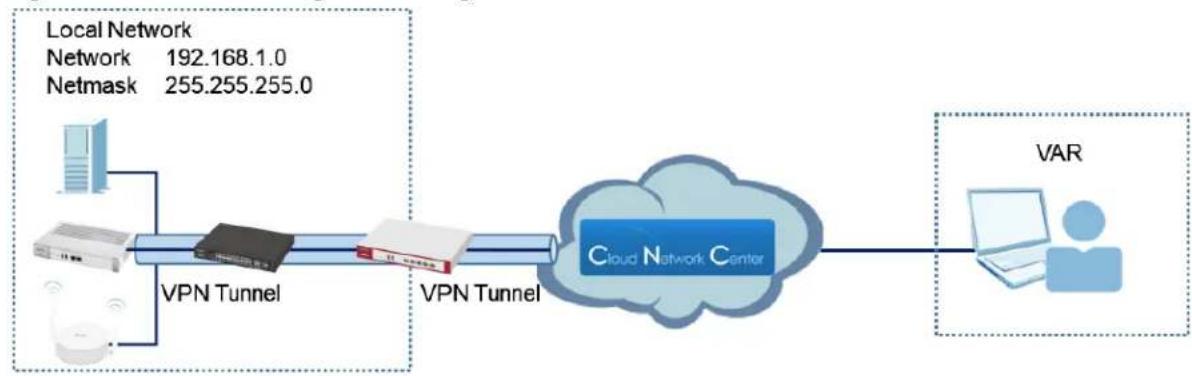
This example shows a remote site architecture. In this architecture, the CNAs are installed in customer site. The CNA establishes VPN tunnel to CNC as soon as it receives Internet access. VARs can monitor and maintain site devices anywhere with Internet access.
Figure 2 Remote Site Management through CNC
flowchart
graph LR
    A["Local Network\nNetwork 192.168.1.0\nNetmask 255.255.255.0"] --> B["VPN Tunnel"]
    B --> C["Cloud Network Center"]
    C --> D["VAR"]
    style A fill:#f9f,stroke:#333
    style B fill:#ccf,stroke:#333
    style C fill:#cfc,stroke:#333
    style D fill:#fcc,stroke:#333

Note: All network IP addresses and subnet masks are used as examples in this article. Please replace them with your actual network IP addresses and subnet masks. This example was tested using USG110, GS1920-24HP, NWA5123-NI, and CNA100.
1.1 Initial Cloud Network Agent Configuration
1 Configure PC IP Address to "169.254.1.1" and connect Ethernet cable to CNA's service port.
Figure 3 Connecting to Service Port
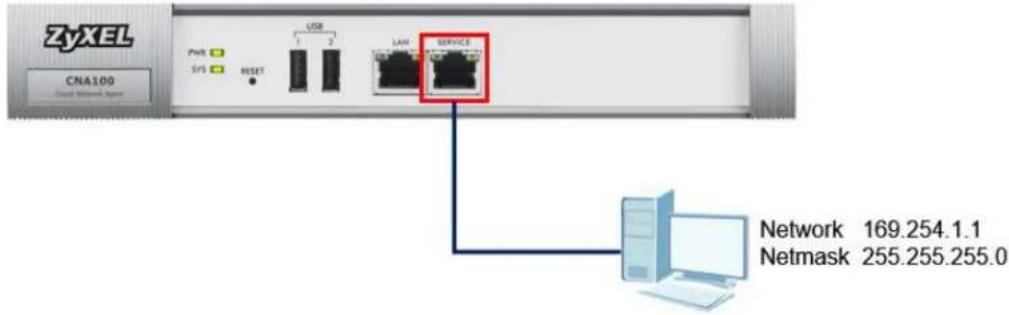
2 Access the CNA's Web GUI using IP address "169.254.1.3". Use the default administrator password.
Figure 4 Login Page
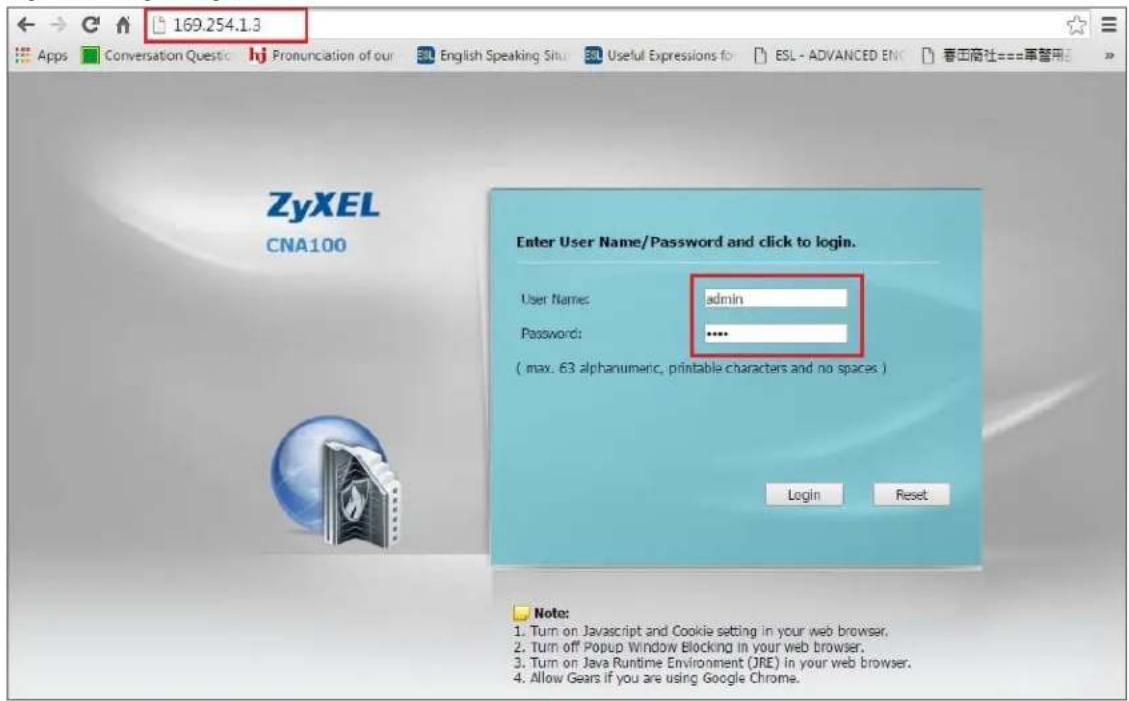
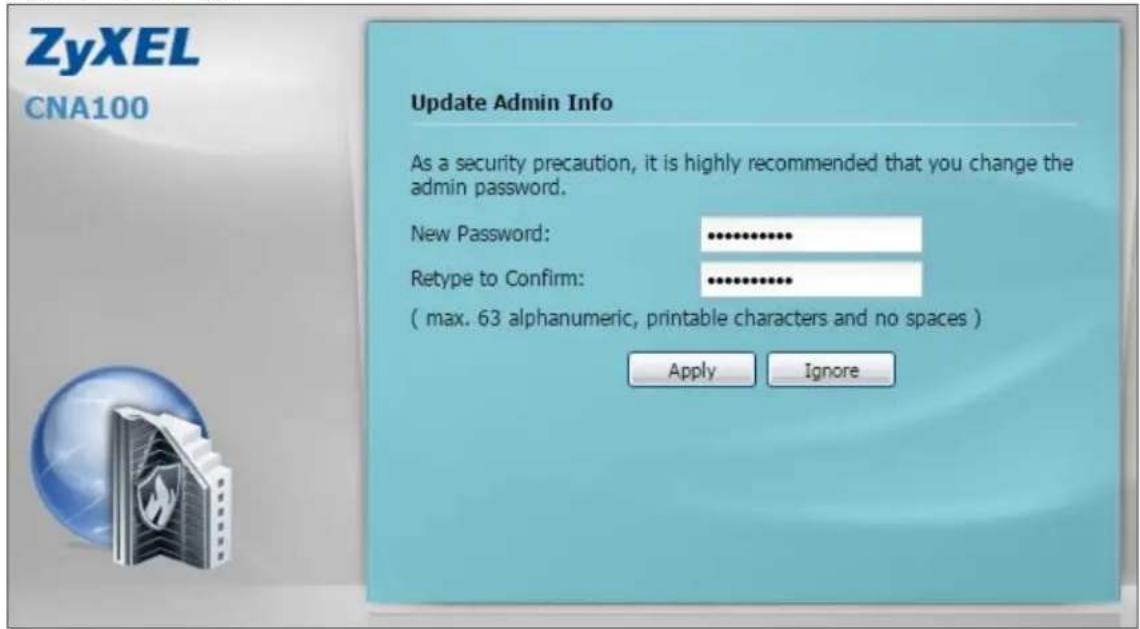
3 For security purposes, it is strongly recommended to change the default admin password.
Figure 5 Login Page
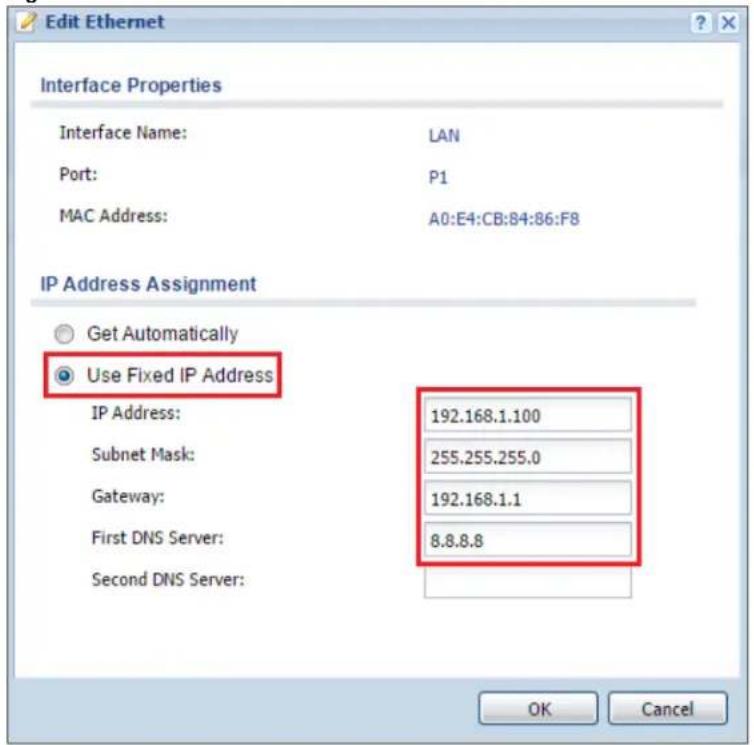
4 If you need to configure the CNA to use static IP addresses instead, go to CONFIGURATION > Network > Interface and edit LAN interface.
Figure 6 CONFIGURATION > Network > Interface > LAN
1.2 Verify that the CNA is Online
1 Log in to the ZyXEL CNC with CNA ownership account, go to Organization View. CNA should appear as online.
Figure 7 Organization View

1.3 What Can Go Wrong?
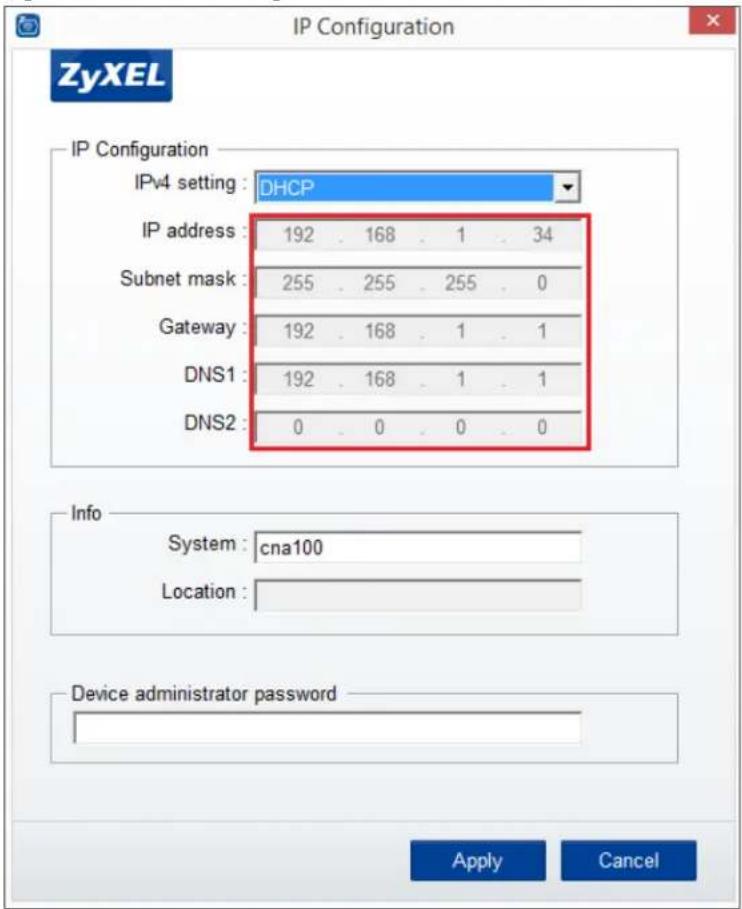
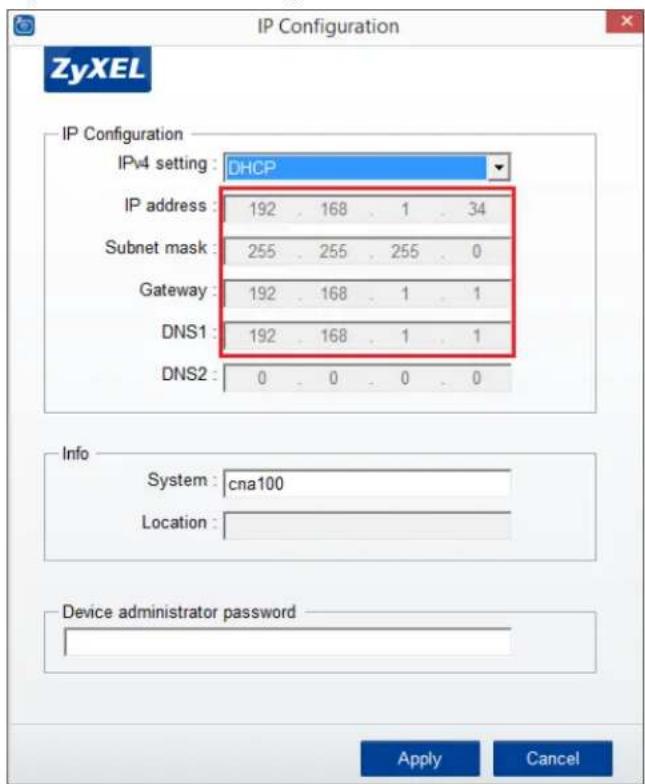
1 If CNC does not display the CNA, CNA may be receiving an incorrect DHCP configuration. Use the ZON utility through the local network to verify the DHCP configurations. IP address configurations should be able to provide CNA access to the Internet.
Figure 8 ZON > IP Configuration
2 If the CNA needs to be configured with a static IP address but forgot the administrator password, press and hold down the "RESET" button on the CNA's front panel for 10 seconds. The administrator password revert to default after boot up.
Figure 9 Resetting Cloud Network Agent

2 How to Share or Transfer CNA Account Management
This example shows how to provide users authority to manage and monitor sites. This example will instruct CNA owners when to provide “read-only” or “full” privilege to different accounts.
Figure 10 Types of Site Administrators
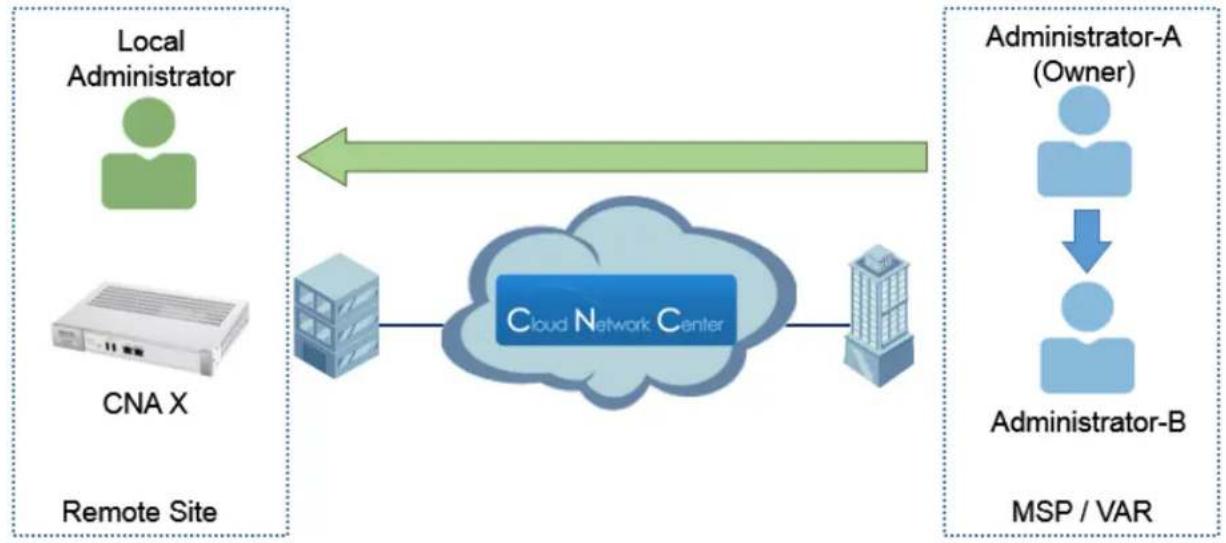
flowchart
graph LR
    A["Local Administrator"] --> B["CNA X"]
    B --> C["Cloud Network Center"]
    C --> D["Administrator-A (Owner)"]
    D --> E["Administrator-B"]
    E --> F["MSP / VAR"]
    style A fill:#99ccff,stroke:#333
    style B fill:#e6f7ff,stroke:#333
    style C fill:#e6f7ff,stroke:#333
    style D fill:#e6f7ff,stroke:#333
    style E fill:#e6f7ff,stroke:#333
    style F fill:#e6f7ff,stroke:#333
2.1 Managing Organization Operators
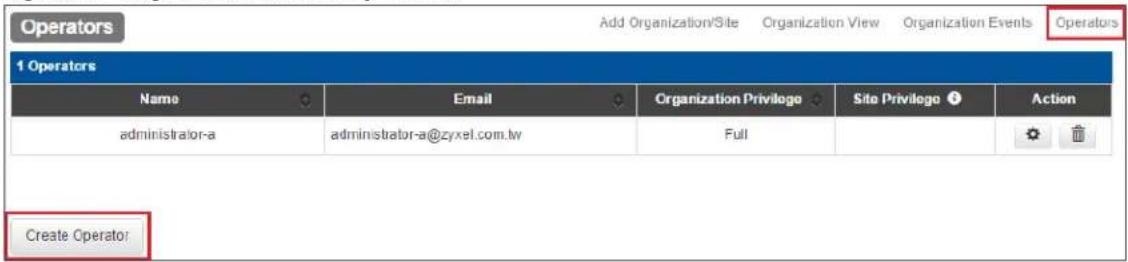
1 Log in to the ZyXEL CNC, go to Organization View > Operators, click on the Create Operator button.
Figure 11 Organization View > Operators
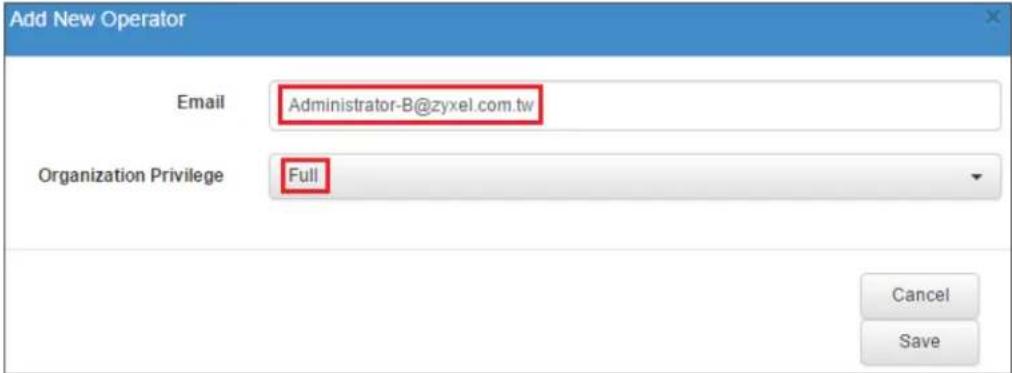
2 Provide "Full" organization privilege to accounts of administrators that are part of the MSP/VAR's organization. "Full" privilege gives the user account to add or remove operators from the organization.
Figure 12 Organization View > Operators > Create Operator
3 Provide "Read-Only" organization privilege to accounts of local administrators in remote site upon requests. "Read-Only" organization privilege prohibits user account from adding or removing operators from the organization. Select how much authority to provide this account by selecting the appropriate site privilege.
Figure 13 Organization View > Operators > Create Operator
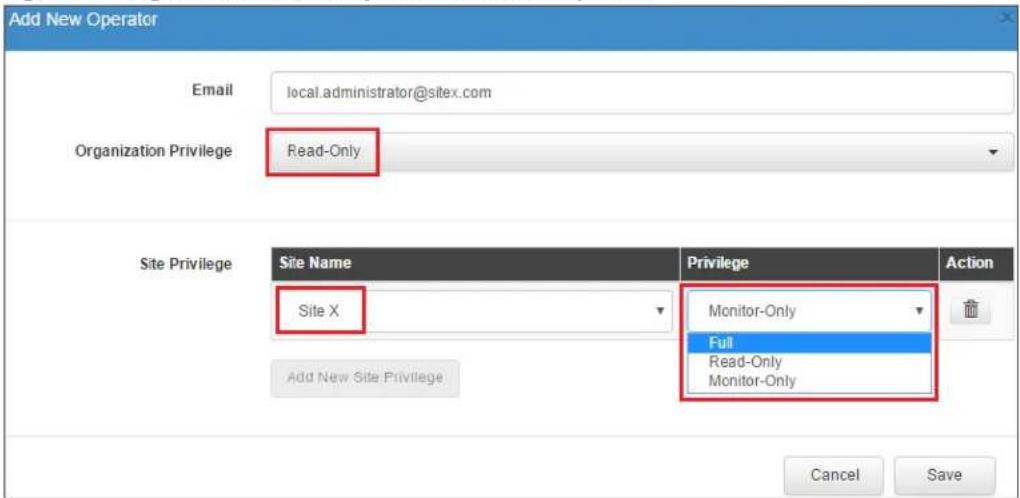

Note: Accounts with "Read-Only" organization privilege and "Read-Only" site privilege have cited functions and access. Restricted functions are greyed-out and will not be clickable.
Accounts with "Read-Only" organization privilege and "Monitor-Only" site privilege can only check whether devices are currently in an active or inactive status.
2.2 Verify that Accounts are Granted Privilege
1 Go to Organization Events. Event should indicate that privilege of users have been added by the administrator.
Figure 14 Organization Events
![Organization Events Add Organization/Site Organization View Organization Events Operators Search Constraints: Legend Organization Events Event ID Task ID Severity Time Organization Name Site Name Event Name 451556 -[-] [-] NORMAL [+] [-] 2018-05-24 13:05:30 UTC+08:00 [-] CSO [-] [-] - [-] [-] Organization Event: orgUserAdd [-] [-] Privilege of user local administrator has been add for organization CSO by administrator-a 450668 -[-] [-] NORMAL [+] [-] 2018-05-24 11:24:09 UTC+08:00 [-] CSO [-] [-] - [-] [-] Organization Event: orgUserAdd [-] [-] Privilege of user administrator-b has been add for organization CSO by administrator-a](/content/2026/05/794464/images/f30a0418b4a640d4d667b887c99f3af3bc41bd2239b5e9546264cceb1de22091.jpg)
2.3 What Can Go Wrong?
1 If CNC does not display the CNA, CNA may be receiving an incorrect DHCP configuration. Use the ZON utility through the local network to verify the DHCP configurations. IP address configurations should be able to provide CNA access to the Internet.
Figure 14 ZON > IP Configuration
3 How to Provide Value Added Service using CNC
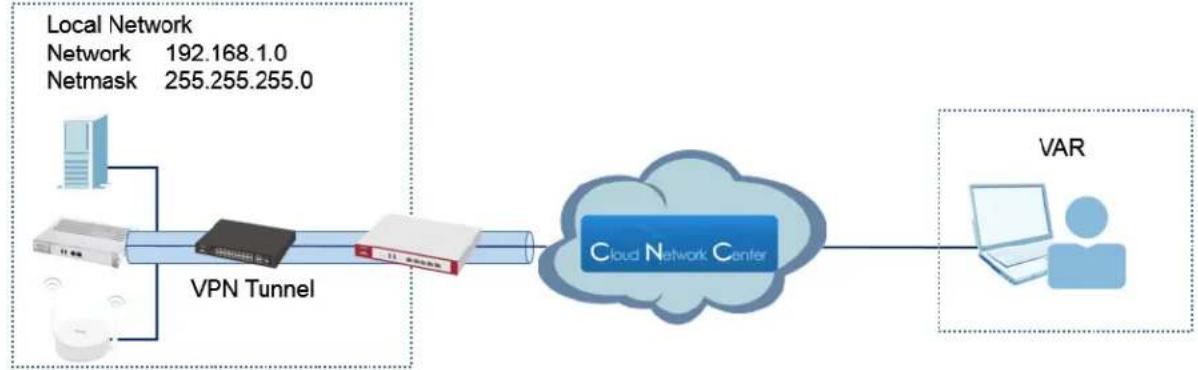
This example shows how to perform value added services to customer site through ZyXEL's Cloud Network Center (CNC). This example showcases the various value added services that CNC provides to remote sites.
Figure 15 Applying Value Added Service to Remote Site
flowchart
graph LR
    A["Local Network\nNetwork 192.168.1.0\nNetmask 255.255.255.0"] --> B["VPN Tunnel"]
    B --> C["Cloud Network Center"]
    C --> D["VAR"]
    style A fill:#f9f,stroke:#333
    style D fill:#bbf,stroke:#333

Note: All network IP addresses and subnet masks are used as examples in this article. Please replace them with your actual network IP addresses and subnet masks. This example was tested using USG110, GS1920-24HP, NWA5123-NI, and CNA100.
3.1 Discover ZyXEL Devices in the Local Network
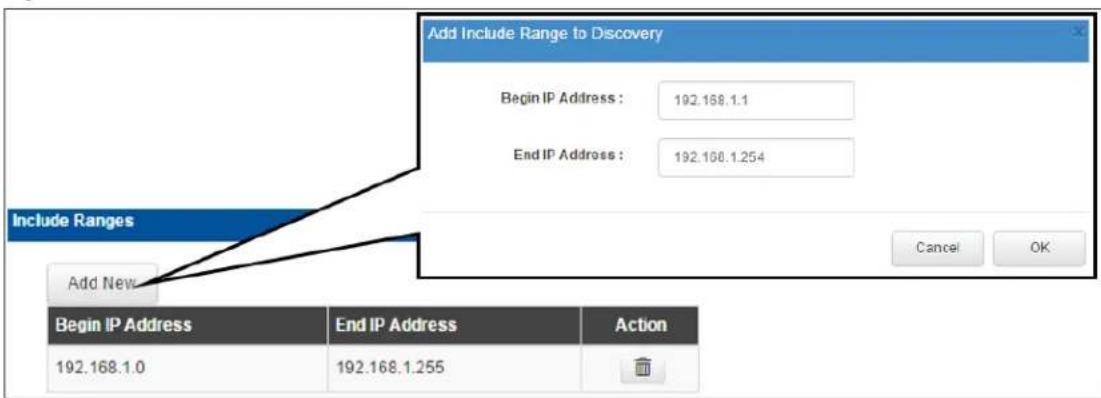
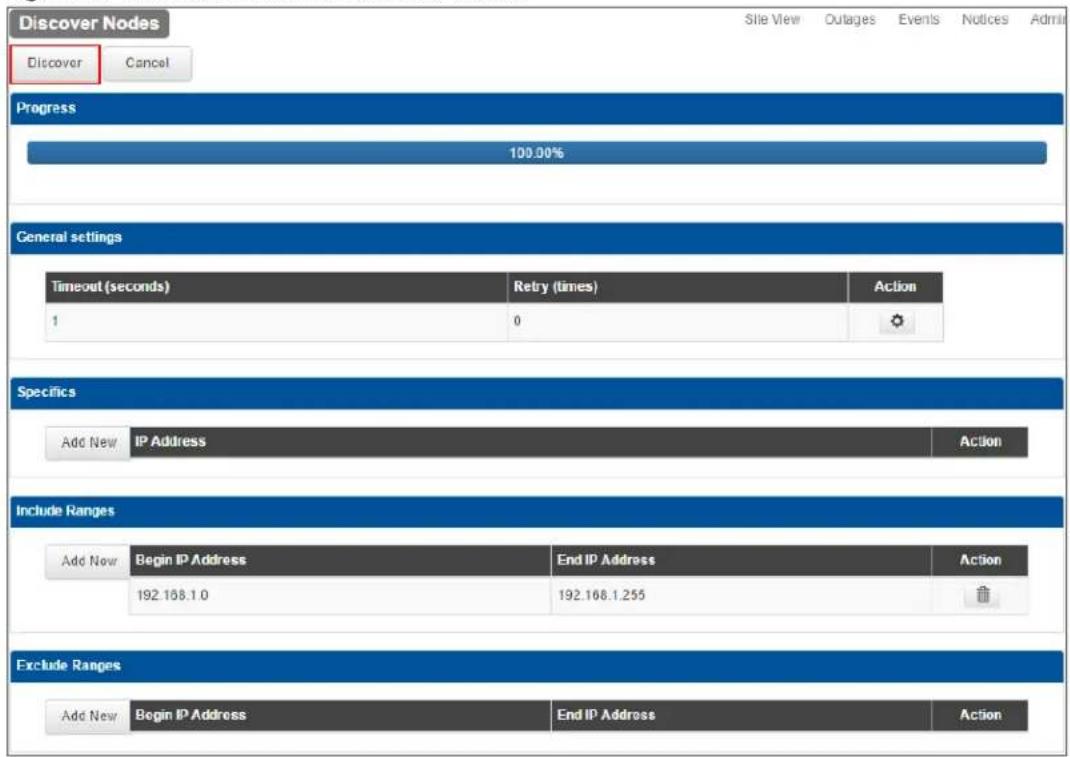
1 Log in to the ZyXEL CNC, go to Site View > Admin > Discover Nodes, Click Add New to input the first and last IP address of the CNA100's network.
Figure 16 Site View > Admin > Discover Nodes
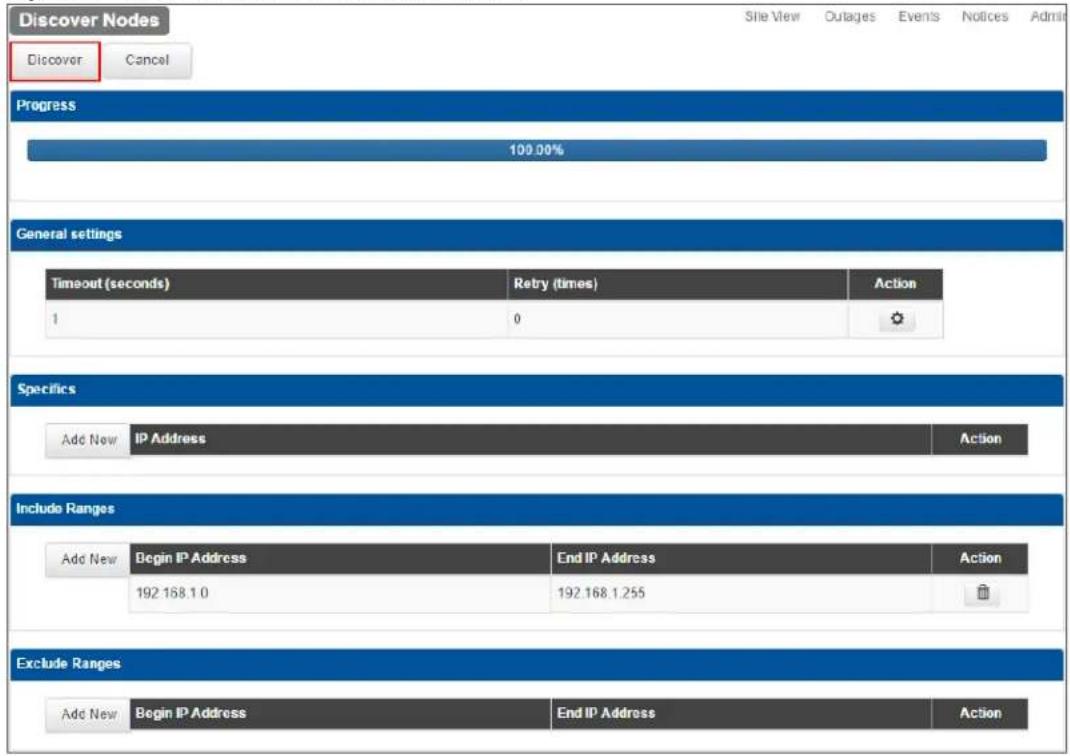
2 Clicking the Discover button initiates the discovery of ZyXEL devices. Wait for a few seconds for CNC to register all devices.
Figure 17 Site View > Admin > Discover Nodes
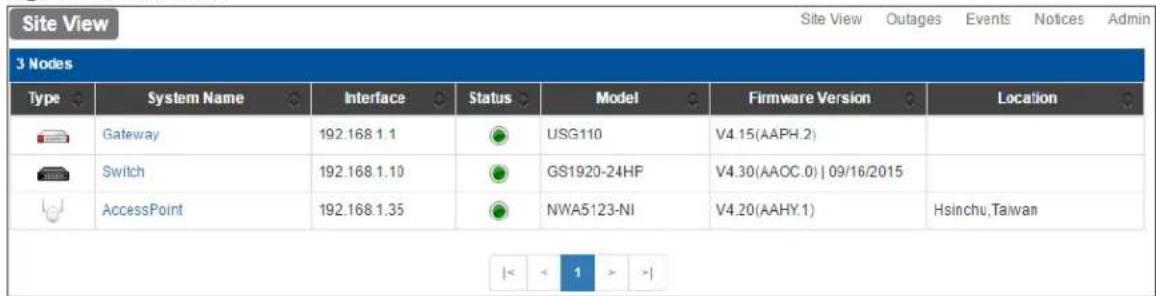
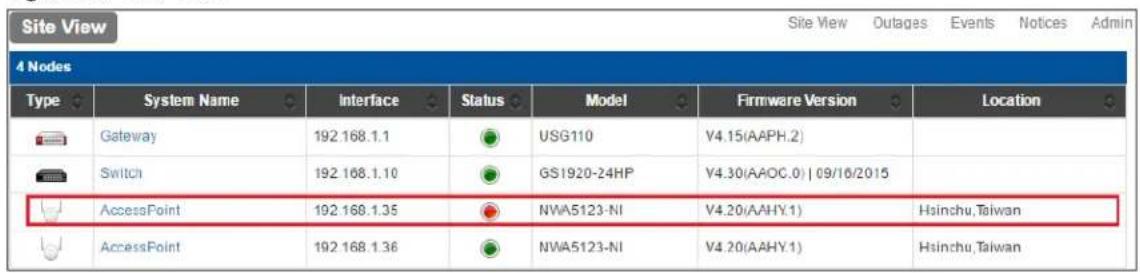
3 Go to Site View to verify that all ZyXEL devices are discovered.
Figure 18 Site View
3.2 Schedule Firmware Upgrade
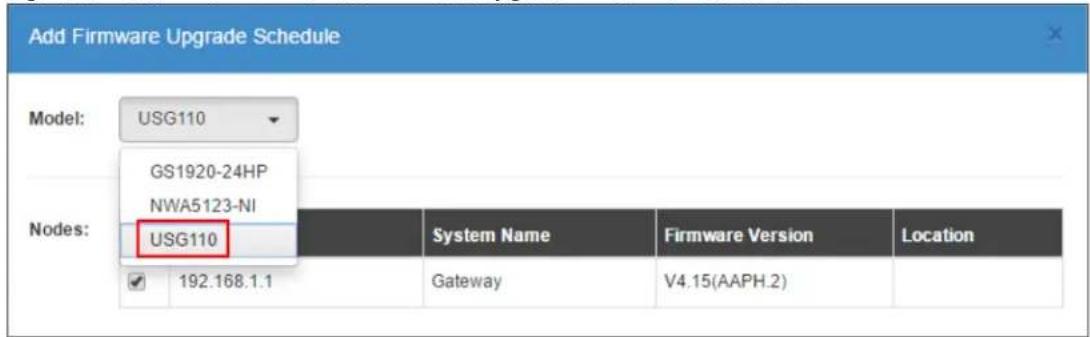
1 Log in to the ZyXEL CNC, go to Site > Admin > Device Firmware Upgrade > Add New Schedule. Select which model on the Model tab and check the IP address of devices ready for firmware upgrade.
Figure 19 Site > Admin > Device Firmware Upgrade > Add New Schedule
2 Select the latest firmware on the Official Firmware tab.
Figure 20 Site > Admin > Device Firmware Upgrade > Add New Schedule
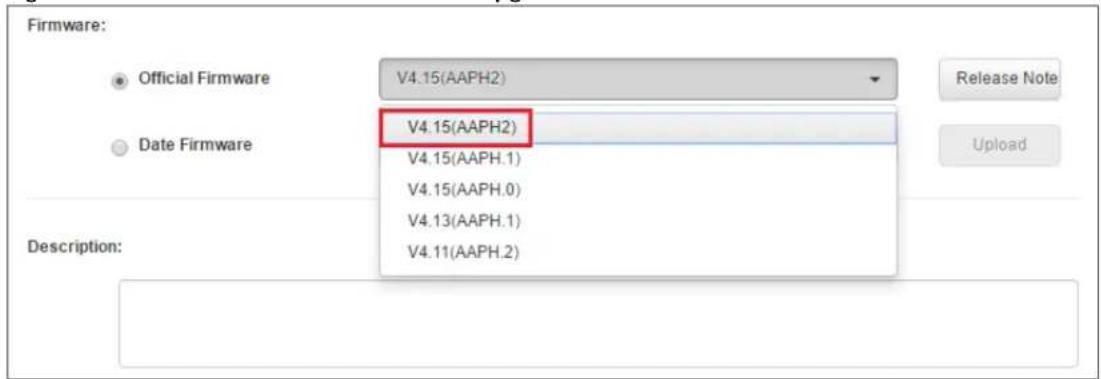

Note: CNC automatically updates the Official Firmware list from the FTP servers. ministrators can upload a Date Firmware from their PC to the cloud server and select this aware to upload to device.
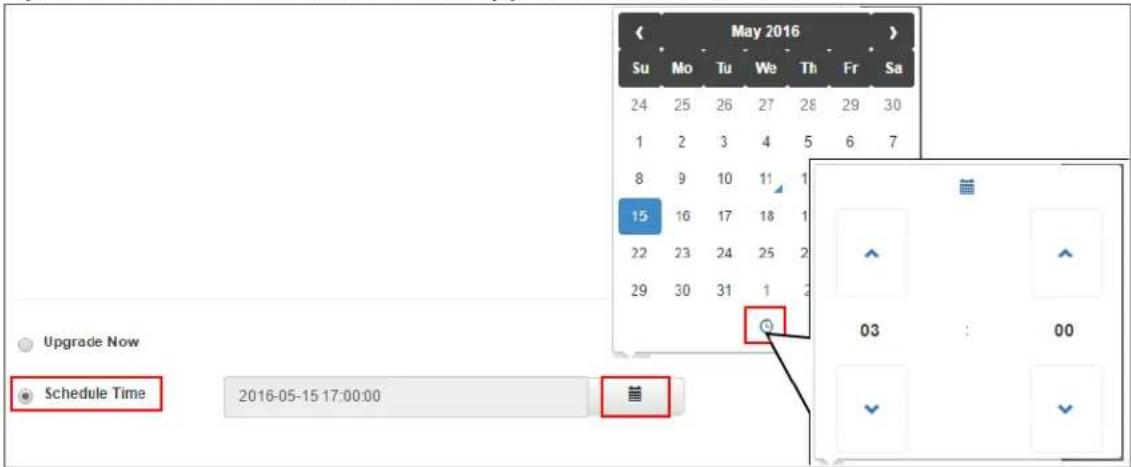
3 Select Upgrade Now to initiate firmware upgrade immediately after clicking the OK button, or select Scheduled Time to initiate firmware upgrade on a specific date and time.
Figure 21 Site > Admin > Device Firmware Upgrade > Add New Schedule
4 Check the Reboot after firmware upgrade box and click the OK button.
Figure 22 Site > Admin > Device Firmware Upgrade > Add New Schedule


Note: Successfully uploading a firmware does not mean device is already using that firmware. New firmware is only applied after a device's successful reboot.
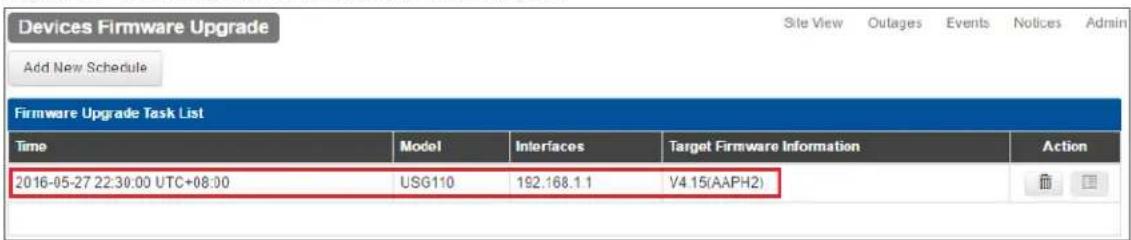
5 Go to Site > Admin > Device Firmware Upgrade > Add New Schedule. An entry should display indicating a pending firmware upgrade schedule.
Figure 23 Site > Admin > Device Firmware Upgrade
3.3 Interpreting Graphs and Node Performance
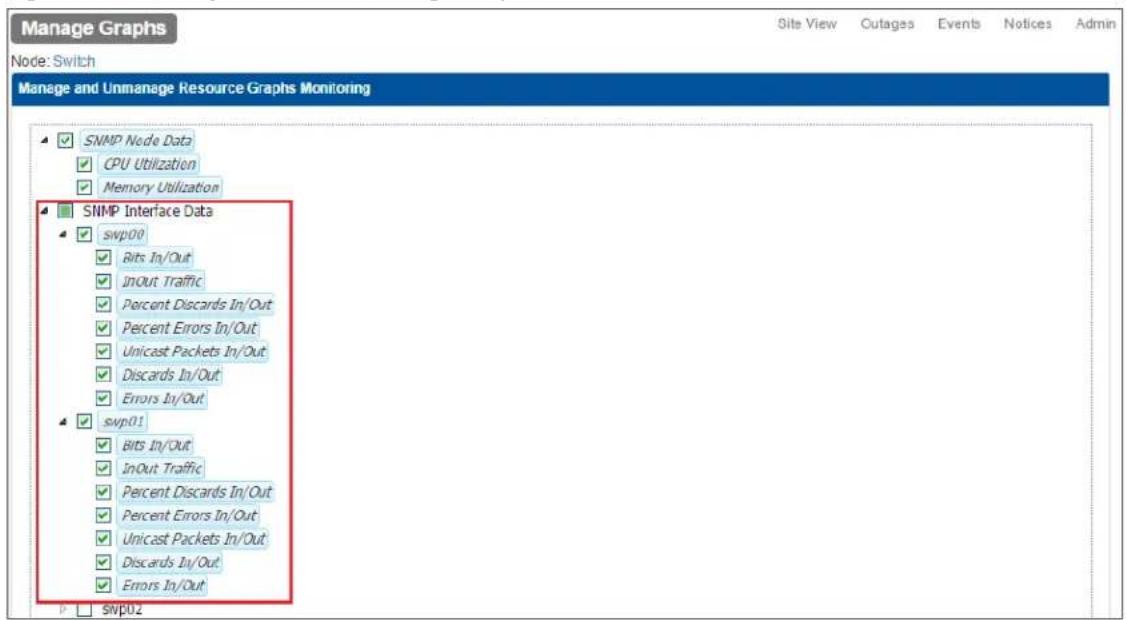
1 Log in to the ZyXEL CNC, go to Site > System Name > Manage Graphs. Check SNMP Interface Data on interfaces to core network resources (ex: uplink port, servers).
Figure 24 Site > System Name > Manage Graphs
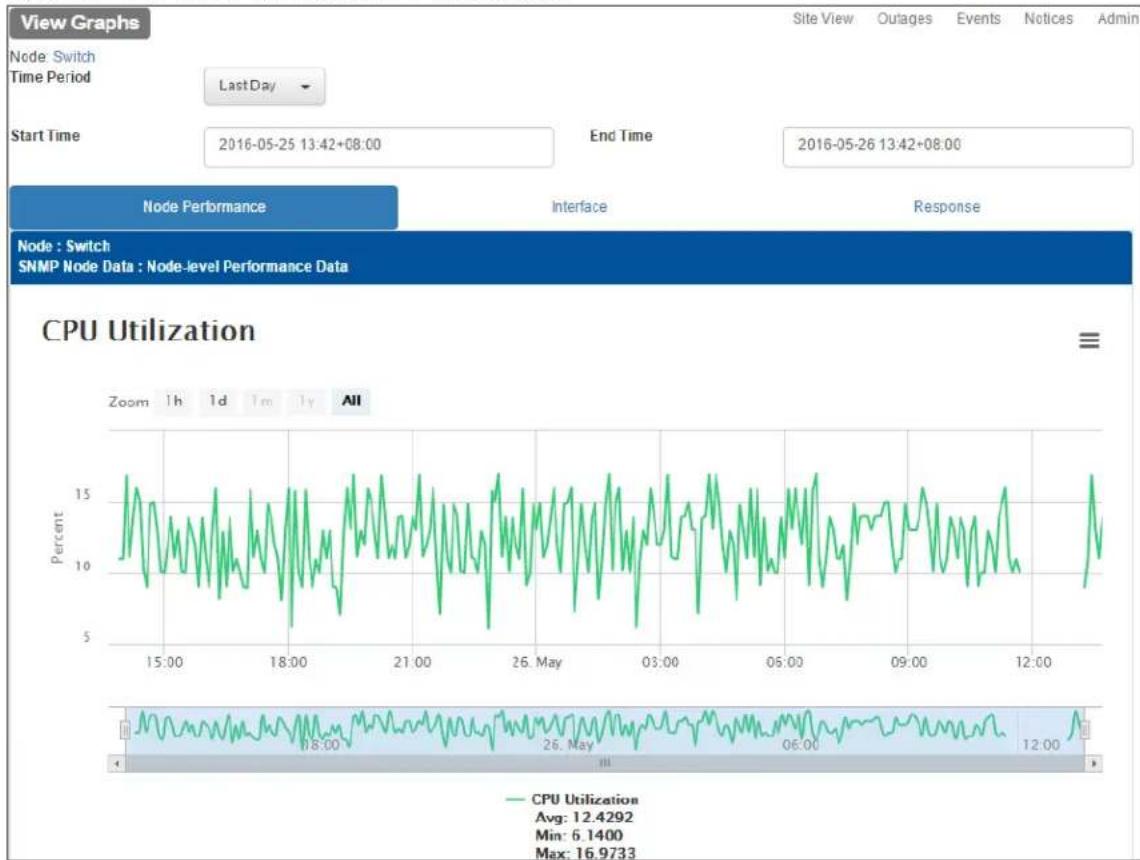
2 Go to Site View > System Name > View Graphs to view the various graphs and statistics.
Figure 25 Site View > System Name > View Graphs
line
| Time | CPU Utilization | | -------- | --------------- | | 15:00 | ~12.4292 | | 18:00 | ~6.1400 | | 21:00 | ~16.9733 | | 26:00 | ~12.4292 | | 03:00 | ~6.1400 | | 06:00 | ~16.9733 | | 09:00 | ~12.4292 | | 12:00 | ~6.1400 |3.4 Receiving Email Notifications and Alerts during Link Failures
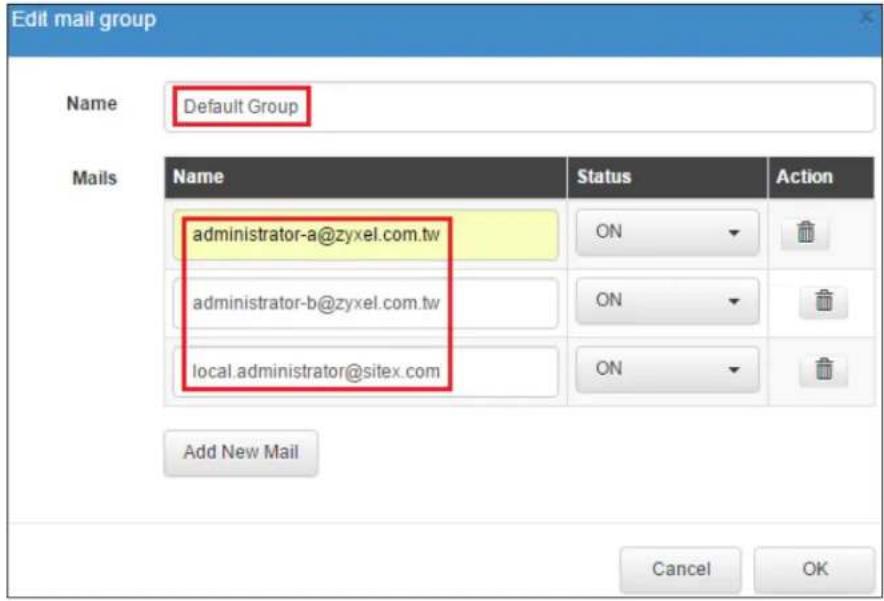
1 Log in to the ZyXEL CNC, go to Site View > Admin > Mail Groups. Add the email addresses of site administrators for Default Group.
Figure 26 Site View > Admin > Mail Groups > Settings
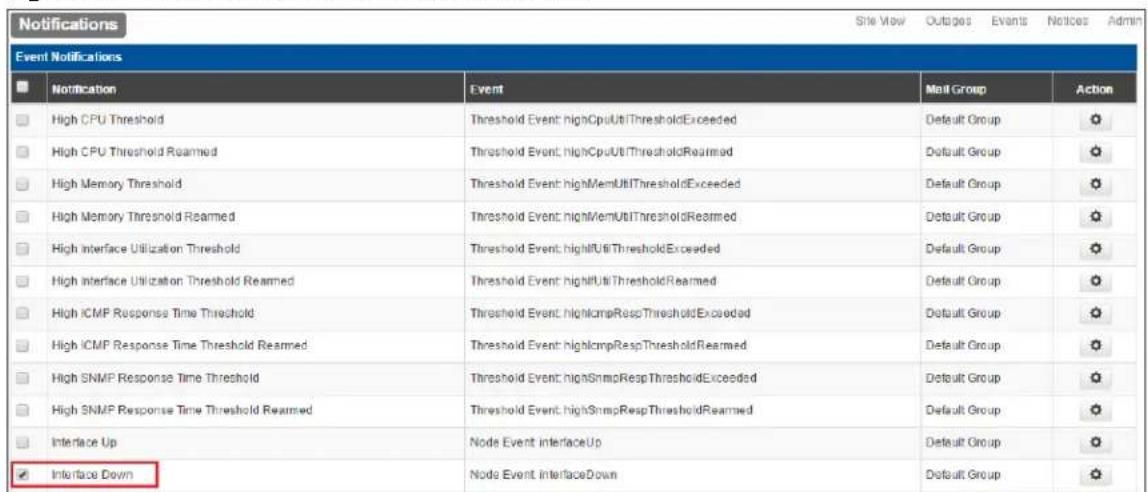
2 Go Site View > Admin > Notifications. Check the Interface Down notification and click the Apply button, afterwards.
Figure 27 Site View > Admin > Notifications
3.5 Backing-Up and Restoring Device Configurations
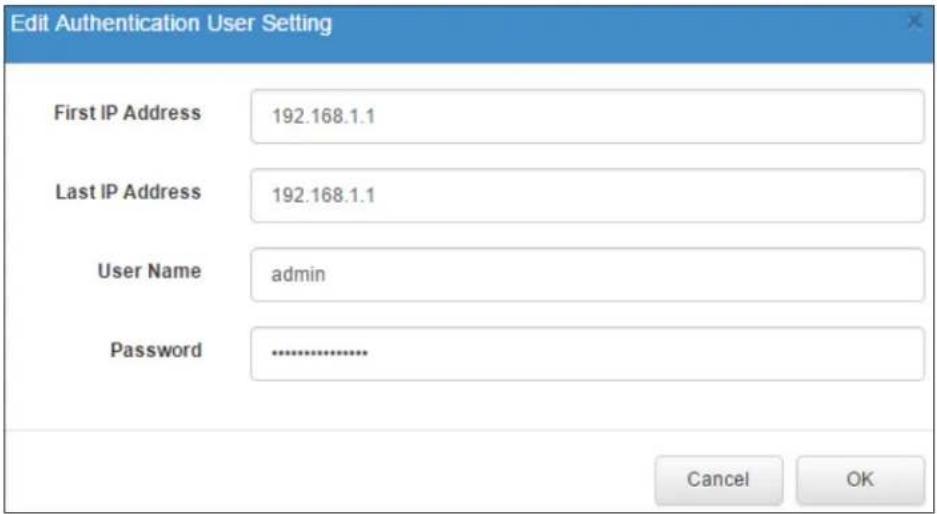
1 Log in to the ZyXEL CNC, go to Site View > Admin > User Name/Password > Add New Setting. Backing-up and restoring configurations requires the device's valid username and password. Edit the Authentication User Setting by setting the device's IP address, valid username, and valid password. The default User Name/Password profile is "admin/1234" for all IP addresses.
Figure 28 Site View > Admin > User Name/Password > Add New Setting
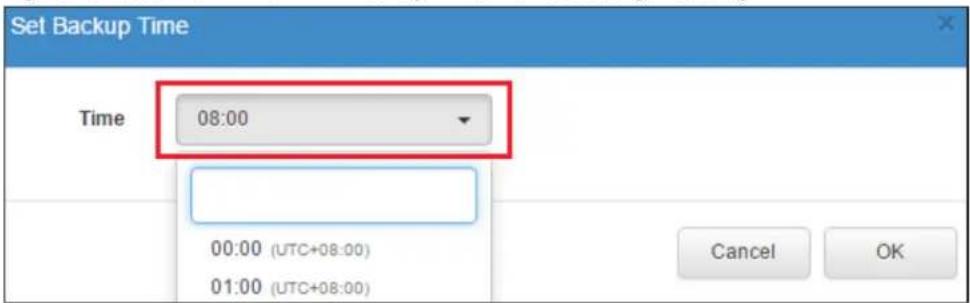
2 Go to Site View > Admin > Backup Time Frame Setting to set the time CNC saves and stores the device's daily running configurations. Click the Setting button under the Action column to edit the time.
Figure 29 Site View > Admin > Backup Time Frame Setting > Setting
3 If you wish to manually back up a device's running configurations, go to Site View > Device. Click on the Backup Now button to save the device's running configurations to CNC.
Figure 30 Site View > Device

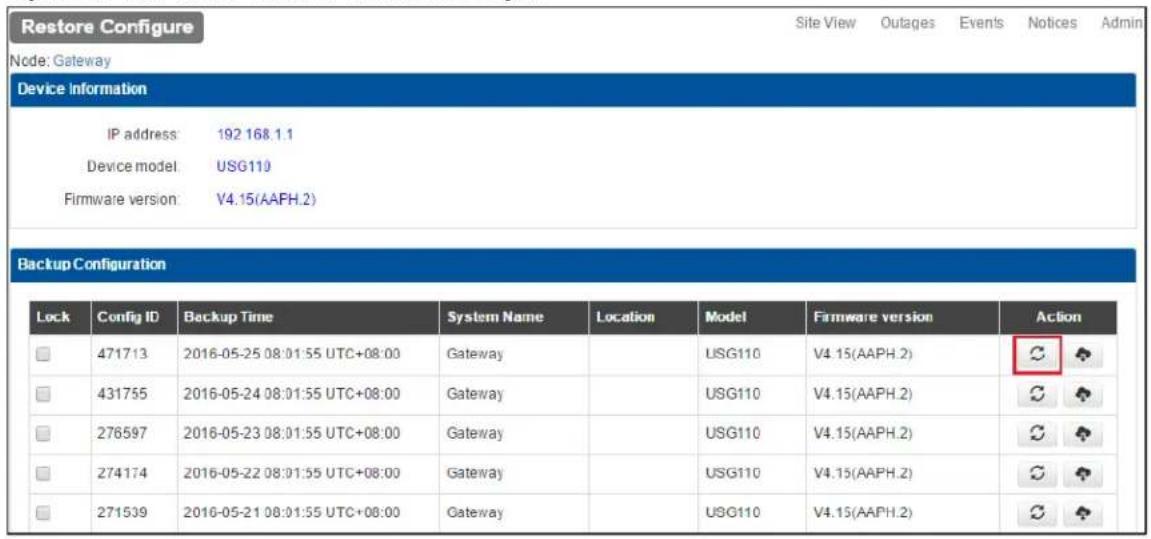
4 To restore running configurations of devices, go to Site View > Device > Restore Configure. Click the Restore button under the Action column of the specific Backup Time to upload this configuration.
Figure 31 Site View > Device > Restore Configure
5 Go to Site View > Device. Recent Events should show a "configRestoreCompleted" message to indicate configuration upload is successful.
Figure 32 Site View > Device
| Recent Events | |||
| Event ID | Time | Severity | Description |
| 477871 | 2016-05-26 13:16:16 UTC+08:00 | NORMAL | Node Event: rescanCompleted |
| 477870 | 2016-05-26 13:16:16 UTC+08:00 | NORMAL | Discovery Event: nodeUpdate |
| 477813 | 2016-05-26 13:16:08 UTC+08:00 | NORMAL | Node Event: rescanStarted |
| 477812 | 2016-05-26 13:16:08 UTC+08:00 | NORMAL | Device Config Event configRestoreCompleted |
| 477860 | 2016-05-26 13:13:22 UTC+08:00 | NORMAL | Device Config Event configRestoreStarted |
| More... | |||
6 Disconnect any non-uplink interface. CNC will send notifications to all accounts in the mail group. Access the mail box check if CNC has sent a notification.
Figure 33 Email Message
From: no-reply@cnc.zyxel.com [mailto:no-reply@cnc.zyxel.com]
Sent: Friday, May 27, 2016 2:31 PM
To: CSO_Switch
Subject: ZyXEL CNC Notification : Interface Down
Dear administrator-a@zyxel.com.tw :
From Site : Site X
All services are down on interface 192.168.1.36 on node AccessPoint.
Best regards,
Cloud Network Center
ZyXEL Communications Corp.
**This is an automatically generated email, please do not reply**
3.6 What Can Go Wrong?
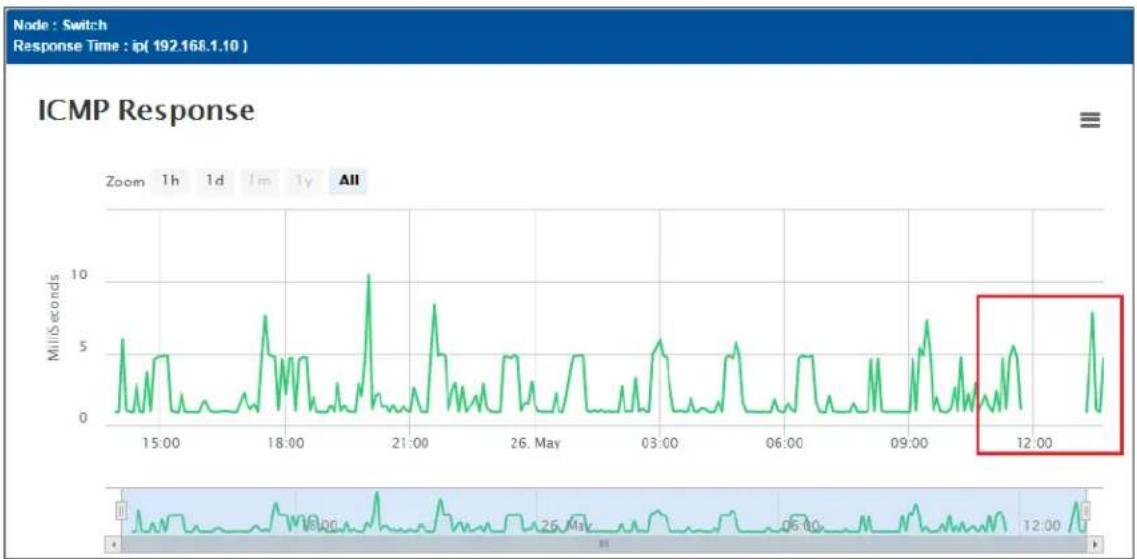
1 If the ICMP Response graph shows missing statistics, the following events may have occurred:
a. CNC lost connection to CNA.
b. CNA lost connection to this device.
c. Network is under the influence of a broadcast storm.
Figure 34 Site View > System Name > View Graphs > Response
line
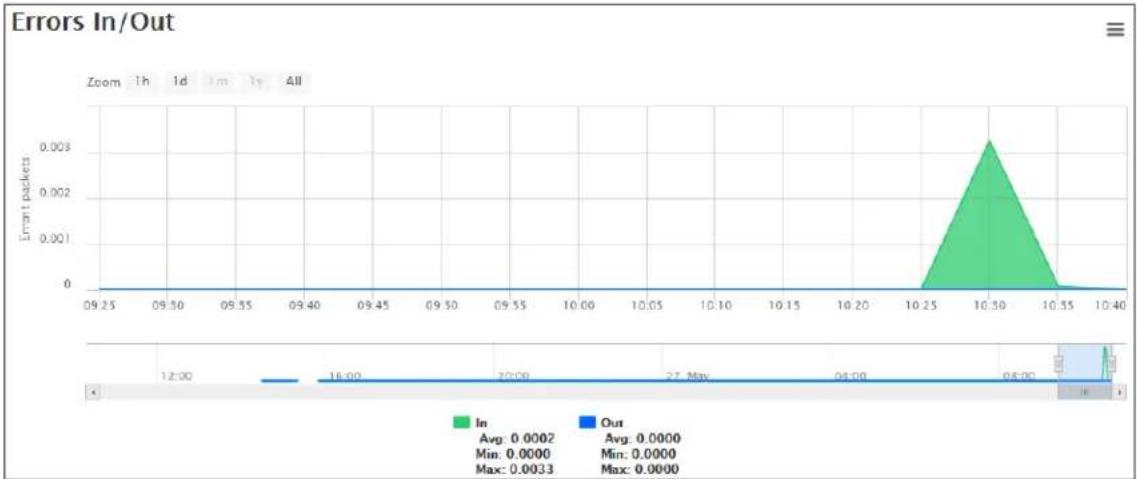
| Time | Response Time (ms) | | -------- | ------------------ | | 15:00 | ~5 | | 18:00 | ~7 | | 21:00 | ~10 | | 26:00 | ~5 | | 03:00 | ~5 | | 06:00 | ~5 | | 09:00 | ~7 | | 12:00 | ~8 |2 If the Errors In/Out interface graph shows any rise in counter, Ethernet cable may be damaged and require replacement.
Figure 35 Site View > System Name > View Graphs > Interface
line
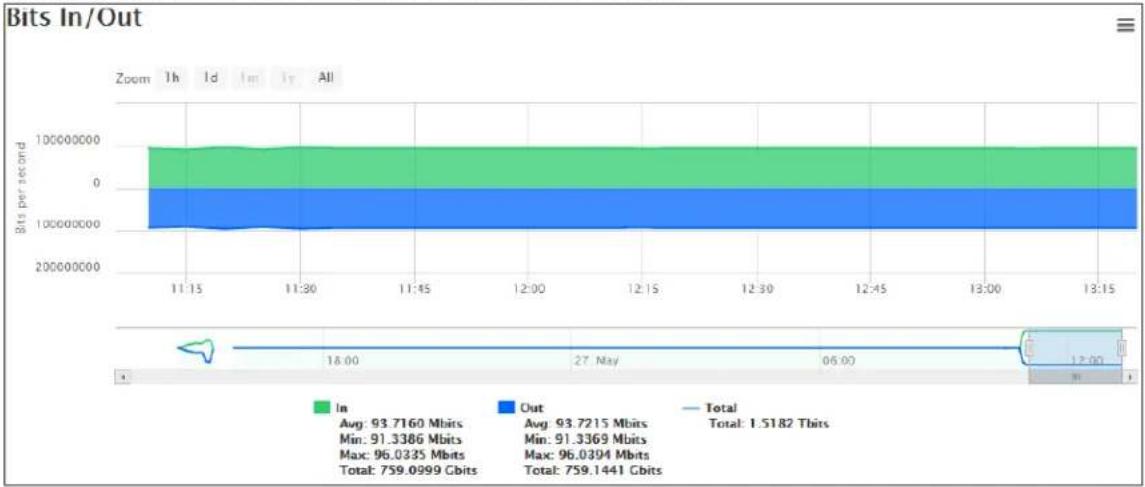
| Time | In | Out | |--------|--------|--------| | 12:00 | 0.0000 | 0.0000 | | 16:00 | 0.0000 | 0.0000 | | 20:00 | 0.0000 | 0.0000 | | 27:00 | 0.0000 | 0.0000 | | 04:00 | 0.0000 | 0.0000 | | 05:00 | 0.0000 | 0.0000 |3 If the Bits In/Out graph of an interface shows a cutoff, the following may have occurred:
a. Link bandwidth is in overcapacity. Consider load balancing traffic.
b. Network is under the influence of a Broadcast storm. Determine if network has connected loops.
Figure 36 Site View > System Name > View Graphs > Interface
line
| Time | In | Out | | -------- | --------- | --------- | | 11:15 | 93.7160 Mbits | 93.7215 Mbits | | 11:30 | 91.3386 Mbits | 91.3369 Mbits | | 11:45 | 96.0335 Mbits | 96.0394 Mbits | | 12:00 | 759.0999 Cbits | 759.1441 Cbits | | 12:30 | 759.1441 Cbits | 759.1441 Cbits | | 12:45 | 759.1441 Cbits | 759.1441 Cbits | | 13:00 | 759.1441 Cbits | 759.1441 Cbits | | 13:15 | 759.1441 Cbits | 759.1441 Cbits |4 If the device Recent Events shows "Device Config Event: configBackupFailed", make sure that CNC is using the correct user name and password in Site View > Admin > User Name/Password > Add New Setting for this device's IP address.
Figure 37 Site View > Device
| Recent Events | |||
| Event ID | Time | Severity | Description |
| 473879 | 2016-05-25 13:51:44 UTC+08:00 | MAJOR | Device Config Event: configBackupFailed |
| 473877 | 2016-05-25 13:51:15 UTC+08:00 | MAJOR | Device Config Event: configBackupFailed |
| 473876 | 2016-05-25 13:26:49 UTC+08:00 | MAJOR | Device Config Event: configBackupFailed |
| 473874 | 2016-05-25 13:22:03 UTC+08:00 | NORMAL | Node Event: manageGraphsEdited |
| 471541 | 2016-05-25 08:02:16 UTC+08:00 | NORMAL | Device Config Event: configBackupCompleted |
| More... | |||
4 How to Replace and Recover Failed Devices
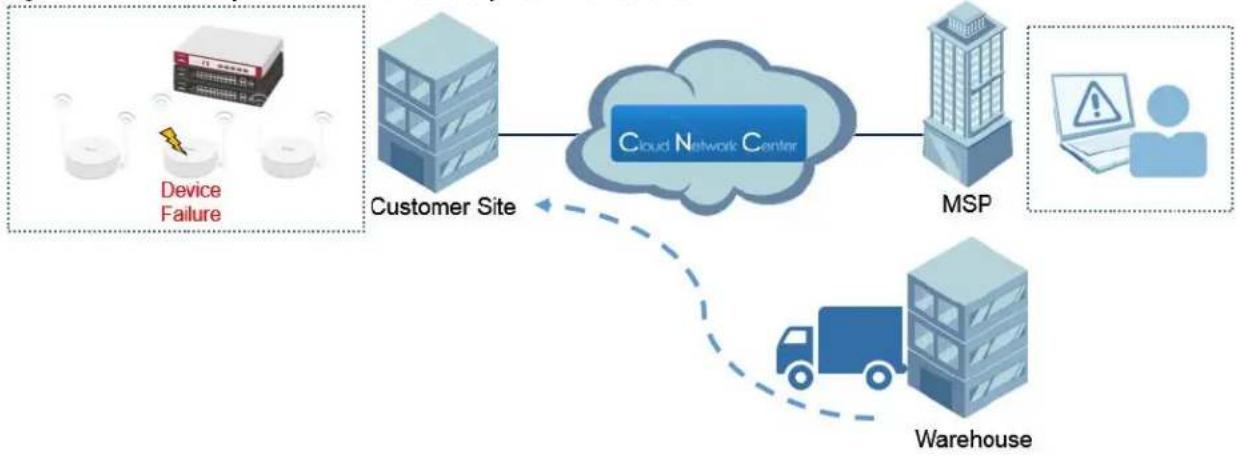
This example shows the general replacement process when a device is discovered to no longer able to power-on or perform any basic management or service on a remote site. The replacement process considers both Centralized and Remote Site management architecture. CNC provides a special feature called Auto Restore that allows convenient configurations and firmware recovery for replacement devices.
Figure 38 Device Replacement and Recovery from MSP to Site
flowchart
graph LR
    A["Device Failure"] --> B["Customer Site"]
    B --> C["Cloud Network Center"]
    C --> D["MSP"]
    D --> E["Warehouse"]
    E -.-> C
4.1 Replacing Devices through Centralized Management
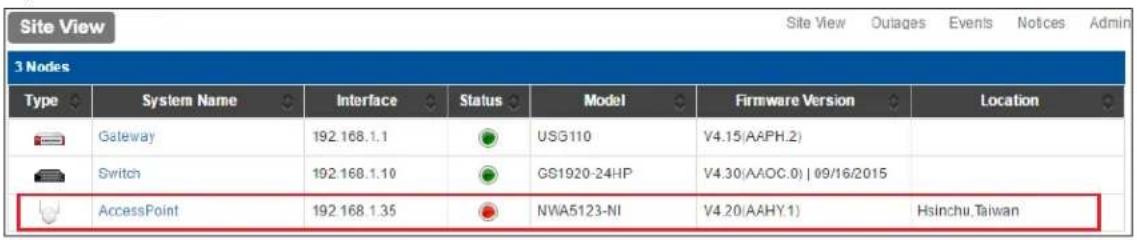
1 Log in to the ZyXEL CNC, go to Site View. The damaged or malfunctioning device will be indicated as offline status.
Figure 39 Site
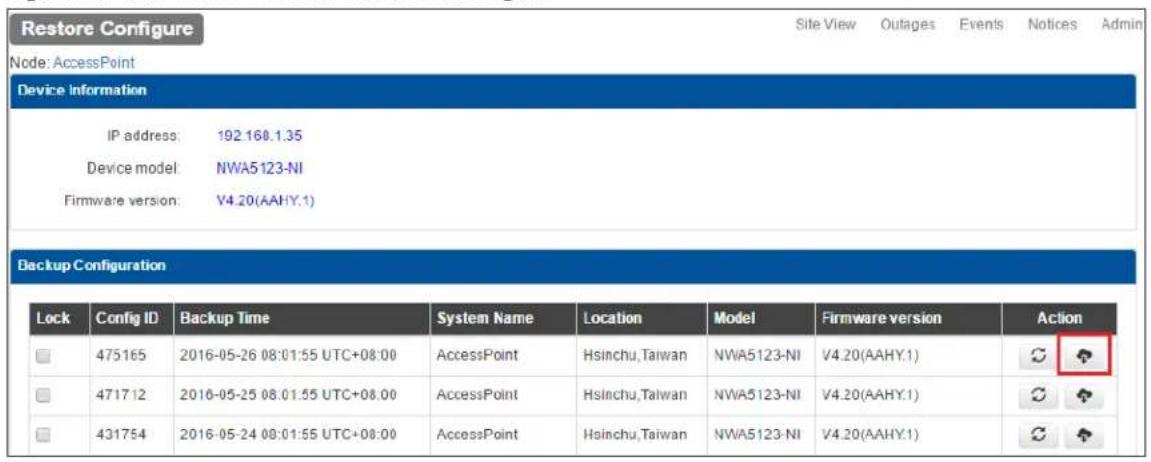
2 Go to Site View > Device > Restore Configure. Download the last good configuration by clicking on the Download button below the Action column.
Figure 40 Site View > Device > Restore Configure
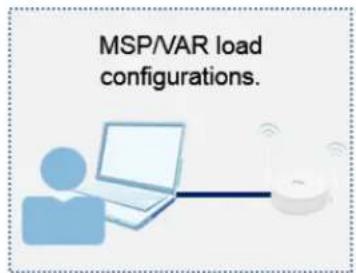
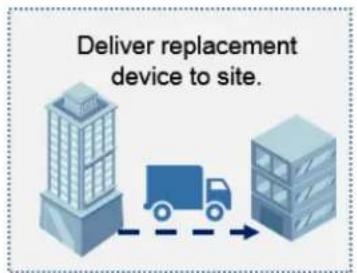
3 Prepare replacement device in MSP office and upload the last good configuration. After uploading and saving configurations, deploy device back to remote site.
Figure 41 Centralized Restoration
flowchart
graph TD
    A["Device 1"] --> B["Switch"]
    B --> C["Device 2"]
    C --> A
    style A fill:#f9f,stroke:#333
    style C fill:#bbf,stroke:#333
4.2 Replacing Devices through Remote Site Management
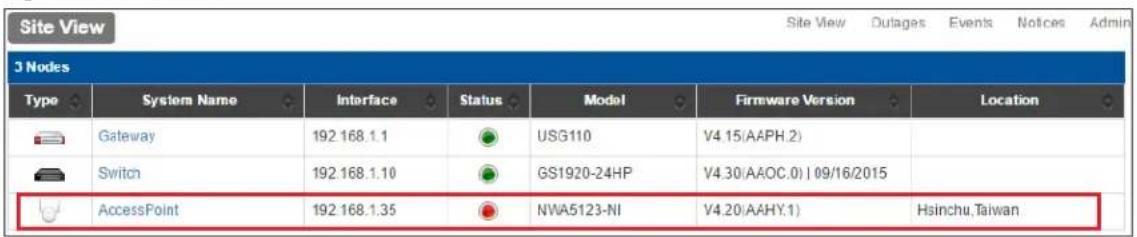
1 Log in to the ZyXEL CNC, go to Site View. The damaged or malfunctioning device will be indicated as offline status.
Figure 42 Site View
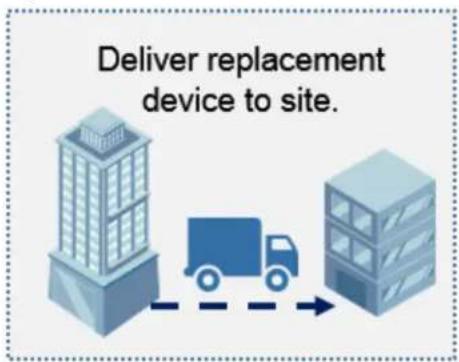
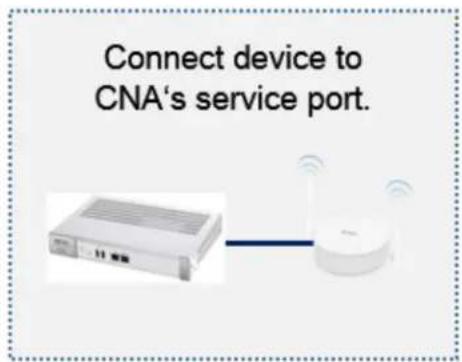
2 Deploy replacement device to remote site. Have the local administrator connect replacement device to the CNA's service port.
Figure 43 Remote Site Restoration
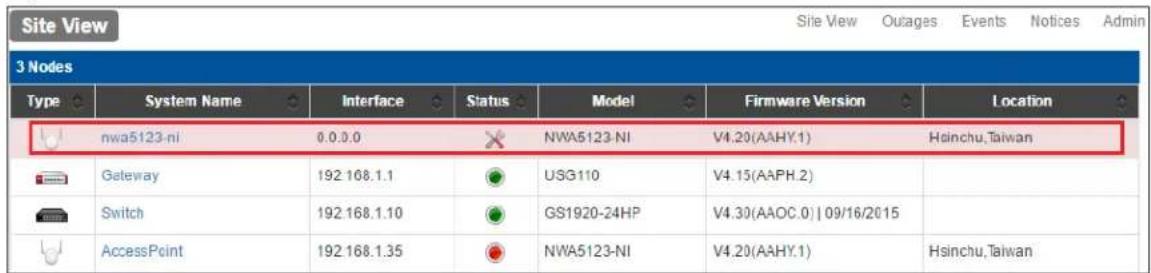
3 Log in to the ZyXEL CNC, go to Site View. Click on the System Name of the device with the unique icon ( ) that appears.
Figure 44 Site View
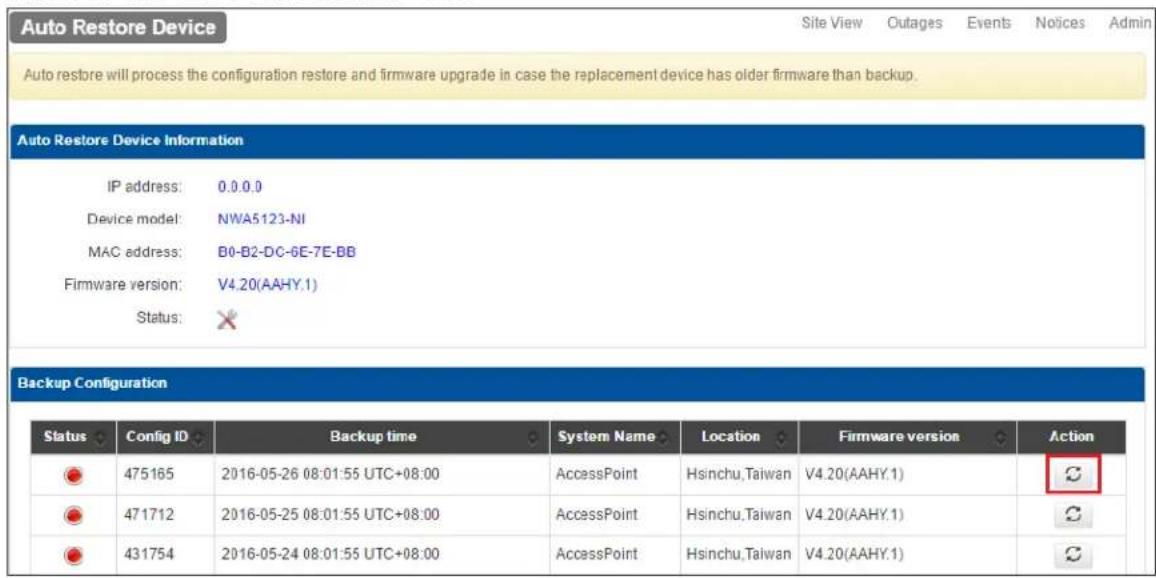
4 Click on the Restore icon of the last known good configuration under the Action column.
Figure 45 Site View > Auto Restore Device
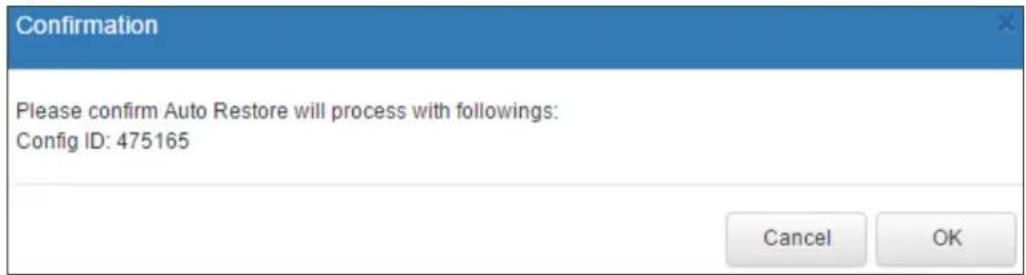
5 Click on the OK button to confirm that device will perform Auto Restore using the selected configurations and firmware. Wait for a few minutes until
Figure 46 Site View > Auto Restore Device > Confirmation
6 Go to Site > Events. Wait for Event Name "autoRestoreCompleted" message to appear. This will indicate that device has been successfully recovered and can now be disconnected from the CNA's service port.
Figure 47 Site > Events
![Events Category: ALL Search Constraints: Event ID Event ID Severity Time System Name Interface Event Name 478042 - [+] [-] NORMAL [+] [-] 2016-05-26 16:48:01 UTC+08:00 [<] [+] AccessPoint [+] [-] 0.0.0.0 [+] [-] Complete restoring procedure to AccessPoint with Config ID: 475165. Auto Restore Event: autoRestoreCompleted [+] [-] 478041 - [+] [-] NORMAL [+] [-] 2016-05-26 16:44:15 UTC+08:00 [<] [+] nwa5123-ni [+] [-] 0.0.0.0 [+] [-] Start restoring procedure to AccessPoint with Config ID: 475165. Auto Restore Event: autoRestoreStarted [+] [-] 478093 - [+] [-] NORMAL [+] [-] 2016-05-26 16:26:16 UTC+08:00 [<] [+] - [+] [-] - [-] [-] Device on service port Gained . Auto Restore Event: DeviceOnServicePortGained [+] [-]](/content/2026/05/794464/images/6b6369c4a2a94fd0d05cbf1928160fc6061daabc1b02e1e675301b397ff2f468.jpg)
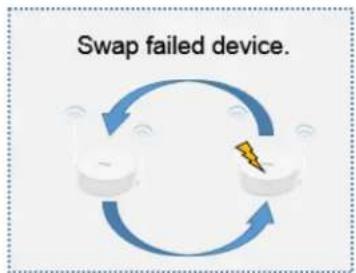
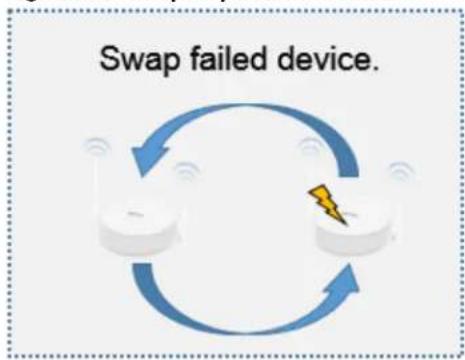
7 Contact the local administrator to swap the damaged or malfunctioning device with the replacement device.
Figure 48 Swap Replacement Device
8 If the malfunctioning or damaged device was using dynamic IP address configurations, go to Site View > Admin > Discover Nodes. Re-discover all the ZyXEL devices in the site's local network.
Figure 49 Site View > Admin > Discover Nodes
9 Go to Site View. If the replacement device is now indicated as an online device, click the System Name of the old entry.
Figure 50 Site View
10 After going to Site View > Device, click the Delete Node button to remove this node from the site device list.
Figure 51 Site View > Device

Note: Removing a node permanently removes the all the node's historic data. This includes the monitoring data, threshold status, and backup configurations.
4.3 What Can Go Wrong?
1 If the CNC does not display the device connected to the service port, go to Organization View to verify how many sites are being managed by this CNA. Auto Restore is disabled if the CNA is managing more than one site.
Figure 52 Organization View

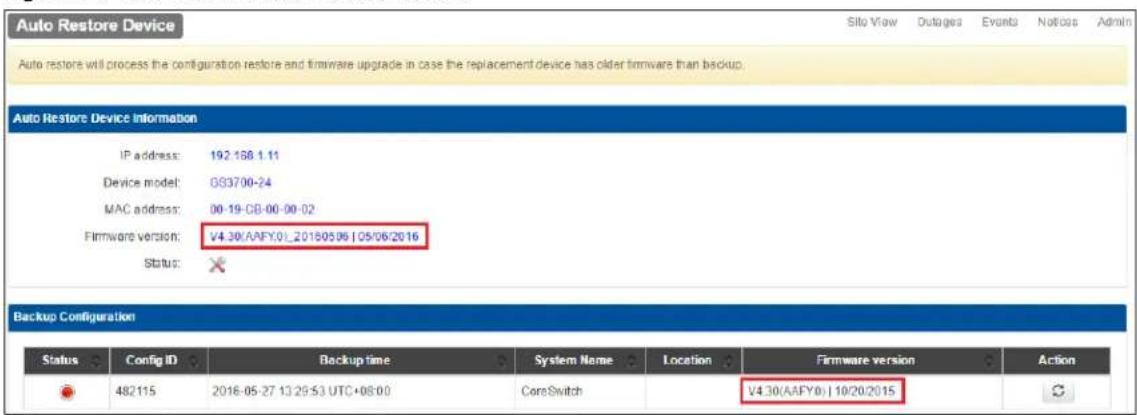
2 If the replacement device did not match the Backup Configuration's firmware after undergoing auto restore, verify which firmware the replacement device was using. Auto Restore only updates firmware if the replacement device's firmware is older than the Backup Configuration.
Figure 53 Site View > Auto Restore Device
- Cloud Network Center/Cloud Network Agent
- Handbook
- Table of Contents
- How to Deploy and Install the Cloud Network Agent....4
- How to Share or Transfer CNA Account Management....9
- How to Provide Value Added Service using CNC....12
- How to Replace and Recover Failed Devices....24
- How to Deploy and Install the Cloud Network Agent
- Initial Cloud Network Agent Configuration
- Verify that the CNA is Online
- What Can Go Wrong?
- How to Share or Transfer CNA Account Management
- Managing Organization Operators
- Verify that Accounts are Granted Privilege
- What Can Go Wrong?
- How to Provide Value Added Service using CNC
- Discover ZyXEL Devices in the Local Network
- Schedule Firmware Upgrade
- Interpreting Graphs and Node Performance
- Receiving Email Notifications and Alerts during Link Failures
- Backing-Up and Restoring Device Configurations
- Figure 33 Email Message
- What Can Go Wrong?
- How to Replace and Recover Failed Devices
- Replacing Devices through Centralized Management
- Replacing Devices through Remote Site Management
- What Can Go Wrong?
Brand : ZYXEL
Model : CNA100
Category : Uncategorized