
BL2480T - Screen BENQ - Free user manual and instructions
Find the device manual for free BL2480T BENQ in PDF.


User questions about BL2480T BENQ
0 question about this device. Answer the ones you know or ask your own.
Ask a new question about this device
Download the instructions for your Screen in PDF format for free! Find your manual BL2480T - BENQ and take your electronic device back in hand. On this page are published all the documents necessary for the use of your device. BL2480T by BENQ.
USER MANUAL BL2480T BENQ
Copyright © 2020 by BenQ Corporation. All rights reserved. No part of this publication may be reproduced, transmitted, transcribed, stored in a retrieval system or translated into any language or computer language, in any form or by any means, electronic, mechanical, magnetic, optical, chemical, manual or otherwise, without the prior written permission of BenQ Corporation.
Disclaimer
BenQ Corporation makes no representations or warranties, either expressed or implied, with respect to the contents hereof and specifically disclaims any warranties, merchantability or fitness for any particular purpose. Further, BenQ Corporation reserves the right to revise this publication and to make changes from time to time in the contents hereof without obligation of BenQ Corporation to notify any person of such revision or changes.
The performance of flicker-free may be affected by external factors such as poor cable quality, unstable power supply, signal interference, or poor grounding, and not limited to the above mentioned external factors. (Applicable for flicker-free models only.)
BenQ ecoFACTS
BenQ has been dedicated to the design and development of greener product as part of its aspiration to realize the ideal of the "Bringing Enjoyment 'N Quality to Life" corporate vision with the ultimate goal to achieve a low-carbon society. Besides meeting international regulatory requirement and standards pertaining to environmental management, BenQ has spared no efforts in pushing our initiatives further to incorporate life cycle design in the aspects of material selection, manufacturing, packaging, transportation, using and disposal of the products. BenQ ecoFACTS label lists key eco-friendly design highlights of each product, hoping to ensure that consumers make informed green choices at purchase. Check out BenQ's CSR Website at http://csr.BenQ.com/ for more details on BenQ's environmental commitments and achievements.

This document aims to provide the most updated and accurate information to customers, and thus all contents may be modified from time to time without prior notice. Please visit the website for the latest version of this document and other product information. Available files vary by model.
I. Make sure your computer is connected to the Internet.
2. Visit the local website from Support.BenQ.com. The website layout and content may vary by region/country.
- User manual and related document
- Drivers and applications
- (EU only) Dismantled information: Available on the user manual download page. This document is provided based on Regulation (EU) 2019/2021 to repair or recycle your product. Always contact the local customer service for servicing within the warranty period. If you wish to repair an out-of-warranty product, you are recommended to go to a qualified service personnel and obtain repair parts from BenQ to ensure compatibility. Do not disassemble the product unless you are aware of the consequences. If you cannot find the dismantled information on your product, contact the local customer service for assistance.
EPREL Registration Number:
BL2283: 341582
BL2381T: 342388
BL2480: 342390
BL2480T: 342399
BL2483TM: 342267
BL2483: 342278
BL2581T: 343918
BL2780: 342402
BL2780T: 342403
BL2783: 343937

Please follow these safety instructions for best performance, and long life for your monitor.
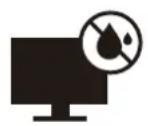
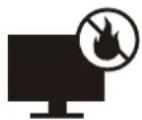
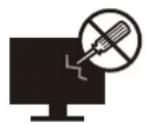
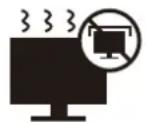
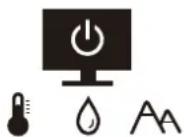
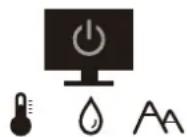
10-90% 0-3000m0-40°C 10-60% 0-12000m-20-60°C
- The AC plug isolates this equipment from the AC supply.
- The power supply cord serves as a power disconnect device for pluggable equipment. The socket outlet should be installed near the equipment and be easily accessible.
- This product should be operated from the type of power indicated on the marked label. If you are not sure of the type of power available, consult your dealer or local power company.
- The Class I pluggable equipment Type A must be connected to protective earth.
- An approved power cord greater or equal to H03VV-F or H05VV-F, 2G or 3G, 0.75mm^2 must be used.
- Use only the power cord provided by BenQ. Never use a power cord that appears to be damaged or frayed.
For Germany only:
- (If the weight of the product is less than or equal to 3 kg) An approved power cord greater or equal to H03VV-F, 3G, 0.75mm^2 must be used.
- (If the weight of the product is more than 3 kg) An approved power cord greater or equal to H05VV-F or H05RR-F, 3G, 0.75mm^2 must be used.
- (If a remote control is provided) RISK OF EXPLOSION IF BATTERY IS REPLACED BY AN INCORRECT TYPE. DISPOSE OF USED BATTERIES ACCORDING TO THE INSTRUCTIONS.
For models with adapter:
- Use only the power adapter supplied with your LCD Monitor. Use of another type of power adapter will result in malfunction and/or danger.
- Allow adequate ventilation around the adapter when using it to operate the device or charge the battery. Do not cover the power adapter with paper or other objects that will reduce cooling. Do not use the power adapter while it is inside a carrying case.
- Connect the power adapter to a proper power source.
- Do not attempt to service the power adapter. There are no service parts inside. Replace the unit if it is damaged or exposed to excess moisture.
Care and cleaning
- Do not place the monitor face down on the floor or a desk surface directly. Otherwise, scratches on the panel surface may occur.
- The equipment is to be secured to the building structure before operation.
• (For models that support wall or ceiling mounting)
• Install your monitor and monitor mounting kit on a wall with flat surface.
- Ensure that the wall material and the standard wall mount bracket (purchased separately) are stable enough to support the weight of the monitor.
- Turn off the monitor and the power before disconnecting the cables from the LCD monitor.
• Always unplug the product from the power outlet before cleaning. Clean the LCD monitor surface with a lint-free, non-abrasive cloth. Avoid using any liquid, aerosol or glass cleaners.
- Slots and openings on the back or top of the cabinet are for ventilation. They must not be blocked or covered. Your monitor should never be placed near or over a radiator or heat sources, or in a built-in installation unless proper ventilation is provided.
- Do not place heavy loads on the monitor to avoid possible personal injury or damage to the monitor.
- Consider keeping the box and packaging in storage for use in the future when you may need to transport the monitor.
- Refer to the product label for information on power rating, manufacture date, and identification markings.
Servicing
- Do not attempt to service this product yourself, as opening or removing covers may expose you to dangerous voltages or other risks. If any of the above mentioned misuse or other accident such as dropping or mishandling occurs, contact qualified service personnel for servicing.
- Contact your place of purchase or visit the local website from Support.BenQ.com for more support.

Support.BenQ.com
Caution
- The monitor should be 50 \~ 70 cm (20 \~ 28 inches) away from your eyes.
- Looking at the screen for an extended period of time causes eye fatigue and may deteriorate your eyesight. Rest your eyes for 5 \~ 10 minutes for every 1 hour of product use.
- Reduce your eye strain by focusing on objects far way.
- Frequent blinking and eye exercise help keep your eyes from drying out.
Typographics
| Icon / Symbol Item Meaning | ||
 | Warning Information mainly to prevent the damage to components, data, or personal injury caused by misuse and improper operation or behavior. | |
 | Tip Useful information for completing a task. | |
 | Note Supplementary information. | |
In this document, the steps needed to reach a menu may be shown in condensed form, for example: Menu > System > Information.
Table of Contents
Copyright 2
Product support 3
Getting started 9
Getting to know your monitor ....12
Front view....12
Bottom view....12
Back view.... 13
Input and output ports.... 13
Connections 15
How to assemble your monitor hardware (for models without height adjustment stand) 22
How to detach the stand and the base ....28
Using the monitor wall mounting kit (for models without height adjustment stand) ....30
Assembling your monitor with a height adjustment stand ....32
How to attach the monitor base.... 32
How to detach the base ....34
Adjusting the monitor height 35
Rotating the monitor 36
Viewing angle adjustment 37
Using the monitor wall mounting kit ....38
Getting the most from your BenQ monitor ....39
Downloading the LCD Monitor driver files from the Internet.... 39
How to install the monitor on a new computer ....40
How to upgrade the monitor on an existing computer 41
How to install on Windows 10 system ....42
How to install on Windows 8 (8.1) system ....43
How to install on Windows 7 system ....44
How to adjust your monitor ....45
The control panel.... 45
Basic menu operation ....46
Picture optimization 48
Customizing the hot keys.... 48
Adjusting display mode.... 48
Choosing an appropriate picture mode 49
Adjusting screen brightness automatically (Bright Intelligence, selected models only) ...... 49
Enabling color vision accessibility (Color Weakness).... 49
Navigating the main menu ....50
Eye Care menu (selected models only) 51
Display menu 53
Picture menu 55
Picture Advanced menu 57
Audio menu 60
System menu 61
ECO menu (selected models only) 65
Troubleshooting 67
Frequently asked questions (FAQ) 67
Need more help? 69
Getting started
When unpacking please check you have the following items. If any are missing or damaged, please contact the place of purchase for a replacement.
BenQ LCD Monitor
(Models with Bright Intelligence function)
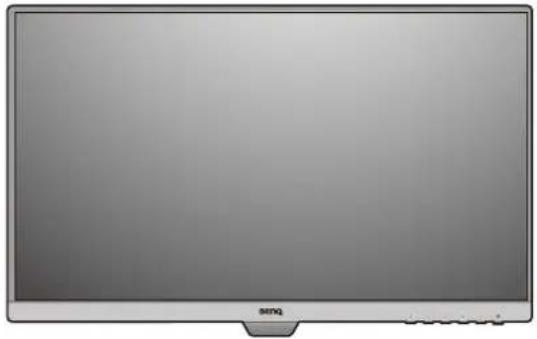
natural_image
Front view of a modern flat-screen monitor with no visible text or symbols on the screen.(Models without Bright Intelligence function)
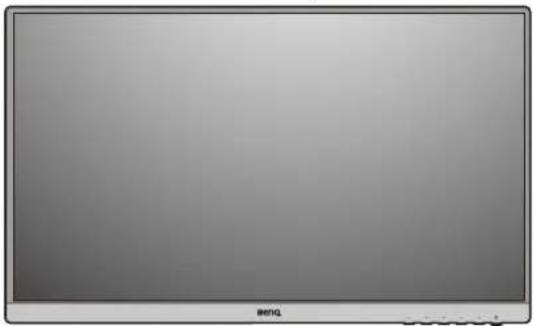
natural_image
Front view of a blank computer monitor with no visible text or symbols on the screen area.(Models with standard bezel)
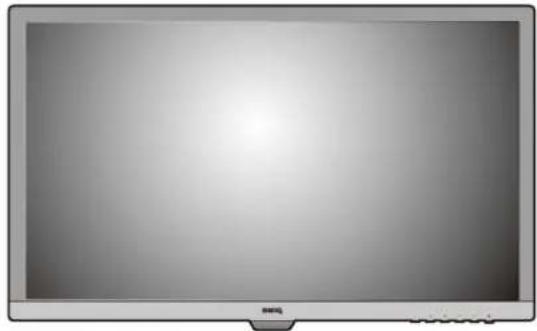
natural_image
Front view of a flat-screen computer monitor with blank screen (no visible text or symbols)(Models with height adjustment stand)
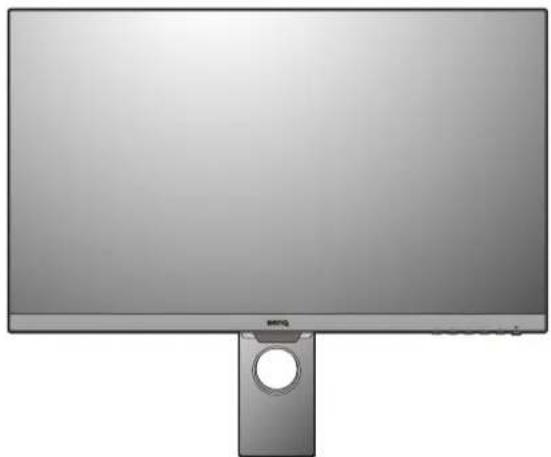
natural_image
Front view of a modern computer monitor with a circular lens and stand (no visible text or symbols)Monitor Stand (for models without height adjustment stand)
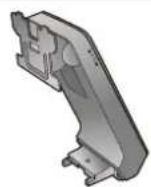
Monitor Base (for models without height adjustment stand)
natural_image
Simple gray T-shaped object with no text or symbolsMonitor Base (for models with height adjustment stand)
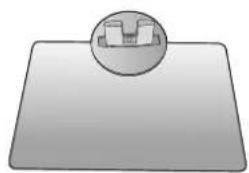
natural_image
Simple 3D illustration of a mechanical component with a circular inset showing a cross-section (no text or symbols)| Quick Start Guide |  |
| Safety Instructions |  |
| Regulatory Statements |  |
| Power Cord(Supplied item may differ by model or region.) | 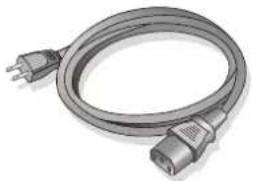 |
| Video Cable: D-Sub(Optional accessory) | 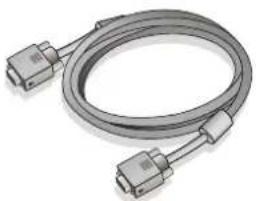 |
| Video Cable: DVI-D(Optional accessory) | 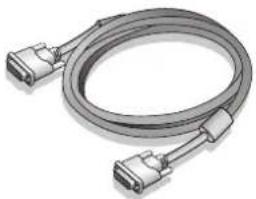 |
| Video Cable: HDMI(Optional accessory) | 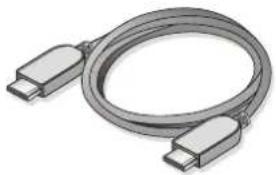 |
| Video Cable: DP(Optional accessory) | 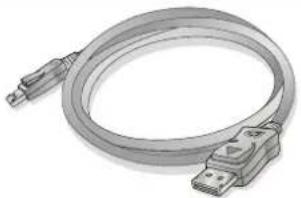 |
| Audio Cable(Optional accessory) | 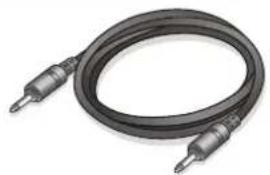 |
| USB Cable(Optional accessory) | 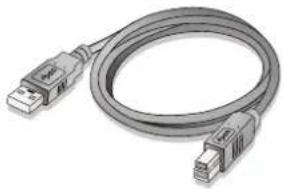 |

• Available accessories and the pictures shown here may differ from the actual contents and the product supplied for your region. And the package contents may subject to change without prior notice. For cables that are not supplied with your product, you can purchase them separately.
- Consider keeping the box and packaging in storage for use in the future when you may need to transport the monitor. The fitted foam packing is ideal for protecting the monitor during transport.

Always keep the product and accessories out of reach of small children.
Getting to know your monitor
Front view
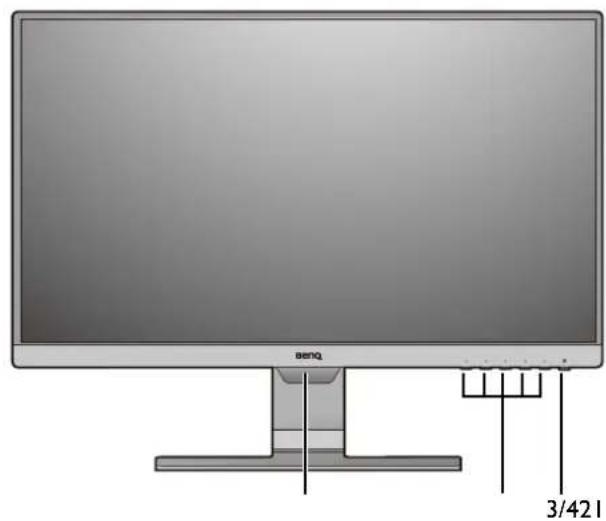
(Models with Bright Intelligence function) (BL2381T)
text_image
benq 3/421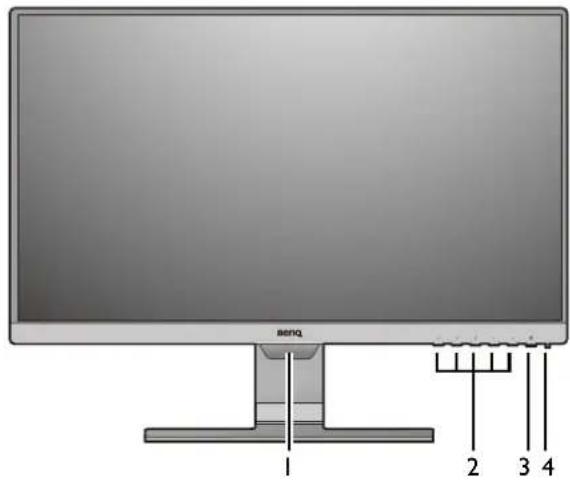
text_image
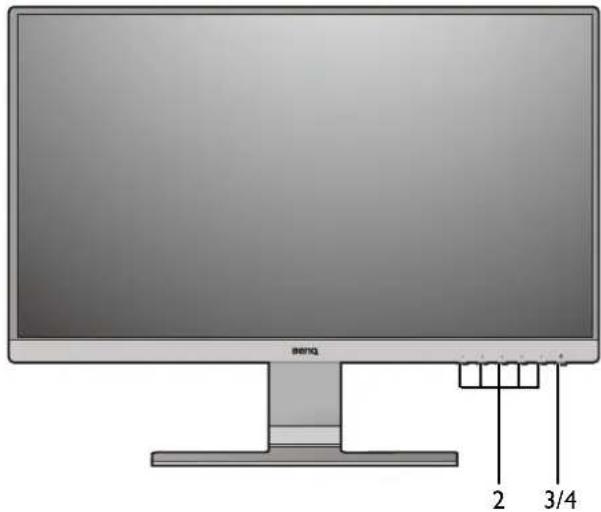
1 2 3 4(Models without Bright Intelligence function)
text_image
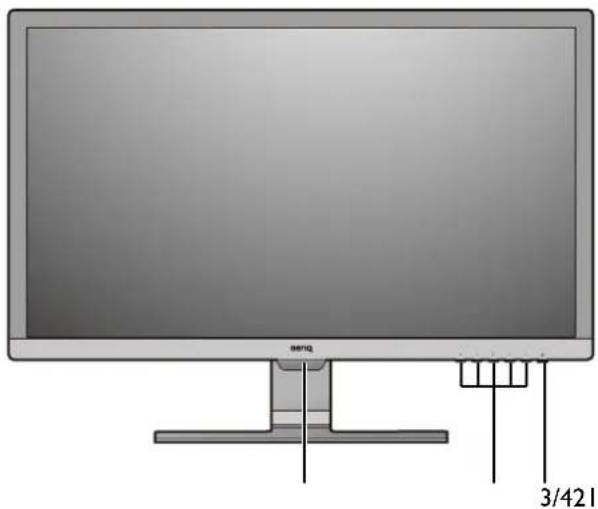
2 3/4(Models with standard bezel)
natural_image
Illustration of a computer monitor with a stand and cable connector, labeled '3/421' (no text or symbols on the device itself)I. Light sensor (available for models with Bright Intelligence)
2. Control buttons
3. Power button
4. Power LED indicator
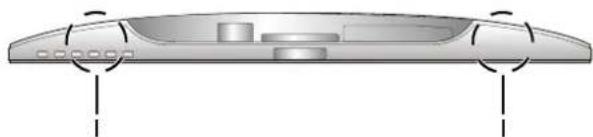
Bottom view
BL238IT / BL258IT / BL2483TM I. Speakers
natural_image
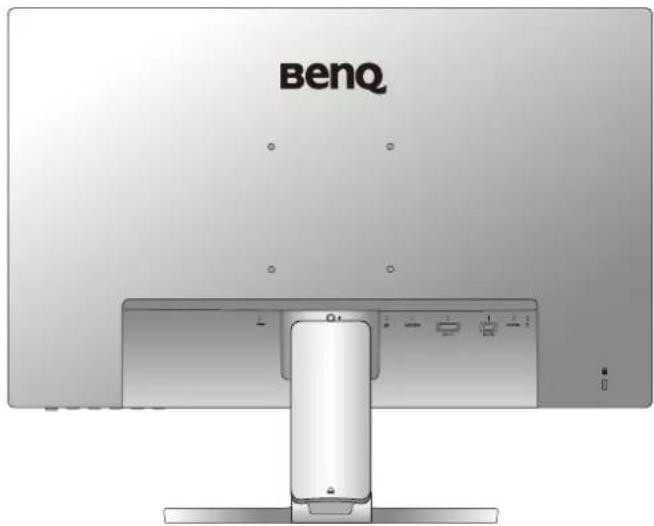
Diagram of a computer monitor rear panel with ventilation slots and ports (no text or labels)Back view
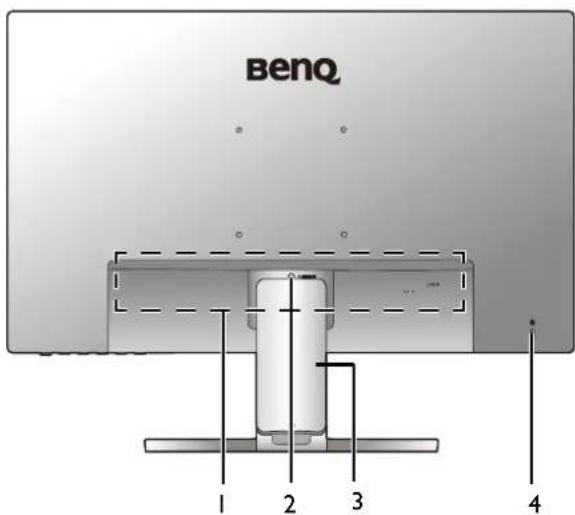
text_image
BenQ 1 2 3 4- Input and output ports (vary by model, see Input and output ports on page 13)
- Stand release
- Cable cover
- Kensington lock slot

- Above diagram may vary depending on the model.
• Picture may differ from product supplied for your region.
Input and output ports
Available input and output ports may vary depending on your purchased model. Check the product specifications on the website for details.
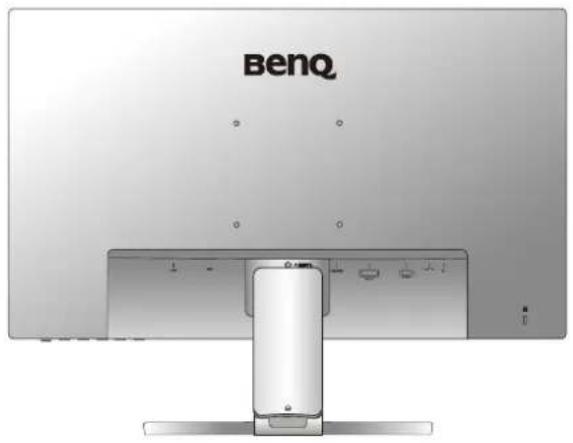
BL2480 / BL2480T / BL2780 / BL2780T I. AC power input jack
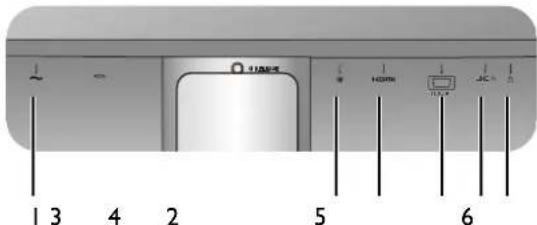
text_image
1 3 4 2 5 6Models with DVI inputs and speakers
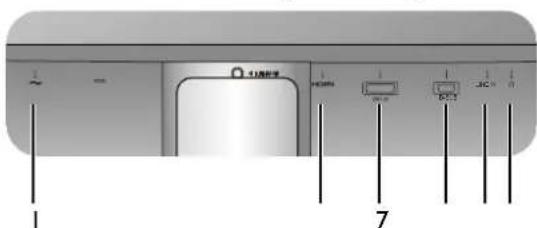
text_image
1 7BL2483 / BL2483T

text_image
1 2 3 4 5 6 7- DisplayPort socket
- HDMI socket
- D-Sub socket
- Audio Line In
- Headphone jack
- DVI-D socket
BL2283 I. AC power input jack
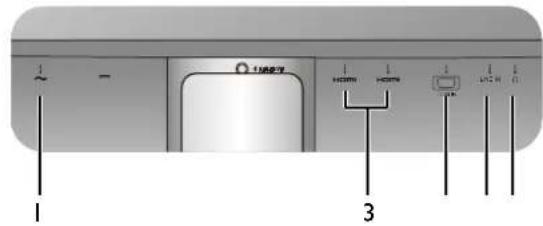
text_image
1 - 100% HORN HORN LPG 3 1 3BL2381T
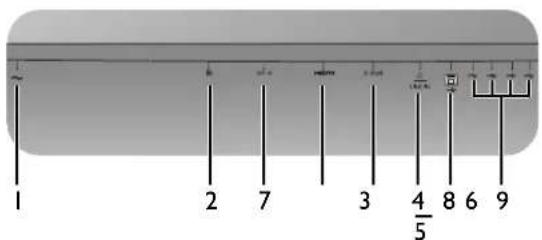
text_image
1 2 7 3 4 5 8 6 9BL2581T
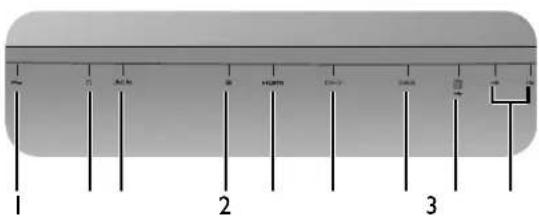
text_image
1 2 3BL2783
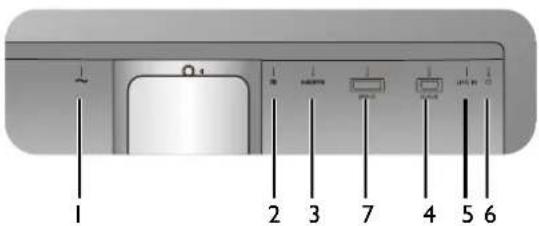
text_image
1 2 3 7 4 5 6BL2483TM
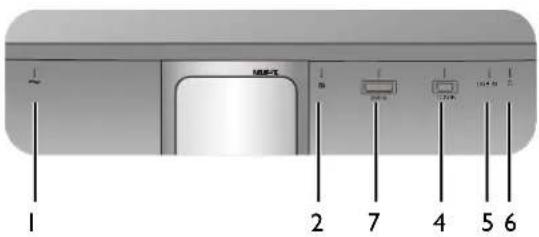
text_image
1 2 7 4 5 6- DisplayPort socket
- HDMI socket
- D-Sub socket
- Audio Line In
- Headphone jack
- DVI-D socket
- USB 3.0 port (upstream; connecting to the PC)
- USB 3.0 ports (downstream; connecting to USB devices)
Connections
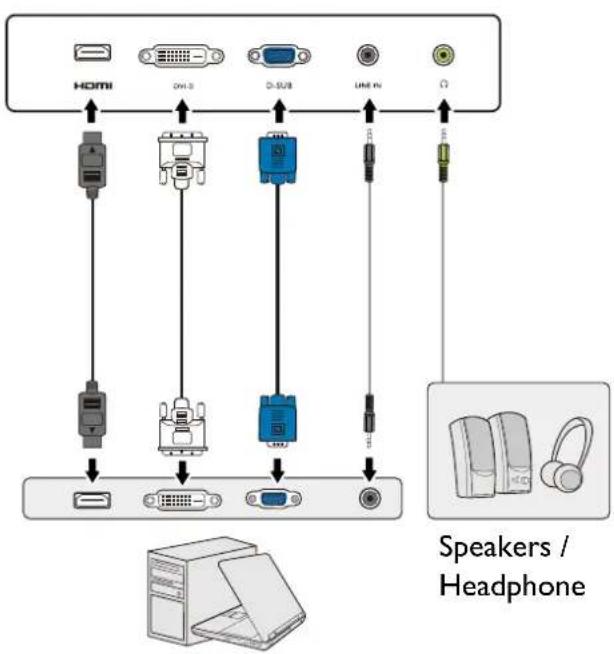
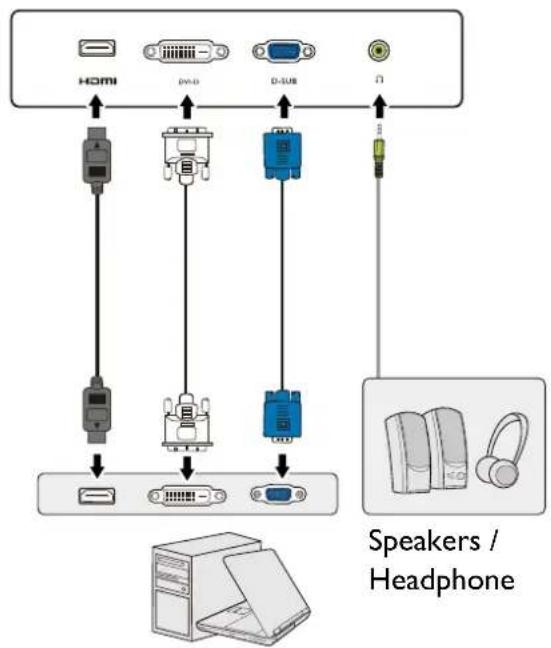
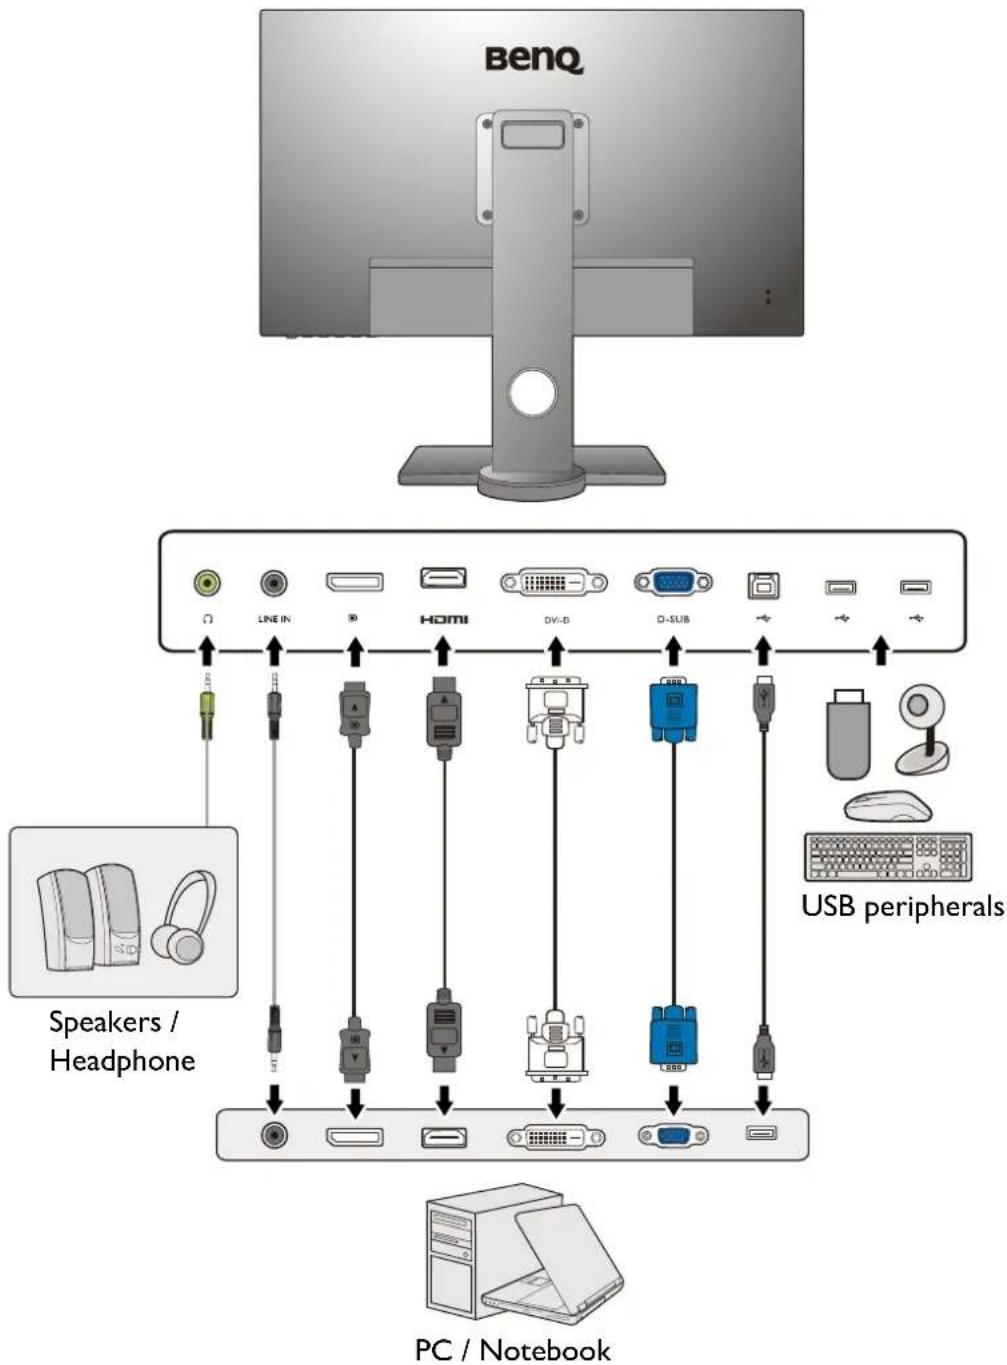
The following connection illustrations are for your reference only. For cables that are not supplied with your product, you can purchase them separately.
For detailed connection methods, see page 24 - 25.
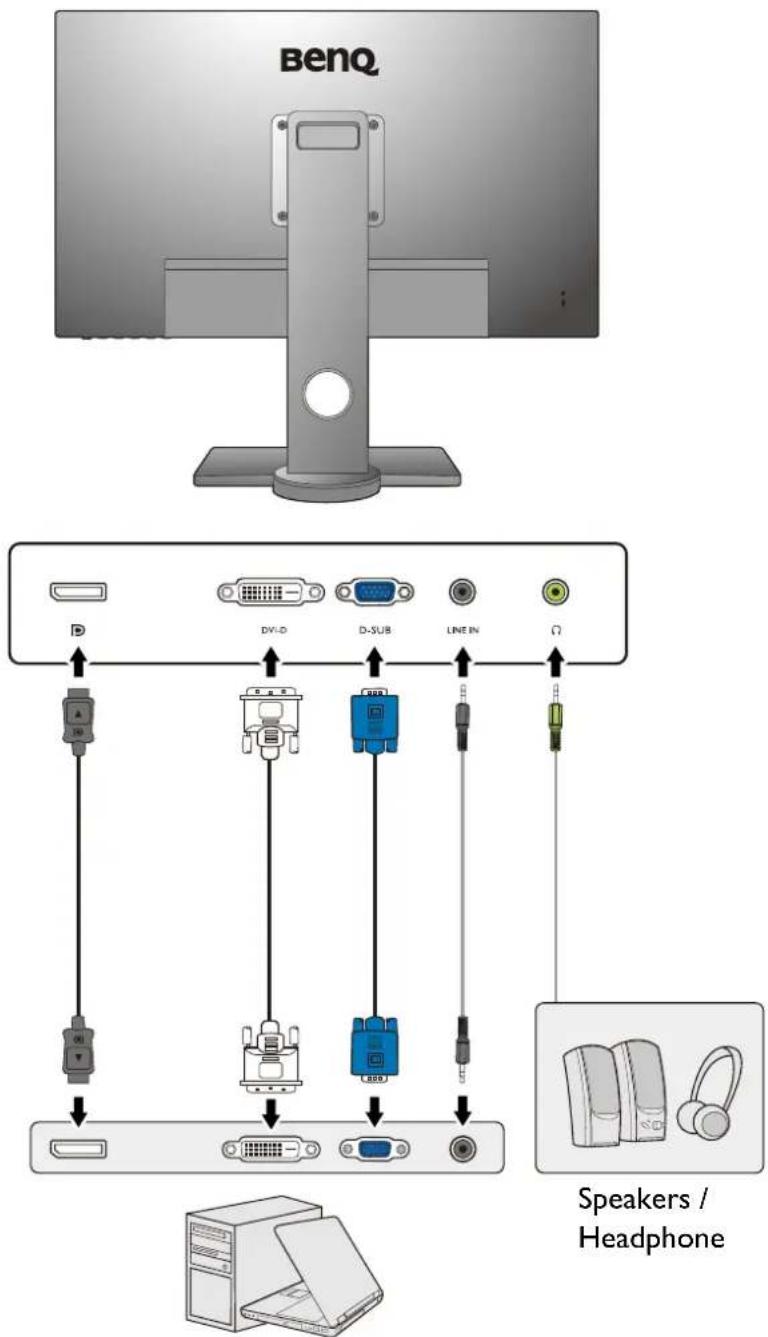
BL2480 / BL2480T / BL2780 / BL2780T
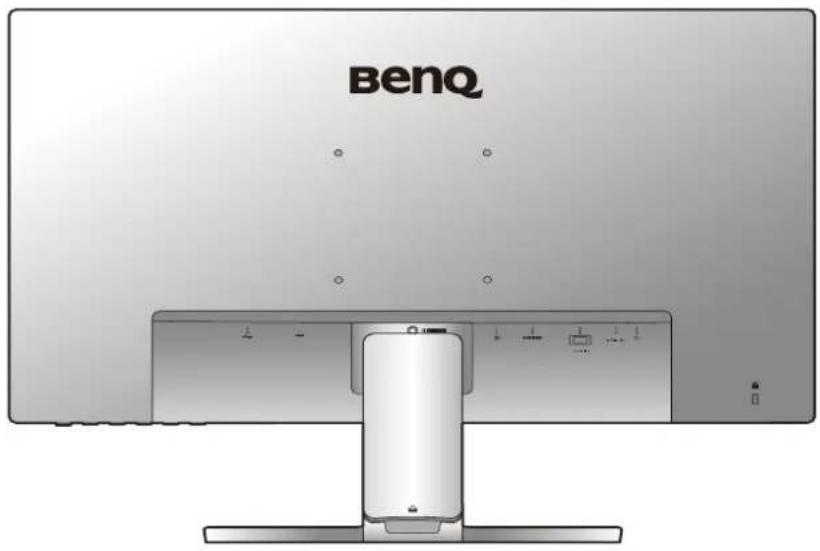
text_image
BenQ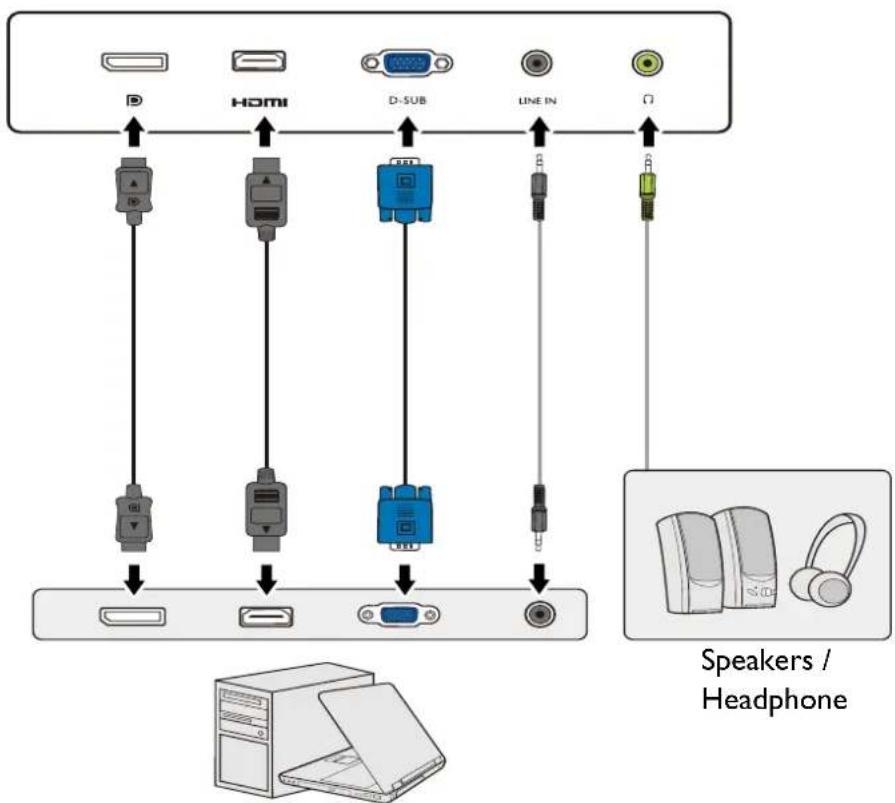
text_image
HDMI D-SUB LINE IN Speakers / HeadphonePC / Notebook
Models with DVI inputs
natural_image
Front view of a BenQ monitor with a vertical stand and control buttons (no readable text or symbols on the screen)BL2483 / BL2483T
flowchart
graph TD
    A[" HDMI "] --> B[" OHL3 "]
    A --> C[" D-SUB "]
    A --> D[" LINE IN "]
    A --> E[" Unknown "]
    B --> F[" Device "]
    C --> G[" Device "]
    D --> H[" Device "]
    E --> I[" Device "]
    F --> J[" Speaker / Headphone "]
    G --> J
    H --> J
    I --> J
PC / Notebook
flowchart
graph TD
    A[" HDMI "] --> B[" HDMI "]
    A --> C[" D-USB "]
    A --> D[" D-USB "]
    B --> E[" Speaker / Headphone "]
    C --> F[" Speaker / Headphone "]
    D --> G[" Speaker / Headphone "]
PC / Notebook
BL2283
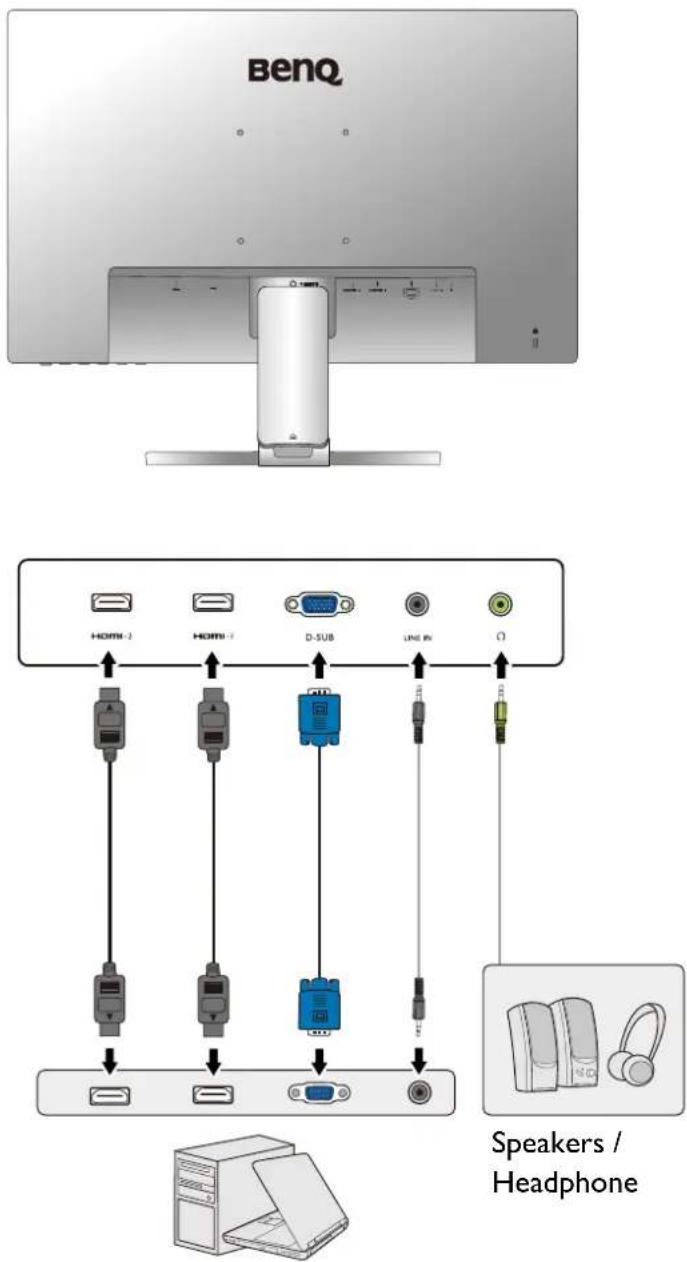
text_image
BenQ HDMI-1 HDMI-2 D-SUB LINE IN Ω Speakers / HeadphonePC / Notebook
BL2381T
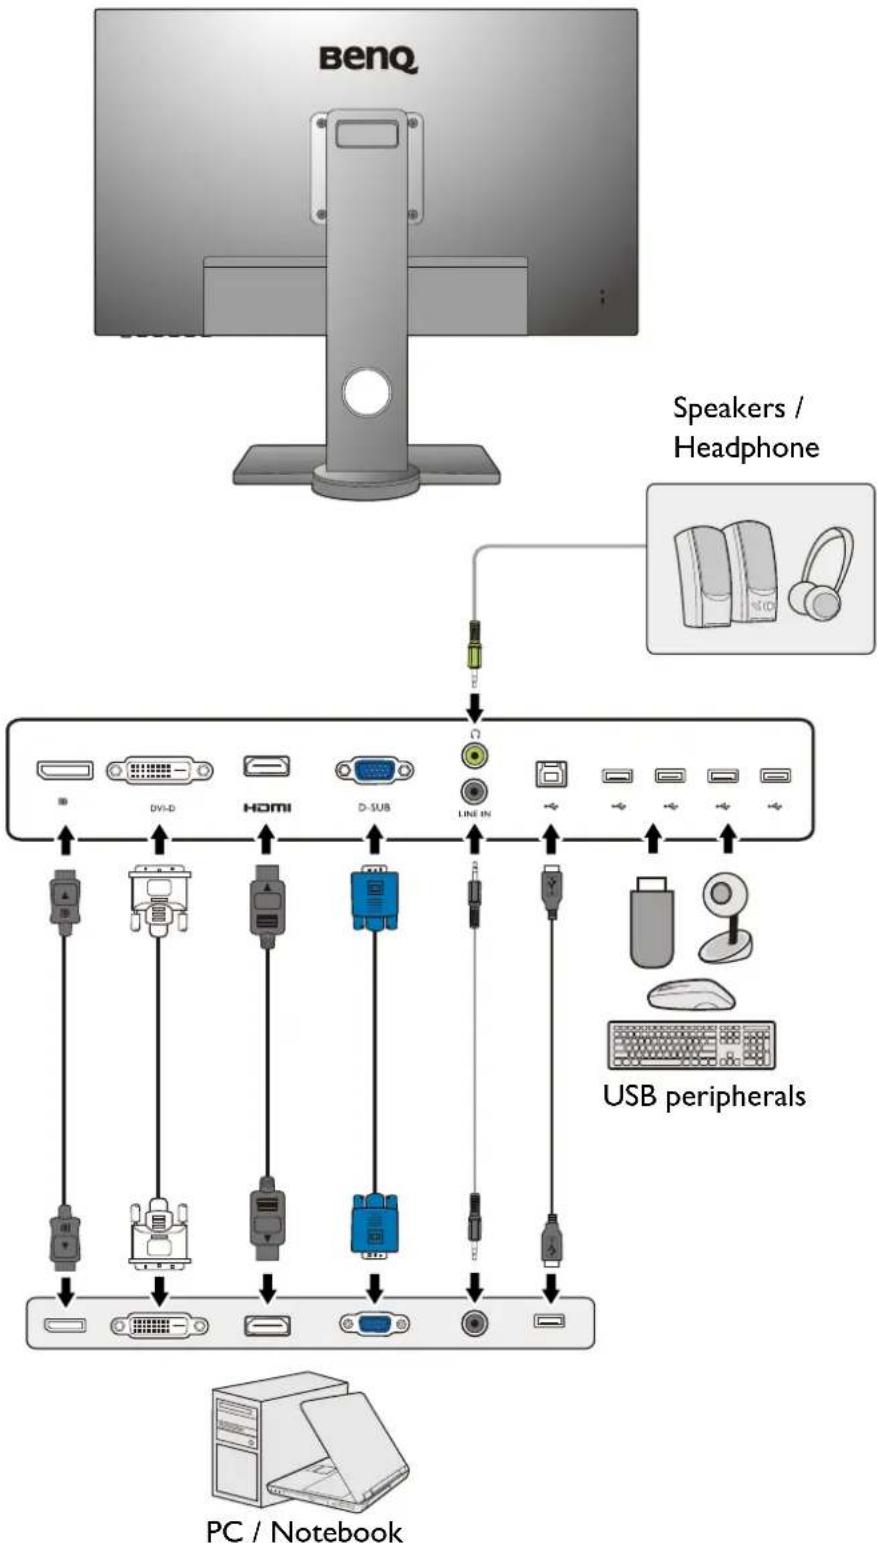
flowchart
graph TD
    A["BenQ"] --> B[" Speakers / Headphone"]
    B --> C["USB peripherals"]
    C --> D["PC / Notebook"]
    D --> E["Line IN"]
    E --> F["DVI-D"]
    E --> G["HDMI"]
    E --> H["D-USB"]
    E --> I["USB peripherals"]
BL2581T
text_image
BenQ Line IN HOMI DVI-D D-SUB USB peripherals Speakers / Headphone PC / NotebookBL2783
natural_image
Front view of a BenQ computer monitor with a vertical stand and control buttons (no visible text or symbols on the screen)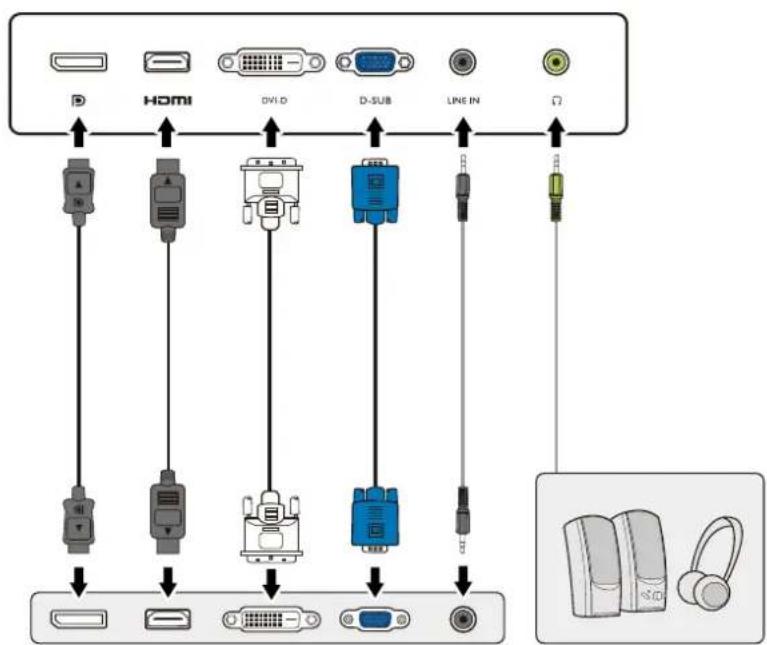
flowchart
graph TD
    A["User"] --> B["+"]
    C["USB"] --> D["+"]
    E["HDVI"] --> F["+"]
    G["D-USB"] --> H["+"]
    I["LINE IN"] --> J["+"]
    K["+"] --> L["Device 1"]
    K --> M["Device 2"]
    K --> N["Device 3"]
    K --> O["Device 4"]
    K --> P["Device 5"]
PC / Notebook
Speakers / Headphone
BL2483TM
text_image
BenQ D DV-D D-SUB LINE IN Ω Speakers / HeadphonePC / Notebook

The location and available input and output jacks may vary depending on the purchased model.
How to assemble your monitor hardware (for models without height adjustment stand)

- If the computer is turned on you must turn it off before continuing.
- Do not plug-in or turn-on the power to the monitor until instructed to do so.
- The illustrations in this document are for your reference only and may look different from the appearance of the product.
- The following illustrations are for your reference only. The location and available input and output jacks may vary depending on the purchased model.
- Avoid finger pressure on the screen surface.
I. Attach the monitor base.

Please be careful to prevent damage to the monitor. Placing the screen surface on an object like a stapler or a mouse will crack the glass or damage the LCD substrate voiding your warranty. Sliding or scraping the monitor around on your desk will scratch or damage the monitor surround and controls.
Protect the monitor and screen by clearing a flat open area on your desk and placing a soft item like the monitor packaging bag on the desk for padding.
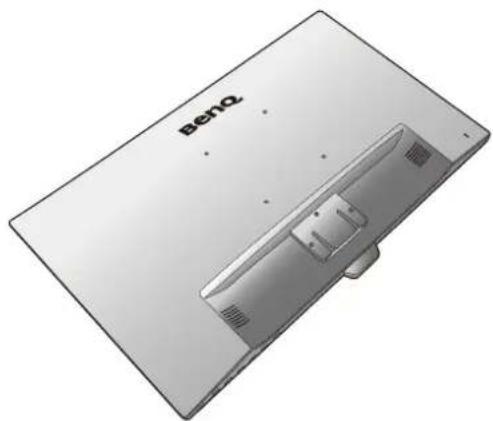
Gently lay the screen face down on a flat clean padded surface.
natural_image
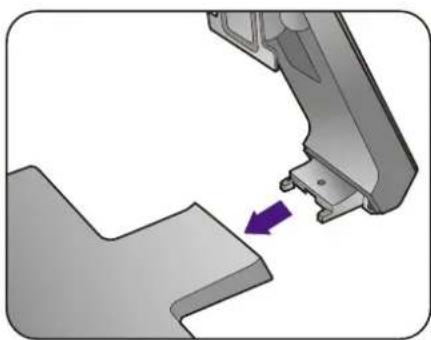
3D rendering of a Beno tablet device with a cutaway view showing internal components (no text or symbols)Attach the monitor stand to the monitor base as illustrated until it locks in place.

Pay attention to the sharp parts during assembly.
natural_image
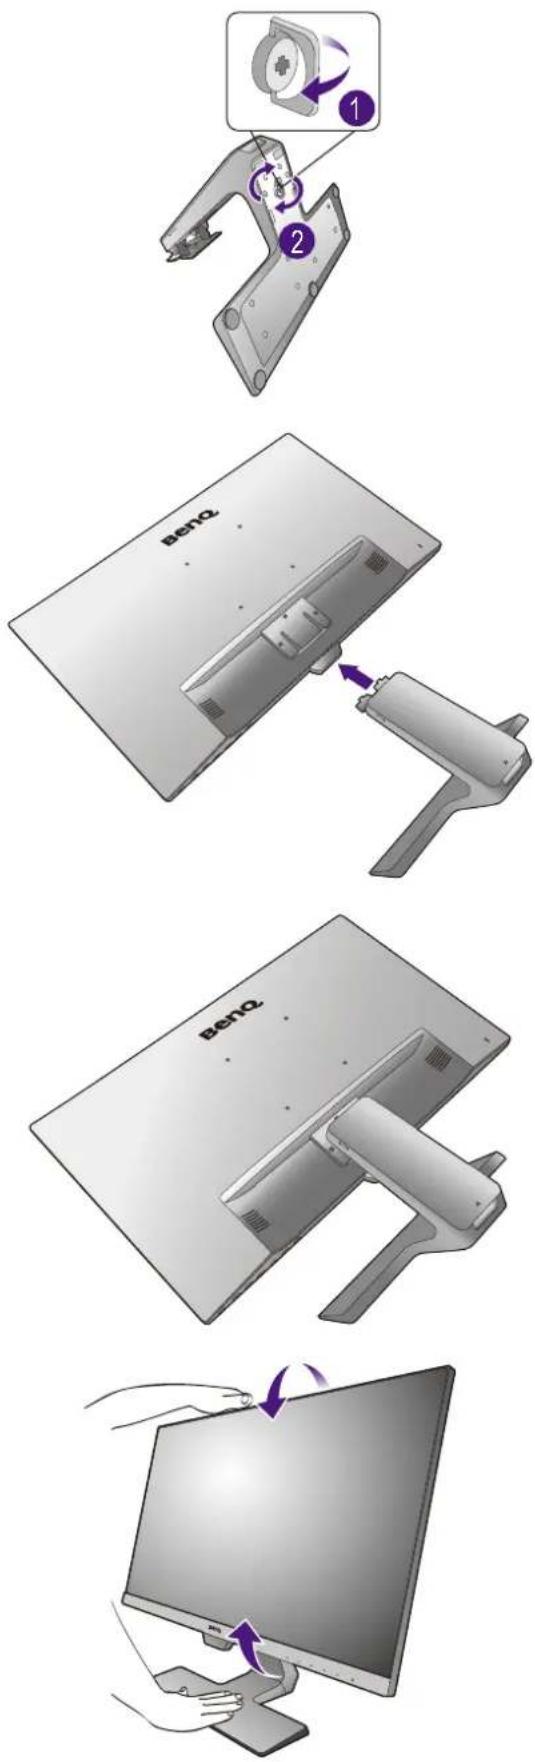
3D mechanical component diagram showing a bracket with a purple arrow pointing to a detail (no text or symbols)Tighten the thumbscrew on the bottom of the monitor base as illustrated.
Orient and align the stand arm with the monitor, then push them together until they click and lock into place.
Carefully lift the monitor, turn it over and place it upright on its stand on a flat even surface.

You should position the monitor and angle the screen to minimize unwanted reflections from other light sources.

Your monitor is an edge to edge monitor and should be handled with care. Adjust the screen angle by placing your hands on the top and on the base of the monitor as illustrated. Excessive force on the display is prohibited.
text_image
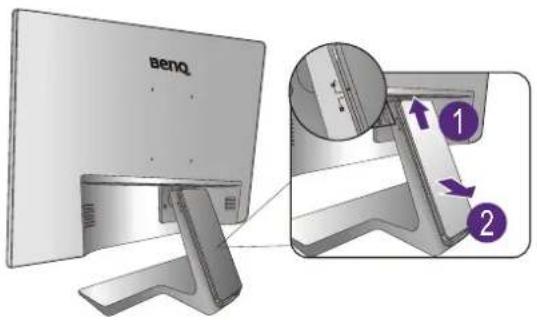
Technical diagram showing a device being processed from a monitor, with numbered steps and brand label 'beno' visible.- Remove the cover of the cable management system.
The stand arm also works as a cable management system that helps keep the cables neat and clean. Slide the cable cover up to align the marking on the cable cover with the unlock icon on the stand arm. Remove the cover as illustrated. You can have one power cord, two video cables, and one audio cable routed together.
Pass a cable through the cable management hole on the stand arm first while cabling. Start with the ones with bigger connectors.

Allow enough cable length while cabling to avoid loose connection and to save the pins or socket connectors from being bent or broken.
- Connect the power cable to the monitor.
Pass the cable through the cable management hole on the stand arm first.
Plug one end of the power cord into the socket labelled \~ on the rear of the monitor. Do not connect the other end to a power outlet just yet.
- Connect the PC video cable.

Do not use both DVI-D cable and D-Sub cable on the same PC. The only case in which both cables can be used is if they are connected to two different PCs with appropriate video systems.
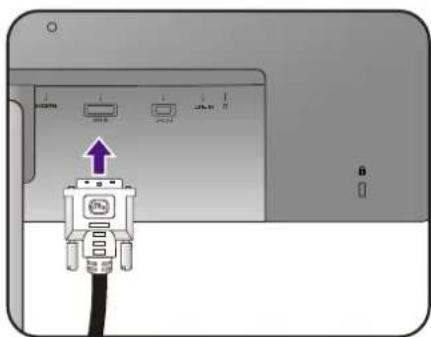
To Connect the DVI-D Cable
Pass the cable through the cable management hole on the stand arm first. Connect the plug of the DVI-D cable (at the end without the ferrite filter) to the monitor video socket. Connect the other end of the cable (at the end with the ferrite filter) to the computer video socket.
Tighten all finger screws to prevent the plugs from accidentally falling out during use.
text_image
benQ 1 2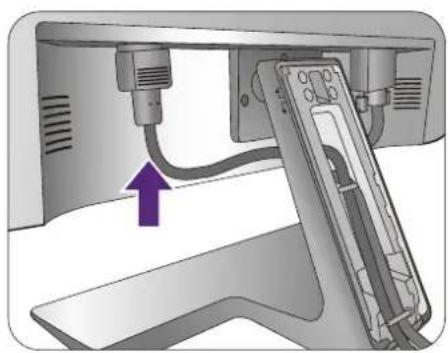
natural_image
Diagram of a computer monitor with cable and stand, showing internal components and a purple arrow indicating direction (no text or symbols)Either
text_image
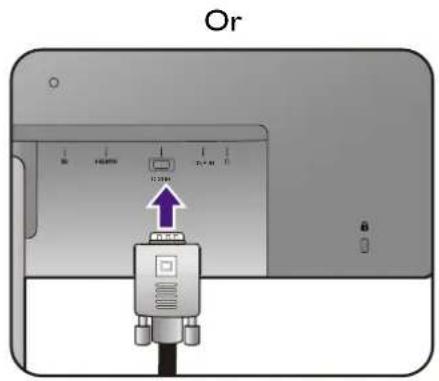
Diagram showing a device with labeled ports and an arrow pointing to it, likely indicating a connection or operation.To Connect the D-Sub Cable
Pass the cable through the cable management hole on the stand arm first. Connect the plug of the D-Sub cable (at the end without the ferrite filter) to the monitor video socket. Connect the other end of the cable (at the end with the ferrite filter) to the computer video socket.
Tighten all finger screws to prevent the plugs from accidentally falling out during use.
To Connect the HDMI Cable
Pass the cable through the cable management hole on the stand arm first. Connect the plug of the HDMI cable to the HDMI port on the monitor. Connect the other end of the cable to the HDMI port of a digital output device.
To Connect the DP Cable
Pass the cable through the cable management hole on the stand arm first. Connect the plug of the DP cable to the monitor video socket.

(BL2381T / BL2581T) After the monitor and the computer are powered on, if the image is not displayed, disconnect the DP cable. Connect the monitor to any video source other than DP first. Go to System > DisplayPort on the OSD menu of the monitor and change the setting from 1.2 to 1.1. Once the setting is done, unplug the current video cable and re-connect the DP cable. To go to the OSD menu, see Basic menu operation on page 46.

If there is more than one video transmission method available to you, you might want to take the picture quality of each video cable into consideration before making the connection.
- Better quality: HDMI / DP / DVI-D
- Good quality: D-Sub

The video cables included in your package and the socket illustrations on the right may vary depending on the product supplied for your region.
text_image
Or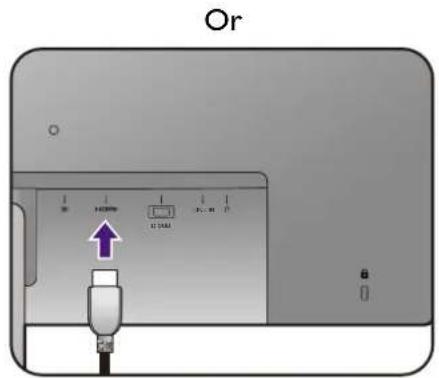
text_image
Or
text_image
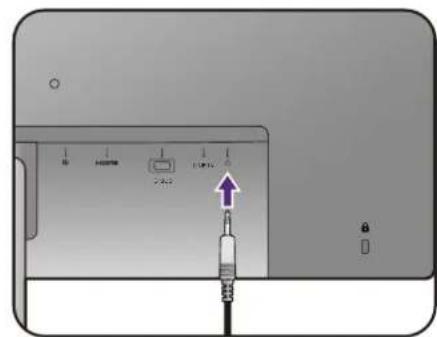
Or5. Connect the headphone.
You may connect headphones to the headphone jack found on the rear of the monitor.
6. Connect the audio cable.
Connect the audio cable between the socket on the rear of the monitor (Line In) and your computer audio outlet.
7. Connect USB devices.
Connect the USB cable between the PC and the monitor (via the upstream USB port at the back). This upstream USB port transmits data between the PC and the USB devices connected to the monitor.
Connect the USB devices via other USB ports (downstream) on the monitor. These downstream USB ports transmit data between connected USB devices and the upstream port.
8. Install the cable cover.
After all cables haven been connected to the monitor, work with the cable management system to route the cables properly.
Align the marking on the cable cover to the unlock icon on the stand arm. Install the cable cover back to the stand arm, and slide down to lock it into place. The marking on the cable cover should be aligned with the lock icon on the stand arm by now.
text_image
Diagram showing a device panel with labeled ports and an arrow pointing to a plug, likely indicating a port or connection.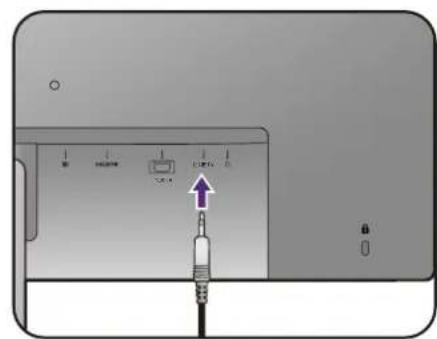
text_image
Diagram showing a device with labeled ports and an arrow pointing to a plug, likely indicating a connection or insertion point.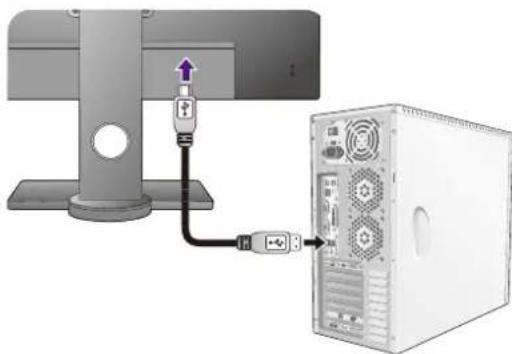
natural_image
Diagram showing connection between a computer tower and a server tower, with no visible text or symbols.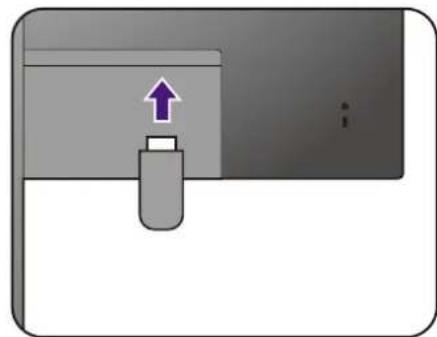
natural_image
Diagram showing a device with an upward arrow pointing to a component, no text or symbols present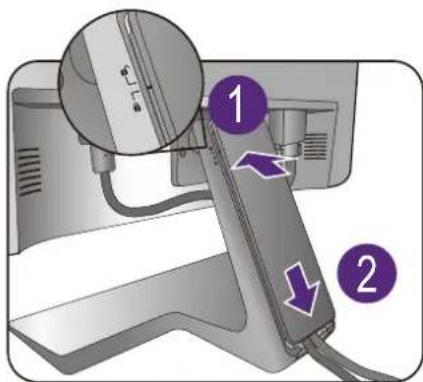
text_image
Diagram showing a computer monitor with labeled parts, including numbered annotations 1 and 2 indicating different components or functions.9. Connect-to and turn-on the power.
Plug the other end of the power cord into a power outlet and turn it on.

Picture may differ from product supplied for your region.
Turn on the monitor by pressing the power button on the monitor.
Turn on the computer too, and select an input source by the OSD control keys. The displayed input icons vary depending on the available video inputs of the purchased model.
Follow the instructions in Getting the most from your BenQ monitor on page 39 to install the monitor software.

To extend the service life of the product, we recommend that you use your computer's power management function.

natural_image
Illustration of a hand inserting a plug into an electrical outlet (no text or symbols)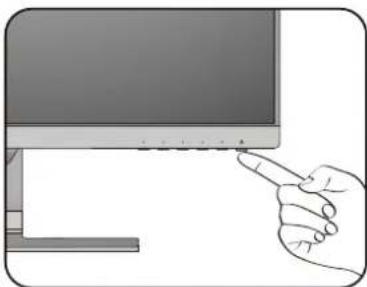
natural_image
Illustration of a hand pointing at a computer monitor (no text or symbols visible)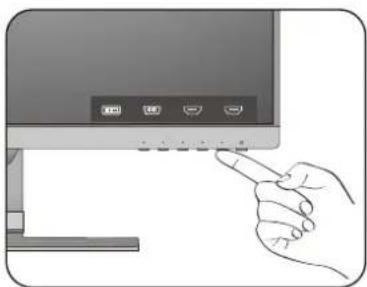
natural_image
Illustration of a hand pointing at a computer monitor with control buttons (no text or symbols)How to detach the stand and the base
I. Prepare the monitor and area.
Turn off the monitor and the power before unplugging the power cable. Turn off the computer before unplugging the monitor signal cable.
Protect the monitor and screen by clearing a flat open area on your desk and placing a soft item like a towel on the desk for padding, before laying the screen face down on a flat clean padded surface.

Please be careful to prevent damage to the monitor. Placing the screen surface on an object like a stapler or a mouse will crack the glass or damage the LCD substrate voiding your warranty. Sliding or scraping the monitor around on your desk will scratch or damage the monitor surround and controls.
2. Remove the monitor stand.
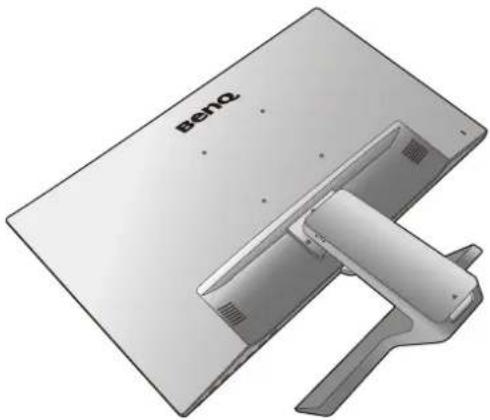
Push down the stand gently until you cannot go further so you can see the release button clearly.
Insert a pointed object such as a screwdriver to the hole above the monitor stand arm, and then push the screwdriver against the release button inside the hole. Then pull the monitor stand backward away from the monitor.
natural_image
3D rendering of a Beno brand electronic device with a flat panel and a mechanical lever (no text or symbols visible)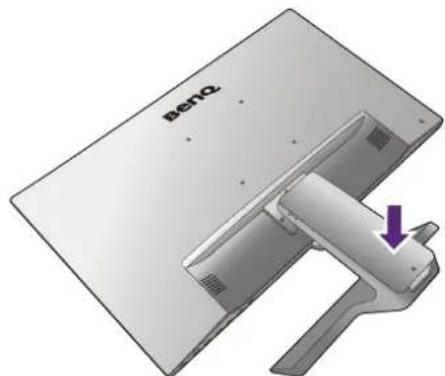
natural_image
3D rendering of a beige electronic device with a purple arrow pointing to a component, no visible text or symbols on the device itself.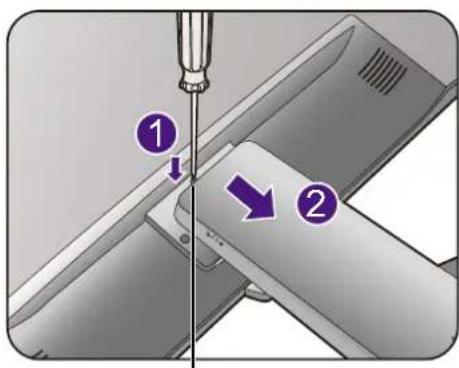
text_image
Diagram showing a screwdriver inserted into a mechanical component with numbered callouts indicating step 1 and step 2.Release button
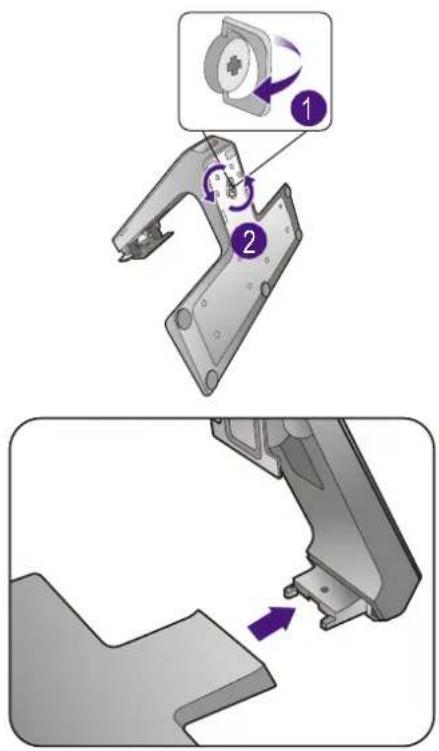
3. Remove the monitor base.
Release the thumbscrew on the bottom of the monitor base and detach the monitor base as illustrated.
text_image
Technical diagram showing mechanical assembly steps with numbered instructions and directional arrows indicating motionUsing the monitor wall mounting kit (for models without height adjustment stand)
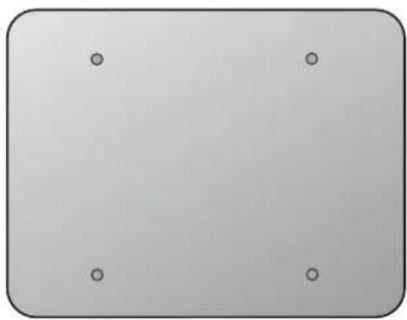
The back of your LCD monitor has a VESA standard mount with 100mm pattern, allowing the installation of a wall mount bracket. Before starting to install a monitor wall mounting kit, please read the precautions carefully.
Precautions
• Install your monitor and monitor mounting kit on a wall with flat surface.
- Ensure that the wall material and the standard wall mount bracket (purchased separately) are stable enough to support the weight of the monitor. Refer to the product specifications on the website for weight information.
- Turn off the monitor and the power before disconnecting the cables from the LCD monitor.
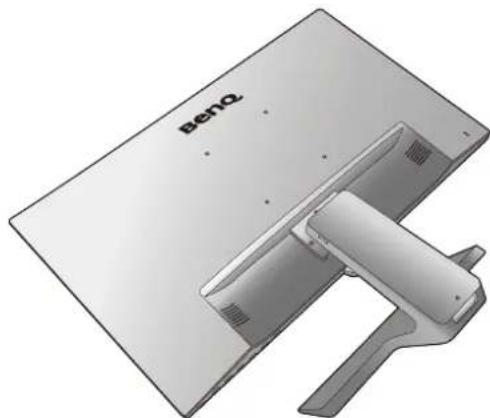
I. Remove the monitor stand.
Lay the screen face down on a clean and well-padded surface.
Push down the stand gently until you cannot go further so you can see the release button clearly.
Insert a pointed object such as a screwdriver to the hole above the monitor stand arm, and then push the screwdriver against the release button inside the hole. Then pull the monitor stand backward away from the monitor.

In case you intend to use your monitor on the stand in the future, please keep the monitor base, monitor stand, and screws somewhere safe for future use.
natural_image
3D rendering of a Beno device with a handle and panel, no visible text or symbols on the device itself.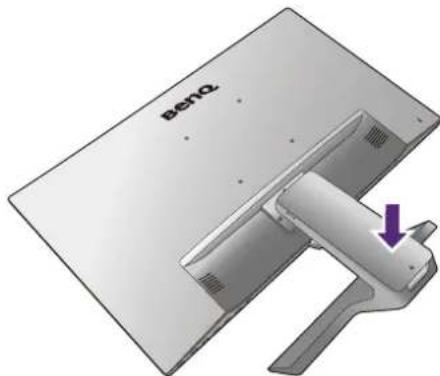
natural_image
3D rendering of a Lenovo monitor with a purple arrow indicating a component (no text or symbols on the device itself)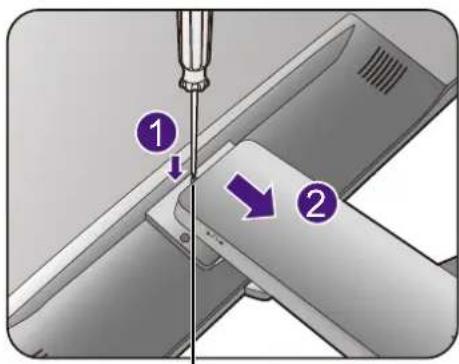
text_image
Diagram showing a screwdriver inserted into a mechanical component with numbered callouts indicating step 1 and step 2.Release button
- Follow the instruction manuals of the wall mount bracket you purchased to complete the installation.

Use four M4 x 10 mm screws to fix a VESA standard wall mount bracket to the monitor. Make sure that all screws are tightened and secured properly. Consult a professional technician or BenQ service for wall mount installation and safety precautions.
natural_image
Plain gray rounded rectangle with four small black dots at the corners (no text or symbols)Assembling your monitor with a height adjustment stand
How to attach the monitor base

- If the computer is turned on you must turn it off before continuing.
Do not plug-in or turn-on the power to the monitor until instructed to do so. - The illustrations in this document are for your reference only and may look different from the appearance of the product.
- The following illustrations are for your reference only. Available input and output jacks may vary depending on the purchased model.
- Avoid finger pressure on the screen surface.

Please be careful to prevent damage to the monitor. Placing the screen surface on an object like a stapler or a mouse will crack the glass or damage the LCD substrate voiding your warranty. Sliding or scraping the monitor around on your desk will scratch or damage the monitor surround and controls.
Protect the monitor and screen by clearing a flat open area on your desk and placing a soft item like the monitor packaging bag on the desk for padding.
Gently lay the screen face down on a flat clean padded surface.
While holding the monitor firmly against the desk, pull the monitor stand arm upwards clear of the monitor.
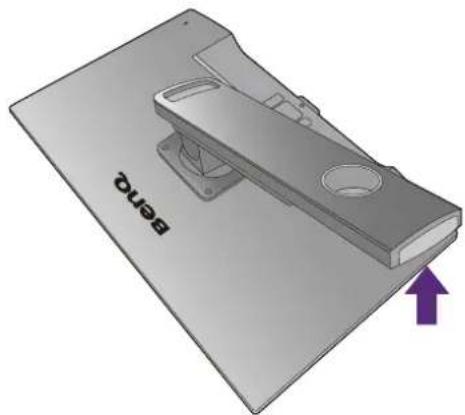
Orient and align the stand base socket with the end of the stand arm, then push them together. Tighten the thumbscrew on the bottom of the monitor base as illustrated.
Gently attempt to pull them back apart to check that they have properly engaged.
Carefully lift the monitor, turn it over and place it upright on its stand on a flat even surface.
Extend the monitor to the maximum extended position. Then tilt the monitor. And rotate the monitor 90 degrees counterclockwise as illustrated.
natural_image
3D rendering of a device with a purple arrow pointing to a component labeled 'Bened' (no other text or symbols)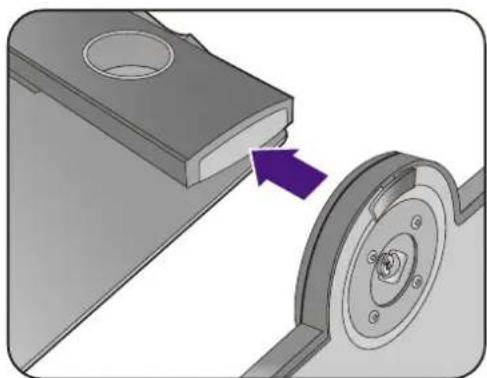
natural_image
Mechanical assembly diagram showing a pinwheel and housing component with a purple arrow indicating direction (no text or symbols)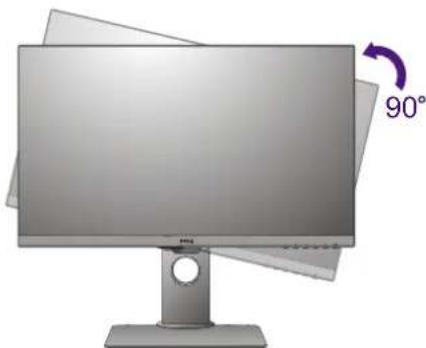
natural_image
Computer monitor with a 90-degree angle indicator and paper sheets on top (no text or symbols on the monitor itself)- You might want to adjust the monitor stand height. See Adjusting the monitor height on page 35 for more information.

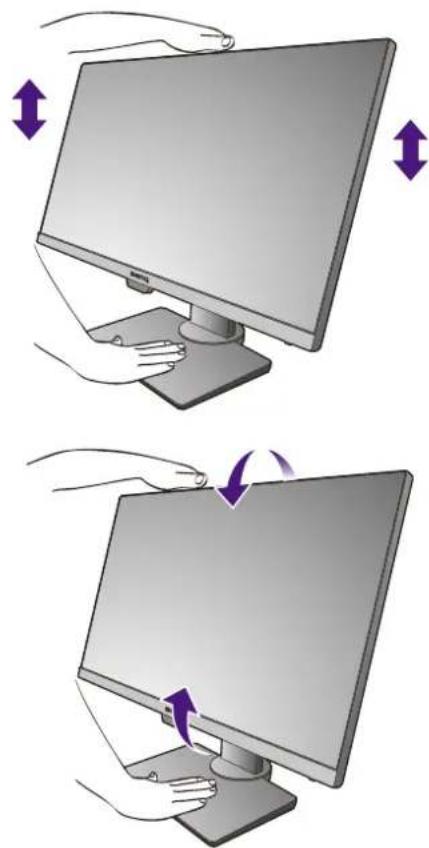
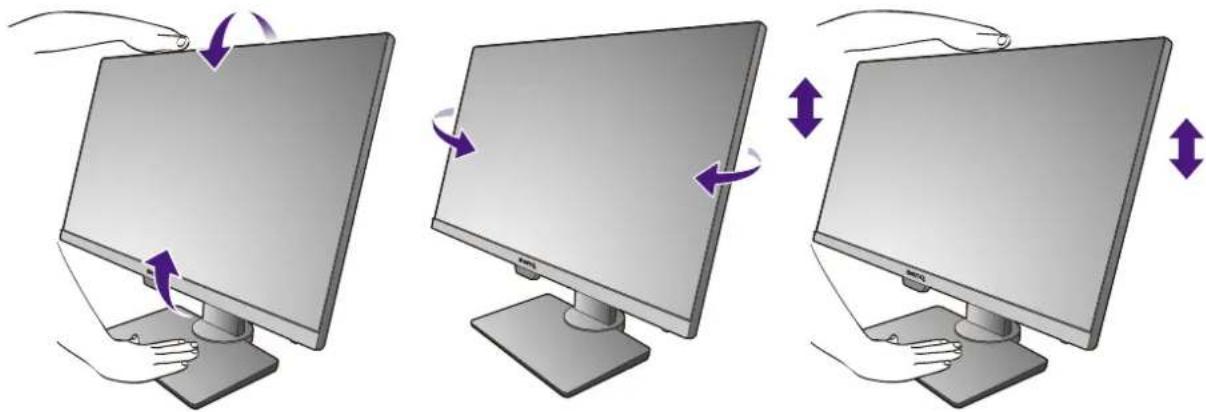
Your monitor is an edge to edge monitor and should be handled with care. Adjust the screen angle by placing your hands on the top and on the base of the monitor as illustrated. Excessive force on the display is prohibited.

You should position the monitor and angle the screen to minimize unwanted reflections from other light sources.
natural_image
Illustration of two hands operating a computer monitor with directional arrows indicating rotation (no text or symbols)Follow the instructions to connect cables and peripherals. The illustrations in this document are for your reference only and may look different from the appearance of the product. The location and available input and output jacks may vary depending on the purchased model.
I. Connect the PC video cable. on page 24.
2. Connect the headphone. on page 26.
3. Connect the audio cable. on page 26.
4. Connect USB devices. on page 26.
5. Connect the power cord to the monitor.
6. Connect-to and turn-on the power. on page 27.
How to detach the base
I. Prepare the monitor and area.
Turn off the monitor and the power before unplugging the power cable. Turn off the computer before unplugging the monitor signal cable.
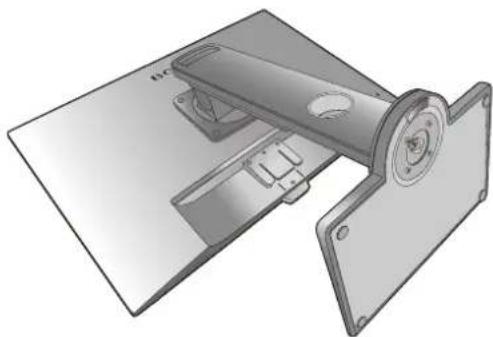
Gently lift the display up and extend the stand to the maximum extended position.
Protect the monitor and screen by clearing a flat open area on your desk and placing a soft item like a towel on the desk for padding, before laying the screen face down on a flat clean padded surface.
natural_image
3D mechanical assembly diagram showing a bracket with mounting flanges and internal components (no text or symbols)
Please be careful to prevent damage to the monitor. Placing the screen surface on an object like a stapler or a mouse will crack the glass or damage the LCD substrate voiding your warranty. Sliding or scraping the monitor around on your desk will scratch or damage the monitor surround and controls.
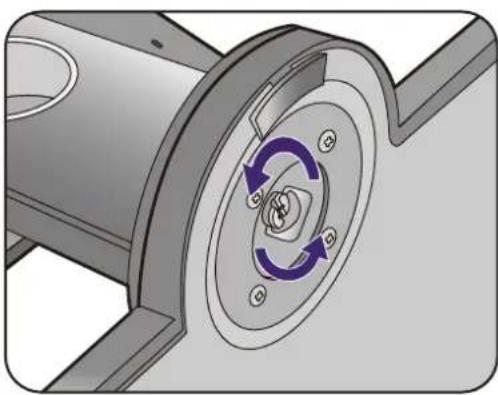
2. Release the thumbscrew on the bottom of the monitor base and detach the monitor base as illustrated.
natural_image
Mechanical assembly diagram showing a rotating component with three curved arrows indicating rotational flow (no text or symbols)Adjusting the monitor height
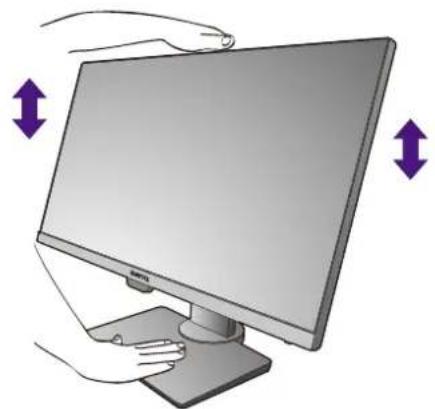
To adjust the monitor height, hold both the top and the bottom of the monitor to lower the monitor or lift it up to the desired height.
natural_image
Illustration of a computer monitor with hands holding the screen, showing two purple directional arrows indicating rotation (no text or symbols present)
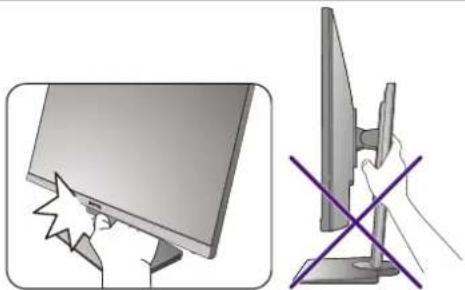
- Avoid placing hands on the upper or lower part of the height-adjustable stand or at the bottom of the monitor, as ascending or descending monitor might cause personal injuries. Keep children out of reach of the monitor while performing this operation.
natural_image
Illustration showing a computer monitor with a starburst effect and a hand holding a crossbar, both without any text or symbols.- If the monitor has been rotated to portrait mode and height adjustment is desired, you should be noted that the wide screen will keep the monitor from being lowered to its minimum height.
Rotating the monitor
I. Pivot the display.
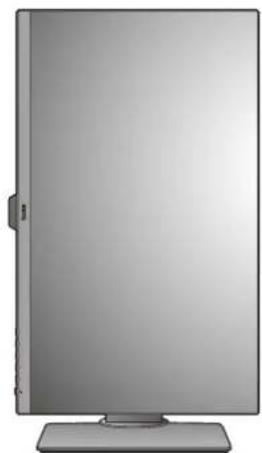
Before rotating the monitor with a portrait viewing orientation, the display has to be rotated 90 degrees.
Right-click the desktop and select Screen resolution from the popup menu. Select Portrait in Orientation, and apply the setting.

Depending on the operation system on your PC, different procedures should be followed to adjust the screen orientation. Refer to the help document of your operation system for details.
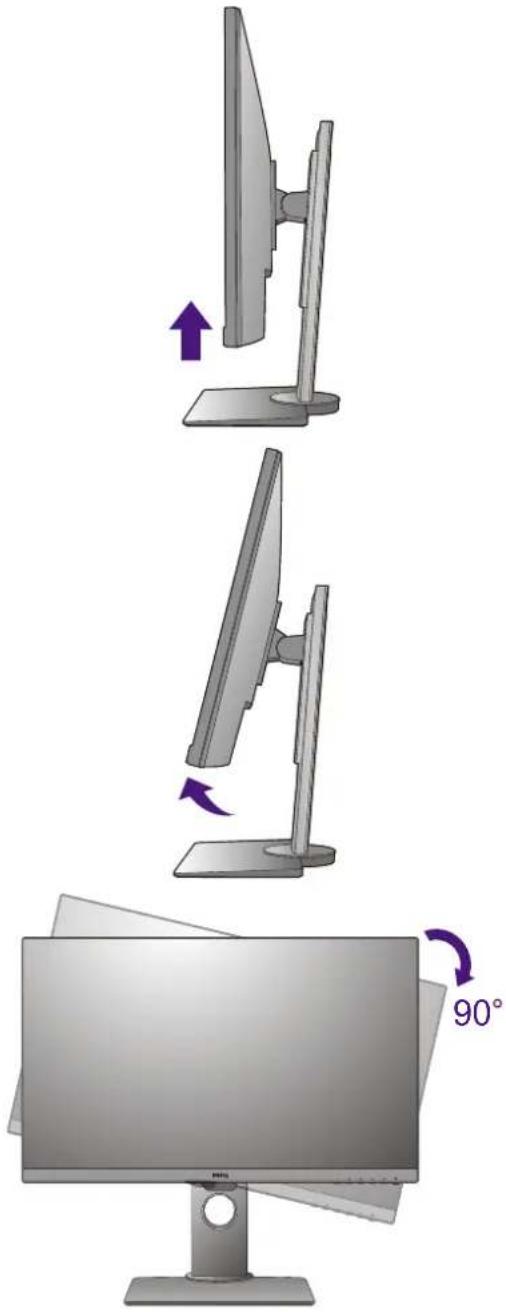
2. Fully extend the monitor and tilt it.
Gently lift the display up and extend it to the maximum extended position. Then tilt the monitor.

The monitor should be vertically extended to allow to rotate from landscape to portrait mode.
3. Rotate the monitor 90 degrees clockwise as illustrated.

To avoid the edge of the LCD display hitting the monitor base surface while it is being rotated, do tilt and extend the monitor to the highest position before you start to rotate the display.
You should also make sure there are no obstacles around the monitor and there is enough room for cables. You might need to route the cables again via the cable clip after the rotation.
text_image
Diagram showing three steps of computer monitor display, with directional arrows indicating rotation and angle measurement.- Adjust the monitor to the desired viewing angle.
natural_image
Front view of a modern flat-screen monitor with a stand (no visible text or symbols)Viewing angle adjustment
You may position the screen to the desired angle with monitor tilt, swivel, and height adjustment functions. Check the product specifications on the website for details.
natural_image
Three-step diagram showing hand positioning of a computer monitor with purple arrows indicating rotation (no text or symbols)Using the monitor wall mounting kit
The back of your LCD monitor has a VESA standard mount with 100mm pattern, allowing the installation of a wall mount bracket. Before starting to install a monitor wall mounting kit, please read the precautions carefully.
Precautions:
• Install your monitor and monitor mounting kit on a wall with flat surface.
- Ensure that the wall material and the standard wall mount bracket (purchased separately) are stable enough to support the weight of the monitor. Refer to the product specifications on the website for weight information.
- Turn off the monitor and the power before disconnecting the cables from the LCD monitor.
I. Remove the monitor stand.
Lay the screen face down on a clean and well-padded surface.
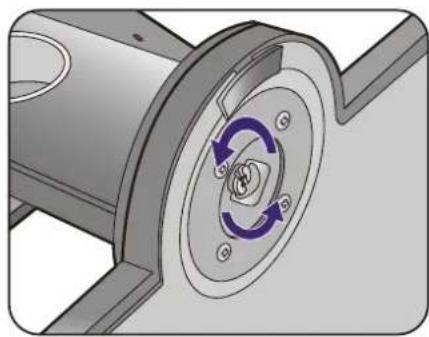
Use a cross-pointed screwdriver to release the screws that fixing the monitor stand to the monitor. The use of a magnetic-head screwdriver is recommended to avoid of losing the screws.
Then pull the monitor stand backward away from the monitor.

In case you intend to use your monitor on the stand in the future, please keep the monitor base, monitor stand, and screws somewhere safe for future use.
natural_image
Mechanical component diagram showing a rotating shaft and housing with no visible text or symbols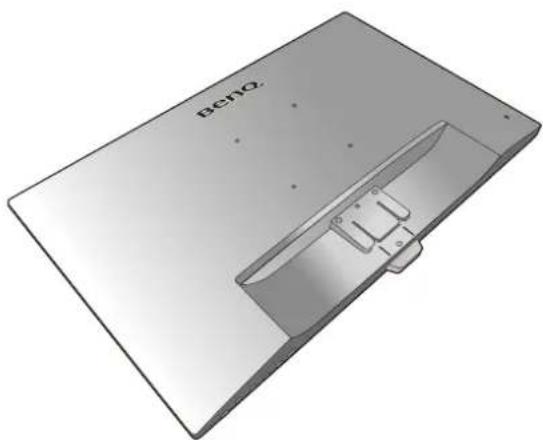
natural_image
3D rendering of a rectangular electronic device with a recessed slot and mounting holes (no text or symbols visible)2. Follow the instruction manuals of the wall mount bracket you purchased to complete the installation.

Use four M4 x 10 mm screws to fix a VESA standard wall mount bracket to the monitor. Make sure that all screws are tightened and secured properly. Consult a professional technician or BenQ service for wall mount installation and safety precautions.
Getting the most from your BenQ monitor
To gain the most benefit from your new BenQ LCD monitor, you should install the custom BenQ LCD Monitor driver software as provided on the local website. See Downloading the LCD Monitor driver files from the Internet on page 39 for details.
The circumstances under which you connect and install your BenQ LCD Monitor will determine which process you need to follow to successfully install the BenQ LCD Monitor driver software. These circumstances relate to which version of Microsoft Windows you are using, and whether you are connecting the monitor and installing the software onto a new computer (without existing monitor driver software), or whether you are upgrading an existing installation (which already has existing monitor driver software) with a newer monitor.
In either case however, the very next time you turn on your computer (after connecting the monitor to your computer), Windows will automatically recognize the new (or different) hardware, and will launch its Found New Hardware wizard.
Follow the wizard instructions. Further details and step-by-step instructions for either an automatic (new) or upgrade (existing) installation, see:
- How to install the monitor on a new computer on page 40.
- How to upgrade the monitor on an existing computer on page 41.

- If you require a User Name and Password to login to your Windows computer, you must be logged on as an Administrator or as a member of the Administrators group in order to install the monitor driver software. Furthermore, if your computer is connected to a network which has security access requirements, network policy settings may prevent you from installing software on your computer.
- To check the name of the purchased model, refer to the specification label on the back of the monitor.
Downloading the LCD Monitor driver files from the Internet
I. Download the correct driver files from Support.BenQ.com.
2. On your computer, have your driver files extracted into an empty folder. Remember the file location the files are extracted to.
How to install the monitor on a new computer
This instruction details the procedure for selecting and installing the BenQ LCD Monitor driver software on a new computer which has never had a monitor driver installed before. This instruction is only suitable for a computer which has never been used before, and for which the BenQ LCD Monitor is the first ever monitor to be connected to it.

If you are adding the BenQ LCD Monitor to an existing computer that has already had another monitor connected to it (and has monitor driver software installed), you should not be following these instructions. You should instead be following the instructions for How to upgrade the monitor on an existing computer.
I. Follow the instructions in How to assemble your monitor hardware (for models without height adjustment stand) on page 22 or Assembling your monitor with a height adjustment stand on page 32.
When Windows starts, it will automatically detect the new monitor and launch the Found New Hardware Wizard. Follow the prompts until it displays the option to Install Hardware Device Drivers.
2. Check Search for a suitable driver for my device option, and click Next.
3. Look to confirm that the wizard has selected the correct name of your monitor and click Next.
4. Click Finish.
5. Restart the computer.
How to upgrade the monitor on an existing computer
This instruction details the procedure for manually updating the existing monitor driver software on your Microsoft Windows computer. It is currently tested as compatible for Windows 10, Windows 8 (8.1), and Windows 7 Operating System (OS).

The BenQ LCD Monitor driver for your model may well function perfectly with other versions of Windows, however, as at the time of writing, BenQ has done no testing of this driver on other versions of Windows and cannot guarantee its operation on those systems.
Installing monitor driver software involves selecting an appropriate information file (.inf) from the downloaded driver files for the particular model monitor you have connected, and letting Windows install the corresponding driver files. You need only steer it in the right direction. Windows has an Upgrade Device Driver Wizard to automate the task and guide you through the file selection and installation process.
See:
• How to install on Windows 10 system on page 42
• How to install on Windows 8 (8.1) system on page 43
- How to install on Windows 7 system on page 44.
How to install on Windows 10 system
I. Open Display Properties.
Go to Start, Settings, Devices, Devices and Printers and right-click the name of your monitor from the menu.
- Select Properties from the menu.
- Click the Hardware tab.
- Click Generic PnP Monitor, and then the Properties button.
- Click the Driver tab and the Update Driver button.
- In the Update Driver Software window, select the option Browse my computer for driver software.
- Click Browse and locate the driver files downloaded from the Internet as instructed in Downloading the LCD Monitor driver files from the Internet on page 39.
- Click Close.
You may be prompted to restart your computer after the driver update is complete.
How to install on Windows 8 (8.1) system
I. Open Display Properties.
Move the cursor to the lower-right of the screen or press the Windows + C buttons on the keyboard to bring up the Charm bar. Go to Settings, Control Panel, Devices and Printers and right-click the name of your monitor from the menu.
Alternatively, right-click the desktop and select Personalize, Display, Devices and Printers, and right-click the name of your monitor from the menu.
- Select Properties from the menu.
- Click the Hardware tab.
- Click Generic PnP Monitor, and then the Properties button.
- Click the Driver tab and the Update Driver button.
- In the Update Driver Software window, select the option Browse my computer for driver software.
- Click Browse and locate the driver files downloaded from the Internet as instructed in Downloading the LCD Monitor driver files from the Internet on page 39.
- Click Close.
You may be prompted to restart your computer after the driver update is complete.
How to install on Windows 7 system
I. Open Display Properties.
Go to Start, Control Panel, Hardware and Sound, Devices and Printers and right-click the name of your monitor from the menu.
Alternatively, right-click the desktop and select Personalize, Display, Devices and Printers, and right-click the name of your monitor from the menu.
- Select Properties from the menu.
- Click the Hardware tab.
- Click Generic PnP Monitor, and then the Properties button.
- Click the Driver tab and the Update Driver button.
- In the Update Driver Software window, select the option Browse my computer for driver software.
- Click Browse and locate the driver files downloaded from the Internet as instructed in Downloading the LCD Monitor driver files from the Internet on page 39.
- Click Close.
You may be prompted to restart your computer after the driver update is complete.
How to adjust your monitor
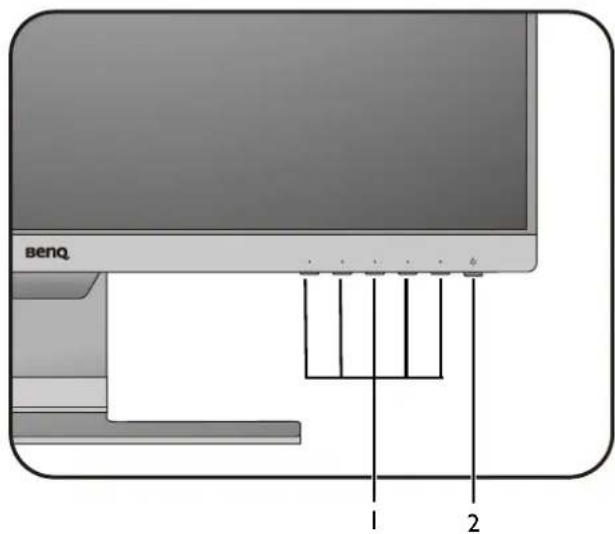
The control panel
text_image
benq 1 2| No. | Name Description | |
| 1. | Control keys | Accesses the functions or menu items displayed on the screen, right next to each key. |
| 2. | Power key Turns the power on or off. | |
Basic menu operation
All OSD (On Screen Display) menus can be accessed by the control keys. You can use the OSD menu to adjust all the settings on your monitor.
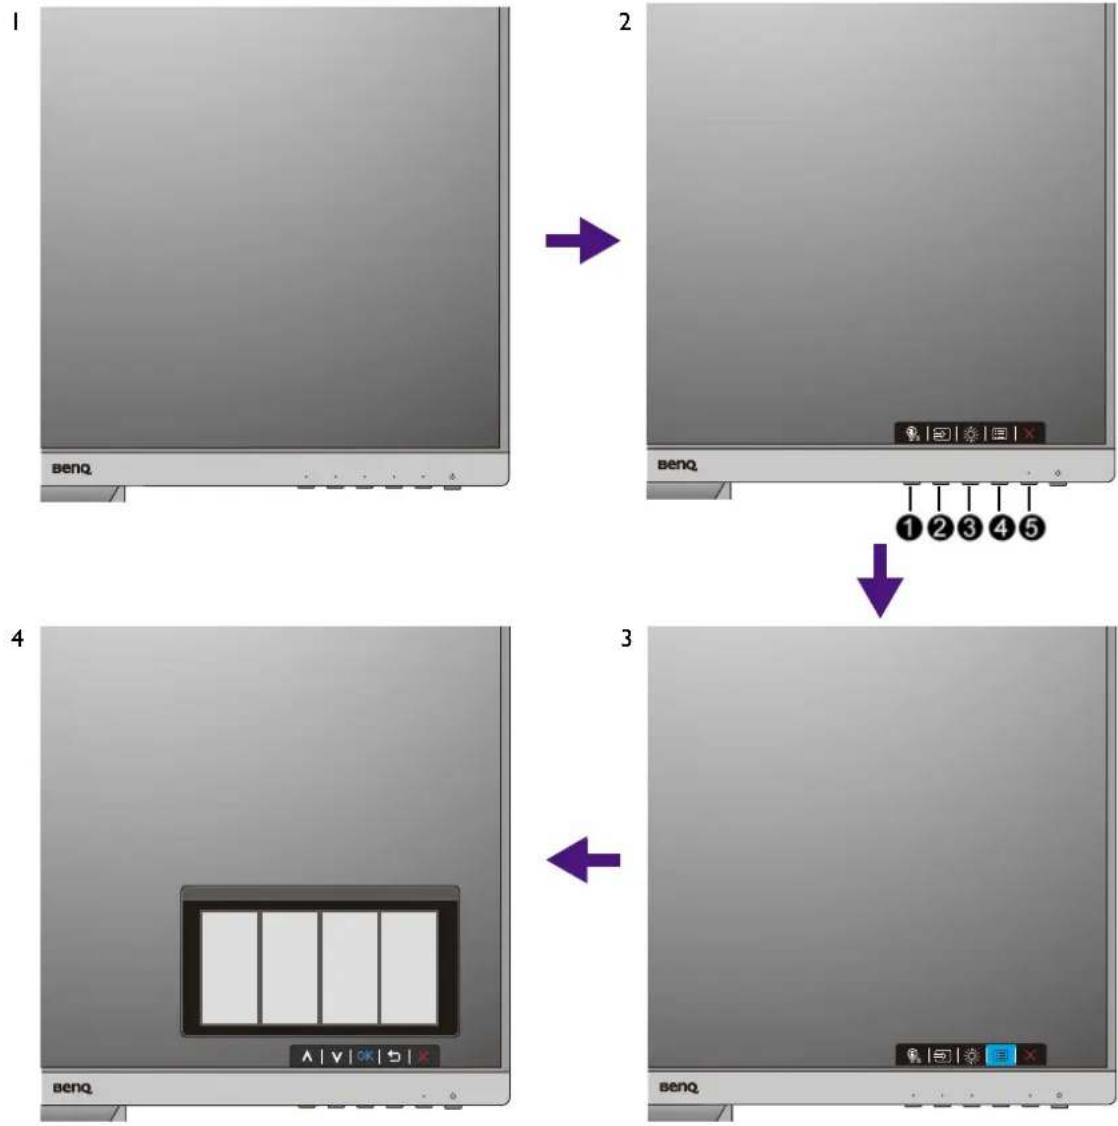
I. Press any of the control keys.
2. The hot key menu is displayed. The left three controls are custom keys and are designated for particular functions.
3. Select [Menu] to access the main menu.
4. In the main menu, follow the icons next to the control keys to make adjustments or selection. See Navigating the main menu on page 50 for details on the menu options.
| No. | OSD in hot key menu | OSD icon in main menu | Function |
| 1 | Custom Key 1 | ^ | By default, the key is the hot key for Low Blue Light.To change the default settings, see Customizing the hot keys on page 48.For Up/Increase adjustment. |
| 2 | Custom Key 2 | ∨ | By default, the key is the hot key for Input. To change the default settings, see Customizing the hot keys on page 48.(BL2483 / BL2783) By default, the key is the hot key for Bright Intelligence. To change the default settings, see Customizing the hot keys on page 48.For Down/Decrease adjustment. |
| 3 | Custom Key 3 | > / √or→ / OK | By default, the key is the hot key for Volume (for models with speakers) or Brightness (for models without speakers). To change the default settings, see Customizing the hot keys on page 48.(BL2483 / BL2783) By default, the key is the hot key for Input. To change the default settings, see Customizing the hot keys on page 48.Enters sub menus.Selects menu items. |
| 4 | Menu | ☐ / < or☐ / ↻ | Activates the main menu.Returns to the previous menu. |
| 5 | Exit | ✕ | Exits OSD |

- OSD = On Screen Display.
The hot keys only operate while the main menu is not currently displaying. Hot key displays will disappear after a few seconds of no key activity.
• To unlock the OSD controls, press and hold any key for 10 seconds.
Picture optimization
The easiest way to obtain an optimal display from an analog (D-Sub) input is to use the Auto Adjustment function. Go to Display and Auto Adjustment to optimize the currently displayed image to the screen.

When you connect a digital input signal using a digital (DVI, HDMI, or DP) cable to your monitor, the Auto Adjustment function will be disabled, because the monitor will automatically display the best image.

Please ensure that the connected graphic card on your computer is set to the native resolution of the monitor when you use the Auto Adjustment function.
If you wish, you can always adjust the screen geometric settings manually using geometry menu items. To assist you in this endeavour, BenQ has provided a screen test image utility which you can use to check for screen color, grayscale and line gradient display. The utility is available on the website. See Product support on page 3 for more information.
- Run the test program auto.exe. You could also use any other image, such as the desktop of your operating system. However, we recommend that you use auto.exe. As you run auto.exe, a test pattern displays.
- Press any of the control keys to bring up the hot key menu. Select ☐ (Menu) to enter the main menu.
- Go to Display and Auto Adjustment.
- If you notice a vertical noise (like a curtain effect-shimmering of vertical lines), select Pixel Clock and adjust the monitor until the noise disappears.
- If you notice a horizontal noise, select Phase and adjust the monitor until the noise disappears.
Customizing the hot keys
The left 3 control keys (also called custom keys) perform as hot keys to provide direct access to pre-defined functions. You can change the default setting and designate different functions for these keys.
I. Press any of the control keys to bring up the hot key menu, and press ☐ (Menu) to access the main menu.
2. Go to System.
3. Select the custom key you want to change.
4. In the sub menu, select a function that can be accessed by this key. A pop-up message will appear, showing that the setup is complete.
Adjusting display mode
To display images of aspect ratios other than your monitor aspect ratio and sizes other than your display size, you can adjust the display mode on the monitor.
I. Press any of the control keys to bring up the hot key menu, and press ☐ (Menu) to access the main menu.
2. Go to Picture Advanced and Display Mode.
3. Select an appropriate display mode. The setting will take effect immediately.
Choosing an appropriate picture mode
Your monitor provides various picture modes that are suitable for different types of images. See Picture Mode on page 57 for all the available picture modes.
Go to Picture Advanced and Picture Mode for a desired picture mode.
If Low Blue Light is preferred, select Low Blue Light to enable it. And go to Eye Care and Low Blue Light to select one of the low blue light modes from the list.
Adjusting screen brightness automatically (Bright Intelligence, selected models only)

The Bright Intelligence function works with certain picture modes only. If it is not available, its menu options will become grayed out.
The built-in light sensor works with Bright Intelligence technology to detect the ambient light, image brightness and contrast, and then balance the screen automatically. It helps keep image details as well as to reduce eye strain.
To enable this function, go to Eye Care > Bright Intelligence > ON.

The performance of Bright Intelligence may be impacted by the light sources and the monitor tilt angle. You can increase the light sensor sensitivity from Eye Care > Bright Intelligence > Sensor Sensitivity if needed. See page 52 for more information.
Enabling color vision accessibility (Color Weakness)
Color Weakness is accessibility that helps people with color vision deficiency to distinguish colors. You are provided with Red Filter and Green Filter on this monitor. Choose one as needed.
I. Go to Eye Care > Color Weakness.
2. Choose either Red Filter or Green Filter.
3. Adjust the value of the filter. A stronger effect is produced as the value increases.
Navigating the main menu
You can use the OSD (On Screen Display) menu to adjust all the settings on your monitor.
Press any of the control keys to bring up the hot key menu, and press ☐ (Menu) to access the main menu. See Basic menu operation on page 46 for details.
Available menu options may vary depending on the input sources, functions and settings. Menu options that are not available will become grayed out. And keys that are not available will be disabled and the corresponding OSD icons will disappear. For models without certain functions, their settings and related items will not appear on the menu.

The OSD menu languages may differ from the product supplied to your region, see Language on page 62 under System and OSD Settings for more details.
For more information on each menu, please refer to the following pages:
- Eye Care menu (selected models only) on page 51
• Display menu on page 53
• Picture menu on page 55
• Picture Advanced menu on page 57
• Audio menu on page 60 - System menu on page 61
• ECO menu (selected models only) on page 65
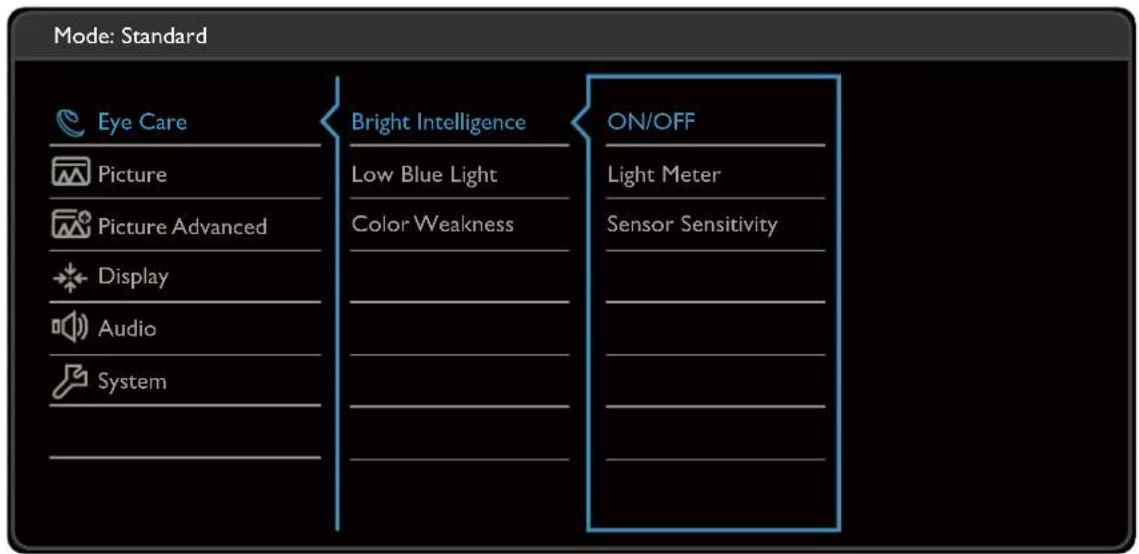
Eye Care menu (selected models only)
Available menu options may vary depending on the input sources, functions and settings. Menu options that are not available will become grayed out. And keys that are not available will be disabled and the corresponding OSD icons will disappear. For models without certain functions, their settings and related items will not appear on the menu.
text_image
Mode: Standard Eye Care Picture Picture Advanced Display Audio System Bright Intelligence Low Blue Light Color Weakness ON/OFF Light Meter Sensor Sensitivity
text_image
A | V | OK | Left | XI. Select ☐ (Menu) from the hot key menu.
2. Use or to select Eye Care.
3. Select or to go to a sub menu, and then use or to select a menu item.
4. Use or to make adjustments, or use or to make selection.
5. To return to the previous menu, select or .
6. To exit the menu, select ✗
| Item Function Range | |||
| Bright Intelligence | Turns the Bright Intelligence function on or off. The built-in light sensor works with Bright Intelligence technology to detect the ambient light, image brightness and contrast, and then balance the screen automatically. | • ON• OFF | |
| Light Meter Sets | to display the light condition around the monitor on the screen. | • ON• OFF | |
| Sensor Sensitivity | Adjusts sensitivity of light sensor to change the brightness range to be detected. This may be helpful to correct uneven lighting in light detection. | 0 ~ 100 | |
| Low Blue Light | Decreases the blue light emitted from the display to reduce the risk of blue light exposure to your eyes.The amount of blue light reduced in each low blue light mode varies and has been set particularly for the specified scenario. Choose one mode to suit your needs. | ||
| Multimedia For | viewing multimedia files. | ||
| Web Surfing For | web surfing. | ||
| Office For office | works or office environment. | ||
| ePaper (selected models only) | For reading e-books or documents in black and white with suitable on-screen brightness and clear texts. | ||
| Reading For reading e-books or documents. | |||
| Color Weakness | Adjusts color matching representation for people with color vision deficiency to distinguish colors easily. | ||
| Red Filter Decides the effect produced by the red filter. A stronger effect is produced as the value increases. | 0 ~ 20 | ||
| Green Filter Decides the effect produced by the green filter. A stronger effect is produced as the value increases. | 0 ~ 20 | ||
Display menu
Available menu options may vary depending on the input sources, functions and settings. Menu options that are not available will become grayed out. And keys that are not available will be disabled and the corresponding OSD icons will disappear. For models without certain functions, their settings and related items will not appear on the menu.
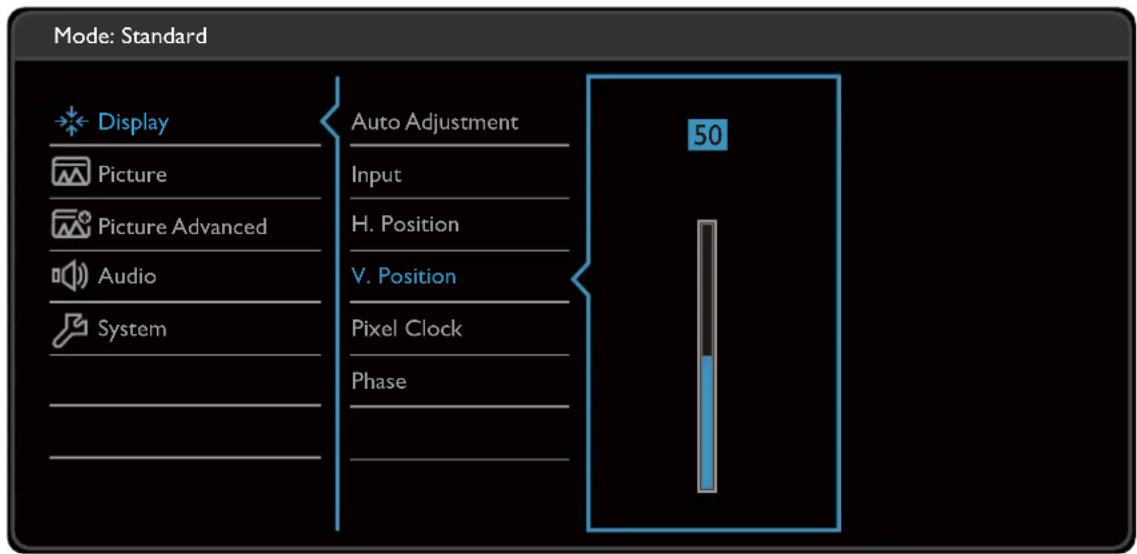
text_image
Mode: Standard Display Picture Picture Advanced Audio System Auto Adjustment Input H. Position V. Position Pixel Clock Phase 50A | V | OK | ↻ | X
I. Select (Menu) from the hot key menu.
2. Use or to select Display.
3. Select or to go to a sub menu, and then use or to select a menu item.
4. Use or to make adjustments, or use or to make selection.
5. To return to the previous menu, select or .
6. To exit the menu, select X
| Item Function Range | ||
| Auto Adjustment | Optimizes and adjusts the screen settings automatically for you.[W40D]Not applicable to a digital input signal. | |
| Item Function Range | ||
| Input | Use this to change the input to that appropriate to your video cable connection type. | • D-Sub• DP (for models with DP inputs)• DVI (for models with DVI inputs)• HDMI |
| H. Position | Adjusts the horizontal position of the screen image. | 0 to 100 |
| V. Position | Adjusts the vertical position of the screen image. | 0 to 100 |
| Pixel Clock | Adjusts the pixel clock frequency timing to synchronize with the analog input video signal.See also: Picture optimization on page 48.[TBAW]Not applicable to a digital input signal. | 0 to 100 |
| Phase | Adjusts the pixel clock phase timing to synchronize with the analog input video signal.See also: Picture optimization on page 48. Not applicable to a digital input signal. Not applicable to a digital input signal. | 0 to 63 |
Picture menu
Available menu options may vary depending on the input sources, functions and settings. Menu options that are not available will become grayed out. And keys that are not available will be disabled and the corresponding OSD icons will disappear. For models without certain functions, their settings and related items will not appear on the menu.
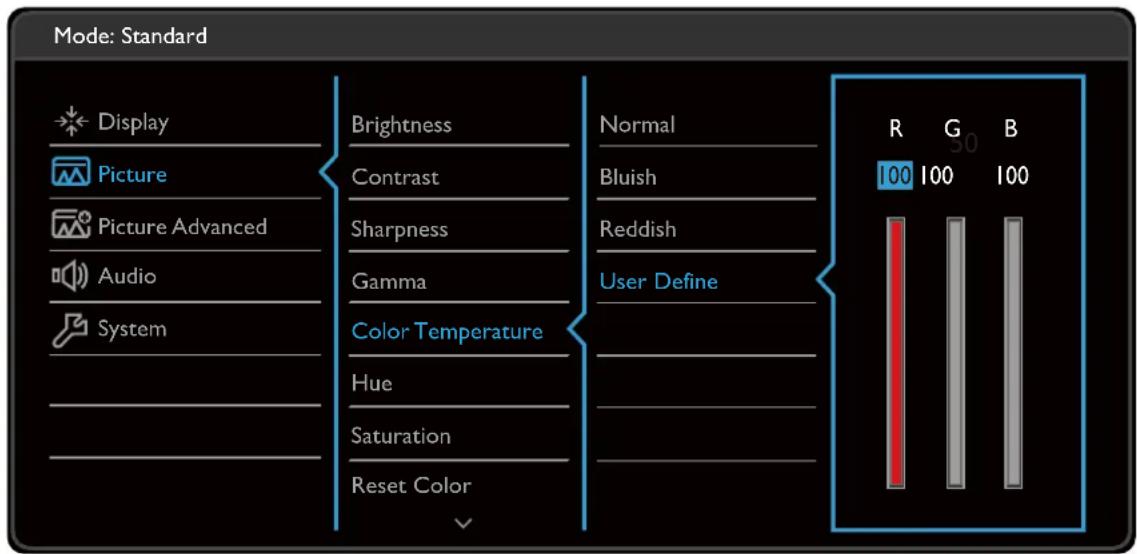
text_image
Mode: Standard Display Picture Picture Advanced Audio System Brightness Contrast Sharpness Gamma Color Temperature Hue Saturation Reset Color Normal Bluish Reddish User Define R G B 100 100 100^
V
OK
b
×
I. Select (Menu) from the hot key menu.
2. Use or to select Picture.
3. Select or to go to a sub menu, and then use or to select a menu item.
4. Use or to make adjustments, or use or to make selection.
5. To return to the previous menu, select or .
6. To exit the menu, select ✗
| Item Function Range | |||
| Brightness | Adjusts the balance between light and dark shades. | 0 to 100 | |
| Contrast Adjusts the degree of difference between darkness and lightness. | 0 to 100 | ||
| Sharpness | Adjusts the clarity and visibility of the edges of the subjects in the image. | 1 to 10 | |
| Item | Function | Range | |
| Gamma | Adjusts the tone luminance. The default value is 3 (the standard value for Windows). | 12345 | |
| Color Temperature | Normal | Allows video and still photographs to be viewed with natural coloring. This is the factory default color. | |
| Bluish | Applies a cool tint to the image and is factory pre-set to the PC industry standard white color. | ||
| Reddish | Applies a warm tint to the image and is factory pre-set to the news print standard white color. | ||
| User Define | The blend of the Red, Green and Blue primary colors can be altered to change the color tint of the image. Go to the succeeding R (red), G (green), and B (blue) menus to change the settings.Decreasing one or more of the colors will reduce their respective influence on the color tint of the image. (e.g. if you reduce the Blue level the image will gradually take on a yellowish tint. If you reduce Green, the image will become a magenta tint.) | R (0~100)G (0~100)B (0~100) | |
| Hue Adjusts the degree of how we perceive colors. 0 ~ 100 | |||
| Saturation | Adjusts the purity degree of colors. | 0 ~ 100 | |
| Reset Color | Resets the custom color settings to the factory defaults. | YESNO | |
| AMA | Improves the gray level response time of the LCD panel. | OFFHighPremium | |
Picture Advanced menu
Available menu options may vary depending on the input sources, functions and settings. Menu options that are not available will become grayed out. And keys that are not available will be disabled and the corresponding OSD icons will disappear. For models without certain functions, their settings and related items will not appear on the menu.
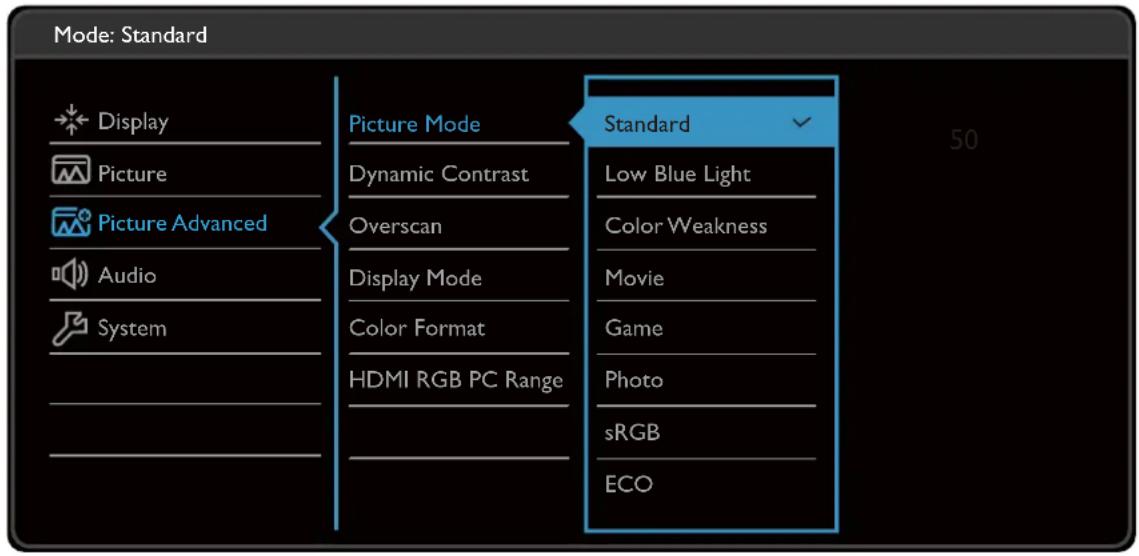
text_image
Mode: Standard Display Picture Picture Advanced Audio System Picture Mode Dynamic Contrast Overscan Display Mode Color Format HDMI RGB PC Range Standard Low Blue Light Color Weakness Movie Game Photo sRGB ECO


I. Select (Menu) from the hot key menu.
2. Use or to select Picture Advanced.
3. Select or to go to a sub menu, and then use or to select a menu item.
4. Use or to make adjustments, or use or to make selection.
5. To return to the previous menu, select or .
6. To exit the menu, select ✗
| Item Function Range | |||
| Picture Mode | Select a picture mode that best suits the type of images shown on the screen. | ||
| Standard For basic PC application. | |||
| Low Blue Light | Decreases the blue light emitted from the display to reduce the risk of blue light exposure to your eyes.[5C×K]There are 4 low blue light modes to suit different needs. To select a desired mode, go to Eye Care > Low Blue Light.See Low Blue Light on page 52 for more information. | ||
| Color Weakness | Adjusts color matching representation for people with color vision deficiency to distinguish colors easily. ^ You are provided with Red Filter and Green Filter on this monitor. Go to Eye Care > Color Weakness and choose one as needed. See Color Weakness on page 52 for more information. You are provided with Red Filter and Green Filter on this monitor. Go to Eye Care > Color Weakness and choose one as needed. See Color Weakness on page 52 for more information. | ||
| Movie | For viewing videos. | ||
| Game For playing video games. | |||
| Photo For viewing still images. | |||
| sRGB For better color matching representation with the peripheral devices, such as printers, digital cameras, etc. | |||
| ECO | For saving electricity with low power consumption by providing minimum brightness for all running programs.S | ||
| User Applies a combination of picture settings defined by users. | |||
| Dynamic Contrast | The function is to automatically detect the distribution of an input visual signal, and then to create the optimal contrast. | 0 to 5 | |
| Overscan | Slightly enlarges the input image. Use this feature to hide annoying edge noise if present around your image. ^[D64D] Available only when the input source is HDMI or D-Sub (VGA converted from Component). | •ON•OFF | |
| Display Mode | This feature is provided to allow aspect ratios other than 16:9 or 16:10 (depending on the purchased model) to be displayed without geometric distortion. ^[Z4CS] The options under Display Mode will be different depending on the input signal sources. ^ Depending on your selection of Picture Mode, different Display Mode option is pre-set. Change the setting if needed. Depending on your selection of Picture Mode, different Display Mode option is pre-set. Change the setting if needed. | ||
| Full | Scales the input image to fill the screen. Ideal for 16:9 or 16:10 (depending on the purchased model) aspect images. | ||
| Aspect The input image is displayed without geometric distortion filling as much of the display as possible. | |||
| Color Format | Determines the color space (RGB or YUV) based on the detected video signal. ^ You might need to manually set the Color Format if colors shown on the monitor screen do not display properly. ^ You might need to manually set the Color Format if colors shown on the monitor screen do not display properly. ^ If the input source is HDMI, color format is not selectable. In other words, Color Format is automatically set depending on the input video source. If the input source is HDMI, color format is not selectable. In other words, Color Format is automatically set depending on the input video source. | ||
| RGB • For D-Sub (VGA) input source from PC.• For DVI input source. | |||
| YUV For D-Sub (Component converted from VGA) input source from a video device. | |||
| HDMI RGB PC Range (selected models only) | Determines the range of color scales. Select an option that matches the RGB range setting on the connected HDMI device. | • Auto Detect• RGB (0~255)• RGB (16~235) | |
| RGB PC Range (BL2483TM only) | Determines the range of color scales. Select an option that matches the RGB range setting on the connected device. | • Auto Detect• RGB (0~255)• RGB (16~235) | |
Audio menu
Available menu options may vary depending on the input sources, functions and settings. Menu options that are not available will become grayed out. And keys that are not available will be disabled and the corresponding OSD icons will disappear. For models without certain functions, their settings and related items will not appear on the menu.
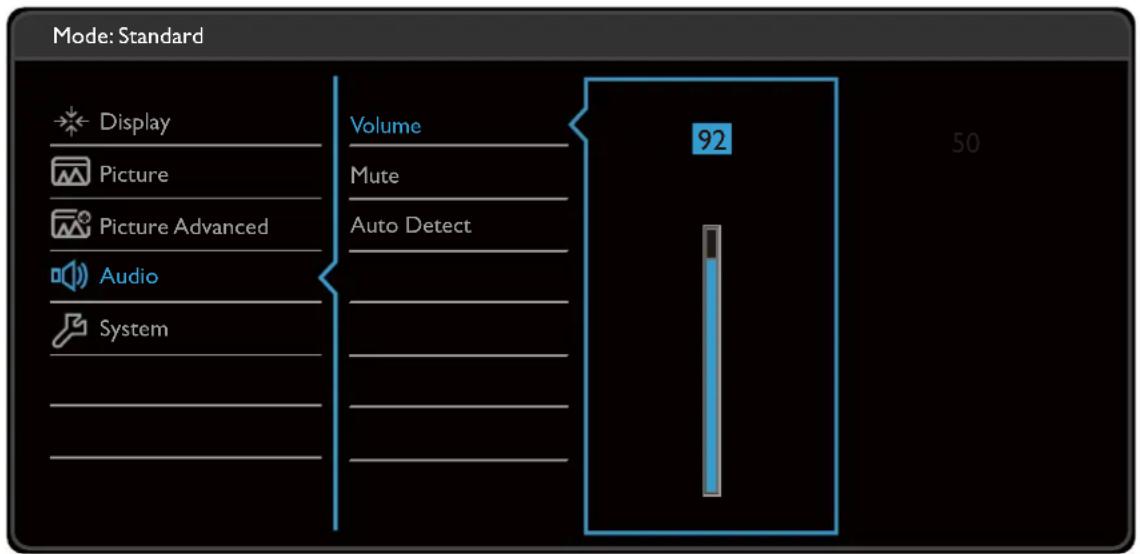
text_image
Mode: Standard Display Picture Picture Advanced Audio System Volume Mute Auto Detect 92 50^ | v | OK | ↻ | ✘
I. Select (Menu) from the hot key menu.
2. Use or to select Audio.
3. Select > or → to go to a sub menu, and then use ∧ or ∨ to select a menu item.
4. Use or to make adjustments, or use or to make selection.
5. To return to the previous menu, select or .
6. To exit the menu, select ✗
| Item Function Range | ||
| Volume Adjusts the audio volume. 0 ~ 100 | ||
| Mute Mutes the audio input. • ON | • OFF | |
| Audio Select | Allow users to select the audio source or let the monitor detect it automatically. | • PC Audio• Auto Detect |
System menu
Available menu options may vary depending on the input sources, functions and settings. Menu options that are not available will become grayed out. And keys that are not available will be disabled and the corresponding OSD icons will disappear. For models without certain functions, their settings and related items will not appear on the menu.
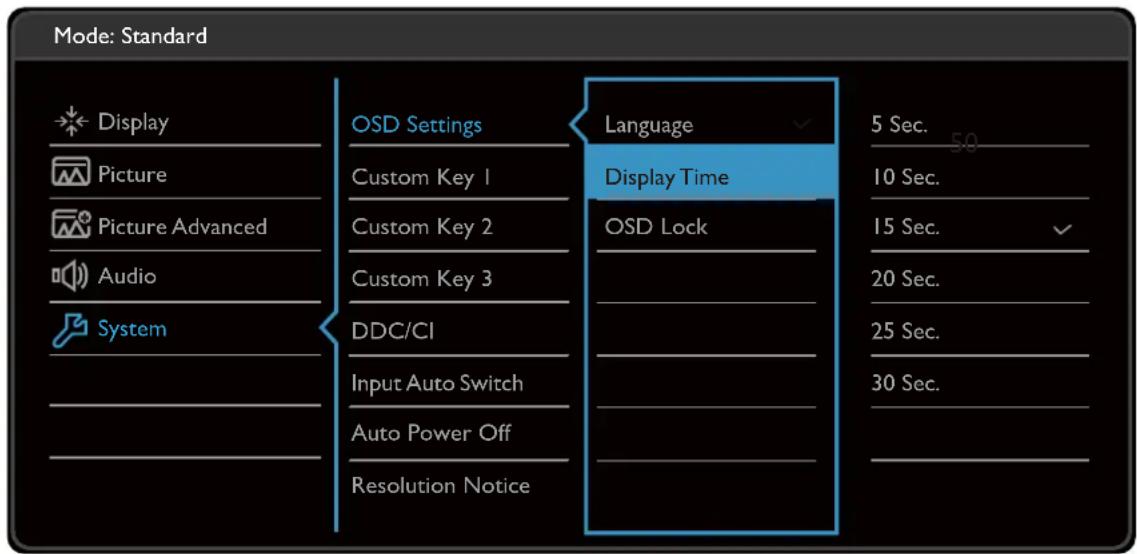
text_image
Mode: Standard Display Picture Picture Advanced Audio System OSD Settings Custom Key 1 Custom Key 2 Custom Key 3 DDC/CI Input Auto Switch Auto Power Off Resolution Notice Language Display Time OSD Lock 5 Sec. 10 Sec. 15 Sec. 20 Sec. 25 Sec. 30 Sec.^
V
OK
←
×
I. Select (Menu) from the hot key menu.
2. Use or to select System.
3. Select or to go to a sub menu, and then use or to select a menu item.
4. Use or to make adjustments, or use or to make selection.
5. To return to the previous menu, select or .
6. To exit the menu, select ✗
| Item Function Range | |||
| OSD Settings | Language | Sets the OSD menu language.
 The language options displayed on your OSD may differ from those shown on the right, depending on the product supplied in your region. The language options displayed on your OSD may differ from those shown on the right, depending on the product supplied in your region. | · English · Français · Deutsch · Italiano · Español · Polski · Česky · Magyar · Română · Nederlands · Русский · Svenska · Português · العربية · 日本語 · 한국어 · 繁體中文 · 筒体中文 |
| Display Time | Adjusts the display time of the OSD menu. • 5 | Sec. · 10 Sec. · 15 Sec. · 20 Sec. · 25 Sec. · 30 Sec. | |
| OSD Lock | Prevents all the monitor settings from being accidentally changed. When this function is activated, the OSD controls and hotkey operations will be disabled. To unlock the OSD controls, press and hold any key for 10 seconds. | ||
| USB Awake (selected models only) | By default, this function is disabled, and the USB ports are not supplied with power while the monitor is in standby mode. To keep supplying power to the USB ports in monitor's standby mode, change the setting to ON. | · ON · OFF | |
| Item Function Range | ||
| Custom Key 1 | Sets the function to be accessed by custom key 1. | Picture ModeLow Blue LightBright Intelligence (selected models only)Display ModeBrightnessContrastAuto AdjustmentVolumeMuteInput |
| Custom Key 2 | Sets the function to be accessed by custom key 2. | |
| Custom Key 3 | Sets the function to be accessed by custom key 3. | |
DDC/CI Allows the monitor settings to be set through the software on the PC. DDC/CI, short for Display Data Channel/Command Interface, which was developed by Video Electronics Standards Association (VESA). DDC/CI capability allows monitor controls to be sent via the software for remote diagnostics. DDC/CI, short for Display Data Channel/Command Interface, which was developed by Video Electronics Standards Association (VESA). DDC/CI capability allows monitor controls to be sent via the software for remote diagnostics. | ONOFF | |
| Input Auto Switch | Sets to automatically detect the available input source. • ON | OFF |
| Auto Power Off | Sets the time to power off the monitor automatically in power saving mode. | OFF10min.20min.30min. |
| Resolution Notice | Sets whether to display the resolution notice of the recommended resolution when a new input source is detected by the monitor. | ONOFF |
| Information | Displays the current monitor property settings. | InputCurrent ResolutionOptimum Resolution (best with the monitor)Model Name |
| DisplayPort (selected models only) | Selects an appropriate DP standard for data transmission. | 1.11.2 |
| OSD Key Bri. (selected models only) | Adjusts the LED indicator's brightness of the power key. | • 1• 2• 3 |
| Reset All | Resets all mode, color and geometry settings to the factory default values. | • YES• NO |
ECO menu (selected models only)
Available menu options may vary depending on the input sources, functions and settings. Menu options that are not available will become grayed out. And keys that are not available will be disabled and the corresponding OSD icons will disappear. For models without certain functions, their settings and related items will not appear on the menu.
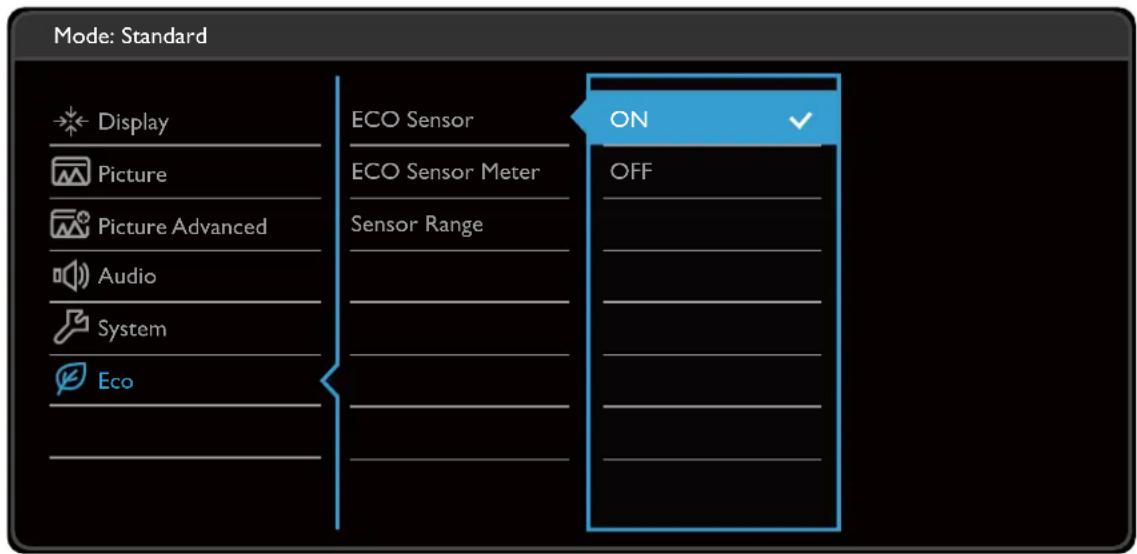
text_image
Mode: Standard Display Picture Picture Advanced Audio System Eco ECO Sensor ECO Sensor Meter Sensor Range ON OFFA | V | OK | ↻ | X
I. Select (Menu) from the hot key menu.
2. Use ∧ V or to select ECO.
3. Select or to go to a sub menu, and then use or to select a menu item.
4. Use or to make adjustments, or use or to make selection.
5. To return to the previous menu, select or .
6. To exit the menu, select .X
| Item Function Range | ||
| ECO Sensor | Your monitor comes with a proximity sensor (called ECO sensor), which detects your presence in front of the monitor within the set range. If the sensor detects no presence, the monitor is turned off in 40 seconds to save power. If the monitor is turned off by the ECO sensor, the power button flashes in white.If the ECO sensor detect no presence for over 2 hours, the monitor will be powered off. Press the power button to turn on the monitor. If the monitor is turned off by the ECO sensor, the power button flashes in white.If the ECO sensor detect no presence for over 2 hours, the monitor will be powered off. Press the power button to turn on the monitor. | • ON• OFF |
| Item Function Range | ||
| ECO Sensor Meter | Sets to display the countdown to turn off the monitor. | • ON• OFF |
| Sensor Range | Decides how far the sensor can detect. • Near | • Middle• Far |
Troubleshooting
Frequently asked questions (FAQ)
Imaging

The image is blurred.

- Download Resolution file from the website (see Product support on page 3). Refer to "Adjusting the Screen Resolution". And then select the correct resolution, refresh rate and make adjustments based on these instructions.
- If a VGA extension cable is used, remove the extension cable for the test. Is the image now in focus? Download Resolution file from the website (see Product support on page 3). Refer to "Adjusting the Screen Resolution". And then select the correct resolution, refresh rate and make adjustments based on these instructions to optimize the image. It is normal for blurring to occur due to conduction losses in extension cables. You can minimize these losses by using an extension cable with better conduction quality or with a built-in booster.

Does the blurring only occur at resolutions lower than the native (maximum) resolution?

Download Resolution file from the website (see Product support on page 3). Refer to "Adjusting the Screen Resolution". Select the native resolution.

Pixel errors can be seen.
One of several pixels is permanently black, one or more pixels are permanently white, one or more pixels are permanently red, green, blue or another color.

- Clean the LCD screen.
- Cycle power on-off.
• These are pixels that are permanently on or off and is a natural defect that occurs in LCD technology.

The image has a faulty coloration.

It has a yellow, blue or pink appearance.
Go to Picture and Reset Color, and then choose YES to reset the color settings to the factory defaults.
If the image is still not correct and the OSD also has faulty coloration, this means one of the three primary colors is missing in the signal input. Now check the signal cable connectors. If any pin is bent or broken off, please contact your dealer to get necessary support.

The image is distorted, flashes or flickers.

Download Resolution file from the website (see Product support on page 3). Refer to "Adjusting the Screen Resolution". And then select the correct resolution, refresh rate and make adjustments based on these instructions.

You are running the monitor at its native resolution, but the image is still distorted.

Images from different input sources may appear distorted or stretched on the monitor running at its native resolution. To have the optimal display performance of each type of input sources, you can use the Display Mode function to set a proper aspect ratio for the input sources. See Display Mode on page 58 for details.

The image is displaced in one direction.

Download Resolution file from the website (see Product support on page 3). Refer to "Adjusting the Screen Resolution". And then select the correct resolution, refresh rate and make adjustments based on these instructions.

Faint shadow from the static image displayed is visible on the screen.

- Activate the power management function to let your computer and monitor go into a low power "sleep" mode when not actively in use.
- Use a screensaver to prevent the occurrence of image retention.
Power LED indicator

The LED indicator is white or orange.

- If the LED lights up in solid white, the monitor is powered on.
- If the LED is illuminated in white and there is a message Out of Range on the screen, this means you are using a display mode that this monitor does not support, please change the setting to one of the supported mode. Download Resolution file from the website (see Product support on page 3). Refer to "Adjusting the Screen Resolution". And then select the correct resolution, refresh rate and make adjustments based on these instructions.
- If the LED is illuminated in orange, the power management mode is active. Press any button on the computer keyboard or move the mouse. If that does not help, check the signal cable connectors. If any pin is bent or broken off, please contact your dealer to get necessary support.
- If the LED is off, check the power supply mains socket, the external power supply and the mains switch.
OSD controls

The OSD controls are inaccessible.

To unlock the OSD controls when it is preset to be locked, press and hold any key for 10 seconds.
OSD messages

A message Out of Range on the screen during computer boot up process.

If there is a message Out of Range on the screen during computer boot up process, this means computer compatibility caused by operating system or graphic card. The system will adjust the refresh rate automatically. Just wait until the operating system is launched.
Audio

No sound can be heard from the built-in speakers. (selected models only)

- Check whether the desired cable to input audio signals is properly connected. See Connect the audio cable. on page 26 for details.
- Increase the volume (volume may be muted or too low).
- Remove your headphone and/or external speakers. (If they are connected to the monitor, the built-in speakers are automatically muted.)

No sound can be heard from the connected external speakers.

- Remove your headphone (if the headphone is connected to the monitor).
- Check whether the headphone jack is properly connected.
- If the external speakers are USB-powered, check whether the USB connection is OK.
- Increase the volume (volume may be muted or too low) on the external speakers.
Sensors (selected models only)

The light sensor of the monitor does not work well.

The light sensor is located at the front bottom of the monitor. Please check:
- If you have removed the sensor protection sticker.
- If the Bright Intelligence function is set to ON. Check Eye Care > Bright Intelligence.
- If there are any obstacles in front of the sensor that keep the sensor from detecting the light properly.
- If there are any objects or clothing in bright colors in front of the sensor. Bright colors (especially white and fluorescent colors) reflect light and the sensor cannot detect the main light sources.
natural_image
Illustration of a computer monitor with a pencil and eraser, no text or symbols present
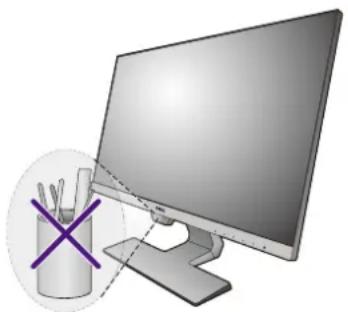
The ECO sensor of the monitor does not work well.

- The ECO sensor is located at the front bottom of the monitor. Check if there are any obstacles in front of the sensor that keep the sensor from detecting your presence properly.
- If your have removed the sensor protection sticker.
- The colors and the materials of your clothes may affect the detection. Adjust the sensor range if needed. See Sensor Range on page 66 for more information.
- Adjust the distance between you and the monitor.
If none of the preceding actions works, it is probably because the materials of your clothes are unique and cannot be detected by the ECO sensor. Please be noted that this is neither a manufacturing defect nor is the sensor damaged. You should turn off the ECO sensor for now in ECO > ECO Sensor.
Need more help?
If your problems remain after checking this manual, please contact your place of purchase or visit the local website from Support.BenQ.com for more support and local customer service.