Security Premium 3.0 - Antivirus Symantec - Norton - Free user manual and instructions
Find the device manual for free Security Premium 3.0 Symantec - Norton in PDF.


User questions about Security Premium 3.0 Symantec - Norton
0 question about this device. Answer the ones you know or ask your own.
Ask a new question about this device
Download the instructions for your Antivirus in PDF format for free! Find your manual Security Premium 3.0 - Symantec - Norton and take your electronic device back in hand. On this page are published all the documents necessary for the use of your device. Security Premium 3.0 by Symantec - Norton.
USER MANUAL Security Premium 3.0 Symantec - Norton
The software described in this book is furnished under a license agreement and may only in accordance with the terms of the agreement.
Documentation version 22.11
Copyright © 2017 Symantec Corporation. All rights reserved.
Symantec, the Symantec Logo, the Checkmark Logo, LiveUpdate, Norton, and Norton Symantec are trademarks or registered trademarks of Symantec Corporation or its affil in the United States and other countries.
The product described in this document is distributed under licenses restricting its use, distribution, and decompilation/reverse engineering. No part of this document may be reproduced in any form by any means without prior written authorization of Symantec Corporation and its licensors, if any.
THE DOCUMENTATION IS PROVIDED "AS IS" AND ALL EXPRESS OR IMPLIED CONDITIONS, REPRESENTATIONS AND WARRANTIES, INCLUDING ANY IMPLIED WARRANTY OF MERCHANTABILITY, FITNESS FOR A PARTICULAR PURPOSE OR NON-INFRINGEMENT, ARE DISCLAIMED, EXCEPT TO THE EXTENT THAT SUCH DISCLAIMERS ARE HELD TO BE LEGALLY INVALID. SYMANTEC CORPORATION SH NOT BE LIABLE FOR INCIDENTAL OR CONSEQUENTIAL DAMAGES IN CONNECTION WITH THE FURNISHING, PERFORMANCE, OR USE OF THIS DOCUMENTATION. THE INFORMATION CONTAINED IN THIS DOCUMENTATION IS SUBJECT TO CHANGE WITHOUT NOTICE.
The Licensed Software and Documentation are deemed to be commercial computer so as defined in FAR 12.212 and subject to restricted rights as defined in FAR Section "Commercial Computer Software - Restricted Rights" and DFARS 227.7202, et seq. "Commercial Computer Software and Commercial Computer Software Documentation," as applicable, and any successor regulations, whether delivered by Symantec as on prem or hosted services. Any use, modification, reproduction release, performance, display or disclosure of the Licensed Software and Documentation by the U.S. Government shall solely in accordance with the terms of this Agreement.
Symantec Corporation
350 Ellis Street,
Mountain View, CA 94043
http://www.symantec.com
Printed in the United States of America.
10 9 8 7 6 5 4 3 2 1
Contents
Chapter 1 Welcome to Norton 7
About your Norton product 7
System requirements for Norton Security 8
Create a Norton account 9
Signing in to your Norton account 10
Norton Early Adopter Program 10
Join the Norton Early Adopter Program 11
Leave the Norton Early Adopter Program 12
Chapter2DownloadingandinstallingNorton.... 13
Downloading and installing Norton 13
Installing Norton on additional devices 15
Transferring your Norton license to a new device 17
Activating your Norton product 18
Troubleshooting with Norton Bootable Recovery Tool 18
Chapter3 Understanding and responding to threats...... 22
Resolve threats if your device is at risk 22
Running LiveUpdate 23
Respond to security risks 23
Act on quarantined risks or threats 25
Types of risks 27
Types of threats 27
Types of viruses 28
Chapter4Managingyoursecurity.... 30
View details of your system activities 30
Check the trust level of a file 31
View the Report Card 32
Chapter5Scanningyourcomputer.... 33
Run a Quick Scan 34
Run a Full System Scan 34
Scan selected drives, folders, or files 34
Run a custom scan 35
Schedule a scan 36
Scan your computer with Norton Power Eraser 37
Automatic Protection settings 38
Turn SONAR Protection off or on 41
Exclude security threats from scanning 41
Add items to the Signature Exclusions 42
Clear IDs of files that are excluded during scans 43
Configure boot time protection 43
Turn on or turn off automatic tasks 44
Run custom tasks 44
Schedule security and performance scans 45
Chapter6Keepingsecureonthelnternet.... 47
Turn Norton Firewall on or off 48
Customize Program Rules 48
Change the order of firewall rules 49
Turn off a Traffic rule temporarily 50
Allow a blocked program 50
Turn off Firewall Block Notification 51
Remove all devices from Intrusion Prevention exclusion list 51
Turn off and turn on Browser Protection 52
Exploit Prevention 53
Turn off or turn on Exploit Prevention 54
Turn off or turn on AutoBlock 54
Unblock AutoBlocked computers 55
Add a device to Device Trust 56
Turn off or turn on Download Intelligence 57
Turn off or turn on spam filtering 58
Define Norton's Internet usage 58
Turn off or turn on Network Cost Awareness 59
Chapter7 Securingyoursensitivedata.... 61
Add the Norton browser extensions 62
Turn on or turn off Norton Safe Web 64
Search the web using Norton Safe Search 65
Turn off or turn on Scam Insight 66
Turn off or turn on Antiphishing 66
Access Identity Safe 67
Turn off or turn on Identity Safe 68
Creating cloud vault 68
Delete your cloud vault 69
Export your Identity Safe data 70
Import your Identity Safe data 71
Enable or disable the Norton toolbar 72
Norton Shopping Guarantee 72
Register a purchase with the Norton Shopping Guarantee 73
File a claim for a purchase in Norton Shopping Guarantee 73
Chapter8KeepingyourPCtunedup.... 74
Viewing the resource usage of running processes 74
Optimize your permanent disks manually 75
Configure performance alerts 75
Run a scan to clean up disk clutter 77
Run Diagnostic Report 77
Manage startup items 77
Optimize your boot volume 78
Chapter9 Protecting your media and data.... 80
Back up your files 80
Restore files 81
Create a new backup set 82
Add files and folders to a backup set 83
Choose a backup location 84
Purchase more cloud storage space 87
Turn off or turn on backup 88
Chapter 10 Customizing settings 90
Configure Network Proxy Settings 90
Customizing your Norton product settings 91
Configure Norton for best battery use 92
Turn on or turn off Remote Management 93
Secure your Norton product settings using a password 93
Reset your Norton product settings password 94
Turn off or turn on Norton Product Tamper Protection 95
How do I use the Search tool? 96
Set a Search Shortcut Key 96
Chapter11Findingadditionalsolutions.... 98
Find the version number of your product 98
Checking for a new version of the product 98
Solve problems with Norton Autofix 99
Reasons for Fix Now failures 100
Uninstall your Norton product 102
WelcometoNorton
This chapter includes the following topics:
■ About your Norton product
■ System requirements for Norton Security
■ Create a Norton account
■ Signing in to your Norton account
■ Norton Early Adopter Program
AboutyourNortonproduct
Thank you for buying the latest Norton product!
Norton combines superior security and fast performance with an easy-to-use to protect your devices from today's advanced threats. It safeguards your protection of your data, and keeps your computer running at peak performance.
Norton protects you whether you have a single computer or multiple device connect your family. Securing your data and information is our only concern why Norton makes this bold promise: From the moment you subscribe, a expert can help keep your devices virus-free or refund your money.
A single Norton subscription can protect all your computers, smartphones, or across Windows, Mac, Android, and iOS operating systems. LiveUpdate automatically installs the latest virus definitions and product features on your to assure that you always have the best protection available.
If you have trouble configuring your Norton product, additional help is available. Your Norton product provides easy-to-use support options.
SystemrequirementsforNortonSecurity
To install Norton Security on your PCs, Macs®, smartphones, or tablets, m that they meet the minimum system requirements.
Norton Security Premium protects up to 10 devices and includes secure ba for PCs only. It does not include secure backup for Mac OS X.
Windows
◆ Operating systems
■ Microsoft Windows® 10 and Windows® 10 Pro (32-bit and 64-bit)
■ Microsoft Windows® 8.1 or later (32-bit and 64-bit)
■ Microsoft Windows® 8 and Windows® 8 Pro (32-bit and 64-bit)
■ Microsoft Windows® 7 (32-bit and 64-bit) with Service Pack 1 or lat
■ Microsoft Windows® Vista (32-bit and 64-bit) with Service Pack 1 or
■ Microsoft Windows® XP with Service Pack 3
Hardware
- Processor
For Windows XP: 300 MHz For Windows 10/8/7/Vista: 1 GHz
■ RAM
For Windows 10: 2 GB (minimum of 512 MB RAM required for Re Tool) For Windows 8/7: 1 GB (32-bit) (minimum of 512 MB RAM required Recovery Tool) For Windows Vista: 512 MB For Windows XP: 256 MB
■ Hard disk space
300 MB of available hard disk space
Browser support for Vulnerability Protection
The following browsers are supported for Vulnerability Protection.
■ Microsoft Internet Explorer® 8.0 or higher (32-bit and 64-bit)
■ Mozilla Firefox® (32-bit and 64-bit)
■ Google Chrome™ (32-bit and 64-bit)
Browser support for Phishing Protection, Safe Search, and Password Management
The following browsers are supported for Phishing Protection, Safe Search and Password Management.
■ Microsoft Internet Explorer® 8.0 or higher (32-bit and 64-bit)
■ Mozilla Firefox® (32-bit and 64-bit)
■ Google Chrome™ (32-bit and 64-bit)
Email clients
Norton Security supports email scanning on all POP3 compatible email
Support for Antispam
The following email client is supported for Antispam:
■ Microsoft Outlook 2003 and later
^1 Some protection features are not available in Microsoft Internet Explorer or later.
^2 As made available by Symantec within your service period.
CreateaNortonaccount
Your Norton account is where you monitor your connected devices and up profile. You can also change your billing preferences or renew your product your Norton account.
You created a Norton account if you made a purchase from the Norton or if you already downloaded and installed your product.
If you signed up for Norton Family, Norton Online Backup, or Norton Safe you may also have a Norton account. Ensure that this account also has Security license associated with it.
TocreateaNortonaccount
1 Go to https://manage.norton.com
2 Click Create account.
3 Enter a valid email address and password for your account. You need these credentials to sign in to Norton in the future.
4 Choose your region.
5 Read the privacy policy and agree to it, and then click Sign Up.
Signing into your Norton account
Sign in to your Norton account to monitor your devices, update your profil change your billing preferences.
TosignintoyourNortonaccount
1 Go to https://manage.norton.com
2 Click Sign in.
3 Enter the email address and password that you used when you create Norton account and click Sign in.
4 If you do not know your password, click Forgot your password?
Follow the instructions to receive an email with a new password link.
Note: If you have opted for the Two-Step Verification to access your No account, you have to use the verification code in addition to your pas For more information, see Two-Step Verification for Norton account
NortonEarlyAdopterProgram
The Norton Early Adopter Program lets you download Norton pre-release so and be among the first to try out new features. You don't need to create Norton account or uninstall Norton to upgrade to the pre-release software. You join the Norton Early Adopter Program, Norton LiveUpdate downloads the pre-release software on your computer.
WhatarethebenefitsofjoiningtheNortonEarlyAdopter Program?
■ Gives you a sneak peak at the latest Norton Security features.
■ Allows you to give feedback that helps shape the final version of the
WhoiseligibletojointheNortonEarlyAdopterProgram?
A limited number of paid or active users will receive an in-product invitation the Norton Early Adopter Program. This is the only way to join the program first time.
HowdolenrollintheNortonEarlyAdopterProgram?
If you receive an in-product invitation for the Norton Early Adopter Program can enroll.
You can decide to leave the Norton Early Adopter Program at any time.
For more information, see Join the Norton Early Adopter Program.
CanlrollbacktomypreviousversionifIleavetheNortonEarly AdopterProgram?
You can leave the Norton Early Adopter program at any time and roll be previous version of Norton product.
For more information, see Leave the Norton Early Adopter Program.
DolneedtobackupmyNortonlocalbackupdrivebefore optingforNortonEarlyAdopterProgram?
You are not required to back up your data. Norton LiveUpdate installs the Norton pre-release software. However, you lose your Norton local settings w you leave the Norton Early Adopter Program.
Let us know your feedback on the Norton Early Adopter Program.
Provide Feedback
Join the Norton Early Adopter Program
If you receive an in-product invitation to join the Norton Early Adopter Pro can enroll.
You can decide to leave the Norton Early Adopter Program at any time.
JoinNortonEarlyAdopterProgramfromtheinvitation
1 In the Norton Early Adopter Program invitation, click Learn More.
2 Read the About Norton EAP page, and then click Join.
3 Read the Norton License Agreement, and then click Agree.
4 Enter your Norton account password, and then click Sign In.
5 In the Enrollment Complete window, click Close. Norton downloads the pre-release software on your computer in the next LiveUpdate session.
JoinNortonEarlyAdopterProgramfromtheNortonAdministrativeSettingswindow
If you have declined or ignored the in-product invitation, you can still join Early Adopter Program using your Norton product.
1 In the Norton main window, click Settings.
2 In the Settings window, under Detailed Settings, click Administrative Settings.
3 In the Administrative Settings window, in the Norton Early Adopter Program row, click Join.
4 Read the About Norton EAP page, and then click Join.
5 Read the Norton License Agreement, and then click Agree.
6 Enter your Norton account password, and then click Sign In.
7 In the Enrollment Complete window, click Close. Norton downloads the pre-release software on your computer in the next LiveUpdate session.
Leave the Norton Early Adopter Program
You can leave Norton Early Adopter Program at any time from the Nortor Administrative Settings window.
LeaveNortonEarlyAdopterProgram
1 In the Norton main window, click Settings.
2 In the Settings window, under Detailed Settings, click Administrative Settings.
3 In the Administrative Settings window, in the Norton Early Adopter Program row, click Unenroll.
4 Your Norton product initiates Norton Remove and Reinstall tool to rollba your previous Norton product version.
5 Read the license agreement, and click Agree.
6 Click Remove & Reinstall.
7 Click Restart Now.
After the computer restarts, follow the on-screen instructions to reinstall previous version of your Norton product.
Downloading and installing Norton
This chapter includes the following topics:
■ Downloading and installing Norton
■ Installing Norton on additional devices
■ Transferring your Norton license to a new device
■ Activating your Norton product
■ Troubleshooting with Norton Bootable Recovery Tool
DownloadingandinstallingNorton
Protecting your devices and managing your Norton product is as easy as new device to your Norton account.
TodownloadandinstallNortononyourcomputer
1 Go to norton.com/setup.
2 If you are not signed in to your Norton account, click Sign In and email address and Norton account password.
If you do not have an account, click Create an Account, and then the sign-up process.
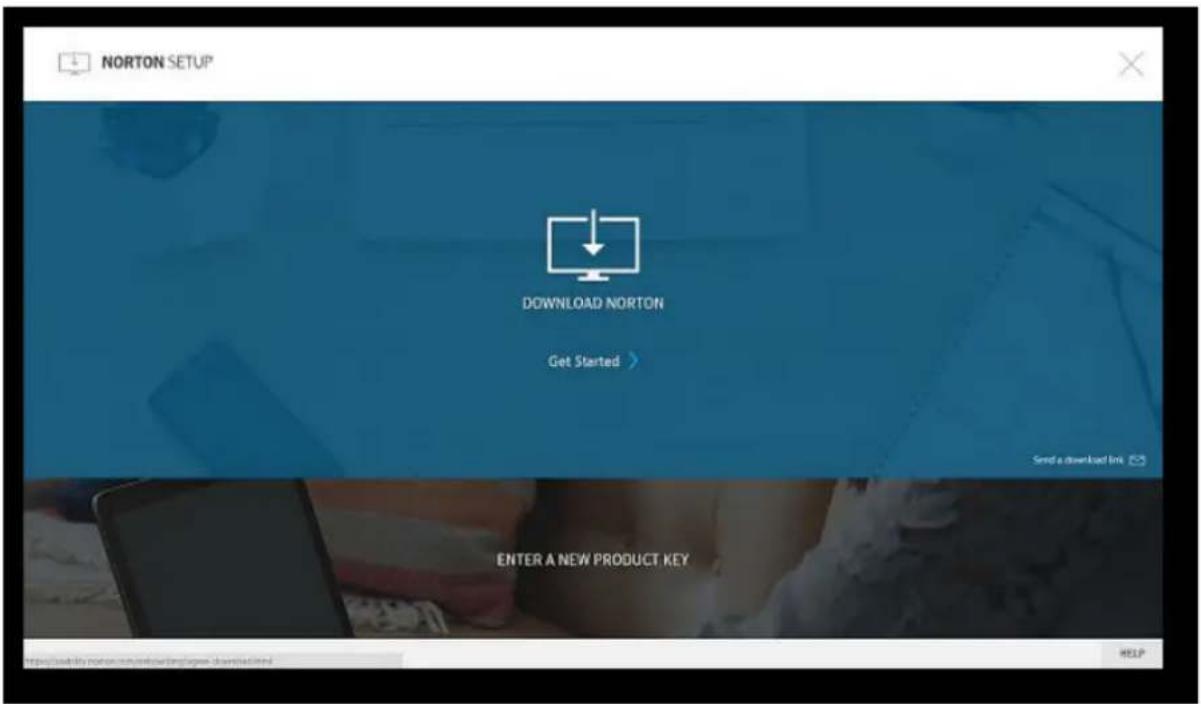
3 In the Norton Setup window, click Download Norton.
text_image
NORTON SETUP DOWNLOAD NORTON Get Started > Send a download link ENTER A NEW PRODUCT KEY HELPTo install a new product that is not yet registered to your Norton aci Enter a New Product Key.
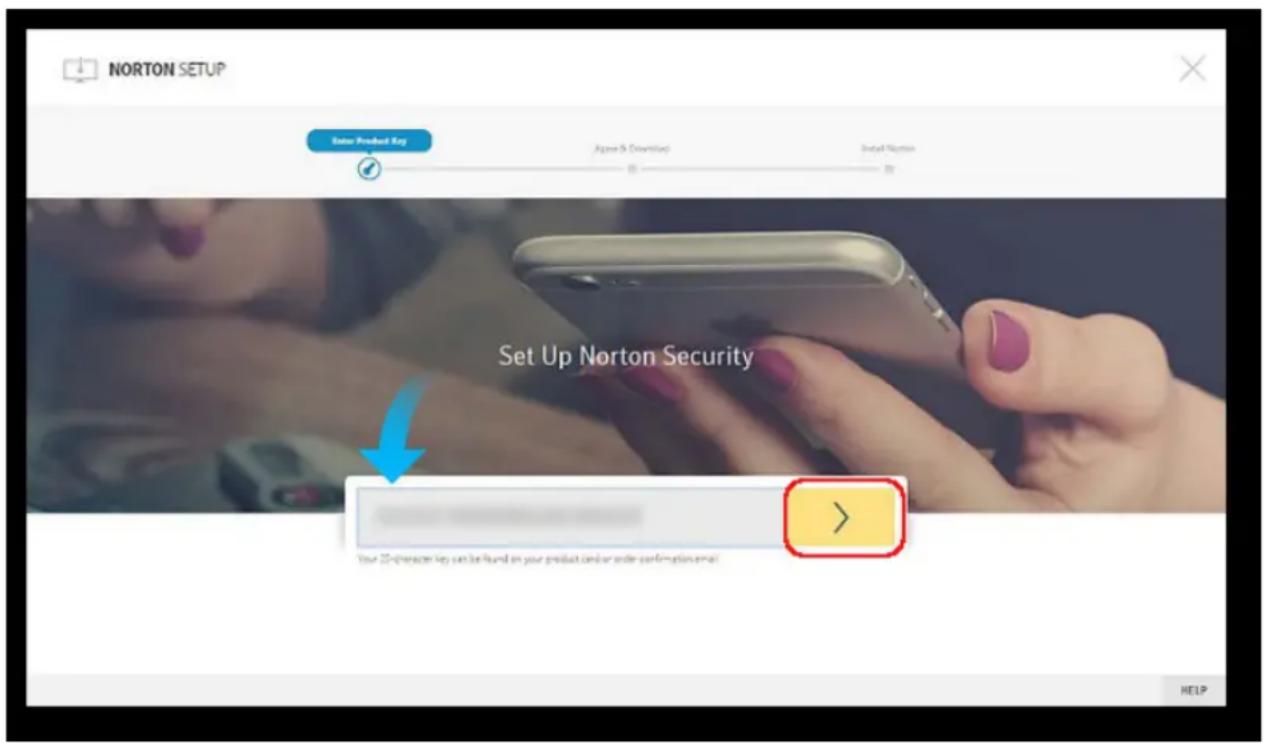
Enter your product key and click the next (>) icon.
text_image
NORTON SETUP Enter Product Key Appearance (Downside) Install Norton Set Up Norton Security Your 25-character key can be found on your product card or order confirmation email >4 Click Agree & Download.
5 Click the area pointed by the on-screen blue arrow and follow the on-instructions.
■ For Internet Explorer or Microsoft Edge browser: Click Run.
■ For Firefox or Safari: On the top-right corner of the browser, click Download option to view the downloaded files, and double-click the that you downloaded.
■ For Chrome: On the bottom-left corner, double-click the file that you downloaded.
6 If the User Account Control window appears, click Continue.
7 Your Norton product gets downloaded, installed, and activated.
InstallingNortononadditionaldevices
From your Norton account, you can send emails to additional devices and Norton on the devices. The email contains the install link and instructions Norton.
ToinstallNortononadifferentdevice
1 Sign in to Norton.
2 If you are not signed in to your Norton account, click Sign In and email address and Norton account password and sign in.
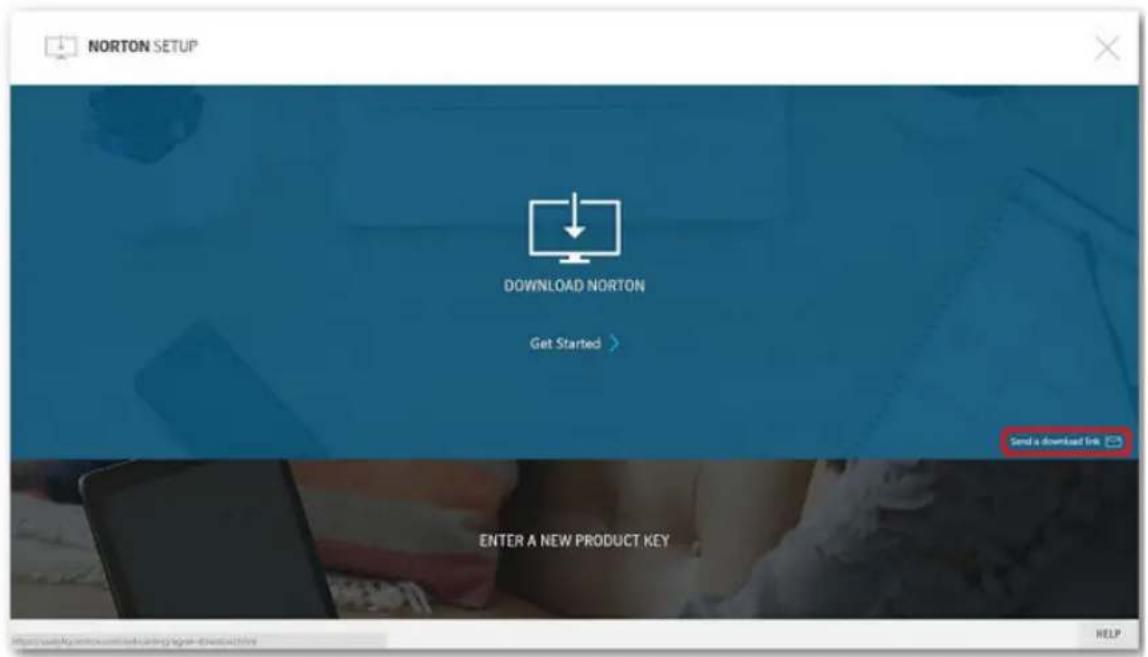
3 In the Norton Setup window, click Send a download link.
text_image
NORTON SETUP DOWNLOAD NORTON Get Started > Send a download file ENTER A NEW PRODUCT KEY HELP4 Enter an email address that you can access on your additional device the send button, and then click Done.
An email is sent to the email address with instructions to install the product.
5 On the device where you want to download Norton, locate and open that you received from The Norton Team.
6 Click Download Now.
7 Click Agree & Download.
8 Save the file on your computer and double-click the file to install North default, the file is saved in the Downloads folder on both Mac and V computers.
Follow the on-screen instructions.
Note: Norton AntiVirus for Mac cannot be managed through your Norton account.
Note: Norton Security Premium customers are redirected to the Norton Fa page after clicking Done.
TransferringyourNortonlicensetoanewdevice
If your Norton product is installed on a device that you no longer use, transfer your Norton product from that device to another device using your account.
TransfertheNortonlicense
1 Sign in to your Norton account.
2 In the Devices page, identify the device that you no longer want to
Note: The device must appear with a green status. If the device that y longer use appears with a red or an orange status, you can remove from your Norton account and free a license.
3 Click the ellipse icon available below the device.
4 In the menu that appears, click Manage License.
5 In the Manage Device page, do the following:
- Click on the device name.
■ Under What would you like to do, click Remove Norton.
- Click Next.
6 In the Remove Norton window that appears, click Yes.
7 In the page that appears, click Install Now.
8 In the Install on New Device page, select one of the following:
■ To install Norton on the current device, click Download.
■ To install Norton on a different device, click Send Link.
9 Click Next.
10 Follow the on-screen instructions to complete the installation.
ActivatingyourNortonproduct
To use Norton's security features, you must first activate your product. Product activation reduces software piracy and ensures that you have authentic Sym software.
If you are connected to the Internet, product activation takes place automatic when you start the product for the first time after installation. If you did your product during installation, Norton prompts for activation each time you the product. Also, you receive an activation alert regularly until you activate product.
ToActivateyourproduct
1 Start your Norton product.
2 In the main window of your Norton product, click Renew or Activate Now.
You can also click Activate Now from the activation alert.
3 If prompted, sign in to your Norton account with your Norton account
4 Do one of the following:
■ If you have product key, click Enter a key, type the product key, and follow the on-screen instructions.
■ If you have any licenses available, select the subscription and follow on-screen instructions.
■ If you want to purchase a license, click Buy a Subscription. You redirected to Norton Store website where you can complete your pur
TroubleshootingwithNortonBootableRecoveryTool
If you are unable to install Norton Security, open Norton Security, or you start your computer, you can use Norton Bootable Recovery Tool to resolve issue.
Norton Bootable Recovery Tool scans and removes viruses, spyware, and security risks. You can run Norton Bootable Recovery Tool only from a D'USB drive.
Note: Norton Bootable Recovery Tool is not a replacement for real-time prote from viruses and security risks.
Step1: Download the Norton Bootable Recovery Tool ISO file on a computer that is not infected
TodownloadtheISOfile
1 Open the browser and go to the following URL:
http://norton.com/nbrt
2 Click Download.
3 Follow the on-screen instructions to download and save the Norton Boot Recovery Tool ISO file.
Step2:CreateaNortonBootableRecoveryToolbootablemedia
You can use any tool to burn the Norton Bootable Recovery Tool ISO fil or a USB drive as a bootable media. You can then run Norton Bootable Tool on any infected computer. You can also use this DVD as a recover any computer.
Warning: If you create Norton Bootable Recovery Tool on a re-writable DVD drive, all the files on DVD or USB drive are permanently deleted. Back to before you create Norton Bootable Recovery Tool on a re-writable DVD or drive.
Note: If you create Norton Bootable Recovery Tool on a USB drive, the US should have a minimum space of 1 GB and should be formatted in FAT system.
Step3: LaunchNortonBootableRecoveryTool
After you create Norton Bootable Recovery Tool on a DVD or a USB dri media to run Norton Bootable Recovery Tool.
TolaunchNortonBootableRecoveryTool
1 Insert the Norton Bootable Recovery Tool DVD or USB drive that you
2 Turn on or restart the infected computer, then enter the BIOS mode b the key that appears on the screen immediately after your computer re
3 Select the DVD or the USB drive on which you created Norton Boota Recovery Tool, and then press Enter. If you use a UEFI-enabled comp select the recovery media under the Legacy Boot option instead of the UEFI
Boot option. The recovery media is the Norton Bootable Recovery Tool or USB drive.
4 In the Welcome to NBRT page, select the Boot option. If the booting fails, then select Boot (Basic Video) option.
5 In the Select Language drop-down list, select your preferred language, then click OK.
6 Read the Norton license agreement and then click Agree to launch the
Step4: Scanandresolvethreats
Norton Bootable Recovery Tool identifies and lists all the known security th You can choose what to do with the items that are identified as potentia
Toscanandresolvethreats
1 Read the Norton license agreement and then click Agree to launch the
2 In the Scan your computer section, click Start Scan.
When the scan is complete, the Scan Completed window lists the following
■ The total number of files scanned
■ The total number of threats detected
3 In the Scan Completed window, review the scan results, and do one following:
- To fix all of the threats that are found on your computer, select the Action column.
■ To perform appropriate actions for each of the threats, select the rel threat that you want to resolve under the Action column.
Note: Review the scan results carefully before resolving the threats, since files that are removed cannot be restored on your computer.
4 Click Fix.
5 In the confirmation dialog box, click OK.
6 The Remediation window displays the status of each threat under the Action column.
7 Click Continue.
8 In the Reboot your computer window, click Reboot to restart your computer.
If you want to run the scan again, click Scan Again.
Norton Bootable Recovery Tool automatically downloads and updates the late virus definitions from the Symantec servers when you initiate the scan and connected to the Internet. The latest virus definitions helps you secure your from the latest viruses and security threats.
Understanding and respondingtothreats
This chapter includes the following topics:
■ Resolve threats if your device is at risk
■ Running LiveUpdate
■ Respond to security risks
■ Act on quarantined risks or threats
■ Types of risks
■ Types of threats
■ Types of viruses
Resolvethreatsifyourdeviceisatrisk
In the Norton main window, the color of Security, Identity, Backup, and Petiles indicates the status of each category as follows:
■ Green: You are Protected.
■ Orange: Your computer needs attention.
■ Red: Your computer is at risk.
Note: The backup category is available only with Deluxe+ and Premium subscriptions.
Norton automatically fixes most issues that reduce your protection or system performance and displays the status as Protected in the main window. Norl displays issues that require your attention as At Risk or Attention.
RespondtoAttentionorAtRiskstatusindicators
1 In the Norton main window, click the red or orange tile of the category indicates At Risk or Attention.
2 Click Fix Now and follow the on-screen instructions.
If you still have issues, click Help > Get Support to run the diagnostic
You can also try using Norton Rescue Tools if you think your computer is severely infected.
RunningLiveUpdate
Symantec recommends that you run LiveUpdate at regular intervals in the 1 cases:
■ If you have turned off Automatic LiveUpdate option
■ If your computer is not connected to the Internet for a long time
Note: To run LiveUpdate, you need a valid subscription and an Internet con
TorunLiveUpdatemanually
1 In the Norton product main window, double-click Security, and then click LiveUpdate.
2 In the Norton LiveUpdate window, when the LiveUpdate is completed successfully, click OK.
Respondtosecurityrisks
When a risk is detected, Norton removes the threat and quarantines it. You view details about the risks that were automatically resolved in the Security window. In some cases, Norton requires your attention to manually resolve detected security risk.
Viewrisksthatwereautomaticallyresolvedduringascan
Viewrisksautomaticallyresolvedduringascan
1 In the Norton main window, double-click Security, and then click History.
2 In the Security History window, in the Show drop-down list, select Resolved Security Risks.
3 Select a risk in the list, then in the Details pane, view the action th
Fixunresolvedrisksdetectedduringascan
In some cases, Norton does not automatically resolve a risk, but recommen action for you to take to resolve the risk.
Fixunresolvedrisksdetectedduringascan
1 In the Norton main window, double-click Security, and then click History.
2 In the Security History window, in the Show drop-down list, select Unresolved Security Risks.
3 Select a risk in the list if there are unresolved risks displayed.
4 Follow the Recommended Action in the Details pane.
RunNortonPowerEraserifyoucan'tfixanunresolvedrisk
Run Norton Power Eraser if you think your system is infected. Norton Power is a powerful malware removal tool that eliminates the security risks that are to remove.
RunNortonPowerEraser
1 In the Norton main window, click Security, and then click Scans.
2 In the Scans window, click Norton Power Eraser.
3 Click Go.
Note: Norton Power Eraser is an aggressive malware removal tool. Sometimes, Norton Power Eraser may remove legitimate files along with malware, so you to review the scan results thoroughly before you delete any file.
Restoreafilethatwasmistakenlyidentifiedasasecurityrisk
By default, Norton removes security risks from your computer and quarantine them. If you think a file was mistakenly removed, you can restore the file Quarantine to its original location and exclude it from future scans.
RestoreafilefromQuarantine
1 In the Norton main window, click Security, and then click History.
2 In the Security History window, under Show drop-down menu, select Quarantine.
3 Select the file that you want to restore.
4 In the Details pane, click Options.
5 In the Threat Detected window, click Restore & exclude this file.
6 In the Quarantine Restore window, click Yes.
7 In the Browse for Folder dialog, select the folder or drive where you restore the file and then click OK.
Note: Exclude a program from the Norton scans only if you are confident to program is safe. For example, if another program relies on a security risk to function, you might decide to keep the program on your computer.

natural_image
Icon of a lock inside a yellow circle with Wi-Fi signal symbol (no text or numbers)Using public Wi-Fi?
Public Wi-Fi is found in places like airports, coffee shops. Keep your information hidden from prying eyes, with a vi Learn More Watch Video
Actonquarantinedrisksorthreats
Quarantined items are isolated from the rest of your computer so that the spread or reinfect your computer. If you have an item that you think is is not identified as a risk by Norton, you can manually put the item in
You cannot open quarantined items accidentally and spread the virus, but you evaluate the quarantined items for possible submission to Symantec.
Types of quarantined items:
Security risks
Items such as spyware and adware that are generally low risk and that another program requires to function properly.
You can restore these items if necessary.
Viruses and other high-risk items. Security threats
Performanactiononaquarantineditem
1 In the Norton product main window, double-click Security, and then clic History.
2 In the Details pane, click Options.
You can use the More Options link to view more details about the you select an action for it. The link opens the File Insight window to more information about the risk.
3 In the Threat Detected window, select the action that you want to perform some of the options are:
Restore
Returns the security risk that is quarantined to the original location on your computer.
This option is available only for manually quarantined items.
Restore & exclude this file
Returns the selected Quarantine item to its original location without repairing it and excludes the item from being detected in the future scans
This option is available for the detected viral and non-viral threats.
Remove from history
Removes the selected item from the Security History log
Submit to Symantec
Sends the selected item to Symantec for evaluation of the security risk
In some cases, Norton might not identify an item as a security threat, but you might suspect that the item is infected. In such cases, you can use this option to submit the item to Symantec for further analysis.
You can also navigate to this window by using the Options link in the File Insight window for some risks.
4 Follow the on-screen instructions.
Typesofrisks
A risk is anything that can be exploited to harm your PC and its data, be used to steal your data. Norton protects your system from a variety of Risks fall into several categories:
Malicious software
These programs are deliberately designed to cause damage to your PC. They include threats such as viruses, worms, and Trojan horses. Malicious software is sometimes called malware.
Spyware
These programs conceal themselves on your PC. They monitor what you do, or look through the information that is stored on your PC, and send the information back to their creators.
Vulnerabilities
These risks consist of flaws in legitimate software that can be exploited, either to cause damage, block data, or steal information. Vulnerabilities are usually exploited through network connections.
Typesofthreats
Threats consist of the software that has been deliberately designed to dest modify, disclose, or block your data.
Threats fall into the following categories:
Viruses
Viruses are the small programs that attach themselves to other programs and replicate themselves.
Worms
Worms are like viruses in that they copy themselves from PC to PC, but they do not attach themselves to other programs.
Trojan horses
These destructive programs claim to be some other type of program, but they cause damage when they run.
Norton scans your PC for viruses, worms, Trojan horses, and other software is intentionally destructive. It also monitors your Internet connection to protect from the Internet-based threats that exploit software vulnerabilities.
Typesofviruses
A virus is a small program that is designed to alter the way your PC or without your knowledge or permission.
To be a virus, a program must do the following:
■ Run on its own, without you having to take any action
■ Make copies of itself so that it can spread to other PCs
Although not all viruses are intended to cause damage, even harmless virus affect the performance and stability of your PC. Norton attempts to remove viruses from your PC.
Viruses fall into the following recognized categories:
| File infectors | These viruses infect program files. When infected files run, they can attach the viruses that they carry to other program files. Norton scans all program files on your PC to find an eliminate file infectors. |
| Boot viruses | These viruses attach themselves to the system areas of your PC and become active as soon as your PC starts. They can attach themselves to disks or other storage devices that is connected to your PC. Norton scans the system areas of your PC to find and remove boot viruses. |
| Multipartite viruses | These viruses use the techniques of both boot and file infector viruses. Norton scans for such viruses and eliminates them. |
| Macro viruses | These viruses attach themselves to the data files that contain executable components, such as some spreadsheet, presentation, and word-processing files. These viruses that are spread when a program runs the executable portion of a data file. Norton scans data files for macro viruses and removes them. |
Norton scans your PC for both known viruses and unknown viruses.
Known viruses are automatically detected and repaired. Unknown viruses are detected by analyzing each executable file for various characteristics common viruses. In addition, Norton automatically updates itself over the Internet to and refine its list of known viruses.
Managingyoursecurity
This chapter includes the following topics:
■ View details of your system activities
■ Check the trust level of a file
■ View the Report Card
Viewdetailsofoursystemactivities
System Insight lets you view details of the system activities that you perform that occurred over the last three months in the Graphs window. The activity include application installations, application downloads, disk optimizations, threat detections, performance alerts, or Quick Scans.
You can use the tabs at the top of the Events graph to obtain details month and for the last two months. The Graphs window displays each icon or stripe. The description for each icon or stripe appears at the bottom graph. The pop-up that appears when you move the mouse pointer over a provides you the details about the activity. The details include the date or an activity was performed and the number of such activities that you perform that date. The View Details link provides additional details of the activity in Security History window.
Viewdetailsofoursystemactivities
1 In the Norton main window, double-click Performance, and then click Graphs.
2 In the Graphs window, click the tab for a month to view the details.
3 In the Events graph, move the mouse pointer over the icon or the s activity.
4 In the pop-up that appears, view the details of the activity.
5 If the View Details option appears in the pop-up, click View Details to view additional details in the Security History window.

natural_image
Icon of a service bell inside a white circle on a yellow background (no text or symbols)Do you need expert help improving computer performance or to fix any other Learn more
Checkthetrustlevelofafile
Norton Insight shows the reputation of Files of Interest on your computer. view a file's signature and the date when the file was installed. You can the trust level, community usage, resource usage, and the source of the f
Note: Norton displays the File Insight option only when you right-click a File of Interest. In Windows Safe mode, you cannot access this option for any file also categorizes any file for which you open the File Insight window to as a File of Interest.
From the File Insight window, you can update the trust value of a file c trust any file.
Checkthetrustlevelorlocationofafile
1 In the Norton main window, double-click Security, and then click Scans.
2 In the Scans window, select Norton Insight, and then click Go.
3 In the Norton Insight window, view the file's details or perform the fo actions:
■ To find the location of the file, click Locate.
In the Details tab, click Trust Now to manually trust the file.
You can manually trust files that are poor, unproven, or not Norton
4 Click Close.
Checkthetrustlevelofaspecificfile
1 In the Norton main window, double-click Security, and then click Scans.
2 In the Scans window, select Norton Insight, and then click Go.
3 In the Norton Insight window, click Check a Specific File.
4 Browse to the location of the file for which you want to check the
5 Select the file, and then click Open.
6 In the File Insight window, view the details of the file.
7 Click Close.
ViewtheReportCard
The Report Card automatically displays all the activities that Norton perform month. In the Norton main window, you can also click Report Card to open the report.
Every time Norton scans files, runs LiveUpdate, analyzes downloads, blocks intrusions, or fixes infected files, information about the activity is logged on Report Card. The Details option in the Report Card window shows the cc list of activities that Norton has performed.
If you do not want the Report Card to automatically display each month, turn off the option. You can still manually open the report.
Turn off Report Card
1 In the Norton main window, click Settings.
2 In the Settings window, under Detailed Settings, click Administrative Settings.
3 In the Report Card row, move the On/Off switch to Off.
HowdolmanuallyviewtheReportCard?
You can also manually view the report using the Report Card option in main window. The Report Card option is available only when Norton has any activity on your computer.
Scanningyourcomputer
This chapter includes the following topics:
■ Run a Quick Scan
■ Run a Full System Scan
■ Scan selected drives, folders, or files
■ Run a custom scan
■ Schedule a scan
■ Scan your computer with Norton Power Eraser
■ Automatic Protection settings
■ Turn SONAR Protection off or on
■ Exclude security threats from scanning
■ Add items to the Signature Exclusions
■ Clear IDs of files that are excluded during scans
■ Configure boot time protection
■ Turn on or turn off automatic tasks
■ Run custom tasks
■ Schedule security and performance scans
RunaQuickScan
A Quick Scan helps you to scan the possible virus-infected areas of a case that the viruses and other security risks often targets. Because this scan is a scan your entire computer, it takes less time to run than a Full System
During idle time, your Norton service runs a Quick Scan when there is a update.
RunaQuickScan
1 In the Norton main window, double-click Security, and then click Scans.
2 In the Scans window, under Scans and Tasks, click Quick Scan.
3 Click Go.
4 On the Results Summary window, do one of the following:
■ If no items require attention, click Finish.
■ If there are items require attention, review the risks in the Threats Detected window.
RunaFullSystemScan
Full System Scan checks all boot records, files, and running processes to the user has access. This scans your computer thoroughly and takes longer
RunaFullSystemScan
1 In the Norton main window, double-click Security, and then click Scans.
2 In the Scans window, under Scans and Tasks, click Full System Scan.
3 Click Go.
Scanselecteddrives,folders,orfiles
Occasionally, you might want to scan a particular file, removable drives, an computer's drives, or any folders or files on your computer. For example, work with removable media and suspect a virus, you can scan that partic Also, if you have received a compressed file in an email message and y a virus, you can scan that individual element.
Scanindividualelements
1 In the Norton main window, double-click Security, and then click Scans.
2 In the Scans window, under Scans and Tasks, click Custom Scan.
3 Click Go.
4 In the Scans window, do one of the following:
- To scan specific drives, click Run next to Drive Scan, select the drives that you want to scan, and then click Scan.
■ To scan specific folders, click Run next to Folder Scan, select the folders that you want to scan, and then click Scan.
■ To scan specific files, click Run next to File Scan, select the files that you want to scan, and then click Add.
You can also press Ctrl, and select multiple files to scan. You can use the following options to suspend a scan:
Pause
Suspends a custom scan temporarily.
Click Resume to continue the scan.
Terminates the scan.Stop
5 In the Results Summary window, do one of the following:
■ If no items require attention, click Finish.
■ If any items require attention, review them on the Threats Detected window.
Runacustomscan
When you run a custom scan, you do not have to redefine what you w You can run a custom scan from the Scans window.
Runacustomscan
1 In the Norton main window, double-click Security, and then click Scans.
2 In the Scans window, under Scans and Tasks, click Custom Scan.
3 Click Go.
4 In the Scans window, click Run next to the custom scan that you want to run.
You can use the following options to suspend a custom scan:
Pause Suspends a custom scan temporarily.
Click Resume to continue the scan.
Stop Terminates a custom scan.
Click Yes to confirm.
5 In the Results Summary window, do one of the following:
■ If no items require attention, click Finish.
■ If any items require attention, review the risks on the Threats Detected window.
Scheduleascan
Norton automatically detects the idle state of your computer and runs Quick However, you can schedule a Full System Scan according to your preferen You can also set up a schedule for a Quick Scan and for the custom you create.
You have complete flexibility in scheduling custom scans. When you select frequently you want a scan to run (daily, weekly, or monthly), you are pr with additional options. For example, you can request a monthly scan, and schedule it to occur on multiple days instead.
In addition to the custom scans that you create, Norton lets you schedule System Scan and Quick Scan.
You can also schedule the scan to run in specific time intervals (hours c
Note:Norton lets you select multiple dates if you schedule a monthly scan.
Scheduleacustomscan
1 In the Norton main window, double-click Security, and then click Scans.
2 In the Scans window, under Scans and Tasks, click Custom Scan.
3 Click Go.
4 In the Scans window, in the Edit Scan column, click the edit icon next to the custom scan that you want to schedule.
5 In the Edit Scan window, on the Scan Schedule tab, do one of the following:
■ If you do not want to run the scan at any particular time, but was the scan options and scan items saved, select Do not schedule th
■ To run the scan at specific time intervals, select Run at a specific time interval.
■ To run the scan at specific time every day, select Daily.
■ To run the scan on a specific day on a week, select Weekly.
■ To run the scan on a specific day on a month, select Monthly.
These frequency options include the additional options that you can use refine the schedule. Set the additional options as required.
6 Under Run the scan, do the following:
■ To run the scan only at idle time, check Only at idle time.
- To run the scan only when your computer is connected with external source, check Only on AC power.
■ To prevent your computer from going to a Sleep or Standby mode, Prevent standby.
7 Under After scan completion, select the state at which your computer be after the scan is complete. Your options are:
■ Stay On
■ Turn Off
Sleep
This option works only if you have configured the power options in computer using the Windows Control Panel.
■ Hibernate
This option works only if you have configured the power options in computer using the Windows Control Panel.
8 Click Next.
9 In the Scan Options tab, click Save.
ScanyourcomputerwithNortonPowerEraser
Norton Power Eraser is a powerful malware removal tool that can help you the security risks that are difficult to remove. If a program hijacked your and you have difficulty detecting or removing it, Norton Power Eraser may that security risk from your computer. It takes on difficult to detect crimew
as scareware or rogueware that cybercriminals use to trick you into unknown download threats onto your computer.
Norton Power Eraser includes detection and removal capabilities for the secure risks that impersonate legitimate applications (fake antivirus software), often kr as scareware, rogueware, or scamware. The tool uses more aggressive tech than your Norton product; hence there is a risk that it flags legitimate pro removal. You should carefully review the scan results before removing any
When you scan and fix threats, Norton Power Eraser creates a system re point. If you removed any essential files, Norton Power Eraser lets you re files using the Undo Previous Fix option. Norton Power Eraser lists the r repair sessions where you can view and restore the essential files.
ScanusingNortonPowerEraser
1 In the Norton product main window, double-click Security, and then click Scans.
2 In the Scans window, under Norton Power Eraser, click Norton Power Eraser.
3 Click Go.
4 In the Norton Power Eraser window, click OK.
5 In the Norton Power Eraser main window, click Advanced Scans.
6 Click System Scan.
7 Review the scan results and follow the on-screen instructions to fix the risks detected.
AutomaticProtectionsettings
Automatic Protection settings help you configure Boot Time Protection and R Time Protection features of Norton. You can configure these settings to change way Norton detects and removes threats. Removable Media Scan checks for when you insert any removable media.
Note: The Removable Media Scan takes a few seconds to complete. Quickly inserting and ejecting a removable media may create a warning that the c in use. If this is the first time you access a removable media using this wait a few seconds before ejecting it.
Boot Time Protection increases security when you start your computer. Boot Protection ensures that Auto-Protect runs during boot time. This allows Nortc scan files before they are used by another program or the operating system
You can use the Real Time Protection options to determine what gets scale also actively detects unknown security risks on your computer. You can de-what happens when a security risk or risk-like activity is encountered. Auto-is a very important component of Real Time Protection, so always keep Auto-on.
HowdolcustomizeAutomaticProtectionsettings?
Auto-Protect loads into memory and provides constant protection while you will check for viruses and other security risks every time that you run your computer.
Auto-Protect checks for viruses when you insert any removable media, access Internet, or use the document files that you receive or create.
CustomizeAutomaticProtectionsettings
1 In the Norton main window, click Settings.
2 In the Settings window, under Detailed Settings, click Antivirus.
3 In the window that appears, set the option to your preferred settings.
4 Click Apply.
Note: Default settings are recommended for normal users. If you want to turn feature temporarily, turn it on as soon as possible. If you want low-risk item automatically, configure SONAR Advanced mode.
HowdolcustomizeSONARAdvancedmode?
Symantec Online Network for Advanced Response (SONAR) provides real-time protection against threats and proactively detects unknown security risks on computer. SONAR identifies emerging threats based on the behavior of applic You can configure how SONAR removes a threat using SONAR Advanced settings.
SetSONARtoremovethreatsautomatically
1 In the Norton main window, click Settings.
2 In the Settings window, click Antivirus.
3 Under Remove Risks Automatically, set the slider to Always.
4 Under Remove Risks if I Am Away, set the slider to Always.
5 Click Apply.
HowdolexcludeafilefromAuto-Protectandscans?
If you think Norton identifies a valid application as a security risk, you can the file from Norton scans.
ExcludefilesfromNortonscans
1 In the Norton main window, click Settings.
2 In the Settings window, under Detailed Settings, click Antivirus.
3 In the Antivirus settings window, click the Scans and Risks tab.
4 Under Exclusions / Low Risks, do one of the following:
In the Items to Exclude from Scans row, click Configure.
- In the Items to Exclude from Auto-Protect, SONAR and Download Intelligence Detection row, click Configure.
5 In the window that appears, click Add Folders or Add Files.
6 In the Add Item dialog box, click the browse icon. In the dialog box select the item that you want to exclude from scans.
7 Click OK.
HowdoladdmyPOP3andSMTPemailprogramstoProtectedPorts?
Norton protects the email accounts that use non-SSL POP3 and SMTP port ensure email protection, Symantec recommends that you check the POP3 and SMTP port numbers for your email program. If your email program does not the default port numbers, you must manually add the port numbers to the Ports window. Protected Ports feature helps protect your email program from and other security threats.
Your Internet service provider (ISP) provides you the port numbers for your program.
AddPOP3andSMTPportstoProtectedPorts
1 In the Norton main window, click Settings.
2 In the Settings window, under Detailed Settings, click Antivirus.
3 In the Antivirus settings window, click Scans and Risks tab.
4 Under Protected Ports, click Configure.
5 In the Protected Ports window, click Add.
6 In the Add Port to protect window, in the Port Type drop-down list, do one of the following:
■ To add the incoming email port, click POP3.
■ To add the outgoing email port, click SMTP.
7 In the Port box, type the port number.
The port number must be between 1 and 65535.
8 Click OK.
9 In the Protected Ports window, click Apply, and then click OK.
10 In the Settings window, click Close.
TurnSONARProtectionofforon
SONAR protects you against malicious code even before virus definitions are available through LiveUpdate. By default, SONAR Protection is turned on to proactively detect unknown security risks on your computer.
When you turn off SONAR Protection, you are prompted with a protection This protection alert lets you specify the amount of time for which you w Protection to be turned off.
Note: When Auto-Protect is turned off, SONAR Protection is also disabled. In case, your computer is not protected against emerging threats.
TurnSONARProtectionofforon
1 In the Norton main window, click Settings.
2 In the Settings window, under Detailed Settings, click Antivirus.
3 On the Automatic Protection tab, under Real Time Protection, move SONAR Protection switch to Off or On.
4 Click Apply.
5 If prompted, select the duration until when you want the SONAR feature turned off, and click OK.
6 In the Settings window, click Close.
Excludesecuritythreatsfromscanning
You can use Scan Exclusions window and Real Time Exclusions window exclude viruses and other high-risk security threats from scanning.
Excludehigh-risksecuritythreatsfromscanning
1 In the Norton main window, click Settings.
2 In the Settings window, under Detailed Settings, click Antivirus.
3 In the Antivirus settings window, click the Scans and Risks tab.
4 Under Exclusions / Low Risks, do one of the following:
In the Items to Exclude from Scans row, click Configure.
- In the Items to Exclude from Auto-Protect, SONAR and Download Intelligence Detection row, click Configure.
5 In the window that appears, click Add Folders or Add Files.
6 In the Add Item dialog box, click the browse icon.
7 In the dialog box that appears, select the item that you want to excl the scan.
8 Click OK.
9 In the Add Item dialog box, click OK.
10 In the window that appears, click Apply, and then click OK.
AdditemstotheSignatureExclusions
To exclude a security risk from scans, you must add the specific security Signature Exclusions window. You can select a known risk by name and to the list.
Note: When you exclude a known security risk from Norton scans, the prote level of your computer reduces. You should exclude items only if you are that they are not infected.
AddasignaturetotheSignatureExclusions
1 In the Norton main window, click Settings.
2 In the Settings window, under Detailed Settings, click Antivirus.
3 In the Antivirus settings window, click the Scans and Risks tab.
4 Under Exclusions / Low Risks, in the Signatures to Exclude from A Detections row, click Configure.
5 In the Signature Exclusions window, click Add.
6 In the Security Risks window, click on a security risk that you want and then click Add.
7 In the Signature Exclusions window, click Apply, and then click OK.
ClearIDsoffilesthatareexcludedduringscans
Norton tags all trusted and favorable files with Trusted and Good trust levels. When a file is tagged as Trusted or Good, Norton does not scan this file again. This can improve the scan performance of the Norton service on your computer.
Norton excludes the Trusted and Good files from being scanned. However, if you want Norton to scan all the files in your computer, you must clear the information of the excluded files.
Note: When you clear IDs of files that are excluded during scans, it might longer time to complete scan.
ClearIDsoffilesthatareexcludedduringscans
1 In the Norton main window, click Settings.
2 In the Settings window, under Detailed Settings, click Antivirus.
3 In the Antivirus settings window, click the Scans and Risks tab.
4 Under Exclusions / Low Risks, in the Clear file IDs excluded during scans row, click Clear All.
5 In the Warning window, click Yes.
Configureboottimeprotection
The boot time protection feature provides enhanced security level from the you start your computer. As soon as you start your computer, Norton star Auto-Protect and all required drivers and plug-ins start functioning. This feature ensures higher level of security from the moment you turn on your compu
Configureboottimeprotection
1 In the Norton main window, click Settings.
2 In the Settings window, under Detailed Settings, click Antivirus.
3 On the Automatic Protection tab, in the Boot Time Protection row, click on one of the settings. Your options are:
■ Aggressive
Normal
■ Off
4 Click Apply, and then click Close.
Turnonorturnoffautomatictasks
Norton runs automatic tasks as it quietly works to protect your computer. automatic tasks include scanning for viruses, monitoring your Internet connect downloading protection updates, and other important tasks. These activities run the background when your computer is turned on.
If any item needs your attention, Norton displays a message with the info on the current status or prompts you to do something. If you do not se messages, then your computer is protected.
You can open Norton at any time to see the status of your computer a to view protection details.
When a background activity is in progress, Norton notifies you with a mes the notification area that is located at the far-right of the task bar. You results of the latest activities the next time you open the Norton main wi
Turnonorturnoffautomaticasks
1 In the Norton main window, click Settings.
2 In the Settings window, under Detailed Settings, click Tasks Scheduling.
3 In the Task Scheduling window, on the Automatic Tasks tab, do the following:
- Check the feature that you want to run automatically.
Check the Tasks check box to check all the features at once.
■ Uncheck the feature that you do not want to run automatically. Uncheck the Tasks check box to uncheck all the features at once.
4 Click Apply, and then click Close.
Runcustomtasks
Norton automatically checks your system and chooses the best settings to your system secure. However, you can run some specific tasks. You can the specific tasks that you want to run by using the options available in Tasks window.
Norton lets you choose your own combination of tasks for a one-time sca can run LiveUpdate, back up your data, clear browsing history, free disk cleaning up disk clutter, and optimize your disks.
Runcustomtasks
1 In the Norton main window, double-click Security, and then click Scans.
2 In the Scans window, under Scans and Tasks, click Custom Task, and then click Go.
3 In the Custom Tasks window, check the tasks that you want to run. To select all the tasks, check Tasks.
4 Click Go.
Schedulesecurityandperformancescans
Use the Task Scheduling settings to have Norton examine your system auto for security and performance issues. You can specify when and how often needs to perform those examinations.
You have the following options for scheduling security and performance scar
Automatic (Recommended)
Examine your PC for security and performance issues whenever your PC is idle.
This setting provides the maximum protection.
Weekly
Examine your PC one or more times each week for security and performance issues.
You can pick the days of the week and the time of day on which the scan performs.
Monthly
Examine your PC once each month for security and performance issues.
You can pick the day of the month and the time of day on which the scan performs.
Manual Schedule
Do not perform a scheduled security or performance scan of your PC.
If you choose this option, you should perform manual security and performance scans of your PC periodically to maintain protection.
Your computer's performance is maximized if you schedule your critical oper to occur when your computer is idle. When you schedule your scans wee
monthly and check the Run only at idle time option, Norton scans your when it is idle. Symantec recommends that you check Run only at idle experience better performance of your computer.
Schedulesecurityandperformancescans
1 In the Norton main window, click Settings.
2 In the Settings window, under Detailed Settings, click Tasks Scheduling.
3 On the Scheduling tab, under Schedule, select an option.
When you click Weekly or Monthly, you must select the time and day to run the automatic tasks. You also have the option of specifying that the a tasks must run only when the PC is idle.
4 Click Apply, and then click Close.
Keepingsecureonthe Internet
This chapter includes the following topics:
■ Turn Norton Firewall on or off
■ Customize Program Rules
■ Change the order of firewall rules
■ Turn off a Traffic rule temporarily
■ Allow a blocked program
■ Turn off Firewall Block Notification
■ Remove all devices from Intrusion Prevention exclusion list
■ Turn off and turn on Browser Protection
■ Exploit Prevention
■ Turn off or turn on Exploit Prevention
■ Turn off or turn on AutoBlock
■ Unblock AutoBlocked computers
■ Add a device to Device Trust
■ Turn off or turn on Download Intelligence
■ Turn off or turn on spam filtering
■ Define Norton's Internet usage
■ Turn off or turn on Network Cost Awareness
TurnNortonFirewallonoroff
Smart Firewall monitors communications between your computer and the other computers on the Internet. It also protects your computer from common security problems. When the Smart Firewall is turned off, your computer is not pro- from Internet threats and security risks.
If you need to turn Smart Firewall off, you should only turn it off for a duration, after which it is turned on again automatically.
TurnNortonFirewallonoroff
1 In the Norton main window, click Settings.
2 In the Settings window, under Detailed Settings, click Firewall.
3 On the General Settings tab, in the Smart Firewall row, move the On/Off switch to Off or On.
4 Click Apply.
5 If prompted, select the duration until when you want the Firewall feature turned off, and click OK.
DisableorenableNortonFirewallfromtheWindowsnotificationarea
1 In the notification area on the taskbar, right-click the Norton icon, and Disable Smart Firewall or Enable Smart Firewall.
2 If prompted, select the duration until when you want the Firewall feature turned off, and click OK.
CustomizeProgramRules
After you use Norton for a while, you might need to change the access certain programs.
CustomizeProgramRules
1 In the Norton main window, click Settings.
2 In the Settings window, under Detailed Settings, click Firewall.
3 On the Program Control tab, in the Program column, select the program that you want to change.
4 In the drop-down list next to the program that you want to change, s access level that you want this program to have. Your options are:
Allow all access attempts by this program.Allow
Deny all access attempts by this program.Block
Custom Create the rules that control how this program accesses the Internet.
5 Click Apply.
Changetheorderoffirewallrules
Each list of firewall rules is processed from the top down. You can adjust firewall rules are processed by changing their order.
Note: Do not change the order of the default Traffic rules unless you are a user. Changing the order of default Traffic rules can affect firewall functions reduce the security of your computer.
ChangetheorderofTrafficrules
1 In the Norton main window, click Settings.
2 In the Settings window, under Detailed Settings, click Firewall.
3 On the Traffic Rules tab, select the rule that you want to move.
4 Do one of the following:
■ To move this rule before the rule above it, click Move Up.
■ To move this rule after the rule below it, click Move Down.
5 When you are done moving the rules, click Apply.
ChangetheorderofProgramrules
1 In the Norton main window, click Settings.
2 In the Settings window, under Detailed Settings, click Firewall.
3 On the Program Control tab, select the program that contains the rule you want to move.
4 Click Modify.
5 In the Rules window, select the rule that you want to move.
6 Do one of the following:
■ To move this rule before the rule above it, click Move Up.
■ To move this rule after the rule below it, click Move Down.
7 When you are done moving the rules, click OK.
8 In the Firewall settings window, click Apply.
TurnoffaTrafficruletemporarily
You can temporarily turn off a Traffic rule if you want to allow specific computer or a program. You must remember to turn on the rule again we are done working with the program or computer that required the change.
Note: You cannot turn off some of the default firewall rules that appear in You can only view the settings of these rules by using the View option.
TurnoffaTrafficruletemporarily
1 In the Norton main window, click Settings.
2 In the Settings window, under Detailed Settings, click Firewall.
3 On the Traffic Rules tab, uncheck the box next to the rule that you want to turn off.
4 Click Apply.
Allowablockedprogram
Sometimes the Smart Firewall blocks certain programs from accessing the In Such programs might include certain streaming-media programs, network game or custom business applications that are provided by your employer. If you that the program's Internet activity is not a threat to your security, you can the program's Internet access.
Allowablockedprogram
1 In the Norton main window, click Settings.
2 In the Settings window, under Detailed Settings, click Firewall.
3 On the Program Control tab, select the program that you want to allow to the Internet.
4 In the Access drop-down list for the program entry, click Allow.
5 Click Apply.
By default Norton firewall automatically configures Internet access settings for Web-enabled programs the first time that they run. When a program tries the Internet for the first time, Automatic Program Control creates rules for want to determine the Internet access settings for your programs, you can Automatic Program Control. When a program tries to access the Internet for first time, an alert prompts you to configure access settings.
TurnoffAutomaticProgramControl
1 In the Norton main window, click Settings.
2 In the Settings window, under Detailed Settings, click Firewall.
3 In the Firewall settings window, click Advanced Program Control.
4 In the Automatic Program Control row, move the On/Off switch to Off.
TurnoffFirewallBlockNotification
When Automatic Program Control is turned on, Smart Firewall automatically malicious applications and applications with low reputation from connecting to Internet or communicating with other machines on your network.
Norton notifies you when Smart Firewall blocks an application from connecting the network. If you do not want to see the notification, you can turn this Advanced Program Control.
TurnoffFirewallBlockNotification
1 In the Norton main window, click Settings.
2 In the Settings window, under Detailed Settings, click Firewall.
3 On the Advanced Program Control tab, move the Show Firewall Block Notification switch to Off.
RemovealldevicesfromIntrusionPrevention exclusionlist
If you are sure that a device on your network is safe, you can change of the device to Full Trust. You can then select the Exclude from IPS option to exclude these trusted devices from Intrusion Prevention scan. Exclude Full Trust devices from Intrusion Prevention scan saves the scan time and the network speed of your computer. When you exclude a Full Trust device
Intrusion Prevention scan, your Norton product does not scan any information is received from this device. The Full Trust devices that are excluded from Prevention scan are added to Intrusion Prevention exclusion list.
If you find that any of the devices that you excluded from Intrusion Prev is infected, you can purge the saved exclusion list and remove all the de
You can purge the saved exclusion list under the following circumstances:
■ Any of the devices that you excluded from Intrusion Prevention scan is
■ Any of the devices that you excluded from Intrusion Prevention scan at to infect your computer.
■ Your home network is infected.
When a device on your network attempts to infect your computer, AutoBloc all the access requests from this device.
When you remove all the devices from the saved exclusion list, Intrusion F scans every request from all the devices that access your computer.
Remove all the devices from the intrusion Prevention exclusion list
1 In the Norton product main window, click Settings.
2 In the Settings window, under Detailed Settings, click Firewall.
3 Click the Intrusion and Browser Protection tab.
4 Under Intrusion Prevention, in the Exclusion List row, click Purge.
5 In the confirmation dialog box, click Yes.
6 In the Settings window, click Close
TurnoffandturnonBrowserProtection
You can choose whether you want to protect your browser by allowing yo product to block unknown programs from accessing your computer.
By default, the Browser Protection option is turned on. In this case, your product proactively blocks new or unknown malware programs before they a your computer. By protecting your browser, your Norton product secures you sensitive information and prevents the attackers from controlling your system remotely. This feature checks for browser vulnerabilities in Internet Explorer later or Firefox 10.0 or later browsers.
TurnofforturnonBrowserProtection
1 In the Norton product main window, click Settings.
2 In the Settings window, under Detailed Settings, click Firewall.
3 Click the Intrusion and Browser Protection tab.
4 In the Browser Protection row, move the On/Off switch to Off or On.
5 Click Apply.
6 If prompted, select the duration until when you want the Browser Prote feature to be turned off, and click OK.
7 In the Settings window, click Close.
ExploitPrevention
The Exploit Prevention feature in your Norton product protects the application files that are prone to exploit attacks. The key features of Exploit Prevention
■ Provides zero-day exploit protection
■ Prevents hackers from exploiting your computer
Whatisanexploitattack?
An exploit is a technique that hackers use to exploit vulnerability in a pro you use and perform malicious actions on your computer.
Types of exploits:
■ Remote exploit - A remote exploit runs over a network and can exploit vulnerability without any prior access to your computer.
■ Local exploit - A local exploit requires prior access to exploit your comp usually involves increasing the user account privileges of the hackers.
An exploit attack can:
■ Slow down your computer.
■ Cause sudden application failure.
■ Expose your personal data and confidential information to hackers.
Howdolmakesurethatmaliciousapplicationsareblocked?
Norton alerts you when you run a program or open a file that is prone attacks. The alert window displays detailed information about the blocked att signature.
TurnofforturnonExploitPrevention
Exploit Prevention protects the applications and files that are prone to exploit By default, the Exploit Prevention is turned on.
Note: Norton recommends you to keep the Exploit Prevention setting turned out to protect your computer against exploit attacks.
TurnofforturnonExploitPrevention
1 In the Norton product main window, click Settings.
2 In the Settings window, under Detailed Settings, click Firewall.
3 Click the Intrusion and Browser Protection tab.
4 In the Exploit Prevention row, move the On/Off switch to Off or On.
5 In the Settings window, click Apply, and then click Close.
TurnofforturnonAutoBlock
When an attack is detected from a computer, the attack is automatically to ensure that your computer is safe. If a different attack signature is de- the same computer, your Norton product activates AutoBlock. The AutoBlock blocks all traffic between your computer and the attacking computer for a time period. During this period, AutoBlock also blocks the traffic that does an attack signature.
Note: You can specify the period for which you want your Norton product 1 the connections from attacking computers. By default, your Norton product b all traffic between your computer and the attacking computer for a period minutes.
AutoBlock stops traffic between your computer and a specific computer.
If AutoBlock blocks a computer or computers that you need to access, yo off AutoBlock.
TurnofforturnonAutoBlock
1 In the Norton product main window, click Settings.
2 In the Settings window, under Detailed Settings, click Firewall.
3 Click the Intrusion and Browser Protection tab.
4 Under Intrusion Prevention, in the Intrusion AutoBlock row, click Configure.
5 In the Intrusion AutoBlock window, under AutoBlock, do one of the following:
■ To turn off Intrusion AutoBlock, click Off.
■ To turn on Intrusion AutoBlock, click On (Recommended), and then in the AutoBlock attacking computers for drop-down list, select how long want to turn on AutoBlock.
6 In the Intrusion AutoBlock window, click OK.
7 In the Settings window, click Close.
UnblockAutoBlockedcomputers
In some cases, benign network activity can appear to be similar to an at AutoBlock blocks the network activity automatically to ensure that your comp is safe. The list of computers that AutoBlock has currently blocked may in computer that you should be able to communicate with.
If a computer that you need to access appears on the list of blocked or you can unblock it. You may want to reset your AutoBlock list if you have your protection settings. To reset the AutoBlock list, you can unblock all of computers that are on the list at one time.
UnblockanAutoBlockedcomputer
1 In the Norton product main window, click Settings.
2 In the Settings window, under Detailed Settings, click Firewall.
3 Click the Intrusion and Browser Protection tab.
4 Under Intrusion Prevention, in the Intrusion AutoBlock row, click Configure.
5 In the Intrusion AutoBlock window, under Computers currently blocked by AutoBlock, select the IP address of the computer.
6 Under the Action column, select Unblock from the drop-down list.
7 In the Intrusion AutoBlock window, click OK.
8 In the Settings window, click Close.
You can manually add a device to the Device Trust. You can add a de specifying the following:
■ The name or description of the device
■ The IP address or physical address of the device
Note: If you trust a device that is not on your network, you can expose y to potential security risks.
1 In the Norton main window, click Settings.
2 In the Settings window, under Detailed Settings, click Firewall.
3 On the General Settings tab, in the Device Trust row, click Configure.
4 In the Device Trust window, click Add.
5 In the Add Device window, in the Name box, type the name of the device that you want to add to your network.
The maximum character length of the device name should not exceed characters.
6 In the IP or Physical Address box, type the IP address or physical of the device that you want to add to the Device Trust.
You can use the following formats in the IP or Physical Address box:
172.16.0.0IPv4 address
fe80::12ac:fe44:192a:14cclPv6 address
11-22-c3-5a-fe-a4Physical address
ftp.myfiles.comResolvable host
The address that you provide is not verified until the device is physical on the network.
7 Select an option from the Trust Level drop-down menu. Your options are:
| Full Trust | Adds a device to the Full Trust list.Full Trust devices are monitored only for known attacks and infections. You should select this setting only when you are sure that the device is completely safe. |
| Restricted | Adds a device to the Restricted list. |
| Restricted devices do not have access to your computer. |
8 If you want the device to be excluded from Intrusion Prevention scans, Exclude from IPS Scanning.
9 Click Add Device.
TurnofforturnonDownloadIntelligence
Download Insight protects your computer against any unsafe file that you or execute after you download it using a supported browser. By default, the Download Intelligence option is turned on. In this case, Download Insight you about the reputation levels of any executable file that you download. The reputation details that Download Insight provides indicate whether the download file is safe to install.
There may be times when you want to turn off Download Insight. For ex you want to download an unsafe file. In this case, you must turn off Dow so that your Norton product lets you download the file and does not rem your computer.
You can use the Download Intelligence option to turn off or turn on Do Insight.
TurnofforturnonDownloadIntelligence
1 In the Norton product main window, click Settings.
2 In the Settings window, under Detailed Settings, click Firewall.
3 Click the Intrusion and Browser Protection tab.
4 In the Download Intelligence row, move the On/Off switch to Off or On.
5 Click Apply.
6 If prompted, select the duration until when you want the Download Inte feature to be turned off, and click OK.
7 In the Settings window, click Close.
Turnofforturnonspamfiltering
With the increase in usage of email, many users receive a number of ur and unsolicited commercial email messages known as spam. Not only does make it difficult to identify valid email messages, but some spam contains messages and images.
To control these spam mails you can use the spam filtering. By default, protection remains active. If for any reason you want to disable it, you can off from within the program itself.
Note: Turning off Norton AntiSpam increases your exposure to receive unsolici email messages.
Turnofforturnonspamfiltering
1 In the Norton product main window, click Settings.
2 In the Settings window, under Detailed Settings, click AntiSpam.
3 On the Filter tab, in the AntiSpam row, move the On/Off switch to Off or On.
4 If you turn spam filtering off, do the following:
In the Security Request window, in the Select the duration drop-down list, select the amount of time that you want to turn off spam filter
5 Click Apply.
6 Click OK.
7 In the Settings window, click Close.
DefineNorton'sInternetusage
Network Cost Awareness lets you control the bandwidth that Norton uses. default, Network Cost Awareness is turned on and set to Auto. In Window earlier, the default setting is No Limit. If you have a slow Internet connection can reduce the bandwidth that Norton uses. You can also set communication for all network connections that your computer uses by changing Network (Awareness settings.
DefineNorton'sInternetusage
1 In the Norton product main window, click Settings.
2 In the Settings window, under Detailed Settings, click Firewall.
3 On the General Settings tab, in the Network Cost Awareness row, c Configure. If the Configure option is disabled, move the On/Off switch to On.
4 In the Network Cost Awareness settings window, under the Policy column, click the drop-down list next to the network connection for which you set up a policy.
5 Select one of the following:
■ Auto Allows Norton to receive all product and virus definition updates based on the Windows cost awareness policy.
Note: The Auto option is available only in Windows 8 or later.
- No Limit Allows Norton to use the required network bandwidth to receive all product and virus definition updates. If you use Windows 7 or the default policy is No Limit.
■ Economy Allows Norton to access the Internet only to receive critical product updates and virus definitions. If you have a limited Internet connection, Economy ensures you are protected from critical security threats.
■ No Traffic Blocks Norton from connecting to the Internet. If you choose this policy, Norton cannot receive critical virus definitions and program updates, which can lead to potential dangers and virus attacks.
6 Click Apply, and then click OK.
7 In the Settings window, click Close.
TurnofforturnonNetworkCostAwareness
You can set up policies to restrict the Internet usage of Norton. If you do to restrict the Internet usage of your Norton product, you can turn off New Awareness.
If you feel that Norton uses too much network bandwidth, you can turn a Cost Awareness. Then, you can set up policies to restrict the Internet us Norton. The Norton product connects to the Internet based on the policy t set up in the Network Cost Awareness settings window. By default, Network Cost Awareness is turned on.
TurnofforturnonNetworkCostAwareness
1 In the Norton product main window, click Settings.
2 In the Settings window, under Detailed Settings, click Firewall.
3 On the General Settings tab, in the Network Cost Awareness row, n the On/Off switch to Off or On.
4 In the Settings window, click Apply, and then click Close.
Securingyoursensitive data
This chapter includes the following topics:
■ Add the Norton browser extensions
■ Turn on or turn off Norton Safe Web
■ Search the web using Norton Safe Search
■ Turn off or turn on Scam Insight
■ Turn off or turn on Antiphishing
■ Access Identity Safe
■ Turn off or turn on Identity Safe
■ Creating cloud vault
■ Delete your cloud vault
■ Export your Identity Safe data
■ Import your Identity Safe data
■ Enable or disable the Norton toolbar
■ Norton Shopping Guarantee
AddtheNortonbrowserextensions
After you install your Norton product, you are prompted to add the Norton extensions to your web browsers. Norton adds the extensions to Internet E Firefox, and Chrome browsers.
You must enable the Norton browser extensions to easily access all the browser-specific features of Norton Security. The Norton browser extensions inc
| Norton Toolbar | A toolbar that warns you of dangerous sites when you browse online, helping to protect you from identity theft and online scams. |
| Norton Safe Search | A secured search engine that uses Ask.com to generate the search results. Norton Safe Search ranks the search results based upon the site safety status and Norton rating. |
| Norton Home Page | A website that uses the Norton Safe Search feature to enhance your web search experience. It provides the site safety status and Norton rating for each of the search result generated. |
| Norton Identity Safe | A secure location where you can store all of your sensitive information such as logins, personal information, and financial information. You can use this information to log in to websites, automatically fill online forms, and online payments. |
InternetExplorer
AddNortonbrowserextensioninInternetExplorer
1 After you install Norton for the first time, the Browser Protection page automatically opens in a new window on launching a new Internet Exp session.
2 In the Browser Protection page, click the Enable option of Norton Security Toolbar.
3 In the extensions pop-up that appears, click Add Extension.
4 After you have enable Norton Security toolbar, you can enable Norton Search, Norton Home Page and Norton Identity Safe extensions for you browser.
You can use the Click to Add option and follow the on-screen instruction enable these features.
5 If you have not installed any one of the extensions, the Internet Explorer Protection Alert notification appears when you launch Internet Explorer a week.
Click Install Now and follow the on-screen instructions to install the ext
Note: If you want to enable the Norton extension at a later time, click Remind Me Later. If you do not want the notification alert to appear, click Don't ask me again.
GoogleChrome
AddNortonbrowserextensionsinGoogleChrome
1 After you install Norton for the first time, the Browser Protection page automatically opens in a new window on launching a new Google Chromatogram session.
2 In the Browser Protection page, click the Enable option of Norton Security Toolbar.
3 In the extensions pop-up that appears, click Add Extension.
4 After you enable Norton Security toolbar, you can enable Norton Safe Norton Home Page and Norton Identity Safe extensions for your browse can use the Click to Add option and follow the on-screen instructions these extensions.
5 If you have not installed any one of the extensions, the Google Chrome Protection Alert notification appears when you launch Google Chrome at a week.
Click Install Now and follow the on-screen instructions to install the ext
Note: If you want to enable the Norton extension at a later time, click Remind Me Later. Click Do not ask me again if you do not want the notification alert to appear.
MozillaFirefox
AddNortonbrowserfeaturesinMozillaFirefox
1 After you install Norton for the first time, the Browser Protection page automatically opens in a new window on launching a new Mozilla Firef session.
2 In the Browser Protection page, click the Enable option of Norton Security Toolbar.
3 In the extensions pop-up that appears, click Add Extension.
4 After you have enable Norton Security toolbar, you can enable Norton Search, Norton Home Page and Norton Identity Safe features for your You can use the Enable option and follow the on-screen instructions to these features.
5 If you have not installed any one of the extensions, the Firefox Protocol Alert notification appears when you launch Firefox after a week.
Note: If you want to enable the Norton extension at a later time, click Remind Me Later. If you do not want the notification alert to appear, click Do not ask me again.
TurnonorturnoffNortonSafeWeb
Norton Safe Web protects you when you surf, search, or shop online using Explorer, Firefox, or Chrome. It analyzes the security level of websites that and shows if the websites are free from threats. It provides site rating ic search results so that you know if a website is malicious or not before
By default, Norton Safe Web is turned on and all Safe Web options are This is the recommended setting.
TurnonorturnoffNortonSafeWeb
1 In the Norton product main window, double-click Identity, and then click ID Settings.
2 Under Safe Surfing, in the Norton Safe Web row, move the On/Off switch to On or Off.
3 Click Apply, and then click Close.
SearchthewebusingNortonSafeSearch
Norton Safe Search enhances your web search experience. When you search Internet using Norton Safe Search, it uses Ask.com to generate the search Norton Safe Search provides the site safety status and Norton rating for e the search results generated.
Norton Safe Search provides you the intelligent search-as-you-type feature that displays search suggestions when you type a few letters of the search ph
Note: Norton Safe Search feature is available only for some regions including Australia, Belgium, Brazil, Canada, Denmark, Finland, France, Germany, Italy, Japan, Netherlands, Norway, Spain, Sweden, Switzerland, the United States, the United Kingdom. The Privacy Safeguard feature is available only for the States, the United Kingdom, and Canada.
You can use Norton Safe Search even when you turn off the Identity Sa
Note: Norton Safe Search is supported only in the Internet Explorer, Firefox, Chrome browsers.
SearchthewebusingNortonSafeSearch
1 Open your browser.
2 On the Norton toolbar, in the Norton Safe Search box, type the search string that you want to search.
3 Do one of the following:
- Click Safe Search.
- In the pop-up window that appears, select a search suggestion that r your search string.
EnableNortonSafeSearchBoxonToolbar
When you install Norton, it adds the Norton toolbar to the supported brow. When you open your browser, you are prompted to enable the Norton Sa box on your toolbar.
If you have manually disabled Norton Safe Search box and want to enable do the following:
1 Open your browser.
2 On the Norton toolbar, click the settings (...) icon.
3 In the menu that appears, move the switch next to Norton Safe Search to On.
To disable the Norton Safe Search box, do the following:
1 Open your browser.
2 On the Norton toolbar, click the settings (...) icon.
3 In the menu that appears, move the switch next to Norton Safe Search to Off.
TurnofforturnonScamInsight
Scam Insight prevents you from divulging your sensitive information such as Security Numbers or credit card information, to fraudulent websites. It helps detect the websites that are suspicious or vulnerable using reputation-based detection. It mainly focuses the websites that require you to enter your pe information.
You can use the Scam Insight option in the Identity Safety settings window to turn on or off the Scam Insight feature.
The Norton Safe Web pop-up window helps you understand if the website you visit is safe or unsafe.
TurnofforturnonScamInsight
1 In the Norton product main window, double-click Identity, and then click ID Settings.
2 Under Safe Surfing, in the Scam Insight row, move the On/Off switch to Off or On.
3 Click Apply, and then click Close.
TurnofforturnonAntiphishing
Antiphishing protects you from visiting unsafe websites. The Antiphishing feature analyzes the security level of all the websites that you visit and displays
in the Norton Safe Web pop-up window. Antiphishing also blocks the webs are confirmed to be fraudulent.
The Norton Safe Web pop-up window helps you understand if the website you visit is safe or unsafe.
You can turn off or turn on Antiphishing in the Safe Surfing section of the Identity Safety settings window.
TurnofforturnonAntiphishing
1 In the Norton main window, double-click Identity, and then click ID Settings.
2 Under Safe Surfing, in the Antiphishing row, move the On/Off switch to Off or On.
3 Click Apply.
4 If asked, select the duration until when you want the Antiphishing feature turned off, and click OK.
5 Click Close.
AccessIdentitySafe
You can access the Identity Safe settings from the following areas:
■ From the Identity section in the product main window
■ From the Norton toolbar
You can access all the Identity Safe data even after the product expires. following are the features that you can view or access after the product
Logins
You can view the stored login information, such as your login credential for your online bank account, email user ID, and password.
Addresses
You can view your stored personal information, such as name, date of postal address, email address, and phone numbers.
Wallet
You can view your stored financial information, such as credit card information, bank account information, and credit payment details.
You can view the text that you entered for future reference.Notes
Note: You must be signed in to Identity Safe to access the Identity Safe. The Identity Safe features are supported only in the Internet Explorer, Firefox Chrome browsers.
Turn off or turn on Identity Safe
Identity Safe helps you manage your identity and provide additional security you perform online transactions. You can use the various features in Identit to manage your personal data such as addresses, date of birth and credit information.
You can turn off or turn on the Identity Safe from the Quick Controls in the Settings window or from the Settings window for Identity Safety.
Note: After you turn on Identity Safe, you must sign in to Identity Safe to the various features.
Turn off or turn on Identity Safe from Quick Controls
1 In the Norton product main window, click Settings.
2 In the Settings window, under Quick Controls, do one of the following
■ To turn off Identity Safe, uncheck Identity Safe.
■ To turn on Identity Safe, check Identity Safe.
Turn off or turn on Identity Safe from the Settings window
1 In the Norton product main window, double-click Identity, and then click ID Settings.
2 In the Identity Safety settings window, in the Identity Safe row, move the On/Off switch to Off or On.
3 Click Apply, and then click Close.
Creating cloud vault
Identity Safe lets you create a cloud vault and save your Identity Safe data can create one cloud vault for each Norton account. You cannot create a vault. However, you can move your existing local vault data to cloud vault you upgrade to the Norton product. When you move your Identity Safe data local vault to cloud vault, the data in your local vault cannot be accessed vault provides you the ease of using your Identity Safe data when you move.
You can access the Identity Safe cloud vault from any computer that is to the Internet.
Tocreatecloudvault
1 In the Norton product main window, double-click Identity, and then click Identity Safe.
2 In the Get started window, click Sign In.
If you do not have a Norton account, use the Sign up now! link to new Norton account.
3 In the New Vault creation: Vault password window, in the Vault Password box, type your password, and then click Next.
4 In the New Vault creation: confirm password window, type the passw again to confirm, and then click Next.
5 In the New Vault creation: password hint box, type a hint for the password, and click Next.
If you already have a backup of your Identity Safe data, click Import the backed-up file to merge to the new account.
6 Click Finish.
Deleteyourcloudvault
Your cloud vault is encrypted and can be accessed only by using your N account and vault passwords. To delete your cloud vault, you have to do Even if you uninstall Norton from your device, you can still continue to u vault from other devices.
Warning: When you delete a vault, all of the Identify Safe data that are s the vault is permanently removed. If you think that you may use your va a later time, do not delete your vault.
Deleteyourcloudvault
1 In the Norton main window, double-click Identity, and then click Identity Safe.
2 In the Vault Closed window, type your password incorrectly for three times.
3 Click the Click here link next to the Need to delete your Vault? option.
4 In the Delete Vault window, click Yes, Delete My Vault.
5 In the warning dialog box, click Yes.
6 Type your Norton account password to validate and click Sign In.
7 In the confirmation window, click OK.
HowdolaccessmycloudvaultaccountafterluninstallNorton?
1 Sign in to the Norton Identity Safe website with your Norton account ci
2 In the Open your vault window, type your vault password and click Vault.
ExportyourIdentitySafedata
You can export your Identity Safe data for security purposes, data recovery when you transfer your Identity Safe data to a new computer. Your vault cannot be reset. So, Symantec recommends that you back up your vault periodically. When you enable automatic backup feature, backups of your va automatically created and stored locally on your device.
You can retrieve Identity Safe data when your product expires.
Note: Norton Identity Safe does not allow the export of Norton Password Ma (.NPM) files.
ExportyourIdentitySafedata
1 In the Norton product main window, double-click Identity, and then click Identity Safe.
2 In the Norton Identity Safe window, click the Settings icon available at the bottom of the window.
3 Click the Import/Export tab.
4 In the Export pane, select the file format.
You can select one of the following:
- Identity Safe Backup Format – DAT File If you want to back up your data with a password for more secu and confirm the password.
- Plain Text - CSV file (Logins & Notes only)
You can access your vault backups at My Documents\Norton Identity Backups\
5 Click Export.
6 In the Validate Password for Identity Safe window, type your vault password to export your Identity Safe data.
7 In the confirmation dialog box, click OK.
ImportyourIdentitySafedata
You can import your Identity Safe data from the file that you previously I. You can also import the Identity Safe data from the portable profile that in the older version of Norton.
The Merge imported data with existing data and Replace existing data with data options appear when you import Identity Safe data from a backup file can merge the imported data with the vault that you are currently signed in the existing data stored in your vault
Note: When you import, the file size must not be more than 15 MB for . Also, Identity Safe does not allow the import of Norton Password Manager files.
Importyourdata
1 In the Norton product main window, double-click Identity, and then click Identity Safe.
2 In the Norton Identity Safe window, click the Settings icon available at the bottom of the window.
3 Click the Import/Export tab.
4 In the Import row, click Import.
5 In the Vault Import window, select one of the following options:
■ Merge imported data with existing data
■ Replace existing data with imported data
6 Click Import.
7 Browse to the location of the file that you want to import.
You can access your vault backups at My Documents\Norton Identity Backups\
8 Select the file, and then click Open.
9 If you have different passwords for the logins that you stored in the using vault and the importing vault, Norton displays a confirmation mess. Select one of the following:
- Click Keep Existing Password to retain the password that is stored in the cloud vault.
- Click Keep Imported Password to overwrite the password that is stored in the cloud vault with the password stored in the importing vault.
10 In the confirmation dialog box, click OK.
EnableordisabletheNortontoolbar
When the Norton toolbar is enabled, Norton Identity Safe displays the Norton Web pop-up window and a security ranking for websites that you visit. What toolbar is disabled, Norton Identity Safe does not display the Norton Safe pop-up window, but still notifies you about suspicious and fraudulent website
EnableordisabletheNortontoolbar
◆ Open your preferred browser:
- On Internet Explorer, right-click the menu bar, check or uncheck Norton Toolbar to enable or disable it, and then follow the on-screen instruction
- On Mozilla Firefox, click Tools > Add-ons > Extensions. In the Extensions page, under Norton Identity Safe Toolbar, click Enable or Disable.
- On Google Chrome, go to the following URL: chrome://extensions. In Extensions page, under Norton Security Toolbar and Norton Identity Safety, check or uncheck Enabled.
NortonShoppingGuarantee
Norton Shopping Guarantee provides Norton Security customers with benefits v they make a purchase on a Norton Secured and Guaranteed merchant site you purchase from a Norton Shopping Guarantee merchant, you receive a Shopping Guarantee certificate that can be used to make a claim. Enrolling this feature is free of cost and is available for all Norton Security users.
The Norton Shopping Guarantee feature is available for a limited time for who have enabled the Norton toolbar and have configured Norton Safe Sea the Google Chrome browser. Norton Safe Search users are protected with Norton Shopping Guarantee, on Norton Secured and Guaranteed merchant purchases.
The Norton Shopping Guarantee icon is displayed as a tile on the Norton It is also displayed on the Norton Safe Search annotations, when the use across a Norton Shopping Guarantee eligible merchant website.
Benefits of Norton Shopping Guarantee
Purchase Guarantee
If a Norton Shopping Guarantee retailer has failed to fulfill the terms of t transaction, you may claim a reimbursement of up to \$1000.
Click on the Norton Shopping Guarantee seal or check your guarantee conf email to verify your benefit details and availability. The benefits of Norton Guarantee expire 30 days from the date of purchase of the product.
Register a purchase with the Norton Shopping Guarantee
To register a purchase with Norton Shopping Guarantee, you need to be to your Norton account. If you make a purchase without logging on to your account, you can manually register the purchase by logging on to the Nor Shopping Guarantee website.
RegisteraPurchase
1 Click the Norton Shopping Guarantee icon on the Norton toolbar and c Register a Purchase.
2 On the Norton Shopping Guarantee Buyer Service Center page, enter Norton account credentials and click Log In.
3 On the Guaranteed Transactions page, follow the on-screen instructions to register a purchase for your product.
File a claim for a purchase in Norton Shopping Guarantee
If you believe that your personal information has been compromised while a purchase or if a Norton Shopping Guarantee merchant has failed to fulfil transaction terms, you can file a claim for the purchase.
Fileaclaimforapurchase
1 Click the Norton Shopping Guarantee icon on the Norton toolbar and c a Claim.
2 On the Norton Shopping Guarantee Buyer Service Center page, enter Norton account credentials and click Log in.
3 On the Guaranteed Transactions page, follow the on-screen instructions to file a claim for a product.
KeepingyourPCtunedup
This chapter includes the following topics:
■ Viewing the resource usage of running processes
■ Optimize your permanent disks manually
■ Configure performance alerts
■ Run a scan to clean up disk clutter
■ Run Diagnostic Report
■ Manage startup items
■ Optimize your boot volume
Viewingtheresourceusageofrunningprocesses
File Insight shows the CPU graph and the system resource usage for run processes. The graph shows the breakdown of overall system CPU usage CPU usage by the process.
Todeterminetheresourceusageofarunningprocess
1 In the File Insight window, in the left pane, click Activity.
2 In the Show drop-down list, do one of the following:
■ Select Performance to view the performance graph of the process.
■ Select Performance Alert to view the performance alert-related details of the process.
■ Select Network to view the network activities of the process.
3 Click Close.
Optimizeyourpermanentdisksmanually
Optimizing your computer's permanent disks can improve performance and reliance. Norton automatically checks your permanent disks for fragmentation and optimising them if they are more than 10 percent fragmented. You can always check reports to see if optimization is necessary.
Note: You can run Disk optimization only when disk has more than 15 per free space.
Some programs, such as movie-editing programs or programs that require la amounts of disk space, can work more efficiently if your disks are optimized to prefer not to wait until Norton performs the automatic optimization, you can your disks manually.
Note: During the disk optimization process, solid-state drives (SSD) are defragmented only in Windows 8 or later operating systems.
Optimizeyourpermanentdisksmanually
1 In the Norton main window, double-click Performance, and then click Optimize Disk.
2 When the activity is complete, click Close.
Configureperformancealerts
You can use the Performance Alerting option in Norton to receive performance alerts when there is an increased usage of system resources by any prog process.
Configureperformancealerts
1 In the Norton main window, click Settings.
2 In the Settings window, under Detailed Settings, click Administrative Settings.
3 Under Performance Monitoring, in the Performance Alerting row, move the switch to:
| Off | Turns off performance alerts.Select this option if you do not want Norton to notify you with performance alerts. |
| On | Turns on performance alerts.Select this option if you want Norton to notify you with performance alerts when a program or process exceeds the threshold limit of the system resource usage. |
| Log Only | Monitors and records the system resource usage.Select this option if you want Norton to only monitor the system resource usage of every program or process running on your computer.By default, the Performance Alerting option is set to Log Only.When a program or process exceeds the threshold limit of the system resource usage, Norton records these details in the Security History window. You can view the details that are related to performance alerts under Performance Alert category in the Security History window. |
4 Under High-Usage Alert for, do one of the following:
■ If you want Norton to monitor the CPU usage, move the CPU switch to On.
- If you want Norton to monitor the memory usage, move the Memory switch to On.
■ If you want Norton to monitor the disk usage, move the Disk switch to On.
■ If you want Norton to monitor the handle count, move the Handles switch to On.
By default, this option is turned off.
5 Click Apply, and then click Close.
Runascantocleanupdiskclutter
Various activities, such as extensive web browsing or a series of software installations produce temporary files. You can run a manual cleanup scan to the temporary files immediately.
Cleanupyourdiskclutter
1 In the Norton main window, double-click Performance, and then click File Cleanup.
2 When the activity is complete, click Close.
RunDiagnosticReport
Diagnostic Report gathers information about your computer, which includes the operating system, programs, and hardware. You can use this report to find the issues.
The Diagnostic Report is a real-time report with a timestamp. Norton does generate this report automatically. You need to use the Diagnostic Report in the Scans window and manually generate the report.
If Norton finds any issues on your computer, you can use the Fix Now resolve the issues.
You can save, email, or print the report when needed for review.
RunDiagnosticReport
1 In the Norton main window, double-click Security, and then click Scans.
2 In the Scans window, select Diagnostic Report, and then click Go.
Managestartupitems
Startup Manager monitors and lists the programs that automatically start when turn on your computer. To reduce the start time of your computer and in performance, you can delay the start of some of the programs when you your computer.
Norton delays the start of the delayed programs by five minutes. The first program in the Startup Manager window starts five minutes after you start computer. Every subsequent delayed program starts with a further delay of seconds.
Delaystartupitems
1 In the Norton main window, double-click Performance, and then click Startup Manager.
2 In the Startup Manager window, in the Delay Start column, select the program that you want to delay.
3 Click Apply.
4 Click Close.
Rundelayedstartupitemsmanually
1 In the Norton main window, double-click Performance, and then click Startup Manager.
2 In the Startup Manager window, click Run Delayed Items Now.
3 Wait for the program to start, and then in the Startup Manager wind of Close.
Optimizeyourbootvolume
The Optimize option lets you optimize your boot volume to improve the b of your computer. Optimization of your boot volume maximizes the usable 1 space by rearranging file fragments into adjacent and contiguous clusters. With the drive head of your hard disk accesses all of the file data in one lc is read into the memory faster.
When you use the Optimize option, Norton optimizes the drive that contain boot volume. Therefore, it requires more time to complete optimization.
You can access the Optimize option at the top of the security status graphs window. You can also optimize your boot volume using the Insight
Optimizer option in the Background Tasks window. The Insight Optimizer row in the background jobs list that is available in the Background Tasks window displays the details of the boot volume optimization process. You can view such as timestamp, duration, and status of the background job.
OptimizeyourbootvolumefromtheGraphswindow
1 In the Norton main window, double-click Performance, and then click Graphs.
2 In the Graphs window, at the top of the security status graph, click Optimize.
OptimizeyourbootvolumefromtheBackgroundTaskswindow
1 In the Norton main window, click Settings.
2 In the Settings window, under Detailed Settings, click Administrative Settings.
3 In the Background Tasks row, click Configure.
4 In the Background Tasks window, under the Norton Tasks column, click the play icon that appears before Insight Optimizer.
Protectingyourmediaand data
This chapter includes the following topics:
■ Back up your files
- Restore files
■ Create a new backup set
■ Add files and folders to a backup set
■ Choose a backup location
■ Purchase more cloud storage space
■ Turn off or turn on backup
Backupyourfiles
You can schedule Norton to run automatic backups for backup sets that y You can view the details of your backup activity under the backup catego Security History window.
Backupyourfiles
1 In the Norton main window, double-click Backup, and then click Run Backup.
2 In the Run Backup window, follow the on-screen instructions for the base sets that have created.
3 Click Close.
Restorefiles
The reason to have a good backup is to restore your files from the bad need arises. Your Norton product provides an easy method to restore your backed-up files.
By default, your Norton product displays the backup location of the most backup set you ran and the original locations of the files.
Note: To restore files from online backup, you must set the Network Cost Awareness option in the Firewall Settings window to No Limit.
When you restore files, you can change any of the following settings:
Restore From
You can choose any of the backup sets to restore the files.
If you backed up your data in an external media, you must connect it to your computer to restore those files. Your Norton product lists all the backup sets that you ran backup for and that your PC can currently detect.
Files
You can restore the backed up files in a backup set that you selected. You can use the Search option to search for files by name and add the selected file to restore. You can also check the Restore All Files and
Categories option next to the Files heading to select all file categories. In addition, you can browse for backed up files based on file categories and folders by using the Browse for Files and Folders option.
You can filter the backed up files in a backu set by the backup file categories.
Restore To
You can restore to the original locations of the files, or navigate to a new location where you can restore your files. Your Norton product displays the total number of files and the total size of the files that you have selected for restoration.
If files with the same name are present at the original location, the files that you restore replace those files.
Restorefiles
1 In the Norton product main window, double-click Backup, and then click Restore Files.
2 In the Restore Files window, do one or more of the following:
■ Under Restore From, change where to restore from.
■ Under Files, specify what to restore.
■ Under Restore To, change where to restore the files to.
3 Click Restore Files.
4 Follow the on-screen instructions to finish restoring your files.
Createanewbackupset
You can create multiple backup sets with different configurations. For example, can create a backup set to back up your pictures to your local fixed dis also configure different schedules for each backup set.
When you create a new backup set, your Norton product applies the default configuration for the backup set. You can change the configuration if the configuration does not meet your needs.
You can identify each backup set with a backup set name. The default r backup set is DefaultSet. You can save a backup set with the default n; But, whenever you create a new backup set, you must provide a name t backup set. The maximum character length of a backup set name is 32 You cannot create more than 10 backup sets.
Createanewbackupset
1 In the Norton product main window, double-click Backup, and then click Backup Sets.
2 On the Summary tab, under Things You Can Do, click Create new backup set.
3 In the window that appears, type a name for your backup set, and t OK.
4 On the What tab, under File Types, select a file category.
5 In the Manage Backup Sets window, click Save Settings.
Addfilesandfolderstoabackupset
You are not limited to backing up the files that Norton automatically detect places into its file categories. You can add files to the set of files to b and you can exclude files from being backed up as well.
Norton lets you select a file or folder from your computer that you want in your backup. The Add or exclude files and folders option on the What tab in the Manage Backup Sets window provides you the options to add files a to a backup set.
You can also right-click a file or a folder and add it to a backup set Security option on the shortcut menu. The shortcut menu is available after configure your backup and when the Manage Backup Sets window and the Restore
Files window are closed. When you add a file to the backup set, Norton information in the window that appears when you click Add or exclude fi folders option. You can view all the files and folders that you added to
You can also remove an addition from the list of items that is included from backup by using the Remove from list option. This option is available window that appears when you click Add or exclude files and folders.
Addfiletoabackupset
1 In the Norton main window, double-click Backup, and then click Backup Sets.
2 On the What tab, click Add or exclude files and folders.
3 In the window that appears, click Include File.
4 In the file selection window that appears, navigate to file that you want click to select it, and then click Open.
5 Click OK.
6 In the Manage Backup Sets window, click Save Settings.
Addfoldertoabackupset
1 In the Norton main window, double-click Backup, and then click Backup Sets.
2 On the What tab, click Add or exclude files and folders.
3 In the window that appears, click Include Folder.
4 In the folder selection window that appears, navigate to the folder that to add, and then click OK.
5 Click OK.
6 In the Manage Backup Sets window, click Save Settings.
AddafileorfoldertoabackupsetinWindowsExplorer
1 In Windows Explorer, right-click the file or folder, select Norton Security Add to Backup.
The Add to Backup option in the shortcut menu is enabled only after configure your backup and when the Manage Backup Sets window and Restore Files window are closed.
2 Click the backup set to which you want to add the file or the folder
Chooseabackuplocation
Norton can back up your files to several kinds of storage locations. The safety, and quantity of your backup depend on the choice of your location backup location is the best in all situations and for all users.
You can choose any storage location that Norton offers for your backup to depending on your PC and the connected devices. Use the information in following table to choose a location that best meets your needs for safety and storage capacity:
Secure Cloud Storage
Your subscription to Norton comes with an allocation of storage space on a secure server that is located on the Internet. This location is the safest, most secure backup choice available because it stores your information in a remote location. As a consequence, even the disasters that might damage or destroy your PC cannot affect your backups. Online backups can take place automatically, as long as your PC has an active Internet connection. However, you require a reasonably fast Internet connection.
You can configure the Internet bandwidth that backup uses to back up your files using Bandwidth Throttle on the Where tab of the Manage Backup Sets window.
You can alter the following bandwidth throttle states:
■ Fastest (recommended)
■ High usage
■ Moderate usage
■ Low usage
You can buy more cloud storage space whenever you want.
Note: To use the Secure Cloud Storage option, you must set the Network Cost Awareness option in the Firewall settings window to No Limit.
C: (Local Fixed Disk)
This choice backs your files up to a special folder on drive C of your PC. Backing up to drive C is very quick and convenient, and is only limited to the amount of free space available on your drive. You can run automatic backups with this choice. Backing up to drive C is a convenient but an unsafe backup method. Any mechanical problem that the drive might experience can damage both your original files and your backups. If you use drive C for quick and automatic backups, you must back up your files occasionally to a different drive or another location.
Other internal or external drive
This choice provides for fast, convenient backups. You can run automatic backups and always have access to your backed up files as long as the drive is connected to your PC
Although using another drive is safer than using drive C, doing so still leaves your data at risk from any PC hardware malfunctions.
If you choose to back up to another drive, yo should also back up your files occasionally to some other location.
Network drive
You can use this choice if your PC is connected to a local network that offers a storage location to which you have access. Depending on the speed of your network, this choice can be almost as fast as backing up to an internal drive or external drive.
This choice does not appear if your PC is not connected to a network that offers a storage device to which you have access.
To back up your data to an external network drive, you must map the external network drive to your computer. When you map a drive, you must also specify a drive letter for the connection.
Flash drive and removable storage devices, including iPod
Flash drives and the other data storage devices that are attached to your PC can also serve as backup locations.
Norton displays such devices as external disk drives. If such a device is always attached to your PC, you can use it for automatic backups.
The amount of storage space that is available on these devices can be less than on hard disks. If you use a flash drive for backups, you should also back up your files occasionally to another storage location.
When you select Secure Cloud you to register to your Norton register to your Norton account.
Storage as the backup location, Norton pro account. You must be connected to the In
To use Secure Cloud Storage as a backup location, you must set the No Cost Awareness option in the Firewall settings window to No Limit.
Note: You must activate Norton with a valid license key to use the cloud space.
Chooseabackuplocation
1 Make sure that the device to which you want to back up your data to your PC and turned on.
2 In the Norton main window, double-click Backup, and then click Backup Sets.
3 On the Where tab, select the location and device where you want you to be stored.
If the device or location does not appear on the list, click Refresh L
4 Click Save Settings.
Purchasemorecloudstoragespace
Your Norton product subscription comes with an allotment of secure cloud space. When your Norton product performs an online backup, it calculates amount of space that it needs for the backup. If your cloud storage does sufficient space for the backup, your Norton product notifies you and provides an option to buy more space.
You do not have to wait until your Norton product tells you that you ne storage space. You can purchase additional space at any time.
You must be connected to the Internet to purchase more cloud storage sp Symantec provides 25 GB of cloud storage for each Norton product key. ' share the cloud storage space that is allocated to you using your Norton among your computers. For example, you have two computers having Norton product installed on them and registered with the same Norton account. You share the storage space among your two computers. You use 10 GB of storage space for your first computer. When you activate the cloud storage second computer using the same Norton account, that computer can use the remaining 15 GB of space.
Note: The cloud storage space differs based on the product that you use.
Purchaseadditionalcloudstoragespacewhenbackingup
1 When Norton notifies you that it needs more cloud storage space, click More Storage.
Your browser opens to a secure page, on which you can purchase an cloud storage space.
2 Follow the instructions on the secure webpage to purchase additional cl storage space.
Purchaseadditionalcloudstoragespaceatothertimes
1 In the Norton product main window, double-click Backup, and then click More Storage.
Your browser opens to a secure page, on which you can purchase an cloud storage space.
2 Follow the instructions on the webpage to purchase additional cloud storage space.
Turnofforturnonbackup
When the Backup option is turned on, your Norton product automatically by your files when your computer is idle. However, if you want to temporarily backup, you can turn it off from within the program.
When you turn off backup, the backup status in the Norton main window from Protected to Disabled. In the Disabled state, your Norton product disables
all automatic backup of files. You can use the Run Backup option in the window if you want to back up your files from all the backup sets.
You can turn off or turn on backup from the Settings window, Backup Settings window, or from the Backup Details window.
TurnbackupofforturnonbackupfromtheSettingswindow
1 In the Norton main window, click Settings.
2 In the Settings window, under Quick Controls, do one of the following
■ To turn off backup, uncheck Backup.
■ To turn on backup, check Backup.
TurnofforturnonbackupfromtheBackupSettingswindow
1 In the Norton main window, click Settings.
2 In the Settings window, under Detailed Settings, click Backup Settings.
3 In the Backup Settings window, do one of the following:
■ To turn off backup, move the On/Off switch to Off.
■ To turn on backup, move the On/Off switch to On.
4 In the Settings window, click Apply.
TurnofforturnonbackupfromtheBackupDetailswindow
1 In the Norton main window, click Backup, and then click View Details
2 In the Backup Details window, under Things You Can Do, do one of the following:
■ To turn off backup, click Turn Off Backup.
■ To turn on backup, click Turn On Backup.
Customizingsettings
This chapter includes the following topics:
■ Configure Network Proxy Settings
■ Customizing your Norton product settings
■ Configure Norton for best battery use
■ Turn on or turn off Remote Management
- Secure your Norton product settings using a password
■ Reset your Norton product settings password
■ Turn off or turn on Norton Product Tamper Protection
■ How do I use the Search tool?
ConfigureNetworkProxySettings
When you use a proxy server to connect to the Internet, you must speci server details. The Network Proxy Settings window lets you enter automati configuration settings, proxy settings, and proxy server authentication settings. Network Proxy settings let you connect to the Internet while you perform t as activating the service or accessing the support options.
ConfigureNetworkProxySettings
1 In the Norton main window, click Settings.
2 In the Settings window, under Detailed Settings, click Administrative Settings.
3 In the Network Proxy Settings row, click Configure.
4 In the Network Proxy Settings window, do the following:
■ If you want your browser to automatically detect network connection se under Automatic Configuration, check Automatically detect settings.
■ If the proxy server requires an automatic configuration URL, under Automatic Configuration, check Use automatic configuration script. Type the URL of the PAC file in the URL box.
- If your network uses a proxy server, under Proxy Settings, check Use a proxy server for your HTTP connections. In the Address box, typ URL or IP address of your proxy server, and in the Port box, typ number of your proxy server. You can specify a value from 1 to
- If your proxy server requires a user name and password, under Authentication, check I need authentication to connect through my firewall or proxy server. Type the user name in the Username bc password in the Password box.
5 In the Network Proxy Settings window, click Apply.
CustomizingyourNortonproductsettings
The default Norton product settings provide a safe, automatic, and efficient protect your computer. However, if you want to change or customize your settings, you can access most features from the Settings window.
You can configure the Norton product settings in the following ways:
- You can use the On/Off switch to turn on or turn off a feature. When you turn off a feature, the color of the On/Off switch turns red, which indicates computer is vulnerable to security threats. When you turn on a feature, of the On/Off switch turns green, which indicates that your computer is against security threats.
- You can drag the slider of a protection feature to your preferred setting often, your Norton product provides the slider setting for you to decide to resolve security threats automatically or ask you before it takes an
- You can configure a protection feature by either selecting the options that provided for the configuration or by providing the required information. Note these options are available as check boxes for you to check or unchecked. You can also use the Use Defaults option to reset the configuration to level.
■ You can select a preferred option from the drop-down list.
- You can check or uncheck the Quick Controls options to turn on or turn off a feature.
The Norton product also provides the Use Defaults option in most of the Settings window. You can use this option to reset the configuration to the default
TocustomizetheNortonproductsettings
1 In the Norton product main window, click Settings.
2 In the Settings window, click the protection feature that you want to c
3 In the window that appears, set the option to your preferred settings.
You may need to click a tab to access the settings that are listed in tab.
4 In the Settings window, do one of the following:
■ To save the changes, click Apply.
■ To close the window without saving the changes, click Close.
ConfigureNortonforbestbatteryuse
When your computer runs on battery power, it is important that all active programs consume minimum resource usage. By reducing resource usage, you computer gains longer battery life and becomes more energy efficient.
You can configure a low threshold profile and ensure that all programs co minimum resource usage. When the resource usage of a program or a pr exceeds the low threshold limit, Norton notifies you with a performance ale, can choose to close the program or the process manually and free the r
If the Use Low Resource Profile On Battery Power option in the Administrative
Settings window is turned on, Norton automatically changes the threshold p to low when your computer runs on battery power. By default, this option on.
Note: Symantec recommends that you keep the Use Low Resource Profile On Battery Power option turned on.
TurntheUseLowResourceProfileOnBatteryPoweroptiononoroff
1 In the Norton main window, click Settings.
2 In the Settings window, under Detailed Settings, click Administrative Settings.
3 Under Performance Monitoring, in the Use Low Resource Profile On Battery Power row, move the On/Off switch to Off or On.
4 Click Apply, and then click Close.
TurnonorturnoffRemoteManagement
Remote Management lets you remotely manage your Norton product using your Norton account. When you turn on the Remote Management option, you do your Norton product details and fix some security issues of your device.
When the Remote Management option is turned on, your Norton product's details related to your Norton product to your Norton account. When this is turned off, your Norton product does not publish any of its details.
By default, the Remote Management option is turned off.
In some cases, you are prompted to enter your Norton account password turning on Remote Management option.
TurnonorturnoffRemoteManagement
1 In the Norton product main window, click Settings.
2 In the Settings window, under Detailed Settings, click Administrative Settings.
3 In the Remote Management row, move the On/Off switch to On or Off.
4 Click Apply, and then click Close.
SecureyourNortonproductsettingsusingapassword
You can secure your Norton product settings from unauthorized access by up a password for your product settings. The Settings Password Protection in the Administrative Settings window lets you secure your Norton product using a password.
After you set up a password for the Norton product settings you must er password each time to view or configure your product settings.
By default, the Settings Password Protection option is turned off. You must on the Settings Password Protection option to set up a password for your settings.
Note: The password must be between 8 and 256 characters in length.
SecureyourNortonproductsettingsusingapassword
1 In the Norton product main window, click Settings.
2 In the Settings window, under Detailed Settings, click Administrative Settings.
3 Under Product Security, in the Settings Password Protection row, mov the On/Off switch to On.
4 Click Apply.
5 In the dialog box that appears, in the Password box, type a password
6 In the Confirm Password box, type the password again.
7 Click OK.
8 In the Settings window, click Close.
ResetyourNortonproductsettingspassword
If you forget your Norton product settings password, you can reset the pa You can reset your Norton product settings password using the Reset sett password option in the Select Your Uninstall Preference window.
To access the Select Your Uninstall Preference window, you must choose to uninstall your Norton product. However, you need not uninstall the product your settings password.
Note: The reset settings password option appears in the Select Your Uninstall Preference window only if the Settings Password Protection option is turned on.
To use the Settings Password Protection option, go to the Norton product window, and then click Settings > Administrative Settings > Product Seci
ResetyourNortonproductSettingspassword
1 On the Windows taskbar, do one of the following:
In Windows XP, Windows Vista, or Windows 7, click Start > Control Panel.
In Windows 8, on the Apps screen, under Windows System, click Control Panel.
In Windows 10, click Start > All apps, under Windows System, click Control Panel.
2 In Windows Control Panel, do one of the following:
■ In Windows XP, double-click Add or Remove Programs.
■ In Windows Vista, double-click Programs and Features.
In Windows 7 or Windows 8, click Programs > Programs and Features.
The Programs option in Windows 7 or Windows 8 is available when select the Category option in the View by drop-down list.
■ In Windows 10, click Uninstall a program.
3 In the list of currently installed programs, do one of the following:
In Windows XP, click your Norton product, and then click Change/Remove.
- In Windows Vista, Windows 7, Windows 8, or Windows 10, click your product, and then click Uninstall/Change.
4 At the bottom of the Select Your Uninstall Preference window, click Reset settings password.
5 In the dialog box that appears, in the Reset Password Key box, type randomly generated key that is displayed against Reset Password Key.
6 In the New Password box, type the new password.
7 In the Confirm New Password box, type the new password again.
8 Click OK.
TurnofforturnonNortonProductTamperProtection
Norton Product Tamper Protection protects the Norton product files from an or modification by any virus or other unknown threat. You can protect you from accidental modification or deletion by keeping the Norton Product Tam Protection option turned on.
If you want to temporarily turn off Norton Product Tamper Protection, you can turn it off for a specified duration.
Note: You cannot run System Restore on your computer when Norton Product Tamper Protection is turned on. You must temporarily turn off Norton Product Tamper Protection to run a successful System Restore.
TurnofforturnonNortonProductTamperProtection
1 In the Norton product main window, click Settings.
2 In the Settings window, under Detailed Settings, click Administrative Settings.
3 Under Product Security, in the Norton Product Tamper Protection row, move the On/Off switch to Off or On.
4 Click Apply.
5 If prompted, select the duration until when you want the feature to be off, and click OK.
6 In the Settings window, click Close.
HowdolusetheSearchtool?
You can open the Search tool by the following ways:
- Press the search shortcut key that you have set. By default, the short set as Ctrl + F and works only when your Norton product has focus. this setting, refer Set a Search Shortcut Key.
■ On the Norton product main window, click the search (

) icon.
- On the taskbar area, right-click on your Norton product icon and then c Search.
■ On the Norton Help Center window, click Search.
The Search tool helps you with the following:
LocateaspecificfeatureinyourNortonproduct
In the Search window, type the feature name in the search box. If you of the feature name, start typing any related keyword to get search suggest that you can use to find the information faster. You can hover your mouse each search suggestion to see a brief explanation about the feature. You change the settings of a feature from the search results.
Set a Search Shortcut Key
You can set a keyboard shortcut to bring the In-Product Search window q. The In-Product Search window helps you locate a specific feature in your product. When you start typing on the In-Product Search window, you get search suggestions that you can use to find the information faster. You can your mouse over the search suggestions to see a brief explanation about the You can also change the settings of a feature from the search results.
By default, the shortcut key is set as Ctrl + F and works only when y product has focus. See the steps below to change this setting.
SetaSearchShortcutKey
1 In the Norton product main window, click Settings.
2 In the Settings window, under Detailed Settings, click Administrative Settings.
3 In the Search Shortcut Key row, move the switch to On.
4 Click the arrow and then choose a key that you want to assign for search.
5 Do one of the following:
■ For the shortcut key to work only when your Norton product has found uncheck the Global option.
- For the shortcut key to work even when your Norton product has no focus, check the Global option.
6 Click Apply, and then click Close.
Findingadditionalsolutions
This chapter includes the following topics:
■ Find the version number of your product
- Checking for a new version of the product
■ Solve problems with Norton Autofix
■ Reasons for Fix Now failures
■ Uninstall your Norton product
Findtheversionnumberofyourproduct
If you want to upgrade your Norton product or want to reach the custom for assistance, you must know the full version number of the Norton product on your computer. This helps you get exact solution for your problems.
Findtheversionnumberofyourproduct
1 In the Norton product main window, click Help.
2 In the Help Center window, under General Information, click About.
Checkingforanewversionoftheproduct
You can upgrade your product to the latest version if you have an active If a new version is made available by Symantec, you can download and new version of your product. You can also let your Norton product notify a new version of your product is available. You can do so by turning o Automatic Download of New Version option in the Administrative Settings window. The latest version of your product may contain new and enhanced for better protection against security threats.
When you check for a new version, details about your product such as name and version are sent to Symantec servers. The servers then check a new version of the specified product is available or not.
If a new version is available, you can download and install it from the \a new version is not available, the webpage informs you about it. In such can run LiveUpdate to obtain latest program and definition updates and keep existing version of your product up to date.
The upgrade process might not work if your browser is incompatible to con with the Symantec servers. The supported browsers are Internet Explorer 6.0 later, Chrome 10.0 or later, and Firefox 3.6 or later.
Note: Your product must be activated, and you need the Internet to check a new version of the product.
Tocheckforanewversionoftheproduct
1 In the Norton product main window, click Help.
2 In the Help Center window, click New Version Check.
The website displays whether a new version is available or not.
Note: This option is available only if you have an active subscription or
3 If a new version is available, follow the on-screen instructions to down new product.
SolveproblemswithNortonAutofix
Note: Your device must be connected to the Internet to resolve issues using Autofix.
Norton Autofix provides additional product support with one-click access from Norton product main window. It performs a Quick Scan of your computer problems without your intervention. If the problem persists, you can use the Support Web Site option to go to the Norton Support website for help online forum, chat, email, or telephone.
In addition, the Norton Support website provides access to the knowledge I articles. These articles can help you resolve your technical problems.
The support technicians can help you solve more complex problems by usi remote-assistance technology. The remote-assistance technology allows Symantec support technicians to access your computer as remote users so that they perform maintenance or service.
Note: Support offerings can vary based on the language or product.
When you click the Get Support option in the Help Center window, your Norton product checks your Internet connection. To access Norton Autofix, ensure that your computer is connected to the Internet.
If you use a proxy server to connect to the Internet, you must configure settings of your Norton product.
If you do not know your proxy settings, contact your Internet service provi network administrator for assistance.
SolveaproblemusingNortonAutofix
1 In the Norton product main window, click Help, and then click Get Support.
2 In the Norton Autofix window, do one of the following:
- If there is a problem connecting to the Internet, ensure that your d connected and then click Retry to complete the Autofix process.
- If you still have problem with the Internet connection, click Skip to continue with other Norton Autofix processes.
- If the problem is not fixed automatically, click Open Support Web Site for further assistance.
■ If you cannot connect to the Support website, use the click here link to get the support contact numbers.
■ If the problem is fixed, click Close.
ReasonsforFixNowfailures
Your Norton product works silently in the background to protect you from of security threats. If Norton detects any significant issues that may block protection or reduce your system performance, it performs a fix now task.
In some circumstances, the fix now task fails.
The reasons for Fix Now failures and how to resolve them:
■ Subscription expiration
Ensure that your subscription is active. To check your subscription, on t window, click Help and then click Subscription Status.
■ Slow Internet connection
Your product obtains the updates from the Norton servers. If your Interr connectivity is slow, the updates that are required to fix issues in your cannot be downloaded. Ensure that your connection has better speed to download all virus definitions.
■ Computer is completely infected
If your computer is severely infected and the product does not have been updates to clean the viruses, Fix Now may fail. Run Norton Power Eraser to clean up your computer. For instructions, See “Scan your computer with Power Eraser” on page 37.
■ Threats not completely removed
When the threats are removed, the Norton product prompts you to restore computer. If you skip to restart, the Fix Now may fail at a later stage run it.
■ Protection updates are outdated
In some cases, you may not have the latest protection updates if you upgraded to the latest version of the product. Run LiveUpdate several get the latest protection updates.
■ LiveUpdate failure
If LiveUpdate fails, Fix Now also fails.
■ No Internet connection
Ensure that your device is connected to the Internet. Check that the p control settings and proxy settings do not block your connection.
■ Network Cost Awareness is set to Economy or no Traffic
If the Network Cost Awareness option is set to Economy or No Traffic mode, your computer cannot get the latest updates. To change this setting, See Norton's Internet usage " on page 58.
■ Firewall does not allow the traffic
Make sure your product's Firewall settings are enabled to allow traffic. Information, See "Turn Norton Firewall on or off" on page 48.
- Date and time is not correct
If your computer date and time was changed manually or incorrect, Fix may fail. Ensure that you have set the date and time correct.
■ Not enough space on your computer
If there is not enough space on the disk to install the updates, Fix I Free some space on the disk and run LiveUpdate.
UninstallyourNortonproduct
Did You Know? Many subscription plans allow you to extend your Norton pi Click here to learn how.
You can remove your Norton product from your computer in the following
■ From Windows Control Panel.
■ From the Start menu.
■ From Windows Start screen (Windows 8/8.1).
Note: You should print out this help topic before continuing with the uninstall You cannot access online Help during uninstallation.
If you want to reinstall your Norton product on your computer, you must your Norton product from your computer. You can reinstall the product using installation file that you downloaded from Norton. To reinstall your Norton p See "Downloading and installing Norton" on page 13.
UninstallyourNortonproductfromWindowsControlPanel
1 Do one of the following:
■ On the Windows Taskbar, click Start > Control Panel.
In Windows 8, go to Apps, and under Windows System, click Control Panel.
In Windows 10, click Start > All apps, and under Windows System, click Control Panel.
2 In Windows Control Panel, do one of the following:
■ In Windows XP, double-click Add or Remove Programs.
■ In Windows Vista, double-click Programs and Features.
In Windows 7 and Window 8, click Programs > Programs and Features. The Programs option is available when you select the Category option in the View by drop-down list.
■ In Windows 10, click Uninstall a program.
3 In the list of currently installed programs, do one of the following:
In Windows XP, click your Norton product, and then click Change/Remove.
In Windows Vista, Windows 7, Windows 8, or Windows 10, click your product, and then click Uninstall/Change.
4 Follow the on-screen instructions.
Your Norton product is not fully uninstalled until you restart your comp
UninstallyourNortonproductfromtheStartmenu
1 On the Windows taskbar, click Start > All Programs/All apps > North Security > Uninstall Norton Security.
2 If you do not want to keep Norton Home Page as your default home Norton Safe Search as your default search provider, select the check it appears at the bottom.
3 Follow the on-screen instructions.
Your Norton product is not fully uninstalled until you restart your comp
UninstallyourNortonproductfromtheStartscreeninWindows8/8.1
1 On the Start screen, right-click your Norton product, and then click Uninstall.
2 In the list of currently installed programs, click your Norton product, and click Uninstall/Change.
3 Follow the on-screen instructions.
Your Norton product is not fully uninstalled until you restart your comp