
Dream - Mobile Phone HTC - Free user manual and instructions
Find the device manual for free Dream HTC in PDF.


| Product Type | Mobile Phone |
| Brand | HTC |
| Model | Dream DREA110 |
| Dimensions (LxWxT) | 117.7 x 55.7 x 17.1 mm |
| Weight (with battery) | 158 g (5.57 oz) |
| Operating System | Android |
| Processor | Qualcomm MSM7201A, 528 MHz |
| Memory | ROM: 256 MB, RAM: 192 MB |
| Display | 3.17-inch TFT-LCD, 320x240 HVGA, touch-sensitive |
| Network | HSPA/WCDMA 2100 MHz; Quad-band GSM/GPRS/EDGE 850/900/1800/1900 MHz |
| Camera | 3.2 megapixel with auto focus |
| Battery | Rechargeable Li-ion, 1150 mAh |
| Talk Time | Up to 350 min (WCDMA) / 406 min (GSM) |
| Standby Time | Up to 402 hours (WCDMA) / 319 hours (GSM) |
| Connectivity | Bluetooth 2.0 with EDR, Wi-Fi 802.11b/g, HTC ExtUSB (11-pin mini-USB 2.0 + audio) |
| Storage Expansion | microSD card slot (SD 2.0 compatible), 1 GB card included |
| Keyboard | Slide-out 5-row QWERTY |
| GPS | Yes, with Google Maps |
| Special Features | Digital compass, motion sensor |
| Power Supply | AC adapter: 100-240V AC, 50/60 Hz; output 5V DC, 1A |
| Maintenance | Clean with a damp cloth; do not use liquid cleaners or aerosols |
| Safety Precautions | Use only designated battery pack (HTC DREA160) and AC adapters; avoid exposure to liquids and high temperatures |
| Spare Parts / Accessories | Battery DREA160, AC adapters (Phihong PSAA05K-050, PSAA05E-050; Delta ADP-5FH D), earphone Cotron HS S200, USB cable, pouch |
| Regulatory Compliance | CE, RoHS, WEEE |
Frequently Asked Questions - Dream HTC
User questions about Dream HTC
0 question about this device. Answer the ones you know or ask your own.
Ask a new question about this device
Download the instructions for your Mobile Phone in PDF format for free! Find your manual Dream - HTC and take your electronic device back in hand. On this page are published all the documents necessary for the use of your device. Dream by HTC.
USER MANUAL Dream HTC
Please Read Before Proceeding
THE BATTERY IS NOT CHARGED WHEN YOU TAKE IT OUT OF THE BOX.
DO NOT REMOVE THE BATTERY PACK WHEN THE DEVICE IS CHARGING.
YOUR WARRANTY IS INVALIDATED IF YOU DISASSEMBLE OR ATTEMPT TO DISASSEMBLE THE DEVICE.
PRIVACY RESTRICTIONS
Some countries require full disclosure of recorded telephone conversations, and stipulate that you must inform the person with whom you are speaking that the conversation is being recorded. Always obey the relevant laws and regulations of your country when using the recording feature of your PDA Phone.
INTELLECTUAL PROPERTY RIGHT INFORMATION
Copyright © 2009 HTC Corporation. All Rights Reserved.
HTC, the HTC logo, HTC Dream, ExtUSB, HTC Innovation and HTC Care are trademarks and/or service marks of HTC Corporation.
Google, Gmail, Google Talk, Google Maps, YouTube, Android, and Android Market are trademarks of Google Inc.
Microsoft, Windows, Windows XP, Windows Vista, and Outlook are either registered trademarks or trademarks of Microsoft Corporation in the United States and/or other countries.
Bluetooth and the Bluetooth logo are trademarks owned by Bluetooth SIG, Inc.
microSD is a trademark of SD Card Association.
Licensed by QUALCOMM Incorporated under one or more of the following patents:
4,901,307 5,490,165 5,056,109 5,504,773 5,101,501 5,778,338
5,506,865 5,109,390 5,511,073 5,228,054 5,535,239 5,710,784
5,267,261 5,544,196 5,267,262 5,568,483 5,337,338 5,659,569
5,600,754 5,414,796 5,657,420 5,416,797
All other company, product and service names mentioned herein are trademarks, registered trademarks or service marks of their respective owners.
HTC shall not be liable for technical or editorial errors or omissions contained herein, nor for incidental or consequential damages resulting from furnishing this material. The information is provided “as is” without warranty of any kind and is subject to change without notice. HTC also reserves the right to revise the content of this document at any time without prior notice.
No part of this document may be reproduced or transmitted in any form or by any means, electronic or mechanical, including photocopying, recording or storing in a retrieval system, or translated into any language in any form without prior written permission of HTC.
Limitation of Damages
TO THE MAXIMUM EXTENT PERMITTED BY APPLICABLE LAW, IN NO EVENT SHALL HTC OR ITS PROVIDERS BE LIABLE TO USER OR ANY THIRD PARTY FOR ANY INDIRECT, SPECIAL, CONSEQUENTIAL, INCIDENTAL OR PUNITIVE DAMAGES OF ANY KIND, IN CONTRACT OR TORT, INCLUDING, BUT NOT LIMITED TO, INJURY, LOSS OF REVENUE, LOSS OF GOODWILL, LOSS OF BUSINESS OPPORTUNITY, LOSS OF DATA, AND/OR LOSS OF PROFITS ARISING OUT OF, OR RELATED TO, IN ANY MANNER, OR THE DELIVERY, PERFORMANCE OR NONPERFORMANCE OF OBLIGATIONS, OR USE OF THE WEATHER INFORMATION, DATA OR DOCUMENTATION HEREUNDER REGARDLESS OF THE FORESEEABILITY THEREOF.
Important Health Information and Safety Precautions
When using this product, the safety precautions below must be taken to avoid possible legal liabilities and damages.
Retain and follow all product safety and operating instructions. Observe all warnings in the operating instructions on the product.
To reduce the risk of bodily injury, electric shock, fire, and damage to the equipment, observe the following precautions.
ELECTRICAL SAFETY
This product is intended for use when supplied with power from the designated battery or power supply unit. Other usage may be dangerous and will invalidate any approval given to this product.
SAFETY PRECAUTIONS FOR PROPER GROUNDING INSTALLATION
CAUTION: Connecting to an improperly grounded equipment can result in an electric shock to your device.
This product equipped with a USB Cable for connecting with desktop or notebook computer. Be sure your computer is properly grounded (earthed) before connecting this product to the computer. The power supply cord of a desktop or notebook computer has an equipment-grounding conductor and a grounding plug. The plug must be plugged into an appropriate outlet which is properly installed and grounded in accordance with all local codes and ordinances.
SAFETY PRECAUTIONS FOR POWER SUPPLY UNIT
- Use the correct external power source
A product should be operated only from the type of power source indicated on the electrical ratings label. If you are not sure of the type of power source required, consult your authorized service provider or local power company. For a product that operates from battery power or other sources, refer to the operating instructions that are included with the product.
This product should be operated only with the following designated power supply unit(s):
AC Adapter
• Phihong, Model PSAA05K-050
• Phihong, Model PSAA05E-050
• Delta, Model ADP-5FH D
- Handle battery packs carefully
This product contains a Li-ion polymer battery. There is a risk of fire and burns if the battery pack is handled improperly. Do not attempt to open or service the battery pack. Do not disassemble, crush, puncture, short external contacts or circuits, dispose of in fire or water, or expose a battery pack to temperatures higher than 60^ C ( 140^ F).

WARNING: Danger of explosion if battery is incorrectly replaced. To reduce risk of fire or burns, do not disassemble, crush, puncture, short external contacts, expose to temperature above 60^ C ( 140^ F), or dispose of in fire or water. Replace only with specified batteries. Recycle or dispose of used batteries according to the local regulations or reference guide supplied with your product.

Note: This product should be operated only with the following designated Battery Pack(s).
• HTC, Model DREA160
• Take extra precautions
- Keep the battery or device dry and away from water or any liquid as it may cause a short circuit.
- Keep metal objects away so they don't come in contact with the battery or its connectors as it may lead to short circuit during operation.
- The phone should be only connected to products that bear the USB-IF logo or have completed the USB-IF compliance program.
- Do not use a battery that appears damaged, deformed, or discolored, or the one that has any rust on its casing, overheats, or emits a foul odor.
- Always keep the battery out of the reach of babies and small children, to avoid swallowing of the battery. Consult the doctor immediately if the battery is swallowed.
- If the battery leaks:
- Do not allow the leaking fluid to come in contact with skin or clothing. If already in contact, flush the affected area immediately with clean water and seek medical advice.
- Do not allow the leaking fluid to come in contact with eyes. If already in contact, DO NOT rub; rinse with clean water immediately and seek medical advice.
• Take extra precautions to keep a leaking battery away from fire as there is a danger of ignition or explosion.
SAFETY PRECAUTIONS FOR DIRECT SUNLIGHT
Keep this product away from excessive moisture and extreme temperatures. Do not leave the product or its battery inside a vehicle or in places where the temperature may exceed 60^ C ( 140^ F), such as on a car dashboard, window sill, or behind a glass that is exposed to direct sunlight or strong ultraviolet light for extended periods of time. This may damage the product, overheat the battery, or pose a risk to the vehicle.
PREVENTION OF HEARING LOSS

CAUTION: Permanent hearing loss may occur if earphones or headphones are used at high volume for prolonged periods of time.
NOTE: For France, Earphone (listed below) for this device have been tested to comply with the Sound Pressure Level requirement laid down in the applicable NF EN 50332-1:2000 and/or NF EN 50332-2:2003 standards as required by French Article L. 5232-1.
- Earphone, manufactured by Cotron, Model HS S200.
SAFETY IN AIRCRAFT
Due to the possible interference caused by this product to an aircraft's navigation system and its communications network, using this device's phone function on board an airplane is against the law in most countries. If you want to use this device when on board an aircraft, remember to turn off your phone by switching to Airplane Mode.
ENVIRONMENT RESTRICTIONS
Do not use this product in gas stations, fuel depots, chemical plants or where blasting operations are in progress, or in potentially explosive atmospheres such as fuelling areas, fuel storehouses, below deck on boats, chemical plants, fuel or chemical transfer or storage facilities, and areas where the air contains chemicals or particles, such as grain, dust, or metal powders. Please be aware that sparks in such areas could cause an explosion or fire resulting in bodily injury or even death.
EXPLOSIVE ATMOSPHERES
When in any area with a potentially explosive atmosphere or where flammable materials exist, the product should be turned off and the user should obey all signs and instructions. Sparks in such areas could cause an explosion or fire resulting in bodily injury or even death. Users are advised not to use the equipment at refueling points such as service or gas stations, and are reminded of the need to observe restrictions on the use of radio equipment in fuel depots, chemical plants, or where
blasting operations are in progress. Areas with a potentially explosive atmosphere are often, but not always, clearly marked. These include fueling areas, below deck on boats, fuel or chemical transfer or storage facilities, and areas where the air contains chemicals or particles, such as grain, dust, or metal powders.
ROAD SAFETY
Vehicle drivers in motion are not permitted to use telephony services with handheld devices, except in the case of emergency. In some countries, using hands-free devices as an alternative is allowed.
SAFETY PRECAUTIONS FOR RF EXPOSURE
- Avoid using your phone near metal structures (for example, the steel frame of a building).
- Avoid using your phone near strong electromagnetic sources, such as microwave ovens, sound speakers, TV and radio.
- Use only original manufacturer-approved accessories, or accessories that do not contain any metal.
- Use of non-original manufacturer-approved accessories may violate your local RF exposure guidelines and should be avoided.
INTERFERENCE WITH MEDICAL EQUIPMENT FUNCTIONS
This product may cause medical equipment to malfunction. The use of this device is forbidden in most hospitals and medical clinics.
If you use any other personal medical device, consult the manufacturer of your device to determine if they are adequately shielded from external RF energy. Your physician may be able to assist you in obtaining this information.
Turn your phone OFF in health care facilities when any regulations posted in these areas instruct you to do so. Hospitals or health care facilities may be using equipment that could be sensitive to external RF energy.
HEARING AIDS
Some digital wireless phones may interfere with some hearing aids. In the event of such interference, you may want to consult your service provider, or call the customer service line to discuss alternatives.
NONIONIZING RADIATION
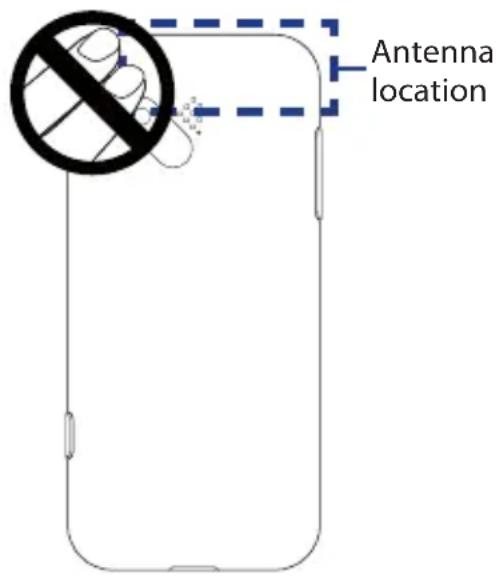
Your device has an internal antenna. This product should be operated in its normal-use position to ensure the radiative performance and safety of the interference. As with other mobile radio transmitting equipment, users are advised that for satisfactory operation of the equipment and for the safety of personnel, it is recommended that no part of the human body be allowed to come too close to the antenna during operation of the equipment.
Use only the supplied integral antenna. Use of unauthorized or modified antennas may impair call quality and damage the phone, causing loss of performance and SAR levels exceeding the recommended limits as well as result in non-compliance with local regulatory requirements in your country.
To assure optimal phone performance and ensure human exposure to RF energy is within the guidelines set forth in the relevant standards, always use your device only in its normal-use position. Contact with the antenna area may impair call quality and cause your device to operate at a higher power level than needed. Avoiding contact with the antenna area when the phone is IN USE optimizes the antenna performance and the battery life.
General Precautions
- Avoid applying excessive pressure to the device
Do not apply excessive pressure on the screen and the device to prevent damaging them and remove the device from your pants' pocket before sitting down. It is also recommended that you store the device in a protective case and only use your finger when interacting with the touch screen. Cracked display screens due to improper handling are not covered by the warranty.
• Device getting warm after prolonged use
When using your device for prolonged periods of time, such as when you're talking on the phone, charging the battery or browsing the web, the device may become warm. In most cases, this condition is normal and therefore should not be interpreted as a problem with the device.
- Heed service markings
Except as explained elsewhere in the Operating or Service documentation, do not service any product yourself. Service needed on components inside the device should be done by an authorized service technician or provider.
• Damage requiring service
Unplug the product from the electrical outlet and refer servicing to an authorized service technician or provider under the following conditions:
- Liquid has been spilled or an object has fallen onto the product.
- The product has been exposed to rain or water.
- The product has been dropped or damaged.
- There are noticeable signs of overheating.
- The product does not operate normally when you follow the operating instructions.
- Avoid hot areas
The product should be placed away from heat sources such as radiators, heat registers, stoves, or other products (including amplifiers) that produce heat.
- Avoid wet areas
Never use the product in a wet location.
- Avoid using your device after a dramatic change in temperature
When you move your device between environments with very different temperature and/or humidity ranges, condensation may form on or within the device. To avoid damaging the device, allow sufficient time for the moisture to evaporate before using the device.
NOTICE: When taking the device from low-temperature conditions into a warmer environment or from high-temperature conditions into a cooler environment, allow the device to acclimate to room temperature before turning on power.
- Avoid pushing objects into product
Never push objects of any kind into cabinet slots or other openings in the product. Slots and openings are provided for ventilation. These openings must not be blocked or covered.
- Mounting accessories
Do not use the product on an unstable table, cart, stand, tripod, or bracket. Any mounting of the product should follow the manufacturer's instructions, and should use a mounting accessory recommended by the manufacturer.
- Avoid unstable mounting
Do not place the product with an unstable base.
- Use product with approved equipment
This product should be used only with personal computers and options identified as suitable for use with your equipment.
- Adjust the volume
Turn down the volume before using headphones or other audio devices.
- Cleaning
Unplug the product from the wall outlet before cleaning. Do not use liquid cleaners or aerosol cleaners. Use a damp cloth for cleaning, but NEVER use water to clean the LCD screen.
Contents
Chapter 1 Getting Started 19
1.1 Getting to Know Your HTC Dream and Accessories 20
Top panel 20
Bottom panel....20
Left panel....21
Right panel....21
Front panel 22
Back panel 23
Inside the box....23
1.2 Installing the SIM Card, Battery, and Storage Card 24
SIM card....25
Battery....26
Storage card....27
1.3 Charging the Battery 29
1.4 Device Controls....30
1.5 Navigating Your Device 31
Finger gestures....31
Use the TRACKBALL....33
1.6 Getting Started....34
Turn your device on and off 34
Set up your device for the first time....35
Turn off the screen when not in use 36
1.7 Home Screen 37
Extended Home screen 38
Customize the Home screen....39
1.8 Device Status and Notifications 43
Status bar....43
Notifications panel 45
Notification LED 46
1.9 Applications....47
Recently-used applications....49
1.10 Settings 49
Settings on your device....49
1.11 Adjusting the Volume 50
1.12 Using the Device's Storage Card as a USB Drive 52
Chapter 2 Using Phone Features and Managing Contacts 53
2.1 Making Calls....54
Use the Dialer....54
Make a call from the Call log....55
Add and call your contacts....55
Add and call favorite contacts....56
Call voice mail....56
2.2 Answering or Rejecting Calls 57
2.3 Call Options....58
Manage multiple calls....60
Set up a conference call....60
2.4 Using the Call Log 62
2.5 Adjusting the Phone Settings 64
2.6 Turning the Phone Function On and Off 64
2.7 Creating and Managing Your Contacts 65
Add a new contact 66
Add favorite contacts 69
Edit and customize your contacts....70
View, organize and search contacts ....71
Communicate with your contacts 74
Keyboard shortcuts in Contacts 76
Chapter 3 Entering Text 77
3.1 Using the Keyboard 78
Special keys....81
Create application shortcuts....81
3.2 Adjusting the Text Settings 82
Chapter 4 Synchronizing Information 83
4.1 About Synchronization 84
4.2 Selecting Applications to Synchronize 84
Chapter 5 Managing Your Time 87
5.1 Using Calendar....88
Open Calendar 88
Create events....89
View events....91
Event reminders....93
Synchronize Microsoft® Outlook® calendar 94
Change the Calendar settings....96
Keyboard shortcuts in Calendar....97
5.2 Setting Alarms 98
Set an alarm....98
Customize the Alarm Clock....99
Chapter 6 Exchanging Messages 101
6.1 Sending Text and Multimedia Messages ....102
Open Messaging 102
Create and send SMS and MMS messages.... 102
Receive text and multimedia messages.... 106
Manage messages and message threads.... 107
Read delivery reports....109
Adjust text and multimedia message settings 110
6.2 Using Gmail™ 112
Create and send e-mails.... 113
Receive and read e-mails 114
Reply to or forward e-mails.... 117
Manage conversations and e-mails 118
Label your e-mails 118
Set new e-mail notifications 120
Keyboard shortcuts in Gmail 121
6.3 Using Email 122
Add an external e-mail account 122
Compose and send e-mails using an external e-mail account 123
Manage e-mails on your external e-mail account 123
Edit or delete an external e-mail account 124
Adjust the external e-mail account settings.... 124
6.4 Using Google Talk 125
Sign in and chat online.... 125
Manage your friends....129
Mobile indicators 130
Adjust instant messaging settings 131
Sign out....131
Chapter 7 Getting Connected 133
7.1 Connecting to the Internet 134
GPRS/3G 134
Wi-Fi 135
Manage links, history, and downloads.... 143
Manage bookmarks 145
Adjust the Browser settings 146
Keyboard shortcuts in Browser.... 148
7.3 Using Bluetooth 149
[Non-Text]
Chapter 8 Getting Around with Maps 153
8.1 Getting to Know Maps ....154
8.2 Searching for Places of Interest 155
8.3 Viewing Maps ....157
Keyboard shortcuts in Maps 160
8.4 Using Street View 161
8.5 Getting Directions ...... 164
Chapter 9 Experiencing Multimedia 167
9.1 Using the Camera 168
Take pictures.... 169
Post-capture screen 169
Adjust the Camera settings.... 170
9.2 Using Pictures 171
View your pictures....172
Edit your pictures.... 174
Send a picture 176
Set a picture as wallpaper or caller ID icon.... 176
View pictures as a slideshow 177
9.3 Using YouTube™ 178
Watch videos 178
Search for videos.... 179
Filter videos by time.... 179
View video details.... 180
Share videos 180
9.4 Using Music....181
Music library 182
Play music....183
Use playlists 184
Set a song as ring tone.... 185
Delete music on the storage card.... 186
Keyboard shortcuts in Music 186
Chapter 10 Getting Applications from Android Market 187
10.1 Opening Android Market ....188
10.2 Navigating Android Market ....189
Featured applications....189
Categorized applications....189
10.3 Installing and Managing Applications ....190
10.4 Sending Feedbacks 191
Chapter 11 Managing Your Device 193
11.1 Changing Basic Settings ....194
Set the date, time zone, and time 194
Display settings 195
Ringer settings....196
Phone services....197
11.2 Protecting Your Device 198
Protect your SIM card with a PIN 198
Protect your phone with a screen lock 198
11.3 Managing Memory 200
11.4 Software Updates 200
11.5 Resetting Your Device 201
Soft reset 201
Factory reset 202
11.6 Battery Saving Tips 202
Appendix 205
A.1 Specifications 206
A.2 Regulatory Notices ....207
Index 215
Chapter 1
Getting Started
1.1 Getting to Know Your HTC Dream and Accessories
1.2 Installing the SIM Card, Battery, and Storage Card
1.3 Charging the Battery
1.4 Device Controls
1.5 Navigating Your Device
1.6 Getting Started
1.7 Home Screen
1.8 Device Status and Notifications
1.9 Applications
1.10 Settings
1.11 Adjusting the Volume
1.12 Using the Device's Storage Card as a USB Drive
1.1 Getting to Know Your HTC Dream and Accessories
Top panel
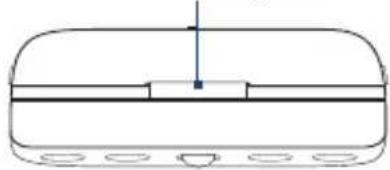
Back Cover Release Tab
See "To remove the back cover" in this chapter.
natural_image
Simple line drawing of a rounded rectangular object with internal components and mounting holes (no text or symbols)Bottom panel
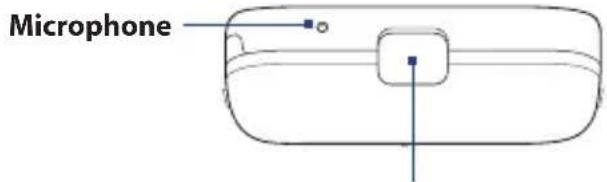
USB Connector/Earphone Jack
Flip open the cover to connect the:
• USB cable and transfer files.
• AC adapter and recharge the battery.
- USB stereo headset for hands-free conversation or for listening to music and videos.
Left panel Right panel
VOLUME UP
Press to increase the ringer or media volume.
VOLUME DOWN
Press to lower the ringer or media volume.
Storage Card Slot
Open the slot cover to install a storage card. See "Storage card" in this chapter for details.
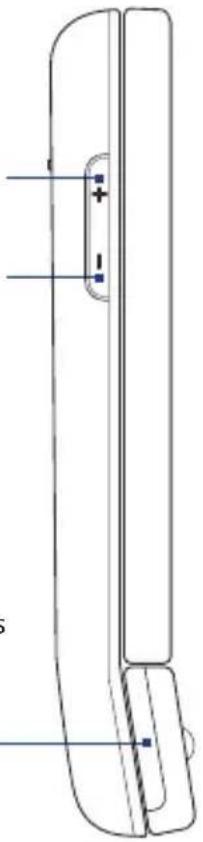
natural_image
Technical line drawing of a mobile phone receiver with ports and buttons (no text or symbols)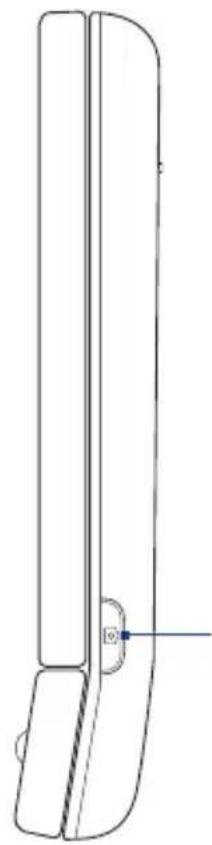
natural_image
Technical line drawing of a vertical mechanical component with a small circular feature and a blue arrow pointing to it (no text or symbols present)CAPTURE
Press to open the Camera application. When in Camera, press half-way to activate auto-focus. Press fully to take the shot. See Chapter 9 for details.
22 Getting Started
Front panel
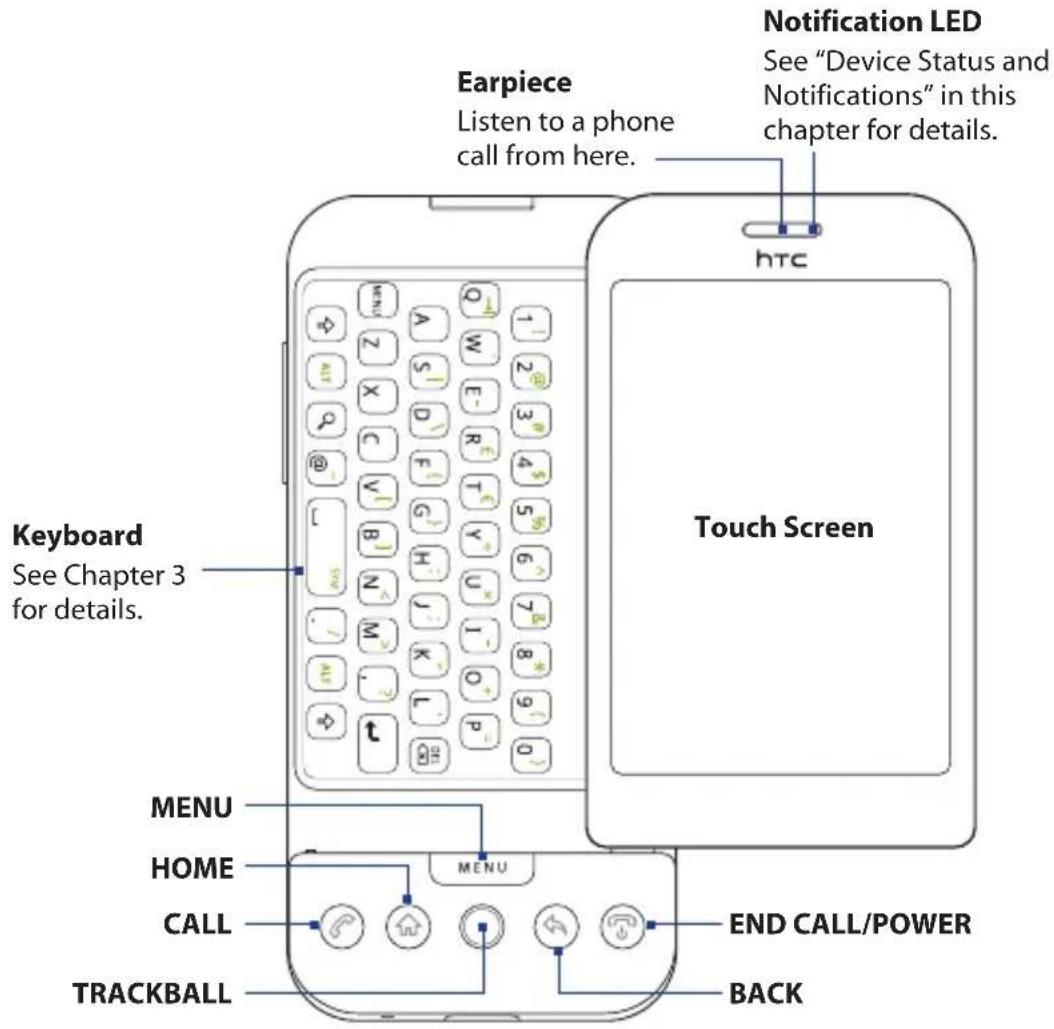
For more information about the functions of the MENU, HOME, CALL, END CALL/POWER and BACK buttons, see "Device Controls" in this chapter. For more information about the TRACKBALL, see "Use the TRACKBALL" in this chapter
Back panel
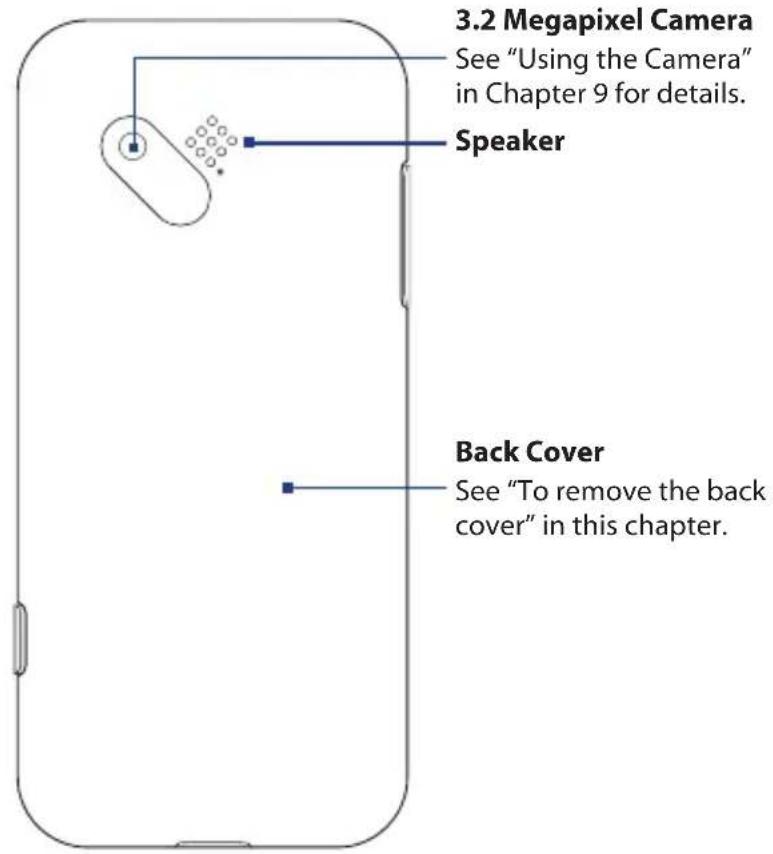
Inside the box
The product package includes the following items and accessories:
- Battery
- Pouch
USB cable - 1GB microSD ^TM card
- AC adapter
- Quick Started Guide
- Wired stereo headset
24 Getting Started
1.2 Installing the SIM Card, Battery, and Storage Card
Always turn off your device before installing or replacing the SIM card, battery, and storage card. You also need to remove the back cover before you can install the SIM card and battery.
To remove the back cover
- Make sure the device is turned off.
- Hold the device sideways with the control buttons on the right.
- Slide the screen panel up to reveal the keyboard and the back cover release tab.
- Gently push down the release tab with your finger until the back cover disengages from the device.
Back cover release tab
4
3
- Pull the back cover out then set it aside.
SIM card
The SIM card contains your phone number, service details, and phonebook/message memory. Your device supports both 1.8V and 3V SIM cards.
Note Some legacy SIM cards may not function with your device. You should consult your wireless service provider for a replacement SIM card. There may be fees for this service.
To install the SIM card
-
Make sure the device is turned off.
-
Locate the SIM card slot, then insert the SIM card with its gold contacts facing down and its cut-off corner facing out the card slot.
-
Slide the SIM card completely into the slot.
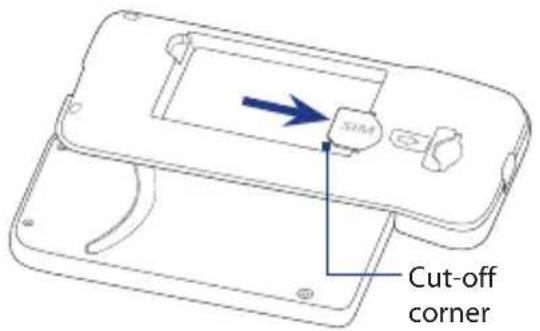
To remove the SIM card
-
Remove the back cover and the battery if these are installed.
-
Locate the groove below the SIM card slot, then push the SIM card out of the slot with your finger.
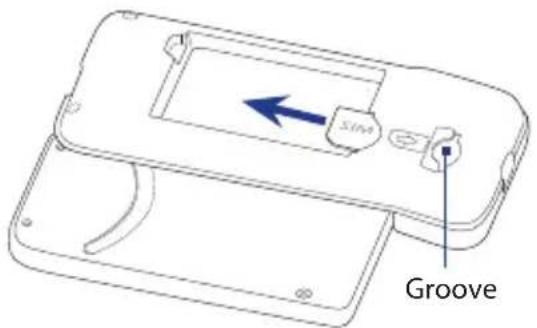
Battery
Your device comes with a rechargeable Lithium-ion battery and is designed to use only manufacturer-specified original batteries and accessories. Battery performance depends on many factors, including network configuration, signal strength, the temperature of the environment in which you operate your device, the features and/or settings you select and use, items attached to connecting ports, and your voice, data, and other program usage patterns.
Battery life estimates (approximations):
Talk time: Up to 350 minutes for WCDMA
Up to 406 minutes for GSM
Standby time: Up to 402 hours for WCDMA
Up to 319 hours for GSM
Note Battery life is subject to network and phone usage.
Warning! To reduce risk of fire or burns:
- Do not attempt to open, disassemble, or service the battery pack.
- Do not crush, puncture, short external contacts, or dispose of in fire or water.
- Do not expose to temperatures above 60^ (140°F).
- Replace only with the battery pack designated for this product.
- Recycle or dispose of used battery as stipulated by local regulations.
To install the battery
-
Align the battery's exposed copper contacts with the battery connectors inside the battery compartment.
-
Insert the contact side of the battery first then gently push the battery into place.
-
Replace the back cover.
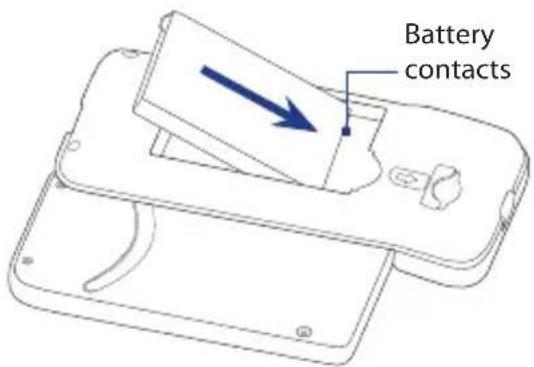
To remove the battery
-
Make sure the device is turned off.
-
Remove the back cover.
-
The top side of the battery has a protruding grip. Lift the battery from the grip to remove it.
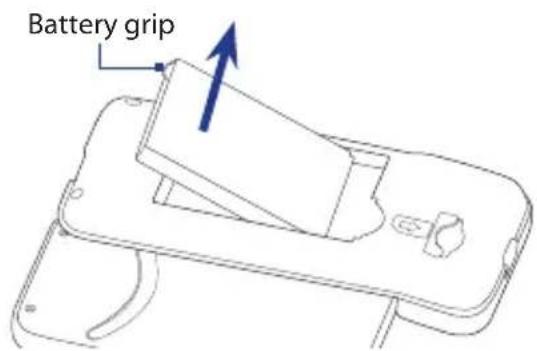
Storage card
To store your pictures, music, and applications, install the supplied microSD ^™ card into your device.
Note You need to install the microSD card before you can use the Camera application.
To install the storage card
- Make sure the device is turned off.
- Hold the device sideways with the control buttons on the right.
28 Getting Started
- Slide up the keyboard, then locate the storage card slot at the side of the control buttons.
- Pry open the storage card slot cover.
- Insert the microSD card into the slot with its golden contacts facing down until it clicks in place.
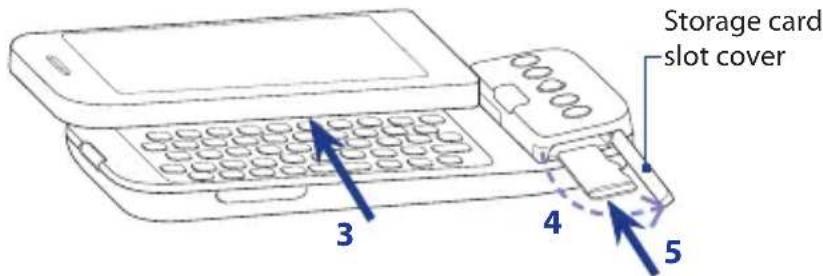
- Replace the storage card slot cover.
Note Make sure that both ends of the cover are properly seated on the slot. The device will not detect the storage card when the slot cover is not properly replaced.
To remove the storage card
- Make sure that the device is turned off.
- Slide up the keyboard, then open the storage card slot cover.
- Push the microSD card inward until it clicks, then release it to eject it from the slot.
- Replace the storage card slot cover.
Note If you want to remove the storage card while the device is on, see "To remove the storage card while the device is on" later in this chapter.
1.3 Charging the Battery
New batteries are shipped partially charged. Before you start using your device, it is recommended that you install and charge the battery. Some batteries perform best after several full charge/discharge cycles.
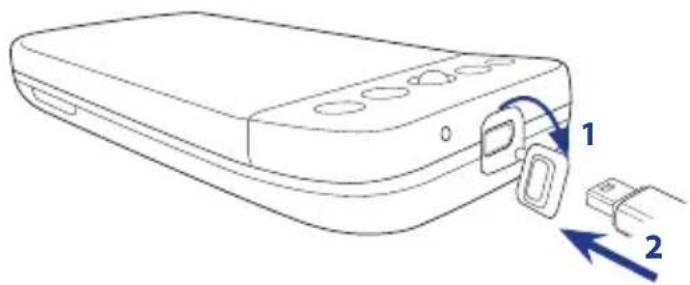
To charge the battery
- Flip open the USB connector cover at the bottom panel of your device.
- Insert the USB connector of the AC adapter to the USB connector on your device.
- Plug in the AC adapter to an electrical outlet to start charging the battery.
natural_image
Line drawing of a device with labeled parts and directional arrows (no text or symbols)Note Only the AC adapter and USB cable provided with your device must be used to charge the battery.
Charging is indicated by a solid amber light in the Notification LED. As the battery is being charged while the device is on, the charging battery icon ( 🔒) is displayed in the status bar of the Home screen. After the battery has been fully charged, the Notification LED shows a solid green light and a full battery icon ( 🔒) displays in the status bar of the Home screen.
For more information about the Notification LED, see "Device Status and Notifications" in this chapter.
Warning! • Do not remove the battery from the device while you are charging it using the AC or car adapter.
- As a safety precaution, the battery stops charging when it overheats.
1.4 Device Controls
Press the control buttons on the front panel of your device to do the following:
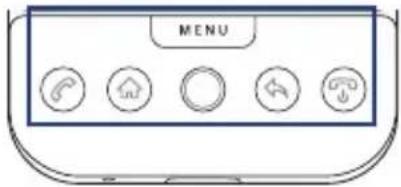
| Button Function | |
| HOME ( Ⓧ) | While on any application or screen, press to return to the Home screen.Press and hold to open the recent applications window. |
| MENU Press to open a list of actions that you can do on the current screen or dialog box. | |
| BACK ( Ⓧ) | Press to go back to the previous screen, or to close a dialog box, menu, or the notifications panel.Press and hold to return to the main screen of the current application. |
| CALL ( Ⓧ) | Press this button to open theCall logtab that displays all recent calls.When a contact, contact number, or phone number is highlighted on the screen, press this button to call the contact or phone number.While on a call, press this button to add another call.If you navigated to another application during a call, press this button to display the ongoing call on the screen. |
| END CALL/POWER ( Ⓧ) | While on a call, press this button to hang up.While not on a call, press and hold to open the phone options menu that allows you to turn off or switch your device to silent mode.While not on a call, press briefly to turn off the screen. |
1.5 Navigating Your Device
Use finger gestures, the trackball, or a combination of both when navigating around your Home screen, menus and application screens on your device.
Finger gestures
A quick and easy way to interact with the Home screen and the whole interface of your device is by touch. Basically, the following are the types of actions, called finger gestures, that you would do when interacting with your device:
Touch
When you want to select items such as icons and options or press on-screen buttons, simply touch them with your finger. Apply some pressure with your finger pad when touching them on the screen.
Swipe or slide
To swipe or slide means to drag your finger vertically or horizontally across the screen. The following are some instances when you would use swiping:
• Getting around the extended Home screen
Swipe your finger horizontally across the screen to go to the left or right side of the extended Home screen. For more information, see "Home Screen" in this chapter.
- Scrolling
To scroll up or down in a list or page on the screen, swipe or slide your finger up or down on the screen. With repeated short, quick brushing gestures, you can accelerate the scroll. Touch your finger on the screen to stop the scrolling.
32 Getting Started
Drag
Touch and hold your finger with some pressure before you start to drag. While dragging, do not release your finger until you have reached the target position.
The following are some instances when you would use dragging:
- Moving or deleting a Home screen item
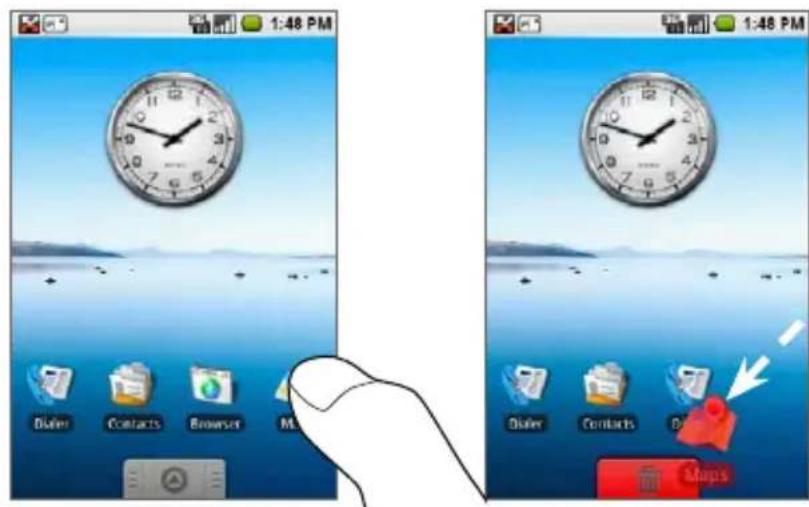
First, touch and hold an application icon, widget, or folder on the Home screen. When the item magnifies and the device vibrates, drag your finger to any part of the screen to move the item, or drag to the Trash button to delete the item. For more information, see "Customize the Home screen" in this chapter.
• Resizing the cropper
When you need to crop a picture, the cropper appears. Touch and hold the cropper edge, then drag your finger inward to or outward from the center of the cropper to resize it.
Flick
Flicking the screen is similar to swiping, except that you need to swipe your finger in light, quicker strokes. This finger gesture is always in a vertical direction, such as when flicking the contacts or message list.
Use the TRACKBALL
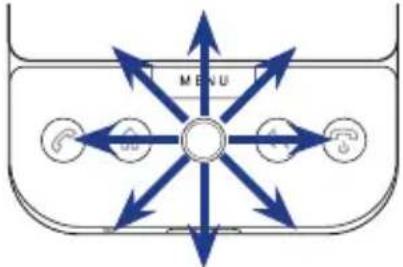
You can use the TRACKBALL to select or highlight items on the screen.
Rolling the TRACKBALL Pressing the TRACKBALL
flowchart
graph TD
    A["MENU"] --> B["Arrow 1"]
    A --> C["Arrow 2"]
    A --> D["Arrow 3"]
    A --> E["Arrow 4"]
    A --> F["Arrow 5"]
    A --> G["Arrow 6"]
    A --> H["Arrow 7"]
    A --> I["Arrow 8"]
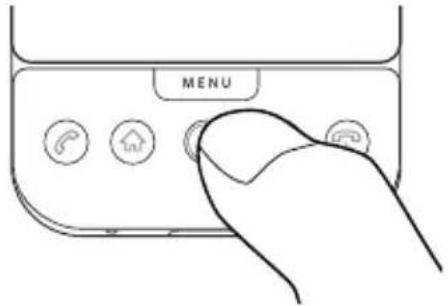
- Roll the TRACKBALL up, down, left, or right to navigate selectable items on the screen. Press the TRACKBALL to select a highlighted item or action.
- Press and hold the TRACKBALL to bring up the selected item's options menu, if applicable.
- On a web page, press the TRACKBALL twice to activate scale and scroll. For more information on scale and scroll, see "Using Browser" in Chapter 7.
- To highlight, copy, cut or paste text on the screen, use the TRACKBALL in combination with keyboard keys. See "Using the Keyboard" in Chapter 3 for details.
1.6 Getting Started
Once you've installed your SIM card and battery, you can turn on your device and start using your device.
Turn your device on and off
To turn on the device
Press the END CALL/POWER button.
Note After you turn on the device for the first time, you may be prompted to set up a Gmail account. For more information on how to set up your device for the first time, see "Set up your device for the first time" in this chapter.
Enter your PIN
If your SIM card is preset with a PIN (personal identification number), you will be prompted to enter the PIN to proceed. Enter the SIM PIN, then touch OK.
To know how to enable or disable the SIM PIN, see "Protecting Your Device" in Chapter 11.
Note If you entered the wrong PIN three times, the SIM card will be blocked. If this happens, you can unblock it with the PUK (PIN Unblocking Key) obtained from your wireless service provider.
To turn off the device
- Press and hold the END CALL/POWER button for a few seconds.
- When the Phone options menu appears, touch Power off.
- Touch OK when prompted to turn off the device completely.
Set up your device for the first time
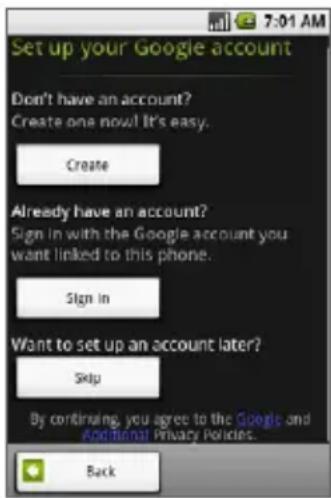
After you turned on the device for the first time, you will be prompted to create a Gmail account or sign in to your existing Gmail account. Touch the screen to begin.
Note Make sure that your device has an active data connection (3G/GPRS) before you create a Gmail account. See "Device Status and Notifications" in this chapter to know if your device has an active data connection.
To create a Gmail account
- Read the setup information on the screen, then touch Next.
- Touch Create.
Tips • Touch Skip if you prefer to set up an account at a later time and start using your device.
- If you already have a Gmail account, touch
Sign in, then open the keyboard. Enter your user name and password, then touch Sign in. After signing in, all e-mails, contacts, and calendar events on your Gmail account will automatically synchronize with your device.
- Open the keyboard. Enter your name and Gmail account user name, then touch Next.
The device connects to the Google server to check if the user name you entered is available. If the user name you entered is already in use, you will be prompted to enter another user name or select from a list of available user names.
- Enter and confirm your Gmail account password.
Tip Refer to the indicator at the right side of the password field to check if your password is too short (less than 8 characters), weak, fair, good, or strong.
- Select a security question from the drop-down menu, then enter the answer
to the security question you have selected.
- Touch Create.
- When the Google Terms of Service screen appears, touch I agree, Next.
- Enter the characters that appear on the screen, then touch Next.
- When your Gmail account is successfully created, close the keyboard, then touch Finish setup. The Home screen displays.
Turn off the screen when not in use
To save battery power, the device automatically turns off the screen when you leave it idle after a certain period of time. You will still be able to receive messages and calls while the device's screen is off.
Tip For information on how to adjust the time before the screen turns off, see "Display settings" in Chapter 11.
You can also turn off the screen quickly by pressing the END CALL/POWER button. Pressing any of the control buttons again or incoming calls will turn on your device screen.
Note If you have set up a screen unlock pattern, you will be prompted to draw the pattern on the screen before it unlocks. For more information on how to create and enable the screen unlock pattern, see "Protecting Your Device" in Chapter 11.
1.7 Home Screen
The Home screen is your starting point for using the applications on your device. You can customize the Home screen to display application icons, shortcuts, folders, and widgets according to your preference.
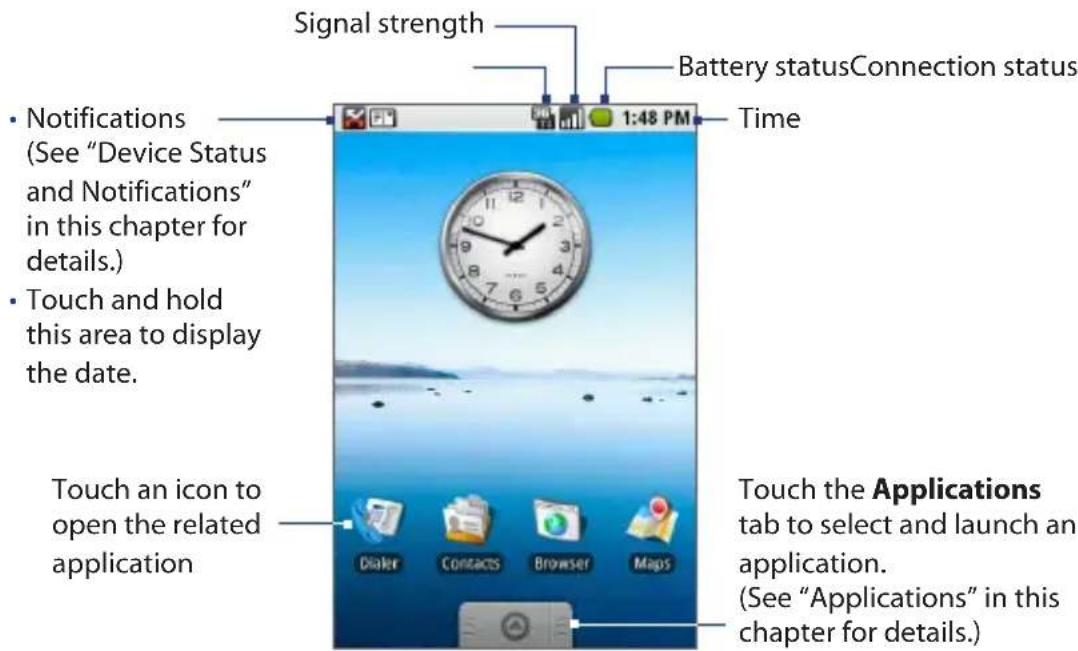
Tip While in any application, press HOME to display the Home screen.
Extended Home screen
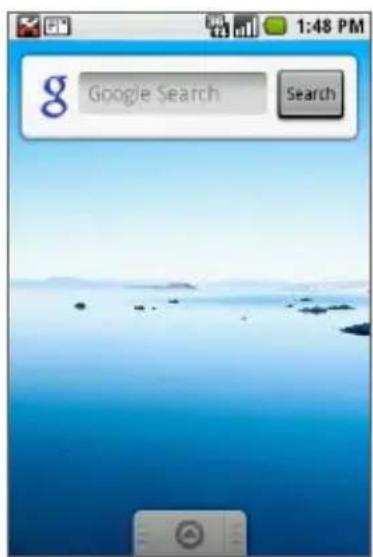
The Home screen extends beyond the screen width to provide more space for adding icons, widgets, and more. Press HOME, then slide your finger horizontally across the screen to go to the left or right side of the extended Home screen.
natural_image
Scenic view of a calm blue lake with distant hills under a clear sky (no text or symbols visible)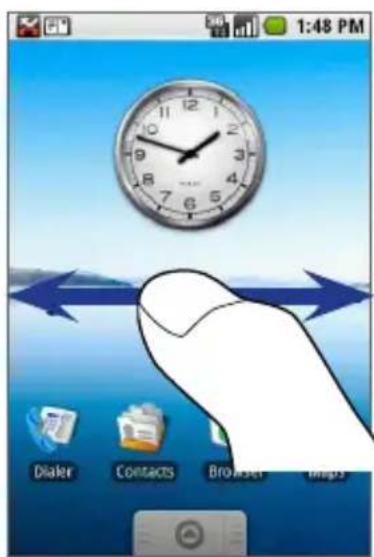
Extended Home screen: Left Extended Home screen: Right
Tip While on an extended Home screen, press HOME to return to the main Home screen.
Customize the Home screen
To add a Home screen item
- Press HOME, then touch and hold the screen.
- When the Add to Home menu opens, select the item you want to add to the Home screen:
- Application. Add your favorite application icons on the Home screen for quick and easy launching. When you select this item, a list of applications installed on your device is displayed. Touch an application to add its icon to the Home screen.
Tip To quickly add an application shortcut to the Home screen, touch the
Applications tab, then touch and hold an application icon. When the device vibrates, release the icon.
- Shortcut. Add shortcuts such as a favorite contact, a playlist, a bookmarked web page, or a folder. For more information on how to create folders, see "To create a folder and add items to it" in this chapter.
- Widget. Add a clock, a picture frame, or the Google search bar.
- Wallpaper. Change the Home screen wallpaper. For more information about customizing the wallpaper, refer to "To change the Home screen wallpaper" later in this chapter.
To move a Home screen item
- Touch and hold the item on the screen to activate move mode.
Note When move mode is activated, the item magnifies and the device vibrates. The Application tab also turns into a Trash button ( ).
- Without lifting your finger on the item, drag it to your desired position on the screen, then release it.
Note To move an item from the Home screen to an extended Home screen, touch and hold the item then drag it to the left or right edge of the screen until the display shifts to the extended Home screen. Position the item on the screen and then release it.
To remove a Home screen item
- Touch and hold the item on the screen to activate move mode.
- Without lifting your finger on the item, drag it to the Trash button. When the item and the Trash button turn red, release the item to remove it from the Home screen.
To change the Home screen wallpaper
You can change the Home screen wallpaper with pictures that you have stored on the storage card or from the Wallpaper gallery that comes pre-installed on your device.
- Do any of the following on the Home screen:
• Press MENU and select Wallpaper.
- Touch and hold the screen to open the Add to Home menu, then touch Wallpaper.
- Select Pictures or Wallpaper gallery.
Wallpaper gallery
- Touch the wallpaper thumbnail to view an enlarged version on the screen.
Note To view the next or previous wallpaper, touch and hold a wallpaper thumbnail, then slide your finger left or right on the screen.
- Touch Set wallpaper.
Pictures
The Pictures application opens when you want to use a stored picture as wallpaper. If this is the first time that you have viewed pictures on your storage card, it may take a while for all the pictures to load.
- Flick your finger on the screen or roll the TRACKBALL to navigate to the picture that you want to use, then touch it.
-
When the cropper tool appears, do any of the following:
-
To adjust the cropper size, touch and hold the cropper edge. When the cropper arrows appear, drag your finger inward to or outward from the center of the cropper to resize it.
- To move the cropper to another area in the picture, touch and hold inside the cropper, then drag it with your finger to the desired position.
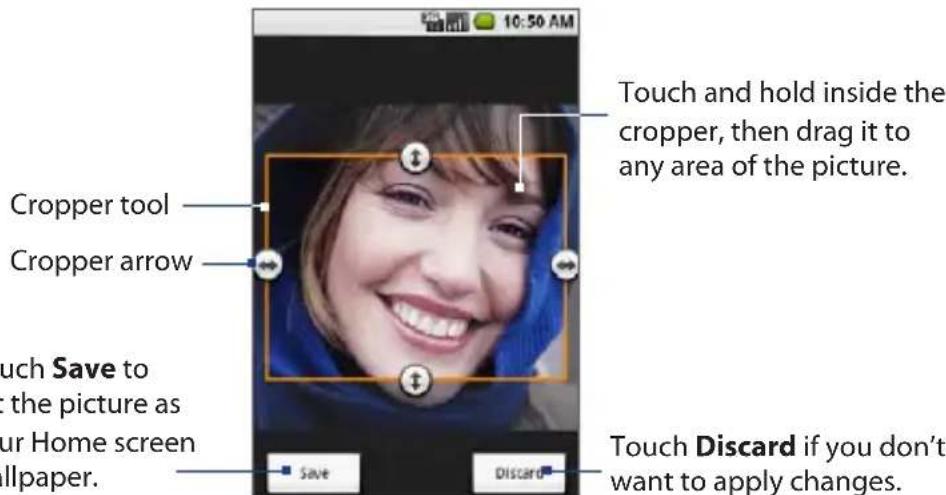
- Touch Save.
Touch Discard if you don't want to apply changes.
42 Getting Started
To change the screen orientation
Slide open the keyboard to change the screen orientation into landscape mode.
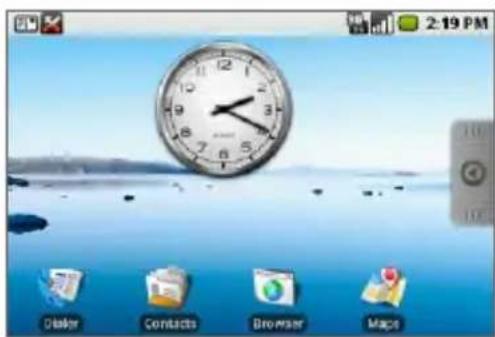
Note In Browser and Pictures, you can set the screen to remain in landscape or portrait orientation regardless of whether the keyboard is open. See Chapter 7 and Chapter 9 for details.
To create a folder and add items to it
You can create folders on the Home screen to hold application icons or shortcuts.
- Do any of the following on the Home screen:
- Press MENU, then touch Add > Shortcut > Folder.
- Touch and hold the screen to open the Add to Home menu, then select Shortcuts > Folder.
A new folder appears on the screen.
-
Touch and hold an application icon or a shortcut on the Home screen to activate move mode, then drag it on top of the folder.
-
Touch the folder to open it. When opened, touch the folder's title bar to close it.
Notes • Delete a folder as you would delete a Home screen item. See "To remove a Home screen item" earlier in this chapter.
- To rename an open folder, touch and hold the folder's title bar. On the Rename folder dialog box, enter the new folder name using the keyboard, then touch OK.
1.8 Device Status and Notifications
Status bar
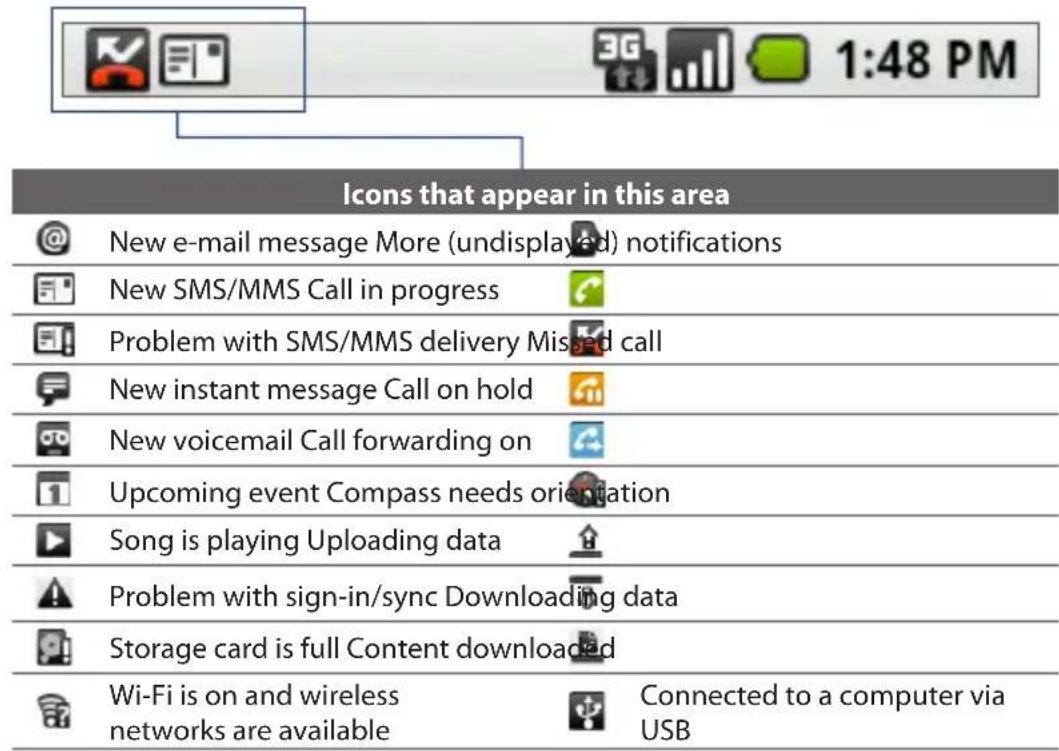
On top of the device screen is the status bar. The left side of the status bar displays notification icons that notify you of a new message, an upcoming calendar event, a missed call, and more. The right side of the status bar displays the device status such as the data connection, connection strength, battery, volume settings, time, and more.
Tip When the status bar is full, touch to display hidden icons/notifications.
Notification icons
These are the icons that appear on the notifications area of the status bar:
44 Getting Started
Status icons
These are the icons that appear on the status area of the status bar:
| Icons that appear in this area | |
| GPRS connected Roaming | |
| GPRS in use No signal | |
| EDGE connected No SIM card installed | |
| EDGE in use Vibrate mode | |
| 3G connected Sound is off | |
| 3G in use Phone is mute | |
| Connected to a Wi-Fi network Battery is very low | |
| Bluetooth is on Battery is low | |
| Connected to another Bluetooth device | Battery is full |
| Airplane mode Battery is charging | |
| Alarm is set GPS is on | |
| Signal strength GPS is connected | |
| Speakerphone on Data is syncing | |
Notifications panel
Notification icons report the arrival of new messages, calendar events, alarm set and ongoing settings such as when call forwarding is on or the current call status. You can open the notifications panel to open the message, reminder, or event notification and know your wireless service provider.
To open the notifications panel
When a new notification icon displays in the status bar, touch and hold the status bar, then slide your finger downward to open the notifications panel.
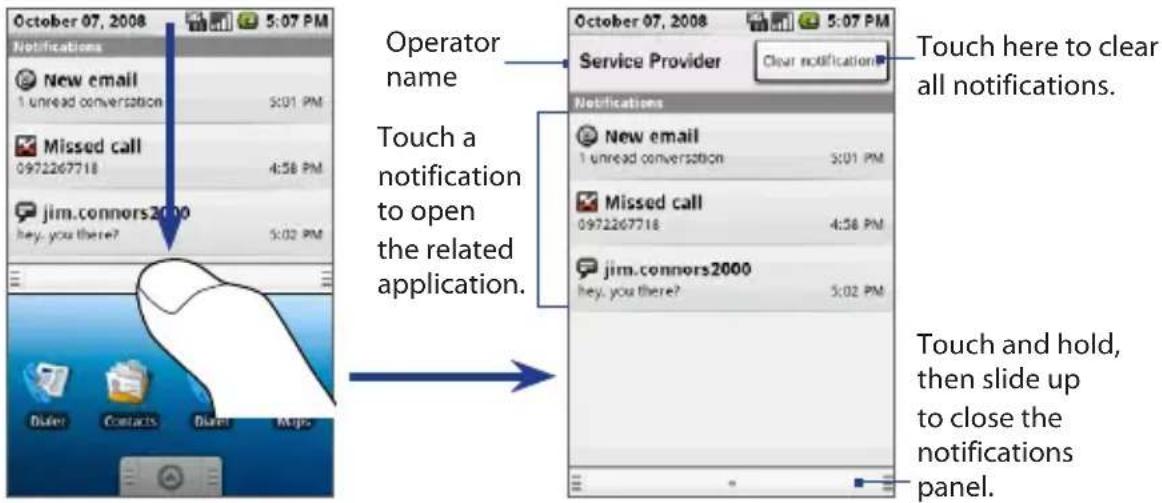
If you have several notifications, you can scroll down the screen to view more notifications.
Tip You can also open the notifications panel on the Home screen by pressing MENU and tapping Notifications.
To close the notifications panel
Do any of the following:
- Touch and hold the bottom bar of the notifications panel, then slide your finger up the screen.
- Press BACK.
Notification LED
The Notification LED located at the right corner of the earpiece provides information on the device status or pending notifications.
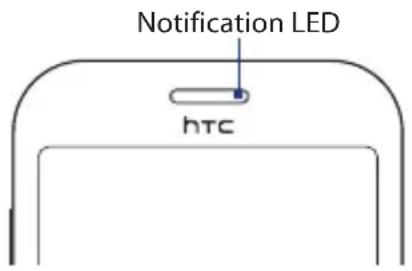
LED Status Indication
Solid green Battery is fully charged
(while the device is connected to the AC adapter).
Solid red Battery is charging.
Flashing red Battery is low.
Flashing green You have a pending notification.
Note The indicators are listed in order of priority. For example, if your device is connected to a power adapter and is charging the battery, the LED will be solid red and will not switch to a flashing green light even if there is a pending notification.
1.9 Applications
The Applications tab holds all pre-installed applications on your device. All icons of applications that you downloaded and installed from Android Market are also added to the Applications tab.
To open the Applications tab
Press HOME, then touch
Note To hide the Applications tab, touch .

The following applications are pre-installed on your device:
Icon Description
 | Alarm Clock Set as many alarms as you want. You can set alarms for appointments, events, and more. See “Alarm Clock” in Chapter 5. |
 | Browser Browse web and WAP sites, and download new programs and files from the Internet. See “Browser” in Chapter 7. |
 | Calculator Perform basic and advanced arithmetic calculations, such as addition, subtraction, multiplication, division, logarithms and more. |
 | Calendar Create events and appointments and keep track of your activities in daily, weekly, and monthly calendars. See Chapter 5 for details. |
 | Camera Take pictures using the device’s built-in camera and share them via e-mail or MMS. See Chapter 9 for details. |
 | Contacts Keep track of your friends and colleagues. Create new contacts or import contacts stored on your SIM card. See Chapter 2 for details. |
 | Dialer Make and receive calls, switch between calls, and set up conference calling. See Chapter 2 for details. |
 | Email Set up and access other e-mail accounts using the e-mail setup. See Chapter 6 for details. |
 | Gmail Create and send e-mails from your device using your Gmail account. See Chapter 6 for details. |
| Icon Description | |
 | IM Chat with family and friends using Google Talk on your device. See Chapter 6 for details. |
 | Maps View your current location, search for places of interest and addresses, seek directions, and more. See Chapter 8 for details. |
 | Market Access Android Market where you can download applications and games to your device. See Chapter 10 for details. |
 | Messaging Send and receive text (SMS) and multimedia (MMS) messages on your device. See Chapter 6 for details. |
 | Music Play back music, create playlists, and more. See Chapter 9 for details. |
 | Pictures View, organize, and sort pictures that are stored on the storage card. See Chapter 9 for details. |
 | Settings Adjust the device settings and configuration. See “Settings” in this chapter or Chapter 11 for details. |
 | SIM Toolkit Access information and other services offered by your wireless service provider. |
 | YouTubeTM Search for uploaded videos in YouTube and play them on your device. See Chapter 9 for details. |
Tip To open applications quickly, you can add the icons of frequently-used applications to the Home screen or to folders which you have created. For details, see "Customize the Home screen" earlier in this chapter.
Recently-used applications
To open a recently-used application
- Press and hold the HOME button to open the recently-used applications window.
The window displays the last six applications you have used after you turned on the device. - Touch an icon in the window to open the related application.
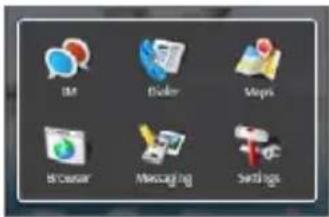
1.10 Settings
Control and customize device settings from the Settings screen.
To open the Settings screen, do any of the following:
- Press HOME > MENU, then touch Settings.
- On the Home screen, touch the Applications tab, then touch Settings.
Settings on your device
| Wireless controls | Configure your device's wireless connections, such as Wi-Fi and Bluetooth, enable Airplane mode, or set the options for roaming, networks, and more. See Chapter 7 for details. |
| Call settings | Set up call services such as voice mail, call forwarding, call waiting, and caller ID. See Chapter 2 for details. |
| Sound & display | Set the call and notification ring tones, or set the screen brightness and screen timeout. See Chapter 11 for details. |
| Data synchronization | Select which applications are synchronized. You can also set automatic synchronization of Gmail, Calendar, and Contacts. See Chapter 4 for details. |
| Security & location | Select the wireless network or the GPS in determining your current location, or set the screen unlock pattern and enable the SIM card lock. See Chapter 8 and Chapter 11 for details. |
| Applications Manage | applications and installation of new programs, or set keyboard shortcuts to launch applications. See Chapter 3 and Chapter 7 for details |
| SD card & phone storage | Check the available storage card and device memory, use the installed storage card as a USB drive, or reset the device to its factory default settings. See Chapter 11 for details. |
| Date & time Set the date, time, time zone, and date or time format. See Chapter 11 for details. | |
| Locale & text Set your preferred language and region, and configure text settings for faster and more accurate text input. See Chapter 3 for details. | |
| About phone See the device status such as the network type, signal strength, battery level, and network name. You can also open this menu to view the legal information and software version of your device. | |
1.11 Adjusting the Volume
Adjusting the ringer volume changes the volume level of the device ring tone, whereas adjusting the media volume changes the volume level of sound notifications and music or video playback. The ringer volume and media volume can be separately adjusted.
To adjust the ringer volume
On any Home or application screens (except during a call or when playing music/video):
-
Press the VOLUME UP or VOLUME DOWN buttons on the left panel of the device to adjust the ringer volume to your desired level. The Ringer volume window appears on the screen to display the volume levels.
-
While in the lowest ringer volume level, press VOLUME DOWN once to set your device to Vibrate mode. The device vibrates and the vibrate mode icon ( ^4 ) appears in the status bar.
- While in Vibrate mode, press VOLUME DOWN once to mute your device. The mute icon (☐) displays in the status bar.
Tip To quickly switch your device to silent mode, press and hold the END CALL/POWER button, then touch Silent mode on the options menu.
You can also adjust the ringer volume on the Settings screen.
- Press HOME > MENU, then touch Settings.
- Touch Sound & display > Ringer volume.
- When the Ringer volume window appears, move the slider to the left (to lower the volume) or to the right (to increase the volume).
- Touch OK to close the window.
Tip You can also increase or lower the volume during a call. See Chapter 2 for details on how to adjust the in-call volume.
To adjust the media volume
When playing music or watching video, press the VOLUME UP or VOLUME DOWN buttons on the left panel of the device to adjust the media volume to your desired level. The Music/video volume window appears on the screen to display the volume level.
You can also adjust the media volume on the Settings screen.
- Press HOME > MENU, then touch Settings.
- Touch Sound & display > Media volume.
- When the Media volume window appears, move the slider to the left (to lower the volume) or to the right (to increase the volume).
- Touch OK to close the window.
1.12 Using the Device's Storage Card as a USB Drive
To transfer music, pictures, and other files from your computer to your device's storage card, you need to set the device's storage card as a USB drive.
To set the device's storage card as a USB drive
- Connect the device to the computer using the USB cable.
- When the USB connected icon ( ) appears in the status bar, touch and hold the status bar, then slide your finger downward to open the notifications panel.
- Touch USB connected, then touch Mount.
- On your computer, navigate to the USB flash drive, then open it.
- Start moving or copying files between the computer and the storage card.
- When finished, disconnect the device from the computer.
Note The device will not recognize the storage card while it is being used as a USB flash drive. Remember to disconnect the device from the computer when you are done copying files to the storage card.
To remove the storage card while the device is on
When you need to remove the storage card while the device is on, you must unmount the storage card first to prevent corrupting or damaging the storage card.
- Press HOME > MENU, and then touch Settings.
- Scroll down the screen, and then touch SD card & phone storage.
- Touch Unmount/eject SD card.
- Remove the storage card by following the instructions in "To remove the storage card" earlier in this chapter.
Chapter 2
Using Phone Features and Managing Contacts
2.1 Making Calls
2.2 Answering or Rejecting Calls
2.3 Call Options
2.4 Using the Call Log
2.5 Adjusting the Phone Settings
2.6 Turning the Phone Function On and Off
2.7 Creating and Managing Your Contacts
54 Using Phone Features and Managing Contacts
2.1 Making Calls
When you press the CALL ( Ⓤ button on your device, the Call log tab always opens first. This tab displays a history list of your incoming, outgoing, and missed calls.
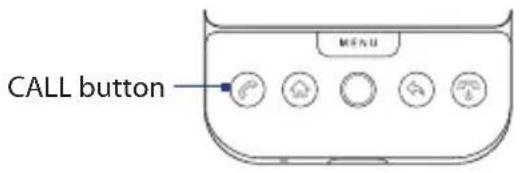
You can place a call to a listed number in the Call log tab, or you can change to the Dialer, Contacts or Favorite tab to make your phone call from any of those tabs.
Use the Dialer
Use the Dialer to enter and call a phone number.
To open the Dialer
Do any of the following:
• On the Home screen, touch Dialer
- On the Home screen, touch the Applications tab, then touch Dialer.
- While on any application screen, press the CALL ( Ⓤ button, then touch the Dialer tab.
To make a call on the Dialer
-
Touch the keys on the dialer to enter the phone number. If you touched a wrong number key, touch ← to erase each subsequent digit of a number. To erase the entire number, touch and hold ←
-
Press the CALL button to place the call.
Tip During a call, press the VOLUME UP/DOWN buttons on the left panel of the device to adjust the in-call volume.
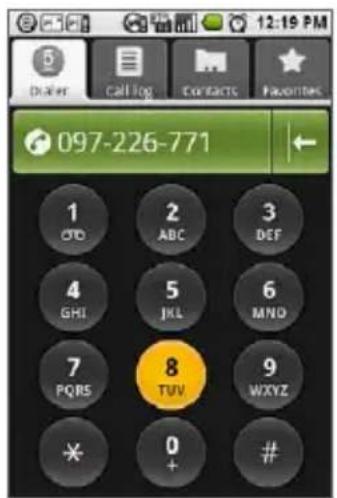
To make an emergency call
On the Dialer tab, enter the international emergency number for your locale (for example, 000), and then press the CALL button on your device.
Notes • When the screen is locked, you need to unlock it first before you can make an emergency call. If your device is in sleep mode, press any button to wake up the device and then press the MENU button to unlock the screen.
• Additional emergency numbers may be included in your SIM card. Contact your wireless service provider for details.
To make an international call
-
Touch and hold the number 0 key on the Dialer tab until the plus (+) sign appears. The plus (+) sign replaces the international prefix of the country that you are calling.
-
Enter the full phone number that you want to dial, and press the CALL button on your device. The full phone number includes the country code, area code (without the leading zero, if any), and phone number.
Make a call from the Call log
While on any application screen, press the CALL button to directly access the Call log tab. You can then touch a missed call, dialed number, or received call that you want to call back.
For more information about the Call log tab, see "Using the Call Log" in this chapter.
Add and call your contacts
In the Contacts tab, add the phone numbers of your contacts so you can easily call them.
- While on any application screen, press the CALL button, and then touch the Contacts tab.
-
Add your contacts to this tab. See "Creating and Managing Your Contacts" later in this chapter for the instructions.
-
Do one of the following:
-
Touch a contact to access the contact details. Navigate to the Dial number section, then touch a phone number that you want to call.
- Touch and hold the contact you want to call and then from the options menu, touch Call Mobile, Call Work, or Call Home to make the call.
Add and call favorite contacts
To quickly find and call contacts who you most frequently communicate with, you can add them as favorite contacts in the Favorites tab.
- While on any application screen, press the CALL button, and then touch the Favorites tab.
- You need to have at least one favorite contact to make a call from this tab. See "Add Favorite Contacts" later in this chapter for the instructions.
-
Do one of the following:
-
Touch a favorite contact to access the contact details. Navigate to the Dial number section, then touch a phone number that you want to call.
- Touch and hold the favorite contact you want to call and then from the options menu, touch Call Mobile, Call Work, or Call Home to make the call.
Call voice mail
The voice mail icon ( ) appears in the status bar when you receive a new voice mail message.
To call voice mail
- Touch and hold the status bar, then slide your finger downward on the screen to open the notifications panel.
- Touch the new voice mail message item in the list.
To use the Dialer to call voice mail
- Press the CALL button, then touch the Dialer tab.
- Touch and hold the number 1 key on the dialer.
Note
If you have not set up your voice mail number, a missing voice mail number error message appears on the screen when you touch and hold the number 1 key. For more information on how to set up your voice mail number, refer to "Adjusting the Phone Settings" in this chapter.
2.2 Answering or Rejecting Calls
When you receive a phone call from someone in Contacts, the Incoming call screen appears and displays the caller ID icon, name, and phone number of the calling party. When you receive a phone call from someone who is not stored in Contacts, only the default caller ID icon and phone number will appear on the Incoming call screen.
To answer an incoming call
Press the CALL ( ⓣ ) button.
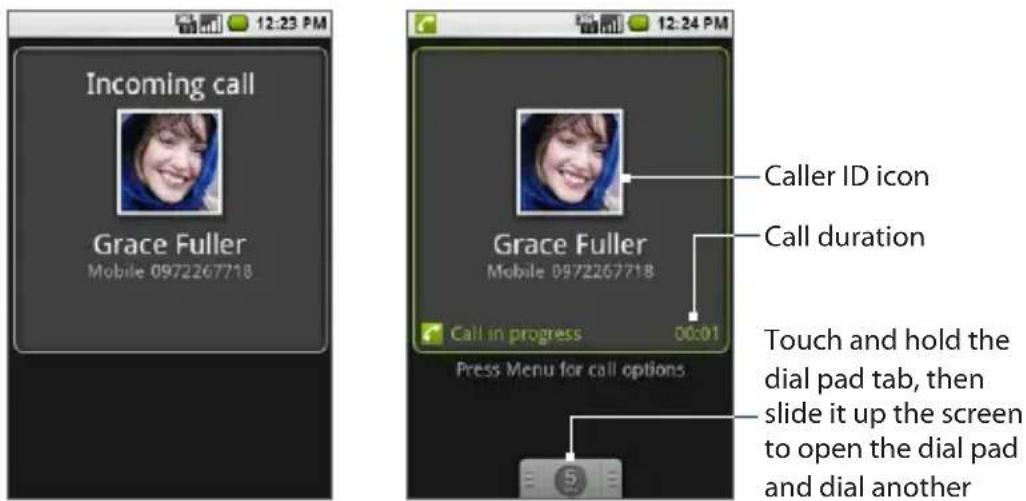
Incoming call screen Answered call screen
- Caller ID icon
Call duration
Touch and hold the dial pad tab, then slide it up the screen to open the dial pad and dial another number.
58 Using Phone Features and Managing Contacts
To reject an incoming call
Press the END CALL/POWER ( Ⓤ button to reject and send the call to your voice mail.
2.3 Call Options
When a call is in progress, press MENU to open the call options. Touch the available buttons on the call options menu to put a call on hold, dial another contact for a phone conference, mute the device microphone, and more.
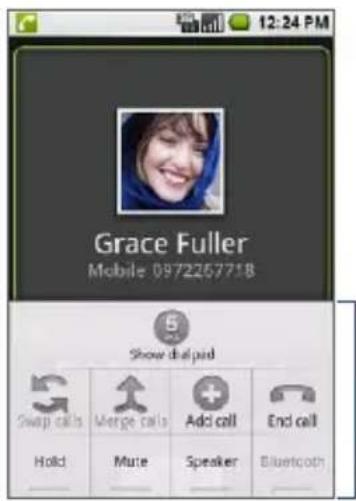
Call options
Note When the device is dialing, only the End call and Speaker buttons are enabled. Other buttons are disabled.
To hold the call
Press MENU, then touch Hold to hold the call. Touch this button again to resume the call. When you hold the call, the Hold call icon( ) appears in the status bar.
To mute the microphone during a call
Press MENU, then touch Mute to toggle between turning the microphone on or off. When the microphone is turned off, the Mute button indicator lights up green and the mute icon ( 📄 appears in the status bar.
To turn the speakerphone on or off
During a call, press MENU, then touch Speaker to toggle between turning the speakerphone on or off. The Speaker button indicator lights up green and the speakerphone icon ( ) appears in the status bar when the speakerphone is on.
Warning! To avoid damage to your hearing, do not hold your device against your ear when the speakerphone is turned on.
To transfer the call to a Bluetooth headset
When a Bluetooth headset is paired and connected with your device, you can receive all incoming calls on the Bluetooth headset for hands-free conversation.
Note For more information on how to connect a Bluetooth headset or a Bluetooth car kit to your device, see "Using Bluetooth" in Chapter 7.
When the Bluetooth headset is disconnected from your device, do the following to reconnect it and transfer the ongoing call:
-
Make sure that Bluetooth on your device and on the Bluetooth headset are on. See "Using Bluetooth" in Chapter 7 for details.
-
During a call, press HOME > MENU, then touch Settings.
-
Touch Wireless controls > Bluetooth settings.
-
In the Bluetooth devices section, touch and hold the name of the Bluetooth headset that you have previously paired and connected to your device, then touch Connect on the pop-up window. When connected, the Bluetooth connected icon (✗) appears in the status bar. The call is automatically transferred to the Bluetooth headset.
-
Press the TALK button to display the ongoing call screen.
-
To transfer the call back to your device, on the ongoing call screen, press MENU, then touch Bluetooth.
To end a call
When a call is in progress, you can do any of the following to hang up:
- Press the END CALL/POWER button.
- Press MENU, then touch End call.
Manage multiple calls
Your device notifies you when you have another incoming call, and gives you the option of rejecting or accepting the call. If you are already on a call and accept the new call, you can choose to swap between the two callers.
- Press the CALL ( Ⓞ button to take the second call, and put the first call on hold. You can also press MENU, then touch Hold call in progress & answer.
- To end the second call and return to the first call, press the END CALL/POWER ( ) button on your device.
- To end the first call and take the incoming call, press MENU, then touch End call in progress & answer.
• To swap between two calls, press MENU, then touch Swap calls.
Set up a conference call
You can set up a conference call of up to six participants, including yourself.
Notes Not all mobile phone networks support conference calling. Contact your wireless service provider for details.
-
Make a call to the first conference call participant. See "Making Calls" earlier in this chapter for details.
-
When connected to the first participant, do any of the following to add another conference call participant:
-
Press MENU, then touch Add call, or touch at the bottom of the ongoing call screen, then dial the number of the next conference call participant.
- Press TALK, touch the Call log, Contacts, or Favorites tab, then select the next conference call participant from the list.
The first call is automatically put on hold.
- When connected to the second conference call participant, press MENU, then touch Merge calls to begin the conference call.
- To add more conference call participants, repeat steps 2 to 4.
- During a conference call, press MENU and touch Manage conference to drop a conference call participant or to talk privately to one of the participants.
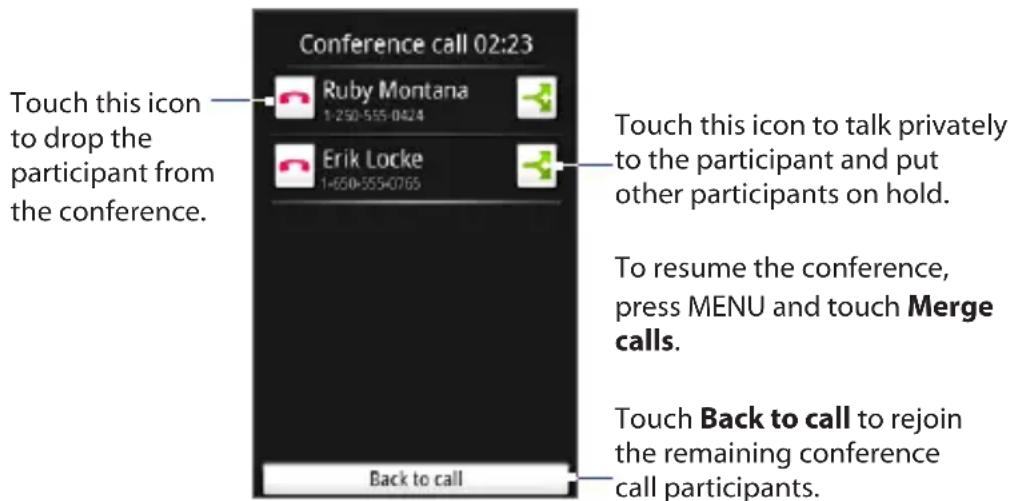
- To end the conference call and disconnect all callers, press the END CALL button.
62 Using Phone Features and Managing Contacts
2.4 Using the Call Log
The Call log tab lists all missed calls ( 📄 dialed numbers ( ), and received calls ( 📄)
To use the Call log tab
- While on any screen, press the CALL button, then touch the Call log tab.
-
Do any of the following:
-
Touch the name or number in the list to call.
- Touch and hold a name or number in the list to display the options menu where you can select to call the contact, view the contact information (if the number is stored in your contacts list), edit the number before you redial, and more.
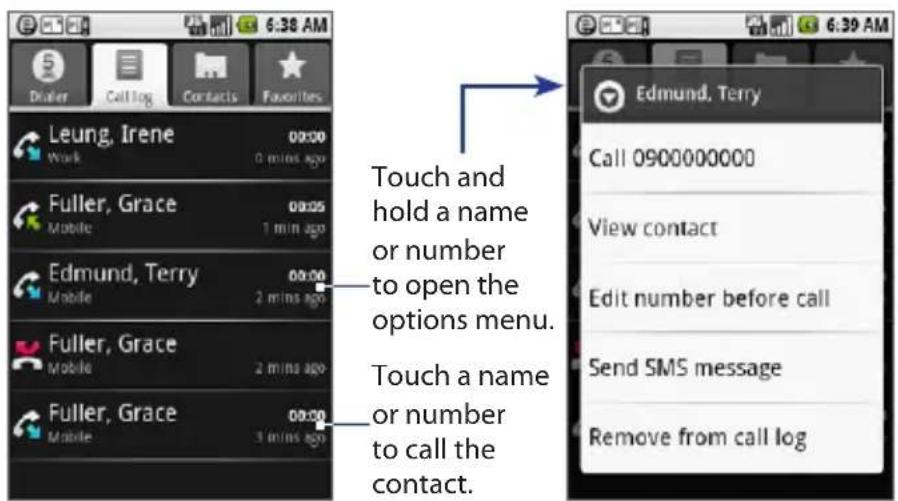
Note If you are signed in to Google Talk, and the contact on the Call log tab is one of your Google Talk friends, the online status of that contact will display below their name. For more information about Google Talk, see "Using Google Talk" in Chapter 6.
To add a new phone number to Contacts
If the phone number of the person who called is not in your contacts list, you can choose to save the number after you hang up.
- While on any screen, press the CALL (④) button, then touch the Call log tab.
- Touch and hold the received call that you want to save to your contacts list, then touch Add to contacts.
- When the Contacts screen appears, touch Create new contact. The received call number is automatically added to the Mobile phone field in the Dial number section.
- Enter other information for the contact, if desired.
- Scroll down the screen, then touch Save.
Note For more information about creating contacts, see "Creating and Managing Your Contacts" in this Chapter.
To check a missed call
You will see the missed call icon in the status bar when you missed a call. To check who the caller was, press the CALL button, then touch the Call log tab. Missed calls are indicated by the missed call icon ( )
Tip You can also touch and hold the status bar, then slide your finger downward on the screen to open the notifications panel. The missed call number and/or contact name is displayed.
To clear the Call log
Do any of the following:
- To remove a name or number from the Call log tab, touch and hold on the name or number, then touch Remove from call log.
• To clear the entire Call log, press MENU then touch Clear call log.
2.5 Adjusting the Phone Settings
You can adjust the phone settings of your device such as your voice mail number, or enable additional call services from your wireless service provider.
To open the phone settings menu, press HOME > MENU, then touch Settings > Call settings.
| Options Description |
| Fixed Dialing Number Restrict outgoing calls to a fixed set of numbers. To enable this feature you must know your SIM card's PIN2 code. If this feature is supported, obtain your PIN2 code from your wireless service provider. |
| Voicemail Specify another voice mail number aside from the voice mail number on your SIM card. |
| Call forwarding Select how you want your device to handle busy, unanswered, and unreachable calls. You can also set the call forwarding option for all incoming calls. |
| Additional call settings Enable or disable caller ID and call waiting services. |
| Operator selection Scan and select a network operator manually, or set the network selection to Automatic. |
2.6 Turning the Phone Function On and Off
In many countries, you are required by law to turn off the device while on board an aircraft. A way to turn off the phone function is to switch your device to Airplane mode. When you enable Airplane mode, all wireless radios on your device are turned off, including the phone function, Bluetooth, and Wi-Fi.
To enable or disable Airplane mode
-
Press HOME > MENU, then touch Settings > Wireless controls.
-
Select the Airplane mode check box to enable or disable Airplane mode. When enabled, the Airplane mode icon (icon 3) displays in the status bar.
Tip When you disable Airplane Mode, the phone function is turned back on and the previous state of Bluetooth is restored.
2.7 Creating and Managing Your Contacts
Similar to an online address book, the Contacts application gives you quick and easy access to the people you want to reach. You can view and create contacts on your device and sync these with your Gmail contacts on the web. You can also import contacts stored on your SIM card.
To view your Contacts list
Do any of the following to display your contacts list:
• Press HOME, then touch Contacts.
- Press the CALL button, then touch the Contacts tab.
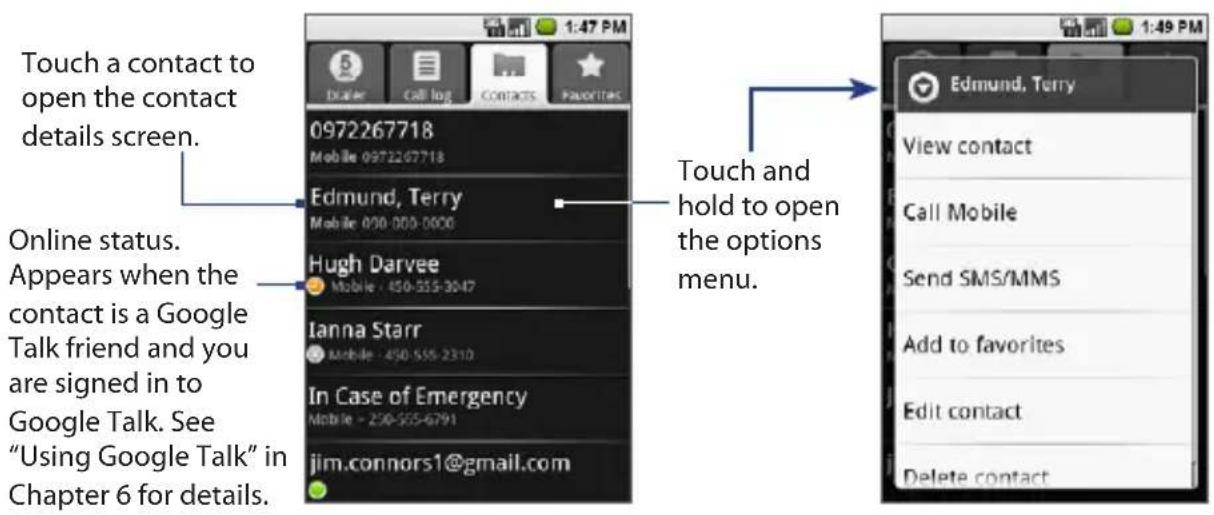
Tip When you reply to or forward an e-mail message to an e-mail address that is not previously stored in Contacts, the e-mail address is automatically added to your contacts list.
Add a new contact
To add a new contact
- In the contacts list, press MENU, then touch New contact.
- Open the keyboard, enter the contact's name, then enter their contact information such as mobile phone number, home phone number, or e-mail address. Roll the TRACKBALL up or down to move among fields.
Note To change a default information label, for example Home e-mail to Work e-mail, touch the information label button, then select another label on the menu. You can also touch Custom on the menu to create another information label that is not in the list.
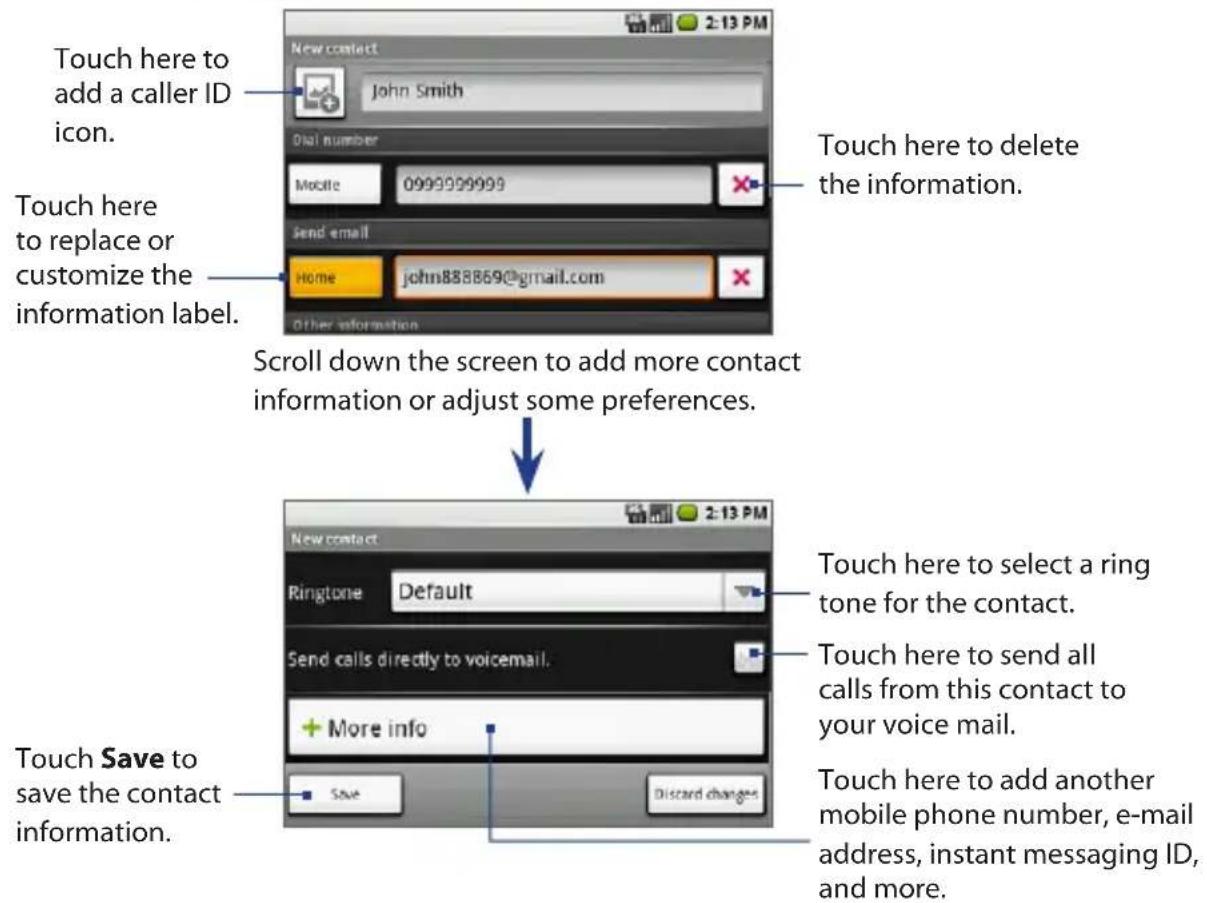
- If you want all calls from this contact to go directly to your voice mail, select the Send calls directly to voicemail check box.
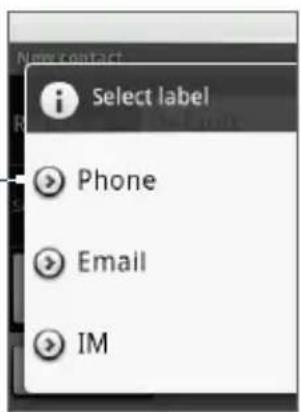
- Touch More info if you want to store additional information for the contact such as a postal address, an instant messaging ID, or additional phone numbers or e-mail addresses.
Select an information label on the menu, then enter the additional contact information.
- When finished, touch Save.
Tip You can also press MENU, then touch Save to save the contact.
Touch to view and select — additional contact information
To import contacts from the SIM card
You can add contacts saved on your SIM card to your device's contacts list.
- Press HOME, then touch Contacts. Your contacts list appears.
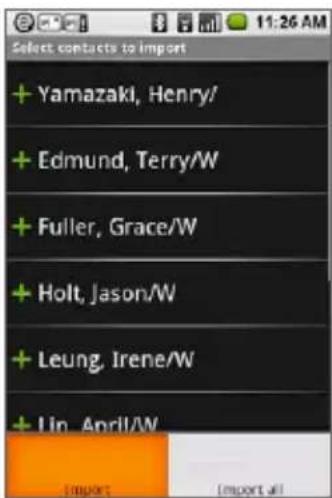
- Press MENU, then touch Import contacts. Wait for the SIM card contacts to load.
-
Do any of the following:
-
To import a contact, navigate to the contact in the list using the TRACKBALL, press MENU, then touch Import.
- To import all contacts, press MENU, then touch Import all.
To add a contact from the Call log tab
Use the Call log tab to create a new contact from dialed, received, or missed call numbers. You can also add these call log numbers to any of your existing contacts.
- In the contacts list, touch the Call log tab.
- Touch and hold the phone number you want to add to your contacts, then touch Add to contacts.
-
Do any of the following:
-
If you want to create a new contact from the number, touch Create a new contact, edit the contact information, then touch Save.
- If you want to add the number to an existing contact, select the contact in the list to add the number to their contact details, then touch Save.
Tip To save a phone number in a text message, open the message thread, then touch the message with the phone number. The Dialer tab opens with the number in the phone number field. Press MENU, then touch Add to contacts. Follow step 3 above.
To import contacts from Microsoft® Outlook®
You can import Microsoft Outlook contacts to your device.
Note The following instructions may vary depending on your computer's operating system and Microsoft Outlook version. For more information on how to import Microsoft Outlook contacts to Gmail, go to http://office.microsoft.com/en-us/outlook/HA011489021033.aspx or http://mail.google.com/support/.
- On your computer, open Office Outlook.
- Click File > Import and Export.
- On the Import and Export Wizard window, select Export to a file, then click Next.
- When prompted to select the type of file you want to create for your contacts, select Comma Separated Values (Windows), then click Next.
-
When prompted to select the folder to export from, select Contacts, then click Next.
-
Specify the folder where you want to save the Comma Separated Values (.csv) file, then click Next.
Tip If you want to map custom contact fields before you export the file, click Map Custom Fields on the next window.
- Touch Finish.
- Open a web browser on your computer, then open Gmail.
- Click Contacts on the left panel of the screen, then click Import near the top right corner of the screen.
- Click Browse to locate the .csv file you created earlier, then click Import. The Microsoft Outlook contacts are imported to your Gmail contacts list.
Tip If you want to add the imported contacts to a particular contact group, select the Also add these imported contacts to option, then select a contact group on the drop-down menu, before you click Import.
The next time your device synchronizes with your contacts on the web, newly-added contacts will appear on your device. For more information about synchronizing contacts, see Chapter 4.
Add favorite contacts
Use the Favorites tab as a way to filter your contacts list.
- In the contacts list, press and hold the contact to open the options menu.
- Touch Add to favorites.
The contact will be added to the contacts list on the Favorites tab. A colored star will also appear with the contact name in the contact details screen.
Edit and customize your contacts
To edit contact information
You can always make changes to the information you have stored for a contact.
-
Do any of the following to open the Edit contact screen:
-
In the contacts list, touch and hold the contact whose information you want to edit, then touch Edit contact.
-
In the contacts list, touch the contact whose information you want to edit to open the contact details screen. On the contact details screen, press MENU, then touch Edit contact.
-
Edit the contact information, then touch Save. To ignore all changes you made, touch Discard changes.
Note Once you've edited a contact's details, the contact is automatically added to the My Contacts group. For more information about My Contacts, see "To select a group to display" in this chapter.
To change the contact's default phone number
The default phone number of a contact appears below the contact's name in the contacts list. The default phone number is used when you initiate a call or send an SMS/MMS message from the contacts list (by tapping and holding a contact). You can change the contact's default phone number.
- In the contacts list, touch the contact to open the contact details screen.
- Touch and hold the phone number you want to use as the contact's default phone number, then touch Make default number. The default phone number moves on top of the list and this icon appears before the phone number.
- Press BACK to save your changes.
To customize contact information
While creating a new or editing an existing contact, you can add a caller ID icon or assign a ring tone to the contact.
Note Before assigning a caller ID icon to a contact, make sure that the contact's picture is stored in the installed microSD card.
- In the New contact or Edit contact screen, touch the Add icon button. The Pictures application opens and displays your albums.
- Navigate to the contact's picture using the TRACKBALL, then touch the picture.
-
When the cropper tool appears. Do any of the following:
-
To adjust the cropper size, touch and hold the cropper edge. When the cropper arrows appear, drag your finger inward to or outward from the center of the cropper to resize it.
-
To move the cropper to another area on the picture, touch and hold inside the cropper, then drag it with your finger to the desired position.
-
Touch Save. The picture is associated with your contact.
Note The caller ID icon will appear on the screen when you receive a call from the contact. If you don't add a caller ID icon, the default placeholder icon (☐) will be used.
- Touch the Ringtone field, then select a ring tone from the list. The ring tone briefly plays when selected.
- If you want to assign the ring tone to the contact, touch OK.
View, organize and search contacts
To browse the contacts list
You can easily browse through your contacts list by using finger gestures.
- To move down the contacts list slowly, drag your finger upward. To move up the contacts list, drag your finger downward.
72 Using Phone Features and Managing Contacts
- To scroll down the contacts list automatically, flick your finger upward on the touch screen. To auto scroll upward, flick your finger downward. Touch the screen to stop scrolling.
To select a group to display
You can manage your contacts easier by selecting a particular group, for example, those contacts with phone numbers, to appear in the contacts list.
- Press HOME, then touch Contacts. Your contacts list appears.
- Press MENU, then touch Display group.
-
Select the group you want to display in the contacts list. You can select:
-
All contacts. Display all contacts that you have created on and added automatically to your phone.
- Contacts with phone numbers. Display only the contacts with phone numbers.
- My Contacts. This is a special group of contacts that displays by default in your contacts list. It includes contacts that you frequently communicate with and those that you have recently edited.
Tip To move a regular contact into the My Contacts group on your device, simply edit the contact's details. Refer to the "To edit contact information" in this chapter.
- Starred in Android. Display only your favorite contacts. For more information, see "Add favorite contacts" in this chapter.
4. Touch OK.
Note All e-mail addresses that you have sent messages to are automatically added to the Suggested Contacts group in Gmail on the web. You can move contacts from the Suggested Contacts into My Contacts, or create additional contact groups using the Gmail on the web. For more information, go to http://mail.google.com/support.
To find a contact on your device
There are several ways to find a contact when your contacts list is long.
- On the Contacts tab, open the keyboard, then press the Search key. Enter the contact information you want to search. As you enter information, matching contacts will appear on the screen. Touch a contact and then touch the Search button or press the Search key again.
- Browse through your contacts by rolling the TRACKBALL, or by sliding your finger up and down on the screen. Rapid brush movements in either direction accelerates the scrolling. Touch the screen to stop the scrolling.
- Another way to find a contact quickly is to use the Quick scroll tab. As soon as you start scrolling with your finger, the quick scroll tab appears on the right, connected to the scroll bar.
Touch and drag the tab up or down to scroll through the alphabet rapidly. Release your finger when the first letter of the name you are looking for appears. You will be taken to that point in the names.
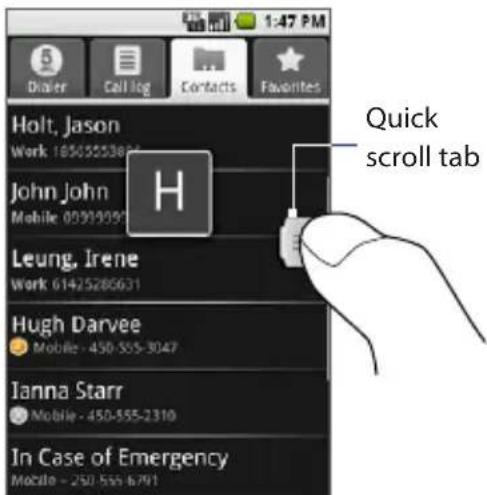
- While on the Home screen, open the keyboard and start entering the contact's name. The Contacts tab opens and displays matching contacts with the information you entered.
74 Using Phone Features and Managing Contacts
Communicate with your contacts
From the contacts list you can quickly call or send a text or multimedia message to a contact's default phone number.
However, to view all the information you have stored for a contact, and to initiate other types of communication with that contact, open the contact details screen.
To open the contact's details screen, touch the contact name in the contacts list.
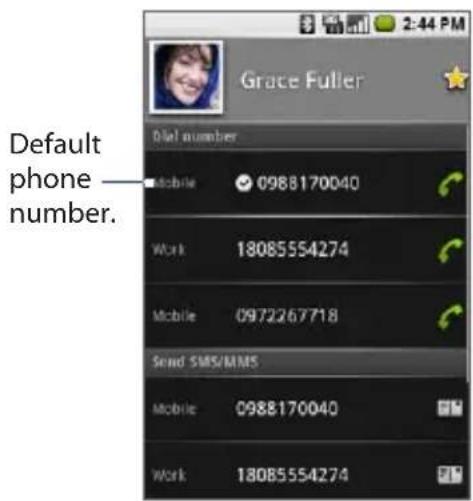
Contact details screen
To call a contact
Do any of the following:
- In the contacts list, use the TRACKBALL to navigate to the contact you want to call, then press the CALL button. The contact's default phone number is dialed.
- To dial a different number for the contact, touch the contact's name in the contacts list to open the contact details screen, then touch a phone number below the Dial number section.
To send a text or multimedia message to a contact
The contact must have a mobile phone number in their contact details for you to send them a text or multimedia message.
Do any of the following:
- When the contact's default number is a mobile phone number, touch and hold the contact's name in the list, then touch Send SMS/MMS on the menu.
- Touch the contact in the list to open the contact details screen, then touch a mobile phone number in the Send SMS/MMS section.
A compose screen opens for your message.
Note For more information about composing and sending text and multimedia messages, see "Sending Text and Multimedia Messages" in Chapter 6.
To send an e-mail to a contact
The contact must have an e-mail address in their contact details for you to send them an e-mail.
- In the contacts list, touch the contact you want to send the e-mail.
- When the contact details screen opens, touch an e-mail address in the Send email section.
Note If you have more than one e-mail account set up on your device, you will be prompted to select which account to use to send the message.
A compose screen opens for your new e-mail.
Note For more information about composing and sending e-mail messages, see "Using Gmail" in Chapter 6.
To send an instant message to a contact
The contact must have a Google Talk ID in their contact details and you must have added them as a friend in Google Talk, before you can send them an instant message.
Tip If you are signed in to and you added the contact as friend in Google Talk, you can check whether the contact is available ( ) via their online status indicators in the contacts list.
Touch the contact to open the contact details screen, then touch the Google Talk ID in the Send instant message section. You will be prompted to sign in to Google Talk if have not signed in yet.
Your chat session begins. If your contact is not available, a message will appear on the chat screen to inform you that the contact is offline.
Note For more information about instant messaging, see "Using Google Talk" in Chapter 6.
To map a contact's address
The contact must have a postal or physical address in their contact details before you can map their location using Maps.
- In the contacts list, touch the contact to open the contact details screen.
- Navigate to the Map address section, then touch the postal or physical address you want to map. The Maps application opens and locates the address.
Note For more information on how to use Maps, see Chapter 8.
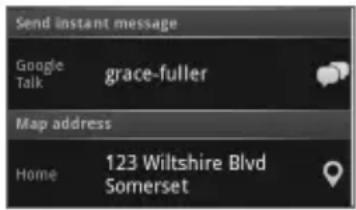
Keyboard shortcuts in Contacts
Contacts list screen
| To Do this | |
| Create a new contact | Press +N |
| View the contact details | Press ← |
| Call the contact | Press ∅ |
| Jump to the top or bottom of the contacts list | Press ,H , then roll the TRACKBALL up/down |
| Contact details screen | |
| To Do this | |
| Edit the contact details | Press +e |
Chapter 3
Entering Text
3.1 Using the Keyboard 3.2 Adjusting the Text Settings
3.1 Using the Keyboard
When you start an application or select a field that requires text or numbers, you can open and use the QWERTY keyboard to enter information. The keyboard is similar to a standard keyboard on your computer.
To open the keyboard
- Hold your device sideways, with the control buttons on the right.
- Push the screen panel up to reveal the keyboard.
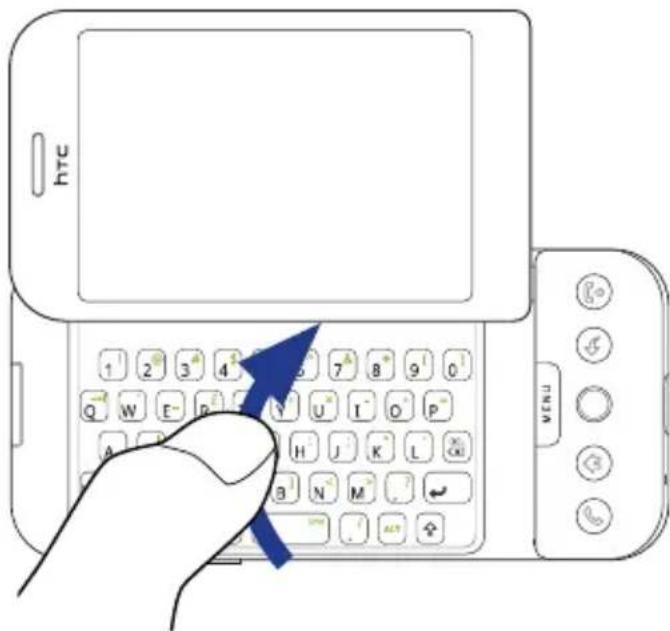
Note The screen automatically changes to landscape orientation when you open the keyboard, except in Browser and Pictures, where you can set the screen orientation depending on your preference.
To use the keyboard
You can do the following with the keyboard:
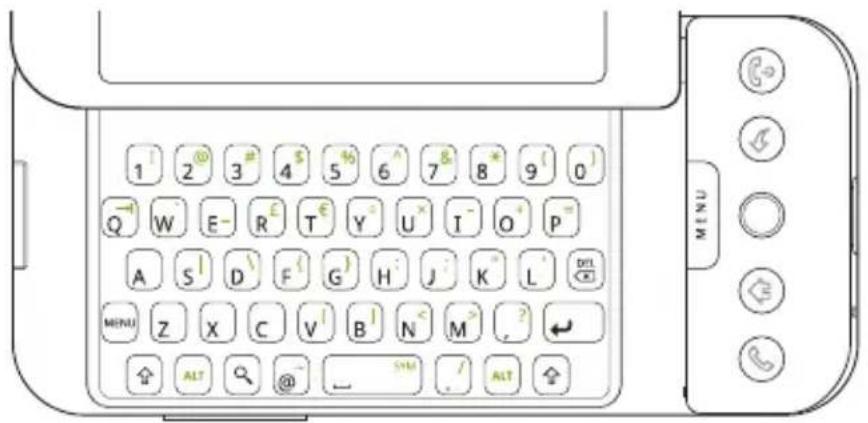
To Do this
| Enter lowercase letters and numbers Press the keys using your thumbs or fingers. | |
| Enter all letters in uppercase | Press SHIFT (↑ twice. Press again to change back to all lowercase letters. |
| Enter a single uppercase letter | Press and then press the corresponding key. |
| Enter the symbol or punctuation mark printed at the upper right corner of an alphabet key | Press ALT ( ), then press the corresponding key. |
| Enter the symbol or punctuation mark printed at the upper right corner of a numeric key | Press and then press the corresponding key. |
| Insert a special character | Press + SPACEBAR ( ) to open the special character window. Touch the special character on the screen to insert it into your text. |
| Insert an @ character | • Press • Press + 2. |
| To Do this | |
| Delete the character to the left | Press DEL ( [IMAGE] |
| Delete the character to the right | Press [IMAGE] |
| Delete the entire line of text | Press [IMAGE] |
| Move the cursor to the beginning or end of the line | Press , then roll the TRACKBALL to the left or right |
| Create a tab character | Press [IMAGE] q |
| Select text | Press [IMAGE], then roll the TRACKBALL |
| Select all text in a field | Press [IMAGE]aHighlight the text, press and hold the TRACKBALL, then touch Select all on the menu. |
| Cut text When the text is highlighted (selected),press [IMAGE]xHighlight the text, press and hold TRACKBALL, then touch Cut on the menu. | |
| Copy text to the clipboard When the text is highlighted (selected),press [IMAGE]cHighlight the text, press and hold TRACKBALL, then touch Copy on the menu. | |
| Paste text copied on the clipboard When the text is highlighted (selected),press [IMAGE]vHighlight the text, press and hold TRACKBALL, then touch Paste on the menu. | |
| Undo change | Press [IMAGE]z |
Special keys
Search
Press the Search key to search information on the current screen or application. For example, while in the Contacts tab, press the Search key to search contact-related information such as names, phone numbers, or e-mail addresses in your contacts list.
Press the Search key while in Maps to search for places of interest. Press the Search key while in the Home screen or Browser to launch Google search and search information on the web.
In any search bar, enter the information you want to search, then press again, or touch the Search button on the screen.
Menu MENU
Instead of pressing the MENU button, you can press the Menu key on the keyboard to open the menu for each screen. This means that, with the keyboard open, you can open the a screen menu using your left hand (by pressing the Menu key) and select a menu option with your right hand (by rolling and pressing the TRACKBALL).
Create application shortcuts
You can set keyboard shortcuts that open individual applications when used together with the Search key. For example, if the shortcut to the Browser application is "b", then on any application screen on your device, you could press + b to open the Browser application.
To assign a shortcut key to an application
- Press HOME > MENU, then touch Settings
- Scroll down the screen, then touch Applications > Quick launch.
Note The keyboard shortcuts are organized alphabetically first (a to z), then followed by numbers 1 to 9.
82 Entering Text
-
Touch an unassigned letter or number.
-
When a list of all installed applications appears, touch the application that you want to assign the shortcut.
To replace a shortcut key
By default, some applications have already been assigned shortcuts, such as "b" for Browser. You can change or replace these default shortcuts.
-
Press HOME > MENU, then touch Settings.
-
Scroll down the screen, then touch Applications > Quick launch.
-
Touch the application shortcut you want to replace, then select the new application that you want to assign the shortcut.
3.2 Adjusting the Text Settings
You can configure the text input settings for faster and more accurate text input.
To adjust the text settings
- Press HOME > MENU, then touch Settings.
- Scroll down the screen, then touch Locale & text.
-
Enable or disable the following options according to your preference:
-
Auto-replace. Turn this feature on to automatically correct commonly mistyped words. The Auto-replace function is not a spell-checker.
- Auto-cap. When enabled, the first letter in a text field or the first letter after a period (.), question mark (?), or exclamation point (!) is automatically capitalized.
- Auto-punctuate. When enabled, a period (.) is automatically inserted to the text when you press the SPACEBAR twice.
Note All text settings are enabled by default.
Chapter 4
Synchronizing Information
4.1 About Synchronization
4.2 Selecting Applications to Synchronize
4.1 About Synchronization
Google applications on your phone, such as Gmail, Calendar, and Contacts, give you access to the same personal information (e-mails, events, and contacts) that you add, view, and edit on your computer using Gmail or Google Calendar.
This means that when you add, change, or delete any information in any of these applications on the web, the updated information also appears on your device, and vice versa. This keeps your personal information intact, so when you lose your device or when your device is destroyed, your personal information can and will appear as before, on a replacement device.
This information mirroring is made possible through over the air data synchronization or data syncing. Data syncing occurs in the background and does not get in your way. You'll know that your data is being synchronized when you see the data synchronization icon ( ) in the status bar.
4.2 Selecting Applications to Synchronize
Sending large amounts of data back and forth over the air can take time and require considerable bandwidth. You can control data synchronization by selecting which applications to sync with those on the web.
To select which application to synchronize
- Press HOME > MENU.
- Touch Settings > Data synchronization.
Note By default, all personal information in Gmail, Calendar, and Contacts will sync whenever you make a change or receive a new message.
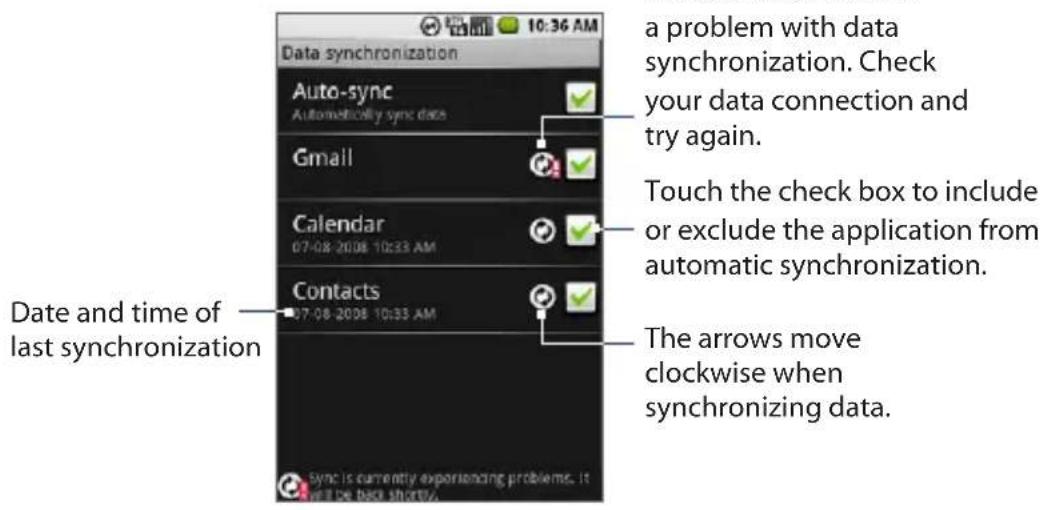
- Select or clear the following option and/or applications:
- Auto-sync. When selected, your device will automatically sync Gmail, Calendar, and Contacts as you make changes or receive new messages. When cleared, information will not be automatically synchronized.
Tip When Auto-sync is disabled, you can synchronize individual applications manually by selecting their respective check boxes on this screen. You can also navigate to an application or item using the TRACKBALL, press MENU, then touch Sync now.
- Gmail. If Auto-sync is enabled, clear the check box to exclude Gmail from automatic synchronization, or select to begin synchronization of e-mails on your device and on the web. You can also control synchronization by selecting which e-mail label you want to synchronize. See "To select labels to synchronize" in Chapter 6 for details.
- Calendar. If Auto-sync is enabled, clear the check box to exclude Calendar from automatic synchronization, or select the item to begin synchronization of calendars and calendar events on your device and on the web.
- Contacts. If Auto-sync is enabled, clear the check box to exclude Contacts from automatic synchronization, or select the item to begin synchronization of contacts on your device and on the web.
To stop synchronization
During synchronization, press MENU, then touch Cancel sync.
Chapter 5
Managing Your Time
5.1 Using Calendar
5.2 Setting Alarms
5.1 Using Calendar
Use Calendar to create and manage events, meetings, and appointments. You can also specify reminders for each event so you are alerted every time an event is coming up. Depending on your synchronization settings, the Calendar on your device stays in sync with your Google Calendar on the web.
Note For more information about Calendar synchronization, see Chapter 4.
Open Calendar
- Press HOME, then touch the Applications tab.
- Touch Calendar. The Calendar in the Agenda view opens.
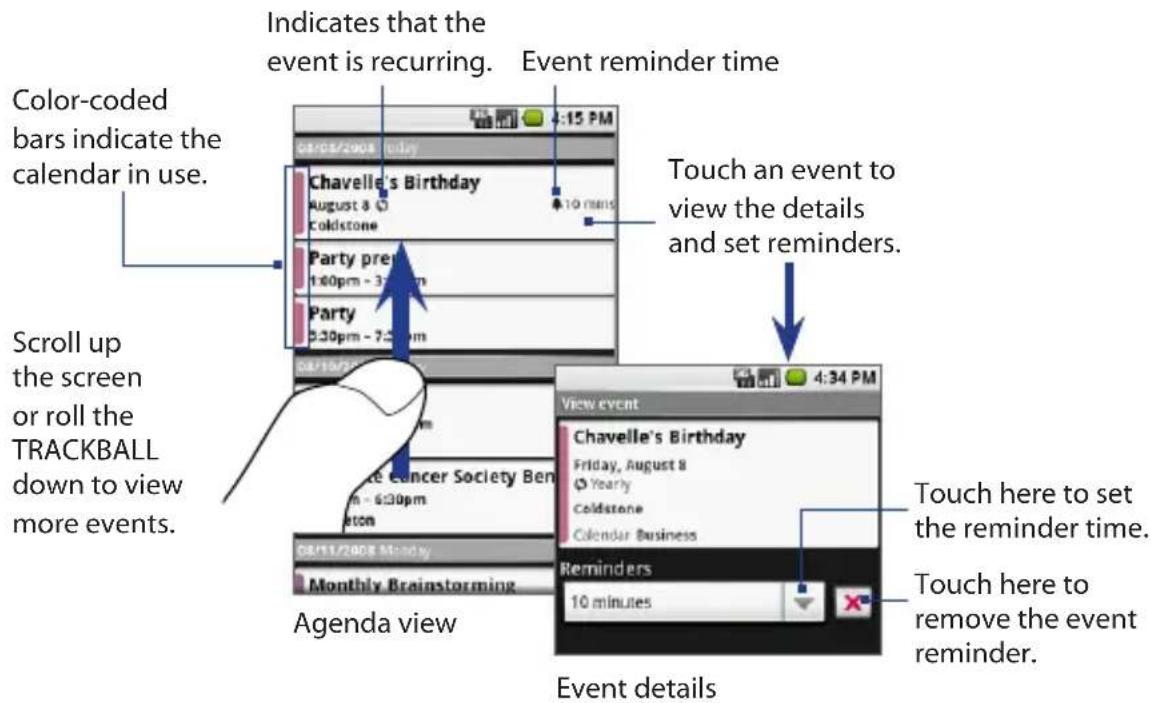
Create events
To create an event
-
On any Calendar view, press MENU and touch New event to open the Event details screen.
-
Open the keyboard and enter the event name.
-
Do one of the following:
- If there is a time frame for the event, touch the From and To date and time to set them.
- If it is a special occasion such as a birthday or a whole-day event, set the From and To date, then select the
All Day check box.
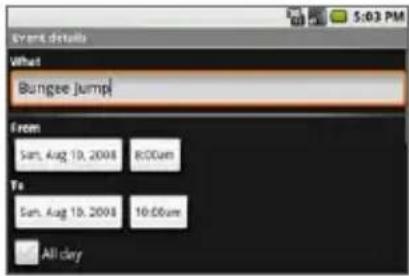
-
Enter the event location and description.
-
If you have more than one calendar, select the calendar you want to use to store the event.
Tip You can create multiple calendars, such as Personal, Business, or Family, using Google Calendar on the web. Depending on your synchronization settings, these calendars are added to your device when you synchronize the Calendar. For more information on how to create calendars, go to http://www.google.com/support/calendar/bin/answer.py?answer=37095&topic=15281.
-
Set the event reminder time in Reminders, then select whether the event is recurring in Repeats.
-
Press 📂, then touch Show extra options to set your online status when the event occurs and to specify whether the event is Private or Public. If you are sharing the current calendar with other people, set the event as Private to keep the event from appearing in your shared calendar.
-
When finished, touch Save.
Tip To quickly create an event in Day or Week view, touch and hold an empty time slot, then touch New event. A new Event details screen appears with the selected time slot and date in the From fields.
To edit an event
- On any Calendar view, use the TRACKBALL to navigate to the event that you want to edit.
- When the event is selected, press the TRACKBALL to view the event details.
- Press, then touch Edit event.
Notes • If the event is shared and you have no write privileges for that event, the Edit event option does not appear on the menu options.
- If the event you are editing is recurring, you will be asked to choose which events you want changed. You may choose to edit only the current one you are editing, all events in the series, or the current event plus future events.
- Edit the event, then touch Save.
To cancel an event
- On any Calendar view, use the TRACKBALL to navigate to the event that you want to edit.
- When the event is selected, press the TRACKBALL to view the event details.
- Press 📋, then touch Delete event.
- When prompted to confirm, touch OK.
View events
You can display the Calendar in daily, weekly, or monthly view. To do this, press MENU, then touch Day, Week, or Month. While on any Calendar view or on any other date, press MENU, then touch Today to return to the current day.
Using the Day view
In Calendar, press MENU, then touch Day. Your daily calendar appears.
Days are divided into horizontal time slots (rows). Events are shown tiled and span the time they last. All-day events are displayed on top of the day list.
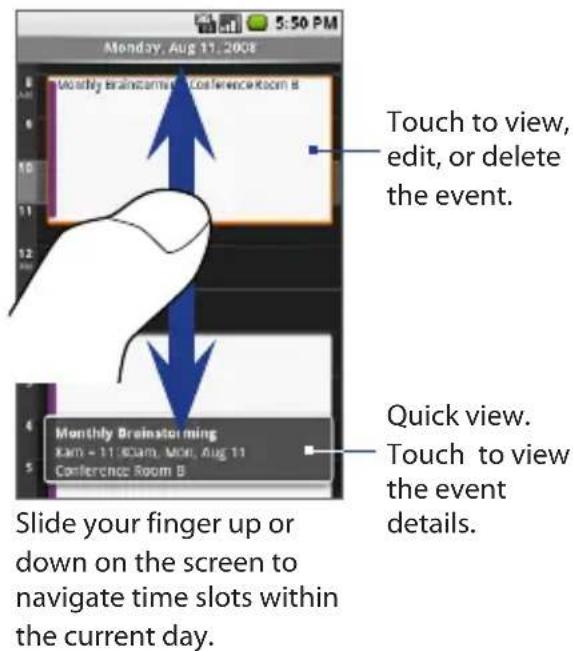
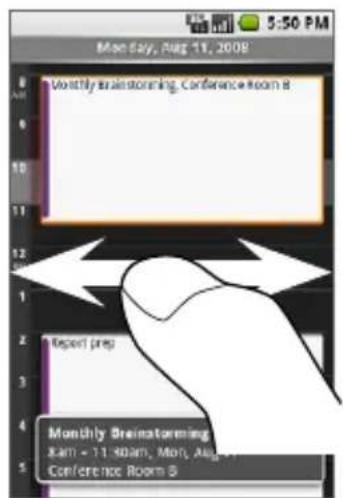
Slide your finger left or right on the screen to navigate to the previous or next day.
- To quickly view the event's details, highlight it using the TRACKBALL. A quick view window appears on the lower part of the screen.
- Roll the TRACKBALL up or down, or slide your finger up or down on the screen to navigate time slots within the current day.
- Roll the TRACKBALL left or right, or slide your finger left or right on the screen to navigate to the previous or next day.
92 Managing Your Time
Using the Week view
In Calendar, press MENU, then touch Week. Your weekly calendar appears.
Days are shown vertically in Week view. Time slots are defined horizontally in rows and events are shown as blocks.
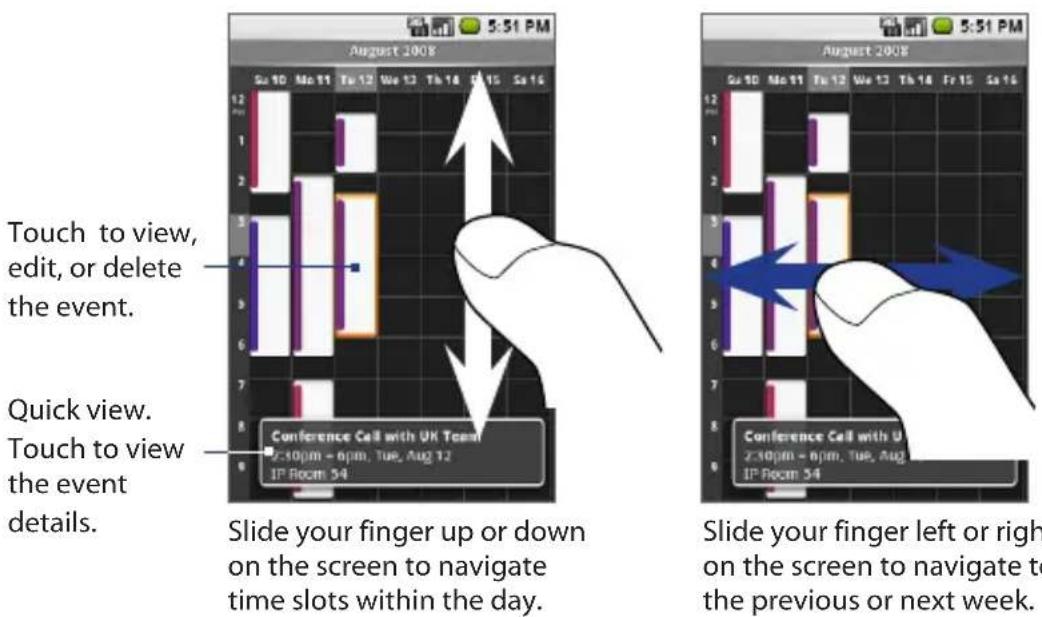
Touch to view, edit, or delete the event.
Quick view.
Touch to view
the event
details.
Slide your finger up or down on the screen to navigate time slots within the day.
Slide your finger left or right on the screen to navigate to the previous or next week.
- To quickly view the event's details, highlight it using the TRACKBALL. A quick view window appears on the lower part of the screen.
- Roll the TRACKBALL up or down, or slide your finger up or down on the screen to navigate time slots within the day.
- Roll the TRACKBALL left or right, or slide your finger left or right on the screen to navigate to the previous or next week.
Using the Month view
In Calendar, press MENU, then touch Month. Your monthly calendar appears.
Days are shown in a month grid. Events are marked as green horizontal bars, and occupies the approximate time slot in the vertical bands located at the right side of the date.
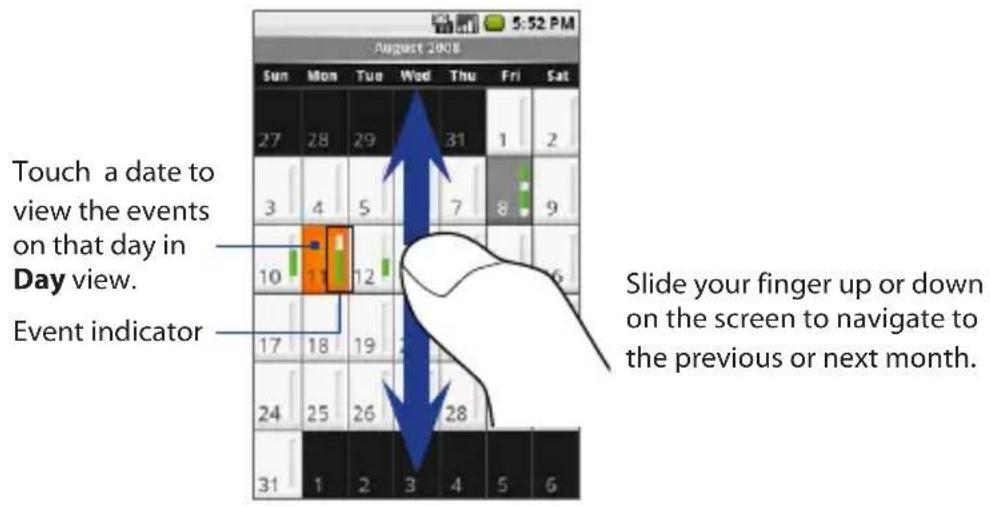
- Touch a date to shift the Calendar view into Day.
- Roll the TRACKBALL up or down, or slide your finger up or down on the screen to go to the next or previous month.
Event reminders
If you have set at least one reminder for an event, the upcoming event icon will appear in the notifications area of the status bar to remind you of the upcoming event.
To view, dismiss, or snooze the reminder
-
Touch the status bar, then slide your finger down the screen to open the notifications panel.
-
Touch the upcoming event name to display the event in the Home screen.
Note If you have other pending event reminders, these events will also appear on the screen.
-
Do any of the following:
-
Touch Snooze all to snooze all event reminders for five minutes.
- Touch Dismiss all to dismiss all event reminders.
- Press BACK to keep the reminders pending in the notifications area of the status bar.
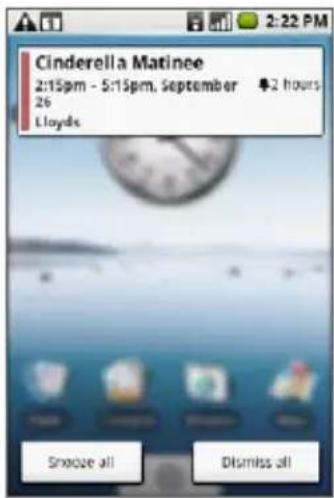
Synchronize Microsoft® Outlook® calendar
You can synchronize Microsoft® Outlook® calendar on your computer with Google Calendar on the web. Since Calendar on your device can automatically synchronize with Google Calendar, you can access your Microsoft Outlook calendar appointments and events on your device anytime.
Note Make sure that your computer is running on Windows Vista® or 32-bit Windows® XP operating system and that your Microsoft® Outlook® version is 2003 or 2007.
To synchronize your Microsoft Outlook calendar
- On your computer, download the Google Calendar Sync application from: http://dl.google.com/googlecalendarsync/GoogleCalendarSync_Installer.exe
- When a dialog box appears, click Save File.
- Once downloading is completed, the file should open automatically. If it doesn't, manually open it from your browser's download window.
- When prompted, click OK to confirm installation.
-
Read through the Google Calendar Sync Terms of Service, and click I Agree.
-
Follow the screen instructions and click Install to finish the set-up process.
- When the application is installed, the Google Calendar Sync Settings window will appear.
- Enter your Gmail address and password.
- Select a sync option, set the sync time interval, then click Save.
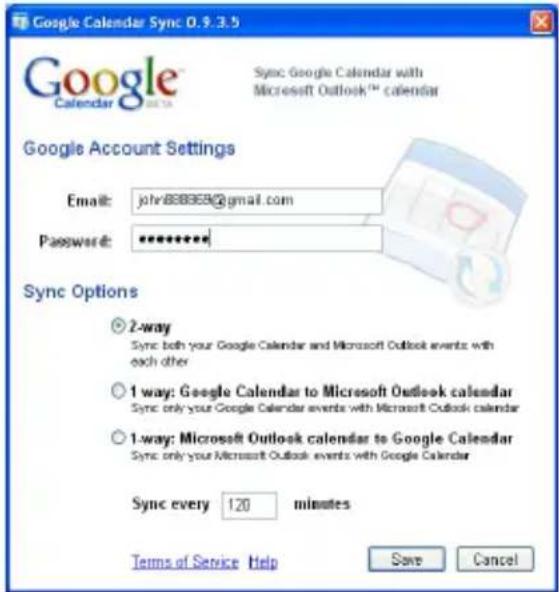
Tip After the initial set-up, you can access the Google Calendar Sync Settings window again by double-clicking the calendar icon in your Windows System tray.
-
Right-click the calendar icon in your Windows System tray, then click Sync.
-
When your Microsoft Outlook calendar is synchronized with Google Calendar on the web, you can now synchronize Calendar on your device and start accessing your Microsoft Outlook appointments.
Note For more information on how to synchronize the Calendar, see Chapter 4. For more information about Google Calendar, go to http://www.google.com/support/calendar/.
Change the Calendar settings
You can select which calendar to display, hide declined events, or configure event reminders according to your preference.
To select the calendar to display
If you created more than one calendar using Google Calendar on the web, you can select any or all of the calendars to display their events in Calendar.
- On any Calendar view, press MENU, and touch More > My calendars.
- All your calendars display in a list. Select the calendar check box you want to display on your device, or clear a calendar check box to keep it from displaying in Calendar.
Tip You can create multiple calendars using Google Calendar on the web. For more information on how to create calendars, go to http://www.google.com/support/calendar/bin/answer.py?answer=37095&topic=15281.
To change other Calendar options
- On any Calendar view, press MENU, and touch More > Settings.
- Adjust the following options:
- Hide declined events. Select the check box if you want to hide all events which you have declined on any Calendar view.
- Set alerts & notifications. Touch to set the type of event reminder you want. You can select an Alert, a Status bar notification, or Off.
- Select ringtone. Touch to open the ring tone menu and select a ring tone for all new event notifications. The ring tone plays briefly when selected.
- Vibrate. Select the check box if you want the phone to vibrate during an event notification.
- Set default reminder. Touch to open the default reminder menu and select an advanced reminder time for all your calendar events. The default reminder time will appear in the Event details screen every time you create a new event.
Keyboard shortcuts in Calendar
On any Calendar view
To Do this
| Create a new event Press + n | MENU |
| Go to today's calendar Press + t | MENU |
| Switch to Agenda view Press + a | MENU |
| Switch to Day view Press + d | MENU |
| Switch to Week view Press + w | MENU |
| Switch to Month view Press + m | MENU |
| Go to the Calendar settings Press + p | MENU |
| Open highlighted event details Press | |
| Edit highlighted event details Press + e | MENU |
| Remove highlighted event Press | SIFI CIDI |
Event details screen
To Do this
| Add an event reminder Press + r | MENU |
| Edit the event details | Press +e |
| Delete the event | Press |
Edit Event details screen
To Do this
| Add an event reminder Press + r | MENU |
5.2 Setting Alarms
The Alarm Clock lets you set as many alarms as you want.
To open Alarm Clock
Press HOME, touch the Applications tab, then touch Alarm Clock.
When you open Alarm Clock for the first time, three alarms are set up by default, ready for you to customize. All three alarms are turned off by default.
Set an alarm
- Touch a default alarm.
- Select the Alarm check box to turn the alarm on.
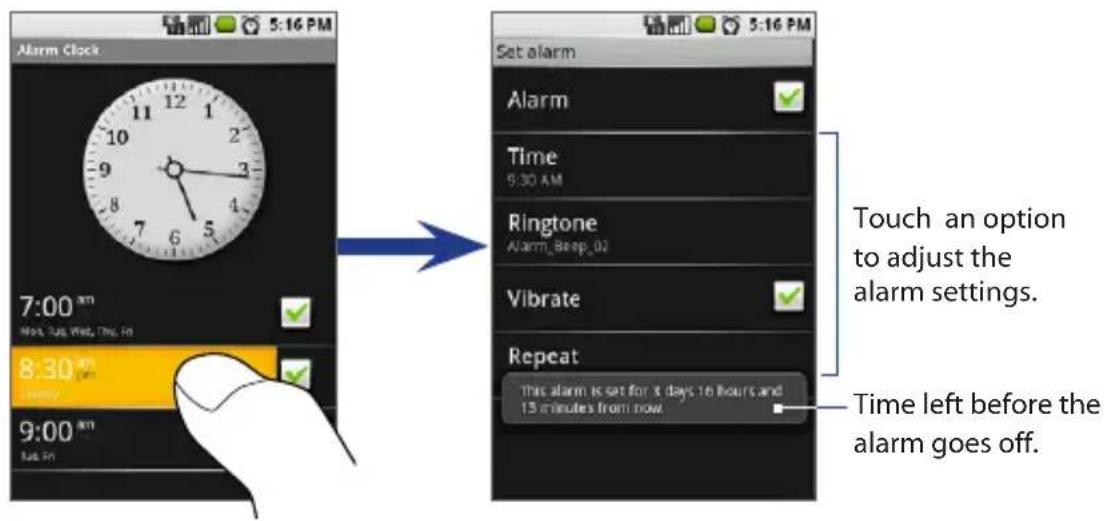
- Touch Time to set the alarm time. Adjust the time by tapping + or - .
Touch AM to change to PM or vice versa, then touch Set when finished.
Note The number of hours and minutes left before the alarm goes off briefly displays at the lower part of the screen.
- Touch Ringtone, then select the alarm ring tone. The ring tone briefly plays when selected.
- Touch Vibrate if you want the device to vibrate when the alarm goes off.
- Touch Repeat, select the days you want the alarm to repeat, then touch OK.
Note By default, the alarm repeat is set to Never which means that your alarm will only go off once.
- If you need to set more than three alarms, press BACK to return to the Alarm Clock screen, press MENU, then touch Add alarm.
- Follow steps 2 to 6 to set up your new alarm.
When the alarm goes off, you are given the option to Snooze (for 10 minutes) or Dismiss it.
Customize the Alarm Clock
You can change the appearance of the clock displayed on the Alarm Clock screen, as well as the date and time format that appears with your alarms.
- On the Alarm Clock screen, touch the clock with your finger to open the clock selection screen. Available clock displays appear at the bottom of the screen.
- Slide your finger left or right on top of the clock displays to view them.
- Touch the clock display you want.
Note To hide the clock display, on the Alarm Clock screen, press MENU, then touch Hide clock.
- To change the date and time format displayed in your alarms, see "Set the date, time zone, and time" in Chapter 11.
100 Managing Your Time
Chapter 6
Exchanging Messages
6.1 Sending Text and Multimedia Messages
6.2 Using Gmail™
6.3 Using Email
6.4 Using Google Talk
6.1 Sending Text and Multimedia Messages
Messaging lets you compose and send text (SMS) and multimedia messages (MMS) to other mobile phones.
Open Messaging
To open the Messaging application, press HOME, touch the Applications tab, then touch Messaging. The message list appears.
If the list is long, you can scroll up the screen to view more messages, or roll the TRACKBALL down.
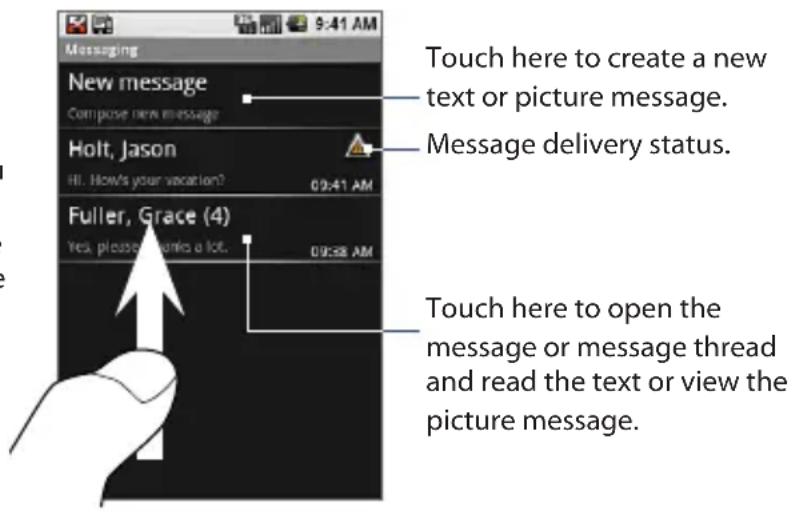
Create and send SMS and MMS messages
You can compose text (SMS) messages of up to 160 characters. If you continue to type after the limit is reached, your message will be delivered as one, but count as more than one message. These are called concatenated messages.
Multimedia messages, also known as MMS, can contain text and a picture, a recorded voice, an audio file, or a picture slideshow.
Note Messaging automatically converts a text message into a multimedia message when you entered an e-mail address in the To field, added a message subject, or attached an item.
To create and send a text message
- On the Messaging screen, touch New message. The Compose screen opens.
- Open the keyboard, then enter the mobile phone number of the message recipient in the To field. As you enter the phone number, matching contacts will appear on the screen. Touch a recipient or continue entering the recipient's phone number.
Note The message is automatically converted into an MMS message when you entered an e-mail address in the To field. See "To create and send a multimedia (MMS) message" in this chapter for details.
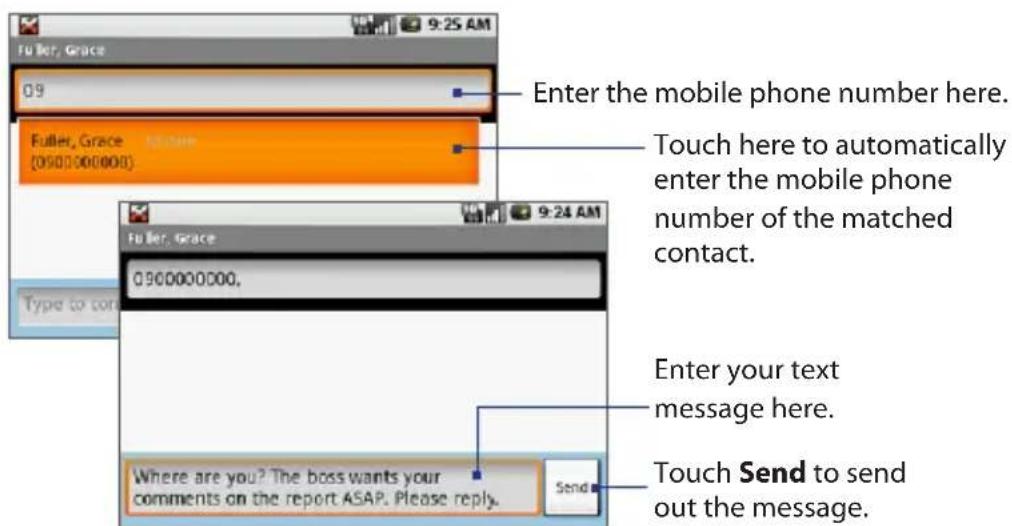
- Roll the TRACKBALL down to select the text box, then start composing your message.
Note As you near the 160-character limit, a counter will appear in the top right corner of the text box to tell you how much characters are left. Once you go over that limit, a new message is created but automatically joined into one when received.
- When done, touch Send or press ↻ to send the text message. The send progress is displayed at the right side of the message in the message thread or in the message list.
Note To receive delivery reports and know when a text message is received, in the message list, press MENU, then touch Settings. In the SMS settings section, select the Delivery reports check box.
To create and send a multimedia (MMS) message
- On the Messaging screen, touch New message. The Compose screen opens.
- Open the keyboard, then enter the mobile phone number or e-mail address of your message recipients in the To field. As you enter the phone number or e-mail address, matching contacts will appear on the screen. Touch a recipient or continue entering the recipient's phone number or e-mail address.
- Press MENU, touch Add subject, then enter your message subject.
- Roll the TRACKBALL down to select the text box, then enter your message.
Note As you near the 160-character limit, a counter will appear in the top right corner of the text box to tell you how much characters are left.
- Press and touch Attach.
-
On the options window, select from the following file attachments:
-
Pictures. Opens the Pictures application. Touch a picture on the screen to attach it into your message.
- Camera. Opens the Camera applications. Take a picture of your subject, then touch Select this picture to attach it into your message. For more information about the Camera application, see Chapter 9.
- Audio. Opens the Select audio menu. Touch an audio file to select, then touch OK to attach the file into your message.
- Record audio. Touch to open the message recorder. Touch to start recording your message, then touch to stop. To listen to your recording, touch . Touch Use this recording to attach the recording into your message.
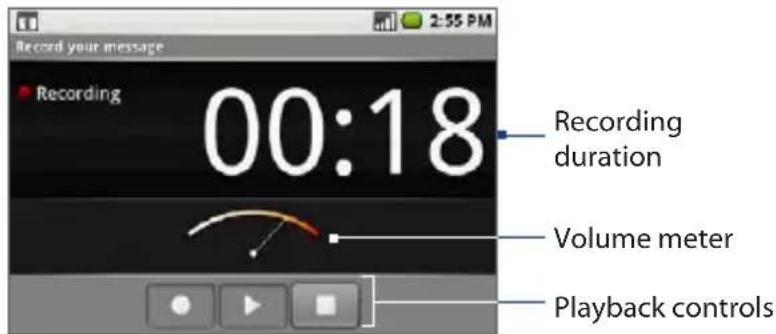
- Slideshow. Touch to open the Edit slideshow screen. Touch Add slide to create a new slide. Touch the created slide (for example, Slide 1), touch Add picture, then select the picture you want to add to the slide. You can also navigate to the text box and enter a caption for the picture. Press to preview the slide, remove the picture, add a music, add another slide, or change the slide duration or layout. When finished, touch Done to attach the slideshow to your message.
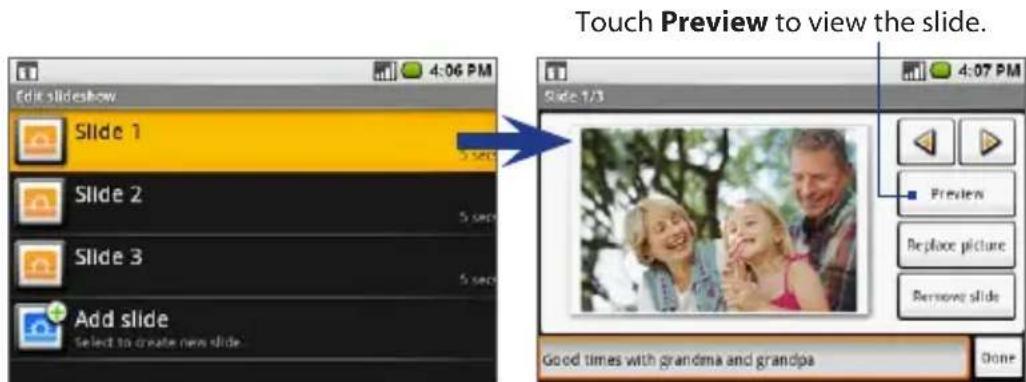
Tip You can create a slideshow of up to ten slides. When editing multiple slides, touch to edit the next slide or touch to return to the previous slide.
Notes To view the slideshow, touch the Preview button while editing the slideshow, or touch the Play button on the Compose screen.
- To remove or replace a picture or an audio attachment, on the Compose screen, touch the Remove button beside the attachment. To remove a slideshow attachment, on the Compose screen, touch Edit, press MENU, then touch Discard slideshow.
- When you are finished composing the multimedia message, touch Send or press The send progress is displayed at the right side of the message in the message thread or in the message list.
Note To receive delivery reports and know when a picture message is received, in the message list, press MENU, then touch Settings. Select the Delivery reports check box below the MMS settings section.
To save a message as a draft
While composing a text or multimedia message, press the BACK button ( ) to automatically save your message as a draft. To resume composing the message, in the message list, touch and hold the draft message, and touch View. Continue editing the message, then touch Send or press to send it.
Receive text and multimedia messages
Depending on your notification settings, the device will play a ring tone, vibrate, or display the message briefly in the status bar when you receive a new text or multimedia message. To change the notification for new text and multimedia messages, see "Adjust text and multimedia settings" later in this chapter.
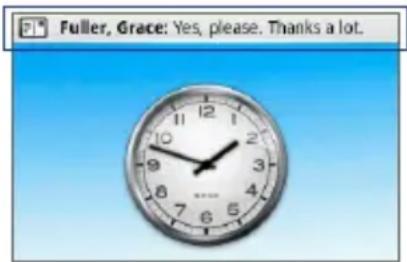
A new message icon (☐) also appears in the notifications area of the status bar to notify you of a new text or multimedia message. To open the message, refer to the next section.
Manage messages and message threads
Text and multimedia messages that are sent to and received from a contact (or a number) are grouped into conversations or message threads. Threaded text or multimedia messages let you see exchanged messages (similar to a chat program) with a contact on the screen. Message threads are listed in order of when you received them, with the latest message on top of the thread.
To open and read a text message
Do any of the following:
- On the Home screen, touch and hold the status bar, then slide it down to open the notifications panel. Touch the new message to open and read it.
- While in the message list, touch the text message or message thread to open and read it.
To return to the message list from a text message thread, press, then touch All threads.
Notes • To view the details of a particular message, in the message thread, touch and hold the message to open the options menu, then touch View message details.
- If a message contains a link to a web page, touch the link to open Browser and view the web page. If a message contains a phone number that you want to save in your contacts, touch the phone number to open the Dialer tab, press then touch Add to contacts.
To open and view a multimedia message
- In the message list, touch a multimedia message or message thread.
- Touch the Play button at the right side of a multimedia message to view it.
Notes • When Auto-retrieve in MMS settings is disabled, only the message header is downloaded. To download the entire message, touch the Download button at the right side of the message. Once the message has downloaded, touch the Play button to view the message. For details, see "Adjusting text and multimedia message settings" later in this chapter.
- If you are concerned about the size of your data downloads, check the multimedia message size before you download it.
To reply to a text or multimedia message
- In the message list, touch a text or multimedia message thread to open it.
- Use the TRACKBALL to navigate to the text box at bottom of the screen, enter your reply message, and then touch Send or press 📋
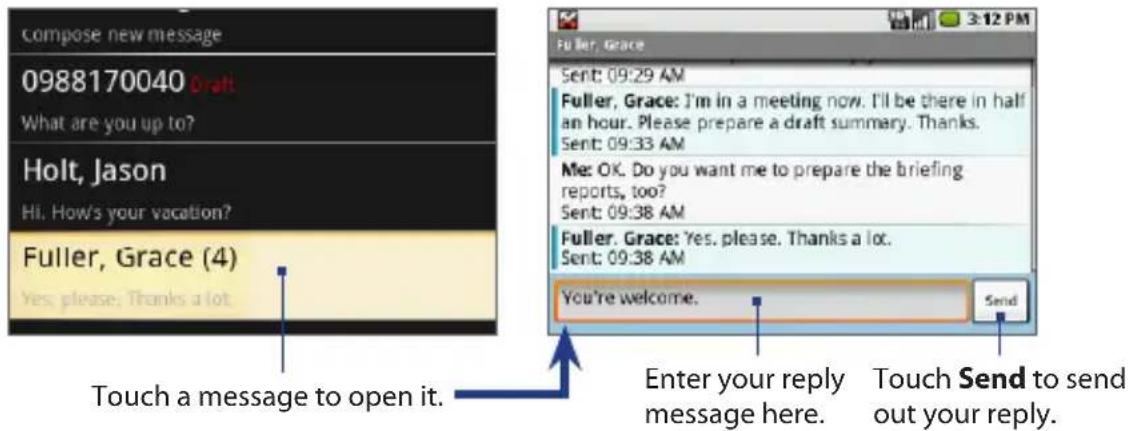
Tip To reply a text message with a multimedia message, open the text message, press MENU, then touch Add subject, or Attach. The text message is automatically converted into a multimedia message.
To delete a message or a message thread
- In the message list, touch the message thread that you want to delete.
- Do any of the following:
- To delete the entire thread, press 📋, then touch Delete thread. When prompted to confirm deletion, touch OK.
- To delete a message in a thread, touch and hold the message that you want to delete, then touch Delete message on the options menu. When prompted to confirm deletion, touch OK.
- To delete all message threads, press BACK to return to the message list, press 📄, then touch Delete threads.
Read delivery reports
To view delivery reports
- Enable Delivery reports in the SMS or MMS settings. For details, see "Adjusting text and multimedia message settings" later in this chapter.
- In the message list, touch a message thread to open it.
- Touch and hold the message in the thread with the delivery report icon ( ), then touch View report on the options menu. Delivery reports can be:
• Received ( ) The message is received by your recipients.
- Pending ( ) The device is still sending the message.
- Failed ( ) The message failed to reach your recipients.
To manage undelivered messages
A delivery problem occurred if this icon appears along with the message in the message list or message thread. Touch and hold the message in the message list, then touch View to edit, retry sending, or delete the message.
To see all your undelivered messages, in the message list, press and touch Undelivered messages.
Adjust text and multimedia message settings
In the message list, press MENU and touch Settings to adjust the text or multimedia message settings. You can set the following options:
SMS settings
| Delivery reports Select this option to receive a report on the delivery status of your message. For more information, refer to “Reading delivery reports” earlier in this chapter. | |
| Manage SIM card messages | Touch to view text messages stored on your SIM card. You can also delete or copy these messages to your device’s memory. |
MMS settings
| Delivery reports Select this option to receive a report on the delivery status of your message. For more information, refer to “Reading delivery reports” earlier in this chapter. | |
| Read reports Select this option if you want to receive a report whether each recipient has read or has deleted the message without reading it. | |
| Auto-retrieve Select this option to automatically retrieve all your MMS messages completely. When selected, the MMS message header plus the message body and attachments will automatically download to your device. If you clear this check box, only the MMS message header will be retrieved and shown in your message list. | |
| Roaming auto-retrieve | Clear this option if you only want the MMS message headers to download while roaming. Select this option to automatically download your complete multimedia messages even while roaming. |
Notification settings
| Notifications Select this option if you want to receive a notification in the status bar when a new text or multimedia message arrives. |
| Select ringtone If you want the device to ring when a new message arrives, touch this option, then select a ring tone that is specific to new text and multimedia messages. Note that the ring tone briefly plays when selected. |
| Vibrate Select this option if you want the phone to vibrate when a new text or multimedia message arrives. |
112 Exchanging Messages
6.2 Using Gmail™
Gmail™, which is already configured when you first set up your device, lets you create and send e-mails from your device. Depending on your synchronization settings, all e-mail messages that you send or receive using Gmail on your device is automatically synchronized with your Gmail account on the web. For more information about synchronization, see Chapter 4.
To open Gmail
Press HOME, touch the Applications tab, then touch Gmail. The Inbox conversations list appears. The Inbox is your default Gmail view. All your received e-mails are delivered to your Inbox.
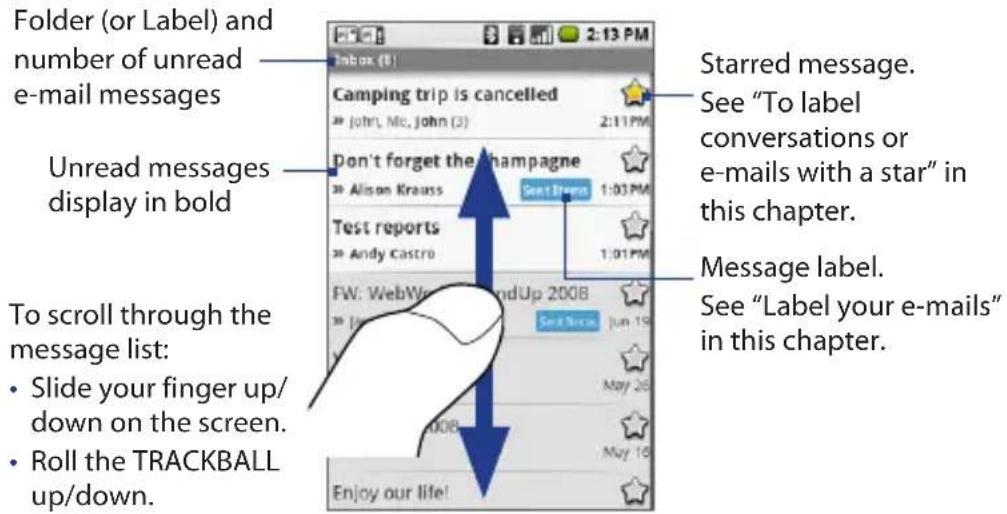
To refresh Gmail
Press MENU, then touch Refresh to send or receive new e-mails and to synchronize your e-mails with your Gmail account on the web.
Create and send e-mails
To create and send an e-mail
- In the Inbox conversations list, press MENU, then touch Compose.
- Open the keyboard, then enter the e-mail address of the message recipient in the To field. As you enter information, matching contacts will appear on the screen. Touch the recipient or continue entering the e-mail address. If you are sending the e-mail to several recipients, separate the e-mail addresses with a comma. You can add as many message recipients as you want.
Note If you want to send a carbon copy (Cc) or a blind carbon copy (Bcc) of the e-mail to other recipients, press 📋 and touch Add Cc/Bcc. Enter the e-mail addresses of the message recipients in the Cc or Bcc fields, as desired.
-
Enter the e-mail subject, then compose your message.
-
If you want to add a picture attachment, press 📂 and touch Attach. Select the picture you want to attach, then touch OK.
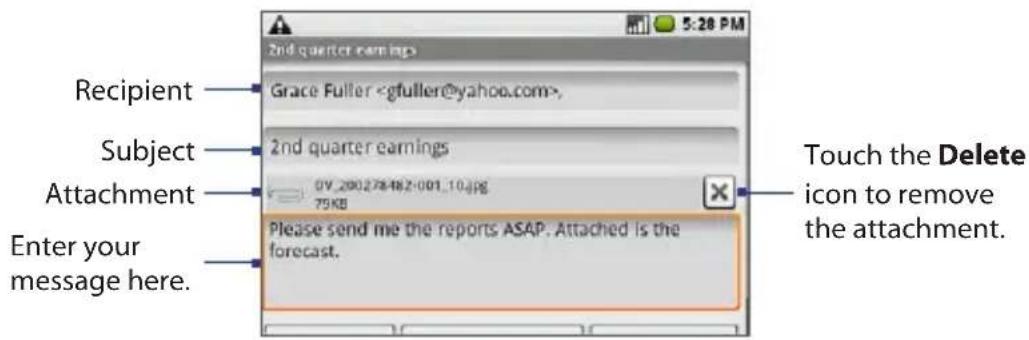
- Scroll down the screen, then touch Send. You can also press MENU and touch Send to send the e-mail message.
Note While composing the message, touch Save as draft or press the BACK button to save it as a draft. To view your draft e-mail messages, in the Inbox conversations list, press then touch View labels >Drafts.
114 Exchanging Messages
To add a signature to e-mails
You can add a signature to every e-mail message you send.
- In the conversations list, press and touch Settings.
- Touch Signature.
- Enter your signature in the text box, then touch OK.
Tip You can create a signature consisting of multiple lines of text. At the end of each line of text, press the Enter key on the keyboard to create another line.
To view your sent messages
In the conversations list, press MENU and touch View labels > Sent.
Receive and read e-mails
Depending on your notification settings, the phone plays a ring tone, vibrates, or displays the e-mail message briefly in the status bar when you receive a new e-mail. A new e-mail message (icon also appears on the notifications area of the status bar to notify you of a new e-mail.
Note For more information on e-mail notification settings, refer to "Set new e-mail notifications" later in this chapter.
Gmail groups each message you send with all the responses you receive. This conversation list continues to grow as new replies arrive, so you can always see your messages in context. Conversations are also referred to as message threads. A new message or a change to the subject of a current message will begin a new thread.
To view e-mails
Do any of the following:
- On the Home screen, touch and hold the status bar, then slide down your finger on the screen to open the notifications panel. Touch the new e-mail to view it.
- While in the Inbox conversations list, touch the unread e-mail or the conversation with the unread e-mail to view it.
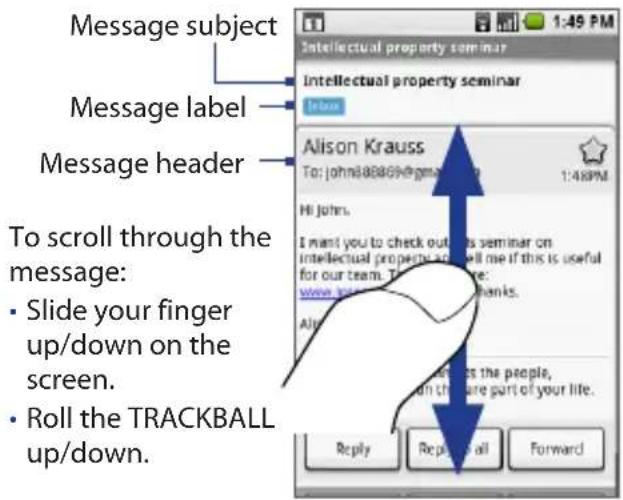
To open or collapse e-mails in a thread
When the message thread is long, the e-mail message subject will appear at the top of the screen and all read messages are collapsed. The latest message will appear at the bottom of the thread.
- Touch the read messages header to expand all message headers in the thread.
- Touch a message header to expand the message for reading.
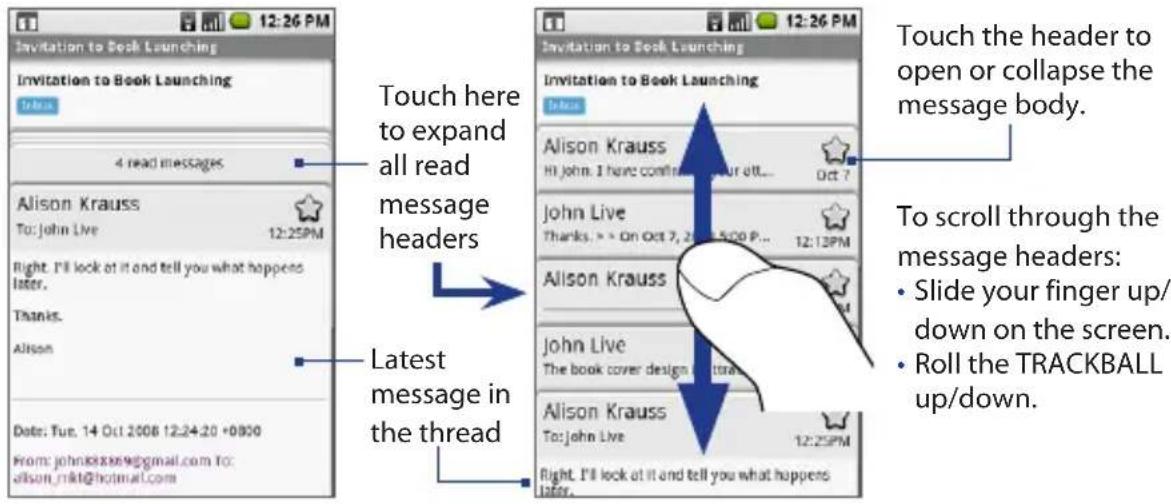
To view or download file attachments
- In the conversations list, touch the conversation or the message with the paper clip icon
Note If the message is inside a thread, touch its header to expand the message body.
-
Do any of the following:
-
If the file attachment is a picture, touch Download to save it to your device, or touch Preview to view it. If you choose to download the picture, it is saved in the download album in Pictures.
-
For all other file attachments, touch Preview to view them.
-
After you have viewed the file attachment, press BACK to return to the message.
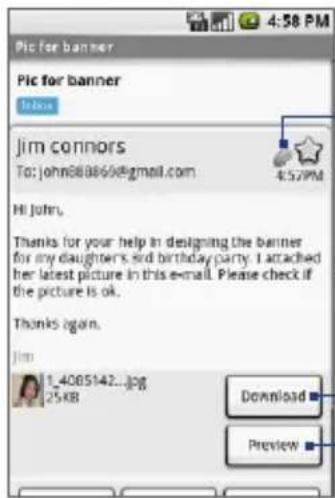
Indicates that the message has a file attachment.
Touch Download to retrieve the attachment.
Touch Preview to view the attachment.
To search for e-mail messages
You can search for a specific e-mail message by sender, word in a subject, or label.
- In the conversations list, press and touch Search.
- Enter the search keyword in the box, then touch Search.
Reply to or forward e-mails
- In the message thread, scroll down to the end of the conversation.
- Touch Reply, Reply to all, or Forward.
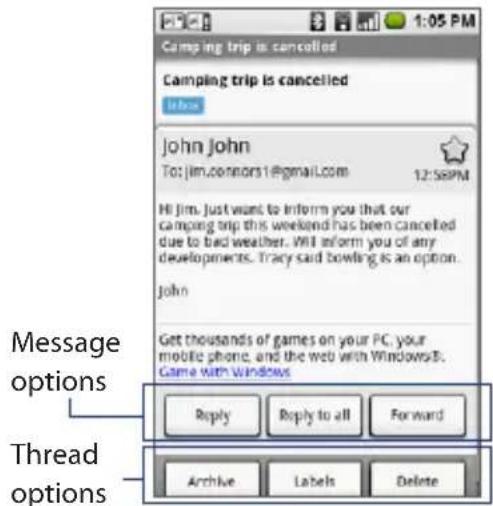
-
Do any of the following:
-
If you selected Reply or Reply all, open the keyboard, then enter your reply message.
-
If you selected Forward, open the keyboard, then specify the message recipients.
-
Scroll down to the end of the message, then touch Send.
Manage conversations and e-mails
Conversations
In the conversations list, touch and hold the conversation, then touch:
- Archive to archive the conversation.
Tip To display your archived messages, in the Inbox conversations list, press, then touch View labels > All mails. - Mark read or Mark unread as desired. Unread messages display in bold in the conversations list.
- Delete to delete the conversation.
• Report spam to report the conversation as spam.
E-mail messages
In the message thread, navigate to the e-mail header or message using the TRACKBALL, press 📋, then touch:
- Archive to archive the e-mail message.
Tip To display your archived messages, in the Inbox conversations list, press , then touch View labels > All mails.
- Mark read or Mark unread as desired. Unread messages or threads with unread messages display in bold in the conversations list.
- Delete to delete the message and the entire thread.
- More > Report spam to report the e-mail message as spam.
Label your e-mails
Organize your e-mails by labeling your conversations or individual e-mail messages with a star or other system labels (such as Inbox, Sent, Outbox, Drafts, and All Mail). You can also use labels to filter the conversations list and show only conversations with a specific label. You can create as many labels and apply as many labels to a conversation or e-mail message as you want.
To label conversations or e-mails with a star
A star (♀) is a special system-provided label. Use stars to mark important conversations or e-mail messages. You can star an entire conversation or just a message inside a conversation.
Do any of the following in a conversations list:
- Touch and hold a conversation, then touch Add star. If the conversation is already starred and you want to remove it, touch and hold the conversation, then touch Remove star. You can also star a conversation by touching the star at the upper right corner of the conversation header. Touch the star again to remove it.
- Touch a conversation to open it for reading. Touch the message header to expand the message you want to star, press MENU, then touch Add Star to label the message. To remove the star label, press MENU again, then touch Remove star.
To change or remove a conversation label
- In the conversations list, touch and hold a conversation, then select Change labels on the menu.
- The Labels menu appears. Labels already applied are marked with unused labels are marked with
- Touch the label to either apply it or to remove it from the conversation, then touch OK to return to the conversations list.
To filter conversations by label
- In the conversations list, press and touch View labels.
- Touch the label of the conversations you want to view. The conversations list is filtered to show only messages with the label you selected.
Note You can also select which conversations to view in Sent, Outbox, Drafts, and All Mail labels/folders. - Press BACK to return to your Inbox.
To select labels to synchronize
You can select which messages to synchronize based on the labels you have assigned to them. Limiting the amount of e-mail that is regularly synchronized will help control your data connection costs.
- In a conversations list, press and touch Settings.
- Touch Labels to open the labels screen. In addition to the labels you have created, all system labels are listed on this screen.
- Touch a label to cycle through the following sync options: Sync recent, Sync all, or Never (no sync option displays).
Note For information on how to automatically or manually synchronize your Inbox, see "Selecting Applications to Synchronize" in Chapter 4.
Set new e-mail notifications
- In a conversations list, press and touch Settings.
-
Do any of the following:
-
Select the Email notifications check box to receive a notification in the status bar when a new e-mail message arrives.
- Touch Select ringtone if you want your phone to ring when a new e-mail message arrives. On the ring tone menu, select a ring tone specific to new e-mail messages. The ring tone plays briefly when selected. If you don't want a ring tone to play when you receive a new e-mail message, touch Silent.
- Select Vibrate if you want your phone to vibrate when you receive a new e-mail message.
Keyboard shortcuts in Gmail
Conversations list
| To Do this | |
| Refresh the conversations list Press + u | MENU |
| Compose a new message Press + c | MENU |
| Open conversation to read Press | |
| Archive conversation Press + y | MENU |
| Jump to the top of list Press, then roll the TRACKBALL up | |
| Jump to the end of list Press, then roll the TRACKBALL down | |
| Page down Press | SYM |
| Page up Press + | |
While in an e-mail message
| To Do this | |
| Reply to the last message in the conversation | Press 📄r |
| Reply all to the last message in the conversation | Press 📄la |
| Forward the last message in the conversation | Press 📄f |
| Archive the conversation | Press 📄y |
6.3 Using Email
The Email application comes with an e-mail setup wizard that lets you easily add up to five external POP3 or IMAP e-mail accounts from popular web-based e-mail service providers such as Yahoo!® Mail Plus, AOL, and more, on your device.
To open Email
Press HOME, touch the Applications tab, then select Email. The Email setup screen appears.
Add an external e-mail account
- On the Email setup screen, touch Next.
- Open the keyboard to enter your e-mail address and password, and then touch Next. The wizard automatically sets up your e-mail account.
Note If the e-mail account you want to add is not pre-configured on your device, you will be prompted to manually enter the e-mail account settings, such as the e-mail server, protocol and more. Obtain these information from your e-mail service provider.
- After your account settings have been verified, touch Finish to display your Inbox.
- While on the account Inbox, press MENU, and then touch Refresh to update your Inbox.
Note To add more e-mail accounts, return to the Email setup screen, press MENU and touch Add account. Repeat steps 1 to 3 of the previous section.
Compose and send e-mails using an external e-mail account
- On your Inbox, press, then touch Compose.
- Use the keyboard to enter the message recipient's e-mail address in the To field. As you enter information, matching contacts will appear on the screen. Touch the recipient or continue entering the e-mail address. If you are sending the e-mail to several recipients, separate the e-mail addresses with a comma. You can add as many message recipients as you want.
- Enter the subject, then compose your message.
- Touch Send.
Note Touch Save as draft or press the BACK button to save the message as a draft.
Manage e-mails on your external e-mail account
To sort messages
- On your Inbox, press Ⓜ, then touch Sort messages to open the Sort menu.
- Select from the following sort options:
• Date. Sorts your e-mail messages by the time you received it.
- Subject. Alphabetically sorts your e-mail messages by subject.
- Sender. Alphabetically sorts your e-mail messages by sender.
To delete a message
- On your Inbox, touch a message to open it for reading.
- Use your finger or the TRACKBALL to navigate to the end of the message, then touch Delete.
Edit or delete an external e-mail account
You can edit or delete an external e-mail account on your device.
- Press HOME, touch the Applications tab, then select Email. The accounts screen appears.
- Do any of the following:
- Touch and hold the account you want to remove, then touch Remove account. When prompted to confirm deletion, touch OK.
- Touch and hold the account you want to edit, then touch Account settings.
See the next section for details.
Adjust the external e-mail account settings
- Press HOME, touch the Applications tab, then touch Email.
- Touch and hold an e-mail account on the screen, then touch Account settings. The account information displays for editing.
- Adjust the following settings according to your preference.
| Check for new email every Touch the drop-down menu to set how frequently you want to check your external e-mail account for new messages. Select Don't check automatically if you want to check your e-mail manually by tapping Refresh in the menu options. | |
| Send email from this account by default. | Select this option if you want to use this account every time you send an e-mail from any application on your device. |
| Notify me when email arrives. | Select this option if you want a new message icon ( ▶) to display in the status bar every time a new e-mail message arrives. |
Incoming server settings Touch to edit the account's incoming server settings such as your user name and password, POP3 server, port, and more.
Outgoing message settings Touch to edit the account's outgoing message settings such as the SMTP server, port, security type, and more.
Add another account Touch to add a new external e-mail account.
- Touch Done to save your changes.
6.4 Using Google Talk
Use Google Talk to send instant messages to your friends. All you need is your Gmail account that you used when you set up the device for the first time.
Sign in and chat online
To sign in to Google Talk
- Press HOME.
- Touch the Applications tab, and then touch IM.
- Touch your Google Talk account on the accounts screen.
Touch your Google Talk account to sign in to — your account and/or display your friends list.
Number of open chats. You can have as many – open chats as you wish.
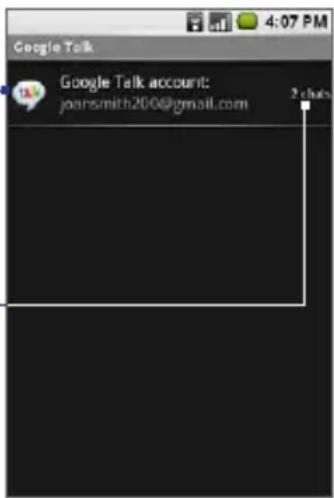
Your friends list will be displayed on the screen:
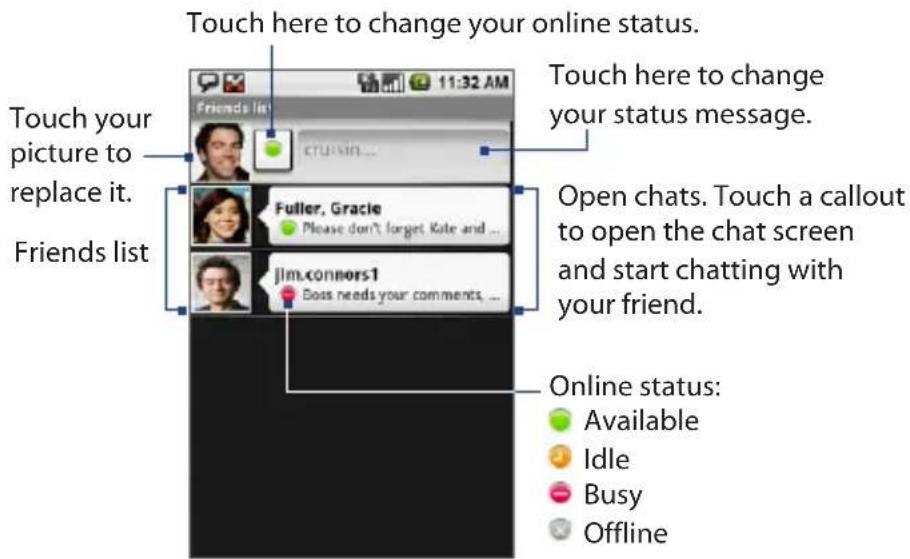
To add a new friend
You can add a friend stored in the Contacts application on your device or invite a new friend.
Note If you want to chat with friends using Google Talk, invite friends with existing Gmail accounts.
- In the friends list, press MENU and touch Add friend.
- Open the keyboard, then enter the Google Talk ID of the friend you want to add.
Note When you add a friend with a Google Talk ID and has been saved in your contacts list, matching contacts will display on the screen as you enter information. You can touch the contact or continue entering the Google Talk ID. For details on how to add the Google Talk ID to a contact, see "Creating and Managing Contacts" in Chapter 2.
- Touch Send invitation.
To start a chat
-
Do any of the following:
-
Touch a friend in the friends list.
- Navigate to a friend using the TRACKBALL, then press
The chat screen opens.
Timestamp. — Appears after every minute of inactivity.
![Chat with Fuller, Grace Fuller, Grace: how are you? Sant at 5:48 PM on Wednesday Me: I'm doin' great. Where are you? Fuller, Grace: just got back from France. you wanna meet up? Me: Sure. I'm free saturday afternoon. Let's have coffee. Fuller, Grace: fine with me. I'll call you later. Great! :-] Send Touch Send to send out your message. Enter your message here.](/content/2026/05/794079/images/c153c05ab9e2ff776e939d3caf45f335a5674cb3e0bbc304aa09f47506a46cc3.jpg)
- Open the keyboard and start entering your message.
- To insert a smiley, press MENU and touch Insert smiley. Touch a smiley to insert it into your message.
- When finished, touch Send or press
To view active chats
While chatting, press BACK to display your friends list. Friends who are actively chatting with you are indicated. Touch an active chat to open the chat screen. Refer to the previous section for details.
To view your invites and accept an invitation
- In the friends list, press MENU and touch Invites. All chat invitations you have sent or received are listed on the pending invitations screen.
- Touch a pending invitation, then touch Accept or Decline.
Note When someone you invite to chat accepts your invitation, the pending invitation disappears from the list.
To switch between active chats
You can switch between chats if you have more than one chat going.
- While on a chat screen or in the friends list, press MENU and touch Switch chats.
- On the panel that opens, touch the friend you want to switch chat with.
To chat with another friend, touch the friend's photo.
To change your online status and message
- Touch the online status icon beside your name, then select the status you want on the menu.
- Touch the text box on the right of your online status icon, enter your status message using the keyboard, then press ↻
To close a chat
Do any of the following:
- In your friends list, touch and hold a friend with an active chat, and then touch End chat on the menu.
• While in a chat screen, press, then touch Close chat.
To start a group chat
You can invite more friends to a chat and start a group chat.
- While on the chat screen, press and touch Add friend to chat.
- Touch the additional friend to invite.
When the additional friend joins, a group chat notification appears on the chat screen for all group chat participants to see.
To close a group chat
To close the group chat, press and touch Close chat. The screen returns to your friends list.
Manage your friends
Friends in your friends list is sorted by their online status — active chats, online, busy, and offline. Within the status groupings, friends are listed alphabetically.
By default, only the friends that you frequently communicate with — the most popular — are in the friends list. If you want to display all your friends, press MENU and touch All friends. To switch back to displaying only your most popular friends, press MENU and touch Most popular.
To find a friend
In the friends list, start entering the name of your friend to filter your list to show only friends with names that match what you have entered.
To block a friend
You can block a friend from sending you messages. When blocked, your friend is also removed from your friends list.
- In the friends list, make sure that the friend you want to block is online.
- Touch and hold the friend's name, then touch Block friend.
Your friend is removed from your friends list and is added to the blocked friends list.
Note To unblock a friend, in the friends list, press MENU and touch Blocked. Touch the name of the friend you want to unblock, then touch OK when prompted.
To pin a friend
You can pin a friend to make sure that friend always appears in your most popular friends list.
- In the friends list, touch and hold the friend's name to open the options menu.
- Touch Pin friend.
Note To unpin a friend, in the friends list, touch and hold the friend you want to unpin, then touch Unpin friend on the menu.
To show a friend in the most popular list
- In the friends list, touch and hold the friend's name to open the options menu.
- Touch Show friend.
Note To keep a friend from appearing in the most popular list, touch and hold the friend's name, then touch Hide friend on the menu.
Mobile indicators
In the friends list, check the icon that appears to the far right of your friend's name.
This icon ( ) indicates that your friend signed in from an Android phone, while this icon ( ) indicates that your friend signed in from a mobile phone.
When you don't see an icon, it indicates that your friend signed in last from a computer.
You can also select to display what type of mobile device you are using in other's friends list. To do this:
- In the friends list, press MENU, and touch More > Settings.
- Select the Mobile indicator option, then press BACK. The mobile indicator icon will display along with your name in other's friends list and will let your friends know what type of mobile device you are using.
Adjust instant messaging settings
To set notifications for new instant messages
You can set the device to play a sound, vibrate, or display a notification icon in the status bar each time you receive a new instant message.
- In the friends list, press MENU and touch More > Settings.
-
Do one or all of the following:
-
Select the IM notifications check box to receive a notification (in the status bar when a new instant message arrives.
- If you want your phone to ring when a new instant message arrives, touch Select ringtone. On the ring tone menu, touch the ring tone to use. The ring tone briefly plays when selected. If you don't want a ring tone to play when you receive a new instant message, select Silent.
-
If you want your phone to vibrate when you receive a new message, select the Vibrate check box.
-
Press BACK to save your settings and return to the friends list.
To sign in automatically
You can sign in to your Google Talk account automatically every time you turn on your device.
- In the friends list, press MENU and touch More > Settings.
- Select the Automatically sign in check box.
- Press BACK to save your setting and return to the friend list.
Sign out
In the friends list, press and touch More > Sign out when you want to sign out from Google Talk.
132 Exchanging Messages
Chapter 7
Getting Connected
7.1 Connecting to the Internet
7.2 Using Browser
7.3 Using Bluetooth
7.1 Connecting to the Internet
Your device's networking capabilities allow you to access the Internet through GPRS/3G (or EDGE, when available) or Wi-Fi.
GPRS/3G
The APNs (Access Point Names) of your wireless service provider's GPRS/3G networks are already preconfigured on your device so you can immediately connect and use GPRS/3G services.
It is recommended that you keep the APN settings. If you need to update an existing APN or add a new APN, make sure that you obtained the correct settings from your wireless service provider. Changing the settings arbitrarily may cause some features or services to stop.
To update the APNs
-
Press HOME > MENU, and then touch Settings > Wireless controls.
-
Scroll down the screen, touch Mobile networks, and then touch Access Point Names.
-
Touch the APN you want to update, and then open the device keyboard.
-
On the Edit access point screen, touch an APN setting, enter or replace it with the updated setting you obtained from your wireless service provider, then touch OK.
-
When you are finished entering the settings, press MENU, and then touch Save.
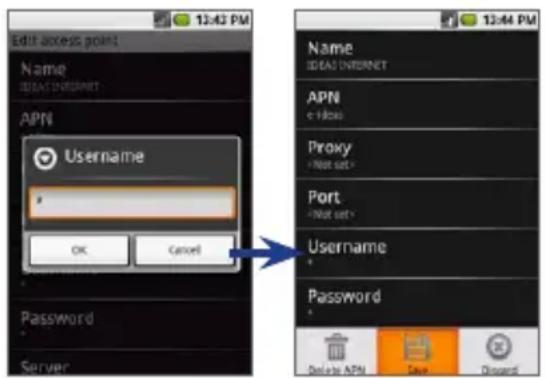
To add a new APN
After you installed a new SIM card from another wireless service provider, you need to add the new APN to your device so you can connect to the wireless service provider's 3G/GPRS network.
- Press HOME > MENU, and then touch Settings > Wireless controls.
- Scroll down the screen, touch Mobile networks, and then touch Access Point Names.
- Press MENU, touch New APN, and then open the device keyboard.
- On the Edit access point screen, touch an APN setting, enter the new setting you obtained from your wireless service provider, then touch OK.
- When you are finished entering the settings, press MENU, then touch Save.
Wi-Fi
Wi-Fi provides wireless Internet access over distances of up to 300 feet (100 metres). To use Wi-Fi on your device, you need access to a wireless access point or "hotspot".
Note The availability and range of the Wi-Fi signal depends on the number, infrastructure, and other objects through which the signal passes.
To turn Wi-Fi on and connect to a wireless network
- Press HOME > MENU, then touch Settings > Wireless controls.
- Select the Wi-Fi check box to turn Wi-Fi on. The device will scan available wireless networks.
Note Clear the Wi-Fi check box to turn Wi-Fi off.
- Touch Wi-Fi settings. The network names and security settings (Open network or Secured with WEP) of detected wireless networks are displayed in the Wi-Fi networks section.
- Touch a wireless network to connect. When you selected an open network, you will be automatically connected to the network. If you selected a network that is secured with WEP, enter the WEP (security) key and then touch Connect.
Notes • The next time your device connects to a previously accessed secured wireless network, you will not be prompted to enter the WEP key again, unless you reset your device to its factory default settings.
- Wi-Fi networks are self-discoverable, which means no additional steps are required for your device to connect to a Wi-Fi network. It may be necessary to provide a username and password for certain closed wireless networks.
To check the wireless network status
You can check the current wireless connection status from any of the following:
- Status bar
When your device is connected to a wireless network, the Wi-Fi icon (☐) appears in the status bar and tells you the approximate signal strength (number of bands that light up). If Network notification in Wi-Fi settings is enabled, this icon ☐ appears in the status bar whenever the device detects an available wireless network within range.
• Wi-Fi networks
On the Wireless controls screen, touch Wi-Fi settings, then touch the wireless network that the device is currently connected to.
The wireless network name, status, speed, signal strength, security information, and IP address are displayed.
Note If you want to remove the wireless network settings on your device, touch Forget on this window. You need to enter the settings again when you connect to this wireless network.
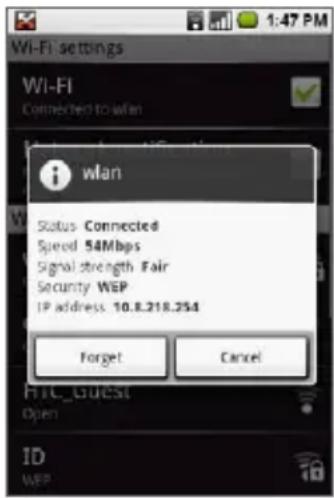
To connect to another wireless network
- On the Wireless controls screen, touch Wi-Fi settings. Detected wireless networks are displayed in the Wi-Fi networks section.
Tip To manually scan for available wireless networks, on the Wi-Fi settings screen, press MENU, then touch Scan.
- Touch another wireless network to connect to it.
Note If the wireless network you want to connect to is not in the list of detected networks, scroll down the screen, then touch Add a Wi-Fi network. Enter the wireless network settings, then touch Save.
7.2 Using Browser
Open Browser to start surfing the web. Browser is fully optimized and comes with advanced functionalities that let you enjoy Internet browsing on your device.
Note You must have an active data (3G, GPRS), or Wi-Fi connection to access the Internet.
To open Browser
-
Do any of the following:
-
On the Home screen, touch Browser.
- On the Home screen, touch the Applications tab, then touch Browser.
Note Browser automatically opens when you touch a web link in an e-mail or text message.
The Browser opens to your home page.
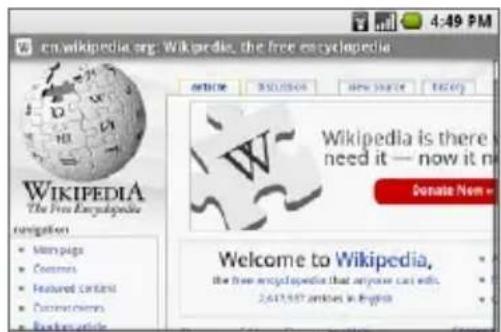
- On the Browser screen, open the keyboard, then press to go to another web page, search information, bookmark the current page, view all opened web pages, refresh the page, and more.
To go to a web page
-
On the Browser screen, press 📂, then touch Go to URL.
-
Enter the web page address using the keyboard. As you enter the address, matching web page addresses will appear on the screen. Touch an address to go directly to that web page or continue entering the web page address.
-
Touch Go or press
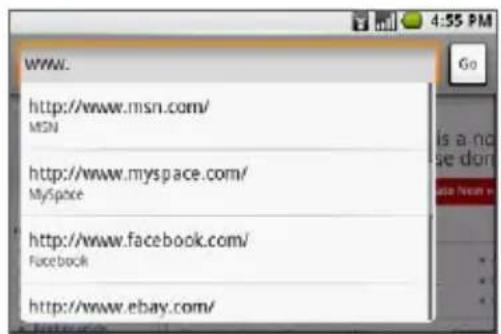
Tip You can also enter the web page address directly on the Browser screen. Make sure that the cursor or selection is not on a text box within the web page, then start entering the web page address.
To search information
- On the Browser screen, press 📋, then touch Search.
- Open the keyboard, then enter the information you want to search in the search box.
- Touch Search or press
To bookmark the web page you are viewing
- On the Browser screen, press 📋, then touch Bookmarks.
- Touch New bookmark.
- Enter a name for the bookmarked page, then touch OK.
Tips • You can also bookmark a link inside a web page. Navigate to the link using the TRACKBALL, press and hold the TRACKBALL, then touch Bookmark link. Enter a name for the bookmarked link, then touch OK.
- For more information about bookmarks, see "Managing bookmarks" later in this chapter.
To open multiple web pages and view them
You can open up to eight web pages, view them in windows, then select which web page to view in full screen.
- While viewing a web page, press MEN then touch Window.
- Touch New window to open a new web page.
- Your home page opens. Press, then touch Go to URL
- Enter the address of the web page you want open, then touch Go or press
- Repeat steps 1 to 4 to open more web pages.
-
On any web page, press 📂, then touch Window. All opened web pages display in window view.
-
Scroll your finger up on the screen or roll the TRACKBALL down to view more web page windows.
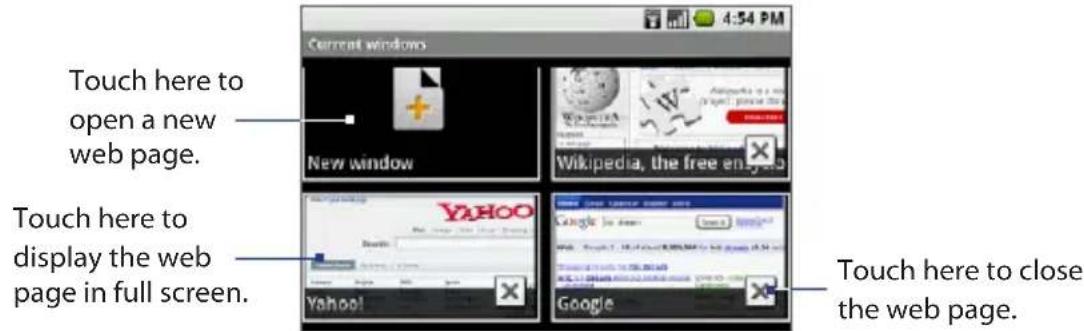
- Press BACK to return to the previous web page you are viewing.
To set your home page
You can set the home page so Browser opens to your favorite web page every time it is launched from the Home screen or from the Applications tab.
- Go to the web page that you want to set as your home page.
- Press MENAT, then touch More > Settings.
- Scroll down the screen, then touch Set home page.
Note If you want to set another web page as your home page, replace the web page address in the text box.
- Touch OK.
Tip While on any web page, press + to go to your home page.
View web pages
While viewing a web page, take advantage of the following zoom and navigation techniques.
To zoom in or out on a web page
Do any of the following to display the Zoom control tab:
- Touch the screen.
- Press the touch More > Zoom.
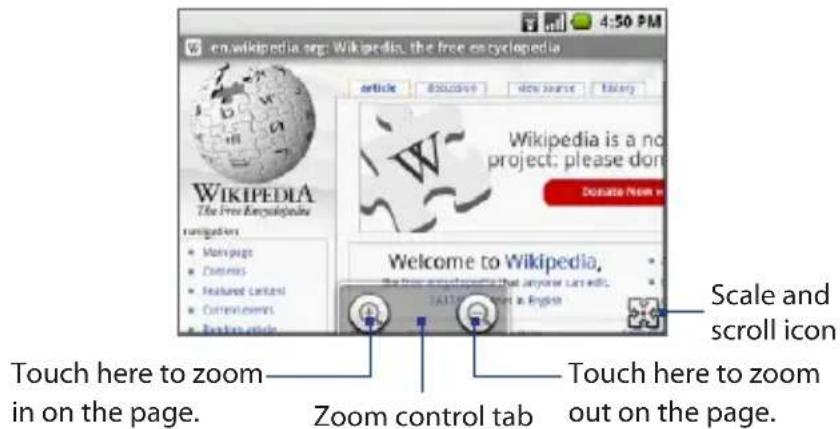
To navigate on a web page
You can roll the TRACKBALL or slide your finger on the screen in any direction to navigate and view other areas of the web page.
You can also use scale and scroll to magnify an area of the web page for easy viewing. To use scale and scroll:
-
Do any of the following:
-
Touch the screen, then touch the scale and scroll icon ( ) at the bottom right corner of the screen.
- Press the TRACKBALL twice.
The web page zooms out to fit the height of the screen and the magnifying window appears.
142 Getting Connected
- Touch and hold the magnifying window, then drag it to the area of the page that you want to view more closely. You can also roll the TRACKBALL to move the magnifying window on any area of the screen.
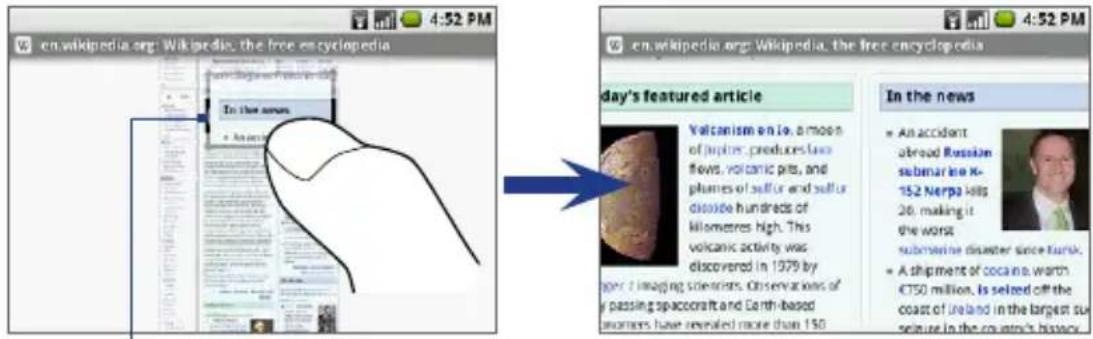
Magnifying window
- Release your finger or press the TRACKBALL to magnify the view.
To open web pages in landscape orientation
When viewing web pages, you can set the screen to stay in landscape orientation even when you close the keyboard.
While viewing a web page in portrait orientation, press MENU and touch More > Flip orientation. The screen will be set to landscape orientation.
Repeat the procedure to automatically set the screen orientation when you open or close the keyboard.
Manage links, history, and downloads
To select links in web pages
Navigate to links on a web page using the TRACKBALL. Links are enclosed in an orange box when selected.
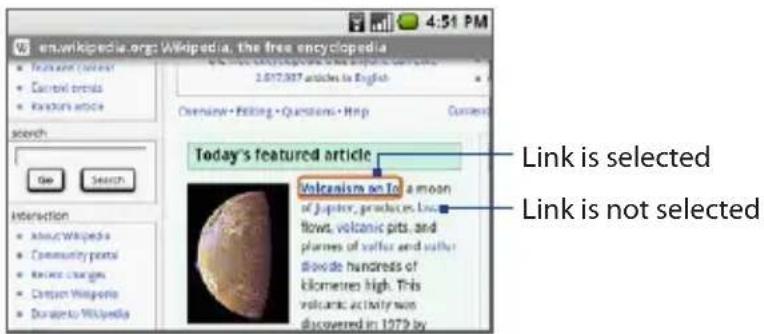
Link What to do
Web page address (URLs)
- Touch the link to open the web page.
- Touch and hold the link to open a menu that allows you to open, bookmark, copy to the clipboard, or share the link via e-mail.
Phone number Touch to open the Dialer tab and call the phone number or save the phone number to your contacts.
E-mail address Touch to send an e-mail message to the e-mail address.
- Touch and hold, then touch Copy on the menu to copy the e-mail address to the clipboard. You can paste the e-mail address later when creating a new contact or sending a new e-mail message.
Tip When links are too small for tapping directly on the screen, highlight it with the TRACKBALL, then either press the TRACKBALL to open the link, or press and hold the TRACKBALL to select an option from the menu.
To open the Browser history
The Browser history screen lists the last 250 web sites you have visited:
-
Do any of the following:
-
On the Browser screen, press and touch More > History.
-
Press + h.
-
Scroll your finger up on the screen or roll the TRACKBALL down to view all web sites you have visited.
-
Touch a web site in the list to open it.
To allow download of web applications
Before you can download web applications, you must first enable downloading from the device settings.
- Press HOME > MENU, then touch Settings.
- Scroll down the screen, then touch Applications.
- Select the Unknown sources check box.
- When the Attention window opens, touch OK.
You can now download applications from the web.
Note All downloaded applications are saved to the storage card. Before you download an application from the web, make sure that you have installed a storage card on your device. For information on how to install a storage card, see Chapter 1.
Warning! Applications downloaded from the web can be from unknown sources. To protect your device and personal data, download applications only from trusted sources such as Android Market. See Chapter 10 for details.
To view your downloads
On a Browser screen, press and touch More > Downloads.
The Download history screen appears with a list of your downloads.
Manage bookmarks
You can store as many bookmarks as you want on your device.
To bookmark any web page
- While viewing a web page, press and touch Bookmarks. The bookmarks screen opens.
- Touch New bookmark.
- Enter the bookmark Name and Location (URL) in the dialog box, then touch OK.
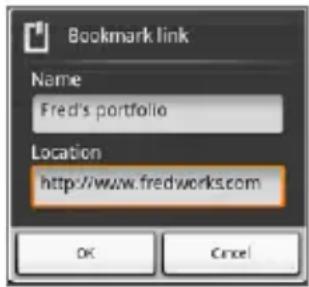
To send a bookmark address
- On the Browser screen, press and touch Bookmarks.
- Touch and hold the bookmark you want to send, then touch Share link on the menu.
Tip If you want to copy the bookmark's URL and paste it later on another application, touch Copy link URL on the options menu.
- The e-mail compose screen opens with the bookmark's web page address in the message field.
- Specify the e-mail recipients and subject, then compose your message.
- Touch Send or press
Note For more information on creating and sending e-mails, refer to Chapter 6.
To open a bookmark
- On the Browser screen, press and touch Bookmarks.
-
Do any of the following:
-
Touch the bookmark you want to open.
- Touch and hold the bookmark you want to open, then touch Open or Open in new window on the options menu.
To edit a bookmark
- On the Browser screen, press and touch Bookmarks.
- Touch and hold the bookmark you want to edit.
- Touch Edit bookmark on the options menu. The edit bookmark dialog box appears.
- Enter your changes and touch OK.
To delete a bookmark
- On the Browser screen, press and touch Bookmarks.
- Touch and hold the bookmark you want to delete, then touch Delete bookmark on the options menu. When prompted to confirm, touch OK.
Adjust the Browser settings
On the Browser screen, press and touch More > Settings to set the Browser settings and options.
Page content settings
| Text size Touch to open the Text size menu where you can set the text toTiny, Small, Normal (default), Large, or Huge. The selected text size applies only on text of web pages viewed using the Browser. | |
| Block pop-up windows | Select this option if you want Browser to block all pop-up windows. |
| Load images Select this option if you want images on web pages to load.Clear this option for faster page loading. | |
| Auto-fit pages Select this option if you want to format web pages to fit the device's screen. | |
| Enable JavaScript Select this option to enable JavaScript on web pages. Some web pages may not work properly when JavaScript is disabled. | |
| Open in background | Select this option if you want to open links in new pages or in a new window on the background. |
| Set home page | Your current home page is shown. To change your home page, touch this option, enter the web page address of your new home page, then touch OK. |
Privacy settings
| Clear cache Clears all cached page contents. | |
| Clear history Clears the Browser history. | |
| Accept cookies Select this option if you want Browser to save cookies. Some web sites might not work properly when you clear this option. | |
| Clear all cookie data | Clears all Browser cookies. |
| Remember form data | Select this option if you want Browser to remember text you have entered in forms, so that you can select the same text later rather than entering it again. |
| Clear form data Clears all saved form data. | |
Security settings
| Remember passwords | Select this option to save user names and passwords you have entered for various web sites. |
| Clear passwords | Clears all saved user names and passwords. |
| Show security warnings | Select this option if you want a warning to display when you are accessing an unsecured web site. |
Advanced settings
| Enable Gears Select this option to enable Gears. Gears is an open source project that extends the Browser's functionality. |
| Gears settings Touch to open the Gears Settings window. |
| Reset to default Touch to clear all Browser data and reset all Browser settings to factory default values, except your home page. |
Keyboard shortcuts in Browser
| To Do this | |
| Go to a new web page | Press |
| Open bookmarked pages | Press |
| Open web page windows | Press |
| View the browsing history | Press |
| Refresh or stop the page | Press |
| Return to the previous page | Press |
| Move forward to the next page | Press |
| Go to the home page | Press |
| Zoom in on the page | Press |
| Zoom out on the page | Press |
| Scroll down the page | Press |
| Scroll up the page | Press |
7.3 Using Bluetooth
Bluetooth is a short-range wireless communications technology that allows Bluetooth devices to exchange information over a distance of about eight meters without requiring a physical connection.
Bluetooth on your device operates in three different modes:
- On. Bluetooth is turned on. Your device can detect other Bluetooth-enabled devices, but not vice versa.
- Discoverable (Visible). Bluetooth is turned on, and all other Bluetooth-enabled devices can detect your device.
- Off. Bluetooth is turned off. In this mode, you can neither send nor receive information using Bluetooth.
Notes • By default, Bluetooth is turned off. If you turn it on, then turn off your device, Bluetooth also turns off. When you turn on your device again, Bluetooth automatically turns on.
- Turn off Bluetooth when not in use to conserve battery power, or in places where using a wireless device is prohibited, such as on board an aircraft and in hospitals.
To turn on Bluetooth and make the device discoverable (visible)
- Press HOME > MENU, then touch Settings.
- Touch Wireless controls, then select the Bluetooth check box to turn on Bluetooth. When on, the Bluetooth (icon appears in the status bar.
- Bluetooth visibility is off by default. Touch Bluetooth settings, then select the Discoverable check box to make the phone visible to other Bluetooth devices on. Your phone will be visible for up to two minutes. You must remain in this screen for the device to remain visible.
Note Clear the Discoverable check box if you don't want other Bluetooth devices to detect your device.
To change the device name
The device name identifies your device in a Bluetooth network.
- Make sure that you have turned Bluetooth on.
- On the Wireless controls screen, touch Bluetooth settings > Device name.
- Enter the name for your device in the dialog box, then touch OK. Your new device name appears on the Bluetooth settings screen.
To pair and connect a Bluetooth hands-free headset or car kit
You can connect your device to a Bluetooth hands-free headset or a Bluetooth car kit and use those devices to send and/or receive calls. Before you can use a Bluetooth hands-free headset or car kit, you must pair it first with your phone.
Note The device only supports the headset and hands-free Bluetooth profiles. If you try to connect the device to a Bluetooth device that is not a hands-free headset or car kit, you will receive an "Unable to connect" message.
- Make sure that you have turned Bluetooth on. See "To turn on Bluetooth and make the device discoverable (visible)" earlier in this chapter.
- Press HOME > MENU, then touch Settings.
- Touch Wireless controls > Bluetooth settings. Your device will start to scan for Bluetooth devices within range and will display all detected devices below the Bluetooth devices section.
Tip If you don't find the device in the list, press MENU, then touch Scan for devices to scan again.
- Touch the hands-free headset or car kit in the list to start pairing.
- When prompted, enter the hands-free headset or car kit's passcode, then touch OK. Refer to the documentation that comes with the hands-free headset or car kit if you don't know the passcode.
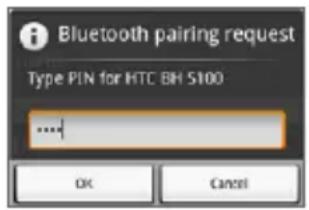
- The pairing and connection status will appear below the hands-free headset or car kit name in the Bluetooth devices list. When the other Bluetooth hands-free headset or car kit is connected to your device, the Bluetooth connected icon ( ) will appear in the status bar. You can now start using the hands-free headset or car kit to make and/or receive phone calls.
Notes • Pairing between two Bluetooth devices is a one-time process. Once pairing is created, the devices can recognize the partnership and exchange information without entering a passcode again.
- If you pair with a second headset while connected to the first, the first headset will remain connected. To switch connection to the second headset you must manually select that headset again in the Bluetooth devices list after pairing.
To disconnect a Bluetooth hands-free headset or car kit
- Press HOME > MENU, then touch Settings.
- Touch Wireless controls > Bluetooth settings.
- Navigate to the Bluetooth devices section, then touch and hold the connected hands-free headset or car kit.
- Touch Disconnect.
Note If you touch Unpair, the device will erase all pairing information with the hands-free headset or car kit. You will be prompted to enter the passcode again when you connect to that Bluetooth device.
152 Getting Connected
Chapter 8
Getting Around with Maps
8.1 Getting to Know Maps
8.2 Searching for Places of Interest
8.3 Viewing Maps
8.4 Using Street View
8.5 Getting Directions
8.1 Getting to Know Maps
Maps lets you track your current location, view real-time traffic situations, and receive detailed directions to your destination. It also provides a search tool where you can locate places of interest or an address on a vector or aerial map, or view locations in street level.
Notes • You need an active data (3G/GPRS) or Wi-Fi connection to use Maps.
• The Maps application does not cover every country or city.
To enable Location source
Before you open Maps and find your location or search for places of interest, you must enable Location source.
- Press HOME > MENU, then touch Settings.
- Touch Security & location.
- Navigate to the My Location settings section, then select Wireless networks, GPS satellites, or both.
Note Selecting GPS satellites lets you locate places of interest in street-level.
However, this requires a clear view of the sky and more battery power.
To open Maps
- Press HOME, then touch Maps, or
- Press HOME, touch the Applications tab, then touch Maps.
To find your location on the map
On the Maps screen, press MENU and touch My Location. Your location is shown on the map as a blinking blue dot.
Your current location —
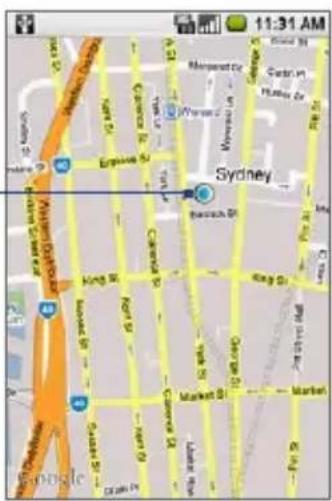
8.2 Searching for Places of Interest
Use Maps to search and locate places of interest, get directions on how to get there, and more.
Note The search feature is available only for certain geographical regions.
To search for a place of interest
- On the Maps screen, press MENU and touch Search.
- Open the keyboard, then enter the place you want to search in the search box. You can enter an address, a city, or type of business or establishment (for example, museums in london).
Enter the place you want to search here.
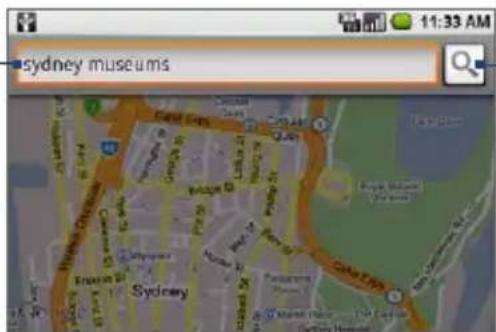
Touch here to search the place you entered.
Tip As you enter information, a list of all the places which you have searched or visited appears on the screen, when available. You can also touch an address on the menu to show its location on the map.
-
Touch Search. Your search results display.
-
Touch a place in the list to show its location on the map.
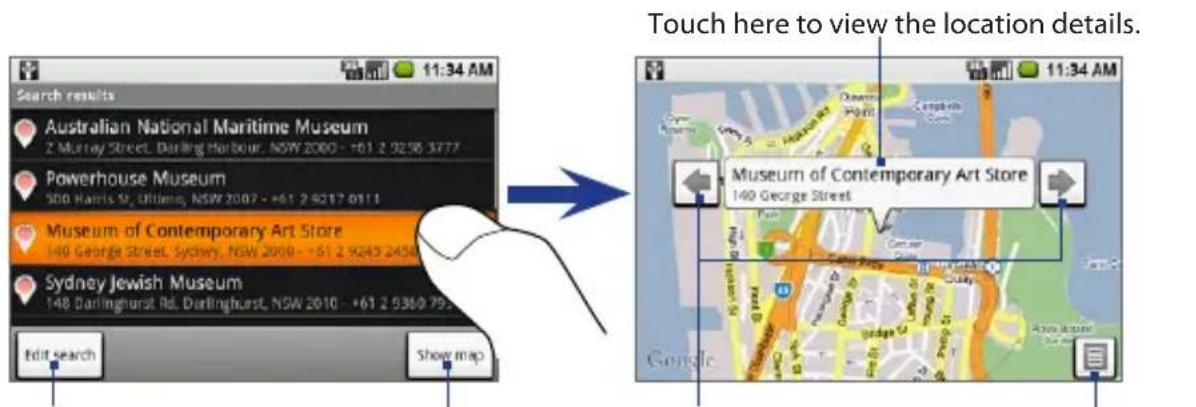
Touch here to edit the search or search for a new place.
Touch the place or touch Show map to show the location of the place on the map.
Touch here to view the location of the previous or the next place in the Search results screen.
Touch here to return to the Search results screen.
Tip On the map, roll the TRACKBALL left or right to view the location of the previous or the next place in the Search results list.
- Touch the callout on the map to open the location details and options.
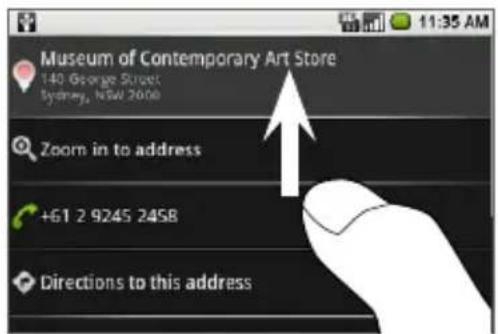
Scroll your finger up the screen or roll the TRACKBALL down to view more location options.
In addition to the location details, on this screen you can:
- Touch the Zoom in to address to zoom in on the location of the place of interest on the map.
- Touch the phone number to open the Dialer and call the place of interest that you have selected.
- Touch Directions to this address to get directions on how to get to the place of interest from your current location.
- Touch Directions from this address to get directions on how to get to another location from the place of interest.
- Touch Add as contact to open the New contact screen and add the place of interest to your contacts list.
- Touch the web page address to open the Browser and view additional information about the place of interest you have selected.
To view your Map history
To open a list of places which you have visited or searched, press and touch More > History while on any map mode (except when in street-level view), or press h. The screen lists all recent searches and viewed positions, and directions. Touch a location to show it on the map.
8.3 Viewing Maps
While viewing a map, take advantage of the following zoom and navigation techniques. You can also use keyboard shortcuts to navigate and zoom on the map.
To zoom in or out on a map
Touch the screen to open the Zoom control tab. Touch 🔒 to zoom in or touch 🔒 to zoom out. With each touch of the button, you zoom in closer or zoom out further on the map.
Tip You can also open the zoom control tab by pressing, and tapping
More > Zoom, or by pressing + z.
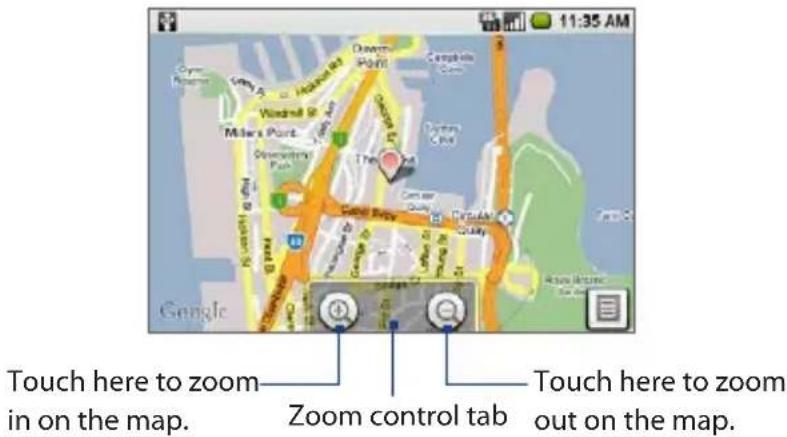
To navigate on a map
Roll the TRACKBALL or slide your finger on the screen in any direction to view other areas of the map.
To change a map mode
When viewing a map, you can switch to another map mode. Press and touch Map mode. Select from Map, Satellite, Traffic, or Street View.
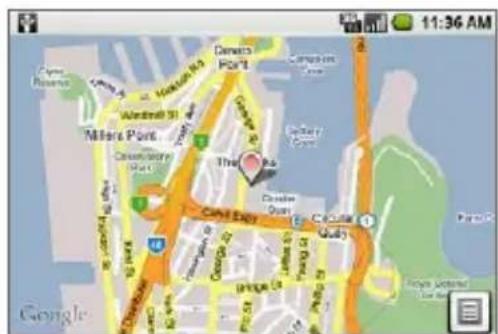
Map mode Satellite mode
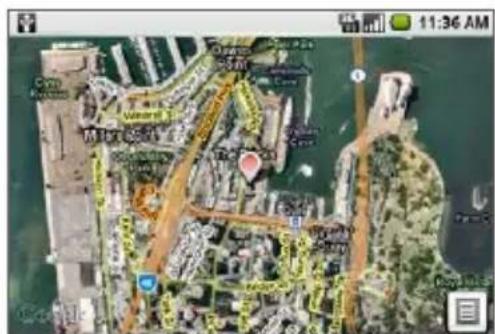
- Map mode This is the default view and displays a map, complete with names of streets, rivers, lakes, mountains, parks, and boundaries.
- Satellite mode Maps uses the same satellite data as Google Earth. Satellite images are not real-time. Google Earth acquires the best imagery available, most of which is approximately one to three years old.
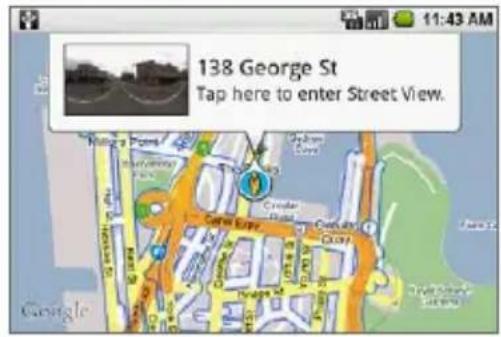
Street View modeTraffic mode
- Traffic mode (available only in certain geographical regions) Real-time traffic conditions are displayed over roads as color-coded lines. Each color represents how fast the traffic is moving.
• Green: More than 80 kph (50 mph)
• Yellow: 40 to 80 kph (25 to 50 mph)
• Red: Less than 40 kph (25 mph)
• Gray: Traffic speed is not available
- Street View mode (available only in certain geographical regions) Provides a street-level view of the location. Blue outlined roads indicate that street view is available on those locations. See "Using Street View" in this chapter for details.
Keyboard shortcuts in Maps
Map screen
| To Do this | |
| Get directions | Press +D |
| Select a map mode | Press +m |
| Show the Maps history | Press +h |
| View My Location | Press +0 (zero) |
| Go to the Maps settings | Press +p |
| Zoom in on the map | Press +j |
| Zoom out on the map | Press +j0 |
| Jump to top/bottom of list | Press then roll the TRACKBALL up or down |
Search results screen
| To Do this | |
| Clear the search results Press + q | MENU |
| View the previous result Press + j | MENU |
| View the next result Press + k | MENU |
Directions screen
| To Do this | |
| View the previous direction point | Pressj |
| View the next direction point | Pressk |
| Cancel directions | Pressq |
| Generate the route | Pressr |
| Edit the route | Presse |
8.4 Using Street View
Street View lets you see a location in street level, including the area around it. Your device also comes with a built-in compass that automatically adjusts the view when you pan, tilt, or turn the screen when using Street View.
Notes • Street View is available only in certain geographical regions.
- The street view imagery is not real-time but is gathered by vehicles equipped with advanced imaging technology, while driving on public streets. The imagery consists of a combination of Google-owned data and data obtained from partners.
To use Street View
- When viewing a map, zoom in on the road that you want to view. See "To zoom in or out on a map" earlier in this chapter.
- Press MENU, touch Map mode, then select Street View on the menu.
162 Getting Around with Maps
3. Touch a blue-outlined road.
Maps will search for the nearest available Street View, and when found, a callout appears with the address and a thumbnail of the Street View.
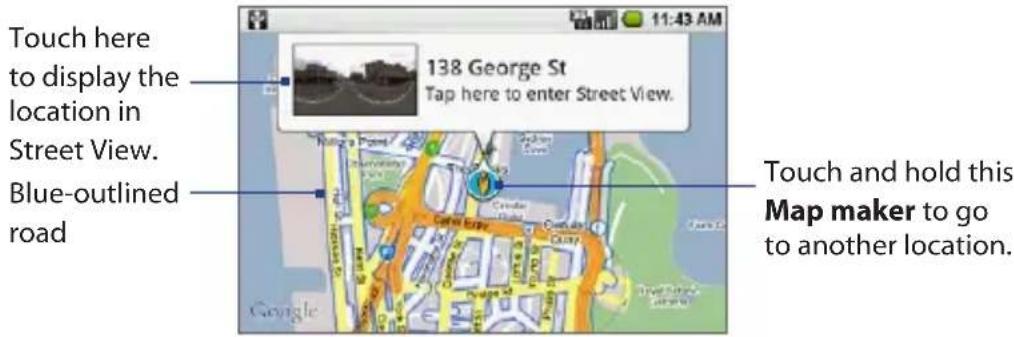
Note If you want to change locations, touch and hold the map marker until it turns into this icon 📁 drag it to the location that you want to view, then release it.
4. Touch the callout to display the Street View of the location.
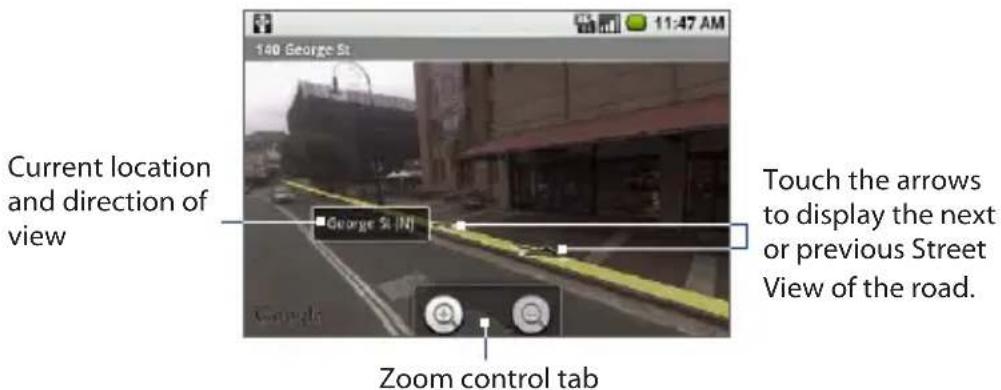
5. Do any of the following when in street view:
- To view the area around the location, slide your finger on the screen or roll the TRACKBALL to any direction.
-
Touch the screen to display the address and direction of your view.
-
Touch the directional arrows on the screen to display the next or previous Street View of the same road.
- To zoom in or out on the image, touch the screen to display the zoom control tab. Touch to zoom in or touch to zoom out.
- Press to display the following options:
Step forward Display the next Street View of the same road.
Step backward Display the previous Street View of the same road.
Zoom Touch to open the Zoom control tab.
Go to map Change the view to map mode.
Report image Report the image to Google Maps. You will be prompted to specify the problem with the image.
Compass mode Touch to turn Compass mode on or off. For more information, see "To use the compass in Street View" in this chapter.
To use the compass in Street View
- While viewing a Street View of a location, press, then touch Compass mode to turn compass mode on.
- Tilt, pan, or turn your device to view the area around the selected location.
- To turn off compass mode, press 📂, then touch Compass mode.
8.5 Getting Directions
Use Maps to get detailed directions to your destination.
Note The driving directions feature is available only in certain geographical regions.
To get directions
- While viewing a map in any mode (except in Street View), press and touch Directions.
- Open the keyboard and enter the starting point in the first text box, then enter your destination in the second text box.
Touch here to exchange your starting point and destination.
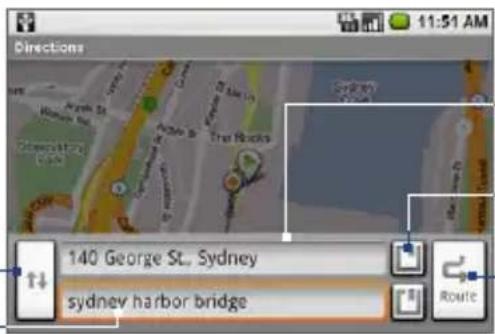
Starting point
Touch here to open the location source menu.
Touch here to generate a route to your destination.
You can also touch to open the location source menu and select a starting point and destination address from the following:
- My current location. Make sure that you have enabled GPS. See "To enable Location source" earlier in this chapter.
-
Contacts. Opens a list of contacts you have saved with a physical or postal address.
• History. Opens a list of places you have searched or visited. -
Touch Route. The turn-by-turn directions to your destination are displayed.
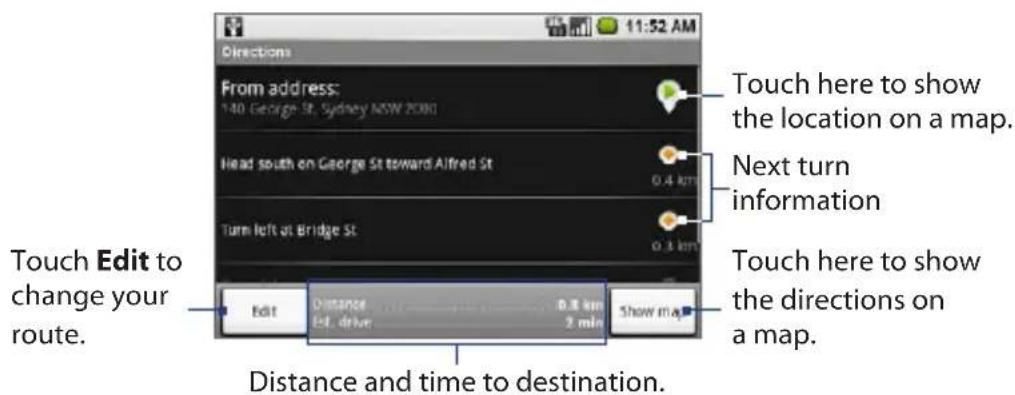
- Touch Show map to display the same directions overlaid on a map.
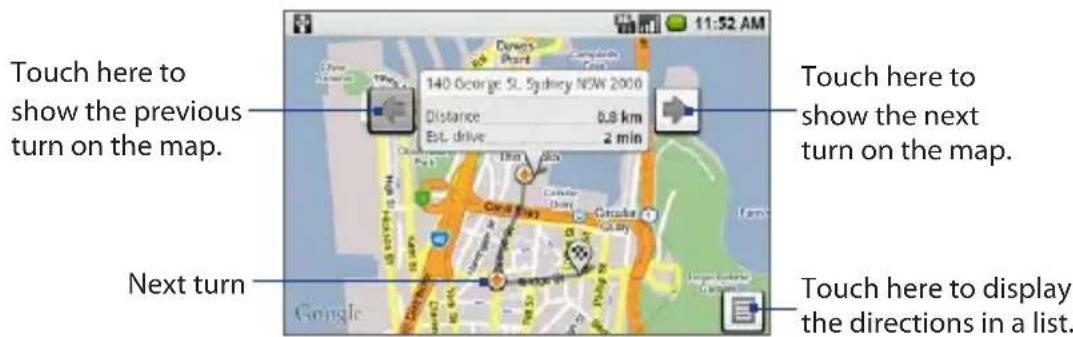
- When you are finished viewing or following the directions, press 📄, then touch Clear map. Your destination is automatically saved in the Maps history.
Getting Around with Maps
Chapter 9
Experiencing Multimedia
9.1 Using the Camera
9.2 Using Pictures
9.3 Using YouTube™
9.4 Using Music
9.1 Using the Camera
Use the Camera to take and share pictures. Your device comes with a 3.2 megapixel camera with auto-focus, and could capture resolutions of up to 2048 x 1536.
Before you proceed
- You must install a storage card before you use the Camera. All pictures that you capture on your device are stored on the storage card. For more information on how to install a storage card on your device, refer to Chapter 1.
- The camera lens at the back of the device is covered by a protective film during shipment. Make sure that you peel off this film before using the camera.
To open the Camera
Do any of the following:
- Press HOME, then press the CAPTURE button on the right panel of the device.
- Press HOME, touch the Applications tab, then touch Camera.
The Camera opens in capture mode and the screen automatically switches to landscape orientation.
To close the Camera
On the Camera screen, press HOME or BACK.
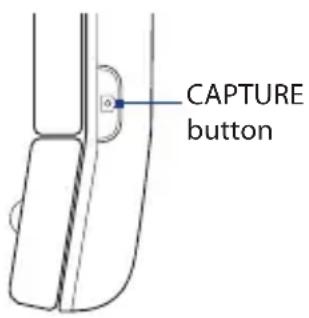
Take pictures
-
Frame your subject on the screen.
-
Press the CAPTURE button half-way to activate auto-focus. The auto-focus indicator appears in the upper-right corner of the screen and the device beeps to indicate that the subject is in focus.

natural_image
Family of three outdoors, including an adult and two children, smiling (no visible text or symbols)Auto-focus indicator
- Fully press the CAPTURE button to take the shot.
Post-capture screen
After capturing, the post-capture screen lets you save, assign, send, or delete the picture by tapping a button at the bottom of the screen.
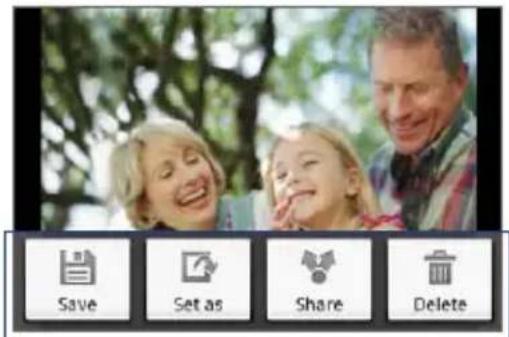
Post-capture buttons
| Button Function | |
| Save Save the picture to the storage card. | |
| Set as | Assign the picture as caller ID icon of a contact, or set the photo as the Home screen wallpaper. |
| Share Send the picture via e-mail or MMS. | |
| Delete Delete the captured picture and return to the Camera screen. | |
Notes - When you touch Save, Set as, or Share, the picture is automatically saved with a random file name into the \DCIM\Camera folder of the storage card.
- Use the Pictures application to view or edit your pictures. For more information, see "Using Pictures" in this chapter.
Adjust the Camera settings
While on the Camera screen, press MENU, then touch Settings. You can adjust the following options according to your preference:
| Store location in pictures | Select this option if you want to save the location information (longitude and latitude) in the picture's metadata so you know the location where the picture was taken. Some applications, such as Picasa Web albums, can then use this information to display your picture on a map. |
| Prompt after capture | Select this option if you always want the post-capture screen to display after capturing a picture. |
9.2 Using Pictures
Pictures lets you view, edit, assign, and share pictures which you have captured using the Camera and pictures which you have stored on the device's storage card. It also allows you view your pictures in a slideshow and more.
To copy pictures into the storage card
- Connect the device to the computer using the USB cable.
- When the USB connected icon ( ) appears in the status bar, touch and hold the status bar, then slide your finger downward to open the notifications panel.
- Touch USB connected, then touch Mount.
- On your computer, navigate to the USB flash drive, then open it.
- Create a top-level folder on the storage card named "Pictures" or some other descriptive name, then open it.
Tip You can also create and use folders inside the Pictures folder to organize your pictures into albums. - Copy your pictures into this folder.
- When finished, disconnect the device from the computer.
To open Pictures
Do any of the following:
- Press HOME, touch the Applications tab, then touch Pictures.
• While on the Camera screen, press MENU, then touch Pictures.
Note When you open Pictures from Camera, all pictures are displayed individually and without any album groupings.
172 Experiencing Multimedia
If you stored your pictures in folders (directories) on the storage card, Pictures will display these folders as separate albums. The top left album always contains all pictures on your device.
This album contains all pictures on your device.
Scroll up the screen or roll the TRACKBALL down to view more albums.
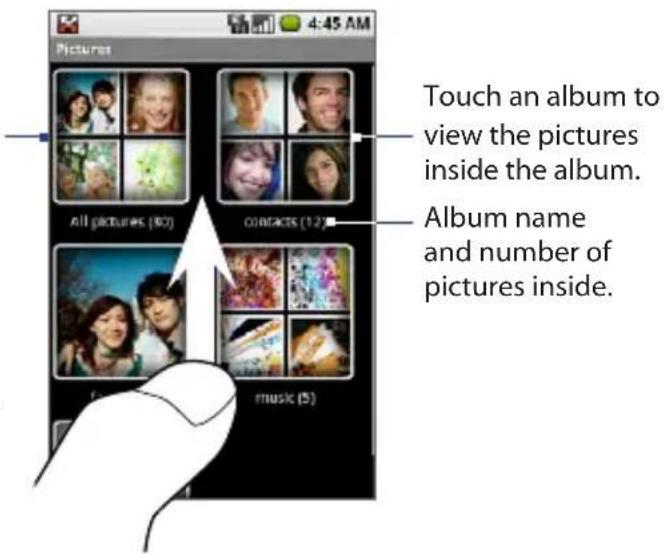
Note Depending on the number of pictures stored on the storage card, it may take a while to load all your photos on the screen.
To close Pictures
While in the Pictures screen, press HOME or BACK to close the application.
Note If you opened Pictures from the Camera application, the screen returns to the Camera screen when you press BACK.
View your pictures
- On the Pictures screen, touch an album to view the pictures within. Individual photos display in a grid in thumbnail format.
Note If there are no picture albums, slide your finger upward or downward the screen, or roll the TRACKBALL up or down to browse through individual pictures.
- Touch a thumbnail to view it in full screen. You can also touch and hold the thumbnail, then touch View on the options menu to open it.
Tip You can choose to display small or large thumbnails or sort your album and display the latest pictures first or last. On the Pictures screen, press MENU, then touch Settings. Navigate to the General settings section, touch Picture size or Picture sort, then adjust the settings accordingly.
To navigate pictures in an album or picture list
When viewing pictures in full screen, do any of the following:
- Roll the TRACKBALL left to view the previous picture, or roll it right to view the next picture in the album or in the pictures list.
- Touch the left area of the screen to view the previous picture, or touch the right area of the screen to view the next picture.
- Touch the screen to display the scroll arrows. Touch the left arrow to view the previous picture, or touch the right arrow to view the next picture.
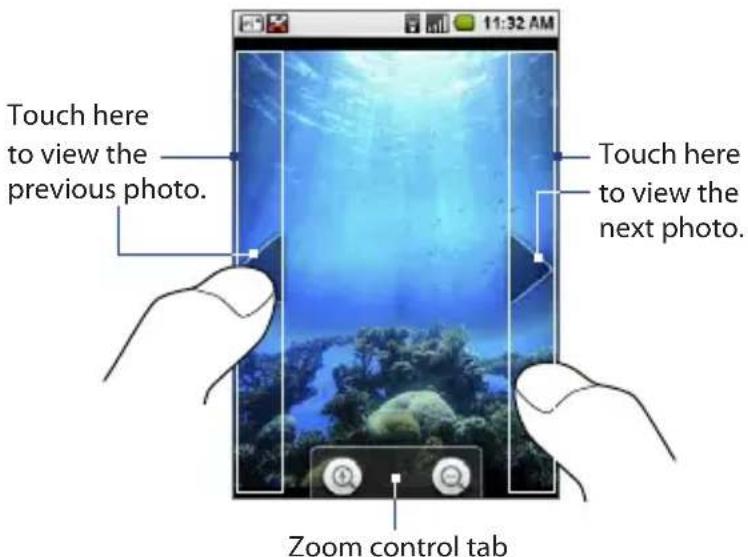
To zoom in or out on a picture
While viewing the picture, touch the screen to open the Zoom control tab. Touch to zoom in, or touch to zoom out on the picture. You can also touch and hold any of these buttons to gradually zoom in or out on the picture.
To change the screen orientation while in Pictures
If you always want your pictures to display in landscape or portrait orientation regardless of whether the keyboard is open, while viewing pictures in thumbnail or in full screen, press MENU and touch Flip orientation. Your pictures will always open to the selected orientation until you change it again.
Edit your pictures
Use the Pictures application to rotate, crop, delete, or view the details of your pictures.
Tip You can edit, share, and assign a picture when it is displayed in full screen or in a thumbnail. When in thumbnail view, touch and hold the picture to open the menu where you can access all editing options.
To crop a picture
- While viewing a picture in full screen, press MENU, then touch More > Crop. The cropper tool appears.
-
Do any of the following:
-
To adjust the cropper size, touch and hold the cropper edge. When the cropper arrows appear, drag your finger inward to or outward from the center of the cropper to resize it.
- To move the cropper to another area on the picture, touch and hold inside the cropper, then drag it with your finger to the desired position.
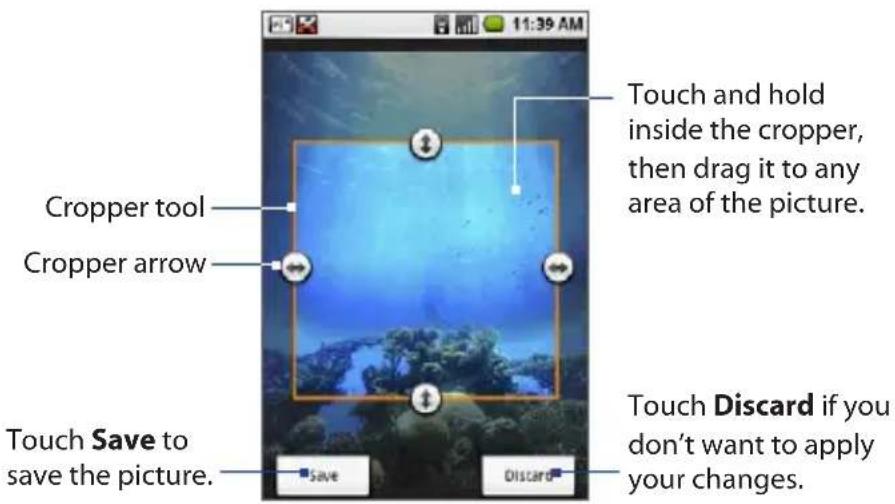
- Touch Save to apply the changes to the picture.
Note The cropped picture is saved in the storage card as a copy. The original picture remains unedited.
To rotate a picture
- While viewing a picture in full screen, press MENU, then touch Rotate.
- On the Rotate window, touch Rotate left or Rotate right as desired.
To view the picture details
While viewing a picture in full screen, press MENU, then touch More > Details.
The picture details window opens with the picture's title, file size, resolution, and the date and time when the picture was taken (when available).
To delete a picture
While viewing a picture in full screen, press MENU, then touch Delete, or press ⬤d. When the Delete dialog window appears, touch OK.
Note If you don't want the Delete dialog window to appear every time you delete a picture, return to the Pictures screen, press MENU, then touch Settings. Clear the Confirm deletions check box.
Send a picture
Send a picture using your favorite e-mail account or via MMS.
- While viewing a picture in full screen, press MENU, then touch Share.
- When prompted, touch Gmail or Messaging.
Note If you have set up an external e-mail account in addition to your Gmail account, that account will display as well when you are prompted to select the account to use to send the picture.
- The picture is automatically attached to your e-mail or MMS message.
Compose your message, then touch Send. For more information on how to create and send e-mail and MMS messages, refer to Chapter 6.
Note If the picture is too big for sending via MMS, you will be prompted to resize it. Touch Resize in the dialog box. Pictures will automatically resize the picture to fit it into your MMS message.
Set a picture as wallpaper or caller ID icon
You can set a picture as your Home screen wallpaper or assign it to your contact as caller ID icon.
To set a picture as Home screen wallpaper
- While viewing a picture in full screen, press MENU, then touch More > Set as > Wallpaper.
- If the picture needs cropping, the cropper tool will appear. See "To crop a picture" earlier in this chapter for details.
- Follow screen instructions to set the picture as Home screen wallpaper.
To assign a picture as a caller ID icon
- While viewing a picture in full screen, press MENU, then touch More > Set as > Contact icon. Your contacts list opens.
-
Touch the contact you want to assign the picture.
-
If the picture needs cropping, the cropper tool will appear. See "To crop a picture" earlier in this chapter for details.
The picture will appear in the contact's details screen, as well as on the incoming call screen when the contact calls you.
View pictures as a slideshow
You can view your pictures as a slideshow. When you play a slideshow, all photos in the selected album will be included.
To view pictures as a slideshow
- While viewing a picture in full screen, press MENU, then touch Slideshow. Your picture slideshow begins.
Note The status bar hides while the picture slideshow is playing.
-
To stop the slideshow, press BACK, touch the screen, or press the TRACKBALL.
-
To resume the playing the picture slideshow, press MENU and touch Slideshow. If you stopped the slideshow, it will resume on the last picture that you have viewed.
To adjust the picture slideshow settings
- On the Pictures screen, press MENU, then touch Settings.
- Navigate to the Slideshow settings section, then adjust the following options:
| Slideshow interval | Select how long each slide plays: 2 seconds, 3 seconds, or 4 seconds. |
| Slideshow transition | Select the transition you want to use between each slide:Fade in & out, Slide left - right, Slide up - down, or Random selection. |
| Repeat slideshow | Select this option to repeat the picture slideshow continuously until you stop it. |
| Shuffle slides | Select this option to shuffle your pictures in the slideshow. |
9.3 Using YouTube™
YouTube™ is a free online video streaming service that allows you to view videos that have been uploaded by YouTube members.
Note You must have an active data (3G, GPRS) or Wi-Fi connection to access YouTube.
To open YouTube
Press HOME, touch the Applications tab, then touch YouTube.
The YouTube screen appears with the videos grouped into categories, such as Featured, Most popular, Most viewed, Top rated, and more.
To close YouTube
While on the YouTube screen, press HOME or BACK to close YouTube. Featured videos. Slide your finger to the left to view more featured videos.
Video categories
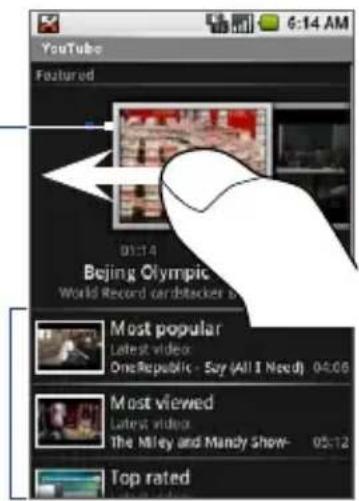
Watch videos
- On the YouTube screen, touch a video category.
- Touch a video to play it. When the keyboard is open, you can also highlight the video using the TRACKBALL, then press to play it.
Note The screen automatically switches to landscape orientation when you play a video.
- Touch the lower part of the screen to display the playback controls.
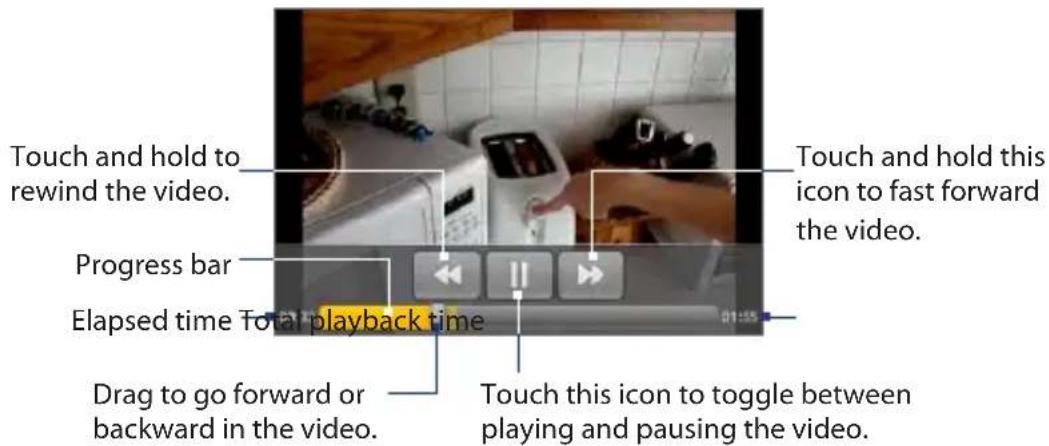
- Press BACK to stop playback and return to the videos list.
Search for videos
- On the YouTube video categories screen, open the keyboard, then press
- Enter a search keyword, then touch Search.
- The number of search results appears below the status bar. Scroll through the results and touch a video to watch it.
Tip To clear your search history, press Ⓜ and touch Settings. Touch Clear search history, then touch OK when prompted.
Filter videos by time
You can filter the video list by the time it was posted on YouTube. While on any video category (except when you are in the Search results screen), press and touch Time categories. Touch a time filter: Today, This week, This month, or All time.
After tapping a time filter, the list is reduced to show only the videos posted during that time period.
View video details
If you want to see the video details and a list of related videos, navigate to a video in the list using the TRACKBALL, touch and hold the video, then touch Details. The video details screen appears showing the author's comment, video length, date it was posted, and more. A list of related videos also appear at the bottom of the screen.
To view comments
While watching a video, or when viewing the video list, you can view the comments posted by the video's viewers.
- Touch and hold a video in a list, then touch Comments on the menu.
• While watching a video, press 📋, then touch Comments.
Share videos
You can share a video by sending its link to your contacts.
-
Do any of the following:
-
While viewing videos in a list, touch and hold the video, then touch Share on the options menu.
• While watching a video, press 📂, then touch Share.
Note If you have set up an external e-mail account in addition to your Gmail account, you will be prompted to select the e-mail account to use to send the video link.
A new e-mail message appears with the video link automatically added to the e-mail message.
- Compose your e-mail then send it. For more information about composing and sending e-mails, refer to Chapter 6.
9.4 Using Music
Music plays digital audio files from the device's storage card. Music supports the following music file formats: MP3, M4A (iTunes application AAC, DRM-free), AMR, WMA (8), MIDI, WAV, OGG Vorbis.
Since Music only plays audio files saved on the storage card, you must copy your audio files to the storage card before you open Music.
To copy music into the storage card
- Connect the device to the computer using the USB cable.
- When the USB connected icon (✗) appears in the status bar, touch and hold the status bar, then slide your finger downward to open the notifications panel.
- Touch USB connected, then touch Mount.
- On your computer, navigate to the USB flash drive, then open it.
- Create a top-level folder on the storage card named "Music" or some other descriptive name, then open it.
Tip You can also create and use folders inside the Music folder to organize your music files. -
Copy audio files into this folder.
-
When finished, disconnect the device from the computer.
To open Music
Press HOME, touch the Applications tab, then touch Music. The Music library screen displays.
Music library
Your music is organized into four categories: Artists, Albums, Songs, and Playlists. Touch a category to view the list within each.
When inside a category, keep tapping the screen until you reach the music you want to play. For example, if you touch Artists, you will see a list of artists in alphabetical order. If you touch an artist, the list opens to display that artist's albums. Select an album and the album's song list displays.
The Music bar appears when a music file is currently playing. Touch it to open the playback screen.
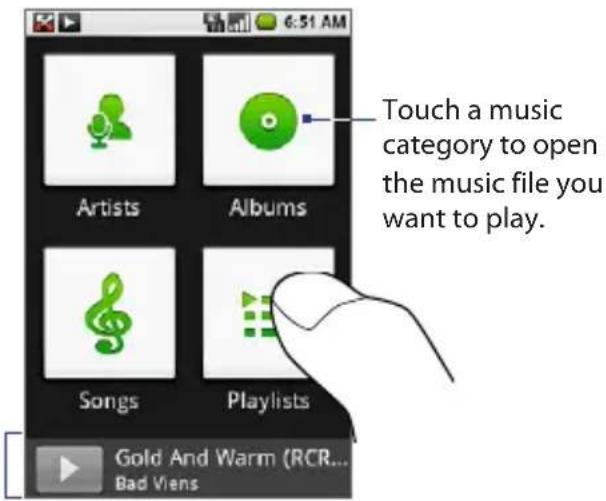
Play music
At any level inside a Music library category, touch and hold an item (a song, artist, album, or playlist) to open the options menu, then touch Play. The playback screen opens.
Note Press the VOLUME UP or VOLUME DOWN button to adjust the playback volume.
Playback screen
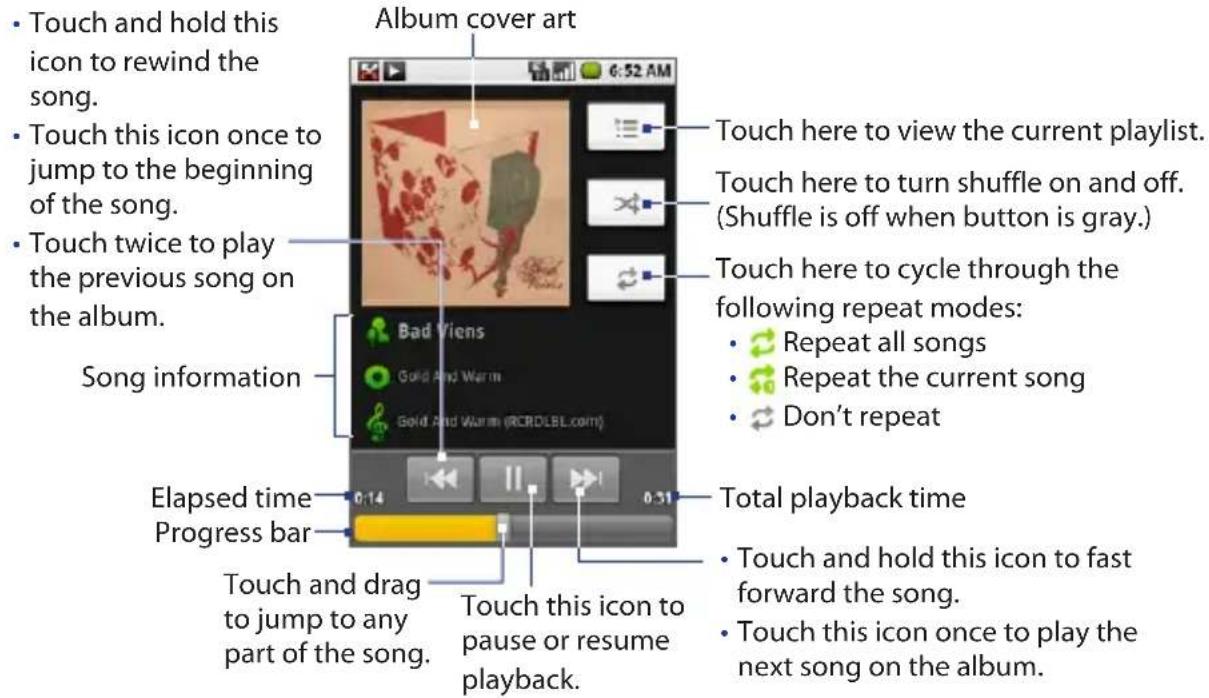
Tip While on the Music library or playback screen, you can play all songs in your library in random order. Press MENU, then touch Party shuffle. The first randomly selected song will play. To turn off Party shuffle, press MENU, then touch Party shuffle off.
Use playlists
Use playlists to organize your music files. You can create as many playlists as you want on your device.
To create a playlist
- Touch a category on the Music library screen.
- In the list that appears, use the TRACKBALL to navigate to the artist, album, or song that you want to add in the playlist.
- Touch and hold the artist, album, or song, then touch Add to playlist on the options menu.
- In the Add to playlist window, touch New.
Tip If you want to add the artist, album, or song to an existing playlist, touch the playlist's name in the Add to playlist window.
-
Open the keyboard, then enter the name for your new playlist.
-
Touch Save.
To manage your playlists
-
Go to the Music library screen, then touch Playlists.
-
Do any of the following:
-
Go to the Music library screen, then touch Playlists.
- Do any of the following:
• To play the songs in a playlist, touch the playlist name.
• To delete a playlist, touch and hold the playlist, then touch Delete.
- To rearrange the songs or remove a song in a playlist, touch and hold the playlist, then touch Edit on the options menu. Touch and hold 🕒 before the song you want to move, drag it to its new position, then release. To delete a song, touch and hold the song, then touch Remove from playlist.
- To rename a playlist, touch and hold the playlist, then touch Rename on the options menu. Open the keyboard, enter the new playlist name, then touch Save.
Note The Recently added playlist is a system playlist and cannot be deleted or renamed.
To import a playlist
You can create playlists on your computer, then save these on your storage card.
Music can access the following playlist formats: M3U, WPL, and PLS.
- On your computer, open a simple text file for editing.
- On separate lines, enter all the music file names you want to include in your playlist.
Note The names you list in the file must be the same with the music file names that appear when you view the storage card through your computer's file system, and not the names that appear in the list of songs on your device.
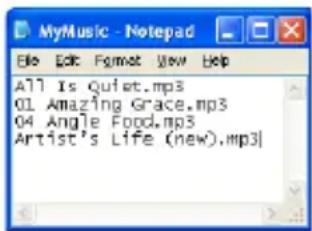
- Save the playlist file using .m3u as the file name extension (for example, MyMusic.m3u).
- Copy the playlist file to the Music folder on the storage card. Follow the instructions in "To copy music into the storage card" section earlier in this chapter.
Note It is recommended that you create a Playlist folder inside your Music folder in the storage card to hold all your playlist files.
Set a song as ring tone
You can use a song as your phone ring tone.
- From the Music library, navigate to the song that you want to use as ring tone.
- Touch and hold the song, then touch Use as phone ringtone on the menu. The song is set as your default incoming call ring tone.
Note To check if the selected song is added as a ring tone, press HOME, then touch Settings > Sound & display > Phone ringtone. The song should be listed as an option.
Delete music on the storage card
You can delete music files on the storage card.
- Touch Artists, Album, or Songs on the Music Library screen.
- Touch and hold the artist, album, or song that you want to delete, then touch Delete on the options menu.
- When prompted, touch OK.
Keyboard shortcuts in Music
Songs list views
To Do this
Play the highlighted song
Press

Playlists screen
To Do this
Play the highlighted song Press

Chapter 10
Getting Applications from Android Market
10.1 Opening Android Market
10.2 Navigating Android Market
10.3 Installing and Managing Applications
10.4 Sending Feedbacks
10.1 Opening Android Market
Android Market provides direct access to useful applications and fun games which you can download and install on your device. Android Market also allows you to send feedbacks and comments about an application, or flag an application that you find objectionable or incompatible with your device.
To open Android Market
- Press HOME, touch the Applications tab, then touch Market.
- When you open Android Market for the first time, the Terms of Service window will appear. Touch Accept to continue.
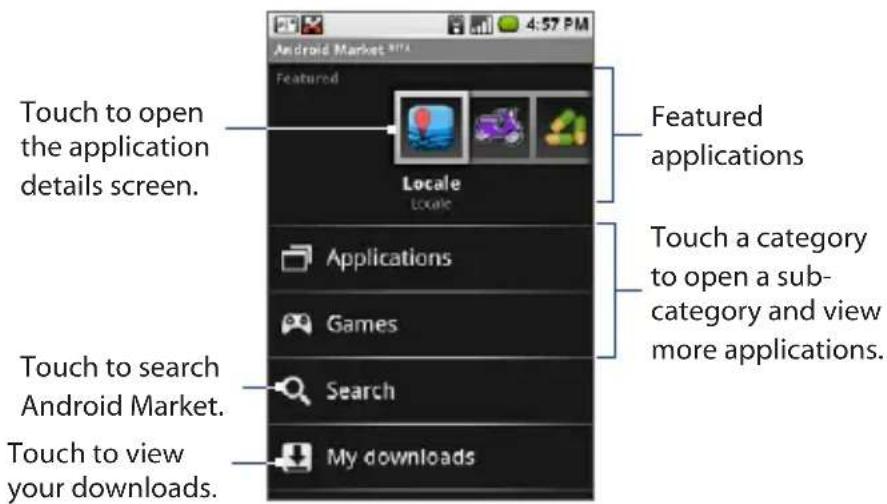
Tip For more information about Android Market, on the Android Market screen, press MENU, then touch Help.
10.2 Navigating Android Market
You can choose to install featured applications that show on top of the Android Market screen, or applications and games which are categorized according to their functions or features.
Featured applications
Featured applications are displayed on top of the screen. To navigate through the featured applications, touch and hold an application icon, then slide your finger left to view more featured applications. Touch an icon to open the application details screen.
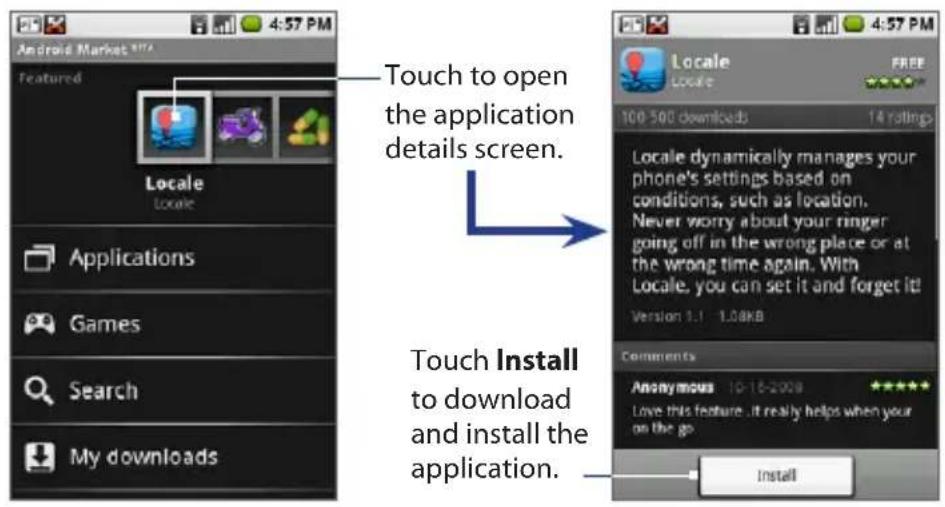
Categorized applications
To view more applications, touch any of the two application categories:
Applications and Games. When you touch a category, the sub-categories appear.
Touch a sub-category to view applications sorted by popularity or by date it was published in Android Market.
Touch an application icon on the By popularity or By date tab to open the application details screen.
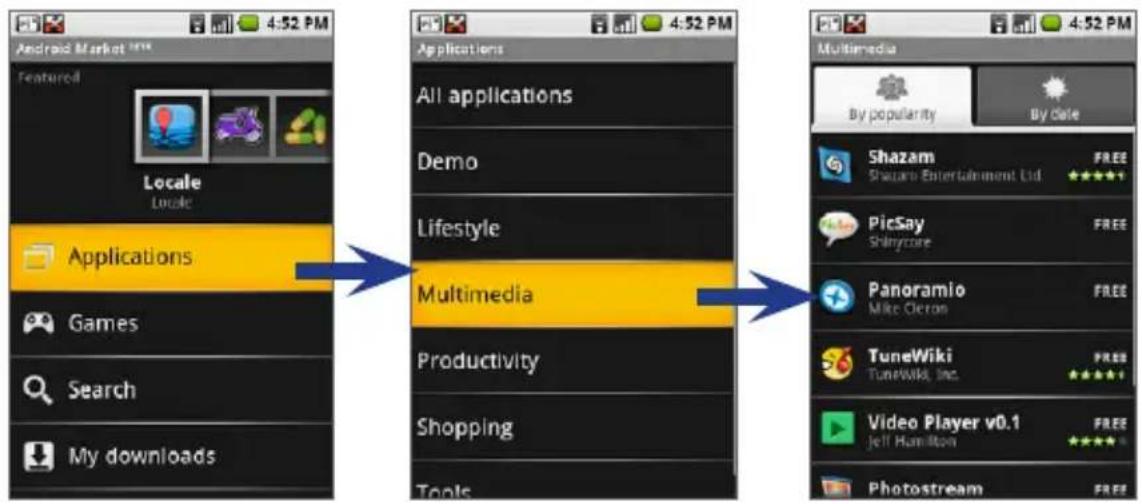
10.3 Installing and Managing Applications
To install and open an application
- On any application details screen, touch Install. Tip If you want to stop downloading the application, touch Cancel download.
- After the application is downloaded and installed on your device, the content download icon ( 📁 appears in the notification area of the status bar.
- On the Android Market screen, touch My downloads.
- Touch the installed application in the list, then touch Open. Tip You can also find the icon of the installed application on the Applications tab.
To view installed applications
On the Android Market main screen, touch My downloads, or press MENU and touch My Downloads. A list of all installed applications appears.
To uninstall an application
You can uninstall any application that you have downloaded and installed from Android Market.
- On the My downloads screen, touch the application you want to uninstall, then touch Uninstall.
- When prompted, touch OK to remove the application on your device.
- Choose the reason for removing the application, then touch OK.
10.4 Sending Feedbacks
You can rate or write a comment about an application. You can also flag an application if you find it objectionable or incompatible with your device. When you flag an application, a message is sent to Android Market for follow-up action.
Note You have to rate an application before you can post a comment about it.
To rate an application
- On the My downloads screen, touch the application you want to rate, then touch Rate it!
- Rate the application by tapping the stars. Your rating displays below the stars.
- Touch OK.
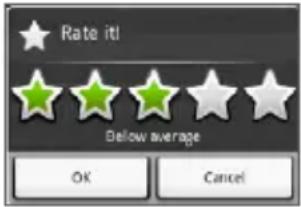
To post a comment about the application
- After rating an application, the Post a comment option appears below My rating in the application details screen. Touch this option to proceed.
- Open the keyboard, then enter your comments in the text box.
- Touch OK when finished.
To remove a rating or comment
You can remove any rating or comment you made for an installed application.
- On the My downloads screen, touch the application you want to modify.
- Press MENU, then touch More > Clear my review. Your rating and/or comments are removed.
To flag an application
- On the My downloads screen, touch the application you want to flag.
-
Do any of the following:
-
If you have rated the application, press MENU, then touch More > Flag content.
-
If you have not rated the application, press MENU, then touch Flag content.
-
When prompted, select the reason why you find the application objectionable, then touch Submit.
Note If you selected Other objection, you will be prompted to specify your objection to the application.
Chapter 11
Managing Your Device
11.1 Changing Basic Settings
11.2 Protecting Your Device
11.3 Managing Memory
11.4 Software Updates
11.5 Resetting Your Device
11.6 Battery Saving Tips
11.1 Changing Basic Settings
Set the date, time zone, and time
By default, your device automatically uses the network-provided date, time zone, and time.
To manually adjust the date, time zone, and time
- Press HOME > MENU, then touch Settings.
- Scroll down the screen, then touch Date & time.
- Clear the Automatic check box.
- Touch Set date. On the Change date window, touch + or - to adjust the date, month, and year, then touch Set when finished.
- Touch Set time zone, then select the time zone in the list. Scroll down the list to view more time zones.
- Touch Set time. On the time window, touch + or - to adjust the hour and minute, then touch AM to change to PM or vice versa. Touch Set when finished.
- Select the Use 24-hour format check box to toggle between using a 12-hour or a 24-hour format.
- Touch Date format then select how you want dates to display on your device. The selected date format also applies to the date displayed in the Alarm Clock.
Note For details on how to set an alarm, see "Setting Alarms" in Chapter 5.
Display settings
To adjust the screen brightness
- Press HOME > MENU, then touch Settings.
- Touch Sound & display, scroll down the screen, then touch Brightness.
- Drag the brightness slider to the left to decrease or to the right to increase the screen brightness.
- Touch OK.
To adjust the time before the screen turns off
After a period of inactivity, the device screen turns off to conserve battery power. You can set the idle time before the screen turns off.
- Press HOME > MENU, then touch Settings.
- Touch Sound & display.
- Scroll down the screen, then touch Screen timeout.
- Select the time before the screen turns off, then touch OK.
Tip To turn off the screen quickly, press the END CALL/POWER button.
To keep the screen on while charging the device
You can keep the device from turning off the screen while you are charging the device.
- Press HOME > MENU, then touch Settings.
- Touch Applications > Development.
- Select the Stay awake check box.
Ringer settings
To change the ring tone
- Press HOME > MENU, then touch Settings.
- Touch Sound & display > Phone ringtone.
- Touch the ring tone you want to use, then touch OK. The ring tone briefly plays when selected.
Tip You can use audio files that you downloaded from the Internet or copied from your computer as ring tones. For a complete list of supported audio file formats for ring tones, see "Specifications" in the Appendix.
To enable touch tones
You can set the phone to play a ring tone every time you touch the screen.
- Press HOME > MENU, then touch Settings.
- Touch Sound & display, then scroll down the screen.
- Select the Audible touch tones option.
To choose the notification ring tone
You can select the ring tone to play when your device receives new notifications.
- Press HOME > MENU, then touch Settings.
- Touch Sound & display > Notification ringtone.
- Select your preferred notification ring tone in the list.
Phone services
Your device can directly link to the mobile phone network, and enable you to access and change the settings of various phone services for your device. Phone services may include Call Forwarding, Call Waiting, Voicemail, and more. Contact your wireless service provider to find out about the availability of phone services for your device.
To access and change the phone services settings
- Press HOME > MENU, then touch Settings.
- Touch Call settings.
Note For more information about the phone services on your device, refer to the "Adjusting the Call Settings" in Chapter 2.
To enable data roaming
Data roaming lets you connect to your wireless service provider's partner networks and access data services when you are out of your wireless service provider coverage area.
- Press HOME > MENU, then touch Settings.
- Touch Wireless controls > Mobile networks.
- Select the Data roaming option.
Note Accessing data services while roaming may incur significant charges. Inquire the data roaming tariffs with your wireless service provider before enabling data roaming.
11.2 Protecting Your Device
Protect your SIM card with a PIN
You can protect your SIM card from unauthorized use by assigning a PIN (personal identification number).
To enable the SIM card PIN
- Press HOME > MENU, then touch Settings.
- Touch Security & location, scroll down the screen, then touch Set up SIM card lock.
- Select the Lock SIM card option.
- Enter the default SIM card PIN using the keyboard, then touch OK.
- To change the SIM card PIN at any time, touch Change PIN code.
Tip Emergency calls can be placed at any time, without requiring a PIN.
Protect your phone with a screen lock
You can further secure your data by locking the screen and/or requiring a screen unlock pattern every time your device is turned on or every time it wakes up from screen off (sleep) mode.
To lock the screen
Press the END CALL/POWER button. Locking the screen prevents accidental screen touches when the device is in your bag, purse, or pocket.
Note To unlock the screen, press MENU twice.
To create and enable the screen unlock pattern
You can increase the security of your device by creating a screen unlock pattern. When enabled, you have to draw the correct unlock pattern on the screen to unlock the device's control buttons and touch screen.
- Press HOME > MENU, then touch Settings.
- Touch Security & location > Set unlock pattern.
- Read the information on the screen, then touch Next.
-
Study the example pattern on the screen, then touch Next.
-
Draw the screen unlock pattern by connecting at least four dots in a vertical, horizontal and/or diagonal direction. Lift your finger from the screen when finished.
Note You must slide your finger on the screen to create the pattern and not touch individual dots.
-
The device records the pattern. Touch Continue.
-
When prompted, draw the screen unlock pattern again, then touch Confirm.
-
Select the Require pattern option to enable the screen unlock pattern.
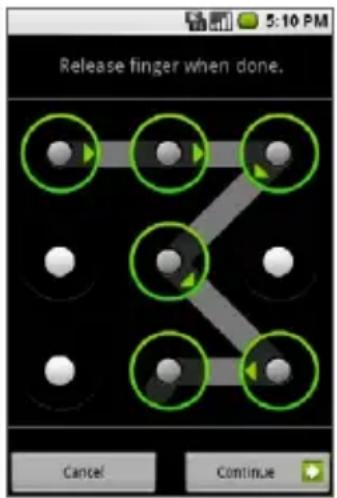
Tip Clear the Use visible pattern check box, if you do not want the unlock pattern to display when you unlock the screen.
Note To change your unlock screen pattern, press HOME > MENU, then touch Settings > Security & location > Change unlock pattern.
When you fail to draw the correct unlock pattern on the screen after five attempts, you will be prompted to wait for 30 seconds before you can try again. If you forgot your screen unlock pattern, touch Forgot pattern. You will be prompted to sign in using your Gmail account name and password, and create a new screen unlock pattern before the Home screen displays.
11.3 Managing Memory
To see how much device memory is available for use
- Press HOME > MENU, then touch Settings.
- Scroll down the screen, then touch SD card & phone storage.
The available device memory displays in the Internal phone storage section.
To see the available storage card space
- Press HOME > MENU, then touch Settings.
- Scroll down the screen, then touch SD card & phone storage.
The total and available storage card space display in the SD card section.
To free some phone memory
If your device is running low on memory, try the following:
- In Browser, clear all temporary Internet files and Browser history information. See "Browser" in Chapter 7 for more information.
- Uninstall downloaded programs you no longer use. See "Android Market" in Chapter 10 for details.
- Reset your device. See "Resetting Your Device" later in this chapter for details.
11.4 Software Updates
Google may send new or updated versions of your device's operating system via over-the-air (OTA) updates. When your device receives an OTA update, it will automatically connect to the Internet using your data connection (3G/GPRS, or EDGE if available) and will download the software update. Since these OTA updates can be up to 64 MB in size, your device will use a considerable amount of bandwidth for which you may be charged with additional connection costs, especially when you are roaming.
If you want to prevent your device from automatically downloading any OTA updates when you're not in your home country, you should disable data roaming on your device before travelling abroad.
When data roaming is disabled, you will not be able to access the Internet or use any other data services on your device while you're out of your wireless service provider's coverage area. For more information on how to enable or disable data roaming, see "To enable data roaming" earlier in this chapter.
11.5 Resetting Your Device
Soft reset
A soft reset clears the device memory and closes running applications. Perform a soft reset when your device hangs or freezes, is running slower than normal, or an application is not performing properly. If a soft reset is performed when applications are running, unsaved information will be lost.
To perform a soft reset
- Remove the back cover.
- Remove the battery for a few seconds.
- Re-install the battery, replace the back cover, then turn on the device.
Note See Chapter 1 for details on how to remove and replace the back cover and the battery.
Factory reset
Performing a factory data reset deletes all data, including downloaded applications, and resets the device back to its initial state—the state before you turned on the device for the first time.
Important Make sure to back up important data you have on the device before you perform a factory data reset.
To perform a factory reset
-
Press HOME > MENU, then touch Settings.
-
Scroll down the screen, then touch SD card & phone storage.
-
Navigate to the Internal phone storage section, then touch Factory data reset.
-
When prompted, touch Reset phone. The phone resets and displays the Home screen.
11.6 Battery Saving Tips
How long your battery power lasts depends on the battery type, the network that you connect to, and how you use your device.
Try the following to conserve battery power:
- When you don't need 3G services, set your phone to connect to your wireless service provider's 2G network. To do this, press HOME > MENU, touch Settings > Wireless controls > Mobile networks, then select the Prefer 2G networks option.
- When your device is not in use, press END CALL/POWER to switch off the screen.
-
Select a shorter idle time before the device screen switches off. See "Display settings" earlier in this chapter.
-
Lower the screen brightness. See "Display settings" earlier in this chapter.
- Use the AC adapter to plug your device into an external power outlet whenever possible.
- Turn Bluetooth off when you are not using it. Make your device visible to other devices only when you are trying to establish a Bluetooth partnership. For more information, see "Using Bluetooth" in Chapter 7.
- Turn Wi-Fi off when you are not using it. For more information about Wi-Fi, see "Connecting to the Internet" in Chapter 7.
- Turn off your device's connection to GPS satellites when not in use. To do this, press HOME > MENU, touch Settings > Security & location, then clear the GPS satellites option. For more information, see Chapter 8.
• Lower the volume. - Close battery-intensive programs, such as the Camera, when you are done using them.
204 Managing Your Device
Appendix
A.1 Specifications
A.2 Regulatory Notices
A.1 Specifications
| Processor Qualcomm® MSM7201ATM, 528 MHz | |
| Operating System AndroidTM | |
| Memory ROM: 256 MBRAM: 192 MB | |
| Dimensions (LxWxT) 117.7 X 55.7 X 17.1 mm (4.63 X 2.19 X 0.67 inches) | |
| Weight 158 g (5.57 ounces) with battery | |
| Display 3.17-inch TFT-LCD flat touch-sensitive screen with 320 X 240 HVGA resolution | |
| Network HSPA/WCDMA:2100 MHzUp to 7.2 Mbps down-link (HSDPA) and 2 Mbps up-link (HSUPA) speedsQuad-band GSM/GPRS/EDGE:850/900/1800/1900 MHz(Band frequency, HSUPA availability, and data speed are operator dependent) | |
| Device Control Trackball with Enter button | |
| Keyboard Slide-out 5-row QWERTY keyboard | |
| GPS GPS navigation capability with Google MapsTM | |
| Connectivity Bluetooth2.0 with Enhanced Data RateWi-Fi: IEEE 802.11b/gHTC ExtUSBTM (11-pin mini-USB 2.0 and audio jack in one) | |
| Camera 3.2 megapixel color camera with auto focus | |
| Audio | Built-in microphone and speakerRing tone formats:AAC, AAC+, AMR-NB, MIDI, MP3, WMA, WAV40 polyphonic and standard MIDI format 0 and 1 (SMF) / SP MIDI |
Battery Rechargeable Lithium-ion battery
• Capacity: 1150 mAh
- Talk time: Up to 350 minutes for WCDMA
Up to 406 minutes for GSM
- Standby time: Up to 402 hours for WCDMA
Up to 319 hours for GSM
(The above are subject to network and phone usage.)
Expansion Slot microSD™ memory card (SD 2.0 compatible)
AC Adapter Voltage range/frequency: 100 - 240V AC, 50/60 Hz DC output: 5V and 1A
Special Features Digital Compass, Motion Sensor
Note Specifications are subject to change without prior notice.
A.2 Regulatory Notices
Regulatory Agency Identifications
For regulatory identification purposes, this product is assigned a model number of DREA110.
To ensure continued reliable and safe operation of this product, use only the accessories listed below with your DREA110.
The Battery Pack has been assigned a model number of DREA160.
Note This product is intended for use with a certified Class 2 Limited Power Source, rated 5 Volts DC, maximum 1 Amp power supply unit.
European Union Notice
Products with CE marking comply with the R&TTE Directive (99/5/EC), the EMC Directive (2004/108/EC), and the Low Voltage Directive (2006/95/EC) issued by the Commission of the European Community.
Compliance with these directives implies conformity to the following European Norms (in parentheses are the equivalent international standards).
Safety of Information Technology Equipment.
• ETSI EN 300 328
Electromagnetic compatibility and Radio spectrum Matters (ERM); Wideband Transmission systems; data transmission equipment operating in the 2.4 GHz ISM band and using spread spectrum modulation techniques.
EN 300 440-2 V1.1.2
Electromagnetic compatibility and Radio spectrum Matters (ERM); Short range devices; Radio equipment to be used in the 1 GHz to 40 GHz frequency range; Part 2: Harmonised EN under Article 3(2) of the R&TTE Directive.
EN 301 489-24
Electromagnetic compatibility and Radio spectrum Matters (ERM); Electromagnetic Compatibility (EMC) standard for radio equipment and services; Part 24: Specific conditions for IMT-2000 CDMA direct spread (UTRA) for mobile and portable (UE) radio and ancillary equipment.
• ETSI EN 301 511
Global system for mobile communications (GSM); Harmonised EN for mobile stations in the GSM 900 and GSM 1800 bands, covering essential requirements of article 3.2 of the R&TTE directive (1995/5/EC).
• ETSI EN 301 489-1
Electromagnetic compatibility and Radio spectrum Matters (ERM); Electromagnetic Compatibility (EMC) standard for radio equipment and services; Part 1: Common technical requirements.
• ETSI EN 301 489-7
Electromagnetic compatibility and Radio spectrum Matters (ERM); Electromagnetic Compatibility (EMC) standard for radio equipment and services; Part 7: Specific conditions for mobile and portable radio and ancillary equipment of digital cellular radio telecommunications systems (GSM and DCS).
Electromagnetic compatibility and Radio spectrum Matters (ERM); Electromagnetic Compatibility (EMC) standard for radio equipment and services; Part 17: Specific conditions for 2.4 GHz wideband transmission systems.
• ETSI EN 301 908-1 & -2
Electromagnetic compatibility and Radio spectrum Matters (ERM); Base Stations (BS), Repeaters and User Equipment (UE) for IMT-2000 Third Generation cellular networks; Part 1: Harmonised EN for IMT-2000, introduction and common requirements, covering essential requirements of article 3.2 of the R&TTE Directive.
EN 50360 / 50361
Product standard to demonstrate the compliance of mobile phones with the basic restrictions related to human exposure to electromagnetic fields (300 MHz – 3 GHz).
CE0678
This equipment may be operated in:
AT BE BG CH CY CZ DE DK
EE ES FI FR GB GR HU IE
IT IS LI LT LU LV MT NL
NO PL PT RO SE SI SK TR
Safety Precautions for Radio Frequency Exposure
Use only original manufacturer-approved accessories, or accessories that do not contain any metal.
Use of non-original manufacturer-approved accessories may violate your local Radio Frequency exposure guidelines and should be avoided.
Exposure to Radio Frequency (RF) Signals
Your phone contains a radio transmitter and receiver. The radiated output power is far below the international radio frequency exposure limits. These limits are part of comprehensive guidelines and establish permitted levels of Radio Frequency energy for the general population. The guidelines are based on the safety standards previously set by international standards bodies:
• American National Standards Institute (ANSI) IEEE. C95.1-1992
• National Council on Radiation Protection and Measurement (NCRP). Report 86. 1986
• International Commission on Non-Ionising Radiation Protection (ICNIRP) 1996
- Ministry of Health (Canada), Safety Code 6. The standards include a substantial safety margin designed to assure the safety of all persons, regardless of age and health.
The exposure standard for wireless mobile phones employs a unit of measurement known as the Specific Absorption Rate, or SAR. The standard incorporates a substantial margin of safety to give additional protection for the public and to account for any variations in usage.
As with other mobile radio transmitting equipment, users are advised that for satisfactory operation of the equipment and for the safety of personnel, it is recommended that no part of the human body be allowed to come too close to the antenna during operation of the equipment.
Your phone has an internal antenna. Use only the supplied integral antenna. Use of unauthorized or modified antennas may impair call quality and damage your phone, causing loss of performance and SAR levels exceeding the recommended limits as well as result in non-compliance with local regulatory requirements in your country.
To assure optimal phone performance and ensure human exposure to Radio Frequency energy is within the guidelines set forth in the relevant standards; always use your phone only in its normal-use position. Do not touch or hold the antenna area unnecessarily when placing or receiving a phone call. Contact with the antenna area may impair call quality and cause your phone to operate at a higher power level than needed. Avoiding contact with the antenna area when your phone is IN USE optimizes the antenna performance and the battery life.
Body-worn measurements were tested for typical body-worn operations with the back of your phone kept 1.5 cm from the body.
SAR Information
0.619 W/Kg@10g (Head)
1.91 W/Kg@10g (Body)
212 Appendix
Telecommunications & Internet Association (TIA) Safety Information
Pacemakers
The Health Industry Manufacturers Association recommends that a minimum separation of six inches be maintained between a handheld wireless phone and a pacemaker to avoid potential interference with the pacemaker. These recommendations are consistent with the independent research by and recommendations of Wireless Technology Research. Persons with pacemakers:
- Should ALWAYS keep your phone more than six inches from their pacemaker when your phone is turned on.
- Should not carry your phone in a breast pocket.
- Should use the ear opposite the pacemaker to minimize the potential for interference. If you have any reason to suspect that interference is taking place, turn your phone off immediately.
Hearing Aids
Some digital wireless phones may interfere with some hearing aids. In the event of such interference, you may want to consult your wireless service provider, or call the customer service line to discuss alternatives.
Other Medical Devices
If you use any other personal medical device, consult the manufacturer of your phone to determine if they are adequately shielded from external Radio Frequency energy. Your physician may be able to assist you in obtaining this information.
Turn the phone off in health care facilities when any regulations posted in these areas instruct you to do so. Hospitals or health care facilities may be using equipment that could be sensitive to external Radio Frequency energy.
WEEE Notice
The Directive on Waste Electrical and Electronic Equipment (WEEE), which entered into force as European law on 13th February 2003, resulted in a major change in the treatment of electrical equipment at end-of-life.
The purpose of this Directive is, as a first priority, the prevention of WEEE, and in addition, to promote the reuse, recycling and other forms of recovery of such wastes so as to reduce disposal.
The WEEE logo (shown at the left) on the product or on its box indicates that this product must not be disposed of or dumped with your other household waste. You are liable to dispose of all your electronic or electrical waste equipment by relocating over to the specified collection point for recycling of such hazardous waste. Isolated collection and proper recovery of your electronic and electrical waste equipment at the time of disposal will allow us to help conserving natural resources. Moreover, proper recycling of the electronic and electrical waste equipment will ensure safety of human health and environment. For more information about electronic and electrical waste equipment disposal, recovery, and collection points, please contact your local city centre, household waste disposal service, shop from where you purchased the equipment, or manufacturer of the equipment.
RoHS Compliance
This product is in compliance with Directive 2002/95/EC of the European Parliament and of the Council of 27 January 2003, on the restriction of the use of certain hazardous substances in electrical and electronic equipment (RoHS) and its amendments.
214 Appendix
Index
3G 134
A
Airplane Mode 64
Alarm
- set an alarm 98
Alarm Clock 47
- about 98
Android Market
- download and install an item 190
- flag an item 192
- open 188
- post a comment 192
- send feedback 191
Applications
- on your phone 47
- tab 47
Application shortcuts
- about 81
- create 81
- replace 82
B
Back cover
- back cover release tab 24
- remove 24
Backlight
- adjust brightness 195
Basic settings 194
Battery
- charge battery 29
- information 26
- install 27
- remove 27
- save battery power 202
Bluetooth
- about 149
- disconnect 151
- modes 149
- visible 149
Bookmarks
- bookmark a web page 145
- delete 146
- edit 146
- manage 145
- open 145
- send the bookmark's address 145
Browser
- about 137
- change the settings 146
- on the Applications tab 47
- open 137
Browser history 144
216 Index
C
Calculator 47
Calendar
- about 88
- change the settings 96
- create events 89
- Day view 91
- edit an event 90
- Month view 93
- on the Applications tab 47
- open 88
- view events 91
- Week view 92
Calendar views
- Day view 91
- Month view 93
- Week view 92
Calling
- from the Call log tab 55
- from the Contacts tab 55
- from the Dialer tab 54
- from the Favorites tab 56
Call Log
- clear 63
- using 62
Call settings
- adjust the call settings 64
Camera
- about 168
- adjust the settings 170
- on the Applications tab 47
- post-capture screen 169
Chat
- close 128
- close a group chat 128
- sign out 131
- start a chat 127
- start a group chat 128
- switch chats 128
Conference call 60
Connect phone to Internet
- ways of connecting 134
Contact details 74
Contacts
- about 65
- add new 66
- call 74
- contacts list 65
- customize 71
- edit 70
- find a contact 73
- map a contact's address 76
- Quick scroll tab 73
- send an e-mail 75
- send an instant message 75
- send a text or picture message 74
Contacts list 71
- browse 71
- select a group to display 72
D
Data roaming
- enable 197
- receive software updates 201
Date 194
Device views
- Back panel 23
- Bottom panel 20
- Front panel 22
- Left panel 21
- Right panel 21
- Top panel 20
Dialer
- on the Applications tab 47
Display settings 195
Downloads 143
E
EDGE 134
- about 122
- add 122
- adjust the settings 124
- compose and send emails 123
- delete a message 123
- delete an account 124
- on the Applications tab 47
- sort 123
Emails
- create and send 113
- label 118
- open 115
- receive and read 114
- search 117
- set notifications 120
Emergency call 55
Events
- create 89
Extended Home screen 38
F
Friends list
- find 129
- manage 129
- pin 129
G
Gmail
- about 112
- create and send emails 113
-on the Applications tab 47 - open 112
- setting up 35
Google Talk
- about 125
- add a friend 126
- change the settings 131
- change your status 128
- friends list 129
- mobile indicators 130
- sign in automatically 131
- sign out 131
- view and accept invitations 127
GPRS 134
GPS satellites 154
H
Home page 140
Home screen
- about 37
- customize 39
- extended Home screen 38
218 Index
|
IM 125
- on the Applications tab 48
Inside the box 23
Instant messaging 125
International call 55
Internet 134
K
Keyboard
- about 78
- open 78
- special keys 81
- use 79
L
Labels
- change or remove 119
- filter by label 119
- select to sync 120
- star 119
Links 143
Location information 170
Location source 154
M
Map history 157
Map marker 162
Map mode
- Map mode 158
- Satellite mode 159
- Street View 159
- Traffic mode 159
Maps
- about 154
- find your location 154
- location source 154
- navigate 158
- on the Applications tab 48
- open 154
- search 155, 157
- view 157
- zoom in or out 157
Market
- on the Applications tab 48
Memory 206
- managing 200
Memory card
- install 27
- remove 28
- remove while the device is on 52
Menu key 81
Message draft 106
Message signature 114
Message threads 107
- delete 108
- open 107
Messaging 102
- on the Applications tab 48
- open 102
Missed call 63
MMS settings 110
Mobile indicators 130
Multiple calls 60
Music
- delete music on memory card 186
- Music Library 182
Index 219
- on the Applications tab 48
- open 181
- playback screen 183
- playlists 184
- play music 183
- set as ring tone 185
- supported file formats 181
Music Library 182
Mute the microphone 59
N
Navigating your phone 31
Notification LED 46
Notification ring tone 196
Notifications
- panel 45
P
Page content settings 146
Phone Controls 30
Phone services 197
Picture message 102
- reply 108
- settings 110
- view 107
Pictures
- about 171
- assign a picture 176
- crop 174
- delete 175
-edit pictures 174 - navigate pictures 173
-
on the Applications tab 48
-
open 171
- rotate 175
- send via e-mail 176
- view pictures 172
- view slideshow 177
- zoom in or out on a picture 174
PIN 198
- enter your PIN 34
Playlists
- about 184
- create 184
- import 185
- manage 184
Post-capture screen 169
Privacy settings 147
Q
Quick scroll tab 73
R
Regulatory notices 207
Reset
- hard reset 202
- soft reset 201
Ringer settings 196
Ring tone 185
- change 196
Roaming
- data 197
- updating the software 201
220 Index
S
Safety information 4
Screen lock 198
Screen orientation 42
Screen unlock pattern 199
Search key 81
Security settings 147
Settings
- on the Applications tab 48
Settings on the device 49
Shortcut 39
SIM Card
- install 25
- remove 25
SIM card
- PIN 198
SIM Toolkit
- on the Applications tab 48
Slideshow
- adjust the settings 177
SMS settings 110
Software updates 200
Speakerphone 59
Specifications 206
Status icons 43
Street View 161
Synchronization
- about 84
- control 84
T
Text message 102
- create and send 103
- reply 108
- settings 110
Text settings 82
Time 194
Time zone 194
Touch tones 196
TRACKBALL 33
Turn off the display 36
Turn phone function on and off 64
Turn power on and off 34
U
USB Drive 52
V
Videos 178
Voice call
- about 54
- answer call 57
- end call 60
Voicemail 56
Volume
- adjust 50
- media volume 51
- ringer volume 50
W
Wallpaper
- change 39
- select 40
Web applications 144
Web history 143
Web page
- bookmark 139
- go to a web page 138
- navigate 141
- search information 139
- set your home page 140
- view 141
- view multiple pages 139
- zoom in or out 141
Wi-Fi 135
Widget 39
Y
YouTube
- about 178
- filter videos 179
- on the Applications tab 48
- open 178
- search videos 179
- share videos 180
- view video details 180
- watch videos 178
222 Index

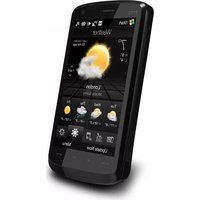
- Please Read Before Proceeding
- PRIVACY RESTRICTIONS
- INTELLECTUAL PROPERTY RIGHT INFORMATION
- Limitation of Damages
- Important Health Information and Safety Precautions
- ELECTRICAL SAFETY
- SAFETY PRECAUTIONS FOR PROPER GROUNDING INSTALLATION
- SAFETY PRECAUTIONS FOR POWER SUPPLY UNIT
- - Use the correct external power source
- AC Adapter
- - Handle battery packs carefully
- • Take extra precautions
- SAFETY PRECAUTIONS FOR DIRECT SUNLIGHT
- PREVENTION OF HEARING LOSS
- SAFETY IN AIRCRAFT
- ENVIRONMENT RESTRICTIONS
- EXPLOSIVE ATMOSPHERES
- ROAD SAFETY
- SAFETY PRECAUTIONS FOR RF EXPOSURE
- INTERFERENCE WITH MEDICAL EQUIPMENT FUNCTIONS
- HEARING AIDS
- NONIONIZING RADIATION
- General Precautions
- - Avoid applying excessive pressure to the device
- • Device getting warm after prolonged use
- - Heed service markings
- • Damage requiring service
- - Avoid hot areas
- - Avoid wet areas
- - Avoid using your device after a dramatic change in temperature
- - Avoid pushing objects into product
- - Mounting accessories
- - Avoid unstable mounting
- - Use product with approved equipment
- - Adjust the volume
- - Cleaning
- Contents
- Chapter 1 Getting Started 19
- Getting to Know Your HTC Dream and Accessories 20
- Installing the SIM Card, Battery, and Storage Card 24
- Charging the Battery 29
- Device Controls....30
- Navigating Your Device 31
- Getting Started....34
- Home Screen 37
- Device Status and Notifications 43
- Applications....47
- Settings 49
- Adjusting the Volume 50
- Using the Device's Storage Card as a USB Drive 52
- Chapter 2 Using Phone Features and Managing Contacts 53
- Making Calls....54
- Answering or Rejecting Calls 57
- Call Options....58
- Using the Call Log 62
- Adjusting the Phone Settings 64
- Turning the Phone Function On and Off 64
- Creating and Managing Your Contacts 65
- Chapter 3 Entering Text 77
- Chapter 4 Synchronizing Information 83
- Chapter 5 Managing Your Time 87
- Chapter 6 Exchanging Messages 101
- Using Email 122
- Using Google Talk 125
- Chapter 7 Getting Connected 133
- Connecting to the Internet 134
- Using Bluetooth 149
- Chapter 8 Getting Around with Maps 153
- Chapter 9 Experiencing Multimedia 167
- Chapter 10 Getting Applications from Android Market 187
- Chapter 11 Managing Your Device 193
- Appendix 205
- Index 215
- Chapter 1
- Getting Started
- Getting to Know Your HTC Dream and Accessories
- Top panel
- Bottom panel
- USB Connector/Earphone Jack
- Left panel Right panel
- VOLUME UP
- VOLUME DOWN
- Storage Card Slot
- CAPTURE
- Getting Started
- Front panel
- Back panel
- Inside the box
- Getting Started
- Installing the SIM Card, Battery, and Storage Card
- To remove the back cover
- SIM card
- To install the SIM card
- To remove the SIM card
- Battery
- To install the battery
- To remove the battery
- Storage card
- To install the storage card
- Getting Started
- To remove the storage card
- Charging the Battery
- To charge the battery
- Device Controls
- Navigating Your Device
- Finger gestures
- Touch
- Swipe or slide
- Getting Started
- Drag
- - Moving or deleting a Home screen item
- • Resizing the cropper
- Flick
- Use the TRACKBALL
- Getting Started
- Turn your device on and off
- To turn on the device
- Enter your PIN
- To turn off the device
- Set up your device for the first time
- To create a Gmail account
- Turn off the screen when not in use
- Home Screen
- Extended Home screen
- Customize the Home screen
- To add a Home screen item
- To move a Home screen item
- To remove a Home screen item
- To change the Home screen wallpaper
- Wallpaper gallery
- Pictures
- Getting Started
- To change the screen orientation
- To create a folder and add items to it
- Device Status and Notifications
- Status bar
- Notification icons
- Getting Started
- Status icons
- Notifications panel
- To open the notifications panel
- To close the notifications panel
- Notification LED
- LED Status Indication
- Applications
- To open the Applications tab
- Recently-used applications
- To open a recently-used application
- Settings
- Adjusting the Volume
- To adjust the ringer volume
- To adjust the media volume
- Using the Device's Storage Card as a USB Drive
- To set the device's storage card as a USB drive
- To remove the storage card while the device is on
- Chapter 2
- Using Phone Features and Managing Contacts
- Using Phone Features and Managing Contacts
- Making Calls
- Use the Dialer
- To open the Dialer
- To make a call on the Dialer
- To make an emergency call
- To make an international call
- Make a call from the Call log
- Add and call your contacts
- Add and call favorite contacts
- Call voice mail
- To call voice mail
- To use the Dialer to call voice mail
- Note
- Answering or Rejecting Calls
- To answer an incoming call
- Using Phone Features and Managing Contacts
- To reject an incoming call
- Call Options
- To hold the call
- To mute the microphone during a call
- To turn the speakerphone on or off
- To transfer the call to a Bluetooth headset
- To end a call
- Manage multiple calls
- Set up a conference call
- Using Phone Features and Managing Contacts
- Using the Call Log
- To use the Call log tab
- To add a new phone number to Contacts
- To check a missed call
- To clear the Call log
- Adjusting the Phone Settings
- Turning the Phone Function On and Off
- To enable or disable Airplane mode
- Creating and Managing Your Contacts
- To view your Contacts list
- Add a new contact
- To add a new contact
- To import contacts from the SIM card
- To add a contact from the Call log tab
- To import contacts from Microsoft® Outlook®
- Add favorite contacts
- Edit and customize your contacts
- To edit contact information
- To change the contact's default phone number
- To customize contact information
- View, organize and search contacts
- To browse the contacts list
- Using Phone Features and Managing Contacts
- To select a group to display
- Touch OK.
- To find a contact on your device
- Using Phone Features and Managing Contacts
- Communicate with your contacts
- To call a contact
- To send a text or multimedia message to a contact
- To send an e-mail to a contact
- To send an instant message to a contact
- To map a contact's address
- Keyboard shortcuts in Contacts
- Chapter 3
- Entering Text
- Using the Keyboard
- To open the keyboard
- To use the keyboard
- Special keys
- Search
- Menu MENU
- Create application shortcuts
- To assign a shortcut key to an application
- Entering Text
- To replace a shortcut key
- Adjusting the Text Settings
- To adjust the text settings
- Chapter 4
- Synchronizing Information
- About Synchronization
- Selecting Applications to Synchronize
- To select which application to synchronize
- To stop synchronization
- Chapter 5
- Managing Your Time
- Using Calendar
- Open Calendar
- Create events
- To create an event
- To edit an event
- To cancel an event
- View events
- Using the Day view
- Managing Your Time
- Using the Week view
- Using the Month view
- Event reminders
- To view, dismiss, or snooze the reminder
- Synchronize Microsoft® Outlook® calendar
- To synchronize your Microsoft Outlook calendar
- Change the Calendar settings
- To select the calendar to display
- To change other Calendar options
- Keyboard shortcuts in Calendar
- On any Calendar view
- Event details screen
- Edit Event details screen
- Setting Alarms
- To open Alarm Clock
- Set an alarm
- Customize the Alarm Clock
- Chapter 6
- Exchanging Messages
- Sending Text and Multimedia Messages
- Open Messaging
- Create and send SMS and MMS messages
- To create and send a text message
- To create and send a multimedia (MMS) message
- To save a message as a draft
- Receive text and multimedia messages
- Manage messages and message threads
- To open and read a text message
- To open and view a multimedia message
- To reply to a text or multimedia message
- To delete a message or a message thread
- Read delivery reports
- To view delivery reports
- To manage undelivered messages
- Adjust text and multimedia message settings
- Exchanging Messages
- Using Gmail™
- To open Gmail
- To refresh Gmail
- Create and send e-mails
- To create and send an e-mail
- Exchanging Messages
- To add a signature to e-mails
- To view your sent messages
- Receive and read e-mails
- To view e-mails
- To open or collapse e-mails in a thread
- To view or download file attachments
- To search for e-mail messages
- Reply to or forward e-mails
- Manage conversations and e-mails
- Conversations
- E-mail messages
- Label your e-mails
- To label conversations or e-mails with a star
- To change or remove a conversation label
- To filter conversations by label
- To select labels to synchronize
- Set new e-mail notifications
- Keyboard shortcuts in Gmail
- Conversations list
- While in an e-mail message
- Using Email
- To open Email
- Add an external e-mail account
- Compose and send e-mails using an external e-mail account
- Manage e-mails on your external e-mail account
- To sort messages
- To delete a message
- Edit or delete an external e-mail account
- Adjust the external e-mail account settings
- Using Google Talk
- Sign in and chat online
- To sign in to Google Talk
- To add a new friend
- To start a chat
- To view active chats
- To view your invites and accept an invitation
- To switch between active chats
- To change your online status and message
- To close a chat
- To start a group chat
- To close a group chat
- Manage your friends
- To find a friend
- To block a friend
- To pin a friend
- To show a friend in the most popular list
- Mobile indicators
- Adjust instant messaging settings
- To set notifications for new instant messages
- To sign in automatically
- Sign out
- Chapter 7
- Getting Connected
- Connecting to the Internet
- GPRS/3G
- To update the APNs
- To add a new APN
- Wi-Fi
- To turn Wi-Fi on and connect to a wireless network
- To check the wireless network status
- - Status bar
- • Wi-Fi networks
- To connect to another wireless network
- Using Browser
- To open Browser
- To go to a web page
- To search information
- To bookmark the web page you are viewing
- To open multiple web pages and view them
- To set your home page
- View web pages
- To zoom in or out on a web page
- To navigate on a web page
- Getting Connected
- To open web pages in landscape orientation
- Manage links, history, and downloads
- To select links in web pages
- Link What to do
- To open the Browser history
- To allow download of web applications
- To view your downloads
- Manage bookmarks
- To bookmark any web page
- To send a bookmark address
- To open a bookmark
- To edit a bookmark
- To delete a bookmark
- Adjust the Browser settings
- Using Bluetooth
- To turn on Bluetooth and make the device discoverable (visible)
- To change the device name
- To pair and connect a Bluetooth hands-free headset or car kit
- To disconnect a Bluetooth hands-free headset or car kit
- Chapter 8
- Getting Around with Maps
- Getting to Know Maps
- To enable Location source
- To open Maps
- To find your location on the map
- Searching for Places of Interest
- To search for a place of interest
- To view your Map history
- Viewing Maps
- To zoom in or out on a map
- To navigate on a map
- To change a map mode
- Keyboard shortcuts in Maps
- Using Street View
- To use Street View
- Getting Around with Maps
- Touch a blue-outlined road.
- Touch the callout to display the Street View of the location.
- Do any of the following when in street view:
- To use the compass in Street View
- Getting Directions
- To get directions
- Chapter 9
- Experiencing Multimedia
- Using the Camera
- Before you proceed
- To open the Camera
- To close the Camera
- Take pictures
- Post-capture screen
- Adjust the Camera settings
- Using Pictures
- To copy pictures into the storage card
- To open Pictures
- Experiencing Multimedia
- To close Pictures
- View your pictures
- To navigate pictures in an album or picture list
- To zoom in or out on a picture
- To change the screen orientation while in Pictures
- Edit your pictures
- To crop a picture
- To rotate a picture
- To view the picture details
- To delete a picture
- Send a picture
- Set a picture as wallpaper or caller ID icon
- To set a picture as Home screen wallpaper
- To assign a picture as a caller ID icon
- View pictures as a slideshow
- To view pictures as a slideshow
- To adjust the picture slideshow settings
- Using YouTube™
- To open YouTube
- To close YouTube
- Watch videos
- Search for videos
- Filter videos by time
- View video details
- To view comments
- Share videos
- Using Music
- To copy music into the storage card
- To open Music
- Music library
- Play music
- Playback screen
- Use playlists
- To create a playlist
- To manage your playlists
- To import a playlist
- Set a song as ring tone
- Delete music on the storage card
- Keyboard shortcuts in Music
- Songs list views
- Playlists screen
- Chapter 10
- Getting Applications from Android Market
- Opening Android Market
- To open Android Market
- Navigating Android Market
- Featured applications
- Categorized applications
- Installing and Managing Applications
- To install and open an application
- To view installed applications
- To uninstall an application
- Sending Feedbacks
- To rate an application
- To post a comment about the application
- To remove a rating or comment
- To flag an application
- Chapter 11
- Managing Your Device
- Changing Basic Settings
- Set the date, time zone, and time
- To manually adjust the date, time zone, and time
- Display settings
- To adjust the screen brightness
- To adjust the time before the screen turns off
- To keep the screen on while charging the device
- Ringer settings
- To change the ring tone
- To enable touch tones
- To choose the notification ring tone
- Phone services
- To access and change the phone services settings
- To enable data roaming
- Protecting Your Device
- Protect your SIM card with a PIN
- To enable the SIM card PIN
- Protect your phone with a screen lock
- To lock the screen
- To create and enable the screen unlock pattern
- Managing Memory
- To see how much device memory is available for use
- To see the available storage card space
- To free some phone memory
- Software Updates
- Resetting Your Device
- Soft reset
- To perform a soft reset
- Factory reset
- To perform a factory reset
- Battery Saving Tips
- Appendix
- Battery Rechargeable Lithium-ion battery
- Expansion Slot microSD™ memory card (SD 2.0 compatible)
- A.2 Regulatory Notices
- Regulatory Agency Identifications
- European Union Notice
- • ETSI EN 301 489-1
- • ETSI EN 301 489-7
- • ETSI EN 301 908-1 & -2
- EN 50360 / 50361
- CE0678
- Safety Precautions for Radio Frequency Exposure
- Exposure to Radio Frequency (RF) Signals
- SAR Information
- Appendix
- Telecommunications & Internet Association (TIA) Safety Information
- Pacemakers
- Other Medical Devices
- WEEE Notice
- RoHS Compliance
- Index
- A
- B
- Index
- C
- D
- E
- F
- G
- H
- Index
- |
- K
- L
- M
- N
- P
- Q
- R
- Index
- S
- T
- U
- V
- W
- Y
Brand : HTC
Model : Dream
Category : Mobile Phone