
29UB67 - Screen LG - Free user manual and instructions
Find the device manual for free 29UB67 LG in PDF.


| Product Type | Monitor |
| Screen Size | 29 inches (73.7 cm) |
| Aspect Ratio | 21:9 |
| Resolution | 2560 x 1080 pixels |
| Panel Type | IPS |
| Refresh Rate | 60 Hz |
| Response Time | 5 ms (GtG) |
| Brightness | 300 cd/m² |
| Contrast Ratio | 1000:1 (typical) |
| Viewing Angle | 178° / 178° |
| Connectivity | DVI-D, HDMI, DisplayPort |
| Speakers | Built-in (2 x 5W) |
| VESA Mount | 100 x 100 mm |
| Adjustability | Height, tilt, swivel |
| Power Consumption (Typical) | 32 W |
| Power Consumption (Standby) | 0.3 W |
| Dimensions (with Stand) | 28.8 x 17.5 x 9.8 inches (73.2 x 44.5 x 24.9 cm) |
| Weight (with Stand) | 13.5 lbs (6.1 kg) |
| Cleaning | Wipe with a dry, soft cloth; do not use solvents |
| Safety | Do not expose to water or heat sources; use provided power cord |
Frequently Asked Questions - 29UB67 LG
User questions about 29UB67 LG
0 question about this device. Answer the ones you know or ask your own.
Ask a new question about this device
Download the instructions for your Screen in PDF format for free! Find your manual 29UB67 - LG and take your electronic device back in hand. On this page are published all the documents necessary for the use of your device. 29UB67 by LG.
USER MANUAL 29UB67 LG
*LG LED Monitors are LCD Monitors with LED Backlighting.
Please read the safety information carefully before using the product.
IPS LED Monitor (LED Monitor) Model List
29UM67
29UB67
34UM67
34UB67
CONTENTS
3 LICENSE
4 ASSEMBLING AND PREPARING
4 Product Components
5 Component and Button Description
8 - How to Use the Joystick Button
9 Moving and Lifting the Monitor
10 Installing the Monitor
10 - Assembling the stand base
12 - Using the cable holder
13 - Installing onto a table
14 - Adjusting the stand height
15 - Adjusting the angle
16 - Pivot feature
17 - Using the Kensington lock
17 - Installing the wall mount plate
18 - Installing to a wall
19 USING THE MONITOR
19 Connecting to a PC
19 - DVI connection
20 - DisplayPort connection
20 - HDMI connection
21 Connecting to AV Devices
21 - HDMI connection
22 Connecting to External Devices
22 - USB Cable connection - PC
22 - Connecting Headphones
23 INSTALLING LG MONITOR SOFTWARE
26 Installing The Dual Controller
28 USER SETTINGS
29 Customizing settings
29 - Menu Settings
29 - -Quick Settings
30 - -PBP
31 - -Picture
33 - -Sound
34 - -General
35 - -Reset
36 - -Picture mode
37 TROUBLESHOOTING
39 SPECIFICATIONS
39 29UM67
40 29UB67
41 34UM67
42 34UB67
43 Factory support mode (DVI-D/ HDMI/ DisplayPort)
43 HDMI Timing (Video)
43 Indicator
44 PROPER POSTURE
44 Proper Posture for Using the Monitor
LICENSE
Each model has different licenses. Visit www.lg.com for more information on the license.

HIGH-DEFINITION MULTIMEDIA INTERFACE
The terms HDMI and HDMI High-Definition Multimedia Interface, and the HDMI logo are trademarks or registered trademarks of HDMI Licensing LLC in the United States and other countries.

VESA, VESA logo, Display Port Compliance Logo and Display Port Compliance Logo for dual-mode source are all registered trademarks of the Video Electronics Standards Association.
The following content is only applied to the monitor which is sold in Europe market and which needs to meet the ErP Directive:
* This monitor is set to be turned off automatically in 4 hours after you turned on display if there is no adjustment to display.
* To make this setting be disabled, change the option to 'Off' in OSD menu of "Automatic Standby".
ASSEMBLING AND PREPARING
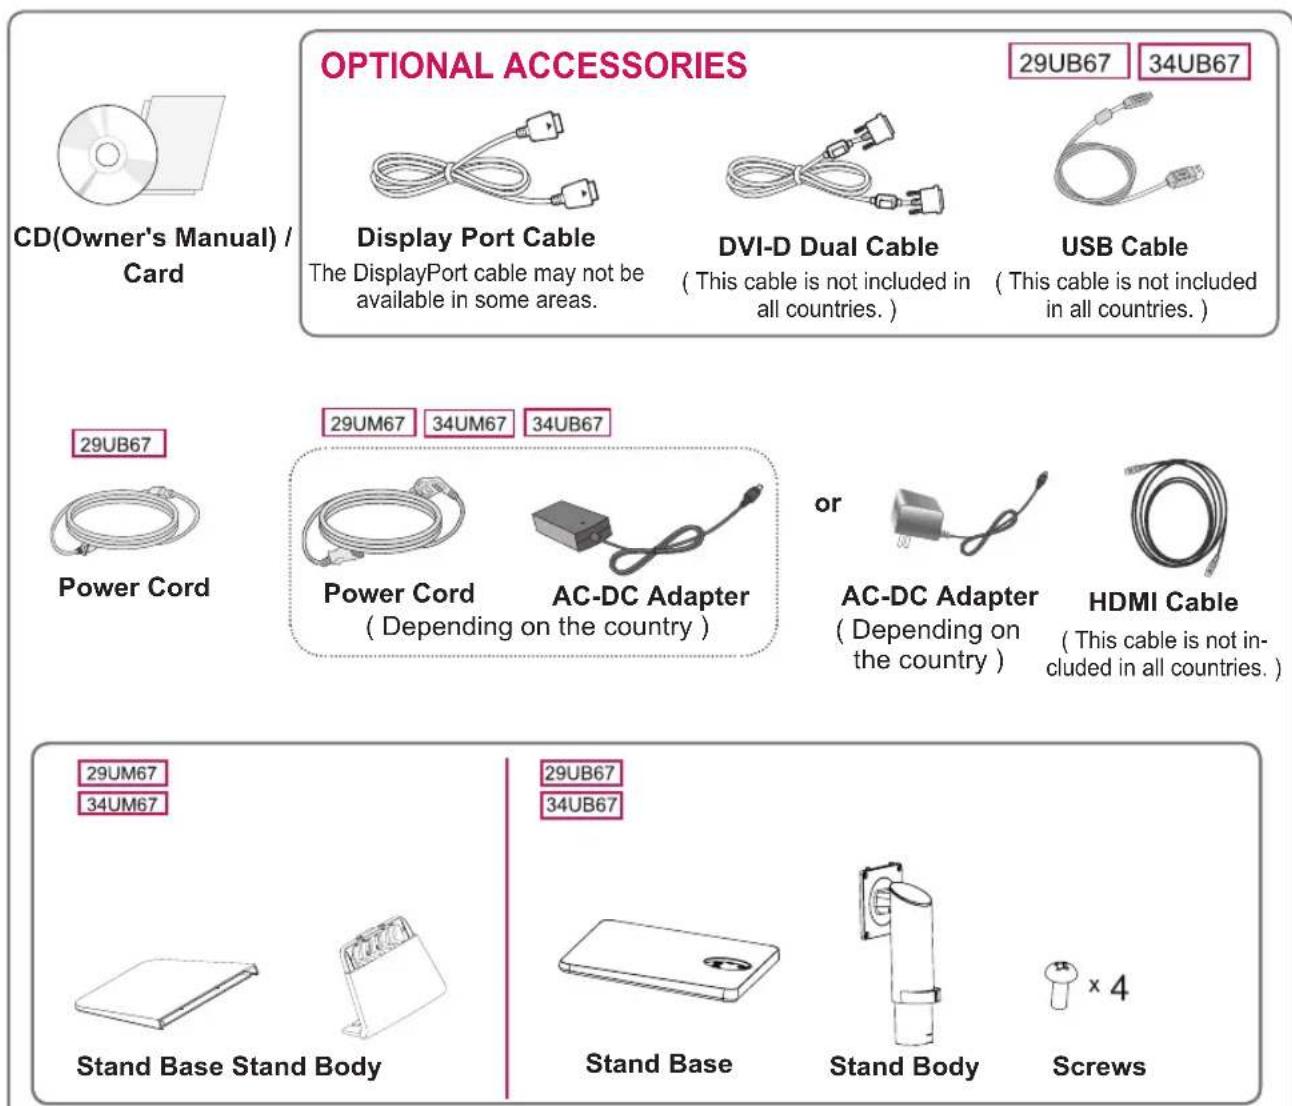
Product Components
Please check whether all the components are included in the box before using the product. If there are missing components, contact the retail store where you purchased the product. Note that the product and components may look different from those shown here.
text_image
OPTIONAL ACCESSORIES CD(Owner's Manual) / Card Display Port Cable The DisplayPort cable may not be available in some areas. DVI-D Dual Cable ( This cable is not included in all countries. ) USB Cable ( This cable is not included in all countries. ) 29UB67 34UB67 29UB67 Power Cord 29UM67 34UM67 34UB67 Power Cord ( Depending on the country ) AC-DC Adapter or AC-DC Adapter ( Depending on the country ) HDMI Cable ( This cable is not included in all countries. ) 29UM67 34UM67 Stand Base Stand Body 29UB67 34UB67 Stand Base Stand Body × 4 Screws
CAUTION
Always use genuine components to ensure safety and product performance.
The product warranty will not cover damage or injury caused by the use of counterfeit components.

NOTE
Note that the components may look different from those shown here.
Without prior notice, all information and specifications in this manual are subject to change to improve the performance of the product.
To purchase optional accessories, visit an electronics store or online shopping site or contact the retail store where you purchased the product.
The DisplayPort cable may not be available in some areas.
Component and Button Description
29UM67
34UM67
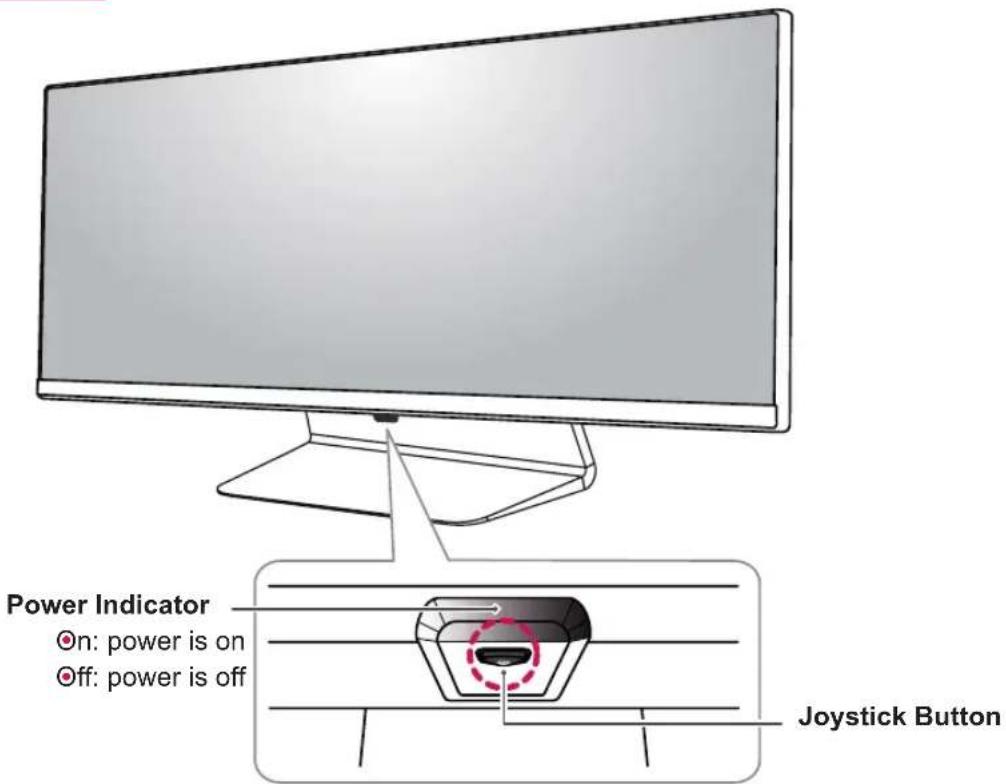
text_image
Power Indicator ●on: power is on ●off: power is off Joystick ButtonInput Connector
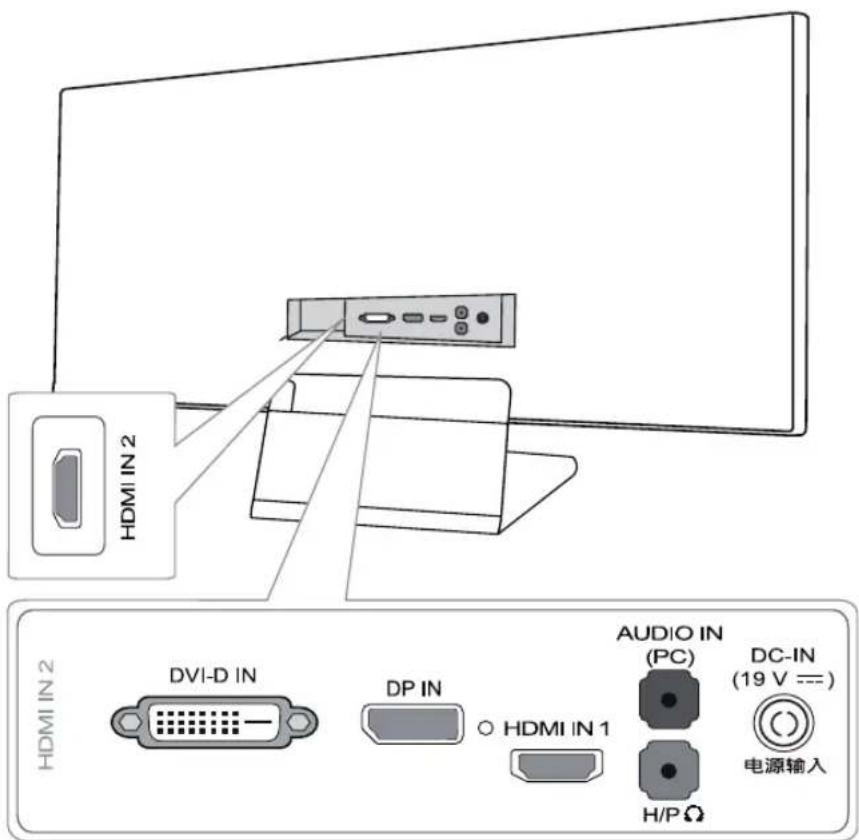
text_image
HDMI IN 2 HDMI IN 2 DVI-D IN DP IN ○ HDMI IN 1 AUDIO IN (PC) DC-IN (19 V ---) H/PΩ 电源输入


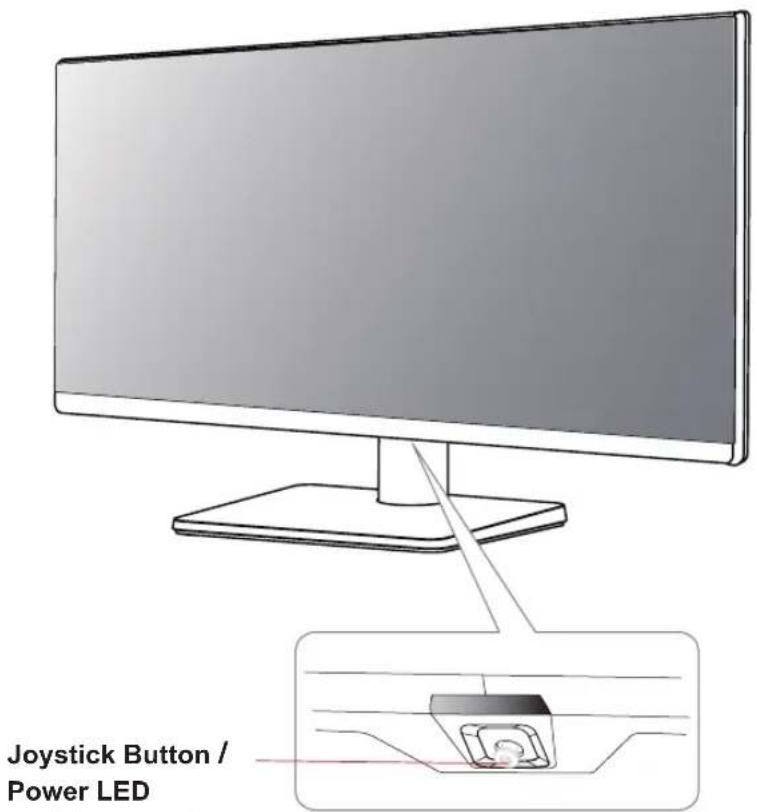
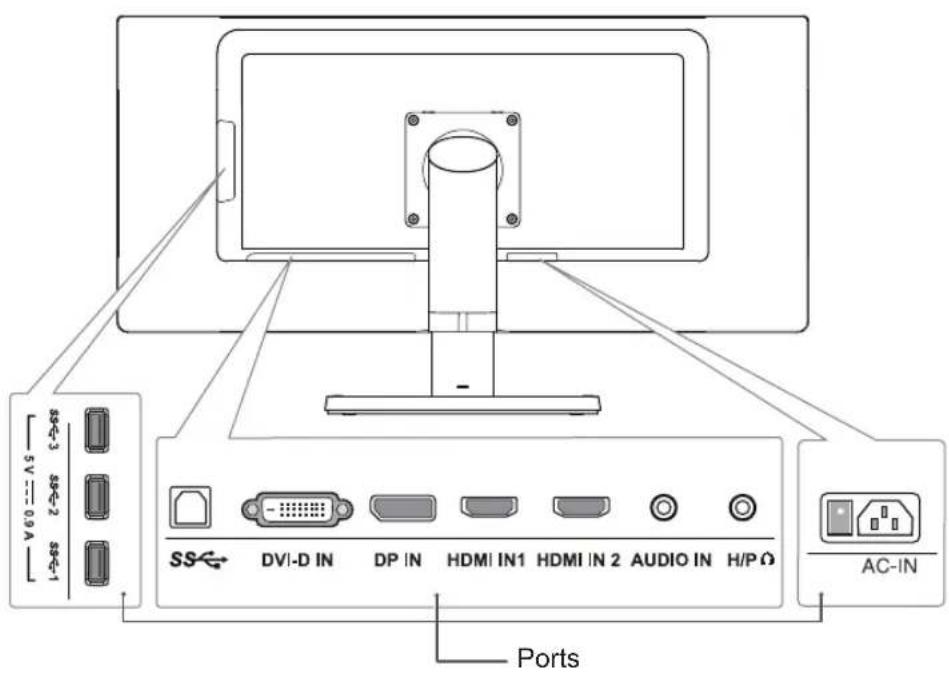
29UB67
text_image
Joystick Button / Power LEDOn: power is on
Off: power is off
Input Connector
text_image
5V 6V 7V 8V 9V 3V 4V 5V 6V 7V 8V 9V SS DVI-D IN DP IN HDMI IN1 HDMI IN 2 AUDIO IN H/PΩ AC-IN Ports34UB67
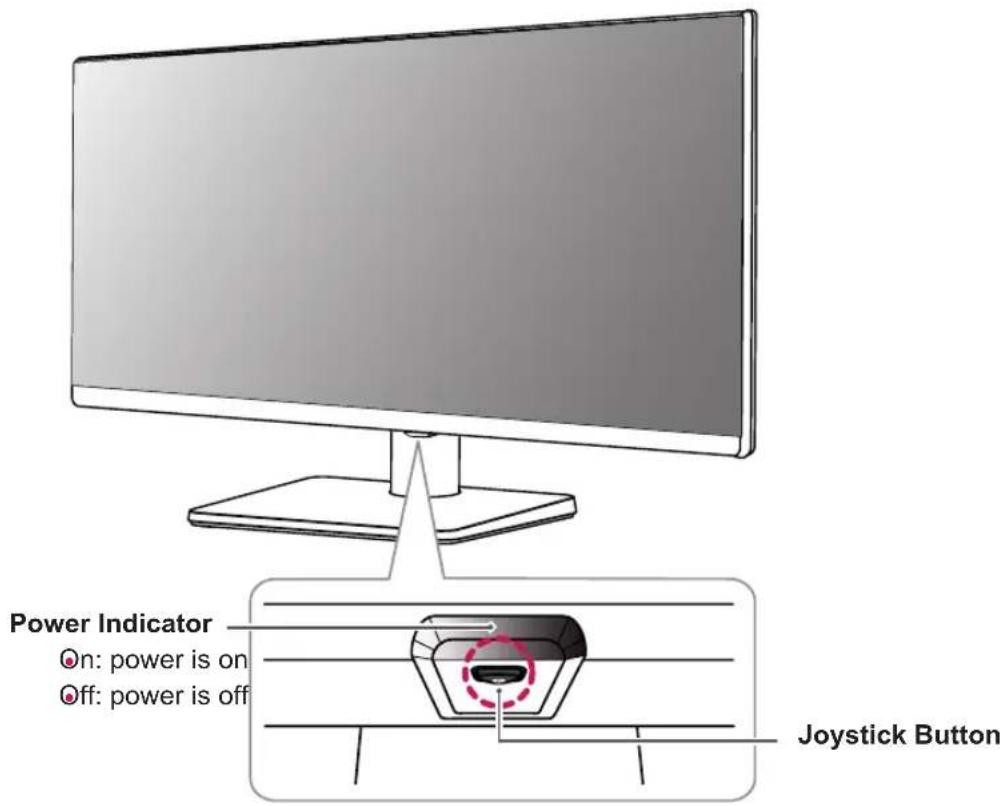
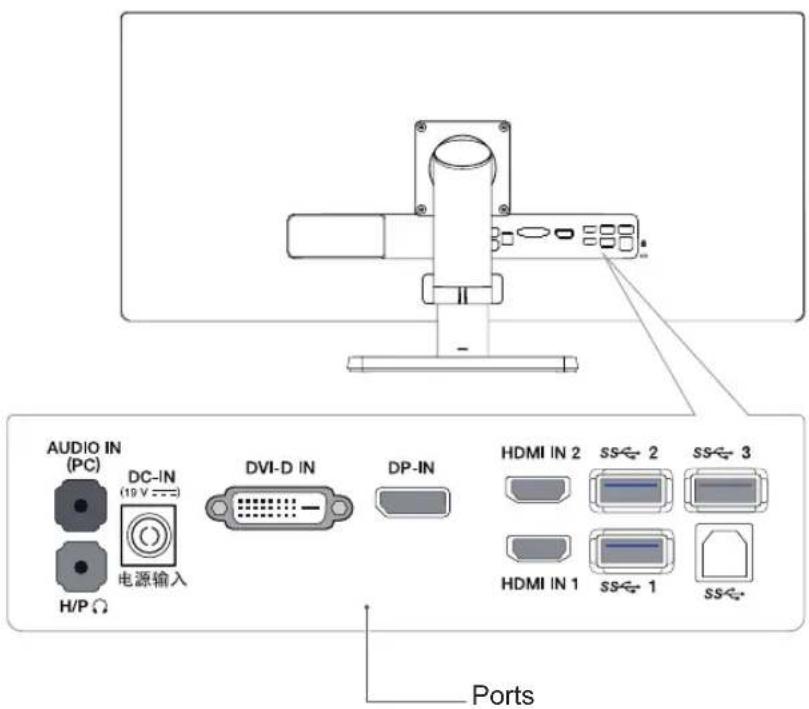
text_image
Power Indicator On: power is on Off: power is off Joystick ButtonInput Connector
text_image
AUDIO IN (PC) DC-IN (19 V -- 电源输入 H/P DVI-D IN DP-IN HDMI IN 2 SS← 2 SS← 3 HDMI IN 1 SS← 1 SS← PortsHow to Use the Joystick Button
You can easily control the functions of the monitor by pressing the joystick button or moving it left/right with your finger.
Basic Functions
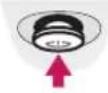 | Power on | Press the joystick button once with your finger to turn on the monitor. | |
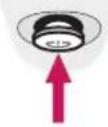 | Power off | Press and hold the joystick button once with your finger to turn off the monitor. | |
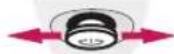 | ◀/▶ | Volume Control | You can control the volume by moving the joystick button left/right. |

NOTE
• The joystick button is located at the bottom of the monitor.
Moving and Lifting the Monitor
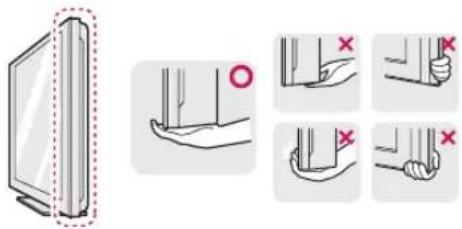
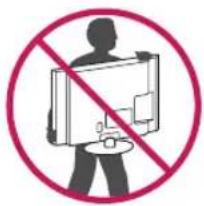
When moving or lifting the monitor, follow these instructions to prevent the monitor from being scratched or damaged and to ensure safe transportation regardless of its shape or size.
It is advisable to place the monitor in the original box or packing material before attempting to move it.
Before moving or lifting the monitor, disconnect the power cord and all cables.
Hold the top and bottom of the monitor frame firmly. Do not hold the panel itself.
text_image
Diagram illustrating a door lock mechanism with labeled hand positions and red/green check marks indicating action points.When holding the monitor, the screen should face away from you to prevent it being scratched.
text_image
Prohibition sign with silhouette of person holding computer monitor, crossed out by red circleWhen moving the monitor, avoid any strong shock or vibrations to the product.
When moving the monitor, keep it upright, never turn the monitor on its side or tilt it sideways.

CAUTION
As far as possible, avoid touching the monitor screen. This may result in damage to the screen or some of the pixels used to create images.
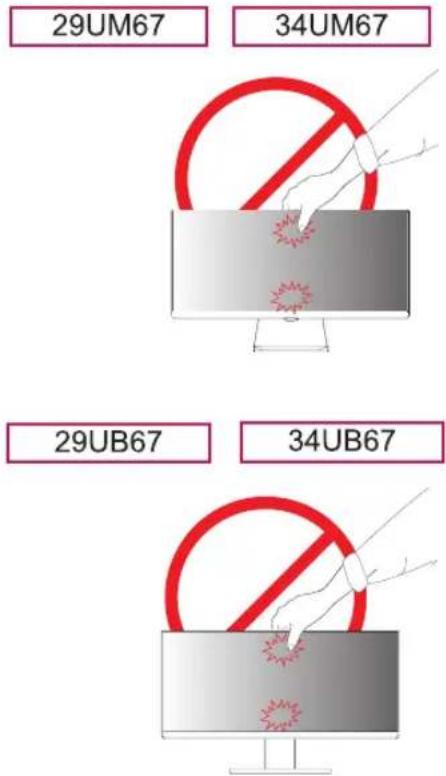
text_image
29UM67 34UM67 29UB67 34UB67If you use the monitor panel without the stand base, its joystick button may cause the monitor to become unstable and fall, resulting in damage to the monitor or human injury. In addition, this may cause the joystick button to malfunction.
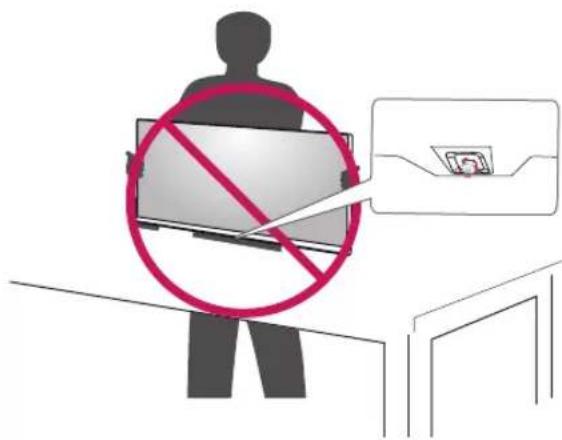
text_image
Safety warning sign with red prohibition symbol over a person holding a monitor, accompanied by a photo inset showing a photo.Installing the Monitor
Assembling the stand base
29UM67 34UM67
1 Place the screen face down.

CAUTION
To protect the screen from scratches, cover the surface with a soft cloth.
2 First, please insert Stand Body to Stand Base, Then tighten two screws into the back of the stand base.
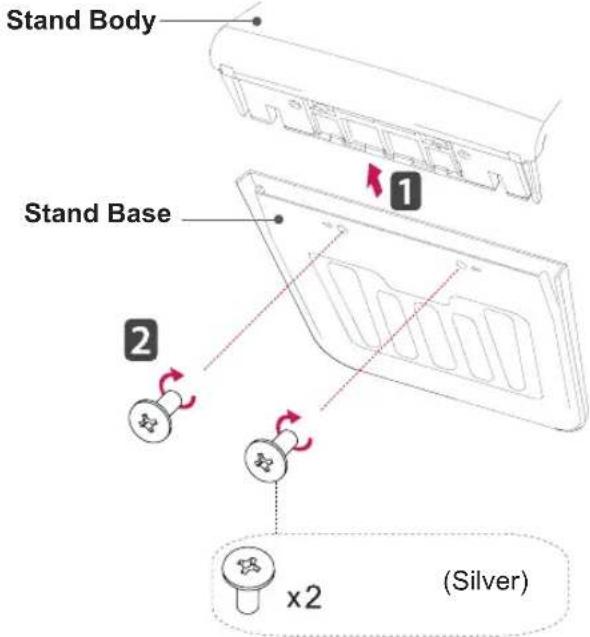
text_image
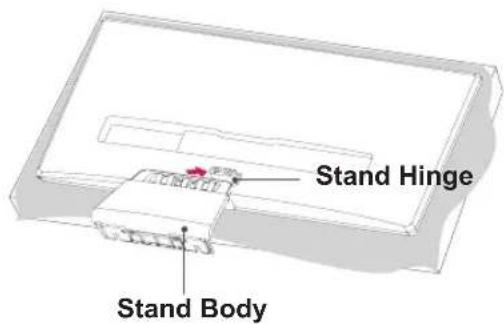
Stand Body Stand Base 1 2 x2 (Silver)3 Check the direction of the stand body (front, back) and then mount the stand body onto the stand hinge.
text_image
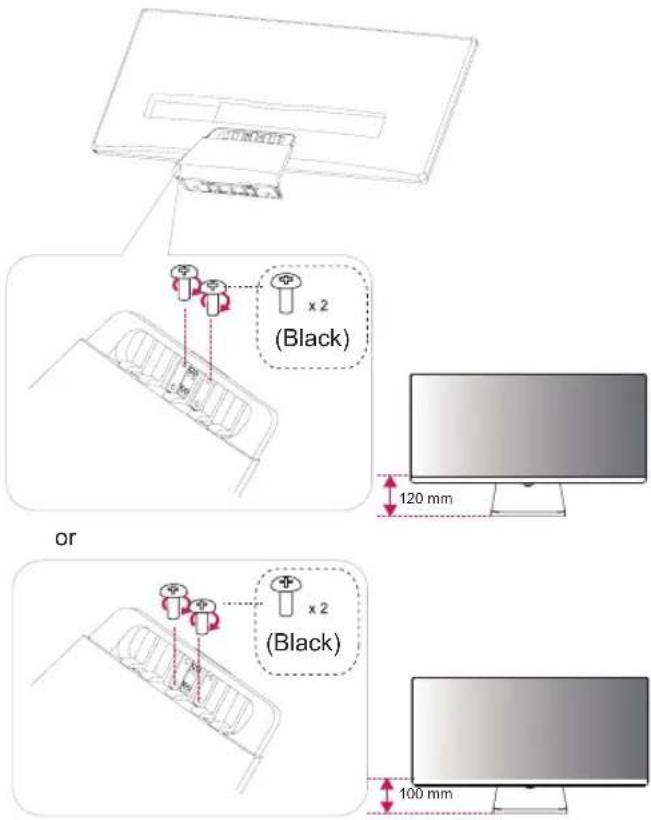
Stand Hinge Stand Body4 Tighten two screws into the back of the stand body.
text_image
x 2 (Black) 120 mm or x 2 (Black) 100 mm
CAUTION
Applying excessive force when tightening the screws may cause damage to the monitor. Damage caused in this way will not be covered by the product warranty.

CAUTION
It may hurt your foot off the stand, so be careful.
29UB67
34UB67
1 Place the screen face down.

CAUTION
To protect the screen from scratches, cover the surface with a soft cloth.
2 Remove a tape on the surface of stand body. Use a tool to attach the stand body as shown in the figure.
2 Check the position (at the front and rear) of the stand body, then mount the stand base on the stand body as shown in the figure.
3 Tighten the screw to the right.
29UB67
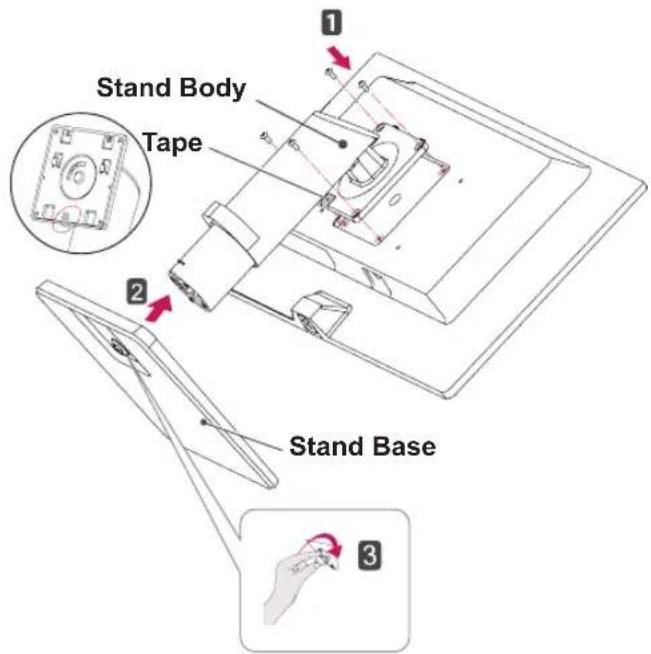
text_image
Stand Body Tape Stand Base34UB67
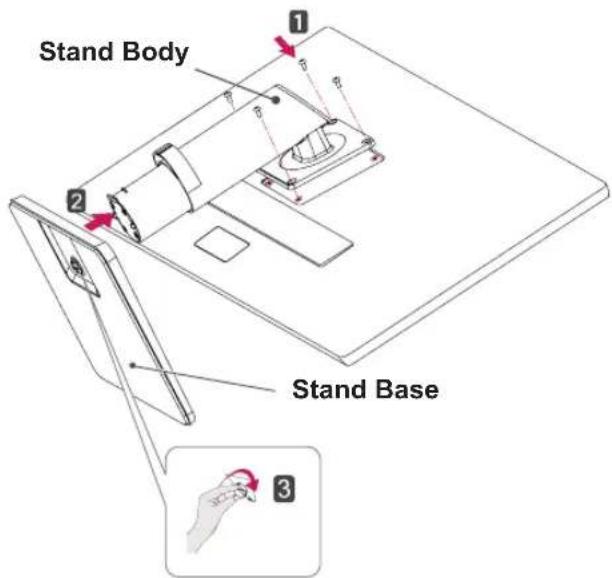
text_image
Stand Body Stand Base
CAUTION
It may hurt your foot off the stand, so be careful.
Using the cable holder
29UB67
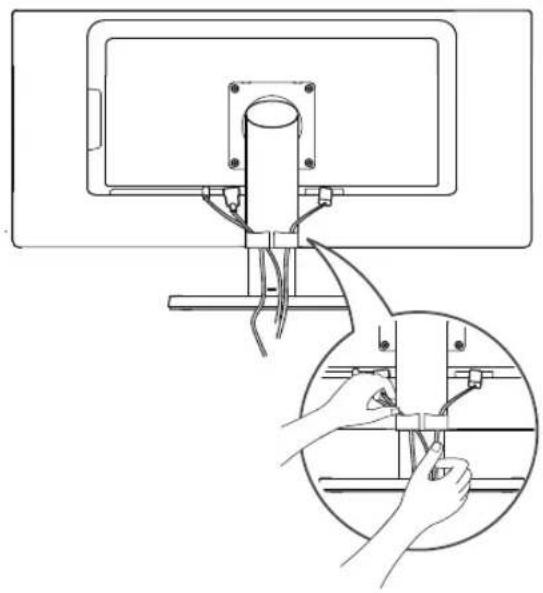
natural_image
Technical line drawing showing a mechanical assembly with a magnified inset of hands adjusting parts (no text or symbols present)34UB67
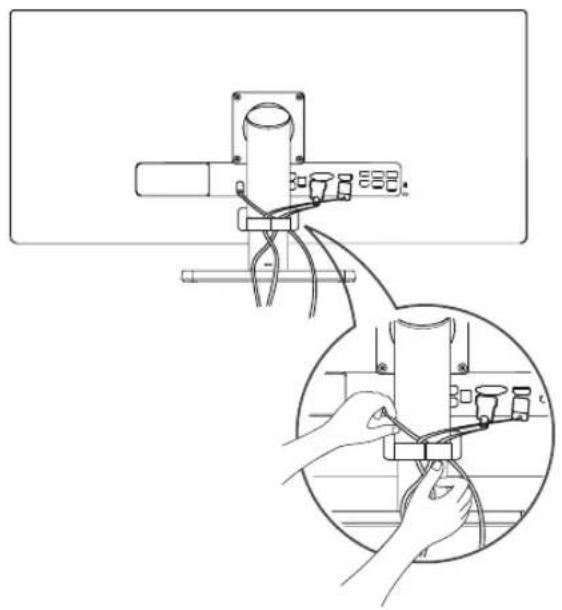
natural_image
Diagram showing a mechanical device with clamps and a magnified view of its internal components (no text or symbols present)
NOTE
You can disassemble the stand in the reverse order of the assembly.

CAUTION
• Illustrations in this document represent typical procedures, so they may look different from the actual product.
- Applying excessive force when tightening screws may cause damage to the monitor. Damage caused in this way will not be covered by the product warranty.
- Be careful not to hurt your hand on the edges of the screw covers.
- Do not carry the monitor upside down by just holding the base. This may cause the monitor to fall off the stand and could result in personal injury.
- When lifting or moving the monitor, do not touch the monitor screen. The force applied to the monitor screen may cause damage to it.
Installing onto a table
1 Lift the monitor and place it on the table in an upright position.
Place at least 10 cm away from the wall to ensure sufficient ventilation.
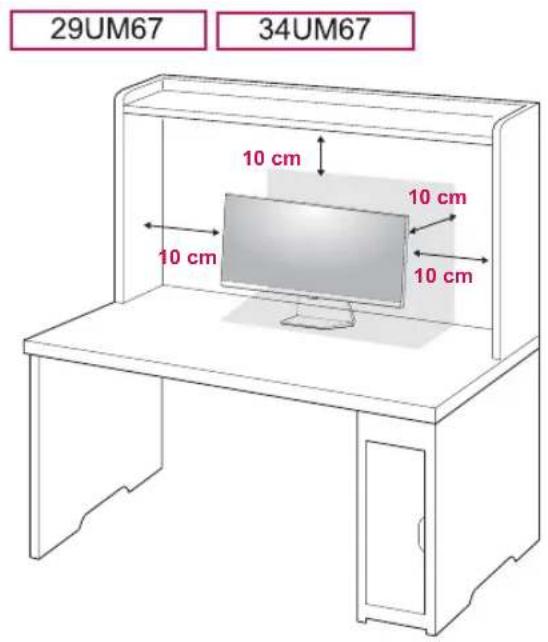
text_image
29UM67 34UM67 10 cm 10 cm 10 cm 10 cm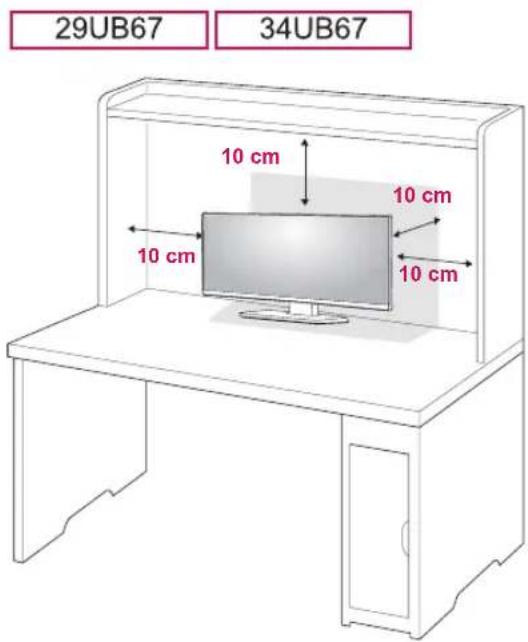
text_image
29UB67 34UB67 10 cm 10 cm 10 cm 10 cm2 Connect the power adapter to the monitor and then plug the power cord into the wall outlet.
29UB67:Press the knob in " □" state.
(“ 📄 ” Open the power).
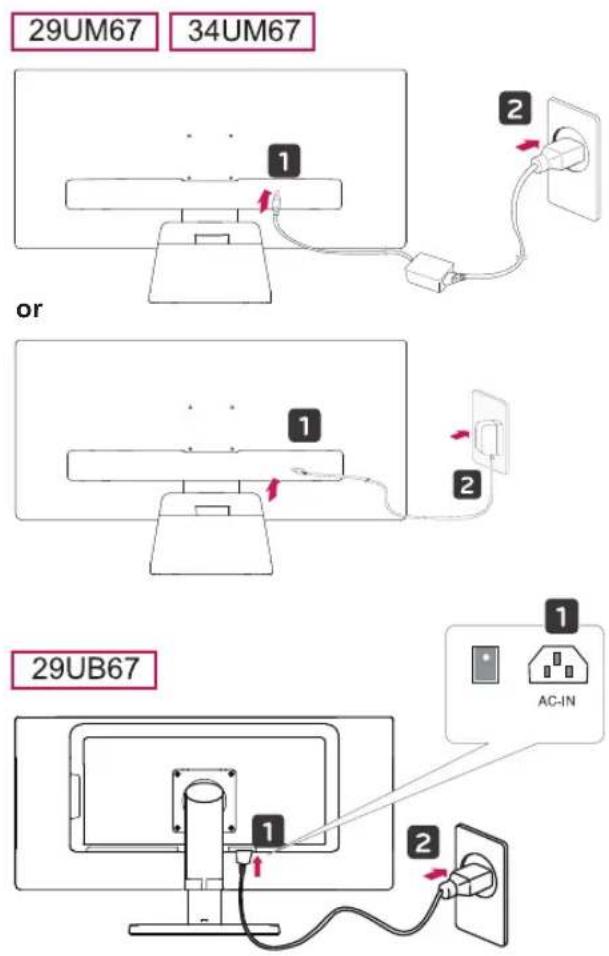
text_image
29UM67 34UM67 or 29UB67 1 2 1 2 1 AC-IN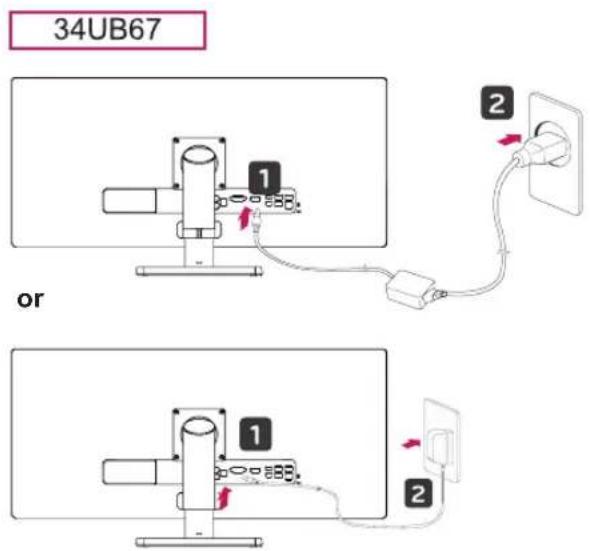
text_image
34UB67 1 2 or 1 23 Press the joystick button on the bottom of the monitor to turn on the monitor.
CAUTION
Unplug the power cord prior to moving or installing the monitor. There is risk of electric shock.
Adjusting the stand height
29UB67
34UB67
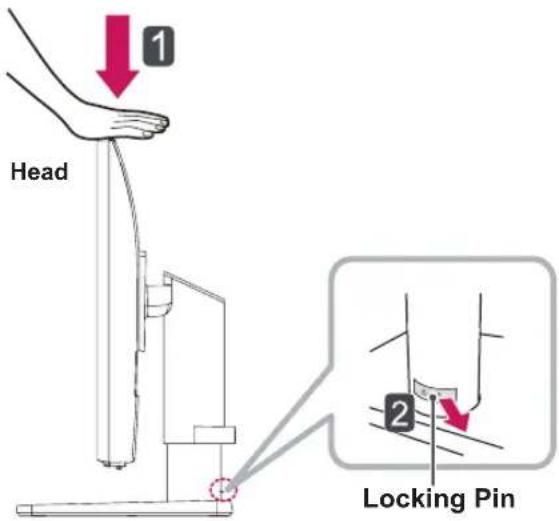
1 Stand the monitor assembled with the stand base in an upright position
2 Remove the tape attached to the bottom back of the stand body and then pull out the locking pin while pressing the head downward.
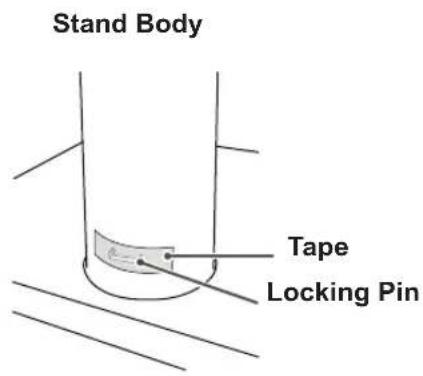
text_image
Stand Body Tape Locking Pin29UB67
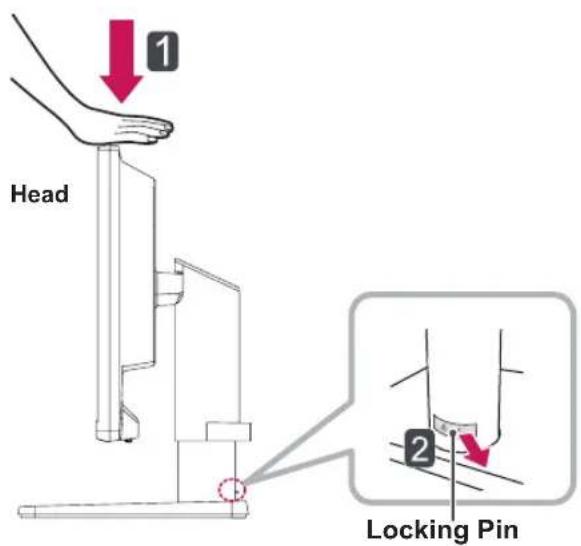
text_image
Head 1 Locking Pin 234UB67
text_image
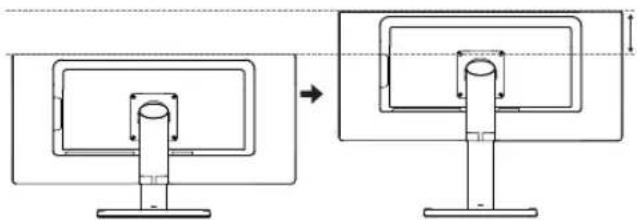
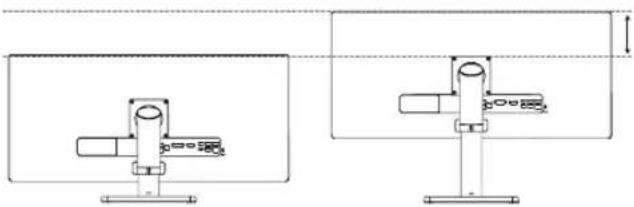
Head 1 Locking Pin 23 The height can be adjusted up to 130.0 mm.
29UB67
130.0 mm
natural_image
Diagram showing a computer monitor setup with an arrow indicating transformation or alignment (no text or symbols present)34UB67
130.0 mm
natural_image
Technical line drawing of a mechanical assembly with two views (top and side), no text or symbols present.
CAUTION
Once the pin is removed, it is not necessary to re-insert it to adjust the height.

WARNING
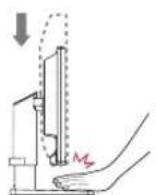
Do not put your fingers or hand between the screen and the base (chassis) when adjusting the screen's height.
Adjusting the angle
1 Place the monitor in an upright position, mounted on the stand base.
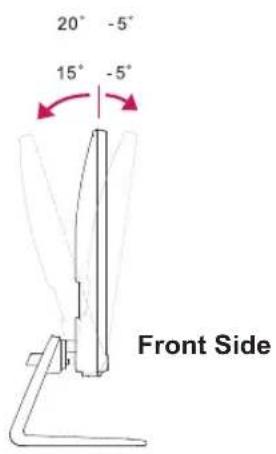
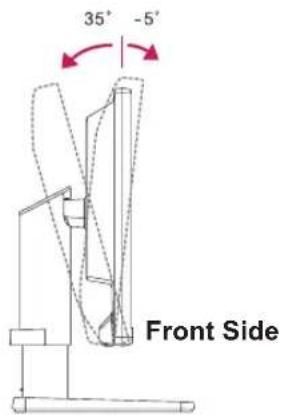
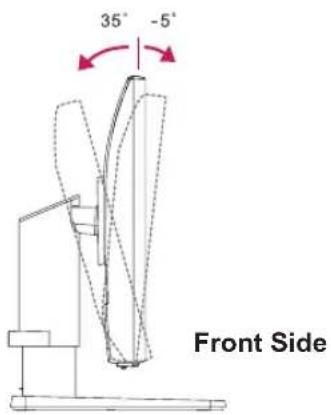
2 Adjust the angle of the screen. The angle of the screen can be adjusted forwards or backwards for a comfortable viewing experience.
29UM67
34UM67
text_image
20° -5° 15° -5° Front SideRear Side
29UB67
text_image
35° -5° Front SideRear Side
34UB67
text_image
35° -5° Front SideRear Side

WARNING
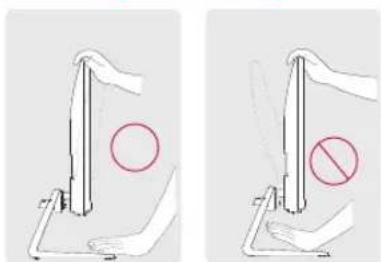
To avoid injury to the fingers when adjusting the screen, do not hold the lower part of the monitor's frame as illustrated below.
29UM67 34UM67
natural_image
Two diagrams showing a hand holding a pen with a circle and a prohibition symbol, no text or labels present.29UB67
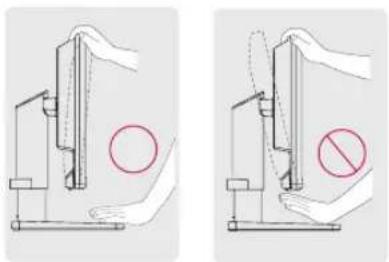
natural_image
Two diagrams showing hand positioning of a device with a circle and a prohibition symbol (no text or labels)34UB67
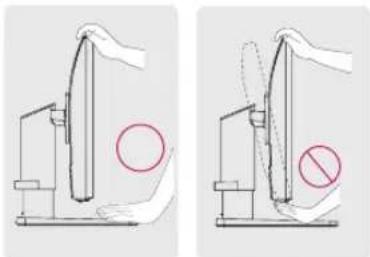
natural_image
Two diagrams showing a hand operating a device with a circular mark and a prohibition symbol (no text or labels)Be careful not to touch or press the screen area when adjusting the angle of the monitor.
29UM67 34UM67
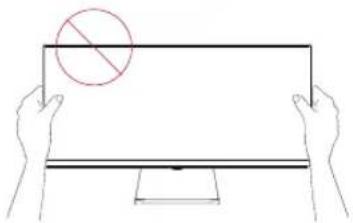
natural_image
Illustration of two hands holding a blank rectangular board with a red prohibition symbol above (no text or labels)29UB67 34UB67
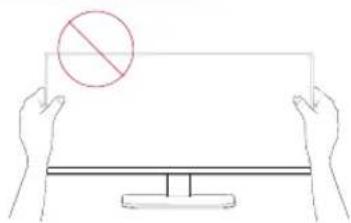
natural_image
Line drawing of two hands holding a blank sign with a red prohibition symbol above (no text or numbers present)29UB67
Pivot feature
The pivot feature allows the monitor to rotate 90 clockwise.

text_image
Head Stand
WARNING
To avoid scratching the stand base, make sure that when rotating the monitor using the pivot feature, the stand does not make contact with the monitor.
1 Raise the monitor up to the maximum height.
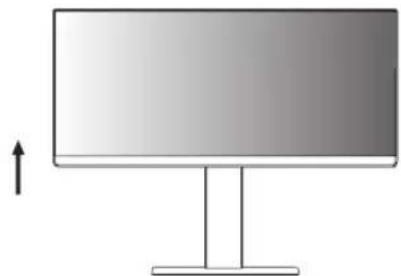
natural_image
Simple line drawing of a monitor with a stand and an upward arrow, no text or symbols present.2 Adjust the angle of the monitor in the direction of the arrow as shown in the figure.
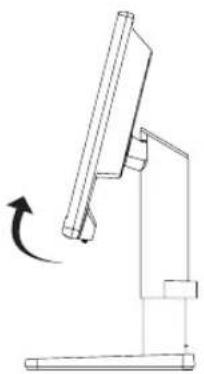
natural_image
Simple line drawing of a mechanical device with an arrow indicating rotational motion (no text or symbols)3 Rotate the monitor clockwise as shown in the figure.
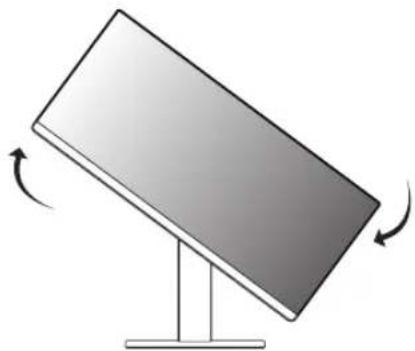
natural_image
Illustration of a flat-screen monitor on a stand with rotational arrows indicating motion (no text or symbols)4 Complete the installation by rotating the monitor 90° as shown below.
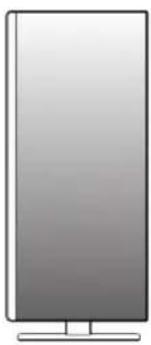
natural_image
Simple illustration of a flat-screen monitor with a stand (no text or symbols)
WARNING
To avoid injury to the fingers when adjusting the screen, do not hold the lower part of the monitor's frame as illustrated below.
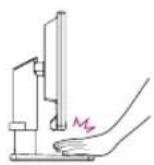

WARNING
Take care when rotating the monitor if the cable is connected.

NOTE
An image displayed on the monitor's screen does not rotate according to the screen orientation.
Using the Kensington lock
The Kensington security system connector is located at the back of the Monitor set.
For more information on installation and usage, refer to the Kensington lock user manual or visit the website at http://www.kensington.com.
Connect the Kensington security system cable between the Monitor set and a table.
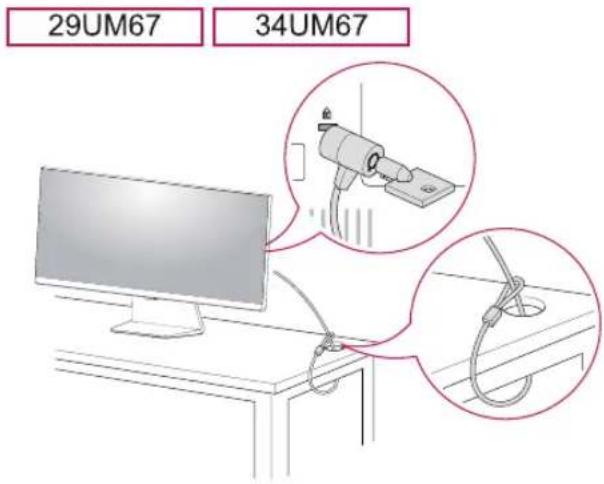
text_image
29UM67 34UM67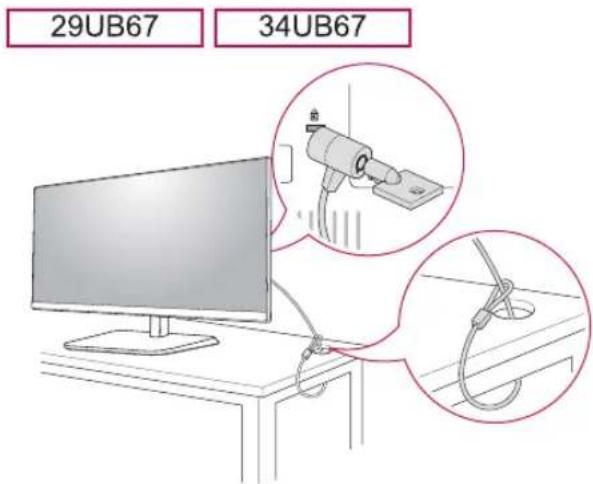
text_image
29UB67 34UB67
NOTE
Use of the Kensington lock is optional. The accessories can be purchased at your local electronics store.
Installing the wall mount plate
This monitor supports the specification of the standard wall mount plate or compatible device.
1 Place the screen face down. To protect the screen from scratches, cover the surface with a soft cloth.
2 Place the wall mount plate onto the monitor and align it with the screw holes.
3 Using a screwdriver, tighten the four screws to fix the plate onto the monitor.
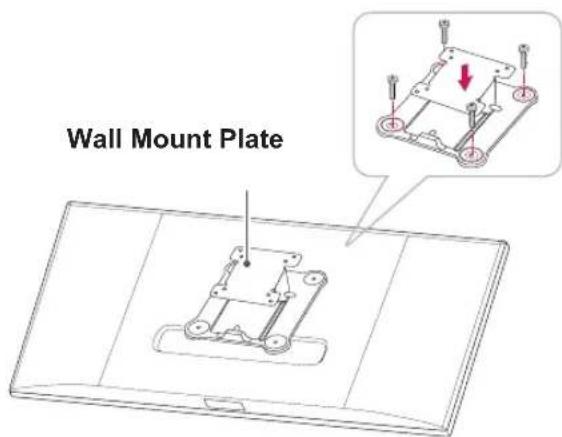
text_image
Wall Mount Plate
NOTE
The wall mount plate is sold separately. For more information on installation, refer to the wall mount plate's installation guide. Be careful not to use excessive force when mounting the wall mount plate, as this can damage the monitor's screen.
Installing to a wall
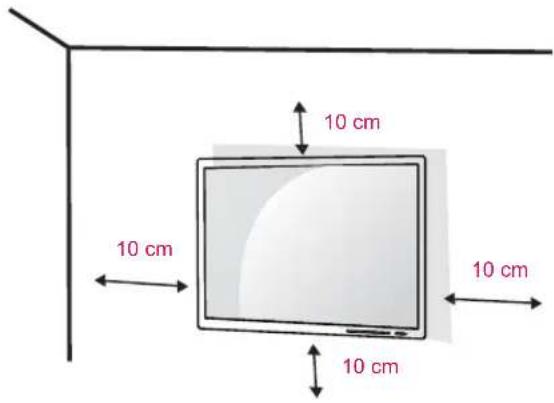
Install the monitor at least 10 cm away from the wall and leave about 10 cm of space at each side of the monitor to ensure sufficient ventilation. Detailed installation instructions can be obtained from your local retail store. Please refer to the manual to install and set up a tilting wall mounting bracket.
text_image
10 cm 10 cm 10 cm 10 cmTo install the monitor to a wall, attach a wall mounting bracket (optional) to the back of the monitor. Make sure that the wall mounting bracket is securely fixed to the monitor and to the wall.
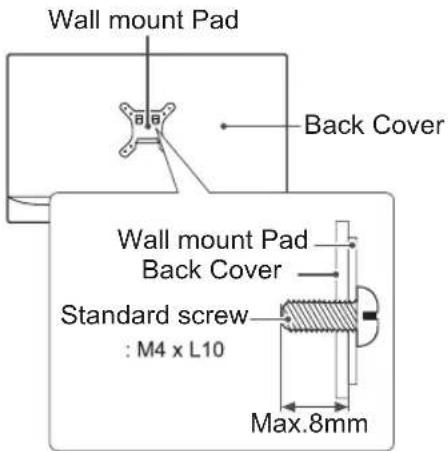
1 If you use screw longer than standard, the monitor might be damaged internally.
2 If you use improper screw, the product might be damaged and drop from mounted position.
In this case, LG Electronics is not responsible for it.
| Model | 29UM67 | 34UM67 | 29UB67 |
| 34UB67 | |||
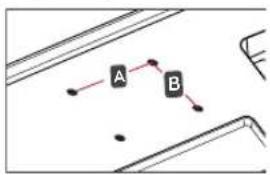
| Wall Mount (A x B) | 75 x 75 | 100 x 100 200 | x 100 |
| Standard screw | M4 x L10 M4 x L10 | ||
| Number of screws | 4 | 4 | |
| Wall Mount Plate (Optional) | RW120 LSW140 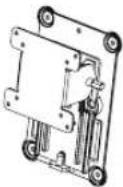 | 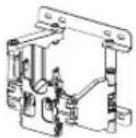 | |
Wall Mount (A x B)
flowchart
graph TD
    A["A"] --> B["B"]
    A --> C["..."]
    B --> D["..."]
    C --> E["..."]

CAUTION
Unplug the power cord before moving or installing the monitor to avoid electric shocks. Installing the monitor on the ceiling or on a slanted wall may result in the monitor falling off, which could lead to injury. Please use the genuine LG wall mounting bracket. For more information, contact your local retail store or a qualified installer.
Applying excessive force when fastening screws may cause damage to the monitor. Damage caused in this way will not be covered by the product warranty.
Use the wall mounting bracket and screws that conform to the VESA standard. Damage caused by the use or misuse of inappropriate components will not be covered by the product warranty.
Screw length from outer surface of back cover should be under 8mm.
text_image
Wall mount Pad Back Cover Wall mount Pad Back Cover Standard screw : M4 x L10 Max.8mm
NOTE
Use the screws specified by the VESA standard.
The wall mount kit includes the installation guide and all necessary parts.
The wall mounting bracket is optional. The accessories can be purchased at your local retail store.
The length of the screw may differ for each wall mounting bracket. Ensure the correct length screw is used.
For more information, please refer to the user manual for the wall mounting bracket.
USING THE MONITOR
Connecting to a PC
This monitor supports the *Plug and Play feature.
*Plug and Play: A feature that allows you to add a device to your computer without having to reconfigure anything or install any manual drivers.
DVI connection
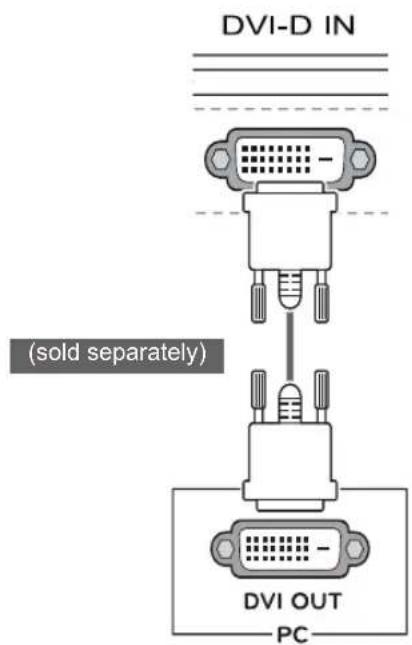
Transmits digital video signals to the monitor. Connect the monitor using the DVI cable as illustrated below.
Press the menu button and then select the input option from the input menu.
To hear the sound in DVI input mode, connect the PC's AUDIO OUT port to the monitor's AUDIO IN (PC) port using the audio cable that came with the product.
text_image
DVI-D IN (sold separately) DVI OUT PC
CAUTION
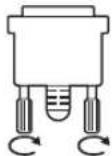
Connect the input signal cable and turn in the direction of the arrow.
To prevent disconnection secure the cable tightly.
Do not press on the screen for a prolonged period of time. This may cause image distortion.
Do not display a still image on the screen for a prolonged period of time. This may cause image retention. If possible, use the screen saver.

NOTE
When connecting the power cord to the outlet, use a grounded (3-hole) multi-socket or a grounded power outlet.
The monitor may flicker when turned on in an area of low temperature. This is normal.
Sometimes red, green, or blue spots may appear on the screen. This is normal.
Using a DVI to HDMI cable may cause compatibility issues.
DisplayPort connection
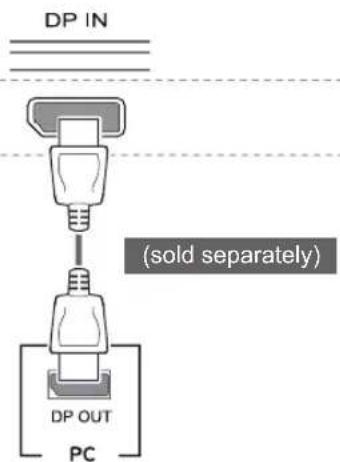
Transmits the digital video and audio signals from your PC to the monitor. Connect your PC to the monitor using the display port cable as illustrated below.
Press the menu button and then select the input option from the input menu.
HDMI connection
Transmits the digital video and audio signals from your PC and A/V devices to the monitor. Connect your PC and AV device to the monitor with the HDMI cable as illustrated below.
Press the menu button and then select the input option from the input menu.
text_image
DP IN (sold separately) DC OUT PC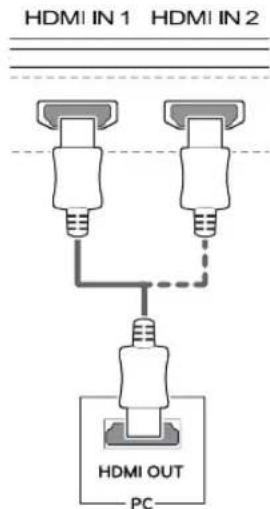
text_image
HDMI IN 1 HDMI IN 2 HDMI OUT PC
NOTE
There may be no video or audio output depending on the DP version of the PC. The DisplayPort cable may not be available in some areas.

NOTE
If you use HDMI PC, it can cause compatibility problem.
Use a certified cable with the HDMI logo attached. If you do not use a certified HDMI cable, the screen may not display or a connection error may occur.
Recommended HDMI cable types
- High-Speed HDMI ^® / ^TM Cable
- High-Speed HDMI ^® / ^TM Cable with Ethernet
Connecting to AV Devices
HDMI connection
Transmits the digital video and audio signals from your PC and A/V devices to the monitor. Connect your PC and AV device to the monitor with the HDMI cable as illustrated below.
Press the menu button and then select the input option from the input menu.
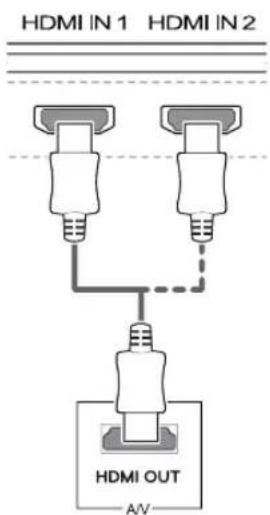
text_image
HDMI IN 1 HDMI IN 2 HDMI OUT A/V
NOTE
If you use HDMI PC, it can cause compatibility problem.
Use a certified cable with the HDMI logo attached. If you do not use a certified HDMI cable, the screen may not display or a connection error may occur.
Recommended HDMI cable types
- High-Speed HDMI®/TM Cable
- High-Speed HDMI®/TM Cable with Ethernet
Connecting to External Devices
USB Cable connection - PC
The USB port on the product functions as a USB hub.

NOTE
• Make sure to install the most recent Windows OS service pack before using the product.
• Peripheral devices are sold separately.
- A keyboard, mouse, or USB device can be connected to the USB port.

CAUTION
Cautions When Using a USB Device
- A USB device with an automatic recognition program installed, or that uses its own driver, may not be recognized.
- Some USB devices may not be supported or may not work properly.
- It is recommended to use a USB hub or hard disk drive with power supplied. (If the power supply is not adequate, the USB device may not be recognized properly.)
29UB67
34UB67
To use USB 3.0, connect the A-B type USB 3.0 cable of the product to the PC.
Peripheral devices connected to the USB IN port can be controlled from the PC.
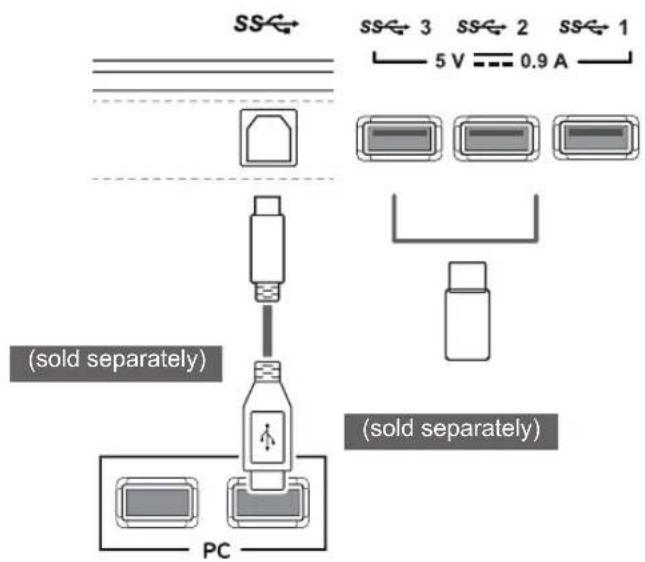
text_image
SS↔ SS↔ 3 SS↔ 2 SS↔ 1 5 V ———— 0.9 A ———— (sold separately) PC (sold separately)Connecting Headphones
Connect peripherals to the monitor via the headphones port. Connect as illustrated.
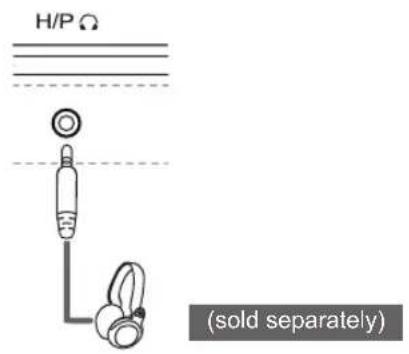
text_image
H/P Ω (sold separately)
NOTE
• Peripheral devices are sold separately.
- If you use angled earphones, it may cause a problem with connecting another external device to the monitor. Therefore, it is recommended to use straight earphones.
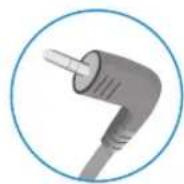
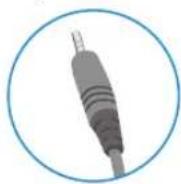
Angled Straight
- Depending on the audio settings of the PC and external device, headphones and speaker functions may be limited.
INSTALLING LG MONITOR SOFTWARE
Insert the the owner's manual CD included in the product package into your PC's CD driver and install the LG Monitor Software.
1 Set the default Web browser to Internet Explorer.
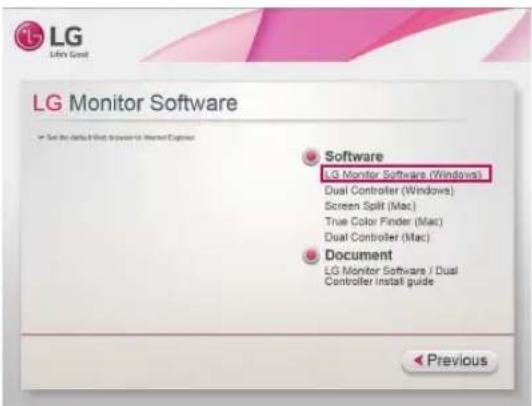
text_image
LG Monitor Software ✓ Set the default file to access to Internet Explorer Software LG Monitor Software (Windows) Dual Controller (Windows) Screen Split (Mac) True Color Finder (Mac) Dual Controller (Mac) Document LG Monitor Software / Dual Controller install guide Previous2 Click the "LG Monitor Software" on the CD's main screen. When the file download window appears, click the Run button. (The file download window may vary depending on the operating system and the Internet Explorer version, but the installation procedures are same.)
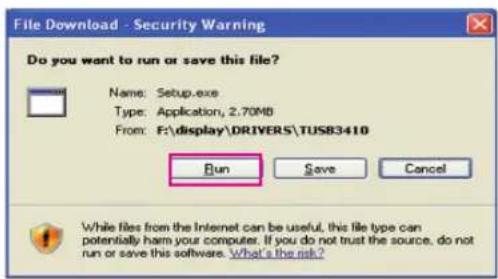
text_image
File Download - Security Warning Do you want to run or save this file? Name: Setup.exe Type: Application, 2.70MB From: F:\display\DRIVERS\TUSB3410 Run Save Cancel While files from the Internet can be useful, this file type can potentially harm your computer. If you do not trust the source, do not run or save this software. What's the risk?
CAUTION
Service Pack 1 or higher is required for Windows 7.
3 Follow the instructions to proceed with the installation.
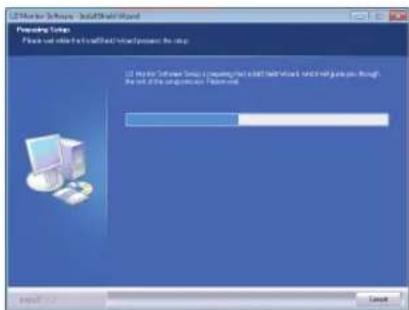
text_image
Installation Setup Place out available at installed level/boost project the help 12. This is for Software Setup (comprising that will not have a wait or wait to perform through the next software version).4 Check "I accept the terms of the agreement" on the License Agreement screen and then click the [Next] button.
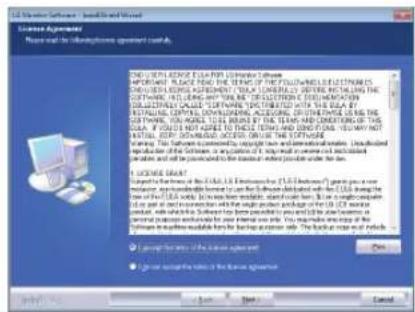
text_image
Scanned screenshot of a software license agreement dialog box with copyright notice and copyright notice text.5 Select the program that you want to install.
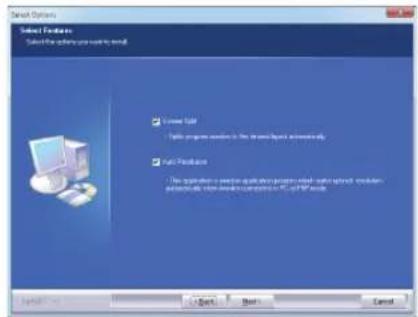
text_image
Select Provider Select the action you need to exit. √ Open Start √ Help program version to the software successfully. √ Next Provider This installation is a specific software version that is installed. It also includes new device configuration and PC's power.
NOTE
Screen Split: This program automatically splits the program window as desired. True Color Finder: This program calibrates the precise color output of the monitor to suit your needs.
6 The LG Monitor Software installation starts as shown below.
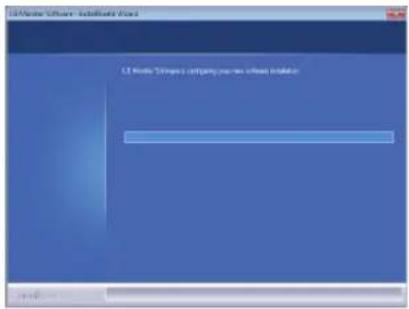
text_image
LT Module 30.000 - On On7 If the TUSB3410 driver has not been installed, it will install automatically. Select "Install this driver software anyway (I)" if the Windows security message is displayed as below.

text_image
Please wait, Installing TUSB3410 driver ... Windows Security Windows can't verify the publisher of this driver software Don't install this driver software You should check your manufacturer's website for updated driver software for your device. Install this driver software anyway Only install driver software obtained from your manufacturer's website or disc. Unsigned software from other sources may harm your computer or steal information. See details8 The program you selected on the Select Features page will install automatically.
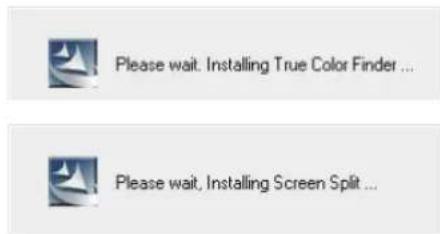
text_image
Please wait. Installing True Color Finder ... Please wait, Installing Screen Split ...9 When the installation is complete, restart your system.
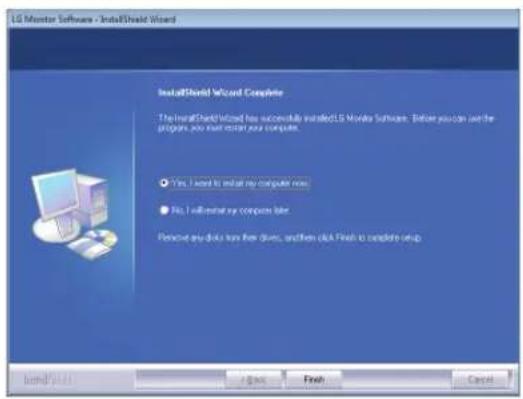
text_image
LG Monitor Software - InstallShield Wizard InstallShield Wizard Complete The InstallShield Wizard has successfully installed LG Monitor Software. Before you can use the program, you will install your computer. Yes, I need to install my computer now. No, I will install my computer later. Remove any data from new drivers, and then click Finish to complete setup.
When you run the True Color Finder software, the True Color Finder icon
[1] appears in the system tray at the right bottom of the PC screen.
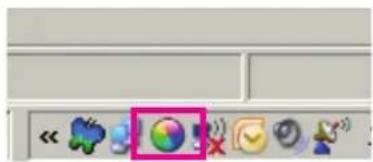
text_image
Screenshot of a software toolbar with icons and a highlighted button, likely from an older application or tool interface.Right-click the True Color Finder icon and select "Start Program" to start the program.
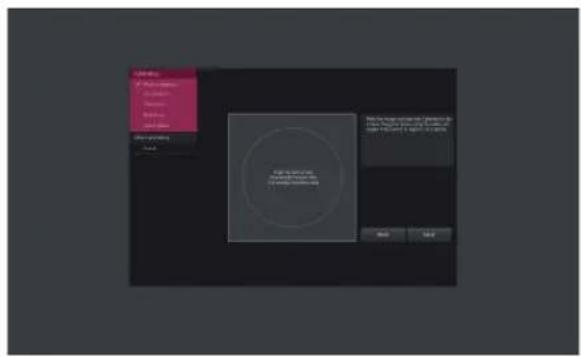
text_image
My Computer My Computer My Computer My Computer My Computer My Computer My Computer My Computer My Computer My Computer My Computer My Computer My Computer My Computer My Computer My Computer My Computer My Computer My Computer My Computer My Computer My Computer My Computer My Computer My Computer My Computer My Computer My Computer My Computer My Computer My Computer My Computer My Computer My Computer Mn Mn Mn Mn Mn Mn Mn Mn Mn Mn Mn Mn Mn Mn Mn Mn Mn Mn Mn Mn Mn Mn Mn Mn Mn Mn Mn Mn Mn Mn Mn Mn Mn Mn
CAUTION
Once you have completed the monitor calibration with the True Color Finder software, remove the calibrator from the monitor and store it at room temperature away from direct sunlight or put it in the box.
- If the calibrator's measuring part is exposed to direct sunlight for a long time, this may cause damage to the calibrator.
- Do not store it in an environment with too low/high temperature and high humidity. If any third-party calibration application is already installed on your PC, the image quality may be affected by a conflict between the two applications. For the best performance, it is recommended to uninstall the other calibration application.

NOTENOTE
To use the True Color Finder function, you must purchase the supported calibrator.
For details on supported calibrators and graphic cards, see the True Color Finder user guide.
If you have changed the input port, it is recommend that you calibrate the monitor's picture quality again.

NOTE
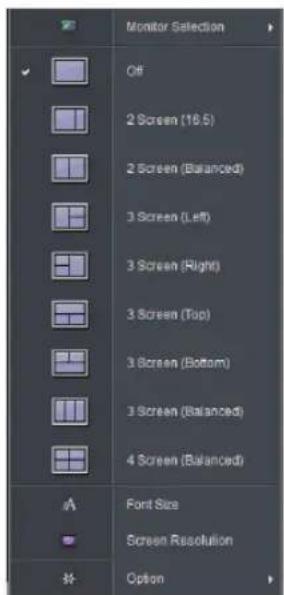
If you run Screen Split, the Screen Split icon [ ] appears in the system tray at the right bottom of the PC screen.

Right-click the Screen Split icon and select a layout you want.
text_image
Monitor Selection Off 2 Screen (16.5) 2 Screen (Balanced) 3 Screen (Left) 3 Screen (Right) 3 Screen (Top) 3 Screen (Bottom) 3 Screen (Balanced) 4 Screen (Balanced) Font Size Screen Resolution OptionInstalling The Dual Controller
Insert the software CD included in the product packaging into your PC's CD drive and install the Dual Controller.
The installation screen images are for reference only. The actual installation screen images may vary depending on the model.
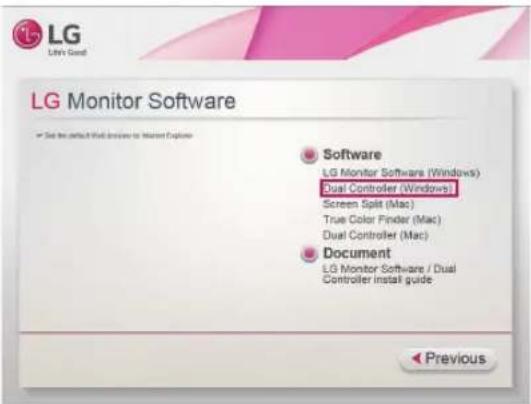
1 Set the default Web browser to Internet Explorer.
text_image
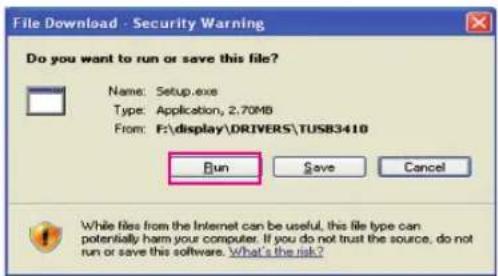
LG Monitor Software ✓ See the default Web browser to Internet Explorer Software LG Monitor Software (Windows) Dual Controller (Windows) Screen Split (Mac) True Color Finder (Mac) Dual Controller (Mac) Document LG Monitor Software / Dual Controller install guide ◀ Previous2 Click the "Dual Controller" on the CD's main screen. When the file download window appears, click the Run button. (The file download window may vary depending on the operating system and the Internet Explorer version, but the installation procedures are same.)
text_image
File Download - Security Warning Do you want to run or save this file? Name: Setup.exe Type: Application, 2.70MB From: F:\display\DRIVERS\TUSB3410 Run Save Cancel While files from the Internet can be useful, this file type can potentially harm your computer. If you do not trust the source, do not run or save this software. What's the risk?
CAUTION
Service Pack 1 or higher is required for Windows 7 & Windows 8.1.
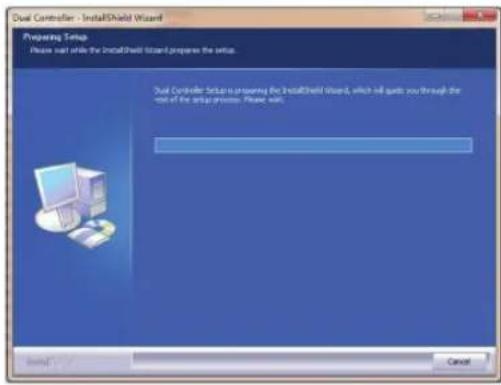
3 Follow the instructions to proceed with the installation.
text_image
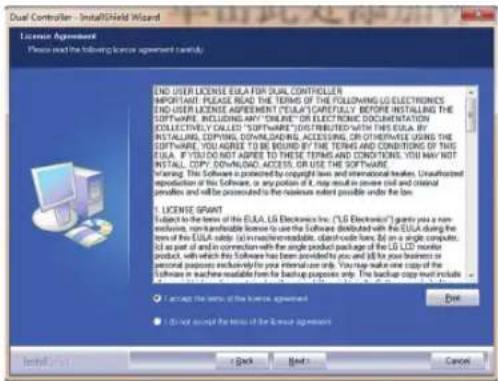
Dual Controller - InstallShield Wizard Preparing Setup Please wait while the InstallShield Wizard prepare the setup. Dual Controller Setup is preparing the InstallShield Wizard, which will guide you through the set of the setup process. Please wait.4 Check "I accept the terms of the agreement" on the License Agreement screen and then click the [Next] button.
text_image
Dual Controller - InstallShield Wizard License Agreement Please read the following license agreement carefully END USER LICENSE EULA FOR DUAL CONTROLLER IMPORTANT: PLEASE READ THE TERMS OF THE FOLLOWING LG ELECTRONICS END USER LICENSE AGREEMENT "EULA CAPITIALLY BEFORE INSTALLING THE SOFTWARE. INCLUDING ANY "ONLINE" OR ELECTRONIC DOCUMENTATION Collectively called "SOFTWARE" DISTRIBUTED WITH THIS EULA BY INSTALLING COPYRIGHT DOWNLOADING ACCESSIBLES, OR OTHERWISE USING THE SOFTWARE. YOU ARE TO BE BOUND BY THE TERMS AND CONDITIONS OF THIS EULA. IF YOU DO NOT AWPE TO THESE TERMS AND CONDITIONS, YOU MAY NOT INSTALL. COPY DOWNLOAD ACCESS OR USE THE SOFTWARE Winning. This Software is powered by copyright laws and international keys. Unauthorized reproduction of this Software, or any portion of it, may result in several civil and external prevention and will be processed to the extensive extent possible under the law. LICENSE GRANT Subject to the terms of the EULA US Electronics Inc. ("LG Electronics") grants you a new exclusive, nonMarketable license to use the Software distributed with the EULA during the term of this EULA subsidy (in millions/million dollars) for an single computer. (5) or part of and in connection with the single product package of the EUS LID monitor product, with which this Software has been provided by you and (6) for your business or personal purposes exclusively for your internal user only. You may make one copy of the Software in where available time for backup purposes only. The backup copy must include Accept the terms of the License agreement Do Not accept the title or its license agreement Install Back Add Help Cancel5 Click the install button.
text_image
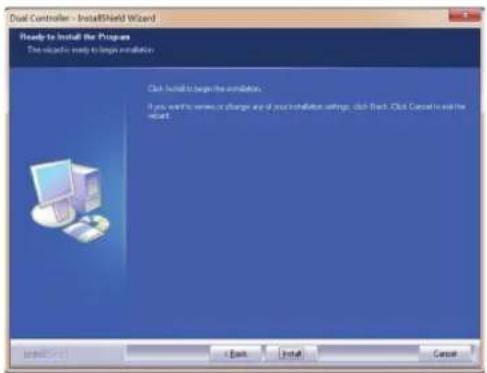
Dual Controller - InstallShield Wizard Ready to Install the Program This project needs to upgrade installation. Click install to begin the installation. If you want to serve or change are if your installation settings, click Back. Click Cancel to end the setup.6 The Dual Controller installation starts as shown below.
text_image
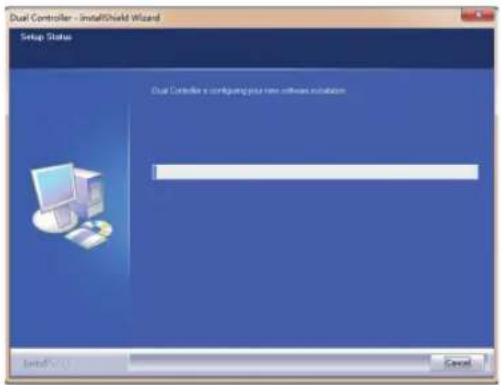
Dual Controller - InstallShield Wizard Setup Status Dual Controller is configuring your new software installation Install Cancel7 When the installation is complete, restart your system.
text_image
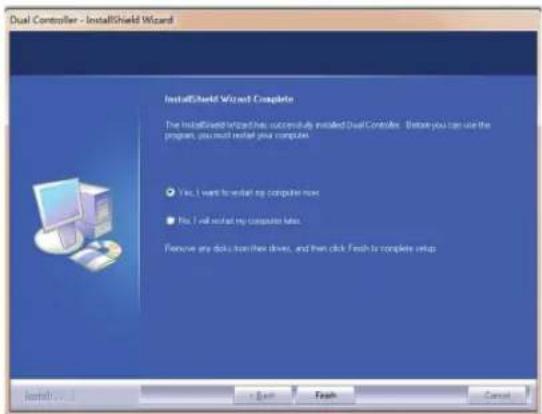
Dual Controller - InstallShield Wizard InstallShield Wizard Complete The InstallShield Wizard has successfully installed Dual Controller - Before you can use the program, you must install your computer. Yes, I want to install my computer now No, I will install my computer now. Remove any dots from their drives, and then click Finish to complete setup
NOTE
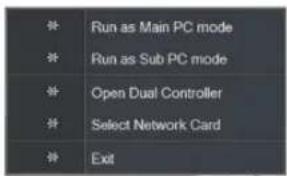
If you run Dual Controller, the Dual Controller icon [ ] appears in the system tray.
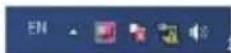
Click the Dual Controller icon and select a layout you want.
text_image
* Run as Main PC mode * Run as Sub PC mode * Open Dual Controller * Select Network Card * ExitUSER SETTINGS
Activating the Main Menu
1 Press the joystick button on the bottom of the monitor.
2 Move the joystick up/down (▲/▼) and left/right(◄/►) to set the options.
3 Press the joystick button once more to exit the main menu.

text_image
29UM67 34UM67 34UB67 Joystick Button 29UB67 Joystick Button| Button Menu Status Description | |||
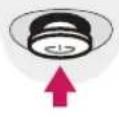 | Main menu disabled | Enables the main menu. | |
| Main menu enabled | Exits the main menu.(Holding down the button to turn off the monitor. You can turn off the monitor this way at any time, including when the OSD is on.) | ||
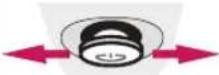 | Main menu disabled | Adjusts the monitor volume level. | |
| Main menu enabled | Enters the menu features. | ||
| Main menu disabled | Adjusts the monitor volume level. | ||
| Main menu enabled | Enters the PBP feature. | ||
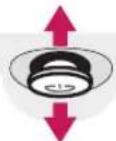 | Main menu disabled | Enables the main menu. | |
| Main menu enabled | Enters the picture mode feature. | ||
| Main menu disabled | Enables the main menu. | ||
| Main menu enabled | Turns off the monitor. | ||
Main Menu Features
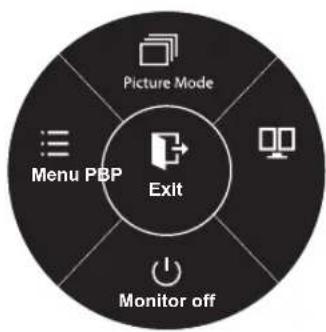
flowchart
graph TD
    A["Picture Mode"] --> B["Menu PBP"]
    B --> C["Exit"]
    D["Monitor off"] --> C
    E["Computer Icon"] --> C

Long press: Monitor off
| Main Menu | Description |
| Menu | Configures the screen settings. |
| Picture Mode | Select picture mode to achieve the best display effect. |
| PBP | Displays the screens of two input modes on one monitor. |
| Monitor off | Turns off the monitor. |
| Exit | Exits the main menu. |


Customizing settings
Menu Settings
-Quick Settings
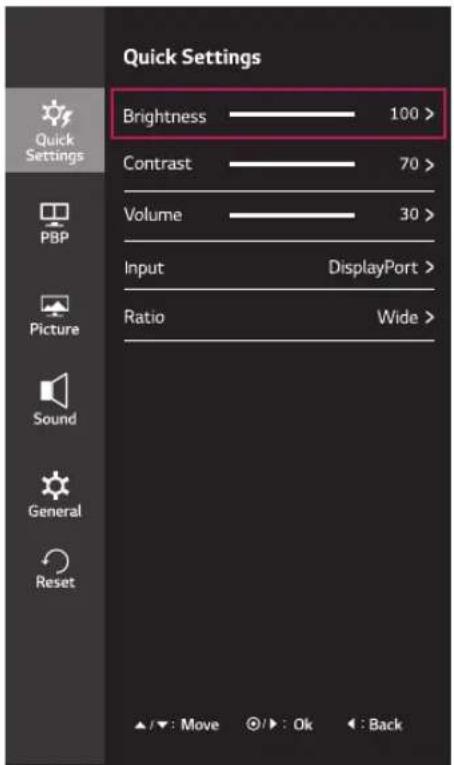
1 To view the OSD menu, press the joystick button at the bottom of the monitor and then enter the Menu.
2 Go to Quick Settings > Brightness by moving the joystick.
3 Configure the options following the instructions that appear in the bottom right corner.
4 To return to the upper menu or set other menu items, move the joystick to ◀ or pressing (OK) it.
5 If you want to exit the OSD menu, move the joystick to ◀ until you exit.
text_image
Quick Settings Brightness 100 > Contrast 70 > Volume 30 > Input DisplayPort > Ratio Wide > ▲/▼: Move ◎/▼: Ok ←: BackEach option is described below.
| Menu > Quick Settings Description | |
| Brightness | Adjusts the color contrast and brightness of the screen. |
| Contrast | |
| Volume Adjusts the volume. | |
| NOTEJog joystick button down ( ⏻ ) in the Volume menu will enable/disable the Mute function. | |
| Input Selects the current input mode. | |
| Ratio Adjusts the screen ratio. | |
| Wide Displays the video in wide-screen, regardless of the video signal input. | |
| Original Displays a video according to the input video signal aspect ratio. | |

NOTE
The display may look the same for Wide, Original options at the recommended resolution (2560 x 1080).
The ratio is disabled in the interlaced signal.
-PBP
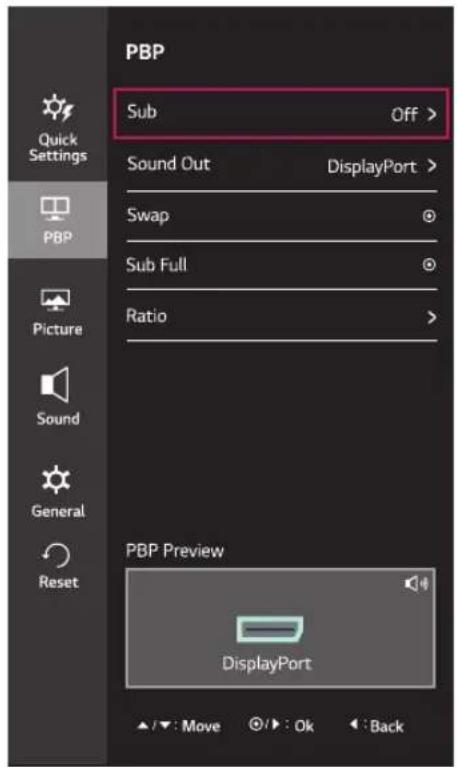
1 To view the OSD menu, press the joystick button at the bottom of the monitor and then enter the Menu.
2 Go to PBP by moving the joystick.
3 Configure the options following the instructions that appear in the bottom right corner.
4 To return to the upper menu or set other menu items, move the joystick to ◀ or pressing (○ OK) it.
5 If you want to exit the OSD menu, move the joystick to ◀ until you exit.
text_image
PBP Quick Settings PBP Picture Sound General Reset Sub Off > Sound Out DisplayPort > Swap Sub Full Ratio > PBP Preview DisplayPort ✓ : Move ✓ : Ok BackEach option is described below.
| Menu > PBP Description | |
| Sub Selects the video signal input of the sub screen. | |
| Sound Out Sound Out have four options.HDMI1, HDMI2, DP, Audio-In. | |
| Swap Toggles between the main screen and sub screen in PBP mode. | |
| Sub Full Converts the sub screen of PBP mode to the wide screen. | |
| Ratio Adjusts the aspect ratio of the main screen or sub screen. | |
| Main Wide Displays the video to fit the PBP screen, regardless of the video signal input. | |
-Picture
1 To view the OSD menu, press the joystick button at the bottom of the monitor and then enter the Menu.
2 Go to Picture by moving the joystick.
3 Configure the options following the instructions that appear in the bottom right corner.
4 To return to the upper menu or set other menu items, move the joystick to ◀ or pressing (OK) it.
5 If you want to exit the OSD menu, move the joystick to ◀ until you exit.
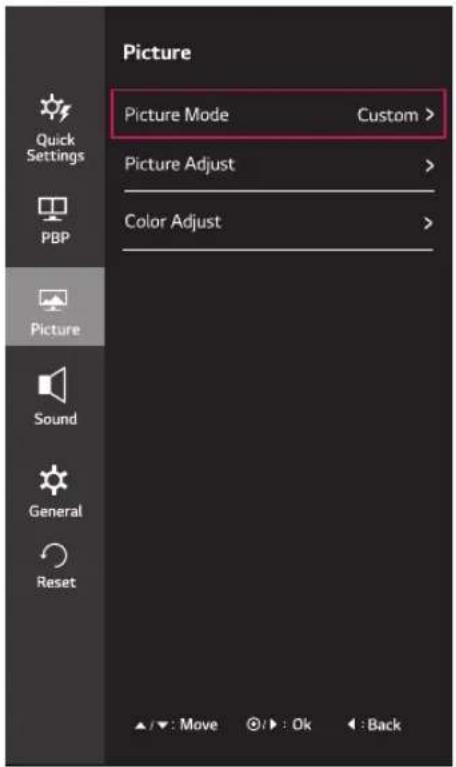
text_image
Picture Picture Mode Custom > Picture Adjust > Color Adjust > Quick Settings PBP Picture Sound General Reset ▲: ▼: Move ⚫: ▶: Ok ◀: BackEach option is described below.
| Menu > Picture | Description | |
| Picture Mode | Custom | Allows the user to adjust each element. The color mode of the main menu can be adjusted. |
| Photo Optimizes the screen to view photos. | ||
| Cinema Optimizes the screen to improve the visual effects of a video. | ||
| Game Optimizes the screen for gameplay. | ||
| Reader 1 It is a mode that the screen is adjusted to the best for the newspaper. If you want screen more bright, you can control brightness in Menu OSD. | ||
| Reader 2 | It is a mode that the screen is adjusted to the best for the cartoon. If you want screen more bright, you can control brightness in Menu OSD. | |
| Calibration Applies the value calibrated by True Color Finder. | ||
| NOTERun the True Color Finder program.Calibration settings for DVI / HDMI / DP(DisplayPort) will be saved separately. | ||
| Picture Adjust Sharpness Adjusts the sharpness of the screen. | ||
| Black Level Sets the offset level (for HDMI only).Offset: as a reference for a video signal, this is the darkest color the monitor can display. | ||
| High The picture of the screen gets brighter. | ||
| Low The picture of the screen gets darker. | ||
| Response Time Sets a response time for displayed pictures based on the speed of the screen. For a normal environment, it is recommended that you use Normal. For a fast-moving picture, it is recommended that you use High. Setting to High may cause image sticking. | ||
| High Sets the response time to High. | ||
| Middle Sets the response time to Middle. | ||
| Low Sets the response time to Low. | ||
| Off Sets the response time to Off. | ||
| Color Adjust Gamma Set your own gamma value. : Gamma 0, Gamma 1, Gamma 2 on the monitor, high gamma values display whitish images and low gamma values display blackish images.If user don't want adjusted gamma, user can select Gamma off. | ||
-Sound
1 To view the OSD menu, press the joystick button at the bottom of the monitor and then enter the Menu.
2 Go to Sound by moving the joystick.
3 Configure the options following the instructions that appear in the bottom right corner.
4 To return to the upper menu or set other menu items, move the joystick to ◀ or pressing (◎ OK) it.
5 If you want to exit the OSD menu, move the joystick to ◀ until you exit.
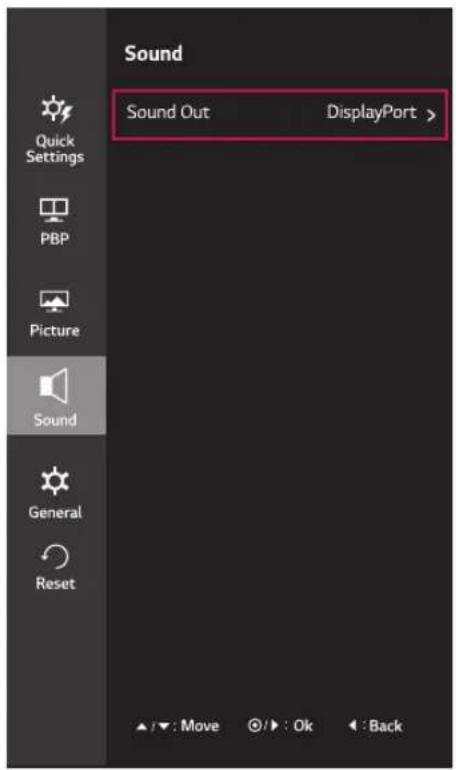
text_image
Sound Sound Out DisplayPort > Quick Settings PBP Picture Sound General Reset ✓ : Move ✓ : Ok ← BackEach option is described below.
| Menu > Sound Description |
| Sound Out Sound Out have four options.HDMI1, HDMI2, DP, Audio-In. |
-General
1 To view the OSD menu, press the joystick button at the bottom of the monitor and then enter the Menu.
2 Go to General by moving the joystick.
3 Configure the options following the instructions that appear in the bottom right corner.
4 To return to the upper menu or set other menu items, move the joystick to ◀ or pressing (OK) it.
5 If you want to exit the OSD menu, move the joystick to ◀ until you exit.
Each option is described below.
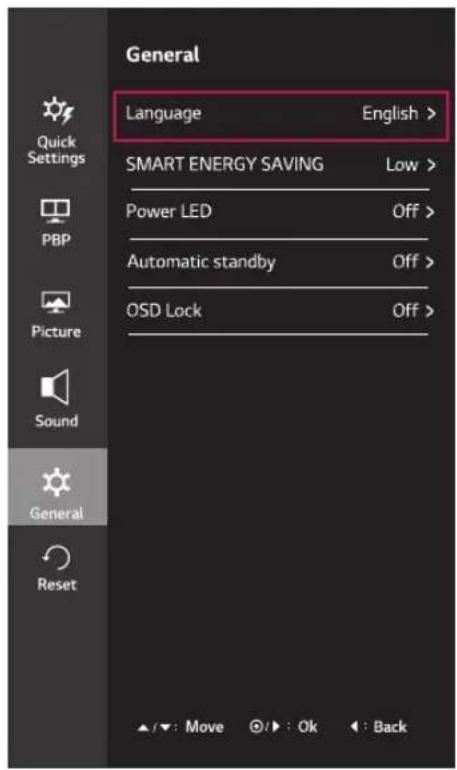
text_image
General Language English > SMART ENERGY SAVING Low > Power LED Off > Automatic standby Off > OSD Lock Off > ▲/▼: Move ◎/▶: Ok ◀: Back| Menu > General Description | ||
| Language To choose the language in which the control names are displayed. | ||
| SMART ENERGY SAVING | High | Enables SMART ENERGY SAVING you can save energy with this energy- high efficient function. |
| Low | Enables SMART ENERGY SAVING you can save energy with this energy- low efficient function. | |
| Off Disables SMART ENERGY SAVING . | ||
| Power LED Turns the power indicator on the front side of the monitor on/off. | ||
| Automatic Standby | The monitor will automatically switch to standby mode after a certain period. | |
| OSD Lock Prevents incorrect key input. | ||
* SMART ENERGY SAVING : Conserve energy by using luminance compensation algorithm.

NOTE
Saving Data depends on the Panel. So, those values should be different from each panel and panel vendor. If option of SMART ENERGY SAVING is High or Low, monitor luminance become higher or lower depend on source.
If option of SMART ENERGY SAVING is High or Low, Picture Mode will automatically be Custom.
-Reset
1 To view the OSD menu, press the joystick button at the bottom of the monitor and then enter the Menu.
2 Go to Reset by moving the joystick.
3 Configure the options following the instructions that appear in the bottom right corner.
4 To return to the upper menu or set other menu items, move the joystick to ◀ or pressing (OK) it.
5 If you want to exit the OSD menu, move the joystick to ◀ until you exit.
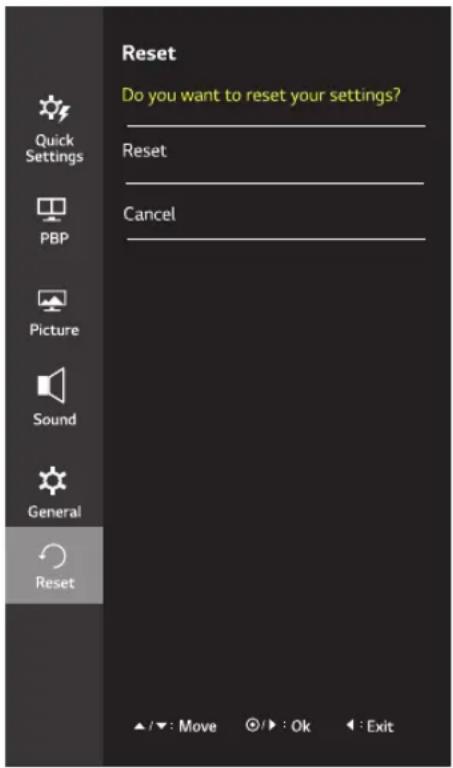
text_image
Reset Do you want to reset your settings? Reset Cancel Quick Settings PBP Picture Sound General Reset ▲/▼: Move ○/▼: Ok ←: ExitEach option is described below.
| Menu > Reset Description | |
| Do you want to reset your settings? | |
| Reset Returns to the default settings. | |
| Cancel Cancel the select. | |
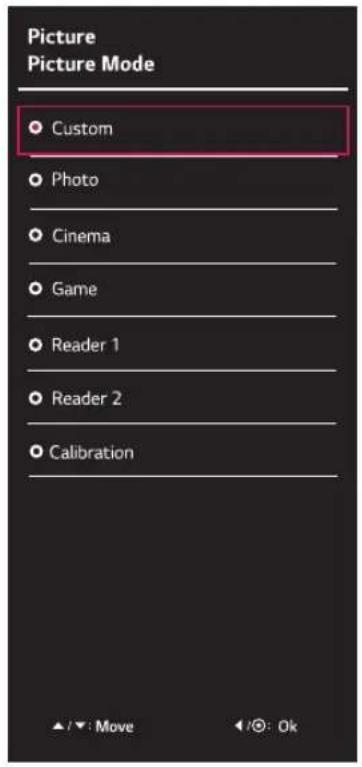
-Picture mode
1 Press the joystick button on the bottom of the monitor.
2 Go to Picture mode by moving the joystick button to ▲.
3 Configure the options following the instructions that appear in the bottom.
text_image
Picture Picture Mode Custom Photo Cinema Game Reader 1 Reader 2 CalibrationEach option is described below.
| Joystick Button >Picture Mode | Description | |
| Picture Mode | Custom | Allows the user to adjust each element. The color mode of the main menu can be adjusted. |
| Photo Optimizes | the screen to view photos. | |
| Cinema Optimizes | es the screen to improve the visual effects of a video. | |
| Game Optimizes | the screen for gameplay. | |
| Reader 1 It is a mode that the screen is adjusted to the best for the newspaper. If you want screen more bright, you can control brightness in Menu OSD. | ||
| Reader 2 It is a mode that the screen is adjusted to the best for the cartoon. If you want screen more bright, you can control brightness in Menu OSD. | ||
Calibration Applies the value calibrated by True Color Finder. NOTERun the True Color Finder program.Calibration settings for DVI / HDMI / DP(DisplayPort) will be saved separately. NOTERun the True Color Finder program.Calibration settings for DVI / HDMI / DP(DisplayPort) will be saved separately. | ||
NOTE
TROUBLESHOOTING
Check the following before calling for service.
| No image appears | |
| Is the power cord of the display connected? | Check and see if the power cord is connected properly to the power outlet. |
| Is the power indicator light on? | Press the Power button. |
| Is the power indicator flickering? | If the display is in sleep mode, try moving the mouse or pressing any key on the keyboard to bring up the screen.Try to turn on the PC. |
| Do you see an "OUT OF RANGE" message on the screen? | This message appears when the signal from the PC (video card) is out of horizontal or vertical frequency range of the display. See the 'Specifications' section of this manual and configure your display again. |
| Do you see a "NO SIGNAL" message on the screen? | When the monitor is on "No-Signal" in 5 minutes, the monitor goes to DPM mode. |
| Can 't you control some functions in OSD? | |
| Can't you select some menu in OSD? | • You can unlock the OSD controls at any time by entering the OSD lock menu and changing items to off. |

CAUTION
Check Control Panel ▶ Display ▶ Settings and see if the frequency or the resolution were changed. If yes, readjust the video card to the recommend resolution.
If the recommended resolution (optimal resolution) is not selected, letters may be blurred and the screen may be dimmed, truncated or biased. Make sure to select the recommend resolution.
The setting method can differ by computer and O/S (Operation System), and resolution mentioned above may not be supported by the video card performance. In this case, please ask to the computer or the video card manufacturer.
| Display image is incorrect | |
| The screen color is mono or abnormal. | Check if the signal cable is properly connected and use a screwdriver to fasten if necessary.Make sure the video card is properly inserted in the slot.Set the color setting higher than 24 bits (true color) atControl Panel▶ Settings. |
| The screen blinks. | Check if the screen is set to interlace mode and if yes, change it to the recommend resolution. |
| Do you see an "Unrecognized monitor, Plug&Play (VESA DDC) monitor found" message? | |
| Have you installed the display driver? | Be sure to install the display driver from the display driver CD (or diskette) that comes with your display. Or, you can also download the driver from our web site: http://www.lg.com.Make sure to check if the video card supports Plug&Play function. |
| The screen is flickering. | |
| Did you select the recommended resolution? | • If the selected resolution is HDMI 1080i 60/50 Hz, the screen may be flickering. Change the resolution to the recommended resolution 1080P. |
SPECIFICATIONS
29UM67
| LCD Screen Type | 73.025 cm TFT (Thin Film Transistor)LCD (Liquid Crystal Display) ScreenDiagonal length of the screen: 73.025 cm | |
| Pixel Pitch 0.2628 mm x 0.2 | 628 mm | |
| Resolution Maximum | um Resolution 2560 x 1080 @ 60 Hz | |
| Recommended Resolution 2560 x 1080 @ 60 Hz | ||
| Video Signal | Horizontal Frequency 30 kHz to 90 kHz | |
| Vertical Frequency DP/HDMI :56 Hz to 75 Hz | ||
| Synchronization Separate Sync. | ||
| Input Connector H | HDMI IN1, HDMI IN2 , DisplayPort, H/P | |
| Power Voltage 19 | V 2.4 A | --- |
| Power consumption (Typ.) | On mode: 31 W (ENERGY STAR® standard)*Sleep Mode ≤ 0.5 WOff Mode ≤ 0.5 W | |
| AC/DC adaptor | Type DA-48F19, Asian Power Devices Inc. productionOr type LCAP35, LIEN CHANG ELECTRONIC ENTERPRISE productionOutput: 19 V--- 2.53 A | |
| Environmental Conditions | Operating Condition | Temperature: 10°C to 35°C; Humidity: 10% to 80% |
| Storing Condition | Temperature: -20°C to 60°C; Humidity: 5% to 90% | |
| Stand Angle Adjustment | Forwards/Backwards: -5° to 20° (Head) | |
| Dimension Monitor | Size (Width x Height x Depth) | |
| With Stand | 70.3 cm x 41.8 cm x 18.1 cm | |
| Without Stand | 70.3 cm x 32.8 cm x 6.4 cm | |
| Weight (Without Packaging) | 6.2 kg | |
The specifications are subject to change without notice.
* The power consumption level can be different by operating condition and monitor setting.
* The On mode power consumption is measured with ENERGY STAR® test standard.
* ENERGY STAR® is a US registered mark of the United States Environmental Protection Agency.
SPECIFICATIONS
29UB67
| LCD Screen Type | 73.025 cm TFT (Thin Film T | Transistor)LCD (Liquid Crystal Display) ScreenDiagonal length of the screen: 73.025 cm |
| Pixel Pitch 0.2628 mm x 0.2 | 628 mm | |
| Resolution Maximum | um Resolution 2560 x 1080 @ 60 Hz | |
| Recommended Resolution 2560 x 1080 @ 60 Hz | ||
| Video Signal | Horizontal Frequency 30 kHz to 90 kHz | |
| Vertical Frequency DVI: 56 Hz to 75 HzHDMI: (AV)25 Hz to 60 Hz(PC)56 Hz to 75 HzDP: 56 Hz to 75 Hz | ||
| Synchronization Separate Sync. | ||
| Input Connector D | VI-D IN, HDMI IN1, HDMI IN2, DP(DisplayPort) IN, H/P, USB | |
| Power consumption | On mode: 31 W (ENERGY STAR® standard)*Sleep Mode<1.2 WOff Mode < 0.3 W | |
| Power Input AC 1 | 00-240V ~ 50/60Hz 1.5 A | |
| Environmental Conditions | Operating Condition Temperature: 10°C to 35°C; Humidity: 10% to 80% | |
| Storing Condition | Temperature: -20°C to 60°C; Humidity: 5% to 90% | |
| Stand Angle Adjustment | Forwards/Backwards: -5° to 35° (Head) | |
| Dimension Monitor | Size (Width x Height x Depth) | |
| With Stand | 70.3 cm x 40.4 cm x 25.2 cm | |
| Without Stand | 70.3 cm x 32.1 cm x 6.4 cm | |
| Weight (Without Packaging) | 8.6 kg | |
The specifications are subject to change without notice.
* The power consumption level can be different by operating condition and monitor setting.
* The On mode power consumption is measured with ENERGY STAR® test standard.
* ENERGY STAR® is a US registered mark of the United States Environmental Protection Agency.
SPECIFICATIONS
34UM67
| LCD Screen Type | 87 cm TFT (Thin Film Transistor) | |
| LCD (Liquid Crystal Display) ScreenDiagonal length of the screen: 87 cm | ||
| Pixel Pitch 0.312(H) mm x 0.310(V) mm | ||
| Resolution Maximum | um Resolution 2560 x 1080 @ 60 Hz | |
| Recommended Resolution 2560 x 1080 @ 60 Hz | ||
| Video Signal | Horizontal Frequency 30 kHz to 90 kHz | |
| Vertical Frequency DP/HDMI :56 Hz to 75 Hz | ||
| Synchronization Separate Sync. | ||
| Input Connector DVI,HDMI IN1,HDMI IN2,DisplayPort,H/P | ||
| Power Voltage 19 | V 3.3 A | --- |
| Power consumption (Typ.) On mode: 43 W (ENERGY STAR® standard)*Sleep Mode ≤ 0.5 WOff Mode ≤ 0.5 W | ||
| AC/DC adaptor Type | DA-65G 19, Asian Power Devices IntroductionOr type LCAP39LIEN CHANG ELECTRONIC ENTERPRISEductionOutput: 19 V--- 3.42 A | |
| Environmental Conditions | Operating Condition | Temperature: 10°C to 35°C; Humidity: 10% to 80% |
| Storing Condition | Temperature: -20°C to 60°C; Humidity: 5% to 90% | |
| Stand Angle Adjustment | Forwards/Backwards: -5° to 15° (Head) | |
| Dimension Monitor | Size (Width x Height x Depth) | |
| With Stand | 82.9 cm x 46.8 cm x 17.2 cm | |
| Without Stand | 82.9 cm x 37.9 cm x 8.2 cm | |
| Weight (Without Packaging) | 7.3 kg | |
The specifications are subject to change without notice.
* The power consumption level can be different by operating condition and monitor setting.
* The On mode power consumption is measured with ENERGY STAR® test standard.
* ENERGY STAR® is a US registered mark of the United States Environmental Protection Agency.
SPECIFICATIONS
34UB67
| LCD Screen Type | 87 cm TFT (Thin Film Transistor) | |
| LCD (Liquid Crystal Display) ScreenDiagonal length of the screen: 87 cm | ||
| Pixel Pitch 0.312(H) mm x 0.310(V) mm | ||
| Resolution Maximum | um Resolution 2560 x 1080 @ 60 Hz | |
| Recommended Resolution 2560 x 1080 @ 60 Hz | ||
| Video Signal | Horizontal Frequency 30 kHz to 90 kHz | |
| Vertical Frequency DP/HDMI :56 Hz to 75 Hz | ||
| Synchronization Separate Sync. | ||
| Input Connector DVI-D IN,HDMI IN1,HDMI IN2,DP(DisplayPort) IN,H/P,USB | ||
| Power Voltage 19 | V 3.3 A | --- |
| Power consumption (Typ.) | On mode: 43 W (ENERGY STAR® standard)*Sleep Mode ≤ 1.2 WOff Mode ≤ 0.3 W | |
| AC/DC adaptor | Type DA-65G 19, Asian Power Devices Inc. productionOr type LCAP39, LIEN CHANG ELECTRONIC ENTERPRISE production.Output: 19 V--- 3.42 A | |
| Environmental Conditions | Operating Condition | Temperature: 10°C to 35°C; Humidity: 10% to 80% |
| Storing Condition | Temperature: -20°C to 60°C; Humidity: 5% to 90% | |
| Stand Angle Adjustment | Forwards/Backwards: -5° to 35° (Head) | |
| Dimension Monitor | Size (Width x Height x Depth) | |
| With Stand | 82.9 cm x 43.6 cm x 25.2 cm | |
| Without Stand | 82.9 cm x 37.9 cm x 4.9 cm | |
| Weight (Without Packaging) | 8.6 kg | |
The specifications are subject to change without notice.
* The power consumption level can be different by operating condition and monitor setting.
* The On mode power consumption is measured with ENERGY STAR® test standard.
* ENERGY STAR® is a US registered mark of the United States Environmental Protection Agency.
Factory support mode (DVI-D/ HDMI/ DisplayPort)
| Display Modes (Resolution) | Horizontal Frequency(kHz) | Vertical Frequency(Hz) | Polarity(H/V) | Remarks |
| 720 x 400 31.468 70.08 -/+ | ||||
| 640 x 480 31.469 59.94 -/- | ||||
| 640 x 480 37.5 75 -/- | ||||
| 800 x 600 37.879 60.317 +/+ | ||||
| 800 x 600 46.875 75 +/+ | ||||
| 1024 x 768 48.363 60 -/- | ||||
| 1024 x 768 60.123 75.029 +/+ | ||||
| 1152 x 864 67.5 75 +/+ | ||||
| 1280 x 720 45 60 +/+ | ||||
| 1280 x 1024 63.981 60.02 +/+ | ||||
| 1280 x 1024 79.976 75.025 +/+ | ||||
| 1600 x 900 60 60 +/+ | ||||
| 1680 x 1050 65.290 59.954 -/+ | ||||
| 1920 x 1080 67.5 60 +/- | ||||
| 2560 x 1080 66.7 60 -/+ | ||||
| 1280 x 1080 (PBP only) 67.5 60 -/+ |
HDMI Timing (Video)
| Factory support mode (Preset Mode) | Horizontal Frequency(kHz) | Vertical Frequency(Hz) | Remarks |
| 480P 31.50 60 | |||
| 576P 31.25 50 | |||
| 720P 37.50 50 | |||
| 720P 45.00 60 | |||
| 1080P 56.25 50 | |||
| 1080P 67.50 60 |
Indicator
| Mode LED Color | |
| On Mode White (Only 15 seconds) | |
| Sleep Mode | Blinking White |
| Off Mode Off | |
PROPER POSTURE
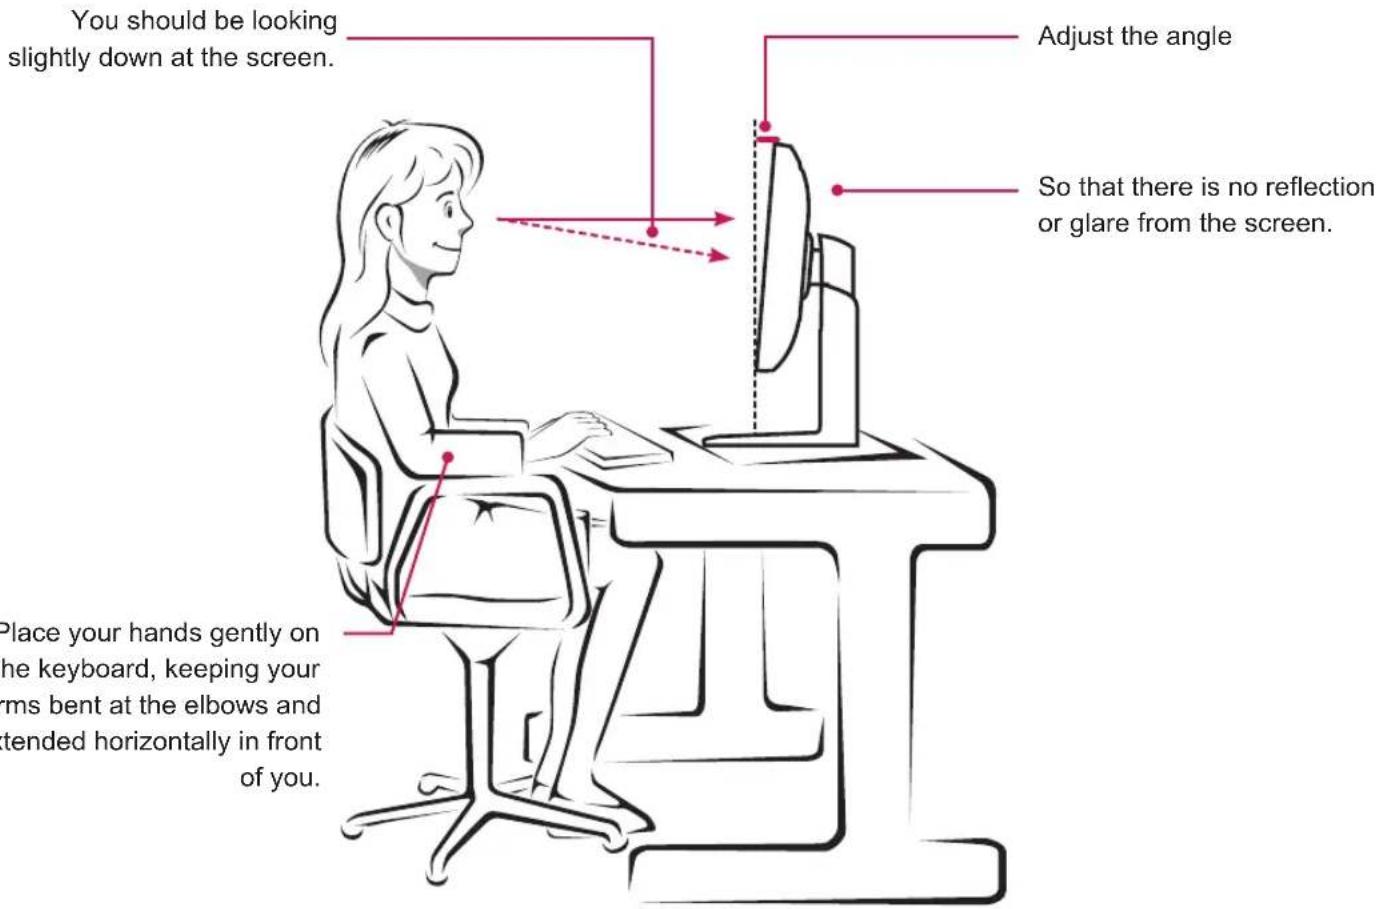
Proper Posture for Using the Monitor
Adjust the screen so that you can comfortably view at a slight downward angle from your natural eye level.
Take a break for approximately ten minutes every hour to reduce any fatigue caused by long-time usage.
The stand of the touch monitor allows the product to be used in the optimum position.
Adjust the stand angle to obtain the best view of the screen.
text_image
You should be looking slightly down at the screen. Adjust the angle So that there is no reflection or glare from the screen. Place your hands gently on the keyboard, keeping your arms bent at the elbows and tended horizontally in front of you.Place your hands gently on the keyboard, keeping your arms bent at the elbows and extended horizontally in front of you.

text_image
LG Life's GoodDeclaration of Conformity
Trade Name: LG
Model: 29UM67, 29UB67, 34UM67, 34UB67
Responsible Party: LG Electronics Inc.
Address : 1000 Sylvan Ave. Englewood Cliffs NJ 07632 U.S.A
TEL: 201-266-2534
*above information is only for USA FCC Regulatory
Make sure to read the Safety Precautions before using the product.
Keep the Owner's Manual (CD) in an accessible place for future reference.
The model and serial number of the SET is located on the back and one side of the SET.
Record it below should you ever need service.
MODEL
SERIAL
ENERGY STAR is a set of power-saving guidelines issued by the U.S.Environmental Protection Agency(EPA).

As an ENERGY STAR Partner LGE U. S. A., Inc. has determined that this product meets the ENERGY STAR guidelines for energy efficiency.
Refer to ENERGY STAR.gov for more information on the ENERGY STAR program.