412G - Dash cam Nextbase - Free user manual and instructions
Find the device manual for free 412G Nextbase in PDF.


User questions about 412G Nextbase
0 question about this device. Answer the ones you know or ask your own.
Ask a new question about this device
Download the instructions for your Dash cam in PDF format for free! Find your manual 412G - Nextbase and take your electronic device back in hand. On this page are published all the documents necessary for the use of your device. 412G by Nextbase.
USER MANUAL 412G Nextbase
natural_image
Black next-to-leading digital camera with lens and external screen (no visible text or symbols)INTRODUCTION TO USING AN IN-CAR CAM
The iN-CAR CAM range of dash cams have been designed specifically with ease of use in mind, it is recommended NOT to change the default settings, which have been carefully selected to give the best performance for day to day use.
Basic operation.
The iN-CAR CAM is set to record video, in files of just 3 minutes in length. This means that each video file is a manageable size should you need to download and send to your insurance company. Eventually your MicroSD card will fill up with video files but don't worry, the camera automatically deletes the oldest file to make space for new recordings. This way you never run out of space and have plenty of driving historical evidence saved.
Typically a 16Gb card will store the last 2 hours of driving footage.
The Time and Date are automatically set upon the camera from satellite data, however it will always set Greenwich Mean Time (GMT). For summer months where the clocks are brought forward or for driving in other countries, adjust the time in the General Settings Menu (Timezone / DST) to account for the time difference from GMT by adding or subtracting 1 hour etc, if required.
There are 3 modes of camera operation - Video, Photo and Playback.
Video Mode: The default mode when the camera is turned on, for video recording.
Photo Mode: Allows you to take still photographs.
Playback mode: Allows you to view recorded video or photographs upon the dash cam LCD screen. Press the MODE button on the iN-CAR CAM to select required mode.
Automatic Start / Stop Technology. The iN-CAR CAM senses power supplied to the cigarette lighter socket as soon as the vehicle ignition is turned on and will start to record automatically.
When the ignition is turned off, the iN-CAR CAM will perform an automatic shutdown process.
- Tips for capturing best video footage:
1.1 Position the iN-CAR CAM in the centre of the windscreen and ideally behind the rear view mirror so it is not a distraction to the driver.
1.2 Reduce the amount of sky in the picture, by angling the view of the camera towards the road. Too much sky will make the road appear darker due to the automatic exposure compensation.
1.3 Remove unnecessary items from your dashboard. If objects are placed on your dashboard these can cause reflections to be seen on the windscreen and these reflections may be captured during recording.
- Tips for stable memory card performance:
2.1 Periodically reformat the memory card. Every 2-3 weeks we recommend that you reformat the memory card. This will wipe any files from the card and set it up afresh for continued use with your iN-CAR CAM.
Of course, you should only do this AFTER you've downloaded any files from the card that you may want to keep, as formatting the card will remove all content.
2.1 Format your memory card using the iN-CAR CAM. This will make sure that the card is structured specifically for your camera. Press MENU twice and choose the Format Card option. Follow the on-screen instructions accordingly.
2.2 Switch off the iN-CAR CAM before removing the SD memory card, to prevent the chance of damage being caused to the memory card or the files stored upon it, turn OFF the iN-CAR CAM before removing or inserting the memory card.
TABLE OF CONTENTS
INTRODUCTION TO USING AN IN-CAR CAM 03
TABLE OF CONTENTS 04
PRECAUTIONS 05
CAUTIONS ON USING THIS PRODUCT 05
PRODUCT SPECIFICATION 06
PACKAGE CONTENTS 07
PRODUCT FEATURES 07
POWERED GPS MOUNT 08
CAMERA - PARTS & CONTROLS 09
IN VEHICLE INSTALLATION 14
VIDEO MODE 18
PHOTO MODE 22
PLAYBACK MODE 24
SETUP MENU 28
PC CONNECTION 31
Please read this manual carefully before operation and keep it for future reference. It will be helpful should you encounter any operational problem.
WARNING: Do not expose this product to rain, moisture or water under any circumstances, doing so may result in the risk of electric shock or fire.
CAUTION: To reduce the risk of electric shock, do not perform any servicing other than that contained in the instruction manual unless you are qualified to do so.
Have the unit serviced by a qualified service technician if;
The Unit has been exposed to rain or water.
The unit does not seem to operate normally.
The unit exhibits a marked change in performance.
LCD: A Liquid Crystal Display (LCD) screen is a multilayer complex component, containing 691,200 pixels. Pixels can however fail during normal product life. 1 pixel = 0.0001% failure rate, and one pixel failure per year of operation is considered normal and not a cause for concern.
WEEE: Disposal of Waste Electrical and Electronic Equipment and/or Battery by users in private households in the European Union.

This symbol on the product or on the packaging indicates that this cannot be disposed of as household waste. You must dispose of your waste equipment and/or battery by handing it over to the applicable take-back scheme for the recycling of electronic equipment and/or batteries. For more information please contact your local household waste disposal office.
CAUTIONS ON USING THIS PRODUCT
- Ensure that the windscreen is free of dirt or grease before placing mount upon it.
- Do not obscure the view of the road ahead or impede the deployment of any airbags in the event of an accident.
- When not in use, please disconnect the car adaptor from both the 12/24Vdc outlet in your vehicle and the device itself.
- Only clean the device with a soft dry cloth, for tough dirt, apply some neutral detergent diluted in 5 to 6 parts water to a soft cloth.
Note that alcohol, thinner, benzene etc could cause damage to the paint or coatings.
Avoid making contact with the lens as damage be caused. 5. se may - If required clean the glass lens carefully using spectacle lens cleaning fluid on a soft cloth only.
- The video recordings made by this Digital Video Recorder are intended for personal use only.
- Publication of the recordings on Youtube, the internet or other methods are subject to the Data Protection Act and the requirements thereof must be adhered to.
If the Digital Video Recorder is to be used within a commercial environment, i.e. truck use, then the CCTV regulation apply also, in addition to the Data Protection Act regulations. This includes labelling to identify the use of CCTV is taking place, the omission of Audio recording and informing the relevant authorities of who controls the data. - Video playback upon the device which is visible to the driver is prohibited or restricted in some countries or States. Please adhere to these laws.
- Whilst driving, do not adjust the controls of your device as this is a distraction to driving.
PRODUCT SPECIFICATION
| Model Number / Name | NBDVR412GW / NEXTBASE iN-CAR CAM PROFESSIONAL |
| Power Requirements | 5V / 1.5A |
| Power Supply | 12-24Vdc Car Power Cable (supplied)Fuse Type: 20mm / 2AOutput: 5Vdc |
| Sensor Resolution | 4M Pixel (4,085,760 Pixel) |
| Lens -Type / Angle / Aperture | 6G / 140° / F1.6 |
| Recording Resolution | 2560 x 1440 @ 30fps (default) |
| Screen Size | 3.0" |
| Screen Resolution | 960 (W) X 240 (H) pixels x RGB |
| Screen Ratio | 16:9 |
| Card Reader | MicroSD, Class 6-10, up to 32GB |
| SD Card(Recommended Type) | 8-32GB SDHC, Class 10 (48mb/s), for best results use arecognized brand |
| SD Card Recorded FileCapacity(based on default settings) | 8GB Micro SD = 45mins of recording (15x 3 minute recordings)16GB Micro SD = 90mins of recording (30x 3 minute recordings)32GB Micro SD = 180mins of recording (60x 3 minute recordings) |
| Recording Format | MOV |
| Video / Audio Out | High Definition: Type C Socket (Video / Audio)Standard Definition: 3.5mm Jack (Video / Audio) |
| Internal Battery | Lithium-ion 3.7V / 260mAh (approx. 30mins recording time)Battery design allows the 'Auto Power Off' feature to function inevent of power loss within the vehicle. It is not intended as analternative power source to replace the supplied car adaptor. |
| Unit Dimensions | 106 x 59 x 38mm |
| Unit Weight | 86g |
'Android' is a trademark of Google Inc. in the United States and other countries.
'Dropbox' and the Dropbox logo are trademarks of Dropbox, Inc.
'Mac' is a registered trademarks of Apple Inc. in the United States and other countries.
‘iOS’ is a trademark or registered trademark of Cisco in the U.S. and other countries.
'Windows' is a registered trademark of Microsoft Corporation in the United States and other countries.
PACKAGE CONTENTS
Please check the contents of your iN-CAR CAM product.
iN-CAR CAM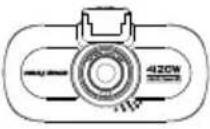 | Powered GPS Mount Car Power Cable USB Cable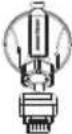 (adhesive mount included) (adhesive mount included) | 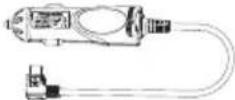 | 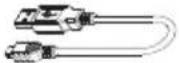 |
Window Sticker | Quick Start Guide | Instruction Manual & Software Disk |
Product appearance may differ slightly to that shown above.
PRODUCT FEATURES
Thank you for purchasing this NEXTBASE iN-CAR CAM product, in this section we will outline some of the features available with this dash cam.
3.0" LCD Colour Screen
LCD screen for ease of use and viewing the playback of recorded videos and photos.
Powered GPS Mount
Supplied with an Easy-Fit powered mount, which allows the iN-CAR CAM to be fitted and removed quickly and easily. The car power cable can remain in place, connected to the mount.
GPS Logger
GPS co-ordinates, date and time are recorded, the journey can then be viewed using the supplied Windows & Mac playback software.
The software is also available to download from www.nextbase.co.uk
WiFi Connectivity
Connect your smartphone or tablet device to the iN-CAR CAM, can be used to Start/Stop recording or to view or download files from the iN-CAR CAM
G Sensor / File Protection
In the event of an impact the device will automatically 'protect' the recording, stopping the file from being over-written. This can also be performed manually, by pressing the 'protect' button. Individual files can also be 'protected' when viewed within playback mode.
Automatic Start / Stop Technology
The iN-CAR CAM senses power supplied to the cigarette lighter socket, as soon as the vehicle ignition is turned on and will start to record automatically.
When the ignition is turned off, the iN-CAR CAM will perform an automatic shutdown process.
Parking Mode
The iN-CAR CAM turns on automatically to record 2 minutes of video, when physical movement of your vehicle is detected.
Built-in Microphone & Speaker
Record audio to compliment the video recordings.
POWERED GPS MOUNT
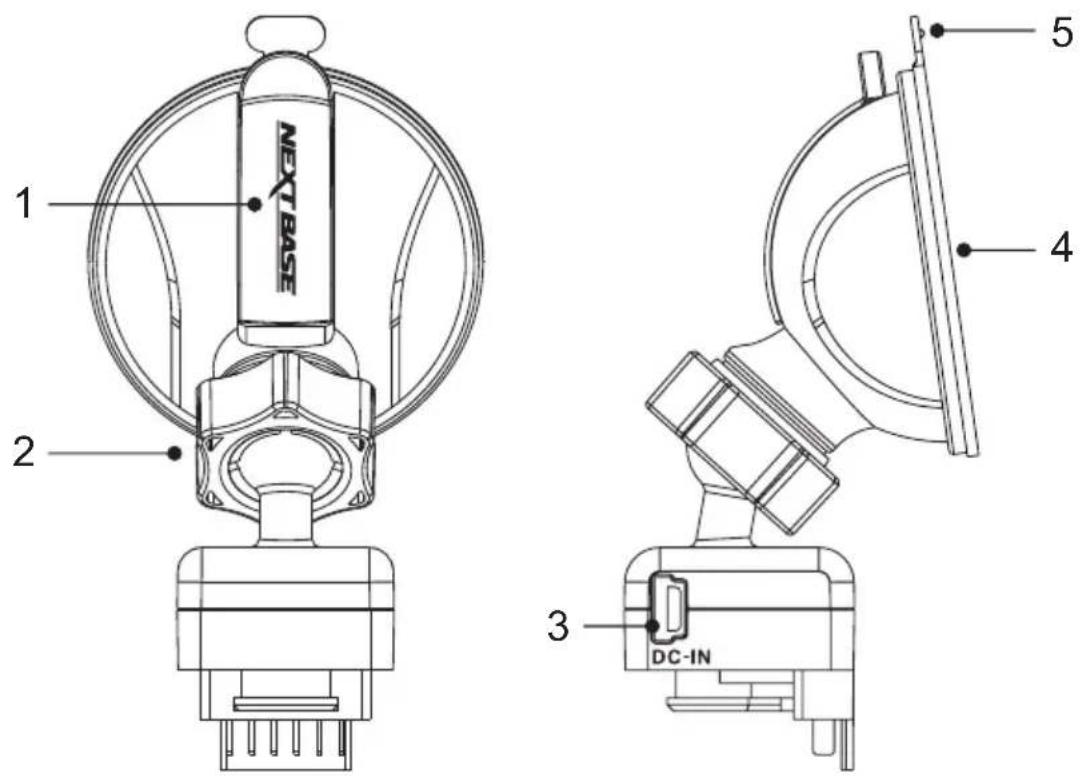
Please see below to identify the parts of the supplied powered mount.
text_image
NEXTBASE 1 2 3 DC-IN 4 51. Locking lever
The locking lever is used to attach and release the window mount to your vehicles windscreen. Pull the lever down to prepare the window mount for use. Once the mount is firmly upon the windscreen (in a suitable location) push the lever to lock the mount in place.
2. Locking ring
Loosen the locking ring to adjust the iN-CAR CAM position if required, remembering to re-tighten before use.
3. DC-IN socket
Connect the supplied car power cable here.
4. Suction cup
This is used to attach and release the window mount to your vehicles windscreen. Affix to a clear piece of windscreen where there is no paint effect applied.
5. Suction release tab
Once the locking lever has been opened use this release tab to break the seal between the mount and windscreen.
CAMERA - PARTS & CONTROLS
Please see below to identify the parts and controls of your iN-CAR CAM.
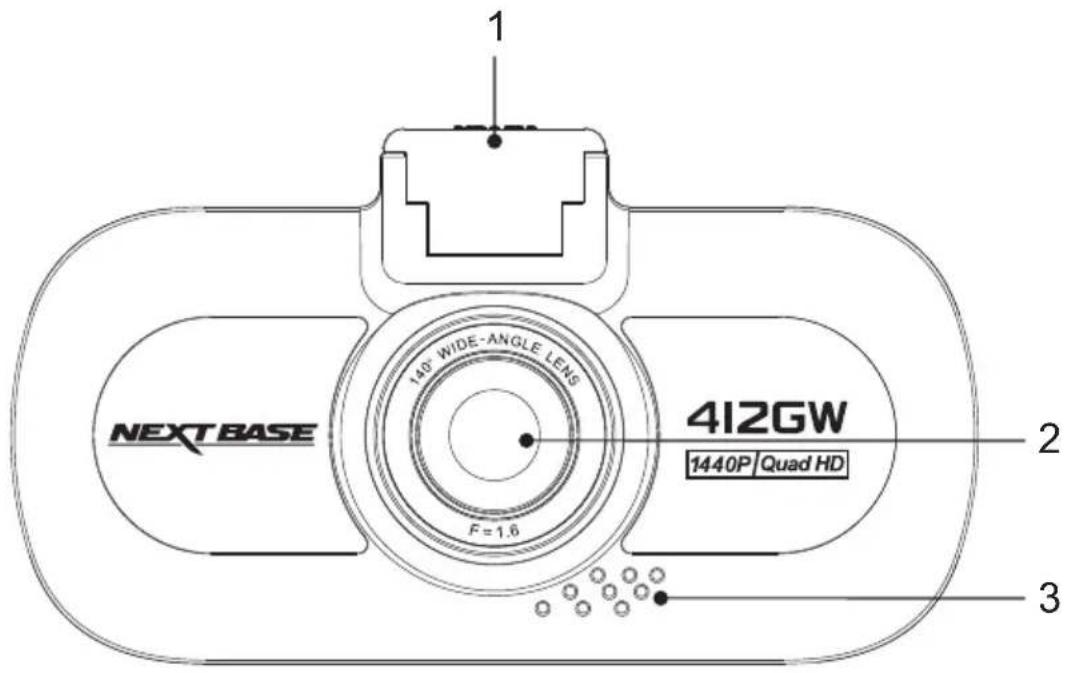
Front:
text_image
NEXTBASE 140° WIDE-ANGLE LENS F = 1.6 412GW 1440P Quad HD 2 3- Mounting point (located under dust cover)
After removing the dust cover, attach the supplied powered GPS mount here.
- Camera lens
Wide Angle 140°, 6 Element glass lens for optimum picture quality.
- Speaker
Integral speaker for audio playback directly from the iN-CAR CAM.
CAMERA - PARTS & CONTROLS (CONTD.)
Back:
text_image
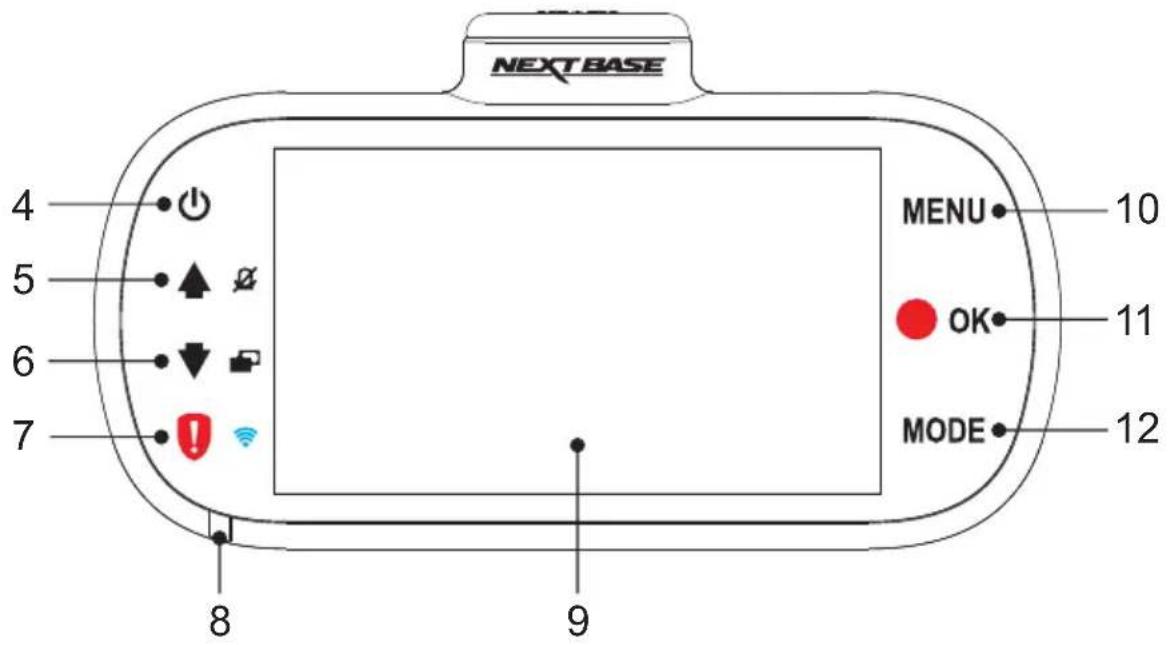
NEXT BASE MENU OK MODE 10 11 12 4 5 6 7 8 94. Power On / Off
Press and hold for 2 seconds to turn on / off the iN-CAR CAM.
5. Up / Microphone Off
Up:
Press to navigate up within menus and to move to the previous file when in playback mode.
Microphone Off:
Press to turn off / on the microphone (audio recording), only available whilst in video mode.
6. Down / Screen Off
Down:
Press to navigate down within menus and to move to the next file when in playback mode.
Screen Off:
Press to turn off / on the screen, only available whilst in video mode.
7. Protect File / WiFi
Protect File:
Press whilst recording to protect the current file in event of an emergency situation.
WiFi:
Press and hold for three seconds to turn on WiFi mode, this is not available whilst recording or during playback.
Note:
- To exit WiFi mode please press the OK button once paired device has been disconnected.
CAMERA - PARTS & CONTROLS (CONTD.)
Continued from previous page.
text_image
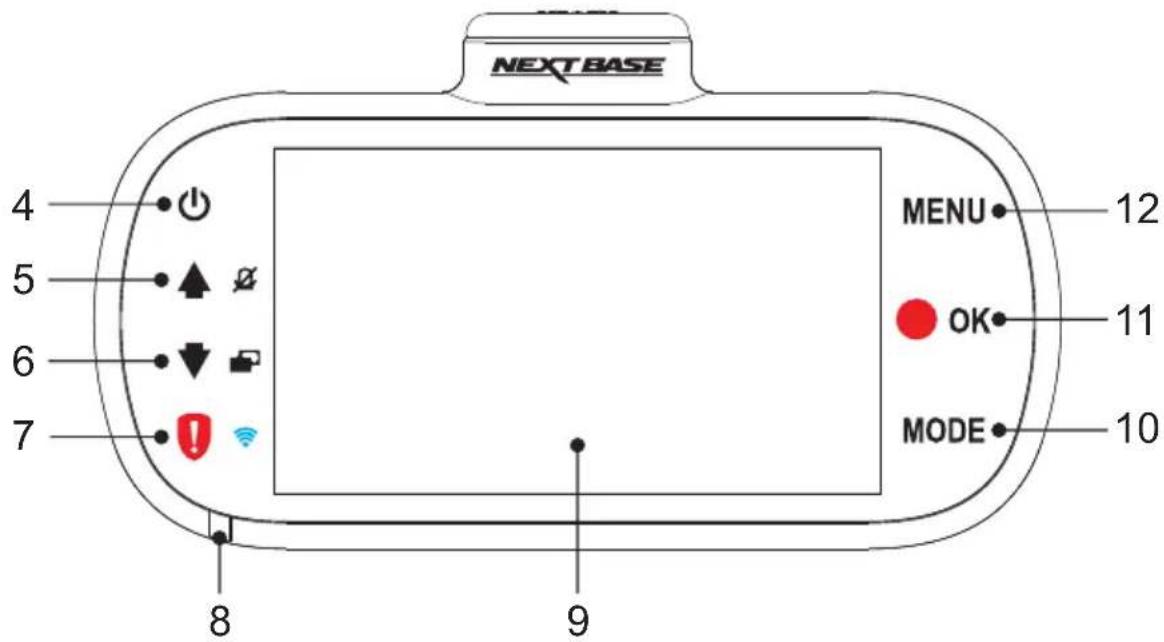
NEXTBASE MENU 12 OK 11 MODE 10 4 5 6 7 8 98. Dual colour LED indicator
Red = power on
Red flashing = recording
Blue = battery charging
9. Screen
3.0' LCD colour screen for the viewing of recorded files on the iN-CAR CAM.
10. Mode
Press to change between video, photo or playback modes.
11. Record / OK
Record:
Press to start or stop a recording when in video mode, or take a photo when in photo mode.
OK:
Press to confirm selection when in menus.
12. Menu
Press to open the menu within current mode, press twice to open the Setup menu.
CAMERA - PARTS & CONTROLS (CONTD.)
Top:
text_image
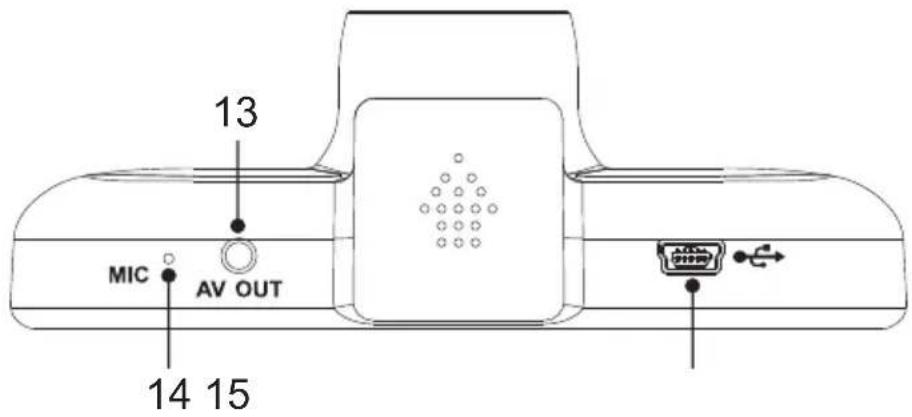
13 MIC AV OUT 14 1513. AV Out socket
Used to connect your iN-CAR CAM to a television using an AV Cable (sold separately).
14. Microphone
Integral microphone for audio recording.
15. DC-IN & USB socket
Connect the supplied car power cable or USB data cable here.
Note:
- Normally the car power cable is connected to the mount when in use, not directly to this socket.
Bottom:
text_image
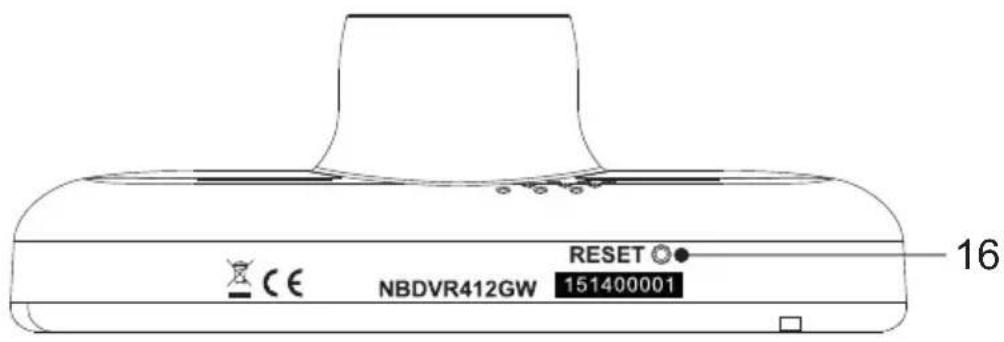
16 NBDVR412GW RESET 151400001 CE16. Reset button
In the unlikely event the iN-CAR CAM becomes unresponsive, press the RESET button to restart the iN-CAR CAM.
CAMERA - PARTS & CONTROLS (CONTD.)
Sides:
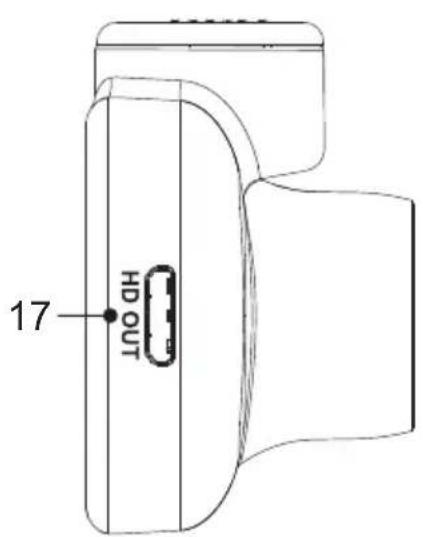
text_image
17 HDOUT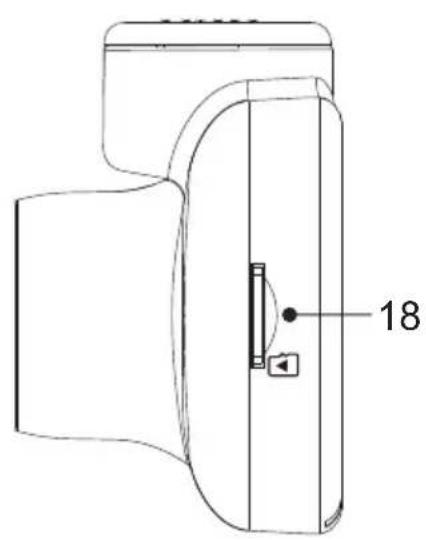
natural_image
Technical line drawing of a door handle with a labeled component (no text or symbols beyond the number 18)17. HD Output
Used to connect your iN-CAR CAM to a television using an HD Cable (sold separately).
18. MicroSD Card slot
Insert the MicroSD card here, taking care that the gold contacts are facing towards the back of the iN-CAR CAM.
IN VEHICLE INSTALLATION
Please follow the instructions below for first-time installation of the iN-CAR CAM. For day to day use simply remove the camera from the mount as required.
1. Insert MicroSD Card
Insert a suitable MicroSD card (Class 10 48/Mbps) in to the iN-CAR CAM, taking care that the gold contacts are facing towards the LCD screen side of the iN-CAR CAM. Push the memory card until it clicks into place.
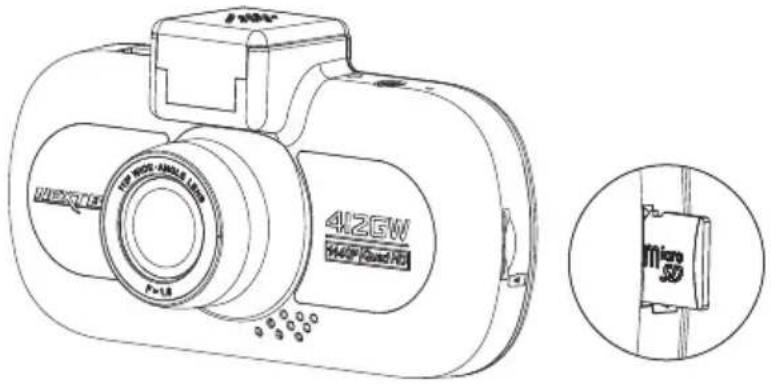
text_image
4125W MicroSDNote:
- Use the edge of a small coin (or similar object) to push the memory card in place if required. Take care that card has 'clicked' into place, a second push inwards will release the memory card.
- Do not remove or insert the memory card when the iN-CAR CAM is turned on. This may damage the memory card.
2. Remove dust cover from iN-CAR CAM
Remove the dust cover that is located on the top of the iN-CAR CAM to gain access to the mounting point.
To remove the dust cover, slide it forwards away from the LCD screen of the iN-CAR CAM.

text_image
412GW D40P Head NB F=1.5Note:
- If the iN-CAR CAM is not to be used for a period of time please replace the dust cover to help keep the metal contacts free of dust or other contaminants.
IN VEHICLE INSTALLATION (CONTD.)
3. Attach the mount to the iN-CAR CAM
Slide the iN-CAR CAM onto the mount. Once attached magnets within the mount will hold the two parts together.
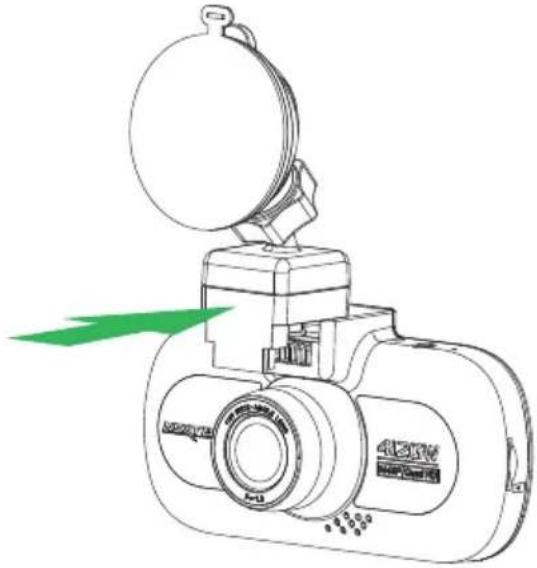
natural_image
Line drawing of a digital camera with a circular lens and green arrow indicating motion (no text or symbols)4. Attach the mount to the windscreen
Remove the protective plastic film from the suction cup of the mount.
Select a suitable position for the mount and clean the windscreen with a dry / clean cloth to achieve a good contact between the glass and suction cup.
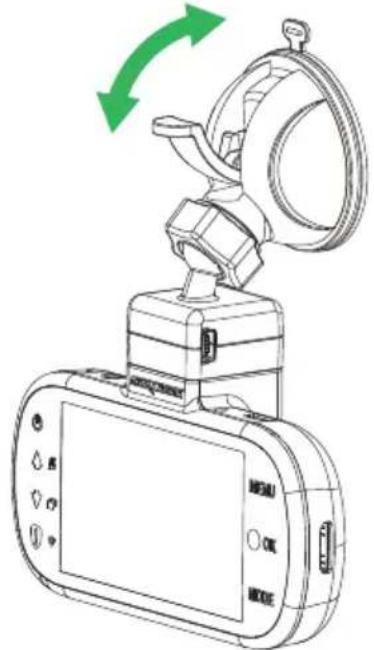
Release the locking lever of the mount by pulling down and then whilst holding the suction cup onto the glass push the lever up to secure the mount to the windscreen.
natural_image
Line drawing of a digital camera with a green directional arrow indicating rotation (no text or symbols)To use the supplied adhesive mount, simply unscrew the locking ring and pull the mount apart. Replace the sucker mount, remembering to tighten the locking ring securely.
Note:
- Choose a smooth glass area without painted effect.
- Please ensure that once mounted the iN-CAR CAM will be located within the area of the vehicles windscreen wipers to maintain a clear view during rainfall.
IN VEHICLE INSTALLATION (CONTD.)
5. Connect car power cable
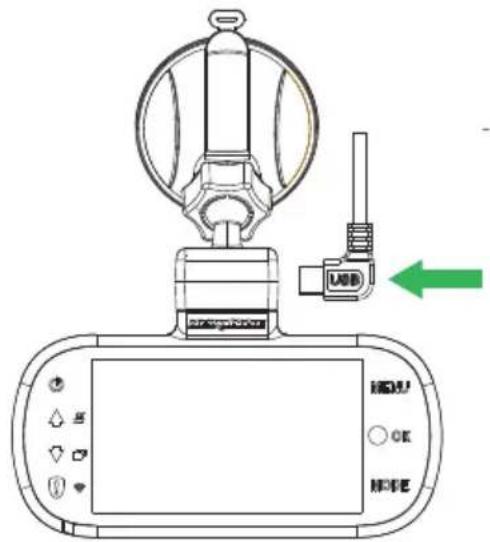
Connect the supplied car power cable to DC-IN socket of the mount.
text_image
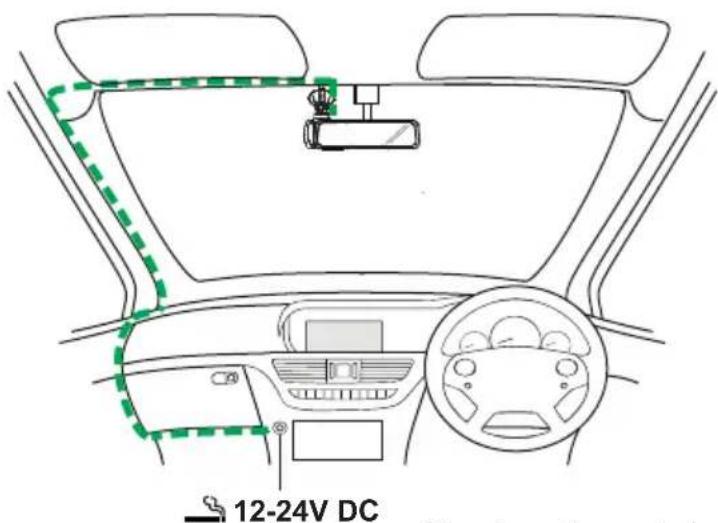
Diagram of a camera with labeled buttons and a green arrow indicating left-side navigationPlug the power cable into the 12-24Vdc outlet of your vehicle.
text_image
12-24V DCThe above diagram is for illustration purposes only.
The iN-CAR CAM will automatically power on and start recording once power is available. In some vehicles this will be when connections are made, for others the iN-CAR CAM will power on once the ignition has been turned on.
Should your vehicle not have a 12-24Vdc outlet, but does have a 5Vdc USB Outlet, this can be used instead. Connect the USB cable supplied with your iN-CAR CAM in place of the car power cable. Ensure you connect the USB cable to the Powered Mount only, NOT directly to the camera when using in-car
Note:
- Do NOT wire the iN-CAR CAM directly to a 12V supply by cutting the cigarette plug off the end of the cable, or damage will result.
- A Nextbase hardwire kit is available from your retailer. This connects directly to the vehicle fusebox and hence leaves your cigarette socket available for Phone / Sat Nav charging. The Nextbase hardwire kit includes the necessary 12-24VDC to 5Vdc convertor and battery protection circuitry.
IN VEHICLE INSTALLATION (CONTD.)
Please read and follow the notes below for the safe operation of your iN-CAR CAM within your vehicle.
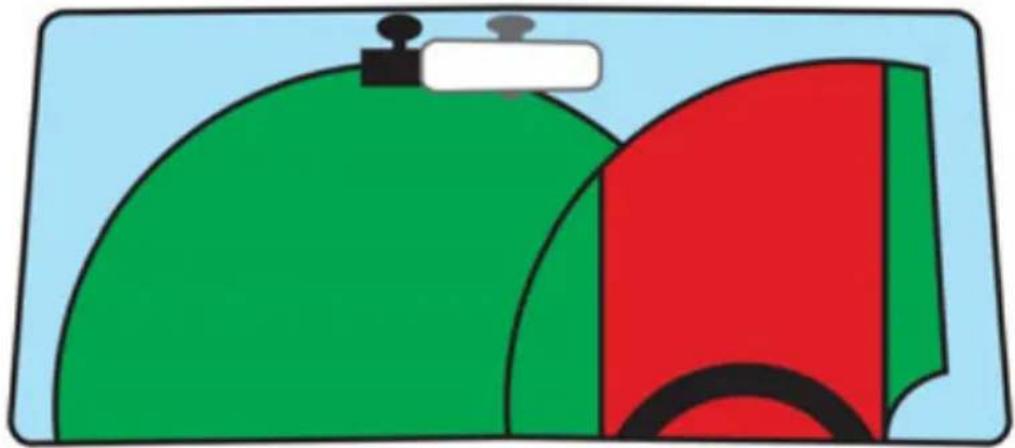
As per the installation instructions, you must install the iN-CAR CAM so it does NOT obstruct the drivers view of the road, preferably on the passenger side of the vehicle and behind the rear view mirror. Whilst the iN-CAR CAM clearly needs to view through the windscreen in an area swept by the windscreen wipers, the iN-CAR CAM should be installed so as not to intrude significantly within the wiped area. A 40mm intrusion into the green wiped area is the maximum permitted by law.
natural_image
Illustration of two colored panels, one green and one red, with a white clip on top (no text or symbols)Do NOT mount the iN-CAR CAM in front of the driver, as depicted by the red area in the above illustration.
When installing the iN-CAR CAM in a vehicle, always place the device securely against the windscreen and where possible conceal the power cable under trim. Make sure that the iN-CAR CAM power cable does not interfere with the drivers operating controls, such as the steering wheel, pedals or gear levers.
Do NOT mount the iN-CAR CAM in front of an airbag field of deployment or in a position to obscure any mirrors.
Clean the windscreen at the point of location, prior to fitting the iN-CAR CAM, also, applying some moisture to the suction cup may be beneficial, to ensure absolute adhesion.
It is recommended NOT to operate the iN-CAR CAM whilst driving. The automatic Start-Stop technology incorporated within the device negates any need to operate the controls whilst driving.
Adjust any settings or review recordings whilst stationery, not whilst driving.
Only use your mobile device whilst stationery, not whilst driving.
After the preliminary SETUP has been carried out upon the iN-CAR CAM, adjust the Screen Saver setting to 1 minute, this will blank the screen automatically shortly after starting the vehicle and therefore the screen will NOT be a distraction in any way to the driver.
VIDEO MODE
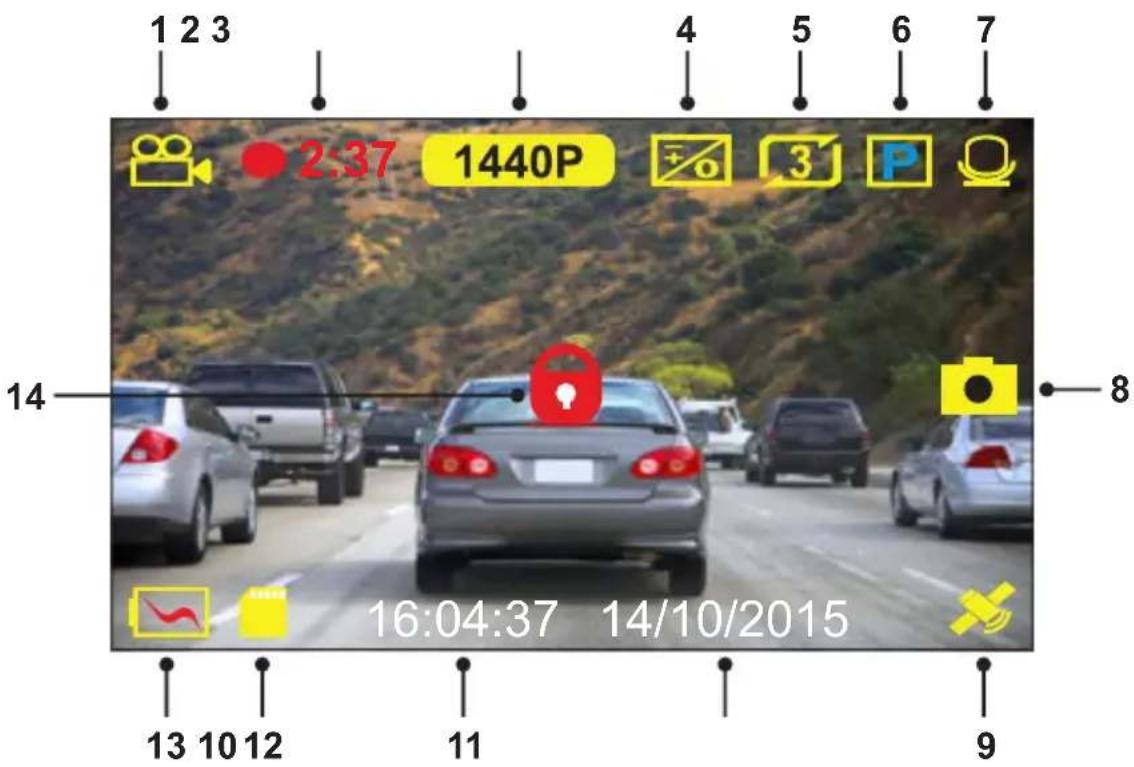
The key below explains the various information displayed on the screen when your iN-CAR CAM is in Video mode, some icons will only be displayed once the relevant function has been selected within the Video menu, as described below.
text_image
1 2 3 2:37 1440P 3 P 14 16:04:37 14/10/2015 8 13 10 12 11 9- Mode: indicates the iN-CAR CAM is in Video mode.
- Recording: appears on screen when recording is in progress.
- Resolution: displays the current resolution.
- Exposure: displays current Exposure level setting.
- Video Length: displays the length of the individual recordings in minutes.
- Parking Mode: appears on screen when Parking Mode has been turned on.
- Microphone: displayed on screen when Audio Recording is active.
- Screen Capture: appears on screen during screen capture.
- GPS: The satellite icon will flash whilst the iN-CAR CAM locates satellites. Once a stable signal is received, the icon will stop flashing and remain on screen.
- Date: current date.
- Time: current time.
- Memory Card: indicates whether a memory card is present.
- Battery: indicates whether iN-CAR CAM is running on battery or external power.
- Protected: shown on screen when a video file has been protected by activation of the G Sensor or by the pressing of the file protect button.
The default settings within the iN-CAR CAM have been set to allow you to use the iN-CAR CAM without the need to change any settings.
See the next page for video menu settings, should you want to make any adjustments however.
VIDEO MODE (CONTD.)
Video Menu
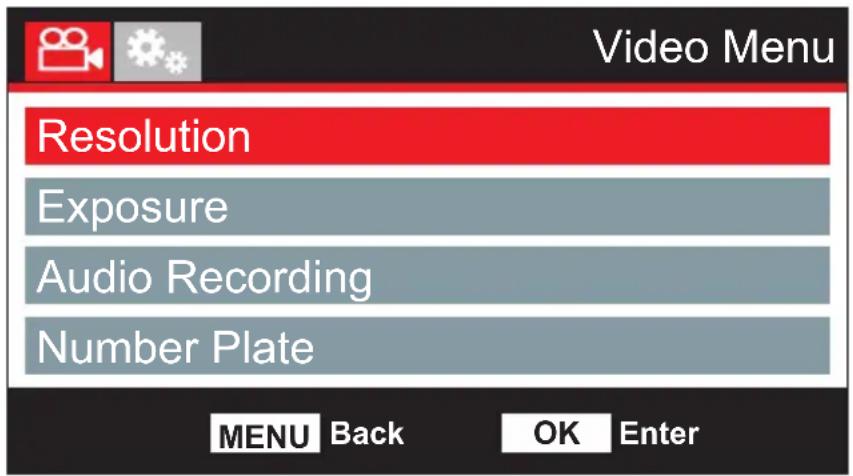
The Video Menu is accessed by pressing the MENU button whilst in video mode.
text_image
Video Menu Resolution Exposure Audio Recording Number Plate MENU Back OK EnterThe default settings have been carefully selected to allow you to use the iN-CAR CAM without the need to change any settings. However, should you wish to change a setting then please see below.
Use the up and down buttons to highlight the function that you'd like to change and press the OK button to enter the settings sub-menu.
Once in the submenu, use the up and down buttons to highlight the required setting and then press OK to confirm your selection and return to the Video Menu.
Press the MENU button twice to return to video mode.
Note:
- Menus are not accessible whilst the iN-CAR CAM is recording.
1. Resolution
Select recording resolution, this will increase or decrease the quality of the recorded video.
Options: 1440P, 1080P 60FPS, 1080P and 720P
Default Setting: 1440P
2. Exposure
Adjust exposure level for different light conditions.
Options: +2, +1, 0, -1 and -2
Default Setting: 0
3. Audio Recording
Turn On / Off the microphone.
Options: On and Off
Default Setting: On
4. Number Plate
Enter the registration number for your vehicle, this will then be shown on the video file.
VIDEO MODE (CONTD.)
Continued from previous page.
text_image
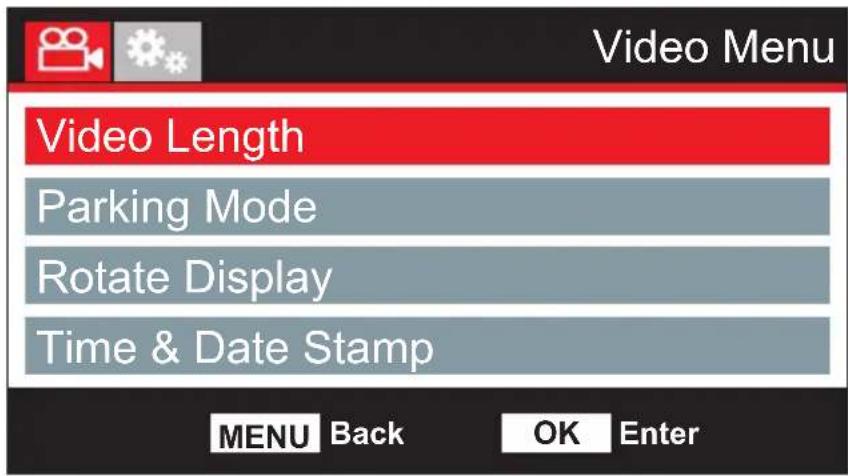
Video Menu Video Length Parking Mode Rotate Display Time & Date Stamp MENU Back OK Enter5. Video Length
Select the duration of the individual recorded video files. The iN-CAR CAM will continue recording, filling the memory card. When the memory card becomes full, the oldest file will be automatically deleted to make space for the new recording.
Note:
- Protected files will never be deleted.
Options: 2 Minutes, 3 Minutes and 5 Minutes Default Setting: 3 Minutes
6. Parking Mode
When Parking Mode has been turned on, the iN-CAR CAM enters standby mode when the 12Vdc supply has been turned OFF (typically removing your ignition key).
The iN-CAR CAM will also enter standby mode if no physical movement is detected for 3 minutes, this is designed to allow use of a permanent 12Vdc supply, i.e hard-wire kit.
Should physical movement of the vehicle be detected, the iN-CAR CAM will power on and start recording a 2 minute protected video. If no further physical movement is detected then the iN-CAR CAM will return to standby mode, if physical movement is detected subsequently, then the camera will continue to record normally, i.e. driving once more.
Options: On and Off
Default Setting: Off
7. Rotate Display
Rotate the display 180^ , particularly useful should the iN-CAR CAM be mounted on the dashboard, the iN-CAR CAM control button functions do not rotate.
8. Time & Date Stamp
Turn On / Off the time and date stamp shown on recorded files.
Options: Off and On
Default Setting: On
VIDEO MODE (CONTD.)
Continued from previous page.
text_image
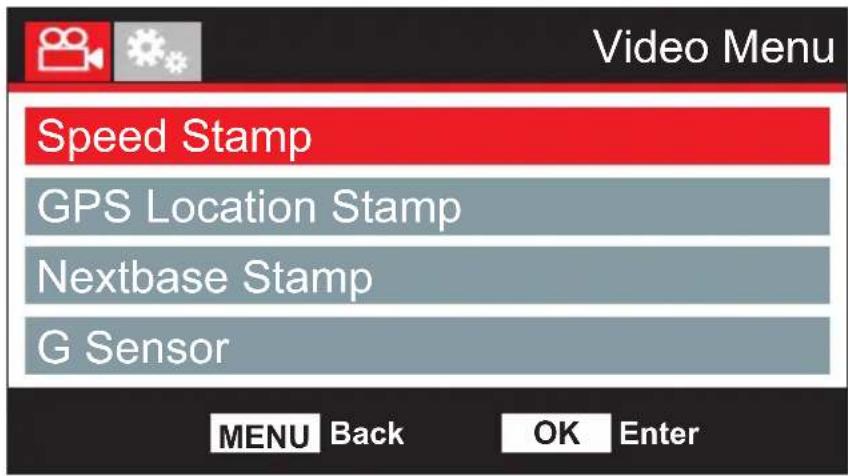
Video Menu Speed Stamp GPS Location Stamp Nextbase Stamp G Sensor MENU Back OK Enter9. Speed Stamp
Turn On / Off the Speed Stamp shown on recorded files.
Options: On and Off
Default Setting: On
10. GPS Location Stamp
Turn On / Off both the GPS co-ordinates and speed stamp that are shown on recorded files. When a recording is viewed using the supplied NEXTBASE Replay playbck software both the GPS co-ordinates and speed information remains available.
Options: On and Off
Default Setting: On
11. Nextbase Stamp
Turn On / Off the NEXTBASE Stamp shown in the top left corner of recorded files.
Options: On and Off
Default Setting: On
12. G Sensor
Turn Off or adjust the sensitivity of the built in G Sensor. The G Sensor detects forces which will automatically protect the current recording in event of a collision.
Note:
- This does not affect Parking mode sensitivity.
Options: High, Medium, Low and Off
Default Setting: Medium
Note:
- Within the Setup Menu which is accessed by pressing the MENU button twice, there is a 'Default Settings' option to allow you to reset the iN-CAR CAM to the factory defaults, if required.
PHOTO MODE
Press the MODE button to select Photo mode.
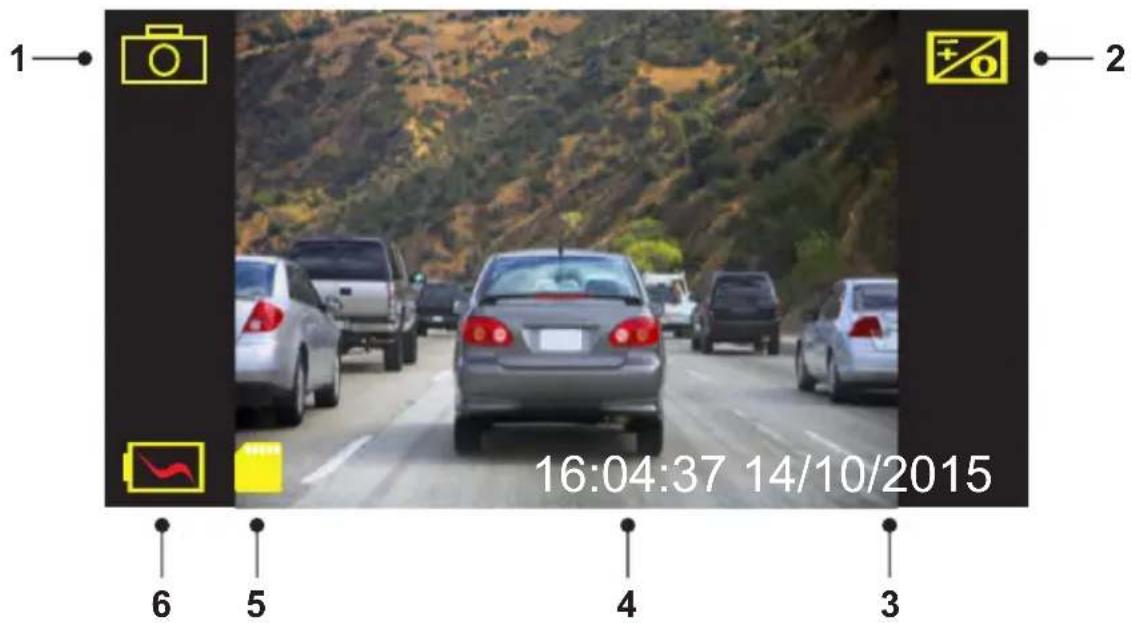
The key below explains the information displayed on the screen when your iN-CAR CAM is in Photo mode.
text_image
1 2 16:04:37 14/10/2015 6 5 4 3- Mode: indicates the iN-CAR CAM is in Photo mode.
- Exposure: displays current exposure level setting.
- Date: current date.
- Time: current time.
- Memory Card: indicates whether a memory card is present.
- Battery: indicates whether iN-CAR CAM is running on battery or external power.
See the next page for photo menu settings.
PHOTO MODE (CONTD.)
Photo Menu
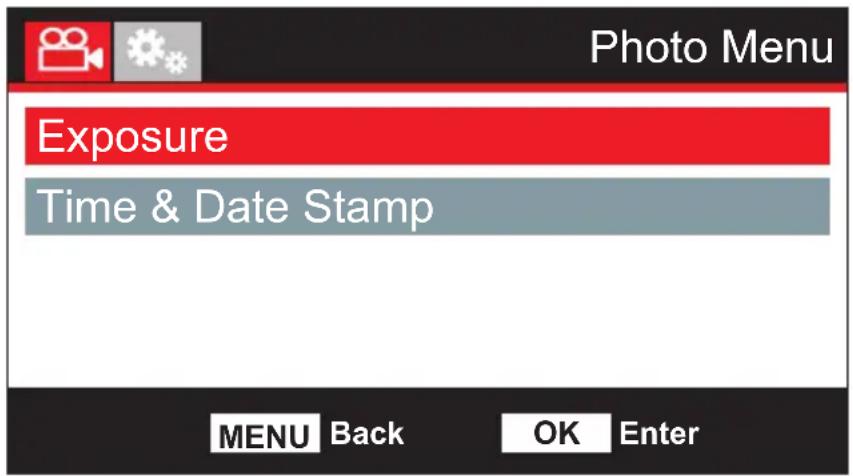
The Photo Menu is accessed by pressing the MENU button whilst in photo mode.
text_image
Photo Menu Exposure Time & Date Stamp MENU Back OK EnterThe default settings have been carefully selected to allow you to use the iN-CAR CAM without the need to change any settings. However, should you wish to change a setting then please see below.
Use the up and down buttons to highlight the function that you'd like to change and press the OK button to enter the settings sub-menu.
Once in the submenu, use the up and down buttons to highlight the required setting and then press OK to confirm your selection and return to the Photo Menu.
Press the MENU button twice to return to photo mode.
1. Exposure
Adjust exposure level for different light conditions.
Options: +2, +1, 0, -1 and -2
Default Setting: 0
2. Time & Date Stamp
Turn On / Off the time and date stamp shown on images.
Options: On and Off
Default Setting: On
Note:
- Within the Setup Menu which is accessed by pressing the MENU button twice, there is a 'Default Settings' option to allow you to reset the iN-CAR CAM to the factory defaults, if required.
PLAYBACK MODE
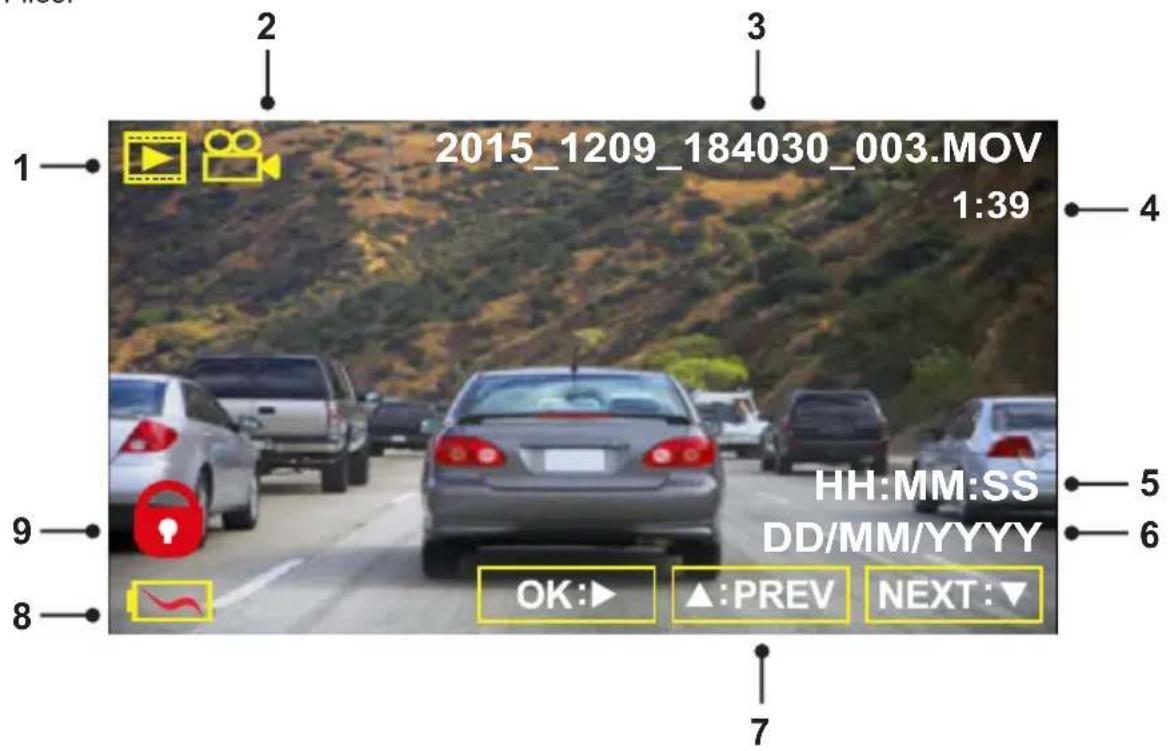
Press the MODE button to select Playback mode, the iN-CAR CAM will display the last recorded file.
Dependent on the type of file, the on-screen information and playback functions differ.
Video Files:
text_image
2015_1209_184030_003.MOV 1:39 HH:MM:SS DD/MM/YYYY OK:▶ ▲:PREV NEXT:- Mode: indicates the iN-CAR CAM is in Playback mode.
- File type: indicates whether a video or photo file is being viewed.
- File number: displays current file number.
- Elapsed time: Displays the elapsed time for the video being watched.
- Time: displays the start time that the current file was recorded.
- Date: displays date that the current file was recorded.
- Playback controls: use the iN-CAR CAM buttons as described below.
- Battery: indicates whether iN-CAR CAM is running on battery or external power.
- Protected file: indicates that the video file is protected.
Playback Controls:
Press the OK button to play / pause playback.
Press the MODE button to stop playback.

Use the UP button to select the previous file, this is only available once playback has been stopped.

During playback press the UP button to rewind, press the DOWN button to cancel.

Use the DOWN button to select the next file, this is only available once playback has been stopped.

During playback press the DOWN button to fast forward, press the UP button to cancel.
PLAYBACK MODE
Photo Files:
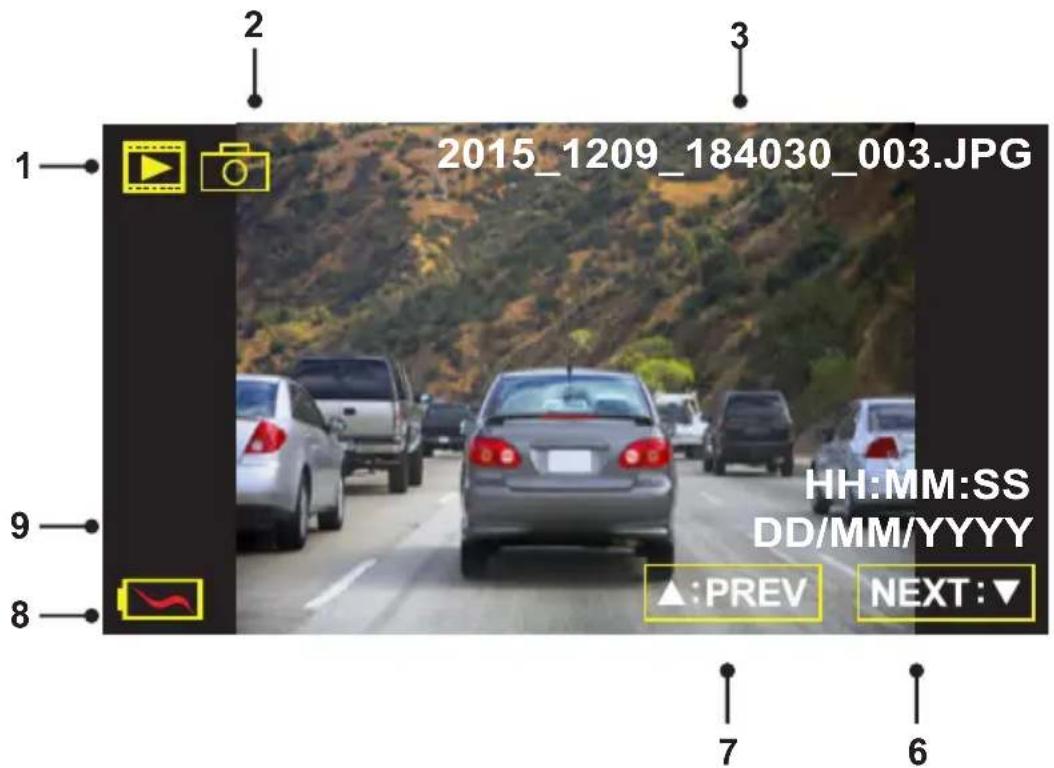
text_image
2015_1209_184030_003.JPG HH:MM:SS DD/MM/YYYY ▲:PREV NEXT:- Mode: indicates the iN-CAR CAM is in Playback mode.
- File type: indicates whether a video or photo file is being viewed.
- File number: displays current file number.
- Time: displays the time that the current image was taken.
- Date: displays the date that the current image was taken.
- Next: press the down button to move to previous file.
- Previous: press the up button to move to previous file.
- Battery: indicates whether iN-CAR CAM is running on battery or external power.
- Protected file: indicates that the video file is protected.
Within Playback mode there are options available to Delete and Protect files, press the MENU button to access the Playback Menu.
See following pages for details.
Highlight the Delete Files option and press the OK button.
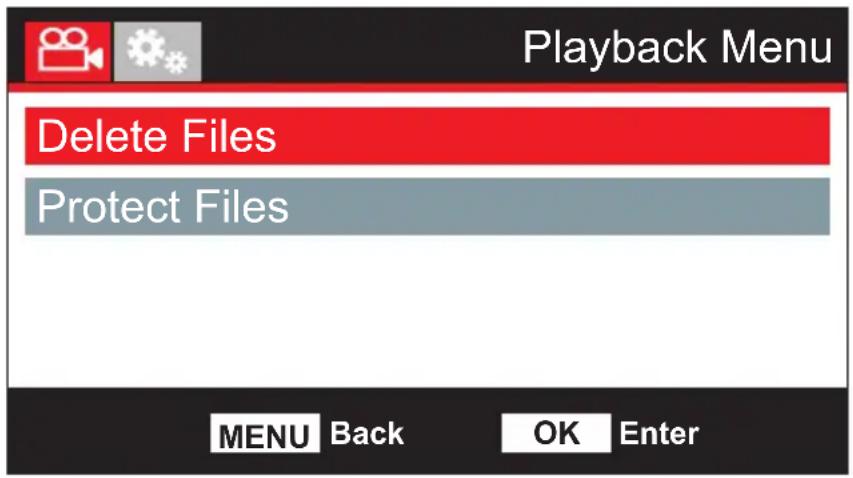
text_image
Playback Menu Delete Files Protect Files MENU Back OK EnterThis will then give you two options:
Delete File
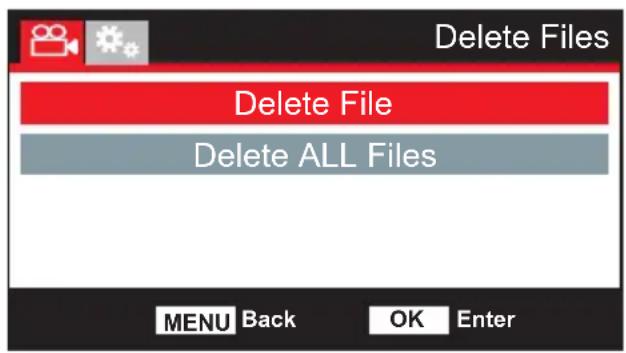
text_image
Delete Files Delete File Delete ALL Files MENU Back OK EnterOnce selected, follow the on screen instructions to delete the current file.
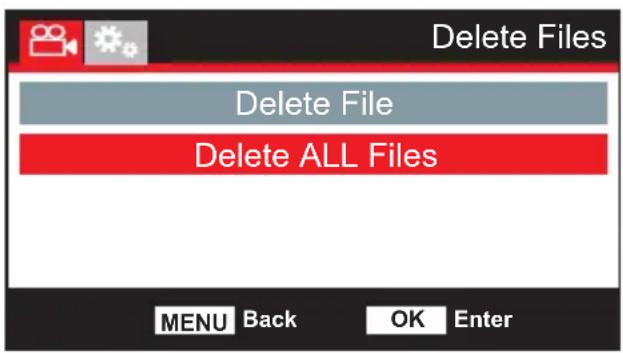
Delete ALL Files
text_image
Delete Files Delete File Delete ALL Files MENU Back OK EnterOnce selected, follow the on screen instructions to delete all files.
Note:
- Protected files cannot be deleted.
This will then give you two options:
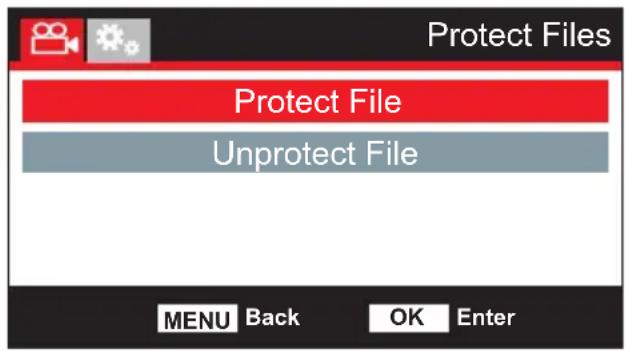
Protect File
text_image
Protect Files Protect File Unprotect File MENU Back OK EnterOnce selected, follow the on screen instructions to Protect the current file
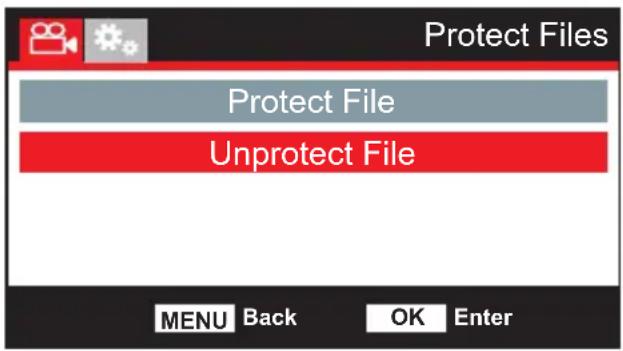
Unprotect File
text_image
Protect Files Protect File Unprotect File MENU Back OK EnterOnce selected, follow the on screen instructions to Unprotect the current file.
Note:
- The 'Protect' button can also be used to Protect files when in Playback Mode.
SETUP MENU
Setup Menu
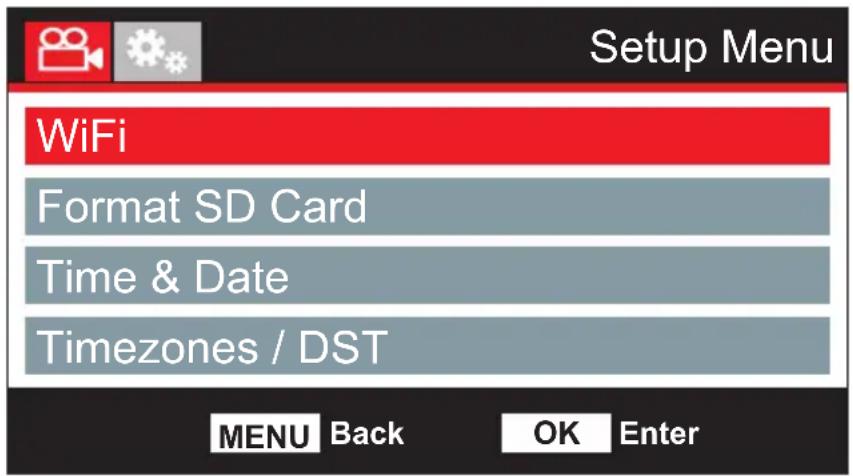
The Setup Menu is accessed by pressing the MENU button twice.
text_image
Setup Menu WiFi Format SD Card Time & Date Timezones / DST MENU Back OK EnterThe default settings have been carefully selected to allow you to use the iN-CAR CAM without the need to change any settings. However, should you wish to change a setting then please see below.
Use the up and down buttons to highlight the function that you'd like to change and press the OK button to enter the settings sub-menu.
Once in the submenu, use the up and down buttons to highlight the required setting and then press OK to confirm your selection and return to the Photo Menu.
Press the MENU button twice to return to video mode.
1. WiFi
The Wi-Fi function allows you to use your smartphone or tablet device to view recordings directly from the dash cam.
See pages 33 to 48 for full guide on using the WiFi function.
2. Format SD Card
Format the inserted memory card, this will delete all content.
Note:
- For stable performance, it is recommended that you format the memory card every 2-3 weeks.
Of course, you should only do this AFTER you've downloaded any files from the card that you may want to keep.
3. Time & Date
Adjust the time / date as required using the OK button to toggle through the fields and use the up & down buttons to set variables. Press MENU to exit and return to the Setup Menu.
4. Time Zones / DST
The time and date is automatically set from the satellite signal, but can be adjusted dependent upon your Time Zone (country) or whether Daylight Savings Time (DST) is operational.
SETUP MENU (CONTD.)
Continued from previous page.
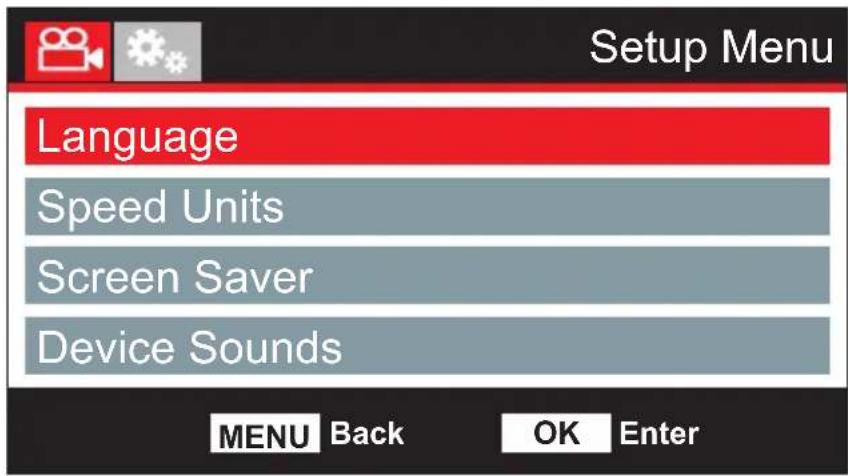
text_image
Setup Menu Language Speed Units Screen Saver Device Sounds MENU Back OK Enter5. Language
Select preferred language.
Options: English, Danish, Dutch, Finnish, French, German, Italian, Norwegian Spanish and Swedish
Default Setting: English
6. Speed Units
Select whether to record and display speed in KMH or MPH.
Options: KMH and MPH
Default Setting: MPH
7. Screen Saver
Turn on the Screen Saver function to shut down the screen after a chosen period of inactivity, press any button to re-activate the display.
Options: Off, 10 Seconds, 30 Seconds and 2 Minutes
Default Setting: Off
8. Device Sounds
Turn Off / On the beep sound which is heard when a button is pressed and also mute the startup and shutdown chimes.
Options: On and Off
Default Setting: On
SETUP MENU (CONTD.)
Continued from previous page.
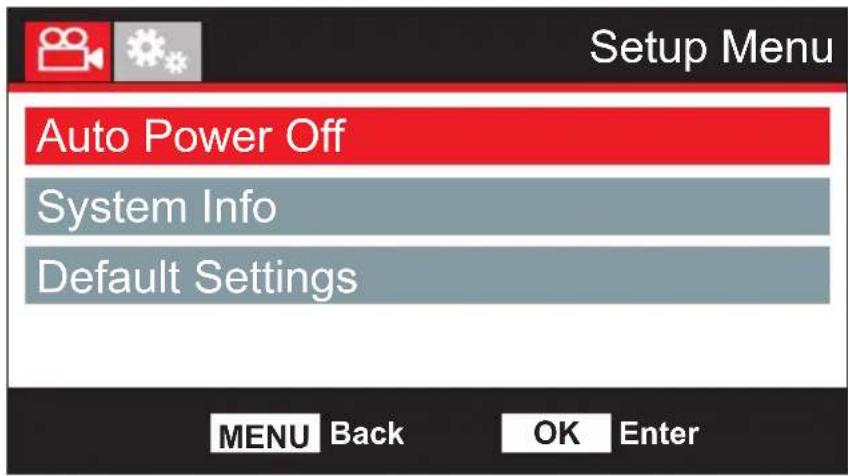
text_image
Setup Menu Auto Power Off System Info Default Settings MENU Back OK Enter9. Auto Power Off
Adjust the timing of the Auto Power Off function, this can be used to continue recording in event of loss of power within the vehicle.
Options: 10 Seconds, 1 Minute and 2 Minutes
Default Setting: 10 Seconds
10. System Info
Version:
The installed software version of your iN-CAR CAM is displayed here.
WiFi Info:
View the SSID (network name) and Password of your iN-CAR CAM.
11. Default Settings
Reset the iN-CAR CAM to the default settings.
PC CONNECTION
Use the supplied USB cable to connect the iN-CAR CAM directly to your PC via the -IN socket, do NOT connect the USB cable to the Powered Mount.
Once connected the iN-CAR CAM will turn on with two options available, as described below.
- Mass Storage
- Power On
Use the UP and DOWN buttons to select required function and press OK to confirm selection.
Mass Storage (Windows)
When this option is selected, the iN-CAR CAM will function as a card reader for your PC. An extra drive will appear, e.g. Removable Disk (D:) and you will be able to view / manage the stored files upon the MicroSD card within the iN-CAR CAM.
Note:
- The iN-CAR CAM is a ‘read-only’ device, therefore uploading files to the SD card when in Mass Storage mode is not possible.
Turn off the camera before disconnecting from your computer.
Mass Storage (Mac)
When this option is selected, the iN-CAR CAM will function as a card reader for your MAC. The iN-CAR CAM will be seen as an external disk upon your MAC and you will be able to view and/or manage stored files.
Note:
- The iN-CAR CAM is a ‘read-only’ device, therefore uploading files to the SD card when in Mass Storage mode is not possible.
Turn off the camera before disconnecting from your computer.
Power On (Windows & Mac)
When this option is selected, the iN-CAR CAM will power on with all functions available. This includes charging of the internal battery, a full charge will take approximately 2 hours.
Note:
- ALWAYS turn Off the iN-CAR CAM before disconnecting from your computer.
The iN-CAR CAM has two methods for video and audio output:
High Definition Output
When you connect a compatible High Definition cable (sold separately) between the iN-CAR CAM and your television, the iN-CAR CAM screen will blank. This is normal, as all output is now visible upon your television.
All functions of the iN-CAR CAM are available whilst using the High Definition output.
Standard Definition Output
When you connect a compatible Audio/Video cable (sold separately) between the iN-CAR CAM and your television, the iN-CAR CAM screen will blank. This is normal, as all output is now visible upon your television.
All functions of the iN-CAR CAM are available whilst using the Standard Definition output.
Please contact your local NEXTBASE dealer for accessory purchases.
Note:
- An external power supply may be required when viewing recordings via the AV or HD output of the iN-CAR CAM, e.g. using the supplied USB cable with a 5Vdc/USB adaptor, of the type typically supplied with mobile phones.
- ENSURE that any external power sources are of the correct 5Vdc output, otherwise damage will be caused that is not covered under the manufacturers warranty.
TROUBLE SHOOTING
| PROBLEM SOLUTION | |
| Video Image is blurred. | Remove the protective lens cover, clean the lens, clean the windscreen! |
| I cannot insert the Micro SD card. | Micro SD card are very small and require delicate use. Align the card with the diagram shown upon the iN-CAR CAM and insert the card until you feel a slight spring resistance. You now need to push the card, using your finger nail, until you hear and feel a small latch. Release pressure and the card will stay retained within the device. Use the edge of a small coin if you have difficulty. |
| I cannot remove the Micro SD card. | With the card previously installed, you now need to push the card further inwards slightly, using your finger nail, until you hear and feel a small latch. Use the edge of a small coin if you have difficulty. Release pressure and the card will spring out sufficiently for you to take hold of it. |
| Video files cannot be played. | The video files from the iN CAR CAM are in .MOV format and may not be compatible with your PC if suitable playback software is not installed. |
| Video file playback is jumpy. | Remove the SD card and reformat to remove non-contiguous files. For best recording use a branded class 10 type (48MB/s) or UHS type 1 micro SD card of 8 to 32GB recommended size. PC may not be sufficient for the playback task, try a different PC. Copy the recorded video files onto the PC / Mac for playback directly rather than use the iN-CAR CAM as a card reader, as the USB system on your PC may be too slow for HD video playback.. |
| The sound is not synchronised with video during playback. | The Codecs upon your PC may not be compatible or the latest standard. Download the latest Codecs from: www.nextbase.co.uk |
| Video has no sound. | Ensure that “Record Audio” setting is turned ON within the Video Menu. |
| Photograph is blurred. | Hold the camera still whilst taking the photo. Please be aware the photo is taken around 1 second after the shutter noise is heard. |
| I can only record a few minutes of video on my Micro SD card. | Change the recording size (Video Length function) to a smaller size. Increase the size of the MicroSD card. Max 32GB. |
| Mass Storage or PC Camera function does not work. | The Mass storage function will work on both Windows and Mac. Restart the PC, as this may be required for the necessary driver to be loaded correctly. Disconnect and reconnect the In-CAR CAM. Contact NEXTBASE for the required driver. |
| I cannot save files to the memory card when the iN-CAR CAM is connected to my computer under Mass Storage mode. | Correct, the iN-CAR CAM is a ‘read-only’ device. It is not recommenced to save files from other sources to the same memory that you will use for recording within the iN-CAR CAM, as these may have a negative effect on the performance of the iN-CAR CAM. |
| The sucker will not stay in place upon my windscreen. | Ensure that the protective cover (plastic film) has been removed from the suction pad. Moisten the sucker slightly before affixing upon the windscreen. Ensure that the locking lever is fully closed. Make sure that the glass is smooth and clean. Do not stick to glass that has any non-smooth effect or paint whatsoever. Affix to the glass firmly and then close the locking lever fully. |
TROUBLE SHOOTING (CONTD.)
| PROBLEM SOLUTION | |
| My iN-CAR CAM shuts down by itself after a while. | Either the battery has gone flat, or there is no power to the iN-CAR CAM and the Auto Power Off period has been triggered. |
| No power to my iN-CAR CAM, but it works upon my PC. | The cigarette power cable is not working. Inspect the fuse in the Car Power plug. Replacement fuse = 2A 32mm type. If the fuse is found to be blown, inspect the power cable for damage which may have caused the fuse blow. |
| The SD card in my iN-CAR CAM cannot be read. | Use a good quality branded SD card between 8GB and 32GB (Class 10 or UHS type 1) and format the card from within the Setup menu. |
| I can't delete files on my SD card within the iN-CAR CAM. | Check to see if these files are 'protected', if so please follow instructions to 'un-protect'. |
| The screen blanks after a few minutes upon my iN-CAR CAM. | The screen saver is set to ON. Change settings to OFF if required. Default setting is off. |
| I get the message "Cluster size wrong. Please format SD card" on screen. | The SD card has been formatted in another device and the Cluster Size is not compatible. Use the Setup option to re-format the SD card from within the iN-CAR CAM. |
| The battery will not charge. | Ensure the iN-CAR CAM is connected to a reliable power source and that the supplied Car Power Cable is being used, with the Green LED lit. |
| The battery only last 30 seconds. | The battery will only receive charge when the iN-CAR CAM is connected to power, please reconnect the car adaptor and leave the iN-CAR CAM turned on. Charging takes approximately 90 minutes and a full charge is indicated when the BLUE (charging) LED goes out. |
| The battery only lasts 6 minutes. | This is normal, the battery design allows the 'Auto Power Off' feature to function in event of power loss within the vehicle. It is not intended as an alternative power source to replace the supplied car adaptor. |
| I get the message "Card Error" on screen. | The SD card has become unusable by the iN-CAR CAM. Remove useful files using your PC and then perform a "FORMAT" upon the SD card from within iN-CAR CAM the Setup Menu. |
| I get the message "Card Full" on screen. | The SD card has become full as there may be too many protected files which will not be deleted to allow for further recording to take place. Delete unnecessary files or perform a full FORMAT upon the SD card from within the iN-CAR CAM Setup Menu. |
| The AV Out from my iN-CAR CAM just buzzes on my TV. | Ensure that the AV cable is correct. Use a stereo 2.5mm jack plug where the tip is the video and the ring is the audio signal. Please visit: nextbaseshop.co.uk to purchase the correct AV Cable (PN: NBDVR212-AVC). |
| I have turned on 'Parking Mode' and now can't stop the recording. | The iN-CAR CAM will start a recording whenever motion is detected. To turn off Parking Mode firstly shutdown the iN-CAR CAM and remove the SD card, this will avoid recording being activated accidentally. Switch the iN-CAR CAM On and within the Setup Menu, turn off the 'Parking Mode'. |
TROUBLE SHOOTING (CONTD.)
| PROBLEM SOLUTION | |
| When I press the MENU button nothing happens. | This is normal during recording. Stop the recording before pressing the MENU button. If recording re-starts before you can press MENU, then see the Parking Mode section above. |
| Downloading files from www.nextbase.co.uk using Google Chrome results in a Malicious Software message. | This is not a cause for concern, simply go to the settings within Google Chrome and turn off the malicious software protection temporarily to download and install the playback software. Reinstate previous Google Chrome settings thereafter. |
| The iN-CAR CAM can not lock onto satellite. | After power on and with the device mounted with clear view of the sky it can take up to 10 minutes to find the three satellites required to achieve a stable signal. Reception can also be affected by atmospheric conditions and the proximity of buildings / trees obscuring the sky. |
| The date & time on my iN-CAR CAM do not adjust for Daylight Savings time (Summer time). | Correct. Adjust the Daylight Savings Time (Summer Time) option manually from with the SETUP. Go to Time Zone / DST and select GMT +1.00 for British Summer Time, as an example. |
| After I manually set the Time correctly upon my iN-CAR CAM, it adjusts itself by one hour to the wrong time shortly afterwards. | The iN-CAR CAM is obtaining the correct date and Time from the Satellite and this is always Greenwich Mean Time (GMT). If you are in a country which uses a different time zone, or need to set for Daylight Savings Time (Summer Time), adjust the option manually from with the SETUP. Go to Time Zone / DST and select GMT +1.00 for British Summer Time, as an example. |
| My Mobile Device will not connect to my camera. | Please ensure that you have turned the iN-CAR CAM WiFi Mode on by either using the WiFi button or through the Settings Menu. When WiFi Mode is turned on the screen of the iN-CAR CAM will display the Network Name and Password. This password is case sensitive. |
| The NEXTBASE Cam Viewer app will not open. | Please uninstall the NEXTBASE Cam Viewer app and re-download again from your devices App Store. |
| When I open the NEXTBASE Cam Viewer App I get a message saying 'Please Check Device'. | Ensure that the in-CAR CAM is in WiFi Mode and that your mobile device has connected to the iN-CAR CAM WiFi connection. |
| When I try to play back a file from my iN-CAR CAM I get a message saying 'Buffering' but the video does not load. | Please restart your mobile device and reconnect to the iN-CAR CAM WiFi connection. Then re-open the Cam Viewer App. |
| Unresolved issues. | Reset the iN-CAR CAM to the default settings within the Setup Menu and try again. Should the problem persist call the helpline (02920) 866429 or email: support@nextbase.co.uk |
NOTES
NEXT BASE
www.nextbase.co.uk