
PL490 - Screen BENQ - Free user manual and instructions
Find the device manual for free PL490 BENQ in PDF.


User questions about PL490 BENQ
0 question about this device. Answer the ones you know or ask your own.
Ask a new question about this device
Download the instructions for your Screen in PDF format for free! Find your manual PL490 - BENQ and take your electronic device back in hand. On this page are published all the documents necessary for the use of your device. PL490 by BENQ.
USER MANUAL PL490 BENQ
natural_image
Abstract grayscale pattern with concentric dotted lines forming a wave-like structure (no text or symbols)Copyright
Copyright 2020 by BenQ Corporation. All rights reserved. No part of this publication may be reproduced, transmitted, transcribed, stored in a retrieval system or translated into any language or computer language, in any form or by any means, electronic, mechanical, magnetic, optical, chemical, manual or otherwise, without the prior written permission of BenQ Corporation.
All other logos, products, or company names mentioned in this manual may be the registered trademarks or copyrights of their respective companies, and are used for informational purposes only.
Disclaimer
BenQ Corporation makes no representations or warranties, either expressed or implied, with respect to the contents hereof and specifically disclaims any warranties, merchantability or fitness for any particular purpose. Further, BenQ Corporation reserves the right to revise this publication and to make changes from time to time in the contents hereof without obligation of BenQ Corporation to notify any person of such revision or changes.
This user manual aims to provide the most updated and accurate information to customers, and thus all contents may be modified from time to time without prior notice. Please visit http://business-display.benq.com/ for the latest version of this manual.
Table of contents
BenQ X-Sign 5
Basic 5
Account 5
Registering an account for X-Sign Manager (Admin) 5
Accessing your account ....7
Setting the permission for users 8
Authorizing other users as admins 10
License 12
Purchasing the license from X-Sign Manager 12
Importing the license(s) to X-Sign Manager 14
Checking the License upgrade notice ....17
Manager 18
Pairing the device with X-Sign Manager 18
Creating the channel 22
Scheduling the content by channel 24
Scheduling the content by device 26
Editing the device management structure 27
Pushing Real-Time Message to your BenQ Smart Signage remotely 30
Controlling the device remotely 32
Updating device Player remotely ....33
Managing the calling system 34
Creating an API table in X-Sign Manager 38
Setting Verification ....41
Getting the system notification ....45
Updating device status immediately 48
Player report (proof-of-play) 50
Using Designer Express 50
Designer 53
Creating a new project file in X-Sign Designer 53
Uploading your content from Designer 55
Creating content in X-Sign Designer 58
Creating content from Designed Templates 62
Creating a clock widget in X-Sign Designer 65
Setting a weather widget 67
Creating an Image or Video slideshow 69
Rotating an image or video 71
Generating a QR Code 73
Adding a data connection ....74
Setting a timer widget ....76
Creating an API template using the demo kit ....79
Creating a TV Input source widget in X-Sign Designer 83
Setting background music in X-Sign Designer 83
Changing the playing order of pages 86
Encrypting a project in X-Sign Designer 87
Opening an X-Sign I.x project file 89
Changing your language in X-Sign Designer 90
Player 92
Switching the mode of Player 92
Playing files with USB 93
USB autoplay 97
Activating an Interactive function in Standalone mode 98
Playing encrypted projects on X-Sign Player 101
Changing Picture Settings in X-Sign Player (SL4302K/L5502K/SL6502K/SL7502K/SL8502K) 103
Local Delivery.... 105
Playing content with Local Delivery 105
Searching for devices in Local Delivery Mode 110
Setting a schedule for Local Delivery Mode .... III
Report...... 116
Getting the activity report of X-Sign Manager 116
Downloading player content report 116
Video Wall.... 118
Setting up the environment for video wall 118
Creating the Video Wall content from X-Sign Designer 120
Fine-tuning the Video Wall from X-Sign Designer 122
Premium 124
Interactive 124
Creating interactive content with Interactive template 124
Creating interactive content from designed templates with Area Link 130
Viewing the structure of an Interactive Template 133
Enabling Interactive Statistics 140
Viewing an Interactive Report 142
Setting the device group control 143
API 146
Creating an API template using the designed template 146
GPL/LGPL Software Licenses Used by X-Sign 147
BenQ X-Sign
Created to help users of BenQ interactive flat panels and digital signages to better utilize their equipment, BenQ X-Sign includes BenQ X-Sign Designer for content creation and standalone mode schedule setting. BenQ X-Sign also includes BenQ X-Sign Manager and BenQ X-Sign Player for cloud-based content management and distribution, to show X-Sign Player in single or group displays.
Basic
Account
Registering an account for X-Sign Manager (Admin)
Watch demonstration video:
With BenQ IAM (Identify and Access Management), you can manage all of your BenQ services (including X-Sign Manager) in one account. Follow the steps below to register an account and connect to X-Sign Manager.
I. Go to BenQ Service website https://service-portal.benq.com/login. Suggested browsers are Chrome, Firefox.
2. If you are an administrator, click Register(Admins only) to register an Administrator account for the company.
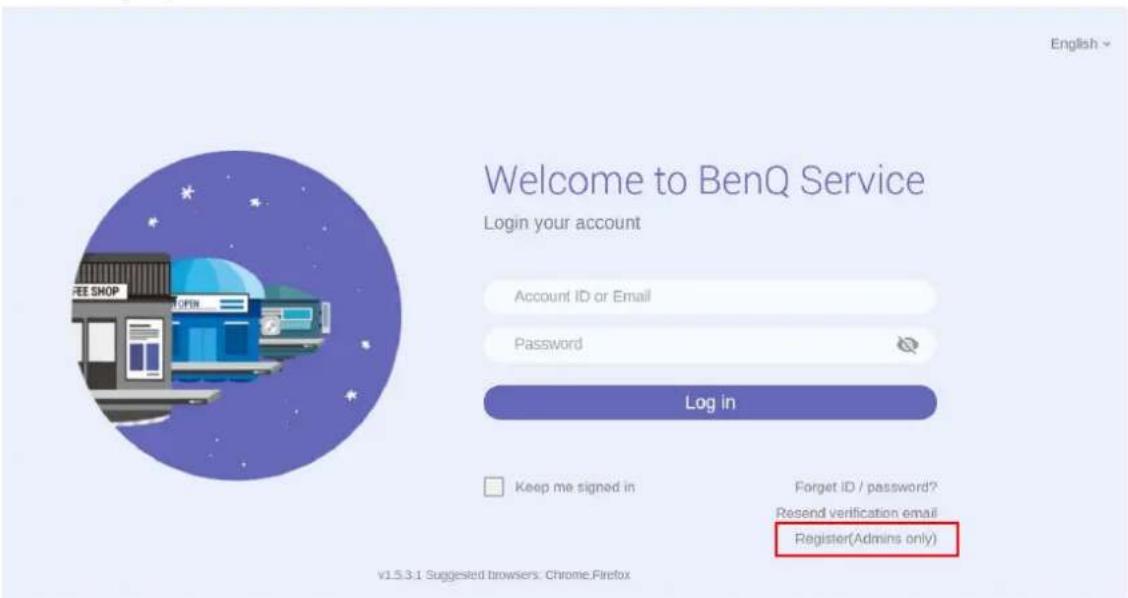
text_image
Welcome to BenQ Service Login your account Account ID or Email Password Log in Keep me signed in Forget ID / password? Resend verification email Register(Admins only) v1.5.3.1 Suggested browsers: Chrome.FirefoxNote: If you are a regular user, ask your company's administrator to create a user account for you. After you receive the account, click Log in directly after verifying your email.
Message
×
The email has not been verified. We'll send the email from "BenQ", so you can quickly search for it. If it isn't in your inbox, check your folders. If a spam filter or email rule moved the email, it might be in the Spam, Junk, Trash, Deleted Items, or Archive folder.
Close
- After you click Register(Admins only), you will see the following message. Go to Click here to proceed.
Message
×
To create an administrator account, click here.
To create a user account, contact your administrator.
Exit
- Fill in the following fields and click Submit to create a new Administrator account.
Sign up
×
Use email as account ID
*Account ID
REMIND: Please do NOT using your personal data to fill the account name. It may increase the risk to reveal you privacy.
*Password
Submit
Cancel
Note:
- For the account ID, enter a value between 4 and 20 characters long. Only numbers (0-9), upper and lowercase alphabets (A-Z, a-z), and the following special characters (-)(.)(_) are allowed in the account ID and name.
- The password must be a combination of alphanumeric and must be between 6-12 characters. Passwords like “2945678” (all numbers), “eduabsc” (all alphabets), “12ab” (less than 6 characters), and “12abcd345678efg” (more than 12 characters) are unacceptable.
- Uppercase and lowercase letters don't need to be typed the same way every time you key in the password.
Accessing your account
Two ways are provided to access your account:
I. Go to BenQ Service website https://service-portal.benq.com/login. Log in and choose X-Sign.
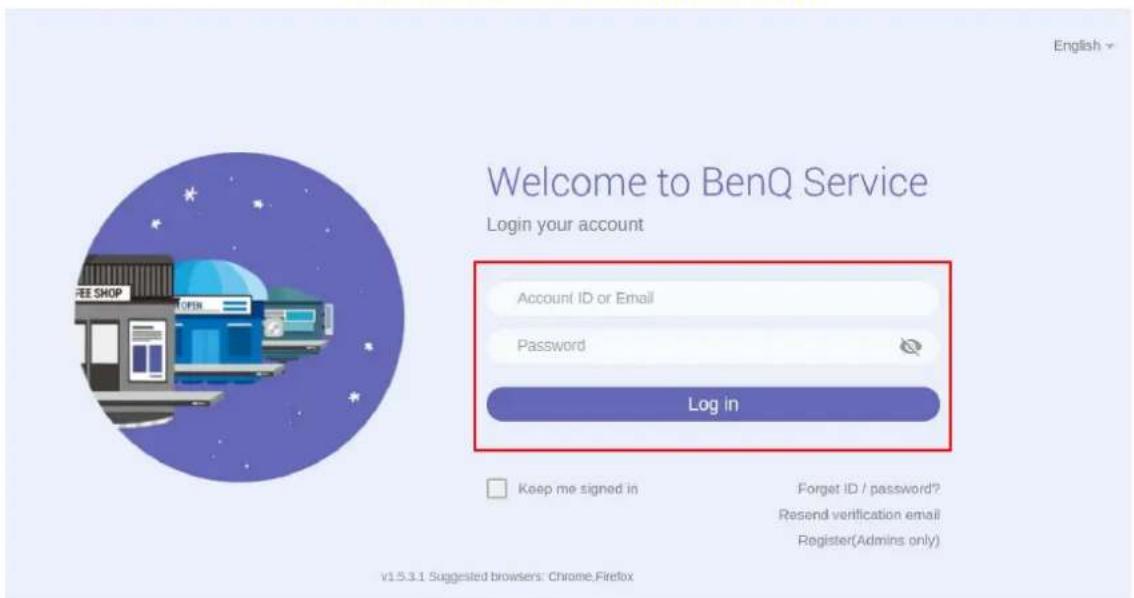
text_image
Welcome to BenQ Service Login your account Account ID or Email Password Log in Keep me signed in Forget ID / password? Resend verification email Register(Admins only) v1.5.3.1 Suggested browsers: Chrome.Firefox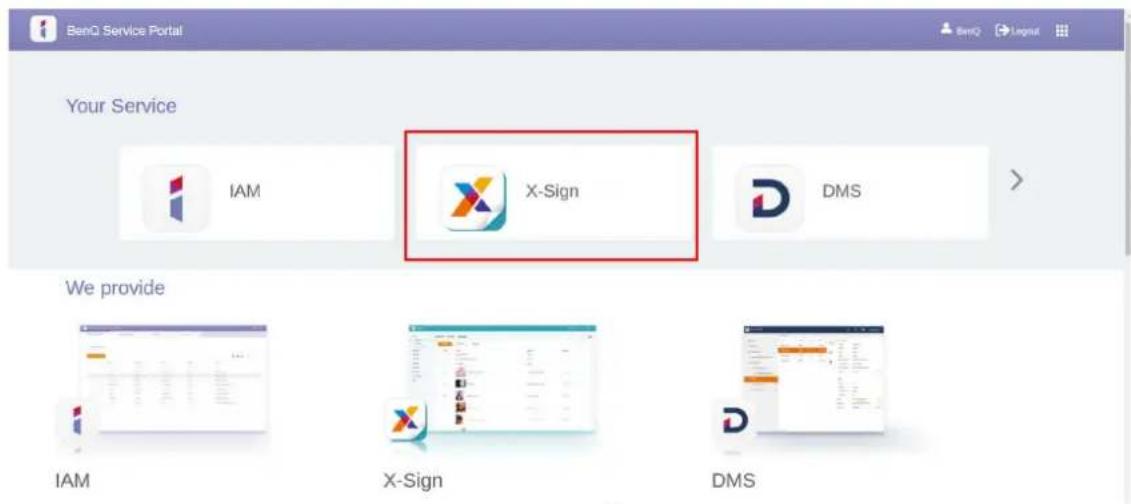
text_image
BenQ Service Portal Your Service IAM X-Sign DMS We provide IAM X-Sign DMS- Go to BenQ display website https://x-sign.benq.com/. Click Login to go to the X-Sign Manager page.
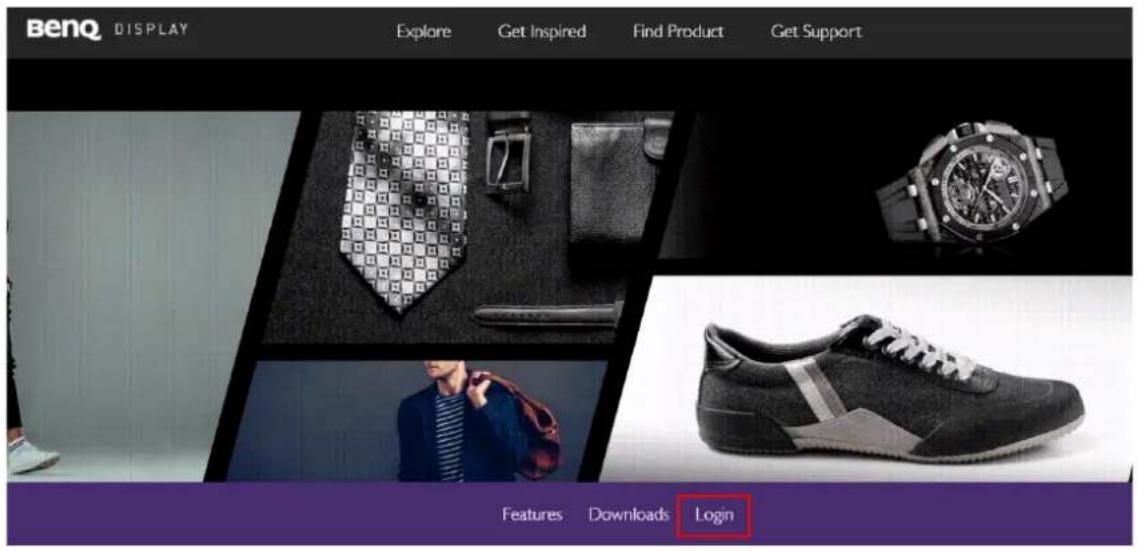
text_image
BenQ DISPLAY Explore Get Inspired Find Product Get Support Features Downloads Login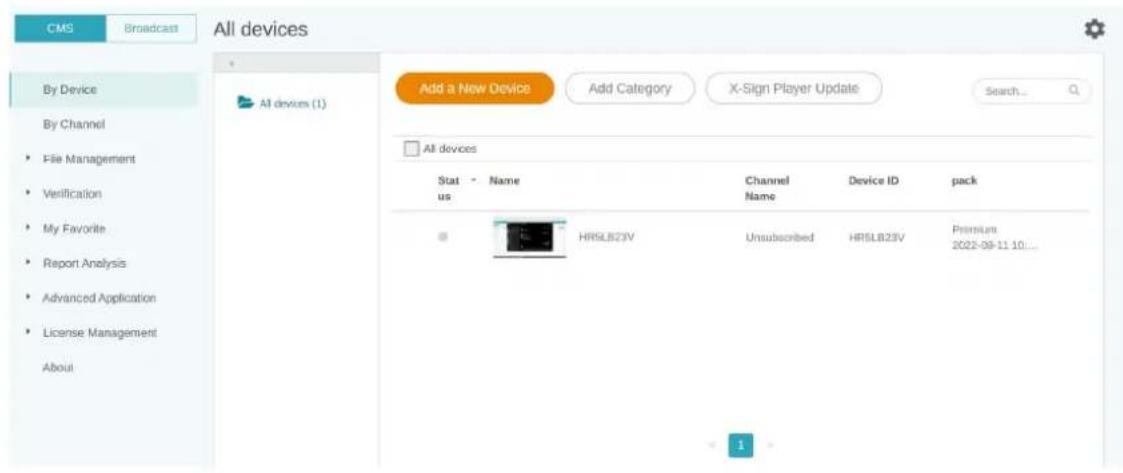
text_image
CMS Broadcast All devices By Device By Channel File Management Verification My Favorite Report Analysis Advanced Application License Management About Add a New Device Add Category X-Sign Player Update Search... All devices Status Name Channel Device ID pack us Name Name HRSLB23V Unsubscribed HRSLB23V Premium 2022-09-11 10...Setting the permission for users
I. To set the permission for users, log in and choose IAM.
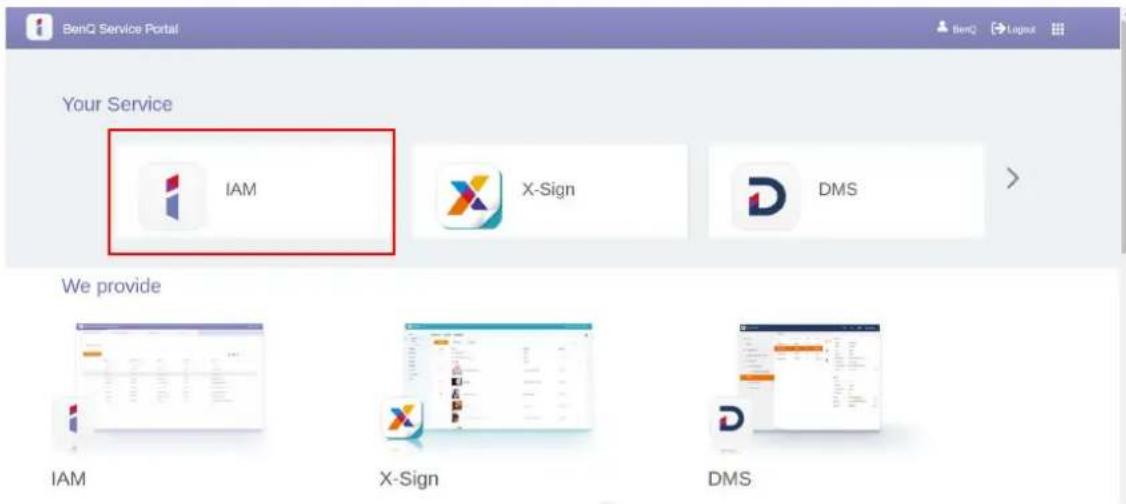
text_image
BenQ Service Portal Your Service IAM X-Sign DMS We provide IAM X-Sign DMS- Select Role Management > X-Sign, then choose the account you want to set the permission to. Click to continue.
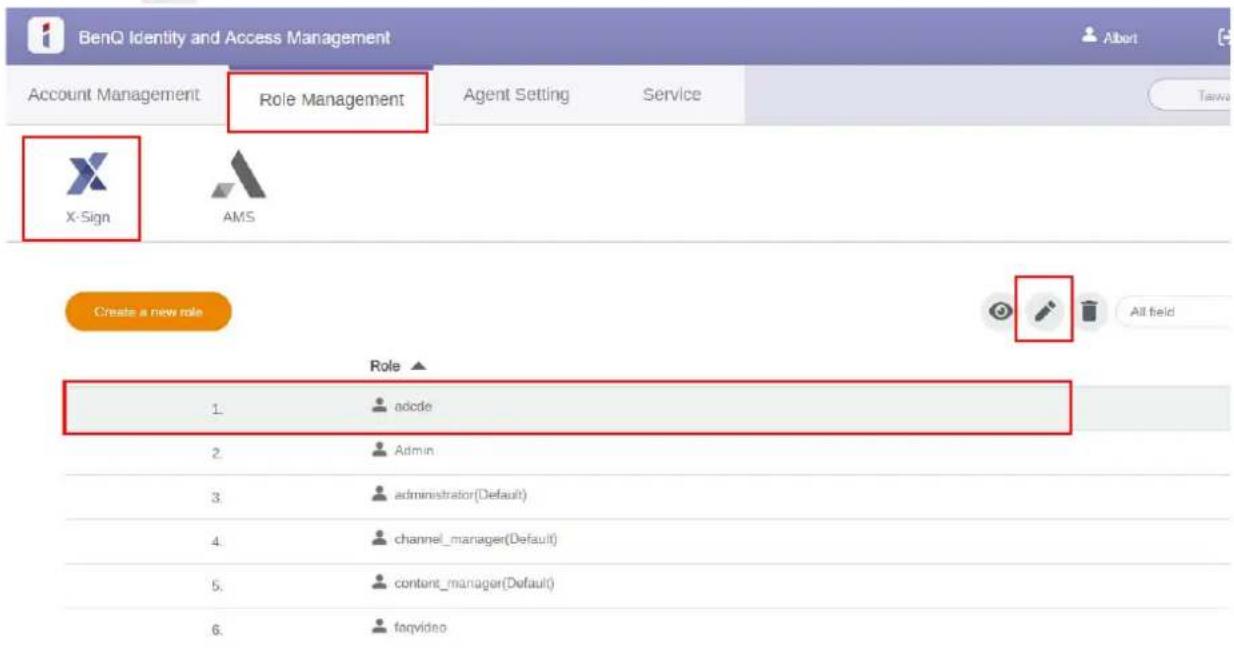
text_image
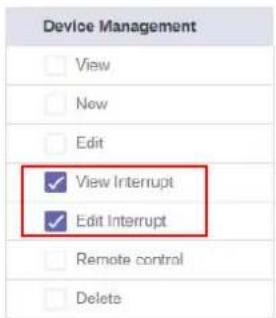
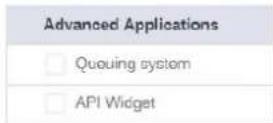
BenQ Identity and Access Management Account Management Role Management Agent Setting Service X-Sign AMS Create a new role Role ▲ 1. adcode 2. Admin 3. administrator(Default) 4. channel_manager(Default) 5. content_manager(Default) 6. faqvideo- You can set the permission to the account by checking the boxes. Click Submit to proceed. Edit role settings
Role Name adcde
Permission
text_image
Device Management View New Edit ✓ View Interrupt ✓ Edit Interrupt Remote control Delete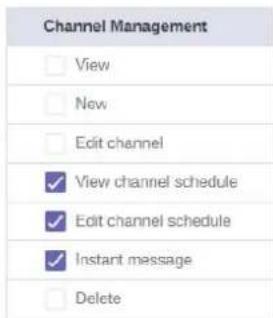
text_image
Channel Management View New Edit channel ✓ View channel schedule ✓ Edit channel schedule ✓ Instant message Delete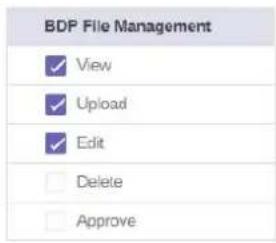
text_image
BDP File Management ✓ View ✓ Upload ✓ Edit Delete Approve
Authorizing other users as admins
Watch demonstration video:

The administrator can authorize other users to manage X-Sign Manager. Please be noted that there can only be THREE admins in the same company, i.e. the original admin with two substitute admins.
I. To authorize agents, go to Account Management.
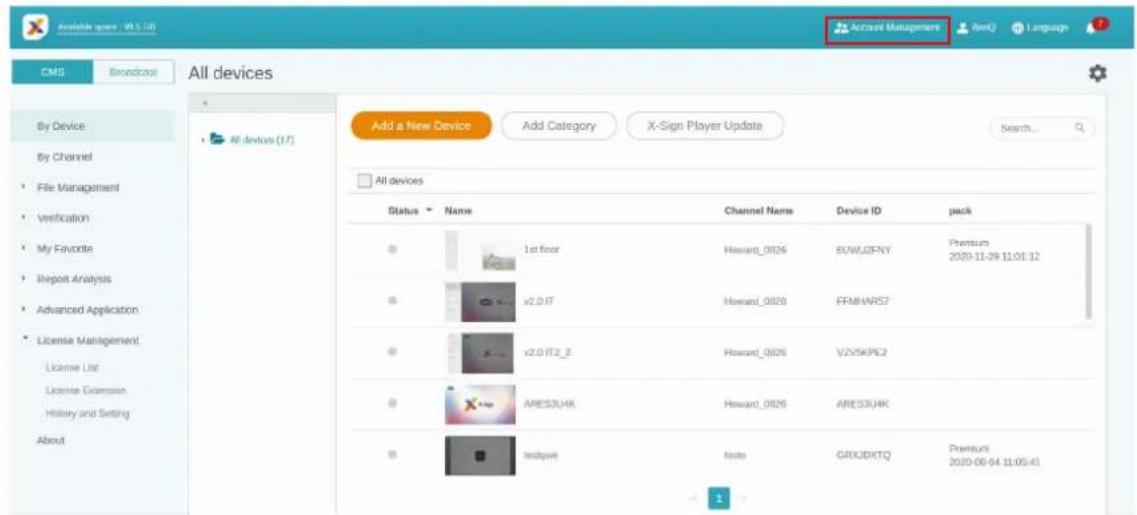
text_image
Available space - 90.5.UR CMS Broadcast All devices By Device By Channel File Management Verification My Favorite Report Analysis Advanced Application License Management License List License Extension History and Setting About Add a New Device Add Category X-Sign Player Update Search... All devices Status Name Channel Name Device ID pack 1st floor Howard_0826 EUWJQNY Premium v2.0 IT Howard_0826 FFMBARS7 v2.0 IT2_3 Howard_0826 VZV5KPE2 ARES3U4K Howard_0826 ARES3U4K testpipe Note GRXUDXTQ Premium 2020-06-04 11:05:412. Click Create New Account to proceed.

text_image
BenQ Identity and Access Management Account Management Role Management Agent Setting Service Beng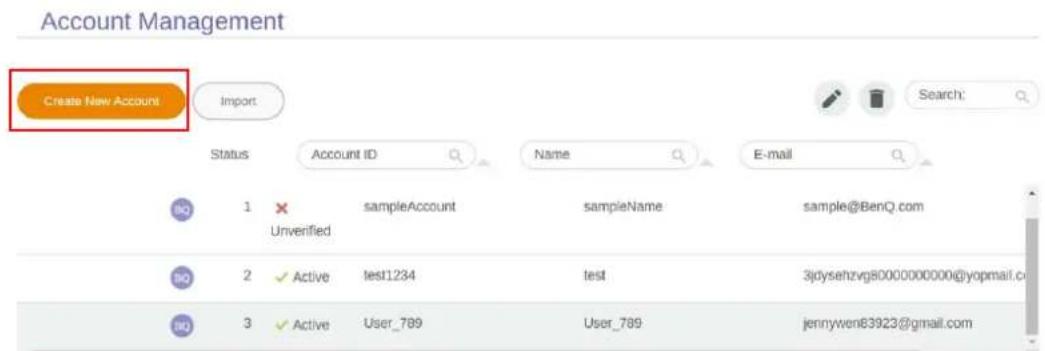
text_image
Account Management Create New Account Import Status Account ID Name E-mail 1 Unverified sampleAccount sampleName sample@BenQ.com 2 Active test1234 test 3jdysehzvg8000000000@yopmail.com 3 Active User_789 User_789 jennywen83923@gmail.comNote: If the user already has an account under the original admin, there is no need to create a new account, just select
to edit.
- Fill in the account information, check the box, and click Submit. You will receive a verification email. After verifying the email, you have successfully authorized agents.
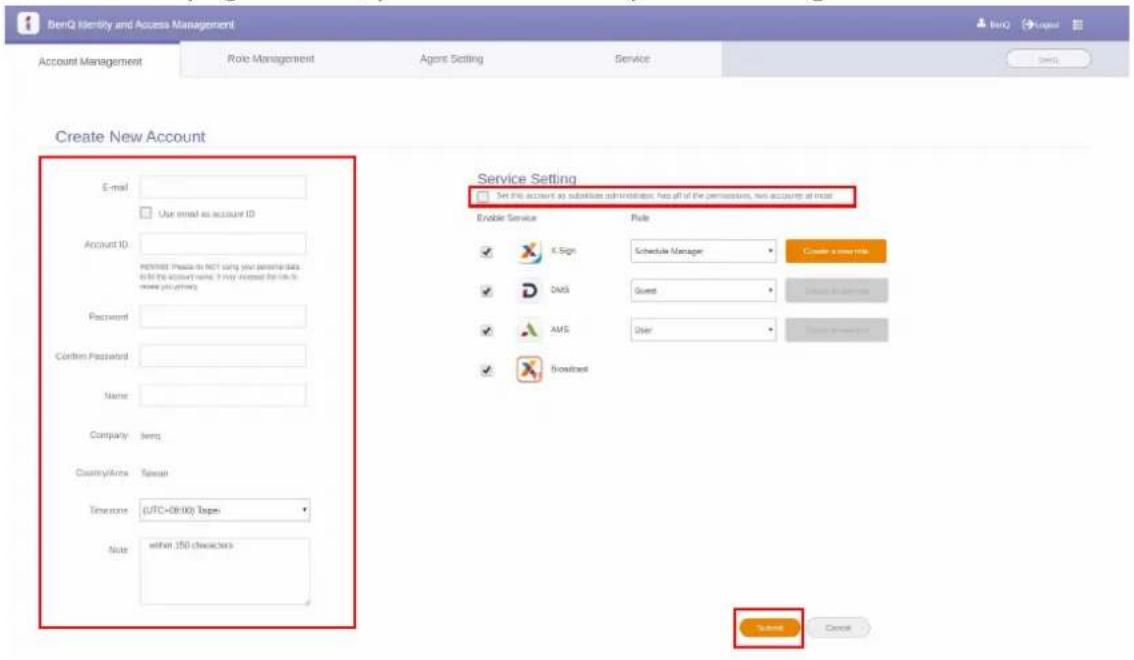
text_image
BenQ Identity and Access Management Account Management Role Management Agent Setting Service Create New Account E-mail: Use email as account ID Account ID: Refinit: Please to NOT say your personal data. To file the account name. It may increase the link to write your account. Password: Custom Password: Name: Company: Texas Country/Area: Taiwan Telephone: (UTC+08:00) Tapes Note: within 150 characters Service Setting SH PRC account as subsidises administration has off of the permissions, two accounts at once Enable Service Pole X Sign Schedule Manager Create a new title DMS Guest Send assistance AMS Over Send assistance Broadband Save CancelLicense
Purchasing the license from X-Sign Manager
Watch demonstration video:

You can purchase the license from X-Sign Manager in License Management > License Extension.
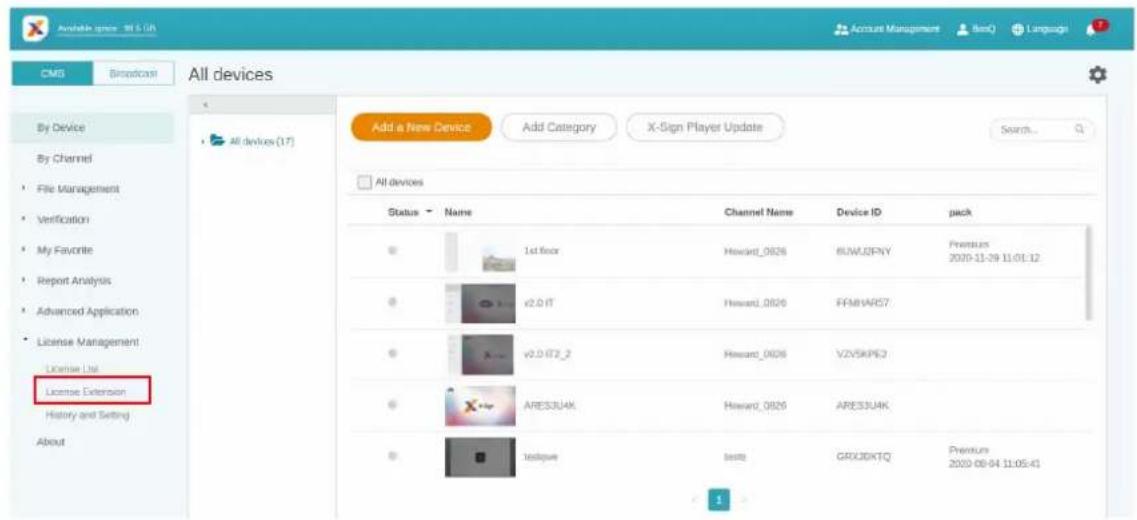
text_image
Available space - 91.5.0H CMG Broadcast All devices Add a New Device Add Category X-Sign Player Update Search... By Device By Channel File Management Verification My Favorite Report Analysis Advanced Application License Management License List License Extension History and Setting About All devices Status Name Channel Name Device ID pack 1st floor Howard_0826 BUMUZIPNY Premiums v2.0 IT Howard_0826 FFMHARS7 2020-11-29 11:01:12 v2.0 IT2_2 Howard_0826 VZV5KPE2 ARES3JUK Howard_0826 ARES3JUK testgue testb GRX3DXTQ Premiums 2020-08-04 11:05:41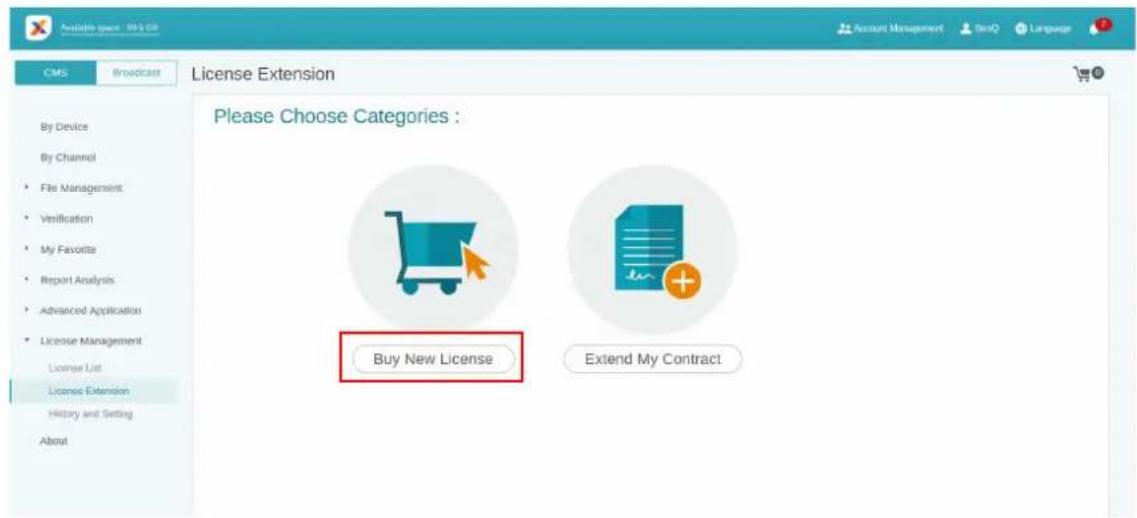
text_image
Available space - 935 GB CMS Broadcast License Extension By Device By Channel • File Management • Verification • My Favorite • Report Analysis • Advanced Application • License Management License List License Extension History and Setting About Please Choose Categories : Buy New License Extend My ContractAfter clicking Buy New License,
I. Choose the quantity of license which you want to purchase. There are two types: Basic and Premium.
2. Select Add to Shopping Cart.
3. Click the shopping cart icon to access to the checkout page.
Note: If the quantity is more than 20, it is highly suggested that you select More than 20.
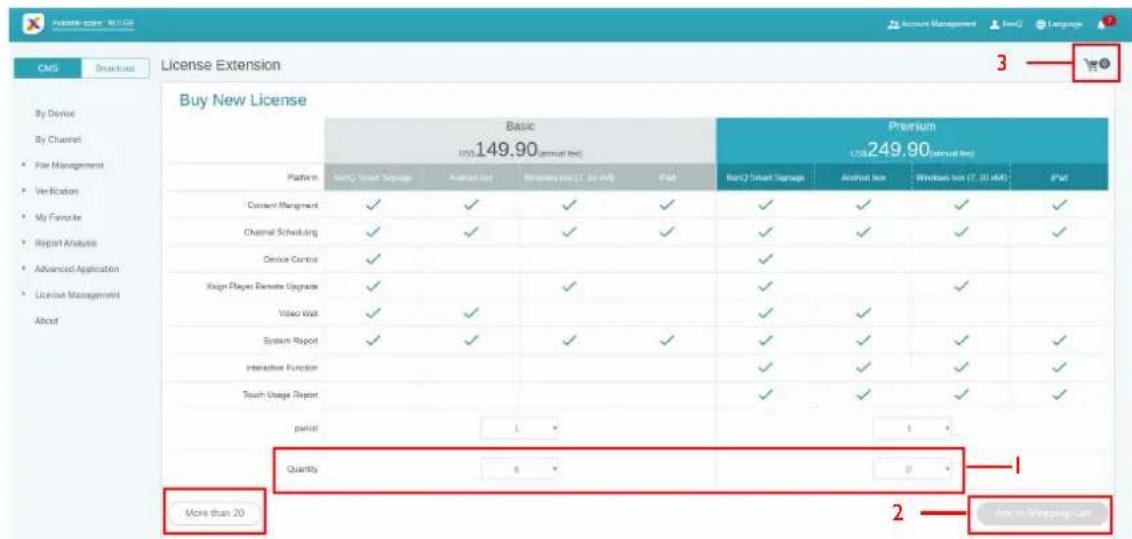
text_image
Buy New License Basic 149.90 Annual Fee Premium USD249.90 Annual Fee Platform NetC Smart Tagups Android Fee Business Fee(1, 3D Avg) Fiat Banc2 Smart Tagups Android Fee Windows Fee (7, 3D Avg) Fiat Content Management ✓ ✓ ✓ ✓ ✓ ✓ ✓ ✓ ✓ ✓ ✓ ✓ ✓ ✓ ✓ ✓ ✓ ✓ ✓ ✓ ✓ ✓ ✓ ✓ ✓ ✓ ✓ ✓ ✓ ✓ ✓ ✓ ✓ ✓ ✓ ✓ ✓ ✓ ✓ ✓ ✓ ✓ ✓ ✓ ✓ ✓ ✓ ✓ ✓ ✓ System Report ✓ ✓ ✓ ✓ ✓ ✓ ✓ ✓ ✓ ✓ ✓ ✓ ✓ ✓ ✓ ✓ ✓ ✓ ✓ ✓ ✓ ✓ ✓ ✓ ✓ ✓ ✓ ✓ ✓ ✓ ✓ ✓ ✓ ✓ ✓ ✓ ✓ ✓ ✓ ✓ ✓ ✓ ✓ ✓ ✓ ✓ ✓ ✓ ✓ #our less than 20- After reading the agreement terms, click the checkbox.
- Click Checkout to go to the payment page.
Note: You can go back to the previous page by clicking the button Back.
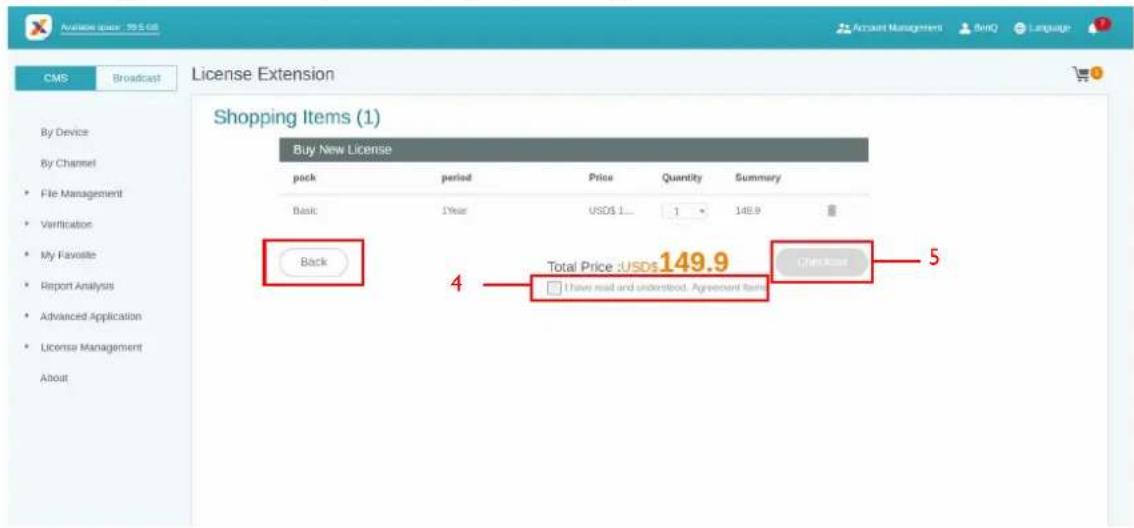
text_image
Buy New License pack period Price Quantity Summary Basic 1 Year USD$ 1... 1 148.9 Back 4 Total Price: USD$ 149.9 □ Have read and understood. Agreement Rank Checkout 56. After checking the quantity and the total price, click PayPal Checkout.
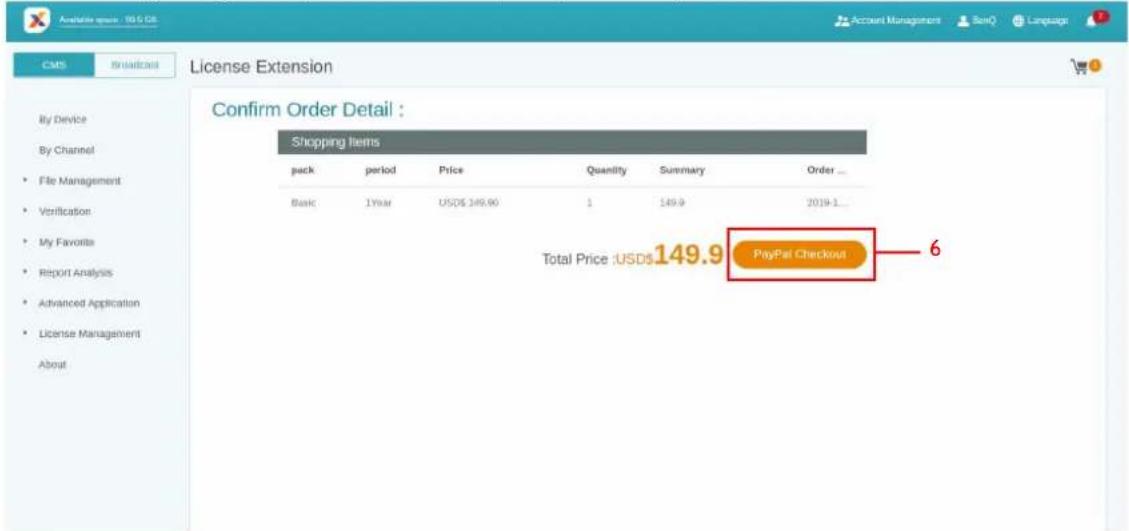
text_image
Confirm Order Detail : Shopping Items pack period Price Quantity Summary Order ... Basic 1Year USD$ 149.90 1 149.9 2019-1... Total Price:USD$ 149.9 PayPal Checkout 67. Log in the Paypal Account and finish the payment.
BenQ DCC's Test Store
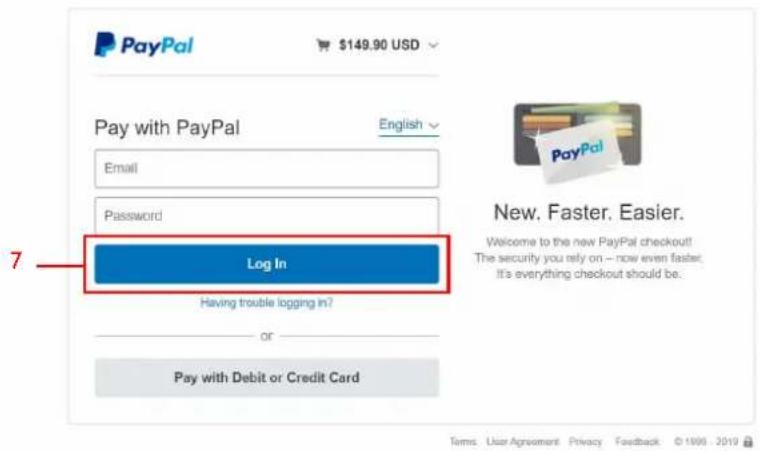
text_image
PayPal $149.90 USD Pay with PayPal English Email Password Log In Having trouble logging in? or Pay with Debit or Credit Card New. Faster. Easier. Welcome to the new PayPal checkout! The security you rely on -- now even faster. It's everything checkout should be.8. You can also pay by your credit card.
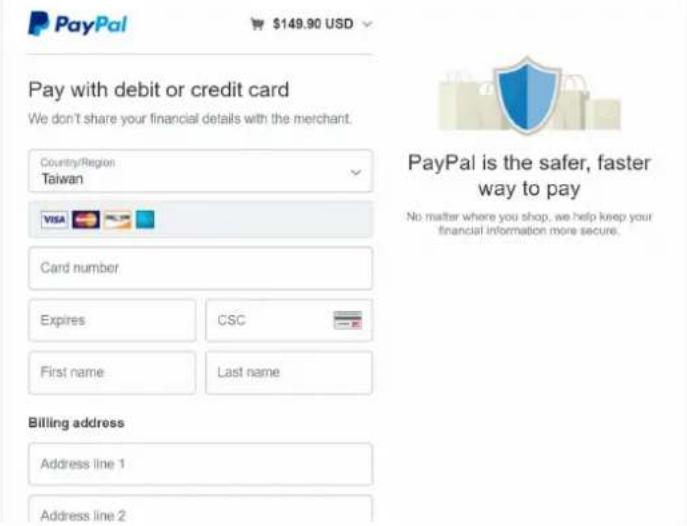
text_image
PayPal $149.90 USD Pay with debit or credit card We don't share your financial details with the merchant. Country/Region Taiwan VISA Card number Expires CSC First name Last name Billing address Address line 1 Address line 2 PayPal is the safer, faster way to pay No matter where you shop, we help keep your financial information more secure.Importing the license(s) to X-Sign Manager
Before controlling your device or playing the content remotely, you must pair the device with the license in X-Sign Manager.
I. You have to buy license(s) from Manager directly or from BenQ reseller. If you buy from Manager, the license will be sent to your Manager account directly. If you buy from the reseller, you have to import license(s) yourself.
2. Go to License Management > License List and click Import License Code.
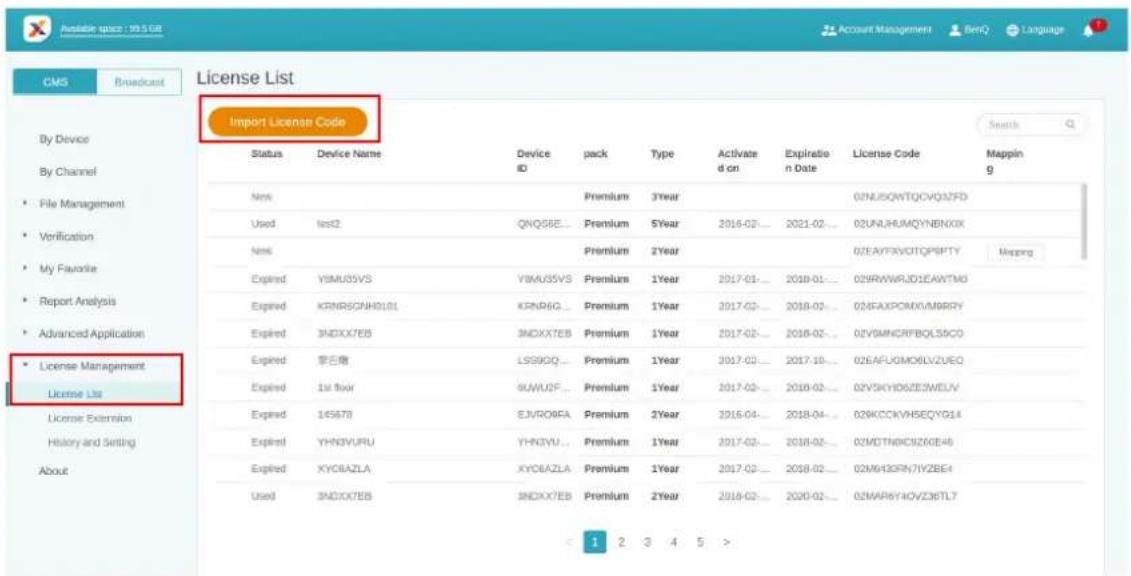
text_image
Available space : 90.5 GB By Device By Channel File Management Verification My Favorite Report Analysis Advanced Application License Management License List License Externation History and Setting About CMS Broadcast License List Import License Code Status Device Name Device ID pack Type Activate on Expiration Date/License Code Mapping New Premium 3Year 02NUJSQNTQCVQ32FD Used Imp2 QNQSBE... Premium 5Year 2016-02... 2021-02... 02UNUHUMQYNBNXIX New Premium 2Year 02EAYFXVGITQPSPTY Mapping Expired YEARMSVS YEARMSVS Premium 1Year 2017-01... 2018-01... 02WRWVRJD1EAWTMD Expired KRNRGQNH010L KRNR6G... Premium 1Year 2017-02... 2018-02... 02FAXPOMXVMRRY Expired 3NDXX7EB 3NDXXTEB Premium 1Year 2017-02... 2018-02... 02VSMNCRFBQLS5CO Expired 索巴塘 LSGOQ... Premium 1Year 2017-02... 2017-10... 02EAFUGOMO6LVZUEQ Expired 1st floor 6MUSF... Premium 1Year 2017-02... 2018-02... 02VSKHYD6ZE3WEDV Expired 145678 EJVRO9FA Premium 2Year 2016-04... 2018-04... 02KCCCKVH5EQYG14 Expired YHN3VJRU YHNIVU... Premium 1Year 2017-02... 2018-02... 02MDTN6ICIZ6OE48 Expired XYO6AZLA XYO6AZLA Premium 1Year 2017-02... 2018-02... 02M6I3QRN7IVZBE4 Used 3NDXX7EB 3NDXXTEB Premium 2Year 2016-02... 2020-02... 02MAR6Y4OVZ6TL7 < 1 2 3 4 5 >- Enter the license code here. Click Add to import multiple licenses at one time.

text_image
Available space: 95.6 GB CMS Broadcast License List Please input license(16 characters) By Device By Channel • File Management • Verification • My Favorite • Report Analysis • Advanced Application • License Management License List License Extension History and Setting About Account Management BonQ Language +Add Import license 1.- After entering the license code, click Import license.
- You will see the imported licenses on the license list.
- Now you can start to pair your devices.
Mapping the license
I. To map the license, go to License Management > License List. Click Mapping to continue.
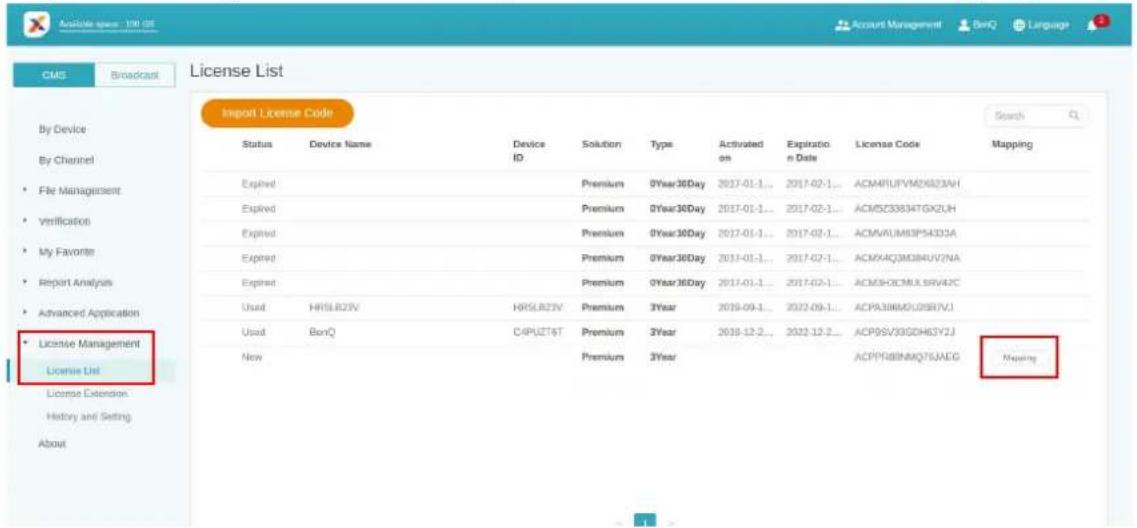
text_image
License List By Device By Channel File Management Verification My Favorite Report Analysis Advanced Application License Management License List License Extension History and Setting About Import License Code Status Device Name Device ID Solution Type Activated on Expiration Date License Code Mapping Expired Premium 0Year36Day 2017-01-1... 2017-02-1... ACM4U/FVM2X823AH Expired Premium 0Year36Day 2017-01-1... 2017-02-1... ACM5Z33834TGX2UH Expired Premium 0Year36Day 2017-01-1... 2017-02-1... ACMVAUM03PS433A Expired Premium 0Year36Day 2017-01-1... 2017-02-1... ACMXAQ3M0B4UV2NA Expired Premium 0Year36Day 2017-01-1... 2017-02-1... ACMSHICMU3SRV42C Used HRSLR23V HRSLR23V Premium 3Year 2019-09-1... 2022-09-1... ACPA3IMMQL05RVVJ Used BenQ C4PUZT6T Premium 3Year 2019-12-2... 2022-12-2... ACP9SV3GDH63YVJ New Premium 3Year ACPPY8BNMQ76JAEG Mapping- Fill in the following fields and click Finish to map the license.
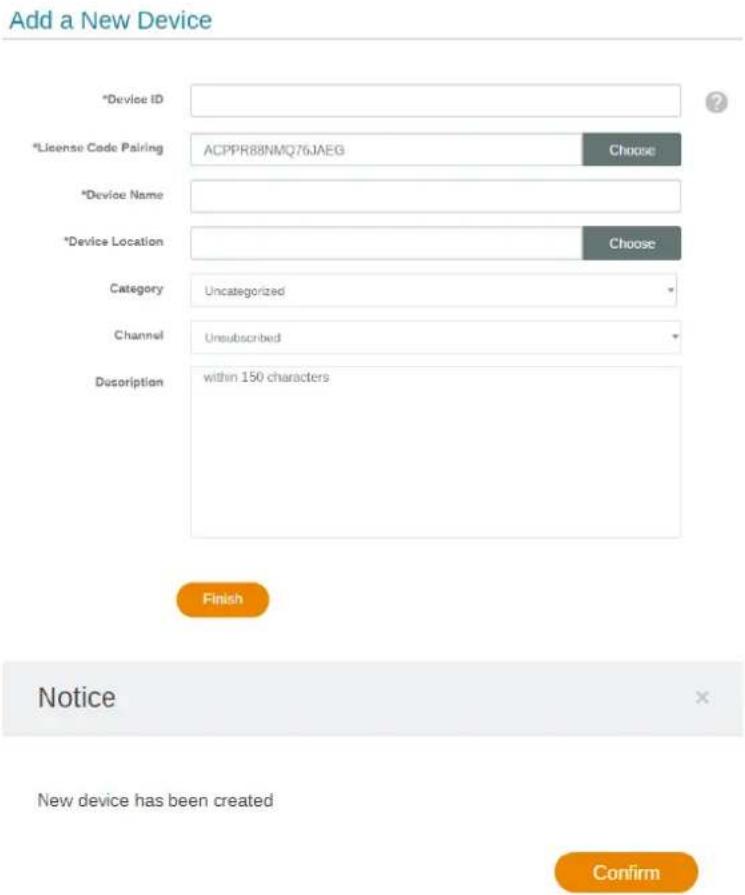
text_image
Add a New Device *Device ID *License Code Pairing ACPPR88NMQ76JAEG Choose *Device Name *Device Location Choose Category Uncategorized Channel Unsubscribed Description within 150 characters Finish Notice New device has been created ConfirmChecking the License upgrade notice
- To check the license upgrade notice, click at the top right corner.
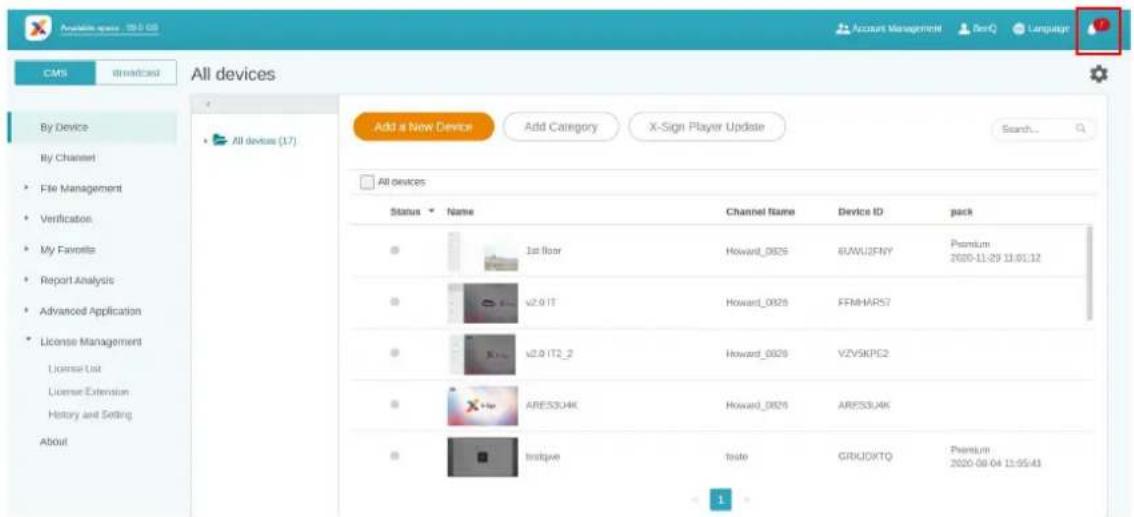
text_image
Add a New Device Add Category X-Sign Player Update All devices Status Name Channel name Device ID pack 1st floor Howard_0825 6UWU2FNY Premium v2.0 IT Howard_0826 FFMHARS7 v2.0 IT2_2 Howard_0829 VZVSKPC2 ARES3J4K Howard_0826 ARES3J4K Instique Testo GRKJOXTQ Premium 2020-08-04 11:05:43- You can see the notification(s). Click to see more information.
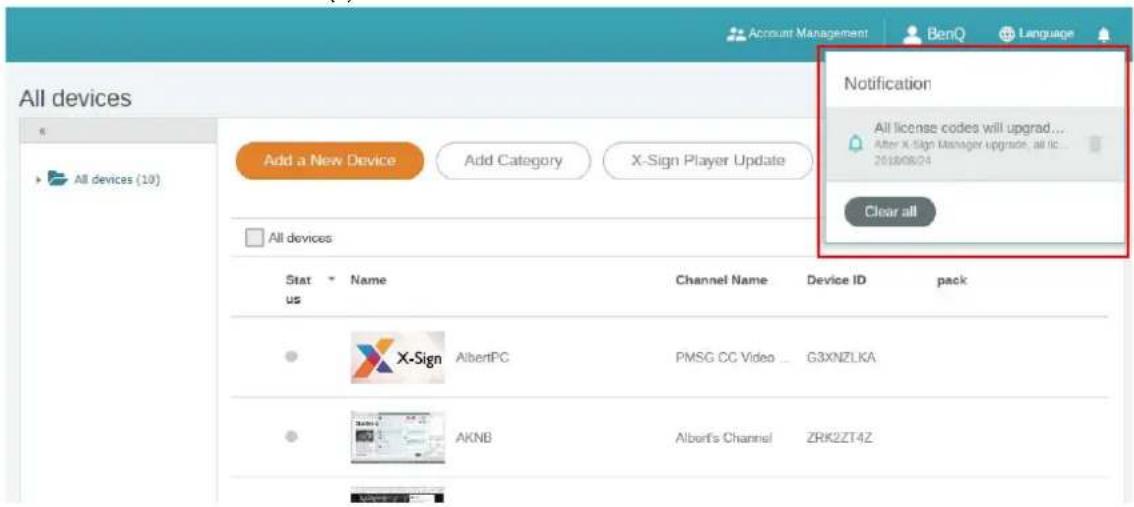
text_image
Account Management BenQ Language All devices Add a New Device Add Category X-Sign Player Update All devices Notification All license codes will upgrad... After X-Sign Manager Upgrade, all IIC... 20180624 Clear all Stat Name Channel Name Device ID pack us US X-Sign AlbertPC PMSG CC Video ... G3XNZLKA AKNB Albert's Channel ZRK2ZT4Z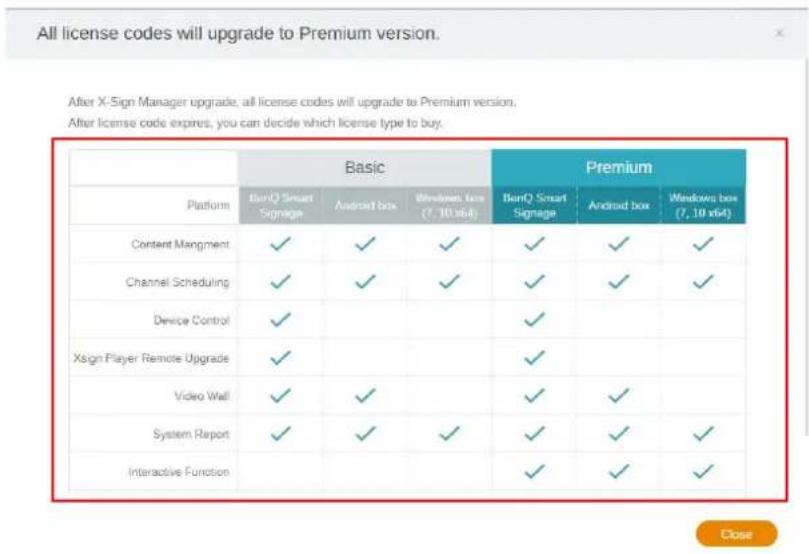
text_image
All license codes will upgrade to Premium version. After X-Sign Manager upgrade, all license codes will upgrade to Premium version. After license code expires, you can decide which license type to buy. Basic Premium Platform BanQ Smart Signage Android box Windows box (7, 10 x64) BanQ Smart Signage Android box Windows box (7, 10 x64) Content Mangement ✓ ✓ ✓ ✓ ✓ ✓ ✓ Channel Scheduling ✓ ✓ ✓ ✓ ✓ ✓ Device Control ✓ ✓ ✓ ✓ ✓ Xsign Player Remote Upgrade ✓ ✓ ✓ ✓ Video Wall ✓ ✓ ✓ ✓ ✓ System Report ✓ ✓ ✓ ✓ ✓ Interactive FunctionNote: You can delete the notification by clicking the trash can icon . Click Clear all to delete all notifications.
Manager
Pairing the device with X-Sign Manager
Watch demonstration video:

If you want to play the content from Internet or control multiple devices remotely, you have to pair the device with X-Sign Manager.
I. Launch X-Sign Player.
2. Press Esc button on Windows Player or MENU on the device remote controller to see the menu bar.
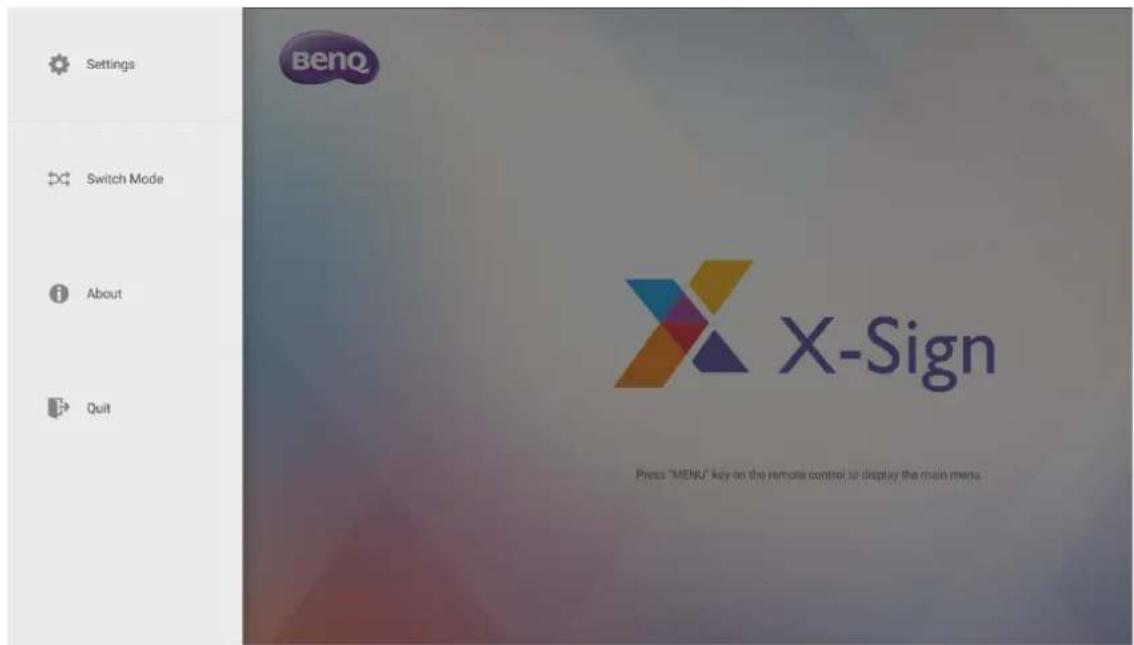
text_image
Settings Switch Mode About Quit BenQ X-Sign Press "MENU" key on the remote control to display the main menu.- Choose Switch Mode to switch to Manager mode.
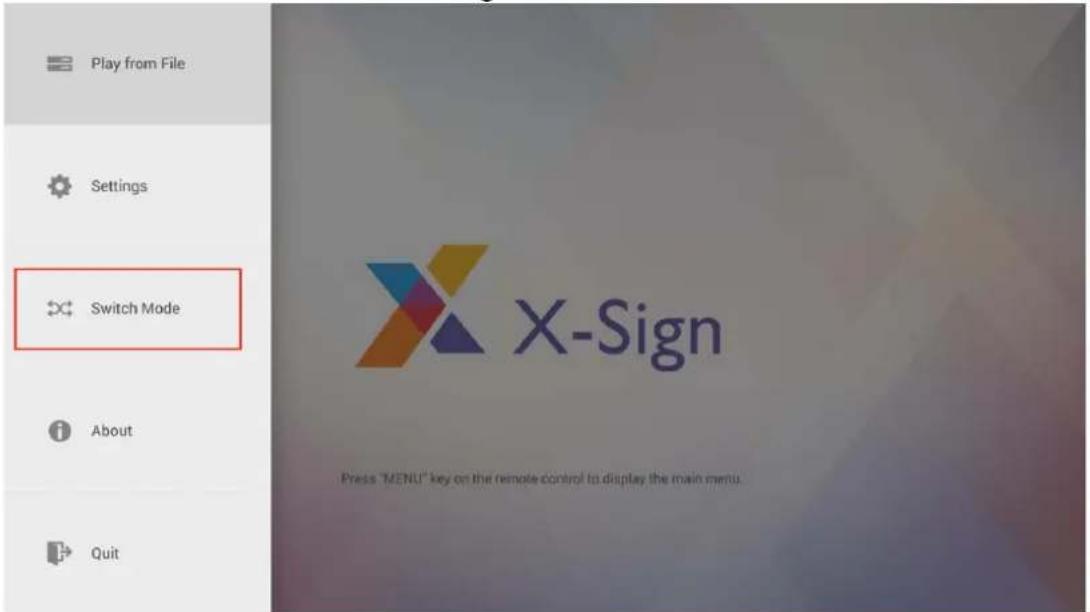
text_image
Play from File Settings Switch Mode About Quit X-Sign Press "MENU" key on the remote control to display the main menu.4. Choose Pair to start pairing.
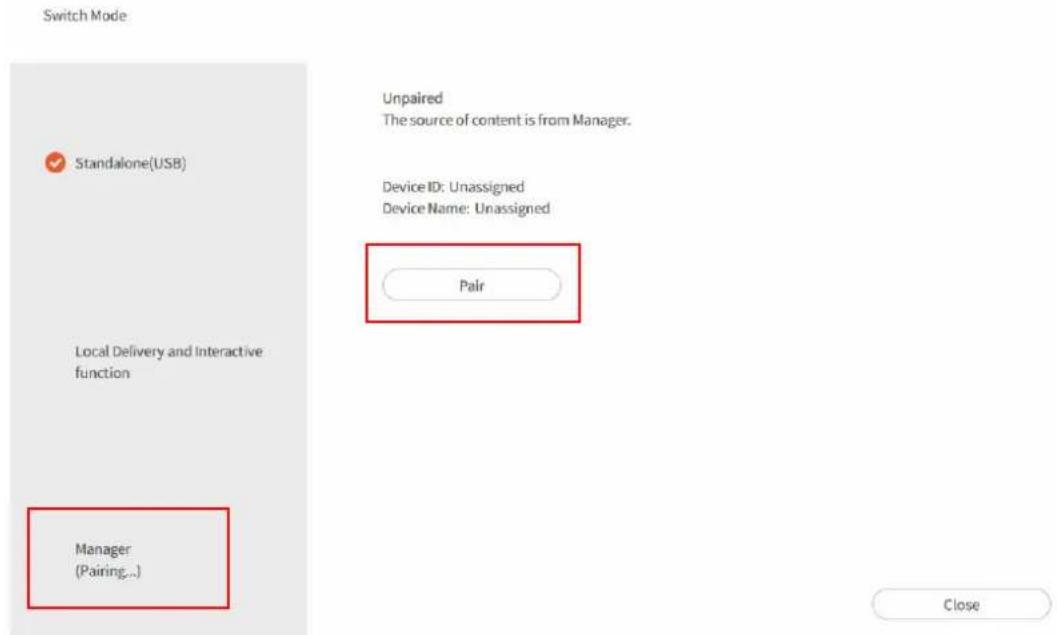
text_image
Switch Mode Standalone(USB) Local Delivery and Interactive function Manager (Pairing...) Unpaired The source of content is from Manager. Device ID: Unassigned Device Name: Unassigned Pair Close5. Get the Device ID on this page then go to X-Sign Manager to pair the license.
New Device
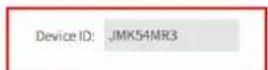
- Please check the network status.
- Please bind the Device ID and pairing code to activate the feature of X-Sign Manager.
Status: Pairing..
Back
6. Go to X-Sign Manager. Then go to By Device and choose Add a new Device.
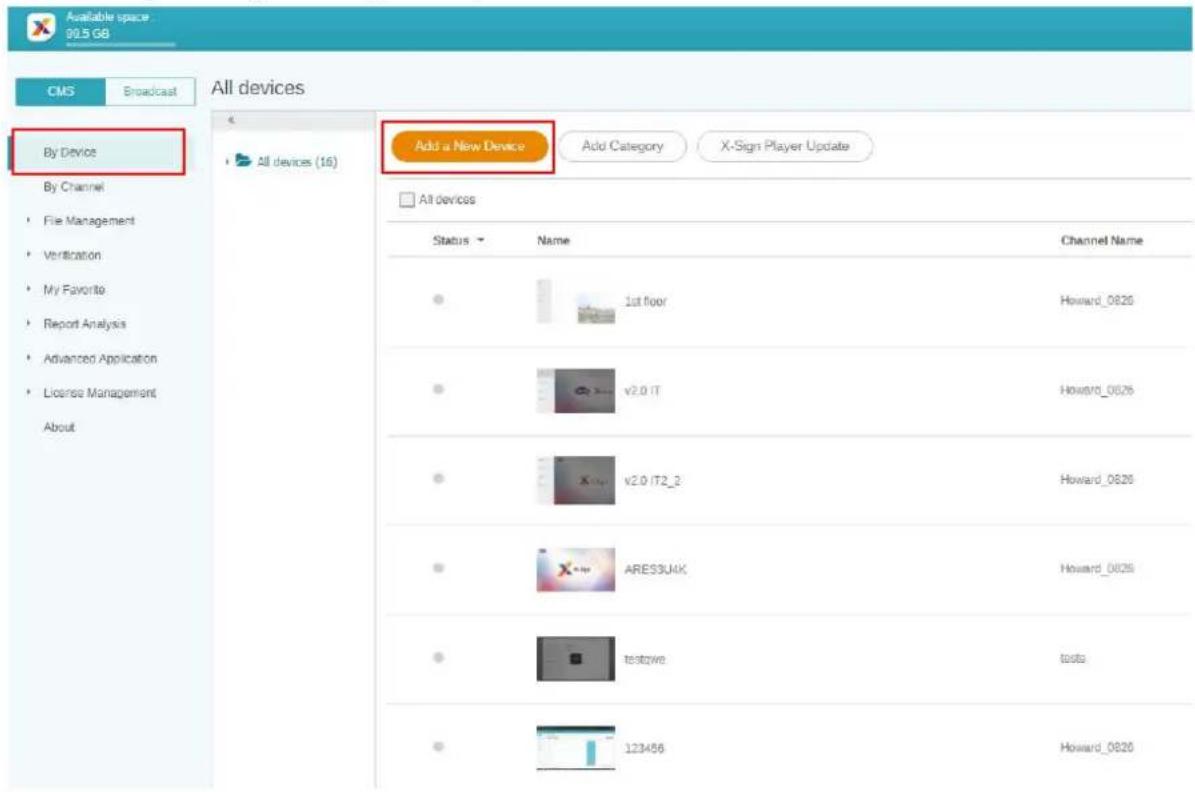
text_image
Available space 90.5 GB CMS Broadcast All devices By Device All devices (16) Add a New Device Add Category X-Sign Player Update All devices Status Name Channel Name 1st floor Howard_0826 v2.0 IT Howard_0826 v2.0 IT2_2 Howard_0826 ARES3UK Howard_0826 testwe tests Howard_0826 123456 Howard_08267. Enter required information as below.
- Device ID: the device information from X-Sign Player.
New Device
Device ID: JMK54MR3
- Please check the network status.
- Please bind the Device ID and pairing code to activate the feature of X-Sign Manager.
Status: Pairing...
Back
- Mapping license code: Choose the license you want to pair with the device. You have to make sure you already buy the license and import to X-Sign Manager.
- Device location: Choose the city where your device lies in. Time zone of the device (Android) needs to be the same as you set here.
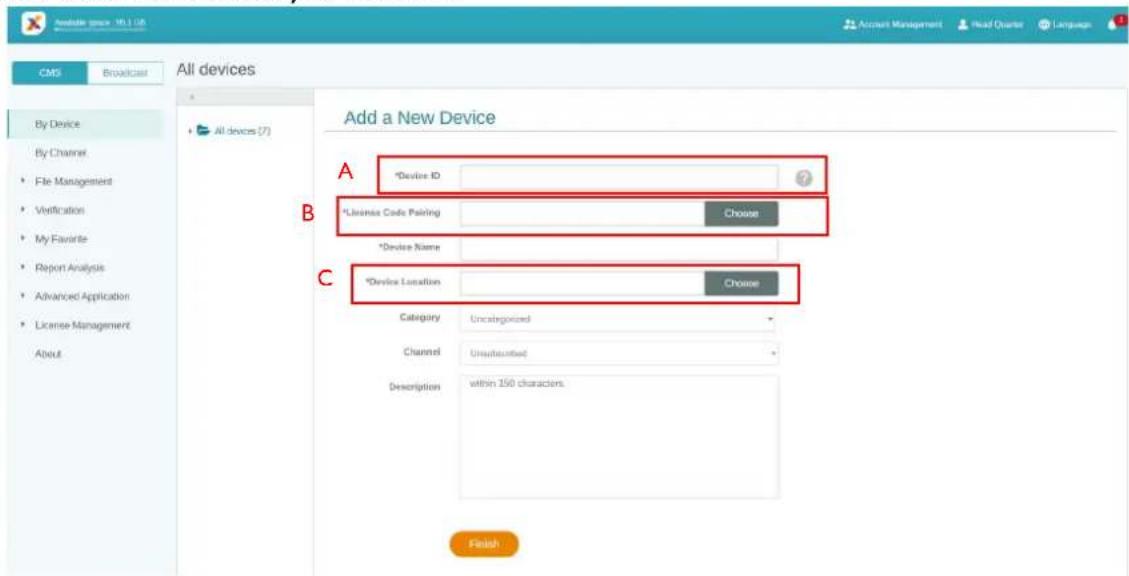
text_image
Add a New Device *Device ID *License Code Pairing *Device Name *Device Location Category Unrecognized Channel Unaudated Description within 250 characters Finish- After you finish the setting, click Finish to continue.
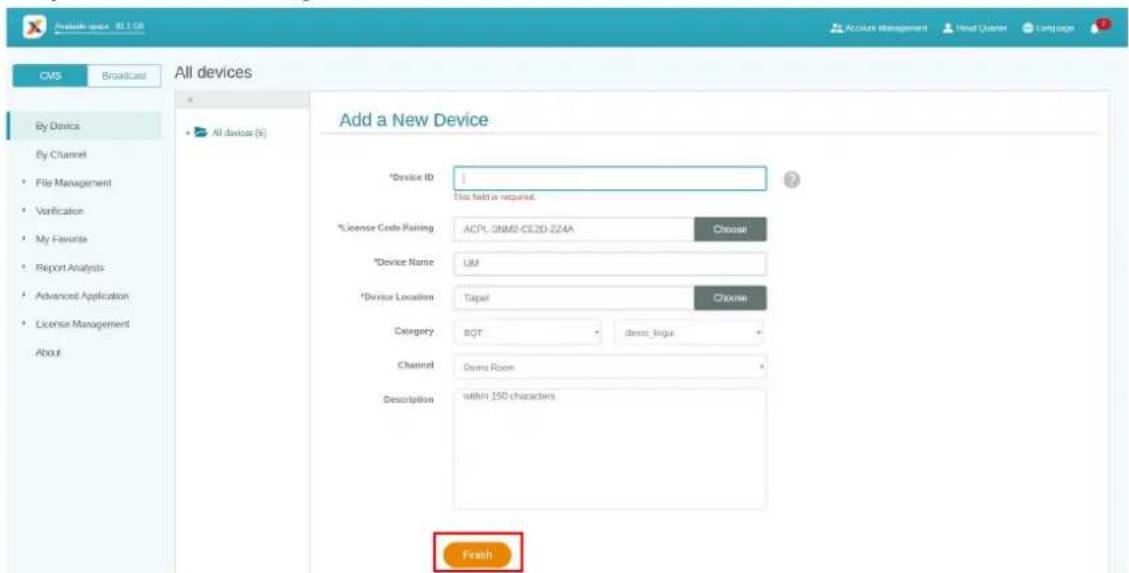
text_image
Add a New Device *Device ID: This field is required. *License Code Pairing ACPL-2NMB-CE2D-2Z4A Choose *Device Name UM *Device Location Taipei Choose Category BQT device Arabia Channel Demo Room Description within 150 characters Finish- A message, "New device has been created", will show up on the screen when the signage is successfully paired with X-Sign Manager.

text_image
Warning Message xNew device has been created
- You will also see the message shown on the signage.
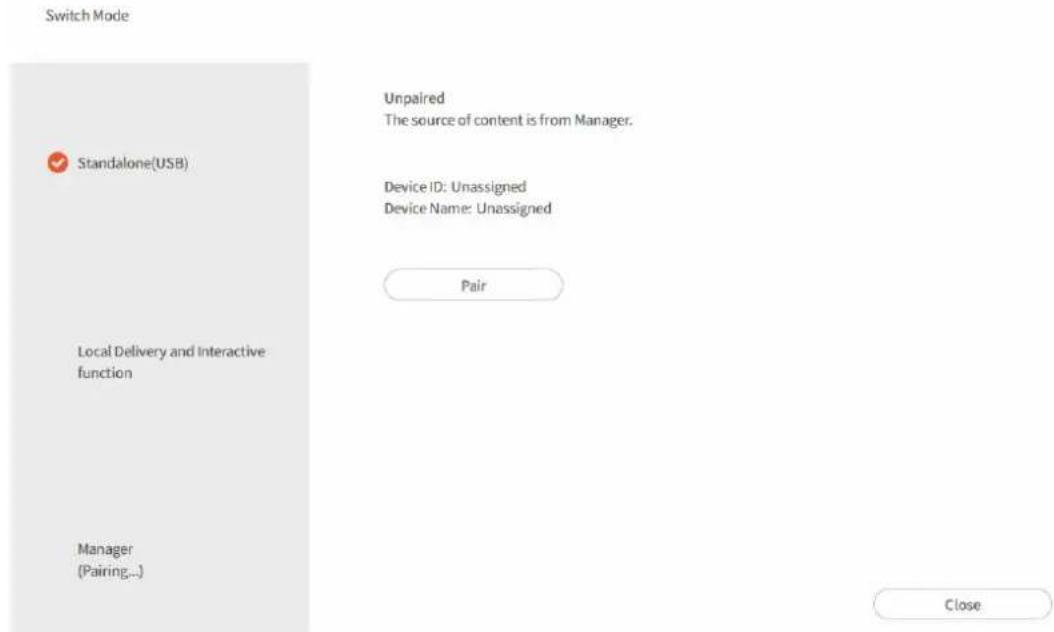
text_image
Switch Mode Unpaired The source of content is from Manager. ✓ Standalone(USB) Device ID: Unassigned Device Name: Unassigned Pair Local Delivery and Interactive function Manager (Pairing...) CloseII. Now you can control your device and play content remotely from X-Sign Manager.
Creating the channel
Watch demonstration video:
Follow the steps A to N to create the channel.
• A. Click By Channel.
• B. Click Add New Channel to the creation page.
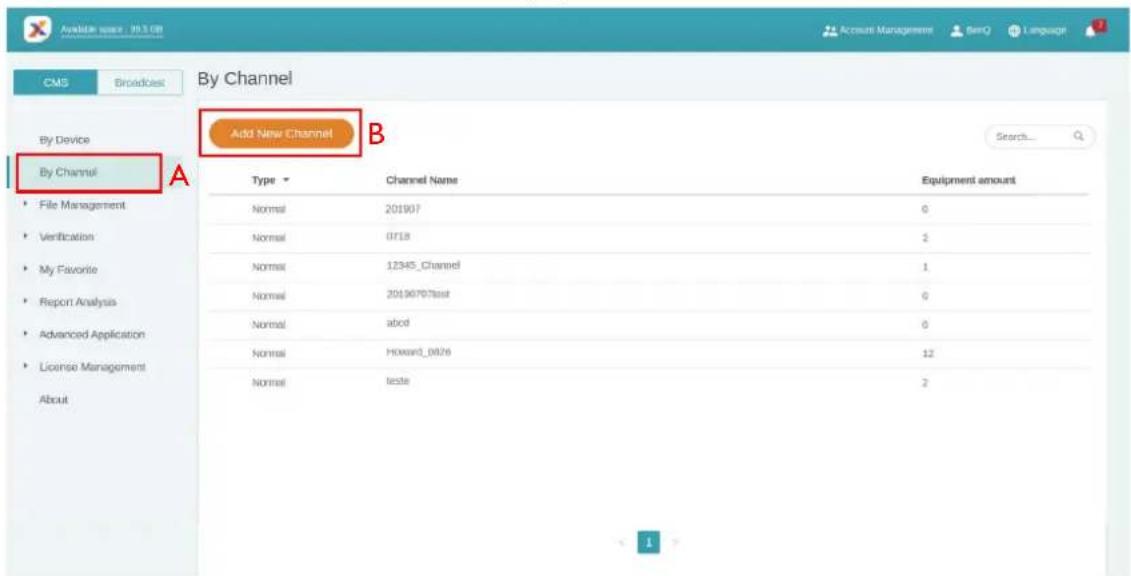
text_image
By Channel Add New Channel By Device By Channel A Type ▼ Channel Name Equipment amount Normal 201907 0 Normal 0718 2 Normal 12345_Channel 1 Normal 20190707test 6 Normal abcd 0 Normal Howard_0876 12 Normal teste 2 About• C. Enter the channel Name.
• D. Select the default playing content when there is no schedule in this channel.
• E. Choose to enable anti-image retention.
• F. Fill in the description of the channel.
• G. Click Confirm to finish the creation page.
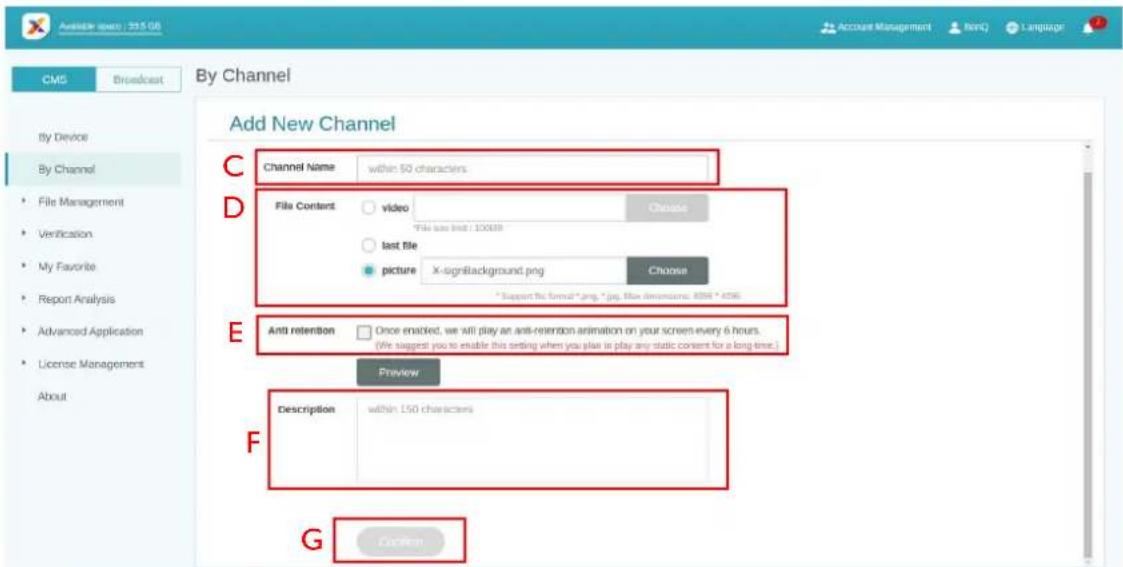
text_image
Add New Channel Channel Name: within 50 characters File Content: video Choose *File size text: 100000 last file picture X-signBackground.png Choose *Support the format*.png. *jpg. Max dimensions: RGB* ADE Anti retention: Once enabled, we will play an anti-retention animation on your screen every 6 hours. (We suggest you to enable this setting when you plan to play any static content for a long time.) Preview Description: within 150 characters C D E F G Backfire• H. Select to finish the settings.
• I. Select to add the existing device to the channel.
Group Setting Finished
The channel is successfully created. Are you going to set equipment for this channel?
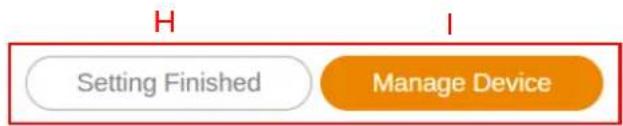
flowchart
graph LR
    A["Setting Finished"] --> B["Manage Device"]
• J. Re-edit the information of the channel.
• K. Add the existing device to the channel, then you will see a new page.
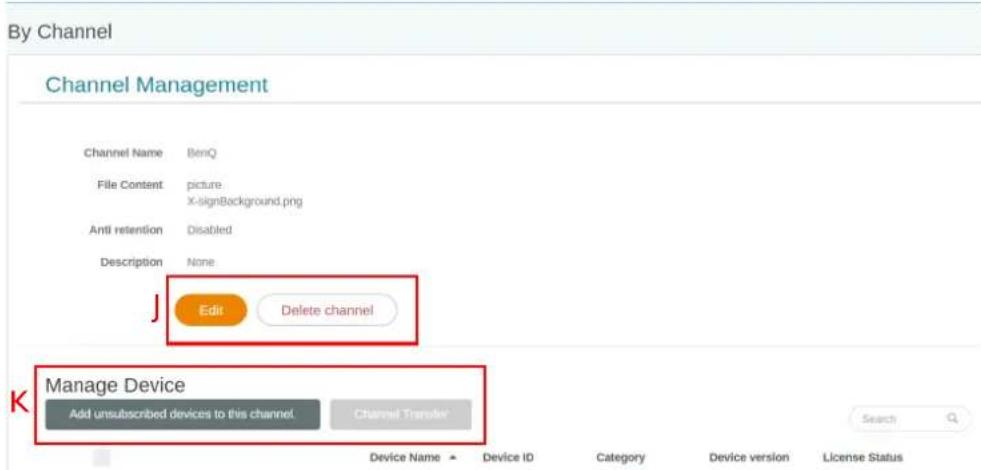
text_image
By Channel Channel Management Channel Name BenQ File Content picture X-signBackground.png Anti retention Disabled Description None Edit Delete channel Manage Device Add unsubscribed devices to this channel Channel Transfer Device Name Device ID Category Device version License Status• L. Select multiple devices to add into the channel.
• M. You can search the name of the device in the search bar.
• N. Click Confirm to finish the operation.
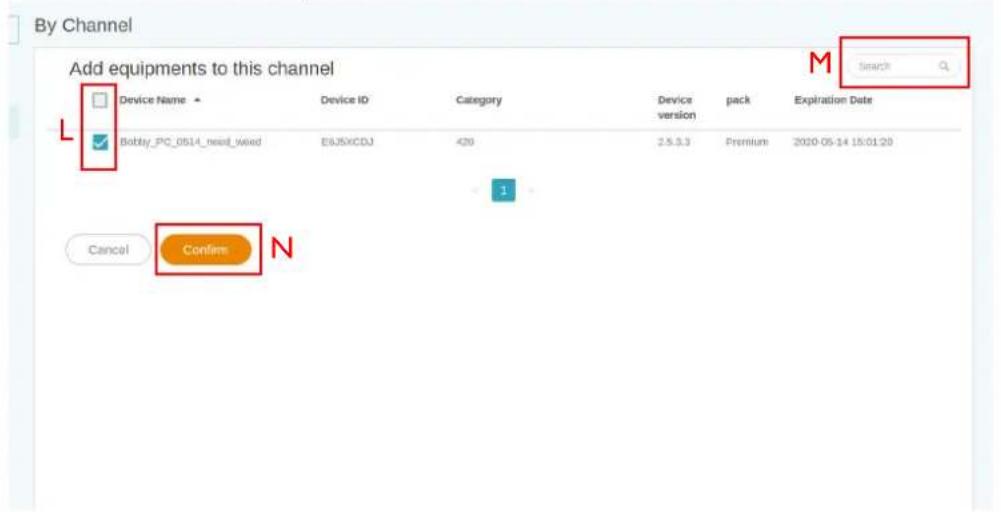
text_image
By Channel Add equipments to this channel M Search Device Name Device ID Category Device version pack Expiration Date L Bobby_PC_0514_next_wied EBJ5XCDJ 420 2.5.3.3 Premium 2020-05-14 15:01:20 Cancel Confirm NScheduling the content by channel
Watch demonstration video:
With X-Sign Manager, you can easily play the same content on multiple devices remotely. You can also play different content whenever you want.
I. Be sure that the device's license in the channel hasn't expired yet.
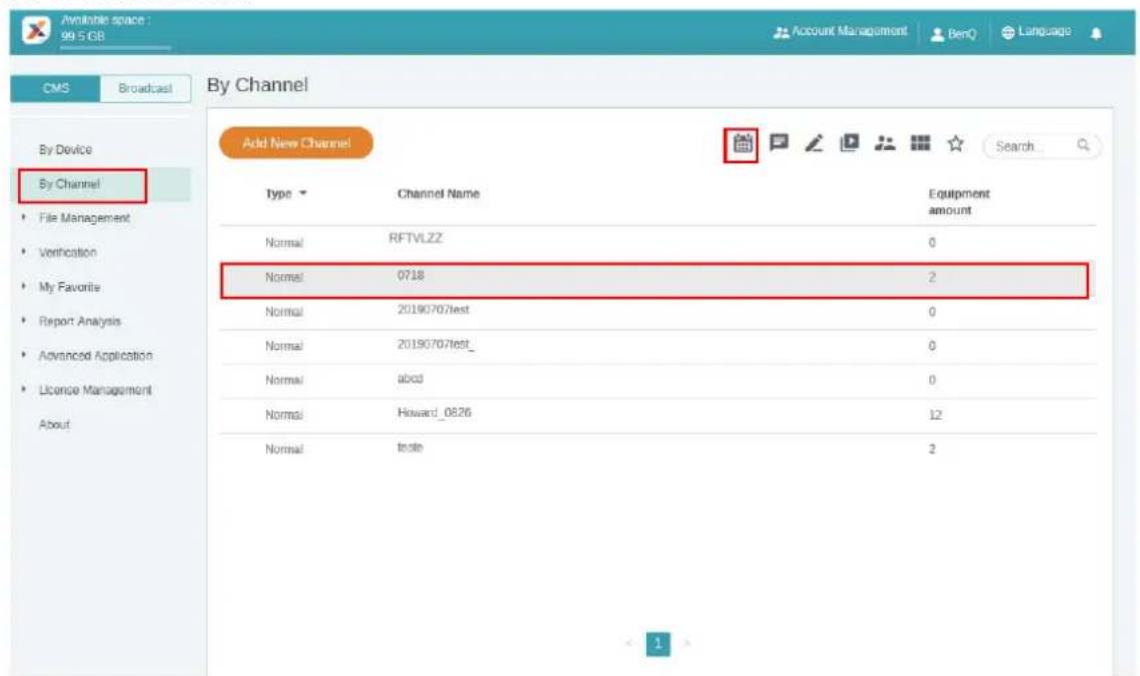
2. Go to By Channel, then choose the channel you want to play the content.
- Click 📁 and you will see the schedule management page of Channel. Click the time slice you want to set schedule.
text_image
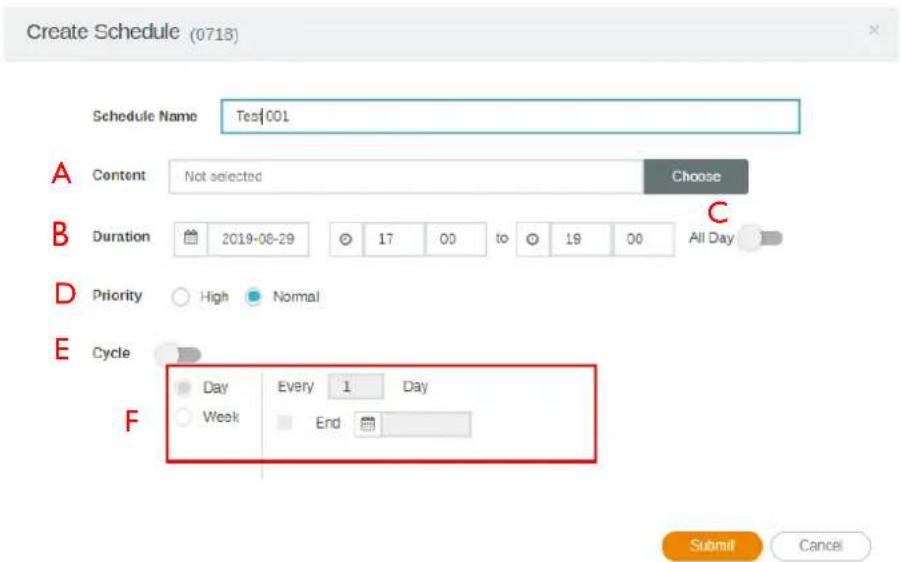
By Channel Add New Channel Type Channel Name Equipment amount Normal RFTVLZZ 0 Normal 0718 2 Normal 20190707test 0 Normal 20190707test_ 0 Normal abcd 0 Normal Howard_0826 12 Normal Inote 2 By Device By Channel File Management Verification My Favorite Report Analysis Advanced Application License Management About 1 Search- You will see the schedule setup window. Below is some required information.
A. Select the project you want to play on the channel. Be sure to upload your project file to Manager first.
B. Set the schedule time you want to play the content.
C. Enable to play content all day long.
D. Select the priority of the project. If it is urgent, select High for interruption scheduling. High priority schedule can overwrite Normal priority schedule by overlapping time blocks.
E. Enable to play content periodically.
F. You can set time here. You have to set the end date and choose to repeat by day or week.
text_image
Create Schedule (0718) Schedule Name Test/001 A Content Not selected Choose B Duration 2019-08-29 17 00 to 19 00 All Day C D Priority High Normal E Cycle Day Every 1 Day F Week End Submit Cancel-
After all configuration is set, click Submit.
-
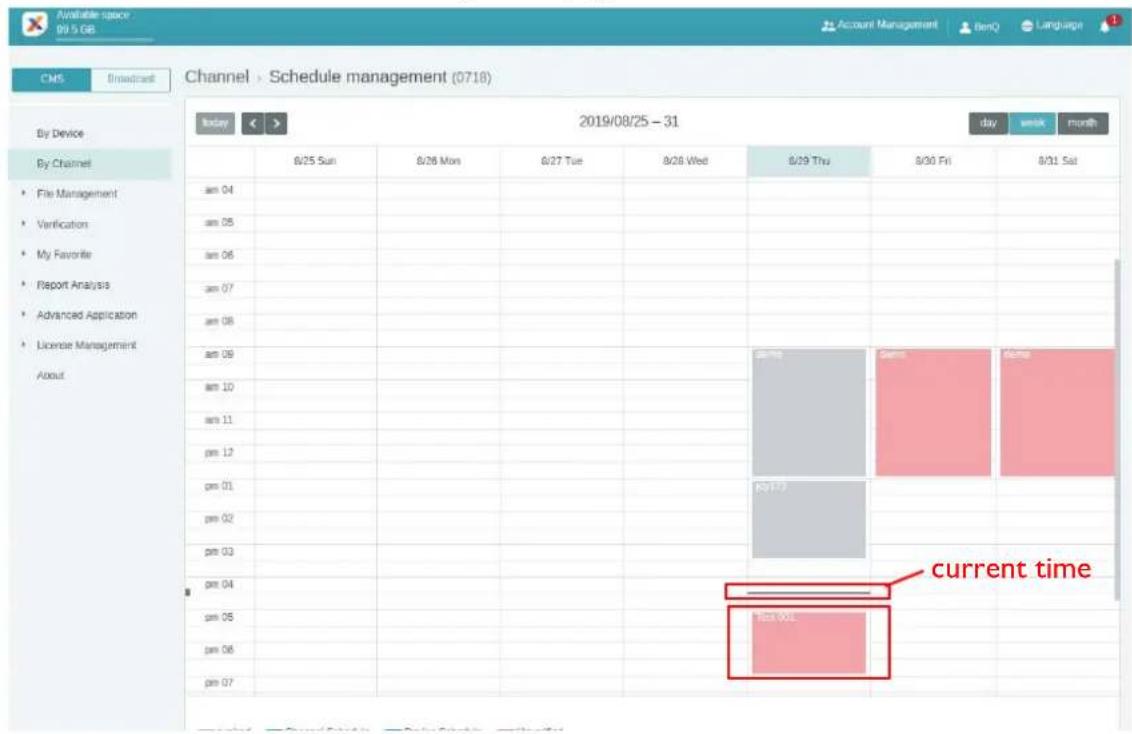
You will see the schedule on the management page.
text_image
Available space 89.5 GB CMS Broadcast Channel > Schedule management (0718) By Device 2019/08/25 – 31 day week month By Channel File Management Verification My Favorite Report Analysis Advanced Application License Management About am 04 am 05 am 06 am 07 am 08 am 09 am 10 am 11 pm 12 pm 01 pm 02 pm 03 pm 04 pm 05 pm 06 pm 07 6/25 Sun 6/26 Mon 6/27 Tue 6/28 Wed 6/29 Thu 8/30 Fri 8/31 Sat Gmms Gms R0177 current time Rsc 001- Double click the schedule event, and you can see the status of devices in the channel.
- No matter by device or by channel, you can create and edit time blocks in the timetable by clicking and dragging.
Scheduling the content by device
Watch demonstration video:

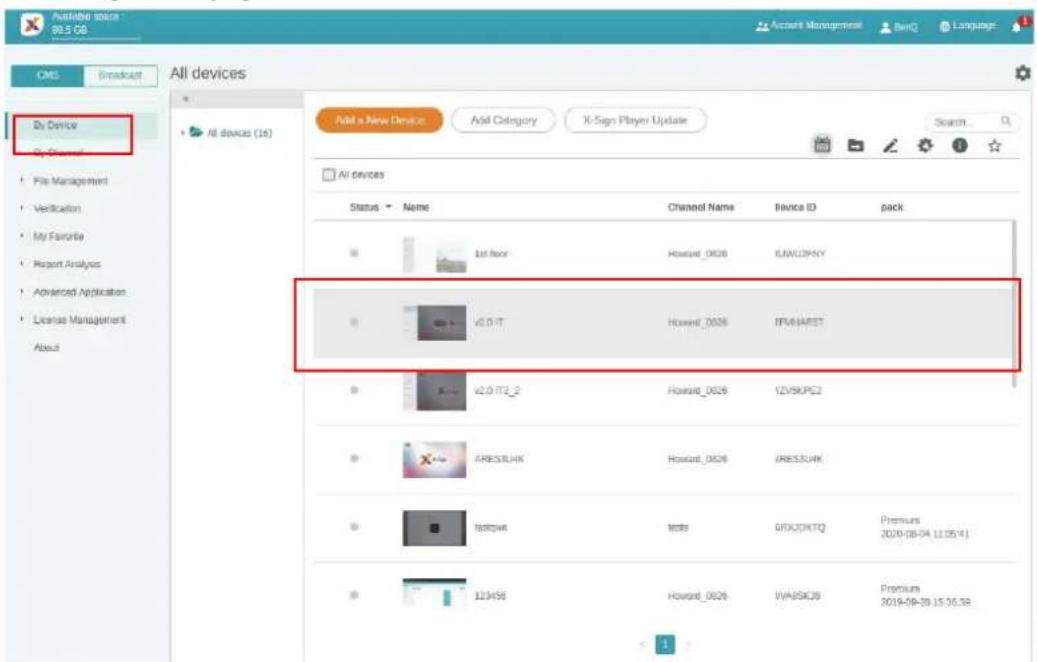
I. Go to By Device, then choose the device you want to play the content. Click 📁 to go to the schedule management page.
text_image
All devices By Device By Channel File Management Verification My Favorite Report Analysis Advanced Application License Management About Add a New Device Add Category X-Sign Player Update Search... All devices Status Name Channel Name Device ID pack 1st floor Howard_0026 IJAXLOPHY v0.0 IT Howard_0026 IFVMHARST v2.0 IT2_2 Howard_0026 YZVSKPC2 ARES3UKI Howard_0026 IRES3UKI testowe tests GTX3DXTQ Premium 2020-08-04 11:05:41 123458 Howard_0026 VVA2SKJ8 Premium 2019-09-30 15:36:38- Click the time slice you want to set schedule.
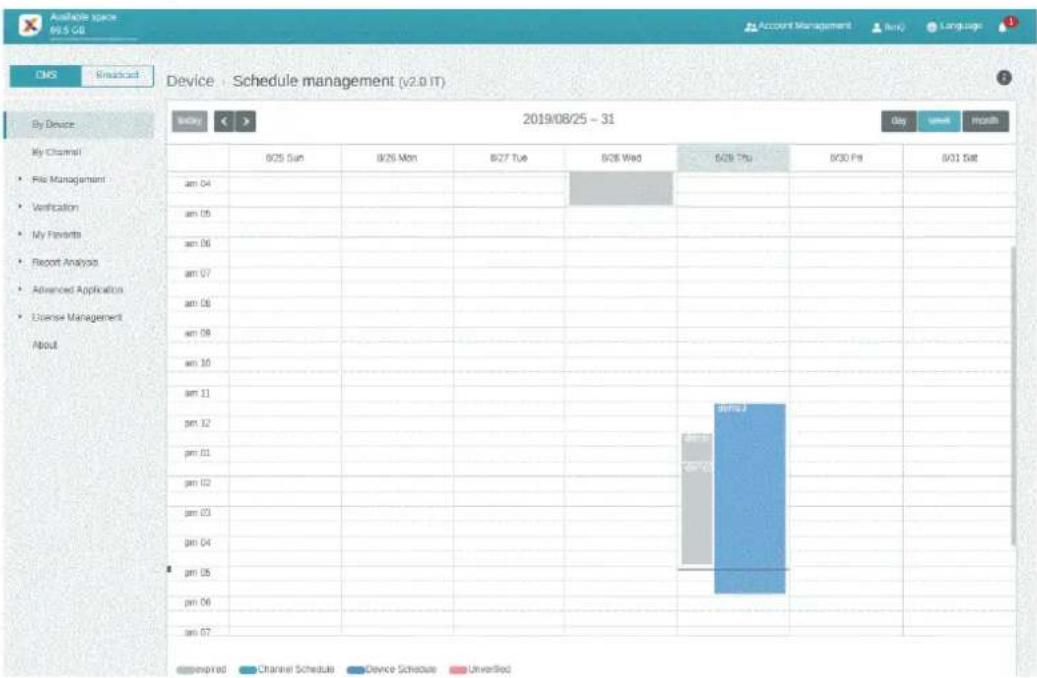
bar
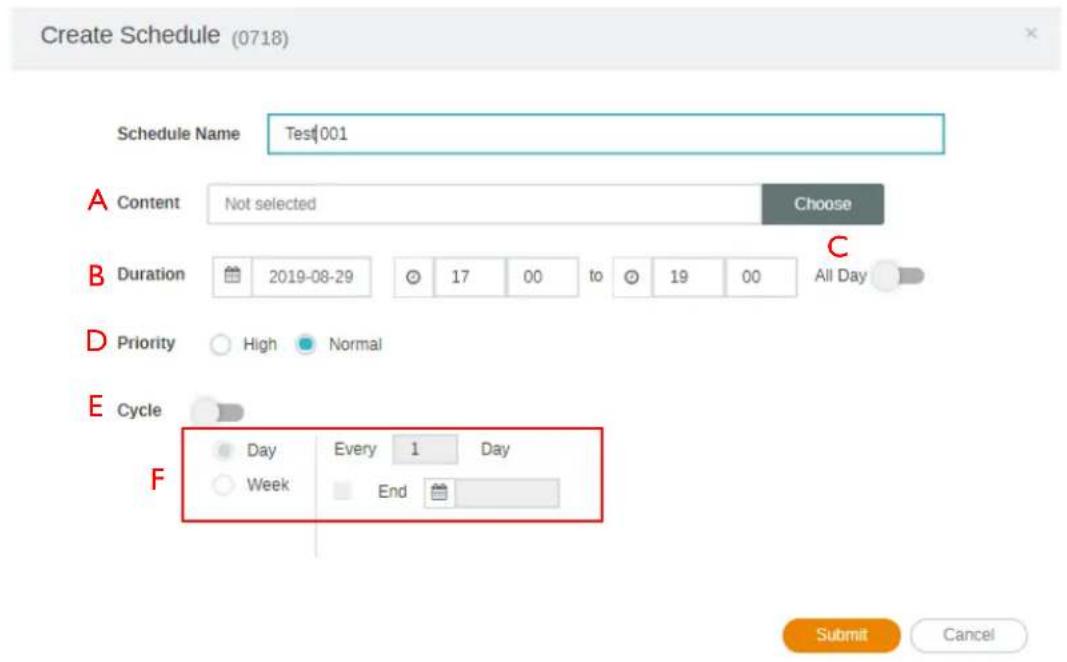
| Time | Company | Channel Schedule | Device Schedule | Unverified | |---|---|---|---|---| | 04 | am 04 | | | | | 05 | am 05 | | | | | 06 | am 06 | | | | | 07 | am 07 | | | | | 08 | am 08 | | | | | 09 | am 10 | | | | | 10 | | | | | | 11 | | | | | | 12 | pm 12 | | | | | 01 | pm 01 | | | | | 02 | pm 02 | | | | | 03 | am 03 | | | | | 04 | pm 04 | | | | | 05 | pm 05 | | | | | 06 | pm 06 | | | | | 07 | am 07 | | | | 2019/08/25 - 31 Day week month 2019/08/25 - 31 Copyright Copyright Date 8/00 Fri 8/01 Sat- You will see the schedule setup window. Refer to Scheduling the content by channel on page 24 for more information about A-F.
text_image
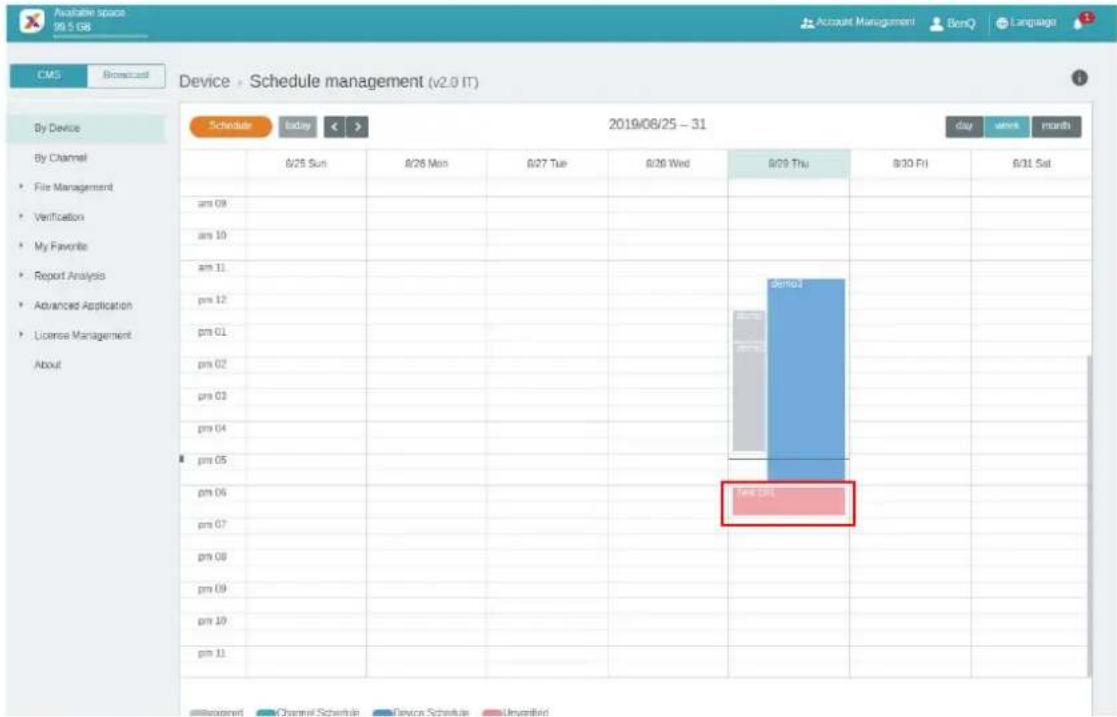
Create Schedule (0718) Schedule Name Test001 A Content Not selected Choose B Duration 2019-08-29 17 00 to 19 00 All Day C D Priority High Normal E Cycle F Day Every 1 Day Week End Submit Cancel- After all configuration is set, click Submit.
- You will see the schedule on the management page.
text_image
Available space 99.5 GB CMS Bromcast Device - Schedule management (v2.0 IT) By Device Schedule Eiding 2019/08/25 – 31 day week month By Channel File Management Verification My Favorite Report Analysis Advanced Application License Management About 0/25 Sun 8/26 Mon 0/27 Tue 0/28 Wed 0/29 Thu 0/30 Fri 0/31 Sat am 09 am 10 am 11 pm 12 pm 01 pm 02 pm 03 pm 04 pm 05 pm 06 pm 07 pm 08 pm 09 pm 10 pm 11 demid test 191- No matter by device or by channel, you can create and edit time blocks in the timetable by clicking and dragging.
Editing the device management structure
Watch demonstration video:
In X-Sign Manager, you can manage devices with hierarchical structures which make you control multiple devices with ease.
I. Click Add category to create a folder.
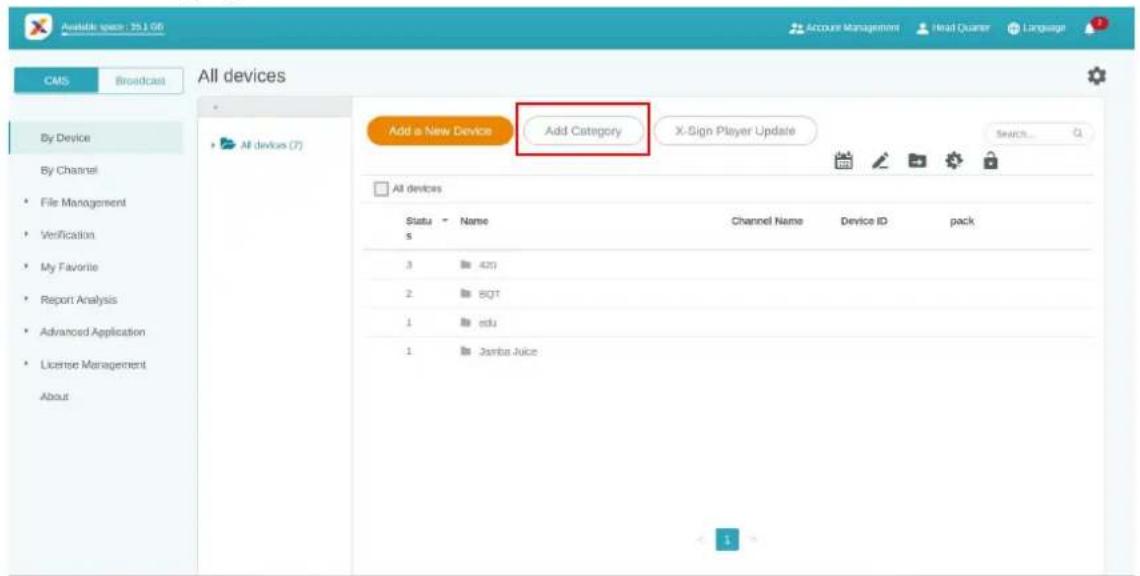
text_image
Available space: 25.1.66 CMS Broadcast All devices By Device Add a New Device Add Category X-Sign Player Update Search... By Channel File Management Verification My Favorite Report Analysis Advanced Application License Management About All devices Status Name Channel Name Device ID pack 3 420 2 8QT 1 edu 1 Jamba Juice 1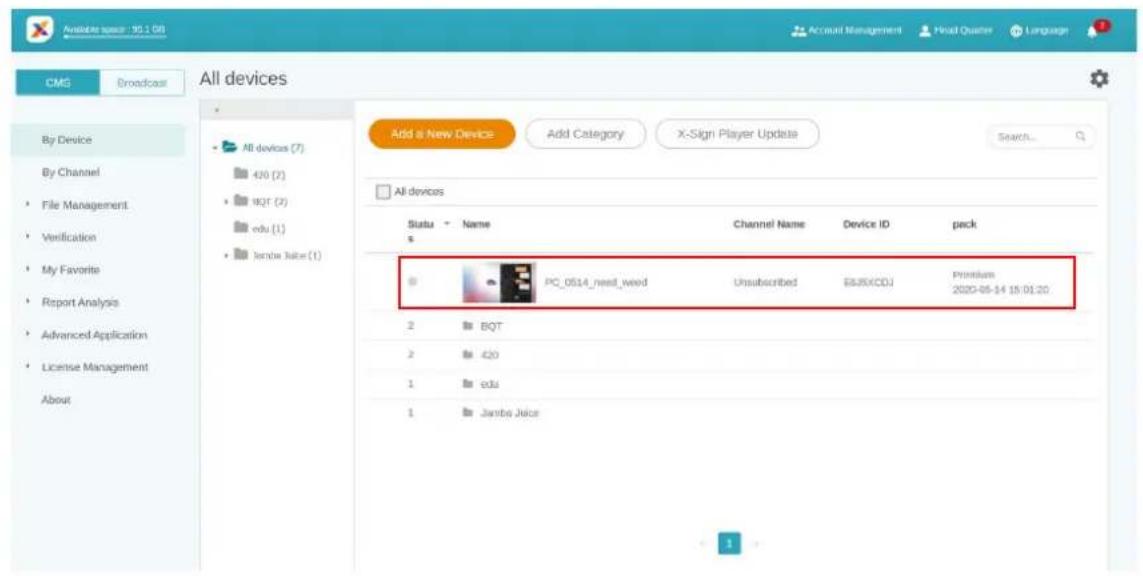
text_image
Available space: 10.1 GB CMG Broadcast All devices Add a New Device Add Category X-Sign Player Update Search... By Device By Channel File Management Verification My Favorite Report Analysis Advanced Application License Management About All devices All devices Add a New Device Add Category X-Sign Player Update Search... Status Name Channel Name Device ID pack PC_0514_next_weed Unsubscribed ESJXCOJ Premium 2 BQT 2 420 1 edu 1 Jambe Juice 1- You can see the folder structure on the left side. You can easily create a hierarchical folder structure.
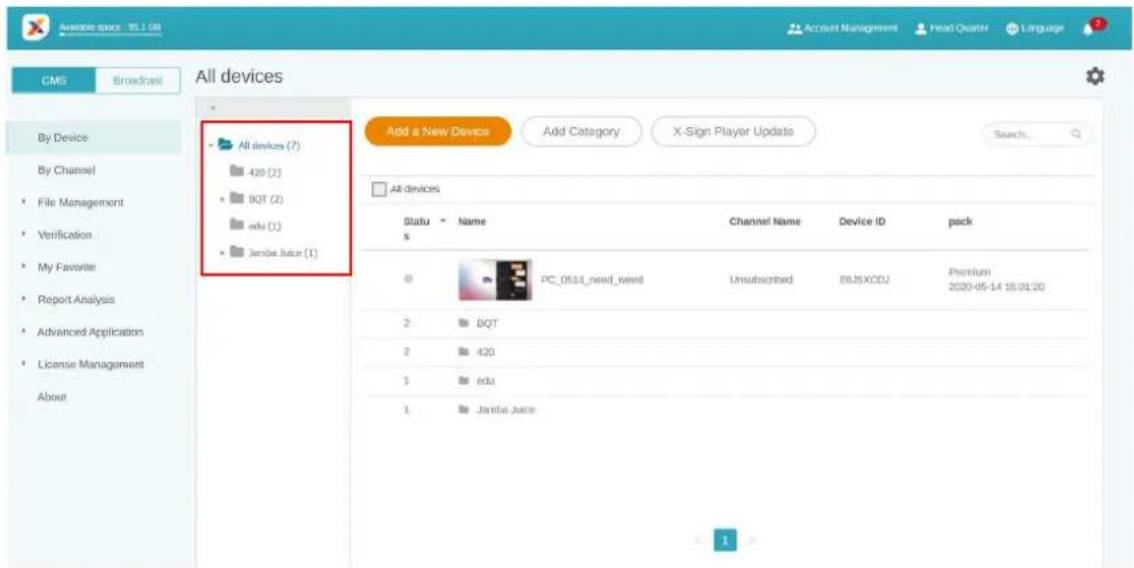
text_image
All devices Add a New Device Add Category X-Sign Player Update Search... By Device By Channel File Management Verification My Favorite Report Analysis Advanced Application License Management About All devices (7) 420 (2) BQT (2) edu (1) Janbe Juice (1) All devices Status Name Channel Name Device ID pack PC_0514_need_wued Unsubscribed BBJ5XCDJ Premium 2 BQT 2 420 1 edu 1 Janbe Juice 1- Click Add a New Device then set it to the related category.
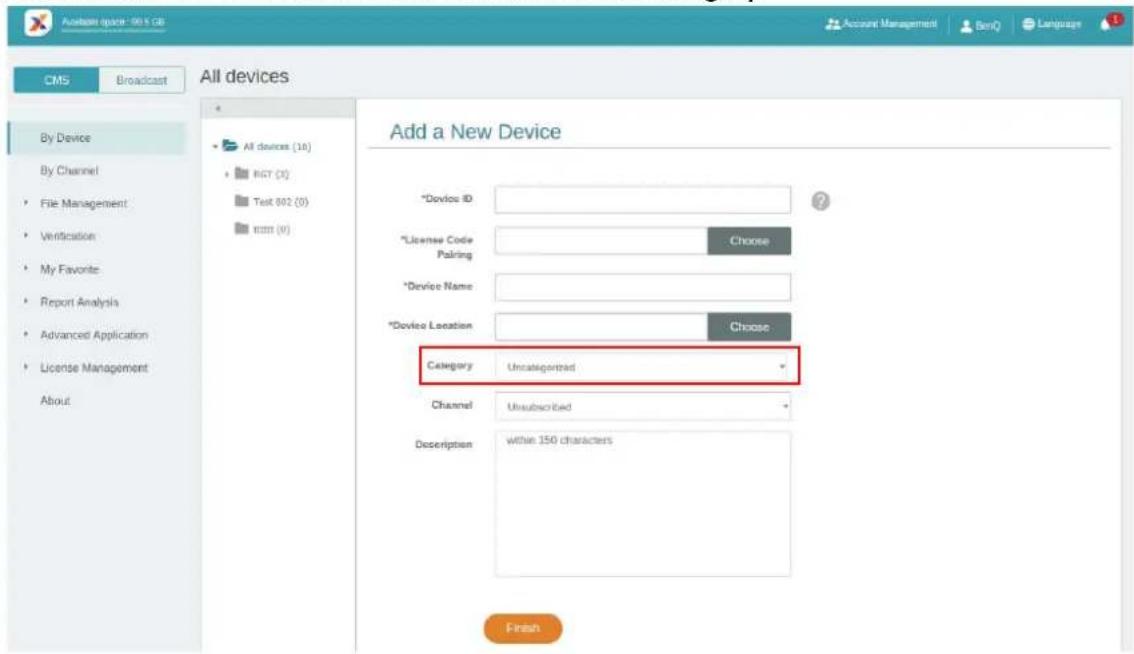
text_image
Anadotian space - 90.5 GB CMS Broadcast All devices By Device By Channel • File Management • Verification • My Favorite • Report Analysis • Advanced Application • License Management About All devices (16) RIGHT (X) Test 802 (0) MSSS (V) Add a New Device *Device ID *License Code Pairing Choose *Device Name *Device Location Choose Category Uncategorized Channel Unsubscribed Description within 150 characters Finish- You will see the device in the related folder.
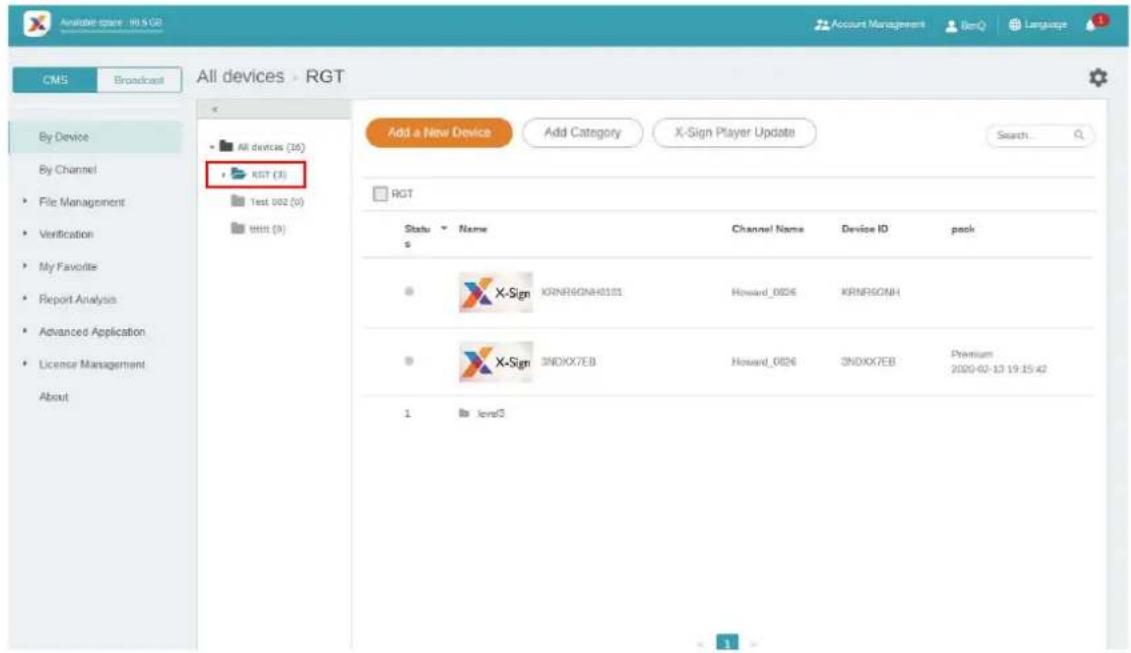
text_image
Available space - 91.5 GB CMS Broadcast All devices > RGT By Device By Channel File Management Verification My Favorite Report Analysis Advanced Application License Management About All devices (16) RGT (3) Test 002 (0) Title (3) Add a New Device Add Category X-Sign Player Update Search... RGT Status Name Channel Name Device ID pack X-Sign KRNRIGNH0101 Howard_0826 KRNRIGNH X-Sign SNDXX7EB Howard_0826 SNDXX7EB Premium 2020-02-17 19:15:42 1 Level3- For existing device(s), click to transfer it to the correct folder.
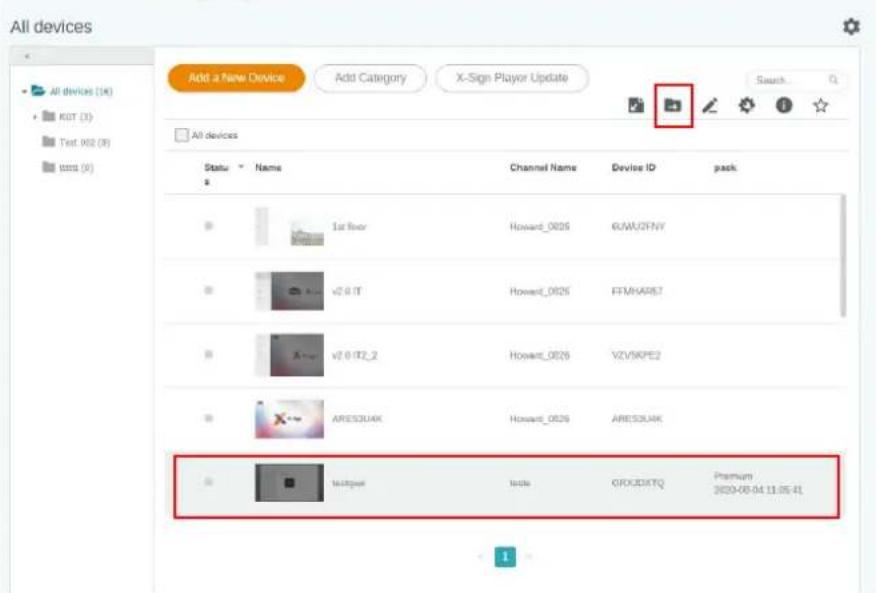
text_image
All devices Add a New Device Add Category X-Sign Player Update Search... All devices Status Name Channel Name Device ID pack 1st floor Howard_0026 GUMUDFNY v2.0 IT Howard_0026 EFMHARIS7 v2.0 IT2_2 Howard_0026 VZV5KPE2 ARES3U4K Howard_0026 ARES3U4K testpath testa QFDJXTQ Premium 2020-08-04 11:05:41- Now you can start to customize your device structure.
Pushing Real-Time Message to your BenQ Smart Signage remotely
Watch demonstration video:
With Real-Time Message on By Channel, you can easily push instant message to single or multiple devices. You don't need to edit content again.
I. Make sure that the device has already paired with X-Sign Manager.
2. You must create one channel and move device(s) into it.
- Go to By Channel, select the channel you want to push the message to. Then click ☐.
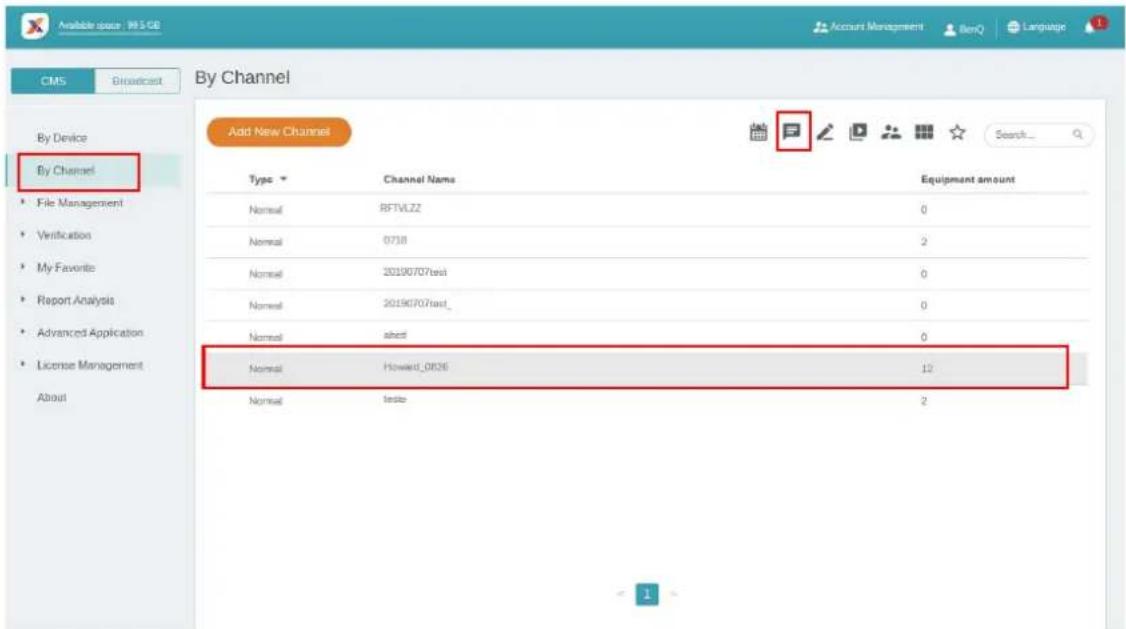
text_image
Available space: 99.5 GE CMS Broadcast By Channel By Device By Channel Add New Channel Type Channel Name Equipment amount Normal 8FTVLZZ 0 Normal 0738 2 Normal 20190707test 0 Normal 20190707test_ 0 Normal abest 0 Normal Howard_0836 12 Normal teste 2 1- You will see the message settings page.
A. Enter the message you want to push.
B. Choose the style and layout for the message.
C. Set the duration for playing the message. The maximum time to play the message is 24 hours.
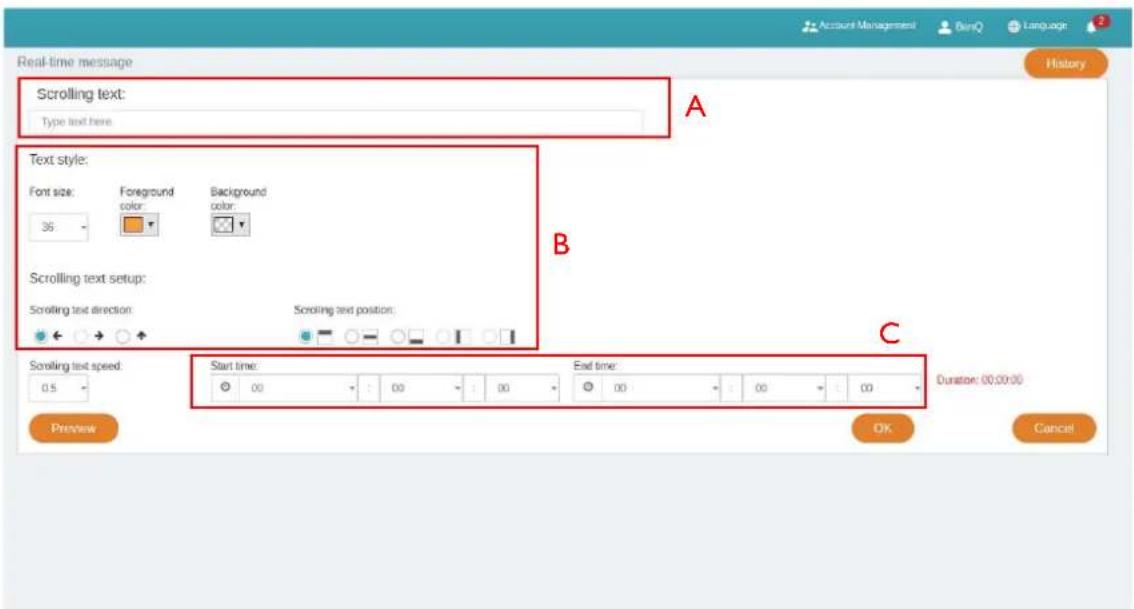
text_image
Real-time message Scrolling text: Type text here. Text style: Font size: Foreground Background color: color: 36 Scrolling text setup: Scrolling text direction: Scrolling text position: Scrolling text speed: Start time: End time: Duration: 00:00:00 0.5 Preview OK Cancel Account Management BinQ Language History- You can click Preview to see what the effect looks like on your display.
-
After you finish the setting, click OK.
-
You can click History to see the record of each real-time message event.
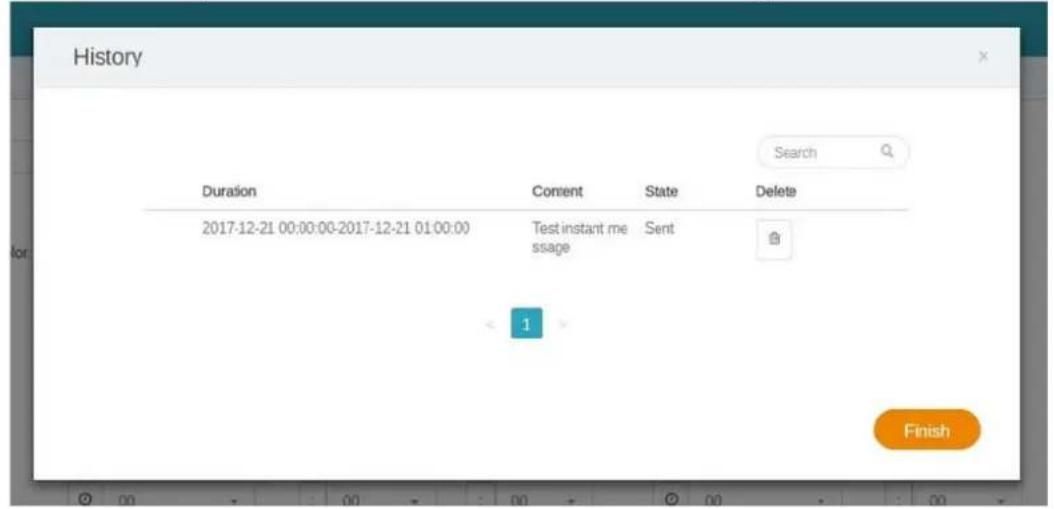
text_image
History Duration Content(State Delete 2017-12-21 00:00:00-2017-12-21 01:00:00 Test instant me ssage Sent 1 Finish- You can also see the status or even delete it.
Controlling the device remotely
Watch demonstration video:
With X-Sign Manager, you can control your devices remotely. The function is only compatible with BenQ Smart Signage Series' hardware.
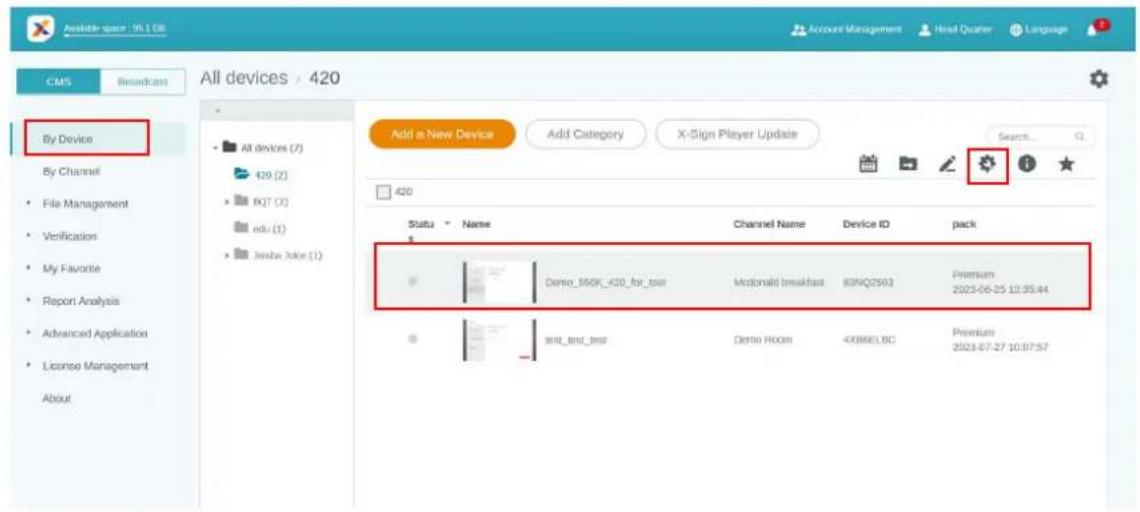
I. Make sure that your device is already paired with X-Sign Manager and is online.
2. Go to By Device, then choose the device you want to control, and click ✿.
text_image
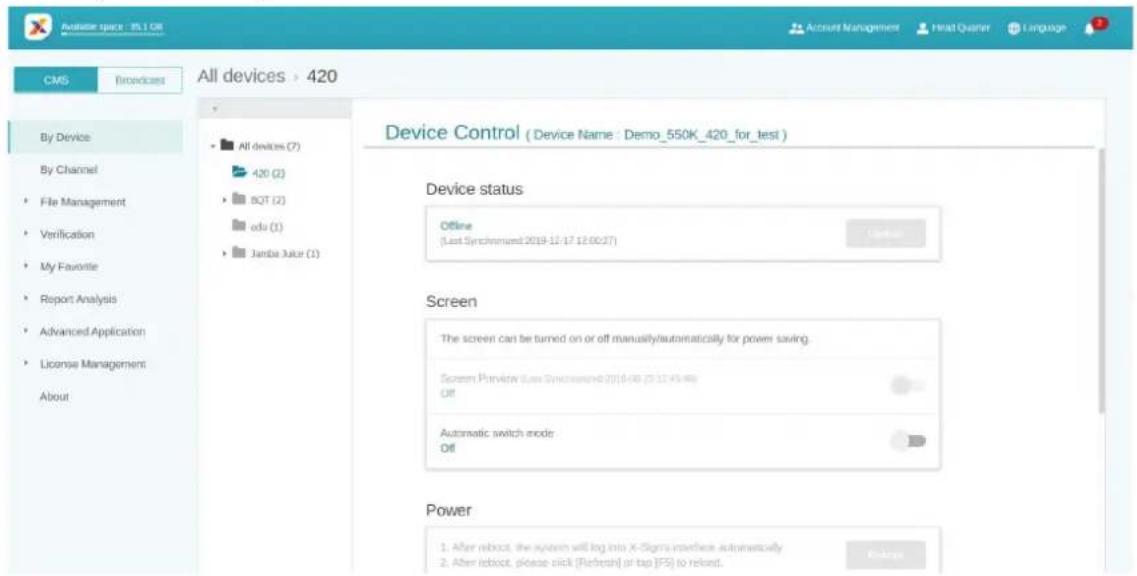
Available space : 96.1 GB CMS Broadcast All devices > 420 By Device All devices (7) 420 (2) BQT (2) edu (1) Jamba Date (1) Add a New Device Add Category X-Sign Player Update Search... 420 Status Name Channel Name Device ID pack Demo_850K_420_for_test McDonald breakfast 83NQ2503 Premium 2023-06-25 10:35:44 test_test_test Demo Room 4X86ELBC Premiums 2023-07-27 10:37:57- You will see the Device control page. You can control Device status/Screen/Power/Voice/Others (Clear Data).
text_image
Analog space : 85.1 OR CMS Broadcasts All devices > 420 By Device By Channel • File Management • Verification • My Favorite • Report Analysis • Advanced Application • License Management About All devices (7) 420 (2) BQT (2) edu (1) Jamba Jute (1) Device Control ( Device Name : Demo_550K_420_for_test ) Device status Offline (Last Synchronized 2019-12-17 12:00:27) Screen The screen can be turned on or off manually/automatically for power saving. Screen Preview Last Synchronized 2016-08 (2:12:45:48) Off Automatic switch mode Off Power 1. After reboot, the system will log into X-Signs interface automatically. 2. After reboot, please click [Refresh] or tap [FS] to reload. Package- You have to reload this page after setting the device to get the latest status.
Updating device Player remotely
Watch demonstration video:

With X-Sign Manager, you can easily update X-Sign Player on your devices remotely.
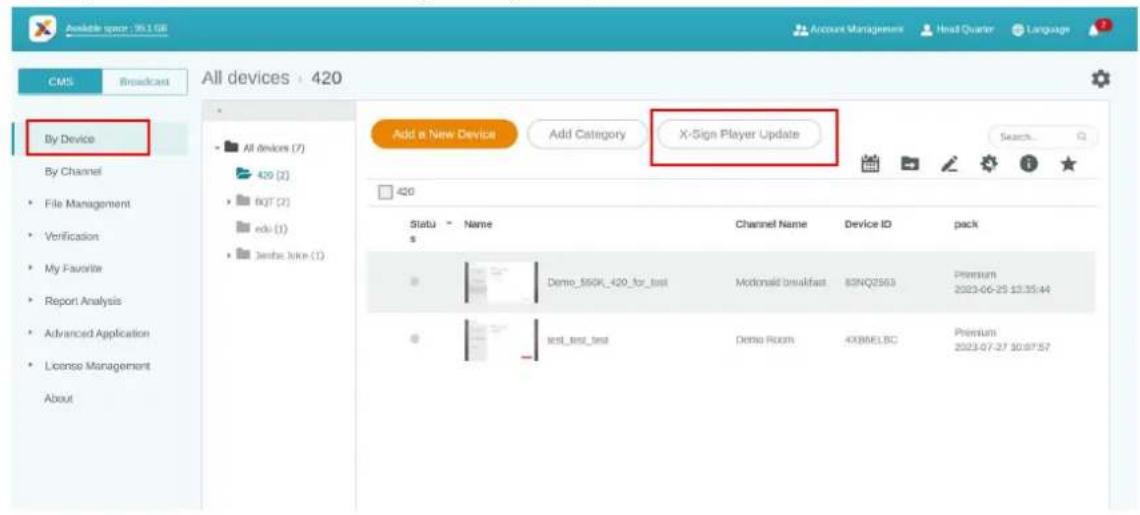
I. Go to By Device, then click X-Sign Player Update.
text_image
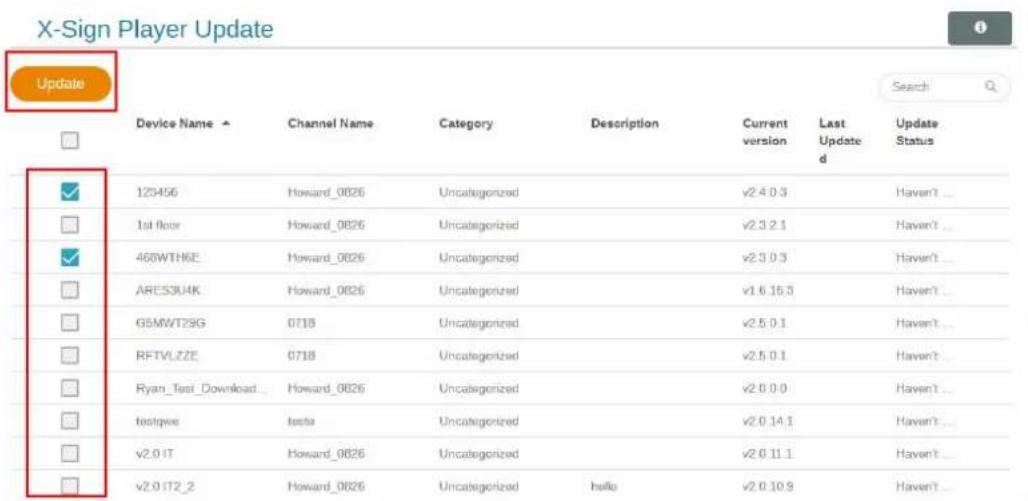
Available space: 95.1 GB CMS Broadcast All devices: 420 By Device All devices (7) 420 (2) BDT (2) edu (1) Dentac Jike (1) Add a New Device Add Category X-Sign Player Update Search... Status Name Channel Name Device ID pack Demo_550K_420_for_test Mcdonald breakfast 83NQ2563 Premium 2023-06-25 13:35:44 test_test_test Demo Room 4X8MELBC Premium 2023-07-27 10:07:57- You will see a list of devices available to be updated. Select the device(s) you want to update.
text_image
X-Sign Player Update Update Device Name ▲ Channel Name Category Description Current version Last Updated Update Status 123456 Howard_0826 Uncategorized v2.4.0.3 Haven't ... 1st floor Howard_0826 Uncategorized v2.3.2.1 Haven't ... 460WTHKE Howard_0826 Uncategorized v2.3.0.3 Haven't ... ARES3U4K Howard_0826 Uncategorized v1.6.15.3 Haven't ... G5MWT29G 0718 Uncategorized v2.5.0.1 Haven't ... RFTVLZZE 0718 Uncategorized v2.5.0.1 Haven't ... Ryan_Test_Download Howard_0826 Uncategorized v2.0.0.0 Haven't ... testpre tests Uncategorized v2.0.14.1 Haven't ... v2.0.1T Howard_0826 Uncategorized v2.0.11.1 Haven't ... v2.0.1T2_2 Howard_0826 Uncategorized hello v2.0.10.9 Haven't ...- During updating, the playing process will temporarily be stopped.
- After the device is updated successfully, it will be removed from the list. The device will be updated to the latest version of Player.
- If the device is offline, the system will wait until the device is online and send the update request.
- If you want to update Player, you have to reboot the device or the device can't play content normally. Go to Device control page and press Reboot under Power. Refer to Controlling the device remotely on page 32 for more information.
Managing the calling system
I. To manage the calling system, select Advanced Application > Calling System.
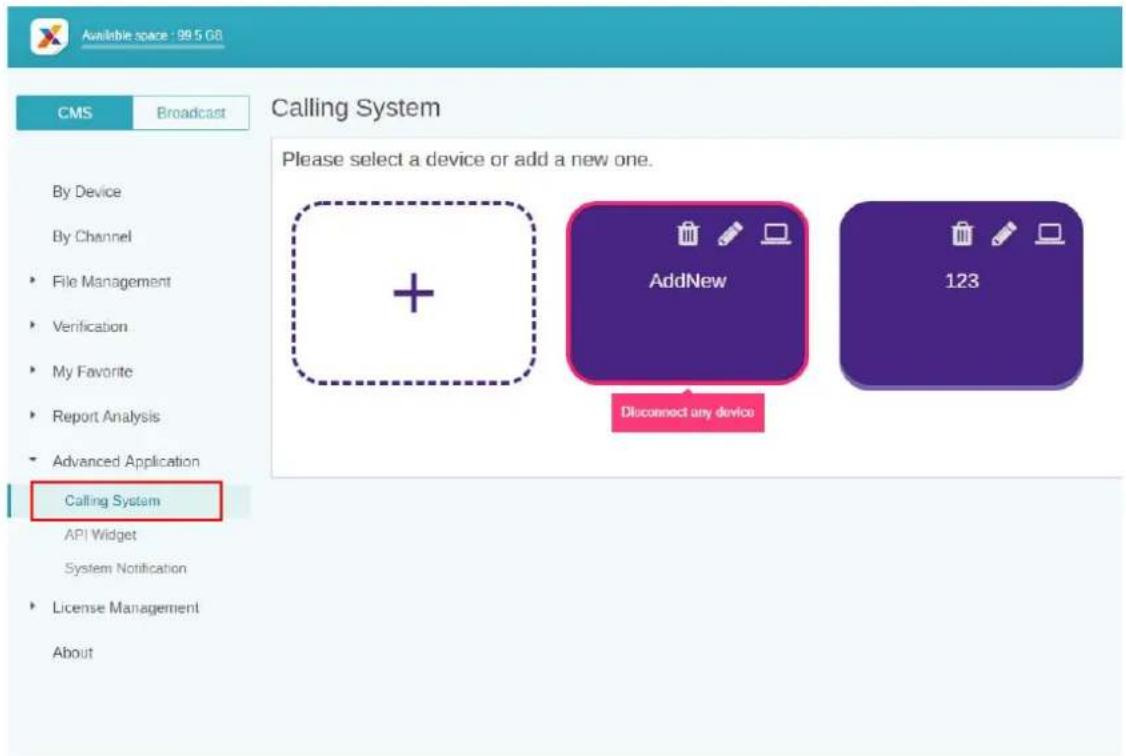
text_image
Available space: 99.5 GB CMS Broadcast Calling System By Device By Channel File Management Verification My Favorite Report Analysis Advanced Application Calling System API Widget System Notification License Management About Please select a device or add a new one. AddNew 123 Dlucetect any device- Click the panel to manage the calling number.
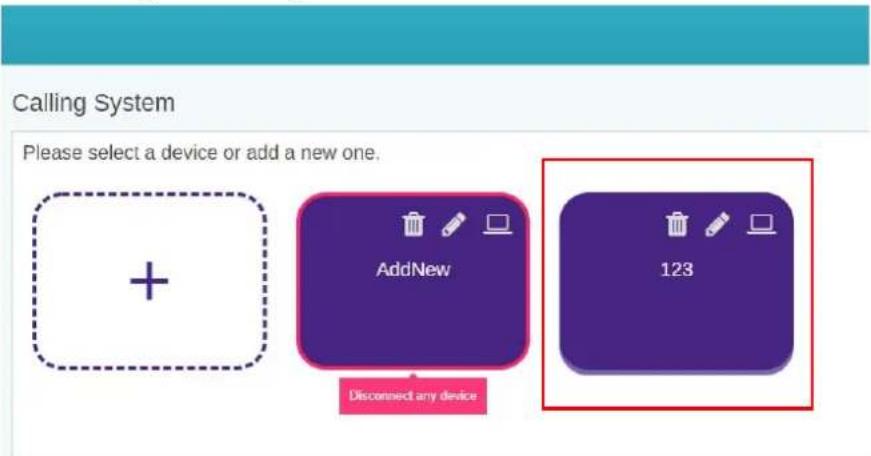
text_image
Calling System Please select a device or add a new one. AddNew 123 Disconnect any device- Enter the corresponding number on the queuing widget in X-Sign Designer for the panel and click Next.
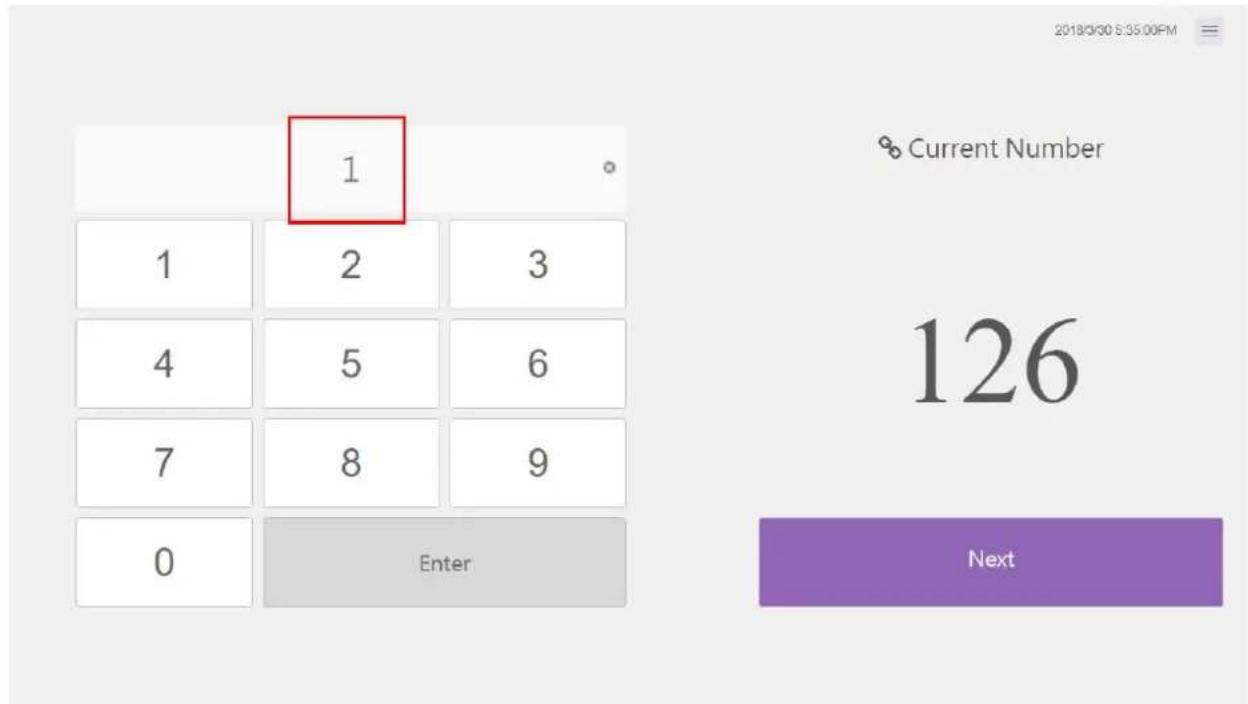
text_image
2018/03/30 5:35:00PM Current Number 1 2 3 4 5 6 7 8 9 0 Enter 126 Next- The current number to the panel is shown on the screen.
Current Number
127
Next
- You can also edit the number by clicking other function buttons alert sound, there will be a sound when the number changed.

. By selecting Setting
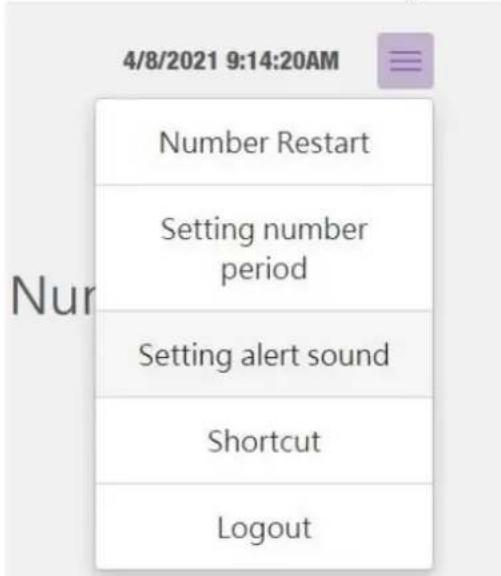
text_image
4/8/2021 9:14:20AM Number Restart Setting number period Setting alert sound Shortcut Logout- To restart the queuing number, select Number Restart and click OK.
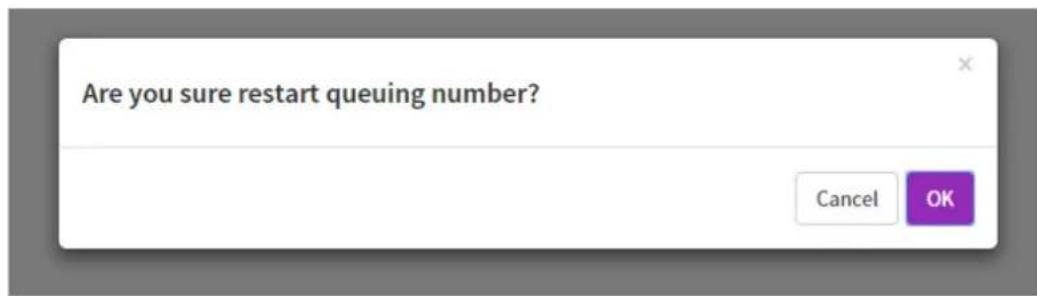
text_image
Are you sure restart queuing number? Cancel OK- The queuing number is restarted.
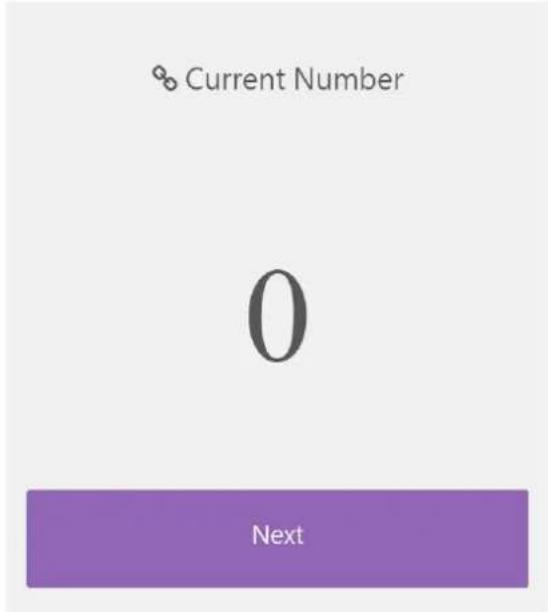
text_image
Current Number 0 Next- To set the period for the next queuing number, select Setting number period, input the number, and click OK.
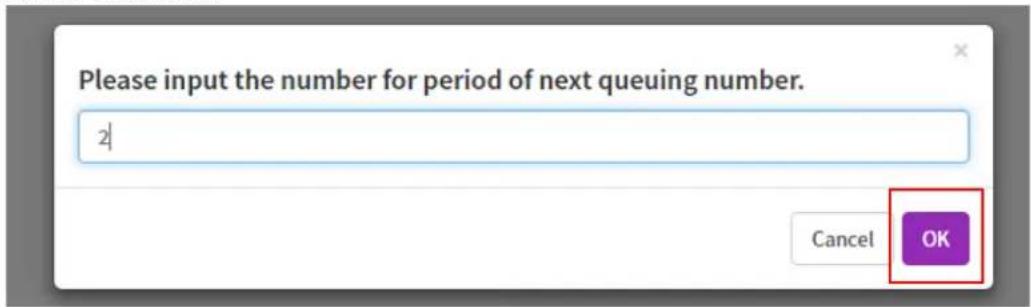
text_image
Please input the number for period of next queuing number. 2 Cancel OK- The number period is set.
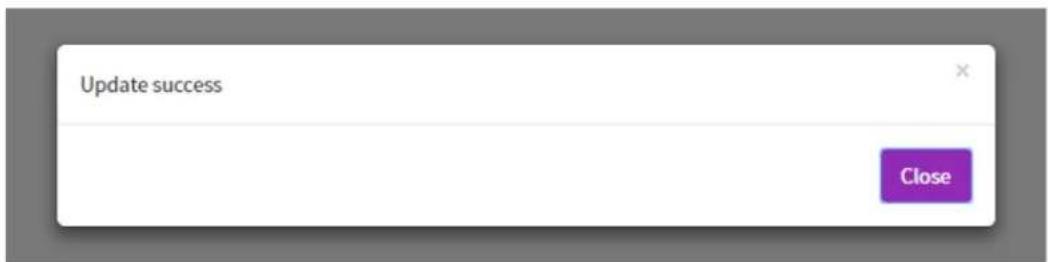
text_image
Update success Close- Select Shortcut for more information about how to add a shortcut to the desktop.
II. To log out, select Logout and click OK.
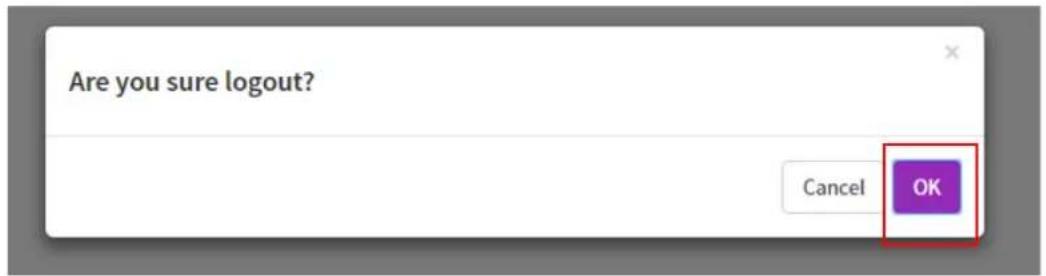
text_image
Are you sure logout? Cancel OKNote:
"Equipment status error" message occurs when the equipment is not online.
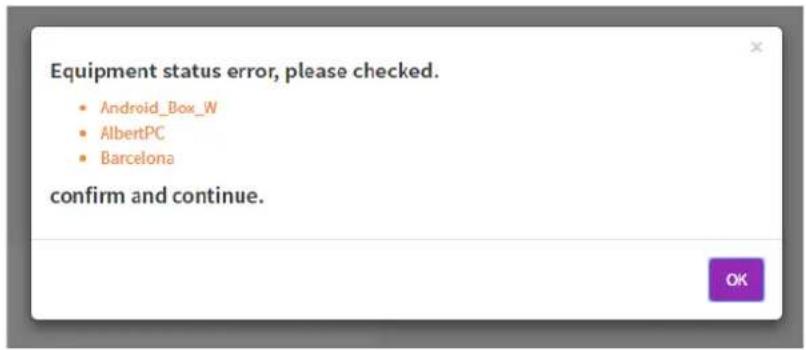
text_image
Equipment status error, please checked. • Android_Box_W • AlbertPC • Barcelona confirm and continue.Creating an API table in X-Sign Manager
I. To create an API table, select Advanced Application > API Widget.
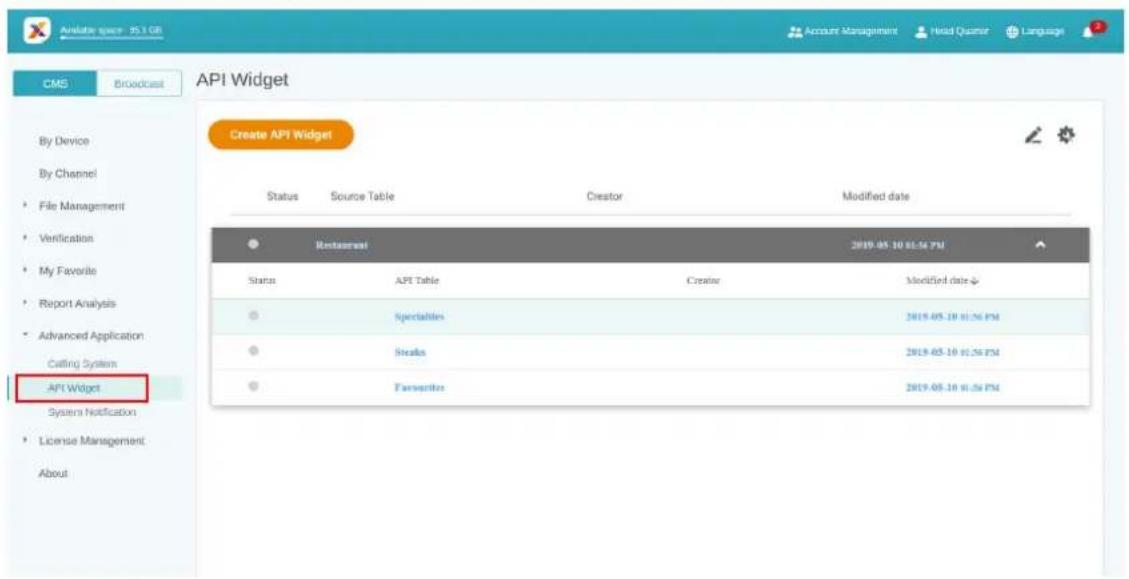
text_image
Apache Space - 95.1 GB CMS Broadcast API Widget Create API Widget By Device By Channel File Management Verification My Favorite Report Analysis Advanced Application Calling System API Widget System Notification License Management About Status Source Table Creator Modified date Restaurant 2019-05-10 01:34 PM Status API Table Creator Modified date Specifications 2019-05-10 01:34 PM Skills 2019-05-10 01:34 PM Favorites 2019-05-10 01:34 PM2. Create the API Widget configuration.
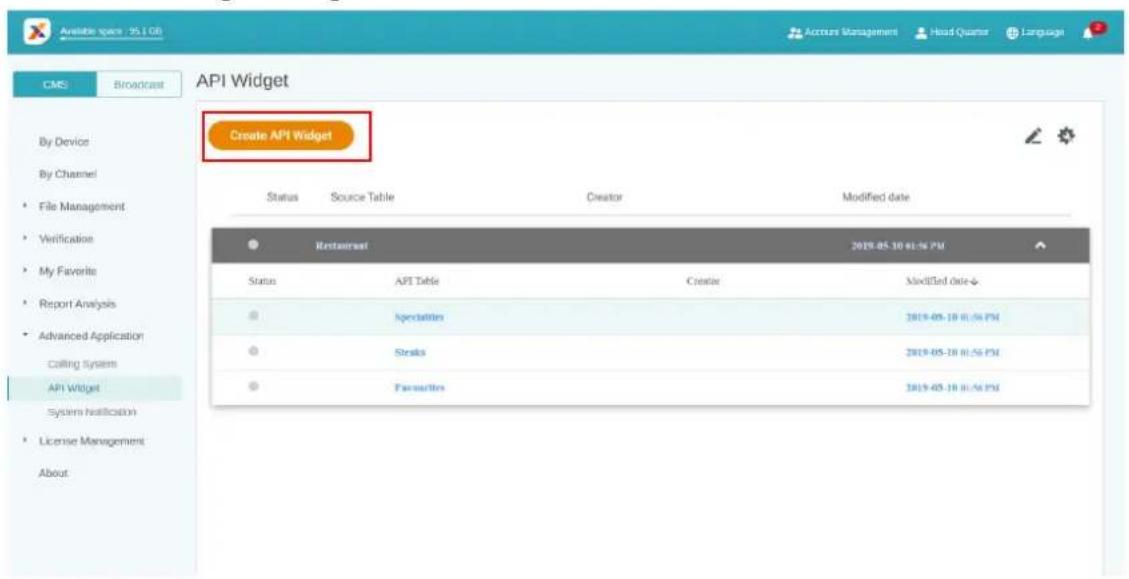
text_image
Available space: 95.1 GB CMS Broadcast API Widget By Device By Channel File Management Verification My Favorite Report Analysis Advanced Application Calling System API Widget System notification License Management About Create API Widget Status Source Table Creator Modified date Restaurant 2019-05-10 01:56 PM Status API Table Create Modified Date Istanbul 2019-05-10 01:56 PM Straks 2019-05-10 01:56 PM Favorites 2019-05-10 01:56 PM- Enter the settings of the configuration.
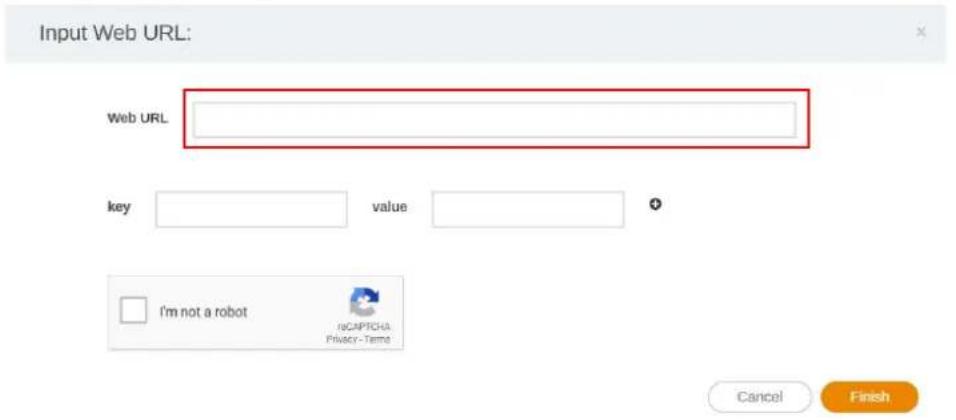
text_image
Input Web URL: Web URL key value I'm not a robot IsCAPTCHA Privacy-Terms Cancel Finish- Create a source table for API.
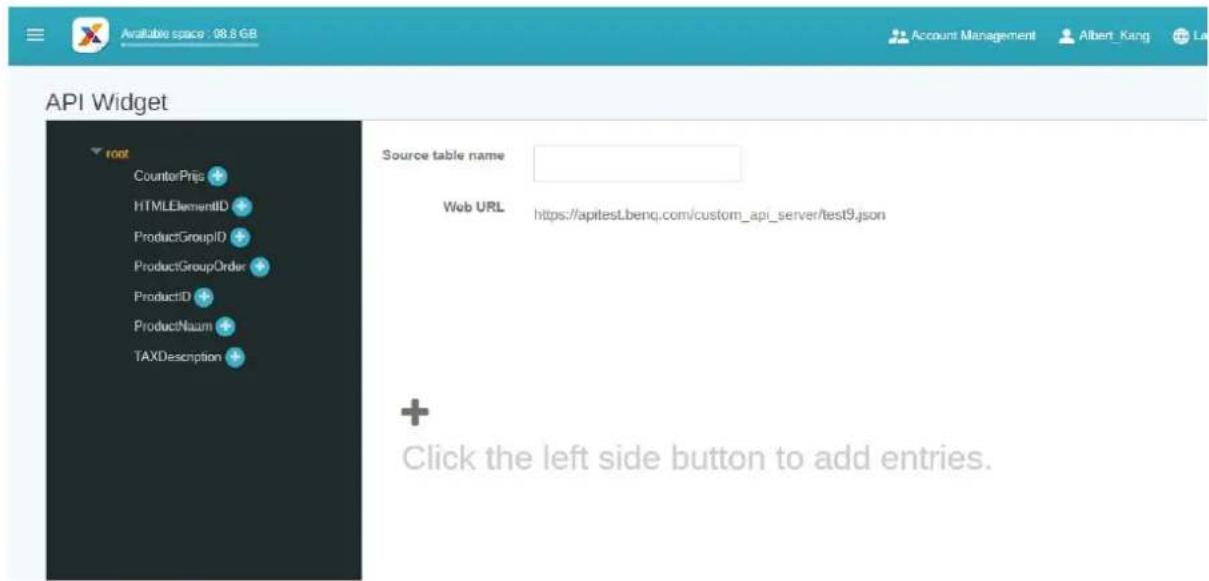
text_image
Available space : 08.8 GB Account Management Albert_Kang La API Widget root CounterPris + HTMLElementID + ProductGroupID + ProductGroupOrder + ProductID + ProductNaum + TAXDescnption + Source table name Web URL https://apitest.benq.com/custom_api_server/test9.json + Click the left side button to add entries.- Select the tags from Json to the source table. Click Save to continue the creating process.
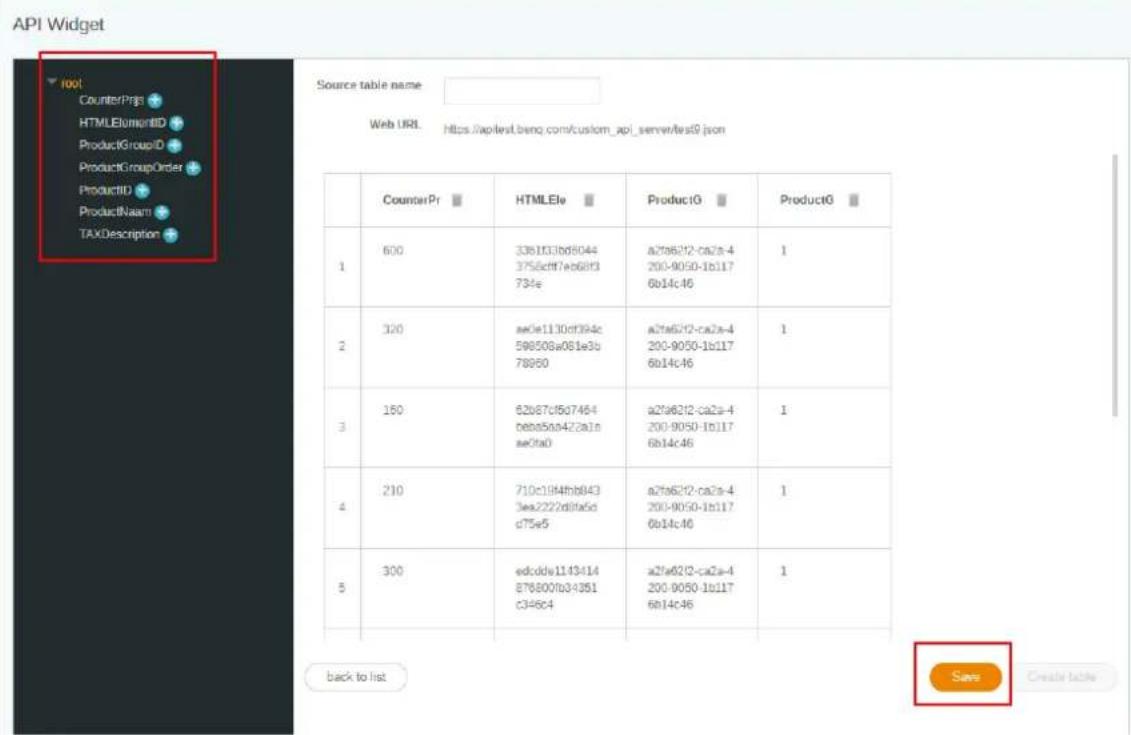
text_image
API Widget root CounterPrjs HTMLElementID ProductGroupID ProductGroupOrder ProductID ProductNaam TAXDescription Source table name: Web URL: https://apiText.beng.com/custom_api_server/tes9.json CounterPr HTMLEle ProductG ProductG 1 600 33b1f03bd8044 375acf7eb68f3 734e 27a62f2-ca2a-4 200-9050-1b117 6b14c46 1 2 320 ae0e1130df394c 598508a081e3b 78960 27a62f2-ca2a-4 200-9050-1b117 6b14c46 1 3 160 62b87cfd67464 6b0a5b0422a1a ae0ta0 27a62f2-ca2a-4 200-9050-1b117 6b14c46 1 4 210 710c19f4fb843 3ea2222d0fa5d d75e5 27a62f2-ca2a-4 200-9050-1b117 6b14c46 1 5 300 aedcde1143414 878800fb34351 c346c4 27a62f2-ca2a-4 200-9050-1b117 6b14c46 1 back to list Save Credit table- A warning message will pop up. Click Yes to continue.
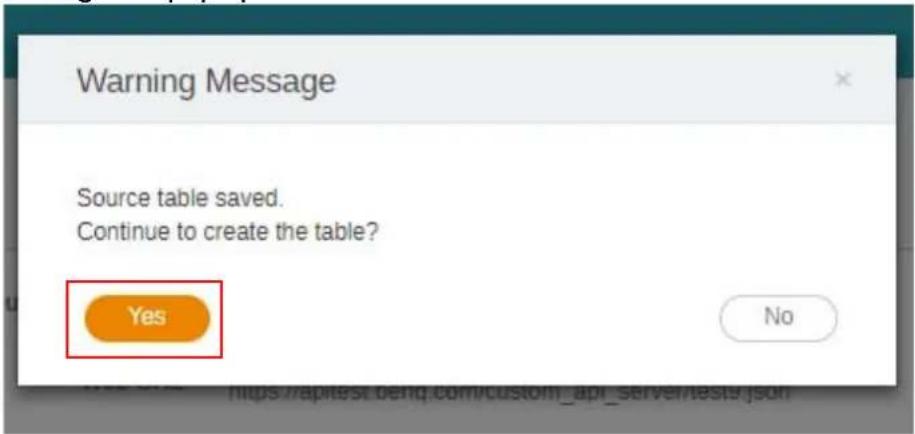
text_image
Warning Message Source table saved. Continue to create the table? Yes No- You can preview the selected range of the table. Click next to continue.
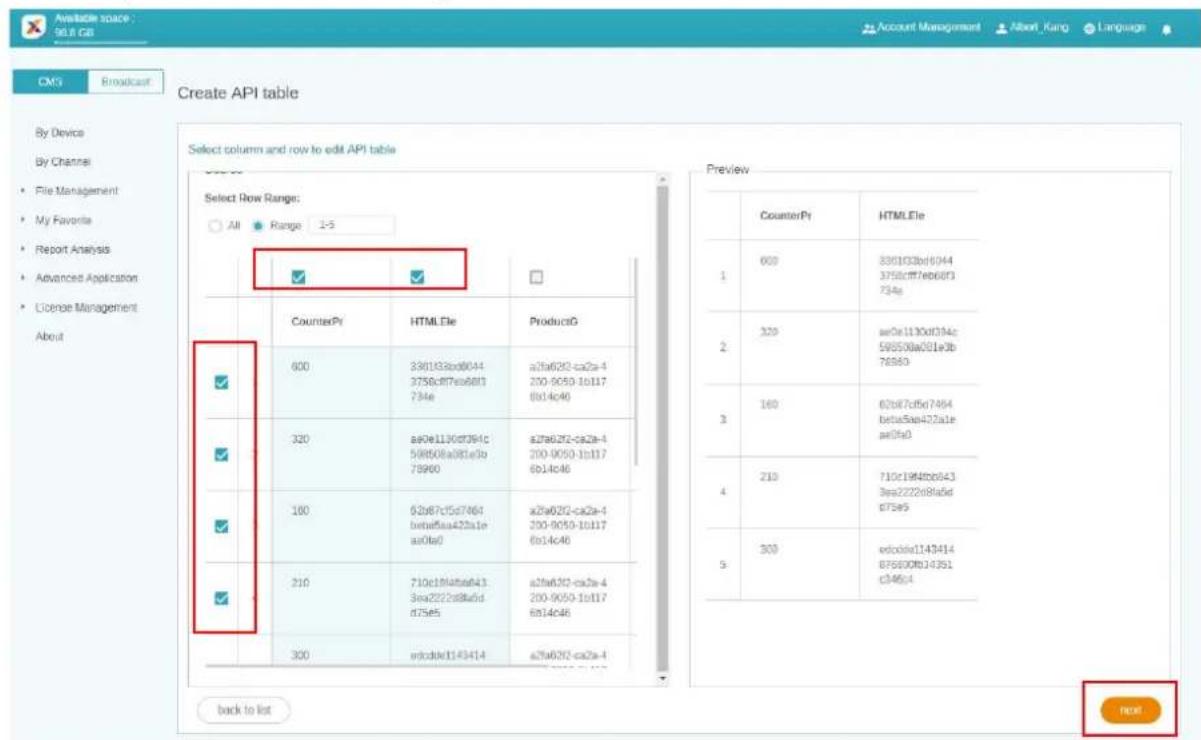
text_image
Available space 50.8 GB Account Management Albert Kung Language CMG Broadcast Create API table By Device By Channel File Management My Favorite Report Analysis Advanced Application License Management About Select column and row to edit API table Select Row Range: All Range 1-5 Preview CounterPr HTMLEle ProductG 600 330133bd0044 a2fa022-ca2a-4 375c8f7eb68f3 734e 320 aa0a1130d394c 598500a01e3b 78980 320 aa0e1130d394c 598508a081e3b 79980 a2fa022-ca2a-4 200-9050-1b117 6b14c46 100 62b87c15d7464 a2fa022-ca2a-4 beta5aa420ale ae0fa0 300-9050-1b117 6b14c46 210 710c194ba643 a2fa022-ca2a-4 3ea222288a5dd 675e5 300 ecdcde1143414 a2fa022-ca2a-4 675e5 Back to list next8. The source table is successfully created.
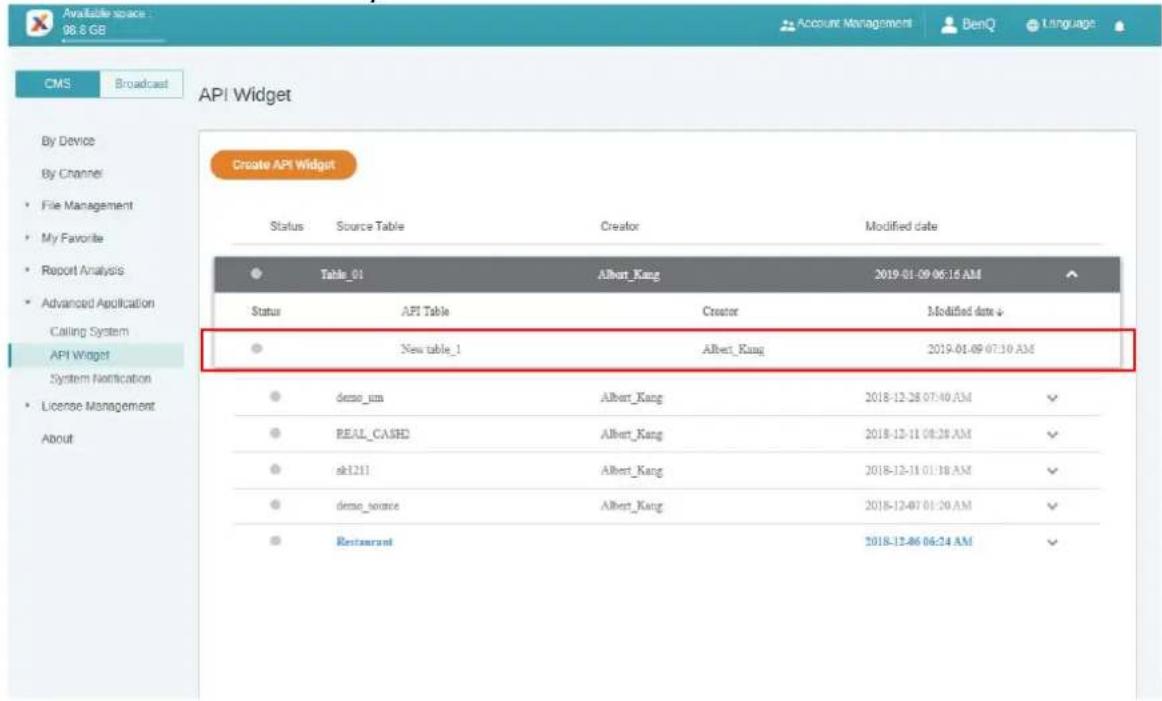
text_image
Available space 08.8 GB CMS Broadcast API Widget By Device By Channel • File Management • My Favorite • Report Analysis • Advanced Application Calling System API Widget System Notification • License Management About Create API Widget Status Source Table Creator Modified date Table_01 Albert_Kang 2019-01-09 06:15 AM Status API Table Creator Modified date ↓ • New table_1 Albert_Kang 2019-01-09 07:10 AM • demo_sum Albert_Kang 2018-12-28 07:40 AM ✓ • REAL_CASH2 Albert_Kang 2018-12-11 08:28 AM ✓ • sk1211 Albert_Kang 2018-12-11 01:18 AM ✓ • demo_source Albert_Kang 2018-12-07 01:30 AM ✓ • Restaurant 2018-12-06 06:24 AM ✓Setting Verification
Watch demonstration video:
Verification in X-Sign Manager functions to control content and schedules to be played on X-Sign Player.
Files
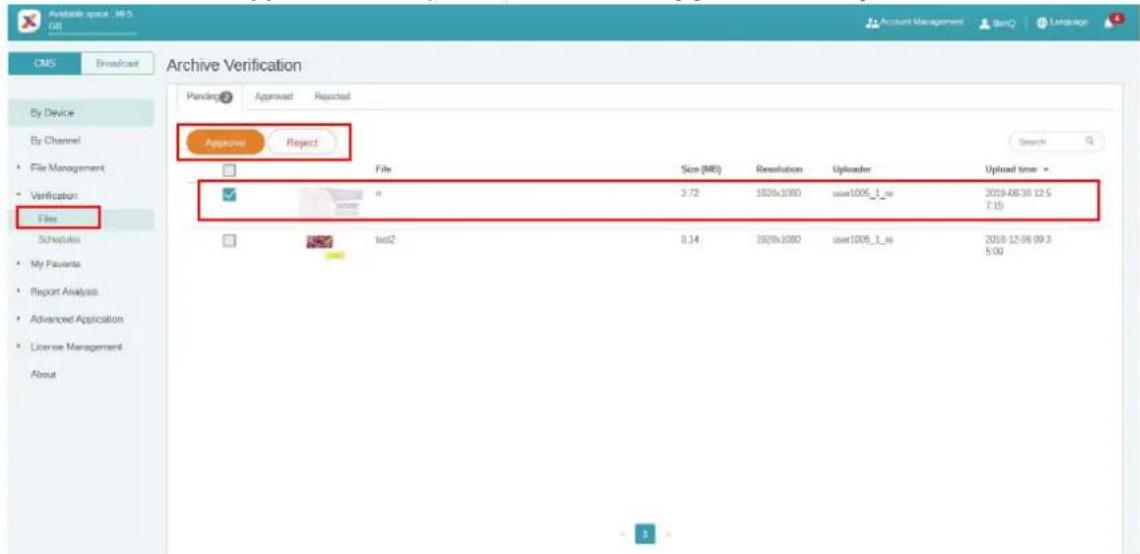
Before a file is delivered publicly, it has to be checked by the administrator. Only when the administrator clicks Approve can the file be added to the schedule.
To verify a file:
I. Go to Verification > Files to check the files uploaded via X-Sign Designer.
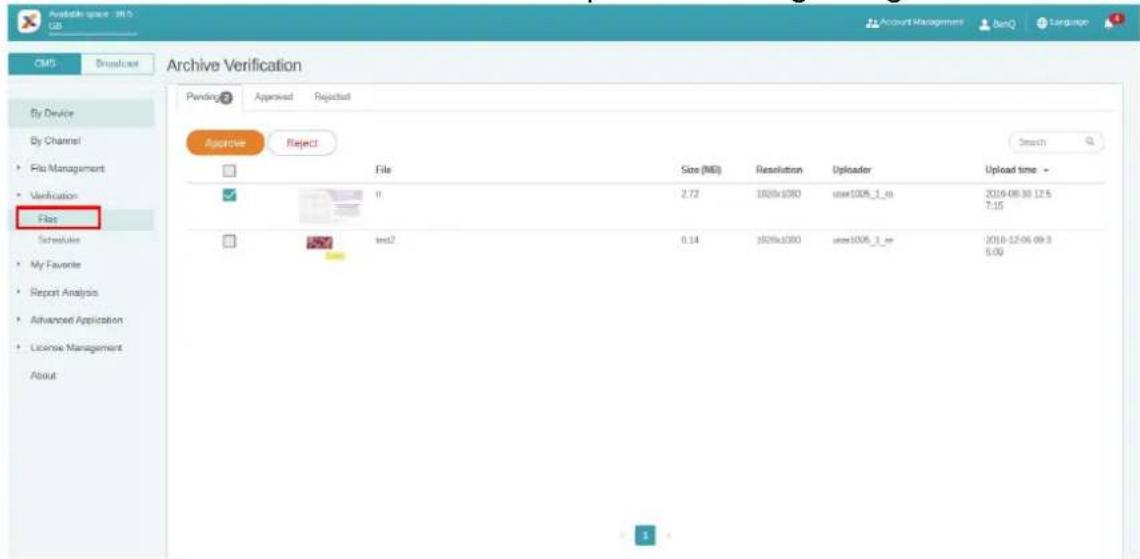
text_image
Available space - 98.5 GB CMS Broadcast Archive Verification Pending Approved Rejected By Device By Channel File Management Verification File Schedules My Favorite Report Analysis Advanced Application License Management About Approve Reject File Size (MB) Resolution Uploader Upload time 11 2.72 100%x1000 Pirus100%_1_nir 2010-08-30 12:5 7:15 test2 0.14 100%x1000 Pirus100%_1_nir 2010-12-06 09:3 5:002. Select the file to be approved or rejected, then click Approve or Reject.
text_image
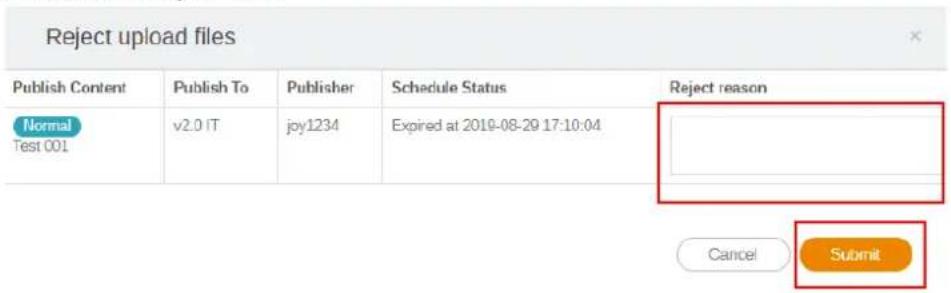
Available space - 14.0 OS CMS Broadcast Archive Verification By Device By Channel File Management Verification Files Schedules My Pauants Report Analysis Advanced Application License Management About Approve Reject File Size (MB) Resolution Uploader Upload time * ✓ n 2.72 100x1080 user1005_1_w 2019-08-38 12:5 7:15 test2 0.14 100x1080 user1005_1_re 2018-12-06 09:3 5:003. You need to fill in the reason you reject the file to be added to the schedule. This is a required field. Click Submit to proceed.
text_image
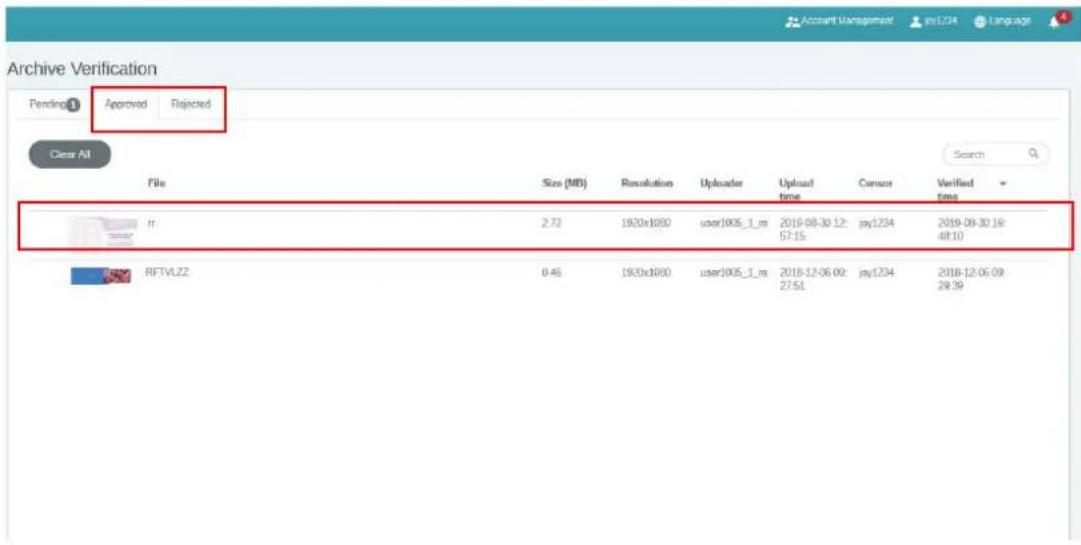
Reject upload files Publish Content Publish To Publisher Schedule Status Reject reason Normal v2.0 IT joy1234 Expired at 2019-08-29 17:10:04 Test 001 Cancel Submit- The file now is under the approved (or rejected) section.
text_image
Archive Verification Pending: Approved Rejected Clear All File Size (MB) Resolution Uploader Upload time Cursor Verified time n 2.72 1930x1080 user1005_1_m 2018-08-30 12:57:15 pyj1234 2018-09-30 16:48:10 RFTVLZZ 0.46 1930x1080 user1005_1_m 2018-12-06 00:27:51 pyj1234 2018-12-06 09:28:39Schedules
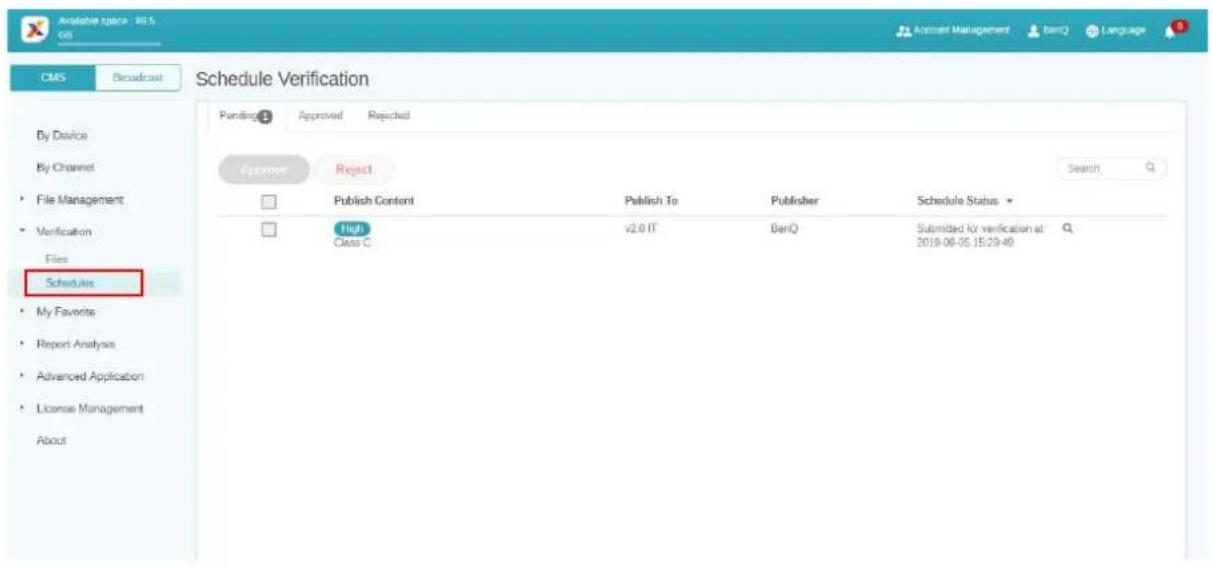
After a scheduled time is set, it has to be checked by the administrator. If the scheduled time is not appropriate, the administrator can reject the schedule. Only when the administrator clicks Approve can the file be played at the scheduled time on X-Sign Player.
To verify a schedule:
I. Go to Verification > Schedules to check the schedule(s).
text_image
Available space: 86.5 CMS Broadcast Schedule Verification Pending Approved Rejected By Device By Channel File Management Verification Files Schedules My Favorite: Report Analysis Advanced Application License Management About Approver Reject Publish Content Publish To Publisher Schedule Status High v2.0 IT BenQ Submitted for verification at Class C 2019-08-05 15:23:40- Select the schedule to be approved or rejected, then click Approve or Reject.
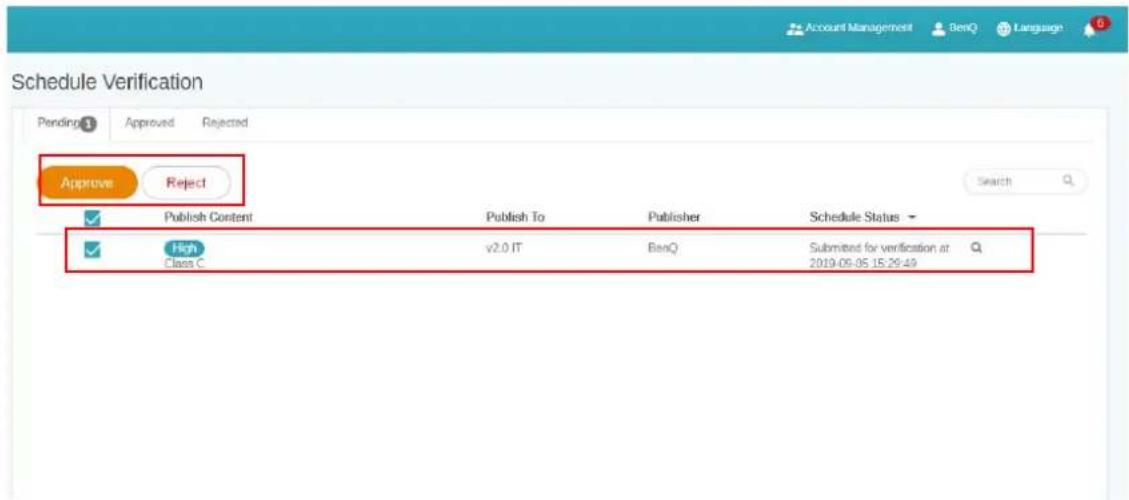
text_image
Schedule Verification Pending Approved Rejected Approve Reject Publish Content Publish To Publisher Schedule Status High Class C v2.0 IT BenQ Submitted for verification at 2019-09-05 15:29:49- You need to fill in the reason you reject the scheduled time. This is a required field. Click Submit to proceed.
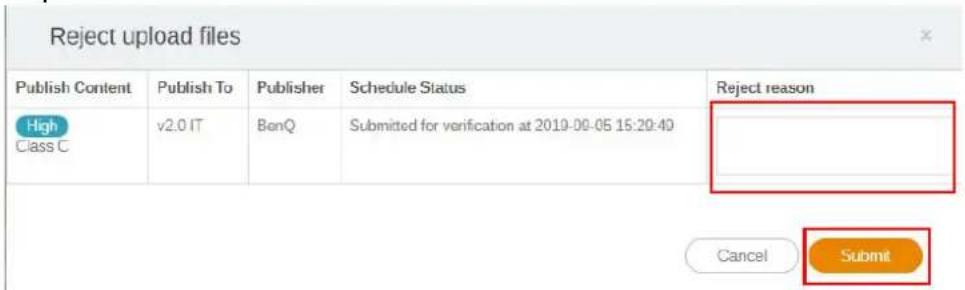
text_image
Reject upload files Publish Content High Class C Publish To v2.0 IT Publisher BonQ Schedule Status Submitted for verification at 2019-09-05 15:20:40 Reject reason Cancel Submit- The file now is under the approved (or rejected) section.
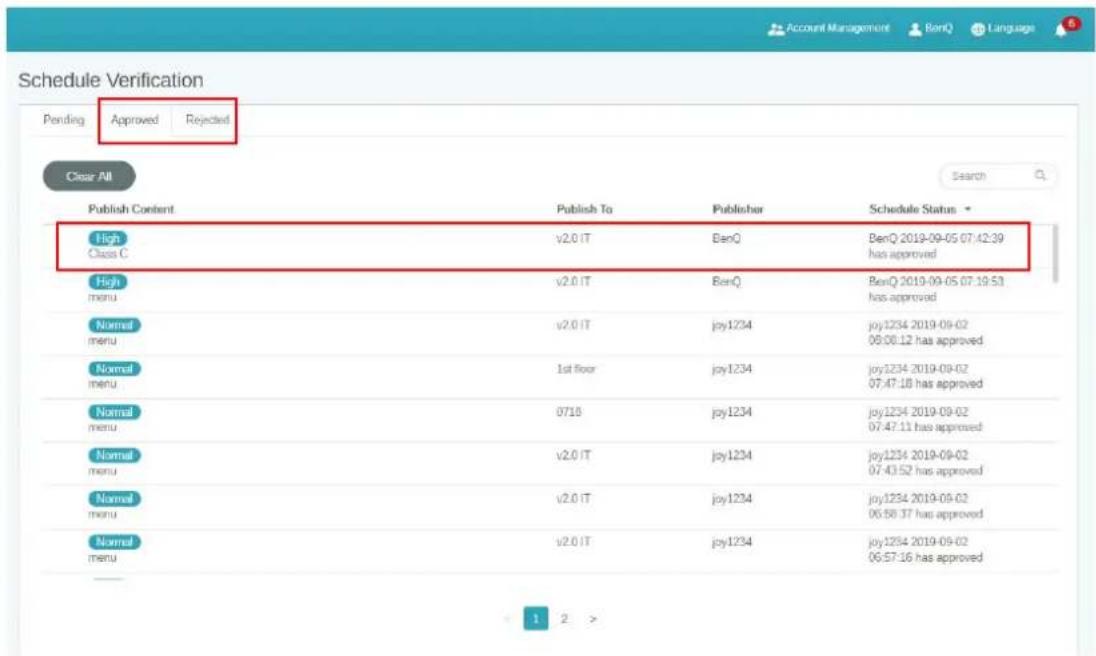
text_image
Schedule Verification Pending Approved Rejected Close All Publish Content Publish To Publisher Schedule Status High V2.0 IT BenQ BenQ 2019-09-05 07:42:39 Class C has approved High V2.0 IT BenQ BenQ 2019-09-05 07:19:53 menu has approved Normal V2.0 IT joy1234 joy1234 2019-09-02 menu 08:00:12 has approved Normal 1st floor joy1234 joy1234 2019-09-02 menu 07:47:18 has approved Normal 07:18 joy1234 joy1234 2019-09-02 menu 07:47:11 has approved Normal V2.0 IT joy1234 joy1234 2019-09-02 menu 07:43:52 has approved Normal V2.0 IT joy1234 joy1234 2019-09-02 menu 06:58:37 has approved Normal V2.0 IT joy1234 joy1234 2019-09-02 menu 06:57:16 has approved- You can click to preview the file uploaded from X-Sign Designer.
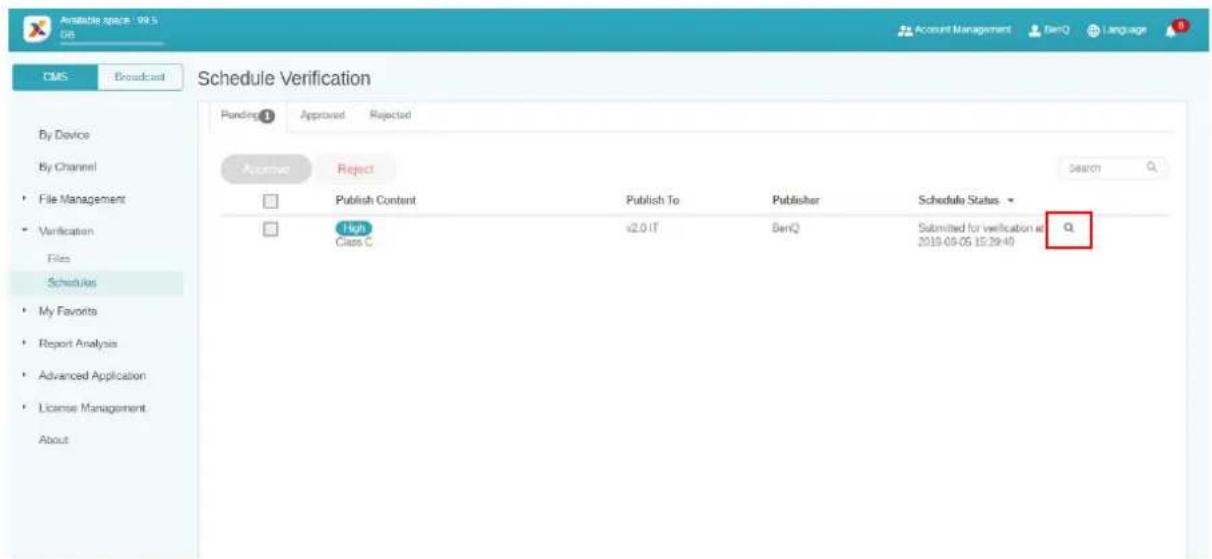
text_image
Available space: 99.5 Get CMS - Broadcast Schedule Verification Pending: Approved Rejected By Device By Channel File Management Verification Files Schedules My Favorites Report Analysis Advanced Application License Management About Revenue Reject Publish Content Publish To Publisher Schedule Status High Class C v2.0 IT BenQ Submitted for verification at Q 2019-09-05 15:29:40- You can view the file on X-Sign Player and edit schedule. Click Approve and Publish or Reject to proceed.
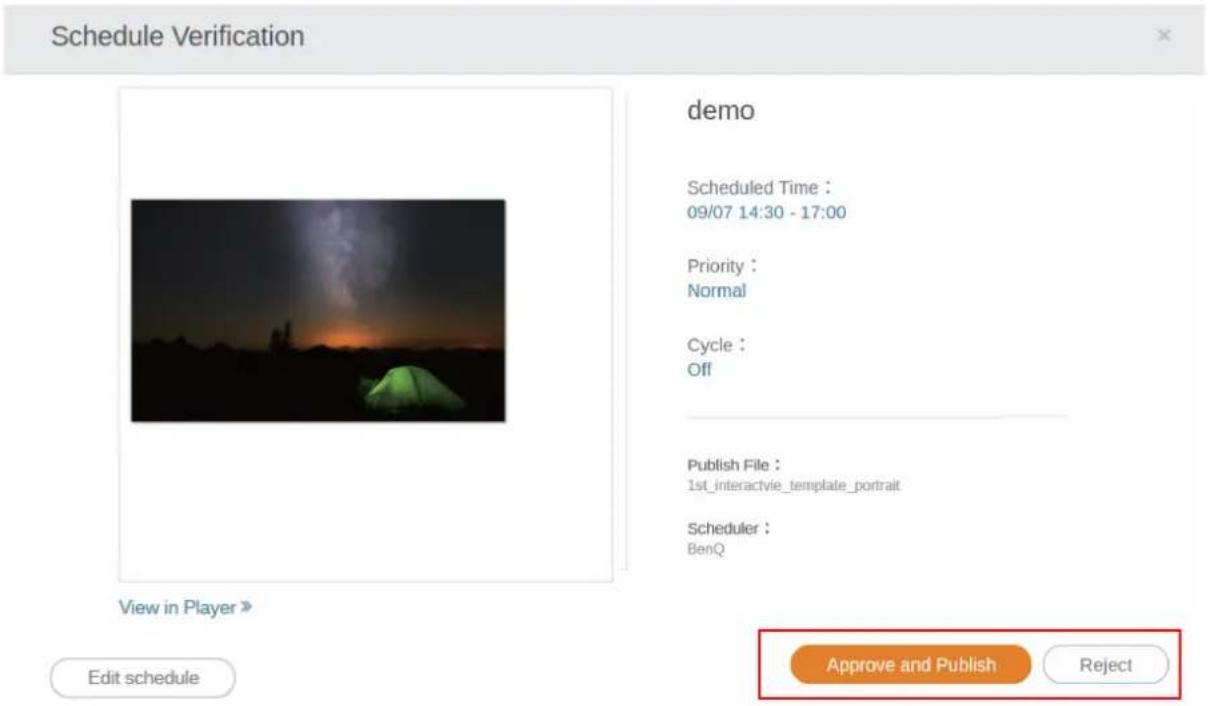
text_image
Schedule Verification demo Scheduled Time : 09/07 14:30 - 17:00 Priority : Normal Cycle : Off Publish File : 1st_interactvie_template_portrait Scheduler : BenQ View in Player » Edit schedule Approve and Publish RejectGetting the system notification
I. Go to Advanced Application > System Notification.
2. Enable System Notification.
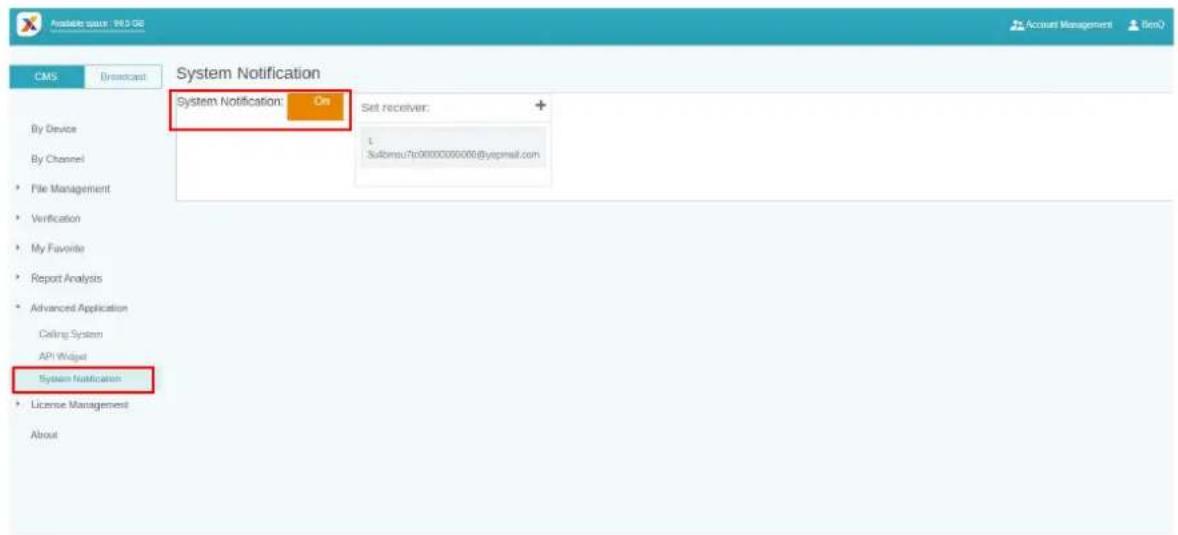
text_image
Available source: 98.5 GB CMS Broadcast System Notification System Notification On Set receiver: 1 Subsea7600000000@yepmail.com By Device By Channel File Management Verification My Favorite Report Analysis Advanced Application Ceiling System API Widget System Notification License Management AboutThen you will get notice when your device is under the following situations.
- When the device time can't sync with the Manager system time, the device can't play content normally.
a. It is highly recommended you enable auto time sync service on your device.
b. Make sure to set the same location on both Manager and the device.

[X-Sign System Notice] Unable to play due to unusual device status

Please kindly be advised that your device(s) with current schedule are in the abnormal status now and may be not able to play the content correctly.
Device name

Category
Uncategorized
Device status
Error - Time Error
Regards,
X-Sign Manager Service Team
- When the device is under schedule but not online, the device can't play content normally.
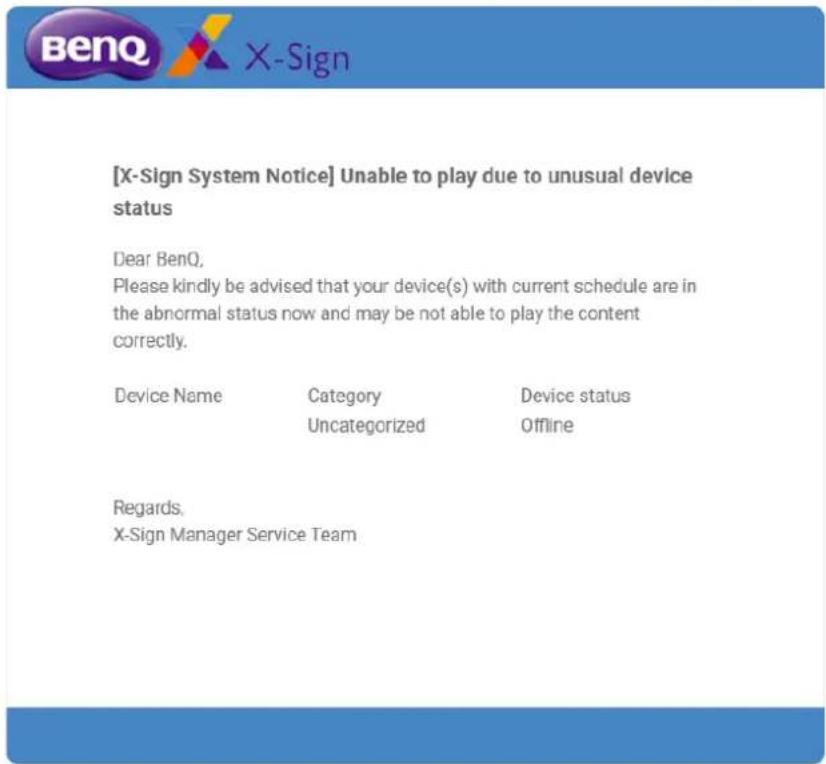
text_image
[X-Sign System Notice] Unable to play due to unusual device status Dear BenQ, Please kindly be advised that your device(s) with current schedule are in the abnormal status now and may be not able to play the content correctly. Device Name Category Device status Uncategorized Offline Regards, X-Sign Manager Service Team• The device license is going to expired.

text_image
Dear The following device already expired today: Device Name Display ID X-Sign
- Press + to add more receivers. The default will be the administrator only.
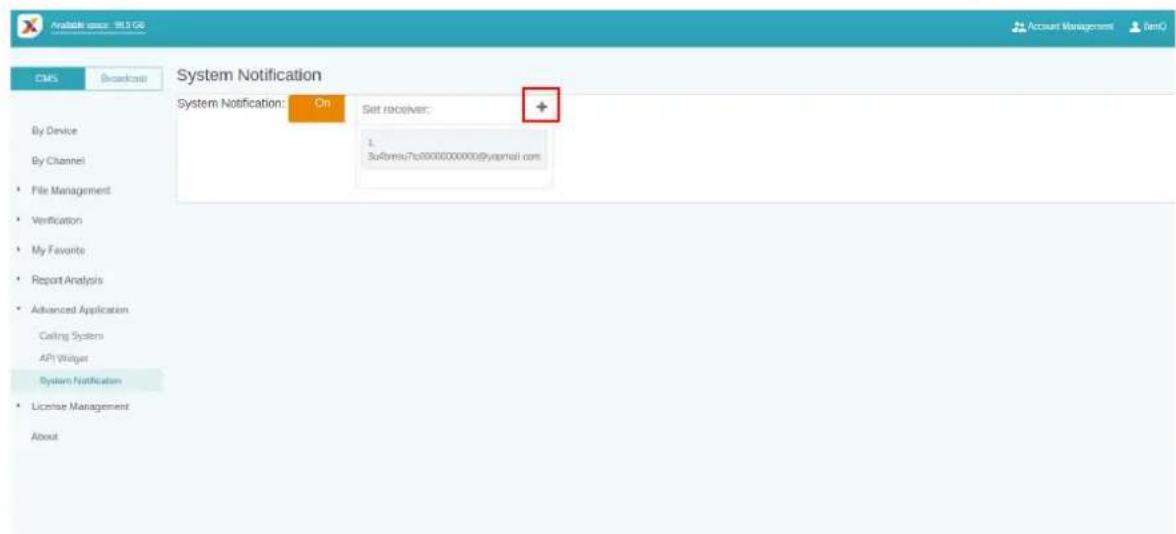
text_image
Available space: 98.5 GB CMS Broadcast System Notification System Notification: On Set receiver: 1. 3u0msa7c000000000@yamai.com By Device By Channel File Management Verification My Favorite Report Analysis Advanced Application Ceiling System API Widget System Notification License Management About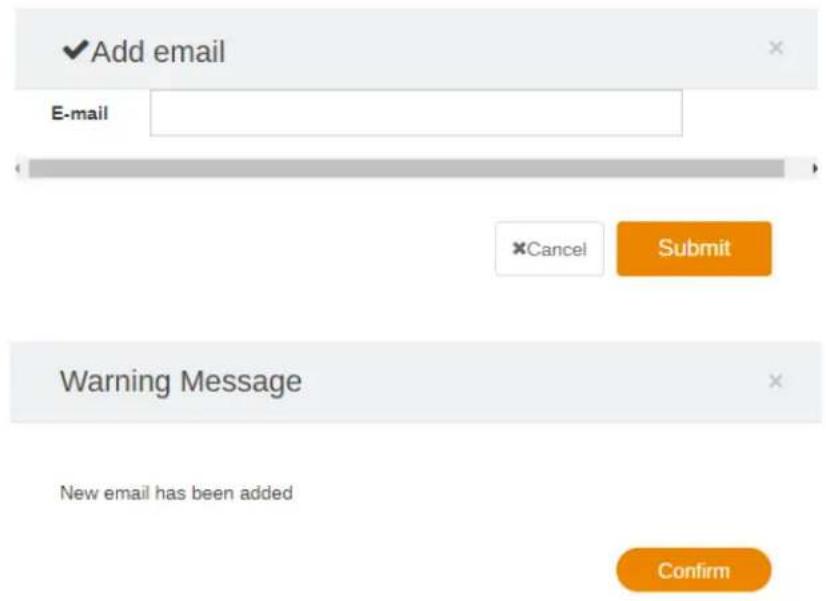
text_image
Add email E-mail Cancel Submit Warning Message New email has been added ConfirmUpdating device status immediately
The pages on X-Sign Manager will automatically do partial refresh if device status changes. Below are three parts that will do partial refresh automatically:
I. Active status of device: Go to By Device, the online/offline status will be shown automatically on the page.

text_image
Available space : 92.3 File CMS Broadcast All devices By Device All devices (19) Add a New Device Add Category X-Sign Player Update Search... All devices Status Name Channel Name Device ID Solution RFTVLZZE 07.10 RFTVLZZE Basic tomato-nb 12345_Channel UP8SZKV3 Basic 0715 Unsubscribed L4UKCW38 Premium X-Sign 8R4SU3VV 12345_Channel 8R4SU3VV Premium 2021-04-27 12:01...- Status of device control: Go to By Device, select the device you want to see the status, and click the online/offline status will be shown automatically on the page.
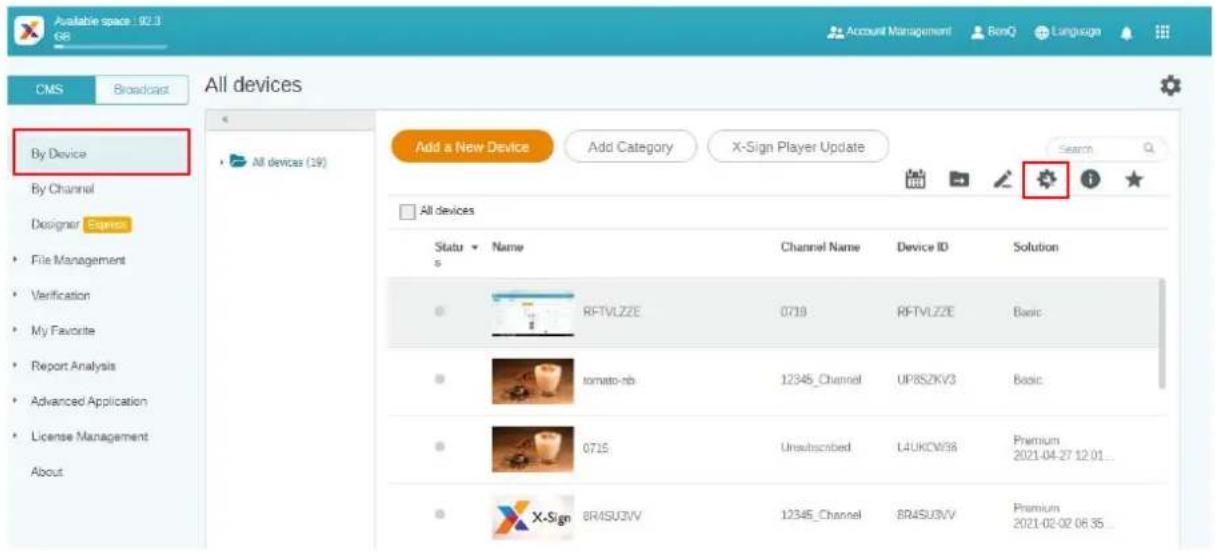
text_image
Available space: 92.3 GB CMS Broadcast All devices By Device By Channel Designer Express File Management Verification My Favorite Report Analysis Advanced Application License Management About Add a New Device Add Category X-Sign Player Update Search All devices Status Name Channel Name Device ID Solution RFTVLZZE 0719 RFTVLZZE Basic tomato-nb 12345_Channel UP8S2KV3 Basic 0715 Unsubscribed L4UKCW38 Premium 2021-04-27 12.01... X-Sign BR4SU3VV 12345_Channel BR4SU3VV Premium 2021-02-02 06.35...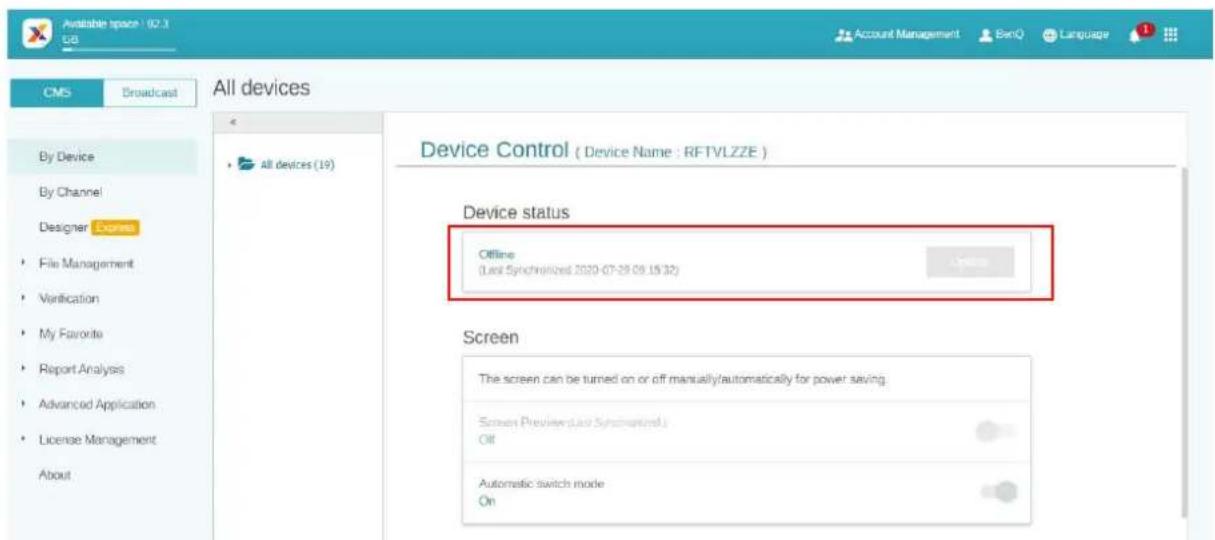
text_image
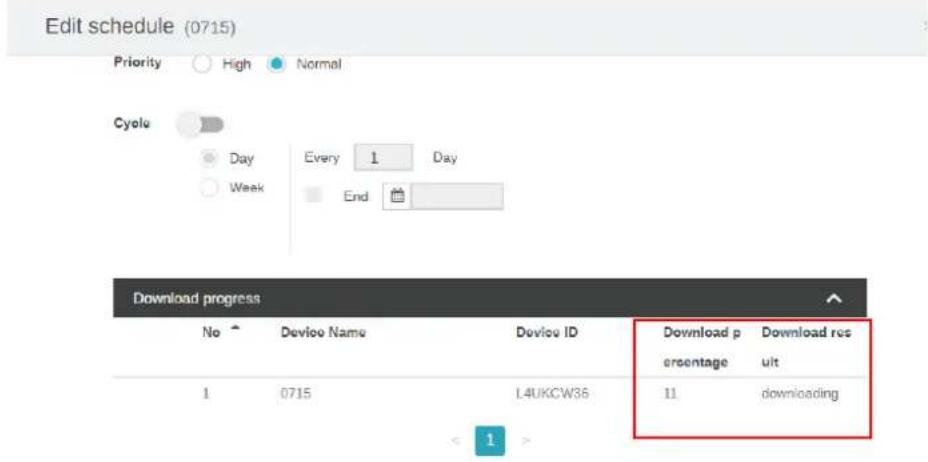
Available space : 02.3 US CMS Broadcast All devices By Device By Channel Designer Express File Management Verification My Favorites Report Analysis Advanced Application License Management About All devices (19) Device Control ( Device Name : RFTVLZZE ) Device status Offline (Lost Synchronized 2020-07-28 09:15:32) Screen The screen can be turned on or off manually/automatically for power saving. Screen Preview (Last Synchronized) Off Automatic switch mode On- Schedule downloading progress: Download percentage and result will refresh automatically.
text_image
Edit schedule (0715) Priority High Normal Cyclo Day Every 1 Day Week End Download progress No Device Name Device ID Download p Download res percentage ult 1 0715 L4UKCW36 11 downloadingPlayer report (proof-of-play)
I. Go to File List, select a file, and click .
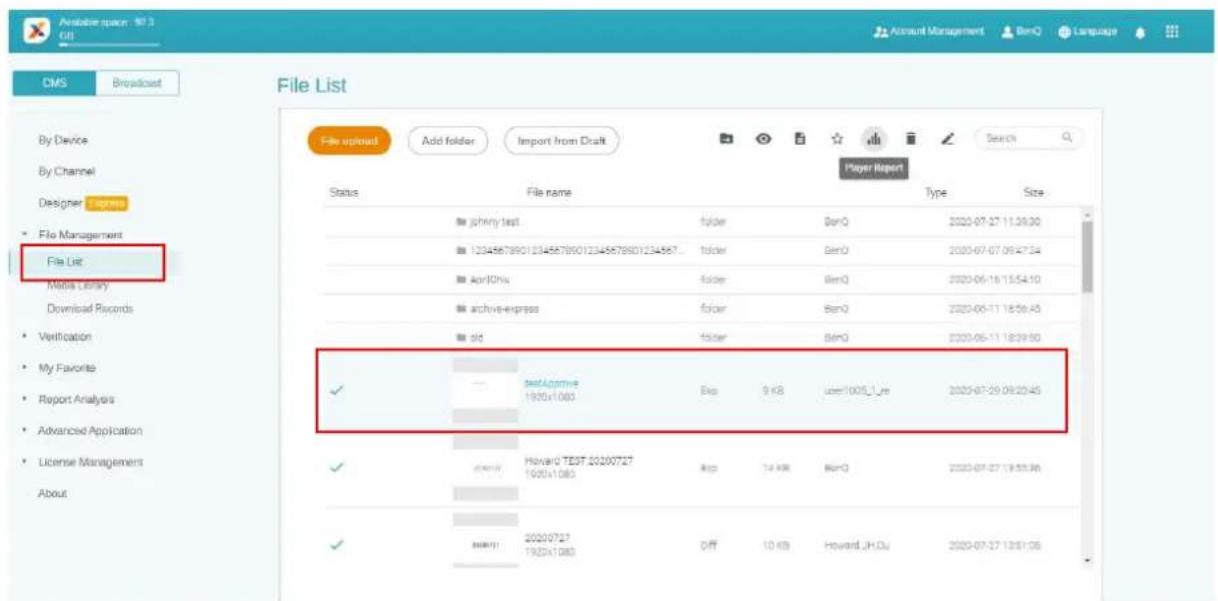
text_image
Available space: 92.3 GIS Account Management BenO Language CMS Broadcast File List File upload Add folder Import from Draft Search By Device By Channel Designer Express File Management File List Matrix Library Download Records Verification My Favorite Report Analysis Advanced Application License Management About Status File name Type Size johnytest folder BenO 2020-07-27 11:39:30 1204567890123456789012345678901234567 folder BenO 2020-07-07 09:47:34 April0% folder BenO 2020-06-16 15:54:10 archive-express folder BenO 2020-06-11 18:58:45 old folder BenO 2020-06-11 18:39:50 testLicense 1920x1083 Exp 9 KB user1005_1_ue 2020-07-29 09:20:45 Howard TEST 2020/7/27 1920x1083 Exp 14 KB BenO 2020-07-27 19:55:36 Howard JH.0u 2020/7/27 1920x1083 Off 10 KB Howard JH.0u 2020-07-27 18:51:062. X-Sign records the playback history of each file on each device. Click Export, then the Player report is exported as an .xls or an .xlsx file type.

text_image
File > Player Report (demo) Date range : 2020-07-01 to 2020-07-30 Confirm Export Device name Play duration Related schedules Other Events 0715 00:00:41 demoUsing Designer Express
I. All the projects you create with Designer Express will store in the draft list. Media Library, which store the assets, can accelerate your design. Click New Project to go to the designer express template editing page.
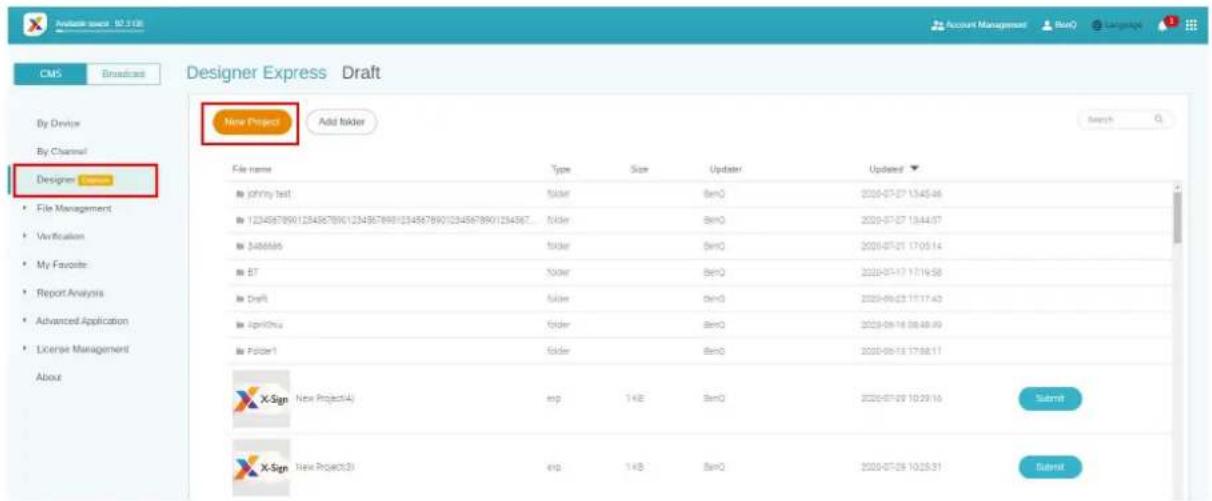
text_image
Analyst search 10.2.138 By Device By Channel Designer Express Draft New Project Add folder File name Type Size Update/ Updated johny test Solder BenO 2020-07-27 13:45:46 1234567890123456789012345678901234567890123456789012345678901234567890123456789012345678901234567890123456789 $486666 Solder BenO 2020-07-21 17:05:14 BT Solder BenO 2020-07-17 17:19:58 Draft Solder BenO 2020-06-23 17:17:43 SprintOne Solder BenO 2020-06-18 08:48:49 Folder1 Solder BenO 2020-06-13 17:58:11 X-Sign New Project(4) emp 1KB BenO 2020-07-29 10:29:16 Submit X-Sign New Project(3) emp 1KB BenO 2020-07-29 10:25:31 Submit2. Click Confirm to proceed.
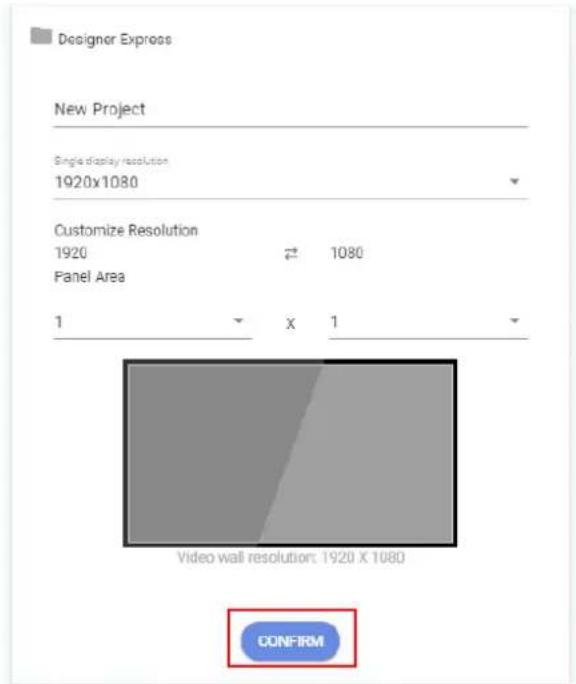
text_image
Designer Express New Project Single display resolution 1920x1080 Customize Resolution 1920 1080 Panel Area 1 x 1 Video wall resolution: 1920 X 1080 CONFIRM3. To add a new page, click +Add Page.
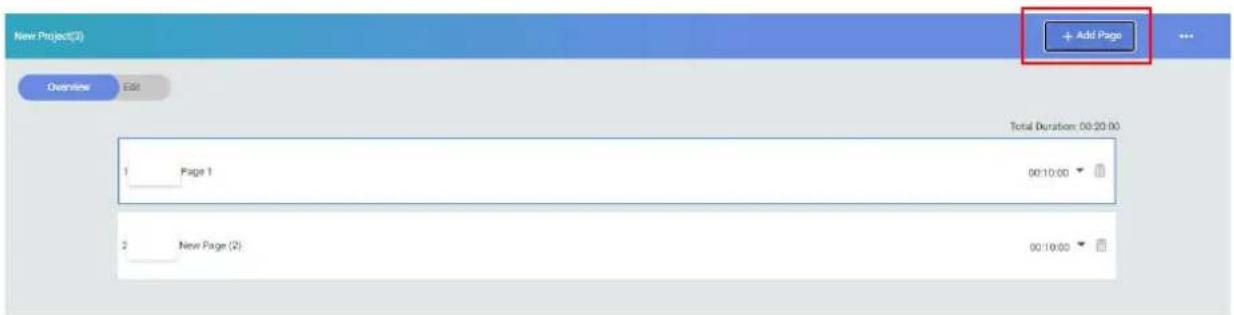
text_image
New Project(3) Add Page Overview Edit Total Duration: 00:20:00 1 Page 1 00:10:00 2 New Page (2) 00:10:004. Add an image from Local File for the first page.
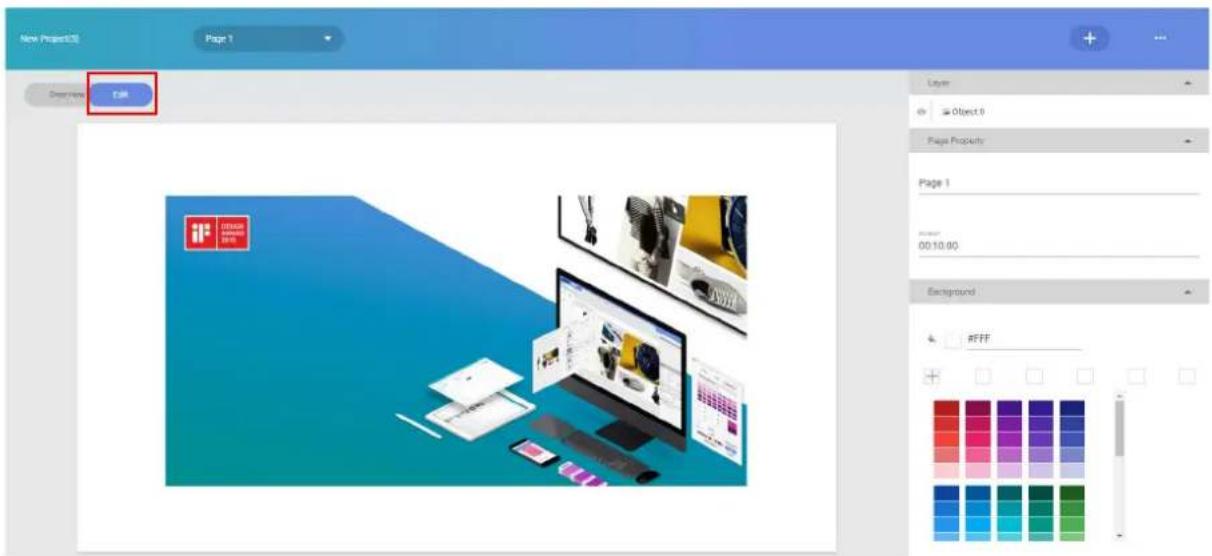
text_image
New Project(0) Page 1 Description Edit Layer Object 0 Page Property Page 1 00:10.00 Background #FFF- Add an image from Media Library for the second page.
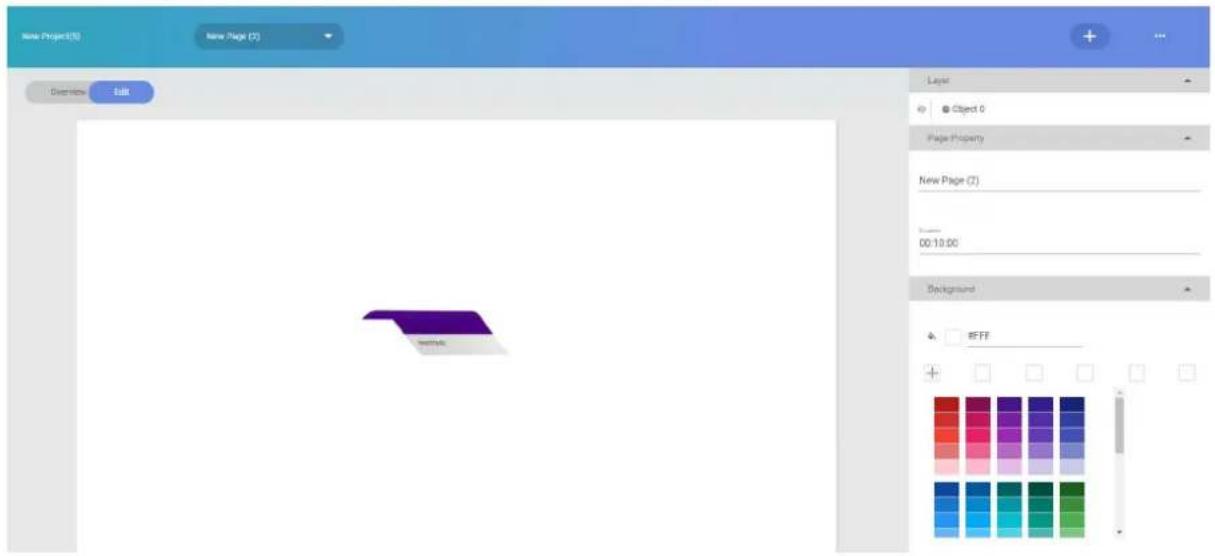
text_image
New Project(S) New Page (2) Overview Help Layer Object 0 Page Property New Page (2) Date: 00:10:00 Background #FFF- Save this project in the draft list and submit to File List. Then, just wait for the admin's approval.
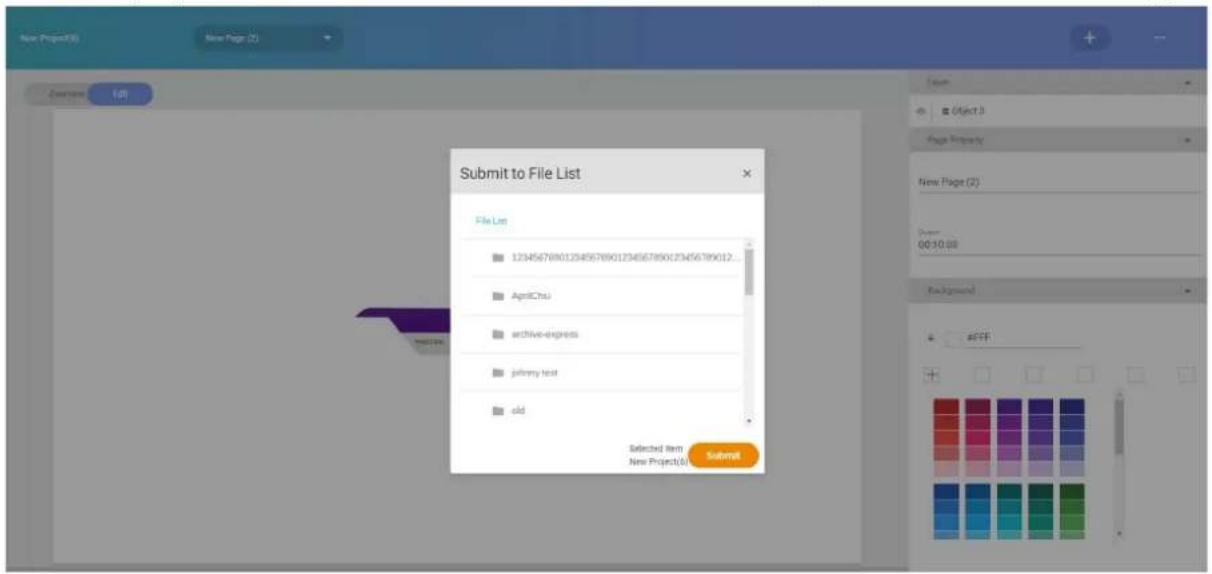
text_image
Submit to File List File List 123456789012945678901234567890123456789012... AprilChu archive-express johny text old Selected Item New Project(s) Submit- The project you have just created will show the approval status on File List.
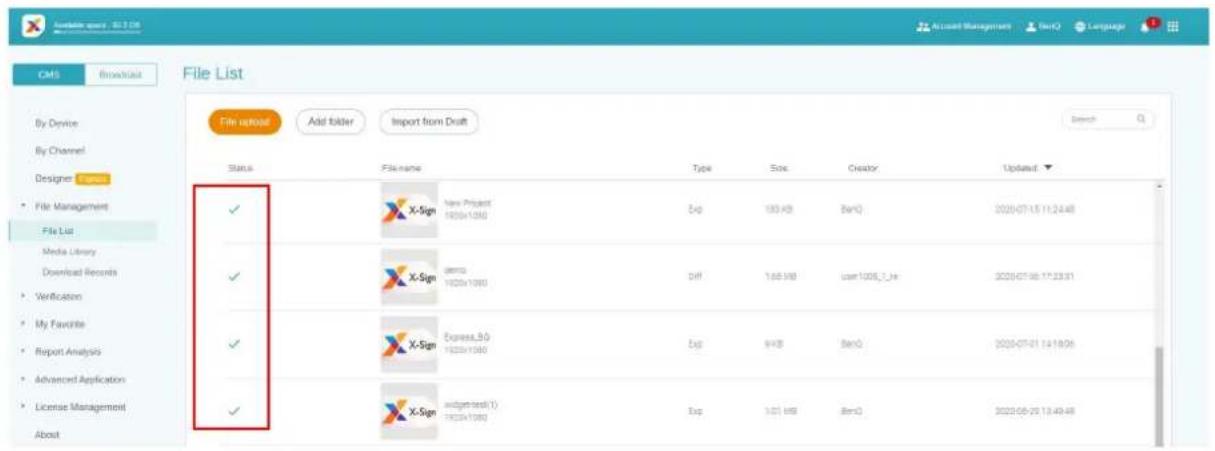
text_image
CMS Broadcast File List File insert Add folder Import from Draft By Device By Channel Designer File List Media Library Download Records Verification My Favorite Report Analysis Advanced Application License Management About Status X-Sign New Project 1020x1000 Exp 103 KB BenQ 2020/07/15 11:24:48 X-Sign demo 1020x1000 Diff 1.68 KB User 1006_7_ke 2020/07/06 17:23:31 X-Sign Express.BG 1020x1000 Exp KB BenQ 2020/07/01 14:18:06 X-Sign adjustmesh(1) 1020x1000 Exp 1.01 KB BenQ 2020/08/29 13:49:48- Then, you can set the schedule with this project.
Designer
Creating a new project file in X-Sign Designer
Watch demonstration video:

In X-Sign Designer you can create your own project with customizable features.
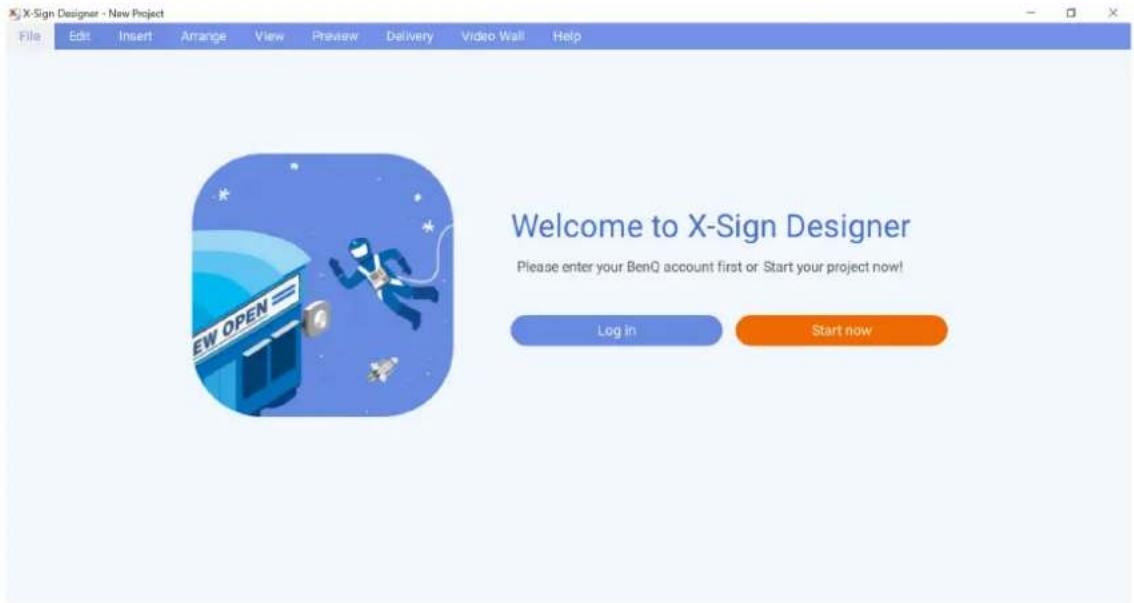
text_image
X-Sign Designer - New Project File Edit Insert Arrange View Preview Delivery Video Wall Help Welcome to X-Sign Designer Please enter your BenQ account first or Start your project now! Log in Start now- By logging in the account, you can upload content on X-Sign Manager.
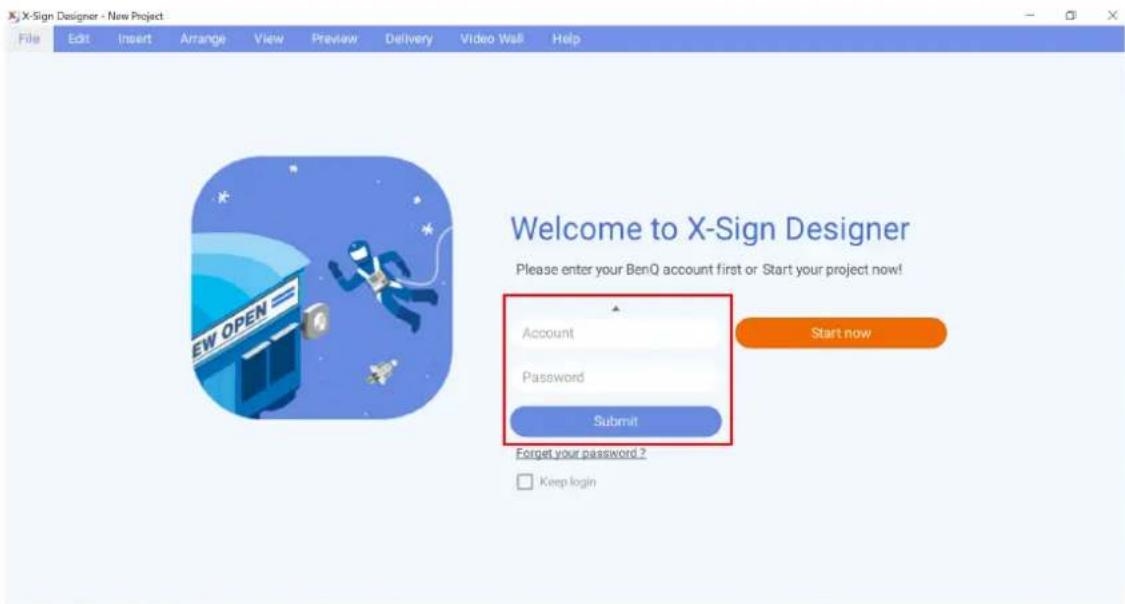
text_image
X-Sign Designer - New Project File Edit Insert Arrange View Preview Delivery Video Wall Help Welcome to X-Sign Designer Please enter your BenQ account first or Start your project now! Account Password Submit Start now Forget your password ? Keep login- You can also use X-Sign Designer without logging in the account by clicking Start now. You cannot upload content on X-Sign Manager only after logging in the account. Read Uploading your content from Designer on page 55 for more information.
To create a new project file in X-Sign Designer:
I. Launch the software and click New project.
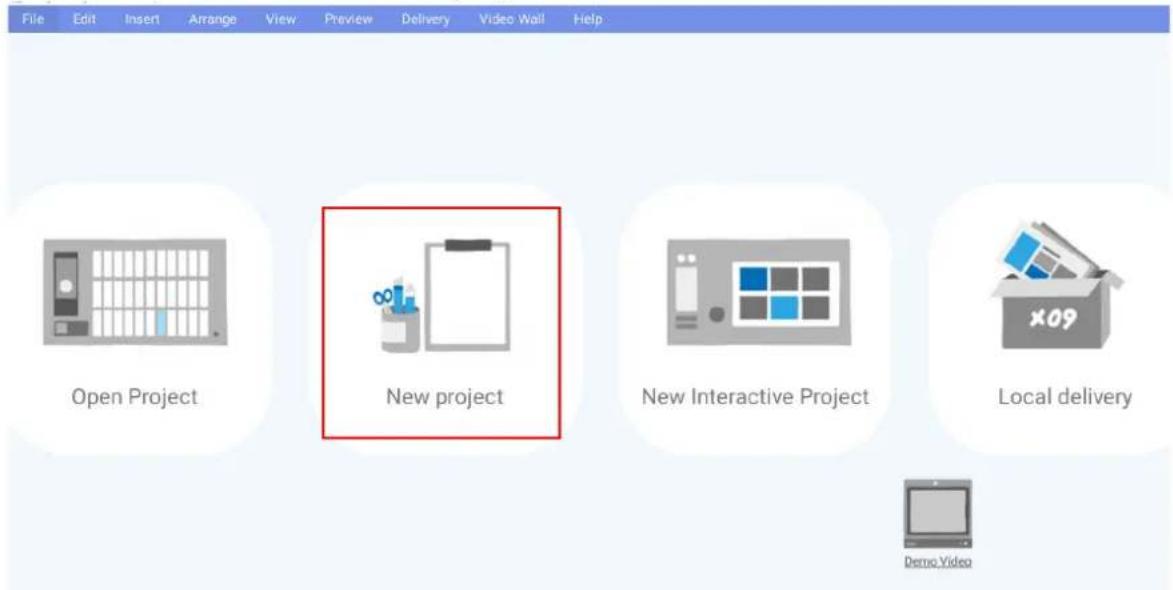
text_image
File Edit Insert Arrange View Preview Delivery Video Wall Help Open Project New project New Interactive Project Local delivery Demo Video2. To customize the project settings, configure the following items:
A. Project Location - Select the folder where your project will be saved.
B. Project Name - Create a name for your project.
C. Project Orientation and Resolution - Choose the layout and size of your project.
D. Panel Area - Adjust this setting for creating a Video Wall project.
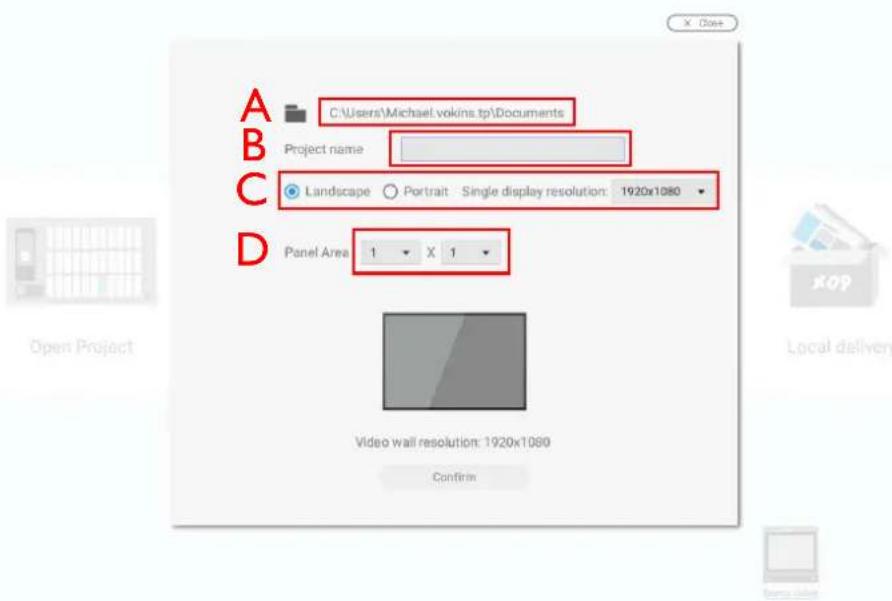
text_image
A:\Users\Michael.vokins.tp\Documents B Project name C Landscape ○ Portrait Single display resolution: 1920x1080 D Panel Area 1 X 1 Video wall resolution: 1920x1080 Confirm3. Select Confirm to create the new project file.
- To adjust the project settings after a project has been created, click Modify in the Page panel.
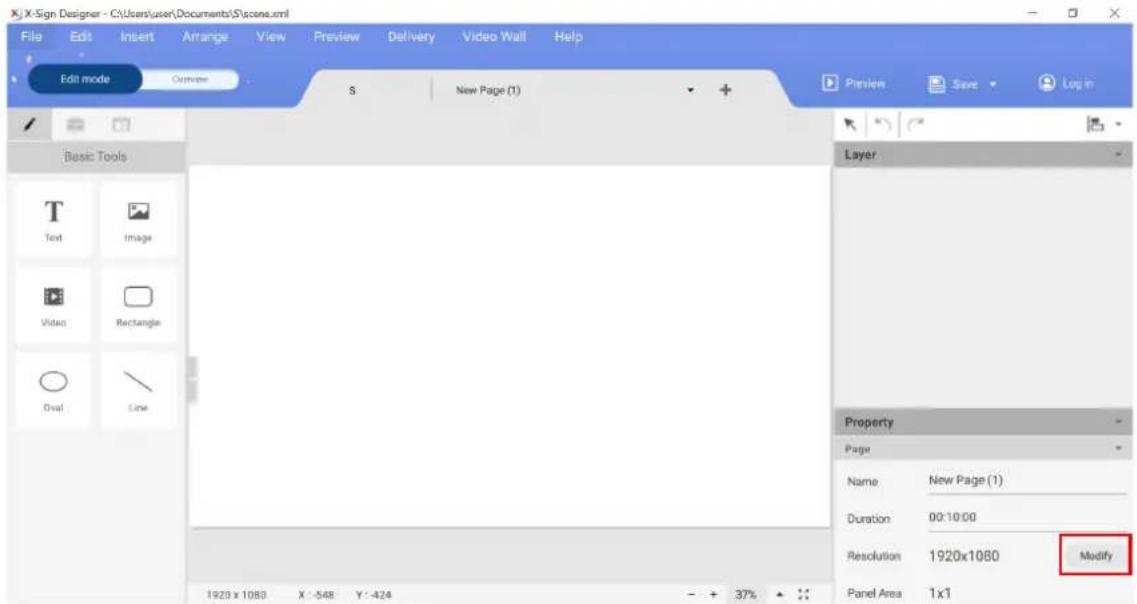
text_image
X-Sign Designer - C:\Users\user\Documents\S\acene.xml File Edit Insert Arrange View Preview Delivery Video Wall Help Edit mode Overview S New Page (1) Preview Save Log in Basic Tools Text Image Video Rectangle Oval Line Layer Property Page Name New Page (1) Duration 00:10:00 Resolution 1920x1080 Modify Panel Area 1x1 1920 x 1080 X : -548 Y : -424 - + 37%- To import media into your project, click the Image or Video button in the Basic Tool panel.
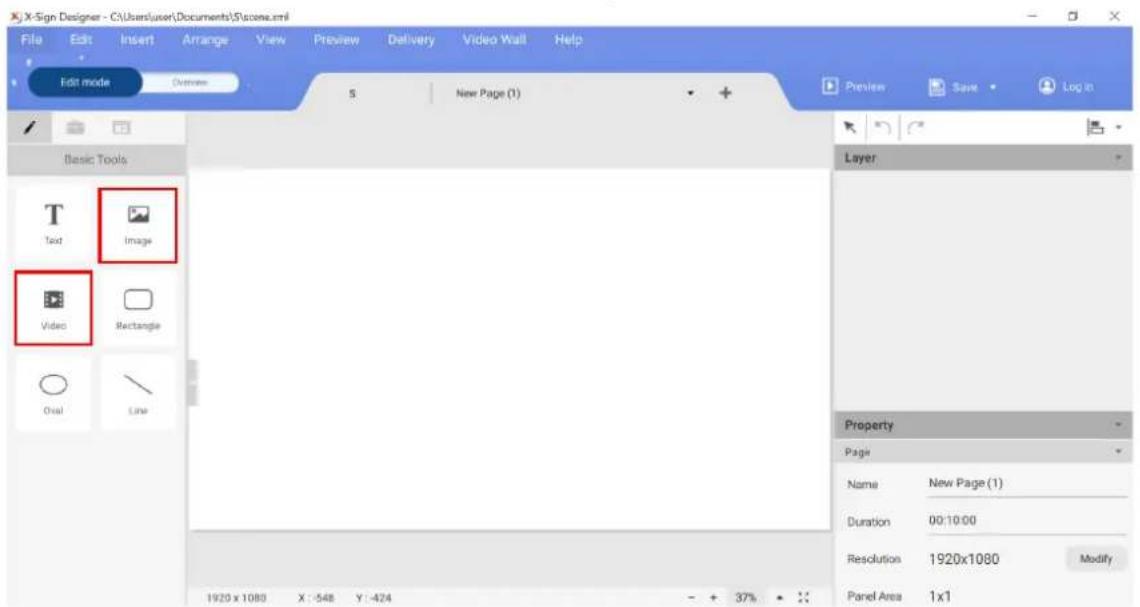
text_image
X-Sign Designer - C:\Users\user\Documents\S\scone.xml File Edit Insert Arrange View Preview Delivery Video Wall Help Edit mode Refresh 5 New Page (1) Preview Save Log In Basic Tools Text Image Video Rectangle Oval Line Layer Property Page Name New Page (1) Duration 00:10:00 Resolution 1920x1080 Modify Panel Area 1x1 1920 x 1080 X : -548 Y : -424 - + 37%- Select the media file to import and click Open.
Uploading your content from Designer
Watch demonstration video:
With X-Sign Designer, you can directly upload your content to Manager. You don't need to save the project and upload it separately.
Note:
- You need to have an account on X-Sign Manager. Refer to Registering an account for X-Sign Manager (Admin) on page 5 for more information.
- Make sure your account has the authority to upload files.
I. You can also use X-Sign Designer without logging in the account by clicking Start now. You cannot upload content on X-Sign Manager only after logging in the account.
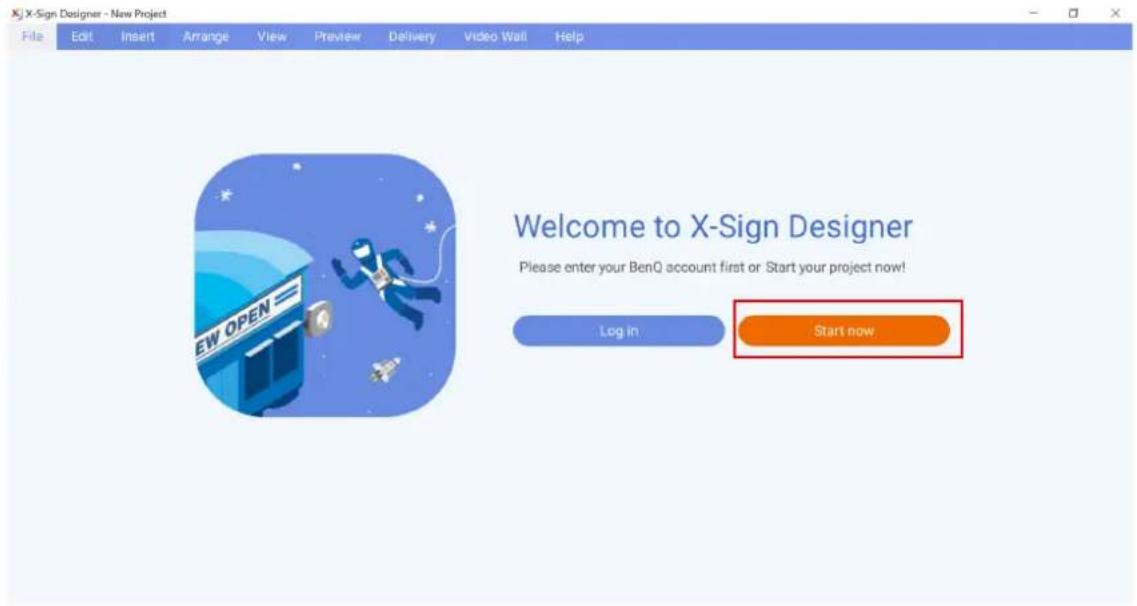
text_image
X-Sign Designer - New Project File Edit Insert Arrange View Preview Delivery Video Wall Help Welcome to X-Sign Designer Please enter your BenQ account first or Start your project now! Log in Start now- Press Log in to log in the X-Sign Manager account.
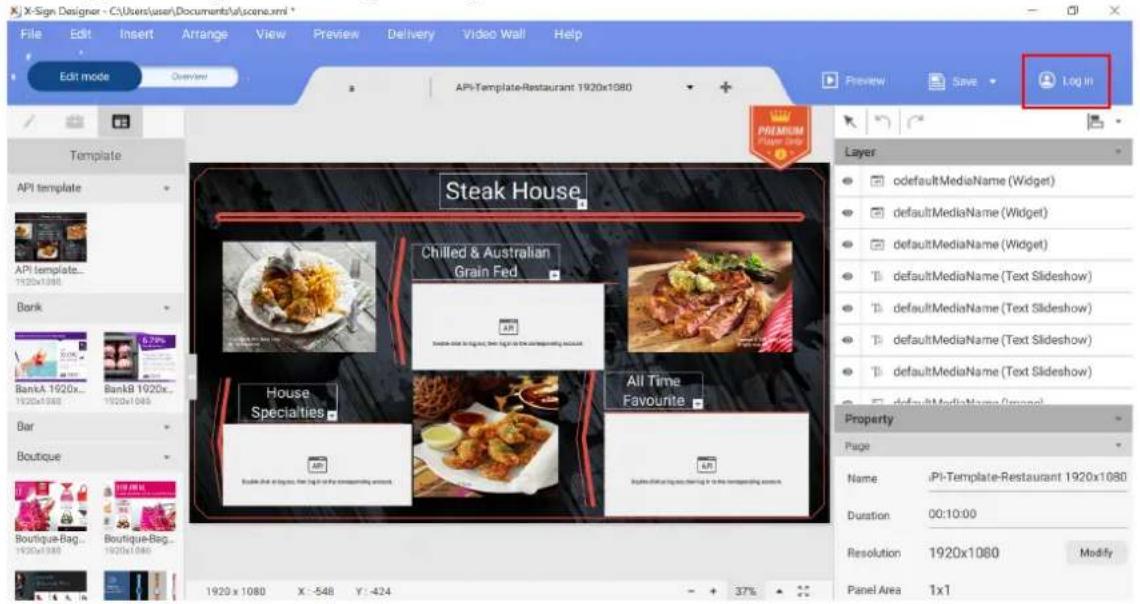
text_image
X-Sign Designer - C:\Users\user\Documents\al\scone.xml File Edit Insert Arrange View Preview Delivery Video Wall Help Edit mode Overview API-Template-Restaurant 1920x1080 Preview Save Log In Template API template API template... Bank BankA 1920x... BankB 1020x... Bar Boutique Boutique-Bag... 1920x1080 Boutique-Bag... 1920x1080 Steak House Chilled & Australian Grain Fed House Specialties All Time Favourite Page Name :JPI-Template-Restaurant 1920x1080 Duration 00:10:00 Resolution 1920x1080 Modify Panel Area 1x1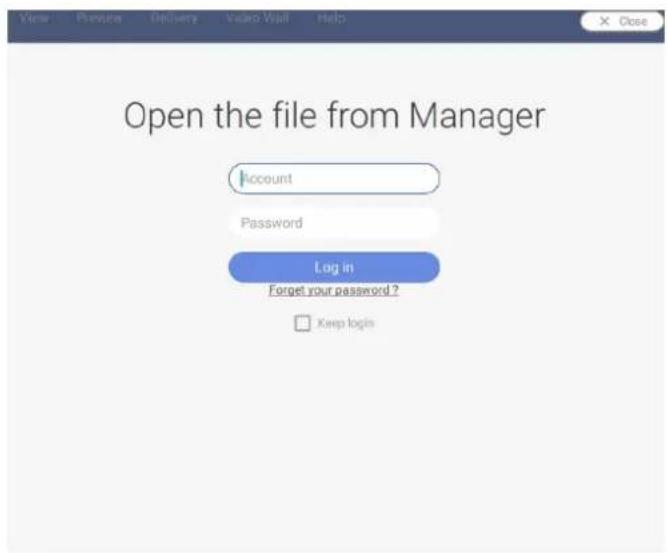
text_image
Open the file from Manager Account Password Log in Forget your password ? Keep login- Once you have successfully logged in, you can see your account information.
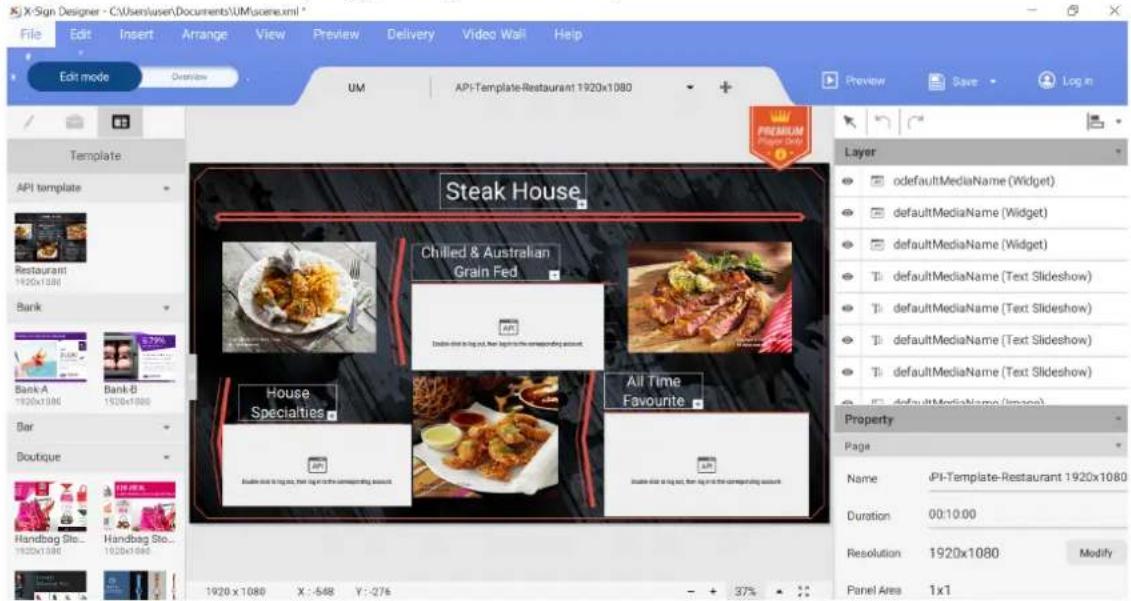
text_image
X-Sign Designer - C:\Users\user\Documents\UM\scene.xml * File Edit Insert Arrange View Preview Delivery Video Wall Help Edit mode Overview UM API+Template-Restaurant 1920x1080 Preview Save Log in Template API template Restaurant 1920x1080 Bank Bank A 1920x1080 Bank B 1920x1080 Bar Boutique Handbag Sto... 1920x1080 Handbag Sto... 1920x1080 X: -548 Y: -276 Steak House Chilled & Australian Grain Fed All Time Favourite House Specialties All Time Favourite Layer odedefaultMediaName (Widget) defaultMediaName (Widget) defaultMediaName (Widget) defaultMediaName (Text Slideshow) defaultMediaName (Text Slideshow) defaultMediaName (Text Slideshow) defaultMediaName (Text Slideshow) defaultMediaName (Images) Property Page Name iPI-Template-Restaurant 1920x1080 Duration 00:10:00 Resolution 1920x1080 Modify Panel Area 1x1- As soon as you finish making the content, press Save and Upload.
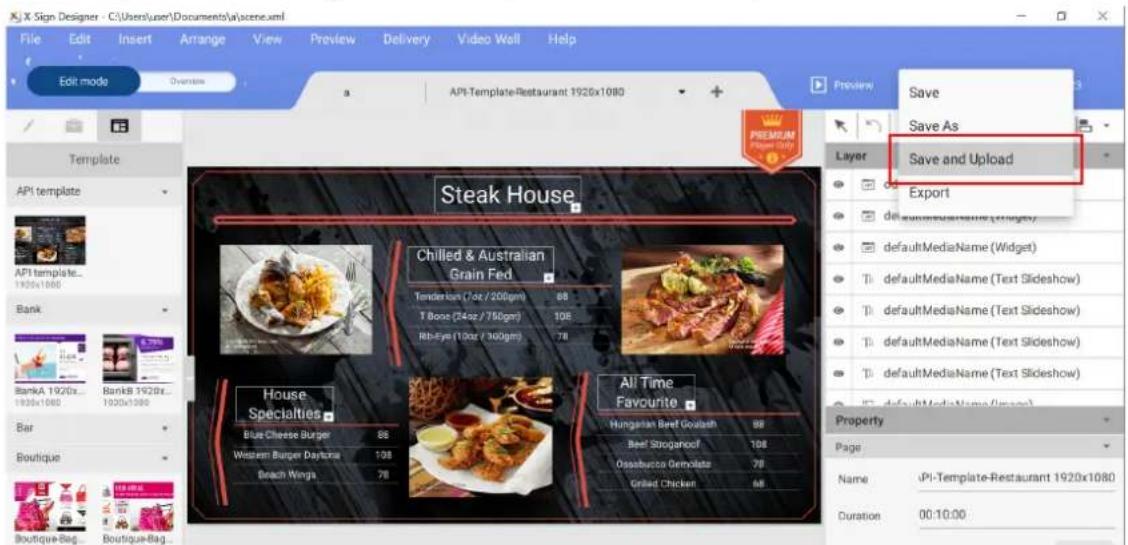
text_image
X Sign Designer - C:\Users\user\Documents\ai\scene.xml File Edit Insert Arrange View Preview Delivery Video Wall Help Edit mode API Template-Restaurant 1926x1080 Save Save As Save and Upload Layer Export defaultMediaName (Widget) defaultMediaName (Text Slideshow) defaultMediaName (Text Slideshow) defaultMediaName (Text Slideshow) defaultMediaName (Text Slideshow) defaultMediaName (loose) Property Page Name iP1-Template-Restaurant 1920x1080 Duration 00:10:00 Template API template API template... BankA 1920s Banks 1920s... Boutique-Bag... Boutique-Bag... Steak House Chilled & Australian Grain Fed Tenderkun (7oz / 200gm) 88 T Bono (24oz / 750gm) 106 Rib-Eye (10oz / 300gm) 78 House Specialties Blue Cheese Burger 86 Western Burger Daytona 108 Beach Winga 78 All Time Favourite Hungarian Beef Goulash 88 Beef Stroganoof 108 Ossobucca Gemlate 78 Grilled Chicken 68 Preview- The file list on Manager will be shown automatically. Choose the path to store the file, then press Confirm.
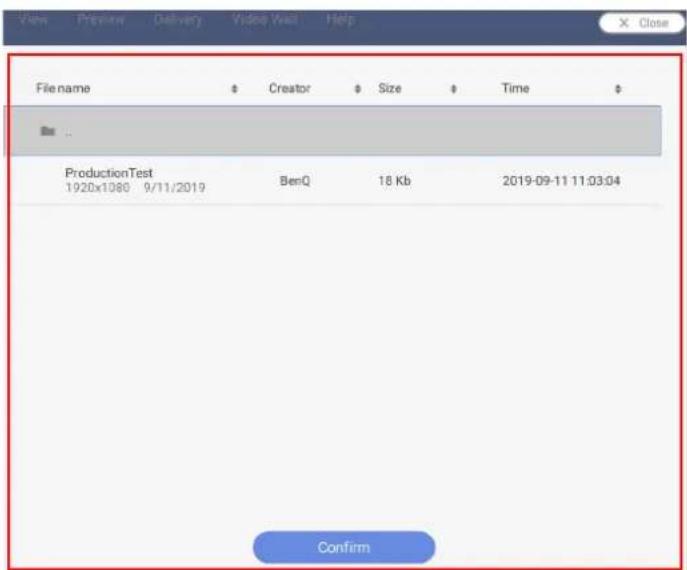
text_image
View Preview Delivery Video Exit Help X Close File name Creator Size Time ProductionTest BenQ 18 Kb 2019-09-11 11:03:04 1920x1080 9/11/2019 Confirm- Designer will automatically upload the file to Manager.
Note: If you want to modify a file, you have to choose the same path and upload the file again. Designer will only upload the changes rather than the whole file.
- Only when the administrator approves the file can the file be added to the schedule. Refer to Setting Verification on page 41 for more information.
Now you can go to X-Sign Manager to schedule your content.
Creating content in X-Sign Designer
Once you have opened a new project, you can begin to customize the content for your project. The following is an introduction to the basic settings used to create content in X-Sign Designer.
To create content in X-Sign Designer:
I. Click the ✿ button to open the Basic Tools panel. The Basic Tools panel allows you to add text, media and shapes to a page. Click on one of the following icons to add a new element to the canvas:
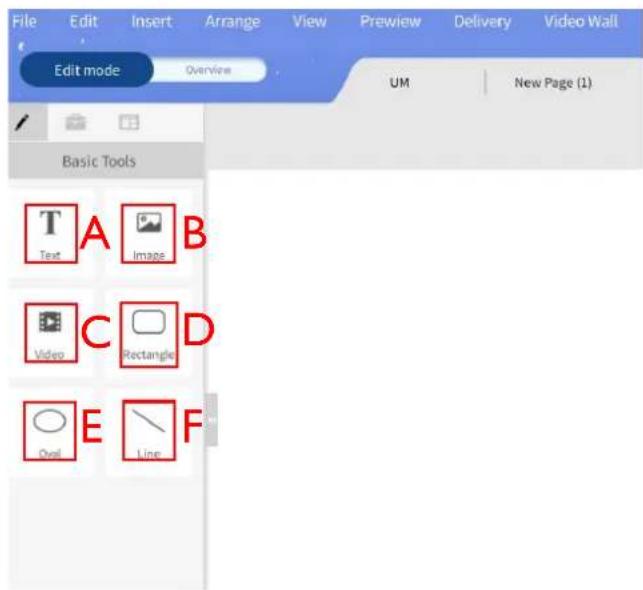
text_image
File Edit Insert Arrange View Preview Delivery Video Wall Edit mode Overview UM New Page (1) Basic Tools T A B Text Image B Video Rectangle D Oval Line FA. Text – Add a new text box to a page. Double-click on the text box to change the text.
B. Image – Add a new image bounding box to a page. A window will automatically appear to select an image from your hard drive, then click Open.
C. Video – Add a new video bounding box to a page. A window will automatically appear to select a video from your hard drive, then click Open.
D. Rectangle – Add a new rectangular bounding box to a page. Adjust the color, border and shadow in the Content panel.
E. Oval – Add a new circular bounding box to a page. Adjust the color, border and shadow in the Content panel.
F. Line – Add a new straight line to a page. Adjust the color in the Content panel.
- Click the 📋 button to open the Widgets panel. The Widgets panel allows you to add specific widgets to a page. Click on one of the following icons to add the respective widget to the canvas:
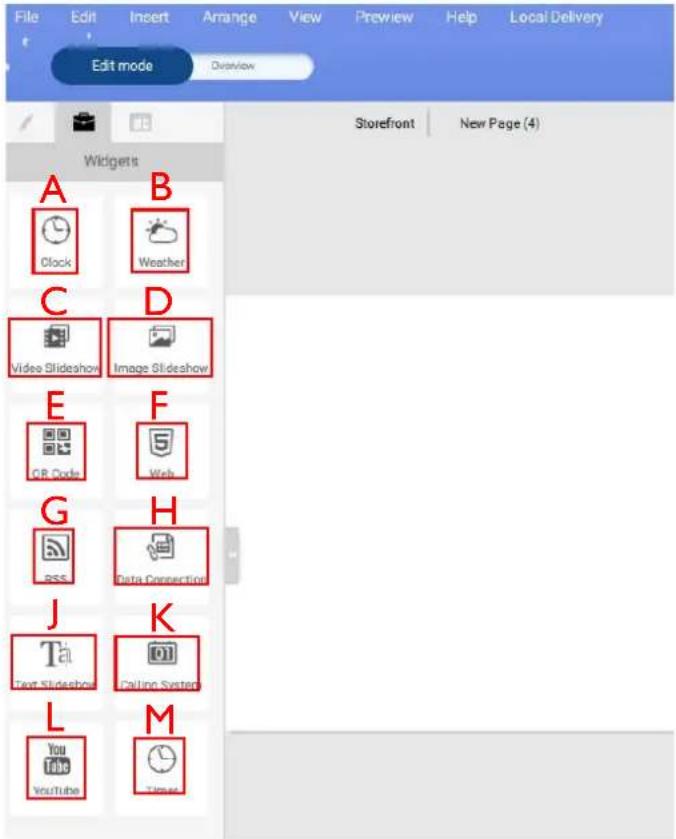
text_image
File Edit Insert Arrange View Preview Help Local Delivery Edit mode Overview Storefront New Page (4) Widgets A B Clock Weather C D Video Slideshow Image Slideshow E F GB Code Web G H RSS Data Connection J K Text Slideshow Calling System L M You YouTube TimesA. Clock – Add a clock to a page. The time is based on your device's region setting. Adjust the settings in the Clock panel and the Content panel.
B. Weather – Add a weather forecast to a page. Weather forecast is based on your device's region setting. Adjust the settings in the Weather panel and the Content panel.
C. Video Slideshow – Add a new video slideshow to a page. Refer to Creating an Image or Video slideshow on page 69 for more information.
D. Image Slideshow – Add an image slideshow to a page. Refer to Creating an Image or Video slideshow on page 69 for more information.
E. QR Code – Add a QR Code to a page to link to an external website. Adjust the settings in the QR Code panel and the Content panel.
F. Web – Add a website to a page. Adjust the settings in the Web panel and the Content panel.
G. RSS – Add an RSS Feed to a page. Adjust the settings in the RSS panel, the Content panel and the RSS Config panel.
H. Data Connection – Add a data document to a page. Data is based on a csv document saved online. Adjust the settings in the Database Connection panel, the Setting panel and the Content panel.
J. Text Slideshow – Add marquee text to a page. Adjust the settings in the Marquee panel, the Content panel, the Carousel panel, and the Transition panel.
K. Calling System – Add a waiting number window to a page. A waiting number system can be created by logging in to your X-Sign Manager account and going to Advanced Application >
Queuing System. Once created, return to X-Sign Designer and adjust the settings in the Waiting Number panel and the Content panel.
L. YouTube – Add a YouTube video to a page. Adjust the settings in the YouTube panel and the Content panel.
M. Timer – Add a timer to a page. Adjust the settings in the Timer panel, the Settings panel and the Appearance panel.
- In Edit mode, you can add and customize different pages:
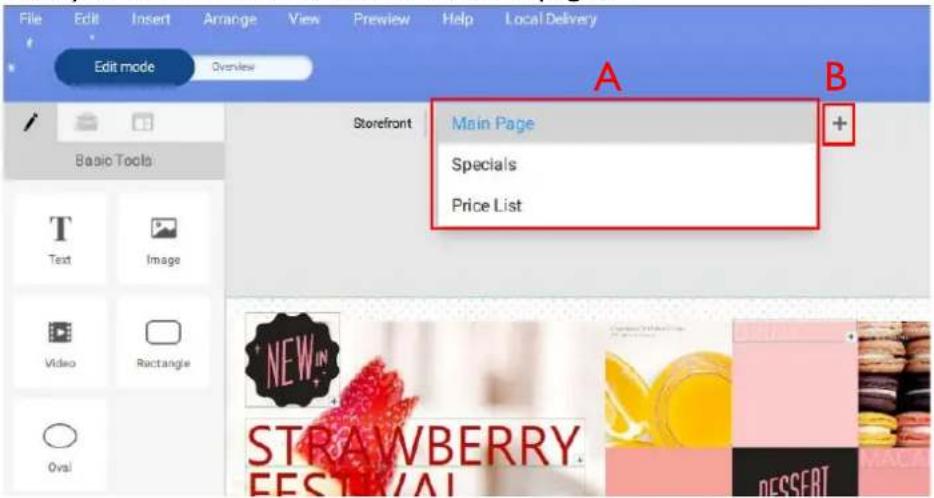
text_image
File Edit Insert Arrange View Preview Help Local Delivery Edit mode Overview A B Storefront Main Page Specials Price List + Text Image Video Rectangle Oval STRAWBERRY FESTIVAL DESSEATA. Pages Drop-down menu – Navigate to different pages by selecting ▼ at the top of the canvas.
B. + - Add a new page by clicking on the + Button at the top of the canvas.
- Click the Overview button to configure the project layout and order.
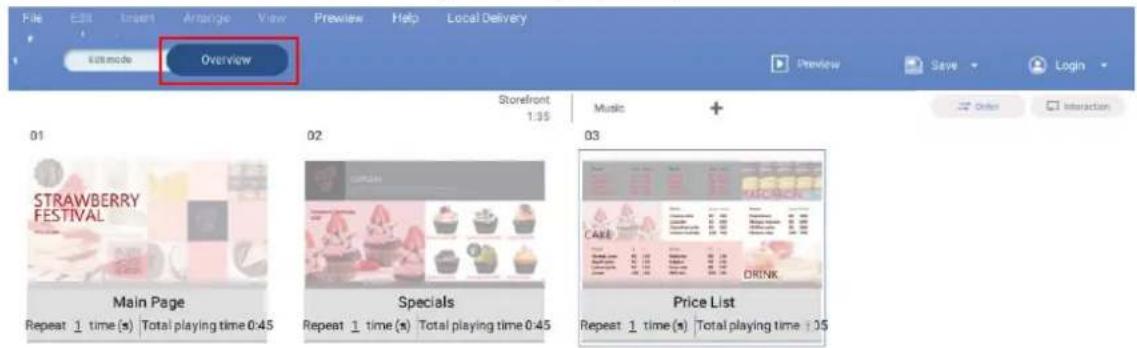
text_image
File Edit Insert Arrange View Preview Help Local Delivery Edit mode Overview Storefront 1:35 Music + Order Interaction 01 STRAWBERRY FESTIVAL Main Page Repeat 1 time (s) Total playing time 0:45 Specials Repeat 1 time (s) Total playing time 0:45 02 CORNIS Price List Repeet 1 time (s) Total playing time 0:35- You can move pages by dragging the page icon to the left or the right.
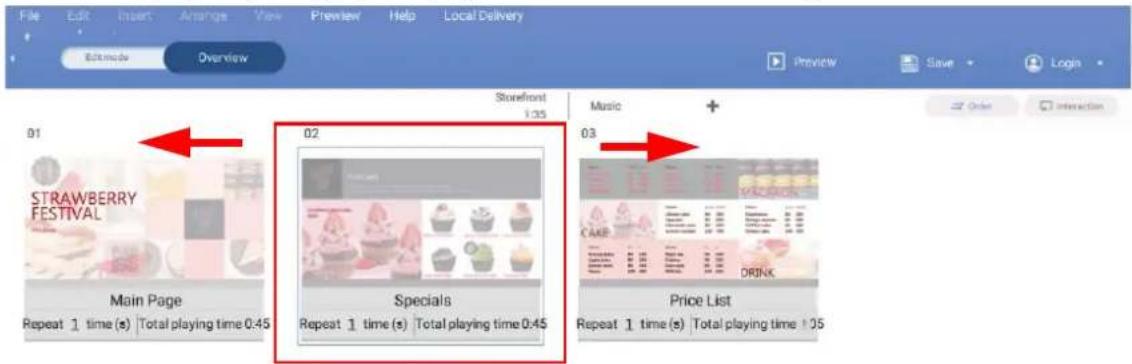
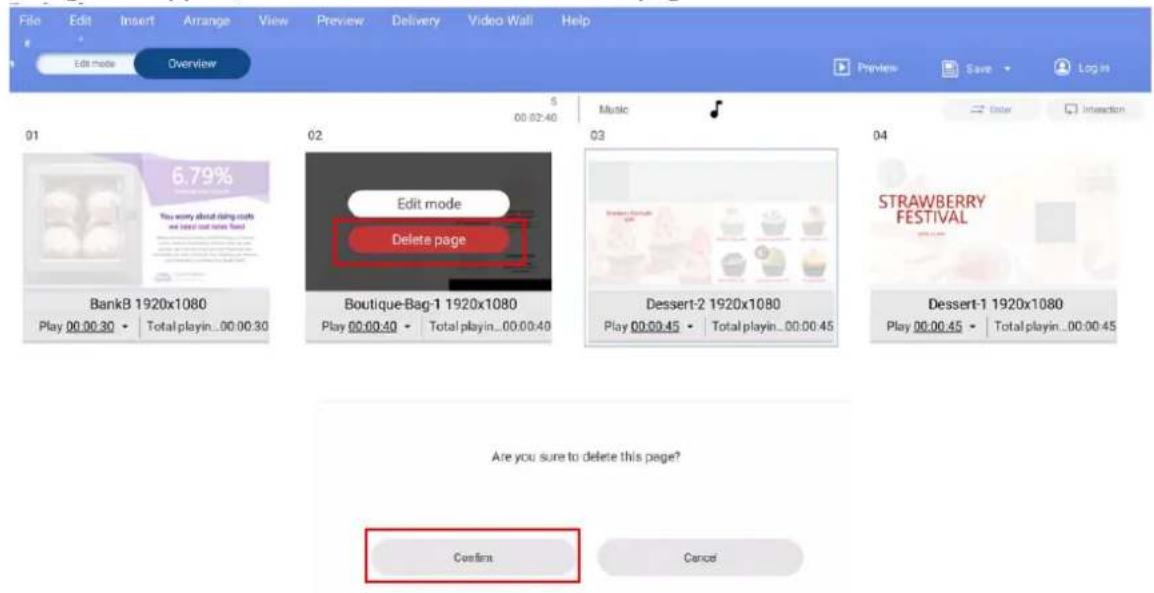
text_image
File Edit Insert Arrange View Preview Help Local Delivery Edit mode Overview Preview Save Login 01 STRAWBERRY FESTIVAL Storefront 1:35 02 Music + Main Page Specials Repeat 1 time (s) Total playing time 0:45 Price List Repeat 1 time (s) Total playing time 1:05- To delete pages, hover your cursor over the page icon and click Delete page. A warning message will appear, select Confirm to delete the page.
text_image
File Edit Insert Arrange View Preview Delivery Video Wall Help Edit mode Overview 01 6.79% You worry about doing costs we have not more fun BankB 1920x1080 Play 00:00:30 Total playin...00:00:30 02 Edit mode Delete page Boutique-Bag-1 1920x1080 Play 00:00:40 Total playin...00:00:40 03 Dessert-2 1920x1080 Play 00:00:45 Total playin...00:00:45 04 STRAWBERRY FESTIVAL Dessert-1 1920x1080 Play 00:00:45 Total playin...00:00:45 Are you sure to delete this page? Confirm Cancel- Select ▼ on the page icon and click Set Repeat Time(s) or Set Total Playing Time to have the page repeat or change the time duration for a page.
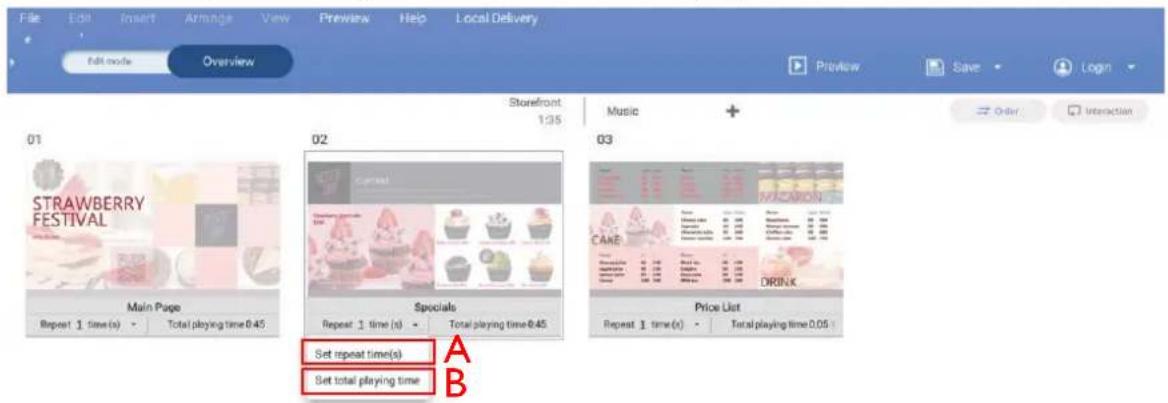
text_image
File Edit Insert Armage View Preview Help Local Delivery Edit mode Overview Storefront 1:35 Music + Order Interaction 01 STRAWBERRY FESTIVAL Main Page Repeat 1 time(s) Total playing time 0:45 02 Specials Repeat 1 time(s) Total playing time 0:45 03 CAKE DRINK Price List Repeat 1 time(s) Total playing time 0:05 Set repeat time(s) Set total playing time A BA. Repeat _ Time(s) – Double-click the number to change the amount of times a page plays.
B. Play 0:00 – Double-click the run time to change the time duration for a page.
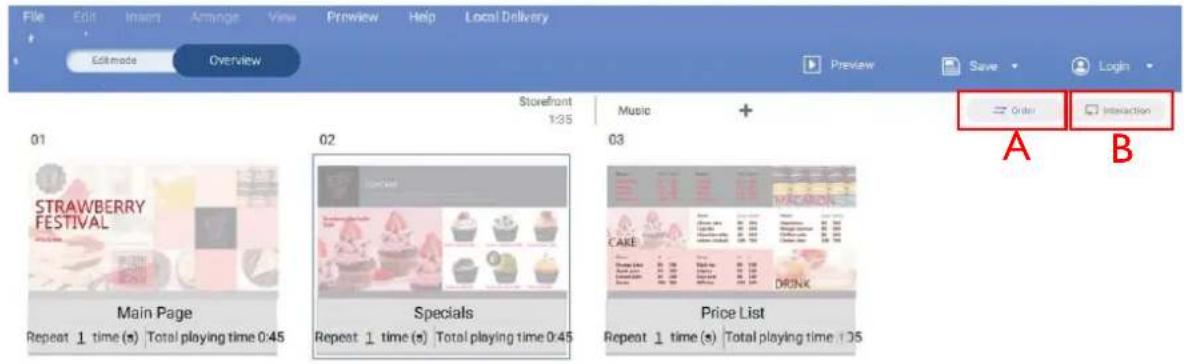
- Click Order or Interaction to choose the play sequence for a project:
text_image
File Edit Insert Arrange View Preview Help Local Delivery Editmode Overview Storefront 1:35 Music + Order Interaction 01 STRAWBERRY FESTIVAL Main Page Repeat 1 time (s) Total playing time 0:45 Specials Repeat 1 time (s) Total playing time 0:45 Price List Repeat 1 time (s) Total playing time : 0:5 A BA. Order – To play all pages in order in a continuous loop, click Order.
B. Interaction – To play a single page or selected pages in a continuous loop, click Interaction.
- You can preview your project by clicking the Preview button. This will play the current project on X-Sign Player. Click ESC to return to X-Sign Designer.
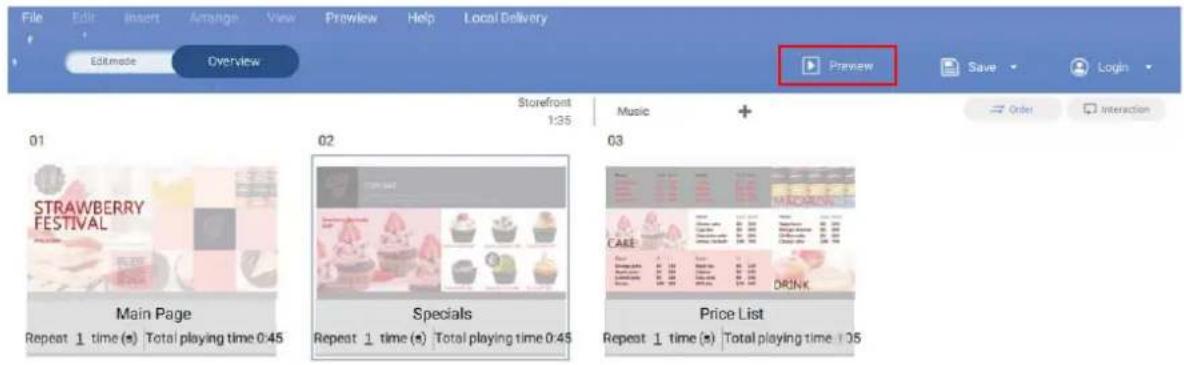
text_image
File Edit Insert Arrange View Preview Help Local Delivery Editmode Overview Preview Save Login Storefront 1:35 Music + 01 STRAWBERRY FESTIVAL Main Page Repeat 1 time (s) Total playing time 0:45 02 Specials Repeat 1 time (s) Total playing time 0:45 03 MERCARDEN CAKE DRINK Price List Repeat 1 time (s) Total playing time 1:05Creating content from Designed Templates
Watch demonstration video:

Once you have opened a new project, you can use Designed Templates to quickly generate content. X-Sign Designer has numerous Designed Templates of varying orientations and resolutions for the user to easily access.
To create content in X-Sign Designer using a Designed Template:
I. Click the button to open a list of templates.
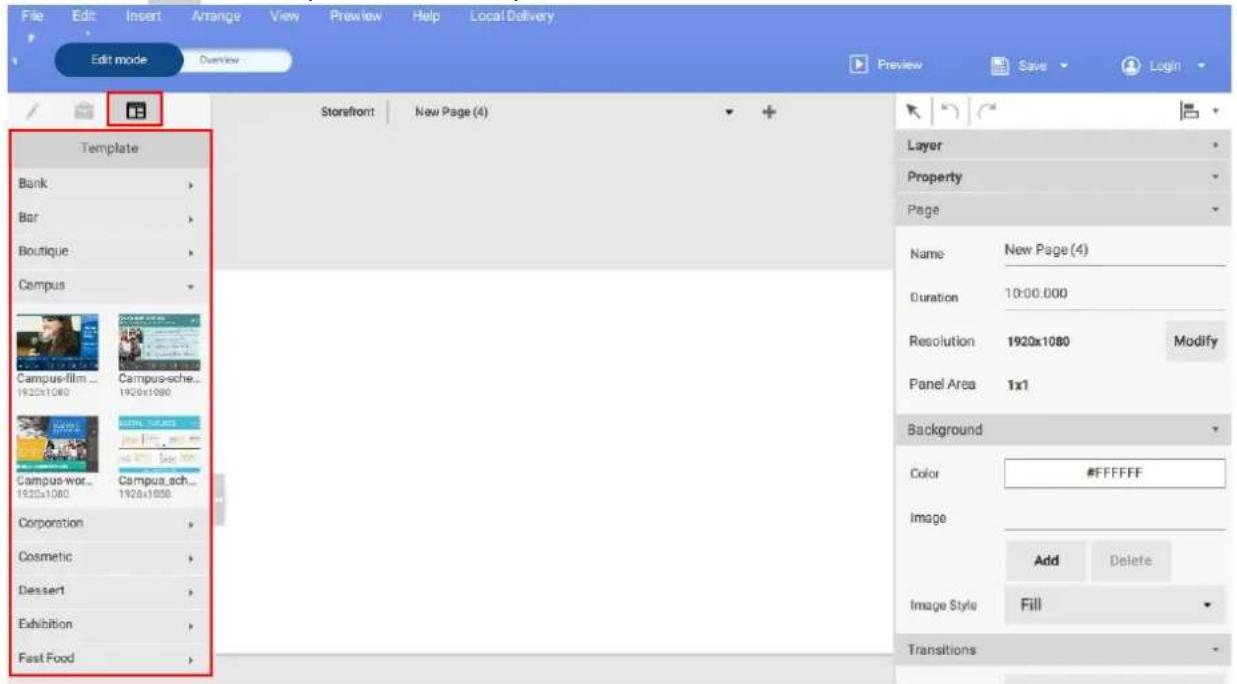
text_image
File Edit Insert Arrange View Preview Help Local Delivery Edit mode Overview Preview Save Login Storefront New Page (4) Template Bank Bar Boutique Campus Campus-film ... 1920x1080 Campus-sche... 1920x1080 Campus-wor... 1920x1080 Campus-ach... 1920x1080 Corporation Cosmetic Dessert Exhibition Fast Food Layer Property Page Name New Page (4) Duration 10:00.000 Resolution 1920x1080 Modify Panel Area 1x1 Background Color #FFFFFF Image Add Delete Image Style Fill Transitions- Click the drop-down menu for the type of template you want to use and then click icon for the template you want to use for your project. A new page with the template will automatically be added to the project and displayed in the canvas window.
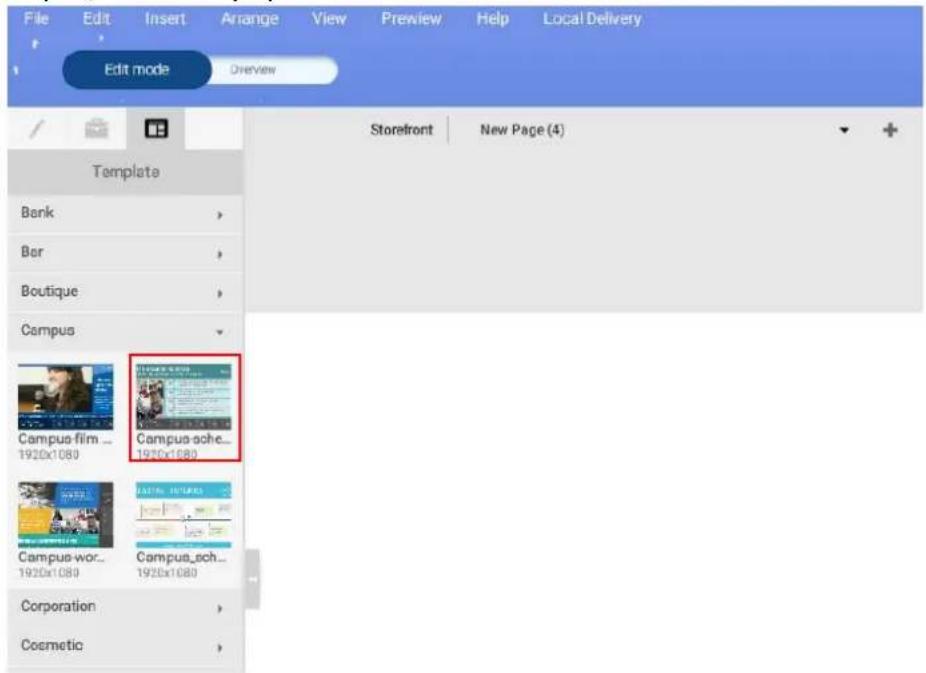
text_image
File Edit Insert Arrange View Preview Help Local Delivery Edit mode Overview Storefront New Page (4) Template Bank Ber Boutique Campus Campus-film ... 1920x1080 Campus-ache ... 1920x1080 Campus-wor... 1920x1080 Campus_sch ... 1920x1080 Corporation CosmeticNote: The template must match the orientation and resolution of your project settings. To modify your project settings, refer to Opening an X-Sign 1.x project file on page 89 for more information.
- Alter text in the template by double-clicking the text box in the canvas and typing in your own text.
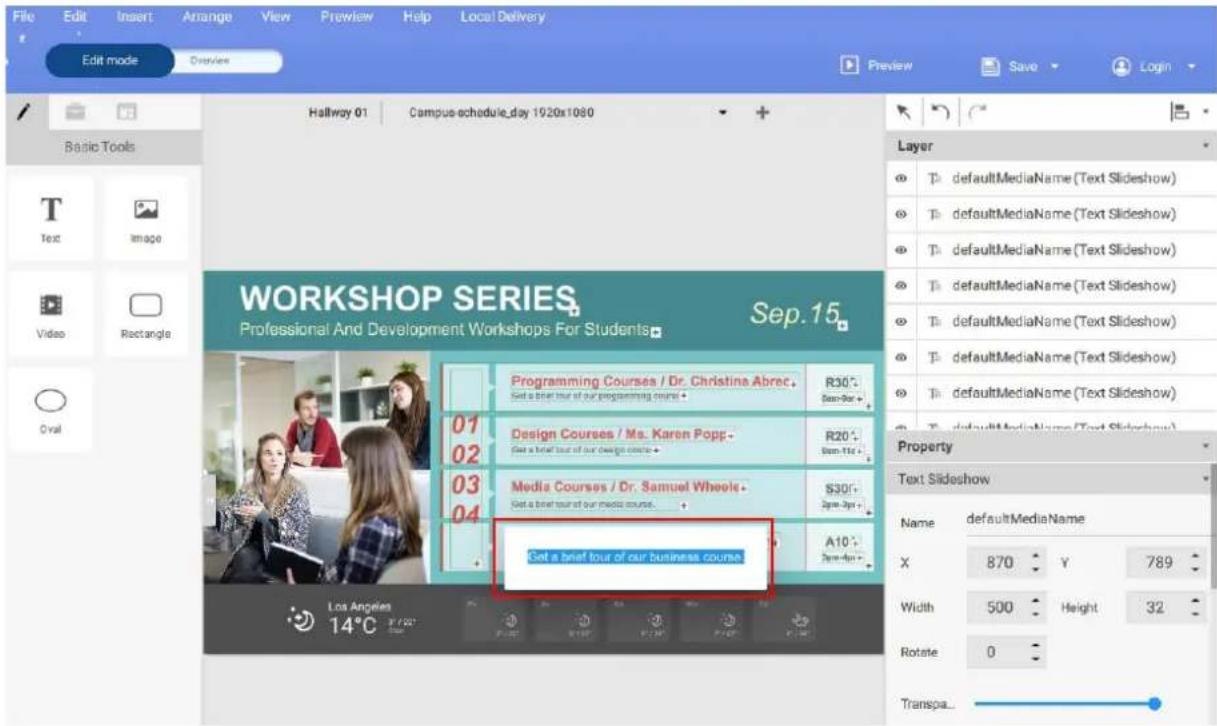
text_image
File Edit Insert Arrange View Preview Help Local Delivery Edit mode Overview Hallway 01 Campus-schedule_day 1920x1080 Basic Tools Text Image Video Rectangle Coral WORKSHOP SERIES Professional And Development Workshops For Students Sep.15 Layer defaultMediaName (Text Slideshow) defaultMediaName (Text Slideshow) defaultMediaName (Text Slideshow) defaultMediaName (Text Slideshow) defaultMediaName (Text Slideshow) defaultMediaName (Text Slideshow) defaultMediaName (Text Slideshow) defaultMediaName (Text Slideshow) defaultMediaName (Text Slideshow) defaultMediaName (Text Slideshow) defaultMediaName (Text Slideshow) defaultMediaName (Text Slideshow) Property Text Slideshow Name defaultMediaName X 870 Y 789 Width 500 Height 32 Rotate 0 Transpa...- You can replace images or video files by selecting the item in the canvas, then click on the ... Button in the Content panel. Select your own image or video to insert into the bounding box.
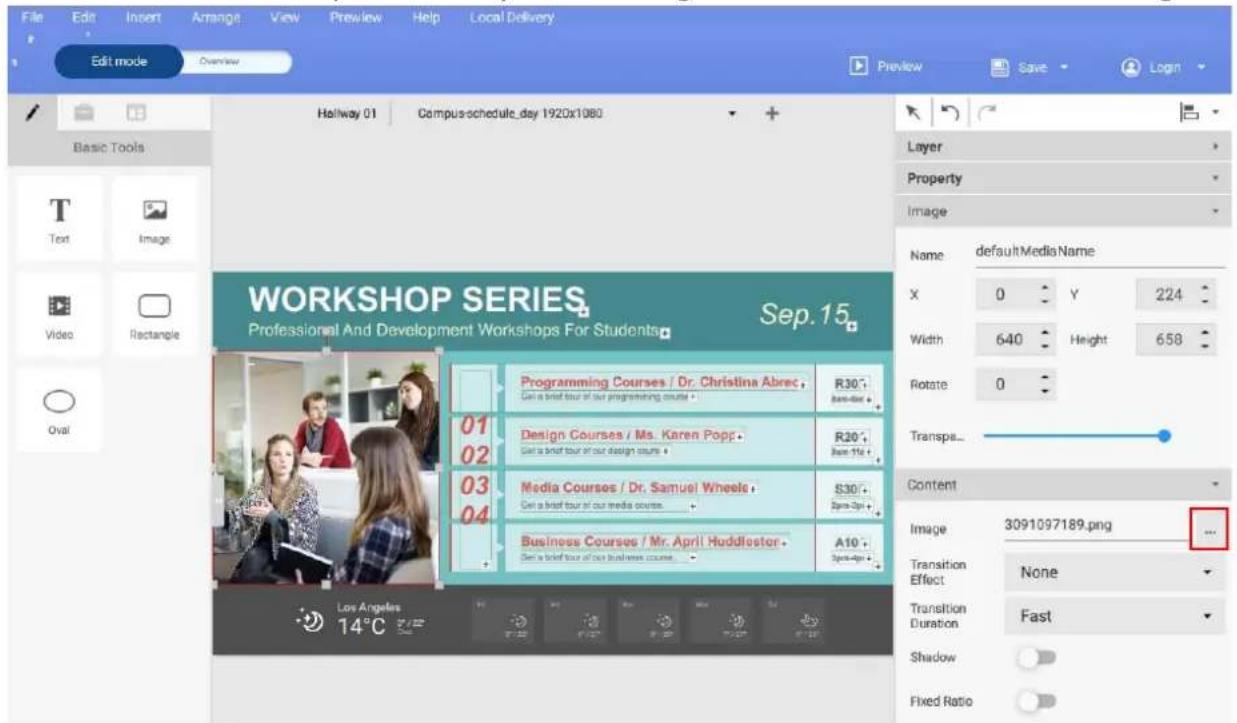
text_image
File Edit Insert Arrange View Preview Help Local Delivery Edit mode Overview Hallway 01 Campus-schedule_day 1920x1080 Basic Tools Text Image Video Rectangle Oval WORKSHOP SERIES Professional And Development Workshops For Students Sep.15 Programming Courses / Dr. Christina Abrec. Get a brief tour of our programming course + 01 02 03 04 Media Courses / Dr. Samuel Wheels. Get a brief tour of our media course + Business Courses / Mr. April Huddleston. Set a brief tour of our business course + Layer Property Image Name defaultMediaName X 0 Y 224 Width 640 Height 658 Rotate 0 Transpa... Content Image 3091097189.png ... Transition Effect None Transition Duration Fast Shadow Fixed Ratio Los Angeles 14°C- You can customize widget information by selecting the respective widget in the canvas, then adjust the settings in the Content panel.
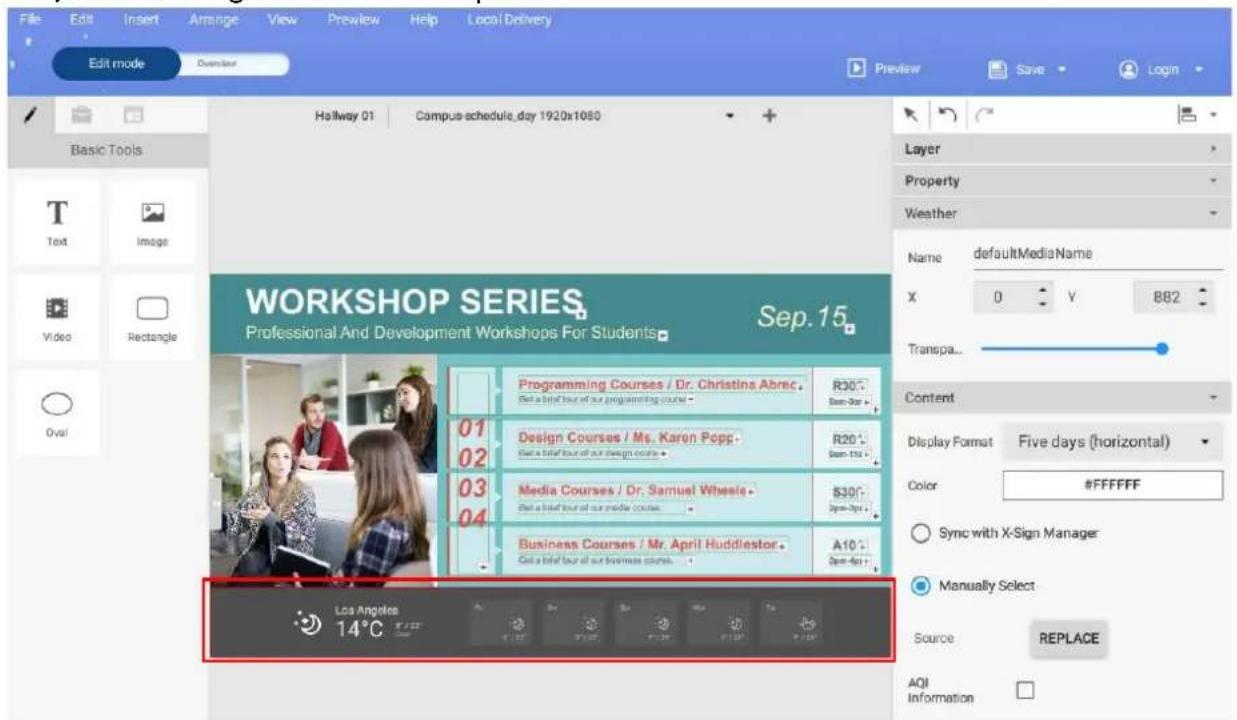
text_image
File Edit Insert Arrange View Prewlew Help Local Delivery Edit mode Developer Hallway 01 Campus schedule_day 1920x1080 Basic Tools Text Image Video Rectangle Oval WORKSHOP SERIES Professional And Development Workshops For Students Sep. 15 Layer Property Weather Name defaultMediaName X 0 Y 882 Transpa... Content Display Format Five days (horizontal) Color #FFFFFF Sync with X-Sign Manager Manually Select Source REPLACE AQI Information- You can move objects on a page by selecting on the bounding box in the canvas and dragging it to the desired location.
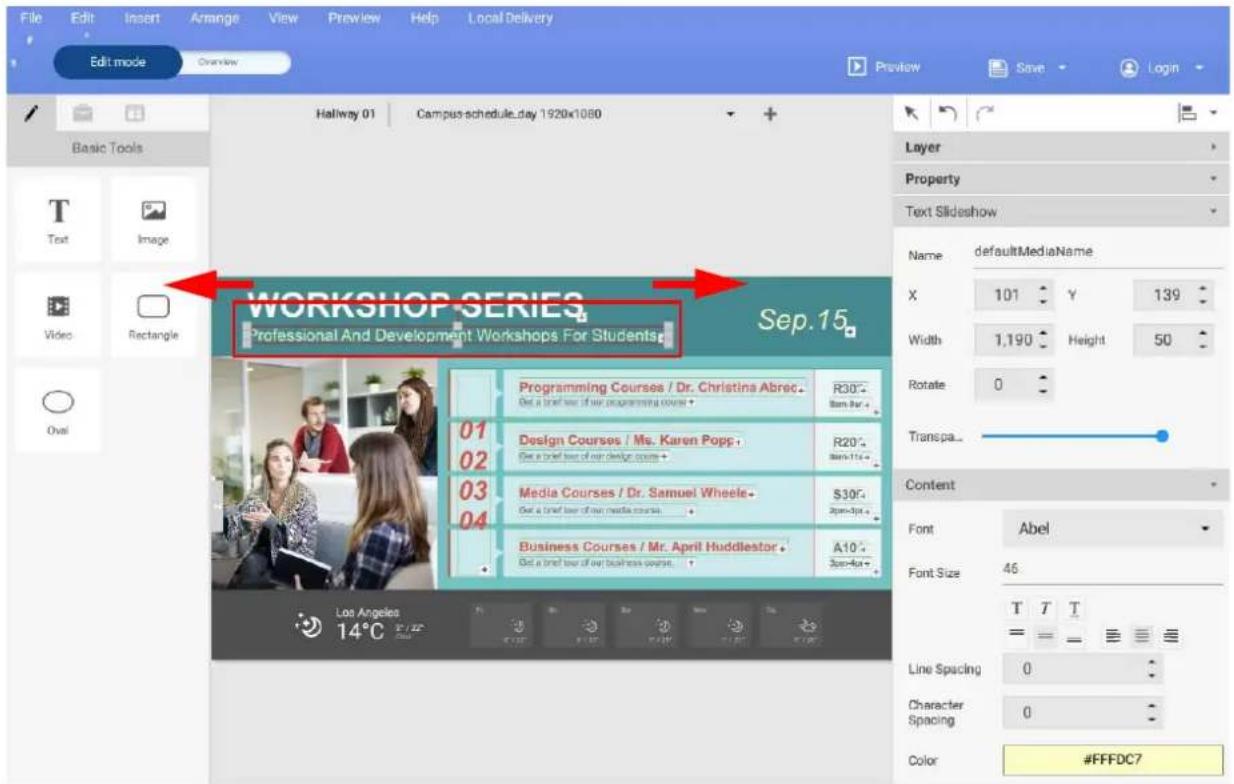
text_image
File Edit Insert Arrange View Preview Help Local Delivery Edit mode Overview Hallway 01 Campus-schedule_day 1920x1080 Basic Tools Text Image Video Rectangle Oval WORKSHOP SERIES Professional And Development Workshops For Students. Sep. 15. Layer Property Text Slideshow Name defaultMediaName X 101 Y 139 Width 1,190 Height 50 Rotate 0 Transpa... Content Font Abel Font Size 46 T T T Line Spacing 0 Character Spacing 0 Color #FFFDC7 Programming Courses / Dr. Christina Abrec. Get a brief tour of our programming course + R30" 8pm-9pt + 01 02 Design Courses / Ms. Karen Popp+ Get a brief tour of our design course + R20" 8pm-11pt + 03 04 Media Courses / Dr. Samuel Wheele+ Get a brief tour of our media course + $30# 2pm-3pt + Business Courses / Mr. April Huddleston+ Get a brief tour of our business course + A10# 2pm-4pt + Los Angeles 14°C #FFDC7Creating a clock widget in X-Sign Designer
- In X-Sign Designer, click on the icon ⏱ to add a clock widget, and you will be prompted to place the clock widget.
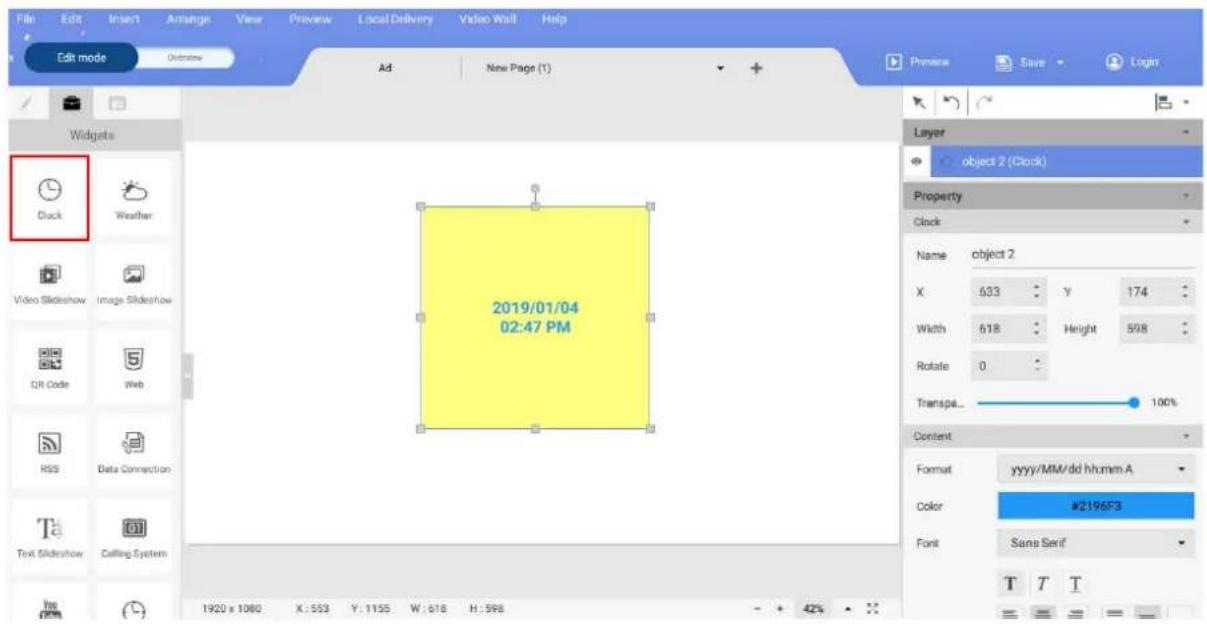
text_image
File Edit Insert Arrange View Preview Local Delivery Video Wall Help Edit mode Widgets Clock Weather Video Slideshow Image Slideshow QR Code Web RSS Data Connection Ta Text Glideshow Ceiling System 2019/01/04 02:47 PM 1920 x 1080 X: 553 Y: 1155 W: 618 H: 598 Layer object 2 (Clock) Property Clock Name object 2 X 633 Y 174 Width 618 Height 598 Rotate 0 Transpa... 100% Content Format yyyy/MM/dd hhmm A Color #2196F3 Font Sans Serif T T T-
You can drag the clock widget anywhere in the template.
-
You may set the properties of the clock widget in the editing area on the right panel.
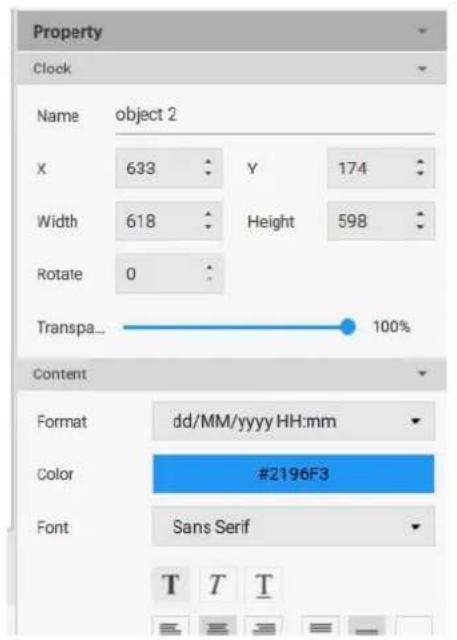
text_image
Property Clock Name object 2 X 633 Y 174 Width 618 Height 598 Rotate 0 Transpa... 100% Content Format dd/MM/yyyy HH:mm Color #2196F3 Font Sans Serif T T T
text_image
Property Content Format dd/MM/yyyy HH:mm Color #AA55FF Font Sans Serif T T T Font Size 44 Character Spacing 0 Line Spacing 0 Background Color #55FF00- You can switch the format of the time/date layout. You can choose to display both the date and time, or only display either the date or the time.
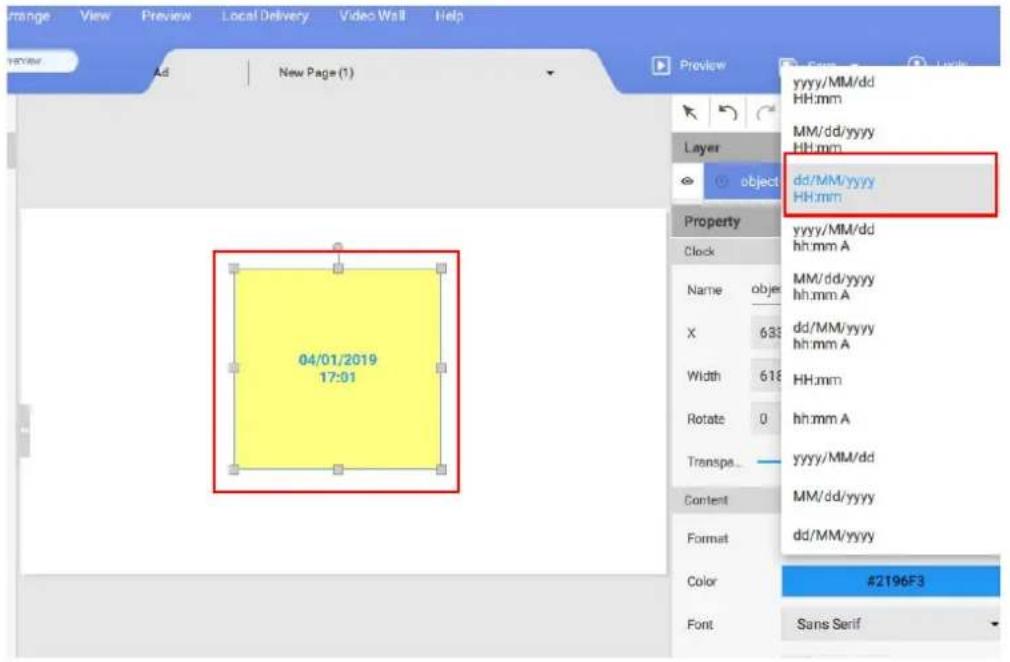
text_image
04/01/2019 17:01 yyyy/MM/dd HH:mm MM/dd/yyyy HH:mm dd/MM/yyyy HH:mm Property yyyy/MM/dd hh:mm A MM/dd/yyyy hh:mm A X 633 dd/MM/yyyy hh:mm A Width 618 HH:mm Rotate 0 hh:mm A Transps. yyyy/MM/dd Content MM/dd/yyyy Format dd/MM/yyyy Color #2196F3 Font Sans Serif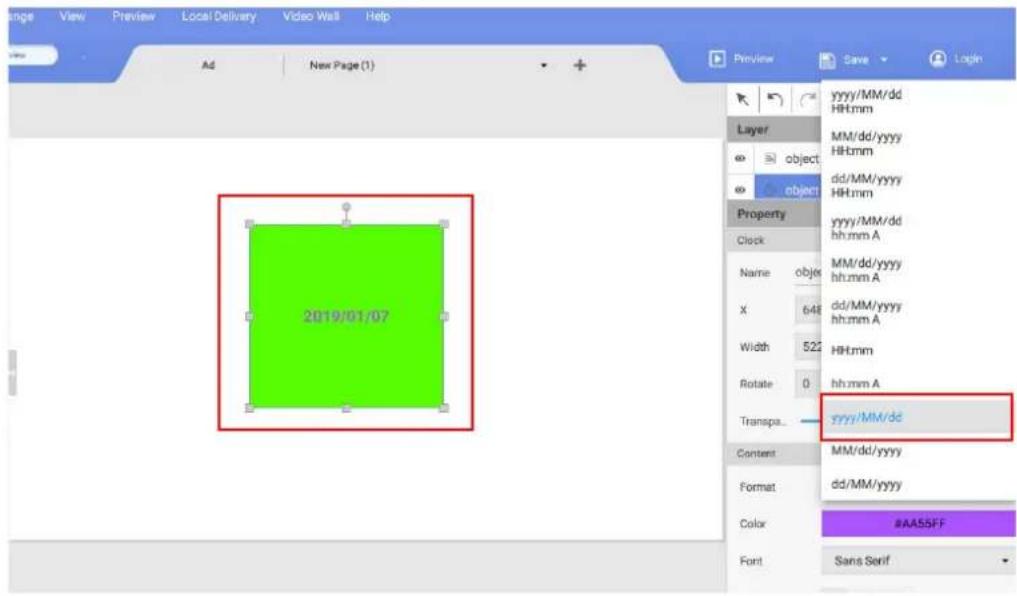
text_image
2019/01/07 yyyy/MM/dd HH:mm MM/dd/yyyy HH:mm dd/MM/yyyy HH:mm yyyy/MM/dd hh:mm A MM/dd/yyyy hh:mm A X 648 dd/MM/yyyy hh:mm A Width 522 HH:mm Rotate 0 hh:mm A Transpa yyyy/MM/dc Content MM/dd/yyyy Format dd/MM/yyyy Color #AAS5FF Font Sans SerifSetting a weather widget
- In X-Sign Designer, click on the icon 📋 to add a weather widget, and you will be prompted to place the weather widget.
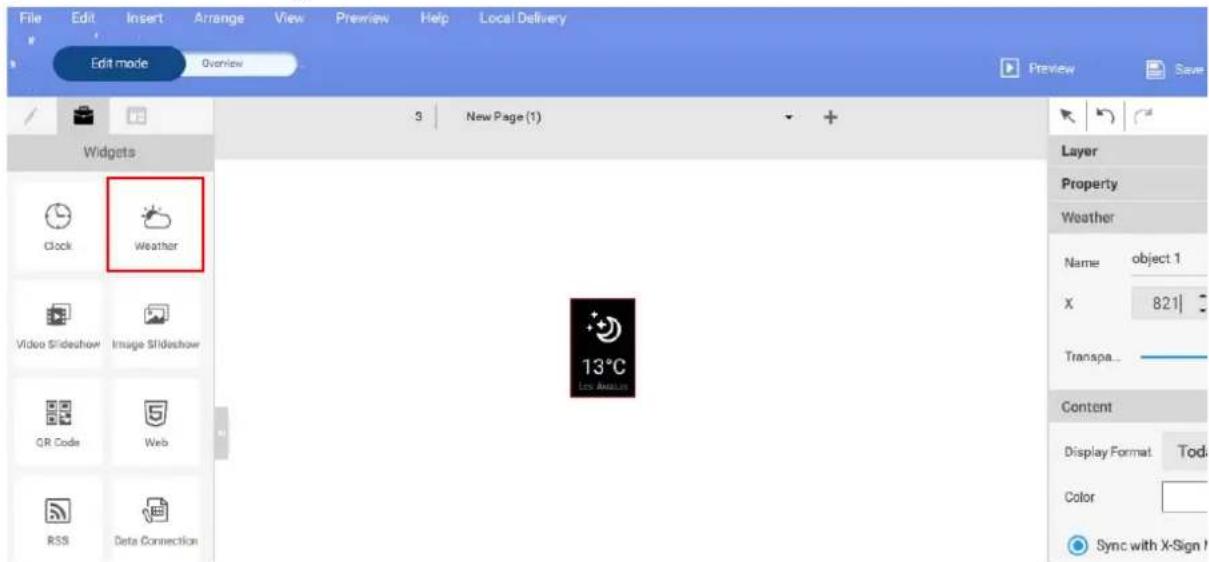
text_image
File Edit Insert Arrange View Preview Help Local Delivery Edit mode Overview Preview Save Widgets Clock Weather Video Slideshow Image Slideshow QR Code Web RSS Data Connection New Page (1) Layer Property Weather Name object 1 X 821 Transpa... Content Display Format Today Color Sync with X-Sign-
Click on the icon 📋 to add more weather widgets. You can drag the weather widget anywhere in the template.
-
You may set the properties of each weather widget. You can set the title layout, text color, and background color.
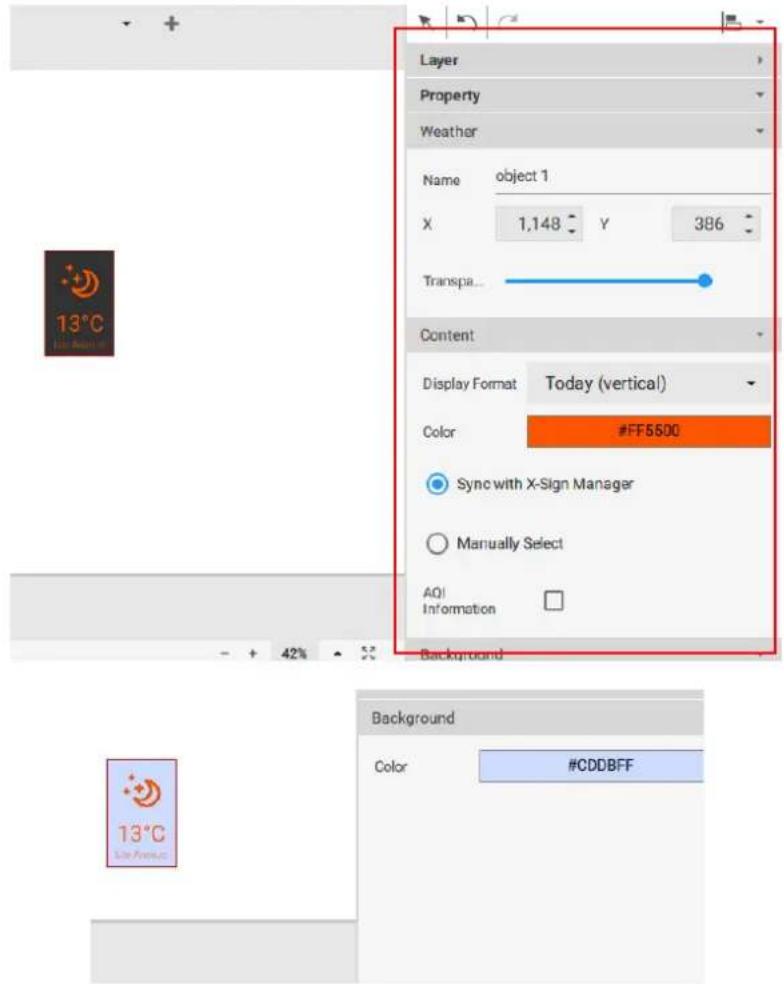
text_image
Layer Property Weather Name object 1 X 1,148 Y 386 Transpa... Content Display Format Today (vertical) Color #FF5500 Sync with X-Sign Manager Manually Select AO! Information Background Background Color #CDBFF 13°C Sun Present- You can also change the display format.
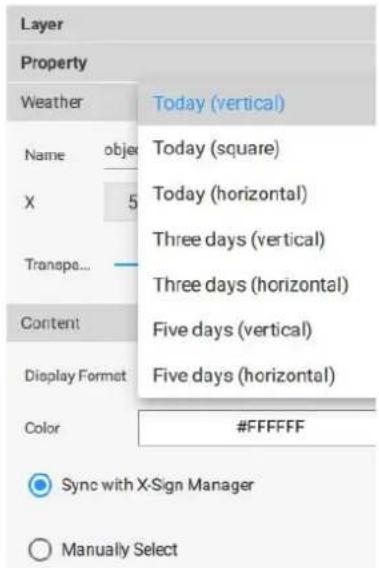
text_image
Layer Property Weather Today (vertical) Name object X 5 Today (square) Today (horizontal) Three days (vertical) Three days (horizontal) Three days (horizontal) Five days (vertical) Five days (horizontal) Content Display Format Color #FFFFFF Sync with X-Sign Manager Manually Select- To set the city, first identify the city in the device management section of the online X-Sign Manager. You can check Sync with X-Sign Manager to sync the city information with the device on X-Sign Manager, or you can check Manually Select to select the city yourself.
Creating an Image or Video slideshow
You can use the Image slideshow or Video slideshow widget to play multiple media files in succession within one window of the project. The following is an introduction to creating an image or video slideshow.
To create an image or video slideshow in X-Sign Designer:
- Click the 📋 button to open the Widget panel and click either the Image slideshow or the Video slideshow widget.
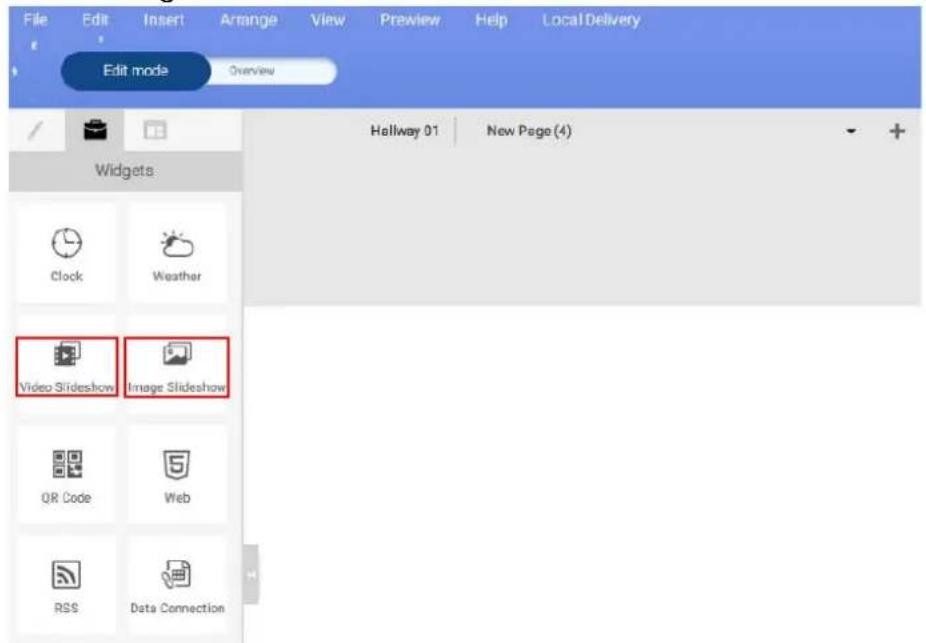
text_image
File Edit Insert Arrange View Preview Help Local Delivery Edit mode Overview Hollway 01 New Page (4) Widgets Clock Weather Video Slideshow Image Slideshow QR Code Web RSS Data Connection- A new bounding box will appear in the canvas area. Select the + button on the lower right corner of the bounding box to add images or videos.
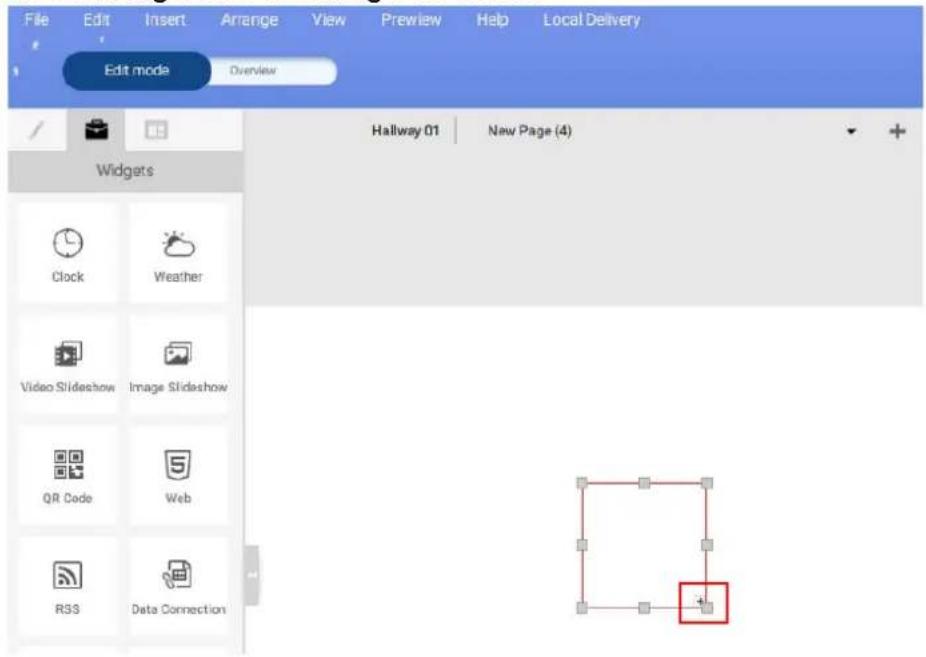
text_image
File Edit Insert Arrange View Preview Help Local Delivery Edit mode Overview Halway 01 New Page (4) Widgets Clock Weather Video Slideshow Image Slideshow QR Code Web RSS Data Connection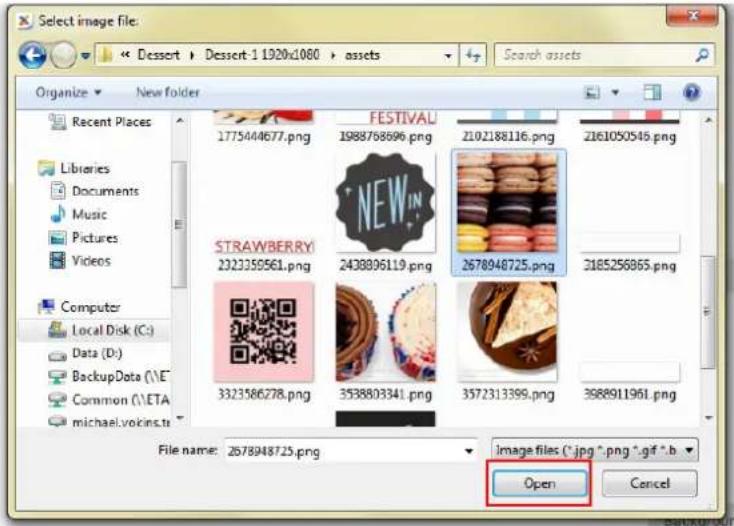
text_image
Select image file: Dessert > Dessert-1 1920x1080 > assets Organize > New folder Recent Places Libraries Documents Music Pictures Videos Computer Local Disk (C:) Data (D:) BackupData (\E" Common (\ETA michael.vokins.te FESTIVAL 1775444677.png 1988768696.png Z102188116.png Z161050545.png STRAWBERRY 2323359561.png 2438896119.png 2678948725.png 3185256865.png 3323586278.png 3538803341.png 3572313399.png 3688911961.png File name: 2678948725.png Image files (*.jpg *.png *.gif *.b Open Cancel- Select one or more images or videos to import and click Open.
- You can resize the slideshow by clicking and dragging on the square nodes of the bounding box.
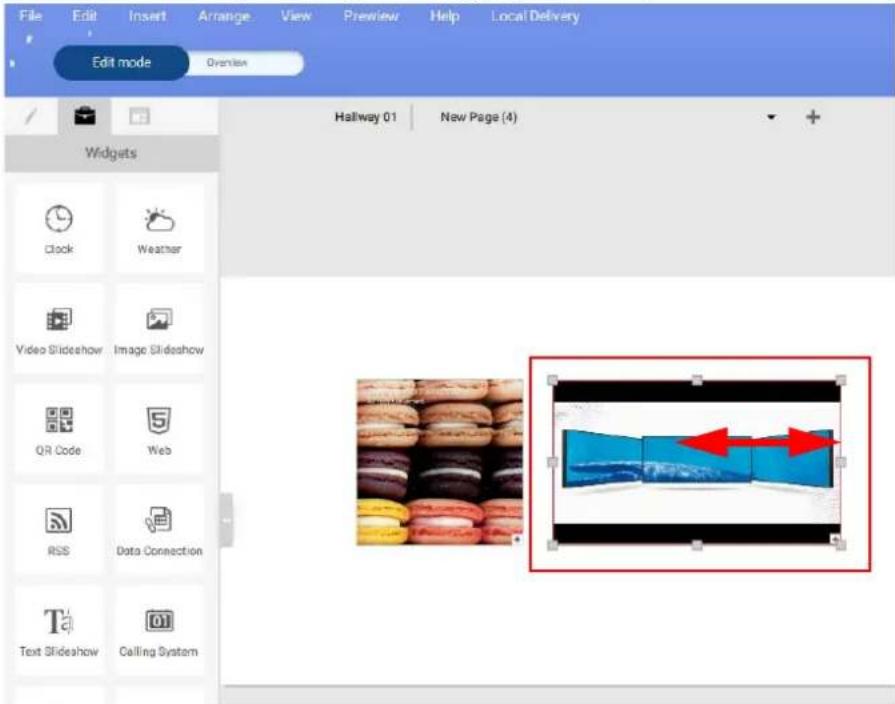
text_image
File Edit Insert Arrange View Preview Help Local Delivery Edit mode Overview Hallway 01 New Page (4) Widgets Clock Weather Video Slideshow Image Slideshow QR Code Web RSS Data Connection Text Slideshow Calling System- To customize the Image slideshow settings, adjust the following items in the Order panel and the Transition panel:
A. Image Slideshow Order – Select the image and drag it upwards or downwards to re-order the slideshow.
B. Add, Replace, Crop, Delete – Select an image to add, replace, crop, and delete.
C. Fill Mode – Select an image to adjust the fill mode. The options include Fit, Fill, Part.
D. Total playing time – Select an image and type in the total playing time.
E. Transition effect – Select a transition effect for the entire slideshow from the menu.
F. Transition speed – Select a transition speed for the entire slideshow from the menu.
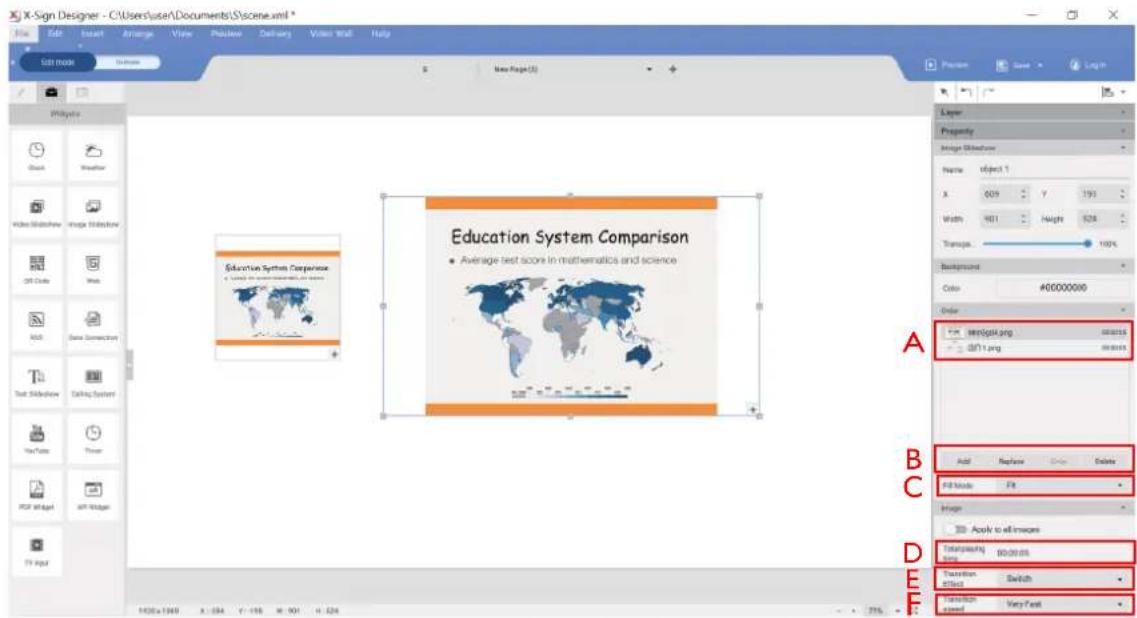
text_image
X-Sign Designer - C:\Users\user\Documents\Syscene.xml * File Edit Insert Arrange View Printew Delivery Video Web Help List Book New Page (S) Preview Save Log In Analysis Check Weather Video Sketchbox Image Structure Off Code Print Data Connection Text Selection Taking System You Data Search PDF Image GIF Widget TV Impact Education System Comparison • Average test score in mathematics and science Education System Comparison A B C D E Layer Property Image Dimensions Name: object 1 X: 009 Y: 193 Width: 401 Height: 528 Transge: 100% Background Color: #00000000 Order Intriglit.png Intriglit.png Add Replace Delete Fill Mode Fill Image Apply to all images Outperforming time 60:00:00 Transition effect Switch Transition speed Very Fast6. To customize the Video slideshow settings, adjust the following items in the Order panel and the Transition panel:
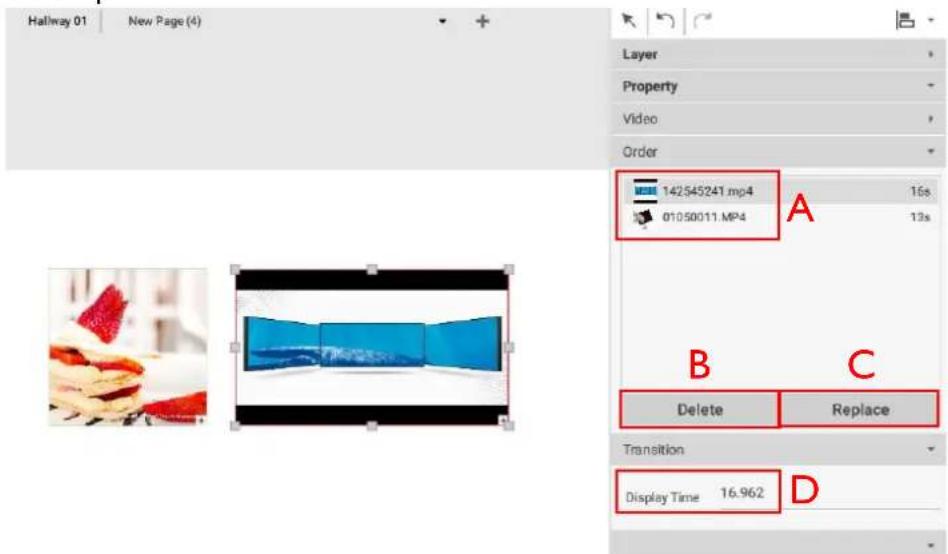
text_image
Hallway 01 New Page (4) Layer Property Video Order 14254524T.mp4 16s 01050011.MP4 13s A B C Delete Replace Transition Display Time 16.962 DA. Video Slideshow Order – Select the video and drag it upwards or downwards to re-order the slideshow.
B. Delete – Select a video to delete and click the Delete button.
C. Replace – Select a video to replace and click the Replace button.
D. Display Time – Select a video and type in the duration time and press Enter.
Rotating an image or video
The following is an introduction of how to rotate images or video on X-Sign Designer and X-Sign Player.
To rotate an image on X-Sign Designer:
- Click and hold the rotation tab located at the top of an image or video file in a project. Drag to the left or right and release at the desired degree of rotation.
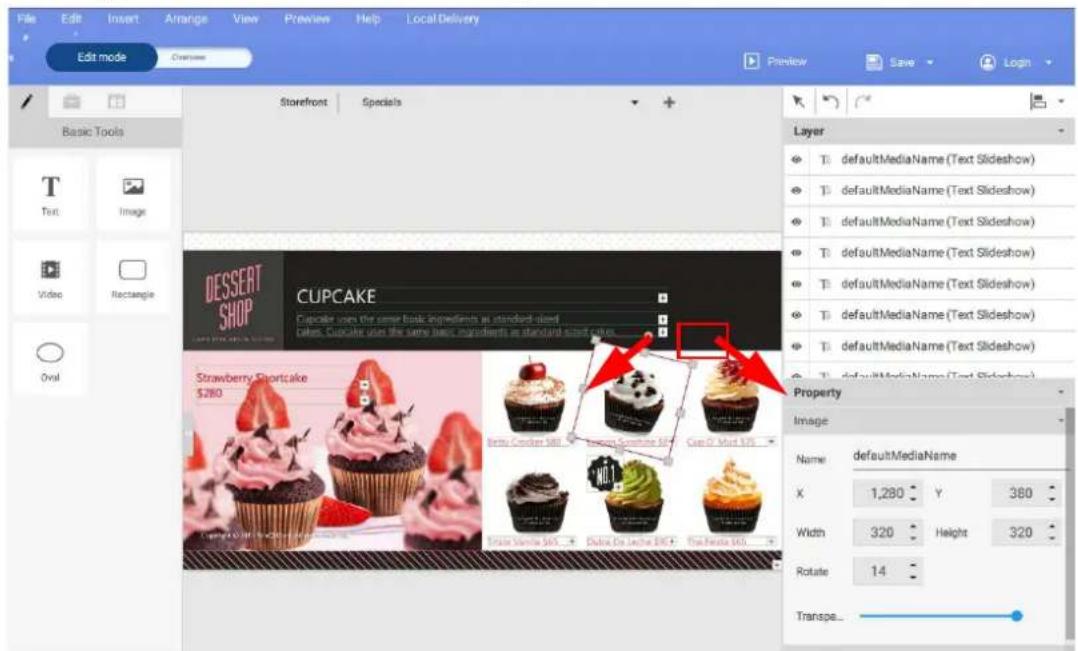
text_image
File Edit Insert Arrange View Preview Help Local Delivery Edit mode Storefront Specials Basic Tools Text Image Video Rectangle Oral DESSERT SHOP CUPCAKE Cupcake uses the same basic ingredients as standard-sized Cakes. Cupcake uses the same basic ingredients as standard-sweet cakes. Strawberry Shortcake $280 Item Cooker Salt Item Cooker Salt Cuor Dot Mud 15% Make some kind - 3x Make some kind - 4x Make some kind - 5x Property Image Name defaultMediaName X 1,280 Y 380 Width 320 Height 320 Rotate 14 - Transps...- You can also rotate an image or video by manually changing the value in the Image or Video panel.
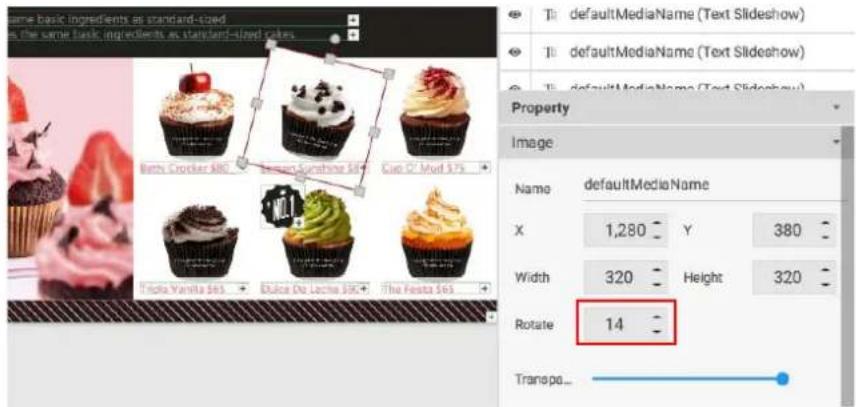
text_image
same basic ingredients as standard-sized as the same basic ingredients as standard-sized rules T1 defaultMediaName (Text Slideshow) T2 defaultMediaName (Text Slideshow) T3 defaultMediaName (Text Slideshow) Property Image: Name defaultMediaName X 1,280 Y 380 Width 320 Height 320 Rotate 14 Transpa...- You may set the properties in the editing area on the right panel.
Generating a QR Code
- In X-Sign Designer, click on the icon 📋 to add a QR code, and you will be prompted to enter the URL corresponding to the QR code.
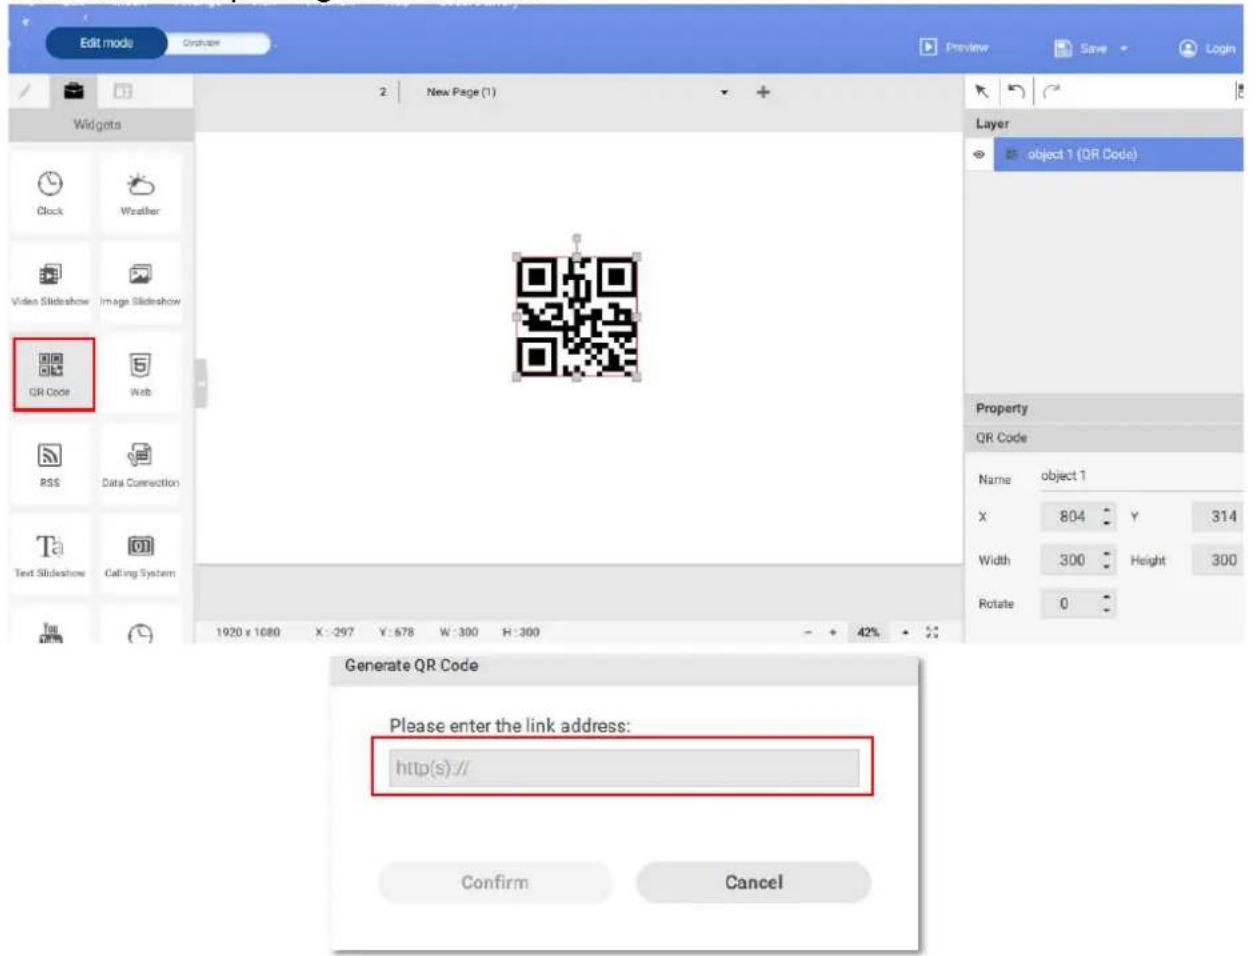
text_image
Edit mode Orchase Preview Save Login Widgets Clock Weather Video Slideshow Image Slideshow QR Code Web RSS Data Connection Text Slideshow Calling System 1920 x 1080 X: -297 Y: 678 W: 300 H: 300 - + 42% + Layer object 1 (QR Code) Property QR Code Name object 1 X 804 Y 314 Width 300 Height 300 Rotate 0 Generate QR Code Please enter the link address: http(s):// Confirm Cancel- Click on the icon 📄 to add more QR codes. You can drag the QR code anywhere in the template. You can also edit the QR code or the link in the editing area on the right panel.
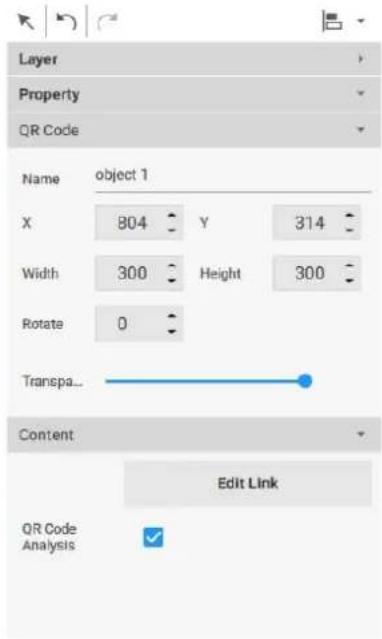
text_image
Layer Property QR Code Name object 1 X 804 Y 314 Width 300 Height 300 Rotate 0 Transpa... Content Edit Link QR Code AnalysisNote:
• Each added QR code has its own carousel controls to be edited independently from others.
• QR code can contain up to 256 words.
Adding a data connection
I. Before adding a data connection to BenQ X-Sign Designer, create the data in Google sheets.
| Movie chart File Edit View Insert Format Data Tools Add-ons Help All changes saved in Drive | ||||||||
| NTS % 0.00 123 - Arial - 10 B I S A - □ □ □ □ □ □ □ □ □ □ □ □ □ □ □ □ □ □ □ □ □ □ □ □ □ □ □ □ □ □ □ □ □ □ □ □ □ □ □ □ □ □ □ □ □ □ □ □ □ □ □ ▢ ▢ ▢ ▢ ▢ ▢ ▢ ▢ ▢ ▢ ▢ ▢ ▢ ▢ ▢ ▢ ▢ ▢ ▢ ▢ ▢ ▢ ▢ ▢ ▢ ▢ ▢ ▢ ▢ ▢ ▢ ▢ ▢ ▢ ▢ ▢ ▢ ▢ ▢ ▢ ▢ ▢ ▢ ▢ ▢ ▢ ▢ ▢ ▢ ▢ ▩ | ||||||||
| A | B | C | D | E | F | G | H | |
| 1 | Sunday | Monday | Tuesday | Wednesday | Thursday | Friday | Saturday | |
| 8:30~10:30 | ||||||||
| 3 | ||||||||
| 4 | 10:40~12:40 | |||||||
| 5 | ||||||||
| 6 | 12:50~14:50 | |||||||
| 7 | ||||||||
| 8 | 15:00~17:00 | |||||||
| 9 | ||||||||
| 10 | 17:10~19:10 | |||||||
| 11 | ||||||||
| 12 | 19:20~21:20 | |||||||
| 13 | 21:30~23:30 | |||||||
| 14 | ||||||||
| 15 | ||||||||
| 16 | ||||||||
- Select File and choose Publish to the web.
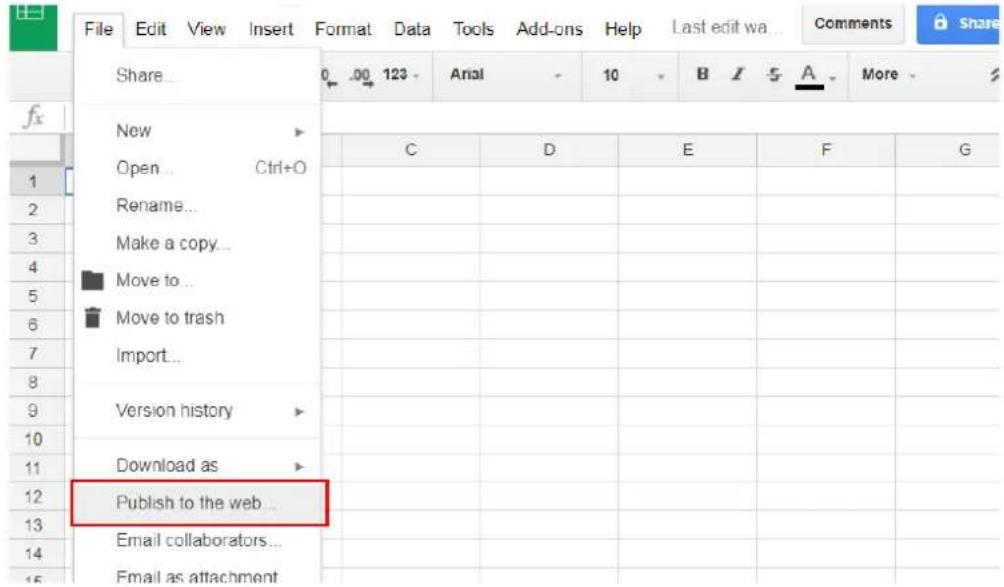
text_image
File Edit View Insert Format Data Tools Add-ons Help Last edit wa... Comments Share Share 0 .00 123 - Arial - 10 - B I S A - More - New Open Ctrl+O Rename... Make a copy... Move to ... Move to trash Import... Version history Download as Publish to the web... Email collaborators... Email as attachment- Make sure the file is saved in CSV format.
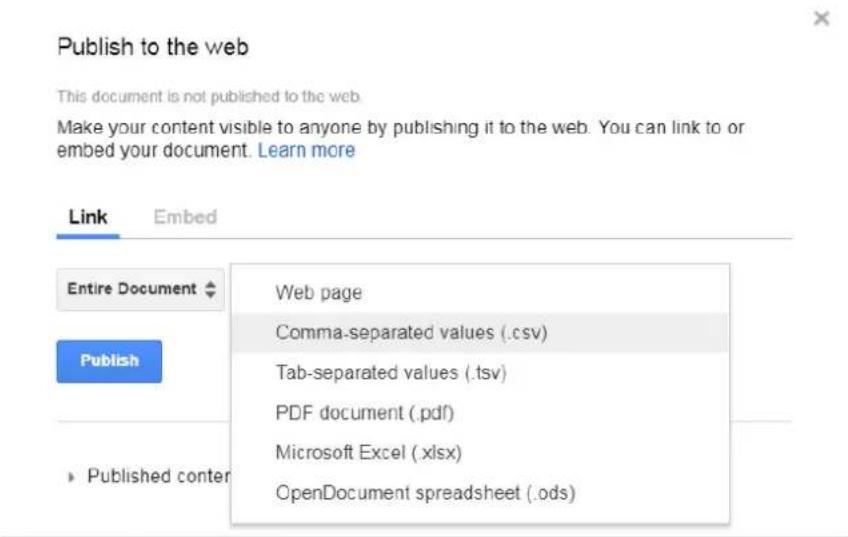
text_image
Publish to the web This document is not published to the web. Make your content visible to anyone by publishing it to the web. You can link to or embed your document. Learn more Link Embed Entire Document Web page Publish Comma-separated values (.csv)text_image
Data Connection settings Source URL: http:// Column From: 1 Column To: 10 +1~10 Row From: 1 Row To: 10 +1~10 Update Freq: 600 secs Confirm CancelSetting a timer widget
1. In X-Sign Designer, click on the icon 📟 to add a timer widget, and you will be prompted to place the timer widget. text_image
File Edit Insert Arrange View Preview Help Local Delivery Edit mode Overview Preview Save Widgets Clock Weather Video Slideshow Image Slideshow QR Code Web RSS Data Connection Text Slideshow Calling System You YouTube Timer 30 : 0 Min Secs 1920 x 1080 X: 1528 Y: 1272 Layer Property Page Name New Pi Duration 10.00.0 Resolution 1920x1 Panel Area 1x1 Background Color Image Transitions Effecttext_image
Settings Function Countdown Mode Calendar Mode Start Date 2018/03/26 Start Time 08:00 End Date 2018/03/26 End Time 08:30text_image
Settings Function Count up Mode Repeat Mode Start Date 2018/03/26 Start Time 08:00 End Date 2018/03/26 End Time 08:30text_image
30 : 0 Min Socs Settings Function Countdown Mode Calendar Mode Start Date 2018/04/20 Start Time 12:00 End Date 2018/04/20 End Time 12:30 Appearancetext_image
April 2018 Sun Mon Tue Wed Thu Fri Sat 35 26 27 28 29 30 31 1 2 3 4 5 6 7 8 9 10 11 12 13 14 15 16 17 18 19 20 21 22 23 24 25 26 27 28 29 30 1 2 3 4 5 Confirm Cancel Layer Property Rotate 0 : Transpa... Settings Function Countdown Mode Calendar Mode Start Date 2018/04/20 Start Time 12:00 End Date 2018/04/20 End Time 12:30text_image
0 : 0 Min Secs Settings Function Count up Mode Repeat Mode Start Date 2018/04/20 Start Time 12:00 End Date 2018/04/20 End Time 12:30text_image
00:00 Min Secs Appearance Display Format Minutes/Seconds Layout Layout A 00 MINS Settings Appearance Display Format Minutes Layout Layout BCreating an API template using the demo kit
1. In X-Sign Designer, click on the icon API to add an API widget, and you will be prompted to select the name of the API table(s) you have created in X-Sign Manager. See Creating an API table in X-Sign Manager on page 38 for more information. text_image
File Edit Insert Arrange View Preview Local Delivery Video Wall Help Edit mode Diagram New New Page (1) Preview Save albertkang Widgets QR Code Web RSS Data Connection Text Slideshow Calling System YouTube Timer POF Widget ARI Widget TV Input 1920 x 1080 X: 938 Y: 193 New table_1 Confirm Cancel Property Page Name New Page (1) Duration 10:00.000 Resolution 1920x1080 Mo Panel Area 1x1 Transitiontext_image
File Edit Insert Arrange View Preview Local Delivery Video Wall Help Edit mode Overlay New New Page (1) Preview Save Widgets QR Code Web RSS Data Connection Text Slideshow Calling System YouTube Timer PDF Widget Widgets CounterPills HTMLU3SegmentID 600 13A:01B:04H:175k:077b:087279e 326 w0a130d394c50450a081c679960 160 42547c15749666a3aa4221aa9749 230 781c194f0b4433m2222c9fddd25e3 300 edcde611404874888b34351e346e4 Layer object 1 (Widget) Property Widget Series Choose series Show table hexa Number Format Number 1,000 Currency ¥ •.0 Content Color| 600 | 3361f33bd60443758cff7eb68f3 734e |
| 320 | ae0e1130df394c598508a081e3b 78960 |
| 160 | 62b87cf5d7464beba5aa422ale ae0fa0 |
| 210 | 710c19f4fbb8433ea2222d8fa5dd75e5 |
| 300 | edcdde1143414876800fb34351c 346c4 |
text_image
File Edit Insert Arrange View Preview Local Delivery Video Wall Help Edit mode New New Page (1) Preview Save Log in Widgets QR Code Web RSS Data Connection Text Slideshow Ceiling System YouTube Timer PDF Widget Widget TV Input CounterPijk HTMLUStream03 600 23615328449774e8746687374e 320 ashv1138674e54955686666666666666666666666666666666666666666666666666666666666666666666666666666 140 404547024985899999999999999999999999999999999999999999999999999999999999999999999999999 220 753e1348e84432e222885a8873e0 380 c5d4b124504578888524E5c348L4 Property Widget Serials Choose series Show table header Number Format Choose data Number 1,000.12 Currency ¥ +0 0+5 5 Content Color #000000 Font Serif 1920 x 1680 X : -355 Y : -228 W : 799 H : 404 + 42%text_image
File Edit Insert Arrange View Preview Local Delivery Video Wall Help Edit mode Options New New Page (1) Preview Save Log in Widgets QR Code Web RSS Data Connection Ta Text Slideshow Talking System YouTube Timer PDF Widget Widget TV Input CounterPrijs HTMLElementID 650 30x20x8x40x70x8x90x100x110x120x130x140x150x160x170x180x190x200x210x220x230x240x250x260x270x280x290x300x310x320x330x340x350x360x370x380x390x400x410x420x430x440x450x460x470x480x490x500x510x520x530x540x550x560x570x580x590x600x610x620x630x640x650x660x670x680x690x700x710x720x730x740x750x760x770x780x790x800x810x820x830x840x850x860x870x880x890x900x910x920x930x940x950x960x970x980x990 1920 x 1080 X: -355 Y: -228 W: 799 H: 454 + + 42% Data CounterPrijs HTMLElementID Layer object 1 (Widget) Property Widget Series Choose series Show table header Number Format Choose data Number 1,000/12 Currency + . 0 0. < 5 5 + Content Color #000/00 Font Serif TEN TENtext_image
Number Format CounterPrijs Choose data Number 1000.12 Currency 1,000.12 1.000,12 Content Color #000000 Font Seriftext_image
Number Format CounterPrijs Choose data Number 1,000.12 Currency ¥ $ ¥ Content Color £ Font €text_image
CounterPrijs HTMLElementID 320 ae0e1130df394c598508a081e3b78960 160 62b87cf5d7464beba5aa422a1ceae0fa0 210 710c19f4fbb8433ea2222d8fa5dd75e5 300 edcdde1143414876800fb34351c346c4 Layer object 1 (Widget) Property Content Color calibri T T T Font Size 37 Character Spacing 5 Line Spacing 0 Table Background color #00FF/F Border color #AA00/F Border width 1 1920 x 1080 X: 1224 Y: 1224 W: 1634 H: 473 + 42% - +text_image
CounterPrijs 320 160 210 300 695 1295 2995 HTMLElementID ae0e1130df394c598508a081e3b78960 62b87cf5d7464beba5aa422a1eae0fa0 710c19f4fb8433ea2222d8fa5dd75e5 edcdde1143414876800fb34351c346c4 Chicken crispy Dragon Roll MERRY WINTER BOX Property Color #005500 Font Serif T T T Font Size 35Creating a TV Input source widget in X-Sign Designer
1. In X-Sign Designer, click on the icon 📋 to add a TV Input widget, and you will be prompted to place the TV Input widget. The TV Input source is transmitted through an HDMI cable. text_image
File Edit Insert Arrange View Preview Local Delivery Video Wall Help Edit mode Overview Ad Program 1 Preview Save Login Widgets RSS Data Connection Text Slideshow Ceiling System YouTube Timer PDF Widget Widget TV Input 1928 x 1080 X: 1806 Y: 1287 W: 949 H: 747 Layer CH1 (TV Input) Property TV Input Name CH1 X 376 Y 113 Width 949 Height 747 Transpa_ 80%text_image
Preview Save Login Layer CH1 (TV Input) Property TV Input Name CH1 X 376 Y 113 Width 949 Height 747 Transpa.. 80%Setting background music in X-Sign Designer
Once you have completed a project, you can add a music file to play in the background when the project is displayed. The following is an introduction to adding music to the background of a project. To add music to a single page in X-Sign Designer: I. While the project is in Edit Mode, go to the Audio panel and toggle the With Background Audio switch to the on position. text_image
File Edit Insert Arrange View Preview Help Local Delivery Edit mode Overview Storefront Price List Basic Tools Text Image Video Rectangle Oval Layer Property Page Background Transitions Effect None Duration Normal Background Audio With Background Audio Source Volume Mute Loop Flavor Chocolate + 80 - 580 + Vanilla + 90 - 690 + Lemon + 80 - 680 + Strawberry + 100 - 700 + flavor + 100 - 8inc + Cheese cake + 80 - 580 + Cupcake + 90 - 690 + Chocolate cake + 80 - 680 + Lemon roulade + 100 - 700 + flavor + 100 - 8inc + Napoleons + 80 - 580 + Mango mousse + 90 - 690 + Chiffon cake + 80 - 680 + Cheese cake + 100 - 700 + CAKE Flavor M L Orange juice + 80 - 130 + Apple juice + 90 - 150 + Lemon juice + 80 - 140 + Cocoa + 100 - 160 + flavor M M Black tea + 80 - 130 + Calpico + 90 - 150 + Coca cola + 80 - 140 + Milk tea + 100 - 160 + DRINKtext_image
MACARON Layer Property Page Background Transitions Effect None Duration Normal Background Audio With Background Audio Source ... DRINK Volume Mute Looptext_image
Select files << MIKE SFX ▶ SI 6000 Series ▶ CD 6001 Organize ▶ New folder Music Pictures Videos Computer Local Disk (C:) Data (D:) BackupData (\E Common (\ETA michael.vokins.t Case (\ETA-File- Client (\ETA-Fil Remote_Job (\E Temp (\ETA-Fil Name # Title Contributing artist Track 19.mp3 19 Track 19 Sound Ideas Track 20.mp3 20 Track 20 Sound Ideas Track 21.mp3 21 Track 21 Sound Ideas Track 22.mp3 22 Track 22 Sound Ideas Track 23.mp3 23 Track 23 Sound Ideas Track 24.mp3 24 Track 24 Sound Ideas Track 25.mp3 25 Track 25 Sound Ideas Track 26.mp3 26 Track 26 Sound Ideas Track 27.mp3 27 Track 27 Sound Ideas Track 28.mp3 28 Track 28 Sound Ideas Track 29.mp3 29 Track 29 Sound Ideas Track 30.mp3 30 Track 30 Sound Ideas File name: Track 20.mp3 Music file (*.mp3) Open Cancel3. You can adjust Volume in the Audio panel.
text_image
MACARON flaver Napoleons Mango mousse Chiffon cake Cheese cake Volume 0% Repeat infinitelyI. While the project is in Overview Mode, click the music button at the top of the canvas.
text_image
File Edit Insert Arrange View Preview Delivery Video Wall Help Edit mode Overview Preview Save Log In UM 00:01:48 Music Order Interaction 01 Greatly Exponential Way Boutique-Shoes 1920x1080 Play 00:00:18 • Total playin...00:00:18 02 STRAWBERRY FESTIVAL Dessert-1 1920x1080 Play 00:00:45 • Total playin...00:00:45 03 Dessert-2 1920x1080 Play 00:00:45 • Total playin...00:00:452. Choose the mp3 file from your hard drive and click Open.
text_image
Add music Organize New folder Downloads Recent Places Libraries Documents Music Pictures Videos Computer Local Disk (C:) Data (D:) BackupData (\E" Common (\ETA) Name # Title Contributing artist Track12.mp3 12 Track 12 Sound Ideas Track13.mp3 13 Track 13 Sound Ideas Track14.mp3 14 Track 14 Sound Ideas Track15.mp3 15 Track 15 Sound Ideas Track16.mp3 16 Track 16 Sound Ideas Track17.mp3 17 Track 17 Sound Ideas Track18.mp3 18 Track 18 Sound Ideas Track19.mp3 19 Track 19 Sound Ideas Track 20.mp3 20 Track 20 Sound Ideas Track 21.mp3 21 Track 21 Sound Ideas Track 22.mp3 22 Track 22 Sound Ideas Track 23.mp3 23 Track 23 Sound Ideas File name: Track 20.mp3 Music file (*.mp3) Open Cancel3. You can replace or delete the mp3 file by selecting the following:
text_image
File Edit Insert Arrange View Preview Delivery Video Wall Help Edit mode Overview 01 Boutique-Shoes 1920x1080 Play 00:00:18 Total playin...00:00:18 02 STRAWBERRY FESTIVAL Dessert-1 1920x1080 Play 00:00:45 Total playin...00:00:45 03 OriSan - Basique C Dessert-2 1920x1080 Play 00:00:45 Total playin...00:00:45 A B Preview Save Log In Order InteractionChanging the playing order of pages
Once all your project pages are completed in X-Sign Designer you can change the playing order for the final content. To change the page order of a project: I. Select the Overview button to see the page layout of the project, the order page icons represent the playing order for the project. text_image
File Edit Insert Arrange View Preview Delivery Video Wall Help Edit mode Overview 01 Growth Delivered Way Boutique-Shoes 1920x1080 Play 00:00:18 Total playin...00:00:18 02 STRAWBERRY FESTIVAL Dessert-1 1920x1080 Play 00:00:45 Total playin...00:00:45 03 Dessert-2 1920x1080 Play 00:00:45 Total playin...00:00:45text_image
File Edit Insert Arrange View Preview Help Local Delivery Edit mode Overview Preview Save Login 01 STRAWBERRY FESTIVAL Storefront 1:35 Track 21.mp3 02 Main Page Repeat 1 time (s) Total playing time 0:45 Specials Repeat 1 time (s) Total playing time 0:45 03 MACARDON CAKE DRINK Price List Repeat 1 time (s) Total playing time 0:45Encrypting a project in X-Sign Designer
Watch demonstration video:  You can encrypt your project using X-Sign Designer. The main purpose of project encryption is to prevent others from playing your file. To encrypt a project in X-Sign Designer:I. Go to File > Encrypt Project.
text_image
File Edit Insert Arrange View Preview Delivery Video Wall Help New Project Ctrl+N Open Project Ctrl+O New Interactive Project Save Ctrl+S Save as... Upload to Manager Export Encrypt Project Quit Over Line2. Select the file you want to encrypt. Enter six-digit code as your verification code, then click Confirm.
text_image
Encrypt Project Enable sealing feature to enhance the security and privacy of your project during playback. Enable encryption code protection Please enter 6-digit private code as encryption code. Confirm Closetext_image
File Edit Insert Arrange View Preview Delivery Video Wall Help Edit mode Overview Local Delivery UM Standalone(USB) Basic Tools Text Imagetext_image
File Edit Insert Assign View Preview Help Local Delivery Open Project New project New Interactive Project Local delivery Demo Videotext_image
Recent Mission X-Sign Cloud Browse your folder Select X-Sign Project: <<__BENQ > xSign 2.0 > Source > Search Source Organize New folder Documents Music Pictures Videos Computer Local Disk (CL) Data (D:) BackupData (\E) Common (\ETA) michael.vokins.tg Case (\ETA-File- Client (\ETA-Fsk Remote Job (\E) Name Date modified Type X-Sign 1.6 files 02/03/2018 8:49 PM File folder X-Sign 2.0 introduction 15/03/2018 11:25 ... File folder X-Sign 2.0_UM_0180130_EN.pdf 02/03/2018 8:41 PM File folder X-Sign Software 2.0 and password 05/03/2018 5:14 PM File folder File name: X-Sign Projects - (scenetum)* .us Open Canceltext_image
Save Save As Save and Uploadtext_image
Organize New folder Favorites Desktop Downloads Recent Places Libraries Documents Music Pictures Videos Documents library Luxury Arrange by: Folder Name Date modified Type assets 07/02/2018 3:00 PM File folder data 07/02/2018 3:00 PM File folder assets.xml 06/02/2018 3:32 PM XML Documen scene.xml 08/02/2018 3:32 PM XML Documen preview.png 08/02/2018 3:32 PM PNG Image storage.db 07/02/2018 3:29 PM Data Base File File name: StorefrontJuly Save as type: All Files (*) Hide Folders Save CancelChanging your language in X-Sign Designer
I. Open your X-Sign Designer, then click Help. 2. Scroll down and click Language.3. Choose your language from the language menu.
text_image
X-Sign Designer - C:\Users\user\Documents\a\scene.html File Edit Insert Arrange View Preview Delivery Video Wall Help Edit mode Overview API Template-Rest About Check for Updates Quick Help Quick Guide for Interactive Template Quick Guide for API Widget Language Server Location Steak Ho Chilled & Australia Grain Fed House Specialties All Time Favourite English 简体中文 繁體中文 Deutsch Nederlands Français Polski Español русский Čeština Italiano 日本語 한국어 Português 1920 x 1080 X: 1192 Y: 1301 Layer odedefaultMediaName (Widget) me (Widget) me (Widget) me (Text Slideshow) me (Text Slideshow) me (Text Slideshow) me (Text Slideshow) me (Image) ite-Restaurant 1920x1080 80 ModifyPlayer
Switching the mode of Player
There are three modes for Player to play the content: • Standalone (USB): Directly play the content from USB. flowchart
graph LR
    A["X-Sign Designer"] --> B["Design the Content\nSave the content to the USB"]
    C["X-Sign Player"] --> D["Display the content\nInteract with the end customers"]
flowchart
graph LR
    A["X-Sign Designer"] --> B["Controller"]
    B --> C["X-Sign Player"]
    style A fill:#f9f,stroke:#333
    style B fill:#ccf,stroke:#333
    style C fill:#cfc,stroke:#333
flowchart
graph LR
    A["X-Sign Designer"] --> B["X-Sign Manager"]
    B --> C["X-Sign Player"]
    style A fill:#f9f,stroke:#333
    style B fill:#ccf,stroke:#333
    style C fill:#cfc,stroke:#333
text_image
Settings Switch Mode About Quit BenQ X-Sign Press 'MENQ' key on the remote control to display the main menu.text_image
Play from File Settings Switch Mode About Quit X-Sign Press "MENUF" key on the remote control to display the main menu.How to pack .xplan file
- Standalone(USB)
I. For Standalone(USB), fill in the schedule name, choose the project you want to play in the schedule and select the start and end time. Press Save to continue. text_image
Schedule Edit Schedule Schedule name Test_0821_sealing fe Deliver File Test_0821_sealing fea... Browse Time All Day Start 09:35 End 16:00 Save Remove2. Select Standalone(USB) to play the file.
text_image
Standalone(USB) Schedule Add Schedule Standalone(USB) 08 am 09 am 10 am 11 am 12 pm 01 pm 02 pm 03 pm 04 pm 05 pmtext_image
Play from File Settings Switch Mode About Quit X-Sign Press "MENLF" key on the remote control to display the main menu.text_image
Select X-Sign playable file: lib mnt mslib proc root sbin sdcard selinux storage sys system tmp Play Back Close3. Select the "usb\_storage" folder.
Selext X-Sign playable file: text_image
asec iso obb samba sdcard secure shell usb_storage Play Back4. Choose the file you want to play, then press Play.
Selext X-Sign playable file: text_image
Android DemoRoom_IL_xplan LOST.DIR Snow Mountain System Volume Information interactive template.xplan interactive_potrait.xplan Play Back5. Now you can enjoy your content.
Note: Once you play files successfully, the path will be remembered. You don't have to choose the path again next time you play files. While turn on Plug in USB and play automatically in Standalone mode, you can play content with your USB. Please be noted that if USB contains both .xplan files and other media files, X-Sign Player will play .xplan files. However, if you would like to play media files, you need to delete .xplan files from your USB to ensure your USB only contains media files which you would like to play. Watch demonstration video:  If you would like to play the latest .xplan file automatically, please turn on Plug in USB and play automatically in Standalone mode. If you would like to play the media files in the root folder of your usb automatically, please turn on Plug in USB and play automatically in Standalone mode and make sure your USB doesn't contain any .xplan files. Please delete .xplan files from your USB to ensure your USB only contains media files which you would like to play. Note: X-Sign Player can read and play the media files in the root folder of USB. Only X-Sign Player (Android, iOS, Windows) version 2.6 and above support this function. To use USB autoplay, switch to Standalone(USB) mode and open the toggle Plug in USB and play automatically. text_image
Standalone Activation Waiting for setting > There is an UUID, please visit "Manager" to pair Preference Verification code Disabled Local Delivery And Interactive (Pairing...) Play encrypted only (Standalone mode) Plug in USB and play automatically. *If you open this fiction, you can't use "Play from File" bottom. Manager Others Mode Description Close| Item Supported format | |
| Image duration 5 seconds | |
| Supported Image format .jpeg, .jpg, .png, .gif, .bmp, .svg | |
| Video duration Depends on video length | |
| Supported Video format .avi, .mp4, .m4v, .rmvb, .mov, .mkv, .mpg, .3gp, .webm | |
| Play order Alphabetical order | |
| Maximum play items 30 (including images and videos) | |
| Priority of Standalone(USB) features | .xplan > media files |
Activating an Interactive function in Standalone mode
You can activate your license both in Standalone mode and Local Delivery mode.- Activate license in Standalone mode:
I. Choose Standalone > Activation.
text_image
Standalone Activation Waiting for setting > There is an USD, please visit "Manager" to pair Preference Local Delivery And Interactive (Pairing...) Verification code Disabled Play encrypted only (Standalone mode) Plug in USB and play automatically. *If you open this function, you can't use "Play from File" bottom. Manager Others Mode Description Close2. Here you can find the Activation Code.
text_image
Switch Mode < Standalone Activation Code EWXQAB Playing Status Not Activated Visit "Manager" for activation. How to Pairing?- Activate license in Local Delivery mode:
I. Choose Local Delivery > Activation.
text_image
Switch Mode Local Delivery And Interactive Activation Waiting for setting > There is an UID, please visit "Manages" to pair Preference Verification code Disabled Local Delivery And Interactive (Parking...) Others Mode Description > Free trial for interactive feature Manager Close2. Here you can find the Activation Code.
text_image
Switch Mode Local Delivery And Interactive Activation Code EVOQAB Playing Status Not Activated Visit "Manager" for activation How to Pairing?I. Select unpaired licenses, then click Mapping.
text_image
License List By Device By Change File Management Verification My Follower Export Analysis Advanced Application License Management License List License Parameters History and Setting About Import License Code Status Device Name Device ID pack Type Activated on Expiration Date/License Code Mapping Export Export Export Export Export Used HIRLEON HIRLEON Premium Price30Day 2017-01-12 15:1.. 2017-02-14 07:1.. ACMRLF/MDKZSH Export Export Export Export Export Export Import Import Import Import Import Import Import Import Import Import2. After mapping licenses, fill in the activation code which shows on your X-Sign Player, then click Finish to complete pairing.
text_image
Add a New Device *Device B License Code Pairing ACP50/1000/1000/23 Choose *Service Name *Device Location Choose Category Unrecognized Channel Unsubscribed Description after 150 characters Finish3. Choose Switch Mode.
text_image
Play from File Settings Switch Mode About Quit X-Sign Press "CSC" to Shipley On-mail Items.text_image
Switch Mode Paired The source of content is from Manager. Standalone(USB) Device ID: SGBLRDZV Device Name: UM Local Delivery And Interactive feature (Pairing...) Pair Manager Closetext_image
Settings Switch Mode About Quit X-Sign Press "MENY" key on the remote control to display the chain modetext_image
Settings Orientation Default Verification code ...... Play encrypted only (Standalone mode) Update Update History Clear all contents Reset and clear all data Close Set Verification Code Enable Verification code 1 2 3 4 5 6 *Letter or digit only Show Verification code Save Canceltext_image
Play from File Settings Switch Mode About Quit X-Sign Press "MENU" key on the remote control to display the main menu.text_image
Settings System notification Auto-launch after startup Orientation Default Verification code Play encrypted only (Standalone mode) Update Update History Closetext_image
Settings Switch Mode About Picture Settings Picture Mode Standard Color Temperature Standard DURtext_image
Picture Settings Picture Mode Custom Brightness 50 Contrast 50 Hue 0 Sharpness 0 Saturation 50 Color Temperature Standard Image Noise Reduction Off| Menu Description | |
| Picture Mode | Presson the remote control to adjust the picture mode. Options are PANTONE®Color, M-Book, Cinema, Photo, Custom. |
| Brightness | Presson the remote control to adjust the brightness. This feature only works underCustomin Picture Mode. |
| Contrast | Presson the remote control to adjust the contrast. This feature only works underCustomin Picture Mode. |
| Saturation | Presson the remote control to adjust the saturation. This feature only works underCustomin Picture Mode. |
| Color temperature | Presson the remote control or click a preset color temperature for the image. Options areCool, Warm, Standard. |
Local Delivery
Playing content with Local Delivery
With X-Sign Local Delivery, you only have to connect your PC (Designer) with BenQ Smart Signage in the same subnet. Then you can play and schedule the content with the device(s) without other servers or Internet. Note: The maximum number of devices that can be played by Local Delivery is 16. I. Switch to Local Delivery and Interactive feature, then press Close. Refer to Creating a new project file in X-Sign Designer on page 53 for more information. text_image
Switch Mode Standalone(USB) Local Delivery And Interactive feature (Pairing...) Manager Unpaired This pairing code can Not enable interactive feature. The source of content is from Designer. Device Name: Unassigned Hardware Code: d0:c5:d3:26:36:6a Pair Closetext_image
Local Delivery Standalone(USB) New Page (1)Local Delivery
1. On the Devices page, you will see all devices which are in the same subnet and in Local Delivery and Interactive function mode.  : Change the name for the device.  : Stop current playing content of the device.  : Device screen has the flash effect to let you distinguish which device is being used now. text_image
DEVICES Devices Deep scan Add device Name IP MAC Address Channel Status BenQ CS8601 192.168.1.54 d4:9e:3b:5e:63:3f Winnie CHANNELStext_image
Devices Channels Add Channel Name ▶ Number of devices Description Channelstext_image
Channels > Add A Name : Enter channel name Description : Enter channel description C Add Device B Name IP MAC Address Status Confirm Canceltext_image
DEVICES CHANNELS Channels > Add > Add Device Name ▶ IP MAC Address Channel Status batype_up c03f:d5:61:7d:26 demo_room_batype BenQ IL490 18:65:71:38:36:49 demo_room_IL BenQ IL490 7C13F7EC-E710-467F-B4A9_ BenQ ST550K 192.168.0.114 40:8b:f6:44:b4:22 BenQ ST650K b0:c5:ca:70:02:a4 test BenQ ST750K b0:c5:cc:70:02:9f dcc2jackyhsieh 0a:00:27:00:00:15 Confirm Canceltext_image
Add Device Name : test Description : Enter channel description Name IP MAC Address Status BenQ ST550K 192.168.0.114 40:8b.f6:44:b4:22 BenQ ST650K b0:c5:ca:70:02:a4 Confirm Canceltext_image
DEVICES Add Channel CHANNELS Name ▼ Number of devices Description BenQ 1 123| Devices | Channels > Schedule Add Schedule Local delivery | |
| Channels | 00 am | |
| 01 am | ||
| 02 am | ||
| 03 am | ||
| 04 am | ||
| 05 am | ||
| 06 am | ||
| 07 am | ||
text_image
Channels > Schedule Edit Schedule Schedule name 123 Deliver File Test_0821_sealing fea... Browse Time All Day Start 01:00 End 02:00 Save Remove10. Select Local delivery to play the file.
text_image
Channels > Schedule Add Schedule Local delivery 00 am 01 am 02 am 03 am 04 am 05 am 06 am 07 am Schedule 1 Time: 04:00 - 06:00 File: Test_0821_sealing feature Schedule 2 Time: 06:30 - 07:30 File: Test_0821_sealing featureSearching for devices in Local Delivery Mode
Watch demonstration video:  Local Delivery allows different displays to be connected over the same local network. This is an introduction to viewing devices in Local Delivery Mode. To open Local Delivery Mode:I. Launch X-Sign Designer and select Local delivery.
text_image
File Edit Insert Arrange View Preview Delivery Video Wall Help Open Project New project New Interactive Project Local delivery Demo Videotext_image
Devices Deep scan Add device Name IP MAC Address Channel Status Channels Can't find any device in the same subnet.text_image
Devices Deep scan Add device Name IP MAC Address Channel Status BenQ CS8601 192.168.1.54 d4:9e:3b:5e:63:3f WinnieSetting a schedule for Local Delivery Mode
When operating several devices in Local Delivery Mode, you can set different schedules for each display to broadcast content. Devices are first added to a channel and then a schedule is set for that channel. Below is an introduction to setting a schedule in Local Delivery Mode. To create a channel in Local Delivery mode:I. Launch X-Sign Designer and select Local delivery.
text_image
File Edit Insert Arrange View Preview Delivery Video Wall Help Open Project New project New Interactive Project Local delivery Demo Video2. In the Device Window click CHANNELS, then click Add Channel to create a new schedule.
text_image
Devices Channels Add Channel Name ▶ Number of devices Description Channelstext_image
Channels > Add A Name : Afternoon Sale B Description : Weekday Sales Info Add Device C Name ▲ IP MAC Address Status BenQ ST550K 192.168.0.114 40:8b:f6:44:b4:22 BenQ ST650K b0:c5:ca:70:02:a4 Confirm Canceltext_image
Channels Add Channel Name Number of devices Description BenQ 1 123text_image
Channels > Schedule Add Schedule Local delivery 00 am 01 am 02 am 03 am 04 am 05 am 06 am 07 amtext_image
Channels > Schedule Edit Schedule Schedule name 123 Deliver File Test_0821_sealing fea... Browse Time All Day Start 01:00 End 02:00 Save Removebar
Channels > Schedule | Time | Add Schedule | Local delivery | |---|---|---| | 00 am | | | | 01 am | | | | 02 am | | | | 03 am | | | | 04 am | 100 | | | 05 am | | | | 06 am | | | | 07 am | | |Report
Getting the activity report of X-Sign Manager I. To access the activity report of X-Sign Manager, go to Report Analysis > X-Sign Manager Report. 2. Choose start time and end time, then click Export. text_image
Available space - 30.5 GB CMS Broadcast X-Sign Player Report By Device By Channel • File Management • Verification • My Favorite • Report Analysis Touch Usage Report (Beta) X-Sign Player Report X-Sign Manager Report • Advanced Application • License Management About Select Report: player Content Report Select Device: 123456 Start Time: 2019-12-17 End Time: 2019-12-24 Export| A | B | C | D | E | |
| 1 | Time Stamp(GMT +00:00) | Event | Account(Authority) | Action | Detail |
| 2 | 2018-03-15 05:59:45 | Device Activity | AlbertKang(Administrator) | Remove | Device(W_PC)(SFRQ6ZSQ) |
| 3 | 2018-03-15 05:59:59 | Device Activity | AlbertKang(Administrator) | Remove | Device(WPC)(BNJ8GYCR) |
| 4 | 2018-03-15 06:02:04 | Device Activity | AlbertKang(Administrator) | Add | Device(demoroomwriter)(8MVRSPHZ) with City(Taiwan) Channel(Uncategorized) |
| 5 | 2018-03-15 06:34:46 | File Activity | AlbertKang(Administrator) | Upload | File Name(test03333333) |
| 6 | 2018-03-15 13:02:21 | Device Activity | AlbertKang(Administrator) | Remove | Device(11f)(DHFFGB7P) |
| 7 | |||||
| 8 | |||||
| 9 | |||||
| 10 | |||||
| 11 | |||||
| 12 | |||||
| 13 | |||||
| 14 | |||||
| 15 | |||||
| 16 | |||||
| 17 | |||||
| 18 | |||||
| 19 | |||||
| 20 | |||||
| 21 | |||||
Downloading player content report
I. To access the player content report, click Report Analysis > X-Sign Player Report > player Content Report.2. Choose start time and end time, then click Export.
text_image
Available space: 99.5 GB CMS Broadcast X-Sign Player Report By Device By Channel • File Management • Verification • My Favorite • Report Analysis Touch Usage Report (Beta) X-Sign Player Report X-Sign Manager Report • Advanced Application • License Management About Select Report player Content Report Select Device 123456 Start Time 2019-12-17 End Time 2019-12-24 Export3. The report is exported as an .xls or an .xlsx file type.
| A | B | C | D | E | F | G | H | I | J | K | L | M | N | O | |
| 1 | Play status | Play type | Play name | Play start at | Schedule name | Device name | Logged at | Logged at UTC | |||||||
| 2 | start play | interrupt | PJT_land | 2018-12-21 13:55:34 | test | AKNB_Drt_MV | 2018-12-21 13:55:34 | ||||||||
| 3 | end play | interrupt | PJT_land | 2018-12-21 13:55:34 | test | AKNB_Drt_MV | 2018-12-21 13:58:05 | ||||||||
| 4 | start play | interrupt | 1234 2018-12-21 13:58:05 | test | AKNB_Drt_MV | 2018-12-21 13:58:05 | |||||||||
| 5 | end play | interrupt | 1234 2018-12-21 13:58:05 | test | AKNB_Drt_MV | 2018-12-21 13:58:12 | |||||||||
| 6 | start play | interrupt | 1234 2018-12-21 13:18:55 | test | AKNB_Drt_MV | 2018-12-21 15:18:55 | |||||||||
| 7 | playing | interrupt | 1234 2018-12-21 15:18:55 | test | AKNB_Drt_MV | 2018-12-21 15:28:55 | |||||||||
| 8 | playing | interrupt | 1234 2018-12-21 15:18:55 | test | AKNB_Drt_MV | 2018-12-21 15:38:55 | |||||||||
| 9 | playing | Interrupt | 1234 2018-12-21 15:18:55 | test | AKNB_Drt_MV | 2018-12-21 15:48:55 | |||||||||
| 10 | |||||||||||||||
| 11 | |||||||||||||||
| 12 | |||||||||||||||
| 13 | |||||||||||||||
| 14 | |||||||||||||||
| 15 | |||||||||||||||
| 16 | |||||||||||||||
| 17 | |||||||||||||||
| 18 | |||||||||||||||
| 19 | |||||||||||||||
| 20 | |||||||||||||||
| 21 | |||||||||||||||
| 22 | |||||||||||||||
| 23 | |||||||||||||||
| 24 | |||||||||||||||
| 25 | |||||||||||||||
| 26 | |||||||||||||||
| 27.0.0.0.0.0.0.0.0.0.0.0.0.0.0.0.0.0.0.0.0.0.0.0.0.0.0.0.0.0.0.0.0.0.0.0.0.0.0.0.0.0.0.0.0.0.0.0.0.0.0. | |||||||||||||||