
File Server 2014 - Logiciel photo/vidéo AVG - Free user manual and instructions
Find the device manual for free File Server 2014 AVG in PDF.


User questions about File Server 2014 AVG
0 question about this device. Answer the ones you know or ask your own.
Ask a new question about this device
Download the instructions for your Logiciel photo/vidéo in PDF format for free! Find your manual File Server 2014 - AVG and take your electronic device back in hand. On this page are published all the documents necessary for the use of your device. File Server 2014 by AVG.
USER MANUAL File Server 2014 AVG
Copyright AVG Technologies CZ, s.r.o. All rights reserved.
All other trademarks are the property of their respective owners.

AVG.
Contents
-
Introduc
-
AVG Inst
32.1 Operation
32.2 File Serv
32.3 Recomm
- AVG Inst
43.1 Installati
53.2 License A
53.3 Activate
63.4 Select In
73.5 Custom 1
83.6 Installati
-
After inst
-
Document
115.1 Overview
135.2 Advance
- AVG for S
166.1 Program
166.2 Accessin
176.3 Antivirus
- FAQ and

AVG
1. Introduction
This user manual provides comprehensive documentation for AVG File Server.
Congratulations on your purchase of AVG File Server!
AVG File Server is one of a range of award winning AVG products designed to provide you with peace of mind and total security for your server. As with all AVG products AVG File Server has been completely redesigned, from the ground up, to deliver AVG's renowned and accredited security protection in a new, more user friendly and efficient way.
AVG has been designed and developed to protect your computing and networking activity. Enjoy the experience of full protection from AVG.
This documentation contains description of specific AVG File Server features. Should you require information about other AVG features, please consult the user guide to Internet Security edition, which contains all the necessary details. You can download the guide from the http://www.avg.com.
2. AVG Installation Requirements
2.1. Operation Systems Supported
AVG File Server is intended to protect workstations/servers with the following operating systems:
• Windows 2003 Server and Windows 2003 Server x64 Edition (Service Pack 1)
• Windows 2008 Server and Windows 2008 Server x64 Edition
• Windows 2008 Server R2 Edition
• Windows 2012 Server and Windows 2012 Server x64 Edition
• Windows 2012 Server R2 Edition
(and possibly higher service packs for specific operating systems)
2.2. File Servers Supported
The following file servers are supported:
• MS SharePoint 2003 Server version
• MS SharePoint 2007 Server version
• MS SharePoint 2010 Server version
• MS SharePoint 2013 Server version
2.3. Recommended Hardware Requirements
Recommended hardware requirements for AVG File Server are:
• Intel Pentium CPU 1,8 GHz
- 512 MB of RAM memory
- 600 MB of free hard drive space (for installation purposes)
3. AVG Installation Process
To install AVG on your computer, you need to get the latest installation file. You can use the installation file from the CD that is a part of your box edition but this file might be out-of-date. Therefore we recommended getting the latest installation file online. You can download the file from the AVG website (at http://www.avg.com/download?prd=msw).
There are two installation packages available for your product - for 32bit operating systems (marked as x86) and for 64bit operating systems (marked as x64). Be sure to use the correct installation package for your specific operating system.
During the installation process you will be asked for your license number. Please make sure you have it available before starting the installation. The number can be found in the CD packaging. If you purchased your copy of AVG on-line, your license number will have been delivered to you via email.
Once you have downloaded and saved the installation file on your hard drive, you can launch the installation process. The installation is a sequence of dialog windows with a brief description of what do at each step. In the following, we offer an explanation for each dialog window:
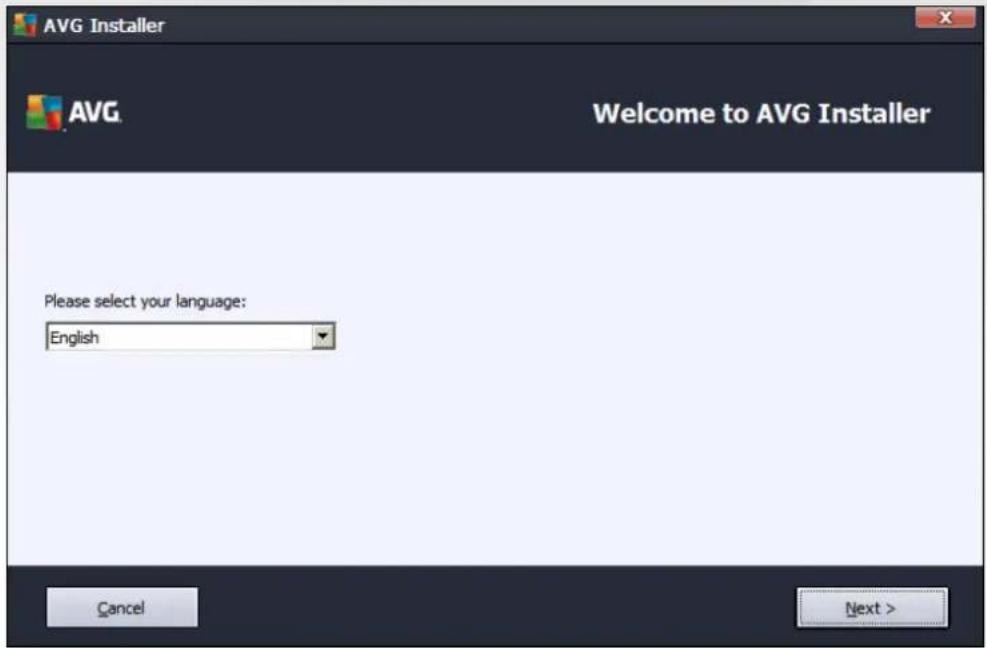
3.1. Installation Launch
text_image
AVG Installer AVG Welcome to AVG Installer Please select your language: English Cancel Next >The installation process always starts with this window. In here you select the language used for the installation process and press the Next button.
You will be able to choose also additional languages for the application interface later during the installation process.
3.2. License Agreement

text_image
AVG Installer AVG Welcome to AVG Installer By installing this product you are agreeing to the following terms and conditions of the AVG License Agreement and the AVG Fair Processing Notice: IMPORTANT: READ THIS AGREEMENT CAREFULLY. IT IS A LEGAL CONTRACT GOVERNING YOUR USE OF SOFTWARE, CERTAIN SERVICES PROVIDED BY AVG TECHNOLOGIES AND AVG TECHNOLOGIES' COLLECTION AND USE OF CERTAIN PERSONALLY IDENTIFIABLE INFORMATION. BY CLICKING THE "ACCEPT" OPTION OR INSTALLING THE ACCOMPANYING SOFTWARE PRODUCT (THE "SOFTWARE"), YOU (ON BEHALF OF YOURSELF AND THE PARTY ON WHOSE COMPUTER THE SOFTWARE IS INSTALLED) CONFIRM THAT YOU ARE 13 YEARS OF AGE OR OLDER, AGREE TO BE BOUND BY THESE TERMS AND CONDITIONS, INCLUDING THE TERMS AND CONDITIONS REFERENCED IN SECTION 4, AND ACKNOWLEDGE THAT AVG TECHNOLOGIES MAY Privacy Policy Printable version Decline < Back AcceptThis dialog allows you to read the license conditions. Use the Printable version button to open the license text in a new window. Press the Accept button to confirm and continue to the next dialog.
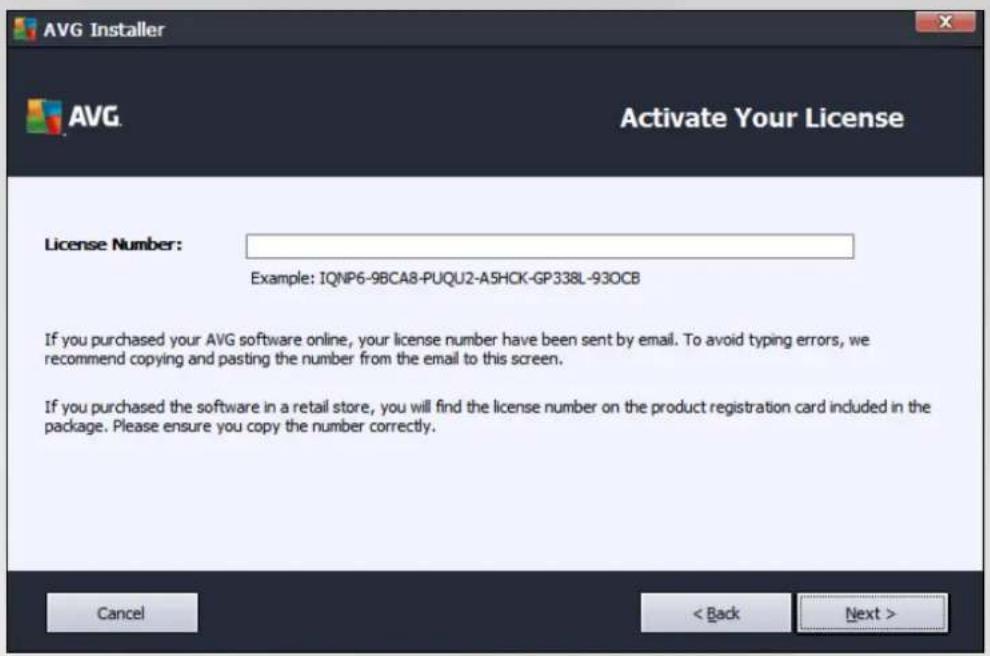
3.3. Activate Your License
In the Activate your License dialog you have to fill in your license number.
Enter your license number into the License Number text field. The license number will be in the confirmation email that you received after purchasing your AVG on-line. You must type in the number exactly as shown. If the digital form of the license number is available (in the email), it is recommended to use the copy and paste method to insert it.

AVG
text_image
AVG Installer AVG Activate Your License License Number: Example: IQNP6-98CA8-PUQU2-A5HCK-GP338L-93OCB If you purchased your AVG software online, your license number have been sent by email. To avoid typing errors, we recommend copying and pasting the number from the email to this screen. If you purchased the software in a retail store, you will find the license number on the product registration card included in the package. Please ensure you copy the number correctly. Cancel < Back Next >Press the Next button to continue the installation process.
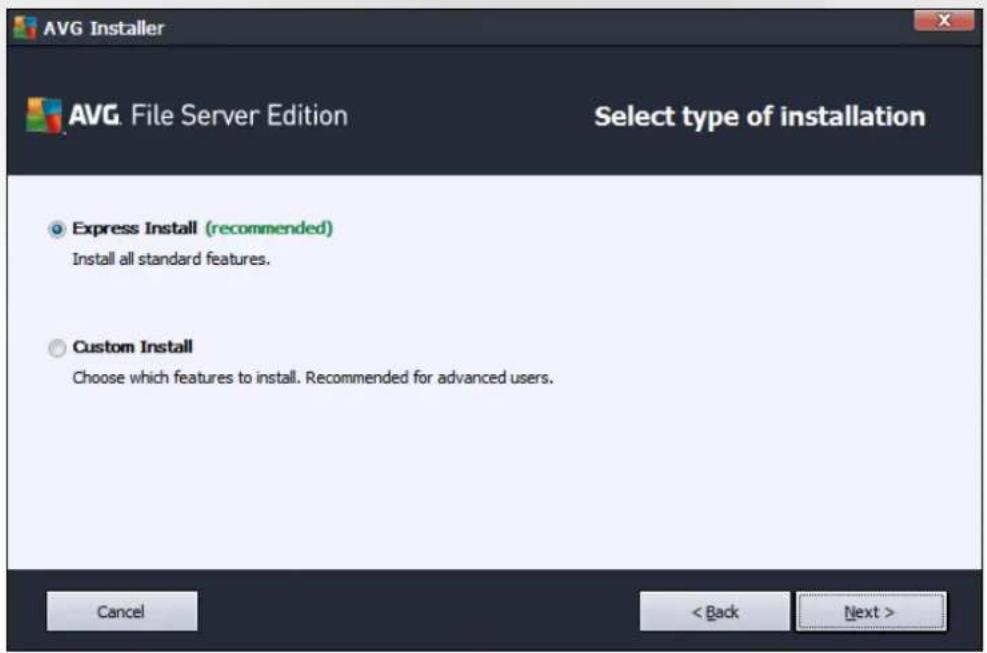
3.4. Select Installation Type
text_image
AVG Installer AVG File Server Edition Select type of installation Express Install (recommended) Install all standard features. Custom Install Choose which features to install. Recommended for advanced users. Cancel < Back Next >The Select type of Installation dialog offers the choice of two installation options: Express Install and Custom Install.
For most users, it is highly recommended to keep to the Express Install that installs AVG in fully automatic mode with settings predefined by the program vendor. This configuration provides maximum security combined with the optimal use of resources. In the future, if the need arises to change the configuration, you will always

AVG
have the possibility to do so directly in the AVG application.
Custom Install should only be used by experienced users who have a valid reason to install AVG with non-standard settings. E.g. to fit specific system requirements.
Upon selecting the Custom Install, the Destination folder section appears in the lower part of the dialog. It allows you to specify the location where AVG should be installed. By default, AVG will be installed to the program files folder located on drive C:. If you want to change this location, use the Browse button to display the drive structure, and select the respective folder.
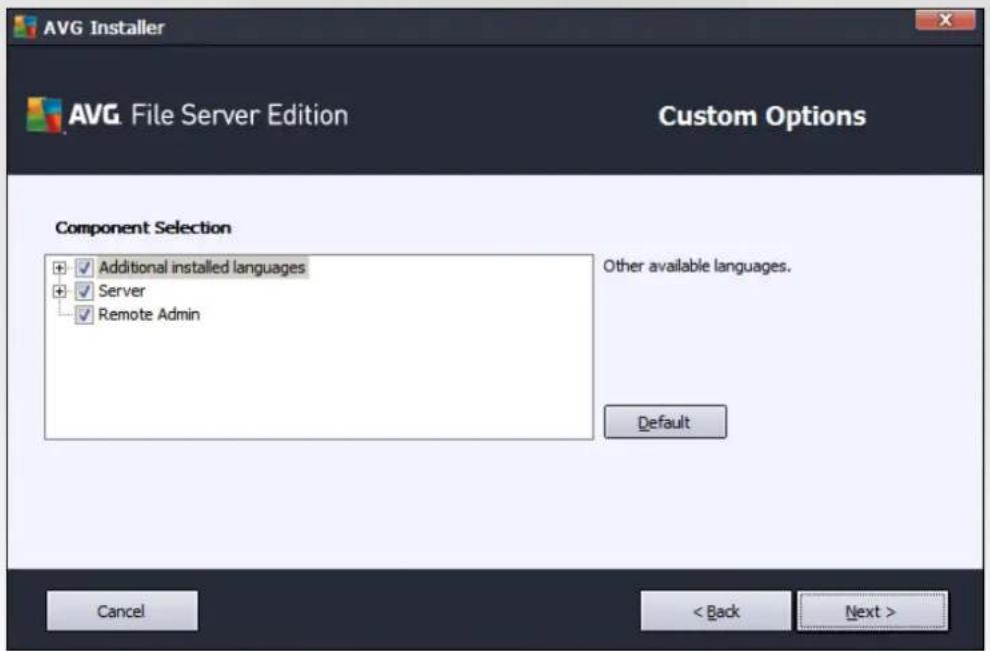
3.5. Custom Install - Custom Options
text_image
AVG Installer AVG File Server Edition Custom Options Component Selection + Additional installed languages + Server - Remote Admin Other available languages. Default Cancel < Back Next >The Component selection section displays an overview of all AVG components that can be installed. If the default settings do not suit you, you can remove/add specific components.
However, you can only select from components that are included in your purchased AVG edition. Only those components will be offered to be installed within the Component Selection dialog!
- Remote Admin - if you intend to connect AVG to an AVG DataCenter (AVG Network Editions), then you need to select this option.
• Additional installed languages - you can define which language(s) AVG should be installed in. Check the Additional installed languages item and then select the desired languages from the respective menu. - Server - only Document Scanner for MS SharePoint server component is available in this AVG edition. It scans documents stored in MS SharePoint and removes all viruses detected.
Continue by pressing the Next button.
3.6. Installation Completion
If you selected the Remote Admin component module during module selection, then the final screen will allow you to define the connection string for connecting to your AVG DataCenter.
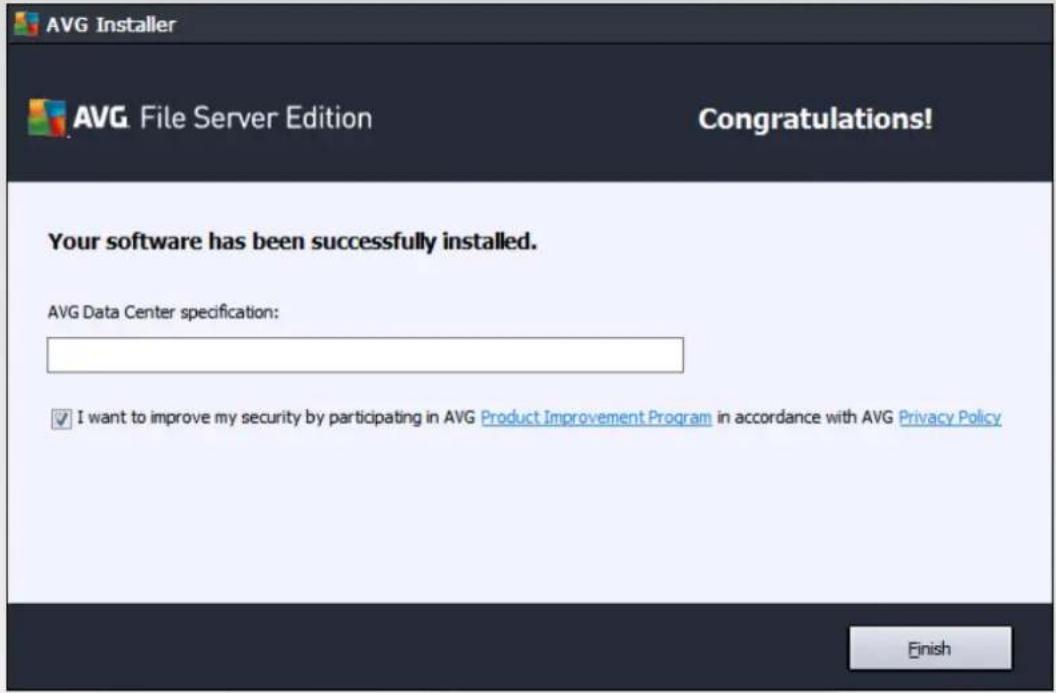
text_image
AVG Installer AVG File Server Edition Congratulations! Your software has been successfully installed. AVG Data Center specification: ✓ I want to improve my security by participating in AVG Product Improvement Program in accordance with AVG Privacy Policy FinishThis dialog also allows you to decide whether you want to participate in the Product Improvement Program that collects anonymous information on detected threats in order to increase the overall Internet security level. If you agree with this statement, please keep the I want to improve my security by participating in AVG Product Improvement Program in accordance with AVG Privacy Policy option checked (the option is confirmed, by default).
Confirm your choices by clicking the Finish button.
AVG is now installed on your computer and fully functional. The program is running in the background in fully automatic mode.
4. After installation
Immediately after the installation is done, the AVG File Server main screen appears:
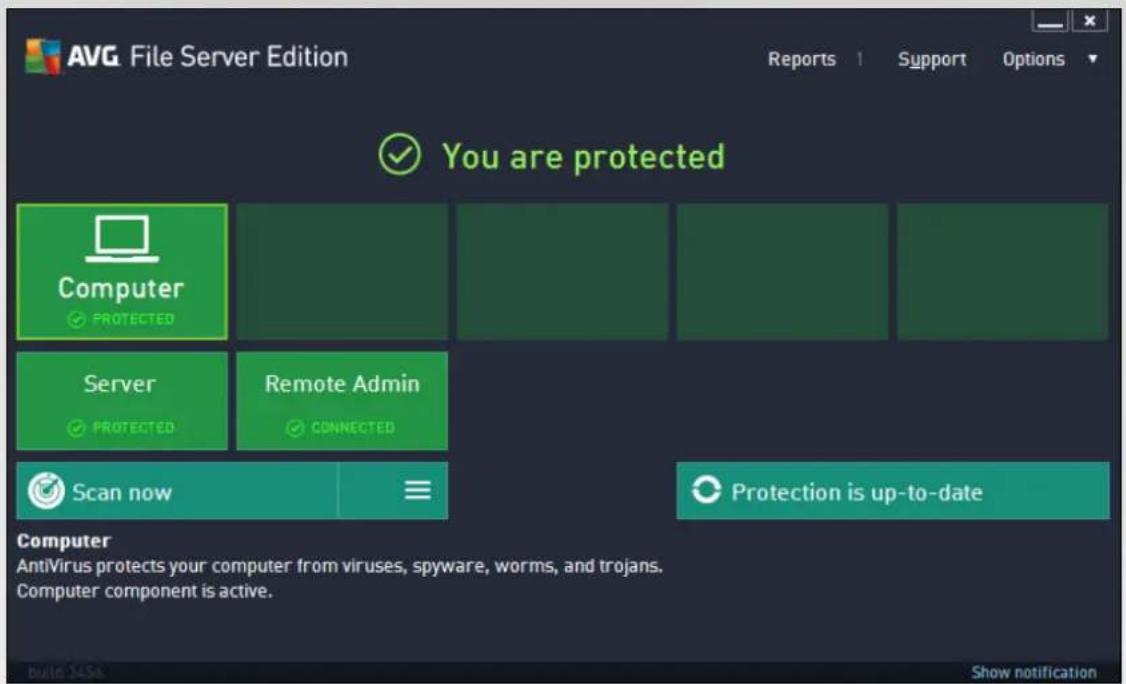
text_image
AVG File Server Edition Reports 1 Support Options ✓ You are protected Computer ✓ PROTECTED Server ✓ PROTECTED Remote Admin ✓ CONNECTED Scan now Protection is up-to-date Computer AntiVirus protects your computer from viruses, spyware, worms, and trojans. Computer component is active.This manual only deals with the AVG File Server specific features; all other components and settings are being described in the AVG Desktop manual. To access the main server components dialog, click the Server button (the one circled in red in the screenshot above). You will see the following screen:
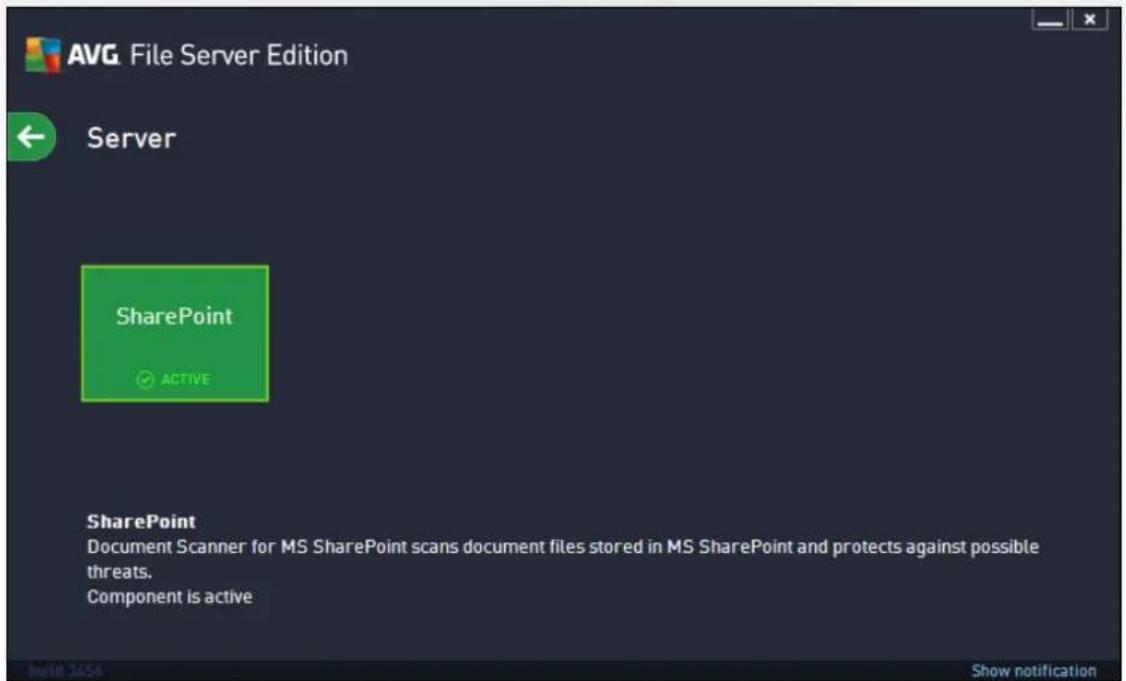
text_image
AVG File Server Edition Server SharePoint ✓ ACTIVE SharePoint Document Scanner for MS SharePoint scans document files stored in MS SharePoint and protects against possible threats. Component is active beid 3454 Show notification
AVG
To individually setup protection for your file server, follow the appropriate chapter:
• Document Scanner for MS SharePoint
• AVG for SharePoint Portal Server
5. Document Scanner for MS SharePoint
5.1. Overview
The AVG for MS SharePoint Server 2003/2007/2010/2013 configuration options are fully integrated within the AVG File Server via the server components screen.
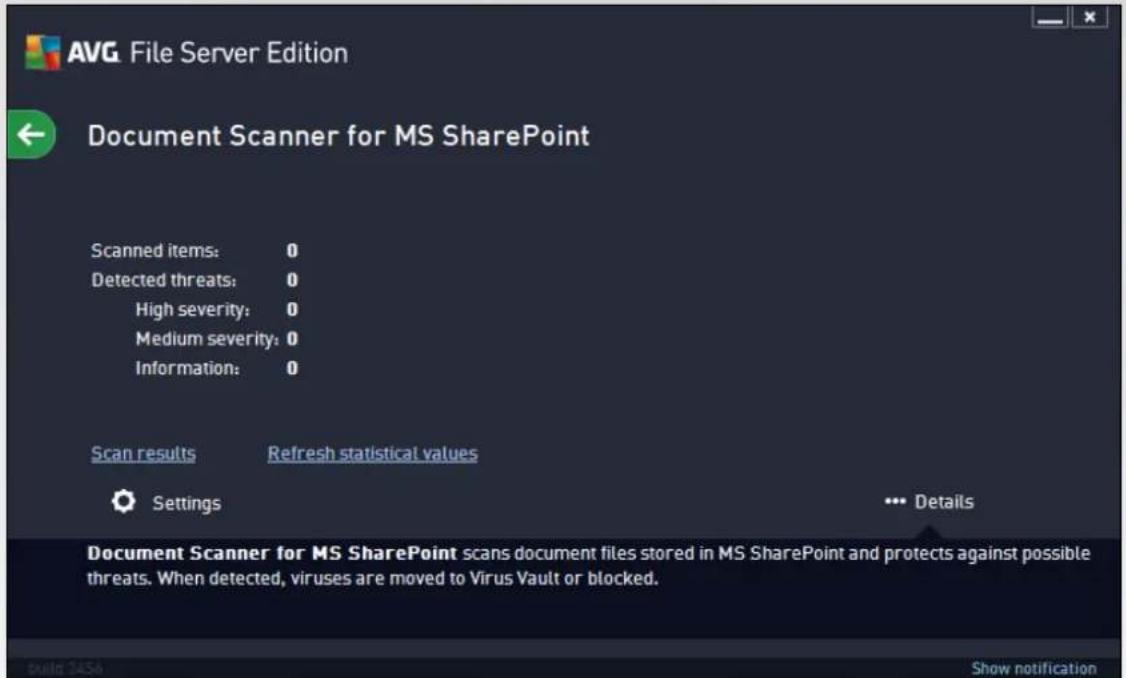
text_image
AVG File Server Edition Document Scanner for MS SharePoint Scanned items: 0 Detected threats: 0 High severity: 0 Medium severity: 0 Information: 0 Scan results Refresh statistical values Settings Details Document Scanner for MS SharePoint scans document files stored in MS SharePoint and protects against possible threats. When detected, viruses are moved to Virus Vault or blocked. Show notificationThe purpose of the Document Scanner for MS SharePoint server component (it is the only one available in this AVG edition) is to scan documents stored in MS SharePoint. If any viruses are detected, they are moved to the Virus Vault, or completely removed.
Microsoft SharePoint is a collection of products and software elements that includes, among a growing selection of components, Internet Explorer-based collaboration functions, process management modules, search modules and a document-management platform. SharePoint can be used to host web sites that access shared workspaces, information stores and documents.
Interface overview:
- Scan Results
Opens a new dialog where you can review scan results:
text_image
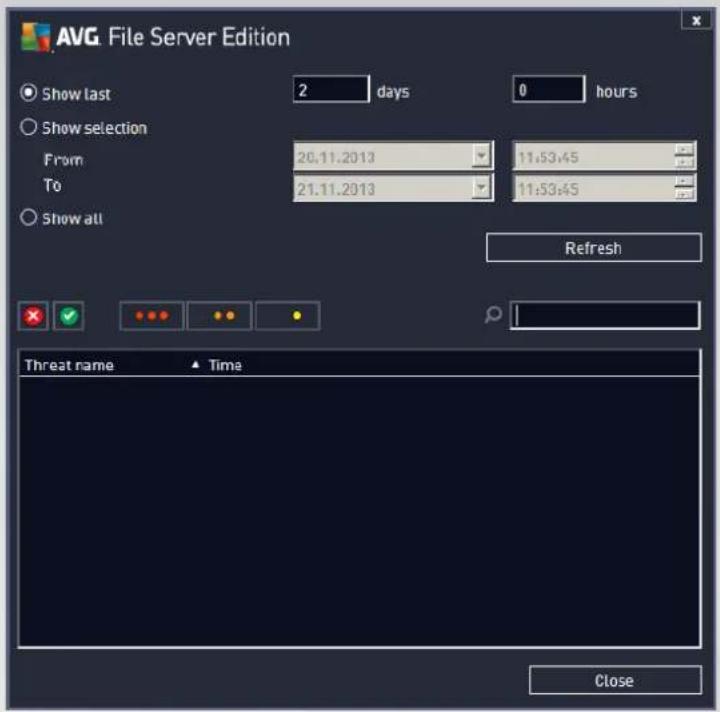
AVG File Server Edition Show last 2 days 0 hours Show selection From 20.11.2013 11:53:45 To 21.11.2013 11:53:45 Show all Refresh Threat name ▲ Time CloseHere you can check messages divided into several tabs according to their severity. See configuration of individual components for amending the severity and reporting.
By default there are displayed only results for the last two days. You can change the displayed period by amending the following options:
- Show last - insert preferred days and hours.
- Show selection - choose a custom time and date interval.
- Show all - Displays results for the whole time period.
Use Refresh button to reload the results.
• Refresh statistical values - updates stats displayed above.
Clicking the Settings working button opens advanced settings for the selected component (you will find more information on individual settings of all components in the chapters below).
5.2. Advanced Settings
5.2.1. General settings
To open the settings of Document Scanner for MS SharePoint, select the Settings button from the interface of the component.
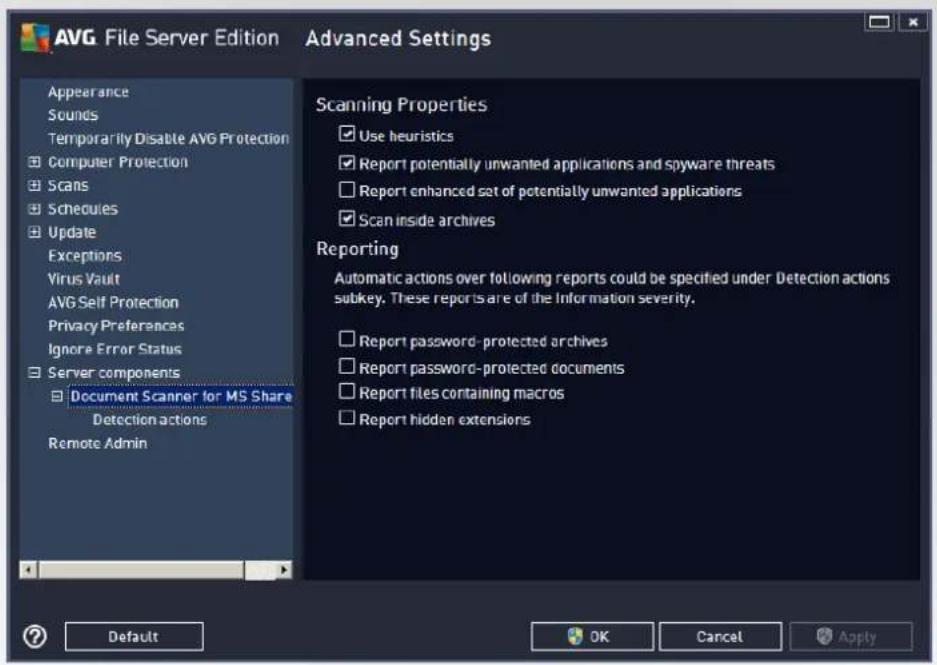
From the Server components list select the Document Scanner for MS SharePoint item:
text_image
AVG File Server Edition Advanced Settings Appearance Sounds Temporarily Disable AVG Protection Computer Protection Scans Schedules Update Exceptions Virus Vault AVG Self Protection Privacy Preferences Ignore Error Status Server components Document Scanner for MS Share Detection actions Remote Admin Scanning Properties Use heuristics Report potentially unwanted applications and spyware threats Report enhanced set of potentially unwanted applications Scan inside archives Reporting Automatic actions over following reports could be specified under Detection actions subkey. These reports are of the Information severity. Report password-protected archives Report password-protected documents Report files containing macros Report hidden extensions Default OK Cancel ApplyThe Scanning properties section:
• Use Heuristics - check this box to enable heuristic analysis method during scanning.
• Report Potentially Unwanted Applications and Spyware threats - check this option to report the presence of potentially unwanted applications and spyware.
- Report enhanced set of Potentially Unwanted Applications - check to detect extended package of spyware: applications that are perfectly ok and harmless when acquired from the manufacturer directly, but can be misused for malicious purposes later, or applications that always harmless but might be unwanted (various toolbars etc.). This is an additional measure that increases your computer security and comfort even more, however it can possibly block legal applications, and is therefore switched off by default. Note: This detection feature is additional to the previous option, so if you want protection from the basic types of spyware, always keep the previous box checked.
- Scan inside archives - check this option to let the scanner look also inside archived files (zip, rar, etc.)
The Reporting section allows you to choose which items should be reported during scanning. This is the default configuration which can be easily amended in the Detection actions section, part Information (see below).
The following options are available:
- Report password protected archives – archives (ZIP, RAR etc.) that are protected by password are not possible to scan for viruses; check the box to report these as potentially dangerous.
- Report password protected documents – documents protected by password are not possible to scan for viruses; check the box to report these as potentially dangerous.
- Report files containing macros – a macro is a predefined sequence of steps aimed to make certain tasks easier for a user (MS Word macros are widely known). As such, a macro can contain potentially dangerous instructions, and you might like to check the box to ensure that files with macros will be reported as suspicious.
- Report hidden extensions – hidden extension can make e.g. a suspicious executable file "something.txt.exe" appear as harmless plain text file "something.txt"; check the box to report these as potentially dangerous.
There are also Detection actions sub-item available in the following tree structure (see the chapter below).
5.2.2. Detection actions

text_image
AVG File Server Edition Advanced Settings Appearance Sounds Temporarily Disable AVG Protection Computer Protection Scans Schedules Update Exceptions Virus Vault AVG Self Protection Privacy Preferences Ignore Error Status Server components Document Scanner for MS Share Detection actions Remote Admin Detection actions (automatic actions) High severity detections Heat Medium severity detections Heat Information severity detections None Default OK Cancel ApplyIn this dialog you can configure how the Document Scanner for MS SharePoint component should behave, when it detects a threat. The threats are divided into three categories:
- High severity detections – malicious codes that copy and spread themselves, often unnoticed until the damage is done.
- Medium severity detections – such programs, in general, vary from positively serious to only potential threats to your privacy.
• Information severity detections – includes all detected potential threats that cannot be classified as

AVG
any of the above categories.
Use the roll-down menus to select an automatic action for each of them:
- None – a document containing such threat will be left alone.
- Heal - tries to heal the infected file/document.
- Move to Vault – every infected document will be moved into Virus Vault quarantine environment.
- Remove – a document where a virus is detected will be deleted.
6. AVG for SharePoint Portal Server
This chapter deals with AVG maintenance on MS SharePoint Portal Server that can be considered a special type of a file server.
6.1. Program Maintenance
AVG for SharePoint Portal Server uses the Microsoft SP VSAPI 1.4 virus-scanning interface for the protection of your server against possible virus infection. The objects on the server are tested for the presence of malware when they are downloaded and/or uploaded from or on the server by your users. The configuration of the antivirus protection can be set up using the Central Administration interface of your SharePoint Portal Server. Within the Central Administration you can also view and manage the AVG for SharePoint Portal Server log file.
You can launch the SharePoint Portal Server Central Administration when you are logged in on the computer that your server is running on. The administration interface is web-based (as well as the user interface of the SharePoint Portal Server) and you can open it using the SharePoint Central Administration option in the Programs/Microsoft Office Server folder (depending on your version also SharePoint Portal Server) of the Windows Start menu, or by navigating to Administrative Tools and selecting Sharepoint Central Administration.
You can also access the SharePoint Portal Server Central Administration web page remotely using the proper access rights and URL.
6.2. Accessing antivirus settings
In the SharePoint Portal Server Central Administration interface you can easily configure the performance parameters and actions of the AVG for SharePoint Portal Server scanner. However, although the antivirus settings themselves are identical to all supported SharePoint versions, the way to access the configuration dialog is slightly different in each of them. Please locate your version in the brief overview below:
MS SharePoint 2003 Server
Choose the Operations option in the Central Administration main screen. A new dialog will appear. Now, select Configure Antivirus Settings item (in the Security Configuration section, see the screenshot below) to open the Antivirus Settings dialog.
Security Configuration

Use these links to update the security options which impact all virtual servers, and to add, update, or change user information for a single top-level Web site.
Set SharePoint administration group
- Manage site collection owners
- Manage Web site users
☐ Manage blocked file types
Configure antivirus settings

AVG
Choose the Operations option in the Central Administration main screen. A new dialog will appear. Now, select Antivirus item (in the Security Configuration section, see the screenshot below) to open the Antivirus dialog.
Security Configuration
■ Service accounts
Information Rights Management
Antivirus
- Blocked file types
- Update farm administrator's group
■ Information management policy configuration
■ Manage settings for single sign-on
MS SharePoint 2010/2013 Server
Choose the Security option in the Central Administration main screen. A new dialog will appear:

Microsoft*
SharePoint 2010
Central Administration ▶ Security
Central
Administration
Application Management
System Settings
Monitoring
Backup and Restore
Security
Upgrade and Migration
General Application
Settings
Configuration Wizards

Users
Manage the farm administrators group | Approve or reject distribution groups
Specify web application user policy

General Security
Configure managed accounts | Configure service accounts
Configure password change settings | Specify authentication providers
Manage trust | Manage antivirus settings | Define blocked file types
Manage web part security | Configure self-service site creation

Information policy
Configure information rights management | Configure Information Management Policy
Select Manage antivirus settings item (in the General Security section) to open the Antivirus dialog.
6.3. Antivirus configuration
The overview below shows how the Antivirus (or Antivirus Settings) dialog looks like in different SharePoint versions:
MS SharePoint 2003 Server
Windows SharePoint Services
Configure Antivirus Settings
Use this page to configure settings for virus scanning. You must install virus scanning software on all Web servers that are hosting documents before these settings can take effect. Show me more information.
Antivirus Settings
Specify when you want documents stored in document libraries and lists to be virus scanned, and whether you want your virus scanner to attempt to clean infected documents. You can also specify how long the virus scanner should run before timing out, and the number of execution threads on the server that it may use. If server response time is slow while scanning, you may want to decrease the number of seconds and threads allowed for virus scanning.
☑ Scan documents on upload
√ Scan documents on download
☐ Allow users to download infected documents
☐ Attempt to clean infected documents
Time out scanning after 300 seconds
Allow scanner to use up to 5 threads
OK
Cancel
MS SharePoint 2007 Server
Central Administration > Operations > Antivirus
Antivirus
Use this page to configure settings for virus scanning. You must install virus scanning software on all Web servers that are hosting documents before these settings can take effect. Learn about configuring antivirus settings.
Antivirus Settings
Specify when you want documents stored in document libraries and lists to be virus scanned, and whether you want your virus scanner to attempt to clean infected documents.
□ Scan documents on upload
□ Scan documents on download
☐ Allow users to download infected documents
☐ Attempt to clean infected documents
Antivirus Time Out
You can specify how long the virus scanner should run before timing out. If server response time is slow while scanning, you may want to decrease the number of seconds.
Time out duration (in seconds):
300
Antivirus Threads
You can specify the number of execution threads on the server that the virus scanner may use. If server response time is slow while scanning, you may want to decrease the number of threads allowed for virus scanning.
Number of threads:
5
OK
Cancel
text_image
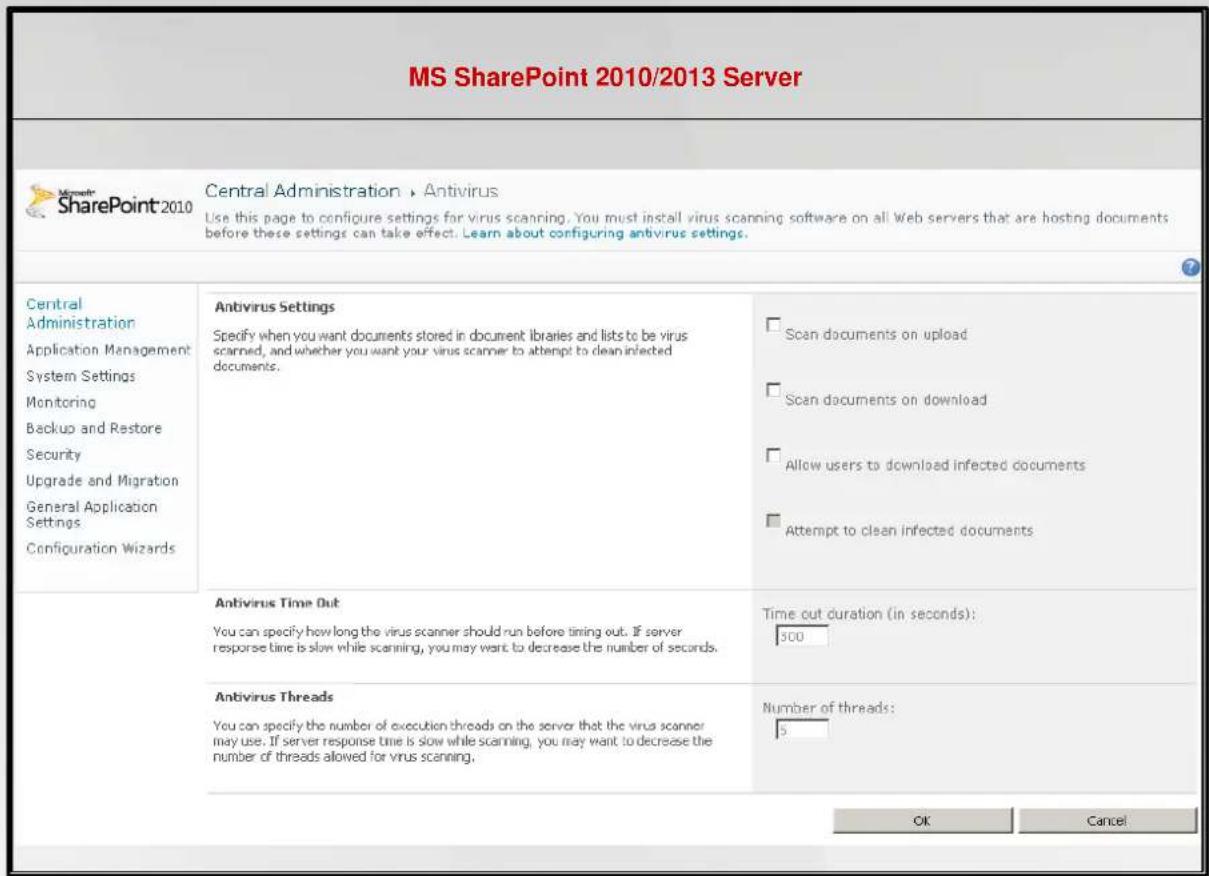
MS SharePoint 2010/2013 Server Central Administration > Antivirus Use this page to configure settings for virus scanning. You must install virus scanning software on all Web servers that are hosting documents before these settings can take effect. Learn about configuring antivirus settings. Antivirus Settings Specify when you want documents stored in document libraries and lists to be virus scanned, and whether you want your virus scanner to attempt to clean infected documents. Antivirus Time Out You can specify how long the virus scanner should run before timing out. If server response time is slow while scanning, you may want to decrease the number of seconds. Antivirus Threads You can specify the number of execution threads on the server that the virus scanner may use. If server response time is slow while scanning, you may want to decrease the number of threads allowed for virus scanning. Scan documents on upload Scan documents on download Allow users to download infected documents Attempt to clean infected documents Time out duration (in seconds): 500 Number of threads: 5 OK CancelWithout regard to the look, the configuration options are completely identical to all supported SharePoint versions:
- Scan documents on upload – enable/disable the scanning of documents being uploaded
- Scan documents on download – enable/disable the scanning of documents being downloaded
- Allow users to download infected documents – allow/disallow users to download infected documents
- Attempt to clean infected documents – enable/disable automatic healing of infected documents (when possible)
- Time out duration (in seconds) – the maximum number of seconds the virus scanning process will run after single launch (decrease the value when the server's response seems to be slow when scanning the documents)
- Number of threads – you can specify the number of virus scanning threads that can run simultaneously; increasing the number may speed up the scanning due to the higher level of parallelism, but it can increase the server's response time on the other hand

AVG
7. FAQ and Technical Support
Should you have any problems with your AVG, either business or technical, please refer to the FAQ section of the AVG website at http://www.avg.com.
If you do not succeed in finding help this way, contact the technical support department by email. Please use the contact form accessible from the system menu via Help / Get help online.