SMART30-D - Card printer iDP - Free user manual and instructions
Find the device manual for free SMART30-D iDP in PDF.


User questions about SMART30-D iDP
0 question about this device. Answer the ones you know or ask your own.
Ask a new question about this device
Download the instructions for your Card printer in PDF format for free! Find your manual SMART30-D - iDP and take your electronic device back in hand. On this page are published all the documents necessary for the use of your device. SMART30-D by iDP.
USER MANUAL SMART30-D iDP
natural_image
Two modern medical pressure monitor devices with visible ports and buttons, no text or symbols present.Copyright Notice
Users must respect the copyright laws applicable in their country. This manual must not be photocopied, translated, reproduced or transmitted in whole or in part for any reason and by the means that might be, albeit electronic or mechanical, without the express, written authorization of the company IDP card printer.
All information contained herein may be subject to modification without prior notice.
IDP card printer accepts no liability for any possible errors herein, nor for any accidental damage or damage caused through the dissemination or the use of this manual.
Trademarks
SMART-50 is a trademark and IDP is a registered trademark of IDP card printer. Windows is registered trademarks of Microsoft Corp. All other trademarks or registered trademarks are marks of their respective holders. SMART-50 Design is a trademark of IDP.
Return Materials Authorization
In order to make a warranty claim you must contact an IDP Reseller. You will be responsible for packaging the printer for shipment and the costs of shipping and insurance of the printer from the point of use of the printer to the IDP Reseller. The IDP Reseller will bear the costs of shipping and insuring the printer from the repair location to the address from which the printer was shipped.
Before returning any equipment for in-warranty or out-of warranty repair, contact an IDP Reseller or an IDP Service Center for a Return Materials Authorization (RMA) number. Repack the equipment in the original packing material and mark the RMA number clearly on the outside of the box. For more information about RMA or IDP warranty statements, refer to the Warranty booklet on the quick install guide.
Table of Contents
1. Introduction......7
1.1 Printer outside features....7
1.1.1 SMART-30 outside feature....7
1.1.2 SMART-50 outside feature....9
1.2 Printer inside features ...... 11
1.2.1 SMART-30 inside feature.... 11
1.2.2 SMART-50 inside feature.... 12
1.3 Ribbon cartridge features ...... 13
1.4 LCD panel display & button operation 14
2. Printer installation....18
2.1. Fitting the ribbon.... 18
2.2. Loading the cards 21
2.3. The withdrawal of printed cards.... 23
2.4. Driver installation (Windows XP, 2000, 2003).... 24
2.5.Driver installation (Windows Vista, 7, 8)....31
2.5. Network configuration 37
3. Driver configuration ....46
3.1. Checking printer properties 46
3.2. Changing printer properties 46
3.3. Other settings....51
4. Utilities ....54
4.1. Card Printer Setup....54
4.2. Card Printer Test....64
4.3. Firmware upgrade 70
5. Optional device driver installation....73
5.1. Contact smartcard reader .... 73
6. Troubleshooting....78
6.1. Cleaning the printer....78
6.2 TPH (Thermal Print Head) replacement 82
6.3. Card movement....83
6.4. Printing quality....84
6.5. Magnetic stripe encoding....85
6.6. General operation....85
7. Printer specification ....87
Table of Pictures
Pic.1 SMART-30 front features....7
Pic.2 SMART-30 back features....7
Pic.3 SMART-30S (Standard) 8
Pic.4 SMART-30R (Rewritable)....8
Pic.5 SMART-30D (Dual) 8
Pic.6 SMART-50 front features....9
Pic.7 SMART-50 rear features....9
Pic.8 SMART-50S 10
Pic.9 SMART-50D....10
Pic.10 SMART-50L.... 10
Pic.11 SMART-30 Inside features 11
Pic.12 SMART-50 Inside features 12
Pic.13 Ribbon cartridge features ...... 13
Pic.14 Top Cover open 18
Pic.15 Take out the ribbon cartridge 18
Pic.16 Loading the ribbon 1.... 19
Pic.17 Loading the ribbon 2.... 19
Pic.18 Installing the cleaning roller.... 19
Pic.19 Peeling the protective wrapper.... 19
Pic.20 Installing the ribbon cartridge 20
Pic.21 Close Top Cover 20
Pic.22 Adjusting the card thickness lever 21
Pic.23 Preparing the card 1 .... 21
Pic.24 Preparing the card 2 .... 21
Pic.25 Loading the cards 1....22
Pic.26 Loading the cards 2....22
Pic.27 Loading the cards 3....22
Pic.28 Loading the cards 4....22
Pic.29 SMART-30 Stacker 23
Pic.30 SMART-50 Stacker 23
Pic.31 Install XP printer driver 1 24
Pic.32 Install XP printer driver 2 24
Pic.33 Install XP printer driver 3 24
Pic.34 Install XP print driver 4....24
Pic.35 Install XP print driver 5....25
Pic.36 Install XP print driver 6....25
Pic.37 Install XP printer driver 7 25
Pic.38 Install XP printer driver 8 25
Pic.39 Install XP printer driver 9 26
Pic.40 Install XP printer driver 10....26
Pic.41 Install XP printer driver 11....26
Pic.42 Install XP printer driver 12....27
Pic.43 Install XP printer driver 13....27
Pic.44 Install XP printer driver 14....27
Pic.45 Install XP printer driver 15....27
Pic.46 Install XP printer driver 16....28
Pic.47 Install XP printer driver 17....28
Pic.48 Install XP printer driver 18....28
Pic.49 Install XP printer driver 19....29
Pic.50 Install XP printer driver 20....29
Pic.51 Install XP printer driver 21....29
Pic.52 Install XP printer driver 22.... 29
Pic.53 Install XP printer driver 23....30
Pic.54 Install XP printer driver 24....30
Pic.55 Install XP printer driver 25....30
Pic.56 Install Win7 driver 1....31
Pic.57 Install Win7 driver 2 31
Pic.58 Install Win7 driver 3....31
Pic.59 Install Win7 driver 4....31
Pic.60 Install Win7 driver 5....32
Pic.61 Install Win7 driver 6 32
Pic.62 Install Win7 driver 7 32
Pic.63 Install Win7 driver 8 32
Pic.64 Install Win7 driver 9 33
Pic.65 Install Win7 driver 10 33
Pic.66 Install Win7 driver 11....33
Pic.67 Install Win7 driver 12 33
Pic.68 Install Win7 driver 13 34
Pic.69 Install Win7 driver 14 34
Pic.70 Install Win7 driver 15 34
Pic.71 Install Win7 driver 16 35
Pic.72 Install Win7 driver 17 35
Pic.73 Install Win7 driver 18 35
Pic.74 Install Win7 driver 19 35
Pic.75 Install Win7 driver 20 36
Pic.76 Install Win7 driver 21 36
Pic.77 Install Win7 driver 22 36
Pic.78 Install Win7 driver 23 36
Pic.79 Rear view of SMART-50 printer 1 37
Pic.80 Rear view of SMART-50 printer 2....37
Pic.81 Running the NetAdmin.... 38
Pic.82 Network printer is not found 38
Pic.83 Connecting to USB port 39
Pic.84 NetAdmin Log-in.... 39
Pic.85 Dynamic IP configuration.... 40
Pic.86 Static IP configuration 40
Pic.87 Network service configuration 41
Pic.88 OCP configuration.... 41
Pic.89 Network user configuration.... 42
Pic.90 USB port state 42
Pic.91 Rebooting the network module 43
Pic.92 Reset to default 43
Pic.93 Upgrading the firmware 1....44
Pic.94 Upgrading the firmware 2.... 44
Pic.95 Upgrading the firmware 3....45
Pic.96 Printer properties 1....46
Pic.97 Printer properties 2....46
Pic.98 Layout 47
Pic.99 Advanced Setup 48
Pic.100 Paper / Ribbon / Printing 49
Pic.101 Side / Media 50
Pic.102 Laminator 50
Pic.103 Printer sharing....51
Pic.104 Ports 51
Pic.105 Advanced 52
Pic.106 Color Management....52
Pic.107 Service 52
Pic.108 Laminator 53
Pic.109 CardPrinterSetup Log-in 54
Pic.110 CardPrinterSetup start 54
Pic.111 CardPrinterSetup – Card Printer Basic Setup 55
Pic.112 SMART-30 R density....56
Pic.113 Color density 57
Pic.114 Resin Black density 57
Pic.115 Overlay density 57
Pic.116 CardPrinterSetup – Card Printer Advanced Setup 59
Pic.117 CardPrinterSetup – Laminator Basic Setup 61
Pic.118 CardPrinterSetup – Laminator Advanced Setup 62
Pic.119 CardPrinterTest....64
Pic.120 Magnetic stripe encoding....66
Pic.121 Contact smartcard encoding 67
Pic.122 Contactless smartcard encoding....68
Pic.123 Upgrading printer firmware 70
Pic.124 Ready for firm-ware upgrade 71
Pic.125 Firm-ware manual upgrade....71
Pic.126 Ready for laminator firm-ware upgrade....72
Pic.127 Firm-ware manual upgrade.... 72
Pic.128 Contact smartcard reader driver installation 73
Pic.129 License agreement....74
Pic.130 Installing the contact smartcard reader driver....74
Pic.131 Completing the smartcard reader driver installation....75
Pic.132 Found New Hardware Wizard 76
Pic.133 Installation method selection 76
Pic.134 Driver location 77
Pic.135 Completing the driver installation....77
Pic.136 Exclusive cleaning card for SMART-50 printer 78
Pic.137 Printer cleaning start.... 78
Pic.138 Printer cleaning Step 1....79
Pic.139 Printer cleaning Step 2....79
Pic.140 Printer cleaning Step 3....80
Pic.141 Printer cleaning Step 4....80
Pic.142 Printer cleaning Step 5....81
Pic.143 Printer cleaning Step 6....81
Pic.144 Thermal Print Head 82
Pic.145 Print head setup 82
Pic.146 Print head replacement 83
Pic.147 Print head angle....83
Pic.148 Printing quality trouble 1....84
Pic.149 Printing quality trouble 2....84
Pic.150 Printing quality trouble 3....84
Pic.151 Printing quality trouble 4....85
Pic.152 Printing quality trouble 5....85
Pic.153 Printer Specification 1....87
Pic.154 Printer Specification 2....88
Pic.155 Printer Specification 3....89
Pic.156 Printer Specification 4....90
1. Introduction
1.1 Printer outside features
1.1.1 SMART-30 outside feature.
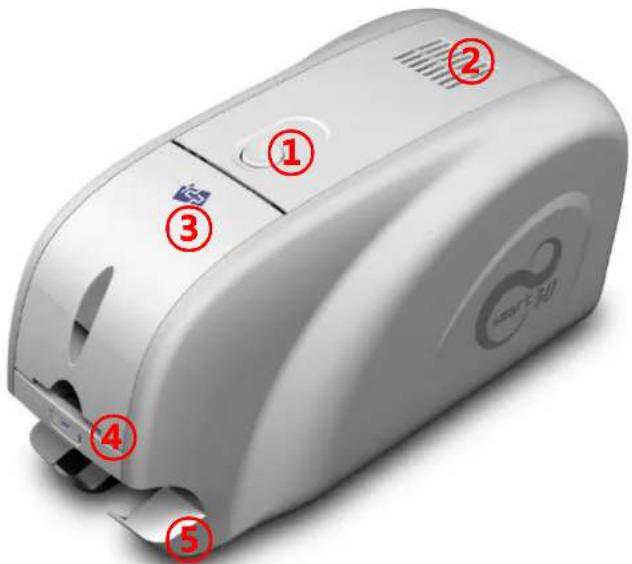
For the user's convenience, SMART-30 status can be seen through LED and the printer can be controlled by a button. It takes a power via the 24V adaptor provided with the printer. Using USB and Network port, it is communicated with the user's PC
The following shows the outside functional features found on the printer.
text_image
1 2 3 4 5 Smart 3D① Top cover open button
② External contactless Smartcard encoding position
③ Input hopper
④ LED buttons
⑤ Dividing Stacker
Pic.1 SMART-30 front features
text_image
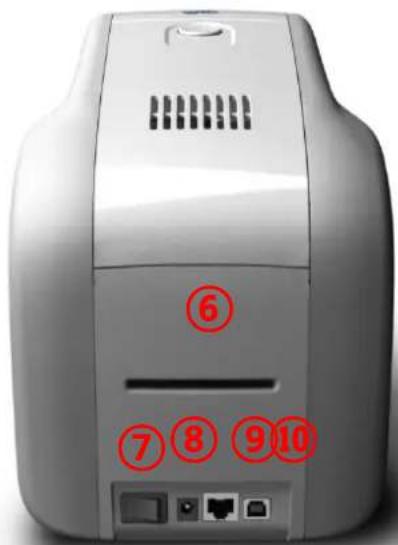
⑥ ⑦⑧⑨⑩⑥ Backside card outlet
⑦ Power switch
⑧ 24V power connector
⑨ Network port
In case there is no network option, it is closed.
⑩ USB port
Pic.2 SMART-30 back features
There are five models in SMART-50 card printer series such as SMART-50S, SMART-50D, SMART-50L.
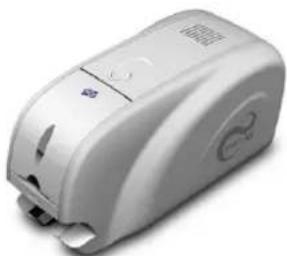
SMART-30S (Pic.5) is the standard card printer. It can be printed in single side with the encoding. This manual is prepared based on SMART-30S.
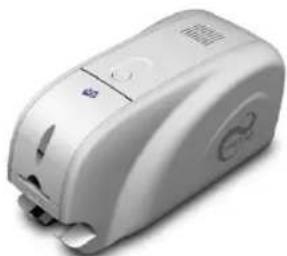
SMART-30R (Pic.6) is the rewritable card printer. It can rewrite on rewritable card in single side with encoding.
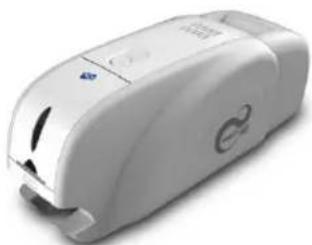
SMART-30D (Pic.7) have a flipper which can enable to print in both side. SMART-30D can print the both side of the card with the encoding.
natural_image
White electronic device with ports and buttons, no visible text or symbolsPic.3 SMART-30S (Standard)
natural_image
White portable electronic device with control panel and buttons (no visible text or symbols)Pic.4 SMART-30R (Rewritable)
natural_image
White medical device with a small circular button and control panel (no visible text or symbols)Pic.5 SMART-30D (Dual)
1.1.2 SMART-50 outside feature.
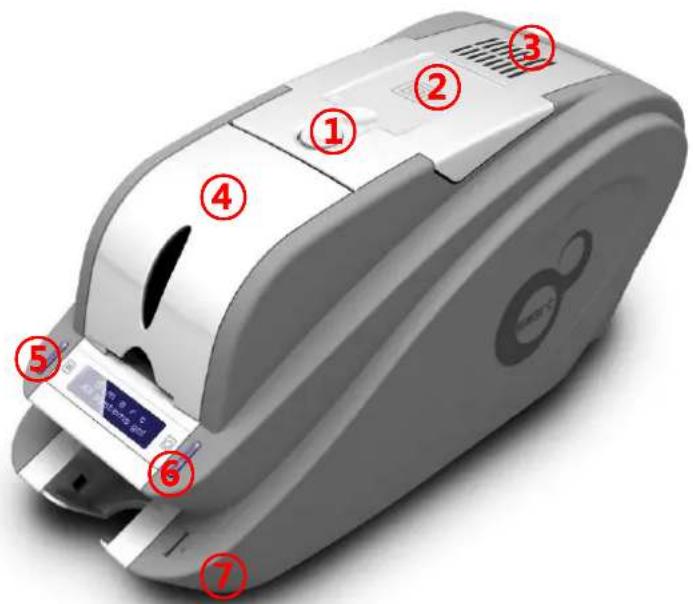
For the user's convenience, SMART-50 status can be seen through LCD with LED and the printer can be controlled by two LED buttons. It takes a power via the 24V adaptor provided with the printer. Using USB and Network port, it is communicated with the user's PC
The following shows the outside functional features found on the printer.
text_image
Diagram of a digital payment machine with numbered parts labeled 1 through 7, showing internal components and control panel.① Top cover open button
② External contactless Smartcard encoding position
③ Fan
④ Input hopper
⑤ LED buttons
⑥ LCD show the process status
⑦ Internal SIM reader
Pic.6 SMART-50 front features
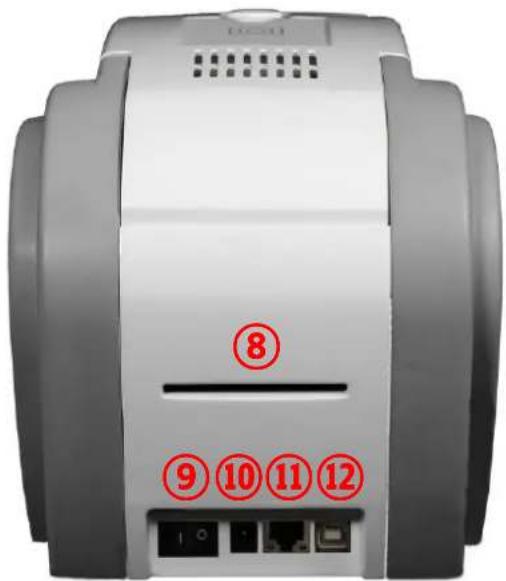
text_image
⑧ ⑨ ⑩ ⑪ ⑫⑧ Backside card outlet
⑨ Power switch
⑩ 24V power connector
⑪ Network port
In case there is no network option, it is closed.
⑫ USB port
Pic.7 SMART-50 rear features
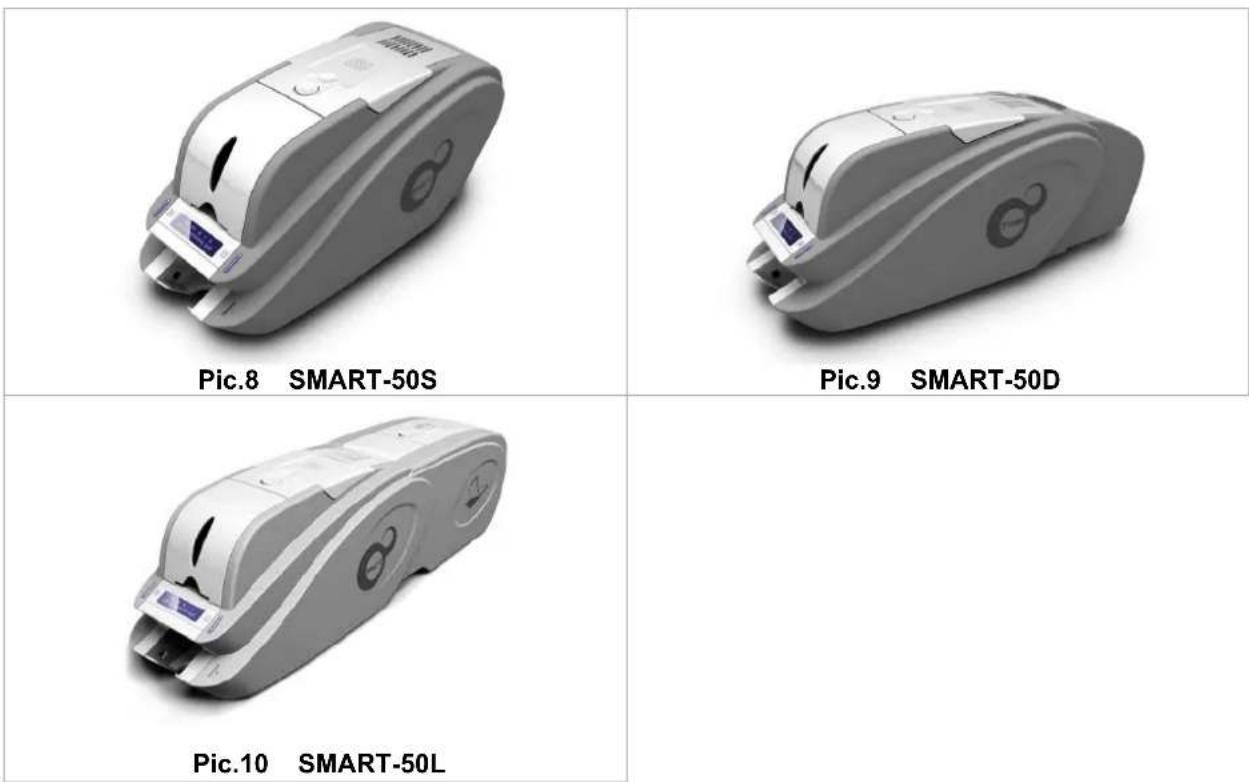
There are five models in SMART-50 card printer series such as SMART-50S, SMART-50D, SMART-50L.
SMART-50S (Pic.8) is the standard card printer. It can be printed in single side with the encoding. This manual is prepared based on SMART-50S.
SMART-50D (Pic.9) have a flipper which can enable to print in both side. SMART-50D can print the both side of the card with the encoding.
SMART-50L (Pic.10) produces long-life cards for ID and access control with customizable security features and ability to print smart cards. To cater to expanding requirement in card security, SMART-50L's DLW(Direct to Laminating in a Wink) technology provides the most stable & fast laminating solutions.
1.2 Printer inside features
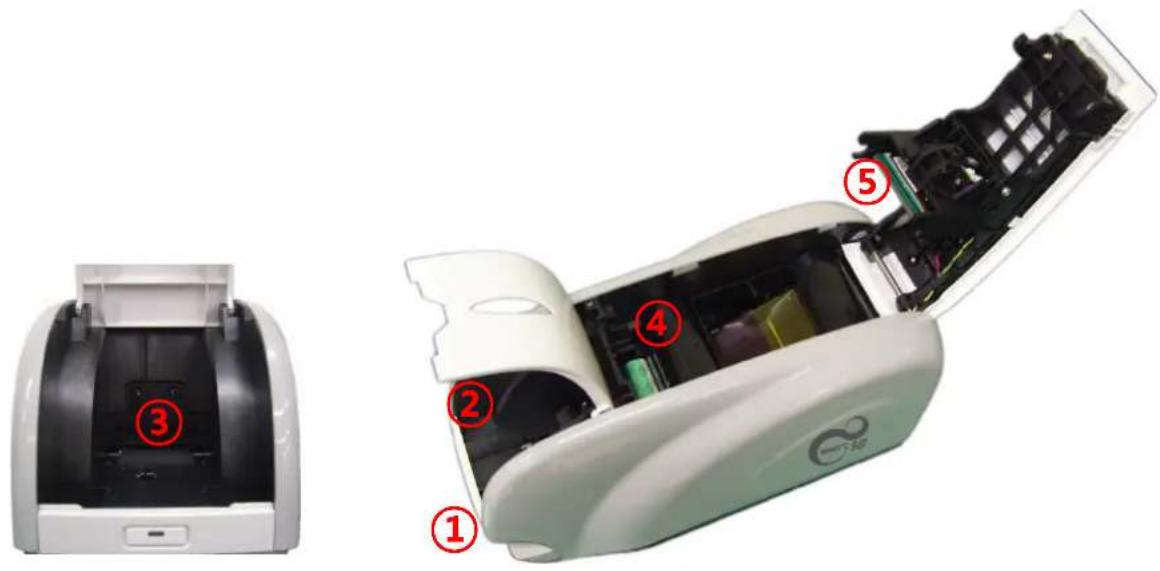
1.2.1 SMART-30 inside feature.
In SMART-30 printer, the ribbon is installed by a ribbon cartridge which can be used semipermanently. The following shows the inside functional features found on your SMART-30 printer.
text_image
Diagram of a printer's internal structure with numbered parts, showing open and closed views of the device.Pic.11 SMART-30 Inside features
① Output hopper(Stacker)
Collect the printed card and/or encoded cards.
② Input hopper
Load the cards for printing.
③ Card thickness control lever
Adjust the cards thickness.
④ Ribbon cartridge
Install the ribbon and the disposable cleaning roller.
⑤ Thermal Print Head
This enables the cards to be printed.
(Caution!: This is very hot after printing. Do not contact the surface of the Thermal Print Head with fingers or a sharp metal object to avoid degrading print quality or damaging printer head permanently.)
1.2.2 SMART-50 inside feature.
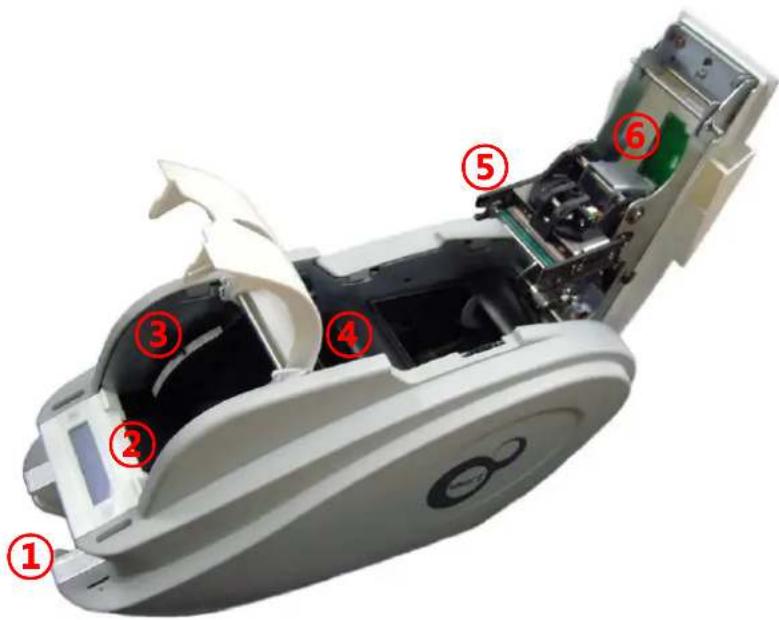
In SMART-50 printer, the ribbon is installed by a ribbon cartridge which can be used semipermanently. The following shows the inside functional features found on your SMART-50 printer.
text_image
Labeled diagram of a device interior showing numbered components for identification① Output hopper
② Input hopper
③ Card thickness control lever
④ Ribbon cartridge
⑤ Thermal Print Head
⑥ External contactless encoder
Pic.12 SMART-50 Inside features
① Output hopper(Stacker)
Collect the printed card and/or encoded cards.
② Input hopper
Load the cards for printing.
③ Card thickness control lever
Adjust the cards thickness.
④ Ribbon cartridge
Install the ribbon and the disposable cleaning roller.
⑤ Thermal Print Head
This enables the cards to be printed.
(Caution!: This is very hot after printing. Do not contact the surface of the Thermal Print Head with fingers or a sharp metal object to avoid degrading print quality or damaging printer head permanently.)
⑥ External contactless encoder
Contactless smartcard encoder.
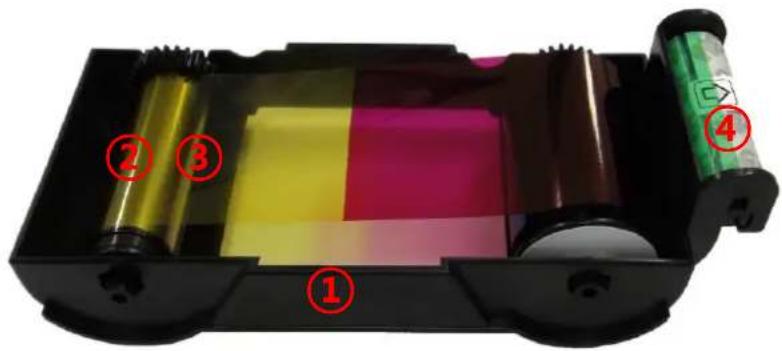
1.3 Ribbon cartridge features
text_image
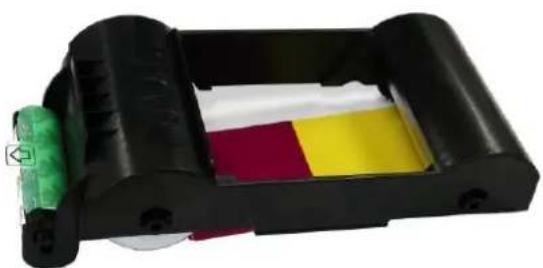
Diagram of a barcode scanner with labeled parts including color swatches and a green barcode tag① Ribbon cartridge
② Take up parts
③ Supply parts
④ Disposable cleaning roller
Pic.13 Ribbon cartridge features
① Ribbon cartridge
- Install a ribbon and a disposable cleaning roller provided with the ribbon.
- In the case of SMART-30 R model, a ribbon is not used, and a disposable cleaning roller is only installed and used.
- This semi-permanent ribbon cartridge is a component of the printer. Printer does not operate if it is broken or damaged. In this case, please contact printer reseller.
② ③ Take up & Supply parts
-. Ribbon is wrapped to the supply parts as the Picture. It should be installed as the Picture.
④ Disposable cleaning roller
- It removes dust on the surface of card to improve print quality before the card is printed. It should be changed together with the ribbon.
- After installing the disposable cleaning roller to the ribbon cartridge, peel off the protective film.
-. It is provided with the ribbon. - In the case of SMART-30 R model, you have to purchase the disposable cleaning roller from the reseller.
1.4 LCD panel display & button operation
SMART-50 printer can show the real-time process status to user. SMART-30's status is displayed in windows tray.
| No | LCD Display | LED Button | State Description | ||||
| Left Right Left Right | |||||||
| 1 | Ver X.XX... Initialize... | On On | Initializing | Initializing | with the indication | on of SMART-50 firmware | version |
| 2 | INIT Error xx | Blinking | Blinking | Repeat | Repeat | Error during initializing | Showing error no. in case of failure of normal initializing while SMART-50 is initialized. (Refer to page13). Press any keys for re-initializing process. |
| 3 | S m a r t Auto Ribbon Set | On On | Automatic ribbon setting | It optimizes the ribbon position setting automatically in case of the replacement of color ribbon(YMCKO or YMCKOK). | |||
| 4 | Auto Ribbon Set Fail!!! | Blinking | Blinking | Fail to optimize the ribbon setting | Display these messages when the auto ribbon setting is failed and it shows the ribbon detecting level. | ||
| 5 | Auto Ribbon Set Color=xxx(xxx) | Blinking | Blinking | Fail to optimize the ribbon setting and display the ribbon's color value | |||
| 6 | S M A R T System Ready | On On | Installed ribbon information | Soft power ON/OFF | Standby | Printer is ready for printing and you can check the installed ribbon information by pressing the left button. Printer turns off by pressing the right button. Printer turns on by pressing the right button when it turns off. | |
| 7 | Wait.. 1°C Temperature=xxx | Blinking | Blinking | Printer's operating temperature is under 1°C | Shown it when printer's operating temperature falls down under 1°C. Normal operating temperature is 15°C~35°C. | ||
| 8 | S m a r t Unlock Please.. | On On | Printer is locked | Physical key option is active using the CardPrinterSetup utility and it shows the locked state. Unable to print. | |||
| 9 | S m a r t Verify your PC | On On | PC is not authenticated | Authentication option is active using the CardPrinterSetup utility. When use the printer with an unauthenticated PC, it is shown. Printer is not working. | |||
| 10 | Ribbon Balance Type / Remains | On On | Card out | Display the ribbon type and remains | Display the installed ribbon's type and the remains. It can be shown by pressing the left LED button on the system ready mode. | ||
| 11 | S M A R T Printing! | On On | Printing | Under printing. | |||
| No | LCD Display | LED Button | State Description | ||||
| Left Right Left Right | |||||||
| 12 | SMARTMag R/W | On On | Reading or writing the Magnetic stripe | Magnetic encoder is reading or writing the magnetic stripe information. | |||
| 13 | Spool Error!<-Any Key Push-> | Blinking | Blinking | Cancel & Initialize | Cancel & Initialize | Printing data is not transmitted properly | Shown it when error occurs in a printing data transmission. Press any keys to delete the spooled data and to return the ready state. |
| 14 | Print Error xx<Replay Cancel> | Blinking | Blinking | Repeat | Cancel & Initialize | Error in printing or moving a card | Error in the printing or the transmission. Retry by pressing the left button or cancel the command by pressing the right button. |
| 15 | Top Cover Open<-Card Moving -> | Blinking | Blinking | Move a card to the back side | Move a card to the front side | Top cover open | Top cover is open. The card in the printer can be moved by pressing the left or right LED button. If press both buttons at the same time, the print head will be up and down. (Flipper will be flip over if it is installed) |
| 16 | Check Please..Ribbon Not Found | Blinking | Blinking | Ribbon redetecting | Ribbon redetecting | There is no ribbon in the printer or fail to detect | Fail to detect the ribbon. Check the ribbon installed state. If there is no ribbon, install the ribbon. If there is a ribbon, pull out it and install again. Press the left or right button to redetect the ribbon. |
| 17 | Check Please..Ribbon Zero | Blinking | Blinking | Ribbon redetecting | Ribbon redetecting | The installed ribbon has run out | It is displayed when the installed ribbon is all used up. Replace with new ribbon. Press the left or right button to redetect the ribbon. |
| 18 | Check Please..TPH Not Found | Blinking | Blinking | Thermal Print head is not installed | Thermal Print Head is not installed or there is a misconnection of the cable. Open the top cover to check the print head installed state or turn off the printer and check the cable connecting state. | ||
| 19 | Print Error xxTop Cover Open | Blinking | Blinking | Fail to move the card out (Check the card in the printer) | The card in the printer will be come out when the initialization or top cover close. If it is not come out, this message will be displayed. Remove the card and close the top cover. | ||
| 20 | Card Out Error<Replay Cancel> | Blinking | Blinking | Repeat | Cancel & Initialize | Fail to move the card out (Check the card in the printer) | After an error occurs in printing, the error card is not come out even though "Replay" or "Cancel" button is pressed. |
| 21 | SMARTDownload... | On On | Firmware downloading | The printer is downloading the firmware. Do not turn off the power until it is rebooting. It takes about 20 seconds. | |||
| 22 | Board Test ModeWait | Test mode state | Test mode which can test the sensors or motors of the printer.User can set the LED status. | ||||
Table1 Status display
Description of printer error code
| Error code | Description |
| 0 Card | in error |
| 1 Card | move center error |
| 2 Card | out error |
| 3 Card | move magnetic error |
| 4 Card | move contact encoder error |
| 5 Card | move contactless encoder error |
| 6 Card | move error from the printer to the flipper |
| 7 Card | move error form the flipper to the printer |
| 8 Print | head up error |
| 9 Print | head down error |
| 10 IC Contactor up | |
| 11 IC Contactor down | |
| 12 Flipper top error | |
| 13 Flipper bottom error | |
| 14 Error in printing | |
| 15 Magnetic stripe read/write error | |
| 16 Ribbon search error | |
| 17 Ribbon move error | |
| 18 No print head installed | |
| 19 Print | head overheating |
| 20 No ribbon | |
| 21 Printing data error | |
| 22 Card | back out error |
| 23 Magnetic data erasing error | |
| 24 Printer password is not correct | |
| 25 Magnetic stripe track 1 read error | |
| 26 Magnetic stripe track 2 read error | |
| 27 Magnetic stripe track 3 read error | |
| 28 Printer locked state | |
| 29 Printer spool full state | |
| 30 No defined | |
| 31 No defined | |
Description of laminator error code
| Error code | Description |
| 0 Laminator head up error | |
| 2 Laminator head down error | |
| 4 Laminator card in error | |
| 6 Laminator card move error | |
| 8 Laminator card front out error | |
| 9 Laminator card rear out error | |
| 10 Flipper error | |
| 13 Error while laminating | |
| 15 Laminator initializing error | |
| 16 Laminator film zero error | |
| 17 Laminator film search error | |
| 31 No laminating film | |
2. Printer installation
2.1. Fitting the ribbon
Before printing, prepare the related items such as a card, a ribbon and a cleaning roller. In this section we invite you to know the proper method of installing the ribbon and the cleaning roller into the printer. In the case of SMRT RW model, the ribbon is no needed so skip 2.1.4 and 2.1.5 process.
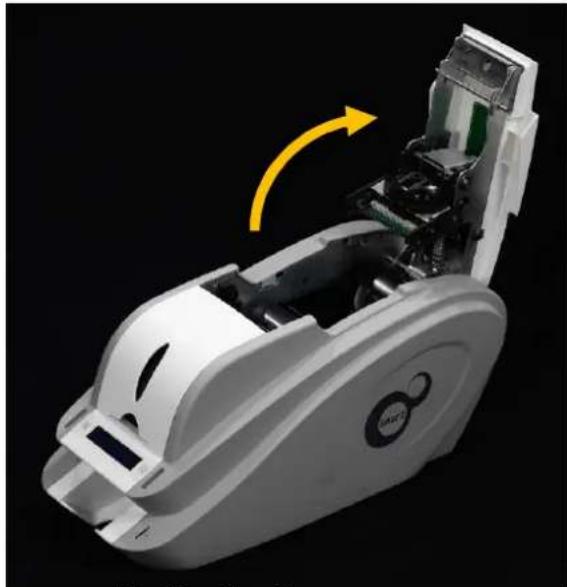
2.1.1. Turn off the printer
natural_image
3D rendering of a white mechanical device with internal components and a yellow arrow indicating rotation (no text or symbols)Pic.14 Top Cover open
2.1.2. Open the printer top cover by pressing the top cover open button.
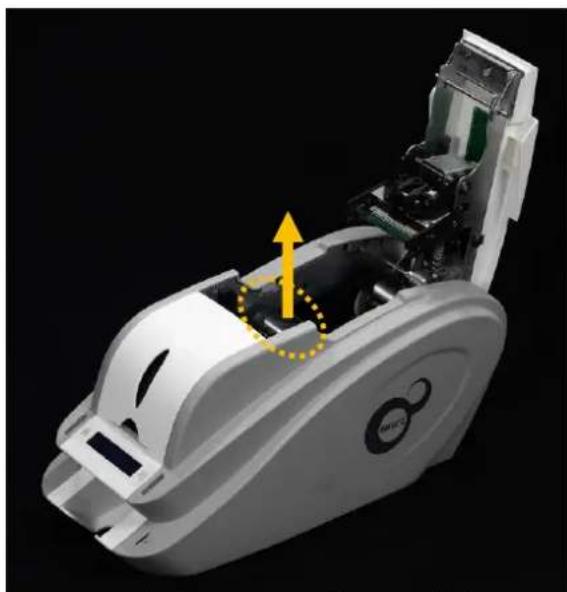
natural_image
3D cutaway view of a white electronic device showing internal components and a yellow arrow indicating motion (no text or symbols)Pic.15 Take out the ribbon cartridge
2.1.3. Take out the ribbon cartridge.
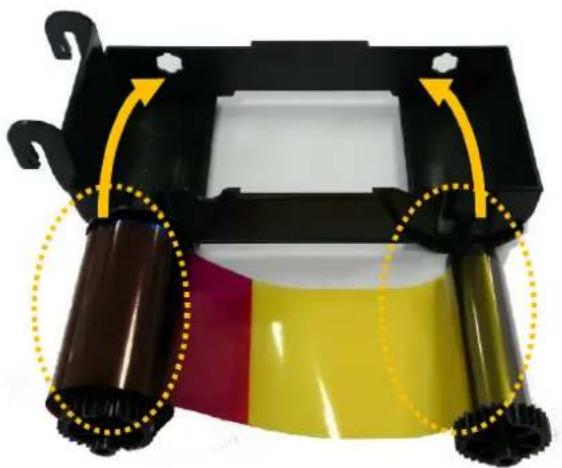
natural_image
Close-up of a mechanical component with yellow and red bands, highlighted by arrows (no text or symbols)Pic.16 Loading the ribbon 1
2.1.4. Install a ribbon into the ribbon cartridge as left picture.
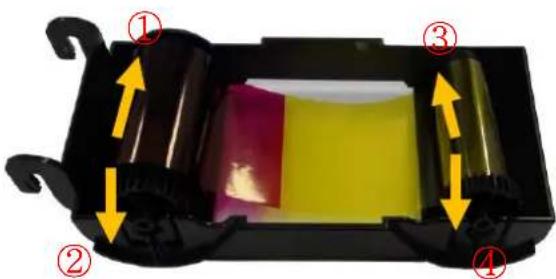
natural_image
Interior view of a black plastic enclosure with yellow and red components, no visible text or symbolsPic.17 Loading the ribbon 2
2.1.5. Insert the supply side of the ribbon to no.1 hole and press the opposite (no.2). Insert the take-up side of the ribbon same method to no.3 and no.4. After inserting, tighten the ribbon.
(Caution! If the ribbon is not tightened, a rolling up error might be happened.)
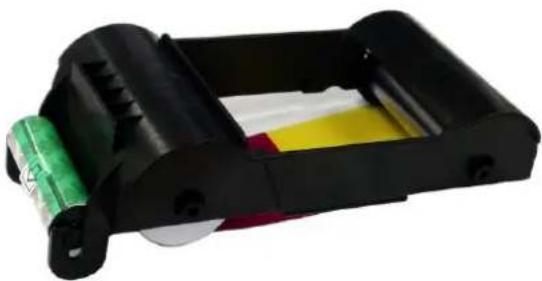
natural_image
Black plastic mechanical device with yellow and red components, no visible text or symbolsPic.18 Installing the cleaning roller
2.1.6. Install the disposable cleaning roller to the ribbon cartridge.
natural_image
Black plastic roller with yellow, red, and green bands inside (no text or symbols visible)Pic.19 Peeling the protective wrapper
2.1.7. Peel the protective wrapper from the cleaning roller.
After removing the protective wrapper, the cleaning roller should be kept clean from fingerprints, dust and foreign substances to avoid contamination because it is adhesive. (Caution! Do not use without peeling off the protective wrapper because the cleaning roller cannot perform its function.)
natural_image
Close-up of a robotic device with a hand pressing a black component, highlighted by yellow dotted circles (no text or symbols visible)Pic.20 Installing the ribbon cartridge
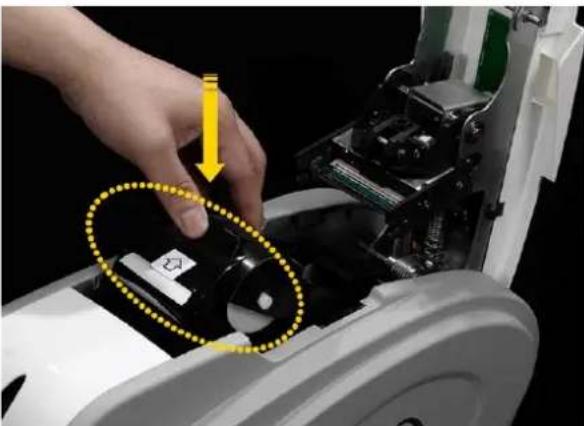
2.1.8. Install the ribbon cartridge into the printer after installing the ribbon with a cleaning roller to the cartridge.
natural_image
Close-up of a white smart air purifier with circular components and a logo (no readable text or symbols)Pic.21 Close Top Cover
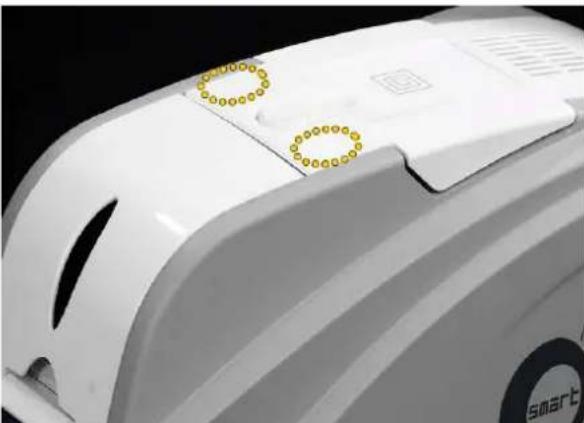
2.1.9. Close the top cover
(If it is not closed properly, check the installation state of the ribbon cartridge.)
2.2. Loading the cards
This section shows how to load the plastic cards.
text_image
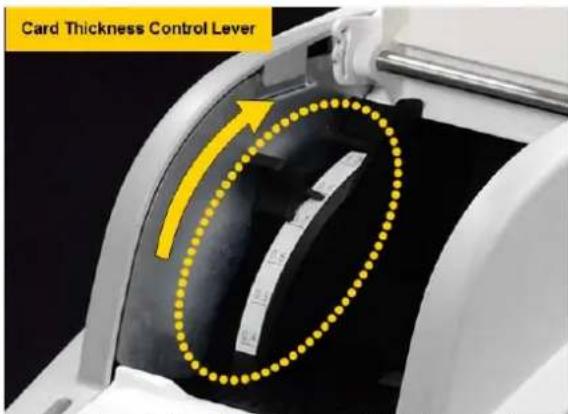
Card Thickness Control LeverPic.22 Adjusting the card thickness lever
2.2.1. Open the input hopper cover.
2.2.2. Adjust the card thickness with the card thickness control lever.
(Caution! If the adjustment is not correct, it will make some error. Use the type of cards in the specification of this manual. Always keep the card surface clean state.)
natural_image
Close-up of a hand holding a white strip with a yellow arrow pointing to it, against a plain background (no text or symbols)Pic.23 Preparing the card 1
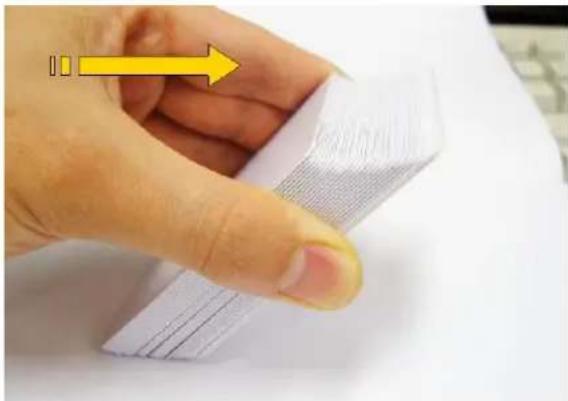
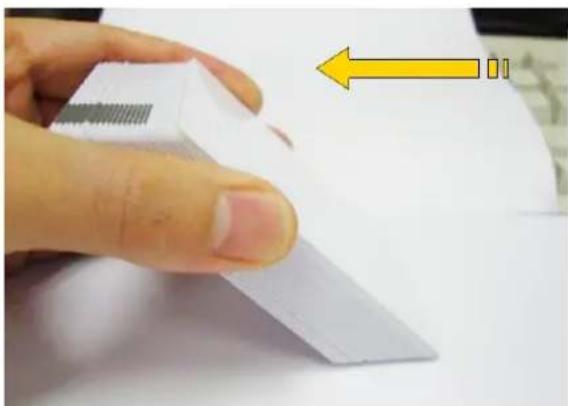
2.2.4. To separate cards from each other push a stack of cards back and forth to an angle about 45 degrees vertically.
(Static charge makes cards stuck with significant adhesive force. These cards must be physically separated from each other before inserted into the feeder. If not separated, feeding or printing problems may occur.)
natural_image
Close-up of a hand holding a white plastic clip with a yellow arrow pointing to it, on a flat surface (no text or symbols visible)Pic.24 Preparing the card 2
natural_image
Close-up of a hand holding a transparent cylindrical object with a metallic strip, against a plain background (no text or symbols visible)Pic.25 Loading the cards 1
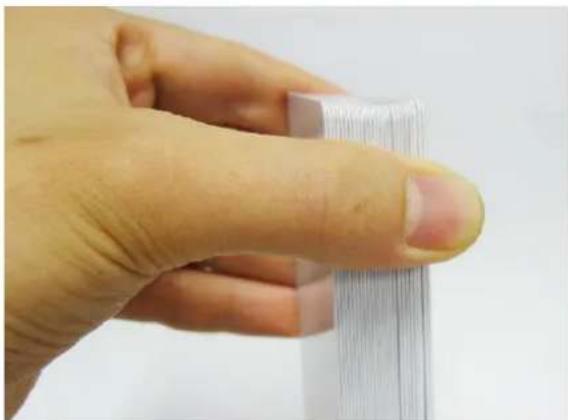
2.2.5. Stand the stack of cards vertically after separating.
natural_image
Close-up of a hand inserting a device into a white scanner (no visible text or symbols)Pic.26 Loading the cards 2
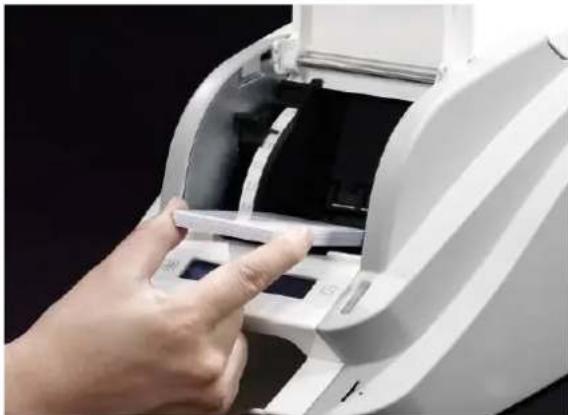
2.2.6. Load the cards on the input hopper properly and close the hopper cover.
natural_image
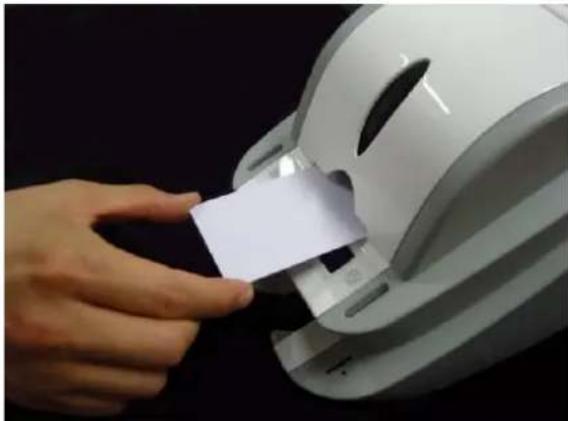
Close-up of a hand inserting a white card into a white plastic device (no text or symbols visible)Pic.27 Loading the cards 3
2.2.7. When insert each one card, insert the card to the end as left picture
natural_image
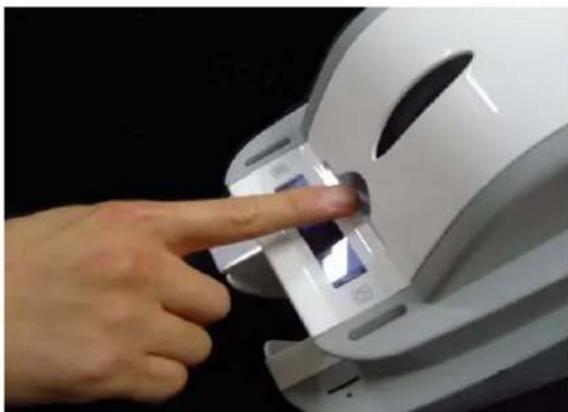
Close-up of a hand pressing a white plastic device component (no visible text or symbols)Pic.28 Loading the cards 4
2.3. The withdrawal of printed cards.
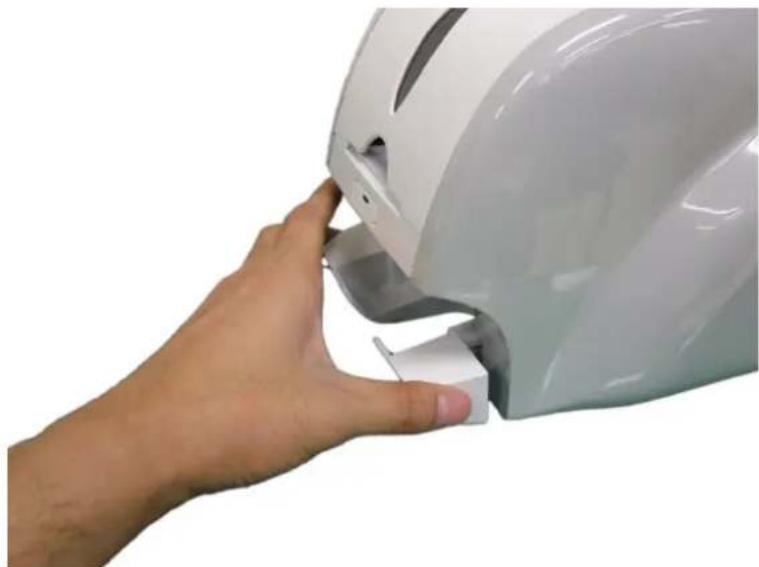
Printed cards are passed out to the stacker of rear bottom side of SMART printer. SMART-30's stacker can be divided as following image.
natural_image
Close-up of a hand pressing a white plastic mechanical component (no text or symbols visible)Pic.29 SMART-30 Stacker
SMART-50's stacker sticks out of the device so you can withdraw the print cards easily.

natural_image
3D rendered image of a white electronic device with a display screen and ports (no visible text or symbols)Pic.30 SMART-50 Stacker
2.4. Driver installation (Windows XP, 2000, 2003)
text_image
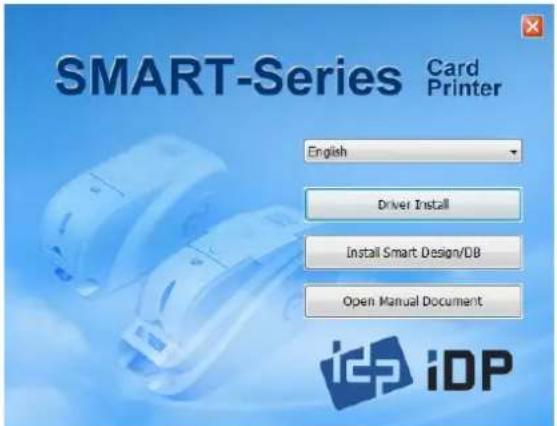
SMART-Series Card Printer English Driver Install Install Smart Design/DB Open Manual Document iCD iDPPic.31 Install XP printer driver 1
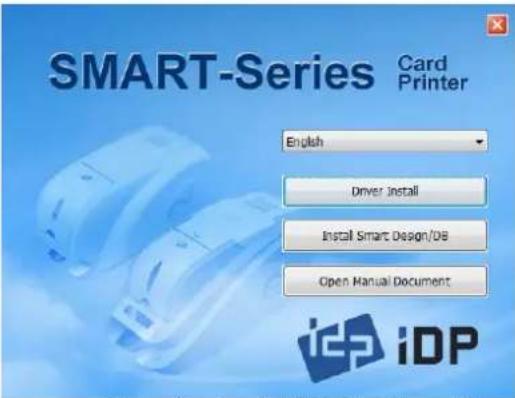
2.4.1. Insert the installation CD provided with the printer.
2.4.2. Choose the language and click "Driver Install".
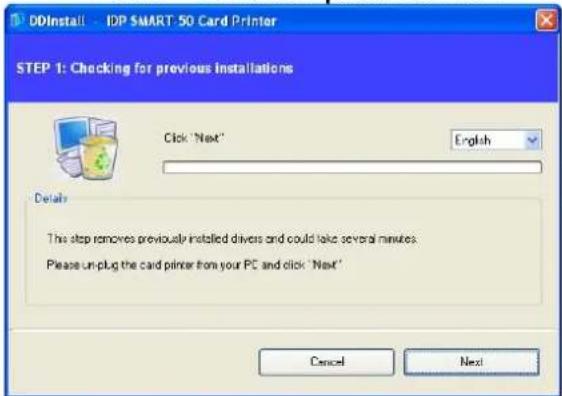
2.4.3. STEP 1:
If the printer is connected to the PC and turned on, turn off the power of the printer.
Click "Next". The existing installed printer driver will be removed.
text_image
DDInstall - IDP SMART: 50 Card Printer STEP 1: Checking for previous Installations Click 'Next' English Details The step removes previously installed drivers and could take several minutes. Please un-plug the card printer from your PC and click 'Next' Cancel NextPic.32 Install XP printer driver 2
If the printer driver is already installed, it will be removed automatically but it may take times.
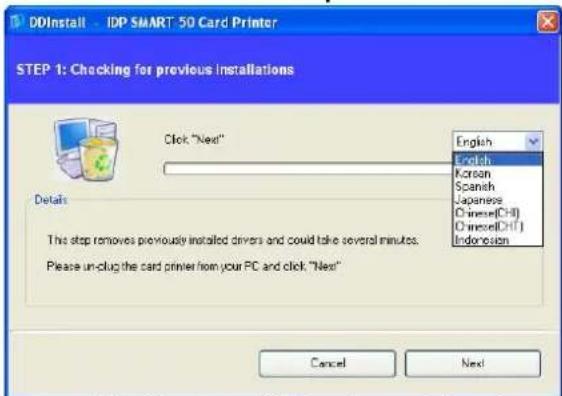
Choose the language as shown on the left.
text_image
DDInstall - IDP SMART 50 Card Printer STEP 1: Checking for previous installations Click "Next" English English Korean Spanish Japanese Chinese(CH) Chinese(CH) Indonesia Details This stop removes previously installed drivers and could take several minutes. Please un-tag the card printer from your PC and click "Next" Cancel NextPic.33 Install XP printer driver 3
text_image
DDInstall - IDP SMART:50 Card Printer STEP 1: Checking for previous Installations Click 'Next' English Details This stop removes previously installed drivers and could take several minutes. Please run-plug the card printer from your PC and click 'Next' Cancel NextPic.34 Install XP print driver 4
text_image
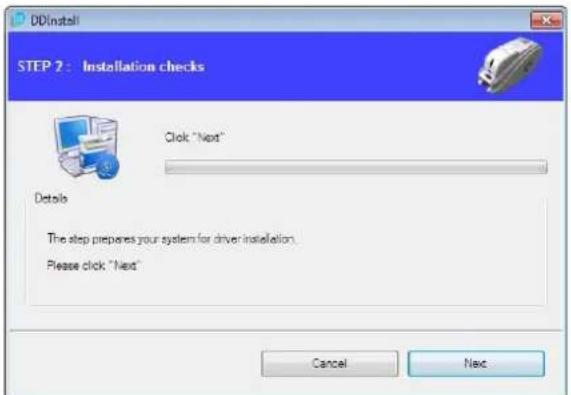
DDInstall - IDP SMART:50 Card Printer STEP 2 : Installation checks Click "Next" Details The step prepares your system for drive installation. Please click "Next" Cancel NextPic.35 Install XP print driver 5
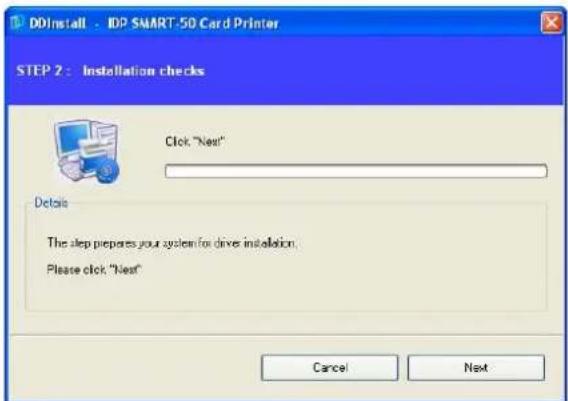
2.4.4. STEP 2:
Click "Next" to ready the installation of the printer driver.
text_image
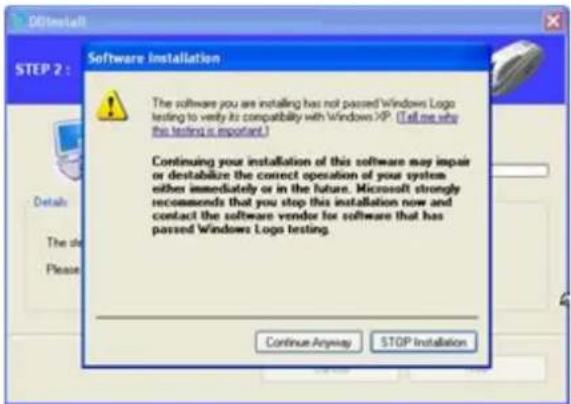
DOInstall STEP 2 : Software Installation The software you are installing has not passed Windows Logo testing to verify its compatibility with Windows XP. (Tell me why this testing is important.) Continuing your installation of this software may impair or destabilize the correct operation of your system either immediately or in the future. Microsoft strongly recommends that you stop this installation now and contact the software vendor for software that has passed Windows Logo testing. Continue Anyway STOP InstallationPic.36 Install XP print driver 6
2.4.5. If there is a pop-up window for the software installation, click "Continue Anyway".
text_image
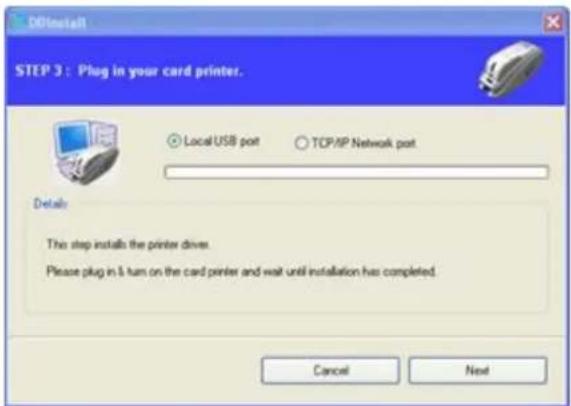
DOInstall STEP 3 : Plug in your card printer. Local USB port TCP/IP Network port. Details The step installs the printer driver. Please plug in & turn on the card printer and wait until installation has completed. Cancel NextPic.37 Install XP printer driver 7
2.4.6. STEP 3:
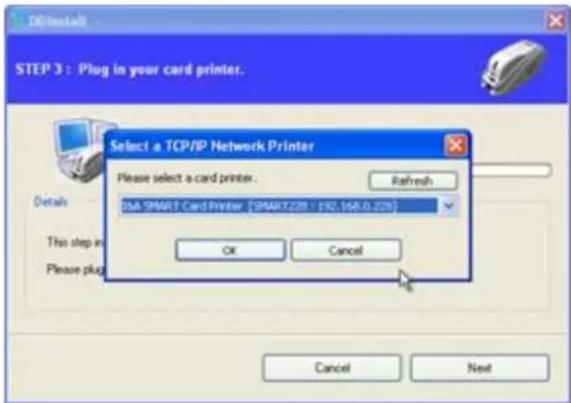
Click "Next" to use USB port. Click "TCP/IP Network port" to use the printer as network printer and choose the printer as shown on the left picture.
(If there is no information on the window f the network printer list, it means that the printer is not connected to the network. Check "2.5 Network Printer" section.)
text_image
STEP 3 : Plug in your card printer. Select a TCP/IP Network Printer Please select a card printer... Refresh SIA SMART Card Printer [SMART.228 : 192.168.0.228] OK Cancel Details This step in Please plug Cancel NextPic.38 Install XP printer driver 8
natural_image
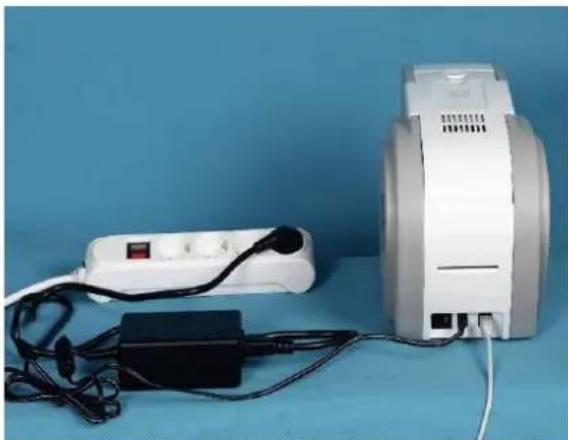
White portable electronic device with power strip and charging plug connected to a black charger, against a blue background (no visible text or symbols)Pic.39 Install XP printer driver 9
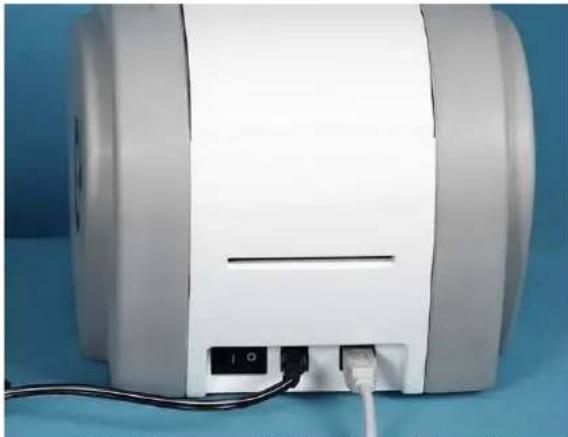
2.4.7. Please connect a power supply to the printer.
(For the network printer, refer to "2.5 Networ Printer" section.)
natural_image
White cylindrical device with attached power outlet and cable, against blue background (no visible text or symbols)Pic.40 Install XP printer driver 10
2.4.8. Please connect USB cable provided with the printer to PC and the printer.
(For the network printer, refer to "2.5 Netwo Printer" section.)
text_image
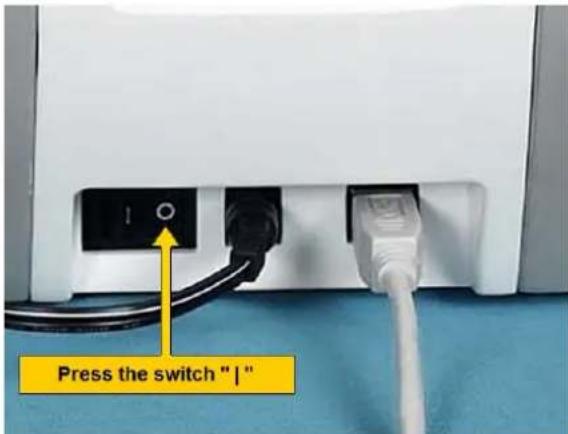
Press the switch "I"Pic.41 Install XP printer driver 11
2.4.9. Turn on the printer to boot up it.
text_image
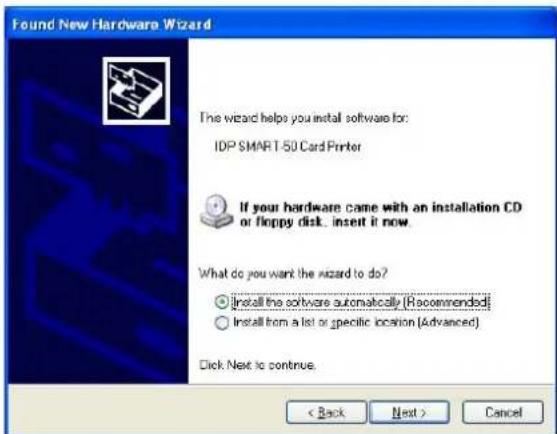
Found New Hardware Wizard The wizard helps you install software for: IDP SMART-50 Card Printer If your hardware came with an installation CD or floppy disk. insert it now. What do you want the wizard to do? • Install the software automatically (Recommended) • Install from a list or specific location (Advanced). Click Next to continue. < Back Next > CancelPic.42 Install XP printer driver 12
2.4.10. Select "Install the software automatically (Recommended)" and click "Next".
text_image
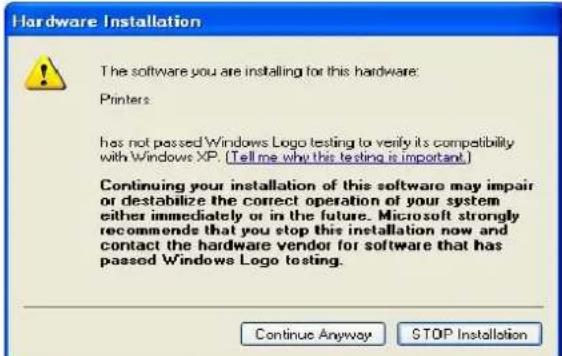
Hardware Installation The software you are installing for this hardware: Printers: has not passed Windows Logo testing to verify its compatibility with Windows XP. (Tell me why this testing is important.) Continuing your installation of this software may impair or destabilize the correct operation of your system either immediately or in the future. Microsoft strongly recommends that you stop this installation now and contact the hardware vendor for software that has passed Windows Logo testing. Continue Anyway STOP InstallationPic.43 Install XP printer driver 13
2.4.11. Click "Continue Anyway" in Software Installation window.
text_image
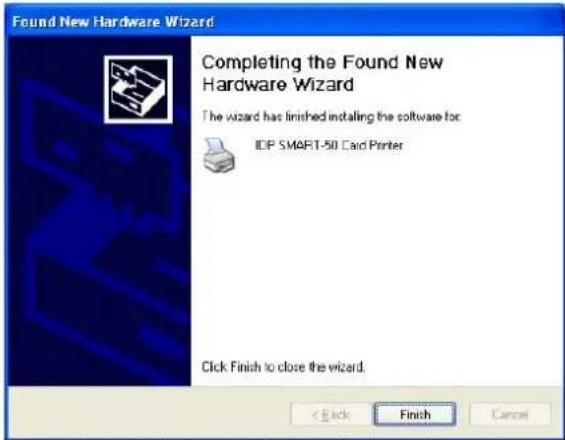
Found New Hardware Wizard Completing the Found New Hardware Wizard The wizard has finished installing the software for IDP SMART-50 Card Printer Click Finish to close the wizard. < Back Finish CancelPic.44 Install XP printer driver 14
2.4.12. Click "Finish" in Completing the Found New Hardware Wizard window.
text_image
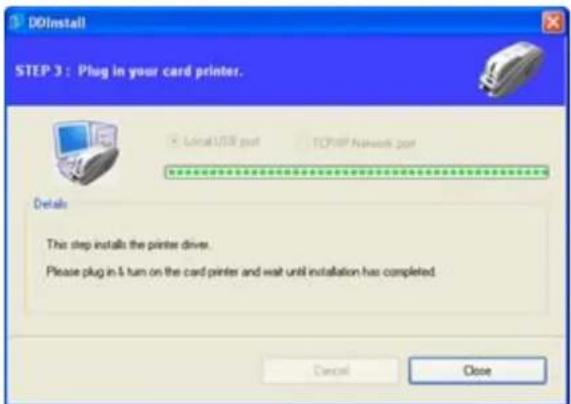
DDInstall STEP 3 : Plug in your card printer. Details This step installs the printer driver. Please plug in & turn on the card printer and wait until installation has completed. Cancel ClosePic.45 Install XP printer driver 15
2.4.13. When the printer driver installation is completed. Click "Close".
text_image
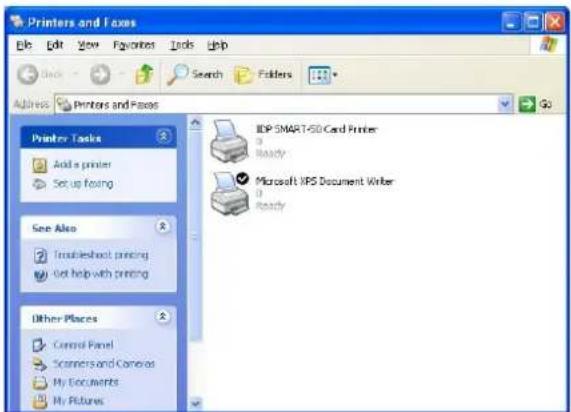
Printers and Faxes File Edit View Favorites Tools Help Address Printers and Faxes Printer Tasks Add a printer Set up fixing See Also Troubleshoot printing Get help with printing Other Places Control Panel Scramers and Canvas My Documents My Pictures I2P SMART-5D Card Printer Ready Microsoft IIPS Document Writer ReadyPic.46 Install XP printer driver 16
2.4.14. Check "IDP SMART-50 Card Printer" is generated in Printers and Faxes window.
text_image
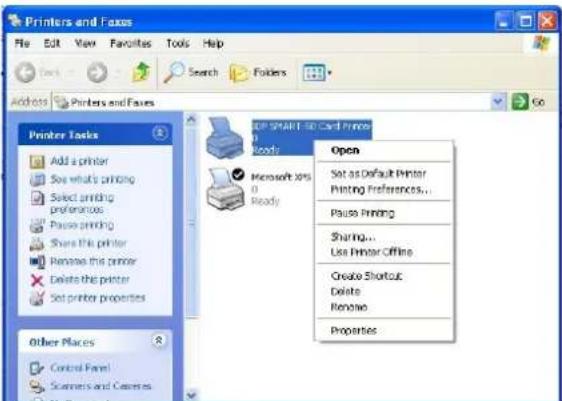
Printers and Faxes File Edit View Favorites Tools Help Search Folders Add to Printers and Faxes Printer Tasks Add a printer Save what's printing Select printing preferences Pause printing Share this printer Remove this printer Delete this printer Set printer properties Other Places Control Panel Scramers and Creases UP SMART 5D Card Printer Tools Microsoft XPS Ready Open Set as Default Printer Printing Preferences... Pause Printing Sharing... Use Printer Offline Create Shortcut Delete Remove PropertiesPic.47 Install XP printer driver 17
2.4.15. After selecting the icon of "IDP SMART-50 Card Printer", click the right mouse button and select the "Properties".
text_image
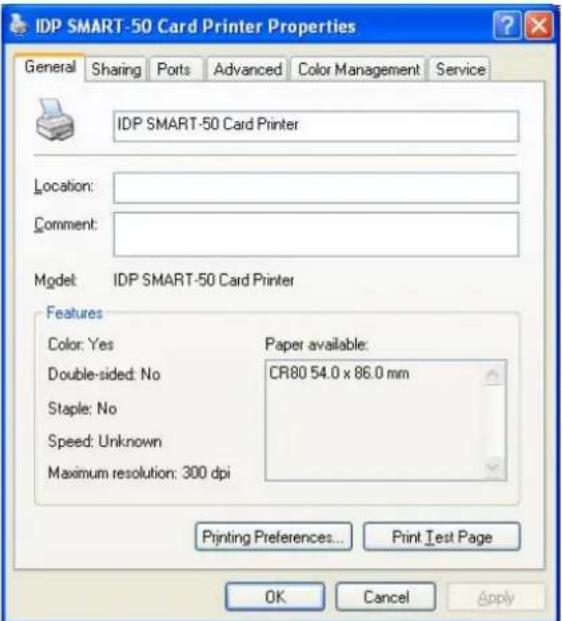
IDP SMART-50 Card Printer Properties General Sharing Ports Advanced Color Management Service IDP SMART-50 Card Printer Location: Comment: Model IDP SMART-50 Card Printer Features Color: Yes Paper available: Double-sided: No CR80 54.0 x 86.0 mm Staple: No Speed: Unknown Maximum resolution: 300 dpi Printing Preferences... Print Test Page OK Cancel ApplyPic.48 Install XP printer driver 18
2.4.16. Select "General" tap and click "Print Test Page" button on the IDP SMART-50 Card Printer Properties window.
text_image
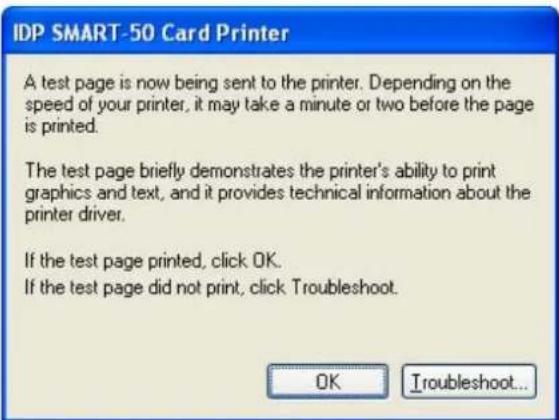
IDP SMART-50 Card Printer A test page is now being sent to the printer. Depending on the speed of your printer, it may take a minute or two before the page is printed. The test page briefly demonstrates the printer's ability to print graphics and text, and it provides technical information about the printer driver. If the test page printed, click OK. If the test page did not print, click Troubleshoot.Pic.49 Install XP printer driver 19
2.4.17. Printer will start the printing and there will be the window which asks the printing success. If the printing is normal, click the "OK"
(If the printing is abnormal or the printer error is occurred, remove the problem refer to "Trouble Shooting" section and execute test printing again.)
text_image
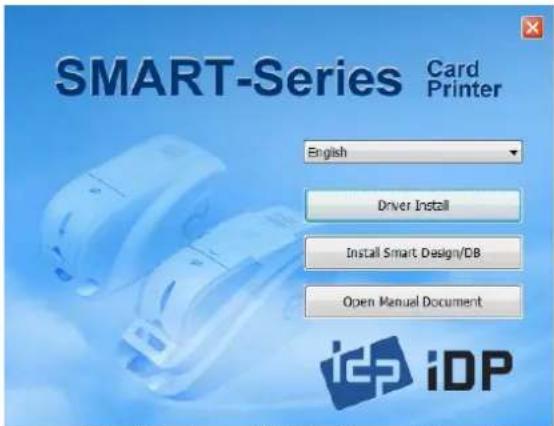
SMART-Series Card Printer English Driver Install Install Smart Design/DB Open Manual Document iCp iDPPic.50 Install XP printer driver 20
2.4.18. Please install "Smart Application" program after installing the printer driver.
text_image
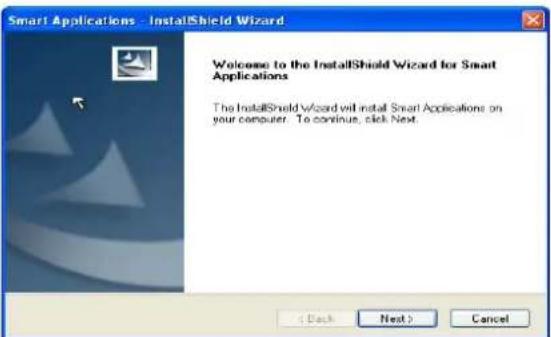
Smart Applications - InstallShield Wizard Welcome to the InstallShield Wizard for Smart Applications The InstallShield Wizard will install Smart Applications on your computer. To continue, click Next. < Back Next > CancelPic.51 Install XP printer driver 21
2.4.19. Click "Next" on the "Smart Applications - InstallShield Wizard" window.
text_image
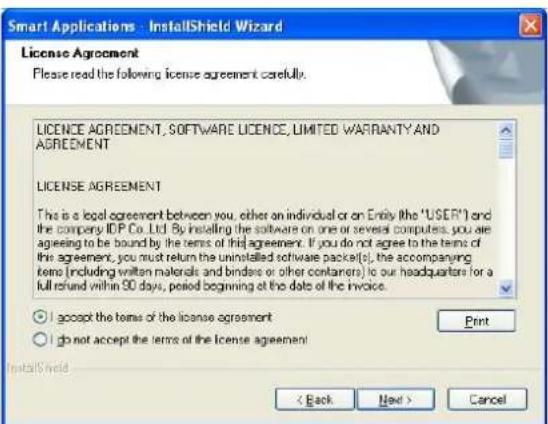
Smart Applications - InstallShield Wizard License Agreement Please read the following license agreement carefully. LICENSE AGREEMENT, SOFTWARE LICENCE, LIMITED WARRANTY AND AGREEMENT LICENSE AGREEMENT This is a legal agreement between you, other an individual or on Entry (the "USER") and the company IDP Co. Ltd. By installing the software on one or several computers, you are agreeing to be bound by the terms of this agreement. If you do not agree to the terms of the agreement, you must return the uninstalled software packet(s), the accompanying items (including written materials and binders or other containers) to our headquarters for a full round within 90 days, period beginning at the date of the invoice. ○ I accept the terms of the license agreement ○ I do not accept the terms of the license agreement < Back Next > CancelPic.52 Install XP printer driver 22
2.4.20. Select "I accept the terms of the license agreement" and click "Next".
text_image
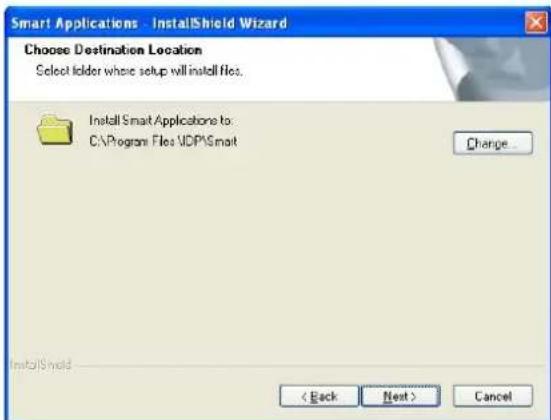
Smart Applications - InstallShield Wizard Choose Destination Location Select folder where setup will install files. Install Smart Applications to: C:\Program Files\MDPSmart Change... < Back Next > CancelPic.53 Install XP printer driver 23
2.4.21. Choose the destination location and click "Next".
text_image
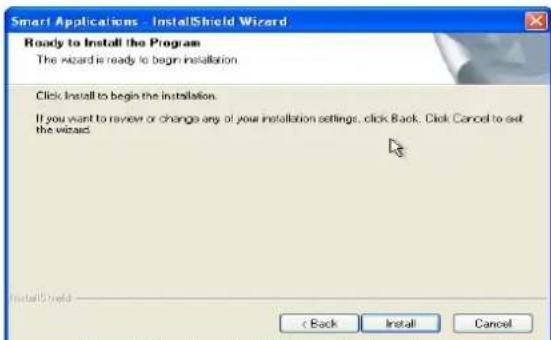
Smart Applications - InstallShield Wizard Ready to Install the Program The wizard is ready to begin installation. Click Install to begin the installation. If you want to review or change any of your installation settings, click Back. Click Cancel to exit the wizard. < Back Install CancelPic.54 Install XP printer driver 24
2.4.22. Click "Install" to begin the installation.
text_image
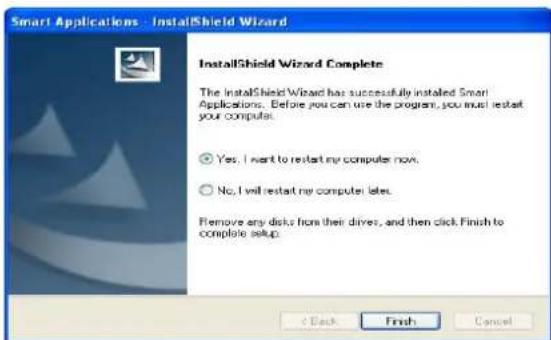
Smart Applications : InstallShield Wizard InstallShield Wizard Complete The InstallShield Wizard has successfully installed Smart Applications. Before you can use the program, you must restart your computer. Yes, I want to restart my computer now. No, I will restart my computer later. Remove any disks from their drives, and then click Finish to complete setup.Pic.55 Install XP printer driver 25
2.4.23. Smart Design/DB program is installed successfully.
2.5. Driver installation (Windows Vista, 7, 8)
text_image
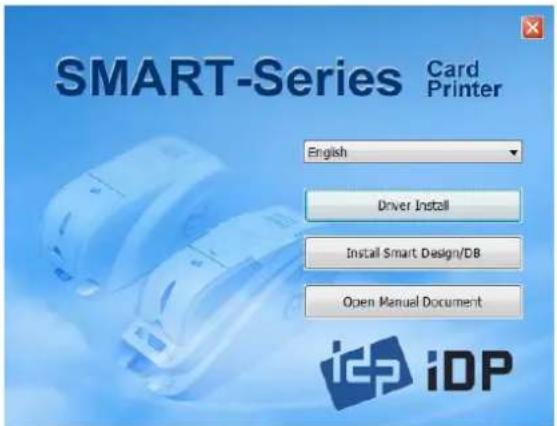
SMART-Series Card Printer English Driver Install Install Smart Design/DB Open Manual Document iCp iDPPic.56 Install Win7 driver 1
2.5.1. Please insert the installation CD.
2.5.2. Please choose language and click "Driver Install".
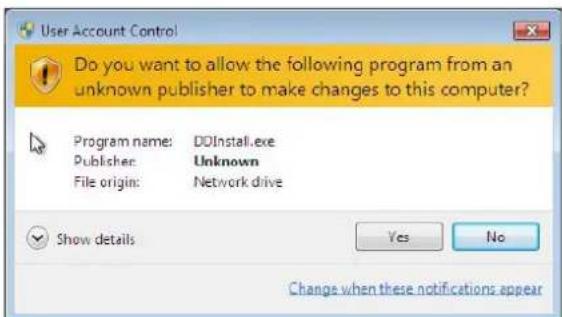
2.5.3. When "User Account Control" window is opened, click "Yes"
text_image
User Account Control Do you want to allow the following program from an unknown publisher to make changes to this computer? Program name: D:\Install.exe Publisher: Unknown File origin: Network drive Show details Yes No Change when these notifications appearPic.57 Install Win7 driver 2

text_image
CDInstall STEP 1: Checking for previous installations Click "Next" English Details This step removes previously installed drivers and could take several minutes. Please run plug the card printer from your PC and click "Next" Cancel NextPic.58 Install Win7 driver 3
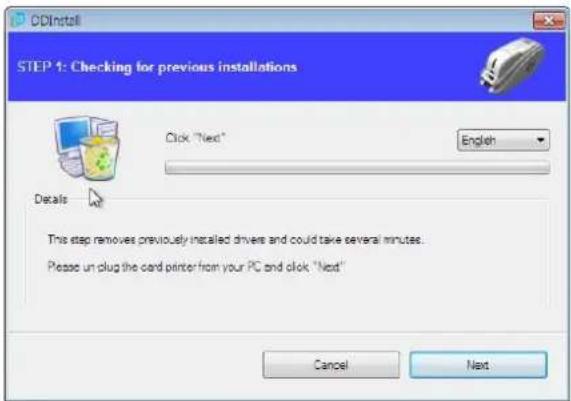
2.5.4. STEP 1:
Please turn off printer if it is connected to PC. Please click "Next".
When you click "Next", older driver will be removed automatically.
This process will take several minutes to remove older driver.
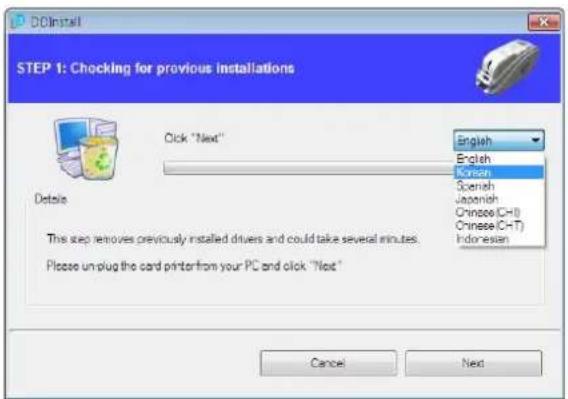
You can select the languages by selecting the combo box as shown on the left picture.
text_image
DCLInstall STEP 1: Chocking for previous installations Click "Next" English English Chinese Spanish Japanese Chinese (CH) Chinese (CH-T) Indonesian Details This step removes previously installed drivers and could take several minutes. Please unplug the card printer from your PC and click "Next" Cancel NextPic.59 Install Win7 driver 4
text_image
CDInstall STEP 1: Checking for previous installations Click "Next" English Details This step removes previously installed drivers and could take several minutes. Please run plug the card printer from your PC and click "Next" Cancel NextPic.60 Install Win7 driver 5
text_image
DDInstall STEP 2 : Installation checks Click "Next" Details The step prepares your system for driver installation. Please click "Next" Cancel NextPic.61 Install Win7 driver 6
text_image
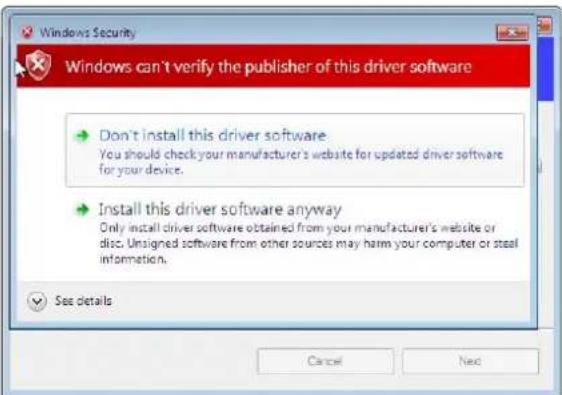
Windows Security Windows can't verify the publisher of this driver software Don't install this driver software. You should check your manufacturer's website for updated driver software for your device. Install this driver software anyway. Only install driver software obtained from your manufacturer's website or disc. Unsigned software from other sources may harm your computer or steal information. See details Cancel NextPic.62 Install Win7 driver 7
text_image
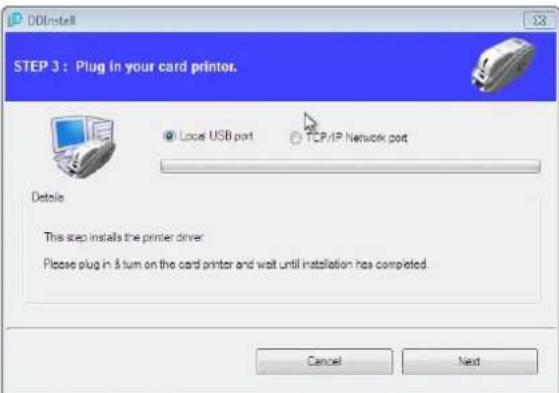
DDInstall STEP 3 : Plug In your card printer. © Lock USB port TCP/IP Network port Details This step installs the printer driver. Please plug in 8 turn on the card printer and wait until installation has completed. Cancel NextPic.63 Install Win7 driver 8
2.5.5. STEP 2:
When you click "Next", the driver installation will be ready.
2.5.6. Please click "Install this driver software anyway" in case "Windows Security" window comes out.
2.5.7. STEP 3:
Please click "Next" if printer is connected to USB only.
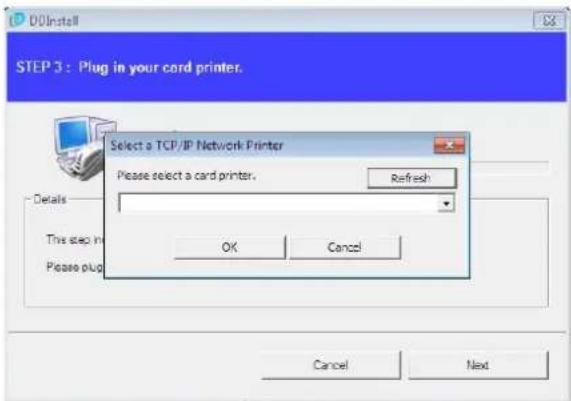
If you want to install the driver for a printer connected to network, please select the "TCP/IP Network port" and select the proper print as shown on the left picture.
(If no printer comes out on the window, please check the connection. Please refer "2.5 Network Printer Setup".)
text_image
DOInstall STEP 3 : Plug in your cord printer. Select a TCP/IP Network Printer Please select a card printer. Refresh Details This step in Please plug OK Cancel Cancel NextPic.64 Install Win7 driver 9
natural_image
White portable air purifier with attached power strip and black plug, connected to a blue background (no text or symbols visible)Pic.65 Install Win7 driver 10
natural_image
White cylindrical device with attached power outlet and cable, against a blue background (no text or symbols visible)Pic.66 Install Win7 driver 11
text_image
Press the switch " | "Pic.67 Install Win7 driver 12
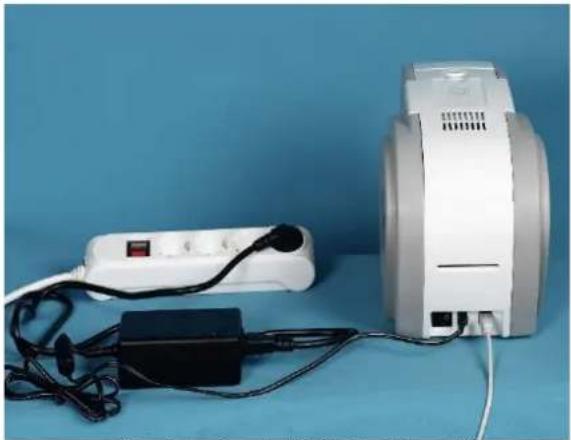
2.5.8. Please connect a power supply to the printer.
(If your printer is for network, please refer 2.5 Network Configuration".)
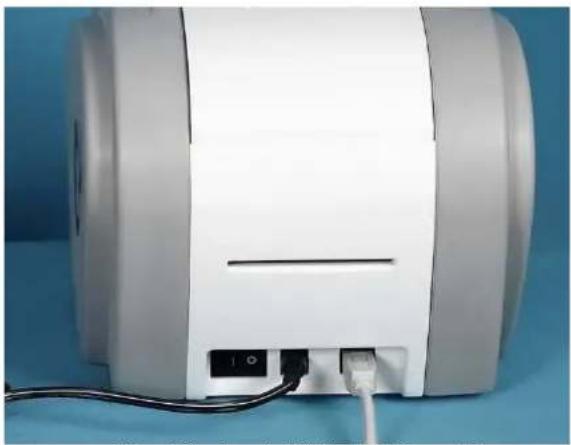
2.5.9. Please connect USB cable to the printer.
(If your printer is for network, please refer 2.5 Network Configuration".)
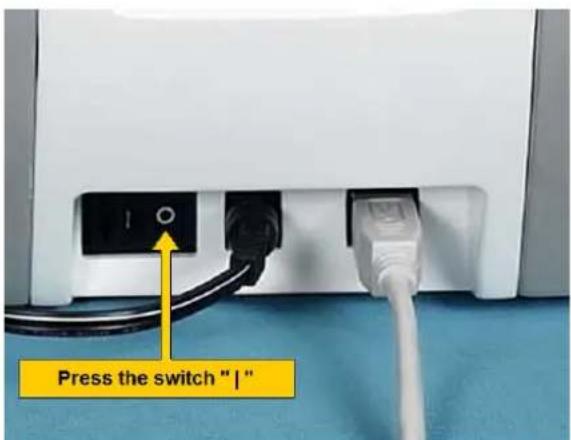
2.5.10. Please turn on the printer.
text_image
00Install STEP 3: Plug in your card printer. Local USB port TCP/IP Network port Details This step installs the printer driver. Please plug in 8 turn on the card printer and wait until installation has completed Cancel ClosePic.68 Install Win7 driver 13
text_image
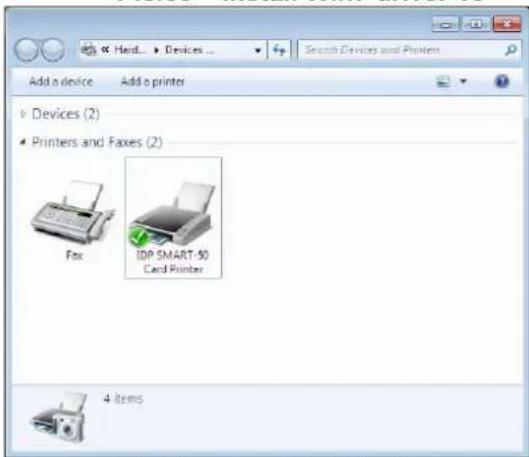
Add a device Add a printer Devices (2) Printers and Faxes (2) Fax IDP SMART-50 Card Printer 4 itemsPic.69 Install Win7 driver 14
text_image
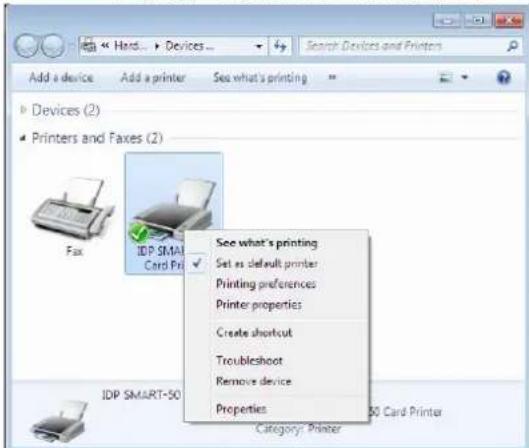
Add a device Add a printer See what's printing Devices (2) Printers and Faxes (2) Fax IDP SMART-50 Card Print See what's printing Set as default printer Printing preferences Printer properties Create shortcut Troubleshoot Remove device Properties Category: PrinterPic.70 Install Win7 driver 15
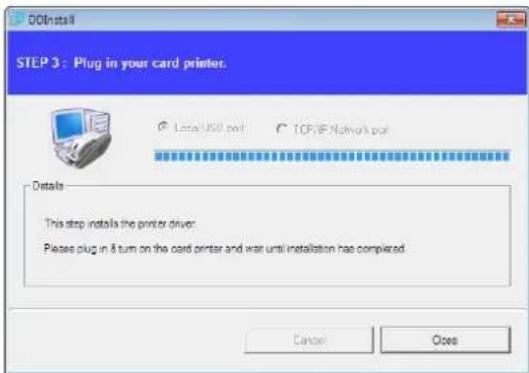
2.5.11. When driver installation is completed, please click "Close".
2.5.12. Please open "Devices and Printers" from "Hardware and Sound". Please check if "IDP SMART-50 Card Printer" is created.
2.5.13. Please click the right mouse button after cursor is placed on "IDP SMART-50 Card Printer" icon. Click "Printer properties".
text_image
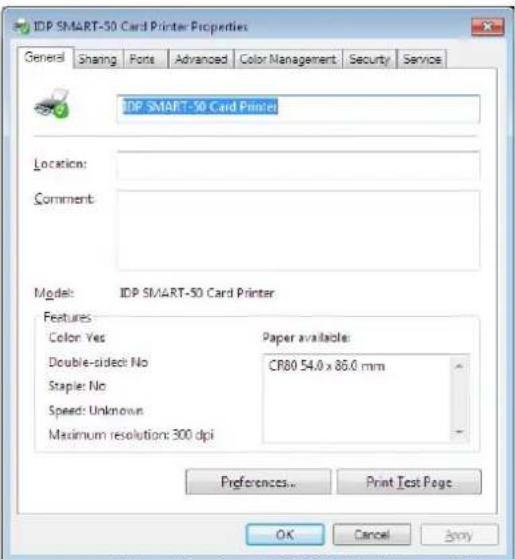
IDP SMART-50 Card Printer Properties General Sharing Ports Advanced Color Management Security Service IDP SMART-50 Card Printer Location: Comment: Model: IDP SMART-50 Card Printer Features: Color Yes Paper available: Double-side No CP80 54.0 x 86.0 mm Staple: No Speed: Unknown Maximum resolution: 300 dpi Preferences... Print Test Page OK Cancel ShowPic.71 Install Win7 driver 16
text_image
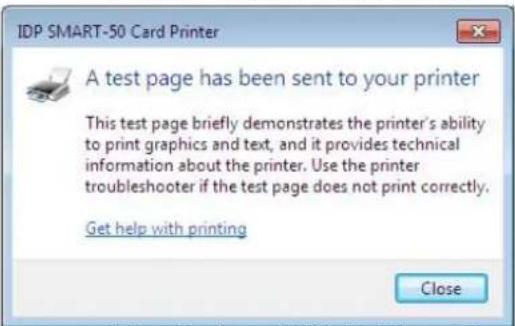
IDP SMART-50 Card Printer A test page has been sent to your printer This test page briefly demonstrates the printer's ability to print graphics and text, and it provides technical information about the printer. Use the printer troubleshooter if the test page does not print correctly. Get help with printing ClosePic.72 Install Win7 driver 17
text_image
SMART-Series Card Printer English Driver Install Install Smart Design/DB Open Manual Document iCD iDPPic.73 Install Win7 driver 18
text_image
Smart Applications - InstallShield Wizard Welcome to the InstallShield Wizard for Smart Applications The InstallShield Wizard will install Smart Applications on your computer. To continue, click Next < Back Next > CancelPic.74 Install Win7 driver 19
2.5.14. Please select "general" tab and click "Printer test page" in "IDP SMART-50 Card Printer Properties" window.
2.5.15. Please check test card if it is printed properly and click "Close" if a card is printed properly.
(If card is not printed or error comes out, please refer "Trouble Shooting".)
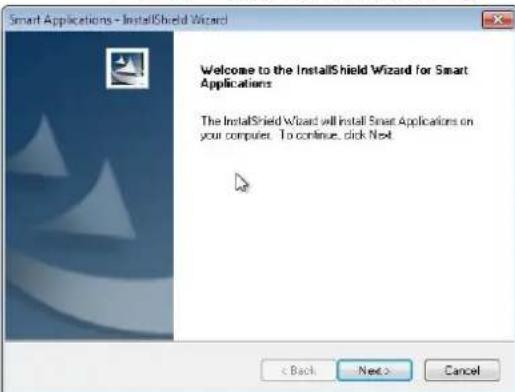
2.5.16. Please install "Smart Design/DB" by clicking "Smart Design/DB Installation".
2.5.17. Please click "Next" when "Smart Application Install Shield Wizard" comes out.
text_image
Smart Applications - InstallShield Wizard License Agreement Please read the following licence agreement carefully LICENSE AGREEMENT, SOFTWARE LICENCE, LIMITED WARRANTY AND AGREEMENT LICENSE AGREEMENT This is a legal agreement between you, either an individual or an Entity (the "USER") and the company ICP Co.,Ltd. By installing the software on one or several computers, you are agreeing to be bound by the terms of the agreement. If you do not agree to the terms of this agreement, you must return the uninstalled software packet(s), the accompanying items (including written materials and binders or other containers) to our headquarters for a full refund within 90 days, period beginning at the date of the invoice. I accept the terms of the license agreement I do not accept the terms of the license agreement InstallShield < Back Next > CancelPic.75 Install Win7 driver 20
text_image
Smart Applications - InstallShield Wizard Choose Destination Location Select mode where setup will install files. Install SmartApplications to C:\Program Files\DPV\smart Change... InstallShield < Back Next > CancelPic.76 Install Win7 driver 21
text_image
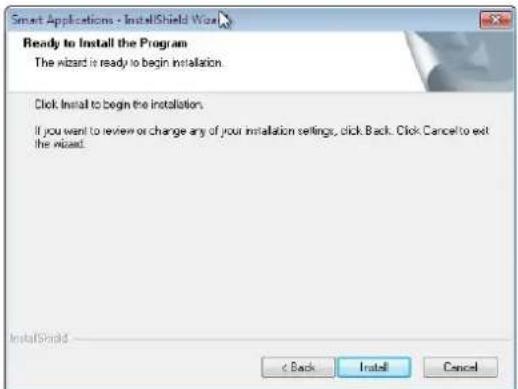
Smart Applications - InstallShield Wizard Ready to Install the Program The wizard is ready to begin installation. Click Install to begin the installation. If you want to review or change any of your installation settings, click Back. Click Cancel to exit the wizard. InstallShield < Back Install CancelPic.77 Install Win7 driver 22
text_image
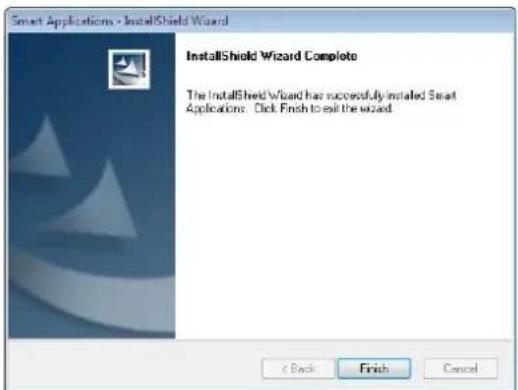
Smart Applications - InstallShield Wizard InstallShield Wizard Complete The InstallShield Wizard has successfully installed Smart Applications: Click Finish to exit the wizard. Back Finish CancelPic.78 Install Win7 driver 23
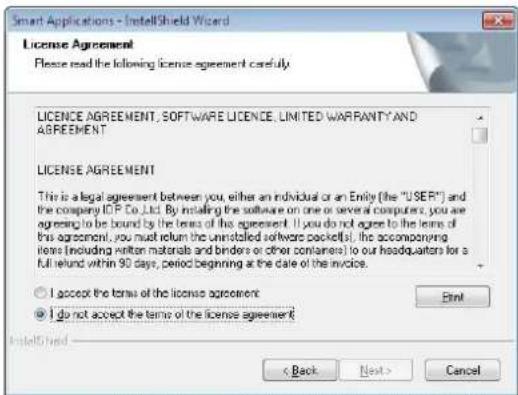
2.5.18. Please agree "I accept the terms of the license agreement" and click "Next".
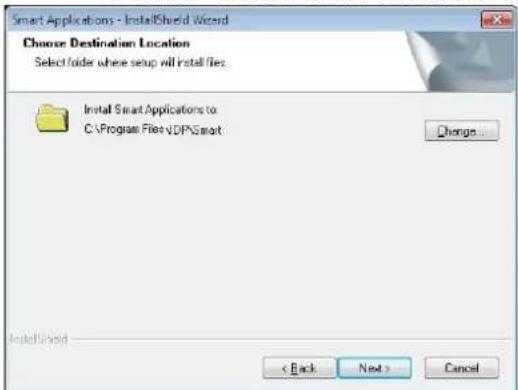
2.5.19. Please select directory for program installation and click "Next".
2.5.20. Please click "Installation".
2.5.21. Please click "Finish".
2.5. Network configuration
2.5.1 Connecting network port
natural_image
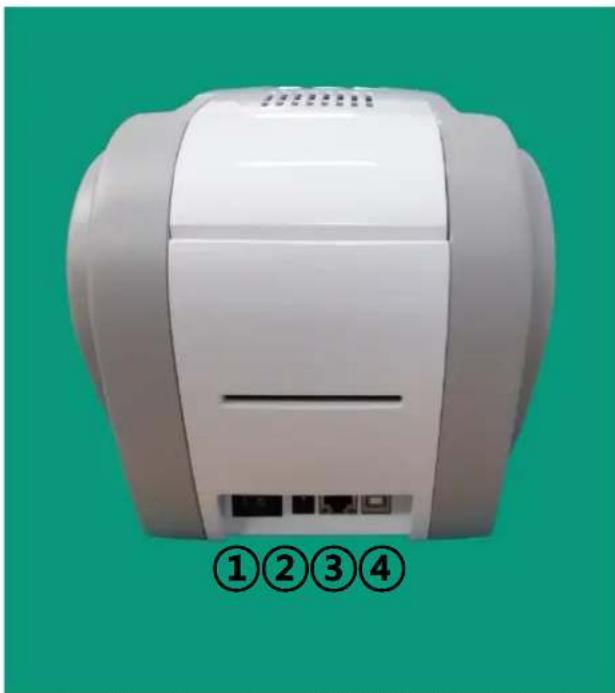
Front view of a white medical device with four numbered labels (① to ④) on a green background, no visible text or symbols on the device itself.Pic.79 Rear view of SMART-50 printer 1
The printer which installed with network option has a port for network connection as shown in the left picture.
① Power Switch
② Power Supply Connector
③ Network Port
④ USB Port
natural_image
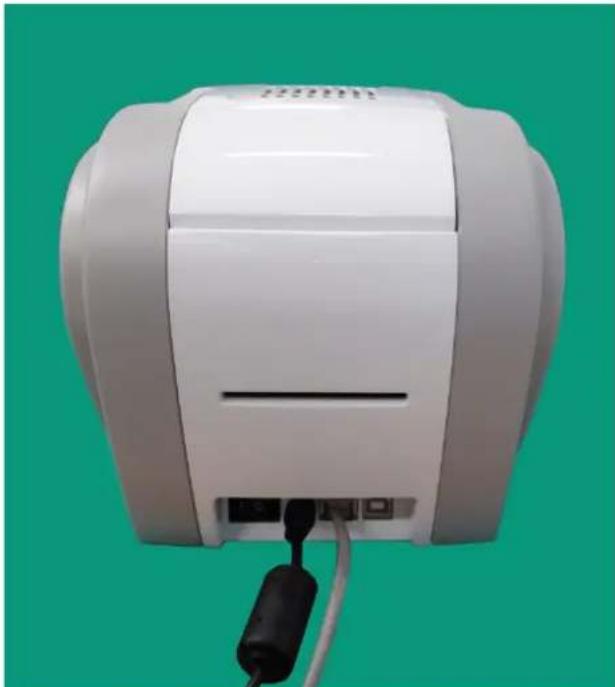
White medical device with attached black plug and ventilation slots, set against a solid green background (no text or symbols visible)Pic.80 Rear view of SMART-50 printer 2
Please connect network cable (RJ45) to a printer.
(Network cable is not supplie d. Please ask network administrator for more questions.)
2.5.2 Network configuration
DHCP (Dynamic Host Configuration Protocol) which automatically assigns IP address to the SMART-50 network printer on the same network is default for IP configuration. If you don't have DHCP server, you need to set static IP.
Please run NetAdmin.exe in the SMART-50 installation CD to set or change network configuration.
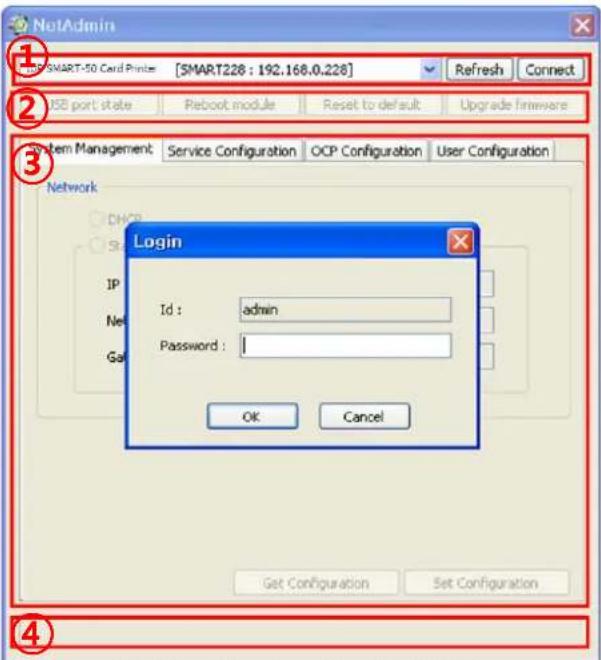
text_image
NetAdmin 1 SMART-50 Card Printer [SMART228 : 192.168.0.228] Refresh Connect USB port state Reboot module Reset to default Upgrade firmware System Management Service Configuration OCP Configuration User Configuration Network Login ID: admin Password: OK Cancel Get Configuration Set Configuration 4Pic.81 Running the NetAdmin
NetAdmin is run as the Pic74 after turning on SMART-50 network printer.
① Printer Connection Status
Searches local network, finds and shows available network printer.
② Network Module Management
Searches connected encoder on network module. Reboots, Resets network module. Firmware upgrade available
③ Printer Configuration Sets detailed system configuration.
④ Network Information
Shows firmware version of network module
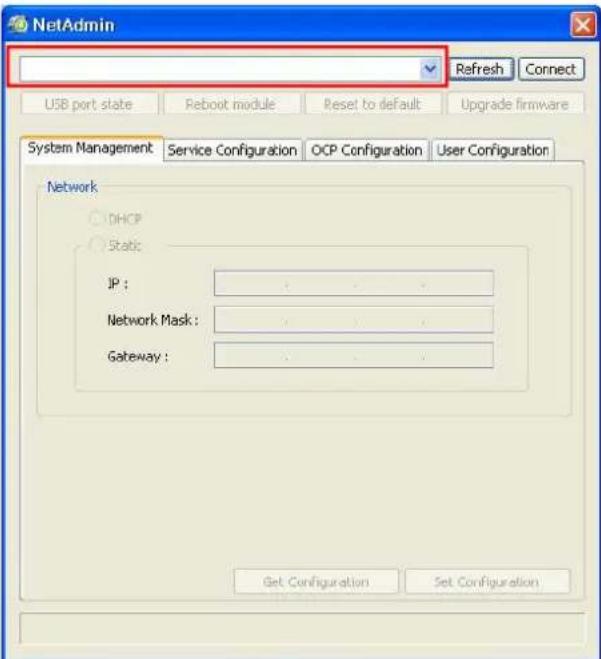
text_image
NetAdmin Refresh Connect USB port state Reboot module Reset to default Upgrade firmware System Management Service Configuration OCP Configuration User Configuration Network DHCP Static JP : Network Mask : Gateway : Get Configuration Set ConfigurationPic.82 Network printer is not found
When no printer is connected to network, there is no printer shown on the box.
Please click "Refresh". If no printer shown, please check as below,
- Please check the printer is turned on.
- Please check network cable is connected to network hub and works properly (LED lamp blinking).
- Please check if there is DHCP server in the local network. When DHCP server is not in your local network, you need to set Static IP.
- If Static IP is used, please check the IP configuration. If another device uses same IF address, it doesn't work.
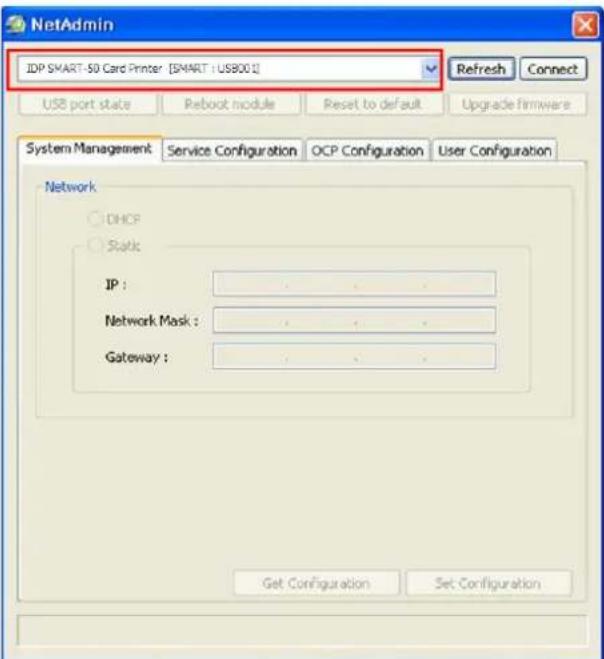
text_image
NetAdmin IDP SMART-5D Card Printer [SMART : US8001] Refresh Connect USB port state Reboot nodule Reset to default Upgrade firmware System Management Service Configuration OCP Configuration User Configuration Network DHCP Stark IP : Network Mask : Gateway : Get Configuration Set ConfigurationPic.83 Connecting to USB port
If you are unable to find printer in local network, please connect printer by USB. You can setup network by USB.
When you click Refresh, you can find a printer connected by USB as shown in the left picture..
- You don't need to in stall device driver for network configuration by USB. Please ignore messages related to device installation.
- You can change values of "System Management" only when you connect a printer by USB. Please connect a printer by network to use all of the functions of Netadmin.exe.
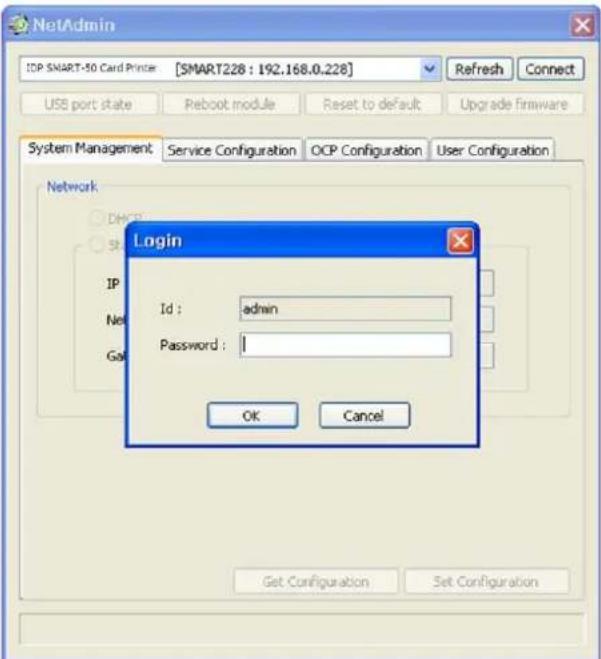
text_image
NetAdmin IDP SMART-50 Card Printer [SMART228 : 192.168.0.228] Refresh Connect USB port state Reboot module Reset to default Upgrade firmware System Management Service Configuration OCP Configuration User Configuration Network Login IP Id : admin Net Password : 1 OK Cancel Get Configuration Set ConfigurationPic.84 NetAdmin Log-in
Please select a proper printer and click "connect". Please enter password and click "OK".
Default password is "admin".
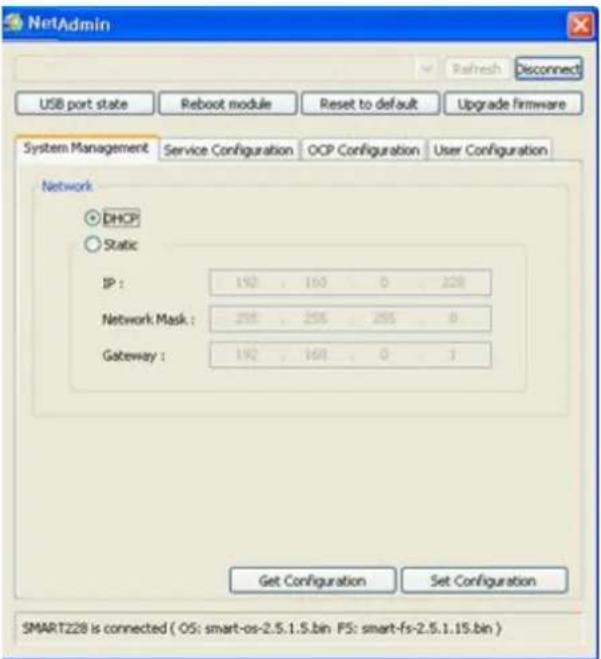
text_image
NetAdmin Refresh Disconnect USB port state Reboot module Reset to default Upgrade Firmware System Management Service Configuration OCP Configuration User Configuration Network DHCP Static IP : 192 . 160 . 0 . 228 Network Mask : 298 . 256 . 285 . 0 Gateway : 192 . 160 . 0 . 1 Get Configuration Set Configuration SMART228 is connected ( OS: smart-os-2.5.1.5.bin PS: smart-fs-2.5.1.15.bin )Pic.85 Dynamic IP configuration
If you setup network automatically, please choose DHCP.
- Please select DHCP and click "Set Configuration".
- "DHCP" is default for SMART-50 printer.
- DHCP server should be in loca I network to use DHCP function.
- Static IP is recommended. DHCP server assigns IP address automatically but this IP address is temporary, so the IP address may be changed. In this case, the network errormay occur in connecting to SMART-50 network printer.
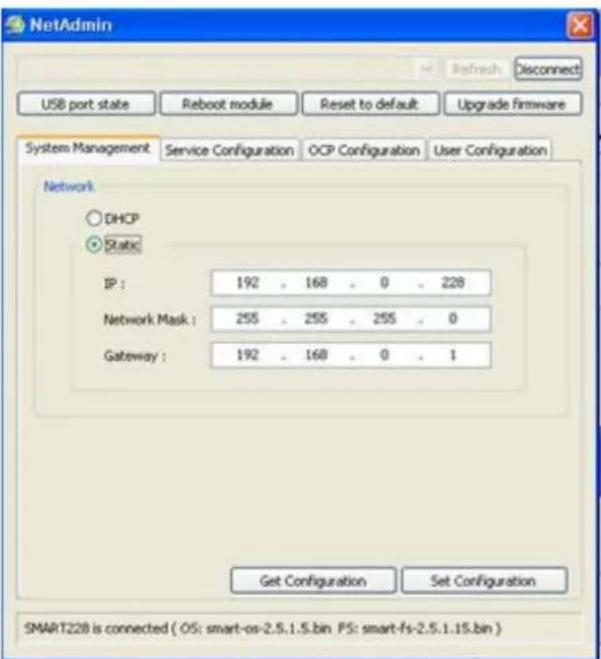
text_image
NetAdmin Refresh: Disconnect USB port state Reboot module Reset to default Upgrade firmware System Management Service Configuration OCP Configuration User Configuration Network DHCP Static IP : 192 . 168 . 0 . 228 Network Mask : 255 . 255 . 255 . 0 Gateway : 192 . 168 . 0 . 1 Get Configuration Set Configuration SMART228 is connected ( OS: smart-os-2.5.1.5.bin. PS: smart-fs-2.5.1.15.bin )Pic.86 Static IP configuration
Please select "Static" for Static IP configuration.
- Please enter values for "IP", "Network Mask", and "Gateway". Click "Set Configuration".
- Please check IP address properly which does not conflict with other devices.
- If you are not aware of static IP, please ask network administrator for Static IP.
- We recommend using Static IP because it is more stable for using SMART-50 network printer.
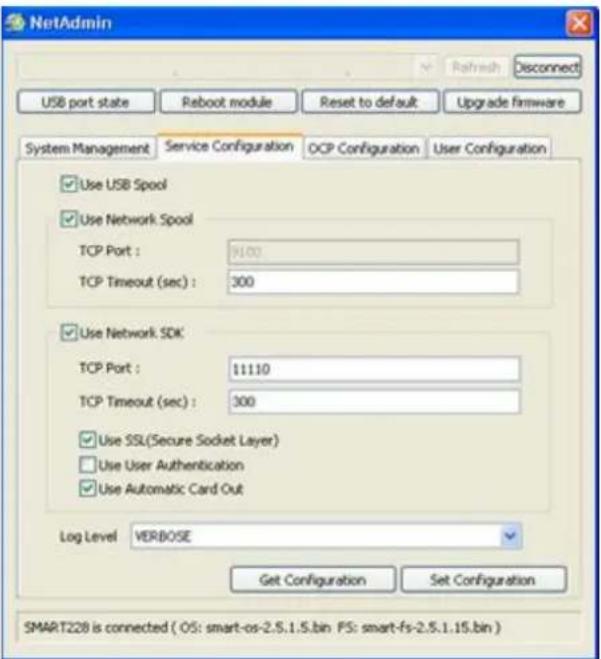
text_image
NetAdmin USB port state Reboot module Reset to default Upgrade firmware System Management Service Configuration DCP Configuration User Configuration Use USB Spool Use Network Spool TCP Port : 9100 TCP Timeout (sec) : 300 Use Network SDK TCP Port : 11110 TCP Timeout (sec) : 300 Use SSL(Secure Socket Layer) Use User Authentication Use Automatic Card Out Log Level: VERBOSE Get Configuration Set Configuration SMART228 is connected ( OS: smart-os-2.5.1.5.bin PS: smart-fs-2.5.1.15.bin ) Refresh DisconnectPic.87 Network service configuration
You can change Service Configuration.
- SMART-50 network printer provides 3 kinds of service (change "USB Spool", "Network Spool" and "Network SDK"). You can select and change the service according to the need.
- In "Network SDK", you can control the print and print a card well, and the printer supports SSL (Secure Sockets Layer) and User Authentication for security.
- Please use default and ask technician for details.
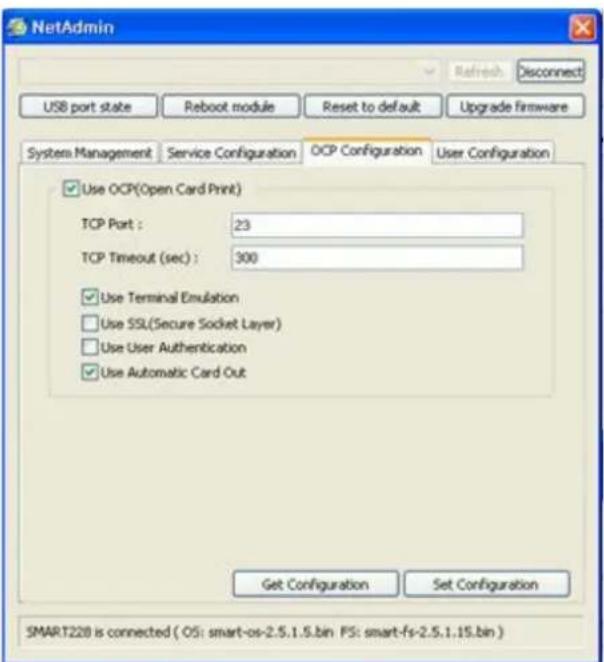
text_image
NetAdmin Refresh: Disconnect USB port state Reboot module Reset to default Upgrade Firmware System Management Service Configuration OCP Configuration User Configuration Use OCP(Open Card Print) TCP Port : 23 TCP Timeout (sec) : 300 Use Terminal Emulation Use SSL(Secure Socket Layer) Use User Authentication Use Automatic Card Out Get Configuration Set Configuration SMART228 is connected ( OS: smart-os-2.5.1.5.bin PS: smart-fs-2.5.1.15.bin )Pic.88 OCP configuration
You can use Open Card Print function.
● This function is for send commands and print through network card regardless of OS
- Click check box "Use OCP"
- “Use Terminal Emulation” is value for getting echo according to the commands through terminal. For security, it supports SSL and User Authentication.
- Please do not change default value exceed special case..
text_image
NetAdmin Refresh: Disconnect USB port state Reboot module Reset to default Upgrade firmware System Management Service Configuration OCP Configuration User Configuration admin Get User Add User Del User Change Password SMART228 is connected ( OS: smart-os-2.5.1.5.bin PS: smart-fs-2.5.1.15.bin ) SMART228 is connected ( OS: smart-os-2.5.1.5.bin PS: smart-fs-2.5.1.15.bin )Pic.89 Network user configuration
2.5.3 Network module management
text_image
NetAdmin USB port state Reboot module Reset to default Upgrade firmware System Management Service Configuration OCP Configuration User Configuration admin USB Ports PORT 0: SMART Card Printer PORT 1: PORT 2: PORT 3: Get User Add User Del User Change Password SMART228 is connected ( OS: smart-os-2.5.1.5.bin F5: smart-fs-2.5.1.15.bin ) Refresh DisconnectPic.90 USB port state
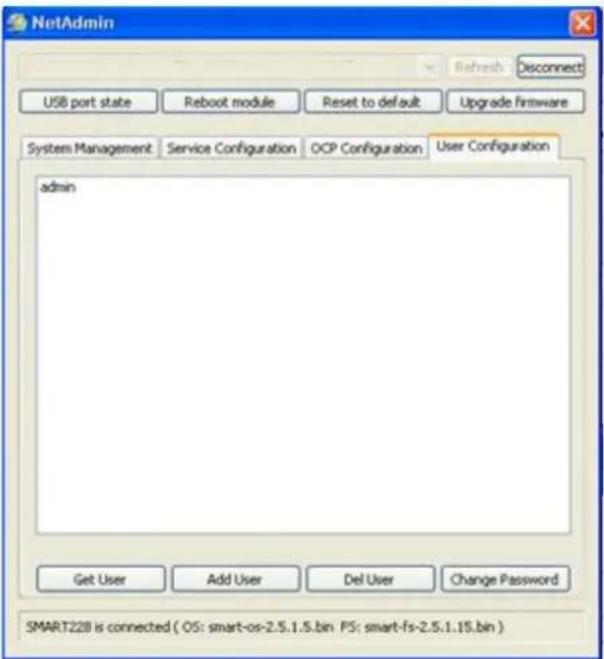
You can add, change, delete User an change its password.
- "admin" is administrator and you can't delete this account. Please don't forget password for "admin"
- "Get User": shows available users
- "Add User": makes new user
- "Del User": deletes selected user
- "Change Password": changes password
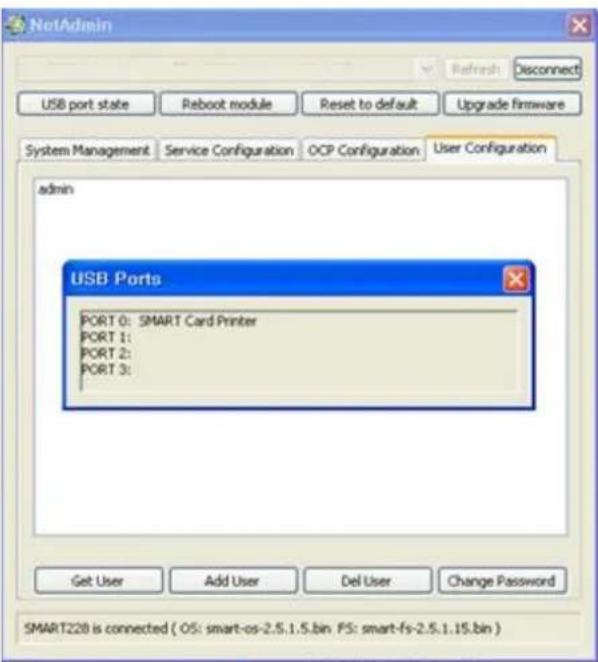
"USB port state" shows USB device status connected on network module.
● Network module has 4 USB ports.
- Network module supports PC/SC. When you install the encoders that support PC/SC on network module, you can recognize the status of encoders.
text_image
NetAdmin Refresh Disconnect USB port state Reboot module Reset to default Upgrade firmware System Management Service Configuration OCP Configuration User Configuration Network DHCP Static IP : 228 Network M: 0 Gateway : 1 CONFIRM Do you want to reboot printer? It will takes several minutes. 0@Y 0HLI.0(N) Get Configuration Set Configuration SMART228 is connected ( OS: smart-os-2.5.1.5.bin PS: smart-fs-2.5.1.15.bin )Pic.91 Rebooting the network module
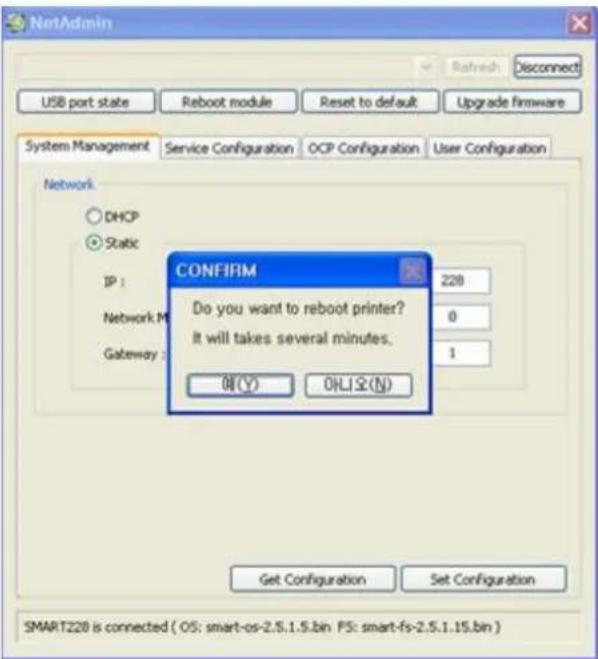
"Reboot m odule" reboots network module.
- Please click "Yes" when pop-up window comes out for reboot.
- It takes 1 minute to reboot.
- Please click "Refresh" after reboot. When proper printer shown, please connect printer by clicking "Connect".
text_image
NetAdmin USB port state Reboot module Reset to default Upgrade firmware System ManagementService Configuration OCP Configuration User Configuration Network DHCP Static IP : Network Gatew CONFIRM Do you want to reset factory defaults? It will takes several minutes. 예(Y) OKI오(N) Get Configuration Set Configuration SMART228 is connected ( OS: smart-os-2.5.1.5.bin PS: smart-fs-2.5.1.15.bin ) Refresh DisconnectPic.92 Reset to default
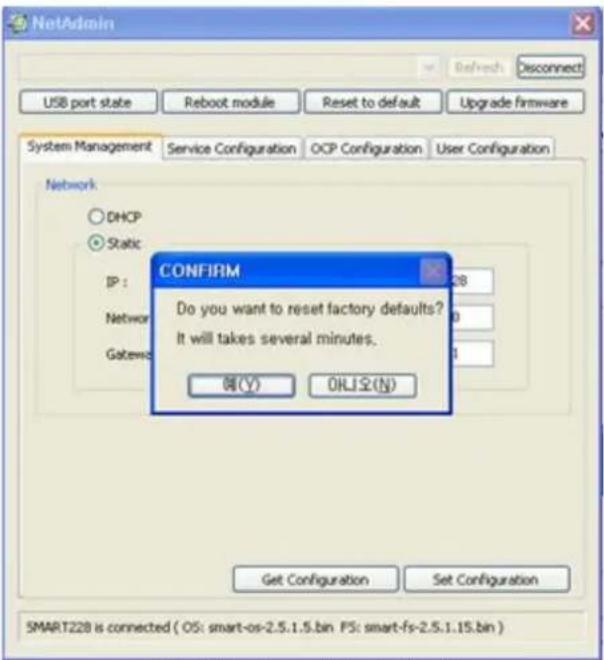
"Reset to default" resets to default and reboot network module.
- Please click "Yes" when pop-up window comes out for reset.
- It takes 1 minute to reboot.
- Please click "Refresh" after reboot. When proper printer shown, please connect printer by clicking "Connect".
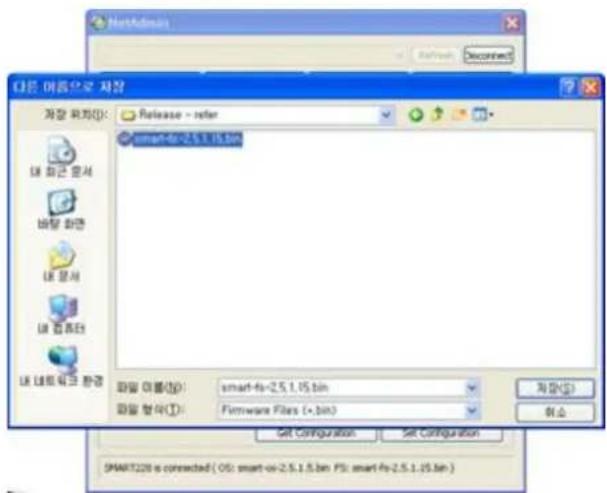
"Upgrade f irmware" enables to upgrade firmware of network module.
- You can choose a firmware file.
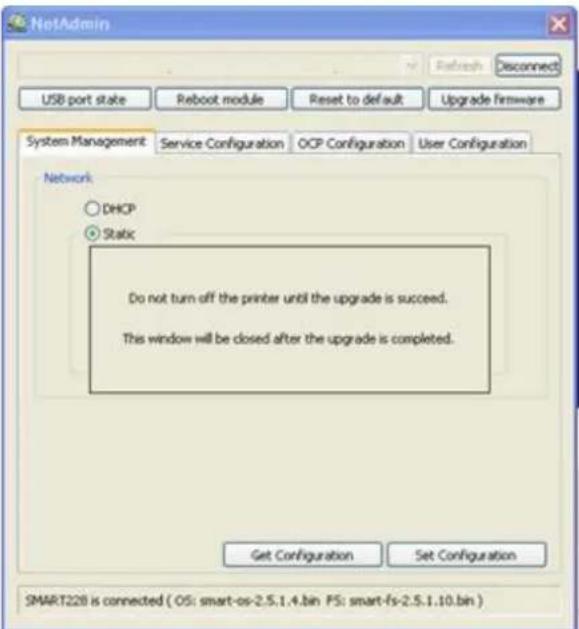
text_image
NetAdmin Refresh Disconnect USB port state Reboot module Reset to default Upgrade Firmware System Management Service Configuration OCP Configuration User Configuration Network ○ DHCP ● Static Do not turn off the printer until the upgrade is succeed. This window will be closed after the upgrade is completed. Get Configuration Set Configuration SMART228 is connected ( OS: smart-os-2.5.1.4.bin PS: smart-fs-2.5.1.10.bin )Pic.94 Upgrading the firmware 2
● Warning box will be shown during firmware upgrade for network module.
- It is recommended not to do other work during firmware upgrade for system reliability.
- Please do not turn off a printer until the upgrade is completed.
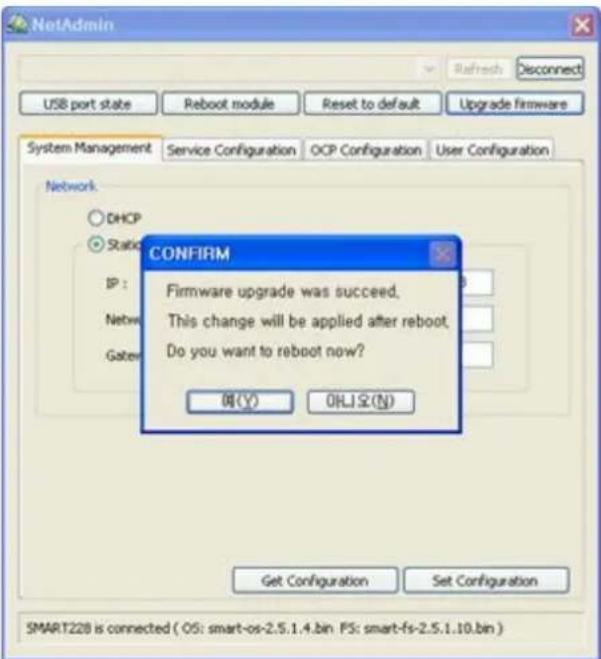
text_image
NetAdmin USB port state Reboot module Reset to default Upgrade firmware System ManagementService Configuration OCP Configuration User Configuration Network DHCP Static CONFIRM Firmware upgrade was succeed. This change will be applied after reboot. Do you want to reboot now? OK(Y) OK(L) OK(N) Get Configuration Set Configuration SMART228 is connected ( OS: smart-os-2.5.1.4.bin. PS: smart-fs-2.5.1.10.bin ) Refresh DisconnectPic.95 Upgrading the firmware 3
- When firmware upgrade is completed, pop-up comes out for reboot. Please click "Yes".
- It takes 1 minute to reboot.
- Please click "Refresh" after reboot. When proper printer shown, please connect printer by clicking "Connect".
3. Driver configuration
3.1. Checking printer properties
To check printer properties, you need to open printer driver. Please open "Drivers and Printers" and right-click "IDP SMART-50 Card Printer". Click "Properties". For Windows 7 or 8, please click "Printer Properties".
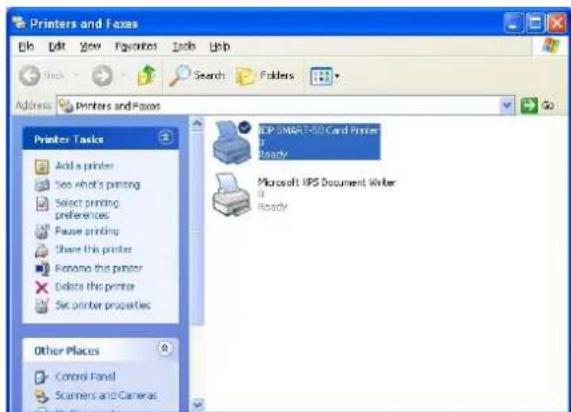
text_image
Printers and Foxes Edit Edit View Favorites Tools Help Back Search Folders Address Printers and Foxes Go Printer Tasks Add a printer See what's printing Select printing preferences Pause printing Share this printer Rename the printer Delete this printer Set printer properties Other Places Control Panel Scanners and Cameras ICP SNAP 3-02 Card Printer Ready Microsoft IPS Document Writer ReadyPic.96 Printer properties 1
When you click "Printer Properties" as like left picture, a device driver of "IDP SMART-50 Card Printer" is shown.
3.2. Changing printer properties
In the general tab shown, you can check the printer model and specifications.
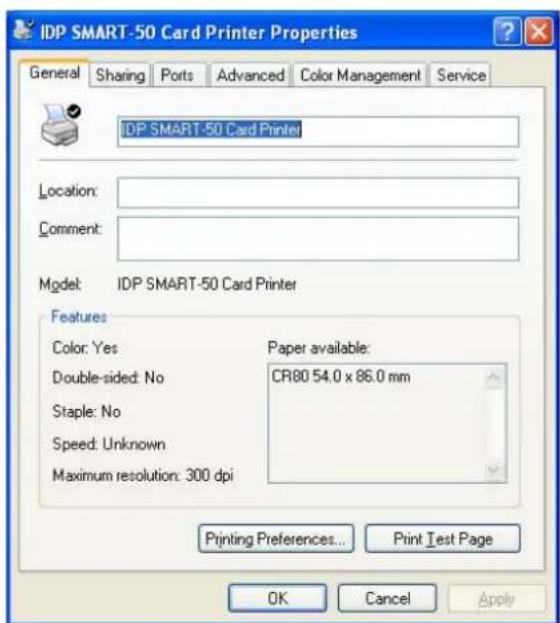
text_image
IDP SMART-50 Card Printer Properties General Sharing Ports Advanced Color Management Service IDP SMART-50 Card Printer Location: Comment: Model: IDP SMART-50 Card Printer Features Color: Yes Paper available: Double-sided: No CR80 54.0 x 86.0 mm Staple: No Speed: Unknown Maximum resolution: 300 dpi Printing Preferences... Print Test Page OK Cancel ApplyPic.97 Printer properties 2
3.2.1. Printing Preferences
Please click "Printing Preferences" shown on the bottom of the left picture..
There are 3 tabs of "Layout", "Paper/Ribbon /Quality" and "Side/Media".
(You can set the options for printing shown)
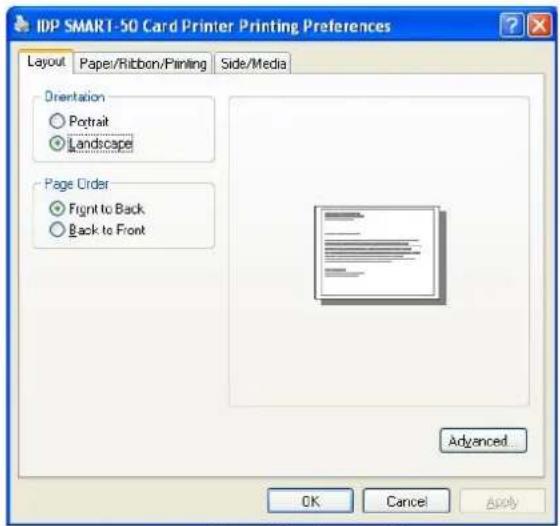
text_image
IDP SMART-50 Card Printer Printing Preferences Layout Paper/Ribbon/Printing Side/Media Orientation ● Portrait ● Landscape Page Order ● Front to Back ○ Back to Front Advanced... OK Cancel ApplyPic.98 Layout
3.2.1.1. Layout
- You can select either horizontal or vertical printi direction. To apply your selection, click "OK".

text_image
IDP SMART-50 Card Printer Advanced Setting Document Options Reset Default Values... Setup... Color Correction Main: 0 Yellow: 0 Magenta: 0 Cyan: 0 Black: 0 Overlay: 0 Resin Black(K) Processing Text: 100 Dot: 100 Threshold: 50 Dithering Degree: 100 Extra Controls Edge Size: 20 Eject Card: Eject Erase Density: 50 Sharpening: Use Flip Front: Normal Flip Back: Normal Magnetic Stripe Encoding Method MS Encode Track 1: Normal Mode MS Encode Track 2: Normal Mode MS Encode Track 3: Normal Mode JIS II Encode Track: Normal Mode Magnetic Card Flip R/W: Normal Mode Magnetic Simple Encoding: Off Magnetic Auto Encoding: Off Magnetic Encoding Ballys Mode: Off Manual Magnetic Stripe Encoding: Not Use MS Encode Track 1: MS Encode Track 2: MS Encode Track 3: JIS II Encode Track: Text String Magnetic Stripe Encoding Start Track 1: l1 Start Track 2: l2 Start Track 3: l3 End Track 1: l End Track 2: l End Track 3: l Coercivity: Lo Encoding Type: ISOPic.99 Advanced Setup
3.2.1.2. Advanced setup
Reset Default Values: Reset to default.
Color Correction: You can correct gamma for colors. You need to use CardPrinterSetup to adjust color densities.
Resin Black (K) Processing: Set criteria for resin black processing.
Text: to set density criteria for extracting black objects
Dot: to set density criteria for extracting black dots
Threshold: to set density criteria on dithering
Dithering Degree: to set sharpness on dithering
Extra Controls :
Edge Size: to set not printed area in case of n using Edge-To-Edge
Eject Card: to set if eject a card after printing
Erase Density : to set erase density for
SMART-30 R Erase
Sharpening: to calibrate image sharpened
Flip Front: to set printed direction of image on front side.
Flip Back: to set printed direction of image on back side.
Magnetic Strip Encoding Method: to set magnetic stripe encoding method for each track
Normal: to encode on LoCo Card forwards
Reverse: to encode on LoCo Card backwards
Bit: to encode on LoCo Card in Bit
HiCo Normal: to encode on HiCo Card forwards
HiCo Reverse: to encode on HiCo Card backwards
HiCo Bit: to encode on HiCo Card in Bit
Magnetic Card Flip R/W: to set back side image printing when magnetic encoding
Magnetic Simple Encoding: Set fast encoding and printing
Magnetic Auto Encoding: Set auto coercivity.
Magnetic Encoding Ballys mode: Set Ballys mode
Manual Magnetic Stripe encoding: to put in data on magnetic stripe manually
Not Use: not to use magnetic stripe encoding
Encoding and Printing: to print after magnetic stripe encoding
Encoding or Laminating only: encoding magnetic or laminating. without printing
Text String Magnetic Stripe Encoding: Set special marker for text string magnetic encoding.
Start Track 1: Start marker of magnetic track1
Start Track 2: Start marker of magnetic track2
Start Track 3: Start marker of magnetic track3
End Track 1: End marker of magnetic track1
End Track 2: End marker of magnetic track2
End Track 3: End marker of magnetic track3
Coercivity: LoCo, HiCo (Lo/Hi)
Encoding Type: Set encoding type (ISO/JIS)
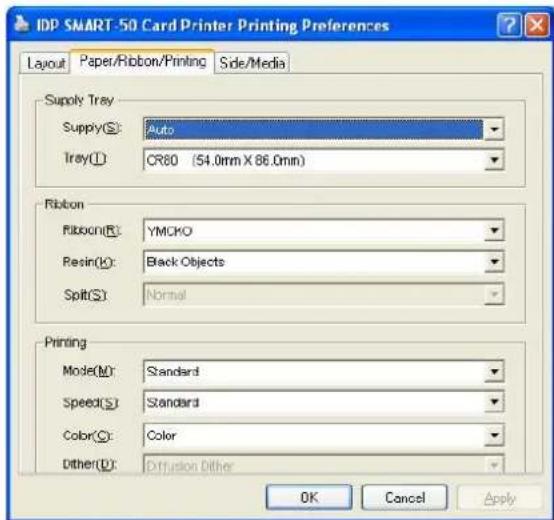
text_image
IDP SMART-50 Card Printer Printing Preferences Layout Paper/Ribbon/Printing Side/Media Supply Tray Supply(S): Auto Tray(I): CR80 (54.0mm x 86.0mm) Ribbon Fibron(R): YMCHO Resin(K): Black Objects Split(S): Normal Printing Mode(M): Standard Speed(S): Standard Color(S): Color Other(D): Diffusion Other OK Cancel ApplyPic.100 Paper / Ribbon / Printing
3.2.1.3. Paper / Ribbon / Printing
- Supply Tray
■ Supply
Please select "CR-80" because SMART-50 has 1 input hopper.
■ Tray
Please select "Auto" because SMART-50 supports CR80 cards only.
- Ribbon
■ Ribbon
It shows the type of installed ribbon. You don't need to select this option as SMART-50 recognizes ribbon automatically with RF Tag.
■ Resin
You can set the method to extract resin black when you use design programs. (If you use Smart Design, you don't need to select this option.) It will be set automatically.
Black Objects: to extract resin black automatically for text, line, box, circle, binary images, etc.
Black Texts: to extract resin black for text only
Black Dots: to extract resin black for all of black
Not Use: not to extract resin black
■ Split You can set the both sides (Front:YMCO, Back:K) to save color ribbon(YMCKO, HYMCKO, BYMCKO). It is only activated while printing both sides option is set.
- Printing
■ Mode
Set printing mode Standard: Default print mode. Prints all area of printing Partial: Partial print mode. It is printed partially for the print area only. Printing speed can be faster than standard mode.
■ Speed
Set printing speed and quality. Standard: Default print mode and best quality setting option of printing High: Fast print mode. This option can be used with only K and KO ribbo. Printing quality might be lower than Standard.
■ Color
You can select color or black&white print. ("Color" option is available only with color ribbon.)
■ Dither
There are 3 possible selections, Threshold, Random, and Diffusion Dither. It is performed with K and KO ribbon only. (Please select "Diffusion Dither" for high quality.)
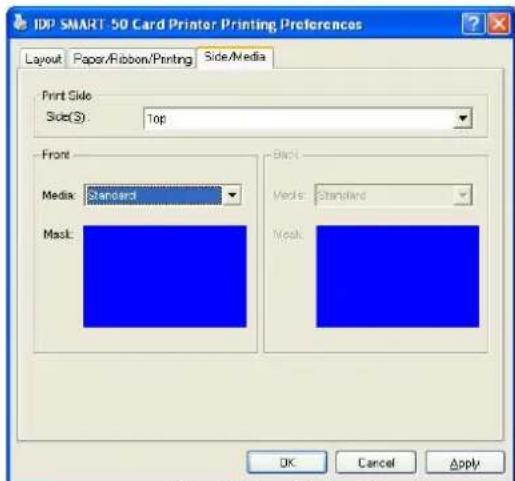
text_image
IDP SMART 50 Card Printer Printing Preferences Layout Paper/Pibbon/Printing Side/Media Print Side Side(S): Top Front Media: Standard Mask: Black Media: Standard Mask:Pic.101 Side / Media
text_image
IDP SMART 50 Card Printer Printing Preferences Layout Paper/Fibbon/Printing Side/Media Laminator Laminator Side Side Tap Overlay Not Use Laminator Control Position (1/1000 inch) ———— 0 Temperature (°C) ———— 140 OK Cancel ApplyPic.102 Laminator
3.2.1.4. Side / Media
To set printing side and printing mask.
- Print Side
You can select one side printing or both sides printing (It is possible only when you have a flipper.)
- Front / Back
You can use a predefined mask or user defined mask (white card, smart card, Magnetic stripe card, etc.) on front or back side.
You can define a mask. User defined mask uses BITMAP file (1012 X 636 pixels).
Blue (RGB(0,0,255)): Print and Overlay
Pink (RGB(255,0,255)): Print only
Black (RGB(0,0,0)): Print, Overlay and Florescent
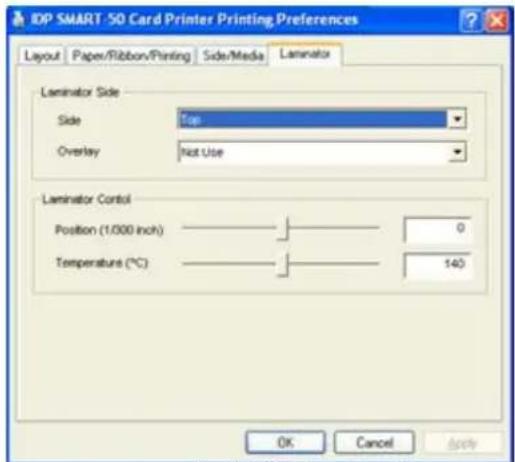
3.2.1.5. Laminator
This tap will be created only when SMART-50L printer is connected to PC. In the case of normal SMART-50 Printer, this tap will be not displayed.
To set Laminator printing options.
- Laminator Side
You can select not use, top side, bottom side and both sides printing
- Overlay
You can select whether overlay prints or not.
Default setting is no overlay when laminating and we recommend to use the default value.
- Position
You can set Laminating start position of width and the values can be set from -50 to 50. The number is 1/300 inch.
- Temperature
You can set Laminating temperature and the valu can be set from 100°C to 180°C.
- Laminating Only
You can skip printing and do laminating only by setting a value in
Printer setup - Print preferences - Advanced Setup - Encoding and Laminating - Set the value as
"Encoding and Laminating Only"
3.3. Other settings
text_image
IDP SMART-50 Card Printer Properties General Sharing Ports Advanced Color Management Service You can share this printer with other users on your network. To enable sharing for this printer, click Share this printer. Windows Firewall is already configured to allow the sharing of printers with other computers on the network. Do not share this printer Share this printer Share name: Drivers If this printer is shared with users running different versions of Windows, you may want to install additional drivers, so that the users do not have to find the print driver when they connect to the shared printer. Additional Drivers... OK Cancel ApplyPic.103 Printer sharing
text_image
IDP SMART-50 Card Printer Properties General Sharing Ports Advanced Color Management Service IDP SMART-50 Card Printer Print to the following port(s). Documents will print to the first free checked port. Port Description Printer COM1: Serial Port COM2: Serial Port COM3: Serial Port COM4: Serial Port FILE: Print to File USB... Virtual printer port to... IDP SMART-50 Card Printer TPVM: ThinPrint Print Port f... Add Port... Delete Port Configure Port... Enable bidirectional support Enable printer pooling OK Cancel ApplyPic.104 Ports
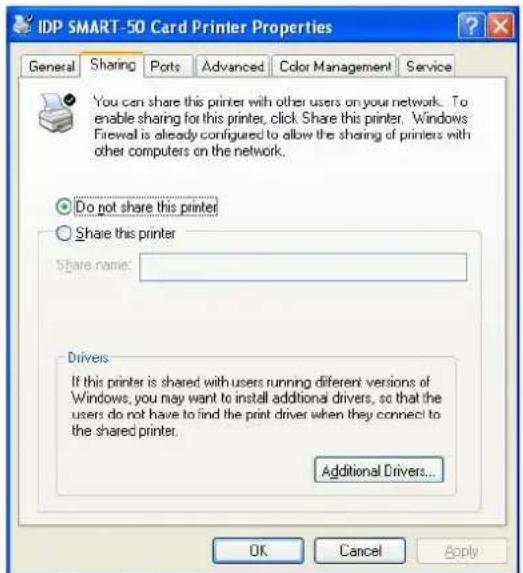
3.3.1. Sharing
You can share a printer with Sharing tab via Network. Default is "Not sharing"
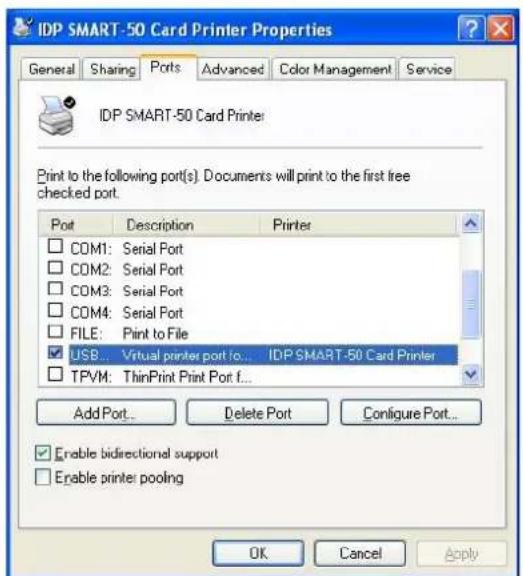
3.3.2. Ports
Port tab shows which port is connected with SMART-50. SMART-50 has connection with USB Virtual printer port as left picture. because SMART-50ises USB connected to PC.
(Caution! This port is selected automatically. It is recommended to maintain default.)
text_image
IDP SMART-50 Card Printer Properties General Sharing Ports Advanced Color Management Service ● Always available ○ Available from 12:00 AM To 12:00 AM Priority: 1 Driver: IDP SMART-50 Card Printer New Driver... ● Spool print documents so program finishes printing faster ○ Start printing after last page is spooled ○ Start printing immediately ○ Print directly to the printer □ Hold mismatched documents ✓ Print spooled documents first □ Keep printed documents ✓ Enable advanced printing features Printing Defaults... Print Processor... Separator Page... OK Cancel ApplyPic.105 Advanced

text_image
IDP SMART-50 Card Printer Properties General Sharing Ports Advanced Color Management Service These settings let you associate color profile(s) with your color printer. Color profiles control the color on your printer based on the type of media being used and the printer configuration. Automatic: Windows will automatically select the best color profile from the list of associated color profiles [Recommended] Manual: Manually select the default color profile for all output from this device from the list of associated color profiles Default color profile: cardprinter_k3 Color Profiles currently associated with the printer: cardprinter_d cardprinter_k cardprinter_k2 cardprinter_k3 Add... Remove Set As Default OK Cancel ApplyPic.106 Color Management
text_image
IDP SMART 50 Card Printer Properties General Sharing Ports Advanced Color Management Service Printer Serial SRCNNN-A40001 Printer ID SMART Driver Version 2.13.1.26 Firmware Version 1.00.82 [IA]DC Ribbon Type Premium YMCKO [IA][DC] Ribbon Balance 89 / 250 Printer Status 00000000 10000100 00000000 00000000 Printer Error 00000000 00000000 00000000 00000000 Print technical support sheet Clean Printer OK Cancel ApplePic.107 Service
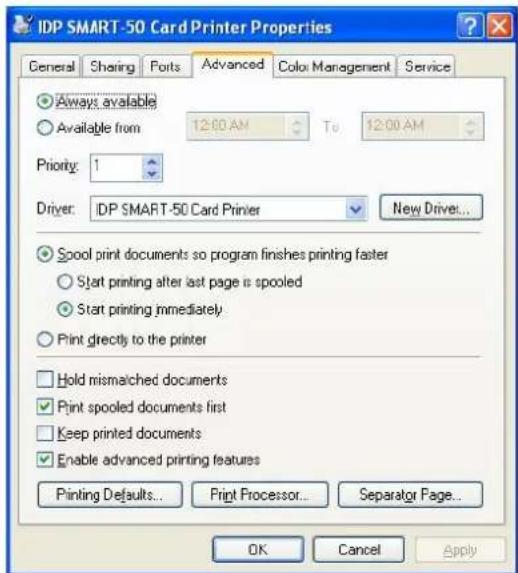
3.3.3. Advanced
It is available for Working Time setting, Priority order, Spool print etc. in "Advanced" tab. "Advanced" setting follows MS Windows standard. If you want to change the setting, please refer to the Window manual.
(It is recommended to maintain default.)
3.3.4. Color Management
In "Color management" tab, you can select color management profile fit to the printer.
SMART-50 uses color profile to express optimal color. The driver selects color profile automatically to fit each ribbon.
(It is recommended to maintain default.)
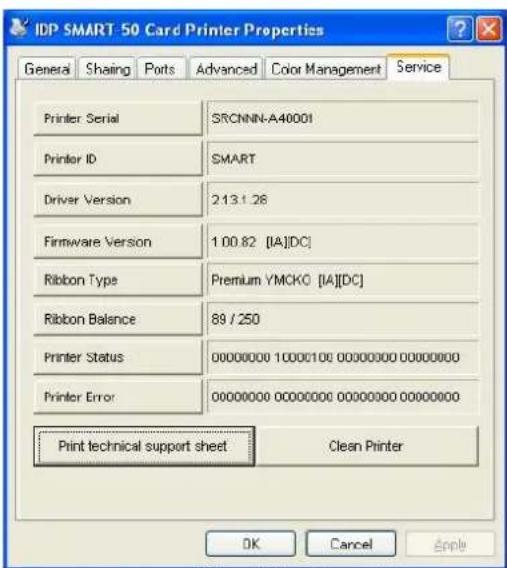
3.3.5. Service
You can recognize printer serial, printer ID, driver version, firmware version, type of ribbon & balance and printer's status.
You can print the "technical support sheet" on a card to check printer's setup value.
To clean printer, please insert a cleaning card in hopper and click "Clean Printer." For further details please refer "6.1. Cleaning Printer".
Please refer "4.2.6 Printer Status" for numbers of "Printer Status" and "Printer error"

text_image
IDP SMART-50 Card Printer Properties General Sharing Ports Advanced Color Management Service Laminator FILM Type CPF(Clear Patch Full) 1.0 ML Balance 138 / ( 250 ) Laminator Version R0.00.60 (Application) Serial Number 1111111111117789 Laminator Status Status 10000000 00000000 00001000 00000000 Error 00000000 00000000 00000010 00000000 OK Cancel ApplyPic.108 Laminator
3.3.6. Laminator
This tap will be shown only when SMART-50L printer is connected to PC. You can recognize laminator film's type, balance, laminator's version, serial number status.
4. Utilities
4.1. Card Printer Setup
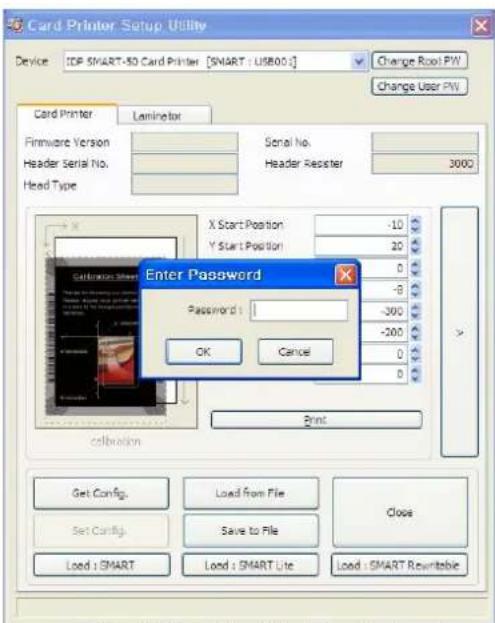
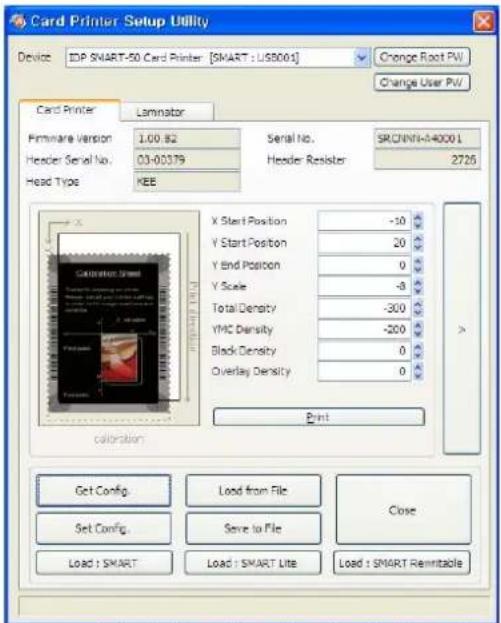
SMART-50 is produced with optimized setting. You need to adjust setting value if required or spare parts are replaced using CardPrinterSetup in our Installation CD. You can adjust following settings with CardPrinterSetup.
4.1.1. Run CardPrinterSetup
text_image
Card Printer Setup Utility Device: IOP SMART-5D Card Printer [SMART: USB001] Change Root PW Change User PW Card Printer Laminetor Firmware Version Serial No. Header Serial No. Header Register 3000 X Start Position -10 Y Start Position 20 Enter Password Password: OK Cancel 0 -8 -300 -200 0 0 Print calibration Get Config. Load from File Set Config. Save to File Load : SMART Load : SMART Lite Load : SMART Rewrite ClosePic.109 CardPrinterSetup Log-in
text_image
Card Printer Setup Utility Device: IDP SMART-50 Card Printer [SMART : USB001] Change Root PW Change User PW Card Printer Laminator Firmware Version 1.00.82 Header Serial No. 03-00379 Head Type KEE Serial No. Header Resistor SRCNNFI-040001 2726 X Start Position -10 Y Start Position 20 Y End Position 0 Y Scale -8 Total Density -300 YMC Density -200 Black Density 0 Overlay Density 0 > Print calibration Get Config. Load from File Set Config. Save to File Close Load : SMART Load : SMART Lite Load : SMART RemntaclePic.110 CardPrinterSetup start
Password input window is displayed when you run this program. If you input the correcpassword, the recorded setup value will be shown and you can change values. The password is saved to SMART-50 printer. If you use another PC with same printer, previous password is required to run this program (Default password is none. Please press OK if you have not set password.)
When you are successful to log-in, you can set values shown as left picture.
4.1.2. Card Printer
4.1.2.1. Basic Setup
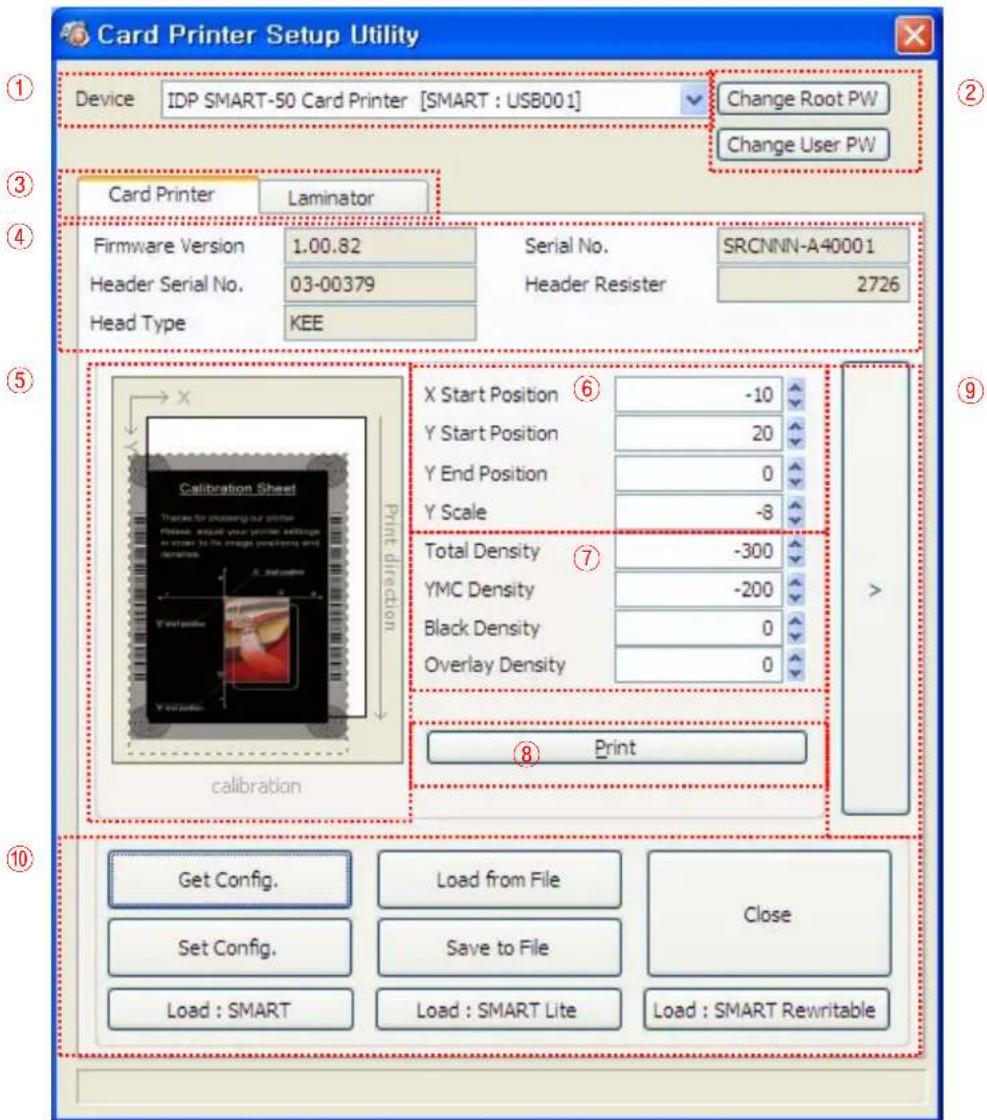
text_image
Card Printer Setup Utility Device IDP SMART-50 Card Printer [SMART : USB001] Change Root PW Change User PW Card Printer Laminator Firmware Version 1.00.82 Serial No. SRCNNN-A40001 Header Serial No. 03-00379 Header Resister 2726 Head Type KEE X Start Position -10 Y Start Position 20 Y End Position 0 Y Scale -8 Total Density -300 YMC Density -200 Black Density 0 Overlay Density 0 8 Print calibration Get Config. Load from File Close Set Config. Save to File Load : SMART Load : SMART RewritablePic.111 CardPrinterSetup – Card Printer Basic Setup
① To show connected printers
Device: You can select a printer using pull-down menu. "IDP SMART-50 Card Printer" is a name of printer. "SMART228" is printer ID, "USB001" is connected port.
② To set administrator password and user password.
Change Root PW: To set administrator (root) password. This password is used to verify user authority for CardPrinterSetup and User Authentication. Also it is required for User password management. (Please set password for security use.)
Change User PW: To set user password for User Authentication.
③ Click "Card Printer" tap.(If laminator is installed, you can setup laminator setting value by "Laminator" tap.
④ To show firmware version, serial number of printer and serial number, resistor & type of print head.
⑤ To show print area. It shows exaggeratingly for user convenience.
⑥ To set print area. Please set it properly to print on an entire card because SMART-50 is a direct thermal card printer. When you click “⑦ Print”, a card is printed as like “④ example”. Please set values properly that all circles of each corner are printed and blank spaces are 0.4mm \~ 0.5mm in the top and the bottom of a card. Please set values by following order.
X Start Position: Please set right and left properly by adjusting X position.
Y Start Position: Please set the start position of printed example image and blank space in the top is 0.4mm \~ 0.5mm.
Y End Position: Please set the end position of printed example image and blank space in the bottom is 0.4mm \~ 0.5mm. It is recommended to set bigger value for "Y scale" than default.
Y Scale: Please set to show circles in the bottom.
⑦ To set density. SMART-50 enables to set different density for each color, resin black and overlay. So, please set each density for high quality. Please optimize the quality by adjusting each value. To optimize, you repeatedly adjust the density and print a Calibration card and check the print state until you get the optimum.
If your printer is SMART-30 R model, please do not install ribbon. You can set density with Rewritable cards. Please adjust total density only.
Total Density: To set all of the density (Color, Black and Overlay) at one time.
If your printer is SMART-30 R model, when the density is too strong, you will have darker background color. (Background color may vary depending on card type.) When density is proper, texts and images are printed clearly and there is no background color. When density is too low, texts and images are printed dull.
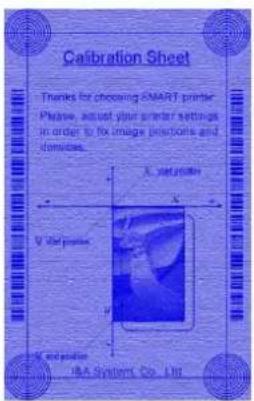
text_image
Calibration Sheet Thanks for choosing SMART printer Please, adjust your printer settings in order to fix image instructions and differences. X: saturation Y: V: test process V: M: intersection IBA System, Co., Ltd.Too Strong
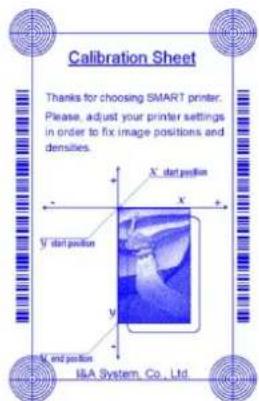
text_image
Calibration Sheet Thanks for choosing SMART printer. Please, adjust your printer settings in order to fix image positions and densities. X start position Y start position X end position I&A System, Co., LtdProper
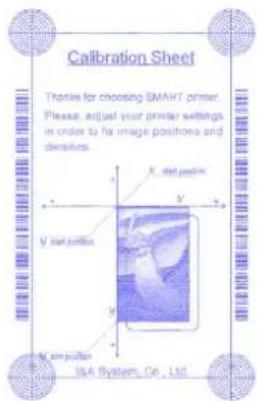
text_image
Calibration Sheet Thanks for choosing SMART printer. Please, adjust your printer settings in order to fix image positions and densities. X: set position Y: set position V: set position X: emposition ISA System, Co., Ltd.Too Low
Pic.112 SMART-30 R density
YMC Density: To set color density. Please maximize YMC density as you can, which enables to express range of color and vivid images. If it is too strong, green or red marks are appeared. If it is too weak, the print quality will be dull.
text_image
Calibration Sheet Thanks for choosing SMART printer. Please, adjust your printer settings in order to fix image positions and densities. X: start position Y: start position I&A System - Do, Ltd.Too Strong
text_image
Calibration Sheet Thanks for choosing SMART printer. Please, adjust your printer settings in order to fix image positions and densities. X: start position Y: start position Z: end position I&A System, Co., Ltd.Proper
text_image
Calibration Sheet Thanks for choosing SMART printer. Please, adjust your printer settings in order to fix image positions and deviations. X start position Y start position Y end position I&A System, Co., Ltd.Too Low
Pic.113 Color density
Black Density: To set resin black density. In the picture, barcode is printed to express density.
When density is too strong, barcode is printed too thick. When density is too weak, barcode is too thin. Please adjust resin black density to express clear barcode. Please refer following pictures.

text_image
Calibration Sheet Thanks for choosing SMART printer. Please, adjust your printer settings in order to fix image positions and denotes. X. stat protein V stat protein I&A System Co., Ltd. Too Strong Proper Too LowPic.114 Resin Black density
Overlay Density: To set overlay density. Please set it when overlay is printed on surface regularly. If it is too strong, it is hazy and marks are appeared. If it is too weak, overlay panel is not printed edge areas. You can check it with printed card under the light.
text_image
Calibration Sheet Thanks for choosing SMART printer Please, adjust your printer settings in order to fix image positions and densities. X start position Y start position V start position V end position I&A System, Co., Ltd.Too Strong
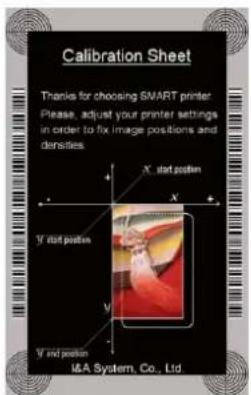
text_image
Calibration Sheet Thanks for choosing SMART printer. Please, adjust your printer settings in order to fix image positions and densities. X: start position Y: start position V: end position I&A System, Co., Ltd.Proper
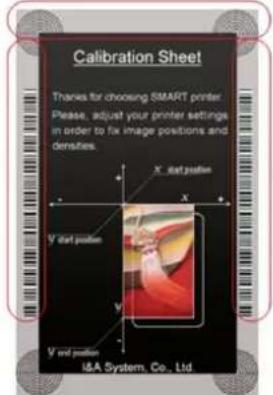
text_image
Calibration Sheet Thanks for choosing SMART printer. Please, adjust your printer settings in order to fix image positions and densities. X _ dial position X V _ dial position V Y end position I&A System, Co., Ltd.Too Low
Pic.115 Overlay density
⑧ To print calibration card.
⑨ To show advanced Setup.
(It is recommended not to set advanced setup.)
⑩ To load or save values.
Get Config.: to get values from current printer
Set Config. : to set values to current printer
Load from File: to load values from file
Save to File : to save values to file
Load Default : to load default. Please adjust values again after load default.
Close : to close CardPrinterSetup
4.1.2.2. Advanced Setup
You can set more values.
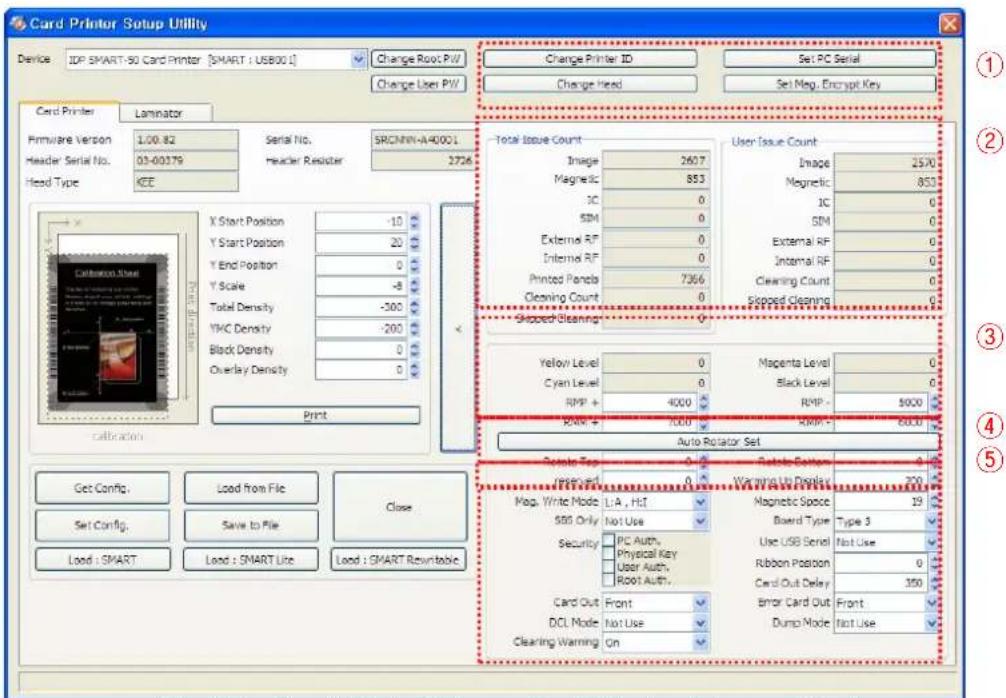
text_image
Card Printer Setup Utility Device ID: SMART-50 Card Printer [SMART : USB001] Change Root PW Change Users PW Card Printer Laminator Firmware Version 1.00.82 Serial No. SRCNNN-A40001 Header Serial No. 03-00379 reader Register 2736 Head Type ICE Total Issue Count Image 2607 Image 2570 Magnetic 853 Magnetic 853 IC 0 IC 0 SIM 0 SIM 0 External RF 0 External RF 0 Internal RF 0 Internal RF 0 Printed Panels 7366 Cleaning Count 0 Cleaning Count 0 Stopped Cleaning 0 Stopped Cleaning Y Start Position -10 Y Start Position 20 Y End Position 0 Y Scale -8 Total Density -300 VMC Density -200 Black Density 0 Overlay Density 0 Print Auto Rotator Set Total Top Right Bottom 0 First Top Forward Left Pinset 200 Mag. Write Mode L:A , HiT Magnetic Space 19 SBS Only Not Use Board Type Type 3 Security PC Auth, Physical Key Use USB Serial Not Use User Auth, Root Auth, Ribbon Position 0 Card Out Front Error Card Out Front DCL Mode Not Use Dump Mode Not Use Clearing Warning OnPic.116 CardPrinterSetup – Card Printer Advanced Setup
① You can set Printer ID, PC serial, Print head and Magnetic encryption key.
Change Printer ID: When SMART-50 is used by SDK, you can set unique ID for SMART-50 printer regardless of whether it is connected by USB or what IP address is. It is useful to connect and use several printers. Default is "SMART-50".
Set PC Serial: One of security function. You can use a printer with specific PC.
It is activated when you click "Set PC Serial" after "PC Authentication" of ⑥ is ticked and rebooted. At that time, the specific information of used PC is saved to SMART-50 printer.
Change Head: When you replace thermal print head, you must change head information for optimal quality. Please change head serial number, resistor and type of head in the Change Head Dialog window after click "Change Head".
Set Mag. Encrypt Key: One of security function. When you use SDK, you can encrypt magnetic stripe encoding data transmitted by USB. You can define and save the encryption key to SMART-50 using "Set Mag. Encrypt Key".
② To show how many cards are issued with SMART-50 printer. "Total Issue Count" is the number of issued cards from factory shipment, "User Issue Count" is the number of issued cards from replacing head. When you replace a head, please initialize the number by ticking "Reset User Issue Count".
③ To show color and motor management. SMART-50 recognizes ribbon color automatically and controls motor by ribbon remaining. "Yellow Level", "Magenta Level", "Cyan Level", "Black Level" are default value for ribbon and user does not change values. "RMP+", "RMP-", "RMM+", "RMM-" are necessary variables to control ribbon motor. Please do not change values for them as it affects card quality.
④ SMART-50D is made by attaching a flipper in SMART-50, so you need to adjust it to be tuned in the horizontal. "Rotate Top" is a value when the card of top side is in line. "Rotate Bottom" is a value when card of bottom side is in line. Please click "Auto Rotator Set" when error is occurred during a card moved to or from a flipper.
⑤ Please refer as below for other values.
Reserved: Not used
Warming Up Display: If you use SMART-30 R, LED buttons are blinked during print head is warming up. You can adjust the timing of LED blinking by adjusting values of "Warming Up Display". It becomes faster as the value is smaller.
Mag. Write Mode: You can order the way how to encode magnetic stripe.
"L:A, H:I": encodes 3 tracks at once for LoCo card and encodes at twice by dividing 1,3 and 2 track for HiCo cards.
Magnetic Space: The distance of magnetic stripe when you encode.
SBS Only: Please enable it when you issue cards with software programmed by SDK. This option disables printer device driver.
Board Type: to choose they type of mainboard. Please do not change it.
Security: There are several ways to set a security function for SMART-50.
PC Authentication: You can use a printer with specific PC. It is activated when you click "Set PC Serial".
Physical Key: You can set this option when physical key is installed.
User/Root Authentication: You can set passwords for User and Administrator.
Use USB Serial: When SMART-50 is connected to USB, it transmits the USB serial number to PC. Default is the same number used by all SMART-50. Please set this option when you use multiple SMART-50 printers connected to 1 PC via USB. It enables unique serial numbers for each USB.
Ribbon Position: To set the ribbon position on card. Please set it default.
Warming Up Temp.: To control the temperature of warming up before printing. For SMART-30 R, you need to warm up print head to print high quality. We recommend warming up to 50 degrees.
Card Out Delay: To set timing of hopper motor for ejecting card. Please set it default.
Card Out: to set the way to eject cards.
Error Card Out: to set the way to eject error cards.
DCL Mode: When you use SDK and print cards with DCL mode, you don't need to install printer device driver.
Dump Mode: It records log data.
4.1.3. Laminator
text_image
Card Printer Setup Utility Device IDP SMART-50 Card Printer [SMART : USB001] Change Root PW Change User PW Card Printer Laminator Firmware Version 1.00.64 Serial No. SRCNNN-A40001 Header Serial No. B21002123120 Header Resister 3120 Head Type KPE Change Serial No. Laminator Version R0.00.60 (Application) Laminator Serial No. 1111111111117789 Information Film Type CLEAR 1.0MIL [JD] Film Remain 122/250 Laminator Code [SM][00][00] Film Code [SM][00][00] Heater Temperature 100 Laminating PPS 700 Laminating Move Pulse 11000 Separation with Card 25 Separation with Film 5 Lami. Start Card Pos. 0 Torque Laminating MAX 700 Torque Laminating MIN 600 Laminating with Pulse 8000 Film Attribute 1 Get Config. Load from File Close Set Config. Save to FilePic.117 CardPrinterSetup – Laminator Basic Setup
① The combo box shows connected printers
② Click Laminator Tap.
③ It shows the information of installed laminator such as firm-ware version, serial number. If you click "Change Serial No." button, you can change serial number.
④ The fields show laminator film's type, balance, code and laminator code.
Film Type : It shows installed film's type and vendor code.
Film Remain : It shows installed film's total number and balance.
Laminator Code : It shows Laminator's code, vendor and local code.
Film Code : It shows installed film code, vendor and local code.
⑤ You can change the values according to the installed film type.
Heater Temperature : It is for laminating temperature.
Laminating PPS : Laminating speed.
Laminating Move Pulse : The distance of laminating movement.
Separation with Card : After laminating and removing film, the value changes the distance of card movement
Separation with Film : After laminating and removing film, the value changes the Distance of film movement.
Lami. Start Card Pos : The value is for laminating start position.
Torque Laminating Max : Maximum torque of motor while laminating.
Torque Laminating Min : Minimum torque of motor while laminating.
Laminating with Pulse : The value is for change laminating width.
Film Attribution : It changes film attribution.
⑥ It shows "Advanced Setup" window.
⑦ "Save" or "Load" the values.
Get Config : Read the values from connected printer.
Set Config. : Set the values to connected printer.
Load from File : Load the values from saved file.
Save to File : Save the values into a file.
Close : Close the program.
4.1.3.2. Advanced Setup
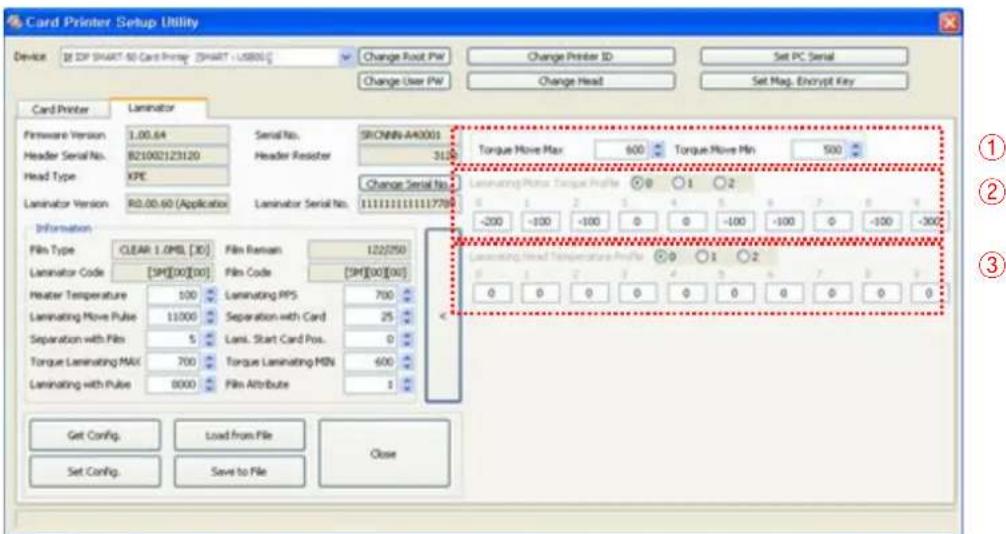
text_image
Card Printer Setup Utility Device: [32 XP SMART-50 Card Printer] [SMART-10800] Change Root PW Change Printer ID Set PC Serial Change User PW Change Head Set Mag. Encrypt Key Card Printer Laminator Firmware Version 1.00.64 Header Serial No. B21002123120 Head Type KPE Laminator Version R0.00.60 (Application) Serial No. Header Resistor SRCNNN-A40001 3120 Change Serial No. 11111111111117700 Information Film Type CLEAR 1.0MB [3D] Film Remain 122(250) Laminator Code [SM][00][00] Film Code [SM][00][00] Heater Temperature 100 Laminating RPS 700 Laminating Move Pulse 11000 Separation with Card 25 Separation with Filts 5 Lens. Start Card Pos. 0 Torque Laminating MAX 700 Torque Laminating MIN 600 Laminating with Pulse 0000 Film Attribute 1 Get Config. Load from File Set Config. Save to File Close Torque Move Max 600 Torque Move Min 500 Laminating Move Torque Profile -200 -100 -100 0 0 -100 -100 0 -100 -300 Laminating Move Temperature Profile -9 0 1 2 0 0 0 0 0 0 0 0 0 0 0 0 0 0 0 0 0 0 0 0 0 0 0 0 0 0 0 0 0 0 0 0 0 0 0 0 0 0 0 0 0 0 0 0 0 0 0 0 0 0 0 ①②③Pic.118 CardPrinterSetup – Laminator Advanced Setup
① It shows total laminating count.
② The values are for setting motor torque of film movement.
Torque Move Max : Change Maximum motor torque
Torque Move Min : Change Minimum motor torque
③ The values are for setting motor torque of laminating.
You can set the values of each section.
4.2. Card Printer Test
Basically Card Printer use standard printer device so you can be used same as general paper printer. In the case of magnetic stripe, contact, contactless encoder option, you will need to install appropriate driver and operate individually. Encoding operation will be controlled by "CARD PRINTER SDK". You can test all feature of printer by Card printer Test. Card Printer Test program is developed by using "SMART Printer SDK"
4.2.1. CardPrinterTest
When CardPrinterTest is run, all function can be tested individually.
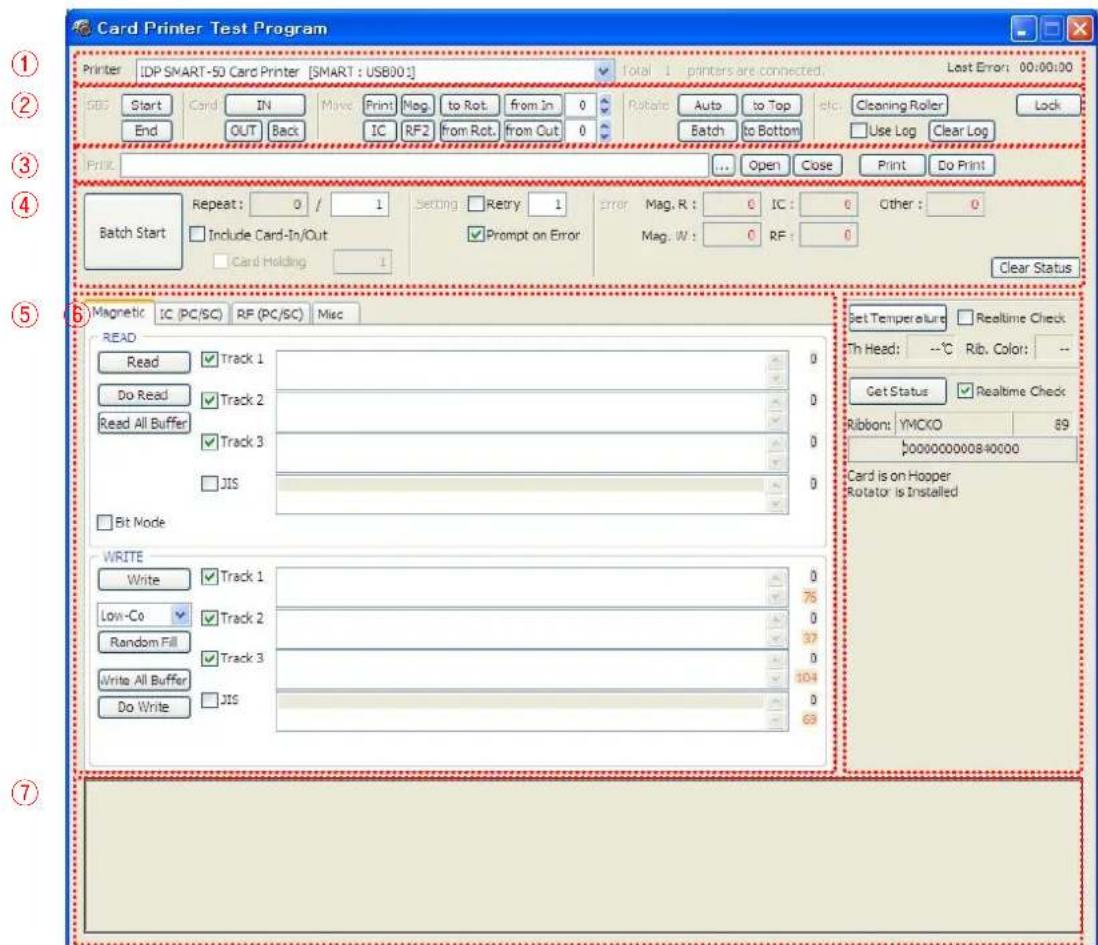
text_image
Card Printer Test Program Printer IDP SMART-50 Card Printer [SMART : USB001] Total 1 printers are connected Last Error: 00:00:00 GBS Start Card IN Move Print Mag. to Rot. from In 0 Rotate Auto to Top etc. Cleaning Roller Lock End OUT Back IC RF2 from Rot. from Out 0 Batch to Bottom Use Log Clear Log Print Open Close Print Do Print Repeat: 0 / 1 Setting: Retry 1 error Mag. R: 0 IC: 0 Other: 0 Include Card-In/Out Prompt on Error Mag. W: 0 RF: 0 Card Holding 1 Clear Status 6 Magnetic IC (PC/SC) RF (PC/SC) Misc READ Read Track 1 0 Do Read Track 2 0 Read All Buffer Track 3 0 JIS 0 Bit Mode WRITE Write Track 1 0 Low-Co Track 2 75 Random Fill Track 3 0 Write All Buffer JIS 104 Do Write 0 Set Temperature Realtime Check Th Head: --°C Rib. Color: -- Get Status Realtime Check Ribbon: YMCKO 89 $000000000840000 Card is on Hooper Rotator is InstalledPic.119 CardPrinterTest
① Select Printer: select printer to test. In the picture, "IDP SMART-50 Card Printer" is the Printer name, SMART228 is the Printer ID, and USB001 is the connected port.
② Control : To execute each step to test
③ Print: Print test with CSD file which is designed by Smart Design program.
④ Batch Start: Repeat selected encoding test by “⑤ Encoding”
⑤ Encoding: Encode Magnetic Stripe, Contact Card, Contactless Card
⑥ Printer Status: Check printer status.
⑦ Message: Description of status by log.
4.2.2 Select printer and control
When you execute CardPrinterTest, it will search connected printers by USB and Network automatically and SMART-50 printer connected to USB has higher priority. Other printers could be selected by pull-down menu. You can test all function with connected printer.
. Control is consisted by SBS(Step by Step), Move, Rotate, Etc. section and you can control printer by each step.
• SBS
SBS is to operate SMART-50 printer in SBS(Step-By-Step) mode which you can control the printer using commands. In SBS mode, after printing data transmission, printing a card will be run only by clicking "DoPrint". It is the main difference between NORMAL mode and SBS mode. When you click "Start", SMART-50 is operated in SBS mode, and existing spooled data will be eliminated. To exit SBS mode, click "Stop".
- Card
Card is to bring a card into printer and eject a card. "In" is to move a card from input hopper to printer and "Out" is to move a card from printer to output hopper. In case the flipper is installed, "Back" ejects a card to the back side.
- Move
Move is to move a card to specific position in the inside of printer. "Print" is to move a card to the printing position, and "Mag." is to the magnetic encoding position, and "IC" is to the contact smartcard encoding position, and "RF" is to the contactless smartcard encoding position. "To Rotator" is to move a card from printer to flipper and "From Rotator" is to move a card from flipper to printer. "from In" is to move a card from the card in sensor to where you define position, and "from Out" is to move a card from the card out sensor to where you define position.
- Rotate
Rotator is to flip over a card in the printer installed flipper. "Auto" is to move a card from printer to flipper and flip over a card and move a card to the printing position automatically. "Batch" is to repeat "Auto" as many times as the number of set. "To Bottom" is to turn to the backside of card and "To Top" is to turn to the front side of card.
• Etc
“Cleaning Roller” is to clean the roller by cleaning card automatically. “Use Log” is to display log in message space.
4.2.3 Print
Print can be done through the CSD file which is designed by Smart Design program. Following the steps in this section.
- Click “...” button and select the CSD file.
- Click "Open" button to prepare CSD file to print.
- Click "Print" Button to move print data to spool. In the NORMAL mode, Click "Print" button to print a card, but in the SBS mode, "Print" button to transmit a printing data from PC to printer and wait for printing. Therefore, you must click "DoPrint" to print in SBS mode. This function is for detail control of printer.
- Click "Close" button to close CSD file.
4.2.4. Batch
Batch is to repeat encoding/decoding test continuously. In the Repeat, you input the number of repeat and click "Batch Start", then the test is run as many times as the number of set. When you check "Include Card In/Out", each time the printer bring a card from input hopper and perform an encoding
test and eject the card. But if not, encoding test will be done only by one card. At that time, if there is no card in the printer, the printer bring a card into the printer from input hopper and repeat the encoding test on the card, and if there is a card in the printer, the encoding test is performed on the card repeatedly.
"Card Holding" is activated when "Include Card In/Out" is ticked. When "Card Holding" is ticked and the repeat number is set, the printer repeats the encoding test as many times as the number of set in the "Card Holding" without ejection. When it is completed, the printer ejects the card and brings a new card into the printer and starts testing.
In the Setting, "Retry" is to retry the encoding test when the error occurred. "Prompt on Error" is to display Pop up Message when the error occurred. If not, Error number will be counted without message. The number of error is displayed at Error section.
4.2.5. Encoding
Magnetic: Magnet Stripe Encoding
“Read” is to read and display the data from magnetic stripe card. It is composed of “Do Read” and “Read All Buffer” and runs “Do Read” and “Read All Buffer” sequentially.
"Do Read" is to read the data from magnetic stripe card and store the data in the buffer.
"Read All Buffer" is to transmit the date stored in the buffer to PC. If the track number is ticked, the data of the ticked track is only transmitted to PC.
"Write" is to write the data to the magnetic stripe. It is composed of "Write All Buffer" and "Do Write" and runs "Write All Buffer" and "Do Write" sequentially.
"Write All Buffer" is to transmit the data to the buffer.
"Do Write" is to write the data stored in the buffer to the magnetic stripe of card. You can choose the magnetic foil type (LoCo or HiCo) and the track of magnetic stripe. "Random Fill" is to create a random magnetic encoding data for testing.
Batch process repeats the following steps sequentially, Card “IN” → Move “Mag” → Magnetic “Random Fill” → Magnetic “Write” → Magnetic “Read” → Card “OUT”.
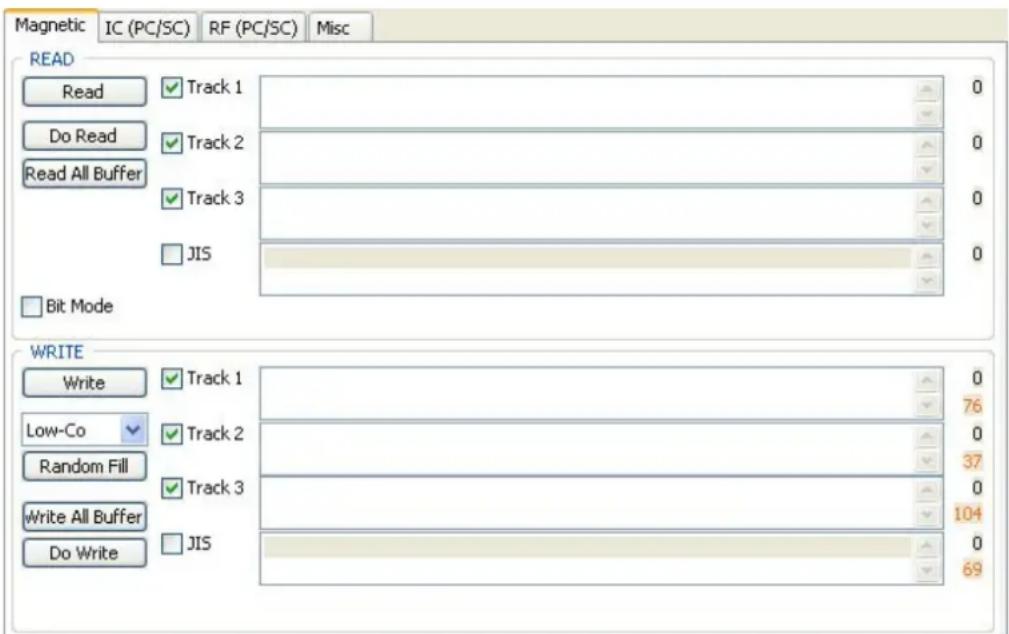
text_image
Magnetic IC (PC/SC) RF (PC/SC) Misc READ Read Track 1 0 Do Read Track 2 0 Read All Buffer Track 3 0 JIS 0 Bit Mode WRITE Write Track 1 0 76 Low-Co Track 2 0 Random Fill Track 3 37 Write All Buffer JIS 0 Do Write 104 69Pic.120 Magnetic stripe encoding
IC(PC/SC) : Contact Smartcard Encoding
In SMART-30 printer, a contact smartcard encoder can be installed and SMART-50 printer supports the contact smartcard encoder in the printer inside and the SIM encoder on the right of front side. "IC(PC/SC)" is to test a contact smartcard and SIM encoding.
"Batch" is applied only to the contact smartcard encoding because SIM encoder is installed outside and can't move a card automatically.
"ICH Contact" is to bring the encoder head into contact with the IC chip of smartcard physically.
"ICH Discontact" is to separate the encoder head from the IC chip of smartcard physically. "Init" is to recognize and display the installed contact smartcard reader. The recognized encoder will be displayed at the pull down control.
"Contact" is to contact with the smartcard electrically and initialize.
"Reset" is to finish the function electrically. After "Contact", you can run "Get ATR", "Read", "Write" and "Clear".
"Get ATR" is to read the ATR data.
"Read" and "Write" are to read and write the defined data (Name, Address and Phone). These could not be applied to all cards.
"Clear" is to clear the displayed data (ATR, Name, Address and Phone).
In case the data is read and written using APDU, Read/Write can be done by APDU commands.
"Load APDU" is to read the stored APDU commands.
"Save APDU" is to save the displayed APDU commands.
"Clear APDU" is to clear the APDU section.
"Send APDU" is to run the APDU commands.
Batch process repeats the following steps sequentially, Card "IN" → Move "IC" → IC "ICH Contact" → IC "Init" → IC "Contact" → IC "Reset" → IC "ICH Dis-contact" → Card "OUT".
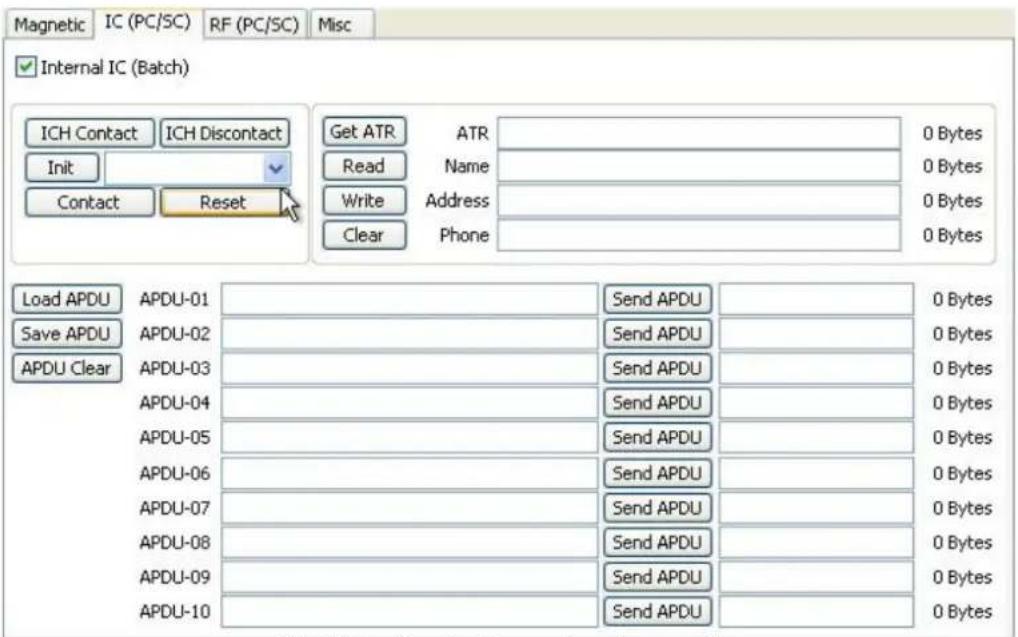
text_image
Magnetic IC (PC/SC) RF (PC/SC) Misc Internal IC (Batch) ICH Contact ICH Discontact Init Contact Reset Get ATR ATR 0 Bytes Read Name 0 Bytes Write Address 0 Bytes Clear Phone 0 Bytes Load APDU APDU-01 Send APDU 0 Bytes Save APDU APDU-02 Send APDU 0 Bytes APDU Clear APDU-03 Send APDU 0 Bytes APDU-04 Send APDU 0 Bytes APDU-05 Send APDU 0 Bytes APDU-06 Send APDU 0 Bytes APDU-07 Send APDU 0 Bytes APDU-08 Send APDU 0 Bytes APDU-09 Send APDU 0 Bytes APDU-10 Send APDU 0 BytesPic.121 Contact smartcard encoding
RF(PC/SC) : Contactless Smartcard Encoding
In SMART-30 printer, a contactless smartcard encoder can be installed and SMART-50 printer has the internal and external contactless smartcard encoder. RF(PC/SC) is to read and write the contactless smartcard. Using internal encoder, the printer brings a card into the printer from input hopper and encodes a smartcard. Using external encoder, after putting a card on the top cover, you can encode because the antenna installed under the top cover is used. Therefore, "Batch" is applied only to the internal contactless smartcard encoding.
"Contact" is to contact with the contactless smartcard electrically and initialize.
"Reset" is to finish the function electrically. After "Contact", you can run "Read", "Write" and "Clear".
"Get UID" is for getting Chip Serial Number(CSN)
"Read" and "Write" are to read and write the defined data (Name, Address and Phone). These could not be applied to all cards.
"Clear" is to clear the displayed data (ATR, Name, Address and Phone).
In case the data is read and written using APDU, Read/Write can be done by APDU commands.
"Load APDU" is to read the stored APDU commands.
"Save APDU" is to save the displayed APDU commands.
"Clear APDU" is to clear the APDU section.
"Send APDU" is to run the APDU commands.
Batch process repeats the following steps sequentially, Card "IN" → Move "RF" → RF "Connect" → Get UID→ RF "Discontact" → Card "OUT"
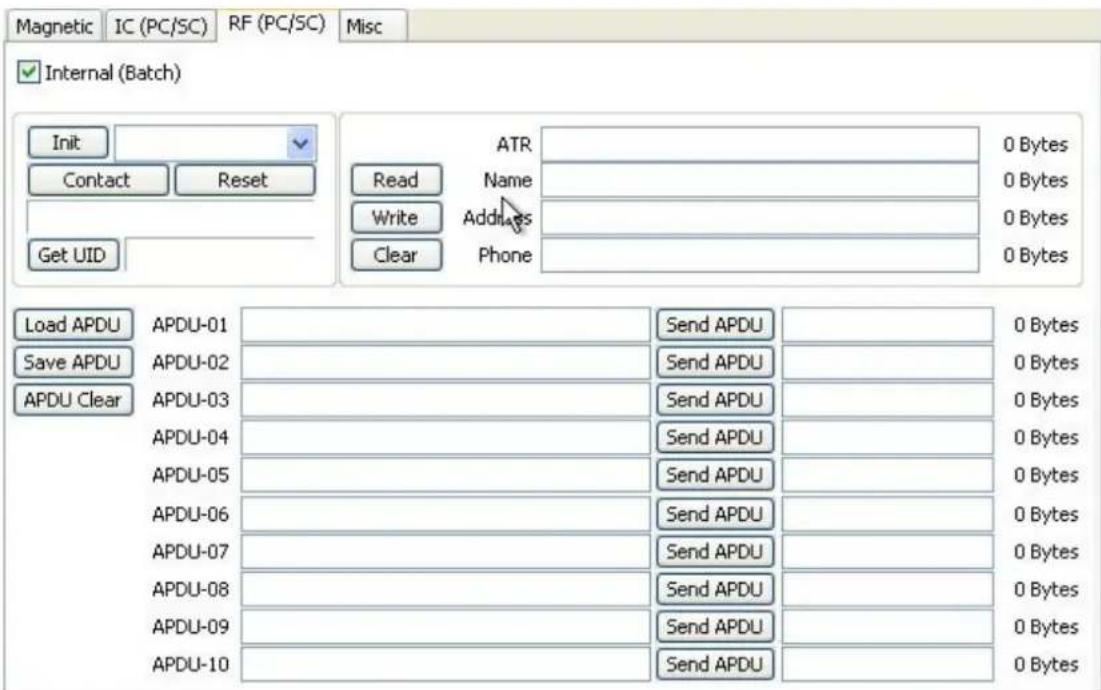
text_image
Magnetic IC (PC/SC) RF (PC/SC) Misc ✓ Internal (Batch) Init Contact Reset Get UID ATR 0 Bytes Read Name 0 Bytes Write Addrs 0 Bytes Clear Phone 0 Bytes Load APDU APDU-01 Send APDU 0 Bytes Save APDU APDU-02 Send APDU 0 Bytes APDU Clear APDU-03 Send APDU 0 Bytes APDU-04 Send APDU 0 Bytes APDU-05 Send APDU 0 Bytes APDU-06 Send APDU 0 Bytes APDU-07 Send APDU 0 Bytes APDU-08 Send APDU 0 Bytes APDU-09 Send APDU 0 Bytes APDU-10 Send APDU 0 BytesPic.122 Contactless smartcard encoding
4.2.6. Printer status
"Get Temperature" is to get and display the temperature of Thermal Print Head. When the "Realtime Check" is ticked, it displays the current temperature of Thermal Print Head in real time.
"Get Status" is to get and display the printer status.
Status Code
| #define | SMSC_M_CARDIN | 0x0000000000000001 | // Card In |
| #define | SMSC_M_CARDOUT | 0x0000000000000002 | // Card Out |
| #define | SMSC_M_MOVE_PRINT | 0x0000000000000004 // Move to print | |
| #define | SMSC_M_MOVE_PRN2ROT | 0x0000000000000008 | // Move from printer to flipper |
| #define | SMSC_M_MOVE_ROT2PRN | 0x0000000000000010 | // Move from flipper to printer |
| #define | SMSC_M_MOVE_IC | 0x0000000000000020 | // Move to contact encode |
| #define | SMSC_M_MOVE_RF | 0x0000000000000040 | // Move to contactless encode |
| #define | SMSC_M_MOVE_MAG | 0x0000000000000080 | // Move to Magnetic encode |
| #define | SMSC_M_THUP | 0x0000000000000100 | // Thermal head up |
| #define | SMSC_M_THDOWN | 0x0000000000000200 | // Thermal head down |
| #define | SMSC_M_ICHUP | 0x0000000000000400 | // Contact head up |
| #define | SMSC_M_ICHDOWN | 0x0000000000000800 // Contact head down | |
| #define | SMSC_M_PRINT | 0x0000000000001000 | // Printing |
| #define | SMSC_M_MAGRW | 0x0000000000002000 | // Read/Write Magnetic data |
| #define | SMSC_M_SEEKRIBBON | 0x0000000000004000 | // Ribbon search |
| #define | SMSC_M_MOVERIBBON | 0x0000000000008000 | // Ribbon Move |
| #define | SMSC_M_ROTATORTOP | 0x0000000000010000 | // Rotate Card up |
| #define | SMSC_M_ROTATORBOTTOM | 0x0000000000020000 | // Rotate Card down |
| #define | SMSC_S_HOPPERHASCARD | 0x0000000000040000 | // Card in hopper |
| #define | SMSC_S_THUP | 0x0000000000080000 | // Thermal head up |
| #define | SMSC_S_CARDIN | 0x0000000000100000 | // Detect Card in |
| #define | SMSC_S_CARDOUT | 0x0000000000200000 | // Detect Card out |
| #define | SMSC_S_ROTATORTOP | 0x0000000000400000 // Card front side up in Flipper | |
| #define | SMSC_S_EQUIPROTATOR | 0x0000000000800000 // Flipper installed | |
| #define | SMSC_M_RECVPRINTDATA | 0x0000000001000000 // Importing print buffer | |
| #define | SMSC_S_HASPRINTBUFFER | 0x0000000002000000 | // Reserving print buffer |
| #define | SMSC_M_SBSRUNNING | 0x0000000004000000 // Executing SBS Commands | |
| #define | SMSC_S_SBSMODE | 0x0000000008000000 // SBS mode | |
| #define | SMSC_S_CASEOPEN | 0x0000000010000000 | // Case open |
| #define | SMSC_M_INIT | 0x0000000020000000 // Initializing | |
| #define | SMSC_S_TESTMODE | 0x0000000080000000 // Test mode | |
From card printer firm-ware version 1.00.60, some values are changed like bellows from black color texts to red color texts.
| #define | SMSC_S_THUP | 0x0000000000080000 | // Thermal head up status |
| #define | SMSC_S_CLEANWARNING | 0x0000000000080000 | // Need cleaning of printer |
| #define | SMSC_S_ROTATORTOP | 0x0000000000400000 | // Front card up status in rotator |
| #define | SMSC_S_EQUIPLAMINATOR | 0x0000000000400000 | // Laminator is installed |
Error Code
| #define | SMSC_F_CARDIN | 0x0000000100000000 | // Error Card in |
| #define | SMSC_F_MOVETOPRINT | 0x0000000200000000 | // Card move Error |
| #define | SMSC_F_CARDOUT | 0x0000000400000000 | // Card out Error |
| #define | SMSC_F_MOVETOMAG | 0x0000000800000000 | // Card move Error (Magnetic) |
| #define | SMSC_F_MOVETOIC | 0x0000001000000000 | // Card move Error (Contact) |
| #define | SMSC_F_MOVETORF | 0x0000002000000000 | // Card move Error (Contactless) |
| #define | SMSC_F_MOVETOROTATOR | 0x0000004000000000 | // Card move Error (Printer to Flipper) |
| #define | SMSC_F_MOVEFROMROTATOR | 0x0000008000000000 | // Card move Error (Flipper to Printer) |
| #define | SMSC_F_THUP | 0x0000010000000000 | // Thermal head up Error |
| #define | SMSC_F_THDOWN | 0x0000020000000000 | // Thermal head down Error |
| #define | SMSC_F_ICHUP | 0x0000040000000000 | // Contact head up Error |
| #define | SMSC_F_ICHDOWN | 0x0000080000000000 | // Contact head down Error |
| #define | SMSC_F_ROTATORTOP | 0x0000100000000000 | // Card rotate up Error |
| #define | SMSC_F_ROTATORBOTTOM | 0x0000200000000000 // Card rotate down Error | |
| #define | SMSC_F_PRINT | 0x0000400000000000 | // Printing Error |
| #define | SMSC_F_MAGRW | 0x0000800000000000 | // Magnetic data Read/Write Error |
| #define | SMSC_E_SEEKRIBBON | 0x0001000000000000 | // Ribbon search Error |
| #define | SMSC_E_MOVERIBBON | 0x0002000000000000 | // Ribbon move Error |
| #define | SMSC_E_NOTH | 0x0004000000000000 | // Uninstalled Thermal head |
| #define | SMSC_E_THOVERHEAT | 0x0008000000000000 // Overheat Thermal head | |
| #define | SMSC_E_EMPTYRIBBON | 0x0010000000000000 // No Ribbon | |
| #define | SMSC_F_DATA | 0x0020000000000000 | // Data Error |
| #define | SMSC_F_CARDBACKOUT | 0x0040000000000000 | // Card out to back Error |
| #define | SMSC_F_CARDERASE | 0x0080000000000000 | // Cannot Remove data |
| #define | SMSC_F_INCORRECT_PW | 0x0100000000000000 // Incorrect Password | |
| #define | SMSC_F_MAGREADT1 | 0x0200000000000000 | // Read data Error Mag. Track.1 |
| #define | SMSC_F_MAGREADT2 | 0x0400000000000000 | // Read data Error Mag. Track.2 |
| #define | SMSC_F_MAGREADT3 | 0x0800000000000000 | // Read data Error Mag. Track.3 |
| #define | SMSC_F_LOCKED | 0x1000000000000000 // Device Locked | |
| #define | SMSC_F_SPOOLFULL | 0x2000000000000000 | // Exceed Printer Spool |
| #define | SMSC_F_SET | 0x4000000000000000 | // Recent motion fail |
Laminator's Status Code
| #define | LMSC_M_HEATHDRLIFTUP | 0x0000000000000001 | // Heat-header is being lifted up |
| #define | LMSC_M_HEATHDRLIFTDOWN | 0x0000000000000004 | // Heat-header is being lifted down |
| #define | LMSC_M_CARDIN | 0x0000000000000010 | // Card In |
| #define | LMSC_M_MOVE_LAMINATE | 0x0000000000000040 | // Moving to laminate position |
| #define | LMSC_M_FRONTCARDOUT | 0x0000000000000100 | // Card is being moved out to front. |
| #define | LMSC_M_REARCARDOUT | 0x0000000000000200 | // Card is being moved out to rear. |
| #define | LMSC_M_ROTATE | 0x0000000000000400 | // Rotating |
| #define | LMSC_S_WAIT | 0x0000000000000800 | // Waiting |
| #define | LMSC_S_CMDRUN | 0x0000000000002000 | // Command is being executed. |
| #define | LMSC_M_HEATING | 0x0000000000004000 | // Heating Heat-header |
| #define | LMSC_S_CASEOPEN | 0x0000000000008000 | // Top cover is opened |
| #define | LMSC_M_LAMINATING | 0x0000000000010000 | // Laminating |
| #define | LMSC_S_CARDINSENSOR | 0x0000000020000000 | // Caught by card in sensor |
Laminator's Error Code
#define LMSC_E_HEATHDRLIFTUP 0x0000000100000000 // Error while lifting up Heat-header
#define LMSC_E_HEATHDRLIFTDOWN 0x0000000400000000 // Error while lifting down Heat-header
#define LMSC_E_CARDIN 0x0000001000000000 // Error while moving card in
#define LMSC_E_MOVE_LAMINATE 0x0000004000000000 // Error while moving to Laminate position.
#define LMSC_E_FRONTCARDOUT 0x0000010000000000 // Error while front card out (printer side)
#define LMSC_E_REARCARDOUT 0x000002000000000 // Error while rear card out (stacker side)
#define LMSC_E_ROTATE 0x000004000000000 // Error while rotating
#define LMSC_E_INIT 0x00008000000000// Error while initializing laminator
#define LMSC_E_EMPTYFILM 0x00010000000000// Film remain count is 0.
#define LMSC_E_NOFILM 0x800000000000/No film is installed, or cannot
4.3. Firmware upgrade
When you run the CardPrinterFirmware, you can see the pop-up window.
Device: Select the local printer that you want to upgrade.
Card Printer / Laminator: Select the device you want upgrade.
Device Version: Displays the current firmware version of selected printer.
Binary File: Click "Browse" button and select new firmware file to update.
Manual Update: It is used when you want to upgrade manually.
Update: Upgrades automatically. In generally, we recommend upgrading automatically.
Close: Exit.
Message : It displays information of upgrading.
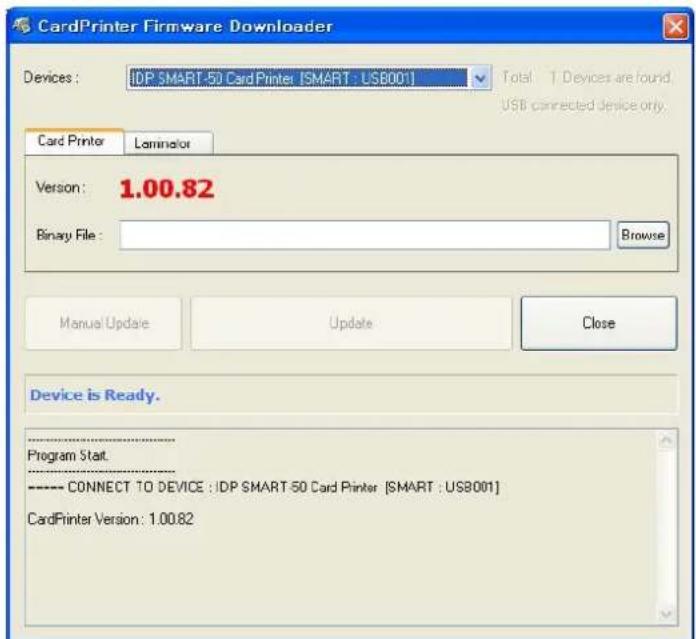
text_image
CardPrinter Firmware Downloader Devices : IDP SMART-50 Card Printer [SMART: US8001] Total 1 Devices are found. USB connected device only. Card Printer Laminator Version : 1.00.82 Binary File : Browse Manual Update Update Close Device is Ready. Program Start ---- CONNECT TO DEVICE : IDP SMART 50 Card Printer [SMART: US8001] CardPrinter Version : 1.00.82Pic.123 Upgrading printer firmware
4.3.1. Card Printer Firm-ware Upgrade.
If you click "Browse" and select the new firmware, "Manual Update" and "Update" are activated. At that time, click "Update" button to upgrade automatically, then the printer is upgraded after rebooting.
(Caution: Please do not close upgrade dialog box until it is completed successfully and do not turn off the printer.)
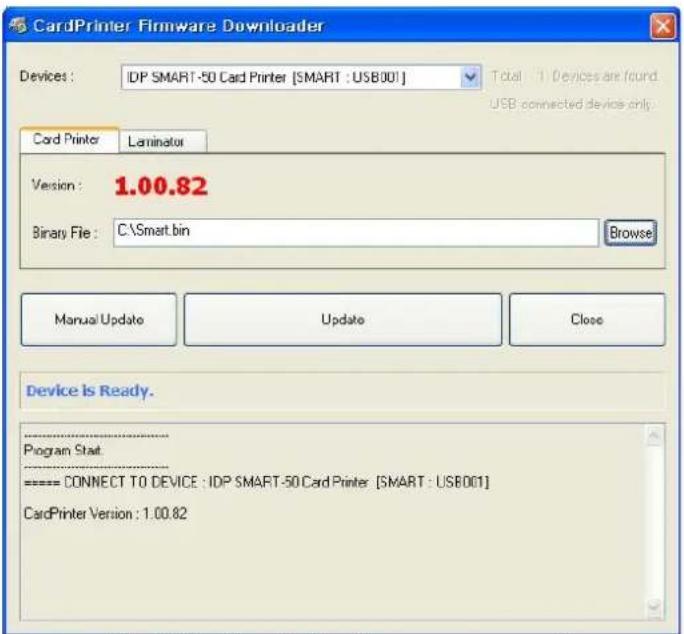
text_image
CardPrinter Firmware Downloader Devices : IDP SMART-50 Card Printer [SMART : USB001] Total: 1 Devices are found. USB connected devices only. Card Printer Laminator Version : 1.00.82 Binary File : C:\Smart.bin Browse Manual Update Update Close Device Is Ready. Program Stat. = CONNECT TO DEVICE : IDP SMART-50 Card Printer [SMART : USB001] CardPrinter Version : 1.00.82Pic.124 Ready for firm-ware upgrade
In case there are some problems in the automatic upgrade, you click "Manual Update" and can see the pop-up widow as below picture. It shows procedure of manual upgrade. You can upgrade manually according to this procedure.
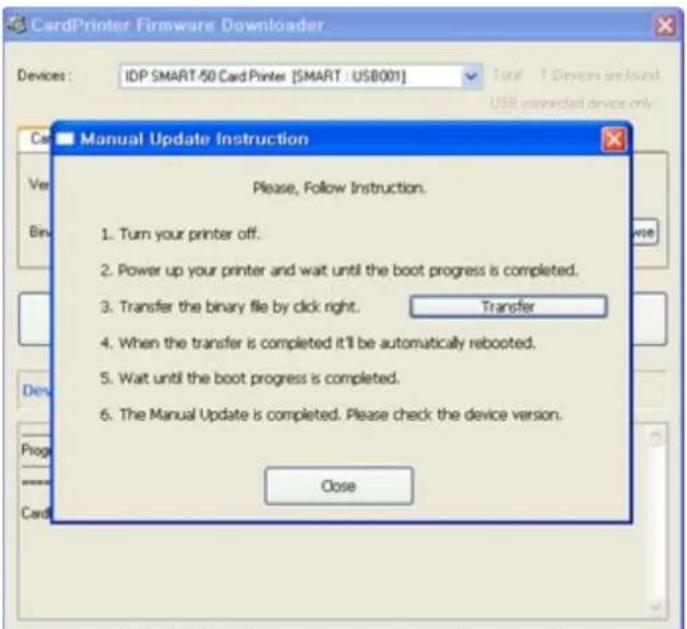
text_image
CardPrinter Firmware Downloader Devices : IDP SMART-50 Card Printer [SMART : USB001] Total 1 Devices are found USB connected device only Car Ver Bin Manual Update Instruction Please, Follow Instruction. 1. Turn your printer off. 2. Power up your printer and wait until the boot progress is completed. 3. Transfer the binary file by click right. Transfer 4. When the transfer is completed it'll be automatically rebooted. 5. Wait until the boot progress is completed. 6. The Manual Update is completed. Please check the device version. ClosePic.125 Firm-ware manual upgrade
4.3.2. Laminator Firm-ware Upgrade.
This function is only for card printer firm-ware version 1.00.60 and laminator should be installed to the printer. If you click "Browse" and select the new firmware, "Manual Update" and "Update" are activated. At that time, click "Update" button to upgrade automatically, then the printer is upgraded after rebooting.
(Caution: Please do not close upgrade dialog box until it is completed successfully and do not turn off the printer.)
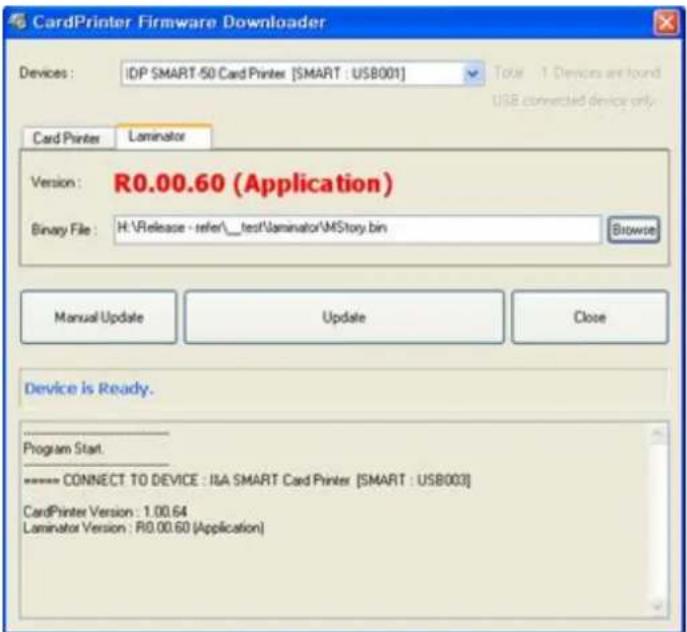
text_image
CardPrinter Firmware Downloader Devices : IDP SMART-50 Card Printer [SMART : USB001] Total ... 1 Devices are found USB connected device only. Card Printer Laminator Version : R0.00.60 (Application) Binary File : H:\Release - refer\_test\laminator\MSTory.bin Browse Manual Update Update Close Device is Ready. Program Start. ***** CONNECT TO DEVICE : IIA SMART Card Printer [SMART : USB003] CardPrinter Version : 1.00.64 Laminator Version : R0.00.60 (Application)Pic.126 Ready for laminator firm-ware upgrade
In case there are some problems in the automatic upgrade, you click "Manual Update" and can see the pop-up widow as below picture. It shows procedure of manual upgrade. You can upgrade manually according to this procedure.
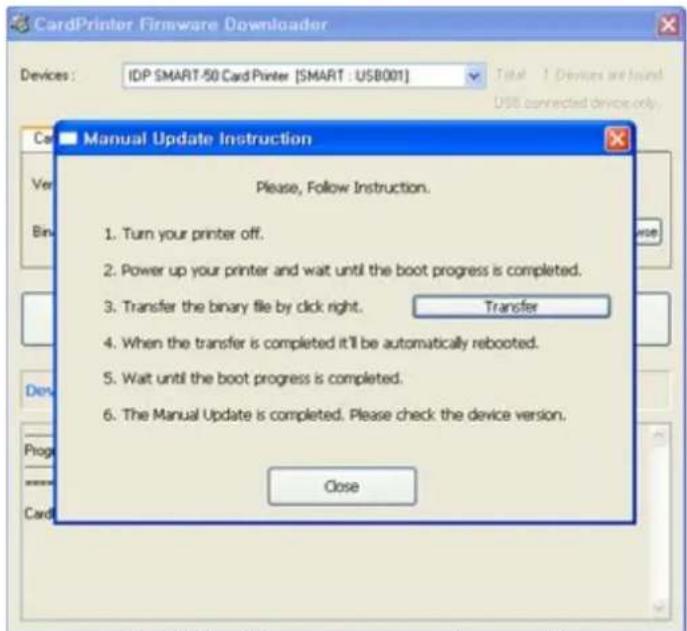
text_image
CardPrinter Firmware Downloader Devices: IDP SMART-50 Card Printer [SMART : USB001] Total 1 Devices are found USB connected device only. Car Ver Bin Manual Update Instruction Please, Follow Instruction. 1. Turn your printer off. 2. Power up your printer and wait until the boot progress is completed. 3. Transfer the binary file by click right. Transfer 4. When the transfer is completed it'll be automatically rebooted. 5. Wait until the boot progress is completed. 6. The Manual Update is completed. Please check the device version. ClosePic.127 Firm-ware manual upgrade
5. Optional device driver installation
In SMART-50 printer, you can install the optional devices that encode contact smartcard or contactless smartcard. If your purchased SMART-50 printer has optional devices, you should also install the smart card reader drivers.
5.1. Contact smartcard reader
In SMART-50 printer, you can install the two types of optional devices which are contact smartcard reader and mobile SIM smartcard reader. If you have one or more smartcard reader devices on your printer, you should install the smartcard device driver as in the following, and connect SMART-50 printer to your PC.
5.1.1. Run the smartcard driver installer
Insert the smartcard installation CD and find "\Options\Gemalto PC Twin" directory on your CD. Find the right directory which is installed OS version on your PC, and run the installer. You can see the smartcard reader driver installation window as the Pic.125. And click "Next".
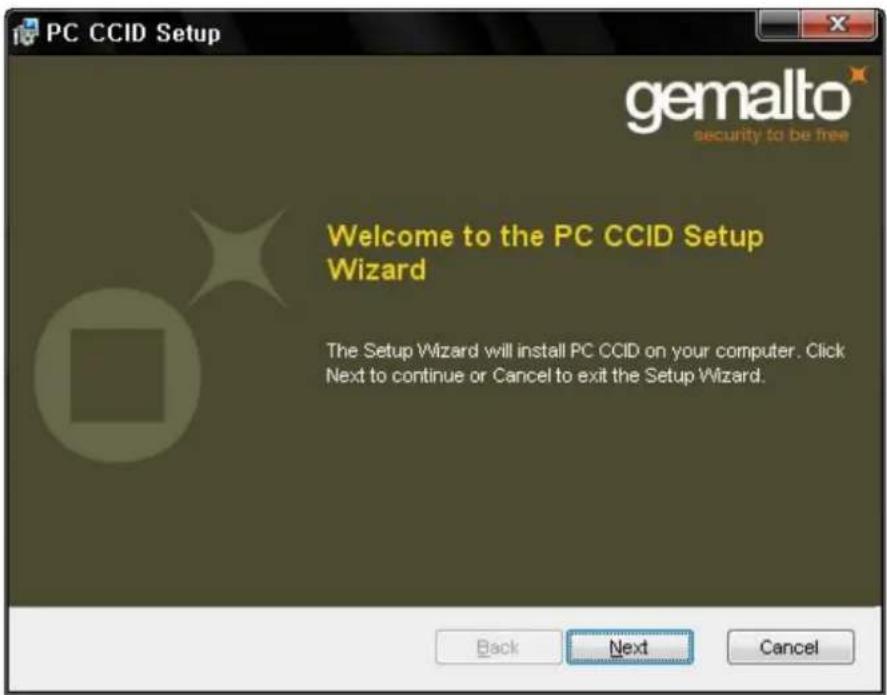
text_image
PC CCID Setup gemalto security to be free Welcome to the PC CCID Setup Wizard The Setup Wizard will install PC CCID on your computer. Click Next to continue or Cancel to exit the Setup Wizard. Back Next CancelPic.128 Contact smartcard reader driver installation
5.1.2. License agreement
The license agreement window is shown. Check at the agreement and click "Next".
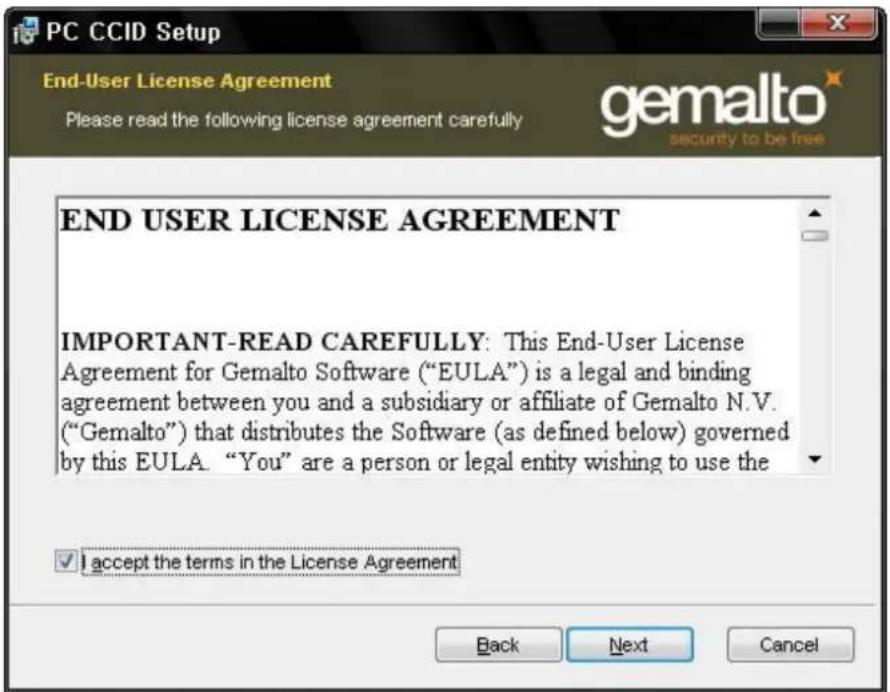
text_image
PC CCID Setup End-User License Agreement Please read the following license agreement carefully gemalto security to be free END USER LICENSE AGREEMENT IMPORTANT-READ CAREFULLY: This End-User License Agreement for Gemalto Software ("EULA") is a legal and binding agreement between you and a subsidiary or affiliate of Gemalto N.V. ("Gemalto") that distributes the Software (as defined below) governed by this EULA. "You" are a person or legal entity wishing to use the ✓ accept the terms in the License Agreement Back Next CancelPic.129 License agreement
5.1.3. Installation
The installation message is shown as the picture. Click "Install" to install driver.
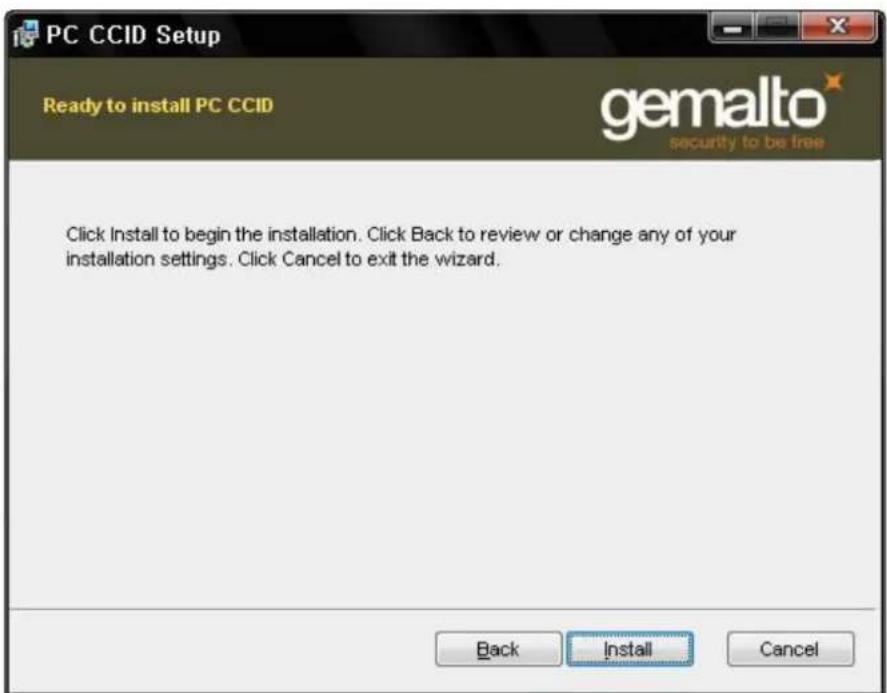
text_image
PC CCID Setup Ready to install PC CCID gemalto security to be free Click Install to begin the installation. Click Back to review or change any of your installation settings. Click Cancel to exit the wizard. Back Install CancelPic.130 Installing the contact smartcard reader driver
5.1.4. Complete installation
When the installation is completed, the window is shown. Click the "Finish" to complete the installation steps.
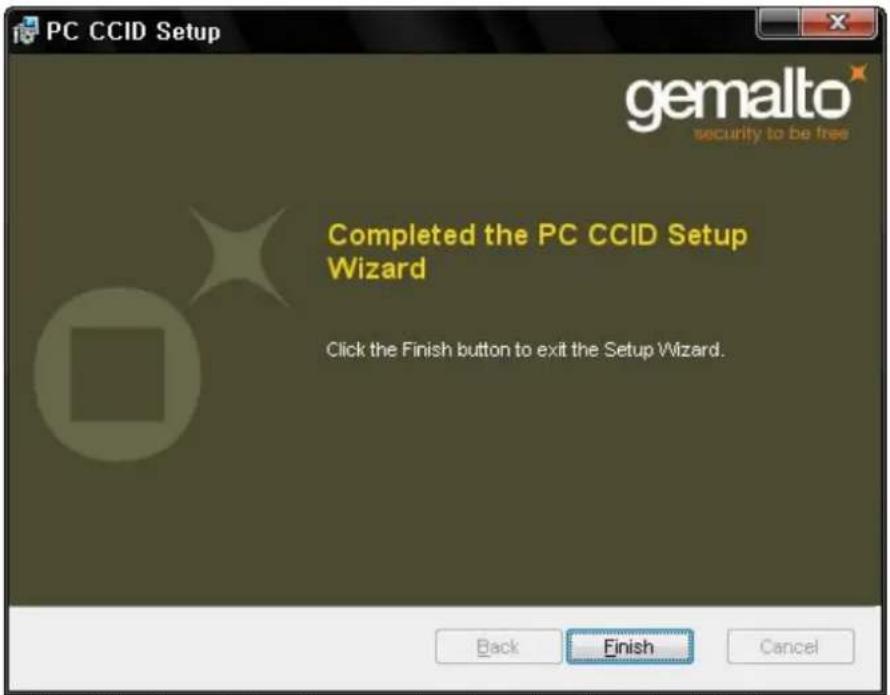
text_image
PC CCID Setup gemalto security to be free Completed the PC CCID Setup Wizard Click the Finish button to exit the Setup Wizard. Back Finish CancelPic.131 Completing the smartcard reader driver installation
5.2. Contactless smartcard reader
In SMART-50 printer, you can install the two types of smartcard reader which are internal contactless smartcard reader and external contactless smartcard reader. If you have one or more contactless smartcard reader devices on your printer, you should install the contactless smartcard device driver as in the following, and connect SMART-50 printer to your PC.
5.2.1. Connect SMART-50 printer to PC
When you connect the printer to PC and turn on the printer, you can see the "Found New Hardware Wizard" as the picture, then Check "No, not that time" and Click "Next" to continue.
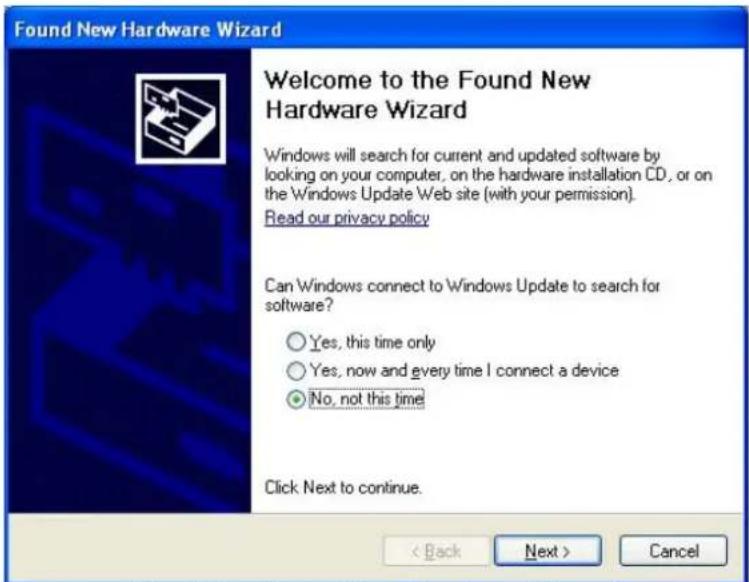
text_image
Found New Hardware Wizard Welcome to the Found New Hardware Wizard Windows will search for current and updated software by looking on your computer, on the hardware installation CD, or on the Windows Update Web site (with your permission). Read our privacy policy Can Windows connect to Windows Update to search for software? Yes, this time only Yes, now and every time I connect a device No, not this time Click Next to continue. < Back Next > CancelPic.132 Found New Hardware Wizard
5.2.2. Choose the installation method
At the window as the picture, select "Install from a list or specific location" and click "Next".
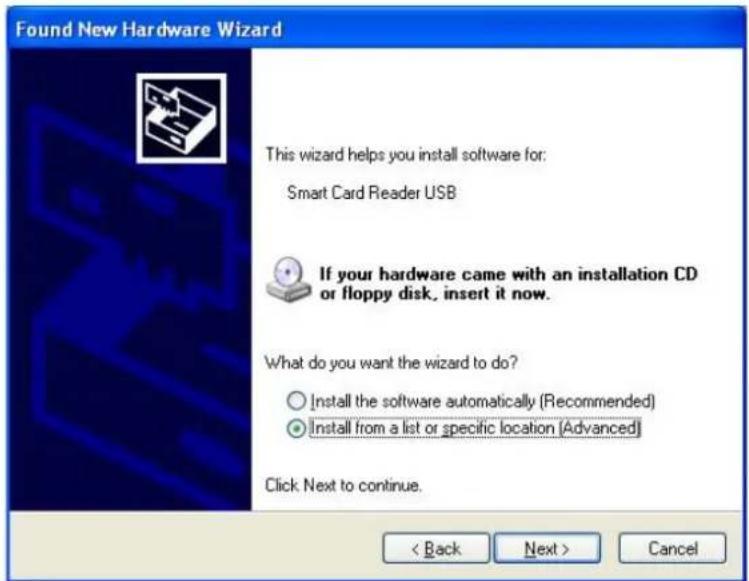
text_image
Found New Hardware Wizard This wizard helps you install software for: Smart Card Reader USB If your hardware came with an installation CD or floppy disk, insert it now. What do you want the wizard to do? ○ Install the software automatically (Recommended) ● Install from a list or specific location [Advanced] Click Next to continue. < Back Next > CancelPic.133 Installation method selection
5.2.3. Driver location
Insert the smartcard installation CD and find "\Options\ Omnikey 5121" directory on your CD. Find the right directory which is installed OS version on your PC, and select the directory as the picture, and click "Next".
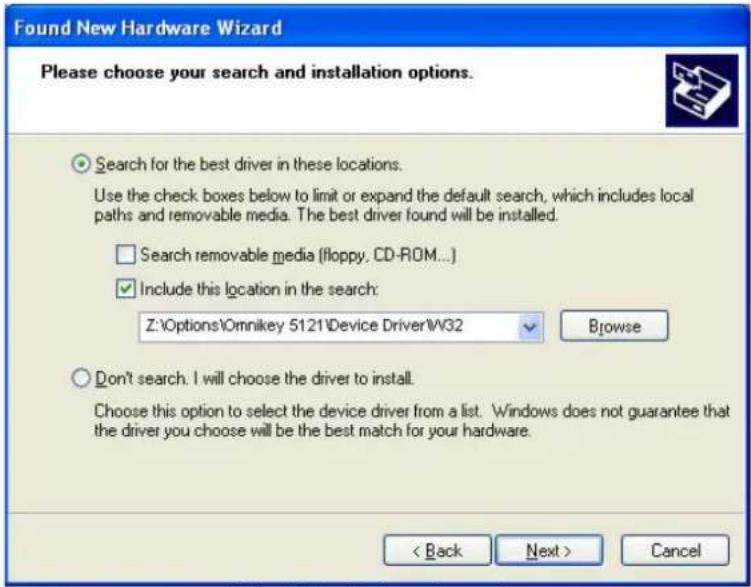
text_image
Found New Hardware Wizard Please choose your search and installation options. Search for the best driver in these locations. Use the check boxes below to limit or expand the default search, which includes local paths and removable media. The best driver found will be installed. Search removable media (floppy, CD-ROM...) Include this location in the search: Z:\Options\Omnikey 5121\Device Driver\W32 Browse Don't search. I will choose the driver to install. Choose this option to select the device driver from a list. Windows does not guarantee that the driver you choose will be the best match for your hardware. < Back Next > CancelPic.134 Driver location
5.2.4. Complete installation
When the installation is completed, the window as the Pic121 is shown, click "Finish" to complete the installation steps.
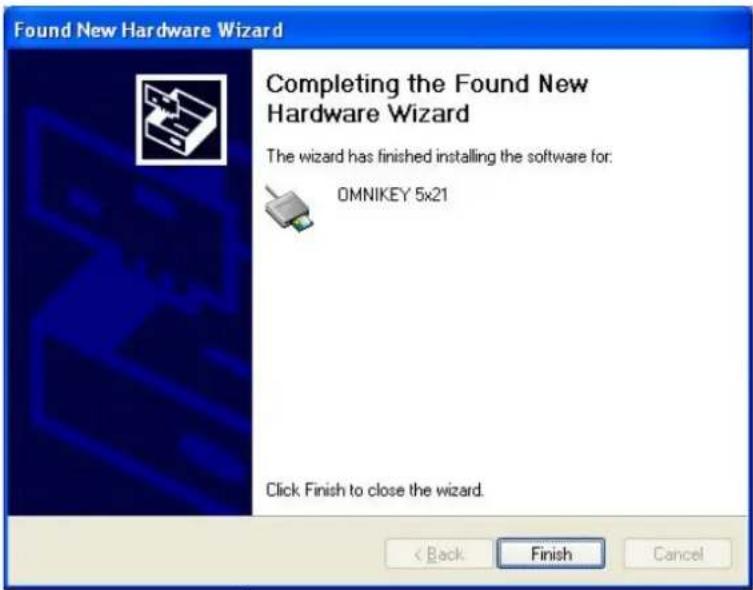
text_image
Found New Hardware Wizard Completing the Found New Hardware Wizard The wizard has finished installing the software for: OMNIKEY 5x21 Click Finish to close the wizard. < Back Finish CancelPic.135 Completing the driver installation
6. Troubleshooting
6.1. Cleaning the printer
To maintain the best condition of SMART-50 printer, you must clean the printer periodically. If you use the exclusive cleaning card as the picture, you can clean the printer easily. For purchase the exclusive cleaning card, ask to SMART-50 printer provider.
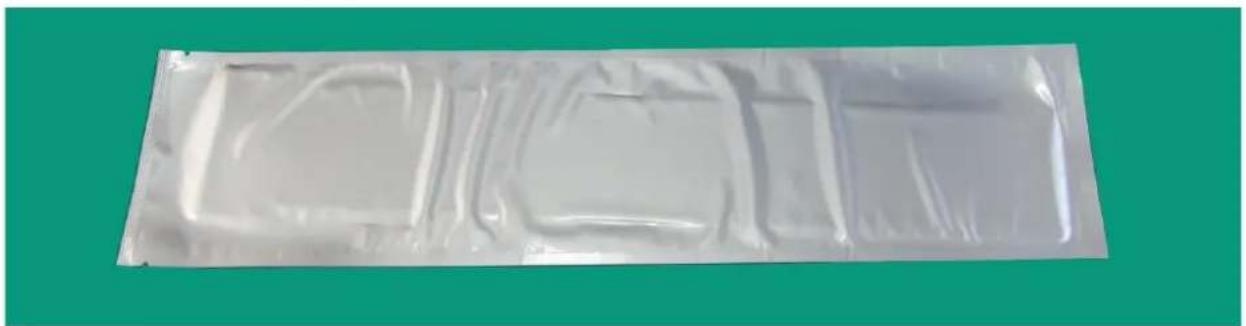
natural_image
Transparent plastic bag with four rounded cutouts, set against a solid green background (no text or symbols visible)Pic.136 Exclusive cleaning card for SMART-50 printer
If the exclusive cleaning card is ready, click the "Clean Printer" in the service tab of SMART-50 printer driver. After click, Clean Printer program to clean the printer is run.
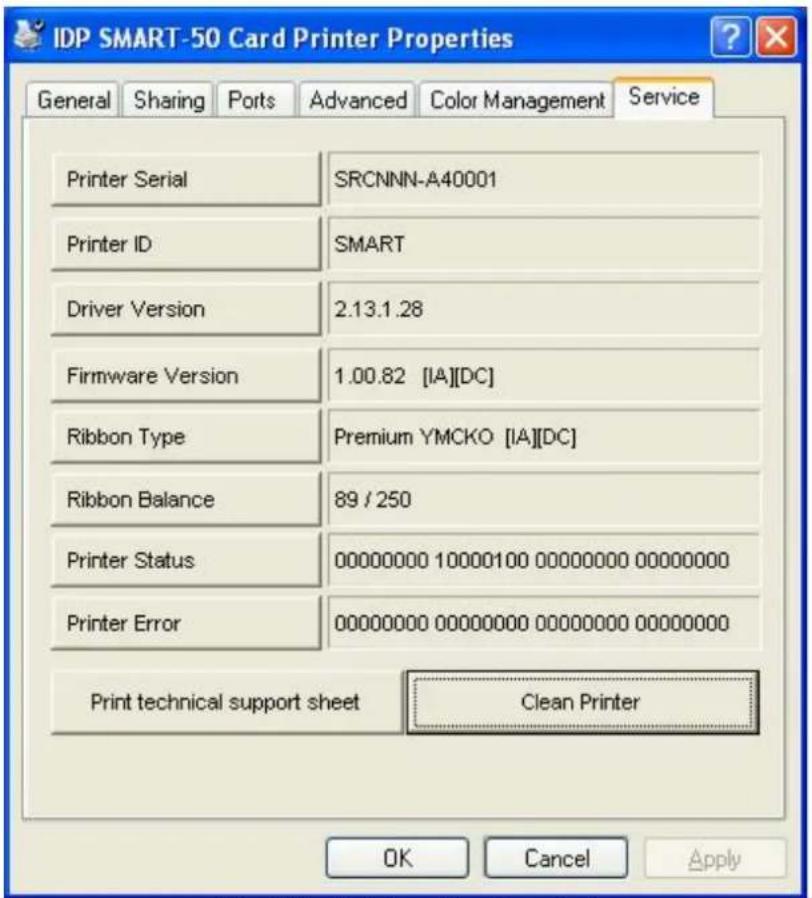
text_image
IDP SMART-50 Card Printer Properties General Sharing Ports Advanced Color Management Service Printer Serial SRCNNN-A40001 Printer ID SMART Driver Version 2.13.1.28 Firmware Version 1.00.82 [IA][DC] Ribbon Type Premium YMCKO [IA][DC] Ribbon Balance 89 / 250 Printer Status 00000000 10000100 00000000 00000000 Printer Error 00000000 00000000 00000000 00000000 Print technical support sheet Clean Printer OK Cancel ApplyPic.137 Printer cleaning start
Step 1. Connect the SMART-50 printer to PC and turn it on, and prepare the exclusive cleaning card.
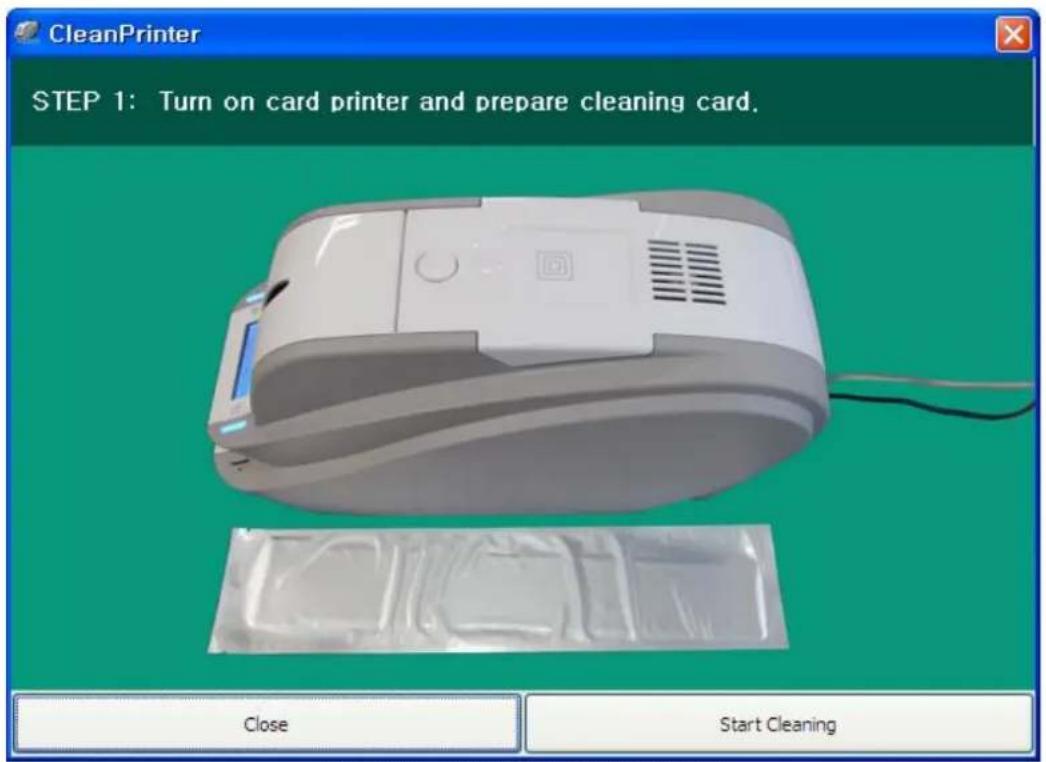
text_image
CleanPrinter STEP 1: Turn on card printer and prepare cleaning card. Close Start CleaningPic.138 Printer cleaning Step 1
Step 2. Open the hopper and top cover and remove the card and ribbon cartridge.
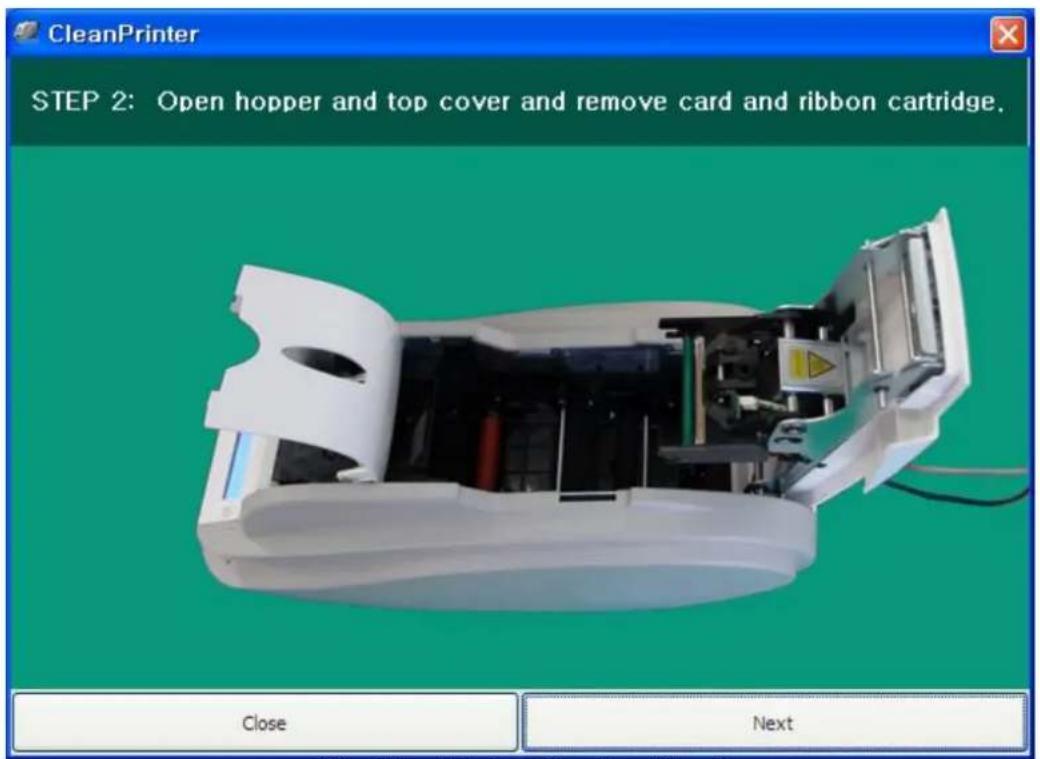
text_image
CleanPrinter STEP 2: Open hopper and top cover and remove card and ribbon cartridge. Close NextPic.139 Printer cleaning Step 2
Step 3. Insert the exclusive cleaning card into the printer through input hopper. When the exclusive cleaning card is inserted to the cleaning roller, it will be move automatically. It is normal that the exclusive cleaning card is inserted to the ends and rollers are moving to clean.
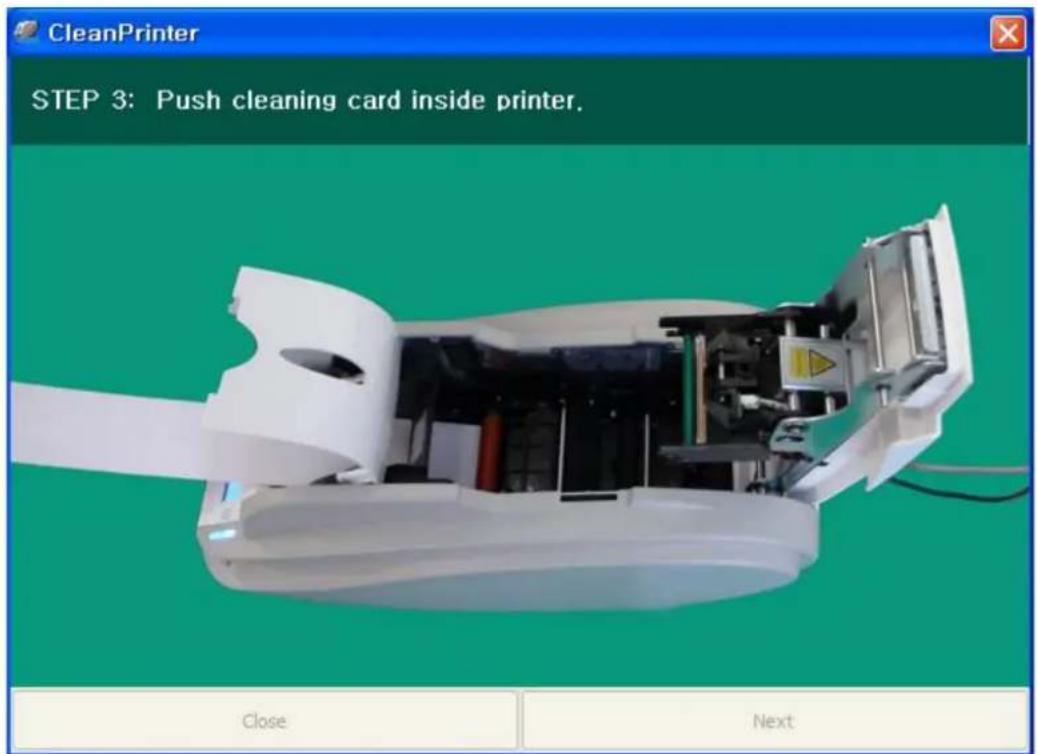
text_image
CleanPrinter STEP 3: Push cleaning card inside printer. Close NextPic.140 Printer cleaning Step 3
Step 4. Close the top cover to clean the Thermal Print Head and the printing roller. When the top cover is closed, cleaning card will be moving back and forth to clean.
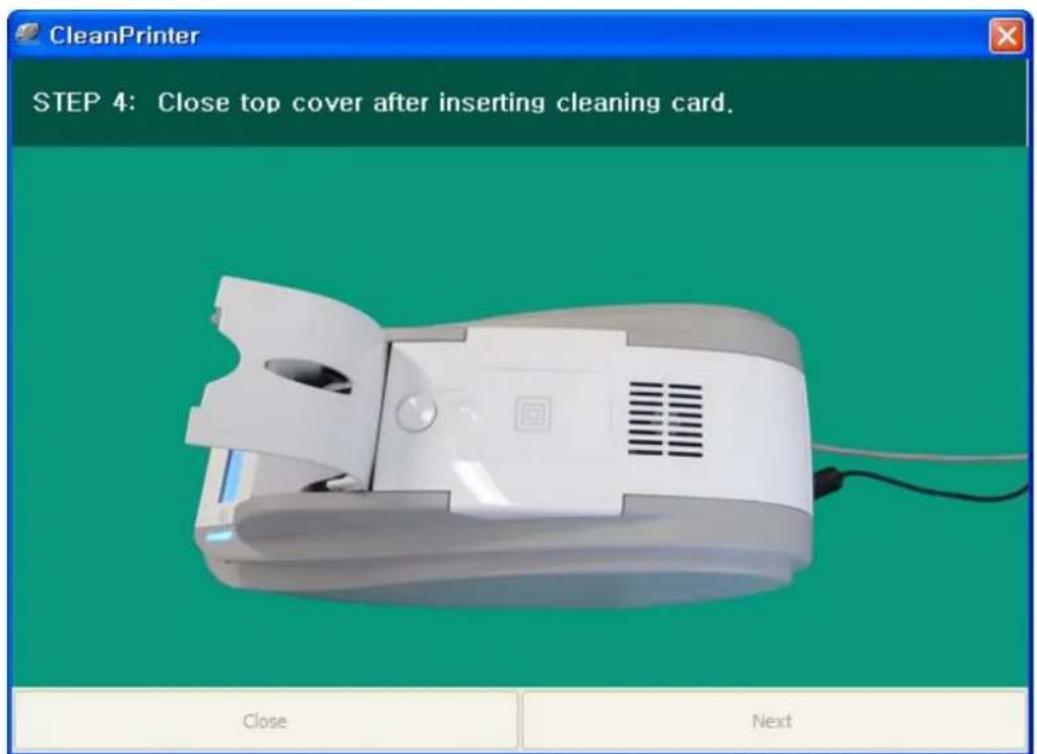
text_image
CleanPrinter STEP 4: Close top cover after inserting cleaning card. Close NextPic.141 Printer cleaning Step 4
Step 5. Wait until the cleaning is completed. When the cleaning is completed, the exclusive cleaning card will be ejected automatically as the picture.
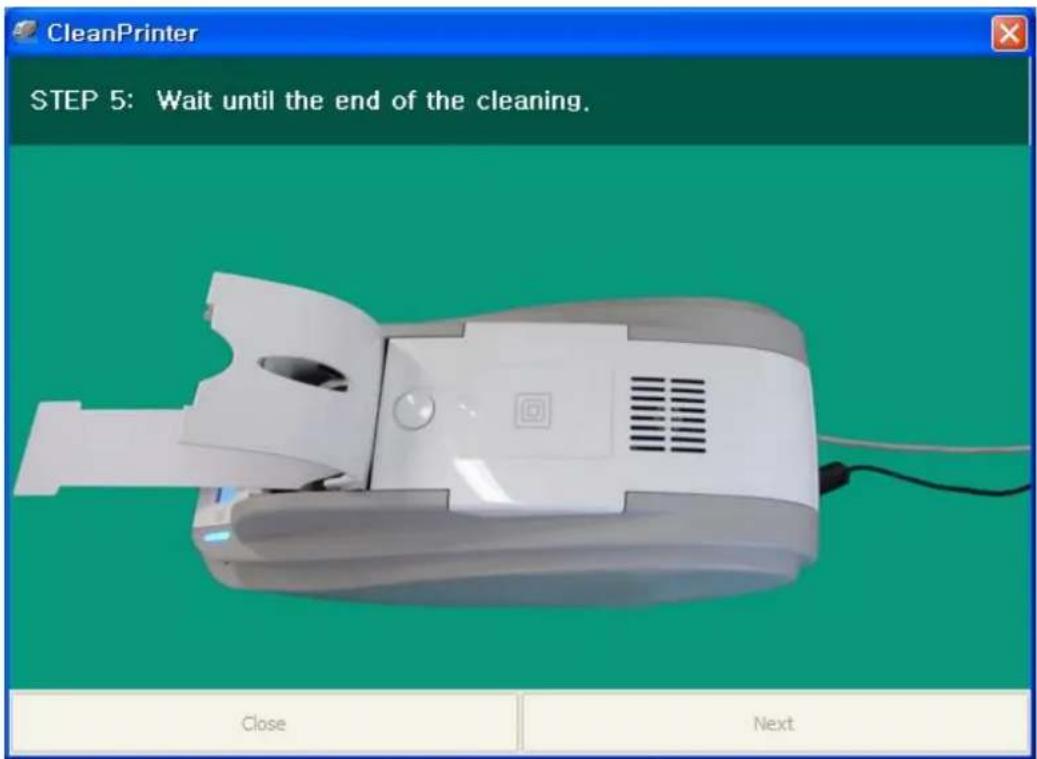
text_image
CleanPrinter STEP 5: Wait until the end of the cleaning. Close NextPic.142 Printer cleaning Step 5
Step 6. Remove the exclusive cleaning card and install ribbon cartridge into the printer.
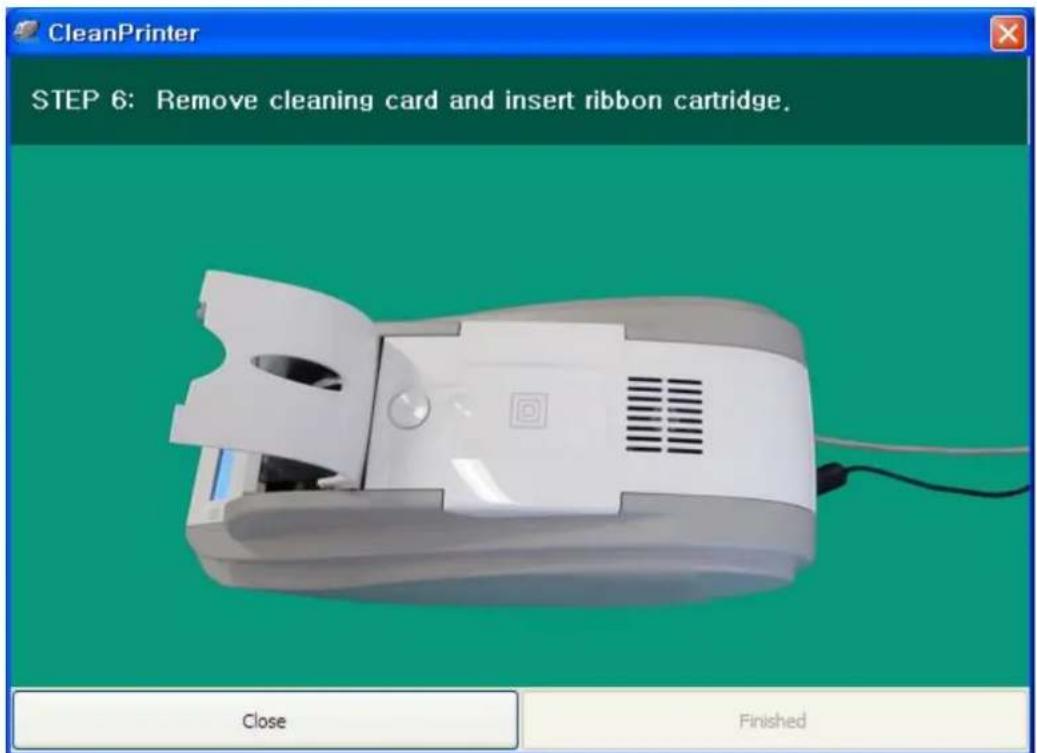
text_image
CleanPrinter STEP 6: Remove cleaning card and insert ribbon cartridge. Close FinishedPic.143 Printer cleaning Step 6
6.2 TPH (Thermal Print Head) replacement
1. Check the serial number and the resistance of new Thermal Print Head as the Picture.
TPH type: A = KEE, B = KPE
Serial No.: see the red box.
TPH resistance: see the green box.
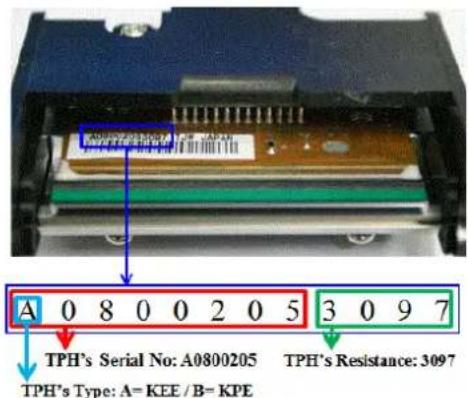
text_image
A 0 8 0 0 2 0 5 3 0 9 7 TPH's Serial No: A0800205 TPH's Resistance: 3097 TPH's Type: A= KEE / B= KPEPic.144 Thermal Print Head
2. Set up the new TPH's configuration using CardPrinterSetup program.
Step1: Run 'Card Printer Setup' in Utilities of the installation CD and click expansion button.
Step2: Click "Change Header" in the extended setup.
Step3: Input the TPH's Serial No., Resistance and Type (choose KEE or KPE) on the TPH's label, and click "OK".
Step4: Click "Set Config" to set the new TPH's configuration.
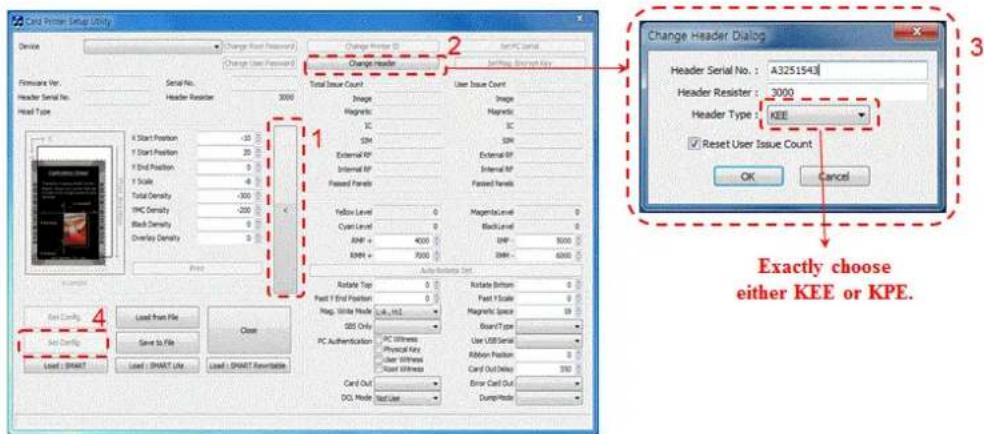
text_image
Card Printer Setup Utility Device Change (Start Password) Change User Password Firmware Ver. Serial No. Header Serial No. Header Resistor 3000 Head Type 1 2 3 4 5 6 7 8 9 10 11 12 13 14 15 16 17 18 19 20 21 22 23 24 25 26 27 28 29 30 31 32 33 34 35 36 37 38 39 40 41 42 43 44 45 46 47 48 49 50 51 52 53 54 55 56 57 58 59 60 61 62 63 64 65 66 67 68 69 70 71 72 73 74 75 76 77 78 79 80 81 82 83 84 85 86 87 88 89 90 91 92 93 94 95 96 97 98 99 100 Auto Attribute Set Aristate Top 0 0 0 0 0 0 0 0 0 0 0 0 0 0 0 0 0 0 0 0 0 0 0 0 0 0 0 0 0 0 0 0 0 0 0 0 0 0 0 0 0 0 0 0 0 0 0 0 0 0 100.0.0.0.0.0.0.0.0.0.0.0.0.0.0.0.0.0.0.0.0.0.0.0.0.0.0.0.0.0.0.0.0.0.0.0.0.0.0.0.0.0.0.0.0.0.0.0.1.1.1.1.1.1.1.1.1.1.1.1.1.1.1.1.1.1.1.1.1.1.1.1.1.1.1.1.1.1.1.1.1.1.1.1.1.1.1.1.1.1.1.1.1.1.1.1.1.1.2.2.2.2.2.2.2.2.2.2.2.2.2.2.2.2.2.2.2.2.2.2.2.2.2.2.2.2.2.2.2.2.2.2.2.2.2.2.2.2.2.2.2.2.2.2.2.2.2.2.3.Pic.145 Print head setup
3. Replacing the new TPH
Step1: Remove the old TPH from the top cover.
(1) Turn off the printer and open the top cover.
(2) Hold the TPH and press the locked hook, then the TPH is disconnected..
(3) Disconnect the TPH from print head wire carefully.
(Caution: TPH is possible to HOT.)
Step2: Installing the new TPH
(1) Connect new TPH to the print head wire.
(2). Put the new TPH on the Shift and pull it up until be locked..
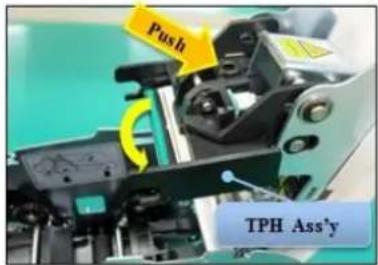
text_image
Push TPH Ass'y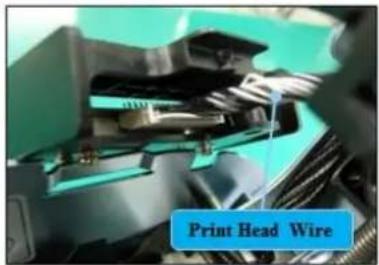
text_image
Print Head Wire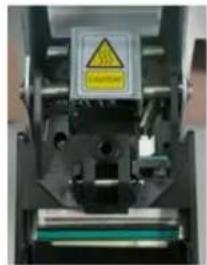
natural_image
Close-up of a mechanical device with a yellow warning sign and green bars (no readable text or symbols)Pic.146 Print head replacement
4. Setup the print position and the color density.
After installing the new TPH, you must reset the print position and the color density using CardPrinterSetup utility. Refer to "4.1.2 Default setting"
5. Calibration of Print Head Angle
To get the best print quality, the TPH should be located vertically with card surface.
If print quality has the problem, it could be caused by print head angle.
Through Adjusting print head angle by screw (red mark in the right picture) you could make good quality of print.
(Use the appropriate screw driver to adjust, and turn the screw by 90 degree at a time.)
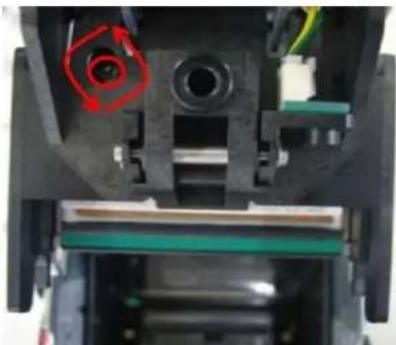
natural_image
Close-up of a mechanical assembly with green and yellow components, no visible text or symbolsPic.147 Print head angle
6.3. Card movement
6.3.1. Cards can't enter into the printer from input hopper.
● Non-standard cards or bad cards.
Change the cards. You can use only ISO CR-80 card (54mm x 86mm).
- Card thickness control lever is set improperly.
Regulate the card thickness control lever to fit the current card thickness.
- Bad card array.
Array the cards again and put them on input hopper as section 2.2 in this manual.
- Cards have static and moisture.
Remove the moisture or static.
6.3.2. Card Transfer Error occurs when the ribbon is coiled around the transfer roller or the printing roller.
Open the top cover and remove the card and the coiled ribbon from SMART-50 printer using front LED buttons. If this problem occurred frequently, check the below things.
● Non-standard cards or bad cards.
Change the cards. You can use only ISO CR-80 card (54mm x 86mm).
- The transfer roller or the printing roller is contaminated with the dust and dirt. Remove the dust and dirt with the cleaning kit as section 6.1
- Wrong printing position setting.
Please contact the local supplier
- When operating temperature and humidity is out of the acceptable operating limit of the printer.
Adjust the operating environment of the printer.
6.3.3. An Error occurs while the card is being transferred.
First of all, check the Error message at LCD display. Open the top cover and remove the card by LED buttons. If this problem occurs frequently, check the followings.
● Non-standard cards or bad cards.
Change the cards. You can use only ISO CR-80 card (54mm x 86mm).
● Printer setting is changed or is not proper.
Please contact the local supplier.
● The transfer roller or the printing roller is contaminated with the dust and dirt.
Remove the dust and dirt with the cleaning kit as section 6.1.
● The card surface is contaminated with the dust and dirt.
Check the card surface and remove the dust and dirt and try again. If this problem occurs again, retry with new card.
6.4. Printing quality
6.4.1. Not printed or wrong colors printed spot.
● The card surface is contaminated with the dust and dirt.
After checking the card, change it to another card.
● The cleaning roller is contaminated with the dust and dirt.
Check the cleaning roller. If there is much dust, change the cleaning roller to the new one.
- Much dust in the printer.
Clean the inside of the printer with the cleaning kit.
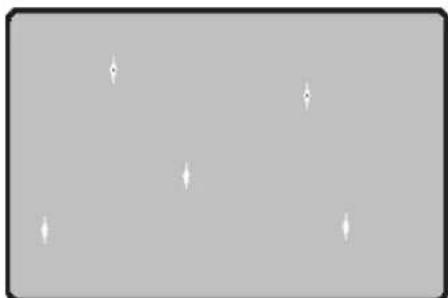
natural_image
Pure gray background with five white downward-pointing arrows, no text or symbols presentPic.148 Printing quality trouble 1
6.4.2. Not printed horizontal line.
● The ribbon cartridge is installed improperly.
Check the ribbon cartridge installation state and whether the ribbon has wrinkles.
● The printer head is contaminated with the dust and dirt.
Clean the printer head with cleaning kit.
● The printer head is damaged.
Please contact the local supplier to replace the printer head.
natural_image
Blank gray rectangle with a thin horizontal line across the center (no text or symbols)Pic.149 Printing quality trouble 2
6.4.3. Unclear or not uniform print.
- Uneven or bad card surface.
Change the card.
● Too high or low setting of the color density.
Please contact the local supplier. The color density default of your printer needs to be changed.
● The printer head is contaminated with the dust and dirt.
Clean the printer head with cleaning kit.
natural_image
Abstract grayscale gradient with diagonal white streak on gray background (no text or symbols)Pic.150 Printing quality trouble 3
6.4.4. Not aligned color print.
● Non-standard cards or bad cards.
Change the cards. You can use only ISO CR-80 card (54mm x 86mm).
- Uneven or bad card surface.
Change the card.
- The transfer roller or printing roller is contaminated with the dust and dirt.
Clean the rollers with the cleaning kit as section 6.1.
● Worn-out printer.
Please contact the local supplier.
natural_image
Simple icon of a flag on a pole, no text or symbols presentPic.151 Printing quality trouble 4
6.4.5. Unplanned color print.
● Non-standard cards or bad cards.
Change the cards. You can use only ISO CR-80 card (54mm x 86mm).
- Uneven or bad card surface. Change the card.
- The transfer roller or printing roller is contaminated with the dust and dirt.
Clean the rollers with the cleaning kit as section 6.1.
● Worn-out printer.
Please contact the local supplier.
natural_image
Blank gray rectangle with magenta and blue vertical borders (no text or symbols)Pic.152 Printing quality trouble 5
6.5. Magnetic stripe encoding
6.5.1. Magnetic encoding error.
First of all, Please press left LED button to retry.
● The magnetic head is contaminated with the dust and dirt.
Clean the magnetic head with the cleaning kit.
● The magnetic encoding data is not transmitted or the wrong data is transmitted.
Check the setting of the program and the driver and the magnetic encoding data you transmitted.
● The card is not magnetic card, or inserting direction is wrong.
Change the card or the direction.
● Bad magnetic stripes on the card.
Change the card.
6.6. General operation
6.6.1. Ribbon snapped during printing.
Open the top cover and take out the cartridge. After putting the snapped pieces on together, install the cartridge again. Check the followings if this kind of problem occur frequently.
● Non-standard cards or bad cards.
Change the cards. You can use only ISO CR-80 card (54mm x 86mm).
● Too high or low setting of the color density.
Please contact the local supplier. The color density default of your printer needs to be changed.
6.6.2. LCD display "Ribbon Not Found"
Press the left LED button to retry. If it occurs frequently, check the followings.
- Not genuine ribbon.
Change to the genuine ribbon. - Ribbon is consumed.
Printing is not possible if ribbon is used up. Change the ribbon.
- Snapped ribbon.
Open the top cover and take out the cartridge. After putting the snapped pieces on together, install the cartridge again.
6.6.3. Printer doesn't operate even if the printing data has been transmitted. Check the following.
● Printer power off.
Check the power. Turn on the printer power.
Check the printer adaptor whether it is connected with a socket and the printer.
● Bad power adaptor.
Please contact the local supplier for replacement of the adaptor.
● The printer driver is "Offline".
Change the printer driver to "Online".
- The printer's USB cable is disconnected or the connection is bad.
Check the cable's connection between PC and the printer.
If not good, make the USB cable connection again.
- Bad USB cable.
Change the USB cable.
● The printing is operated with another printer driver.
Select the correct SMART-50 printer driver again.
- Wrong USB port setting of the printer driver.
Check the port setting of the printer driver and change the port setting.
- No ribbon in the printer or error occurred. Install ribbon in the printer or resolve the err
- Too long power or USB cable (more than 1.5M). Use the cable provided with the printer.
- PC's USB port is down: Reboot your PC.
7. Printer specification
| Product Specification SMART-30S SMART-30R | ||
| Printing | ||
| Print Type Dye-Sublimation | / Resin Thermal Transfers Direct Thermal Printing & Erasing | |
| Print Area | Edge to Edge | |
| Resolution | 300 dpi | |
| Dual Side Printing Option - | ||
| Cards | ||
| Card Feeding | Automatic | |
| Card Size | ISO CR-80 (54mm x 86mm / 2.12" x 3.38") | |
| Card Thickness | 0.38mm (15mil) ~ 0.76mm (30mil) | |
| Card Type PVC, Composit | PVC, PET Rewritable Thermochromic Material | |
| Print Speed(Max.) | ||
| Monochrome 6 sec. (600 cards/hour) 20 sec (180 cards/hour) for Erase & Write | ||
| YMCKO 28 sec. (128 cards/hour) - | ||
| YMCKOK - - | ||
| Capacity | ||
| Input Hopper | 80 cards | |
| Output Hopper | 25 cards | |
| Monochrome Ribbon | 1200 cards/roll | - |
| Color Ribbon YMCKO 250 | cards/roll | - |
| System | ||
| Memory | 64MB | |
| Control Panel | 1 LED Buttons | 1 LED Buttons |
| Supported Platform | Microsoft Windows 2003, XP, Vista(32/64bit), 7(32/64bit), 8(23/64bit) | |
| Communications | USB, Ethernet(Option) | |
| Power Supply(Adapter) | Free Voltage (AC 100/220V, 50~60Hz) | |
| Power Consumption | 45W | |
| Temperature/Humidity | 15~35°C / 20~80% | |
| Dimensions | ||
| Size(W x L x H) | 172mm x 377mm x 190mm | 172mm x 377mm x 190mm |
| Weight | 3.4Kg / 7.5lbs | 3.1Kg / 6.8lbs |
| Encoding | ||
| Magnetic Stripe | ISO7811 (Track I, II, III Read / Write), JIS II, HiCo / LoCo | |
| Contact Smart Card | ISO7816 (ID-1), SIM Type - ISO7816 (ID-000) | |
| Contactless Smart Card | MiFare, DesFire, ISO 14443(type A/B), ISO 15693, iClass | |
| Certifications | ||
| Certifications | CE, FCC, KC | |
| Product Specification | SMART-30D | |
| Printing | ||
| Print Type | Dye-Sublimation / Resin Thermal Transfers | |
| Print Area | Edge to Edge | |
| Resolution | 300 dpi | |
| Dual Side Printing | Yes | |
| Cards | ||
| Card Feeding | Automatic | |
| Card Size | ISO CR-80 (54mm x 86mm / 2.12" x 3.38") | |
| Card Thickness | 0.38mm (15mil) ~ 0.76mm (30mil) | |
| Card Type | PVC, Composit PVC, PET | |
| Print Speed(Max.) | ||
| Monochrome | 5 sec. (720 cards/hour) | |
| YMCKO | 28 sec. (128 cards/hour) | |
| YMCKOK | 32 sec. (112 cards/hour) | |
| Capacity | ||
| Input Hopper | 100 cards | |
| Output Hopper | 25 cards | |
| Monochrome Ribbon | 1200 cards/roll | |
| Color Ribbon | YMCKO 250 cards/roll | |
| System | ||
| Memory | 64MB | |
| Control Panel | 1 LED Buttons | |
| Supported Platform | Microsoft Windows 2000/2003/XP/Vista/7/8, Mac OS, Linux | |
| Communications | USB, Ethernet(Option) | |
| Power Supply(Adapter) | Free Voltage (AC 100/220V, 50~60Hz) | |
| Power Consumption | 48W | |
| Temperature/Humidity | 15~35°C / 20~80% | |
| Dimensions | ||
| Size(W x L x H) | 172mm x 472mm x 190mm | |
| Weight | 4.2Kg / 9.2lbs | |
| Encoding | ||
| Magnetic Stripe | ISO7811 (Track | , || , || Read / Write), JIS || , HiCo / LoCo | |
| Contact Smart Card | ISO7816 (ID-1), SIM Type - ISO7816 (ID-000) | |
| Contactless Smart Card | MiFare, DesFire, ISO 14443(type A/B), ISO 15693, iClass | |
| Certifications | ||
| Certifications | CE, FCC, KC | |
| Product Specification SMART-50S SMART-50D | ||
| Printing | ||
| Print Type | Dye-Sublimation / Resin Thermal Transfers | |
| Print Area | Edge to Edge | |
| Resolution | 300 dpi | |
| Dual Side Printing Option Yes | ||
| Cards | ||
| Card Feeding | Automatic | |
| Card Size | ISO CR-80 (54mm x 86mm / 2.12" x 3.38") | |
| Card Thickness | 0.38mm (15mil) ~ 1.0mm (40mil) | |
| Card Type | PVC, Composit PVC, PET | |
| Print Speed(Max.) | ||
| Monochrome | 5 sec. (720 cards/hour) | |
| YMCKO | 22 sec. (164 cards/hour) | |
| YMCKOK - 27 sec. (130 cards/hour) | ||
| Capacity | ||
| Input Hopper | 100 cards | |
| Output Hopper | 40 cards | |
| Monochrome Ribbon | 1200 cards/roll | |
| Color Ribbon | YMCKO 250 cards/roll, YMCKOK 200 cards/roll | |
| System | ||
| Memory | 64MB | |
| Control Panel | LCD Display / 2 LED Buttons | |
| Supported Platform | Microsoft Windows 2003, XP, Vista(32/64bit), 7(32/64bit) | |
| Communications | USB, Ethernet(Option) | |
| Power Supply(Adapter) | Free Voltage (AC 100/220V, 50~60Hz) | |
| Power Consumption | 45W | |
| Temperature/Humidity | 15~35°C / 20~80% | |
| Dimensions | ||
| Size(W x L x H) 170mm x 420mm x 195mm 170mm x 510mm x 195mm | ||
| Weight 4.5Kg / 10lbs 5.5Kg / 10lbs | ||
| Encoding | ||
| Magnetic Stripe | ISO7811 (Track I , II , III Read / Write), JIS II , HiCo / LoCo | |
| Contact Smart Card | ISO7816 (ID-1), SIM Type - ISO7816 (ID-000) | |
| Contactless Smart Card | MiFare, DesFire, ISO 14443(type A/B), ISO 15693, iClass | |
| Certifications | ||
| Certifications | CE, UL, FCC, KC | |
| Product Specification | SMART-50L | |
| Printing | ||
| Print Type | Dye-Sublimation | |
| Print Area | Edge to Edge | |
| Resolution | 300 dpi | |
| Dual Side Printing | Yes | |
| Laminating | ||
| Laminating Mode | Single & Double with flip-over | |
| Laminates | 0.6mil, 1.0mil, Clear and Holographic | |
| Cards | ||
| Card Feeding | Automatic | |
| Card Size | ISO CR-80 (54mm x 86mm / 2.12" x 3.38") | |
| Card Thickness | 0.76mm (29.9mil) ~ 1.0mm (40mil) | |
| Card Type | PVC, Composit PVC, PET-G | |
| Speed(Max.) | ||
| Simultaneous Mode (Front in/Back out) | ||
| YMCK & Single side Laminate | 23 sec. (156 cards/hour) | |
| YMCFK & Single side Laminate | 31 sec. (116 cards/hour) | |
| YMCKK & Single side Laminate | 33 sec. (109 cards/hour) | |
| One-by-One Mode (Front in/Front out) | ||
| YMCK & Single side Laminate | 44 sec. (82 cards/hour) | |
| YMCFK & Single side Laminate | 52 sec. (69 cards/hour) | |
| YMCKK & Single side Laminate | 54 sec. (67 cards/hour) | |
| Capacity | ||
| Simultaneous Mode (Front in/Back out) | ||
| Input Hopper | 100 cards | |
| Output Hopper | 25 cards | |
| One-by-One Mode (Front in/Front out) | ||
| Input Hopper | 100 cards | |
| Output Hopper | 40 cards | |
| System | ||
| Memory | 64MB | |
| Display & Control Panel | LCD Display / 2 LED Buttons | |
| Supported Platform | Microsoft Windows 2003, XP, Vista(32/64bit), 7(32/64bit) | |
| Communications | USB, Ethernet(Option) | |
| Power Supply(Adapter) | Free Voltage (AC 100/240V, 50~60Hz) | |
| Temperature / Humidity | 15~35 °C / 20~80% | |
| Dimensions | ||
| Size(W x L x H) | 170mm x 900mm x 195mm | |
| Weight | 9.2Kg / 20lbs | |
| Encoding | ||
| Magnetic Stripe | ISO7811 (Track | ,|| ,III Read / Write), JIS || , HiCo / LoCo | |
| Contact Smart Card | ISO7816 (ID-1) | |
| Contactless Smart Card | MiFare, DesFire, ISO 14443(type A/B), ISO 15693, iClass | |
Pic.153 Printer Specification 1
Pic.154 Printer Specification 2
Pic.155 Printer Specification 3
Pic.156 Printer Specification 4