MWDI7554 - Washing machine Montpellier - Free user manual and instructions
Find the device manual for free MWDI7554 Montpellier in PDF.


User questions about MWDI7554 Montpellier
0 question about this device. Answer the ones you know or ask your own.
Ask a new question about this device
Download the instructions for your Washing machine in PDF format for free! Find your manual MWDI7554 - Montpellier and take your electronic device back in hand. On this page are published all the documents necessary for the use of your device. MWDI7554 by Montpellier.
USER MANUAL MWDI7554 Montpellier
Installation and Operating Instructions
Model: MWDI7554
INTEGRATED WASHER DRYER
natural_image
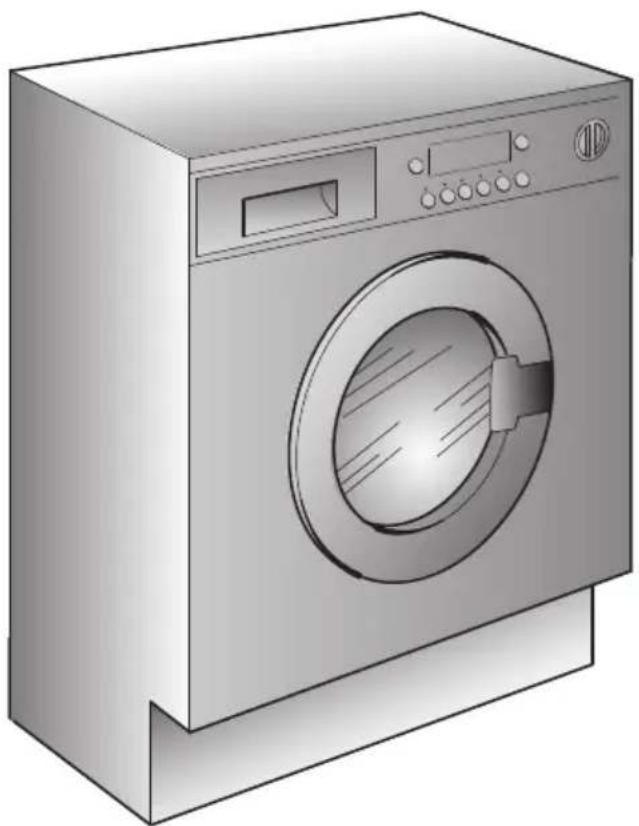
Illustration of a silver washing machine with front panel and side control buttons (no text or symbols)7.5kg Wash – 5kg Dry
Please read these instructions carefully before attempting to install or use this appliance. It is advisable to keep these instructions in a safe place for future reference.
Introduction
Thank you for choosing this Montpellier appliance. It has been designed to give years of trouble-free use provided it is installed and maintained correctly.
Please read these instructions carefully before installing or using your appliance. It is advisable to keep your purchase and installation receipts with these instructions in a safe place for future reference. Included is some important safety information in addition to guidelines and recommendations that will enable you to take full advantage of all the functions available.
This quality appliance has been tested and certified to meet all applicable UK electrical and safety standards.
This appliance must be installed and connected in accordance with current regulations by a qualified electrician.
After unpacking the appliance ensure that there is no visible damage. If the appliance has been damaged during transit, do not use it, contact your retailer immediately.
Your 2 year Manufacturer's guarantee
THIS DOES NOT AFFECT YOUR STATUTORY RIGHTS.
Your new Montpellier appliance carries a free guarantee which protects you against the cost of repairs during the first 24 months from date of purchase provided that:
Any claim is accompanied by evidence of the model reference, model serial number and proof of purchase, such as a Sales Receipt, showing that the appliance was purchased within the 24 months prior to the date of claim.
What is not covered under the guarantee:
- Any appliance not correctly installed and operated in accordance with the manufacturer's instructions.
- Any appliance that is used for anything other than domestic purposes.
- Any defect caused by accident, misuse, unauthorized modification or inexpert repair.
- Cost of Call-out where a fault cannot be found with the appliance.
- Cost of Call-out for work covering routine maintenance, such as, but not exclusively, cleaning of filters.
- Cost of Call-out for work required to correct the alignment of doors following door reversal procedures carried out by you.
- Use of the appliance by anyone other than the Householder.
- Use in any commercial environment.
- Consumable items, such as, but not exclusively, fuses in plugs, bulbs and breakable items which require routine replacement.
- Repair costs incurred that have not been authorised by Repairtech and/or carried out by a non-approved Repairtech engineer.
To Register your Appliance simply complete the card in your appliance pac and return it with a stamp affixed or Alternatively you can Register online at www.montpellier-appliances.com
SERVICE HELP-LINE
Should your appliance develop a fault, please call the
Repairtech Service Helpline on:
01527-888133
Please remember to have all your product details available, including the model number, serial number, date of purchase and your retailer's details before registering a fault.
Your service call cannot progress without this information.
General safety rules
- This appliances is intended to be used in household and similar applications such as:
- Staff kitchen areas in shops, offices and other working environments;
- Farm houses;
- By clients in hotels, motels and other residential type environments;
• Bed and breakfast type environments.
A different use of this appliance from household environment or from typical housekeeping functions, as commercial use by expert or trained users, is excluded even in the above applications. If the appliance is used in a manner inconsistent with this it may reduce the life of the appliance and may void the manufacturer's warranty. Any damage to the appliance or other damage or loss arising through use that is not consistent with domestic or household use (even if located in a domestic or household environment) shall not be accepted by the manufacturer to the fullest extent permitted by law.
- This appliance can be used by children aged from 8 years and above and persons with reduced physical, sensory or mental capabilities or lack of experience and knowledge if they have been given supervision or instruction concerning use of the appliance in a safe way and understand the hazards involved.
Children shall not play with the appliance. Cleaning and user maintenance shall not be made by children without supervision. - Children should be supervised to ensure that they do not play with the appliance.
- Children of less than 3 years should be kept away unless continuously supervised.
- If the supply cord is damaged, it must be replaced by the manufacturer, its service agent or similarly qualified persons in order to avoid a hazard.
- Only use the hose-sets supplied with the appliance for the water supply connection (do not reuse old hose-sets).
- Water pressure must be between 0,05 MPa and 0,8 MPa.
- Make sure that a carpet do not obstruct the base of the machine and ventilation openings.
- The OFF condition is reached by placing the reference mark on the programmes control/knob in the vertical position. Any other different position of such control sets the machine in ON condition (only for models with programmes knob).
- The final part of a washer dryer cycle occurs without heat (cool down cycle) to ensure that the items are left at a temperature that ensures that the items will not be damaged.
WARNING: never stop a washer dryer before the end of the drying cycle unless all items are quickly removed and spread out so that the heat is dissipated.
- For the installation of built in appliances, please look at the specific paragraph.
- After installation, the appliance must be positioned so that the plug is accessible.
- The appliance must not be installed behind a lockable door, a sliding door or a door with a hinge on the opposite side to that of the washer dryer, in such way that a full opening of the washer dryer door is restricted.
- The maximum load capacity of dry clothes depends on the model used (see control panel).
- The appliance is not to be used if industrial chemicals have been used for cleaning.
- Do not dry unwashed items in the washer dryer.
- Items that have been soiled with substances such as cooking oil, acetone, alcohol, petrol, kerosene, spot removers, turpentine, waxes and wax removers should be washed in hot water with an extra amount of detergent before being dried in the washer dryer.
-
Items such as foam rubber (latex foam), shower caps, waterproof textiles, rubber backed articles and clothes or pillows fitted with foam rubber pads should not be dried in the washer dryer.
– Fabric softeners, or similar products, should be used as specified by the fabric softener instructions.
–Oil-affected items can ignite spontaneously, especially when exposed to heat sources such as a washer dryer. The items become warm, causing an oxidation reaction in the oil, Oxidation creates heat. If the heat cannot escape, items can become hot enough to catch fire. Piling, stacking or storing oil-effected items can prevent heat from escaping and so create a fire hazard. -
If it is unavoidable that fabrics contain vegetable or cooking oil or have been contaminated by hair care products be placed in a washer dryer they should first be washed in hot water with extra detergent - this will reduce, but not eliminate, the hazard.
- Remove all objects from pockets such as lighters and matches.
-To consult the product fi che please refer to the manufacturer website. - Before cleaning or maintaining the washing machine, unplug the appliance and turn off the water faucet.
- Make sure the electrical system is grounded. Otherwise, seek qualified professional assistance.
- Please do not use converters, multiple sockets or extension cords.
Safety instructions
WARNING: water may reach very high temperatures during the wash cycle.
- Make sure there is no water in the drum before opening the porthole.
- Do not pull on the power cord or appliance to unplug the machine.
- Do not expose the washing machine to rain, direct sunlight or other weather elements.
- When moving, do not lift the washing machine by the knobs or detergent drawer; during transport, never rest the porthole on the trolley. We recommend two people lift the washing machine.
- In the event of fault and/or malfunction, turn off the washing machine, close the water faucet and do not tamper with the appliance. Immediately contact the Customer Service Centre and only use original spare parts. Failure to observe these instruction may jeopardise appliance safety.
By placing the C€ mark on this product, we are confirming compliance to all relevant European safety, health and environmental requirements which are applicable in legislation for this product.
egaPs
| Introduction | 2 | |
| Guarantee details explained | 3 | |
| General safety rules | 4-6 | |
| seton yreviledare | 8 | |
| Quick start | 8 | |
| Description of controls | 9-15 | |
| Programme Table | 16-17 | |
| Programme selector | 18-20 | |
| Detergent drawer | 21 | |
| Detergents, washi | esu ostanda sdia gn | 22-23 |
| Useful advice for the user | 24 | |
| The main wash | 25-26 | |
| Drying | 27 | |
| egniyrD | 28 | |
| Automatic washing/drying cycle | 29-30 | |
| Cleaning and routine maintenance | 31-32 | |
| Investigating malfunctions | 33-34 | |
| atadacinhceT | 35 | |
| Setting up + installation | 36-40 | |
| Service helpline and weee disclaimer | 43-44 | |
BEFORE SWITCHING ON THE APPLIANCE MAKE SURE IT IS CORRECTLY INSTALLED AND THAT THE TRANSIT SCREWS ARE REMOVED AS SHOWN IN PAGE 36.
Please read these instructions for use carefully and all other information enclosed with the washing machine.
Keep all documentation in a safe place for future reference or for any future owners.

natural_image
Simple line drawing of an open book with no text or symbols visibleGeneral delivery notes
On delivery check that there is the following with the appliance:
- Instruction manual
– Certificate of guarantee - Caps
- Inlet hose
and check that no damage has occurred during transit, and if so, call your nearest
Authorised Technical Support Service agent (see Customer Service)
Quick start
Washing
- Open the door by using the handle "A" (Fig. 1, page 9)
- Select laundry and put it in the machine
- Close the door
- Put detergent in the compartments as indicated in the programme guide in this instruction manual
- Select programme
- The display will show the settings for the programme selected.
- Adjust the wash temperature if necessary.
DRYING
If you would like the drying cycle to begin automatically after washing, select the programme required using the Drying Selection button.
Otherwise it is possible to finish the wash and then decide on the drying programme and load.
Press additional function buttons (if required)
- Press the "Start/Pause" button (page 10)
- The programme starts.
After washing
- The word "End" will appear on the display.
- Wait for the door lock to be released (about 2 minutes after the programme has finished). The “Door Security” indicator light will go out.
- Switch off the washing machine by turning the selector to "OFF" position.
- Open the door and remove the laundry.
Ensure that the machine is correctly installed in line with the instructions found on page 36.
Description of controls
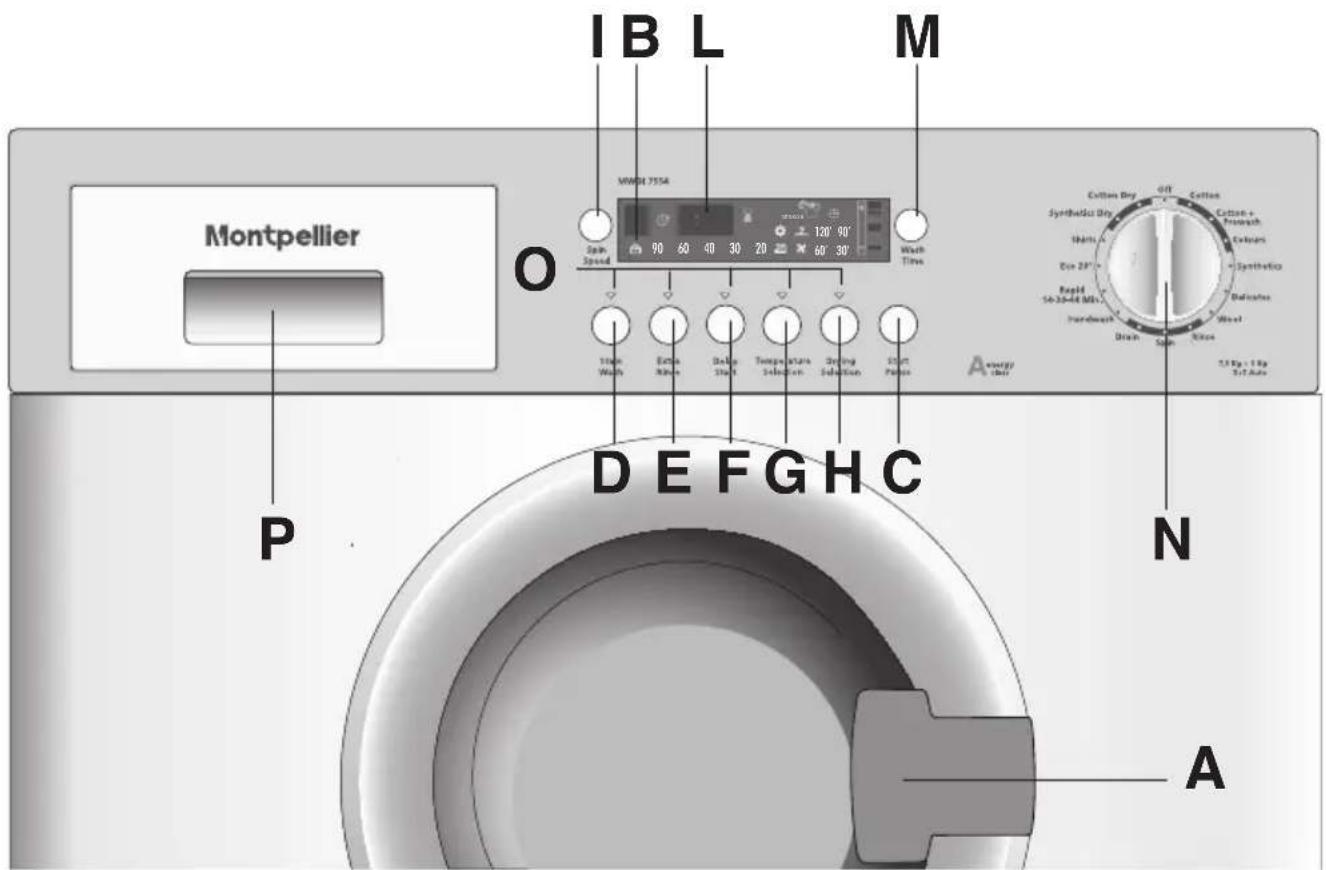
text_image
Montpellier O P IB L M MMDE 7554 Spin Speed 90 60 40 30 20 120' 90' 60' 30' Wash Time 1 Hour Wash Extra Wash Delay Start Temperature Selection Drilling Selection Light Pulse A N Cotton Dry Off Cotton Synthetic Dry Thermal Box 25" Synthetic Rapid 14-33-44 Mix Handwash Sham Spin Silk 1.5 Kg - 1.8g 3x1 Auto D E F G H C A"Door Security" indicator light
"Start/Pause" button
Wats1" button
"Extra Rinse" button
"Delay Start" button
"Temperature Selection" button
"Drying Selection" button
"Spin Speed" button
Digital display
"Wash Time" button
Programme selector with "OFF" position
Buttons indicator light
rand tnegreD
AeldnaH rooD
B
C
D
E
F
G
H
I
L
M
N
O
P
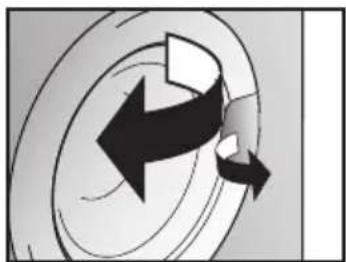
Door handle
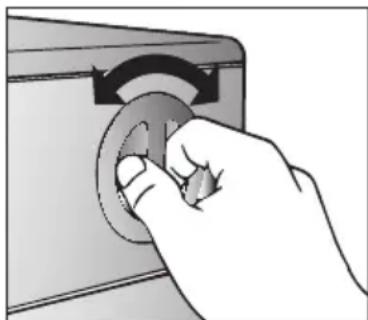
To open the door turn the handle in the manner illustrated in fig.
A
natural_image
Diagram of a mechanical or fluidic component with two opposing curved arrows indicating rotational motion (no text or symbols)DOOR SECURITY indicator light

B
The "Door Security" indicator light is illuminated when the door is fully closed and the machine is ON. When "Start/Pause" is pressed on the machine with the door closed the indicator will flash momentarily and then illuminate.
If the door is not closed the indicator will continue to flash.
A special safety device prevents the door from being opened immediately after the end of the cycle. Wait for 2 minutes after the wash cycle has finished and the "Door Security" light has gone out before opening the door. At the end of the cycle turn the programme selector to "OFF".
"START/PAUSE" button
C
Press to start the selected cycle.
NOTE: When the "Start/Pause" button has been pressed, the appliance can take few seconds before it starts working.
Changing the settings after the programmes has started (PAUSE)
Press and hold the "Start/Pause" button for about 2 seconds, the flashing lights on the options buttons and time remaining indicator will show that the machine has been paused, adjust as required and press the "Start/Pause" button again to cancel the flashing lights. If you wish to add or remove items during washing, wait 2 minutes until the safety device unlocks the door.
When you have carried out the manoeuvre, close the door, press "Start/Pause" button and the appliance will continue working where it left off.
CANCELLING THE PROGRAMME
To cancel the programme, set the selector to the "OFF" position.
Select a different programme.
Re-set the programme selector to the "OFF" position.
The option buttons should be selected before pressing the "Start/Pause" button.
"STAIN WASH" Button
D
By pressing this button, which can only be activated in the Cotton cycles, the sensors in the new system come into operation. They affect both the selected temperature, keeping it at a constant level throughout the wash cycle, and the mechanical function of the drum.
The drum is made to turn at two different speeds at crucial moments. When the detergent enters the garments, the drum rotates in such a way that the detergent is distributed in a uniform manner; during the wash and rinse procedures, however, the speed increases in order to maximise the cleaning action. Thanks to this special system, the efficiency of the wash procedure is improved WITHOUT ANY INCREASE IN THE LENGTH OF THE PROGRAM.
"EXTRA RINSE" button
E
This option allows you to add one rinse at the end of the washing cycle and is useful for people with delicate and sensitive skin, for which a small amount of detergent residue can cause irritations or allergies.
It is advisable to also use this function for the children clothes and for the washing of heavily soiled items, which requires a lot of detergent to be used, or for the washing of toweling items whose fibres mostly have the tendency to hold the detergent.
"DELAY START" button
F
This button allows you to pre-programme the wash cycle to delay the start of the cycle for up to 24 hours.
To delay the start use the following procedure:
Set the required programme.
Press the button once to activate it (h00 appears on the display) and then press it again to set a 1 hour delay (h01 appears on the display); the pre-set delay increases by 1 hour each time the button is pressed, until h24 appears on the display, at which point pressing the button again will reset the delay start to zero.
Confirm by pressing the "Start/Pause" button (the light on the display starts to flash). The countdown will begin and when it has finished the programme will start automatically.
It is possible to cancel the delay start by taking the following action:
Press and hold the button for 5 seconds until the display will show the settings for the programme selected.
At this stage it is possible to start the programme previously selected by pressing the "Start/Pause" button or to cancel the process by setting the selector to the "OFF" position and then selecting another programme.
Warning: If there is any break in the power supply while the machine is operating, a special memory stores the selected programme and, when the power is restored, it continues where it left off.
"TEMPERATURE SELECTION" button

When a programme is selected the relevant indicator will light up to show the recommended wash temperature.
The Temperature button can be used to decrease or increase the temperature of your chosen wash cycle.
Each time the button is pressed, the new temperature level is shown on the Wash Temperature Indicator.
If you want carry out a cold wash all the indicators must be off.
"DRYING SELECTION" button

With the programme selector not in the "OFF" position, press the button to select the required drying programme; an indicator will light to display the drying result selected each time you press the button.
To cancel the selection before the start of a drying programme, press the button repeatedly until the indicators go out or return the programme selector to the "OFF" position.
To cancel the cycle during the drying phase, hold the button down for 2 seconds until the cooling indicator lights up; given the high temperature inside the drum, we recommend that you allow the dryer to complete the cool down period before returning the programme selector to the "OFF" position and removing the laundry.
"SPIN SPEED" button
The spin cycle is very important to remove as much water as possible from the laundry without damaging the fabrics. You can adjust the spin speed of the machine to suit your needs.
By pressing this button, it is possible to reduce the maximum speed, and if you wish, the spin cycle can be cancelled. To reactivate the spin cycle press the button until you reach the spin speed you would like to set. To prevent damage to the fabrics, it is not possible to increase the speed over that which is automatically suitable during the selection of the program.
It is possible to modify the spin speed without to pausing the machine.
Note:
The machine is fitted with a special electronic device, which prevents the spin cycle should the load be unbalanced. This reduces the noise and vibration in the machine and so prolongs the life of your machine.
“DIGITAL” Display
text_image
display 3 18 4 5 6 8 SENSOR 120'90' 90 60 403020 60' 30' 2 7
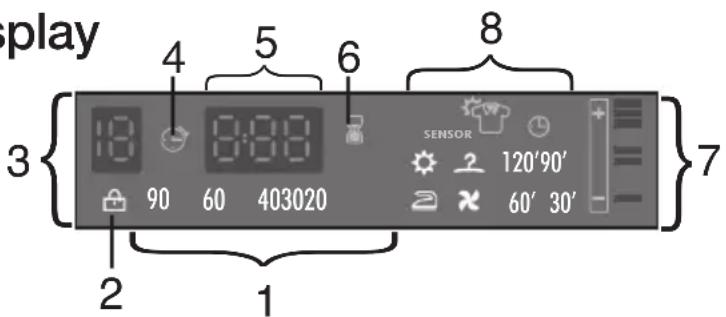
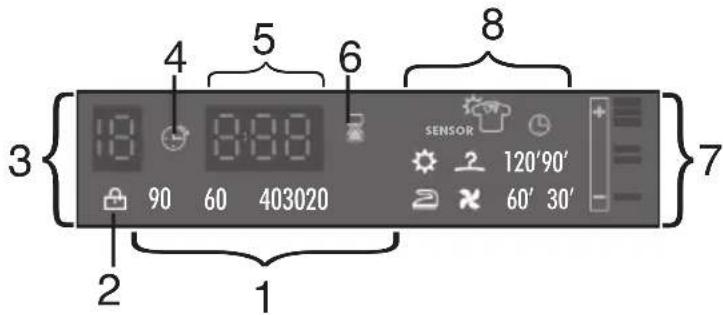
The display's indicator system allows you to be constantly informed about the status of the machine:
1) WASH TEMPERATURE
When a programme is selected the relevant indicator will light up to show the recommended wash temperature. The Temperature button can be used to decrease or increase the temperature of your chosen wash cycle. Each time the button is pressed, the new temperature level is shown on the Wash Temperature Indicator.
If you want carry out a cold wash all the indicators must be off.
2) DOOR LIGHT
Once the "Start/Pause" button has been pressed the light first flashes then stops flashing and remains on until the end of the wash. 2 minutes after the end of the wash the light goes off to show that the door can now be opened.
3) SPIN SPEED
Once the programme has been selected, the maximum spin speed allowed for that programme appears on the display. Pressing the spin button will reduce the speed by 100 rpm each time the button is pressed. The minimum speed allowed is 400 rpm, or it is possible to omit the spin by pressing the spin button repeatedly.
This flashes when delay start has been set.
5) CYCLE DURATION
When a programme is selected the display automatically shows the cycle duration, which can vary, depending on the options selected. Once the programme has started you will be kept informed constantly of the time remaining to the end of the wash. If is selected the automatic washing/drying, at the end of the wash phase, the drying time remaining to the end will be shown on the display.
text_image
3 4 5 6 8 7 13 90 60 403020 SENSOR 120'90' 60' 30' 2 16) PROGRAMME START LIGHT
This lights up when the START button has been pressed.
7) WASH TIME
Once the programme has been selected the indicator light will automatically show the wash time set for that programme. Selecting a different wash time the relevant indicator will light up.
8) DRYING PROGRAMME INDICATORS
The indicators display the type of the drying programme:
The washer dryers incorporate an Automatic Sensor Drying function which takes the guesswork out of setting the drying time. You simply select the degree of dryness you require and the dryer automatically switches off when that level is reached. For added flexibility there are 3 Sensor Drying levels to choose from:

= Extra dry programme

= Cupboard dry programme

= Iron dry programme
USEFUL TIPS:
Once the programme option has been selected, press the "Start/Pause" button. The appliance will then calculate the time to the end of the selected programme based upon a full dry load. During the cycle the appliance will update the time to suit the actual load size and dampness of the fabrics.
Timed programmes:
Alternatively you may select a pre-determined time for the drying cycle. The Timed Drying programmes may be set to the following times:
120 minutes – 90 minutes – 60 minutes – 30 minutes:
Cool down phase

A 10 minute cool down phase occurs at the end of each drying cycle to ensure clothes are not too hot to touch when the cycle finishes.
"WASH TIME" button
M
By selecting this button (active only on COTTON and MIXED FIBRES programmes) there is a choice of 3 levels of wash intensity, depending on how much the fabrics are soiled. Once the programme has been selected the indicator light will automatically show the wash time set for that programme. Selecting a different wash time the relevant indicator will light up. For example: Using this button on the Rapid Wash cycle will enable you to select either a 14, 30 or 44 minute wash cycle.
PROGRAMME selector with "OFF" position
N
When the programme selector is turned the display lights up to show the settings for the programme selected.
To switch the machine off, turn the programme selector to the "OFF" position.
natural_image
Hand inserting a circular button into a device (no text or symbols visible)Today, most detergents have been improved to wash efficiently at lower temperatures, therefore we have set the default temperature settings of each programme to a lower level, saving electricity and reducing the carbon footprint of your machine.
you can select an high temperature by pressing the temperature button.
please refer to the programme guide for the maximum temperature to which each programme can be set.
Press the "Start/Pause" button to start the selected cycle.
Once a programme is selected the programme selector remains stationary on the selected programme till cycle ends.
Switch off the washing machine by turning the selector to "OFF".
Note:
The programme selector must be returned to the "OFF" position at the end of each cycle or when starting a subsequent wash cycle prior to the next programme being selected and started.
Buttons indicator light
O
These light up when the relevant buttons are pressed.
If an option is selected that is not compatible with the selected programme then the light on the button first flashes and then goes off.
TABLE OF PROGRAMMES
| PROGRAM FOR: | PROGRAMME SELECTOR ON: | WEIGHT MAX kg | RECOMMENDED TEMP. °C | MAX TEMP. °C | CHARGE DETERGENT | ||
| II | ∅ | I | |||||
| Resistant fabrics Cotton, linen | 1) Cotton * | 7,5 | 60° | Up to: 90° | ● | ● | |
| Cotton, mixed resistant, Coloureds with Prewash | 1) Cotton + Prewash * | 7,5 | 40° | Up to: 60° | ● | ● | ● |
| Resistant fabrics | 1) Colours ** * | 7,5 | 40° | Up to: 60° | ● | ● | |
| Mixed fabrics and synthetics Cotton, mixed fabrics, synthetics | Synthetics * | 3,5 | 40° | Up to: 60° | ● | ● | |
| Very delicate fabrics | Delicates | 2,5 | 40° | Up to: 40° | ● | ● | |
| "MACHINE WASHABLE" woollens | Wool | 2 | 40° | Up to: 40° | ● | ● | |
| Rinse | Rinse * | - | - | - | ● | ||
| Fast spin | Spin * | - | - | - | |||
| Drain only | Drain | - | - | - | |||
| Hand wash | Handwash | 1,5 | 30° | Up to: 30° | ● | ● | |
| Resistant fabrics Mixed fabrics and synthetics Rapid 14 minute | 2) Rapid 14-30-44 Min. * | 1,5 | 30° | Up to: 30° | ● | ● | |
| Resistant fabrics Mixed fabrics and synthetics Rapid 30 minute | 2,5 | 30° | Up to: 40° | ● | ● | ||
| Resistant fabrics Mixed fabrics and synthetics Rapid 44 minute | 3,5 | 30° | Up to: 40° | ● | ● | ||
| Resistant fabrics Mixed fabrics and synthetics | Eco 20° * | 7,5 | 20° | Up to: 20° | ● | ● | |
| Cotton - Mixed | Shirts * | 3,5 | 30° | Up to: 30° | ● | ● | |
| Mixed - Drying | Synthetics Dry | 3,5 | - | - | |||
| Cotton - Drying | Cotton Dry | 5 | - | - | |||
natural_image
Illustration of a washing machine with three cups and a bottle, showing fluid flow (no text or symbols)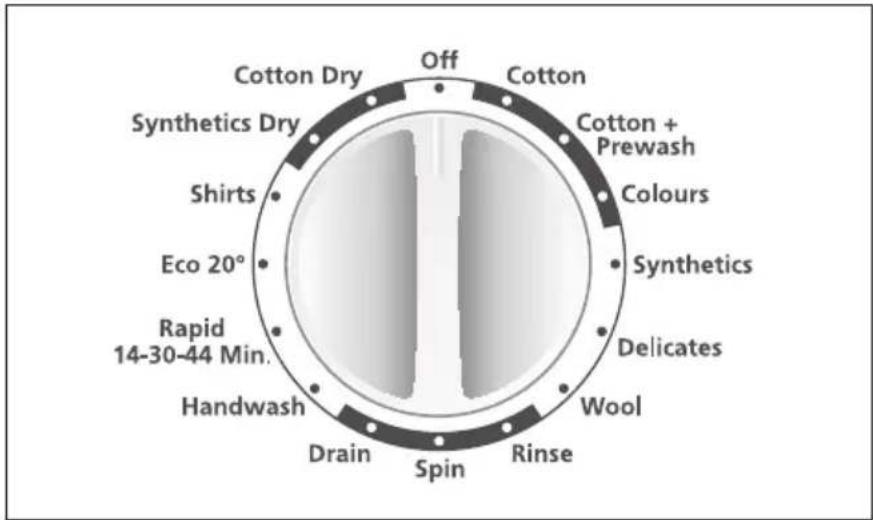
text_image
Cotton Dry Off Cotton Synthetics Dry Shirts Eco 20° Rapid 14-30-44 Min. Handwash Drain Spin Rinse Wool Delicates Synthetics Colours Cotton + Prewash OffPlease read these notes
Information for the test laboratories (Ref. EN 50229 Standards)
Washing
Use the programme ** with the maximum wash time selected, maximum spin speed and a temperature of 60°C.
Programme recommended also for test with a lower temperature.
Drying
First drying with 5kg (the load consist: pillowcases and hand-towels) selecting the cotton drying programme (Cotton Dry) cupboard dry (2).
Second drying with 2,5kg (the load consist: 2 sheets and hand towels) selecting the cotton drying programme (Cotton Dry) cupboard dry (2).
The spin speed may also be reduced, to match any guidelines suggested on the fabric label, or for very delicate fabrics cancel the spin completely this option is available with a spin speed button.
- Pressing the wash temperature button makes it possible to wash at any temperature below the maximum allowed.
* Programmes for automatic drying.
1) For the programmes shown you can adjust the duration and intensity of the wash using the Wash Time button.
2) Using the Wash Time button on the Rapid cycle will enable you to select either a 14,30 or 44 minute wash cycle.
Programme selector
For the various types of fabrics and various degrees of dirt the washing machine has different programme bands according to: wash cycle, temperature and lenght of cycle (see table of washing cycle programmes).
COTTONS
The Cottons programme is designed for maximum washing and rinsing efficiency. With spin cycles in between, the programme guarantees the laundry is rinsed perfectly. The final spin cycle ensures laundry is spun dry as much as possible up to the maximum speed.
The Cotton programme includes a Prewash cycle. This option is particularly useful for really dirty loads and can be used independently of the main wash programme. Additional detergent for the Prewash part of the programme should be added to the first compartment of the soap drawer labelled "I" (please refer to the section of this manual entitled "Detergent"). We recommend you use only 20% of the quantity used for the main wash programme.
Cotton
Cotton + Prewash
Colours
MIXED AND SYNTHETIC FABRICS
The main wash and the rinse gives best results thanks to the rotation rhythms of the drum and to the water levels.
A gentle spin will mean that the fabrics become less creased.
Synthetics
SPECIAL DELICATE FIBRES
This is a new wash cycle which alternates washing and soaking and is particularly recommended for very delicate fabrics.
The wash cycle and rinses are carried out with high water levels to ensure best results.
Delicates
WOOL PROGRAMME
The special cycle enables to thoroughly wash garments without damaging them. The cycle comprises of alternate periods of activity and pauses. The programme has a maximum temperature of 40^ C and concludes with 3 rinses and a short spin.
Wool
SPECIAL "RINSE" PROGRAMME
This programme carries out three rinses with a intermediate spin (which can be reduced or excluded by using the correct button). It can be used for rinsing any type of fabric, eg. use after hand-washing.
Rinse
SPECIAL "SPIN" PROGRAMME
Programme "SPIN" carries out a maximum spin (which can be reduced by using the correct button).
Spin
DRAIN ONLY
This programme drains out the water.
Drain
SPECIAL "HAND WASH"
This washing machine also has a gentle Hand Wash programme cycle. This programme allows a complete washing cycle for garments specified as “Hand Wash only” on the fabric care label. The programme has a temperature of 30^ C and concludes with 3 rinses and a slow spin.
Handwash
RAPID PROGRAMME
This programme is particularly suited to slightly dirty cottons and mixed fabrics. Using the Wash Time button on the Rapid cycle will enable you to select either a 14, 30 or 44 minute wash cycle.
Rapid 14-30-44 Min.
When selecting the rapid programme, please note that we recommend you use only 20% of the recommended quantities shown on the detergent pack. For information about these programmes please refer to the programmes table.
ECO 20°C
This innovative programme, allows you to wash different fabrics and colours together, such as cottons, synthetics and mixed fabrics at only 20^ C and provides an excellent cleaning performance.
Eco 20°
Consumption on this program is about 40% of a conventional 40^ C cottons wash.
"SHIRTS" PROGRAMME
This programme allows a complete washing cycle for shirts.
Shirts
The main wash and the rinse gives best results thanks to the rotation rhythms of the drum and to the water levels.
The programme has a maximum temperature of 30^ C and concludes with 3 rinses and a short spin.
LOW HEAT
Synthetics Dry
Low temperature drying programme for synthetics and mixed fibres, always refer to the care label.
HIGH HEAT
Cotton Dry
High temperature drying programme for Cottons and linen items, always refer to the care label
Automatic Variable Capacity
The washing machine is fitted with an automatic reduction in consumption system (known as Automatic Variable Capacity).
This system enables the machine to use the amount of water needed to wash and rinse the laundry in relation to the particular load.
This results in a reduction in the amount of water used and electricity needed to heat it to the minimum required, without in any way compromising the washing and rinsing performance.
In fact the amount of water and electricity used will always be appropriate for the amount of washing.
The washing machine therefore ensures you achieve excellent washing results whilst respecting the environment and saving you money.
Detergent drawer
P
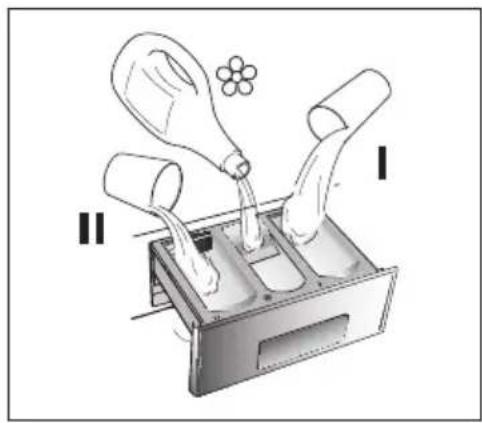
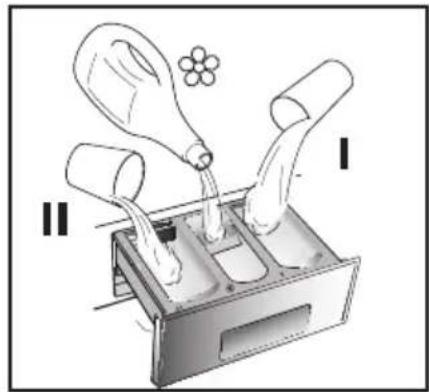
The detergent drawer is split into 3 compartments:
- the compartment labelled "I" is for prewash detergent;
- the compartment labelled " & is for special additives, fabric softeners, fragrances, starch, brighteners etc;
- the compartment labelled "II" is for main wash detergent.
natural_image
Illustration of a mechanical device with three cups pouring liquid into a tray, no text or symbols presentNOTE:
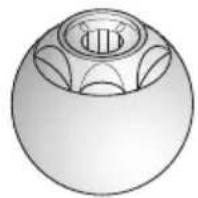
Some Detergents are Difficult to utilise. Ensure to use an in drum dispenser if recommended by the detergent Manufacturer.
natural_image
Simple line drawing of a spherical object with internal geometric patterns (no text or symbols)Note: only put liquid products in the compartment labelled “ ✿”. The machine is programmed to automatically take up additives during the final rinse stage for all wash cycles.
Detergents, washing aids and amounts to use
Choice of detergent
General purpose detergents
- Powder detergents, for a thorough wash, with bleaching agent, particularly suitable for use in hot wash programmes (60°C and over), for heavily soiled and stained laundry.
- Liquid detergents, particularly suitable for grease stains, such as greasy skin marks, cosmetics and oil.
These detergents are not suitable for washing stained laundry, as they do not contain bleach. - Biological detergents, not all the products available give a really thorough wash.
Additional laundry aids
- Water softener, means less detergent can be used where water hardness is classed as hard to very hard.
- Prewash substances, for the programmed treatment of stains prior to the main wash. Using them means the subsequent wash can be at a low temperature or with bleach-free detergents.
- Fabric softener, prevents static build-up in synthetic fabrics and softens fabrics. If you own a tumble dryer, clothes are softened even without the use of a fabric softener.
Do not put solvents in the washing machine!
Keep detergents and other laundry products out of children's reach.
Before pouring in the detergent check that there are no foreign bodies in the detergent drawer.
Dosage details are usually shown on the detergent packaging. Follow those instructions.
Dosages
Only use detergents which are suitable for use in a washing machine.
You will obtain the best results from your wash with the minimum use of chemical products and the best care for your laundry if you take into consideration the degree of soiling as well as the type of detergent to choose.
The amount of detergent to use depends on:
- water hardness: depending on the hardness of the water and the type of detergent used, it is possible to reduce the amount of detergent.
- the degree of soiling: it is possible to reduce the amount of detergent used depending on the degree of soiling.
- amount of laundry: it is possible to reduce the amount of detergent when washing only a small amount of laundry.
Dosage for powder detergent
For normal and low concentration detergents: for normally soiled laundry choose a programme without prewash.
Put the detergent in compartment "II" of the drawer.
For heavily soiled laundry, choose a programme with prewash.
Put 1/4 of the detergent in compartment "I", 3/4 in compartment "II" of the drawer.
When using water softeners, first put in the detergent, then add the softener to compartment "II".
For highly concentrated detergents not in single dose format, follow what is shown on pack exactly as regards type and amount of dosage.
To avoid the difficulty of checking if the detergent has been taken up, use the dosage aids provided in the detergent packaging.
Liquid detergent dosage
Liquid detergents may be used in accordance with the instructions on the relevant packaging, for all programmes without prewash, by using the special container which is placed in the drum or, for those models that have it, in the special insert for liquid detergents.
Recommendations on the use of detergent at various temperatures
When washing heavily soiled whites, we recommend using cotton programs of 60^ C or above and a normal washing powder (heavy duty) that contains bleaching agents that at medium/high temperatures provide excellent results. For washes between 40^ C and 60^ C the type of detergent used needs to be appropriate for the type of fabric and level of soiling. Normal powders are suitable for “white” or colour fast fabrics with high soiling, while liquid detergents or “colour protecting” powders are suitable for coloured fabrics with light levels of soiling. For washing at temperatures below 40^ C we recommend the use of liquid detergents or detergents specifically labeled as suitable for low temperature washing. For washing wool or silk, only use detergents specifically formulated for these fabrics. For dosage amounts please follow the instructions on the detergent package label.
Useful advice for users
Tips on using your domestic appliance in the most environmentally-friendly and economical way
Do a full load in your washing machine
To prevent any possible waste of energy, water or detergent we recommend that you put a full load in your washing machine, not exceed the recommended maximum load size. Up to 50% energy saving can be made with one full load compared to two half load washes
When is prewashing really needed?
Only with particularly dirty loads!
Energy savings of 5 to 15% are made by not selecting the prewash option for normal soiled laundry.
Which wash temperature should you choose?
Using stain removers before machine washing reduces the need to wash at temperatures over 60^ C.
Energy savings of up to 50% can be made by using a 60°C wash temperature rather than 90°C
Before using a drying programme...
SAVE energy and time by selecting a high spin speed to reduce the water content in laundry before using a drying programme.
Main wash
Sorting the laundry
- It is recommended you wash only items which are machine washable with water and detergent and not dry-clean items.
- If you need to wash rugs, bedspreads or other heavy items, it is best not to spin them.
- Sort the laundry according to fabric type, degree of soiling and wash temperature: Always follow the wash care advice on the garment label for the most suitable care and treatment of the laundry
Laundry for hot wash 95°
Coloured, easy-care materials 60° 50° 40°
Delicates and wool 40° 30°
Wash by hand
Items labelled with the following symbol are not suitable for machine washing:
Dry clean
For very delicate items, such as net curtains, underwear, tights etc., you are advised to use a laundry net or wash bag.
- Woollen items must be labelled with the "Pure New Wool" symbol to be washed in the machine and must also be labelled "non-matting" or "machine washable".
- Colour often leaks from new coloured items.
This can then colour other lighter items being washed.
We therefore recommend that coloured items should be washed for the first time separately.
For future washes, colourfast items can only be washed with whites up to 40^ C.
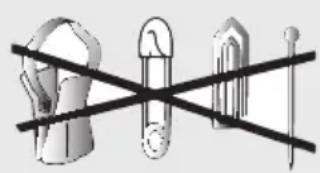
Warning: when sorting laundry
- check there are no metal objects in the laundry (such as paper clips, safety pins, pins, coins etc...);
- button up pillowcases, fasten zips, hook & eye fasteners, belts and long dressing gown cords;
- remove curtain hooks;
- pay close attention to the labels on items
- if you notice stubborn stains whilst sorting the laundry, remove them using a special detergent or a special stain remover.
natural_image
Three mechanical components with a diagonal line crossing through them (no text or symbols)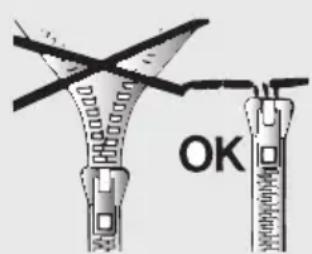
text_image
OK- We recommend that you do not do a full load of towelling items only as these become too heavy since they absorb a lot of water.
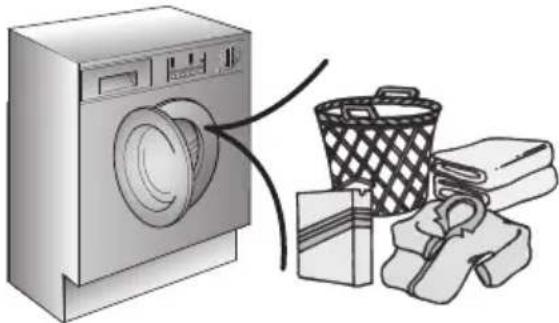
The correct way to wash
Preparing the laundry
A) Select the laundry.
Loading the laundry
B) Open the porthole.
C) Put the laundry in the washing machine.
Close the porthole again, ensuring that no items of laundry are obstructing the lock.
Putting detergent in machine
D) Open the drawer, choose the detergent and put in the correct amount, according to the manufacturer's instructions and the advice on page 22.
Add any other laundry aids (see page 22). Close the drawer again.
natural_image
Illustration of a washing machine connected to a basket and stacked goods (no text or symbols)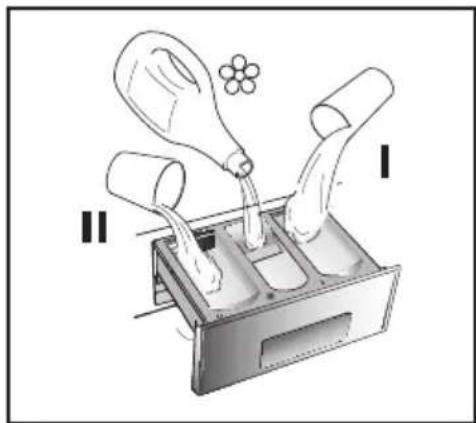
natural_image
Illustration of a washing machine with three tubes and a bulb, no text or symbols presentSelecting the wash programme
Refer to the programme guide or the programme descriptions on the machine to select the most suitable programme.
Turning the selector knob, the required programme is activated.
Adjust the wash temperature if necessary.
Press additional function buttons (if required).
Check that the tap is turned on and that the discharge hose is positioned correctly.
Press the "Start/Pause" button.
When the "Start/Pause" button is pressed the machine sets the working sequence in motion.
The programme carries out with the programme selector stationary on the selected programme till cycle ends.
Warning: If there is any break in the power supply while the machine is operating, a special memory stores the selected programme and, when the power is restored, it continues where it left off.
When the programme is finished
The word "End" will appear on the display.
Wait for the door lock to be released (about 2 minutes after the programme has finished).
The "Door Security" indicator light will go out.
Switch off the machine by turning the programme selector on the "OFF" position. Open the door and remove the laundry. Turn off the tap.
DRYING
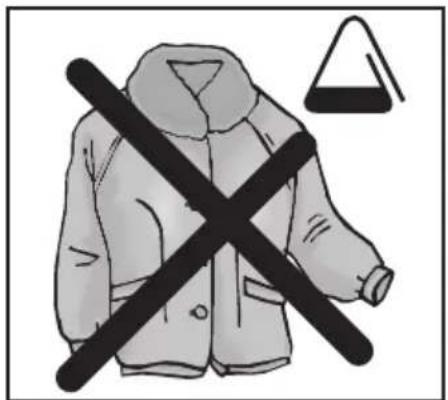
DON'T DRY GARMENTS MADE FROM FOAM RUBBER OR FLAMMABLE MATERIALS.
IMPORTANT:
THIS DRYER CAN ONLY BE USED FOR LAUNDRY WHICH HAS BEEN WASHED AND SPIN DRIED.
natural_image
Illustration of a person in a jacket crossed with a diagonal line, no text or symbols present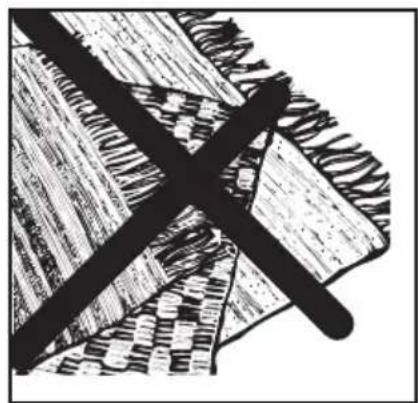
natural_image
Abstract black-and-white sketch of intersecting diagonal and horizontal lines forming a cross-like pattern (no text or symbols)WARNING:
Indications given are general, therefore some practice is needed for the best drying results. We recommend setting a lower drying time than indicated, when first using, so as to establish the degree of dryness required. We recommend not to dry fabrics that fray easily, such as rugs or garments with a deep pile, to avoid air duct clogging.
The water is then conveyed to the drain circuit, wich is sealed and therefore, no steam can be released outside.
Important
Never open the door after the drying cycle has begun - wait until the cool down period provided for by the cycle. ✕
Only dry pre-spun laundry
The washer/dryer can perform two types of drying:
1 Cotton, terry towelling, linen, hemp fabrics, etc... Cotton Dry symbol on programme dial. Advisory note
During drying phase the drum will accelerate to a higher speed to distribute the load and to optimize the drying performance
2 Mixed fabrics (synthetics/cotton), synthetic fabrics Synthetics Dry symbol on programme dial.
Drying cycle
The correct way to dry:
- Open door.
- Fill with up to 5 kg - in case of large items (e.g. sheets) or very absorbent items (e.g. towels or jeans), it is a good idea to reduce the load.
- Close door.
- Turn programme dial to Cotton Dry cotton.
Select the degree of dryness that you require.
This ranges from Extra Dry ( ⚙ ) for bath towels and bathrobes, through Cupboard Dry ( ⏱ ) for items that will be put away without ironing, to iron dry ( Ⓞ ) that leaves the laundry suitable for ironing.
If you wish to select a timed drying cycle, press the "drying selection" button until the required time indicator lights up.
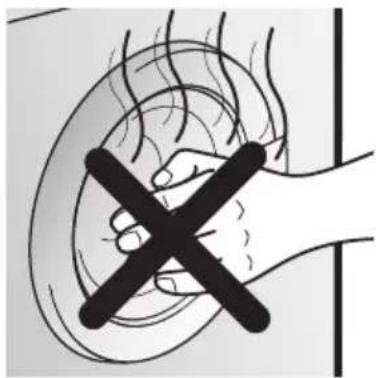
DOUBLE-SKIN DOOR
The appliance door is fitted with a protective shield to prevent contact with the glass door which can reach high temperatures, during the drying cycle.
It should not be necessary to remove the shield from the machine during the normal course of use.
natural_image
Illustration of a hand holding a circular object with a black X symbol, no text or symbols presentWarning: do not touch door for any reason.
• Make sure water inlet valve is open.
• Make sure water drain is correctly positioned.
Warning:
do not dry woollen garments or articles with special padding, (e.g. quilts, quilted anoraks, etc.).
Delicate fabrics if garments are drip/dry, load less items ao as to prevent creasing.
Press the START button.
The drying phase will begin with the programme dial fixed on the Cotton Dry symbol until the end of drying.
The drying programme indicator will be on until the cool down phase will begin and the indicator “ ✕ ” will go on.
When the programme is finished
The word "End" will appear on the display.
Wait for the door lock to be released (about 2 minutes after the programme has finished).
The "Door Security" indicator light will go out.
Switch off the machine by turning the programme selector on the "OFF" position. Open the door and remove the laundry. Turn off the tap.
Automatic washing/drying cycle
Warning: only a maximum 5 kg of dry laundry can be loaded otherwise the dried laundry will be not satisfactory.
WASHING:
Open the drawer, choose the detergent and put in the correct amount.
Refer to the list of washing programmes according to fabrics to be washed (e.g. very dirty cotton) and without pressing START button, prepare wash as described:
Turning the selector knob, the required programme is activated.
The display will show the settings for the programme selected.
Adjust the wash temperature if necessary.
Press the option buttons (if required)
Check that the tap is turned on and that the discharge hose is positioned correctly.
DRYING:
Select the degree of dryness that you require.
This ranges from Extra Dry ( ⚙ ) for bath towels and bathrobes, through Cupboard Dry ( ⚡ ) for items that will be put away without ironing, to iron dry ( ≅ ) that leaves the laundry suitable for ironing.
If you wish to select a timed drying cycle, press the “drying selection” button until the required time indicator lights up.
Press the "Start/Pause" button.
When the "Start/Pause" button is pressed the machine sets the working sequence in motion.
The programme carries out with the programme selector stationary on the selected programme till cycle ends.
At the end of the wash phase the display will shown the drying time remaining.
The washer-dryer will then complete the entire drying programme.
The drying programme indicator will be on until the cool down phase will begin and the indicator “ ✕ ” will go on.
When the programme is finished
The word "End" will appear on the display.
Wait for the door lock to be released (about 2 minutes after the programme has finished).
The "Door Security" indicator light will go out.
Switch off the machine by turning the programme selector on the "OFF" position. Open the door and remove the laundry. Turn off the tap.
Table of drying times (in minutes):
| PROGRAMME | DEXIM NOTTOC | |||
| Min 1 Kg | Max 5 Kg | Min 1 Kg | Max 3,5 Kg | |
| Extra | from 30' | to 230' | from 30' | to 170' |
| Cupboard | from 30' | to 220' | from 30' | to 150' |
| Iron | from 30' | to 170' | from 30' | to 80' |
The time remaining shown on the digital display will show the time remaining for a full load. However, this will be corrected during the cycle once the appliance assesses the weight and dampness of the laundry.
USEFUL TIPS:
Do not dry unwashed items in the washer dryer.
Items that have been soiled with substances such as cooking oil, acetone, alcohol, petrol, kerosene, spot removers, turpentine, waxes and wax removers should be washed in hot water with an extra amount of detergent before being dried in the washer dryer.
Items such as foam rubber (latex foam), shower caps, waterproof textiles, rubber backed articles and clothes or pillows fitted with foam rubber pads should not be dried in the washer dryer.
Fabric softeners, or similar products, should be used as specified by the fabric softener instructions.
The final part of a washer dryer cycle occurs without heat (cool down cycle) to ensure that the items are left at a temperature that ensures that the items will not be damaged.
WARNING:
Never stop a washer dryer before the end of the drying cycle unless all items are quickly removed and spread out so that the heat is dissipated.
Cleaning and routine maintenance
Do not use alcohol-based scourers and / or thinners on the outside of your washing machine, just a wipe with a damp cloth will suffice. The washing machine needs very little maintenance:
- Cleaning the drawer compartments.
- Cleaning the filter.
- Cleaning the door glass.
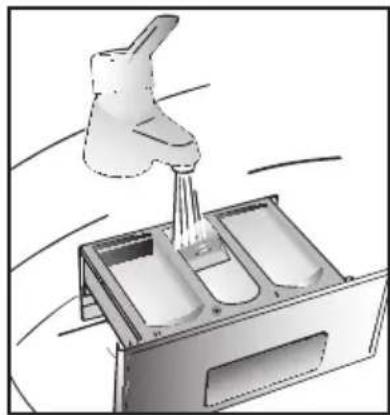
Cleaning the drawer compartments
Even if it is not strictly necessary, it is good to clean the compartments for bleaching detergents and additives occasionally.
A) To do this you just need to pull them out firmly, but without forcing them.
B) Clean everything in the compartment under running water.
C) Put everything back in its proper place.
Cleaning the filter
The washing machine is fitted with a special filter for handling large deposits which could block the discharge hose (coins, buttons etc.) and which can, therefore, be easily retrieved.
We recommend that the filter be cleaned at least once a month.
The cleaning operation is as follows:
1) Before removing the filter, place an absorbent towel below the filter cap to collect the small amount of water likely to be inside the pump
2) Turn the filter anti-clockwise until it stops in the vertical position.
Remove and clean.
3) After cleaning, replace by turning the notch on the end of the filter clockwise.
natural_image
Illustration of a showerhead spraying water into a washing machine (no text or symbols)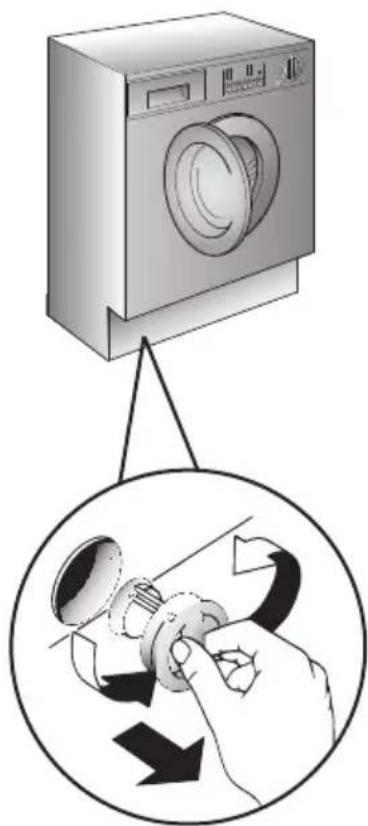
natural_image
Illustration of a washing machine with a hand holding a button, showing a circular action diagram below (no text or symbols)Attention: if the filter needs cleaning while there is washing still in the drum, follow the instructions on the following page to empty the water. This will prevent excessive loss of water via the filter.
Cleaning the door glass
Regularly clean the door glass with a damp cloth. A build up of soiling and
residues from the water may result in water leaking from the door.
Do not use abrasive cleaners as they can scratch the surface.
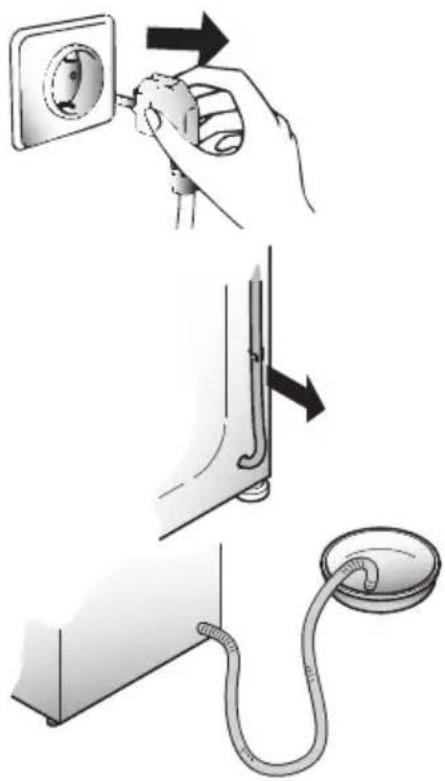
Transporting the appliance or long periods when appliance is not in use
If the appliance is being transported or is out of use for long periods in unheated places, all remaining water must be completely removed from the hoses.
Ensure mains power is off, then unclip the hose and point it downwards into a basin until all the water has emptied out.
When finished, repeat the operation in the reverse order.
natural_image
Illustration of a hand using a tool to install a wall socket, with no text or symbols present.Investigating malfunctions
What might be the cause of... Defects you can remedy yourself
| MALFUNCTION | CAUSE REMEDY | |
| 1. Does not work on any programme | Plug not in socket.Not switched on.Power failure.Fuse blown.Door open. | Plug it in.Switch on.Check.Check.Close door. |
| 2. Does not fill with water | See cause 1.Tap turned off.Programme selector not correctly positioned.Fill hoses are kinked | Check.Turn on tap.Position programme selector correctly.Straighten fill hoses |
| 3. Water does not drain away | Kink in discharge hose.House drain is blockedForeign bodies in filter | Straighten discharge hose.Clean drainExamine filter |
| 4. Water on floor around the washing machine | Leaking gasket between tap and water inlet hose.House drain is blockedSoap drawer blocked with soap residues | Replace gasket and tighten hose and tap well.Clean drainClean soap drawer |
| 5. Does not spin | Water has not yet drained away."No spin" selected (certain models only). | Wait a few minutes for machine to empty.Reset button or turn "no spin" knob. |
| 6. Machine vibrates a lot during spin | Washing machine not completely level.Transit brackets not removed yet.Load not distributed evenly. | Adjust the special adjustable feet.Remove transit brackets.Rearrange the laundry evenly. |
| 7. Door will not open | Two minutes have not elapsed since the programme finished. | Wait two minutes. |
| 8. Display reads error0, 1, 5, 7, 8, 9 | - | Call service. |
| 9. Display reads error 2 | No water fill. | Check water supplies are on. |
| 10. Display reads error 3 | No pump out. | Check drain is clear.Check drain hose is not kinked. |
| 11. Display reads error 4 | Machine overfilled with water. | Turn off water supply to machine.Call service. |
| During drying phase the drum will accelerate to a higher speed to distribute the load and to optimize the drying performance | ||
The machine makes a different noise when spinning! This is because it has a brush motor for better performance.
Only a small level of water can be seen in the drum! This is because new machines do not use much water, yet achieve the same standard of washing and rinsing.
Note:
The use of environmentally-friendly, phosphate-free detergents can have the following effects:
- waste water from rinsing may be cloudier because of the presence of zeolites held in suspension, without the rinse performance being adversely affected;
- presence of white powder (zeolites) on laundry after washing, which is not absorbed by the fabric and does not alter the colour of the fabric.
- The presence of foam in the final rinsing water is not necessarily an indication of poor rinsing.
- Anionic surfactants used in washing detergent formulae often prove to be difficult to remove from the laundry itself and, even in small quantities, can still cause considerable foam production.
- Carrying out more rinse cycles does not serve any purpose in such cases.
text_image
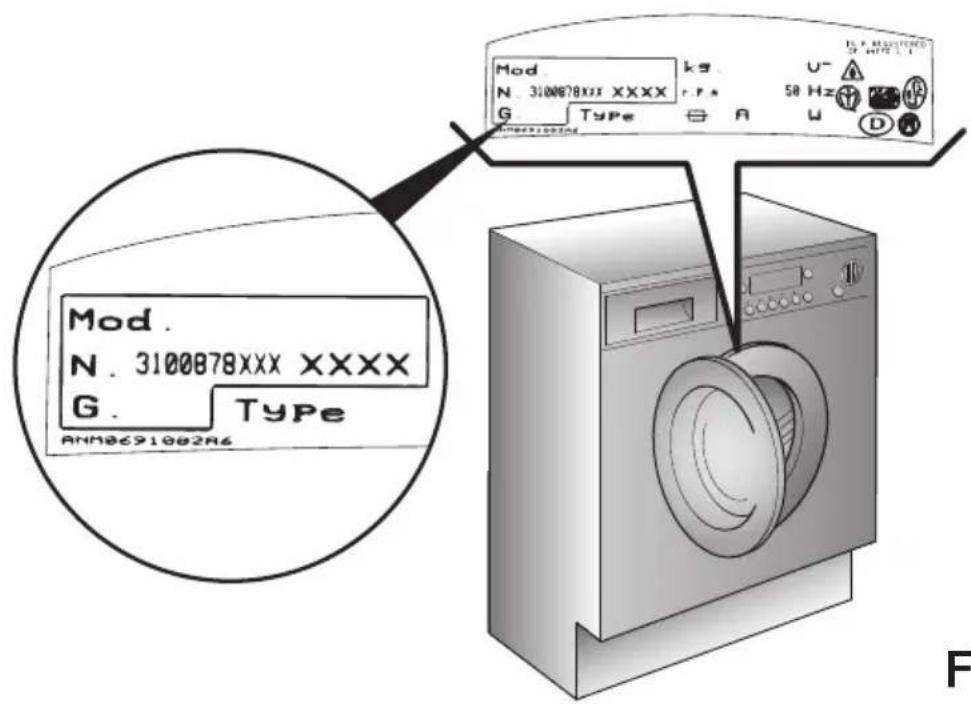
Mod. N. 3100878XXX XXXX G. Type ANM8691002A6 kg U- 58 Hz D S T P R U D FFig. 2
| Technical data | ||
| ■ Max. load of dry laundry■ Max. load of dry laundry for drying■ Water pressure | 7,5 kg5 kg0,05 ÷ 0,8 MPa | |
| Measurements■ Width■ Depth■ Height | 60 cm54 cm82 cm |
Note: For specifications regarding electrical data, see the data panel on the front of the washing machine (porthole area) - as shown in diagram above.
SETTING UP + INSTALLATION
natural_image
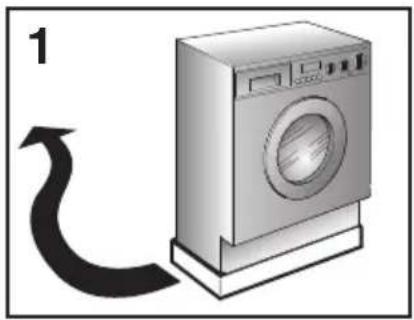
Illustration of a washing machine with a curved arrow indicating direction (no text or symbols)Remove the polystyrene base and place the machine near its permanent position (diagram 1).
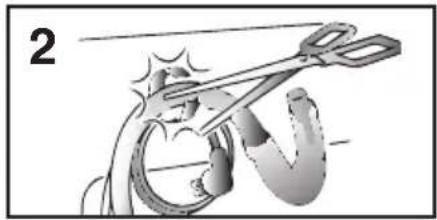
Carefully cut through the hose retaining clip at the rear of the appliance (diagram 2).
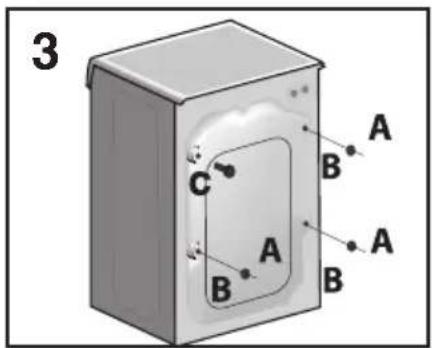
Remove the 3 fixing screws marked (A) and remove the 3 spacers marked (B) (diagram 3).
natural_image
Illustration of a mechanical clamp or hook with a spring, no text or symbols presentRemove the screw (C).
A spacer will fall inside the machine.
By tilting the machine, remove the above mentioned spacer.
Cover the 4 holes using the caps provided in the instruction booklet pack (diagram 4).
natural_image
3D diagram of a rectangular box with internal curved lines and marked points, labeled '4' (no text or symbols on the diagram itself)WARNING:
DO NOT LEAVE THE PACKAGING WITHIN REACH OF CHILDREN AS IT IS A POTENTIAL SOURCE OF DANGER.
Apply the insulation sheet of corrugated material to the base as shown.
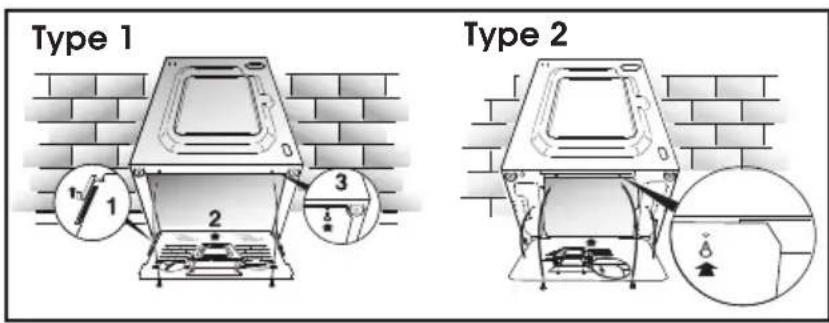
text_image
Type 1 1 2 3 Type 2Use the 4 feet to level the machine with the floor:
a) Turn the nut clockwise to release the screw adjuster on the foot.
b) Rotate the foot to raise or lower it until it stands firmly on the ground.
c) Lock the foot in position by turning the nut
anti-clockwise until it comes up against the bottom of the machine.
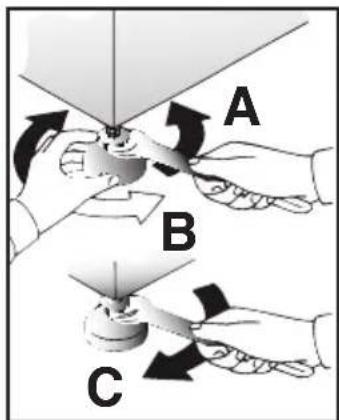
text_image
A B CNote: we recommend you keep the screws to immobilise the machine for future transit.
The Manufacturers will not be responsible for any possible damage to the machine caused by not following the rules relating to releasing the mechanism. The user is responsible for all costs of installation.
Water connection
The appliance must be connected to the water mains using new hose-sets.
The old hose-sets should not be re-used.
The machine has an inlet hose with 3/4" B.S.P threaded end connection to attach between the threaded connector on the appliance and the cold water supply.
This machine only uses cold water, therefore only one hose is needed to connect to the cold water supply. Do not connect to the hot supply. Cold fill is an energy efficient system. Only the water required for the washing is heated. There is no loss of heat in the pipeline from a hot water tank or boiler to the machine.
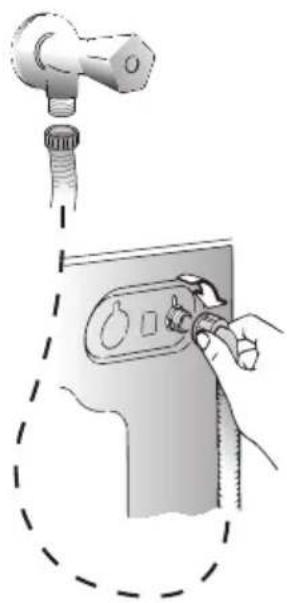
natural_image
Illustration of a hand holding a device with a valve and control panel (no text or symbols)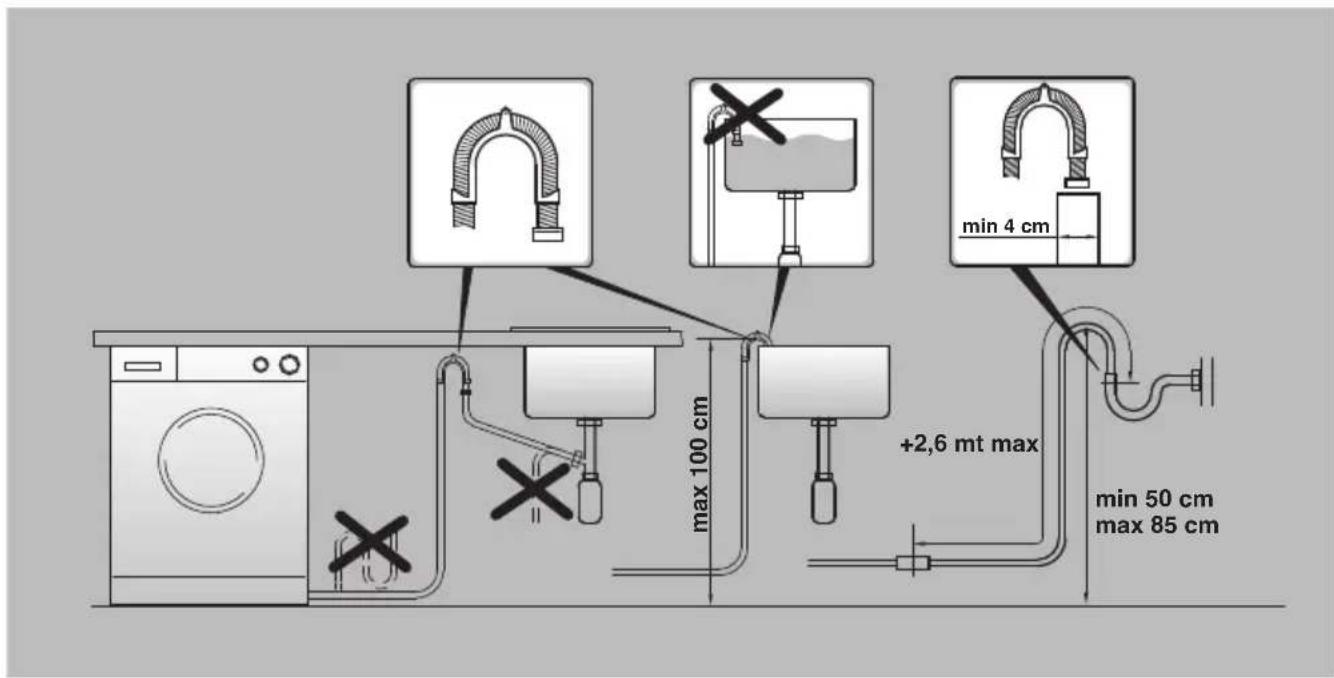
text_image
max 100 cm +2,6 mt max min 4 cm min 50 cm max 85 cmNote: it is advisable to turn off the tap after each wash to isolate the washing machine from the water supply.
The appliance must not be installed behind a lockable door, a sliding door or a door with a hinge on the opposite side to that of the washer dryer.
For the washing machine to function properly the terminal end of the discharge hose (mouth) must be at a minimum of 50 cm and a maximum of 85 cm from the ground.
ELECTRICAL CONNECTIONS
After installation, the appliance must be positioned so that the plug is accessible.
If the plug we supply does not fit
CUT IT OFF AND DESTROY IT!
You can't use it on other appliances, and the exposed wires could be dangerous if plugged in.
To fit a replacement plug, proceed as follows:
Connect to the terminal in the plug
green and yellow wire marked with the letter E,
OR marked
with the symbol,
OR coloured green,
OR coloured green and yellow.

blue wire marked N
OR coloured black.
brown wire marked L
OR coloured red.
WARNING
This appliance must be earthed
Fuses and plugs
This appliance should be used only on a socket with a minimum rating of 13 Amp.
Our ready-fitted plug is already equipped with a 13 amp fuse which is BS 1362 ASTA approved. Any replacement should be exactly the same.
If the fuse cover is lost, do not use the plug until it is replaced. A correct replacement fuse cover (obtainable from your local retailer) must be the same colour as shown or named on the insert on the base of the plug.
INSTRUCTIONS FOR MOUNTING DOOR
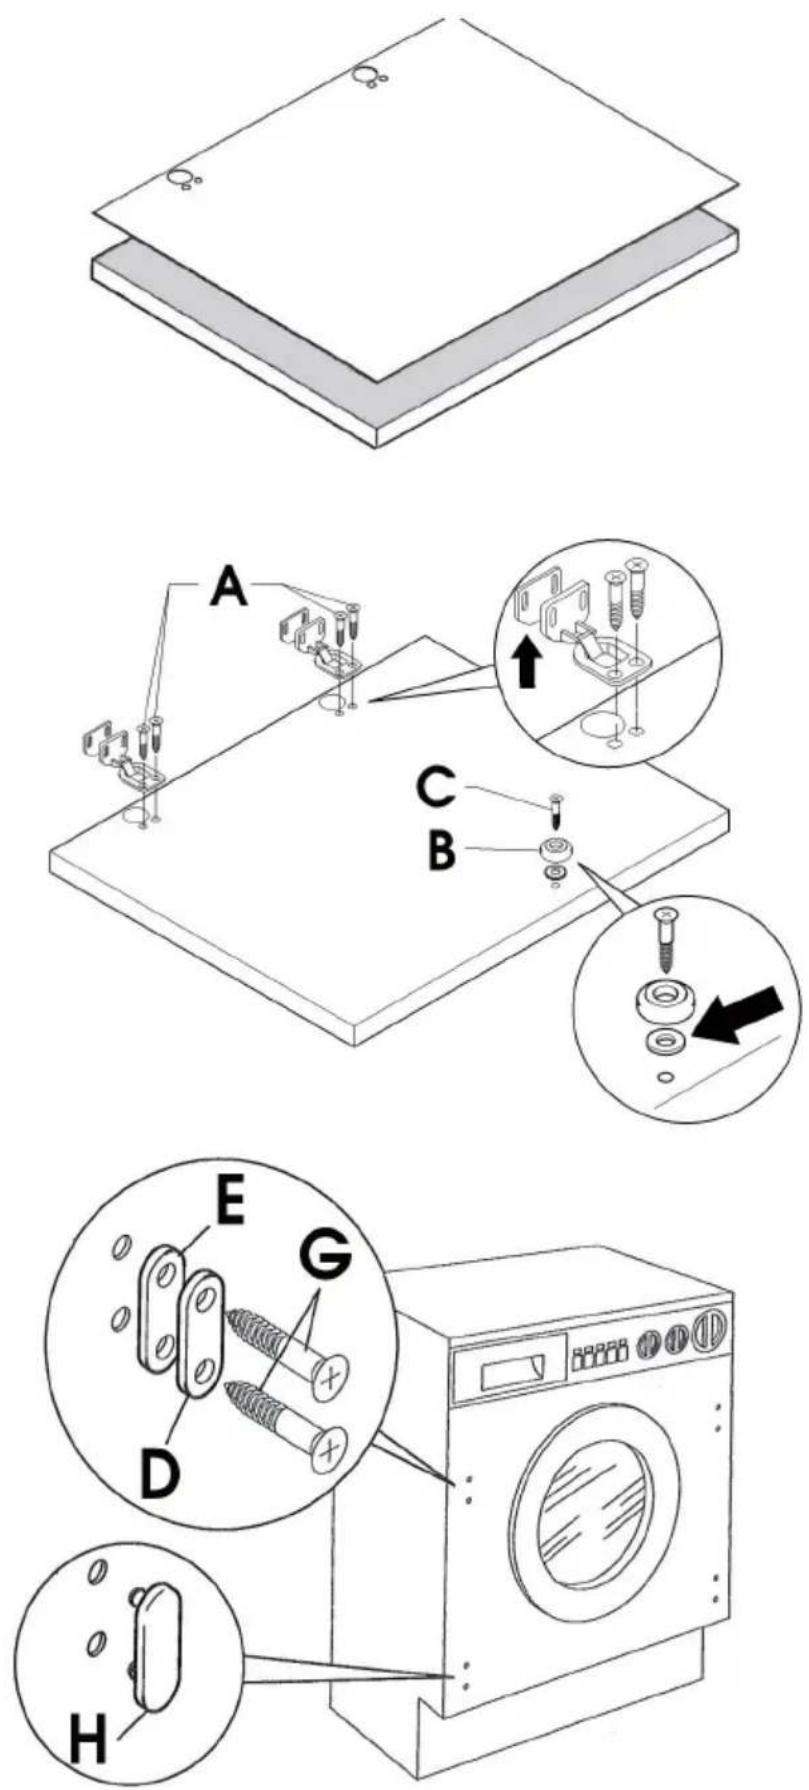
Drill holes in the door using the cardboard template as indicated in Fig. 1 to mount the hinges and closure magnet in the right or left-hand position according to your requirements. The position of the hinges refers to the upper edge.
Screw the hinges in place with the 4 screws (A). Screw on the magnet (B) with screw (C).
Mount the plate (D) in the right or left-hand position, according to your requirements. Place the rubber washers under the plate and screw in place with screw (G). Snapmount cap (H) in the lower position.
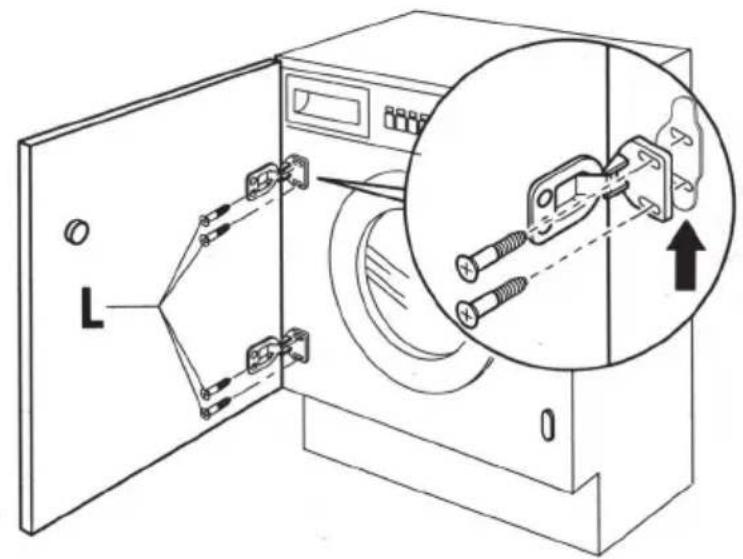
Mount the door with hinges by screwing with screws (L) to the front of the washing machine.
NOTE: You are advised to mount the door so that it opens towards the left, in the same direction as the washing machine load door for more loading space.
Slide the washing machine into an opening of adequate size. The lower skirting may be applied as preferred but within the size provided for.
The four adjustable feet allow the height of the washing machine to be adjusted from 820 mm (by removing the nuts supplied and substituting with 5 mm nuts) to a max. 840 mm by raising the feet and blocking the lock nut to the base of the plate.
text_image
Diagram showing a washing machine with labeled components and an inset close-up of the component being inserted into a socket.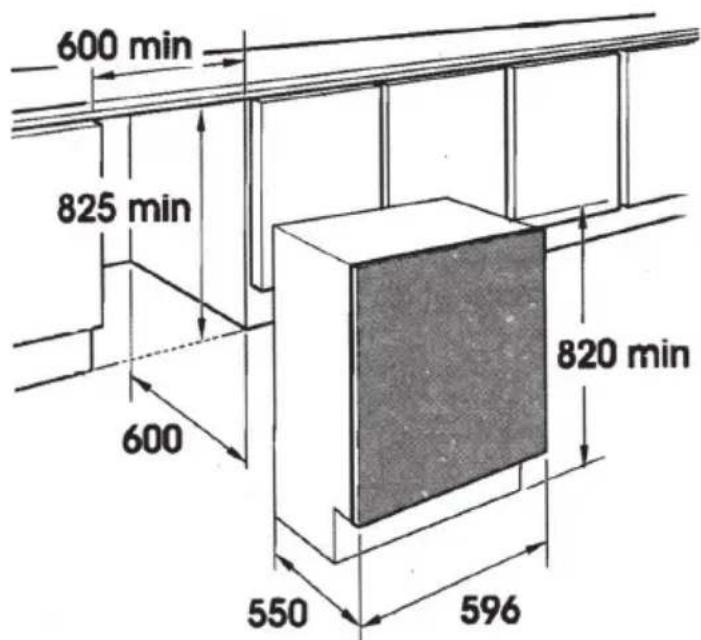
text_image
600 min 825 min 600 820 min 550 596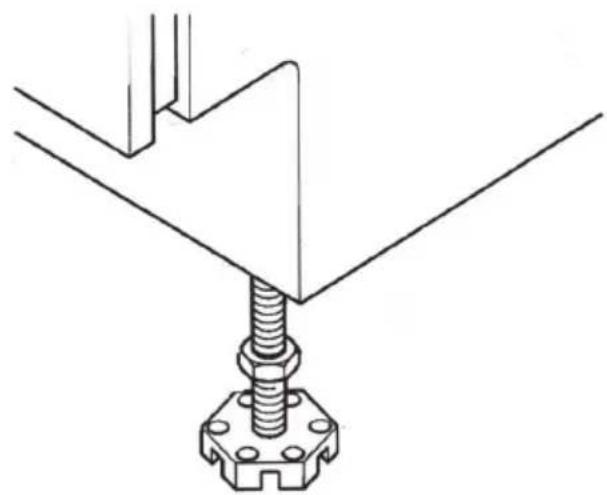
natural_image
Technical line drawing of a mechanical assembly with a bolted base and support structure (no text or symbols)SERVICE HELP-LINE
Should your appliance develop a fault, please call the
Montpellier Service Helpline on:
01527-888133
or email your enquiry to
service@repairtechuk.co.uk
www.montpellier-appliances.com
Important Note:
This appliance is marked according to the European directive 2002/96/EC on Waste Electrical and Electronic Equipment (WEEE). By ensuring this product is disposed of correctly, you will help prevent potential negative consequences for the environment and human health, which could otherwise be caused by inappropriate waste handling of this product.
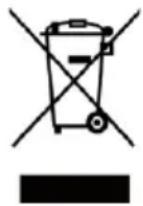
The symbol on the product, or on the documents accompanying the product, the Crossed Out Wheelie Bin, indicates that this appliance may not be treated as household waste. Instead it shall be handed over to the applicable collection point for the recycling of electrical and electronic equipment.
Disposal must be carried out in accordance with local environmental regulations for waste disposal. For more detailed information a b o u t treatment, recovery and recycling of this product, please contact your local authority, your household waste disposal service or the retailer where you purchased the product.
We continuously try to improve our products for the benefit of our customers. For this reason we reserve the right to make changes to any product at any time, without notice
Issue: 01/29.06.2016