
WOT24255ES - Washing machine BOSCH - Free user manual and instructions
Find the device manual for free WOT24255ES BOSCH in PDF.


User questions about WOT24255ES BOSCH
0 question about this device. Answer the ones you know or ask your own.
Ask a new question about this device
Download the instructions for your Washing machine in PDF format for free! Find your manual WOT24255ES - BOSCH and take your electronic device back in hand. On this page are published all the documents necessary for the use of your device. WOT24255ES by BOSCH.
USER MANUAL WOT24255ES BOSCH
natural_image
Close-up of a transparent plastic washing machine head with internal components and water droplets (no text or symbols visible)Register your new Bosch now: www.bosch-home.com/welcome
natural_image
Stack of folded clothes including a blue-sleeved band and red-sleeved shirt, no text or symbols visible
natural_image
Close-up of a showerhead with water droplets on its surface (no text or symbols visible)Washing machine

BOSCH
en Instruction Manual and Installation Instructions
Your new washing machine
You have chosen a Bosch washing machine.
Please take a few minutes to read and become familiar with the advantages of your washing machine.
To meet the high quality demands required by Bosch, every washing machine that leaves our factory is carefully checked to ensure that it functions correctly and is in perfect condition.
For more information on our products, accessories, replacement parts and services, see our website www.bosch-home.com or contact our after-sales service centres.
If the operating and installation instructions describe different models, any differences will be pointed out at the relevant points in the text.
Read these operating and installation instructions before switching on the washing machine.
Display rules
⚠ Warning!
This combination of symbol and signal word indicates a possibly dangerous situation. Not heeding the warning can cause death or injuries.
Caution!
This signal word indicates a possibly dangerous situation. Not heeding the caution can cause property and/or environmental damage.
i
Information about the optimum use of the appliance/any other useful information.
-
-
- / a) b) c)
-
The steps are represented by numbers or letters.
■ / -
Lists are represented by a small box or a dash.
Before washing
■ Intended use 4
Safety instructions 5
■ Protection of the environment 7
- Getting to know your appliance 11
Operating the appliance
■ Before each washing 12
Washing 15
■ After washing 16
Cleaning and maintenance
■ Care and maintenance 17
■ Faults, what to do? 20
- Customer service 24
Installing the appliance
Standard accessories 25
Installation 27
■ Remove transportation protection devices 29
■ Connecting the water 30
■ Alignment 33
Electrical connection 34
Before the 1st washing 35
Transportation, e.g. if moving house 36
Index
37

■ For use in the household only.
The washing machine is suitable for washing machine-washable textiles and hand-washable wool in wash liquor.
The washing machine is suitable to be operated with cold drinking water and commercially available detergents and care products which are suitable for use in washing machines.
- When dosing all detergents, cleaning aids, cleaning products and cleaning agents, always follow the manufacturer's instructions.
The washing machine may be operated by children from 8 years of age, by persons who have limited physical, sensory or mental abilities and by persons who have inadequate experience or knowledge, provided they are supervised or have been instructed by a responsible person.
- Keep pets away from the washing machine!
Read and follow the operating and installation instructions and all other information enclosed with the washing machine.
Retain documents for subsequent use.
⚠ Warning!
Risk of fatal injury from electrocution!
Your life is at risk if you touch live components.
- Only remove the mains plug by pulling on the plug body. Do not pull on the cable.
- Only plug in or disconnect the mains plug if your hands are dry.
⚠ Warning!
Risks to children!
- Do not leave children unattended near the washing machine.
- Children must not play with the washing machine.
- Children may lock themselves in appliances, putting their lives at risk.
For appliances that have reached the end of their service life:
- Disconnect the mains plug.
- Cut through the mains cable and remove complete with plug.
- Destroy the lock on the lid.
- Children must not perform cleaning or maintenance work unsupervised.
- Children may become wrapped in packaging/film or packing parts if allowed to play with them or pull them over their head and suffocate.
Keep packaging, film and packaging parts out of the reach of children.
- Detergents and care products may be poisonous if consumed, or may cause irritation if they come into contact with the eyes or skin.
Keep detergents and additives out of the reach of children.
⚠ Warning!
Risk of explosion!
Items of laundry pretreated with cleaning agents containing solvents, e.g. stain remover/cleaning solvent may cause an explosion after being loaded into the washing machine.
Thoroughly rinse out laundry items in advance by hand.
Caution!
Risk of scalding!
When you are washing at high temperatures, there is a risk of scalding if you come into contact with hot water (e.g. if hot water is being drained into a wash basin or if you have to empty the appliance in the event of a fault). Allow the water to cool down.
Caution!
Risk from damage to the appliance!
- The lid may break!
Do not climb onto the washing machine.
Caution!
Risk from contact with liquid detergents/care products!
Take care when opening the lid when the detergent dispenser is full.
In the event of contact with the eyes/skin, rinse thoroughly.
If swallowed accidentally, seek medical advice.

Packaging/Old appliance

Dispose of packaging in an environmentally friendly manner. This appliance is labelled in accordance with European Directive 2012/19/EU concerning used electrical and electronic appliances (waste electrical and electronic equipment - WEEE). The guideline determines the framework for the return and recycling of used appliances as applicable throughout the EU.
Saving tips
■ Always fill the appliance with the maximum amount of laundry for the relevant programme.
■ Wash normally soiled laundry without a prewash.
■ Automatic switch-off: If the appliance is not operated for a relatively long period of time, it switches itself off automatically before the programme start and after the programme end in order to save energy. To switch the washing machine back on again, turn the programme selector to Aus/O (Off) and then back to the desired programme.
If the laundry is subsequently dried in a tumble dryer, select the spin speed according to the tumble dryer manufacturer's instructions.
Information about the EU regulation
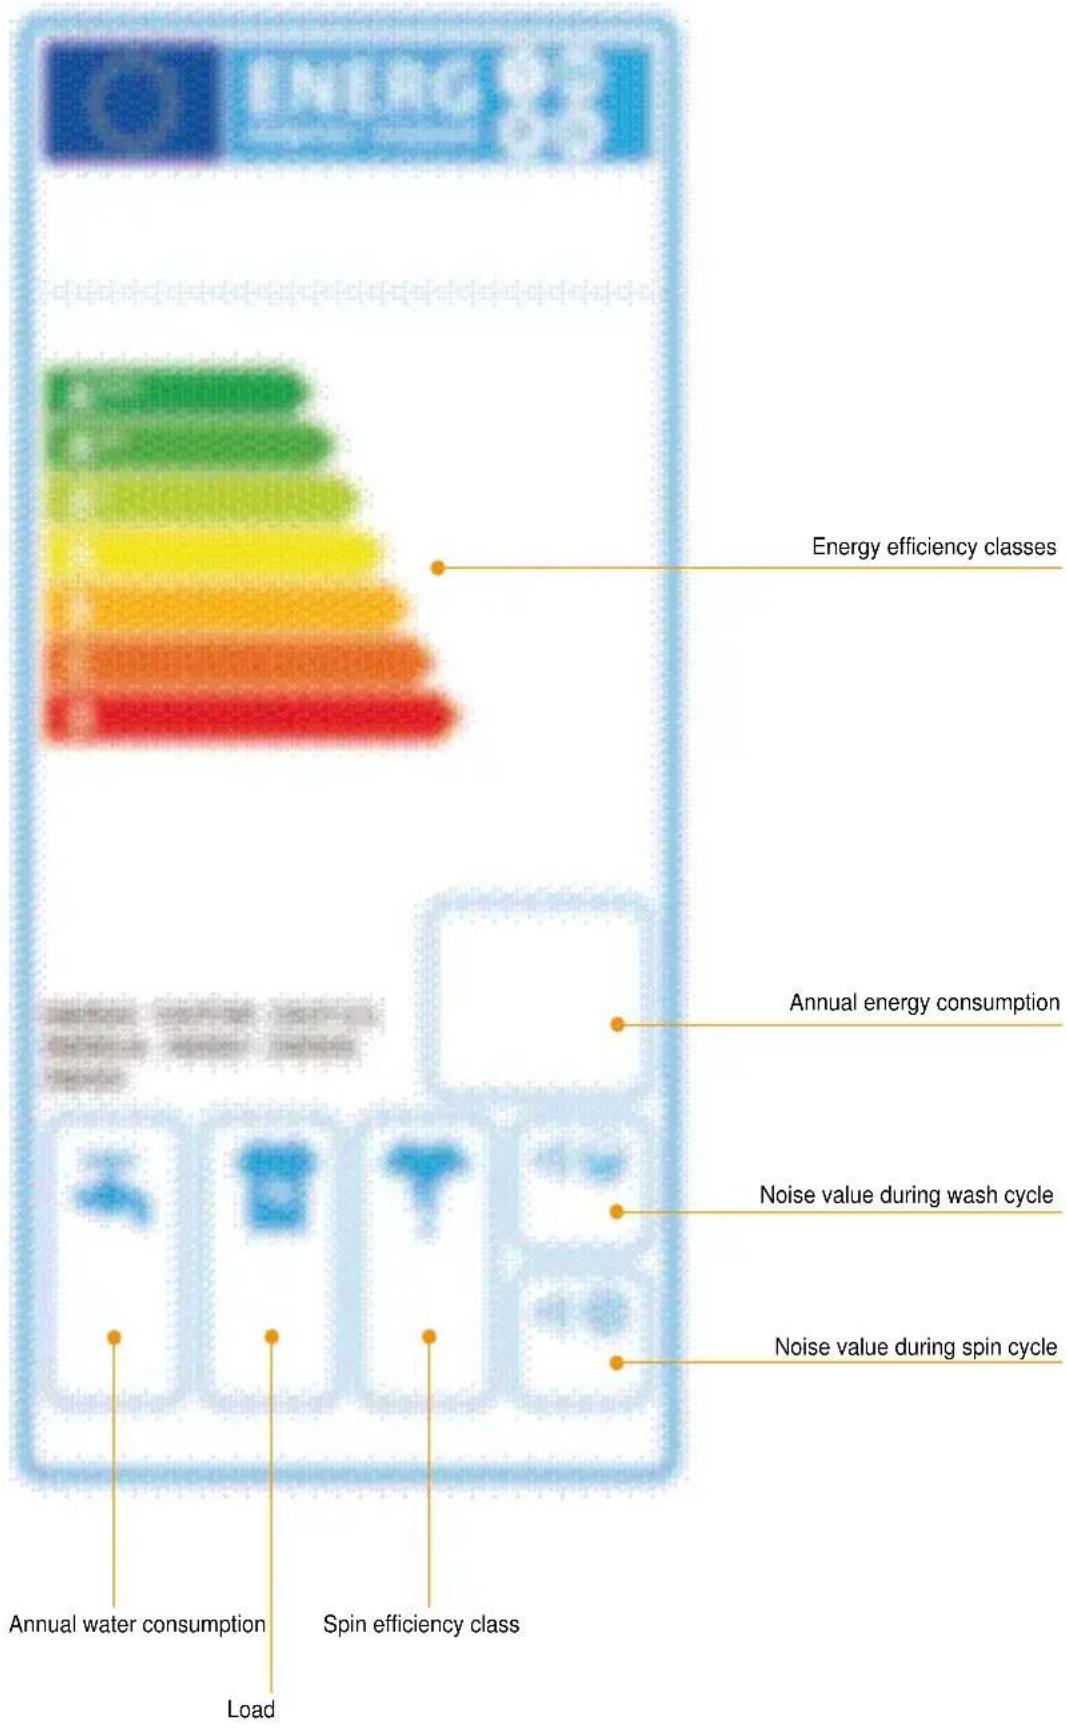
In accordance with regulation (EU) 1015/2010, further product information is provided below. The background to this is the energy-saving regulations that all appliances sold in the EU must comply with. A sample energy label is provided with explanations on a later page in these instructions. The energy label for your appliance can be found on the side or front of the appliance. The energy label contains an overview of the specific values of your appliance.
Product information
■ Efficiency test programmes for cotton fabrics
Programmes that are suitable for cleaning normally soiled cotton fabrics and are the most efficient in terms of their combined energy and water consumption are contained in the attached programme table.
Programme setting for testing and energy labelling in accordance with Directive 2010/30/EU with cold water (15 °C). The programme temperature information is based on the temperature stated on the care label for the fabrics. The actual washing temperature may deviate from the stated programme temperature for energy-saving reasons.
■ Residual moisture in the laundry
The spin efficiency class of your appliance can be seen on the energy label. The percentage of residual moisture for the spin efficiency class in question can be seen in the following table.
| Spin efficiency class Residual moisture D in % | |
| A (highest efficiency) D < 45 | |
| B 45 ≤ D < 54 | |
| C 54 ≤ D < 63 | |
| D 63 ≤ D < 72 | |
| E 72 ≤ D < 81 | |
Correct selection of detergent
The care label is crucial for the correct selection of detergent, temperature and treatment of the laundry. See also the website www.sartex.ch. On the www.cleanright.eu website, you will find further useful information about detergent, care products and cleaning agents for domestic use.
| Laundry and fabric typeBoil-washable white laundry made from linen or cotton 🎨 | Washing temperature20 °C - max. 90 °C S | Detergentstandard detergent with bleach and optical brighteners |
| Coloured laundry made from linen or cotton 🎨 | 20 °C - max. 60 °C D | detergent for colours without bleach or optical brighteners |

| Laundry and fabric typeColoured laundry made from easy-care fibres, synthetic fibres 🎨 | Washing temperature20 °C - max. 60 °CD | Detergentetergent for colours/delicates without optical brighteners |
| Delicate, fine fabrics, silk or viscose 🎨 | 20 °C - max. 40 °CD | Detergent for delicates |
| Wool 🎨 | 20 °C - max. 40 °CD | Detergent for woollens |
Environmental protection and tips on economical use
In addition to the information in the instruction manual, you can lower your costs further and protect the environment by following the tips below. For light and normal soiling, it is possible to reduce the energy (lower washing temperature) and detergent.
| Reduced temperature and detergent quantity as per the recommended dosage for light soiling | Leicht (Light) | No visible dirt or stains. Clothing has taken on some body odour, e.g. light summer/sports clothing (worn for a few hours), T-shirts, shirts, blouses (worn for up to 1 day), guest bed linen and hand towels (used for 1 day) |
 | Normal Visible dirt or a few light stains, e.g. T-shirts, shirts, blouses (soaked in sweat, worn a few times), towels, bedding (used for up to 1 week) | |
| Temperature as per care label and detergent as per recommended dosage for heavy soil-ing | Stark (Intense) | Dirt and/or stains clearly visible, e.g. tea towels, baby items, work clothing |

text_image
Living Water Energy efficiency classes Annual energy consumption Noise value during wash cycle Noise value during spin cycle Annual water consumption Spin efficiency class LoadMuch more important information can be found in your operating and installation instructions.

Getting to know your appliance
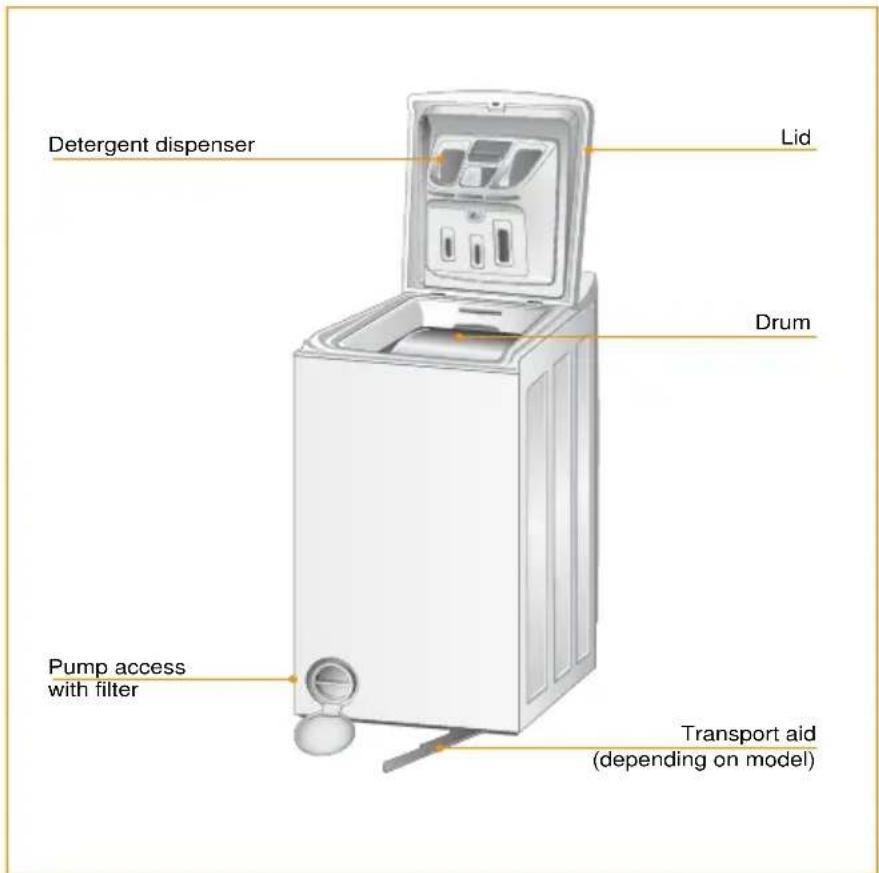
Your appliance
text_image
Detergent dispenser Lid Drum Pump access with filter Transport aid (depending on model)Detergent dispenser
natural_image
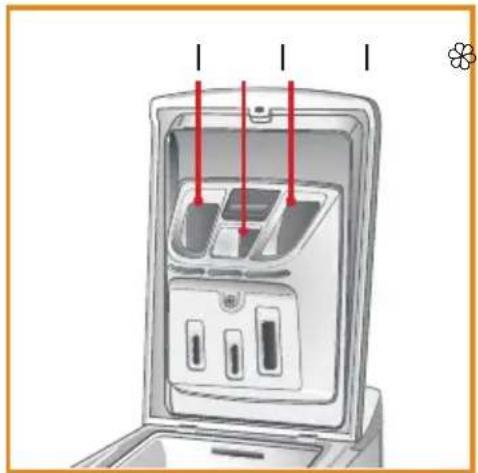
Diagram of a refrigerator interior with three drawers and labeled buttons (no text or symbols present)Compartment I detergent for prewash Compartment ✿ fabric softener, starch, bleach Compartment II detergent for the main wash, water softener, stain re- mover
i Never exceed the "MAX" mark in each compartment.
Before each washing
i Make sure that
- The washing machine has been correctly installed and connected. From Page 27
- A complete wash cycle without laundry has been run before the first use. Page 35
1. Preparing the washing
Sorting the washing according to:
natural_image
Green icon showing three T-shirts with arrows pointing upward and downward, no text or symbols present■ Type of fabric/fibre.
Colour.
Soiling.
- Follow manufacturer's care information.
■ Care label specifications:


Cottons 95 °C, 90 °C


Coloureds 60 °C, 40 °C, 30 °C


Easy-Care 60 °C, 40 °C, 30 °C


Delicates 40 °C, 30 °C


Hand and machine-washable silk and woollens cold, 40 °C, 30 °C

Do not wash laundry in the washing machine.
Protecting the washing and the machine:
i – When dosing all detergents, cleaning aids, cleaning products and cleaning agents, always follow the manufacturer's instructions.
- Keep detergents and agents for the pretreatment of washing (e.g. stain remover, prewash sprays, ...) away from the surfaces of the washing machine. Using a damp cloth, immediately remove any fine spray residue and other residue/droplets.
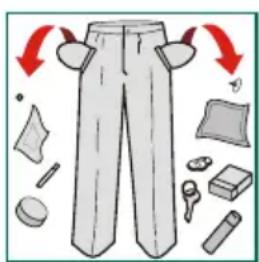
text_image
Illustration of a pair of pants with directional arrows indicating movement or selection, surrounded by other items like accessories and bags.- Empty pockets.
- Remove metal parts (paper clips, etc.).
- Wash delicates in the net/bag (tights, underwired bras).
- Close zips, button up covers.
- Brush sand out of pockets and collars.
- Remove curtain fittings or include in the net/bag.
- Wash new items separately.
2. Preparing the appliance

Insert mains plug.
Turn on water tap.
3. Placing the laundry in the drum, selecting the programme
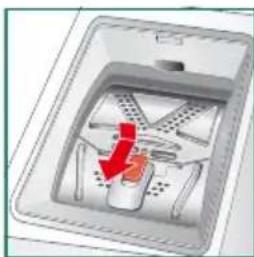
natural_image
Diagram of a kitchen sink with a red arrow indicating a drop or reduction, showing interior layout (no text or symbols)- Open the machine lid by lifting it up.
- Hold the rear drum flap, push the slide in the direction of the arrow with the other hand and push the front drum flap down gently until the locking mechanism releases.
- Place the items of laundry in one at a time. Do not exceed the maximum load shown in the programme table.
i – Overfilling has a negative impact on the washing result and promotes creasing.
- Mix large and small items of laundry. Laundry items of different sizes distribute themselves better during the spin cycle.
- Do not press laundry into the drum with the drum flaps.
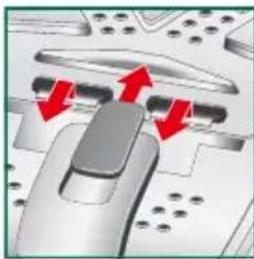
natural_image
Mechanical component diagram showing a lever mechanism with red arrows indicating motion direction (no text or symbols)- To close, place both drum flaps over the drum opening, with the rear one on top of the front one, then push them both down gently until the locking mechanism engages.
i - Make sure that the drum flaps lock correctly: the metal hook must engage fully; the slide must protrude slightly over the rear drum flap.
- Do not trap any laundry between the flap and the drum.
- Select the programme. Select the programme with additional functions according to the programme table. Set the temperature and spin speed.
4. Detergents and care products
-
The detergent that should be selected depends on:
-
Fabric type
- Fabric colour
- Washing temperature
- Type and degree of soiling
i – Do not use liquid detergent if the "Startverzögerung" (Delay start) function is set.
- Do not use liquid detergent for the main wash if the "Vorwäsche" (Pre-wash) additional function has been selected.
- Only use detergent and care products for domestic washing machines.
-
Dilute thick fabric softener and conditioner with a little water.
-
Measure accordingly:
-
Manufacturer's instructions
- Type and degree of soiling
- Water hardness (ask your water supply company)
- Size of load (half load = 3/4 dosage, minimum load = 1/2 dosage)
i – Using too much detergent results in increased foaming and has an adverse effect on the cleaning action.
- Using too little detergent causes the laundry to turn grey and results in limescale build-up.
-
Add highly concentrated powder and liquid detergents directly to the drum.
-
To add detergent and care products:
-
Do not fill the detergent or care product over the "MAX" mark.
- For programmes without a pre-wash and with temperatures between cold and 40 °C, you should use liquid detergent. Likewise if "Startverzögerung" (Delay start) is not activated. This prevents detergent residues.
5. Starting the programme
i You can find information about the programmes in the separate programme table.
Select Start.

During the washing cycle
■ Childproof lock (if present; depends on the model)
The childproof lock can be activated to prevent the functions that have been set on the washing machine from being changed inadvertently.
To activate/deactivate: press and hold the buttons with the key symbol at the same time for at least 3 seconds.
A key symbol appears in the display (if present).
■ Changing the programme
If you have accidentally started the wrong programme.
- Select Start. The indicator lamp flashes.
- Select a different programme, option, temperature or spin speed.
- Select Start. The new programme starts in the same phase in which the previous programme was interrupted.
■ Cancelling the programme
- Press and hold Löschen (clear) for approx. 3 seconds.
- rES appears in the display (if present).
- Any water present is drained.
- The lid can be opened.
Programme end
The "Deckel frei" (lid released) symbol lights up or appears in the display (if present).
- Set the programme selector to "Aus" (off).
- Open the machine, take out the laundry
i – Do not leave any items of laundry in the drum. They could shrink in the next wash or discolour another item.
- Leave the lid and drum open so that any remaining water can dry.
- Always wait for the end of the programme, otherwise the appliance will still be locked.
- Turn off the tap.



Care and maintenance
Machine housing/control panel
■ Remove detergent residues immediately.
■ Wipe with a soft, damp cloth.
- Do not clean with a water jet.
- Do not use cleaning agents containing solvents, scouring powder, glass cleaner, multi-purpose cleaner or flammable liquids. These could damage the surfaces.
Drum
Use chlorine-free cleaning agent, do not use steel wool, do not use flammable liquids.
Descaling
Not required if detergent dosed correctly. However, if this does occur, follow the instructions of the descaling agent manufacturer. Suitable descalers can be purchased on our website or from customer service. → Page 24
Cleaning the detergent dispenser
Clean the detergent dispenser regularly (at least 3 or 4 times a year) to prevent detergent from accumulating.
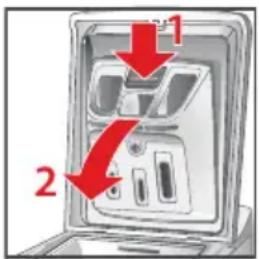
text_image
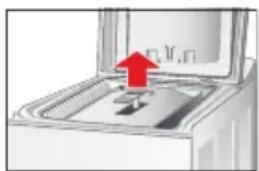
Diagram showing a device with labeled parts and red arrows indicating direction of movement or change.- Press the push-button above the fabric softener compartment in the middle of the detergent dispenser downwards.
- Pull out the detergent dispenser towards the front.
i There may be water in the detergent dispenser. Hold the detergent dispenser upright.
- Rinse out the detergent dispenser under running water. The insert for the fabric softener compartment on the back of the detergent dispenser can be removed for cleaning purposes.
- If applicable, refit the insert for the fabric softener compartment on the back of the detergent dispenser.
- Insert the lower retaining brackets on the detergent dispenser into the corresponding openings in the lid and push the detergent dispenser towards the lid until it engages.
natural_image
Diagram of a mechanical device with a red arrow indicating upward motion (no text or symbols)Filter in drain pump blocked
The washing machine is fitted with a self-cleaning pump. The filter catches objects such as buttons, coins, etc.
Check the filter regularly (at least two or three times a year). In particular:
■ if the washing machine is not draining or spinning correctly.
■ if the "Pumpe reinigen" (clean pump) display lights up.
⚠ Warning!
Risk of scalding!
When you wash at high temperatures, the water gets very hot. If you come into contact with the hot water, you may be scalded.
Allow the water to cool down.
i Turn off the tap so that no more water can flow in and has to be drained via the drain pump.
natural_image
Simple line drawing of a spoon and plate (no text or symbols)- Switch off the appliance. Disconnect the mains plug.
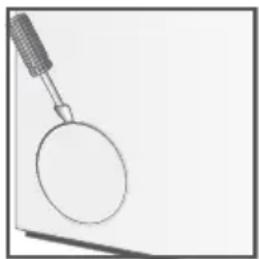
- Open the access to the pump, e.g. with a screwdriver.
- Place a bowl underneath.
- Slowly turn the filter anti-clockwise. Do not remove it yet!
-
Allow the water to drain out.
-
Unscrew the filter completely.
- Clean the filter and filter compartment.
- Make sure that the pump impeller (behind the filter in the housing) can move.
- Refit the filter. Screw in tightly as far as it will go in a clockwise direction.
- Pour 1 litre of water into the drum to ensure that no water escapes from the filter.
- Close the access to the pump.
- Connect the mains plug.
Drainage hose on the siphon blocked
text_image
Diagram showing pipe installation with a valve and inset image of circular components being inserted- Switch off the appliance. Pull out the mains plug!
Note: Residual water may run out!
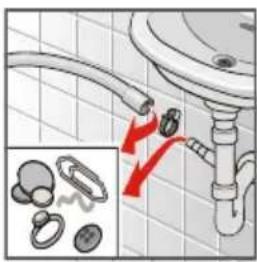
- Loosen hose clip, carefully remove drainage hose.
- Clean drainage hose and siphon spigot.
- Re-attach drainage hose and secure connection point with hose clip.
Filter in the water supply blocked
Check and clean the filter regularly (at least two to three times a year).
- Turn off the tap. Disconnect the mains plug.
- Unscrew the hose from the tap.
- Carefully clean the filter on the end of the hose with a small brush (e.g. toothbrush).
i Do not immerse the hose in water.
- Screw the hose back onto the tap. Do not use pliers.
- Connect the mains plug.
i Supply hose
- Regularly check for brittleness and cracks and replace if necessary.
natural_image
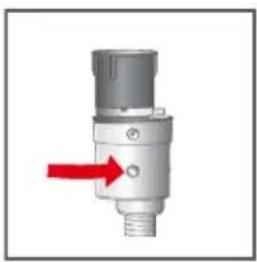
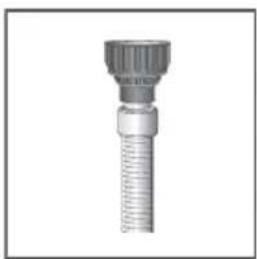
Close-up of a mechanical pressure relief valve with a red arrow pointing to the valve tip (no text or symbols visible)- The Aqua-Stop supply hose (fig. left) has a safety valve that protects against the uncontrolled supply of water. If the inspection window (see horizontal arrow) on this valve turns red, the safety mechanism has been triggered. The hose must be replaced after-sales service
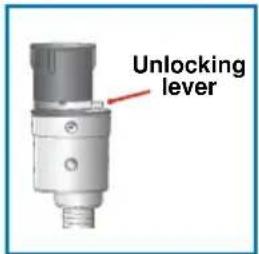
- Depending on the model, the water stop supply hose may have an unlocking device (see horizontal arrow), which must be pressed and held while the hose is being unscrewed from the tap.
- On supply hoses with a transparent covering, regularly check the colour of the covering. An intensification of the colour in places indicates that there is a leak. The hose must be replaced. After-sales service
natural_image
Close-up of a metallic mechanical component with threaded shaft and flange (no text or symbols visible)?
Faults, what to do?
Removing an object from between the drum and outer tub
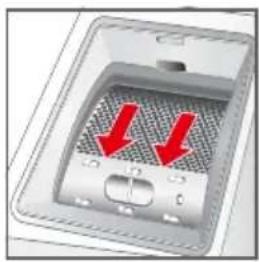
If an object should fall between the drum and the tub, you can remove it as follows:

natural_image
Close-up of a computer monitor with two red arrows pointing to the interior panel (no text or symbols visible)- Switch off the appliance and disconnect the mains plug.
- Remove the laundry from the drum.
- Close the drum flaps and turn the drum through half a turn.
natural_image
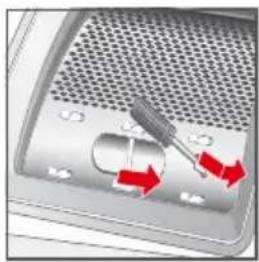
Close-up of a screwdriver inserted into a metal rack with red directional arrows indicating motion (no text or symbols)- Use a screwdriver to press on the plastic end and, as you do so, push the plastic part from left to right; the part falls into the drum.
natural_image
Diagram showing a red object placed on a gray surface with circular elements, no text or symbols present.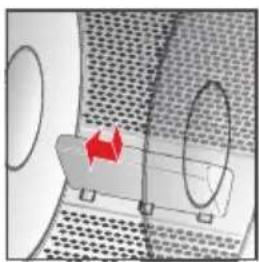
natural_image
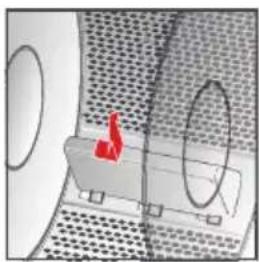
Diagram showing a mechanical setup with two circular components and a red directional arrow, no visible text or symbols- Turn the drum through half a turn; the object can now be removed through the opening that has been created in the drum.
- Refit the plastic part inside the drum. Position the plastic tip over the opening on the right-hand side of the drum.
-
Push the plastic part from right to left until it engages.
-
Close the drum flaps and turn the drum through half a turn. Check the position and fitting of the plastic part.
-
Connect the mains plug
| Problem Cause/Remedial action/Suggestions | |
| The machine will not start; no displays light up | - Is the plug plugged in?- Is the socket faulty? Does it contain a fuse? |
| The appliance does not start when Start/Pause is pressed | - Is the lid closed properly?- Is the button lock activated? To unlock it, press and hold the two buttons with the key symbol at the same time for at least 3 seconds. The key symbol goes out in the display. |
| Washing machine stops during a programme, Start/Pause display flashes | - Is rinse hold activated? Press Start/Pause or start draining to end the programme.- The programme has been changed. Reselect the programme and start it.- Was the programme interrupted and the lid opened? Close the lid and restart the programme.- Are any fault displays lit up?- Check the water supply and hose. |
| Remains of detergent in the detergent dispenser after washing | - Is the detergent dispenser inserted correctly?- Is the filter in the supply hose blocked? |
| Intense noise, vibrations and "wandering" during spinning. | - Is the washing machine level? Has it been installed correctly?- Transportation safety device removed? |
| Spin result not satisfactory.Laundry wet/too damp. | The appliance has an unbalanced load detection system. If it has been loaded with heavy individual items (e.g. a bathrobe), the spin speed is automatically reduced to protect the machine. If necessary, the spin cycle is stopped (see also the "Imbalance during spinning" section below).- Add some light items of laundry and repeat the spin programme.- Excessive foaming can prevent spinning. Start "Spülen und Schleudern" (Rinse and spin). Avoid using excessive quantities of detergent.- Has a low spin speed been set? |
Problem Cause/Remedial action/Suggestions
| Programme duration longer/shorter than originally displayed/ specified. | Not a fault.The washing machine adapts the programme duration accordingly based on factors such as excessive foaming, load imbalance due to heavy items of laundry, longer heating time due to lower supply water temperature, etc. |
| "Unwucht beim Schleudern" (Imbalance during spin- ning)The spin indicator in the programme se-quence display flashes or the spin speed flashes in the display once the pro-gramme has ended (depending on the model). The laundry is still very damp. | A laundry load imbalance during spinning has caused the spin cy-cle to be cancelled to protect the washing machine. The cause could be a small load that consists of just a few absorbent items (e.g. towels) or large/heavy items of laundry.- If possible, avoid washing small loads.- If possible, add a few more items of various sizes if you are washing a large or heavy item of laundry.If you want to spin the wet laundry: Add several items of laundry of various sizes and start the "Spülen & Schleudern" (Rinse & spin) programme. |
| Flashing fault display | Contents of display (if present) | Cause/remedial action |
| Wasserhahn zu (Tap closed) | No water supply, or water supply insufficient.- Tap off/not turned on fully,- Supply hose kinked/trapped- Water pressure too low. Clean the filter.- For models with an Aqua-Stop hose: if the colour in the inspection window of the safety valve is red, replace the hose. | |
| Pumpe reinigen (Clean pump) | The water is not emptied.- Detergent solution pump blocked. Clean the filter.- Drain hose/waste pipe blocked. Clean the drain hose at the siphon.Once the fault has been rectified, start the Abpumpen (drain) programme or press and hold the Löschen (Clear) button for at least 3 seconds. | |
| Service bdd (mod-els without display: all indicator lamps light up) | The washing machine stops in the middle of a pro-gramme.The drum flap is open/not closed properly: Press and hold the Löschen (Clear) button for at least 3 seconds until "Tür offen" (Door open) lights up. Turn the pro-gramme selector to "Aus" (Off), open the lid, close the drum flap. Restart the programme. | |
| Service From F02 to F35 | Fault in an electrical component.Start the "Abpumpen" (Drain) programme or press and hold the "Löschen/Abpumpen" (Clear/drain) button for at least 3 seconds. | |
| F06 | Check whether the correct programme has been selected for the type of laundry, and whether the maximum load has been observed (see programme table).Press and hold "Löschen" (Clear) for at least 3 seconds; the programme is cancelled. Then select a suitable programme for the type of laundry. | |
| FA | Fault in the Aqua-Stop device.Switch off the appliance, pull out the mains plug, turn off the tap.Carefully tip the appliance forwards. Allow the water to drain out of the appliance base. Then:- Connect the mains plug-Turn the tap on-Restart the programme | |
| Service Fod Excessive foaming | Programme interrupted because of excessive foaming- Start the Spülen und Schleudern (Rinse and spin) programme.- Restart the desired programme. Use less detergent | |
| Should the malfunction persist: unplug the mains plug, turn off the tap and call the after-sales service. | ||

Customer service
If you cannot remedy the fault yourself, Faults and what to do about them Page 20, please contact our after-sales service. We will always find an appropriate solution and will avoid unnecessary visits by engineers.
Please give the after-sales service the product number (E no.) and the production number (FD) of the appliance.
E-Nr. FD
Product number Production number
You can find this information behind the pump access flap and on the rear of the appliance.
Trust the expertise of the manufacturer.
Contact us for assistance. You will thereby ensure that the repairs are performed by trained service personnel using genuine spare parts.
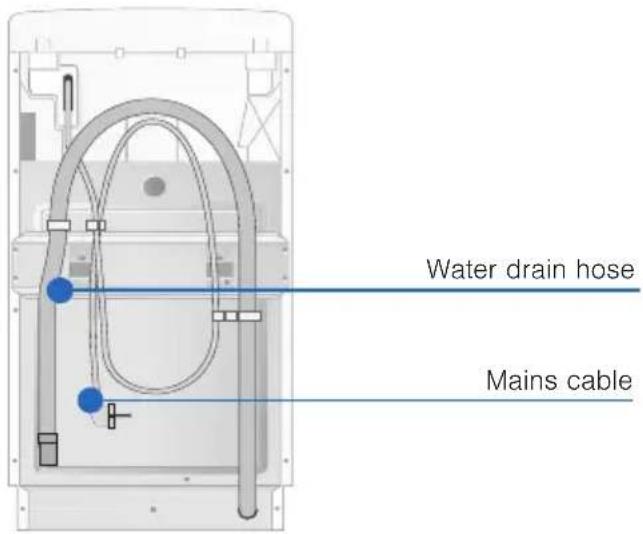
text_image
Water drain hose Mains cable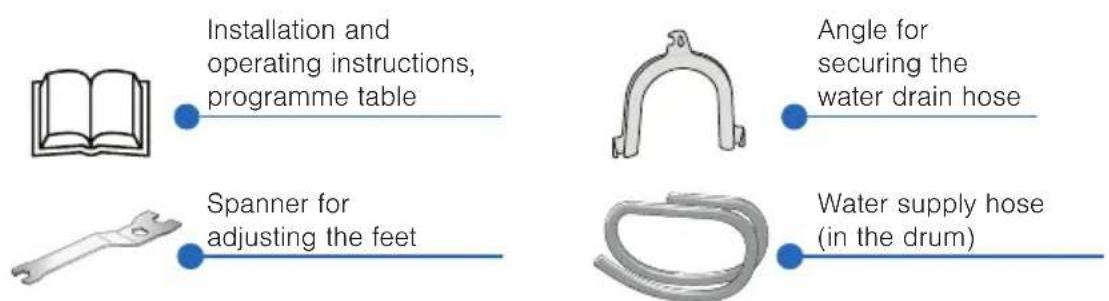
text_image
Installation and operating instructions, programme table Spanner for adjusting the feet Angle for securing the water drain hose Water supply hose (in the drum)Also required for connection of the water drainage hose to a siphon:
1 hose clip ∅ 24–40 mm (DIY store) is also required for connection to a siphon. Connecting the water → Page 32
Useful tools:
■ Spirit level for levelling
Flat-head screwdriver or hexagon socket wrench no. 8 for undoing the transport locks
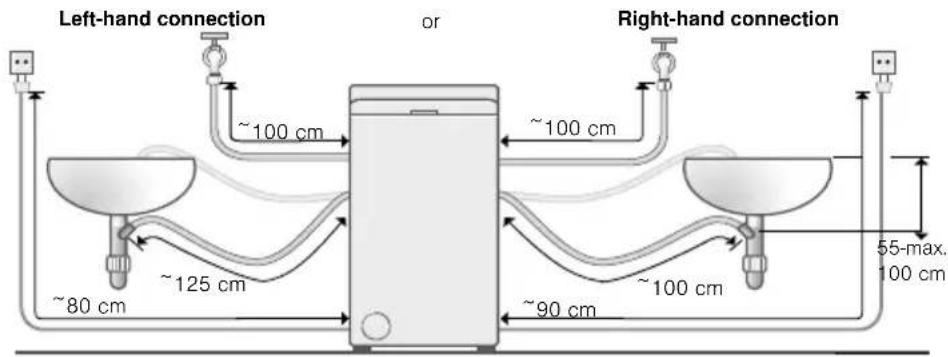
Hose and cable lengths
Depending on the model:
text_image
Left-hand connection or Right-hand connection ~100 cm ~100 cm ~80 cm ~125 cm ~90 cm ~100 cm 55-max. 100 cmi Using the hose clips reduces the number of possible hose lengths
Available from specialist retailers/after-sales service:
■ Extension for Aqua-Stop or cold-water supply hose (approx. 2.50 m). Order no. WMZ2380, WZ10130, CZ11350, Z7070X0
- Longer supply hose (approx. 2.5 m) for standard model.
Technical data
Dimensions 40 x 65 x 90 cm
(width x depth x height)
Weight Approx. 58 kg
Mains connection Nominal voltage 220-240 V, 50 Hz
Nominal current 10 A
Nominal output 2300 W
Water pressure 100-1000 kPa (1-10 bar)
i Humidity in the drum is caused by the final inspection.
Secure installation
⚠ Warning!
Risk of injury!
- The washing machine is heavy – caution: take care when lifting it.
- If the washing machine is raised by protruding components (e.g. washing machine door), the components may break off and cause injuries. Donot lift the washing machine by its projecting parts.
Caution!
Risk of stumbling!
If the hoses and power cord are installed improperly, there is a risk of tripping and injury.
Lay hoses and cables in such a way that there is no risk of stumbling.
Caution!
Washing machine may be damaged!
- Frozen hoses may tear/burst.
Do not install the washing machine in an area where there is a risk of frost or outdoors. - If the washing machine is raised by protruding components (e.g. washing machine door), the components may break off and the washing machine may be damaged.
Donot lift the washing machine by its projecting parts.
i – In addition to the safety information listed here, the local water and electricity supplier may have special requirements.
- If in doubt, have the appliance connected by a technician.
⚠ Warning!
Risk of injury!
- The washing machine is extremely heavy - take care when lifting it. Have it lifted by at least two people.
- When the washing machine is lifted, protruding parts (e.g. the lid) may break off and cause injuries. Do not lift the washing machine by protruding parts.
Caution!
Risk of tripping!
If the hose and mains lead are not routed properly, there is a risk of tripping and injury.
Lay hoses and cables in such a way that there is no risk of tripping.
Caution!
The washing machine could be damaged.
- Frozen hoses may rip/burst.
Do not install the washing machine in areas exposed to frost or outdoors. - If the washing machine is lifted by protruding parts (e.g. lid), the parts may break off and the washing machine could be damaged. Do not lift the washing machine by protruding parts.
i – In addition to the safety information listed here, the local water and electricity supplier may have special requirements.
- If in doubt, have the appliance connected by a specialist.
Installation area
i Stability is important to prevent the washing machine from wandering!
- The installation area must be firm and level.
- Soft floors/floor coverings are not suitable.
Installation on a wooden floor or floating floor
⚠ Warning!
The washing machine could become damaged!
Secure the feet of the washing machine with holding brackets.
Holding brackets: order no. WMZ 2200, WX 9756, CZ 110600, Z 7080X0
i - If possible, place the washing machine in a corner.
- Screw a water-resistant wooden board (min. 30 mm thick) to the floor.


Remove transportation protection devices
Caution!
The washing machine may become damaged.
If the transportation safety devices are not removed, the drum may become damaged, for example, when the washing machine is operated.
Before using the appliance for the first time, make sure that you completely remove the transportation safety device and keep it in a safe place.
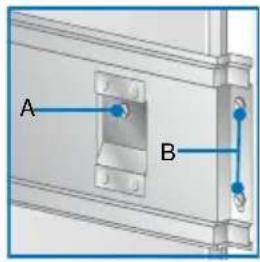
text_image
A B- Remove the two "A" screws and the four "B" screws with a flat-head screwdriver or a hexagon socket wrench no.8.

natural_image
Hand interacting with a metal tray or shelf, showing red arrows indicating movement or force (no text or symbols present)- Remove the transportation safety devices.
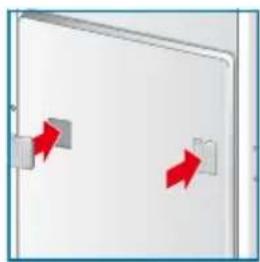
natural_image
Diagram of a door with two red arrows indicating clockwise motion (no text or symbols)-
Refit the four outer screws "B". Tighten the screws.
-
Insert the cover caps supplied into the openings.
Caution!
Do not forget to refit the four outer screws "B". Tighten them firmly.
Caution!
The washing machine may become damaged.
To prevent transport damage from occurring if the appliance is moved at a later date, you must refit the transportation safety device before transporting the appliance.

Connecting the water
Caution!
Do not immerse the Aqua-Stop safety device in water.
i - To prevent leaks and water damage, you must follow the instructions in this section.
- Only operate the washing machine using cold drinking water.
- Do not connect to the mixer tap of an unpressurised hot-water boiler.
- Do not use a used inlet hose. Only use the inlet hose supplied or one that was purchased from an authorised specialist retailer.
- If in doubt, have the appliance connected by a specialist.
Water supply
Do not bend, squash, modify or cut through the water supply hose (otherwise its strength is no longer guaranteed).
Optimum water pressure in the supply network: 100-1000 kPa (1-10 bar)
When the tap is open, the water flow is at least 8 l/min.
If the water pressure is higher than this, a pressure reducing valve must be installed.
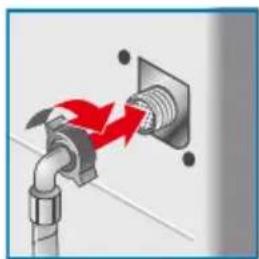
- Connect the water supply hose.
Caution!
The thread on the screw connection may be damaged
If the screw connections are tightened too much with a tool (pliers), the thread may be damaged.
Only tighten the screw connections by hand.
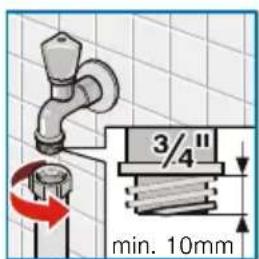
text_image
3/4" min. 10mmAt the tap ( ^3/_4 " = 26.4 mm):
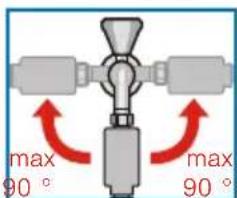
text_image
max 90° max 90°At the appliance:
natural_image
Diagram of a pipe connection with red arrows indicating flow direction (no text or symbols)To unscrew the Aqua-Stop hose:
text_image
Unlocking leverTo unscrew the Aqua-Stop hose (if present), press and hold the unlocking lever (if present).
- Open the water tap carefully, checking the leak tightness of the connection points.

i The screw connection is under mains water pressure.
Connect the water drain hose
i - Do not kink the water drain hose or put strain on it lengthways.
- Height difference between the installation surface and the drain: 55 - max. 100 cm
Outlet in a sink
⚠ Warning!
Possible water damage!
If the drain hose slips out of the wash basin during draining due to the high water pressure, any escaping water can cause water damage.
Secure the drain hose so that it cannot slip out.
Caution!
The appliance may become damaged.
If the end of the drain hose is immersed in the drained water, water may be sucked back into the appliance.
- The plug must not block drainage from the sink.
- Small hand wash basins are not suitable.
– During emptying, check whether the water is draining away quickly enough.
- The end of the outlet hose must not be immersed in the drained water.
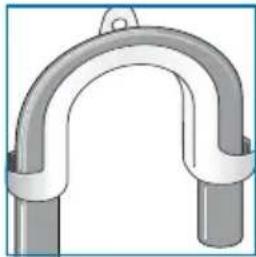
Routing the drain hose:
natural_image
Illustration of a U-shaped pipe fitting with two cylindrical ends and a hook (no text or symbols)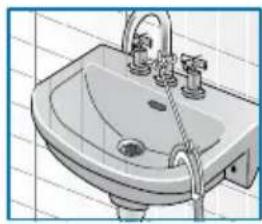
natural_image
Illustration of a single bathtub with faucet and sink (no text or symbols)i The elbow must be secured right at the end of the drain hose.
Drainage into a siphon
⚠ Warning!
Water damage possible!
If the drainage hose slips off the siphon connection due to high water pressure when draining the washing machine, leaking water may cause damage.
Connection point must be secured with hose clip, ∅ 24–40 mm (specialist outlet).

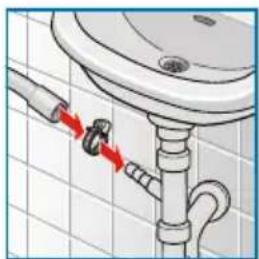
natural_image
Diagram of a plumbing sink with pipe fittings and red directional arrows indicating movement (no text or symbols)Connecting
Outlet to a plastic pipe with rubber bushing
⚠ Warning!
Possible water damage!
If the drain hose slips out of the plastic pipe during draining due to the high water pressure, any escaping water may cause water damage.
Secure the drain hose so that it cannot slip out.
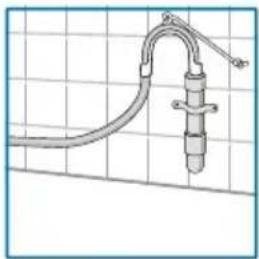
natural_image
Technical line drawing of a mechanical or electrical component with tubing and connectors (no text or symbols)Connection

Alignment
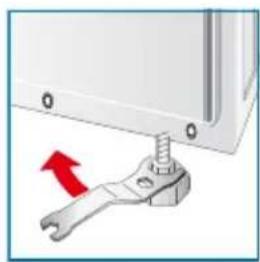
natural_image
Close-up of a wrench being inserted into a wall-mounted device, with a red arrow indicating the wrench's direction (no text or symbols present)-
Undo the lock nut with a wrench in the direction of the arrow.
-
Check the alignment of the washing machine with a spirit level and adjust if necessary. Change the height by turning the appliance feet.
i All appliance feet must stand firmly on the ground. The washing machine must not wobble.
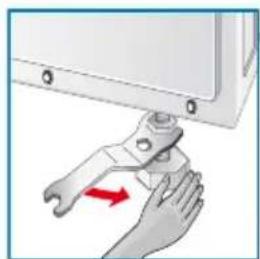
natural_image
Illustration of a hand holding a wrench with a red arrow indicating motion (no text or symbols)- Tighten the lock nut against the housing. In doing so, hold the foot tight and do not adjust its height.
- The lock nuts on all of the appliance feet must be screwed tightly against the housing. - Intense noise, vibrations and "wandering" may be the result of incorrect levelling.

Electrical connection
Electrical safety
⚠ Warning!
Danger of death from electric shock!
Danger of death if live parts are touched.
- Never pull out the mains plug by tugging the power cord.
- Insert/pull out the mains plug with dry hands only.
- Never pull out the mains plug during operation.
- Connect the washing machine to an alternating current via a correctly installed earthed socket only.
- The mains voltage and voltage specifications on the washing machine (appliance rating plate) must match.
- Connected load as well as required fuse are indicated on the appliance rating plate.
Ensure that:
- Mains plug and socket match fit.
- Cable cross-section is adequate.
– Earthing system has been installed correctly. - A damaged power cord may be replaced by an electrician only. A replacement mains cable can be obtained from customer service.
- Do not use multiple plugs/couplings or extension cables.
- If a residual-current-operated circuit breaker is used, use only a type which features this symbol:
Only this symbol guarantees compliance with currently valid regulations. - The mains plug must be accessible at all times.

The washing machine was thoroughly tested before leaving the factory. To remove any water that may be left over from the test, do not load any laundry the first time that you run a washing programme.
i The washing machine must be installed and connected correctly as described in the Installation chapter from Page 33 onwards.
- Check the machine.
i Never use a damaged machine. Inform the after-sales service. → Page 24
- Remove the protective film from the display (if present).
- Connect the mains plug.
- Turn the tap on.
- Open the lid; make sure that the drum flaps are closed correctly (do not load any laundry).
- Select the Baumwolle (cottons) programme.
- Set the temperature to 60^ C.
- Add 1/3 of the amount of standard detergent recommended by the manufacturer for light soiling to compartment II.
To prevent foaming, only use approximately a third of the recommended amount of detergent. Do not use detergent for wool or delicates.
- Close the lid.
- Select start/pause.
- At the end of the programme, turn the programme selector to "Aus" (off).
Your washing machine is now ready to use.

Transportation, e.g. if moving house
Preparatory work
natural_image
Simple diagram of a monitor with a circular lens and a red arrow indicating motion (no text or symbols)- Disconnect the mains plug.
- Turn off the tap.
- Remove the water supply and drain hose.
- Wait until the water has cooled in order to prevent scalding. Drain the remaining detergent solution. Maintenance – detergent solution pump blocked → Page 19
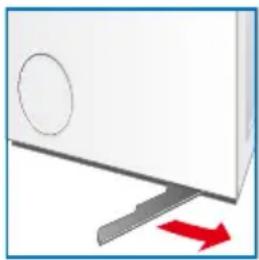
- For easier transport, slightly pull out the handle at the bottom of the appliance on the front (depending on the model). If necessary, use foot to help pull out the handle fully.
Fitting the transport lock
- Refit the transport lock.
- Transport the appliance in an upright position.
Before initial use:
i - You must remove the transport lock. → Page 29
- Return the transport handle to its original position.
- To prevent unused detergent from flowing straight into the drain during the next wash: Pour 1 litre of water into the drum and start the Abpumpen (drain) or Löschen/Abpumpen (clear/drain) programme (depending on the model).
Index
A Alignment, 33
C Cancelling the Childproof lock, 15
programme, 15
Care, 17
Drum, 17
Machine housing/control
panel, 17
Changing the
programme, 15
Childproof lock, 15
Cleaning
Detergent dispenser, 17
Filter, 19
the siphon, 19
Connecting the water, 30
Customer service, 24
D Descaling, 17 Drain pump blocked, 18
E Electrical connection, 34
F Faults, what to do?, 20
G Getting to know your appliance, 11
H Hose and cable lengths, 26
Installation, 27 Intended use, 4
M Maintenance, 17
Object between the drum and Old appliance, 7
outer tub, 20
P Packaging, 7 Protection of the
Programme end, 15
| S | Safety instructions, 5 Saving tips, 7 Sorting the washing, 12 | Standard accessories, 25 Starting the programme, 14 |
| T | Technical data, 26 Transport bolts , 29 | Transport locks Fitting, 36 |
| W | Water connection Drain, 31 | Water supply, 30 |
Aqua-Stop warranty
For appliances with Aqua-Stop only
In addition to warranty claims against the seller based on the contract of sale and in addition to our appliance warranty we shall pay damages under the following conditions:
- If water damage is caused by a fault in our water safety system, we shall make reparation for the damage with respect to private users.
- The liability warranty applies to the service life of the appliance.
- A claim can only be made under the warranty if the appliance and Aqua-Stop have been correctly installed and connected according to our instructions; this also includes a correctly installed Aqua-Stop extension (original accessory).
- Our guarantee does not apply to defective cables/hoses or to fittings up to the connection on the tap.
- Appliances which feature Aqua-Stop can be left unattended during operation and it is not necessary to turn off the tap afterwards.
- The tap should only be turned off if you are away for a prolonged period, e.g. several weeks holiday.
To book an engineer visit and product advice
GB 0844 8928979 Calls from a BT landline will be charged at up to 3 pence per minute.
IE 01450 2655 0.03 € per minute at peak. Off peak 0.0088 € per minute.
Please find the contact data of all countries in the enclosed customer service list.
text_image
Black and white barcode image with vertical lines and patterned barsen (C-9407)
9001014109 501960000301