MDI650X - Dishwasher Montpellier - Free user manual and instructions
Find the device manual for free MDI650X Montpellier in PDF.


User questions about MDI650X Montpellier
0 question about this device. Answer the ones you know or ask your own.
Ask a new question about this device
Download the instructions for your Dishwasher in PDF format for free! Find your manual MDI650X - Montpellier and take your electronic device back in hand. On this page are published all the documents necessary for the use of your device. MDI650X by Montpellier.
USER MANUAL MDI650X Montpellier
Installation and Operating Instructions
natural_image
Black-and-white photo of kitchen utensils and glassware arranged in a metal rack (no visible text or symbols)Semi Integrated Dishwasher
MDI650X-K-W
Stainless/Black/White
Thank you for choosing this Montpellier Semi Integrated Dishwasher.
Our Integrated Dishwasher has been designed to provide you with the best combination of style, reliability and performance to give you years of trouble-free use.
You may be familiar with a similar product, but please take time to read these instructions carefully before installing or using your Integrated Dishwasher to ensure you get the most from your purchase.
We recommend that you keep this manual in a safe place for future reference.

text_image
2 YEAR GUARANTEE — PARTS&LABOUR— ACROSS ALL OUR MODELS Montpellier www.montpellier-appliances.comYour Integrated Dishwasher is covered by a comprehensive 2 Year Parts & Labour Guarantee. In the unlikely event that you experience a problem with your Semi Integrated Dishwasher, you can rest assured that you are fully protected against the cost of repairs for the first 24 months. Please note that any claim must be accompanied by the model reference number, serial number and proof of purchase.
To activate your guarantee, you will need your product serial number. This can be found on the rear of the machine.
There are two ways to register your Guarantee:
- Online: Visit the Support page on our website and complete the online Product Registration form. www.montpellier-appliances.com
- By Post: Simply detach and fill in the form provided, attach a stamp and send it in the post. Don't forget to include your e-mail address so that we can send confirmation through to you.

Note: We are unable to take registrations over the phone.
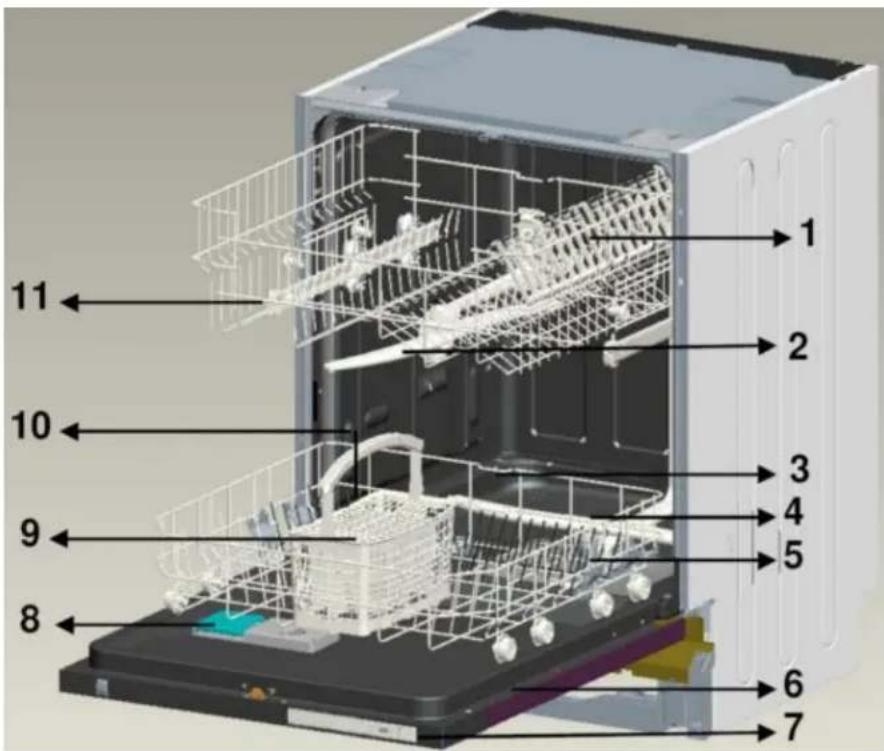
Description of the Appliance
text_image
1 2 3 4 5 6 7 8 9 10 11- Upper basket with racks
- Upper spray arm
- Lower basket
- Lower spray arm
- Filters
- Rating plate
- Control Panel
- Detergent and rinse-aid dispenser
- Cutlery basket
- Salt dispenser
- Upper basket track latch
natural_image
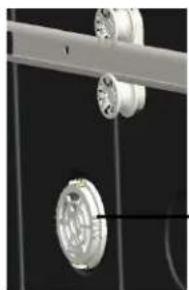
Close-up of mechanical components with no visible text or symbolsActive drying unit: This system provides better drying performance for your dishes.
12
CONTENTS:
Section 1. Installation
Section 2. Safety Advice
Section 3. Operating the Appliance
Section 4. Maintenance
Section 1. Installation
- Position the appliance in a dry, well ventilated room with a solid level floor. The room temperature must not fall below +5° or rise above +35°.
- This appliance is fitted with adjustable feet so that you can ensure it is sitting level. Adjust the feet by turning left or right until the appliance is level.
- The adjustable feet must never be removed.
- Plug the 3pin moulded plug into a nearby 13amp plug socket. Always make sure that you can easily gain access to switch the power on or off at the plug socket.
- N.B. This appliance must be earthed!
- If you have installed this appliance underneath a work surface the plug socket should have a fused switch located above the work surface so that you can easily switch the appliance on or off.
- You are advised to turn the power off at the plug socket when you have finished using your appliance.
- Before using the appliance for the first time, you must set the water softener, add salt, add rinse aid and add detergent.
- Your plumber will connect the water hose (supplied) to the water inlet connection at the rear of the appliance and to an adjacent cold water supply. It is your responsibility to ensure that the supplied washers have been used and that both connections are water tight.
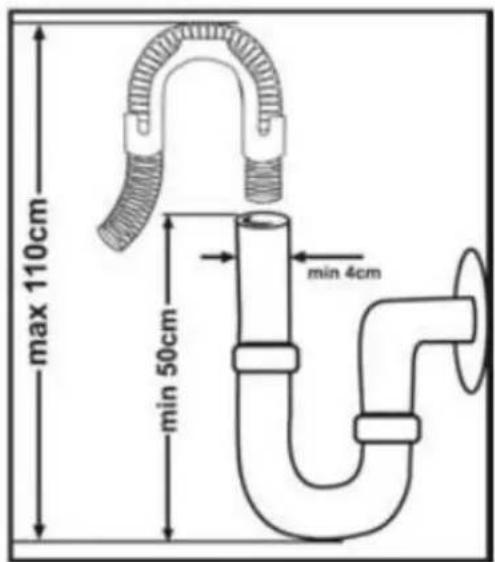
- Ensure water pressure is within the range specified on the Rating Label. Your plumber will connect the water drain pipe to an adjacent sink (see Pic.1 below)
- Ensure that the water hose and water drain pipe are not kinked when the appliance is pushed into place. If either of these pipes is kinked the appliance will not operate correctly.
- Ensure that the appliance is not standing on the power cable or hoses.
- Do not use the water inlet hose of your old machine. Use the new water inlet hose and connect the hose directly to the water inlet tap. The pressure supplied by the tap should be a minimum of 0.03 Mpa and at a maximum of 1 Mpa. If the water pressure is above 1 Mpa, a pressure relief valve should be fitted.
After the connections are made, the tap should be turned on fully and checked that it is water tight. You should always turn off the water inlet tap after a wash programme is finished.
Note: An Aquastop water hose is used in some models. In such circumstances, heavy tension will exist. Do not cut the Aquastop water hose and do not let it get folded or twisted.
Water Outlet Hose
The water drain hose can be connected either directly to the water drain hole or to the sink outlet spigot using a special bent pipe (if available). The hose connection should be at a minimum of 50cm and at a maximum of 110 cm from the floor.
Please note that a drain hose longer than 4m must not be used as it may prevent the appliance from washing correctly.
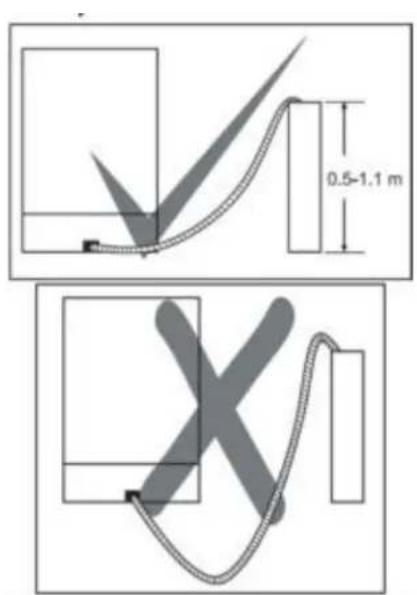
text_image
max 110cm min 50cm min 4cmSection 2. Safety Advice
This appliance is manufactured and intended for DOMESTIC use only. Any guarantee offered with the appliance is not valid for any installation in a commercial environment.
This Appliance MUST BE EARTHED!
Never try and disconnect the power by pulling the supply cable – hold the plug firmly and pull it out of the socket.
Never touch the plug or power cable with wet hands.
Check the power cable periodically for signs of damage and ensure that it is not trapped underneath the appliance. If the cable is damaged, turn off the power at the socket and arrange for a qualified electrician to replace the cable.
Never remove the power cable, open the appliance cabinet or try to modify the appliance in any way. All service work must be carried out by a qualified electrician.
The appliance is not intended for use by persons (including children) with reduced physical, sensory or mental capabilities, or lack of experience and knowledge, unless they have been given supervision or instruction concerning the use of the appliance by a person responsible for their safety. Children should be supervised to ensure that they do not play with the appliance.
Ensure that the appliance is sited well away from other heat sources, i.e. open fires, boilers etc and in a dry, well ventilated room. The temperature must not fall below +5° or rise above +35°.
Do not sit on the appliance or stand on the open door – the appliance could tip forwards.
Keep children away from detergent and rinse aid, keep children away from the open door of the dishwasher, there could still be some detergent left inside. This appliance is not a toy – ensure that children are supervised at all times whilst in the vicinity of this appliance.
Take care when loading the baskets with knives and cutlery. Always ensure that sharp points are pointing away from you or down into the basket.
Only wash crockery and utensils that are clearly marked 'dishwasher safe'. Do not wash plastic items unless they are clearly marked 'dishwasher safe'.
Only use dishwasher detergents and rinse aid clearly marked for use with automatic dishwashers.
Never use non dishwasher detergent in this appliance, i.e. hand soap, washing machine detergent, washing up liquid etc.
Always add dishwasher salt to your dishwasher, even when using 3-in-1
tablets. This will help protect your appliance against limescale.
If the power supply cord is damaged, it must be replaced by the
manufacturer, its service agent or similarly qualified persons in order to avoid a hazard.
Section 3. Operating the Appliance
3.1. Before Operating the Appliance
3.1.1. Adding Salt
text_image
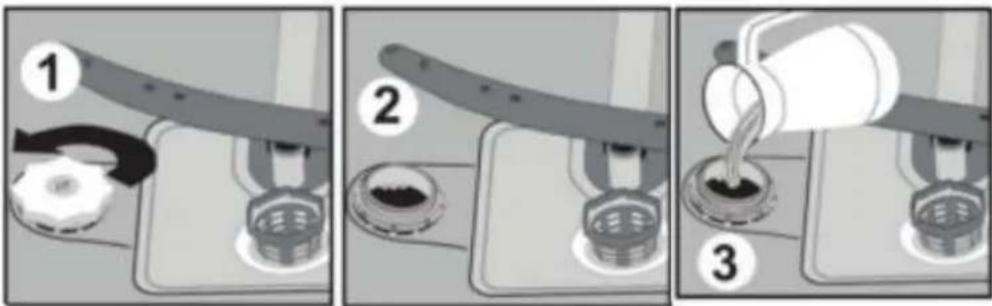
Three-step diagram illustrating a mechanical or industrial process with labeled steps 1, 2, and 3.- The sole use of 3-in-1 tablets is not recommended as failure to add salt to the salt container will leave your dishwasher exposed to limescale damage which is not covered by the manufacturers guarantee. Protect your appliance by adding salt as follows:
- Remove the lower basket and then unscrew the salt container cap (1). Add water and approximately 1 kg of specialist dishwasher salt to the container until almost overflowing. N.B. It is normal for a small amount of water to come out of the container whilst filling it with salt. Note: Fill the salt compartment with water at first use only.
- Now replace the screw cap correctly and ensure that it is tight. If not, salt may leak into the dishwasher chamber which can be detrimental to the stainless steel interior.
• This is not covered by the manufacturers guarantee. - After adding salt you should run a programme immediately to activate the water softener and flush away any salt spilled into the machine. If salt is low the indicator light will show on the control panel.
3.1.2. Adding Rinse Aid
text_image
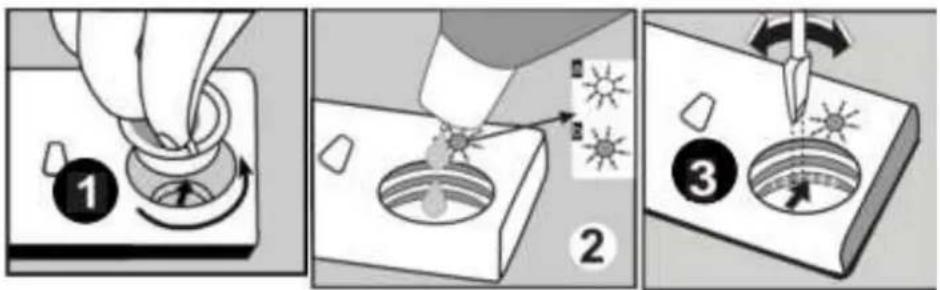
Three-step diagram illustrating a hairpin application process with labeled steps 1, 2, and 3.Remove the Rinse Aid Filler Cap (1).
Add Rinse Aid until the rinse aid level indicator becomes dark (2).
Replace the Filler Cap (3).
If the rinse aid level is sufficient the indicator light will be dark on the control panel (2B). If more rinse aid is required the indicator will be light (2A).
3.1.3. Adding Detergent
Use specialist dishwasher detergent powder or dishwasher tablets in this appliance. However, please note that tablets do not always dissolve fully during shorter wash programmes, so you are advised to operate your appliance on a longer wash programme if using tablets.
In addition, the use of tablets may result in spots appearing on dishes and glasses.
natural_image
Diagram of a door handle with a curved handle and a circular arrow indicating rotation (no text or symbols)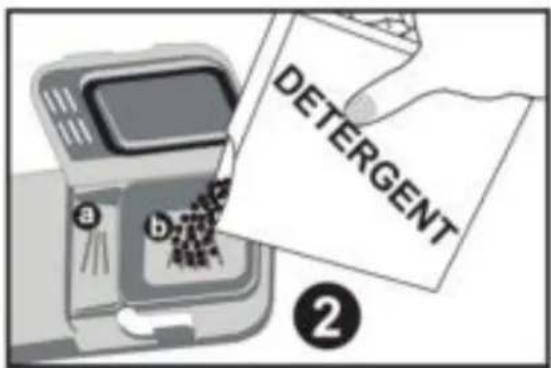
text_image
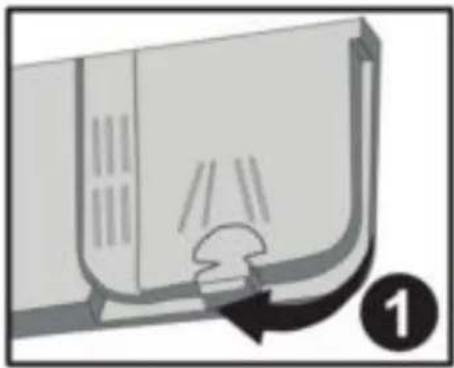
DETERGENT ②Push the latch to open the detergent container as shown in image 1. The detergent pod has level lines inside to help measure the amount of detergent you use. The pod can take a total of 40cm^3 of detergent. If your dishes are heavily soiled pour 25cm^3 of detergent into the larger compartment (b), if they are less soiled use only 15cm^3 .
If the programme selected has a pre-wash cycle you should add 5cm ^3 of detergent to the pre-wash compartment (a).
If using combined detergents, make sure to check the specifications on the product to ensure that it is appropriate for the wash programme, your machine, and the level of hardness of the mains water.
3.1.4. Combined Detergent – Recommended Usage
If you are using a combined detergent, add a rinse aid agent to your machine and switch the rinse agent setting to its lowest position (1) and activate the tablet detergent button in order to obtain better results. Depending on the water hardness you may need to fill the salt container with salt.
We do not recommended using 3 in 1 tablets on fast or rapid programmes as the tablet may not fully dissolve. For these programs we suggest using normal dishwasher powder.
3.1.5. Adjusting the Water Softener
The water softener in your appliance has been pre-set to the mid-setting, but if you need to change the setting please proceed as follows:
text_image
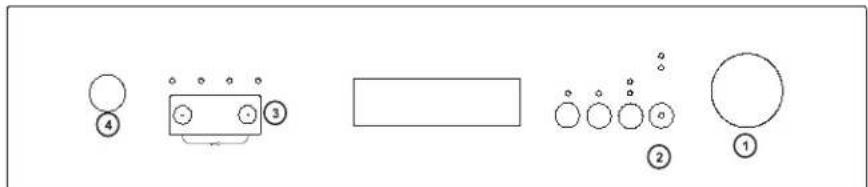
Diagram showing labeled circular shapes and geometric shapes with numbered annotationsAdjust the water softener according to how hard your tap water is.

Move the programme selector knob to the 0 (Reset) position while your machine is not in operation.1

After resetting your machine, press the Start/Pause button and keep it pressed down.

Meanwhile, energise the machine by pressing the Power On/Off button. 4

Keep the Start/Pause button pressed until "SL" disappears from the display.2

Release the Start/Pause button after "SL" disappears from the display. 2
Your machine displays the latest entered water hardness setting.
Water hardness can be adjusted by pressing "+" and "-" on display. According to Table of Water Hardness Level Settings.

After adjusting the water hardness level, press on/off button to save settings in memory.4
| Water hardness level | British hardness dE | Hardness Level Indicator |
| 1 | 0-6 | L1 is seen on display. |
| 2 | 7-14 | L2 is seen on display. |
| 3 | 15-21 | L3 is seen on display. |
| 4 | 22-28 | L4 is seen on display. |
| 5 | 29-39 | L5 is seen on display. |
| 6 | 40-63 | L6 is seen on display. |
3.2. The Control Panel
text_image
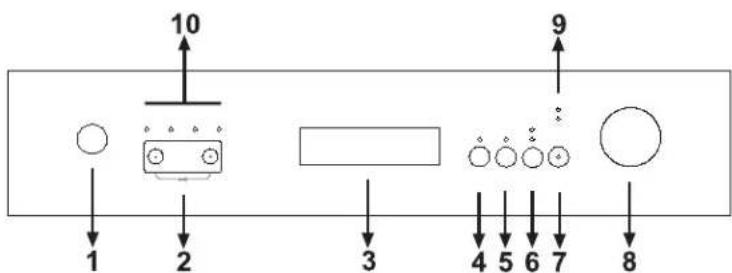
10 9 1 2 3 4 5 6 7 8- Power On/Off Button
- Remaining Time Indicator – Displays the programme times and remaining time on a programme. Additionally you can adjust the delay timer by pressing the buttons on the indicator before the programme starts.
- Door Handle
- Tablet Detergent Button – Press this button when using combined detergents that include salt and rinse-aid.
- Pre-Wash Button – Selecting this function will improve washing performance as it changes the water temperature and washing time of some programmes. Please note that if a programme is not compatible with this function, a buzzer will be activated.
- 12 Load Button – Using this function, 3 different sorts of washing can be done: The lower basket, upper basket and both baskets.
If you have dishes in both baskets press the half load button and select the position in which both lamps are highlighted.
If you have dishes in only the upper basket, press the half load button until just the upper lamp is highlighted. No washing will be done in the lower basket.
If you have dishes only in the lower basket, press the half load button until just the lower lamp is highlights. No washing will be done in the upper basket.
Please note: This feature may remain active following your wash, if you wish to deactivate it for your newly selected program press the selected feature button again and check that the indicator lamp goes out.
-
Start/Pause Button – This button will start or pause your wash programme. When washing the status lamp will indicate "wash" and while paused the Start/Pause LED will blink.
-
Programme Select Knob – Allows you to select a suitable wash programme.
-
Salt Warning Indicator – When your machine needs salt the salt warning indicator will come on. When this happens, add more salt.
Rinse Aid Warning Indicator – When there is insufficient rinse aid in your machine the rinse aid warning indicator will come on. When this happens, fill the rinse aid chamber.
- Programme Monitor Lights – Programme status can be monitored via lights showing, Wash, Rinse, Dry, End.
Child Lock – In order to activate the child lock, press "+" and "-" on the remaining time indicator simultaneously for 4 seconds, "CL" will appear for 2 seconds on the remaining time indicator. Holding these buttons down again will remove the lock and "CL" will blink

3.3. Loading the Baskets
3.3.1. Upper Basket
text_image
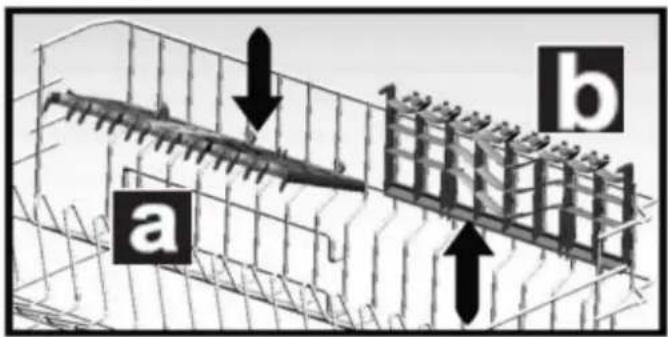
a bThere are dish racks on the upper basket of your machine.
You can use these dish racks in an open or closed position depending on whether you want to place cups, long glasses, or cutlery on them
Ensure that items are not blocking the rotation of the top spray arm.
Upper Basket Height Adjustment
natural_image
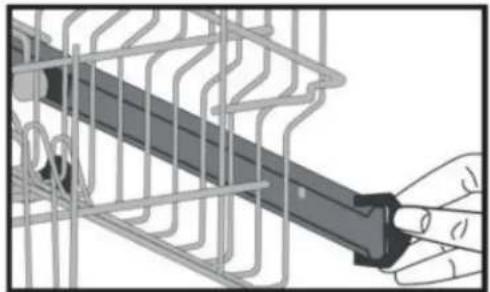
Illustration of a hand inserting a plug into a wire rack (no text or symbols)The upper baskets location can be slightly altered as shown in the image to the left.
The benefit of this is by dropping or moving the basket up in the machine you will have more space either below or above for larger items.
natural_image
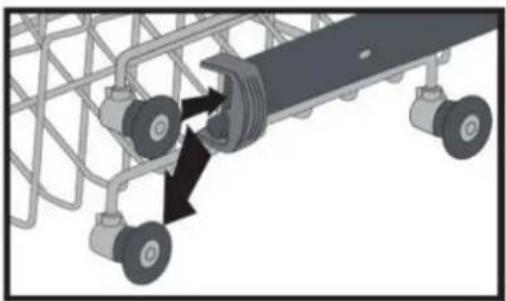
Mechanical assembly diagram showing a vehicle chassis with wheels and a shaft, no text or symbols presentIn order to change the height, remove the basket by shifting the clip at the end of the rail to the side.
You can then reposition the basket on the other wheels, do not forget to shift the clip at the end of the rail back into position to lock the basket and prevent it from sliding out.
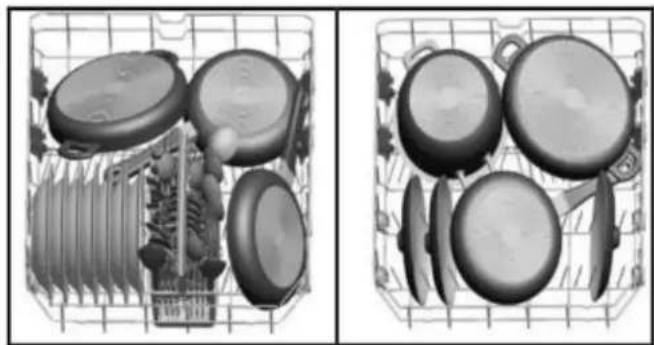
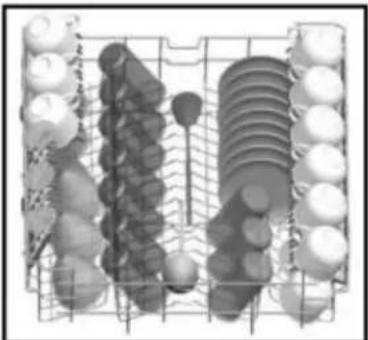
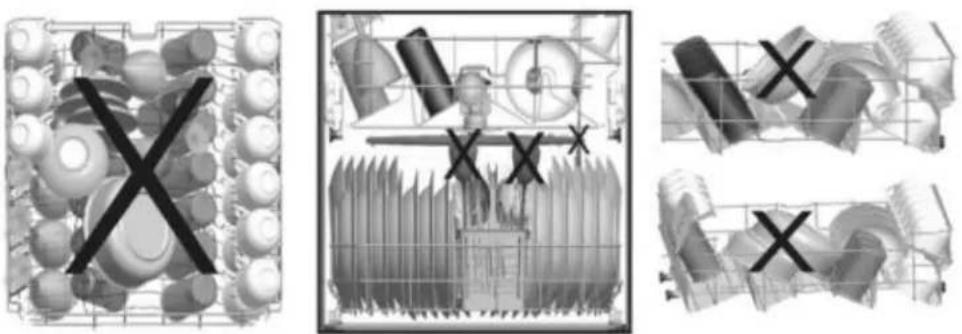
3.3.2. Alternate Basket Loads
Lower Basket
natural_image
Two grayscale images showing a food basket with various kitchen utensils and cooking items, no text or symbols visible.Upper Basket
natural_image
Grid of food items including eggs, tomatoes, and condiments arranged in rows (no text or labels visible)Incorrectly Distributed Loads
natural_image
Three grayscale 3D renderings showing industrial machinery components with no visible text or symbols3.4. Programme Selection Table
| Programme No | Prewash Auto | Delicate | Auto Normal Auto | Intensive | Quick | Eco | 55'60°C | Hygiene | Extra Hygiene (Prewash+Hygiene 60°C) |
| Programme names and temperatures | -30-50°C 50-60°C 60-70°C 40°C 50°C 60°C 60°C 70°C | ||||||||
| Type of food waste | Pre-wash to rinse and loosen residue- awaiting full load- then select a programme | Automatically adjust the washing time with temperature and amount of water by determining the soil level of dishes | coffee, milk, tea, cold meats, vegetables, not kept for long | coffee, milk, tea, cold meats, vegetables, not kept for long | soups, sauces, pasta, eggs, pilaf, potato and oven dishes, fried foods | Dishes with dense dirt waiting for a long time or requiring hygienic washing. | Dishes with dense dirt waiting for a long time or requiring hygienic washing. | ||
| Level of soil | - | small | high | high | small | medium | medium | high | |
| Detergent amount B:25 cm/15 cm A:5 cm3 | - | B | A+B | A+B | B | A+B | A+B | A+B | A+B |
| PrewashEnd | Automatically adjust the washing time with temperature and amount of water by determining the soil level of dishes | Prewash | Prewash | Prewash | Prewash | Prewash | |||
| 40°C Wash | 50°C Wash | 60°C Wash | 60°C Wash | 50°C Prewash | |||||
| Cold Rinse | Cold Rinse | Cold Rinse | Cold | 70°C Wash | |||||
| Hot rinse | Hot rinse | Hot rinse | Hot rinse | Cold Rinse | |||||
| Dry | Dry | Dry | Dry | Warmish Rinse | |||||
| End | End | End | End | Hot Rinse | |||||
| Dry | |||||||||
| End | |||||||||
| Programme duration (min.) | 15 | 64-95 | 100-132 | 111-184 | 30 | 166 | 55 | 124 | 169 |
| Electricity consumption (kW hours) | 0,02 | 0,81-0,96 | 1,12-1,3 | 1,22-1,8 | 0,88 | 0,90 | 1,07 | 1,55 | |
| Water consumption (liters) | 4,2 | 10,6-17,7 | 10,9-18,5 | 13,3-24,6 | 11 | 9 | 11 | 15 | 22,7 |
Warning: Short programs do not include a drying step.
The values declared above are the values obtained under laboratory conditions according to relevant standards. These values can change depending on
conditions of product's use and environment (network tension, water pressure, water input temperature and environment temperature).
3.5. Selecting a Programme
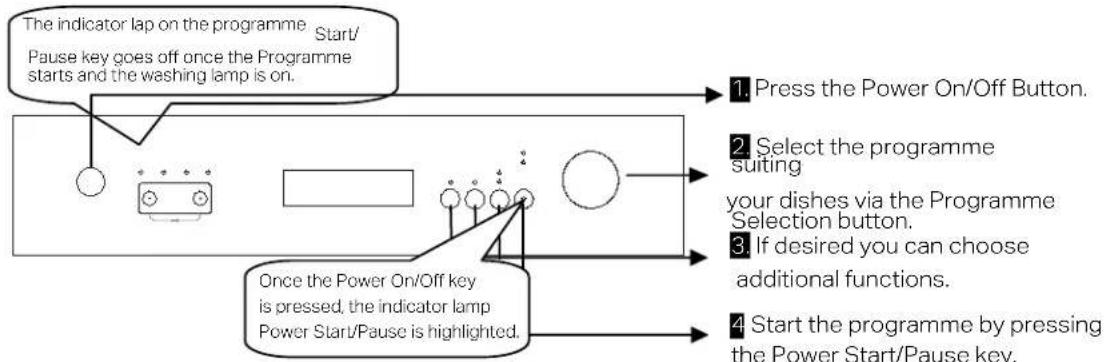
flowchart
graph TD
    A["Start/ Pause key goes off once the Programme starts and the washing lamp is on."] --> B["Press the Power On/Off Button."]
    B --> C["Select the programme suiting your dishes via the Programme Selection button."]
    C --> D["If desired you can choose additional functions."]
    D --> E["Start the programme by pressing the Power Start/Pause key."]
    F["Once the Power On/Off key is pressed, the indicator lamp Power Start/Pause is highlighted."] --> G["End of programme"]
Programme followup
You can follow the program flow using the program follow-up lambs located on the control panel.

text_image
As long as washing continues, the indicator lights of washing, rinsing and drying remain illuminated. The machine remains silent for about 40-50 minutes when the drying indicator lamp is on. Once the program is over, the Finished indicator lamp is illuminated. Do not open before the Finished indicator lamp is on.Changing a programme
If you would like to change programmes while a washing programme is running do the following.
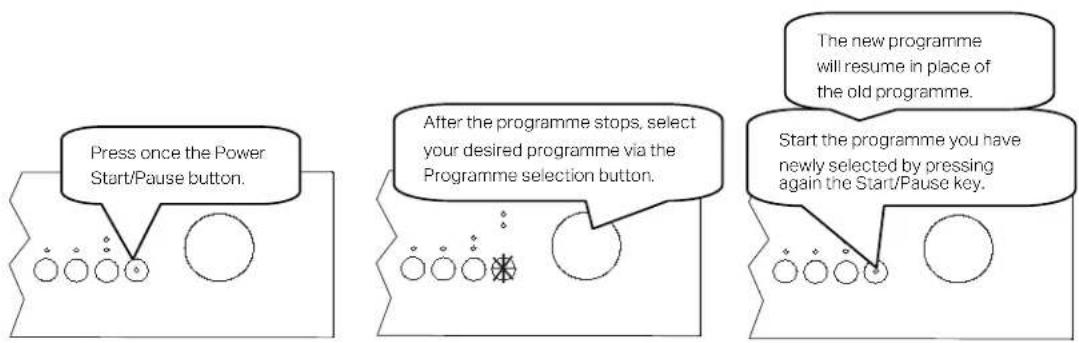
flowchart
graph TD
    A["Press once the Power Start/Pause button."] --> B["After the programme stops, select your desired programme via the Programme selection button."]
    B --> C["Start the programme you have newly selected by pressing again the Start/Pause key."]
Cancelling a programme
If you would like to cancel a programme please do the following.
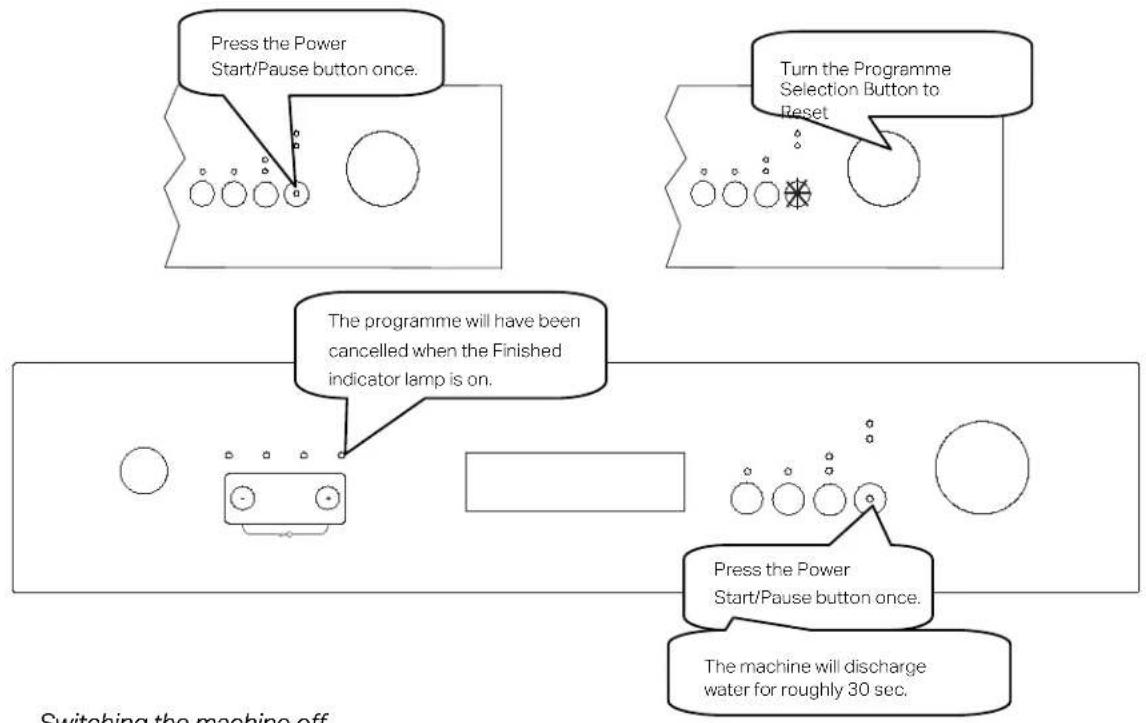
flowchart
graph TD
    A["Press the Power Start/Pause button once."] --> B["Turn the Programme Selection Button to Reset"]
    B --> C["The programme will have been cancelled when the Finished indicator lamp is on."]
    C --> D["Press the Power Start/Pause button once."]
    D --> E["The machine will discharge water for roughly 30 sec."]
Switching the machine off
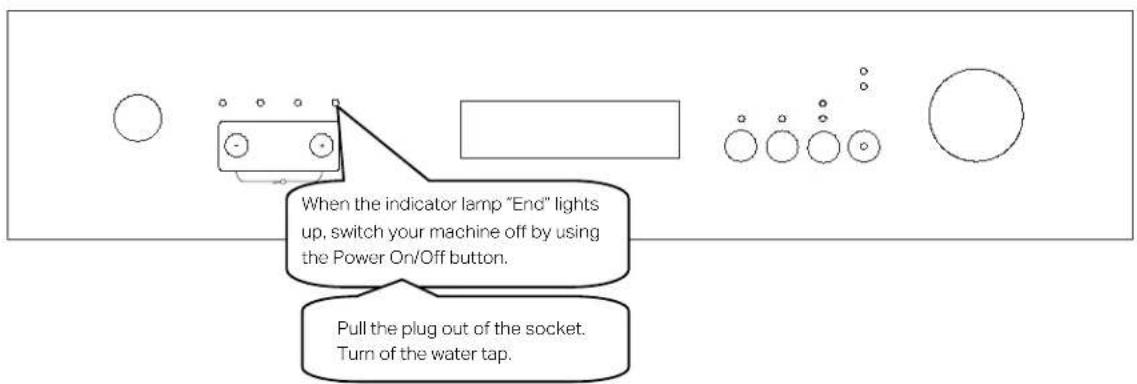
text_image
When the indicator lamp "End" lights up, switch your machine off by using the Power On/Off button. Pull the plug out of the socket. Turn of the water tap.Note: Once your wash programme has finished, leave the dishwasher door slightly ajar to help aid the drying process.
Section 4. Maintenance
4.1. Cleaning the Filter
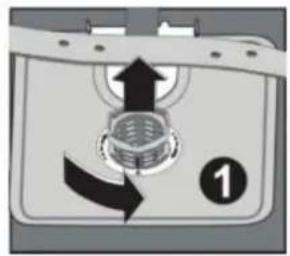
The filter helps prevent large pieces of food or other items entering the pump and causing damage. It is important that you examine and clean the filter system on a regular basis. Blocked filters are not covered under the Guarantee!
natural_image
Diagram of a device with directional arrows and a numbered label (1), no readable text or symbols present.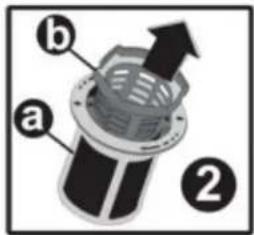
text_image
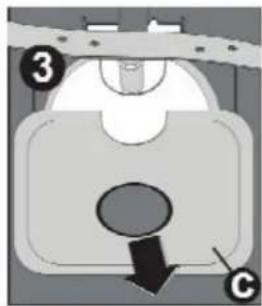
a b ②The filter assembly is located inside the appliance just underneath the lower spray arm.
text_image
Diagram of a car interior with numbered parts and directional arrow indicating movement or force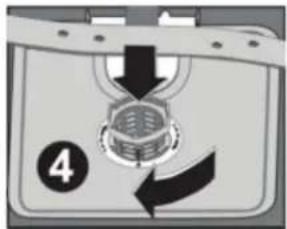
text_image
4To remove the filter assembly, turn it anti-clockwise and lift the assembly out.
Pull out the metal/plastic filter and then pull the coarse filter out of the micro filter.
Rinse with lots of water under the tap before refitting.
a. Micro Filter b. Coarse Filter c. Metal/Plastic Filter
4.2. Cleaning the Door
Periodically clean the inner stainless steel lining of the door with a warm damp cloth. Pay particular attention to the edges so that food deposits do not build up, causing the door seal to fail. Clean the door seal with warm soapy water.
Never use abrasive cleaners or polishes on the stainless steel!
4.3. Cleaning the Spray Arms
Small particles of food will over time get into the spray arms and cause blockages. Periodically remove the spray arms (as shown below) and wash them in warm soapy water. Blocked spray arms are not covered under the Guarantee!

natural_image
Diagram of a mechanical or electrical component with directional arrows indicating motion (no text or symbols)To remove the lower spray arm pull it upwards, so that the upper spray arm nut can be removed by turning the nut to the left.
Be sure that the nut is perfectly tightened when refitting the upper spray arm.
4.4. Daily Maintenance
Follow these useful tips to ensure your dishwasher stays in tip-top working order:
- Always switch off the power supply at the socket when your dishwasher is not in use.
- Always pay particular attention to the filter and spray arms – give them a regular clean as described in 4.1. and 4.3. above.
- Clean the door edges and door seal as described in 4.2. above. Add salt
. to your appliance when prompted by the salt light on the control panel. Always run a programme after to remove salt spillage.
- Add rinse aid to your appliance when prompted by the rinse aid light on the control panel.
Only use Dishwasher salt, Dishwasher detergent and Dishwasher rinse aid in your dishwasher.
• Never use abrasive cleaners to clean your appliance.
When the appliance is not in use, leave the door slightly ajar in order to avoid moisture and odours building up inside. However, this may not be advisable if small children have unsupervised access to the area where the dishwasher is sited.
If you are vacating the house for a long period, run a rinse cycle through the machine and then ensure that the water and power supplies to the dishwasher have been turned off. Leave the door ajar.
4.5. Error Codes
| ErrorCode Error Description Control | |
| F5 Inadequate water supply | Make sure the water inlet tap is totally open and that there is no water leakClose the water inlet tap, remove the water inlet hose from the tap and clean the filter at the connection end of the hose Restart your machine, contact the Repairtech helpline if the error resumes |
| F3 Continuous water input Turn off the tapContact the Repairtech helpline | |
| F2 The waste water in the machine cannot be discharged | Water discharge hose is cloggedThe filters of your machine might be cloggedPower on/off your machine and activate the program cancel commandIf the error continues, contact the Repairtech helpline |
| F8 Heater error Contact the Repairtech helpline | |
| F1 Alarm is active showing water overflow | Power off your machine and turn off the tap & contact the Montpellier service helpline. |
| FE Faulty electronic card | Contact the Montpellier service helpline. |
| F7 Overheating error Contact the Montpellier service helpline. | |
| F9 Diverter error Contact the Montpellier service helpline. | |
| F6 Faulty heater sensor | Contact the Montpellier service helpline. |
4.6. Before Calling Service
If you appear to have a problem with your dishwasher, please take a few minutes to check the following 'trouble shooting' guide. The problem may be easily solved without the need for a service call.
Dishwasher Will Not Start
• Is the power on at the socket?
• Is the Start/Pause button set to Pause?
• Have you checked the fuse in the plug?
• Is the dishwasher door closed correctly?
• Is your water pressure low – if yes, wait until normal pressure is resumed
Water Left In Bottom of Dishwasher
- Check & clean the filter
• Make sure the drain hose is not trapped/kinked
Soap Suds in the Dishwasher
• Are you using the correct dishwasher detergent/tablets. You must only use specialist dishwasher detergent in a dishwasher
- You may have spilled rinse aid into the dishwasher whilst topping up the dispenser – it will clear after one or two rinse or wash programmes
There Are Rust Stains on the Cutlery
- Your utensils may not be dishwasher safe – you must use dishwasher safe utensils
• You may have spilled salt into the dishwasher whilst topping up the salt dispenser and not run a programme to flush it away (see 3.1.1 - Page 9)
Knocking Noise From Inside the Cabinet
- The spray arm is catching against an item in the basket – reposition the items
- Items of crockery are loose in the basket and water pressure is causing them to move – reposition the items of crockery
The Crockery is not Clean
- Ensure that you load items correctly – do not stack items on top of other items
• You selected the wrong wash programme – select a stronger wash Did
• you use enough detergent?
• Have you cleaned the spray arms recently?
• Have you cleaned the filters recently?
The Glasses are Cloudy
- Are your glasses dishwasher safe? You must only place dishwasher safe glassware in a dishwasher
• Soft water can leave cloudy marks on glassware
• Too much detergent can cause cloudy marks on glassware
The Crockery is not Drying
• Ensure you load the baskets with space around the items
- Check your rinse aid – top up the dispenser
- Do not unload your dishwasher too soon - allow the drying process time to work
Warning!
If your dishwasher overflows or develops a water leak, you must turn off both the water and power supplies until an engineer has corrected the fault!
Technical Specifications
| Capacity 12 Place Settings | |
| Height 820mm – 870mm | |
| Width 598mm | |
| Depth 570mm | |
| Net Weight 42kg | |
| Electricity Input 220-240 V, 50Hz | |
| Total Power 1900W | |
| Heating Power 1800W | |
| Pump Power 100W | |
| Drain Pump Power 30W | |
| Water Supply Pressure 0.03 Mpa (0,3 bar) – 1 Mpa (10 bar) | |
| Current 10 A | |
After-sales assistance
If you continue to experience problems with your Semi Integrated Dishwasher, please call the Montpellier customer service helpline on: 03333 234 473.
Please have all your product details available, including the model number, serial number, date of purchase, and your retailer's details before registering a fault.
The service call cannot progress without this information.
Your 2 year Manufacturer's guarantee
THIS DOES NOT AFFECT YOUR STATUTORY RIGHTS.
Your new Montpellier appliance carries a free guarantee which protects you against the cost of repairs during the first 24 months from date of purchase provided that:
Any claim is accompanied by evidence of the model reference, model serial number and proof of purchase, such as a Sales Receipt, showing that the appliance was purchased within the 24 months prior to the date of claim.
What is not covered under the Guarantee
- Any appliance not correctly installed and operated in accordance with the manufacturer's instructions.
- Any appliance that is used for anything other than domestic purposes.
- Any defect caused by accident, misuse, unauthorised modification or inexpert repair.
- Cost of Call-out where a fault cannot be found with the appliance.
- Cost of Call-out for work covering routine maintenance, such as, but not exclusively, cleaning of filters or defrosting.
- Cost of Call-out for work required to correct the alignment of doors following door reversal procedures carried out by you.
• Use of the appliance by anyone other than the Householder.
• Use in any commercial environment. - Consumable items, such as, but not exclusively, fuses in plugs, bulbs and breakable items which require routine replacement.
- Repair costs incurred that have not been authorised by Repairtech and/or carried out by a non-approved Repairtech engineer.
YOUR GUARANTEE IS VALID ONLY IN THE UK & ROI.
To register your appliance simply complete the card in your appliance pack and return it with a stamp affixed or alternatively you can register online at www.montpellier-appliances.com/support
SERVICE HELP-LINE
Should your appliance develop a fault, please call the Montpellier customer service helpline on: 03333 234 473.
Please remember to have all your product details available, including the model number, serial number, date of purchase and your retailer's details before registering a fault.
Your service call cannot progress without this information.
Montpellier Domestic Appliances Ltd.
Unit 1, Tewkesbury Retail Park, Northway Lane,
Tewkesbury, Gloucestershire GL20 8JU
www.montpellier-appliances.com
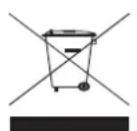
The symbol on the product or on its packaging indicates that this product may not be treated as household waste. Instead it shall be handed over to the applicable collection point for the recycling of electrical and electronic equipment. By ensuring this product is disposed of correctly, you will help prevent potential negative consequences for the environment and human health, which could otherwise be caused by inappropriate waste handling of this product. For more detailed information about recycling of this product, please contact your local city office, your household waste disposal service or the shop where you purchased the product.