DHMD163 - Humidifier GET - Free user manual and instructions
Find the device manual for free DHMD163 GET in PDF.


User questions about DHMD163 GET
0 question about this device. Answer the ones you know or ask your own.
Ask a new question about this device
Download the instructions for your Humidifier in PDF format for free! Find your manual DHMD163 - GET and take your electronic device back in hand. On this page are published all the documents necessary for the use of your device. DHMD163 by GET.
USER MANUAL DHMD163 GET
text_image
G G E T TUSER INSTRUCTIONS FOR PORTABLE DEHUMIDIFIERS
natural_image
Line drawing of a portable air conditioner unit with ventilation grilles and mounting feet (no text or symbols)THANK YOU FOR CHOOSING YOUR NEW DEHUMIDIFIER. BEFORE USING THE UNIT READ THESE INSTRUCTIONS FULLY AND RETAIN THEM FOR FUTURE REFERENCE
THESE DEHUMIDIFIERS ARE INTENDED FOR DOMESTIC USE ONLY.
SAFETY NOTES
- Do not connect to any AC socket outlet that is damaged *.
- Do not use with extension leads and multi-way adapters.
- Ensure hands are not wet when inserting the plug into the power socket.
- Do not use in the following locations:-
Next to a source of fire.
An area where oil is likely to splash.
An area exposed to direct sunlight.
An area where water is likely to splash.
Near a bath, shower or a swimming pool.
In a greenhouse.
An area where flammable gases or liquids are present.
- Never insert your finger or any foreign objects into the air outlet. Take special care to warn children of these dangers.
-
Always store the unit upright in order to maintain the compressor in a proper working condition. If not, leave the unit upright for at least 24 hours before operating.
-
Always unplug the unit before cleaning.
-
Do not cover the unit or place any object on the control panel
-
Do not obstruct the air inlets/outlets of the appliance.
-
Do not allow children to play with or climb on the machine.
-
If a fault develops or if servicing is required, this must only be carried out be a qualified service engineer.
-
If the supply cord of this appliance becomes damaged, it must be replaced by a qualified engineer.
-
This appliance is fitted with an approved BS 1363 13A 3 pin plug and a 13A BS 1362 fuse. In the event of either requiring replacement ensure that equivalent rated and approved components are used. See plug replacement details below.
PLUG REPLACEMENT
If the plug is damaged and requires replacement, follow the wiring instructions supplied with the new plug.
-
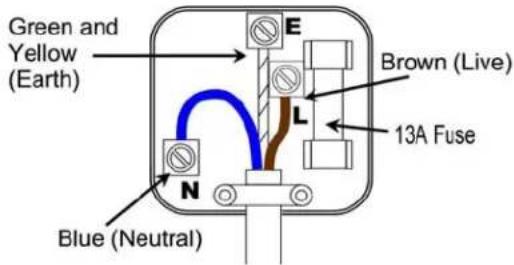
The green and yellow wire must be connected to the terminal marked with the letter E or the earth symbol.
-
The blue wire must be connected to the terminal marked with the letter N.
-
The brown wire must be connected to the terminal marked with the letter L.
-
A 13 amp plug to BS 1363 must be fitted a 13 Amp fuse to BS 1362.
text_image
Green and Yellow (Earth) Brown (Live) 13A Fuse Blue (Neutral)* For your safety and protection, this unit is earthed through the power cord plug when plugged into a matching wall socket. If you are not sure whether the wall sockets in your home are properly earthed, consult a qualified electrician. Do not use plug adaptors or extension cords with this unit.
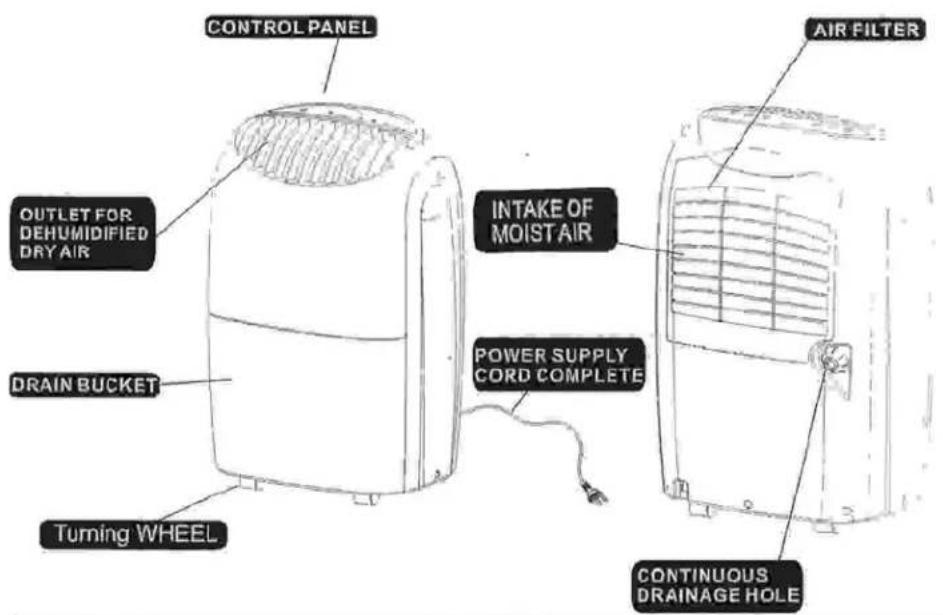
IDENTIFICATION OF PARTS
text_image
CONTROL PANEL OUTLET FOR DEHUMIDIFIED DRY AIR DRAIN BUCKET Turning WHEEL INTAKE OF MOIST AIR POWER SUPPLY CORD COMPLETE CONTINUOUS DRAINAGE HOLE AIR FILTERCONTROL PANEL
text_image
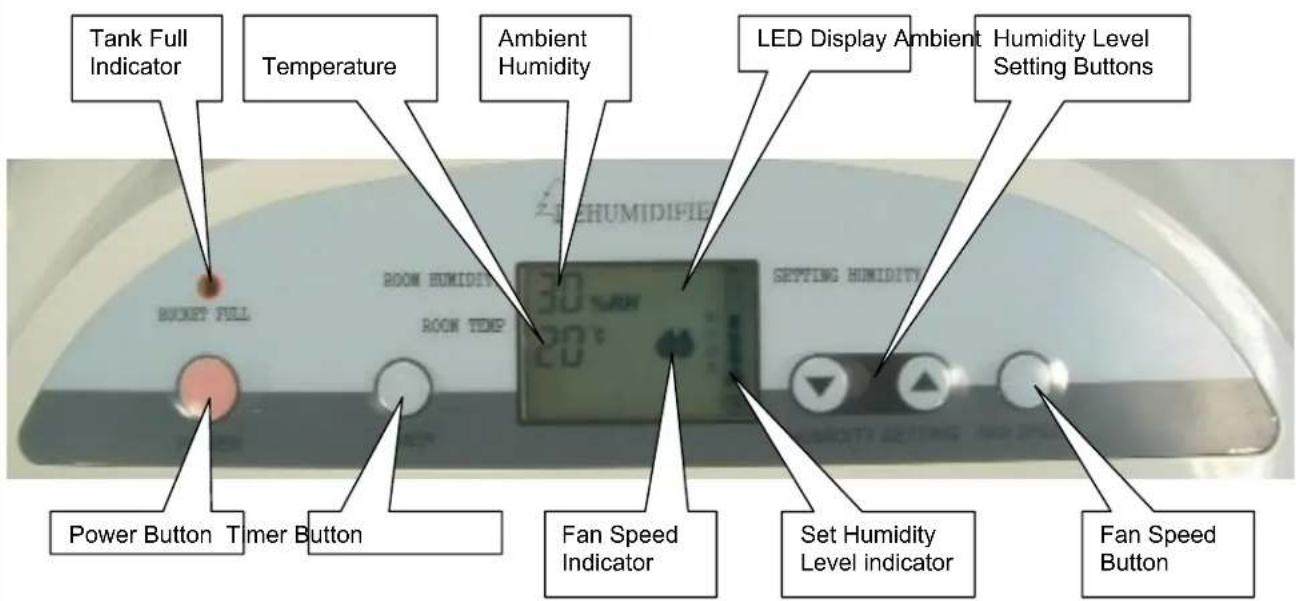
Tank Full Indicator Temperature Ambient Humidity LED Display Ambient Humidity Level Setting Buttons BUCKET FULL ROOM HUMIDITY ROOM TEMPLE 30° 20° Power Button Timer Button Fan Speed Indicator Set Humidity Level indicator Fan Speed ButtonLCD DISPLAY
text_image
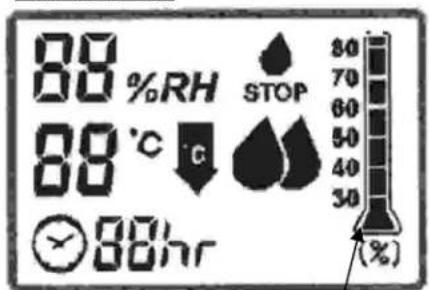
88 %RH 88 °C C 88hr STOP 80 70 60 50 40 30 (%)Set Humidity level indicator
| 88%RH | Relative Humidity of the surrounding air in the room |
| 88°C°F | Temperature of the surrounding air in the room |
| 88hr | Timer setting in hours (01 to 12) |
| This symbol shows when machine is defrosting | |
| STOP | Machine stopped due to full water tank |
| Fan on LOW speed | |
| Fan on HIGH speed |
BUTTON FUNCTIONS
POWER BUTTON
Used for switching the unit from "Standby" to "On" and from "On" to "Standby".
TIMER BUTTON
With the machine on "Standby", this can be used to set the time until the machine switches "On". With the machine "On", this can be used to set the time until the machines switches back onto "Standby".
HUMIDITY LEVEL SET BUTTON
Up (▲) and Down (▼) buttons used to set the required humidity level as shown by the Set Humidity Level Indicator.
FAN SPEED BUTTON
Used for selecting either High fan speed (💧) or Low fan speed (💧)
OPERATING INSTRUCTIONS
-
Ensure the plug on the dehumidifier is inserted fully into a working power socket. The machine will emit an audible "Bleep" and will be in "Standby" mode.
-
It is important to ensure that the water tank is correctly positioned within the unit and that it is not full of water. If the "Bucket Full" indicator is illuminated when the unit is plugged in for the first time, pull the water tank out of the unit slightly and push it back into its proper position.
-
With the machine in Standby mode, pressing the Power Button will turn the machine on. The internal fan will start up and repeated pressing of the Fan Speed button will switch the fan between high speed and low speed. The fan speed is shown on the LED display, 🔊 = High speed and 🔒 Low speed. The LED display will also show the humidity level in the room and the room temperature. The desired humidity level can be set using the up (▲) and down (▼) buttons and the set level will be shown on the Set Humidity Level indicator.
-
If the surrounding humidity level is higher than the level set on the machine, the compressor within the machine will start up and any moisture in the air drawn through the machine by the fan will form as water droplets on the condenser within the machine. These water droplets will eventually collect in the water tank in the front of the machine.
-
When the machine brings the humidity level in the room down to the level set on the machine, the compressor will switch off but the fan will continue to run.
-
The compressor will continue to cycle on and off, keeping the surrounding humidity level close to the level set on the machine.
7. Setting the Timer
The timer can be used to:- a) Switch the machine ON after a predetermined time period of 1 to 12 hrs. If this is required, the machine should be plugged into a power socket and in "Standby" mode. Pressing the Timer button once will cause the timer display to flash "00". Each time the timer button is pressed whilst the display is flashing, will advance the time by one hour, i.e. "01", "02", "03" etc. When the desired time (in hours) to "switch-on" is shown on the display do not press the timer button again. The time set will then be permanently displayed on the machine and the machine will switch ON after the pre-set time has elapsed.
b) Switch the machine OFF after a predetermined time period of 1 to 12 hrs.
If this is required, the machine should be plugged in and running. Pressing the Timer button once will cause the timer display to flash "00". Each time the timer button is pressed whilst the display is flashing, will advance the time by one hour, i.e. "01", "02", "03" etc. When the desired time (in hours) to "switch-off" is shown on the display do not press the timer button again. The time set will then be permanently displayed on the machine and the machine will switch OFF after the preset time has elapsed.
- The moisture extracted from the surrounding air, is collected in the water tank at the front of the unit. The rate at which the water is collected in the tank is dependant on a number of factors, such as the room temperature, the size of the room and the source of the humidity. It is a known fact that at low room temperatures the extraction rate is also low.
- When the water tank is full the machine will stop and the "Bucket Full" light will illuminate. The water tank should be carefully removed from the machine by sliding it outwards from the front of the machine and it should be emptied. When the empty tank is replaced properly into the machine, the machine will start up and run normally.
Note: When the “Bucket Full” light is on after the machine has been running for some time, the water should be emptied out from the tank. If the tank is not emptied, the appliance will not operate.
10. DEFROSTING
When the machine is operated at low temperatures (less than 12^ C) the surface of the evaporator may accumulate a layer of frost which would reduce the efficiency of the machine.
When this happens the machine will go into periodic defrost mode. The defrost symbol ↓ on the LCD display will come on. The machine will operate in temperatures down to 5°C. The time taken to defrost may vary. If the machine freezes up it should be turned off at the power supply and re-started. If the temperature remains below 5°C the machine should be switched off.
CONTINUOUS DRAINING OPTION
When the dehumidifier is used in a situation where it is neither desirable nor convenient to keep having to empty the water tank, there is a facility to enable the unit to be continuously drained. This will allow the unit to be run continually without the need to periodically empty the water tank. To use the continuous draining facility, the following procedure should be used.
- It is necessary to obtain a length of flexible PVC hose having a bore (internal) diameter of 13mm. The length of the hose should be sufficient to reach a suitable drain or a water container in which the water may be collected.
- The water tank on the machine must be empty and fitted correctly in position on the machine.
- Remove the domed knob on the rear of the machine that screws over the continuous drainage outlet, by rotating it anti-clockwise.
- Remove the rubber bung from the drainage outlet and keep in a safe place.
- Push one end of the drainage hose (as detailed in 1 above) firmly onto the end of the drainage outlet.
- Place the other end of the drainage hose into a suitable container (or into a drain), ensuring that no part of the hose is higher than the drainage outlet on the machine. Ensure there are no kinks or blockages in the hose.
- When reverting back to tank draining on the machine, remove the drain hose from the outlet, replace the rubber bung into the drain outlet and replace the domed knob on the drain outlet by screwing it in place in a clockwise direction.
PRECAUTIONS
Do not pull on the mains lead when removing the plug from the power socket.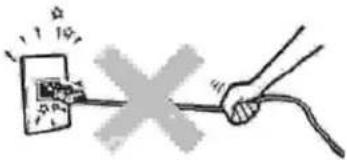 | Do not use sprays cans containing insect repellent, paint or oil near the machine as it could damage the plastic parts or cause a fire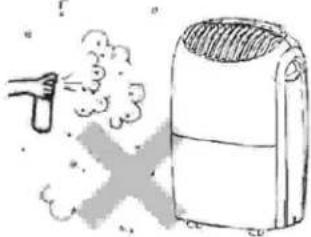 |
Do not place the machine on an uneven floor as it could cause noise, vibration and spillage of water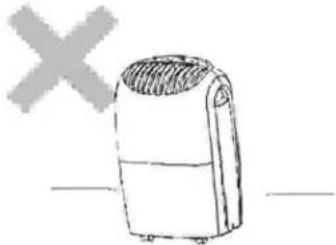 | Keep the unit at least 20cm from a wall to dissipate the heat. Clothes may be hung no closer than 50cm above the machine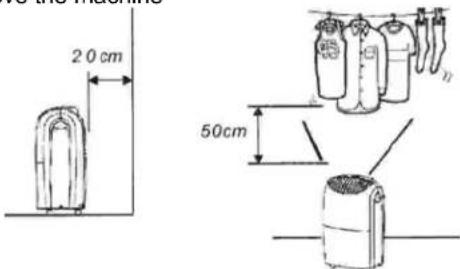 |
It is dangerous to put any object into the intake and outlet grilles of the machine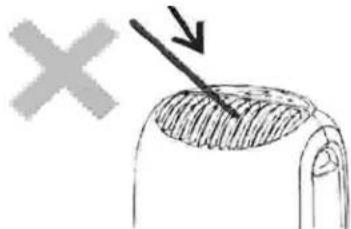 | Closing doors and windows will maximise the efficiency of the unit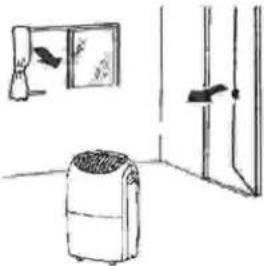 |
Do not expose the unit to any sources of heat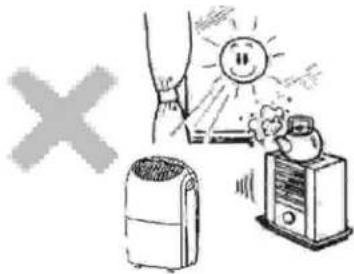 | When moving or storing the unit do not lay it on it's side or turn it upside down.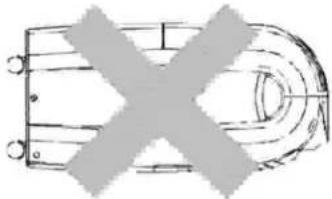 |
MAINTENANCE
IMPORTANT
Make sure the machine is un-plugged from the power socket before carrying out any cleaning or servicing.
CLEANING THE CABINET
- Wipe the cabinet of the unit with a soft, clean and dry cloth.
- If the cabinet is very dirty, use a mild detergent applied with a damp cloth. Wipe off the detergent with a clean damp cloth.
- Do not wash the machine with water or a hose, as water could enter the machine and cause a fault or create an electric shock hazard.
CLEANING THE AIR FILTER
The purpose of the air filter is to remove any dust or unclean material from the air. If the filter is clogged with dust and dirt the efficiency of the machine will be significantly reduced. For maximum efficiency of operation it is recommended that the air filter is removed and cleaned every two weeks of use.
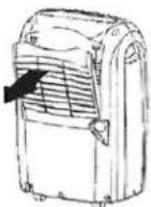
- Remove the filter by pulling it out at the top edge and lifting it away from the machine
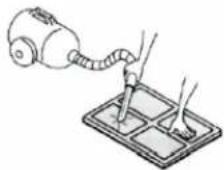
- Clean the filter by means of a vacuum cleaner or wash it with clean water and dry using a cloth.
- Replace the filter by engaging the bottom edge in the slots provided in the body and push the top edge inwards until it clips into place.
TROUBLESHOOTING
If you have any minor problems with the dehumidifier check the items mentioned below before contacting the helpline.
| Problem | Possible Cause | Solution |
| Both fan and compressor not working | No power to unit | Check power to the socketCheck power is switched on. |
| Compressor of fan not working | Motor failureUnit is in time delay periodFaulty electronics | Return for serviceWaitReturn for service |
| Not Collecting Water | Air intake filter blockedRefrigerant is low.Temperature and Humidity are too low | Clean filterReturn for serviceNormal function |
| Noisy Unit | Floor is uneven | Place on a level surface. |
| Condenser is frozen | Filter is dirtyTemperature is too low | Clean filterSwitch off and wait for temperature to rise |
| Leaks | Water tank is not installed properlyMicro switch failureUnit has frozen | Fit properlyReturn for serviceUnplug and allow ice to melt |
STORAGE OF THE UNIT
If the unit is not going to be used for some time it should be stored in an upright position in a cool dry place and covered to protect the unit from dust.
SERVICING
If a fault develops or if servicing is required DO NOT attempt to do this yourself. This should ONLY be carried out by a qualified service engineer.
SPECIFICATION
| MODEL | DHMD163 | DHMD203 |
| POWER | 220-240V / 50Hz | 220-240V / 50Hz |
| MOISTURE REMOVAL | 16 L/D (30°C 80% RH) | 20 L/D (30°C 80% RH) |
| POWER INPUT | 300W | 350W |
| REFRIGERANT | R-134a, 190g | R-134a, 210g |
| PRESSURE (SUCTION) | 12kg/cm2. | 12kg/cm2. |
| PRESSURE (DISCHARGE) | 24kg/cm2 | 24kg/cm2 |
| OVERALL SIZE (H x W x D) | 58.2cm x 36.2cm x 27.0cm | 58.2cm x 36.2cm x 27.0cm |
| WEIGHT | 14.5kg | 15.0kg |
| OPERATING TEMPERATURE | 5°C to 35°C | 5°C to 35°C |
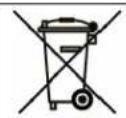
NOTE:
Waste electrical products and products containing refrigerants should not be disposed of with household waste.
Please recycle where facilities exist.
Check with your local authority or retailer for recycling advice.

GET Plc., Key Point, 3 – 17, High Street, Potters Bar, Herts. EN6 5AJ
Helpline Telephone No. 0121 565 7770
AR1131 Ed.B