MIFF501 - Fridge Montpellier - Free user manual and instructions
Find the device manual for free MIFF501 Montpellier in PDF.


User questions about MIFF501 Montpellier
0 question about this device. Answer the ones you know or ask your own.
Ask a new question about this device
Download the instructions for your Fridge in PDF format for free! Find your manual MIFF501 - Montpellier and take your electronic device back in hand. On this page are published all the documents necessary for the use of your device. MIFF501 by Montpellier.
USER MANUAL MIFF501 Montpellier
Installation and Operating Instructions
natural_image
Interior of a grocery store shelf with colorful plastic bottles and stacked food containers (no visible text or labels)Integrated Fridge Freezer
MIFF501 - Static - 50/50 Split
Introduction and 5 Year Guarantee
Thank you for choosing this Montpellier appliance.
It has been designed to give years of trouble-free use provided it is installed and maintained correctly.
Please read these instructions carefully before installing or using your appliance. It is advisable to keep your purchase and installation receipts with these instructions in a safe place for future reference.
Included is some important safety information in addition to guidelines and recommendations that will enable you to take full advantage of all the functions available.
This quality appliance has been tested and certified to meet all applicable UK electrical and safety standards.
This appliance must be installed and connected in accordance with current regulations by a qualified electrician.
After unpacking the appliance ensure that there is no visible damage. If the appliance has been damaged during transit, do not use it, contact your retailer immediately.
THE 5 YEAR MANUFACTURERS GUARANTEE DOES NOT AFFECT YOUR STATUTORY RIGHTS.
Your new Montpellier appliance carries a free guarantee which protects you against the cost of repairs during the first 60 months from date of purchase provided that:
Any claim is accompanied by evidence of the model reference, model serial number and proof of purchase, such as a Sales Receipt, showing that the appliance was purchased within the 60 months prior to the date of claim.
What is not covered under the Guarantee:
- Any appliance not correctly installed and operated in accordance with the manufacturer's instructions.
- Any appliance that is used for anything other than domestic purposes.
- Any defect caused by accident, misuse, unauthorised modification or inexpert repair.
- Cost of Call-out where a fault cannot be found with the appliance.
- Cost of Call-out for work covering routine maintenance, such as, but not exclusively, cleaning of filters or defrosting.
-
Cost of Call-out for work required to correct the alignment of doors following door reversal procedures carried out by you.
-
Use of the appliance by anyone other than the Householder.
- Use in any commercial environment.
- Consumable items, such as, but not exclusively, fuses in plugs, bulbs and breakable items which require routine replacement.
- Repair costs incurred that have not been authorised by Montpellier Service.
- Repairs carried out by a non-approved Montpellier Service engineer.
YOUR GUARANTEE IS VALID ONLY IN THE UK & ROI.
To Register your Appliance
Simply complete the card in your appliance pack and return it with a stamp affixed or alternatively you can register online (please see link below).
Service Helpline
Should your appliance develop a fault, please call Montpellier Service on: 03333 234 473
Please remember to have all your product details available, including the serial number, before registering a fault.
Your service call cannot progress without this information.
Congratulations on your choice of a MONTPELLIER quality Appliance which has been designed to give you service for many years.
WARNING!
IMPORTANT!
DO NOT connect your appliance to the electricity supply until all packing and transit protectors have been removed.
- Leave to stand for at least 4 hours before switching on to allow compressor oil to settle if transported horizontally.
- If you are discarding an old refrigerator with a lock or latch fitted to the door, disable the lock/latch, ensure that it is left in a safe condition to prevent the entrapment of young children.
- This fridge/freezer must only be used for its intended purpose i.e the storing and freezing of edible foodstuff.
- Do not dispose of the appliance on a fire. At MONTPELLIER the care and protection of our environment is an ongoing commitment. This appliance which is among the latest range introduced is particularly environment friendly. Your appliance contains non CFC / HFC natural substances in the cooling system (Called R600a) and in the insulation (Called cyclopentane) which are potentially flammable
if exposed to fire. Therefore, take care not to damage, the cooling circuit / pipes of the appliance in transportation and in use. In case of damage do not expose the appliance to fire, potential ignition source and immediately ventilate the room where the appliance is situated.
• We suggest you contact your local authority for disposal information and facilities available.
• We do not recommend use of this appliance in an unheated, cold room.
(E.g.: garage, conservatory, annex, shed, out-house etc.) See Installation Instructions on page 5 for further information.
- To obtain the best possible performance and trouble free operation from your appliance it is very important to carefully read these instructions.
- Ensure that the plug remains readily accessible. Do not use multiple adapter bar.
- Failure to observe these instructions may invalidate your right to free service during the guarantee period.
- Route electrical supply cord to allow easy connection and disconnection after installation.
- We recommend a separate switch be employed to ensure easy switch on / off.
WARNING- Keep ventilation openings, in the appliance enclosure or in the built-in structure, clear of obstruction.
WARNING- Do not use mechanical devices or other means to accelerate the defrosting process, other than those recommended by the manufacturer.
WARNING- Do not damage the refrigerant circuit.
WARNING- Do not use electrical appliances inside the food storage compartments of the appliance, unless they are of the type recommended by the manufacturer.
• We suggest you keep these instructions in a safeplace for easy reference.
- This appliance is not intended for use by persons (including children) with reduced physical, sensory or mental capabilities, or lack of experience and knowledge, unless they have been given supervision or instruction concerning use of the appliance by a person responsible for their safety.
• Children should be supervised to ensure that they do not play with the appliance.
| Built in Fridge Freezer MIFF501 | |
| PERFORMANCE | |
| Energy efficiency class | A+ |
| Energy consumption - Kwh/year | 291 |
| Net storage - vol fresh food ltrs (cu.ft.) | 163 (5.75) |
| Net storage - vol frozen food ltrs (cu.ft.) | 102 (3.6) |
| Total net vol - ltrs (cu.ft.) | 265 (9.35) |
| Frozen food compartment rating | 4 STAR |
| Conservation time from failure | 14 h. |
| Freezing capacity fresh food - kg (lb) / 24 hrs. | 4.75 (10.45) |
| Climate class | SN-ST |
| Operating noise level dB(A) | 39 |
CONTENTS PAGE
SAFETY FIRST / ELECTRICAL REQUIREMENTS 5
TRANSPORTATION INSTRUCTIONS 6
IMPORTANT INSTALLATION INSTRUCTIONS 7
GETTING TO KNOW YOUR FRIDGE / FREEZER 8
SUGGESTED ARRANGEMENT OF FOOD IN THE FRIDGE / FREEZER 9
TEMPERATURE CONTROL AND ADJUSTMENT 10
STARTING 11
STORING FROZEN FOOD 11
FREEZING FRESH FOOD 11
MAKING ICE CUBES 11
DEFROSTING 12
CLEANING AND CARE 13
REPLACING THE INTERIOR LIGHT BULB 13
ENERGY SAVING TIPS 13
PROBLEM SOLVING 13
DO'S AND DON'TS 14
INSTALLATION INSTRUCTIONS DETAILED STEP BY STEP 15-21
REVERSING THE DOORS 22-23
INSTALLATION OF HIGH LEVELLING FOOT 24-25
POINTS OF CONTACT & GUARANTEE 26-27
ELECTRICAL REQUIREMENTS
Before you insert the plug into the wall socket make sure that the voltage and the frequency shown in the rating plate inside the appliance corresponds to your electricity supply.
Rating label is on the left hand side of fridge inner liner.
We recommend that this appliance be connected to the mains supply via a suitable switched and fused socket. The appliance must be positioned so that the plug is accessible.
WARNING: When positioning the appliance ensure the supply cord is not trapped or damaged.
Should the mains lead of the appliance become damaged or should it need replacing at any time, it must be replaced by a special purpose made mains lead which can only be obtained from a Montpellier Authorised Service Agent.
WARNING: Do not locate extension sockets or charging transformers/power supplies or Lithium-Iron battery operated products adjacent to the compressor as they could overheat.
WARNING! THIS APPLIANCE MUST BE EARTHED
If the fitted moulded plug is not suitable for your socket, then the plug should be cut off and a plug with priate plug fitted. Destroy the old plug which is cut o bared cord could cause a shock hazard if inserted into a socket elsewhere in the house.
The moulded plug on this appliance incorporates a 13 A fuse. Should the fuse need to be replaced an ASTABEAB approved BS 1362 fuse of the same rating must be used. Do not forget to refit the fuse cover. In the event of losing the fuse cover the plug must not be used until a replacement fuse cover has been fitted. Colour of the replacement fuse cover must be the same colour as that visible on the pin face of the plug. Fuse covers are available from any good electrical store.
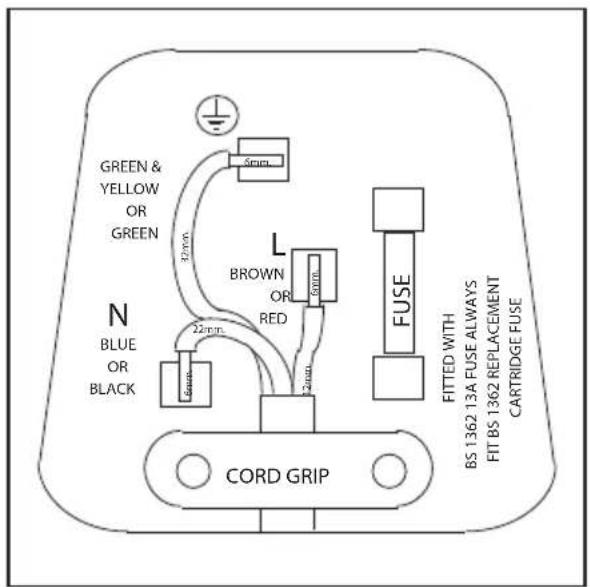
IMPORTANT! FITTING A DIFFERENT PLUG
As the colours of the wires in the mains lead of this appliance may not correspond with the coloured markings identifying the terminals in your plug proceed as follows: (See diagram).
-
Connect the green-yellow or green (Earth) wire to the terminal in the plug marked "E" or with the symbol ⏚ or coloured green and yellow or green.
-
Connect the blue (Neutral) wire to the terminal in the plug marked 'N' or coloured black.
-
Connect the brown (Live) wire to the terminal in the plug marked 'L' or coloured red.
text_image
GREEN & YELLOW OR GREEN N BLUE OR BLACK 32mm L BROWN OR RED 22mm 2mm FUSE CORD GRIP FITTED WITH BS 1362 13A FUSE ALWAYS FIT BS 1362 REPLACEMENT CARTRIDGE FUSEWith alternative plugs a 13 A fuse must be fitted either in the plug or adaptor or in the main fuse box.
If in doubt contact a qualified electrician.
TRANSPORTATION INSTRUCTIONS
- The appliance should be transported only in a vertical upright position. The packing as supplied must be intact during transportation.
- If during the course of transport the appliance has to be transported horizontally, it must only be laid on its left hand side when standing in the front of the appliance. After bringing it to upright position, it must not be operated for at least 4 hours to allow the system to settle.
- Failure to comply with the above instructions could result in damage occurring to the appliance. The manufacturer will not be held responsible if these instructions are disregarded.
- The appliance must be protected against rain, moisture and other atmospheric influences.
- When positioning your appliance take care not to damage your flooring, kitchen furniture, related parts and doors, pipes, wall coverings etc. Do not move the appliance by pulling by the door.
- Empty any water in the drain tray before moving. See section 'Defrosting' and 'Care & cleaning' for further information.
- Make sure that the defrosted water pipe at the back of the product is fixed to the plastic evaporating pan on the top of the compressor, to avoid defrosted water spillage on the floor.
IMPORTANT: Care must be taken while cleaning / carrying the appliance to avoid touching the bottom of the condenser metal wires at the back of the appliance as you might injure your fingers and hands.
Do not attempt to sit or stand on top of your appliance as it is not designed for such use. You could injure yourself or damage the appliance.
"IMPORTANT: Make sure that mains cable is not caught under the appliance during and after carrying / moving the appliance, to avoid the mains cable becoming cut or damaged."
Do not allow children to play with the appliance or tamper with the controls. Montpellier Domestic Appliances Ltd declines to accept any liability should the instructions not be followed.
IMPORTANT
INSTALLATION INSTRUCTIONS
- The space in the room where the appliance is installed must not be smaller than 10 cubic metres.
- See pages 13 to 21 for detailed Installation Instructions including reversing door opening direction.
- Do not put your fridge freezer in a cold room where the temperature is likely to go below +10 degrees C (50 degrees F) during night time and/or especially in winter. If the ambient temperature is below 0 degrees C, the food in the fridge compartment will freeze. So, we recommend you don't use the fridge compartment in such low ambient conditions. You can continue using the freezer compartment as usual.
This appliance has been designed to operate in ambient temperatures up to +38 degrees C (100 degrees F). Therefore if the appliance is installed in an unheated/cold room (eg: conservatory/annex/shed/garage etc) then the appliance will not operate causing the freezer compartment to run warmer and as a result the storage time of frozen food may be reduced.
- Do not place the appliance near cookers, radiators or in direct sunlight as this will cause your appliance to work harder. If installed next to a source of heat or freezer, maintain the following minimum side clearances:
| From Cookers | 50 mm (2") |
| From Radiators | 300 mm (12") |
| From Freezers | 25 mm (1") |
-
Refer to cleaning and care section to prepare your appliance for use.
-
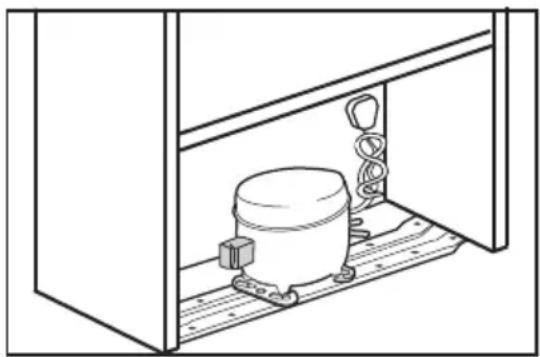
A special receptacle is supplied to store the mains plug during transit. The receptacle is fixed at the back of the cabinet, on the side of the compressor. (See diagram) Gently remove the plug from the receptacle. Never pull the mains cord, you may damage the appliance. In the case of transportation, ensure you locate the plug in the receptacle provided to avoid transit damage.
natural_image
Line drawing of a mechanical device inside a cabinet or enclosure, with no visible text or symbols.GETTING TO KNOW YOUR COMBI FRIDGE/FREEZER
text_image
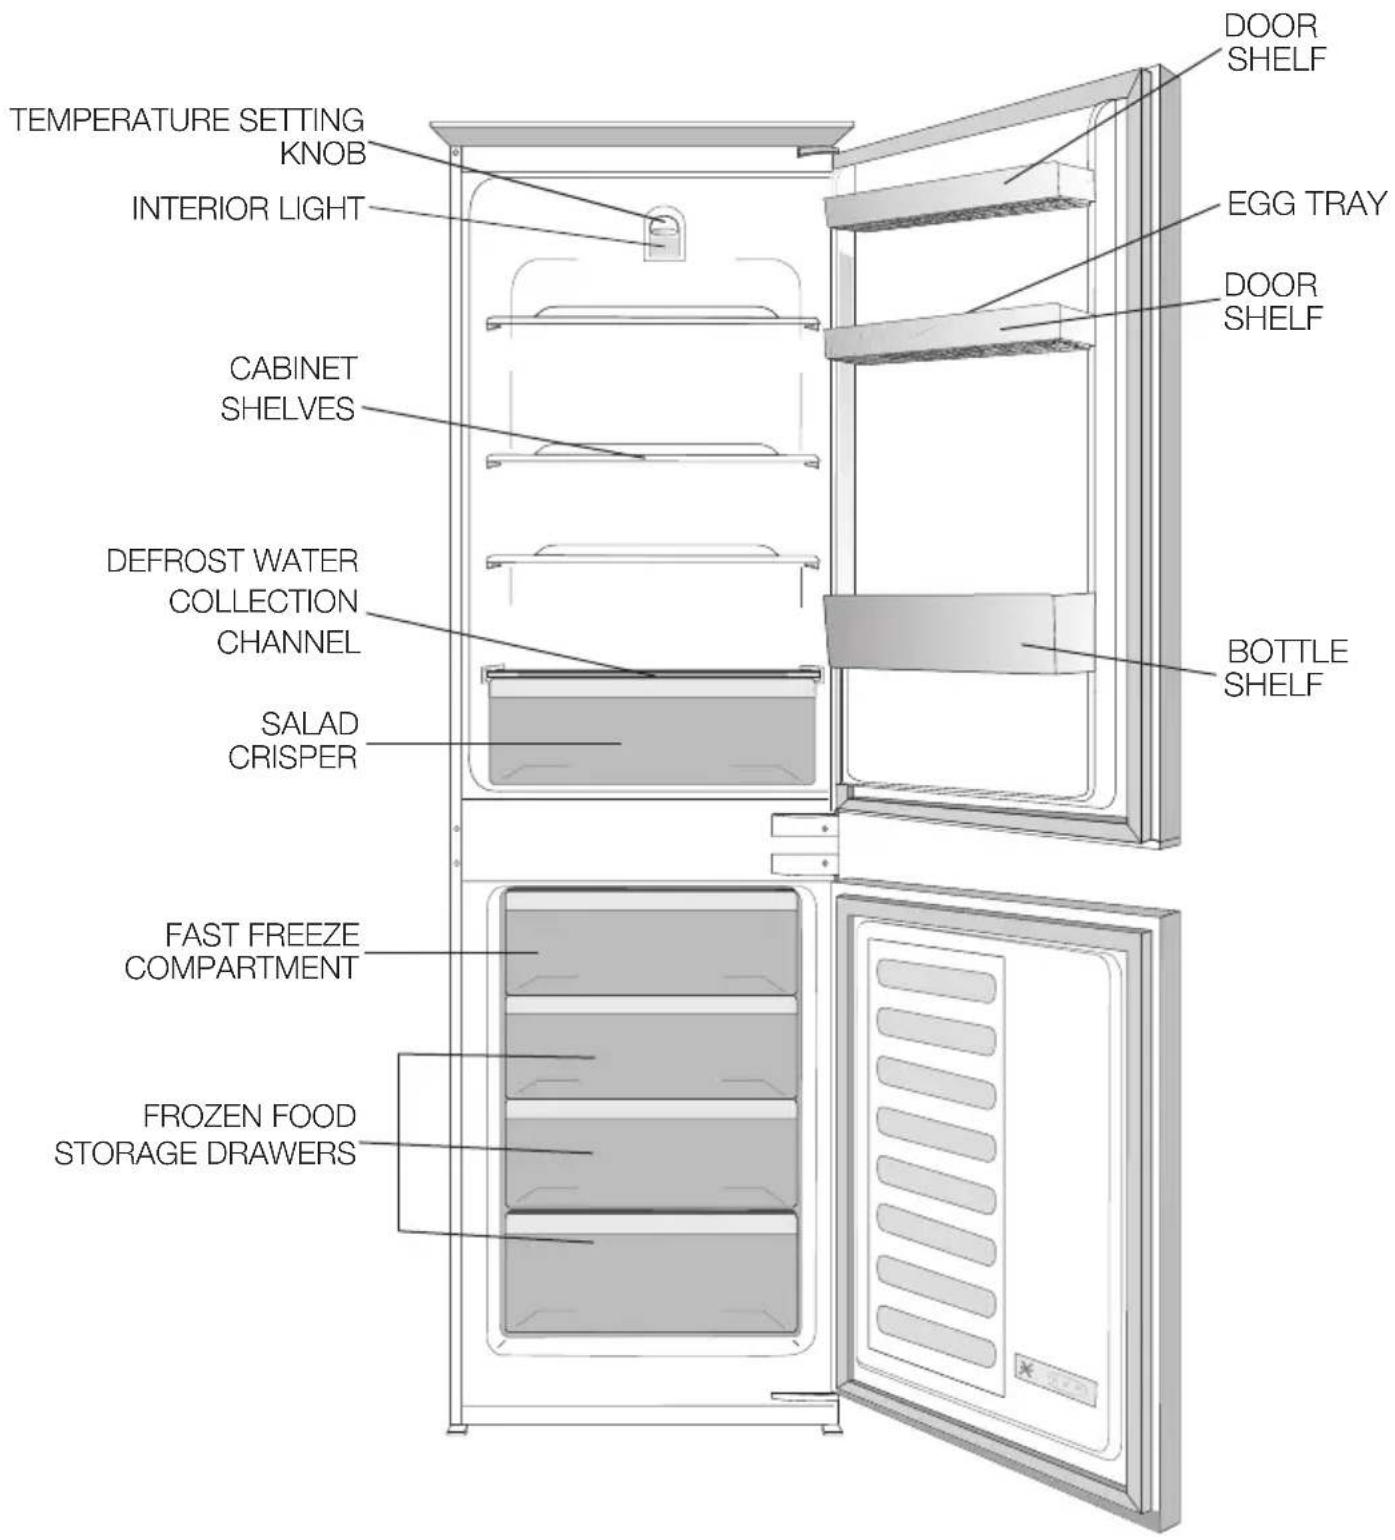
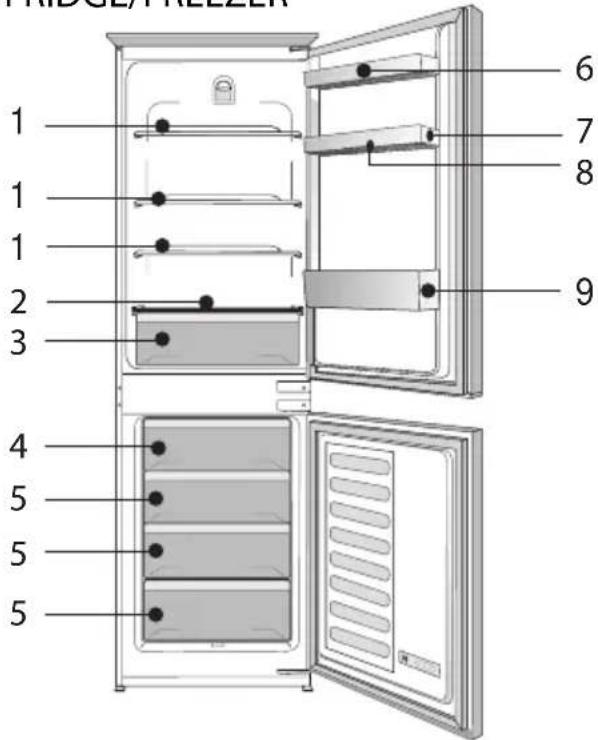
TEMPERATURE SETTING KNOB INTERIOR LIGHT CABINET SHELVES DEFROST WATER COLLECTION CHANNEL SALAD CRISPER FAST FREEZE COMPARTMENT FROZEN FOOD STORAGE DRAWERS DOOR SHELF EGG TRAY DOOR SHELF BOTTLE SHELFi Figures in this user manual are schematic and may not match the product exactly. If the subject parts are not included in the product you have purchased, then those parts are valid for other models.
SUGGESTED ARRANGEMENT OF FOOD IN THE FRIDGE/FREEZER
Arrangement Examples (See diagram)
- Baked, chilled cooked food, dairy products, cans.
- Meat, sausages, cold cuts.
- Fruit, vegetables, salads.
- Frozen food and freezing of fresh food.
- Frozen food.
- Butter, cheese.
- Small bottles, cans, tubes.
- Eggs.
- Tall, large bottles, beverages.
text_image
RIDGE/PRELLER 1 1 1 2 3 4 5 5 5 6 7 8 9The following guidelines and recommendations are suggested to obtain the best results and storage hygiene.
- The fridge compartment is for the short term storage of fresh food and drinks.
-
The freezer compartment is * * * * rated and suitable for the freezing and storage of pre frozen food. The recommendation for storage as stated on the food packaging should be observed at all times.
-
Cooked dishes must be stored in airtight covered containers.
-
Fresh wrapped produce can be placed on the shelf. Fresh fruit and vegetables should be cleaned and stored in the crisper bins.
-
Bottles can be placed in the door section.
-
To store raw meat, wrap in polythene bags and place on the lowest shelf. Do not allow to come into contact with cooked food to avoid contamination. For safety, only store raw meat for two to three days.
-
Keep the food packed, wrapped or covered. Allow hot food and beverages to cool before placing them in the fridge. Do not store explosive substances. High proof alcohol must be stored upright in sealed containers. Left over canned food should not be stored in the can.
-
Fizzy drinks should not be frozen and products such as flavoured water ices should not be consumed too cold.
-
Some fruit and vegetables suffer damage if kept at temperatures near 0°C. Therefore wrap pineapples, melons, cucumbers, tomatoes and similar produce in polythene bags.
-
Place chilled cooked food and similar food near the rear of the fridge inner liner where the cold wall is located.
-
Shelves, racks, crisper bins, drawers, flaps, bottle grippers are all removable.
-
Do not leave frozen food at room temperature to thaw; the best way to defrost food is to put it in the fridge to thaw slowly. Make sure you avoid defrosting food or food juices drip onto other food.
-
For hygiene reasons, always wrap food using a suitable packaging material before storing in your appliance to avoid contact with the appliance surface.
TEMPERATURE CONTROL AND ADJUSTMENT
natural_image
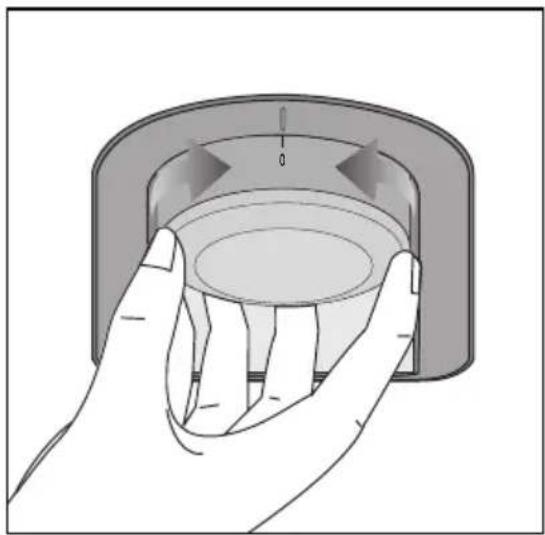
Illustration of a hand holding a circular component with directional arrows indicating rotation (no text or symbols)Operating temperatures are controlled by the thermostat knob (see diagram) located on the ceiling of fridge compartment. Settings may be made from 1 to 5, 5 being the coldest position.
When the appliance is switched on for the first time, the thermostat should be adjusted so that after 24 hours, the average fridge temperature is no higher than +5°C (+41°F). We recommend you set the thermostat half way between the 1 and 5 setting and monitor to obtain the desired temperature i. e. towards 5 you will obtain a colder fridge temperature and vice versa. Some sections of the fridge may be cooler or warmer ( such as the salad crisper and the top part of the cabinet ) which is quite normal.
The normal storage temperature of the freezer should be -18°C (0°F). Lower temperatures may be obtained by adjusting thermostat knob towards 5 position.
We recommend that you check the temperature with an accurate thermometer to ensure that the storage compartments are kept to the desired temperature.
Remember you must take your reading very quickly since the thermometer temperature will rise very rapidly after you remove it from the freezer.
Please remember each time the door is opened cold air escapes and the internal temperature rises. Therefore never leave the door open and ensure it is closed immediately after food is put in or removed.
In case of a temporary ice build up in the fridge compartment, reduce the thermostat setting to 1, monitoring at the same time that the fridge temperature is maximum +5 degrees C [41 degrees F]. Once the ice build up disappears and the appliance starts auto defrosting again as normal, then you may increase the thermostat setting, if required.
If the ambient (room or garage) temperature is between 0 °C and -15 °C, we recommend you adjust the knob to setting 4 to reach -18 C in the freezer compartment. Lower temperatures may be obtained by adjusting setting knob towards max position.
STARTING
Final Check
Before you start using the fridge/freezer check that:
- The interior is dry and air can circulate freely at the rear of the cabinet.
- Clean the interior as recommended under "CLEANING AND CARE."
- Insert the plug into the wall socket and switch on the electricity supply.
- When the door is open the fridge interior light will come on.
- You will hear a noise as the compressor starts up. The liquid and gases sealed within the refrigeration system may also give rise to noise, whether the compressor is running or not which is quite normal.
- Set temperature setting knob half way between 1 and 5.
- Front edges of the cabinet may feel warm. This is normal. These areas are designed to be warm to avoid condensation.
- "Do not load the appliance immediately it is switched on. Wait until the correct storage temperature has been reached. We recommend that you check the temperature with an accurate thermometer (see; Temperature Control and Adjustment)"
STORING FROZEN FOOD
Prepacked commercially frozen food should be stored in accordance with the frozen food manufacturer's instructions for a ✦ frozen food storage compartment. To ensure that the high quality achieved by the frozen food manufacturer and the food retailer is maintained, the following should be remembered:
- Put packets in the freezer as quickly as possible after purchase.
- Ensure that contents are labelled and dated.
- Do not exceed "Use By", "Best Before" dates on the packaging.
If there is a power failure do not open the door. Frozen food should not be affected if the failure lasts for less than 14 hrs. If the failure is longer, then the food should be checked and either eaten immediately or cooked and then refrozen.
FREEZING FRESH FOOD
Please observe the following instructions to obtain the best results.
Do not freeze too large a quantity at any one time. The quality of the food is best preserved when it is frozen right through to the core as quickly as possible.
Do not exceed the freezing capacity of your appliance in 24 h which is 4.75 kg (10.45 lb). Placing warm food into the freezer compartment causes the refrigeration compressor to operate continuously until the food is frozen solid. This can temporarily lead to excessive cooling of the refrigeration compartment.
You may place fresh food to be frozen in any part of the freezer.
Take special care not to mix already frozen food and fresh food.
MAKING ICE CUBES
Fill the ice - cube tray 3/4 full with water. Loosen frozen trays with the handle of a spoon, never use sharp edged objects such as knives, forks.
Note: If freshly made ice cubes are not consumed for several weeks, they will slowly reduce in size and eventually disappear completely.
DEFROSTING
A) FRIDGE COMPARTMENT
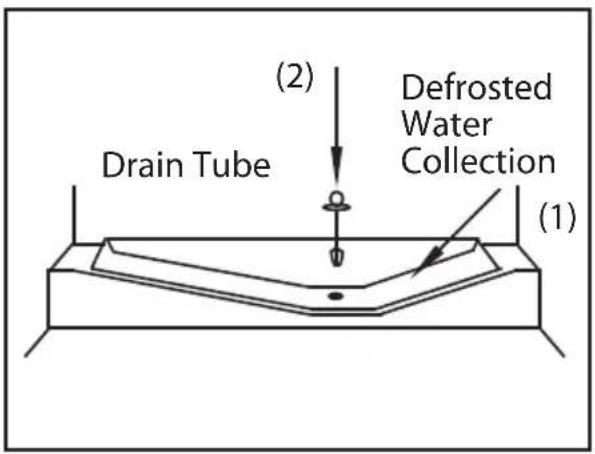
The fridge compartment defrosts automatically. The defrosting water runs to the drain tube via a collection container at the back of the appliance (1). (see diagram)
During defrosting water droplets may form at the back of the fridge compartment where concealed evaporator is located. Some droplets may remain on the liner and refreeze when defrosting is completed. Do not use pointed or sharp edged objects such as knives, forks to remove the droplets which have frozen.
text_image
(2) Defrosted Water Collection Drain Tube (1)If at any time the defrosted water does not drain from the collection channel, check to ensure that no food particles have blocked the drain tube. The drain tube can be cleared by pushing the special plastic plunger provided down the drain tube (2). If the frost layer reaches about 1/4"(7 mm), reduce the setting (i.e. from 4 to 1) to restart automatic defrosting.
Deep freezer compartment does not perform automatic defrosting in order to prevent decaying of the frozen food.
Defrosting is very straightforward and without mess, thanks to a special defrost collection basin. Defrost twice a year or when a frost layer of around 7 (1/4") mm has formed.
To start the defrosting procedure, switch off the appliance at the socket outlet and pull out the mains plug.
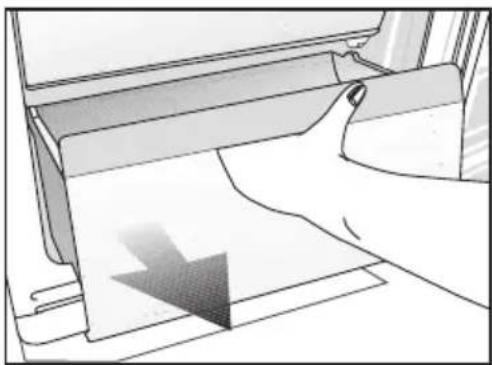
All food should be wrapped in several layers of newspaper and stored in a cool place (e.g. fridge or larder). Remove all freezer drawers. Containers of warm water may be placed carefully in the freezer to speed up the defrosting.
Do not use pointed or sharp-edged objects, such as knives or forks to remove the frost. Never use hair dryers, electrical heaters or other such electrical appliances for defrosting. Sponge out the defrost water collected in the bottom of the freezer compartment. After defrosting, dry the interior thoroughly.
Insert the plug into the wall socket and switch on the electricity supply.
natural_image
Illustration of a hand pressing down on a sheet of paper with a downward arrow symbol (no text or symbols present)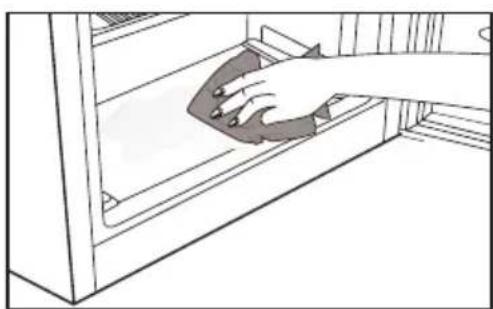
natural_image
Line drawing of a hand cleaning or removing a surface from a shelf (no text or symbols)CLEANING AND CARE
** We recommend that you switch off the appliance at the socket outlet and pull out the mains plug before cleaning.
** Never use any sharp abrasive instrument, soap, household cleaner, detergent and wax polish for cleaning.
** Use luke warm water to clean the cabinet of the appliance and wipe it dry.
** Use a damp cloth wrung out in a solution of one teaspoon of bicarbonate of soda to one pint of water to clean the interior and wipe it dry.
** Make sure that no water enters the lamp housing.
** If the appliance is not going to be used for a long period of time unplung the appliance, remove all food, clean it and leave the door ajar.
** Check door seals regularly to ensure they are clean and free from food particles.
** Removal of door tray
- dRemove door racks, remove all the contents and then simply push the door rack upwards from the base.
** To remove a freezer drawer, pull it as far as possible, and then tilt it upwards, and then pull it out completely.
REPLACING THE INTERIOR LIGHT BULB
To change the Bulb/LED used for illumination of your refrigerator, call your Authorised Service.
The lamp(s) used in this appliance is not suitable for household room illumination. The intended purpose of this lamp is to assist the user to place foodstuffs in the refrigerator/freezer in a safe and comfortable way.
The lamps used in this appliance have to withstand extreme physical conditions such as temperatures below -20^ C.
ENERGY SAVING TIPS
1- Ensure your appliance is installed in a well ventilated area. If the ambient temperature is low (but in no case lower than 10 degrees C), then the energy saving will be more. In this case, check temperatures of fridge and freezer compartments with an accurate thermometer and lower the thermostat setting (towards 1) if necessary.
2- Ensure the time between buying chilled/frozen food and placing them in your appliance is kept at minimum, particularly in summer. We recommend you use a cool bag or a special carrier bag to carry frozen food.
3- Do not leave the door (s) of your appliance open longer than necessary and ensure they are closed properly after each opening.
4- Defrost your appliance regularly (see "Defrosting")
5- Defrost frozen food in the fridge compartment, so that frozen food acts as an ice pack to assist cooling in the fridge.
PROBLEM SOLVING
If the appliance does not operate, check whether:
- The plug is inserted properly in the socket and that the power supply is on. (To check the power supply to the socket, plug in another appliance)
- The fuse has blown/circuit breaker has tripped/main distribution switch has been turned off.
- The temperature control has been set correctly.
- New plug is wired correctly if you have changed the fitted moulded plug.
If the appliance is still not operating after the above checks, please refer to Service.
Please ensure that above checks have been made as a charge will be made if no fault is found.
DO'S AND DON'TS
Do- Clean and defrost your appliance regularly (See "Defrosting")
Do- Keep raw meat and poultry below cooked food and dairy products.
Do- Take off any unusable leaves on vegetables and wipe off any soil.
Do- Leave lettuce, cabbage, parsley and cauliflower on the stem.
Do- Wrap cheese firstly in greaseproof paper and then in a polythene bag excluding as much air as possible. For best results take out of the fridge compartment an hour before eating.
Do- Wrap raw meat and poultry loosely in polythene or aluminium foil. This prevents drying.
Do- Wrap fish and offal in polythene bags.
Do- Wrap food which have a strong odour or can dry out in polythene bags, aluminium foil or place in an airtight container.
Do- Wrap bread well to keep it fresh.
Do- Chill white wines, beer, lager and mineral water before serving.
Do- Check contents of the freezer every so often.
Do- Keep food for as short a time as possible and adhere to "Best Before", "Use by" etc. dates.
Do- Store commercially frozen food in accordance with the instructions given on the packets that you buy.
Do- Always choose high quality fresh food and be sure it is thoroughly clean before you freeze it.
Do- Prepare fresh food for freezing in small portions to ensure rapid freezing.
Do- Wrap all food in aluminium foil or freezer quality polythene bags and make sure any air is excluded.
Do- Wrap frozen food when you buy it and put it in to the freezer as soon as possible.
Do- Defrost food in the fridge compartment.
Do- Remove ice cream from the freezer 10-20 minutes before serving.
Don't- Store bananas in your fridge compartment.
Don't- Store melon in your fridge. It can be chilled for short periods as long as it is wrapped to avoid it flavouring other food.
Don't- Store poisonous or any dangerous substances in your appliance. It has been designed for the storage of edible foodstuffs only.
Don't- Consume food which has been stored for an excessive time in the fridge.
Don't- Store cooked and fresh food together in the same container. They should be packaged and stored separately.
Don't- Let defrosting food or food juices drip onto food.
Don't- Leave the door open for long periods as this will make the appliance more costly to run and cause excessive ice formation.
Don't- Use pointed sharp edged objects such as knives, forks to remove the ice.
Don't- Put hot food into the appliance. Let it cool down first.
Don't- Put liquid-filled bottles or sealed cans containing carbonated liquids into the freezer as they may burst.
Don't- Exceed the maximum freezing loads (4.75 kg in any 24 hours) when freezing fresh food.
Don't- Give children ice-cream and water ices direct from the freezer. The low temperature may cause 'freezer burns' on lips.
Don't- Freeze fizzy drinks.
Don't- Try to keep frozen food which has thawed, it should be eaten within 24 hours or cooked and refrozen.
Don't- Remove items from the freezer with wet hands.
Don't- Close the freezer door before placing the compartment cover in its place.
Don't- Leave frozen food at room temperature to thaw; the best way to defrost food is to put it in the fridge to thaw slowly. Make sure you avoid defrosting food or food juices drip onto other food.
INSTALLATION INSTRUCTIONS DETAILED STEP BY STEP
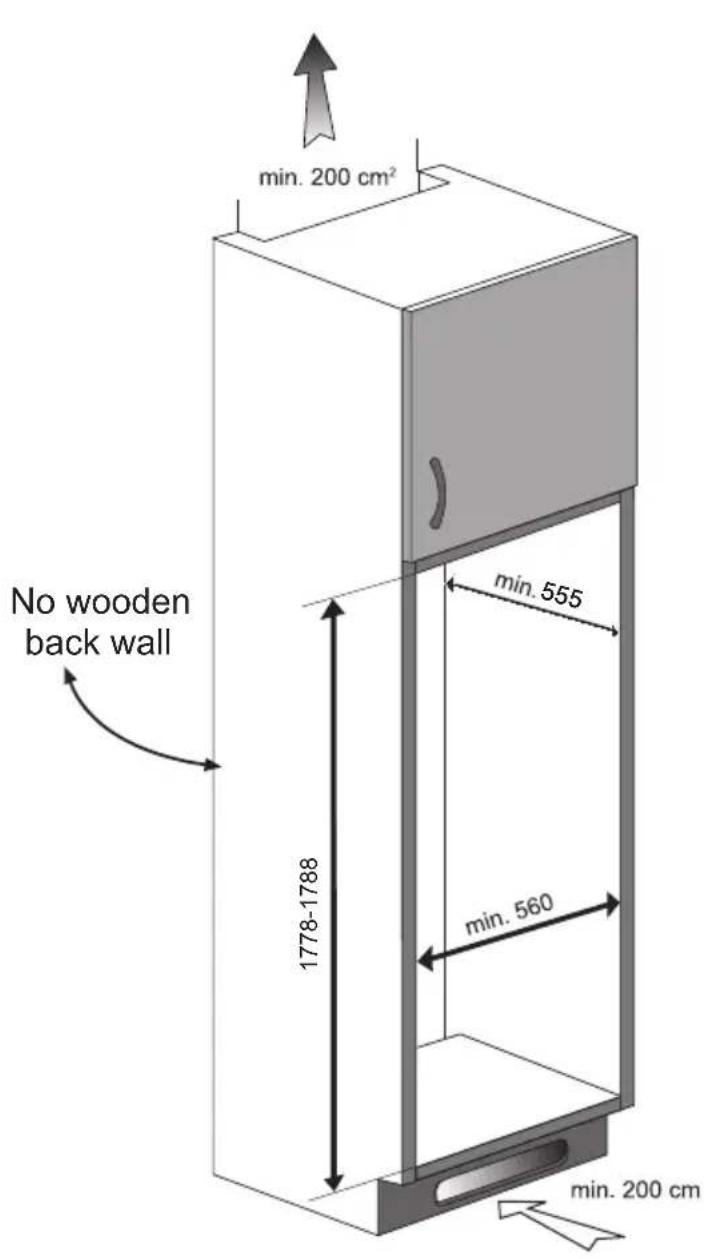
text_image
min. 200 cm² min. 555 1778-1788 min. 560 min. 200 cm No wooden back wall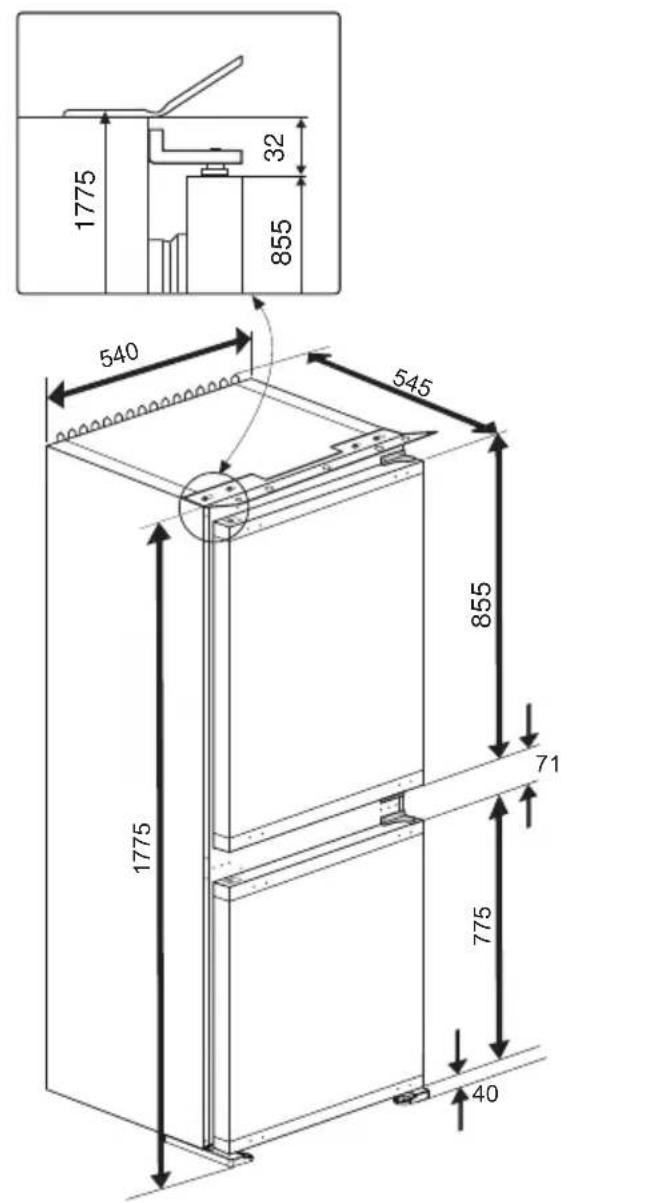
text_image
1775 32 855 540 545 855 71 1775 775 40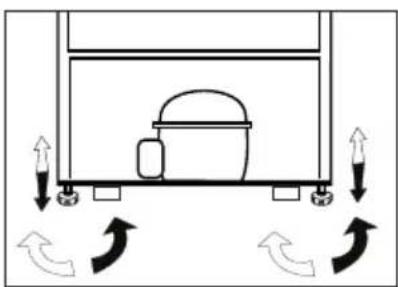
natural_image
Diagram of a bathtub with directional arrows indicating movement or flow (no text or symbols)Adjusting the legs (\*optional)
If your refrigerator is unbalanced:
You can balance your refrigerator by turning the legs of it as illustrated in the figure. The corner where the leg exists is lowered when you turn in the direction of black arrow and raised when you turn in the opposite direction. Taking help from someone to slightly lift the refrigerator will facilitate this process.
* If the subject parts are not included in the product you have purchased, then it is valid for other models.
The backwall of the wooden cabinet must be left open completely to kitchen wall in order to allow sufficient air circulation to cool down the condenser unit for energy efficiency.

text_image
200 cm²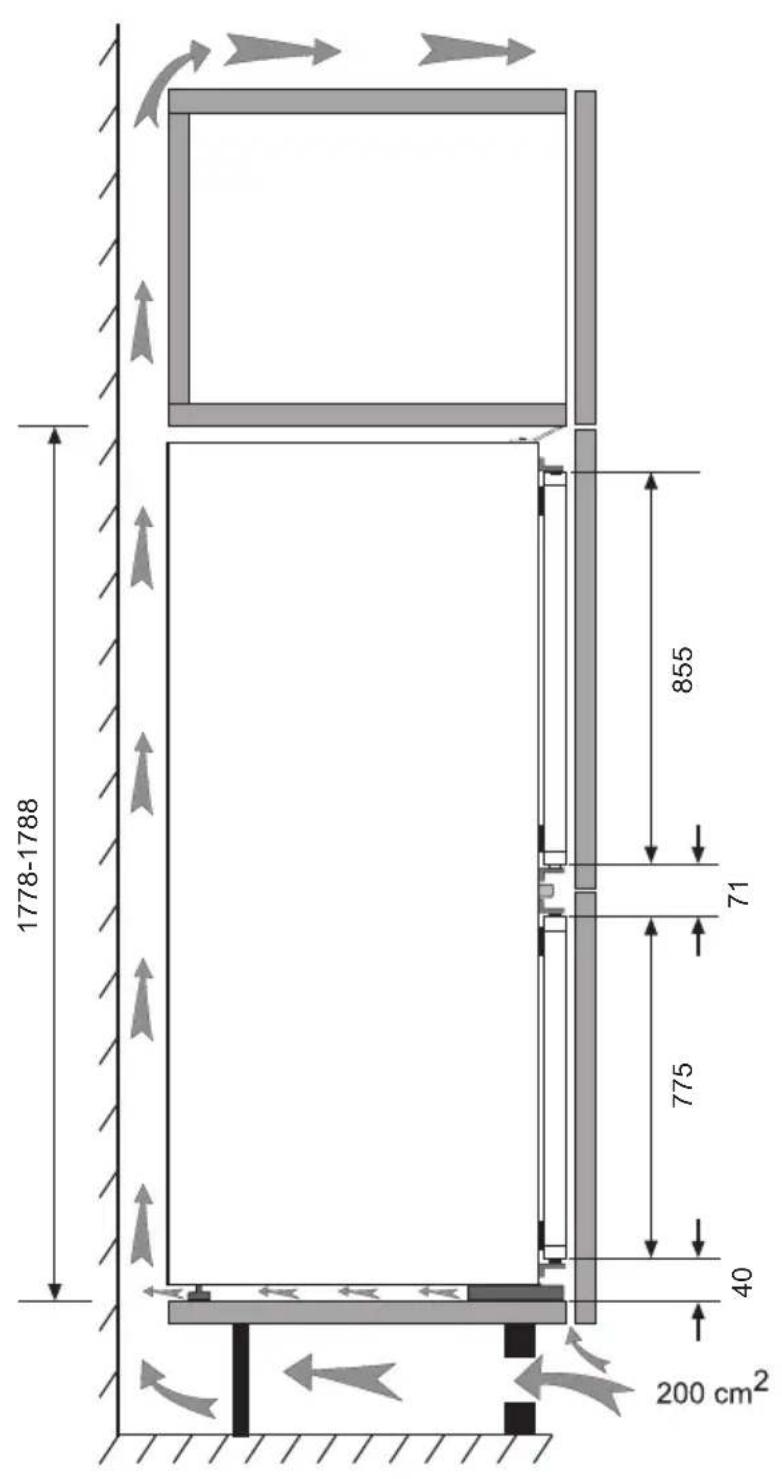
text_image
1778-1788 855 71 775 40 200 cm²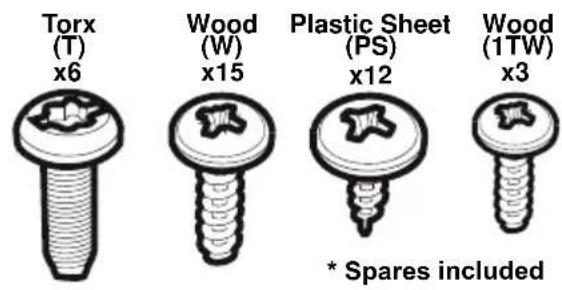
text_image
Torx (T) x6 Wood (W) x15 Plastic Sheet (PS) x12 Wood (1TW) x3 * Spares included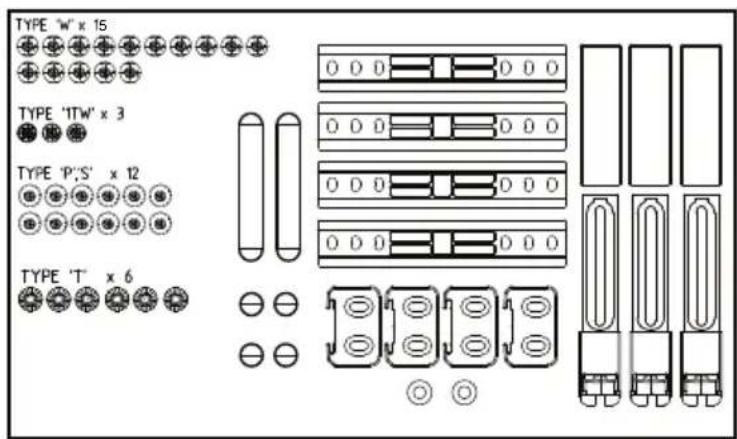
text_image
TYPE 'W' x 15 TYPE 'ITW' x 3 TYPE 'P',S' x 12 TYPE 'T' x 6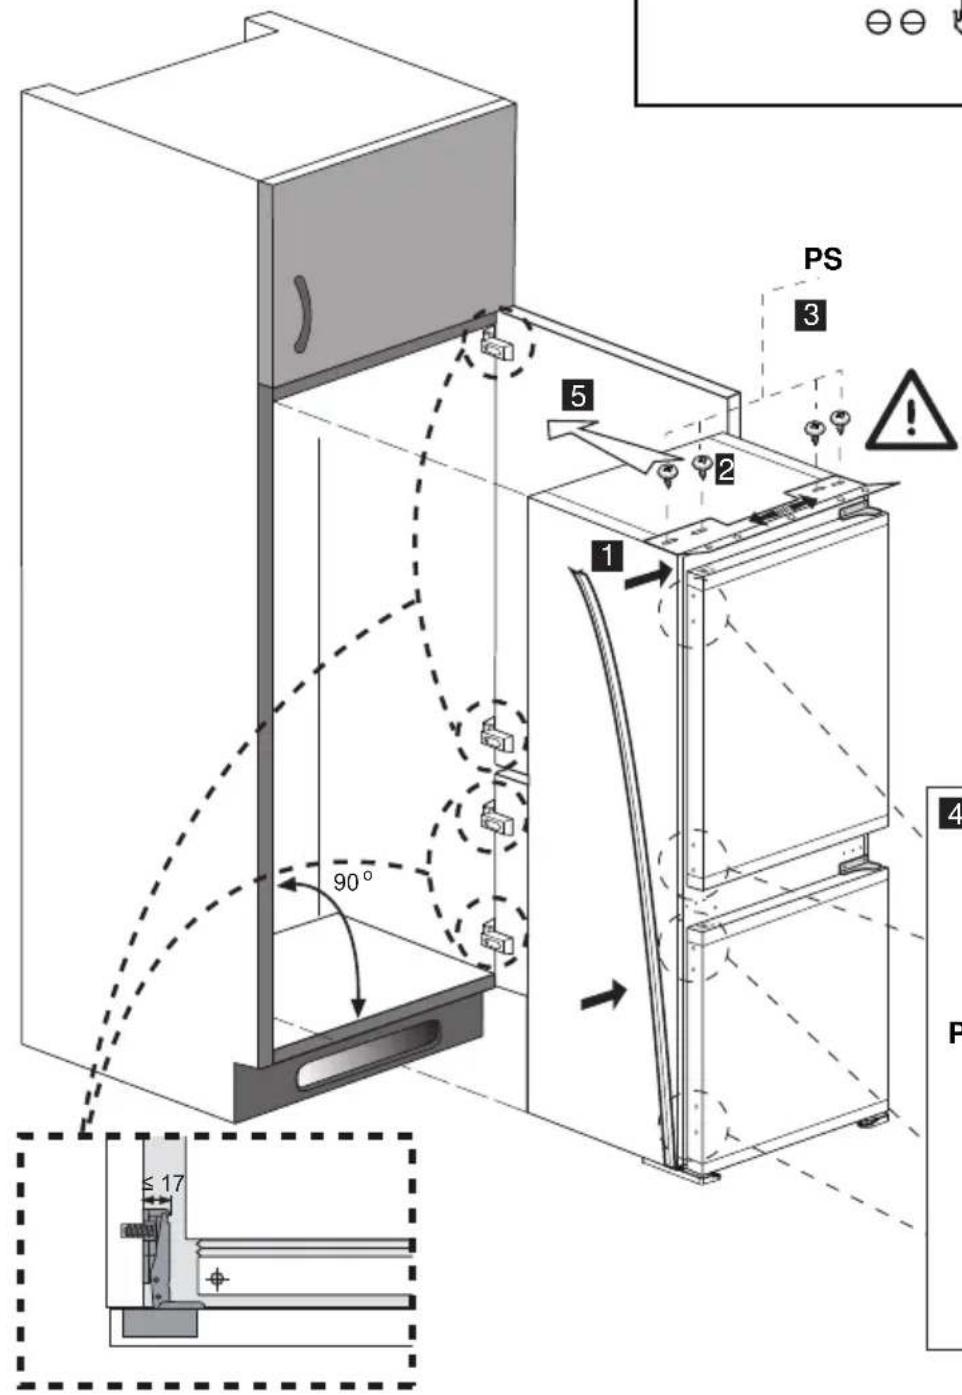
text_image
PS 3 5 2 1 90° 4 ≤ 17 P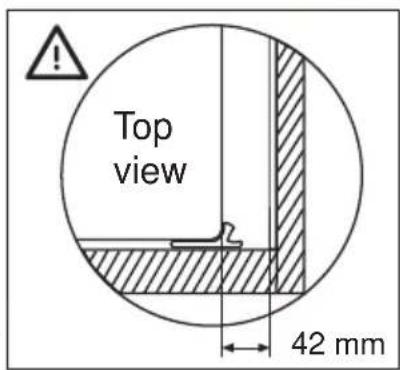
text_image
Top view 42 mm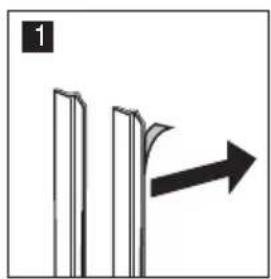
natural_image
Diagram showing two vertical panels with an arrow pointing right, no text or symbols present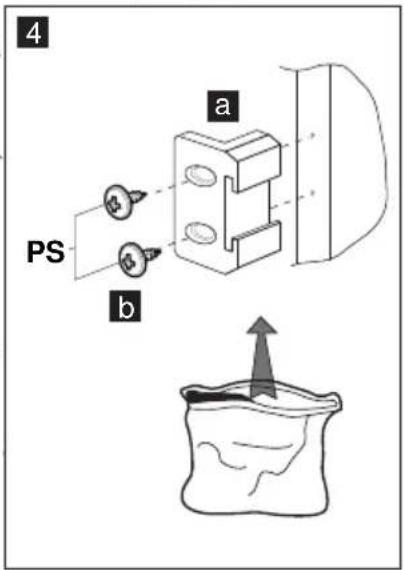
text_image
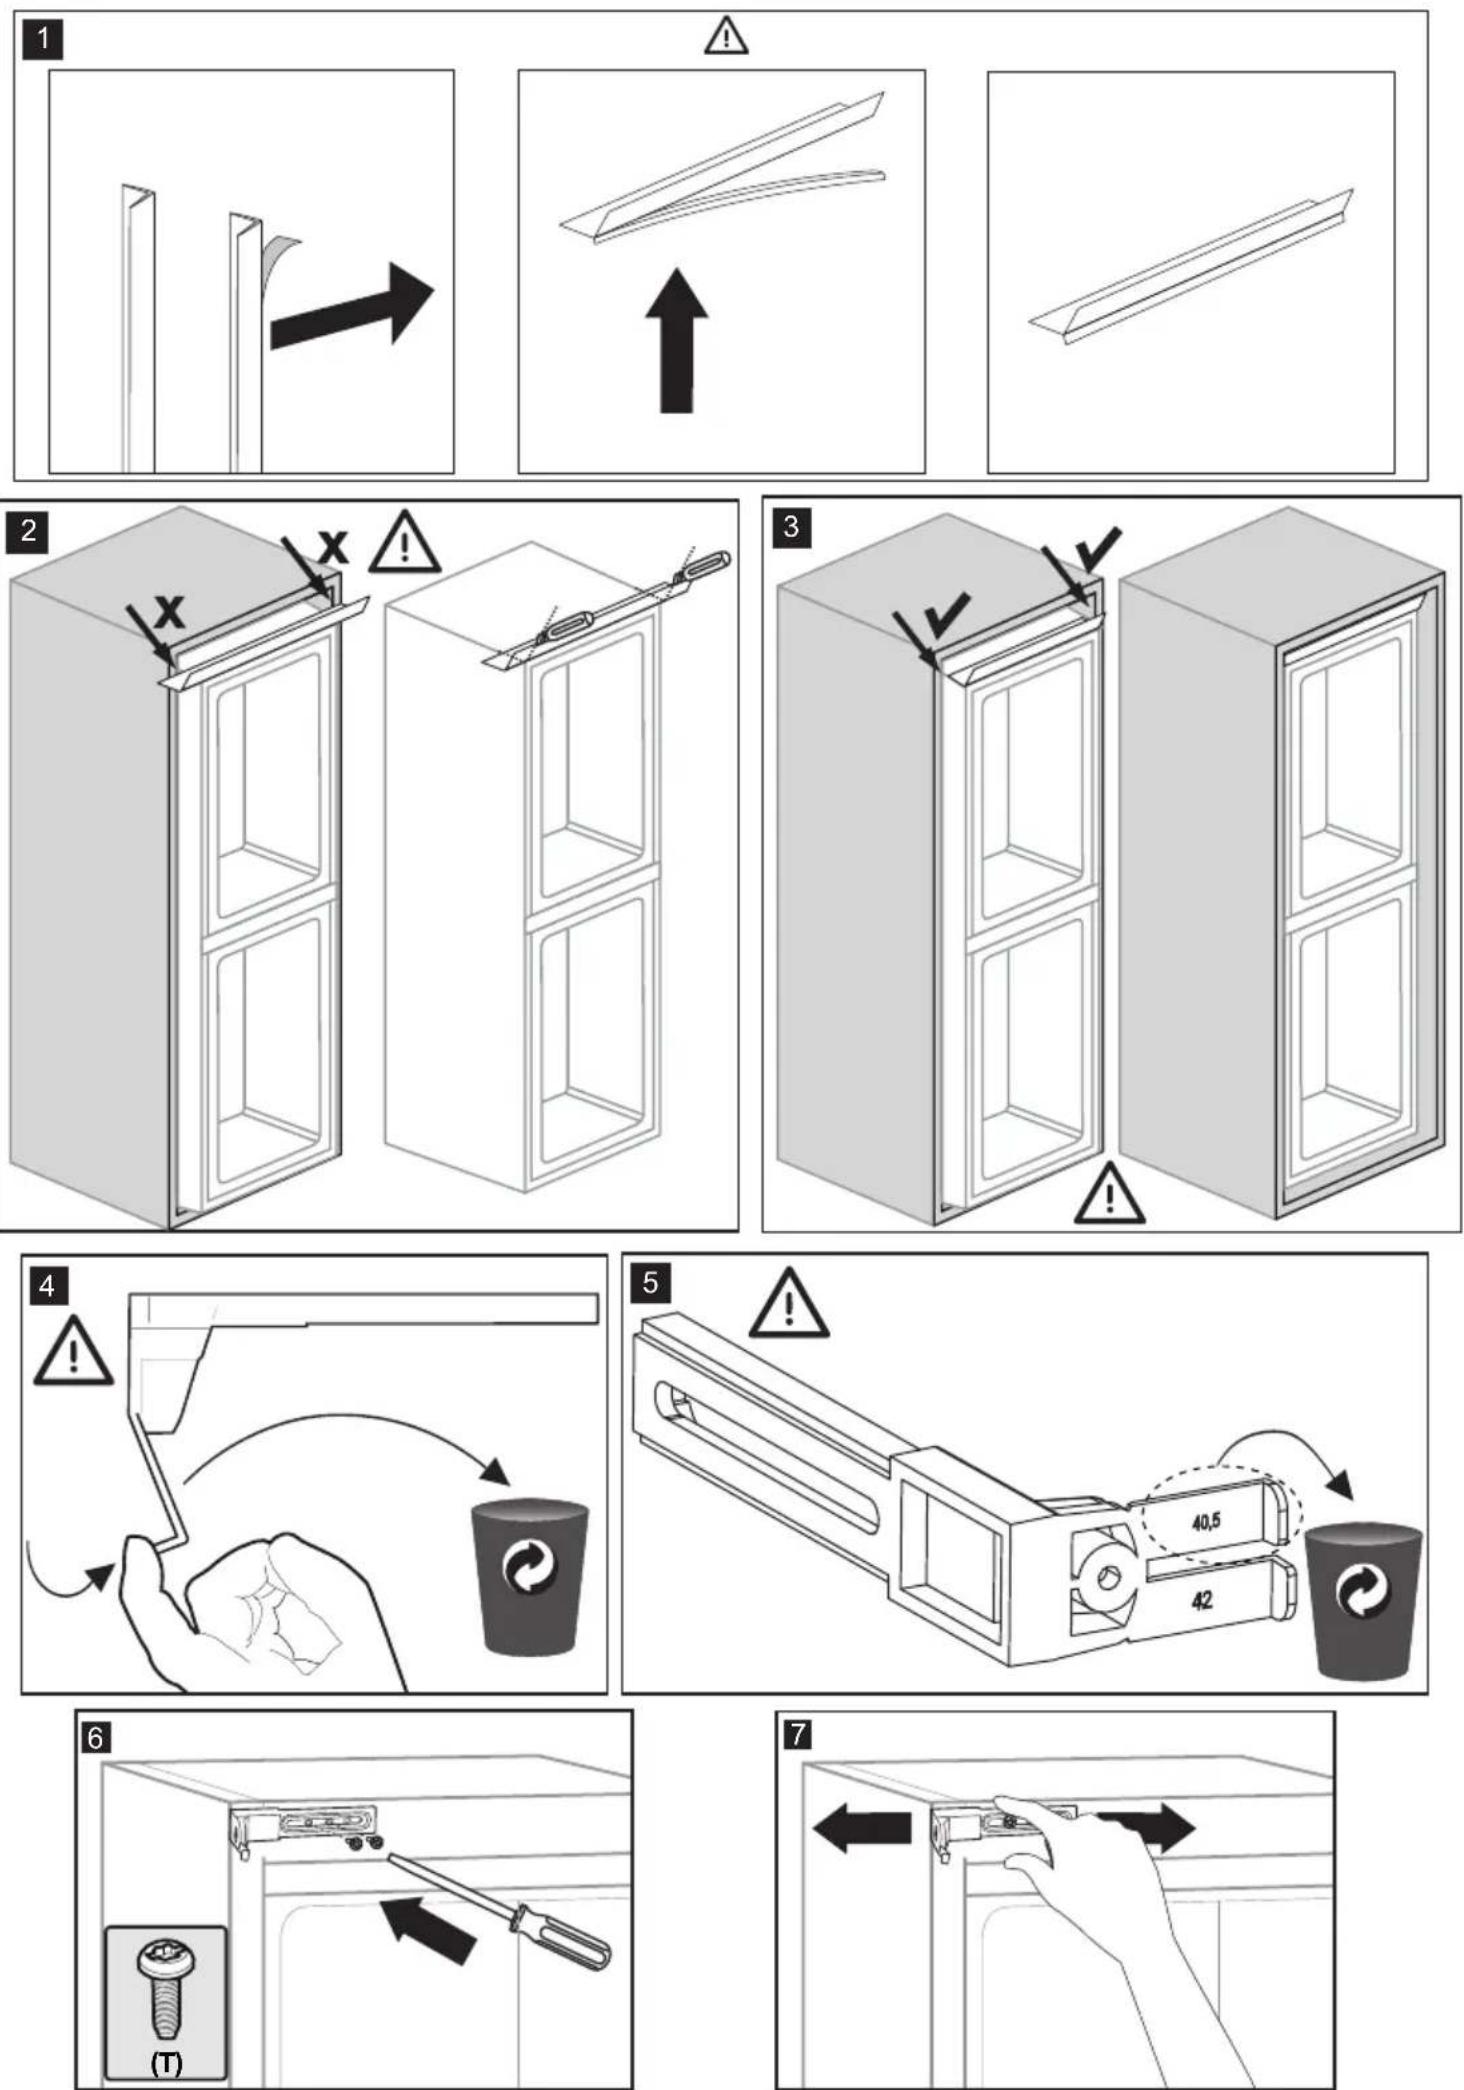
4 PS a bNote: Installation step for 2, screws for connecting top plastic part should not be screwed very hard, because of moving the plastic part easily left or right side.
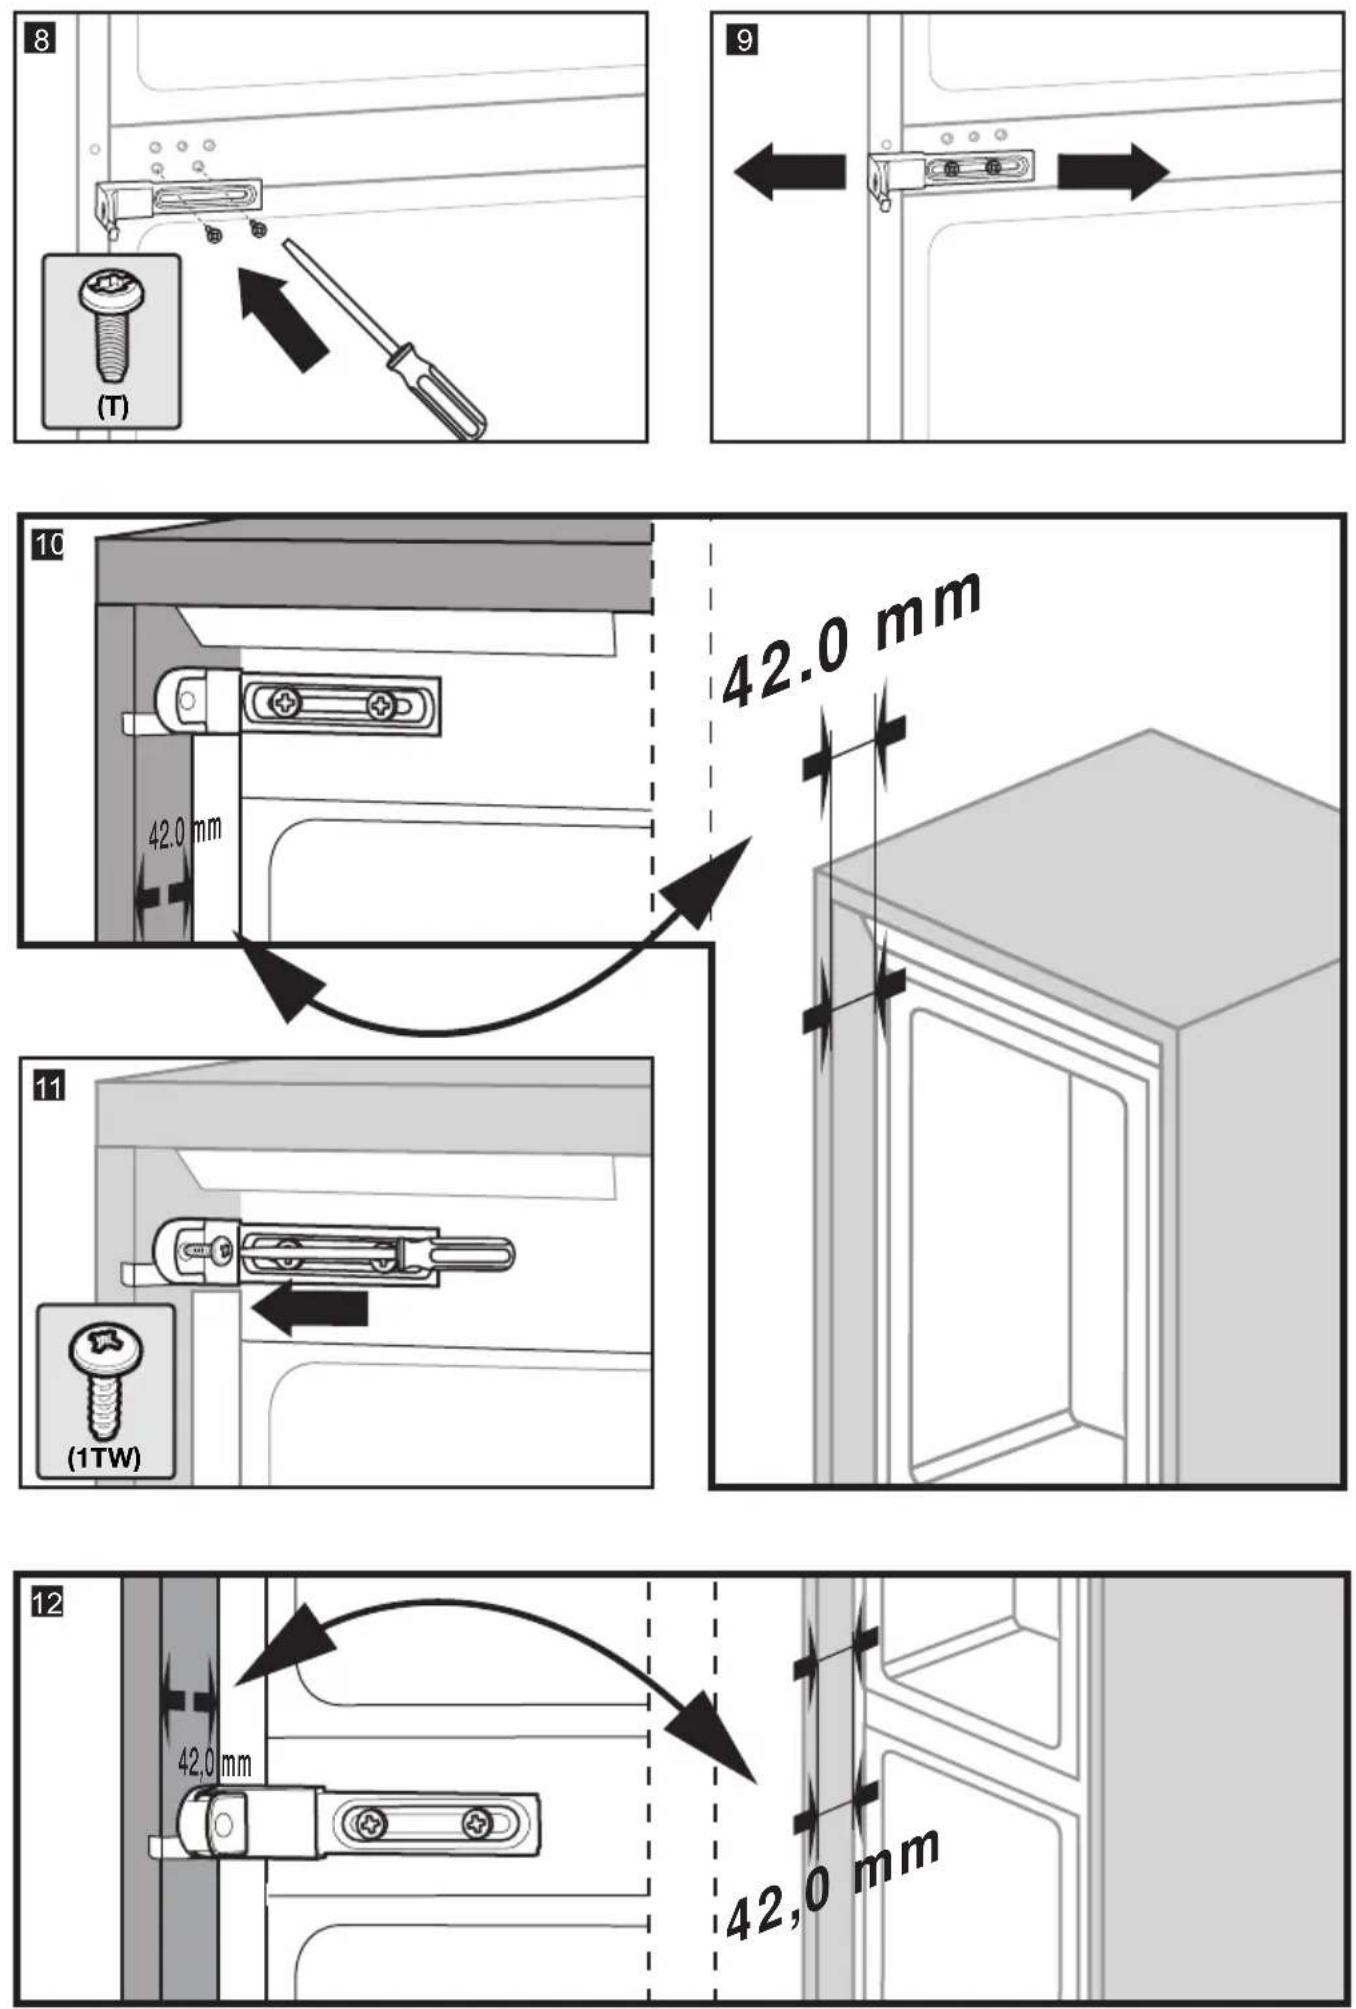
text_image
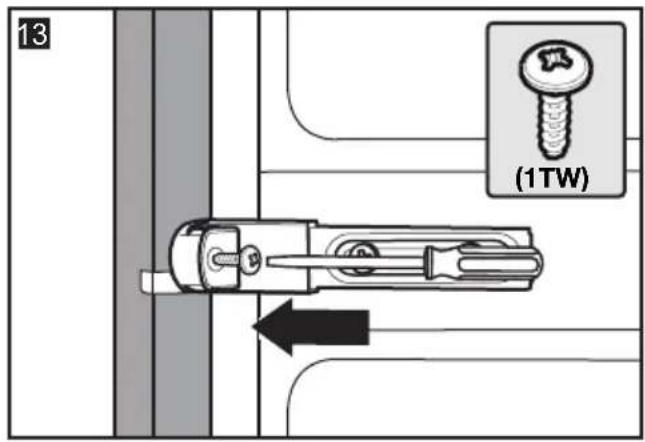
13 (1 TW)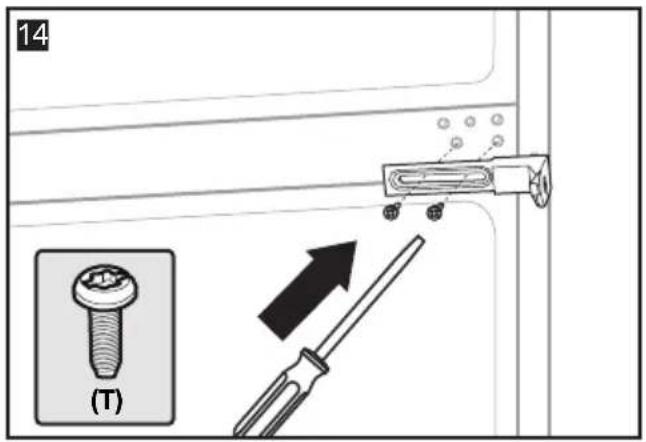
text_image
14 (T)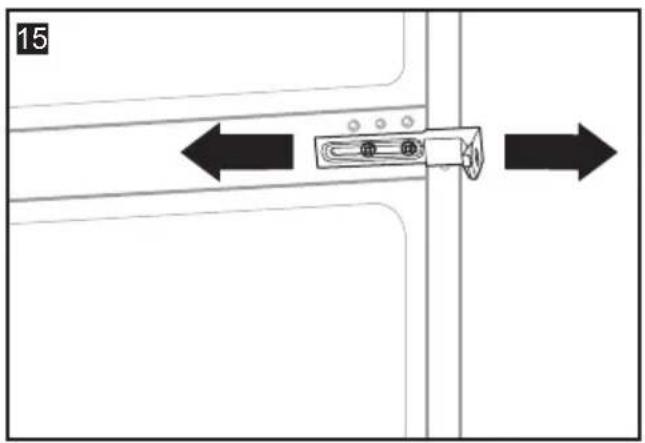
text_image
15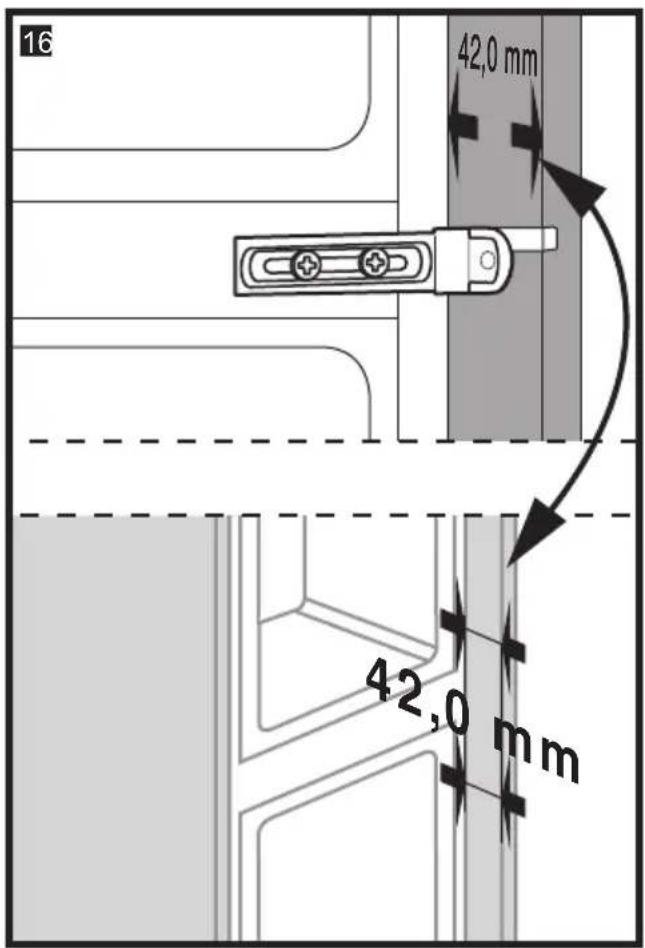
text_image
16 42,0 mm 42,0 mm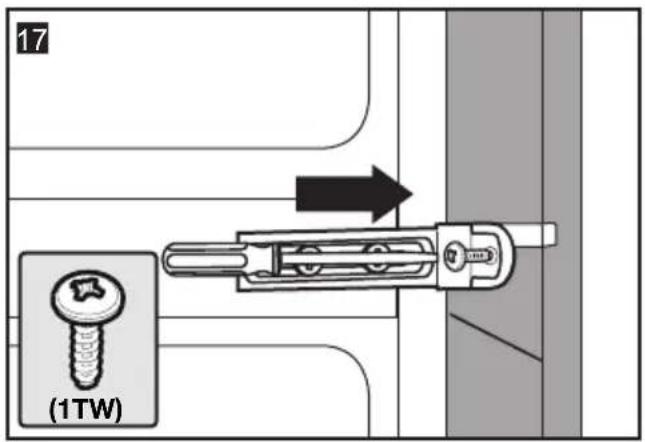
text_image
17 (1TW)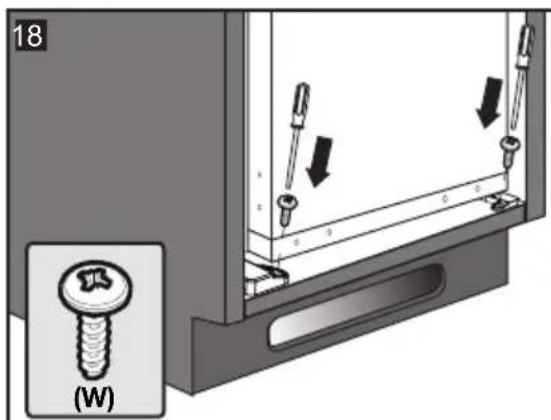
text_image
18 (W)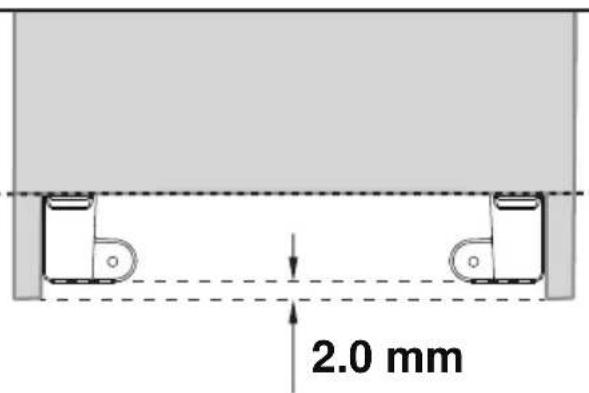
text_image
2.0 mm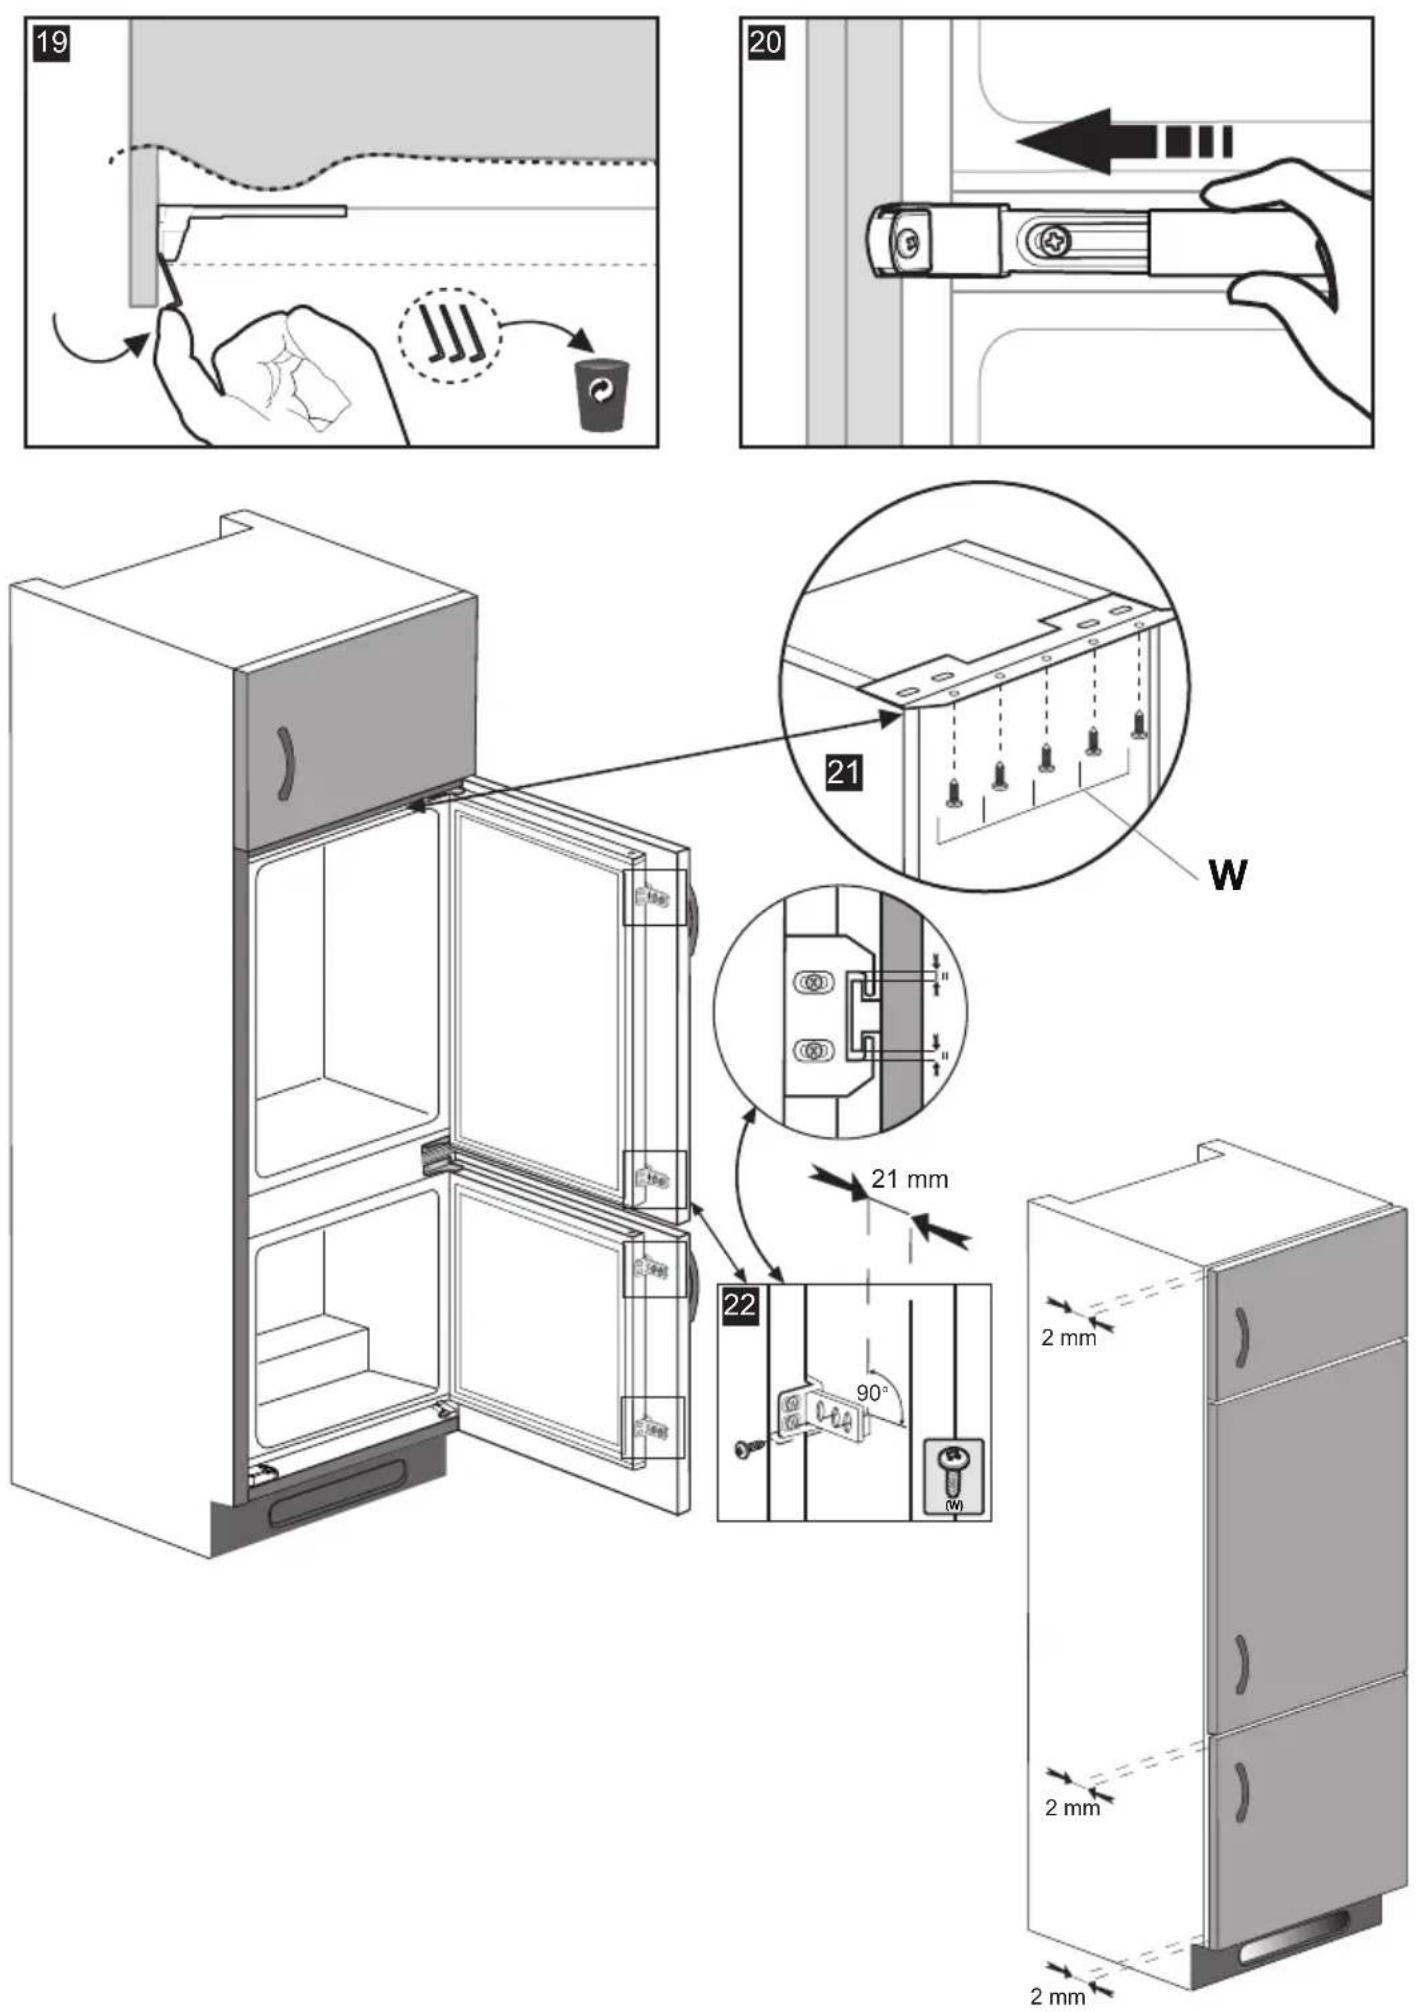
REVERSING THE DOORS
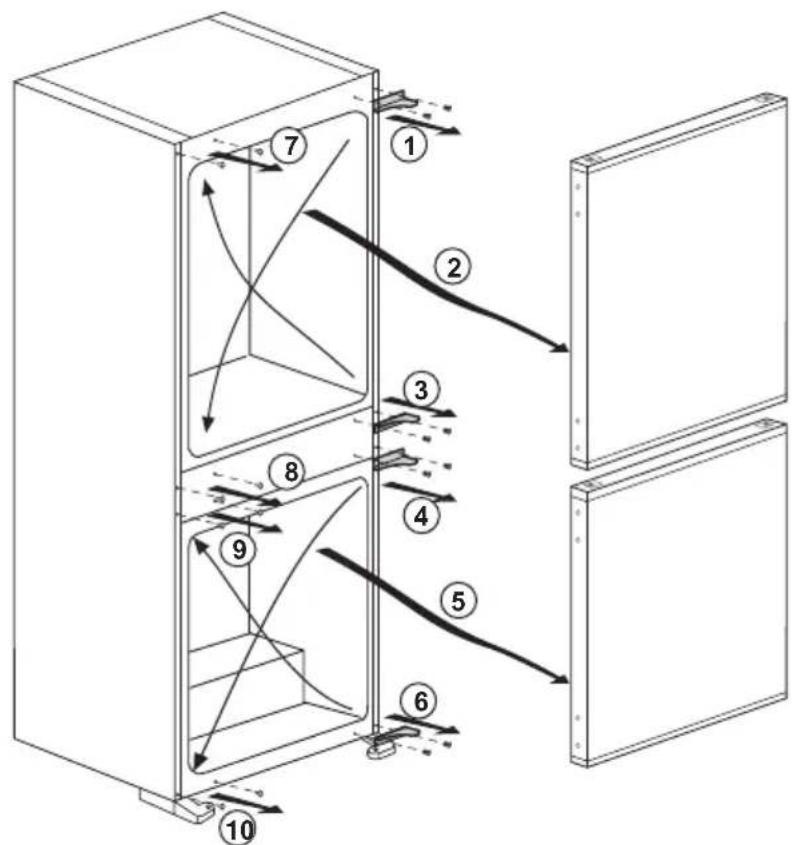
Proceed in numerical order.
text_image
Technical diagram of a multi-level cabinet with numbered components and directional arrows indicating flow or movement.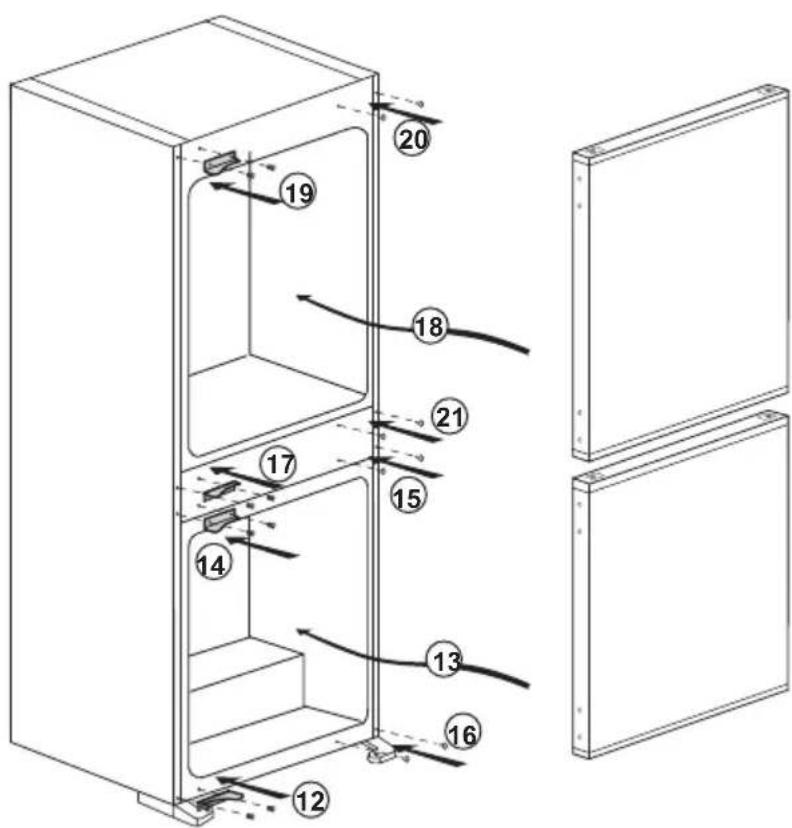
text_image
Technical diagram of a refrigerator with numbered parts and airflow indicators, showing internal structure and exterior panel.Top Door
- Unscrew top hinge (1).
- Carefully remove the top door (2).
- Unscrew lower hinge (3).
- Remove plastic plugs (7 & 8).
- Refit top hinge (1) as lower hinge (17) on the left hand side.
- Replace top door (18).
- Refit lower hinge (3) as top hinge (19) on the left hand side.
Lower door
- Unscrew top hinge (4).
- Carefully remove the lower door (5).
- Unscrew lower hinge (6).
- Remove plastic plugs (9 &10).
- Refit hinge (4) as lower hinge (12) on the left hand side.
- Replace lower door (13).
- Refit lower hinge (6) as top hinge (14) on the left hand side.
Refit plastic plugs (7, 8, 9 & 10) into the screw holes on the right hand side (15, 16, 20 & 21).
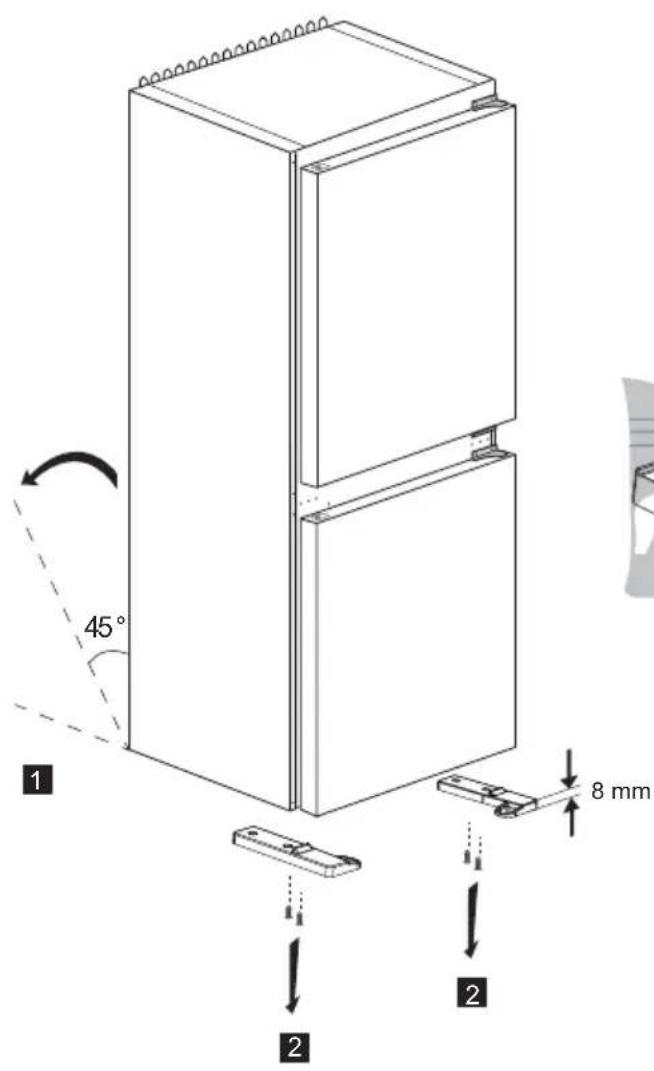
INSTALLATION OF HIGH LEVELLING FOOT
(All dimensions are in mm)
text_image
45° 1 8 mm 2 2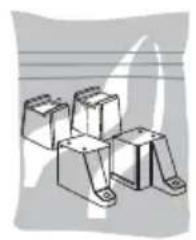
natural_image
Illustration of four mechanical components or blocks arranged in a staggered layout (no text or symbols visible)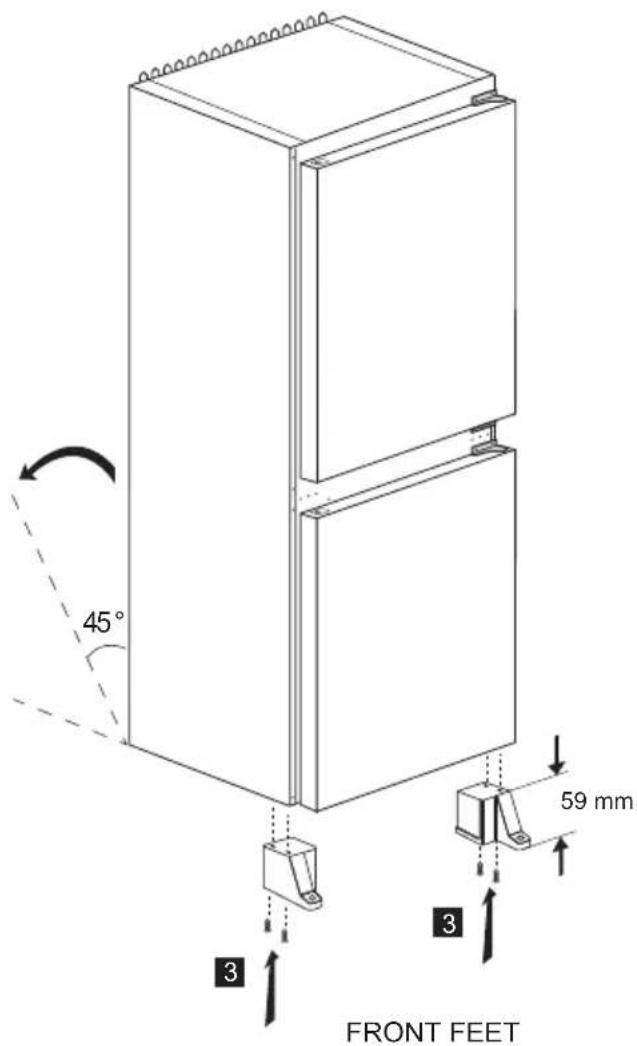
text_image
45° 59 mm 3 3 FRONT FEET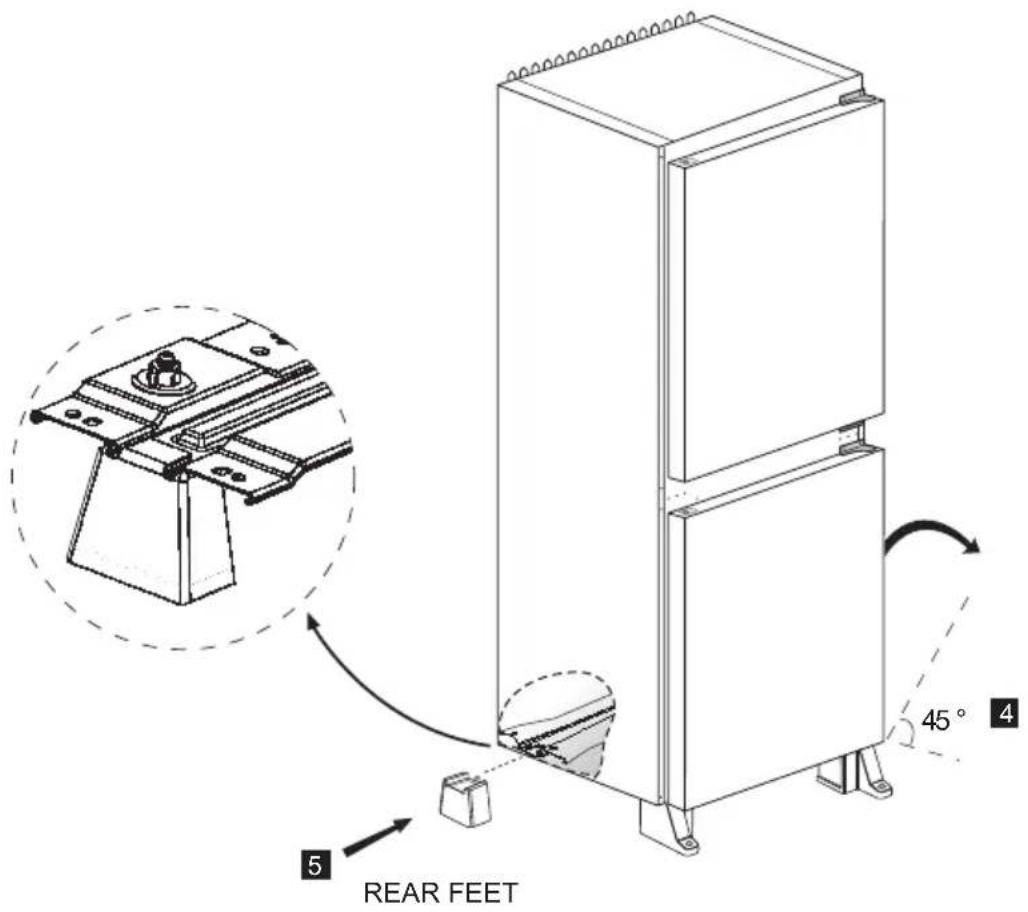
text_image
45° 4 REAR FEET 5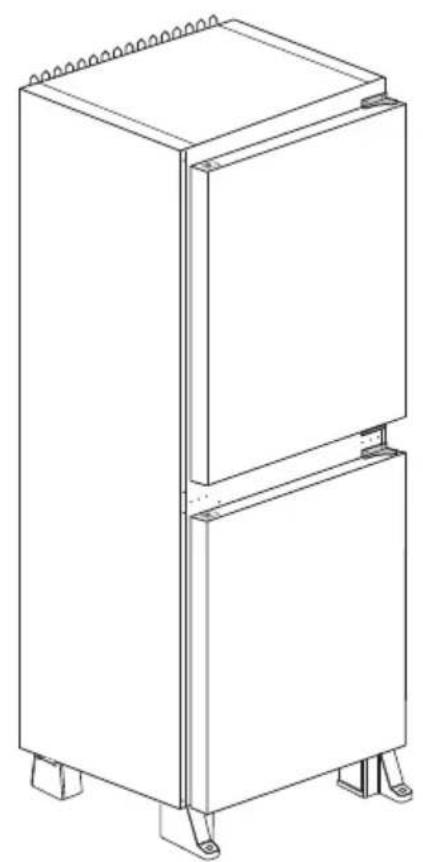
natural_image
Line drawing of a two-tiered rectangular cabinet or enclosure with mounting feet (no text or symbols)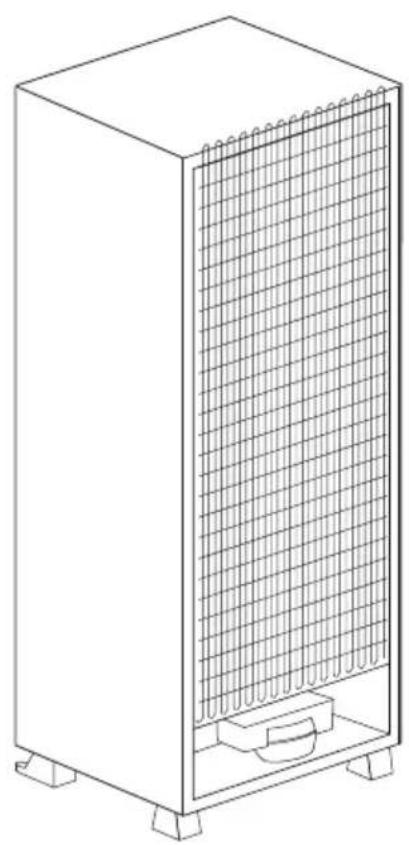
natural_image
Line drawing of a rectangular industrial machine with a grid-patterned front panel and base (no text or symbols)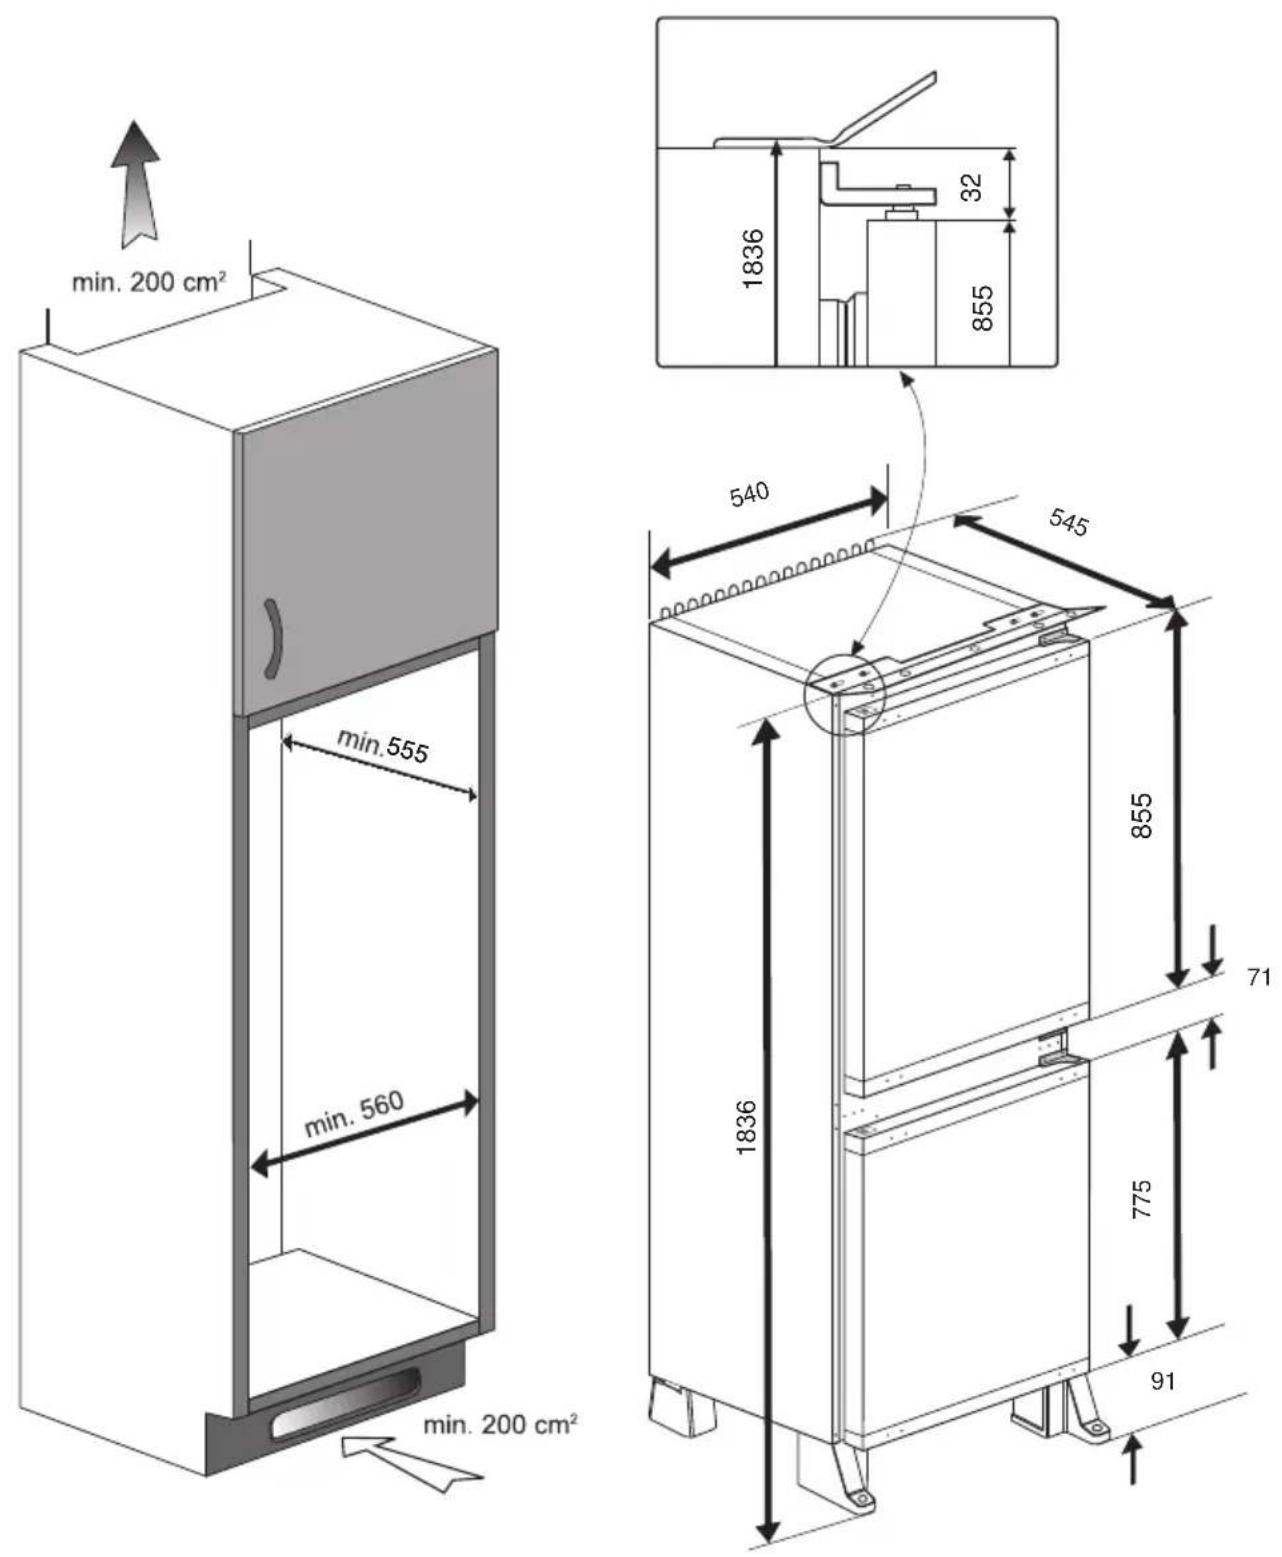
Help-line
If after the previous checks there is still a fault, please contact the Montpellier Service Help-line below.
Please ensure that you have the model number, serial number, date of purchase and retailers information available before you make the call.
Service Help-Line
Should your appliance develop a fault, please call Montpellier Service on: 03333 234 473
Electrical connection (for UK type plug)
For your safety please read the following information. Warning: This appliance must be earthed.
This appliance operates from 220-240 volts and should be protected by a 13amp fuse in the plug.
The appliance is supplied with a standard 13 amp 3-pin mains plug fitted with a 13-amp fuse. Should the fuse require replacement, it must be replaced with a fuse rated at 13 amp and approved to BS1362.
Insurance
The warranty provided with this product does not cover loss of food content.
Any claim for loss, damage, costs or expenses of an indirect or consequential nature including any economic loss or damage to foodstuffs or any other goods is excluded. We recommend that you inspect your appliance regularly to check that it is working correctly, losses can result from deterioration following breakdown or accidental failure of the appliance, fuses, plugs or public electricity supply, these can be covered by your standard home insurance or might require extra cover. Check with your insurance provider.
Important Note:
This appliance is marked according to the European directive 2002/96/EC on Waste Electrical and Electronic Equipment (WEEE). By ensuring this product is disposed of correctly, you will help prevent potential negative consequences for the environment and human health, which could otherwise be caused by inappropriate waste handling of this product.
The symbol on the product, or on the documents accompanying the product, the Crossed Out Wheelie Bin, indicates that this appliance may not be treated as household waste. Instead it shall be handed over to the applicable collection point for the recycling of electrical and electronic equipment.
Disposal must be carried out in accordance with local environmental regulations for waste disposal. For more detailed information about treatment, recovery and recycling of this product, please contact your local authority, your household waste disposal service or the retailer where you purchased the product.
Montpellier
THE PERFECT BALANCE OF FUNCTION, STYLE AND RELIABILITY
LAUNDRY - DISHWASHING - COOKING - COOLING
We continuously try to improve our products for the benefit of our customers. For this reason we reserve the right to make changes to any product at any time, without notice
Issue: 31/07/2017
Montpellier Domestic Appliances Ltd.
Unit 1, Tewkesbury Retail Park, Northway Lane,
Tewkesbury, Gloucestershire GL20 8JU
www.montpellier-appliances.com
The symbol on the product or on its packaging indicates that this product may not be treated as household waste. Instead it shall be handed over to the applicable collection point for the recycling of electrical and electronic equipment. By ensuring this product is disposed of correctly, you will help prevent potential negative consequences for the environment and human health, which could otherwise be caused by inappropriate waste handling of this product. For more detailed information about recycling of this product, please contact your local city office, your household waste disposal service or the shop where you purchased the product.