DPF-LOOK - Digital photo frame Odys - Free user manual and instructions
Find the device manual for free DPF-LOOK Odys in PDF.


| Product Type | Digital Photo Frame |
| Brand | Odys |
| Model | DPF-LOOK |
| Display Size (Diagonal) | 8 inches |
| Display Type | TFT LCD |
| Aspect Ratio | 4:3 |
| Resolution | 800 x 600 pixels |
| Dimensions (W x H x D) | 215 x 173 x 32 mm |
| Power Supply | DC 9V 1.5A (AC adapter included, input 100-240V AC 50/60Hz) |
| Supported Photo Formats | JPEG (max. 4000x4000 pixels) |
| Supported Audio Formats | MP3 (bitrate 32-320 Kbps CBR/VBR) |
| Supported Video Formats | MPEG-1, MPEG-4 (ASP, Xvid), M-JPEG (up to VGA, 30fps) |
| Memory Card Slots | SD/MMC/MS (4-in-1), CF |
| USB Ports | USB Host 2.0 (for USB flash drives), USB Device 2.0 (for PC connection) |
| Built-in Speakers | Stereo |
| Earphone Jack | Yes |
| Remote Control | Infrared remote control included |
| Slideshow Effects | Multiple transition effects (Random, Fading, etc.) |
| Additional Functions | Calendar, alarm clock, file manager (copy/delete), auto power on/off |
| Cleaning | Use soft, lint-free cloth; non-ammonia, non-alcohol glass cleaner for screen |
| Safety | Keep away from water, heat; use only supplied adapter; do not block ventilation |
| Repairability | No user-serviceable parts; refer to qualified personnel |
| Warranty | 24 months (conditions apply) |
Frequently Asked Questions - DPF-LOOK Odys
User questions about DPF-LOOK Odys
0 question about this device. Answer the ones you know or ask your own.
Ask a new question about this device
Download the instructions for your Digital photo frame in PDF format for free! Find your manual DPF-LOOK - Odys and take your electronic device back in hand. On this page are published all the documents necessary for the use of your device. DPF-LOOK by Odys.
USER MANUAL DPF-LOOK Odys
Important Safety Precautions....2
Features.... 3
Location of Controls....3
Remote Control....4
Getting Started....4
Connecting the power cable 4
Inserting memory cards 5
Connecting a USB device 5
Viewing the first slideshow 5
Viewing Photos....6
Main screen....6
Running a slideshow....6
Viewing thumbnails....6
Browsing a single picture....6
Using OSD menu....7
Listening to Music....7
Watching Videos....8
Managing Files......8
Coping files....8
Deleting files....9
Changing Frame Settings 9
Settings menus....9
Setting auto power on/off....10
Setting time....10
Setting alarm clock 10
Displaying Calendar 10
Frequently Asked Questions ....11
Specification 12
Warranty condition....13
Introduction
Congratulations on your purchase of this Digital Photo Frame (DPF).
Before operating this unit, please read this manual thoroughly and keep it for future reference.
This manual will help you use many of the exciting features to make your Digital Photo Frame view more enjoyable.
The DPF is compatible with SD, MMC, MS and CF memory card formats, which enables you to view digital photo directly from your camera's memory card.
This manual contains important safety instructions and correct operation information, so please read all the information carefully before you use the unit in order to avoid any unexpected accidents.
We assume no responsibility for the errors or omissions in this manual. We also have no responsibility for damages or loss of data caused by improper operation.
The instruction manual is subject to change for improvement without notice.
Trademarks and trade names used in this instruction manual are owned by their respective companies or organizations.
Important Safety Precautions
Always follow these basic safety precautions when using your Digital Photo Frame. This will reduce the risk of fire, electric shock, product damage and personal injury.
- Warning: To reduce the risk of electric shock, do not remove the cover or back. There are no user-serviceable parts inside. Refer servicing to qualified personnel.
• Warning: To prevent fire or electric shock hazard, do not expose the unit to rain or moisture. - Do not expose the Digital Photo Frame to water (dripping or splashing) and no objects filled with liquids, such as vases, should be placed on the unit.
- Keep the Digital Photo Frame away from direct sunlight and heat source such as radiators or stoves.
- Do not block the ventilation openings. Slots and openings on the unit are provided for ventilation. The openings should never be blocked by placing your Digital Photo Frame on a cushion, sofa or other similar surface
- Do not place the Digital Photo Frame on unstable cart, stand, tripod, bracket or table. The unit may fall, resulting in possible damage or injury.
• Never place heavy or sharp objects on the LCD panel or frame.
• Only use the AC adapter included with Digital Photo Frame. Using any other adapter will void your warranty. - Protect the power cord from being walked on or pinched particularly at plugs, receptacles and the point where the cord attached to the Digital Photo Frame.
• Unplug the power from the outlet when the unit is not in use.
Cleaning
• Before cleaning the product make sure it is turned off.
• Never spray or pour liquid directly onto the screen or plastic casing.
• To clean the LCD screen, wipe the screen with a clean, soft, lint-free cloth. This removes dust and other particles. If it still is not clean, apply a small amount of non-ammonia, non-alcohol based glass cleaner on a clean, soft, lint-free cloth to clean the screen.
• To clean the plastic casing, use a soft, dry cloth. If it still is not clean, apply a small amount of non-ammonia, non-alcohol based, mildly non-abrasive detergent on a clean, soft, lint-free cloth to clean the surface.
• To clean the frame, use a soft, dry cloth.
Disclaimer: Authorized Dealer does not recommend the use of any ammonia or alcohol-based cleaners on the LCD screen or plastic casing. Some chemical cleaners have been reported to damage the screen and/or display case. Authorized Dealer will not be liable for damage resulting from the use of any ammonia or alcohol-based cleaners.
ODYS DPF LOOK
Tips regarding environmental protection
At the end of its operating life, this product may not be disposed of by way of your normal household waste. Instead it must be delivered to a collection point for recycling electrical and electronic equipment. The icon on the product, in the operating instructions or on the packaging, indicates this.
The materials used in manufacturing this product are recyclable, depending on their identifying markings. By recycling this equipment, by recycling its components, or through other procedures of re-using outdated equipment, you are making an important contribution to protection our environment. Please ask you local municipal administration for the location of the corresponding recycling point.
Features
• High quality matrix TFT LCD
• Decorative appearance, good quality
• Displays digital pictures (JPEG) without a computer
• Automatic slide show with multiple transition effects and desired interval.
- Instantly plays MP3 music with built-in speakers
• Digital photos slide show with MP3 music on the background
• Supports playback of MPEG-1, MPEG-4 and M-JPEG
• Supports multiple repeat mode of music/video playback
- Calendar display
- Alarm setting
• Support earphone connection
- Compatible with SD/MMC/MS and CF memory cards
• USB Host for connecting to the USB mass storage
• USB2.0 high speed transmission for connecting to your computer to download the files.
• Two ways to control: either by 8 keys on the back side of the unit, or by infrared remote control.
Location of Controls
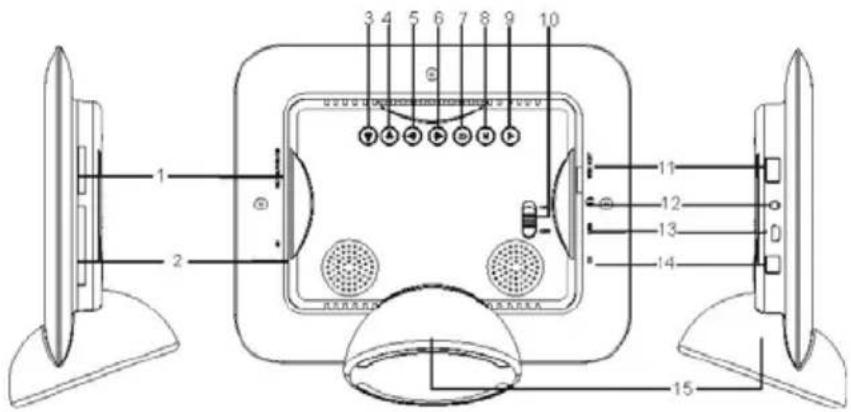
-
SD/MMC/MS-card slot
-
CF-card slot
-
[▼] Press to move the cursor down or select the next picture/music/movie; Press and hold to decrease the volume.
-
[▲] Press to move the cursor up or select the previous picture/music/movie; Press and hold to increase the volume.
-
[▶] Press to move the cursor right or rotate the picture.
-
[◀] Press to move the cursor left or rotate the picture.
-
[⊃] Press to return to the previous menu.
-
[M] Press to return to the main menu. Press and hold to display the OSD menu while playing photos or movies
-
[▶] Press to start playback or confirm the selection.
-
Power on/off switch
-
USB HOST for connecting the USB device directly.
-
Earphone jack
-
Mini USB port for connecting the computer
-
DC 9V 1.5A Port
-
Frame base
Remote Control
| 1 Press to turn the player on or to standby mode. | ||
| 2 ▲ | Press | to move the cursor upward or select previous picture/music/movie. |
| 3 | ◀ | Press to move the cursor leftward or rotate the picture. |
| 4 MENU Press to return to the main menu. | ||
| 5 ▼ | Press | to move the cursor downward or select next picture/music/movie. |
| 6 | ◀◀ | Press to search backward quickly during music or movie playback. |
| 7 Press to zoom in the picture. | ||
| 8 4:3/16:9 Press to select aspect ratio of 4:3 or 16:9. | ||
| 9 VOL+ Press to increase the volume. | ||
| 10 SETUP Press to go to the setup menu. | ||
| 11 | OK | Press to confirm the selection or start or pause playback. |
| 12 | ▶ | Press to move the cursor rightwards or rotate the picture. |
| 13 | OSD | Press to open or exit the OSD bar display. |
| 14 | ⊃ | Press to return to the previous menu. |
| 15 | ▶▶ | Press to search forward quickly during music or movie playback. |
| 16 | Press to starts slide show with music on the background. | |
| 17 | ♪ | Press to stop or start music playback during slideshow. |
| 18 | VOL- | Press to decrease the volume. |

Battery Recycling
In order to ensure the environmentally friendly disposal of batteries, please do NOT dispose of used batteries through normal household waste. Please take the batteries to your local retail or community collection point for recycling.
The following may be an indication of a discharged battery: The device cannot be switched on. The device switches off automatically and "Battery Empty" is shown in the display. The device and or battery do not function properly.
Getting Started
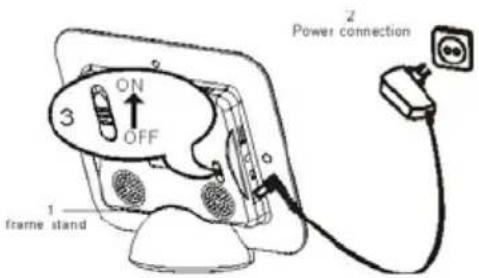
Connecting the power cable
- Fix the Photo Frame on the slot of Frame Base, and place the frame on a stable and flat surface.
- Use the supplied power adapter to connect the digital photo frame to an electrical outlet.
- Slide the power switch on the back of the photo frame from OFF to ON.
Note:
- You can leave the power switch on, and use the [O] button on the remote control to turn the frame on or to standby mode.
• To turn off the power of the Digital Photo Frame completely, slide the power switch from ON to OFF.
ODYS DPF LOOK
Inserting memory cards
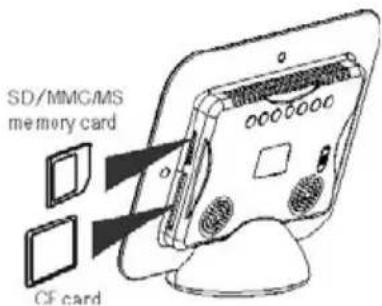
To play the content of a memory card you just have to insert it into the respective card slot on the Digital Photo Frame.
This Digital Photo Frame is compatible with the following memory cards:
- Secure Digital Card (SD)
• Multimedia Card (MMC)
- Memory Stick (MS)
• Compact Flash card (CF)
Insert the SD/MMC/MS card into the 4-in-1 card slot with the metallic contacts facing towards the display.
Insert the CF card into the CF card slot with the pinholes pointing towards the photo frame.

Note:
- Do not force the memory card in the memory slot.
- The 4-in-1 card slot only reads one memory card at a time. Do not insert more than one card into the memory card slot.
• To remove the cards, pull out the card slowly.
Connecting a USB device
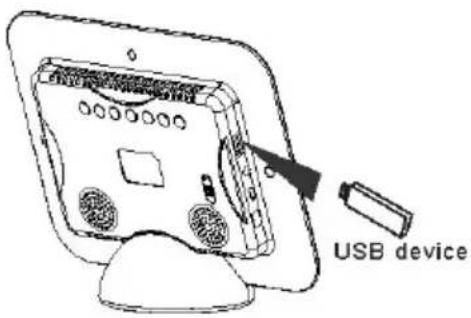
You can view the pictures on your USB memory device by inserting it into the USB HOST slot.
Viewing the first slideshow
Once you switch on the digital photo frame, the main screen appears.
When a memory device is inserted into the Digital Photo Frame, the corresponding icon appears on the main screen.
Use the [◀] or [▶] button on the remote control to select a memory device, and press the [☐] button to start slideshow of selected device.
The music files on the selected device will start to play back automatically on the background.

Note:
• If no button is pressed for 6 seconds after turning on the Digital Photo Frame, the slideshow will start automatically.
• If several memory devices connect to the frame simultaneously, the Digital Photo Frame will read the memory source by the priority order: USB, CF, SD/MMC/MS
Viewing Photos
Main screen
In the main screen, you can select connected source to view pictures, change frame settings, or display the calendar.
- Press the [MENU] button on the remote control to access the main screen. All connected source, setup and calendar icons are displayed.
| USB driver Appears when you inserted a USB flash driver. |
| SD/MMC Appears when you insert a SD or MMC card. |
| MS Appears when you insert a MS card. |
| CF Appears when you insert a CF card. |
| SETUP To customize the settings of Digital Photo Frame. |
| CALENDAR To display the Calendar on the screen. |
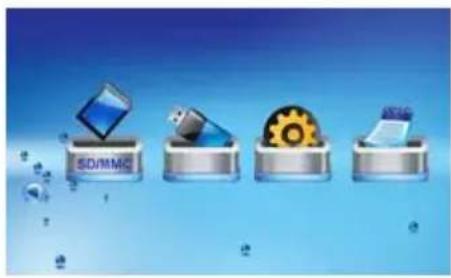
- Press the [◀] or [▶] button on the remote control to highlight a picture source.
To start a slideshow, press the [icon] button.
To display photo, music, movie or file individually, press the [OK] button.

Running a slideshow
In any mode, press the [☐] button to start slideshow. The music stored on the memory source will start playback on the background automatically during slideshow.
• To pause the slideshow and view a single picture, press the [OK] button. To resume the slideshow, press the [OK] button again.
• To increase or decrease the volume of background music, press the [VOL+] or [VOL-] button.
- To stop or start background music playback, press the [ musical button.
Note:
- Press the [MENU] button to exit the slideshow and return to the main screen.
- Press the [ ↗] button to exit the slideshow and view the pictures in thumbnail.
Viewing thumbnails
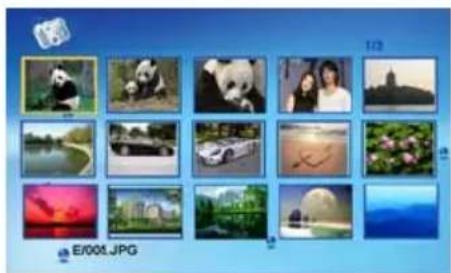
The pictures on the selected memory source can be displayed on the screen as thumbnails. Up to 15 pictures are displayed at a time.
- Select a memory source (e.g. USB, SD/MMC) in the main screen and press the [OK] button. The mode menu appears.
- Press the [◀] or [▶] button on the remote control to select Photo, and press the [OK] button. The pictures are displayed on the screen as thumbnails.
- To navigate through the thumbnails, press the [▲], [▼], [◀] or [▶] on the remote control.
Note: You can also press the [⊃] button from a slideshow or a single view to return to the thumbnails view.
Browsing a single picture
You can select a single picture to display on the screen, without a slideshow.
- Select a picture in the thumbnail view, and press the [OK] button. The selected picture is displayed on the full screen.
• To view the previous or next photo, press the [▲] or [▼] button.
• To rotate a picture, press the [◀] or [▶] button.
- To magnify a picture up to 16X, press the [ ] button repeatedly. When a picture is magnified, press the [▲], [▼], [◀] or [▶] to
ODYS DPF LOOK
view the other part of the picture.
- To return to the thumbnail view, press the [⊃] button.
- To start slide show from the current picture, press the [OK] button.
Using OSD menu
You also can use the OSD menu to manually view the photos one by one.
- Press the [OSD] button during viewing the picture or slideshow. The OSD menu appears on the screen and slideshow pauses.


Picture.jpg
- Press the [◀] or [▶] button to navigate between the icons on the OSD menu.
• To start slide show, highlight ▶ and press the [OK] button.
- To skip to previous picture, highlight and press the [OK] button.
- To skip to next picture, highlight ▶ and press the [OK] button.
• To stop or start music playback during slide show, highlight ⏻ and press the [OK] button.
• To start slide show with music on the background, highlight 📋 and press the [OK] button.
- To zoom in the picture, highlight and press the [OK] button. When a picture is magnified, press the [▲], [▼], [◀] or [▶] to view the other part of the picture.
Listening to Music
If there are MP3 files on the memory device, you can play them on the Digital Photo Frame.
- Select a memory source (e.g. USB, SD/MMC) in the main screen and press the [OK] button. The mode menu appears.
- Press the [◀] or [▶] button on the remote control to select Music, and press the [OK] button. The music list and playback interface appears.
- Use the [▲] or [▼] button on the remote control to select the desired track and press the [OK] button to play.
• To pause playback, press the [OK] button. To resume playback, press the [OK] button once again.
• To increase or decrease the volume, press the [VOL+] or [VOL-] button.
• To fast search forward or backward within a track, press the [◀] or [▶] button. Each time the button is pressed, the speed of search changes accordingly. Press the [OK] button to resume the playback from the searched point.
• To stop playback, press the [→] button. Press it again to return to the mode menu.


Watching Videos
You can watch the videos on the Digital Photo Frame. It supports the format of MPEG-1, MPEG-4 and M-JPEG used by most digital cameras.
- Select a memory source (e.g. USB, SD/MMC) in the main screen and press the [OK] button. The mode menu appears.
- Press the [◀] or [▶] button on the remote control to select Movie, and press the [OK] button. The video list with a thumbnail video window appears.
- Press the [▲] or [▼] button on the remote control to select a video file. The corresponding video starts playback in thumbnail view.
- Press the [OK] button to watch the video in full screen.
• To pause playback, press the [OK] button. To resume playback, press the [OK] button once again.
• To increase or decrease the volume, press the [VOL+] or [VOL-] button.
• To skip to previous or next video, press the [▲] or [▼] button.
- To fast search forward or backward within a track, press the [◀] or [▶] button. Each time the button is pressed, the speed of search changes accordingly. Press the [OK] button to resume the playback from the searched point.
• To stop playback and return to the video list menu, press the [→] button.
Managing Files
In the File mode, you can view all playable files and folders on the memory source. You also can copy files from a memory device to another memory device or delete the files.
- Select a memory source (e.g. USB, SD/MMC) in the main screen and press the [OK] button. The mode menu appears.
- Press the [◀] or [▶] button on the remote control to select File, and press the [OK] button. The file list appears.
- Use the [▲] or [▼] button on the remote control to navigate between files and folders. When a file is highlighted, the detailed information of file is displayed on the right of the screen.
To play a file, highlight it and press the [OK] button.
To open a folder, highlight it and press the [OK] button.


Coping files
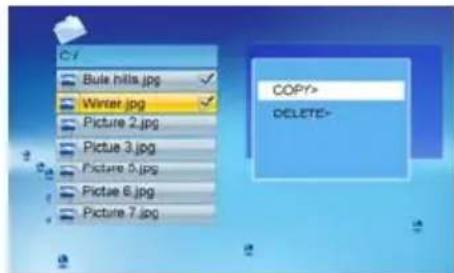
- Highlight a file using the [▲] or [▼] button and press the [▶] button. A check mark is displayed next to the file.
To check more files, repeat above step. - Press the [OSD] button. A menu with COPY and DELETE options is displayed on the right screen.
- Use the [▲] or [▼] button to select COPY and press the [OK] button. The other available memory source is displayed.
- Use the [▲] or [▼] button to select a memory device and press the [▶] button to select the destined directory.
- Press the [OK] button to start coping files.
ODYS DPF LOOK
Deleting files
- Highlight a file using the [▲] or [▼] button and press the [▶] button. A check mark √ is displayed next to the file. To check more files, repeat above step.
- Press the [OSD] button. A menu with COPY and DELETE options is displayed on the right screen.
- Use the [▲] or [▼] button to select DELETE and press the [OK] button.
- Use the [◀] or [▶] button to select "☑" or "✗" to delete the file or exit without deleting.
Changing Frame Settings
The system settings let you customize and configure your Digital Photo Frame.
- Select the SETUP icon in the main screen and press the [OK] button. Or press the [SETUP] button any time.
The Setup Menu and software version appear on the screen. - To select a setting option, press the [▲] or [▼] button.
- To change the value, press the [◀] or [▶] button and press the [OK] button to confirm.
- Press the [⊃] button to exit.

Settings menus
| Setting options Description | |
| LANGUAGE Choose the on-screen language. | |
| SLIDESHOW TIME | Specify how long each picture is displayed in a slide show.The available options include: 3s, 5s, 15s, 1 min, 15mins, 1 hour. |
| TRANSITION EFFECT | Specify the transition effect between pictures in a slide show.The available options include: Random, Fading, Vexpand_Top, Vexpand_Bottom, Vexpand_Middle, Hexpand_Left, Hexpand_Right, Hexpand_Middle, Off, Bottom_To_Top, Top_To_Bottom, Left_To_Right, Right_To_Left, Door_Close, Door_Open, Hori_Cross, Verti_Cross. |
| MUSIC REPEAT MODE | Choose the file repeat mode for music playback.Repeat one: Play the selected music repeatedly.Repeat all: Play all music files on the selected memory source repeatedly.Repeat off: Play all music files on the selected memory source once. |
| MOVIE REPEAT MODE | Choose the file repeat mode for movie playback.Repeat one: Play the selected movie repeatedly.Repeat all: Play all movie files on the selected memory source repeatedly.Repeat off: Play all movie files on the selected memory source once. |
| TFT BRIGHTNESS | Adjust the brightness of the TFT screen.The available options include: -3, -2, -1, 0, 1, 2, 3. |
| TFT CONTRAST | Adjust the contrast of the TFT screen.The available options include: -3, -2, -1, 0, 1, 2, 3. |
| TFT SATURATION | Adjust the saturation of the TFT screen.The available options include: -3, -2, -1, 0, 1, 2, 3. |
| AUTO POWER ON | Set the Digital Photo Frame to turn on after the set time everyday or once. |
| AUTO POWER OFF Set the Digital Photo Frame to turn off after the set time everyday or once. | |
| TIME Set calendar to the current date and time. | |
| ALARM Set the time, ring and schedule of alarm clock. | |
| DEFAULT Reset all settings to the default setting. | |
Setting auto power on/off
You can enable the Digital Photo Frame to turn on or off automatically at the specified time.
Note: The current time must be set correctly before setting up this feature.
- Press the [SETUP] button. The Setup Menu appears on the screen.
- Press the [▲] or [▼] button to select AUTO POWER ON or AUTO POWER OFF.
- Press the [◀] or [▶] button to highlight next or previous setting (hour, minutes, schedule). And press the [▲] or [▼] button to adjust the time or select the schedule as below.
• Off: Disables the auto power on or off function.
• Every: The Digital Photo Frame will turn on or off at the set time everyday.
• Once: The Digital Photo Frame only turns on or off at the set time once.
- Press the [OK] button to confirm.
Setting time
You can set the system time to the current date and time so that the Calendar display is correct.
- Press the [SETUP] button. The Setup Menu appears on the screen.
- Press the [▲] or [▼] button to select TIME.
- Press the [◀] or [▶] button to highlight next or previous setting (year, month, day, hour, minutes). And press the [▲] or [▼] button to adjust the time.
- Press the [OK] button to confirm.
Setting alarm clock
The Digital Photo Frame can also work as an alarm.
- Press the [SETUP] button. The Setup Menu appears on the screen.
- Press the [▲] or [▼] button to select ALARM.
- Press the [◀] or [▶] button to highlight next or previous setting (hour, minutes, ring, schedule). And press the [▲] or [▼] button to adjust the time, select the ring or select the schedule as below.
• Off: Disables the auto power on or off function.
• Every: The Digital Photo Frame will turn on or off at the set time everyday.
• Once: The Digital Photo Frame only turns on or off at the set time once.
- Press the [OK] button to confirm.
Displaying Calendar
You can switch your Digital Photo Frame to Calendar mode that the current date and time is displayed on the screen with a slide show in thumbnail.
- Select the Calendar icon on the main screen and press the [OK] button.
The Calendar is displayed on the screen and all photos in the all memory source start slide show in thumbnail.
- To exit the Calendar mode, press the [⊃] button.
Note:
- The Digital Photo Frame will switch to Calendar mode automatically if it is non-usage for 5 minutes (except for Pause mode).
- The date and time can be adjusted in the SETUP mode.

ODYS DPF LOOK
Frequently Asked Questions
- Why cannot the Digital Photo Frame display some files from my Flash card or USB device?
• Some unpopular memory cards are not compatible with the device. Use a card which matches with the Digital Photo Frame.
- The file formats on your card or USB device might not be supported (only JPEG pictures are accessible). Provide files with the supported JPEG.
- There is a memory card inserted in the Digital Photo Frame, but the device is not able to read the card. What can I do?
- First, make sure that you are using a memory card type that is supported by the Digital Photo Frame.
• Secondly, make sure that the memory card is inserted correct.
- Thirdly, check if the USB device is inserted into the unit. This Digital Photo Frame always reads the files in the USB device if USB device and a card are inserted simultaneously.
• The file formats on your card might not be supported (only JPEG pictures are accessible). Provide files with the supported JPEG.
Note: Some digital cameras save images into non-standard formats. Please refer to the operating manual of your camera for specifics.
- Why do some pictures load faster than others?
• Higher resolution pictures load slower. Use pictures with lower resolution to speed up the loading time.
Note: The Digital Photo Frame supports up to 4000*4000 pixels picture display.
- Why does the screen not show anything?
• The device might not have been turned ON or the adapter is not well connected.
- Can I rotate a picture on the screen?
• YES. Use the [◀] or [▶] button to rotate a picture.
Note: The rotated picture will return to its original orientation after you power off the Digital Photo Frame.
- Why doesn't my Digital Photo Frame go into Auto-off or Auto-on status after I set it?
• Make sure you set current time correctly. The Digital Photo Frame will automatically turn on or turn off its display exactly at the Auto-on or Auto-off time. If the time has already passed for the day, it will start entering Auto-on or Auto-off status at the specified time from the next day.
- Don't slide the power switch to OFF position after you turn the Digital Photo Frame to standby mode using the Remote Control.
- What is the best picture resolution displayed on the screen?
• The best resolution is 800*600 and the max picture resolution of this Digital Photo Frame is 4000*4000 pixels.
Specification
| Display | Digital TFT LCDPanel size: 8 inchesScreen aspect ratio: 4:3Resolution: 800*600 pixels |
| I/O | Remote control, DC in, Stereo speaker |
| Power adaptor | Input: 100~240V AC, 50/60HzOutput: 9V 1.5A DC |
| USB port | USB Host 2.0 & USB device 2.0Supports USB flash media |
| Supported peripheral devices | SDTM (Secure Digital Card), MMCTM (MultiMedia Card), MSTM (Memory Stick), CFTM (Compact Flash) |
| Supported photo format | JPEG, Maximum resolution:4000*4000 pixels |
| Supported audio format | MP3: Bit rate 32~320Kbps (CBR, VBR), |
| Supported video format | MPEG-1(MP@ML), MPEG-4(ASP, Xvid Compliant), M-JPEG(up to VGA, 30fps) |
| Operating temperature | 5°C ~ 35°C |
| Dimension | 215*173*32 mm |
| Weight |
ODYS DPF LOOK
Warranty condition
The following conditions comprise the requirements and scope of our warranty conditions and do not affect our legal and contractual warranty obligations.
We offer a warranty on our products in accordance with the following conditions:
- Odys products are covered by a 24 month warranty. We will resolve damages or defects on Odys products free of charge within 12 months of the purchase date under the following warranty conditions. For any damage or defect determined later than 12 months after the purchase date, proof of a manufacturing fault must be submitted for repair under warranty.
The warranty does not cover batteries and other parts, which are considered consumables, parts that break easily such as glass or plastic or defects based on normal wear and tear. There is no warranty obligation in the event of marginal differences compared to the target appearance and workmanship provided these have a negligible effect on the product's fitness for use, in the event of damage caused by chemical or electrochemical effects, by water or generally from abnormal conditions. - The warranty will be performed in such a way that we shall decide whether to repair the defective parts or to replace them with working parts free of charge. AXDIA reserves the right to exchange the product for a replacement product of equal value if the product that is sent in cannot be repaired within a reasonable time or at reasonable cost. The product can also be exchanged for a different model of the same value. Requests cannot be made for repairs to be carried out on site. Parts that have been replaced or exchanged become our property.
- The warranty claim does not apply if repairs or other work is carried out by unauthorized persons or if our products are equipped with additional parts or accessories that are not approved for our products.
- Warranties that have been activated do not cause the warranty period to be extended, nor do they trigger a new warranty period. The warranty period for any replacement parts installed ends with the warranty period for the entire product.
- Any other or further claims are excluded, especially those for replacement due to damage caused outside of the product, provided there is no obligatory legal liability. We therefore accept no liability for accidental, indirect or other consequential damage of any kind, which leads to usage restrictions, data loss, loss of earnings or interruption to business.
Asserting a warranty claim
- To make use of the warranty service, you must contact the AXDIA Service Center by e-mail, fax or phone (see below for contact details). You can also use the service form on our website or on the back of the warranty conditions.
- AXDIA Service Center will try to diagnose and solve your problem. If it is determined that a warranty claim exists, you will be given an RMA number (Return Material Authorization) and you will be asked to send the product to AXDIA.
IMPORTANT: AXDIA will only accept parcels that have an RMA number.
Please observe the following when sending the product:
- Send the product suitably packaged with carriage and insurance paid. Do not enclose any accessories with the products (no cables, CD's, memory cards, manuals, etc.), unless the AXDIA Service Centre specifies otherwise.
- Mark the RMA number on the outside of the package in such a way that it is visible and clearly legible.
- You must enclose a copy of the sales slip as proof of purchase.
- Once AXDIA has received the product, it will meet its warranty obligations in accordance with the warranty conditions and will return the product to the sender with carriage and insurance paid.
Service outside of warranty
AXDIA can refuse any service claim made that is not covered by the warranty. If AXDIA agrees to provide a service outside the warranty, the customer will be invoiced for all repair and transport costs. AXDIA will not accept any packages that have not first been approved by AXDIA by means of an RMA (Return Material Authorization).


- INTRODUCTION
- IMPORTANT SAFETY PRECAUTIONS
- CLEANING
- ODYS DPF LOOK
- TIPS REGARDING ENVIRONMENTAL PROTECTION
- FEATURES
- LOCATION OF CONTROLS
- BATTERY RECYCLING
- GETTING STARTED
- CONNECTING THE POWER CABLE
- NOTE
- INSERTING MEMORY CARDS
- CONNECTING A USB DEVICE
- VIEWING THE FIRST SLIDESHOW
- VIEWING PHOTOS
- MAIN SCREEN
- RUNNING A SLIDESHOW
- VIEWING THUMBNAILS
- BROWSING A SINGLE PICTURE
- USING OSD MENU
- LISTENING TO MUSIC
- WATCHING VIDEOS
- MANAGING FILES
- COPING FILES
- DELETING FILES
- CHANGING FRAME SETTINGS
- SETTING AUTO POWER ON/OFF
- SETTING TIME
- SETTING ALARM CLOCK
- DISPLAYING CALENDAR
- FREQUENTLY ASKED QUESTIONS
- WARRANTY CONDITION
- WE OFFER A WARRANTY ON OUR PRODUCTS IN ACCORDANCE WITH THE FOLLOWING CONDITIONS
- ASSERTING A WARRANTY CLAIM
- IMPORTANT: AXDIA WILL ONLY ACCEPT PARCELS THAT HAVE AN RMA NUMBER
- SERVICE OUTSIDE OF WARRANTY
Brand : Odys
Model : DPF-LOOK
Category : Digital photo frame