
32L4300U - TV TOSHIBA - Free user manual and instructions
Find the device manual for free 32L4300U TOSHIBA in PDF.


User questions about 32L4300U TOSHIBA
0 question about this device. Answer the ones you know or ask your own.
Ask a new question about this device
Download the instructions for your TV in PDF format for free! Find your manual 32L4300U - TOSHIBA and take your electronic device back in hand. On this page are published all the documents necessary for the use of your device. 32L4300U by TOSHIBA.
USER MANUAL 32L4300U TOSHIBA
Integrated High Definition LED Television User's Guide:
32L4300U / 39L4300U / 50L4300U 50L7300U / 58L7300U / 65L7300U
If you need assistance:
Toshiba's Support Web site support.toshiba.com
For more information, see “Troubleshooting” on page 160 in this guide.
Owner's Record
The model number and serial number are on the back and side of your television.
Record these numbers, whenever you communicate with your Toshiba dealer about this Television.
Model name:
Serial number:
Register your Toshiba Television at register.toshiba.com
Note: To display a High Definition picture, the TV must be receiving a High Definition signal (such as an over-the-air High Definition TV broadcast, a High Definition digital cable program, or a High Definition digital satellite program). For details, contact your TV antenna installer, cable provider, or satellite provider
GMA300019012
4/13
CHILD SAFETY:
PROPER TELEVISION PLACEMENT MATTERS
natural_image
Three people interacting at a tech exhibition booth, one holding a tablet (no visible text or symbols)
natural_image
Family of three smiling and sitting together, no visible text or symbols
natural_image
Two people standing beside a large blackboard on a white wall (no visible text or symbols)
natural_image
A young boy smiling while sitting at a desk with a vintage telephone and TV, in front of a computer monitor (no visible text or symbols)TOSHIBA CARES
• Manufacturers, retailers and the rest of the consumer electronics industry are committed to making home entertainment safe and enjoyable.
- As you enjoy your television, please note that all televisions – new and old- must be supported on proper stands or installed according to the manufacturer's recommendations. Televisions that are inappropriately situated on dressers, bookcases, shelves, desks, speakers, chests, carts, etc., may fall over, resulting in injury.
TUNE IN TO SAFETY
- ALWAYS follow the manufacturer's recommendations for the safe installation of your television.
- ALWAYS read and follow all instructions for proper use of your television.
- NEVER allow children to climb on or play on the television or the furniture on which the television is placed.
- NEVER place the television on furniture that can easily be used as steps, such as a chest of drawers.
- ALWAYS install the television where it cannot be pushed, pulled over or knocked down.
- ALWAYS route cords and cables connected to the television so that they cannot be tripped over, pulled or grabbed.
WALL OR CEILING MOUNT YOUR TELEVISION
- ALWAYS contact your retailer about professional installation if you have any doubts about your ability to safely mount your television.
- ALWAYS use a mount that has been recommended by the television manufacturer and has a safety certification by an independent laboratory (such as UL, CSA, ETL).
- ALWAYS follow all instructions supplied by the television and mount manufacturers.
- ALWAYS make sure that the wall or ceiling where you are mounting the television is appropriate. Some mounts are not designed to be mounted to walls and ceilings with steel studs or cinder block construction. If you are unsure, contact a professional installer.
- Televisions can be heavy. A minimum of two people is required for a wall or ceiling mount installation.
MOVING AN OLDER TELEVISION TO A NEW PLACE IN YOUR HOME
- Many new television buyers move their older CRT televisions into a secondary room after the purchase of a flat-panel television. Special care should be made in the placement of older CRT televisions.
- ALWAYS place your older CRT television on furniture that is sturdy and appropriate for its size and weight.
- NEVER place your older CRT television on a dresser where children may be tempted to use the drawers to climb.
- ALWAYS make sure your older CRT television does not hang over the edge of your furniture.
Dear Customer,
Thank you for purchasing this Toshiba LED TV. This document will help you use the many exciting features of your new LED TV. Before operating your LED TV, carefully read this manual completely.
Safety Precautions
WARNING: TO REDUCE THE RISK OF FIRE OR ELECTRIC SHOCK, DO NOT EXPOSE THIS APPLIANCE TO RAIN OR MOISTURE.


WARNING: TO REDUCE THE RISK OF ELECTRIC SHOCK, DO NOT REMOVE COVER (OR BACK). NO USER-SERVICEABLE PARTS INSIDE. REFER SERVICING TO QUALIFIED SERVICE PERSONNEL

The lightning flash with arrowhead symbol, within an equilateral triangle, is intended to alert the user to the presence of uninsulated “dangerous voltage” within the product’s enclosure that may be of sufficient magnitude to constitute a risk of electric shock to persons.

The exclamation point within an equilateral triangle is intended to alert the user to the presence of important operating and maintenance (servicing) instructions in the literature accompanying the appliance.
WARNING
To prevent injury, this apparatus must be securely attached to the floor/wall in accordance with the installation instructions. See item 26) on page 4.
WARNING: If you decide to wall mount this television, always use a mounting bracket that has been Listed by an independent laboratory (such as UL, CSA, ETL) and is appropriate for the size and weight of this television. The use of inappropriate or non-Listed mounting brackets could result in serious bodily injury and/or property damage. See "To Display your LED TV using a Wall Bracket:" on page 6.
NOTE TO CATV INSTALLERS
This is a reminder to call the CATV system installer's attention to Article 820-40 of the U.S. NEC, which provides guidelines for proper grounding and, in particular, specifies that the cable ground shall be connected to the grounding system of the building, as close to the point of cable entry as practical. For additional antenna grounding information, see items 33) and 34) on page 5.
Important Safety Instructions
1) Read these instructions.
2) Keep these instructions.
3) Heed all warnings.
4) Follow all instructions.
5) Do not use this apparatus near water.
6) Clean only with dry cloth.
7) Do not block any ventilation openings. Install in accordance with the manufacturer's instructions.
8) Do not install near any heat sources such as radiators, heat registers, stoves, or other products (including amplifiers) that produce heat.
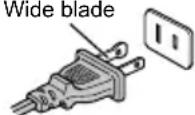
9) Do not defeat the safety purpose of the polarized or grounding type plug. A polarized plug has two blades with one wider than the other. A grounding type plug has two black grounding prong. The wide blade prong are provided for your safe plug does not fit into your outlet, electrician for replacement of the
Wide blade
10) Protect the power cord from being walked on or pinched, particularly at plugs, convenience receptacles, and the point where they exit from the apparatus.
11) Only use attachments/accessories specified by the manufacturer.
12) Use only with the cart, stand, tripod, bracket, or table specified by the manufacturer, or sold with the apparatus. When a cart is used, use caution when moving the cart/apparatus combination to avoid injury from tip-over.

13) Unplug this apparatus during lightning storms or when unused for long periods of time.
14) Refer all servicing to qualified service personnel. Servicing is required when the apparatus has been damaged in any way, such as power-supply cord or plug is damaged, liquid has been spilled or objects have fallen into the apparatus, the apparatus has been exposed to rain or moisture, does not operate normally, or has been dropped.
Additional Safety Precautions
14a) CAUTION: If the TV is dropped and the cabinet or enclosure surface has been damaged or the TV does not operate normally, take the following precautions:
- ALWAYS turn off the TV and unplug the power cord to avoid possible electric shock or fire.
- NEVER allow your body to come in contact with any broken glass or liquid from the damaged television. The LCD panel inside the TV contains
glass and a toxic liquid. If the liquid comes in contact with your mouth or eyes, or your skin is cut by broken glass, rinse the affected area thoroughly with water and contact your doctor immediately.
- ALWAYS contact a service technician to inspect the TV any time it has been damaged or dropped.
15) CAUTION:
- To reduce the risk of electric shock, do not use the polarized plug with an extension cord, receptacle, or other outlet unless the blades can be inserted completely to prevent blade exposure.
- To prevent electric shock, match wide blade of plug to wide slot; fully insert.
16) CAUTION:
- Do not let children swallow any small parts included on or with the product or play with the plastic bag. Keep the small parts and the plastic bag out of the reach of children.
17) CAUTION:
- Do not let water or other liquids come into contact with the product, as it may result in damage.
18) WARNING:
- To prevent the spread of fire, keep candles or other open flames away from this product at all times.
- Keep the product away from direct sunlight, fire or a heat source such as a heater. This may reduce the product lifetime or result in fire.
Installation, Care, and Service
Installation
Follow these recommendations and precautions and heed all warnings when installing your TV:
19)
WARNING: NEVER expose batteries to excessive heat such as sunshine, fire, or the like.
20) ALWAYS plug the product into an outlet that is located in such a manner that it can be easily unplugged in case the product requires service.
21) NEVER route the product's power cord inside a wall or similar enclosed area.
22) Never modify this equipment. Changes or modifications may void: a) the warranty, and b) the user's authority to operate this equipment under the rules of the Federal Communications Commission.
23) DANGER: RISK OF

SERIOUS PERSONAL INJURY, DEATH, OR EQUIPMENT DAMAGE

Never place the TV on an unstable cart, stand, or table. The TV may fall, causing serious personal injury, death, or serious damage to the TV.
24) When selecting a location for the TV,
- NEVER allow any part of the TV to hang over the edge of the supporting furniture,
- NEVER place the TV on tall furniture (for example, entertainment centers or bookcases) without anchoring both the furniture and the TV to a suitable support,
- Never place cloth or other material between the TV and the supporting furniture.
- NEVER allow children to climb on the TV.
25) To avoid damage to this product, never place or store the TV in direct sunlight; hot, humid areas; or areas subject to excessive dust or vibration.
26) Always place the TV on the floor or a sturdy, level, stable surface that can support the weight of the unit. Secure the TV using one of the following methods:
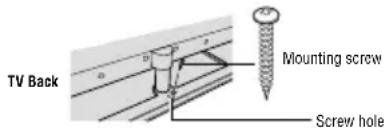
(1) Secure the TV with a mounting screw (Recommended.)
- Place the TV on a sturdy surface that has a sufficient thickness and screw the unit on the surface securely by using the mounting screw and the fall-prevention screw hole.
text_image
TV Back Mounting screw Screw hole(2) Secure the TV with a sturdy strap to a wall stud, pillar, or other immovable structure. When connecting the strap:
- attach the strap to the TV using the hooks on the back of the TV, the clips on the pedestal, or the hole in the base of the pedestal as available. - make sure the strap is tight, secure, and parallel to the floor.
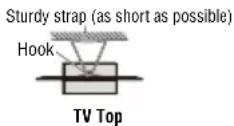
27) The apparatus shall not be exposed to dripping or splashing, and that no objects filled with liquids, such as vases, shall be placed on the apparatus.
28) Never block or cover the slots or openings in the TV cabinet back, bottom, and sides. Never place the TV:
- on a bed, sofa, rug, or similar surface;
- too close to drapes, curtains, or walls; or
- in a confined space such as a bookcase, built-in cabinet, or any other place with poor ventilation.
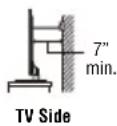
29) Always leave a space of at least 4 (four) inches around the TV. The slots and openings are provided to protect the TV from overheating and to help maintain reliable operation of the TV.
30) Never allow anything to rest on or roll over the power cord, and never place the TV where the power cord is subject to wear or abuse.
31) Never overload wall outlets and extension cords.
32) Always operate this equipment from a 120V AC, 60 Hz power source.
33) Always make sure the antenna system is properly grounded to provide adequate protection against voltage surges and built-up static charges (see Section 810 of the National Electric Code).
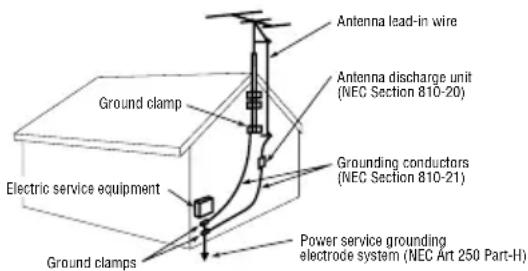
text_image
Antenna lead-in wire Antenna discharge unit (NEC Section 810-20) Ground clamp Grounding conductors (NEC Section 810-21) Electric service equipment Power service grounding electrode system (NEC Art 250 Part-H) Ground clamps34)
DANGER: RISK OF SERIOUS PERSONAL INJURY OR DEATH!
- When installing a rooftop antenna, use extreme care to make sure you are never in a position where your body (or any item you are in contact with, such as a ladder or screwdriver) can accidentally touch overhead power lines. Never locate the antenna near overhead power lines or other electrical circuits.
- Never attempt to install any of the following during lightning activity: a) an antenna system; or b) cables, wires, or any home theater component connected to an antenna or phone system.
Care
For better performance and safer operation of your TOSHIBA TV, follow these recommendations and precautions:
35) If you use the TV in a room whose temperature is 32^ F ( 0^ C) or below, the picture brightness may vary until the LCD warms up. This is not a sign of malfunction.
36)
WARNING: RISK OF SERIOUS PERSONAL INJURY OR EQUIPMENT DAMAGE!
- Never use chemicals (such as air fresheners, cleaning agents, etc.) on or near the TV pedestal. Studies indicate that plastics may weaken and crack over time from the combined effects of chemical agents and mechanical stress (such as the weight of the TV). Failure to follow these instructions could result in serious injury and/or permanent damage to TV and TV pedestal.
- Always unplug the TV before cleaning. Gently wipe the display panel surface (the TV screen) using a dry, soft cloth (cotton, flannel, etc.). A hard cloth may damage the surface of the panel. Avoid contact with alcohol, thinner, benzene, acidic or alkaline solvent cleaners, abrasive cleaners, or chemical cloths, which may damage the surface. Never spray volatile compounds such as insecticide on the cabinet. Such products may damage or discolor the cabinet.
37) Never hit, press, or place anything on the back cover. These actions will damage internal parts.
38)

WARNING: RISK OF ELECTRIC SHOCK!

Never spill liquids or push objects of any kind into the TV cabinet slots.
39) During a lightening storm, do not touch the connecting cables or product.
40) For added protection of your TV from lightning and power surges, always unplug the power cord and disconnect the antenna from the TV if you leave the TV unattended or unused for long periods of time.
41) Always unplug the TV to completely disconnect from mains power. When the TV is turned off using the on/off switch, it is not completely disconnected from power and a minute amount of current is still consumed.
42) During normal use, the TV may make occasional snapping or popping sounds. This is normal, especially when the unit is being turned on or off. If these sounds become frequent or continuous, unplug the power cord and contact a Toshiba Authorized Service Provider.
43) WARNING: RISK OF SERIOUS

PERSONAL INJURY OR EQUIPMENT DAMAGE!
Never strike the screen with a sharp or heavy object.
44) The LCD screen of this product can be damaged by ultraviolet radiation from the sun. When selecting a location for the television, avoid locations where the screen may be exposed to direct sunlight, such as in front of a window. - Never touch, press, or place anything on the LCD screen. These actions will damage the LCD screen. If you need to clean the LCD screen follow the instructions (in item 36) on page 5.
Service
45)

WARNING: RISK OF ELECTRIC SHOCK!

Never attempt to service the TV yourself. Opening and removing the covers may expose you to dangerous voltage or other hazards. Failure to follow this WARNING may result in death or serious injury. Refer all servicing not specified in this manual to a Toshiba Authorized Service Provider.
46) If you have the TV serviced:
- Ask the service technician to use only replacement parts specified by the manufacturer.
- Upon completion of service, ask the service technician to perform routine safety checks to determine that the TV is in safe operating condition.
Choosing a location for your LED TV
To Display your LED TV on the included Pedestal Stand:
Observe the following safety precautions:
1) Read and follow the pedestal assembly instructions included with the pedestal. CAUTION: Before beginning pedestal assembly, carefully lay the front of the LCD Panel face down on a flat, cushioned surface such as a quilt or blanket. Leave the bottom of the unit protruding over the edge of the surface and assemble the pedestal as indicated below.
Note: Extreme care should always be used when attaching the pedestal stand to avoid damage to the LCD panel.
2) Place the TV on a sturdy, level surface that can support the weight of the TV.
3) Be sure to secure the TV to a wall, pillar, surface, or other immovable structure see item 26) page 4 for additional details.
To Display your LED TV using a Wall Bracket:
If you decide to wall mount your LED TV, always use a wall bracket Listed by an independent laboratory (such as UL, CSA, ETL) that is appropriate for the size and weight of the TV (see page 2):
1) CAUTION: Two people are required for installation.
2) Unplug and remove any cables and/or other component connectors from the rear of the TV.
3) Remove the screws of the VESA Mounting Pattern show in the table if applicable.
CAUTION: Do not use the screws removed from the back cover to attach the wall mount bracket to the TV.
4) Always use the screws supplied or recommended by the wall mount manufacturer.
5) Follow the instructions provided with your wall bracket. Before proceeding, make sure the appropriate bracket(s) are attached to the wall and the back of the TV as described in the instructions provided with the wall bracket.
6) After attaching the appropriate bracket(s) to the wall and the back of the TV, remove the pedestal stand from the TV, as described below.
7) VESA Mounting Pattern
| TV Size Hole Pattern (HxV) Screw Size |
| 32L4300U 200x200 mm M6 |
| 39L4300U 200x200 mm M6 |
| 50L4300U 400x400 mm M8 |
| 50L7300U 400x200 mm M6 |
| 58L7300U 400x400 mm M6 |
| 65L7300U 400x400 mm M6 |
(unit in mm)
Removing the Pedestal Stand
1) Carefully lay the front of the unit face down on a flat, cushioned surface such as a quilt or blanket. Leave the stand protruding over the edge of the surface.
Note: Extreme care should always be used when removing the pedestal stand to avoid damage to the LCD panel.
2) Remove the screws shown in the below diagram. This will allow removal of the pedestal stand.
3) Once you have removed all of the screws holding the pedestal stand in place, remove the pedestal stand from the TV.
2) Remove the screws shown in the below diagram. This will allow removal of the pedestal stand. 3) Once you have removed all of the screws holding the pedestal stand in place, remove the pedestal stand from the TV.
L7300 Series
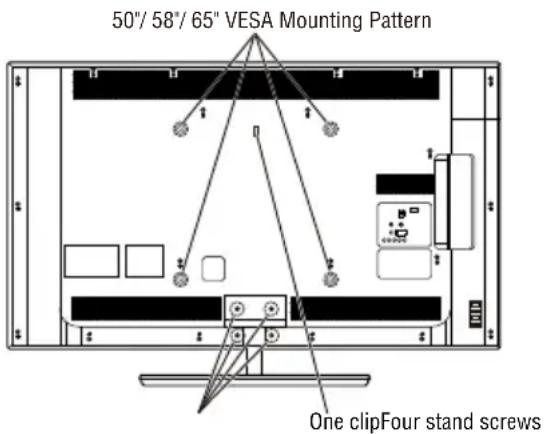
text_image
50"/ 58"/ 65" VESA Mounting Pattern One clipFour stand screwsL4300U and L7300U Series
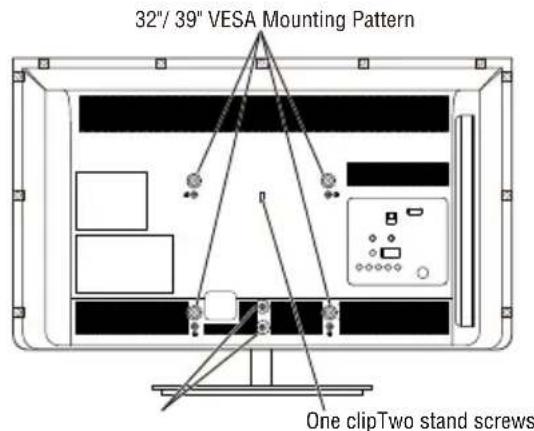
text_image
32"/ 39" VESA Mounting Pattern One clipTwo stand screws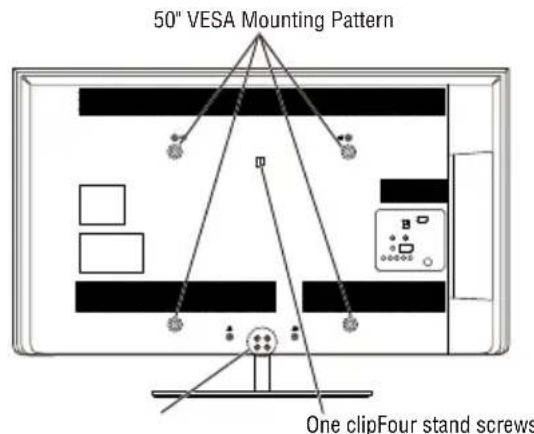
text_image
50" VESA Mounting Pattern One clipFour stand screwsCAUTION: Always place the TV on the floor or a sturdy, level, stable surface that can support the weight of the unit. Secure the TV as described in item 26) of the Important Safety Instructions in this document.
FCC Caution
To assure continued compliance, follow the attached installation instructions. Any changes or modifications not expressly approved by Toshiba America Information Systems, Inc. could void the user's authority to operate this device. Service Center or an experienced radio/TV technician for help.
FCC Declaration of Conformity Compliance Statement (Part 15):
Toshiba television models 32L4300U, 39L4300U, 50L4300U, 50L7300U, 58L7300U and 65L7300U, comply with Part 15 of the FCC Rules.
Operation is subject to the following two conditions: (1) This device may not cause harmful interference, and (2) This device must accept any interference received, including interference that may cause undesired operation. The party responsible for compliance to these rules is: Toshiba America Information Systems, Inc. 9740 Irvine Blvd., Irvine, CA 92618. Phone: 800-631-3811
Note: This equipment has been tested and found to comply with the limits for a Class B digital device, pursuant to Part 15 of the FCC Rules. These limits are designed to provide reasonable protection against harmful interference in a residential installation. This equipment generates, uses, and can radiate radio frequency energy and, if not installed and used in accordance with the instructions, may cause harmful interference to radio communications. However, there is no guarantee that interference will not occur in a particular installation. If this equipment does cause harmful interference to radio or television reception, which can be determined by removing and applying power to the equipment, the user is encouraged to try to correct the interference by one of the following measures:
• Reorient or relocate the receiving antenna.
- Increase the separation between the equipment and receiver.
- Connect the equipment into an outlet on a circuit different from that to which the receiver is connected.
- Consult the dealer or an experienced radio/TV technician for help.
Caution: Changes or modifications to this equipment not expressly approved by Toshiba could void the user's authority to operate this equipment.
Wireless Radio
For product available in the USA/Canada market, only channel 1–11 can be operated. Selection of other channels is not possible. The device could automatically discontinue transmission in case of absence of information to transmit, or operational failure. Note that this is not intended to prohibit transmission of control or signaling information or the use of repetitive codes where required by the technology. If this device is going to be operated in 5.15–5.25GHz frequency range, then it is restricted to an indoor environment only.
Important: Any changes or modifications not expressly approved by the party responsible for compliance could void the user's authority to operate this equipment. This device and its antenna(s) must not be co-located or operating in conjunction with any other antenna or transmitter.
FCC Radiation Exposure Statement: This equipment complies with FCC radiation exposure limits set forth for an uncontrolled environment. This equipment should be installed and operated with minimum distance 20cm between the radiator & your body.
Wireless Radio
For product available in the USA/Canada market, only channel 1–11 can be operated. Selection of other channels is not possible.
The device could automatically discontinue transmission in case of absence of information to transmit, or operational failure. Note that this is not intended to prohibit transmission of control or signaling information or the use of repetitive codes where required by the technology.
Important: Any changes or modifications not expressly approved by the party responsible for compliance could void the user's authority to operate this equipment.
IMPORTANT NOTE:
IC Radiation Exposure Statement: This equipment complies with IC RSS-102 radiation exposure limits set forth for an uncontrolled environment. This equipment should be installed and operated with minimum distance 20cm between the radiator & your body.
ENERGY STAR® User Information
ENERGY STAR User Information Statement: the factory default settings of this television meet ENERGY STAR® requirements. Changing Picture Settings may increase energy consumption, possibly beyond the limits required for ENERGY STAR qualification.
To ensure your television is operating at optimal energy efficiency, select [Home] mode during initial activation. To return to [Home] mode settings, select [Home] under the Installation Tab of the TV Menu.. [AutoView] mode is recommended for normal home use.

ENERGY STAR ^® qualified TV.
Products that earn the ENERGY STAR prevent green house gas emissions by meeting strict guidelines set by the U.S. Environmental Protection Agency. ENERGY STAR and the ENERGY STAR mark are registered U.S. marks.
Important notes about your TV
The following symptoms are technical limitations of LCD Display technology and are not an indication of malfunction; therefore, Toshiba is not responsible for perceived issues resulting from these symptoms.
1) An afterimage (ghost) may appear on the screen if a fixed, non-moving image appears for a long period of time. The afterimage is not permanent and will disappear in a short period of time.
2) The LCD panel contained in this TV is manufactured using an extremely high level of precision technology; however, there may be an occasional pixel (dot of light) that does not operate properly (does not light, remains constantly lit, etc.). This is a structural property of LCD technology, is not a sign of malfunction, and is not covered under your warranty. Such pixels are not visible when the picture is viewed from a normal viewing distance.
Note: Interactive video games that involve shooting a "gun" type of joystick at an on-screen target may not work with this TV.
Trademark Information
- AutoView, Cinema Series, ClearScan, ColorMaster, ColorStream, CQ Engine, DynaLight, GameTimer, Native Mode and TriVector are trademarks or registered trademarks of Toshiba America Information Systems, Inc.
- ActiveX is a registered trademark of the Microsoft Corporation.
- Android is a trademark of Google Inc.

- Manufactured under license from Audyssey Laboratories. U.S. and foreign patents pending. Audyssey Premium Television™ is a trademark of Audyssey Laboratories. Audyssey Premium Television™ is a suite of technologies that remove the acoustical problems caused by small speakers and drivers. Working together these technologies deliver a better translation of the audio content and make the television experience sound closer to the original.
- Blu-ray Disc™, Blu-ray™, and the logos are trademarks of the Blu-ray Disc Association
- CinemaNow is a registered trademark of BBY Solutions, Inc.
- DivX ^ , DivX Certified ^ , DivX Plus ^ HD and associated logos are trademarks of Rovi Corporation or its subsidiaries and are used under license.
DOLBY.
- Manufactured under license from Dolby Laboratories. Dolby and the double-D symbol are trademarks of Dolby Laboratories.
- ENERGY STAR and the ENERGY STAR mark are registered U.S. marks.
- The terms HDMI and HDMI High-Definition Multimedia Interface, and the HDMI logo are trademarks or registered trademarks of HDMI Licensing LLC in the United States and other countries.
- Intel and the Intel logo are trademarks of Intel Corporation in the U.S. and/or other countries.
- iTunes Store is a trademark of Apple Inc., registered in the U.S. and other countries.
- MPEG Layer-3 audio coding technology licensed from Fraunhofer IIS and Thomson.
• Netflix is a registered trademark of Netflix, Inc. - Skype, the Skype logo and the "S" logo are trademarks of Skype and are used with the permission of Skype
• VUDU, Vudu Apps, and Vudu HD Movies are trademarks and registered trademarks of VUDU, Inc - WiFi is a registered mark of the Wi-Fi Alliance.
- Designed with UEI Technology™. Under License from Universal Electronics Inc. Portions © UEI 2000-2012.
- All other brand and product names are trademarks or registered trademarks of their respective companies.
- THIS PRODUCT IS LICENSED UNDER THE AVC PATENT PORTFOLIO LICENSE FOR THE PERSONAL AND NONCOMMERCIAL USE OF A CONSUMER TO (i) ENCODE VIDEO IN COMPLIANCE WITH THE AVC STANDARD ("AVC VIDEO") AND/OR (ii) DECODE AVC VIDEO THAT WAS ENCODED BY A CONSUMER ENGAGED IN A PERSONAL AND NON-COMMERCIAL ACTIVITY AND/OR WAS OBTAINED FROM A VIDEO PROVIDER LICENSED TO PROVIDE AVC VIDEO. NO LICENSE IS GRANTED OR SHALL BE IMPLIED FOR ANY OTHER USE. ADDITIONAL INFORMATION MAY BE OBTAINED FROM MPEG LA, LLC. SEE HTTP://WWW.MPEGLA.COM
- THIS PRODUCT IS LICENSED UNDER THE VC-1 PATENT PORTFOLIO LICENSE FOR THE PERSONAL AND NONCOMMERCIAL USE OF A CONSUMER TO (i) ENCODE VIDEO IN COMPLIANCE WITH THE VC-1 STANDARD ("VC-1 VIDEO") AND/OR (ii) DECODE VC-1 VIDEO THAT WAS ENCODED BY A CONSUMER ENGAGED IN A PERSONAL AND NON-COMMERCIAL ACTIVITY AND/OR WAS OBTAINED FROM A VIDEO PROVIDER LICENSED TO PROVIDE VC-1 VIDEO. NO LICENSE IS GRANTED OR SHALL BE IMPLIED FOR ANY OTHER USE. ADDITIONAL INFORMATION MAY
BE OBTAINED FROM MPEG LA, LLC. SEE HTTP://WWW.MPEGLA.COM
- THIS PRODUCT IS LICENSED UNDER THE MPEG-4 VISUAL PATENT PORTFOLIO LICENSE FOR THE PERSONAL AND NON-COMMERCIAL USE OF A CONSUMER FOR (i) ENCODING VIDEO IN COMPLIANCE WITH THE MPEG-4 VISUAL STANDARD ("MPEG-4 VIDEO") AND/OR (ii) DECODING MPEG-4 VIDEO THAT WAS ENCODED BY A CONSUMER ENGAGED IN A PERSONAL AND NON-COMMERCIAL ACTIVITY AND/OR WAS OBTAINED FROM A VIDEO PROVIDER LICENSED BY MPEG LA TO PROVIDE MPEG-4 VIDEO. NO LICENSE IS GRANTED OR SHALL BE IMPLIED FOR ANY OTHER USE. ADDITIONAL INFORMATION INCLUDING THAT RELATING TO PROMOTIONAL,INTERNAL AND COMMERCIAL USES AND LICENSING MAY BE OBTAINED FROM MPEG powered LA,LLC. SEE HTTP://WWW.MPEGLA.COM
Copyright
This guide is copyrighted by Toshiba America Information Systems, Inc. with all rights reserved. Under the copyright laws, this guide cannot be reproduced in any form without the prior written permission of Toshiba. No patent liability is assumed, however, with respect to the use of the information contained herein.
©2013 by Toshiba America Information Systems, Inc. All rights reserved.
Notice
The information contained in this manual, including but not limited to any product specifications, is subject to change without notice.
TOSHIBA CORPORATION AND TOSHIBA AMERICA INFORMATION SYSTEMS, INC. (TOSHIBA) PROVIDES NO WARRANTY WITH REGARD TO THIS MANUAL OR ANY OTHER INFORMATION CONTAINED HEREIN AND HEREBY EXPRESSLY DISCLAIMS ANY IMPLIED WARRANTIES OF MERCHANTABILITY OR FITNESS FOR ANY PARTICULAR PURPOSE WITH REGARD TO ANY OF THE FOREGOING. TOSHIBA ASSUMES NO LIABILITY FOR ANY DAMAGES INCURRED DIRECTLY OR INDIRECTLY FROM ANY TECHNICAL OR TYPOGRAPHICAL ERRORS OR OMISSIONS CONTAINED HEREIN OR FOR DISCREPANCIES BETWEEN THE PRODUCT AND THE MANUAL. IN NO EVENT SHALL TOSHIBA BE LIABLE FOR ANY INCIDENTAL, CONSEQUENTIAL, SPECIAL, OR EXEMPLARY DAMAGES, WHETHER BASED ON TORT, CONTRACT OR OTHERWISE, ARISING OUT OF OR IN CONNECTION WITH THIS MANUAL OR ANY OTHER INFORMATION CONTAINED HEREIN OR THE USE THEREOF.
Contents
Chapter 1: Introduction ......18
Safety icons....18
Features 19
Overview of installation, setup, and use 20
TV front and side panel controls and connections.....21
Front panel 22
Left side....22
TV back panel controls and connections 23
Back panel controls 24
Back panel connections 25
Chapter 2: Connecting Your TV ....26
Overview of cable types.... 26
Coaxial cable (F-type) 26
Standard A/V cables (red/white/yellow)....26
Component video cables (red/green/blue)......27
HDMI ^™ cable (with HDMI Logo)....27
Dual-wand IR blaster cable....27
Optical audio cable 28
Analog RGB (15-pin) computer cable....28
3.5mm Stereo to RCA Y-cable 28
LAN cable 29
About the connection illustrations 29
Connecting an antenna, satellite receiver, and/or cable TV box....29
Connecting DVD to ColorStream ^® or VCR to composite video 31
Connecting remote IR devices....32
Using the IR blaster OUT terminal 32
Connecting a digital audio system....35
Connecting an HDMI ^™ or DVI device to the HDMI ^™ input 36
Using the TV remote and HDMI ^™ CEC Control to control other devices 38
Connecting an HDMI ^TM audio system 39
Connecting a computer 40
Connecting a computer to the TV's PC IN terminal....40
Connect a computer to the TV's HDMI ^™ terminal....41
Connecting to a home network....43
Connecting the TV directly to a computer without an Internet connection 43
Connecting the TV to a home network without an Internet connection....43
Connecting the TV to a home network with an Internet connection - wired 44
Connecting the TV to a home network with an Internet connection - wireless....45
Chapter 3: Using the Remote Control....47
Controlling other devices 47
Installing batteries....47
Remote control effective range 49
Learning about the remote control 50
Chapter 4: Initial Setup and Menu ....52
Initial setup 52
Performing the initial setup 53
Navigating the menu system 62
Quick Menu 63
Chapter 5: Setting up your TV....64
How to navigate the menu....64
Changing initial settings 64
Individual settings 64
Storing channels in memory (optional) 66
Skipping channels 67
Skipping video inputs 68
Labeling analog TV channels 68
Labeling video inputs....69
Configuring shared input 69
Chapter 6: Basic features....70
Tuning Channels....70
Tuning to the next programmed channel ...... 70
Tuning to a specific channel (programmed or unprogrammed)....70
Using Channel Return....70
Selecting the video input to view....71
Using closed captions 72
Analog CC mode....72
Digital CC settings 73
Setting the PIN code....74
Entering a new PIN code 75
Changing or deleting your PIN code 75
Forgotten PIN code....75
Using parental controls 76
Blocking TV programs and movies by rating (V-Chip) 76
Downloading an additional rating system....76
Displaying ratings....79
Unlocking programs....79
Locking specific channels 79
Locking video inputs 80
Setting a time limit for games....80
Locking the control panel 81
Using HDMI™ CEC Control....81
Controlling HDMI™ CEC playback devices 82
HDMI ^™ CEC Control input source selection......83
Adjusting the amplifier's audio 83
Other HDMI™ CEC Control functions 84
Viewing the HDMI ^TM signal information 84
Using your computer with the TV....85
Adjusting the image....85
Setting the computer audio 86
Setting the timer to turn on the TV 86
Setting the sleep timer 87
Setting No Signal Power Down 88
Setting TV Power On Control 89
Displaying TV status information 89
Viewing support information....90
Resetting to Factory Defaults 90
Power failure 90
Chapter 7: Picture and Sound Controls ....91
Selecting the picture size....91
Scrolling the picture 95
Using the Auto Aspect feature....96
Using the 4:3 Stretch 96
Adjusting the picture 97
Selecting the picture mode 97
Adjusting the picture quality 98
Using the advanced picture settings features......99
Edge Enhancer....99
Dynamic Contrast....99
DynaLight ^® 100
ClearScan ^® 100
Cinema Mode (L4300U Series)....100
MPEG NR 101
UltraClear DNR 101
Ambient Light Sensor....102
ColorMaster™ 102
Base Color Adjustment 102
Color temperature....103
Resetting advanced picture settings to the factory default....103
Setting the expert picture settings....103
Test Pattern 103
RGB Filter 104
White Balance....104
Adjusting the audio 105
Muting the sound 105
Selecting stereo/SAP broadcasts....105
Adjusting the audio balance....106
Adjusting the range 106
TV Speakers On/Off 106
Setting the Primary Audio Language .... 106
Selecting the optical audio output format ...... 107
Using the Dolby ^® Digital Dynamic Range Control feature....108
Audyssey Premium Television™ 108
Using Audyssey EQ ^® for Wall Mounted or Table-top TVs....109
Using Audyssey Dynamic Volume ^® ..... 109
Audyssey ABX™ 109
Using the surround sound feature .... 110
Chapter 8: Advanced features....111
Using your home network....111
When using a Wireless network connection ..... 112
Setting up the Network....113
Wireless Setup 113
Advanced Network Setup....118
Network Connection Test....120
Using the software keyboard....121
Enter text using the software keyboard....122
Performing a Software Upgrade....123
Viewing the Software Licenses....123
Using Intel ^® WiDi 124
Changing the Intel ^® WiDi Device Name...... 125
Device List....125
Using the Cloud TV Service....126
Using the Cloud TV Service features 126
eMANUAL....127
Featured apps 127
Netflix ^® 127
VUDU™ HD Movies and VUDU™ Apps ...... 128
Internet....129
Using Skype™ 131
MediaShare (Videos, Music, and Photos)......141
MediaShare specifications....142
Basic operation....142
Viewing movie files....145
Playing music files....149
Viewing photo files 151
Search 154
Network Device Setup 155
External Control Setup....155
Setting up the Media Renderer feature .... 156
Chapter 9: Cloud TV Companion Apps ....157
Using Apps on a Tablet or Smart phone 157
Apps Control Profile 158
Pairing....159
Chapter 10: Troubleshooting ....160
General troubleshooting 160
Picture problems....161
Sound problems....162
Remote control problems....163
Channel tuning problems 163
Closed caption problems....164
Rating blocking (V-Chip) problems 164
HDMI™ CEC Control operation 164
HDMI ^™ problems 165
Network problems....165
Wireless network problems....167
MediaShare problems 167
Light Indicator....168
Power On/Standby light 168
If the problem persists after trying the solutions..... 168
Appendix A: Specifications....169
Television system 169
Channel coverage....169
Power source 170
Power consumption 170
Audio power....170
Speaker type 171
Video/audio terminals 171
Video/audio input 171
ColorStream ^® (component video) HD input.....171
HDMI ^™ input 171
Digital audio output 172
PC input....172
Wireless connection....172
Ethernet 172
USB 172
Dimensions with table stand 173
Weight (mass) with stand 173
Operating conditions....173
Supplied accessories....174
Acceptable signal formats for PC IN and HDMI™ ..... 175
PC IN signal formats....175
HDMI ^TM signal formats....176
Operating the TV with combination buttons ...... 177
Appendix B: Wireless QWERTY keyboard with touchpad ....178
International Key......181
Index....182
Chapter 1
Introduction
Safety icons
This manual contains safety instructions that must be observed to avoid potential hazards that could result in personal injuries, damage to your equipment, or loss of data. These safety cautions have been classified according to the seriousness of the risk, and icons highlight these instructions as follows:
DANGER
Indicates an imminently hazardous situation which, if not avoided, will result in death or serious injury.
▲WARNING
Indicates a potentially hazardous situation which, if not avoided, could result in death or serious injury.
▲ CAUTION
Indicates a potentially hazardous situation which, if not avoided, may result in minor or moderate injury.
CAUTION
Indicates a potentially hazardous situation which, if not avoided, may result in property damage.
NOTE Provides important information.
Features
- Integrated digital tuning (8VSB ATSC and QAM) —
Eliminates the need for a separate digital converter set-top box (in most cases).
1920 x 1080 display resolution.
Four HDMI™—Digital, High-Definition Multimedia Interfaces with 1080p input support
HDMI™ capabilities ARC (Audio Return Channel)—Enables the audio signal of the TV to be sent to an AV amplifier via an HDMI™ cable.
HDMI™ CEC Control—Allows control of external devices from the TV remote via HDMI™ connection
ColorStream® HD—High-resolution component video input.
Digital Audio Out—Optical audio connection with Dolby® Digital optical output format, see “Connecting a digital audio system” on page 35.
CQ Engine™—A powerful video processing engine with an array of advanced technology including Edge Enhancement, Dynamic Gamma, ColorMaster, Expert Mode and new UltraClear DNR that creates superior picture quality.
UltraClear DNR—The new Dynamic Noise Reduction technology that filters out video noise without decreasing picture sharpness for clean, crystal-clear images, see “DNR” on page 101.
PC IN (Analog RGB)—Computer Input terminal, see “Connecting a computer” on page 40.
IR Blaster Out—Controls infrared remote controlled devices from the TV.
Built-in WLAN—Allows the television to access your home wireless network.
Intel ^® WiDi—Allows direct wireless connection between the TV and Intel ^® WiDi equipped computers or mobile devices
ColorMaster™—Allows you to adjust the TV's standard colors, see "ColorMasterTM" on page 102.
ClearScan® 120Hz—Technology utilizes advanced backlight control with image synchronization to double the television refresh rate for clearer fast motion video. This technology is ideal for watching action movies, sports and video games. (For L4300U)
ClearScan® 240Hz—Technology uses both frame interpolation technology and advanced backlight control with image synchronization to quadruple the TV refresh rate for an even clearer fast motion video.
AutoView®—Allows you to automatically adjust picture settings including Brightness, Contrast, Gamma, and Sharpness based on ambient room light conditions and incoming picture content to create the best possible picture settings without any manual adjustment. See “ENERGY STAR® User Information” on page 8.
Audyssey Premium Television ^® — includes innovative audio enhancement technologies that create clear, rich, and natural sound. These technologies include EQ ^® , ABX ^™ , Dynamic Volume ^® , Volume ExtensionTM, and Day/Night and Wall/Table Modes. see “Audyssey Premium Television ^™ ” on page 108.
MediaShare—Allows you to view photo files and play music or movie files, see “MediaShare (Videos, Music, and Photos)” on page 141.
Cloud TV—Enhanced content discovery includes real time streaming news, true social interaction features, and mobile device interaction.
ENERGY STAR ^® qualified

Overview of installation, setup, and use
Follow these steps to set up your TV and begin using its many exciting features.
1 Carefully read the important safety, installation, care, and service information. Keep this manual for future reference.
2 To choose a location for the TV:
Read “Important notes about your TV” on page 8.
Place the TV on the floor or a sturdy, level, stable surface that can support the weight of the unit. Secure the TV to a wall, pillar, or other immovable structure, see 24) on page 4.
Place the TV in a location where light does not reflect on the screen.
Place the TV far enough from walls and other objects to allow proper ventilation. Inadequate ventilation may cause overheating, which will damage the TV. THIS TYPE OF DAMAGE IS NOT COVERED UNDER THE TOSHIBA WARRANTY.
3 Do not plug in any power cords until after you have connected all cables and devices to your TV.
4 Before connecting cables or devices to the TV, review the functions of the TV's connections and controls, see "Overview of cable types" on page 26.
5 Connect your other electronic device(s) to the TV, see “Connecting Your TV” on page 26.
6 Install the batteries in the remote control, see “Installing batteries” on page 47.
7 See “Using the Remote Control” on page 47 for an overview of the buttons on the remote control.
8 After connecting all cables and devices, plug in the power cords for your TV and other devices. Then press the POWER button on the TV control panel or remote control to turn on the TV.
NOTE: If the TV stops responding to the buttons on the remote control or TV control panel and you cannot turn the TV off or on, unplug the power cords for a few seconds and then plug them in and try again.
9 See “Navigating the menu system” on page 62 for a quick overview of navigating the TV’s menu system.
10 Program channels into the TV's channel memory, see “Auto Tuning” on page 66.
11 For details on using the TV's features, see chapters 6, 7, and 8.
12 For help, refer to “Troubleshooting” on page 160.
13 For technical specifications, see “Specifications” on page 169.
TV front and side panel controls and connections
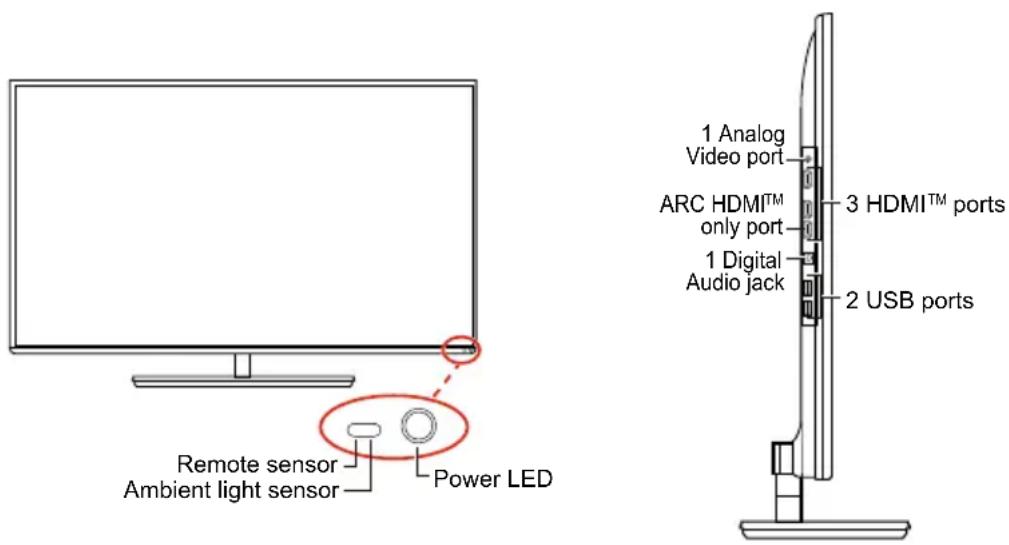
(Sample Illustration) L7300U Series front and side panel controls and connections
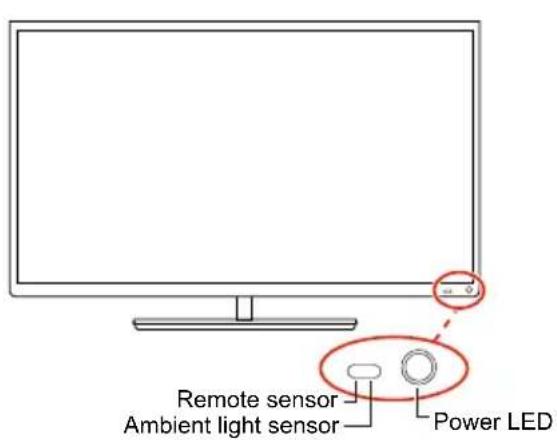
text_image
Remote sensor Ambient light sensor Power LED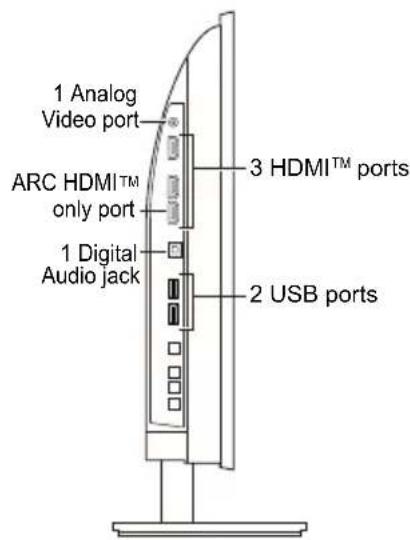
text_image
1 Analog Video port ARC HDMI™ only port 1 Digital Audio jack 2 USB ports 3 HDMI™ ports(Sample Illustration) L4300U Series front and side panel controls and connections
Front panel
1 Power On/Standby LED—Power indicator light, (glows green when the TV power is On).
2 Ambient light sensor—This sensor detects the ambient light conditions to optimize the backlighting levels, see “Ambient Light Sensor” on page 102.
3 Remote Sensor—Point the remote control toward this remote sensor, see “Remote control effective range” on page 49.
Left side
4 Analog Video Port—Analog Video input. Connect using a commercially available conversion cable.
5 3 HDMI™ Ports—High-Definition Multimedia Interface input receives digital audio and uncompressed digital video from an HDMI™ device or uncompressed digital video from a DVI device. HDMI™ connection is necessary to receive 1080p signals.
6 ARC HDMI ^TM only port—Audio Return Channel (ARC) enables the audio signal of the TV to be sent to an AV amplifier via the HDMI cable.
7 Digital Audio Jack—Optical audio output in Dolby ^® Digital or PCM (pulse-code modulation) format for connecting an external Dolby ^® Digital decoder, amplifier, A/V receiver, or home theater system with optical audio input.
8 2 USB Ports—Used to access video, music, or photo files with USB device. Works with wireless keyboard (but only included with L7300).
TV back panel controls and connections
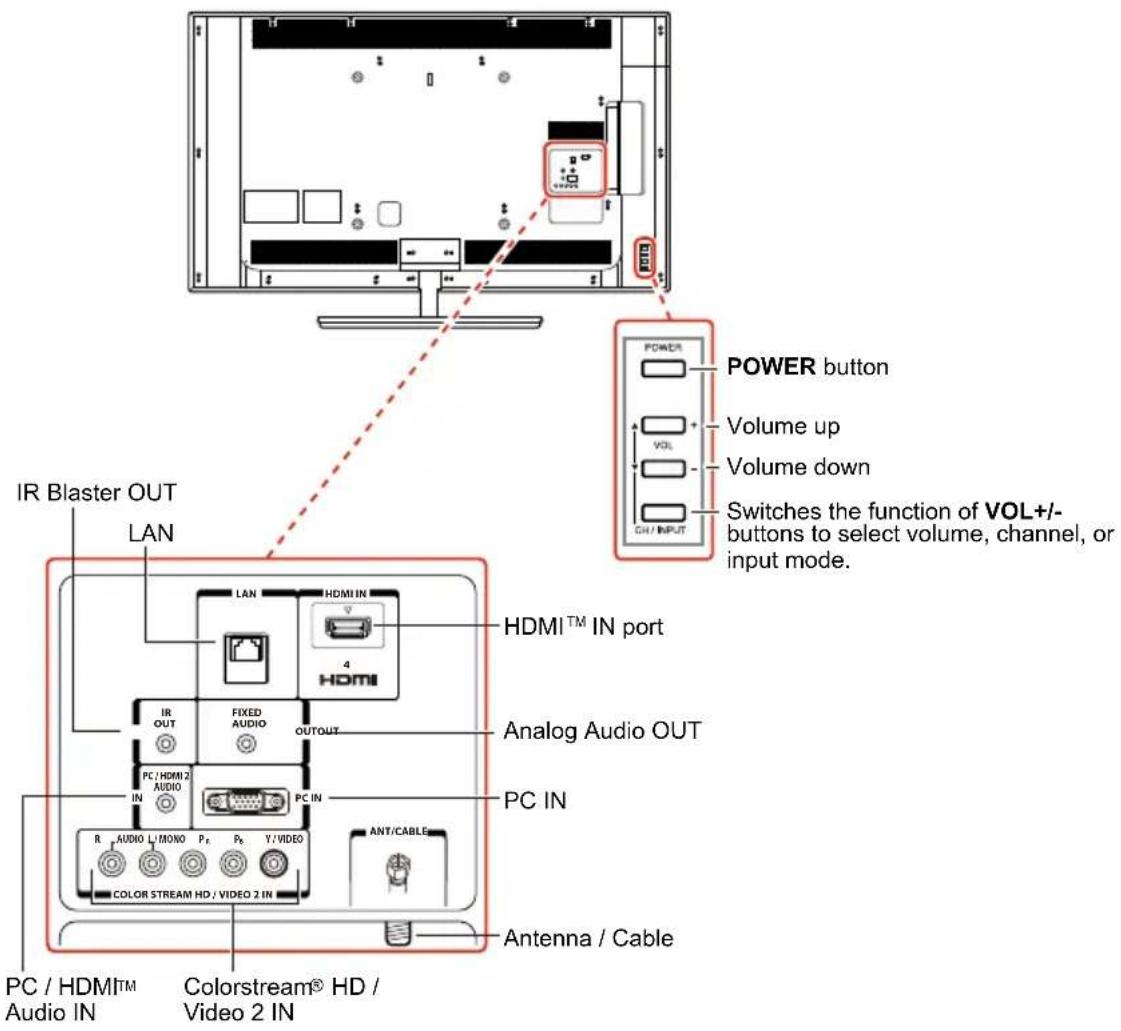
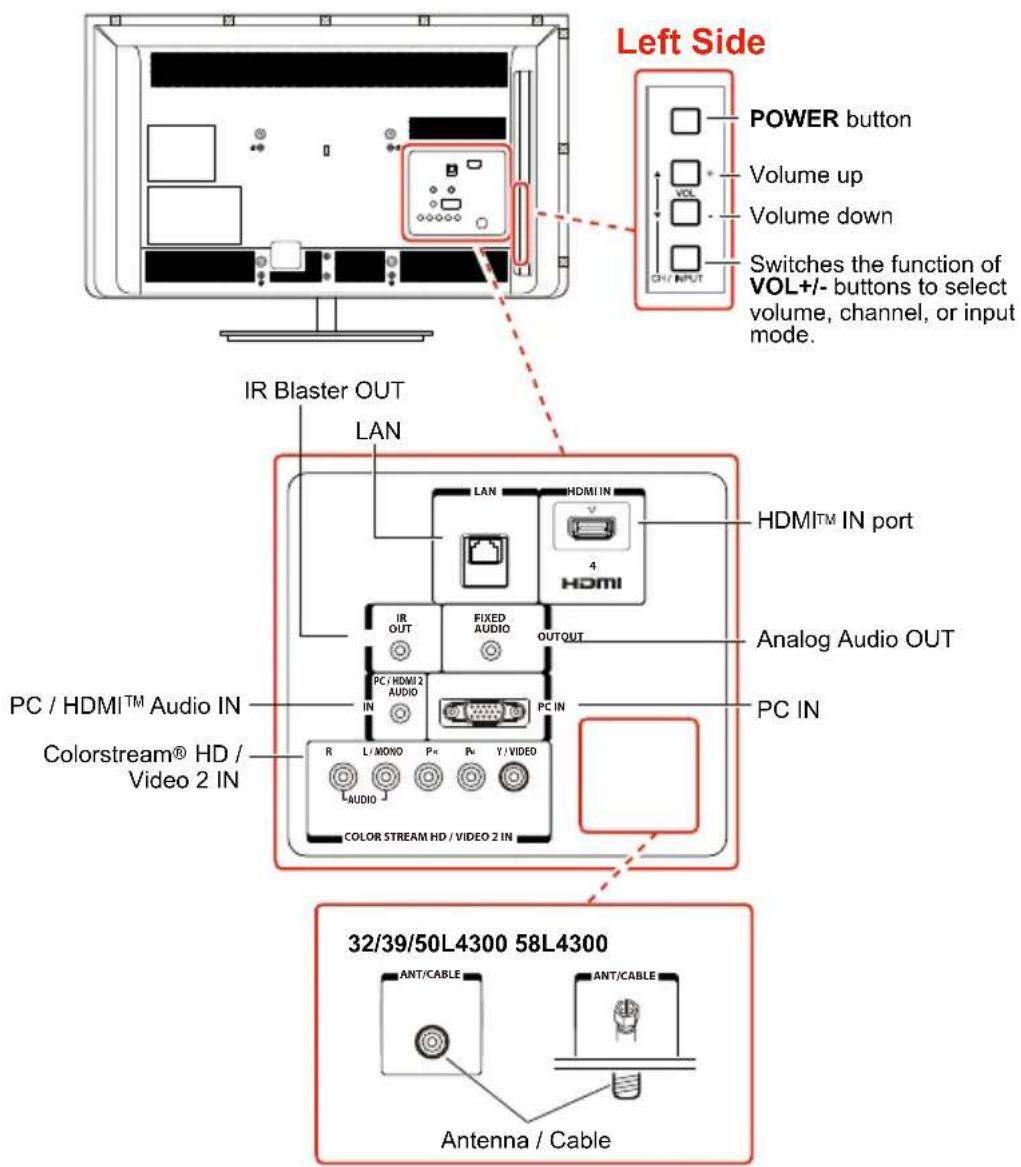
For explanations of cable types and connections, see “Connecting Your TV” on page 26.
text_image
POWER button Volume up Volume down CH/INPUT IR Blaster OUT LAN HDMI™ IN port Analog Audio OUT PC IN R AUDIO L/MONO P_F P_R Y/VIDEO ANT/CABLE COLOR STREAM HD / VIDEO 2 IN PC / HDMI™ Audio IN Colorstream® HD / Video 2 IN Antenna / Cable(Sample Illustration) L7300U Series back panel controls and connections
text_image
Left Side POWER button Volume up Volume down Switches the function of VOL+/- buttons to select volume, channel, or input mode. IR Blaster OUT LAN HDMI™ IN port HDMI™ 4 HDMI IR OUT FIXED AUDIO OUTPUT Analog Audio OUT PC / HDMI™ Audio IN PC IN Colorstream® HD / Video 2 IN R L/MONO P+ P+ Y/VIDEO AUDIO COLOR STREAM HD / VIDEO 2 IN 32/39/50L4300 58L4300 Antenna / Cable(Sample Illustration) L4300U Series back panel controls and connections
Back panel controls
1 POWER—Turns the TV On and Off.
2 VOL +/- —Adjust the volume level, change the channel, or change the input or source you are viewing, depending on the mode, which is selected by the CH/INPUT button.
3 CH / INPUT— Switches the function of the VOL +/- buttons to select the volume, channel, or input mode.
In Volume mode, the arrow buttons increase or decrease the volume.
In Channel mode, the arrow buttons change the channel up or down.
Back panel connections
4 LAN—Connects the TV to your home network.
5 HDMI ^TM IN—High-Definition Multimedia Interface input receives digital audio and uncompressed digital video from an HDMI ^TM device or uncompressed digital video from a DVI device. HDMI ^TM connection is necessary to receive 1080p signals.
6 Analog Audio Port—Analog audio outputs for connecting an audio amplifier.
7 PC IN—For use when connecting a personal computer.
8 ANT/CABLE—Antenna input that supports analog (NTSC) and digital (ATSC) off-air antenna signals and analog and in the clear, unencrypted digital Cable TV (QAM) signals.
9 ColorStream ^® HD/ Video 2 IN—These include standard A/V connections, see “Connecting DVD to ColorStream ^® or VCR to composite video” on page 31.
10 PC/HDMI™ Audio IN—PC audio input terminals are shared with HDMI™-2 analog audio input terminals, and their use can be configured in the Configuring shared inputs menu, see “Configuring shared inputs” on page 69.
11 IR Blaster OUT—Used to connect and control infrared remote-controlled devices.
NOTE Component/Standard (composite) video cables carry only video information; separate audio cables are required.
Chapter 2
Connecting Your TV
Overview of cable types
Before purchasing cables, know the connector types your devices require. You can purchase cables from most stores that sell audio/video devices.
Coaxial cable (F-type)

natural_image
Pure electrical circuit lines without any symbols(Sample Illustration) Coaxial cable
Coaxial (F-type) cable connects your antenna, cable TV service, and/or cable converter box to the ANT/CABLE input on your TV.
NOTE Please tighten this connection by hand. Using tools may damage the connection.
Standard A/V cables (red/white/yellow)
natural_image
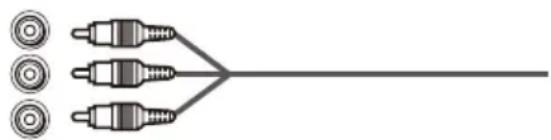
Pure diagram of three connectors connected to a central line, with circular endpoints on the left (no text or symbols)(Sample Illustration) Standard A/V cables
Standard A/V cables (composite video) usually come in sets of three, and connect to video devices with analog audio and composite video output. These cables (and the related inputs on your TV) are typically color-coded according to use: yellow for video, red for stereo right audio, and white for stereo left (or mono) audio.
Component video cables (red/green/blue)
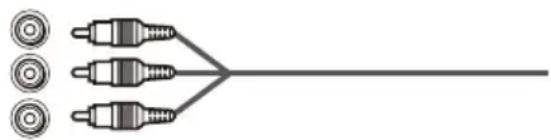
natural_image
Pure diagram of three connectors connected to a central line, with circular icons on the left (no text or symbols)(Sample Illustration) Component video cables
Component video cables come in sets of three and are for use with video devices with component video output. (ColorStream ^® is Toshiba's brand of component video.) These cables are typically color-coded red, green, and blue. Separate audio cables are required for a complete connection.
NOTE Component video cables provide better picture quality than composite video cables.
HDMI™ cable (with HDMI Logo)

natural_image
Pure diagram of a USB cable connector without any text or symbols(Sample Illustration) HDMI ^TM cable
HDMI ^™ (High-Definition Multimedia Interface) cable connects to devices that have an HDMI ^™ output. An HDMI ^™ cable delivers digital audio and video in its native format. Separate audio cables are not required, see “Connect a computer to the TV’s HDMI ^™ terminal” on page 41.
NOTE HDMI ^™ cables provide the best audio and picture quality.
Dual-wand IR blaster cable
Connect the dual-wand IR blaster cable to the IR blaster terminal to control infrared remote controlled devices from the TV.
Optical audio cable

(Sample Illustration) Optical audio cable
Optical audio cable connects receivers with Dolby® Digital or PCM (pulse-code modulation) optical audio input to the TV's Digital Audio Out terminal, see “Connecting a digital audio system” on page 35.
Analog RGB (15-pin) computer cable
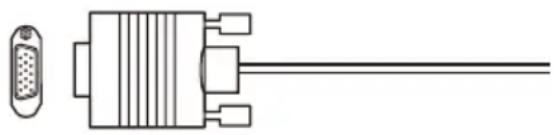
natural_image
Pure electrical connector diagram without any text, numbers, or symbols(Sample Illustration) Analog RGB (15-pin) computer cable
Analog RGB (15-pin) computer cable connects a computer to the to the TV's PC IN terminal, see "Connecting a computer to the TV's PC IN terminal:" on page 40.
NOTE Separate audio cables are required.
3.5mm Stereo to RCA Y-cable

natural_image
Pure electrical connector diagram showing two coaxial connectors and a terminal block (no text or symbols)(Sample Illustration) 3.5mm Stereo to RCA Y-cable
3.5mm Stereo to RCA Y-cable connects an audio signal from DVI device to TV.
LAN cable

(Sample Illustration) LAN cable
Standard LAN cable connects the TV to your home network, see "Connecting the TV to a home network with an Internet connection - wired" on page 44.
Crossover LAN cable connects the TV directly to a computer, see "Connecting the TV directly to a computer without an Internet connection" on page 43.
About the connection illustrations
You can connect different types and brands of devices to your TV in several different configurations. The connection illustrations in this manual are representative of typical device connections only. The input/output terminals on your devices may differ from those illustrated. For details on connecting and using your specific devices, refer to each device's owner's manual.
Connecting an antenna, satellite receiver, and/or cable TV box
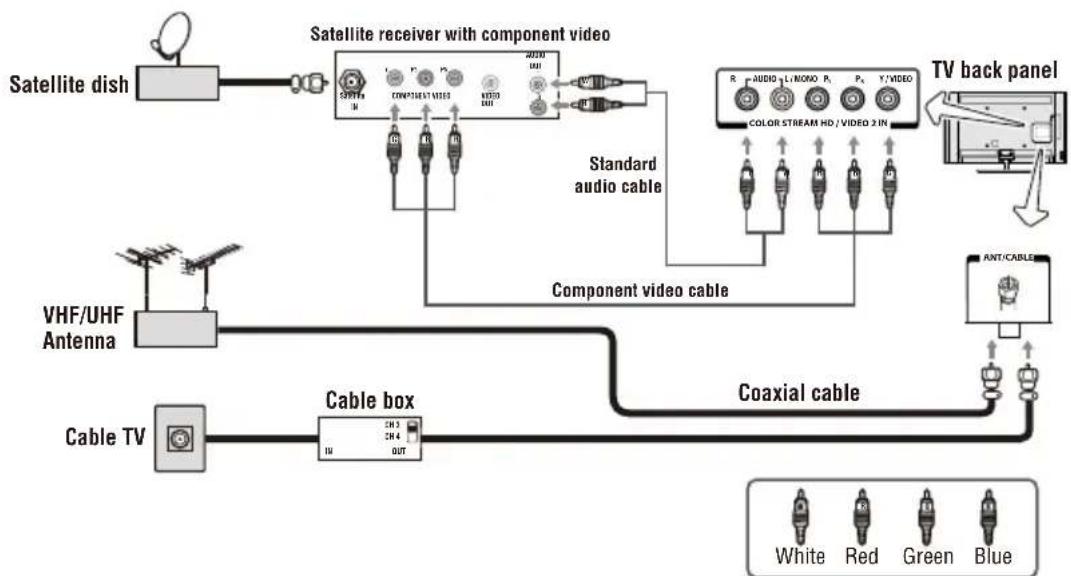
flowchart
graph TD
    A["Satellite dish"] --> B["Satellite receiver with component video"]
    B --> C["TV back panel"]
    C --> D["Ant/CABLE"]
    D --> E["Cable TV"]
    E --> F["Cable box"]
    F --> G["Component video cable"]
    G --> H["TV back panel"]
    H --> I["TV back panel with color stream HD/VIDEO 2 IN"]
    I --> J["TV back panel with audio cable"]
    J --> K["TV back panel with standard audio cable"]
    K --> L["VHF/UHF Antenna"]
    L --> M["TV back panel with white, red, green, blue cables"]
(Sample Illustration) L7300U Series—Connecting to an antenna, satellite receiver, and/or cable TV box
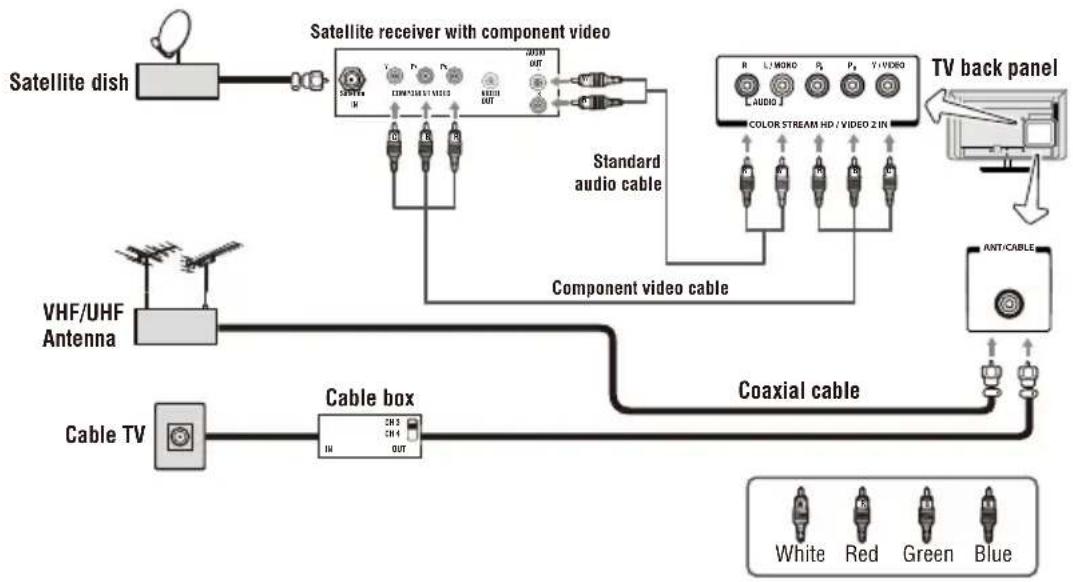
flowchart
graph TD
    A["Satellite dish"] --> B["Satellite receiver with component video"]
    B --> C["TV back panel"]
    D["VHF/UHF Antenna"] --> E["Cable TV"]
    F["Cable TV"] --> G["Cable box"]
    G --> H["Component video cable"]
    H --> I["TV back panel"]
    J["TV back panel"] --> K["Ant/Cable"]
    L["TV back panel"] --> M["Coaxial cable"]
    N["TV back panel"] --> O["TV back panel"]
    P["TV back panel"] --> Q["TV back panel"]
    R["TV back panel"] --> S["TV back panel"]
    T["TV back panel"] --> U["TV back panel"]
    V["TV back panel"] --> W["TV back panel"]
    X["TV back panel"] --> Y["TV back panel"]
(Sample Illustration) L4300U Series—Connecting to an antenna, satellite receiver, and/or cable TV box
Items needed:
Coaxial cables
Standard AV cables
◆ Component video cables (red/green/blue)
NOTE When you use a cable box, you may not be able to use the remote control to program or access certain features on the TV.
To view the antenna or cable signal:
Select ANT/CABLE video input source on the TV.*
To view basic and premium cable channels:
Select the ANT/CABLE video input source on the TV.* Tune the TV to channel 3 or 4 (whichever channel the cable box output is set to). Use the cable box controls to change channels.
To view the VCR or camcorder video:
Turn On the VCR or camcorder video. Select VIDEO input source on the TV.*
*To select the video input source, press the INPUT button on the remote control, see “Selecting the video input to view” on page 71.
NOTE The unauthorized recording, use, distribution, or revision of television programs, videotapes, DVDs, and other materials is prohibited under the Copyright Laws of the United States and other countries, and may subject you to civil and criminal liability.
Connecting DVD to ColorStream® or VCR to composite video
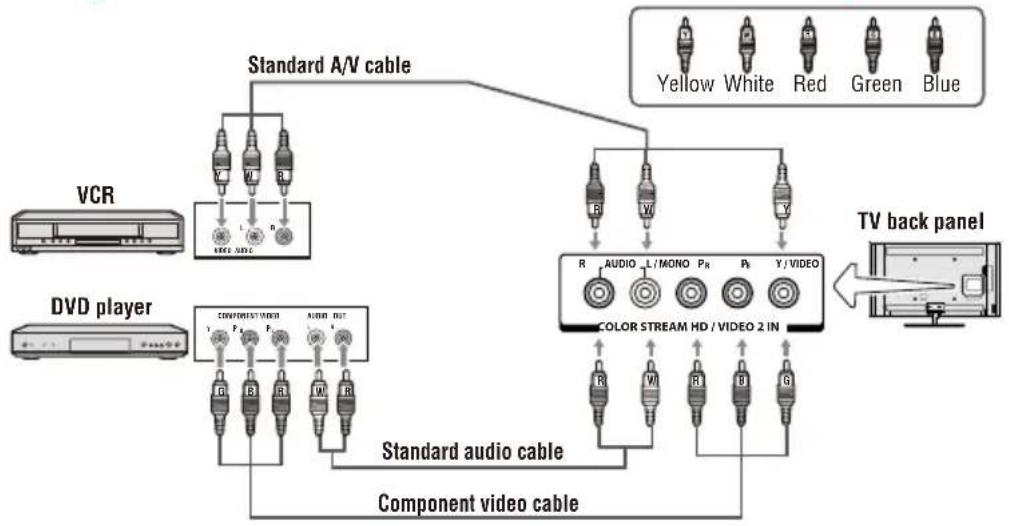
flowchart
graph TD
    A["VCR"] --> B["Standard A/V cable"]
    C["DVD player"] --> D["Component video cable"]
    D --> E["Component video cable"]
    F["TV back panel"] --> G["Color Stream HD / VIDEO 2 IN"]
    G --> H["Yellow White Red Green Blue"]
    I["TV back panel"] --> J["TV back panel"]
    K["Component video cable"] --> L["Component video cable"]
    M["Standard audio cable"] --> N["Component audio cable"]
    O["Component audio cable"] --> P["Component audio cable"]
(Sample Illustration) L7300U Series—Connecting a DVD with ColorStream® or a VCR with composite video
Items needed:
Coaxial cables
Standard AV cables
Standard audio cables
◆ Composite or component video cables
You can connect the component video cables (plus audio cables) from the DVD player or satellite receiver to the COLOR STREAM HD terminal in the TV. The COLOR STREAM HD terminal can be used to display Progressive (480p, 720p, 1080p) and Interlaced (480i, 1080i) scan systems. If your DVD player or satellite receiver does not have component video, connect a standard A/V cable to the AUDIO/VIDEO terminal. If your DVD player has HDMI™ video, see “Connecting an HDMI™ or DVI device to the HDMI™ input” on page 36.
NOTE When you use ColorStream ^ HD or Video, please switch to the appropriate AV mode.
To view antenna or Cable channels:
Select the ANT/CABLE video input source on the TV.*
To view the DVD player:
Turn ON the DVD player. Select the ColorStream ^® HD video input source on the TV.*
To view satellite programs using the component video connections:
Turn ON the satellite receiver. Select the ColorStream ^® HD video input source on the TV.*
To view the VCR or view and record antenna channels:
Turn ON the VCR. Tune the VCR to the channel you want to watch. Select the VIDEO video input source on the TV.*
To record a TV program while watching a DVD:
Turn ON the VCR. Tune the VCR to the channel to record. Select the ColorStream® HD video input source on the TV* to view the DVD.
*To select the video input source, press the INPUT button on the remote control, see “Selecting the video input to view” on page 71.
NOTE The unauthorized recording, use, distribution, or revision of television programs, videotapes, DVDs, and other materials is prohibited under the Copyright Laws of the United States and other countries, and may subject you to civil and criminal liability.
Connecting remote IR devices
Using the IR blaster OUT terminal
You can use the TV's IR OUT terminal to remotely operate many infrared remote-controlled devices enclosed in an entertainment center or similar cabinet.
Items needed:
Dual-wand IR blaster cable (see “Dual-wand IR blaster cable” on page 27)
Other cables as required to connect the device(s) to the TV (see "Overview of cable types" on page 26)
See the remote IR blaster setup section (see page 58).
To connect the IR blaster cable:
1 Locate the infrared sensor on the front of your device. This sensor is marked on some devices. If you are having issues locating the device's infrared sensor, see "If you cannot locate the device's infrared sensor:" on page 34.
2 Align one of the IR blaster cable's wands approximately 1 inch away from the infrared sensor on the front of the device and attach it using double-sided mounting tape. If you have a second device, attach the second wand in a similar manner.
NOTE If you do not have a second device, coil the second wand with a rubber band and leave it behind the TV.
3 Plug the IR blaster cable's plug into the TV's IR Blaster Out terminal.
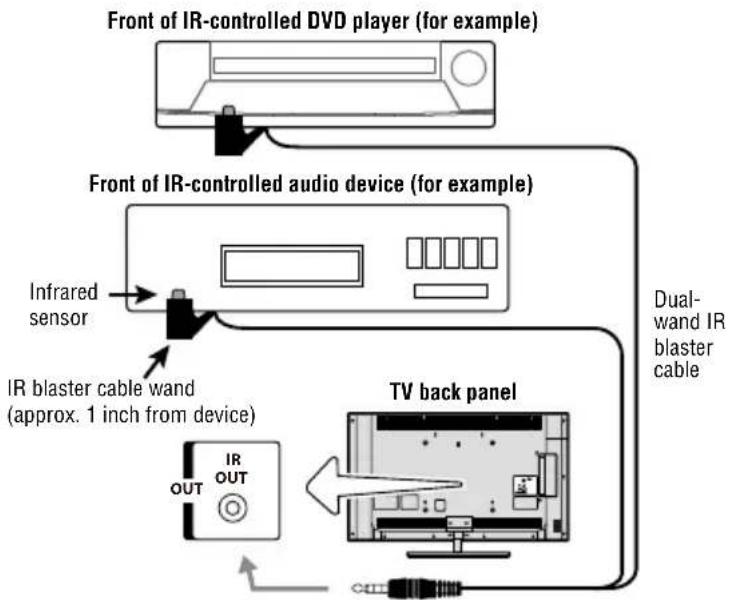
flowchart
graph TD
    A["Front of IR-controlled DVD player (for example)"] --> B["Front of IR-controlled audio device (for example)"]
    B --> C["Infrared sensor"]
    B --> D["IR blaster cable wand (approx. 1 inch from device)"]
    D --> E["TV back panel"]
    E --> F["Dual-wand IR blaster cable"]
    E --> G["IR OUT"]
(Sample Illustration) L7300U Series—Using the IR blaster OUT terminal
To control the device(s):
Point the TV remote control toward the front of the TV and press the button for the desired function. The signal passes from the remote control through the TV to the device via the IR Blaster cable. For more information, see “Setting the IR Blaster” on page 58.
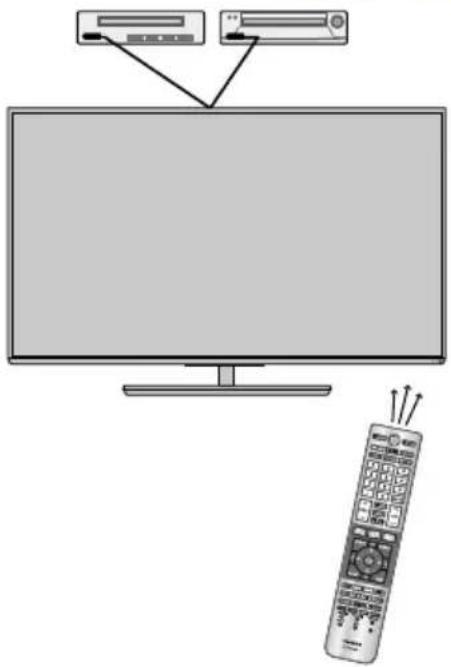
natural_image
Illustration of a desktop monitor connected to a remote control with two monitors above it (no text or symbols present)(Sample Illustration) Controlling the device(s) - remote control
NOTE
The IR pass-through feature does not support all IR controlled devices. Satisfactory quality may not be attainable with certain devices.
If you cannot locate the device's infrared sensor:
1 Turn off the device.
2 Starting at the device's lower-left corner, place the end of the device's remote control (with the infrared emitter) so it touches the front of the device. Press the POWER button. (Do not use the TV's remote control for this step.)
3 If the device turns on, the sensor is located where the remote control touched the device.
4 If the device does not turn on, move the remote control slightly to the right and press the POWER button again.
5 Repeat the previous steps if necessary.
Connecting a digital audio system
The TV's Digital Audio Out terminal outputs a Dolby ^ Digital or 2-channel down-mixed PCM (pulse-code modulation) signal for using with an external Dolby ^ Digital decoder or other external audio systems with optical audio input.
You will need an Optical audio cable (Use an optical audio cable that has the larger “TosLink” connector and not the smaller “mini-optical” connector.)

flowchart
graph LR
    A["TV back panel"] --> B["HDMI IN"]
    B --> C["Digital Audio OUT"]
    C --> D["Optical audio cable"]
    D --> E["Digital audio system"]
    E --> F["Output"]
(Sample Illustration) L7300U Series—Connecting a digital audio system
Before controlling the audio, see “Selecting the optical audio output format” on page 107.
NOTE Some audio systems may not be compatible with Dolby Digital bitstream signals. Older audio systems that are not compatible with standard optical out signals may not work properly, creating a high noise level that may damage speakers or headphones. THIS DAMAGE IS NOT COVERED BY YOUR WARRANTY. The DIGITAL AUDIO OUT terminal may not output some digital audio sources because of copy restrictions.
The Dolby Digital format is available in the following situations:
- When tuned to a digital RF channel
- When an HDMI input is used
- When network devices are used
Connecting an HDMI ^™ or DVI device to the HDMI ^™ input
The HDMI ^™ input on your TV receives digital audio and uncompressed digital video from an HDMI ^™ source device, or uncompressed digital video from a DVI (Digital Visual Interface) source device.
This input is designed to accept HDCP (High-Bandwidth Digital-Content Protection) program material in digital form from EIA/CEA-861-D-compliant[1] consumer electronic devices (such as a set-top box or DVD player with HDMI^TM or DVI output).
The HDMI ^™ input can accept and display VGA, SVGA, XGA, WXGA, SXGA, 480i (60Hz), 480p (60Hz), 720p (60Hz), 1080i (60Hz), and 1080p (24Hz/30Hz/60Hz) signal formats. For detailed signal specifications, see “HDMI ^™ signal formats” on page 176.
The supported Audio formats are Linear PCM and Dolby ^® Digital, sampling rate 32/44.1/48 kHz.
NOTE To connect a PC to the HDMI ^™ input, see “Connect a computer to the TV's HDMI ^™ terminal” on page 41.
To connect an HDMI ^™ device, you will need one HDMI ^™ cable (type A connector) per HDMI ^™ device:
For proper operation, it is recommended that you use an HDMI ^TM cable with the HDMI ^TM Logo (HDMI
To display an 1080ip/60Hz signal format, you will need a High Speed HDMI™ cable. A conventional HDMI™/DVI cable may not work properly.
HDMI™ cables transfer both video and audio. Separate analog audio cables are not required (see illustration).
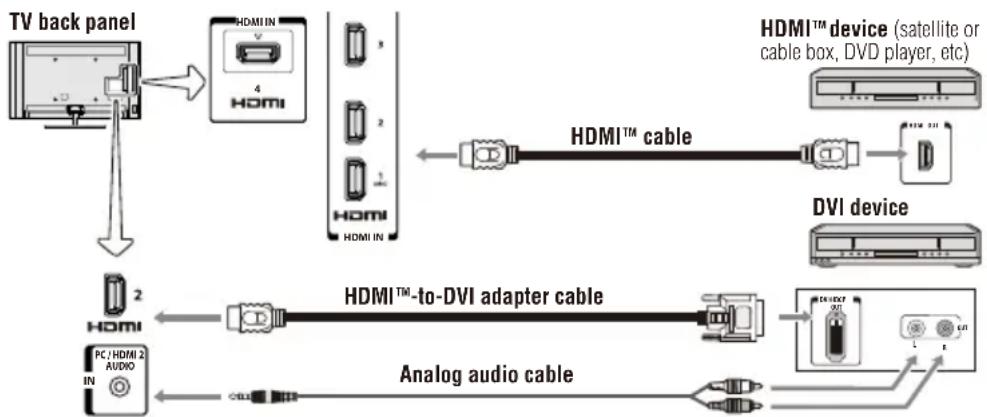
flowchart
graph TD
    A["TV back panel"] --> B["HDMI IN 4"]
    B --> C["HDMI"]
    C --> D["HDMI™ cable"]
    D --> E["DVI device"]
    E --> F["HDMI™ to-DVI adapter cable"]
    F --> G["Analog audio cable"]
    G --> H["PC/HDMI 2 AUDIO IN"]
    style A fill:#f9f,stroke:#333
    style B fill:#ccf,stroke:#333
    style C fill:#cfc,stroke:#333
    style D fill:#fcc,stroke:#333
    style E fill:#cff,stroke:#333
    style F fill:#ffc,stroke:#333
    style G fill:#cfc,stroke:#333
    style H fill:#fcc,stroke:#333
(Sample Illustration) L7300U Series—Connecting an HDMI ^™ or DVI device to the HDMI ^™ Input
To view the HDMI™ device video:
Select HDMI 1, HDMI 2, HDMI 3 or HDMI 4 video input source on the TV. (Press the INPUT button on the remote control. For more information, see “Selecting the video input to view” on page 71.
To connect a DVI device, you will need:
HDMI™ to DVI adapter cable
For proper operation, the length of an HDMI ^™ to DVI adapter cable should not exceed 9.8 ft (3m). The recommended length is 6.6 ft (2m).
3.5mm Stereo to RCA Y-cable
An HDMI ^™ to DVI adapter cable transfers video only. Separate analog audio cables are required (see illustration).
NOTE To ensure that the HDMI ^TM or DVI device is reset properly:
When turning on your electronic components, turn on the TV first, and then the HDMI ^™ or DVI device.
When turning off your electronic components, turn off the HDMI ^TM or DVI device first, and then the TV.
NOTE [1] EIA/CEA-861-D compliance covers the transmission of uncompressed digital video with high-bandwidth digital content protection, which is being standardized for reception of high definition video signals. Because this is an evolving technology, it is possible that some devices may not operate properly with the TV.
Using the TV remote and HDMI™ CEC Control to control other devices
To control the basic functions of connected audio/video devices using the TV's remote control, connect an HDMI^TM CEC compatible audio system or playback device. The HDMI^TM CEC Control feature uses CEC technology as regulated by the HDMI^TM standard.
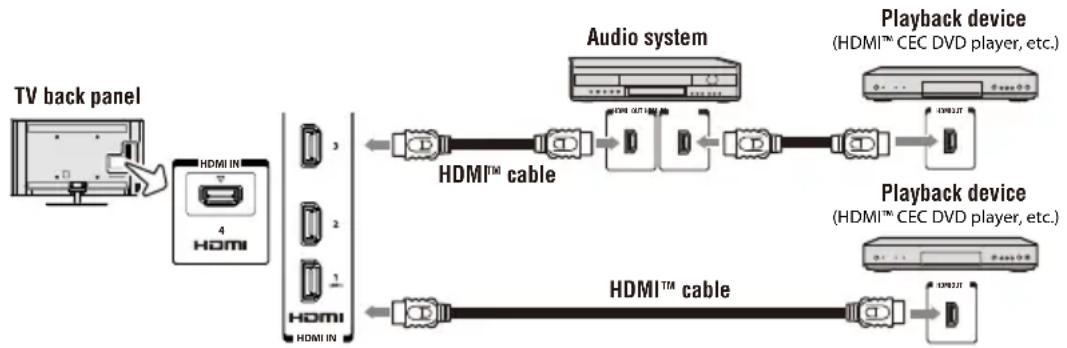
flowchart
graph LR
    A["TV back panel"] --> B["HDMI IN 4 HDMI"]
    B --> C["3"]
    B --> D["2"]
    B --> E["1"]
    C --> F["HDMI™ cable"]
    D --> F
    E --> F
    F --> G["Audio system"]
    G --> H["HDMI™ CEC DVD player, etc."]
    H --> I["Playback device"]
    I --> J["HDMI™ CEC DVD player, etc."]
    J --> K["Playback device"]
    K --> L["HDMI™ cable"]
    L --> M["HDMI™"]
(Sample Illustration) L7300U Series—Connecting an HDMI™ CEC compatible audio system and playback device
To connect an audio system and playback devices, you will need HDMI ^™ cables, see “HDMI ^™ cable (with HDMI Logo)” on page 27.
NOTE
If several devices are connected, HDMI™ CEC Control feature may not operate properly, see “HDMI™ CEC Control input source selection” on page 83.
For proper operation, it is recommended that you use HDMI™ cables with the HDMI™ Logo (HDMI)
HDMI™ CEC devices can be controlled by TV remote only when it is the TV mode.
Before controlling the devices:
For an explanation of setup and operations, see “Other HDMI™ CEC Control functions” on page 84.
Configure the connected devices. See each device's operation manual.
NOTE This feature is limited to models incorporating HDMI ™ CEC Control feature. However, Toshiba is not liable for those operations. See the individual instruction manuals for compatibility information.
When using an external AV amplifier the picture and sound may not be properly synchronized. In this case, adjust the delay time of the sound on the AV amplifier.
NOTE The control range of the delay time differs according to the device you use.
Connecting an HDMI™ audio system
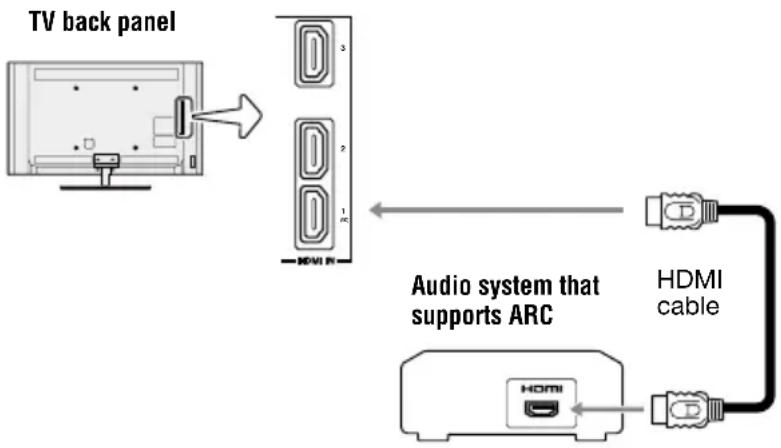
If your HDMI ^™ audio system supports ARC, audio from the TV can be sent to the audio system via an existing HDMI ^™ cable.
You will need an HDMI ^TM cable.
text_image
TV back panel 3 2 1 HDMI IN Audio system that supports ARC HDMI cable HDMI(Sample Illustration) /L7300U Series— Connecting to HDMI™ ARC
HDMI™'s ARC (Audio Return Channel) feature
This feature enables the audio signal of the TV to be sent to an audio system via the HDMI ^™ cable. It will not be necessary to connect a cable from the audio output of the TV to the audio input of the audio system to reproduce the audio received from the tuner of the TV through the audio system.
Connecting a computer
With either the PC IN or HDMI™ connection, you can view your computer's display on the TV and hear the sound from the TV's speakers.
Connecting a computer to the TV's PC IN terminal
When connecting a computer to the PC IN terminal on the TV, use an analog RGB (15-pin) computer cable and a PC audio cable. For more information, see “Overview of cable types” on page 26.
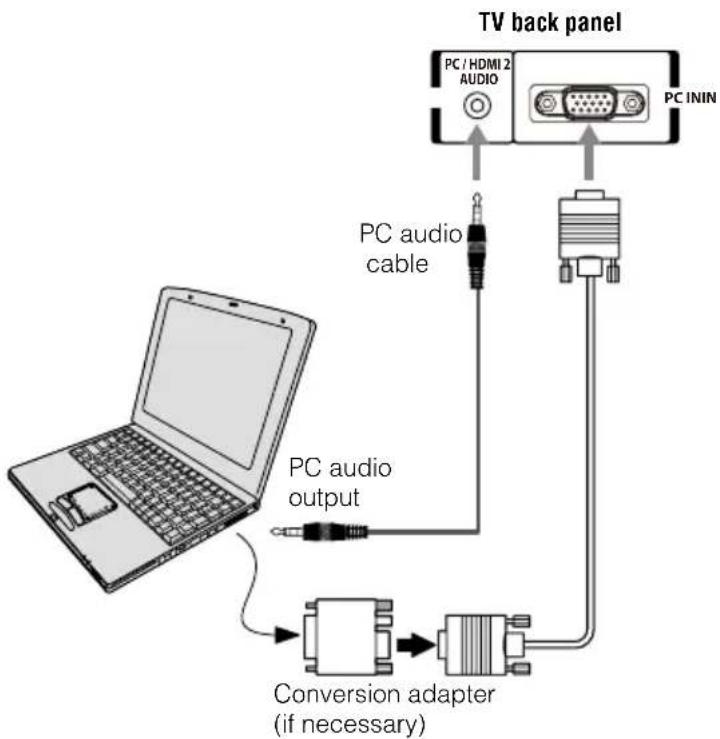
text_image
TV back panel PC / HDMI 2 AUDIO PC ININ PC audio cable PC audio output Conversion adapter (if necessary)(Sample Illustration) L7300U Series—Connecting to a computer through analog RGB cable
To use a computer, set the monitor output resolution on the computer before connecting it to the TV. The supported signal formats are VGA, SVGA, XGA, WXGA and SXGA. For detailed signal specifications, see “Acceptable signal formats for PC IN and HDMI ^™ ” on page 175.
Other formats or non-standard signals will not be displayed correctly. To display the optimum picture, use the computer setting feature, see “Using your computer with the TV” on page 85.
NOTE
The PC audio input terminal on the TV is shared with the HDMI 2 terminal. For configuration information, see "Setting the computer audio" on page 86.
Some computer models cannot be connected to this TV.
If the computer has a compatible mini D-sub15-pin terminal, an adapter is not required.
Depending on the content's title and the computer's specifications, some scenes may be skipped or you may not be able to pause during multi-angle scenes.
Signal names for mini D-sub 15-pin connector:
| Pin SignalNo.: Name: | Pin No.: SignalName: | Pin No.: SignalName: |
| 1 R 6 Ground 11 NC | ||
| 2 G 7 Ground 12 SDA | ||
| 3 B 8 Ground 13 H-sync | ||
| 4 NC* 9 5V 14 V-sync | ||
| 5 Ground 10 Ground 15 SCL |
*NC=Not connected
Connect a computer to the TV's HDMI™ terminal
When connecting a computer with a DVI port to the HDMI ^TM terminal on the TV, use an HDMI ^TM to DVI adapter cable and analog audio cables.
When connecting a computer with an HDMI ^™ port, use an HDMI ^™ cable (type A connector). Separate analog audio cables may not be necessary, depending on computer hardware and setup.
For more information, see "Overview of cable types" on page 26.
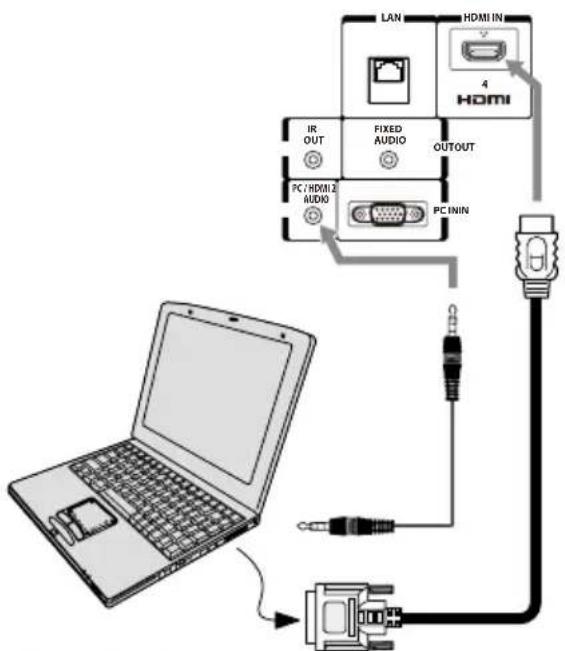
text_image
LAN HDMI IN 4 HDMI IR OUT FIXED AUDIO OUTOUT PC / HDMI 2 AUDIO PC ININ LAMP(Sample Illustration) L7300U Series—Connecting to an HDMI ^™ terminal
The supported signal formats are VGA, SVGA, XGA, WXGA, SXGA, 480i (60Hz), 480p (60Hz), 720p (60Hz), 1080i (60Hz), and 1080p (24Hz/30Hz/60Hz). For signal specifications, see “Acceptable signal formats for PC IN and HDMI™” on page 175.
NOTE
The edges of the picture may be hidden.
If receiving a 480i (HDMI), 480p (HDMI), 720p, 1080i, or 1080p signal program, Native mode scales the video to display the entire picture within the borders of the screen (i.e. no overscanning).
Connecting to a home network
The LAN port allows your Toshiba TV to connect to your home network. You can use this home network to access photos, movies, and music files that are stored on a connected Media Server and play them on your TV.
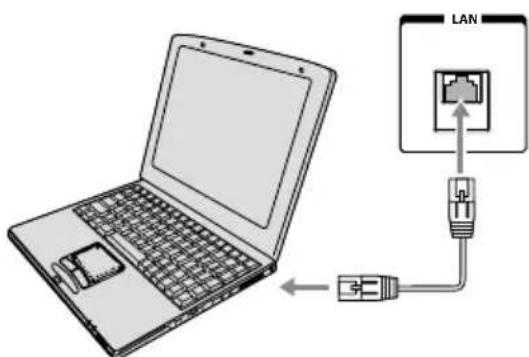
Connecting the TV directly to a computer without an Internet connection
You will need a Crossover LAN cable.
text_image
Diagram showing a laptop connected to an LAN device via USB cable, illustrating network connection or data transfer.(Sample Illustration) L7300U Series—Connecting a computer without Internet connection
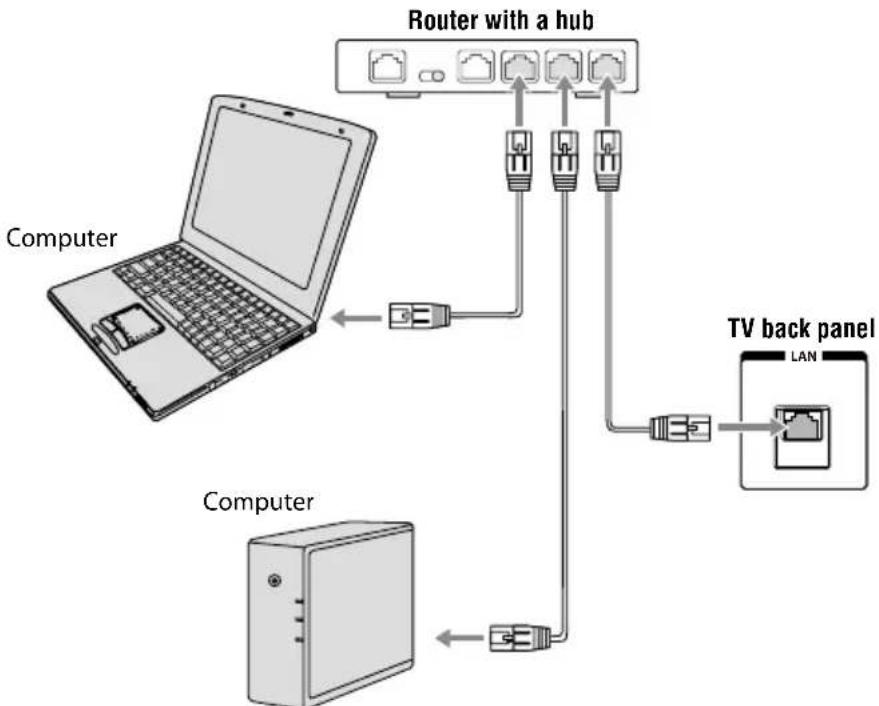
Connecting the TV to a home network without an Internet connection
Items needed:
Standard LAN cables
Router with a hub
flowchart
graph TD
    A["Laptop"] -->|Computer| B["Router with a hub"]
    B --> C["Computer"]
    C --> D["TV back panel LAN"]
    D --> E["Computer with port"]
    style A fill:#f9f,stroke:#333
    style B fill:#ccf,stroke:#333
    style C fill:#cfc,stroke:#333
    style D fill:#fcc,stroke:#333
    style E fill:#ffc,stroke:#333
(Sample Illustration) L7300U Series—Connecting a network without Internet connection
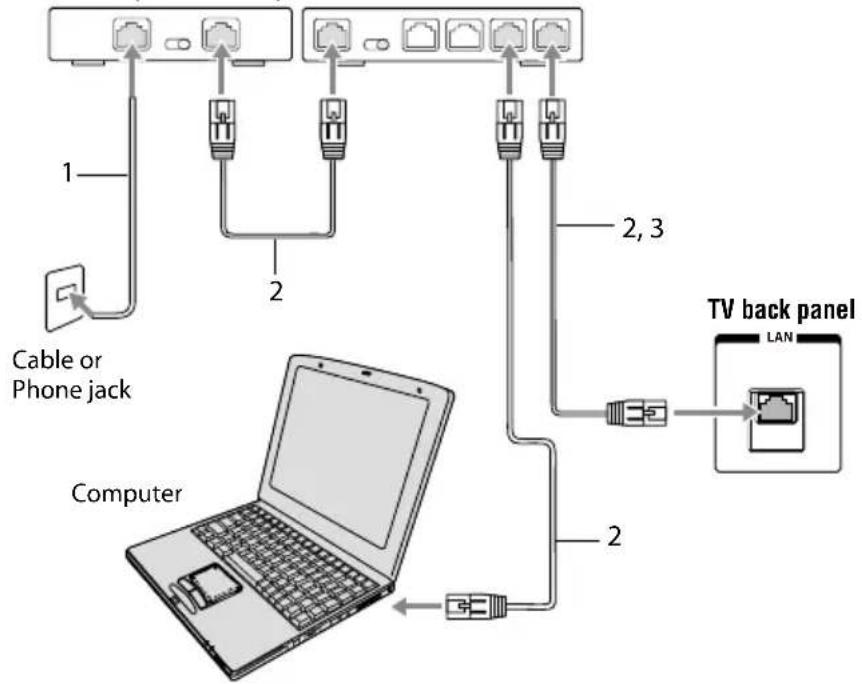
Connecting the TV to a home network with an Internet connection - wired
Items needed:
Coaxial or telephone cable (depending on your modem type)
Standard LAN cables
Router with Hub
Modem (DSL or cable)
Modem (DSL or cable) Router with a hub
text_image
1 2 Cable or Phone jack 2, 3 Computer 2 TV back panel LAN(Sample Illustration) L7300U Series—Connecting with Internet connection - wired
Item: Description:
1 Coaxial or telephone cable (depending on your modem type)
2 Standard LAN cable
3 Do NOT connect a phone jack directly to the TV's LAN port.
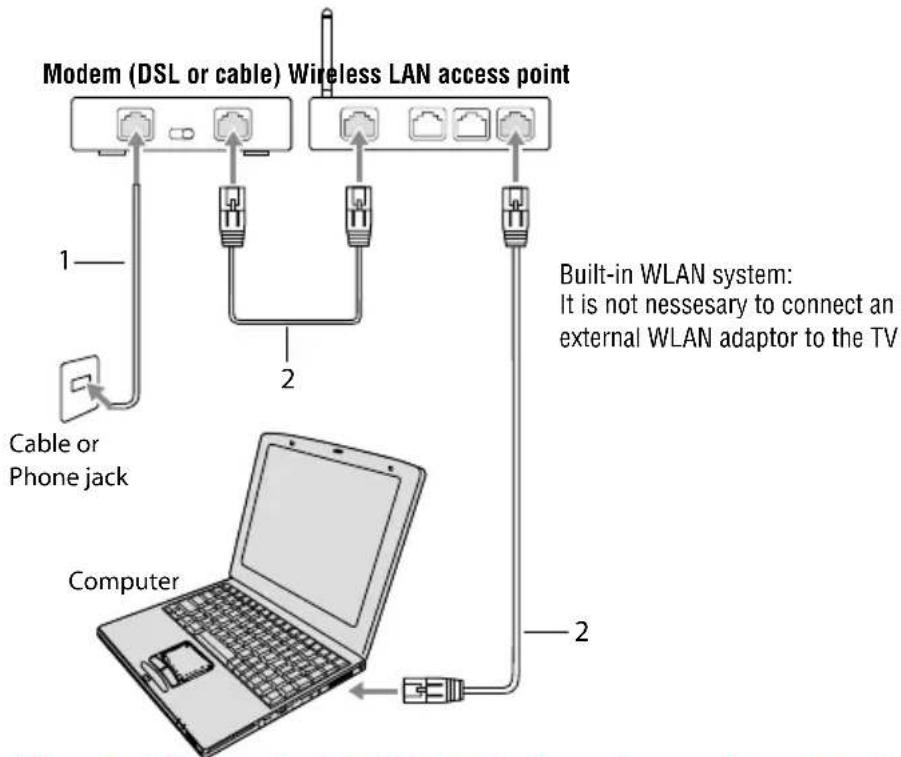
Connecting the TV to a home network with an Internet connection - wireless
Items needed:
Coaxial or telephone cable (depending on your modem type)
Standard LAN cables
Wireless LAN access point or wireless router
Modem (DSL or cable)
text_image
Modem (DSL or cable) Wireless LAN access point 1 2 Cable or Phone jack Computer Built-in WLAN system: It is not necessary to connect an external WLAN adaptor to the TV 2(Sample Illustration) L7300U Series—Connecting with Internet connection - wireless
Item: Description:
1 Coaxial or telephone cable (depending on your modem type)
2 Standard LAN cable
The transmission speed over the wireless LAN and the distance over which wireless LAN can reach may vary depending on surrounding electromagnetic environment, obstacles, access point design and configuration, and client design and software/hardware configurations. The actual transmission speed will be lower than the theoretical maximum speed.
NOTE The Built-in WLAN Adapter is based on the IEEE 802.11n specification and may not be fully compatible with, or support some features (e.g., security) of certain Wi-Fi equipment that are based on the draft version of IEEE 802.11n.
Chapter 3
Using the Remote Control
Controlling other devices
The TV's remote control can operate other devices as described in the IR Blaster section on page 58.
Installing batteries
To install batteries:
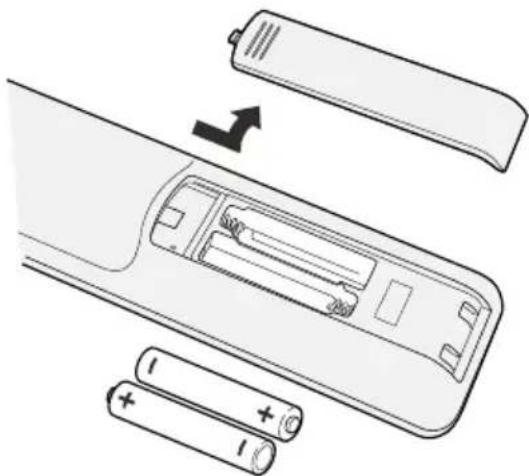
1 Slide back and pull up to open the cover.
natural_image
Diagram of a remote control panel with battery and cylindrical batteries, showing internal components and an upward arrow indicating rotation (no text or symbols)(Sample Illustration) Removing the battery cover
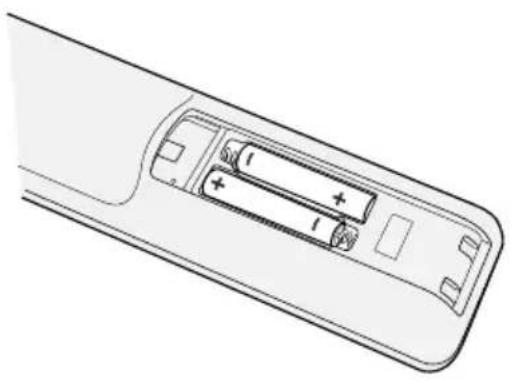
2 Install two AAA size batteries.
NOTE Use carbon zinc batteries or alkaline batteries.
natural_image
Diagram of a remote control casing showing battery and internal components (no text or labels)(Sample Illustration) installing the batteries
3 Slide on the cover.
CAUTION
Do not expose batteries to excessive heat such as sunshine, fire, etc.
NOTE
◆ Dispose of batteries in a designated disposal area.
Always consider the environment when disposing of batteries.
◆ Always follow applicable laws and regulations.
If the remote does not operate correctly, or if the operating range is reduced, replace the batteries.
Always replace both batteries with new ones. Never mix battery types or use new and used batteries together.
Always remove batteries from the remote if they are dead or if the remote control is not to be used for an extended period of time. This prevents battery acid from leaking into the battery compartment.
Remote control effective range
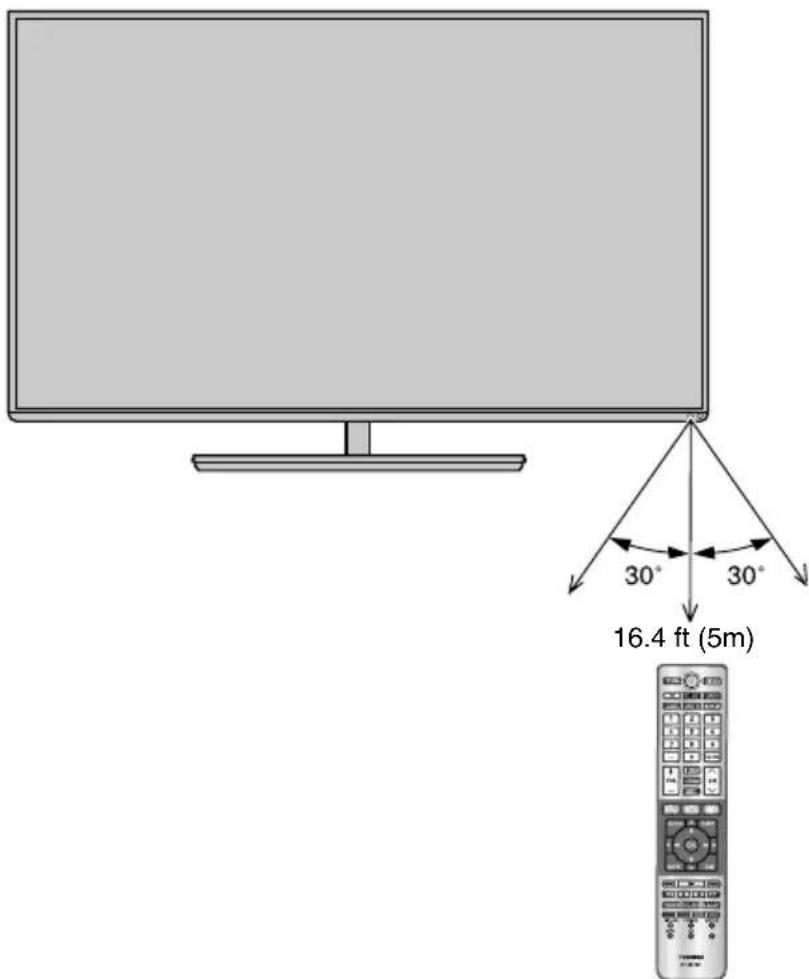
1 For optimum performance, aim the remote control directly at the TV and make sure there are no obstructions between the remote control and the TV.
text_image
30° 30° 16.4 ft (5m)(Sample Illustration) Remote control effective range
Learning about the remote control
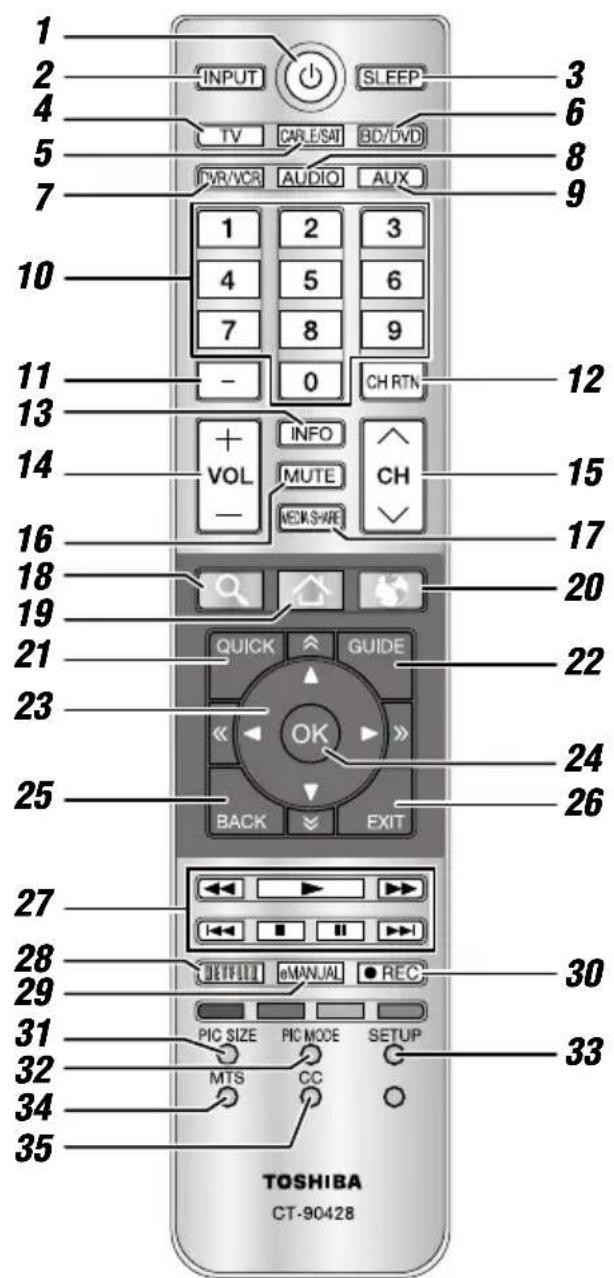
Only the buttons used to operate the TV are described in this section. For the HDMI™ CEC Control functions, see “Using HDMI™ CEC Control” on page 81.
text_image
1 2 3 4 5 6 TV CARLE/SAT BD/DVD 7 IWR/VCR AUDIO AUX 1 2 3 4 5 6 7 8 9 10 - 0 CH RTN 11 12 13 14 + INFO VOL MUTE CH - MECK-SWRE 15 16 17 18 20 19 21 22 23 24 25 26 27 28 29 30 31 32 33 34 35 TOSHIBA CT-90428(Sample Illustration) Remote control overview
NOTE The error message "Not Available" may appear if you press a button for a function that is not available.
Item:Description:Function:
| 1 POWER button Turns the TV On and Off. Whenthe TV is on, the power LEDindicator on the TV front glowsgreen. | |
| 2 INPUT button Selects the video input source. | |
| 3 SLEEP button Accesses the sleep timer. | |
| 4 TV button | |
| 5 Cable/Satellitebutton | Sets the remote control mode tocontrol the device:TV,CABLE/SAT,BD/DVD,DVR/VCR,AUDIO,or AUX |
| 6 BD/DVD button | |
| 7 DVR/VCR button | |
| 8 Audio button | |
| 9 Auxiliary button | |
| 10 Channel Numberbuttons (0-9) | Directly tunes channels. |
| 11 (−) button Enters 2-part channel numbers. | |
| 12 CH RTN button Returns to the last viewedchannel or source. | |
| 13 INFO button Displays TV status informationas well as program details, whenavailable. | |
| 14 VOL (+/−) buttons Adjusts the volume level. | |
| 15 CH ( ▲/▼) buttons Cycles through programmedchannels. | |
| 16 MUTE button | Reduces or turns off the sound. |
| 17 MEDIA SHAREbutton | Accesses the MediaShareService. |
| 18 SEARCH button | Accesses the SearchAll function. |
| 19 HOME button Accesses the Cloud TV PortalPages. | |
| 20 INTERNET button | Launches the web browser on-screen. |
Item:Description:Function:
| 21 QUICK button | Launches the Quick menu. |
| 22 GUIDE button Launches the MediaGuideapplication on-screen. | |
| 23 (▲/▼/◄/►) | Selects or adjusts programmingbuttons menus when a menu ison-screen. |
| 24 OK button Selects the highlighted items onthe screen. | |
| 25 BACK button | Returns to the previous screen. |
| 26 EXIT button | Closes on-screen menus. |
| 27 (►/-◄◄/►►/-◄◄/►►/-/■/I) | ► : PLAY button◄◄ : REWIND button►► : FAST FORWARD button◄◄ : SKIP-BACK button►► : SKIP-FORWARD button■ : STOP buttonII : PAUSE button |
| 28 NETFLIX button | Launches the Netflix®application on-screen. |
| 29 eMANUAL button | Launches the eManualapplication on-screen.Internet connection required. |
| 30 REC button | Used for TV, Cable/Sat, BD/DVD, Aux devices |
| 31 PIC SIZE button Cycles through the picture sizes. | |
| 32 PIC MODE button | Selects the picture mode. |
| 33 SETUP button | Accesses the main TV menusystem. |
| 34 MTS button | Accesses the MTS options. |
| 35 CC button | Accesses the closed-captionfeature. |
Chapter 4
Initial Setup and Menu
Initial setup
When you first turn on or reset the TV, the Menu Language screen appears.
NOTE
You can stop Initial setup by pressing the EXIT button. However, if you do not finish Channel Tuning setting, the Quick Setup screen will appear every time you turn on your TV.
The EXIT button does not work until after you have set the Store/Home Mode setting.
Performing the initial setup
1 Menu Language
Select a language and press the OK button.
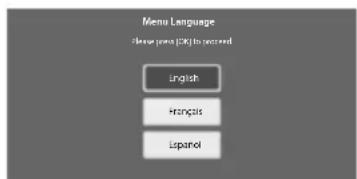
text_image
Menu Language please you [OK] to recommend English Français Lspanol(Sample Illustration) Selecting Menu Language
◆ Quick Setup screen will appear.
About the Quick Setup screen
The Quick Setup screen is divided into the progress window and setup window.
The progress window shows the Quick Setup items being set up. The finished items are dark, and the finish mark (√) appears by them.
The setup window shows the settings.
Progress window
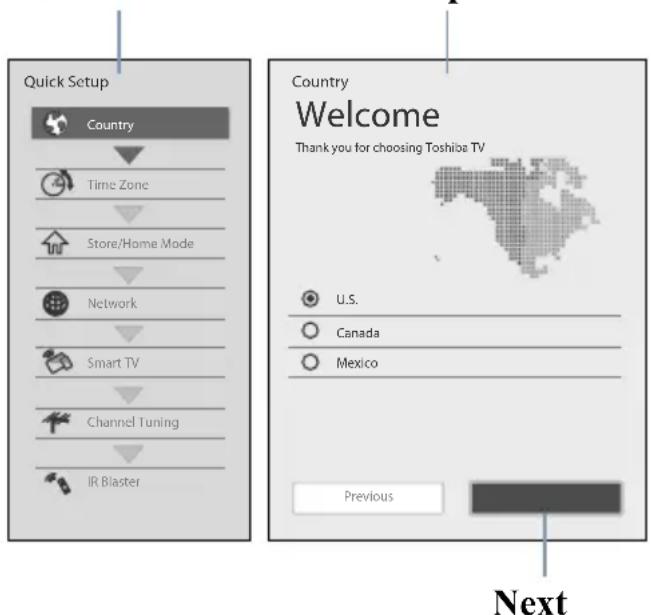
text_image
Quick Setup Country Time Zone Store/Home Made Network Smart TV Channel Tuning IR Blaster Country Welcome Thank you for choosing Toshiba TV U.S. Canada Mexico Previous Next(Sample Illustration) Quick Setup and Welcome window.
Basic Operations in Quick Setup
1 Use the ▲/▼ (arrow) buttons to select an item on the setup window, and press the OK button.
2 Select Next and press the OK button.
The next item will appear.
Some items have sub menus, which appear when the OK button is pressed.
Use the ▲/▼ (arrow) buttons to select an item on the sub menu, and press the OK button.
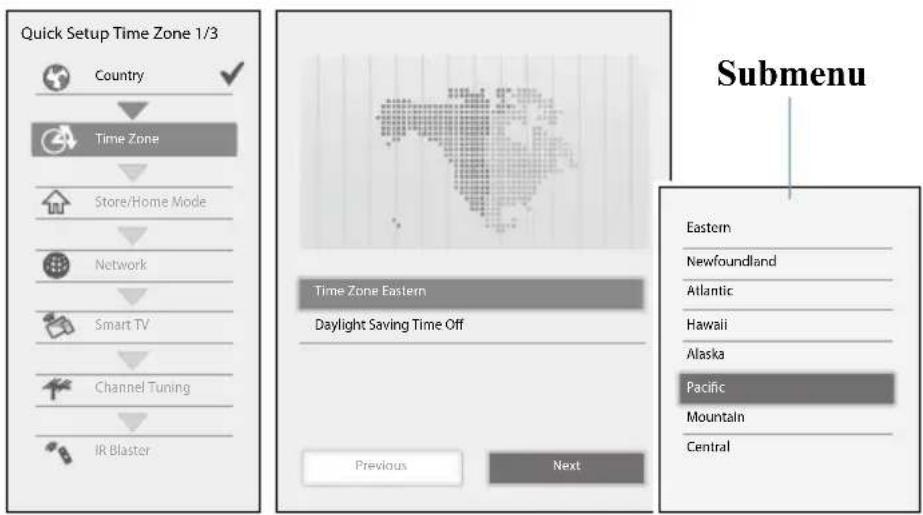
text_image
Quick Setup Time Zone 1/3 Country Time Zone Store/Home Mode Network Smart TV Channel Tuning IR Blaster Submenu Time Zone Eastern Daylight Saving Time Off Previous Next Eastern Newfoundland Atlantic Hawaii Alaska Pacific Mountain Central(Sample Illustration) Quick Setup and Welcome window.
Alternatively, press the ▶ (arrow) button to show the sub menu.
When the ◀ (arrow) button is pressed on the setup window, the focus moves to the progress window. On the progress window, you can select a finished item using the ▲/▼ (arrow) buttons.
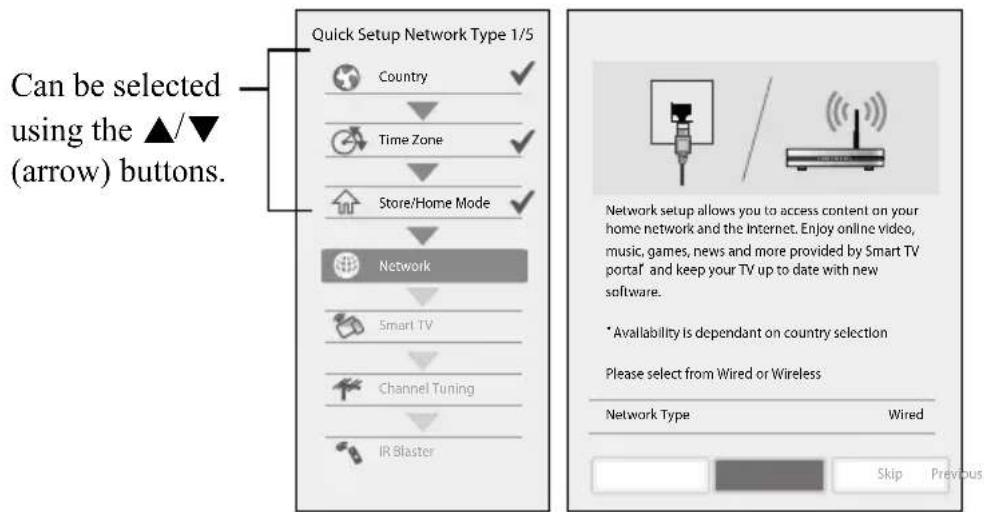
text_image
Can be selected using the ▲/▼ (arrow) buttons. Quick Setup Network Type 1/5 Country Time Zone Store/Home Mode Network Smart TV Channel Tuning IR Blaster Network setup allows you to access content on your home network and the Internet. Enjoy online video, music, games, news and more provided by Smart TV portal' and keep your TV up to date with new software. * Availability is dependant on country selection Please select from Wired or Wireless Network Type Wired Skip Previous(Sample Illustration) Quick Setup and Welcome window.
Repeat the above procedure to continue setting up.
Performing the Quick Setup
1 Country
Select a country then press the OK button.
2 Time Zone
Select Time Zone, and select a time zone from the submenu. Select Daylight Saving Time, and select On or Off from the submenu. Select Next.
3 Store / Home Mode
Select Store / Home Mode, and select Home or Store from the submenu. To use at home, select Home. Select Next.
NOTE Store Mode is only available if the TV is set to Store Mode at initial setup. This option is hidden in the Home Mode.
4 Network
To make full use of the functions, it is recommended that you set up a network and connect to the Internet.
To start the Network Setup, select Next on the screen or to skip the setup, select Skip. If you skip this setup, you can setup the Network at any time through the Network menu.
Network setup
1 Select Network Type, and select Wired or Wireless from the sub menu.
Select Next.
If you select Wired, proceed to the Network Connection Test (Step 3). If you selected Wireless, please proceed to the following step.
2 Select Wireless Setup, and select Easy Setup, Assisted Setup, or Manual Setup from the sub menu.
Select Next.
NOTE
Easy Setup. If your Access Point (AP) supports WPS, this method can be used. WPS is a standard designed to simplify the connection of wireless LAN equipment and the setup of network security features.
Assisted Setup (setup using the AP's notification information). The Network Name, Authentication, and Encryption are decided based on information from the AP. You need to manually set the Security Key for this method.
◆ Manual Setup (to input all settings manually).
3 Once your wired or wireless network has been configured, perform a Network Connection Test.
A network connection test screen will appear while the test is being performed. If the test was successful, the successful connection screen will appear.
If the network connection test failed, the connection failure screen will appear.
For more information, see “Setting up the Network” on page 113.
4 Press the OK button.
When the network can be accessed, Software Upgrade availability check starts automatically. When Software Upgrade is completed, proceed to the next step.
NOTE In order to secure your home network, it is strongly recommended that you use a wireless access point with encryption.
5 Smart TV
Select TV Power On Control, and select Enabled or Disabled from the sub menu.
If you select Enabled, you can turn on or off the television from the companion devices such as Tablet or Smartphone.
Select Next.
When Enabled is selected, perform the following procedure:
1 Select Enable Control, and select On or Off from the sub menu. When On is selected, you can control the TV using companion devices such as a tablet or smartphone.
2 Select Media Renderer, and select On or Off from the sub menu.
When On is selected, the Media Renderer function can be used.
3 Select Next.
6 Channel Tuning
Select Antenna or Cable, and select Start Scan.
Auto Tuning will start.
While scanning is in progress, the Auto Tuning Progress screen appears.
NOTE If you do not want to scan channels, you do not need to make a selection for Channel Tuning. Select Skip to skip this step.
NOTE If you want to stop scanning, pressing the EXIT button while scanning is in process.
While scanning is in progress, the Auto Tuning Progress screen appears.
After scanning is complete, the auto tuning results screen (such as the one below) will appear.
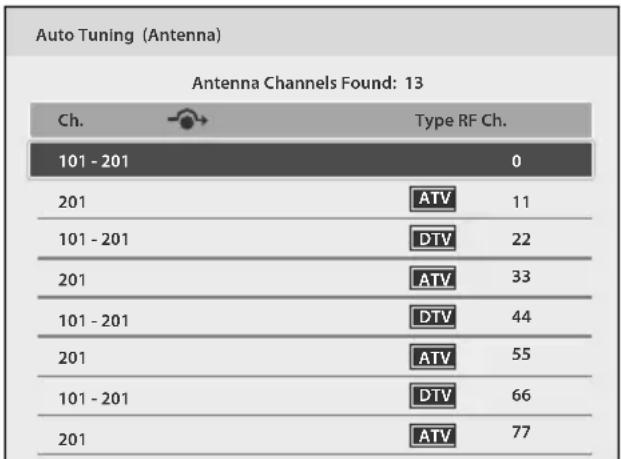
other
Auto Tuning (Antenna) Antenna Channels Found: 13 | Channel | Type RF Ch. | |---|---| | 101 - 201 | 0 | | 201 | ATV 11 | | 101 - 201 | DTV 22 | | 201 | ATV 33 | | 101 - 201 | DTV 44 | | 201 | ATV 55 | | 101 - 201 | DTV 66 | | 201 | ATV 77 |(Sample Illustration) Auto Tuning Results screen
Press the OK button.
NOTE The encrypted channels are not listed on the auto tuning result screen.
If some channels are not found after scanning:
Check the antenna/cable connections, and scan again.
Connect the TV to the antenna or cable box directly and scan again.
1 Press the SETUP button. Select Installation > Quick Setup and press the OK button.
A confirmation message appears.
2 Select Yes then press the OK button.
3 Repeat setup to step 6 (Channel Tuning).
If you selected Antenna previously, selecting Cable might be effective.
If you selected Cable previously, selecting Antenna might be effective.
4 Select Start Scan.
7 IR Blaster
Select Next or Skip.
To start the IR Blaster setup, select Next on the screen, or to skip the setup, select Skip. If you skip this setup, you can setup the IR Blaster at any time through the Installation > IR Blaster Setup menu.
NOTE The IR Blaster may not work with some devices, and it may not control certain features on your external devices.
Setting the IR Blaster
IR Blaster Setup
1 Select Add on the screen. Device Type screen will appear.
Device Type
1 Select Device Type, and use the ◀/▶ (arrow) buttons to select a device type from the following:
Cable Box
Satellite Box
VCR
Blu-ray, DVD Player
◆ Receiver, Misc Audio
Amplifier
CD Player
Video Accessory
2 Press the ▼ (arrow) button then press the GREEN button. The Brand screen will appear.
3 Use the ▲/▼ (arrow) buttons to select the brand name then press the OK button.
Select a field and press the OK button to show the software keyboard. Enter the first few characters of the brand name and press the GREEN button. The brand name starting with the entered characters will appear on the Brand screen.
4 Press the OK button. Model Name screen will appear.
Model Name
1 Press the GREEN button.
The Model Name screen will appear.
2 Use the ▲/▼ (arrow) buttons to select the model name then press the OK button.
Select a field and press the OK button to show the software keyboard. Enter the first few characters of the model name and press the GREEN button. The model name starting with the entered characters will appear on the Model Name screen.
3 Press the ▼ (arrow) button to select Code Set then press the OK button.
Code Set screen will appear.
Code Set
1 Use the ◀/▶ (arrow) buttons to select the code.
After the code is selected, press the RED button to show the Test screen. The test will start automatically.
NOTE If a model has more than one Code Set, a message will appear stating “This model has more than one Code Set. Please select and test your preferred Code Set.” You will need to choose a code set using the ▲/▼ (arrow) buttons and perform the Test option to ensure the correct Code Set has been selected.
2 Press the OK. button Input & Mode Key screen will appear.
Input & Mode Key
1 Use the ◀/▶ (arrow) buttons to select the TV input to which the IR device is connected.
- --- (Appears when Device Type is set to Receiver, Misc Audio or Amplifier)
ANT/CABLE
Video1
Video2
ColorStream HD
HDMI 1
HDMI 2
HDMI 3
HDMI 4
PC
2 Press the ▼ (arrow) button.
3 Use the ◀/▶ (arrow) buttons to select device mode key.
CABLE/SAT
BD/DVD
DVR/VCR
Audio
AUX
4 Press the OK button.
When Device Type is set to Receiver, Misc Audio or Amplifier, the Volume Control screen will appear.
When Device Type is set to Cable Box, Satellite Box, Blu-ray or DVD Player, the Guide Preferences screen will appear.
When Device Type is set to VCR, CD Player or Video Accessory, press the OK button on the IR Blaster Setup complete screen.
Support Information screen will appear.
Volume Control
1 Use the ◀/▶ (arrow) buttons to set up the Volume control to select:
TV (this is the default)
External
The Volume + or - and MUTE buttons will control the external equipment through the IR blaster.
2 Press the OK button.
Press the OK button on the IR Blaster Setup complete screen. Support Information screen will appear.
Guide Preferences
1 Use the ◀/▶ (arrow) buttons to set up the Guide preferences to select:
TV MediaGuide
External Device Guide
2 Press the ▼ (arrow) button to select Interval Time.
0.125 sec
0.25 sec
0.375 sec
0.5 sec
0.625 sec
0.75 sec
0.875 sec
1 sec
After the interval time is selected, press the RED button to show the Test screen. The test will start automatically.
3 Press the OK button.
Press the OK button on the IR Blaster Setup complete screen. Support Information screen will appear.
8 Support Information
Read through the information, and press the OK button.
The initial setup is completed.
NOTE Refer to this information if there is a problem and you need to contact
Customer Support. To find help, the following operation can be performed at any time. SETUP button > Get Help > System Information > OK button.
Navigating the menu system
To open the menu system, press the SETUP button on the remote control.
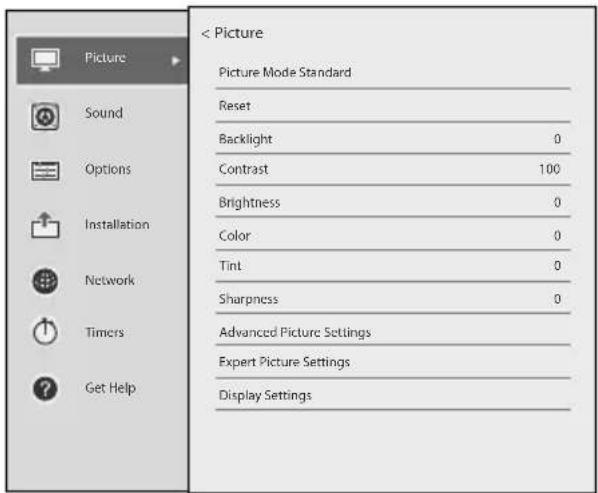
text_image
Picture Sound Options Installation Network Timers Get Help < Picture Picture Mode Standard Reset Backlight 0 Contrast 100 Brightness 0 Color 0 Tint 0 Sharpness 0 Advanced Picture Settings Expert Picture Settings Display Settings(Sample Illustration) Main menu
When a menu is open, press the ▲/▼/ ◀/▶ (arrow) buttons on the remote control to move in the corresponding direction.
To show the setup items or sub menus, press the ▶ (arrow) button (or the OK button).
To select a highlighted item or save your menu settings, press the OK button. (A highlighted menu item appears in a different color in the menu.)
All menus close automatically if no selection is made within approximately 60 seconds.
To close a menu instantly, press the EXIT button.
Quick Menu
Quick menu helps you access some options more quickly.
Press the QUICK button to display the Quick menu and press the ▲/▼ (arrow) buttons to select an option.
NOTE Quick menu items differ depending on the current mode.
Quick Menu Item Page
| Intel® WiDi page 124 | |
| Picture Mode page 97 | |
| Picture Size page 91 | |
| Sleep Timer page 87 | |
| HDMI CEC Device Control page 81 | |
| Speakers page 106 | |
| Device Information page 144 | |
| Wireless Information page 117 | |
| Interval Time page 152 | |
| Repeat page 146 | |
| Sound page 105 | |
| Picture page 91 | |
| Background Music | page 153 |
| Play List | page 146 |
Chapter 5
Setting up your TV
How to navigate the menu
Press the SETUP button. Select Installation, Main menu, Submenu, and then press the OK or EXIT button.
Changing initial settings
From Quick Setup:
1 Press the SETUP button.
2 Select Installation > Quick Setup, and press the OK button. A confirmation message appears.
3 Press the ◀/▶ (arrow) buttons to select Yes.
4 Press the OK button.
To change settings, see “Initial setup” on page 52.
Individual settings
Menu Language
You can choose from three different menu language settings (English, Français, and Español). The TV displays menus and messages in your preferred language.
1 Press the SETUP button.
2 Select Installation > Menu Language and press the OK button.
3 Press the ▲/▼ (arrow) buttons to select your preferred language.
4 Press the OK button.
Country
You can select the country in which you reside.
1 Press the SETUP button.
2 Select Installation > Country and press the OK button.
3 Press the ▲/▼ (arrow) buttons to select the country.
4 Press the OK button.
Time Zone
This setting allows you to specify the correct time zone for your region.
1 Press the SETUP button.
2 Select Installation > Time Zone and press the OK button.
3 Press ▲/▼ (arrow) buttons to select your time zone.
4 Press the OK button.
Daylight Saving Time
1 Press the SETUP button.
2 Select Installation > Daylight Saving Time and press the OK button.
3 Press the ▲/▼ (arrow) buttons to select On or Off.
4 Press the OK button.
Store / Home Mode
You can select Store or Home to designate the TV location. Select Home for normal home use.
1 Press the SETUP button.
2 Select Installation > Store / Home Mode and press the OK button.
3 Press the ▲/▼ (arrow) buttons to select Home or Store.
4 Press the OK button.
NOTE Store Mode is only available if the TV is set to Store Mode at initial setup.
ANT/CABLE In
This setting configures the antenna input source for the ANT/CABLE terminal.
1 Press the SETUP button.
2 Select Installation > Channel Tuning > ANT/CABLE In and press the OK button.
3 Press the ▲/▼ (arrow) buttons to select Antenna or Cable.
4 Press the OK button.
5 Select Start Scan.
After scanning is complete, the auto tuning results screen will appear.
6 Press the OK or EXIT button.
Storing channels in memory (optional)
To make sure your TV stops only on the channels you want when you press the CH ▲/▼ buttons on the remote control or the control panel, store those channels in the TV's memory.
Auto Tuning
NOTE You must set up the antenna/cable input source first. See "Initial setup" on page 52.
You can set up the TV to detect all active channels in your area and store them in its memory. Then you can manually store or skip individual channels from memory.
Option: Description:
Cable Note: If you select Cable, auto tuning deletes previously stored channels from memory. This setup requires some time, but you do not need to repeat the setup unless your cable TV service's lineup changes significantly.
Antenna To skip an antenna source channel and remove it from memory, set the channel to be skipped. See “Skipping channels” on page 67.
NOTE To tune to channels not stored in memory, use buttons 0–9 and the DASH button on the remote control.
1 Press the SETUP button.
2 Select Installation > Channel Tuning > Auto Tuning, and then press the OK button.
A confirmation screen appears.
3 Press the OK button to start Auto Tuning or press EXIT button to abort.
The TV cycles through the channels and stores all active channels in memory.
4 To view the programmed channels, press the CH ▲/▼ buttons.
Manual Tuning
After storing channels in memory, you can manually enter channels if the channel number is known.
1 Press the SETUP button.
2 Select Installation > Channel Tuning > Manual Tuning, and then press the OK button.
3 Use buttons 0–9 on the remote control to enter the channel number (for example, 56).
4 Press the OK button.
5 Press the OK button again to begin Manual Tuning.
The channels found are listed at the bottom of the screen.
Option: Description:
| ATV Analog channel |
| DTV Digital channel |
Skipping channels
To prevent a channel from being viewed, you can set it to be skipped.
1 Press the SETUP button.
2 Select Options > Channel Options and then press the OK button. The list of channels appears.
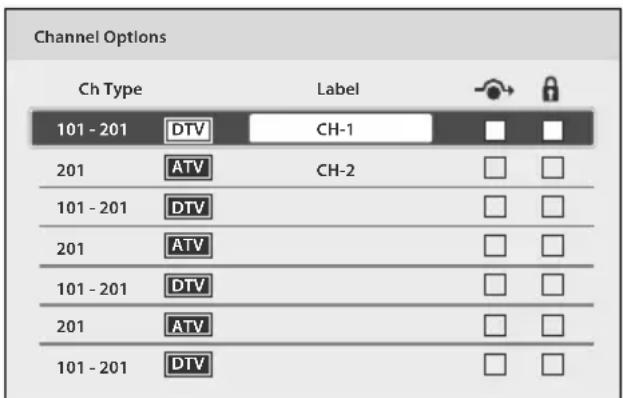
text_image
Channel Options Ch Type Label 101 - 201 DTV CH-1 201 ATV CH-2 101 - 201 DTV 201 ATV 101 - 201 DTV 201 ATV 101 - 201 DTV(Sample Image) Channel options
3 Press the ◀/▶ (arrow) buttons to select the Skip column (→) and press the ▲/▼ (arrow) buttons to select a channel to skip.
4 Press the OK button.
The box is selected.
5 To clear the selection, press the OK button.
NOTE You cannot tune skipped channels using the CH ▲/▼ buttons. Use buttons 0–9 and the DASH button on the remote control.
Skipping video inputs
You can set video inputs to be skipped when selecting inputs in the Input selection screen.
To turn on skip
1 Press the SETUP button.
2 Select Options > Input Option > Input Labeling and press the OK button.
3 Press the ▲/▼ (arrow) buttons to select the item you wish to skip. Then press the RED button to turn on Skip.
To turn off skip
Press the RED button again to turn off Skip.
Labeling analog TV channels
1 Press the SETUP button.
2 Select Options > Channel Options, and then press the OK button. The list of channels appears.
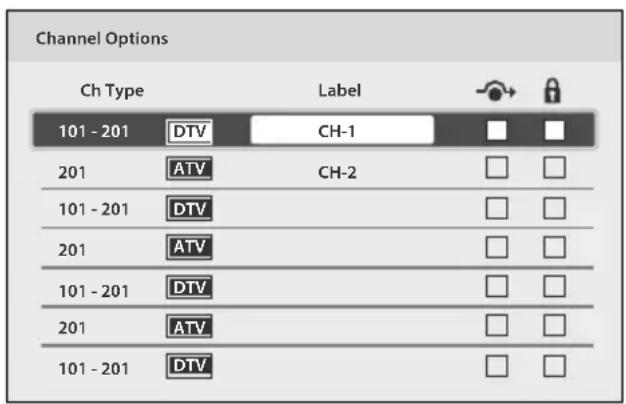
text_image
Channel Options Ch Type Label 101 - 201 DTV CH-1 201 ATV CH-2 101 - 201 DTV 201 ATV 101 - 201 DTV 201 ATV 101 - 201 DTV(Sample Image) Channel options
3 Press the ▲/▼ (arrow) buttons to select a channel to label.
4 Press the OK button.
The Software Keyboard window appears.
5 Input a name using the Software Keyboard, see “Using the software keyboard” on page 121.
6 Press the GREEN button.
Labeling video inputs
The input labels are shown in the input selector and banner displays. You can label video inputs according to the devices you have connected to the TV.
1 Press the SETUP button.
2 Select Options > Input Option > Input Labeling and press the OK button.
3 Press the ▲/▼ (arrow) buttons to select the item you wish to label. Press the ◀/▶ (arrow) buttons to select Receiver, Cable, DVD, Game, PC, Recorder, Satellite, VCR or Blu-ray™.
When entering arbitrary characters, press the GREEN button. The Software Keyboard window appears.
Input a name using the Software Keyboard, see “Using the software keyboard” on page 121.
4 Repeat Step 3 for other video inputs.
Configuring shared input
To set Shared PC Audio
1 Press the SETUP button.
2 Select Options > Input Option > PC/HDMI 2 Audio and press the OK button.
3 Press the ▲/▼ (arrow) buttons to select PC or HDMI 2.
NOTE To apply the setting, switch the input to PC or HDMI 2.
Chapter 6
Basic features
Tuning Channels
Tuning to the next programmed channel
Press the CH ▲/▼ buttons on the remote control or TV control panel.
Tuning to a specific channel (programmed or unprogrammed)
Channel: Description:
Analog Use the 0–9 buttons on the remote control. (For example, to select channel 125, press 1, 2, 5.), and then press the OK button.
Digital Use the 0–9 buttons on the remote control to enter the major channel number. (and press the DASH button if needed, (For example, to select digital channel 125-1, press 1, 2, 5, -, 1.)), and then press the OK button.
Using Channel Return
You can switch between two channels without entering a channel number each time. This feature also works for external inputs.
1 Select the first channel you want to view.
2 Select a second channel using the Channel Number buttons (and press the DASH button if needed).
3 Each time you press the CH RTN button, the TV switches between the last two channels that were tuned.
Selecting the video input to view
To select the video input to view:
1 Press the INPUT button.
2 Change the input:
Press 0–7.
Repeatedly press the ▲/▼ (arrow) button and then press the OK button.
◆ Repeatedly press the INPUT button.
Inputs
| 0 ANT/CABLE | |
| 1 Video 1 | |
| 2 Video 2 / ColorStream HD | |
| 3 HDMI 1 | |
| 4 HDMI 2 | |
| 5 HDMI 3 | |
| 6 HDMI 4 | |
| 7 | PC |
NOTE
You can label the video input sources according to the specific devices you have connected to the TV, see "Labeling video inputs" on page 69.
You can skip sources, see “Skipping video inputs” on page 68.
Inputs that are set to be skipped will be skipped when selecting by repeatedly pressing the INPUT button or the ▲/▼ (arrow) buttons.
You can select inputs that are set to be skipped using the number buttons.
If one or more HDMI™ CEC devices are connected to an HDMI™ input, the icon appears in the input selector. In this case, the label, see "Labeling video inputs" on page 69 will not appear in the input selector.
To select an HDMI™ CEC device:
1 Press the ▲/▼ (arrow) buttons to select an HDMI™ input.
2 Press the ▶ (arrow) button. The list of HDMI™ CEC devices for that input appears.
3 If the input has multiple HDMI ^TM CEC devices, press the ▲/▼ (arrow) buttons to select a device.
4 Press the OK button.
Using closed captions
To turn on the closed caption mode:
1 Press the SETUP button.
2 Select Options > Closed Captions.
3 Press the OK button.
4 Press the ▲/▼ (arrow) buttons to select Closed Captions Display and press the OK button.
5 Press the ▲/▼ (arrow) buttons to select On or Off.
NOTE If Closed Captions Display is set to Off, Analog CC Mode and Digital CC Settings will be not available.
Analog CC mode
The closed caption mode has two options:
Mode: Description:
| Captions Displays the dialogue, narration, and sound effects of TV programs and videos that are closed captioned (usually marked “CC” in program guides). |
| Text Displays information not related to the current program, such as weather or stock data (when provided by individual stations). |
To view captions or text:
1 Press the SETUP button.
2 Select Options > Closed Captions.
3 Press the OK button.
4 Press the ▲/▼ (arrow) buttons to select Analog CC Mode and press the OK button.
To view captions:
Press the ▲/▼ (arrow) buttons to highlight CC1, CC2, CC3, or CC4.

text_image
Giant pandas eat leaves.(Sample Illustration) Captions
NOTE If the program or video you have selected is not closed captioned, no captions will be displayed.
To view text:
Press the ▲/▼ (arrow) buttons to highlight T1, T2, T3, or T4.
text_image
WORLD WEATHER Temps Current F C Weather LONDON 51 11 MOSCOW 57 14 PARIS 53 12 ROME 66 19 TOKYO 65 18 Clear Cloudy Clear Cloudy Rain(Sample Illustration) Captions - text
NOTE If text is not available in your area, a black rectangle may appear on the screen. You can remove this rectangle by setting Closed Captions Display to Off.
NOTE A closed caption signal may not be displayed when a videotape is dubbed, signal reception is weak, or signal reception is non-standard.
Digital CC settings
You can customize the closed caption display characteristics.
NOTE
These settings are available for digital channels only.
You cannot set Caption Text and Background as the same color.
Mode: Description:
| Caption Size Auto, Small, Standard, Large |
| Caption Text Type Auto, Default, Mono (with Serif), Prop. (with Serif), Mono (without Serif), Prop. (without Serif), Casual, Cursive, Small Capitals |
| Caption Text Edge Auto, None, Raised, Depressed, Uniform, Left Drop Shadow, Right Drop Shadow |
| Caption Text Color Auto, Black, White, Red, Green, Blue, Yellow, Magenta, Cyan |
| Text Foreground Opacity Auto, Transparent, Translucent, Flashing, Solid |
| Background Color Auto, Black, White, Red, Green, Blue, Yellow, Magenta, Cyan |
| Text Background Opacity Auto, Transparent, Translucent, Flashing, Solid |
| Caption Text Edge Color Auto, Black, White, Red, Green, Blue, Yellow, Magenta, Cyan |
To customize the closed captions:
1 Press the SETUP button.
2 Select Options > Closed Captions.
3 Press the OK button.
4 Press the ▲/▼ (arrow) buttons to select Digital CC Settings.and then press the OK button.
5 Press the ▲/▼ (arrow) buttons to select a characteristic and then press the OK button.
Press the ▲/▼ (arrow) buttons to select the format for that characteristic.
Using the Closed Caption button
If you press the CC button when an analog channel is tuned or from an external input (480i signal from the video input):
The CC bar will appear and will display the options, CC1-4, T1-4.
If you press the CC button when a digital channel is tuned:
The CC bar will appear and will display the available caption options for that channel or service.
Setting the PIN code
A PIN code is necessary for some menus.
NOTE The Parental Control and Locks menu is grayed out if no PIN has been set.
Entering a new PIN code
1 Press the SETUP button.
2 Select Options > Parental PIN Setup.
3 Press the OK button.
4 Use the number buttons to enter a 4-digit number, and then confirm the code.
NOTE The PIN code cannot be set to "0000".
Changing or deleting your PIN code
1 Press the SETUP button.
2 Select Options > Parental PIN Setup.
3 Press the OK button.
4 Use the number buttons to enter your 4-digit PIN code.
5 Select Change PIN or Delete PIN, and then press the OK button.
NOTE
The PIN code cannot be set to "0000".
If you delete the PIN code, the settings of Parental Controls and Locks are reset.
Forgotten PIN code
1 Press the SETUP button.
2 Select Options > Parental PIN Setup.
3 Press the OK button.
4 Press the INFO button 4 times quickly.
5 Select Change PIN and press the OK button.
6 Enter a new PIN code.
Using parental controls
Blocking TV programs and movies by rating (V-Chip)
Some TV programs and movies include signals that classify the content of the program (as unsuitable for younger viewers). The V-Chip feature in this TV detects the signals and blocks the programs according to the ratings you select.
NOTE The V-Chip feature in this TV supports the U.S. V-Chip system only.
1 Press the SETUP button.
2 Select Options > Parental Control and Locks.
3 Press the OK button.
4 Enter your 4-digit PIN code.
5 Press the ▲/▼ (arrow) buttons to select Enable Rating Blocking and press the OK button.
6 Press the ▲/▼ (arrow) buttons to select On.
7 Press the ▲/▼ (arrow) buttons to select Edit Rating Limits, and then press the OK button.
The Edit Rating Limits screen appears.
8 Press the ▲/▼/◄/► (arrow) buttons.
9 Press the OK button to select a level of blocking.
A box with an “X” indicates a rating that will be blocked. As you highlight a rating, the rating’s definition appears at the bottom of the screen.
10 Select Done and then press the OK button.
NOTE This feature will not be available if no PIN code is set.
Downloading an additional rating system
An additional rating system may be available for use in selectively blocking TV programs and movies.
NOTE The currently tuned station must be receiving a digital signal before an additional rating system can be downloaded.
1 Press the SETUP button.
2 Select Options > Parental Control and Locks.
3 Press the OK button.
4 Enter your 4-digit PIN code.
The Parental Control and Locks screen appears.
5 Press the ▲/▼ (arrow) buttons to select Enable Rating Blocking and press the OK button.
6 Press the ▲/▼ (arrow) buttons to select On.
7 Press the ▲/▼ (arrow) buttons to select Edit Rating Limits, and then press the OK button.
The Edit Rating Limits screen appears.
8 Select Alt RS, and then press the OK button. The Edit Alternate Ratings screen appears.
NOTE
The Alt RS button is only available if an additional rating system is currently available.
The download may take several minutes.
The information displayed on the Alternate Ratings screen depends on the configuration of the additional rating system available at the time of download.
9 Press the ▲/▼/◄/► (arrow) buttons.
10 Press the OK button to select the desired level of blocking. A box with an “X” indicates the rating that will be blocked.
NOTE
You can only download the additional rating system once. You cannot download updates if they become available.
The additional rating system is not designed, transmitted, or controlled by the TV or Toshiba, nor is the availability of an additional rating system determined or controlled by Toshiba.
Similarly, the rating of programs in an additional rating system is not determined, transmitted, or controlled by the TV or Toshiba.
The additional rating system is an evolving technology; therefore, availability, content, and format may vary.
Rating system
Independent rating system for broadcasters:
Ratings: Description and Content themes:
| TV-MA Mature Audience Only (This program is specifically designed to be viewed by adults and therefore may be unsuitable for children under 17. L) Crude or indecent language S) Explicit sexual activity V) Graphic violence | |
| TV-14 Parents Strongly Cautioned (This program contains some material that many parents would find unsuitable for children under 14 years of age.) D) Intensely suggestive dialogue L) Strong, coarse language S) Intense sexual situations V) Intense violence | |
| TV-PG Parental Guidance Suggested (This program contains material parents may find unsuitable for younger children.) D) Some suggestive dialogue L) Infrequent coarse language S) Some sexual situations V) Moderate violence | |
| TV-G General Audience (Most parents would find this program suitable for all ages.) | |
| TV-Y7, TV-Y7FV | Directed to Older Children (This program is designed for children age 7 and above. NOTE: Programs in which fantasy violence may be more intense or more combative than other programs in this category are designated TV-Y7FV.) |
| TV-Y All Children (This program is designed to be appropriate for all children.) | |
Independent rating system for movies
Ratings: Description and Content themes:
| X X-rated (For adults only) |
| NC-17 Not intended for anyone 17 and under |
| R Restricted (Under 17 requires accompanying parent or adult) |
| PG-13 Parents Strongly Cautioned (Some material may be inappropriate for children under 13) |
| PG Parents Strongly Cautioned (Some material may be inappropriate for children under 13) |
| G General Audience (Appropriate for all ages) |
| Indication other than rating system |
Display: Description:
| NONE The program is rated None. |
| (No rating appears) No rating information is provided. |
NOTE If you place an "X" in the box next to "Rated "None"', programs rated "None" or "Not Rated" will be blocked; Programs that do not provide any rating information will not be blocked.
Displaying ratings
To display the rating of the program you are watching, press the INFO button on the remote control.
Unlocking programs
If you try to tune to a program that exceeds the rating limits you have set, the TV will enter program lock mode and a warning message will appear on screen. Follow the instructions to temporarily unlock the program.
Locking specific channels
A channel that is configured as Locked cannot be viewed unless the PIN code is entered first, see “Setting the PIN code” on page 74.
1 Press the SETUP button.
2 Select Options > Channel Options.
3 Press the OK button.
The list of channels appears.
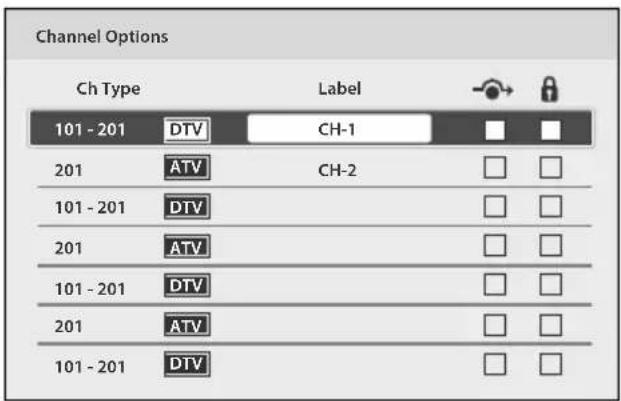
text_image
Channel Options Ch Type Label 101 - 201 DTV CH-1 201 ATV CH-2 101 - 201 DTV 201 ATV 101 - 201 DTV 201 ATV 101 - 201 DTV(Sample Illustration) Channel options
4 Press the ▶ (arrow) button and then press the ▲/▼ (arrow) buttons to select a channel in the lock column, and then press the OK button.
5 You must enter your PIN code to lock channels.
NOTE If no PIN code has been set, a warning appears. See, "Setting the PIN code" on page 74.
6 The box is selected. To clear the selection, press the OK button.
Locking video inputs
You can lock video inputs. You cannot view the input sources until you unlock the inputs by entering the PIN code.
1 Press the SETUP button.
2 Select Options > Parental Control and Locks.
3 Press the OK button.
4 Enter your 4-digit PIN code.
5 Press the ▲/▼ (arrow) buttons to select Input Lock and press the OK button.
6 Press the ▲/▼ (arrow) buttons to select Video or Off.
Mode: Description:
Video Locks Video 1, Video 2, ColorStream HD, HDMI 1, HDMI 2, HDMI 3, HDMI 4, and PC.
Off Unlocks all video inputs.
Setting a time limit for games
You can use the GameTimer ^® to set a time limit for playing a video game. When the time expires, the TV locks all external inputs.
1 Press the SETUP button.
2 Select Timers > GameTimer.
3 Press the OK button.
4 Enter your 4-digit PIN code.
5 Press the ▲/▼ (arrow) buttons to select 30, 60, 90, or 120 minutes.
6 To cancel the timer, select Off.
To deactivate the Input Lock once the GameTimer ^® has activated it:
Set the Input Lock to Off, see “Locking video inputs” on page 80.
NOTE
A message appears when 10 minutes, 3 minutes, and 1 minute are remaining.
If the TV loses power with time remaining, the TV will enter Input Lock mode when power is restored (as if the GameTimer had been activated). You must deactivate the Input Lock, see “Locking video inputs” on page 80.
Locking the control panel
You can lock the control panel to prevent your settings from being changed accidentally (by children, for example). When Panel Lock is set to On, none of the controls on the control panel operate except POWER.
1 Press the SETUP button.
2 Select Options > Panel Lock and press the OK button.
3 Press the ▲/▼ (arrow) buttons to select On.
NOTE When Panel Lock is set to On, "Panel Lock" appears on screen when the buttons on the TV control panel are pressed. Unless the TV is in "Active Standby", then control panel POWER button can turn on the TV
To unlock the control panel:
Select Off in Step 3 above.
Using HDMI™ CEC Control
This feature uses CEC technology and allows you to control Toshiba HDMI ^™ CEC compatible devices from the TV remote control via HDMI ^™ connection.
When Enable HDMI CEC Control in the HDMI CEC Control Setup menu is set to On, the following HDMI ^™ CEC Control functions are enabled.
To set HDMI™ CEC Control Setup
1 Press the SETUP button.
2 Select Options > HDMI CEC Control Setup and press the OK button.
3 Press the ▲/▼ (arrow) buttons to select Enable HDMI CEC Control and press the OK button.
4 Press the ▲/▼ (arrow) buttons to select On.
NOTE If you set Enable HDMI CEC Control to Off, the other items under HDMI CEC Control Setup will be grayed out.
5 Press the ▲/▼ (arrow) buttons to select an item and press the OK button.
Press the ▲/▼ (arrow) buttons to select On or the desired mode:
TV Auto Power: On/Off
Auto Standby: On/Off
Amplifier Control: On/Off
Initial Speaker Setting: TV Speakers/Amplifier
NOTE These functions depend on the connected devices.
Controlling HDMI™ CEC playback devices
With your TV's remote control, you can control the connected HDMI ^TM CEC playback device (DVD player, etc.) you are watching.
Button: Description:
| ▶ | Begins playback |
| ■ | Stops playback |
| II | Pauses the picture during play or record mode |
| ▶▶ | Skips forward. |
| ◀◀ | Skips backward. |
| ▶▶ | Fast forward |
| ◀◀ | Rewind/reverse |
| ▲ ▼ ◀ ▶ | Menu navigation, etc. |
| OK Enters content with a menu | |
| RED, GREEN, YELLOW, BLUE | Controls various operation |
| 0–9 buttons Controls various operation, e.g. tuning to a specific channel for tuner device. | |
| Channel ▲/▼ | Changes to the next available channel up or down in the sequence |
NOTE These functions depend on the connected devices.
HDMI™ CEC Player Control menu functions
1 Press the QUICK button to open the Quick menu.
2 Select HDMI CEC Device Control, and then press the OK button.
3 Press the ▲/▼ (arrow) buttons to select the item you want to control, and then press the OK button.
Item: Description:
| Power Turns the selected device On and Off |
| Root Menu Accesses the selected device's top menu |
| Contents Menu Accesses the content list when the OK button is pressed |
| Setup Menu Accesses the device's setup menu |
| Audio Select the divice's sound |
| Eject Ejects the device's media |
NOTE These functions depend on the connected devices.
The HDMI™ CEC Device Control item is not available under the following conditions:
A non-HDMI™ input is selected
The Enable HDMI CEC Control item is set to Off
The connected HDMI™ CEC device is not a playback, recording, or tuner device
HDMI™ CEC Control input source selection
If an HDMI ^TM CEC device with HDMI ^TM switching capability (e.g. an amplifier) is connected to the HDMI ^TM input, you can select another HDMI ^TM CEC device that is connected to the master HDMI ^TM device.
Use the INPUT button on the remote control or the control panel, see "Learning about the remote control" on page 50.
Adjusting the amplifier's audio
Using the TV's remote control, you can adjust or mute the sound volume of your audio system.
The VOL (+ -) buttons adjust the volume level.
The MUTE button turns off the sound.
1 Press SETUP button.
2 Select Options > HDMI CEC Control Setup and press the OK button.
3 Press the ▲/▼ (arrow) buttons to select Initial Speaker Setting and press the OK button.
4 Press the ▲/▼ (arrow) buttons to select Amplifier.
NOTE Confirm that a connected HDMI ™ CEC device (such as DVD player, etc.) is selected for the Amplifier input source.
NOTE
You can also use this function when the audio system is connected to the TV's DIGITAL AUDIO OUT terminal (not HDMI™ connection). Select a digital audio input mode on the amplifier.
These functions depend on the device connected.
Other HDMI™ CEC Control functions
When Enable HDMI CEC Control and all items in the HDMI ^™ CEC Control Setup menu are set to On, the following functions will be enabled:
Item: Description:
| TV Auto Power If an HDMI ^TM CEC device is turned on, the TV turns on automatically. | |
| Auto Standby If the TV is turned off, it will send a message to turn off all of theHDMI ^TM CEC devices connected to the TV. | |
| Amplifier Control | IfAmplifier Controlis set toOn, you can adjust the sound volumeor turn off the sound using the remote control. |
| Initial SpeakerSetting | With this item, you can set your audio output preference to the TVSpeakers or the Amplifier. When this item is set to Amplifier, the remotecontrol can be used to adjust or mute the volume of the audio. Thisitem will not be available and set to TV Speakers automatically unlessan HDMI ^TM CEC compatible audio system is connected. |
NOTE When you turn on the audio system, change its input source, or adjust the sound volume, the sound will be output from the audio system's speakers even if TV Speakers has been selected. Turn the TV off and on again to output the sound from the TV speakers.
Viewing the HDMI™ signal information
1 Press the SETUP button.
2 Select Options > HDMI Information Display and press the OK button.
3 Press the ▲/▼ (arrow) buttons to select On.
4 Press the INFO button.
HDMI™ Information is shown (Resolution, Scan Type, Frame Rate, Aspect, Bit Depth, Color Space, RGB/YUV, Chroma Format), and the normal banner and signal information banner appear.
NOTE
The signal information banner will appear when this feature is set to On and you watch an HDMI™ input and press the INFO button. The signal information will disappear after 60 seconds.
If you press the INFO button when this feature is set to Off, only the normal banner will appear.
Using your computer with the TV
Adjusting the image
If the edges of the picture are hidden, readjust Horizontal Position and Vertical Position. If the picture is affected by interference, readjust Clock Phase and Sampling Clock.
1 Select PC input mode, see “Selecting the video input to view” on page 71.
2 Press the SETUP button.
3 Select Picture > Display Settings and press the OK button.
4 Press the ▲/▼ (arrow) buttons to select PC Settings, and then press the OK button.
NOTE If a computer is not connected or there is no PC input signal, this menu will not be available.
5 Press the ▲/▼ (arrow) buttons to select an item and press the OK button.
6 Press the ◀/▶ (arrow) buttons to make adjustments.
NOTE The screen is disrupted momentarily when adjusting the PC settings. This is not a sign of malfunction.
Mode: Description: Adjustment Range
| Horizontal Position Moves the picture left/right Within ±10 from center* | |
| Vertical Position Moves the picture up/down Within ±10 from center* | |
| Clock Phase Helps to reduce noise and sharpen the picture | Within ±32 from center* |
| Sampling Clocks Helps to reduce noise and minimize periodic vertical stripes on the screen | Within ±5 from center* |
* The default settings and/or adjustment ranges vary depending on the input signal format.
To reset the PC Settings:
Select Reset, and then press the OK button.
Setting the computer audio
You can output sound from your computer when connecting it to your TV, using the AUDIO IN terminal and PC audio cable.
1 Press the SETUP button.
2 Select Options > Input Options and press the OK button.
3 Press the ▲/▼ (arrow) buttons to select PC/HDMI 2 Audio and press the OK button.
4 Press the ▲/▼ (arrow) buttons to select PC.
NOTE To apply the setting, switch the input to PC or HDMI 2.
Setting the timer to turn on the TV
You can set the on timer to turn on the TV to a preset channel or input at a preset time.
To activate the timer:
1 Press the SETUP button.
2 Select Timers > On Timer.
3 Press the OK button.
4 Press the ▲/▼ (arrow) buttons to select Enable On Timer and press the OK button.
5 Press the ◀/▶ (arrow) buttons to select On.
NOTE If the Enable On Timer is set to Off, other menus under On Timer cannot be changed. It can take the TV approximately 60 seconds to turn on through the ON TIMER feature.
To set the timer:
1 Press the SETUP button.
2 Select Timers > On Timer.
3 Press the OK button.
4 Set these options to your preference:
Item: Description:
Input Video input source
Channel Channel to view
Volume Volume level
Time until Power On Desired length of time until the TV turns on:
minimum=00:10, maximum=12:00
Press ◀/▶ (arrow) buttons
Use the number buttons
5 Select Done, and then press the OK button.
NOTE If you do not operate the TV for 1 hour after it is powered on by the On Timer feature, it turns off.
To cancel the timer:
1 Press the SETUP button.
2 Select Timers > On Timer.
3 Press the OK button.
4 Press the ▲/▼ (arrow) buttons to select Enable On Timer and press the OK button.
5 Press the ◀/▶ (arrow) buttons to select Off.
Setting the sleep timer
You can set the TV to turn off after a specific amount of time (maximum = 12 hours).
Using the remote control:
1 Press the SLEEP button.
2 Set the amount of time until the TV turns off.
Repeatedly press the SLEEP button to increase the time.
Press the ▲/▼ (arrow) buttons to increase or decrease the time.
Using the on-screen menus:
1 Press the SETUP button.
2 Select Timers > Sleep Timer.
3 Press the OK button.
4 Select the amount of time until the TV turns off.
Use the number buttons.
◆ Press the ▲/▼ (arrow) buttons to increase or decrease the time.
NOTE If a power failure occurs, the sleep timer setting may be cleared.
To display the time remaining until the TV turns off, press the SLEEP button.
To cancel the sleep timer, press the SLEEP button repeatedly or press the ▲/▼ (arrow) buttons until it is set to 0 minutes.
NOTE When the following features are set, the feature that is set for the nearest time will function.
Sleep Timer
Auto shutdown after 1 hour of inactivity (after powering on by On Timer)
No signal auto power off (after approximately 15 minutes of no signal)
Setting No Signal Power Down
When an input's setting in this feature is set to On, The TV will automatically turn itself off after about 15 minutes if no signal is detected.
You can change each input's setting to Off: ANT/CABLE, Video 1, Video 2, ColorStream HD, HDMI 1, HDMI 2, HDMI 3, HDMI 4, or PC.
1 Press the SETUP button.
2 Select Options > Power Management > No Signal Power Down, and then press the OK button.
3 Press the ▲/▼ (arrow) buttons to select the item you want to change and press the OK button.
4 Press the ▲/▼ (arrow) buttons to select On or Off.
5 Press the EXIT button.
NOTE
◆ Default setting for each input is On.
A warning message will appear 1 minute before turning off.
Setting TV Power On Control
When the TV is connected to the home network via Wireless LAN with the TV Power On Control in Enabled, your TV can be turned on by control from Apps.
1 Press the SETUP button.
2 Select Options > Power Management > TV Power On Control and press the OK button.
3 Press the ▲/▼ (arrow) buttons to select Enabled (Active Standby).
NOTE
Depending on the device connected to the home network, it may take a while for the TV to turn on.
Depending on the device connected to the home network, this feature may not work.
If the unencrypted Wireless Setup is done, this feature can not be used.
The power consumption during Active Standby is more than it during Normal Standby.
After the change from Power On state to Active Standby, there may be a period of several seconds when the TV does not receive the operation from a remote control or external apparatus.
Displaying TV status information
To display TV status information, press the INFO button.
The following information will be displayed (if applicable):
◆ Current input (ANT/CABLE, Video, etc.)
Either “CABLE” (for cable TV) or “ANT” (for over-the-air broadcasts), if ANT/CABLE is the current input
◆ Channel number (if in ANT/CABLE mode)
Input label (if set)
◆ Digital signal strength indicator (for ATSC/QAM signals only)
- Stereo, Mono, or SAP audio status (when in HDMI ^TM input mode, PCM)
Video resolution
Aspect ratio of incoming video signal (4:3 or 16:9)
V-Chip rating status (if available)
GameTimer (if set)
◆ Channel Label (if set or received)
To close the screen, press the INFO button again.
The following additional information (only available for ANT/CABLE input) will display for digital channels (if applicable):
Title
Duration
Detailed description
◆ Next program’s information
Viewing support information
1 Press the SETUP button.
2 Select Get Help > System Information.
3 Press the OK button to display support information containing Web/Customer service numbers for US, Canada, and Mexico.
Resetting to Factory Defaults
You can reset all settings and channels to Factory Defaults.
1 Press the SETUP button.
2 Select Installation > Reset TV.
3 Enter your PIN code (if a PIN code has been set). A confirmation screen appears.
4 Select Yes, and then press the OK button. The TV will turn off automatically.
To cancel the reset:
Press the ◀/▶ (arrow) buttons to select No, and then press the OK button.
Power failure
If power is lost while you are watching the TV, the Last Mode Memory feature automatically turns on the TV when power is restored.
Chapter 7
Picture and Sound Controls
Selecting the picture size
You can view many program formats in several picture sizes—Native, 4:3, Full, TheaterWide 1, TheaterWide 2, TheaterWide 3, Normal, and Dot by Dot.
NOTE
The picture size illustrations are examples only. The format of the image (in any of the picture sizes) depends on the format of the signal you are currently watching. Select the picture size that displays the current program in the way that looks best to you.
Using these functions to change the picture size (i.e., changing the height/width ratio) for any purpose other than your private viewing may be prohibited under the Copyright Laws of the United States and other countries, and may subject you to civil and criminal liability.
Some picture sizes may not be available depending on the format of the signal being received.
If you select a TheaterWide® picture size, the top and bottom edges of the picture (including subtitles or captions) may be hidden. To view these edges, adjust the Picture Position or try viewing the program in 4:3 or Full, see “Scrolling the picture” on page 95.
You can save separate picture size preferences for each input on your TV.
To select the picture size using the Quick menu:
1 Press the QUICK button to open the Quick menu.
2 Select Picture Size, and then press the OK button.
3 Press the ▲/▼ (arrow) buttons to select the Picture Size, and then press the OK button.
To select the picture size using the remote control :
1 Press the PIC SIZE button.
2 While the Picture Size screen is open, repeatedly press the PIC SIZE button.
Native Mode™
This applies pixel-for-pixel image reproductions of Full HD content and eliminating overscanning; you see all of the original picture within the screen and eliminate scaling artifacts for a more accurate image.
These settings are for viewing in 480i (HDMI ^TM ), 480p (HDMI ^TM ), 720p, 1080i, and 1080p signal programs.
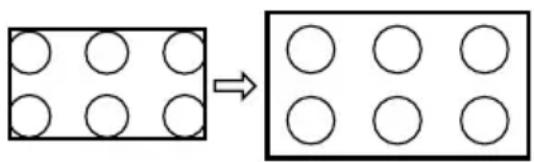
text_image
Diagram showing transformation of a 3x3 grid of circles into a 2x2 grid of circles, with an arrow indicating the direction.(Sample Illustration) Picture size - Native
If receiving a 1080i, 1080p, 720p, 480i (HDMI ^TM ), or 480p (HDMI ^TM ) signal program, the video is scaled to display the entire picture within the borders of the screen (i.e. no overscanning).
This is especially useful for external HD sources such as DVHS movies, video games, or computer graphics.
None of the picture is hidden.
NOTE
This mode is supported only for HDMI ^™ (1080i, 1080p, 720p, 480i, and 480p), ColorStream ^® (1080i and 720p), and ANT/CABLE (digital) inputs (1080i, 1080p, and 720p).
Depending on the input signal, the picture's border may be hidden, displayed in black, or noisy.
4:3
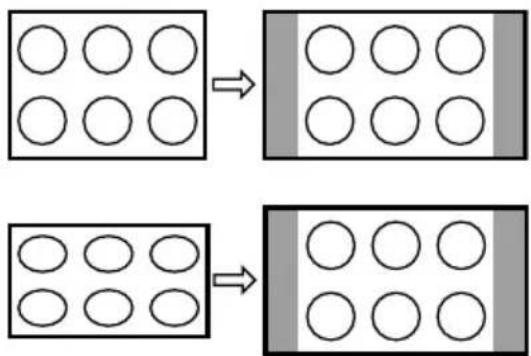
flowchart
graph TD
    A["Grid with 6 circles"] --> B["Grid with 10 circles"]
    C["Grid with 8 circles"] --> D["Grid with 10 circles"]
    E["Grid with 8 circles"] --> F["Grid with 10 circles"]
(Sample Illustration) Picture size - 4:3
Some program formats will display with sidebars and/or bars at the top and bottom.
Full
This setting is for viewing in the 16:9 (480i, 480p) source programs only.
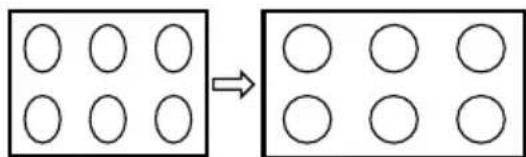
text_image
Diagram showing transformation of four circles in a 2x2 grid to two empty circles, likely illustrating a mathematical or logical pattern.(Sample Illustration) Picture size - Full 16:9
If receiving a squeezed 4:3 format program, the picture is stretched horizontally to fill the width of the screen but not stretched vertically.
This setting is for viewing in the 1080i, 1080p, and 720p program source.
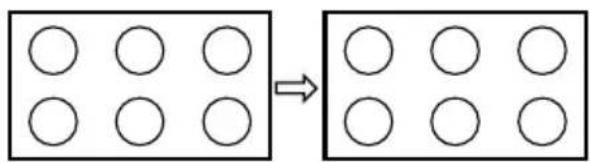
text_image
Diagram showing transformation of six circles in a 2x2 grid to four circles in a 3x3 grid, with an arrow indicating the process.(Sample Illustration) Picture size - Full
The edges of the picture may be hidden.
TheaterWide1
This setting is for viewing in 4:3 format programs.
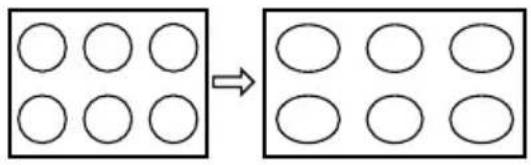
text_image
Diagram showing transformation of a 3x3 grid of circles into a 2x2 grid, with an arrow indicating the direction.(Sample Illustration) Picture size - TheaterWide1
The center of the picture remains close to its original proportions, but the left and right edges are stretched horizontally to fill the screen.
TheaterWide2
This setting is for viewing letter box programs.
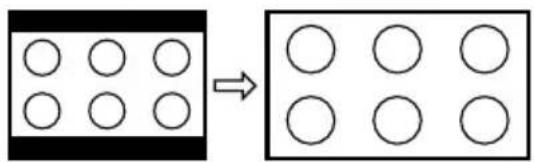
text_image
Diagram showing transformation of six circles in a 2x2 grid to four circles in a 3x3 grid, with an arrow indicating the process.(Sample Illustration) Picture size - TheaterWide2, letter box
The picture's top and bottom edges may be hidden*.
TheaterWide3
This setting is for viewing letter box programs with subtitles.
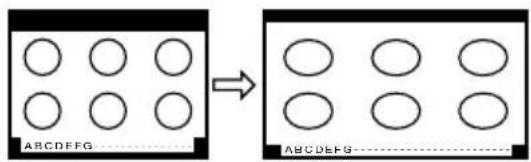
text_image
ABCDEFG → ABCDEFG(Sample Illustration) Picture size - TheaterWide3, letter box with subtitles
The picture's top and bottom edges are hidden*.
Normal
This setting is for viewing SVGA, XGA, WXGA, and SXGA sources.
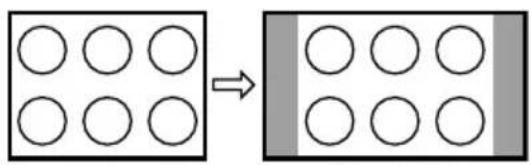
text_image
Diagram showing transformation of a 2x2 grid of circles into a 3x3 grid, with an arrow indicating the direction.(Sample Illustration) Picture size - Normal
This size is a non-stretched display. Some input signal formats will display with sidebars and/or bars at the top and bottom.
Dot by Dot
This setting is for viewing SVGA, XGA, WXGA, and SXGA sources.
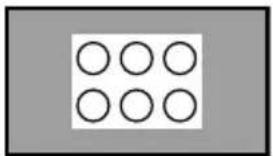
natural_image
Simple diagram of six circles arranged in a 2x2 grid within a gray rectangle (no text or symbols)(Sample Illustration) Picture size - Dot by Dot
“Dot by Dot” is a non-scaling display. Depending on the input signal format, the picture appears with sidebars and/or bars at the top and bottom, for example, SVGA input source.
* To view the hidden areas (such as subtitles or captions), see “Scrolling the picture” on page 95.
Scrolling the picture
If the edges of the picture are hidden, you can adjust the image's position.
NOTE
You can adjust the picture position when the picture size is set to TheaterWide2 or TheaterWide3.
When viewing Cloud TV, MediaShare, or Internet content this feature is not available.
1 Press the SETUP button.
2 Select Picture > Display Settings > Picture Position and press the OK button.
3 Press the ▲/▼ (arrow) buttons to select Vertical Position and press the OK button.
4 Press the ◀/▶ (arrow) buttons to make the appropriate adjustments. The adjustment range is from -5 to +10.
Using the Auto Aspect feature
When this feature is set to On, the TV will automatically select the picture size when one of the following input sources is received:
480i, 480p, 720p, 1080i digital signal from the ANT/CABLE input
480i, 480p, 720p, 1080i, 1080p, or VGA (60/72/75 Hz) signal from the HDMI ^TM 1/2/3/4 input
NOTE The auto aspect ratio feature is not applicable to the PC input.
1 Press the SETUP button.
2 Select Picture > Display Settings > Auto Aspect and press the OK button.
3 Press the ▲/▼ (arrow) buttons to select On.
4 Press the EXIT button.
Using the 4:3 Stretch
When 4:3 Stretch is activated, the TV displays 4:3 programs as a full-screen picture.
NOTE This feature is available when Auto Aspect is set to On.
1 Press the SETUP button.
2 Select Picture > Display Settings > 4:3 Stretch and press the OK button.
3 Press the ▲/▼ (arrow) buttons to select On.
4 Press the EXIT button.
Adjusting the picture
Selecting the picture mode
You can select your desired picture settings from the modes described below.
Mode: Description:
| AutoView® | Automatically adjusts multiple picture settings including Brightness, Contrast, Gamma, and Sharpness based on ambient room light conditions and incoming picture content to create the best possible picture settings without any manual adjustment. |
| Dynamic Maximizes Contrast, Color Saturation, Sharpness, Gray Scale and Brightness to create more vivid and dynamic images | |
| Standard Standard picture settings | |
| Movie Lower contrast for a darkened room | |
| Game Optimized for playing video games by displaying the images in their purest form (4:4:4) without the loss of color information. The result is superior image quality and shorter signal to screen time for a faster gaming experience. | |
| PC Optimized for viewing your personal computer | |
NOTE
PC mode is available for HDMI ^™ and PC inputs only (not displayed for other input sources).
Game mode is not available in ANT/CABLE input.
1 Press the SETUP button.
2 Select Picture > Picture Mode and press the OK button.
3 Press the ▲/▼ (arrow) buttons to select a mode.
4 Press the EXIT button.
NOTE The picture mode you select affects the current input only. You can select a different picture mode for each input.
Adjusting the picture quality
The adjustments you make to picture quality under a picture mode are saved to that picture mode.
| Selection Press (◀) Press (▶) | |
| Backlight* Darker Lighter | |
| Contrast Lower Higher | |
| Brightness Darker Lighter | |
| Color Paler Deeper | |
| Tint Reddish Greenish | |
| Sharpness Softer Sharper | |
* Backlight: Adjusts the brightness of the entire screen. When in video mode and no signal is input, this selection is set to 0. (Settings are stored in memory.)
NOTE
Some settings cannot be adjusted when the picture mode is set to AutoView.
To adjust the picture quality:
1 Press the SETUP button.
2 Select Picture and press the OK button.
3 Press the ▲/▼ (arrow) buttons to select the setting you would like to adjust (Backlight, Contrast, Brightness, Color, Tint, or Sharpness).
4 Press the ▶ (arrow) button.
5 Press the ◀/▶(arrow) buttons to adjust the setting.
6 Press the EXIT button.
NOTE
◆ Any picture settings that you adjust affect the current input only. You can adjust the picture quality separately for each input.
Depending on a Sharpness value, the Edge Enhancer effect may be reduced.
To reset to the factory defaults:
1 Press the SETUP button.
2 Select Picture > Reset.
3 Press the OK button.
A confirmation screen appears.
4 Press the ◀/▶(arrow) buttons to select Yes, and then press the OK button.
Using the advanced picture settings features
NOTE Some of the Advanced Picture Settings features will not be available for adjustment when the Picture Mode is set to AutoView.
Edge Enhancer
If the Edge Enhancer set to On, the clarity levels can be adjusted automatically.
1 Press the SETUP button.
2 Select Picture > Advanced Picture Settings > Edge Enhancer and press the OK button.
3 Press the ▲/▼ (arrow) buttons to select On.
4 Press the EXIT button.
NOTE
If the picture mode is set to AutoView, Edge Enhancer is not available.
This feature may not work properly depending on the content.
Noise may appear on the image depending on the device connected to the TV (e.g. a device with a specific enhancer function).
Dynamic Contrast
Dynamic Contrast detects changes in picture quality that affect the appearance of your contrast settings and then automatically adjusts the video.
1 Press the SETUP button.
2 Select Picture > Advanced Picture Settings > Dynamic Contrast and press the OK button.
3 Press the ▲/▼ (arrow) buttons to select High, Middle, Low, or Off.
4 Press the EXIT button.
DynaLight®
The DynaLight ^® dynamic backlight control monitors the brightness of each video frame and automatically adjusts backlight intensity based on the content to create higher dynamic contrast, for deeper blacks and increased depth.
1 Press the SETUP button.
2 Select Picture > Advanced Picture Settings > DynaLight and press the OK button.
3 Press the ▲/▼ (arrow) buttons to select On or Off.
4 Press the EXIT button.
ClearScan®
ClearScan ^® 120Hz technology utilizes advanced backlight control with image synchronization to double the television refresh rate for clearer fast motion video. This technology is ideal for watching action movies, sports and video games. (For L4300U series)
ClearScan ^® 240Hz uses both frame interpolation technology and advanced backlight control with image synchronization to quadruple the TV refresh rate for an even clearer fast motion video. (For L7300U series)
1 Press the SETUP button.
2 Select Picture > Advanced Picture Settings > ClearScan and press the OK button.
3 Press the ▲/▼ (arrow) buttons to select Cinema, Smooth, Standard, or Off.
4 Press the EXIT button.
NOTE
If the picture mode is set to Game or PC mode, this feature is automatically not available.
Cinema Mode (L4300U Series)
This feature provides smoother motion and a crisper image.
1 Press the SETUP button.
2 Select Picture > Advanced Picture Settings > Cinema Mode and press the OK button.
3 Press the ▲/▼ (arrow) buttons to select On or Off.
4 Press the EXIT button.
NOTE
If the picture mode is set to Game or PC mode, this feature is automatically set and is not available.
MPEG NR
The MPEG noise reduction feature allows you to reduce visible interference caused by MPEG compression.
1 Press the SETUP button.
2 Select Picture > Advanced Picture Settings > Noise Reduction and press the OK button.
3 Press the ▲/▼ (arrow) buttons to select MPEG NR and press OK.
4 Press the ▲/▼ (arrow) buttons to select Low, Middle, High, or Off.
5 Press the EXIT button.
NOTE
If the picture mode is set to Game or PC, this feature is not available.
UltraClear DNR
DNR is a Dynamic Noise Reduction technology that filters out video noise without decreasing picture sharpness for clean, crystal-clear images.
1 Press the SETUP button.
2 Select Picture > Advanced Picture Settings > Noise Reduction and press the OK button.
3 Press the ▲/▼ (arrow) buttons to select DNR and press the OK button.
4 Press the ▲/▼ (arrow) buttons to select Low, Middle, High, Auto, or Off.
5 Press the EXIT button.
NOTE
The differences may not always be noticeable. For the best results, use lower settings, as picture quality may be greatly reduced if the setting is too high.
If the picture mode is set to Game or PC, this feature is not available.
Ambient Light Sensor
When the ambient light function of Ambient Light Sensor is set to On, the TV optimizes the backlighting levels to suit ambient light conditions.
1 Press the SETUP button.
2 Select Picture > Advanced Picture Settings > Auto Brightness Sensor and press the OK button.
3 Press the ▲/▼ (arrow) buttons to select On or Off.
4 Press the EXIT button.
NOTE When the picture mode is set to AutoView ^® , this feature is automatically set to On.
ColorMaster™
The ColorMaster ^TM feature allows you to adjust standard colors.
1 Press the SETUP button.
2 Select Picture > Advanced Picture Settings > ColorMaster and press the OK button.
3 Press the ▲/▼ (arrow) buttons to select On or Off.
4 Press the EXIT button.
Base Color Adjustment
When ColorMaster ^TM is set to On, the list of base colors appears.
You can select a base color to adjust.
1 Press the SETUP button.
2 Select Picture > Advanced Picture Settings > Base Color Adjustment.
3 Press the OK button.
The Base Color Adjustment screen appears.
4 Press the ▲/▼ (arrow) buttons to select a color. Press ▶ (arrow) button.
5 Press the ◀/▶ (arrow) buttons to select Hue, Saturation, or Brightness.
6 Press the ▲/▼ (arrow) buttons to adjust the setting.
7 Repeat Steps 4 through 6 to adjust other colors. To reset the adjustments to the factory defaults, select Reset on the screen, and then press the OK button. (A confirmation screen appears. Press ◀/▶(arrow) buttons to select Yes, and then press the OK button.)
Color temperature
1 Press the SETUP button.
2 Select Picture > Advanced Picture Settings > Color Temperature and press the OK button.
3 Select Color Temperature and press the OK button. Press the ▲/▼ (arrow) buttons to select Cool, Medium, or Warm.
4 Press the OK button.
5 Press the ▲/▼ (arrow) buttons to select the Red Level, Green Level, or Blue Level.
6 Press the ▶ (arrow) button.
7 Press the ◀/▶ (arrow) buttons to adjust the color level. The adjustment range is -10 (less of selected color) to +10 (more of selected color).
8 Press the EXIT button.
NOTE This feature is not available in Standard and Movie mode.
Resetting advanced picture settings to the factory default
1 Press the SETUP button.
2 Select Picture > Advanced Picture Settings > Reset.
3 Press the OK button.
A confirmation screen appears.
4 Select Yes, and then press the OK button.
Setting the expert picture settings
NOTE This feature is only available in Standard and Movie mode.
Test Pattern
When the test pattern is on screen, you can navigate the Picture submenus without removing the image. When you move to a non-Picture menu, or close the menus, regular video will be restored.
1 Press the SETUP button.
2 Select Picture > Expert Picture Settings > Test Pattern and press the OK button.
3 Press the ▲/▼ (arrow) buttons to select On.
4 Adjust picture settings.
RGB Filter
This feature individually enables or disables the red, green, and blue components of the picture to allow for more accurate adjustment of each color.
1 Press the SETUP button.
2 Select Picture > Expert Picture Settings > RGB Filter and press the OK button.
3 Press the ▲/▼ (arrow) buttons to select Red, Green, or Blue to adjust.
4 Press the ▶ (arrow) button.
5 Press the ▲/▼ (arrow) buttons to select On, and then press the OK button.
6 Press the ▼(arrow) button to select Color or Tint, press ◀/▶ (arrow) button to adjust.
7 Press the EXIT button.
NOTE It is not possible to turn off all three colors simultaneously.
White Balance
Window Display
This feature displays the Window Pattern to adjust the white balance.
1 Press the SETUP button.
2 Select Picture > Expert Picture Settings > White Balance and press the OK button.
3 Press the ▲/▼ (arrow) buttons to select Window Display and press the OK button.
4 Press the ▲/▼ (arrow) buttons to select On.
5 Adjust the picture settings.
Setting Type
You can adjust the white balance setting.
2P White Balance:
1 Press the SETUP button.
2 Select Picture > Expert Picture Settings > White Balance > Setting Type and press the OK button.
3 Press the ▲/▼ (arrow) buttons to select 2P and the press the OK button.
4 Press the ▲/▼ (arrow) buttons to select 2P White Balance and press the OK button.
5 Press the ▲/▼ (arrow) buttons to select Red-Offset, Green-Offset, Blue-Offset, Red-Gain, Green-Gain, or Blue-Gain.
6 Press the ▶ (arrow) button.
7 Press the ◀/▶ (arrow) buttons to adjust.
10P White Balance:
1 Press the SETUP button.
2 Select Picture > Expert Picture Settings > White Balance > Setting Type and press the OK button.
3 Press the ▲/▼ (arrow) buttons to select 10P and the press the OK button.
4 Press the ▲/▼ (arrow) buttons to select 10P White Balance and press the OK button.
5 Press the ▲/▼ (arrow) buttons to select IRE, Red, Green, or Blue.
6 Press the ▶ (arrow) button.
7 Press the ◀/▶ (arrow) buttons to adjust.
Adjusting the audio
Muting the sound
Press the MUTE button to partially reduce (1/2 Mute) or turn off (Mute) the sound. Each time you press the MUTE button, the mute mode changes in the following order: 1/2 Mute, Mute, Volume, 1/2 Mute, etc.
NOTE If you modify items in the Sound menu while Mute is active, Mute is cancelled.
Selecting stereo/SAP broadcasts
The MTS (multi-channel TV sound) feature is only available for analog signals on the ANT/CABLE input. When the TV receives a stereo or SAP (second audio program) broadcast, the icon STEREO or SAP appears on screen when the INFO button is pressed.
To listen in stereo sound:
1 Press the SETUP button.
2 Select Sound >MTS and press the OK button.
3 Press the ▲/▼ (arrow) buttons to select Stereo.
4 Press the EXIT button.
NOTE
You can typically leave the TV in Stereo mode because it outputs the type of sound being broadcast (stereo or monaural).
If the sound is noisy, select Mono.
If there is no sound in SAP mode, select Stereo.
Adjusting the audio balance
You can adjust the audio balance.
1 Press the SETUP button.
2 Select Sound > Balance and press the OK button.
3 Press the ◀/▶ (arrow) buttons to adjust the balance.
4 Press the EXIT button.
Adjusting the range
You can adjust bass and treble.
1 Press the SETUP button.
2 Select Sound > Bass or Treble.
3 Press the OK button.
4 Press the ◀/▶ (arrow) buttons to adjust the range.
5 Press the EXIT button.
TV Speakers On/Off
This feature allows you to turn the TV speakers off when connecting the audio system.
1 Press the SETUP button.
2 Select Sound > TV Speakers and press the OK button.
3 Press the ▲/▼ (arrow) buttons to select On or Off.
To turn on the built-in speakers:
1 Choose On in step 3 above.
Setting the Primary Audio Language
You can set the Primary Audio Language of the digital broadcast.
1 Press the SETUP button.
2 Select Sound > Primary Audio Language and press the OK button.
3 Press the ▲/▼ (arrow) buttons to select English, Français, or Español.
4 Press the EXIT button.
Selecting the optical audio output format
You can select the optical audio output format when you connect a Dolby® Digital decoder or other digital audio systems to the TV's DIGITAL AUDIO OUT terminal.
Audio Format
1 Press the SETUP button.
2 Select Sound > Digital Audio Output > Audio Format and press the OK button.
3 Press the ▲/▼ (arrow) buttons to select Auto or PCM.
4 Press the EXIT button.
Audio Delay
1 Press the SETUP button.
2 Select Sound > Digital Audio Output > Audio Delay and press the OK button.
3 Press the ▲/▼ (arrow) buttons to select Auto or Manual.
Auto: This mode automatically adjusts the audio timing to meet the video timing. The time lag might be large between the image and sound depending on the connected equipment (amplifier etc.). In that case, select Manual.
Manual: You can manually adjust the audio signal timing to meet the video signal timing.
4 Press the EXIT button.
Delay Adjustment
1 Press the SETUP button.
2 Select Sound > Digital Audio Output > Delay Adjustment and press the OK button.
3 Press the ◀/▶ (arrow) buttons to adjust the audio signal timing (0 - 250ms) to meet the video signal timing.
4 Press the EXIT button.
NOTE
This feature is grayed out when Audio Delay is in Auto.
A time lag will occur when the video signal or audio signal is changed. Adjust the timing accordingly.
When adjusting the timing, turn down the volume of the AV equipment used as far as possible.
Depending on the equipment, noise etc. may occur when the signal is changed.
Depending on the connected equipment (amplifier, etc.), adjustment may not be possible.
When the optical audio output setting (Auto PCM) is changed, it may be necessary to adjust the timing again.
Do not use other than for audio output from the AV amplifier, etc. (Malfunction may occur)
Using the Dolby® Digital Dynamic Range Control feature
You can further compress Dolby ^® Digital and Dolby ^® Digital Plus dynamic range so you can switch from digital to analog broadcasts at the same dynamic range.
1 Press the SETUP button.
2 Select Sound > Dynamic Range Control and press the OK button.
3 Press the ▲/▼ (arrow) buttons to select On.
NOTE This feature is available when Dolby ^® Digital or Dolby ^® Digital Plus is input to the TV in the following situations:
When tuned to a digital RF channel
When an HDMI™ input is used
This feature is automatically set to Off when Dynamic Volume (Audyssey
Dynamic Volume ^® is set to Day or Night.
This feature will also affect Digital Audio Output when the optical audio output format is set to PCM.
Audyssey Premium Television™
These televisions use a suite of technologies for better sound including:
Audyssey EQ ^® —provides clear, accurate and natural sound right out of the box. This technology ensures you enjoy your audio experience as much as your video.
Audyssey ABXTM—technology uses sophisticated driver analysis and low frequency monitoring to extend the range and bass of small speakers. This enables the system to produce lower frequencies than would be possible with a traditional system of the same size.
Audyssey Dynamic Volume®—automatically adjusts volume to
provide a consistent sound level between television programs, commercials, and between the loud and soft passages of movies.
Audyssey Volume Extension®—doubles the volume capability in small speakers while blocking distortion so your TV gets loud and still sounds great.
Day/Night Modes—automatically keeps the volume of the TV at the perfect level for day or night.
Wall/Table Modes—automatically keeps the volume at the perfect level for television mounted on a wall or located on a table-top.
Using Audyssey EQ ^® for Wall Mounted or Table-top TVs
This feature automatically keeps the volume at the perfect level for television mounted on a wall or located on a table-top.
1 Press the SETUP button.
2 Select Sound > Audyssey Premium Television > TV Mounting and press the OK button.
3 Press the ▲/▼ (arrow) buttons to select Wall or Table.
Using Audyssey Dynamic Volume®
This feature provides a consistent sound volume between television programs, commercials, and between the loud and soft passages of movies.
1 Press the SETUP button.
2 Select Sound > Audyssey Premium Television > Dynamic Volume and press the OK button.
3 Press the ▲/▼ (arrow) buttons to select Night, Day, or Off.
NOTE
If Dynamic Range Control is set to On, this feature is automatically set to Off.
This feature does not affect the audio signal output from the DIGITAL AUDIO OUT terminal.
Audyssey ABX™
Audyssey ABX ^™ technology uses sophisticated driver analysis and low frequency monitoring to extend the range and bass of small speakers.
To turn on Audyssey ABX™:
1 Press the SETUP button.
2 Select Sound > Audyssey Premium Television > Audyssey ABX
and press the OK button.
3 Press the ▲/▼ (arrow) buttons to select Off, Low, or High.
Audyssey EQ ^® and Audyssey Volume Extension ^® are default settings that are set to On.
Using the surround sound feature
Surround settings help to create a thrilling surround sound experience with deep, rich bass from stereo sound sources. Your TV's audio will sound fuller, richer, and wider.
Press the SETUP button. Select Sound > Surround, and then select On or Off.
Chapter 8
Advanced features
Using your home network
This TV can share videos, music, and photos across your home network and other connected products through the MediaShare feature. In order to do this, you will have to configure the network settings on your TV, see “MediaShare (Videos, Music, and Photos)” on page 141.
If you want to use your home network with an Internet connection, you will have to configure the network settings on your TV. If necessary, change the network settings, see “Setting up the Network” on page 113.
If you use Internet services, see the following note before use.
Third party Internet services are not provided by Toshiba, may change or be discontinued at any time, and may be subject to third party restrictions. Toshiba makes no warranties, representations, or assurances about the content, availability, or functionality of third party content or services. Third party internet services may require the creation of a separate account through a computer with internet access, and payment of one-time and/or recurring charges.
Certain features currently not available in Canada/Mexico.
When using a Wireless network connection
Wireless LAN and your Health:
Wireless LAN products, like other radio devices, emit radio frequency electromagnetic energy. However, the level of energy emitted by Wireless LAN devices is much less than the electromagnetic energy emitted by wireless devices like mobile phones.
Because Wireless LAN products operate within the guidelines found in radio frequency safety standards and recommendations, Toshiba believes Wireless LAN is safe for use by consumers. These standards and recommendations reflect the consensus of the scientific community and result from deliberations of panels and committees of scientists who continually review and interpret the extensive research literature.
In some situations or environments, the use of Wireless LAN may be restricted by the proprietor of the building or responsible representatives of the organization. Such restrictions may apply in environments where the risk of interference to other devices or services is perceived or identified as harmful.
If you are uncertain of the policy that applies to the use of wireless devices in a specific organization or environment, you are encouraged to ask for authorization to use the Wireless LAN device prior to turning on the equipment.
Using the TV in a wireless LAN environment:
It is recommended to use IEEE 802.11a or IEEE 802.11n on 5 GHz for audio and SD video streaming.
It is recommended to use IEEE 802.11n on 5 GHz for HD video streaming.
It is recommended that the encoding rate of video content be 20 Mbps or less.
It is not recommended to use 2.4 GHz for audio and video streaming.
Content playback may be interrupted by surrounding interference.
Setting up the Network
You can select the Network Type.
1 Press the SETUP button.
2 Select Network > Network Setup > Connection Type and press the OK button.
3 Press the ▲/▼ (arrow) buttons to select Wired or Wireless.
4 Press the OK button.
If you select Wired, see “Advanced Network Setup” on page 118. If you select Wireless, see the next section.
Wireless Setup
NOTE Continued AP (Access Point) connection is not guaranteed. Connection may be lost while watching TV.
There are three methods for wireless setup:
Easy Setup (WPS)
If AP supports WPS, this can be used.
WPS is a standard designed to simplify the connection of wireless LAN equipment and the setup of network security features.
Assisted Setup (setup using the AP's notification information) Network Name, Authentication, and Encryption are decided based on information from the AP. You need to manually set the Security Key.
◆ Manual Setup
Requires manually entering all settings.
NOTE
In order to secure your home network, it is strongly recommended that you use a wireless access point with encryption.
When Encryption is set to “None”, data transmitted over a wireless LAN is not securely protected. Unauthorized users may access your data and network without appropriate security measures. Selecting an encryption setting from your Toshiba TV and using a secure network for wireless LAN transmissions may help avoid unauthorized access to your important data and/or TV. Toshiba disclaims any and all responsibility or liability resulting from any wireless transmissions over the Internet through your Toshiba TV.
Easy Setup using PBC (Push button configuration)
1 Press the SETUP button.
2 Select Network > Network Setup > Wireless Setup and press the OK button
3 Press the ▲/▼ (arrow) buttons to select Easy Setup and press the OK button.
4 Press the ▲/▼ (arrow) buttons to select PBC.
5 Press the ▼ (arrow) button to select Start Scan, and then press the OK button.
6 Following the on-screen instructions, push the appropriate button on your AP.
7 When a screen reporting that “the setup has succeeded” appears, press the OK button.
To cancel searching for the AP:
Press the BACK button while searching for the AP. A message appears. Press the ◀/▶ (arrow) buttons to select Yes, and then press the OK button.
Easy Setup using PIN (Personal Identification Number)
1 Press the SETUP button.
2 Select Network > Network Setup > Wireless Setup and press the OK button.
3 Press the ▲/▼ (arrow) buttons to select Easy Setup and press the OK button.
4 Press the ▲/▼ (arrow) buttons to select PIN.
5 Press the ▼ (arrow) button to select Start Scan, and then press the OK button.
The Scan screen appears.
6 Enter the PIN displayed on this screen into your computer or AP.
7 Press the ▲/▼ (arrow) buttons to select the desired AP, and then press the OK button.
NOTE Check the MAC address on the label or in the manual of the AP and select an AP.
8 When a screen reporting that “the setup succeeded” appears, press the OK button.
To cancel searching for the AP:
Press the BACK button while searching for the AP. A message appears. Press the ◀/▶ (arrow) buttons to select Yes, and then press the OK button.
Assisted Setup
1 Press the SETUP button.
2 Select Network > Network Setup > Wireless Setup and press the OK button.
3 Press the ▲/▼ (arrow) buttons to select Assisted Setup and press the OK button.
4 Press the ▲/▼ (arrow) buttons to select the desired AP, and then press the OK button.
NOTE Check the MAC address on the label or in the manual of the AP and select an AP.
5 Select Security Key, and then press the OK button. The Software Keyboard appears.
6 Input the Security Key using the Software Keyboard. For more information, see “Using the software keyboard” on page 121.
7 To save your settings, press the GREEN button.
NOTE The Security Key must adhere to the following conditions:
TKIP/AES: 8-63 ASCII or 64 Hex characters
WEP: 5 or 13 ASCII or 10 or 26 Hex characters
8 Select Done, and then press the OK button.
NOTE Settings are not saved if the BACK button is pressed before Done is selected.
Manual Setup
1 Press the SETUP button.
2 Select Network > Network Setup > Wireless Setup and press the OK button.
3 Press the ▲/▼ (arrow) buttons to select Manual Setup, and then press the OK button.
4 Press the ▲/▼ (arrow) buttons to select Network Name, and then press the OK button.
The Software Keyboard window appears.
5 Input the Network Name using the Software Keyboard. For more information, see “Using the software keyboard” on page 121.
6 To save your settings, press the GREEN button.
7 Press the ▲/▼ (arrow) buttons to select Authentication and press the OK button.
Press the ▲/▼ (arrow) buttons to select Open System, Shared Key, WPA-PSK, or WPA2- PSK.
8 Press the ▲/▼ (arrow) buttons to select Encryption and press the OK button.
Press the ▲/▼ (arrow) buttons to select None, WEP, TKIP, or AES.
NOTE Certain encryption types are only compatible with specific authentication types.
When Authentication is Open System and Shared Key, only WEP or None are compatible.
When Authentication is WPA-PSK or WPA2-PSK, only TKIP or AES are compatible.
When incompatible Authentication/Encryption pairings are attempted, a warning message will be displayed, and no connection attempt will be made until the incompatibility is resolved.
9 Press the ▲/▼ (arrow) buttons to select Security Key, and then press the OK button.
The Software Keyboard window appears.
10 Input the Security Key using the Software Keyboard. For more information, see “Using the software keyboard” on page 121.
11 To save your settings, press the GREEN button.
NOTE This item is grayed out when Encryption is set to None.
12 Select Done, and then press the OK button. When Encryption is set to None, a message appears.
13 Press the ◀/▶ (arrow) buttons to select Yes, and then press the OK button.
NOTE Settings are not saved if the BACK button is pressed before Done is selected.
Wireless Information
The settings configured in Wireless Setup can be confirmed.
1 Press the QUICK button.
2 Select Wireless Information, and then press the OK button.
3 Press the RED button to check the availability of surrounding APs. A Wireless Information screen appears when a connection is successfully made.
Item: Description:
| Status The message, “Connected” appears when the TV is connected to the APThe message, “Disconnected” appears when the TV is disconnected from the AP | |
| Signal Connection signal strength with the AP (STRONG/MEDIUM/WEAK) | |
| Speed The link speed with the AP | |
| Mode Working mode (11a, 11b, 11g, 11n) | |
| Channel The channel in use (1-165) | |
| Network name SSID set | |
| Authentication Authentication set | |
| Encryption Encryption set | |
| Security key Security Key set | |
| AP MAC address The AP’s MAC address appears when the TV is connected to the AP | |
| TV MAC address The TV’s MAC address | |
| DHCP The message, “Enabled” appears when you use DHCP.The message, “Disabled” appears when you do not use DHCP. | |
| IP address The TV’s IP address | |
| Subnet Mask | Value of the Subnet Mask |
| Default Gateway | Default GATEWAY’s address |
| DNS | DNS’s address |
NOTE Even if an AP for IEEE 802.11n is used when Encryption is set to WEP or TKIP, the Speed value might be low. We recommend that the Encryption setting are changed to AES (Under manual setup).
Advanced Network Setup
NOTE When manually setting the IP Address, set Auto Setup to Off.
IP Address Setup
NOTE The settings in Auto Setup are linked to those selected in the DNS Setup menu. If Auto Setup is set to On, then Auto Setup in the DNS Setup menu will also be set to On.
Auto Setup:
1 Press the SETUP button.
2 Select Network > Network Setup > Advanced Network Setup and press the OK button.
3 Press the ▲/▼ (arrow) buttons to select IP Address Setup, and then press the OK button.
4 Press the ▲/▼ (arrow) buttons to select Auto Setup and press the OK button.
5 Press the ▲/▼ (arrow) buttons to select On.
NOTE Other items are grayed out when Auto Setup is set to On.
Manual Setup:
1 Press the SETUP button.
2 Select Network > Network Setup > Advanced Network Setup and press the OK button.
3 Press the ▲/▼ (arrow) buttons to select IP Address Setup, and then press the OK button.
4 Press the ▲/▼ (arrow) buttons to select Auto Setup and press the OK button.
5 Press the ▲/▼ (arrow) buttons to select Off.
6 Press the ▲/▼ (arrow) buttons to select IP Address.
7 Press the ◀/▶ (arrow) buttons to select the IP Address field and use the 0-9 buttons to enter in a digit. Press the ▶ (arrow) button to select the subsequent fields. To save the setting, press the OK button.
NOTE IP address field numbers must be between 0 and 255. If you input an incompatible number and press the OK button, the field number will be reset to the previous value.
8 Press the ▲/▼ (arrow) buttons to highlight Subnet Mask, and edit in the same way as IP Address.
9 Press the ▲/▼ (arrow) buttons to highlight Default Gateway, and edit in the same way as IP Address.
NOTE If you manually set the IP address, you must not use the same IP address with any other device. The IP address you use should be a private address. If you do not know the correct values to use, contact your network administrator or internet service provider.
DNS Setup
NOTE
When the DHCP function of the router connected to this TV is Off, set Auto Setup to Off, and manually set the DNS address(es). Your Internet Service Provider should have provided these to you.
The settings in Auto Setup are linked to those selected in the IP Address Setup menu. If Auto Setup is set to On, then Auto Setup in the IP Address Setup menu will also be set to On.
Auto setup:
1 Press the SETUP button.
2 Select Network > Network Setup > Advanced Network Setup and press the OK button.
3 Press the ▲/▼ (arrow) buttons to select DNS Setup, and then press the OK button.
4 Press the ▲/▼ (arrow) buttons to select Auto Setup and press the OK button.
5 Press the ▲/▼ (arrow) buttons to select On.
NOTE Other items are grayed out when Auto Setup is set to On.
Manual setup:
1 Press the SETUP button.
2 Select Network > Network Setup > Advanced Network Setup and press the OK button.
3 Press the ▲/▼ (arrow) buttons to select DNS Setup, and then press the OK button.
4 Press the ▲/▼ (arrow) buttons to select Auto Setup and press the OK button.
5 Press the ▲/▼ (arrow) buttons to select Off.
6 Press the ▲/▼ (arrow) buttons to select Primary DNS Address.
7 Press the ◀/▶ (arrow) buttons to select the field you want to change, and then use the number buttons to input the Primary DNS Address. To save the setting, press the OK button.
NOTE DNS address field numbers must be between 0 and 255. If you input an incompatible number and press the OK button, the field number will be reset to the previous value.
8 Press the ▲/▼ (arrow) buttons to select Secondary DNS Address, and edit in the same way as Primary DNS Address.
MAC Address
You can view the fixed MAC address for the TV.
1 Press the SETUP button.
2 Select Network > Network Setup > Advanced Network Setup and press the OK button.
3 Press the ▲/▼ (arrow) buttons to select MAC Address, and then press the OK button.
Network Connection Test
This function checks Internet connectivity.
1 Press the SETUP button.
2 Select Network > Network Setup > Network Connection Test, and then press the OK button.
A message appears to indicate whether the connection was successful or not.
NOTE Favorable Network Connection Test results do not guarantee an Internet Connection. Depending on the situation, some Internet features may not be available.
To cancel Network Connection Test, press the EXIT button while searching for the Internet connection.
Using the software keyboard
You can enter text using the Software Keyboard.
The Software Keyboard window will appear when you press the OK button on a field that accepts character input.
NOTE When using the SmartTV features, software keyboard availability depends on the Internet service being accessed.
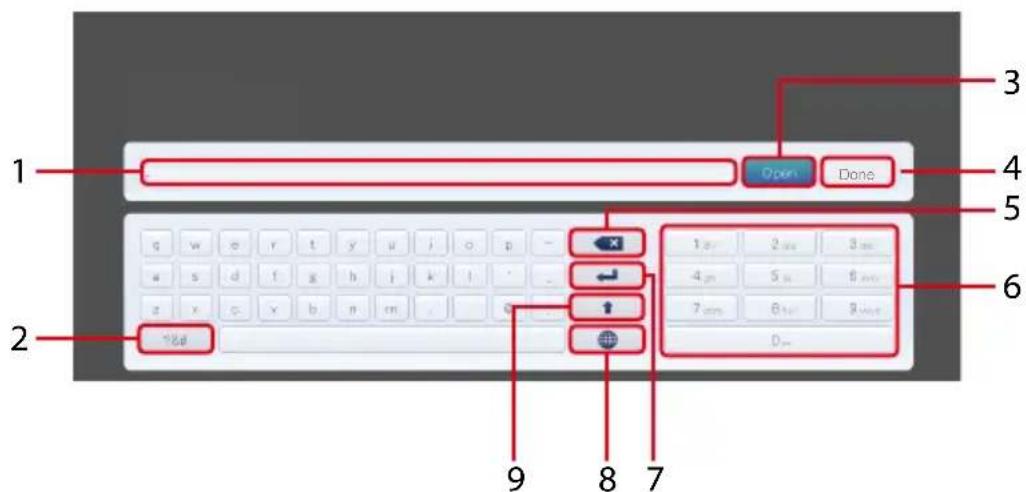
text_image
1 2 3 4 5 6 7 8 9 10 Open Done 11 22 33 44 55 66 77 88 99 100(Sample Illustration) Software keyboard
Item: Description:
1 Text entry field Press the OK button on this field, caret moving.
2 Symbol To switch Symbol character.
3 Open Display the Multi Line Input field. If it does not work, the button will be grayed out.
4 Done Saves whatever text was entered, exits the software keyboard and enters that text into the appropriate text field on the previous screen.
5 Delete Deletes one character to the left of the cursor
6 Number pad Inputs numbers. In keypad, these keys are used to select a character for entry.
7 Line Break To enter the Line Break.
8 Switch Language Display the Switch Keyboard Language Popup.
9 Shift To shift.
Enter text using the software keyboard
1 Highlight the desired character on the on-screen software keyboard.
2 Press the OK button.
3 Repeat Step 1 and 2 until you have entered all desired text.
4 Select Done or press the GREEN button to save your settings and return to the previous screen.
NOTE If the BACK button is pressed, changes are not saved and the software keyboard window is closed.
Input operation on the remote control:
Item: Description:
OK Inputs the selected character
0-9 These keys are used to select a character for entry.

Moves the character highlight
RED Deletes one character to the left of the cursor
GREEN Done
YELLOW Shortcut key for Shift
BLUE To display the help
BACK Closes the Software Keyboard window without saving changes
Performing a Software Upgrade
TOSHIBA may offer upgrades for the TV's software in the future.
The TV's software is upgraded via the Network.
NOTE An Internet connection is required.
Before downloading software:
1 Configure your TV to connect to the Internet.
NOTE
You will not be able to use the TV set while performing the upgrade.
Do not turn off the TV during the upgrade.
By upgrading, the factory default values may be changed.
2 Press the SETUP button.
3 Select Get Help > Software Upgrade.
4 Press the OK button.
The Network Upgrade screen appears.
5 Press the OK button.
NOTE If the network is not available, a warning message appears.
6 After a successful download, the TV software upgrade will start automatically.
Viewing the Software Licenses
The Licenses for the software used in this TV are available for viewing.
1 Press the SETUP button.
2 Select Get Help > Software Licenses.
3 Press the OK button.
A screen appears displaying all the licensing information required for the television's software.
Using Intel ^® WiDi
Intel ^® Wireless Display (Intel ^® WiDi) is supported on this TV. Toshiba has also included peer-to-peer wireless technologies to allow direct wireless connection between the TV and Intel ^® WiDi equipped PC or mobile device. If your PC or mobile device has Intel ^® WiDi, the Toshiba Cloud TVs allow you to display the small screen content on the big screen quickly and easily.
1 Press the QUICK button to open the Quick Menu.
2 Press the ▲/▼ (arrow) buttons to select Intel® WiDi and then press the OK button.
A prompt will appear on the screen when Connection Type is set to Wireless. Select Yes.
3 Launch the Intel ^ WiDi software on your device and select “scan for available adaptors”.
Intel ^® WiDi device name and ID list will then be displayed on the device screen.
Select the TV which you wish to connect to.
"Connecting" will be shown on the TV.
4 Connecting your PC to the TV the first time
When selecting the Toshiba TV for the first time, a 4-digit or 8-digit code will appear on your TV screen. This code needs to be inputted into your computer to authenticate the connection.
If authentication has already taken place
“Please Wait” will appear on screen.
5 After the Intel ^ WiDi connection is complete, the TV screen will mirror the content shown on the device screen.
NOTE
When connecting Intel ^® WiDi, device must have power turned on.
When the TV Network Settings are set to Wireless and Intel ^® WiFi software is starting up, other TV applications cannot be used.
Intel ^® WiFi device name of the TV can be changed from the Intel ^® WiFi software.
To exit Intel ^® WiDi:
Exit Intel ^® Wireless Display by pushing the disconnect button on Intel ^® WiDi software on the device or by pressing the EXIT button on the TV remote control.
NOTE If the device has been inactive for some time, the Intel ^ WiDi connection will be disconnected automatically.
Changing the Intel ^® WiDi Device Name
The TV's Intel ^® WiDi device name can be changed.
1 Press the SETUP button.
2 Select Network > Network Device Setup > Intel ^® WiDi Setup and press the OK button.
3 Press the ▲/▼ (arrow) buttons to select Intel® WiDi Device Name and press the OK button.
4 Select the Intel ^® WiDi Device Name and press the OK button. The Software Keyboard window will appear.
5 Input the Intel ^ WiDi device name by using the software keyboard. Press the GREEN button.
6 Select Done and press the OK button to save your setting.
Device List
Device List displays a list of MAC addresses for previously connected device that have been connected before. The maximum number that can be stored is 20.
If the list run out of space, the least-recently-used MAC address will be deleted and the new MAC address added automatically.
1 Press the SETUP button.
2 Select Network > Network Device Setup > Intel ^® WiDi Setup and press the OK button.
3 Press the ▲/▼ (arrow) buttons to select Device List and press the OK button.
Device List will appear.
The registered device can be deleted one by one by pressing Red button in the List.
When doing so the following text can be seen “Do you want to unregister this device? Yes/No” (default cursor is “No”).
Using the Cloud TV Service
Toshiba's universal portal for internet content and services. (services are dependent on country).
NOTE You need to connect to the Internet before using this feature, see "Setting up the Network" on page 113.
1 Press the 🔊 button. The menu screen of the Cloud TV service is displayed.
2 Press the ▲/▼/◄/► (arrow) buttons to select a Cloud TV service, and press the OK button.
Using the Cloud TV Service features
NOTE
You need to connect to the Internet before using this feature, see "Setting up the Network" on page 113.
- Certain services may not be currently available in your area.
User registration or login may be required to use some services.
Third party Internet services are not provided by Toshiba, may change or be discontinued at any time and may be subject to Internet service provider restrictions. Toshiba makes no warranties, representations, or assurances about the content, availability or functionality of third-party content or services. Use of third party Internet services may require the creation of a separate account through a computer with Internet access and/or payment of one-time and/or recurring charges and membership. Not all third party services may be available on or compatible with this product. In order to experience the full suggested capabilities of this product, fully-compatible devices may be required.
NOTE
If the display of the date and time is wrong, try to turn off the TV, and turn it on again.
The menu items for features like the Apps may change in the upgrade process.
eMANUAL
The eMANUAL provides on-screen, context-sensitive, instructions that describe the TV features.
To access the eManual, press the eMANUAL button on the remote control and select "eManual". Or you can access the eManual through the icon on the Cloud TV Portal pages.
Featured apps
With easier content discovery, Cloud TV puts you closer than ever to the things you love—like Netflix ^® and Hulu Plus ^® , along with video on demand, broadcast programming, the Web, even music, photos and videos on your home network.
NOTE Apps will vary by country and availability may change in the future with respect to current apps.
Netflix®
Watching movies with Netflix®
1 Press the NETFLIX button on the remote control and select the Netflix ^® icon.
2 Follow the on-screen instructions.
After having activated Netflix ^® player and prepared an Instant Queue, movies and TV episodes in your Instant Queue will appear on the TV screen. Select the desired content using the remote control.
NOTE
The resolution of video content streamed from Netflix ^® varies depending on the communication speed and bit-rate and is controlled by Netflix ^® .
Future upgrades can change the screens and messages displayed in the Netflix® feature.
Netflix® is supported in the U.S. and Canada, and may not be available in other countries or regions.
To close Netflix ^® , press the EXIT button.
To confirm the Netflix ESN (Electronic Serial Number):
1 Press the SETUP button.
2 Select Network > Smart Apps Setup > Netflix Setup and press the OK button.
3 Press the ▲/▼ (arrow) buttons to select ESN, and then press the OK button.
The Netflix ESN screen appears.
To deactivate your device:
1 Press the SETUP button.
2 Select Network > Smart Apps Setup > Netflix Setup and press the OK button.
3 Press the ▲/▼ (arrow) buttons to select Deactivation, and then press the OK button.
4 Press the ◀/▶ (arrow) buttons to select Yes, and then press the OK button.
VUDU™ HD Movies and VUDU™ Apps
VUDU ^™ HD Movies and VUDU ^™ Apps offer on-demand service that offers high definition movies on the Web.
1 Press the △ button.
2 Press the ◀/▶ (arrow) buttons to select VUDU, and then press the OK button.
NOTE
Use of VUDU™ requires a working broadband Internet connection (1 to 2 Mbps for SD video, 2.25 to 4.5 Mbps for HD video, and 4.5 to 9 Mbps for HDX video).
The message "Buffering..." will display if the speed of your Internet connection can not keep up with the speed of the streaming content from VUDU™.
To close VUDU, press the EXIT button.
To deactivate your device:
1 Press the SETUP button.
2 Select Network > Smart Apps Setup > VUDU Deactivation.
3 Press the OK button.
4 Press the ◀/▶ (arrow) buttons to select Yes, and then press the OK button.
NOTE If the VUDU™ icons are not shown in the Cloud TV, you may need to update the TV firmware. You can access VUDU™ through the web browser.
Internet
Open/Web Browser
The open/web browser with HTML5 video and audio codecs which allow you to explore the web the way you want. Search for, bookmark, and browse your favorite sites to enjoy the content you want, with simple, intuitive navigation.
The web browser on this device:
does not support platform-dependent technologies such as ActiveX ^ .
◆ only supports preinstalled plug-ins.
- may not support media formats other than the following: JPEG / PNG / GIF.
uses a single built-in font. Some text may not be displayed as intended.
does not support downloading of files or fonts.
is a TV browser. It may work differently than PC browsers.
does not support parental control or locks in the content, and it is the responsibility of the user to monitor browser usage by minors.
NOTE Some pages may not be displayed correctly or may display differently on different devices.
Using the web browser
1 Connect to the network.
2 Press the 🔊 button on the remote control to access the web browser page.
3 Use the ▲/▼/◄/► (arrow) buttons to select to the URL Address Bar and press the OK button.
4 Enter the desired URL address by using the software keyboard, see "Using the software keyboard" on page 121.
Press the GREEN button when finished.
5 You can now browse websites on your TV using the ▲/▼/◄/► (arrow) buttons on the remote control.
NOTE
When you press the GREEN button while browsing web content, you can use the ▲/▼/◄/► (arrow) buttons on the remote control in mouse control mode.
You can use the Wireless QWERTY keyboard in addition to the software keyboard. (L7300U series only)
Browsing favorite websites
1 Connect to the network.
2 Press the 🔊 button on the remote control to access the web browser page.
3 Use the ▲/▼/◄/► (arrow) buttons to select the Favorites STAR icon on the browser menu bar and press the OK button.
NOTE By adding frequently visited websites to Favorites, you can browse them easily.
You can view the addresses of the websites you visited previously.
4 Select the item or folders to move to the desired URL address and press the OK button.
NOTE You can press the GREEN button on the remote for thumbnail view of all your favorites.
5 You can now browse websites on your TV using the ▲/▼/◄/► (arrow) buttons on the remote control.
NOTE When you press the GREEN button while browsing web content, you can use the ▲/▼/◄/► (arrow) buttons on the remote control in mouse control mode.
Adding favorite websites
1 Connect to the network.
2 Press the 🔒 button on the remote control to access the web browser page.
3 Follow “Using the web browser” on page 129 to display your desired website.
4 Press the Navigation buttons to scroll to Favorites STAR on the Browser Menu Bar and press the OK button.
NOTE By adding frequently visited websites to Favorites, you can browse them easily.
You can view the addresses of the websites you visited previously.
5 Press the OK button to save the desired website to your favorites.
NOTE The desired website is highlighted and displayed on the top row with the + (Add) icon.
The + (Add) icon will change to a page icon after the website has been saved to favorites.
6 Press the BACK button on the remote to return to browsing your website.
PIP (Picture-in-picture) function
When viewing the web browser page, currently airing programs or images from external inputs can be displayed in a PIP window (sub-screen).
1 Press the RED button while viewing the web browser page.
The currently airing program or images from external inputs are displayed in a PIP window.
The position of the PIP window, and whether it is displayed or not can be set in the web browser Settings.
To stop displaying the PIP window:
Press the RED button when the PIP window is displayed.
NOTE
The ▲/▼CHuttons cannot be used when the PIP window is displayed.
Using Skype™
Skype ^TM -ready Toshiba TVs bring your family and friends closer to your home. Skype ^TM on your Toshiba TV allows you to share special moments no matter the distance.
Before using Skype™ - Preparation
Connect the FREETALK HD Camera: TALK-7291 to the TV's USB terminal. Do not use a USB hub. For a Skype™-ready Toshiba TV compatible camera, please visit the following website: http://shop.skype.com
- Arrange the HD camera on top of the TV, ensuring it's in the center.
Connect to the network.
NOTE
◆ The HD camera is sold separately.
Do not connect a camera other than the recommended HD camera.
Using a wireless network may result in degraded call quality.
Some of the features available on other versions of Skype™ are not available on the television.
When using Skype™, some functions of the TV will not be available.
The sound settings are switched to Skype™ mode.
If you cannot hear the person you're speaking with, check your TV volume.
When Optical Digital output or Analog output is used and you are signed in, the ring tone may not sound.
The volume level on Skype™ may differ from other features on your TV.
When the Reset TV feature is used from the TV Menu, Skype™ information is reset to factory default settings.
- Screenshots used in this manual may differ from the TV Menu, Skype™ will be reset to its factory default settings.
▲WARNING
No emergency calls with Skype™
Skype™ cannot be used for emergency calls.
Getting started
1 Press the button on the remote control.
2 Select Skype and press the OK button. "Welcome to Skype" screen appears.
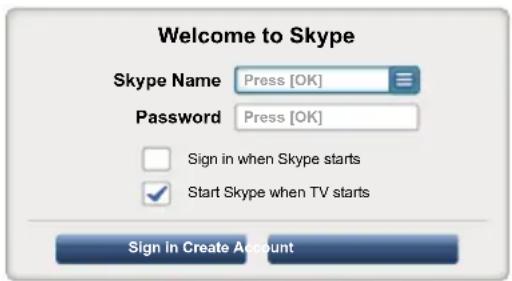
text_image
Welcome to Skype Skype Name Press [OK] Password Press [OK] Sign in when Skype starts Start Skype when TV starts Sign in Create Account(Sample Image) Welcome Skype screen
3 Select Sign in or Create Account.
To create a new account:
If you do not already have a Skype ^TM account, you can create a new one from your TV.
1 Select Create Account in the Welcome to Skype screen and press the OK button.
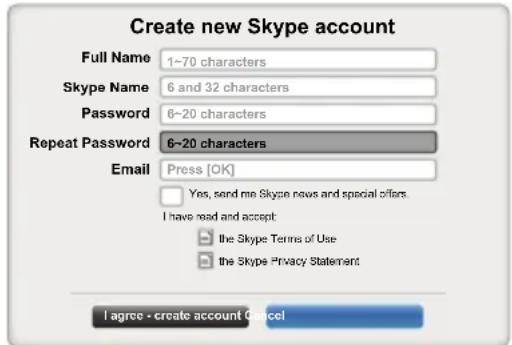
text_image
Create new Skype account Full Name 1-70 characters Skype Name 6 and 32 characters Password 6-20 characters Repeat Password 6-20 characters Email Press [OK] Yes, send me Skype news and special offers: I have read and accept: the Skype Terms of Use the Skype Privacy Statement I agree - create account Cancel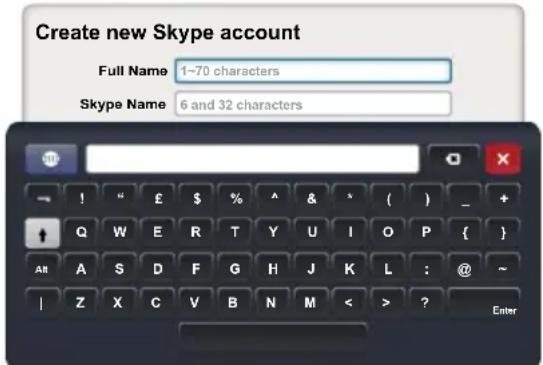
text_image
Create new Skype account Full Name 1-70 characters Skype Name 6 and 32 characters(Sample Image) Welcome Skype screen
2 Enter your Full Name, Skype Name, Password, Repeat password, and Email.
If you want to receive Skype™ news and special offers, check the selection box. Skype™ will inform users about new products, features and special offers by email.
3 Select "I agree - create an account" and press the OK button.
4 You'll now be signed into your new account.
NOTE
Please ensure that you have entered your email address correctly. It is required in case you lose or forget your password.
If you forget your password, visit skype.com to retrieve it.
If a message appears informing you that the entered Skype™ name is already registered, please choose a different name.
To Sign into Skype™:
If you have a Skype ^TM account, sign into Skype ^TM in the Welcome to Skype screen.
1 Enter your Skype Name and Password.
2 Select Sign in and press the OK button.
If “Sign in when Skype starts” is checked, your account will sign in automatically when you launch Skype™ from the menu.
If “Start Skype when TV starts” is checked, your account will sign in automatically when you turn on the TV.
Basic Operation
Press the ▲/▼ (arrow) buttons to select a tab (Contacts/People, Recent, Dialer, or Settings). Press the ▶/▲/▼ (arrow) buttons to select a contact from the list.
Your contact list will contain the following information:
Contact name / Current online status / Profile picture / Mood message
Your profile picture, status, Skype Name, mood message and available Skype Credit.
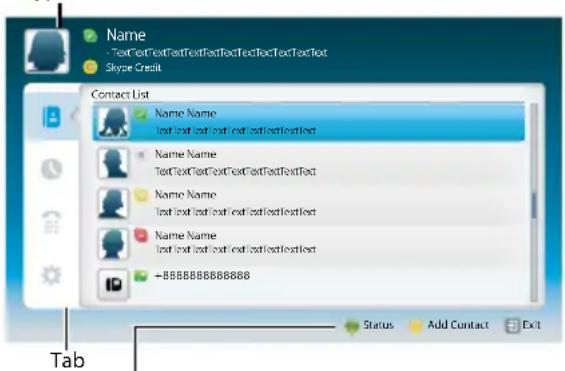
text_image
Name - TextTextTextTextTextTextTextTextTextTextText Skype Credit Contact List Name Name Text text text text text text text Name Name TextTextTextTextTextTextTextText Name Name Text text text text text text text Name Name Text text text text text text text +BBBBBBBB88888888888888888888888888888888888888888888888888888888888888888888888888888888888888888888888888880000000000000000000000000000000000000000000000000000000000000000000000000000000000000000000000000000 Tab
Status: Change your availability status
Add Contact: Add a Skype account or phone number
EXIT: Return to previous screen. When at contact list, the EXIT button will close Skype application without sign out.
The current status for each of your contacts are explained below:
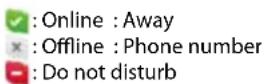

: Offline with voice messaging or call forwarding enabled
(Sample Image) Skype ^TM contact list menu
Contacts/People

Press the ▲/▼ (arrow) buttons to select Contacts tab. Press the ▶/▲/▼ (arrow) buttons to select a contact.
After pressing the OK button on each contact, the following functions will be displayed:
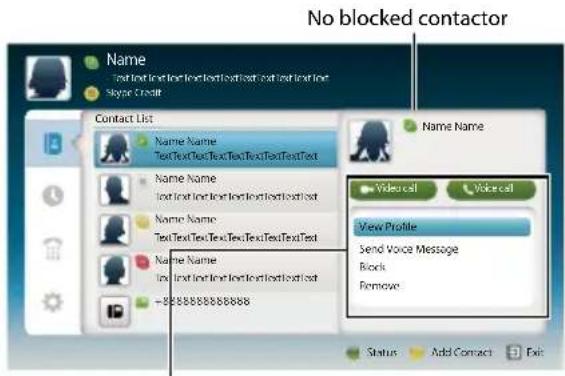
text_image
No blocked contactor Name TextTextTextTextTextTextTextText Skype Credit Contact List Name Name TextTextTextTextTextTextTextText Name Name TextTextTextTextTextTextText Name Name TextTextTextTextTextTextText Name Name TextTextTextTextTextTextText Name Name Text Text Text Text Text Text Text -888888888888 Name Name Text Text Text Text Text Text Text Vide call Voice call View Profile Send Voice Message Block Remove Status Add Contact ExitInitiate Video Call
View Profile - View contact profile (including Skype name, full name, birth date, gender, location, mobile number and email).
Send Voice Message - Send Voice Message to contact Block - Block / unblock contact Remove - Remove contact from list
(Sample Image) Skype ^TM contact list - select menu
Video or Voice call
Press the ▲/▼/◄/► (arrow) buttons to select Video call or Voice call, your screen will now display your call as shown below.
Video call
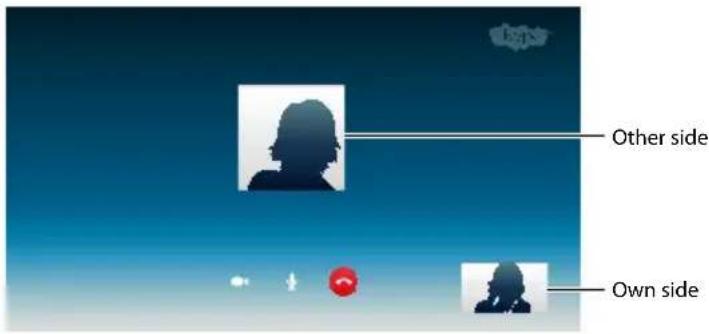
text_image
Other side Own sideVoice call
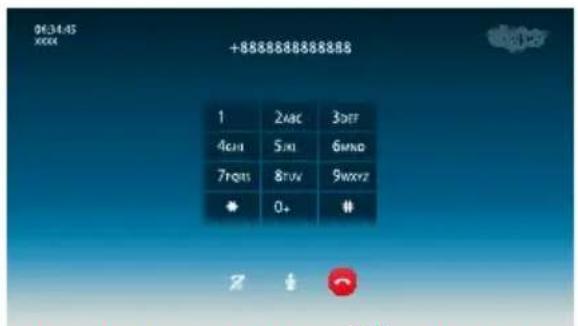
text_image
0634:45 xxxx +8888888888888 1 2ABC 3OFF 4GHz 5JX 6MND 7FQI 8TUV 9WXYZ * 0+ # Z ↓(Sample Image) Skype ^TM video/voice call screen
Below is all icon pictures in conversation window.

Start video

Stop video

Resume the call

Unmute the webcam mic

Mute the webcam mic

Normal size video

Full screen video

Open dial pad

End call ( Hang up the call )
Group calls
Using your Toshiba TV, you can join Skype ^™ group voice and video calls. However, you can only send and receive audio while on these calls.
NOTE You must be invited on to a group call, you cannot initiate it from the TV.
Incoming call
Incoming calls on Skype ^TM will be displayed on the bottom right hand corner of your TV screen. You'll also hear a ring tone which can be adjusted using the Volume buttons on your remote control.
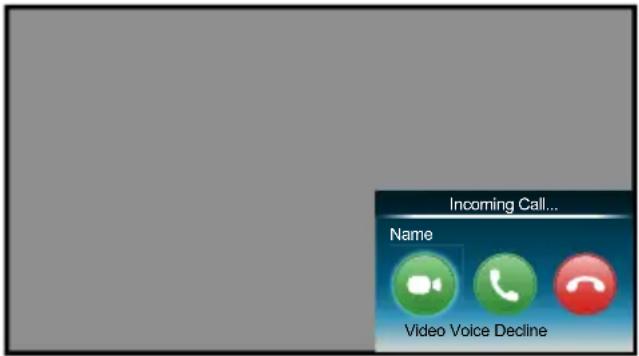
text_image
Incoming Call... Name Video Voice Decline(Sample Image) Skype ^TM incoming call menu
You are given three options when an incoming call arrives:
Video : Answer by video call.
Voice : Answer by voice call.
◆ Decline : Decline the incoming call.
NOTE If other applications are active or recording, you'll only get an "Incoming call notification" until the application or recording has stopped.
Status
When pressing the GREEN button, the change status window is displayed as below. You can change your status by pressing the ▲/▼ (arrow) buttons and then pressing the OK button. Exit by pressing the BACK button.
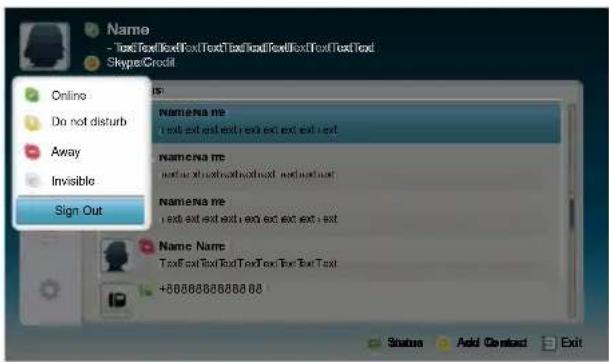
text_image
Name - TextText/TextText/TextText/TextText/TextText/Text Skype/Credit Online Do not disturb Away Invisible Sign Out Name:na me text ext ext ext ext ext ext ext ext Name:na me text ext ext ext ext ext ext ext ext Name:na me text ext ext ext ext ext ext ext ext Name Name TextText/Text/Text/Text/Text/Text/Text +8666666666666 Status Add Contact Exit(Sample Image) Skype ^TM status menu
Add Contact
You can add contacts to your contact list.
When you press the Yellow button on the remote control, the Add Contact Type menu window will appear on the screen.
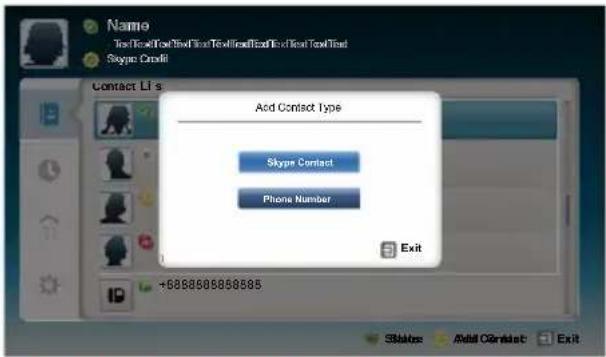
text_image
Name Text Real Text Real Text Real Text Real Text Real Text Real Skype Credit Contact Li's Add Contact Type Skype Contact Phone Number Exit +6888888888885 Status: Add Contact: Exit(Sample Image) Skype ^TM Add Contact Type menu
Two sub-functions are supported.
Press the ▲▼ (arrow) buttons to select Skype Contact or Phone Number and press the OK button.
Skype Contact
Enter the Skype Name of the person you're looking for. The search result will show up after get response from Skype™ server.
Phone Number
You can also enter a phone number in the search window.
Contact Search Results
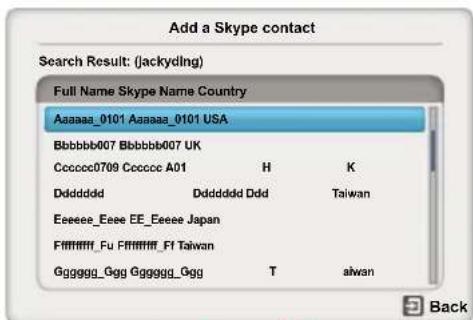
text_image
Add a Skype contact Search Result: (jackydling) Full Name Skype Name Country Aaaaa_0101 Aaaaa_0101 USA Bbbbb007 Bbbbb007 UK Ccccccc0709 Ccccccc A01 H K Ddddddd Ddddddd Ddd Taiwan Eeeee_Eeee EE_Eeeee Japan Fffffff_Fu Fffffff_F1 Taiwan Gggggg_Ggg Gggggg_Ggg T alwan(Sample Image) Skype ^TM contact search results screen
You can send a contact request to a person displayed in the search results. Press the ▲/▼ (arrow) buttons to select a person and press the OK button.
Notification of authorization request
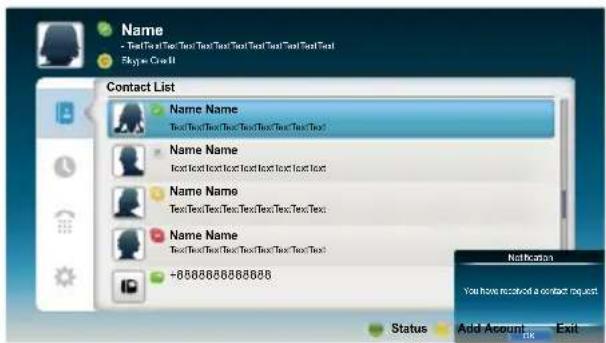
text_image
Name - Text File at Text Text Text Text Text Text Text Text Text Shyns Cre 81 Contact List Name Name Text Text Text Text Text Text Text Text Text Name Name Text Text Text Text Text Text Text Text Name Name Text Text Text Text Text Text Text Text Name Name Text Text Text Text Text Text Text Text +858888888888 Status Add Amount Exit Notification You have received a contact request(Sample Image) Skype ^TM notification of authorization request screen
When you receive a contact request, a pop-up menu will appear where you can choose to Accept, Block or Decline the request.
Press the ▲/▼ (arrow) buttons to select and press the OK button.
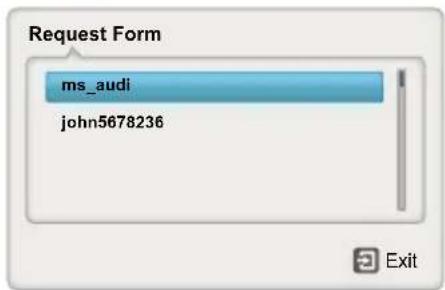
text_image
Request Form ms_audi john5678236(Sample Image) Skype ^TM request form screen
Press the ◀/▶ (arrow) button to select and press the OK button.
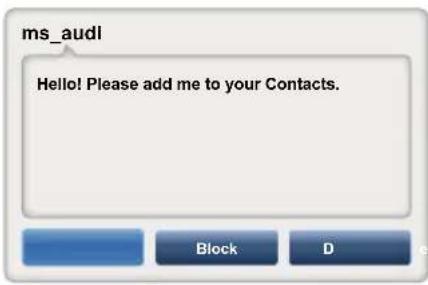
text_image
ms_audi Hello! Please add me to your Contacts. Block D(Sample Image) Skype ^TM request form screen
Recent
You can see a list of past events in "Recent".
Press the ▲/▼ (arrow) buttons to select the Recent tab. Press the ▶/▲/▼ (arrow) buttons to select an item and press the OK button.
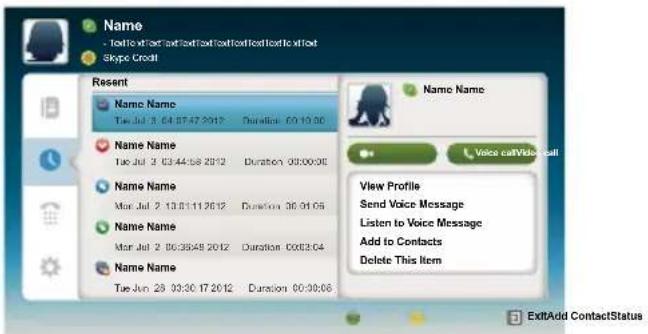
text_image
Name - Textile information textiles/Textiles/Textiles/Textiles Skype Credit Recent Name Name Tue Jul 3 04 07:47 2012 Duration: 00:10:00 Name Name Tue Jul 2 03:44:56 2012 Duration: 00:00:00 Name Name Mar Jul 2 13:01:11 2012 Duration: 30:01:05 Name Name Mar Jul 2 00:38:49 2012 Duration: 00:03:04 Name Name Tue Jun 28 03:30 17 2012 Duration: 00:38:06 Name Name Voice callVideo Call View Profile Send Voice Message Listen to Voice Message Add to Contacts Delete This Item ExitAdd ContactStatus(Sample Image) Skype ^TM recent screen
Press the ◀/▶ (arrow) buttons to select Video call or Voice call.
Each call has an icon with it. The meaning of each icon is as follows:
| Icons Description | |
| Incoming call | |
| Outgoing call | |
| Missed call | |
| Unread voice message | |
| Voice Message | |
Dialer
You can call mobiles and landlines from this screen.
Press the ▲/▼ (arrow) buttons to select the Dialer tab. Press the ▶/▲/▼ (arrow) buttons to navigate this screen.
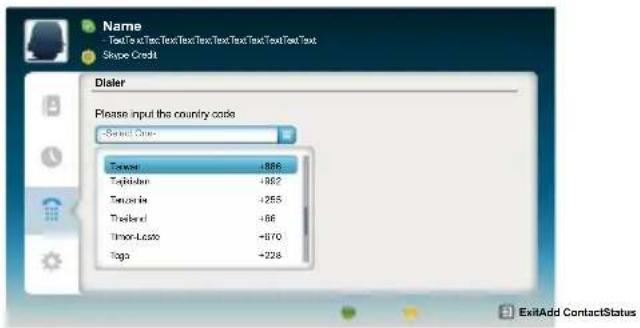
text_image
Name TextText Text Text Text Text Text Text Text Text Text Shape Credit Dialer Please input the country code -Select Date Turkey +866 Tupiahian +862 Turkishia +255 Thailand +66 Timor-Luatu +870 Taga +228 ExitAdd ContactStatus(Sample Image) Skype ^TM dialer screen
Select the country or region first, and then enter the phone number with area code. You'll need a little Skype™ Credit in your account to call mobiles or landlines using Skype™.
▲WARNING
Emergency calls over Skype™ are not supported.
Settings

Press the ▲/▼ to select the Settings tab and press the OK button.
The Settings page will appear.
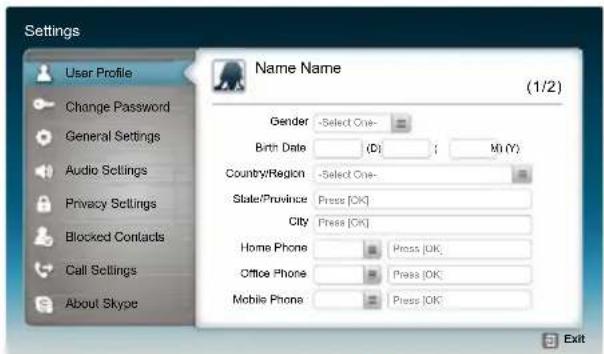
text_image
Settings User Profile Change Password General Settings Audio Settings Privacy Settings Blocked Contacts Call Settings About Skype Name Name (1/2) Gender -Select One- Birth Date (C): 0 (Y) Country/Region -Select One- State/Province Press [OK] City Press [OK] Home Phone Press [OK] Office Phone Press [OK] Mobile Phone Press [OK](Sample Image) Skype ^TM options screen.
You can change the following settings:
User Profile
Add or change your personal information e.g. birth date, country/region or phone number.
Change Password
You can change your password by entering your existing password and new password twice.
General Settings
Select whether Skype™ should automatically start when turning on the TV.
Audio Settings
Adjust the speaker / ringtone volume manually.
The volume of your speakers will be different on Skype ^TM compared to your normal TV volume level. The speaker volume range is 0 - 100% by 1 steps, and ringtone volume is 0 - 100% by 25 steps.
Privacy Settings
Set who you allow calls from, whether it's Anyone or People in my Contact list only.
◆ Blocked Contacts
If you do not want someone to reach you, simply block them by entering their Skype™ Name or phone number from this menu. Successfully blocked contacts are displayed in this window.
Call Settings
If you're not signed into Skype™, you can forward incoming calls to another phone number, Skype™ name or choose to accept voice messages. However you'll need to have Skype™ Credit to turn this feature on.
About Skype
Displays information about Skype™.
MediaShare (Videos, Music, and Photos)
MediaShare provides a simple graphic interface to quickly access and share videos, music, and image files across your home network and the other connected devices.
To access the MediaShare Service, press the MEDIA SHARE button on the remote or select the MediaShare tab from the Cloud TV Portal pages.
NOTE
To use MediaShare please configure the network settings on your TV. For more information, see "Connecting to a home network" on page 43.
Do not insert/remove a USB device while in use.
The SETUP button is not available while using the MediaShare feature.
MediaShare specifications
Devices:
USB device: USB Mass Storage Class devices (MSC)
◆ Connected Media Server: Your computer (for example)
NOTE
◆ Connectivity is not guaranteed for all devices.
Some functionality may be lost with a USB HUB connection.
Supported file system:
FAT16 and FAT32
NOTE You must obtain any required permission from copyright owners to download or use copyrighted content. Toshiba cannot and does not grant such permission.
Basic operation
Using MediaShare with a USB device
When Auto Start is enabled, you will be asked if you want to start the MediaShare when a USB device is inserted. If Auto Start is disabled (or if you want to connect to a media server on the network), you must manually start the MediaShare from the Cloud TV Portal pages or press the MEDIA SHARE button on the remote control.
To change the Auto Start setting
1 Press the SETUP button.
2 Select Options > MediaShare Setup > USB Auto Start and press the OK button.
3 Press the ▲/▼ (arrow) buttons to select On or Off.
Auto Start
1 Insert a USB device into the USB terminal. A prompt appears.
2 Press the ◀/▶ (arrow) buttons to select Yes, and then press the OK button.
3 Press the ▲/▼ (arrow) buttons to select Videos, Music, or Photos, and then press the OK button.
4 To change the device, press the ▲/▼/◄/► (arrow) buttons to select the devices on the screen, and then press the OK button.
5 Press the ▲/▼ (arrow) buttons to select the device and then press the OK button.
6 Press the ▲/▼ (arrow) buttons to select OK and then press the OK button.
NOTE If Auto Start is set to Off, you can start the MediaShare manually.
Manual Start
1 Insert a USB device into the USB terminal.
2 Press MEDIA SHARE.
3 To change the device, press the ▲/▼/◄/► (arrow) buttons to select the devices on the screen, and then press the OK button.
4 Press the ▲/▼ (arrow) buttons to select the device and then press the OK button.
5 Press the ▲/▼ (arrow) buttons to select OK and then press the OK button.
To select a file in the list of contents
1 Press the ▲/▼/◄/► (arrow) buttons to select a file or folder.
File:
Press the OK button to play or view.
Folder:
Press the OK button to move to the next layer, or press the BACK button to return to the previous layer.
Sort
1 Select the Sort and press the OK button.
2 Press the ▲/▼ (arrow) buttons to select the sorting (File Name, New or Old) rule and press the OK button.
3 Select OK and press the OK button.
NOTE Sorting may take a little time.
To close the MediaShare
1 Press the EXIT button.
2 Press the ◀/▶ (arrow) buttons to select Yes and then press the OK button.
The TV will return to the last-viewed channel or video input.
Using MediaShare with a Media Server
You need to configure a home network before using this feature, see “Setting up the Network” on page 113.
1 Press the MEDIA SHARE button.
2 To change the device press the ▲/▼/◄/► (arrow) buttons to select the Device Name button on the screen, and then press the OK button.
3 Press the ▲/▼ (arrow) buttons to select the device and then press the OK button.
4 Press the ▲/▼ (arrow) buttons to select OK and then press the OK button.
To select a file in the list of contents
1 Press the ▲/▼/◄/► (arrow) buttons to select a file or folder. File:
Press the OK button to play or view.
Folder:
Press the OK button to move to the next layer, or press the BACK to return to the previous layer.
Sort
1 Select the Sort and press the OK button.
2 Press the ▲/▼ (arrow) buttons to select the sorting (Title, New or Old) rule and press the OK button.
3 Select OK and press the OK button.
NOTE
◆ Sorting may take a little time.
◆ Depending on the Media server, this function may not be usable.
To close the MediaShare
1 Press the EXIT button.
2 Press the ◀/▶(arrow) buttons to select Yes and then press the OK button.
The TV will return to the last-viewed channel or video input.
To display the device information
1 Press the QUICK button to open the Quick menu in list mode or Multi View mode.
2 Press the ▲/▼ (arrow) buttons to select Device Information.
Viewing movie files
Basic Playback
1 Select a file, see "To select a file in the list of contents" on page 143.
2 Press the OK button or PLAY button to begin playback.
NOTE Depending on the file size, it may take some time to start playback.
3 Press the STOP button to stop playback.
The screen returns to the list.
If playback finishes before the STOP button is pressed, the screen returns to the list.
NOTE When the repeat mode is set to All, the next file will start playing automatically.
Resume Playback
You can resume playback from where it was last stopped.
- Press the STOP button while playing the movie to memorize the stopped position.
If the same file is selected and played, playback will resume from the last stopped position.
NOTE
If you play different content or exit MediaShare, the memorized stopped position will be deleted.
This function may not be available depending on the content.
To pause playback
◆ Press the PAUSE button during playback.
To resume normal playback, press the PLAY button.
NOTE The PAUSE button or operations during Pause may not be functional depending on content or media server.
To locate a specific file
Press the Skip Reverse or Skip Forward button repeatedly to access the desired file.
◆ (◀◀): Playback starts from the beginning of the current file or previous file.
◆ (▶▶): To locate subsequent files.
To play in fast reverse or fast forward directions
Press the ◀◀ or ▶▶ button during playback. Each time you press the ◀◀ or ▶▶ ▼ button, the playback speed will change.
NOTE These features may not be operable depending on the content or media server.
To set the repeat mode
1 Press QUICK button.
2 Press the ▲/▼ (arrow) buttons to select Repeat. The current repeat setting appears.
3 Press the ◀/▶ (arrow) buttons to select Off, All, or 1.
4 Press the BACK button.
The setting is effective until the TV is turned off.
Mode: Description:
Off The content is played back only once
All All contents in the same folder are repeatedly played back
1 The same content is repeatedly played back
To select a movie from Play List (except for Media Renderer function)
While playing a movie, you can select a different movie from the Play List.
1 Press the QUICK button to open the Quick Menu.
2 Press the ▲/▼ (arrow) buttons to select Play List and press the OK button.
The Movie List will appear.
3 Press the ▲/▼ (arrow) buttons to select a file name.
To display the file status information
1 Press the INFO button during playback.
The information will be displayed at the bottom of the screen.
2 Press the INFO button again to hide the information.
NOTE The information may not correctly display depending on the content or media server.
To register your TV to a DivX® account:
This TV allows you to play back files purchased or rented from DivX ^® Video-On Demand (VOD) services. When you purchase or rent DivX ^® VOD files on the internet, you will be asked to enter a registration code.
1 Press the SETUP button.
2 Select Options > MediaShare Setup > DivX® VOD and press the OK button.
3 Press the ▲/▼ (arrow) buttons to select DivX® VOD Registration, and then press the OK button.
4 The DivX ^® VOD window will appear and you will see the registration code. For details on registration, please visit the DivX ^® website at http://vod.divx.com
5 Copy the activation file to a memory device and play it on the TV.
To unregister your device:
1 Press the SETUP button.
2 Select Options > MediaShare Setup > DivX® VOD and press the OK button.
3 Press the ▲/▼ (arrow) buttons to select DivX® VOD Deregistration, and then press the OK button.
4 A confirmation message will appear. Select Yes and press the OK button.
5 The DivX ^® VOD window will appear and you will see the deregistration code. For details on registration, please visit the DivX ^® website at http://vod.divx.com
ABOUT DIVX VIDEO: DivX ^® is a digital video format created by DivX, LLC, a subsidiary of Rovi Corporation. This is an official DivX Certified ^® device that plays DivX video. Visit divx.com for more information and software tools to convert your files into DivX videos.
ABOUT DIVX VIDEO-ON-DEMAND: This DivX Certified ^® device must be registered in order to play purchased DivX Video-on-Demand (VOD) movies. To obtain your registration code, locate the DivX VOD section in your device setup menu. Go to vod.divx.com for more information on how to complete your registration.
DivX Certified ^® to play DivX ^® and DivX Plus ^® HD (H.264/MKV) video up to 1080p HD including premium content.
To playback DivX Plus® HD content:
To play in fast reverse or fast forward directions, press the ◀◀ or ▶▶ button during playback. Each time you press the ◀◀ or ▶▶ button, the playback speed will change.
If the content contains no chapter, this TV generates original chapter point in 10% increments for 10 chapters in total, that are accessible by using the Number buttons on the remote control.
During playback, press the ▶ button to skip to the beginning of the next chapter. When the ▶ button is pressed twice in succession, it will repeat two times of above. If the ▶ button is pressed at the last chapter, the confirmation message will appear. If Yes is selected, playback will skip to the beginning of the next content.
Press the ◀ button to skip to the beginning of the current chapter.
When the ◀ button is pressed twice in succession, it will skip to the beginning of the previous chapter. If the ◀ button is pressed twice continuously at the first chapter, playback of the current content will stop and the confirmation message will appear. If Yes is selected, playback will skip to the beginning of the previous content.
Press the ▲ (arrow) button to skip to the beginning of the previous content. Press the ▼ (arrow) button to skip to the beginning of the next content.
The Number button is used for direct jump.
For example: If you press the 3 button and then press the OK button, playback will jump to the beginning of 3rd chapter.
NOTE
◆ Depending on the content data will not be operated.
The playback speed ( ◀◀◀ / ▶▶ ) may not change depending on the stream.
Using Multi Title and Alternative Timelines Multi Title
DivX Plus ^® HD files may contain up to 100 titles.
You can change the title (It contains same video file) by pressing the RED button.
When the RED button is pressed, it will display the title change window at the bottom on the screen (same as Subtitle or Audio change window).
The title is changed cyclically each time the RED button is pressed.
Playback starts from the beginning of the title, which is selected by the ▲ or ▼ (arrow) buttons.
Pressing the ◀/▶ (arrow) buttons also changes the multi title.
NOTE Depending on the content data will not be operated.
File specifications:
USB use:
File format: MPEG2 PS, MPEG2 TS, MPEG-2 VOB, AVI, MOV, MP4, ASF, DivX, Xvid, MKV, Flash Video (FLV1), 3GPP, Motion JPEG
Video: MPEG2, H.264, MPEG-4 part2, DivX, Xvid, VC-1 (WMV9), RealVideo 8,9,10, Sorenson H.263 (FLV1), JPEG
Audio: MPEG1-Layer2/MPEG1-Layer3/Dolby® Digital (AC3)/LPCM, AAC, WMA7/8/9, ADPCM
Maximum number of files: 1000 per folder
Maximum video resolution: 640x480 (Motion JPEG), 1920 x 1080 (other)
Content on a connected Media Server:
File format: MPEG2 PS, MPEG2 TS, MP4 (Low resolution)
Video: MPEG2 (PS), H.264
Audio: LPCM/MPEG1-Layer2/ MPEG2-Layer2/ Dolby Digital (AC3)/AAC
Maximum number of files: 1000 per folder
Maximum video resolution: 1920 x 1080
NOTE It may not be possible to use certain playback features or display some files. In some cases certain files and servers may not support playback features, such as pause.
Playing music files
Basic Playback
1 Select a file, see “To select a file in the list of contents” on page 143. Press the OK button or the PLAY button to begin playback.
NOTE Depending on the file size, it may take some time to start playback.
2 Press the STOP button to stop playback.
The screen returns to the list.
If playback finishes before the STOP button is pressed, the screen returns to the list.
To pause playback
1 Press the PAUSE button during playback.
2 To resume normal playback, press the PLAY button.
NOTE
The PAUSE button or operations during Pause may not be functional depending on content or media server. Certain processes may take some time to complete.
To locate a specific file
Press the Skip Reverse or the Skip Forward button repeatedly to access the desired file.
◆ (◀◀): Playback starts from the beginning of the current file or previous file.
◆ (▶▶): To locate subsequent files.
To play in fast reverse or fast forward directions
Press the ◀◀ or ▶▶ button during playback. Each time you press the ◀◀ or ▶▶ button, the playback speed will change.
NOTE
These features may not be operable depending on the content or media server.
To set the repeat mode
1 Press the QUICK button.
2 Press the ▲/▼ (arrow) buttons to select Repeat.
The current repeat setting appears.
3 Press the ◀/▶ (arrow) buttons to select Off, All, or 1.
4 Press the BACK button.
The setting is effective until the TV is turned off.
Mode: Description:
Off The content is played back only once
All All contents in the same folder are repeatedly played back
1 The same content is repeatedly played back
To select a music from Play List (except for Media Renderer function)
While playing a music file, you can select a different music file from the Play List.
1 Press the QUICK button to open the Quick Menu.
2 Press the ▲/▼ (arrow) buttons to select Play List and press the OK button.
The Music List will appear.
3 Press the ▲/▼ (arrow) buttons to select a file name.
To display the file status information:
1 Press the INFO button during playback. The information appears at the bottom of the screen.
2 Press the INFO button again to hide the information.
NOTE The information may not correctly display depending on the content or media server.
File specifications:
USB use:
File format: MP3, MP4 (AAC), WMA7/8/9, WAV (LPCM)
Sampling frequency: 32 kHz, 44.1 kHz, 48 kHz
Bit rate: From 32 to 320 kbps
Maximum number of files: 1000 per folder
Content on a connected Media Server:
File format: MP3, MP4 (AAC), WMA9 std, LPCM
Sampling frequency: 32 kHz, 44.1 kHz, 48 kHz
Bit rate: From 32 to 320 kbps
Maximum number of files: 1000 per folder
NOTE It may not be possible to use certain playback features or display some files. In some cases certain files and servers may not support playback features, such as fast-forward.
Viewing photo files
Multi View mode
This view mode allows you to search for photos in a grid format.
These pictures are displayed using thumbnail data in each image file.
1 Press the ▲/▼/◄/► (arrow) buttons to move the highlight by one window.
If all of the photos will not fit in one screen, when pressing the ▲ (arrow) button at the left thumbnail, the screen will scroll up one by one. Similarly, when pressing the ▼ (arrow) button at the bottom thumbnail, the screen will scroll down one by one.
2 When you select a folder, press the OK button to move to the next layer.
Press the BACK button to move back to the previous layer.
3 Press the OK button to view the selected photo in Single View mode.
NOTE
◆ Displaying thumbnail data may take time.
In order to use the ▲/▼ (arrow) button to scroll the screen, there must be enough content to take up two screens.
Single View mode
In this view mode, only files located in the selected directory are displayed. When moving from Multi View mode to Single View mode, the currently selected photo appears.
1 On Multi view mode, press the ▲/▼/◄/► (arrow) buttons to select a file, and then press the OK button.
2 Press the ◀/▶ (arrow) buttons to view the next or previous file.
NOTE Single view mode is changed to Multi View mode when the BACK button is pressed.
Slide Show mode
This view allows you to watch a slide show of the photos. In this mode, only files located in the selected directory appear.
1 To switch to Slide Show mode, press the OK button while in Single View mode.
To return to Single View mode, press the OK button again.
2 Press the ◀/▶ (arrow) buttons to view the next or previous file.
Mode settings
1 Press the QUICK button to open the Quick menu while in Single View mode or Slide Show mode.
2 Press the ▲/▼ (arrow) buttons to select the item (Interval Time or Repeat).
3 Press the ◀/▶ (arrow) buttons to adjust the setting.
4 Press the BACK button to return to Single View mode or Slide Show mode.
Mode: Description:
Interval Time Sets a time interval at which to view photos
Repeat Displays photos in the same directory repeatedly (On/Off)
Rotate the image
While viewing the image in Single View mode or Slide Show mode, press the ▲/▼ (arrow) buttons to rotate the image 90 degrees.
To zoom in/out photos (except for Media Renderer function)
During the Single View mode or Slideshow mode, the zoom function can be used. The Slideshow mode changes to the Single View mode.
RED button : Zoom in
$$ \mathrm{x} 1 \rightarrow \mathrm{x} 2 \rightarrow \mathrm{x} 4 \rightarrow \mathrm{x} 8 \text { zoom } $$
GREEN button : Zoom out
$$ \mathrm{x} 8 \rightarrow \mathrm{x} 4 \rightarrow \mathrm{x} 2 \rightarrow \mathrm{x} 1 \text { zoom } $$
▲/▼/◄/► (arrow) buttons: Vertical or Horizontal scrolling
To set Background Music
1 Press the QUICK button to open the Quick Menu while in the Slide Show mode or Single View mode.
2 Select Background Music and press the OK button.
3 Press the ▲/▼ (arrow) buttons to select On.
The music file in the same folder as the displayed photo will start playing.
NOTE
- AI the music files in the same folder as the photo will be played repeatedly.
To stop music file playback, select Off in Background Music.
To select a photo from Play List (except for Media Renderer function)
While in the Single View mode or Slide Show mode, you can select a different photo from the Play List.
1 Press the QUICK button to open the Quick Menu from Single View mode or Slide Show mode.
2 Press the ▲/▼ (arrow) buttons to select Play List and press the OK button.
The Photo List will appear.
3 Press the ▲/▼ (arrow) buttons to select a file name.
Display file status information
1 Press the INFO button.
The information appears at the bottom of the screen.
2 Press the INFO button again to hide the information.
NOTE The information may not correctly display depending on the content or media server. Certain processes may take some time to complete.
File specifications:
USB use:
Data compatibility: JPEG Exif ver 2.2
File format: JPEG, BMP
Maximum viewable resolution:
15360 × 8640 (JPEG:Base-line), 1024 × 768 (JPEG:Progressive), 9600 × 6400 (BMP)
Maximum number of files: 1000 per folder
Content on a connected Media Server:
Data compatibility: JPEG Exif ver 2.2
File format: JPEG
Maximum photo resolution: 4096 × 4096
Maximum number of files: 1000 per folder
NOTE It may not be possible to use certain function or display some files.
Search
To search for content,
1 Select the search.
2 Enter in keyword and the search will search for:
Media server
Videos; Title name
Music; Title name/Artist name/ Album name
Photos; Title name
USB
Videos/Music/Photos; File name
NOTE Folders are not subject to the search function.
3 The retrieval result is displayed.
4 Select one of the search results.
5 The selected content will play.
NOTE The search retrieval stops when content is being played.
The results screen shows different categories of media; Videos, Music and Photos. Select the ▼ below a category and press the OK button to display results only for that category of media on the screen.
text_image
Videos 99/100To return to the previous display, select ▲ and press the OK button.
Network Device Setup
In order to set the access the External Control Setup, Media Renderer Setup, or Device Name Setup, you must use the Network Device Setup menu.
External Control Setup
1 Press the SETUP button.
2 Select Network > Network Device Setup > External Control Setup and press the OK button.
3 Use the ▲/▼ (arrow) buttons to select and set Enable Control to On or Off.
To access the Home Control Profile:
1 Press the SETUP button.
2 Select Network > Network Device Setup > External Control Setup and press the OK button.
3 Use the ▲/▼ (arrow) buttons to select and set Enable Control to On or Off.
4 Use the ▲/▼ (arrow) buttons to select Home Control Profile and press the OK button.
The Home Control Profile window will appear.
5 Use the ▲/▼/◄/► (arrow) buttons to navigate to the User Name or Password field. Input the user name and password using the Software Keyboard or Wireless QWERTY keyboard (for L7300U series only).
For more information, see “Using the software keyboard” on page 121.
NOTE Only the 0-9 and capital/lowercase A-Z characters may be used for the user name and password.
Setting up the Media Renderer feature
The TV can be configured as a Media Renderer. When operating as a Media Renderer, the TV displays content provided mobile devices or PCs. The selection of the media is done by the media controller.
The TV can play photo, movie, or audio files when operating as a Media Renderer.
1 Press the SETUP button.
2 Select Network > Network Device Setup > Media Renderer and press the OK button.
3 Press the ▲/▼ (arrow) buttons to select On or Off, and then press the OK button.
Device Name setup
The device name as a Media Renderer can be changed.
1 Press the SETUP button.
2 Select Network > Network Device Setup > Device Name Setup and press the OK button.
3 Select the Device Name field. Press the OK button. The Software Keyboard screen appears.
4 Input the device name by using the Software Keyboard. To save your setting, press the GREEN button.
5 Select Done. Press the OK button.
NOTE The maximum number of characters allowed for the device name is 15. Only 0-9, A - Z (upper case only), "-" can be used in the device name.
Chapter 9
Cloud TV Companion Apps
Using Apps on a Tablet or Smart phone
Toshiba provides apps for tablets and smart phones. The apps will vary by country and availability may change in the future with respect to current apps.
NOTE Apps will vary by country and availability may change in the future on current apps.
These apps are available for compatible Toshiba equipment using compatible tablets and smart phones powered by Android ^™ or iOS. You can download these apps through the Google Play ^™ or the iTunes Store. In order to use these apps, you must configure the settings through the Apps Control Profile.
NOTE
Third party Internet services are not provided by Toshiba, may change or be discontinued at any time, and may be subject to Internet service provider restrictions. Toshiba makes no warranties, representations, or assurances about the content, availability, or functionality of third-party content or services. Use of third-party Internet services may require the creation of a separate account through a computer with Internet access and/or payment of one-time and/or recurring charges and membership. Not all third-party services may be available on or compatible with this product. In order to experience the full suggested capabilities of this product, fully-compatible devices may be required.
- Apps can only be used when your TV and your tablet or smart phone are connected to the Internet.
Starting and operation of this service may take several minutes.
◆ Software updates may be needed in order to use this service.
In order to experience the full suggested capabilities of this product, fully-compatible devices may be required. - Certain features may not be available in all countries.
◆ Companion Apps available through the Cloud may be changed or removed at any time. Not all operating system Apps may be compatible with the Cloud. Services depicted in this eManual and provided through the Cloud may not be available in your region and may not be available to you. Please check your individual device for app compatibility.
As soon as the application is deployed, this feature can be used.
Apps Control Profile
To select the Apps Control Profile
1 Press the SETUP button.
2 Select Network > Network Device Setup > External Control Setup and press the OK button.
3 Press the ▲/▼ (arrow) buttons to select and set Apps Control Profile and press the OK button.
The Apps Control Profile window will appear.
4 Press the ▲/▼ (arrow) buttons to select Device Registration Setup and press the OK button.
The Device Registration Setup window will appear.
5 Use the ▲/▼ (arrow) buttons to select the Companion Device ID.
6 Select the Cancel, All, or Delete buttons.
NOTE
If the maximum number of registered devices (20) is exceeded, no additional devices can be registered. Delete unnecessary devices before registering a new device.
When re-registering a device which has been deleted from the list, pairing must be carried out again.
To enable the New Device Detection:
1 Press the SETUP button.
2 Select Network > Network Device Setup > External Control Setup and press the OK button.
3 Press the ▲/▼ (arrow) buttons to select and set Apps Control Profile and press the OK button.
The Apps Control Profile window will appear.
4 Press the ▲/▼ (arrow) buttons to select New Device Detection and press the OK button.
5 Use the ◀/▶ (arrow) buttons to select Enable or Disable.
6 Press the OK button to submit.
Pairing
To use Apps, it is necessary to connect a compatible tablet or smart phone and this TV to your home network, and carry out pairing (using a 4 or 8 digit password to authenticate the device).
Refer to the Apps manual for more details about pairing.
NOTE
- Pairing with external devices cannot be carried out when the TV is connected to an unencrypted wireless LAN access point. Activate the encryption settings for the wireless LAN access point before carrying out Pairing.
When the Enable Control is not set to ON in External Control Setup, Apps functions including Pairing cannot be used.
Chapter 10
Troubleshooting
General troubleshooting
Before calling a service technician, review this chapter or visit the
Toshiba Support Web site at "support.toshiba.com" for possible causes/solutions for the problem you are experiencing.
Before you begin to troubleshoot any problem, first unplug the TV from the AC wall outlet, wait approximately one minute, and then plug the TV back into the AC wall outlet. If the problem still exists attempt to troubleshoot the problem.
Black box on screen.
The closed caption feature is set to one of the Text modes (T1, T2, T3, or T4). Set the closed caption feature to Off, see “Using closed captions” on page 72.
TV stops responding to controls.
If the TV stops responding to the buttons on the remote control or TV control panel and you cannot turn off the TV, unplug the TV from the AC wall outlet and plug it back in.
If you cause a static discharge when touching the TV and the TV fails to function, simply unplug the TV from the AC outlet and plug it back in.
The TV should return to normal operation.
Other problems.
If your TV's problem is not addressed in this Troubleshooting chapter or the recommended solution has not worked, use the Reset Factory Defaults procedure, see “Resetting to Factory Defaults” on page 90.
TV will not turn on.
Check the AC wall outlet by trying another device in the AC wall outlet.
Ensure the power cord is plugged in properly, and then press the POWER button.
Replace the batteries in the remote control, see “Installing batteries” on page 47.
Try the control panel buttons on the TV.
Picture problems
General picture problems.
Check the antenna/cable connections, see “Connecting Your TV” on page 26.
Press the INPUT button on the remote control or on the TV and select a valid video input source, see “Selecting the video input to view” on page 71. If you have no picture after selecting a Input source, check the device connected to that input for proper operation. For device connection details, see “Connecting Your TV” on page 26.
Antenna reception may be poor. Use a highly directional outdoor antenna (if applicable).
The station may be having broadcast difficulties. Try another channel.
Adjust the picture quality, see “Using the advanced picture settings features” on page 99.
If Edge Enhancer does not achieve a sharper picture, change the Sharpness value to increase the sharpness level, see “Edge Enhancer” on page 99.
Video Input Selection problems.
If the Input Selection window does not appear when you press the INPUT button on the remote control or the TV control panel, press the INPUT button a second time. The TV displays the next video input source and the Input Selection screen.
Cannot view external signals.
If you cannot view signals from external devices connected to VIDEO 1, VIDEO 2, ColorStream HD, HDMI 1, HDMI 2, HDMI 3, HDMI 4 or PC, ensure that the Input Lock is set to Off, see “Locking video inputs” on page 80.
Poor display color or no color.
Check for proper hookup connections between your devices
The station may be having broadcast difficulties. Try another channel.
Adjust the Tint and/or Color, see “ColorMaster™” on page 102.
Poor composite picture.
If the TV is connected to an external A/V device (e.g. DVD player, video game system, set-top box, etc.) try using a ColorStream or HDMI ^™ video connection instead.
Picture and sound are out of sync.
As with all products that contain a digital display, this may occur in rare instances, when viewing certain content (e.g. television broadcasts, video games, DVDs). The cause may include, without limitation, video processing within the TV, video processing in an attached gaming system, and video processing or different compression rates used by broadcasters in their programming.
Try the following:
If the TV is connected to an A/V receiver that has a programmable audio delay feature, use this feature to help synchronize the sound to the picture.
If the problem occurs only on certain TV channels, inform your local broadcast, cable, or satellite provider.
The settings of PC/HDMI 2 Audio may be not correct. Check the connections, see “Connecting a computer” on page 40.
- Turn off and unplug the TV from the AC wall outlet for a few seconds and plug it back in.
Sound problems
Check the antenna/cable connections, see “Connecting a digital audio system” on page 35.
The station may be having broadcast difficulties. Try another channel.
The sound may be muted. Press the VOL (+ -) buttons or MUTE button.
If you connect a computer using either the PC IN terminal or an HDMI ^™ terminal, make sure that the Rear Shared Audio setting is properly set, see “Connecting a digital audio system” on page 35.
Remote control problems
Remove all obstructions between the remote control and the TV.
Replace the remote control's batteries, see “Installing batteries” on page 47.
Your TV's remote control may not operate certain features on your external device. Refer to the owner's manual for your other device to determine its available features. If your TV remote control does not operate a specific feature on another device, use the remote control that came with the device, see “Learning about the remote control” on page 50.
If the TV still does not act as expected, perform the Reset Factory Defaults procedure, see “Resetting to Factory Defaults” on page 90.
Channel tuning problems
Ensure that the remote control is set to the correct device mode, see “Learning about the remote control” on page 50.
The Auto Tuning feature may have erased the channel from memory. To add the channel to the channel memory, see “Manual Tuning” on page 67.
The Lock feature may have blocked the channel. To unblock the channel, see “Unlocking programs” on page 79.
If you cannot tune digital channels, check the antenna configuration, see “Initial setup” on page 52. If the problem persists, clear all channels from the channel list and reprogram channels into memory, see “Storing channels in memory (optional)” on page 66. For additional information, see “TV stops responding to controls.” on page 160. If the problem persists, use the Reset Factory Defaults procedure, see “Resetting to Factory Defaults” on page 90.
Closed caption problems
If the program or video you have selected is not closed captioned, no captions appear on the screen.
If text is not available, a black rectangle may appear. If this happens, turn off the closed caption feature, see “Using closed captions” on page 72.
A closed caption signal may not display correctly under the following circumstances:
The recording is dubbed
The signal reception is weak
The signal reception is nonstandard
For additional information, see “Using closed captions” on page 72.
Rating blocking (V-Chip) problems
Forgotten PIN code.
When the PIN code screen appears, press the INFO button 4 times within approximately 5 seconds. The old PIN code is cleared, see “Forgotten PIN code” on page 75.
The V-Chip feature is available for U.S. V-Chip systems only, see “Using parental controls” on page 76.
HDMI™ CEC Control operation
HDMI ^™ CEC Control feature is available for Toshiba HDMI ^™ CEC compatible devices.
Ensure that HDMI ^™ cables with the (HDMI) Logo are used.
The HDMI ^™ CEC operation is not working correctly.
When the connected HDMI^TM CEC device does not work correctly after you have changed the device's settings, turn off the TV and unplug the power cord. After approximately one minute, plug the power cord in and turn on the TV. You may also try using a different HDMI^TM cable.
If several devices are connected, the HDMI ^™ CEC Control feature may not operate properly.
Read the instruction manual of the connected HDMI ^TM CEC device.
HDMI™ problems
Ensure that HDMI ^™ cables with the (HDMI ^® ) Logo are used, see “Connecting an HDMI ^™ or DVI device to the HDMI ^™ input” on page 36.
Network problems
Cannot connect to the Internet.
Check the modem and its incoming cable/telephone connections, see "Connecting to a home network" on page 43.
Confirm your modem's operation.
Ensure that your IP address is set up correctly, see “IP Address Setup” on page 118.
No network connection.
If using a wired network connection, check to ensure that the LAN cables are connected properly, see “Connecting the TV to a home network with an Internet connection - wired” on page 44.
Ensure that the modem and router power cords are plugged in and the devices are operating properly.
Ensure that your IP address is set up correctly, see “IP Address Setup” on page 118.
Check to ensure proper operation of other network connected devices.
Network Setup fails (Auto).
Check to ensure that the LAN cables are connected properly, see "Connecting the TV to a home network with an Internet connection - wired" on page 44.
DHCP is not enabled on the router, or no router is present. Refer to your router's documentation for instructions on enabling DHCP. If your router does not support DHCP, you must manually set up the IP address.
Internet service is not available. Check your cable/DSL modem or contact your ISP for Internet service issues.
Network Setup fails (Manual).
Ensure that the TV IP address is not the same as any other device on the network.
Example: IP address 192.168.0.100 and IP address 192.168.0.101 are different addresses on the same network.
Make sure the TV IP address is on the same subnet as the networked
computer.
Example of proper setup: The computer has the IP address 192.168.0.100 with the Subnet mask 255.255.255.0, the TV has the IP address 192.168.0.101 with the Subnet mask 255.255.255.0; both are on the same subnet.
Example of improper setup: The computer has the IP address 192.168.1.100 with the Subnet mask 255.255.255.0, the TV has the IP address 192.168.0.101 with the Subnet mask 255.255.253.0; they are on different subnets.
Unstable network connection.
When using a wired home network connection, unplug the LAN cables, and then reconnect them.
When using a wireless home network connection:
Reboot the router:
1 Remove AC power from the router and the television for approximately one minute.
2 Reconnect AC power to the router.
3 Reconnect AC power to the television and turn it On.
4 After approximately two minutes, check connection stability.
Connect with LAN cables, if possible, and check connection stability.
- Repeat the wireless network setup procedure and check connection stability.
The media server name is not displayed.
The LAN cables, if used, are not connected properly, see “Connecting the TV to a home network with an Internet connection - wired” on page 44.
The WLAN, if used, is not configured properly.
The network setup on the Server is incorrect. Make sure both the media server and TV are using the same network type (DHCP/manual) and have compatible network settings.
Too many devices are connected. You cannot connect more than 32 sharing devices at one time.
The media server is not turned On.
The “server” is not a media server device.
Check the firewall and streaming settings on the media server.
Wireless network problems
Check that the router/AP (Access point) power is On.
After starting wireless network setup, confirm that the network is configured properly by performing the network connection test, see “Network Connection Test” on page 120.
Check the router/AP's connection status.
If the router/AP does not support PBC or WPS, Easy Setup (PBC) will not work even if the push-button is pressed, see “Wireless Setup” on page 113.
If the available router/AP list is not displayed in Easy Setup (PBC) or Assisted Setup, the power of the router/AP may be Off. Check that it is On, and then try restarting the scan for available routers/APs, see “Easy Setup using PBC (Push button configuration)” on page 114.
Refer to the router/AP's instruction manual.
MediaShare problems
Ensure that the devices (TV and Server) are connected correctly.
Incorrect functionality may occur when using a USB HUB connection.
Photo files that were processed and edited using the computer's application software may not be viewable.
When viewing content that supports two or more formats the TV may select one format automatically.
Copyright protected content stored on the media server may not be playable on the TV.
Content playback stability may be affected by heavy network traffic.
Content originally recorded on a computer may not play correctly.
Set the media sharing of the media server to the correct settings, according to the media server instruction manual.
Confirm that the contents of either the media server or the USB storage device are in formats that are supported by this TV, see “MediaShare specifications” on page 142.
Depending on the media server, access may be limited by the MAC address. Set the server according to the media server's instruction manual. This TV's MAC Address can be confirmed in the Network Setup portion of the User Menu, see “MAC Address” on page 120.
For Connected MediaShare
Depending on the media server, it may take time to display the list.
Media Renderer
Depending the state of this TV, Media Controller may not be able to control a Media Renderer playback.
If Media Renderer playback starts regardless of the user's intention, set Media Renderer to Off.
Light Indicator
The Power light on the front of the TV indicates the TV's status, as described below.
Power On/Standby light
Green:
The TV is On and operating properly.
Red:
The power is Off or in Standby.
If the problem persists after trying the solutions
In the U.S., visit TAIS Consumer Solutions on the web at "support.toshiba.com" or call 800-631-3811.
In Canada, locate the nearest Toshiba authorized service depot. or Visit www.toshiba.ca, click “Home Entertainment,” and then click “Support.”
Appendix A
Specifications
NOTE
This model complies with the specifications listed below.
◆ Designs and specifications are subject to change without notice.
This model may not be compatible with features and/or specifications that may be added in the future.
Television system
| NTSC standard | |
| ATSC standard 8VSB | |
| Digital Cable 64 QAM, 256 QAM; in-the-clear, unencrypted | |
Channel coverage
| VHF 2 through 13 | |
| UHF 14 through 69 | |
| Cable TV | Mid band (A-8 through A-1, A through I) |
| Super band (J through W) | |
| Hyper band (AA through ZZ, AAA, BBB) | |
| Ultra band (65 through 94, 100 through 135) |
Power source
120 V AC, 60 Hz
Power consumption
| 32L4300U 0.9 A (maximum current) |
| 0.3 W in Standby mode |
| 39L4300U 1.2 A (maximum current) |
| 0.3 W in Standby mode |
| 50L4300U 2.0 A (maximum current) |
| 0.3 W in Standby mode |
| 50L7300U 1.9 A (maximum current) |
| 0.3 W in Standby mode |
| 58L7300U 1.5 A (maximum current) |
| 0.3 W in Standby mode |
| 65L7300U 1.8 A (maximum current) |
| 0.3 W in Standby mode |
Audio power
| 32L4300U 7 W + 7 W |
| 39L4300U 7 W + 7 W |
| 50L4300U 7 W + 7 W |
| 50L7300U 10W + 10 W |
| 58L7300U 10W + 10 W |
| 65L7300U 10W + 10 W |
Speaker type
| 32L4300U Main 11.7 | cm x 4.0 cm (4 3/5 x 1 3/5 inch) x 2 pcs |
| 39L4300U Main 11.7 | cm x 4.0 cm (4 3/5 x 1 3/5 inch) x 2 pcs |
| 50L4300U Main 11.7 | cm x 4.0 cm (4 3/5 x 1 3/5 inch) x 2 pcs |
| 50L7300U Main 16.5 | cm x 2.8 cm (6 1/2 x 1 1/10 inch) x 2 pcs |
| 58L7300U Main 16.5 | cm x 2.8 cm (6 1/2 x 1 1/10 inch) x 2 pcs |
| 65L7300U Main 3.5 | cm x 7.5 cm (2/5 x 2 19/20 inch) x 2 pcs |
Video/audio terminals
Video/audio input
| Video 1 V (p-p), 75 ohm, negative sync, NTSC. | |
| Audio 200 mV (rms) | (-20dBFS) |
ColorStream® (component video) HD input
| Video | Y: 1V (p-p), 75 ohm |
| PR: 0.7V (p-p), 75 ohm | |
| PB: 0.7V (p-p), 75 ohm | |
| Suggested formats: 1080p (60Hz), 1080i (60Hz), 720p (60Hz), 480p, 480i | |
| Audio 200 mV (rms) | 22 k ohm or greater |
HDMI™ input
| HDMI ^TM compliant | |
| HDCP compliant | |
| Suggested formats See table on page 176 | |
| HDMI ^TM Audio Dolby | ^ Digital and 2-channel Linear-PCM; 32/44.1/48 kHz sampling frequency; 16/20/24 bits per sample |
Digital audio output
Optical type
PC input
15-Pin D-sub Analog RGB
Wireless connection
| Standard IEEE 802.11a | /b/g/n/ |
| Host Interface USB 2.0 | compatible |
| Frequency Range | 5.15-5.35 GHz, 5.47-5.725 GHz, 5.725-5.850 GHz, 2.400–2.473 GHz |
| Security WEP 64/128, | TKIP, AES, WPA/WPA2-PSK, WPS, None |
Ethernet
IEEE 802.3.
USB
Universal Serial Bus Specification, Revision 1.1.
Universal Serial Bus Specification, Revision 2.0.
Dimensions with table stand
| 32L4300U | Width 28.9” (734 mm) |
| Height 19.8” (504 mm) | |
| Depth 7.2” (182 mm) | |
| 39L4300U | Width 35.0” (889 mm) |
| Height 23.3” (591 mm) | |
| Depth 8.0” (202 mm) | |
| 50L4300U | Width 44.8” (1139 mm) |
| Height 29.2” (742 mm) | |
| Depth 9.5” (242 mm) | |
| 50L7300U | Width 44.5” (1131 mm) |
| Height 29.2” (741 mm) | |
| Depth 9.2” (233 mm) | |
| 58L7300U | Width 51.4” (1306 mm) |
| Height 33.5” (851 mm) | |
| Depth 13.1” (334 mm) | |
| 65L7300U | Width 57.9” (1470 mm) |
| Height 36.9” (938 mm) | |
| Depth 14.1” (357 mm) |
Weight (mass) with stand
| 32L4300U 15.0 lbs (6.8 kg) |
| 39L4300U 19.2 lbs (8.7 kg) |
| 50L4300U 38.4 lbs (17.4 kg) |
| 50L7300U 42.5 lbs (19.3 kg) |
| 58L7300U 61.1 lbs (27.7 kg) |
| 65L7300U 79.8 lbs (36.2 kg) |
Operating conditions
| Temperature 32° - 95° F (0° - 35° C) |
| Humidity 20 - 80% (no moisture condensation) |
Supplied accessories
◆ Universal remote control (2x AAA” batteries)
L7300U model number: CT-90428
L4300U model number: CT-90428
Resource Guide
Pedestal and hardware
Warranty information
- Wireless QWERTY keyboard with touchpad (2x AA batteries) (Not available in Mexico.)
L7300U : supplied
L4300U : not supplied
IR blaster cable
NOTE The Wireless QWERTY keyboard supplied with L7300U series is a standard U.S. layout keyboard. The accented characters for French and Spanish may not be available in certain cases.
Acceptable signal formats for PC IN and HDMI™
PC IN signal formats
NOTE
The PC IN on this TV only accepts signal formats which are compliant with VESA-DMT as in the table below. Since some PCs input signals are different from the resolution and frequency described in the table below, the following problems may occur: incorrect display, false format detection, picture position failure, blur, or judder. In these cases, set the monitor output format on your computer to conform to any of the signals in the table below.
The signals whose vertical frequency is 56 Hz, 70 Hz, 72 Hz, or 75 Hz are converted to a 60 Hz signal.
When you connect a computer to this TV, it is recommended that you set the refresh rate of your computer to 60 Hz.
The PC IN on this TV does not accept the Sync on Green, Composite Sync, and Interlace signals.
| Format Resolution V. Frequency | H. Frequency | Pixel Clock Frequency | VESA Standard (DMT) | |
| VGA 640 x 480 59.940/60 Hz | 31.469/31.500 kHz | 25.175/25.200 MHz | ● | |
| 72.809 Hz 37.861 kHz 31.500 MHz ● | ||||
| 75.000 Hz 37.500 kHz 31.500 MHz ● | ||||
| SVGA 800 x 600 56.250 Hz | 35.156 kHz 36.000 MHz ● | |||
| 60.317 Hz 37.879 kHz 40.000 MHz ● | ||||
| 72.188 Hz 48.077 kHz 50.000 MHz ● | ||||
| 75.000 Hz 46.875 kHz 49.500 MHz ● | ||||
| XGA 1024 x 768 60.004 Hz | 48.363 kHz 65.000 MHz ● | |||
| 70.069 Hz 56.476 kHz 75.000 MHz ● | ||||
| 75.029 Hz 60.023 kHz 78.750 MHz ● | ||||
| WXGA | 1280 x 768 59.995 Hz | 47.396 kHz 68.250 MHz ● | ||
| 59.870 Hz 47.776 kHz 79.500 MHz ● | ||||
| 74.893 Hz 60.289 kHz 102.250 MHz ● | ||||
| 1360 x 768 60.015 Hz | 47.712 kHz 85.500 MHz ● | |||
| SXGA | 1280 x 1024 | 60.020 Hz | 63.981 kHz | 108.000 MHz ● |
| 75.025 Hz | 79.976 kHz 135.000 MHz ● | |||
HDMI™ signal formats
NOTE
The HDMI™ inputs on this TV only accept VGA, SVGA, XGA, WXGA, and SXGA signal formats which are compliant with VESA-DMT as in the table below. Since some computer, HDMI™, or DVI device input signals are different from the resolution and frequency described in the table below, the following problems may occur: incorrect display, false format detection, picture position failure, blur, or judder. In these cases, set the monitor output format on your computer, HDMI™, or DVI device to conform to any of the signals in the table below.
The signals whose vertical frequency is 24 Hz, 56 Hz, 70 Hz, 72 Hz, or 75 Hz are converted to a 60 Hz signal.
When you connect a computer to this TV, it is recommended that you set the refresh rate of your computer to 60 Hz.
| Format Resolution V. Frequency | H. Frequency | Pixel Clock Frequency | VESA Standard (DMT) | ||
| VGA 640 x 480 59.940 Hz | 31.469 kHz 25.175 MHz | ||||
| 72.809 Hz 37.861 kHz 31.500 MHz | |||||
| 75.000 Hz 37.500 kHz 31.500 MHz | |||||
| SVGA 800 x 600 56.250 Hz | 35.156 kHz 36.000 MHz | ||||
| 60.317 Hz 37.879 kHz 40.000 MHz | |||||
| 72.188 Hz 48.077 kHz 50.000 MHz | |||||
| 75.000 Hz 46.875 kHz 49.500 MHz | |||||
| XGA 1024 x 768 60.004 Hz | 48.363 kHz 65.000 MHz | ||||
| 70.069 Hz 56.476 kHz 75.000 MHz | |||||
| 75.029 Hz 60.023 kHz 78.750 MHz | |||||
| WXGA | 1280 x 768 59.995 Hz | 47.396 kHz 68.250 MHz | |||
| 59.870 Hz 47.776 kHz 79.500 MHz | |||||
| 74.893 Hz 60.289 kHz 102.250 MHz | |||||
| 1360 x 768 60.015 Hz | 47.712 kHz 85.500 MHz | ||||
| SXGA | 1280 x 1024 | 60.020 Hz | 63.981 kHz | 108.000 MHz | |
| 75.000 Hz 79.976 kHz 135.000 MHz | |||||
| 480i | 720 x 480i | 59.940/60 Hz | 15.734/15.750 kHz | 27.000/27.027 MHz | |
| 480p | 720 x 480p | 59.940/60 Hz | 31.469/31.500 kHz | 27.000/27.027 MHz | |
| 720p | 1280 x 720p | 59.940/60 Hz | 44.955/45.000 kHz | 74.176/74.250 MHz | |
| 1080i | 1920 x 1080i | 59.940/60 Hz | 33.716/33.750 kHz | 74.176/74.250 MHz | |
| 1080p | 1920 x 1080p | 23.976/24 Hz | 26.973/27.000 kHz | 74.176/74.250 MHz | |
| 29.970/30 Hz | 33.720/33.750 kHz | 74.176/74.250 MHz | |||
| 59.940/60 Hz | 67.433/67.500 kHz | 148.352/148.500 MHz | |||
Operating the TV with combination buttons
You can directly operate the TV power, input, picture size, and picture mode by pressing a combination button while holding down a color button.
| Button Color Combination Button Behavior/Mode | |
| RED | INPUT Power Off |
| POWER Power On | |
| 1 Input 1 | |
| 2 Input 2 | |
| 3 Input 3 | |
| 4 Input 4 | |
| 5 Input 5 | |
| 6 Input 6 | |
| 7 Input 7 | |
| 8 Input 8 | |
| 0 ANT/CABLE | |
| MUTE Mute On | |
| GREEN | 1 Native (picture size) |
| 2 4:3 (picture size) | |
| 3 TheaterWide 1 (picture size) | |
| 4 TheaterWide 2 (picture size) | |
| 5 TheaterWide 3 (picture size) | |
| 6 Full (picture size) | |
| 7 Normal (picture size) | |
| 8 Dot by Dot (picture size) | |
| MUTE 1/2 Mute On | |
| YELLOW | 1 AutoView (picture mode) |
| 2 Dynamic (picture mode) | |
| 3 Standard (picture mode) | |
| 4 Movie (picture mode) | |
| 5 - (picture mode) | |
| 6 Store (picture mode) | |
| 7 Game (picture mode) | |
| 8 PC (picture mode) | |
| MUTE Mute Off | |
Appendix B
Wireless QWERTY keyboard with touchpad
How to enter French or Spanish characters using the Wireless QWERTY keyboard with touchpad, which is included with L7300 series
For L4300 series, the Wireless QWERTY keyboard with touchpad must be purchased separately.
For how to use the Wireless QWERTY keyboard with touchpad, refer to the User's Guide that comes with the keyboard.
Setting the keyboard layout
Before entering French or Spanish characters, configure the following setting on the TV:
1 Press the SETUP button.
2 Select Options > USB Keyboard Layout.
3 Press the OK button.
4 Press the ▲/▼ (arrow) buttons to select U.S. International Layout and press the OK button.
For how to enter characters, refer to the table below:
NOTE The input characters may be different from the table below depending on the situation you are entering characters.
| Printing\Simultaneous Key | normal Shift | Right Alt(Alt Gr) Shift + Right Alt | ||
| a and A a or A * | 1 á or Á * | 1 | ||
| b and B b or B * | 1 | |||
| c and C c or C * | 1 | © | ¢ | |
| d and D d or D * | 1 Ó ð | |||
| e and E e or E * | 1 é or É * | 1 | ||
| f and F f or F * | 1 | |||
| g and G g or G * | 1 | |||
| h and H h or H * | 1 | |||
| i and I i or I * | 1 í or Í * | 1 | ||
| j and J | j or J *1 | |||
| k and K k or K * | 1 | œ or Ć *1 | ||
| l and L | l or L *1 ø or ∅ * | 1 | ||
| m and M | m or M *1 | μ | ||
| n and N n or N * | 1 | ñ or Ñ *1 | ||
| o and O o or O * | 1 | ó or Ó *1 | ||
| p and P p or P * | 1 ö or Ö * | 1 | ||
| q and Q q or Q * | 1 | ä or Ä *1 | ||
| r and R | r or R *1 | ® | ||
| s and S | s or S *1 | β | § | |
| t and T | t or T *1 | þ or þ *1 | ||
| u and U u or U * | 1 | ú or Ú *1 | ||
| v and V v or V * | 1 | |||
| w and W | w or W *1 | å or Å *1 | ||
| x and X x or X * | 1 | |||
| y and Y y or Y * | 1 | ü or Ü *1 | ||
| z and Z z or Z * | 1 | æ or Æ *1 | ||
| 1 and ! | 1 | ! | i | |
| 2 and @ | 2 | @ | 2 | |
| 3 and # | 3 | # | 3 | |
| 4 and | 4 | ☐ | £ | |
| 5 and % | 5 | % | € | |
| 6 and ^ | 6 | 1⁄4 | ||
| 7 and & | 7 | & | 1⁄2 | |
| 8 and * | 8 | * | 3⁄4 | |
| 9 and ( | 9 | ( | ‘ | |
| 0 and ) | 0 | ) | ’ | |
| Spacebar | Space | Space | ||
| - and _ (underscore) | - | - (underscore) | ¥ | |
| = and + | = | + | × | ÷ |
| [ and { | [ | { | « | “ |
| ] and } ] } » ” | ||||
| \backslash and | \ | ¬ | ||||
| ; and : ; : ¶ ° | ||||
| ‘ and “ ’ ” | ||||
| Grave Accent(’) and Tilde(~) | ||||
| , and < , < | ç or Ç * | 1 | ||
| . and > . > | ||||
| / and ? | / | ? | ¿ | |
| Keypad / | / / | |||
| Keypad * | * | * | ||
| Keypad - | - | - | ||
| Keypad + | + | + | ||
| Keypad 1 | 1 | |||
| Keypad 2 | 2 | |||
| Keypad 3 | 3 | |||
| Keypad 4 | 4 | |||
| Keypad 5 | 5 | |||
| Keypad 6 | 6 | |||
| Keypad 7 | 7 | |||
| Keypad 8 | 8 | |||
| Keypad 9 | 9 | |||
| Keypad 0 | 0 | |||
| Keypad . | . | |||
*1: Character is Depends on CapsLock On/Off
International Key
To enter special characters, follow the table below:
| Diacritic press first (Dead key) | press second | |||||||||||||||||
| Space | E | e | A | a | O | o | U | u | Y | y | I | i | Z | z | R | r | ||
| Acute 'or' | ' É é Á á Ó | ó Ú ú | Ý ŷ | Í í | Ž | ž | Ř | ř | ||||||||||
| Grave ` ` E | è À à Ó ò | Ù ù Ý | ý | Ì ì | ||||||||||||||
| Umlaut Shift + ' (") | ' Ē c Ā | ä Ö | ö Û | Ù ü | Ÿ ŷ | Ï ë | ||||||||||||
| Tilde | Shift + ' (~) | ~ | Ê | ē | Â | ã | Õ | ô | Û | ũ | Ŷ | ÿ | Î | î | ||||
| Circumflex | Shift + 6 (^) | ^ | Ê | ê | Â | â | Ô | ô | Û | û | Ŷ | ÿ | Î | î | Ž | ž | ||
| Breve Alt Gr + Shift + 9 | - Ê | ě | Ã | ă | Õ | õ | Ü | ü | Î | ǐ | ||||||||
| Háček | Alt Gr + Shift + . (>) | - | Ê | ě | Ã | ă | Õ | õ | Ü | ü | Î | ǐ | Ž | ž | Ř | ř | ||
| Double acute | Alt Gr + Shift + 2 | " | Õ | õ | Ü | ü | ||||||||||||
| Ogonek | Alt Gr + Shift + 8 | , £ | ç | A | q | Q | q | U | u | l | j | |||||||
| Macron | Alt Gr + Shift + 3 | - Ê | c̄ | Ã | ā | Õ | ō | Ü | ū | Ÿ | ÿ | Î | ī | |||||
| Overdot | Alt Gr + . | · Ê | è | À | á | Ó | ò | Ÿ | ÿ | Î | ı | Ž | ž | R | í | |||
| Underdot Alt Gr + Shift + - | . É | ç | A | a | Q | q | U | u | Y | y | I | Z | z | R | r | |||
| Ring | Alt Gr + Shift + 0 | 0 | Â | ä | Ü | ü | ÿ | |||||||||||
| Diacritic press first (Dead key) | press second | |||||||||||||||||||
| Space | M | m | N | n | P | p | W | w | S | s | G | g | K | k | L | l | C | c | ||
| Acute | 'or' | ' | ||||||||||||||||||
| Grave | ` | ` | ||||||||||||||||||
| Umlaut | Shift + ' (" ) | “ | ||||||||||||||||||
| Tilde | Shift + ' (~ ) | ~ | ||||||||||||||||||
| Circumflex | Shift + 6 (^ ) | ^ | ||||||||||||||||||
| Breve Alt Gr + Shift + 9 | - | |||||||||||||||||||
| Háček | Alt Gr + Shift + . (>) | - | ||||||||||||||||||
| Double acute | Alt Gr + Shift + 2 | " | ||||||||||||||||||
| Ogonck | Alt Gr + Shift + 8 | ‘ | ||||||||||||||||||
| Macron | Alt Gr + Shift + 3 | - | ||||||||||||||||||
| Overdot | Alt Gr + . | · | g | |||||||||||||||||
| Underdot Alt Gr + Shift + - | . | |||||||||||||||||||
| Ring | Alt Gr + Shift + 0 | 0 | ||||||||||||||||||
Index
Numerics
4/3 stretch
using 96
A
advanced picture settings
Ambient Light Sensor 102
Base Color Adjustment 102
ClearScan ^® 100
Color temperature 103
ColorMaster™ 102
DNR 101
DynaLight ^® 100
Dynamic Contrast 99
Edge Enhancer 99
MPEG NR 101
resetting to factory default 103
using 99
audio
adjusting balance 105
adjusting range 106
Audyssey Dynamic Volume ^® 109
bass/treble 106
Dolby ^® Digital Dynamic Range Control 108
muting sound 105
optical audio output format 107
Auto Aspect
using 96
C
cables
3.5mm to RCA Y-cable 28
analog RGB (15-pin) 28
coaxial (F-type) 26
component video (red/green/blue) 27
Dual-wand IR blaster cable 27
HDMI ^TM 27
LAN 29
optical audio 28
overview of cables 26
standard A/V (red/white/yellow) 26
channel return 70
channels
auto tuning 66
labeling analog TV channels
labeling video inputs 69
locking specific channels 79
manual tuning 67
next programmed channel 70
skipping 67
skipping video inputs 68
specific channel 70
storing in memory 66
closed captions
Analog CC mode 72
button 74
Digital CC settings 73
using 75
computer
adjusting image 85
setting the audio 86
to the TV's HDMI™ 41
using with the TV 85
connecting
a computer 40
audio system 35
cable TV 29
camcorder 29
computer to TV's PC IN 40
DVD player with ColorStream ^® 31
DVI device to HDMI ^™ input 36
HDMI ^TM audio system 39
HDMI ^TM device to HDMI ^TM input 36
IR devices 32
satellite receiver 29
to a computer (no Internet connection) 43
to a home network 43
to a home network (no Internet connection) 43
to a home network (wired Internet connection) 44
to a home network (wireless
Internet connection) 45
TV's HDMI ^TM 41
VCR 31
VCR and antenna 31
control other devices
HDMI ^TM -CEC Control 38
control panel
lock 81
controlling other devices
TV remote 38
E
expert picture settings
RGB Filter 104
setting 103
Test Pattern 103
White Balance 104
External Control Setup 155
F
Factory Defaults
reset 76
favorites
adding 130
browsing 130
features 19
H
HDMI ^TM
viewing signal information 84
HDMI ^TM CEC
adjusting amplifier's audio 83
controlling playback devices 82
input source selection 83
other functions 84
HDMI™ CEC Control
using 81
HDMI ^TM settings feature
using 84
home network
using 111
|
icon
safety 18
IR Blaster Out terminal
using 32
IR Blaster setup 58
M
Media Renderer
device name setup 156
setup 156
MediaShare (Media Player)
basic operation 142
playing music files 149
specifications 142
viewing movie files 145
viewing photo files 151
N
network
advanced setup 113
connection test 143
DNS setup 119
quick setup 55
setup 124
wireless setup 118
Network Device Setup 155
no signal power down
set 88
0
overview
installation 20
setup 20
use 20
P
parental controls
blocking programs/movies by
rating (V-Chip) 76
using 76
picture
adjusting 95
adjusting quality 98
picture mode
selecting 97
picture size
4/3 93
Dot by Dot 95
Full 93
Native 92
Normal 95
selecting 91
TheaterWide 1 94
TheaterWide 2 94
TheaterWide 3 94
pin code
changing 75
deleting 75
entering new pin code 75
forgotten 75
setting pin code 74
power failure 90
program ratings
displaying 79
unlocking programs 79
Q
quick setup
channel tuning 57
country 55
IR Blaster 58
network 55
smart TV 56
store / home mode 55
time zone 55
R
rating system 78
downloading additional 76
S
safety
icons 18
scrolling the picture 95
shared inputs configuring 69
SmartTV using 126
SmartTV™ Netflix® 127 VUDU™ 128
software keyboard using 121
software licenses show 123
software upgrade performing 123
specifications acceptable signal formats 175 audio power 170
channel coverage 169
ColorStream ^® HD input 171
Digital audio output 172 ethernet 172
HDMI ^TM input 171
HDMI ^™ signal formats 176 mass (weight) 173
operating conditions 173
PC IN signal formats 175
PC input 172
power consumption 170
power source 170
remote, combination buttons 177
speaker type 171
supplied accessories 173
TV system 169
USB 172
video/audio terminals 171
wireless connection 172
support information show 90
T
time limit set for games 80
timer sleep timer 87 turn on TV 86
troubleshooting 160 channel tuning problems 163 closed caption problems 164 contact Toshiba 168 HDMI™ 165 HDMI™ CEC Control problems 164 light indicator 168 light indicator functions 168 MediaShare (Media Player) problems 167 network problems 165 picture problems 161 Rating blocking problems 164 remote control problems 163 sound problems 162 wireless network problems 167
TV connections front 21 side 21
TV panel connections back 23
TV panel controls front 22 left side 22 side 22
TV remote control other devices 47 effective range 49 functionality 50 install batteries 47
TV status information show 89
V
Video video input locking 80
selecting 71
W
web browser 128
access web page 131
adding favorites 131
browsing favorites 130