
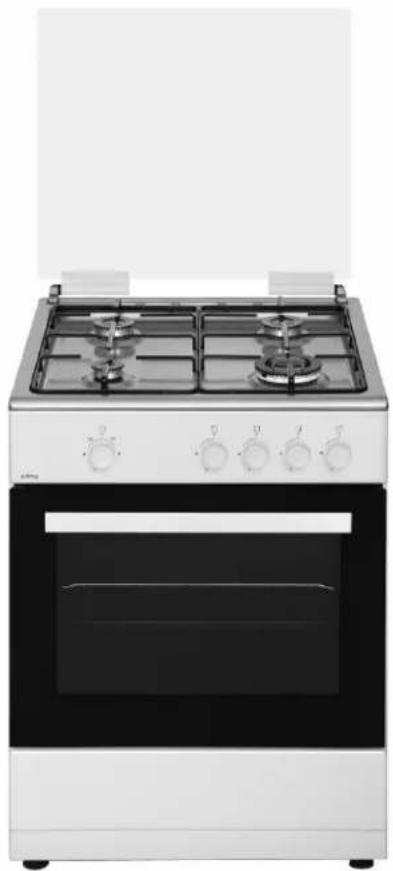
OR 644 ZW - Cooker Orima - Free user manual and instructions
Find the device manual for free OR 644 ZW Orima in PDF.


| Brand | Orima |
| Model | OR 644 ZW |
| Product Type | Freestanding Gas/Electric Cooker |
| Dimensions (W x D x H) | 500 x 565 x 855 mm (50x55), 500 x 630 x 855 mm (50x60), 600 x 630 x 855 mm (60x60) |
| Oven Capacity | 48 L (50x55/50x60), 62 L (60x60) |
| Oven Heating Elements | Bottom: 1000-1200 W; Top: 800-1000 W; Turbo: 1800-2200 W; Grill: 1500-2000 W |
| Hotplates (Electric) | 1x 145 mm (1000 W), 1x 180 mm (1500 W), 1x 145 mm rapid (1500 W), 1x 180 mm rapid (2000 W) |
| Gas Burners (Hob) | Wok (3.60 kW), Rapid (2.75 kW), Semi-rapid (1.60-1.70 kW), Auxiliary (0.90 kW) |
| Oven Gas Burner | 1.80-1.85 kW |
| Grill Gas Burner | 1.50-1.55 kW |
| Power Supply | 220-240 V ~50/60 Hz or 220-240/400 V ~50/60 Hz; 16 or 32 A fuse |
| Oven Lamp | 15 W, E14 bulb |
| Gas Type Compatibility | LPG G30 (28-30 mbar), Natural Gas G20 (20 mbar), G25 (25 mbar) |
| Special Features | Gas safety system, catalytic walls, grill deflector sheet, telescopic rail (optional) |
| Control Type | Knobs with automatic ignition, thermostat (50-280 °C), mechanical timer (0-90 min) |
| Installation Requirements | Well-ventilated space, chain lashing to wall, gas hose connection, earth socket |
| Cleaning & Maintenance | Use mild soapy water, avoid abrasives; removable oven door and glass; catalytic walls self-clean |
| Safety Warnings | Do not use steam cleaners; keep children away; never extinguish grease fire with water |
| Accessories Included | Deep tray, standard tray, wire grill, coffee pot support unit, chain for wall fixing |
| Manufacturer Contact | Customer Service: +351 231 467 436; After-sales: +351 231 467 427 |
Frequently Asked Questions - OR 644 ZW Orima
User questions about OR 644 ZW Orima
0 question about this device. Answer the ones you know or ask your own.
Ask a new question about this device
Download the instructions for your Cooker in PDF format for free! Find your manual OR 644 ZW - Orima and take your electronic device back in hand. On this page are published all the documents necessary for the use of your device. OR 644 ZW by Orima.
USER MANUAL OR 644 ZW Orima
MANUAL DE INSTRUÇÕES
INSTRUCTION MANUAL LIVRE D'INSTRUCTIONS LIBRO DE INSTRUCCIONES
www.orima.pt
facebook.com/orima.pt
natural_image
Front view of a white electric stove with four gas stove covers and open door (no visible text or symbols)
FOGÃO
Cooker | Estufa | Cuisinière
OR-644-ZW
SERVIÇO DE APOIO AO CLIENTE
Apoio ao Cliente:
Tel.: (+351) 231 467 436 E: apoiocliente@orima.pt
Serviço Pós Venda:
Tel.: (+351) 231 467 427 E: assistencia@orima.pt
UK Thank you for purchasing this ORIMA product. Please read this manual carefully before using the appliance.
natural_image
Pure technical line drawing of a mechanical assembly (no text or symbols)18.2
natural_image
Pure technical line drawing of a mechanical assembly without any text, numbers, or symbolsnatural_image
Silhouette of a cooking pot on a gas stove (no text or symbols)Falso
Falso
natural_image
Silhouette of a cooking pot with steam rising from it, no text or symbols presentFalso
natural_image
Silhouette of a cooking pot on a stove (no text or symbols)Verdadeiro
natural_image
Line drawing of a vintage kitchen oven with open door and side panels (no text or symbols)Figura 3
natural_image
Line drawing of an open kitchen oven with four stovels and a door open, showing internal components (no text or symbols)Figura 4
natural_image
Four circular diagrams showing structural details of a vehicle frame, including front and side views with no text or symbols.Figura 3.1 Figura 3.2 Figura 4.1 Figura 4.2
natural_image
Technical line drawing of a mechanical assembly with arrows indicating direction (no text or symbols)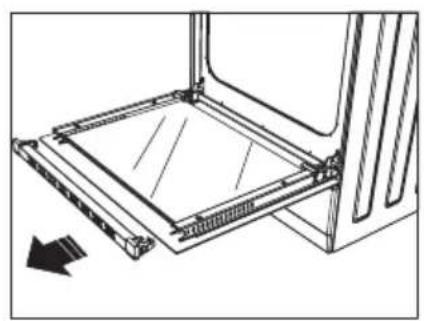
natural_image
Technical line drawing of a mechanical assembly with no visible text or symbols
Figura 5 Figura 6 Figura 7
natural_image
Hand holding a tool interacting with a curved mechanical component (no text or symbols visible)Figura 8
natural_image
Line drawing of a mechanical component with a knob and arrow indicating rotation (no text or symbols)Figura 9
ACESSÓRIOS
natural_image
Simple line drawing of a square frame with no text or symbolsnatural_image
Pure geometric diagram of a square frame with internal lines and dots, no text or symbols present.Tabuleiro
natural_image
Line drawing of a rectangular grid pattern with parallel lines (no text or symbols)Grelha de arame
natural_image
Technical line drawing of a long horizontal rod or beam with two flanged ends and a central support (no text or symbols)Prateleira telescópica\* (opcional)
natural_image
Isometric view of a rectangular metal grate with slats and four corner holes (no text or symbols)Grelha de arame no tabuleiro\* (opcional)
natural_image
Pure technical line drawing of multiple parallel ribbed structures without any text or symbolsnatural_image
Technical line drawing of a mechanical component with no visible text or symbolsFigura 11
natural_image
Technical line drawing of a mechanical component with rotating shaft and base, no text or symbols presentFigura 12
DEFINIÇÃO DO CAUDAL DE GÁS REDUZIDO PARA AS TORNEIRAS DA PLACA
natural_image
Line drawing of a hand pointing to a control panel with buttons and dials (no text or symbols)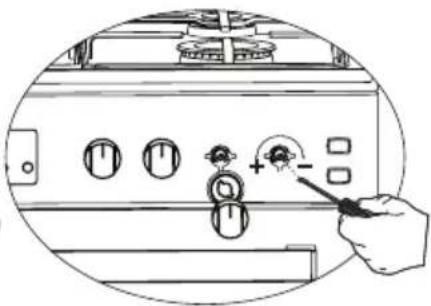
natural_image
Line drawing of a hand pressing a button on an electronic control panel (no text or symbols visible)Figure 13 Figure 14
DESMONTAGEM DO FUNDO DO FORNO A GÁS E QUEIMADOR SUPERIOR E INSTALAÇÃO DO INJETOR
natural_image
Line drawing of an open laptop case with internal components and ventilation slots (no text or symbols)Figura 19
natural_image
Technical line drawing of an open refrigerator with internal compartments and ventilation slots (no text or symbols)Figura 20
natural_image
Technical line drawing of an open laptop with internal components and ventilation slots (no text or symbols)Figura 21
natural_image
Line drawing of an open refrigerator with internal compartments and ventilation slots (no text or symbols)MANGUEIRA DE GÁS
natural_image
Diagram of a gasifier with internal compartments and a gas cylinder, showing no text or symbols.Figura 22
natural_image
Diagram of a gas cylinder inside a refrigerated storage unit with internal compartments and a checkmark icon (no text or symbols)Figura 23
Figura 24
natural_image
Simple line drawing of a curved rectangular object with two protrusions, labeled 'a 25' (no text or symbols on the object itself)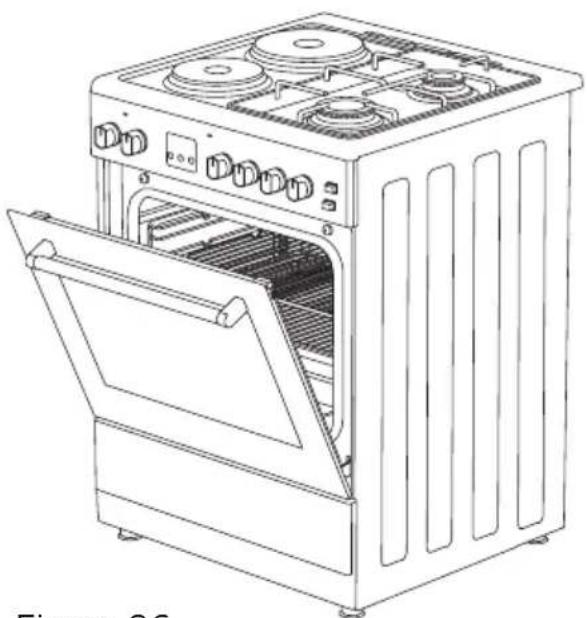
natural_image
Line drawing of an open kitchen oven with multiple gas stove covers (no text or symbols)Figura 26
natural_image
Line drawing of a simple electric stove with four fans and top cabin (no text or symbols)Figura 27
natural_image
Line drawing of hands installing or adjusting a ventilation grille inside a rectangular frame (no text or symbols)Figura 28
Remover as paredes catalíticas
natural_image
Technical line drawing of a mechanical or electrical enclosure with internal components and mounting holes (no text or symbols)Figura 29
natural_image
Symbol of a trash bin crossed with no text or numbers, representing waste sorting or disposal (no text present)Our objective is to make this product provide you with the best output which is manufactured in our modern facilities in a careful working environment, in compliance with total quality concept.
Therefore, we suggest you to read the user manual carefully before using the product and, keep it permanently at your disposal.
Note: This user manual is prepared for more than one model. Some of the features specified in the Manual may not be available in your appliance.
All our appliances are only for domestic use, not for commercial use.
"THISAPPLIANCESHALLBEINSTALLEDINACCORDANCEWITHTHE REGULA TIONS FORCE AND ONLY USED IN A WELL VENTILATED SPACE. READ THE INSTRUCTIONS BEFORE INSTALLING OR USING THIS APPLIANCE"
"Conforms with the WEEE Regulations."
CONTENTS
Important warnings
Introduction of the Appliance 31
Important warnings
Chain Lashing Illustration 33
Installation of your oven
Technical features of your oven 34
If the appliance does not operate 36
Control panel 3
Using cooker section 37
Using oven section
Maintenance and cleaning
Installation of the Oven Door 41
Cleaning and maintenance of the oven's front door glass 42
Changing the Oven Lamp
Accessories 43
Nozzle change operation 44
Reduced Gas Flow Rate Setting For Hob Taps 44
Removal of the Lower and Upper Burner and Installation of the Injector to the Gas Oven 45
Gas Hose Passage Way
Using The Grill Deflector Sheet 47
Catalytic Walls 48
Chicken Roasting 48
Environmentally-Friendly Disposal and Package Information 49
IMPORTANT WARNINGS
- WARNING: To avoid electrocution, ensure that the electrical circuit of the product is open before replacing the lamp.
- WARNING: Before touching the connection terminals, all supply circuit should be disconnected.
- WARNING: While operating the grill, the reachable sections can be hot. Keep the children away.
4.WARNING:Any inadvertent cooking made with fats and oils can be dangerous and cause fire. - WARNING: Risk of fire; do not store the food materials on the cooking surface.
6.WARNING: If the surface is cracked, unplug the device to prevent any risk of electric shock. - WARNING: During usage the reachable sections can be hot. Keep the small children away.
8.WARNING:The appliance and its reachable sections become hot during usage. - The setting conditions of this appliance is indicated on the label. (Or data tag)
- This appliance is not connected to a combustion product discharge system. This appliance shall be connected and installed as per the applicable installation legislation. Consider the requirements related with ventilation.
- Using a gas hob will release humidity and combustion products in the room where it resides. Especially
during when the appliance in use, ensure that the kitchen is well ventilated and retain the natural ventilation holes or install a mechanical ventilation system. (Hood on top of the oven) Sustained usage of the appliance may require additional ventilation. For example opening a window or if available, increasing the ventilation level of a mechanical ventilation system.
- The reachable sections can become hot when the grill is used. Keep the small children away.
- WARNING: The appliance is intended for cooking only. It must not be used for other purposes like room heating.
- There are additional protective equipment to prevent inadvertent touching to the oven doors. This equipment should be installed if there are children.
- "This appliance should be installed as per regulations and in well-ventilated location only. Read the instructions before installing or operating the appliance."
- "Before placing the appliance check the local conditions (gas type and gas pressure) and ensure that the settings of the appliance is appropriate."
- "These instructions are applicable for countries of which symbols are indicated on the appliance. If the country symbol is not available on the appliance, in order to adapt the appliance to the conditions of such country, the technical instructions should be read."
- "Do not operate the system for more that 15 seconds. If the burner does not ignite at the end of 15
GB
seconds stop the operation of the system and open the section door and/or wait for at least 1 minute before igniting the burner.
- Do not use steam cleaners to clean the appliance.
- Before opening the oven door clean the remnants on it. Before closing the oven door, let it cool.
- NEVER try to extinguish a fire with water, first disconnect the mains supply and then using, for example a lid or blanket, cover the fire.
- Do not use hard and abrasive cleaning agents or hard metal scrapers to clean the oven door glass as they may scratch and shatter the surface.
- After placing a dish, ensure that the door is firmly closed.
- Unless continuous supervision is provided, the children of age 8 or below should be kept away.
- Pay attention for not to touch the heating elements.
- This appliance can be used by children aged from 8 years and above and persons with reduced physical, sensory or mental capabilities or lack of experience and knowledge if they have been given supervision or instruction concerning use of the appliance in a safe way and understand the hazards involved.
INTRODUCTION OF THE APPLIANCE
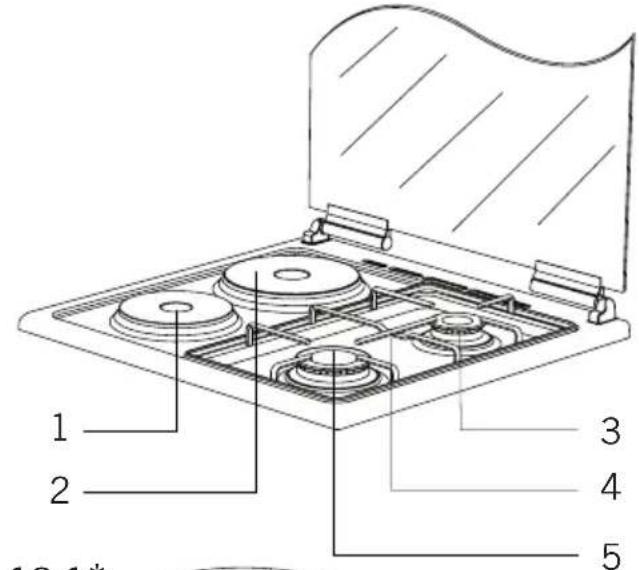
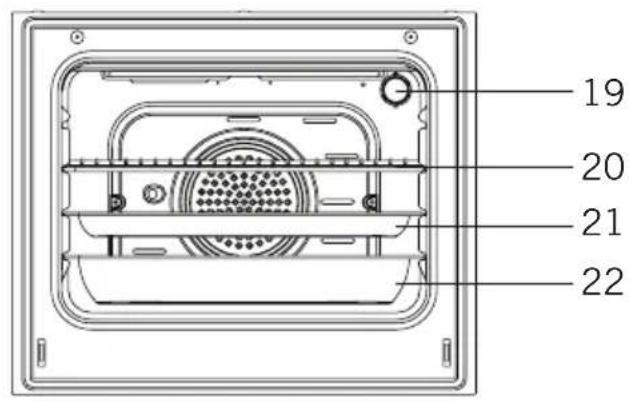
natural_image
Technical line drawing of a mechanical assembly with no visible text or symbols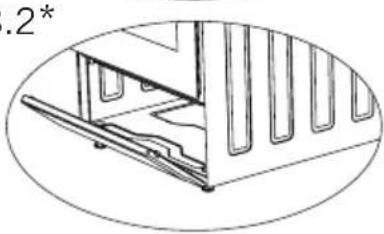
natural_image
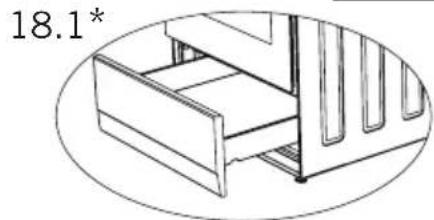
Technical line drawing of a mechanical assembly with vertical supports and mounting brackets (no text or symbols)Figure 18.1 and 18.2 are optional for ovens with dimensions 50x60 and 60x60(*)
Figure 18.1 is not available for oven with dimension 50x55 and 18.2 is optional. (*)
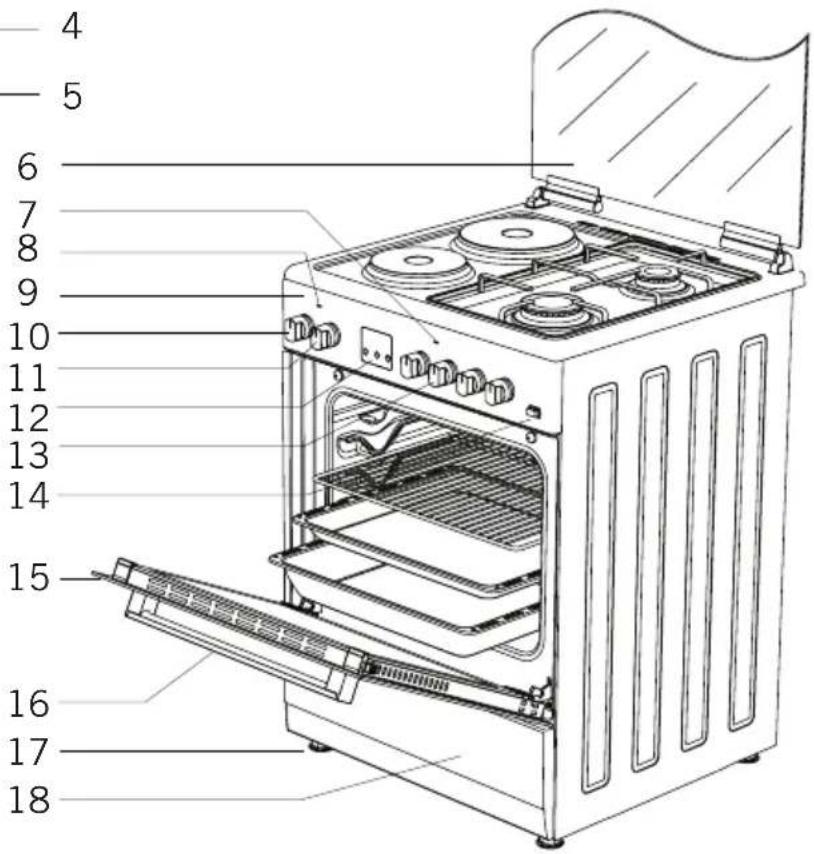
- Hotplate ∅145mm
- Hotplate ∅185mm
- Middle Burner
- Trivet
- Large Burner
- Glass Door (Sheet Metal Door)
- Cooker Section Led Lamp
-
Oven Section Led Lamp
-
Control Panel
- Thermostat Setting
- Oven Setting
- Digital Timer
- Cooker Section Control Switches
- Push Button Lighter
- Door
-
Handle
-
Plastic Leg
- Lower Cabinet
Door
18.1 Drawer
18.2 Flap Door - Lamp
- Grill
- Standard Tray
- Deep Tray
IMPORTANT WARNINGS
Electrical Connection and Security
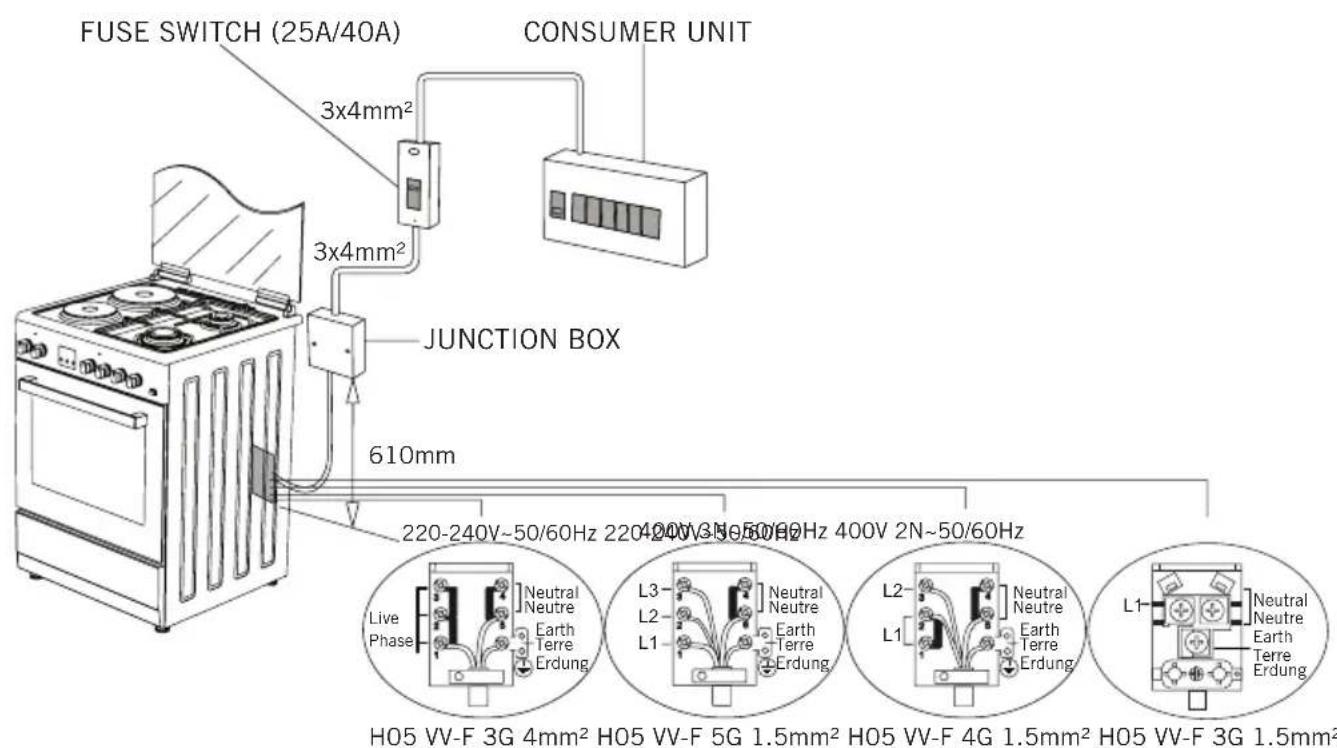
- Your oven requires 16 or 32 Ampere fuse according to the appliance's power. If necessary, installation by a qualified electrician is recommended.
- Your oven is adjusted in compliance with 220-240V\~50/60Hz. (or 220-240V/400V\~50/60Hz.) electric supply. If the mains are different from this specified value, contact your authorized service.
- Electrical connection of the oven should only be made by the sockets with earth system installed in compliance with the regulations. If there is no proper socket with earth system in the place where the oven will be placed, immediately contact a qualified electrician. Manufacturer shall never be responsible from the damages that will arise because of the sockets connected to the appliance with no earth system. If the ends of the electrical connection cable are open, according to the appliance type, make a proper switch installed in the mains by which all ends can be disconnected in case of connecting / disconnecting from / to the mains.
- If your electric supply cable gets defective, it should definitely be replaced by the authorized service or qualified electricians in order to avoid from the dangers.
- Electrical cable should not touch the hot parts of the appliance.
- Please operate your oven in dry atmosphere.
Gas Connection and Security
Please operate your oven in dry atmosphere.
- Fit the clamp to the hose. Push one of the hose until it goes to the end of the pipe.
- For the sealing control; ensure that the buttons in the control panel are closed, but the gas cylinder is open. Apply some soap bubbles to the connection. If there is gas leakage, there will be foaming in the soaped area.
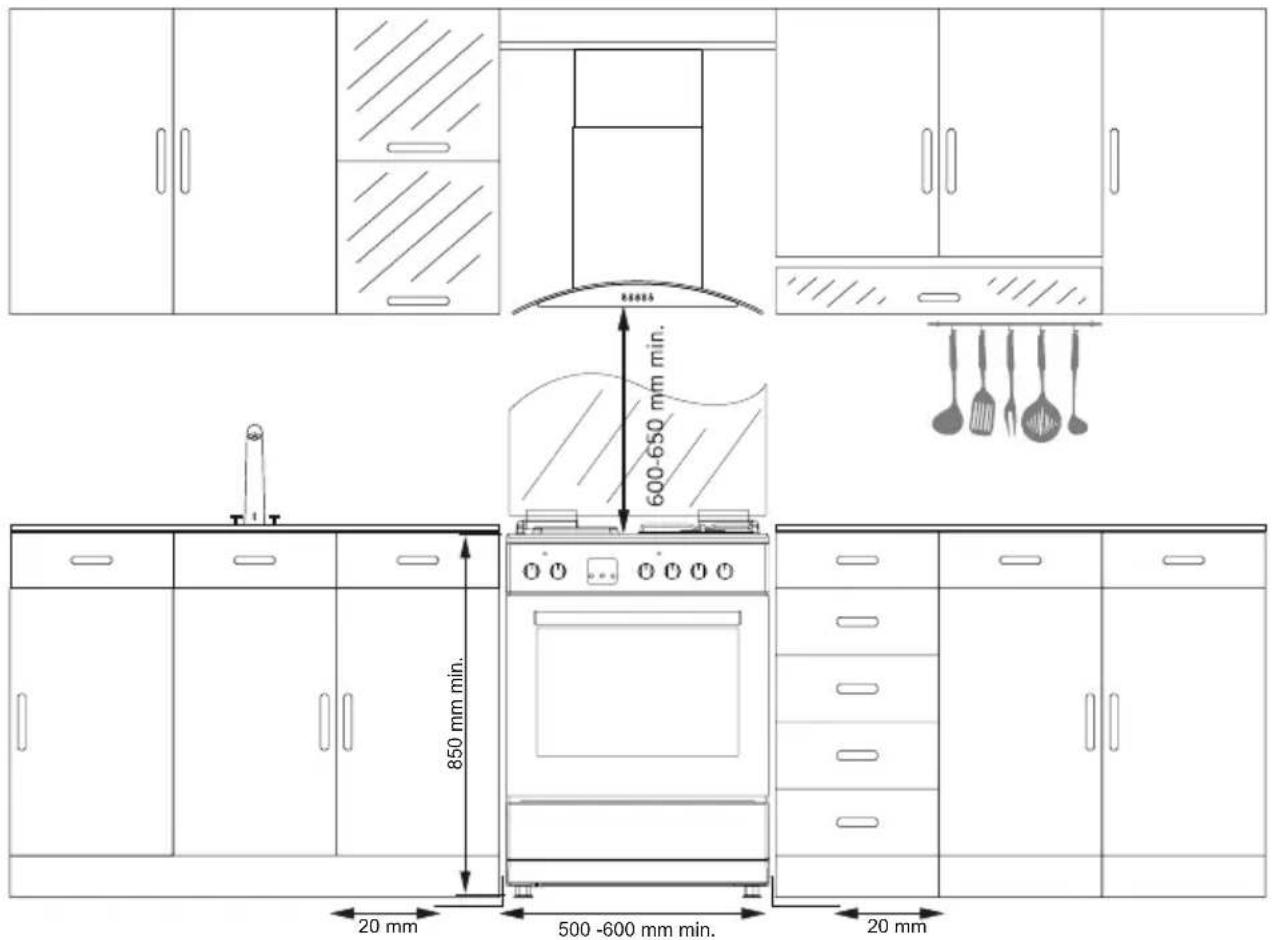
- The oven should be using a well ventilation place and should be install on flat ground.
- Re-inspect the gas connection.
- When placing your oven to its location, ensure that it is at the counter level. Bring it to the counter level by adjusting the feet if necessary.
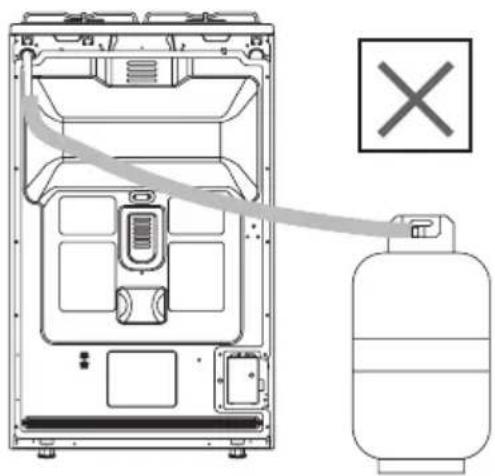
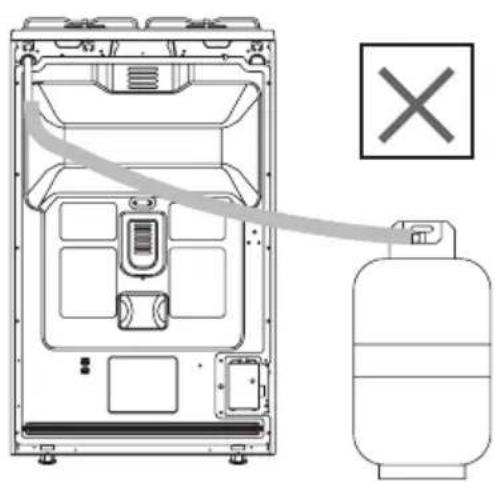
- Do not make gas hose and electrical cable of your oven go through the heated areas, especially through the rear side of the oven. Do not move gas connected oven. Since the forcing shall loosen the hose, gas leakage may occur.
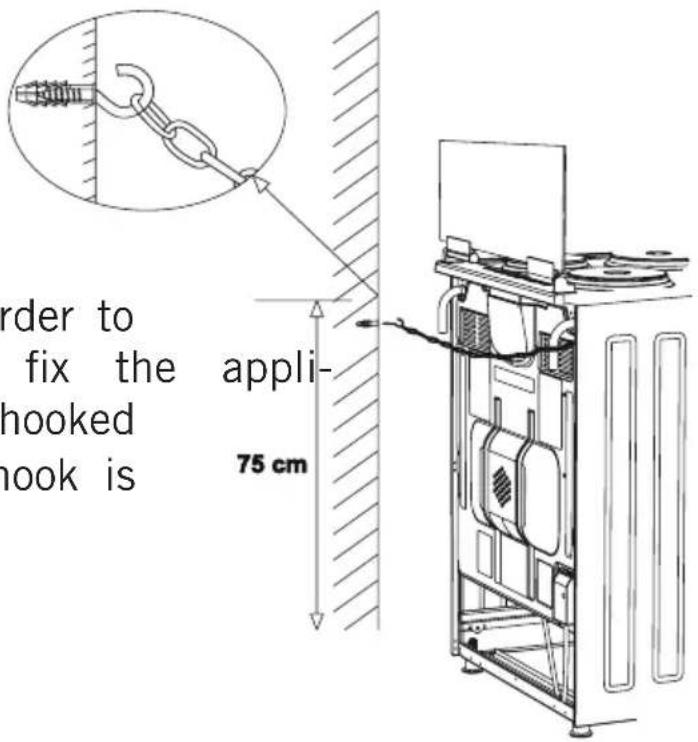
- Before using the appliance, in order to ensure safe use, be sure to
fix the appliance to the wall using the chain and hooked screw supplied. Ensure that the hook is screwed into the wall securely.
- Please use flexible hose for gas connection.
ELECTRICAL CONNECTION SCHEME
CHAIN LASHING ILLUSTRATION
Before using the appliance, in order to ensure safe use, be sure to fix the ance to the wall using thechain and hooked screw supplied. Ensure that the hook is screwed into the wall securely.
INSTALLATION OF YOUR OVEN
| TECHNICAL FEATURES OF YOUR OVEN | |||
| SPECIFICATIONS 50x55 50x60 60x60 | |||
| Outer width 500mm 500mm 600mm | |||
| Outer depth 565mm 630mm 630mm | |||
| Outer height 855mm 855mm 855mm | |||
| Inner width 341mm 341mm 441mm | |||
| Inner depth 443mm 443mm 443mm | |||
| Inner height 316mm 316mm 316mm | |||
| Inner volume 48lt 48lt 62lt | |||
| Lamp power 15W 15W 15W | |||
| Bottom heating element 1000W 1000W 1200W | |||
| Top heating element | 800W 800W | 1000W | |
| Turbo heating element | ---- | 1800W 2200W | |
| Grill heating element | 1500W 1500W 2000W | ||
| Supply Voltage | 220-240V AC,50/60Hz Or(220-240V/400V AC,50/60 Hz) |
| Hot Plate 145mm 1000W | |
| Hot Plate 180mm 1500W | |
| Hot Plate rapid 145mm 1500W | |
| Hot Plate rapid 180mm 2000W |
| BURNER INJECTOR VALUES ACCORDING TO THE GAS TYPE | LPG G30/28-30 mbar | NG G20/20 mbar | NG G25/25 mbar | |
| Wok Burner | Injector ∅ mm | 0,96 1,30 1,40 | ||
| Power kW 3,60 | 3,35 3,66 | |||
| Consumption Gr/h,m3/h | 259,20 0,300 0,365 | |||
| Rapid Burner | Injector ∅ mm | 0,85 1,15 1,15 | ||
| Power kW 2,75 | 2,75 2,75 | |||
| Consumption Gr/h,m3/h | 198 0,263 0,287 | |||
| Semi Rapid Burner | Injector ∅ mm | 0,65 0,97 0,97 | ||
| Power kW 1,60 | 1,70 1,70 | |||
| Consumption Gr/h,m3/h | 115,20 0,165 0,175 | |||
| Auxiliary Burner | Injector ∅ mm | 0,50 0,72 0,72 | ||
| Power kW 0,90 | 0,90 0,90 | |||
| Consumption Gr/h,m3/h | 64,80 0,085 0,097 | |||
| Oven Burner | Injector ∅ mm | 0,65 0,97 0,97 | ||
| Power kW 1,80 | 1,85 1,85 | |||
| Consumption Gr/h,m3/h | 129,60 0,174 0,192 | |||
| Grill Burner | Injector ∅ mm | 0,60 0,92 0,92 | ||
| Power kW 1,50 | 1,55 1,55 | |||
| Consumption Gr/h,m3/h | 108 0,153 0,164 | |||
IF THE APPLIANCE DOES NOT OPERATE
- Please check the plug of power supply cord has a well connection with wall socket or not.
- Please check the electric network.
- Please check the fuse.
- Please check power supply cord for any damage problems.
- If you can not solve the problem, get in contact with manufacturer supplier service agent or similar qualified persons.
DESCRIPTION OF OVEN and CONTROL PANELS
 | Tumspit Fan | ||
 | Top + Bottom heating element | Turbo heating + Fan | |
 | Lamp | Bottom + Top heating elements + Fan | |
 | Bottom heating element + Fan | Grill heating element+Fan | |
 | Grill heating element | Grill burner / Grill heating element | |
 | Grill heating element+Lamp | Top heating element | |
 | Electrical timer | Oven burner / Bottom heating element | |
 | Flame Ignition lighter |
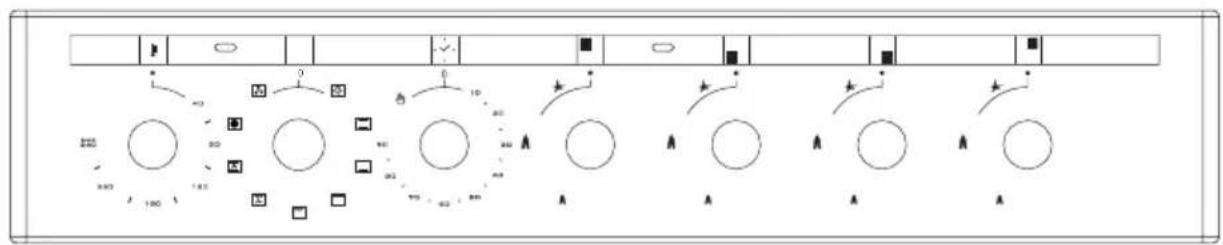
THERMOSTAT KNOB; In order to operate the oven, thermostat must be-adjusted to desired temperature. Your thermostat has a feature of adjustment to 50 - 280 degree.
MECHANIC TIMER KNOB(Optional); Inordertooperatetheoven, timerswitch should be adjusted to desired time from 0-90 minute. You can use cooking time table.
CONTROL PANELS

flowchart
graph TD
    A["Start"] --> B{Step 1}
    B --> C["Step 2"]
    C --> D{Step 3}
    D --> E["Step 4"]
    E --> F{Step 5}
    F --> G["End"]
flowchart
graph TD
    A["Start"] --> B{Decision}
    B -->|Yes| C["Process Step 1"]
    B -->|No| D["Process Step 2"]
    C --> E["End"]
    D --> F["End"]
 |  |  |  |
| Front electric hot plate | Rear electric hot plate | Rear left burner (middle burner) | Front left burner (big burner) |
 |  |  |  |
| Grill burner or heating element | Oven burner (optional) or heating element | Timer (optional) | Thermostat (optional) |
USING COOKER SECTION
Using Gas Burners:
| WOK Burner 24-28cm |
| Big Burner 22-26cm |
| Normal Burner 18-22cm |
| Small Burner 12-18cm |
- Closed
Fully open
Half open
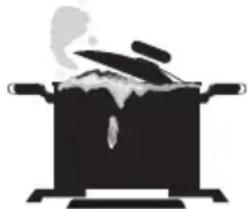
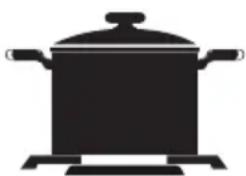
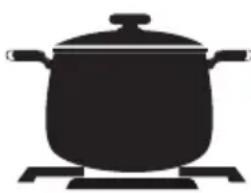
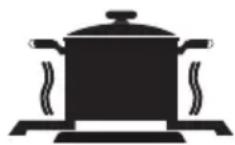
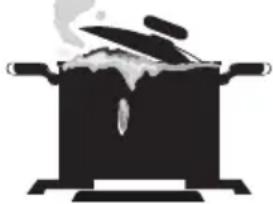
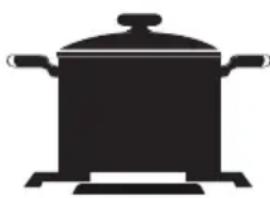
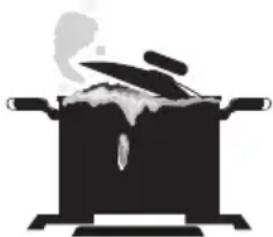
- In order to obtain maximum output, be careful that the saucepan which will be used should be flat bottomed, and use the saucepans with dimensions given herein above.
- The valves controlling the gas cookers have special security mechanism. In order to light the cooker always press on the switch forward and bring it to flame symbol by turnin counterclockwise. All of the lighters shall operate and the cooker you controlled shall light only. Keep the switch pressed until ignition i performed. Press on the lighter button and
GB
turn the knob counter clockwise.
- Do not continuously operate the igniter for more than 15 seconds. If the burner does not ignite, wait minimum one minute before try again. If the burner is extinguished because of any reason, close the gas control valve and wait minimum one minute before try again.
- In models with Gas Security System, when flame of the cool extinguished, control valve cuts off the gas automatically. For operate the burners with gas security system you must press the knob and turn counter-clock-wise. After the ignition you must wait nearly 5-10 second for gas security systems activation. If the burner is extinguished for of the any reason, close the gas control valve and wait a minimum of one minute before trying again.
USING HOT PLATES
| LEVEL 1 LEVEL 2 LEVEL 3 LEVEL 4 LEVEL 5 LEVEL 6 | ||||||
| 80mm | 200W 250W 450W --- --- --- | |||||
| 145mm | 250W 750W 1000W --- --- --- | |||||
| 180mm | 500W 750W 1500W --- --- --- | |||||
| 145mm rapid | 500W 1000W 1500W --- --- --- | |||||
| 180mm rapid | 850W 1150W 2000W --- --- --- | |||||
| 145mm | 95W 155W 250W 400W 750W 1000W | |||||
| 180mm | 115W 175W 250W 600W 850W 1500W | |||||
| 145mm rapid | 135W 165W 250W 500W 750W 1500W | |||||
| 180mm rapid | 175W 220W 300W 850W 1150W 2000W | |||||
- Electric hotplates have standard of 6 temperature levels (as describe herein above)
- When using first time, operate your electric hotplate in position 6 for 5 minutes. This will make the agent on your hotplate which is sensitive to heat get hardened by burning.
- Use flat bottomed saucepans which fully contact with the heat as much as you can, so that you can use the energy more productively.
natural_image
Silhouette of a cooking pot on a stovetop (no text or symbols)False
False
natural_image
Simple black-and-white illustration of a cooking pot with steam rising from it (no text or symbols)False
natural_image
Silhouette of a cooking pot with lid and side handles (no text or symbols)True
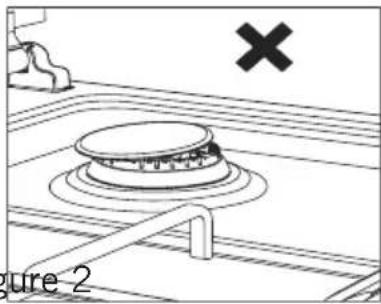
Before operating your hob please make sure that the burner caps are well positioned. The right placement of the burner caps are shown as below.
natural_image
Diagram of a gas stove with a valve and switch, labeled Figure 2 (no text or symbols on the diagram itself)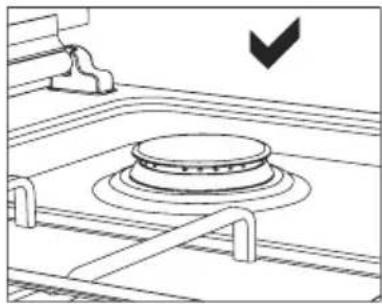
natural_image
Line drawing of a kitchen stove with a circular vent and a downward arrow indicating a drop (no text or symbols)Figure 1 Figure 2
USING OVEN SECTION
Using oven burners
- If your oven equipped with burners that operates with gas, appropriate knob should be used in order to ignite the burners. Some models have automatic ignition from the knob; it is easy to ignite the burner by turning the knob. Also, burners can be ignited by pressing the ignition button or they can be ignited with a match.
- Do not continuously operate the igniter for more than 15 seconds. If the burner does not ignite, wait minimum one minute before trying again. If the burner is extinguished for of the any reason, close the gas control valve and wait a minimum of one minute before trying again.
Using oven heating elements
- When your oven is operated first time, an odor will be spread which will be sourced from using the heating elements. In order to get rid of this, operate it at 250 °C for 45-60 minutes while it is empty.
- Oven control knob should be positioned to desired value; otherwise oven does not operate.
- Kinds of meals, cooking times and thermostat positions are given in cooking table. The values given in the cooking table are characteristic values and were obtained as a result of the tests performed in our laboratory. You can find different flavors suitable for your taste depending on your cooking and using habits.
- You can make chicken revolving in your own by means of the accessories.
- Cooking times: The results may change according to the area voltage and material having different quality, amount and temperatures.
- During the time when cooking is being performed in the oven, the lid of the oven should not be opened frequently. Otherwise circulation of the heat may be imbalanced and the results may change.
- Using cake forms while cooking cake gives better result.
- 5 - 10 min. preliminary heating should be done prior cooking.
COOKING TIME TABLE
| Meals Temperature (°C) Rack Position Cooking Time (min.) | |||
| Creamed cake 150-1 | 70 2 30-35 | ||
| Pastry 200-220 2 35-45 | |||
| Biscuit 160-170 3 20-25 | |||
| Cookie 160-170 3 20-35 | |||
| Cake 160-180 2 25-35 | |||
| Braided cookie 200- | 220 2 30-40 | ||
| Filo Pastry 180-220 | 2 35-45 | ||
| Savory pastry 160-180 2 20-30 | |||
| Lamb meat 210-230 | 1 90-120 | ||
| Veal | 210-230 1 90-120 | ||
| Mutton | 210-230 1 90-120 | ||
| Chicken (pieced) | 210-230 1 75-100 | ||
| Fish | 190-210 2 40-50 | ||
MAINTENANCE and CLEANING
- Disconnect the plug supplying electricity for the oven from the socket.
- While oven is operating or shortly after it starts operating, it is extremely hot. You must avoid touching from heating elements.
- Never clean the interior part, panel, lid, trays and all other parts of the oven by the tools like hard brush, cleaning mesh or knife. Do not use abrasive, scratching agents and detergents.
- After cleaning the interior parts of the oven with a soapy cloth, rinse it and then dry thoroughly with a soft cloth.
- Clean the glass surfaces with special glass cleaning agents.
- Do not clean your oven with steam cleaners.
- Before opening the upper lid of the oven, clean spilled liquid off the lid. Also, before closing the lid, ensure that the cooker table is cooled enough.
- Never use inflammable agents like acid, thinner and gasoline when cleaning your oven.
- Do not wash any part of your oven in dishwasher.
- In order to clean the front glass lid of the oven; remove the fixing
screws fixing the handle by means of a screwdriver and remove the oven door. Than clean and rinse it thoroughly. After drying, place the oven glass properly and re-install the handle.
INSTALLATION OF THE OVEN DOOR
natural_image
Line drawing of a vintage cooktop oven with open door and side panels (no text or symbols)Figure 3

natural_image
Line drawing of an open oven with four stovels and a door open, showing internal components (no text or symbols)Figure 4
natural_image
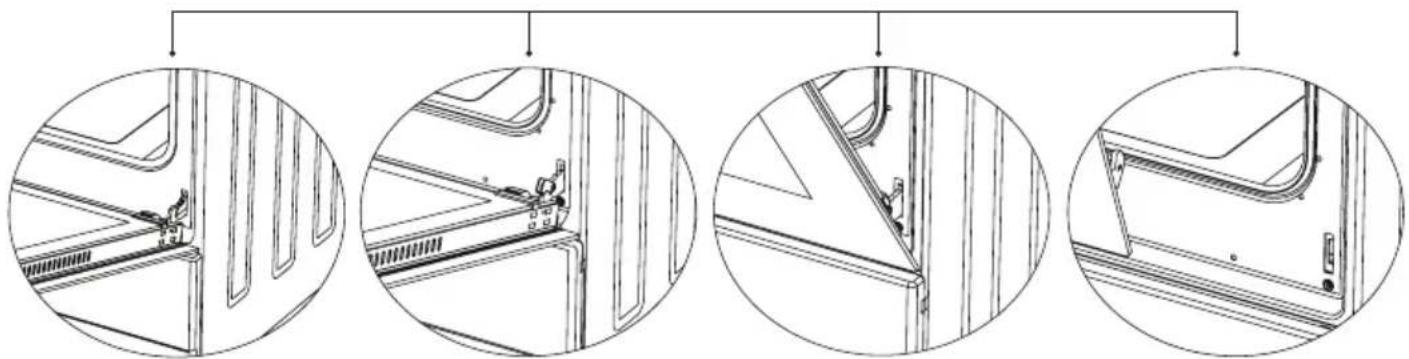
Four circular diagrams showing internal structural components of a vehicle frame, with no visible text or symbols.Figure 3.1 Figure 3.2 Figure 4.1 Figure 4.2
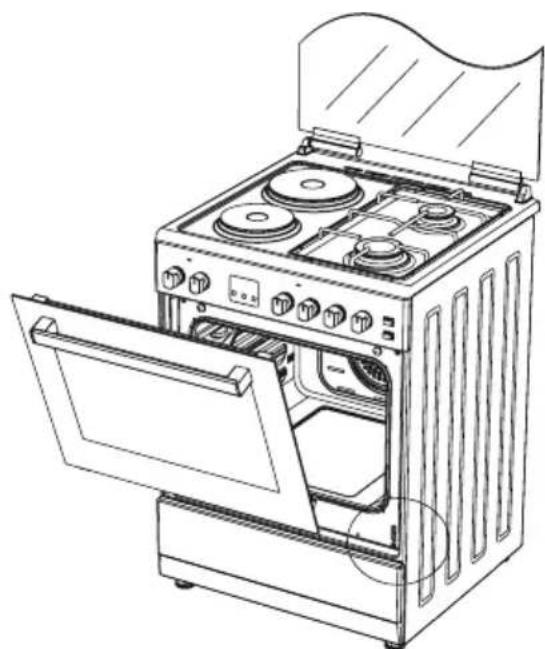
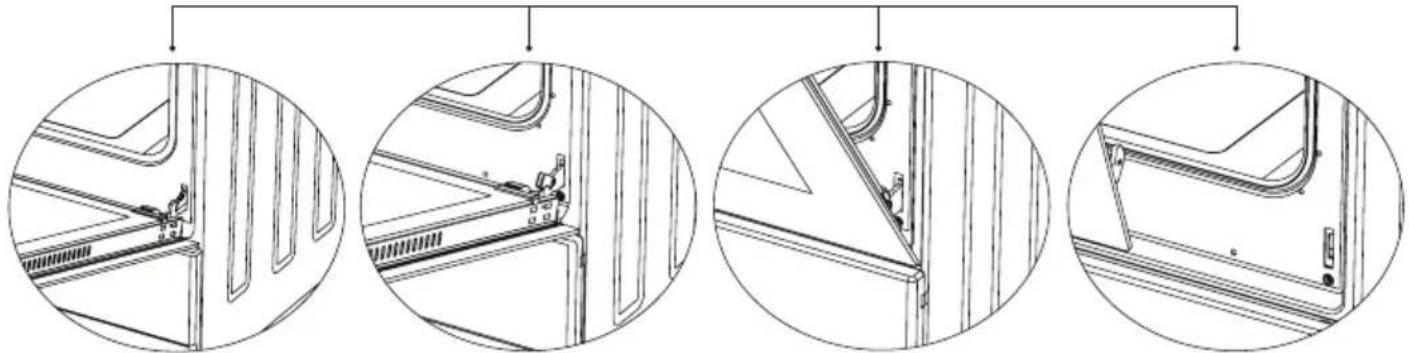
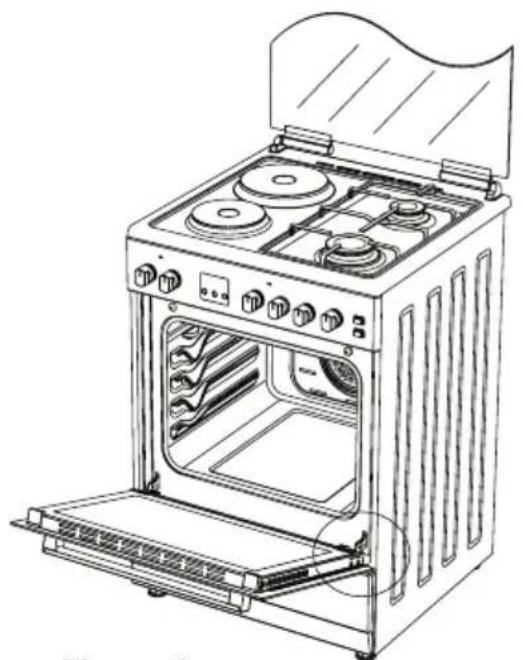
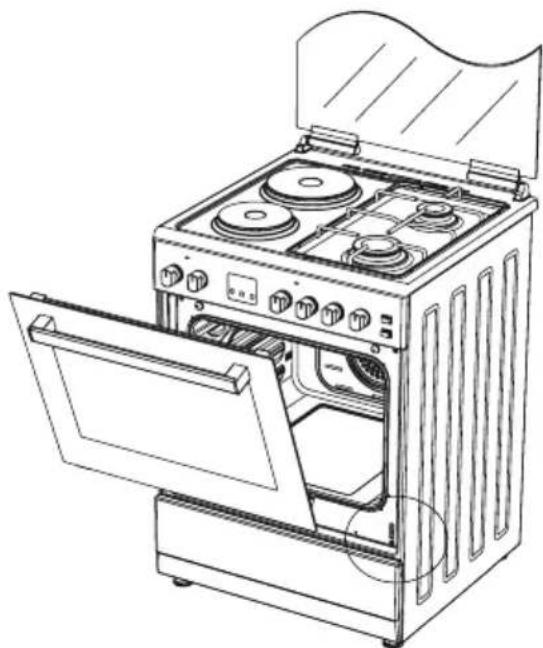
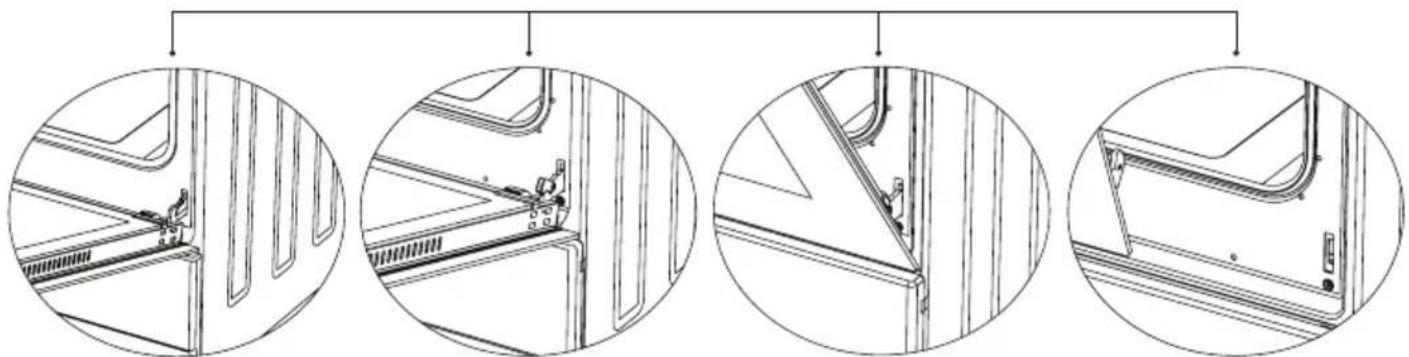
Completely open the oven door by pulling it to yourself. Afterwards, perform the un-locking process by pulling the hinge lock upwards with the help of a screw driver as shown in
Figure 3.1.
Bring the hinge lock to the widest angle as shown in Figure 3.2. Bring both hinges connecting the oven door to the oven to the same position.
Afterwards, close the oven door as to lean on the hinge lock as shown in Figure 4.1.
To remove the oven door, pull it upwards by holding it with both hands when close to the closed position as shown in Figure 4.2.
In order to re-place the oven door, perform the abovementioned steps in reverse.
CLEANING AND MAINTENANCE OF THE OVEN'S FRONT DOOR GLASS
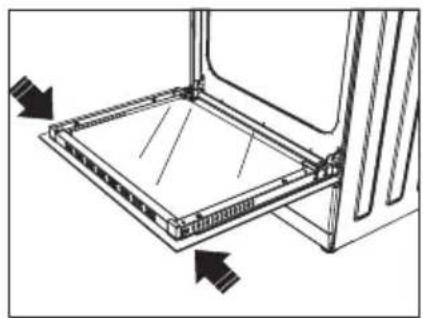
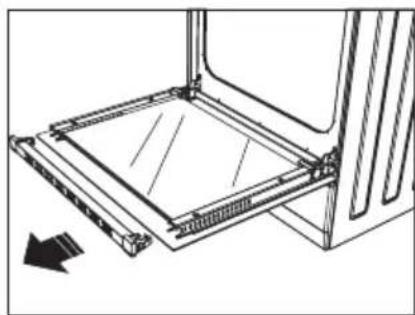
Remove the profile by pressing the plastic latches on both left and right sides as shown in Figure 5 and pulling the profile towards yours shown in Figure 6. Then remove the inner-glass as shown in Figure 7. If required, middle glass can be removed in the same way. After cleaning and maintenance are done, remount the glasses and the profile in reverse order.
Make sure the profile is properly seated in its place.
natural_image
Technical line drawing of a mechanical assembly with arrows indicating direction (no text or symbols)Figure 5 Figure 6
natural_image
Technical line drawing of a mechanical assembly with no visible text or symbols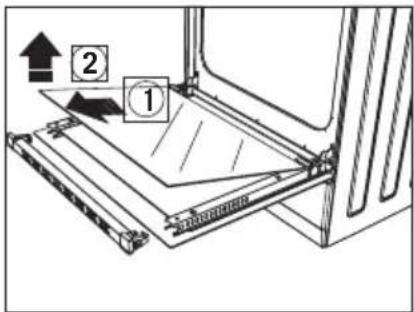
Figure 7
CHANGING THE OVEN LAMP
In order to avoid the possibility of an electric shock, ensure that the circuit of the appliance is open before changing the lamp. (The open-circuit is an electrical circuit that does not conduct current.)
1- First of all, cut the electrical connection of the appliance and ensure that the appliance is cooled down.
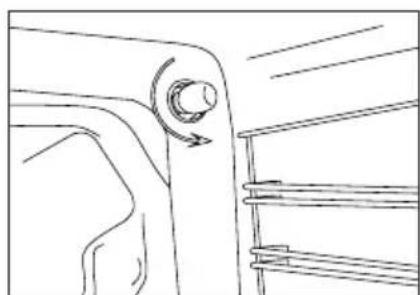
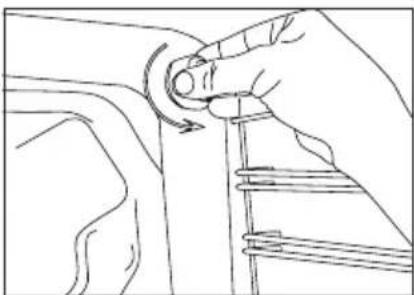
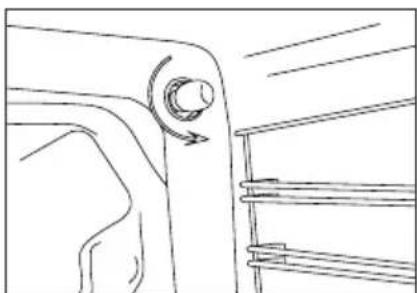
2- Remove the glass protection by turning as shown in the figure. If you have difficulty in turning it, the use of plastic gloves will help you.
3- Afterwards, remove the lamp by turning and install the new lamp with the same specifications. The specifications of the lamp should be as follows:
- 230 V, AC
- 15 W
- Type E14
4- Place the glass protection and complete the replacing process by plugging in the electric cable of the appliance. Now, you can use your oven.
natural_image
Line drawing of a hand adjusting a car seatbelt (no text or symbols)Figure 8
natural_image
Line drawing of a mechanical component with a knob and arrow indicating rotation (no text or symbols)Figure 9
ACCESORIES
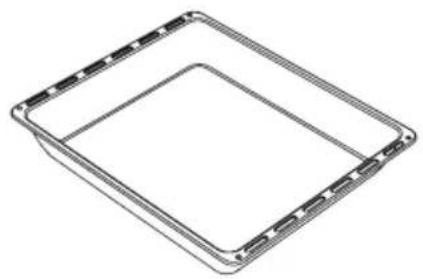
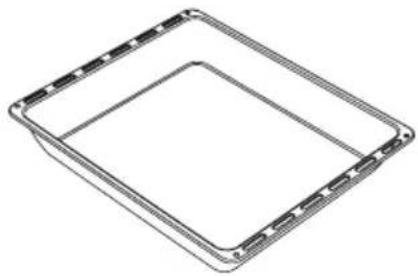
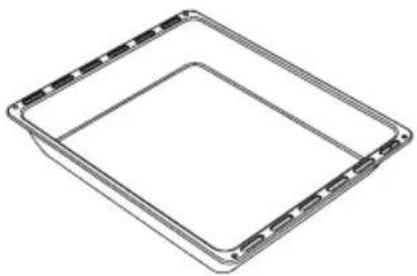 | Deep TrayUsed for pastries, deep fried foods and stew recipes. In case of frying directly on the grill for cakes, frozen foods and meat dishes, it can be used of oil pick-up tray. |
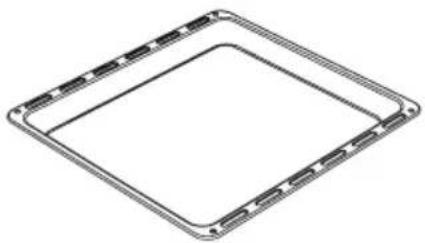 | TrayUsed for pastries (cookies, biscuits etc.) and frozen foods. |
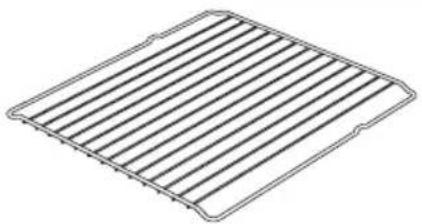 | Wire GrillUsed for frying and/or placing the foods to be baked, fried and frozen foods on the desired rack. |
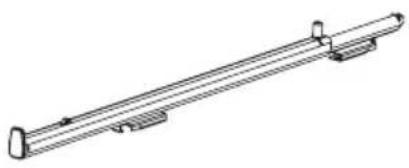 | Telescopic RailWith the help of telescopic rails, the trays and/or wire racks can be easily placed and removed. |
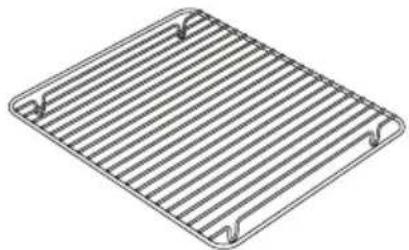 | In Tray Wire GrillFoods that can stick while cooking such as beef are placed on in tray grill. Thus, the contact and sticking of the food is prevented. |
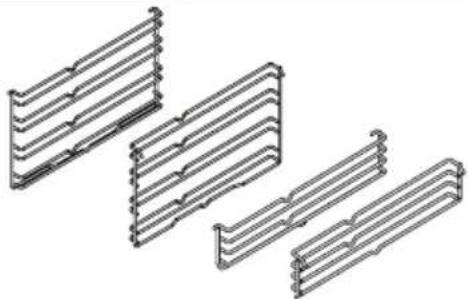 | Lower and Upper Wire RacksWhile cooking, you can place the deep tray and tray on the lower and upper wire racks. |
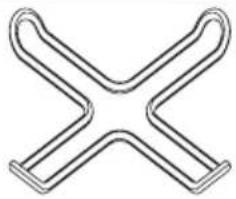 | Coffee Pot Support UnitCan be used for coffee pot. |
GB
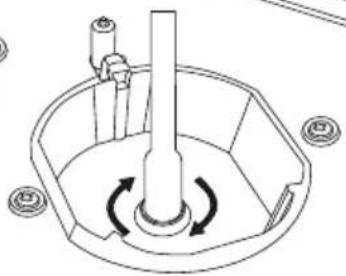
- Please use driver with special head for removed and install nozzle as (Figure-10)
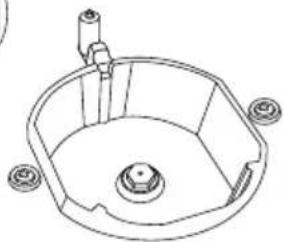
- Please remove nozzle (Figure -11) from burner with special nozzle driver and install new nozzle (Figure -12)
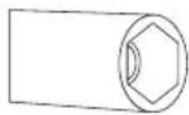
Figure 10
natural_image
Technical line drawing of a mechanical component with no visible text or symbolsFigure 11
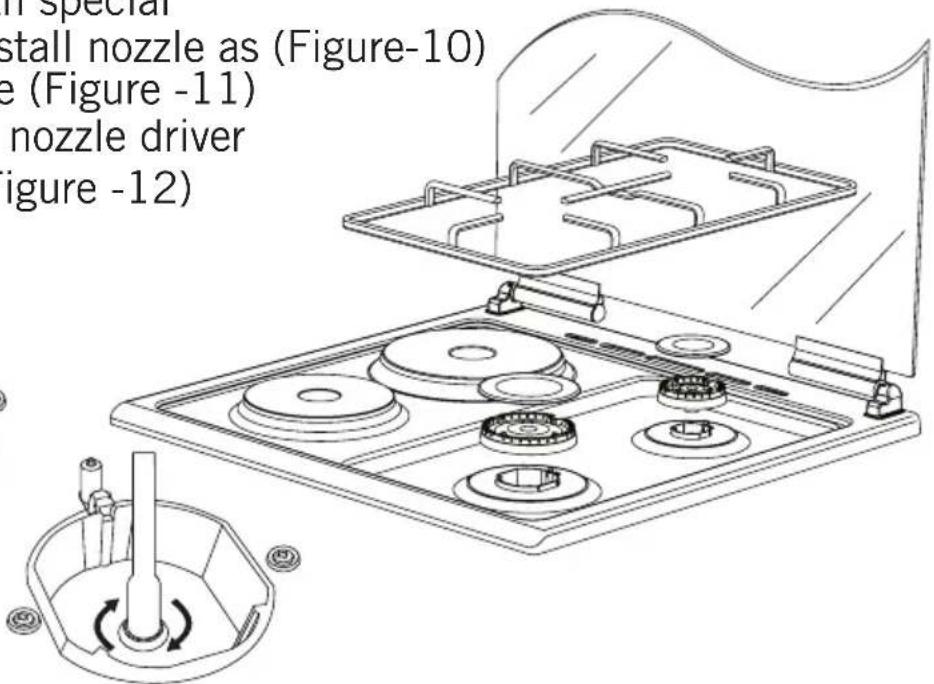
Figure 12
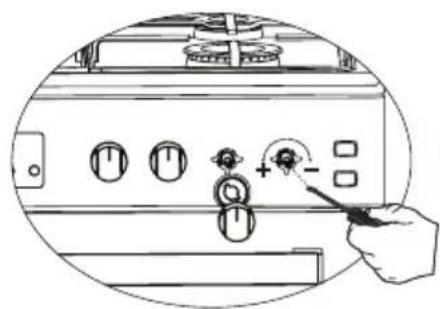
REDUCED GAS FLOW RATE SETTING FOR HOB TAPS
- Ignite the burner that is to be adjustment and turn the knob to the reduced position.
- Remove the knob from the gas tap.
- Use an appropriately sized screwdriver to adjust the flow rate adjustment screw.
For LPG (Butane - Propane) turn the screw clockwise. For the naturel gas, you should turn the screw counter- clockwise once.
"The normal length of a straight flame in the reduced position should be 6-7 mm.
- If the flame is higher then the desired position, turn the screw clockwise. If it is smaller turn anticolockwise.
- For the last control, bring the burner both to higt-flame and reduced positions and check whether the flame is on or off.
Depending on the type of gas tap used in your appliance the adjustmen screw position may vary.
natural_image
Line drawing of a kitchen control panel with buttons and a hand pointing to the knob (no text or symbols)
natural_image
Line drawing of a hand pressing a button on an electronic device panel (no text or symbols visible)Figure 13 Figure 14
REMOVAL OF THE LOWER AND UPPER BURNER AND INSTALLATION OF THE INJECTOR TO THE GAS OVEN
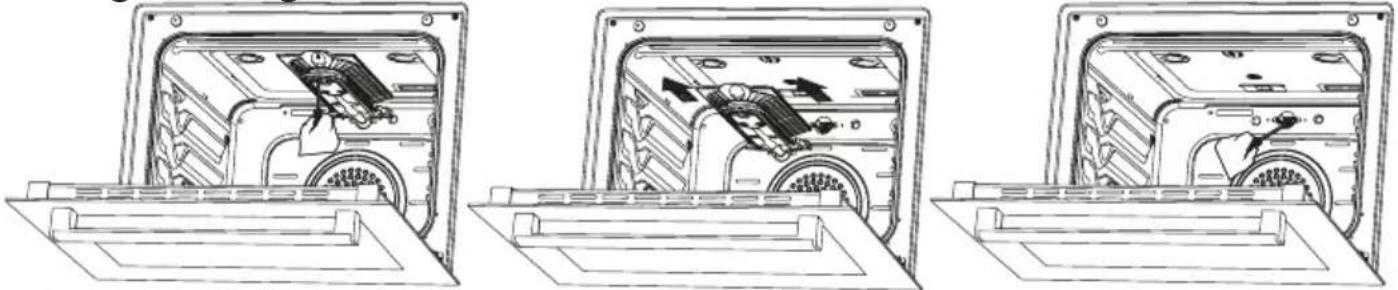
Removal of the Upper Burner:
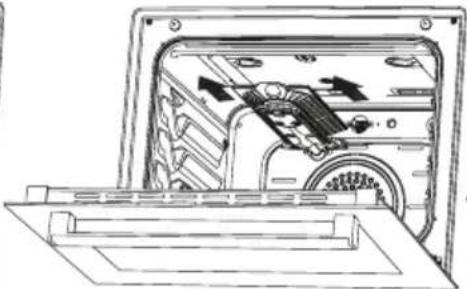
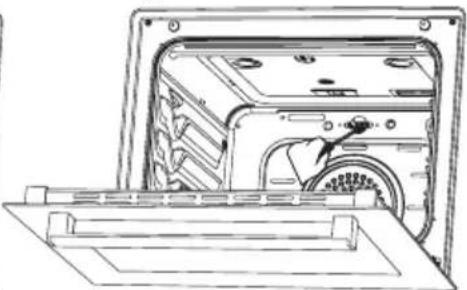
With the help of a screw driver, remove the screw as shown in Figure 15. As shown in Figure 16, remove the burner from its place by pulling it to yourself. As shown in Figure 17, remove the injector in the bearing with a socket wrench. In order to re-place the burner, apply the removal process reversely.
Figure 15 Figure 16
natural_image
Three technical line drawings of a device interior showing internal components and mounting brackets (no text or symbols)Figure 17
Removal of the Lower Burner:
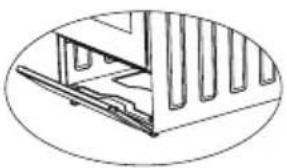
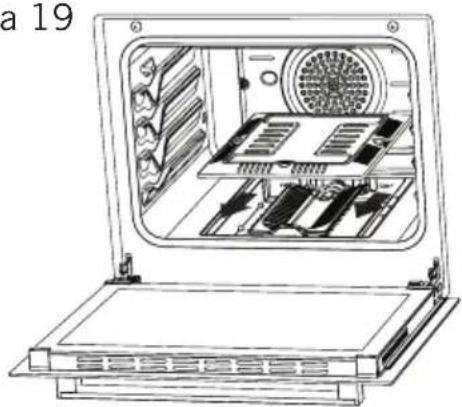
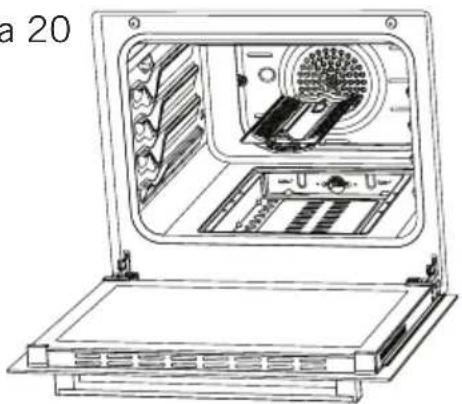
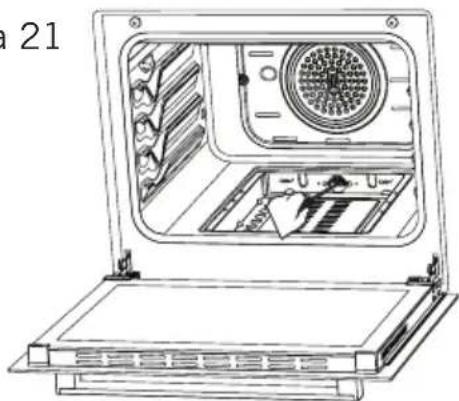
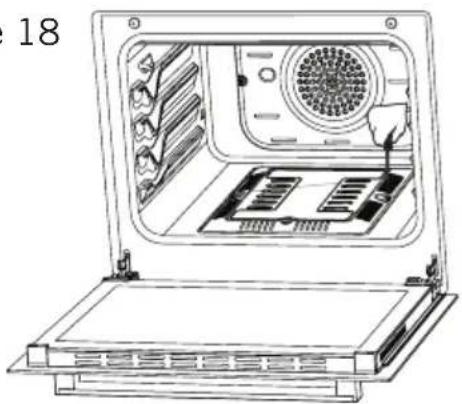
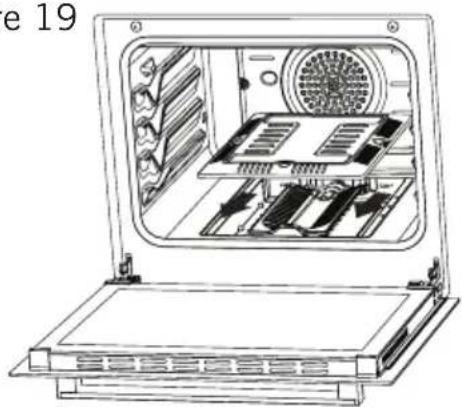
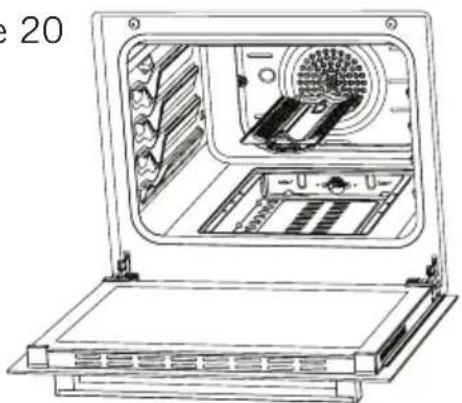
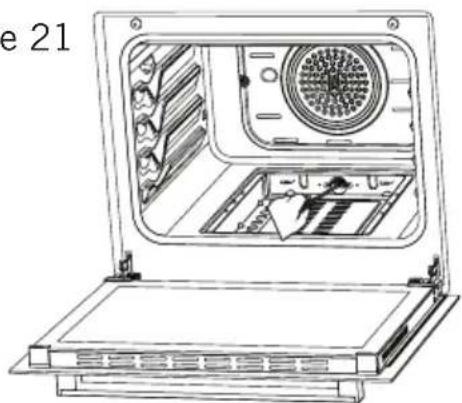
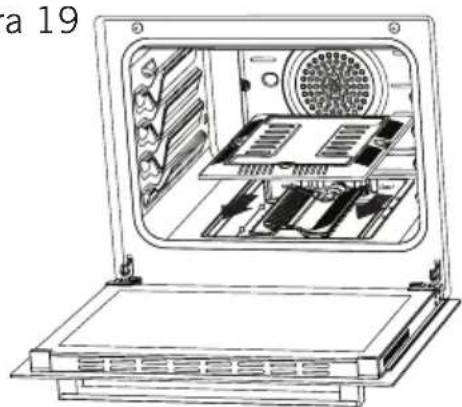
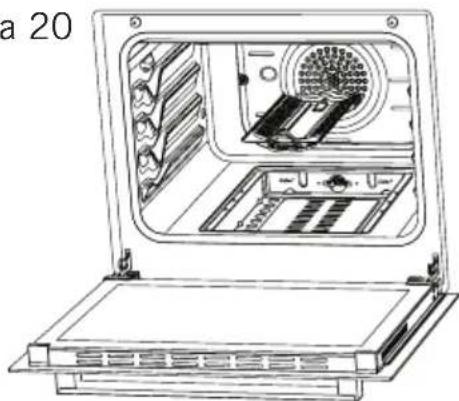
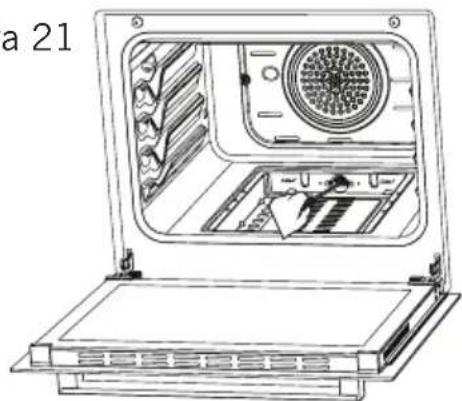
The lower burner door has been fixed with two screws. As shown, Figure 18, remove it with the help of a screw driver. Remove the door by pulling upwards as shown in Figure 19. Remove the burner from its place by pulling it to yourself as shown in Figure 20. As shown in Figure 21, remove the injector in the bearing with a socket wrench. In order to replace the burner, apply the removal process reversely.
Figure 18
natural_image
Line drawing of an open laptop case with internal components and ventilation slots (no text or symbols)Figure 19
natural_image
Technical line drawing of an open refrigerator with internal compartments and ventilation slots (no text or symbols)Figure 20
natural_image
Technical line drawing of an open laptop case with internal components (no text or symbols)Figure 21
natural_image
Line drawing of an open refrigerator with ventilation grilles and a door (no text or symbols)natural_image
Technical line drawing of a gasifier unit with internal compartments and a gas cylinder, plus a checkmark icon (no text or symbols on the diagram itself)Figure 22
-
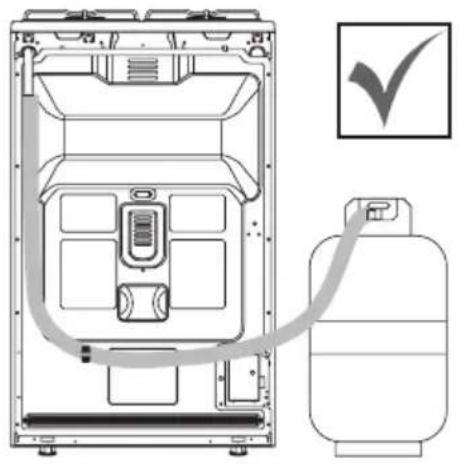
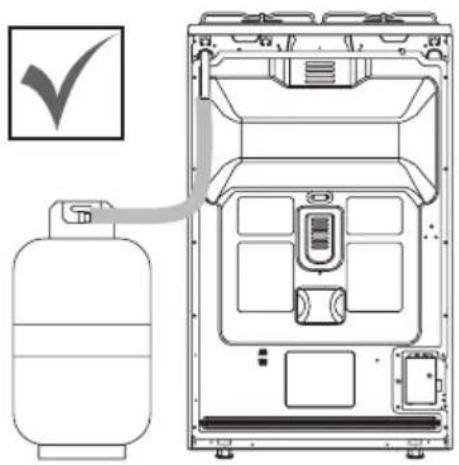
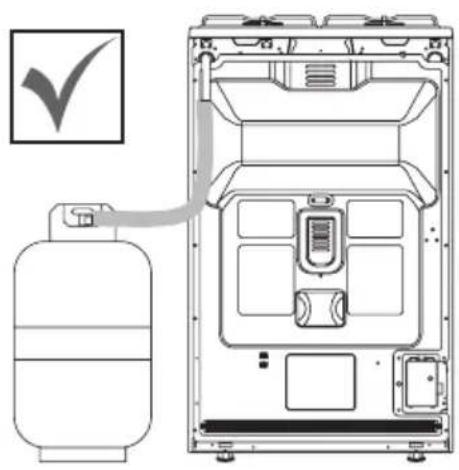
Connect the appliance to the gas piping tap in shortest possible route and in a way that ensure no gas leakage will occur.
-
In order to carry on a tightness and sealing safety check ensure that the knobs on the control panel are closed and the gas cylinder is open.
natural_image
Diagram of a gas cylinder connected to an internal device with a checkmark icon (no text or symbols on the diagram itself)Figure 23
-
While performing a gas leakage check, never use any kind of lighter, match, cigarette or similar burning substance.
-
Apply soap bubble on the connection points. If there is any kind of leakage then it will cause bubbling.
natural_image
Diagram of a gas storage unit with internal compartments and a gas cylinder, showing no text or symbols.Figure 24
-
While inserting the appliance in place ensure that it is on the same level with the worktop. If required adjust the legs inorder the make level with the worktop.
-
Use the appliance on a level surface and in a well ventilated environment.
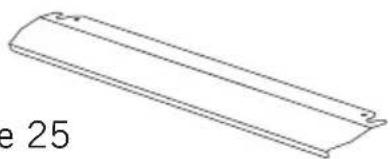
USING THE GRILL DEFLECTOR SHEET
natural_image
Simple line drawing of a rectangular object with rounded ends and a curved top edge, labeled 'e 25' (no other text or symbols)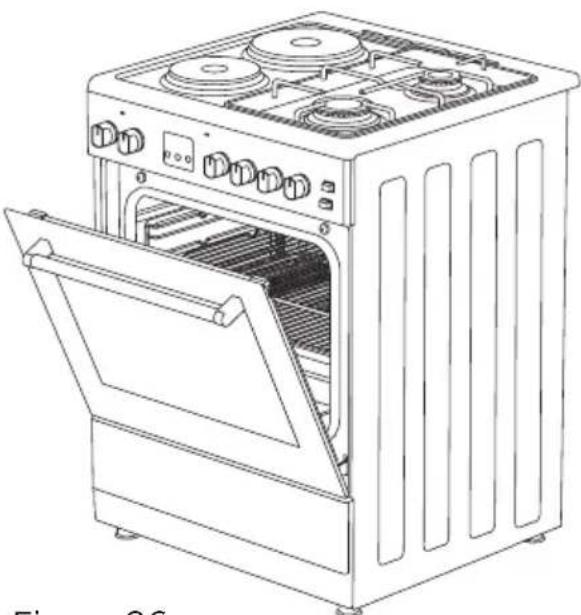
natural_image
Line drawing of a vintage kitchen oven with multiple gas stove units and an open door (no text or symbols)Figure 26
natural_image
Line drawing of a simple electric stove with four fans and top cabin (no text or symbols)Figure 27
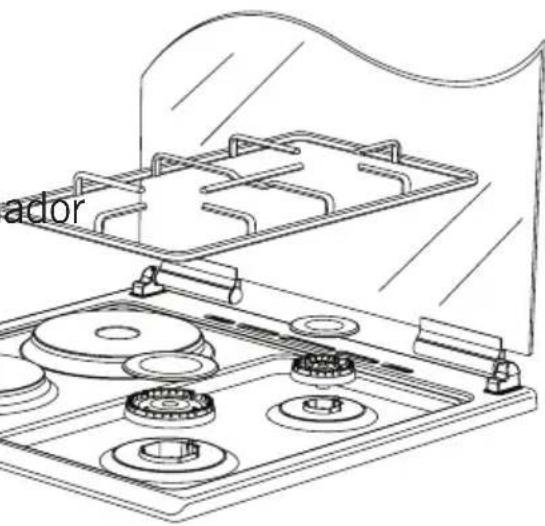
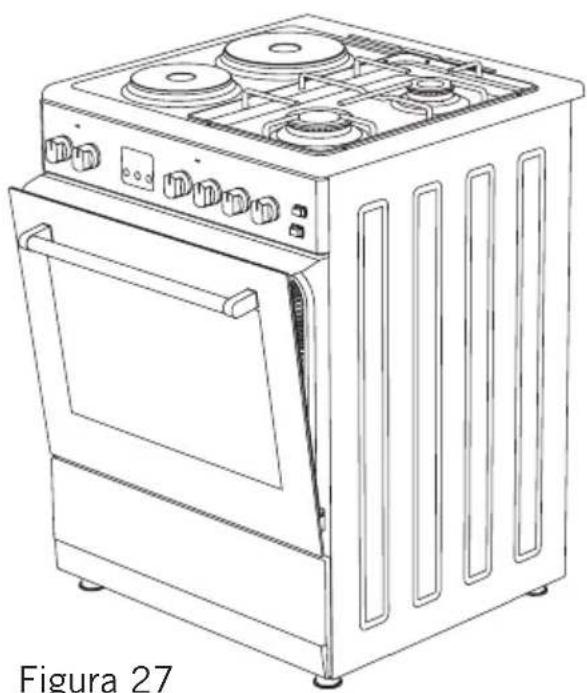
- A safety panel is designed to protect control panel and the buttons when the oven is in Grill mode (Figure 25)
- Please use this safety panel in order to avoid the heat to damage control panel and the buttons when the oven is Grill mode.
WARNING: Accessible parts may be hot when the grill in use. Young children should be kept away.
- Place the safety panel under control panel by opening the oven front cover glass (Figure 26)
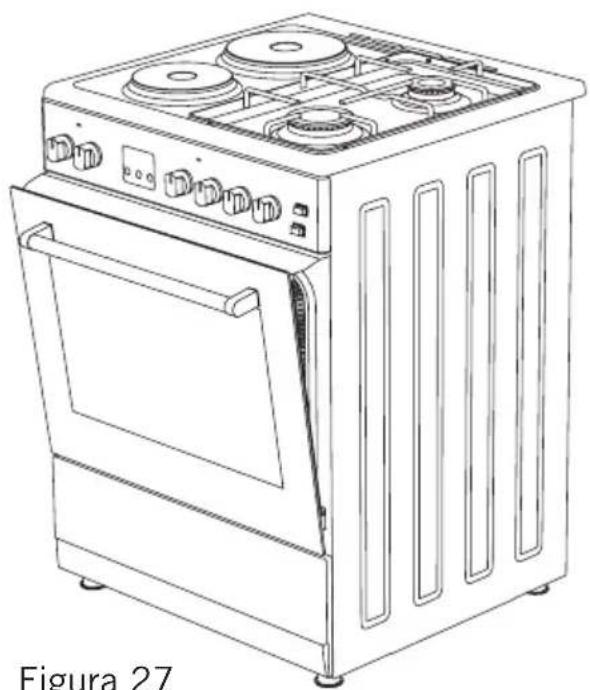
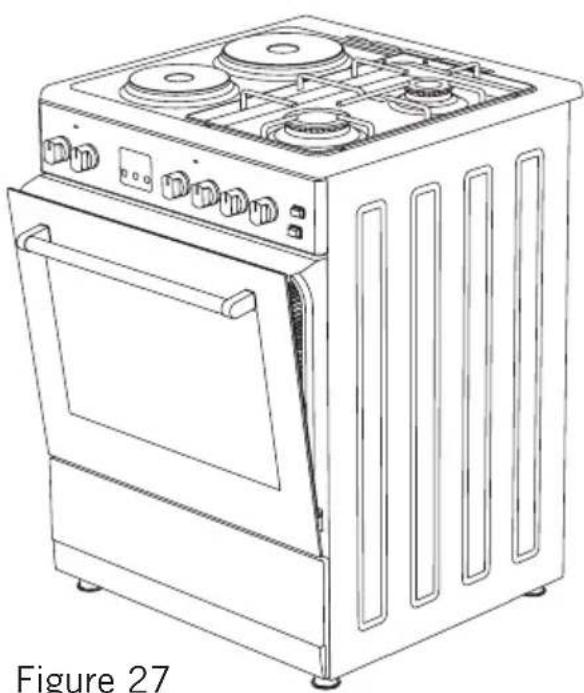
- And then secure the safety panel in between oven and front coverbygentlyclosingthecover. (Figure 27)
- It is important for cooking to keep the cover open in specified distance when cooking in grill mode.
- Safety panel will provide an ideal cooking circumstance while protecting control panel and buttons.
If the cooker has the “CLOSED GRILL FUNCTIONED” option with thermostat, you can keep the oven door closed during operation; in this case the grill deflector sheet will be unnecessary.
CATALYTIC WALLS
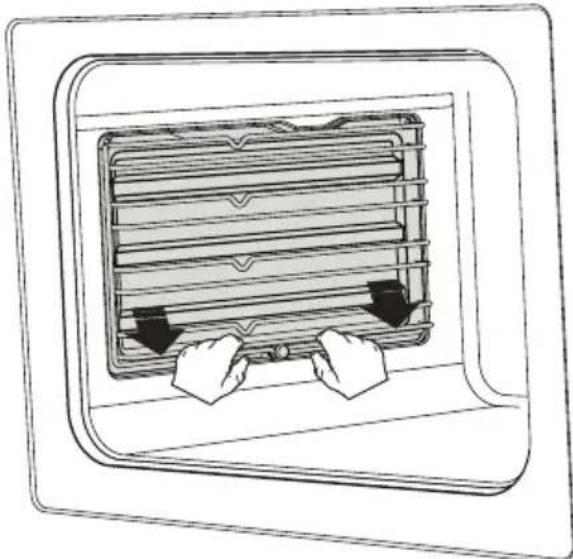
Catalytic walls are located on the left and the right side of cavity under the guides. Catalytic walls banish the bad smell and obtain the best performance from the cooker. Catalytic walls also absorb oil residue and clean your oven while it's operating.
natural_image
Diagram of a ventilation system inside a duct, showing airflow direction with arrows (no text or labels)Figure 28
Removing the catalytic walls
In order to remove the catalytic walls; the guides must be pulled out. As soon as the guides are pulled out, the catalytic walls will be released automatically. The catalytic walls must be changed after 2-3 years.
CHICKEN ROASTING

natural_image
Technical line drawing of a mechanical device interior with internal components and mounting holes (no text or symbols)Figure 29
Place the spit on the frame. Slide turn spit frame into the oven at the desired level. Locate a dripping pan through the bottom in order to collect the fast. Add some water in dripping pan for easy cleaning. Do not forget to remove plastic part from spit. After grilling, screw the plastik handle to the skewer and take out the food from oven.
"ALWAYS GRILL WITH THE OVEN DOOR CLOSED"
ENVIRONMENTALLY-FRIENDLY DISPOSAL
natural_image
Symbol of a trash bin crossed with no text or labels, representing waste sorting or disposal (no text present)Dispose of packaging in an environmentally-friendly manner.
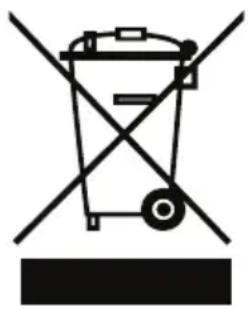
This appliance is labelled in accordance with European Directive 2012/19/EU concerning used electrical and electronic appliances (waste electrical and electronic equipment - WEEE). The guideline determines the framework for the return and recycling of used appliances as applicable throughout to the EU.
PACKAGE INFORMATION
Packaging materials of the product are manufactured from recyclable materials in accordance with our National Environment Regulations. Do not dispose of the packaging materials together with the domestic or other wastes. Take them to the packaging material collection points designated by the local authorities.
natural_image
Technical line drawing of a mechanical component with internal channels and mounting brackets (no text or symbols)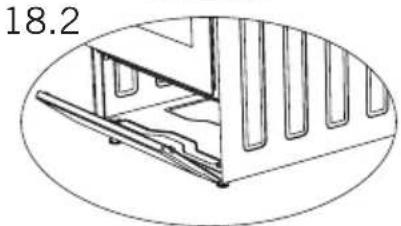
natural_image
Technical line drawing of a mechanical assembly with no visible text or symbols| NIVEL 1 | NIVEL 2 | NIVEL 3 | NIVEL 4 | NIVEL 5 | NIVEL 6 | ||
| ∅80mm | 200W | 250W | 450W | --- --- --- | |||
| ∅145mm | 250W | 750W | 1000W | --- --- --- | |||
| ∅180mm | 500W | 750W | 1500W | --- --- --- | |||
| ∅145mm Rápido | 500W | 1000W | 1500W | --- --- --- | |||
| ∅180mm Rápido | 850W | 1150W | 2000W | --- --- --- | |||
| ∅145mm | 95W | 155W | 250W | 400W | 750W | 1000W | |
| ∅180mm | 115W | 175W | 250W | 600W | 850W | 1500W | |
| ∅145mm Rápido | 135W | 165W | 250W | 500W | 750W | 1500W | |
| ∅180mm Rápido | 175W | 220W | 300W | 850W | 1150W | 2000W |
natural_image
Silhouette of a cooking pot on a gas stove (no text or symbols)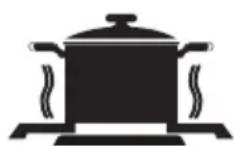
natural_image
Silhouette of a cooking pot with steam rising from its lid (no text or symbols)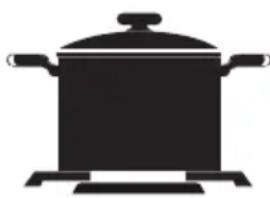
natural_image
Silhouette of a cooking pot on a stove (no text or symbols)False TrueFalseFalse
natural_image
Diagram of a kitchen sink with a circular component and a cross symbol, no readable text or labels present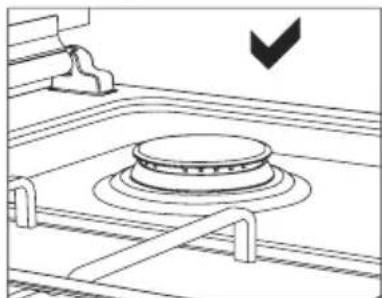
natural_image
Diagram of a kitchen appliance with a circular lid and handle, showing no text or symbolsFigura 1 Figura 2
MANEJO DEL HORNO
natural_image
Line drawing of a vintage kitchen oven with open door and side panels (no text or symbols)Figura 3
natural_image
Line drawing of an open oven with four stovels and a door open, showing internal components (no text or symbols)Figura 4
natural_image
Four circular diagrams showing mechanical assembly steps, including front and side views of a vehicle frame (no text or symbols present)Figura 3.1 Figura 3.2 Figura 4.1 Figura 4.2
natural_image
Technical line drawing of a mechanical assembly with arrows indicating direction (no text or symbols)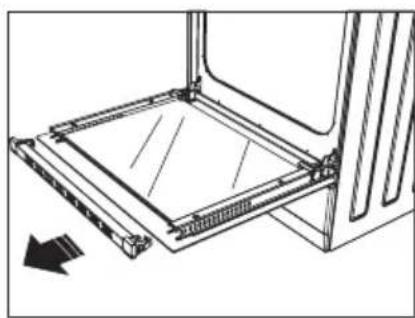
natural_image
Technical line drawing of a mechanical assembly with no visible text or symbols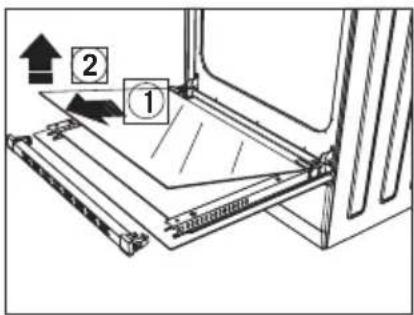
Figura 5 Figura 6 Figura 7
natural_image
Line drawing of a hand adjusting a car seatbelt with a circular arrow indicating rotation (no text or symbols)Figura 8
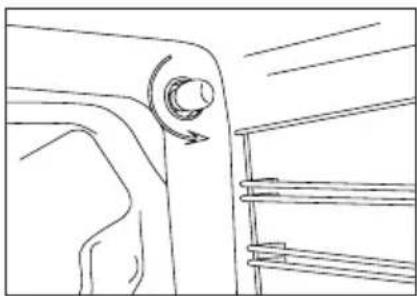
natural_image
Line drawing of a mechanical component with a knob and arrow indicating rotation (no text or symbols)Figura 9
ACCESORIOS
natural_image
Pure technical line drawing of a square frame with mounting holes (no text or symbols)Bandeja Profunda
natural_image
Pure geometric diagram of a square frame with rounded corners and internal lines, no text or symbols present.Bandeja
natural_image
Line drawing of a rectangular grid pattern with parallel lines (no text or symbols)Parrilla de Alambre
natural_image
Technical line drawing of a mechanical support or rod assembly (no text or symbols)Reil Telescópico
natural_image
Isometric view of a rectangular metal grate with slats and two side supports (no text or symbols)Parrilla de Alambre Dentro de Bandeja
natural_image
Pure technical line drawing of four identical mechanical components arranged in a zigzag pattern (no text or symbols)natural_image
Pure geometric X-shaped line drawing without any text, numbers, or symbolsCafetera
natural_image
Technical line drawing of a mechanical component with no visible text or symbolsFigura 11
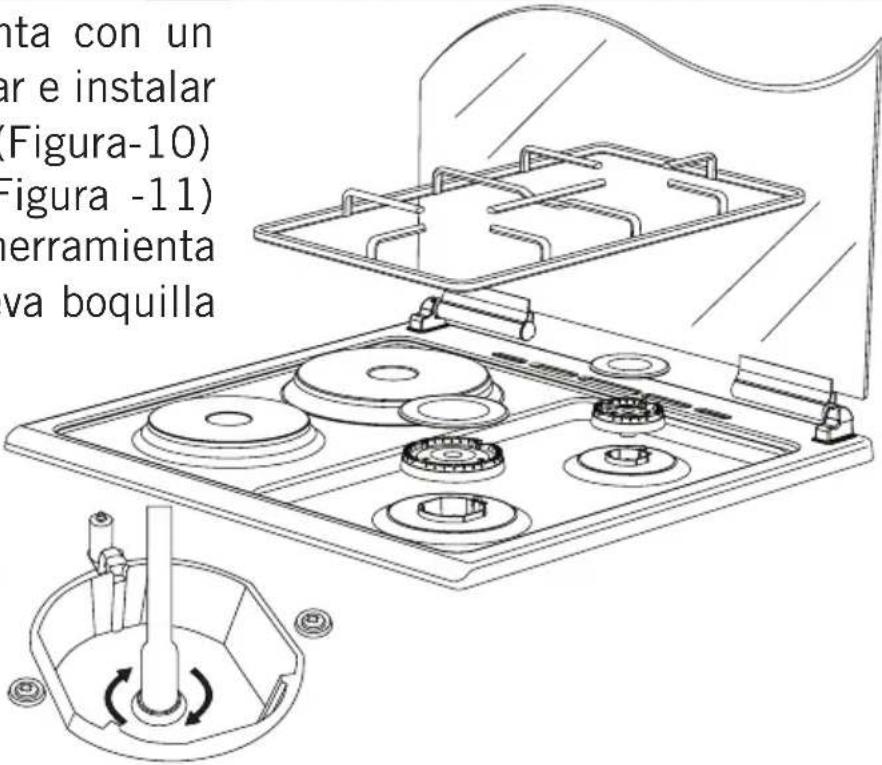
Figura 12
AJUSTE DEL FLUJO DE GAS REDUCIDO PARA LAS LLAVES DE LAS PLACAS
natural_image
Line drawing of a hand pressing a button on an electronic control panel (no text or symbols visible)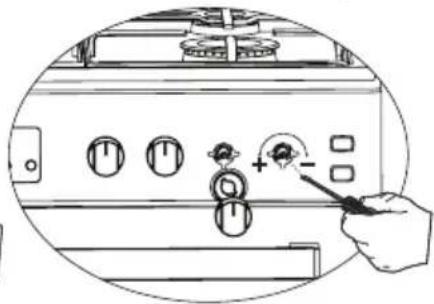
natural_image
Line drawing of a hand pressing down on a control panel with buttons and a plus/minus icon (no text or symbols)Figura 13 Figura 14
DESMONTAR FOGONES DE INFERIOR Y SUPERIOR DEL HORNO DE GAS Y PO- NER INYECTOR
Quitar El Fogón:
natural_image
Technical line drawing of an open refrigerator with internal components (no text or symbols)Figura 16
natural_image
Technical line drawing of a mechanical device interior showing internal components and airflow direction (no text or symbols)Figura 17
natural_image
Line drawing of an open refrigerator with visible door, wheels, and ventilation slots (no text or symbols)natural_image
Diagram of an open laptop case showing internal components and ventilation slots (no text or symbols)Figura 19
natural_image
Technical line drawing of an open refrigerator with internal compartments and ventilation slots (no text or symbols)Figura 20
natural_image
Technical line drawing of an open refrigerator with internal compartments and ventilation slots (no text or symbols)Figura 21
natural_image
Line drawing of an open laptop front panel with ventilation slots and a circular vent (no text or symbols)natural_image
Technical line drawing of a gasifier unit with internal compartments and a gas cylinder, plus a checkmark icon (no text or symbols)Figura 22
natural_image
Diagram of a gas cylinder connected to a container with internal compartments and a checkmark icon (no text or symbols)Figura 23
natural_image
Diagram of a gas storage unit with internal compartments and a gas cylinder, showing no text or symbols.Figura 24
natural_image
Line drawing of a curved rectangular object with no text or symbols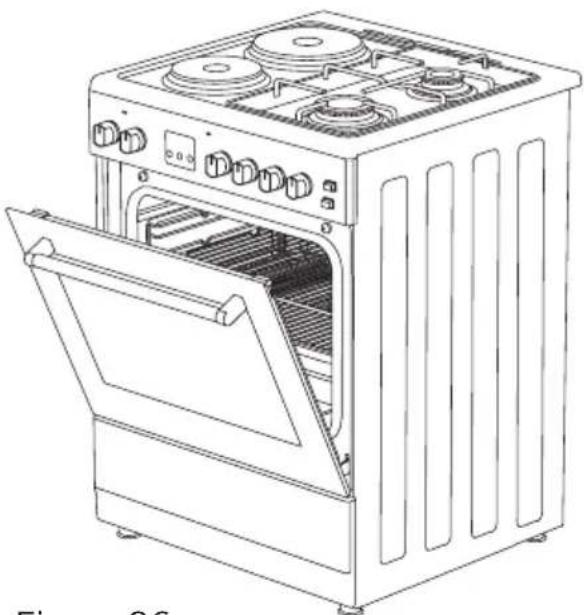
natural_image
Line drawing of a single oven with multiple gas stove covers and open door (no text or symbols)Figura 26
natural_image
Line drawing of a simple electric stove with four fans and top cabin (no text or symbols)Figura 27
natural_image
Line drawing of a window with two hands inserting a fan into the air gap (no text or symbols)Figura 28
natural_image
Technical line drawing of a mechanical or electrical component with internal components and mounting holes (no text or symbols)Figura 29
natural_image
Symbol of a trash bin crossed with a diagonal line, no text or labels present
- MANUAL DE INSTRUÇÕES
- ACESSÓRIOS
- Tabuleiro
- Grelha de arame
- Prateleira telescópica\* (opcional)
- Grelha de arame no tabuleiro\* (opcional)
- DEFINIÇÃO DO CAUDAL DE GÁS REDUZIDO PARA AS TORNEIRAS DA PLACA
- DESMONTAGEM DO FUNDO DO FORNO A GÁS E QUEIMADOR SUPERIOR E INSTALAÇÃO DO INJETOR
- MANGUEIRA DE GÁS
- Remover as paredes catalíticas
- CONTENTS
- IMPORTANT WARNINGS
- GB
- Electrical Connection and Security
- Gas Connection and Security
- IF THE APPLIANCE DOES NOT OPERATE
- DESCRIPTION OF OVEN and CONTROL PANELS
- CONTROL PANELS
- USING COOKER SECTION
- Using Gas Burners:
- USING OVEN SECTION
- Using oven burners
- Using oven heating elements
- COOKING TIME TABLE
- MAINTENANCE and CLEANING
- CLEANING AND MAINTENANCE OF THE OVEN'S FRONT DOOR GLASS
- CHANGING THE OVEN LAMP
- REDUCED GAS FLOW RATE SETTING FOR HOB TAPS
- REMOVAL OF THE LOWER AND UPPER BURNER AND INSTALLATION OF THE INJECTOR TO THE GAS OVEN
- Removal of the Upper Burner:
- Removal of the Lower Burner:
- USING THE GRILL DEFLECTOR SHEET
- CATALYTIC WALLS
- Removing the catalytic walls
- CHICKEN ROASTING
- ENVIRONMENTALLY-FRIENDLY DISPOSAL
- PACKAGE INFORMATION
- MANEJO DEL HORNO
- ACCESORIOS
- Bandeja Profunda
- Bandeja
- Parrilla de Alambre
- Reil Telescópico
- Parrilla de Alambre Dentro de Bandeja
- Cafetera
- AJUSTE DEL FLUJO DE GAS REDUCIDO PARA LAS LLAVES DE LAS PLACAS
- DESMONTAR FOGONES DE INFERIOR Y SUPERIOR DEL HORNO DE GAS Y PO- NER INYECTOR
- Quitar El Fogón:
Brand : Orima
Model : OR 644 ZW
Category : Cooker