ZWD81660NW - Washing machine ZANUSSI - Free user manual and instructions
Find the device manual for free ZWD81660NW ZANUSSI in PDF.


User questions about ZWD81660NW ZANUSSI
0 question about this device. Answer the ones you know or ask your own.
Ask a new question about this device
Download the instructions for your Washing machine in PDF format for free! Find your manual ZWD81660NW - ZANUSSI and take your electronic device back in hand. On this page are published all the documents necessary for the use of your device. ZWD81660NW by ZANUSSI.
USER MANUAL ZWD81660NW ZANUSSI
natural_image
Abstract graphic with geometric shapes and lines, no text or symbols presentUser Manual
GETTING STARTED? EASY.
natural_image
Line drawing of a washing machine with smoke inside (no text or symbols)ZWD 81660 NW
EN User Manual
Washer Dryer
ZANUSSI
Before the installation and use of the appliance, carefully read the supplied instructions. The manufacturer is not responsible for any injuries or damages that are the result of incorrect installation or usage. Always keep the instructions in a safe and accessible location for future reference.
CHILDREN AND VULNERABLE PEOPLE SAFETY

WARNING!
Risk of suffocation, injury or permanent disability.
- This appliance can be used by children aged from 8 years and above and persons with reduced physical, sensory or mental capabilities or lack of experience and knowledge if they have been given supervision or instruction concerning the use of the appliance in a safe way and understand the hazards involved.
- Children between 3 and 8 years of age and persons with very extensive and complex disabilities shall be kept away unless continuously supervised.
- Children of less than 3 years of age should be kept away unless continuously supervised.
- Do not let children play with the appliance.
- Keep all packaging away from children and dispose of it appropriately.
- Keep detergents away from children.
- Keep children and pets away from the appliance when the door is open.
- If the appliance has a child safety device, it should be activated.
- Children shall not carry out cleaning and user maintenance of the appliance without supervision.
GENERAL SAFETY
- Do not change the specification of this appliance.
- The appliance shall be installed as a freestanding product or below the kitchen worktop if space margins permit.
- Do not install the appliance behind a lockable door, a sliding door or a door with a hinge on the opposite side, that would prevent the appliance door from being fully open.
- Connect the mains plug to the mains socket only at the end of the installation process. Make sure that the mains plug is accessible after installation.
- The ventilation opening in the base must not be covered by a carpet, mat, or any floor covering.
- WARNING: The appliance must not be supplied through an external switching device, such as a timer, or connected to a circuit that is regularly switched on and off by a utility.
- Ensure good air ventilation in the room where the appliance is installed to avoid the backflow of unwanted gases into the room from appliances burning gas or other fuels, including open fires.
- Exhaust air must not be discharged into a flue which is used for exhausting fumes from any appliances burning gas or other fuels.
- The operating water pressure at the water entry point from the outlet connection must be between 0.5 bar (0.05 MPa) and 8 bar (0.8 MPa).
- Do not exceed the maximum load of 8 kg (refer to the "Programme chart" chapter).
- The appliance must be connected to the water mains using the new supplied hose sets, or other new hose sets supplied by the Authorised Service Centre.
- Old hose sets must not be reused.
- If the mains power supply cable is damaged, it must be replaced by the manufacturer, its Authorised Service Centre or similarly qualified persons to avoid an electrical hazard.
- Wipe away lint or packaging debris that has accumulated around the appliance.
- Items that have been soiled with substances such as vegetable or mineral oil, acetone, alcohol, petrol, kerosene, spot removers, turpentine, waxes and wax removers should be washed separately with an extra amount of detergent before being dried in the washer dryer.
- Do not use the appliance if items have been soiled with industrial chemicals.
- Do not dry unwashed items in the wash dryer.
- Items such as foam rubber (latex foam), shower caps, waterproof textiles, and rubber backed articles and clothes, or pillows fitted with foam rubber pads should not be dried in the washer dryer.
- Fabric softeners, or similar products, should only be used as specified by the product manufacturer's instructions.
- Remove all objects from items that could be a source of fire ignition such as lighters or matches.
- Never stop the washer dryer before the end of the drying cycle unless all items are quickly removed and separated so that residual heat can dissipate.
- The final part of the washer dryer cycle takes place without heat (cool down cycle) to ensure that items reach a temperature that will not cause damage to them.
- Do not use high pressure water sprays and/or steam to clean the appliance.
- Clean the appliance with a moist cloth. Use only neutral detergents. Do not use abrasive products, abrasive cleaning pads, solvents or metal objects.
- Before any maintenance operation, deactivate the appliance and disconnect the mains plug from the socket.
SAFETY INSTRUCTIONS
INSTALLATION

The installation must comply with relevant national regulations.
- Follow the installation instructions supplied with the appliance.
- Do not install or use the appliance where the temperature can be less than 0^ or where it is exposed to the weather.
- Always keep the appliance vertical when being moved.
- Make sure that there is air circulation between the appliance and the floor.
-
Remove all the packaging and the transit bolts.
-
The floor area on which the appliance is to be installed must be flat, stable, heat resistant and clean.
- Keep the transit bolts in a safe place. If the appliance is to be moved in the future they must be reattached to lock the drum to prevent an internal damage.
- Always take care when moving the appliance as it is heavy. Always use safety gloves and enclosed footwear.
- Do not install or use a damaged appliance.
- Do not install the appliance where the appliance door cannot be fully opened.
- Adjust the feet to have the necessary space between the appliance and the flooring.
- When the appliance is in its permanent position, check that it is fully level with the aid of a spirit level. If it is not, adjust the feet accordingly.
ELECTRICAL CONNECTION

WARNING! Risk of fire and electric shock.
- The appliance must be earthed.
- Always use a correctly installed shockproof socket.
- Do not use multi-plug adapters and extension cables.
- Do not pull the mains cable to disconnect the appliance. Always pull the mains plug.
- Do not touch the mains cable or the mains plug with wet hands.
- UK and Ireland only. This appliance is fitted with a 13 A mains plug. If it is necessary to change the mains plug fuse, use only a 13 A ASTA (BS 1362) fuse.
- This appliance complies with the E.E.C. Directives.
WATER CONNECTION
- Do not cause damage to the water hoses.
- Before connection to new pipes, pipes not used for a long time, where repair work has been carried out or new devices fitted (water meters, etc.), let the water flow until it is clean and clear.
- Ensure that there are no visible water leaks during and after the first use of the appliance.
USE

WARNING! Risk of injury, electric shock, fire, burns or damage to the appliance.
- This appliance is for household use only.
- Do not put flammable products or items that are wet with flammable products in, near or on the appliance.
- Do not touch the glass door while a programme is in operation. The glass can get hot.
- Do not dry damaged (torn, frayed) items that contain padding or fillings.
- If laundry has been washed with a stain remover, carry out an additional rinse cycle before starting a drying cycle.
- Make sure that all metal objects are removed from the laundry.
- Only dry fabrics that are suitable to dry in the washer dryer. Follow the cleaning instruction on the item label.
- Plastic items are not heat resistant.
- If a detergent ball is used, remove it before starting a drying programme.
- Do not use a detergent ball if setting a non-stop programme.

WARNING! Risk of injury or damage to the appliance.
- Do not sit or stand on the open door.
- Do not dry dripping wet clothes in the appliance.
DISPOSAL
- Disconnect the appliance from the mains electrical and water supplies.
- Cut off the mains electrical cable close to the appliance and dispose of it.
- Remove the door catch to prevent children or pets from becoming trapped in the drum.
- Dispose of the appliance in accordance with local requirements for the disposal of Waste Electrical and Electronic Equipment (WEEE).
APPLIANCE OVERVIEW

text_image
1 3 4 5 6 7INSTALLATION ON SUSPENDED FLOORING
Suspended wooden floors are particularly susceptible to vibration.
To limit vibration we recommend placing a waterproof wooden panel, at least 15 mm thick, under the appliance. It should be screwed to at least 2 floor beams and should extend beyond the front feet.
If possible, install the appliance where the floor is more stable.
FIXING PLATE KIT (4055171146)
Available from your authorised dealer.
If you install the appliance on a plinth, secure the appliance in the fixing plates.
Read carefully the instructions supplied with the accessory.
1 Worktop
2 Detergent dispenser
3 Control panel
4 Door handle
5 Rating plate
6 Drain pump filter
7 Feet for levelling the appliance
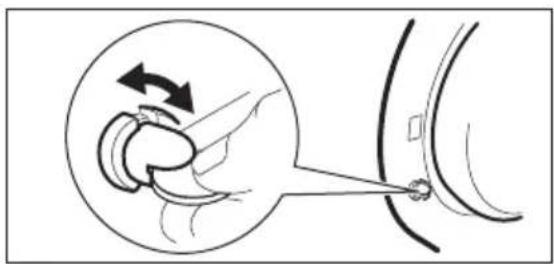
HOW TO ACTIVATE THE CHILD SAFETY DEVICE
This device prevents children or pets from being closed in the drum.
Turn the device clockwise, until the groove is horizontal.
You cannot close the door.
natural_image
Diagram showing a hand holding a device with an arrow indicating rotation, enclosed in a circular inset (no text or symbols)To close the door, turn the device anticlockwise until the groove is vertical.
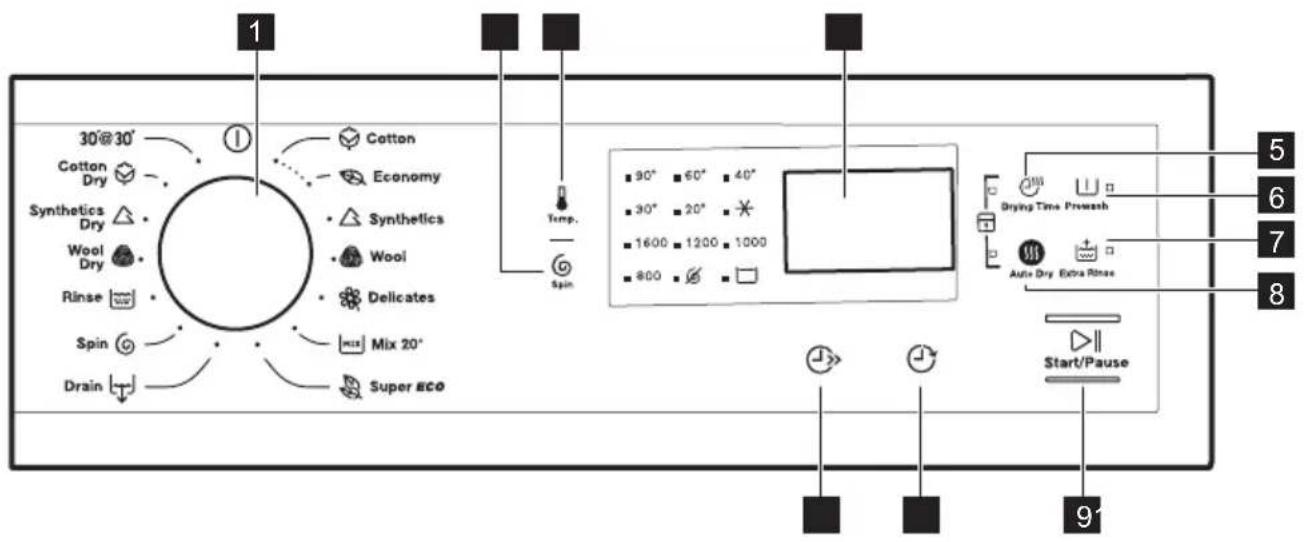
CONTROL PANEL DESCRIPTION
flowchart
graph TD
    A["1"] --> B["30°@30° Cotton Dry"]
    B --> C["Cotton"]
    C --> D["Economy"]
    D --> E["Synthetics Dry"]
    E --> F["Wool Dry"]
    F --> G["Rinse"]
    G --> H["Spin"]
    H --> I["Drain"]
    I --> J["Mix 20°"]
    J --> K["Super Eco"]
    K --> L["Temp."]
    L --> M["Spin"]
    M --> N["5"]
    N --> O["Drying Time Prowash"]
    O --> P["6"]
    P --> Q["7"]
    Q --> R["8"]
    R --> S["9'"]
    S --> T["Start/Pause"]
1 Programme knob
2 Spin reduction (Spin)
3 Temperature (Temp.)
4 Display
5 Drying time (Drying Time)
6 Prewash phase (Prewash)
7 Additional rinse (Extra Rinse)
8 Automatic drying level (Auto Dry)
9 Start/Pause ▷(Start/Pause)
10 Delay start
11 Time save
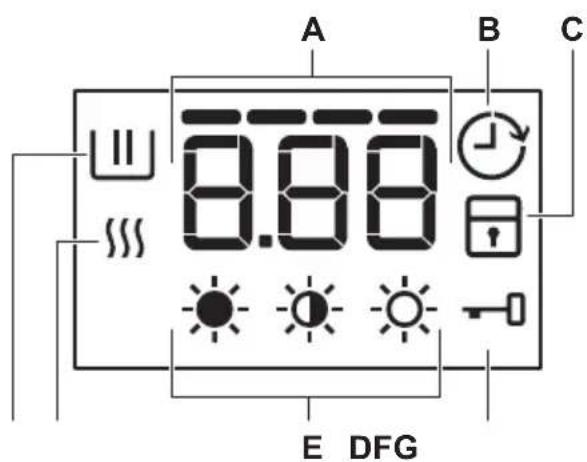
DISPLAY
text_image
A B C 8.88 E DFG| A | Time area | 1.25: Programme duration |
| 40: Selected drying time | ||
| 2h: Delay start | ||
| E20: Alarm codes | ||
| Err: Message of error | ||
| 0: The programme is completed. | ||
| Time programme indicators | ----: Normal duration indicator | |
| --: Quick indicator | ||
| -: Super quick indicator | ||
| B Delay | startIndicator | |
| C | Child safety lock indicator | |
| D | Door locked indicator | |
| E | Indicators of dryness level | |
| F | Drying phase indicator | |
| G | Washing phase indicator |
PROGRAMMES
PROGRAMME CHART
| Programme Temperature range | Maximum load Maximum spin speed | Programme description (Type of load and soil level) |
| Washing programmes | ||
[05TT]   - -  | 8 kg1600 rpm | White cotton and coloured cotton. Normal soil and light soil. |
[0H2X][07XK] - -  | 8 kg1600 rpm | White cotton and fast-coloured cotton.Normal soil. The energy consumption decrea-ses and the time of the washing programme is extended. |
[STDD]  - [6W65] - [6W65] | 3.5 kg1200 rpm1.5 kg 1200 rpm | Synthetic items or mixed fabric items. Nor-mal soil.Machine washable wool, hand washable wool and other fabrics with «hand washing» care symbol3). |
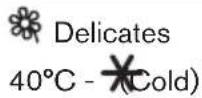 | 3.5 kg 1200 rpm | Delicate fabrics such as acrylics, viscose and mixed fabrics requiring a mild washing. Normal soil. |
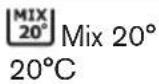 | 3 kg 1200 rpm | Special programme for cotton, synthetic and mixed fabrics lightly soiled. Select this programme to reduce the energy consumption. Make sure that the detergent is suitable for low temperatures in order to have good washing results4). |
 | 3 kg 1200 rpm | Mixed fabric (cotton and synthetic items)5). |
 | 8 kg To drain the water in the drum. All fabrics. | |
 | 8 kg6) 1600 rpm7) | To spin the laundry and to drain the water in the drum. All fabrics, except woollens and delicate fabrics. |
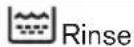 | 8 kg6) 1600 rpm7) | To rinse and spin the laundry. All fabrics, except woollens and very delicate fabrics. Reduce the spin speed accordingly to the type of laundry. |
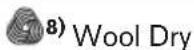 | 1 kg Drying programme for woollens. | |
 | 2 kg Drying programme for synthetic items. | |
 | 4 kg Drying programme for cotton items. | |
| 30°@30°Miniprogramme 30°C | 1.5 kg800 rpm | A short cycle for synthetic and delicate items with light soil level or for items to freshen up. |
1) The washing programme Economy at 60^ C with a load of 8 kg and the drying programme Cotton Dry are the reference programmes for the data entered in the energy label, in compliance with EEC 92/75 standards.

The water temperature of the washing phase may differ from the temperature declared for the selected programme.
2) Woolmark Apparel Care. The wool wash cycle of this machine has been approved by The Woolmark Company for the washing of machine washable wool products provided that the products are washed according to the instructions on the garment label and those issued by the manufacturer of this washing machine. M1380 In UK, Eire, Hong Kong and India the Woolmark symbol is a certification trademark.
3) During this cycle the drum rotates slowly to ensure a gentle wash. It can seem that the drum doesn't rotate or doesn't rotate properly, but this is normal for this programme.
4) The appliance performs the short heating phase if the water temperature is below 20^ C. The appliance can show the temperature setting as “cold”.
5) This programme is for daily use and has the lowest energy and water consumption whilst maintaining a good washing performance.
6) The maximum load refers to cottons items. Reduce the load accordingly in case of other type of laundry.
7) The maximum spin speed is related to cotton items. Set the spin speed. Make sure that it agrees with the laundry.
8) Woolmark Apparel Care. The wool drying cycle of this machine has been approved by The Woolmark Company for the drying of machine washable wool products provided that the products are washed and dried according to the instructions on the garment label and those issued by the manufacturer of this machine. M1381 In UK, Eire, Hong Kong and India the Woolmark symbol is a certification trademark
Programme options compatibility
1) Only the QUICK option is available.
2) Available only if the last spin speed step is lower than 800 rpm.
PROGRAMMES FOR AUTOMATIC DRYING
| Dryness Level Type of fabric Load | ||
 Extra DryFor towelling materials Extra DryFor towelling materials | Cottons and Linen(bathrobes, bath towels, etc) | up to 4 kg |
 Cupboard Dry1)For items to be stored Cupboard Dry1)For items to be stored | Cottons and Linen(bathrobes, bath towels, etc) | up to 4 kg |
| Synthetics and mixed fabrics(jumpers, blouses, underwear, household and bed linen) | up to 2 kg | |
 Iron DrySuitable for ironing Iron DrySuitable for ironing | Cottons and Linen(sheets, tablecloths, shirts, etc) | up to 4 kg |
1) Hints for test institute The test performance, in accordance with EN 50229, must be carried out with a FIRST drying load of the maximum declared drying capacity (load composition according to EN61121) by setting the AUTOMATIC CUPBOARD DRY for Economy programme. The SECOND drying load with the residual load must be tested by setting the AUTOMATIC CUPBOARD DRY for Economy programme.
PROGRAMMES FOR TIMED DRYING
| Dryness Level Type | of fabric Load (kg) | Spin speed (rpm) | Suggested duration (mins) | |
| Extra DryFor towelling materials | Cottons and Linen(bathrobes, bath towels, etc) | 4 1600 165 - 180 | ||
| 2 1600 90 - 100 | ||||
| 1 1600 60 - 70 | ||||
| Cupboard DryFor items to be stored | Cottons and Linen(bathrobes, bath towels, etc) | 4 1600 155 - 170 | ||
| 2 1600 80 - 90 | ||||
| 1 1600 50 - 60 | ||||
| Cupboard DryFor items to be stored | Synthetics and mixed fabrics(jumpers, blouses, underwear, household and bed linen) | 2 1200 90 - 105 | ||
| 1 1200 40 - 50 | ||||
| Iron DrySuitable for ironing | Cottons and Linen(sheets, tablecloths, shirts, etc) | 4 1600 110 - 125 | ||
| 2 1600 65 - 75 | ||||
| 1 1600 40 - 50 | ||||
| Wool dry Wool | (woollen jumpers) | 1 1200 80 - 100 | ||
CONSUMPTION VALUES

Stated values are obtained in laboratory conditions with relevant standards. Different causes can change the data: the quantity and type of laundry and ambient temperature. Water pressure, the supply voltage and the temperature of inlet water may also affect the washing programme duration.

Technical specifications may be changed without prior notice to improve the quality of product.

At the start of the programme, the display shows the programme duration for the maximum load capacity.
During the washing phase the programme duration is automatically calculated and can be greatly reduced if the laundry load is lower than the maximum load capacity (e.g. Cotton 60°C, maximum load capacity 8 kg, the programme duration exceeds 2 hours; actual load 1 kg, the programme duration will be less than 1 hour).
When the appliance is calculating the real programme duration a dot flashes in the display.
| Programmes Load (kg) | Energy consumption (kWh) | Water consumption (litre) | Approximate pro-gramme duration (minutes) | |
| Cottons 60°C 8 1.35 67 175 | ||||
| Economy Cotton Energy Saving Pro-gramme 60°C1) | 8 1.07 | 63 241 | ||
| Cottons 40°C 8 0.85 67 170 | ||||
| Synthetics 40°C 3.5 0.40 48 115 | ||||
| Delicates 40°C 3.5 0.50 55 80 | ||||
| Wool/Handwash 30°C 1.5 0.25 | 45 60 |
1) «Cotton Energy Saving programme » at 60°C with a load of 8kg is the reference programme for the data entered in the energy label, in compliance with EEC 92/75 standards.
OPTIONS
TEMP.

Set this option to change the default temperature.
Indicator ✕ cold water.
The display shows the set temperature.
SPIN
With this option you can change the default spin speed.
The indicator of the set speed comes on.
Additional spin options:
No Spin
- Set this option to deactivate all spin phases. Only the drain phase is available.
- The related indicator comes on.
- Set this option for very delicate fabrics.
- The rinses phase uses more water for some washing programmes.
Rinse Hold
- Set this option to prevent the laundry creases.
- The related indicator comes on.
- There is a water in the drum when the programme is completed.
- The drum turns regularly to prevent the laundry creases.
- The door stays locked. You must drain the water to unlock the door.

To drain the water refer to 'At the end of the programme'.
DRYING TIME
With this option you can set the time for the fabrics you have to dry. The display shows the set value.
Each time you press this touchpad the time value increases by 5 minutes.

You cannot set all time values for different types of fabrics.
AUTO DRY
With this option you can set an automatic level of dryness for the laundry. The display shows the symbol of the set level.
- Extra dry level for cotton items
- Cupboard dry level for cotton and synthetic items
- Iron dry level for cotton items
PREWASH
With this option you can add a prewash phase to a washing programme.
Use this option for heavy soil.
When you set this option the programme duration increases.
The related indicator comes on.
EXTRA RINSE
With this option you can add some rinses to a washing programme.
Use this option for persons allergic to detergents and in areas where the water is soft.
The related indicator comes on.
DELAY START
With this option you can delay the start of a programme from 30 minutes to 20 hours.
The display shows the related indicator.
The appliance starts working and the lid is locked.
After a few minutes the lid can be opened.
SETTINGS
CHILD LOCK
With this option you can prevent that the children play with the control panel.
- To activate/deactivate this option, press and at the same time until the indicator comes on/goes off.

You can activate this option:
- After you press : the options and the programme knob are locked.
- Before you press : the appliance cannot start.
PERMANENT EXTRA RINSE
With this option you can permanently have an extra rinse when you set a new programme.
BEFORE FIRST USE
-
Connect the mains plug to the mains socket.
-
Open the water tap.
-
Put 2 litre of water in the detergent compartment for washing phase.
This activates the drain system.
- Put a small quantity of detergent in the compartment for washing phase.
WARNING! Refer to Safety chapters.
LOADING THE LAUNDRY
Open the water tap. Connect the mains plug to the mains socket.
TIME SAVE
Press Time Save to decrease the programme time. You can select:
- QUICK: to wash items with daily soil.
- SUPER QUICK: to wash quickly items with almost no soil.

Some programmes accept only one of these options.
- To activate/deactivate this option press and at the same time until the indicator comes on/goes off.

ACOUSTIC SIGNALS
The acoustic signals operate when:
- The programme is completed.
- The appliance has a malfunction.
To deactivate/activate the acoustic signals, press and at the same time for 6 seconds.

If you deactivate the acoustic signals, they continue operate when the appliance has a malfunction.
- Set and start a programme for cotton at the highest temperature without laundry.
This removes all possible dirt from the drum and the tub.
- Pull the door handle to open the appliance door.
- Put the laundry in the drum, one item at a time.
- Shake the items before you put them in the appliance.
Make sure not to put too much laundry in the drum. Refer to max. loads indicated in "Programme chart".
- Close the door.
text_image
Safety warning symbol with warning sign, circular diagram, and cross indicating no crossing
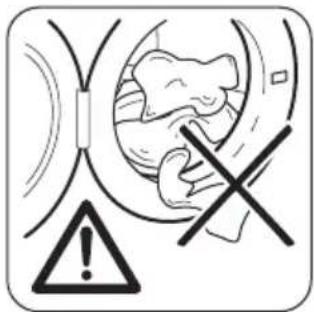
CAUTION! Make sure that no laundry stays between the seal and the door. There is a risk of water leakage or damage to the laundry.

Washing heavily oiled, greasy stains could cause damage rubber parts of the washing machine.
USING DETERGENT AND ADDITIVES
text_image
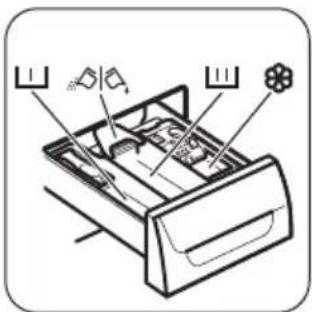
Diagram of a refrigerator interior with labeled parts and arrows indicating parts of the drawer- Measure out the detergent and the fabric conditioner.
- Put the detergent and the fabric conditioner into the compartments.
- Carefully close the detergent drawer.
DETERGENT COMPARTMENTS
| Detergent compartment for pre-wash phase. | |
| Detergent compartment for washing phase. | |
| Compartment for liquid additives (fabric conditioner, starch). | |
| Flap for powder or liquid detergent. |
LIQUID OR POWDER DETERGENT
text_image
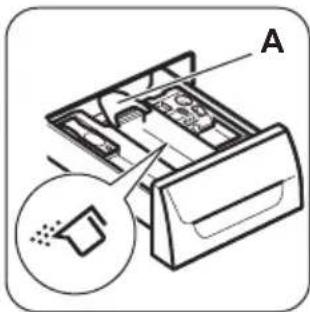
A- Position A for powder detergent (factory setting).
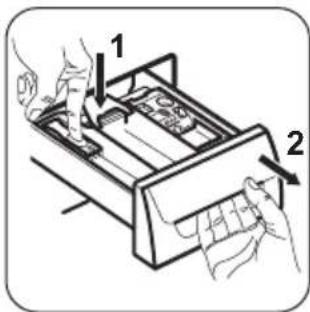
text_image
Diagram showing two hands operating a device with labeled parts 1 and 2, likely illustrating a mechanical or electrical component assembly.- Extract the detergent dispenser.
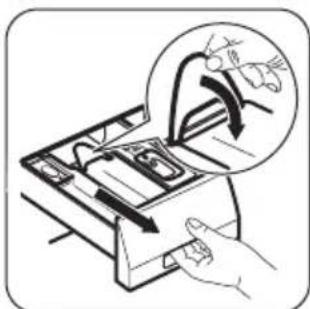
natural_image
Illustration of a hand inserting a device into a box with an arrow indicating direction (no text or symbols present)- Turn the flap downwards.
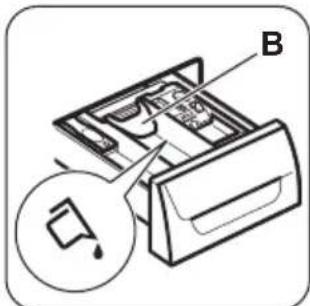
text_image
Diagram of a refrigerator interior with labeled parts and a magnified view showing a device component.- Position B for liquid detergent.
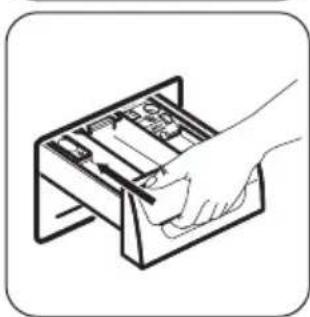
natural_image
Illustration of a hand inserting a device into a tray (no text or symbols)- Close the detergent dispenser.
i
When you use the liquid detergent:
- Do not use gelatinous or thick liquid detergents.
- Do not put more liquid then the maximum level.
- Do not set the prewash phase.
- Do not set the delay start.
SETTING A PROGRAMME
-
Turn the programme knob to switch the appliance on and set the required programme:
-
The indicator flashes.
-
The display shows the level of the Time Manager, the programme duration and the indicators of the phases of the programme.
-
If necessary, change the temperature and the spin speed or add available options. When you activate an option, the indicator of the set option comes on.
i
If you set something incorrect, the display shows the message Err
STARTING A PROGRAMME WITHOUT THE DELAY START
Press ▷.||
- The indicator of stops to flash and stays on.
- The indicator starts to flash on the display.
- The programme starts, the door locks, the display shows the indicator.
- The drain pump can operate for a short time when the appliance fills water.
i
After approximately 15 minutes from the start of the programme:
- The appliance adjusts automatically the programme duration agree with the laundry load.
- The display shows the new value.
STARTING A PROGRAMME WITH THE DELAY START
-
Press again and again until the display shows the delay you want to set. The related indicator comes on the display.
-
Press ▷∥
- The appliance starts the countdown.
- The door locks, the display shows the indicator ↩.
- When the countdown is completed, the programme starts automatically.
i
You can cancel or change the set of the delay start before you press the ▷||. To cancel the delay start:
- Press to set the appliance to pause.
- Press until the display shows
- Press again to start the programme immediately.
INTERRUPTING A PROGRAMME AND CHANGING THE OPTIONS
You can change only some options before they operate.
- Press ▷II.
The indicator flashes.
-
Change the options.
-
Press again.
The programme continues.
CANCELLING A RUNNING PROGRAMME
- Turn the programme knob to position to cancel the programme and to deactivate the appliance.
- Turn the programme knob again to activate the appliance. Now, you can set a new washing programme.
i
Before starting the new programme the appliance could drain the water. In this case, make sure that the detergent is still in the detergent compartment, if not fill the detergent again.
OPENING THE DOOR
!
CAUTION! If the temperature and level of the water in the drum are too high and the drum still rotates, you cannot open the door.
While a programme or the delay start operates, the appliance door is locked and the display shows the indicator.
Open the appliance door when the programme or the delay start operates:
- Press to pause the appliance.
- Wait until the door lock indicator goes off.
- Open the door.
- Close the door and press again .
The programme or delay start continues to operate.
AT THE END OF THE PROGRAMME
- The appliance stops automatically.
- The acoustic signal operates (if it is activated).
- In the display comes on.
- The indicator of the goes off.
- The door lock indicator flashes for a few minutes, then goes off.
- You can open the door.
- Remove the laundry from the appliance. Make sure that the drum is empty.
- Close the water tap.
- Turn the programme knob to position to deactivate the appliance.
- Keep the door ajar, to prevent the mildew and odours.
The washing programme is completed, but there is water in the drum:
- The drum turns regularly to prevent the creases in the laundry.
- The door lock indicator is on. The indicator ▷∥ flashes. The door stays locked.
- You must drain the water to open the door.
DAILY USE - DRYING ONLY

WARNING! Refer to Safety chapters.

This appliance is an automatic washer dryer.
DRYING SETTING

WARNING! Make sure that the water tap is open.
- Turn the programme knob to to activate the appliance.
- Load the laundry one item at a time.
- Turn the programme dial to the programme applicable for the items to dry. The display shows the drying indicator ·s·s .
To drain the water:
- Press . The appliance drains the water and spins.
- When the programme is completed, the door lock indicator flashes for a few minutes. When it goes off, you can open the door.
- Turn the programme knob to position td deactivate the appliance.

The appliance drains and spins automatically after approximately 18 hours (except for Wool programme).
STAND-BY
Some minutes after the end of the washing programme, if you do not deactivate the appliance, the energy saving status activates.
The energy saving status decreases the energy consumption when the appliance is on the stand by.
- All indicators and the display go off.
- The indicator of the flashes slowly
- Press one of the options to deactivate the energy saving status.

If you set a programme or an option that ends with water in the drum, the energy saving status function doesn't activate to remind you to drain the water.

To have a good drying performance do not exceed the maximum drying loads recommended in the user manual. Do not set a spin speed lower than the automatic speed of the set programme.
DRYING AT AUTOMATIC LEVELS
The laundry can be dried at pre-defined levels of dryness:
- Press again and again until the display shows one of the dryness level indicator:
- : IRON DRY level indicator for cotton items
- : GUPBOARD DRY level indicator for cotton and synthetic items
- ✿: EXTRA DRY level indicator for cotton items
The display shows a time value, calculated on the default load size. If the amount of your laundry is more or less than the default size, the appliance adjusts automatically the time value during the cycle.
- Press to start the programme.
The display shows the door locked indicator —0. The drying indicator starts to flash.
i
You cannot set all dryness levels for any type of laundry.
TIMED DRYING
The laundry can also be dried with a manual timed drying:
- Press again and again to set the time value (see the «Programmes for timed drying» table).
- The display shows 10 minutes. Each time you press this touchpad the time value increases by 5 minutes.
- The display shows the set time value: for example 40.
-
After some seconds the display shows a new time value: .The appliance calculates also the duration of the anti-crease and the cooling phases.
-
Press ▷∥ to start the programme.
- The display shows regularly a new time value.
DAILY USE - WASHING & DRYING

WARNING! Refer to Safety chapters.

This appliance is an automatic washer dryer.
NON-STOP PROGRAMME
- Turn the programme knob to to activate the appliance.
- Load the laundry one item at a time.

To have a good drying performance do not exceed the maximum drying loads recommended in the user manual. Do not set a spin speed lower than the automatic speed of the set programme.
- The drying indicator ·s·s starts to flash.
- The display shows the door locked indicator : -0
i
If you set only 10 minutes of drying, the appliance performs only a cooling phase.
If the laundry is not sufficient dry, set again a short drying time.
END OF THE DRYING PROGRAMME
The appliance stops automatically.
- The acoustic signals operate (if they are active).
- In the display comes on.
- The indicator goes off.
- The last minutes of the drying cycle the appliance performs a cooling and anti-crease phase. The door is still locked.
When the door locked goes off in the display, you can open the door.
- Turn the programme knob to deactivate the appliance.
After some minutes from the end of the programme, the energy saving function automatically deactivates the appliance.
- Remove the laundry from the appliance. Make sure that the drum is empty.
- Keep the door ajar, to prevent mildew and odours.
-
Close the water tap.
-
Put the detergent and the additives in the appropriate compartment.
- Turn the programme dial to the washing programme.
The display shows the indicators of the different washing phases.
- Set the available options.
WASHING & AUTOMATIC DRYING
-
Press again and again until the display shows one of the dryness level indicator:
-
: IRON DRY level indicator for cotton items
- : CUPBOARD DRY level indicator for cotton and synthetic items
- ✅: EXTRA DRY level indicator for cotton items
The display shows the indicator the time value on the display is the duration of the washing + drying cycles, calculated on a default load size.

To have a good drying the appliance does not let you set a too low spin speed for the items to be washed and dried.
- Press to start the programme.
In the display the indicator of the set dryness level stays on.
The door locked indicator goes on.
The display shows regularly a new time value.

The last minutes of the drying cycle the appliance performs the anti-crease and the cooling phases.
WASHING & TIMED DRYING
To have a good drying the appliance does not let you set a too low spin speed for the items to be washed and dried.
- Press to set the drying time value. The display shows 10 minutes.
The indicator comes on in the display. The display shows the set drying value time: for example
- After some seconds the display shows the
final time value, that is the total duration of the washing and drying cycles (washing + drying + anti-crease + cooling phases).

If you set only 10 minutes of drying after washing, the appliance calculates also the duration of the anti-crease and the cooling phases.
- Press to start the programme.
In the display the indicator →0 comes on. The door is locked. The display shows regularly a new time value.
HINTS AND TIPS

WARNING! Refer to Safety chapters.
THE LAUNDRY LOAD
- Divide the laundry in: white, coloured, synthetics, delicates and wool.
- Obey the washing instructions that are on the laundry care labels.
END OF THE PROGRAMME
The appliance stops automatically. The acoustic signals operate (if they are active).
For more information see "At the end of the drying programme" of the previous chapter.
- Remove the laundry from the appliance.
Make sure that the drum is empty. - Keep the door ajar to prevent mildew and odours.
- Close the water tap.
FLUFF IN THE FABRICS
During the washing and/or drying phase, some types of fabric, (sponge, wool, sweatshirt) could release fluff.
The released fluff could stick to the fabrics during the next cycle.
To prevent the fluff in your laundry, we recommend that you:
- Do not wash dark fabrics after you have washed and dried light coloured fabrics (new sponge, wool, sweatshirt) and the contrary.
- Line dry this type of fabrics at open air when they are washed the first time.
- Clean the drain filter.
- After the drying phase, clean the empty drum, the gasket and the door with a wet cloth.
HOW TO REMOVE THE FLUFF IN THE GARMENTS
To remove the fluff inside the drum, set a special programme:
- Empty the drum.
- Clean the drum, the gasket and the door with a wet cloth.
-
Set the rinse programme.
-
Press at the same time ⊥ and ∥ to activate the cleaning function until the display shows CLE.
-
Press to start the programme.
-
Do not wash white and coloured items together.
- Some coloured items can discolour with the first wash. We recommend that you wash them separately for the first times.
- Button up pillowcases, close zippers, hooks and poppers. Tie up belts.
- Empty the pockets and unfold the items.
-
Turn multilayered fabrics, wool and items with painted illustrations inside out.
-
Remove hard stains with a special detergent.
- Wash and pre-treat heavy soil stains before putting items in drum
- Be careful with the curtains. Remove the hooks and put the curtains in a washing bag or pillowcase.
- Do not wash laundry without hems or with cuts. Use a washing bag to wash small and/or delicate items (e.g. underwired bras, belts, tights, etc.).
- A very small load can cause balance problems with the spin phase. If this occurs, adjust manually the items in the tub and start the spin phase again.
STUBBORN STAINS
For some stains, water and detergent is not sufficient.
We recommend that you pre-treat these stains before you put the items in the appliance.
Special stain removers are available. Use the special stain remover that is applicable to the type of stain and fabric.
DETERGENTS AND ADDITIVES
- Only use detergents and additives specially made for washing machines:
- powder detergents for all types of fabric,
- powder detergents for delicate fabrics (40 °C max) and woollens,
– liquid detergents, preferably for low temperature wash programmes (60 °C max) for all types of fabric, or special for woollens only.
- Do not mix different types of detergents.
- To help the environment, do not use more than the correct quantity of detergent.
- Obey the instructions that you find on the on packaging of these products.
- Use the correct products for the type and colour of the fabric, the programme temperature and the level of soil.
- If your appliance does not have the detergent dispenser with the flap device, add the liquid detergents with a dosing ball (supplied by the detergent's manufacturer).
ECOLOGICAL HINTS
- Set a programme without the prewash phase to wash laundry with normal soil.
- Always start a washing programme with the maximum load of laundry allowed.
- If necessary, use a stain remover when you set a programme with a low temperature.
- To use the correct quantity of detergent, check the water hardness of your domestic system. Refer to "Water hardness".
WATER HARDNESS
If the water hardness in your area is high or moderate, we recommend that you use a water softener for washing machines. In areas where the water hardness is soft it is not necessary to use a water softener.
To know the water hardness in your area, contact your local water authority.
Use the correct quantity of the water softener.
Obey the instructions that you find on the packaging of the product.
DRYING HINTS
Prepare the drying cycle
- Open the water tap.
- Check if the drain hose is connected properly. Refer to installation chapter for more information.
- For the maximum laundry load of the drying programmes, refer to the drying programmes table.
ITEMS NOT SUITABLE FOR DRYING
Do not set a drying programme for this laundry:
- Very delicate items.
- Synthetic curtains.
- Pieces of clothing with metal inserts.
- Nylon stockings.
- Quilts.
- Bed covers.
- Duvets.
- Anoraks.
- Sleeping bags.
- Fabrics with residue of hair sprays, nail solvents or similar.
- Garments with foam-rubber or materials similar to foam-rubber.
GARMENT LABELS
When you dry the laundry, obey the indications on the labels of the manufacturers:
- =The item can be tumble dried
- =The drying cycle is at high temperature
- = The drying cycle is at reduced temperature
- =The item can not be tumble dried.
DRYING CYCLE DURATION
The drying time can change depending on:
- speed of the last spin
- dryness level
- type of laundry
- weight of the load
ADDITIONAL DRYING
If, at the end of the drying programme, the laundry is still damp, set a short drying cycle again.

WARNING! To avoid creasing and shrinkage do not overdry the laundry.
GENERAL TIPS
Refer to the «Drying programmes» table to find the average drying times.
CARE AND CLEANING

WARNING! Refer to Safety chapters.
EXTERNAL CLEANING
Clean the appliance with soap and warm water only. Fully dry all the surfaces.

CAUTION! Do not use alcohol, solvents or chemical products.
DESCALING
If the water hardness in your area is high or moderate, we recommend that you use a water descaling product for washing machines.
Regularly examine the drum to prevent limescale and rust particles.
To remove rust particles use only special products for washing machines. Do this separately from the laundry wash.

Always obey the instructions that you find on the packaging of the product.
CLEANING THE DETERGENT DISPENSER
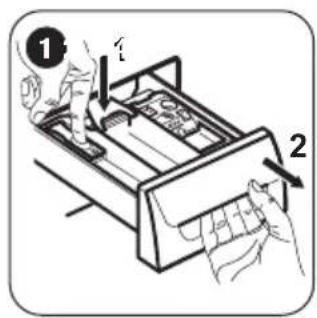
text_image
Diagram showing a hand operating a device with labeled parts and directional arrows, likely illustrating a process or operation.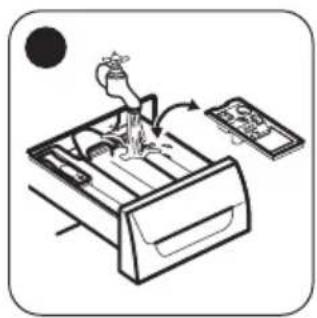
natural_image
Illustration of a person jumping from a drawer to a tablet, with no visible text or symbolsExperience will help you to dry the laundry better. Take note of the duration of the cycles done before. To avoid the static charge at the end of the drying cycle:
- Use fabric conditioner in the washing cycle.
- Use special fabric conditioner for tumble dryers.
When the drying programme is completed remove the laundry promptly.
MAINTENANCE WASH
With the low temperature programmes it is possible that some detergent stays in the drum. Perform a maintenance wash regularly. To do this:
- Remove all laundry from the drum.
- Select the cotton programme with the highest temperature with a small quantity of detergent.
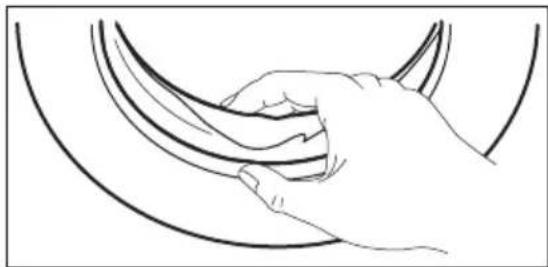
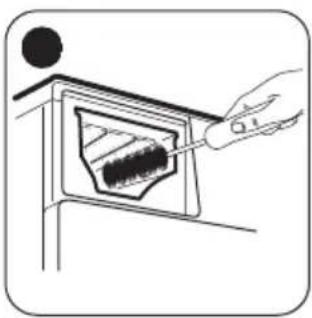
DOOR SEAL
natural_image
Line drawing of a hand gripping a curved object (no text or symbols)Regularly examine the seal and remove all objects from the inner part.
natural_image
Illustration of a hand using a tool to remove or remove a dark object inside a container (no text or symbols)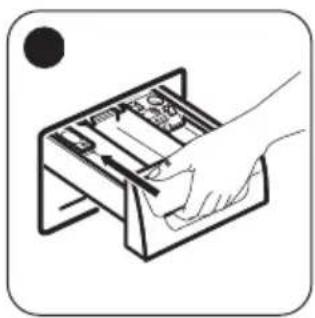
natural_image
Illustration of a hand inserting or removing a device into a rectangular box (no text or symbols visible)CLEANING THE DRAIN FILTER

WARNING! Do not clean the drain filter if the water in the appliance is hot.

Repeat the steps 2 and 3 until the water stops flowing out.

Regularly check the drain pump filter and make sure that it is clean.

natural_image
Hand inserting a card into a device (no text or symbols visible)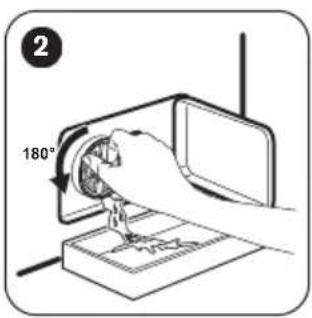
text_image
180°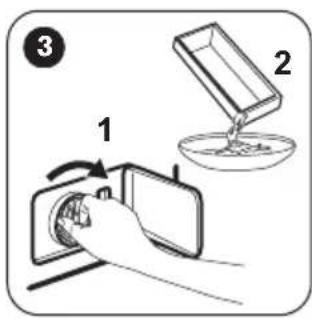
text_image
Diagram showing a hand holding a device with labeled parts and a magnified view of the device's internal structure.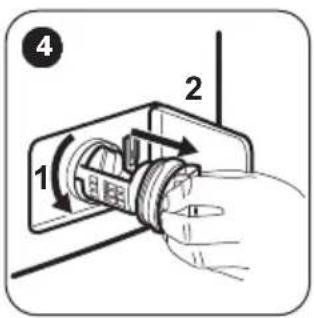
text_image
4 1 2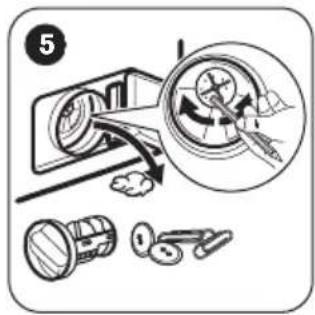
text_image
5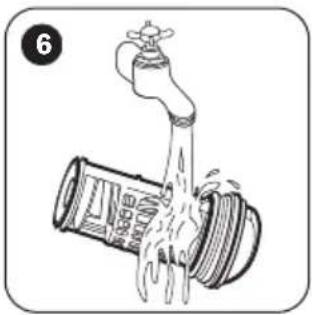
natural_image
Illustration of a faucet pouring liquid into a cylindrical tank (no text or symbols)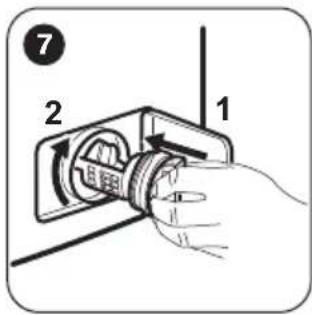
text_image
7 2 1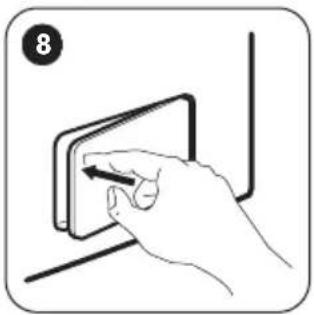
natural_image
Hand inserting a card into a wall, no text or symbols visibleCLEANING THE INLET HOSE AND THE VALVE FILTER
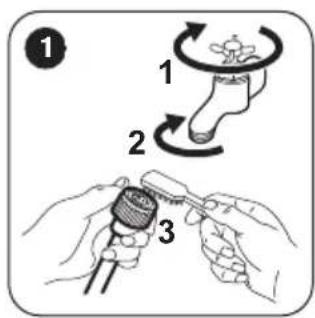
text_image
Diagram illustrating three-step robotic manipulation: foot rotation, tool use, and manual grip.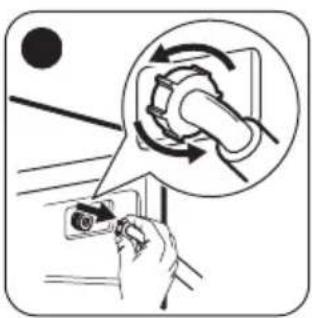
natural_image
Illustration of a hand holding a camera with a magnified inset showing rotational motion (no text or symbols)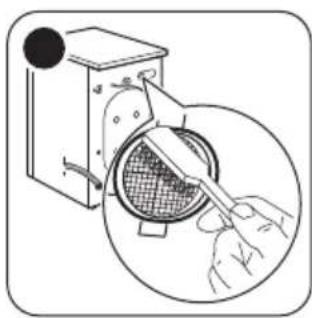
natural_image
Illustration of a hand using a tool to clean or inspect a circular component, with no visible text or symbols.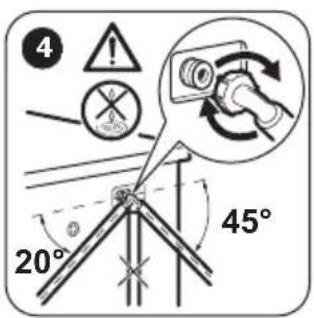
text_image
4 20° 45°EMERGENCY DRAIN
Because of a malfunction, the appliance cannot drain the water.
If this occurs, do steps (1) through (8) of 'Cleaning the drain filter'. If necessary, clean the pump.
When you drain the water with the emergency drain procedure, you must activate the drain system again:
-
Put 2 litres of water in the main wash compartment of the detergent dispenser.
-
Start the programme to drain the water.
FROST PRECAUTIONS
If the appliance is installed in an area where the temperature can be less than 0^ C, remove the remaining water from the inlet hose and the drain pump.
-
Disconnect the mains plug from the mains socket.
-
Close the water tap.
-
Put the two ends of the inlet hose in a container and let the water flow out of the hose.
-
Empty the drain pump. Refer to the emergency drain procedure.
-
When the drain pump is empty, install the inlet hose again.

WARNING! Make sure that the temperature is higher than 0 °C before you use the appliance again. The manufacturer is not responsible for damages caused by low temperatures.
TROUBLESHOOTING

WARNING! Refer to Safety chapters.
INTRODUCTION
The appliance does not start or it stops during operation.
First try to find a solution to the problem (refer to the table). If the problem persists, contact the Authorised Service Centre.
With some problems, the acoustic signals operate and the display shows an alarm code:
- E10 - The appliance does not fill with water properly. Start the appliance again by pressing Start/Pause button. After 10 seconds the door will be unlocked.
- The appliance does not drain the water.
- The appliance door is open or not closed correctly. Please check the door!
- The mains supply is unstable. Wait until the mains supply is stable.
- No communication between electronic elements of the appliance. Switch off and switch on again. The programme was not finished properly or the appliance stopped too early. If the alarm code appears again, contact the Authorised Service Centre.

WARNING! Deactivate the appliance before you do the checks.
POSSIBLE FAILURES
| Problem Possible solution | |
| The programme does not start. | Make sure that the mains plug is connected to the mains socket.Make sure that the appliance door is closed.Make sure that there is not a damaged fuse in the fuse box.Make sure that the Start/Pause has been pressed.If the delay start is set, cancel the setting or wait for the end of countdown.Deactivate the Child Lock function if it is on. |
| The appliance does not fill with water properly. | Make sure that the water tap is open.Make sure that the pressure of the water supply is not too low. For this information, contact your local water authority.Make sure that the water tap is not clogged.Make sure that the filter of the inlet hose and the filter of the valve are not clogged. Refer to “Care and cleaning”.Make sure that the inlet hose has no kinks or bends.Make sure that the connection of the water inlet hose is correct.Make sure that the connections of the water inlet hoses are correct. |
| The appliance does not fill with water and drain immediately. | Make sure that the drain hose is in the correct position. The hose may be too low. Refer to 'Installation instruction'. |
| The appliance does not drain the water. | Make sure that the sink spigot is not clogged.Make sure that the drain hose has no kinks or bends.Make sure that the connection of the drain hose is correct.Set the drain option if you set a programme without drain phase.Set the drain option if you set an option which ends with water in the drum.Make sure that the drain filter is not clogged. Clean the filter, if necessary. Refer to 'Care and cleaning'.If problem remains please contact the Authorised Service Centre. |
| The spin phase does not operate or the washing cycle lasts longer than usually. | Set the spin option.Set the drain option if you set an option which ends with water in the drum.Make sure that the drain filter is not clogged. Clean the filter, if necessary. Refer to 'Care and cleaning'.Adjust manually the items in the tub and start the spin phase again. This problem may be caused by balance problems. |
| There is water on the floor. | Make sure that the couplings of the water hoses are tight and there is not water leakages.Make sure that the water inlet hose and the drain hose have no damages.Make sure you use the correct detergent and the correct quantity of it. |
| You cannot open the appliance door. | Make sure that the washing programme is finished.Set the drain or the spin option if there is water in the drum.Do the emergency drain procedure. See "Frost precautions" (in "Care and Cleaning" chapter).Make sure that the appliance receives electrical power.This problem may be caused by a failure of the appliance. Contact the Authorised Service Centre. If you need to open the lid, please read carefully "Emergency door opening". |
| The appliance makes an unusual noise. | Make sure the levelling of the appliance is correct. Refer to 'Installation instruction'.Make sure that the packaging and/or the transit bolts are removed. Refer to 'Installation instruction'.Add more laundry in the drum. The load may be too small. |
| The cycle is shorter than the time displayed. | The appliance calculates a new time according to the laundry load. See the 'Consumption Values' chapter. |
| The cycle is longer than the time displayed. | An unbalanced laundry load increases the duration time. This is a normal behaviour of the appliance. |
| The washing results are not satisfactory. | Increase the detergent quantity or use a different detergent.Use special products to remove the stubborn stains before you wash the laundry.Make sure that you set the correct temperature.Decrease the laundry load. |
| You cannot set an option. | Make sure that you press only the wanted touch button(s). |
| The appliance does not dry or does not dry correctly. | Turn the water tap on.Make sure the drain filter is not clogged.Reduce the laundry load.Make sure you have set the correct cycle. If necessary ,set again a short drying time. |
| The laundry is full of different colours fluff. | The fabrics washed in the previous cycle released fluff of a different colour:The drying phase helps to eliminate some fluff.Clean the clothes with a fluff remover.In case of an excessive amount of fluff in the drum run the special programme to clean it (refer to “Fluff in the fabrics” for more details). |
After the check, activate the appliance. The programme continues from the point of interruption.
If the problem occurs again, contact the Authorised Service Centre.
If the display shows other alarm codes. Deactivate and activate the appliance. If the problem continues, contact the Authorised Service Centre.
EMERGENCY DOOR OPENING
In case of power failure or appliance failure the appliance door remains locked. The washing programme continues, when the power is restored. If the door remains locked in case of failure, it is possible to open it using the emergency unlock feature.
Before opening the door:

CAUTION! Make sure that the water temperature and the laundry are not hot. Wait till they cool down, if necessary.

CAUTION! Make sure that the drum is not rotating. Wait till the drum stops rotating, if necessary.

Make sure that the water level inside the drum is not too high. Proceed with an emergency drain, if necessary (refer to «Emergency drain» in «Care and cleaning» chapter).
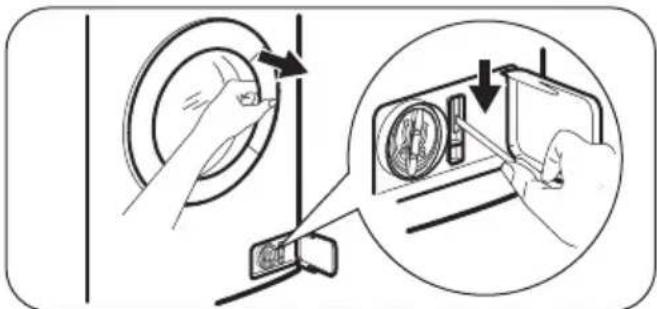
To open the door, proceed as follows:
- Turn the selector to ① position to switch the appliance off.
- Disconnect the mains plug from the mains socket.
- Open the filter flap.
- Keep the emergency unlock trigger pulled downward and, at the same time, open the appliance door.
text_image
Diagram illustrating a device operation with hand positioning and screen capture steps, showing circular dial and screen display setup.- Take out the laundry and then close the appliance door.
- Close the filter flap.
TECHNICAL DATA
| Dimension Width/ Height/ | Depth/ Total depth | 600 mm/ 850 mm/ 522 mm/ 555 mm |
| Electrical connection Voltage | 230-240 V | |
| 2200 W | ||
| 13 A | ||
| 50 Hz | ||
| Level of protection against ingress of solid particles and moisture ensured by the protective cover, except where the low voltage equipment has no protection against moisture | IPX4 | |
| Water supply 1) Cold water | ||
| Water supply pressure 2) | Minimum Maximum | 0,5 bar (0,05 MPa)8 bar (0,8 MPa) |
| Maximum wash load Cotton 8 kg | ||
| Maximum dry load Cotton | Synthetics | 4 kg2 kg |
| Spin Speed Maximum 1600 rpm | ||
1) Connect the water inlet hose to a water tap with a 3/4" thread.
2) The appliance works correctly if the water pressure is not lower than 0.05 MPa (0.5 bar). If you cannot connect the water inlet hose to the cold water tap of the primary hydraulic system, connect it to your domestic cold water storage system. Make sure not to exceed a distance of 5.02 m (16.5 ft) between the appliance inlet hose and the bottom of the water storage tank.
ENVIRONMENTAL CONCERNS
Recycle materials with the symbol Put the packaging in relevant containers to recycle it. Help protect the environment and human health by recycling waste of electrical and electronic appliances. Do not dispose of appliances marked
with the symbol with the household waste. Return the product to your local recycling facility or contact your municipal office.
WWW.ZANUSSI.COM/SHOP