
WTW87561GB - Tumble drier BOSCH - Free user manual and instructions
Find the device manual for free WTW87561GB BOSCH in PDF.


User questions about WTW87561GB BOSCH
0 question about this device. Answer the ones you know or ask your own.
Ask a new question about this device
Download the instructions for your Tumble drier in PDF format for free! Find your manual WTW87561GB - BOSCH and take your electronic device back in hand. On this page are published all the documents necessary for the use of your device. WTW87561GB by BOSCH.
USER MANUAL WTW87561GB BOSCH
natural_image
Close-up of a white washing machine with mesh chamber and side panel (no visible text or symbols)Register your new Bosch now: www.bosch-home.com/welcome
natural_image
Stack of white fabric swatches with no visible text or symbolsTumble dryer WTW87561GB
natural_image
Abstract pattern of evenly spaced black dots forming a semi-circular shape (no text or symbols)
BOSCH
en Installation and operating instructions
Your new tumble dryer
You have opted for a tumble dryer manufactured by Bosch.
Please take a few minutes to read and become familiar with the advantages of your tumble dryer.
To meet the high quality demands required by Bosch, every tumble dryer that leaves our factory is carefully checked to ensure that it functions correctly and is in perfect condition.
For more information on our products, accessories, replacement parts and services, see our website www.bosch-home.com or contact our Customer Service centres.
If the operating and installation instructions describe different models, any differences will be pointed out at the relevant points in the text.
Read these operating and installation instructions before operating the tumble dryer.
Display rules
⚠ Warning!
This combination of symbol and signal word indicates a possibly dangerous situation. Not heeding the warning can cause death or injuries.
Caution!
This signal word indicates a possibly dangerous situation. Not heeding the caution can cause property and/or environmental damage.
Note/tip
Information about the optimum use of the appliance/any other useful information.
1. 2. 3. / a) b) c)
The steps are represented by numbers or letters.
/ -
Lists are represented by a small box or a dash.
Table of contents

Intended use. 4

Safety instructions .....4
Children/people/pets 4
Installation....6
Operation 8
Cleaning/Maintenance ..... 10

Energy-saving tips.....12

Installing and connecting the appliance ....12
Included with the appliance: ..... 12
Installing the appliance ..... 13
Connecting the appliance.....15
Before using the appliance for the first time. 16
Optional accessories 16

Appliance settings.....17
Childproof lock 17
Activating setting mode ..... 17
Exiting setting mode ..... 18

Quick reference guide .....19

Familiarising yourself with your appliance .....20
Appliance overview. 20
Panel 21
Display 22

Overview of programmes .....23

Programme settings .....25

Laundry....27
Preparing the laundry ..... 27
Sorting laundry 28

Operating the appliance ..... 29
Loading laundry and switching on the appliance. 29
Setting a programme. . . . . . . . . . . . . . . . 30
Starting a programme .....30
Programme progress .....30
Changing the programme or adding more laundry. . . . . . . . . . . . 30
Cancelling the programme .....30
Programme end ....30
Removing laundry and switching off the appliance. . . . . . . . . . . . . . . . . . . . . . . . . . . . . . . . . . . . . . . . . . . 31
Emptying the condensation container ....31
Removing the fluff .....32

Draining the condensation water 34

Cleaning and maintenance....37
Cleaning the appliance . . . . . . . . . . . . 37
Cleaning the moisture sensor .....37
Cleaning the filter in the condensation container .....38

Information on the display . . . . 39

Help with the appliance ..... 40

Transporting the appliance . . . 42

Consumption values ..... 43
Consumption values table .....43
Most efficient programme for cotton laundry ....43

Technical specifications.....44

Disposal 44

After-sales service 45

Intended use
■ This appliance is intended for private domestic use only.
- Do not install or operate this appliance anywhere that is liable to experience frost and/or outdoor conditions. There is a risk that the appliance will be damaged if residual water in it freezes. If hoses freeze up, they may crack/burst.
This appliance must only be used for drying and freshening up domestic laundry, consisting of items that have been washed with water and are suitable for tumble drying (see label on item). Using the appliance for any other purpose is outside of the scope of its intended application and is forbidden.
■ This appliance is intended for use up to a maximum height of 4000 metres above sea level.
Before you switch on the appliance:
Check that there is no visible damage to the appliance. Do not operate the appliance if it is damaged. Should you have any problems, please contact your specialist dealer or our customer service.
Read and follow the operating and installation instructions and all other information provided with this appliance.
Retain the documents for subsequent use or for subsequent owners.

Safety instructions
The following safety information and warnings are provided to protect you from injury and to prevent material damage to your surroundings.
It is nevertheless important to take the necessary precautions and to proceed with care when installing, maintaining, cleaning and operating the appliance.
Children/people/pets

Warning
Risk of death!
Children and other people who are unable to assess the risks involved when using the appliance may injure themselves or may find themselves in life-threatening situations. Therefore please note:
■ The appliance may be used by children over the age of 8 years and by persons with reduced physical, sensory or mental capacity or by persons with a lack of experience or knowledge as long as they are supervised or have received instruction on how to use the appliance safely and they have understood the potential risks of using the appliance.
■ Children must not play with this appliance.
■ Do not allow children to clean or maintain this appliance unsupervised.
- Keep children under 3 years and pets away from this appliance.
■ Do not leave the appliance unattended when children or other people who are unable to assess the risks are in the vicinity.
⚠ Warning Risk of death!
Children may lock themselves inside appliances and find themselves in a life-threatening situation.
■ Do not position the appliance behind a door, as this may obstruct the appliance door or prevent it from opening completely.
■ Once an appliance has reached the end of its life, pull the mains plug from the socket before severing the mains cable, and then destroy the lock on the appliance door.
⚠ Warning Risk of suffocation!
If allowed to play with the packaging/plastic film or packing components, children may become caught in these or pull them over their heads and suffocate. Keep packaging, plastic film and packing components away from children.
⚠ Warning Risk of poisoning!
Detergents and care products may result in poisoning if consumed. If accidentally swallowed, seek medical advice. Keep detergents and care products out of the reach of children.
⚠ Warning Eye/skin irritation!
Contact with detergents or care products may cause eye/skin irritation. Rinse eyes/skin thoroughly if they/it come(s) into contact with detergents or care products. Keep detergents and care products out of the reach of children.
Installation
Warning
Risk of electric shock/fire/material damage/damage to the appliance!
If the appliance is not installed properly, this may lead to a dangerous situation. Ensure the following:
■ The mains voltage on your power socket must match the rated voltage specified on the appliance (identification plate). The connected loads and the required fuse protection are specified on the identification plate.
■ The appliance must not be supplied through an external switching device, such as a timer, or connected to a circuit that is regularly switched on and off by a utility.
■ The mains plug and the protective contact socket must match and the earthing system must be correctly installed.
■ The installation must have an adequate cross section.
■ The mains plug must be freely accessible at all times. If this is not possible, in order to comply with the relevant safety regulations, a switch (all pole disconnection) must be built into the permanent installation in accordance with electrical installation regulations.
If using a residual current circuit breaker, only use one that bears the following mark: 📌. The presence of this mark is the only way to be sure that it fulfils all the applicable regulations.
Warning
Risk of electric shock/fire/material damage/damage to the appliance!
If the appliance's mains cable is altered or damaged, this may result in electric shock, short circuiting or fire due to overheating.
The mains cable must not be kinked, crushed or altered, and must not come into contact with any heat sources.
Warning
Risk of fire/material damage/ damage to the appliance!
The use of extension cords or power strips may result in fire due to overheating or short circuiting.
Connect the appliance directly to an earthed socket that has been correctly installed. Do not use extension cords, power strips or multi-way couplers.
Warning
Risk of injury/material damage/damage to the appliance!
■ The appliance may vibrate or move when in operation, potentially resulting in injury or material damage.
Place the appliance on a clean, even, solid surface and, using a spirit level to guide you, level it with the screw-in feet.
■ Incorrectly placing (stacking) this appliance on top of a washing machine may result in injury, material damage and/or damage to the appliance.
If this appliance is to be placed on top of a washing machine, the washing machine must be of at least the same depth and width as the appliance, and it must be secured in place with the appropriate connection set if available. → Page 16
The appliance MUST be secured with this connection set. Stacking the appliance in any other way is forbidden.
If you take hold of any of the appliance's protruding parts (e.g. the appliance door) in order to lift or move it, these parts may break off and cause injury.
Do not take hold of any of the appliance's protruding parts in order to move the appliance.
⚠ Warning Risk of injury!
■ The appliance is very heavy. Lifting it may result in injury. Do not lift the appliance on your own.
■ The appliance has sharp edges on which you could cut your hands. Do not take hold of the appliance by its sharp edges. Wear protective gloves to lift it.
If the hoses and mains cables are not correctly routed, they may constitute a tripping hazard, which may result in injury.
Route hoses and cables such that they do not constitute a tripping hazard.
Operation
⚠ Warning Risk of explosions/fire!
Laundry that has come into contact with solvents, oil, wax, wax remover, paint, grease or stain remover may ignite when dried in the machine, or even cause the appliance to explode. Therefore please note:
■ Rinse the laundry thoroughly with warm water and detergent before drying it in the machine.
■ Do not place laundry in this appliance to be dried if the laundry has not been washed first.
■ Do not use the appliance if industrial chemicals have been used to clean the laundry.
⚠ Warning Risk of explosions/fire!
If there is any residual material left in the fluff filter, this may ignite when drying is in progress, or even cause the appliance to catch fire or explode. Clean the fluff filter regularly.
■ Certain objects may ignite when drying is in progress, or even cause the appliance to catch fire or explode. Remove any lighters or matches from pockets on items of clothing.
If there is coal dust or flour in the air around the appliance, this may cause an explosion. Make sure that the area around the appliance is kept clean when it is in operation.
⚠ Warning Risk of fire/material damage/ damage to the appliance!
The appliance contains R290, a refrigerant that is environmentally friendly but flammable. Keep open fire and ignition sources away from the appliance.

Warning
Risk of fire/material damage/ damage to the appliance!
If a program is terminated before the drying cycle has finished, this prevents the laundry from cooling down sufficiently and may cause the laundry to ignite, or may result in material damage or damage to the appliance.
■ During the last part of the drying cycle, the laundry in the drum is not heated (cooling cycle). This is to ensure that it remains at a temperature at which it will not be damaged.
- Do not switch off the appliance before the drying cycle has finished unless you remove all items of laundry from the drum immediately and spread them out (to dissipate the heat).
Warning
Risk of poisoning/material damage!
Condensation water is not suitable for drinking and may be contaminated with lint. Contaminated condensation water may be hazardous to health and may cause material damage. Do not drink or reuse.
Warning
Risk of poisoning!
Poisonous fumes may be given off by cleaning agents that contain solvents, e.g. cleaning solvent.
Do not use cleaning agents that contain solvents.
Warning
Risk of injury!
■ If you support your weight/sit on the appliance door when it is open, the appliance may tip over, which may result in injury.
Do not support your weight on the appliance door when it is open.
■ If you climb onto the appliance, the worktop may break, which may result in injury.
Do not climb onto the appliance.
■ If you reach into the drum while it is still rotating, you risk injuring your hands. Wait until the drum has stopped rotating.
Caution!
Material damage/damage to the appliance
If the amount of laundry in the appliance exceeds its maximum load capacity, it may not be able to operate properly, or this may result in material damage or damage to the appliance. Do not exceed the maximum load capacity of dry laundry. Make sure you comply with the maximum load capacities specified for each of the programs. Page 23
If you operate the appliance without a fluff catcher (e.g. fluff filter, fluff depot, depending on appliance specifications), or if the fluff catcher is incomplete or defective, this may result in damage to the appliance. Do not operate the appliance without a fluff catcher, or with a fluff catcher that is incomplete or defective.
■ Light objects such as hair and lint may be sucked into the air inlet when the appliance is in operation. Keep these away from the appliance.
■ Foam and foam rubber may deform or melt if dried in the appliance.
Do not dry laundry items that contain foam or foam rubber in the appliance.
If you pour the wrong quantity of detergent or cleaning agent into the appliance, this may result in material damage or damage to the appliance. Use detergents/care products/cleaning agents and softeners in accordance with the manufacturers' instructions.
If the appliance overheats, it may not be able to operate properly, or this may result in material damage or damage to the appliance. Make sure that the appliance's air inlet is never obstructed when the appliance is in operation, and that the area around the appliance is adequately ventilated.
Cleaning/Maintenance
Warning
Risk of death!
The appliance is powered by electricity. There is a risk of electric shock if you come into contact with live components. Therefore please note:
■ Switch off the appliance. Disconnect the appliance from the power supply (pull out the plug).
■ Never take hold of the mains plug with wet hands.
■ When removing the mains plug from the socket, always take hold of the plug itself and never the mains cable, otherwise this may damage the mains cable.
■ Do not make any technical modifications to the appliance or its features.
■ Repairs and any other work on the appliance must only be conducted by our customer service or by an electrician. The same applies for replacing the mains cable (when necessary).
- Spare mains cables can be ordered from our customer service.
Warning
Risk of poisoning!
Poisonous fumes may be given off by cleaning agents that contain solvents, e.g. cleaning solvent.
Do not use cleaning agents that contain solvents.
Warning
Risk of electric shock/material damage/damage to the appliance!
If moisture penetrates the appliance, this may cause it to short circuit.
Do not use a pressure washer, steam cleaner, hose or spray gun to clean your appliance.
Warning
Risk of injury/material damage/damage to the appliance!
The use of spare parts and accessories supplied by other brands is dangerous and may result in injury, material damage or damage to the appliance. For safety reasons, use genuine spare parts and accessories only.
Caution!
Material damage/damage to the appliance
Cleaning agents and agents for pretreating laundry (e.g. stain removers, prewash sprays, etc.) may cause damage if they come into contact with the surfaces of the appliance. Therefore please note:
- Do not allow these agents to come into contact with the surfaces of the appliance.
■ Clean the appliance with nothing but water and a soft, damp cloth.
■ Remove any detergent, spray or other residues immediately.

Energy-saving tips
■ Spin the laundry before drying. The drier the laundry, the shorter the programme will be, in turn reducing energy consumption.
- Load the appliance with the maximum loads permitted for the programmes.
Note: If the maximum load is exceeded, this extends the programme duration and increases energy consumption.
■ Operate the appliance in a ventilated room and make sure that the air inlet on the appliance is unobstructed so that air exchange can take place unhindered.
■ Regularly remove the fluff from the appliance. If there is fluff in the appliance, this extends the programme duration and increases energy consumption.
If you do not perform any actions on the appliance for an extended period before the programme starts or once the programme has ended, the appliance will automatically switch to Energy saving mode. The display and indicator lights will go out after a few minutes and Start/Pause ▷□□ will flash. To end Energy saving mode, all you need to do is perform an action on the appliance, such as opening and closing the door.
If you do not perform any actions on the appliance for an extended period when it is in Energy saving mode, the appliance will automatically switch itself off.

Installing and connecting the appliance
Included with the appliance:
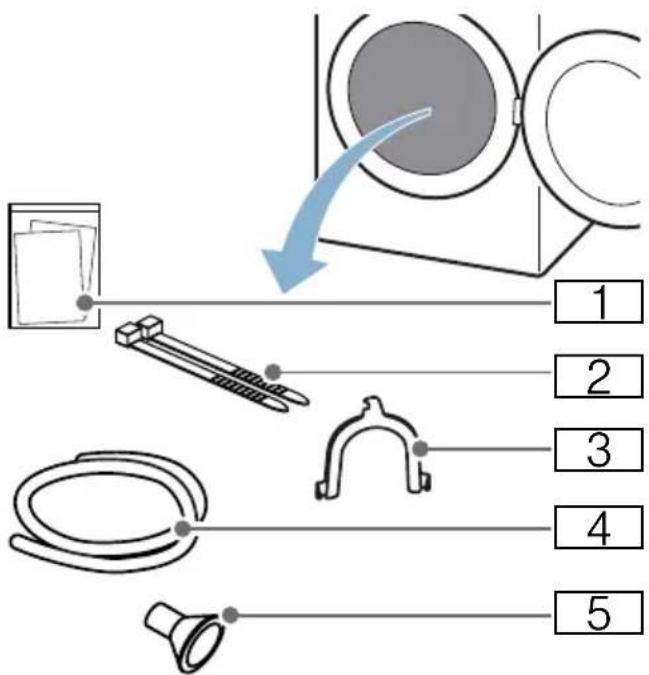
text_image
Diagram illustrating a mechanical assembly with labeled parts and a blue arrow indicating direction, likely illustrating a process or assembly.1 Accompanying documents (e.g. installation and operating instructions)
2 Fastening parts
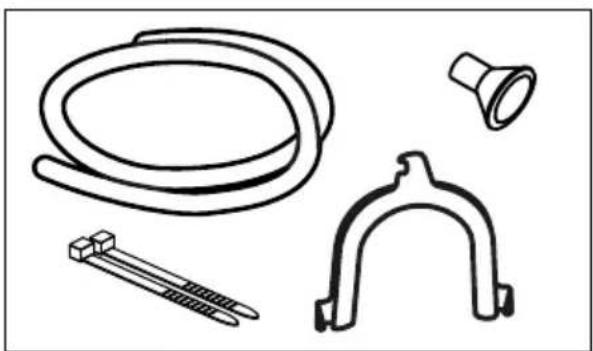
3 U-piece for fixing the drain hose in place
4 Drain hose
5 Connection adapter
- Remove any packaging and protective covers completely from the appliance.
- Open the door.
- Remove all the accessories from the drum.
You can now install and connect the appliance.
Caution!
Risk of material damage/damage to the appliance
Objects remaining in the drum that are not designed for operation with the appliance may result in material damage and damage to the appliance. Remove these objects, along with all accessories, from the drum.
Installing the appliance

Warning
Risk of death!
Children may lock themselves inside appliances and find themselves in a life-threatening situation.
- Do not position the appliance behind a door, as this may obstruct the appliance door or prevent it from opening completely.
■ Once an appliance has reached the end of its life, pull the mains plug from the socket before severing the mains cable, and then destroy the lock on the appliance door.

Warning
Risk of explosions/fire!
If there is coal dust or flour in the air around the appliance, this may cause an explosion.
Make sure that the area around the appliance is kept clean when it is in operation.
Warning
Risk of fire/material damage/damage to the appliance!
The appliance contains R290, a refrigerant that is environmentally friendly but flammable.
Keep open fire and ignition sources away from the appliance.

Warning
Risk of injury/material damage/ damage to the appliance!
■ The appliance may vibrate or move when in operation, potentially resulting in injury or material damage.
Place the appliance on a clean, even, solid surface and, using a spirit level to guide you, level it with the screw-in feet.
■ Incorrectly placing (stacking) this appliance on top of a washing machine may result in injury, material damage and/or damage to the appliance.
If this appliance is to be placed on top of a washing machine, the washing machine must be of at least the same depth and width as the appliance, and it must be secured in place with the appropriate connection set if available.
→ Page 16
The appliance MUST be secured with this connection set. Stacking the appliance in any other way is forbidden.
If you take hold of any of the appliance's protruding parts (e.g. the appliance door) in order to lift or move it, these parts may break off and cause injury.
Do not take hold of any of the appliance's protruding parts in order to move the appliance.

Warning
Risk of injury!
■ The appliance is very heavy. Lifting it may result in injury.
Do not lift the appliance on your own.
■ The appliance has sharp edges on which you could cut your hands.
Do not take hold of the appliance by its sharp edges. Wear protective gloves to lift it.
Caution!
Material damage/damage to the appliance
If the appliance overheats, it may not be able to operate properly, or this may result in material damage or damage to the appliance.
Make sure that the appliance's air inlet is never obstructed when the appliance is in operation, and that the area around the appliance is adequately ventilated.
Install the appliance as follows:
- Place the appliance on a clean, even, solid surface.
- Check that the appliance is level using a spirit level.
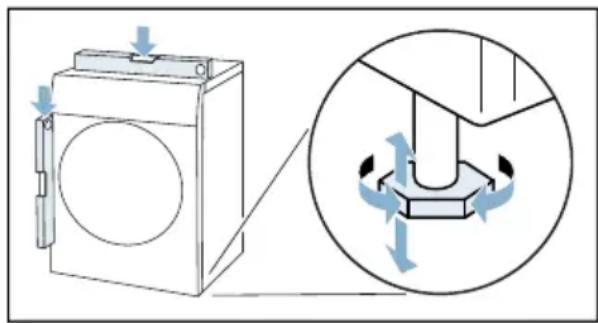
natural_image
Diagram showing a washing machine connected to a mechanical component with directional arrows indicating rotation (no text or symbols present)- If necessary, turn the appliance feet to make sure it is level.
You can now connect the appliance.
Notes
■ All appliance feet must stand firmly on the ground.
If appliances are not installed correctly, this may result in noises, vibrations, uneven drum operation and/or to residual water leaking out of the appliance.
Connecting the appliance
Warning
Risk of electric shock/fire/material damage/damage to the appliance!
If the appliance is not installed properly, this may lead to a dangerous situation. Ensure the following:
■ The mains voltage on your power socket must match the rated voltage specified on the appliance (identification plate). The connected loads and the required fuse protection are specified on the identification plate.
■ The appliance must not be supplied through an external switching device, such as a timer, or connected to a circuit that is regularly switched on and off by a utility.
■ The mains plug and the protective contact socket must match and the earthing system must be correctly installed.
■ The installation must have an adequate cross section.
■ The mains plug must be freely accessible at all times. If this is not possible, in order to comply with the relevant safety regulations, a switch (all pole disconnection) must be built into the permanent installation in accordance with electrical installation regulations.
If using a residual current circuit breaker, only use one that bears the following mark: 📌. The presence of this mark is the only way to be sure that it fulfils all the applicable regulations.
Warning
Risk of electric shock/fire/material damage/damage to the appliance!
If the appliance's mains cable is altered or damaged, this may result in electric shock, short circuiting or fire due to overheating.
The mains cable must not be kinked, crushed or altered, and must not come into contact with any heat sources.
Warning
Risk of fire/material damage/damage to the appliance!
The use of extension cords or power strips may result in fire due to overheating or short circuiting.
Connect the appliance directly to an earthed socket that has been correctly installed. Do not use extension cords, power strips or multi-way couplers.
Warning
Risk of injury!
If the hoses and mains cables are not correctly routed, they may constitute a tripping hazard, which may result in injury.
Route hoses and cables such that they do not constitute a tripping hazard.
Connect the appliance as follows:
- Connecting the drain hose.
→ Page 34
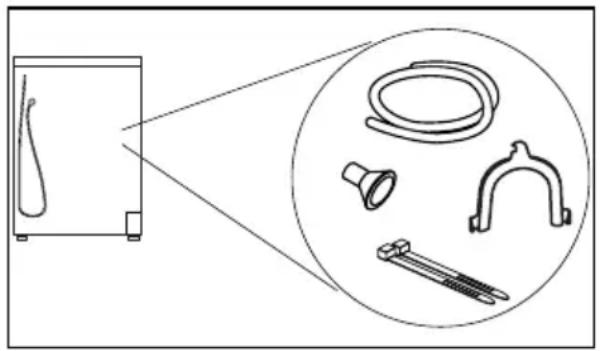
natural_image
Diagram showing a washing machine with attached tubing and a clamp, enclosed in an inset circle (no text or labels)- Plug the appliance's mains plug into the designated socket.
- Check that the mains plug is in securely.
Your appliance is now ready to use.
Caution!
Risk of material damage/damage to the appliance
The appliance contains refrigerant and may be damaged if it is operated immediately after transportation.
Allow the appliance to rest for two hours before initial use.
Note: If in doubt, have your appliance connected by a qualified professional.
Before using the appliance for the first time
Before you switch on the appliance:
Check that there is no visible damage to the appliance. Do not operate the appliance if it is damaged. Should you have any problems, please contact your specialist dealer or our customer service.
Note: Once the appliance has been properly installed and connected, it is ready to use. No further steps are necessary.
Optional accessories
Order optional accessories* from the after-sales service:
■ Basket for woollens:
Dry or air individual woollen items, sports shoes and soft toys in the basket for woollens.
- Order number: WMZ20600.
Platform:
For easier loading and unloading, raise your dryer with a platform. You can transport laundry with the laundry basket integrated into the platform drawer. - Order number: WMZ20500.
■ Washer-dryer stack connection kit:
To save space, the dryer can be placed on top of a suitable washing machine of the same width and depth.
Only this connection kit may be used to secure the dryer to the washing machine.
– Order number with pull-out worktop: WTZ11400
- Order number without pull-out worktop: WTZ20410.
* Depending on the appliance features

Appliance settings
Childproof lock
Activating the childproof lock prevents the settings from being accidentally changed on the control panel.
Activating/deactivating the childproof lock:
■ Press and hold Child lock push 3 sec for 3 seconds.
Note: The childproof lock will remain active, even once the appliance has been switched off. If you wish to change settings on the control panel when you turn on the appliance, you will need to deactivate the childproof lock.
Activating setting mode
In order to apply the settings described below, you will first need to activate setting mode. The options on the programme selector that will allow you to do this are as follows:
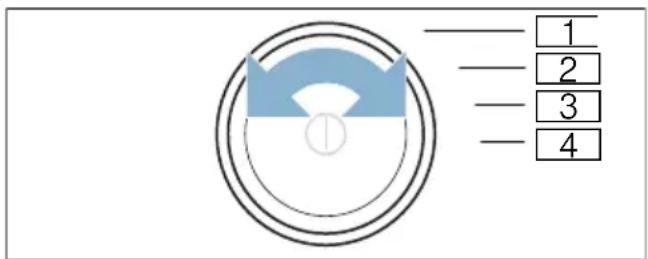
text_image
1 2 3 41 Activate setting mode
2 Activate setting mode and adjust audible notification signal volume
3 Adjust the audible button signal volume
4 Automatic switch-off function
- Switch on the appliance.
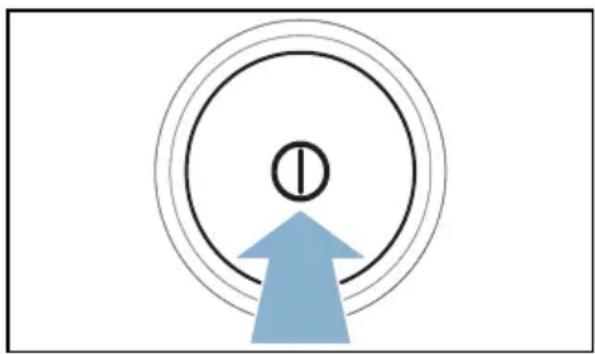
natural_image
Simple diagram with a circle containing a symbol and an upward arrow, no text or labels present.- Turn the programme selector to position 1.
- Press Fine adjust and, at the same time, turn the programme selector to position 2.
- Release Fine adjust.
Setting mode is now activated.
Changing the audible signal volume
You can adjust the volume of audible notification signals (that indicate that a programme has ended, for example) and audible button signals by turning the rotary selector to the following positions:
■ 2: Audible notification signal volume
■ 3: Audible button signal volume
- Activate setting mode.
- Turn the programme selector to the required position.
- Use the Finished in + or - button to set the volume you require (0 = off; 4 = very loud).
Switching the automatic switch-off function on/off
If the appliance is not used for an extended period, it may automatically switch itself off until a programme starts or when a programme has ended in order to save energy. It can be switched back on again at any time by pressing ①.
You can switch the appliance's automatic switch-off function on or off as follows:
- Activate setting mode.
- Turn the programme selector to position 4.
- Use the Finished in + or - button to switch the appliance's automatic switch-off function on or off.
Exiting setting mode
Once you have applied all the settings, press ① to switch off the appliance.
The settings you have selected will be saved and will take effect the next time the washing machine is switched on.

Quick reference guide
Note: The appliance must be correctly installed and connected. → Page 12
| 1 | Before starting the programme: | Sort the laundry. Switch on the appliance. | Select a programme. | |
| 2 | Open the door and place the laundry in the drum. | Close the door. If necessary: Adjust the programme settings. | Start the programme. | |
| 3 | Once the programme has ended: | Switch off the appliance. | Open the door and remove the laundry. | Empty the condensation container. |
natural_image
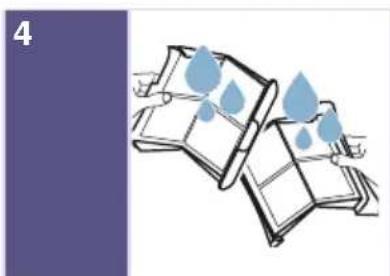
Illustration of folded documents with blue water droplets (no text or symbols)Remove the fluff.

Familiarising yourself with your appliance
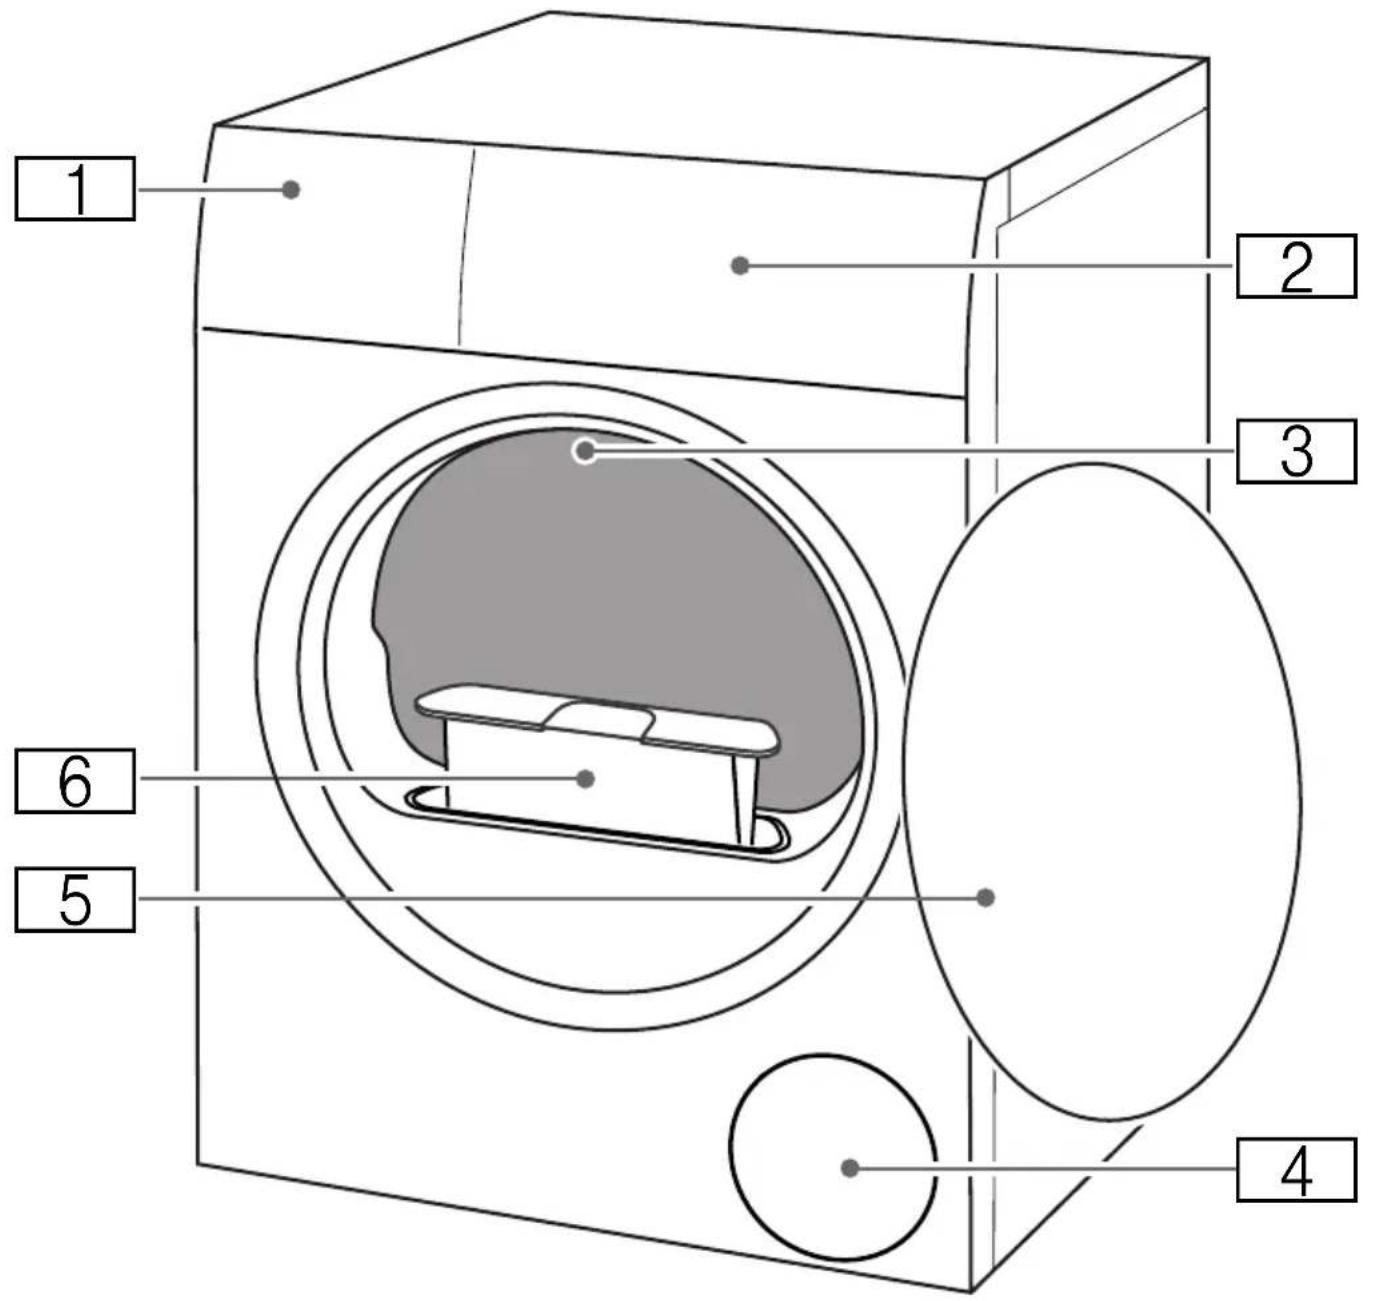
Appliance overview
text_image
1 2 3 4 5 61 Condensation container
2 Control panel
3 Drum interior lighting (depending on the model)
4 Air inlet
5 Door
6 Fluff filter
Panel
text_image
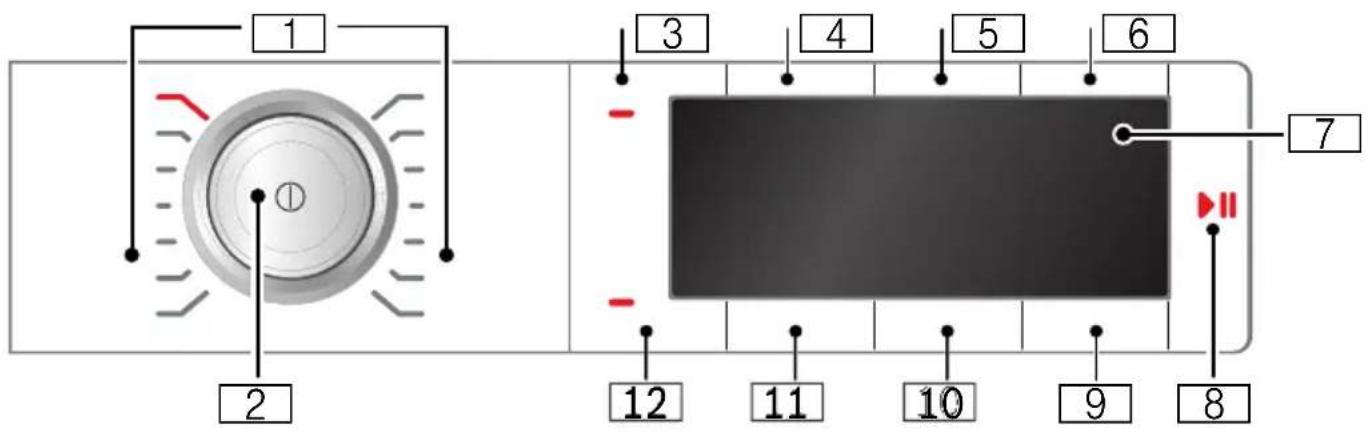
1 2 3 4 5 6 7 12 11 10 9 81 Programmes → Page 23
2 Programme selector
■ Press to switch the appliance on/off
■ Turn to set a programme
3 Childproof lock
Prevents the functions you have set from being changed accidentally.
To activate/deactivate it: → Page 17
4 Anti-Crease 60 min
5 Anti-Crease 120 min
6 Low-Heat Drying
7 Display
Displays settings and information
8 ▷ for:
■ Starting a programme
■ Pausing a programme, e.g. to add items of laundry
■ Cancelling a programme
9 Ready in
10 Degree of dryness
11 Dryness level
12 Audible signal
Display
text_image
Digital display interface showing weather icons and a timer reading '8:88'
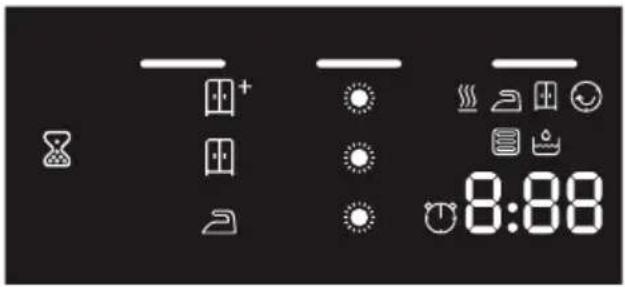
Empty the condensation
container → Page 32
Remove the fluff → Page 32

The heat exchanger is being
cleaned automatically
Programme progress for:
Drying

Iron Dry

Cupboard Dry

Anti-Crease
-p-
Pause
-0-
Programme end
Dryness levels for:

Iron Dry

Cupboard Dry

Cupboard Dry Plus

Degree of dryness selected

Timed programme selected
1:27 Expected programme
duration in hours and minutes
3h Programme delay in hours
when "Ready in" time is selected

Overview of programmes
| Programme Maximum load | |
| Programme nameBrief explanation of the programme and the items for which it is suitable. | Maximum load based on the dry weight of the items |
| CottonsHard-wearing items and heat-resistant items made of cotton or linen. | 9 kg |
| Easy-CareItems made of synthetic or blended fabrics. | 3.5 kg |
| Mixed LoadMixed load consisting of items made from cotton and synthetic fabrics. | 3 kg |
| DelicatesDelicate, washable items, e.g. made from satin, or synthetic or blended fabrics. | 2 kg |
| Wool FinishMachine-washable items made of wool or containing wool.Notes■ Laundry becomes fluffier but not dry.■ Remove laundry once the programme has ended and allow to dry. | 0.5 kg |
| Timed Progr. ColdTimed programme for all types of fabric except for wool and silk.For freshening up or airing clothing that has hardly been worn.Note: You can adjust the programme duration.→ "Programme settings" on page 25 | 3 kg |
| Timed Progr. WarmTimed programme for all types of fabric except silk.Suitable for pre-dried or slightly damp laundry and for drying off multi-layered, thick laundry.Notes■ Dry woollens, sports shoes and soft toys only with the basket for woollens.■ In the timed programme, the laundry's remaining moisture is not automatically detected. If the laundry is still too damp when the drying programme has ended, repeat the programme and, if required, extend the programme duration.→ "Programme settings" on page 25 | 3 kgMax. load for wool-lens/soft toys in the basket: 1 basket loadMax. load for shoes in the basket: 1 pair |
| ShirtsShirts/blouses made of cotton, linen, or synthetic or blended fabrics.Note: Once the laundry is dry, iron it or hang it up. This will allow the residual moisture to be distributed evenly. | 1.5 kg |
| Duvet | 2.5 kg |
| Clothing, pillows, quilts or bedspreads filled with synthetic fibres. | |
| Note: Dry large items individually. Follow the instructions on the care label. | |
| Down Wear | 1.5 kg |
| Clothing, bedspreads or eiderdowns stuffed with down. | |
| Notes | |
| ■ Dry large items individually. | |
| ■ Once the programme has ended, shake the items of laundry to distribute the stuffing and eliminate any pockets of moisture.Restart the programme if necessary. | |
| Sportswear | 1.5 kg |
| Weatherproof and outdoor clothing with a membrane coating and water-repellent fabrics. | |
| Towels | 6 kg |
| Hard-wearing towels and dressing gowns made of cotton. | |
| Super Quick 40' | 2 kg |
| Mixed load of synthetic fabrics and light cottons. | |
| Allergy+ | 4 kg |
| Hard-wearing items. | |
| Note: The programme reaches high temperatures. Particularly suitable for strict hygiene requirements. | |
P+Programme settings
| Buttons Displays Explanations and information | |
| Note: Not all buttons and their functions can be selected in all programmes. | |
| Reduced Ironing60 minReduced Ironing120 min | The drum moves the laundry at regular intervals after drying to prevent creasing. You can extend the automatic Anti-Crease function by 60 minutes (by pressing Reduced Ironing 60 min) or 120 minutes (by pressing Reduced Ironing 120 min) after any programme has finished. |
| Low Heat Reduced temperature for delicate fabrics, e.g. polyacrylic or elastane; may increase the drying time. | |
| End Signal | Use the End Signal button to activate or deactivate the audible signal that sounds to indicate that the programme has ended. If the setting has been selected, the button's indicator light will be lit and the signal tone is activated. |
| Drying target : | Select the dryness level depending on the required degree of dryness.If you have selected a dryness level, this will be stored for the selected programme even after the appliance has been switched off. Exception: The settings will not be saved for Cottons. |
| Cupboard-dry plus 📄 Multi-layered, thick laundry that does not dry readily. | |
| Cupboard dry 📄 Normal, single-layered laundry. | |
| Iron dry 📋 Normal, single-layered laundry that still needs to be damp after drying and is suitable for ironing or hanging up. | |
Fine adjust  | If you think the laundry is still too damp when the drying programme has ended, you can adjust the degree of dryness to achieve a particular dryness level. To increase the dryness level, set the degree of dryness to between ⚙️ and ⚙️ ⚙️ ⚙️. This will extend the programme duration but the temperature will remain the same.Once you have adjusted the degree of dryness for a programme, this setting will be retained for the programme even after the appliance has been switched off. |
en Programme settings
| Finished in | 1-24 | Before starting the programme, you can preselect the programme end time ("Ready in" time) in hourly increments (h = hour), up to a maximum of 24 hours:1. Select a programme.The programme duration will be displayed for the selected programme, e.g. 1:45 (hours:minutes).2. Press Finished in repeatedly until the required number of hours is displayed.Note: Use the Finished in + button to increase the setting values, and the Finished in - button to reduce them.3. Press Start/Pause ▷□□.This activates the time delay.Before the programme starts, the selected number of hours (e.g. 8) is shown on the display and counts down until the drying programme starts. The duration of the programme will then be displayed.Note: The programme duration is included in the "Ready in" time. |
| E.g.0:40 | The drying time for timed programmes can be extended to up to 3 hours 30 minutes in 10-minute increments. |

Laundry
Preparing the laundry

Warning
Risk of explosions/fire!
Certain objects may ignite when drying is in progress, or even cause the appliance to catch fire or explode. Remove any lighters or matches from pockets on items of clothing.
Caution!
Risk of damage to the drum and laundry
Leaving objects in the pockets of your clothing can cause damage to the drum and laundry when the appliance is in operation. Remove all objects (e.g. metal items) from clothing pockets.
Prepare the laundry as follows:
■ Tie cloth belts, apron strings, etc. together or use a laundry bag.
■ Close zips, hooks, eyelets and buttons. Button up large items of laundry, such as covers.
■ Always dry very small items of laundry, e.g. babies' socks, together with large items such as towels.
■ Use timed programmes for single items.
- Knitted items, such as T-shirts and jerseys, often shrink slightly the first time they are tumble-dried. Use a gentle programme.
- Do not overdry easy-care laundry. This leads to increased creasing of your laundry.
■ Some detergents and care products, e.g. starch or softeners, contain particles that may accumulate on the moisture sensor. This may impair the sensor's performance and, in turn, the drying result.
Notes
- When washing laundry to be tumble-dried, use the correct amount of detergent and care products as specified in the manufacturer's instructions.
- Clean the moisture sensor regularly Page 37.
Sorting laundry
Note: Load the laundry item by item into the appliance. For more effective drying, do not stuff an entire bundle of laundry into the dryer at once.
Caution!
Risk of material damage to the dryer or laundry
Laundry that is unsuitable for tumble-drying may damage the appliance and the laundry when it is dried. Before you dry it, sort the laundry according to the information given on the care label:
☐ Suitable for tumble drying
Dry at normal temperature
Dry at low temperature
Do not tumble-dry
When sorting the laundry to be dried, take the following points into account:
■ To achieve an even drying result, only dry laundry of the same type of fabric and texture together. If you dry thin, thick and multi-layered fabrics together, they will dry to differing degrees.
■ Use the fabric descriptions given for the individual drying programmes to help you choose the most appropriate programme.
→ "Overview of programmes"
on page 23
Note: You can select a timed programme to add extra drying time for laundry that is still damp.
Caution!
Risk of material damage to the appliance and laundry
Do not tumble-dry the following items or fabrics in the appliance:
■ Laundry contaminated with solvents, wax or grease.
■ Unwashed items.
■ Items made from non-breathable fabrics (e.g. rubber-coated).
■ Items made from delicate fabrics, such as silk and curtains made of synthetic material.

Operating the appliance
Loading laundry and switching on the appliance
Note: The appliance must be correctly installed and connected. → Page 12
- Prepare and sort the laundry.
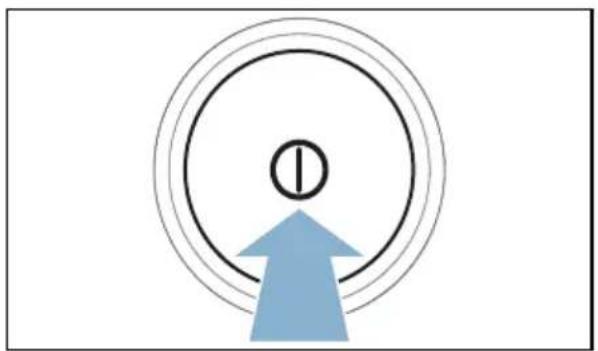
- Press ① to switch on the appliance.
natural_image
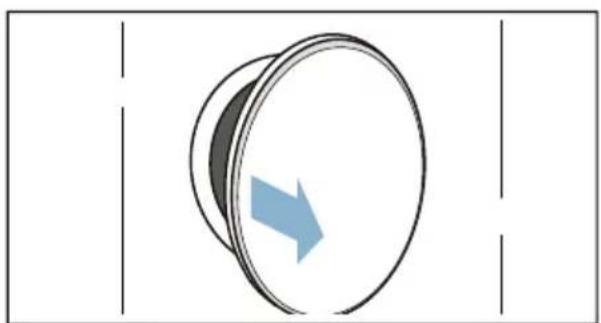
Simple diagram with a circle containing a symbol and an upward arrow, no text or labels present.- Open the door.
Check that the drum has been completely emptied. Empty it if necessary.
natural_image
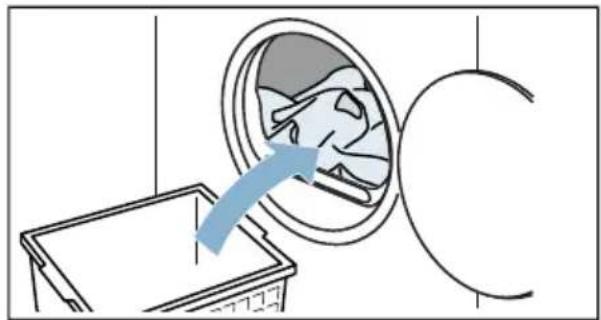
Diagram of a circular object with a blue arrow pointing inward, no text or symbols present- Load the laundry unfolded into the drum.
natural_image
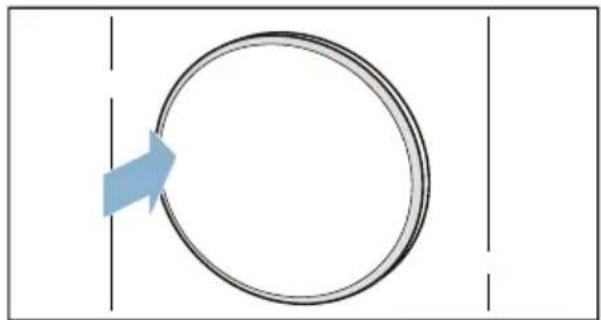
Diagram showing a device with a blue arrow pointing to a circular component, no text or symbols present- Close the appliance door.
natural_image
Simple circular diagram with a blue arrow pointing inward, no text or symbols presentCaution!
Risk of material damage to the appliance or laundry.
Make sure that laundry is not trapped in the door.

text_image
Diagram showing a medical device inside a circular chamber with a red X mark and a vertical line, likely indicating a medical or diagnostic procedure.Note: The appliance's drum is lit up after the door is opened and closed and once the programme has started. The drum's interior light goes out on its own.
Setting a programme
Note: If you have activated the childproof lock, you must deactivate it before you can set a programme. → Page 17
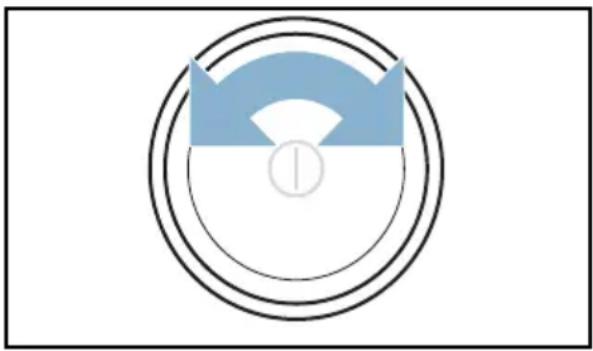
- Set the programme you require.
natural_image
Abstract circular diagram with concentric rings and a central symbol (no text or labels)The programme settings will appear on the display.
- Adjust the programme settings, if required. → "Programme settings" on page 25
Starting a programme
Press Start/Pause ▷□□.
Note: If you want to prevent the programme from being adjusted inadvertently, you can activate the childproof lock. → Page 17
Programme progress
The programme status will be indicated on the display.
Note: When a programme is selected, the expected drying time for the maximum permitted load is displayed. The moisture sensor measures the residual moisture in the laundry as it is being dried. The programme duration and the remaining time indicated on the display are automatically adjusted as the programme progresses, depending on how damp the laundry is (exception: Timed programmes).
Changing the programme or adding more laundry
You can remove or add laundry and change or adjust the programme at any time during drying.
- Open the door or press Start/Pause ▷ to pause the programme.
- Add or remove laundry.
-
If required, select a different programme or a different programme setting.
→ "Overview of programmes"
on page 23
→ "Programme settings" on page 25 -
Close the door.
-
Press Start/Pause ▷II.
Note: The programme duration is updated on the display, depending on the load and on the residual moisture in the laundry. The values displayed may change when the programme or load is changed.
Cancelling the programme
The programme can be cancelled at any time by opening the door or pressing Start/Pause ▷.
Caution!
Risk of fire. Laundry may catch fire.
If you cancel the programme, remove all items of laundry from the dryer and spread them out to allow the heat to dissipate.
Programme end
- 0 - will appear on the display.
Removing laundry and switching off the appliance
- Remove the laundry.
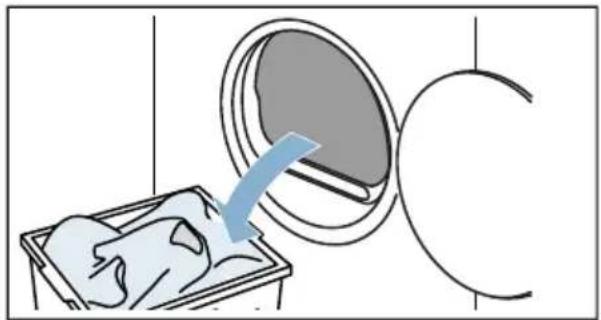
natural_image
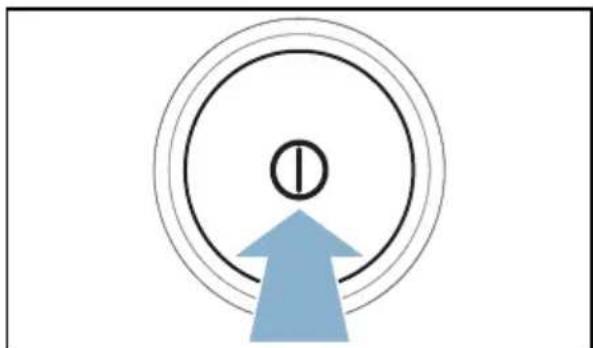
Medical illustration showing a patient undergoing CT scan with an arrow indicating the procedure (no text or symbols present)- Press ① to switch off the appliance.
natural_image
Simple diagram with concentric circles and a blue upward arrow, no text or symbols presentEmptying the condensation container
Condensation will form in the appliance as it dries the laundry.
If there is no drain hose connected to the appliance, the condensation water from the appliance will run into the condensation container. In this case, you will need to empty the condensation container each time the dryer finishes drying the laundry, and also if it becomes full before drying is complete.
- Pull out the condensation container horizontally.
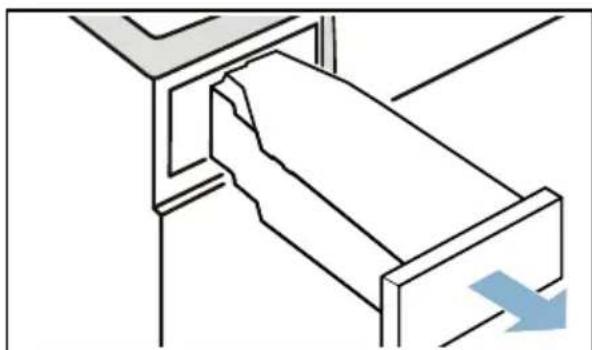
natural_image
Line drawing of a bed with a pillow and drawer, showing a blue arrow indicating direction (no text or symbols)- Pour out the condensation water.
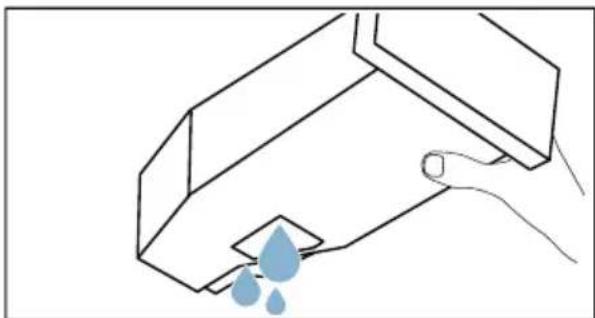
natural_image
Line drawing of a hand holding a rectangular object with blue droplets, no text or symbols presentCaution!
Risk of harm to health and material damage
Condensation water is not suitable for drinking and may be contaminated with fluff.
Contaminated condensation water may be harmful to your health and cause material damage. Do not drink the condensation water or reuse it.
- Push the condensation container back into the appliance until you feel it lock into place.
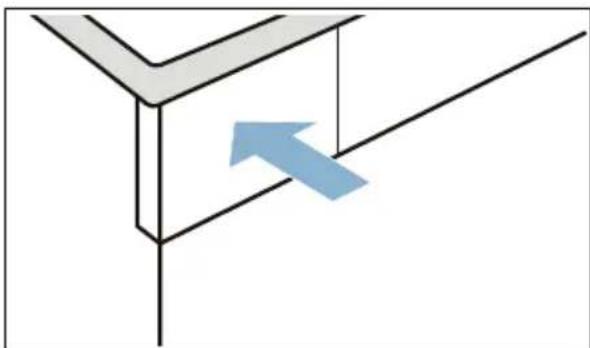
natural_image
Pure diagram of a 3D mechanical part with a blue arrow indicating direction, no text or symbols presentNote: The filter in the condensation container filters the condensation water, which is used during the appliance's automatic cleaning cycle. The filter is cleaned by emptying out the condensation water. You should still check the filter regularly for any build-up, and remove this if necessary.
→ "Cleaning the filter in the condensation container" on page 38
Removing the fluff
Note: During drying, fluff and hair from the laundry is trapped by the fluff filter. If the fluff filter is clogged or dirty, this reduces the flow of air, preventing the appliance from achieving optimal drying results. Dirty fluff filters increase the power consumption and increase the required drying time.
Clean the fluff filter after each drying cycle:
-
Open the door and remove all fluff from it.
-
Pull out the two-part fluff filter.
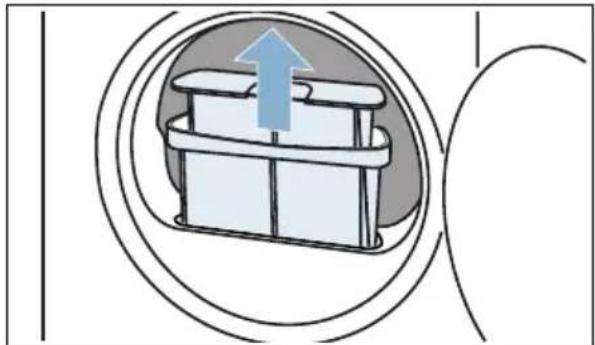
natural_image
Diagram of a mechanical device inside a circular frame, showing a blue upward arrow and layered components (no text or symbols)- Remove the fluff from the fluff filter recess. Ensure that no fluff falls into the open shaft.
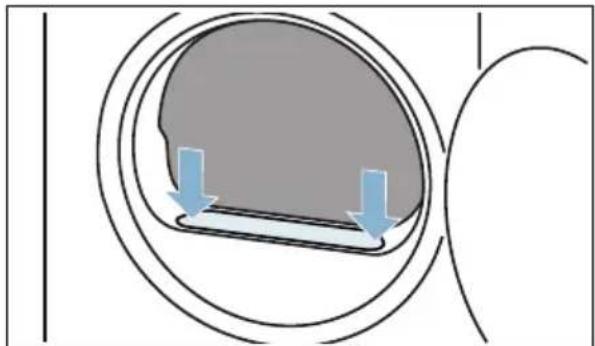
natural_image
Diagram showing a circular object with two blue arrows pointing downward, no text or symbols present- Pull the two-part fluff filter apart.
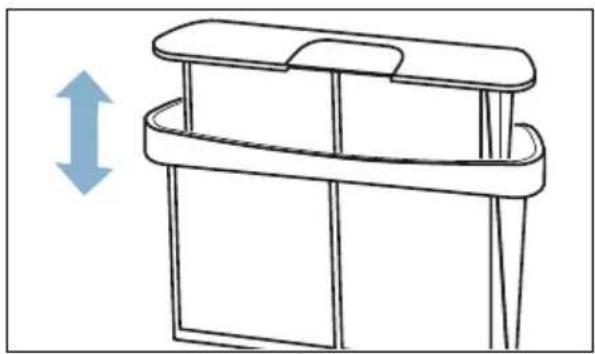
natural_image
Line drawing of a mechanical device with a blue upward arrow indicating rotation (no text or symbols)- Open the two parts of the filter.
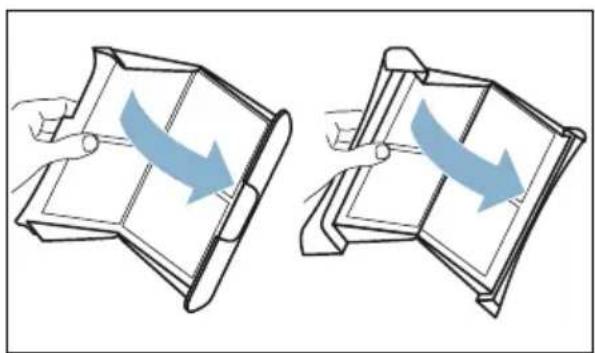
natural_image
Two identical diagrams showing a hand holding a folded device with a blue curved arrow indicating rotation (no text or symbols)- Remove all fluff from both parts of the filter.
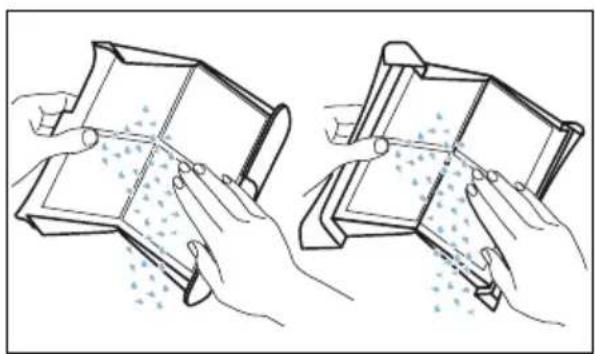
natural_image
Illustration of two hands holding a device with dotted particles, no text or symbols present- Rinse off fluff under warm, running water.
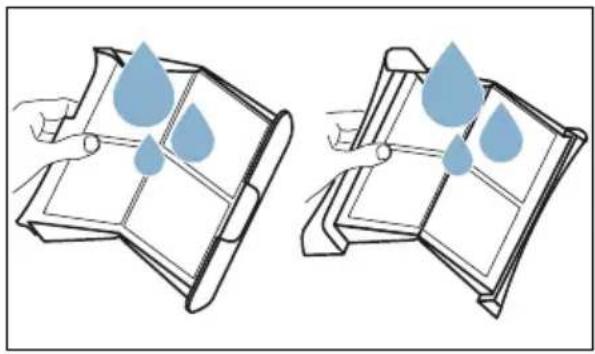
natural_image
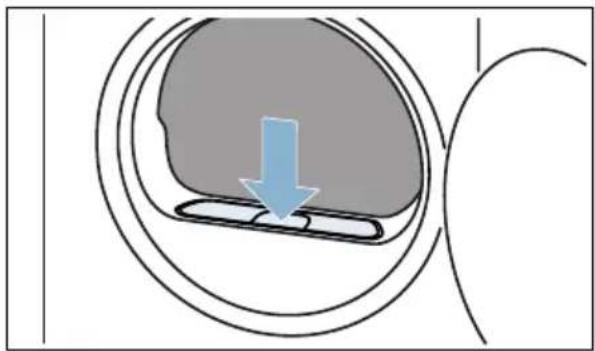
Illustration of two open bookshelves with water droplets on their surfaces (no text or symbols)- Dry the two parts of the fluff filter, snap them shut and reinsert the filter.
natural_image
Diagram showing a blue arrow pointing to a gray circular object inside a curved boundary (no text or symbols)Caution!
Material damage/damage to the appliance
If you operate the appliance without a fluff catcher (e.g. fluff filter, fluff depot, depending on appliance specifications), or if the fluff catcher is incomplete or defective, this may result in damage to the appliance.
Do not operate the appliance without a fluff catcher, or with a fluff catcher that is incomplete or defective.

Draining the condensation water
Condensation will form in the appliance as it dries the laundry.
You must ensure that the drain hose is connected when you operate the appliance.
If there is no drain hose connected to the appliance, the condensation water from the appliance will run into the condensation container. In this case, you will need to empty the condensation container each time the dryer finishes drying the laundry, and also if it becomes full before drying is complete.
Connect the drain hose as follows:
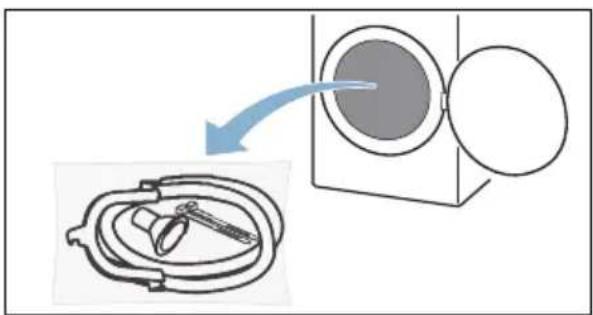
- Remove any accessories from the drum.
natural_image
Diagram showing a mechanical component being processed into a circular housing, with an arrow indicating process direction (no text or symbols present)- Remove all items from the bag.
natural_image
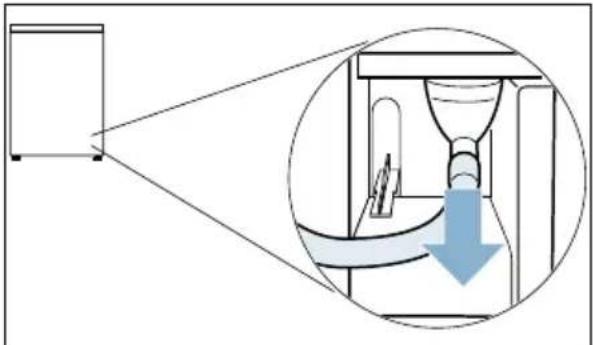
Line drawings of various mechanical components including a coiled tube, a pin, and a bracket (no text or symbols)- Detach the condensation hose from the socket.
natural_image
Diagram showing a device emitting a beam of light through a funnel, with an inset illustrating the process (no text or symbols present)Note: The appliance comes delivered with the condensation hose already fitted to the socket.
- Place the condensation hose in the "parked" position.
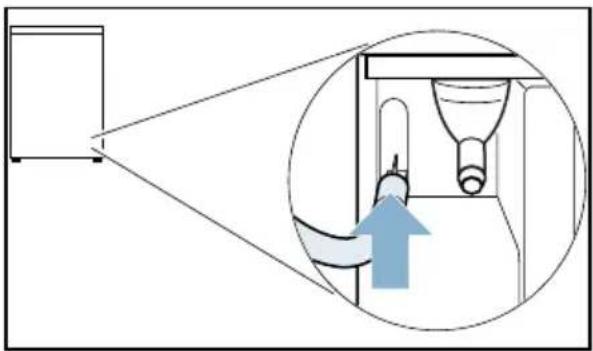
natural_image
Diagram showing a device emitting light rays into a chamber with an inset magnified view of the internal structure (no text or symbols)- Take the drain hose from the accessories and attach it to the free socket, pushing it up to the stop.
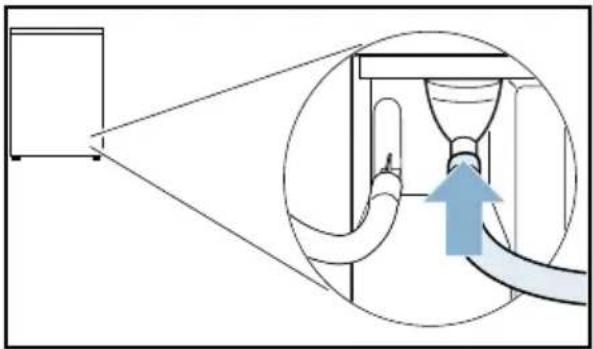
natural_image
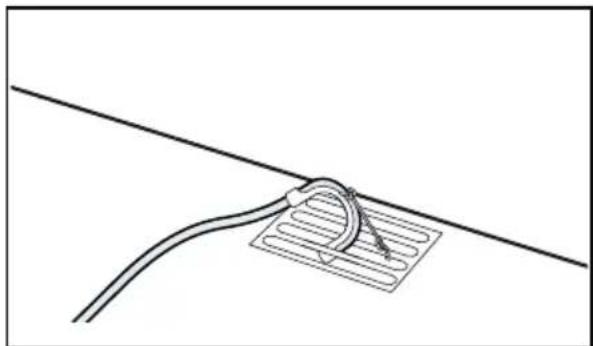
Diagram showing a pipe pouring liquid into a container with an inset magnified view of the pipe outlet (no text or symbols)- Secure the other side of the drain hose using the remaining accessories, depending on the connection situation.
Washbasin:
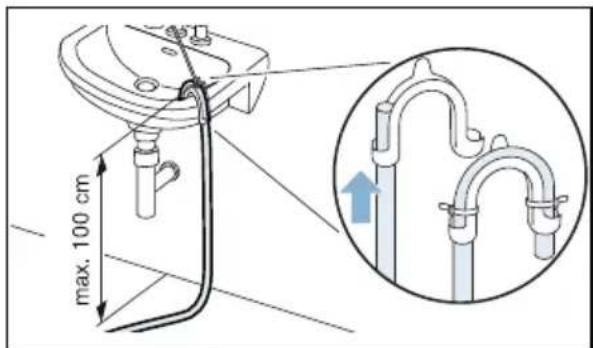
text_image
max. 100 cmSiphon:
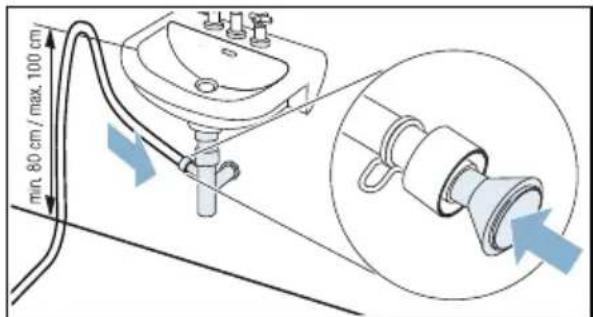
text_image
min. 80 cm / max. 100 cm/The connection point must be secured using a hose clamp (12-22 mm clamping range, available from specialist retailers).
When connecting to a siphon, make sure that the drain hose is routed at a height of at least 80 cm, but no more than 100 cm.
Floor drain:
natural_image
Simple line drawing of a cable being tied with a string, mounted on a grid-patterned surface (no text or symbols)Caution!
Risk of material damage due to leaks or draining water.
Secure the drain hose to prevent it from slipping out. Do not kink or bend the drain hose. The height difference between the surface on which the appliance is installed and the drain hose must be no more than 100 cm.
Caution!
Risk of accumulated water being drawn back into the appliance and causing material damage.
Check that the water drains away quickly. The drain must not be sealed or blocked.
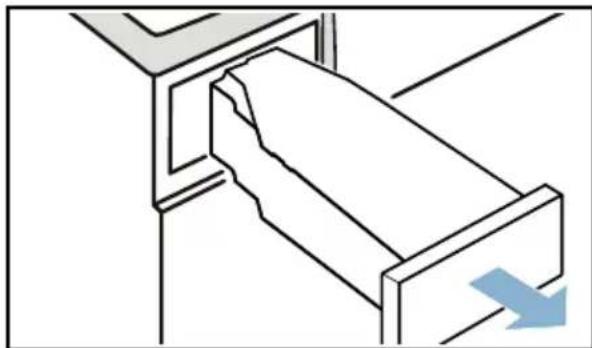
- Pull out the condensation container horizontally and empty it.
natural_image
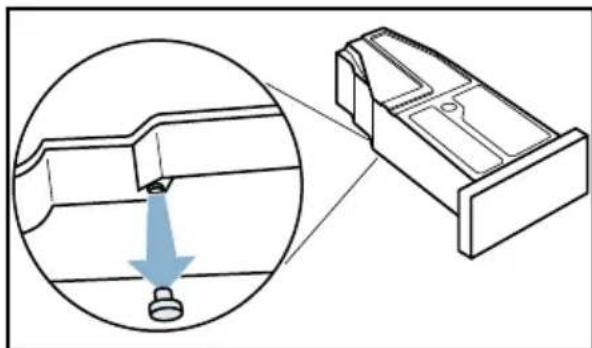
Line drawing of a mechanical device with a blue arrow indicating direction (no text or symbols)- Turn the condensation container 180° onto its underside and remove the stopper that is fitted.
natural_image
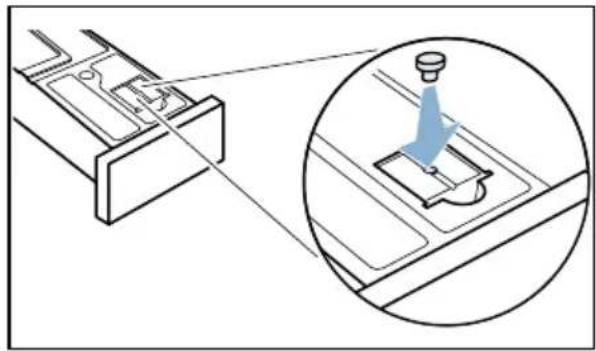
Technical diagram showing a mechanical component with a magnified inset view of a pin inserted into a housing (no text or symbols present)- Turn the condensation container 180° again and insert the stopper into the recess in the top of the condensation container.
natural_image
Technical diagram showing a mechanical component with an inset close-up of a tool interacting with a base (no text or symbols present)- Pull the filter out of its snap-in lock.

natural_image
Technical line drawing of a mechanical component with a blue arrow indicating direction (no text or symbols)- Place the filter into the recess on the condensation container.
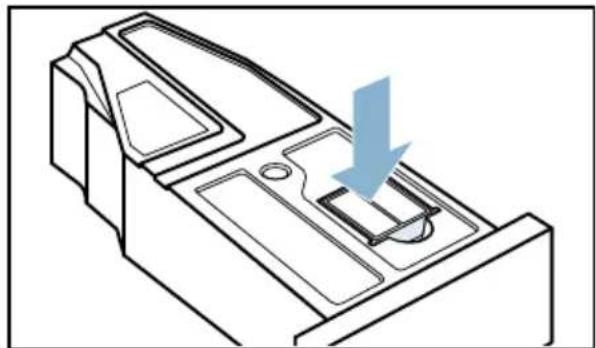
natural_image
Technical line drawing of a mechanical component with a blue arrow indicating a downward force or insertion (no text or symbols present)12.Slide in the condensation container until it clicks into place.
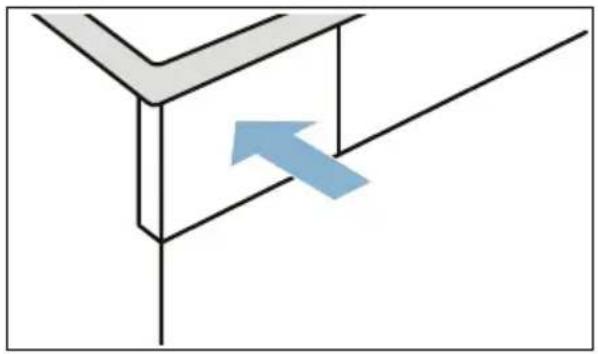
natural_image
Pure diagram of a 3D mechanical part with an arrow indicating direction, no text or symbols presentThe condensation water is now discharged via the drain hose into the waste-water system or into a washbasin.
Note: If you want to drain the condensation water back into the condensation container, reverse these steps.
Caution!
Risk of material damage/damage to the appliance
If you are draining condensation water into the condensation container, liquid may leak out of the socket and cause material damage. Before operating the appliance, make sure that the condensation hose is secured to the socket.

Cleaning and maintenance
Cleaning the appliance
Warning
Risk of death!
The appliance is powered by electricity. There is a risk of electric shock if you come into contact with live components. Therefore please note:
■ Switch off the appliance. Disconnect the appliance from the power supply (pull out the plug).
■ Never take hold of the mains plug with wet hands.
- When removing the mains plug from the socket, always take hold of the plug itself and never the mains cable, otherwise this may damage the mains cable.
- Do not make any technical modifications to the appliance or its features.
■ Repairs and any other work on the appliance must only be conducted by our customer service or by an electrician. The same applies for replacing the mains cable (when necessary).
- Spare mains cables can be ordered from our customer service.
Warning
Risk of poisoning!
Poisonous fumes may be given off by cleaning agents that contain solvents, e.g. cleaning solvent. Do not use cleaning agents that contain solvents.
Warning
Risk of electric shock/material damage/damage to the appliance!
If moisture penetrates the appliance, this may cause it to short circuit. Do not use a pressure washer, steam cleaner, hose or spray gun to clean your appliance.
Caution!
Material damage/damage to the appliance
Cleaning agents and agents for pretreating laundry (e.g. stain removers, prewash sprays, etc.) may cause damage if they come into contact with the surfaces of the appliance. Therefore please note:
- Do not allow these agents to come into contact with the surfaces of the appliance.
■ Clean the appliance with nothing but water and a soft, damp cloth.
■ Remove any detergent, spray or other residues immediately.
Cleaning the moisture sensor
Note: The moisture sensor measures the amount of moisture in the laundry. After long periods of usage, the moisture sensor may become covered by a fine layer of limescale or detergent and care product residue. These deposits must be removed regularly, otherwise the drying results may not be optimal.
- Open the door.
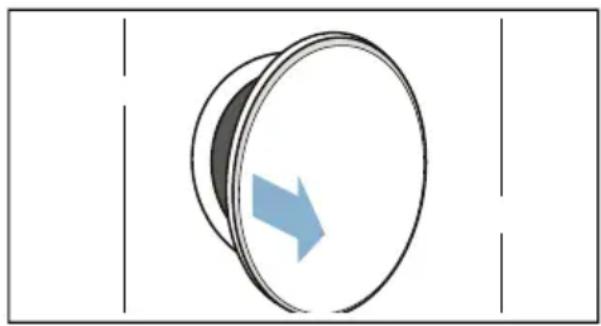
natural_image
Diagram of a cylindrical object with a blue arrow indicating direction, no text or symbols presenten
Cleaning and maintenance
- Clean the moisture sensor with a rough sponge.
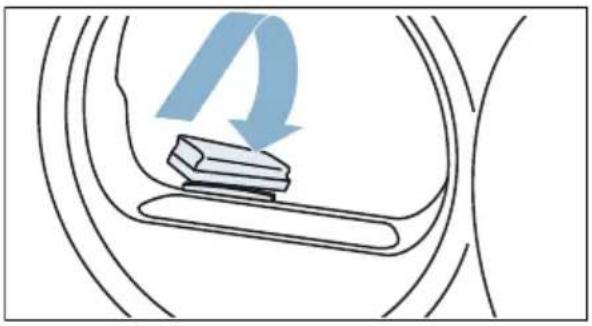
natural_image
Diagram showing a mechanical component with a curved arrow indicating rotation or motion, no text or symbols presentCaution!
Risk of damaging the moisture sensor.
The moisture sensor is made from stainless steel. Do not clean the sensor with abrasive cleaning products or wire wool.
Cleaning the filter in the condensation container
Note: The filter in the condensation container cleans the condensation water, which is used during the appliance's automatic cleaning cycle.
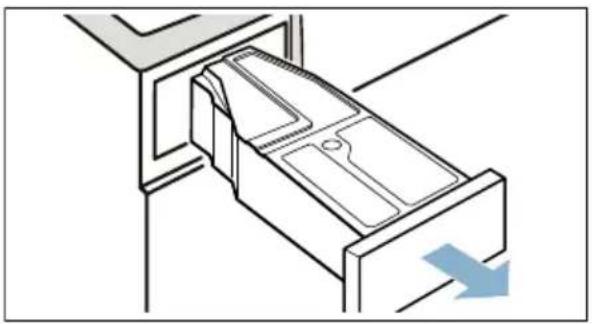
- Pull out the condensation container horizontally.
natural_image
Line drawing of a drawer with an arrow indicating direction (no text or symbols)-
Pour out the condensation water.
-
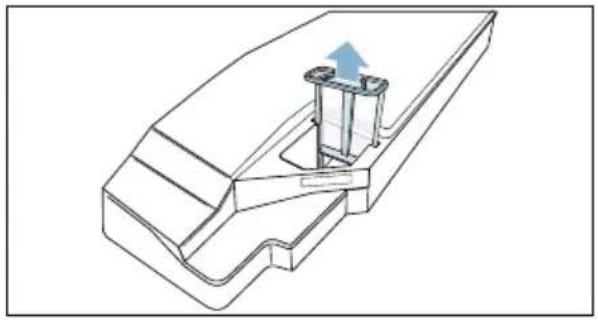
Remove the filter.
natural_image
Technical line drawing of a mechanical component with a blue arrow indicating direction (no text or symbols)-
Clean the filter under warm, running water or in the dishwasher.
-
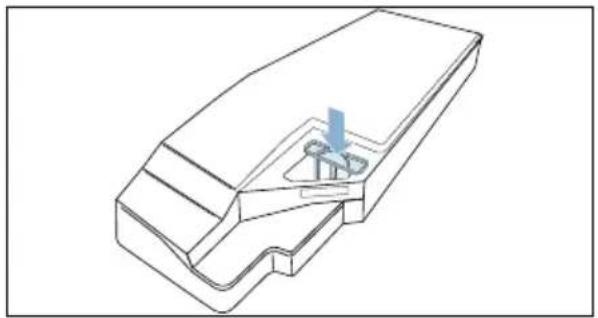
Push the filter in until you feel it lock into place.
natural_image
Technical line drawing of a mechanical component with a blue arrow indicating a feature (no text or symbols present)Caution!
If the filter is not inserted, fluff can find its way inside the appliance and damage it.
Only operate the appliance with the filter inserted.
- Push the condensation container in until you feel it lock into place.

Information on the display
| Faults Cause/remedy | |
| on the display and drying has stopped. | Empty the condensation container and reinsert it.→ Page 31Press Start/Pause ▷□□.Once you have installed the optional drain hose*, make sure that it:Is correctly connected → Page 34Is free of kinksIs not blocked or clogged, e.g. with deposits |
| on the display. | Remove the fluff.→ Page 32Press Start/Pause ▷□□. |
| on the display. | Not a fault. The heat exchanger is being cleaned automatically. Do not pull out the condensation container while this is displayed. |
| The display goes out and Start/Pause ▷□□ flashes. | Not a fault. Energy saving mode is active . |
| * Depending on how the appliance is equipped or the available accessory | |
Note:
If you cannot rectify the fault yourself by turning the appliance off and then on again, please contact our after-sales service.→ Page 45

Help with the appliance
| Faults Cause/remedy | |
| The appliance will not start. Check the mains plug and the fuses. | |
| Creasing. | Load exceeded or incorrect programme selected for a type of fabric.All the required information can be found in the programmetable.→Page 23Remove laundry from the drum as soon as the drying programmehas finished. Creasing occurs when clothing is left in the drum. |
| Water is leaking out. The appliance may be positioned at an angle. Level the appliance.→Page 13 | |
| Programme duration displayed changes as drying progresses. | Not a fault. The moisture sensor measures the residual moisture in the laundry and adjusts the programme duration (with the exception of timed programmes). |
| Laundry is not dried properly or is still too damp. | After the programme has ended, warm laundry feels damper than it actually is. Spread out the laundry and let it cool down.Adjust the drying time or increase the degree of dryness. This will extend the drying time but the temperature will remain the same.Select a timed programme to add extra drying time for laundry that is still damp.Select a timed programme for a small load.Do not exceed the maximum load for a programme.→Page 23Clean the moisture sensor in the drum. The sensor may become covered in a fine layer of limescale or detergent and care product residue, which then impairs its performance.→Page 37Drying has been interrupted as a result of a power cut, because the condensation container is full or because the maximum drying time has been exceeded.Note:See also the laundry tips.→Page 27 |
| The programme will not start Make sure that:The door is closed.Child lock push 3 sec has been deactivatedYou have pressed Start/Pause ▷Note:If the programme has been delayed by settingFinished in, the programme will start later. | |
| Drying taking too long. | The appliance may have fluff in it. This will increase the drying time.Remove the fluff.→Page 32If the air inlet on the appliance is blocked or not fully open, the drying time may increase. Make sure that the air inlet remains unob-structed.If the ambient temperature is lower than 15 °C or higher than 30 °C, this may increase the drying time.Inadequate air circulation in the room may increase the drying time.Make sure the room is adequately ventilated. |
| Humidity in the room is increasing. | Make sure the room is sufficiently ventilated. |
| Drying programme is stopped. If the drying programme is stopped due to a power failure, restart the programme or remove the laundry and spread it out. | |
| Unusual noises when drying. Automatic cleaning of the heat exchanger produces noises. This does not indicate that there is a malfunction on the appliance. | |
| The appliance feels cold despite drying. | Not a fault. The appliance can dry effectively at low temperatures using a heat pump. |
| Residual water in the condensation container despite the appliance being connected to the drain hose*. | If the optional drain hose is installed, residual water remains in the condensation container due to the appliance's self-cleaning function. |
| * Depending on how the appliance is equipped or the available accessory | |
Note:
If you cannot rectify the fault yourself by turning the appliance off and then on again, please contact our after-sales service.→ Page 45

Transporting the appliance
Warning
Risk of injury/material damage/ damage to the appliance!
If you take hold of any of the appliance's protruding parts (e.g. the appliance door) in order to lift or move it, these parts may break off and cause injury. Do not take hold of any of the appliance's protruding parts in order to move the appliance.
Warning
Risk of injury!
■ The appliance is very heavy. Lifting it may result in injury.
Do not lift the appliance on your own.
■ The appliance has sharp edges on which you could cut your hands. Do not take hold of the appliance by its sharp edges. Wear protective gloves to lift it.
Prepare the appliance for transportation as follows:
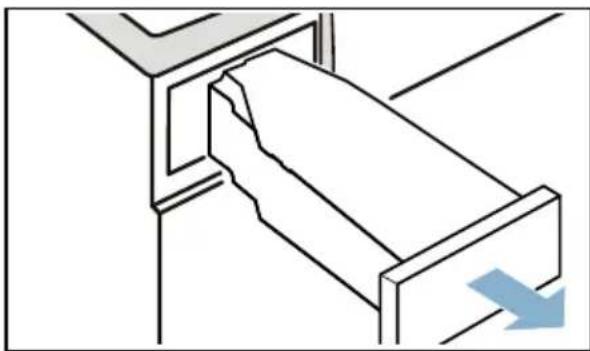
- Pull out the condensation container horizontally and empty it.
natural_image
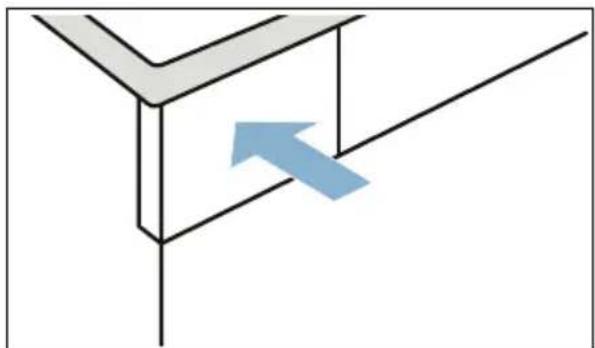
Simple line drawing of a mechanical device with a blue arrow indicating direction (no text or symbols)- Push the condensation container back into the appliance until you feel it lock into place.
natural_image
Pure 3D diagram of a Y-shaped structure with an arrow indicating direction, no text or symbols present- Switch on the appliance.
- Set any programme.
- Press Start/Pause ▷III.
- Wait for 5 minutes.
The condensation water will be drained. - Empty the condensation container again.
- If installed, remove the drain hose from the washbasin, siphon or floor drain. → Page 34
Caution!
Secure the drain hose to the appliance to prevent it from slipping out. Do not kink the drain hose.
-
Switch off the appliance.
-
Disconnect the appliance's mains plug from the power supply.
The appliance is now ready to be transported.
Caution!
Risk of material damage/damage to the appliance
Despite draining, there will always be some residual water in the appliance. Any residual water may leak out and cause material damage.
The appliance should therefore be transported upright.

Consumption values
Consumption values table
| Programme | Spin speed used for spinning the laundry (in rpm) | Duration** (in min) | Energy consumption** (in kWh) | ||
| ü Cottons | 9 kg | 4.5 kg | 9 kg | 4.5 kg | |
| Cupboard Dry ☐* 1400 | 146 98 1.77 1.09 | ||||
| 1000 166 108 2.06 1.24 | |||||
| 800 186 118 2.35 1.39 | |||||
| Iron Dry ☐* 1400 | 109 71 1.26 0.76 | ||||
| 1000 129 81 1.55 0.91 | |||||
| 800 | 149 91 1.84 1.06 | ||||
| Easy-Care | 3.5 kg | 3.5 kg | |||
| Cupboard Dry ☐* | 800 | 57 | 0.55 | ||
| 600 | 65 | 0.65 | |||
* Programme setting in accordance with the applicable EN61121 standard when using the external drain hose.
** The values may differ from those specified, depending on the type of fabric, composition of laundry to be dried, residual moisture in the laundry, the degree of dryness that has been set, the amount of laundry being loaded, the environmental conditions, and any additional functions that have been activated.
Most efficient programme for cotton laundry
The "standard cottons programme" below (denoted by the ü symbol) is suitable for drying cotton laundry with a normal dampness level, and is the most efficient programme for drying damp cotton laundry in terms of combined energy consumption.
| Standard programmes for cottons in accordance with current EU regulation 932/2012 | |||
| Programme + dryness level | Load (in kg) | Energy consumption (in kWh) | Programme duration (in min) |
| ü Cottons + Cupboard dry ☒ | 9/4.5 | 2.06/1.24 | 166/108 |
| Programme setting for testing and energy labelling in accordance with Directive 2010/30/EU. | |||

Technical specifications
Dimensions:
85 × 60 × 60 mm
(height x width x depth)
Weight:
57 kg (depending on the model)
Mains connection:
Mains voltage 220 - 240 V, 50 Hz
Nominal current 10 A
Nominal power max. 1000 W
Maximum load:
9 kg
Power consumption when switched off:
0.10 W
Power consumption when left on:
0.10 W
Drum interior light\*
Ambient temperature:
5 - 35 °C

Disposal

Dispose of packaging and the appliance in an environmentally responsible manner.
This appliance is labelled in accordance with the European Directive 2012/19/EU, which governs waste electrical and electronic equipment (WEEE). The directive provides a framework for the collection and recycling of old appliances, which is valid across the EU.
Caution!
Risk of fire/risk of poisoning/risk of material damage and damage to the appliance
The appliance contains R290, a refrigerant that is environmentally friendly but flammable. If it is not disposed of correctly, this may result in fire or poisoning.
Dispose of the appliance correctly and do not damage the pipes in the refrigerant circuit.

After-sales service
If you cannot rectify the fault yourself by turning the appliance off and then on again, please contact our after-sales service.→ Enclosed after-sales service directory or cover page
We will always find an appropriate solution in order to avoid unnecessary visits by engineers.
Please provide the after-sales service with the product number (E no.) and the production number (FD) of the appliance.
E-Nr. FD
E no. Product number FD Production number
You can find this information, depending on the model*:
On the inside of the door*/open service flap* and at the rear of the appliance.
Trust in the expertise of the manufacturer.
Contact us for assistance. By doing so, you can be sure that the repairs are carried out by trained service engineers using genuine spare parts.


Advice and repair order in the event of faults
GB 0344 892 8979 (Calls charged at local or mobile rate.)
IE 01450 2655 (0.03 € per minute at peak. Off peak 0.0088 € per minute.)
You can find the contact information for all countries in the attached after-sales service directory.