WMDF610 - Washing machine ProAction - Free user manual and instructions
Find the device manual for free WMDF610 ProAction in PDF.


User questions about WMDF610 ProAction
0 question about this device. Answer the ones you know or ask your own.
Ask a new question about this device
Download the instructions for your Washing machine in PDF format for free! Find your manual WMDF610 - ProAction and take your electronic device back in hand. On this page are published all the documents necessary for the use of your device. WMDF610 by ProAction.
USER MANUAL WMDF610 ProAction
Installation & User Instructions – Please keep for future reference
- %'□□□
natural_image
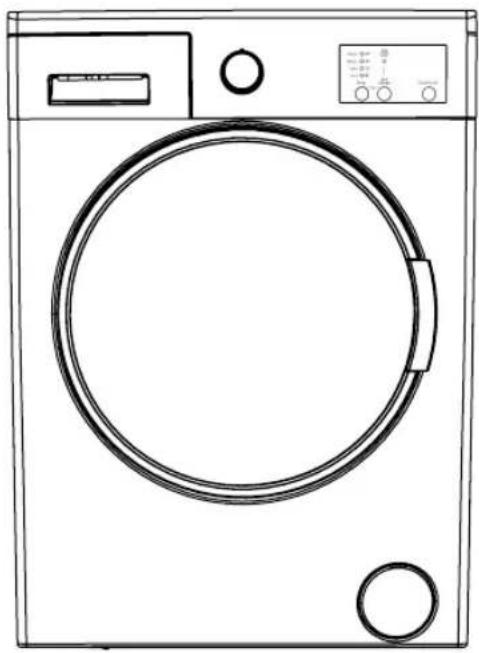
Line drawing of a front-loading washing machine with circular vent and control panel (no text or symbols)- %' □□□
Important – Please read these instructions fully before installing or using
These instructions contain important information which will help you get the best from your appliance and ensure safe and correct installation, use and maintenance.
If you need help or have damaged or missing parts, call the
Customer Helpline:0345 257 7271
Safety Information
Parts
Installation
Unpacking your washing machine 4
Removing the packing bolts 4
Adjusting the feet
Water inlet hose connection 5
Drain hose connection
Electrical connection
Introduction of control panel 7
Detergent drawer
Program selection
Electronic display
Auxiliary functions
Child Lock
Cancelling Programme
Finishing Programme
Program Selection Guide 14
User Instructions
Before first use
Preparing for a wash 15
Error Signals
Care and Maintenance 17
Water inlet filters
Pump filter
Detergent drawer
Siphon plug
Cabinet 18
Drum 19
Trouble Shooting
Technical Specifications 22
Guarantee 23
3
4
text_image
2 4 5 68
10
10
12
13
13
13
15
15
16
17
17
18
18
20
Product codes
- %' 000
Safety Information
Important — Please read these Instructions fully before Installation
Before use During use
- The installation of this appliance is best carried out by 2 people.
- Dispose of all packing carefully and responsibly.
- This appliance is for indoor use only. Only install in a dry indoor environment.
- The appliance MUST be positioned on a firm level base.
- Do not position the appliance where it is exposed to direct sunlight or heat sources as this will age the plastic and rubber components.
- Warning: Ensure all 4 packing bolts have been removed.
- Ensure the appliance is connected directly to a domestic mains water supply.
- Warning: This washing machine MUST only be connected to a cold water supply.
- Ensure all electrical connections are as stated in this document.
- Ensure the appliance is plugged into a separate earthed socket that is easily accessible.
- Ensure the power lead is not trapped under the appliance.
- Do not connect the appliance to the power supply until installation is complete.
- This appliance is for domestic/household use only and is not suitable for commercial use.
-
Check that the water hose joints and connections are secure and there are no leaks. If the hoses leak, do not use until the leaks have been stopped.
-
This appliance is not to be used by children or persons with reduced physical, sensory or mental capabilities, Persons with lack of experience and knowledge.
- Do not use a multiple socket or extension cord.
- Do not use if the power lead is damaged. It must be replaced by the manufacturer, their approved service agent or similarly qualified person.
Customer Helpline: 0345 257 7271.
- Do not insert the plug into the power supply with wet hands.
- Do not touch or use the appliance when barefoot or with wet or damp hands.
- Do not open the detergent drawer during a wash cycle.
- Do not touch the porthole (door) during the washing cycle - it will get hot.
- Never force the machine door open while the machine is running.
- Do not open the door if water is visible through the porthole.
- Do not wash foam rubber or sponge like materials on a hot wash.
- The machine can reach high temperatures while running. Do not touch the drain hose or waste water during draining.
- Do not forget that the packing material of your machine may be hazardous for children.
- Keep your pet away from your machine.
- Do not use flammable detergent, sprays or dry cleaning agents in or near to the appliance.
- Do not remove or insert the plug in the presence of flammable gas.
- The appliance should not be put on a carpet which can block the air ventilation on the bottom side.
- Do not place heavy objects or sources of heat or damp on top of the washing machine.
- Only use detergents which are suitable for automatic washing machines and follow the detergent manufacturers recommendations.
- Do not use this appliance if there are any missing or damaged parts.
- Do not attempt to repair the appliance yourself. Contact the manufacturer, their approved service agent or the Customer Helpline: 0345 257 7271.
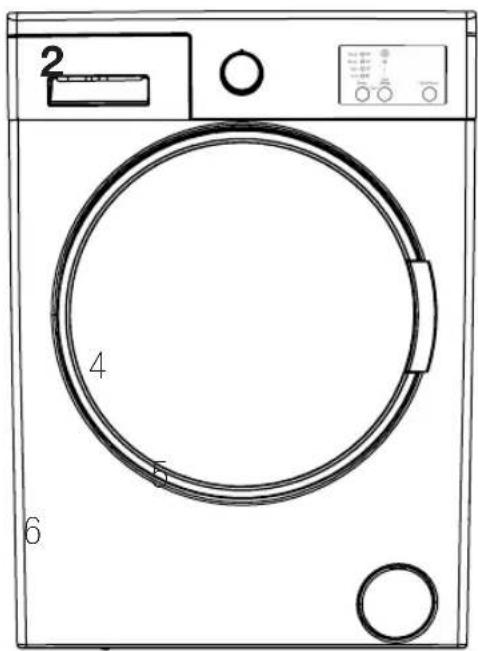
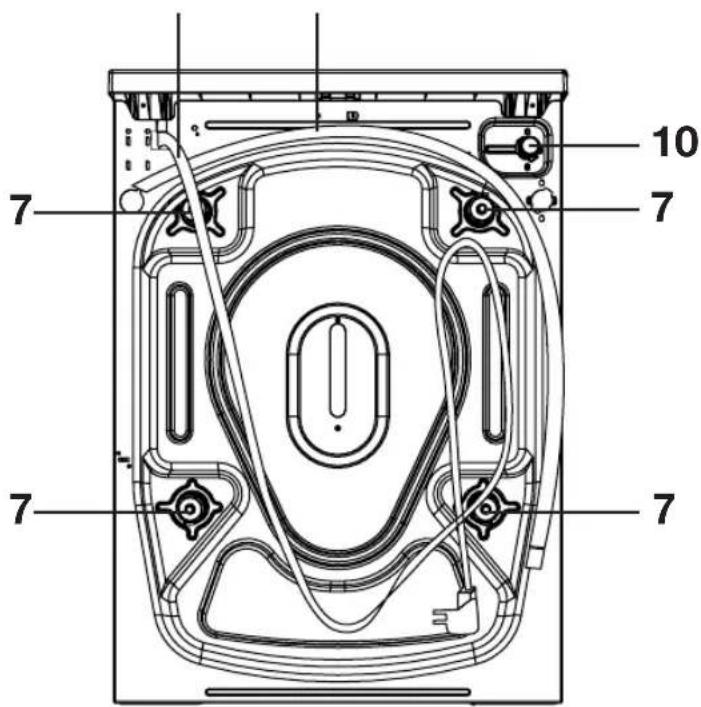
Please familiarise yourself with the parts and accessories listed below

text_image
2 3 8 9 1 4 5 6Front
- Detergent drawer
- Top panel
- Program selection dial
- Start / Pause button
- Door
- Filter
text_image
10 7 7 7 7Back
7.Packing bolt x 4
8.Power lead
9.Drain hose
10. Water inlet
Accessories Included
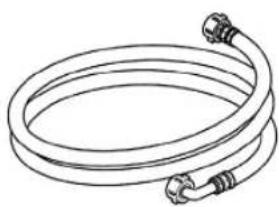
natural_image
Line drawing of a coiled hose with connectors (no text or symbols)Waterinlethosex1

Plastic plug x 4
Unpacking your washing machine
Caution: 2 people are required to unpack the washing machine, it is recommended that gloves are worn.
a: Carefully remove all packaging materials including the foam base, dispose of correctly.
Note: When opened, water droplets may be visible in the drum etc. this is normal as each appliance is factory tested.
Removing the packing bolts
Important: The packing bolts are designed to support the internal components during transit, these MUST be removed before use.
a: Loosen the screws by rotating counterclockwise with a suitable wrench. (1 & 2)
b: Remove the bolts by pulling them. (3)
c: When the transport bolts have been removed, insert the plastic transport screw taps found in the accessories bag into the holes. (4)
Adjusting the feet
a: For your machine to work efficiently with minimum vibration it should be settled on flat, non-slippery, firm ground.
b: You can adjust the balance of your machine by changing the positioning of its feet.
c: First, loosen the plastic adjustment nut. (5)
d: Adjust by rotating the feet upwards or downwards. (6)
e: After the desired position has been reached, tighten the plastic adjustment nut again by rotating it upwards.
Note: Never put cartons, wooden blocks or similar materials under the machine to balance irregularities in the level of the ground.
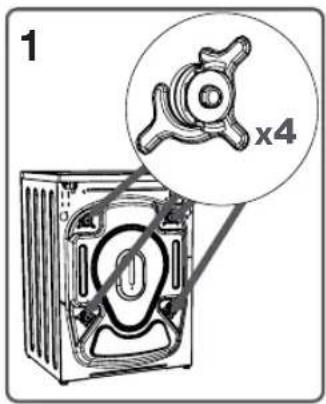
text_image
1 x4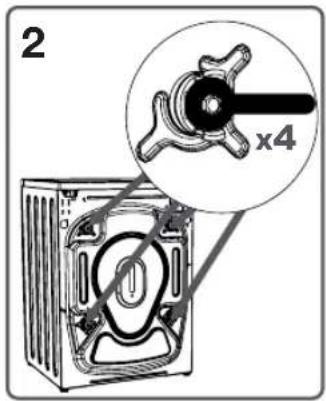
text_image
2 x4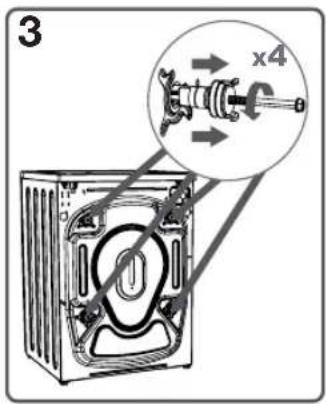
text_image
3 x4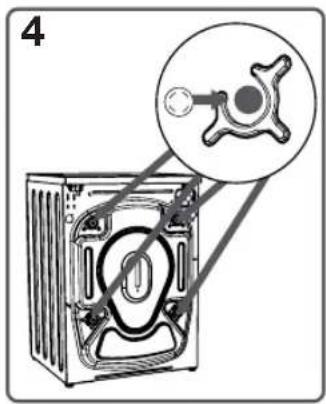
text_image
4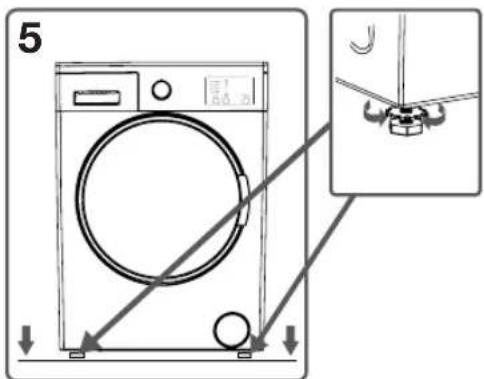
text_image
5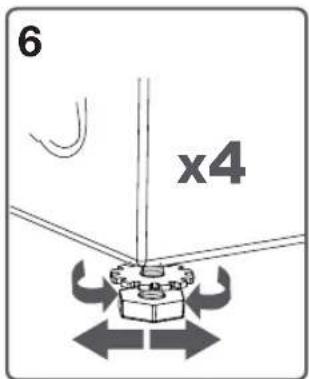
text_image
6 x4Water Inlet hose connections
Important: This washing machine MUST only be connected to a cold water supply.
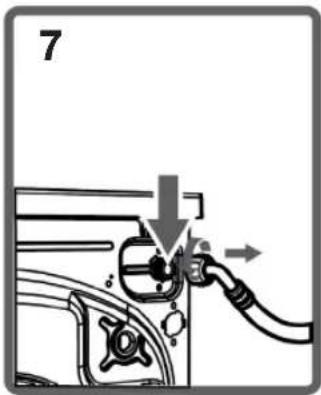
a: Connect the water inlet hose, the angled connection attaches to the water inlet on the back of the washing machine. (7)
b: The straight connection attaches to the water supply valve. (8)
c: Ensure all seals are in place before connecting.
Important: Only tighten the hose connection nut by hand - do not overtighten.
Drain hose connections
Important: The height of the top of the curve in the drain hose MUST be between 60 - 100cm from the floor. (9)
Important: The end of the water drain hose may be fitted directly to the waste water outlet hole or a special apparatus mounted on the outlet bracket of the wash-stand.
Important: Never attempt to extend the water drain hose by adding extra parts.
text_image
7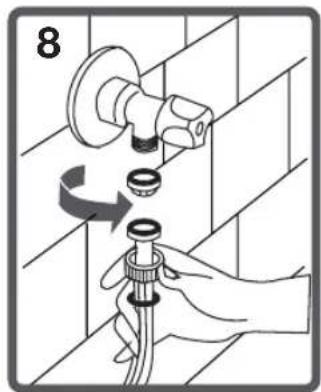
text_image
8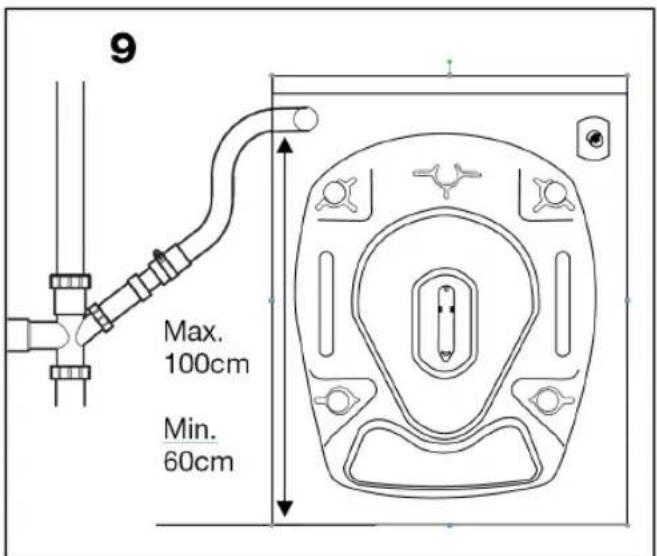
text_image
9 Max. 100cm Min. 60cmElectrical connections

Any electrical work that is required to install this washing machine MUST be carried out by a qualified electrician.

Warning: THIS APPLIANCE MUST BE EARTHED
Before making any electrical connections, ensure that:
- Ensure the power socket is suitable for the maximum power of the washing machine (fuses in the power circuit must be 13 amp).
- The supply voltage should be the same as that indicated in the technical specifications (page 17) and the appliance rating plate (located where shown).
- The appliance should be earthed and in compliance with the applicable law.
- Additional earth cables should not be necessary if the plug and socket are earthed. If necessary, an additional earth cable should be attached to the earth terminal on the back of the washing machine and earthed.
- When installed, the power socket must be within easy reach.
- The use of adapters, multiple connectors or extension cables are not recommended.
- The appliance must be connected to a 220-240 volt 50 cycle AC supply by means of a three pin socket, suitably earthed and protected by a 13 amp fuse.
- Should the fuse need to be replaced, a 13 amp fuse approved to BS1363/A must be used.
- The plug contains a removable fuse cover that must be refitted when the fuse is replaced. If the fuse cover is lost or damaged, the plug must not be used until a replacement cover has been fitted or the plug is replaced.
- A damaged plug should be cut off as close to the plug body as possible, the fuse should be removed and the plug disposed of safely.
Plug replacement (UK & Ireland only)
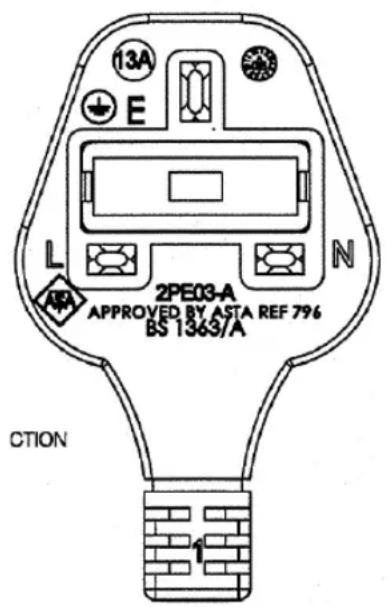
Should you need to replace the plug; the wires in the power cable are coloured in the following way:
Blue – Neutral 'N'
Brown – Live 'L'
Green & Yellow – Earth 'E'
As the colours of the wires in the power cable may not correspond with the coloured markings identifying the terminals in your plug, and proceed as follows:
The green & yellow wire must be connected to the terminal in the plug that is marked with the letter E or by the earth symbol.
The blue wire must be connected to the terminal that is marked with the letter N.
The brown wire must be connected to the terminal that is marked with the letter L.
If the power lead is damaged, it must be replaced by a qualified electrician.
text_image
13A E L N 2PE03-A APPROVED BY ASTA REF 796 BS 1363/A CTIONIntroduction of control panel
text_image
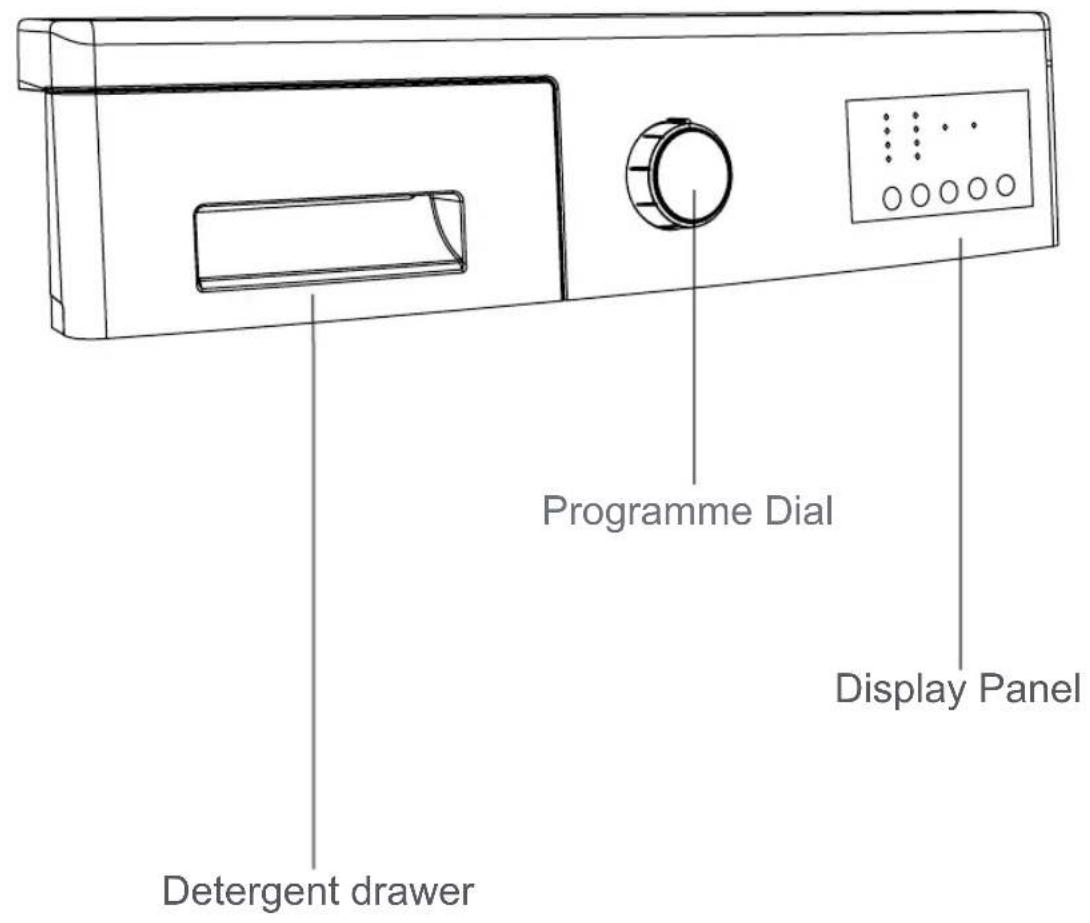
Programme Dial Display Panel Detergent drawerIntroduction of control panel
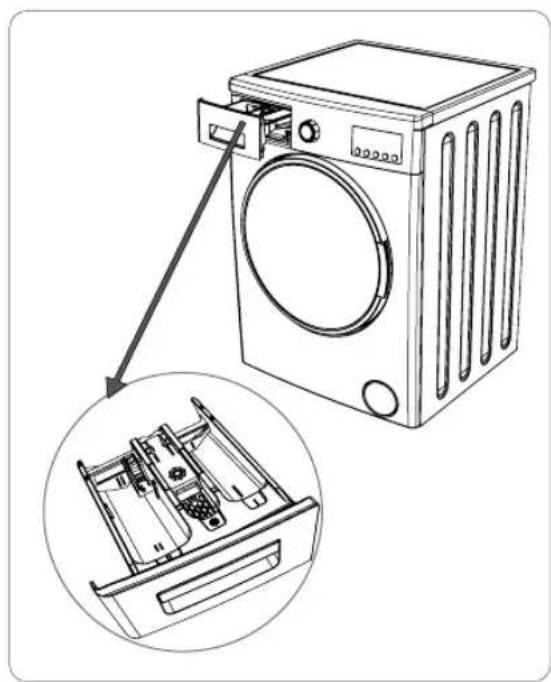
Detergent drawer
You can use the liquid level determination plate when you want to wash your laundry with liquid detergent. You can use your liquid detergents in all programs without prewashing. Place the liquid detergent apparatus in the second compartment (which is available inside the machine) of the detergent drawer (*) and set the detergent amount. (Use the recommended amount of liquid detergent by detergent producers). Do not exceed the MAX level, use only for liquid detergent, do not use this apparatus for powder detergent and take it out.)
natural_image
Line drawing of a washing machine with a close-up inset showing internal components (no text or symbols)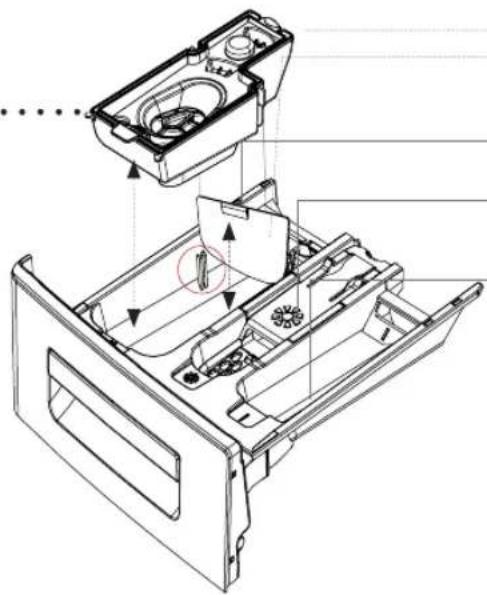
natural_image
Technical line drawing of a mechanical device with internal components and directional arrows (no text or symbols)Liquid Detergent Apparatus
Main wash detergent compartment
Softener
Compartment
Pre-wash detergent compartment
Introduction of control panel
Detergent drawer
Sections
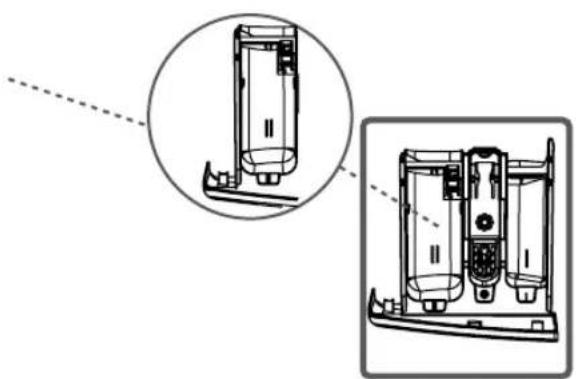
Main wash detergent compartment:
In this compartment, only materials like detergent (liquid or powder), lime preventer and such can be used. You can find the liquid detergent apparatus inside your machine at first installation. (*)
natural_image
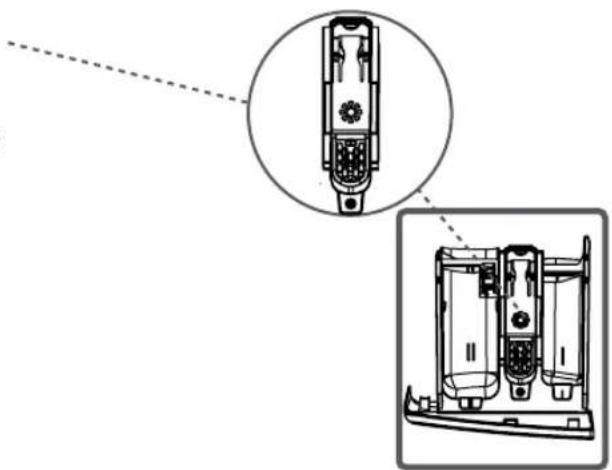
Technical line drawing of a device with two views: top shows internal components, bottom shows external devices (no text or symbols)Fabric conditioner, starch, detergent compartment:
You can use softener for your laundry (recommended amount and type by the producer is recommended). Sometimes the fabric conditioners you use for your laundry may remain in this compartment. The reason for this is that the conditioner is not viscous. To prevent this situation, other liquid softeners are recommended to be used or the softener could be thinned and then used.
natural_image
Technical line drawing of a device with internal components and a magnified inset showing internal structure (no text or symbols)Pre-wash detergent compartment:
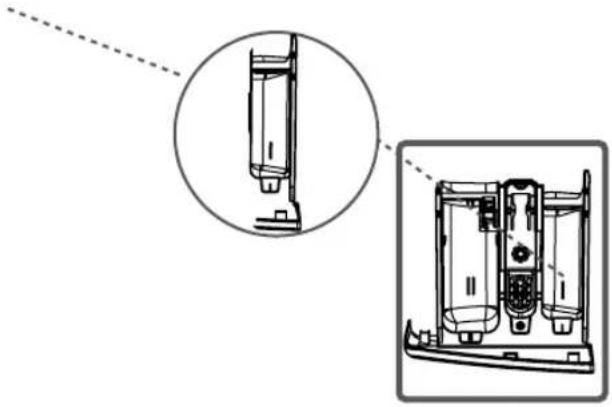
This compartment must only be used when the pre-wash feature is selected. Pre-wash feature is recommended for very dirty laundry.
natural_image
Technical line drawing of a mechanical device with internal components and an inset view (no text or symbols)(*) Machinery specifications may vary depending on the product purchased.
Introduction of control panel
Programme selection
Electronic display
Programme selection dial
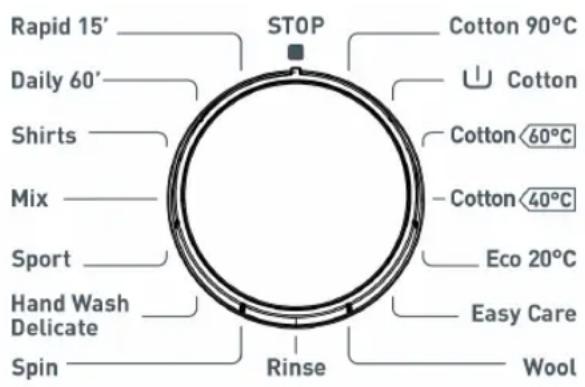
With the program knob, you can select the program with which you desire to wash your clothes. You can select programs by turning the program knob in both directions. You must be careful that the adjustment sign of the program knob is exactly on the program you want to select. If you move the program knob to 0 (off) position, while your machine is running, your program will be cancelled.
text_image
Rapid 15' Daily 60' Shirts Mix Sport Hand Wash Delicate Spin STOP Cotton 90°C Cotton Cotton 60°C Cotton 40°C Eco 20°C Easy Care Wool RinseNote: If you want to activate an additional function after the machine has started washing, press the additional function button that you want to use. If the additional function selected can still be used at that program stage, the LED of the function button will be turned on and the function will be added to the program. If the LED is not turned on, the function selected is not possible at that stage of the current program and will not be activated.
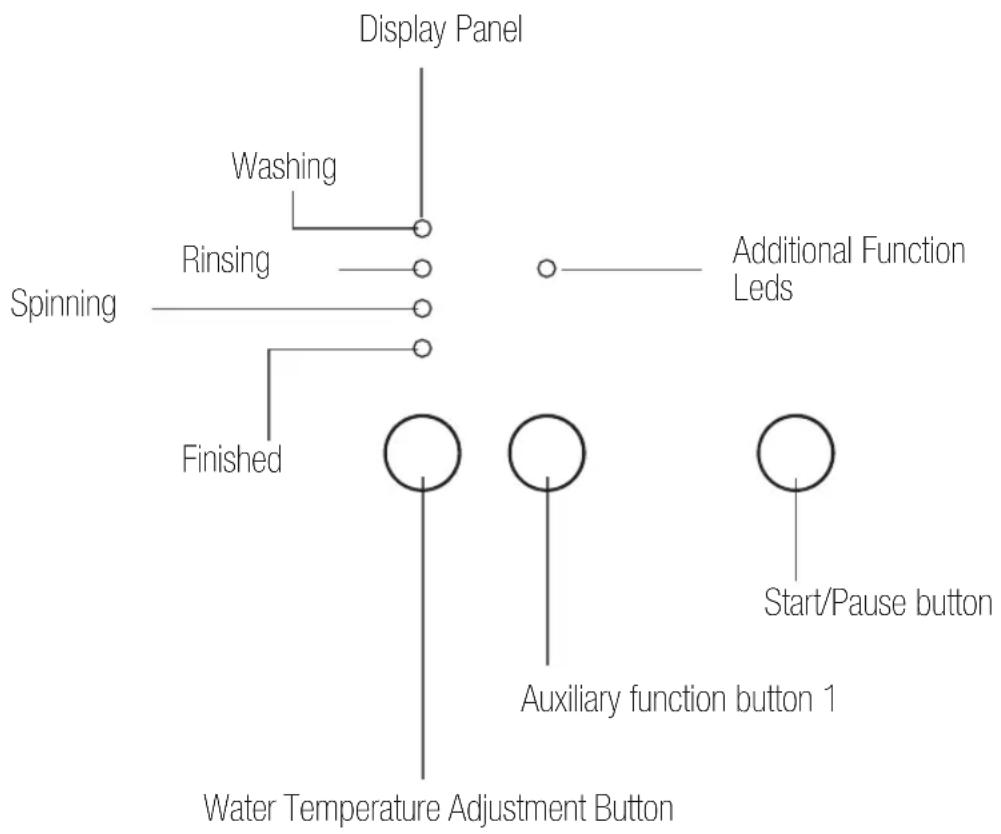
From the function leds of your machine, the washing water temperature of your machine, the auxiliary functions you have selected and the stage of the programme you are running on your machine. (pre wash / wash state, rinsing stage, spinning stage).
Furthermore, electronic display will warn you by means of led combinations that will turn on its display when a fault occurs on your machine and notify you of the completion of the washing programme by revealing expression of “Finished” on the display as soon as the washing programme you have selected has finished as well.
Introduction of control panel
Electronic display
flowchart
graph TD
    A["Display Panel"] --> B["Washing"]
    B --> C["Rinsing"]
    C --> D["Spinning"]
    D --> E["Finished"]
    E --> F["Water Temperature Adjustment Button"]
    G["Additional Function Leds"] --> H["Auxiliary function button 1"]
    I["Start/Pause button"] --> J["Water Temperature Adjustment Button"]
Introduction of control panel
Auxiliary functions
1- Temperature selection
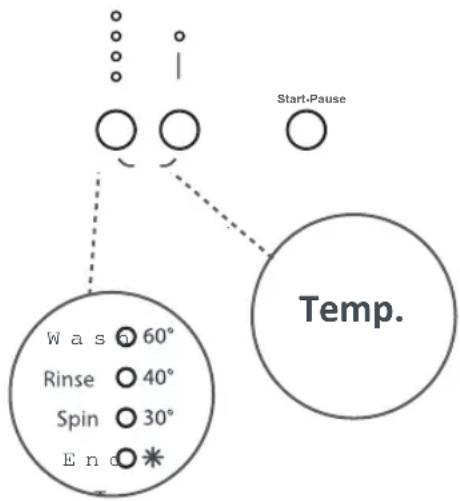
You can select the washing water temperature with the washing water temperature adjustment button.
When you select a new programme, there won't be any display on the temperature adjustment leds on the display panel. When you press the temperature adjustment button, the max. temperature value of the programme you have selected shall appear on the led display panel.
You can gradually decrease the washing water temperature between the maximum washing water temperature of the selected programme and cold washing *selections by pressing temperature adjustment button.
If you have missed the washing water temperature you wanted, you can return to the intended temperature by continuously pressing the washing water temperature adjustment button.
NOTE: When 90° programme is selected, the max. temperature value of the selected programme is not displayed on the display panel. When the temperature value is decreased to 60°, 40°, 30°, * (cold washing) temperature levels by pressing the temperature adjustment button, the decreased temperature value is displayed on the display panel.
2- Anti- Allergic
In the programmes where this auxiliary function is active, you may have your machine perform an Extra rinse operation on your laundries prior to latest rinsing operation.
You may make the programme active by pressing the anti-allergic auxiliary function button when the led light of the 📂 symbol turns on.
text_image
Start-Pause Temp. Was 60° Rinse 40° Spin 30° End *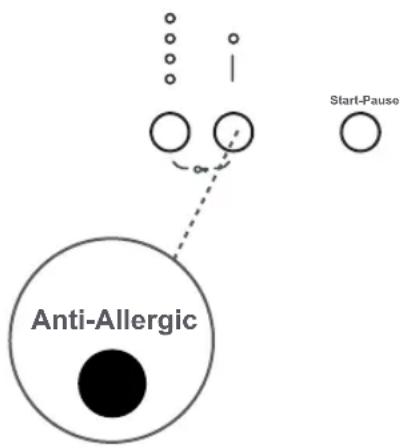
text_image
Anti-Allergic Start-PauseIntroduction of control panel
Child Lock
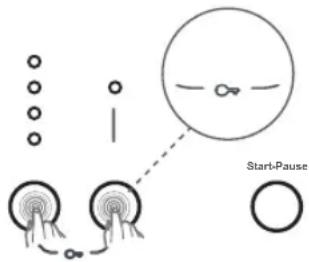
To avoid programme flow from being affected if programme buttons are pressed or programme button is turned when performing a washing operation in your machine, a child lock is available. Child lock will be activated when both auxiliary functions 3 and 4 are pressed at the same time for more than 3 seconds. You can see the auxiliary function leds on the display when activated.
text_image
Start-PauseIf any button while child lock is active, the Additional Function Leds will blink on the display.
If while the child lock is engaged and any programme is running, the programme knob is switched to the CANCEL position and another programme is selected, the programme previously selected continues from where it left.
To deactivate the child lock, you should press on the same buttons for more than 3 seconds. When the child lock is deactivated, the Additional Function Leds will blink on the display.
Cancelling Programme
If you want to cancel any programme running:
1 - Switch the programme knob to the "CANCEL" position.
2- Your machine will stop the washing operation and the programme will be cancelled.
3- To get rid of the water accumulated in the machine switch the programme knob to any programme.
4- Your machine will perform the necessary discharge operation and cancel the programme.
5- You can run your machine by selecting a new programme.
Finishing Programme
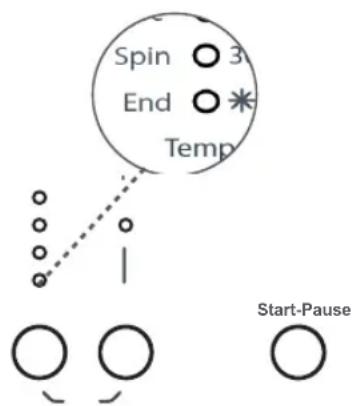
Your machine will stop by itself as soon as the programme you have selected finishes.
- "End" led will blink on the display panel.
text_image
Spin 3 End * Temp Start-Pause- You can open the machine's door and remove the laundry.
- Leave the door of your machine open to allow the inner part of your machine to dry after removing your laundries.
- Switch the programme knob to CANCEL position.
- Unplug your machine.
- Turn the water tap off.
If you have damaged or missing parts Programme Selection Guide
| Programme | Washing temperature (°C) | Prog. Time (mins) | Deter-gent com-part. | Max load capacity (kg) | Type of laundry |
| Cotton 90° | 90° 179 | 2 6 Very dirty, cotton and flax textiles. (Underwears, linen, tablecloth, towel (maximum 3,0 kg), bedclothes, etc. | |||
| Pre-wash cotton | 60° | 164 | 1&2 | 6 | Dirty cotton and flax textiles. (Underwears, linen, tablecloth, towel (maximum 3,0 kg), bedclothes, etc. |
| Cotton eco | 60° 200 | 2 6 Dirty cotton and flax textiles. (Underwear, linen, tablecloth, towel (maximum 3,0 kg), bedclothes, etc. | |||
| Cotton | 40° 190 | 2 6 Dirty cotton and flax textiles. (Underwear, linen, tablecloth, towel (maximum 3,0 kg), bedclothes, etc. | |||
| Eco | 20° 96 | 2 3 Less dirty, cotton and linen textiles. (Underwear, bedsheet, tablecloth, towel (max. 2 kg) bedcloth, etc. | |||
| Easy care | 40° 89 | 2 3 Very dirty or synthetic-mixed textiles. (Nylon socks, shirts, blouses, synthetic-including trousers etc.) | |||
| Wool | 30° 39 | 2 2 Woollen clothing with machine wash labels. | |||
| Rinse | - 36 - 6 | If you want to additionally rinse your laundry upon completion of washing operation, you may use this programme for any type of laundry. | |||
| Spin | - 15 - 6 | If you want to additionally wring your laundry upon completion of washing operation, you may use this programme for any type of laundry. | |||
| Hand wash/ delicate | 30° 90 | 2 2 Laundry recommended for hand wash or sensitive laundry. | |||
| Sports wear | 30° 80 | 2 3 Sportswear | |||
| Mixed | 30° 79 | 2 3 Dirty cotton, synthetics, colour and flax textiles can be washed together. | |||
| Blouses / shirts | 60° 105 | 2 3 Dirty cotton, synthetic and synthetic-mixed shirts and blouses can be washed together. | |||
| Daily 60 min. | 60° 60 | 2 3 You can wash your dirty cotton, colour and flax textiles at 60°C in 60 minutes. | |||
| Rapid 15 min. | 30° 15 | 2 You can wash your slightly stained, cotton, coloured and flax textile within only 15 minutes. | |||
(*) You can use softeners in all programs (except spinning and draining programs) optionally. When you choose the quantity of the softener, comply with the warning of the softener producer. Fill your softener in the ⚙softener) compartment of the detergent drawer.
Note: Durations vary according to wash load (weight and type), tap water, ambient temperature and selected extra functions.
Before first use
a: Plug in the machine.
b: Open the water tap.
c: There may be water left inside your machine after factory tests and trials. It is recommended that the first wash cycle be carried out with no laundry, to remove this water; pour half a measuring cup of normal laundry detergent into compartment 2 and select cotton program at 90°C.
Preparing for a wash
Laundry
- Sort your clothes according to their types (cotton, synthetic, delicate, woollen, etc.), washing temperatures and level of dirtiness.
- Never wash your white and coloured clothes together.
- Since your new coloured clothes may release dye on the first wash, wash them separately.
- Remove any small objects from the pockets of your clothes.
- Ensure that all zips and buttons on your clothes are fastened.
- Remove the plastic or metal hooks of curtains or place them inside a washing bag and tie.
- Turn clothes such as trousers, knitted fabrics, t-shirts and sweat shirts inside out.
- Wash your small clothes like socks and handkerchiefs in a washing bag.
Placing clothes into the machine
- Open the door of your machine.
- Put your clothes into your machine in a well-balanced manner.
- Place your clothes loosely in the machine.
- When you shut the door of your machine, be careful that no clothing is jammed between the cover and the seals.
- Shut the door of your machine securely, otherwise your machine will not start the washing process.
Detergent
The quantity of detergent to be loaded into the machine will depend on the following criteria:
- Your detergent consumption will change depending on how dirty the clothes are. For your
slightly dirty clothes, do not pre-wash and put a small amount of detergent in compartment 2 of the detergent drawer.
- For your excessively dirty clothes, select a program with pre-washing; fill 14 portion of the detergent in compartment 1 in the detergent drawer and the remaining portion in compartment 2.
- Use detergents developed especially for automatic washing machines. The quantities that will be used for your clothes are written on the packaging of the detergents.
- As the hardness of your water increases, the amount of the detergent to be consumed will also increase.
- As the amount of clothing increases, the amount of the detergent that will need to be used will also increase.
- Fill your softener in the softener compartment in your detergent drawer. Do not exceed the MAX level. Otherwise, the softener will diffuse in the washing water via the siphon.
- Concentrated softeners with high viscosity should be diluted with water before loading in the drawer. This is because high-viscosity softeners obstruct the siphon and prevent the flow of the softener.
- You can use liquid detergents in all programs without pre-washing. For this, fit the liquid detergent level plate in the second compartment of the detergent drawer and arrange the amount of liquid detergent according to the levels on this plate.
Your machine is equipped with systems which will take the necessary precautions and warn you in case of any. IMPORTANT: IT CAN TAKE UPTO 10 MINUTES FOR ERROR TO REGISTER.
| Failure code Probable failure Process to be followed | ||
EC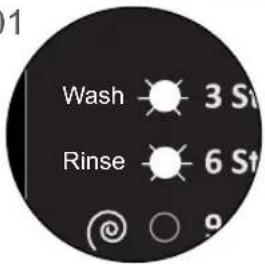 | The door is not shut properly. Shut the door properly so that you hear the click. If the problem persists, turn off the machine unplug and contact the nearest authorised service agent immediately. | |
EC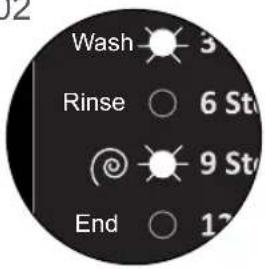 | The water level in your machine is below heater. The pressure of your water supply may be low or water supply may be blocked. | Turn on the tap fully. The water supply may be interrupted. If the problem persists, your machine will automatically stop after a while.Unplug your machine, turn off the tap and contact the nearest authorised service agent immediately. |
EC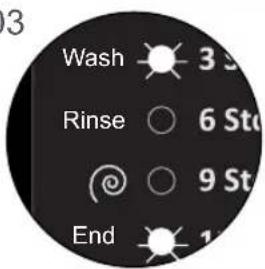 | The pump has failed or the pump filter is obstructed. | Clean the pump filter.If the problem persists and contact the nearest authorised service agent immediately. (*) |
EC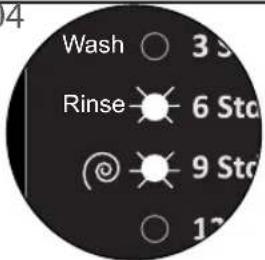 | Your machine has excessive amount of water. | Your machine will discharge water by itself. Pursuant to discharging operation, turn off your machine and unplug it. Turn off your tap and contact the nearest authorised service. |
(*) See the section regarding the care and maintenance of your machine.

Before cleaning your washing machine.
a: Unplug your machine from the mains power supply.
b: Close the water tap.
Water inlet filters
On the tap part of your machine's water inlet hose and at the ends of water inlet valves, there are filters to prevent entrance of the dirt and foreign materials in the water to the machine. If the machine is unable to receive sufficient water even though your water tap is fully opened, filters should be cleaned.
- Remove the water inlet hose.
- Remove the filters found on the water inlet valves by using a pincer and wash thoroughly with a brush. (1)
- Clean the filters of the water inlet hoses located on the tap side by removing manually together with the seal. (2)
• After you clean the filters, you can fit them the same way as you have removed them.
Pump filter
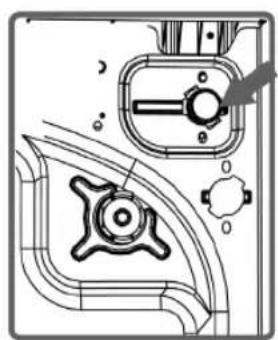
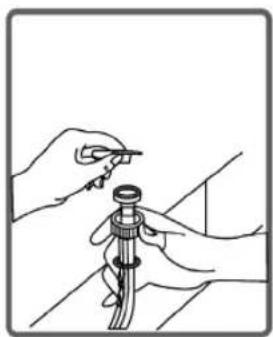
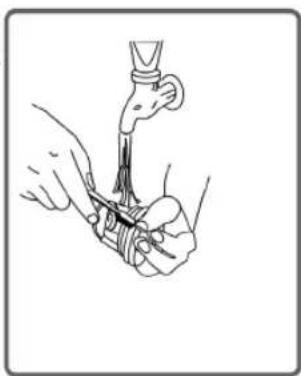
The pump filter system elongates the life of your pump, which is used to drain the dirty water. It prevents dirt entering the pump. Cleaning of your pump filter every 2-3 months is recommended. To clean your pump filter:
- To open the pump cover, you can use the powder detergent spade (*) or liquid detergent level plate coming out of your machine. (1-A & 2-A)
- Before opening the filter cover, place a cup in front of the filter cover to prevent flow of the remaining water in the machine. - Clean the foreign materials in the filter with a brush and flush with clean water. (3-A) - Check for the rotation of the pump manually. - After cleaning the filter, fit the filter cover and tighten it by rotating it in clockwise direction.
(4-A)
- Remove the foreign materials from the filter.
- Do not forget that if you do not fit the filter cover properly, it will leak water.
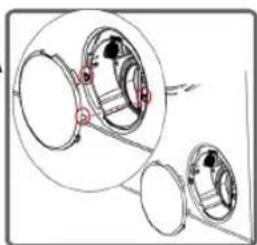
- While closing the pump cover, ensure that the parts on the inner side of the cover match the holes on the front panel side. (5-A)
- You can reattach the pump cover in the reverse order that you removed it.

Danger of being scalded! The water inside the pump maybe hot- wait for it to cool.
(*) Machinery specifications may vary depending on the product purchased.
1
natural_image
Technical line drawing of a mechanical component with no visible text or symbols2
natural_image
Illustration of hands using a tool to adjust or install a mechanical component (no text or symbols visible)1A
natural_image
Diagram showing a mechanical component with a circular arrow and dotted line indicating direction (no text or symbols)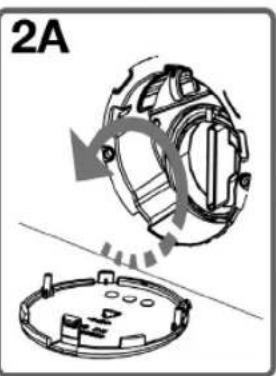
natural_image
Mechanical assembly diagram showing a gear-like component being processed into a circular base (no text or symbols)3A
natural_image
Illustration of a hand holding a small object with a tool, possibly a tool or device, against a plain background (no text or symbols)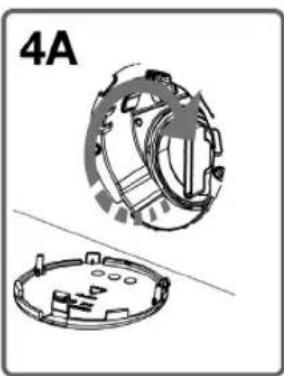
natural_image
Technical illustration of a mechanical component with two views: top shows a circular assembly with internal gears, bottom shows a circular housing with internal components (no text or symbols)5A
natural_image
Diagram of mechanical components with highlighted parts, showing circular and linear assembly (no text or symbols)Detergent drawer
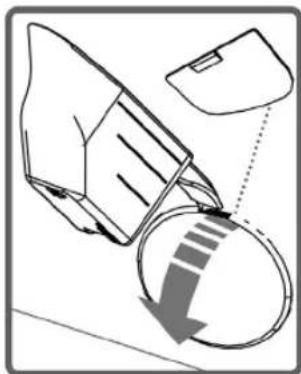
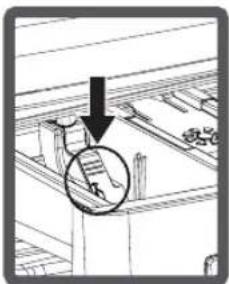
Detergents may form sediments in your detergent drawer or in the housing of the detergent drawer over time. To clean the sediment, pull out the detergent drawer from time to time. To pull out the detergent drawer:
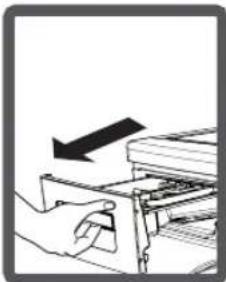
- Pull the detergent drawer to the end. (1)
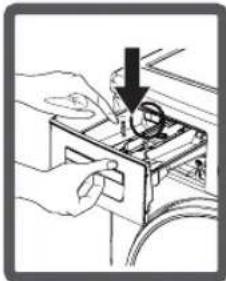
- Keep on pulling by depressing on the section shown below in the detergent drawer and keep pulling and then remove the detergent drawer. (2&3)
- Clean the detergent drawer with a soft brush like an old toothbrush and flush with clean water
- Collect residues in the housing of the detergent drawer without dropping them inside the machine.
- Assemble the detergent drawer after drying it using a towel or dry cloth.
- Do not wash your detergent drawer in a dishwasher!
1
natural_image
Illustration of a hand inserting a file into a folder with an arrow indicating direction (no text or symbols)2
natural_image
Illustration of hands operating a device with a magnifying glass and arrow indicating action (no text or symbols)3
natural_image
Diagram showing a document being inserted into a library or archive (no text or symbols visible)Liquid Detergent Apparatus (\*)
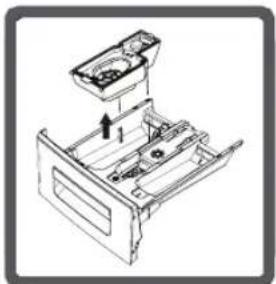
Take out the liquid detergent level apparatus for cleaning and maintenance purposes as shown in the picture and clean away detergent residues. Put the apparatus back into its place. Make sure no residues are left inside.
(*) Machinery specifications may vary depending on the product purchased.
Siphon plug
Pull out the detergent drawer. Remove the siphon plug and clean any residues away. Fit the cleaned siphon plug in its location. Check it is placed properly.(3)
Cabinet
Clean the exterior surface of the cabinet of your machine with lukewarm water and a cleaning substance that will not damage the cabinet. After rinsing with clean water, wipe it with a soft and dry cloth.
Note: To get the best out of your machine. We recommend that you periodically run a wash cycle with limescale remover, especially in hard water areas.
Note: After each wash leave the door of the machine open to help air the drawer and reduce any mould build up;
natural_image
Technical line drawing of a mechanical device with an upward arrow indicating motion (no text or symbols)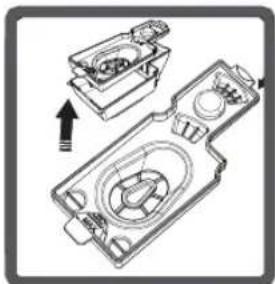
natural_image
Technical line drawing of a mechanical device with internal components and an arrow indicating assembly direction (no text or symbols)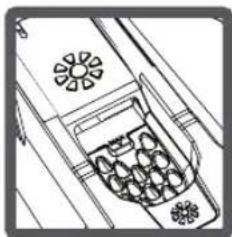
natural_image
Line drawing of a refrigerator interior with fans and a basket (no text or symbols)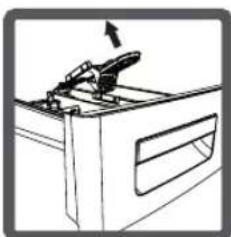
natural_image
Line drawing of a mechanical device with a lever and handle (no text or symbols)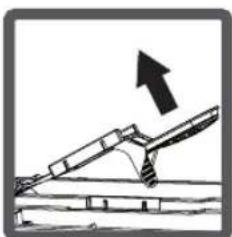
natural_image
Diagram of a mechanical lever system with an upward arrow indicating motion (no text or symbols present)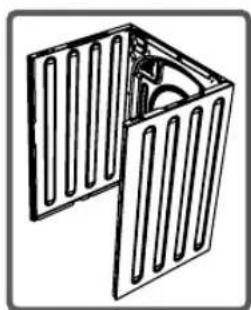
natural_image
Technical line drawing of a structural frame with vertical slats and a central circular component (no text or symbols)Note: Wipe the door seal ideally after each wash;
Note: Undertake a maintenance wash every 4-6 weeks with the drum empty. This wash should be undertaken with lime scale and detergent remover;
Drum
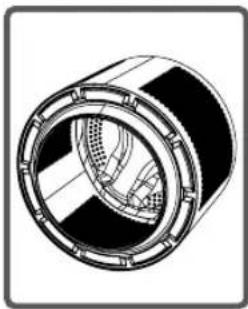
Do not leave metallic objects such as needles, paper clips, coins etc. in your machine. These objects lead to stains in the drum. To clean such rust stains, use a non-chlorine cleaning agent and follow the instructions of manufacturers of the cleaning agent. Never use wire wool or similar hard objects for cleaning rust stains.
natural_image
Technical illustration of a cylindrical mechanical component with internal channels and mounting flanges (no text or symbols)All repairs to the machine must be carried out by an authorised repair agent. When a repair is required or you are unable to eliminate the failure with the help of the information below:
a: Unplug the machine.
b: Close the water tap.
c: Contact the nearest authorised repair agent.
FAILURE PROBABLE CAUSE METHODS OF
ELIMINATION
| Your machine does not operate. | It is unplugged. Insert the plug into the socket. | |
| Your fuse is defective. Change your fuse. | ||
| The electric power is off. Check the electric power. | ||
| Start/pause button has not been pressed. | Press the start/pause button. | |
| The programme dial is in the 0 (off) position. | Turn the programme dial to the desired position. | |
| The door is not shut properly. Shut the door properly. You should hear the click. | ||
| Your machine does not receive water. | Water tap is closed. Open water tap. | |
| The water inlet hose may be bent. Check the water inlet hose. | ||
| The water inlet hose is obstructed. Clean the filters of water inlet hose. (*) | ||
| The valve inlet filter is obstructed. Clean the valve inlet filters. (*) | ||
| The door is not shut properly. Shut the door properly. You should hear the click. | ||
| Your machine is not draining water. | The drain hose is obstructed or bent. Check the drain hose. | |
| The pump filter is obstructed. Clean the pump filter. (*) | ||
| The clothes are not placed inside the machine in a well-balanced manner. | Spread the clothes inside the machine in an orderly and well-balanced manner. | |
| Your machine is vibrating. | The feet of your machine are not adjusted. | Adjust the feet. (**) |
| Transportation screws are not removed. | Remove transportation screws. (**) | |
| Your machine is vibrating. | There are only few clothes in the device. | It does not prevent operation of the machine. |
| Excessive amount of clothes are filled in the machine or the clothes are not placed in a well-balanced manner. | Do not exceed the recommended quantity of clothes and spread your clothes in the machine in a well-balanced manner. | |
| Your machine is touching a rigid object. | Ensure machine is not in contact with hard objects. | |
(*) See the section concerning the care and maintenance of your machine.
(**) See the section concerning installation of your machine.
FAILURE PROBABLE CAUSE METHODS OF
| ELIMINATION | ||
| Excessive foam in the detergent drawer. | Too much detergent has been used. | Press the start/pause button.In order to stop the foam,dilute one table-spoon of softener in half liter of water and pour it in the detergent drawer.Press the start/pause button after 5-10 minutes.Arrange the amount of the detergent properly in the next washing process. |
| Wrong detergent has been used. Use only the detergents produced for full automatic machines. | ||
| The washing result is poor. | Your laundry is too dirty for the programme you have selected. | Select a suitable programme. (see page 8) |
| The amount of detergent used is not sufficient. | Use more detergent. | |
| The washing result is not good. | Clothes exceeding the maximum capacity have been loaded in the machine. | Put the clothes in your machine in a manner not to exceed its maximum capacity. |
| Your water may be hard. Use the amount of detergent specified by the detergent manufacturer. | ||
| Distribution of the clothes in your machine is not well-balanced. | Spread the clothes inside the machine in an orderly and well-balanced manner . | |
| The water is drained from the machine as soon as it is filled. | The end of the water drain hose is in a position too low according to the machine. | Position the water drain at an appropriate height.(**) |
| No water is seen in the drum during washing. | No failure. The water is in the lower part of the drum. | - |
| There are residues of detergent on the clothes. | Some detergents contain ingredients which are not soluble in water and which may form white stains on your clothes. | By adjusting your machine, carry out an additional rinse, or eliminate the stains after drying, with a brush. |
| There are grey stains on the clothes. | These stains may be caused by oil,cream or ointment . | In the next washing operation, use the maximum detergent amount declared by the detergent producer. |
| The spinning process is not done or starts with delay . | No failure. The unbalanced load control may work in that way. | The unbalanced load control system will try to distribute your clothes in a homogenous manner. After your clothes are distributed, passage to spinning process will be realized. In the next washing process,place your clothes into the machine in a well-balanced manner. |
(*) See the section concerning the care and maintenance of your machine.
(**) See the section concerning installation of your machine.
| Model / Item | WMDF610 |
| Power supply | (220-240) V ~/50Hz |
| Max working current | 10 amp |
| Water pressure | Maximum : 1MpaMinumum : 0.01 MPa |
| Maximum power | 2100 watt |
| Maximum washing load (dry) | 6 kg |
| Spinning speed | 1000 rpm |
| Washing pro-grammes | 15 |
| Size | 845 x 597 x 497 |
| Net weight | 57 kg |
Disposal Information

natural_image
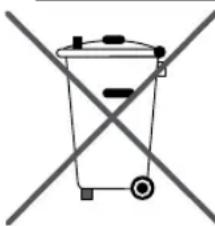
Simple line drawing of a trash bin with crossed diagonal lines (no text or symbols)The symbol on the product or its packaging indicates that this product may not be treated as household waste. Instead it should be handed over to the applicable collection point for the recycling of electrical and electronic equipment. By ensuring this product is disposed of correctly, you will help prevent potential negative consequences for the environment and human health, which could otherwise be caused by inappropriate waste handling of this product. For more detailed information about recycling this product, please contact your local council office, your household waste disposal service or the shop where the product was purchased.
ProAction
Product Guarantee
This product is guaranteed against manufacturing defects for a period of

text_image
1Year
This product is guaranteed for twelve months from the date of original purchase. Any defect that arises due to faulty materials or workmanship will either be replaced, refunded or repaired free of charge where possible during this period by the dealer from whom you purchased the unit.
The guarantee is subject to the following provisions:
- The guarantee does not cover accidental damage, misuse, cabinet parts, knobs or consumable items.
- The product must be correctly installed and operated in accordance with the instructions contained in this manual.
- It must be used solely for domestic purpose.
- The guarantee will be rendered invalid if the product is re-sold or has been damaged by inexpert repair.
- Specifications are subject to change without notice.
- The manufacturer disclaims any liability for the incidental or consequential damages.
- The guarantee is in addition to, and does not diminish your statutory or legal rights.
- In the event of a problem with the product with in the guarantee period call the Customer Helpline: 0345 257 7271
Guarantor: Argos Ltd 489 - 499 Avebury Boulevard Central Milton Keynes MK9 2NW