A799-780E-TI00 - Printer Cognitive TPG - Free user manual and instructions
Find the device manual for free A799-780E-TI00 Cognitive TPG in PDF.


| Product Type | Two-color thermal receipt printer |
| Model | A799-780E-TI00 |
| Print Technology | Thermal (no ribbon or cartridge) |
| Print Speed (Monochrome) | Up to 250 mm/s |
| Print Resolution | 8 dots/mm |
| Paper Width (Supported) | 58 mm, 60 mm, 80 mm, 82.5 mm |
| Paper Roll Diameter (Max) | 90 mm |
| Paper Length (Nominal) | 322 ft (98 m) |
| Core Diameter | 22 mm outside, 11.5 mm inside |
| Paper Sensing | Paper low (adjustable) and paper out |
| Communication Interfaces | USB, RS-232C (9-pin), Ethernet, Powered USB (varies by config) |
| Memory | 4 MB Flash (upgradable to 8 MB) |
| Resident Code Pages | 858, 860, 862, 863, 865, 866, 874, 1251, 1252, 1255, KZ_1048 |
| Integrated Bar Codes | Code 39, Code 128, UPC-A, UPC-E, EAN, PDF-417, QR code, GS1 Databar |
| Color Printing | Two-color (black + second color) |
| Paper Cutter | Standard (partial cut) |
| Cash Drawer Connection | 1 or 2 cash drawers (Y-cable required for two) |
| Power Supply | 24 Vdc, 2.5 A (60W), UL listed Class 2 |
| Power Cord Options | US, UK, International |
| Human Interface | Paper feed button, green LED, audible beep |
| Certifications | FCC Class B, IC, VCCI, CE |
| Optional Accessories | Wall mount kit, spill guard, additional memory |
| Software Utilities | LogoEZ colorization utility, Receiptware marketing software |
| Operating Temperature Range | 25°C to 50°C (ambient) |
Frequently Asked Questions - A799-780E-TI00 Cognitive TPG
User questions about A799-780E-TI00 Cognitive TPG
0 question about this device. Answer the ones you know or ask your own.
Ask a new question about this device
Download the instructions for your Printer in PDF format for free! Find your manual A799-780E-TI00 - Cognitive TPG and take your electronic device back in hand. On this page are published all the documents necessary for the use of your device. A799-780E-TI00 by Cognitive TPG.
USER MANUAL A799-780E-TI00 Cognitive TPG
Federal Communications Commission (FCC) Radio Frequency Interference Statement Warning
Changes or modifications to this unit not expressly approved by the party responsible for compliance could void the user's authority to operate the equipment.
Note
This equipment has been tested and found to comply with the limits for a Class B digital device, pursuant to Part 15 of the FCC Rules. These limits are designed to provide reasonable protection against harmful interference when the equipment is operated in a commercial environment. This equipment generates, uses, and can radiate radio frequency energy and, if not installed and used in accordance with the instruction manual, may cause harmful interference to radio communications. Operation of this equipment in a residential area is likely to cause harmful interference in which case the user will be required to correct the interference at his own expense.
Information to the User
This equipment must be installed and used in strict accordance with the manufacturer's instructions. However, there is no guarantee that interference to radio communications will not occur in a particular commercial installation. If this equipment does cause interference, which can be determined by turning the equipment off and on, the user is encouraged to contact CognitiveTPG immediately.
CognitiveTPG is not responsible for any radio or television interference caused by unauthorized modification of this equipment or the substitution or attachment of connecting cables and equipment other than those specified by CognitiveTPG. The correction of interferences caused by such unauthorized modification, substitution or attachment will be the responsibility of the user.
In order to ensure compliance with the Product Safety, FCC and CE marking requirements, you must use the power supply, power cord, and interface cable which are sold for use with this product or which meet the following parameters:
Power Supply
UL Listed (QQGQ), Class 2 power supply with SELV (Secondary Extra Low Voltage), non-energy hazard output, LPS (limited power source), input rated 100-240 Vac, 2.0 A, 50/60 Hz, output rated 24 Vdc, 2.5 A for 60 watt unit.
Use of this product with a power supply other than the CognitiveTPGpower supply will require you to test the power supply and CognitiveTPG printer for FCC and CE mark certification.
Communication Interface Cable
A shielded (360 degree) interface cable must be used with this product. The shield must be connected to the frame or earth ground connection or earth ground reference at EACH end of the cable.
Use of a cable other than described here will require that you test the cable with the CognitiveTPG printer and your system for FCC and CE mark certification.
Power Cord
A UL listed, detachable power cord must be used. For applications where the power supply module may be mounted on the floor, a power cord with Type SJT marking must be used. For applications outside the US, power cords which meet the particular country's certification and application requirements should be used.
Use of a power cord other than described here may result in a violation of safety certifications which are in force in the country of use.
Industry Canada (IC) Radio Frequency Interference Statement
This Class B digital apparatus meets all requirements of the Canadian Interference-Causing Equipment Regulations.
Voluntary Control Council for Interference (VCCI) Radio Frequency Interference Statement
This is a Class B product based on the standard of the voluntary Control Council for Interference by Information Technology Equipment (VCCI). If this equipment is used in a domestic environment, radio disturbance may arise. When such trouble occurs, the user may be required to take corrective actions.
Disclaimer
Information in this document is subject to change without notice. Consult your CognitiveTPG sales representative for information that is applicable and current. CognitiveTPG reserves the right to improve products as new technology, components, software, and firmware become available.
No part of this document may be reproduced, transmitted, or translated in any form or by any means, electronic or mechanical, for any purpose without the express written permission of CognitiveTPG.
Copyright
Copyright © 2013 by CognitiveTPG, LLC.
950 Danby Road, Ithaca, New York 14850, USA. All rights reserved. Printed in USA. Property of CognitiveTPG, LLC.
Trademarks
CognitiveTPG ^™ is a trademark of CognitiveTPG, LLC.
Microsoft, Windows are registered Trademarks of Microsoft Corporation in the U.S.A. and/or other countries.
Inside Out Networks, Inside Out, EPIC, and Edgeport are trademarks of Inside Out Networks.
All other trademarks and registered trademarks are the property of their respective holders.
Website: http://www.CognitiveTPG.com
Made under one or more of the following U.S. patents:
4886381, 5579043, 5613787, 5651624, 5713678, 5752779, 5789916, 5800080, 5879090, 5887999, 5975776, 6027266, 6085973, 6089450, 6129465, 6155483, 6404452, 6486902, 6504331, 5749277, 6722754, 6739773, 6784909.
Contents
Chapter 1: About this Guide ....5
How to use this guide ....5
Where to find advanced technical information ....5
Download manuals and drivers ....5
Support 5
Chapter 2: About the Printer ....7
Description of printer ....7
Printer controls 8
Available printer configurations 9
Printer configuration identification 9
Communication interfaces 9
Standard Features ....10
Factory-installed options ....10
Add-on options 11
Printing features ......11
LogoEZ ^® colorization utility and Receiptware marketing software. .....11
Chapter 3: Setting up the Printer ....13
Unpack the printer ....13
Check the packing list ....13
Load or change the receipt paper 14
Adjusting Paper Low Setting 15
Changing the paper path width ....15
Mounting the printer on a vertical surface ....16
Installing the optional Spill Guard 16
Connect the cables 17
Cash drawer cables 17
Communication cables 18
RS-232C cable (9-pin and 25-pin) and parallel 18
USB cable....19
Powered USB cable 19
Ethernet communication cable 20
Power supply cable 20
Cable routing 21
Test the printer 21
Chapter 4: Using the Printer ......23
Configuring the printer 23
To enter the configuration mode: 24
Paper-savings 26
Monochrome paper print density 26
Color density 26
When to change the receipt paper 27
Printhead Setting 28
Preventing overheating of the printhead 28
Troubleshooting the printer 29
Printer tone and green LED 29
Printing issues ......29
Printer does not function ....31
Chapter 5: Paper and Supplies ......33
Ordering from CognitiveTPG 33
Ordering thermal paper 33
Thermal paper specifications ....33
Qualified Paper Grades ....34
Cash drawers 35
Power supply and power cords 35
Chapter 1: About this Guide
How to use this guide
The guide is designed to help you find the information you need quickly and easily, whether you are installing, servicing, or making adjustments to a CognitiveTPG printer.
For basic printer setup, refer to Chapter 3: Setting up the Printer. This section has been written under the assumption that the printer will arrive pre-configured. For instructions on checking the configuration or reconfiguring the printer, look in Chapter 4: Using the Printer.
Having problems? Check the troubleshooting section in the back of Chapter 4.
Need paper specs? Look in Chapter 5: Paper and Supplies.
Where to find advanced technical information
Since CognitiveTPG printers are shipped pre-configured and have been designed to operate with no maintenance, this guide provides only essential technical and configuration information. CognitiveTPG also has a Programming Guide for this printer with more detailed discussion of programming capabilities. The A799 Programming Guide has been developed as a companion to the User Guide and includes additional programming information. The A799 Service Guide is available to qualified service technicians who have been certified by CognitiveTPG to perform advanced procedures.
Because of the printer's wide array of printing capabilities, you may prefer to contact CognitiveTPG support for more assistance.
Download manuals and drivers
The A799 Setup Guide, A799 User Guide, A799 Programming Guide, and various printer drivers can be downloaded from the CognitiveTPG website in .pdf format: http://www.CognitiveTPG.com, under "Downloads."
Support
For more advanced procedures and troubleshooting, you may need to refer to the printer's programming or service guides or speak to CognitiveTPG technical support. Your CognitiveTPG representative is also able to provide you with necessary information.
Additional information about CognitiveTPG's products and services is posted on the CognitiveTPG website, at http://www.CognitiveTPG.com. The website can also direct you to service and support within your area, or e-mail: support@cognitivetpg.com.
Chapter 2: About the Printer6
Chapter 2: About the Printer
Description of printer
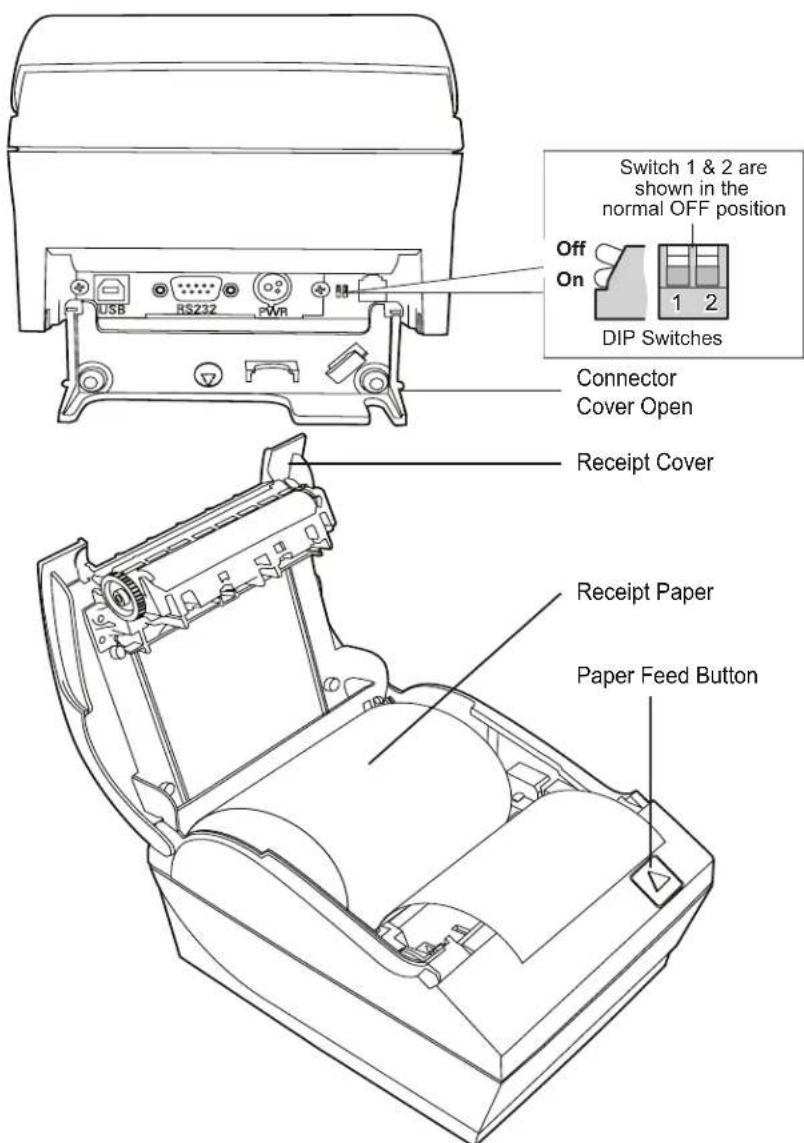
The A799 ColorPOS ^® two-color thermal receipt printer is easy to install, use, and maintain. Utilizing CognitiveTPG's Clamshell design, simply snap open the receipt cover and drop the paper roll in place. You never need to change a printer ribbon or cartridge because it uses thermal print technology.
text_image
USB RS232 PWR Switch 1 & 2 are shown in the normal OFF position Off On 1 2 DIP Switches Connector Cover Open Receipt Cover Receipt Paper Paper Feed ButtonThis printer is compatible with CognitiveTPG's LogoEZ ^ logo and colorization utility. See Programming Guide for more information on obtaining this utility and using the LogoEZ ^ commands.
Printer controls
text_image
LED (Green) Paper Feed Button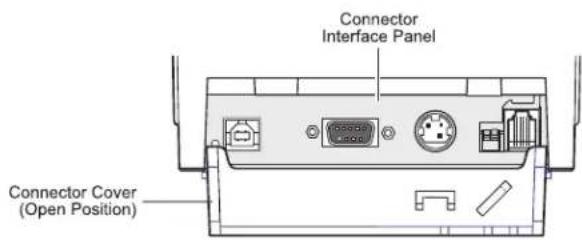
text_image
Connector Interface Panel Connector Cover (Open Position)Configuration switch (DIP switch 1)
The configuration switch allows you to change the configuration settings of the printer.
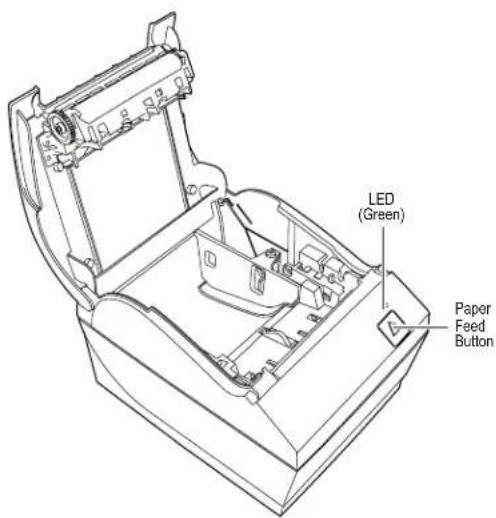
Paper feed button
During normal use, the paper feed button advances the paper. It is also used to access the configuration menu.
LED
The green LED indicates basic information about the printer status. A steady green light means the printer is on and operating normally. A flashing LED means the printer needs operator assistance. Refer to the troubleshooting section on page 29 for more information.
Beep
A single beep means the printer has successfully completed its startup routine. It should beep after being powered up or reset.
If the printer beeps twice, it may be experiencing a problem. Refer to the troubleshooting section on page 29 for more information, or use the interactive tech support tool on our website at www.tpgprinters.com/techsupportpub.aspx
Connector Cover
The connector cover provides protection and strain relief for the printer connectors and cables. This cover should remain on the printer and utilized as described in Chapter 3, Cable routing.
Available printer configurations
There are several configurations of the printer, depending on the combination of desired options.
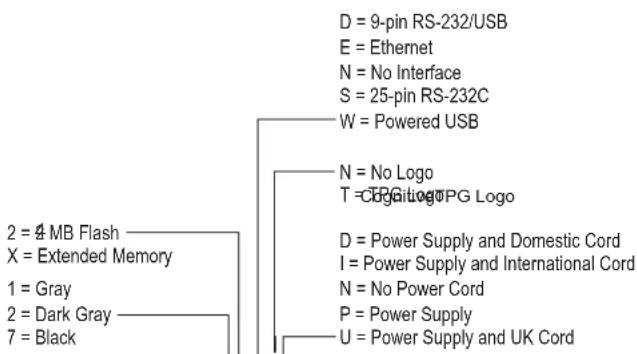
Printer configuration identification
See the sample below to determine the printer configuration. The printer configuration identification (Model ID) is located on the model label attached to the back of the printer. The Model ID description is shown below.
Communication interfaces
• RS-232C serial interface (25-pin)
• Universal Serial Bus (USB)/RS232 serial (9-pin)
- Ethernet
- Powered USB
• Parallel (non-ROHS option)
text_image
D = 9-pin RS-232/USB E = Ethernet N = No Interface S = 25-pin RS-232C W = Powered USB N = No Logo T = CERGInitiPG Logo 2 = 4 MB Flash X = Extended Memory 1 = Gray 2 = Dark Gray 7 = Black D = Power Supply and Domestic Cord I = Power Supply and International Cord N = No Power Cord P = Power Supply U = Power Supply and UK Cord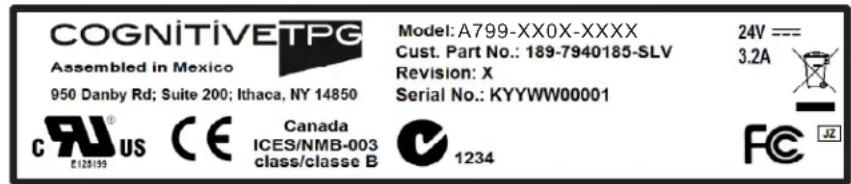
text_image
COGNITIVE TPG Assembled in Mexico 950 Danby Rd; Suite 200; Ithaca, NY 14850 Model: A799-XX0X-XXXX Cust. Part No.: 189-7940185-SLV Revision: X Serial No.: KYYWW00001 24V === 3.2A CE Canada ICES/NMB-003 class/classe B 1234 FC J2Standard Features
| InterfacesParallel | Interfaces vary according to specific configuration: USB/RS232, 25-pin serial, Ethernet, PUSB |
| Memory/Firmware 4 MB flash memory, History EEROM, 4K buffer(see factory-installed options below for additional memory) | |
| Resident character sets858 (with Eurosymbol), 860 (Portuguese), 862 (Hebrew), 863 (French Canadian), 865 (Nordic),866 (Cyrillic), 874 (Windows Thai), 1251 (Windows Cyrillic), 1252 (Windows Latin 1), 1255(Windows Hebrew), and KZ_1048 (Kazakh) | PC code pages 437 (US), 850 (Multilingual), 737 (Greek), 852 (Slavic), 857 (Turkish), |
| Downloadable Fontsupon request. | Code pages 874 (Thai), 932 (Kanji), 949 (Korean), and 950 (Traditional Chinese). Available |
| Integrated bar codesCodabar, Code 128, PDF-417 (two-dimensional), ITF, Code 128 extended, GS1 Databar,and QR code | Code 39, Code 93, Code 128, UPC-A, UPC-E, JAN8 (EAN), JAN13 (EAN), Interleaved 2 of 5,Codabar, Code 128, PDF-417 (two-dimensional), ITF, Code 128 extended, GS1 Databar,and QR code |
| Print Monochrome or two-color print in either 44 (standard) or 56 (compressed) columns on80 mm wide thermal paperMonochrome or two-color print in either 49 (standard) or 62 (compressed) columns on82.5 mm wide thermal paperOptions for 58 mm and 60 mm wide paper are also available | |
| Paper path | 58 mm, 60 mm, 80.0 mm, 82.5 mm paper path width models |
| Print resolution | 8-dots/mm |
| Speedup to 150 mm/second throughput (mono-chrome); | Up to 250 mm/second throughput (mono-chrome); |
| Paper Sensing | Paper low and paper out |
| Human interfaceissued through paper feed button. Green LED status light, located next to the paper feedbutton. | Audible tone from speaker (software-driven). Simple commands in configuration menu |
| Cash drawer driver | Connector for one or two cash drawers (obtain a "Y" cord for two drawers) |
| Knife | Paper cutter standard on all units. |
| Linerless label | TBA |
Factory-installed options
- 8 MB memory
• Cabinet color with or without CognitiveTPG logos - Spill Guard
Add-on options
For part numbers and additional ordering information, refer to Chapter 5: Paper and Supplies.
• Wall mount kit for printer
- Spill Guard
• Power supply: 60-watt
• Power cords: US, UK AC, and International AC cords
- LogoEZ ^® , downloadable colorization utility
- Receiptware ^® , downloadable marketing software
Printing features
The A799 printer is versatile, with diverse printing options available. Text, graphics, and bar codes can be presented in many different forms and sizes. For more information on available options, LogoEZ ^® colorization utility, Receiptware marketing software, and programming the printer to change text, graphics, or other characteristics, refer to the A799 Programming Guide.
LogoEZ ^® colorization utility and Receiptware marketing software.
LogoEZ ^® and Receiptware ^® are available from your CognitiveTPG customer service representative or downloadable from www.CognitiveTPG.com
The LogoEZ ^® utility provides a simple setup of basic two-color and logo features to get you started. Receiptware ^® is a simple and flexible receipt editing tool to help you create custom receipts.
Chapter 3: Setting up the Printer12
Chapter 3: Setting up the Printer
Unpack the printer
Check the packing list
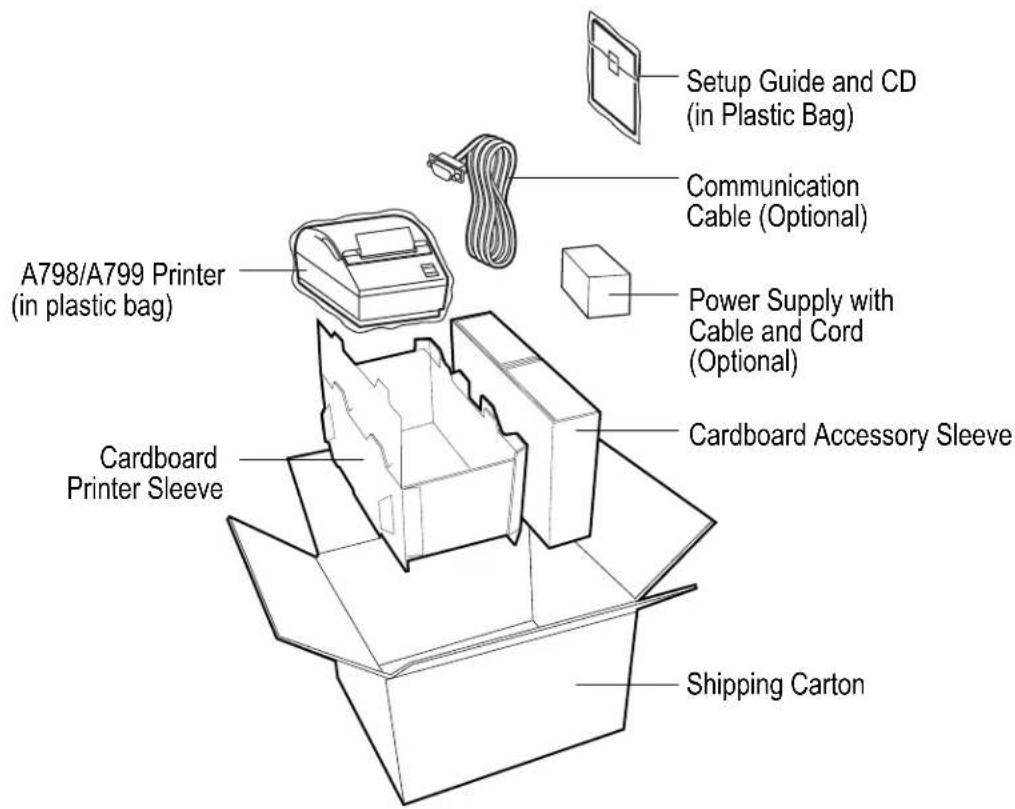
Save the packing materials in case you need to repack the printer for shipping or storage. Before installation, check that all the items on this list have been shipped (printers shipped in bulk may not include all these items):
- Printer (enclosed in a plastic bag with foam pack)
• Test printout (in paper compartment). - Setup Guide
• Power supply with cable and cord (if ordered)
• Printer-host communication cable (if ordered)
To report any missing items or shipping-related problems, contact your representative or call CognitiveTPG customer service at (800) 732-8950, option 4.
text_image
Setup Guide and CD (in Plastic Bag) Communication Cable (Optional) Power Supply with Cable and Cord (Optional) A798/A799 Printer (in plastic bag) Cardboard Printer Sleeve Cardboard Accessory Sleeve Shipping CartonLoad or change the receipt paper
Caution: You must use qualified paper rolls with CognitiveTPG printers. The list of qualified paper is in Chapter 5; refer to the website www.CognitiveTPG.com for update to this list. Using unqualified paper may void the warranty.
You will later use the same procedure to change the receipt paper as you will to load it during installation. The minor difference is noted in the directions below.
If you are installing the printer using the wall mount kit, you may find it easier to load the paper roll after installation.
Note: The printer must be set to the paper type being used for proper operation. This can be done by sending the command 1D 81 m n or by a selection in the configuration menu. To change the paper type in the configuration main menu select "Set Paper Type" and make selections. (See page 24 for how to enter the configuration menu.)
text_image
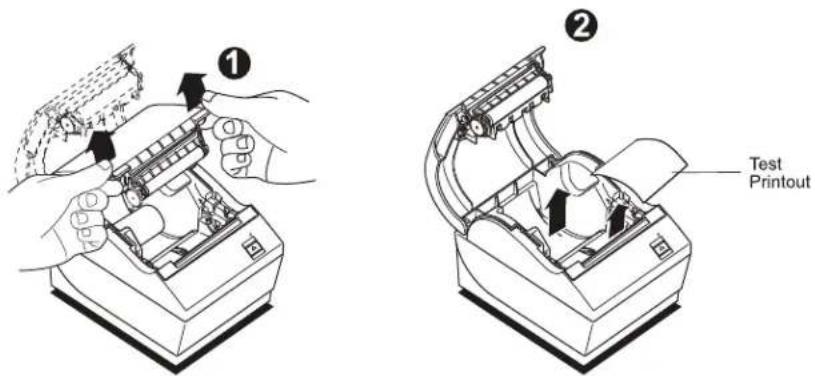
① ② Test Printout1 Open the receipt cover by pushing up evenly on each side of the cover until it unsnaps (1).
2 Loading: Remove the test printout (2). Retain the test printout with the configuration listing until the printer is successfully installed
Changing: Remove the used paper roll.
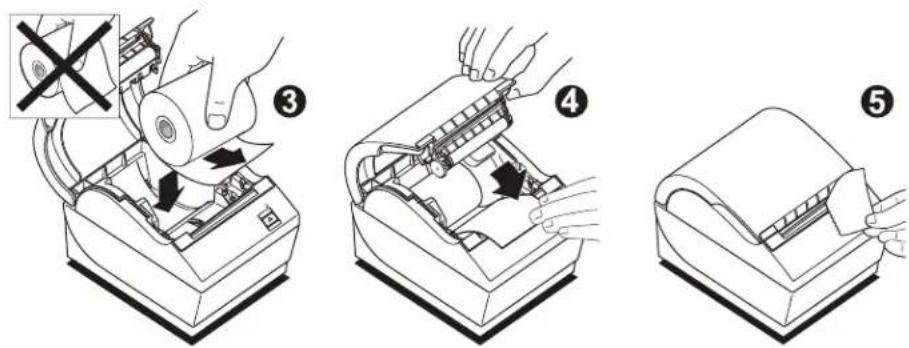
3 Tear a clean edge on the new receipt paper roll, making sure the tape has been completely removed.
4 Place the receipt paper into the paper compartment so it unrolls from the bottom (3). Leave a few inches of paper sticking out of the printer.
5 While holding the paper in place, close the receipt cover (4). To test that the paper is loaded correctly, advance the paper with the paper feed button.
Note: If the paper jams, make sure the roll is inserted correctly. Check the illustration above for proper orientation.
6 Tear the excess paper off against the blade in the cover (5).
text_image
Diagram illustrating a mechanical device operation with numbered steps and a crosshair indicating a disassembly or disassembly process.Adjusting Paper Low Setting
The amount of paper left on the roll when the “paper low” indication is given by the printer should be approximately 5-20 feet. If too much paper is left, there is an adjustable setting in the configuration menu that can be modified. To enter the configuration menu, see “Configuring the printer” in Chapter 4. Enter the “Hardware Options” section and vary the “paper low extension” setting. The setting chosen will decrease the amount of footage at paper low.
Changing the paper path width
The A799 can be adjusted to print on paper rolls with widths of 58 or 60 mm. To perform this adjustment, please refer to the A799 Service Guide. A trained service technician must perform this adjustment.
Note: The A799 printer can also print on paper rolls 82.5 mm wide. This option for the printer is factory installed. Please contact CognitiveTPG for details.
Mounting the printer on a vertical surface (using optional kit TPG-K260)
1 Select a location that allows adequate support for the printer and is within easy cable length of the host.
2 Follow the instructions provided with wall-mount kit (K260) to attach the bracket to the vertical surface and the printer to the bracket.
Caution: Attach the power and communication cables to the printer prior to attaching the printer to the bracket.
Note: The "paper low" option will not function when the printer is vertically mounted.
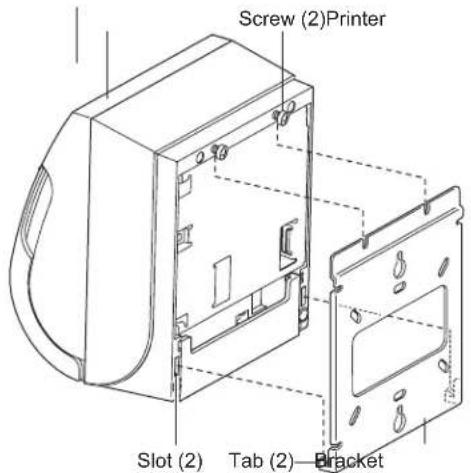
text_image
Screw (2)Printer Slot (2) Tab (2) BracketInstalling the optional Spill Guard
The spill guard provides added protection for your printer from moisture or spills.
To install the spill guard:
1 Open the printer receipt cover.
2 Align the tabs of the spill guard with the edges of both sides of the receipt cover.
3 Slide the spill guard along the edges and over the receipt cover until it snaps in place.
4 Close the cover. Print a sample to verify spill guard is properly installed.
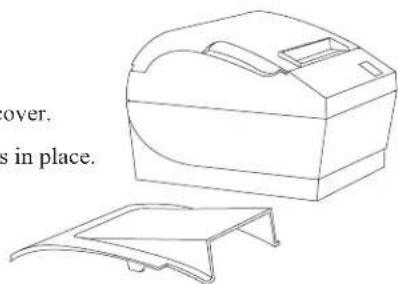
natural_image
Line drawing of a portable electronic device with a separate flat panel (no text or symbols)Caution: Damage to spill guard may occur if removed improperly. Contact tech support for assistance.
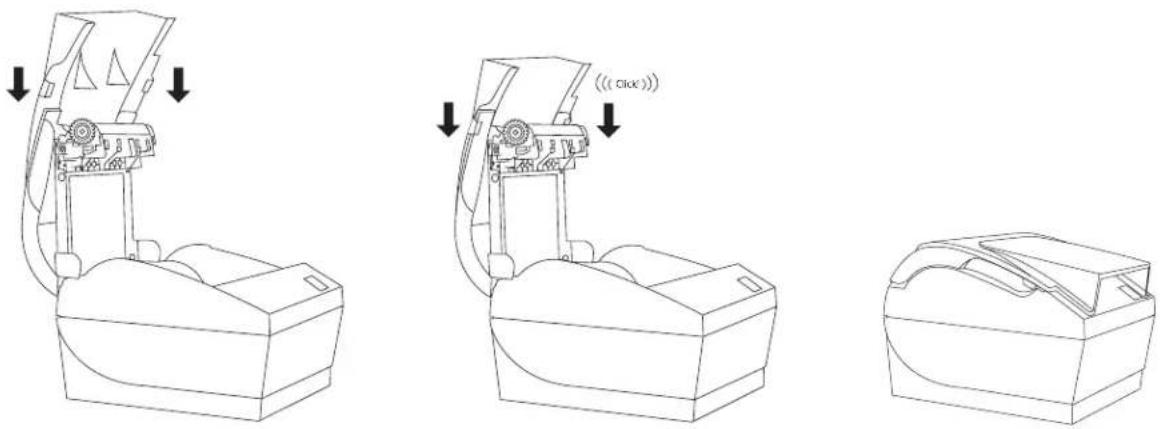
text_image
Technical diagram showing three steps of a device with directional arrows indicating motion, including '(( Clock))' annotation.Connect the cables
Cable connections are made at the back of the printer.
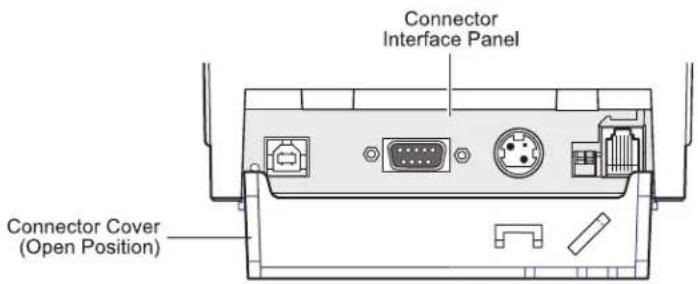
text_image
Connector Interface Panel Connector Cover (Open Position)Caution: Connect the cables to the printer before applying power. The host computer should always be turned off before connecting communication cables.
Cash drawer cables
The cash drawer cable connects the printer to one or two cash drawers.
(For pin-out, see Service Guide.)
To install the cash drawer cable:
1 Open the connector cover.
2 Plug the cable into the cash drawer connector located at the right side of the illustration.
3 Route the cable up and through the strain relief clip above the connector and through the opening in the connector cover when shut.
Note: If installing two cash drawers, you will need to obtain a Y-cable as shown in the illustration below.
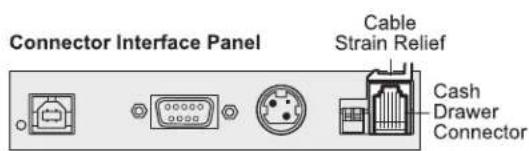
text_image
Connector Interface Panel Cable Strain Relief Cash Drawer Connector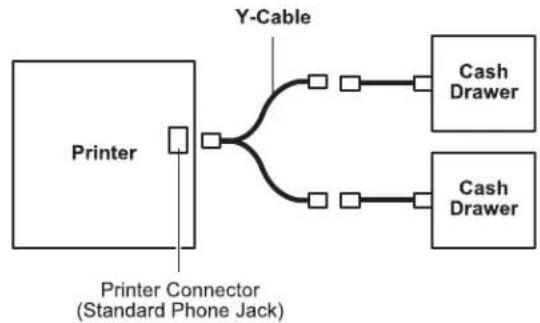
flowchart
graph TD
    A["Printer"] --> B["Y-Cable"]
    B --> C["Cash Drawer"]
    B --> D["Cash Drawer"]
    E["Printer Connector (Standard Phone Jack)"] --> B
    style A fill:#f9f,stroke:#333
    style B fill:#ccf,stroke:#333
    style C fill:#cfc,stroke:#333
    style D fill:#cfc,stroke:#333
Communication cables
According to your printer configuration, the printer has different communication connection options. Select and attach either 9-pin RS-232C, 25-pin RS-232C, standard USB, powered USB, or Ethernet communication cable to the printer and host computer.
For printers with both 9-pin RS-232C and USB connectors, only a single communication connection is to be used during operations.
RS-232C cable (9-pin and 25-pin) and parallel
The communication cable connects the printer to the host computer using either the 9-pin or 25-pin RS-232C, or 25-pin parallel interface. Installation is identical for all connectors.
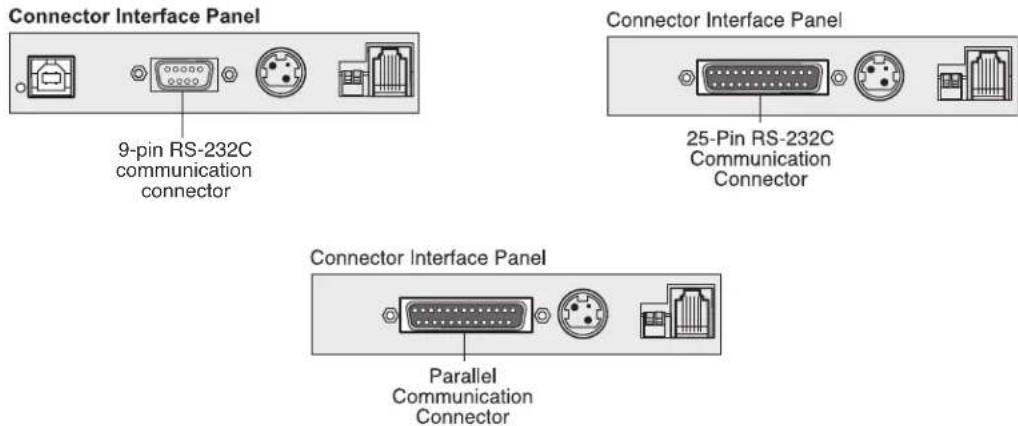
To install the communication cable:
1 Make sure the host computer is off.
2 Open the connector cover at the rear of the printer.
3 Attach the communication cable to the communication connector, shown in the center in the illustration. Tighten the screws to secure the cable and ensure a stable connection.
4 Connect the cable to the host computer.
USB cable
Unlike the other connections, the USB cable may be attached and detached while the system is operating.
Using the USB connector with the printer requires that you install the CognitiveTPG USB driver appropriate for your system. If you are replacing a USB-equipped CognitiveTPG printer, you may not need to reinstall the driver.
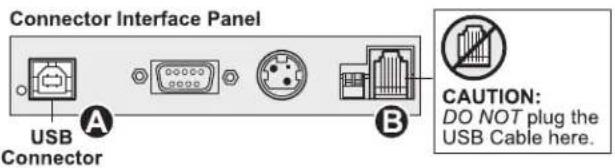
text_image
Connector Interface Panel USB Connector A B CAUTION: DO NOT plug the USB Cable here.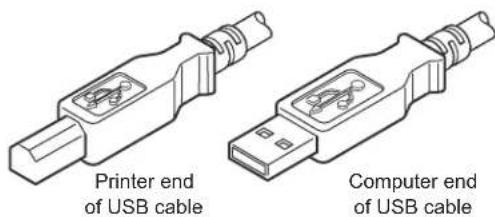
text_image
Printer end of USB cable Computer end of USB cableTo install the USB cable:
1 Open the connector cover at the rear of the printer.
2 Attach the USB cable to the USB connector, shown at the left above (A). Don't plug the USB cable into the cash drawer connector (B) by mistake! Doing so may damage the printer. The USB symbol should face up when inserted into the port. Make sure the connection is snug.
3 Route the cable through the strain relief on the connector cover (see the "Cable routing" section which follows on page 21).
4 Connect the cable to the USB port in the host computer. Again, make sure the USB symbol on the connector is face up when you plug it into the port.
After you have completed setting up the printer, you can install the USB driver on the host computer.
Download the USB driver to the host computer from the CognitiveTPG corporate website at http://www.CognitiveTPG.com. Downloads can be found in the Downloads section of the site.
Powered USB cable
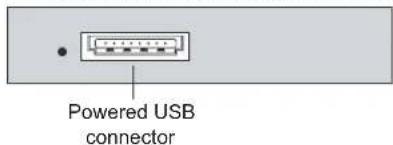
Powered USB communication connector panel
text_image
Powered USB connector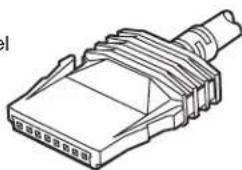
natural_image
Technical line drawing of a connector housing (no text or symbols)Printer end of USB cable
natural_image
Line drawing of a mechanical connector or connector (no text or symbols)Computer end of USB cable
1 Be sure the host computer is turned off.
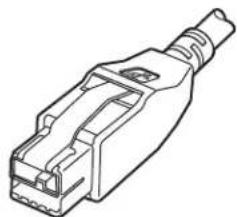
2 Plug the printer end of the USB cable into the USB connector port on the printer.
3 Route the cable from the printer through the strain relief tab as shown under Cable Routing on page 21.
4 Plug the computer end of the USB cable into the computer.
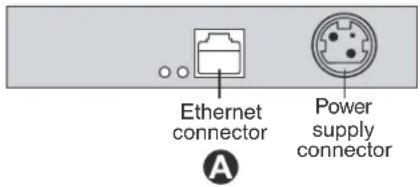
Ethernet communication cable
Ethernet communication connector panel
text_image
Ethernet connector Power supply connector A1 You don't need to turn off the computer. Plug the printer end of the Ethernet cable into the Ethernet connector port on the printer (A). Make sure the connector snaps firmly in place.
2 Plug the computer end of the Ethernet cable into the Ethernet port of the computer. Make sure the connector snaps firmly in place.
3 After you have connected the printer, you may need to set the printer internal parameters for Ethernet operation. See Ethernet Setup Guide.
Power supply cable
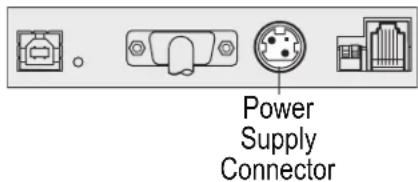
To avoid damaging the printer, connect the power supply last.
Connector Interface Panel
text_image
Power Supply Connector1 Plug the power cable into the power supply connector shown in the center of the illustration above.
2 Close the connector cover until it snaps, making sure that all the cables are aligned with the slots in the connector cover. Double-check that the strain relief on the connector cover is aligned with the power supply cable (see “Cable routing” section which follows).
3 Plug the power cord into the power supply.
4 Plug the power supply into a grounded outlet. When it is properly powered, the green LED on the top of the printer will light up.
WARNING! Using this device without a grounded outlet is a safety hazard and voids the printer Warranty, Safety, FCC and CE Mark designation.
Cable routing
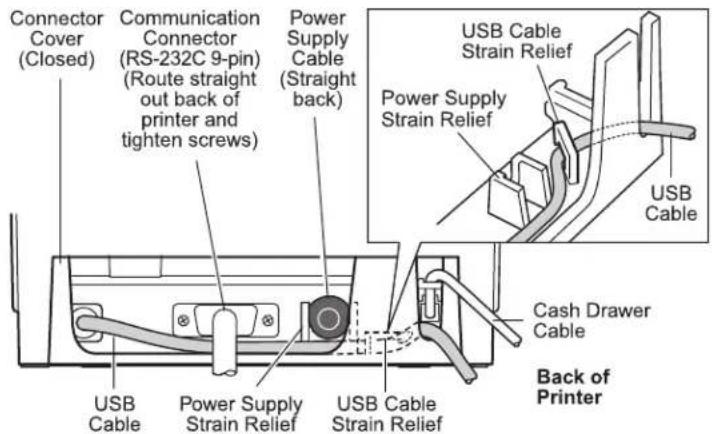
To prevent the printer from becoming unplugged accidentally, make sure the cables are routed as shown in the illustration below.
text_image
Connector Cover (Closed) Communication Connector (RS-232C 9-pin) (Route straight out back of printer and tighten screws) Power Supply Cable (Straight back) USB Cable USB Cable Strain Relief Power Supply Strain Relief USB Cable Cash Drawer Cable Back of Printer USB Cable Power Supply Strain Relief USB Cable Strain ReliefFor USB printers only:
Guide the USB cable through the strain relief and out the slot in the connector cover, as shown in the illustration. The USB cable fits underneath the power supply and cash drawer cables. The RS-232C cable routes straight out the back when attached.
Test the printer
If the printer is functioning normally, it will beep once. If it responds differently, look in Chapter 4: Using the Printer, "Troubleshooting the printer" (page 29) or use the interactive tech support tool on the website, www.CognitiveTPG.com, or contact CognitiveTPG for technical support.
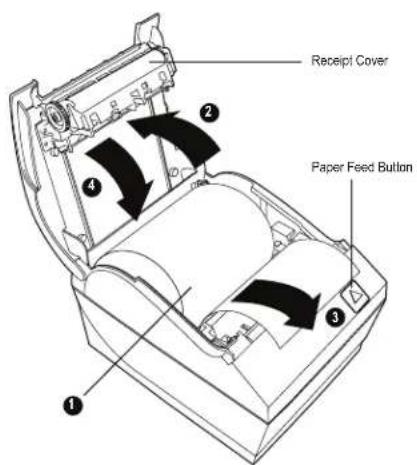
The printer will arrive for installation pre-configured. The printer's current configuration appears on the test (diagnostics) printout. However, if you would like to run a new print test or check the configurations, you can run a diagnostics printout detailing the current configuration.
text_image
Receipt Cover Paper Feed ButtonTo run a diagnostic test:
1 Make sure paper is in the printer (1).
2 Open the receipt cover (2).
3 Press and hold the paper feed button (3).
4 Close the receipt cover, continually holding the paper feed button until the configuration printout begins (4).
For further instructions, see Chapter 4: Using the printer, "Configuring the printer" (page 24).
Chapter 4: Using the Printer22
Chapter 4: Using the Printer
Configuring the printer
The configuration menu allows the user to set general printer parameters. The test prints the diagnostics form, which details settings for all functions. The printer will partially cut the paper between each variation.
The printouts may vary for each model. The test ends with a partial cut of the paper. A complete test printout may require the use of several feet of paper.
Since the printer is usually shipped pre-configured, most users do not need to change the configuration of the printer. If you make adjustments to the configuration, be careful not to inadvertently change settings that may affect the printer's performance. CognitiveTPG does not recommend that users change the printer configuration.
Additional information on configuring the printer is found in the A799 Programming Guide.
Hint: The printer is shipped with a test printout that includes the preset configuration. If you run into problems after changing the printer configuration, use these settings as a default. For guidance or assistance, you may contact a CognitiveTPG representative.
To enter the configuration mode:
text_image
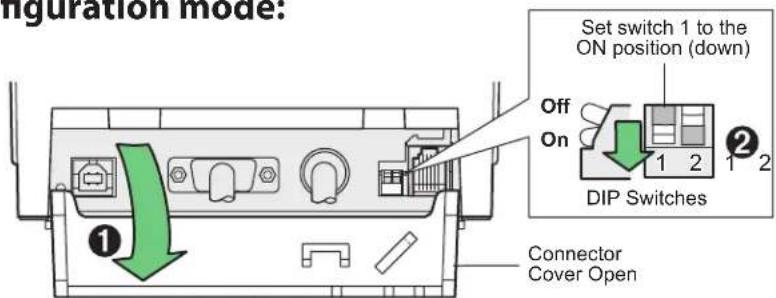
Configuration mode: Set switch 1 to the ON position (down) Off On DIP Switches Connector Cover Open1 Turn power off to printer.
2 Open connector cover (1).
3 Set DIP switch 1 to the ON position (down) (2).
text_image
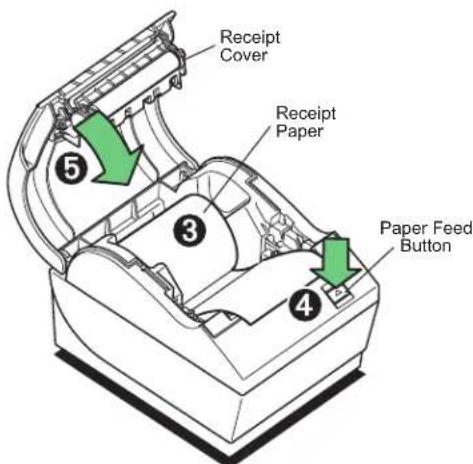
Receipt Cover Receipt Paper Paper Feed ButtonDIP switch 2 should be in the OFF position (up).
4 Make sure receipt paper (3) is loaded in the printer before proceeding. Make sure cover is closed.(See page 12.)
5 Apply power to printer and immediately press and hold the paper feed button (4) until the configuration printout begins.
- The printer beeps, then prints the diagnostics form and the configuration main menu.
- The printer pauses and waits for a main menu selection to be made (see sample printout on the next page; short clicks are used, except when answering "yes" or validating selection).
6 To communicate with the printer, you will press the paper feed button using either short or long clicks. Use a long click for "yes" (more than one second) and a short click for "no." Follow the printed instructions to make selections.
7 Continue through your menu selections until you are asked, "Save New Parameters?" Select "Yes."
a Return DIP Switch 1 to the OFF position (up).
b Reset the Printer.
c Open the receipt cover.
Press and hold the paper feed button while closing the receipt cover.
• The diagnostic printout verifies your new settings.
\*\*\* A799 - Diagnostics Form \*\*\*
Model number : A799-120D-TD00
Serial number : 0000000000
Boot Firmware
Revision : V3.02
CRC : 7E22
P/N : 189-7940489B
Flash Firmware
Revision : V3.01
CRC : 4448
P/N : 189-7940490A
H/W parameters
Flash Memory Size : 4 Mbytes
Flash Logos/Fonts : 1024 kbytes
Flash User Storage : 960 kbytes
Flash Perm'nt Fonts : 960 kbytes
Flash Journal Size : 128 kbytes
SRAM Size : 512 kbytes
Head settling : D
Motor ID : 1
Paper Type Setting : Type 0, Monochrome
Color Density Adj : n/a
Print Density, Mono : 100%
Max Speed : 250 mm/sec
Paper Width : 80 mm
Max Power : 55 W
Knife : Enabled
Partial Cut : 125 steps
Paper Low Sensor : Enabled
No Paper Low Extension
Comm. Interface
USB Driver Type : Printer Class
USB Packet w/Error : Reject
To enter Printer Config Menu :
1) Flip DIP switch #1 down
2) Reset the printer, while holding
the Paper Feed button down
\*\*\*\*\*\*\*\*\*\*\*\*\*\*\*\*\*\*\*\*\*\*\*\* MAIN MENU \*\*\*\*\*\*\*\*\*\*\*\*\*\*\*\*\*\*\*\*\*\*\*\*
\*\*\*\*\*\*\*\*\*\*\*\*\*\*\*\*\*\*\*\*\*\*\*\*\*\*\*\*\*\*\*\*\*\*\*\*\*\*\*\*\*\*\*\*\*\*\*\*\*\*\*\*\*\*\*\*\*\*\*\*\*\*\*\*\*\*\*\*\*\*\*\*\*\*\*\*\*\*\*\*\*\*\*\*\*\*\*\*
Select a sub-menu :
- EXIT -> 1 click
- Print Current Configuration -> 2 clicks
- Set Communication Interface -> 3 clicks
- Set Diagnostics Modes -> 4 clicks
- Set Emulation/Software Options -> 5 clicks
- Set Hardware Options -> 6 clicks
- Set Paper Type -> 7 clicks
- Set Firmware Features -> 8 clicks
Enter code, then hold Button DOWN
at least 1 second to validate
Print Test and Configuration Menu Sample.
Samples will vary depending on the printer model.

Current Printer tallies are
printed after the Diagnostic information and will vary
per printer use.
Paper-savings
This function makes it possible to use less receipt paper. Paper-savings can be achieved by configuring the printer to reduce white space between lines, and by using a downloadable paper-savings font.
To configure paper-savings features, use the POS Configuration utility, available from your CognitiveTPG representative or downloadable from our website, www.CognitiveTPG.com.
Monochrome paper print density
This function makes it possible to adjust the energy level of the printhead to darken the printout or adjust for paper variations. An adjustment should only be made when necessary. The factory setting is 100%.
Warning: Choose an energy level no higher than necessary to achieve a dark printout. Failure to observe this rule may result in a printer service call or voiding of the printer warranty. Running at a higher energy level will reduce the printhead life. Consult your CognitiveTPG representative or CognitiveTPG technical support if you have any questions.
When the printer prints high-density print lines (text or graphics), it automatically slows down.
To change the print density:
1 Enter the configuration menu (follow directions on page 24-25).
2 Select "Set Hardware Options" from the main menu.
Printer responds, "Hardware Options Menu," and when scrolled prompts, "Set Print Density?"
3 Select "Yes".
A warning is printed, followed by the density adjustment selections.
Enter clicks for selection, then hold button down at least 1 second to validate.
Color density
This function makes it possible to adjust the energy level of the printhead to darken the color printing or adjust for paper variations. An adjustment should only be made when necessary. The factory setting is 100%.
Warning: Choose an energy level no higher than necessary to achieve a dark printout. Failure to observe this rule may result in a printer service call or voiding of the printer warranty. Running at a higher energy level will reduce the printhead life. Consult your CognitiveTPG representative or CognitiveTPG technical support if you have any questions.
When the printer prints high-density color print lines (text or graphics), it automatically slows down.
To change the color density:
1 Enter the configuration menu (follow directions on page 24-25).
2 Select "Set Hardware Options" from the main menu.
Printer responds, "Hardware Options Menu," and when scrolled prompts, "Set Color Density Adjustment?".
3 Select "Yes".
A warning is printed, followed by the density adjustment selections.
Enter clicks for selection, then hold button down at least 1 second to validate.
When to change the receipt paper
Change the paper when it is near the end of the roll or out. When the paper is low, you will want to monitor usage to avoid running out part way through a transaction. When the paper is out, you must load a new roll immediately or data may be lost!
When paper is low:
- Colored stripe appears on the receipt paper, (if paper is purchased with stripe) and indicates enough paper remains for a small transaction.
- If paper low option is installed on the printer, the green LED flashes slowly indicating that approximately 15 feet of paper remains. If too much paper is left on the roll, the “paper low” setting can be adjusted by entering the configuration menu and changing the “paper low” extension setting.
When paper is out:
- Green LED flashes quickly indicating the paper must be installed.
Warning: Do not try to operate the printer or host computer if the printer runs out of paper. The printer may continue to accept data from the host computer even though it is unable to print. Data may be lost as a result!
For instructions on how to change the receipt paper, look in Chapter 3: Setting up the Printer, “Load or change the receipt paper” (see page 14).
Note: When changing the type of paper being used, you must set the printer to the new paper type. This is done through the command 1D 81 m n or through the configuration menu. (See A799 Programming Guide for command usage or page 21 to enter configuration menu.)
Paper type grades
Type 0: Monochrome
Type 4: Two-color
Type 5: Two-color
Printhead Setting
The printhead energy rating and printer setting must match. The setting will be preconfigured from the factory but may require changing should service to the thermal mechanism be required. The “Head Setting” on the diagnostic printout must match the letter marked on the front right of the thermal mechanism. Whenever the thermal mechanism is replaced, if the letter on the the mechanism is different from the head setting, you must enter the configuration menu and set the printhead to match. (See A799 Service Guide for replacing the thermal mechanism.)
Preventing overheating of the printhead
There are restrictions on the duty cycle because of the heat generated by the thermal printhead when printing solid blocks (regardless of the length of the block in relation to the print line). The restrictions are ambient temperature, the percentage of time (measured against one minute) of continuous solid printing, and the amount of coverage.
Keep in mind that the ambient temperature may be affected by factors such as direct exposure to sun or close proximity to heating elements.
Caution: When the duty cycle exceeds the limits shown in the table, the receipt printhead will heat up and shut down. This may damage the printhead.
To avoid this problem, do one or a combination of the following:
1 Reduce the amount of coverage.
2 Reduce the time of continuous solid printing.
3 Reduce the ambient temperature.
Allowable duty cycle (measured over one minute of continuous printing)
Amount of solid coverage Ambient temperature
| 25°C 35°C 50°C | |||
| 20% | 100% | 50% | 20% |
| 40% | 50% | 25% | 10% |
| 100% | 20% | 10% | 4% |
Duty cycle
Percentage of time that the specified "Amount of solid coverage" can be printed during a one minute period of time.
Example: at 20% solid coverage, 35°C temperature, a 50% duty cycle is to be used, resulting in 30 seconds of printing and 30 seconds without printing.
For reference:
- A typical receipt with text (contains some blank spaces) is approximately 12% dot coverage.
- A full line of text characters (every cell on the line has a character in it) is approximately 25% dot coverage.
• Graphics are approximately 40% dot coverage. - Barcodes are approximately 50% dot coverage.
• A solid black line is 100% dot coverage.
Troubleshooting the printer
The printer is simple and generally trouble-free, however unexpected conditions may arise. Use the charts below to diagnose and solve these printer conditions, or use the interactive tech support tool at www.CognitiveTPG.com. To resolve complex issues, you may need to contact a service representative.
If unexpected conditions arise while installing the USB driver, take a look in the FAQ section located at www.CognitiveTPG.com.
Printer tone and green LED
Condition Possible causes What to do Where to go for more information
| Green LED, quick steady Paper out Load a new paper roll Chapter 3: Setting up the Printer, flashing “Load or change the receipt paper”(See page 14) | |||
| Receipt cover open Close the cover | |||
| Knife unable to home Stop using the printer representative. | Contact your authorized service | ||
| Green LED, slow steady paper is low (if paper low sensor installed) | “Load or change the receipt paper”(See page 14) | Load a new paper roll | Chapter 3: Setting up the Printer, |
| be indicated | Other problems may representative | Stop using the printer | Contact your authorized service |
| Printer beeps (two-tone—low frequency, high frequency) | Printer has been turned on and is ready to operate | No action is required | |
| Printer beeps and flashes green LED in various combinations | These all indicate serious conditions service representative | Stop using the printer | Contact your authorized |
Printing issues
| Condition Possible Causes | What to Do | Where to Go | ||
| Colored stripe on the receipt | Paper is low | Change the paper(See page 14) | Chapter 3: Setting up the printer, "Load or change the receipt paper" | |
| Receipt does not come out all the way any jammed paper | Paper is jammed inspect the knife, and clear | Open the receipt cover, | ||
| Printer starts to print, but stops while the receipt is being printed | Paper is jammed | Open the receipt cover, inspect the knife, and clear any jammed paper | ||
| Receipt is not cut | Paper is jammed inspect the knife, and clear any jammed paper | Open the receipt cover, | ||
| Print is light or spotty Paper roll loaded Check that the paper Chapter 3: Setting up the printer, incorrectly is loaded properly “Load or change the receipt paper”(See page 14) | |||
| thermal receipt paper | Thermal printhead is dirty "Ordering thermal paper" | Use recommended(See note below.) (See pages 33-34) | Chapter 5: Paper and Supplies, |
| “Set Hardware Options” of printer Configuration Menu to 110% or 120% as needed (monochrome printer only) | Variations in paper representative or refer to Chapter 4: Using the Printer, “Configuring the printer”USE CAUTION when changing settings (See page 26) | Increase print density in | Contact your authorized service |
| Color print is light printhead in “Color printer configuration menu | Variations in paper “Configuring the printer” page 27 | Increase energy level of Density Adj" of the | Chapter 4: Using the Printer, and the Programming Guide |
| Inconsistent printing, no two-color print setting to type 0, 1, 4, or 5 | Paper type used and paper type do not match and the Programming Guide | Print diagnostic form and verify setting paper type | Chapter 4: Using the Printer, “Configuring the printer” pages 24-25 |
| Vertical column of print is missing condition with the electronics | This indicates a serious printer service representative | Stop using the printer | Contact your authorized |
| One side of receipt is missing electronics | This indicates a serious condition with the printer | Stop using the printer service representative | Contact your authorized |
Note: If paper has been used which is not on the CognitiveTPG recommend paper list, resulting in a dirty printhead, the printhead may require cleaning prior to switching back to CognitiveTPG recommended paper. See Chapter 5 for a list. If non-recommended paper is used over an extended period, attempting to clean the printhead will have little effect on print quality.
Do not try to clean within the printer except as noted in the A799 Service Guide, Chapter 4: Cleaning and Maintenance.
Printer does not function
Condition Possible Causes What to Do Where to Go
| Printer does not function Printer not plugged in Check that printer cables Chapter 3: Setting up the printer, when turned on are properly connected "Connect the cables" (See page 17) on both ends |
| Check that the host or power supply is getting power |
| Chapter 3: Setting up the printer, "Connect the cables" (See page 17) |
| Receipt cover not fully closed |
| Close and latch the receipt cover |
| Printer stops functioningcool downprinthead" (See page : |
| Printhead has overheated "Preventing overheating" |
| Allow the printhead to of the |
| Chapter 4: Using the Printer, |
| Interrupted data signal | Ensure the standard USB |
| over USB connection | cable is no more than 5 |
| meters long, with no extensions; eliminate hubs | |
| Faulty USB portport on host computer |
| Plug cable into another USB |
| Interruption of data workingUSB host |
| RS-232C mode not been connected to |
| Printer had previously RS-232C faults. |
| Reset printer and check normal |
| Printer goes off-line(red LED on USB connector is on or off)USB cable, reset the printer, and reboot the host computer; check that USB cable are properly connected on both ends |
| USB cable is not connected properly |
| If printer doesn't auto-recover after 5–20 seconds, reconnect the |
| Chapter 3: Setting up the Printer, "Connect the cables" (See page 17) |
Chapter 5: Paper and Supplies32
Chapter 5: Paper and Supplies
Ordering from CognitiveTPG
Printer parts, accessories, and small quantities of paper can be ordered directly from CognitiveTPG. While the CognitiveTPG part numbers are listed here for your convenience, keep in mind that these numbers may change before this guide is outdated. To place an order or get more non-technical information, call your CognitiveTPG representative or the sales line at (800) 732-8950.
CognitiveTPG is able to provide paper in small lots to facilitate product evaluation and testing. Contact your CognitiveTPG representative for more information on ordering.
Ordering thermal paper
Thermal paper specifications
The printer requires qualified thermal paper with the following dimensions:
Width Diameter Length
| 58 ± 0.2 mm (2.28 ± 0.01") | 90 mm max. (3.54") | 322' nominal |
| 60 ± 0.2 mm (2.36 ± 0.01") | 90 mm max. (3.54") | 322' nominal |
| 80 ± 0.2 mm (3.15 ± 0.01") | 90 mm max. (3.54") | 322' nominal |
| 82.5 ± 0.2 mm (3.25 ± 0.01") 90 mm max. (3.54") 322' nominal |
The paper must not be attached at the core. Use paper with a colored stripe at the end to indicate that the paper is running low, required when the printer is positioned vertically.
The above figures are based on a core diameter of 22 ± 0.5 mm (0.87") outside, 11.5 ± 0.5 mm (0.45") inside.
Qualified Paper Grades
Contact the converter of your choice to order paper. CognitiveTPG recommends the following paper grades produced by their respective manufacturers. There are a number of paper converters qualified to provide this paper, provided the POS rolls are from these recommended grades. Refer to the website www.CognitiveTPG.com for updates to this list.
Note: When changing paper type, you will need to set the printer to that paper type by sending the "Set paper type" command (1D 81 m n) or by changing the paper type setting in the configuration menu. (See Programming Guide for command usage or page 24 to enter the configuration menu.)
Monochrome (black ink) paper:
| Qualified manufacturers Phone/Fax Paper grade | ||
| Appleton Papers, Inc. (USA) Voice: (800) 922-1729 Alpha 400-2.3 (was T1030)825 E. Wisconsin Ave. Fax: (800) 922-1712 Alpha 800-2.4 (was T1012A) | ||
| Appleton, WI 54912 POS-Plus 600-2.4http://www.appletonideas.com | Alpha 900-3.4 (was Superior)All current Appleton papers are BPA-free | |
| Jujo Thermal Ltd. | Voice: 358 (0) 10 303 200 | AF50KS-E3 |
| P.O. Box 92 FI-27501 | Fax: 358 (0) 10 303 2419 | AP62KS-E3 |
| Kauttua, Finland | ||
| http://www.jujothermal.com/ | ||
| Kanzaki Specialty Papers (USA) | Voice: (888) 526-9254 | P30023 (was P-300), P31023 (was P-310), |
| 20 Cummings St. | Fax: (413) 731-8864 | P35024 (was P-350), P35032 (was P-354), |
| Ware, MA 01082-2002 | P39023 (BPA free, was P-390), P30521 (BPA free) | |
| http://www.kanzakiusa.com/ | P30523 (BPA free), P31523 (BPA free), P35532 (BPA free) | |
| Koehler UK Ltd. (Great Britain) | Voice: (44) 1322 661010 | KT55-F20 (WN-T55) |
| 2 White Oak Square | Fax: (44) 1322 614656 | |
| London Road | ||
| Swanley, Kent BR8 7AG, U.K. | ||
| http://www.koehlerpaper.com/en/-or- | ||
| Koehler AG Voice: (49) 7802 81-0 | ||
| Hauptstr. 2-4 Fax: (49) 7802 81-4330 | ||
| D-77704 Oberkirch, Germany | ||
| Mitsubishi Int'l Corp. (USA) | Voice: (212) 605-2000 | P-5035 |
| 655 Third Ave. | Fax: (212) 605-2597 | T-8051 |
| New York, New York 10017 | TP-8065 | |
| http://www.mitsubishicorp.com/us/en/ | PP-5051 | |
| OJI Paper Company Ltd. | Voice: (81)3-3563-1111 | KF-60 |
| Ginza 4-chome | Fax: (81)3-3563-1135 | PD-170R |
| Tokyo 104, Japan | PD-160R | |
| http://www.ojipaper.co.jp/english/ | ||
| Thermal Solutions Intl, Inc. | Voice: (800) 479-6070 | 19018RDT |
| 6740 Broadview Ave, Suite D | (904) 860-1966 | Features: 30% post-consumer waste, recycled/BPA free |
| Jacksonville, FL 32254 Fax: (904) 646-4530 | ||
| http://thermalsolutionsinternational.com | ||
| Two-color paper: | ||
| Qualified manufacturers Phone/Fax Paper grade | ||
| Mitsubishi Int'l Corp. (USA) | Voice: (212) 605-2000 | PB-770 (Blue and Black) |
| 655 Third Ave. | Fax: (212) 605-2597 | |
| New York, New York 10017 | ||
| http://www.mitsubishicorp.com/us/en/ | ||
Ordering miscellaneous supplies
Cash drawers
Order cash drawers from the following suppliers:
Cash Drawers Number
| NCR 7052-K657 | TM |
| M-S Cash Drawer Corp. EP-125 K series | ^TM , EP-127 ^TM , EP-102 ^TM |
| APG Cash Drawer Model 322 | TM |
| Indiana Cash Drawer Model SLD | TM |
Power supply and power cords
Other suppliers may use different part numbers.
Item Type Order Number
| 60-Watt power supply with attached cable to printer and U.S. power supply cord | TPG-K330 | |
| 60-Watt power supply, attached cable | TPG-K301 | |
| Power supply cord (to outlet) | United States | TPG-K320 |
| United Kingdom | TPG-K322 | |
| International | TPG-K326 |
| Communication cables | Length | Order Number |
| RS-232C 9-pin female (printer) to 9-pin female (ferrite-host) | (3 meters–9.8 feet) | TPG-K340 |
| USB | (2 meters~6 feet) | TPG-K345 |
| Ethernet | Not available |
Wall-mount kits Order Number
| Printer wall-mount kit: | TPG-K260 |
| Spill guards | Order |
| Spill Guards (qty. 30): | A799-K572-30 |
| Spill Guard (qty. 1): | 189-7940425 |
Documentation and utilities
| A799 Setup Guide* | A799-SUG0001 |
| A799 User Guide* | A799-UG00001 |
| A799 Programming Guide* | A799-PG00001 |
| A799 Service Guide(TPG certified service technicians only-Contact a sales representative to order)) | A79x-SERV001 |
| A799 Ethernet Setup Guide* | TPG-ETHSUG |
| CognitiveTPG LogoEZ colorization utility* | |
CognitiveTPG Receiptware marketing software*
* Downloadable from CognitiveTPG website http://www.CognitiveTPG.com (documentation provided in .pdf format)
COGNÍTÍVETPG