Nightwatch 2 - Tent Sierra Designs - Free user manual and instructions
Find the device manual for free Nightwatch 2 Sierra Designs in PDF.


User questions about Nightwatch 2 Sierra Designs
0 question about this device. Answer the ones you know or ask your own.
Ask a new question about this device
Download the instructions for your Tent in PDF format for free! Find your manual Nightwatch 2 - Sierra Designs and take your electronic device back in hand. On this page are published all the documents necessary for the use of your device. Nightwatch 2 by Sierra Designs.
USER MANUAL Nightwatch 2 Sierra Designs
PITCHING INSTRUCTIONS
Congratulations on the purchase of you new Sierra Designs tent! In order to familiarize yourself with your new tent, we recommend you "test pitch" it before embarking on your wilderness adventure.
PACKAGE INCLUDES: Tent body with attached Rain Fly, 1 Hooped Pole, 1 Hubbed Pole, Guy Cords, Stakes, Pole/Stake Bag, Stuff Sack.
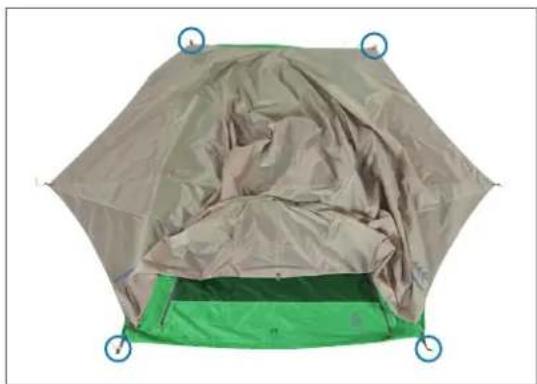
STEP 1: Find an even piece of ground; be sure area is clear of debris. Lay out your tent as shown. Stake the 4 corners (circled).
natural_image
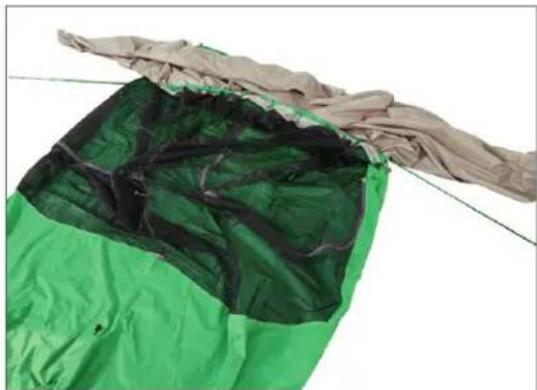
Top-down view of a green tent with a beige interior and blue circular markers at corners (no text or symbols visible)STEP 3: Locate the Green/Yellow sleeve under the fly at the front of the tent. Insert long Green/Yellow pole. Do not put in grommet.
natural_image
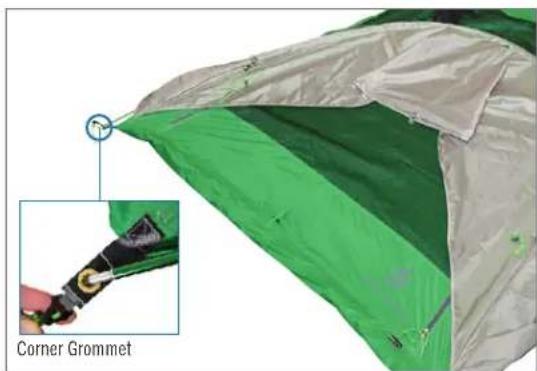
Close-up of a green and beige fabric bag with black stitching, partially lifted by strings (no text or symbols visible)STEP 5: Insert pole tip of front hoop pole in grommet at corner of tent. Push pole into sleeve attaching opposite pole tip to grommet on other side. Note: There will be a lot of tension.
natural_image
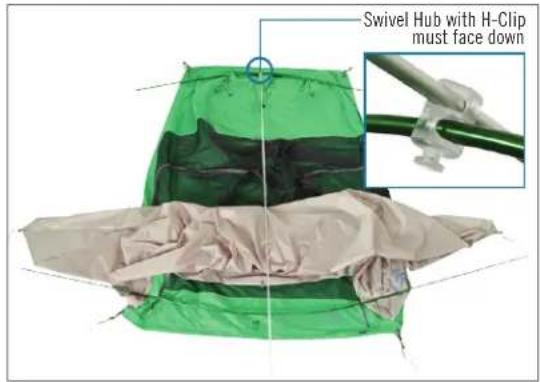
Close-up of a green and gray striped tent with a small inset showing a corner grommet tool (no text or symbols on the tent itself)STEP 2: Assemble poles. The long single Green/Yellow pole should go across front. The long Silver/Grey pole goes down the middle with the short hubbed Green/Yellow pole across the back. Make sure H-Clip is facing down.
text_image
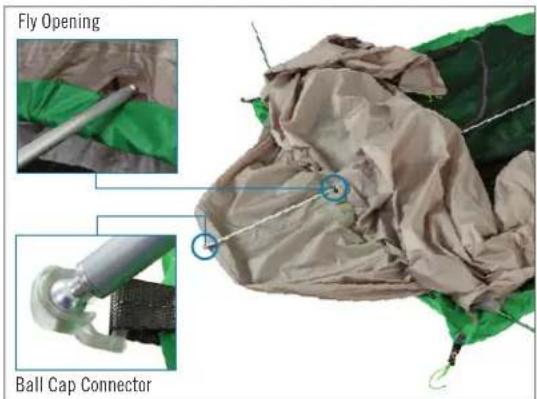
Swivel Hub with H-Clip must face downSTEP 4: Locate the small central opening in the fly at the apex of the hoop pole sleeve. Insert the Silver/Grey pole through the opening and connect the pole tip ball with the ball cap connector.
text_image
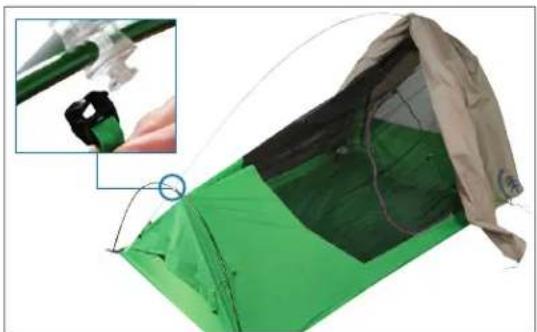
Fly Opening Ball Cap ConnectorSTEP 6: Insert rear pole in corner grommets and clip H-Clip on tent body to bottom of Swivel Hub (circled).
natural_image
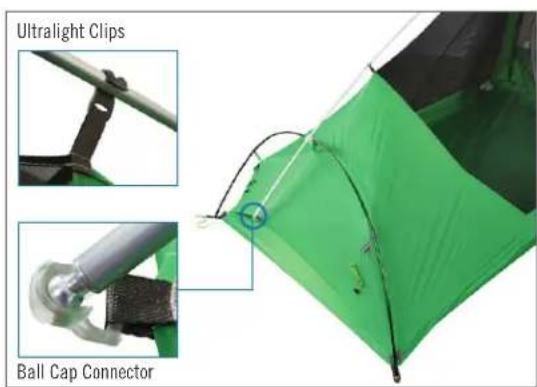
Green and beige camping tent with a small inset showing a green clip being inserted (no text or symbols visible)STEP 7: Attach all clips to the poles. Attach Ball Cap Connector to rear awning of tent.
text_image
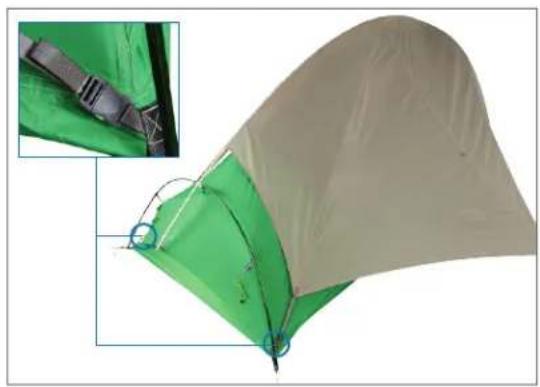
Ultralight Clips Ball Cap ConnectorSTEP 8: Pull attached fly over tent clipping to corner buckles. Stake out gear closets and your tent is pitched.
natural_image
Green tent with beige cover and attached cable, shown with an inset detail view (no text or symbols)NIGHTWATCH 2 (STANDARD & FL MODELS) USING YOUR TENT

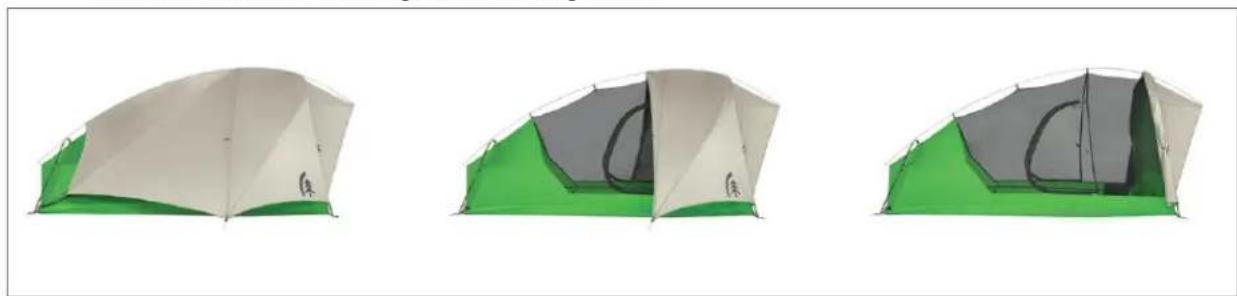
THREE PITCH CONFIGURATIONS: The Nightwatch features an integrated rainfly that can quickly and easily be deployed in 3 versatile configurations.
Full Rain Protection Partial Nightwatch Full Nightwatch
natural_image
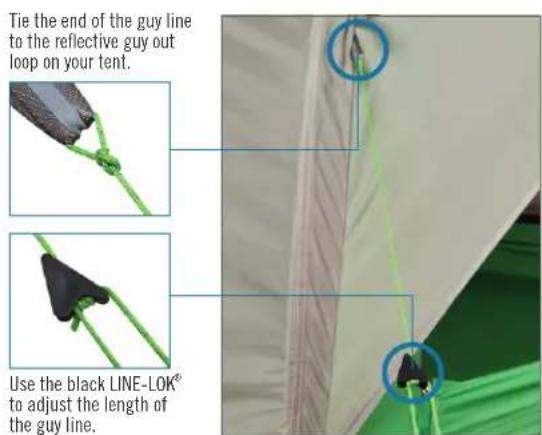
Three identical camping tent designs shown in white, green, and gray, with no text or symbols visible.GUYING OUT YOUR TENT: Your tent includes guy out loops, guylines, and stakes. It is good practice to always guy out your tent, but is absolutely necessary when it's windy.
text_image
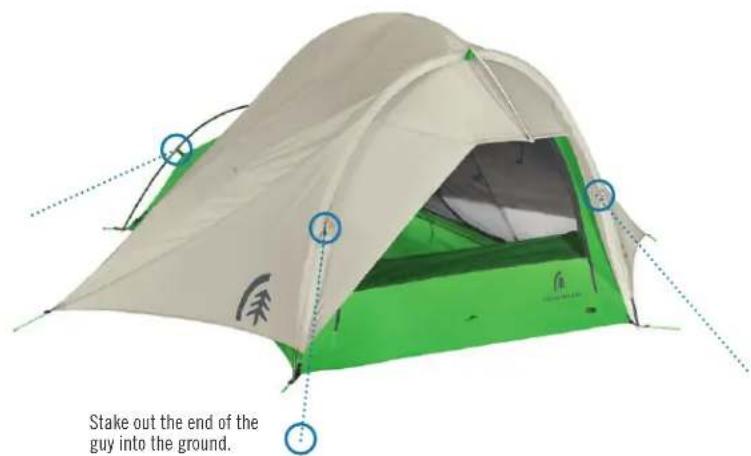
Tie the end of the guy line to the reflective guy out loop on your tent. Use the black LINE-LOK® to adjust the length of the guy line.Guy out your Nightwatch 2 tent where shown below to prevent pole rotation/breakage during high winds.
text_image
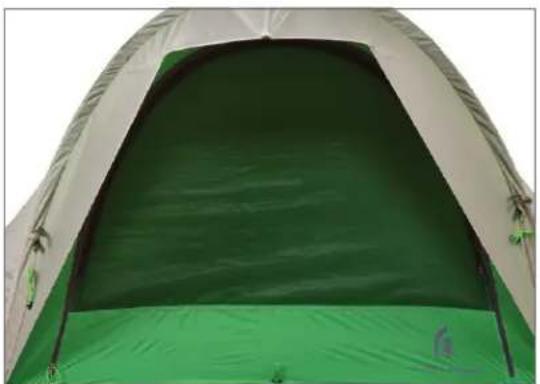
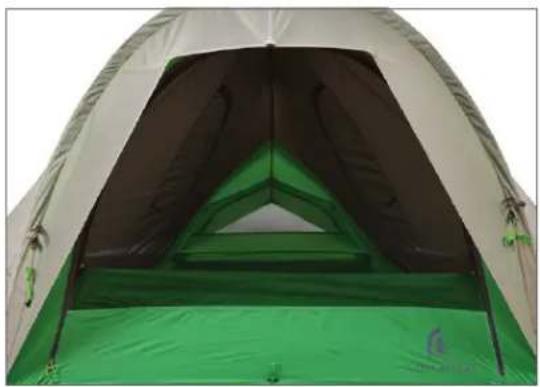
Stake out the end of the guy into the ground.VENTILATION / VISIBILITY: Because we have replaced the vestibule with an awning above the door you have the ability to control the visibility and ventilation during a downpour. Simply zip up or zip down the waterproof for the coverage you desire.
natural_image
Interior view of a green camping tent with a dark green opening (no text or symbols visible)Zip Up Zip Down
natural_image
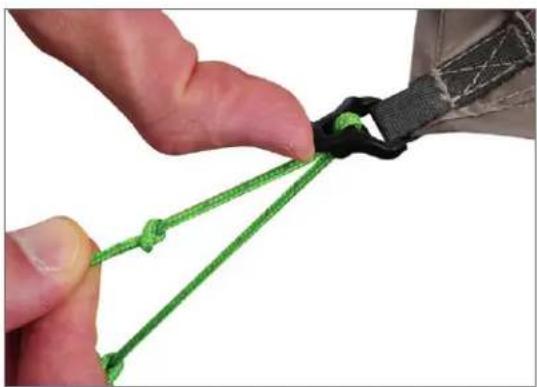
Interior view of a camping tent with green canopy and black interior (no text or symbols visible)STRING LOCKS: All tent and awning stake-out points feature String Locks. Lift up on the tab to decrease tension. Pull on the knotted end to increase tension.
AWNING POLE: Your tent comes with an awning pole already in its sleeve. We recommend leaving this pole in place and rolling your tent around it for storage. In the unlikely event that a pole breaks, a new pole can be reinserted. Please call our warranty department for replacement. 800-635-0461
natural_image
Close-up of hands tying a green rope knot with a black strap (no text or symbols visible)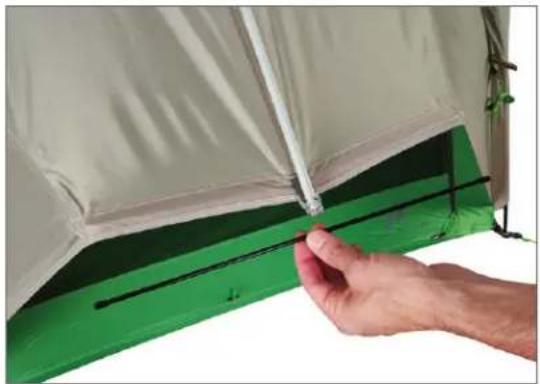
natural_image
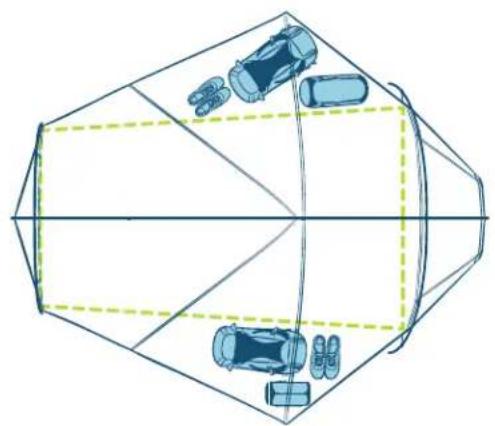
Close-up of a person adjusting a white and green tent cover with a black line (no text or symbols visible)GEAR STORAGE: Your SD tent provides gear storage out of the doorway of the tent with access from INSIDE through the "fair weather" doors or OUTSIDE by loosening the String Lock.
natural_image
Top-down diagram of a vehicle's perspective view showing front, top, and side views with no text or symbols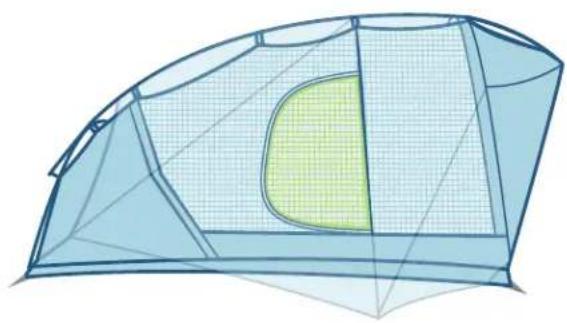
natural_image
3D wireframe diagram of a tent structure with a highlighted green space (no text or symbols)SIERRA DESIGNS TENT USER MANUAL

DANGER
CARBON MONOXIDE GAS WILL KILL YOU
Stoves, heaters, grills, lanterns, candles, and other fuel-burning devices that burn propane, natural gas, charcoal, kerosene, coal, or other fuels produce a toxic gas called carbon monoxide. Because carbon monoxide gas is invisible, odorless, and colorless, a dangerous level of carbon monoxide gas can accumulate in a tent which cannot be detected by sight, smell, or taste. For these reasons:
• DO NOT use matches, lighters, stoves, heaters, grills, lanterns, candles, cooking equipment, or other fuel-burning devices inside or near a tent
• DO NOT build fires inside or near a tent
• DO NOT leave campfires unattended
PROTECT YOUR CHILDREN
• DO NOT leave children unattended inside a tent or in camp
• DO NOT allow children to assemble a tent
- DO NOT allow children to enter or exit a tent except through the door
• DO NOT allow children to remain in a closed-up tent on hot days
Your failure to follow these warnings will cause death, serious injury, or permanent disability to you or others.
COPING WITH THE UNEXPECTED
Even though Sierra Designs uses only the best quality materials, accidents and normal wear and tear do take their toll on your tent.
POLES
Before pitching your tent, be sure all sections of your poles are fully engaged at their joints. Gaps at section joints will expose the pole inserts to forces for which they were not intended. This can cause them to bend or break. Tent pole inserts are sufficiently strong for their function, but only when they are fully joined and connected with their mating tube sections. While assembling or folding your poles, be sure not to allow pole sections to snap against one another as their impact can cause denting of the tube ends and stress fractures. Try to avoid stepping on or striking your poles on rocks during setup. Since pole damage most frequently occurs during pitching or when horseplay occurs around the tent, be sure not to bend your poles into tighter curves than they naturally assume in the tent – take extra caution in high wind situations. Excessive bending or distortion of the poles can occur in a free-standing tent if it is picked up by only one of its poles while moving the tent. Move a free-standing tent by grasping it at the pole intersections. A slightly bent pole does not lose its strength and does not require replacement unless it distorts the shape of the tent. Proper care of poles includes keeping them clean and free of dirt and salt. Always rinse poles with fresh water if exposed to salt water or after coastal camping. Occasional lubrication of the section joints with silicone spray will help the joints slide together freely and will ward off ice-forming problems in snow.
SHOCKCORD
Your Sierra Designs poles are assembled with extreme weather shockcord – the only shockcord created especially to withstand the rigors of serious backpacking/mountaineering use. Keeping your poles in a fully, or even a partially extended position during long-term storage will relieve the tension on the elastic cord and help to insure maximum performance and reliability. When folding your poles, be sure to fold from the center out so as not to place uneven tension on the elastic cord. Occasionally the shockcord in your poles may break, pull out of the pole, or just go limp. This is not a disaster, the pole is still perfectly functional, the tension on the pole when it is set in place on the tent will keep it together. Finish your trip and return the pole to the Sierra Designs Warranty Department at your leisure for repair.
ZIPPERS
Always be gentle when opening zippers, avoid standing on them and try to limit exposing them to dirt and grit. Taking these precautions combined with frequent cleaning will protect them against premature failure.
TEARS AND DAMAGE
Despite your best efforts, sometimes damage does occur to your tent. Waterproof self-adhesive repair tape is sold at many outdoor stores and several pieces can be tucked into the tent bag without adding any appreciable weight. Urethane-based seam sealing products can be used to plug small holes on polyurethane-coated fabrics. Silicone-based seam sealing products can be used to plug small holes on silicone-coated fabrics. Duct tape also works well for minor field repair. It is a good idea to carry one or a combination of these things with your tent in the event the tent is damaged while in use.
CONDENSATION
Condensation is the build-up of moisture on the inside of your rainfly and tent walls due to a temperature difference between the inside and outside of your tent. Condensation occurs mostly when the conditions are cold, rainy, or humid, although it can occur at any time. The best way to minimize condensation is to increase the ventilation within your tent and between the tent body and fly. Completely buying out the rainfall often helps, as does leaving the door window or vestibule door open as much as possible. We recommend carrying a small micro fiber towel to wipe condensation away as necessary.

Sierra Designs
6235 Lookout Rd Suite B,
Boulder, CO > USA 800.635.0461
SierraDesigns.com

KEEP ALL FLAME AND HEAT SOURCES AWAY FROM THIS TENT FABRIC
This tent is made with flame resistant fabric which meets CPAI-84 specifications. IT IS NOT FIREPROOF. The fabric will burn if left in continuous contact with any flame source. The application of any foreign substance to the tent fabric may render the flame-resistant properties ineffective.
Your failure to follow these warnings could cause death, serious injury, or permanent disability to you or others.
REFER TO ASSEMBLY INSTRUCTIONS FOR ADDITIONAL SAFETY INFORMATION
HOW TO CARE FOR YOUR TENT
WEATHERPROOFING YOUR TENT
You have just purchased a tent that is factory seam sealed and therefore requires no additional sealing. [Note: If you purchased an Elite tent it is NOT seam sealed] While seam tape significantly increases the weatherproofness of your tent, additional seam sealing will improve the performance of your tent in rainy conditions. For additional weatherproofness, seal all places where attachments are sewn to the fly, including webbing, Velcro, snaps, guy-outs, and zipper tracks. The best way to seal your tent is to use a urethane-based seam sealer for polyurethane-coated fabrics or a silicone-based seam sealer for silicone-coated fabrics. Run a thin bead around the base of the attachment, where it is sewn to the fly. Do this to attachments both on the inside and the outside of the tent.
CARING FOR YOUR TENT ON THE TRAIL
It is important to select a site which has been cleared of any sharp objects such as rocks or sticks. Many people prefer to use footprints under the tent for additional protection. If you choose to do so, make sure the floor of the tent completely covers the footprint, or else the sheet will collect rain. Tent footprints are available for select Sierra Designs tents on our website.
STAKING AND GUYING OUT YOUR TENT
Most Sierra Designs tents are free-standing, not requiring the use of stakes in order to pitch the tent. This is a matter of convenience, allowing quick set-up and easy moving and cleaning of the tent. All tents, free-standing or not, must be staked out properly in order to achieve full structural integrity and prevent wind damage. No lightweight, back-packing style tent, whether rated at 3-season or 4-season, is capable of withstanding strong wind gusts without damage unless anchored and guyed properly. Guying out your tent can increase rain protection and ventilation and greatly enhance strength and wind resistance.
FIRE
Your tent is constructed of flame-retardant materials [with the exception of our Elite tent models that do not have flame-retardant materials], however these material will melt if exposed to sufficient heat or open flame. Use prudence in positioning your tent near campfires, stoves, barbecues, etc.
Caution: Sierra Designs is absolutely against cooking inside a tent.
Asphyxiation, severe or even fatal burns are possible if a stove is used in a tent or vestibule without adequate ventilation. Additionally, a hot stove can melt through your tent floor if the stove is not rigorously insulated; and pots of hot liquid, if left uncovered, may create a condensation in the tent.
ULTRAVIOLET (UV) LIGHT
UV light is one of the most damaging of all the elements. When exposed to prolonged and extensive sunlight most fabrics will fade, lose strength, and eventually break down. Try to minimize exposing your tent to the sun. Store it during the day or pitch it in shady areas.
ANIMAL HAZARDS
Animal damage to tents is all too common, but is usually easily avoidable: Never store food in your tent!
WHAT TO DO WHEN THE TRIP IS OVER
It is important to dry your tent completely before returning it to its stuff sack. If stored wet, mildew will likely occur. Mildew damage is not covered under warranty. Hand wash your tent with a mild soap and a sponge. Do not use harsh detergents, chemicals, or abrasive materials. Dirt particles left in the weave of the material speed up the deterioration of the fabric. Clean tents last longer. Never machine-wash your tent! Over extended periods, store your tent loosely, out of the bag in a cool, dry environment.
SIERRA DESIGNS WARRANTY AND REPAIR SERVICE
We maintain a full repair facility to assist you with any problems you may have with any Sierra Designs product. We offer a limited lifetime warranty against defects in materials and workmanship, and for a nominal charge we will repair damage due to accidents or normal wear and tear. This warranty does not cover damages caused by improper care, accidents, or the natural breakdown of materials over extended use and time. State law requires all items returned for repair must be clean. Sierra Designs does not wash tents! Dirty tents will be returned to sender for cleaning. You may contact the Warranty and Repair Department with comments or questions online at http://www.sierradesigns.com/support/parts-warranty-info or by calling 800-736-8592 during regular business hours.