
LED-3269 - TV DENVER - Free user manual and instructions
Find the device manual for free LED-3269 DENVER in PDF.


User questions about LED-3269 DENVER
0 question about this device. Answer the ones you know or ask your own.
Ask a new question about this device
Download the instructions for your TV in PDF format for free! Find your manual LED-3269 - DENVER and take your electronic device back in hand. On this page are published all the documents necessary for the use of your device. LED-3269 by DENVER.
USER MANUAL LED-3269 DENVER
HD LED TV with DVB-T2/S2/DVB-C and H.265/HEVC Support
Model: 26-DEL
natural_image
Line drawing of a flat-screen monitor with a blank screen and a stand (no text or symbols)User's Guide
NOTE:
Read all of the instructions before using this TV and keep the instruction manual in a safe place for future reference.
Contents
| Safety Information | 1-3 |
| Product Introduction | 4 |
| Connections | 5 |
| Remote Control | 6-7 |
| Select Input Source | 8 |
| First Time Installation | 9-10 |
| Main Menu Operation | 11-13 |
| OSD MENU | 14-25 |
| 1.Picture menu | 14-15 |
| 2.Sound menu | 16 |
| 3.Time menu | 17-18 |
| 4.Lock menu | 19-21 |
| 5.Setup menu | 22-25 |
| 6.Screen menu | 26 |
| Media Operation | 26-30 |
IMPORTANT SAFETY INSTRUCTIONS - READ CAREFULLY BEFORE USE.
Take note of the following safety information which appears on the back of the TV.

CAUTION TO PREVENT ELECTRICAL SHOCK, DO NOT REMOVE ANY COVER SCREWS, NO USER SERVICEABLE PARTS INSIDE, REFER SERVICING TO QUALIFIED SERVICE PERSONNEL.

This symbol indicates that there are important operating maintenance instructions in the literature accompanying this unit.

This symbol indicates that dangerous voltage constituting a risk of electric shock is present within this unit.
Keep these instructions
• Do not use this TV near water.
• Clean only with a slightly damp cloth.
• Do not block any ventilation openings.
• Install in accordance with the supplied Quick Start Guide and this User Guide.
- Protect the power chord from being walked on or pinched, particularly at plugs, and the point where it exits from the TV.
- Do not allow the power chord to overhang the edge of a table.
• Unplug this TV during lightening storms or when unused for long periods of time.

WARNING! TO REDUCE THE RISK OF FIRE OR ELECTRICAL SHOCK, DO NOT EXPOSE THIS TV TO RAIN OR MOISTURE. THE TV MUST NOT BE EXPOSED TO DRIPPING AND SPLASHING AND NO OBJECTS FILLED WITH LIQUIDS SHOULD BE PLACED ON THE TV.
NOTE: No naked flames such as candles should be placed on the TV.
IMPORTANT SAFETY INFORMATION (Continued)
This unit has been produced according to all current safety regulations. The following safety tips should safeguard users against careless use and the dangers connected with such use.
- Although this appliance has been carefully manufactured and rigorously checked prior leaving the factory, as with all electrical appliances it is possible for problems to develop. If you notice smoke, an excessive build up of heat or any other unexpected phenomena, you should disconnect the plug from the mains power socket immediately.
- Ensure that the unit is sufficiently ventilated! Never place next to or underneath curtains!
- The mains plug or appliance coupler is used as the disconnect device, the disconnect device shall remain readily operable.
- This set should only be connected to a mains power supply which matches that stated on the label on the rear of the TV – do not attempt to connect it to any other type of supply.
- The socket – outlet must be installed near the equipment and easily accessible.
- To prevent overload, don't share the same mains supply socket with too many other items of equipment.
- Apparatus with Class 1 construction shall be connected to a mains socket outlet with a protective earthing connection.
- Keep away from rodents. Rodents enjoy biting into electric flexes.
- Always hold the plug when pulling out the plug from the mains supply socket. Do not pull on the flex, the flex can become overloaded and cause a short circuit.
- Set up the unit so that no one is able to trip over the flex.
- Do not place heavy items on the flex, which may damage it.
- Take note that the flex cannot be reached and pulled by young children, avoiding injury.
- Do not set up the unit near to heat sources. The casing and the flex could be damaged by the impact of heat.
- The screen is made of plastic and can break if damage is done to it. Be careful when collecting sharp edged plastic splinters to avoid injury.
- Avoid placing the unit on any surfaces that may be subject to vibrations or shocks.
- To protect the unit during a thunderstorm unplug the AC power cable and disconnect the aerial. Caution: Do not touch the aerial (RF) connector.
- When you leave your home for long periods of time, unplug the AC power cable for safety reasons.
- The unit becomes warm when in operation. Do not place any covers or blankets on the unit in order to prevent overheating. The ventilation holes are not to be blocked. Do not set up near radiators. Do not place in direct sunshine. When placing on a shelf leave 5 cm (2") free space around the whole unit.
- Do not allow water or moisture to enter the TV. Do NOT use in wet or moist areas such as Bathrooms, steamy kitchens or near swimming pools.
- Do not use this unit when moisture condensation may occur
- Any repairs must be carried out by qualified personnel only.
- Do not open this unit. A non-expert attempting to repair the unit could be dangerous and potentially cause a fire hazard.
IMPORTANT SAFETY INFORMATION (continued)
- Liquids spilt into the unit can cause serious damage. Switch the set OFF and disconnect the mains power supply, then consult a qualified service person before attempting to use the unit again.
- Do NOT remove the safety covers. There are no useable or serviceable parts inside. You may invalidate the warranty. Qualified personnel must only service this apparatus.
- Do NOT tap or shake the screen, you may damage the internal circuits. Take good care of the remote control, do not drop.
- Never place hot objects or open flame sources on or close to the TV.
• High temperatures can melt plastic and lead to fires.
- To clean the TV use a soft dry cloth. Do NOT use solvents or petrol based fluids. For stubborn stains, you may use a damp cloth with dilute detergent.
Headphone Warning
Loud music can damage your hearing irreversibly, therefore do not set the volume to a high level when listening through headphones, particularly for lengthy listening periods.
Where to install
Locate the television away from direct sunlight and strong lights, soft indirect lighting is recommended for comfortable viewing. Use curtains or blinds to prevent direct sunlight falling on the screen. Place the TV on a sturdy platform of which the surface should be flat and steady. This will prevent it from falling over.
Make sure the television is located in a position where it cannot be pushed or hit by objects, as pressure will break or damage the screen, and so that small objects cannot be inserted into the ventilation slots or openings in the cabinet.
Smell/odor from TV
New televisions may produce an unusual smell or odor when first turned on.
Due to the manufacturing process of components, televisions and other electronic products can have parts that may produce a smell after the product is first turned on and warms up. The smell will usually dissipate within a few days of use and does not return.
This is normal and occurs with many electronic products. Please ensure there is sufficient ventilation around the TV and in the room and the odor will dissipate.
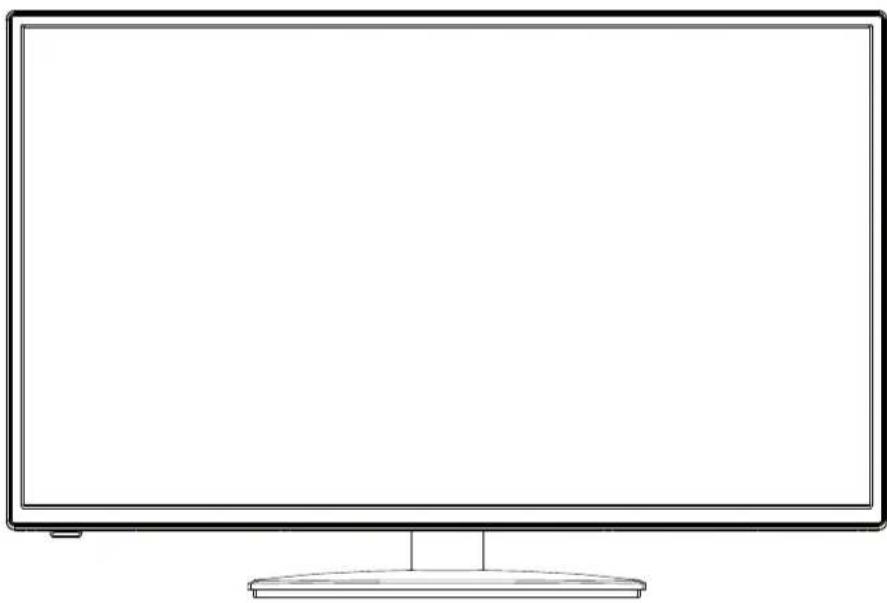
Front View

text_image
LED indicator Remote Control window(keep clear)The functions of the TV buttons are described below.
POWER/STANDBY: Turn on/off the TV set.
INPUT: Press to select the source.
MENU: Press to display the OSD menu, Press again to exit the menu.
CH+/CH-: Press to scan through channels.
They are also can be used to move down/up in the OSD menu screen.
VOL+/VOL-: Press to adjust the volume.
They are also can be used to move left/right in the OSD menu screen.
VOL+ button can be used to skip forward to next menu.
natural_image
Technical line drawing of a mechanical or electrical enclosure with multiple horizontal slats and a central rectangular component (no text or symbols)
text_image
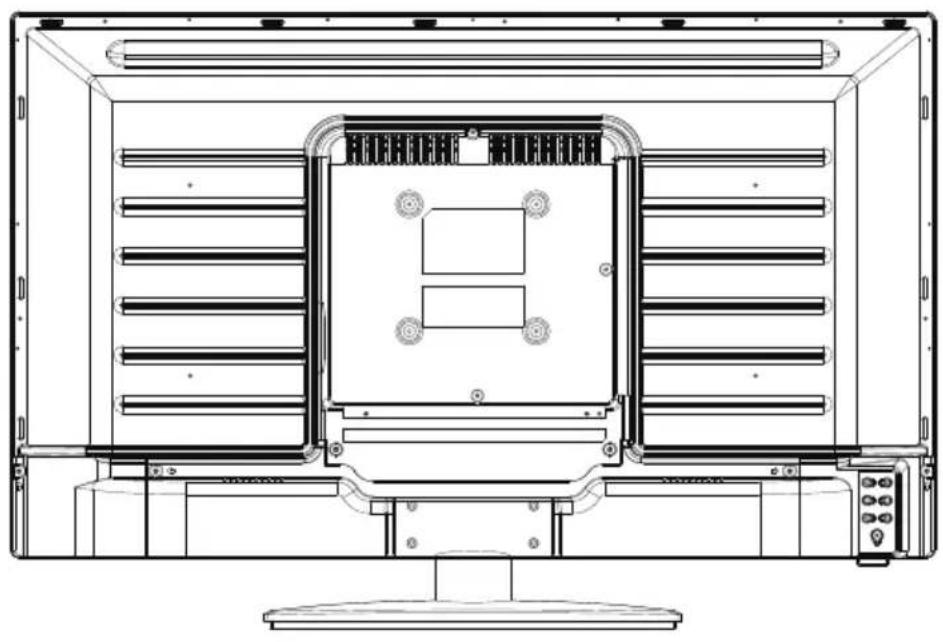
HDMI2 HDM13 COAX Comm SN Litter 25-8 Mini AV Mini YPDPr USB ∅| PC AUDIO | SCARTVGA | TV1(S2) TV2( )T2/C | HDMI1 |
VGA: For PC display. Connect it to the D-Sub 15 pins analog output connector of the PC.
PC AUDIO: Connect it to the audio output terminal of PC.
SCART: Connect them to the SCART video output terminal of DVD.
TV1(S2): Connect a Satellite signal.
TV2(T2/C): To connect to the aerial socket on the wall with the RF coaxial cable.
HDMI: Connect DVD/Blu-ray player or other equipment.
Coax: Digital output to AV receiver.
Common Interface: CI slot.
MINI AV: Connect it to the audio & video output terminal of DVD with the Converter cable. (Audio terminals are shared with YPbPr)
MINI YPbPr: Connect it to the YPbPr video output terminal of DVD with the Converter cable.
USB: Connect to USB device for multimedia.
Ω : Connect it to your headphone or other audio equipment.
The remote control is using Infra-Red(IR). Point it towards the front of the LED TV. The remote control may not work correctly if it is operated out of range or out of angle.
text_image
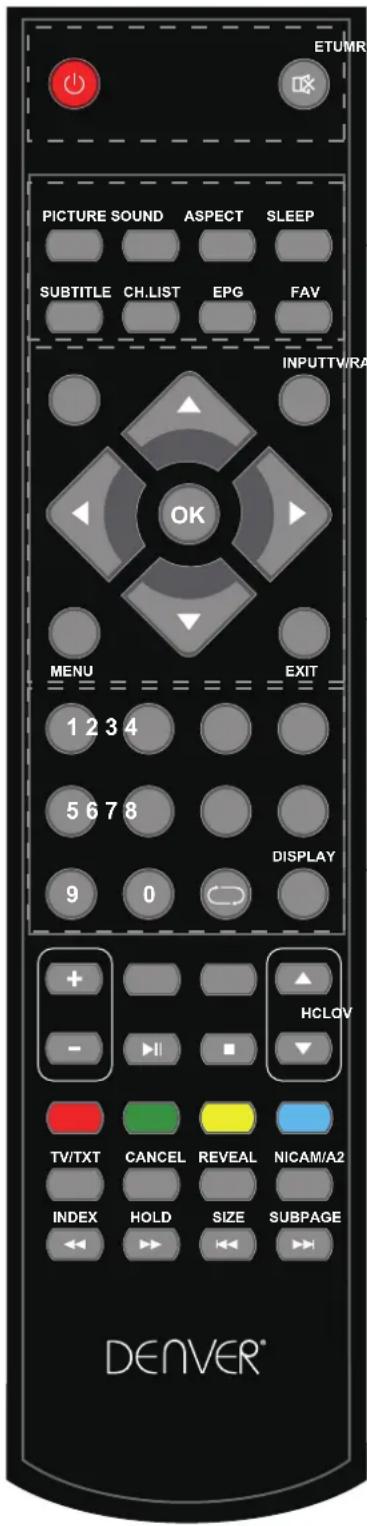
ETUMR PICTURE SOUND ASPECT SLEEP SUBTITLE CH.LIST EPG FAV INPUTTV/RA OK MENU EXIT 1 2 3 4 5 6 7 8 DISPLAY 9 0 + - HVLOV - ▶ ■ TV/TXT CANCEL REVEAL NICAM/A2 INDEX HOLD SIZE SUBPAGE DENVER®POWER(red button): Turn the TV on/standby.
MUTE: Press to mute the sound, press again or press VOL+ to unmute.
PICTURE: Select the picture mode.
SOUND: Select the sound mode.
ASPECT: Adjust picture size
SLEEP: StandbyTimer
SUBTITLE: Turn on/off the subtitle display in DTV mode
CH.LIST: Display the programs list.
EPG: To show the Electronic Program Guide during no-menu state only in DTV mode.
FAV: Display the favorite program list.
Buttons for Basic operating
TV/RADIO: Switch to TV/RADIO.
INPUT : Display the input source menu.
THUMBSTICK( ◀ / ▶ / ▲ / ▼ OK): Allows you to navigate the on-screen menus and adjust the system settings to your preference.
MENU: Press to display the OSD menu.
EXIT: Press to exit the OSD menu.
NUMBER BUTTONS: Choose channel directly. Press number buttons and press OK button to play the channel.
: Return to the previous channel viewed.
DISPLAY: Press to display the current mode's information.
text_image
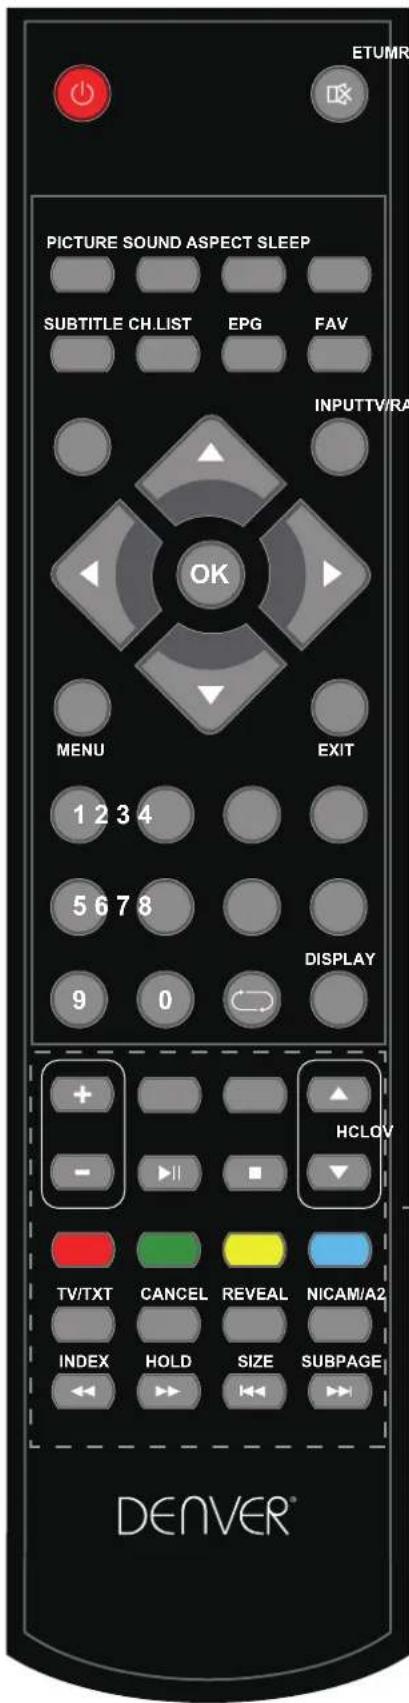
ETUMR PICTURE SOUND ASPECT SLEEP SUBTITLE CH.LIST EPG FAV INPUTTV/RA OK MENU EXIT 1 2 3 4 5 6 7 8 DISPLAY 9 0 + HCLOV - -VOL +/- : Volume +/- .
CH ▲/▼: Channel/Program +/-
▶II : Play/pause program.
■ : Stop program.
◀ : Fast reverse.
▶▶ : Fast forward.
◀◀ : Previous chapter.
▶▶ | : Next chapter.
Colour buttons : Short cuts-follow the coloured links in the text.
Buttons for TELETEXT operating
You could use the buttons only in TELETEXT.
TV/TXT: Turn off/on the Teletext display.
CANCEL: Cancel the Teletext display.
REVEAL: Reveal any hidden text.
NICAM/A2: TV Nicam/A2 select.
INDEX: Go to index.
HOLD: Hold or carry on the current subpage.
SIZE: Press to see top half of page double size. Press again to see the bottom half of page double size. Press again for normal size.
SUBPAGE: Press to enter subpages, press again to cancel.
SELECT INPUT SOURCE
text_image
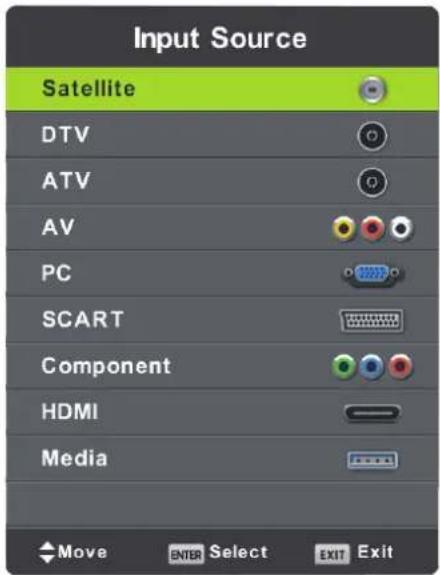
Input Source Satellite DTV ATV AV PC SCART Component HDMI Media Move ENTER Select EXIT ExitPress INPUT button to display the input source list,
Press ▼ / ▲ or OK button to select the input source you want to,
Press OK button to enter the input source,
Press EXIT button to quit.
First Time Installation
Connect an RF cable from the Tv's input called "RF-In" and to your TV Aerial socket.
- Press the menu button
- Press ▶ button, enter "SETUP" page, choose First Time Installation by pressing ▶ button.
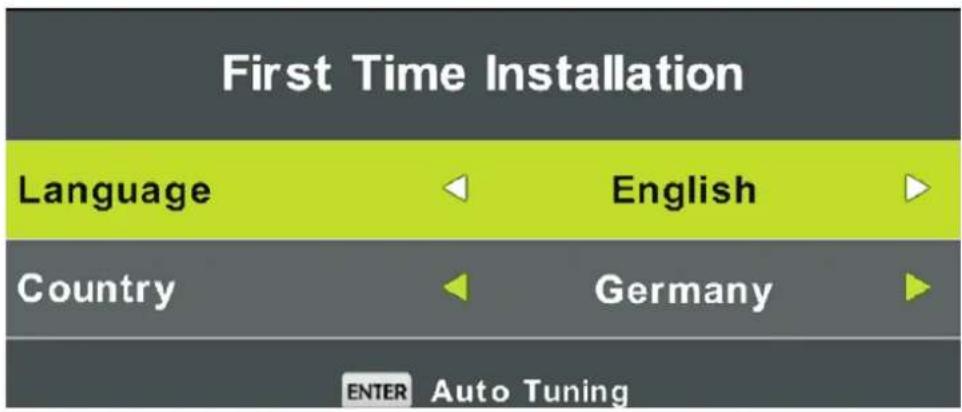
Select Language
Press ◀ / ▶ button to select the language to be used for menus and message.
Select Country
Press ▼ / ▲ button to highlight country menu.
Press ◀ / ▶ button to select the country you want to.
Press OK for Auto Tuning.
text_image
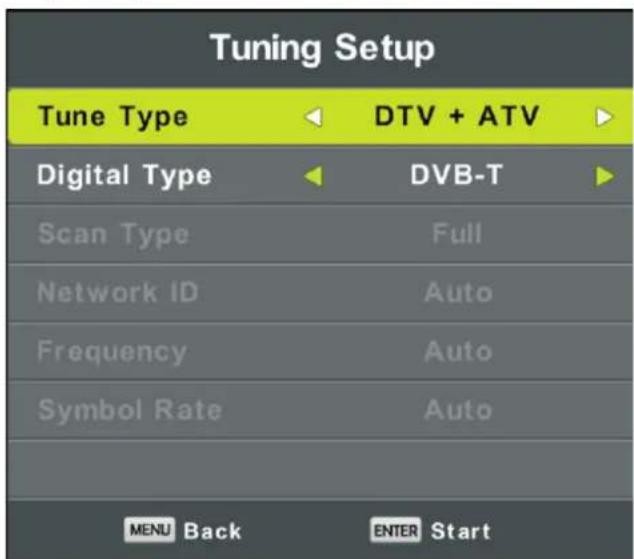
First Time Installation Language English Country Germany ENTER Auto TuningTune Type :Select Tune Type as DTV+ATV or DTV, you can choose Air(DVB-T), Cable(DVB-C), in "Digital Type".
Air(DVB-T) Auto Tune:
text_image
Tuning Setup Tune Type DTV + ATV Digital Type DVB-T Scan Type Full Network ID Auto Frequency Auto Symbol Rate Auto MENU Back ENTER StartSelect DTV+ATV in "Tune Type", and DVB-T in Digital Type, then press OK to start tuning.
Cable (DVB-C) Auto Tune:
| Tuning Setup | |
| Tune Type | DTV + ATV |
| Digital Type | DVB-C |
| Scan Type | Full |
| Network ID | Auto |
| Frequency | Auto |
| Symbol Rate | Auto |
| MENU Back ENTER Start | |
Select DVB-C in "Digital Type":
There are 2 options for DVB-C "Scan Type":
1.Full: Select "FULL" in "Scan Type" and choose "OK" to start Auto Search for the channels.
2. Network: Select "Network" in "Scan Type" Input the number of the Network ID of the channel and choose the frequency and press "OK" button to find specific TV channel. (Please notice you need to know the Network ID + Frequency+Symboal Rate from your TV provider).
Satellite(Auto Tune):
| Tuning Setup | ||
| Tune Type | DTV | |
| Digital Type | Satellite | |
| Satellite | 01 HOTBIR... | |
| Scan Mode | Default | |
| Channel Type | Free+Scaram... | |
| Service Type | All | |
| MENU Back ENTER Start | ||
Select "Satellite" in "Digital Type":
Operations in Satellite Auto Tune menu are show in the following table:
| Option Value | |
| Satellite 60 satellite for searching | |
| Scan Mode Default,Blind Scan,Network | |
| Channel Type Scramble,free,free+Scaramble | |
| Service Type All,Radio,DTV | |
Main Menu Operation
Channel Menu
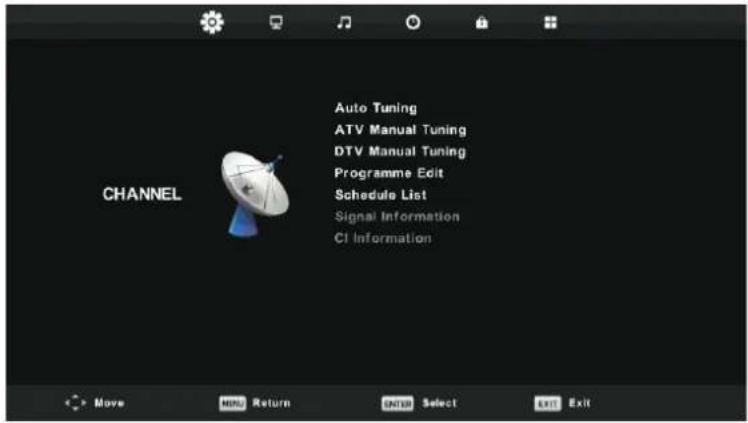
Press MENU button to display the main menu.
Press ◀ / ▶ button to select CHANNEL in the main menu.
text_image
CHANNEL Auto Tuning ATV Manual Tuning DTV Manual Tuning Programme Edit Schedule List Signal Information CI Information Move NEW Return ENTER Select Exit Exit- Press ▼ / ▲ button to select the option that you want to adjust in the CHANNEL menu.
- Press OK button to adjust.
- After finishing your adjustment, Press OK button to save and return to the previous menu.
Auto Tuning
Refer to P. 9 and P.10.
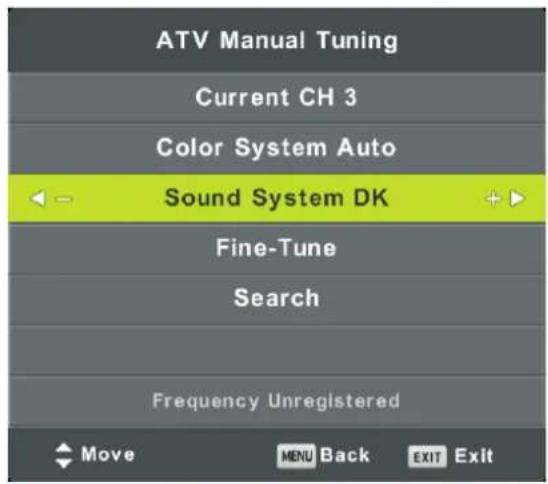
ATV Manual Tuning
Press MENU, then choose ATV Manual Tuning.
text_image
ATV Manual Tuning Current CH 3 Color System Auto Sound System DK Fine-Tune Search Frequency Unregistered Move MENU Back EXIT ExitCurrent CH
Set the channel number.
Color System
Select the color system
(Available System: AUTO, PAL, SECAM)
Sound System
Select the Sound system
Fine-Turn
Adjust the frequency of the channel finely.
Search
Start searching channel by presing ▶ button.
Once a channel is found, it will automatically stored.
Repeat the step by changing the channel number.
DTV Manual Tuning
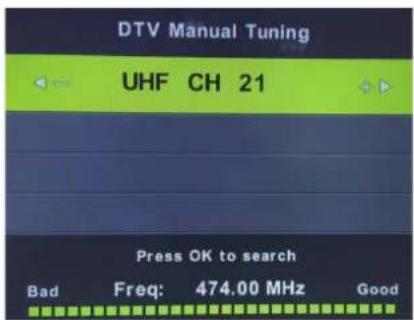
DVB-T Manual Tuning:
text_image
DTV Manual Tuning UHF CH 21 Press OK to search Bad Freq: 474.00 MHz GoodEnter the DTV Manual Tuning. Press ◀/▶ button to adjust the channel and press OK button to manual tune.
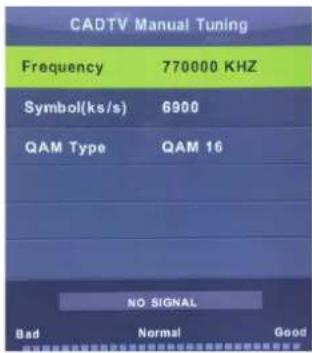
DVB-C Manual Tuning:
text_image
CADTV Manual Tuning Frequency 770000 KHZ Symbol(ks/s) 6900 QAM Type QAM 16 NO SIGNAL Bad Normal GoodEnter the CADTV Manual Tuning. Press ▲ / ▼ button to select the item and press ◀ / ▶ button to adjust the "Frequency", "Symbol", "QAM Type" and press OK button to manual tune.
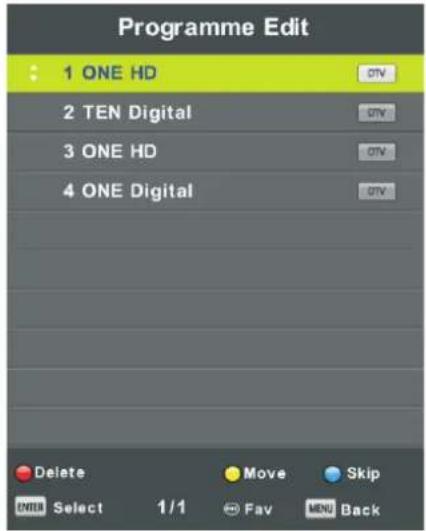
Program Edit
Press ▼ / ▲ button to select Program Edit, then press OK button to enter sub-menu.
text_image
Programme Edit 1 ONE HD 2 TEN Digital 3 ONE HD 4 ONE Digital Delete Move Skip ENTER Select 1/1 Fav MOV Back
The three colored key is the shortcut key for programming the channel.
First press ▼ / ▲ to highlight the channel you want to select, then:
Press the Red button to delete the program in the list.
Press the Yellow button to move the channel in favorite list.
Press the Blue button to skip the selected channel.
Press Fav button to add or remove the channel to/from your favorite list.
(Your TV set will skip the channel automatically when using CH+/- to view the channels.)
Signal Information
Press ▼ / ▲ button to select Signal Information, press the OK button to see the detail information about the signal. Only available when there is signal in DTV.
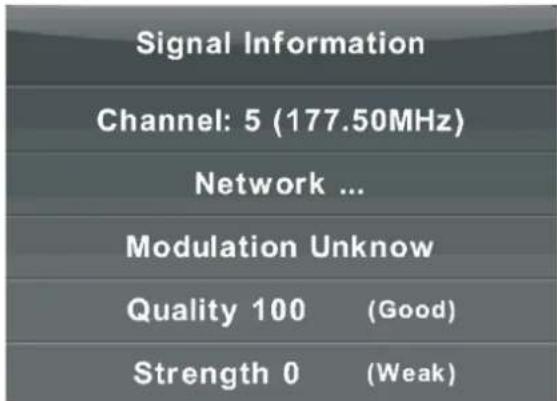
text_image
Signal Information Channel: 5 (177.50MHz) Network ... Modulation Unknow Quality 100 (Good) Strength 0 (Weak)Picture Menu
Press MENU button to display the main menu.
Press ◀ / ▶ button to select PICTURE in the main menu.
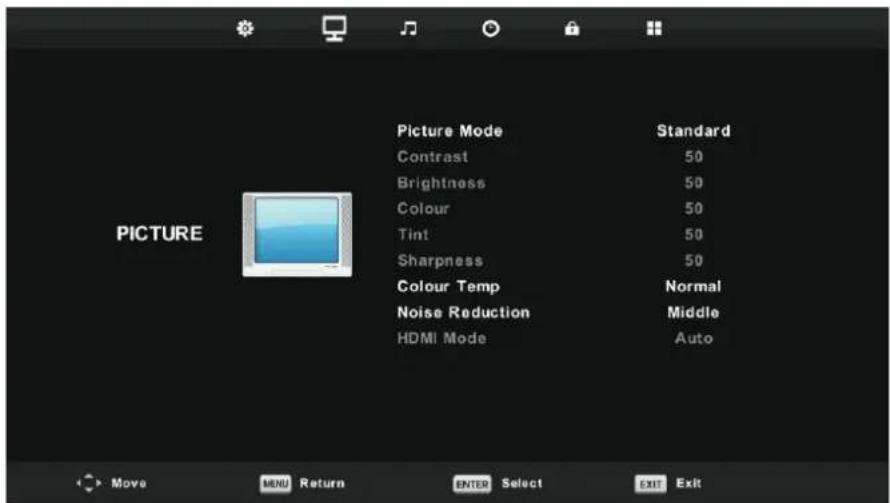
text_image
Picture Mode Contrast Brightness Colour Tint Sharpness Colour Temp Noise Reduction HDMI Mode Standard 50 50 50 50 Normal Middle Auto- Press ▼ / ▲ button to select the option that you want to adjust in the PICTURE menu.
- Press OK button to adjust.
- After finishing your adjustment, Press MENU button to save and return back to the previous menu.
Picture Mode
Press ▼ / ▲ button to select Picture Mode, then press OK button to enter sub-menu.
You can change the value of contrast, brightness, color, sharpness and tint when the picture is in
Personal mode.
TIPS: You can press PMODE button to change the Picture Mode directly.

text_image
Picture Mode Dynamic Standard Mild Personal ENTER Select MENU BackContrast/ Brightness/ Color/ Tint / Sharpness
Press ▼ / ▲ button to select option, then press ◀ / ▶ button to adjust.
Contrast Adjust the highlight intensity of the picture, but the shadow of the picture is invariable.
Brightness Adjust the optical fiber output of the entire picture, it will effect the dark region of the picture.
Color Adjust the saturation of the color based on your own like.
Tint Use in compensating color changed with the transmission in the NTSC code.
Sharpness Aadjust the peaking in the detail of the picture.
Color Temp
Change the overall color cast of the picture.
Press ▼ / ▲ button to select Color Temperature, then press OK button to enter sub-menu.
Press ◀ / ▶ button to select. (Available Picture mode: Cool, Medium, Warm).
You can change the value of red, green and blue when the color temperature is in User mode.
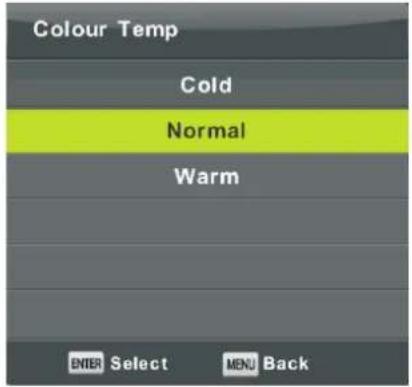
text_image
Colour Temp Cold Normal Warm ENTER Select MENU BackCold Increase the blue tone for the white.
Normal Increase the Six-linked colors for the white.
Warm Increase the red color for the white.
Noise Reduction
To filter out and reduces the image noise and improve picture quality.
Press ▼ / ▲ button to select Noise Reduction, then press OK button to enter sub-menu.
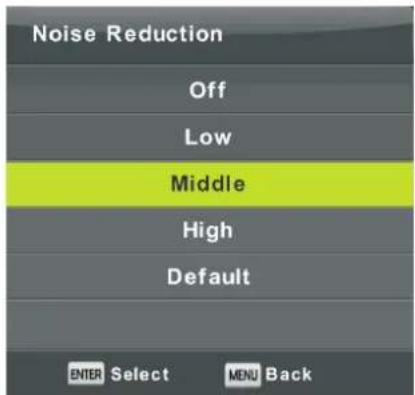
text_image
Noise Reduction Off Low Middle High Default ENTER Select MENU BackOff Select to turn off video noise detection.
Low Detect and reduce low video noise.
Middle Detect and reduce moderate video noise.
High Detect and reduce enhanced video noise.
Default Set as Default.
Sound Menu
Press MENU button to display the main menu.
Press ◀ / ▶ button to select SOUND in the main menu.
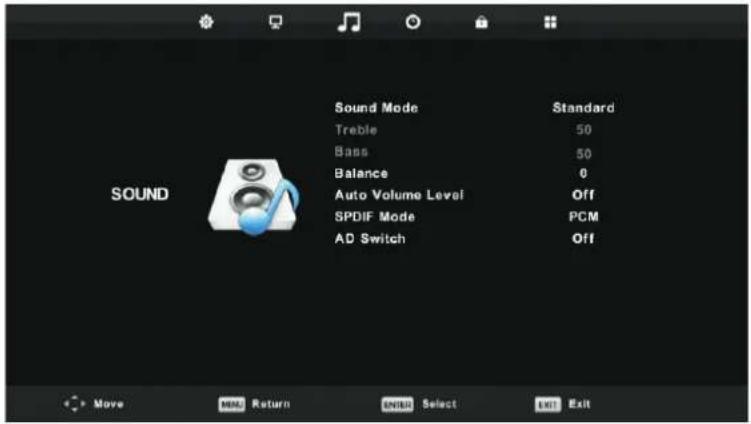
text_image
Sound Mode Treble Bass Balance Auto Volume Level SPDIF Mode AD Switch Standard 50 50 0 Off PCM Off- Press ▼ / ▲ button to select the option that you want to adjust in the SOUND menu.
- Press OK button to adjust.
- After finishing your adjustment, Press OK button to save and return to the previous menu.
text_image
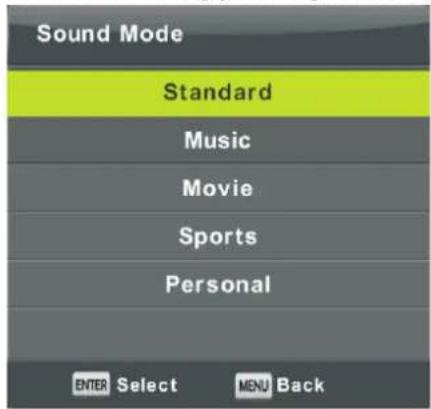
Sound Mode Standard Music Movie Sports Personal ENTER Select MENU BackSound Mode
Press ▼ / ▲ button to select Sound Mode, then press OK button to enter sub-menu.
Press▼/▲ button to select.
You can change the value of Treble and Bass when the sound is in Personal mode.
TIPS: You can press SMODE button on the remote control to change the Sound Mode directly.
Standard Produces a balanced sound in all environments.
Music Preserves the original sound.Good for musical programs.
Movie Enhances treble and bass for a rich sound experience.
Sports Enhances vocals for sports.
Personal Select to customize picture settings.
Note: The treble and bass are only available in User mode, you can adjust them as you like.
Balance
Press ▼ / ▲ button to select option, Press ◀ / ▶ button to adjust.
Auto Volume level
Press ▼ / ▲ button to select Auto Volume Level, then press ◀ / ▶ button to select On or Off.
SPDIF Mode
Press ▼ / ▲ button to select SPDIF Mode, then press ◀ / ▶ button to select Off / PCM / Auto.
AD Switch
Press ▼ / ▲ button to select AD Switch, then press ◀ / ▶ button to select On or Off.
Amblyopia function for the blind, the tracks will be mixed describe the current screen.
It need codestream to support.
NOTE:
Balance: This item can adjust the speaker's output, it enables you to listen to best at your position.
Auto Volume: This item is used for reducing the difference between channel and program's volume automatically.
Time Menu
Press MENU button to display the main menu.
Press ◀ / ▶ button to select TIME in the main menu.
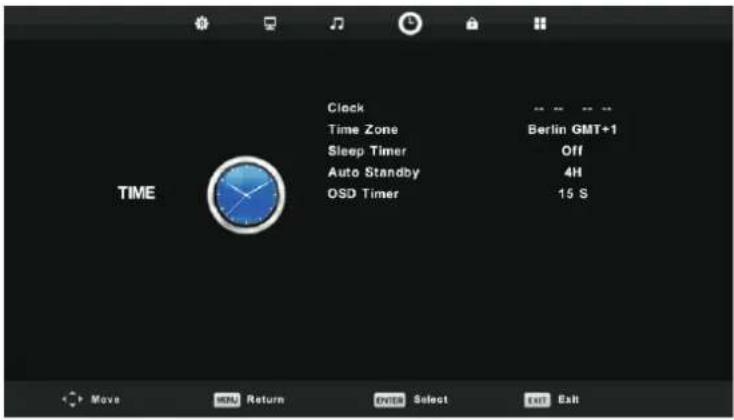
text_image
Clock Time Zone Sleep Timer Auto Standby OSD Timer Berlin GMT+1 Off 4H 15 S Move MENU Return ENTER Select Exit Exit- Press ▼ / ▲ button to select the option that you want to adjust in the TIME menu.
- Press OK button I to adjust.
- After finishing your adjustment, Press OK button to save and return to the previous menu.
Time Zone
Press ▼ / ▲ / ◀ / ▶ button to select time zone, then press "OK" button to confirm selection and enter the sub-menu.
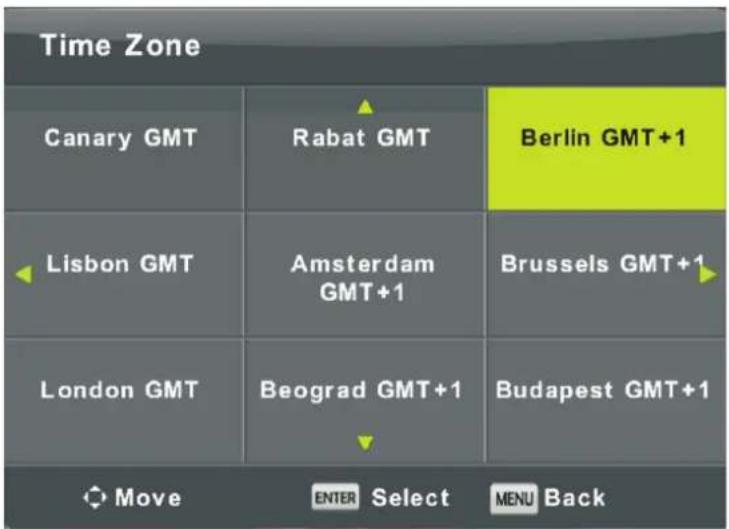
text_image
Time Zone Canary GMT Rabat GMT Berlin GMT+1 Lisbon GMT Amsterdam GMT+1 Brussels GMT+1 London GMT Beograd GMT+1 Budapest GMT+1 Move ENTER Select MENU BackSleep Timer
text_image
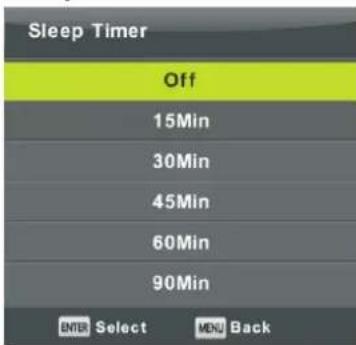
Sleep Timer Off 15Min 30Min 45Min 60Min 90Min ENTER Select MENU BackPress ▼ / ▲ button to select Sleep Timer, then press "OK" button to confirm selection and enter the sub-menu.
Press ▼ / ▲ button to select Auto Standby, then press "OK" button to confirm selection and enter the sub-menu.
Tips: The remote control does not make any operation in the hypothesis time, it will close down automatically. If you do any operation, it will reset the time.
OSD Timer
text_image
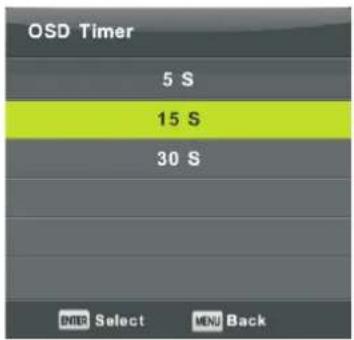
OSD Timer 5 S 15 S 30 S ENTER Select MENU BackPress ▼ / ▲ button to select OSD Timer, then press "OK" button to confirm selection and enter the sub-menu.
Lock Menu
Press MENU button to display the main menu.
Press ◀ / ▶ button to select Lock in the main menu.
text_image
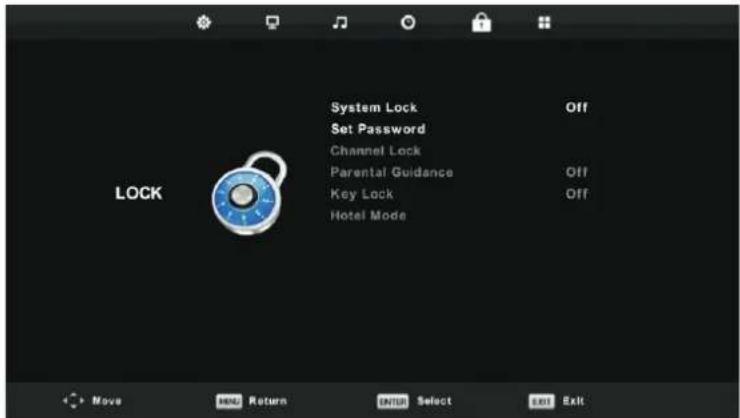
System Lock Set Password Channel Lock Parental Guidance Key Lock Hotel Mode OFF OFF OFF LOCK Move Help Return ENTER Select Exit Exit- Press ▼ / ▲ button to select the option that you want to adjust in the LOCK SYSTEM menu.
- Press OK / ◀ / ▶ button to adjust.
- After finishing your adjustment, Press MENU button to return back to the previous menu
Lock System
text_image
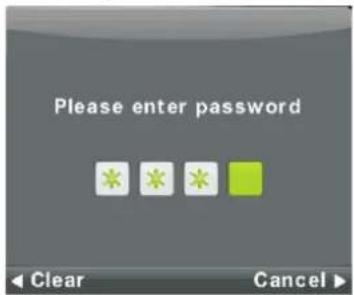
Please enter password Clear CancelPress ▼ / ▲ button to select Lock System, then press OK button to make the following 3 options valid.
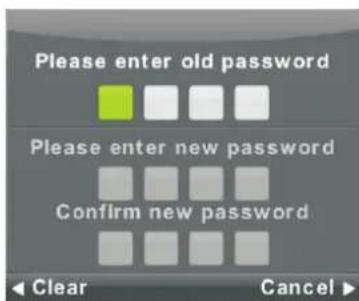
Default password is 0000
Set Password
text_image
Please enter old password Please enter new password Confirm new password Clear Cancel ▶Press ▼ / ▲ button to select Set Password, then press OK button to enter sub-menu to set new password.
Channel Lock
text_image
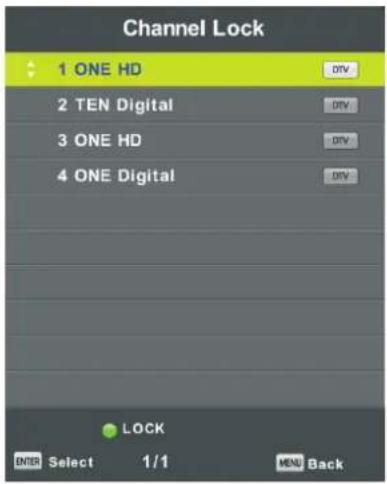
Channel Lock 1 ONE HD 2 TEN Digital 3 ONE HD 4 ONE Digital DRV DRV DRV DRV LOCK ENTER Select 1/1 MENU BackPress ▼ / ▲ button to select Channel Lock then press OK button to enter sub-menu to select. Press Green button to lock or unlock the channel.
Parental Guidance
text_image
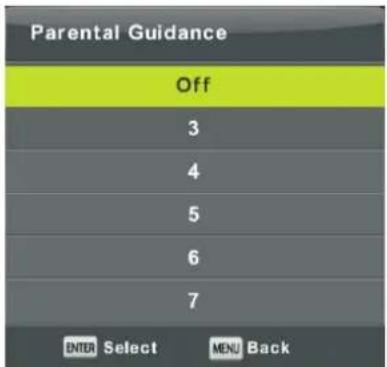
Parental Guidance Off 3 4 5 6 7 ENTER Select MENU BackPress ▼ / ▲ button to select Parental Guidance, then press OK button to enter sub-menu to select the number of age which is suitable for your children.
Key Lock
Press ▼ / ▲ button to select Key Lock, then press ◀ / ▶ button to select Off or On. When Key Lock's statue is on, you can't use the Key panel button.
Hotel Mode
text_image
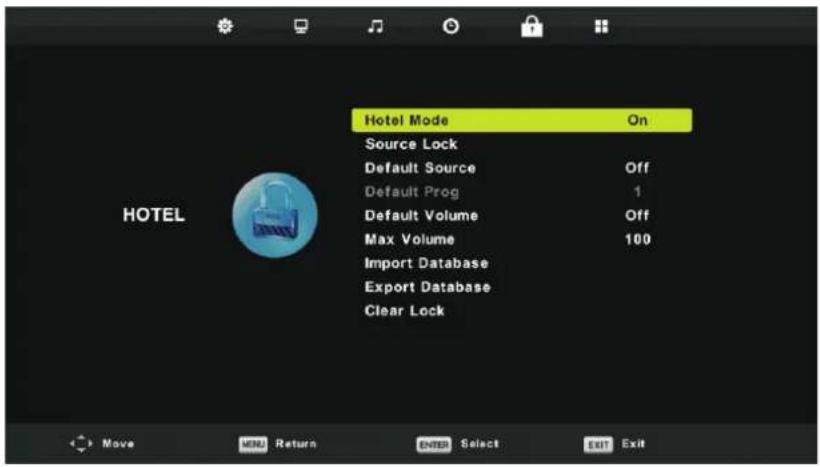
Hotel Mode On Source Lock Default Source Off Default Prog 1 Default Volume Off Max Volume 100 Import Database Export Database Clear Lock- Press ▼ / ▲ button on the remote control to select hotel mode in the Lock menu.
- Press OK button on the remote control to enter the sub-menu.
- After finishing your adjustment, Press MENU button to save and return back to the previous menu.
Hotel Mode
Press ▼ / ▲ button to select Hotel Mode, then press ◀ / ▶ button to select on or off.
Source Lock
Press ▼ / ▲ button to select Source Locke, then press OK button to enter sub-menu to select.
Default Source
Press ▼ / ▲ button to select Default Source, then press OK button to enter sub-menu to select.
Default Prog
Press ▼ / ▲ button to select Default Prog, then press ◀ / ▶ button to adjust. It is available when the default source is TV.
Max Volume
Press ▼ / ▲ button to select Max Volume, then press ◀ / ▶ button to adjust.
Clear Lock
Press ▼ / ▲ button to select Clear Lock, then press OK button to clear the setting you have done before.
Setup Menu
Press MENU button to display the main menu.
Press ◀ / ▶ button to select SETUP in the main menu.
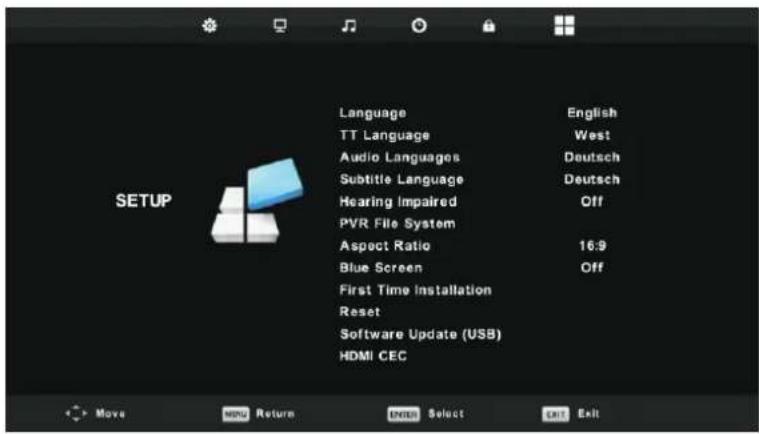
text_image
Language TT Language Audio Languages Subtitle Language Hearing Impaired PVR File System Aspect Ratio Blue Screen First Time Installation Reset Software Update (USB) HDMI CEC English West Deutsch Deutsch Off 16:9 Off Move NEW Return ENTER Select Exit Exit- Press ▼ / ▲ button to select the option that you want to adjust in the SETUP menu.
- Press OK button to adjust.
- After finishing your adjustment, Press OK button to save and return to the previous menu.
OSD Language
Select an OSD menu language can be displayed. Default English is selected as menu language.
Press ▼ / ▲ / ◀ / ▶ button to select Menu Language.
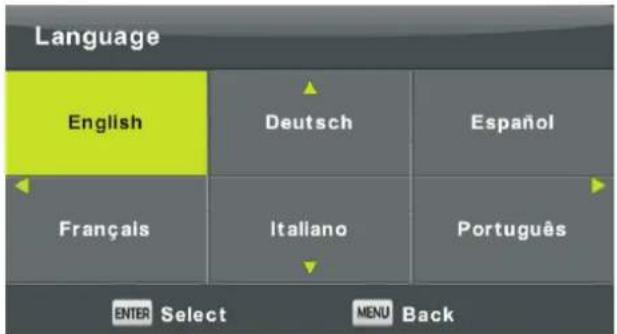
text_image
Language English Deutsch Español Français Italiano Português ENTER Select MENU BackTT Language
Press ▼ / ▲ button to select TT Language, then press OK button to enter sub-menu. Press ▼ / ▲ / ◀ / ▶ button to select TT language.

text_image
TT Language West East Russian Arabic Farsi ENTER Select MENU BackAudio Languages
Press ▼ / ▲ button to select Audio Languages, then press OK button to enter sub-menu.
Press ◀ / ▶ button to select the primary of Audio Languages.
Press ▼ / ▲ / ◀ / ▶ button to select the Audio Languages.
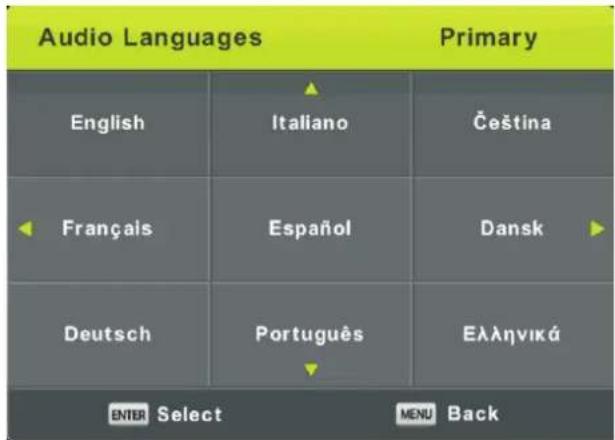
text_image
Audio Languages Primary English Italiano Čeština Français Español Dansk Deutsch Português Ελληνικά ENTER Select MENU BackSubtitle Language
Press ▼ / ▲ button to select Subtitle Language, then press OK button to enter sub-menu.
Press ◀ / ▶ button to select the primary of Subtitle Language.
Press ▼ / ▲ / ◀ / ▶ button to select the Subtitle Language.
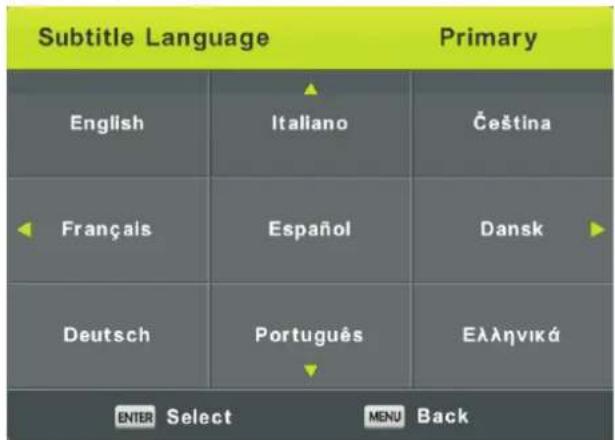
text_image
Subtitle Language Primary English Italiano Čeština Français Español Dansk Deutsch Português Ελληνικά ENTER Select MENU BackHearing Impaired
Press ▼ / ▲ button to select Hearing Impaired, then press OK button to select On or Off.
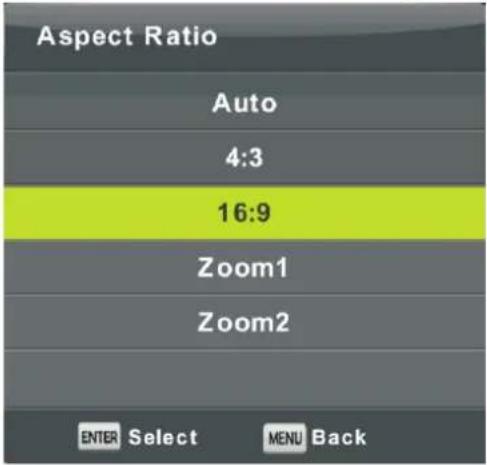
Aspect Ratio
Press ▼ / ▲ button to select Aspect Ratio, then press OK button to enter sub-menu.
Press ▼ / ▲ button to select aspect ratio. (Available options are: Auto, 4:3, 16:9, Zoom1, Zoom2).
text_image
Aspect Ratio Auto 4:3 16:9 Zoom1 Zoom2 ENTER Select MENU BackBlue Screen
Press ▼ / ▲ button to select Blue Screen, then press OK button to select On or Off.
First Time Installation
Press ▼ / ▲ button to select First time installation, then press OK button to enter.
Reset
Press ▼ / ▲ button to select Reset, then press OK button to enter sub-menu.
Software Update(USB)
Press ▼ / ▲ button to select Software Update (USB), plug your USB device in the USB slot, then press OK button to update the right software.
HDMI CEC
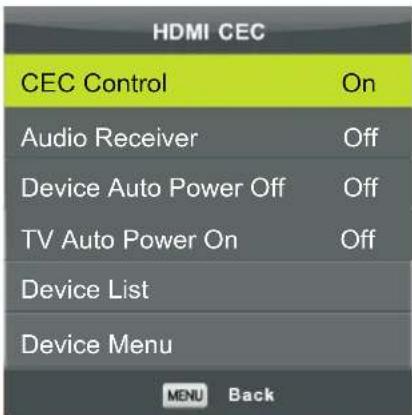
Press ▼ / ▲ button to select HDMI CEC, then press OK button to enter the sub-menu.
text_image
HDMI CEC CEC Control On Audio Receiver Off Device Auto Power Off Off TV Auto Power On Off Device List Device Menu MENU BackCEC Control Press button to turn the CEC Control on or off.
Audio Receiver Press button/to turn the Audio Receiver on or off.
Device Auto Power Off Press ◀ / button to turn the Device Auto Power Off on or off.
TV Auto Power Off Press button to turn the TV Audio Power Off on or off.
Device List Press OK button to open the main menu of device.
Device Menu Press OK button to open the Device Menu.
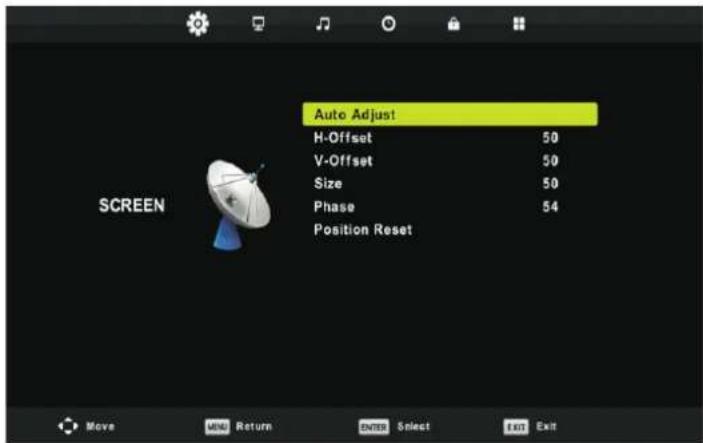
Screen Menu(Under PC mode only)
Press INPUT, choose PC.
Press MENU button to display the main menu.
text_image
Auto Adjust H-Offset 50 V-Offset 50 Size 50 Phase 54 Position Reset SCREEN Move MIN Return ENTER Select Exit Exit- Press ▼ / ▲ button to select the option that you want to adjust in the SCREEN menu.
- Press OK button to adjust.
- After finishing your adjustment, Press OK button to save and return to the previous menu.
Auto Adjust
Press OK button to start adjusting H-Offset/V-Offset/Size/Phase automatically.
H-Offset.
Adjust the horizontal position of the picture.
Press ◀ / ▶ button to select H-Offset, then press OK button to enter sub-menu.
V-Offset
Adjust the vertical position of the picture.
Press ◀ / ▶ button to select V-Offset, then press OK button to enter sub-menu.
Size
Adjust the display size.
Press ◀ / ▶ button to select Size, then press OK button to enter sub-menu.
Phase
Adjust the horizontal interfering lines.
Press ◀ / ▶ button to select Phase, then press OK button to enter sub-menu.
Position Reset
Press OKOKutton to select Position Reset, then press button to enter.
Notes:
- Noise Reduction in PICTURE option is invalid.
- AD Switch in SOUND option is invalid.
- TIME menu and description are the same as that for Air mode.
- Block Program and Parental Guidance in LOCK option is invalid.
- Audio Languages, Subtitle Language, Hearing Impaired and PVR File System in SETUP option is invalid.
6.PC mode has no CHANNEL menu.
Media OPERATION
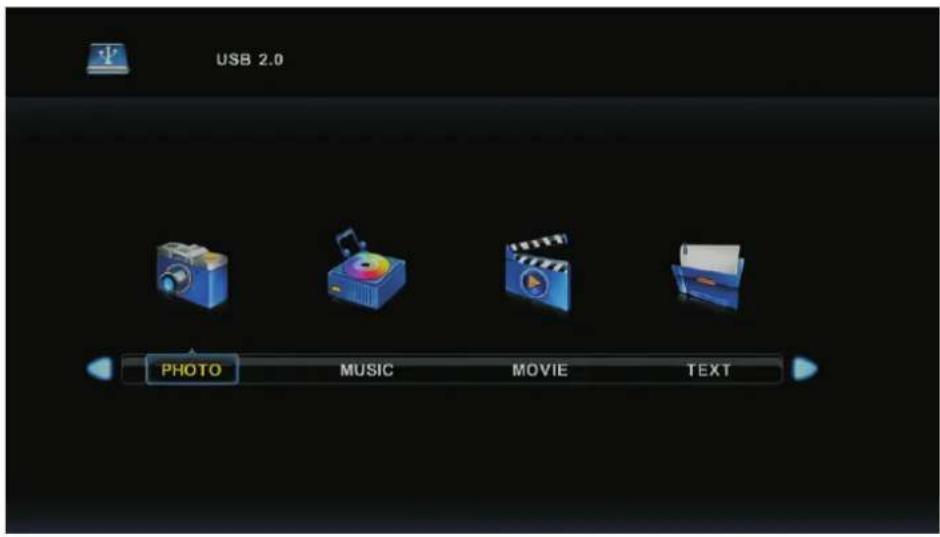
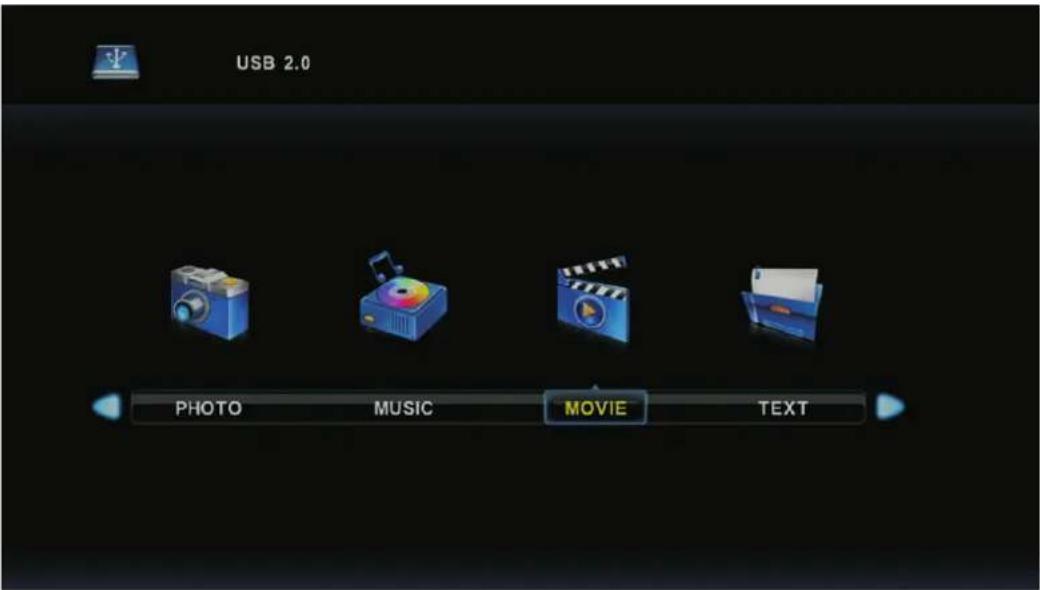
Note: Before operating Media menu, Plug in USB device, then press INPUT button to set the Input Source to Media.
Press ▼ / ▲ button to select Media in the Source menu, then press OK button to enter.
text_image
USB 2.0 PHOTO MUSIC MOVIE TEXTPress ◀ / ▶ button to select the option you want to adjust in the main Media menu,
then press OK button to enter.
Photo Menu
Press ◀ / ▶ button to select PHOTO in the main menu, then press OK button to enter.
Press Exit button to return to the previous menu and exit menu to quit.
text_image
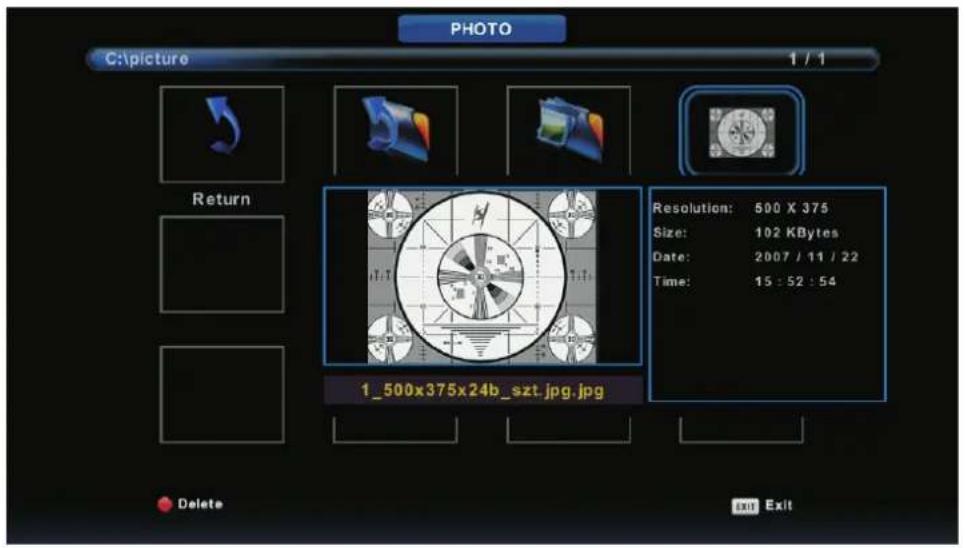
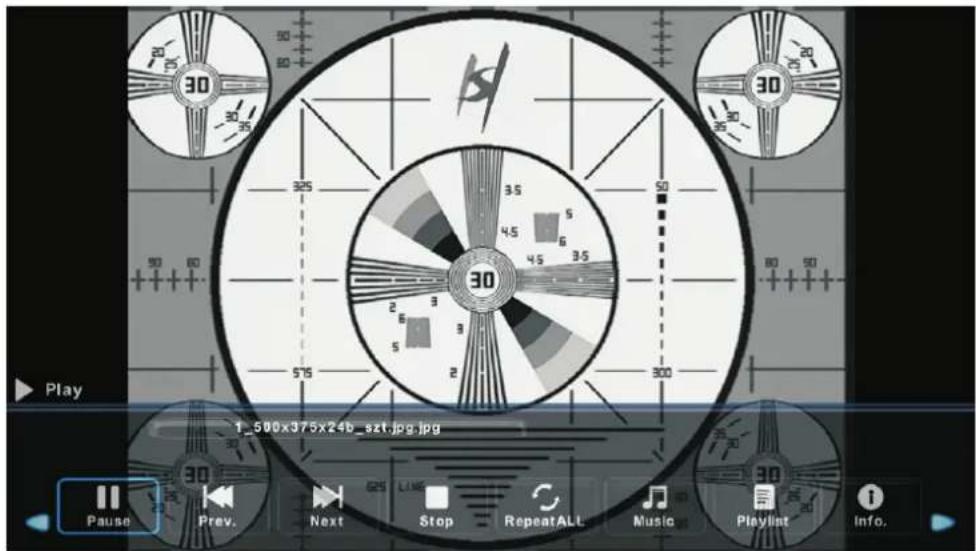
PHOTO C:\picture 1 / 1 Return Resolution: 500 X 375 Size: 102 KBytes Date: 2007 / 11 / 22 Time: 15 : 52 : 54 1_500x375x24b_szt.jpg.jpg Delete Exit ExitPress ◀ / ▶ button to select the file you want to watch in the file selecting menu, then press media button to display picture.
When highlighting the option you select, the file information will appear on the right and picture will be previewed in the center.
text_image
Play 1_500x375x24b_szt.jpg.jpg Pause Prev. Next Stop RepeatALL Music Playlist Info.Music Menu
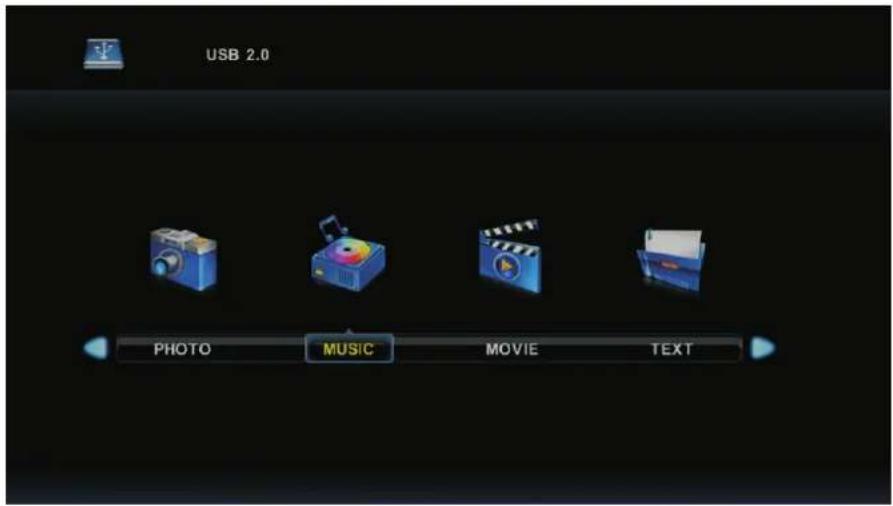
Press ◀ / ▶ button to select MUSIC in the main menu, then press OK button to enter.
Press Exit button to return to the previous menu and exit menu to quit.
text_image
USB 2.0 PHOTO MUSIC MOVIE(TEXT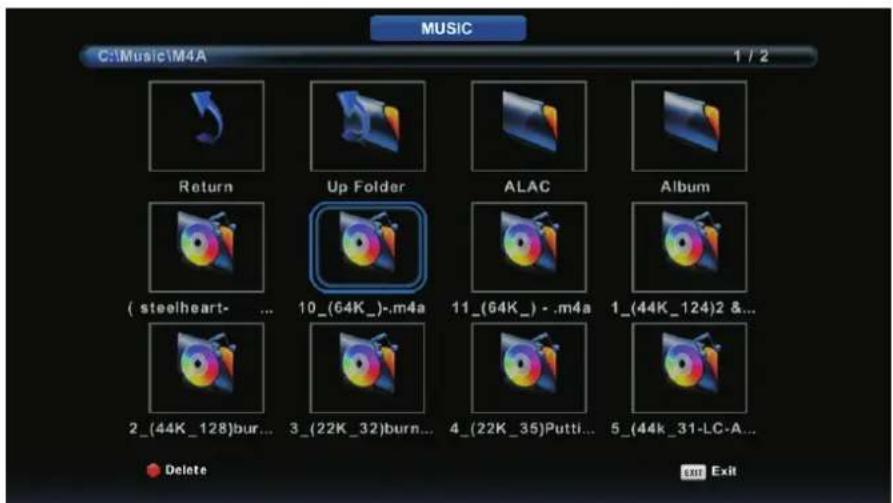
text_image
MUSIC C:\Music\M4A 1 / 2 Return Up Folder ALAC Album ( steelheart- ... 10_(64K_)-.m4a 11_(64K_) - .m4a 1_(44K_124)2 &... 2_(44K_128)bur... 3_(22K_32)burn... 4_(22K_35)Puttl... 5_(44k_31-LC-A... Delete EXIT ExitPress ◀ / ▶ button to select drive disk you want to watch, then press OK button to enter.
Press ◀ / ▶ button to select return option to the previous menu.
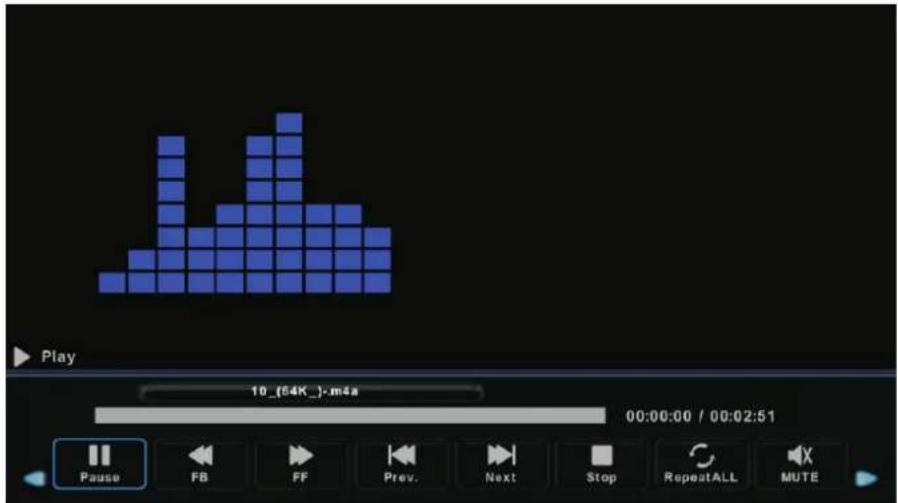
text_image
Play 10_(64K_)m4a 00:00:00 / 00:02:51 Pause FB FF Prev. Next Stop RepeatALL MUTEMovie Menu
Press ◀ / ▶ button to select MOVIE in the main menu, then press OK button to enter.
Press Exit button to return to the previous menu and exit menu to quit.
text_image
USB 2.0 PHOTO MUSIC MOVIE TEXTPress ◀ / ▶ button to select drive disk you want to watch, then press OK button to enter.
Press media button to play the selected movie.
Press display button to select menu in the bottom you want to run, then press OK button to operate.
Press Exit button to back to the previous menu and exit button to quit the entire menu.
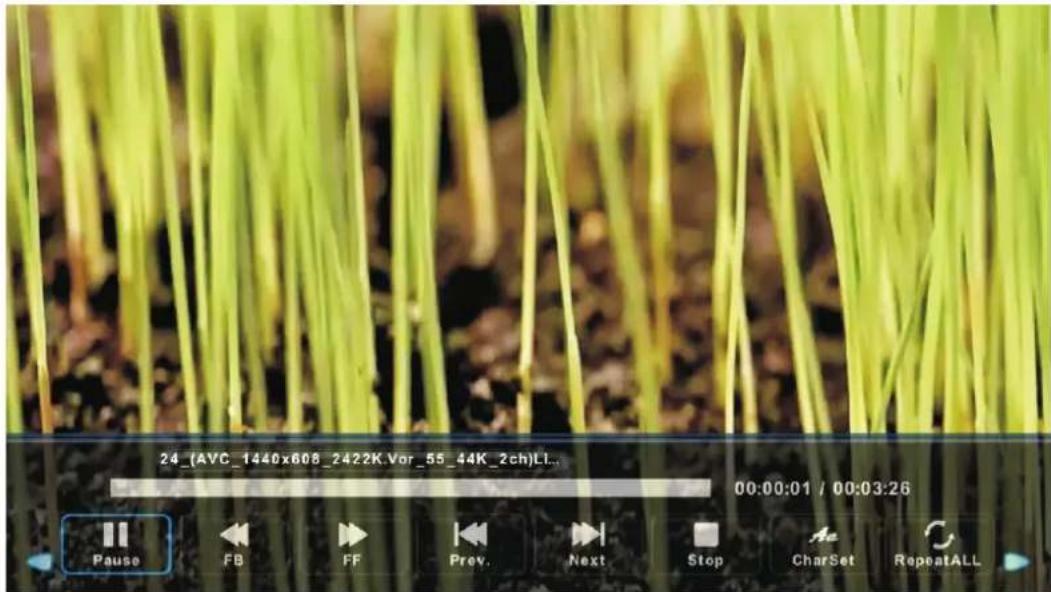
text_image
24_(AVC_1440x608_2422K.Vor_55_44K_2ch)Li... 00:00:01 / 00:03:26 Pause FB FF Prev. Next Stop CharSet RepeatALLText Menu
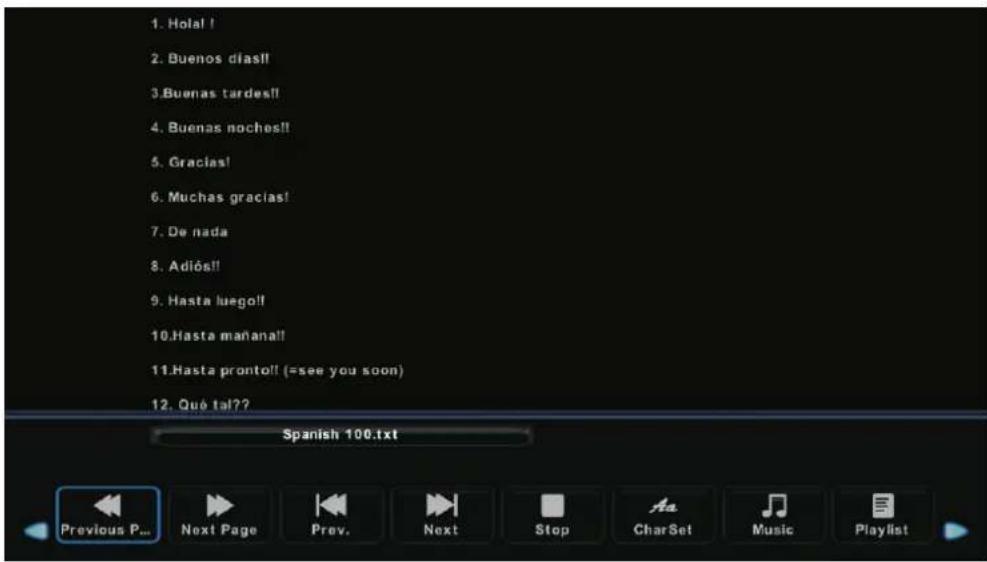
Press ◀ / ▶ button to select TEXT in the main menu, then press OK button to enter.
Press Exit button to return to the previous menu and exit menu to quit.
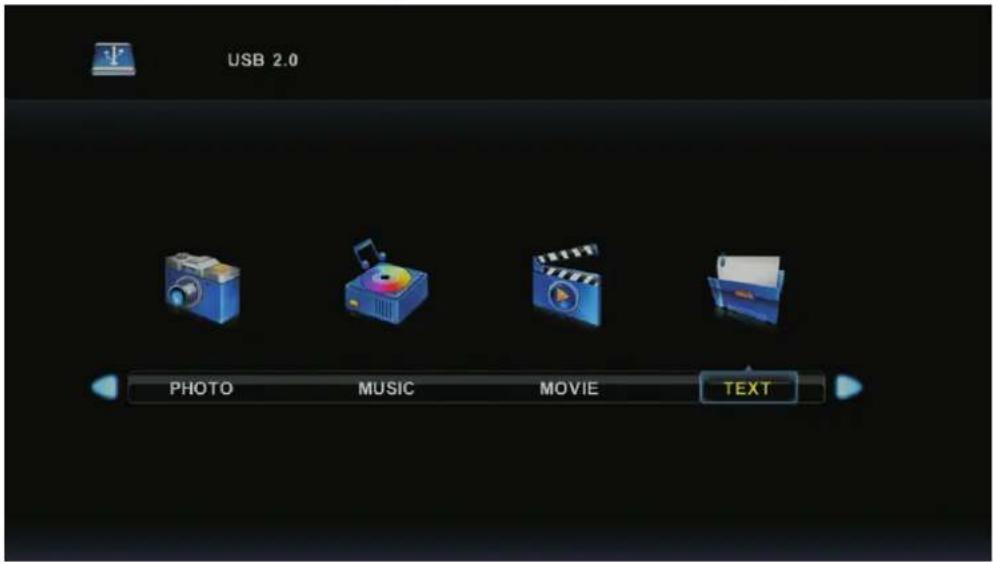
text_image
USB 2.0 PHOTO MUSIC MOVIE TEXTPress ◀ / ▶ button to select drive disk you want to watch, then press OK button to enter.
Press ◀ / ▶ button to select return option to back to the previous menu.
text_image
1. Holal ! 2. Buenos días!! 3. Buenas tardes!! 4. Buenas noches!! 5. Gracias! 6. Muchas gracias! 7. De nada 8. Adiós!! 9. Hasta luego!! 10. Hasta mañana!! 11. Hasta pronto! (=see you soon) 12. Qué tal?? Spanish 100.txt Previous P... Next Page Prev. Next Stop CharSet Music PlaylistSimple Troubleshooting
If the display fails or performance dramatically deteriorates check the Display in accordance with the following instructions. Remember to check the peripherals to point the source of the failure.
If the display still fails to perform as expected, connect your helpline for assistance.
No power
- Check all connections to the TV.
- Press either the power button or the Standby button on the Remote control.
No picture or sound
- Ensure that the TV is plugged in and the power is on.
- Ensure that the aerial is connected.
- Try a different program.
Poor picture quality
- Check the aerial connections.
- Check that the channel is tuned in properly.
- Adjust the picture settings:brightness,color,sharpness,contrast,hue.
- Make sure that the TV is not located close to electrical appliances that may emit radio frequency interference.
No colour
- Adjust the color setting.
- Check that the programme is broadcast in color.
- Check that the channel is tuned properly.
TV does not respond to remote control
- Check that there are no obstructions between the remote control and the unit.
- Check that the remote control is within range of the unit.
- Check that the batteries in the remote control and not weak or exhausted.
This TV is for household use and registered as harmless on electromagnetic waves.
Therefor, you can use it in every location as well as residential areas.
DENVER®
www.denver-electronics.com

text_image
CE RECOCONSTITUTElectric and electronic equipment and included batteries contains materials, components and substances that can be hazardous to your health and the environment, if the waste material (discarded electric and electronic equipment and batteries) is not handled correctly.
Electric and electronic equipment and batteries is marked with the crossed out trash can symbol, seen below. This symbol signifies that electric and electronic equipment and batteries should not be disposed of with other household waste, but should be disposed of separately.
As the end user it is important that you submit your used batteries to the appropriate and designated facility. In this manner you make sure that the batteries are recycled in accordance with legislature and will not harm the environment.
All cities have established collection points, where electric and electronic equipment and batteries can either be submitted free of charge at recycling stations and other collection sites, or be collected from the households. Additional information is available at the technical department of your city.
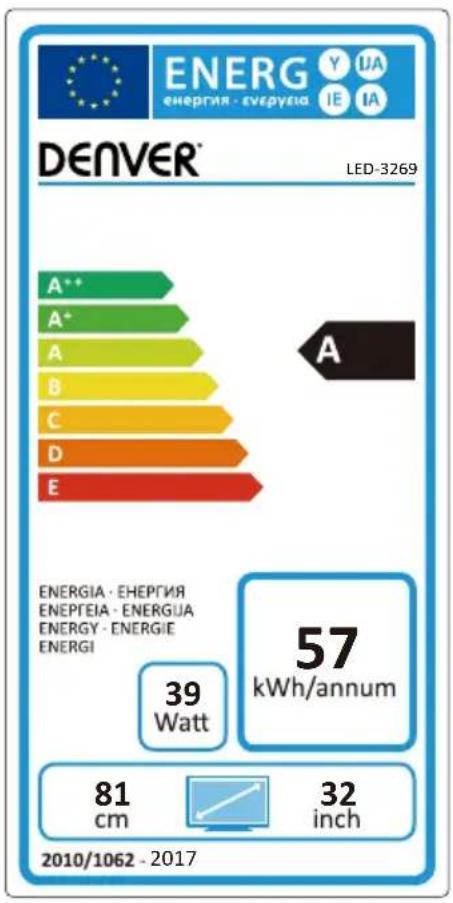
Hereby, Inter Sales A/S declares that the radio equipment type LED-3269 is in compliance with Directive 2014/53/EU. The full text of the EU declaration of conformity is available at the following internet address: http://www.denver-electronics.com/denver-LED-3269/
Operating Frequency Range: 177.5MHz \~ 858MHz Max Output Power: 52W
Imported by:
DENVER ELECTRONICS A/S
Omega 5A, Soeften
DK-8382 Hinnerup
Denmark
www.facebook.com/denverelectronics
text_image
ENERG Y IJA ENERGIA - Energia IE IA DENVER® LED-3269 A** A* A B C D E ENERGIA - ENEPTIA ENERGUA ENERGY - Energie ENERGI 39 Watt 57 kWh/annum 81 cm 32 inch 2010/1062 - 2017CE