
WF-J125N - Washing machine SAMSUNG - Free user manual and instructions
Find the device manual for free WF-J125N SAMSUNG in PDF.


User questions about WF-J125N SAMSUNG
0 question about this device. Answer the ones you know or ask your own.
Ask a new question about this device
Download the instructions for your Washing machine in PDF format for free! Find your manual WF-J125N - SAMSUNG and take your electronic device back in hand. On this page are published all the documents necessary for the use of your device. WF-J125N by SAMSUNG.
USER MANUAL WF-J125N SAMSUNG
Washing Machine Owner's Instructions
WF-J145N(V/C/S)
WF-J125N(V/C/S)
WF-J105N(V/C/S)
WF-J85N(V/C/S)
WF-B145N(V/C/S)
WF-B125N(V/C/S)
WF-B105N(V/C/S)
WF-B85N(V/C/S)
WF-R125N(V/C/S)
WF-R105N(V/C/S)
WF-R85N(V/C/S)
WF-F125N(V/C/S)
WF-F105N(V/C/S)
WF-F85N(V/C/S)
natural_image
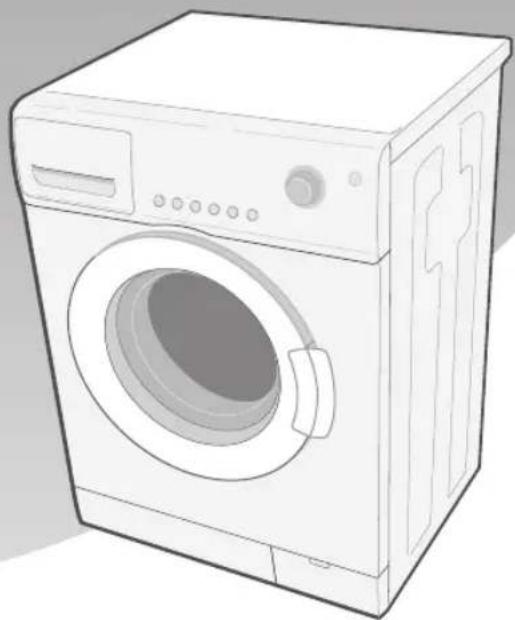
Line drawing of a single washing machine with control panel and door (no text or symbols)Register your product at www.samsung.com/global/register Code No.: DC68-02211A_EN
Safety Precautions
Congratulations on your purchase of this Samsung washing machine. These Owner's Instructions contain valuable information on the installation, use, and care of this appliance. Please take the time to read these instructions so that you can take full advantage of the washing machine's features and enjoy this appliance for many years to come.
Before using the appliance
- Packing materials can be dangerous to children; keep all packing material (plastic bags, polystyrene, etc.) well out of the reach of children.
• The appliance is designed for home use only.
- Make sure that water and electrical connections are made by qualified technicians, observing the manufacturer's instructions (see "Installing the Washing Machine") and local safety regulations.
- All packaging and shipping bolts must be removed before the appliance is used. Serious damage may occur if they are not removed. See "Removing the shipping bolts".
- Before washing clothes for the first time, you must run a complete cycle without clothes. See "Washing for the first time".
Safety instructions
- Before cleaning or carrying out maintenance, unplug the appliance from the electrical outlet or set the (On/Off) button to Off.
- Make sure that the pockets of all clothing to be washed are empty. Hard, sharp objects, such as coins, safety pins, nails, screws, or stones can cause extensive damage to the appliance.
• Always unplug the appliance and turn off the water after use.
- Before you open the door of the appliance, check that the water has drained. Do not open the door if you can still see water.
- Pets and small children may climb into the appliance. Check the appliance before each use.
- The glass door becomes very hot during the washing cycle. Keep children away from the appliance while it is in use.
- Do not attempt to repair the appliance yourself. Repairs made by inexperienced or unqualified persons may cause injury and/or make more serious repairs to the appliance necessary.
- If the plug (power supply cord) is damaged, it must be replaced by the manufacturer or its service agent or a similarly qualified person in order to avoid a hazard.
- This appliance should only be serviced by an authorized service center, and only genuine spare parts should be used.
- This appliance is not intended for use by young children or infirm persons unless they have been adequately supervised by a responsible person to ensure that they can use the appliance safely. Young children should be supervised to ensure that they do not play with the appliance.
- This appliance has to be connected to the plug endurable to proper power consumption.
- This appliance has to be positioned so that the plug is accessible after installation.
- If this appliance is supplied from a cord extension set or an electrical portable outlet device, the cord extension set or electrical portable outlet device must be positioned so that it is not subject to splashing or ingress of moisture. Additionally, the cord extension set or electrical portable out let device must be of a current rating suitable for the appliance.
- Do not use processed water containing oil, cream or lotion, which is usually found in skin-care shops or massage clinics.
- Otherwise this will cause the packing to be deformed, which causes a malfunction or water leak.
- A stainless washing tube does not usually rust. However if some metal such as a hair pin is left in the tube for an extended time, the tube could rust.
- Do not leave water or bleach containing chlorine in the tube for an extended period of time.
- Do not regularly use or leave water containing iron in the tube for an extended period of time.
If rust starts appearing on the surface of the tube, apply a cleansing agent (neutral) to the surface and use a sponge or soft cloth to clean it. (Under no circumstances use a metal brush)
- For washing machines with ventilation openings in the base, that a carpet must not obstruct the openings.
- Use the new hose-sets and old hose-sets should not be reused.
♦ SAVE THESE INSTRUCTIONS
Table of Contents
Safety Precautions .... inside cover
Installing the Washing Machine ....2
Unpacking the Washing Machine 2
Overview of the washing machine . . . . . . . . . . . . . . . . . . . . . . . . . . . . . . . . . . . . . . . . . . . . 2
Selecting a location ....3
Adjusting the leveling feet . . . . . . . . . . . . . . . . . . . . . . . . . . . . . . . . . . . . . . . . . . . . . . 3
Removing the shipping bolts ....3
Connecting the water supply hose(Option) 3
Connecting the water supply hose....4
Positioning the drain hose 4
Plugging in the machine 5
Washing a Load of Laundry 6
Overview of the control panel 6
Washing for the first time .8
Putting detergent in the washing machine 8
Washing clothes using Fuzzy Logic. 9
Washing clothes manually 10
Using Delay Start 10
Washing tips and hints. 11
Maintaining the Washing Machine .....12
Draining the washing machine in an emergency .....12
Repairing a frozen washing machine .....12
Cleaning the exterior 12
Cleaning the detergent drawer and recess 13
Cleaning the debris filter 13
Cleaning the water hose mesh filter 14
Troubleshooting ....15
Problems and solutions ....15
Understanding error messages .....15
Programme Chart ....16
Appendix 18
Fabric care chart....18
Electrical warnings....18
Protecting the environment .....19
Declaration of conformity 19
Specification 19
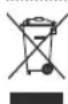
This marking shown on the product or its literature, indicates that it should not be disposed with other household wastes at the end of its working life. To prevent possible harm to the environment or human health from uncontrolled waste disposal, please separate this from other types of wastes and recycle it responsibly to promote the sustainable reuse of material resources.
Household users should contact either the retailer where they purchased this product, or their local government office, for details of where and how they can take this item for environmentally safe recycling.
Business users should contact their supplier and check the terms and conditions of the purchase contract. This product should not be mixed with other commercial wastes for disposal.
SAMSUNG Washing Machine Owner's Instructions
Installing the Washing Machine
Unpacking the Washing Machine
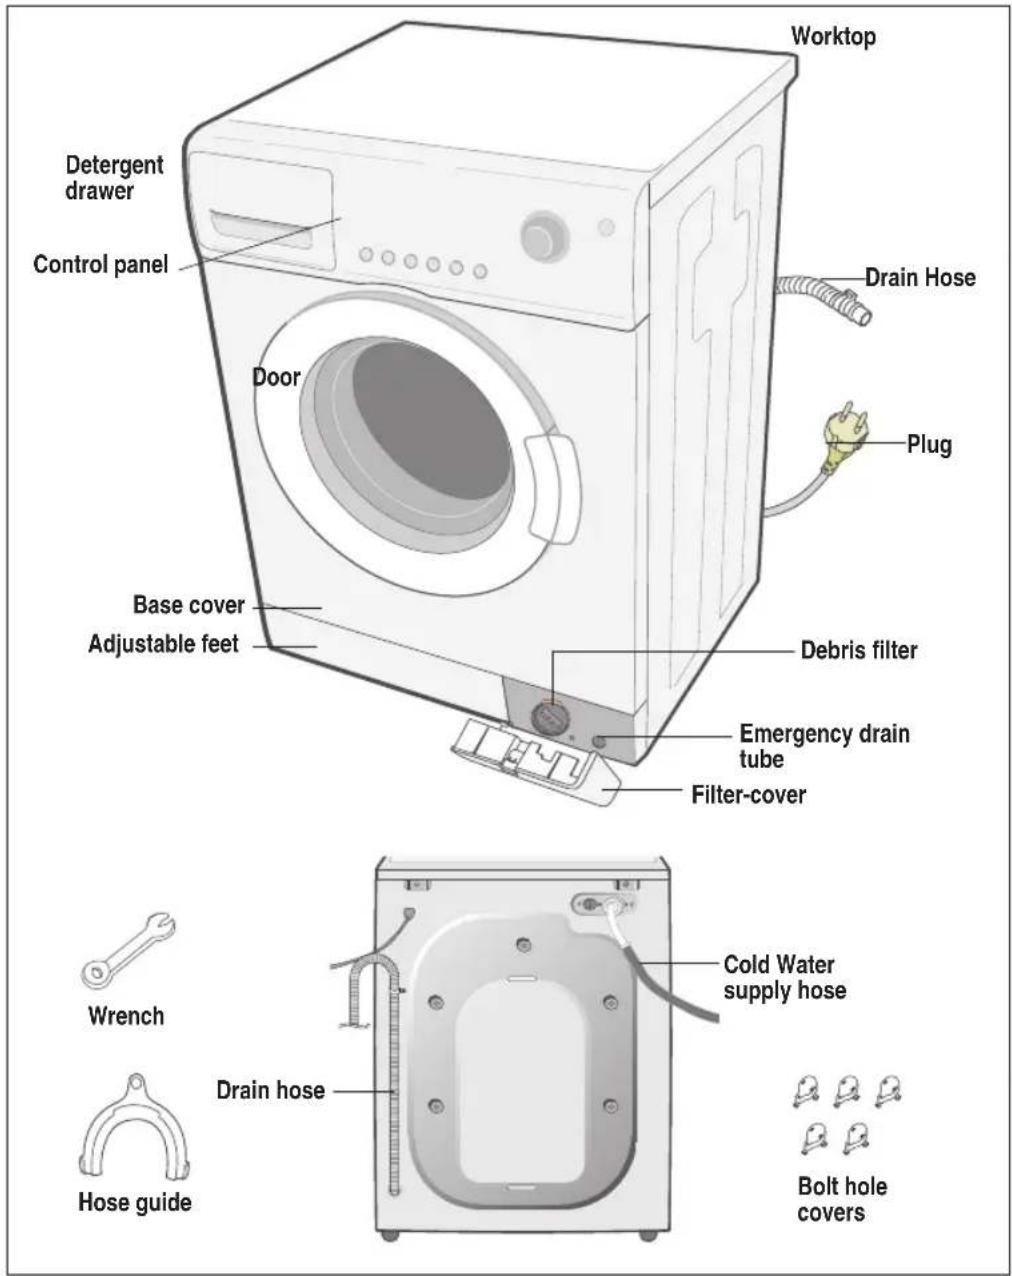
Unpack your washing machine and inspect it for shipping damage. Also make sure that you have received all of the items shown below. If the washing machine was damaged during shipping or you do not have all of the items, contact your Samsung dealer immediately.
Overview of the washing machine
text_image
Worktop Detergent drawer Control panel Door Drain Hose Plug Base cover Adjustable feet Debris filter Emergency drain tube Filter-cover Wrench Hose guide Drain hose Cold Water supply hose Bolt hole covers2 SAMSUNG Washing Machine Owner's Instructions
Installing the Washing Machine
Selecting a location
Before you install the washing machine, select a location with the following characteristics:
- A hard, level surface (if the surface is uneven, see "Adjusting the leveling feet," below)
• Away from direct sunlight. - Adequate ventilation
• Room temperature that will not fall below 0 °C - Away from sources of heat such as coal or gas
Make sure that the washing machine does not stand on its power cord.
Ventilation openings must not be obstructed by carpeting when the washing machine is installed on a carpeted floor.
Adjusting the leveling feet
If the floor is uneven, adjust the feet (do not insert pieces of wood or any other objects under the feet):
- Loosen the leg bolt by turning it with your hand until it is at the desired height.
- Tighten the locking nut by turning it with the supplied wrench.

natural_image
Mechanical linkage diagram showing a lever and two base blocks (no text or symbols)- Place the washer on a sturdy, flat surface.
If the washer is placed on an uneven or weak surface, noise or vibration occurs. (Only a 1 degree angle is allowed.)
Removing the shipping bolts
Before using the washing machine, you must remove the five shipping bolts from the back of the unit. To remove the bolts:

flowchart
graph TD
    A["Step ①"] --> B["Step ②"]
    B --> C["Step ③"]
- Loosen all bolts with the supplied wrench before removing them.
- Take each bolt head and pull it through the wide part of the hole. Repeat for each bolt.
- Fill the holes with the supplied plastic covers.
- Keep the shipping bolts for future use.
Connecting the water supply hose(Option)
| 1. Remove the adaptor from the water supply hose. |  |  | 4. Connect the water supply hose to the adaptor. Pull down part (c) of the water supply hose. When you release part (c) the hose automatically connects to the adaptor making a ‘click’ sound. |
| 2. First, using a “+” type screw driver, loosen the four screws on the adaptor. Next, take the adaptor and turn part(b) following the arrow until there is a 5mm gap. |  | 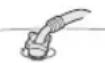 | 5. Connect the other end of the water supply hose to the inlet water valve at the top of the washer. Screw the hose clockwise all the way in. |
| 3. Connect adaptor to the water tap by tightening the screws firmly. Then, turn part (b) following the arrow and put(a) and (b) together. |  | [3AZA] | • If the water tap has a screw type faucet, connect the water supply hose to the tap as shown. |
NOTICE
After completing connection, if water leaks from the hose, then repeat the same steps. Use the most conventional type of faucet for water supply. In case the faucet is square or too big, remove the spacing ring before inserting the faucet into the adaptor.
SAMSUNG Washing Machine Owner's Instructions
Installing the Washing Machine
Connecting the water supply hose
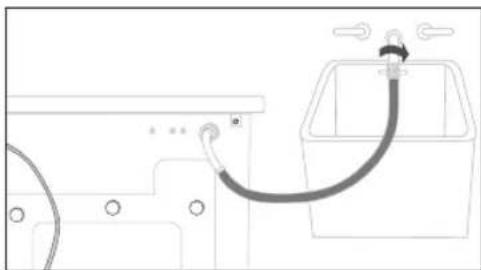
The water supply hose must be connected to the washing machine at one end and to the water faucet at the other. Do not stretch the water supply hose. If the hose is too short and you do not wish to move the water faucet, replace the hose with a longer, high pressure hose.
To connect the water supply hose:
- Take the L-shaped arm fitting for the cold water supply hose and connect to the cold water supply intake on the back of the machine. Tighten by hand.
natural_image
Diagram of a car interior with hoses and a water tank (no text or symbols)- Connect the other end of the cold water supply hose to your sink's cold water faucet and tighten it by hand. If necessary, you can reposition the water supply hose at the washing machine end by loosening the fitting, rotating the hose, and retightening the fitting.
Option:
- Take the red L-shaped arm fitting for the hot water supply hose and connect to the red hot water supply intake on the back of the machine. Tighten by hand.
- Connect the other end of the hot water supply hose to your sink's hot water faucet and tighten it by hand.
- Use a Y-piece if you only want to use cold water.
Note: The appliance is to be connected to the water mains using new hose-sets and that old hose-sets should not be used.
Positioning the drain hose
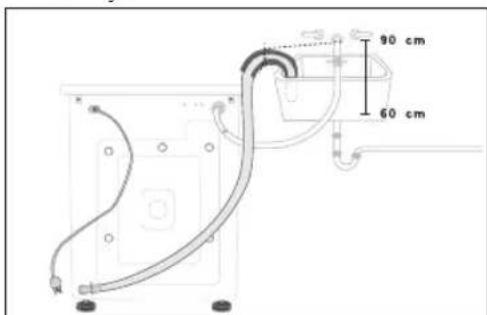
The end of the drain hose may be positioned in three ways:
Over the edge of a sink
The drain hose must be placed at a height of between 60 and 90 cm. To keep the drain hose spout bent, use the supplied plastic hose guide. Secure the guide to the wall with a hook or to the faucet with a piece of string to prevent the drain hose from moving.
text_image
90 cm 60 cmIn a sink drain pipe branch
The drain pipe branch must be above the sink siphon so that the end of the hose is at least 60 cm above the ground.
In a drain pipe
Samsung recommends that you use a 65 cm high vertical pipe; it must be no shorter than 60 cm and no longer than 90 cm.
4 SAMSUNG Washing Machine Owner's Instructions
Installing the Washing Machine
Plugging in the machine
You MUST ground the plug of the washing machine.
Check with a licensed electrician before using the machine to make sure it is properly grounded.
For U.K. Users.
Wiring Instructions
WARNING THIS APPLIANCE MUST BE EARTHED.
This appliance must be earthed. In the event of an electrical short circuit, earthing reduces the risk of electric shock providing an escape wire for the electric current. The appliance is equipped with a mains lead which includes an earth wire for connecting to the earth terminal of your mains plug. The plug must be plugged into a socket that is properly installed and earthed.
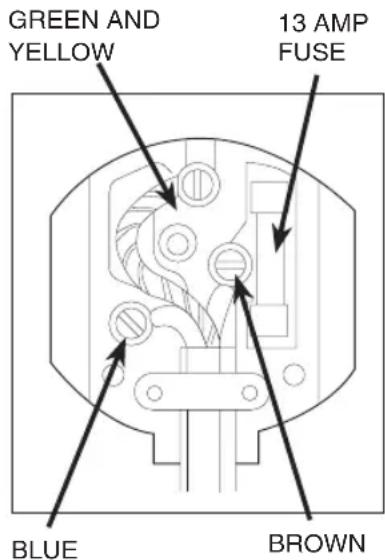
* The wires in this mains lead are coloured in accordance with the following code:
- Green and yellow : Earth
- Blue : Neutral
-
Brown : Live
-
AS the colours of the wires in the mains lead of this appliance may not correspond with the coloured markings indentifying the terminals in your plug, proceed as follows.
- Connect the green and yellow wire to the terminal in the plug marked with the letter E or the earth symbol ( ± ) or coloured green or green-and-yellow.
- Connect the blue wire to the terminal marked with the letter N or coloured black.
- Connect the brown wire to the terminal marked with the letter L or coloured red.
* Consult a qualified electrician or service technician if in doubt about any of these instructions. The manufacturer of this washing machine will not accept any liability for damage to persons or material for non observance of these requirements. There are no user serviceable parts inside the washing machine and if the mains lead of this appliance is damaged, it must only be replaced by qualified service personnel approved by the manufacturer because special tools are required.
text_image
GREEN AND YELLOW 13 AMP FUSE BLUE BROWNWARNING
Ensure that the plug and power cord are not damaged before use. If you have any reason to remove the moulded plug from this appliance, immediately remove the fuse and dispose of the plug.
Do not connect the plug to a mains socket under any circumstances as there is a danger of electric shock.
CIRCUITS
Your washing machine should be operated on a separate circuit from other appliances. Failure to do this may cause the circuit breaker to trip or the fuse to blow.
Washing a Load of Laundry
Overview of the control panel
text_image
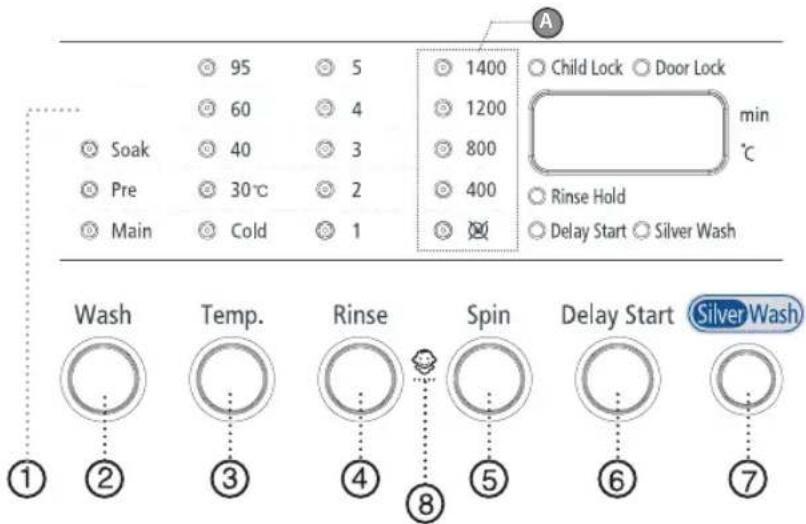
95 60 40 30°C 2 Cold 1 Soak Pre Main 1400 1200 800 400 Child Lock Door Lock min °C Rinse Hold Delay Start Silver Wash Wash Temp. Rinse Spin Delay Start Silver Wash ① ② ③ ④ ⑤ ⑥ ⑦This is a general manual. The INLAY system may be different from that of the product you purchased. For Ⓐ, see item 5 below to select the right specifications that match your product.
1. Digital graphic display
Displays the remaining wash cycle time, all of washing information and error messages.
2. Wash selection button
Press the button to select wash. Wash is available only with Baby Cotton, Heavy Soil, Mixed Load, Calm Wash, Cotton, Coloureds, Synthetics, Delicates.
3. Temperature selection button
Press the button repeatedly to cycle through the available water temperature options (cold water(30°C, 40°C, 60°C and 95°C).
4. Rinse selection button
Press the rinse button to add rinse cycles. Maximum number of rinse cycles is five.
5. Spin selection button
Press the button repeatedly to cycle through the available spin speed options.
| WF-J145N/WF-B145N | Rinse hold, 400, 800, 1200, 1400 rpm |
| WF-J125N/WF-B125N/WF-R125N/WF-F125N | Rinse hold, 400, 800, 1000, 1200 rpm |
| WF-J105N/WF-B105N/WF-R105N/WF-F105N | Rinse hold, 400, 600, 800, 1000 rpm |
| WF-J85N/WF-B85N/WF-R85N/WF-F85N | Rinse hold, 400, 600, 800 rpm |
☒: no spin,
No spin
The laundry remains in the drum without being spun after the final drain
Rinse Hold
The laundry remains soaking in the final rinse water.
Before the laundry can be unloaded, either "Drain" or the "Spin" program must be run.
6 SAMSUNG Washing Machine Owner's Instructions
Washing a Load of Laundry
text_image
Baby Cotton Heavy Soil Mixed Load Calm Wash Drain Spin Rinse+Spin Cotton Coloureds Synthetics Delicates Wool Handwash Quick ⑨ ⑩ ⑪6. Delay Start selection button
Press the button repeatedly to cycle through the available delayed start options (from 4 hour to 24 hours in one hour increments).
Displayed hours means the time of finished washing-cycle.
7. Silver Nano selection button
Silver Nano water is supplied in washing as well as the last rinse, featuring sterilization and antibacterial coating.
8. Child Lock selection button
This is a button for preventing children from manipulating the washing machine. On/Off - To set the program on: Press the Start/Pause button to turn on the washing machine. Press and hold down the [Rinse] + [Spin] button for 2-3 seconds. It can only be activated when the machine is turned on. Once you set the Child Lock function while in washing, no button is activated until you set it off. Only POWER button can activate. The Child Lock lamp lights on and off. To set the program off: Press and hold down the [Rinse] + [Spin] button again for 2-3 seconds, then the lamp lights off and is set off.
Note: Check out the Baby Program button first when no button is activated while the washing machine is working.
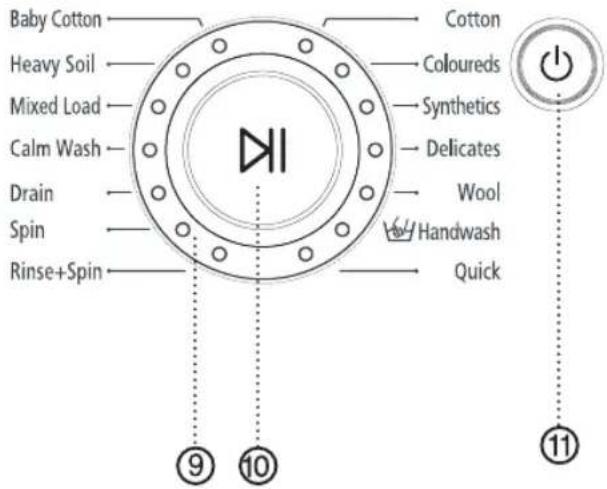
9. Fuzzy Control dial
Turn the dial to select one of the 14 available wash programs.
Cotton, Coloureds, Synthetics, Delicates, Wool, Hand wash, Quick, Rinse+Spin, Spin, Drain, Baby Cotton, Heavy Soil, Mixed Load, Calm Wash
10. Start/Pause selection button
Press to pause and restart programs. Press the Start/Pause button before adding the laundry. This can only be selected within 5 minutes of the start.
11. @(On/Off) selection button
Press once to turn the washing machine on, press again to turn the washing machine off. If the washing machine power is left on for longer than 10 minutes without any buttons being touched, the power automatically turns off.
SAMSUNG Washing Machine Owner's Instructions
Washing a Load of Laundry
Washing for the first time
Before washing clothes for the first time, you must run a complete cycle without clothes. To do this:
-
Press the (On/Off) button.
-
Pour a little detergent into compartment in the detergent drawer.
-
Turn on the water supply to the washing machine.
-
Press the Temperature button repeatedly until 40^ C is displayed.
-
Press the Start/Pause button.
- This will remove any water from the manufacturer's remaining in the machine.
text_image
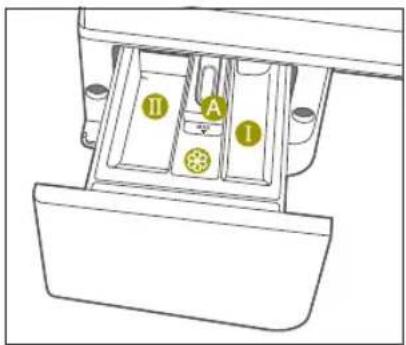
I II A IDispenser ⓄDetergent for prewash or starch.
Dispenser ⑪: Detergent for main wash, water softener, pre-soaking agent, bleach and stain removal product.
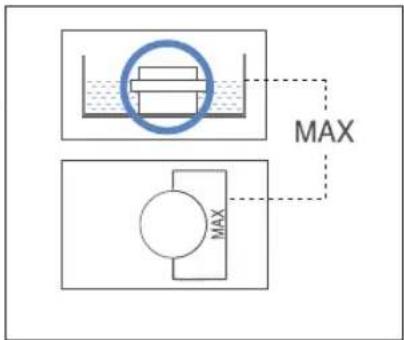
Dispenser Ⓞ: Additives, e.g. fabric softener or former (fill no higher than lower edge of insert "A")
Putting detergent in the washing machine
- Pull out the detergent drawer.
- Add laundry detergent into compartment
- Add softener into compartment® (if you desire).
- Add prewash detergent into compartment(if you desire).
Caution : Concentrated or thick fabric softener and conditioner must be diluted with a little water before being poured into the dispenser (prevents the overflow from becoming blocked.)
text_image
MAX MAX8 SAMSUNG Washing Machine Owner's Instructions
Washing a Load of Laundry
Washing clothes using Fuzzy Logic
Your new washing machine makes washing clothes easy, using Samsung's "Fuzzy Logic" automatic control system. When you select a wash program, the machine will set the correct temperature, washing time, and washing speed.
To wash clothes using the Fuzzy Logic programs:
- Turn on your sink's water faucet.
- Press the (On/Off) button.
- Open the door.
- Load the articles one at a time loosely into the drum, without overfilling.
- Close the door.
- Add the detergent, softener, and wash detergent (if necessary) into the appropriate compartment.
Note: Wash is only available when washing Duvet, Bedding, Towel, Curtain, Cotton, Coloureds, Synthetics and Delicates programs. It is only necessary if your clothing is heavily soiled.
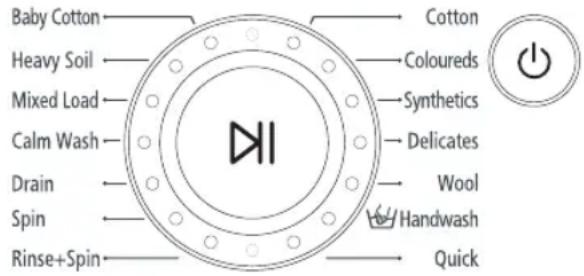
- Turn the Fuzzy Control dial to select the appropriate program for the type of clothes Cotton, Coloureds, Synthetics, Delicates, Wool, Hand wash, Quick, Rinse+Spin, Spin, Drain, Baby Cotton, Heavy Soil, Mixed Load, Calm Wash.
You will see the indicators light up on the control panel.
text_image
Baby Cotton Heavy Soil Mixed Load Calm Wash Drain Spin Rinse+Spin Cotton Coloureds Synthetics Delicates Wool Handwash Quick- At this time, you can control the wash temperature, rinsing times, spin speed, delay time by pressing the appropriate option button.
- Press the Start/Pause button on the Fuzzy Control dial and the wash cycle will begin. The process indicator will light up and the remaining time for the cycle will appear in the display.
When the cycle is finished:
After the total cycle has finished, the power will turn off automatically.
- Open the door.
Note: The door will not open until 3 minutes after the machine stops or the power turns off.
- Remove laundry.
Washing a Load of Laundry
Washing clothes manually
You can wash clothes manually without using the Fuzzy Logic feature. To do so:
- Turn the water supply on.
- Press the ^① (On/Off) button on the washing machine.
- Open the door.
- Load the articles one at a time loosely into the drum, without overfilling.
- Close the door.
- Put the detergent and, if necessary, softener or prewash detergent, in the appropriate compartments.
- Press the Temperature button to select the temperature (cold water, 30^ C, 40^ C, 60^ C, 95^ C)
- Press to rinse button to select the required number of rinse cycles. Maximum number of rinse cycles is five. The washing duration will be prolonged accordingly.
- Press the Spin button to select the spin speed. Note: The rinse hold program allows you to take clothes that are dripping wet out of the washing machine. ☑: No Spin
- Press the button repeatedly to cycle through the available delayed start options (from 4 hour to 24 hours in one hour increments). Displayed hours means the time of finished washing-cycle.
- Press the Start/Pause button and the machine will begin the cycle.
Using Delay Start
You can set the washing machine to finish your wash automatically at a later time, choosing from 4 to 24 hour delay (in 1 hour increments). Displayed hours means the time of finished washing-cycle.
To do this:
- Manually or automatically set your washing machine for the type of clothes you are washing.
- Press the Delay Start button repeatedly until the delay time is set.
- Press the Start/Pause button. The Delay Start indicator will light, and the clock will begin counting down until it reaches your finish time.
- To cancel Delay Start, press the ⏻ (On/Off) button, then turn the washing machine on again.
Washing a Load of Laundry
Washing tips and hints
Sorting your laundry : Sort your laundry according to the following characteristics:
- Type of fabric care label symbol : Sort laundry into cottons, mixed fibers, synthetics, silks, wools and rayon.
• Colour: Divide whites and colours. Wash new, coloured items separately. - Size: Placing items of different sizes in the same load will improve the washing action.
- Sensitivity: Wash delicate items separately, using the Delicate wash program for pure new wool, curtains and silk articles. Check the labels on the items you are washing or refer to the fabric care chart in the appendix.
Emptying pockets : Coins, safety pins and similar items can damage linen, the washing machine drum, and the water tank.
Securing fasteners: Close zippers and fasten buttons or hooks; loose belts or ribbons should be tied together.
Prewashing cotton : Your new washing machine, combined with modern detergents, will give perfect washing results, thus saving energy, time, water and detergent. However, if your cotton is particularly dirty, use a prewash with a protein-based detergent.
Determining load capacity: Do not overload the washing machine or your laundry may not wash properly. Use the chart below to determine the load capacity for the type of laundry you are washing.
| Fabric Type | Load Capacity | |||
| Coloured/cotton | WF-J145N/J125N/J105N/J85N | WF-B145N/B125NB105N/B85N | WF-R125N/R105N/R85N | WF-F125N/F105N/F85N |
| -average/lightly soiled | 7.0 kg 6.0 kg 5.2 kg 4.5 kg | |||
| -heavily soiled | 7.0 kg 6.0 kg 5.2 kg 4.5 kg | |||
| Synthetics | 3.0 kg 3.0 kg 2.5 kg 2.5 kg | |||
| Delicates | 2.5 kg 2.5 kg 2.0 kg 2.0 kg | |||
| Wools | 2.0 kg 2.0 kg 1.5 kg 1.5 kg | |||
Detergent tips: The type of detergent you should use is based on the type of fabric (cotton, synthetic, delicate items, wool), colour, wash temperature, degree and type of soiling. Always use "low suds" laundry soap, which is designed for automatic washing machines.
Follow the detergent manufacturer's recommendations based upon the weight of the laundry, the degree of soiling, and the hardness of the water in your area. If you do not know how hard your water is, ask your water authority.
Note: Keep detergents and additives in a safe, dry place out of the reach of children.
Maintaining the Washing Machine
Draining the washing machine in an emergency
WF-J145N/J125N/J105N/J85N/B145N/B125N/B105N/B85N
- Unplug the washing machine from the power supply.
- Open the filter-cover by using a coin or a key.
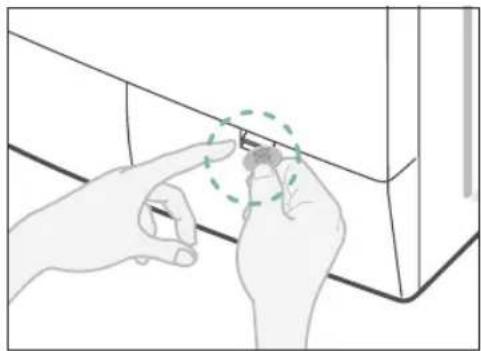
natural_image
Illustration of hands adjusting a small object on a table, with a green dashed circle highlighting the point (no text or symbols present)- Unscrew the emergency drain cap by turning left. Grip the cap on the end of the emergency drain tube and slowly pull it out about 15 cm.
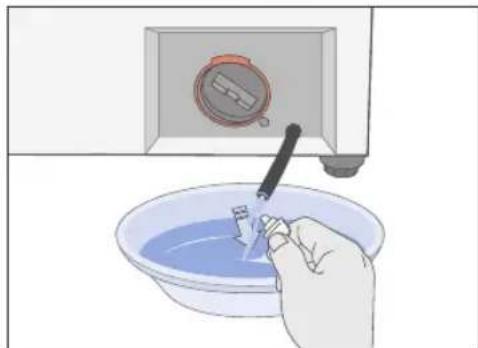
natural_image
Illustration of a hand pouring liquid into a bowl with a tool, next to a microwave oven (no text or symbols)- Allow all the water to flow into a bowl.
- Reinsert the drain tube and screw the cap back on.
- Replace the filter-cover.
Repairing a frozen washing machine
If the temperature drops below freezing and your washing machine is frozen:
- Unplug the washing machine.
- Pour warm water on the source faucet to loosen the water supply hose.
- Remove the water supply hose and soak it in warm water.
- Pour warm water into the washing machine drum and let it sit for 10 minutes.
- Reconnect the water supply hose to the water faucet and check if the water supply and drain operations are normal.
Cleaning the exterior
- Wipe the washing machine surfaces, including the control panel, with a soft cloth and non-abrasive household detergents.
- Use a soft cloth to dry the surfaces.
- Do not pour water on the washing machine.
12 SAMSUNG Washing Machine Owner's Instructions
Maintaining the Washing Machine
Cleaning the detergent drawer and recess
- edisni eht no revel esaeler eht sserP of the detergent drawer and pull it out.
- Remove the cap from compartment.
- Wash all of the parts under running water.
- Clean the draw or recess with an old toothbrush.
- Reinsert the cap (Pushing it firmly into place) and replace the liquid detergent divider into the drawer.
- Push the draw er back in to place.
- Run a rinse program without any laundry in the drum.
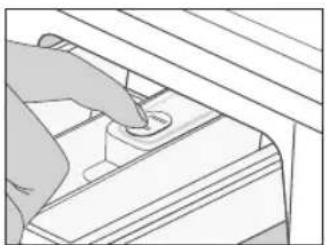
natural_image
Illustration of a hand pressing a button on a mechanical component (no text or symbols visible)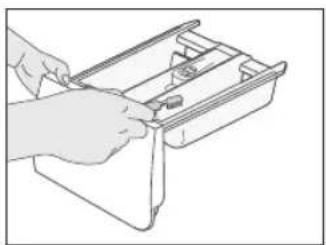
natural_image
Line drawing of a hand using a tool to adjust or install a mechanical component (no text or symbols visible)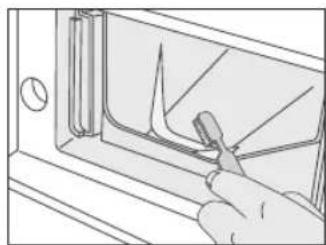
natural_image
Line drawing of a hand using a tool to adjust or install a component inside a cabinet (no text or symbols)Cleaning the debris filter
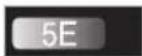
Clean the debris filter 5 or 6 times a year, or when you see the following error message on the display:
5E
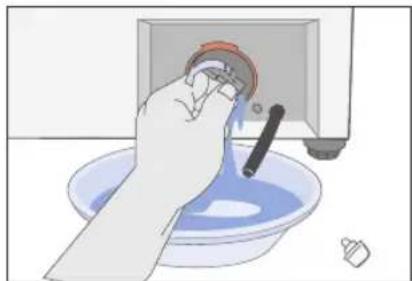
- Open the filter-cover, See "Draining the washing machine in an emergency" on page 12.
- Unscrew emergency drain cap by turning left and drain off all the water. See "Draining the washing machine in an emergency" on page 12.
- Unscrew the filter cap and take it out.
natural_image
Illustration of a hand washing a microwave oven with a tool, no text or symbols present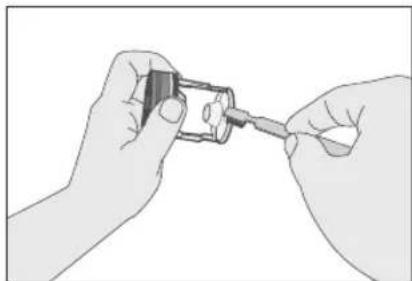
natural_image
Illustration of two hands holding a small mechanical component (no text or symbols visible)- Wash any dirtorotherm material from the filter. Make sure the drain pump propeller behind the filter is not blocked. Replace the filter cap.
- Replace the filter-cover.
Maintaining the Washing Machine
Cleaning the water hose mesh filter
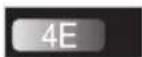
You should clean the water hose mesh filter at least one time per year, or when you see the following error message on the display:
4E
To do this:
- Turn off the water source to the washing machine.
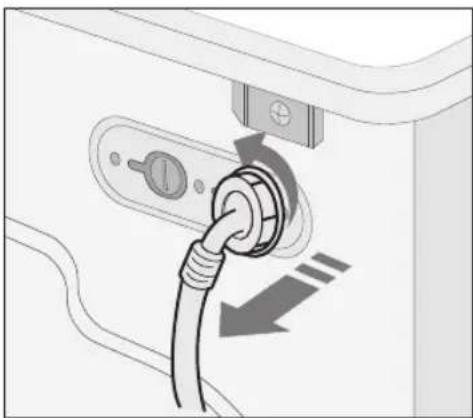
- Unscrew the hose from the back of the washing machine.
- With a pair of pliers, gently pull out the mesh filter from the end of the hose and rinse it under water until clean. Also clean the inside and outside of the threaded connector.
natural_image
Diagram of a cable being inserted into a device socket (no text or symbols visible)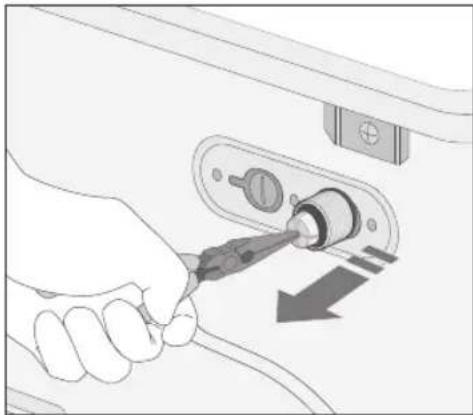
natural_image
Hand inserting a plug into a door handle, showing mechanical components and a downward arrow (no text or symbols)- Push the filter back into place.
- Screw the hose back onto the washing machine.
- Turn on the faucet and make sure the connections are watertight.
Troubleshooting
Problems and solutions
The washing machine will not start
• Make sure the door is firmly closed.
• Make sure the washing machine is plugged in.
• Make sure the water source faucet is turned on.
• Make sure to press the Start/Pause button.
No water or insufficient water supply
• Make sure the water source faucet is turned on.
- Make sure the water source hose is not frozen.
• Make sure the water intake hose is not bent.
- Make sure the filter on the water intake hose is not clogged.
Detergent remains in the detergent drawer after the wash program is complete
• Make sure the washing machine is running with sufficient water pressure.
- Put the detergents in the inner parts of the detergent drawer(away from the outside edges).
Washing machine vibrates or is too noisy
- Make sure the washing machine is set on a level surface. If the surface is not level, adjust the washing machine feet to level the appliance.
• Make sure that the shipping bolts are removed.
• Make sure the washing machine is not touching any other object.
• Make sure the laundry load is balanced.
The washing machine does not drain and/or spin
• Make sure the drain hose is not squashed or bent.
• Make sure the debris filter is not clogged
The Door does not open
- The door will not open until 3 minutes after the machine stops or the power turns off.
Understanding error messages
Error displayed
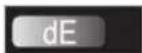
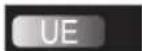
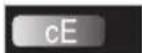
Solution
- Close the door.
- Make sure the source water faucet is turned on.
- Check the water pressure.
- Clean the debris filter.
- Make sure the drainage hose is installed correctly.
- Call after-sales service.
- Laundry load is unbalanced; loosen any tangled laundry. If only one item of clothing needs washing, such as a bathrobe or jeans, the final spin result might be unsatisfactory and an "UE" error message will be shown in the display window.
Before contacting After-Sales service:
- Try to remedy the problem (See "Troubleshooting" on this page).
- Restart the programme to see if the fault is repeated.
- If the malfunction persists, call after-sales service and describe the problem.
Programme Chart
(*user option)
| PROGRAM | Max load(kg) | DETERGENT AND ADDITIVES | Tem (°C) | Spin Speed(MAX)rpm | Delay start | Cycle Time (min) | ||||||||
| WF-J145N/J125N/J105N/J85N | WF-B145N/B125N/B105N/B85N | WF-R125N/R105N/R85N | WF-F125N/F105N/F85N | Pre-wash | wash | Sof-tener | Max | WF-J145N/B145N | WF-J125N/B125N/R125N/F125N | WF-J105N/B105N/R105N/F105N | WF-J85N/B85N/R85N/F85N | |||
| Cotton | 7.0 6.0 | 5.2 4.5 | * | yes | * | 95 1 | 400 120 | 00 1000 | 800 | * | 126 | |||
| Coloureds | 7.0 6.0 | 5.2 4.5 | * | yes | * | 60 1 | 400 120 | 00 1000 | 800 | * | 99 | |||
| Synthetics | 3.0 3.0 | 2.5 2.5 | * | yes | * | 60 8 | 800 800 | 800 800 | * | 72 | ||||
| Delicates | 2.5 2.5 | 2.0 2.0 | * | yes | * | 40 8 | 800 800 | 600 600 | * | 55 | ||||
| Wool | 2.0 2.0 | 1.5 1.5 | - | yes | * | 40 4 | 400 400 | 400 400 | * | 40 | ||||
| Handwash | 2.0 2.0 | 1.5 1.5 | - | yes | * | 40 4 | 400 400 | 400 400 | * | 35 | ||||
| Quick | 3.0 3.0 | 2.0 2.0 | - | yes | * | 60 1 | 400 120 | 00 1000 | 800 | * | 47 | |||
| PROGRAM | Type of WASH |
| Cotton | Averagely or lightly soiled cottons, bed linen, table linen, underwear, towels, shirts, etc. |
| Coloureds | Averagely or lightly soiled cottons, bed linen, table linen, underwear, towels, shirts, etc. |
| Synthetics | Averagely or lightly soiled blouses, shirts, etc., Made of polyester (diol trevira), polyamide (perlon, nylon) or other similar blends. |
| Delicates | Delicate curtains, dresses, skirts, shirts and blouses. |
| Wool | Only machine washable woolens with pure new wool label. |
| Handwash | Very light wash course like hand wash. |
| Quick | Lightly soiled cottons or linen blouses, shirts, dark coloured terry cloth coloured linen articles, jeans, etc. |
- Programme with prewash lasts approx. 15 minutes longer.
- The programme duration data has been measured under the conditions specified in Standard IEC 456.
- Consumption in individual homes may differ from the values given in the table due to variations in the pressure and temperature of the water supply, the load and the type of laundry.
Programme Chart
(*user option)
| PRO-GRAM | Max load(kg) | DETERGENT AND ADDITIVES | Tem (°C) | Spin Speed(MAX)rpm | Delay start | Cycle Time (min) | ||||||||
| WF-J145N/J125N/J105N/J85N | WF-B145N/B125N/B105N/B85N | WF-R125N/R105N/R85N | WF-F125N/F105N/F85N | Pre-wash | wash | Sof-tener | Max | WF-J145N/B145N | WF-J125N/B125N/R125N/F125N | WF-J105N/B105N/R105N/F105N | WF-J85N/B85N/R85N/F85N | |||
| Baby Cotton | 7.0 6.0 | 5.2 4.5 | * | yes | * | 95 1 | 400 120 | 00 1000 | 800 | * | 122 | |||
| Heavy Soil | 7.0 6.0 | 5.2 4.5 | * | yes | * | 60 1 | 400 120 | 00 1000 | 800 | * | 109 | |||
| Mixed Load | 2.5 2.5 | 2.0 2.0 | * | yes | * | 60 8 | 00 800 | 800 800 | * | 77 | ||||
| Calm Wash | 3.0 3.0 | 2.0 2.0 | * | yes | * | 40 | No Spin | * | 98 | |||||
| PROGRAM | Type of WASH |
| Baby Cotton | Averagely or lightly soiled baby cottons, bed linen, table linen, underwear, towels, shirts, etc. |
| Heavy Soil | Stained or heavy soiled cottons, bed linen, table linen, underwear, towe shirts, jeans, etc. |
| Mixed Load | A mix of lightly soiled cottons and synthetic fabrics. |
| Calm Wash | Extremely low noise level during the entire cycle and finish rinse hold Cottons, bed linen, table linen, underwear, towels, shirts. |
Appendix
Fabric care chart

Resistant material

Can be ironed at 100 °C max

Delicate fabric

Do not iron


Item may be washed at 95 °C

Can be dry cleaned using any solvent


Item may be washed at 60 °C

Dry clean with perchloride, lighter fuel, pure alcohol or R113 only


Item may be washed at 40 °C

Dry clean with aviation fuel, pure alcohol or R113 only


Item may be washed at 30 °C

Do not dry clean

Item may be hand washed

Dry flat

Dry clean only

Can be hung to dry

Can be bleached in cold water

Dry on clothes hanger

Do not bleach

Tumble dry, normal heat

Can be ironed at 200 °C max

Tumble dry, reduced heat

Can be ironed at 150 °C max

Do not tumble dry
Electrical warnings
To reduce the risk of fire, electrical shock, and other injuries, keep these safety precautions in mind:
- Operate the appliance only from the type of power source indicated on the marking label. If you are not sure of the type of power supplied to your home, consult your appliance dealer or local power company.
- Use only a grounded or polarized outlet. For your safety, this appliance is equipped with a polarized alternating current line plug having one blade wider than the other. This plug will fit into the power outlet only one way. If you are unable to insert the plug fully into the outlet, try reversing the plug. If the plug still doesn't fit, contact your electrician to replace your outlet.
- Protect the power cord. Power supply cords should be routed so that they are unlikely to be walked on or pinched by items placed on or against them. Pay particular attention to cords at plugs, convenience receptacles, and the point where they exit from the unit.
- Do not overload the wall outlet or extension cords. Overloading can result in fire or electric shock.
Appendix
Protecting the environment
- This appliance is manufactured from recyclable materials. If you decide to dispose of this appliance, please observe local waste disposal regulations. Cut off the power cord so that the appliance cannot be connected to a power source. Remove the door so that animals and small children cannot get trapped inside the appliance.
- Do not exceed the detergent quantities recommended in the detergent manufacturers' instructions.
- Use stain removal products and bleaches before the wash cycle only when strictly necessary.
- Save water and electricity by only washing full loads (the exact amount depends upon the program used).
Declaration of conformity
This appliance complies with European safety standards, EC directive 93/68 and EN Standard 60335.
Specification
| TYPE | FRONT LOADING WASHER | |||||||||||||
| DIMENSION | WF-J145N/J125N/J105N/J85N | WF-B145N/B125N/B105N/B85N | WF-R125N/R105N/R85N | WF-F125N/F105N/F85N | ||||||||||
| W598mm ×D600mm ×H844mm | W598mm × D550mm × H844mm | W598mm × D450mm × H844mm | W598mm × D404mm × H844mm | |||||||||||
| WATER PRESSUERE | 50 kPa ~ 800 kPa | |||||||||||||
| WATER VOLUME | 60 L 54 L 49 L 48 L | |||||||||||||
| NET WEIGHT | 75 kg 75 kg 66 kg 62 kg | |||||||||||||
| WASH and SPIN CAPACITY | 7 kg (DRY LAUNDRY) | 6 kg (DRY LAUNDRY) | 5.2 kg (DRY LAUNDRY) | 4.5 kg (DRY LAUNDRY) | ||||||||||
| POWER CONSUMP -TION | MODEL | WF-J145N/J125N/J105N/J85N | WF-B145N/B125N/B105N/B85N | WF-R125N/R105N/R85N | WF-F125N/F105N/F85N | |||||||||
| WASHING AND HEATING | 220V | 2000W | 220V | 2000W | 220V | 1900W | 220V | 1800W | ||||||
| 240V | 2400W | 240V | 2400W | 240V | 2200W | 240V | 2100W | |||||||
| SPIN | MODEL | WF-J145N | WF-J125N | WF-J105N | WF-J85N | WF-B145N | WF-B125N | WF-B105N | WF-B85N | WF-R125N | WF-R105N | WF-F125N | WF-F105N | |
| 230V | 700W | 360W | 320W | 270W | 580W | 530W | 500W | 430W | 550W | 500W | 430W | 270W | ||
| PUMPING | 34W | |||||||||||||
| PACKAGE Wt | MODEL | WF-J145N/J125N/J105N/J85N | WF-B145N/B125N/B105N/B85N | WF-R125N/R105N/R85N | WF-F125N/F105N/F85N | |||||||||
| PAPER | 2.5kg | 2.5kg 2.1kg 1.9kg | ||||||||||||
| PLASTIC | 1.0kg | 1.0kg 0.9kg 0.8kg | ||||||||||||
| SPIN REVOLUTION | MODEL | WF-J145N/B145N | WF-J125N/B125N/R125N/F125N | WF-J105N/B105N/R105N/F105N | WF-J85N/B85N/R85N/F85N | |||||||||
| rpm | 1400 | 1200 | 1000 | 800 | ||||||||||
SAMSUNG Washing Machine Owner's Instructions
SAMSUNG
Contact SAMSUNG WORLD WIDE
If you have any questions or comments relating to Samsung products, please contact the SAMSUNG customer care center.
Samsung Electronics U.K. Ltd.
Unit C, Stafford Park 12 Telford, Shropshire TF3 3BJ
The United Kingdom
0870 242 0303
www.samsung.com/uk
CE