
DS-55302 - Audio/video extender Digitus - Free user manual and instructions
Find the device manual for free DS-55302 Digitus in PDF.


| Product Type | HDMI Extender Splitter Set (1x2) |
| Brand | Digitus |
| Model | DS-55302 |
| Input Connector | 1 x HDMI (Type A, 19-pin female) |
| Output Connectors | 2 x RJ45 (to receivers), 1 x HDMI Loop-Out |
| Max Transmission Distance | 40 m (131 ft) via CAT6/6a/7 cable |
| Max Video Resolution | 1920 x 1080 @ 60 Hz |
| Supported Audio Formats | PCM, DTS, AC3 |
| IR Passback | Yes, 20-60 kHz |
| EDID Support | 8 built-in modes, manual switch |
| HDCP Version | HDCP 1.4 |
| Power Supply | DC 5V / 2A (transmitter only); PoC (Power over Cable) to receivers |
| Power Consumption | < 10 W |
| Housing Material | Metal enclosure |
| Transmitter Dimensions (L x W x H) | 157.8 x 62 x 21.6 mm |
| Receiver Dimensions (L x W x H) each | 71.6 x 66.6 x 22.6 mm |
| Transmitter Weight | 0.24 kg |
| Receiver Weight (each) | 0.08 kg |
| Mounting | Wall-mountable (screws included) |
| Operating Temperature | 0 °C to 60 °C |
| Storage Temperature | -20 °C to 70 °C |
| Relative Humidity | 20% to 90% (non-condensing) |
| Package Contents | 1x Transmitter, 2x Receivers, 1x DC 5V/2A Adapter, 1x IR Blaster, 2x IR Receiver Cables, User Manual |
| Care & Cleaning | Disconnect power before cleaning. Wipe with a dry, soft cloth. Do not use liquids or abrasive cleaners. |
| Safety Precautions | Use only the supplied power adapter. Do not plug/unplug cables while device is powered. Avoid mixing transmitter and receiver units or IR cables. |
| Spare Parts & Repairability | Contact manufacturer or authorized service center for spare parts. No user-serviceable parts inside. |
Frequently Asked Questions - DS-55302 Digitus
User questions about DS-55302 Digitus
0 question about this device. Answer the ones you know or ask your own.
Ask a new question about this device
Download the instructions for your Audio/video extender in PDF format for free! Find your manual DS-55302 - Digitus and take your electronic device back in hand. On this page are published all the documents necessary for the use of your device. DS-55302 by Digitus.
USER MANUAL DS-55302 Digitus
DIGITUS® Professional
HDMI Extender Splitter Set, 1x2

Manual
DS-55302
The Digitus HDMI Extender Splitter Set, 1x2 offers an extender and splitter solution of up to 40 m for the highest demands. It is used to transmit digital video and audio signals to a maximum length of up to 40 m and to distribute them to up to two monitors/screens. The highest supported video resolution is 1080p / 60Hz. The transmitter unit features an EDID switch, which can be used to regulate resolution and audio format of the output signal. The transmitter also has an HDMI Loop Out Port, which allows you to connect a local monitor. Thanks to PoC (Power over Cable) support, it is only the transmitter unit that needs to be powered. The package includes three infrared units (1x transmitter, 2x receivers), which can be used for the remote control of the connected input source.
Important Safety Instructions
1 Do not mix up the Transmitter and Receiver, and the IR blaster and IR receiver.
2 Do not plug-in/out the cables, when it is in using.
3 Use DC 5V power supply only. Make sure the specification matched if using 3rd part DC adapters.
4 Support power from transmitter to receiver unit over the CAT6 cable.
Package Contents
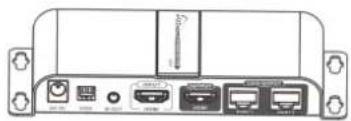


Transmitter unit ×1pcs Receiver unit ×2pcs DC5V/2A ×1pcs

User Manual ×1pcs extension

IR blaster extension cable x1pcs

IR receiver cable ×2pcs
Features
- Distribute 1 HDMI source to 2 HD displays over network cable simultaneously
- Support one HDMI Loop-out
- Compatible with CAT6/6a/7 network cables
- The transmission distance is 40m/131ft
- The Highest resolution is up to 1920×1080@60Hz
- Support 20\~60KHz IR pass back
- Support EDID
- Support power from transmitter to receiver unit over the CAT6 cable.
- Plug and play
- Wall-mounted function, easy installation
| Specification | |
| Part No. DS-55302 | |
| Technical | |
| Input HDMI×1 (Type A, 19 | pin, female) |
| Output | RJ45×2 |
| Transmission distance 40 meters via CAT6 | |
| Video support | 480i@60Hz, 480p@60Hz, 576i@50Hz, 576p@50Hz, 720p@50/60Hz, 1080i@50/60Hz, 1080p@50/60Hz |
| Audio format PCM DTS AC3 | |
| TMDS signal 0.5~1.5Vp-p (TMDS) | |
| DDC signal 5Vp-p (TTL) | |
| IR Passback Function Support | |
| IR frequency Range (KHz) | Support 20~60KHz IR frequency devices |
| HDCP version HDCP1.4 | |
| Mechanical | |
| Housing Metal enclosure | |
| Dimensions (L×W×H mm) | TX: 157.8×62×21.6 mmRX: 71.6×66.6×22.6mm |
| Weight TX: 0.24kg RX: 0.08kg x 2pcs | |
| Fixedness wall-mounting case with screws | |
| Power supply 5V/2A | |
| Power consumption <10W | |
| Operation temperature 0~60° | |
| Storage temperature | -20~70° |
| Relative humidity | 20-90% (no condensation) |
Installation Requirements
- HDMI source device
(computer graphics card, DVD, PS3, HD monitoring equipment etc.)
-
HDMI display device like SDTV, HDTV, and projector with HDMI port.
-
UTP/STP CAT6/6A/7 cable, follow standard IEEE-568B.
Panel Description
1. Transmitter unit (TX)
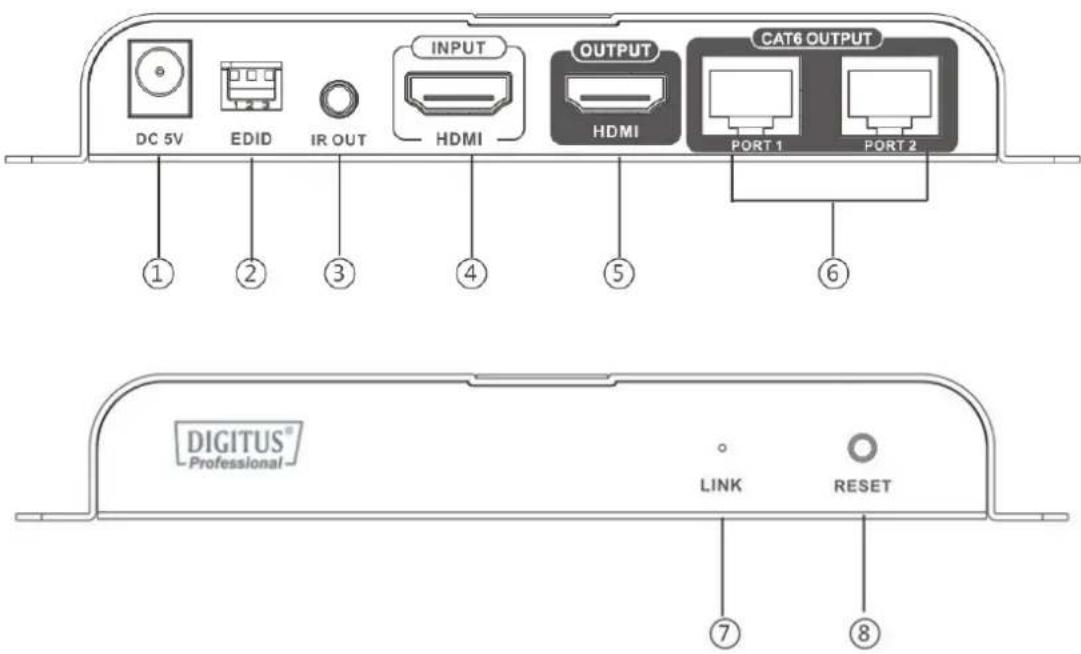
① Power input (DC5V)
② EDID dip switch
③ IR signal output to connect with blaster extension cable
④ HDMI input
⑤ HDMI output
⑥ RJ45 signal output
⑦ Power/signal indicator
⑧ Reset button
2. Receiver unit (RX)

① LENGTH: for adjusting to the length of network cable
② RJ45 signal input
③ RJ45 indicator led it lights on all the time with HDMI signal transmission, flashes with no signal transmission
④ DC5V power input (OPTIONAL)
⑤ HDMI signal output
⑥ IR signal input to connect with IR receiver extension cable
Remarks: The LENGTH key is designed for switching between automatic and manual setting to adjust cable length. Powered on without any operation, extender works with parameter set and memorized before. Powered on and then press LENGTH key, the first two press, it will enter automatic mode to adapt cable length. The following 12 times of pressing, it will enter manual mode in 12 levels to meet different cable length. After all 12 levels of press, it will entering auto mode again and into next loop.
Installation Procedures

1. How to make a CAT5/5E/6 network cable
Follow the standard of IEEE-568B:
1- Orange/white
3- Green/white
5- Blue/white
7- Brown/white
2- Orange
4- Blue
6- Green
8- Brown
2. Connection
![graph TD A[" DVD "] --> B[" HDMI input "] B --> C[" HDMI extender splitter "] C --> D[" HDMI Out "] D --> E[" TV "] D --> F[" Cable "] F --> G[" Receiver "] G --> H[" TV "] G --> I[" TV "] D --> J[" power "] D --> K[" HDMI Out "] K --> L[" DC SV "] K --> M[" EDID "] K --> N[" IR OUT "] K --> O[" HDM…](/content/2026/05/791049/images/aac3f6f7b2aacfe0984954c56805ef85c9d38466d368ab3466b5edda825c8ae9.jpg)
Remarks: Please do not remote control two or RX units' IR cable at the same time, which to avoid interference.
3. Connection instruction:
A. Connect the HDMI signal source device to the Transmitter HDMI input port with HDMI cable.
B. Connect IR blaster to EXTENDER IR OUT.
C. Connect the Transmitter RJ45 port to HDMI EXTENDER RX's RJ45 input port by network cable.
D. Connect HDMI EXTENDER RX's HDMI output port to HDMI display's HDMI input port by HDMI cable and set the HDMI display's signal source to be HDMI port.
E. Supply the power (Power's signal light is red, when there are signal input then the power light is blue), the product will work.
4. EDID Setting
1) HDMI source device reads the EDID information of the transmitter (TX) and then output the relative HDMI signal format.
2) There are 8 build-in EDID status, and others could be selected by the EDID switch in the HDMI extender splitter (transmitter), the detail Setting Information shown as below:
Switch UP: Use the Arabic numeral "1" to represent
Switch DOWN: Use the Arabic numeral "0" to represent
| Switch Status | SW1 SW2 SW3 | EDID Mode | ||
| 0 | 0 | 0 | 720P@50Hz 2.1CH | |
| 1 | 0 | 0 | 720P@50Hz 7.1CH | |
| 0 | 1 | 0 | 1080i@60Hz 2.1CH | |
| 1 | 1 | 0 | 1080i@60Hz 7.1CH | |
| 0 | 0 | 1 | 1080P@60 2.1CH | |
| 1 | 0 | 1 | 1080p@60Hz 7.1CH | |
| 0 | 1 | 1 | Read Loop-out (if not connect the loop-out show default) | |
| 1 | 1 | 1 | Default 720P@50Hz | |
2.1CH
FAQ
Q: No image or audio output on display?
A: 1) Please check whether display on standby mode
2) Please check whether display HDMI signal channel in accord with HDMI input port
3) Please check whether "LINK" LED on RX side keeps on, LED flash means RX does not receive signal from TX.
4) Please check whether signal indicator LED on TX turns blue, LED on red means no input signal
5) Please check whether input resolution is supported by this product.
Q: Image unstable?
A: 1) Press the "LENGTH" or "RESET" button on the transmitter to re-identify the signal
2) Please pull & plug CAT cable on corresponding port to reconnect.
Q: Only partial ports have output?
A: 1) Please check whether CAT cable or HDMI cable connected correctly
2) Press the "LENGTH" or "RESET" button on the transmitter to re-identify the signal
3) Please pull & plug CAT cable on corresponding port to reconnect.
Disclaimer
The product name and brand name may be registered trademark of related manufacturers. TM and ® may be omitted on the user manual. The pictures on the user manual are just for reference, and there may be some slight difference with the real products. We reserve the rights to make changes without further notice to a product or system described herein to improve reliability, function or design.
Hereby Assmann Electronic GmbH, declares that the Declaration of Conformity is part of the shipping content. If the Declaration of Conformity is missing, you can request it by post under the below mentioned manufacturer address.
www.assmann.com
Assmann Electronic GmbH
Auf dem Schüffel 3
58513 Lüdenscheid
Germany



- DIGITUS® PROFESSIONAL
- HDMI EXTENDER SPLITTER SET, 1X2
- MANUAL
- DS-55302
- IMPORTANT SAFETY INSTRUCTIONS
- PACKAGE CONTENTS
- FEATURES
- INSTALLATION REQUIREMENTS
- PANEL DESCRIPTION
- TRANSMITTER UNIT (TX)
- RECEIVER UNIT (RX)
- INSTALLATION PROCEDURES
- HOW TO MAKE A CAT5/5E/6 NETWORK CABLE
- CONNECTION
- CONNECTION INSTRUCTION
- EDID SETTING
- FAQ
- Q: NO IMAGE OR AUDIO OUTPUT ON DISPLAY
- Q: IMAGE UNSTABLE
- Q: ONLY PARTIAL PORTS HAVE OUTPUT
- DISCLAIMER
Brand : Digitus
Model : DS-55302
Category : Audio/video extender