Smart Vx570 - Payment terminal CCV - Free user manual and instructions
Find the device manual for free Smart Vx570 CCV in PDF.


User questions about Smart Vx570 CCV
0 question about this device. Answer the ones you know or ask your own.
Ask a new question about this device
Download the instructions for your Payment terminal in PDF format for free! Find your manual Smart Vx570 - CCV and take your electronic device back in hand. On this page are published all the documents necessary for the use of your device. Smart Vx570 by CCV.
USER MANUAL Smart Vx570 CCV
User Manual
CCV Smart
text_image
11.34 BETRY.THE.hk HINDERE.THE.hk
natural_image
Abstract flower-like logo with five colored petals (green, blue, dark blue) radiating from a white center, no text or symbols present.Faults caused by a failure to adhere to the instructions in this User Manual are not covered by the Service Agreement.
The scope of the services provided by CCV and the applicable terms and conditions are set out in the General Terms and Conditions of CCV Holland B.V. (version of August 2012) and the service leaflet of the relevant product. These documents were enclosed with the quotation you received from CCV.
All rights reserved. No part of this publication may be reproduced, stored in a retrieval system, or transmitted, in any form or by any means, electronic, mechanical, photocopying, recording or otherwise, without the prior written permission of CCV Holland B.V.
TABLE OF CONTENTS
1 INTRODUCTION 5
1.1 The CCV Smart payment terminal and PINpad 5
1.2 Parties facilitating the transaction process 5
2 INSTALLATION OF PAYMENT TERMINAL AND PINPAD 6
2.1 Components supplied 6
2.2 Installation guidelines 7
2.2.1 Position of PINpad 7
2.2.2 Use of card reader 7
2.2.3 Environmental factors 7
2.3 Installation of equipment 8
2.4 Communication settings 9
2.4.1 Taking out an Internet subscription 9
2.4.2 View current communication settings 9
2.4.3 Assigning a static IP address 10
2.4.4 Assigning a dynamic IP address 12
3 WORKING WITH THE PAYMENT TERMINAL AND PINPAD 13
3.1 Overview of payment terminal and PINpad 13
3.2 Keypad of payment terminal and PINpad 15
3.3 PINpad touchscreen 17
3.3.1 Entering letters 17
3.4 Payment terminal menu 18
3.4.1 Symbols for menu options 18
3.4.2 Status symbols 19
3.5 Merchant password 20
3.6 Activating and deactivating the payment terminal 21
3.6.1 Activating the terminal 21
3.6.2 Deactivating the terminal 21
3.7 Use of payment cards 22
3.8 Replacing a printer roll 22
4 CARRYING OUT TRANSACTIONS 23
4.1 Overview of transaction types 23
4.2 Sale 24
4.2.1 Manual credit card transactions 25
4.3 Cancellation 26
4.4 Reservation 27
4.5 Sale after reservation 29
5 PAYMENT CARDS 30
5.1 Viewing payment card settings 30
5.2 Changing payment card settings 32
5.2.1 Adding a payment card 32
5.2.2 Deleting a payment card 34
5.2.3 Changing the Merchant ID for a payment card 35
6 FINANCIAL REPORTS 37
6.1 Types of financial reports 37
6.2 Automatically printing reports when the terminal is deactivated 37
6.3 Printing interim reports 38
6.3.1 Printing an interim totals report 38
6.3.2 Printing an interim E-Journal 40
6.4 Changing report settings 42
6.4.1 Activating the E-Journal feature 42
6.4.2 Deactivating the E-Journal feature 44
6.5 Deleting the E-Journal 45
7 OPTIONAL FEATURES 46
7.1 Overview of optional features 46
7.2 Instruction cards for optional features 46
8 MAINTENANCE AND TECHNICAL PROBLEMS 47
8.1 Maintaining the payment terminal and PINpad 47
8.1.1 Cleaning the payment terminal and PINpad 47
8.1.2 Cleaning the PINpad chip card reader 48
8.1.3 Cleaning the PINpad magnetic card reader 48
8.2 Periodic software version control 49
8.3 What to do in the event of faults / technical problems 49
8.3.1 Looking up the TMS Terminal ID and payment terminal code 50
9 SUPPLIES FOR THE PAYMENT TERMINAL 51
9.1 Ordering supplies 51
9.2 Ordering printer rolls on your payment terminal 51
10 TERMS AND DEFINITIONS 52
11 CONTACT INFORMATION 54
11.1 CCV phone numbers 54
11.2 CCV opening hours 54
11.3 CCV general address details 54
11.4 Acquirer phone numbers 54
1 INTRODUCTION
1.1 The CCV Smart payment terminal and PINpad
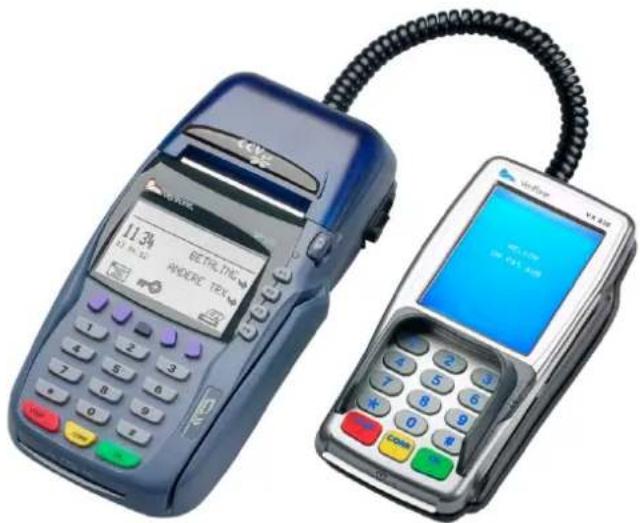
The CCV Smart system consists of the Vx570 payment terminal and the VX 820 PINpad. The CCV Smart system allows you to process transactions with payment cards, loyalty cards and customer cards. The payment terminal is future-proof and conforms to the latest national security standards as well as the EMV standard. The EMV standard was developed by the credit card companies Europay, MasterCard, Visa and JCB to prevent payment card fraud. The security of the transaction process is enhanced because the payment terminal reads the EMV chip on the payment card, rather than a magnetic strip.
1.2 Parties facilitating the transaction process
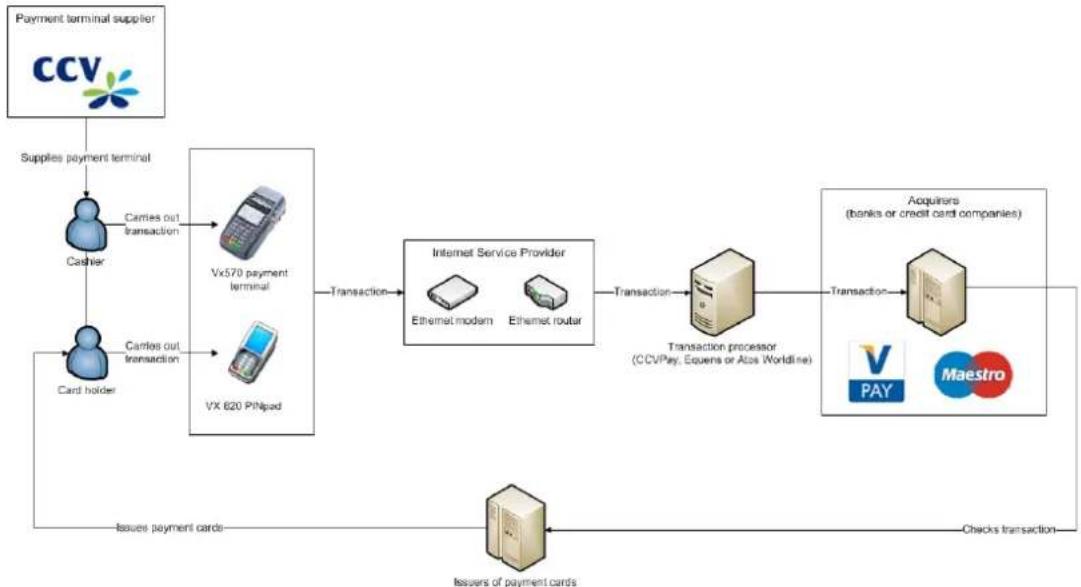
This User Manual makes frequent reference to the various parties involved in the processing of transactions. An overview of these parties is provided below.
flowchart
graph TD
    A["CCV"] --> B["Supplies payment terminal"]
    B --> C["Cashier"]
    B --> D["Card holder"]
    C --> E["Vx570 payment terminal"]
    D --> F["VX 620 PINpad"]
    E --> G["Transaction"]
    F --> G
    G --> H["Internet Service Provider"]
    H --> I["Transaction processor (CCVPay, Equens or Atos Worldline)"]
    I --> J["Transaction"]
    J --> K["Acquirers (banks or credit card companies)"]
    K --> L["Chacks transaction"]
    M["Issuers of payment cards"] --> N["Issues of payment cards"]
    N --> O["Issues payment cards"]
    style A fill:#f9f,stroke:#333
    style K fill:#ccf,stroke:#333
Party Explanation
| Payment terminal supplier | You purchased your payment terminal from a payment terminal supplier (in this case CCV). |
| Cashier | The cashier operates the Vx570 payment terminal during the transaction. |
| Card holder | The card holder is the person to whom you charge a transaction amount for a product or service. The card holder operates the VX 820 PINpad during the transaction. |
| Internet Service Provider | Your transaction data are sent to a transaction processor via an Ethernet connection. You can take out a contract for an Ethernet connection with an Internet Service Provider. |
| Transaction processor | The transaction processor forwards the transaction data to acquirers (banks or credit card companies) for further processing. |
| Acquirer | The acquirer contacts the issuer of the payment card to check if the payment card transaction can be processed. |
| Issuer of payment card Payment cards | ards are usually issued by a bank or financial institution. Payment cards are used by card holders to conduct transactions. |
2 INSTALLATION OF PAYMENT TERMINAL AND PINPAD
2.1 Components supplied
If the payment terminal and PINpad were delivered as a plug & play pack, you should have received the following components.
| Overview of components supplied | ||
| 1 | Vx570 payment terminal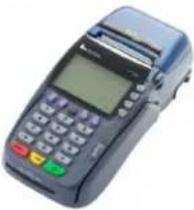 | The cashier unit operated by you (the cashier). |
| 2 | VX 820 PINpad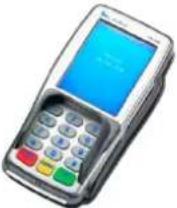 | The customer unit operated by the card holder. |
| 3 | Power supply cable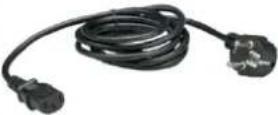 | You can plug the power supply into a wall socket (230 Volt) using the power supply cable. |
| 4 | Power supply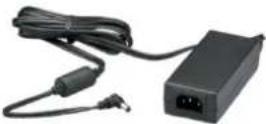 | Connect the power supply to the power supply cable and the Vx570 payment terminal. |
| 5 | PINpad cable | Use the PINpad cable to interconnect the Vx570 payment terminal and the VX 820 PINpad. |
| 6 | Ethernet cable | Plug the Ethernet cable into the Vx570 payment terminal and a communication module (Ethernet modem or Ethernet router). |
Refer to section 2.3 for more information about connecting the equipment.
2.2 Installation guidelines
The Dutch Payments Association (Betaalvereniging Nederland) is an organisation that aims to maintain and improve the security of electronic payment transactions in the Netherlands. In order to enhance the security of such transactions, the Association has drawn up the following guidelines concerning the position of the PINpad and the use of the card reader.
2.2.1 Position of PINpad
- The position of the PINpad must be such as to allow the card holder to shield the keypad with his/her other hand or with his/her body when entering the PIN code. If the PINpad is installed in a horizontal position, the following dimensional requirements must be met:
The PINpad must be at least 80 cm and no more than 120 cm above floor level. You are only allowed to deviate from these rules if a special set-up ensures that the entry of the PIN code is completely shielded from sight. - It must not be possible to observe the entry of a PIN code from a raised area, by means of mirrors or cameras, or in any other way.
- During the transaction, the keypad should be positioned to provide the card holder with adequate privacy when entering the PIN code, so that third parties are prevented from observing the number entered (as far as reasonably possible).
- The PINpad is fitted with a privacy shield. The card holder can use this shield to hide the keypad from view when entering the PIN code. Please contact the CCV Service Center if your PINpad is not fitted with a privacy shield.
2.2.2 Use of card reader
Make sure that the payment card is never out of the card holder's sight. You should therefore always let the card holder insert the card in the chip card reader or swipe it through the magnetic card reader. If this is not practicable, you should make sure the card holder is watching while you insert the card in the chip card reader or swipe it through the magnetic card reader.
2.2.3 Environmental factors
Environmental factors can affect the operation of the equipment. You must therefore take them into consideration when installing the equipment. Your payment terminal will operate correctly under the following environmental conditions:
• Ambient temperature between 0 and 40°C
• Relative atmospheric humidity between 5 and 90%
Avoid:
• Shocks and vibrations
• Direct sunlight and heat-emitting objects
• Excessive heat and dust
- Oil and dirt
• Water and condensate
- Installing the equipment near objects that cause excessive power fluctuations and/or generate electromagnetic fields
2.3 Installation of equipment
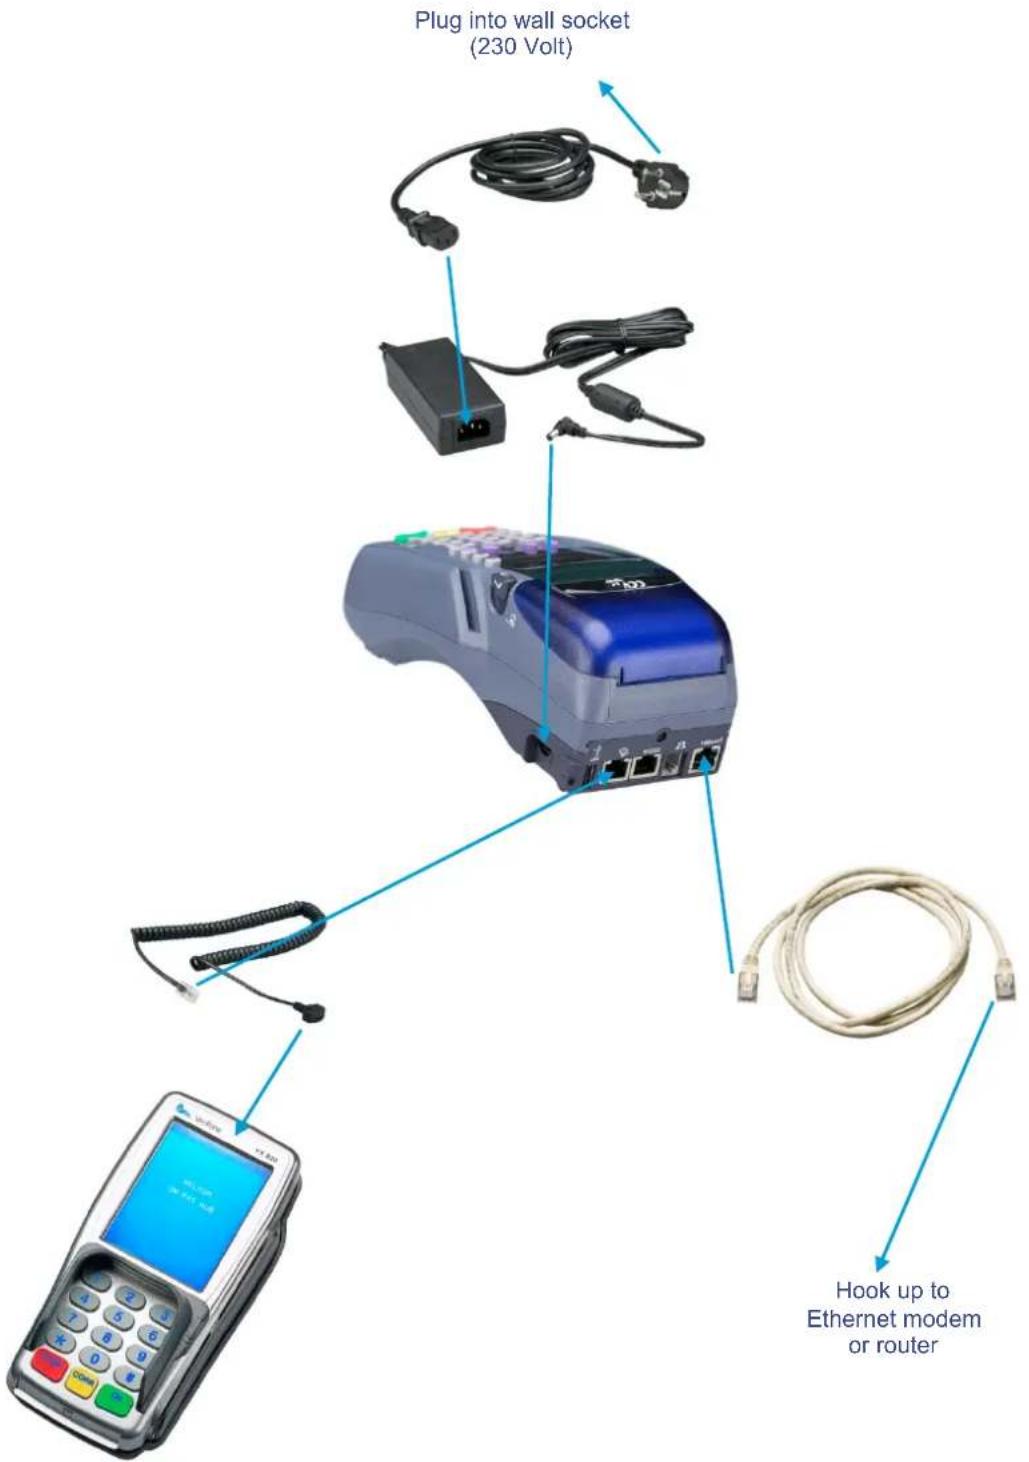
If your payment terminal and PINpad were delivered as a plug & play pack, you must install the equipment yourself. Connect the equipment as depicted below.
If you need to temporarily disconnect the equipment (e.g. because you wish to relocate it), you can reconnect it as depicted below.
text_image
Plug into wall socket (230 Volt) Hook up to Ethernet modem or router2.4 Communication settings
Your payment terminal must be able to communicate via the Internet. An Internet connection is required to forward transaction data to an acquirer for processing. You also need it to communicate with the CCV Terminal Management System, so that new software can be installed on your payment terminal, for instance.
2.4.1 Taking out an Internet subscription
Your payment terminal must be connected to the Internet via a broadband Ethernet connection (e.g. cable or ADSL). You can take out a subscription for a broadband connection with an Internet Service Provider. You can opt for PolP (PIN over IP) broadband connection certified by Currence, or a non-certified broadband connection (part of the public Internet).
A certified broadband connection offers the best guarantee of high availability and good service. We therefore advise you to opt for a certified broadband connection. Visit the Currence website (www.currence.nl) for an up-to-date overview of suppliers of certified broadband connections.
Important: If you want your payment terminal to communicate via a non-certified broadband connection (part of the public Internet), please contact the CCV Service Center to implement the correct communication settings.
2.4.2 View current communication settings
Complete the following steps to view the current communication settings of your payment terminal:
Vx570 screen Step
text_image
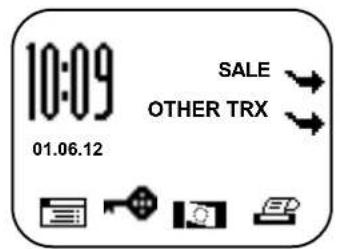
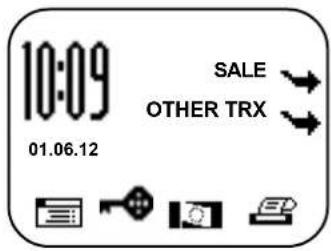
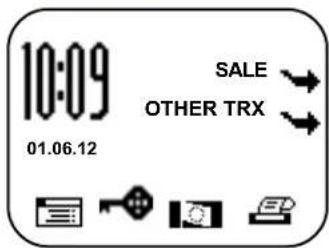
10:09 SALE OTHER TRX 01.06.121 Press the purple function key below the symbol to open the menu.
text_image
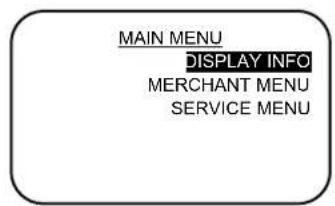
MAIN MENU DISPLAY INFO MERCHANT MENU SERVICE MENU2 Select DISPLAY INFO.
text_image
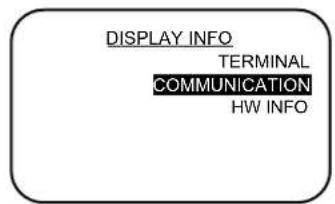
DISPLAY INFO TERMINAL COMMUNICATION HW INFO3 Select COMMUNICATION.
text_image
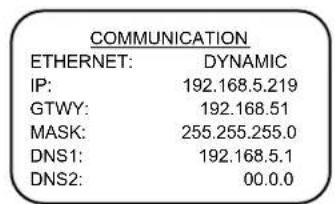
COMMUNICATION ETHERNET: DYNAMIC IP: 192.168.5.219 GTWY: 192.168.51 MASK: 255.255.255.0 DNS1: 192.168.5.1 DNS2: 00.0.04 The payment terminal's IP address, gateway and subnet mask are now displayed on screen.
2.4.3 Assigning a static IP address
Important: Your Internet Service Provider will provide you with the required details of your communication settings. Please contact your Internet Service Provider if you do not have the required information at your disposal.
Complete the following steps to assign a static IP address to your payment terminal:
Vx570 screen Step
text_image
10:09 SALE OTHER TRX 01.06.121 Press the purple function key below the symbol to open the menu.

2 Select MERCHANT MENU.
MAIN MENU
DISPLAY INFO
MERCHANT MENU
SERVICE MENU
PROTECTED ITEM
MERCHANT PASSWORD:
3 Enter the merchant password (the default password is 99999) and confirm by pressing
MERCHANT MENU
REPORTS
FUNCTIONS
CONFIGURE
CONFIGURE
TERMINAL
C-TAP
4 Select CONFIGURE.
5 Select TERMINAL.
TERMINAL
COMMUNICATION
MERCHANT PASSWORD
E-JOURNAL
6 Select COMMUNICATION.
COMMUNICATION
SELECT MODEM
TCP/IP
7 Select TCP / IP.
TCP/IP
RESET ALL (DHCP)
STATIC IP ADDRESS
IP ADDRESS DNS1
8 Select STATIC IP ADDRESS.
TCP/IP
TERMINAL IP ADDRESS
SUBNET MASK
GATEWAY
9 Select TERMINAL IP ADDRESS.
Vx570 screen Step
TERMINAL IP ADDRESS
0.0.0.0
TERMINAL IP ADDRESS
(0.0.0.0)
10 Press
11 Enter the IP address and confirm by pressing
Important: Use the numeric keys and the
TCP/IP
TERMINAL IP ADDRESS
SUBNET MASK
GATEWAY
SUBNET MASK
0.0.0.0
12 Select SUBNET MASK.
13 Press
SUBNET MASK
(0.0.0.0)
14 Enter the subnet mask and confirm by pressing
15 Select GATEWAY.
TCP/IP
TERMINAL IP ADDRESS
SUBNET MASK
GATEWAY
GATEWAY
0.0.0.0
16 Press
GATEWAY
(0.0.0.0)
17 Enter the gateway and confirm by pressing
18 Press
Important: After entering the communication settings, you must always check if the settings are correct. You can do so by accessing the communication settings of your payment terminal (see subsection 2.4.2).
2.4.4 Assigning a dynamic IP address
If you want your payment terminal to use a dynamic IP address, you must first remove the static IP address. Complete the following steps to remove the static IP address:
Vx570 screen Step
text_image
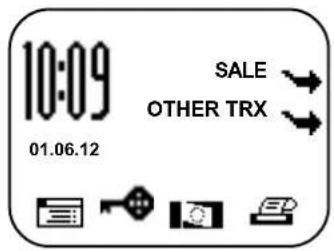
10:09 SALE OTHER TRX 01.06.121 Press the purple function key below the symbol to open the menu.
text_image
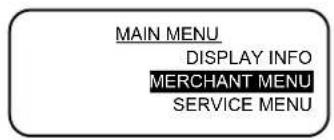
MAIN MENU DISPLAY INFO MERCHANT MENU SERVICE MENU2 Select MERCHANT MENU.
text_image
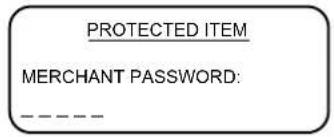
PROTECTED ITEM MERCHANT PASSWORD: - - - - -3 Enter the merchant password (the default password is 99999) and confirm by pressing
text_image
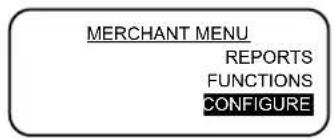
MERCHANT MENU REPORTS FUNCTIONS CONFIGURE4 Select CONFIGURE.
text_image
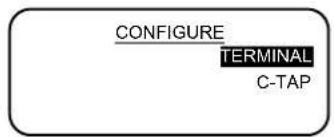
CONFIGURE TERMINAL C-TAP5 Select TERMINAL.
text_image
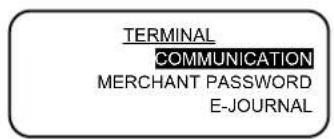
TERMINAL COMMUNICATION MERCHANT PASSWORD E-JOURNAL6 Select COMMUNICATION.
text_image
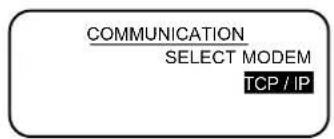
COMMUNICATION SELECT MODEM TCP / IP7 Select TCP / IP.

text_image
TCP / IP RESET ALL (DHCP) STATIC IP ADDRESS IP ADDRESS DNS18 Select RESET ALL (DHCP).
text_image
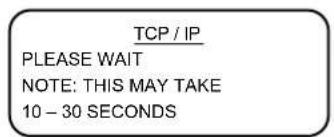
TCP / IP PLEASE WAIT NOTE: THIS MAY TAKE 10 - 30 SECONDS9 Wait 30 seconds and then press
3 WORKING WITH THE PAYMENT TERMINAL AND PINPAD
3.1 Overview of payment terminal and PINpad
The Vx570 payment terminal is the cashier unit and is operated by you (the cashier).
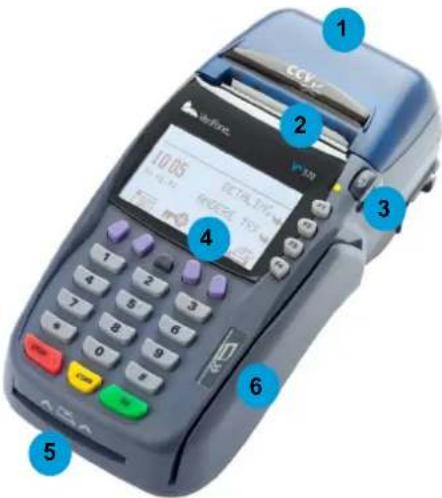
text_image
1 2 3 4 5 6 7 8 9 10.05 ECE10, T10 N FREQ 10 N CCV10Components of Vx570 payment terminal
| 1 | Printer cover | Cover of thermal printer. |
| 2 | Printer The thermal printer prints receipts and reports. | |
| 3 | Release button | Press this button to release the printer cover. |
| 4 | Screen The screen displays messages when actions are performed on the payment terminal. | |
| 5 | Chip card reader | The chip card reader is not operational. The card holder must insert the payment card in the VX 820 PINpad. |
| 6 | Magnetic card reader | The magnetic card reader is not operational. The card holder must swipe the payment card through the VX 820 PINpad. |
The VX 820 PINpad is the customer unit and is operated by the card holder during the transaction.
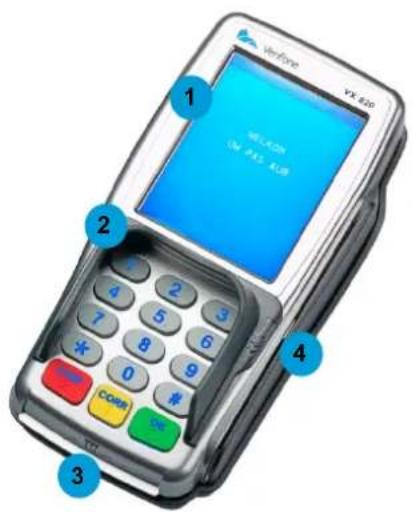
text_image
Verifree VK 8.20 1 2 3 4 5 6 7 8 9 0 Cost EnComponents of VX 820 PINpad
| 1 | Touchscreen | The touchscreen displays messages, touchscreen buttons and options to be selected by the card holder (e.g. the message ‘YOUR CARD PLEASE’). Refer to section 3.3 for more information about the touchscreen. |
| 2 | Privacy shield | The privacy shield is a protective shield around the keypad. The card holder can use this shield and his/her own hand to hide the keypad from view when entering the PIN code. This reduces the risk of third parties observing the entry of the code. |
| 3 | Chip card reader | The card holder can insert a payment card in the chip card reader to conduct a transaction. The card must always be inserted in the card reader with the chip facing up and towards the PINpad. |
| 4 | Magnetic card reader | The card holder can swipe a payment card through the magnetic card reader to conduct a transaction. The card must always be swiped through the card reader with the magnetic strip facing down and towards the PINpad. |
3.2 Keypad of payment terminal and PINpad
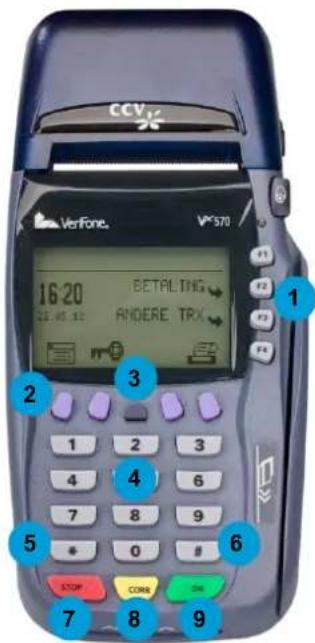
text_image
CCV Verifone V570 16:20 BETALING 2 CE 45.32 ANDERE TRX 3 1 2 3 4 4 6 5 7 8 9 * 0 # 6 STOP COMB OK 7 8 9Keypad of Vx570 payment terminal
| 1 | Grey function keys | Four grey function keys are located to the right of the payment terminal screen. You can press these keys to select the menu options displayed on the screen. |
| 2 | Purple function keys | Four purple function keys are located below the payment terminal screen. Function symbols can be displayed above these keys. Press the purple function key below a symbol to select the corresponding function. |
| 3 | key | If you press the greykey, you can use the numeric keys to enter letters and punctuation marks. Refer to subsection 3.3.1 for more information about entering letters and punctuation marks. |
| 4 | Numeric keys | You can use the numeric keys to enter numbers, for instance to enter a transaction amount. |
| 5 | Asterisk key<*> | You can use this key to enter a number of pre-programmed punctuation marks. Refer to subsection 3.3.1 for more information about entering punctuation marks. |
| 6 | Hash key<#> | You can use this key to enter a number of pre-programmed punctuation marks. Refer to subsection 3.3.1 for more information about entering punctuation marks. |
| 7 | key | Press the redkey to cancel an action. For instance, you can pressto cancel a transaction.If you are in the payment terminal menu, you can also pressto go back to a previous menu. Pressseveral times to return to the start screen. |
| 8 | key | Press the yellowkey to correct numbers, letters or punctuation marks after entry. You can also use this key to change the settings of your payment terminal. |
| 9 | key | Press the greenkey to confirm entered data or an action. |
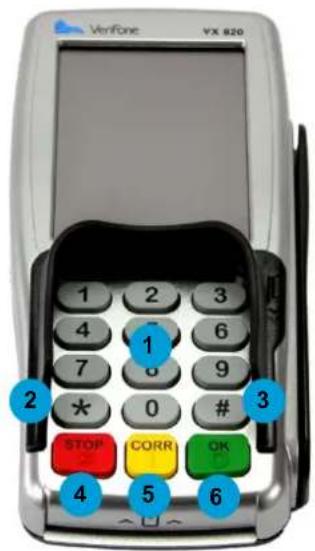
text_image
Verifone VX 820 1 2 3 4 6 7 9 * 0 # 2 3 STOP CORR OK 4 5 6Keypad of VX 820 PINpad
| 1 | Numeric keys | The card holder can use the numeric keys to enter the PIN code. |
| 2 | Asterisk key <*> | During a transaction, buttons for performing specific actions may be displayed on the touchscreen (see section 3.3). You can perform the action by touching the button. If the button on the touchscreen includes an asterisk, you can also perform the action by pressing the asterisk key <*>. |
| 3 | Hash key <#> | During a transaction, buttons for performing specific actions may be displayed on the touchscreen (see section 3.3). You can perform the action by touching the button. If the button on the touchscreen includes a hash tag, you can also perform the action by pressing the hash key <#>. |
| 4 | key | The card holder can cancel the transaction by pressing the redkey. |
| 5 | key | The card holder can press the yellowkey to correct the PIN code after entry. |
| 6 | key | The card holder can press the greenkey to approve the entered PIN code and the transaction amount. |
A number of keys on the payment terminal and PINpad have a symbol in relief for the benefit of blind and visually impaired users.
Key Symbol in relief
| <5> Dot (.) | |
| Vertical line (I) | |
3.3 PINpad touchscreen
The card holder can operate the VX 820 PINpad using the keypad. During a transaction, the card holder can also perform specific actions using the touchscreen buttons. The card holder can activate buttons or options on the touchscreen by touching them.
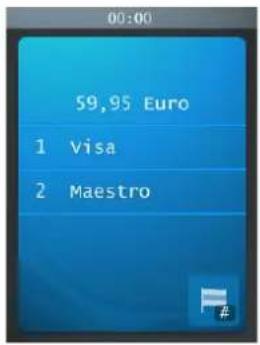
In the example given here (see picture on the right), the card holder must select either Visa or Maestro. An option can be selected in two ways:
- The card holder presses the numeric key that corresponds with his/her choice
- The card holder touches the area on the screen that corresponds with his/her choice
The card holder can change the PINpad language to English, German or
French by pressing the flag symbol or the hash key <#>.
text_image
00:00 59,95 Euro 1 visa 2 Maestro3.3.1 Entering letters
Only numbers are printed on the numeric keys of your Vx570 payment terminal. However, the numeric keys and the asterisk <^> and hash-tag <#> keys have also been pre-programmed for the entry of letters and punctuation marks. You can enter letters and punctuation marks using the ALPHA key.
First press a numeric key, the asterisk key <> or the hash key # , and then press the key. The number of times you press the key determines the letter or punctuation mark that appears on screen (see table below).
| key | ||||||||||||||
| 1x | 2x | 3x | 4x | 5x | 6x | 7x | 8x | 9x | 10x | 11x | 12x | 13x | 14x | |
| 1 | Q Z . | q z 1 | ||||||||||||
| 2 | A | B | C | a | b | c | 2 | |||||||
| 3 | D | E | F | d | e | f | 3 | |||||||
| 4 | G | H | I | g | h | i | 4 | |||||||
| 5 | J | K | L | j | k | l | 5 | |||||||
| 6 | M | N | O | m | n | o | 6 | |||||||
| 7 | P | R | S | p | r | s | 7 | |||||||
| 8 | T | U | V | t | u | v | 8 | |||||||
| 9 | W | X | Y | w | x | y | 9 | |||||||
| 0 | - | space | + | 0 | ||||||||||
| * | , | ‘ | “ | ( ) | < | > | [ ] | _ | { } | ~ | * | |||
| # | ! | ? | : | ; | @ | = | & / | \ % | $ | | ^ | # | |||
If you want to enter the word 'PIN', for instance, you can do so as follows:
P Press numeric key 7 and press the
I Press numeric key 4 and press the
N Press numeric key 6 and press the
3.4 Payment terminal menu
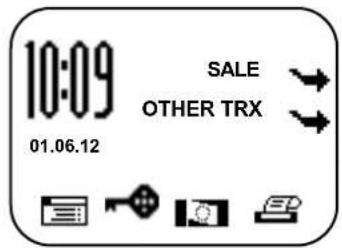
The Vx570 payment terminal has a menu that you can use to carry out various actions. Press the purple function key below the symbol to open the main menu.
text_image
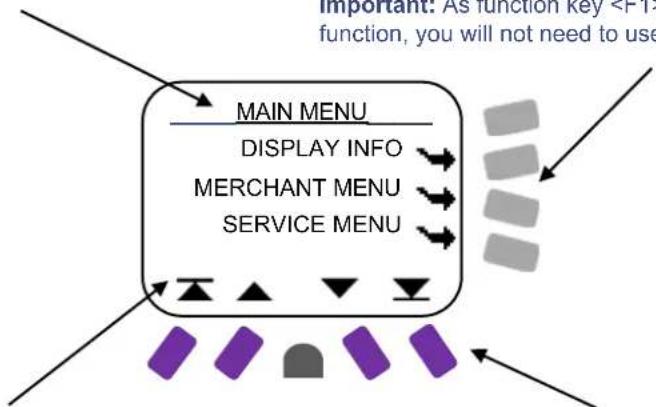
10:09 SALE OTHER TRX 01.06.12Up to eight lines can be displayed on the screen. The top line (i.e. the line above the dividing line) always states the name of the current menu.
Grey function keys (F1, F2, F3 and F4) are located next to each line. You can use these keys to select a menu option.
Important: As function key
flowchart
graph TD
    A["MAIN MENU"] --> B["DISPLAY INFO"]
    B --> C["MERCHANT MENU"]
    C --> D["SERVICE MENU"]
    D --> E["Purple icon"]
    style A fill:#f9f,stroke:#333
    style B fill:#ccf,stroke:#333
    style C fill:#ccf,stroke:#333
    style D fill:#ccf,stroke:#333
    style E fill:#dfd,stroke:#333
A menu may contain more menu options than can be displayed on screen. In that case, scroll arrows will appear on the bottom line of the screen.
Symbols corresponding with a menu option or status may appear on the bottom line of the screen.
If a menu option is displayed, you can select the option by pressing the purple function key directly below it
3.4.1 Symbols for menu options
| Symbol Function | |
 | Press the purple function key below this symbol to open the main menu. |
 | This symbol indicates that the terminal has not yet been activated. Press the function key below this symbol to activate the terminal (see subsection 3.6.1). |
 | This symbol indicates that the terminal has been activated. Press the function key below this symbol to deactivate the terminal (see subsection 3.6.2). |
 | Print a copy receipt of the most recent transaction. You can use this feature for up to five minutes after the transaction is completed. After this period, the copy receipt is deleted from the payment terminal memory. |
 | The menu options are not located at exactly the same level as the function keys. The arrow points to the function key that you must press to select the corresponding menu option. |
 | Scroll to the first line in the menu. |
 | Scroll up one line. |
| [BYZC] | Scroll down one line. |
 | Scroll to the last line in the menu. |
3.4.2 Status symbols
| Symbol Meaning | |
 | The card holder has inserted the payment card in the chip card reader or swiped a card through the magnetic card reader before you started the transaction. |
 | The payment terminal has read a payment card, but 30 seconds have gone by without a transaction being started. The payment card must be re-inserted or swiped in order to carry out a transaction. |
 | The card holder has swiped the payment card through the magnetic card reader, but the card must be inserted in the chip card reader. |
 | The card holder has inserted the payment card in the chip card reader, but the card must be swiped through the magnetic card reader. |
 | The card holder must remove his/her payment card from the chip card reader. |
 | The payment terminal has not read the payment card correctly. Re-insert the card in the chip card reader or swipe it through the magnetic card reader. |
3.5 Merchant password
Access to the merchant menu of the payment terminal is protected by a password. You must also enter this merchant password in order to perform certain actions, for instance to activate the terminal.
Important: The default merchant password is 99999. We advise you to change the merchant password to prevent abuse of your payment terminal by third parties. It is not possible to change the default password to a non-secure password such as 12345 or 11111. Once you have changed the password, you cannot change it back to the default value (99999).
Complete the following steps to change the merchant password:
Vx570 screen Step
text_image
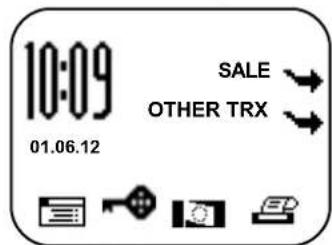
10:09 SALE OTHER TRX 01.06.121 Press the purple function key below the symbol to open the menu.
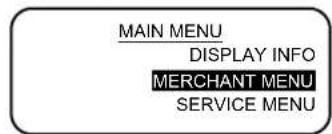
2 Select MERCHANT MENU.
3 Enter the merchant password (the default password is 99999) and confirm by pressing
4 Select CONFIGURE.
5 Select TERMINAL.
6 Select MERCHANT PASSWORD.
7 Enter the current password and confirm by pressing
8 Enter a new five-digit password and confirm by pressing
9 Press
text_image
MAIN MENU DISPLAY INFO MERCHANT MENU SERVICE MENU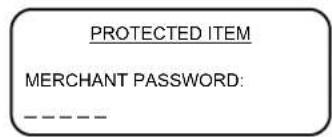
text_image
PROTECTED ITEM MERCHANT PASSWORD: - - - - -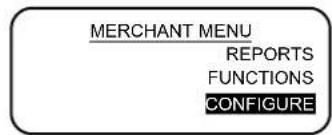
text_image
MERCHANT MENU REPORTS FUNCTIONS CONFIGURE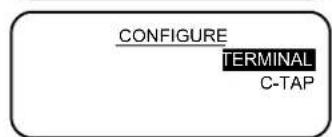
text_image
CONFIGURE TERMINAL C-TAP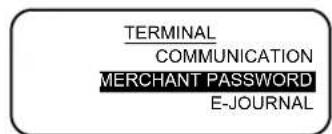
text_image
TERMINAL COMMUNICATION MERCHANT PASSWORD E-JOURNAL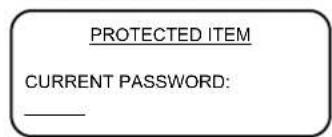
text_image
PROTECTED ITEM CURRENT PASSWORD: _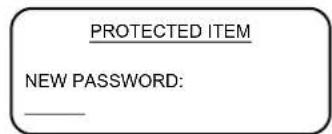
text_image
PROTECTED ITEM NEW PASSWORD: __________________3.6 Activating and deactivating the payment terminal
Your Vx570 payment terminal must be plugged into a wall socket at all times, to make sure it is always supplied with power. This means that the payment terminal is always switched on and cannot be switched off.
However, you must activate the payment terminal at the start of business. This procedure will open a new financial reporting period. The terminal keeps track of all transactions that you carry out and records them in financial reports. At the end of the day you must deactivate the payment terminal. The financial reporting period will be closed and the terminal will print the reports. The procedures for activating and deactivating the terminal are described in the subsections below.
3.6.1 Activating the terminal
Complete the following steps to activate the payment terminal:
Vx570 screen Step
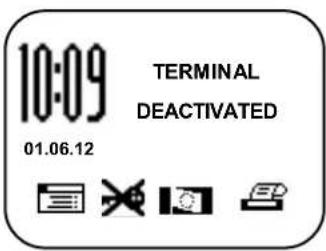
text_image
10:09 01.06.12 TERMINAL DEACTIVATED1 Press the purple function key below the ⚡ symbol.
text_image
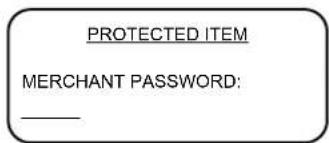
PROTECTED ITEM MERCHANT PASSWORD: __________________2 Enter the merchant password (the default password is 99999) and confirm by pressing
3.6.2 Deactivating the terminal
Complete the following steps to deactivate the payment terminal:
Vx570 screen Step
text_image
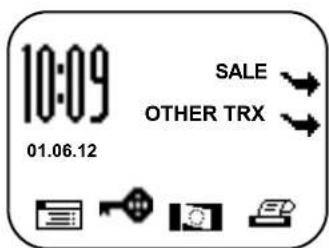
10:09 SALE OTHER TRX 01.06.121 Press the purple function key below the symbol.
text_image
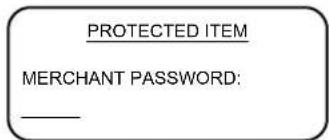
PROTECTED ITEM MERCHANT PASSWORD: __________________2 Enter the merchant password (the default password is 99999) and confirm by pressing
The payment terminal is now deactivated, and the financial reports will be printed automatically. Which reports are printed depends on the settings of your payment terminal. You can change the report settings yourself (see section 6.4).
Important: The printer roll may run out while the reports are being printed. In that case you must replace the printer roll and print the reports again.
3.7 Use of payment cards
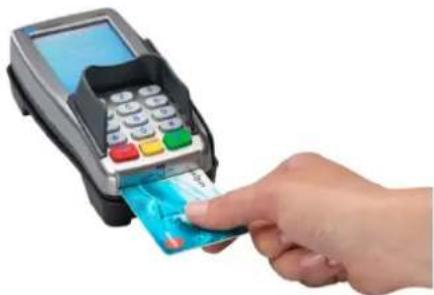
The type of payment card determines whether the holder should insert or swipe the card.
natural_image
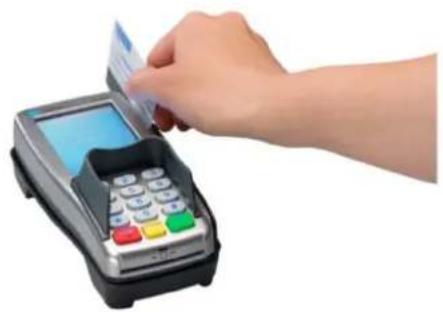
Hand inserting a card into a POS terminal (no visible text or symbols)A payment card with an embedded EMV chip must be inserted in the chip card reader. The card must be inserted in the chip card reader with the chip facing up and towards the PINpad.
natural_image
Hand inserting a card into a POS terminal (no visible text or symbols)A payment card with a magnetic strip must be swiped through the magnetic card reader. The card must be swiped through the magnetic card reader with the magnetic strip facing down and towards the PINpad.
3.8 Replacing a printer roll
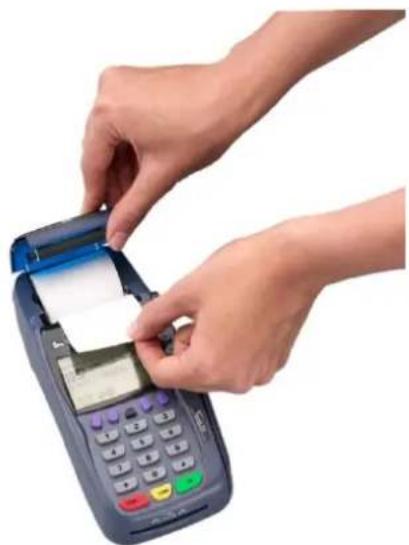
Complete the following steps to replace a printer roll. Always be careful during this procedure! The cutting edge is sharp and the printer may be hot.
text_image
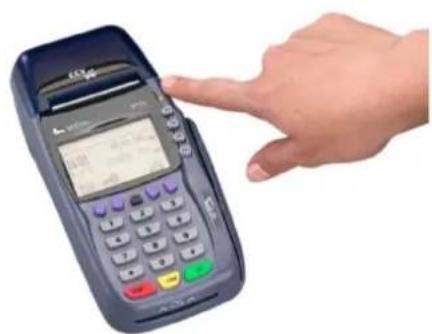
Hand holding a payment terminal with visible interface and payment display screen- Press the release button and open the printer cover. Remove the old printer roll if necessary.
natural_image
Close-up of hands inserting a card into a POS terminal (no visible text or symbols)- Insert the new printer roll as indicated in the above photograph. Make sure to leave a strip of paper sticking out and close the printer cover. Tear off the strip of paper along the cutting edge.
4 CARRYING OUT TRANSACTIONS
4.1 Overview of transaction types
Your payment terminal supports several different transaction types. However, not all transaction types are supported by all payment cards. The acquirer and the type of payment card determine which types of transactions you can carry out.
Important: Contact your acquirer if you are unable to carry out a transaction with a particular type of payment card.
The table below lists the different types of transactions you can carry out, and describes the situations in which they occur.
Overview of transaction types
| Sale The card holder pays using a payment card. | |
| Cancellation | Cancellation of a previous transaction. |
| Cash advance | The card holder withdraws cash at a point-of-sale terminal. |
| Reservation | Reservation of a specific amount of money for a specific period of time. |
| Sale after reservation | Complete a sale following an earlier reservation. |
| Refund | Refunding money to a card holder when a product is returned. |
| Sale referral | A transaction in which you enter an authorisation code that you have obtained by telephone. |
| Cash advance after referral | The card holder withdraws cash at a point-of-sale terminal. During this transaction, an authorisation code must be entered which has been obtained by telephone. |
| Card check | Contacting the card issuer to check if the payment card is still valid. |
| Extra reservation | Increase a previously reserved amount. |
4.2 Sale
You carry out a sale when a card holder pays you using a payment card.
Complete the following steps to carry out a sale:
Vx570 screen Step
text_image
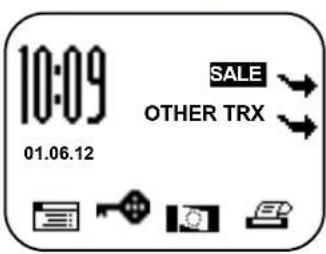
10:09 SALE OTHER TRX 01.06.121 Select SALE.
2 Enter the amount and confirm by pressing
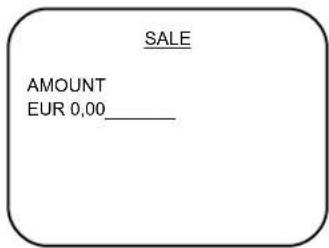
text_image
SALE AMOUNT EUR 0,00__3 The card holder inserts the payment card in the chip card reader or swipes it through the magnetic card reader.
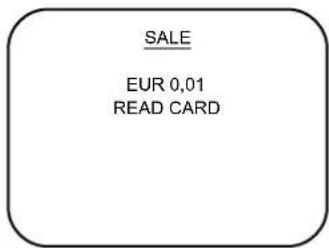
text_image
SALE EUR 0,01 READ CARD4 The card holder enters his/her PIN code and approves the transaction by pressing
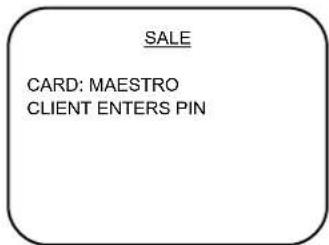
text_image
SALE CARD: MAESTRO CLIENT ENTERS PIN5 The sale is now successfully completed.
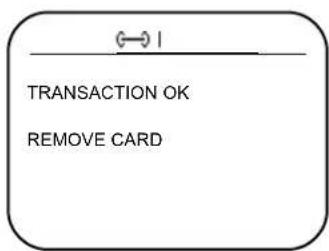
text_image
TRANSACTION OK REMOVE CARD4.2.1 Manual credit card transactions
You can carry out manual credit card transactions on the payment terminal. Because you enter the card details manually, no card needs to be inserted in the PINpad during the transaction.
Complete the following steps to carry out a manual credit card transaction:
Vx570 screen Step
text_image
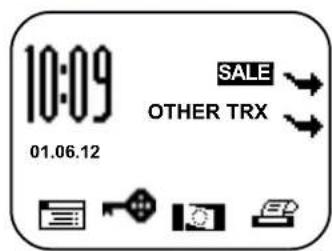
10:09 SALE OTHER TRX 01.06.121 Select SALE.
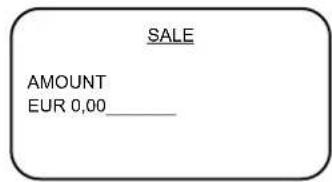
2 Enter the amount and confirm by pressing
3 Press the purple function key below the symbol.
text_image
SALE AMOUNT EUR 0,00__________________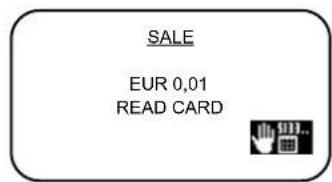
text_image
SALE EUR 0,01 READ CARD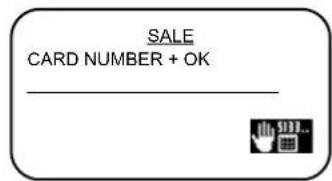
text_image
SALE CARD NUMBER + OK ___________________4 Enter the card number and confirm by pressing
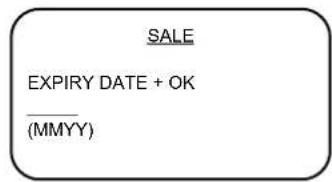
5 Enter the expiry date and confirm by pressing
text_image
SALE EXPIRY DATE + OK (MMYY)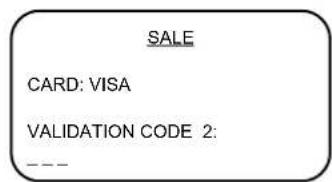
text_image
SALE CARD: VISA VALIDATION CODE 2: ---6 Enter the CVC2 code and confirm by pressing
Important: The CVC2 code is a three- or four-digit code which is usually printed on the back of the card.
7 Press
Important: If you are carrying out a transaction with a chipless credit card (card holder does not need to enter a PIN code), the terminal will automatically print two copy receipts immediately after the transaction. One copy is for the card holder and the other is for your records. Always make sure that the card holder signs the copy for your records.
4.3 Cancellation
You can cancel a previous transaction if necessary.
Complete the following steps to carry out a cancellation:
Vx570 screen Step
text_image
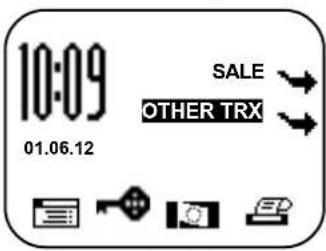
10:09 SALE OTHER TRX 01.06.121 Select OTHER TRX.
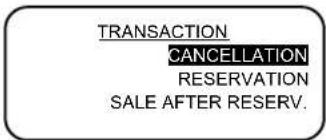
2 Select CANCELLATION.
3 Enter the merchant password (the default password is 99999) and confirm by pressing
4 Enter the amount and confirm by pressing
5 The card holder inserts the payment card in the chip card reader or swipes it through the magnetic card reader.
6 Select the transaction type that you wish to cancel.
7 Enter the authorisation code and confirm by pressing
Important: The authorisation code is printed on the copy receipt of the previously completed transaction (see section 4.4).
8 The card holder must press
9 The cancellation is now successfully completed.
text_image
TRANSACTION CANCELLATION RESERVATION SALE AFTER RESERV.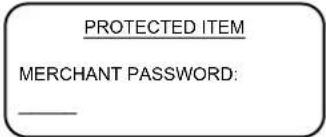
text_image
PROTECTED ITEM MERCHANT PASSWORD: _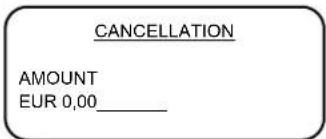
text_image
CANCELLATION AMOUNT EUR 0,00__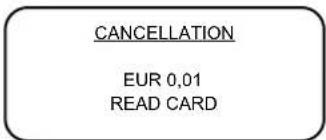
text_image
CANCELLATION EUR 0,01 READ CARD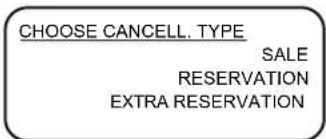
text_image
CHOOSE CANCELL. TYPE SALE RESERVATION EXTRA RESERVATION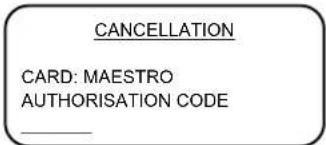
text_image
CANCELLATION CARD: MAESTRO AUTHORISATION CODE __________________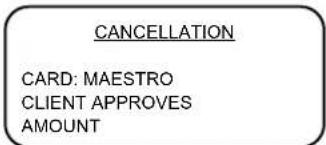
text_image
CANCELLATION CARD: MAESTRO CLIENT APPROVES AMOUNT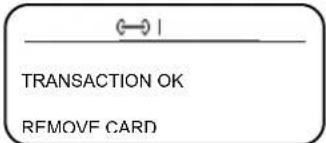
text_image
TRANSACTION OK RFMOVE CARD4.4 Reservation
You can reserve an amount for a specific period of time.
Important: The amount you can reserve and the duration of the reservation period depend on the acquirer and the payment card.
Complete the following steps to carry out a reservation:
Vx570 screen Step
text_image
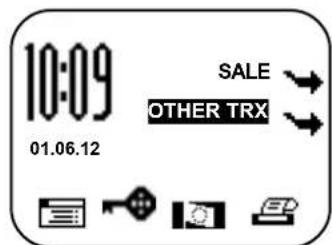
10:09 SALE OTHER TRX 01.06.121 Select OTHER TRX.
2 Select RESERVATION.
3 Enter the amount and confirm by pressing
4 The card holder inserts the payment card in the chip card reader or swipes it through the magnetic card reader.
5 The card holder enters his/her PIN code and approves the transaction by pressing
6 The reservation is now successfully completed. The terminal will now print a copy receipt stating the authorisation code. See the next page for an example of such a copy receipt.
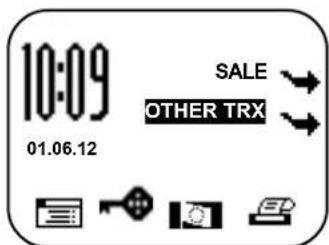
text_image
10:09 SALE OTHER TRX 01.06.12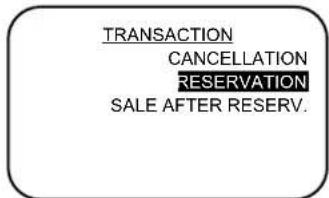
text_image
TRANSACTION CANCELLATION RESERVATION SALE AFTER RESERV.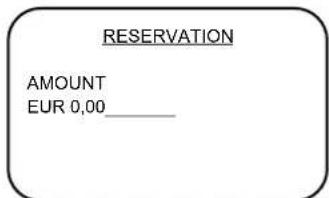
text_image
RESERVATION AMOUNT EUR 0,00__________________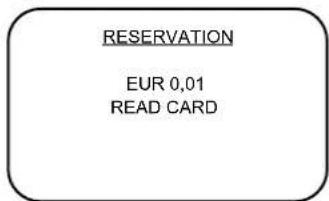
text_image
RESERVATION EUR 0,01 READ CARD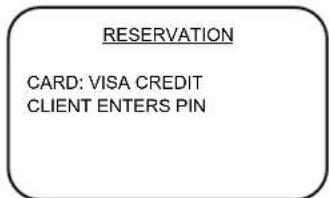
text_image
RESERVATION CARD: VISA CREDIT CLIENT ENTERS PIN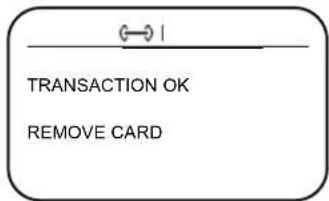
text_image
TRANSACTION OK REMOVE CARDImportant: You need an authorisation code to actually complete the sale at a later time, based on the earlier reservation. You can find the authorisation code on the copy receipt which is printed after the reservation has been completed. See the next page for an example of such a copy receipt.
Journal
CCV Holland B.V.
Card: xxxxxxxxxxxxxxx6015
4.5 Sale after reservation
If you reserved an amount for a specific period of time, you must complete the actual sale at a later time.
Important: You need an authorisation code to complete this transaction. You can find the authorisation code on the copy receipt of the previously completed reservation transaction (see section 4.4).
Complete the following steps to complete a sale after a reservation:
Vx570 screen Step
text_image
10:09 SALE OTHER TRX 01.06.12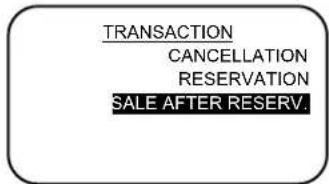
text_image
TRANSACTION CANCELLATION RESERVATION SALE AFTER RESERV.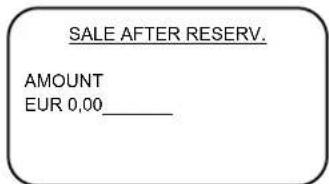
text_image
SALE AFTER RESERV. AMOUNT EUR 0,00__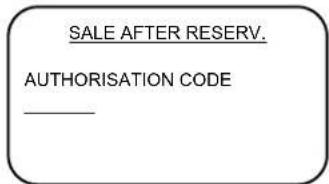
text_image
SALE AFTER RESERV. AUTHORISATION CODE __________________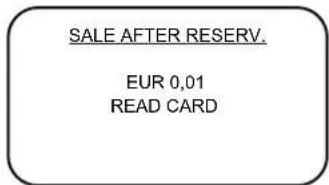
text_image
SALE AFTER RESERV. EUR 0,01 READ CARD
text_image
SALE AFTER RESERV. CARD: VISA CREDIT CLIENT APPROVES AMOUNT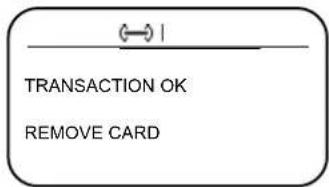
text_image
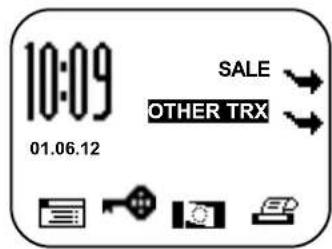
TRANSACTION OK REMOVE CARD1 Select OTHER TRX.
2 Select SALE AFTER RESERV.
3 Enter the amount and confirm by pressing
4 Enter an authorisation code and confirm by pressing
Important: The authorisation code is printed on the copy receipt of the previously completed reservation transaction (see section 4.4).
5 The card holder inserts the payment card in the chip card reader or swipes it through the magnetic card reader.
6 The card holder must press
7 The sale after reservation is now successfully completed.
5 PAYMENT CARDS
You can accept a number of different payment cards for transactions on your payment terminal. You must conclude a contract with an acquirer for each payment card you wish to accept. An acquirer is a party that facilitates payment card transactions on your payment terminal.
You yourself can select the acquirers you wish to conclude a contract with. For instance, at any time you can switch to another acquirer that charges lower rates. To do so you must allocate a card (e.g. MasterCard) to the transaction processor of your choice.
5.1 Viewing payment card settings
You can print a card allocation report to gain an overview of the payment cards currently accepted by your payment terminal, and the acquirer to which each card is allocated.
We advise you always to print out a card allocation report and check it after you have changed the payment card settings.
Complete the following steps to print a card allocation report:
Vx570 screen Step
text_image
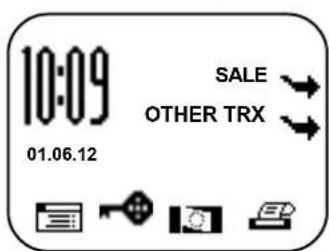
10:09 SALE OTHER TRX 01.06.121 Press the purple function key below the symbol to open the menu.
text_image
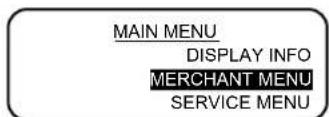
MAIN MENU DISPLAY INFO MERCHANT MENU SERVICE MENU2 Select MERCHANT MENU.
text_image
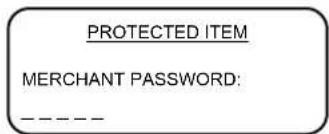
PROTECTED ITEM MERCHANT PASSWORD: --------3 Enter the merchant password (the default password is 99999) and confirm by pressing
text_image
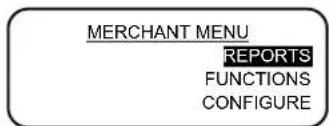
MERCHANT MENU REPORTS FUNCTIONS CONFIGURE4 Select REPORTS.
text_image
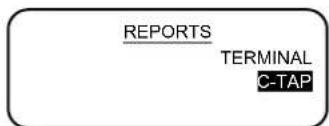
REPORTS TERMINAL C-TAP5 Select C-TAP.
text_image
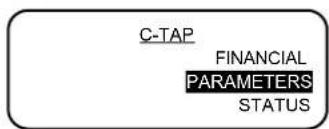
C-TAP FINANCIAL PARAMETERS STATUS6 Select PARAMETERS.
text_image
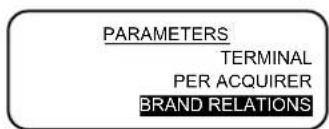
PARAMETERS TERMINAL PER ACQUIRER BRAND RELATIONS7 Select BRAND RELATIONS. The terminal will now print the card allocation report.
See the next page for an example of a card allocation report.
\*\* C-TAP \*\*
RELATION REPORT
TMS TERM-ID: 1234567890
DATE: 01/06/2012 10:09:20
APPLICATION VERSION: 09.17
CARD BRAND TABLE
\*\* CCV \*\*
ACQUIRER TERM-ID: CT003298
BRAND MERCHANT ID: REL.
Maestro 20633731 YES
VPAY 20466832 YES
VISA 1234 NO
Mastercard 1234 NO
\*\* Equens host \*\*
ACQUIRER TERM-ID: CT042298
BRAND MERCHANT ID: REL.
VISA 4567 YES
Mastercard 4567 YES
\*\* AWL NL \*\*
ACQUIRER TERM-ID:
BRAND MERCHANT ID: REL.
Maestro 1234 NO
VPAY 1234 NO
REPORT END
TMS Terminal ID: this is the identification number of your payment terminal in the CCV Terminal
Date and time when the report was printed
Transaction processor CCV
The report includes an overview of the various types (brands) of payment cards. The report also specifies the Merchant ID of each card. The third column specifies if the card is allocated to the transaction processor.
Transaction processor Equens
The report includes an overview of the various types (brands) of payment cards. The report also specifies the Merchant ID of each card. The third column specifies if the card is allocated to the transaction processor.
Transaction processor Atos Worldline
The report includes an overview of the various types (brands) of payment cards. The report also specifies the Merchant ID of each card. The third column specifies if the card is allocated to the transaction processor.
5.2 Changing payment card settings
The table below lists the various changes you can make to the payment card settings, and the information you need to make each change. The table also states the subsection in this document where you can find detailed instructions on carrying out the change concerned.
| Change | Required information | Subsection |
| Accepting a payment card | Merchant ID of acquirerTransaction processor (CCV, Equens or Atos Worldline) | 5.2.1 |
| Terminating acceptance of a payment card | You do not need any specific information to make this change. | 5.2.2 |
| Allocating a payment card to a different acquirer while retaining the current transaction processor | Merchant ID of acquirerCurrent transaction processor (CCV, Equens or Atos Worldline) | 5.2.3 |
| Allocating a payment card to a different acquirer and a different transaction processor | Merchant ID of acquirerNew transaction processor (CCV, Equens or Atos Worldline) | 5.2.1 |
5.2.1 Adding a payment card
Important: You need the Merchant ID for the payment card in order to carry out this change. You also need to know which transaction processor will process the transactions. If you do not have this information at your disposal, please contact your acquirer.
Complete the following steps to add a payment card:
Vx570 screen Step
text_image
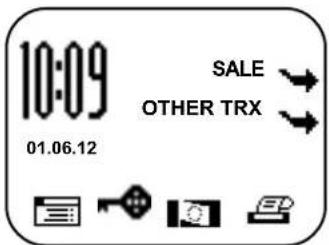
10:09 SALE OTHER TRX 01.06.121 Press the purple function key below the symbol to open the menu.
text_image
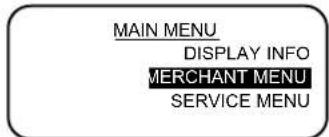
MAIN MENU DISPLAY INFO MERCHANT MENU SERVICE MENU2 Select MERCHANT MENU.
text_image
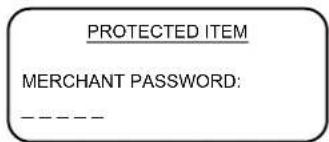
PROTECTED ITEM MERCHANT PASSWORD: --------3 Enter the merchant password (the default password is 99999) and confirm by pressing
text_image
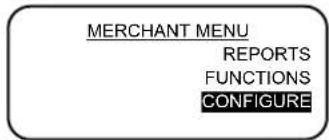
MERCHANT MENU REPORTS FUNCTIONS CONFIGURE4 Select CONFIGURE.
text_image
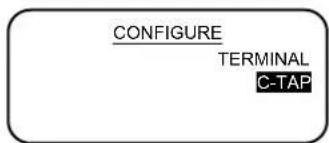
CONFIGURE TERMINAL C-TAP5 Select C-TAP.
Vx570 screen Step
CONFIGURATION EDIT RELATIONS
SELECT ACQUIRER
CCV Equens host AWL NL
6 Select EDIT RELATIONS.
7 Select the transaction processor (CCV, Equens or Atos Worldline) to which you wish to link the payment card.
8 Select ADD BRAND.
EDIT RELATIONS ADD BRAND DELETE BRAND CHANGE MERCHANT ID
ADD BRAND
UnionPay VISA Maestro
9 Select the payment card you wish to add on your payment terminal.
All possible cards will be displayed, provided they are supported by the transaction processor you selected.
ADD BRAND
BRAND ALREADY HAS A RELATION WITH:: CCV DISC RELATION? NO = [STOP] / YES = [O
10 This message appears on screen if the card you selected is already allocated to a transaction processor.
Press
ADD BRAND
MERCHANT ID: 1234
11 Press
ADD BRAND
MERCHANT ID: (1234)
12 Enter the Merchant ID you received from the acquirer, and confirm by pressing
13 Press
If the card has been successfully added, the payment terminal will print a receipt with the message: 'ACQUIRER PARAMETER SESSION SUCCEEDED'.
Important: If you did not succeed in adding the payment card, the Merchant ID may be unknown to the transaction processor. Contact the acquirer to check if the Merchant ID has been activated. If the Merchant ID has been activated, you should check if you have entered the Merchant ID correctly. You can do so by printing a card allocation report and checking the Merchant ID (see section 5.1).
5.2.2 Deleting a payment card
Important: You must deactivate the terminal (see subsection 3.6.2) before deleting a payment card.
Complete the following steps to delete a payment card:
Vx570 screen Step
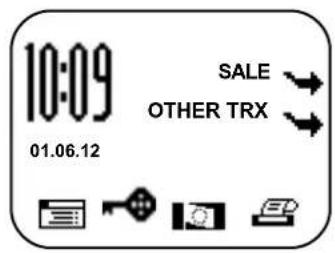
text_image
10:09 SALE OTHER TRX 01.06.121 Press the purple function key below the symbol to open the menu.

text_image
MAIN MENU DISPLAY INFO MERCHANT MENU SERVICE MENU2 Select MERCHANT MENU.
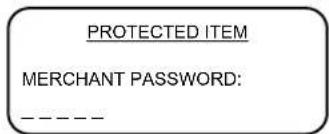
text_image
PROTECTED ITEM MERCHANT PASSWORD: - - - - -3 Enter the merchant password (the default password is 99999) and confirm by pressing
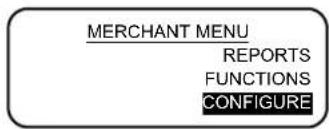
text_image
MERCHANT MENU REPORTS FUNCTIONS CONFIGURE4 Select CONFIGURE.
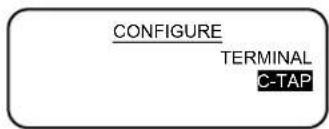
text_image
CONFIGURE TERMINAL C-TAP5 Select C-TAP.
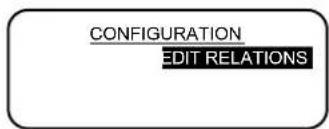
text_image
CONFIGURATION EDIT RELATIONS6 Select EDIT RELATIONS.
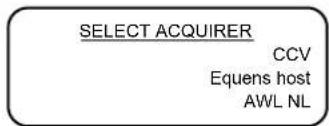
text_image
SELECT ACQUIRER CCV Equens host AWL NL7 Select the transaction processor (CCV, Equens or Atos Worldline) allocated to the payment card that you wish to delete.
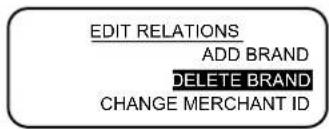
text_image
EDIT RELATIONS ADD BRAND DELETE BRAND CHANGE MERCHANT ID8 Select DELETE BRAND.
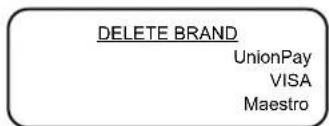
text_image
DELETE BRAND UnionPay VISA Maestro9 Select the payment card you wish to delete.
10 Press
If the card has been successfully deleted, the payment terminal will print a receipt with the message: 'ACQUIRER PARAMETER SESSION SUCCEDED'. If the receipt states 'ACQUIRER PARAMETER SESSION FAILED', please contact the CCV Service Center.
5.2.3 Changing the Merchant ID for a payment card
Important: You must deactivate the terminal (see subsection 3.6.2) before changing the Merchant ID for a payment card.
Complete the following steps to change the Merchant ID for a payment card:
Vx570 screen Step
text_image
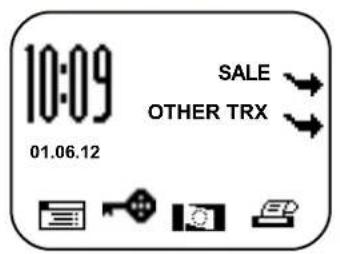
10:09 SALE OTHER TRX 01.06.121 Press the purple function key below the symbol to open the menu.
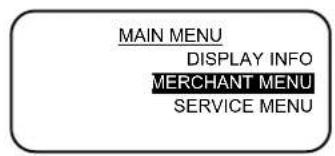
2 Select MERCHANT MENU.
3 Enter the merchant password (the default password is 99999) and confirm by pressing
4 Select CONFIGURE.
5 Select C-TAP.
6 Select EDIT RELATIONS.
7 Select the transaction processor (CCV, Equens or Atos Worldline) allocated to the payment card that you wish to change.
8 Select CHANGE MERCHANT ID.
text_image
MAIN MENU DISPLAY INFO MERCHANT MENU SERVICE MENU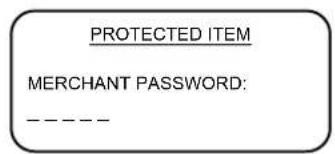
text_image
PROTECTED ITEM MERCHANT PASSWORD: --------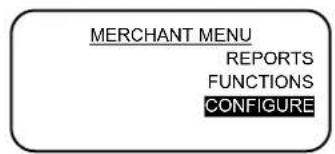
text_image
MERCHANT MENU REPORTS FUNCTIONS CONFIGURE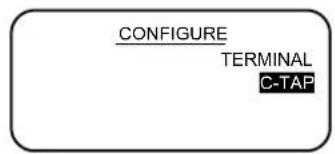
text_image
CONFIGURE TERMINAL C-TAP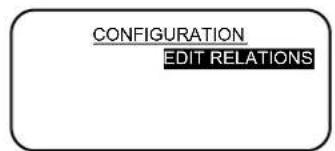
text_image
CONFIGURATION EDIT RELATIONS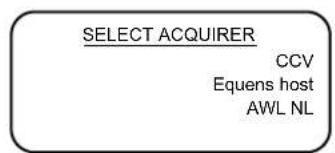
text_image
SELECT ACQUIRER CCV Equens host AWL NL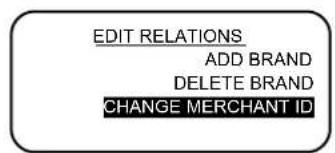
text_image
EDIT RELATIONS ADD BRAND DELETE BRAND CHANGE MERCHANT IDVx570 screen
CHANGE MERCHANT ID
UnionPay
VISA
Maestro
Step
9 Select the payment card of which you wish to change the Merchant ID.
Only the cards allocated to the transaction processor you selected will be displayed on screen.
CHANGE MERCHANT ID
MERCHANT ID:
1234
10 Press
CHANGE MERCHANT ID
MERCHANT ID:
(1234)
11 Enter the Merchant ID you received from the acquirer, and confirm by pressing
12 Press
If the Merchant ID for the card has been successfully changed, the payment terminal will print a receipt with the message: 'ACQUIRER PARAMETER SESSION SUCCEEDED'.
Important: If your attempt to change the Merchant ID for the payment card was unsuccessful, the new Merchant ID may be unknown to the transaction processor. Contact the acquirer to check if the Merchant ID has been activated. If the Merchant ID has been activated, you should check if you have entered the Merchant ID correctly. You can do so by printing a card allocation report and checking the Merchant ID (see section 5.1).
6 FINANCIAL REPORTS
6.1 Types of financial reports
Your payment terminal keeps track of the transactions completed during a specific period (day or shift). This period starts when you activate the terminal, and ends when you deactivate the terminal. The terminal will print the following financial reports (depending on the settings):
| Financial reports | |
| E-Journal | If the E-Journal is printed, a copy receipt is printed of every transaction completed during the period.Important:The terminal will only print the E-Journal if the E-Journal feature has been activated (see subsection 6.4.1). |
| Totals report | The totals report is a report listing the period totals of all transactions that you completed during the period, specified according to transaction type and card type. |
6.2 Automatically printing reports when the terminal is deactivated
The payment terminal automatically prints reports when you deactivate the terminal (see subsection 3.6.2). Which reports are printed depends on the settings of your payment terminal.
6.3 Printing interim reports
Do you want to print an interim report before the end of the period? The subsections below describe how to print an interim totals report and an interim E-Journal, respectively.
6.3.1 Printing an interim totals report
Complete the following steps to print an interim totals report:
Vx570 screen Step
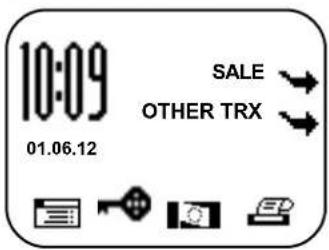
text_image
10:09 SALE 01.06.12 OTHER TRX1 Press the purple function key below the symbol to open the menu.
2 Select MERCHANT MENU.
3 Enter the merchant password (the default password is 99999) and confirm by pressing
4 Select REPORTS.
5 Select TERMINAL.
6 Select FINANCIAL.
7 Select CURRENT PERIOD.
8 Select GENERAL REPORT. The terminal will now print the totals report.
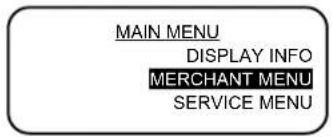
text_image
MAIN MENU DISPLAY INFO MERCHANT MENU SERVICE MENU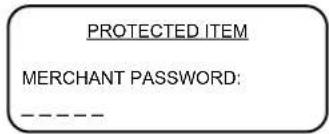
text_image
PROTECTED ITEM MERCHANT PASSWORD: --------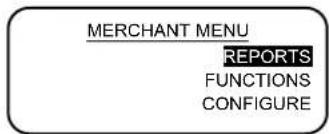
text_image
MERCHANT MENU REPORTS FUNCTIONS CONFIGURE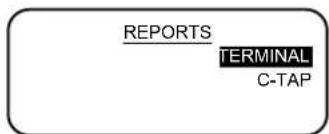
text_image
REPORTS TERMINAL C-TAP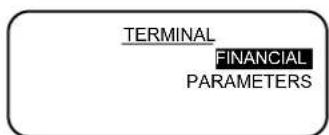
text_image
TERMINAL FINANCIAL PARAMETERS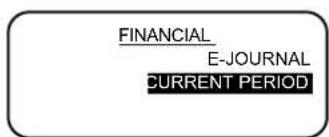
text_image
FINANCIAL E-JOURNAL CURRENT PERIOD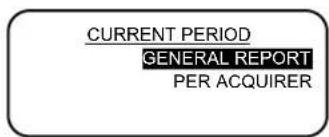
text_image
CURRENT PERIOD GENERAL REPORT PER ACQUIRERSee the next page for an example of an interim totals report.
| CCV Holland B.V. Westervoortsedijk 55 6827 AT Arnhem | ||
| DATE: 01/06/2012 10:09:20 | ||
| TOTAL REPORT INTERIM TOTALS | ||
| TMS TERM-ID: CSL003 PERIOD ID: 2 PERIOD START: 01/06/2012 10:01:16 PERIOD END: STILL OPEN | ||
| EFT TOTALS | ||
| #TRX | EUR | |
| SALE: 5 | 0,05 | |
| CANCELLATION SALE: 1 | -0,01 | |
| REFUND: 1 | -0,01 | |
| TOTAL: | 0,03 | |
| CCV | ||
| Maestro #TRX | EUR | |
| SALE: 2 | 0,02 | |
| TOTAL: | 0,02 | |
| VPAY #TRX | EUR | |
| SALE: 1 | 0,01 | |
| TOTAL: | 0,01 | |
| MasterCard #TRX | EUR | |
| SALE: 2 | 0,02 | |
| CANCELLATION SALE: 1 | -0,01 | |
| REFUND: 1 | -0,01 | |
| TOTAL: | 0,00 | |
| REPORT END | ||
6.3.2 Printing an interim E-Journal
Important: The E-Journal is deleted from the terminal memory after printing.
Complete the following steps to print an interim E-Journal:
Vx570 screen Step
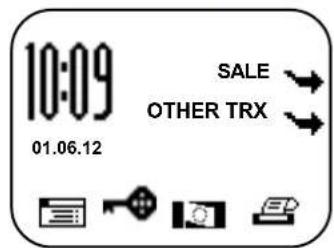
text_image
10:09 SALE 01.06.12 OTHER TRX1 Press the purple function key below the the menu.

2 Select MERCHANT MENU.
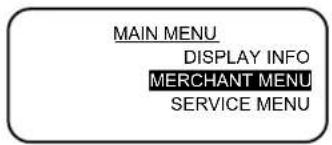
text_image
MAIN MENU DISPLAY INFO MERCHANT MENU SERVICE MENU3 Enter the merchant password (the default password is 99999) and confirm by pressing
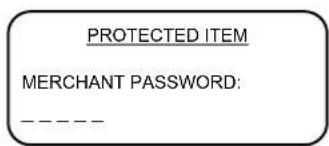
text_image
PROTECTED ITEM MERCHANT PASSWORD: --------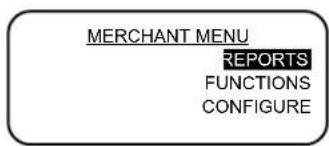
text_image
MERCHANT MENU REPORTS FUNCTIONS CONFIGURE4 Select REPORTS.
text_image
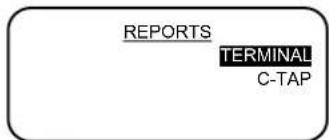
REPORTS TERMINAL C-TAP5 Select TERMINAL.
text_image
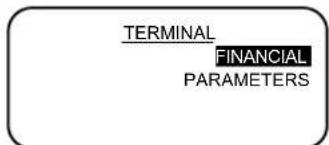
TERMINAL FINANCIAL PARAMETERS6 Select FINANCIAL.
text_image
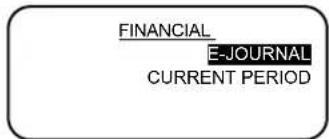
FINANCIAL E-JOURNAL CURRENT PERIOD7 Select E-JOURNAL. The terminal will now print the E-Journal. See the next page for an example of an E-Journal.
text_image
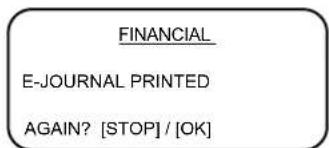
FINANCIAL E-JOURNAL PRINTED AGAIN? [STOP] / [OK]8 Press
text_image
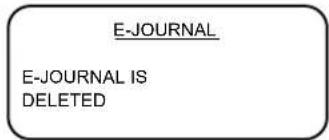
E-JOURNAL E-JOURNAL IS DELETED9 The screen will display the following message: 'E-JOURNAL IS DELETED'.
Card: xxxxxxxxxxxx6015
Card: xxxxxxxxxxxx6015
Data and time when you printed the E-Journal; TMS Terminal ID of the payment terminal
Receipt of a completed transaction
Receipt of a cancellation transaction
6.4 Changing report settings
The E-Journal feature on your payment terminal is activated by default. As standard, the payment terminal will print one receipt upon completion of a transaction. The second receipt (i.e. the copy receipt for your records) is temporarily saved in the payment terminal memory. The terminal will automatically print all copy receipts when you deactivate the terminal.
You can activate and deactivate the E-Journal feature yourself. The subsections below provide detailed instructions on activating and deactivating the E-Journal feature.
6.4.1 Activating the E-Journal feature
In order to activate the E-Journal feature, you must:
- Enter the maximum number of transactions to be saved in the E-Journal memory
- Define the 'threshold', i.e. the number of transactions when you want to receive a warning that the E-Journal memory is almost full
Complete the following steps to activate the E-Journal feature:
Vx570 screen Step
text_image
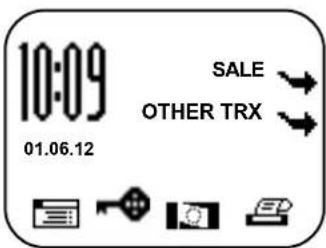
10:09 SALE OTHER TRX 01.06.121 Press the purple function key below the symbol to open the menu.
text_image
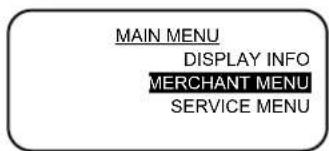
MAIN MENU DISPLAY INFO MERCHANT MENU SERVICE MENU2 Select MERCHANT MENU.
text_image
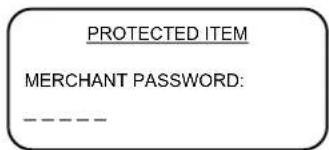
PROTECTED ITEM MERCHANT PASSWORD: - - - - -3 Enter the merchant password (the default password is 99999) and confirm by pressing
text_image
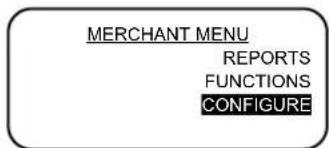
MERCHANT MENU REPORTS FUNCTIONS CONFIGURE4 Select CONFIGURE.
text_image
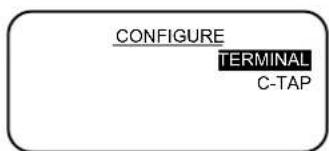
CONFIGURE TERMINAL C-TAP5 Select TERMINAL.
text_image
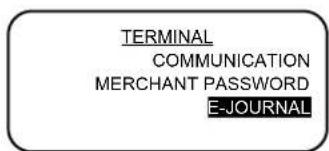
TERMINAL COMMUNICATION MERCHANT PASSWORD E-JOURNAL6 Scroll down and select E-JOURNAL.
Vx570 screen
E-JOURNAL
MAX TRX ENTRIES
THRESHOLD ALM. FULL
E-JOURNAL
MAX TRX ENTRIES:
0
(0)
E-JOURNAL
MAX TRX ENTRIES:
(0)
E-JOURNAL
MAX TRX ENTRIES
THRESHOLD ALM. FULL
E-JOURNAL
THRESHOLD ALM. FULL:
0
(0)
E-JOURNAL
THRESHOLD ALM. FULL:
(0)
E-JOURNAL
CHANGE E-JOURNAL
SUCCESSFUL
Step
7 Select MAX TRX ENTRIES.
8 Press
9 Enter the maximum number of transactions to be saved in the E-Journal memory, and confirm by pressing
Important: You can save up to 500 transactions in the E-Journal memory.
10 Select THRESHOLD ALM. FULL.
11 Press
12 Enter the threshold number of transactions when the payment terminal should issue a warning that the E-Journal memory is almost full, and confirm by pressing
13 If the E-Journal feature has been successfully activated, the following message will appear on screen: 'CHANGE E-JOURNAL SUCCESSFUL'.
6.4.2 Deactivating the E-Journal feature
You can deactivate the E-Journal feature by entering zero as the maximum number of transactions to be saved in the E-Journal memory.
Complete the following steps to deactivate the E-Journal feature:
Vx570 screen
text_image
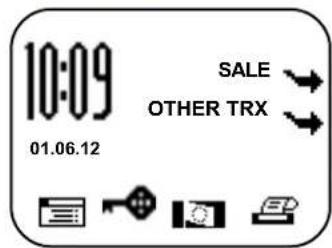
10:09 SALE OTHER TRX 01.06.12Step
1 Press the purple function key below the symbol to open the menu.
2 Select MERCHANT MENU.
3 Enter the merchant password (the default password is 99999) and confirm by pressing
4 Select CONFIGURE.
5 Select TERMINAL.
6 Scroll down and select E-JOURNAL.
7 Select MAX TRX ENTRIES.
8 Press
You can now enter the maximum number of transactions to be saved in the E-Journal memory. Enter zero (0), and confirm by pressing
text_image
10:09 SALE OTHER TRX 01.06.12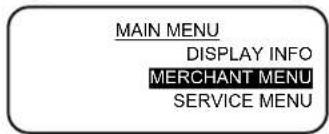
text_image
MAIN MENU DISPLAY INFO MERCHANT MENU SERVICE MENU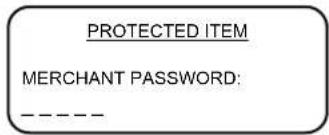
text_image
PROTECTED ITEM MERCHANT PASSWORD: - - - - -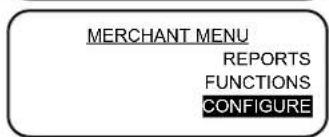
text_image
MERCHANT MENU REPORTS FUNCTIONS CONFIGURE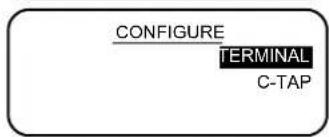
text_image
CONFIGURE TERMINAL C-TAP
text_image
TERMINAL COMMUNICATION MERCHANT PASSWORD E-JOURNAL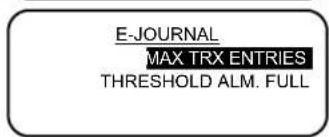
text_image
E-JOURNAL MAX TRX ENTRIES THRESHOLD ALM. FULL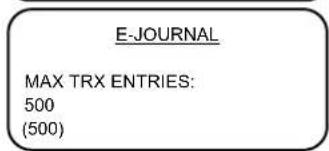
text_image
E-JOURNAL MAX TRX ENTRIES: 500 (500)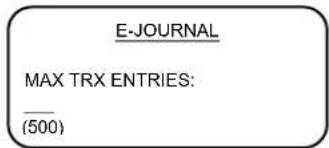
text_image
E-JOURNAL MAX TRX ENTRIES: (500)If the E-Journal feature has been successfully deactivated, the following message will appear on screen: 'E-JOURNAL CHANGE SUCCESSFUL'. If the message 'E-JOURNAL MEMORY NOT EMPTY / FIRST DELETE OR PRINT' appears on screen, you must first print the E-Journal (see subsection 6.3.2) or delete the E-Journal (see section 6.5).
6.5 Deleting the E-Journal
You can delete the E-Journal without printing it.
Complete the following steps to delete the E-Journal:
Vx570 screen Step
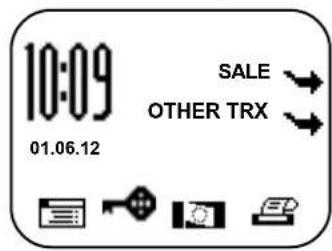
text_image
10:09 SALE OTHER TRX 01.06.121 Press the purple function key below the symbol to open the menu.
2 Select MERCHANT MENU.
3 Enter the merchant password (the default password is 99999) and confirm by pressing
4 Select FUNCTIONS.
5 Select TERMINAL.
6 Scroll down and select DELETE E-JOURNAL.
7 Enter the merchant password (the default password is 99999) and confirm by pressing
8 The E-Journal has now been deleted.
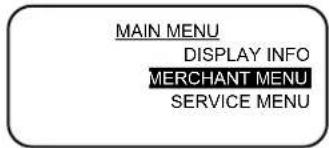
text_image
MAIN MENU DISPLAY INFO MERCHANT MENU SERVICE MENU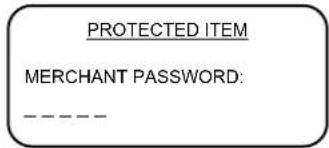
text_image
PROTECTED ITEM MERCHANT PASSWORD: - - - - -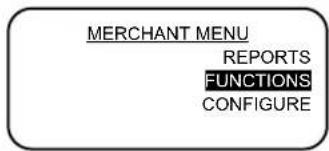
text_image
MERCHANT MENU REPORTS FUNCTIONS CONFIGURE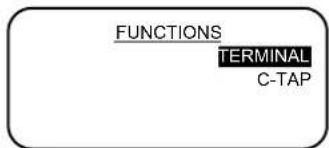
text_image
FUNCTIONS TERMINAL C-TAP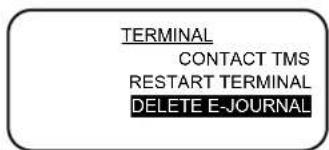
text_image
TERMINAL CONTACT TMS RESTART TERMINAL DELETE E-JOURNAL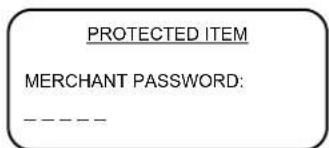
text_image
PROTECTED ITEM MERCHANT PASSWORD: --------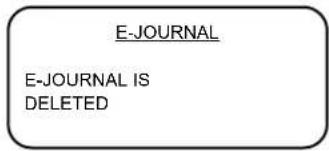
text_image
E-JOURNAL E-JOURNAL IS DELETED7 OPTIONAL FEATURES
7.1 Overview of optional features
Your payment terminal offers a number of optional features. You can have some of these features activated by the CCV Service Center, while others are only available if permitted by the acquirer.
| Feature | Description | Availability |
| Dynamic Currency Conversion | With Dynamic Currency Conversion, you can offer foreign customers the option of paying in their own currency. | If permitted by acquirer |
| Transaction reference | This feature allows you to assign a reference (e.g. a number or description) to a particular transaction while the transaction is being carried out. The reference is then stated on the copy receipt. | Activation by CCV Service Center |
| Employees The Employees feature provides insight into the transactions completed by your employees during a shift.After the close of business, the terminal can print a report specifying the transaction totals according to the employee(s) who completed the transactions.The copy receipt will state the name of the employee who completed the transaction.An employee can also print a report of the transactions he/she has completed. | Activation by CCV Service Center |
7.2 Instruction cards for optional features
Instruction cards for optional features are available on our website www.ccv.nl, Service, Handleidingen.
Important: The instruction cards are only available in Dutch!
8 MAINTENANCE AND TECHNICAL PROBLEMS
8.1 Maintaining the payment terminal and PINpad
In order to extend the service life of your equipment, it is advisable to clean your payment terminal regularly. This depends on the number of transactions you carry out and the environment in which the payment terminal has been installed.
For instance, if you notice that the performance of the card readers is deteriorating, you can use the special-purpose cleaning cards to clean the readers.
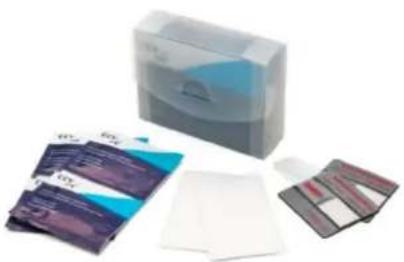
A special cleaning set is available for cleaning the payment terminal and PINpad. The cleaning set includes the following items:
• Anti-static and anti-bacterial cleaning pads
• A cleaning card for the chip card reader
• A cleaning card for the magnetic card reader
Chapter 9 describes how you can order the cleaning set and other supplies.
natural_image
Assorted medical or laboratory equipment including a transparent box, blue boxes with purple and blue patterns, and colored test sheets (no visible text or symbols)8.1.1 Cleaning the payment terminal and PINpad

natural_image
Hand inserting a coin into a digital payment terminal (no visible text or symbols)You can use anti-static and anti-bacterial cleaning pads to clean the payment terminal and PINpad. Thoroughly wipe the housing, keypad and screen of the payment terminal and PINpad with a cleaning pad. Pay particular attention to the keys. As with computer keyboards and telephones, the keys may contain high levels of bacteria as a result of regular use over a long period of time.
8.1.2 Cleaning the PINpad chip card reader
Complete the following steps to clean the PINpad chip card reader:

natural_image
Hand holding a payment terminal with a handheld device (no visible text or symbols)- Insert the cleaning card in the PINpad chip card reader.
natural_image
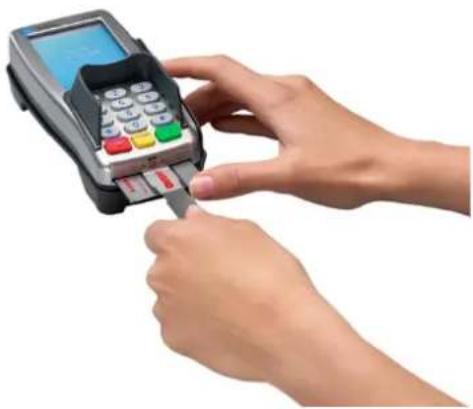
Close-up of hands using a payment terminal to press a finger, no visible text or symbols- Keep hold of the dark-grey section of the card with one hand as depicted in the above photograph. Then move the transparent section back and forth several times with your other hand.
8.1.3 Cleaning the PINpad magnetic card reader
Complete the following steps to clean the PINpad magnetic card reader:
natural_image
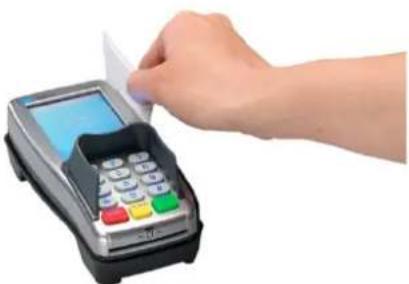
Hand inserting a card into a POS terminal (no visible text or symbols)Swipe the cleaning card through the magnetic card reader. Hold the cleaning card in an upright position and swipe at a constant speed. The cleaning card has two cleaning strips on both sides. The best result is obtained when you swipe the cleaning card through the magnetic card reader twice, without turning the card over.
8.2 Periodic software version control
Your payment terminal will periodically contact the CCV Terminal Management System for version control purposes. This procedure is carried out automatically and at night. The Terminal Management System checks the version of the payment terminal software. If a new software version is available, it is installed on the payment terminal. If the version control procedure has been successful, the terminal will print a receipt with the message 'CONFIGURATION SUCCESSFUL'.
Important: The version control procedure can only be carried out if the Ethernet connection is working properly and the external power supply is plugged in.
8.3 What to do in the event of faults / technical problems
This section describes what you can do to resolve any faults or technical problems that may occur.
Problems with reading payment cards:
- As a test, try to complete a transaction for one euro cent (€ 0.01) using another payment card. You should preferably use a payment card issued by another bank. If the test transaction is successful, this may be an indication that the card holder's payment card is not working properly. If the test transaction is unsuccessful, there may be a problem involving the card reader of the payment terminal.
- You can reset the payment terminal by interrupting the power supply to the cashier unit for approx. 15 seconds.
Communication problems:
- You can reset the payment terminal by interrupting the power supply to the cashier unit for approx. 15 seconds.
- Check the lights above the Ethernet port of your payment terminal (the words '10BaseT' are printed above the port). If the connection is working properly, a yellow light will be blinking and a green light will be burning continuously.
- If the two lights above the Ethernet port are not burning as described, you should check for any damage to the connectors of the payment terminal or to the Ethernet cable.
- If you suspect that your payment terminal is not properly connected, you should contact your Internet Service Provider to check the connection and your subscription.
- If the connection is working properly and none of the preceding steps were successful in resolving the problem, please contact the CCV Service Center for technical support.
Important: Make sure that you have the TMS Terminal ID or payment terminal code to hand. This will enable our staff to assist you more quickly. The next page describes where you can find this information.
8.3.1 Looking up the TMS Terminal ID and payment terminal code
The TMS Terminal ID is the identification number of your payment terminal in the CCV Terminal Management System. You can look up the TMS Terminal ID in your payment terminal.
Complete the following steps to look up the TMS Terminal ID:
Vx570 screen Step
text_image
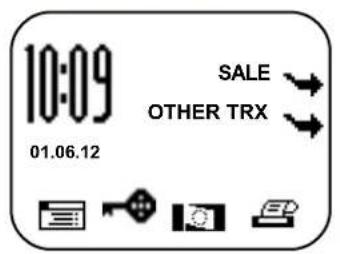
10:09 SALE OTHER TRX 01.06.121 Press the purple function key below the symbol to open the menu.
2 Select DISPLAY INFO.
3 Select TERMINAL.
4 Write down the TMS Terminal ID (CSL001 in this example).
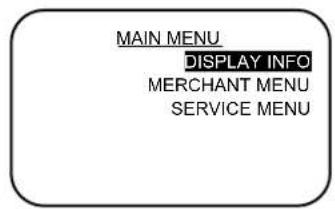
text_image
MAIN MENU DISPLAY INFO MERCHANT MENU SERVICE MENU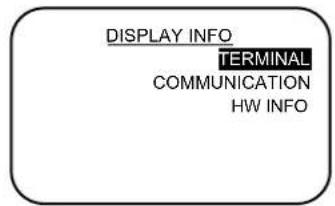
text_image
DISPLAY INFO TERMINAL COMMUNICATION HW INFO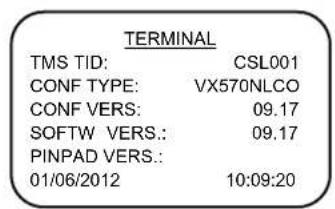
text_image
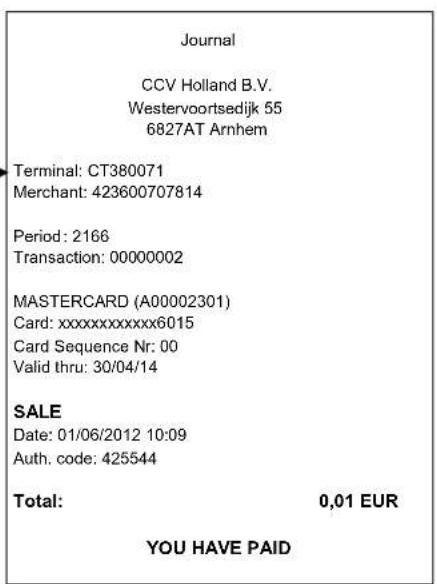
TERMINAL TMS TID: CSL001 CONF TYPE: VX570NLCO CONF VERS: 09.17 SOFTW VERS.: 09.17 PINPAD VERS.: 01/06/2012 10:09:20If you are unable to look up the TMS Terminal ID, you can also refer to the payment terminal code. The payment terminal code is printed on the copy receipts of the transactions.
Payment terminal code — (CT380071 in this example)
text_image
Journal CCV Holland B.V. Westervoortsedijk 55 6827AT Arnhem Terminal: CT380071 Merchant: 423600707814 Period: 2166 Transaction: 00000002 MASTERCARD (A00002301) Card: xxxxxxxxxxxx6015 Card Sequence Nr: 00 Valid thru: 30/04/14 SALE Date: 01/06/2012 10:09 Auth. code: 425544 Total: 0,01 EUR YOU HAVE PAID9 SUPPLIES FOR THE PAYMENT TERMINAL
9.1 Ordering supplies
You can order supplies for your payment terminal in several different ways:
- Ordering online: www.ccv.nl, Web Shop
• Ordering by telephone: +31 88 228 9849 - Ordering on your payment terminal (printer rolls only)
9.2 Ordering printer rolls on your payment terminal
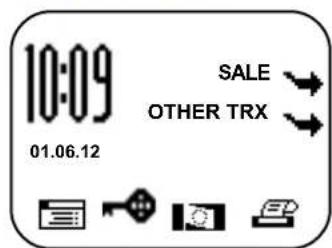
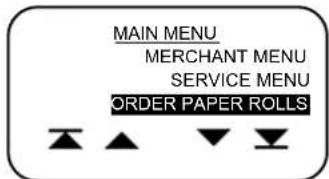
You can order printer rolls directly on your payment terminal. Complete the following steps to order printer rolls on your payment terminal:
Vx570 screen Step
text_image
10:09 SALE OTHER TRX 01.06.121 Press the purple function key below the symbol to open the menu.
2 Scroll down and select ORDER PAPER ROLLS.
3 Enter the merchant password (the default password is 99999) and confirm by pressing
4 Use the purple function keys below the ▲ and ▼ symbols to adjust the number of printer rolls you wish to order. You can order printer rolls in one or more boxes containing 25 rolls each.
Important: You can order a maximum of 200 printer rolls per order.
5 Press
text_image
MAIN MENU MERCHANT MENU SERVICE MENU ORDER PAPER ROLLS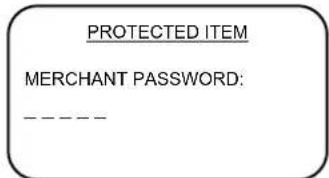
text_image
PROTECTED ITEM MERCHANT PASSWORD: --------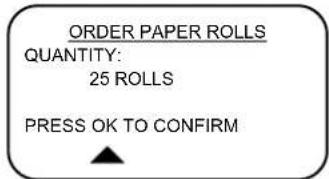
text_image
ORDER PAPER ROLLS QUANTITY: 25 ROLLS PRESS OK TO CONFIRM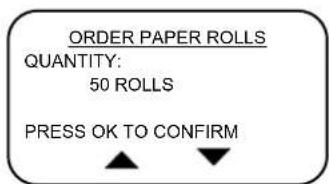
text_image
ORDER PAPER ROLLS QUANTITY: 50 ROLLS PRESS OK TO CONFIRMWhen you order printer rolls using your payment terminal, you are authorizing CCV to debit the amount due from your account number as known to CCV. Your order will be delivered to the physical location of your payment terminal. Please check if the address details are correct on the receipt that is printed after you have placed your order.
10 TERMS AND DEFINITIONS
| Term Definition | |
| Acquirer | A payment institution or bank that receives and processes transactions. An acquirer also issues information required for the acceptance of transactions. |
| Acquirer Merchant ID | The Merchant ID for a payment card. You need this number to accept a payment card on your payment terminal. |
| Acquirer parameter session | A communication session with the acquirer host for the purpose of retrieving acquirer parameters for your payment terminal. These parameters determine which cards are accepted by your terminal and how the terminal handles these cards. |
| Authorisation code | A unique code that you are required to enter when carrying out the following transaction types: cancellation, sale after reservation, sale referral, extra reservation, and cash advance after referral. |
| Card allocation report A report listing the types of payment cards accepted by your payment terminal, and specifying the transaction processor(s) to which these payment cards are allocated. | |
| Card holder | A person to whom you charge money for a specific product and/or service, and who pays for that product and/or service with a payment card. |
| Currence | An organisation that certifies data communication providers with respect to transactions using ‘Chipknip’ stored-value cards. |
| CVC2 code | A three- or four-digit code printed on the front or back of a payment card for security purposes. |
| Dutch Payments Association | The Dutch Payments Association (Betaalvereniging Nederland) organises collective activities in the national payment system on behalf of its members. The Association’s members are providers of payment services in the Dutch market, i.e. banks, payment institutions and electronic money institutions. The Association coordinates the collective activities of its members in the area of infrastructure, standards and shared product features. These activities are aimed at ensuring an effective, secure, reliable and efficient payment system. |
| Dynamic IP address | An automatically assigned IP address that can change over time. |
| E-Journal | A financial report consisting of copy receipts of all transactions completed during a specific period. |
| EMV standard An international standard for payment transactions and cash advances using payment cards. | |
| Ethernet connection | A connection used to interconnect devices in a network. Your payment terminal must be connected to the Internet via an Ethernet connection. |
| Internet Service Provider | An organisation that provides facilities to private individuals and/or enterprises for the purpose of connecting a computer or other device to the Internet. |
| Merchant password | A password that restricts access to the merchant menu and that must be entered to perform specific actions. |
| Terminal Management System | A system for the management and maintenance of payment terminals. |
| TMS Terminal ID | A unique payment terminal identification number that serves as a key providing access to the CCV Terminal Management System. |
Term Definition
| Totals report A financial report listing the totals for all transactions carried out during a particular period, specified according to transaction processor, type of payment card and transaction type. | |
| Transaction processor | The party to whom transaction data are sent in accordance with the Common Terminal Acquirer Protocol (C-TAP). The transaction processor then forwards the transaction data to the correct acquirer for further processing. |
| Static IP address | An assigned IP address that is not subject to change over time. |
11 CONTACT INFORMATION
11.1 CCV phone numbers
CCV Service Center (reporting faults and ordering supplies) +31 88 228 9849
Ordering supplies online www.ccv.nl, Web Shop
CCV Sales Department +31 88 228 9870
11.2 CCV opening hours
CCV office hours:
Monday through Friday 8:30 – 17:00 hrs
CCV Service Center:
Monday through Friday 7:00 – 22:00 hrs
Saturday 8:00 – 18:00 hrs
Sunday 9:00 – 17:30 hrs
N.B.: The 24-hour service is only available for technical problems that need to be resolved urgently.
11.3 CCV general address details
CCV Holland B.V.
P.O. Box 9226
NL-6800 KH Arnhem
The Netherlands
T +31 88 228 9911
F +31 88 228 9900
E info@nl.ccv.eu
| www.ccv.nl
11.4 Acquirer phone numbers
European Merchant Services (EMS) +31 20 660 3120
B+S Card Service +31 20 428 8737
American Express +31 20 504 8333
Bank Card Company (BCC) +32 22 05 85 85
China UnionPay +31 30 283 7333
Citibank +32 27 74 55 55
ConCardis +49 69 79 22 22 28
Diners Club +31 20 654 5524
JCB +31 30 283 7333
OmniPay +31 30 283 7333
PaySquare +31 30 283 7333
YourGift Cards +31 10 240 9259