
AQV09ASAX - Air-conditioner SAMSUNG - Free user manual and instructions
Find the device manual for free AQV09ASAX SAMSUNG in PDF.


User questions about AQV09ASAX SAMSUNG
0 question about this device. Answer the ones you know or ask your own.
Ask a new question about this device
Download the instructions for your Air-conditioner in PDF format for free! Find your manual AQV09ASAX - SAMSUNG and take your electronic device back in hand. On this page are published all the documents necessary for the use of your device. AQV09ASAX by SAMSUNG.
USER MANUAL AQV09ASAX SAMSUNG
Thank you for purchasing this Samsung product.
To receive more complete service, please
register your product at
www.samsung.com/global/register
SAMSUNG
features of your new air conditioner
- Cool Summer Offer
On those hot sweltering summer days and long restless nights, there is no better escape from the heat than the cool comforts of home. Your new air conditioner brings an end to exhausting hot summer days and lets you rest. This summer, beat the heat with your own air conditioner.
- Cost Efficient System
Your new air conditioner not only provides maximum cooling power in the summer, but can also be an efficient heating method in the winter with the advanced "Heat pump" system. This technology is up to 300% more efficient than electrical heating, so you can further reduce its running cost. Now, meet year-round needs with one air conditioner.
• A Look for Everywhere
The elegant and harmonious design gives priority to the esthetics of your space and complements any of your existing interior decor. With its soft color and rounded-edge shape, the new air conditioner adds class to any room. Enjoy what your air conditioner offers both functionally and esthetically.
- mpizone
mpizone generates hydrogen(H) and oxygen( O_2 ) to attack undesirable air contaminants such as bacteria, pollen, and odor. Breathe as if you were around waterfalls, ocean surf, rivers and mountains.
- gondtdeep
good'sleep mode automatically adjustments room temperature to make sure you sleep comfortably while saving energy.
SAMSUNG
For easy future reference write the model and serial number down. You will find your model number on the right side of the air conditioner.
Model #
Serial #
02\_features
safety information
To prevent electric shock, disconnect the power before servicing, cleaning, and installing the unit.
SAFETY INFORMATION
Before using your new air conditioner, please read this manual thoroughly to ensure that you know how to safely and efficiently operate the extensive features and functions of your new appliance.
Because the following operating instructions cover various models, the characteristics of your air conditioner may differ slightly from those described in this manual. If you have questions, call your nearest contact center or find help and information online at www.samsung.com.
What the icons and signs in this user manual mean:
 WARNING WARNING | Risk of death or serious personal injury. | |
 CAUTION CAUTION | Potential risk of personal injury or material damage. | |
 CAUTION CAUTION | To reduce the risk of fire, explosion, electric shock, or personal injury when using your air conditioner, follow these basic safety instructions: | |
 | Do NOT attempt. | |
 | Do NOT disassemble. | |
 | Do NOT touch. | |
 | Follow directions carefully. | |
 | Unplug the power plug from the wall socket. | |
 | Make sure the machine is grounded to prevent electric shock. | |
 | Call the contact center for help. | |
 | Recommended instructions or useful information for use. | |
These warning signs are here to prevent injury to you and others.
Please follow them carefully.
After reading this section, keep it in a safe place for future reference.
SEVERE WARNING SIGNS

Do not cut the power plug and connect to a different power cable.
Never attempt to lengthen the power cable.
• Potential risk of fire or electric shock.
Do not yank the power cable and touch the power plug with wet hands.
• Potential risk of fire or electric shock.
Never use a damaged power plug, power cable, or loosened power receptacle.
• Potential risk of fire or electric shock.
safety information _03
safety information
SEVERE WARNING SIGNS

Do not place the air conditioner near hazardous substances or equipment that releases free flames to avoid fires, explosions or injuries.
• Potential risk of fire hazard or explosion.
Do not spray flammable gases such as insecticide near the air conditioner.
- Potential risk of electric shock, fire or unit malfunction.
Do not block or place items in front of the air conditioner. Do not step, hang onto, or place heavy items on the air conditioner.
• Potential risk of personal injury.
Do not insert anything such as fingers or branches into the air conditioner vents.
- Keep children away from the air conditioner. Potential risk of personal injury.
Do not install the air conditioner in areas exposed to inflammable gas leakage or potential risk of gas leakage.
• Potential risk of fire hazard or explosion.
Do not install the outdoor unit on an unstable place such as outer high wall of an apartment or building and on an outside terrace to avoid falls.
- If the outdoor unit falls, it may cause personal injury or loss of property.

Consult the place of purchase or a contact center to disassemble or reinstall the air conditioner.
- Potential risk of unit malfunction, water leakage, electric shock, or fire.
Do not connect the air conditioner with a heating apparatus or do not attempt to disassemble, remodel or repair it by yourself.
- Potential risk of malfunction, electric shock or fire. If repairs are needed, consult the contact center.

Consult the place of purchase or a contact center to install the air conditioner.
- Improper installation carries a risk of unit malfunction, water leakage, electric shock or fire.
- If installing in specialty areas, such as a factory complex or saline coastal area, consult the place of purchase or contact center for specific installation details.
Install the air conditioner with the support bracket securely fastened to use for an extended period of time.
- If the air conditioner falls, it may cause personal injury or loss of property.
Ensure the air conditioner is installed in compliance with current national safety standards.
Use a rated circuit breaker only.
- Never use steel wires or copper wires as a circuit breaker. It may cause fire or unit malfunction.
Use an exclusive power source for the air conditioner.
• Potential risk of electric shock or fire.
Do not put undue stress on the power cable or place heavy objects on it. Do not bend the power cable excessively.
• Potential risk of fire or electric shock.
04\_ safety information

If the air conditioner becomes wet, turn the power off immediately and call your nearest contact center.
• Potential risk of fire or electric shock.
Install an exclusive circuit breaker and short-circuit breaker for the air conditioner.
• Potential risk of electric shock or fire.
If the power cable or cord is damaged, the manufacturer, a qualified service technician must replace it to avoid a potential risk.

Disconnect the air conditioner from power supply before it is repaired or disassembled.

Use a receptacle that has a ground terminal. The receptacle must be used exclusively for the air conditioner.
- Improper electrical grounding may cause electric shock or fire.
Ensure proper ground has been established when installing the air conditioner. Do not connect the ground cable of the unit to a gas pipe, a water pipe or a telephone line.
• Potential risk of electric shock.
CAUTION SIGNS

Ensure no water gets into the air conditioner.
• Potential risk of fire or electric shock.
Do not install the air conditioner close to heating appliances to avoid damage.
Turn off the air conditioner using the provided remote control or control accessory (if provided). Do not unplug to turn off the unit (unless there is an immediate danger).
Do not open the front grille during operation.
- Potential risk of electric shock or unit malfunction.
Cool air should not flow directly towards people, pets, and plants.
- It is harmful to your health, pets, and plants.
Do not run the air conditioner for an extended period of time in a room with the door closed or with babies, elderly or disabled people.
- In case residential application, refreshing the air into the room (from external air to prevent oxygen shortage), in order to guarantee at least 1-2 renewal/h. For different application the renewal air has to be guarantee according to UNI 10339.
Do not use the air conditioner as a cooling precision instrument for food, pets, plants, cosmetics or machinery.
• Potential risk of property loss.
Do not drink water from the air conditioner.
• Potential risk of health hazard.
Do not give excessive shock to the air conditioner.
- Potential risk of fire or unit malfunction.
Do not expose the dust filter to direct sunlight while drying.
• Strong direct sunlight may deform the dust filter.
Do not spray water directly on the air conditioner or use benzene, thinner or alcohol to clean the surface of the unit.
• Potential risk of electric shock or fire.
- Potential risk of damage to the air conditioner.
safety information
CAUTION SIGNS

Do not place containers with liquid or other objects on the unit.
Do not touch the pipe connected to the air conditioner.
• Potential risk of personal injury or burn.

The air conditioner is composed of moving parts. Keep children away from the unit to avoid physical injury.

Check for damage on delivery. If damaged, do not install the air conditioner and call the place of purchase immediately.
Make sure the voltage and frequency of the electric system are compatible with the air conditioner.
Insert the dust filter before operating the air conditioner.
- If there is no dust filter inside the air conditioner, accumulated dust may shorten the life of the air conditioner and cause electricity waste.
Keep indoor temperatures stable and not extremely cold, especially where there are children, elderly or disabled people.
Clean the air conditioner after the inner fan stops operating.
• Potential risk of injury or electric shock.
Clean the dust filter every 2 weeks. Clean the filter more frequently if the air conditioner is operated in dusty areas.
Inspect the condition, electric connections, pipes and external case of the air conditioner regularly by a qualified service technician.
Do not open doors and windows in the room being cooled during operation unless necessary.
Do not block air conditioner vents. If objects block the air flow, it may cause unit malfunction or poor performance.
The packaging material and used batteries of the remote control(optional) must be disposed of in accordance with the national standards.
The refrigerant used in the air conditioner must be treated as chemical waste. Dispose the refrigerant following national standards.
Have a qualified service technician install the air conditioner and perform a trial operation.
Install the air conditioner away from direct exposure to sunlight, heating apparatus, and humid places.
- Hang curtains on windows to boost cooling efficiency and to avoid the risk of electric shock.
Firmly connect the drain hose to the air conditioner for proper water drainage.
- If it does not drain well, the condensed-water from the indoor unit may overflow and leak into the room.
Install the outdoor unit where the normal operating noise and residual vibration (subjective parameters) will not disturb your neighbor and be well-ventilated with no obstacle.
• Potential risk of malfunction.

Install a pipe length according to minimum and maximum limit prescribed into installation manual.
- with length different from specified, the system performance and reliability will be reduced drastically.
If a power outage occurs while the air conditioner is working, turn off the power source immediately.
When cleaning the outdoor unit, touch the heat exchanger radiator fins with extreme care.
- Wearing thick gloves can protect your hands.
Make sure there are no obstacles under the indoor unit.
• Potential risk of fire or loss of property.
Make sure that children take precautions against access to the air conditioner and that they do not play with the unit.
The maximum input power & current and the input power & current are measured in accordance with the rules given in the IEC/ISO.
Use the wireless remote control only up to a distance of about 7m from the remote control sensor of the air conditioner.
- The air conditioner may not work over the distance of 7m.
Make sure the cover or any obstacle is not near the air conditioner. Allow sufficient space for air circulation.
• Insufficient ventilation may result in poor performance.
Batteries should be removed from the wireless remote control and kept separately when unused for a long period of time.
If failure or damage occurs on the conditions of improper use not followed by the installation manual, the repair expense will not be covered by product warranty.
- Potential risk of malfunction, electric shock or fire if repairs or installations are attempted by a non-qualified service technician.

Ensure the on-off and protection switches are properly installed.
Do not use the air conditioner if damaged. If problems occur, immediately stop operation and disconnect the plug from the power supply.
If the air conditioner will not be used for an extended period of time (for example, over several months), unplug the power from the wall.

Call the place of purchase or a contact center if repairs are needed.
- Potential risk of fire or electric shock if disassembly or repairs are attempted by a non-qualified service technician.
If you smell burning plastic, hear strange sounds, or see smoke coming from the unit, unplug the air conditioner immediately and call a contact center.
• Potential risk of fire or electric shock.
contents
VIEWING YOUR AIR CONDITIONER BEFORE USE
10
10 Checking the indoor unit and digital display
10 Main parts
10 Indoor unit digital display
11 Removing the front panel
11 Power button and Room temperature sensor
11 Checking the outdoor unit
12 Checking the remote control
13 Remote control display
13 Using the remote control
13 Installing the batteries
14 Turning the air conditioner on and off
14 Selecting operation mode
14 Auto
15 Cool
16 Dry
17 Fan
18 Heat
19 Adjusting the air flow direction
19 Vertical air flow
19 Horizontal air flow
08 contents
USING ADVANCED FUNCTIONS
20
20 Using the Turbo function
21 Setting the timer
21 On timer
22 Off timer
23 Combining On timer and Off timer
24 good'sleep
26 Using the mpizone function
27 Using the Energy saving function
28 Using the Silence function
28 Using the Evaporator clean function
CLEANING AND MAINTAINING THE AIR CONDITIONER
29
29 Cleaning the exterior
29 Cleaning the filter
29 Air filter
30 Anti-allergy filter
31 Replacing the filter
31 Deodorizing filter
31 Maintaining your air conditioner
APPENDIX
32
32 Troubleshooting
33 Operation ranges
Correct Disposal of This Product
(Waste Electrical & Electronic Equipment)
(Applicable in the European Union and other European countries with separate collection systems)
This marking shown on the product or its literature, indicates that it should not be disposed with other household waste at the end of its working life. To prevent possible harm to the environment or human health from uncontrolled waste disposal, please separate this from other types of waste and recycle it responsibly to promote the sustainable reuse of material resources.
Household users should contact either the retailer where they purchased this product, or their local government office, for details of where and how they can take this item for environmentally safe recycling.
Business users should contact their supplier and check the terms and conditions of the purchase contract.
This product should not be mixed with other commercial waste for disposal.
contents 09
viewing your air conditioner before use
Congratulations on the purchase of a Samsung air conditioner. We hope you will enjoy the features of your air conditioner and stay cool or warm with optimal efficiency.
Please read the user manual to get started and to make the best use of the air conditioner.
CHECKING THE INDOOR UNIT AND DIGITAL DISPLAY
Carefully unpack your air conditioner, and check the unit to make sure it is not damaged.
text_image
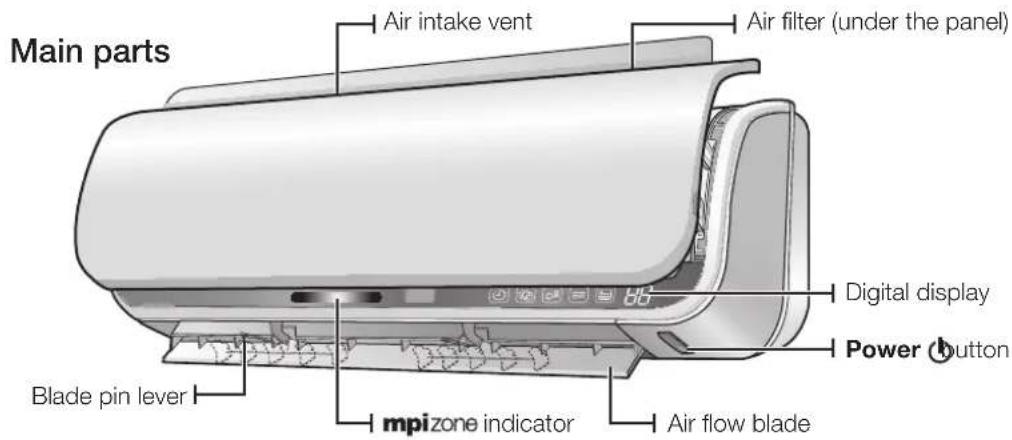
Main parts Air intake vent Air filter (under the panel) Digital display Power button Blade pin lever mpizone indicator Air flow bladeYour air conditioner may look slightly different from the illustration shown above depending on your model.
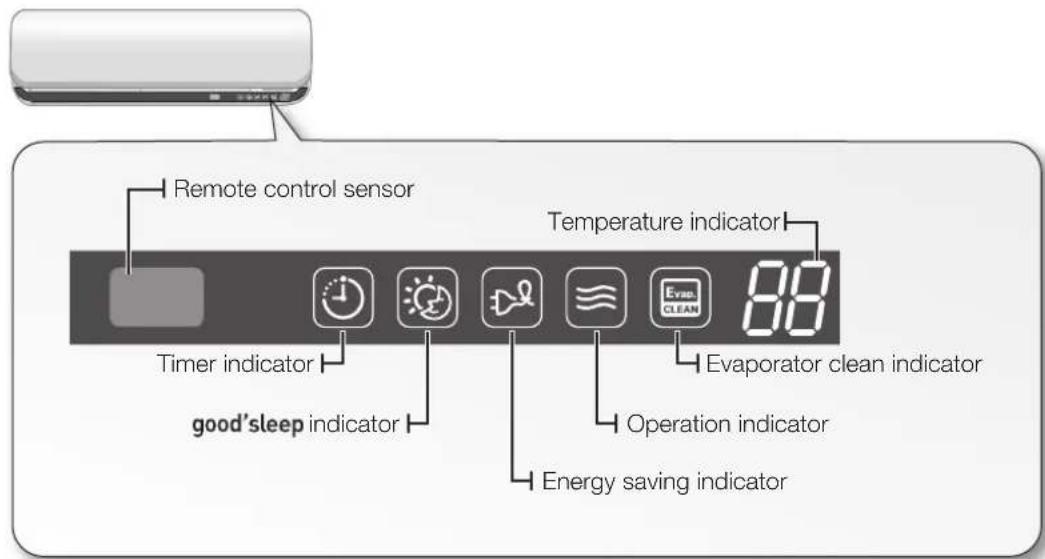
Indoor unit digital display
text_image
Remote control sensor Temperature indicator Timer indicator good'sleep indicator Evaporator clean indicator Operation indicator Energy saving indicator10_ viewing
REMOVING THE FRONT PANEL
Grab the grooved side of the front panel tightly and pull the bottom side of the panel upwards to remove the front panel.
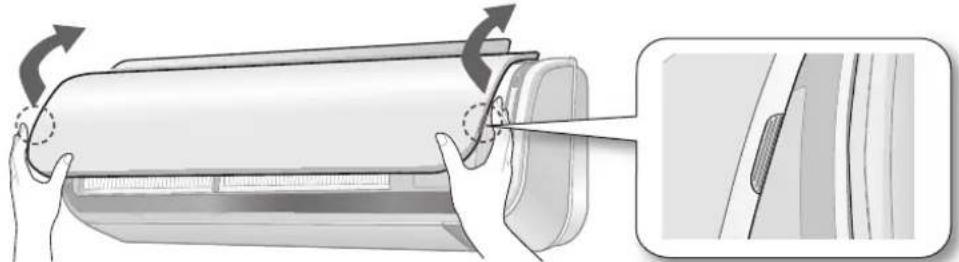
natural_image
Illustration of a hand holding a large air conditioner with a close-up view showing the blade and handle (no text or symbols)Power button and Room temperature sensor
You may locate the Power ⏻ button on the right bottom side of the air conditioner. If the front panel is open, you can check the room temperature sensor.
You can turn on the air conditioner without the remote control by pressing the Power Button. The room temperature sensor measures indoor room temperature.
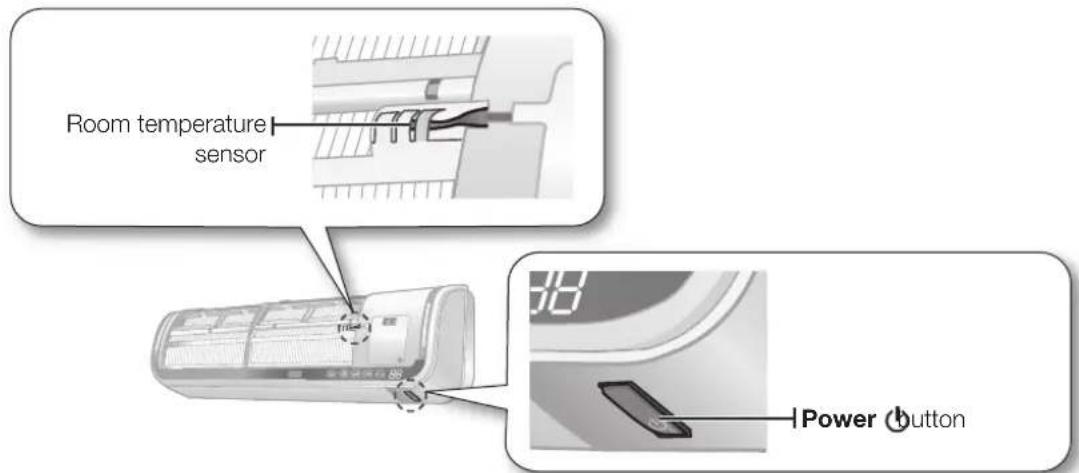
text_image
Room temperature sensor Power buttonCHECKING THE OUTDOOR UNIT
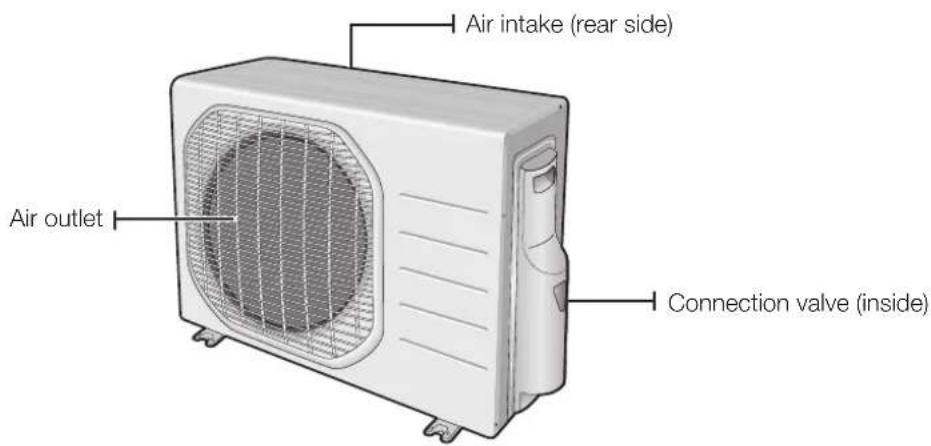
text_image
Air intake (rear side) Air outlet Connection valve (inside)viewing_11
viewing your air conditioner before use
CHECKING THE REMOTE CONTROL
Activate the air conditioner by pointing the remote control directly at the unit.
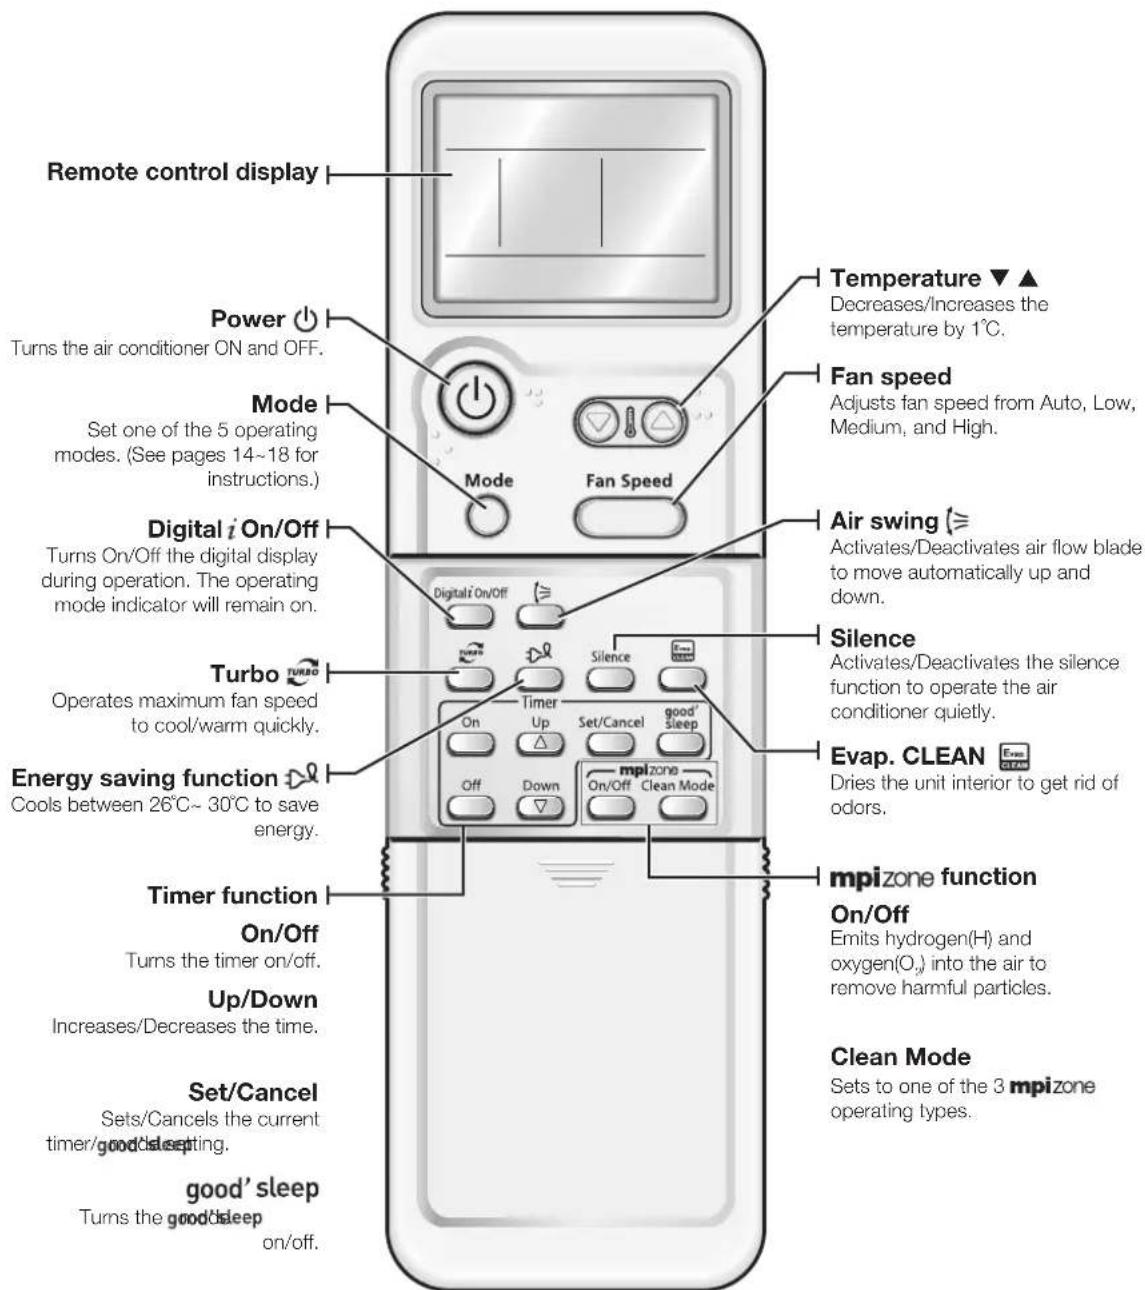
text_image
Remote control display Power Turns the air conditioner ON and OFF. Mode Set one of the 5 operating modes. (See pages 14~18 for instructions.) Digital i On/Off Turns On/Off the digital display during operation. The operating mode indicator will remain on. Turbo Operates maximum fan speed to cool/warm quickly. Energy saving function Cools between 26°C~30°C to save energy. Timer function On/Off Turns the timer on/off. Up/Down Increases/Decreases the time. Set/Cancel Sets/Cancels the current timer/good/sleeping. good' sleep Turns the good/sleep on/off. Temperature ▼ ▲ Decreases/Increases the temperature by 1°C. Fan speed Adjusts fan speed from Auto, Low, Medium, and High. Air swing ≧ Activates/Deactivates air flow blade to move automatically up and down. Silence Activates/Deactivates the silence function to operate the air conditioner quietly. Evap. CLEAN Dries the unit interior to get rid of odors. mpizone function On/Off Emits hydrogen(H) and oxygen(O₂) into the air to remove harmful particles. Clean Mode Sets to one of the 3 mpizone operating types.
Each time you press a button, a short beep will sound and a transmit indicator appears on the remote control display.
12\_ viewing
Remote control display
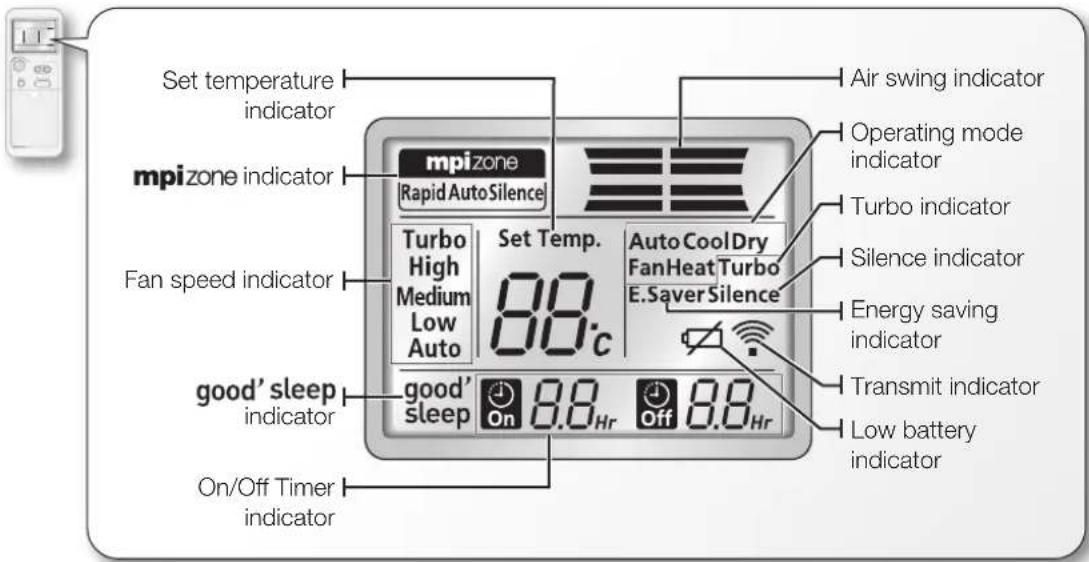
text_image
Set temperature indicator mpi zone indicator Rapid AutoSilence Fan speed indicator good' sleep indicator On/Off Timer indicator Set Temp. 80°C good' sleep On 8.0 Hr Off 8.0 Hr Air swing indicator Operating mode indicator Turbo indicator Silence indicator Auto CoolDry FanHeat Turbo E.SaverSilence Energy saving indicator Transmit indicator Low battery indicatorUsing the remote control
- Point the remote control towards the remote control sensor of the unit.
- The unit will beep each time a button is pressed on the remote control.

- The remote control may not operate correctly if inverter fluorescent lighting is used in close proximity of the unit.
- If other electrical products operate by the remote control, call your nearest contact center.
Installing the batteries
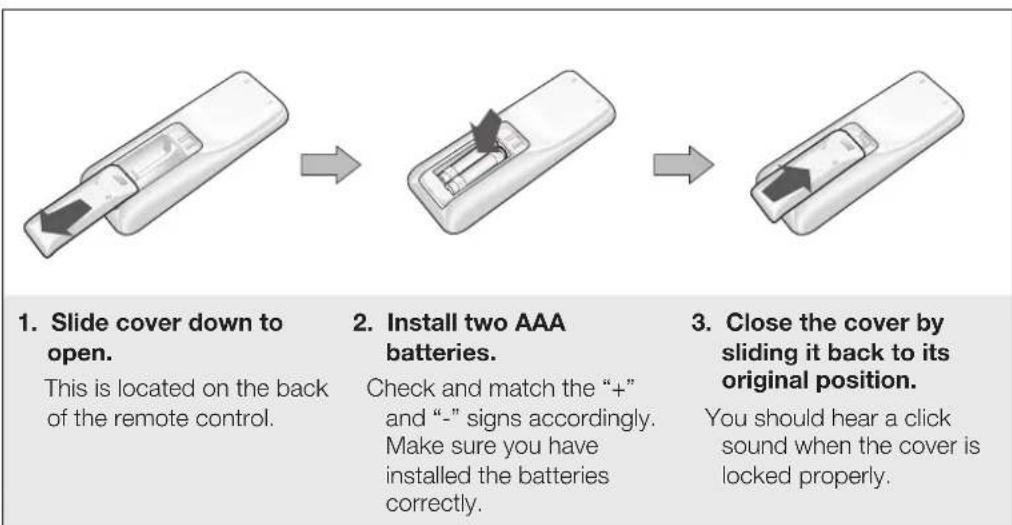
flowchart
graph LR
    A["Slide cover down to open\nThis is located on the back of the remote control."] --> B["Install two AAA batteries.\nCheck and match the "+" and "-" signs accordingly.\nMake sure you have installed the batteries correctly."]
    B --> C["Close the cover by sliding it back to its original position.\nYou should hear a click sound when the cover is locked properly."]

operating basic function
TURNING THE AIR CONDITIONER ON AND OFF
Press the Power Button on the remote control.
You will hear a ringing sound and the front panel will lift up when the air conditioner is properly turned on. The mpizone indicator will also fade in and fade out.
When you turn off the air conditioner, the mpizone indicator will fade in and fade out and the front panel will return to its closed position.
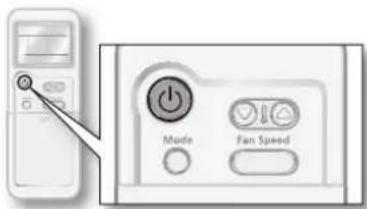
text_image
Diagram showing a device control panel with labeled buttons for Mode and Fan Speed, alongside a close-up of the left panel.
Turning on/off your air conditioner without the remote control.
You can operate your air conditioner by pressing the Power Button on the bottom right side of the air conditioner.
In Auto mode, the air conditioner will automatically set the temperature and fan speed depending on the room temperature detected by the room temperature sensor.
- Turn on the air conditioner.
Press the Power button on the remote control.
- Set the operating mode.
Press the Mode button on the remote control until Auto mode and Auto fan speed indicator appear on the remote control display.
The air conditioner will automatically set the temperature and fan speed to cool or heat according to the current room temperature.
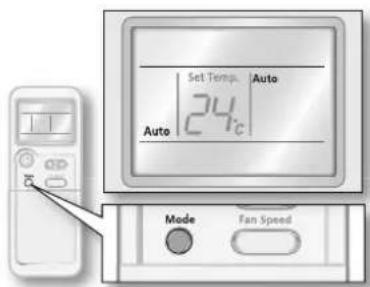
text_image
Set Temp. Auto 24°C Auto Mode Fan Speed
When you press the Mode button, the mode will change in order of Auto, Cool, Dry, Fan and Heat.
- Set the Temperature.
Press the Temperature ▼ or ▲ button on the remote control to decrease or increase the desired temperature.
You can set the desired temperature between the range of 16^ C\~ 30^ C.

You can decrease/increase the temperature by 1°C.
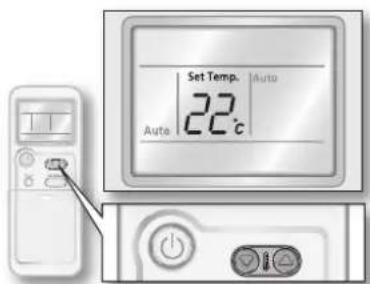
text_image
Set Temp. Auto 22°C Auto
- When the air conditioner is already operating in another mode, press the Mode button until the Auto mode indicator appears on the remote control display.
- When using the remote control, make sure the indicator matches your selection on the remote control display.
• Air flow can be adjusted manually. (See page 19 for instructions.)
14\_ operating
Cool
In Cool mode, the air conditioner will cool your room. You can adjust the temperature and the fan speed to feel cooler.
- Turn on the air conditioner.
Press the Power button on the remote control.
- Set the operating mode.
Press the Mode button on the remote control until Cool mode indicator appears on the remote control display.
The air conditioner operates in Cool mode and will lower the temperature in your room.

When you press the Mode button, the mode will change in order of Auto, Cool, Dry, Fan and Heat.
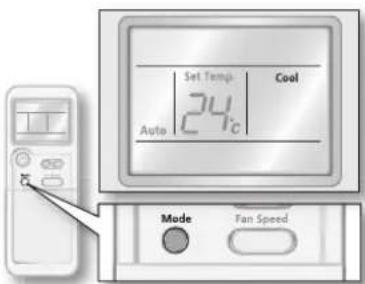
text_image
Set Temp. Cool 24°C Auto Mode Fan Speed- Set the temperature.
Press the Temperature ▼ or ▲ button on the remote control to decrease or increase the desired temperature. You can set the desired temperature between the range of 16°C\~30°C.

You can decrease/increase the temperature by 1°C.
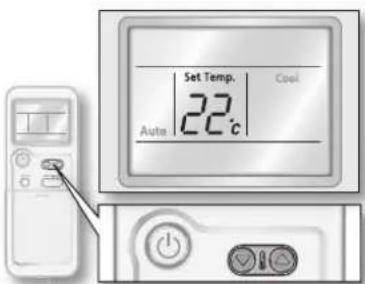
text_image
Set Temp. 22°C Cool Auto- Set the fan speed.
Press the Fan Speed button on the remote control to set the desired fan speed.
If room temperature reaches the desired temperature, the air conditioner will stop cooling and simply run the fan.

When you press the Fan Speed button, fan speed will change in order of Auto, Low, Medium and High.
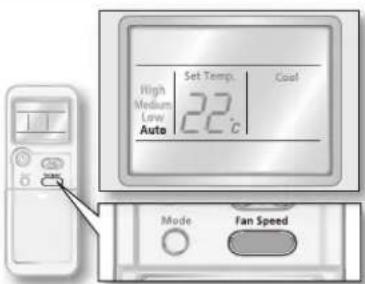
text_image
High Medium Low Auto Set Temp. Cool 22°C Mode Fan Speed
- When using the remote control, make sure the indicator matches your selection on the remote control display.
• Air flow can be adjusted manually. (See page 19 for instructions.) - If current outside temperatures are much higher than the selected indoor temperature, it may take time to bring the inner temperature to the desired coolness.
operating basic function
The air conditioner in Dry mode acts like a dehumidifier by removing moisture indoors. Dry mode makes the air refreshing even in humid climates.
- Turn on the air conditioner.
Press the Power button on the remote control.
- Set the operating mode.
Press the Mode button on the remote control until Dry mode indicator appears on the remote control display. The air conditioner operates in Dry mode and automatically adjusts the fan speed to Auto.

When you press the Mode button, the mode will change in order of Auto, Cool, Dry, Fan and Heat.
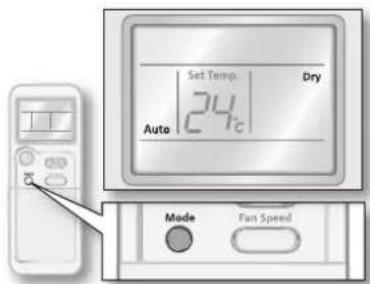
text_image
Set Temp. Dry 24°C Auto Mode Fan Speed- Set the temperature.
Press the Temperature ▼ or ▲ button on the remote control to decrease or increase the desired temperature. You can set the desired temperature between the range of 18°C\~30°C.

You can decrease/increase the temperature by 1^ C.
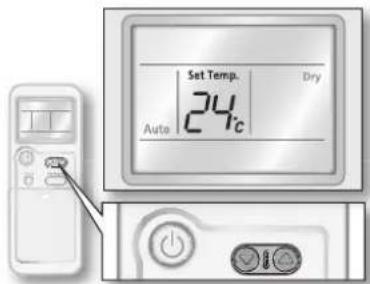
text_image
Set Temp. Dry 24°C Auto
- When using the remote control, make sure the indicator matches your selection on the remote control display.
• Air flow can be adjusted manually. (See page 19 for instructions.)
16\_ operating
Fan
Fan mode can be selected to ventilate your room. Fan mode is helpful in refreshing the stale air in your room.
- Turn on the air conditioner.
Press the Power button on the remote control.
- Set the operating mode.
Press the Mode button on the remote control until Fan mode indicator appears on the remote control display.
The air conditioner operates in Fan mode and automatically adjusts the temperature according to the current room temperature.

When you press the Mode button, the mode will change in order of Auto, Cool, Dry, Fan and Heat.
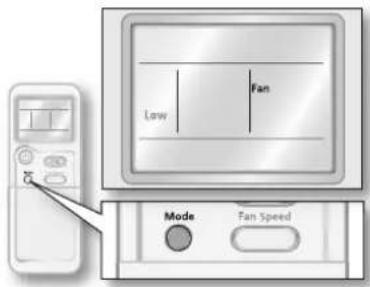
text_image
Low Fan Mode Fan SpeedENGLISH
- Set the fan speed.
Press the Fan Speed button on the remote control to set the desired fan speed.

When you press the Fan Speed button, fan speed will change in order of Low, Medium and High.
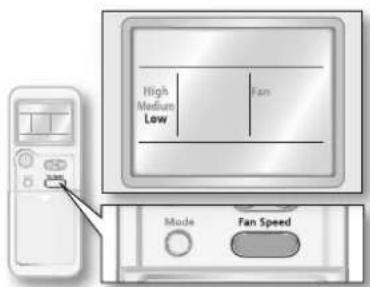
text_image
High Medium Low Fan Mode Fan Speed

- When using the remote control, make sure the indicator matches your selection on the remote control display.
• Air flow can be adjusted manually. (See page 19 for instructions.)
operating basic function
The air conditioner heats as well as cools. Warm your room with this versatile appliance in the cold of winter.
- Turn on the air conditioner.
Press the Power button on the remote control.
- Set the operating mode.
Press the Mode button on the remote control until Heat mode indicator appears on the remote control display. The air conditioner operates in Heat mode and warms your room.

When you press the Mode button, the mode will change in order of Auto, Cool, Dry, Fan and Heat.

text_image
Set Temp. 24°C Heat Auto Mode Fan Speed- Set the temperature.
Press the Temperature ▼ or ▲ button on the remote control to decrease or increase the desired temperature.
You can set the desired temperature between the range of 16^ C\~ 30^ C.

You can decrease/increase the temperature by 1°C.
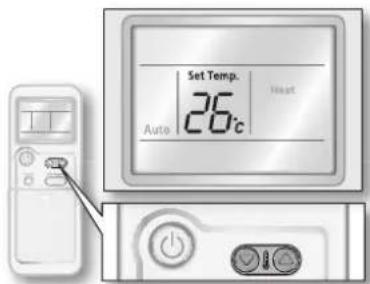
text_image
Set Temp. 26°C Auto Heat- Set the fan speed.
Press the Fan Speed button on the remote control to set the desired fan speed.
When room temperature reaches the desired temperature, heating will temporarily stop.

- When you press the Fan Speed button, fan speed will change in order of Auto, Low, Medium and High.
- Fan may not operate for about 3\~5 minutes at the beginning to prevent any cold blasts while the air conditioner is warming up.
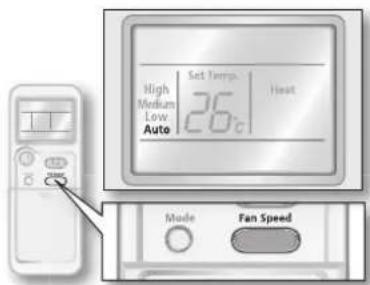
text_image
High Medium Low Auto Set Temp. Heat 26°C Mode Fan Speed
• Air flow can be adjusted manually. (See page 19 for instructions.)
- Since the air conditioner heats the room by taking heat energy from outdoor air, the heating capacity may decrease when outdoor temperatures are extremely low. If you feel the air conditioner insufficiently heats, using an additional heating appliance in combination with the air conditioner is recommended.
18\_ operating
ADJUSTING THE AIR FLOW DIRECTION
Air flow can be adjusted to your desired position.
Vertical air flow
Air flow blades move up and down.
- Press the Air swing (button on the remote control.
Air swing indicator turns on and the number of indicator lights move up and down. Air flow blades move up and down continuously to circulate the air.
To keep the air flow direction in a constant position, press the Air swing ( ≥slant button on the remote control again.
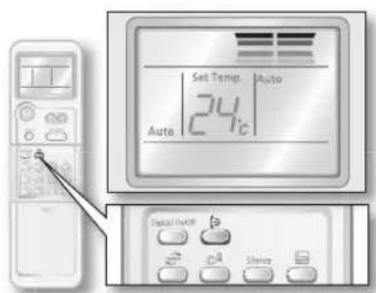
text_image
Set Temp. Auto 24°C Auto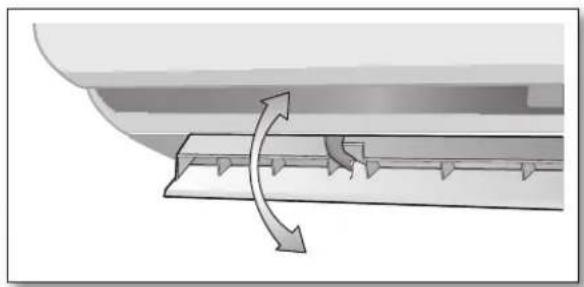
natural_image
Diagram of airflow or fluid flow through a curved channel with directional arrows indicating flow direction (no text or symbols)Horizontal air flow
Make sure none of the blade pins that stick out of the air flow blades are broken.
- Move the blade pin lever left or right to position the air flow to the preferred direction.

text_image
Diagram showing a hand pressing down on a computer's keyboard, with Chinese text labels indicating the process.Caution Be extremely careful while adjusting the Horizontal air flow direction. There is a potential risk of personal injury when the unit is mishandled.
using advanced functions
USING THE TURBO FUNCTION
Turbo function will be helpful to cool or heat your room quickly and effectively by operating at the maximum fan speed for 30 minutes.
- Turn on the air conditioner.
Press the Power button on the remote control.
- Set the operating mode.
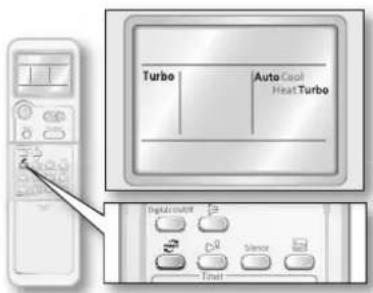
Press the Turbo button on the remote control until Turbo indicator appears on the remote control display.
The air conditioner operates in Turbo fan speed and automatically adjusts the temperature according to the current room temperature. The unit operates for 30 minutes and then operates in the last mode used, or in Auto mode if Dry/Fan mode is the most recent mode used.
text_image
Turbo Auto Canal Heat Turbo Digital Control ControlTurbo function is only available in Auto/Cool/Heat mode. If Turbo function is selected in Dry/Fan mode, operating mode changes to Auto.
To deactivate Turbo function
- Press the Turbo button on the remote control again.
The air conditioner operates in the last mode used, or in Auto mode if Dry/Fan mode is the most recent mode used.

- When using the remote control, make sure the indicator matches your selection on the remote control display.
- Temperature/Fan speed cannot be adjusted while using this function.
• Air flow can be adjusted manually. (See page 19 for instructions.) - When the Turbo function is activated, pressing Mode button will automatically cancel the function.
20_ using advanced functions
SETTING THE TIMER
This advanced Timer function allows you to turn on/off your air conditioner automatically even when you are away. Simply set the time and your air conditioner will turn on/off automatically.
On timer
This function allows you to turn on the air conditioner automatically within the time range of 24 hours. On timer is available while your air conditioner is on/off.
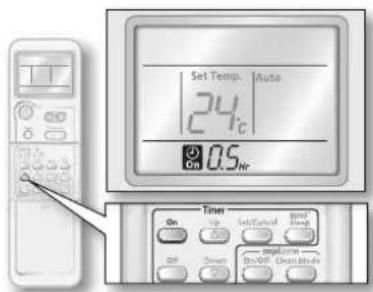
- Press the On button on the remote control.
On timer indicator blinks on the remote control display.
text_image
Set Temp. Auto 24°C 0.5 Np On Timer On Up Set/Control 8007 Amp Off Down 100000000000000000000000000000000000000000000000000000000000000000000- Set the time you want the air conditioner to turn on automatically.
Press the Up or Down button on the remote control to change the time setting while On timer indicator is blinking. You can set the time up to 24 hours, increasing by 30 minute intervals up to the first 3 hours and then hourly after the first 3 hours.
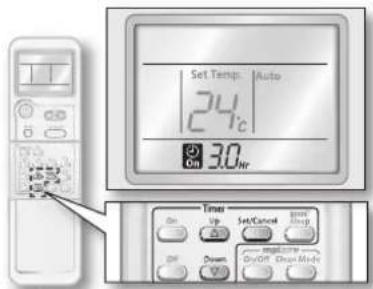
- Press the Set/Cancel button on the remote control to activate.
text_image
Set Temp. Auto 24°C On 30 Nv Timer Up Set/Control Group Up Draw On Off Chain BlockThe remote control display will show the hour(s) you have set.
The air conditioner will operate automatically at the set time and then the On timer indicator disappears. If the On timer is not set within 10 seconds, the air conditioner will end setting.
- Set the operating mode.
Press the Mode button on the remote control until the desired mode appears on the remote control display.
The air conditioner will operate in the mode you set.

text_image
Set Temp. 24°C On 30 hr AutoCoolDry FanHeat Mode Fan Speed
On timer function is available in Auto/Cool/Dry/Fan/Heat mode.

- Temperature can also be adjusted. (See step 3 on page 15 for instructions.)
- After the timer has been set and the unit is turned off, all indicators will turn off except the On timer indicator and the remaining time in approximately 10 seconds.
- Change the timer setting by pressing the ON button, pressing the Up/Down button to change the time, then press the Set/Cancel button to activate.
To deactivate the On timer
- Press the Set/Cancel button on the remote control.
The set time will cancel and the On timer indicator will disappear.
using advanced functions
SETTING TIMER
Off timer
This function allows you to turn off the air conditioner automatically within the time range of 24 hours. Off timer is functional while the unit is in operation.
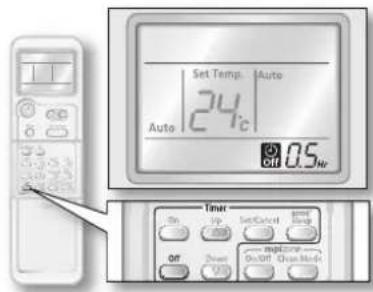
- Press the Off button on the remote control. Off timer indicator blinks on the remote control display.
text_image
Set Temp Auto 24°C Auto 0.5 Nc Timer On Off Set/Control On/OFF On/OFF On/OFF On/OFF On/OFF On/OFF On/OFF On/OFF On/OFF On/OFF On/OFF On/OFF On/OFF On/OFF On/OFF On/OFF On/OFF On/OFF On/OFF On/OFF On/OFF On/OFF On/OFF On/OFF On/OFF On/Off On/Off On/Off On/Off On/Off On/Off On/Off On/Off On/Off On/Off On/Off On/Off On/Off On/Off On/Off On/Off On/Off On/Off On/Off On/Off On/Off On/Off On/Off On/Off On/Off On/Oft On/Oft On/Oft On/Oft On/Oft On/Oft On/Oft On/Oft On/Oft On/Oft On/Oft On/Oft On/Oft On/Oft On/Oft On/Oft On/Oft On/Oft On/Oft On/Oft On/Oft On/Oft On/Oft On/Oft On/Oft On/Olt-
Set the time you want the air conditioner to turn off automatically. Press the Up or Down button on the remote control to change the time setting while the Off timer indicator is blinking. You can set the time up to 24 hours, increasing by 30 minute intervals up to the first 3 hours and then hourly after the first 3 hours.
-
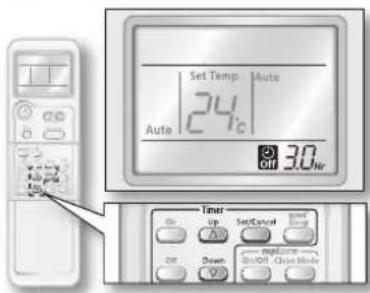
Press the Set/Cancel button on the remote control to activate.
text_image
Set Temp. Auto 24°C Auto 30V Timer SetCancel or Down insert Short Close ModeThe remote control display will show the hour(s) you have set. The air conditioner will operate automatically at the set time and then the Off timer indicator disappears. If the Off timer is not set within 10 seconds, the air conditioner will end setting.

- Change the timer setting by pressing the OFF button, pressing the Up/Down button to change the time, then press the Set/Cancel button to activate.
- You can combine the Off timer function with the On timer function to turn on and then off the air conditioner at the desired time. (See page 23 for instructions.)
To deactivate the Off timer
- Press the Set/Cancel button on the remote control. The set time will cancel and the OFF timer indicator will disappear.

Off timer function is available in Auto/Cool/Dry/Fan/Heat mode.
22_ using advanced functions
Combining On timer and Off timer
You can combine the On timer and Off timer together for more convenient use of the timer function.
- Set the On timer.
Press the On button.
Set the time for the unit to turn on with the Up and Down button.
Press the Set/Cancel button to activate the On timer.
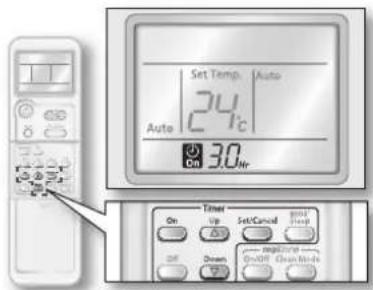
text_image
Set Temp. Auto 24°C 30.0m On Timer On Up Set/Cancel Reset Temp ON Down SELECTED ON/OFF Clean Mode
See page 21 for more detail instructions on setting the On timer.
- Set the Off timer.
Press the Off button.
Set the time for the unit to turn off with the Up and Down button.
Press Set/Cancel button to activate the Off timer.
When you set the time, there can be two possible options:
On timer is shorter than Off timer
The air conditioner will turn on and then off automatically. Set up should be done while the air conditioner is off.
Example: If the On timer is set at 3 hours and the Off timer at 5 hours, the air conditioner will turn on in 3 hours, then operate for the next two hours before turning off automatically.
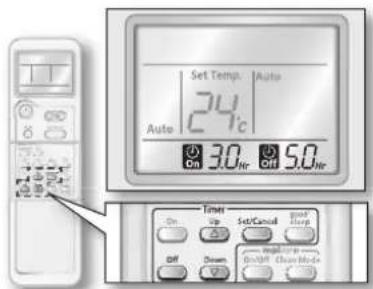
text_image
Set Temp. Auto 24°C Auto 30.00 50.00 On Up Set/Canal up/Up off Down Up/Off Churn ModeOn timer is longer than Off timer
The air conditioner will turn off and then on automatically. Set up should be done while the air conditioner is operating.
Example: If the On timer is set at 3 hours and the Off timer at 1 hour, the air conditioner will turn off in an hour, remain turned off for 2 hours then turn on automatically.
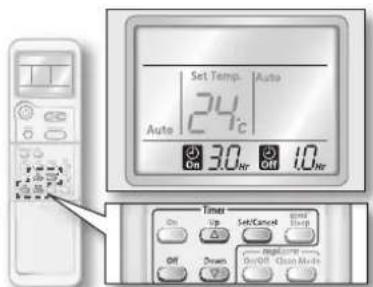
text_image
Set Temp. Auto 24°C Auto 3.0 hr Off 1.0 hr Timer On Up Set/Cancel on/Help OFF Drawn on/Help on/Cancel on/Help On/Help On/Cancel on/Help On/Help On/Cancel on/Help On/Help On/Cancel on/Help On/Help On/Cancel on/Help On/Help On/Cancel on/Help On/Help On/Cancel on/Help On/Help On/Cancel on/Help On/Help On/Cancel on/Help On/Help On/Cancel ON/Help On/Cancel on/Help On/Help On/Cancel on/Help On/Help On/Cancel on/Help On/Help On/Cancel on/Help On/Help On/Cancel on/Help On/Help On/Cancel on/Help On/Help On/Cancel on/Help On/Help On/Cancel on/Help On/Help ON/OFF/GN/H/N/OFF/GN/H/N/OFF/GN/H/N/OFF/GN/H/N/OFF/GN/H/N/OFF/GN/H/N/OFF/GN/H/N/OFF/GN/H/N/OFF/GN/H/N/OFF/GN/H/N/OFF/GN/H/N/OFF/GN/H/N/OFF/GN/H/N/OFF/GN/H/N/OFF/GN/H/N/OFF/GN/H/N/OFF/GN/H/N/OFF/Gn/H/N/OFF/Gn/H/N/OFF/Gn/H/N/OFF/Gn/H/N/OFF/Gn/H/N/OFF/Gn/H/N/OFF/Gn/H/N/OFF/Gn/H/N/OFF/Gn/H/N/OFF/Gn/H/N/OFF/Gn/H/N/OFF/Gn/H/N/OFF/Gn/H/N/OFF/Gn/H/N/OFF/Gn/H/N/OFF/Gn/H/N/OFF/Gn/H/N/Off/Gn/H/N/Off/Gn/H/N/Off/Gn/H/N/Off/Gn/H/N/Off/Gn/H/N/Off/Gn/H/N/Off/Gn/H/N/Off/Gn/H/N/Off/Gn/H/N/Off/Gn/H/N/Off/Gn/H/N/Off/Gn/H/N/Off/Gn/H/N/Off/Gn/H/N/Off/Gn/H/N/Off/Gn/H/N/Off/Gn/H/Mo/ On/ Up/ Set/Cancel/ on/ Help/ on/ Help/ on/ Help/ on/ Help/ on/ Help/ on/ Help/ on/ Help/ on/ Help/ on/ Help/ on/ Help/ on/ Help/ on/ Help/ on/ Help/ on/ Help/ on/ Help/ on/ Help/ on/ Help/ on/ Help/ on/ Help/ on/ Help/ on/ Help/ on/ Help/ on/ Help/ on/ Help/ on/ Help/ on/
See page 22 for more detailed instructions on setting the Off timer.
To deactivate the timer combination
- Press the Set/Cancel button on the remote control.
Both the On and Off timer will be canceled and the indicators will disappear.
using advanced functions
SETTING TIMER
good'sleep mode
good' sleep mode lets you sleep comfortably in ideal temperatures while saving energy.
good' sleep mode can be set up when the air conditioner is on.
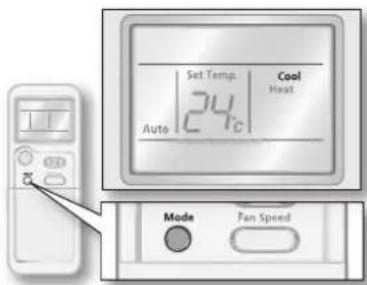
- Set operating mode.
Press the Mode button on the remote control until Cool/Heat appears on the remote control display.
text_image
Set Temp. Cool Heat 24°C Auto Mode Fan Speed
good' sleep is only available in Cool/Heat mode.
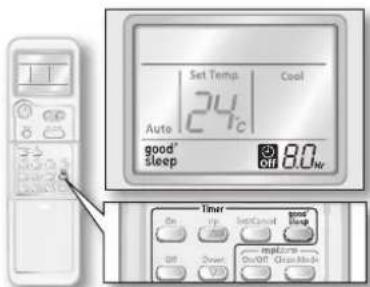
- Press the good sleep the remote control.
ingood's sleeppears and the Off timer indicator starts blinking on the remote control display.
text_image
Set Temp. Cool 24°C Auto good' sleep 8.0V OFF Timer On Up Init/Control good' Stop Off Down mplicator 6x101 Glass Mode- Set the length of time you want the air conditioner to stay on.
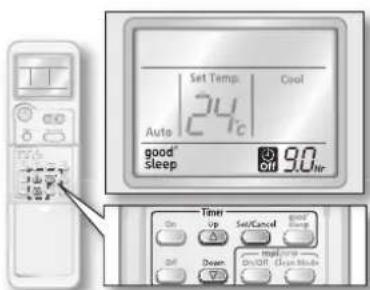
Default tigned's sleep to 8 hours. Press the Up or Down button on the remote control to change the time setting while the Off timer indicator is blinking.
You can set the time up to 12 hours, increasing by 30 minute intervals up to the first 3 hours and then hourly after the first 3 hours.
text_image
Set Temp Cool 24°C Auto good' Sleep 9.0 Off 9.0 No Up Set/Cancel good' Stop Down Up/Down 6x70F (Clean Mode)- Press the Set/Cancel button on the remote control to activate.
The remote control display will show the hour(s) you have set.
When the set time has elapsed, the air conditioner will automatically turn off and then good's sleep disappears.
If good/steep not set within 10 seconds, the air conditioner will end setting.

- Temperature/Fan speed/Air swing can be adjusted after setting good' sleep in Heat mode.
- Temperature can be adjusted and the air conditioner automatically adjusts the Fan speed/Air swing accordingly after setting good' sleep in Cool mode.
24\_ using advanced functions
Temperature changes in good sleep
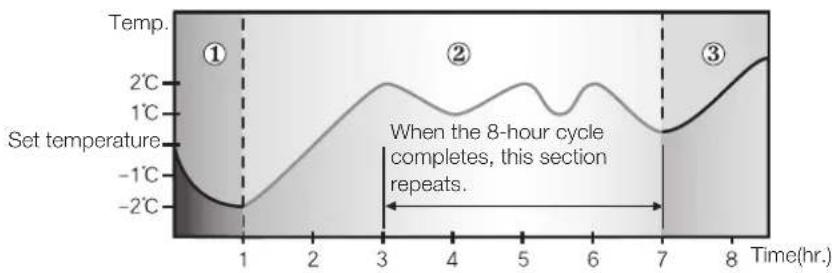
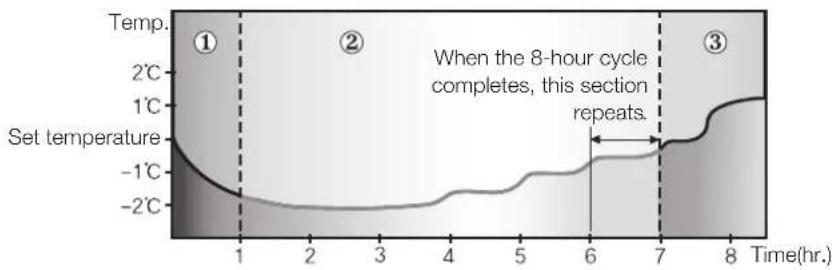
To prevent excessive cooling/heating during sleep, the good's sleep automatically modifies the temperature setting in accordance with the time setting. Temperature and air current change according to the three stages; Falling asleep, Sound sleep, and Waking up from good's sleep mode, and then the air conditioner will automatically turn off when the set time has elapsed.
Three stage good' sleep prevents you from having difficulty sleeping on extremely hot/cold nights.
① Falling asleep: Eases you into sleep by dropping the temperature.
② Sound sleep : Relaxes your body and raises your temperature slightly.
③ Waking up from gombleep
Allows you to wake up to comfortable crisp air making you feel refreshed and energized.

- Set the Off timer ingood'sleep more than 5 hours. Sleep may be disturbed if the good'sleep mode is set for too short or too long a time because the temperature changes are set to an 8-hour cycle.
- If the good sleep set for less than 4 hours, the operation will stop at the set time. If the good sleep set for over 5 hours, the last hour will run in Waking Up stage before shutting off.
- Recommended set temperature is between 25°C\~27°C for cooling and 21°C\~23°C for heating.
Cool mode
line
| Time(hr.) | Temperature (°C) | | --------- | ---------------- | | 1 | -2 | | 2 | -1 | | 3 | 1 | | 4 | 2 | | 5 | 1 | | 6 | 0 | | 7 | -1 | | 8 | 1 |Heat mode
line
| Time(hr.) | Temperature | | --------- | ----------- | | 0 | 2°C | | 1 | -1°C | | 2 | -2°C | | 3 | -2°C | | 4 | -2°C | | 5 | -1°C | | 6 | 0°C | | 7 | 1°C | | 8 | 2°C |To deactivate good sleep
- Press the Set/Cancel button on the remote control.
good's sleeps off and the indicator wibodis'sleep.
using advanced functions
USING THE mFUNCTION
MPI, Micro Plasma Ion, zone generates hydrogen (H) and oxygen (O2) to remove viruses and allergy-causing microbes in the air by neutralizing them and turning into water. Now, breathe as if surrounded by waterfalls, rivers, trees, and mountains. mpi zater on the unit will fade in and fade out continuously while the mpi zion is activated.
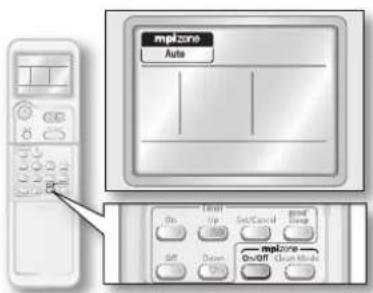
- Press the npi/Off button on the remote control while the air conditioner off. mpizone indicator will appear on the remote control display. The air conditioner generates MPI in Ampizone mode.
text_image
mpZone Auto Up Set/Control Go Up Set/Control Go/Off mpZone Go/Off Clean Mode- Set the operating type.
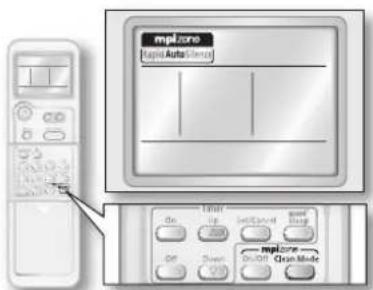
Each time you press the Clean Mode button while the air conditioner is off, the operating type will change in order of Auto, Silence and Rapid.
Auto : adjusts the fan speed automatically.
Silence : operates at minimum fan speed quietly.
Rapid : operate at maximum fan speed to clean and purify the air effectively and quickly.
text_image
mplzone Capital Auto/ServiceThe Clean Mode button will not work while the air conditioner is on.
When you activate the mpizone while the air conditioner is on, functiompizone automatically sets to Auto.
To deactivate mpioche
- Press the nopi/Off button on the remote control.
mopsis mets off and the blue light will turn off.
26_ using advanced functions
USING THE ENERGY SAVING FUNCTION
This function will set the temperature range limit to help you save energy while the air conditioner is operating in Cool mode.
- Press the Energy saving button on the remote control while the air conditioner is operating in Cool mode.
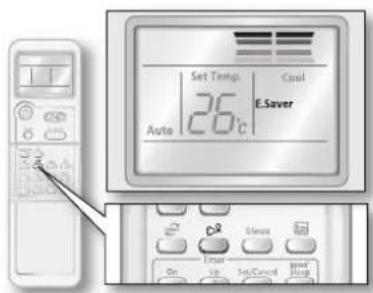
E. Saver indicator and air swing indicator appear automatically on the remote control display. The air flow blades move up and down.
If the current set temperature is lower than 26^ C, it will automatically raise the set temperature to 26^ C.
text_image
Set Temp. Canal 126°C E.Saver Auto
• Energy saving function is only available in Cool mode.
- When the Energy saving function is activated, the temperature range will be limited to 26°C\~30°C.
- If the desired temperature is lower than 26°C, turn off the energy saving function by pressing the Energy saving button again.
- Temperature/Fan speed can also be adjusted. (See step 3\~4 on page 15 for instructions.)
• Air flow can be adjusted manually. (See page 19 for instructions.)
To deactivate the Energy saving function
- Press the Energy saving button on the remote control.
The Energy saving function shuts off and the Energy saving indicator will disappear on the remote control display.
using advanced functions
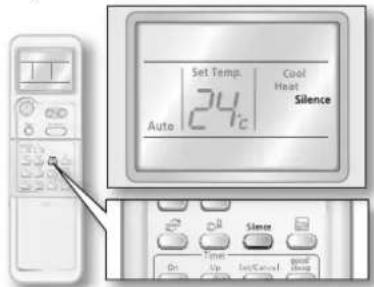
This function will help you operate your air conditioner quietly while operating in Cool/Heat mode.
- Press the Silence button on the remote control while the air conditioner is operating in Cool/Heat mode.
Silence indicator appears on the remote control display. The air conditioner will operate more quietly.
text_image
Set Temp. Cool Heat Silence 24°C Auto
- Silence function is only available in Cool/Heat mode.
- When the Silence function is activated, pressing Mode button will automatically cancel the function.
- When the Silence function is activated, temperature can be adjusted and the fan speed will automatically set to Auto.
To deactivate Silence function
- Press the Silence button on the remote control.
The Silence function shuts off and the Silence indicator will disappear on the remote control display.
USING THE EVAPORATOR CLEAN FUNCTION
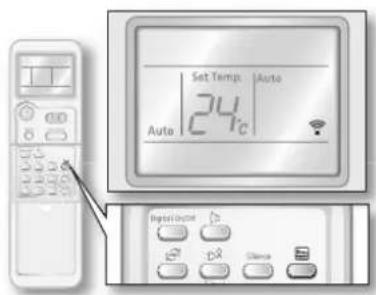
The evaporator clean function keeps moisture from accumulating inside the unit. This prevents mold growth and bacteria from spreading, keeping your family healthier.
- Press the Evap. CLEAN 📋 button.
▶ When the air conditioner is turned off,
The E indicator on the indoor unit display appears and the Auto cleaning function starts.
▶ When the air conditioner is turned on,
The ECD indicator on the indoor unit display appears and the Auto cleaning function starts after the air conditioner stops operation.
Evaporator Cleaning time can vary, depending on the previously used mode.
Auto(cool), Cool, Dry mode : approximately 30 minutes.
Auto(heat), Heat, Fan mode : approximately 15 minutes.

The Evaporator Clean function only operates after the air conditioner stops running.
text_image
Set Temp Auto 24°C Auto Digital P D C Dmax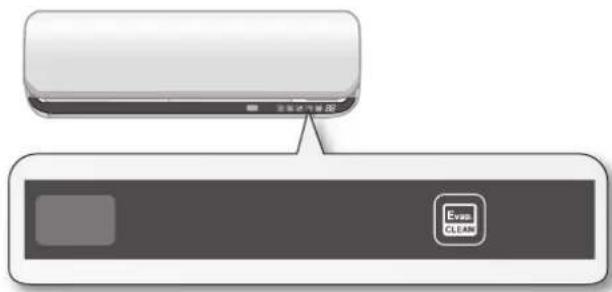
text_image
Everb CLEAM28_ using advanced functions
cleaning and maintaining the air conditioner
CLEANING THE EXTERIOR
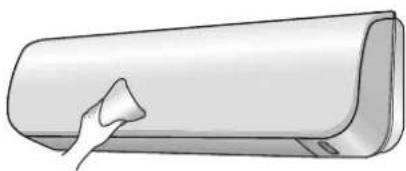
- Wipe the surface of the unit with a slightly wet or dry cloth when needed.
natural_image
Illustration of a hand cleaning a large cylindrical object (no text or symbols)
Do not use Benzene, Thinner or Clorox™. They may damage the surface of the air cleaner and can create a risk of fire.
CLEANING THE FILTER
When cleaning the filter, make sure to unplug the power from the unit. No special tools are needed to clean it.
Air filter
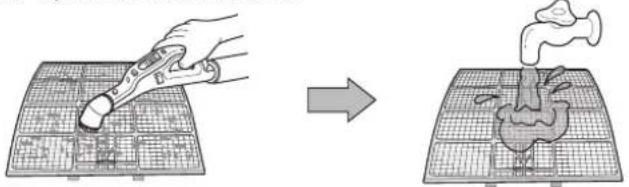
This air filter captures large particles in the air. The filter can be cleaned with a vacuum or by hand.
- Remove the front panel.
Grab the grooved side of the front panel tightly and pull the bottom side of the panel upwards to remove the front panel.
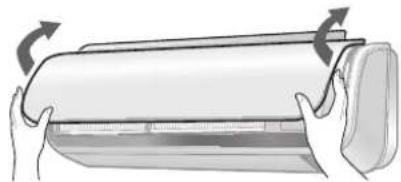
natural_image
Illustration of hands holding a cylindrical object with arrows indicating rotation (no text or symbols)- Grab the handle. Then, pull the Air filter towards you and slide it down.
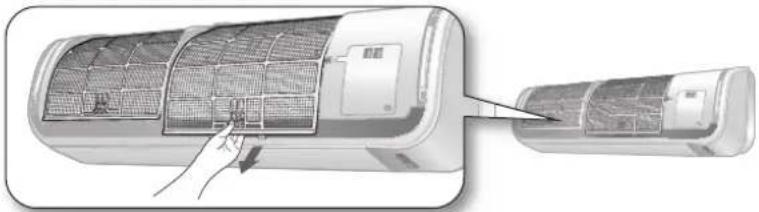
natural_image
Diagram of a car air conditioner unit being placed into a fan, showing internal grid and ventilation slots (no text or symbols)- Clean the Air filter with a vacuum cleaner or soft brush. If dust is too heavy, then rinse it with running water and dry it in a ventilated area.
natural_image
Diagram showing a hand using a pipette to clean or store items on a grid, and a close-up of a food item being placed on a tray (no text or symbols present)
- For best conditions, repeat every two weeks.
-
If the Air filter dries in a confined (or humid) area, odors may generate. If this occurs, re-clean and dry it in a well-ventilated area.
-
Insert the Air filter back into its original position.
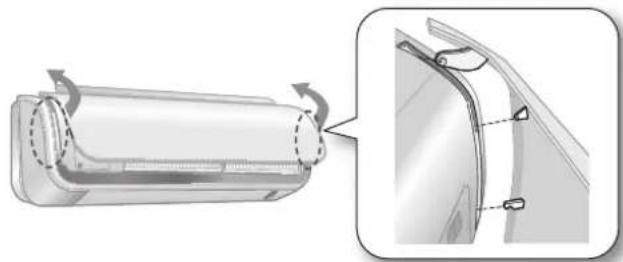
- Reattach the front panel.
Insert the hooks located on the top of the panel into the correct slots then push in the bottom part of the panel.
cleaning and maintaining
cleaning and maintaining the air conditioner
CLEANING THE FILTER
DNA filter
Using the structure of DNA, the DNA filter is a new technology that screens selectively only toxic agents. This enables a smarter air management.
- Remove the front panel.
Grab the grooved side of the front panel tightly and pull the bottom side of the panel upwards to remove the front panel.
natural_image
Diagram showing a cylindrical device with internal components and a close-up view of its edge detail (no text or symbols)- Remove the Air filter.
Grab the handle and lift it up. Then, pull the Air filter towards you and slide it down.
- Slide the DNA filter out to remove it from the slot.
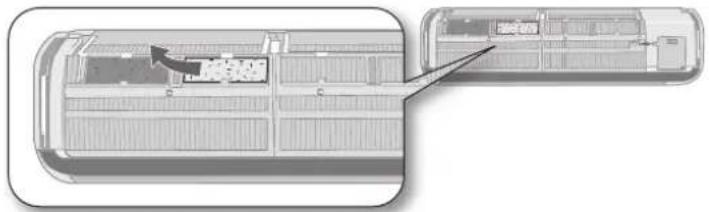
natural_image
Top-down schematic of a vehicle showing internal components and structural layout (no text or symbols)
The DNA filter can be placed in any of the 4 slots beneath the air filter.
- Clean the DNA filter with a vacuum cleaner or soft brush.
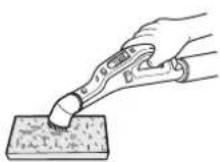
-
Install the DNA filter back in position.
-
Reattach the front panel.
Insert the hooks located on the top of the panel into the correct slots then push in the bottom part of the panel.

Clean the DNA filter every 3 months. The cleaning term may differ depending on usage and environmental conditions.
The expected life span of the DNA filter is 3 years.
30_ cleaning and maintaining
REPLACING THE FILTER
Replacement filters may be purchased from the retail store or ordered from the dealer where you purchased the unit. If you cannot find one, please call a contact center.
Deodorizing filter
The deodorizing filter efficiently absorbs cigarette smoke, pet odors and other unpleasant smells. Cleaning is simple, just remove the old filter and install a new one.
- Remove the front panel.
Grab the grooved side of the front panel tightly and pull the bottom side of the panel upwards to remove the front panel.
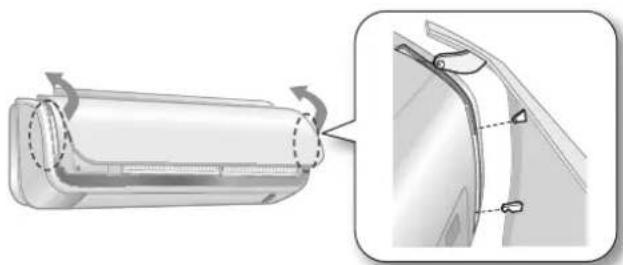
natural_image
Technical illustration of a cylindrical component with internal flow arrows and a close-up view of the edge detail (no text or symbols)- Remove the Air filter.
Grab the handle and lift it up. Then, pull the Air filter towards you and slide it down.
- Slide the Deodorizing filter out to remove it from the slot.
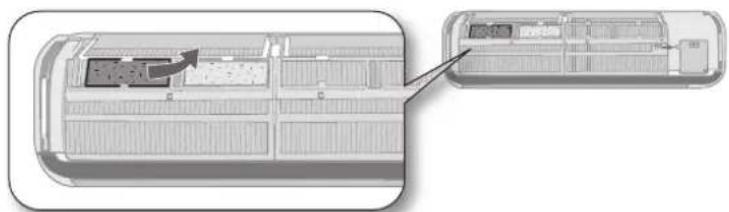
natural_image
Top-down schematic of a vehicle showing internal compartments and storage areas, with no visible text or symbols.
The Deodorizing filter can be placed in any of the 4 slots beneath the air filter.
-
Install the new Deodorizing filter back into position.
-
Reattach the front panel.
Insert the hooks located on the top of the panel into the correct slots then push in the bottom part of the panel.
- The replacement of the Deodorizing filter differs depending on usage and environmental conditions.
- Even if Deodorizing and DNA filters are installed in an inverted position, it will not affect its filtration system.
MAINTAINING YOUR AIR CONDITIONER
If the air conditioner will not be used for an extended period of time, dry the air conditioner to maintain its best condition.
-
Dry the air conditioner thoroughly by operating in Fan mode for 3 to 4 hours and disconnect the power plug. There may be internal damage if moisture is left in its components.
-
Before using the air conditioner again, dry the inner components of the air conditioner again by running in Fan mode for 3 to 4 hours. This helps remove odors which may have generated from dampness.
appendix
TROUBLESHOOTING
Refer to the following chart if the air conditioner operates abnormally. This may save time and unnecessary expenses.
| PROBLEM SOLUTION | |
| The air conditioner does not operate immediately after it has been restarted. | Because of the protective mechanism, the appliance does not start operating immediately to keep the unit from overloading.The air conditioner will start in 3 minutes. |
| The air conditioner does not work at all. | Check that the power plug is properly connected. Insert the power plug into the wall socket correctly.Check if the circuit breaker is switched off.Check if there is a power failure.Check your fuse. Make sure it is not blown out. |
| The temperature does not change. | Check if you selected Fan mode.Press the Mode button on the remote control to select another mode. |
| The cool(warm) air does not come out of the air conditioner. | Check if the set temperature is higher (lower) than the current temperature. Press the Temperature button on the remote control to change the set temperature. Press the Temperature ▼ or ▲ button to decrease or increase the temperature.Check if the air filter is blocked by dirt. Clean the Air filter every two weeks.Check if the air conditioner has just been turned on. If so, wait 3 minutes. |
| The fan speed does not change. | Check if you selected Auto or Dry mode.The air conditioner automatically adjusts the fan speed to Auto in Auto/Dry mode. |
| Timer function does not set. | Check if you pressed the Set/Cancel button on the remote control after you have set the time. |
| Odors permeate in the room during operation. | Check if the appliance is running in a smoky area or if there is a smell entering from outside. Operate the air conditioner in Fan mode or open the windows to air out the room. |
| The air conditioner makes a bubbling sound. | A bubbling sound may be heard when the refrigerant is circulating through the compressor. Let the air conditioner operate in a selected mode. |
| Water is dripping from the air flow blades. | Check if the air conditioner has been cooling for an extended period of time with the air flow blades pointed downwards. Condensation may generate due to the difference in temperature. |
| Remote control is not working. | Check if your batteries are depleted.Make sure batteries are correctly installed.Make sure nothing is blocking your remote control sensor.Check that there are no strong lighting apparatuses near the air conditioner. Strong light which comes from fluorescent bulbs or neon signs may interrupt the electric waves. |
| SYMPTOMS CHECK ERROR MODE (DISPLAYED) MANAGEMENT | ||
| The abnormal signal is displayed | Some signal is displayed on the windowLED like F101, F121, C122, E159, E162 , F183, IEC0K, , , , , F221, E231, E251 F418, F458, F415, F4162, E4164, E4165, E4167 F460, F459, F411, E412, E559, E556 | This product has something wrong, please call the nearest contact center. |
32\_ appendix
OPERATION RANGES
The table below indicates the temperature and humidity ranges the air conditioner can be operated within. Refer to the table for efficient use.
| MODE OPERATING CONDITIONS IF OUT OF CONDITIONS | ||
| COOL | Indoor temp: 16°C~32°C - A safety | - Device will stop continuously the system functioning;- Condensation may occur on the indoor unit with risk to have either water blow off or drops on the floor; |
| Indoor humidity: below 80% | ||
| Outdoor temp: -10°C~43°C | ||
| HEAT | Indoor temp: below 27°C | - A safety device will stop continuously the system functioning; |
| Outdoor temp: -15°C~24°C | ||
| DRY | Indoor temp: 16°C~32°C - A safety | - Device will stop continuously the system functioning;- Condensation may occur on the indoor unit with risk to have either water blow off or drops on the floor; |
| Indoor humidity: below 80% | ||
| Outdoor temp: -10°C~43°C | ||
| POWER SUPPLY | Single phase rated voltage minimum and maximum limit | 220V-240V~50Hz198V min.-264V max. |

Any damage occurs out of condition specified cannot be covered by product warranty. If the system works continuously outside of conditions, its performance and reliability will be compromised.
SAMSUNG
QUESTIONS OR COMMENTS?
| COUNTRY CALL OR VISIT US ONLINE AT | ||
| BELGIUM | 0032 (0)2 201 24 18 www.samsung.com/be | |
| CZECH REPUBLIC | 844 000 844 www.samsung.com/cz | |
| DENMARK | 70 70 19 70 www.samsung.com/dk | |
| FINLAND | 030-6227 515 www.samsung.com/fi | |
| FRANCE | 3260 SAMSUNG(726-7864)08 25 08 65 65(€ 0,15/Min) | www.samsung.com/fr |
| GERMANY | 01805-121213(€ 0,14/Min) www.samsung.de | |
| HUNGARY | 06-80-SAMSUNG(726-7864) www.samsung.com/hu | |
| ITALIA | 800-SAMSUNG(726-7864) www.samsung.com/it | |
| LUXEMBURG | 0035 (0)2 261 03 710 www.samsung.com/be | |
| NETHERLANDS | 0900 20 200 88(€ 0,10/Min) www.samsung.com/nl | |
| NORWAY | 815-56 480 www.samsung.com/no | |
| POLAND | 0 801 801 881022-607-93-33 | www.samsung.com/pl |
| PORTUGAL | 80 8 200 128 www.samsung.com/pt | |
| SLOVAKIA | 0800-SAMSUNG(726-7864) www.samsung.com/sk | |
| SPAIN | 902 10 11 30 | www.samsung.com/cs |
| SWEDEN | 0771-400 200 | www.samsung.com/se |
| U.K | 0870-SAMSUNG(726-7864) www.samsung.com/uk | |
| REPUBLIC OF IRELAND | 0818 717 100 | www.samsung.com/ie |
| AUSTRIA | 0800-SAMSUNG(726-7864) | www.samsung.com/at |
| SWITZERLAND | 0800-SAMSUNG(726-7864) | www.samsung.com/ch |
E S F I P D G DB98-28606A(1)