
RS21JCSV - Fridge SAMSUNG - Free user manual and instructions
Find the device manual for free RS21JCSV SAMSUNG in PDF.


User questions about RS21JCSV SAMSUNG
0 question about this device. Answer the ones you know or ask your own.
Ask a new question about this device
Download the instructions for your Fridge in PDF format for free! Find your manual RS21JCSV - SAMSUNG and take your electronic device back in hand. On this page are published all the documents necessary for the use of your device. RS21JCSV by SAMSUNG.
USER MANUAL RS21JCSV SAMSUNG
OWNER'S MANUAL AND INSTALLATION
CONTENTS
SAFETY WARNING....2
OPERATING INSTRUCTIONS
SETTING UP THE REFRIGERATOR ....4
MAJOR FEATURES....4
CONTROL PANEL 5
DIGITAL PANEL 7
TEMPERATURE CONTROL 8
ICE AND COLD WATER DISPENSER 8
USING THE WATER DISPENSER(optional)....9
SHELVES AND BINS 11
FOOD STORAGE GUIDE ....12
CoolSelect Zone™Drawer GUIDE....14
REMOVING FREEZER ACCESSORIES....16
REMOVING REFRIGERATOR ACCESSORIES....16
BEVERAGE STATION™(optional) 16
CLEANING ACCESSORIES....17
CHANGING THE INTERIOR LIGHT....18
WATER FILTER....19
DOORS....19
INSTALLATION INSTRUCTIONS
INSTALLATION OF THE REFRIGERATOR ....20
REMOVING THE FRONT LEG COVER ....21
REMOVING THE REFRIGERATOR DOORS 22
REATTACHING THE REFRIGERATOR DOORS....24
ADJUSTING THE CLEARANCE BETWEEN THE DOORS......27
CHECKING THE WATER DISPENSER LINE 29
INSTALLAING THE WATER DISPENSER LINE....30
TROUBLESHOOTING....35
SAFETY WARNINGS
- Before operating the appliance, please read this manual thoroughly and retain it for your reference.
- Because these following operating instructions cover various models, the characteristics of your refrigerator may differ slightly from those described in this manual
- The appliance is not intended for use by children or infirm persons without adult supervision.
- Children should be supervised to ensure that they do not play with the appliance.
- R600a or R134a is used as a refrigerant. Check the compressor label on the rear of the appliance and the rating label inside the fridge to see which refrigerant is used for your refrigerator.
- The refrigerator only use ice makers which made by samsung Electronics for the refrigerator.
- The incorporated ice-makers are to be installed only by the manufacture or its service agent.
CAUTION/WARNING SYMBOLS USED OTHER SYMBOLS USED
 WARNING WARNING | Indicates that a danger of death or serious injury exists. | Represents something you must NOT | |
| Represents something you must NOT disassemble. | |||
| Represents something you must NOT touch. | |||
 CAUTION CAUTION | Indicates that a risk of personal injury or material damage exists. | Represents something you must follow. | |
| Indicates that you must disconnect the power plug from the socket. | |||
| Represents a ground is needed to prevent electric shock. |

WARNINGS

Do not plug several appliances into the same multiple power board.
• This could cause overheating and the risk of fire.
Make sure that the power plug is not squashed or dam-aged by the back of the refrigerator.
- A damaged power plug may overheat and cause fire.
Do not bend the power cord excessively or placeheavey articles on it.
- This constitutes a fire hazard. If the power cord is damaged, have it replaced immediately by the manufacturer or its service agent.
Do not directly spray water inside or outside the refrigerator. - There is a risk of fire or electric shock.
Do not spray inflamable gas near the refrigerator.
• There is a risk of explosion or fire.
Do not insert the power plug with wet hands. - You may receive an electric shock.
Do not put a container filled with water on the refrigerator. - If spilled, there is a risk of fire or electric shock.
Do not install the refrigerator in a damp place or a place where it may come in contact with water. - Deteriorated insulation of electrical parts may cause an electric shock or fire.
Do not store volatile or flammable substances in the refrigerator. - The storage of benzene, thinner, alcohol, ether, LP gas and other such products may cause explosions.

Do not disassemble or repair the refrigerator by yourself.
- You run the risk of causing a fire, malfunctions and/or personal injury.

Pull the power plug out of the socket before changing the interior light of the refrigerator.
- Otherwise, there is a risk of electric shock.

If you wish to dispose of the refrigerator / freezer throw it away after first removing the doors and seals.
- Do so in a way, that is not possible for a child to remain trapped inside.

The refrigerator must be grounded.
- You must ground the refrigerator to prevent any power leak ages or electric shocks caused by current leakage from the refrigerator.

Never use gas pipes, telephone lines or other potential lightening rods as ground.
- Improper use of the ground plug can result in electric shock.

WARNING
- Keep ventilation openings in the appliance enclosure or mounting structure clear of obstruction.
- Do not use mechanical devices or any other means to accelerate the defrosting process, other than those recommended by the manufacturer.
- Do not damage the refrigerant circuit.
- Do not use electrical appliances inside the refrigerator/freezer, unless they are of a type recommended by the manufacturer.

CAUTIONS

Do not overfill the refrigerator with food.
- When you open the door, an item may fall out and cause personal injury or material damage.
Do not put bottles or glass containers in the freezer.
- When the contents freeze, the glass may break and cause personal injury.
If the wall socket is loose, do not insert the power plug.
• There is a risk of electric shock or fire.

Do not disconnect the power cord by pulling on it.
- Damage to the cord may cause a short-circuit, fire and/or electric shock.
- If the power cord is damaged, it must be replaced by the manufacturer, a certified service agent or qualified service personnel.
Do not store articles on the top of the appliance.
- When you open or close the door, the articles may fall and cause personal injury and/or material damage.
Do not store pharmaceuticals products, scientific materials or temperature-sensitive products in the refrigerator.
- Products that require strict temperature controls must not be stored in the refrigerator.
Do not let children hang on the door. If not, a serious injury may occur.
If you smell pharmaceutical or smoke, pull out the power plug immediately and contact your SAM-SUNG Electronics service center.
Do not touch the inside walls of the freezer or products stored in the freezer with wet hands.
• This may cause frostbite.

Do not insert your hands into the bottom area under the appliance.
- Any sharp edges may cause personal injury.
Never put fingers or other objects into the dispenser hole and ice chute. It may cause personal injury or material damage
Either R600a or R134a are the refrigerants used. Check the compressor label on the rear of the appliance and the rating label inside the fridge to see which refrigerant is used for your refrigerator.

CAUTIONS
The refrigerant used in the refrigerator/freezer and the gases in the insulation material require special disposal procedures. Ensure that none of the pipes on the back of the appliance are damaged prior to disposal.
natural_image
Diagram of a refrigerator interior showing front and side views with no text or symbols
Do not use a wet or damp cloth when cleaning the plug. Remove any foreign matter or dust from the power plug pins.
- Otherwise there is a risk of fire.
- If the refrigerator is disconnected from the power supply, you should wait for at least five minutes before plugging it back.

If the refrigerator is not to be used for a long period of time, pull out the power plug.
• Deterioration in the insulation may cause fire.

The appliance is not intended for use by young children or infirm persons without supervision. Young children should be supervised to ensure
that they do not play with the appliance.

Do not place the equipment directly under the sunlight.
The appliance must be positioned so that the plug is accessible after installation
If the power cord is damaged it must be replaced
by manufacturer, a certified service agent or qualified service personnel.

This appliance contains a small amount of isobutane refrigerant (R600a), a natural gas with high environmental compatibility that is, however, also combustible. When transport-
ing and installing the appliance, care should be taken to ensure that no parts of the refrigerating circuit are damaged.
Refrigerant squirting out of the pipes could ignite or cause an eye injury. If a leak is detected, avoid any naked flames or potential sources of ignition and air the room in which the appliance is standing for several minutes.
- In order to avoid the creation of a flammable gas-air mixture if a leak in the refrigerating circuit occurs, the size of the room in which the appliance may be sited depends on the amount of refrigerant used.
The room must be 1m ^3 in size for every 8 g of R600a refrigerant inside the appliance. The amount of refrigerant in your particular appliance is shown on the identification plate inside the appliance.
- Never start up an appliance showing any signs of damage. If in doubt, consult your dealer.
SETTING UP THE REFRIGERATOR
Once you have performed the following steps, your refrigerator should be fully operational. If not, check the power supply and electricity source. If you have any questions, contact your SAMSUNG service center.

Place the refrigerator in an appropriate location with reasonable clearance between the wall and the refrigerator. (refer to installation instructions in this mannal)
Set the temperature control to the coldest temperature and wait for an hour. The freezer should get slightly chilled and the motor should run smoothly.
When the refrigerator is plugged in, the interior light should come on when you open the doors.
Once the refrigerator temperature is sufficiently low, you can store food in the refrigerator. After starting the refrigerator, it takes a few hours to reach the appropriate temperature.
MAJOR FEATURES
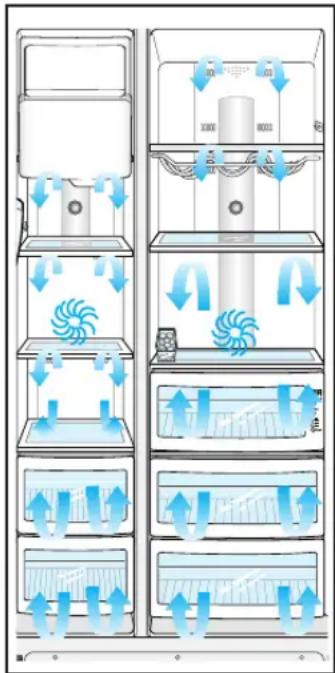
Twin Cooling System
- The refrigerator and the freezer have two evaporators. Given this independent system, the freezer and the refrigerator are cooled individually as required and are, therefore, more efficient. Food odor from the refrigerator does not affect food in the freezer due to separate of air flow circulation.
Multi-Flow System
- Cool air circulates through multiple vents on every shelf level. This provides even distribution of cooling inside cabinets to keep your food fresh longer.
Door Alarm
- A beeper reminds you if the door is left open.
High humidity for fresher food
- You can keep food, fruit and vegetables fresh for longer because your refrigerator supplies highly humidified cold air. This can be up to four or five times more effective than a normal refrigerator.
Energy-saving fridge/freezer
- Power consumption is kept to a minimum by distributing cool air separately to the refrigerator and freezer.
Faster cooling times
- The power freeze function allows you to freeze food more quickly.
Abundant supply of ice and cold water
- The ice and water dispenser provides ice and cold water at any time.
Beverage Station (optional)
- You do not have to open the main door to access frequently used food in the extra refrigerating compartment. This saves time and money.
Deodorizer (optional)
- Reusable deodorizer keeps the refrigerator air fresh and odor free.
CoolSelect
Zone™Drawer (optional)
- User can select Quick Cool, Thaw and Select buttons for quickly chill, thaw and cools items. Select Soft Freeze, Cool or Chill to control the temperature of drawer.
text_image
Diagram illustrating airflow patterns in a multi-level appliance or ventilation system with labeled components and directional arrows.
This operation instruction covers various models.
The characteristics of your appliance may differ slightly from those described in this manual.
CONTROL PANEL
flowchart
graph TD
    A["Basic Model"] --> B["Twin cooling"]
    B --> C["Dispenser Model"]
    C --> D["Water"]
    D --> E["Freezer Temp. Button"]
    D --> F["FRIDGE Temp. Button"]
    D --> G["Power FREEZE BUTTON"]
    D --> H["ICE TYPE BUTTON"]
    D --> I["Power COOL BUTTON"]

    B --> J["Power Freeze"]
    B --> K["Freeze Temp."]
    B --> L["Power Freeze"]
    B --> M["Freeze Temp."]
    B --> N["Deodorizer"]
    B --> O["Drainer"]
    B --> P["Power Cool"]
    B --> Q["Fridge Temp."]

    C --> R["Ice Type"]
    C --> S["Ice"]
    C --> T["Ice"]
    C --> U["Ice Type"]
    C --> V["Ice"]
    C --> W["Ice"]
    C --> X["Ice"]

    D --> Y["Power Freeze"]
    D --> Z["Freeze Temp."]
    D --> AA["Ice Type"]
    D --> AB["Ice"]

    E --> AC["Power Freeze"]
    E --> AD["Freeze Temp."]
    E --> AE["Ice Type"]
    E --> AF["Ice"]

    F --> AG["Power Freeze"]
    F --> AH["Freeze Temp."]
    F --> AI["Ice Type"]
    F --> AJ["Ice"]

    G --> AK["Power Freeze"]
    G --> AL["Freeze Temp."]
    G --> AM["Ice Type"]
    G --> AN["Ice"]

    H --> AO["Power Freeze"]
    H --> AP["Freeze Temp."]
    H --> AQ["Ice Type"]
    H --> AR["Ice"]

    I --> AS["Power Freeze"]
    I --> AT["Freeze Temp."]
    I --> AU["Ice Type"]
    I --> AV["Ice"]

    J --> AW["Power Freeze"]
    J --> AX["Freeze Temp."]
    J --> AY["Ice Type"]
    J --> AZ["Ice"]

    K --> BA["Power Freeze"]
    K --> BB["Freeze Temp."]
    K --> BC["Ice Type"]
    K --> BD["Ice"]

    L --> BE["Power Freeze"]
    L --> BF["Freeze Temp."]
    L --> BG["Ice Type"]
    L --> BH["Ice"]

    M --> BI["Power Freeze"]
    M --> BJ["Freeze Temp."]
    M --> BK["Ice Type"]
    M --> BL["Ice"]

    N --> BM["Power Freeze"]
    N --> BN["Freeze Temp."]
    N --> BO["Ice Type"]
    N --> BP["Ice"]

    O --> BQ["Power Freeze"]
    O --> BR["Freeze Temp."]
    O --> BS["Ice Type"]
    O --> BT["Ice"]

    P --> BU["Power Freeze"]
    P --> BV["Freeze Temp."]
    P --> BW["Ice Type"]
    P --> BX["Ice"]

    Q --> BY["Power Freeze"]
    Q --> BZ["Freeze Temp."]
    Q --> CA["Ice Type"]
    Q --> CB["Ice"]

    R --> CC["Power Freeze"]
    R --> CD["Freeze Temp."]
    R --> CE["Ice Type"]
    R --> CF["Ice"]

    S --> CG["Power Freeze"]
    S --> CH["Freeze Temp."]
    S --> CI["Ice Type"]
    S --> CJ["Ice"]

    T --> CK["Power Freeze"]
    T --> CL["Freeze Temp."]
    T --> CM["Ice Type"]
    T --> CN["Ice"]

    U --> CO["Power Freeze"]
    U --> CP["Freeze Temp."]
    U --> CQ["Ice Type"]

    V --> CR["Power Freeze"]
    V --> CS["Freeze Temp."]
    V --> CT["Ice Type"]

    W --> CU["Power Freeze"]
    W --> CV["Freeze Temp."]
    W --> CW["Ice Type"]

    X --> CX["Power Freeze"]
    X --> CY["Freeze Temp."]
    X --> CZ["Ice Type"]

    Y --> DA["Power Freeze"]
    Y --> DB["Freeze Temp."]
    Y --> DC["Ice Type"]

    Z --> DE["Power Freeze"]
    Z --> DF["Freeze Temp."]
    Z --> DG["Ice Type"]

    AA --> DH["Power Freeze"]
    AA --> DI["Freeze Temp."]
    AA --> DJ["Ice Type"]

    AC & AD & AE & AF & AG & AH & AI & BJ & BK & BL & BM & BN & BO & BP & BPB & BQ & BW & BWB & BWC & BWD & BWE & BWF & BWG & BWH & BWI & BWJ & BWK & BWL & BWM & BWN & BWO & BWP & BWQ & BW R & BW S & BW T & BW U & BW V & BW W & BW X & BW Y & BW Z & BW W & BW X & BW Y & BW Z & BW W & BW X & BW Y & BW Z & BW W & BW X & BW Y & BW Z & BW W & BW X & BW Y & BW Z & BW W & BW X & BW Y & BW Z & BW W & BW X & BW Y & BW Z & BW W & BW X & BW Y & BW Z & BW W & BW X & BW Y & BW Z & BW W
CHILD LOCK BUTTON
When the child lock button is pressed for 3 seconds, the child lock indicator is on with an audible tone. When it is locked, all keys can not be modified except the ice type button, and all lamps turn off except the ice type lamp and child lock indication lamp. This function will prevent accidental setting that may be caused by children or pets. To unlock the setting functions, press this button for 3 seconds again.
Also, this button has another function. When this button is pressed for 3 seconds (lock indication lamp turn on), the heater for sweat control is off at a same time. If sweat is appeared around the cover dispenser or beverage station with this function, press this button for 3 seconds again. then, the light will turn off and the sweat control function will be performed. and all keys will be unlocked at a same time.
CONTROL PANEL
text_image
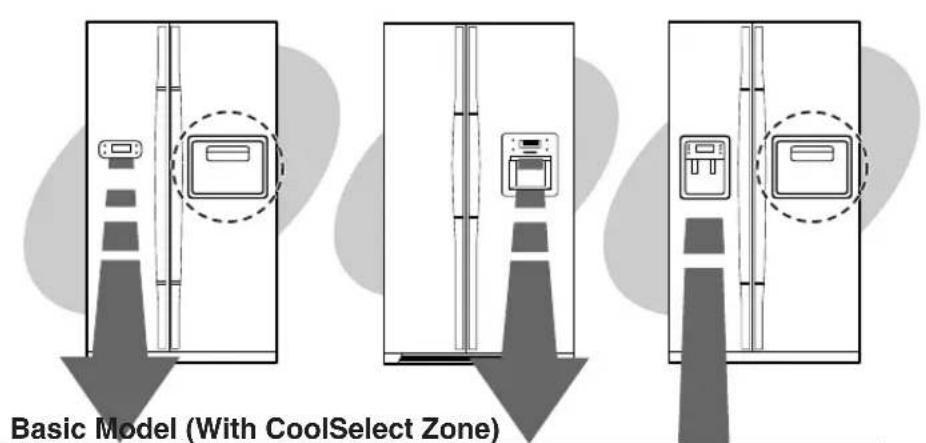
Basic Model (With CoolSelect Zone)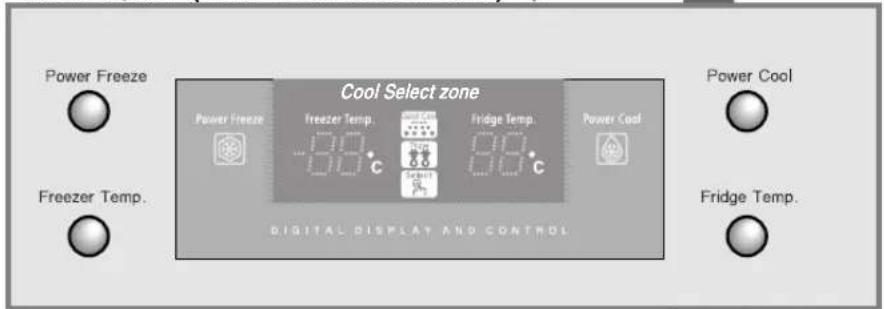
text_image
Power Freeze Freezer Temp. Cool Select zone Power Freeze Freezer Temp. Fridge Temp. Fridge Temp. Digital Display and Control Power Cool Power Cool Fridge Temp.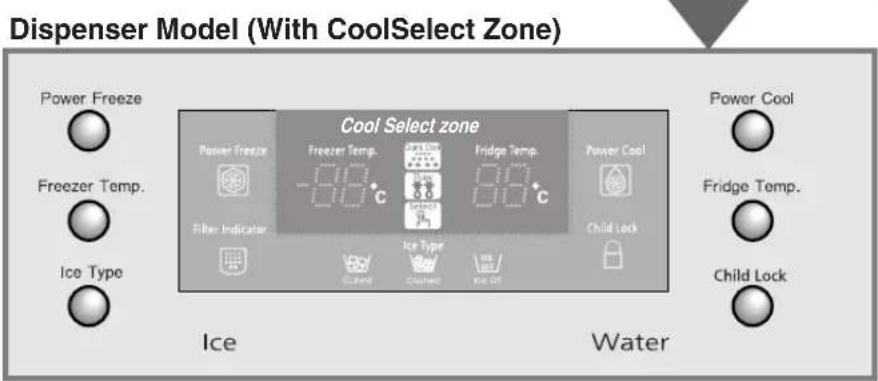
text_image
Dispenser Model (With CoolSelect Zone) Power Freeze Freezer Temp. Ice Type Cool Select zone Power Freeze Freezer Temp. Fridge Temp. Fridge Temp. Fridge Temp. Fridge Temp. Fridge Temp. Fridge Temp. Fridge Temp. Fridge Temp. Fridge Temp. Fridge Temp. Fridge Temp. Fridge Temp. Fridge Temp. Fridge Temp. Fridge Temp. Fridge Temp. Fridge Temp. Fridge Temp. Fridge Temp. Fridge Temp. Fridge Temp. Fridge Temp. Fridge Temp. Fridge Temp. Fridge Temp. Fridge Temp. Fridge Temp. Fridge Temp. Fridge Temp. Fridge Temp. Fridge Temp. Fridge Temp. Fridge Temp. Fridge Temp. Fridge Temp. Fridge Temp. Fridge Temp. Fridge Temp. Fridge Temp. Fridge Temp. Fridge Temp. Fridge Temp. Fridge Temp. Fridge Temp. Fridge Temp. Fridg Fridg Fridg Fridg Fridg Fridg Fridg Fridg Fridg Fridg Fridg Fridg Fridg Fridg Fridg Fridg Water Ice WaterDIGITAL PANEL
text_image
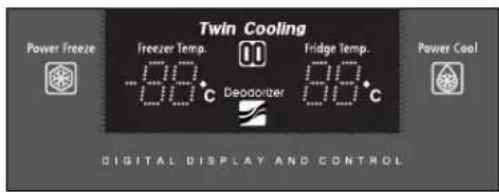
Twin Cooling Power Freeze Freezer Temp. -00°C Deodorizer Fridge Temp. 80°C Power Cool DIGITAL DISPLAY AND CONTROL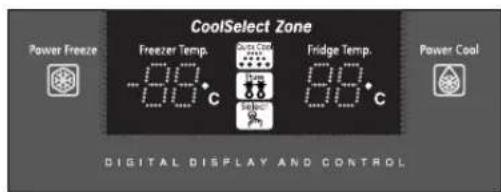
text_image
CoolSelect Zone Power Freeze Freezer Temp. -80°C Fridge Temp. 90°C Power Cool DIGITAL DISPLAY AND CONTROL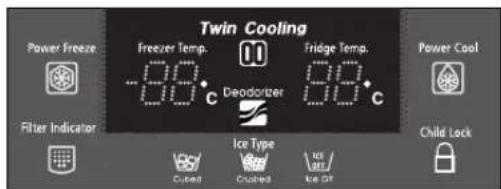
text_image
Twin Cooling Power Freeze Freezer Temp. Fridge Temp. Filter Indicator Deodorizer Ice Type Child Lock Cuffed Cuffed Ice Off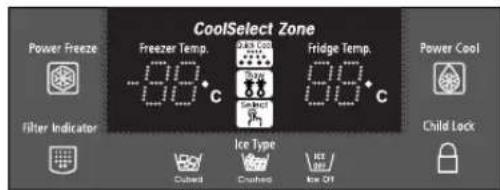
text_image
CoolSelect Zone Power Freeze Freezer Temp. Fridge Temp. Power Cool Filter Indicator C C C Child Lock Ice Type Crushed Crushed Ice OffFreezer Temp. indicates the current freezer temperature.
Fridge Temp. indicates the current refrigerator temperature.
Quick Cool, Thaw, and Select show the status of the CoolSelect Zone™Drawer
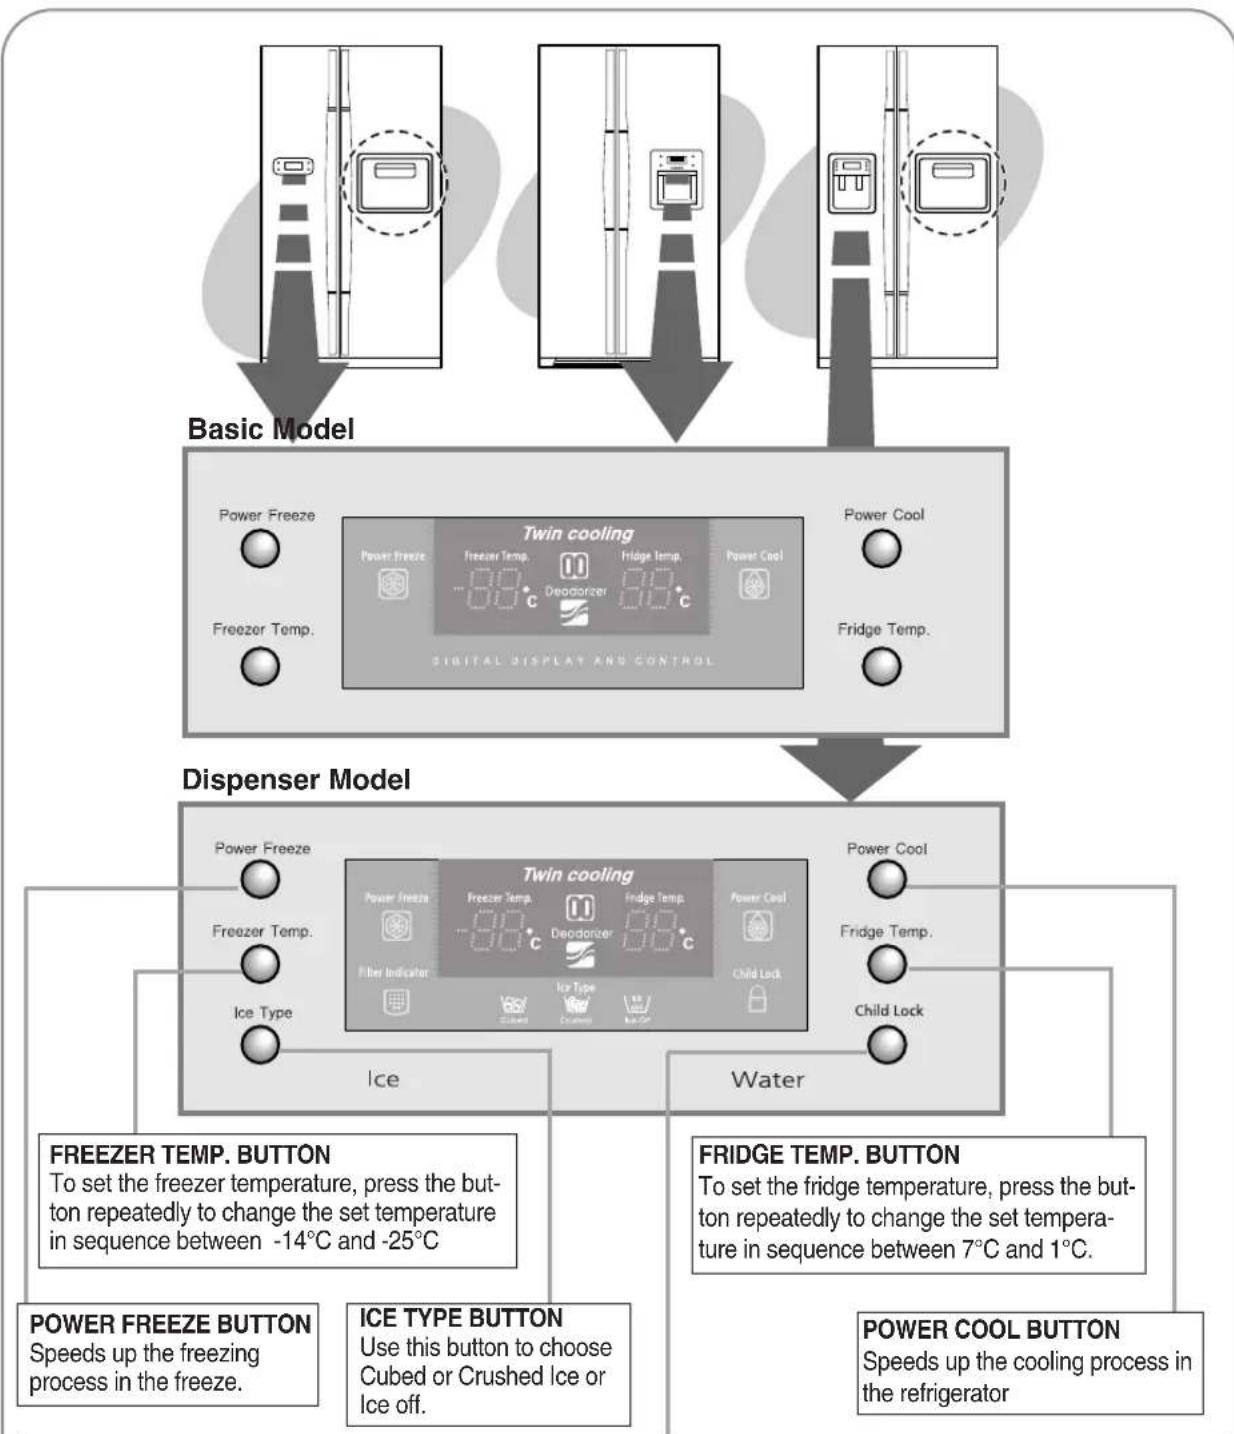
Power Freeze

- This light is on when you press the Power Freeze button.
Press this button to quickly return the freezer to the set temperature. - If you need much ice, you can get ice faster.
- Press the button again to cancel the Power Freezer mode.
Power Cool

• This light is on when you press the Power Cool button.
Press the button to quickly return the refrigerator to the set temperature.
- Press the button again to cancel the Power Cool mode.
Deodorizer

- This light indicates the recyclable deodorizer is in operation.
- Recycle the honeycomb cartridge once or twice a year (see "Cleaning the Accessories" section)
Cubed Ice, Crushed Ice and Ice Off Ice Type

Crushed


Ice Off
- Press the Ice Type button in sequence to choose
Cubed Ice, Crushed Ice or Ice Off to stop making ice.
• Light icon indicates the ice state currently operated.
Filter Indicator

- When the green light changes to orange, it is time to replace the water filter. If indicator is red, quick replacement is strongly recommended.
- When the water filer is replaced, reset the indicator by pressing the Ice Type button and the Child Lock buttons simultaneously for 3 seconds.
- To turn this indicator off, press the Ice Type and Child Lock buttons simultaneously for 5 seconds.
TEMPERATURE CONTROL
Freezer
- The freezer temperature can be set between -14^ and -25^ .
- Press the Freezer Temp. button repeatedly until the desired set temperature is shown in the temperature display.
- The temperature display changes in sequence between -14^ and -25^ . When the display reaches 14^ , it returns to -25^ .
• After five seconds, the display reverts to the actual freezer temperature. The unit will then work to adjust to the new desired temperature.
Refrigerator
- The refrigerator temperature can be set between 7°C and 1°C.
- Press the Fridge Temp. button repeatedly until the desired temperature is shown in the temperature display.
- The temperature display changes in sequence and reverts in the same way as the freezer.

WARNING
- When ice cream is stored above -15^ in freezer, it may melt.
- The temperature of the freezer or the refrigerator rises from frequent openings, when sweeping and from warm food. This may cause the digital display to blink . The digital display will stop blinking when the freezer and refrigerator return to the normal temperature.
ICE and COLD WATER DISPENSER
Ice Maker (Basic Model)

flowchart
graph LR
    A["Outdoor stove with 20+ ovens"] --> B["Processed food with a bag, microwave oven, and keyboard"]
    B --> C["Finished food inside refrigerator with hands gesture"]
Ice Dispenser
The ice maker produces 10 cubes at once and about 120 cubes a day automatically. This quantity may be influenced by factors such as the freezer temperature, the Power Freeze function and the number of door openings. When your refrigerator is plugged in, the Cubed Ice mode is automatically selected.
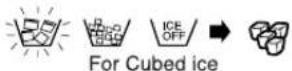
Press the Ice Type button to select the type of ice:
- Cubed Ice
- Crushed Ice
- No Ice
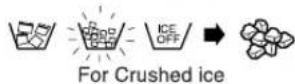


NOTE
If the Ice remains in the Ice bucket, the cubed ice is obtained.
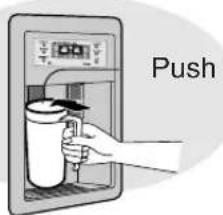
Push the ice dispenser lever with a cup.
- Place a cup to line of the dispenser lever to prevent the ice from jumping out.
text_image
Push- Pull out the ice tray.
- Add water until it reaches the water level indicator.
- Put the ice tray back in place.
Water Dispenser
The capacity of the water tank is approximately 1.2 L.
Cold Water
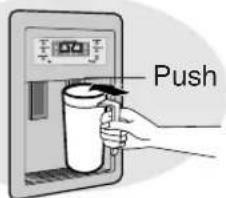
- Push the water dispenser lever with a cup.
- If you have just installed the refrigerator, throw away the first six glassfuls of water to flush out impurities in the water supply system.
text_image
Push
If you have a long vacation or business trip and won't use the water or ice dispensers, close the water valve. Otherwise, water may occur leakage.
Never put fingers or any other objects in the dispenser opening. It may cause injury.
USING THE WATER DISPENSER (OPTION)
With the water dispenser, you can obtain chilled water easily without opening the refrigerator door. In addition, you can save electricity by reducing the number of times the door is opened by more than 30%.
Overview
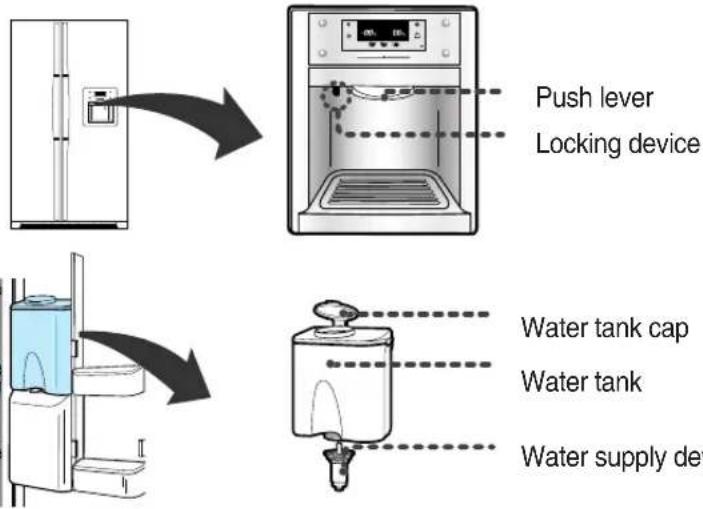
natural_image
Diagram of a door lock mechanism with a blue component and directional arrow (no text or symbols)Water tank cap
Water tank
Water supply device

WHEN THE WATER DISPENSER IS NOT USED. THE FOLLOWING WAYS RECOMMENDED

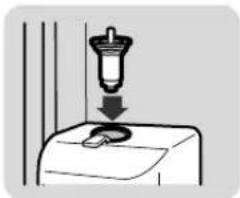
Fix the water supply device tightly into the fixing hole.
- The door will not be closed automatically when the water supply device is pulled out for a long time because of cold leaking.
natural_image
Simple line drawing of a mechanical component with a downward arrow indicating motion (no text or symbols)
Set the locking device to the "LOCK".
- When pressing the "PUSH" button with the water supply device only fixed at the fixing hole, and the locking device is set on "OPEN", the water supply device can be removed from the fixing hole and cold leaks.

When exposing to child, set the locking device to the "LOCK".

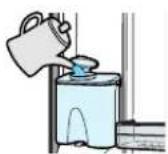
FILLING THE WATER TANK

Open the water tank by removing the round cap and fill it up with drinking water.
- Fill the tank up to the full level (just over 4.2 litres).

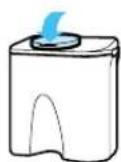
Replace the round cap by pushing down on it until it clicks into place.

INSTALLING A REGULAR BOTTLE

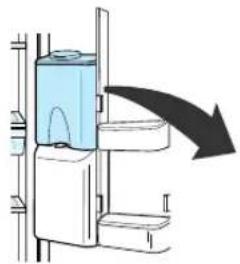
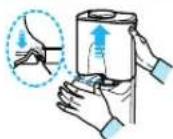
Press the fixing lever, lift the exclusive water tank upwards, then remove it.

Remove the water supply device from the exclusive water tank, then set the inner groove of the water supply device in a regular spring water bottle and fix it in position by turning it.
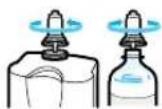

Turn the water supply device over, then fix it in position in the fixing hole.
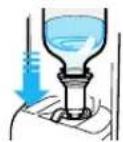

- If you use the PET bottle, the flow of water can be weaken.
- Gurgling sounds may be heard when air enters the water tank from regular mineral water or beverage bottles.
- Some regular mineral water or beverage bottles may not fit the water supply device, depending on their size.
- If water does not come out satisfactorily when you press the "push" button, press it again.
- Do not use carbonated drinks, such as cola, cider or sodas. When you press the button, the beverage may spurt out due to the pressure of carbonic gas accumulated in the upper part of beverage bottle.
- Use bottled mineral water or boiled tap water that does not contain any particles.

Water Tank / Supply Device

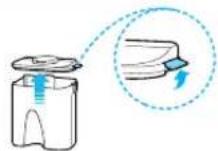
Pull upward and disassemble the hooks on both sides of the large-sized cap.

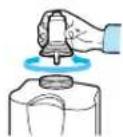
Loosen the water supply device by turning it in the direction of the arrow and removing it.

Wipe the large-sized cap and the exclusive water tank with warm water and detergent.
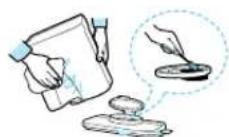
- Hold the cap and pull it upwards to remove it. Clean the cap and waste filtering bottle attached to the cap with a soft brush.

After cleaning the water supply device with a soft brush, press the water supply device operation lever, then wash it in running water.
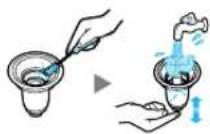

WARNING
- Clean the water tank frequently if it used to dispense tea or other such beverages. Only use filtered tea. For better hygiene, beverages with a high sugar content (juice, soft drinks) are not recommended.
- Deposits can be cleaned by wiping the tank with a cloth dampened in vinegar or salt water.
- Check that the rubber seal on the water supply device has not slipped off or is not damaged by a sharp-edged object. Otherwise, it may leak.
SHELVES AND BINS

FREEZER
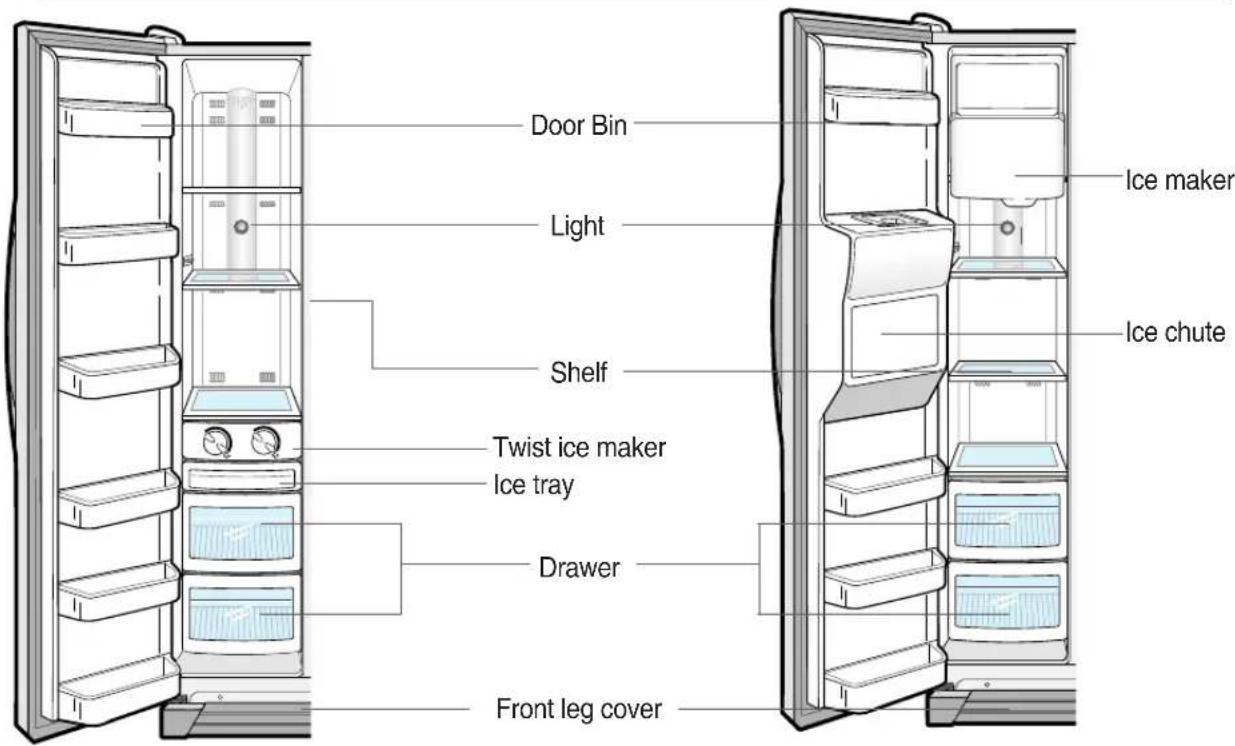
text_image
Door Bin Light Ice maker Ice chute Shelf Twist ice maker Ice tray Drawer Front leg coverBasic model Model with ice and water dispenser

REFRIGERATOR
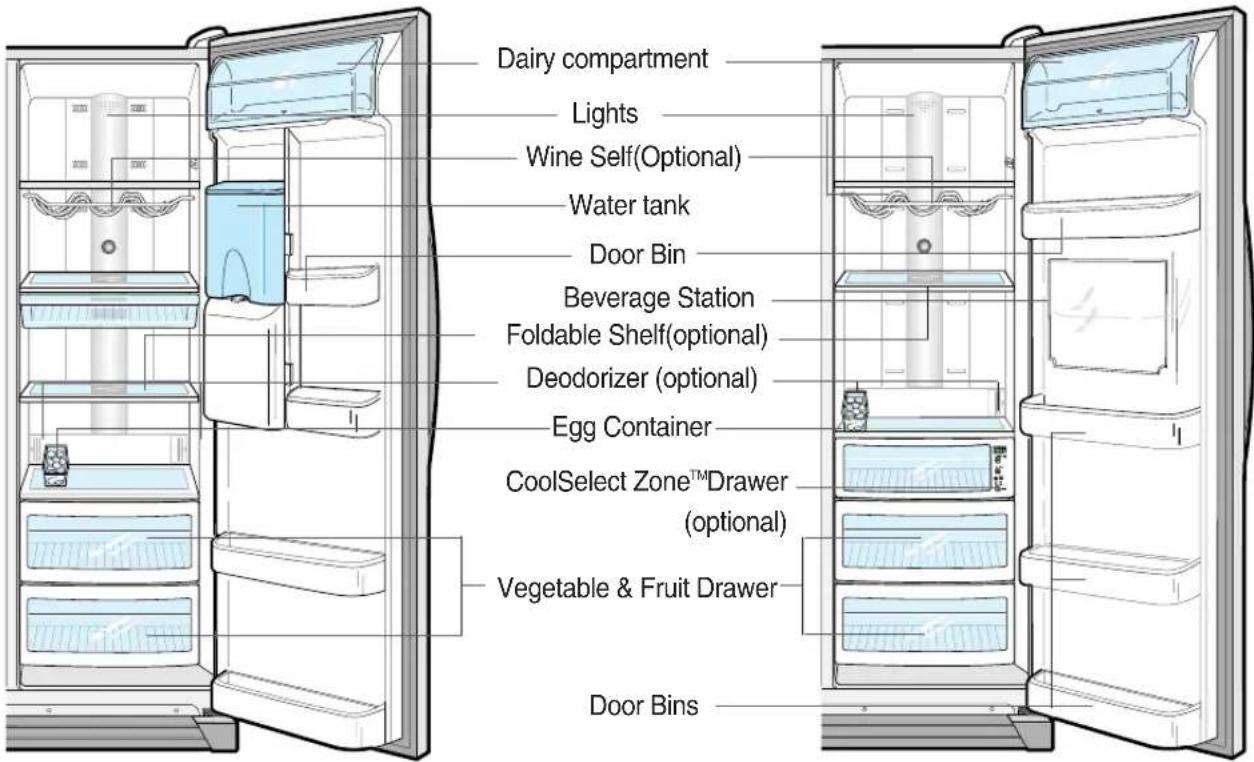
text_image
Dairy compartment Lights Wine Self(Optional) Water tank Door Bin Beverage Station Foldable Shelf(optional) Deodorizer (optional) Egg Container CoolSelect Zone™Drawer (optional) Vegetable & Fruit Drawer Door BinsFOOD STORAGE GUIDE
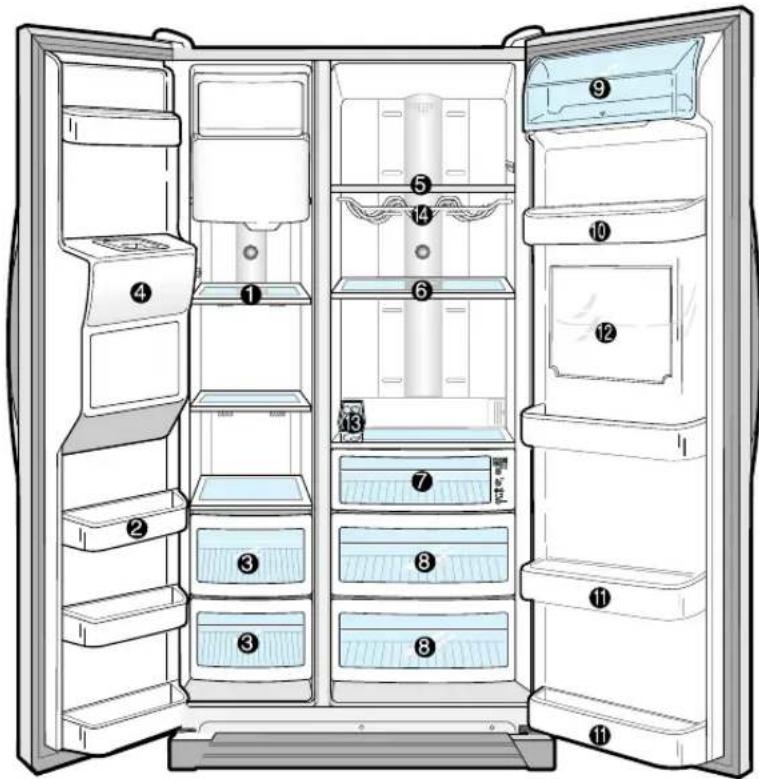
text_image
Diagram of a refrigerator interior with numbered compartments for identification- For more space, you can store food with drawers and ice maker removed.
- Declared net volume is calculated with upper or upper/middle freezer drawer(s) removed.
Tempered Glass Shelf
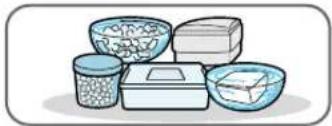
- Can be used to store all types of frozen food.

Door Bin
- Can be used for small packages of frozen food.

Plastics Drawer
- Can be used to store meat and dry foods. Stored food should be wrapped securely using foil or other suitable wrapping materials or containers.

Ice chute (optional)
natural_image
Illustration of a dessert with cream, ice cream, and a glass of cheese (no text or symbols)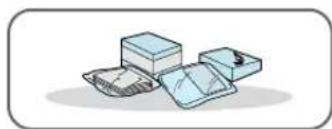
natural_image
Illustration of three stacked rectangular blocks with textured surfaces, no text or symbols present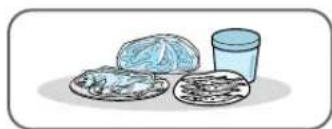
natural_image
Illustration of a breakfast and lunch items including a bun, plate with cheese, and a cup (no text or symbols)
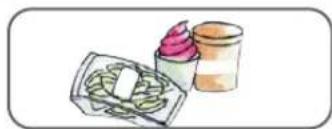
Do not put your fingers, hands or any other in suitable objects in the chute or ice-maker bucket. It may result in personal injury or material damage.
FOOD STORAGE GUIDE
CHILLED FOOD STORAGE IN REFRIGERATOR

Tempered Spill Proof Glass Shelf
- Can be used to store all types of chilled food.
- Safe and hard to be broken.
• Circular marks on the glass surface are a normal phenomenon.

Foldable shelf (optional)
- If you need more taller space for tall items. Raise the front of shelf slightly and it back to make it half. You can use the shelf in this position to allow taller items to be stored.

CoolSelect Zone™Drawer (optional)
- Helps to preserve the taste of food and prolongs its freshness. Use to store cheese, meat, poultry, fish or any other foods used quickly.

Fruit & Vegetable Drawer (Upper and Lower)
• Is used to store fruits and vegetables.
- This drawer is airtight. Optimized humidity control design helps to preserve the freshness of the stored vegetables and fruits.

Dairy Compartment
- Can be used to store butter or margarine.

Door Bins
- Can be used to store foods in small packages, such as milk and yogurt.

Beverage Station (optional)
- Can be used to store the frequently used items, such as canned beverages and snacks and allows access to these items without opening the refrigerator door.

CAUTION

Egg Container
- Put eggs in the container and place them on the shelf.

Wine Shelf (optional)
- Place your wine bottle on the shelf to maintain their taste.
natural_image
Illustration of various food containers and containers (no text or symbols)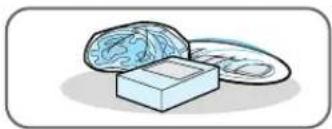
natural_image
Illustration of a rolled-up cheese and its open lid (no text or symbols)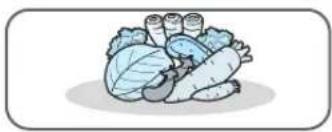
natural_image
Illustration of fresh vegetables including lettuce, cabbage, radish, and beans (no text or symbols)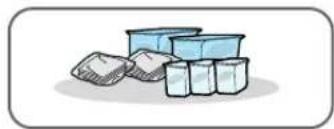
natural_image
Illustration of stacked plastic containers (no text or symbols)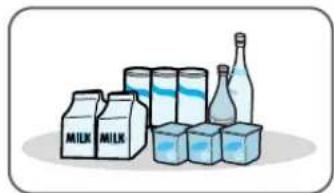
natural_image
Illustration of dairy products including milk cartons, cans, and bottles (no text or symbols)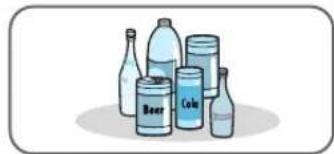
natural_image
Illustration of various beverage containers including bottles, cans, and a beer jar (no text or symbols)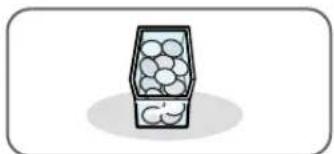
natural_image
Simple line drawing of a container filled with round fruits, no text or symbols present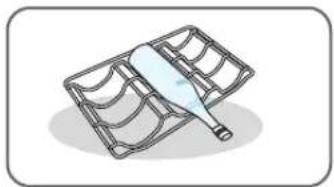
natural_image
Illustration of a bottle inside a wire cage (no text or symbols)
WARNING
- If you have a long vacation planned, you must empty the refrigerator and turn it off. Wipe excess moisture from the inside and leave the doors open. Otherwise, odor and mold may develop.
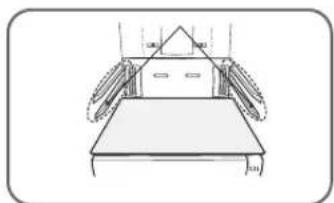
- In case the model has CoolSelect zone Do not insert a shelf to this rail, or the shelf can collide with beverage station cover and the beverage station cover can be broken.
The Rail that should not be used for CoolSelect zone model
natural_image
Simple line drawing of a mechanical assembly with no text or symbolsCoolSelect Zone™Drawer GUIDE
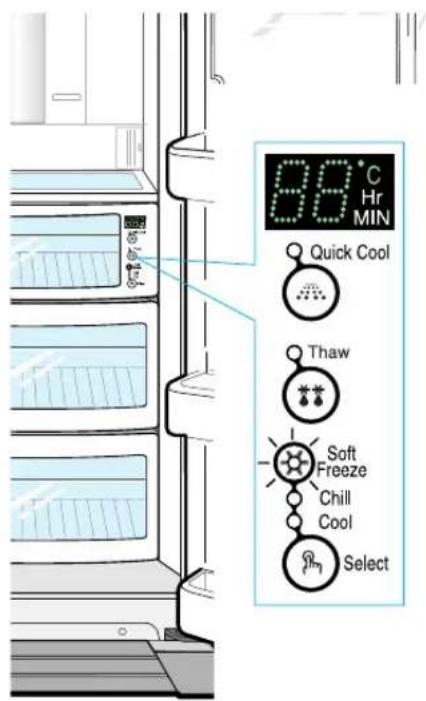
"Select" button (Optional)
1
Soft Freeze
- When "Soft Freeze" is chosen, the temperature on the digital panel displays -5^ regardless of the set temperature of the refrigerator.
- "Soft-Freeze" temperature helps keep meats and fishes fresh longer.
- Can cut meat easily without drips.
2
Chill
- When "Chill" is chosen, the temperature of the CoolSelect Zone™ Drawer is kept at -1°C regardless of the set refrigerator temperature.
- "Chill" temperature helps keep meat or fish fresh longer.
3
Cool
- When “Cool” is chosen, the temperature will be the same as the set temperature of the refrigerator. The digital panel shows the same temperature as that of the display panel.
- The CoolSelect Zone™Drawer allows extra refrigerator space.
text_image
88°C Hr MIN Quick Cool Thaw Soft Freeze Chill Cool SelectCoolSelect Zone™Drawer GUIDE
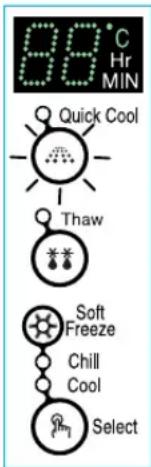
"Quick Cool" button
- You can use the Quick Cool feature with the CoolSelect Zone™.
- “Quick Cool” allows 1\~3 canned beverages to cool within 60 min.
- To cancel this option, press the "Quick Cool" button again.
CoolSelect Zone ^TM returns to the previous temperature. - When "Quick Cool" ends, it returns to the "Cool" temperature setting.

Depending on the beverages, the cool-down time may vary.
- For "Quick Cool" option, food stored in the CoolSelect Zone™ Drawer should be removed.
text_image
88°C Hr MIN Quick Cool Thaw Soft Freeze Chill Cool Select"Thaw" button
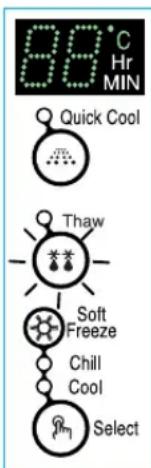
- Drips loss and quality deterioration of meats reduces the freshness of foods.
- After "Thaw" is selected, warm and cold air is alternately supplied into the CoolSelect Zone™Drawer.
- Depending on the weight of meat, thawing time can be selected for 4 hrs, 6 hrs, 10 hrs, and 12 hrs sequentially.
- When “Thaw” ends, CoolSelect Zone™ display returns to “chill” condition.
- When "Thaw" ends, there are no juice in the meats and they are half-freezed condition so it is easy to cut them for cooking.
- To cancel this option, press any button except "Thaw".
- The approximate thawing time of meat and fish are shown below. (Based on 1 inch thickness)
text_image
89°C Hr MIN Quick Cool Thaw Soft Freeze Chill Cool Select| Thaw Time 4 hours | 6hours | 10 hours | 12 hours | ||
| Weight 400 g | 600 g | 800 g | 1000g |

Depending on the size and thickness of meat and fish, the thawing time may vary. The above weight represents the total weight of food in the CoolSelect Zon™Drawer. Ex) The total thawing time for 400g frozen beef and 600g frozen chicken will be 10 hours.
- With the “Thaw” option, food stored in the CoolSelect Zone™Drawer should be removed.
REMOVING THE FREEZER ACCESSORIES

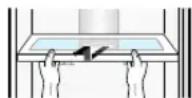
Tempered glass shelf
- Pull the shelf out as far as it goes. Then lift it up and remove it.

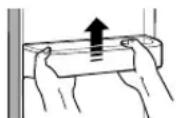
Ice maker bucket (optional)
- Remove the bucket lifting up and pulling out.

Door bins
- Hold the door bin in both hands and then lift it up.

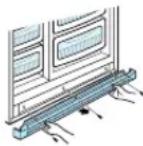
Front Leg cover
- Open the freezer and refrigerator doors, remove the three screws and detach the cover.
- To reassemble the leg cover, put it back into position and tighten the three screws.
* Only remove the leg cover if strictly necessary.

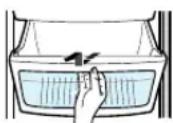
Drawers
- Remove the drawer by pulling it out and lifting it up slightly.

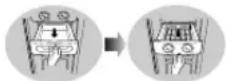
- Do not use excessive force when disassembling the cover; otherwise, you may cause damage.

Ice maker and tray
- Remove the ice tray by pulling it towards you. Then remove the ice maker (basic model only).
REMOVING THE REFRIGERATOR ACCESSORIES

Tempered glass shelf
Pull the shelf out as far as it will go. Then lift it up and remove it.

Door bins
- Hold the door bin in both hands and remove it by lifting it up.

Fresh fruit & vegetable drawer and cover
- Remove the compartment by holding the handle, pulling the compartment towards you and lifting it up slightly. - Remove the cover by pulling it towards you.

Wine shelf (optional)
- Simpy take the shelf and pull it toward you.
BEVERAGE STATION™ (optional)
To access the extra refrigerating compartment, hold the compartment door handle and pull it downwards.
- The extra refrigerating compartment gives you added convenience because you do not need to open the main refrigerator door. In addition, this saves energy.
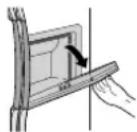
It is recommended that you use the extra refrigerating compartment for frequently used foods like beverages.
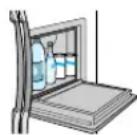
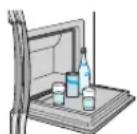
When the door is opened, it can be used as a tray to support items, such as beverage bottles and glasses.
- Do not scratch the surface of the door.
- Before removing the freezer and refrigerator accessories, please move the stored foods to other space.
- The door of the Beverage Station should never be removed.
The Beverage Station ^TM cannot function if its door is missing. - When you close the door of beverage station, be careful not to put your hands or fingers in a position where those can be caught or injured.
- If you use the opened door as a tray do not place heavy objects on it.
- Do not allow children to hang on the door, because there is a risk of personal injury or material damage.
CLEANING THE ACCESSORIES
Inside
- Clean the accessories using a mild detergent. Then wipe with a dry cloth.
• After washing the accessories, make sure that they are dry before using them again.
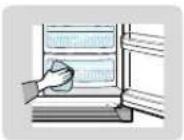
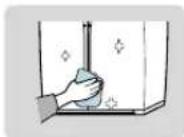
Exterior
• Wipe the front control panel with a clean cloth.
• The doors and door handles should be cleaned with a mild detergent and cloth. Dry them with a clean cloth.
• The exterior should be polished once or twice a year.
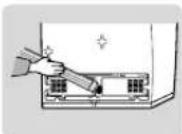
Rear
- Use a vacuum cleaner to remove dust once or twice a year.
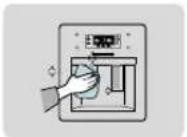
Ice and water dispenser and drainage grid (optional)
- Use a damp cloth to clean the ice and water dispenser. Then wipe it with a dry cloth.
- Keep the ice and water dispenser and drainage grid dry.
Beverage station (optional)
- Use a damp cloth to clean the extra refrigerating compartment. Then wipe it with a dry cloth.
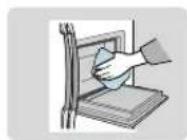
Rubber door seals
- If the rubber door seals are dirty, the door will not close properly and the refrigerator and freezer will be unable to function efficiently. Clean them with a mild detergent and damp cloth. Then wipe them with a dry cloth.
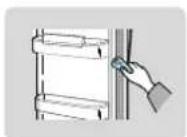

- When cleaning the appliance or if you are not going to use it for a long time, remove the power plug, leave the doors open and keep the appliance dry.
- Do not clean it by spraying it directly with water.
- Do not clean it with benzene, thinner or car detergent.
CLEANING THE ACCESSORIES
Deodorizer (optional)
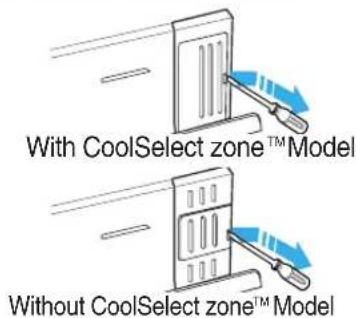
- Remove the cover with a flat blade screw driver as shown.
• Take out the cartridge from the cover and soak it in clean, warm water for at least 4 hrs. Completely dry out the cartridge with sunlight for at least 8 hrs in an open area. - Repeat this process once or twice a year.
text_image
With CoolSelect zone™ Model Without CoolSelect zone™ Model

- If it is dried in a confined area, odor may be spread to that area.
- Keep the children away from yellow water, they may drink water.
CHANGING THE INTERIOR LIGHT
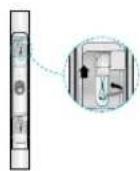
Before changing the interior light, unplug the appliance from the power supply. If you experience difficulty when changing the light, contact your service centre.

INTERIOR LIGHT IN THE FREEZER (BASIC MODEL ONLY) / REFRIGERATOR

Place a flat screwdriver under the light cover hooks and push in the direction of the arrow.
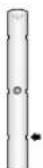

Pull the cover in the direction of the arrow.
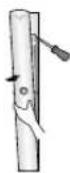

After changing the bulb, replace the light cover.


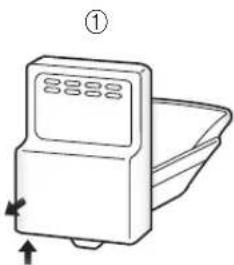
INTERIOR LIGHT IN THE FREEZER (MODEL WITH ICE AND WATER DISPENSER)

Lift and pull out the ice maker cover (①).

Use a screwdriver to remove the light cover (②).

Replace the bulb with a new one (③), and then secure the light cover back into place using a screwdriver.

Replace the ice maker cover.
natural_image
Line drawing of a portable electronic device with a digital display and control panel (no text or symbols)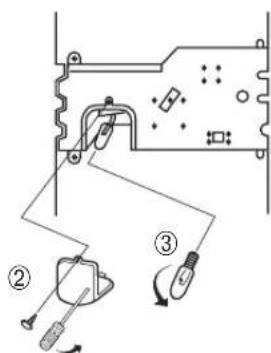
text_image
Diagram showing electrical circuit components with labeled parts and directional arrows indicating connectionsWATER FILTER
The water "Filter Indicator" light
- “Filter Indicator” light lets you know when it is time change your water filter cartridge. The light will change from green to orange. This tells you that it is almost time to change the current cartridge.
It is recommended that you replace the cartridge when the light changes to red.
(see "Install the water filter" section for more information)
Using the dispenser without the water filter
- You can not use the water and ice dispenser without a water filter cartridge because of the water line block at the water supply.
Ordering replacement filters
- To order more water filter cartridges, contact your authorized Samsung dealer.
DOORS
The refrigerator doors have a special door opening and closing feature to make sure that the doors close all the way and are securely sealed.
When opening the door, it will only open so far. After reaching a certain point, it will remain open.
When the door is partially open, it will close automatically.
INSTALLATION OF THE REFRIGERATOR

Checking the Dimensions of your Entrance Door

- Check the dimensions of your entrance door to determine whether the refrigerator can pass through it.
- Moving refrigerator through door if depth or width of refrigerator is bigger than door's, removes refrigerator doors.

Selecting the Location for the Refrigerator
- Select a location with easy access to the water supply.
- Select a location with enough space for the refrigerator.
- Select a location without direct exposure to sunlight.
- Before disassembling the freezer door, the water supply line needs to be disconnected. (If not, the water supply line can be damaged.)
- See “Separating the water supply line from the refrigerator” on the next page.
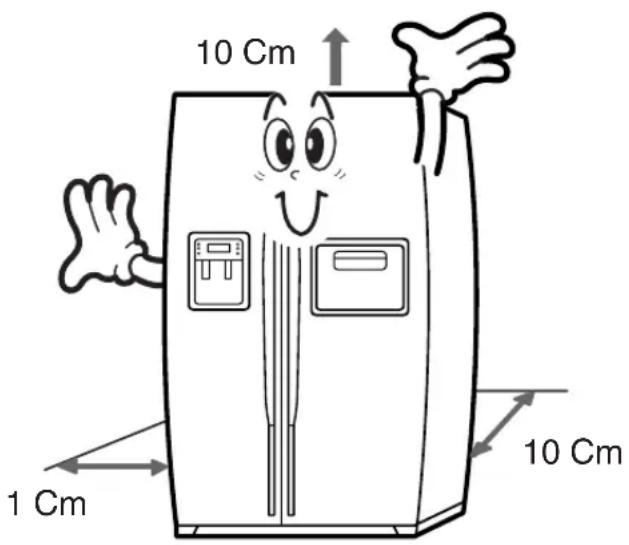
Allow sufficient space to install the refrigerator on a flat surface.
- If your refrigerator is not level, the internal cooling system may not work correctly.
text_image
10 Cm 1 Cm 10 Cm
When you install the refrigerator, it is recommended that the clearance be maintained as much as specified above.
If the space is not allowed, maintain at least 5cm clearance to the back wall.
REMOVING THE FRONT LEG COVER

Removing the Front Leg Cover (Optional)
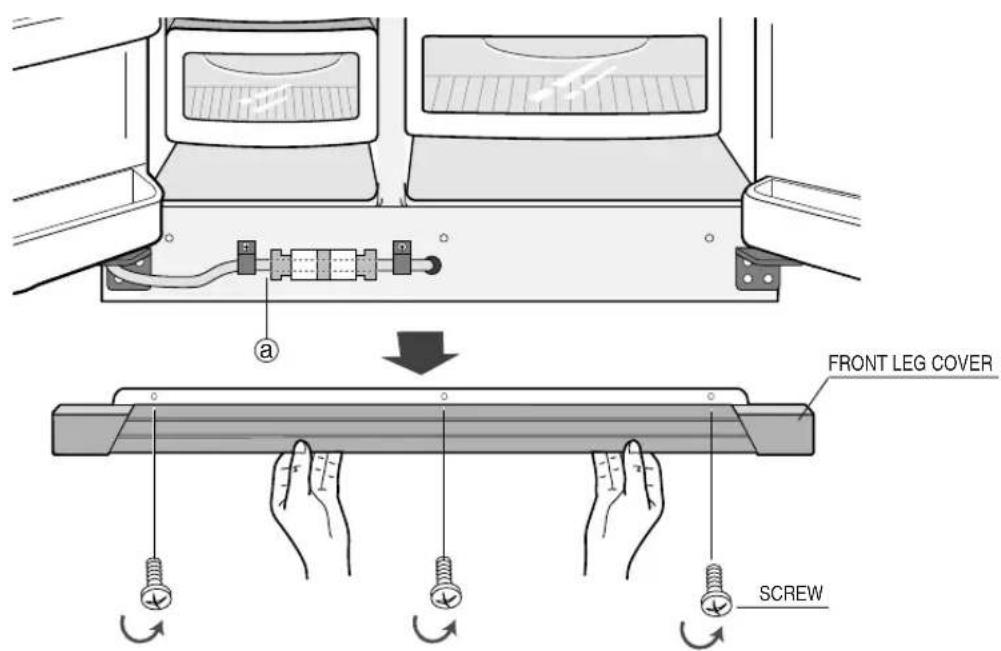
Open the freezer and refrigerator doors, and then take off the front leg cover assembly by turning the three screws counter-clockwise.
text_image
a FRONT LEG COVER SCREW
Separating the water supply line from the refrigerator (Optional)
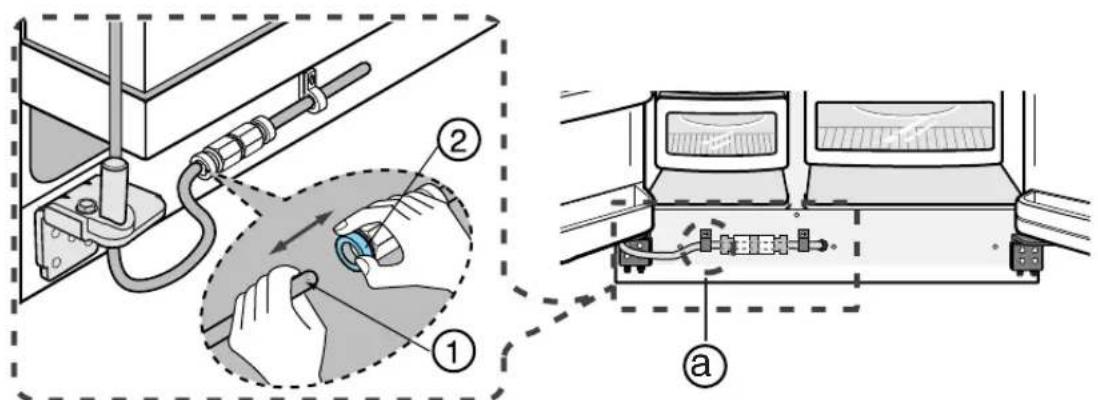
1) Remove the screw from clamp (a).
2) Remove the water tube by pressing the coupler (②) and pulling the water tube (①) away.
text_image
Technical diagram showing a mechanical assembly with labeled parts and a close-up of a hand operating a tool.
Do not cut the water tube but separate it from the coupler.
REMOVING THE REFRIGERATOR DOORS

- Lift the door straight up.
- Be careful not to pinch the water tubing and wire harness on the door.
- Place doors on a protected surface.

Removing the Freezer Door
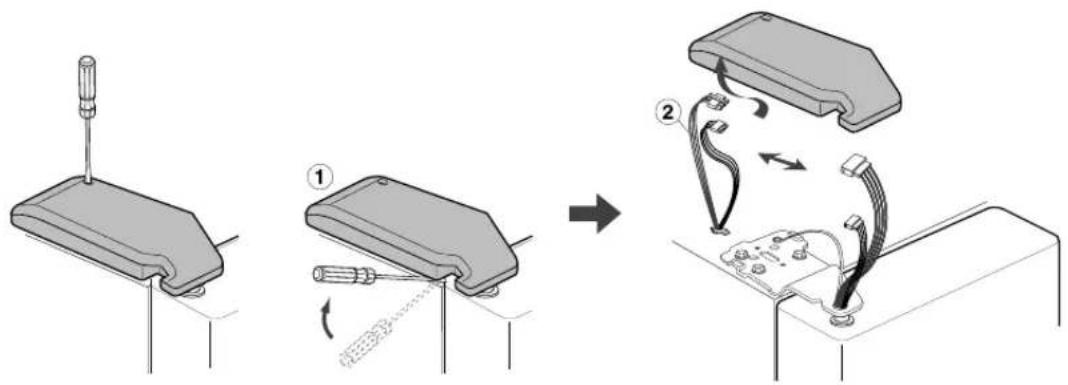
1) With the door closed, remove the upper hinge cover (①) using a screwdriver, and then disconnect the wires (②).
text_image
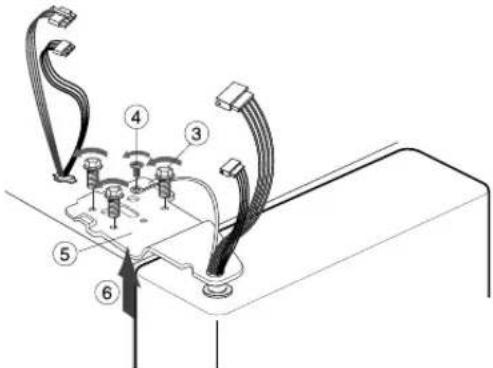
Diagram illustrating the step-by-step installation of a device's internal components, showing pinning, cable insertion, and cable connection.2) Remove hinge screws (③) and ground screw (④) counter-clockwise, and take off the upper hinge (⑤) along the arrow (⑥). Take care when removing the door to ensure that it does not fall on you.
text_image
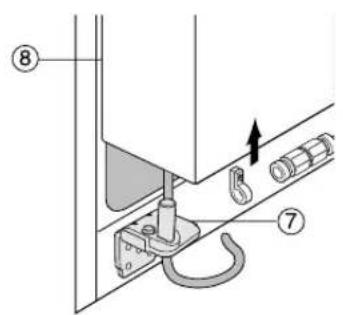
Technical diagram showing labeled components of a device with cable connectors and wiring connections3) Remove the door from the lower hinge (⑦) by carefully lifting the door (⑧).
4) Remove the lower hinge (⑨) using a screwdriver.
text_image
Technical diagram showing mechanical assembly with labeled parts and directional arrow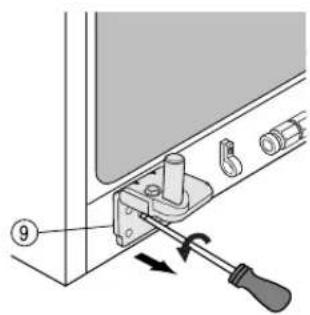
text_image
Diagram showing a mechanical assembly with numbered component and directional arrows indicating movement or forceREMOVING THE REFRIGERATOR DOORS

Removing the Refrigerator Door
1) With the door closed, remove the upper hinge cover (①) using a screwdriver, and then disconnect the wires (②).
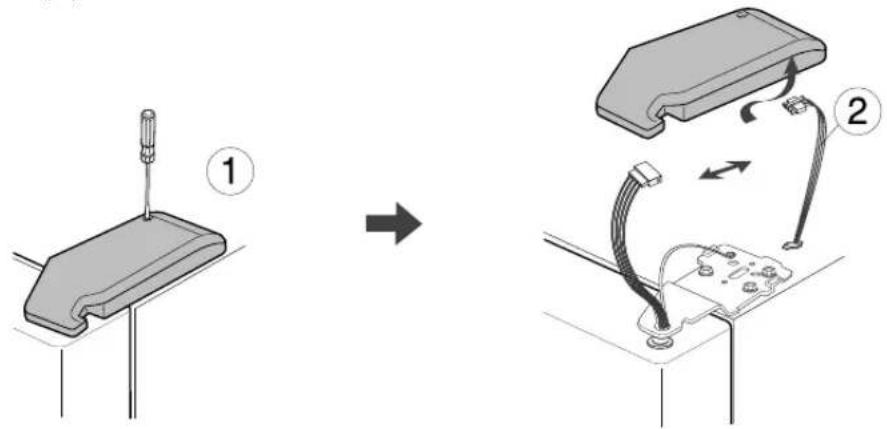
text_image
Diagram illustrating the process of inserting a cable into a device, showing step 1 before and step 2 after assembly.2) Remove hinge screws (③) and ground screw (④) counter-clockwise, and take off the upper hinge (⑤) in the direction of the arrow (⑥). Take care when removing the door to ensure that it does not fall on you.
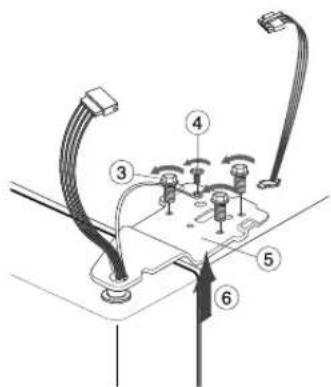
text_image
Technical diagram showing labeled components of a device with cable and connectors, numbered 3 to 6.3) Remove the door from the lower hinge (⑦) by lifting the door (⑧).
4) Remove the lower hinge (⑨) from the bracket lower hinge (⑩) by lifting the lower hinge (⑨) in the direction of the arrow.
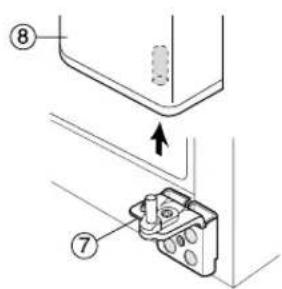
text_image
Technical diagram showing labeled components of a mechanical or electrical component with numbered parts 7 and 8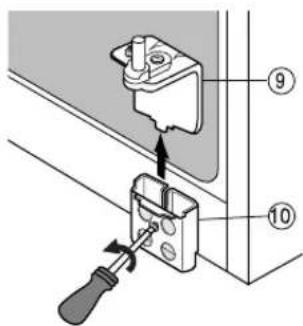
text_image
Technical diagram showing a screwdriver inserted into a bracket with numbered parts labeled 9 and 10
• After disassembling the freezer / refrigerator door, move it to the appropriate location. you must reassemble it.
REATTACHING THE REFRIGERATOR DOORS

Reattaching the Freezer Door
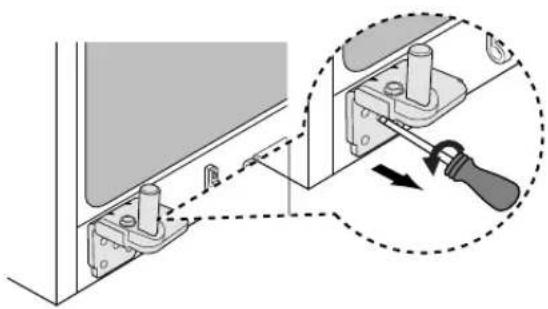
1) Reattach the lower hinge (①) using screwdriver.
2) Reattach the freezer door by inserting the hose (②) in the lower side of the door into the hole in the lower hinge (③) and pulling the hose down.
natural_image
Diagram showing a mechanical assembly with a tool inserted into a bracket, no text or symbols present
text_image
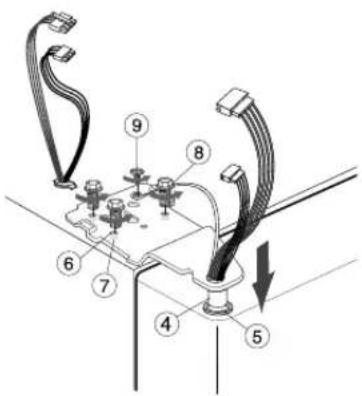
Technical diagram showing a mechanical assembly with labeled parts ② and ③, including a pull rod and connection points.3) Insert the upper hinge shaft (④) into the hole (⑤). After levelling the upper hinge hole (⑥) with the hole of the cabinet (⑦). Fasten bolts (⑧) and screw (⑨) in a clockwise direction.
text_image
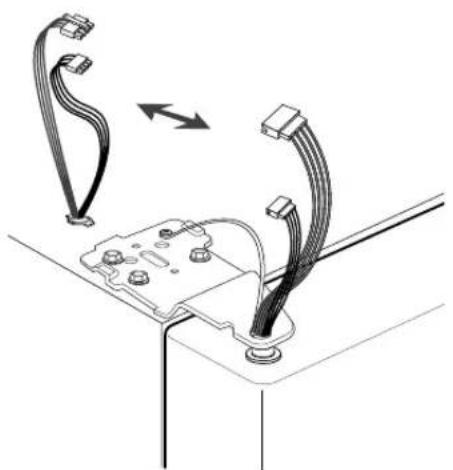
Technical diagram showing labeled components of a mechanical or electrical assembly with numbered parts and a downward arrow indicating direction.4) Connect the wires. 5) Put the front part of the upper hinge cover ( )
10
on the front part of the upper hinge (11) and reattach from the front part of the upper hinge cover first.
natural_image
Diagram showing two cable connectors with attached components, no text or symbols present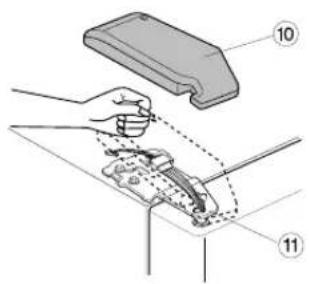
text_image
Technical diagram showing a hand operating a mechanical device with labeled parts 10 and 11
natural_image
3D diagram of a mechanical component with a screw and lever (no text or symbols)REATTACHING THE REFRIGERATOR DOORS

Reattaching the Refrigerator Door
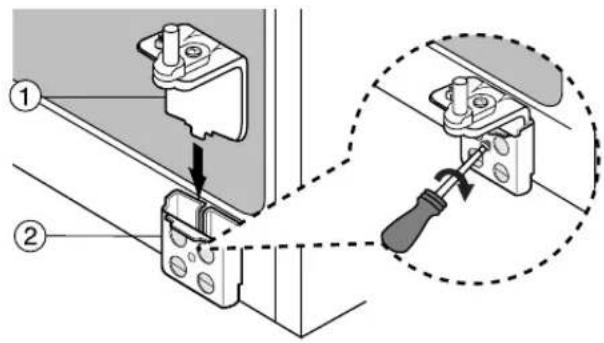
1) Insert the lower hinge (①) in the bracket lower hinge (②).
text_image
Technical diagram showing installation steps of a mechanical component with labeled parts and a magnified view of the tool.2) Place the hole in the refrigerator door (③) over the lower hinge (④).

text_image
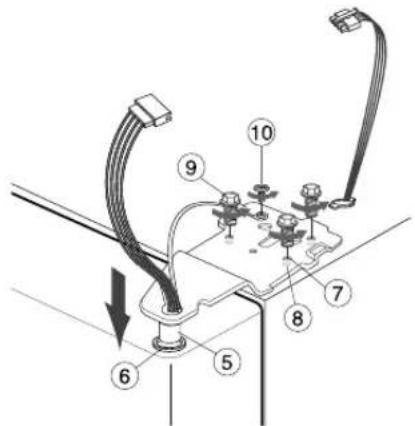
Technical diagram showing a mechanical assembly with labeled parts and an arrow indicating direction of movement.3) Insert the upper hinge shaft (⑤) into the hole (⑥). After levelling the upper hinge hole (⑦) with the hole of the cabinet (⑧). Fasten hinge screws (⑨) and screw (⑩) in the clockwise direc-tion.
text_image
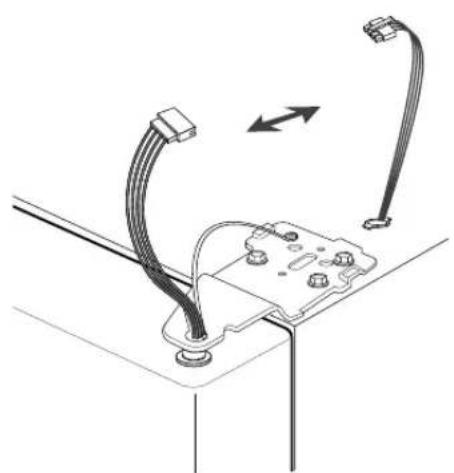
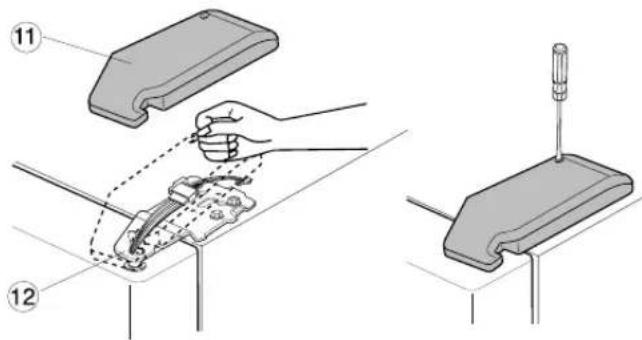
Technical diagram showing labeled components of a mechanical or electrical assembly with numbered parts and directional arrow indicating movement.4) Connect the wires. 5) Put the front part of the upper hinge cover ( )
natural_image
Technical diagram showing cable connections and a component mounted on a base, with no visible text or symbols.on the front part of the upper hinge (12) and reattach it from the front part of the upper hinge cover first.
text_image
Technical diagram showing mechanical assembly steps with numbered components and labeled partsREATTACHING THE REFRIGERATOR DOORS

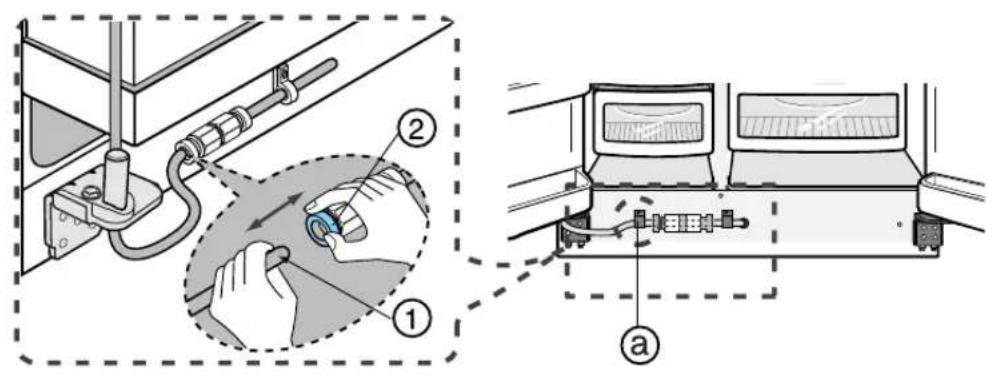
Reattaching the Water Tube (Optional)
1) While pressing the front face of coupler (②), insert the water line (①) in the coupler.
2) Tighten the screw on the clamp (a).
text_image
Technical diagram showing installation steps of a mechanical device with labeled components and a close-up view of the device's internal structure.
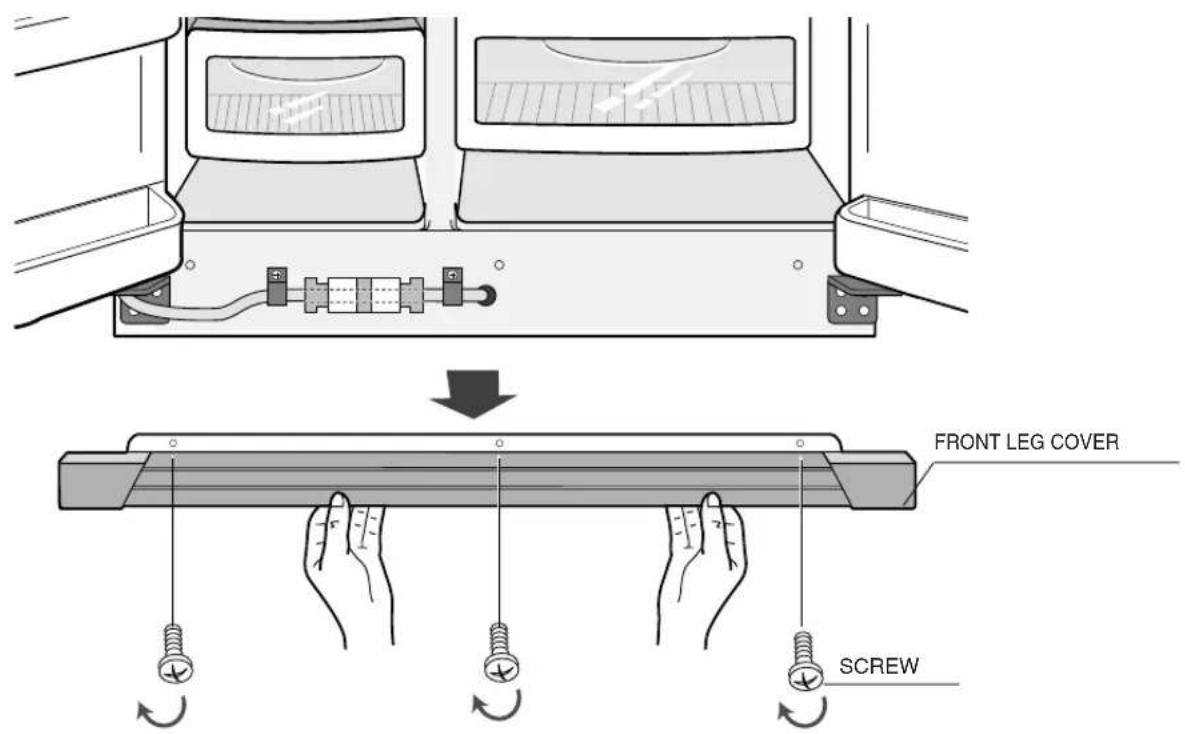
Reattaching the Front Leg Cover (Optional)
Put on the front leg cover by turning the three screws clockwise, as shown in the figure.
text_image
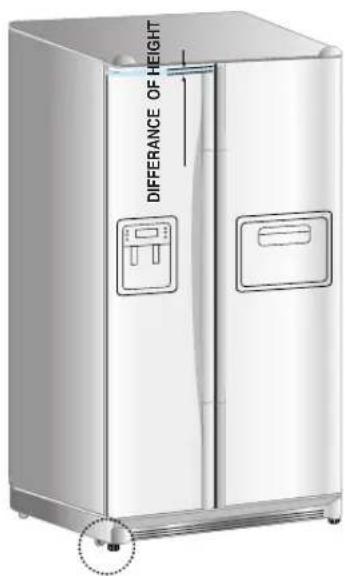
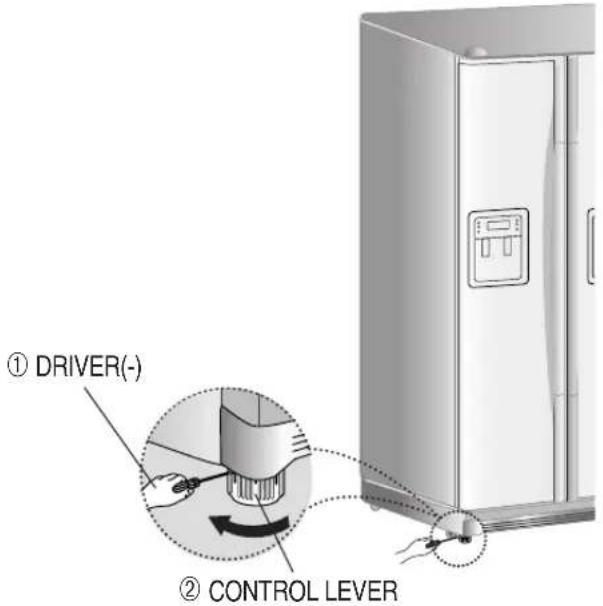
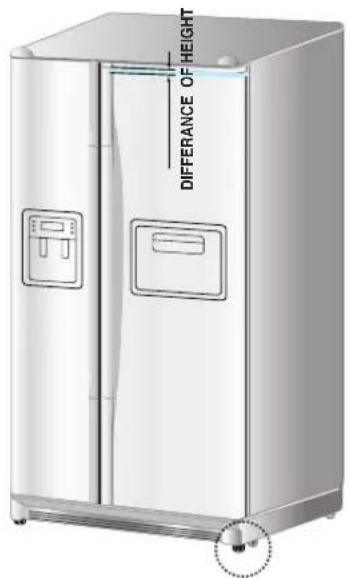
FRONT LEG COVER SCREWPlease level the refrigerator first.
The doors will be uneven if the refrigerator is not level.
Case 1) Freezer door is lower than that of the refrigerator
Insert a straight screwdriver (-) (①) into a slot of the control lever (②), turn it clockwise and level the refrigerator.
text_image
DIFFERENCE OF HEIGHTCase 2) Freezer door is higher than that of the refrigerator
text_image
① DRIVER(-) ② CONTROL LEVERInsert a straight screwdriver (-) (①) into a slot of the control lever (②), turn it clockwise and level the refrigerator.
text_image
DIFFERENCE OF HEIGHT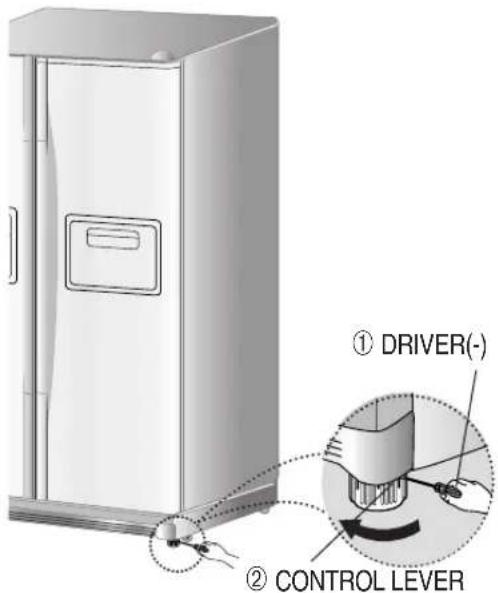
text_image
① DRIVER(-) ② CONTROL LEVER
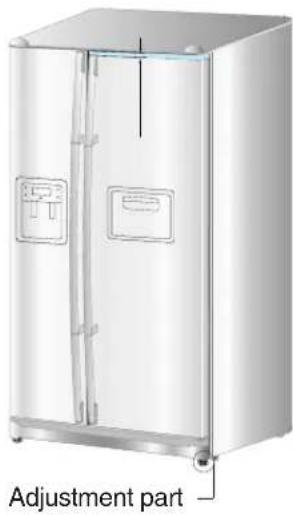
Do not make small adjustment by turning the control lever, Please refer to the next page.
Making small adjustments between doors.
text_image
Adjustment partPlease open the doors and adjust the doors as follows:
1) Release the nut (①) on the lower hinge until the upper end of the bolt (②).

When you release the nut(①), use enclosed hex wrench (③) to turn the bolt(②) a little counter clockwise to make the nut(①) loose with your fingers.
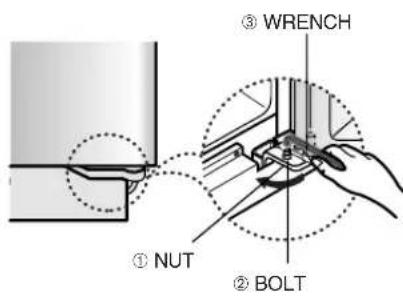
text_image
③ WRENCH ① NUT ② BOLT2) Please adjust the height difference between the doors turning the bolt (②) turn clockwise( ) or counter clockwise ( ).

When you turn clockwise ( √ ), the door goes up.
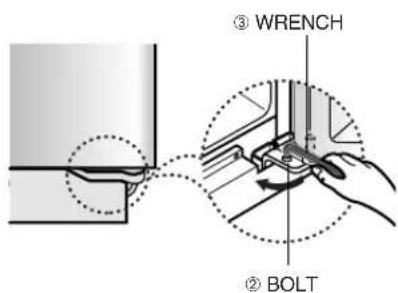
text_image
③ WRENCH ② BOLT3) After adjusting the doors, turn the nut (①) turn clockwise ( ) until the lower end of the bolt, then tighten the bolt again with the wrench (③) to fix the nut(①).

text_image
① NUT ② BOLT ③ WRENCH
If you do not fix the nut (①) firmly, the bolt (②) may be released.
CHECKING THE WATER DISPENSER LINE (OPTIONAL)
1) In order to operate the ice maker properly, water pressure of 1.4 10 ~kgf/cm^2 is required. In this range a 100 cc paper cup can be filled in 10 seconds.
2) The water filter removes particles. It does not sterilize or destroy any micro-organisms.
3) If the refrigerator is installed in an area with low water pressure (below 1.4kgf/cm^2 ), you should install a booster pump to compensate for the low pressure.
4) Ensure the water storage tank inside the refrigerator is properly filled initially. Push the water dispenser lever until the water runs from the outlet.
NOTE
A universal water supply kit is available at extra cost from your dealer. The refrigerator manufacturer recommends using a water supply kit containing copper tubing.

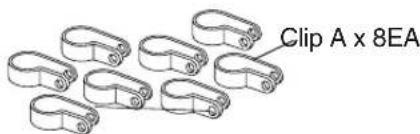
Checking the Parts
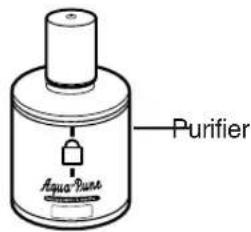
text_image
Purifier Aqua-Punt(Interior model)
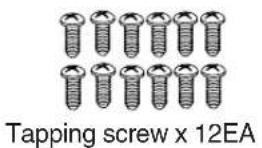
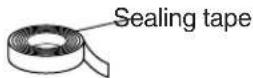
text_image
Clip A x 8EA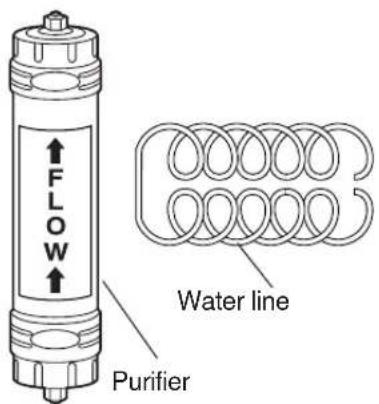
text_image
FLOW Water line Purifier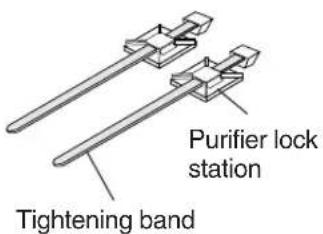
text_image
Purifier lock station Tightening band(Exterior model)
INSTALLING OF THE WATER DISPENSER LINE
For Interior Model
(Case 1)

Connecting to water supply line
- Shut off the main water supply line and turn the Ice maker to the off position.
- Locate the nearest cold drinking water line.
- Follow the instructions in the ice maker installation kit.
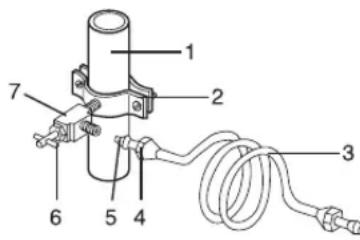
text_image
Technical diagram of a mechanical device with numbered components for identification- Cold Water line
- Pipe Clamp.
- Copper (or Plastic) line
4.Compression Nut
5.Compression Sleeve
6.Shut Off Valve
7.Packing Nut.

Connect the water line to the refrigerator
- Slip the compression nut and plastic ferrule through the plastic tube.
- After inserting the sleeve, tighten the compres-sion nut onto 1/4" compression fitting(union).

NOTE
- Slip the compression ferrule and nut on copper(or plastic) tubing as shown.
Tighten the compression nut onto the com-pression fitting(union).
- Turn water on and check for any leakage.
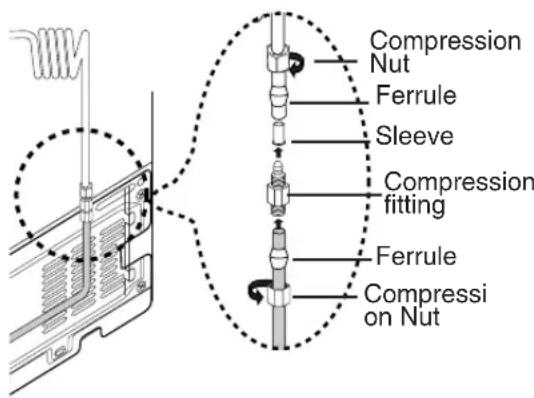
text_image
Compression Nut Ferrule Sleeve Compression fitting Ferrule Compression on Nut
Waterline must be connected to drinkable water only
(Case 2)

Check the water supply line
Connect the water pipe with coupler and tap.
- Close the main water tap.
- Connect coupler "A" to the tap.
- Every join should be protected with sealing tape.
WARRANTY INFORMATION
This water line installation is not covered by the refrigerator or ice maker manufacturer's warranty.
Follow these instructions carefully to minimise the risk of expensive water damage.
Note:
If the coupler does not fit on the current tap, go the nearest authorised service dealer and purchase the right couplers fittings.
CAUTION
The water line must be connected to the cold water pipe.
If it is connected to the hot water pipe, it may cause the purifier to malfunction.
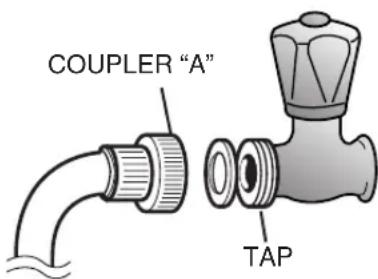
text_image
COUPLER "A" TAPINSTALLING THE WATER DISPENSER LINE

Connect the water line to the refrigerator.
- Remove the compressor cover of the refrigerator.
- Connect the water line to the valve, as shown in the figure.
- When connected, check if there is any leakage. If any, repeat the connection.
- Reattach the compressor cover of the refrigerator.
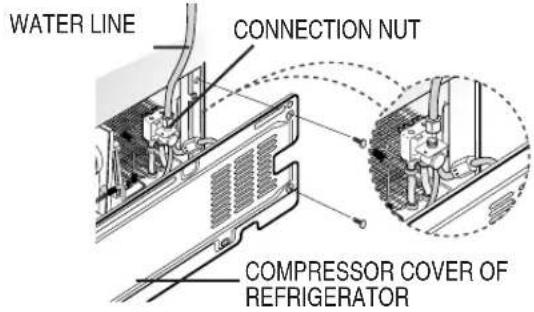
text_image
WATER LINE CONNECTION NUT COMPRESSOR COVER OF REFRIGERATOR
Secure the water line.
- Using clip "A", fix the water line to the wall (the back of refrigerator).
- When the water line is secure, make sure whether the water line is not excessively bent, pinched or squashed. Complete the installation of the water supply line.
- Power on the refrigerator and press the lever on the right of the dispenser until water runs out through the water line and all air has been empty.
- At this time, check for any possible leakages at the join point in the water line. After securing the water line, move the refrigerator to the required location. Once the refrigerator is in position, do not move possibly.
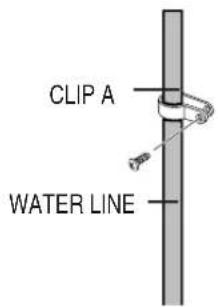
text_image
CLIP A WATER LINE
Install the water filter.
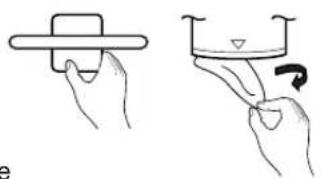
- As shown, separate the sticker in the refrigerator.
Remove the water filter from the box and put a month indicator sticker on the filter as shown.
- Write the month you installed the filter on the label.
EX) If the water filter was installed in March, put "MAR" - Remove the protective cap then position and insert the filter as shown,
- Slowly turn the water filter clockwise 90^ to align the indication mark on the cover, locking the filter in position. Do not overtighten.
natural_image
Illustration of two hands holding a small object, one with a handle and the other with a curved arrow (no text or symbols)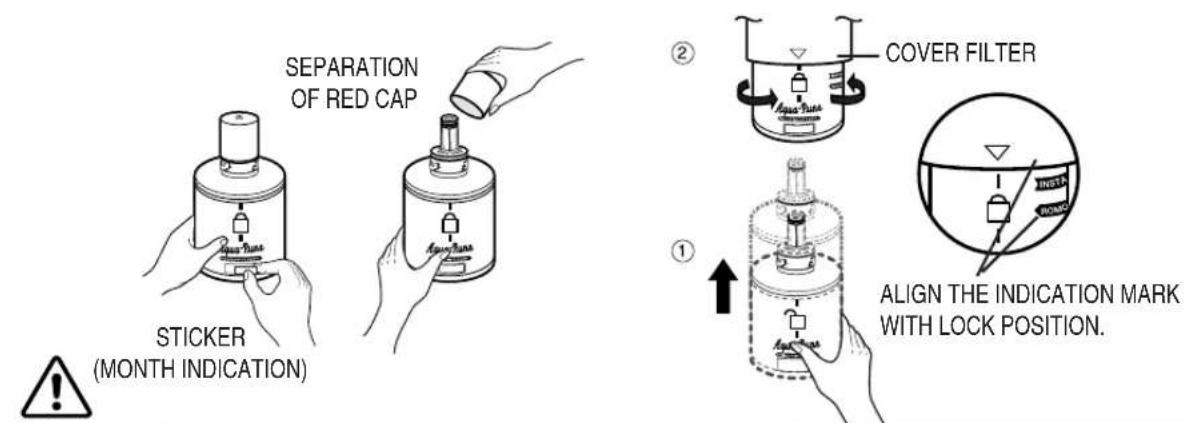
text_image
SEPARATION OF RED CAP STICKER (MONTH INDICATION) ② COVER FILTER ① ALIGN THE INDICATION MARK WITH LOCK POSITION.CAUTION
Please check if the indication line aligns with the lock position.
INSTALLING THE WATER DISPENSER LINE
For Exterior model

Connect to the water supply line
Connect the water pipe with coupler and tap.
- Close the main water tap.
- Connect coupler "A" to the tap.
- Every join should be protected with sealing tape.
WARRANTY INFORMATION
This water line installation is not covered by the refrigerator or ice maker manufacturer's warranty. Follow these instructions carefully to minimise the risk of expensive water damage.
Note:
If the coupler does not fit on the current tap, go the nearest authorised service dealer and purchase the right couplers fittings.
CAUTION
The water line must be connected to the cold water pipe. If it is connected to the hot water pipe, it may cause the purifier to malfunction.
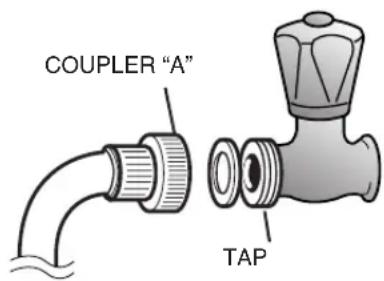
text_image
COUPLER "A" TAPSelect the location where the purifier is to install. (Model with the purifier)
- Cut the water line attached to the purifier to the appropriate place after measuring the distance between the purifier and the cold water tap.
- If you wish to reassemble the water inlet and outlet sides of the purifier during purifier installation, see the reference illustration.
Remove any residual matter inside the purifier. (Model with the purifier)
- Open the main water tap to check whether water is running through the water tube on the water inlet side of the purifier.
- If water does not come out through the line, check whether the tap is open.
- Leave the tap open until clean water is running out and any residual matter that built up during manufacturing has been removed.
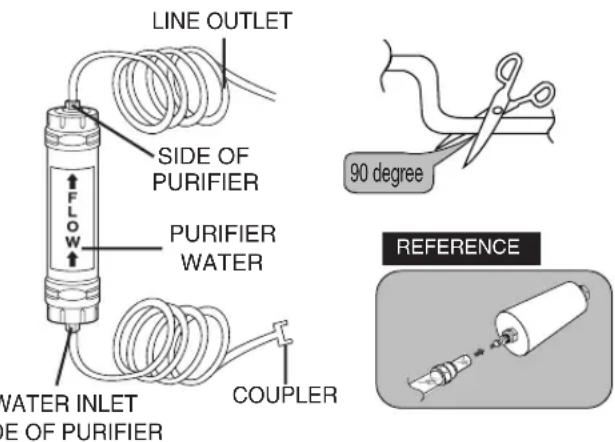
text_image
LINE OUTLET SIDE OF PURIFIER PURIFIER WATER WATER INLET ONE OF PURIFIER COUPLER 90 degree REFERENCE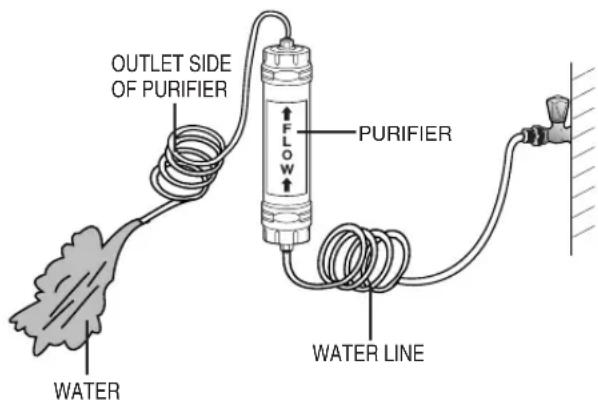
text_image
OUTLET SIDE OF PURIFIER PURIFIER WATER LINE WATERINSTALLING THE WATER DISPENSER LINE
Attach the purifier lock stations.
- Hold the purifier lock stations in the appropriate position (under the sink for example) and fix it tightly into place where to screw.
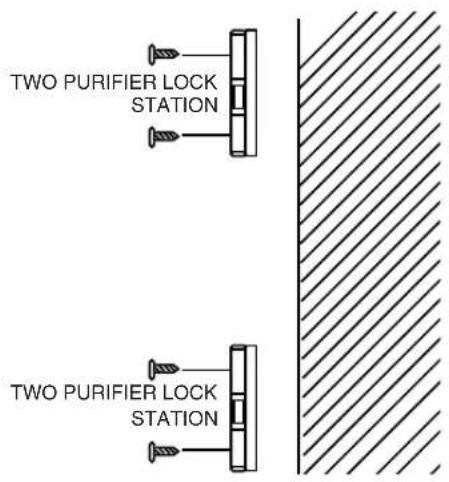
text_image
TWO PURIFIER LOCK STATION TWO PURIFIER LOCK STATIONSecure the purifier in position.
- Fix the purifier in position, as shown in the figure on the right.
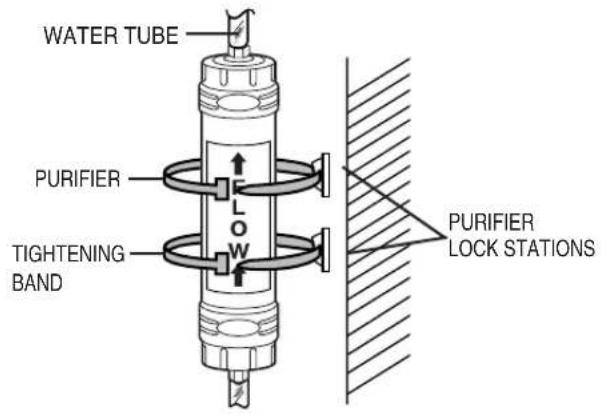
text_image
WATER TUBE PURIFIER TIGHTENING BAND LOW PURIFIER LOCK STATIONSConnect the water line to the refrigerator.
- Remove the compressor cover of the refrigerator.
- Connect the water line to the valve, as shown in the fig-ure.
- When connected, check if there is any leakage. If any, repeat the connection.
- Reattach the compressor cover of the refrigerator.
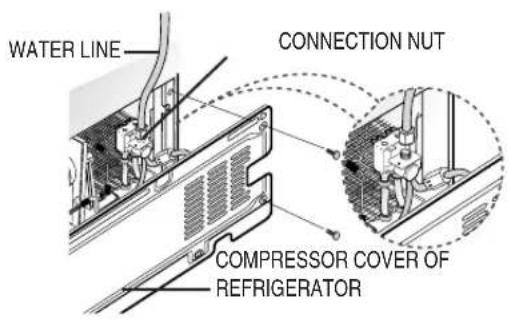
text_image
WATER LINE CONNECTION NUT COMPRESSOR COVER OF REFRIGERATORSecure the water line.
- Using clip "A", fix the water line to the wall (the back of refrigerator).
- When the water line is secure, make sure whether the water line is not excessively bent, pinched or squashed.
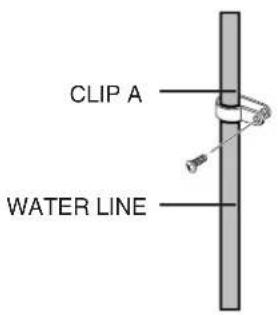
text_image
CLIP A WATER LINEINSTALLING THE WATER DISPENSER LINE

Remove any residual matter inside the water supply line
1) Turn on the main water supply & shut-off valve of the water supply line.
2) Run water through the dispenser until the water runs clear (6\~7 minutes). This will clean the water supply system and clear air from the lines.
3) Additional flushing may be required in some households.
4) Open the refrigerator door and check if water leaks around the water filter.

text_image
ICE WATER
- A newly-installed water filter cartridge may cause water to briefly spurt from the dispenser.
- Before reinstalling the water filter, remove the wine shelf.

Check the amount of water supplied to the ice tray.
1) Lift up (①) and pull out (②) the ice maker bucket in the freezer.
2) When you press the test button, the ice cube container is filled with water from the water supply tap.
Check the amount of water (see the illustration below).
If the water level is too low,
the ice cubes will be small.
This is not a problem with the ice maker but of the water pressure in the pipe, and occurs frequently.
When this problem occurs, contact the dealer service center to check the amount of water supplied.
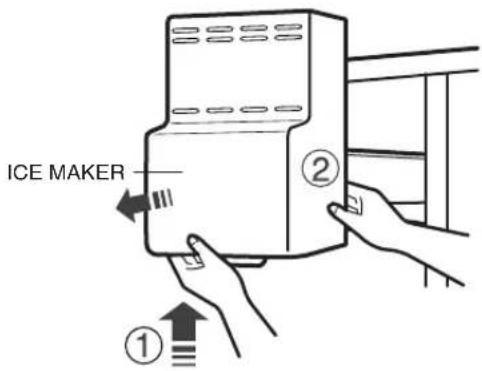
text_image
ICE MAKER ① ②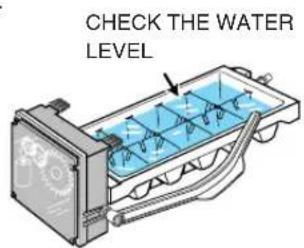
text_image
CHECK THE WATER LEVEL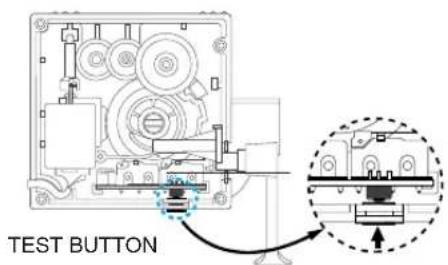
text_image
TEST BUTTON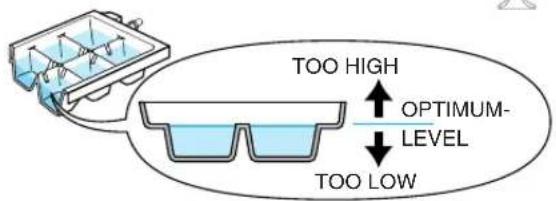
text_image
TOO HIGH OPTIMUM- LEVEL TOO LOWTROUBLESHOOTING
The refrigerator does not work at all or it does not chill sufficiently
- Check that the power plug is properly connected.
- Is the temperature control on the display panel set to the correct temperature? Try setting it to a lower temperature.
- Is the refrigerator in direct sunlight or located near a heat source?
- Is the back of the refrigerator too close to the wall?
The food in the refrigerator is frozen
- Is the temperature control on the display panel set to the correct temperature? Try setting it to a warmer temperature.
• Is the temperature in the room too low? - Did you store the food with a high water content in the coldest part of the refrigerator.
You can hear unusual noise or sounds
- Check that the floor is levelled and stable.
- Is the back of the refrigerator too near to the wall?
- Was anything dropped behind or under the refrigerator?
- A “ticking” sound may be heard from inside the refrigerator, but this is normal. This occurs because various accessories are contracted or expanded.
The front corners and sides of the cabinet are hot; condensation occurs.
- Anti-condensators are installed in the front corners of the refrigerator to prevent condensation.
- Condensation can occur when you leave the door open for a long time.
Ice is not dispensed
• Did you stop the ice making function?
- Is there any ice in the ice storage unit?
- Is the water line connected and the shut-off valve open?
- Is the freezer temperature too warm? (Set the temperature lower)
- Did you wait for 12 hours after installation of the water supply line before making ice?
You can hear water bubbling in the refrigerator
- The bubbling comes from the refrigerant circulating in the refrigerator and is normal.
There is a bad smell in the refrigerator
- Wrap food with a strong smell so that it is airtight. Throw away any rotten food.
Frost forms on the wall of the freezer
• Is the air vent blocked?
- Allow sufficient space between the foods stored for efficient air circulation.
• Is the door closed properly?
No water is supplied
- Is the water line connected and the shut-off valve open?
• Is the water supply line crushed? - Is the water tank frozen because the refrigerator temperature is too low? Select a warmer setting on the display panel.
Ambient Room Temperature Limits
This fridge/freezer is designed to operate in ambient temperatures specified by its temperature class marked on the rating plate.
| Temperature Class | Symbol | Ambient Temperature | |
| Maximum Minimum | |||
| Extended Temperate | SN 32°C (90°F) | 10°C (50°F) | |
| Temperate N 32°C (90°F) | 16°C (61°F) | ||
| Subtropical ST 38°C (100°F) | 18°C (64°F) | ||
| Tropical T 43°C (109°F) | 18°C (64°F) | ||
NOTE: Internal temperatures may be affected by such factors as the location of the fridge/freezer, ambient temperature and the frequency with which you open the door. Adjust the temperature as required to compensate for these factors.
English
natural_image
Symbol of a trash bin crossed with a diagonal line, no text or labels presentCorrect Disposal of This Product
(Waste Electrical & Electronic Equipment)
(Applicable in the European Union and other European countries with separate collection systems)
This marking shown on the product or its literature, indicates that it should not be disposed with other household wastes at the end of its working life. To prevent possible harm to the environment or human health from uncontrolled waste disposal, please separate this from other types of wastes and recycle it responsibly to promote the sustainable reuse of material resources.
Household users should contact either the retailer where they purchased this product, or their local government office, for details of where and how they can take this item for environmentally safe recycling.
Business users should contact their supplier and check the terms and conditions of the purchase contract. This product should not be mixed with other commercial wastes for disposal.
Contact SAMSUNG WORLD WIDE
If you have any questions or comments relating to Samsung products, please contact the SAMSUNG customer care center.
| Country | Customer Care Center ☎ | Web Site |
| AUSTRALIA | 1300 362 603 | www.samsung.com/au |
| CHILE | 800-726-7864(SAMSUNG) | www.samsung.com/cl |
| CZECH REPUBLIC | 844 000 844 | www.samsung.com/cz |
| FRANCE | 3260 SAMSUNG(7267864) or 08 25 08 65 65 (€ 0,15/min) | www.samsung.com/fr |
| GERMANY | 01805 - 121213 (€ 0,14Min) | www.samsung.de |
| HONG KONG | 3698 - 4698 | www.samsung.com/hk |
| HUNGARY | 06-80-SAMSUNG(7267864) | www.samsung.com/hu |
| INDONESIA | 0800 112 8888 | www.samsung.com/id |
| ITALIA | 800-SAMSUNG(7267864) | www.samsung.com/it |
| MALAYSIA | 1800-88-9999 | www.samsung.com/my |
| MEXICO | 01-800-SAMSUNG (7267864) | www.samsung.com/mx |
| NETHERLANDS | 0900 20 200 88 (€ 0.10/Min) | www.samsung.com/nl |
| PHILIPPINES | 1800-10-SAMSUNG (7267864) | www.samsung.com/ph |
| POLAND | 0 801 801 881, 022-607-93-33 | www.samsung.com/pl |
| RUSSIA | 8-800-55-555-55 | www.samsung.ru |
| SINGAPORE | 1800-SAMSUNG (7267864) | www.samsung.com/sg |
| SLOVAKIA | 0800-SAMSUNG(7267864) | www.samsung.com/sk |
| SOUTH AFRICA | 0860 7267864 (SAMSUNG) | www.samsung.com/za |
| SPAIN | 902 10 11 30 | www.samsung.com/es |
| TAIWAN | 0800-329-999 | www.samsung.com/tw |
| THAILAND | 1800-29-3232. 02-689-3232 | www.samsung.com/th |
| TRINIDAD & TOBAGO | 1-800-7267-864 | www.samsung.com/latin |
| U.A.E | 800SAMSUNG (7267864), 8000-4726 | www.samsung.com/mea |
| U.K | 0870 SAMSUNG (7267864) | www.samsung.com/uk |
| REPUBLIC OF IRELAND | 0818 717 100 | www.samsung.com/uk |
| U.S.A | 1-800-SAMSUNG (7267864) | www.samsung.com/us |
| VENEZUELA | 0-800-100-5303 | www.samsung.com/latin |
| VIETNAM | 1 800 588 889 | www.samsung.com/vn |
| INDIA | 3030 8282, 1800 110011 | www.samsung.com/in |