CM13102 - TV Curtis Mathes - Free user manual and instructions
Find the device manual for free CM13102 Curtis Mathes in PDF.


User questions about CM13102 Curtis Mathes
0 question about this device. Answer the ones you know or ask your own.
Ask a new question about this device
Download the instructions for your TV in PDF format for free! Find your manual CM13102 - Curtis Mathes and take your electronic device back in hand. On this page are published all the documents necessary for the use of your device. CM13102 by Curtis Mathes.
USER MANUAL CM13102 Curtis Mathes
natural_image
Front view of a CurtisMathes CRT television set with control buttons and display (no visible text or symbols on the device body)Customer Support: 1-800-270-4535
www.curtismathes.com
 | CAUTIONRISK OF ELECTRIC SHOCKDO NOT OPEN | 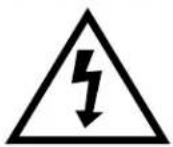 |
CAUTION : TO REDUCE THE RISK OF ELECTRIC SHOCK, DO NOT REMOVE COVER (OR BACK) NO USER-SERVICEABLE PARTS INSIDE. REFER SERVICING TO QUALIFIED SERVICE PERSONNEL.
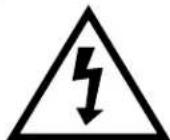
The lightning flash with arrowhead symbol, within an equilateral triangle, is intended to alert the user to the presence of uninsulated “dangerous voltage” within the product’s enclosure that may be of sufficient magnitude to constitute a risk electric shock.

The exclamation point within an equilateral triangle is intended to alert the user to the presence of important operating and servicing instructions in the literature accompanying the appliance.
WARNING
TO PREVENT FIRE OR SHOCK HAZARD, DO NOT EXPOSE THIS APPLIANCE TO RAIN OR MOISTURE.
CAUTION
CHANGES OR MODIFICATIONS NOT EXPRESSLY APPROVED BY THE MANUFACTURER COULD VOID THE USER'S AUTHORITY TO OPERATE THE EQUIPMENT.
NOTE TO CATV SYSTEM INSTALLER
THIS REMINDER IS PROVIDED TO CALL THE CATV SYSTEM INSTALLER'S ATTENTION TO ARTICLE 820-40 OF THE NEC THAT PROVIDES GUIDELINES FOR PROPER GROUNDING AND, IN PARTICULAR, SPECIFIES THAT THE CABLE GROUND SHALL BE CONNECTED TO THE GROUNDING SYSTEM OF THE BUILDING, AS CLOSE TO THE POINT OF CABLE ENTRY AS PRACTICAL.
CAUTION
The AC power cord provided with this product is polarized (one blade wider than the other). To provide power to the TV, insert the AC plug into a standard 120V 60Hz polarized outlet.
NOTE
Never connect the plug to an electrical source other than one providing 120V 60Hz power. Use only the attached power cord. If the polarized AC cord does not fit into a non-polarized outlet, do not cut or file the blade. You are responsible for having the obsolete outlet replaced with a polarized outlet.
If you feel a static discharge when touching the unit, and the unit does not function, simply unplug the unit from the outlet. When you plug the unit back in, it should work normally.
Do not install power cords near any heating element or cooking appliances.
CurtisMathes
3100 West Big Beaver Rd.
Troy, MI 48084
1-800-270-4535
Dear Customer :
CurtisMathes would like to thank you for choosing this color television receiver. It incorporates a host of features designed to give you excellent performance for many years to come.
We realize that you're eager to turn it on and begin enjoying the high-quality pictures it delivers just as quickly as possible, but we ask you to take a few minutes to read the instructions in the booklet to familiarize yourself with the receiver, its functions and some features which may be new to you. If you follow the instructions, this unit should give you many years of viewing pleasure.
If for any reason it does not, we want to hear about it. Please write to us at the address above. CurtisMathes always welcomes comments and suggestions on this or any of our other products.
On the other hand, when you discover the enjoyment, reliability and ease of use that is built into it, we hope that you will tell your friends, and consider CurtisMathes when you make your next purchase of home entertainment equipment.
In addition to TV receivers, CurtisMathes produces a full line of audiovisual products built to the same high design, engineering, and manufacturing standards as this unit.
Here are a few tips that will keep your TV receiver looking great and performing for years to come:
- Avoid putting it in excessively hot locations. Damage to the cabinet or premature component failures can result.
- There are ventilation holes in the bottom and rear of the cabinet. Make sure that they remain unobstructed. Do not place the receiver on top of a thick cloth.
- If you don't plan to use the receiver for several days, it's a good idea to unplug it from the power outlet.
- Many common household cleaning agents, sprays, solvents, and polishes will cause permanent damage to the surface of the cabinet. The best cleaning agents are mild soap and a damp cloth.
Again, thank you for choosing this CurtisMathes product. We have employed advanced engineering techniques in its design, and manufactured it in one of the world's most up-to-date production facilities. The result is a TV receiver that we know you will be as proud to own as we were to create.
Very truly yours,
CurtisMathes
CONTENTS
Table of Contents
Important Safeguards 2
Chapter 1: Overview of Your Equipment 4
Your TV's Front Panel 4....
Your TV's Back Panel 5
Your Remote Control 6
Installing your remote control batteries 7....
Notes 7 ......
Chapter 2: Connecting an Antenna or Cable to Your TV 8.
Connecting an Antenna 8
Connecting a Cable System 9
Connecting Other Pieces of Equipment 10
Safety Note 10
Chapter 3: Operating Your TV 1-1
Turning your TV On 11
Programming Your TV's Channel Memory ·H
Changing Channels 12
Changing the Volume 12
Changing the TV's Channel Memory 13
Adding/Deleting a channel to memory 13
Displaying the Current Channel 13
Changing the TV's Input 14
Adjusting Video Settings 15
Returning to the factory settings 16
Descriptions of video settings 16
Chapter 4: Using Timer Functions
Setting the Clock 17
Setting the Wake-Up Time 17
Setting the Off Time 18
Canceling the Wake-Up Time or Off Time 18
Setting the Sleep Timer 19
Chapter 5 : Additional Features
Changing the Language of the On-Screen Menus 20
Captioning 20
CC on Mute 21
Power Restore 21
Parental Control Settings 22
Description of Parental Control Settings 23
Chapter 6 : Troubleshooting
Remote
Warranty
IMPORTANT SAFEGUARDS
PLEASE READ ALL THESE INSTRUCTIONS REGARDING YOUR TELEVISION EQUIPMENT AND RETAIN FOR FUTURE REFERENCE. FOLLOW ALL WARNINGS AND INSTRUCTIONS MARKED ON THE TV RECEIVER.
1 Read all of these instructions.
2 Save these instructions for later use.
3 Unplug this television equipment from the wall outlet before cleaning. Do not use liquid cleaners or aerosol cleaners. Use a damp cloth for cleaning.
4 Do not use attachments not recommended by the television equipment manufacturer as they may result in the risk of fire, electric shock or other personal injury.
5 Do not use this television equipment near water, for example, near a bathtub, washbowl, kitchen sink, or laundry tub, in a wet basement, or near a swimming pool, or the like.
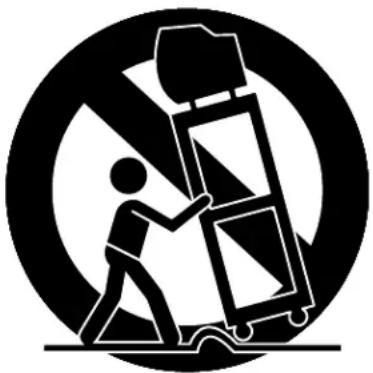
6 Do not place this television equipment on an unstable cart, stand, or table. The television equipment may fall, causing serious injury to a child or adult, and serious damage to the equipment. Use only with a cart or stand recommended by the manufacturer, or sold with the television equipment. Wall or shelf mounting should follow the manufacturer's instructions, and should use a mounting kit approved by the manufacturer.
6A An appliance and cart combination should be moved with care. Quick stops, excessive force, and uneven surfaces may cause the appliance and cart combination to overturn.
natural_image
Symbolic illustration of a person pushing a cart with a flag, enclosed in a circle (no text or symbols)2 Important Safeguards
7 Slots and openings in the cabinet and the back or bottom are provided for ventilation and to ensure reliable operation of the television equipment; and to protect it from overheating, these openings, must not be blocked or covered. The openings should never be blocked by placing the television equipment on a bed, sofa, rug, or other similar surface. (This equipment should never be placed near or over a radiator or heat register.) This television equipment should not be placed in a built-in installation such as a bookcase unless proper ventilation is provided.
8 This television equipment should be operated only from the type of power source indicated on the marking label. If you are not sure of the type of power supplied to your home, consult your television dealer or local power company.
9 This television equipment is equipped with a polarized alternating current line plug (a plug having one blade wider than the other). This plug will fit into the power outlet only one way. This is a safety feature. If you are unable to insert the plug fully into the outlet, try reversing the plug. If the plug should still fail to fit, contact your electrician to replace your obsolete outlet. Do not defeat the safety purpose of the polarized plug.
10 Do not allow anything to rest on the power cord. Do not locate this television equipment where the cord will be abused by persons walking on it.
11 Follow all warnings and instructions marked on the television equipment.
12 For added protection for this television equipment during a lightning storm, or when it is left unattended and unused for long periods of time, unplug it from the wall outlet and disconnect the antenna or cable system. This will prevent damage to the equipment due to lightning and power-line surges.
13 An outside antenna system should not be located in the vicinity of overhead power lines or other electric light or power circuits, or where it can fall into such power lines or circuits. When installing an outside antenna system, extreme care should be taken to keep from touching such power lines or circuits, as contact with them might be fatal.
14 Do not overload wall outlets and extension cords, as this can result in fire or electric shock.
15 Never push objects of any kind into this television equipment through openings, as they may touch dangerous voltage points or short-out parts that could result in a fire or electric shock. Never spill liquid of any kind on the television equipment.
16 Do not attempt to service this television equipment yourself, as opening or removing covers may expose you to dangerous voltage or other hazards. Refer all servicing to qualified service personnel.
17 Unplug this television equipment from the wall outlet and refer servicing to qualified service personnel under the following conditions:
(a) When the power-supply cord or plug is damaged or frayed.
(b) If liquid has been spilled, or objects have fallen into the television equipment.
(c) If the television equipment has been exposed to rain or water.
(d) If the television equipment does not operate normally by following the operating instructions. Adjust only those controls that are covered by the operating instructions, as an improper adjustment of other controls may result in damage and will often require extensive work by a qualified technician to restore the TV receiver to its normal operation.
(e) If the television equipment has been dropped or the cabinet has been damaged.
(f) When the television equipment exhibits a distinct change in performance - this indicates a need for service.
18 When replacement parts are required, be sure the service technician has used replacement parts specified by the manufacturer that have the same characteristics as the original part. Unauthorized substitutions may result in fire, electric shock or other hazards.
19 Upon completion of any service or repairs to this television equipment, ask the service technician to perform safety checks to determine that the television is in a safe operating condition.
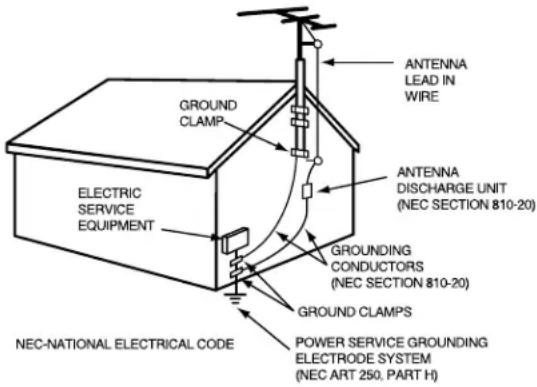
20 If an outside antenna or cable system is connected to the television receiver, be sure the antenna or cable system is grounded so as to provided some protection against voltage surges and built-up static charges.
Section 810 of the National Electrical Code, ANSI/NFPA N0.70-1984, provides information with respect to proper grounding of the mast and supporting structure, grounding of the lead-in wire to an antenna discharge unit, size of grounding conductors, location of antenna-discharge unit, connection to grounding electrodes, and requirements for the grounding electrode.
EXAMPLE OF ANTENNA GROUNDING
text_image
ANTENNA LEAD IN WIRE GROUND CLAMP ELECTRIC SERVICE EQUIPMENT ANTENNA DISCHARGE UNIT (NEC SECTION 810-20) GROUNDING CONDUCTORS (NEC SECTION 810-20) GROUND CLAMPS POWER SERVICE GROUNDING ELECTRODE SYSTEM (NEC ART 250, PART H) NEC-NATIONAL ELECTRICAL CODEOverview of Your Equipment
Your TV comes with a remote control. The section below summarizes the buttons, controls, and terminals that you will use with your TV.
Your TV's Front Panel
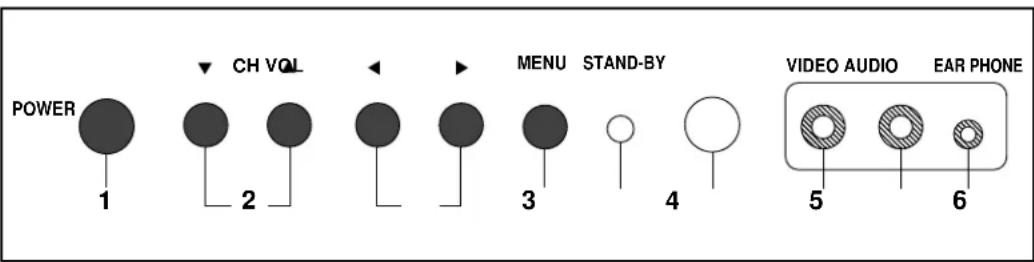
text_image
POWER 1 CH VQL 2 MENU STAND-BY 3 4 VIDEO AUDIO EAR PHONE 5 61 POWER
Use this button to turn your TV on or off.
2 ▼CH▲△
Use these buttons to change channels on your TV, or to select items in the menu system.
3 ◀VOL▶
Use these buttons to change your TV's volume, to activate selections in the menu system, or to change audio and video settings.
4 MENU
Use this button to turn the TV's menu system on and off.
5 STAND-BY(red) indicator
This indicator lights up when the power is off.
6 Remote control receiver
This receiver receives a signal from your remote control. Do not block it.
7 VIDEO IN jack
Use this jack to receive a video signal from another A/V component.
8 AUDIO IN jack
Use this jack to receive an audio signal from another A/V component.
9 EAR PHONE jack
Use this jack to receive an audio signal from your TV.
4 Chapter 1 : Overview of Your Equipment
Your TV's Back Panel
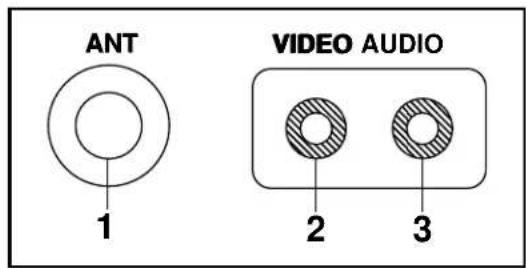
text_image
ANT 1 VIDEO AUDIO 2 31 Antenna terminal(ANT)
Use this terminal to attach an antenna or cable system to your TV.
2 VIDEO IN
This terminal allows the TV to receive a video signal from another component, such as a VCR.
3 AUDIO IN
This terminal allows the TV to receive an audio signal from another component, such as a VCR.
Your Remote Control
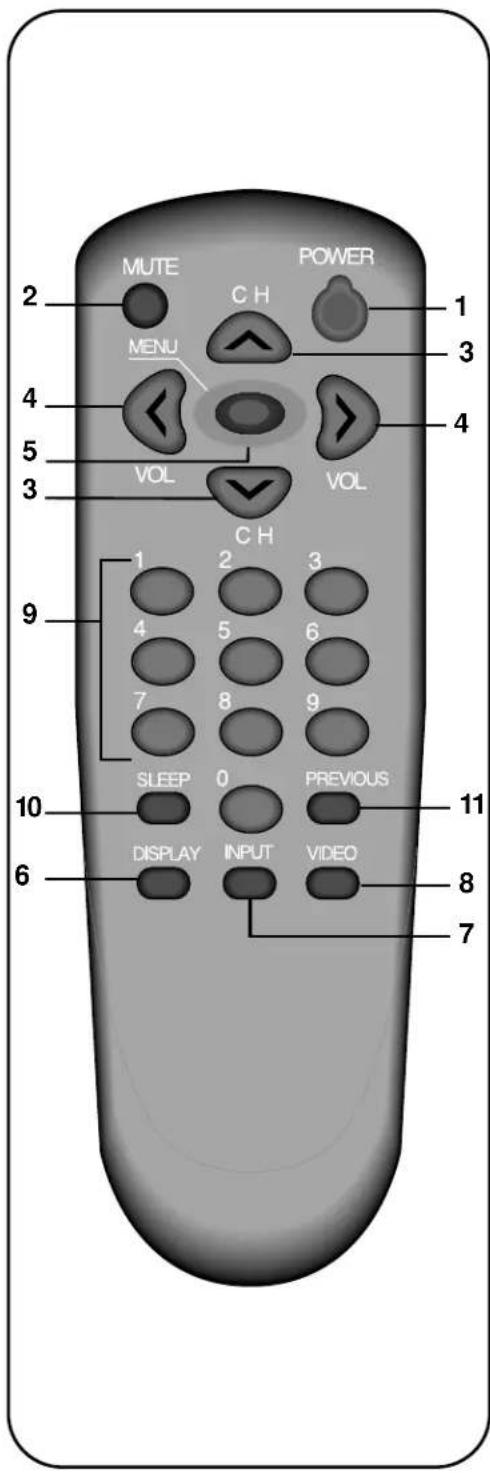
text_image
MUTE MENU C H POWER 1 3 4 5 VOL VOL C H 1 2 3 4 5 6 7 8 9 SLEEP 0 PREVIOUS 10 DISPLAY INPUT VIDEO 6 8 71. POWER
Use this button to turn your TV on or off.
2. MUTE
Use to turn the TV's sound on and off.
3. ▲CH▼▽
Use these buttons to change channels on your TV, or select items in the menu system.
4. ◀VOL▶
Use these buttons to change your TV's volume, to activate selections in the menu system, or to change audio and video settings.
5. MENU
Use this button to turn the TV's menu system on and off.
6. DISPLAY
Use this button to display the channel number and status.
7. INPUT
Use this button to select TV or VIDEO mode.
8. VIDEO
Use this button to display video adjustment items.
9.0-9
Use these buttons to change channels.
10. SLEEP
Use this button to program the TV to turn off after a certain time.
11. PREVIOUS
Use this button to return to the previous channel you were watching.
Installing your remote control batteries
1 Open the battery compartment on the back of the remote control.
2 Install two AA-size batteries (not included) as shown. Make sure the "+" and "-" terminals are oriented correctly.
3 Replace the cover.
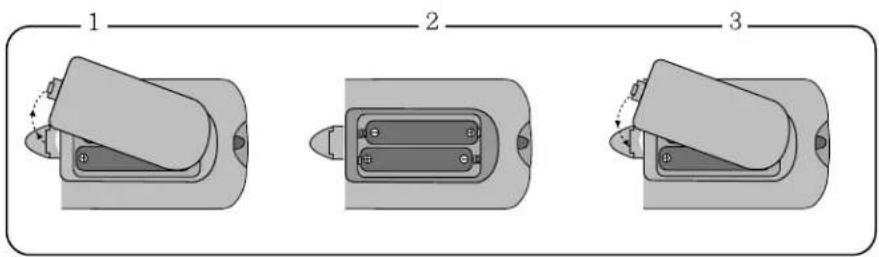
text_image
1 2 3Notes
Do not mix different types of batteries, or mix an old and a new battery.
Remove and replace weak batteries. Weak batteries can leak and damage your controller. Dispose of batteries properly; never throw them into a fire.
Point your remote at the receiver on the center of the front of the TV. Make sure the receiver is not blocked.
The remote control can operate up to 30 feet away from the TV, if you are directly facing the front of the TV. Operating distance diminishes as you move to the sides of the TV.
Connecting an Antenna or Cable to Your TV
Your TV will provide you with the best performance if you connect it to an external antenna or cable system. Follow the directions below to make this connection. Please note that you will normally only have to make one of the connections shown below, not all of them.
All connections will be made to the antenna terminal on the back of your TV. The antenna terminal is a silver metal post partially surrounded by two plastic tabs. For help in locating the antenna terminal, see “Your TV's Back Panel” on page 5.
Connecting an Antenna
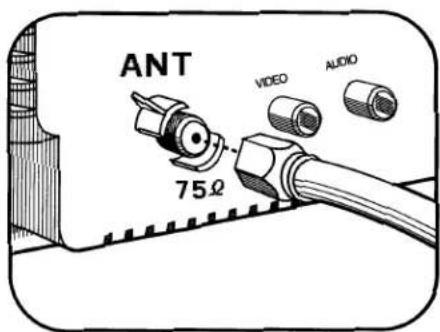
text_image
ANT 75Ω VIDEO AUDIOIf your antenna ends in a single coaxial lead, simply press or screw the cable onto the antenna terminal on the back of your TV.
If your antenna ends in a pair of 300 ohm twin leads, you must use a 300-ohm/75-ohm adapter(available at your local electronics store). Place the leads underneath the screws on the adapter, tighten the screws, then press the adapter onto the antenna terminal on the back of the TV.
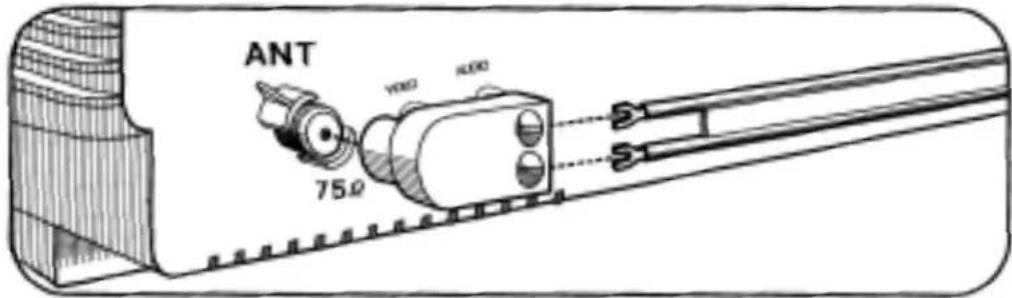
text_image
ANT 75Ω YOD HODAntennas with two sets of leads
You might have two sets of leads from your antenna system, especially if you have one antenna for VHF signals and one antenna for UHF signals.
If your antenna system has both a coaxial lead and twin 300-ohm leads, you must obtain a combiner (available at your local electronics store). Press or screw the coaxial lead onto the combiner; place the twin leads underneath the screws on the combiner and tighten the screws. Press the cable from combiner onto the antenna terminal on the back of your TV.
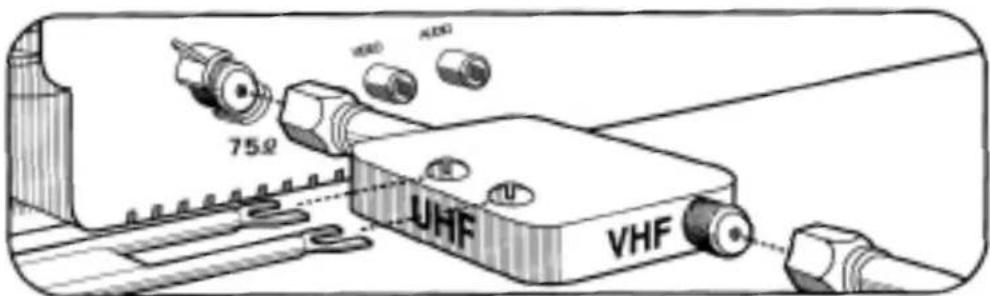
text_image
75.2 1000 4000 UHF VHFIf your antenna system has two sets of twin 300-ohm leads, you must obtain a combiner (available at your local electronics store). Place one set of twin leads underneath the screws on the combiner and tighten the screws. Do the same with the other set of twin leads. Press the cable from the combiner onto antenna terminal on the back of your TV.
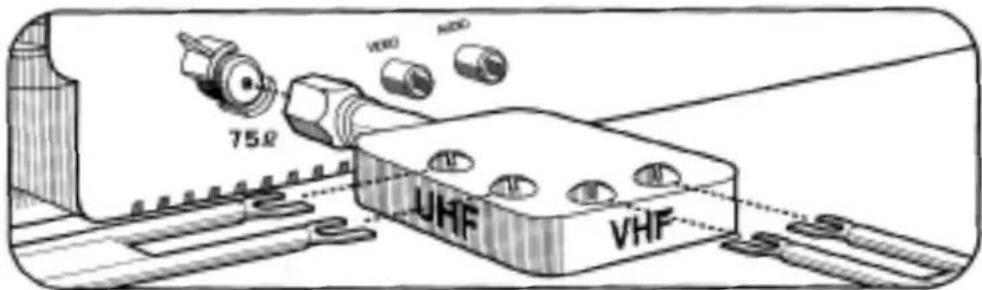
text_image
75Ω VREF AUDIO UHF VHFConnecting a cable system
text_image
ANT 75Ω VIDEO AUDIOIf your cable set-up is not described below, please contact your cable company for more information.
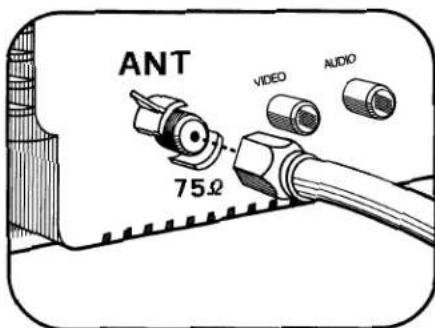
If your cable system does not require the use of a cable box, simply press or screw the incoming cable onto the antenna terminal on the back your TV.
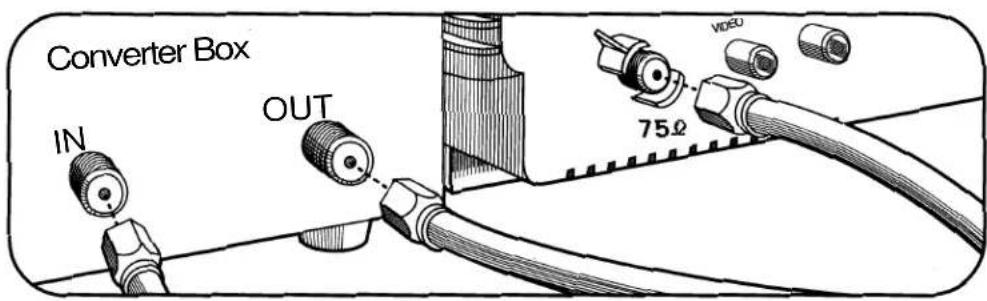
If your cable system requires you to use a converter box for all channels, connect the incoming cable to the IN terminal on the converter box. Connect another cable between the OUT terminal on the converter box and the antenna terminal on the TV. You will need to keep your TV tuned to channel 3 or 4 and change channels using the converter box.
text_image
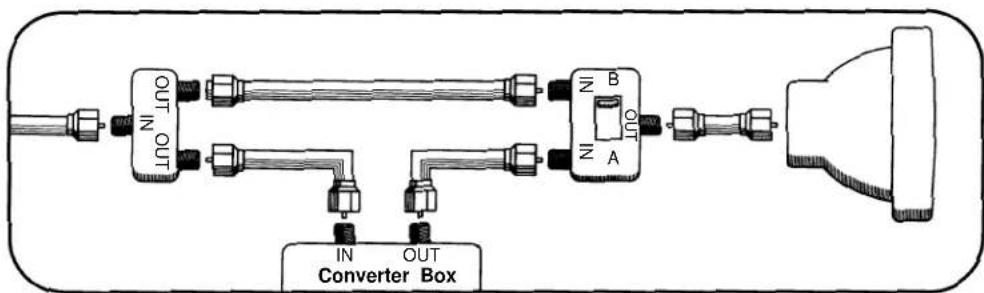
Converter Box IN OUT 75Ω VIDEOIf your cable system only requires you to use a converter box for some channels (i. e. pay-TV channels), follow these steps: Find the primary incoming coaxial cable. Plug this cable into a splitter (available at your local electronics store). Connect one coaxial cable between one OUT terminal on the splitter and the IN terminal on the converter box. Connect another coaxial cable between the other OUT terminal on the splitter and the B-IN terminal on an A/B switch (available at your local electronics store.) Connect a third coaxial cable between the OUT terminal on the converter box and the A-IN terminal on the A/B switch. Finally, connect a coaxial cable between the OUT terminal on the A/B switch and the antenna terminal on the back of your TV.
flowchart
graph LR
    A["Input"] --> B["Converter Box"]
    B --> C["Transformer A"]
    C --> D["Output"]
    B --> E["IN"]
    B --> F["OUT"]
    style B fill:#f9f,stroke:#333
    style C fill:#ccf,stroke:#333
    style D fill:#cfc,stroke:#333
When the A/B switch is in the A position, you need to change channels on the converter box (and your TV should be tuned to channel 3 or 4); when the A/B switch is in the B position you can change channels on the TV.
Connecting Other Pieces of Equipment
You may want to connect a VCR, laser disc player, satellite receiver, or another type of equipment to your TV. We recommend that you follow the instructions included with the piece of equipment you wish to connect.
Safety Note
If you plan on being away from your home for an extended period of time, or if a thunderstorm is approaching, you should unplug your television, and you may wish to disconnect your TV from a rooftop or satellite antenna. You do not need to disconnect your TV from a cable system.
CHAPTER 3
Operating Your TV
Once you have connected your TV to an antenna or cable system, plugged the TV in, and put batteries in the remote, you are ready to use the TV. The first thing you should do is program your TV so it memorizes all of available channels.
Turning Your TV On
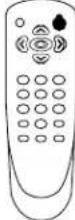
1 To turn your TV on, press the POWER button on the remote control. You can also use the POWER button on the front panel. Make sure your TV is plugged in before you try to turn it on.
Programming Your TV's Channel Memory
Your TV's memory determines the channels that are available using the ▲CH▼ buttons. If a channel is not in memory, you can tune to it with the number buttons, but not with the ▲CH▼ buttons. Follow these steps to program your TV's memory:
1 With the TV on, press the MENU button twice, then "Set-Up" menu will appear.
2 Use the ▲CH▼ buttons to select “Reception”, then use the ◀VOL▶ buttons to select ‘Air’ or ‘Cable’. If you connected an antenna to your TV, select ‘Air’; If you connected a cable system, select ‘Cable’.
3 Use the ▲CH▼ buttons to select "Memorize Channels", then use the ◀VOL▶ buttons to enter the "Memorize Channels" process. Again, press the ◀VOL▶ buttons to begin.
4 Press the MENU button to return to Set-Up menu.
5 Press the MENU button three times to return to normal TV viewing.
Your TV's channel memory will not be affected by a power outage. You will not need to re-program the memory unless you change the type of cable or antenna connected to your TV.
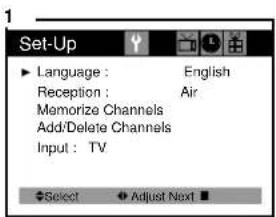
text_image
Set-Up ► Language : English Reception : Air Memorize Channels Add/Delete Channels Input : TV Select Adjust Next ■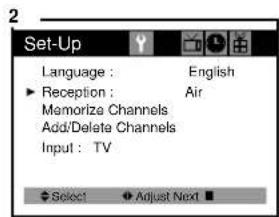
text_image
Set-Up Language : English ► Reception : Air Memorize Channels Add/Delete Channels Input : TV Select Adjust Next ■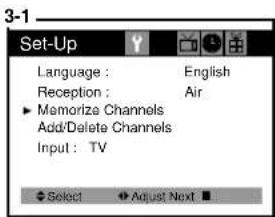
text_image
3-1 Set-Up Language : English Reception : Air ▶ Memorize Channels Add/Delete Channels Input : TV Select ▶ Adjust Next ■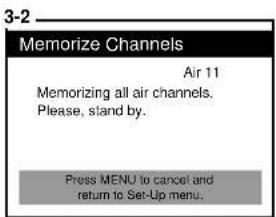
text_image
3-2 Memorize Channels Air 11 Memorizing all air channels. Please, stand by. Press MENU to cancel and return to Set-Up menu.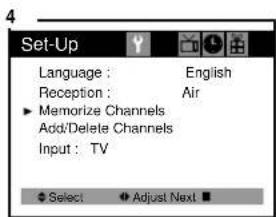
text_image
Set-Up Language : English Reception : Air ▶ Memorize Channels Add/Delete Channels Input : TV Select ▶ Adjust Next ■
natural_image
Empty rectangular frame with no text, numbers, or symbolsChanging Channels
1
2
3
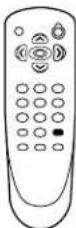
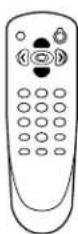
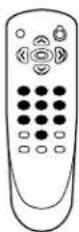
You can change channels in three ways:
1 The ▲CH▼ buttons will take you through all memorized channels, one by one. The ▲CH▼ buttons will not access channels that have not been programmed into the TV's memory. For more information about programming channels into memory, see the section "Programming your TV's Channel Memory" on the previous page.
2 The number buttons (0-9) will take you to any channel, even if it has not been memorized. To change to a channel, enter its number; the TV will tune to the new channel when you enter the second digit of the channel.
3 The PREVIOUS button will take you instantly to the last channel you were watching.
Changing the Volume
1
2
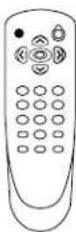
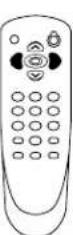
1 To change the volume of the TV set, use the ◀VOL▶ buttons on the remote or on the front panel.
2 To quickly turn off the sound, press the MUTE button on the remote. The 'MUTE' will appear on screen, colored green. To return the volume to its previous level, press MUTE again.
Changing the TV's Channel Memory
Your TV's memory determines the channels that are available using the ▲CH▼ buttons. You can add channels to this memory or remove them from memory. If a channel is removed from memory, you can tune to it with the number buttons, but you cannot tune to it with the ▲CH▼ buttons.
If there is just one channel memorized, then the Add/Delete Channels function will search all the channels. But if there are two or more channel memorized, then the Add/Delete Channels function will search the memorized channels only.
Adding/Deleting a channel to memory
1 Use the number buttons to tune to the channel.
2 Press the MENU button twice, then "Set-Up" menu will be displayed.
3 Use the ▲CH▼ buttons to select "Add/Delete Channels", then use the ◀VOL▶ buttons to enter the "Add/Delete Channels" process.
4 If the channel is not in memory, then use the ◀VOL▶ buttons to add the channel from memory.
5 If the channel is in memory, then use the ◀VOL▶ buttons to delete the channel from memory.
6 If you are going to delete another channel, then press the ▲CH▼ buttons until desired channel is selected. And press the ◀VOL▶ buttons to delete the channel.
7 Wait 10 seconds, or press the MENU button to return to normal TV viewing.

text_image
1 11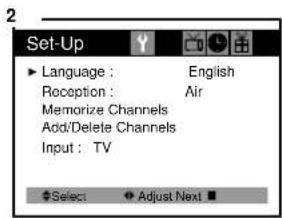
text_image
Set-Up Language : English Reception : Air Memorize Channels Add/Delete Channels Input : TV Select Adjust Next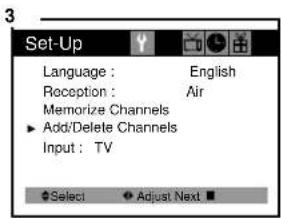
text_image
Set-Up Language : English Reception : Air Memorize Channels ► Add/Delete Channels Input : TV ◆ Select ◆ Adjust Next ■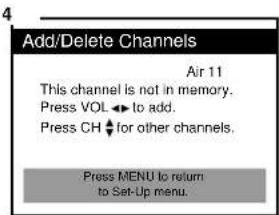
text_image
Add/Delete Channels Air 11 This channel is not in memory. Press VOL ▶ to add. Press CH ◆ for other channels. Press MENU to return to Set-Up menu.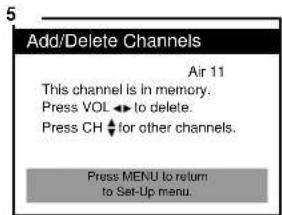
text_image
Add/Delete Channels Air 11 This channel is in memory. Press VOL ↩ to delete. Press CH ↕ for other channels. Press MENU to return to Set-Up menu.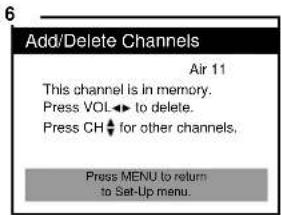
text_image
Add/Delete Channels Air 11 This channel is in memory. Press VOL←→ to delete. Press CH←→ for other channels. Press MENU to return to Set-Up menu.Displaying the Current Channel
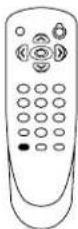
1 To quickly see the current channel number and status, press DISPLAY button on the remote control.
The current channel number and status will be displayed.
Changing the TV's Input
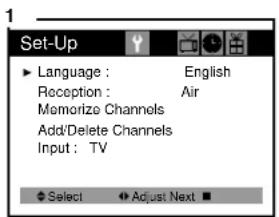
Normally, your TV displays the signal coming through the antenna terminal. However, If you've connected another component to your TV(such as a VCR) using the Video/Audio input, you will want to be able to view the signal from the component.
To do this, you will need to switch from the 'TV' input to the 'Line' Input, as follows.
1 With the TV on, press the MENU button twice, then "Set-Up" menu will appear.
2 Use the ▲CH▼ buttons to select "Input".
3 Press the ◀VOL▶ buttons to change from 'TV' to 'Line'.
4 Wait 10 seconds, or press the MENU button to return to normal TV viewing.
text_image
Set-Up Language : English Reception : Air Memorize Channels Add/Delete Channels Input : TV Select Adjust Next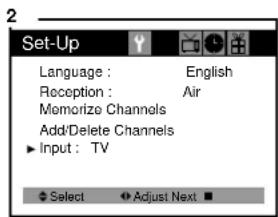
text_image
Set-Up Language : English Reception : Air Memorize Channels Add/Delete Channels Input : TV Select Adjust Next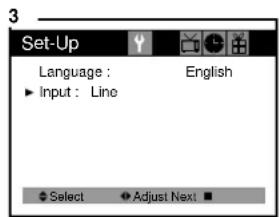
text_image
Set-Up Language : English Input : Line Select Adjust NextWhen connecting an Video/Audio cable from the Video/Audio out jack on the VCR to the Video/Audio in jack on the front of your TV, and your TV's back panel at the same time, the former takes precedence over the latter.
Adjusting Video Settings
You may wish to adjust the video settings (e. g. contrast or color) to obtain the most pleasing picture. To do so, follow these directions:
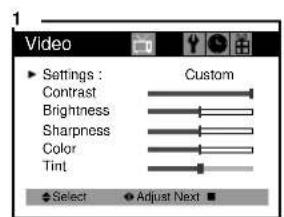
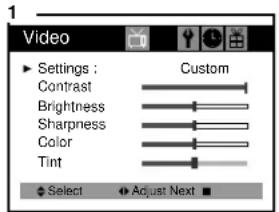
1 With the TV on, press the MENU button, then "Video" menu will appear.
2 The "Settings" item will be selected. Use the ◀VOL▶ buttons to turn Settings to Preset or Custom.
3 Use the ▲CH▼ buttons to select the video setting you wish to adjust. Descriptions of the video settings are on the next page.
4 Use the ◀VOL▶ buttons to adjust the video setting to the level you prefer.
5 Use the ▲CH▼ buttons to select another video setting to adjust.
6 When you are finished, press the MENU button until menu disappears.
text_image
Video Settings : Custom Contrast Brightness Sharpness Color Tint Select Adjust Next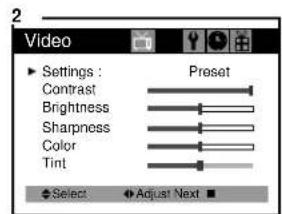
text_image
2 Video Settings : Preset Contrast Brightness Sharpness Color Tint Select Adjust Next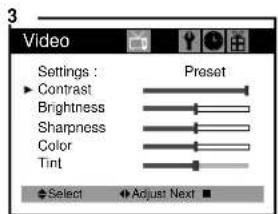
text_image
3 Video Settings : Preset Contrast Brightness Sharpness Color Tint Select Adjust Next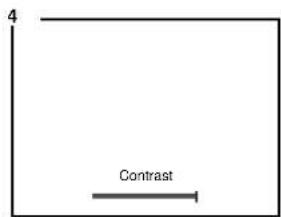
text_image
4 Contrast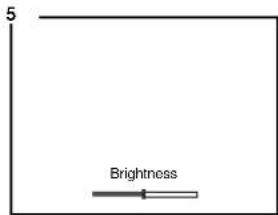
text_image
5 Brightness
natural_image
Empty rectangular frame with a single corner marker (no text or symbols)Returning to the factory settings
If you would like to return to the original video settings, as they were calibrated at the factory, follow these steps :
1 With the TV on, press the MENU button, then "Video" menu will appear.
2 Press the ◀VOL▶ buttons to set the “Settings” to ‘Preset’.
The TV will remember the ‘Custom’ settings you had previously chosen. When you set “Settings” to ‘Custom’ again, your previous custom settings will be restored.
text_image
Video ▶ Settings : Custom Contrast Brightness Sharpness Color Tint Select Adjust Next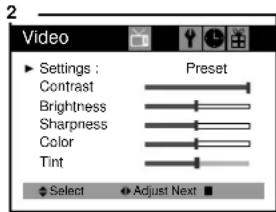
text_image
Video Settings : Contrast Brightness Sharpness Color Tint Preset Select Adjust Next
natural_image
Empty white rectangle with black border (no text or symbols)Descriptions of video settings
The contrast setting controls the relation between the light and black areas of the screen. If the light areas are too bright and are losing details, press the ◀VOL button; if the picture is gray and lacks contrast, press the VOL▶ button.
The brightness setting controls the overall amount of light in the picture. If the picture is too bright, press the ◀VOL button; if the picture is too dark, press the VOL ▶ button.
Sharpness controls how the TV displays edges of objects on-screen. If the TV shows multiple vertical lines at the edges of an object, press the ◀VOL button; if the vertical edges of on-screen objects are fuzzy, press the VOL▶ button.
The color setting controls the intensity of color. If the color is over-saturated, press the ◀VOL button; if the color is washed out, press the VOL▶ button.
The tint setting controls the relationship of red and green in a picture. Tint is especially noticeable in flesh tones. If flesh tones seem too red or purple, press the VOL▶ button; if flesh tones are too green, press the ◀VOL button.
Using Timer Functions
Your TV has a built in-clock, and you can set the TV to turn on and off at times that you select. You can also set your TV to turn off after counting down a certain amount of time.
Setting the Clock
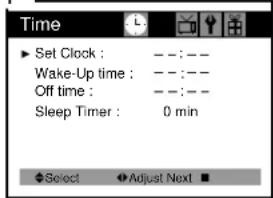
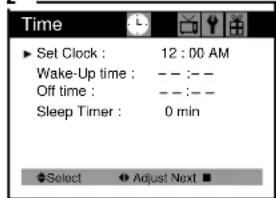
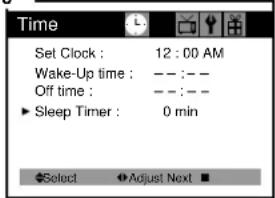
1 With the TV turned on, press the MENU button until "Time" menu is displayed.
2 The “Set Clock” item will be selected. Press the ◀VOL▶ buttons to set the clock.
If you hold down either ◀VOL or VOL▶ button, the corresponding numbers will change more quickly.
3 When the clock is set correctly, use the ▲CH▼ buttons to select another “Time” function, or press the MENU button to return to normal TV viewing.
1
text_image
Time ► Set Clock : --:-- Wake-Up time : --:-- Off time : --:-- Sleep Timer : 0 min ◆Select ▶Adjust Next ■2
text_image
Time ► Set Clock : 12 : 00 AM Wake-Up time : -- :-- Off time : -- :-- Sleep Timer : 0 min Select Adjust Next ■3
text_image
Time Set Clock : 12:00 AM Wake-Up time : --:-- Off time : --:-- Sleep Timer : 0 min Select Adjust Next ■Settings the Wake-Up Time
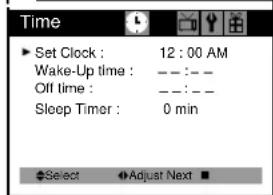
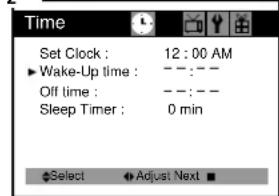
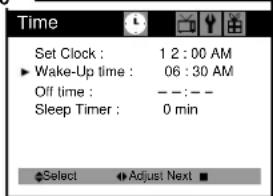
If you enter a time in the “Wake-Up time” setting, your TV will automatically turn on at that time. Follow these instructions to set the “Wake-Up time”.
After Wake-up Timer turned on the TV set, if user does not input the user control (e.g. remote CH or VOL key) within 15 minutes, the TV set will turn off automatically. If user inputs the user control within 15 minutes, the TV set will turn on continuously. It is a safety feature to prevent any kind of problem without human control.
1 With the TV turned on, press the MENU button until "Time" menu is displayed.
2 Use the ▲CH▼ buttons to select “Wake-Up time” item.
3 If you hold down either ◀VOL or VOL▶ button, the corresponding numbers will change more quickly.
4 When the setting is correct, use the ▲CH▼ buttons to select another “Time” function, or press the MENU button to return until menu disappears.
1
text_image
Time ▶ Set Clock : 12 : 00 AM Wake-Up time : ---:--- Off time : ---:--- Sleep Timer : 0 min Select ▶Adjust Next ■2
text_image
Time Set Clock : 12 : 00 AM ► Wake-Up time : — —:— Off time : — —:— Sleep Timer : 0 min Select ▼ Adjust Next ■3
text_image
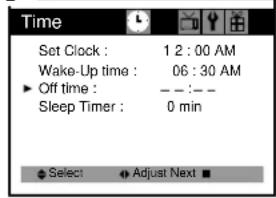
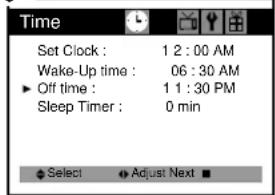
Time Set Clock : 1 2 : 00 AM ► Wake-Up time : 06 : 30 AM Off time : — — : — Sleep Timer : 0 min Select ▶ Adjust Next ■Setting the Off Time
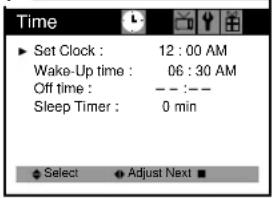
If you enter a time in the “Off time” setting, your TV will automatically turn off at that time. Follow these instructions to set the “Off time”.
1 With the TV turned on, press the MENU button until "Time" menu is displayed.
2 Use the ▲CH▼ buttons to select "Off time" item.
3 If you hold down either ◀VOL or VOL▶ button, the corresponding numbers will change more quickly.
4 When the setting is correct, use the ▲CH▼ buttons to select another “Time” function, or press the MENU button until menu disappears.
1
text_image
Time ► Set Clock : 12 : 00 AM Wake-Up time : 06 : 30 AM Off time : - - : - Sleep Timer : 0 min Select Adjust Next ■2
text_image
Time Set Clock : 1 2 : 00 AM Wake-Up time : 06 : 30 AM ▶ Off time : — — : — Sleep Timer : 0 min Select Adjust Next ■3
text_image
Time Set Clock : 1 2 : 00 AM Wake-Up time : 06 : 30 AM ▶ Off time : 1 1 : 30 PM Sleep Timer : 0 min Select Adjust Next ■Canceling the Wake-Up Time or Off Time
If you would like to cancel the Wake-up Time or the Off Time, Press the ◀VOL▶ buttons until the time settings return to “- -:- -”.
The Wake-Up Time and Off Time will not function correctly unless the clock has been set.
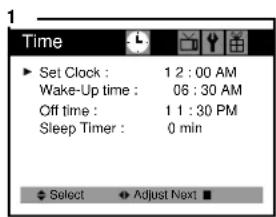
Setting the Sleep Timer
The sleep timer allows you to set an amount of time from 15 minutes to 120 minutes.
The TV will count down the amount of time you set, then turn itself off.
To set the sleep timer:
1 With the TV turned on, press the MENU button until "Time" menu is displayed.
2 Use the ▲CH▼ buttons to select "Sleep Timer" item.
3 Use the ◀VOL▶ buttons to set the sleep time. Each time you press VOL, you step between the available sleep times : 15min, 30min, 45min, 60min, 90min, and 120min.
4 When the setting is correct, use the ▲CH▼ buttons to select another “Time” function, or press the MENU button until menu disappears.
5 You can also set the "Sleep Timer" during normal TV viewing, simply by pressing the SLEEP button on the remote control. This button steps through the available sleep times (see step 3), one by one.
To cancel the Sleep timer, turn the TV off, or set the sleep time to "0" using one of the methods described above.
text_image
1 Time ► Set Clock : 12:00 AM Wake-Up time : 06:30 AM Off time : 11:30 PM Sleep Timer : 0 min Select Adjust Next ■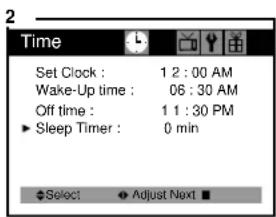
text_image
2 Time Set Clock : 1 2 : 00 AM Wake-Up time : 06 : 30 AM Off time : 1 1 : 30 PM ► Sleep Timer : 0 min Select ▼ Adjust Next ■
text_image
3 Time Set Clock : 1 2 : 00 AM Wake-Up time : 06 : 30 AM Off time : 1 1 : 30 PM ► Sleep Timer : 60 min Select Adjust Next ■Additional Features
This section contains descriptions of the more advanced features of your TV.
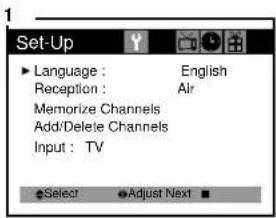
Changing the Language of the On-screen Menus
You can choose to display the on-screen menus in English, Spanish or French. To change the on-screen language:
1 With the TV on, press the MENU button twice, then "Set-Up" menu will appear.
2 The "Language" item will be selected. Press the ◀VOL▶ buttons to select the language you want to use: English, Spanish or French.
3 To return normal TV viewing, press the MENU button until menu disappears.
text_image
Set-Up Language : English Reception : Air Memorize Channels Add/Delete Channels Input : TV Select Adjust Next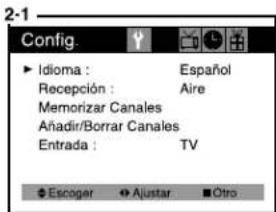
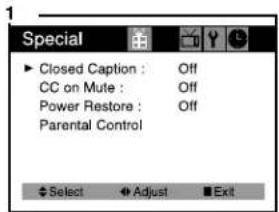
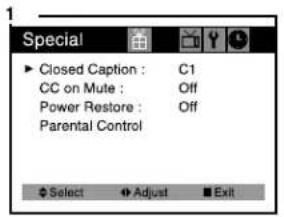
Many TV shows contain “Closed Captions”. These captions are hidden words that can be displayed on your TV screen. There are two types of these words: “captions” usually follow the action on-screen, providing a written version of the dialogue, narration, and sound effects; “text” is not usually related to the action on-screen, often providing information such as news or weather. A TV program might be providing more than one set of captions or one set of text.
To set your TV to display captions or text;
1 With the TV turned on, press the MENU button until "Special" menu is displayed.
2 The "Closed Caption" item should be selected. To turn captioning on, use the ◀VOL▶ buttons to select Captions (C1 or C2) or Text (T1 or T2).
At the time these instructions were written, only C1 was available, but feel free to try the other selections.
3 Wait 10 seconds, or press the MENU button to return to normal TV viewing. Your setting will remain intact until you change it.
text_image
Special ► Closed Caption : Off CC on Mute : Off Power Restore : Off Parental Control Select Adjust Exit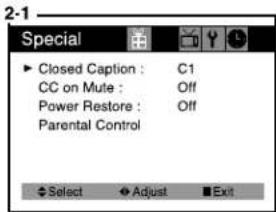
text_image
Special ► Closed Caption : C1 CC on Mute : Off Power Restore : Off Parental Control Select Adjust Exit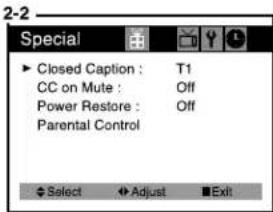
text_image
Special ► Closed Caption : T1 CC on Mute : Off Power Restore : Off Parental Control Select Adjust ExitCC on Mute
When the sound is muted, user can select the caption display. It will display the caption content instead of sound mute.
1 With the TV turned on, press the MENU button until "Special" menu is displayed.
2 Use the ▲CH▼ buttons to select "CC on Mute" item.
3 Use the ◀VOL▶ buttons to select "C1" or "C2".
text_image
Special ► Closed Caption : C1 CC on Mute : Off Power Restore : Off Parental Control Select Adjust Exit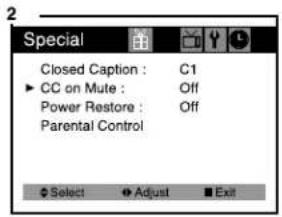
text_image
Special Closed Caption : C1 ▶ CC on Mute : Off Power Restore : Off Parental Control Select Adjust Exit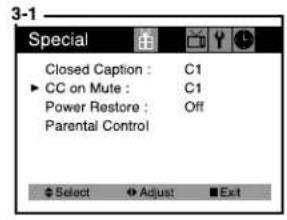
text_image
3-1 Special Closed Caption : C1 ► CC on Mute : C1 Power Restore : Off Parental Control Select Adjust Exit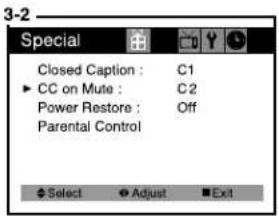
text_image
Special Closed Caption : C1 ► CC on Mute : C2 Power Restore : Off Parental Control Select Adjust ExitPower Restore
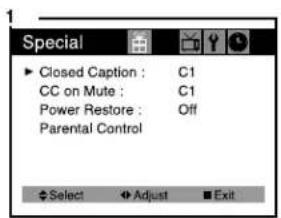
User can select the On/Off status when the power cord is plugged into the wall outlet. If user has a cable box with AC outlet, then user can connect the TV power cord to the AC outlet and control the TV without TV remote control. This function is rarely used for home use, so special care is needed while using.
1 With the TV turned on, press the MENU button until "Special" menu is displayed.
2 Use the ▲CH▼ buttons to select "Power Restore" item.
3 Use the ◀VOL▶ buttons to select "On" or "Off".
text_image
Special ► Closed Caption : C1 CC on Mute : C1 Power Restore : Off Parental Control Select Adjust Exit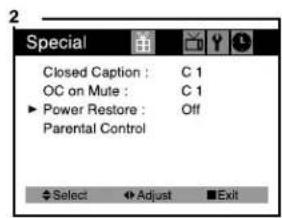
text_image
Special Closed Caption : C 1 OC on Mute : C 1 ► Power Restore : Off Parental Control Select Adjust Exit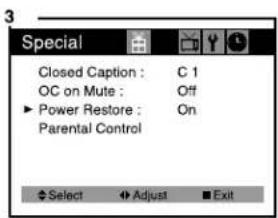
text_image
Special Closed Caption : C 1 OC on Mute : Off ▶ Power Restore : On Parental Control Select ▶ Adjust ■ ExitParental Control Settings
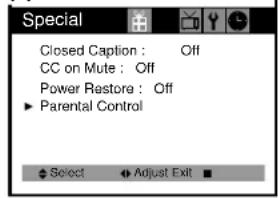
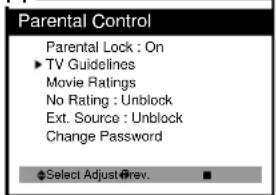
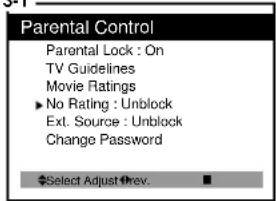
This item helps parents to set the standard for the programs which their children are going to watch.
1 With the TV on, press the MENU button until "Special" menu appears.
2 Use the ▲CH▼ buttons to select "Parental Control" item.
3 Use the ◀VOL▶ buttons to enter into “Parental Control” settings.
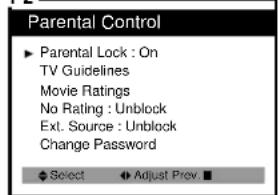
4 Use the number buttons(0-9) to enter your password, then "Parental Control" menu will be displayed. If this is the first time you are using your "Parental Control" menu, after entering your password you have to remember it.
5 The Parental Lock feature will be selected. Use the ◀VOL▶ buttons to toggle “On” or “Off”.
6 Use the ▲CH▼ buttons to select the Parental Control settings you wish to adjust.
Descriptions of the Parental Control settings are on the next page.
7 Use the ◀VOL▶ buttons to adjust the Parental Control settings.
8 Use the MENU button to return to the menu one level up.
1-1
text_image
Special Closed Caption : Off CC on Mute : Off Power Restore : Off ► Parental Control Select Adjust Exit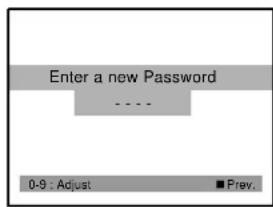
text_image
Enter a new Password 0-9 : Adjust ■ Prev.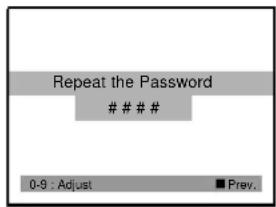
text_image
Repeat the Password ### 0-9 : Adjust Prev.1-2
text_image
Parental Control ► Parental Lock : On TV Guidelines Movie Ratings No Rating : Unblock Ext. Source : Unblock Change Password ◆ Select ◆ Adjust Prev. ■Description of Parental Control Settings
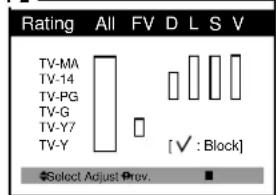
- The TV Guidelines set the standard for TV programs excluding sports and news. Use the ▲CH▼ buttons to select, ◀VOL▶ buttons to adjust. You can set individual settings with ◀VOL▶ buttons.
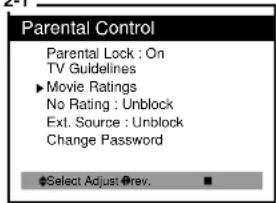
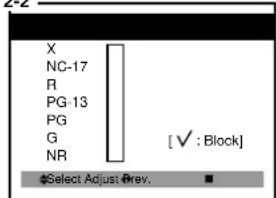
- The Movie Ratings set the standard for movie, video, and other media excluding TV programs. Use the ▲CH▼ buttons to select, ◀VOL▶ buttons to adjust.
- The No Rating item toggles between “Unblock” and “Block”. This item determines whether to block or not the programs which are not rated by “Movie Ratings” and “TV Guidelines”. Use VOL buttons to change the settings.
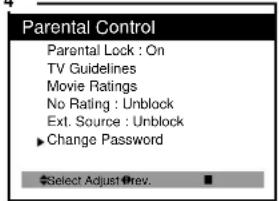
- The Set Password item let you change the password for entering Parental Control item. You had better change the initial password "0000". Use ◀VOL▶ buttons to enter the password input display, and use the number buttons(0-9) to enter new password. After you entered the new password, a confirmation display will appear. Type the password again.
1-1
text_image
Parental Control ►Parental Lock : On ►TV Guidelines Movie Ratings No Rating : Unblock Ext. Source : Unblock Change Password ◆Select Adjust#rev.1-2
text_image
Rating All FV D L S V TV-MA TV-14 TV-PG TV-G TV-Y7 TV-Y [✓ : Block] Select Adjust Prev.2-1
text_image
Parental Control Parental Lock : On TV Guidelines ►Movie Ratings No Rating : Unblock Ext. Source : Unblock Change Password ●Select Adjust▼rev.2-2
text_image
X NC-17 R PG-13 PG G NR [✓ : Block] #Select Adjust Prev.3-1
text_image
Parental Control Parental Lock : On TV Guidelines Movie Ratings ► No Rating : Unblock Ext. Source : Unblock Change Password $Select Adjust#rev.4
text_image
Parental Control Parental Lock : On TV Guidelines Movie Ratings No Rating : Unblock Ext. Source : Unblock ►Change Password Select Adjust1#rev.Troubleshooting
Your CurtisMathes television is designed to give you trouble-free performance for many years. If you have a problem with your TV, try the solutions listed below.
If the suggestions listed below do not solve your problem, contact your CurtisMathes dealer or an authorized CurtisMathes service center. You can also call CurtisMathes directly at 1-800-270-4535.
There is no picture or sound, or the TV doesn't turn on.
• Make sure the TV is plugged in.
• Make sure the MUTE is not set.
• Make sure the power is on.
- If there is neither picture or sound, unplug the TV for 30 seconds, then plug it in and try again.
There is no picture or sound on some UHF channels.
- Try another station. If the other stations are OK, it may be a station problem.
- Check that the antenna is connected, is in good working order, has no broken wires, and is adjusted correctly.
• See if anything is interfering with the antenna signal. - Make sure the AIR/CABLE setting is correct.
The sound is OK, but the picture is poor.
- Try another station. If the other stations are OK, it may be a station problem.
- Check that the antenna is connected and is in good working order, has no broken wires, and is adjusted correctly.
The picture is OK, but the sound is poor.
- Try another station. If the other stations are OK, it may be a station problem.
- Check that the antenna is connected, is in good working order, has no broken wires, and is adjusted correctly.
There is poor reception on some channels.
- Try another station. If the other stations are OK, it may be a station problem.
- Check that the antenna is connected, is in good working order, has no broken wires, and is adjusted correctly.
You cannot tune to a cable channel.
- Make sure the AIR/CABLE setting is correct.
- The channel may not be programmed into memory.
The picture rolls, slants, shows lines, is grainy, has poor color, or has ghosts.
- Try another station. If the other stations are OK, it may be a station problem.
- Check that the antenna is connected, is in good working order, has no broken wires, and is adjusted correctly.
• See if anything is interfering with the antenna signal.
The remote control does not work.
• Make sure the TV is plugged in.
- Make sure there are fresh batteries in the remote control.
- Make sure there is nothing blocking the remote control signal.
CurtisMathes ORIGINAL REMOTE CONTROL
Please call 1-800-270-4525 to order a replacement CurtisMathes original remote control. Exact replacement of your original remote control will allow access to all the features of this product.
UNIVERSAL REMOTE CONTROLS
Optionally, you may desire to purchase a universal remote control available at most electronics Super Stores including Kmart. Please see compatibility chart below with remote control codes for the different categories of CurtisMathes video products. This chart is provided as an aid to help you program your new universal remote control with the correct CurtisMathes code. The chart below is not provided as an endorsement for the brands listed but purely to facilitate the programming of your new universal remote control. For additional information on universal remotes, please contact your universal remote control manufacturer directly.
| Brand of Universal Remote | CurtisMathes | ||
| Color Television TV/VCR Combo VCR | |||
| ONE for All CODE | SEARCHING CODE SEARCHING CODE SEARCHING0624, 0451, 0092, 0278,0019, 0039,0030, 0060, 0154, 02020466, 1147, 1347 | 0278, 00450035 0035, 0041, 0060, | |
| SOLE Control 4664 | 4655, 4633, 6610, 6790, 6789,4632, 4623, 4598, 6788,4574, 4573, 4572, 6632,4494, 4465, 4446,4431, 4424, 4401 6804,4641, 4614, 4531,4521, 4516, 4480,4439, 4415 | 6610, 6790, 6789,6752, 6688, 6788, 6752, 6688,6621, 6604, 6632, 6621, 6604,6765, 6732, 6804, 6765, 6732,6731, 6680, 6657, 6731, | 6680, 6657, |
| RCA 190, 004, 005, | 006, 027, 015, 017, 019,016, 017, 018, 126, 025,127, 171,000, 015, 105, 162, 018, | 027, 015, 017, 019,026, 028, 110,000, 002, 009, 013,016, 021, 022,024, 115, | 026, 028, 110,000, 002, 009, 013,016, 021, 022,024, 115, |
| SONY | SEARCH or041, 035, 036, 003, VCR019, 023, | TV - TV Code- VCR Code | 044, 015, 012,007, 041, |
| ZENITH | CODE SEARCH CODE SEARCH CODE SEARCH311, 002, 102, 110, 334,203, 214, 221, 303,314, 403, 407, 502,503, 505, 512, 611,805,103, 112, 502, 506,601, 701, | 505, | 334, 033, 133, 134,234, 434, 533, 642,034, 143, 233, 532,631, 637, 831, 932, |
| JENSEN | 477, 473, 468, 465,459, 455, 453, 414, 613,448, 442, 411, | 674, 672, 623, 622,670, 663, 645, 628,626, 610, 607, 626, 610, | 674, 672, 623, 622,670, 663, 645, 628,607, |
NOTE : Universal remote controls do not always enable the user to operate all features provided in your new television or video product.
Warranty Information
Limited Warranty
The manufacturer warrants that this product is free from defective material and workmanship. The manufacturer further warrants that if the product fails to operate properly within the specified warranty period and the failure is due to improper workmanship or defective material, the manufacturer will repair or replace the product at its option. All warranty repairs must be performed by a CurtisMathes authorized service center. The name and address of the service center nearest you can be obtained by calling the number below toll free:
1-800-270-4535 Or visit our web site at: www.curtismathes.com
Terms of Warranty
• Labor: Ninety days for carry-in service
• Parts: One (1) year
• Picture Tube: 2 years
On carry-in models, transportation to and from the service center is the customer's responsibility. The customer's original dated receipt is the only proof of purchase accepted for warranty claims. It must be presented to the Curtis Mathes authorized service center at the time the service is requested. No exceptions can be made.
Exclusions
This warranty does not cover damage due to accident, misuse, neglect, fire, flood, and/or acts of God; incorrect line voltage, improper installation, improper or unauthorized repairs, commercial use, incorrect wiring not our own, unauthorized modification, or damage which occurs in shipping, or use in violation of supplied instructions, nor products which have been repaired or altered outside the factory, nor cases where the serial number thereof has been removed, defaced or changed. Exterior and interior finish, lamps, glass, and temperature probes, if supplied are not covered under this warranty. Customer adjustments, which are explained in the instruction manual, are not covered under the terms of this warranty. The warranty is only valid on products purchased and used in the United States and Puerto Rico.
This warranty is in lieu of all warranties expressed or implied and no representative or person is authorized to assume for us any other liability in connection with the sale of this electronic product.
Initially defective product Over-the-Counter Exchange
"Initially defective" is described as when the dealer opens the product carton and finds that the product is inoperative or a customer opens a new product and finds that the product is inoperable. The product may be returned to the factory by the dealer only for exchange. Under no circumstances will the customer be permitted to return the defective product directly to the factory. The customermust return the product directly to the dealer where the product was purchased for exchange. Exchanges will be made on initially defective products returned to the dealer within 10 days of original date of purchase.
MEMO

This product is listed by Underwriter's Laboratories, Inc. It is designed and manufactured to meet rigid U.L. safety standards against X-radiation, fire casualty and electrical hazards.
FCC RULES: "THIS TELEVISION RECEIVER PROVIDES
☐ DISPLAY OF TELEVISION CLOSED
□ CAPTIONING IN ACCORDANCE WITH
☐ SECTION 15.119 OF THE FCC RULES."

text_image
energyAs an ENERGY STAR® Partner, CurtisMathes has determined that this product or product model meets the ENERGY STAR® guidelines for energy efficiency.
CurtisMathes
3100 West Big Beaver Road
Troy, MI 48084
For more information about this or other CurtisMathes products, please visit our web site at: www.curtismathes.com.