
W5810 - Server Thecus - Free user manual and instructions
Find the device manual for free W5810 Thecus in PDF.


| Product Type | NAS Server |
| Brand | Thecus |
| Model | W5810 |
| Operating System | Windows Storage Server 2012 R2 Essentials |
| Processor | Intel Atom D2700 (from manual reference) or similar |
| System Memory | 2 GB (minimum, upgradable to 4 GB) |
| Drive Bays | 5 x 3.5" SATA HDD (with locks) |
| Network Interfaces | 2 x Gigabit Ethernet (WAN/LAN1, LAN2) |
| USB Ports | 1 x USB 3.0 (front), 1 x USB 3.0 (rear), 2 x USB 2.0 (rear) |
| Video Output | HDMI, VGA |
| Audio | LINE Out (rear) |
| Display | LCD panel (front) for system status |
| Power Supply | 100-240V AC, 60-50Hz, 3-1.3A |
| Cooling | 1 x system fan (rear) |
| Management | Windows Server Essentials Dashboard, Remote Desktop, Connector software |
| Data Protection | RAID support (via Windows), backup and recovery options |
| Security | Active Directory, domain controller, password policies |
| Recovery Method | Recovery DVD/USB with ISO download |
| Dimensions | Not specified in manual; estimated ~ 200 x 200 x 250 mm |
| Weight | Not specified; estimated ~ 5 kg |
Frequently Asked Questions - W5810 Thecus
User questions about W5810 Thecus
0 question about this device. Answer the ones you know or ask your own.
Ask a new question about this device
Download the instructions for your Server in PDF format for free! Find your manual W5810 - Thecus and take your electronic device back in hand. On this page are published all the documents necessary for the use of your device. W5810 by Thecus.
USER MANUAL W5810 Thecus
Thecus WSS Getting Started Guide
W2000/W4000/W5000/W5810 series

Copyright and Trademark Notice
Thecus and other names of Thecus products are registered trademarks of Thecus Technology Corp. Microsoft, Windows, and the Windows logo are registered trademarks of Microsoft Corporation. Apple, iTunes and Apple OS X are registered trademarks of Apple Computers, Inc. All other trademarks and brand names are the property of their respective owners. Specifications are subject to change without notice.
Copyright © 2015 Thecus Technology Corporation. All rights reserved.

About This Manual
All information in this manual has been carefully verified to ensure its correctness. In case of an error, please provide us with your feedback. Thecus Technology Corporation reserves the right to modify the contents of this manual without notice.
Product name: W2000/W2000+/W4000/W4000+/W5000/W5000+/W5810 series
Manual Version: 1.3
Release Date: November 2015

Limited Warranty
Thecus Technology Corporation guarantees all components of Thecus NAS products are thoroughly tested before they leave the factory and should function normally under general usage. In case of any system malfunctions, Thecus Technology Corporation and its local representatives and dealers are responsible for repair without cost to the customer if the product fails within the warranty period and under normal usage. Thecus Technology Corporation is not responsible for any damage or loss of data deemed to be caused by its products. It is highly recommended that users conduct necessary back-up practices.
Check the functions that are available on your particular Thecus WSSE NAS model at:
http://WSS.thecus.com
For your safety, please read and follow the following safety warnings:
Read this manual thoroughly before attempting to set up your Thecus IP storage.
Your Thecus IP storage is a complicated electronic device. DO NOT attempt to repair it under any circumstances. In the case of malfunction, turn off the power immediately and have it repaired at a qualified service center. Contact your vendor for details.
DO NOT allow anything to rest on the power cord and DO NOT place the power cord in an area where it can be stepped on. Carefully place connecting cables to avoid stepping or tripping on them.
Your Thecus IP storage can operate normally under temperatures between 5°C and 40°C, with relative humidity of 20% – 85%. Using Thecus IP storage under extreme environmental conditions could damage the unit.
➢ Ensure that the Thecus IP storage is provided with the correct supply voltage (W2000/W2000+: Input 12Vdc, 5.0A, W4000/W4000+: Input 12Vdc, 8.5A, W5000/W5000+/W5810: Input 100-240Vac, 60-50Hz, 3-1.3A). Plugging in Thecus IP storage an incorrect power source could damage the unit.
Do NOT expose Thecus IP storage to dampness, dust, or corrosive liquids.
Do NOT place Thecus IP storage on any uneven surfaces.
DO NOT place Thecus IP storage in direct sunlight or expose it to other heat sources.
➢ DO NOT use chemicals or aerosols to clean Thecus IP storage. Unplug the power cord and all connected cables before cleaning.
DO NOT place any objects on the Thecus IP storage or obstruct its ventilation slots to avoid overheating the unit.
Keep packaging out of the reach of children.
If disposing of the device, please follow your local regulations for the safe disposal of electronic products to protect the environment.
Risk of explosion if battery is replaced by an incorrect type.
➢ Dispose of used batteries according to the instructions
Table of Contents
Copyright and Trademark Notice......ii
About This Manual....ii
Limited Warranty....ii
Safety Warnings....iii
§Chapter 1: Introduction......v
1.1 Package Contents......v
1.2 W2000/W2000+......vi
1.3 W4000/W4000+.......viii
1.4 W5000/W5000+.....x
1.5 W5810....xii
§Chapter 2: Hardware Installation. ....1
§ Chapter 3: Getting started. ....3
3.1 Hardware installation....3
3.2 First Power On....3
3.3 Essentials Administrative Dashboard......4
- Configure Essentials Administrative Dashboard....4
- To set up a new Active Directory environment....4
• To deploy your WSSE NAS in an existing Active Directory environment. .... 7
3.4 Connect to WSSE using Remote Desktop Connection....11
3.5 Connect your computer to the WSSE by using the Connector software. . 11
§Chapter 4: System Recovery. ....12
§Appendix: Frequently Asked Questions. 13
1.1 Package Contents
• W2000/W2000+/W4000/W4000+/W5000/W5000+/W5810
◆ System Unit x1
♦ Licensing key x1
♦ QIG (Quick Installation Guide) x1
◆ Ethernet Cable x1
- Accessory bag x1
◆ Multiple Languages Warranty Card x1
Power adapter x1 (except W5000/W5000+/W5810)
Power cord x1
Please check to see if your package is complete. If you find that some items are missing, contact your dealer.
1.2 W2000/W2000+:
- Front Panel
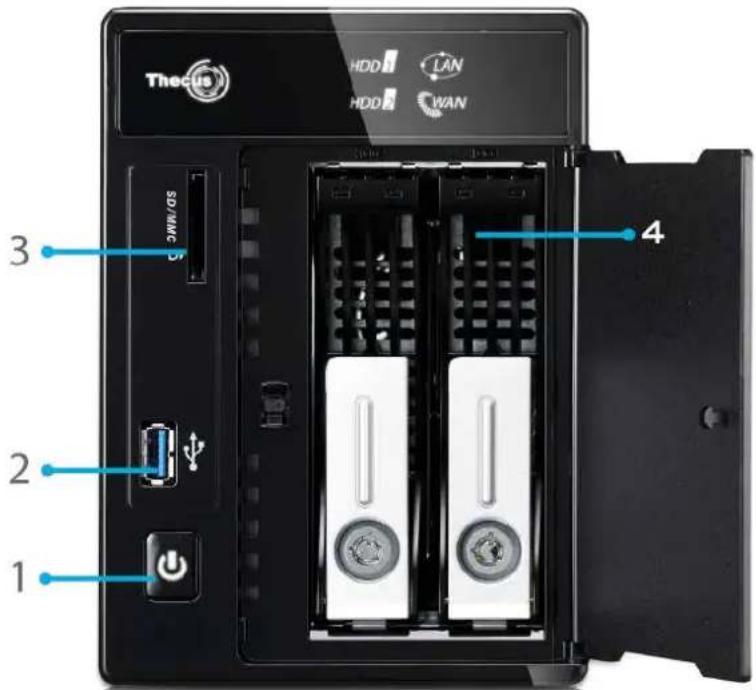
The Thecus W2000/W2000+'s front panel shows the device's indicators and hard disk install slots:
text_image
Thecis HDD HDD LAN CWAN 3 4 2 1| Front Panel | |
| Item Description | |
| 1. Power Button Powers | the W2000/W2000+ on/off. |
| 2. USB Port | USB 3.0 port for compatible USB devices, such as digital cameras, USB disks, and USB printers. |
| 3. Card reader Supports | SD/SDHC/MMC cards via USB interface. |
| 4. HDD Tray Two HDD trays support 4x 3.5" or 4 x 2.5" HDDs | |
- Rear Panel
The W2000/W2000+'s rear panel features ports and connectors.
Item Description
- eSATA Port eSATA port for high-speed external storage expansion.
- USB 2.0 Port USB 2.0 port for compatible USB devices, such as digital cameras, USB disks, and USB printers.
- WAN/LAN1 Port WAN/LAN1 port for connecting to an Ethernet network through a switch or a router.
- LAN2 Port LAN2 port for connecting to a local Ethernet network through a switch or a router.
- System Fan System fan that exhausts heat from the unit.
- Power Connector To connect the power adaptor
- HDMI For Video/Audio out
- VGA For Video out
1.3 W4000/W4000+:
- Front Panel
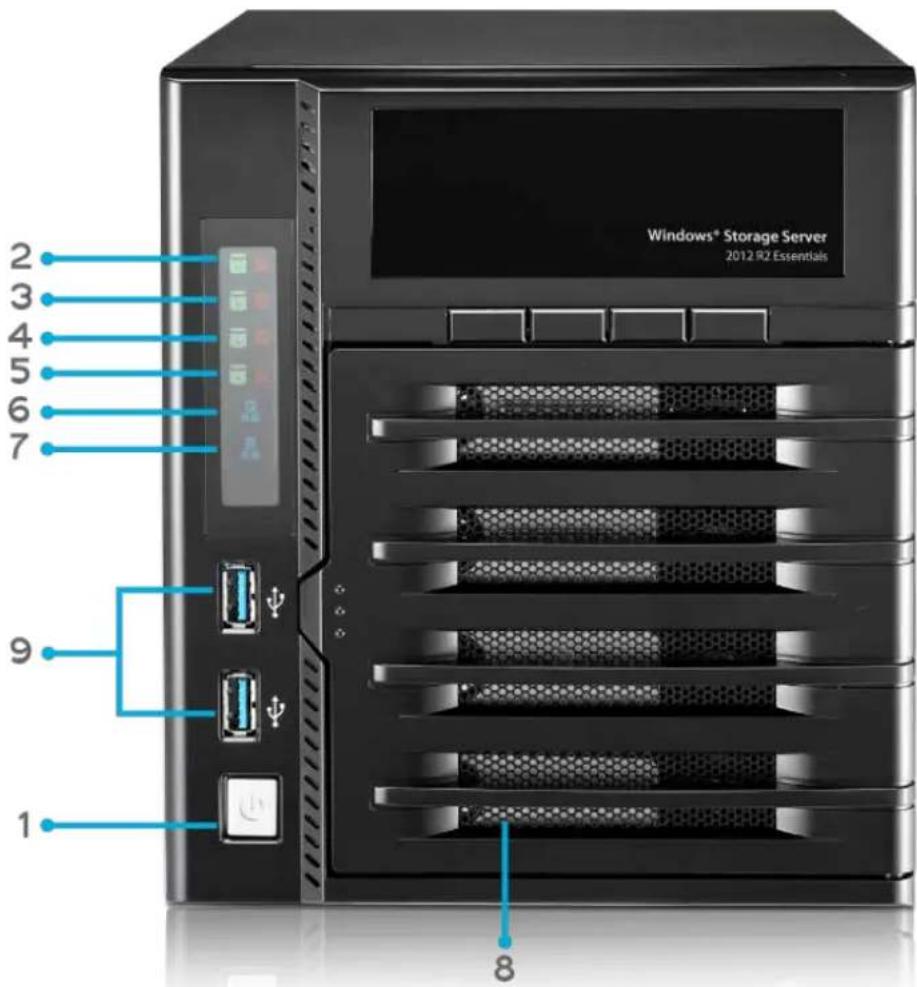
The Thecus W4000/W4000+'s front panel shows the device's indicators and hard disk install slots:
text_image
Windows® Storage Server 2012 R2 Essentials 1 2 3 4 5 6 7 9 8| Front Panel | |
| Item Description | |
| 1. Power Button Powers the W4000/W4000+ on/off. | |
| 2. HDD1 LED | Yellow: HDD activityRed: HDD failure |
| 3. HDD2 LED | Yellow: HDD activityRed: HDD failure |
| 4. HDD3 LED | Yellow: HDD activityRed: HDD failure |
| 5. HDD4 LED | Yellow: HDD activityRed: HDD failure |
| 6. WAN/LAN1 LED Blinking green: network activity | |
| 7. LAN2 LED Blinking green: network activity | |
| 8. HDD Tray Four HDD trays support 4x 3.5" or 4 x 2.5" HDDs | |
| 9. USB Port | USB 3.0 port for compatible USB devices, such as digital cameras, USB disks, and USB printers. |
- Rear Panel
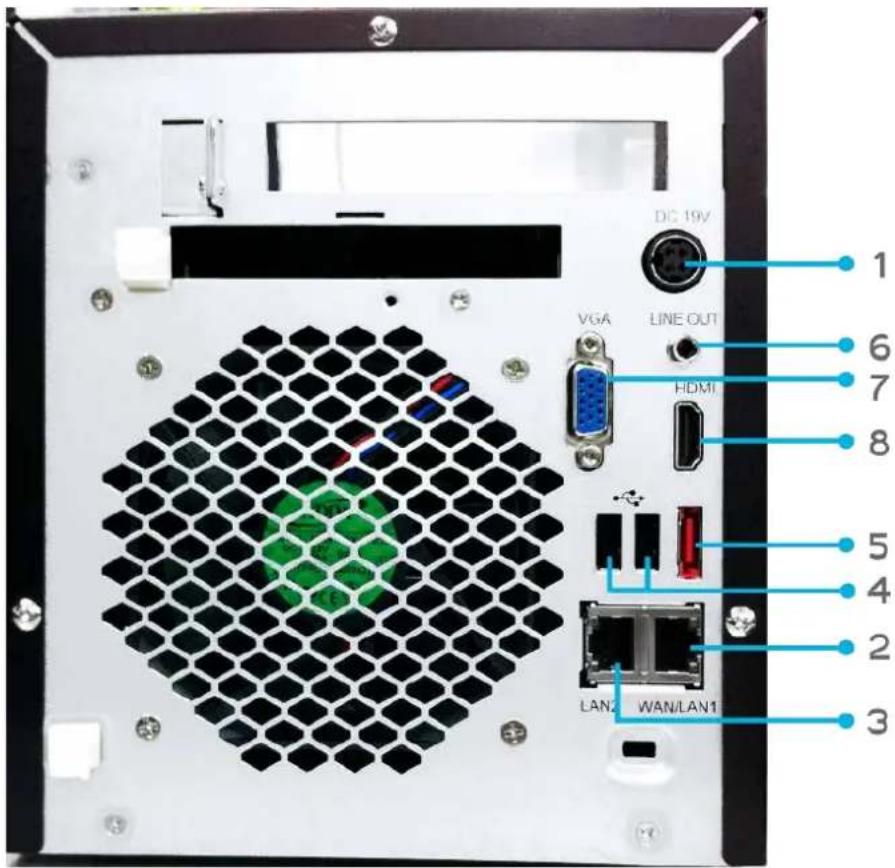
The W4000/W4000+'s rear panel features ports and connectors.
text_image
DC 19V VGA LINE OUT HDMI LAN2 WAN/LAN1 1 6 7 8 5 4 2 3| Back Panel | |
| Item Description | |
| 1. Power Connector To | connect the power adaptor |
| 2. WAN/LAN1 Port | WAN/LAN1 port for connecting to an Ethernet network through a switch or a router. |
| 3. LAN2 Port LAN2 port | for connecting to a local Ethernet network through a switch or a router. |
| 4. USB 2.0 Port | USB 2.0 port for compatible USB devices, such as digital cameras, USB disks, and USB printers. |
| 5. eSATA Ports eSATA port for high-speed storage expansion | |
| 6. LINE Out For Audio out | |
| 7. VGA For Video out | |
| 8. HDMI For Video/Audio out | |
1.4 W5000/W5000+:
- Front Panel
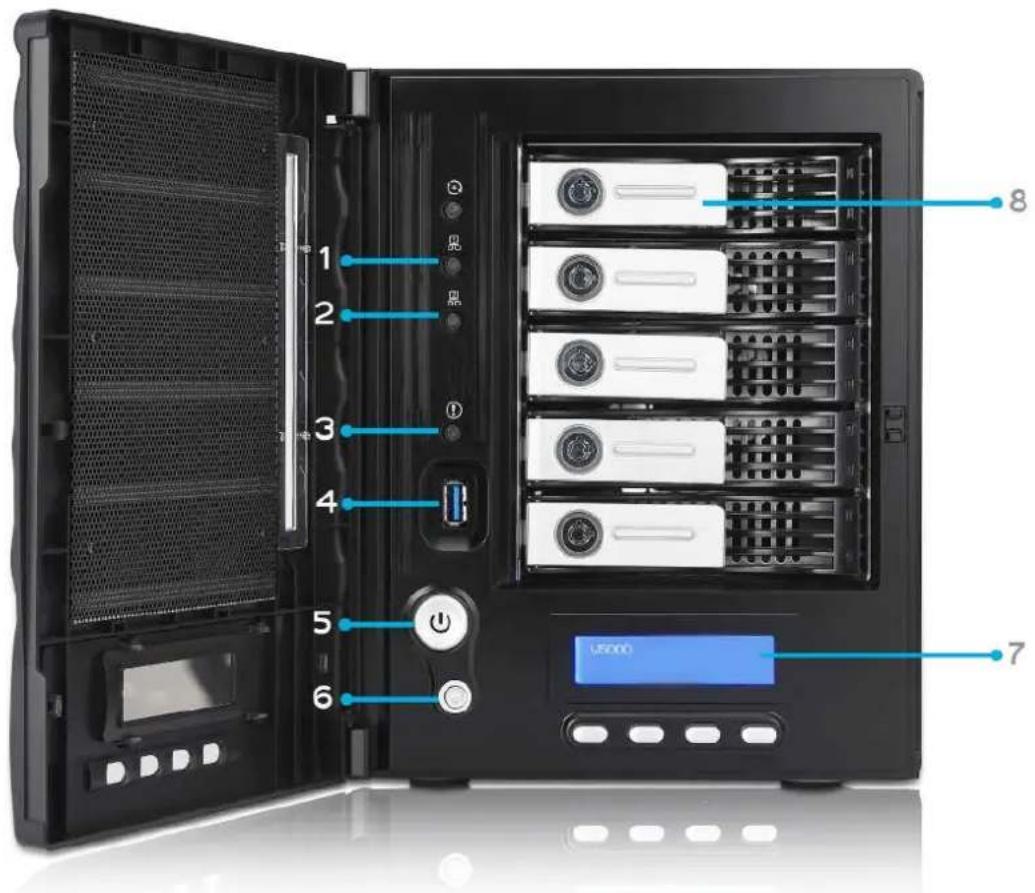
The Thecus W5000/W5000+'s front panel shows the device's indicators and hard disk install slots:
text_image
1 2 3 4 5 6 8 7| Front Panel | |
| Item Description | |
| 1. WAN/LAN1 LED | Solid green: Network linkBlinking green: Network activity |
| 2. LAN2 LED | Solid green: Network linkBlinking green: Network activity |
| 3. Syetem Warning LED Solid RED: System error | |
| 4. Reboot Button Reboot the System. | |
| 5. USB Port USB 3.0 port for compatible USB devices, such as USB disks. | |
| 6. Power Button/ Power LED | Power on/off W5000/W5000+ and Power LED.Solid blue: System is power on. |
| 7. LCD Display Displays current system status. | |
| 8. HDD Trays | Five 3.5" SATA HDD trays.Locks are provided for added security. |
- Rear Panel
The W5000/W5000+'s rear panel features ports and connectors.
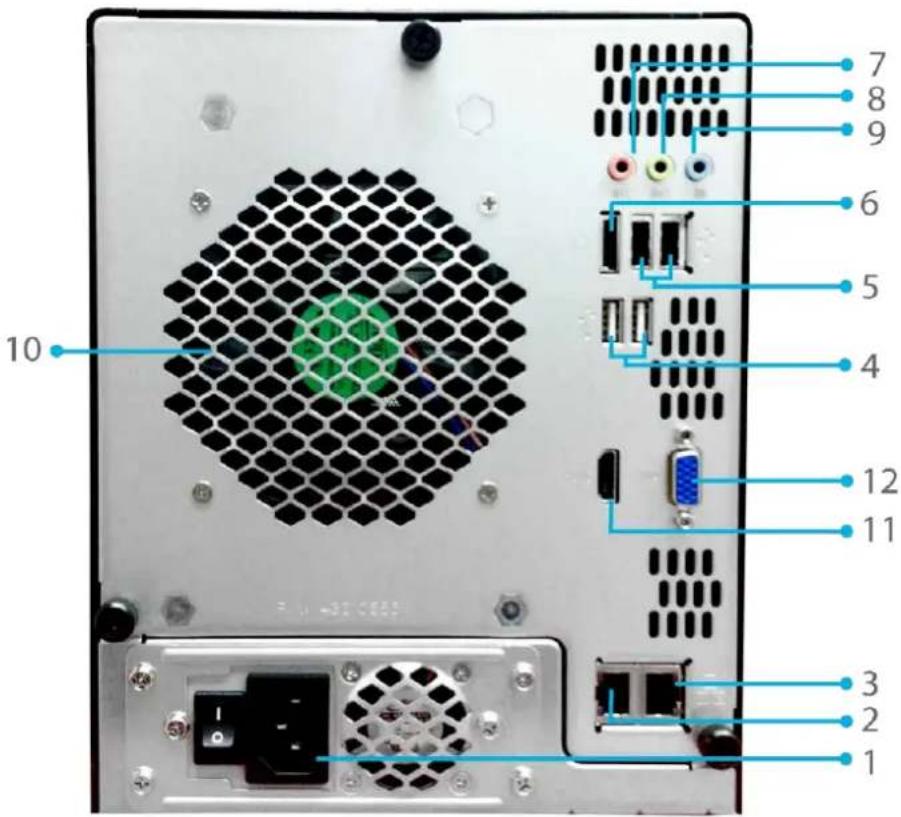
text_image
10 7 8 9 6 5 4 12 11 3 2 1| Back Panel | |
| Item Description | |
| 1. Power Connector Connect the included power cords to these connectors | |
| 2. WAN/LAN1 Port | WAN/LAN1 port for connecting to an Ethernet network through a switch or a router. |
| 3. LAN2 Port LAN2 port for connecting to a local Ethernet network through a switch or a router. | |
| 4. USB 2.0 Port | USB 2.0 port for compatible USB devices, such as digital cameras, USB disks, and USB printers. |
| 5. USB 2.0 Port | USB 2.0 port for compatible USB devices, such as digital cameras, USB disks, and USB printers. |
| 6. eSATA Port eSATA port for high-speed storage expansion | |
| 7. Line in For Audio in | |
| 8. LINE Out For Audio out | |
| 9. Mic input Microphone input | |
| 10. System Fan System fan that exhausts heat from the unit. | |
| 11. HDMI Port For Video/Audio out | |
| 12. VGA Port For Video out | |
1.5 W5810:
- Front Panel
The Thecus W5810's front panel shows the device's indicators and hard disk install slots:
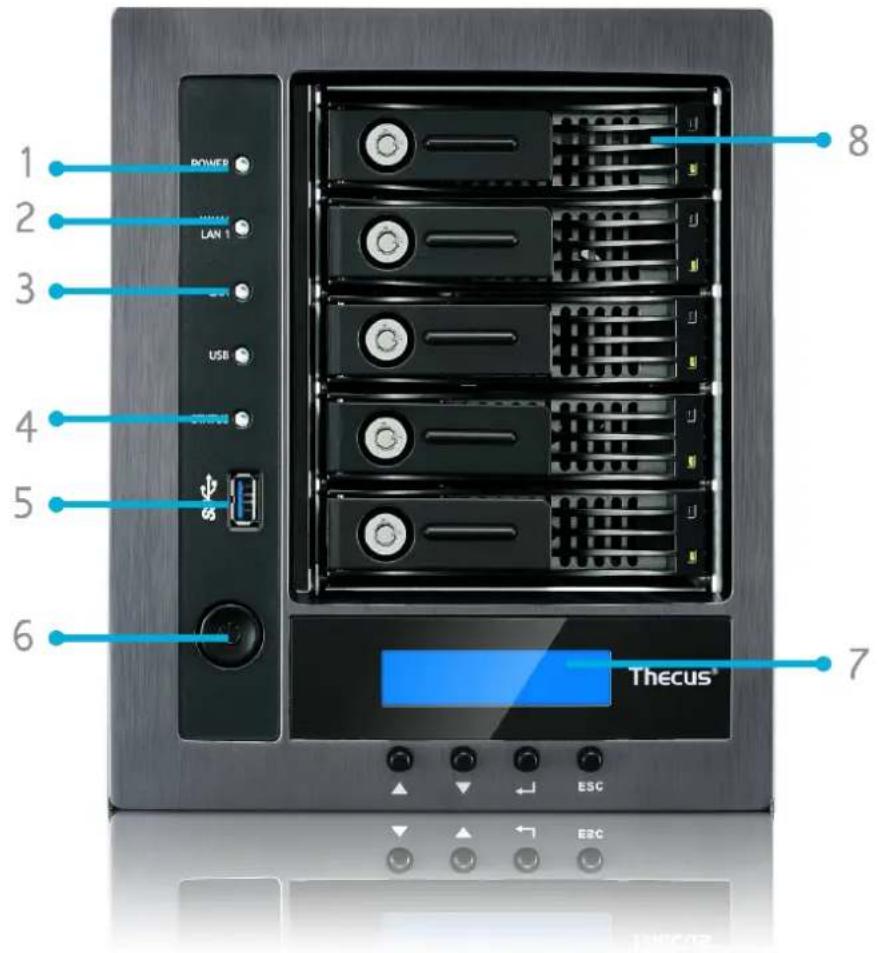
text_image
1 POWER 2 LAN 1 3 USB 4 CPU 5 6 7 ESC 8 Thecus®| Front Panel | |
| Item Description | |
| 1. Power LED White: System is power on. | |
| 2.WAN/LAN1 LED White: Network activity | |
| 3.LAN2 LED White: Network activity | |
| 4. System LED | White: System is being upgraded or ;is starting up; data currently inaccessible RED: System error |
| 5.USB Port USB 3.0 port for compatible USB devices, such as USB disks. | |
| 6.Power Button Power on/off W5810 and Power LED. | |
| 7.LCD Display Displays current system status and warning messages. | |
| 8.HDD Trays | Five 3.5" SATA HDD trays. Locks are provided for added security. |
- Rear Panel
The W5810's rear panel features ports and connectors.
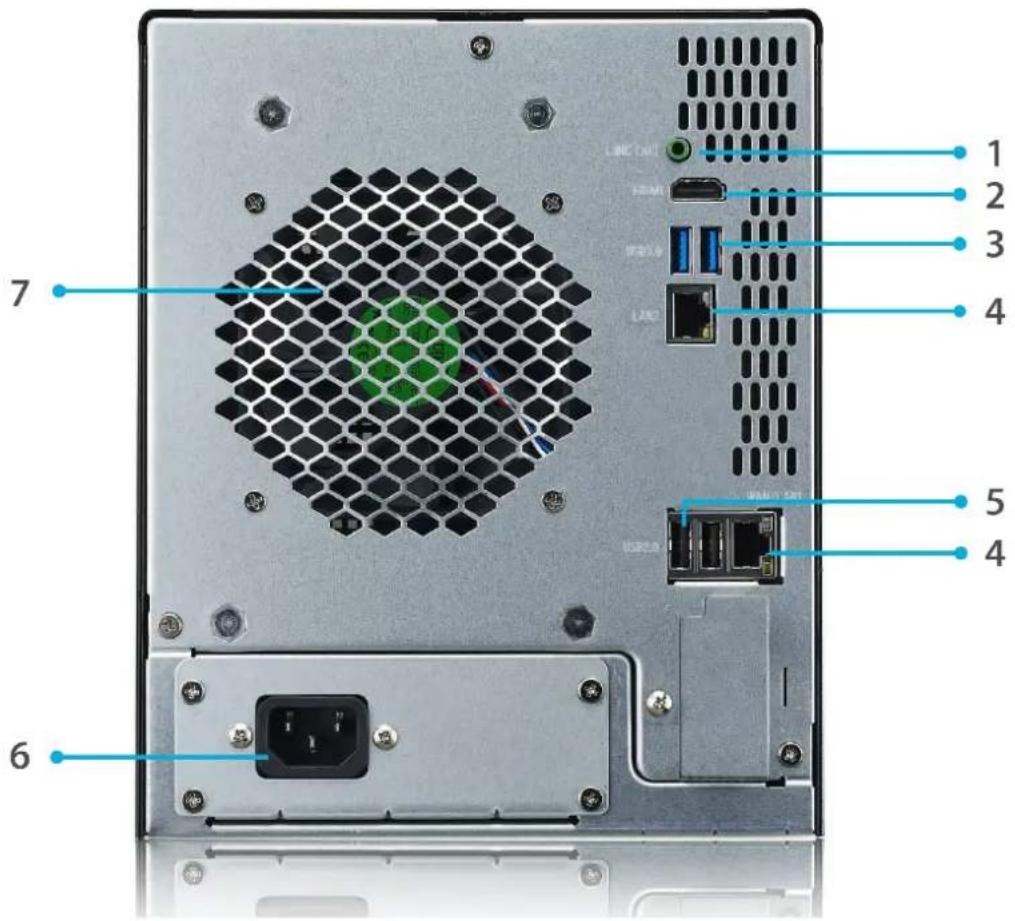
text_image
1 2 3 4 5 4 6 7 HDMI I/O port LANC WIFI port| Back Panel | |
| Item Description | |
| 1. LINE Out For Audio out | |
| 2. HDMI Port For Video/Audio out | |
| 3. USB 3.0 Port | USB 3.0 port for compatible USB devices, such as digital cameras, USB disks, and USB printers. |
| 4. WAN/LAN1/LAN2 | WAN/LAN1 port for connecting to an Ethernet network through a switch or router |
| 5. USB 2.0 Port USB 2.0 port for compatible USB devices. | |
| 6. Power Connector Connect the included power cords to these connectors | |
| 7. System Fan System fan that exhausts heat from the unit. | |
§Chapter 2: Hardware Installation
2.1 Overview
To help you get started, the following chapter will help you quickly get your Thecus WSSE NAS up and running. Please read it carefully to prevent damaging your unit during installation.
2.2 Before You Begin
Before you begin, be sure to take the following precautions:
-
Read and understand the Safety Warnings outlined in the beginning of the manual.
-
If possible, wear an anti-static wrist strap during installation to prevent static discharge from damaging the sensitive electronic components on the Thecus WSSE NAS.
-
Be careful not to use magnetized screwdrivers around the Thecus WSSE NAS's electronic components.
2.3 Cable Connections
To connect the Thecus WSSE NAS product to your network, follow the steps below:
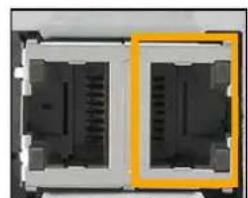
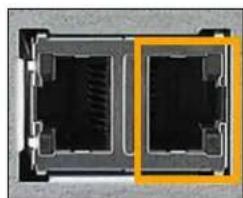
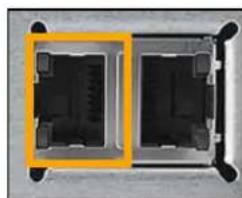
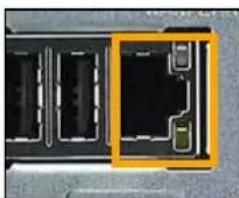
- Connect an Ethernet cable from your network to the LAN port on the back panel of the Thecus IP storage.
natural_image
Close-up of a dual-chamber electronic component with black and yellow casing (no visible text or symbols)W2000/ W2000+ LAN port
natural_image
Cross-sectional diagram of a mechanical or electronic component with two internal chambers and a highlighted section (no text or symbols)W4000/ W4000+ LAN port
natural_image
Two black electronic components with mounting holes, enclosed in a yellow square frame (no text or symbols visible)W5000/ W5000+ LAN port
natural_image
Close-up of a circuit board with visible traces and components, highlighted by a yellow rectangular overlay (no text or symbols)W5810 LAN port
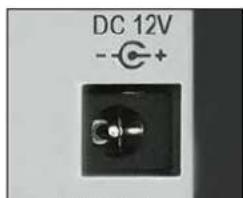
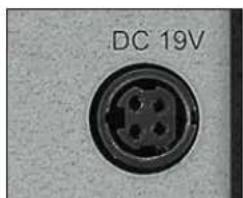
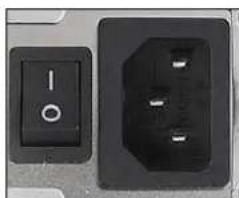
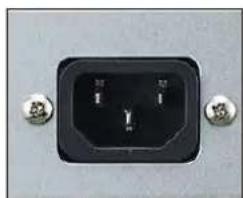
- Connect the provided power cord into the universal power socket on the back panel. Plug the other end of the cord into a surge protector socket.
text_image
DC 12V - - +W2000/ W2000+ Power socket
text_image
DC 19VW4000/ W4000+ Power socker
natural_image
Close-up of two black electrical switches, one with a minus sign and the other with three dots (no text or symbols visible)W5000/ W5000+ power socket
natural_image
Close-up of a black electrical outlet with two metallic pins (no visible text or symbols)W5810 power socket
- Connect a USB Keyboard and Mouse to the back USB 2.0 ports of your WSSE NAS system. Using an HDMI or VGA cable, also connect a monitor to the device.

Please DO NOT connect your USB Keyboard to USB 3.0 ports.
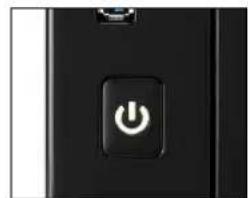
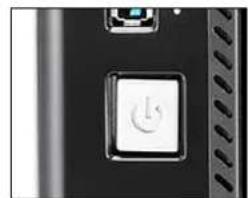
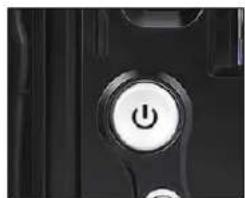
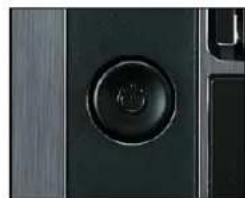
- Press the power button on the Front Panel to boot up the Thecus WSSE NAS.
natural_image
Close-up of a black smartphone power button with white power symbol (no text or numbers visible)W2000/ W2000+ Power button
natural_image
Close-up of a black electronic device's power button with a circular icon, no visible text or symbolsW4000/ W4000+ Power button
natural_image
Close-up of a black electronic device's power button with a white circular icon (no text or symbols visible)W5000/ W5000+ power button
natural_image
Close-up of a black circular button on a dark surface, no visible text or symbolsW5810 power button
§ Chapter 3: Getting started
3.1 Hardware installation
For instructions on how to connect the WSSE NAS to your network, please see Chapter 2.
3.2 First Power On
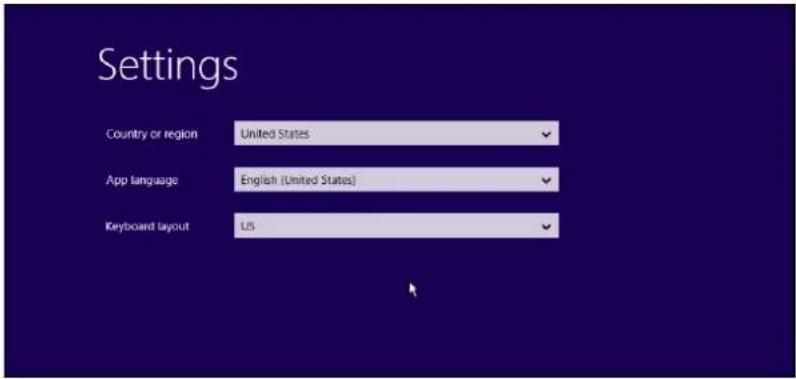
- Power on the WSSE NAS.
- Select a preferred language and time zone.
text_image
Settings Country or region United States App language English (United States) Keyboard layout US- Enter your Product Key.
- Read and accept the Software License Terms.
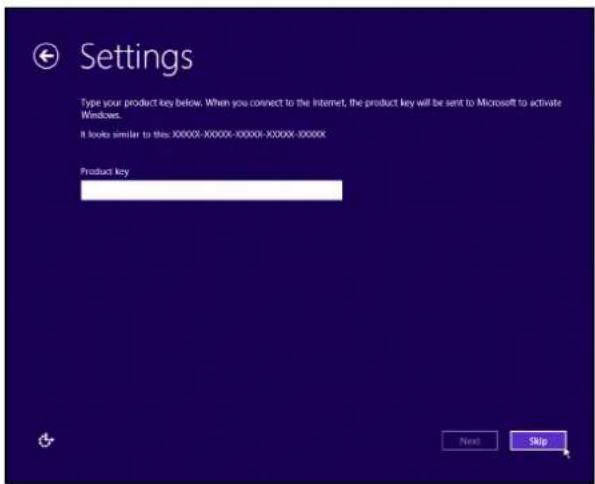
text_image
Settings Type your product key below. When you connect to the Internet, the product key will be sent to Microsoft to activate Windows. It looks similar to this.XXXXX-XXXXX-XXXXX-XXXXX-XXXXX Product key Next Skip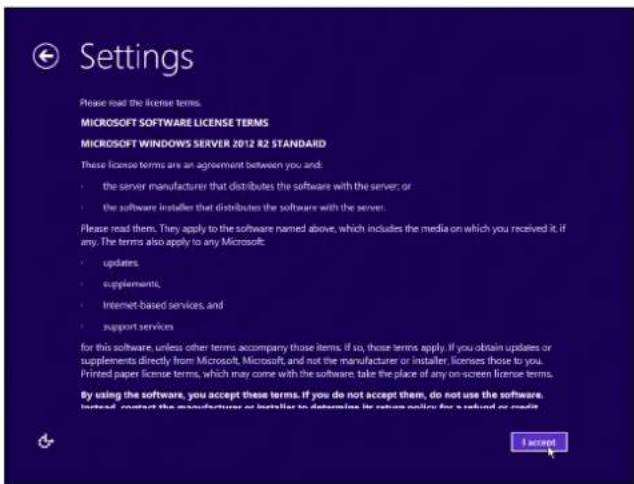
text_image
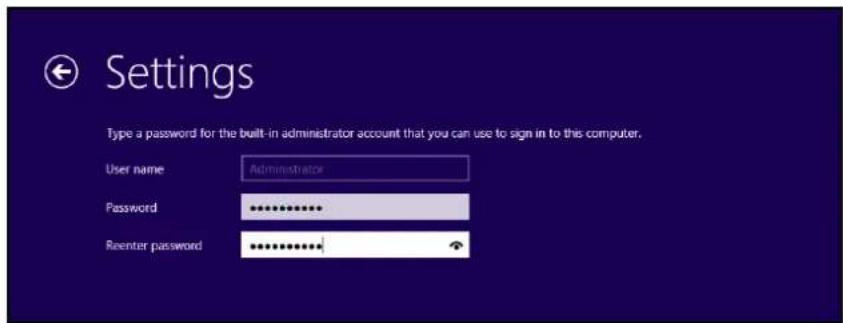
Settings Please load the license terms. MICROSOFT SOFTWARE LICENSE TERMS MICROSOFT WINDOWS SERVER 2012 R2 STANDARD These license terms are an agreement between you and: • the server manufacturer that distributes the software with the server; or • the software installer that distributes the software with the server. Please read them. They apply to the software named above, which includes the media on which you received it, if any. The terms also apply to any Microsoft • updates • supplements • Internet-based services, and • support services for this software, unless other terms accompany those items. If so, those terms apply. If you obtain updates or supplements directly from Microsoft, Microsoft, and not the manufacturer or installer, licenses those to you. Printed paper license terms, which may come with the software, take the place of any on-screen license terms. By using the software, you accept these terms. If you do not accept them, do not use the software. Instead, contact the manufacturer or installer to determine its return policy for a refund or credit. I accord- Set an administrative password. The password must contain at least 10 characters, including a mixture of uppercase and lowercase letters (a-z, A-Z) and base numbers (0-9).
text_image
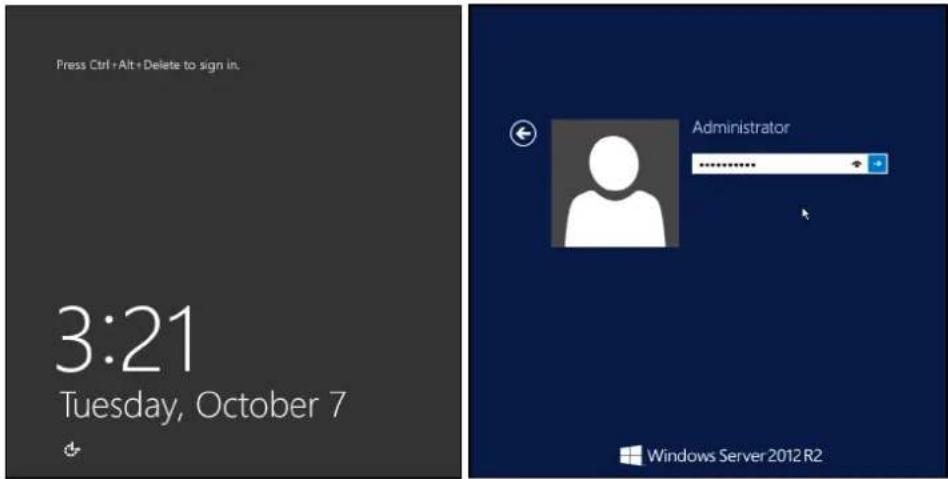
Settings Type a password for the built-in administrator account that you can use to sign in to this computer. User name Administrator Password ********** Reenter password ********* ↑- Log into Windows Storage Server 2012 R2 Essentials.
text_image
Press Ctrl + Alt + Delete to sign in. 3:21 Tuesday, October 7 Administrator Windows Server 2012 R23.3 Essentials Administrative Dashboard
The Dashboard is the command and control center for Windows Storage Server 2012 R2 Essentials. Designed with a streamlined look and feel and enhanced with improved functionality, the Dashboard is used to perform all the management and maintenance tasks you need to control how your server behaves on your network.
To use the Essentials Administrative Dashboard, you must create or join an Active Directory environment. The Configure Windows Storage Server Essentials wizard can help you to quickly set up an Active Directory environment and related server features.
For more information about Active Directory Domain Service, please see TechNet-Active Directory Domain Services Overview.
- Configure Essentials Administrative Dashboard.
If you want to set up a new Active Directory environment, please follow the wizard to configure Windows Storage Server Essentials.
You can also join an existing Active Directory environment, for step by step instructions please see: "To deploy Windows Storage Server Essentials in an existing Active Directory environment"
• To set up a new Active Directory environment.
- After the Windows Welcome page, the Configure Windows Server Essentials Wizard will be visible on your desktop.
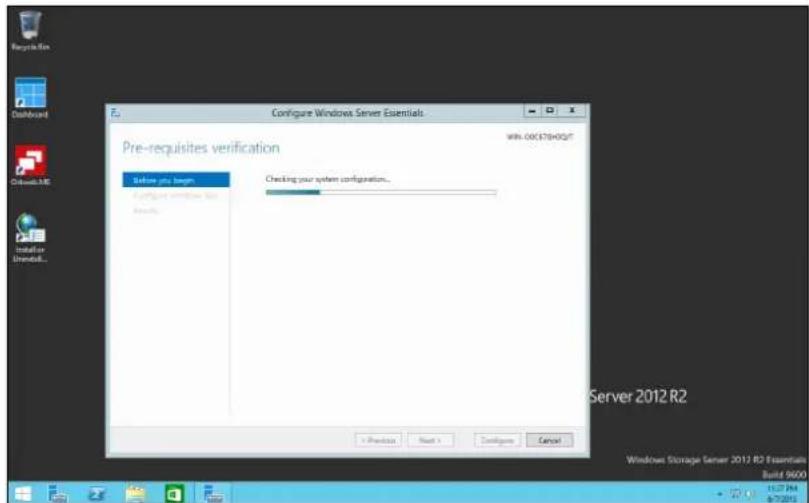
text_image
Configure Windows Server Essentials Pre-requisites verification Before you begin Configure the system configuration... Checking your system configuration... + Previous Next > Configure Cancel WIN:00(ST8+OUT) Server 2012 R2 Windows Storage Server 2012 R2 Essentials Build 9600 15.27 PM 6/7/2013- On the Configure Windows Server Essentials page, click Next.
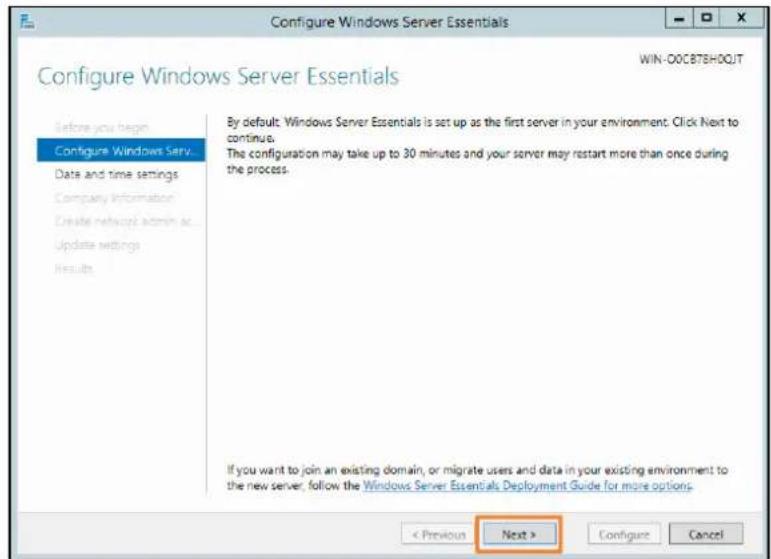
text_image
Configure Windows Server Essentials WIN-00C87EHOQT Configure Windows Server Essentials Before you begin Configure Windows Serv Data and time settings Company Information Create network admin as... Update settings Results By default: Windows Server Essentials is set up as the first server in your environment. Click Next to continue. The configuration may take up to 30 minutes and your server may restart more than once during the process. If you want to join an existing domain, or migrate users and data in your existing environment to the new server, follow the Windows Server Essentials Deployment Guide for more options. < Previous Next > Configure Cancel- In Time settings, make sure your date, time, and time zone are correct, and then click Next.
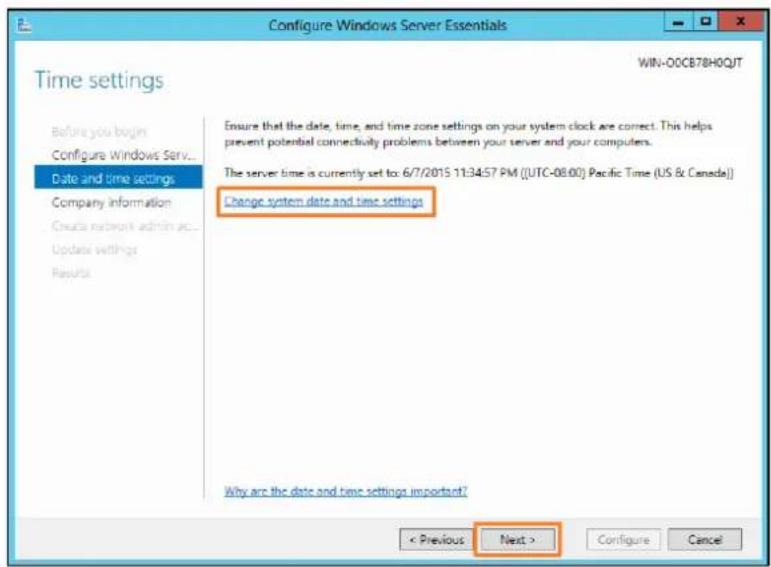
text_image
Configure Windows Server Essentials Time settings WIN-00CB7BH0QJT Before you begin Configure Windows Serv... Date and time settings Company information Create network admin ac... Update settings Results Ensure that the date, time, and time zone settings on your system clock are correct. This helps prevent potential connectivity problems between your server and your computers. The server time is currently set to: 6/7/2015 11:34:57 PM ([UTC-08:00) Pacific Time (US & Canada)] Change system date and time settings Why are the date and time settings important? < Previous Next > Configure Cancel- In Company Information, type your company name, and then click Next. Optionally, you can change the internal domain name and server name.
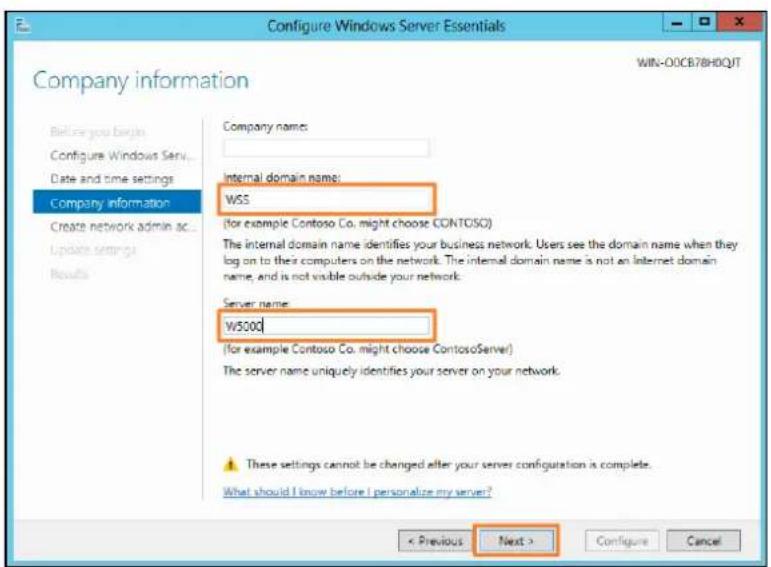
text_image
Configure Windows Server Essentials WIN-00CB78H0QT Company information Before you begin Configure Windows Serv... Date and time settings Company information Create network admin ac... Update settings Results Company name: Internal domain name: WSS (for example Contoso Co. might choose CONTOSO) The internal domain name identifies your business network. Users see the domain name when they log on to their computers on the network. The internal domain name is not an Internet domain name, and is not visible outside your network. Server name: w500d (for example Contoso Co. might choose ContosoServer) The server name uniquely identifies your server on your network. These settings cannot be changed after your server configuration is complete. What should I know before I personalize my server? < Previous Next > Configure Cancel
The company information cannot be changed after your server configuration is complete.
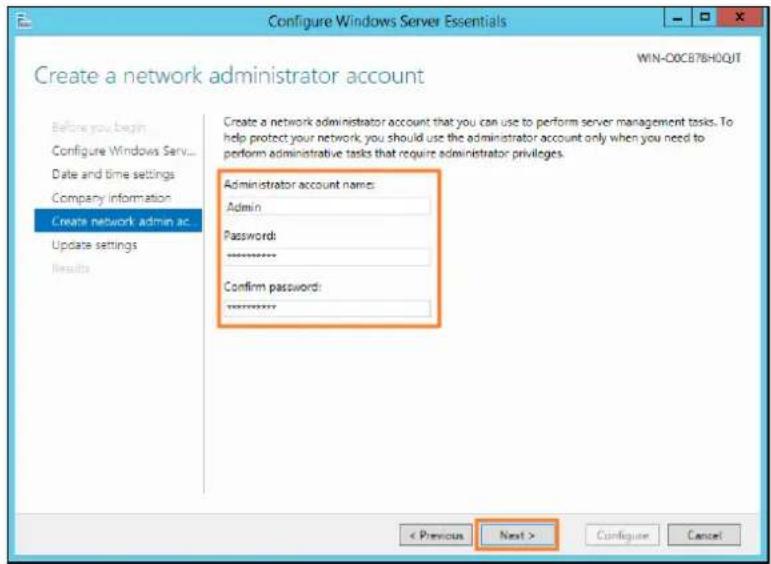
- In Create Network Admin, type a new administrator account name and password, and then click Next.
text_image
Configure Windows Server Essentials Create a network administrator account WIN-00CB76H0QJT Before you begin Configure Windows Serv... Date and time settings Company information Create network admin ac Update settings Results Create a network administrator account that you can use to perform server management tasks. To help protect your network, you should use the administrator account only when you need to perform administrative tasks that require administrator privileges. Administrator account name: Admin Passwords: ****** Confirm password: ****** < Previous Next > Configure Cancel
Do not use the default Administrator account name.

The password must contain at least 10 characters, including a mixture of uppercase and lowercase letters (a-z, A-Z) and base numbers (0-9).
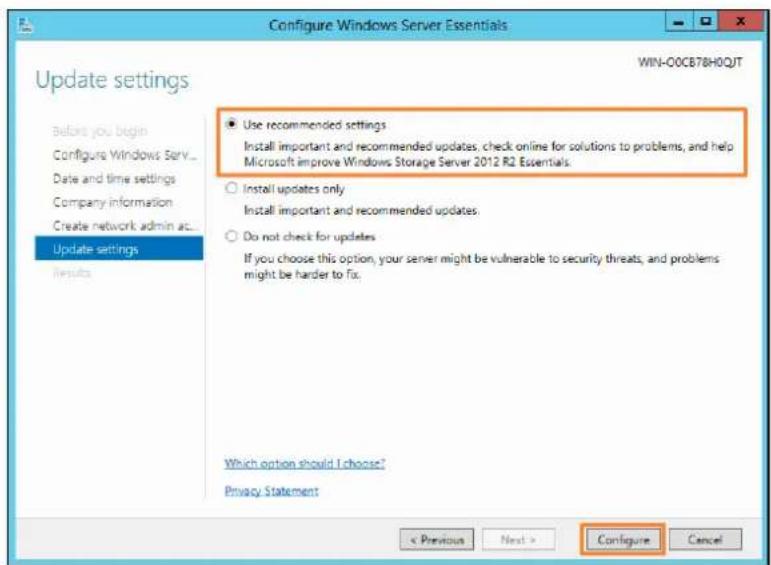
- Select " Use Recommended Settings", and then click Configure.
text_image
Configure Windows Server Essentials Update settings WIN-00CB7BH0QJT ● Use recommended settings Install important and recommended updates, check online for solutions to problems, and help Microsoft improve Windows Storage Server 2012 R2 Essentials. ○ Install updates only Install important and recommended updates. ○ Do not check for updates If you choose this option, your server might be vulnerable to security threats, and problems might be harder to fix. Which option should I choose? Privacy Statement < Previous Next > Configure CancelThe server will restart multiple times during the configuration process, and your logons will be automatic until the configuration is finished. This process takes about 30 minutes.

Please do not perform any other operations that can change the server configuration or turn it off.
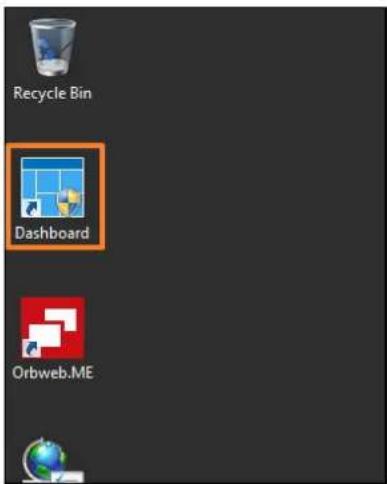
- On the desktop, click the Dashboard icon to start the server Dashboard. On the Home page, complete the Getting Started tasks listed on the Setup tab.
text_image
Recycle Bin Dashboard Orbweb.ME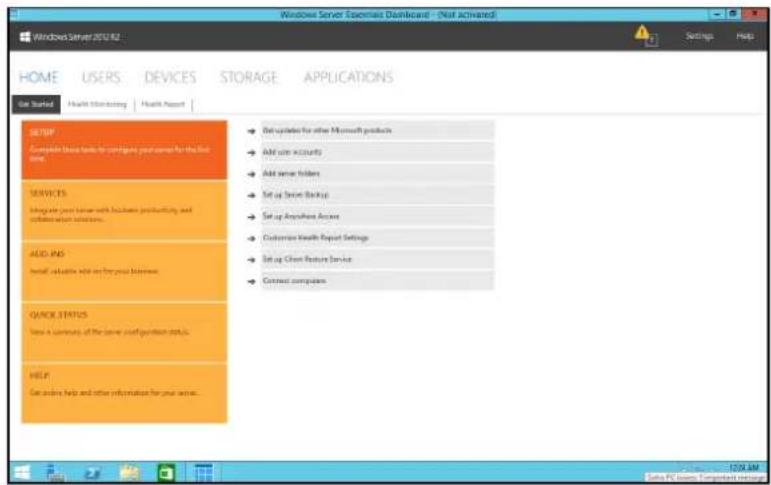
text_image
Windows Server 2012/14 HOME USERS DEVICES STORAGE APPLICATIONS Get Started Health Monitoring Health Report SETUP Complete these tasks to configure your server for the line SERVICES Integrate your server with attributes productivity and correlation with solutions. AUD-INS Install details with any for your business. QUICK STATUS View a community of the server configuration defaults. HELP Get online help and other information for your server. Del upsets for other Microsoft products Add user accounts Add server folders Set up Server Backup Set up Anxious Access Customize Health Report Settings Set up Clean Feature Service Connect computersFor more information about Dashboard, see TechNet-Overview of the Dashboard
• To deploy your WSSE NAS in an existing Active Directory environment
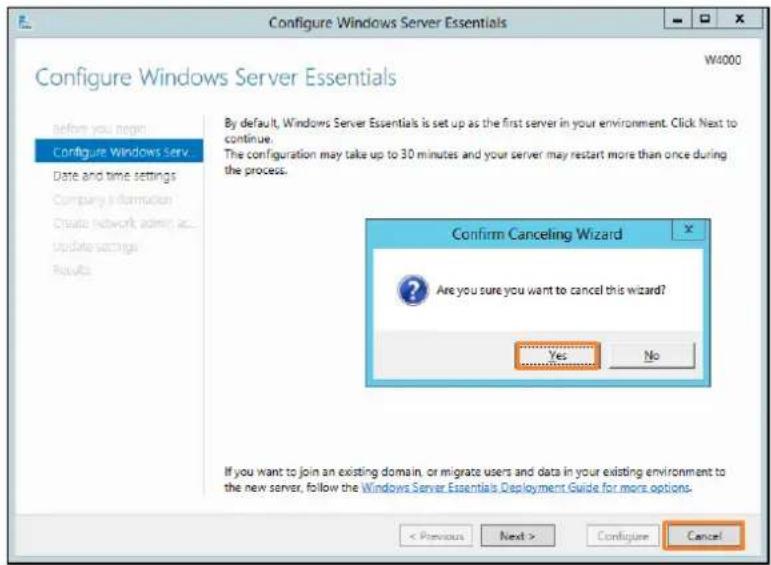
- After the Windows Welcome page, click "Cancel" to cancel the Configure Windows Server Essentials Wizard.
text_image
Configure Windows Server Essentials W4000 Configure Windows Server Essentials Before you begin Configure Windows Serv Date and time settings Company information Create network admin as... Update settings Results By default, Windows Server Essentials is set up as the first server in your environment. Click Next to continue. The configuration may take up to 30 minutes and your server may restart more than once during the process. Confirm Canceling Wizard Are you sure you want to cancel this wizard? Yes No If you want to join an existing domain, or migrate users and data in your existing environment to the new server, follow the Windows Server Essentials Deployment Guide for more options. < Previous Next > Configure Cancel- If your want to change your computer name:
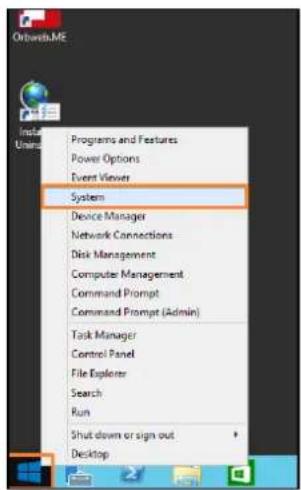
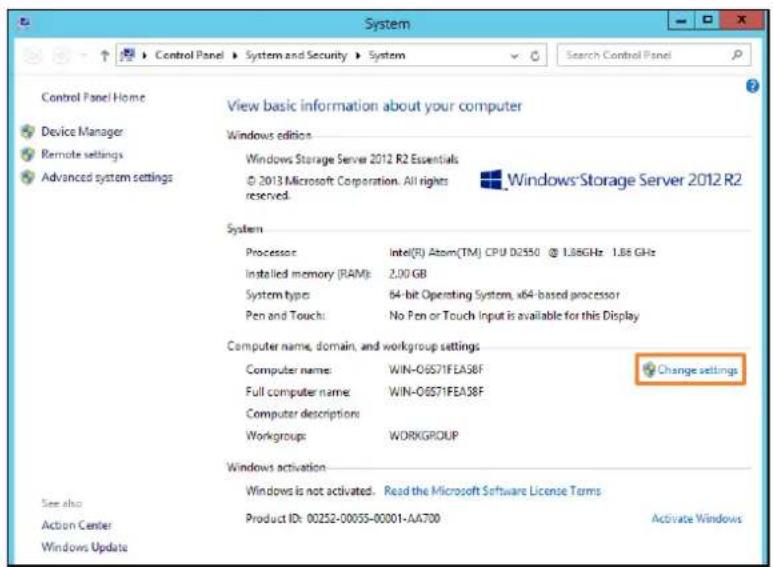
a. Open System by right-clicking Start button, and then clicking System.
text_image
Orbuds.ME Install Units Programs and Features Power Options Event Viewer System Device Manager Network Connections Disk Management Computer Management Command Prompt Command Prompt (Admin) Task Manager Control Panel File Explorer Search Run Shut down or sign out Desktopb. Under Computer name, domain, and workgroup settings, click "Change settings".
text_image
System Control Panel Home Device Manager Remote settings Advanced system settings View basic information about your computer Windows edition Windows Storage Server 2012 R2 Essentials © 2013 Microsoft Corporation. All rights reserved. Windows: Storage Server 2012 R2 System Processor Intel(R) Atom(TM) CPU D2550 @ 1.86GHz 1.86 GHz Installed memory (RAM): 2.00 GB System types: 64-bit Operating System, x64-based processor Pen and Touch: No Pen or Touch Input is available for this Display Computer name, domain, and workgroup settings Computer name: WIN-06S71FEAS8F Full computer name: WIN-06S71FEAS8F Computer descriptions Workgroups: WORKGROUP Windows activation Windows is not activated... Read the Microsoft Software License Terms See also Action Center Product ID: 00252-00055-00001-AA700 Windows Update Change settings Activate Windowsc. On the Computer Name tab, click "Change".
d. Type a new computer name, and then click OK.
e. Restart the WSSE NAS.

text_image
System Properties Computer Name Hardware Advanced Remote Windows use the following information to identify your computer on the network. Computer description: For example: "IIS Production Server" or "Accounting Server" Full computer name: WIN OSS 71FEASEF Workgroup: WORKGROUP To rename this computer or change its domain or workgroup, click Change. Change... OK Cancel Apply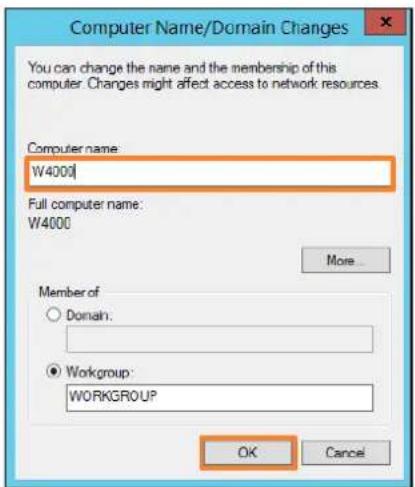
text_image
Computer Name/Domain Changes You can change the name and the membership of this computer. Changes might affect access to network resources. Computer name: W4000 Full computer name: W4000 More... Member of ○ Domain: ● Workgroup: WORKGROUP OK Cancel- Open the Server Manager, click the flag, and then click "Promote this server to a domain controller."
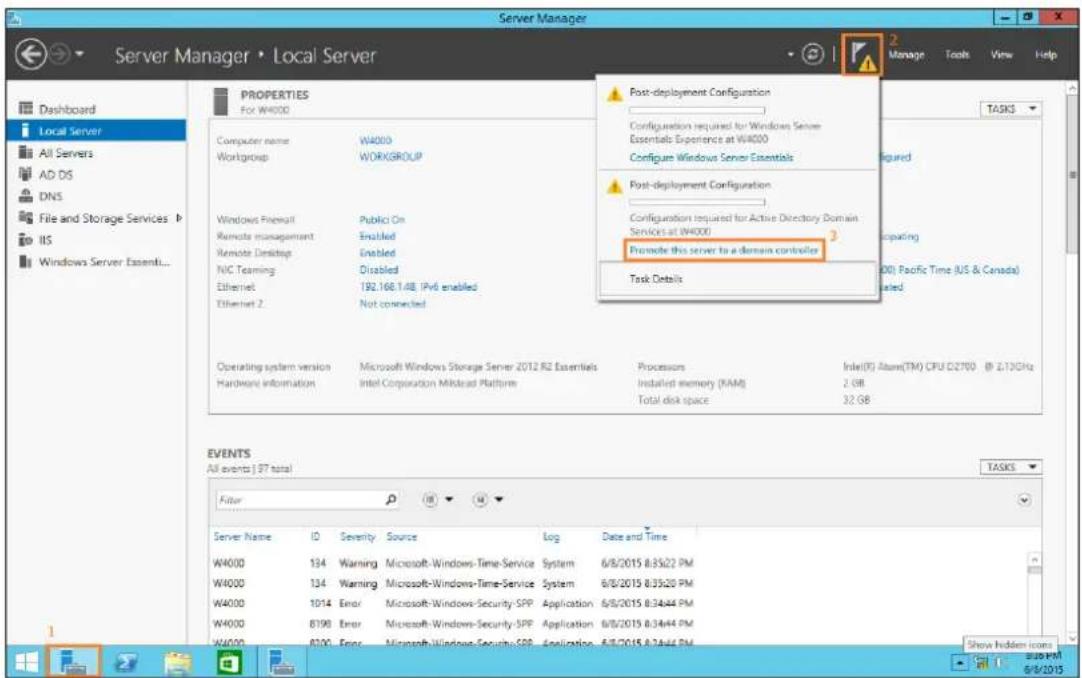
text_image
Server Manager Server Manager • Local Server Post-deployment Configuration Configuration required for Windows Server Essentials Experiences at W4000 Configure Windows Server Essentials Post-deployment Configuration Configuration required for Active Directory Domain Services at W4000 Promote this server to a domain controller Task Details Computer name W4000 Workgroup WORKGROUP Windows Firewall Public On Remote management Enabled Remote Desktop Enabled NIC Teaming Disabled Ethernet 192.166.1.48, IPv enabled Ethernet 2 Not connected Operating system version Microsoft Windows Storage Server 2012 R2 Essentials Processors Intel(R) Altam(TM) CPU D2700 @ 2.13GHz Hardware information Intel Corporation Machine Platform Installed memory (KAM) 2 GB Total disk space 32 GB EVENTS All events | 37 total Filter Server Name ID Severity Source Log Data and Time W4000 134 Warning Microsoft-Windows-Time-Service System 6/8/2015 8:35:22 PM W4000 134 Warning Microsoft-Windows-Time-Service_System 6/8/2015 8:35:20 PM W4000 1014 Error Microsoft-Windows-Security-SPP Application 6/8/2015 8:34:44 PM W4000 8798 Error Microsoft-Windows-Security-SPP Application 6/8/2015 8:34:44 PM W4000 8798 Error Microsoft-Windows-Security-SPP_APPLICATION 6/8/2015 8:34:44 PM- Select the option "Add a domain controller to an existing domain", and then click the "Select..." button. For more information about AD Deployment Configuration, see TechNet AD DS Installation and Removal Wizard Page Descriptions.
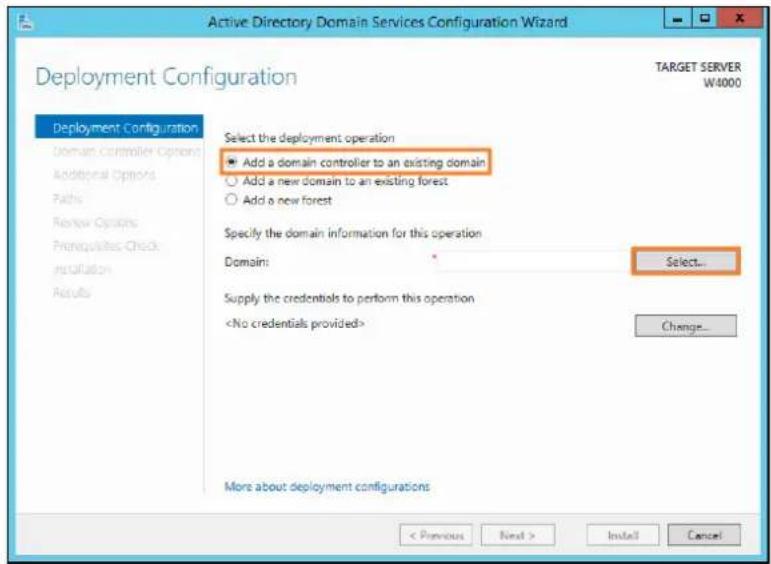
text_image
Active Directory Domain Services Configuration Wizard Deployment Configuration TARGET SERVER W4000 Deployment Configuration Domain Controller Options Additional Options Paths Review Options Prerequisites Check Installation Results Select the deployment operation Add a domain controller to an existing domain Add a new domain to an existing forest Add a new forest Specify the domain information for this operation Domain: Select... Supply the credentials to perform this operation
If you do not want this server to be a domain controller. Please see TechNet-How to join your computer to a domain.
- Enter the domain administrator credentials, and then select the domain name that exists in the local network.
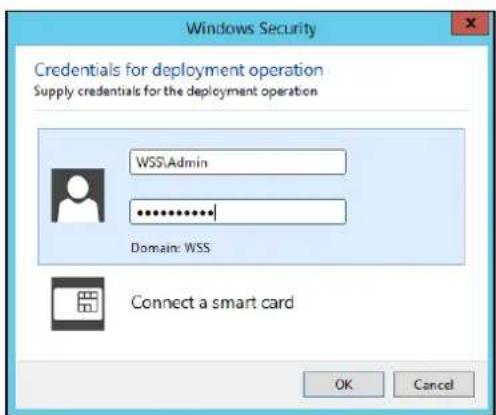
text_image
Windows Security Credentials for deployment operation Supply credentials for the deployment operation WSS\Admin ************ Domain: WSS Connect a smart card OK Cancel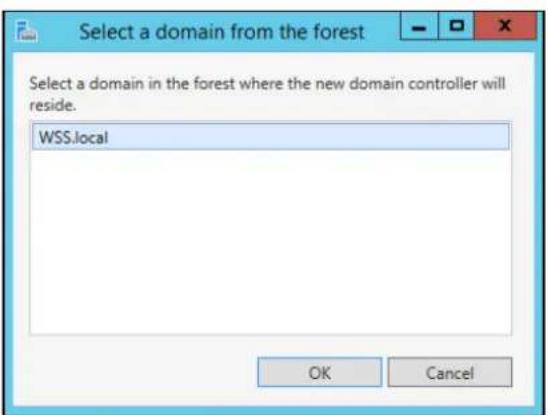
text_image
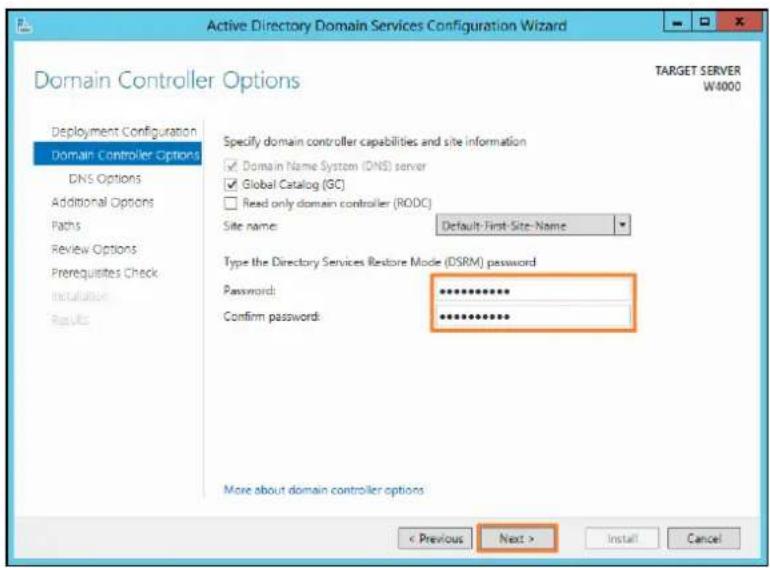
Select a domain from the forest Select a domain in the forest where the new domain controller will reside. WSS.local OK Cancel- Type the DSRM password. Click "Next".
text_image
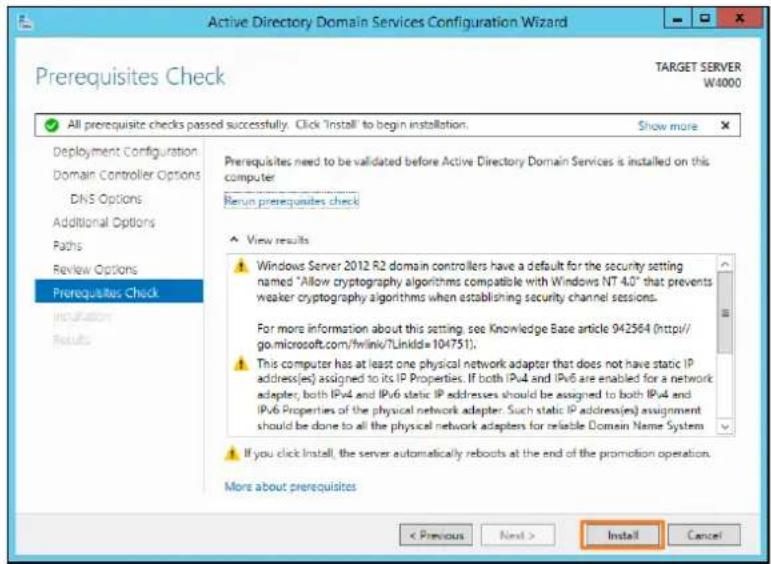
Active Directory Domain Services Configuration Wizard Domain Controller Options TARGET SERVER W4000 Deployment Configuration Domain Controller Options DNS Options Additional Options Paths Review Options Prerequisites Check Installation Results Specify domain controller capabilities and site information Domain Name System (DNS) server Global Catalog (GC) Read only domain controller (RODC) Site name: Default-First-Site-Name Type the Directory Services Restore Mode (DSRM) password Password: ********** Confirm passwords: ********** More about domain controller options < Previous Next > Install Cancel- Click the "Next" button until you reach the Prerequisite Check page.
- Click "Install" to proceed. The server will automatically reboot at the end of the operation.
text_image
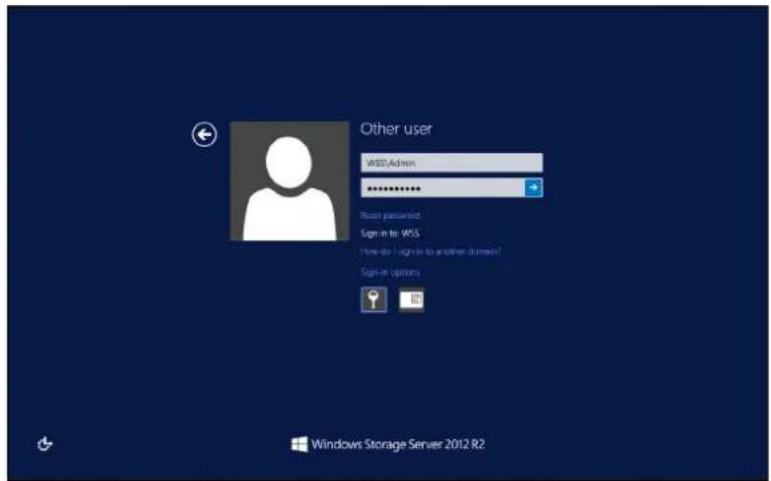
Active Directory Domain Services Configuration Wizard Prerequisites Check TARGET SERVER W4000 ✓ All prerequisite checks passed successfully. Click 'Install' to begin installation. Show more Deployment Configuration Domain Controller Options DNS Options Additional Options Paths Review Options Prerequisites Check Installation Results Prerequisites need to be validated before Active Directory Domain Services is installed on this computer Rename prerequisites check ✓ View results Windows Server 2012 R2 domain controllers have a default for the security setting named "Allow cryptography algorithms compatible with Windows NT 4.0" that prevents weaker cryptography algorithms when establishing security channel sessions. For more information about this setting, see Knowledge Base article 942564 (http:// go.microsoft.com/ftwlink/TLinkld=104751). This computer has at least one physical network adapter that does not have static IP address(es) assigned to its IP Properties. If both IPv4 and IPv6 are enabled for a network adapter, both IPv4 and IPv6 static IP addresses should be assigned to both IPv4 and IPv6 Properties of the physical network adapter. Such static IP address(es) assignment should be done to all the physical network adapters for reliable Domain Name System ✓ If you click Install, the server automatically reboots at the end of the promotion operation. More about prerequisites < Previous Next > Install Cancel- Log into WSSE by using domain administrator account. (e.g. WSS\Admin)
text_image
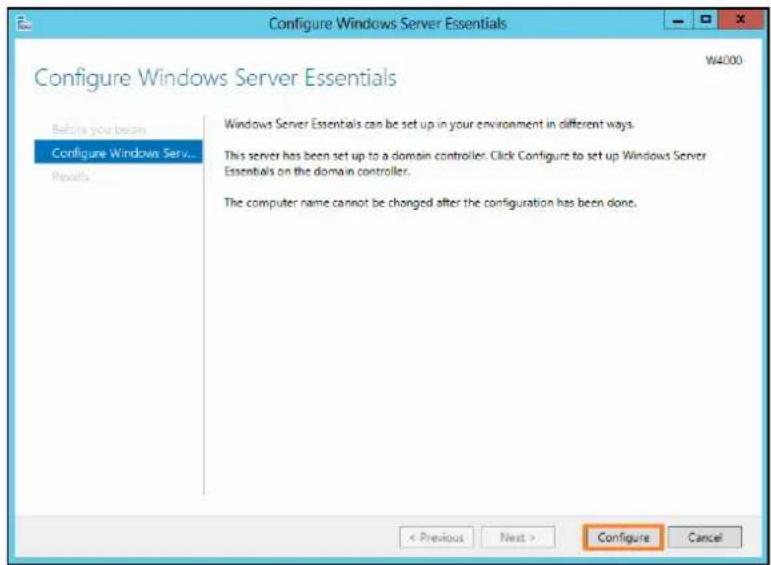
Other user WSS\Admin ****** Login password Sign in to: WSS How do I sign in to another domain? Sign-in options Windows Storage Server 2012 R2- After the Windows Welcome page, the Configure Windows Server Essentials Wizard is visible on your desktop. Click "Configure" to proceed.
text_image
Configure Windows Server Essentials W4000 Configure Windows Server Essentials Before you begin Configure Windows Serv... Results Windows Server Essentials can be set up in your environment in different ways. This server has been set up to a domain controller. Click Configure to set up Windows Server Essentials on the domain controller. The computer name cannot be changed after the configuration has been done. < Previous Next > Configure Cancel
The computer name cannot be changed after your server configuration is complete.
- On the desktop, click the Dashboard icon to start the server Dashboard. On the Home page, complete the Getting Started tasks listed on the Setup tab.
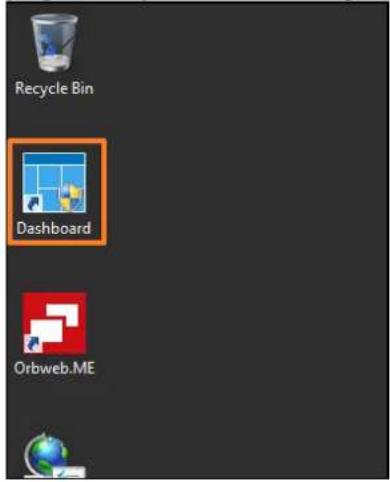
text_image
Recycle Bin Dashboard Orbweb.ME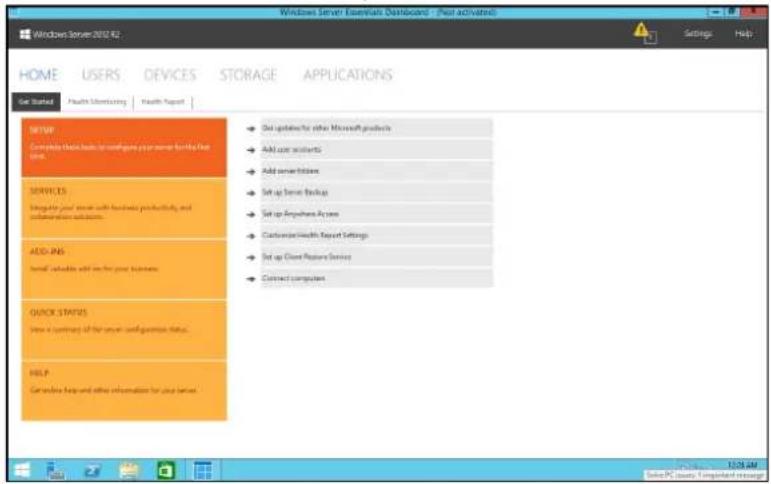
text_image
Windows Server Essentials Dashboard - Post-activated HOME USERS DEVICES STORAGE APPLICATIONS Get Started Health Monitoring Health Report SETUP Complete check back to configure your server for the Web SERVICES Integrate your server with basic productivity, and information about. ADD INS Install variable add to the your business. QUICK STATUS View a summary of the server configuration status. HELP Can you help and other information for your server. Set updates for other Microsoft products Add user accounts Add server issues Set up server backup Set up Anywhere access Customize Health Report Settings Set up Close Package Service Connect computersFor more information about Dashboard, see TechNet-Overview of the Dashboard
3.4 Connect to WSSE using Remote Desktop Connection
- On your PC or laptop, Click the Start icon and then search "Remote Desktop Connection".
- Type your WSSE computer name or IP, then Click Connect.
- Enter your domain account and password, then Click OK.
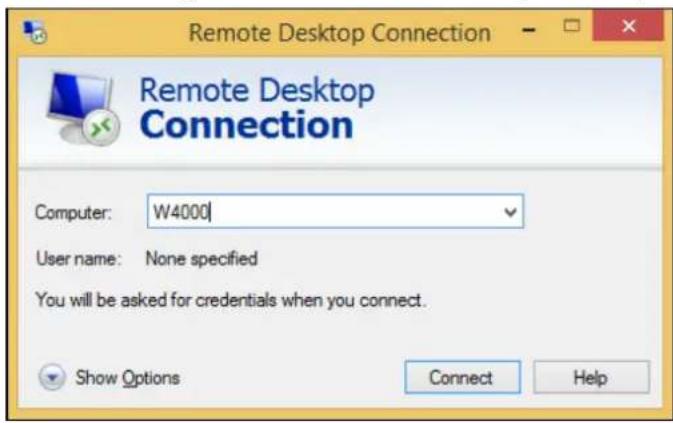
text_image
Remote Desktop Connection Remote Desktop Connection Computer: W4000 User name: None specified You will be asked for credentials when you connect. Show Options Connect Help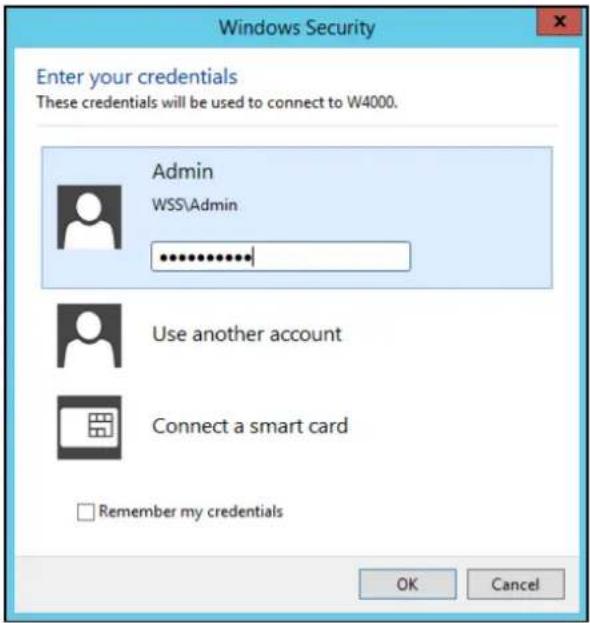
text_image
Windows Security Enter your credentials These credentials will be used to connect to W4000. Admin WSS\Admin Use another account Connect a smart card Remember my credentials OK CancelFor more information about Remote Desktop Connection, Please see here
3.5 Connect your computer to the WSSE by using the Connector software
Please see TechNet-Get Connected in Windows Server Essentials
§Chapter 4: System Recovery

- The standard system is shipped with the OS pre-installed (WSS 2012 R2 Essentials). First select the system language, then enter the license key.
- Before you start to re-install the system disk via the recovery DVD or USB, please download the .ISO image file at http://ftp.thecus.com/wss/ and save it to a bootable DVD-R or bootable USB.

Please backup all your data first. The action will delete all of your data on your OS disk.
Step 1. Connect your recovery media.
Step 2. Power on the system, set up BIOS boot priority. Confirm that the system can boot from DVD or associated boot device.
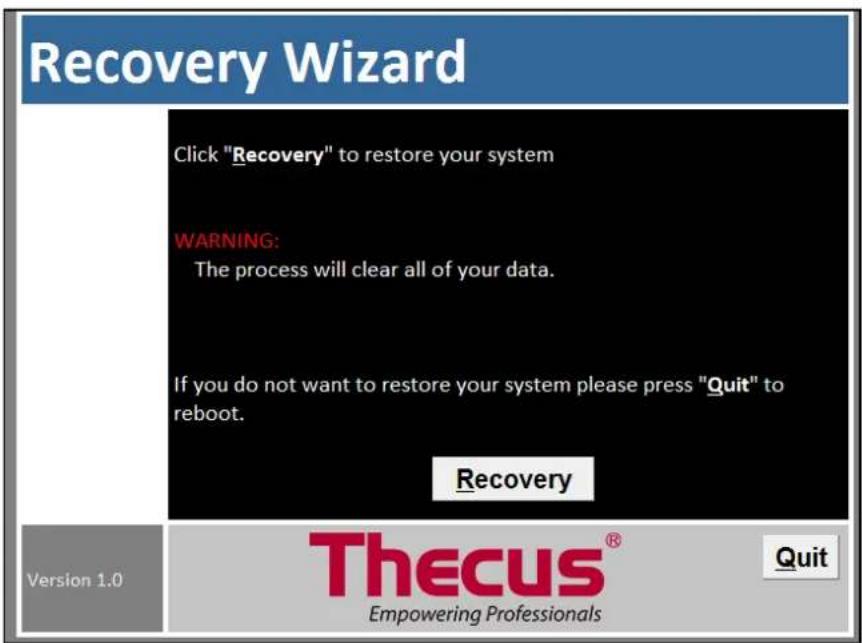
Step 3. When the screen appears, press the "Recovery" button. Confirm by pressing "yes" which starts system recovery.
Step 4. After the recovery process is finished, press the "Quit" button to restart.
text_image
Recovery Wizard Click "Recovery" to restore your system WARNING: The process will clear all of your data. If you do not want to restore your system please press "Quit" to reboot. Recovery Version 1.0 Thecus® Empowering Professionals QuitStep 5. Restarting will take some time. Establish the language of choice, input license key, and set up password. System installation is now complete.
§Appendix: Frequently Asked Questions
- How to configure NAS boot from DVD or USB driver.
• How to upgrade W2000 W4000 & W5000 to 4GB DRAM total
• W2000 SD card reader reinitializes
• WSS 2012 R2 Essentials recovery DVD ISO for W2000 W4000 W5000
• WSS FAQ Client Computer Backups - WSS FAQ Drives detected but unable to see partition or data
- WSS FAQ How to access shared folders from WSS & map network drives without joining Active Directory domain (AD)
• WSS FAQ How to add & remove shared folders from WSS - WSS FAQ How to create a user account in Active Directory(AD)
• WSS FAQ How to update W2000 W4000 W5000 BIOS - WSS FAQ Remote Desktop Protocol disconnecting after Windows Update
• WSS FAQ System unable to repair Parity Virtual Disk - WSS FAQ Why I cannot activate WSS 2012 R2 Essentials from W2000 W4000 W5000
- WSS FAQ Windows (Storage) Server 2012 R2 Products and Editions Comparison
- WSS W2000/W4000/W2000+/W4000+ Why 60G SSD but have 31.9GB volume usable?
• WSS W2000/W4000/W5000 ORBWEB support? - WSS W2000/W4000/W5000/W2000+/W4000+/W5000+ how to recovery to factory default HDD content? (ALL HDD DATA WILL BE ERASE!!)
- WSS W2000/W4000/W5000/W8900/W12000/W16000 how to found the Winodows license key?
Still have questions? please go to Thecus tech support website or Microsoft TechNet.