
FA110 - Dehumidifier POLTI - Free user manual and instructions
Find the device manual for free FA110 POLTI in PDF.


| Product Type | Dehumidifier |
| Brand | Polti |
| Model | FA110 (Dryer FA 110) |
| Power Supply | 230-240 V ~ 50 Hz |
| Power Consumption | 360 W |
| Humidity Control Range | 40% to 80% RH |
| Continuous Dehumidification | Yes (CONT. position) |
| Automatic Defrost | Activated below 12°C |
| Tank Capacity | Not specified (removable tank) |
| Continuous Drainage | Yes (PVC pipe 14 mm ID) |
| Air Filter | Washable cartridge-type |
| Filter Cleaning Interval | Every 2 weeks |
| Operating Temperature Range | 5°C to 35°C |
| Noise Level | Not specified |
| Dimensions (WxDxH) | Not specified |
| Weight | Not specified |
| Safety Features | Automatic shut-off on full tank, defrost protection |
| Warranty | Refer to Polti Service Centre |
Frequently Asked Questions - FA110 POLTI
User questions about FA110 POLTI
0 question about this device. Answer the ones you know or ask your own.
Ask a new question about this device
Download the instructions for your Dehumidifier in PDF format for free! Find your manual FA110 - POLTI and take your electronic device back in hand. On this page are published all the documents necessary for the use of your device. FA110 by POLTI.
USER MANUAL FA110 POLTI
natural_image
Exterior view of a white portable air purifier with horizontal ridges and a circular top (no visible text or symbols)
Dryer FA 110

CE
1 - Water tank
2 - Laundry flap (Directional drawhole)
3 - Control panel
4 - Air filter
5 - Air inlet
6 - Hole for direct condensation drainage
7 - Top air outlet
8 - Power cord winder
9 - Power cord
TECHNICAL DETAILS
Power supply 230/240 V - 50 Hz
Absorbed power 360 W
Polti S.p.A. reserves the right to change equipment or accessory specification without prior notice.
CONTROL PLATE DESCRIPTION

A - DEFROST
Defrost funtion indicator light
B - TANK FULL
Full tank indicator light
C - OPERATION
Operation indicator light
D - HUMIDITY SETTING
Humidity control knob
MAINFUNCTIONS AND FEATURES
DRYER FA 110 is a dehumidifier equipped with an automatic device to preset and select the required humidity indoors from 40% Relative Humidity (RH) up to 80% RH.
This device maintains the required humidity inside a room by automatically starting and stopping the appliance. This also saves energy, as the appliance starts operating only when it is necessary to restore the correct humidity.
DRYER FA 110 is equipped with the continuous dehumidifying function. By turning the “HUMIDIFY SETTING” knob on the “CONT.” position, the automatic stopping device is in fact excluded and the appliance operates continuously.
The condensation is collected in a tank which can be easily removed as required. When the tank is full, the appliance stops operating and the water level indicator (TANK FULL) lights up.
DRYER FA 110 is also equipped with an automatic defrost device. When the room temperature is lower than 12^ C, the device automatically starts operating for 8 minutes every hour. During this operation mode the “DEFROST” indicator light lights up.
INSTALLATION
- Before connecting the unit to the mains, make sure that the power supply corresponds to the one specified on the technical details labels.
- Do not install the appliance on a soft or uneven floor surface (to avoid possible vibrations or excessive noise).
- Do not place the appliance near heat sources such as stoves, heaters etc. This will allow better operation and energy saving.
- Keep the areas behind and in front of the unit clear from obstruction, so that the air flow is not hindered.
- Avoid putting water containers, watered plants, or heavy objects on the unit.
PRECAUTIONS
- Read the operating instructions carefully before using your dehumidifier for the first time and keep them for future reference.
- Use the appliance only for domestic use and only for the purpose it was designed for.
- Never operate the appliance if it has been subjected to violent knocks, if it is damaged or if a malfunction has caused damage to the electrical connections.
- Do not allow children or people who are not familiar with the instructions to use the appliance.
- Disconnect the appliance from the mains when it is not in use, before moving it and before cleaning it.
- To avoid spillage, empty the water tank before moving the appliance.
- Do not tip the appliance to the side as spilling water could cause damage to the inside components.
- Do not insert sharp objects through the air inlet screen.
- Never immerse the appliance in water or any other liquid.
OPERATION
- DRYER FA 110 is able to operate properly in places where temperature is included between 5 and 35°C. Outside this range, the protection device of the compressor will stop the operation of the appliance. This condition is to be considered normal.
- If the dehumidifier does not start, check that the set humidity required is not higher than the humidity in the room.
-
If the dehumidifier does not start or it stops working, check the appliance is correctly connected. If the plug and power supply are OK, wait for about 10 minutes (the automatic safety cut out takes about 10 minutes to respond) and restart the appliance. If the appliance still does not work, contact your authorised Polti Service Centre.
-
When the DRYER FA 110 is in operation, the compressor will produce heat and the room temperature could become slightly higher. This condition is quite normal.
- Close all the doors and windows when the appliance is in operation to obtain better dehumidifying results.
INSTRUCTIONS
- Put the humidity control knob on the "OFF" position, turning it to the left.
- Insert the plug in a suitable supply socket.
- Start the dehumidifier by turning the humidity control knob (D) to the right, and set it to the desired humidity (normally on position 7, corresponding to RH60%). When the compressor is in operation, the green indicator light (C) comes on.
- To turn off the dehumidifier, turn the humidity control knob to the left on position "OFF".
SUGGESTED:UMIDITY SETTINGS
The range of relative humidity corresponding to the numbers on the humidity control knob is the following:
Control knob Approx.humidity position nr. regulation
1 20%
3 30%
5 40%
7 60%
9 80%
For living-rooms, dining-rooms and bedrooms we suggest position "7". For store rooms, or other places that need to be drier, we suggest position "5".
AUTOMATIC@DEFROSING
- If the temperature in a room is lower than 12^ C , the unit is automatically switched to the "defrost" function for 8 minutes every hour. During this functioning mode the "DEFROST" indicator light comes on.
WATERELENDICATOR
- DRYER FA 110 is equipped with a water level indicator: when the water storage level becomes full, the compressor and the fan stop and the red indicator light “TANK FULL” lights up to signal the necessity to pour out the water from the storage tank.
AOCN/OCEMPLYTHEEL/ATERS/DRAGEERANK
• Take out the water tank by gently pulling it outwards, through the hollow at the base of the tank (fig. 1).
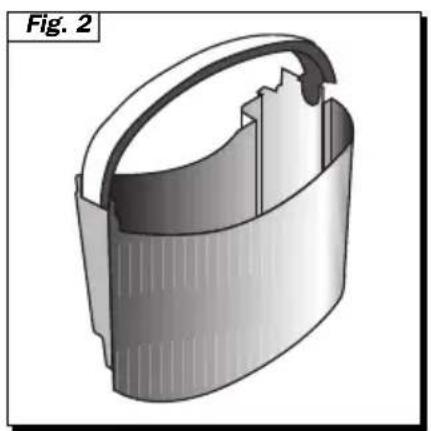
- For an easy transport, lift up the handle of the tank (fig. 2).
- Empty the tank and gently place it back in the unit, paying attention that it reaches the correct position. If the tank is not in the correct position, the compressor will not start.

natural_image
Illustration of a portable air purifier with heat exchanger and control panel (no text or symbols)IMPORTANT!
- When the unit stops it is necessary to wait for about 3 minutes before starting it again. This waiting time has been factory-set to protect the compressor from damage.
- Therefore, it is suggested not to remove and replace the tank repeatedly, as these actions involve a repeated start of compressor with consequent risk of wear and malfunction.
natural_image
3D rendered mechanical component with cutaway view, labeled Fig. 2 (no text or symbols on the object itself)USERCONTINUOUS/LATERDRAINN
• Take out the water tank by pulling it outwards.
- With a tool remove the cover of the hole for direct condensation drainage, which is at the back of the unit (fig. 3).
- Insert a PVC water drainage pipe of 14 mm I.D. in the drainage hole and connect it to the drainage mouth at the front of the unit (fig. 4).
- Place the water tank back in the unit.
Important: make sure that the continuous drainage pipe is connected to a suitable drainage in order to prevent the liquid from spilling on the floor.

natural_image
Illustration of a hand holding a magnifying glass over a device panel, with no visible text or symbols.
natural_image
Technical diagram of a mechanical component with wavy internal structure and directional arrow (no text or symbols)SUGGESTIONS FOR GENERAL MAINTENANCE
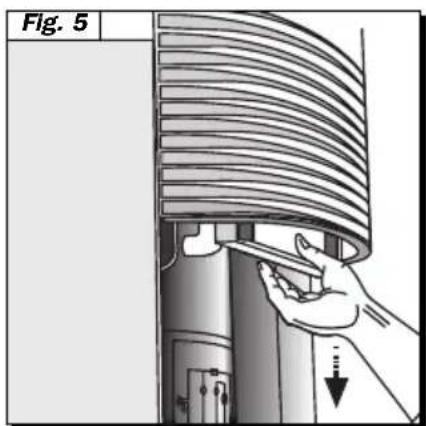
- The appliance is equipped with an extractable and washable cartridge-type filter. To take out the filter it is enough to slip it off by pulling it downwards (fig. 5). After the cleaning operation, insert the filter back in its place by running it in the guides until it is completely fitted in.
- It is recommended to clean the filtering net at least once every two weeks of operation, simply using some water with temperature lower than 40^ C. Do not use alcohol, solvents or boiling water.
natural_image
Illustration of a hand pressing down on a mechanical component, labeled Fig. 5 (no text or symbols on the diagram itself)- To avoid deformation, let the filtering net dry away from heat sources such as sun, stoves, heaters etc.
- For cleaning the outside of the appliance simply use a moist cloth. Do not use detergents or abrasive sponges, these may cause damage to the plastic surface.
- In case of failure or malfunction, do not attempt to disassemble the appliance but contact your Polti Service Centre.
:TROBREESHOOTING
PROBLEM CAUSE REMEDY
The appliance does The appliance is not Connect the appliance to not function connected to the mains the mains
| Full water tank Empty the water tank | ||
| Water tank not properly installed | Place water tank correctly | |
| Appliance on, airflow too weak | Dirty air filter | Clean air filter |
| Appliance is too noisy | Appliance is on an uneven surface | Put the appliance on a level surface |
| One of the lights remains on incorrectly | Program fault | Unplug the unit for at least 1 minute. |


Brand : POLTI
Model : FA110
Category : Dehumidifier