CF 7 - Uncategorized EZ Dupe - Free user manual and instructions
Find the device manual for free CF 7 EZ Dupe in PDF.


| Product Type | Standalone flash memory duplicator |
| Model | CF 7 |
| Brand | EZ Dupe |
| Supported Media | USB 1.1/2.0/3.0, eUSB, SD/SDHC/Micro SD/MMC/Mini SD, CompactFlash Type I/II, Micro Drive |
| Number of Target Channels | 7 (other configurations available) |
| Operation Mode | Standalone (no PC required) |
| Copy Modes | Synchronous and Asynchronous |
| Copy Speed | Up to 33 MB/s per channel |
| Data Verification | 32-bit CRC checksum |
| Supported File Systems | FAT16, FAT32, NTFS, Linux Ext2, Ext3 |
| Display | 2-line backlit monochrome LCD |
| Control Panel | 4 push-buttons (ENT, ESC, UP, DOWN) |
| Power Supply | 115V or 230V AC (switchable) |
| Operating Temperature | 32°F to 167°F (0°C to 75°C) |
| Storage Temperature | -4°F to 185°F (-20°C to 85°C) |
| Operating Humidity | 20% to 80% |
| Duplication Functions | Copy, Compare, Copy+Compare, Capacity Check |
| Utility Functions | Format FAT, Measure Speed, Quick Erase, Full Erase, Media Check, USB/SD/CF Info, System Info, Device Info, System Update |
| Copy Area Options | Only Data Area or Whole Media |
| Safety Features | Skip size check, unknown format handling, button beep enable/disable |
Frequently Asked Questions - CF 7 EZ Dupe
User questions about CF 7 EZ Dupe
0 question about this device. Answer the ones you know or ask your own.
Ask a new question about this device
Download the instructions for your Uncategorized in PDF format for free! Find your manual CF 7 - EZ Dupe and take your electronic device back in hand. On this page are published all the documents necessary for the use of your device. CF 7 by EZ Dupe.
USER MANUAL CF 7 EZ Dupe
1.1 Features 2
1.2 Control Panel Overview 3
1.3 Specifications 4
II. Duplication Options Overview
2.1 Copy 5
2.2 Compare 6
2.3 Copy+Compare 6
2.4 Capacity Check 6
2.5 Utility 7
2.5.1 Format FAT 7
2.5.2 Measure Speed 7
2.5.3 Quick Erase 7
2.5.4 Full Erase 7
2.5.5 Media Check 7
2.5.6 USB Information 8
2.5.7 Device Information 8
2.5.8 System Information 8
2.5.9 System Update 8
2.6 Setup 9
2.6.1 Copy Area 9
2.6.2 Asynchronous 9
2.6.3 Skip Size Check 9
2.6.4 Unknown Format 10
2.6.5 Button Beep 10
2.6.6 Clear Setup 10
I. Introduction
1. Features
- Each channel has its own processing control unit and operates independently with dedicated bandwidth of up to 33Mb per second.
● Standalone operation, no PC or software is required to operate. Minimizes possible computer virus infection. Instant power on and off, no warm-up or cool-down required.
● Easy-to-use One-Touch Copy operation. Available Compare function to verify copy accuracy - User-friendly menu options easily accessible through the 4-button control panel. Use 🔒 or ▼ button to scroll through the options and view the operation status of each channel on the 2-line backlit LCD display.
● Support Synchronous and Asynchronous copy modes for best operation efficiency.
● Powerful 32-bit CRC checksum to assure data integrity.
● Heavy-duty construction for every day commercial production or personal use.
● 115V and 230V switching power supply maximizes portability for operation anywhere. -
Designed to save users time and effort in creating multiple copies quickly and reliably.
-
Control Panel Overview
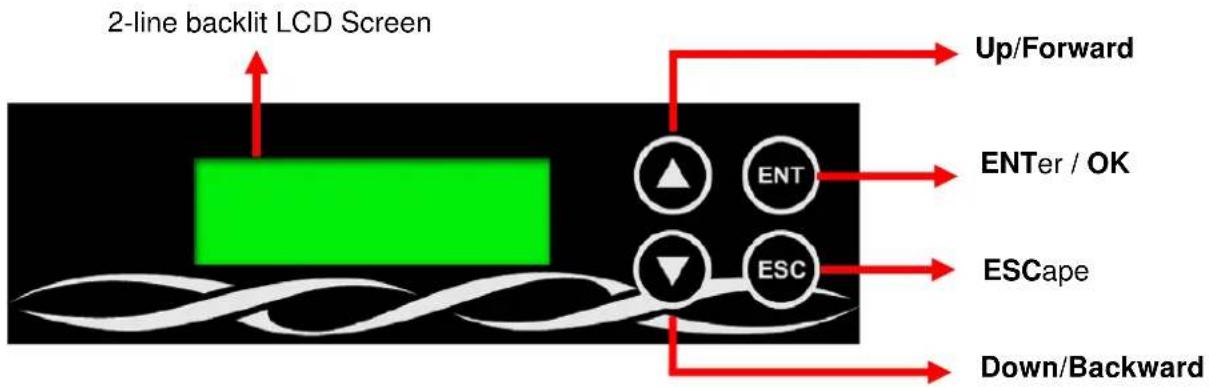
text_image
2-line backlit LCD Screen Up/Forward ENTer / OK ESCape Down/Backward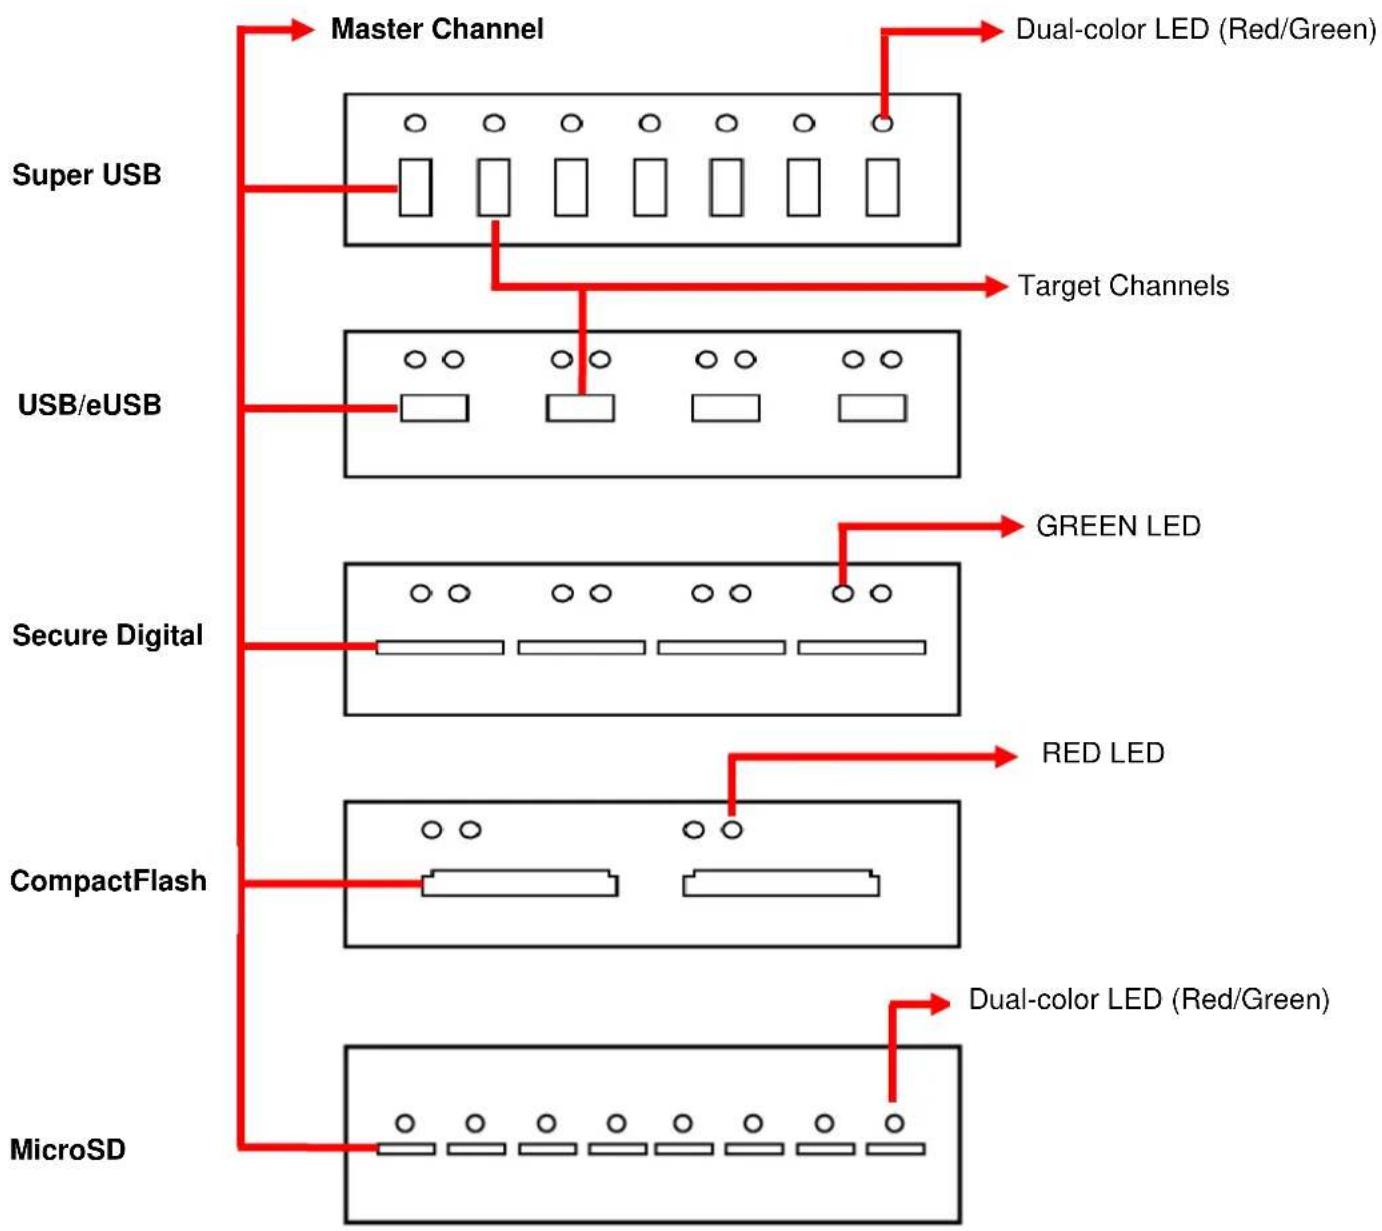
flowchart
graph TD
    A["MicroSD"] --> B["CompactFlash"]
    B --> C["Secure Digital"]
    C --> D["USB/eUSB"]
    D --> E["Super USB"]
    E --> F["Master Channel"]
    F --> G["Dual-color LED (Red/Green)"]
    F --> H["Target Channels"]
    C --> I["RED LED"]
    C --> J["Green LED"]
    B --> K["Dual-color LED (Red/Green)"]
3. Specifications
| Model | USB, eUSB, Secure Digital, MicroSD or CompactFlash Duplicator | |
| Target | 7, 15, 20, 34, 48, 55, 63, 118 (other configurations may be available) | |
| Operation | Standalone (No PC or Software is required) | |
| Supported Media | USB/eUSB: USB 1.1/2.0/3.0 compatible devices, eUSB (embedded USB) | |
| Secure Digital: SD / SDHC / Micro SD / MMC / Mini SD | ||
| CompactFlash: Type 1, II, Micro Drive | ||
| Key Features | 1. Easy-to-use One-Touch Operation | |
| 2. Support true Asynchronous & Synchronous copy modes | ||
| 3. Up to 33Mbps dedicated throughput per channel | ||
| 4. Support popular file formats: FAT 16/32/NTFS/Linux (Ext 2, Ext 3) | ||
| 5. Powerful 32-bit CRC data error checking to assure data integrity | ||
| Display | 2-line Backlit Monochrome LCD | |
| Power Supply | 115V or 230V | |
| Control Button | 4 push-button control panel (ENT, ESC, UP, DOWN) | |
| Humidity | Working | 20% ~ 80% |
| Storage | 5% ~ 95% | |
| Temperature | Working 32 | °F ~ 167°F |
| Storage | - °F ~ 185°F 4 | |
*Product specs may change
withou
II. Duplication Options Overview
1. COPY:
There are two copy modes available: Asynchronous and Synchronous. Please check section 2.6.2 Asynchronous under menu 2.6 Setup to select the correct copy mode.
1.1 Synchronous Copy
The duplicator will not start to copy the data from source to target devices until all target devices have been inserted into proper target channels. The copy process will begin and end at the same time.
(USB Flash drive was used as the sample device in this manual.)
- Select function "1. Copy", then insert source device into the master channel.
- Insert blank devices into the appropriate target channels. LCD will display the number of target devices found.
- Press "OK" button to start the copy process once all target devices have been inserted into proper target channels; or the duplicator will start the copy process automatically once all target channels are occupied.
- Copy process is completed. LCD displays number of successful and failed copy as well as total copy time.
Note:
-
The Green LED's will start flashing when copying is in progress. The Green LED will stop flashing but remain on once when the copy process is completed. The Red LED will be on when the duplicator encounter any error.
-
DO NOT remove target device when the Green LED is flashing. This may damage the duplicator as well as the flash device.
-
It is strongly recommended using source and target devices of same or similar sizes and specifications to avoid error.
1.2 Asynchronous Copy
When Asynchronous copy is enabled, the duplicator will copy the data from source device into system memory and from system memory directly onto target devices. Each target channel will start copy process immediately after a new target device is inserted into any target channel.
-
Select function "1. Copy", then insert the source device into the master channel and press OK. The duplicator will start reading and loading the source content into system buffer memory. The copy process starts immediately once a target device has been inserted into proper target channel.
-
The Green LED above each target channel will begin flashing during the copy process. DO NOT remove any device while the Green LED is flashing. Remove the target devices only after the Green LED stops flashing and replace with a new target device. The copy process starts automatically.
- You do not have to wait for copy process to complete on all target channels. Simply repeat the process of removing the finished target devices and replacing with a blank one in each individual target channel. LCD displays the number of successful and failed copy as well as copy still in progress. The Red LED will come on when there is an error.
Note
- You can press 🔒 Key to view the status and progress of each independent target channel during Asynchronous copy process.
- You can also press ⚠️ key to check the status of each device for error when Red LED comes on.
2. Compare:
This option allows you to compare the target device with copied data against the source for accuracy.
3. Copy + Compare
This option allows duplicator to start copy process for a certain amount of data and compare the copy result with source immediately. If there is no error, the process will continue to copy another certain amount of data and follow with compare again until finish copy and compare all data.
4. Capacity check
This option allows you to verify the device capacity.
-
Insert target device into proper channel. Using ▲▼ buttons to scroll down the menu option to option 4: "Capacity Check", then press OK to select. The duplicator will verify the device capacity within 3 seconds. Press ▼ to display the actual capacity.
-
Use 🔒 Buttons to toggle through all devices in each channel to verify individual capacity.
Note:
You can use ▲ Buttons to verify the device capacity when the Red LED comes on indicating the duplicator has encountered an error.
5. Utility
5.1 Format FAT
This option allows you to format the file structure of the select target flash device to standard FAT format (FAT32 by default). Insert the target flash device into the target channel, scroll to menu option 5.1 Format FAT and press ENT. The duplicator will detect target device capacity automatically and format the device accordingly.
Note:
You can use 🔒 buttons to view the real-time status of each individual target device during Format process.
- To avoid accidental format of source device, the Master Channel will not support Format option.
5.2 Measure Speed
This option allows you to measure the actual “Read” and “Write” speed of the target device. This option will NOT alter or erase existing data on the target device.
-
Insert target device into proper channel, scroll to menu option 5. Utility, select submenu option 2. Measure Speed, press ENT to being the process.
-
Use 🔒 Buttons to view the exact Read and Write speed of each individual target device.
5.3 Quick Erase
This option erases the table of content of target device but will NOT alter FAT structure. Use 🔒 button to view the real-time status of each individual channel.
5.4 Full Erase
This option completely erases the content of target device, including both file structure format and content. Use ESC button to exit the process. However, the original format and content will be lost.
5.5 Media Check
This option allows you to verify the component quality of the target device before you start the copy process. You can select either "Verify" or "Check USB" mode and define the percentage of verification range on target device you wish the duplicator to verify.
5.5.1 Verify 100%: Duplicator will read through the entire target device.
This option will NOT alter or erase the data format and existing content.
5.5.2 Check USB 100%: To check quality by "0" and "1" reading/writing the flash.
Note: Existing content will be erased during the test!!!
5.5.3 Set Range: This option allows you to define the percentage of target device which you wish to have the duplicator to verify.
5.6 USB/eUSB/SD/CF information
This option displays basic information of USB/eUSB/SD/CF selected, such as type of flash media, total capacity, file format and content size.
5.7 Device information
This option displays basic information of USB/eUSB/SD/CF selected, such as device model.
5.8 System Information
This option displays general information of the duplicator, including controller model, and system firmware version.
5.9 System Update
This option allows you to update the firmware of duplicator when necessary.
→ Obtain proper update firmware file from manufacturer
→ Save the un-zipped files to a flash device supported by the duplicator (DO NOT put the files in a folder!).
→ Select option 5.6 System Update, and press ENT. The duplicator will automatically start updating the firmware. Once completed, please turn off the duplicator for at least 5 seconds before turning it back on again to activate the new firmware.
TIPS:
①. DO NOT remove any target device during the Copy process, i.e. when the Green LED is flashing. This may not only damage the target device or the duplicator.
Some users may like to use a USB converter to copy other different types of flash cards, such as CF, SD, or Memory stick etc. Since the quality and stability of each USB converter in the market is very different, a poor quality USB converter may cause the damage to the machine and also the copy quality from the Flash card.
6 Setup
6.1 Copy Area
This option allows you to select the area on the source device to copy onto the target devices. You may select either "Only Data Area" to skip all the unoccupied area on the source device or "Whole Media".
6.1.1 Only Data Area
The duplicator first analyzes the file format of source device. You may copy only the data area to save overall copy time if the file format is FAT16, FAT32, NTFS or Linux (Ext2, Ext3). Otherwise, the duplicator will copy the entire source device content to the target devices including unoccupied space. For instance, the source device has 2GB capacity but with only 50MB of data in FAT32 file format. The duplicator will copy only the 50MB of data area to the target device, hence shortening overall copy time.
6.1.2 Whole Media
When selected, the duplicator copies the entire content on the source device, including both the data and empty spaces. This option is used when you have a source device with unknown file format. For instance a source device has 2GB capacity; 50MB of data and unknown file format, the duplicator will copy the whole 2GB of content to target device.
6.2 Asynchronous
Select enable or disable Asynchronous Copy Mode. If the option is enabled, the duplicator will activate Asynchronous mode automatically when the source device is inserted into source channel regardless of the file size. The data will be read from source into the system memory to speed up the copy process. When a target device is inserted into a target channel, it will start copy process for this target device immediately, so there is no waiting time for other target device to be inserted and get ready. If this option is disabled, the duplicator will default to Synchronous copy mode, and have to wait for all target devices to be inserted in order to start copy at same time.
6.3 Skip Size Check
This option allows you to enable or disable Skip Size Check. If the option is enabled, the copy process will start without checking the size difference between source and target devices.
6.4 Unknown Format
This option allows you to Copy or Skip unknown format. If option Skip is selected here, the unknown format from source will not be copied during copy process.
6.5 Button Beep
This option allows you to enable or disable beep sound when a button is pressed.
6.6 Clear Setup
Resets the duplicator controller back to factory default settings.