
TB400 - Uncategorized TIPTEL - Free user manual and instructions
Find the device manual for free TB400 TIPTEL in PDF.


User questions about TB400 TIPTEL
0 question about this device. Answer the ones you know or ask your own.
Ask a new question about this device
Download the instructions for your Uncategorized in PDF format for free! Find your manual TB400 - TIPTEL and take your electronic device back in hand. On this page are published all the documents necessary for the use of your device. TB400 by TIPTEL.
USER MANUAL TB400 TIPTEL
natural_image
Abstract logo with four colored oval shapes (green, blue, orange) arranged in a cross pattern on white background (no text or symbols)Yeastar
TB200/400 User Manual
Version 18.18.0.2
Contents
Introduction 4
Application Description.... 5
Configuration Guide....8
1. Login....8
2. Status 9
2.1 System Status....9
2.1.1 IP Trunk Status 9
2.1.2 BRI Status 10
2.1.3 Network Status 10
2.1.4 System Info.... 10
2.2 Reports....11
2.2.1 Call Logs 11
2.2.2 System Logs.... 11
3. System....13
3.1 Network Preferences .... 13
3.1.1 LAN Settings.... 13
3.1.2 DDNS Settings 14
3.1.3 Static Route.... 14
3.2 Security Center 15
3.2.1 Certificates 15
3.2.2 Firewall Rules....16
3.2.3 IP Blacklist 17
3.3 System Preferences....18
3.3.1 Password Settings.... 18
3.3.2 Date and Time 19
3.3.3 Backup and Restore 19
3.3.4 Reset and Reboot....20
3.3.5 Firmware Update 21
4. Gateway....22
4.1 Physical Trunk 22
4.1.1 Module List....22
4.2 VoIP Settings 26
4.2.1 VoIP Trunk 26
4.2.2 SIP Settings....28
4.2.3 Trunk Group.... 33
4.2.4 General Preferences....33
4.3 Route Settings 34
4.3.1 Route List 34
4.3.2 Blacklist 37
4.4 Audio Settings....37
4.4.1 Custom Prompts....37
5. Logout....39
Introduction
Yeastar TB200/400 is a compact and reliable standalone VoIP BRI gateway (BRI-VoIP/VoIP-BRI) offering 2 or 4 BRI ports for companies using ISDN BRI lines an easy, cost-effective and flexible integration into any VoIP system or enabling any IP PBX to be connected to the public ISDN network.
Features
| ● 2 or 4 BRI ports |
| ● Programmable NT/TE modes |
| ● Type of connection: Point to Point, Point to Multipoint |
| ● T.38 FAX |
| ● Flexible number manipulation |
| ● Least cost routing |
| ● SIP Registrar for IP phones |
| ● Simple Web-based management |
| ● Trace and debug tools for diagnostics |
For more information, please click:
http://www.yeastar.com/Products/BRI-VoIP-Gateway-TB200-&-TB400
Yeastar TB200/400 BRI Gateway features 2 or 4 BRI interfaces for connection of BRI providersone 10/100 Mbps LAN port.
For more information about the TB200/400 hardware specification and how to install the TB200/400, please refer to the document below:
http://www.yeastar.com/download/Yeastar_TB_BRI_VoIP_Gateways_Installation_Guide_en.pdf
Application Description
TB200/400 BRI VoIP Gateway supports up to 4 or 8 simultaneous phone calls from SIP to ISDN BRI or from BRI to SIP. TB200/400 is interoperable with most IP PBX and Unified Communication vendors such as MyPBX, Elastix, Asterisk, 3CX, Skype etc.
Three modes are available for you to connect your SIP server and TB200/400 gateway. We call them SIP Account Mode, VoIP Mode and SPS (Service Provider SIP) Mode. You can choose any one of the 3 modes to connect your SIP server and TB200/400. SPS Mode is recommended.
Account Mode:
Create one SIP account on TB200/400, and take the SIP account to register one SIP trunk on your SIP server. Then TB400 and your SIP server are connected by the account.
➢ Calls from SIP to BRI
1) Create one outbound route on your SIP sever, and select the SIP trunk you have registered just now.
2) Configure a route on TB200/400, choose the SIP account in the field "Call Comes in From", and choose BRI trunk in the field "Send calls Through".
3) Make a call from your SIP Server and the call should match the outbound route dial rules.
Calls from BRI to SIP
1) Create an inbound route on your SIP server, and select the SIP trunk you have registered just now.
2) Configure another route on TB200/400, choose BRI trunks in the field "Call Comes in From", and choose the SIP account in the filed "Send Calls Through".
3) When a call comes to BRI trunk on TB200/400, the call will be routed to the destination of the SIP server inbound route.
Register SIP account on IP phone
With account mode, you can directly take the SIP account to register on your SIP phone or softphone; then make calls from softphone though BRI trunk on TB200/400 and receive incoming calls on your SIP phone or softphone. In this way, you don't have to set up any SIP server.
VoIP Mode
Take a SIP account from your SIP server, and register it on TB200/400 as a VoIP trunk. In this way, TB200/400 and your SIP server are connected.
Calls from SIP to BRI
1) Configure a route on TB200/400; choose the VoIP trunk in the field "Call Comes in From", and choose BRI trunk in the field "Send calls Through". Enable Two-stage Dialing on the route.
2) Make a call from your SIP server, dial the SIP account number which is registered on TB200/400. You will hear a dial tone or two-stage dialing prompt, then dial the external number out through BRI trunk.
Calls from BRI to SIP
1) Configure another route on TB200/400, choose BRI trunks in the field "Call Comes in From", and choose the SIP trunk in the filed "Send Calls Through". Enable Two-stage Dialing on the route.
2) When an incoming call reaches BRI trunk on TB200/400, you will hear a dial tone or two-stage dialing prompt, then dial an extension number of the SIP server.
SPS Mode(Recommended)
Create a Service Provider SIP trunk on TB200/400 to connect to your SIP server. Add another Service Provider SIP trunk on your SIP server, connecting to TB200/400.
Calls from SIP to BRI
1) Create one outbound route on your SIP sever, and select the SIP trunk you have created just now.
2) Configure a route on TB200/400, choose the SPS trunk in the field "Call Comes in From", and choose BRI trunk in the field "Send calls Through".
3) Make a call from your SIP Server and the call should match the outbound route dial rules.
Calls from BRI to SIP
1) Configure another route on TB200/400, choose BRI trunks in the field "Call Comes in From", and choose the SPS trunk in the filed "Send Calls Through".
2) Create one inbound route on your SIP server and select the SIP trunk created just now.
3) When an incoming call reaches BRI trunk on TB200/400, it will be routed to the destination of the SIP server inbound route.
Note: if you want the call to go directly to the destination number of your SIP server, you don't have to create an inbound route on SIP server, instead set a Hotline number on TB200/400 route.
Typical Application
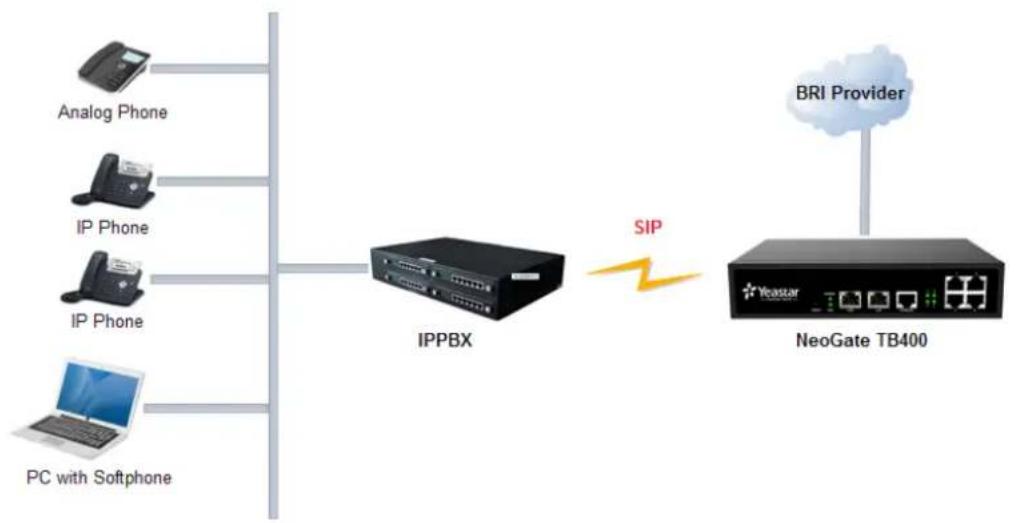
flowchart
graph LR
    A["Analog Phone"] --> D["IPPBX"]
    B["IP Phone"] --> D
    C["IP Phone"] --> D
    E["PC with Softphone"] --> D
    D --> F["SIP"]
    G["BRI Provider"] --> H["NeoGate TB400"]
Typical Application
Configuration Guide
1. Login
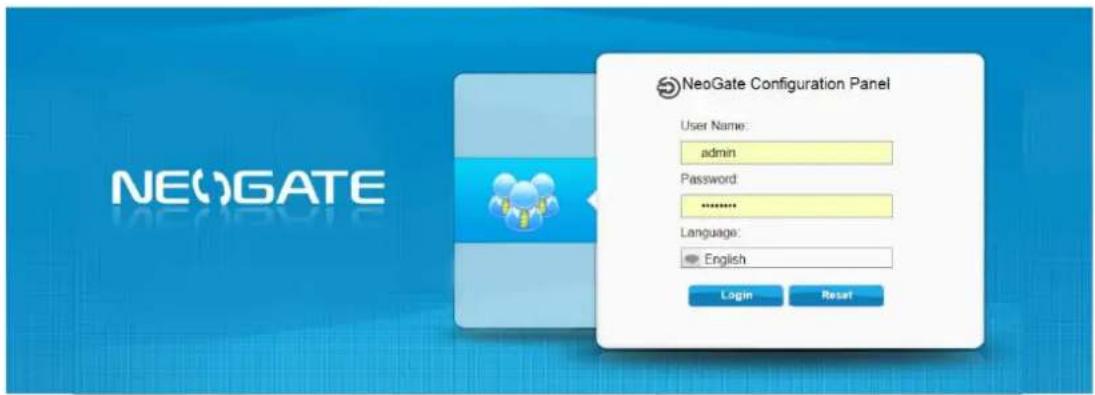
TB200/400 provides web-based configuration interface for administrator. The user can manage the device by logging in the web interface. Check the factory defaults below:
IP address: http://192.168.5.150
User Name: admin
Default Password: password
In this guide, the IP address of TB200/400 is http://192.168.6.125.
-
Start the browser on PC. In the address bar, enter the IP address, click "Enter" button and then you can see the Web Configuration Panel login page (see Figure 1-1).
-
Enter the Admin User Name and Password to log in.

text_image
192.168.6.125 192.168.6.125BRI VoIP Gateway for Cost Reduction
text_image
NeoGate Configuration Panel User Name: admin Password: ****** Language: English Login ResetCopyright © 2006-2015 Yeastar Information Technology Co. Ltd. All Rights Reserved.
Figure 1-1 Web Configuration Panel Login Page
2. Status

Click Status to check the status of TB200/400, including the system status and the detailed reports.
2.1 System Status
In this page, we can check the status of the system, including trunk status, network status and system information.
2.1.1 IP Trunk Status
Status of all the SIP trunks and SIP accounts are displayed on this page.
SIP Type
Table 2-1 Description of SIP Trunk Status
| Status Description | |
| Registered | Successful registration, trunk is ready for use. |
| Unregistered Trunk registration failed. | |
| Request Sent Registering. | |
| Waiting for Authentication | Wrong password. |
SP-SIP Type
Table 2-2 Description of SP-SIP Trunk Status
| Status Description | |
| OK Successful registration, trunk is ready for use. | |
| Unreachable The trunk is unreachable. | |
| Failed Trunk registration failed. | |
SIP Account
Table 2-3 Description of SIP Account Status
| Status Description | |
| Registered | The account is registered successfully on the SIP server. |
| Unregistered Trunk registration failed. | |
2.1.2 BRI Status
On this page, you can check the status of BRI trunks. If there is no BRI module inserted on TB400, you cannot see any BRI trunk here.
Table 2-4 Description of SIP Account Status
| Status Description | |
| OK | The BRI trunk is connected and configured correctly, trunk is ready to use. |
| Disconnected | The BRI trunk is not connected or configured wrong. |
2.1.3 Network Status
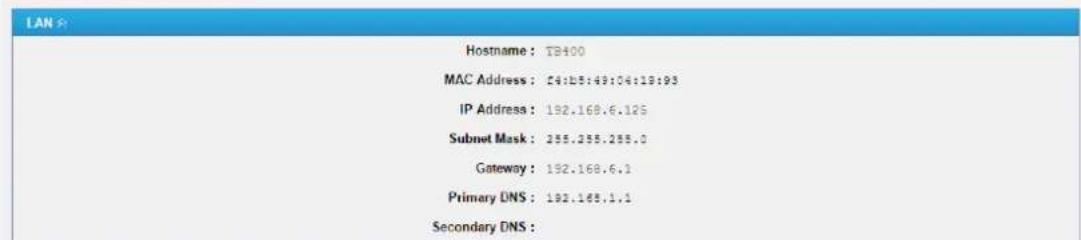
In this page, the IP address of LAN port will appear with their status. If your VLAN or VPN are configured, you can check the status in this page also.
Network Status
text_image
LAN Hostname: TB400 MAC Address: 14:15:49:04:13:93 IP Address: 192.168.6.125 Subnet Mask: 255.255.255.0 Gateway: 192.168.6.1 Primary DNS: 192.168.1.1 Secondary DNS:Figure 2-1 Network Status
2.1.4 System Info
In this page, you can check the hardware/firmware version, or the disk usage of TB200/400.

text_image
System Info General Product Type: TB600 Hardware Version: 72.00 0000-0000 Firmware Version: 18.18.0.1-bmta02 Uptime: 20:37:20 up: 2 days, 10:57 Disk Usage Note: If there is not enough disk space on the system, the oldest call lag files will be automatically deleted as necessary. Disk Usage: Used/Total (UK-blocks) use% flash: 16660/90112 17% Memory Usage Memory Usage: Used/Total (UK-blocks) use% Nm: 78312/10796 69%Figure 2-2System Info
2.2 Reports
In this page, you can check the call detailed log, system log, and use the packet tool to debug the system when needed.
2.2.1 Call Logs
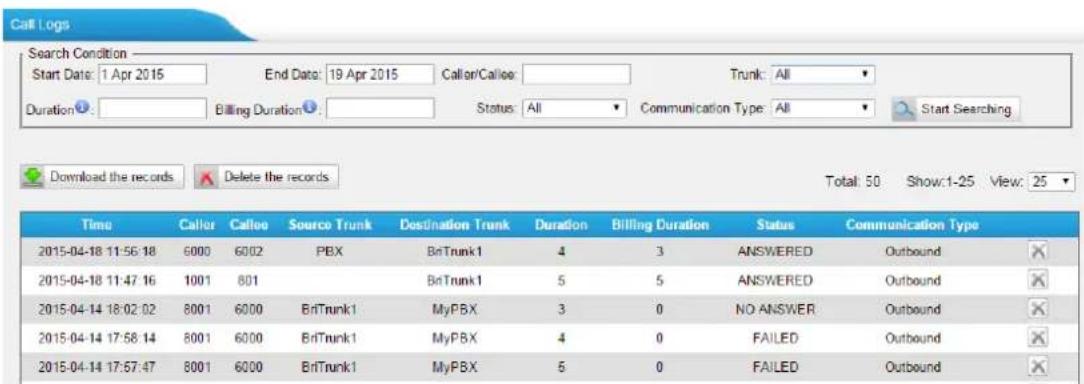
The call log captures all call details, including call time, caller number, callee number, call type, call duration, etc. An administrator can search and filter call data by call date, caller/callee, trunk, duration, billing duration, status, or communication type.
text_image
Call Logs Search Condition Start Date: 1 Apr 2015 End Date: 19 Apr 2015 Caller/Callor: Trunk: All Duration: Billing Duration Status: All Communication Type: All Start Searching Download the records Delete the records Total: 50 Show:1-25 View: 25 Time Caller Callor Source Trunk Destination Trunk Duration Billing Duration Status Communication Type 2015-04-18 11:56:18 6000 6002 PBX BriTrunk1 4 3 ANSWERED Outbound 2015-04-18 11:47:16 1001 801 BriTrunk1 5 5 ANSWERED Outbound 2015-04-14 18:02:02 8001 6000 BriTrunk1 MyPBX 3 0 NO ANSWER Outbound 2015-04-14 17:58:14 8001 6000 BriTrunk1 MyPBX 4 0 FAILED Outbound 2015-04-14 17:57:47 8001 6000 BriTrunk1 MyPBX 5 0 FAILED OutboundFigure 2-3Call Logs
2.2.2 System Logs
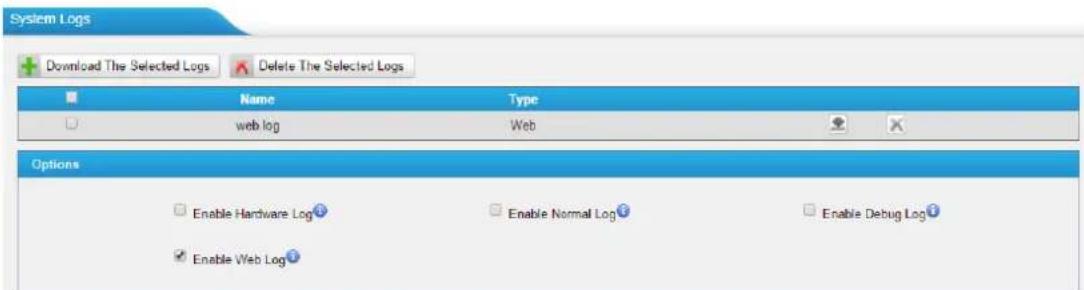
You can download and delete the system logs of TB200/400.
text_image
System Logs Download The Selected Logs Delete The Selected Logs Name Type web log Web Options Enable Hardware Log Enable Normal Log Enable Debug Log Enable Web LogFigure 2-4 System Logs
- Enable Hardware Log
Save the information of hardware; (up to 4 log files) - Enable Normal Log
Save the prompt information; (up to 16 log files) - Enable Web Log
Save the history of web operations (up to 2 log files)
- Enable Debug Log
Save debug information (up to 2 log files)
Packet Tool
TB200/400 provides a tool to capture packets for technician. Packet capture tool "Wireshark" is integrated in TB200/400.
Users also could specify the destination IP address and port to get the packets.

text_image
Packet Capture Tool IP: Port: Start Stop DownloadFigure 2-5 Packet Tool
3. System

Click System to access. In this page, we can configure the network settings, security settings and some system preferences.
3.1 Network Preferences
3.1.1 LAN Settings

text_image
LAN Settings DHCP: No ▼ Enable SSH: No ▼ Port: 8022 Hostname: TB400 IP Address: 192.168.6.125 Subset Mask: 255.255.255.0 Gateway: 192.168.6.1 Primary DNS: 192.168.1.1 Secondary DNS: IP Address2: Subset Mask2:Figure 3-1LAN Settings
Table 3-1 Description of LAN Settings
| Items Description | |
| DHCP | If this option is set as yes, TB200/400 will act as DHCP client to get an available IP address from your local network. We don’t recommend enabling this, as without the right IP address you cannot access TB200/400. |
| Enable SSH | By using SSH, you can log in to TB200/400 and run commands. It’s disabled by default. We don’t recommend enabling it if not needed.The default port for SSH is 8022; |
| Hostname | Set the host name for TB200/400. |
| IP Address | Set the IP Address for TB200/400. |
| Subnet Mask | Set the subnet mask for TB200/400. |
| Gateway | Set the gateway for TB200/400. |
| Primary DNS | Set the primary DNS for TB200/400. |
| Secondary DNS | Set the secondary DNS for TB200/400. |
| IP Address2 | Set the second IP Address for TB200/400. |
| Subnet Mask2 | Set the second subnet mask for TB200/400. |
3.1.2 DDNS Settings
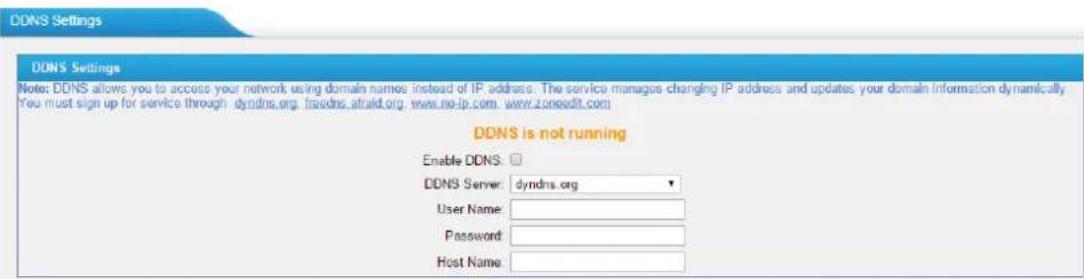
DDNS (Dynamic DNS) is a method/protocol/network service that provides the capability for a networked device, such as a router or computer system using the Internet Protocol Suite, to notify a Domain Name System (DNS) name server to change, in real time, the active DNS configuration of its configured hostnames, addresses or other information.
text_image
DDNS Settings DDNS Settings Note: DDNS allows you to access your network using domain names instead of IP address. The service manages changing IP address and updates your domain information dynamically. You must sign up for service through dyndns.org, freedns.afraid.org, www.no-ip.com, www.toneedit.com DDNS is not running Enable DDNS: DDNS Server: dyndns.org User Name: Password: Host Name:Figure 3-2 DDNS Settings
Table 3-2 Description of DDNS Settings
| Items Description | |
| DDNS Server | Select the DDNS server you sign up for service. |
| User Name | User name the DDNS server provides you. |
| Password | User account's password. |
| Host Name | The host name you have got from the DDNS server |
Note: DDNS allows you to access your network using domain names instead of IP address. The service manages changing IP address and updates your domain information dynamically. You must sign up for service through dyndns.org, freedns.afraid.org, www.no-ip.com, www.zoneedit.com.
3.1.3 Static Route
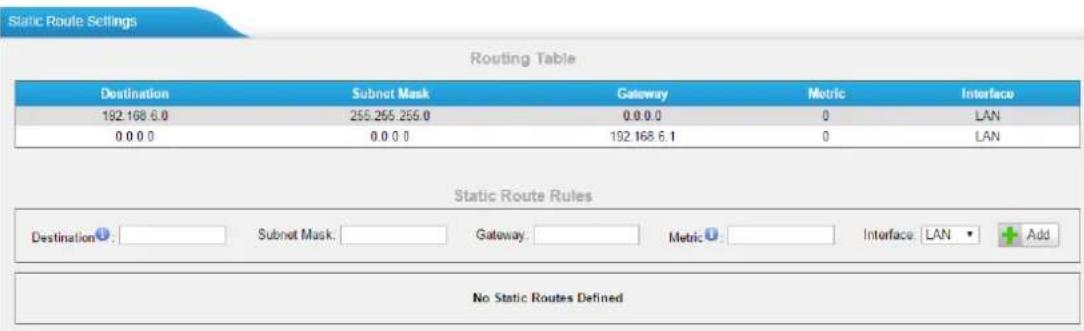
TB200/400 will have more than one Internet connection in some situations but it has only one default gateway. You will need to set some Static Route for TB200/400 to force it to go out through different gateway when accessing to different internet.
The default gateway priority of TB200/400 from high to low is VPN/VLAN→LAN port.
text_image
Static Route Settings Routing Table Destination Subnet Mask Gateway Metric Interface 192.168 6.0 255.255.255.0 0.0.0.0 0 LAN 0.0.0.0 0.0.0.0 192.168 6.1 0 LAN Static Route Rules Destination: Subnet Mask: Gateway: Metric: Interface LAN Add No Static Routes DefinedFigure 3-3Static Route
1) Route Table
The current route rules of TB200/400.
2) Static Route Rules
You can add new static route rules here.
Table 3-3 Description of Static Route
| Items Description | |
| Destination | The destination network to be accessed to by TB200/400. |
| Subnet Mask | Specify the destination network portion. |
| Gateway | Define which gateway TB200/400 will go through when accessing the destination network. |
| Metric | The cost of a route is calculated by using what are called routing metric.Routing metrics are assigned to routes by routing protocols to provide measurable statistic which can be used to judge how useful (how low cost) a route is. |
| Interface | Define which internet port to go through. |
3.2 Security Center
3.2.1 Certificates
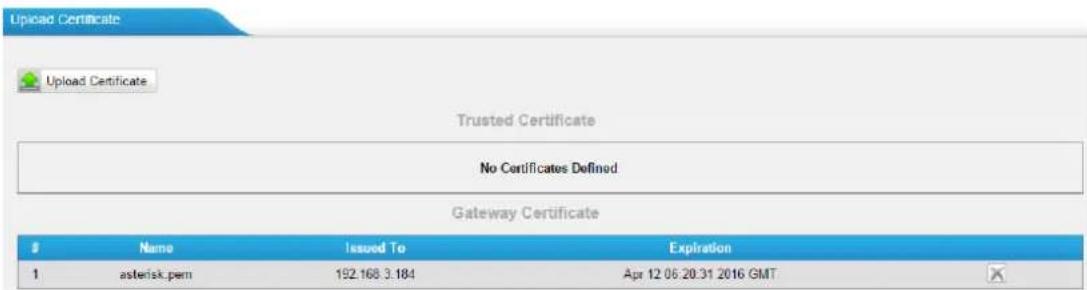
TB200/400 can support TLS trunk. Before you register TLS trunk to TB200/400, you should upload certificates first.
text_image
Upload Certificate Upload Certificate Trusted Certificate No Certificates Defined Gateway Certificate Name Issued To Expiration 1 asterisk.pem 192.168.3.184 Apr 12 06:20:31 2016 GMTFigure 3-4 Certificates
- Trusted Certificate
This certificate is a CA certificate. When selecting "TLS Verify Client" as "Yes", you should upload a CA. The relevant IPPBX should also have this certificate.
• Gateway Certificate
This certificate is server certificate. No matter selecting "TLS Verify Client" as "Yes" or "No", you should upload this certificate to TB200/400. If IPPBX enables "TLS Verify server", you should also upload this certificate on IPPBX.
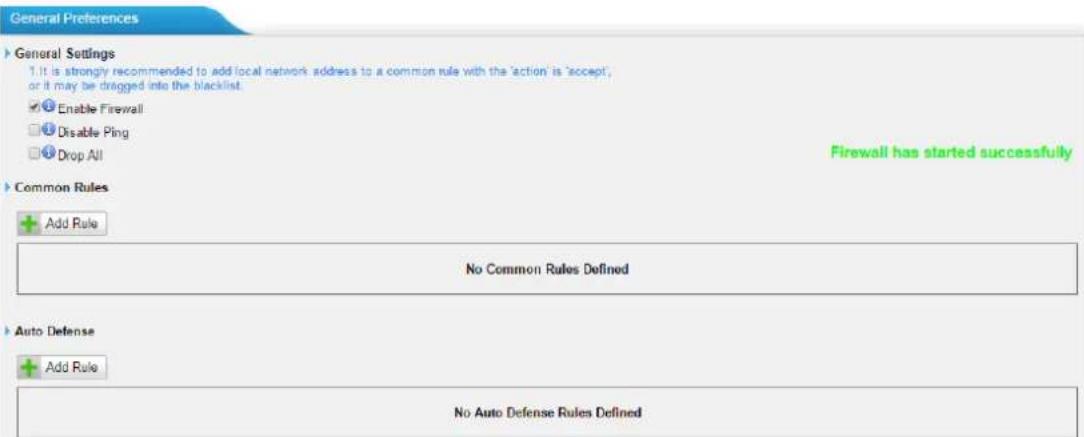
3.2.2 Firewall Rules
text_image
General Preferences ► General Settings 1. It is strongly recommended to add local network address to a common rule with the 'action' is 'accept', or it may be dragged into the blacklist. ✓ Enable Firewall ☐ Disable Ping ☐ Drop All Firewall has started successfully ► Common Rules + Add Rule No Common Rules Defined ► Auto Defense + Add Rule No Auto Defense Rules DefinedFigure 3-5 Firewall Rules
1) General Settings
Table 3-4 Description of Firewall General Settings
| Items Description | |
| Enable Firewall | Enable the firewall to protect the device. You should reboot the device to make the firewall run. |
| Disable Ping | Enable this item to drop net ping from remote hosts. |
| Drop All | When you enable “Drop All” feature, the system will drop all packets or connection from other hosts if there are no other rules defined. To avoid locking the devices, at least one “TCP” accept common rule must be created for port used for SSH access, port used for HTTP access and port sued for CGI access. |
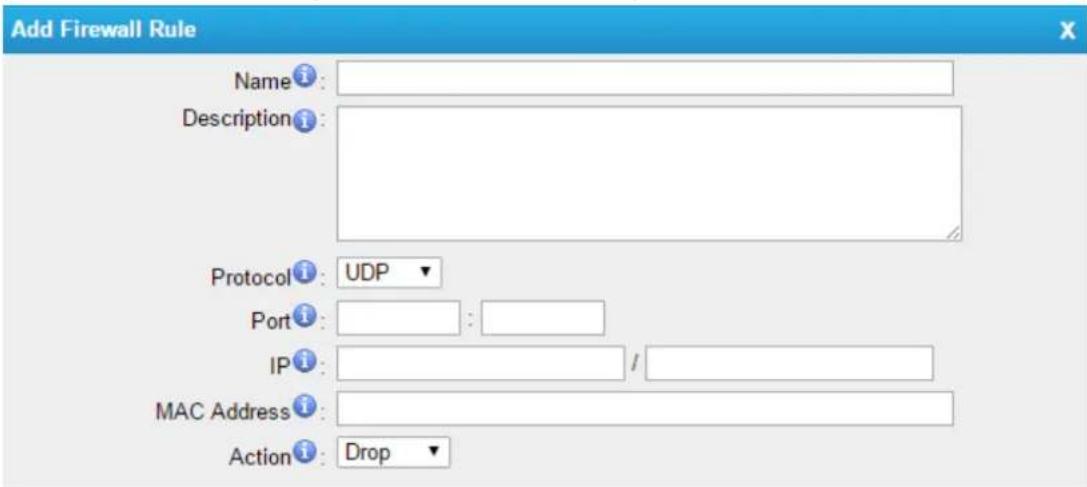
2) Common Rules
There is no default rule; you can create oneas required.
text_image
Add Firewall Rule Name: Description: Protocol: UDP Port: IP: / MAC Address: Action: DropFigure 3-6 Common Rules
Table 3-5 Description of Common Rules
| Items Description | |
| Name | A name for this rule, e.g. “HTTP”. |
| Description | Simple description for this rule. E.g. accept the specific host to access the Web interface for configuration. |
| Protocol | The protocols for this rule. |
| Port | Initial port should be on the left and end port should be on the right. The end port must be equal to or greater than start port. |
| IP | The IP address for this rule. The format of IP address is: IP/maskE.g. 192.168.5.100/255.255.255.255 for IP 192.168.5.100E.g. 192.168.5.0/255.255.255.0 for IP from 192.168.5.0to 192.168.5.255. |
| MAC Address | The format of MAC Address is XX:XX:XX:XX:XX:XX, X means 0~9 or A~F in hex, the A~F are not case sensitive. |
| Action | Accept: Accept the access from remote hosts.Drop: Drop the access from remote hosts.Ignore: Ignore the access. |
Note: the MAC address will be changed when it's a remote device, so it will not be working to filter using MAC for remote devices.
3.2.3 IP Blacklist
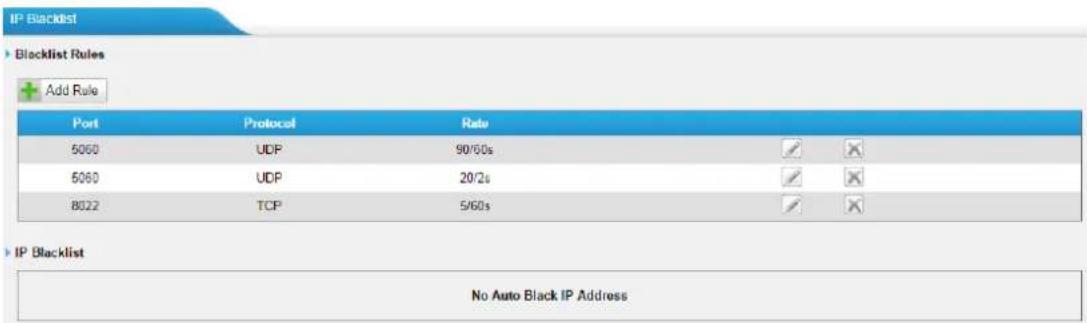
You can set some packets accept speed rules here. When an IP address which hasn't been accepted in common rules sends packets faster than the allowed speed, it will be set as ablack IP address and beblocked automatically.
text_image
IP Blacklist Blacklist Rules Add Rule Port Protocol Rate 5060 UDP 90/60s ✓ ✕ 5060 UDP 20/2s ✓ ✕ 8022 TCP 5/60s ✓ ✕ IP Blacklist No Auto Black IP AddressFigure 3-7 IP Blacklist
1) Blacklist rules
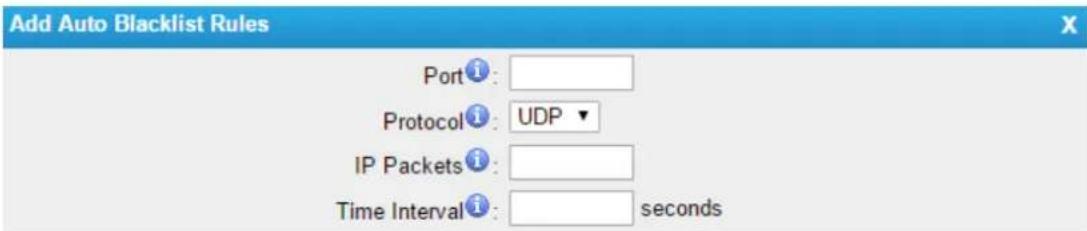
We can add the rules for IP blacklist rate as demanded.
text_image
Add Auto Blacklist Rules Port: Protocol: UDP IP Packets: Time Interval: secondsFigure 3-8 Auto Blacklist Rule
Table 3-6 Description of Auto Blacklist Rules
| Items Description | |
| Port | Auto defense port |
| Protocol | Auto defense protocol. TCP or UDP. |
| IP Packets | Allowed IP packets number in the specific time interval. |
| Time interval | The time interval to receive IP packets. For example, IP packets 90, time interval 60 means 90 IP packets are allowed in 60 seconds. |
2) IP blacklist
The blocked IP address will display here, you can edit or delete it as you wish.
3.3 System Preferences
In this page, we can set other system preferences, like the password for admin account, system date and time, firmware update, backup and restore, reset and reboot.
3.3.1 Password Settings
The default password is "password". To change the password, enter the new password and click "Save". The system will then prompt you to re-login using your new password.

text_image
Change Password Change Password Enter Old Password: Enter New Password: Retype New Password:Figure 3-9 Password Settings
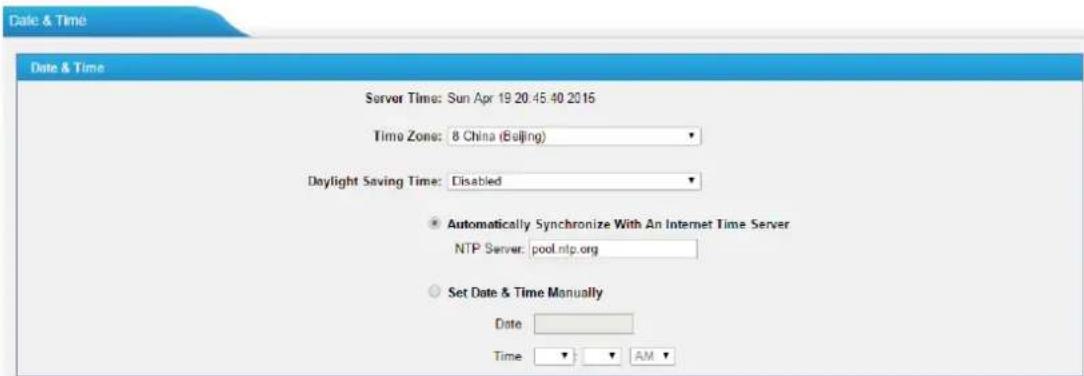
3.3.2 Date and Time
Set the date and time for TB200/400.
text_image
Date & Time Server Time: Sun Apr 19 20:45:40 2016 Time Zone: 8 China (Buljing) Daylight Saving Time: Disabled • Automatically Synchronize With An Internet Time Server NTP Server: pool.ntp.org ○ Set Date & Time Manually Date: Time : : : AM : :Figure 3-10 Date and Time
Table 3-7 Description of Date and Time Settings
| Items Description | |
| Time Zone | You can choose your time zone here. |
| Daylight Saving Time | Set the mode to Automatic or disabled. |
| Automatically Synchronize With an Internet Time Server | Input the NTP server so that TB200/400 will update the time automatically. |
| Set Date & Time Manually | You can set the time to your local time manually here. |
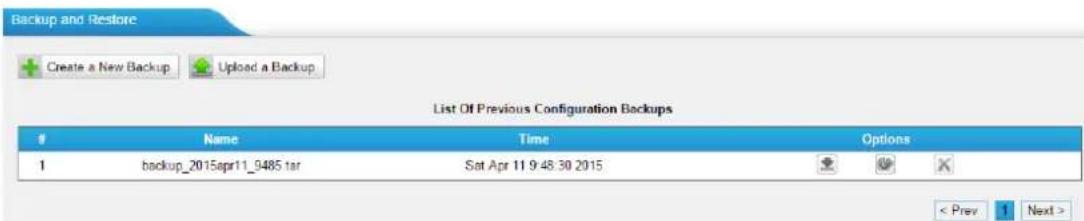
3.3.3 Backup and Restore
We can back up the configurations before resetting TB200/400 to factory defaults, and then restore it on this package.
text_image
Backup and Restore Create a New Backup Upload a Backup List Of Previous Configuration BackupsName Time Options
1 backup_2015apr11_9485 tar Sat Apr 11 9:48:30 2015 < Prev 1 Next >Figure 3-11 Backup and Restore
Notes:
-
Only configurations, custom prompts will be backed up.
-
If you have updated the firmware, it's not recommended to restore using old package.
3.3.4 Reset and Reboot
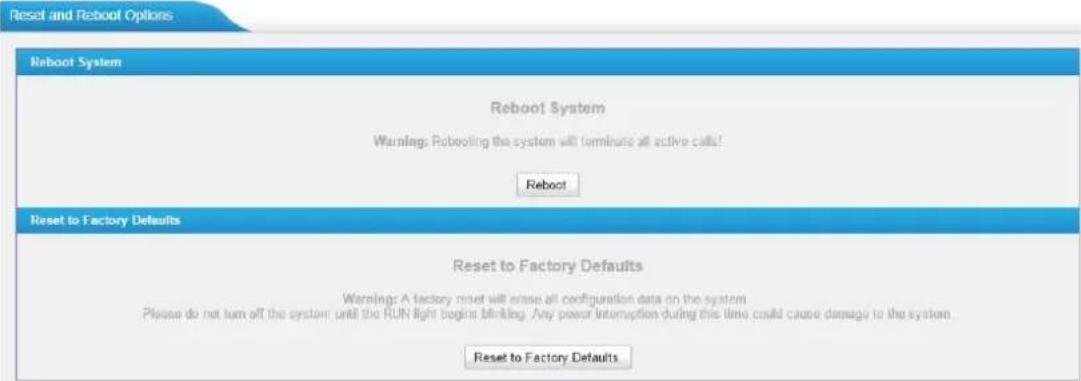
We can reset or reboot TB200/400 directly on this page.
text_image
Reset and Reboot Options Reboot System Reboot System Warning: Rebooting the system will terminate all active calls! Reboot Reset to Factory Defaults Reset to Factory Defaults Warnings: A factory reset will erase all configuration data on the system. Please do not turn off the system until the RUN light begins blinking. Any power interruption during this time could cause damage to the system. Reset to Factory DefaultsFigure 3-12 Restore and Reboot
- Reboot System
Warning: rebooting the system will terminate all active calls!
- Reset to Factory Defaults
Warning: a factory reset will erase all configuration data on the system.
Please do not turn off the system until the RUN light begins blinking. Any power interruption during this time could cause damage to the system.
3.3.5 Firmware Update
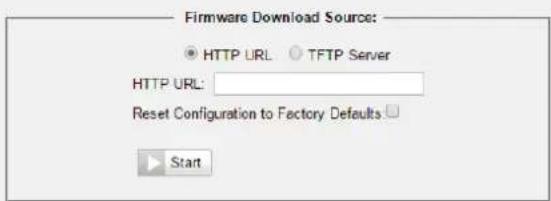
Firmware upgrading is possible through the Administrator Web interface using a TFTP Server or an HTTP URL.
Enter your TFTP Server IP address and firmware file location, then click "Start" to update the firmware
Notes:
- If "Reset configuration to Factory Defaults" is enabled, the system will restore to factory default settings.
- When updating the firmware, please don't turn off the power. Or the system will get damaged.
Update System Firmware
text_image
Firmware Download Source: ● HTTP URL ○ TFTP Server HTTP URL: Reset Configuration to Factory Defaults □ StartFigure 3-13 Firmware Update
4. Gateway

Click Gateway to access the gateway configuration page. We can configure the details of BRI ports, VoIP settings, gateway settings and advanced settings.
4.1 Physical Trunk
4.1.1 Module List
All the BRI trunks are listed here. You can edit each BRI trunk by clicking "Edit" button.Before configure anything, please make sure the cable is OK, and you have got enough information from the ISDN provider.
| Trunk Name | Port | Signaling | Max. Call Duration(min) | Call Duration(min) | Clear Stat. |
| BnTrunk1 | 1 | BRI-CPE | 0 | 7 | 0 |
| BnTrunk2 | 2 | BRI-NET-PTMP | 0 | 0 | 0 |
Figure 4-1 Module List
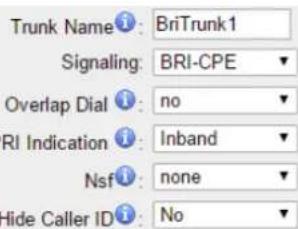
1) General Settings
text_image
Trunk Name: BriTrunk1 Signaling: BRI-CPE Overlap Dial: no RI Indication: Inband Nsf: none Hide Caller ID: No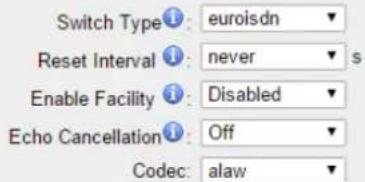
text_image
Switch Type: euroisdn Reset Interval: never Enable Facility: Disabled Echo Cancellation: Off Codec: alawFigure 4-2 General Settings of BRI Trunk
Table 4-1 Description of BRI General Settings
| Items Description | |
| Trunk Name | Define a name for this trunk. |
| Signaling | Choose the signaling of BRI. TB400 supports the following signaling:√ BRI-NET√ BRI-NET-PTMP√ BRI CPE√ BRI-CPE-PTMP |
| Switch Type | Choose the switch type of BRI.√ national: National ISDN type2 (common in the US)√ ni1: National ISDN type 1✓ dms100: Nortel DMS100✓ 4ess: AT&T 4ESS✓ 5ess: Lucent 5ESS✓ euroisdn: EuroISDN✓ qsig: Minimalistic protocol to build a "network" with two or more PBX of different vendors |
| Overlap Dial | Define whether TB400 can dial this switch using overlap digits. If you need Direct Dial-in (DDI; in German "Durchwahl") you should change this to yes, then TB400 will wait after the last digit it receives. |
| Reset Interval | Setthe time in seconds between restart of unused channels. Some PBXs don't like channel restarts. So set the interval to a very long interval e.g. 100000000 or "never" to disable entirely. If you are in Israel, the following is important. As Bezeq in Israel doesn't like the B-Channel resets happening on the lines, it is best to set the reset interval to 'never' when installing a box in Israel. Our past experience also shows that this parameter may also cause issues on local switches in the UK and China. |
| PRI Indication | Tells how Device should indicate Busy () and Congestion() to the switch/user. Accepted values are:✓ inband: Device plays indication tones without answering; not available on all PRI/BRI subscription lines .✓ Outof Band: Device disconnects with busy/congestion information code so the switch will play the indication tones to the caller. Busy() will now do same as setting PRI_CAUSE=17 and Hangup(). |
| Enable Facility | To enable transmission of facility-based ISDN supplementary services (such as caller name from CPE over facility). |
| Nsf | Used with AT&T PRIs. If outbound calls are being rejected due to "Mandatory information element missing" and the missing IE is 0x20, then you need this setting. |
| Echo Cancellation | This disables or enables echo cancellation, it is recommended not to turn this off. |
| Hide Caller ID | Whether to hide Caller ID. |
| Codec | Choose the codec:✓ alaw✓ ulaw |
2) Call Duration Settings

text_image
Call Duration Setting Max. Call Duration(min): 0 Clear Stat.: 0 ▼Figure 4-3 Call Duration Settings
Table 4-2 Description of Call Duration Settings
| Items Description | |
| Max Call Duration (min) | Define the maximum call duration within a month through this BRI trunk. (0 means unlimited) |
| Clear Stat | Set the day in a month on which the statistics data on Max. Call Duration are deleted. This parameter is ignored if set to 0. |
3) Caller ID Prefix

text_image
Caller ID Prefix ISDN Dialplan: No International Prefix: Local Prefix: Unknown Prefix:Figure 4-4 Caller ID Prefix
Table 4-3 Description of Caller ID Prefix
| Items Description | |
| ISDN Dialplan | Whether theDialplan Settingsare set to make the caller ID prefix work according to information sent from the BRI provider. |
| International Prefix | When there are international calls coming in via this BRI trunk, the International Prefix you have set here will be added before the CID. So you can know this is an international call before you answer it. |
| National Prefix | When there are national calls coming in via this BRI trunk, the National Prefix you have set here will be added before the CID. So you can know this is a national call before you answer it. |
| Local Prefix | When there are Local calls coming in via this BRI trunk, the Local Prefix you have set here will be added before the CID. So you can know this is a local call before you answer it. |
| Private Prefix | When there are Private calls coming in via this BRI trunk, the Private Prefix you have set here will be added before the CID. So you can know this is a Private call before you answer it. |
| Unknown Prefix | When there are calls with unknown number coming via this BRI trunk, the Unknown Prefix you set here will be shown as the caller ID. |
4) Dialplan

text_image
Dialplan Remote Dialplan: Default Location Dialplan: Default Remote Number Type: Default Location Number Type: DefaultFigure 4-5 Dialplan
Table 4-4 Description of Dialplan
| Items Description | |
| Remote Dialplan | Called number type |
| Remote Number Type | Called number identification |
| Location Dialplan | Calling number type |
| Location Number Type | Calling number identification |
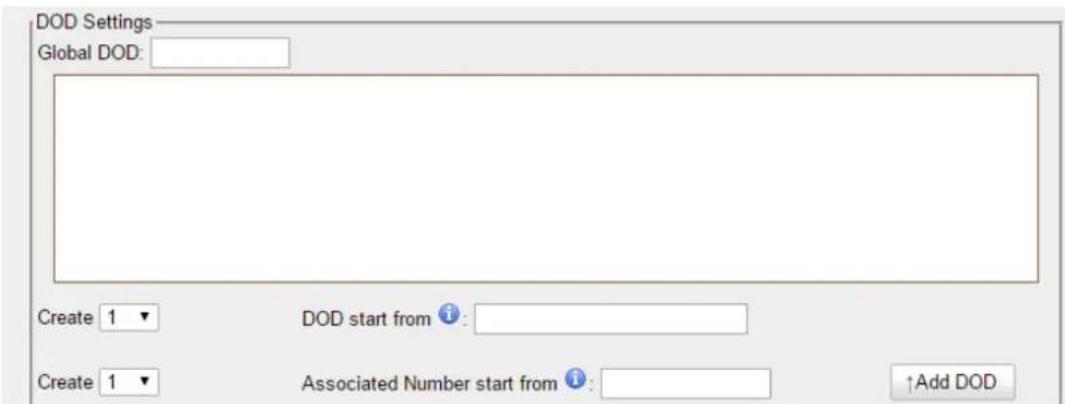
5) DOD Settings
DOD (Direct Outward Dialing) means the caller ID displayed when dialing out. Before configure this, please make sure the provider supports this feature.
You can set Global DOD for the BRI trunk.
Also, you can set different DOD numbers for different extensions.
text_image
DOD Settings Global DOD: Create 1 ▼ DOD start from ⓘ: Create 1 ▼ Associated Number start from ⓘ: ↑Add DODFigure 4-6 DOD Settings
Note:
If you want to set continuous associated numbers to show continuous DOD numbers, you can choose the count of DOD number and associated number first, and then input starting number respectively.
The count of the DOD number must be only one or equal to the count of the associated number.
4.2 VoIP Settings
In this page, we can create VoIP trunk, trunk group for routing, and SIP settings.
4.2.1 VoIP Trunk
There are 3 types of trunks listed in this page, Account, Trunk and Service Provider.

text_image
VoIP Trunks VoIP Trunks Add VoIP Trunk Name Type Transport Hostname/IP Max. Cell Duration(min) Cell Duration(min) Clear Stat. 1000 Account udp - 0 8 0 ✓ ✗ 1001 Account udp - 0 0 0 ✓ ✗ PBX VoIP Trunk udp 192 168 6.31 0 0 0 ✓ ✗Figure 4-7 VoIP Trunk
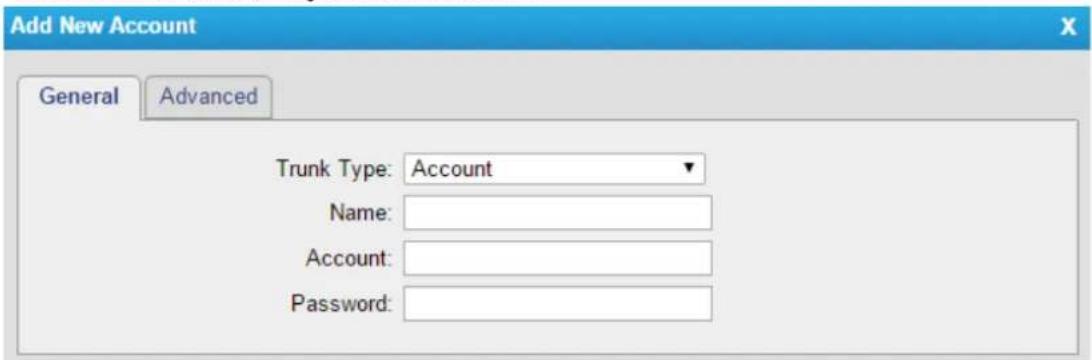
1) Account
It's an SIP account created in TB400 so that the other devices can register SIP trunk at their side using these information.
text_image
Add New Account General Advanced Trunk Type: Account Name: Account: Password:Figure 4-8 Account
Table 4-5 Description of Account Settings
| Items Description | |
| Trunk Type | Choose the type of trunk, “Account”. |
| Name | Define the name. |
| Account | Define the Account number. |
| Password | Set a password for this account. |
2) VolP Trunk
It's a SIP trunk configured in TB400 to register to the SIP provider, please make sure this trunk works properly in advance with provider before configuring TB400.
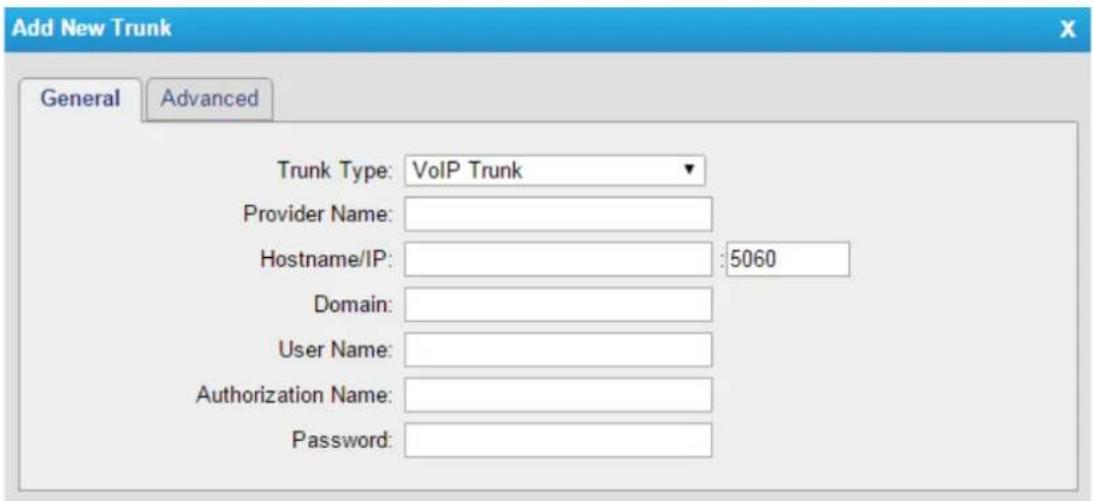
text_image
Add New Trunk General Advanced Trunk Type: VoIP Trunk Provider Name: Hostname/IP: :5060 Domain: User Name: Authorization Name: Password:Figure 4-9 VoIP Trunk Settings
Table 4-6 Description of VoIP Trunk Settings
| Items Description | |
| Trunk Type | Choose the type of trunk, “VoIP Trunk”. |
| Provider Name | A unique label to help you identify this trunk when listed in outbound rules, incoming rules etc. E.g. “yeastar”. |
| Hostname/IP | Service provider's hostname or IP address.Note:5060 is the standard port number used by SIP protocol. Don't change this part if it is not required. |
| Domain | VoIP provider's server domain name or IP address. |
| User Name | User name of SIP account provided from the SIP Server provider. |
| Authorization Name | Authorization Name of SIP account provided from the SIP Server provider. |
| Password | Password of the SIP account. |
3) Service Provider
This is service provider trunk (peer to peer mode) which authorized using IP address only.
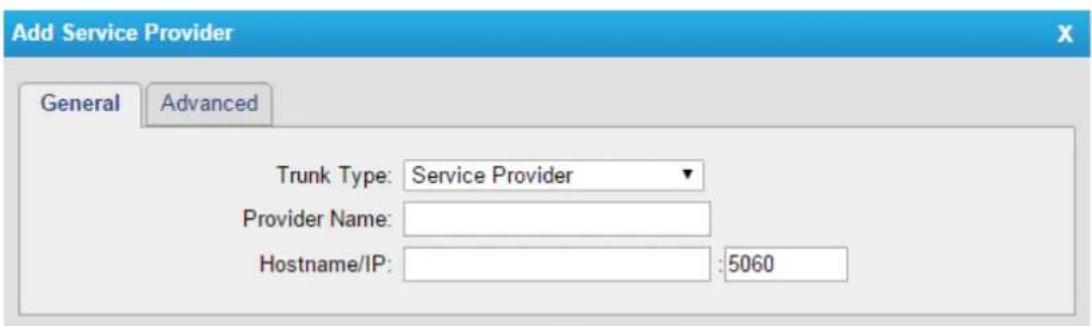
text_image
Add Service Provider General Advanced Trunk Type: Service Provider Provider Name: Hostname/IP: :5060Figure 4-10 Service Provider Trunk Settings
Table 4-7 Description of Service Provider Trunk Settings
| Items Description | |
| Trunk Type | Choose the type of trunk, “Service Provider”. |
| Provider Name | A unique label to help you identify this trunk when listed in outbound rules, incoming rules etc. E.g. “yeastar”. |
| Hostname/IP | Service provider’s hostname or IP address.Note:5060 is the standard port number used by SIP protocol. Don’t change this part if it is not required. |
4.2.2 SIP Settings
This is the SIP settings in TB200/400, including General settings, NAT, Codecs, QoS, Response Code, T.38, and advanced settings.
1) General
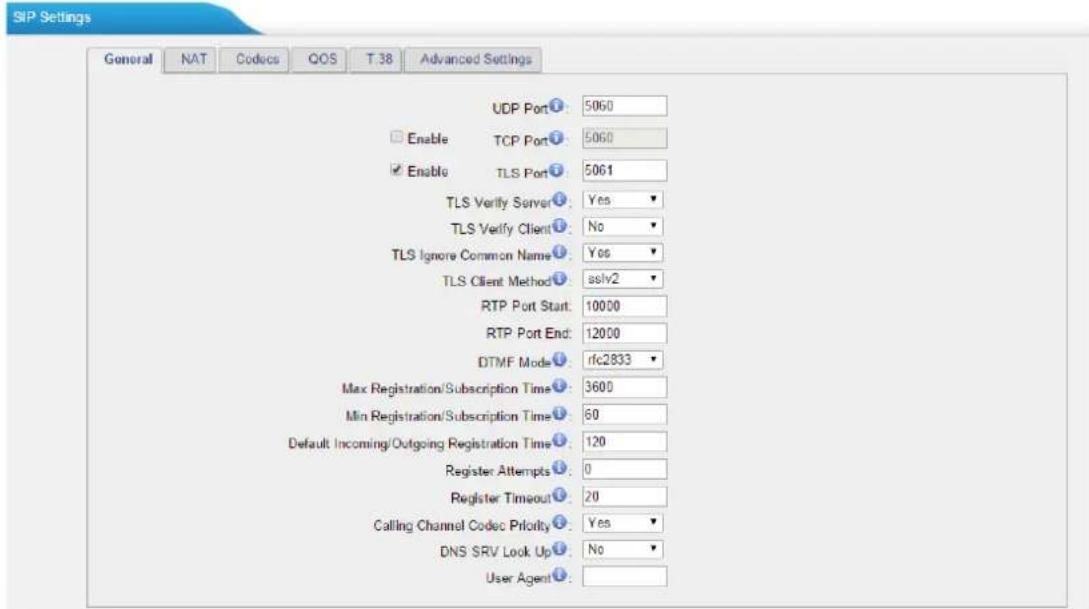
text_image
SIP Settings General NAT Codes COS T.38 Advanced Settings UDP Port: 5060 Enable TCP Port: 5060 Enable TLS Port: 5061 TLS Verify Server: Yes TLS Verify Client: No TLS Ignore Common Name: Yes TLS Client Method: sslv2 RTP Port Start: 10000 RTP Port End: 12000 DTMF Mode: rfc2833 Max Registration/Subscription Time: 3600 Min Registration/Subscription Time: 60 Default Incoming/Outgoing Registration Time: 120 Register Attempts: 0 Register Timeout: 20 Calling Channel Codec Priority: Yes DNS SRV Look Up: No User Agent:Figure 4-11 SIP General Settings
Table 4-8 Description of SIP General Settings
| Items Description | |
| UDP Port | Port used for SIP registrations. Thedefaultis 5060. |
| TCP Port | Port used for SIP registrations. The default is 5060. |
| TLS Port | Port used for SIP registrations. The default is 5061. |
| TLS Verify Server | When using TB200/400 as a TLS client, whether or not to verify server's certificate. It is “No” by default. |
| TLS Verify Client | When using TB200/400 as a TLS server, whether or not to verify client's certificate. It is “No” by default. |
| TLS Ignore Common Name | Set this parameter as “No”, then common name must be the same with IP or domain name. |
| TLS Client Method | When using TB200/400 as TLS client, specify the protocol for outbound TLS connections. You can select it as tlsv1, sslv2 or sslv3. |
| RTP Port Start | Beginning of the RTP port range. |
| RTP Port End | End of the RTP port range. |
| DTMF Mode | Set the default mode for sending DTMF. The default setting:rfc2833 |
| MaxRegistration/Subscription Time | Maximum duration (in seconds) of a SIP registration. The default is 3600 seconds. |
| Min Registration/Subscription Time | Minimum duration (in seconds) of a SIP registration. The default is 60 seconds. |
| Default Incoming/Outgoing Registration Time | Default Incoming/Outgoing Registration Time: the default duration (in seconds) of incoming/outgoing registration. |
| Register Attempts | The number of SIP REGISTER messages to send to a SIP Registrar before giving up. The default is 0 (no limit). |
| Register Timeout | Number of seconds to wait for a response from a SIP Registrar before classifying the register has timed out. The default is 20 seconds. |
| Calling Channel Codec Priority | Once enabled, when dialing out via SIP/SPS trunks, the codec of calling channel will be selected preferentially. If not, TB200/400 will follow the priority order in your SIP/SPS trunks. |
| DNS SRV Look Up | Please enable this option when your SIP trunk contains more than one IP address. |
| User Agent | To change the user agent parameter of asterisk, the default is “TB200/400”; you can change it if needed. |
2) NAT
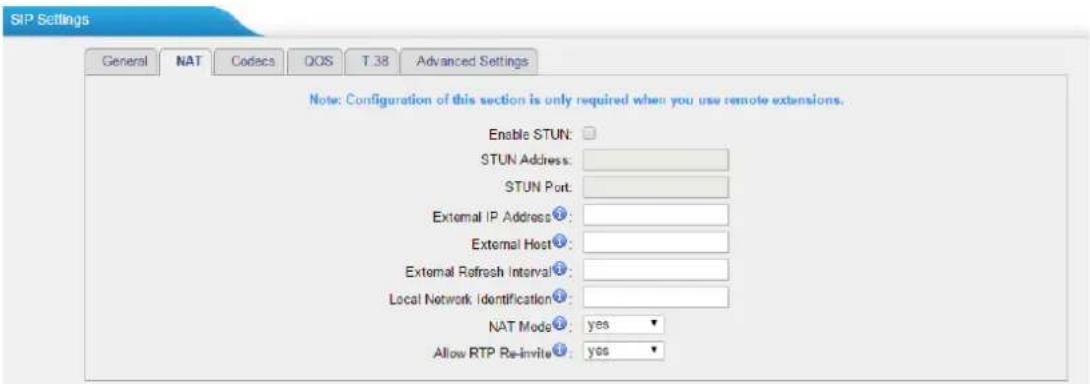
text_image
SIP Settings General NAT Codes QOS T 38 Advanced Settings Note: Configuration of this section is only required when you use remote extensions. Enable STUN: STUN Address: STUN Port: External IP Address: External Host: External Refresh Interval: Local Network Identification: NAT Mode: yes Allow RTP Re-invite: yesFigure 4-12 NAT Settings
Table 4-9 Description of NAT Settings
| Items Description | |
| Enable STUN | STUN (Simple Traversal of UDP through NATs) is a protocol for assisting devices behind a NAT firewall or router with their packet routing. |
| STUN Address | The STUN server allows clients to find out their public address, the type of NAT they are behind and the internet side port associated by the NAT with a particular local port. This information is used to set up UDP communication between the client and the VOIP provider and so establish a call. |
| STUN Port | STUN Port |
| External IP Address | The IP address that will be associated with outbound SIP messages if the system is in a NAT environment. |
| External Host | Alternatively you can specify an external host, and the system will perform DNS queries periodically.This setting is only required when your public IP address is not static. It is recommended that a static public IP address issued with this system. Please contact your ISP for more information. |
| External Refresh Interval | If an external host has been supplied, you may specify how often the system will perform a DNS query on this host. This value is specified in seconds. |
| Local Network Identification | Used to identify the local network using a network number/subnet mask pair when the system is behind a NAT or firewall.Some examples of this are as follows:“192.168.0.0/255.255.0.0”: All RFC 1918 addresses are local networks;“10.0.0.0/255.0.0.0”: Also RFC1918;“172.16.0.0/12”:Another RFC1918 with CIDR notation;“169.254.0.0/255.255.0.0”: Zero conf local network.Please refer to RFC1918 for more information. |
| NAT Mode | Global NAT configuration for the system; the options for this setting are as follows:Yes = Use NAT. Ignore address information in the SIP/SDP headers and reply to the sender's IP address/port.No = Use NAT mode only according to RFC3581.Never = Never attempt NAT mode or RFC3581 support.Route = Use NAT but do not include rport in headers. |
| Allow RTP Reinvite | By default, the system will route media steams from SIP endpoints through itself. Enabling this option causes the system to attempt to negotiate the endpoints to route packets to each other directly, bypassing the system. It isnot always possible for the system to negotiate endpoint-to-endpoint media routing. |
3) Codec
We can choose the allowed codec in TB200/400, a codec is a compression or decompression algorithm that used in the transmission of voice packets over a network or the Internet. For more information about codec, you can refer to this page: http://en.wikipedia.org/wiki/List_of_codec
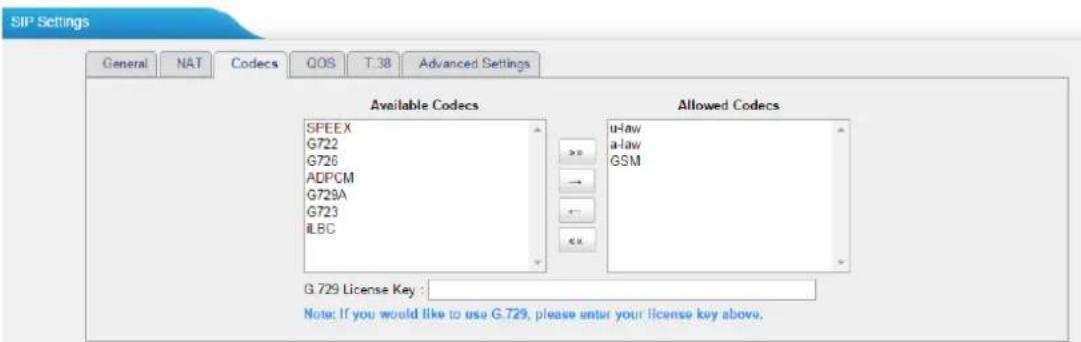
text_image
SIP Settings General NAT Codes QOS T 38 Advanced Settings Available Codes Allowed Codes SPEEX G722 G726 ADPCM G729A G723 ILBC u-law a-law GSM G.729 License Key : Note: If you would like to use G.729, please enter your license key above.Figure 4-13 Codec
Note: if you want to use codec G729, we recommend buying a license key and input it here.
4) QoS
QoS (Quality of Service) is a major issue in VoIP implementations. The issue is how to guarantee that packet traffic for a voice or other media connection will not be delayed or dropped due interference from other lower priority traffic. When the network capacity is insufficient, QoS could provide priority to users by setting the value.

text_image
SIP Settings General NAT Codes QOS T.38 Advanced Settings Tos SIP: CS3 Cos SIP: 3 Tos Audio: EF Cos Audio: 5Figure 4-14 QoS
Note: it's recommended that you configure the QoS in your router or switch instead of TB200/400 side.
5) T.38
Settings on this page is for the purpose of improving receiving and sending T.38 FAX.

text_image
SIP Settings General NAT Codes QOS T.38 Advanced Settings Re-invite SDP Not Add T.38 Attributes No Error Correction FEC T38 Max BitRate 14400Figure 4-15 T.38
Table 4-10 Description of T.38 Settings
| Items Description | |
| Re-invite SDP Not Add T.38 Attributes | If set to Yes, SDP in re-invite packet will not add T.38 attributes. |
| Error Correction | Re-invite SDP T38FaxUdpEc. |
| T.38 Max Bit Rate | Set T38 Max Bit Rate. |
6) Advanced Settings
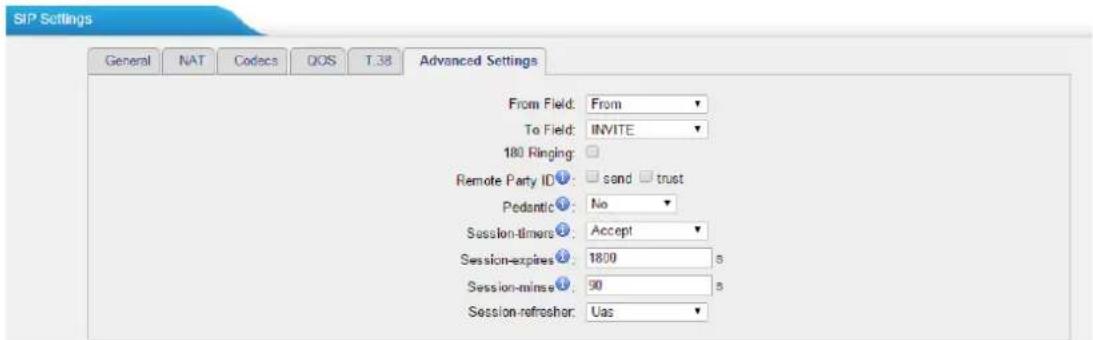
text_image
SIP Settings General NAT Codes QOS T.38 Advanced Settings From Field: From To Field: INVITE 180 Ringing: Remote Party ID: sand trust Pedantic: No Session-timers: Accept Session-expires: 1800 s Session-minse: 90 s Session-refresher: UasFigure 4-16 Advanced Settings
Table 4-11 Description of Advanced Settings
| Items Description | |
| From Field | Where to get the caller ID in SIP packet. |
| To Field | Where to get the DID in SIP packet. |
| 180 Ringing | It is set when the telecom provider needs. Usually it is not needed. |
| Remote Party ID | Whether to send Remote-Party-ID on SIP header or not. Default: no. |
| Allow Guest | Whether to allow anonymous registration extension or not. Default: no. It's recommended that it is disabled for security reason. |
| Pedantic | Enable pedantic parameter. Default: no. |
| Alwaysauthreject | If enabled, when TB200/400 rejects “Register” or “Invite” packets, TB200/400 always respond the packets using “SIP404 NOT FOUND”. It's recommended that it is enabled for security reason. |
| Session-timers | Enable session-timer mode, default: yes. If you find the call is cut off every 15 minutes every time, please disable this. |
| Session-expires | The max refresh interval |
| Session-minse | The min refresh interval, which mustn't be shorter than 90s. |
| Session-refresher | Choose the session-refresher, the default is Uas. |
4.2.3 Trunk Group
Trunk group is a feature that allows you to define specific SIP trunks or BRI trunks to a group. A trunk group can be used in a route. When a call is coming or going through the route, an available trunk would be selected in the trunk group.
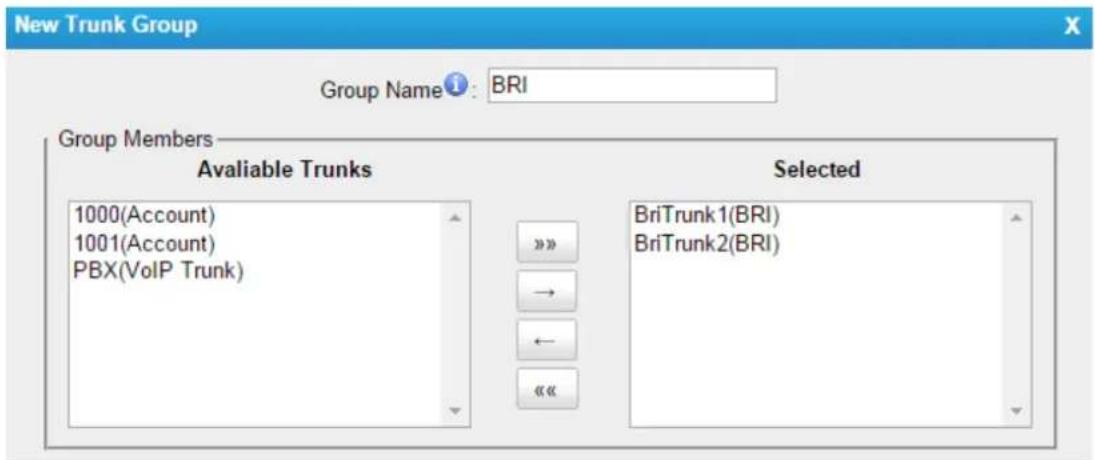
text_image
New Trunk Group Group Name: BRI Group Members Available Trunks 1000(Account) 1001(Account) PBX(VoIP Trunk) Selected BriTrunk1(BRI) BriTrunk2(BRI)Figure 4-17 Trunk Group
Table 4-12 Description of Trunk Group
| Items Description | |
| Group Name | Define the Group name. |
| Group Members | All the SIP trunks and BRI trunks are listed in the Available Trunks Box. Move the desired trunks to the Selected Box, they will be the group members. |
4.2.4 General Preferences
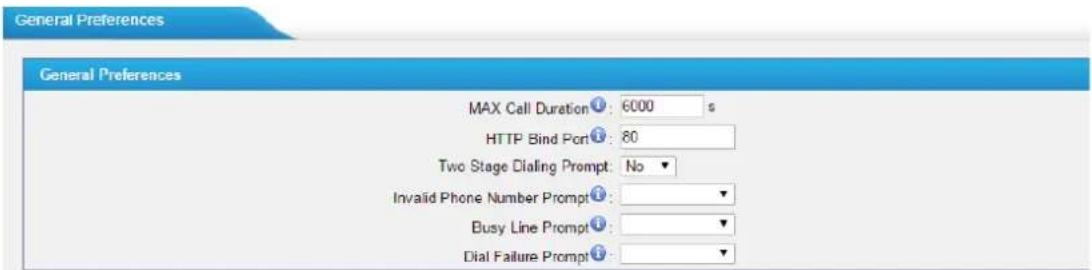
text_image
General Preferences General Preferences MAX Call Duration: 6000 s HTTP Bind Port: 80 Two Stage Dialing Prompt: No ▼ Invalid Phone Number Prompt: ▼ Busy Line Prompt: ▼ Dial Failure Prompt: ▼Figure 4-18 General Preferences
Table 4-13 Description of General Preferences
| Items Description | |
| Max Call Duration | The absolute maximum amount of time permitted for a call. A setting of 0 disables the timeout. The default value is 6000s. |
| HTTP Bind Port | Port to use for HTTP sessions. Default: 80 |
| Two-stage Dialing Prompt | Whether to play the prompt if Two-stage Dialing is enabled. |
| Invalid Phone Number Prompt | Choose the prompt for a call to an invalid phone number. |
| Busy Line Prompt | Choose the prompt for a busy call. |
| Dial Failure Prompt | Choose the prompt when calling failed. |
4.3 Route Settings
4.3.1 Route List
There are two default routes on this page,
bri_2_sip
Control incoming calls to TB400 BRI trunk and route calls to the SIP Server which is connected to TB400.
sip_2_bri
Control calls from the SIP Server which is connected to TB400 and route calls to external numbers through BRI trunks on TB400.
Click "Edit" to check the route details, there are two modes for you.
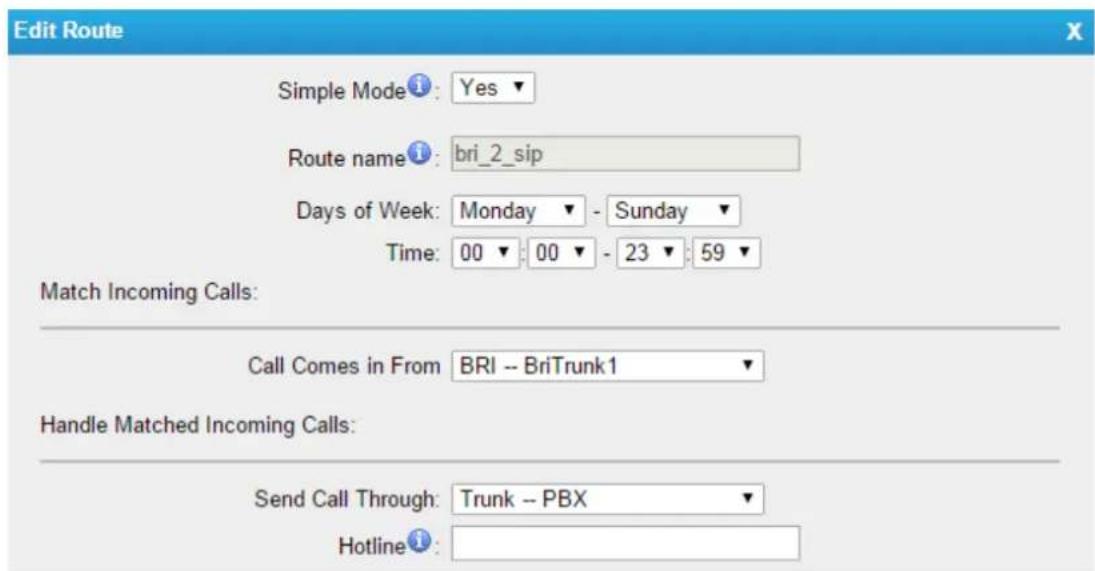
1) Simple Mode
Choose "Yes" for Simple Mode, the simple mode configuration page appears as below.
text_image
Edit Route Simple Mode ⓘ: Yes ▼ Route name ⓘ: bri_2_sip Days of Week: Monday ▼ - Sunday ▼ Time: 00 ▼: 00 ▼ - 23 ▼: 59 ▼ Match Incoming Calls: Call Comes in From BRI -- BriTrunk1 ▼ Handle Matched Incoming Calls: Send Call Through: Trunk -- PBX ▼ Hotline ⓘ:Figure 4-19 Simple Mode Route
Table 4-14 Description of Simple Mode Route
| Items Description | |
| Route Name | Define the route name. |
| Days of Week | Limit the days that the route can be used. |
| Time | Limit the time when the route can be used. |
| Call Comes in From | Choose the trunk or trunk group for the incoming calls. |
| Send Call Through | Choose the trunk or trunk group to route the incoming calls to. |
| Hotline | Direct number to the SIP Server. The parameter is ignored if a SIP Account is selected on this route. |
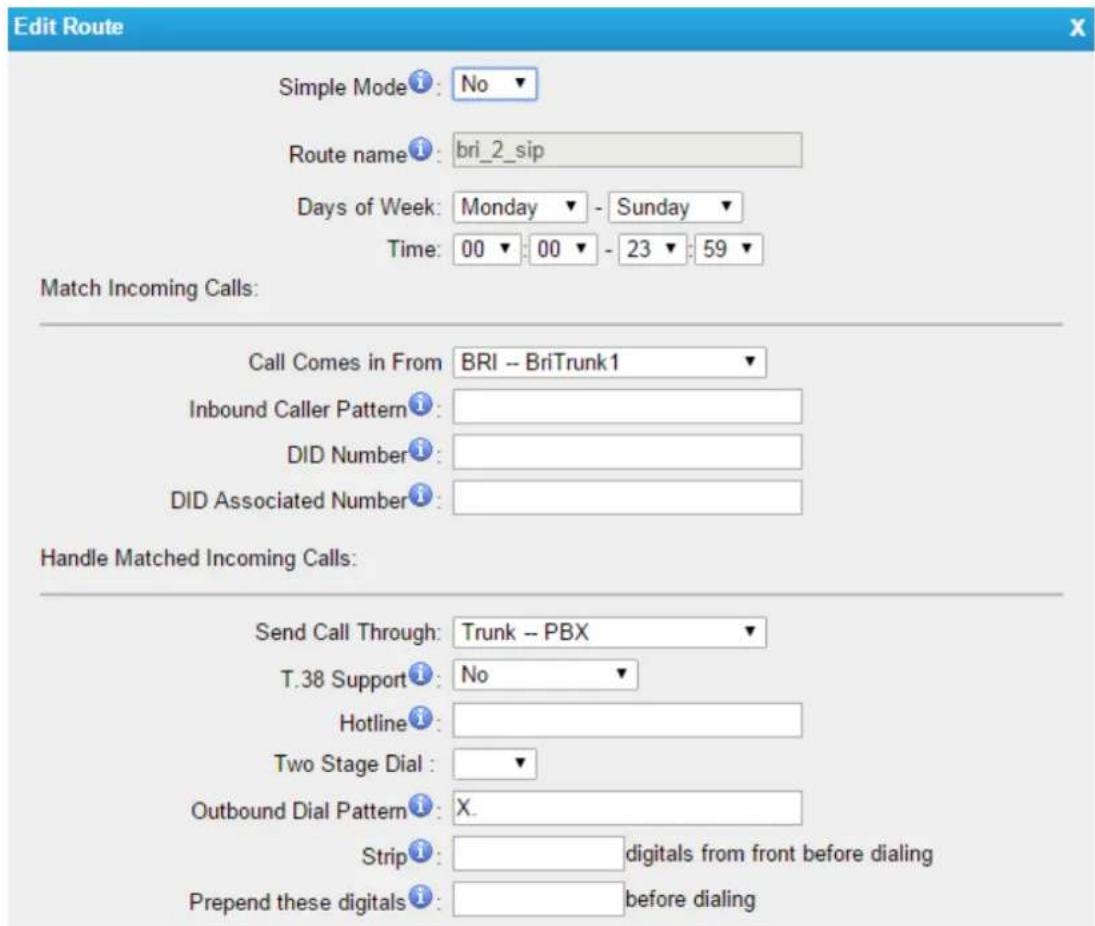
2) Detail Mode
Choose "No" for Simple Mode, you will see the detailed configuration page as the following picture shows. Detailed settings for Match Incoming Calls and Handle Matched Incoming Calls are provided in Detailed Mode.
text_image
Edit Route Simple Mode: No Route name: bri_2_sip Days of Week: Monday - Sunday Time: 00 00 - 23 59 Match Incoming Calls: Call Comes in From: BRI -- BriTrunk1 Inbound Caller Pattern: DID Number: DID Associated Number: Handle Matched Incoming Calls: Send Call Through: Trunk -- PBX T.38 Support: No Hotline: Two Stage Dial: Outbound Dial Pattern: X. Strip: strip: strip numbers from front before dialing strip numbers before dialingFigure 4-20Detailed Mode Route
Table 4-15 Description of Match Incoming Calls Settings
| Items Description | |
| Call Comes in From | Choose the trunk or trunk group for the incoming calls. |
| Inbound Caller Pattern | Match the prefix of caller ID for incoming calls. |
| DID Number | Define the expected DID Number if this trunk passes DID on incoming calls. Leave this field blank to match calls with any or no DID info. You can also use pattern matching to match a range of numbers. |
| DID Associated Number | Define the extension for DID number. You can input number and “-”in this field, and the format can be xxx or xxx-xxx. The count of the number must be only one or equal the count of the DID number. |
Table 4-16 Description of Handle Matched Incoming Calls Settings
| Items Description | |
| Send Call Through | Choose the trunk or trunk group to route the incoming calls to. |
| T.38 Support | Enable or disable T.38 FAX. |
| Hotline | Direct number to the SIP Server. The parameter is ignored if a SIP Account is selected on this route. |
| Two-stage Dialing | Enable or Disable Two-stage Dialing. |
| Outbound Dial Pattern | Outbound calls that match this dial pattern will use this outbound route. |
| Strip | Allows the user to specify the number of digits that will be stripped from the front of the phone number before the call is placed. For example, if users must press 0 before dialing a phone number, one digit should be stripped from the dial string before the call is placed. |
| Prepend | These digits will be prepended to the phone number before the call is placed. For example, if a trunk requires 10-digit dialing, but users are more comfortable with 7-digit dialing, this field could be used to prepend a 3-digit area code to all 7-digit phone numbers before calls are placed. |
4.3.2 Blacklist
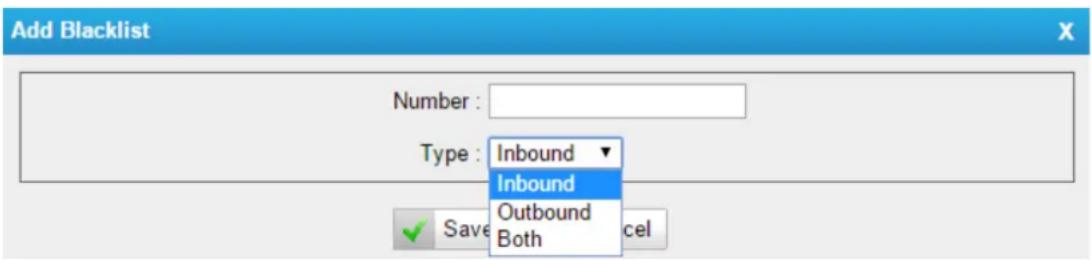
Blacklist is used to block an incoming or outgoing call. If the number of incoming or outgoing call is listed in the number blacklist, the caller will hear the following prompt: "The number you have dialed is not in service. Please check the number and try again". The system will then disconnect the call.
You can add a number with the type: inbound, outbound or both.
text_image
Add Blacklist Number : Type : Inbound ▼ Inbound Outbound Both Save celFigure 4-21 Blacklist
4.4 Audio Settings
4.4.1 Custom Prompts
Upload custom prompts on this page. You can also download it and save it as a backup.

text_image
Custom Prompts Upload a promptName Options
1 default Delete 2 pinuser-entry Delete 3 pinuser-error DeleteFigure 4-22Custom Prompts
The administrator can upload prompts following the steps:
1) Click "Upload Prompt".
2) Click "Browse" to choose the desired prompt.
3) Click "Upload" to upload the selected prompt.
Note:
The file must not be larger than 1.8 MB, and the file must be WAV format:
√ GSM 6.10 8 kHz, Mono, 1 Kb/s;
√ Alaw/Ulaw 8 kHz, Mono, 1 Kb/s;
√ PCM 8 kHz, Mono, 16 Kb/s.
5. Logout
Click

to log out TB200/400 configuration page.
[The End]