DTHL1C - Digital timer SMJ - Free user manual and instructions
Find the device manual for free DTHL1C SMJ in PDF.


| Product Type | Digital Timer |
| Brand | SMJ |
| Model | DTHL1C |
| Category | Programmable Digital Timer |
| Voltage | 230 V AC |
| Frequency | 50 Hz |
| Max Current | 16 A |
| Max Power | 3500 W |
| IP Rating | IP20 |
| Working Temperature | 0°C to 55°C |
| Time Setting Interval | 1 minute |
| Maximum Programs | 98 on/off per week |
| Countdown Range | 1 second to 99:59:59 |
| Random Function Off Time | 26 to 42 minutes |
| Random Function On Time | 10 to 26 minutes |
| Display Type | LCD with 12/24 hour format |
| Power Backup | Rechargeable battery (Ni-MH) |
| Plug Type | Type F (Schuko) - 230V |
| Summer Time Setting | Yes, via CLOCK + ▼ buttons |
| Override Modes | ON, AUTO, OFF |
| Safety | Indoor use only |
Frequently Asked Questions - DTHL1C SMJ
User questions about DTHL1C SMJ
0 question about this device. Answer the ones you know or ask your own.
Ask a new question about this device
Download the instructions for your Digital timer in PDF format for free! Find your manual DTHL1C - SMJ and take your electronic device back in hand. On this page are published all the documents necessary for the use of your device. DTHL1C by SMJ.
USER MANUAL DTHL1C SMJ
Instruction Manual for Programmable Digital Timer
Item No. DTHL1C
A. Functions
-
The Programmable Digital Timer (hereinafter refer as “Timer”) can preset specific on/off time of your home electrical appliances, e.g. using in coffee machine, lamps. It is ideal for energy saving and home security.
-
The countdown function can switch on/off your appliance on your pre-set time and random functions allows you to switch on and off the appliance in irregular time, it is not only ideal for home automation, also prevent burglary during your absence.
-
The LCD displays program setting status and real time.
-
With maximum 98 on/off programs per week.
B. Diagram & Descriptions
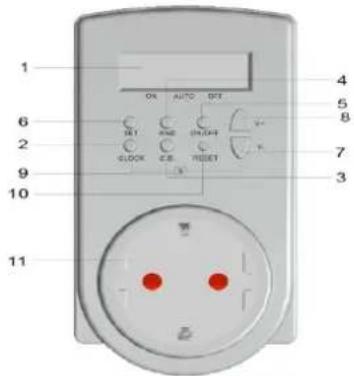
text_image
1 6 2 9 10 11 ON AUTO DET SET CLOCK C.S. BEET 4 5 8 7 3| No. | Description | Functions |
| 1 | LCD Display | Shows time and program setting. |
| 2 | CLOCK Button | - Return to real time display when in program setting- Press and hold to interchange between 24 hours to 12 hours display- press together with ▼-Button to change to Summer Time |
| 3 | CD Button | Press the button to start/stop countdown program when it is in AUTO status and when Timer is plugged into AC socket |
| 4 | RND Button | Press the button to start/stop random program when it is in AUTO status and Timer is plugged into AC socket |
| 5 | On/Off Button | Change the setting mode to ON, ATUO or OFF. When press the button each time, the horizontal line in the LCD moves to ON←→AUTO←→OFF which were silk printed on the Timer |
| 6 | SET Button | Press and hold to start setting time and week and to confirm setting |
| 7 | ▼- Button | Press the button to reduce the time, week or program group |
| 8 | ▲+ Button | Press the button to increase the time, week or program group |
| 9 | S Printing | Press CLOCK Button and ▼- Button at the same time to change to Summer Time. Time display adds one hour automatically and “S” are shown on the LCD. |
| 10 | R Button | Press and hold to reset all the programs |
| 11 | Socket & Plug | Connect your appliance to the socket and plug the timer to the wall AC socket to get power |
C. Time Display
There are two different kinds of time displays:
- 12-hour display: the digital number is from 11:59 to 12:00 with AM or PM shown on the LCD
- 24-hour display: the digital number is from 00:00 to 23:59, no AM or PM is shown on the LCD
- To change from 12-hour display to 24-hour display, or vice versa, press CLOCK Button and hold it till the LCD display changes. Press CLOCK Button again to return to original display.
D. Week & Time Setting
1. Week Setting
1.1 Press and hold the SET Button until the week display flashes, which indicates setting is ready
1.2 Press ▲+ Button to increase the day, or ▼- Button to reduce the day, the sequence of the display is shown as follows:

flowchart
graph LR
    A["→"] --> B["Mo→Tu→We→Th→Fr→Sa→Su→"]
1.3 Press ▲+/▼-Button once will increase or reduce the day by sequence slowly. To press and hold the button, the week display moves quickly. Release the button until your desired day of the week shown on the display. Press SET Button to confirm your setting.
2. Time Setting
2.1 After setting the day of the week, hour display flashes to indicate setting time can be started
2.2 Press ▲+Button to increase number of hour, or ▼- Button to reduce.
2.3 Press ▲+/▼-Button once will increase or reduce each hour slowly. To press and hold the button, the hour display moves quickly. Release the button until your desired hour shown on the display. Press SET Button to confirm your setting.
2.4 “Minute” display then flashes to indicate setting minute is ready. Repeat the same procedures in setting hour as in #2.2 and #2.3 to set minutes.
3. Summer Time Setting
3.1. Press CLOCK Button and ▼—Button at the same time to change to summer time, time display automatically adds one hour and “S” is shown on the LCD.
3.2. By pressing Clock Button and ▼- Button again to cancel the summer time setting.
Noted:
LCD must be in real time display to start week and time setting. If LCD is in program setting display, press CLOCK Button once to return to real time display.
E. Program Setting
- When the LCD is in real time display, press ▲+ Button once to change to program setting display, “1ON” will be shown on the lower left corner of the LCD:
1.1 “1” indicates the program group’s number (program group is from 1 to 14)
1.2 “ON” indicates power on time.
1.3 "OFF" indicates power off time
2. To chose the program group and on/off status, press ▲+ Button to increase the group number, sequence as follows:
→1ON→1OFF→ ..... 14ON→14OFF→ d ON/OFF (for countdown)→ real time display →
- To reduce the program group number, press -Button, LCD displays in the following sequence:
→d ON/OFF (for countdown)→14OFF→14ON→ ...... 1OFF→1ON→ real time display →
- After choosing the program group, then can set the week and time. Press SET Button until the week display flashes, press + Button each time, the LCD will display the following in sequence:
4.1 MO TU WE TH FR SA SU
4.2 MO → TU → WE → TH → FR → SA → SU
4.3 MO WE FR
4.4 TU TH SA
4.5 SA SU
4.6 MO TU WE
4.7 TH FR SA
4.8 MO TU WE TH FR and
4.9 MO TU WE TH FR SA
- By pressing the ▼-Button, the week display will be shown in the opposite direction as above sequence.
- Press ▲+/▼—Button once will increase or reduce the week display slowly. To press and hold the button, the display moves quickly. Release the button until your desired week pattern shown on the display. Press SET Button to confirm, week display stops flashing.
- After set the day of the week, the hour display flashes, repeat procedures mentioned in Part D2. Time Setting to set time.
- To set other program group's on/off time, repeat procedures mentioned from #2 to #7.
Noted:
(a). To change a preset program, repeat procedures #2 to #7 as mentioned in Part E and input the new data to replace the old setting
(b). After program setting, press CLOCK Button to return to clock display at once, or it will be returned automatically after 15 seconds without pressing any other buttons.
F. Countdown Setting
- When the LCD is in real time display, press ▼- Button once to change to countdown setting display, "d ON (or OFF)" will be shown on the lower left corner of the LCD
1.1 “d”: indicates the program is in countdown mode
1.2 “ON”: counting down the power on time
1.3 "OFF": counting down the power off time
2. Press SET Button until the on/off display flashes, setting the countdown power on/off status is
ready.
- Press + / -Button to chose countdown on/off program and press SET Button to confirm
- Hour display flashes after setting the on/off status, then press ▲+/▼-Button to increase or reduce hour and press SET Button to confirm.
- Minute display then flashes, press ▲+/▼-Button to increase or reduce minute and press SET Button to confirm
- Second display flashes, press ▲+/▼-Button to increase or reduce the hour display and press SET Button to confirm. Setting interval is from 99:59:59 to 1 second.
- Connect the Timer to the AC socket and set the Timer to AUTO status in order to start /stop the countdown functions.
- Press CD Button once to start the countdown function, "d ON (or OFF)" flashes in the lower corner of the LCD to indicate countdown is in progress. Press CD Button again to stop the countdown function.
Noted:
(a). When countdown is in progress, LCD is in real time display, press ▼ - Button once to view the countdown details.
(b) To change a preset program, repeat the above procedures #2 to #6 in Part F Countdown Setting and input the new data to replace the old setting
(b). After program setting, press CLOCK Button to return to clock display at once, or it will be returned automatically after 15 seconds without pressing any other buttons.
G. Random Setting
- Random function turns on and off the appliance irregularly:
1.1 Minimum time for power off: 26 minutes
1.2 Maximum time for power off: 42 minutes
1.3 Minimum time for power on: 10 minutes
1.4 Maximum time for power on: 26 minutes
-
Connect the Timer to the AC socket and set the program to AUTO status in order to start/stop the random function.
-
Press RND Button once, "r OFF" is flashing in the lower corner of the LCD, random function is activated. Power is off for 26 to 42 minutes. The mode will change to "r ON", where power turns on from 10 to 26 minutes. Then back to "r OFF" again.
-
Press RND Button again can stop the random function, "r OFF" or "r ON" disappears from the LCD.
H. Override/Resume Preset Program
Press ON/OFF Button each time can override/resume the preset program, LCD changes the display in the following sequence:
1.ON: override the preset program and appliance remains on at all time
2. AUTO: resume the preset program, appliance will be turned on and off automatically according to the preset time
3.OFF: override the preset program and appliance remains off at all time
Noted:
(a). The preset countdown or random functions only activates when the Timer is in AUTO status and plugged into the AC socket.
(b). When countdown function is activated, random and auto on/off program setting will not active.
(c). When random function is activated, countdown and auto on/off program setting will not active.
I. Connections
- Preset your desired On/off programs on the Timer as mentioned above.
- Switch off your electrical appliance
- Connect your appliance's power cord to the Timer's socket, then connect the Timer to the AC socket to get power
- Switch on your appliance.
- Appliance will then be turned on/off according to your preset programs unless manual override pressed.
J. Safety Precaution
- This Timer is for indoor use only, DO NOT use outdoor.
- Appliance to be plugged into the Timer must not exceed the ratings as in "Specification"
- Disconnect from the socket before removing the battery cover.
- The Timer is using a rechargeable battery. When changing the batteries, the preset program will all be reset and need to input new program afterwards.
K. Specifications
- Current : 230VAC, 50Hz, 16A
- Max. Power : 3500W
- IP Rating : IP20
- Working Temp : 0 - 55° C
- Time Setting Interval: 1 Minute