
GP60NS50 - Uncategorized LG - Free user manual and instructions
Find the device manual for free GP60NS50 LG in PDF.


User questions about GP60NS50 LG
0 question about this device. Answer the ones you know or ask your own.
Ask a new question about this device
Download the instructions for your Uncategorized in PDF format for free! Find your manual GP60NS50 - LG and take your electronic device back in hand. On this page are published all the documents necessary for the use of your device. GP60NS50 by LG.
USER MANUAL GP60NS50 LG
Hardware Installation
NOTES
- Please pay attention to handling Electrostatic Sensitive Devices, you may use anti-static products such as wrist straps, heel straps, mats to protect your body from electrostatic.
- Make sure you have a personal computer with one or two open USB ports before connecting the drive to your computer.
- Power for all other devices should be turn off before attaching the cables.
Connecting to computer
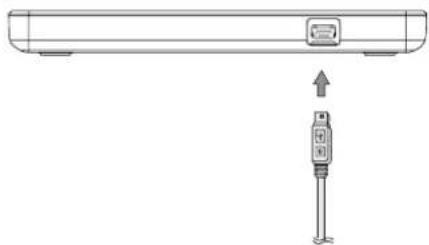
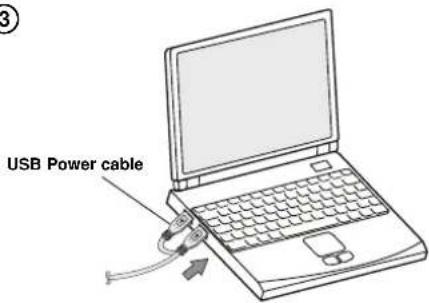
Connect the drive to the computer as shown in figure.
① Connect the USB 2.0 (Y type) cable to the drive.
② Connect the other end of the USB 2.0 cable to your computer.
③ The drive may get its power from the PC USB power. All systems may not meet USB power requirements and full performance may not be achieved. In this case, connect to the USB power cable.
When the computer is ready, confirm that the drive is detected. And then, insert the supplied software CD into the drive and install the software.
①
natural_image
Diagram of a device with a sensor connected to a vertical connector (no text or symbols present)②

natural_image
Line drawing of a laptop with a cable and connector, no text or symbols present③
text_image
USB Power cableNOTES
- Please do not connect the USB cables by any means other than specified above. Using the wrong type of cable with this drive can cause it to malfunction.
- The appliance is not intended for use by young children or infirm persons without supervision. Young Children should be supervised to ensure that they do not play with appliance.
- If the appliance is supplied from a cord extension set or an electrical portable outlet device, the cord extension set on electrical portable outlet device must be positioned so that it is not subject to splashing or ingress of moisture.
The drive supports both Windows and Mac®. To use it properly, please follow directions below. How to Eject Disc from the drive
- When using with Mac
- Click the eject button located on Mac OS menu or toolbar.
- When using with Windows
- Press the eject button in the front of the product.
* Software CD (for Windows only) - The Software CD includes DVD software for usage for Windows.
Location and function of controls
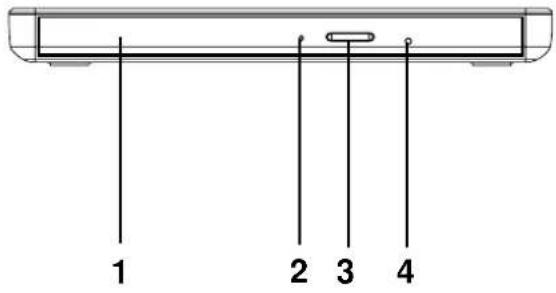
This following is the general figure of the design of the drive.
The drive's appearance and specifications may change without prior notice.
Front
- Disc Tray
- Drive activity indicator
The LED is used to indicate the operation of drive.
- Eject Button
- Emergency Eject Hole
Rear
- USB Connector (mini)
This connector is used to connect to the USB 2.0 cable.
text_image
1 2 3 4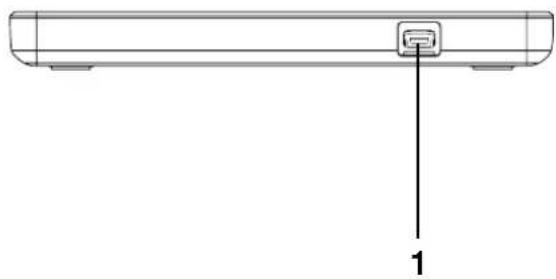
natural_image
Line drawing of a rectangular electronic device with a labeled component (no text or symbols on the device itself)Removing the USB converter cable (For Windows)
The drive supports the plug and play(not swap) function of Windows, and can be removed and inserted by performing the following operation.
- Stop the application software being currently used.
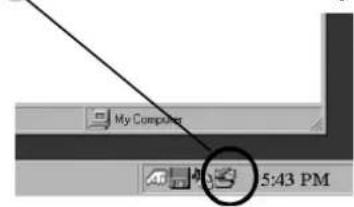
- Click the icon "②" of the taskbar located on your screen's bottom right side.
text_image
My Computer 5:43 PM- Click "Safely Remove USB Mass Storage Device-Drive[x:]".
- Click "Ok" and then remove the USB converter cable.
NOTE
Don't remove the USB 2.0 cable when the busy indicator on the drive blinks, or during computer startup. The removing procedure varies depending on your OS.
To install of your product, please read this guide manual carefully and completely.
Features
• Universal Serial Bus (USB) 2.0 interface for high-speed data transfer.
• Buffer Under Run error protection technology
• Emergency eject support
- Combination of CD-R/RW, DVD-R/RW, DVD+R/RW, DVD+R DL, DVD-R DL, M-Disc (DVD+R SL) and DVD-RAM drive functions into one drive.
• Supports region playback control Phase II.
• PC USB powered, no AC adapter needed.
Package Items
| Item Quantity | |
| - Slim Portable DVD Writer 1 | |
| - USB 2.0 cable (Y type) 1 | |
| - Software Installation disc (for Windows only) | 1 |
| - Quick Guide for Drive | 1 |
Cautlons
System meeting the following requirements is needed in order to use USB 2.0 operation with this drive.
- Computer that is equipped with a USB 2.0 – compliant USB connector or PCI adapter card, and on which the USB 2.0 EHCI (Enhanced Host Controller Interface) driver software ^1) has been installed.
^1 The USB 2.0 EHCI driver software is supplied with currently available PCI adapter cards that conform to USB 2.0. Further, Microsoft has released the USB 2.0 EHCI driver software for Windows XP, therefore it is also possible to use this driver software with Windows XP SP3.
If you want to know in detail, please contact your USB 2.0 adapter dealer or consult your PC manufacturer, or consult the Microsoft Corporation Web site
- Under Windows 8 operating system, a specific mainboard with nVidia GeForce 7025 Chipset may cause an abnormal operation.
System Environment
Computer
This unit can be operated in the system environment explained here.
| System requirements | CPU | Pentium IV 2.4 GHz or Higher(with USB 2.0) for basic performance (Recommended for optimal performance: Pentium IV 3.2 GHz or Higher). |
| Memory | 256 MB or larger (Recommended: 512 MB). | |
| Hard disk | 20 GB or more tree space. (The free space needed for writing depends on the quantity of data.) | |
| Video Memory | 64 MB (Recommended: 128 MB). | |
| Interface | USB 2.0 port | |
| CD-ROM drive | For Software Installation | |
| Software Required OS | Windows 8/Windows 7/Windows Vista (32 bit, 64 bit)/ Windows XP SP3, Mac OS X v.10.5.4 or Higher, Direct X 9.0 or Higher | |
| CD-R, CD-RW, DVD-R, DVD-RW, DVD+R, DVD+RW, DVD-RAM, DVD±R DL discs | CD-R : LG, Mitsubishi Kagaku Media, Verbatim, That's, TDK, Ritek or HP discs are recommended. CD-RW : LG, Mitsubishi Kagaku Media, Verbatim are recommended. DVD-R : Mitsubishi Kagaku Media, Maxell, That's are recommended. DVD-RW : Victor, JVC, Mitsubishi Kagaku Media, TDK are recommended. DVD+R : Mitsubishi Kagaku Media, That's, Maxell are recommended. DVD+RW : TDK, Mitsubishi Kagaku Media, Ricooh are recommended. DVD-RAM : Maxell, Mitsubishi Kagaku Media are recommended. M-Disc (DVD+R SL) : Millenniata DVD±R DL : Mitsubishi Kagaku Media, Verbatim are recommended. | |
* For Windows 8/Windows 7/ Windows Vista, 1 GB of RAM or large is recommended.
* Compatibility problem in write/read function may occur with some media depending on the media manufacturing quality.
* To achieve maximum Record & Write speed your system may require data to be copied first to the computer's hard drive rather than directly from another source disc or drive.
* Please visit http://www.m-disc.com to learn more about the M-DISC™.
Specifications
Supported Discs
| DVD-ROM(Single/Dual), DVD-RW, DVD-R, DVD+RW, DVD+R, DVD+R Double layer, DVD-R Dual layer, DVD- RAM, M-Disc (DVD+R SL), CD-Digital Audio & CD-Extra, CD-Plus, CD-ROM, CD-ROM XA-Ready, CD-I FMV, CD-TEXT, CD-Bridge CD-R, CD-RW, Photo-CD (Single & Multi-Session) Video CD, DVD-VIDEO |
Dimensions (WxHxD) 144 mm x 14 mm x 137.5 mm
Weight About 200 g
Interface USB 2.0 Read/Write Speed
| Write : (DVD-R): 2x, 4x, 8x |
| (DVD-R DL): 2x, 4x, 6x |
| (DVD-RW): 2x, 4x, 6x |
| (DVD-RAM): 2x, 3x, 5x (Ver. 2.2 & higher) |
| M-Disc (DVD+R SL): 4x |
| (DVD+R): 2.4x, 4x, 8x |
| (DVD+R DL): 2.4x, 4x, 6x |
| (DVD+RW): 2.4x, 3.3x, 4x, 8x |
| (CD-R): 10x, 16x, 24x |
| (CD-RW): 4x, 10x, 16x, 24x |
| Read : (DVD-R/RW/ROM): 8x/8x/8x max. |
| (DVD-R DL): 8x max. |
| (DVD-RAM) (Ver.2.2 & Higher): 6x max. |
| M-Disc (DVD+R SL): 8x max. |
| (DVD-Video) (CSS Compliant Disc): 4x max |
| (DVD+R/+RW): 8x/8x max. |
| (DVD+R DL): 8x max. |
| (CD-R/RW/ROM): 24x/24x/24x max. |
| (CD-DA (DAE)): 24x max. |
* The drive's appearance and specifications may change without prior notice.
- The maximum data transfer rate varies according to the performance capabilities of the PC.
- For the sake of periodic improvements, specifications and appearance are subject to change without notice.
- We have taken all possible measures to assure the quality of our products, but we cannot be responsible for the consequences if defect occurs.
Data transfer rate
| Sustained CD-ROM : 3,600 kB/s (24x max) | |
| DVD-ROM : 11.08 MB/s (8x max) | |
| Average Access CD-ROM : 140 ms (Typical) | |
| Time ( ^1/_3 Stroke) | DVD-ROM : 160 ms (Typical) |
| DVD-RAM : 200 ms (Typical) | |
| Buffer capacity 0.75 MB | |
| MTBF 60,000 Power On Hours (Duty Cycle 10 %) | |
Power Requirement 5 V DC
| Operating Environment |
| Temperature 5 °C to 40 °CHumidity 15 % to 85 % |
| Storage Environment |
| Temperature -30 °C to 60 °CHumidity 10 % to 90 % RH |
Software
Install the appropriate CD Recording Authoring Software before using this unit. * Please uninstall any previous CD burning software you may have loaded on your PC in order to prevent possible compatibility issues.
Once you have installed the application software, you may (if you wish) begin to reinstall previous software, taking note for errors. We recommend using the drive with the latest software as some problems encountered when using the drive can be solved by updating the software.
Please visit www.lgservice.com and install the program,
"LG ODD Online F/W update." By using the program,
you can automatically check the latest information about FirmWares and update the FirmWare.
Worldwide support ; http://www.LGservice.com
Worldwide corporate site : http://www.LG.com
Safety Instructions
CAUTION: The laser used in the Drive can damage your eyes. Do not attempt to open the cover. To reduce the risk of electric shock, do not remove the cover (or back).
There are no user-serviceable parts inside. Refer servicing to qualified service personnel. Use of controls or performance of procedures other than those specified herein may result in hazardous radiation exposure.
WARNING: To reduce the risk of fire or electric shock, do not expose this appliance to rain or moisture.a
LG Electronics hereby declares that this/these product(s) is/are in compliance with the essential requirements and other relevant provisions of Directive 2004/108/EC, 2006/95/EC, 2009/125/EC and 2011/65/EU.
European representative : LG Electronics Inc. - EU Representative Krijgsman 1, 1186 DM Amstelveen The Netherlands
CLASS 1 LASER PRODUCT
KLASSE 1 LASER PRODUKT
LUOKAN 1 LASER LAITE
KLASS 1 LASER APPARAT
CLASE 1 PRODUCTO LASER
CLASSE 1 PRODOTTO LASER
CAUTION : CLASS 3B VISIBLE AND INVISIBLE LASER RADIATION WHEN OPEN AND INTERLOCKS DEFEATED.AVOID EXPOSURE TO THE BEAM.
ADVARSEL : KLASSE 3B SYNLG OG USYNLG LASERSTRÅLING I ÅBN TILSTAND OG VED AFBRUDT LASEFUNKTION. UNDGA AT BLIVE RAMT AF LASERSTRÅLEN. VAROI : LUOKKA 3B AVATTAESSA JA KUMOTTAESSA LUKITUS NÄKYVÄÄ JA NÄKYMÄTÖNTÄ LASERSÄTEILYÄ, VÄLTÄ LASERSÄTEILLE ALTISTUMISTA.
ATTENTION : CLASSE 3B RAYONNEMENT LASER VISIBLE ET INVISIBLE EN CAS D'OUVERTURE ET ENCLENCHEMENTS DEFECTUEUX, EVITER L'EXPOSITION AU FAISCEAU.
Note: This equipment has been tested and found to comply with the limits for a Class B digital device, pursuant to Part 15 of the FCC Rules. These limits are designed to provide reasonable protection against harmful interference in a residential installation. This equipment generates, uses, and can radiate radio frequency energy and, if not installed and used in accordance with the instructions, may cause harmful interference to radio communications. However, there is no guarantee that interference will not occur in a particular installation. If this equipment does cause harmful interference to radio or television reception, which can be determined by turning the equipment off and on, the user is encouraged to try to correct the interference by one or more of the following measures:
- Reorient or relocate the receiving antenna.
- Increase the separation between the equipment and receiver.
- Connect the equipment into an outlet on a circuit different from that to which the receiver is connected.
-
Consult the dealer or an Authorized Service Center for help.
-
FCC WARNING
Changes or modifications not expressly approved by the party responsible for compliance could void the user's authority to operate the equipment. - This Drive is for use only with UL listed personal computers that have installation instructions detailing user-installation of card cage accessory.
■ Microsoft ^® and Windows ^® are trademarks registered in the United States and other countries by the Microsoft Corporation.
■ The company names and product names written in this manual are trademarks or registered trademarks of the respective companies.