Ab0006 - Switch Intronics - Free user manual and instructions
Find the device manual for free Ab0006 Intronics in PDF.


User questions about Ab0006 Intronics
0 question about this device. Answer the ones you know or ask your own.
Ask a new question about this device
Download the instructions for your Switch in PDF format for free! Find your manual Ab0006 - Intronics and take your electronic device back in hand. On this page are published all the documents necessary for the use of your device. Ab0006 by Intronics.
USER MANUAL Ab0006 Intronics
xtraCoN Series: Video+Audio+USB Extender Over LAN (or USB)
| Model Number | Resolution Max. | Platform | LAN | Output Connector | Audio Connector |
| MACNM-H90 19 | 20 x 1080 | Windows/ Mac | 100BASE | HDMI Female | Audio via HDMI |
| MACNM-H92 | 1920 x 12002048 x 1152 | ||||
| MACNM-G90 19 | 20 x 1080 | Windows/ Mac | 1000BASE | HDMI Female | Audio via HDMI |
| MACNM-G92 | 1920 X 12002048 x 1152 | ||||
| MACND-H20 12 | 30 x 1024 | Windows/ Mac | 100BASE | DVI-D Female | Speaker + Mic |
| MACND-H60 16 | 00 x 1200 | ||||
| MACND-H90 19 | 20 x 1080 | ||||
| MACND-H92 | 1920 X 12002048 x 1152 | ||||
| MACND-G90 19 | 20 x 1080 | Windows/ Mac | 1000BASE | DVI-D Female | Speaker + Mic |
| MACND-G92 | 1920 X 12002048 x 1152 | ||||
| MACNA-H20 12 | 30 x 1024 | Windows/ Mac | 100BASE | HDB15 Female | Speaker + Mic |
| MACNA-H60 16 | 00 x 1200 | ||||
| MACNA-H90 19 | 20 x 1080 | ||||
| MACNA-H92 | 1920 X 12002048 x 1152 | ||||
| MACNA-G90 19 | 20 x 1080 | Windows/ Mac | 1000BASE | HDB15 Female | Speaker + Mic |
| MACNA-G92 | 1920 X 12002048 x 1152 |
Extend HDMI/ DVI/ VGA signal over LAN or USB interface from a single source computer to multiple displays
Related Products
xtraViU Series: Video+Audio Extender Over LAN (or USB)
| Model Number | Resolution Max. | Platform | LAN | Output Connector | Audio Connector |
| VCNM-H90 | 1920 x 1080 | Windows/ Mac | 100BASE | HDMI Female | Audio via HDMI |
| VCNM-H92 | 1920 x 1200 2048 x 1152 | ||||
| VCNM-G90 | 1920 x 1080 | Windows/ Mac | 1000BASE | HDMI Female | Audio via HDMI |
| VCNM-G92 | 1920 x 1200 2048 x 1152 | ||||
| VACND-H20 | 1280 x 1024 | Windows/ Mac | 100BASE | DVI-D Female | Speaker + Mic |
| VACND-H60 | 1600 x 1200 | ||||
| VACND-H90 | 1920 x 1080 | ||||
| VACND-H92 | 1920 x 1200 2048 x 1152 | ||||
| VACND-G90 | 1920 x 1080 | Windows/ Mac | 1000BASE | DVI-D Female | Speaker + Mic |
| VACND-G92 | 1920 x 1200 2048 x 1152 | ||||
| VACNA-H20 | 1280 x 1024 | Windows/ Mac | 100BASE | HDB15 Female | Speaker + Mic |
| VACNA-H60 | 1600 x 1200 | ||||
| VACNA-H90 | 1920 x 1080 | ||||
| VACNA-H92 | 1920 x 1200 2048 x 1152 | ||||
| VACNA-G90 | 1920 x 1080 | Windows/ Mac | 1000BASE | HDB15 Female | Speaker + Mic |
| VACNA-G92 | 1920 x 1200 2048 x 1152 |
Transmit DVI/VGA signal via USB interface from a single source computer to a single display. The color depth is supported up to 32 bits at the maximum resolution.
Related Products xtraViU Series: USB-to-Video Extender
| Model Number Input | Output | |
| VCUA-20/ 60/ 90/ 92 USB | VGA | |
| VCUD-20/ 60/ 90/ 92 USB | DVI-D | |
| VCUB-20/ 60/ 90/ 92 USB | DVI-D + VGA |
* UP TO FOUR xtraCoN series through the USB 2.0 ports can be connected at a time, enjoying multiple windows on the multiple monitors, increasing your productivity like never before!
* The driver installation procedure and software operations may differ from version to version, that may cause the snapshot on this user's manual slightly differ from others without affecting the function.
* The final specifications are based on the actual product.
* Features and functions may be added or changed since the manual was written. Please visit our website to download the latest version of manual for reference
* To prevent damages to your installation, it is important that all devices are properly grounded.
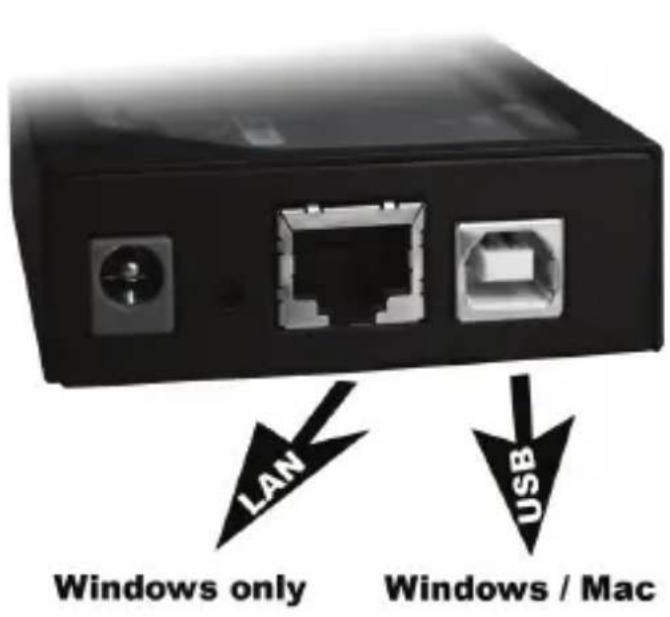
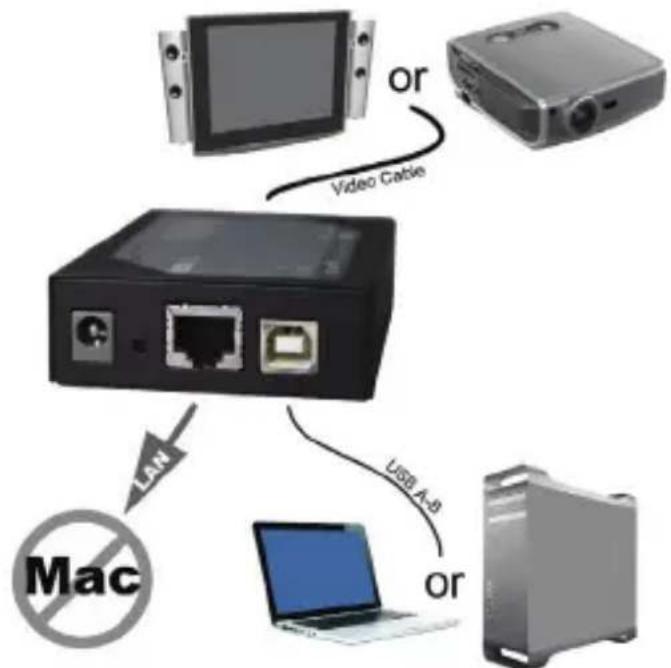
* For Mac users the signal extending over LAN is not applicable.
text_image
LAN USB Windows only Windows / Mac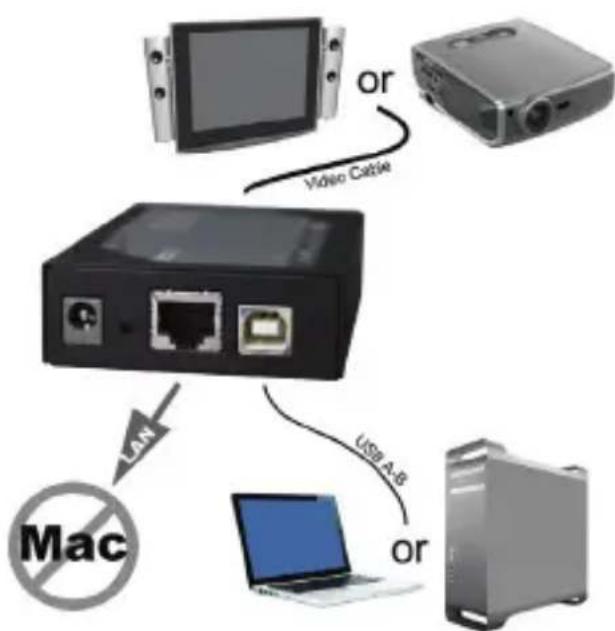
flowchart
graph TD
    A["Mac"] -->|LAN| B["Router"]
    B -->|USB A-B| C["Laptop"]
    C -->|or| D["Desktop"]
    B -->|Video Cable| E["Monitor or projector"]
Table of Content
Introduction 5
Features 6
Packing Checklist....6
System Requirements....7
Additional Requirements 8
Product Description....9
Connection....11
Before the Connection ....11
Connection Patterns....11
Windows 2000/XP/Vista/7 12
Driver Installation.... 12
Operation 15
Via USB....15
Via the Local Area Network System 26
Intel-based Mac OS 10.4/10.5/10.6....37
Driver Installation.... 37
Operation 39
Specifications 45
Troubleshooting.... 47

Please read this manual thoroughly and follow the Installation procedures to prevent any damage to the unit or any connecting device
RoHS



Introduction
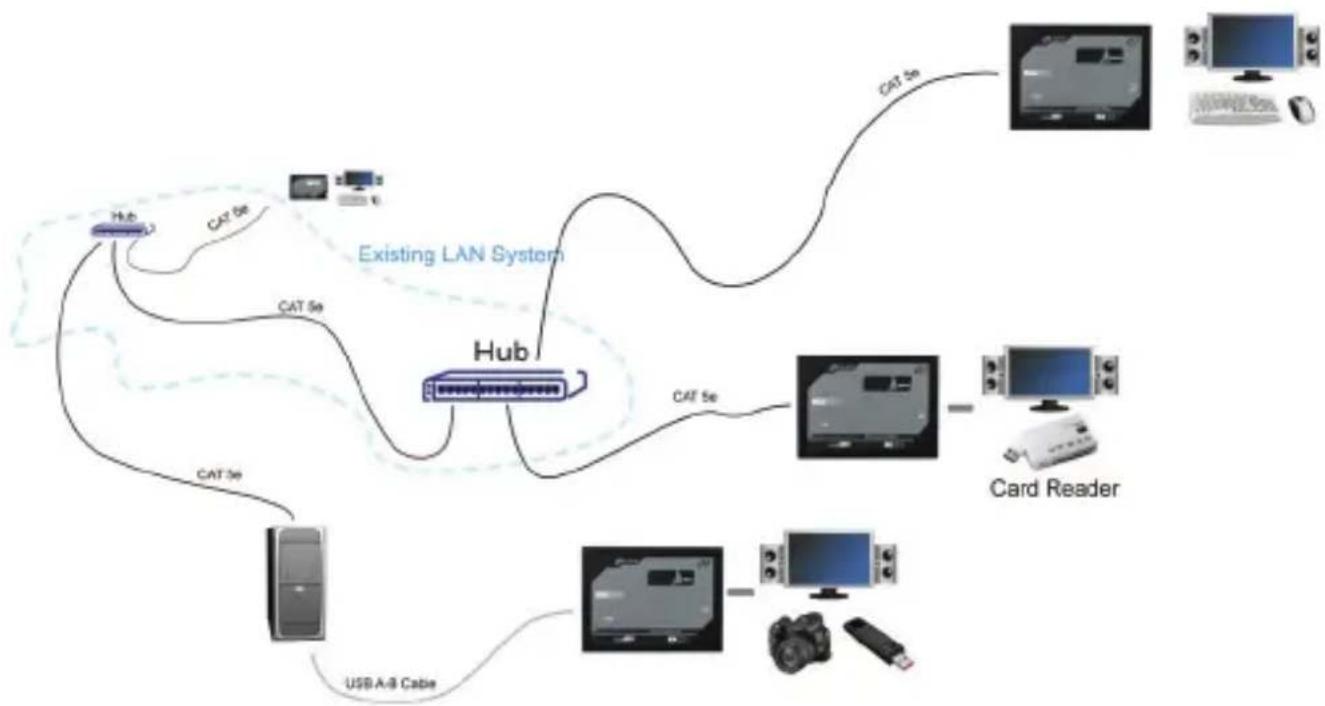
xtraCoN series, Video+ Audio+ USB Extender over LAN : MCNM/ MACND/MACNA series --- provides LAN connectivity via CAT5 cable (or USB cable connection) for HDMI/ DVI / VGA extension from a single video source to multiple video display devices with maximum resolution up to SXGA(1280 x 1024) / UXGA(1600 x 1200)/ Full HD (1920 x 1080). The installation can be easily achieved with an easy 2-step process---installing the driver and connecting both the display and Hub (or source computer) to the Extender Unit by Video and CAT5 cables (or USB A-B cable) respectively. It supports most of the popular Windows systems and Intel-based Mac OS system for extending video via USB connection. Users can have two displays at both the local and remote locations from the same video source and up to 4 Units can be daisy chained at a time.
The connected monitor can be configured to either clone the primary screen, or extend the Windows desktop allowing visibility of more applications at the same time such as while reading the email on one monitor, open the attachment on the other monitor.
With its portability and small footprint, it can be plugged in quickly to deliver high definition signal to a projector or monitor display from a PC or other media repository, which is perfect for situations that require immediate Video/Audio/ USB signal extension with easy set up and high quality output such as applications on public broadcasting, exhibits, courtrooms, classrooms, boardrooms, stock tickers, bus stations etc.
flowchart
graph TD
    A["Hub"] -->|CAT 5e| B["Existing LAN System"]
    A -->|CAT 5e| C["USB A-B Cable"]
    A -->|CAT 5e| D["Card Reader"]
    A -->|CAT 5e| E["PC"]
    B --> F["Card Reader"]
    C --> G["USB A-B Cable"]
    D --> H["PC"]
    E --> I["PC"]
Features
■ Easily add the extra console(s) via the USB or the exiting LAN system without additional wiring.
■ Add up to 4 extra consoles allowing 4 + 1 users to share one computer at a time; the control power is on first-come, first-serve basis.
■ Unique Multi-users network configuration, negotiable controlling access setting.
■ Enable USB peripherals sharing via network connection.
■ Support HDMI/ DVI/ VGA display. (depends on model)
■ Perform the multiple windows on the multiple displays and increase productivity like never before.
■ Demonstrate media files and DVDs in either extend or clone mode.
■ Support the high resolution up to UXGA (1600 x 1200)/Full HD (1920 x 1080) and 2048 x 1152 for certain models.
■ Fully support Windows 2000 SP4, Windows XP SP2 or SP3, Windows Vista SP1/SP2, Windows 7.
■ Fully support Intel-based Mac OS 10.4/10.5 for the video extending via USB connection.
■ Ideal for applications on public broadcasting, exhibits, retail stores, courtrooms, etc.
Packing Checklist
- xtraCoN Unit x 1
- Power Adapter with necessary AC Cord Or
Plug-in Power Adapter x 1 (select only one of three) Or
USB power cable
-
CD with the driver & User's Manual x 1
-
USB A-B Cable x 1
-
CAT5 Cable x 1
-
Foot Pad Set x 1
Optional
Magnetic foot pads with necessary screws x 1 set
(Avoid locating it near any strong sources of electromagnetic radiation such as CRT monitors, high power electric cabling, audio equipments, and tape recorders)
★System Requirements
Network: Supports 100/1000 Mbps of bandwidth.
Display: Monitor(s) or Projector(s)
Computer (Windows Vista):
-
WEI (Windows Experience Index) score of at least 3.0 overall. The recommended hardware depends on the display resolution: 1366x768: overall WEI score of at least 3.5 1920x1080 (HD): overall WEI score of at least 4.0
-
VGA or DVI video card
-
CD-ROM or DVD drive
-
At least one USB 2.0 port (optional)
Computer (Windows 2000/XP/7) based on full screen DVD Display:
1.1. For 1-2 monitors, business usage, productivity target. This may not provide full frame rate DVD playback at full screen:
- 1.2GHz Single Core CPU (Celeron or Atom N270 for example)
- 512MB memory
1.2. For 3 monitors where 1 could run DVD video while also targeting productivity and business apps. Will support only 1 video of DVD resolution at full screen:
- 1.6GHz CPU
- 1GB memory
1.3. For 4 monitors where 1 screen can run full screen DVD video:
- 1.8GHz Core Duo
- 1GB memory
-
VGA or DVI video card
-
CD-ROM or DVD drive
-
At least one USB 2.0 port (optional)
NOTE: More Unit connections for signal simultaneous transmission, more computer resources may be consumed.
★Additional Requirements
The Unit software can be installed on any desktop or laptop system running Windows 2000 SP4, Windows XP SP2 or SP3, Windows Vista SP1/SP2 32-bit and 64-bit editions, Windows 7 and Intel-based Mac OS 10.4/10.5. Any predecessor versions of the Windows or other platforms that are not mentioned here won't be supported by any drives currently.
Depending on the interconnection deployments that include Video+Audio extending via LAN and Video+Audio extending via USB, users can select the appropriate Unit software driver from the provided CD for the driver installation to the source computer.
- For the source computer running Windows 2000 SP4, Windows XP SP2 or SP3, Windows Vista SP1/SP2 32-bit and 64-bit editions, and Windows 7, the scheme of Video+Audio extending via LAN/USB can be implemented by using any model of xtraCoN Series.
- For the source computer running Intel-based Mac OS 10.4/10.5, the scheme of video extending via USB can be implemented by using any model of xtraCoN Series, and the scheme of video extending via LAN is impracticable in this platform.
For the details of driver installation, please proceed to the sections entitled “Windows 2000/ XP/ Vista/ 7” or “Intel-based Mac OS 10.4/10.5”
NOTE: Long cable lengths between the Units and source computer may adversely affect image quality at high resolutions and refresh rates. If users need to run remote displays at high resolutions and frequencies, use as little Ethernet cabling between locations as possible and avoid practices such as “coiling” unused cable in a ceiling or behind the display.
(USB A-B Cable for connection between the source computer and the Unit should not exceed 5 meters.)
Product Description
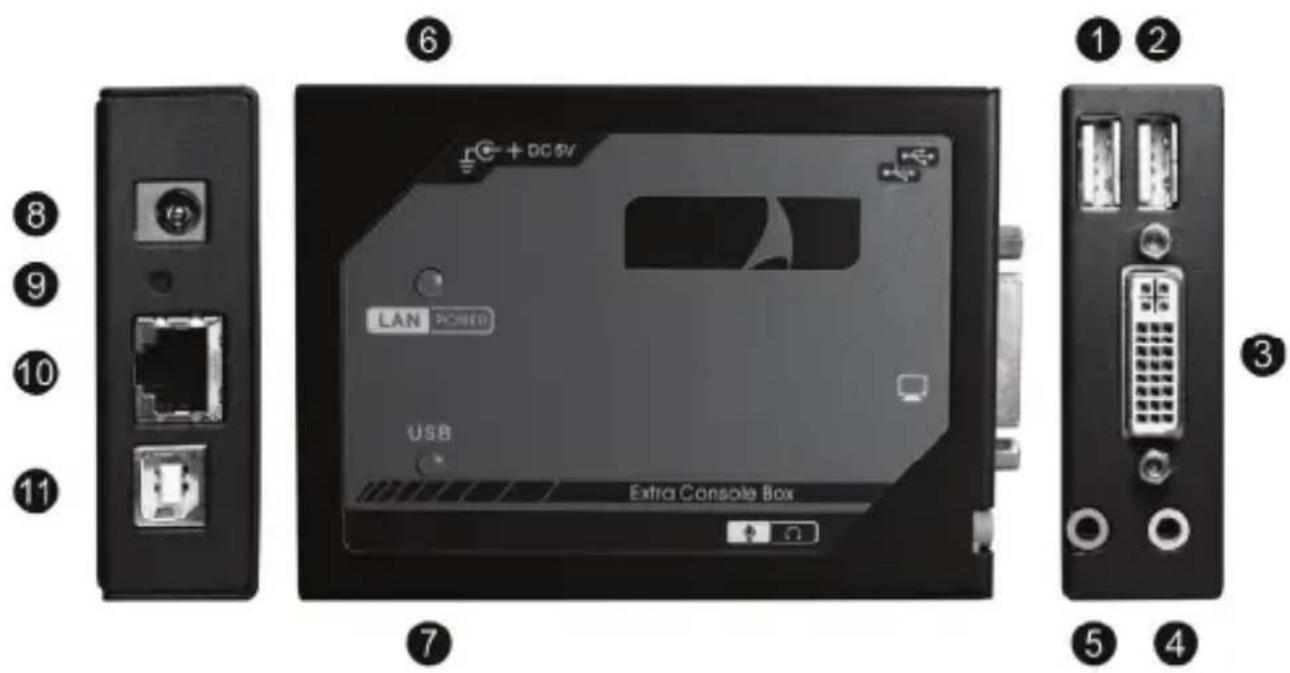
| 1 | USB Connector | Connect to USB (1.0/ 2.0) Peripherals(USB connector does not support USB hub) |
| 2 | ||
| 3 Video Connector Connect to VGA / DVI / HDMI Display Device | ||
| 4 Connect to Speaker Device | ||
| 5 | Audio Connector(Not available for HDMI model) | Connect to MIC Device |
| 6 | LED Indicator(LAN) | Green: Power OnFlash Green and Blue: Connect to the active network |
| 7 | LED Indicator(USB) | Blue: Power OnLight Off: Extra monitor off |
| 8 Power Supply Apply the proper power to the unit | ||
| 9 Reset Button Reset to the factory default | ||
| 10 RJ-45 Jack Use CAT5 cable for the LAN connection | ||
| 11 | USB Connector Connect to the Computer USB port | |
Figures listed below illustrate typical applications of xtraCoN series. The model you have purchased may be slightly different from those described in the figures.
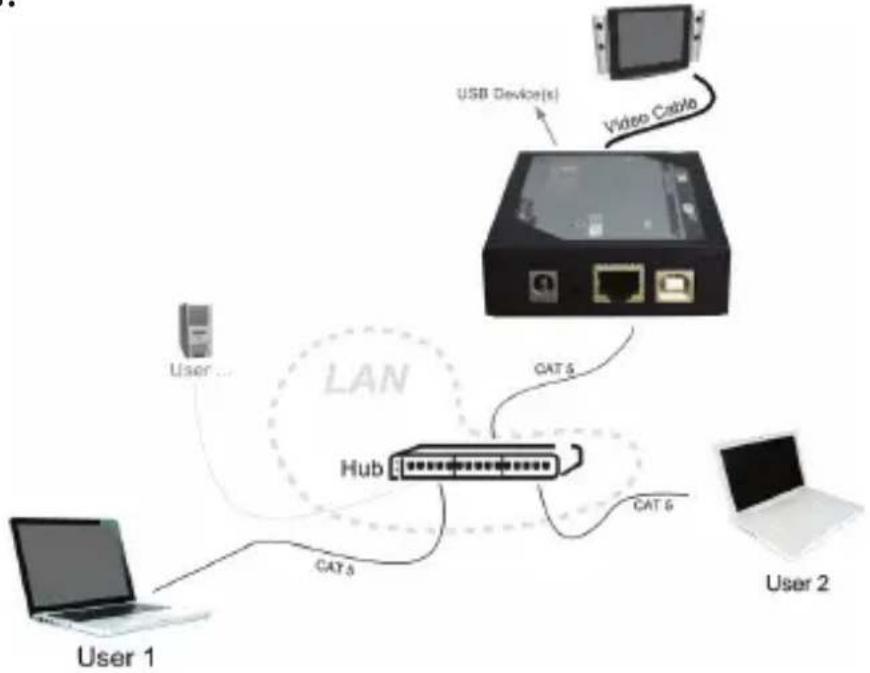
flowchart
graph TD
    User1["User 1"] -->|CATs| Hub["Hub"]
    User1 -->|CATs| VideoCable["Video Cable"]
    User1 -->|CATs| User2["User 2"]
    User1 -->|USB Device(s)| VideoCable
    VideoCable -->|USB Device(s)| Hub
    User2 -->|CATs| Hub
    User2 -->|CATs| Hub
    User2 -->|CATs| User1
Extend the Video+Audio via the Local Area Network system
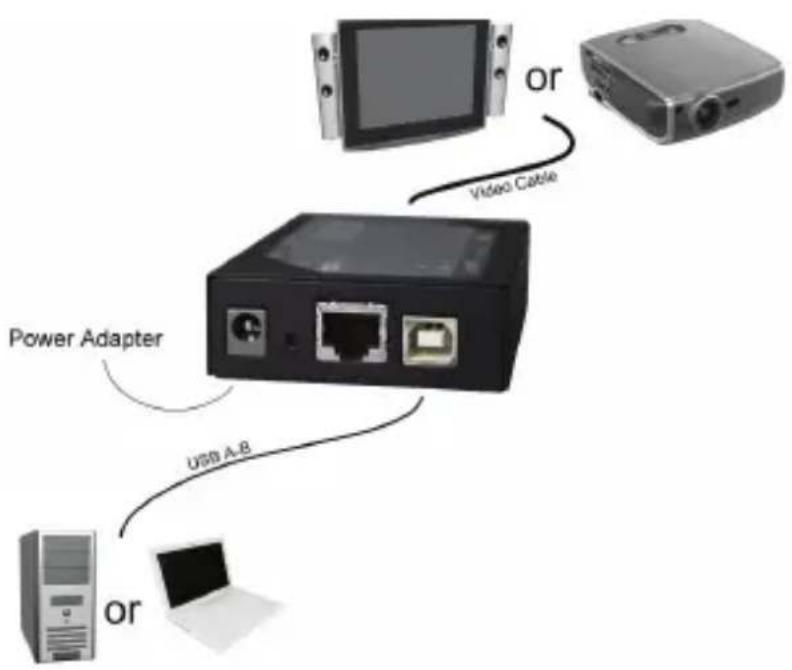
flowchart
graph TD
    A["Power Adapter"] -->|USB A-B| B["Computer"]
    C["Video Cable"] -->|or| D["Computer"]
    style A fill:#f9f,stroke:#333
    style B fill:#ccf,stroke:#333
    style C fill:#cfc,stroke:#333
    style D fill:#fcc,stroke:#333
Extend the Video+Audio via USB
Before the Connection
- Install the software to the computer first BEFORE the physical installation
- Prior to the installation, ensure to power off all devices that will be connected to this system.
- Ensure that all devices you will connect are properly grounded.
- Place cables away from fluorescent lights, air conditioners, and machines that are likely to generate electrical noise.
- Avoid locating the magnetic foot pad near any strong sources of electromagnetic radiation such as CRT monitors, high power electric cabling, audio equipments, especially tape recorders, which are very sensitive to electron-magnetic fields.
Connection Patterns
■ For the maximum capability and extension, up to 4 Units can be daisy chained and connected to an Ethernet Hub at a time.
■ Connect the provided power cord into an appropriate power source and plug the opposite end into the power connector on the xtraCoN Unit. The POWER LED on the top panel of the Unit flashes GREEN-BLUE followed by steady BLUE indicating the power ON.
■ Use a HDMI/DVI/VGA cable for the connection between xtraCoN Unit and the monitor display.
■ On the xtraCoN Unit, connect the mouse/keyboard to USB connectors and Audio Jack to Speakers and MIC.
■ For LAN connection pattern, use CAT5 cables for the connection among the xtraCoN series, source computer, and Ethernet Hub. The LAN LED on the top panel of the Unit flashes BLUE to confirm the connection.
■ For USB connection pattern, use a USB A-B cable for the connection between the source computer and the xtraCoN models. The USB LED on the top panel illuminates BLUE to confirm the connection.
Driver Installation
The source computer running Windows 2000/XP/Vista/7 is required to install the appropriate Unit software according to the interconnection deployment method that could be Extending the video via the Local Area Network system or Extending the video via USB. Please follow the instructions below listed step by step for your driver installation.
All the prompt screens and dialog boxes shown in this section are for Windows 2000/XP/Vista/7. Some dialog boxes and folders may slightly different in other versions of Windows.
NOTE: The driver installation procedure and software operations may differ from version to version, that may cause the snapshot on this user's manual slightly differ from others without affecting the function.
NOTE: If you have software installed you must uninstall it, using the Windows Add/Remove Programs feature, before installing this release.
NOTE: On some machines you may need to reboot before you can use your xtraCoN enabled device.
● Install the xtraviU driver (Windows 2000/XP/Vista/7)
- Insert the CD into the CD/DVD-ROM drive and browse:
X:\ Windows\ XtraviU\ XtraViU_X.x.xxxxx
Double-click on the “XtraViU_X.x.xxxxx” file to begin the installation (The version of driver may vary, please contact your local dealer for the latest driver)
-
Use an USB A-B Cable to connect the Unit to your computer after the installation completed.
-
Power ON the Unit and you can find this icon in the System Tray:
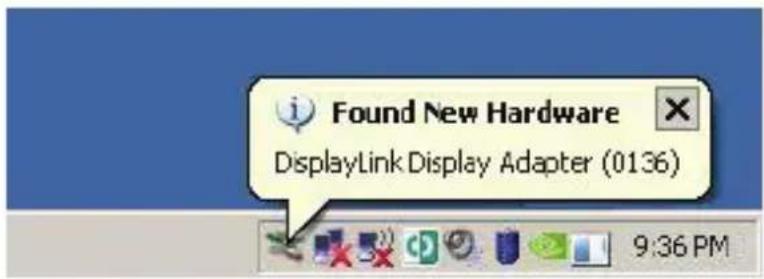
text_image
Found New Hardware DisplayLink Display Adapter (0136) 9:36 PM- Install the XtraViU_NET driver (Windows 2000/XP/Vista/7)
- Insert the CD into the CD/DVD-ROM drive, and then browse: X:\Windows\XtraViU_NET\USBServer_XtraViU_NET_xx Double-click the file “USBServer_XtraViU_NET_xx” to begin the Installation (The version of driver may vary, please contact your local dealer for the latest driver).
USBServer_XtraviJ_NET_0048
Mn32 Cabinet Self-Extractor
Microsoft Corporation
- Restart your computer after the installation completed.
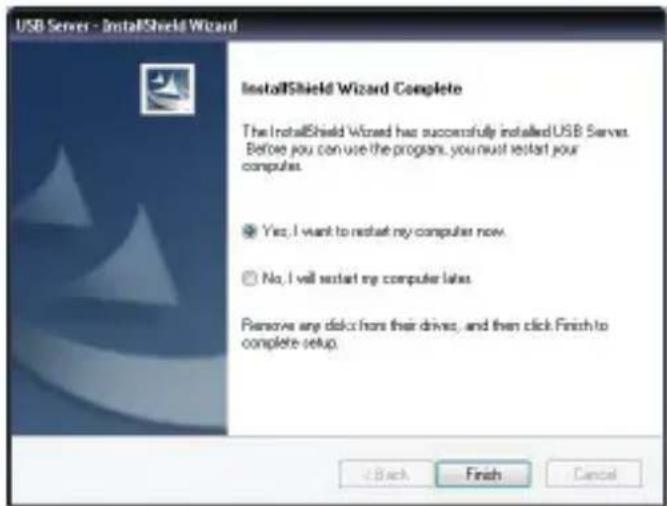
text_image
USB Server - InstallShield Wizard InstallShield Wizard Complete The InstallShield Wizard has successfully installed USB Server. Before you can use the program, you must restart your computers. Yes, I want to restart my computer now. No, I will restart my computer lakes. Remove any disk from their drive, and then click Finish to complete setup. Back Finish Cancel- After Windows has been loaded, users can find a shortcut “Launch USB Server” on the Windows desktop. Follow the procedure outlined below to avoid complications at the configuration stage.
3-1) Confirm proper operations of each of the monitor(s) to be connected to the xtraCoN Unit
3-2) Switch OFF the power of monitor(s)
3-3) Confirm that your network is operating normally and keep your computer online
3-4) Connect the xtraCoN Unit RJ-45 Connector to the network by using an Ethernet CAT5 cable
3-5) Connect the xtraCoN Unit to the monitor and switch on each connected monitor
3-6) Power ON the the xtraCoN Unit
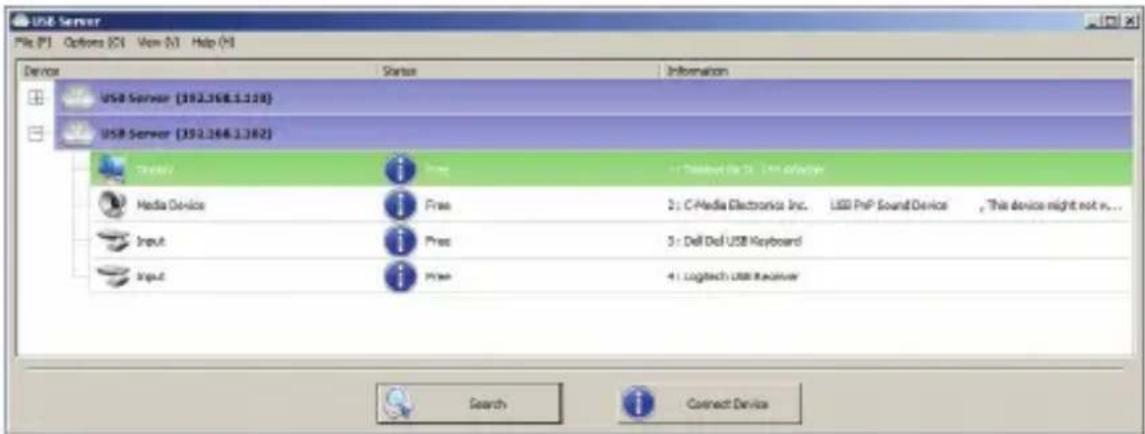
- When the xtraCoN Unit is powered ON, double-click on the shortcut "Launch USB Server", a Pop-Up Screen indicating the current connecting Status.
text_image
USB Server File (F) Options (C) View (V) Help (H) Device USB Server (350.268.1.118) USB Server (350.268.1.182) Trinity Media Device Input Print 4: Digital bus 3.1 USB Interface Free Press 3: C Media Electronics Inc. USB PrP Sound Device This device might not in... Dell Doi USB Keyboard Logitech USB Receiver Search Connect Device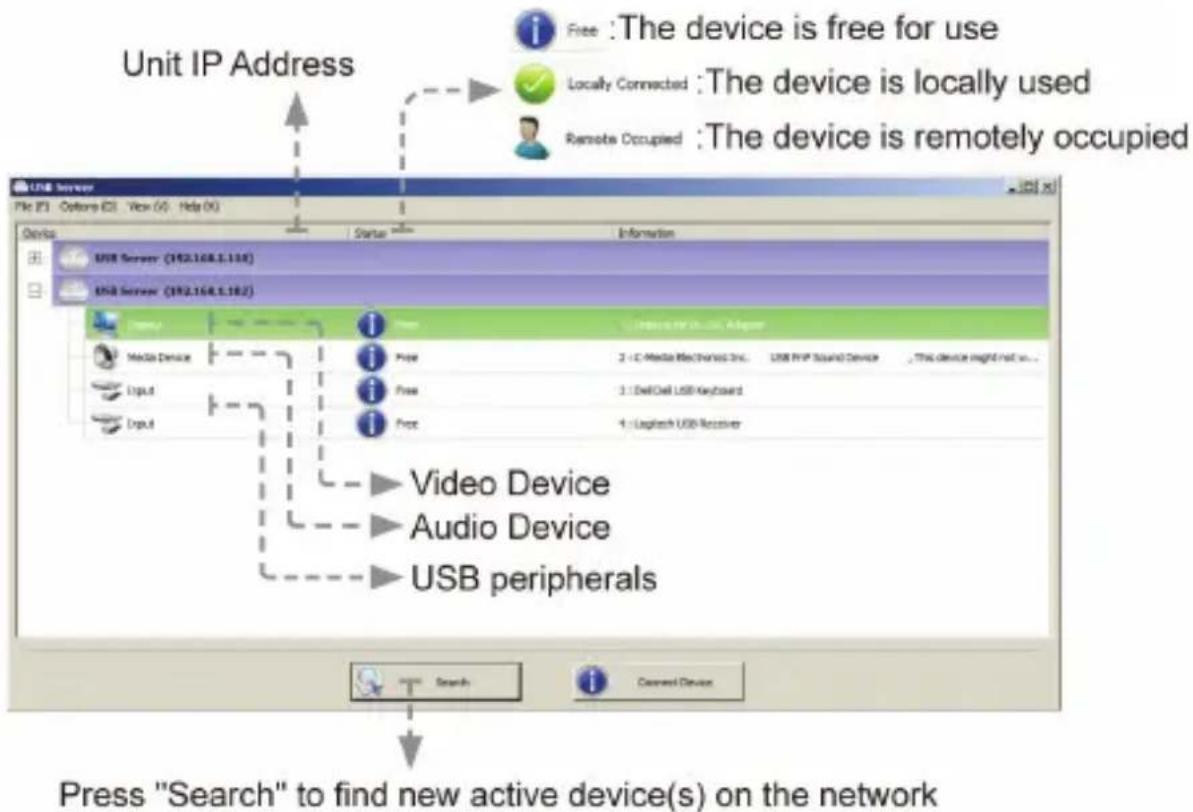
flowchart
graph TD
    A["Unit IP Address"] --> B["Free: The device is free for use"]
    A --> C["Locally Connected: The device is locally used"]
    A --> D["Remote Occupied: The device is remotely occupied"]
    B --> E["USB Server (192.168.1.110)"]
    C --> F["USB Server (192.168.1.182)"]
    D --> G["Video Device"]
    D --> H["Audio Device"]
    D --> I["USB peripherals"]
    E --> J["Search"]
    F --> K["Search"]
    G --> L["Search"]
    H --> M["Search"]
    I --> N["Search"]
    J --> O["User Interface / USB Adapter"]
    K --> P["User Interface / USB Adapter"]
    L --> Q["User Interface / USB Adapter"]
    M --> R["User Interface / USB Adapter"]
    N --> S["User Interface / USB Adapter"]
Operation
Extend the video via USB
- Using Menu Bar Control (Windows 2000/XP/Vista/7)
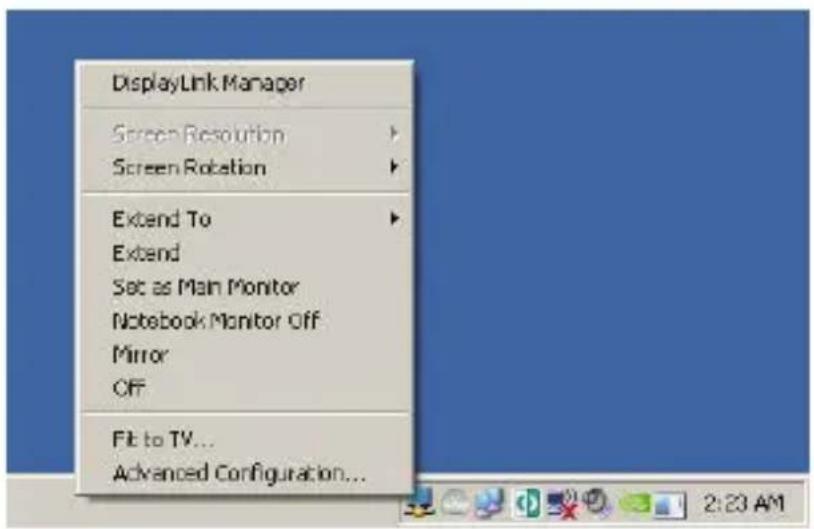
Once the software and hardware of the xtraCoN Unit are properly installed and connected, the user can easily find the icon located at the lower right corner of desktop as the snapshot shown below, click on it to bring up the following screen. By default, the xtraCoN Unit is set to Extend mode. (Any of icon selection from this bar will achieve the screen setting to the extra screen-the secondary screen.)
text_image
DisplayLink Manager Screen Resolution Screen Rotation Extend To Extend Set as Main Monitor Notebook Monitor Off Mirror Off Fit to TV... Advanced Configuration...1. Screen Resolution
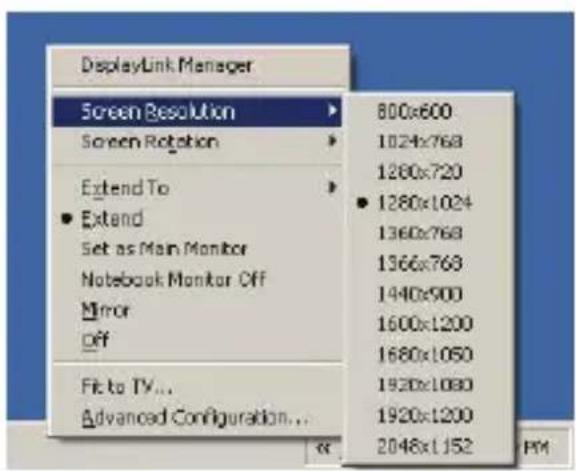
The user can select a desired resolution by accessing to “Screen Resolution” listed at the icon as the following figure shown
text_image
DisplayLink Manager Screen Resolution 800x600 1024x768 1280x720 • 1280x1024 1360x768 1366x768 1440x900 1600x1200 1680x1050 1920x1080 1920x1200 2048x1152 Extend To • Extend Set as Main Monitor Notebook Monitor Off Mirror Off Fit to TV... Advanced Configuration...NOTE: The resolution options may vary from monitor to monitor. Check the capability for your monitor.
2. Screen Rotation
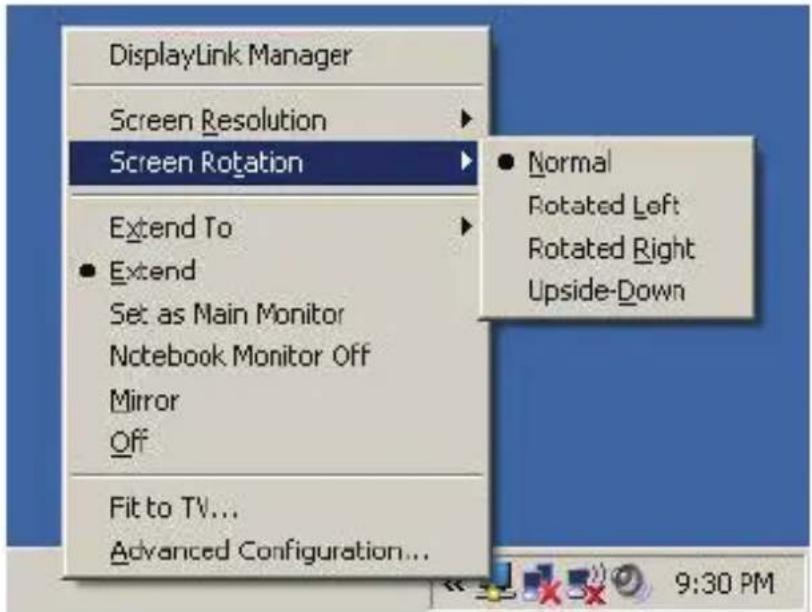
The user may rotate the extra screen to the desired angle for certain applications.
text_image
DisplayLink Manager Screen Resolution Screen Rotation Extend To Extend Set as Main Monitor Notebook Monitor Off Mirror Off Fit to TV... Advanced Configuration... Normal Rotated Left Rotated Right Upside-Down 9:30 PMNormal: keeps the extra screen with the same angle as the primary screen.
Rotated Left: rotates the extra screen 90 degree clockwise.
Rotated Right: rotates the extra screen 90 degree counterclockwise.
Upside-Down: rotates the extra screen 180 degree.

text_image
2Normal

natural_image
Abstract grayscale graphic with a stylized white curved shape against a dark textured background (no text or symbols)Rotated Left

natural_image
Abstract grayscale graphic with a large white curved shape against a dark textured background (no text or symbols)Rotated Right

text_image
ZUpside-Down
3. Extend To
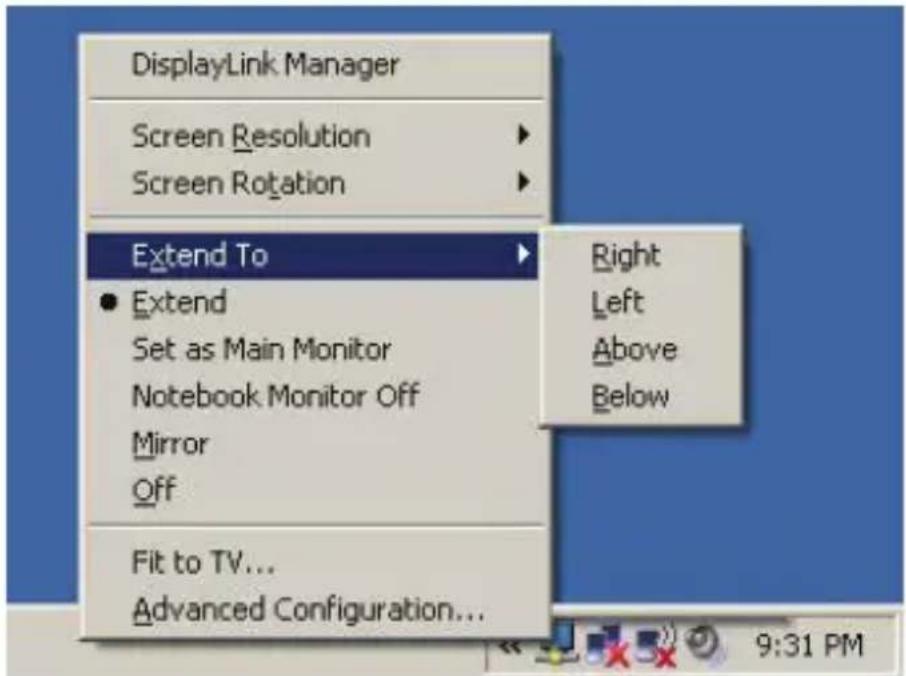
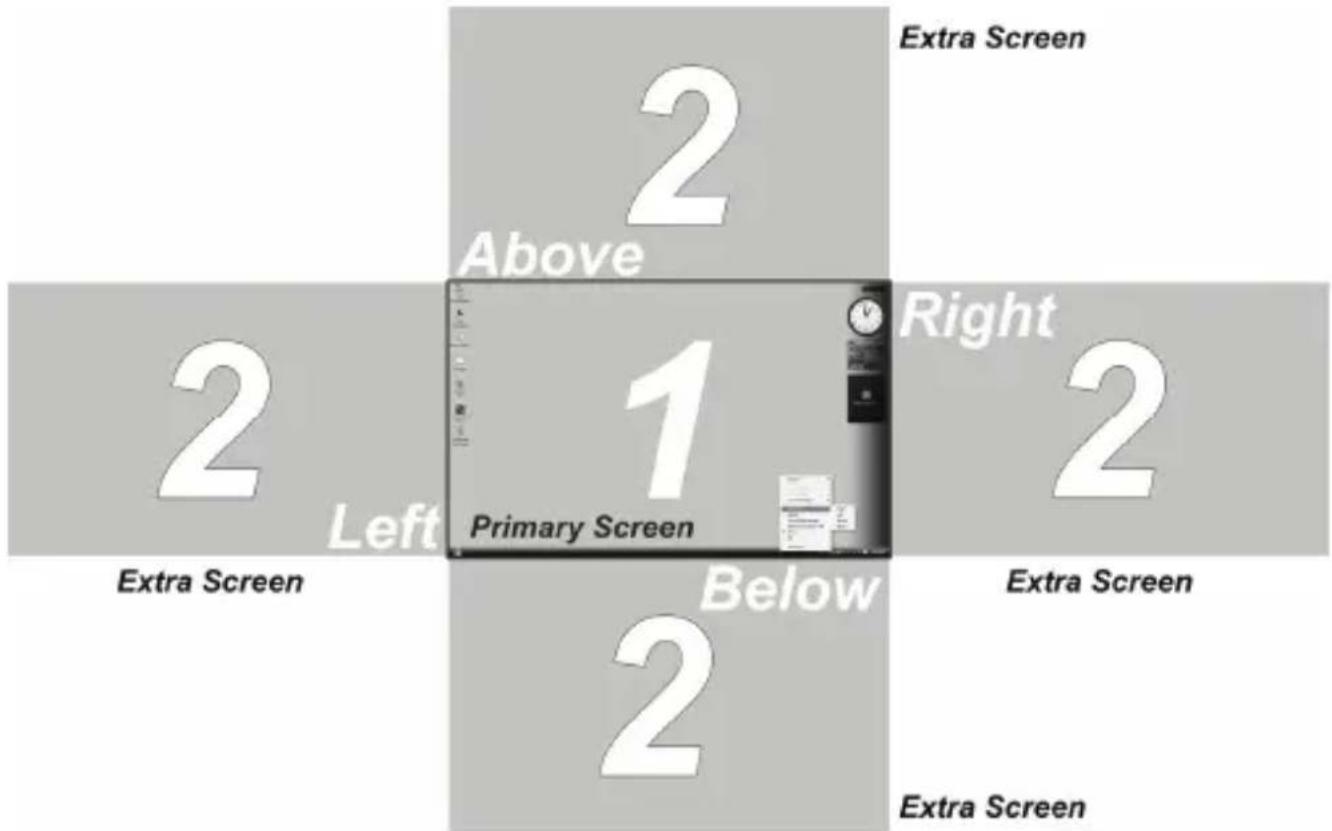
Allows the user to set the extra screen extend to the above, below, left, and right of the primary screen.
text_image
DisplayLink Manager Screen Resolution Screen Rotation Extend To Extend Set as Main Monitor Notebook Monitor Off Mirror Off Fit to TV... Advanced Configuration... Right Left Above Below 9:31 PMIn Extend Mode, the monitor attached to the xtraCoN Unit forms part of the extended windows desktop. The extra desktop area is a great productivity aid, allowing more applications or documents to be visible at a time.
text_image
Extra Screen Above 2 Right 2 1 Primary Screen 2 Extra Screen Below 2 Extra Screen Extra Screen4. Set as Main Monitor
Allow the user to set the extra screen as the primary screen
NOTE: Please check the capability of your extra monitor first before you try to perform this configuration.
5. Notebook Monitor Off
After setting the extra screen as the primary screen, the user can turn off the laptop screen and continue the laptop operation without any obstacle. (The extra screen will replace the laptop screen)
6. Mirror
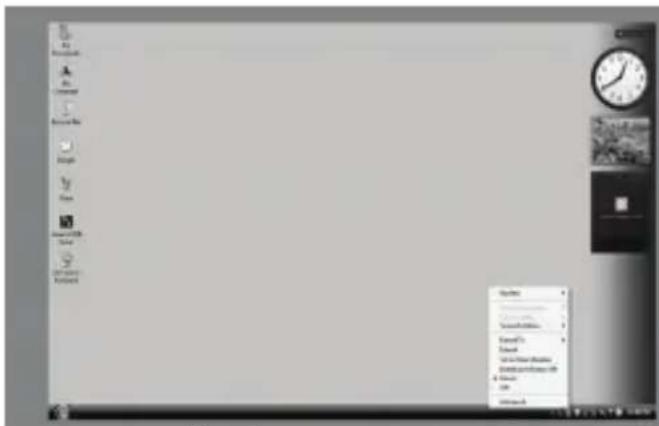
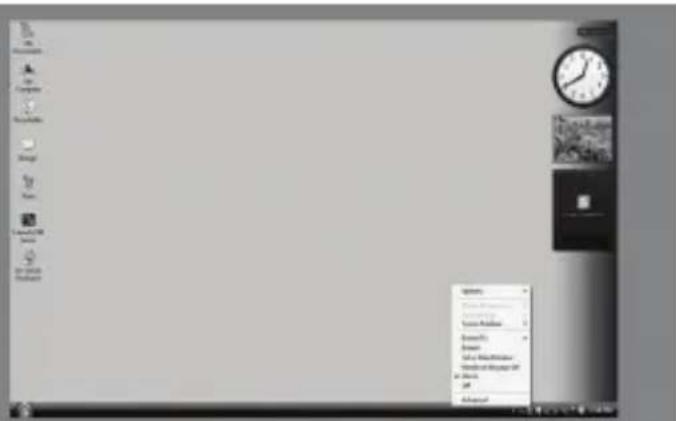
Allow users to set the extra screen as a clone of the primary screen.
text_image
Screenshot of a desktop computer interface with taskbar, context menu, and calendar visiblePrimary screen
text_image
Save As Save As New Save As New Save As New Save As New Save As New Save As NewExtra screen
7. Off
Allow users to turn off the extra screen.
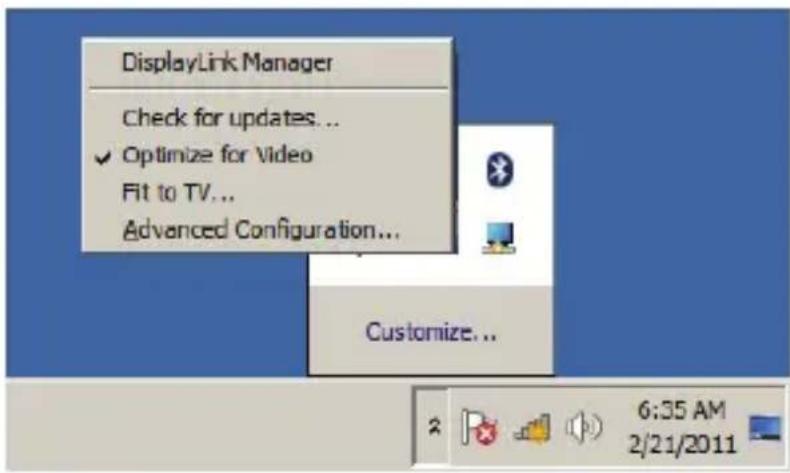
8. Optimize for Video (Vista and Windows 7 Only)
Configure the secondary display for optimum full screen video performance output. Select this option for better movie playback performance on the xtraCoN enabled displays. Only select this option when playing back video content.
Note: Text may appear less clear when enabled.
text_image
DisplayLink Manager Check for updates... ✓ Optimize for Video Fit to TV... Advanced Configuration... Customize... 6:35 AM 2/21/20119. Fit to TV
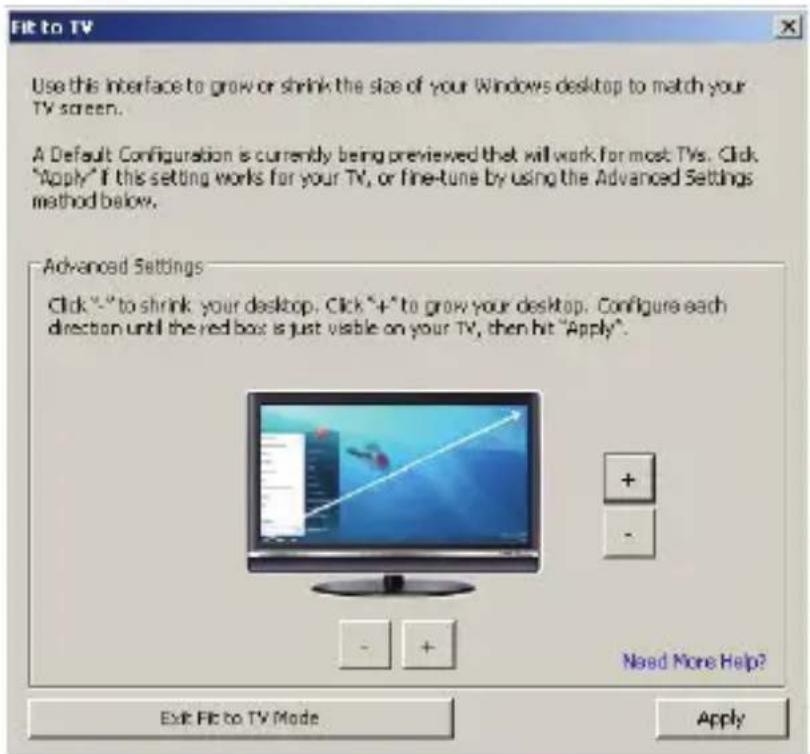
If the Windows desktop does not completely appear on TV, this option can be used to adjust the size of the Windows desktop. However, only on TV screen, users can adjust the size to full screen while this function may not be applicable to some PC monitors.
Note: Fit to TV only works in extend mode. If choosing the option while in mirror mode, the screen will change to extend and be placed above the laptop screen in Windows Display Properties. Fit to TV does not support rotated modes.
text_image
Use this interface to grow or shrink the size of your Windows desktop to match your TV screen. A Default Configuration is currently being previewed that will work for most TVs. Click "Apply" if this setting works for your TV, or fine-tune by using the Advanced Settings method below. Advanced Settings Click "-" to shrink your desktop. Click "+" to grow your desktop. Configure each direction until the red box is just visible on your TV, then hit "Apply". + - Need More Help? Exit Fit to TV Mode Apply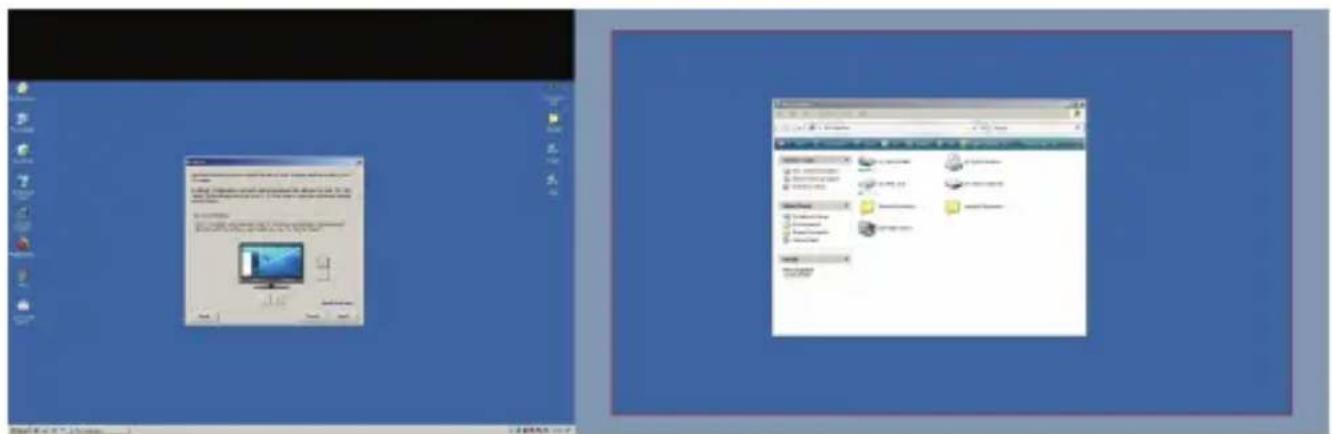
text_image
Screenshot of a Windows desktop showing two open applications: one with a computer screen and the other with a folder or file list.You will also see a red border on the extend screen
text_image
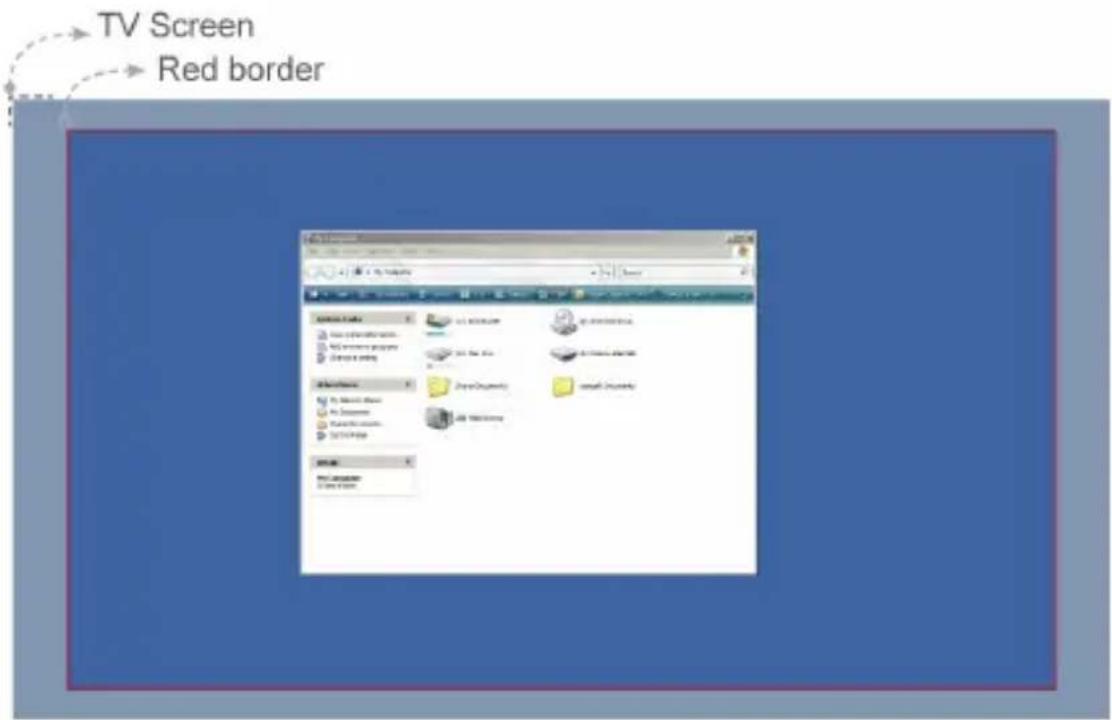
TV Screen Red borderThe red border shows the size of the new Windows desktop (Extend). Use the “+” and “-” controls on the Fit to TV Screen to change the size of the red border until it fits on the TV screen. Once the red border is at the edges of the TV screen, click “Apply” to resize the Windows desktop.
Note: Finer configuration of the size of the border can be achieved by holding down the CTRL key and clicking the “+” and “-”.
10. Advanced
Provide more options for settings as following shown.
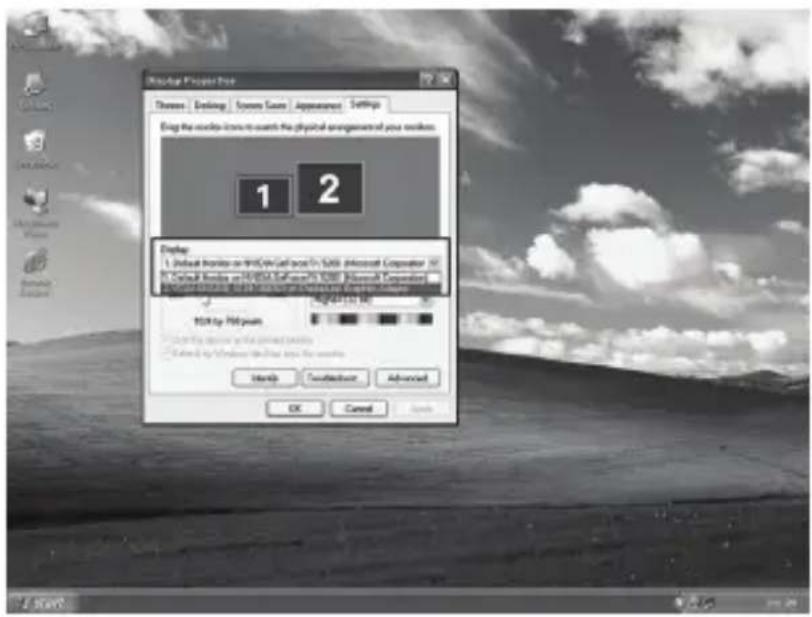
■ Display selection
text_image
Mac OS Property Free Options Desktop System Tools Appearance Settings Bring the website links to search the physical environment of your website. 1 2 Display 1. Default Monitor or WiFi/On Callback To Sable Microsoft Corporation 2. Default Monitor or WiFi/On Callback To Sable Microsoft Corporation 3. Default Monitor or WiFi/On Callback To Sable Microsoft Corporation HKEY: HKEY.COM HKEY: HKEY.COM HKEY: HKEY.COM HKEY: HKEY.COM HKEY: HKEY.COM HKEY: HKEY.COM HKEY: HKEY.COM HKEY: HKEY.COM HKEY: HKEY.COM HKEY: HKEY.COM HKEY: HKEY.COM HKEY: HKEY.COM HKEY: HKEY.COM HKEY: HKEY.COM HKEY: HKEY.COM OK Cancel Help■ Resolution and Color Quality Settings
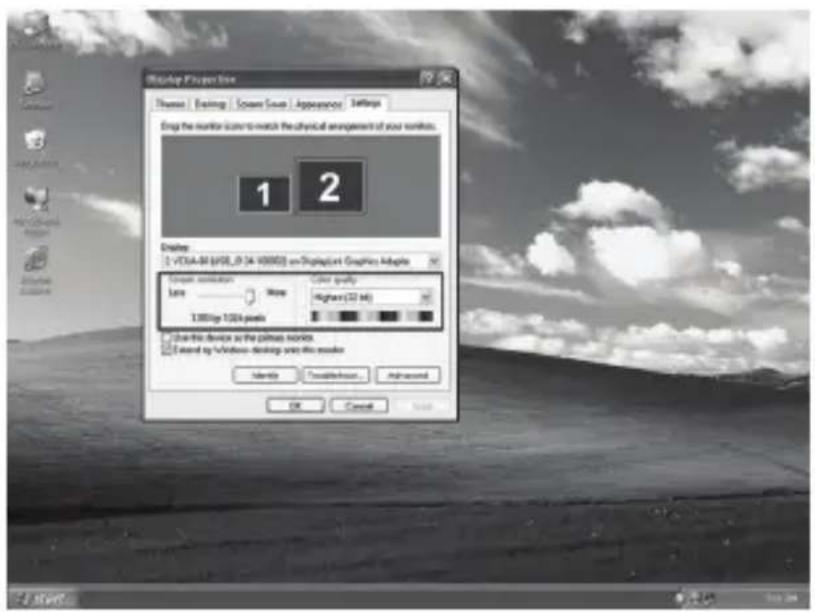
text_image
Display Player Line Thesis Eating Screen Save App Psychology Settings Eng the monitor uses to match the physical arrangement of your works. 1 2 Displays VCTDA-03 (VSEL_034-V5000) on Displayset Graphics Adapte Stream options Low High 1.000pp 100% pixels Color quality Highest (32 Mb) Use the device in the prime works. Extend by Windows - displaying your works Name Installment... Refreshed OK Cancel Help■ Refresh Rate: Click “Advance”→“Adapter”→“List all mode...”, all valid combinations of resolution, color quality and refresh rate are fully listed here. Flat panel monitors do not flicker and require a low refresh rate.
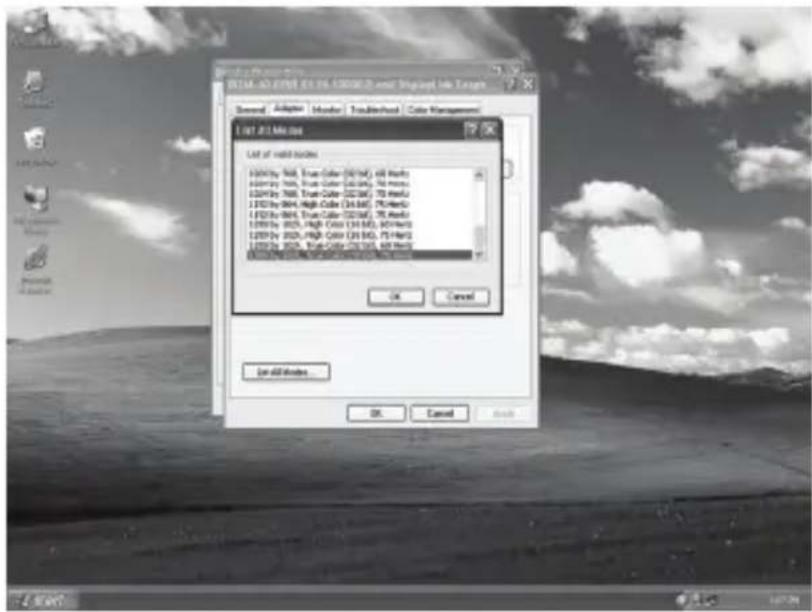
text_image
Start Menu BYD: All Files 01.06.430002 and Embedded Job Target General Adopter Monitor Traditional Color Management I Can I'll Move List of Web Sites 100% by Web, True Color (52/16), 68 Mbps 100% by Web, True Color (52/16), 70 Mbps 100% by Web, True Color (52/16), 75 Mbps 100% by Web, High Color (34/16), 95 Mbps 100% by Web, True Color (34/16), 95 Mbps 100% by Web, High Color (34/16), 95 Mbps 100% by Web, True Color (34/16), 95 Mbps OK Cancel Can All Files... OK Cancel Add◆ Windows 7 System
On Windows 7, you can configure an xtraCoN device through the use of Windows Display Properties (WDP). WDP provides a simple method to attach, rotate, duplicate or extend screens as well as modify screen resolution.
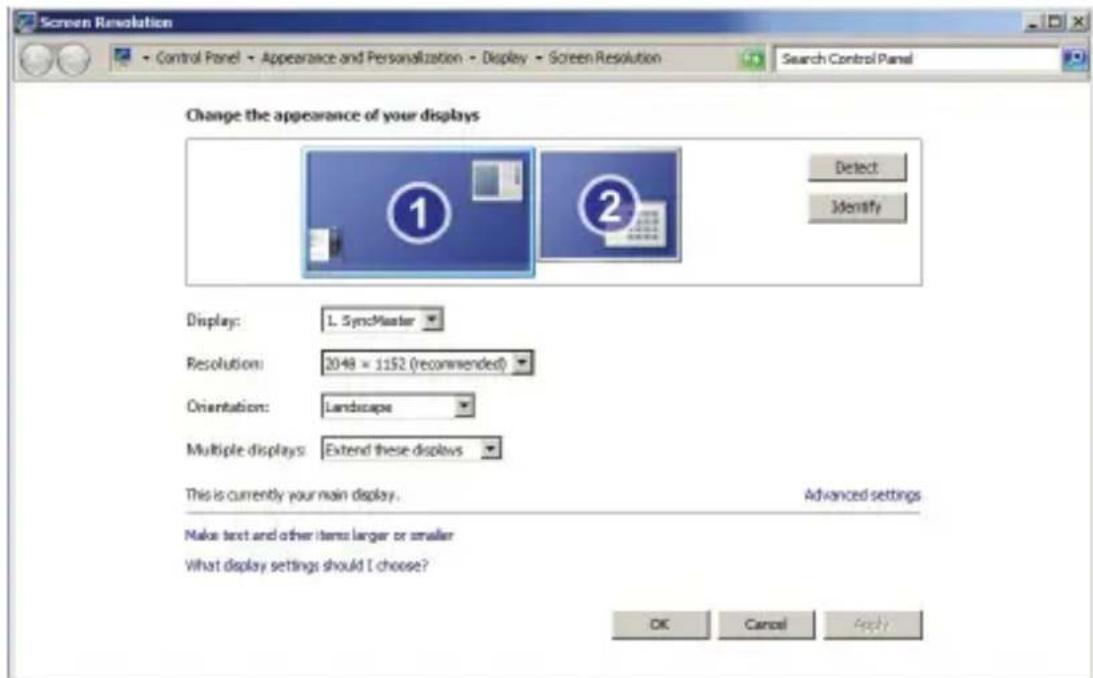
text_image
Screen Revolution Control Panel → Appearance and Personalization → Display → Screen Resolution Search Control Panel Change the appearance of your displays Detect Identify Display: L SyncMaster Resolution: 2048 × 1152 (recommended) Orientation: Landscape Multiple displays: Extend these displays This is currently your main display. Advanced settings Make text and other items larger or smaller What display settings should I choose? OK Cancel ApplyOrientation:
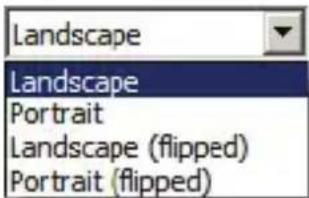
text_image
Landscape Landscape Portrait Landscape (flipped) Portrait (flipped)Multiple displays:
text_image
Extend these displays Duplicate these displays Extend these displays Show desktop only on 1 Show desktop only on 2Portrait
text_image
Screenshot of a software interface with a 3D layout and Chinese menu items, likely from an older application or system.Portrait (flipped)
natural_image
Pure diagram of a 3D printer with no text, numbers, or symbols visibleLandscape
text_image
Screenshot of a legacy Windows application interface showing a file browser with icons and a dialog box containing text and buttons.Landscape (flipped)
text_image
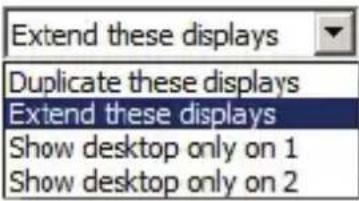
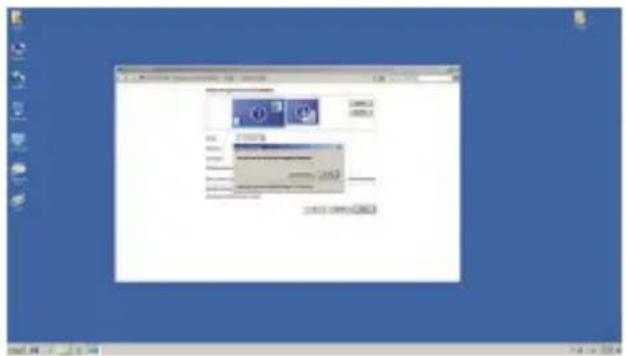
Screenshot of a legacy Windows application interface showing a dialog box with Chinese text and buttons, likely for system or configuration purposes.Duplicates these displays: Reproduces the main display on the second display.
Extend these displays: Extends the main display onto the secondary display.
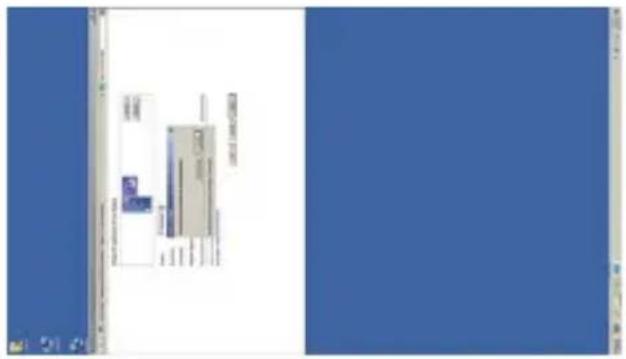
Show Desktop only on 1: The desktop appears on the display “1”. The display marked 2 becomes blank.
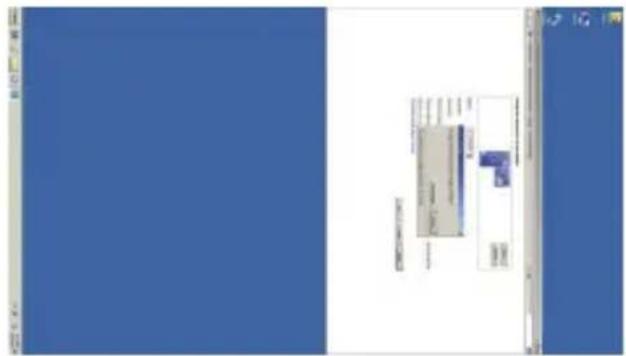
Show Desktop only on 2: The desktop appears on the display “2”. The display marked 1 becomes blank.
To control the behavior of an attached xtraCoN display, it is also possible to use Windows Key+P to display a menu (and cycle through it) to switch mode.
Select the Windows Key+P. The following menu appears. Click on one of the options. The display updates to reflect your choice.
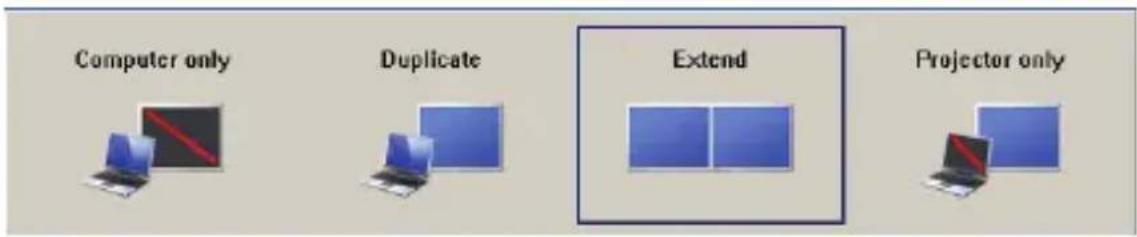
text_image
Computer only Duplicate Extend Projector only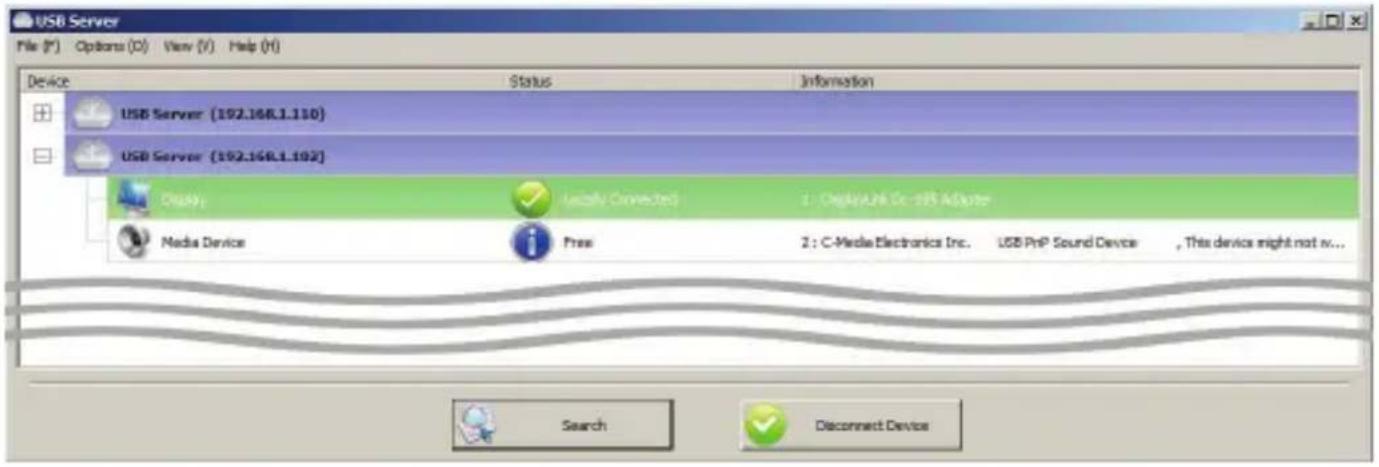
text_image
USB Server File (F) Options (O) View (V) Help (H) Device Status Information USB Server (192.168.1.110) USB Server (192.168.1.102) Display: Modify Connected 1: CogiaLink Co - USB Adapter Media Device Free 2: C-Media Electronics Inc. USB PrNP Sound Device , This device might not iv... Search Disconnect DeviceThe "Video Device" is now locally used
Device Disconnection
When finishing the Audio/Video transmission, user may disconnect the device(s) and left the controlling access for the next user. As figure shown below
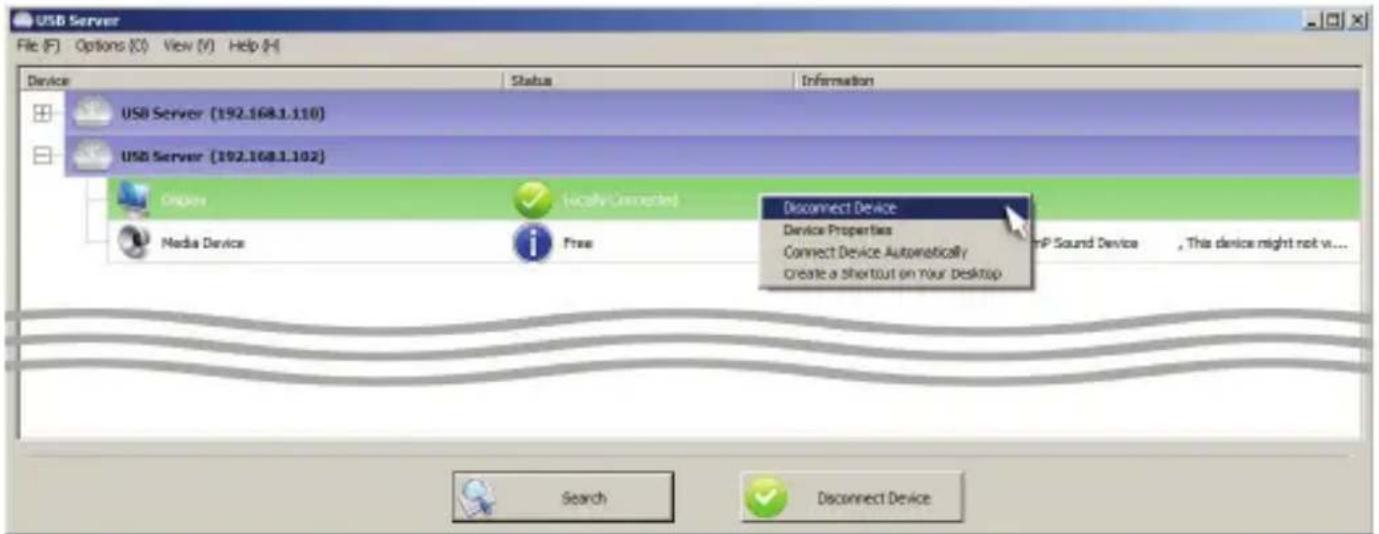
text_image
USB Server File (F) Options (C) View (V) Help (H) Device Status Information USB Server (192.168.1.110) USB Server (192.168.1.102) Options Media Device Locally Connected Free Disconnect Device Device Properties Connect Device Automatically Create a Shortcut on Your Desktop MP Sound Device , This device might not v... Search Disconnect Device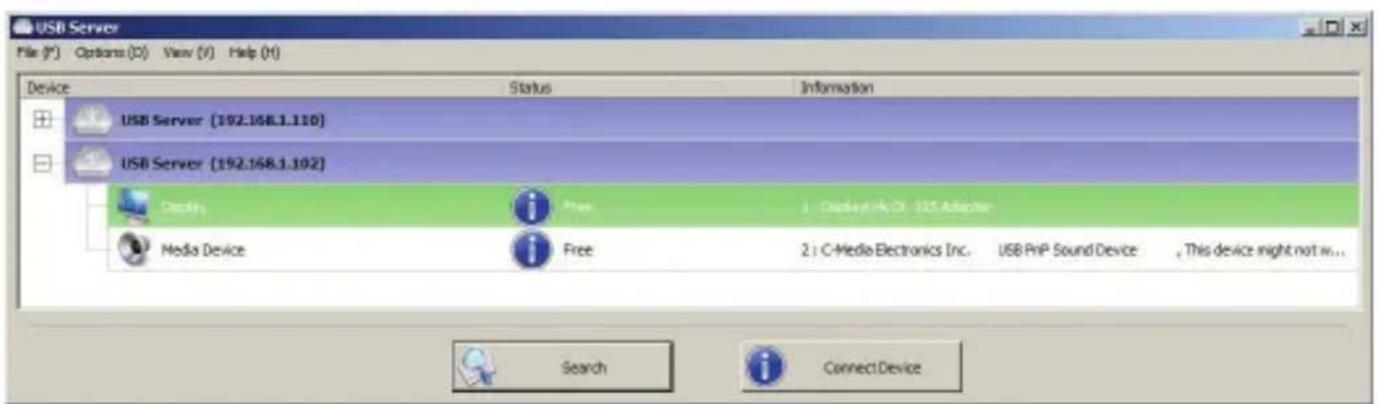
text_image
USB Server File (F) Options (O) View (V) Help (H) Device Status Information USB Server (192.168.1.110) USB Server (192.168.1.102) Pending Free 1: Displayink Cl - USB Adapter Media Device Free 2: C-Media Electronics Inc. USB PriP Sound Device , This device might not w... Search Connect DeviceThe “Video Device” is now free for use
Audio Configuration (Speakers)
After the “Media Device” is locally connected, users can find the Volume control options on the taskbar. Open Volume control options window and check Speakers
(USB PnP Sound Device)
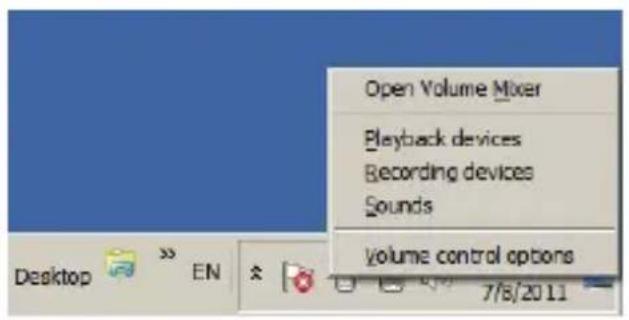
text_image
Open Volume Mixer Playback devices Recording devices Sounds Volume control options 7/8/2011 Desktop EN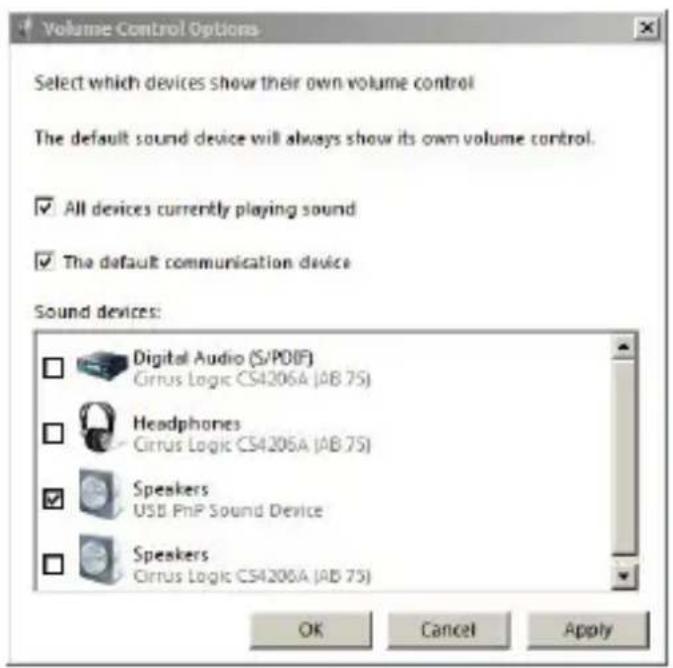
text_image
Volume Control Options Select which devices show their own volume control The default sound device will always show its own volume control. ✓ All devices currently playing sound ✓ The default communication device Sound devices: Digital Audio (S/PDIF) Cirrus Logic CS4206A (AB 75) Headphones Cirrus Logic CS4206A (AB 75) Speakers USB PnP Sound Device Speakers Cirrus Logic CS4206A (AB 75) OK Cancel ApplyAudio Configuration (Microphone)
Attach the microphone to the xtraCoN Unit. Then users can find “Recording devices” option on the taskbar. Click “Recording devices”.
Under Microphone (USB PnP Sound Device), open “Properties” option for volume adjustment.
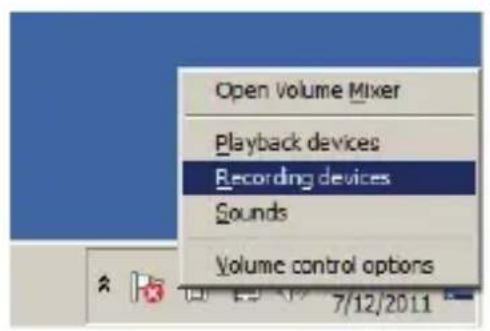
text_image
Open Volume Mixer Playback devices Recording devices Sounds Volume control options 7/12/2011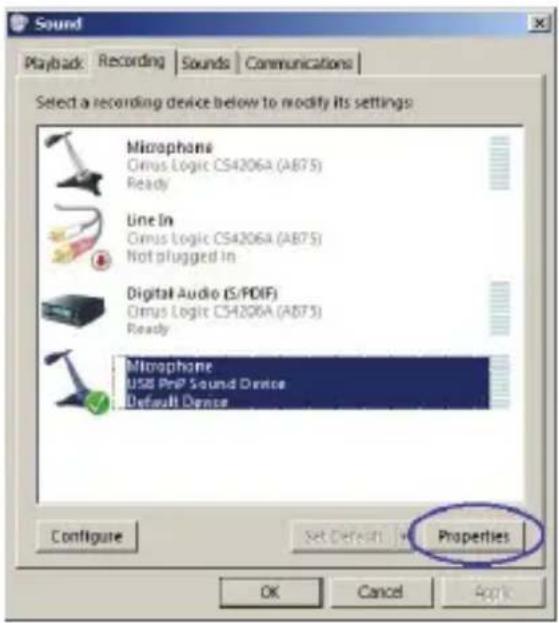
text_image
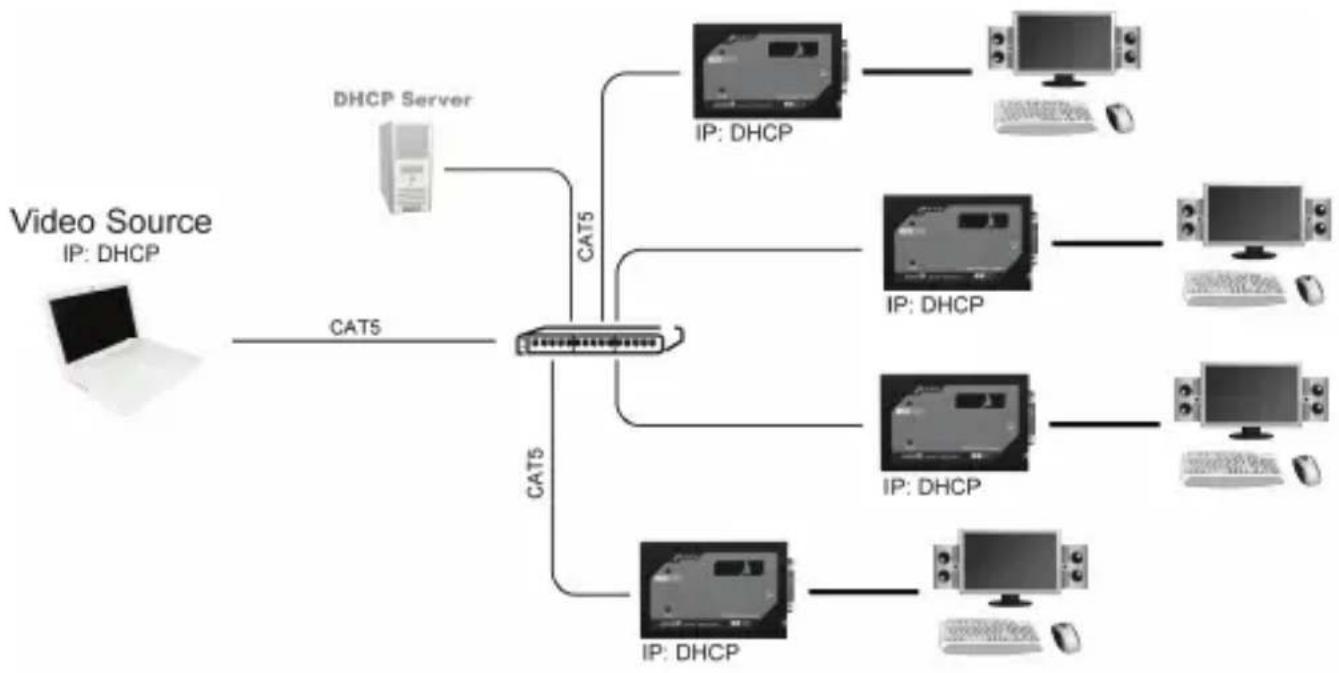
Sound Playback: Recording | Sounds | Communications | Select a recording device below to modify its settings: Microphone Ornus Logic CS4206A (AB75) Ready Line In Ornus Logic CS4206A (AB75) Not plugged In Digital Audio (S/PDIF) Ornus Logic CS4206A (AB75) Ready Microphone USB PrIP Sound Device Default Device Configure Set Default Properties OK Cancel ApplyBy default, the xtraCoN Unit gets the IP Address from DHCP server automatically. The PC's IP Address must be in the same subnet as the xtraCoN Unit's IP Address for the two devices to communicate. (For example, if xtraCoN Unit's IP Address is 192.168.1.104, with a subnet mask of 255.255.255.0, then your computer's IP Address should be 192.168.1.x, where x is a value between 1\~254, excluding 104.)
NOTE: To add additional xtraCoN Units, simply connect them to the network. A maximum total of 4 Units can be expanded.
flowchart
graph TD
    A["Video Source\nIP: DHCP"] --> B["DHCP Server"]
    B --> C["CAT5"]
    C --> D["IP: DHCP"]
    C --> E["IP: DHCP"]
    C --> F["IP: DHCP"]
    C --> G["IP: DHCP"]
    D --> H["Computer"]
    E --> I["Computer"]
    F --> J["Computer"]
    G --> K["Computer"]
    style A fill:#f9f,stroke:#333
    style B fill:#ccf,stroke:#333
    style C fill:#cfc,stroke:#333
    style D fill:#fcc,stroke:#333
    style E fill:#fcc,stroke:#333
    style F fill:#fcc,stroke:#333
    style G fill:#fcc,stroke:#333
    style H fill:#cff,stroke:#333
    style I fill:#cff,stroke:#333
    style J fill:#cff,stroke:#333
    style K fill:#cff,stroke:#333
● Network Configuration
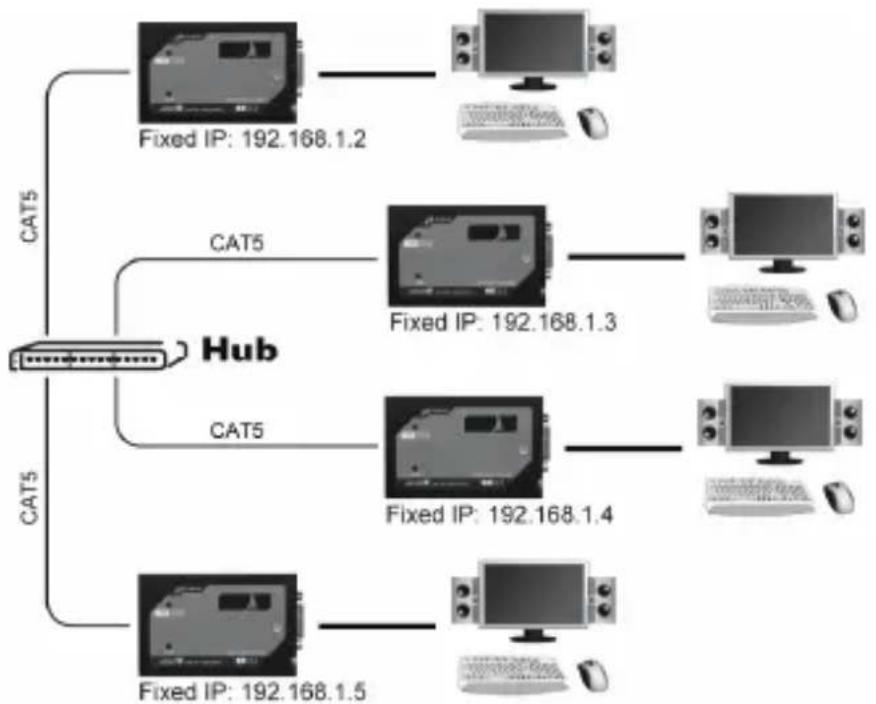
If your network doesn't have or support DHCP Server, please assign a unique IP for each connected xtraCoN Unit.
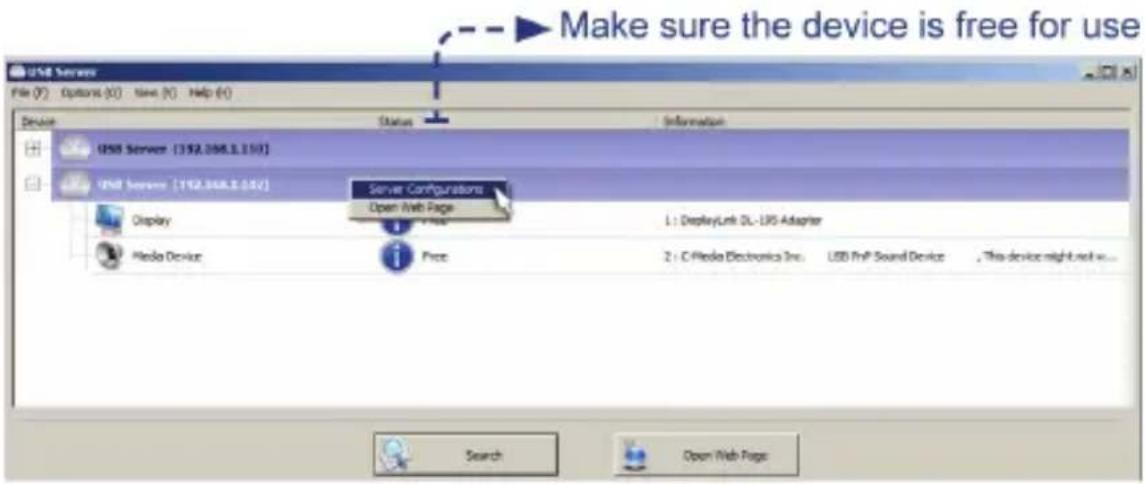
Step 1. Right click the device on the list and select “Server Configurations”
text_image
Make sure the device is free for use File (F) Options (C) New (N) Help (H) Device Status Information USB Server [152.068.3.150] USB Server [152.068.3.057] Server Configurations Open Web Page Display Media Device Price 1: DisplayLink DL-IPS Adapter 2: C:\Media Electronics Inc. USB Ph# Sound Device, This device might not want... Search Open Web PageNOTE: The device status should be on "Free" status
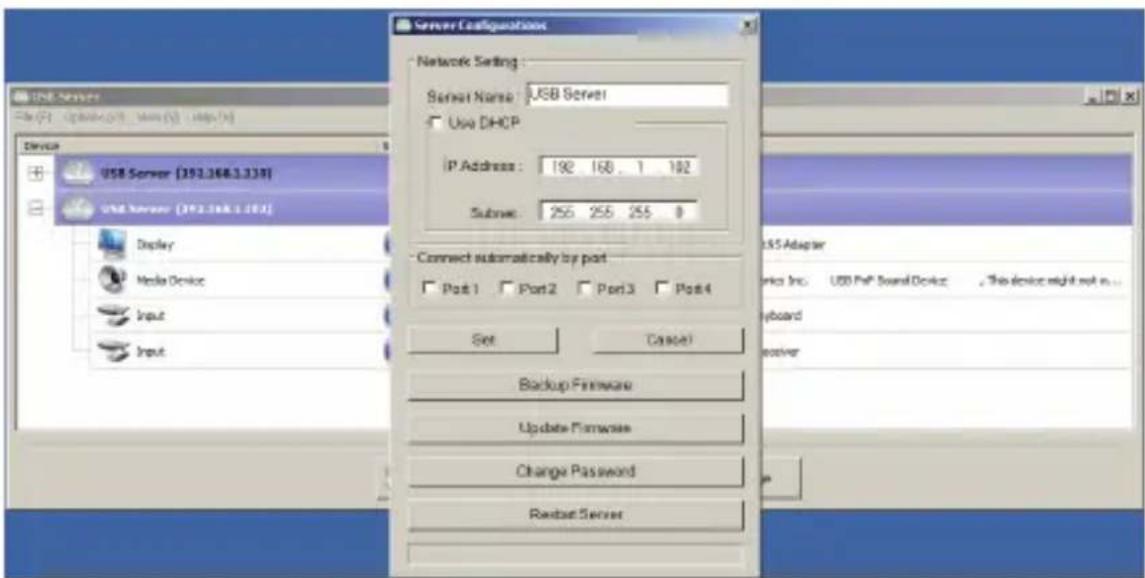
Step 2. Uncheck the “Use DHCP” and set a valid IP address for the Unit
text_image
Server Configurations Network Setting: Server Name: USB Server Use DHCP IP Address: 192 168.1 102 Subsea: 255 255 255 0 Connect automatically by port Port 1 Port 2 Port 3 Port 4 Set Cancel Backup Firmware Update Firmware Change Password Restart ServerStep 3. Press "Set" button for the confirmation
natural_image
White laptop computer with blank screen (no visible text or symbols)Fixed IP: 192.168.1.1

natural_image
Front view of a computer drive (no visible text or symbols)

Fixed IP: 192.168.1.2
Video Source
Fixed IP: 192.168.1.1
CAT5
flowchart
graph TD
    A["Central Hub"] -->|CAT5| B["Fixed IP: 192.168.1.2"]
    A -->|CAT5| C["Fixed IP: 192.168.1.3"]
    A -->|CAT5| D["Fixed IP: 192.168.1.4"]
    A -->|CAT5| E["Fixed IP: 192.168.1.5"]
NOTE: The PC's IP Address must be in the same subnet as the xtraCoN Unit's IP Address for the devices to communicate.
NOTE: No password is set by factory defaults.
● Network Configuration Multi-users
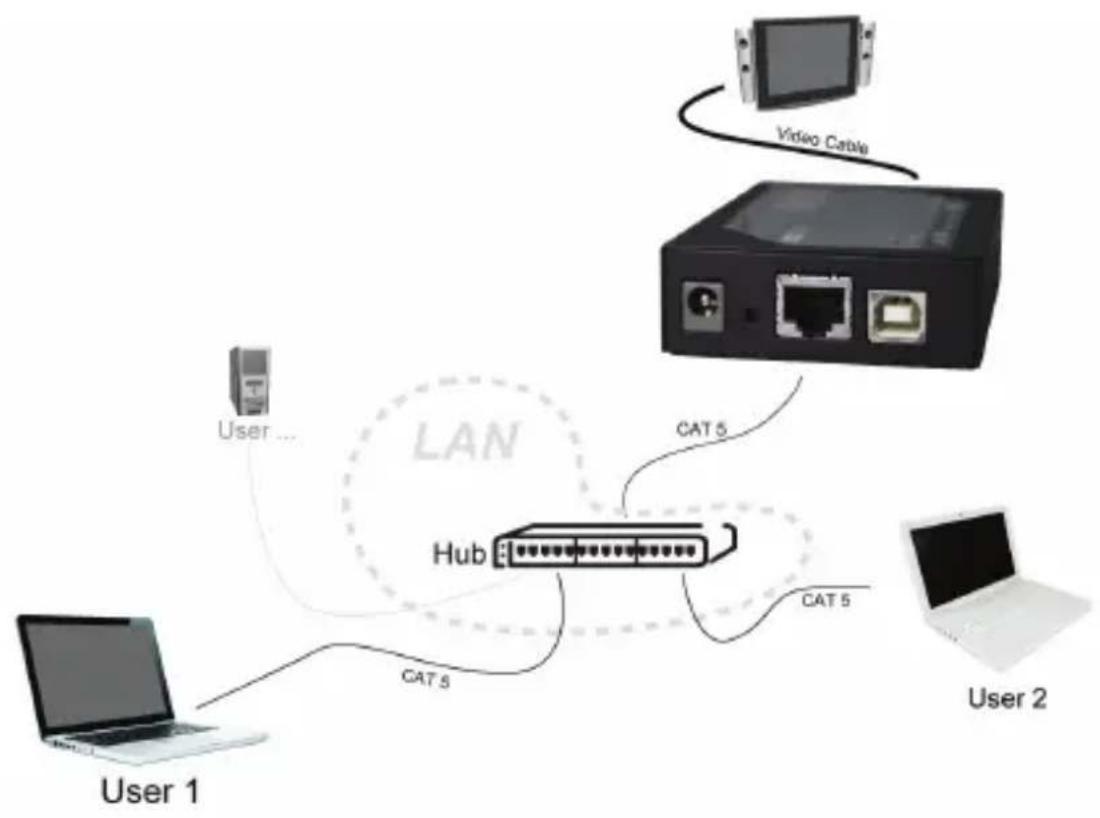
flowchart
graph TD
    A["User 1"] -->|CAT 5| B["Hub"]
    C["User 2"] -->|CAT 5| B
    D["User 3"] -->|CAT 5| B
    E["Video Cable"] -->|CAT 5| B
    B -->|LAN| A
    B -->|LAN| C
    B -->|LAN| D
xtraCoN operation is on first-come first-serve basis. Different users cannot access the same xtraCoN unit simultaneously. Three statuses can be found on the USB Server screen as the following figure shown.

Free : The device is free for use

Locally Connected : The device is locally used

Remote Occupied : The device is remotely occupied
For the best usability and flexibility of the Audio/ Video transmission in multi-users condition, please un-check the “Connect Device Automatically” item for all devices listed on the USB Server window as the following figure shown.
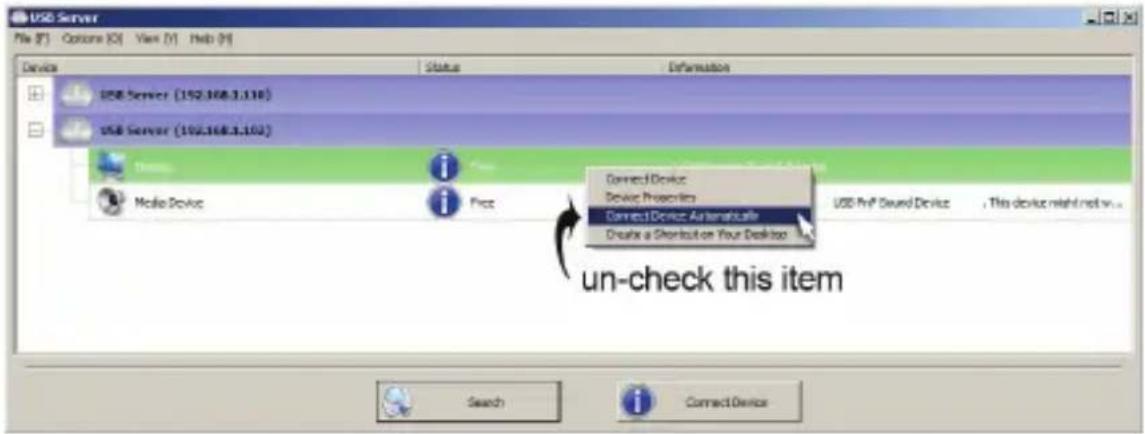
text_image
USB Server File (F) Options (O) View (V) Help (H) Device Status Information USB Server (192.168.3.130) USB Server (192.168.3.130) Media Device Free Connect Device Service Properties Connect Device Automatically Create a Desktop on Your Desktop UN- check this item Search Connect DeviceRequest Disconnect Device
text_image
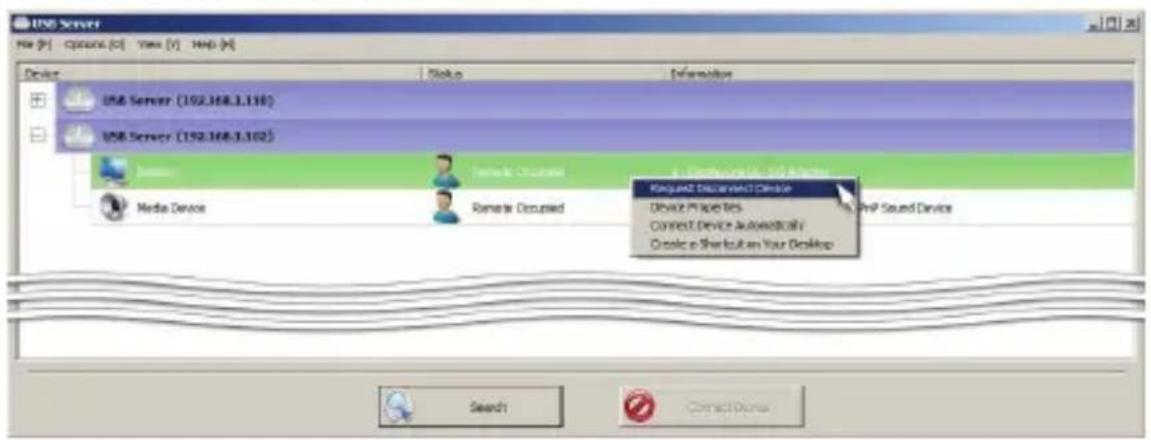
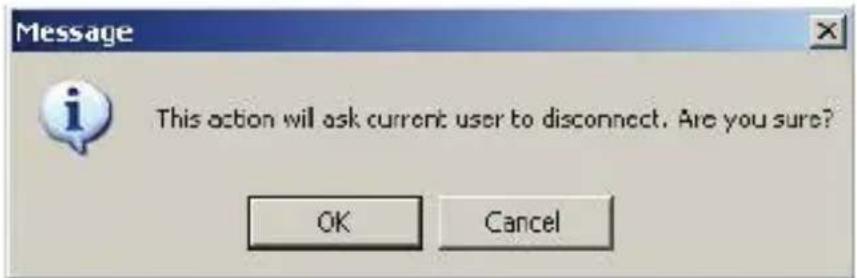
USB Server File [F] Options [O] Tools [V] Help [H] Device USB Server (192.168.3.130) USB Server (192.168.3.102) Media Device Remote Occupied Request Download/Download Device Places Res Connect Device Automatically Create a Shortcut on Your Desktop PhP Sound Device Search ConnectionsUnder multi-users situation you may send “Request Disconnect Device” message to the current user and ask for accession to the xtraCoN device. Right click on the device you want to access and then select “Request Disconnect Device” As figure shown above. The following Pop-Up screen will then ask for confirmation.
text_image
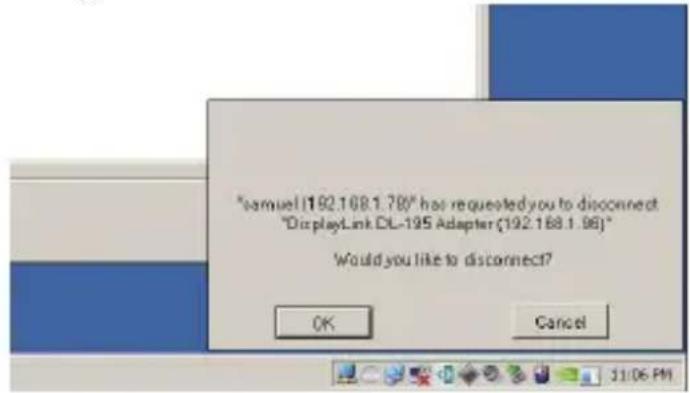
Message This action will ask current user to disconnect. Are you sure? OK CancelThe current user will receive a message indicating the disconnection request, and he/ she can decide whether to yield the controlling access or not. As the figure shown below
text_image
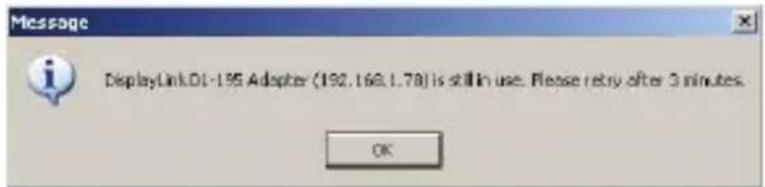
"samuel (192.168.1.78)" has requested you to disconnect "DisplayLink DL-195 Adapter (192.168.1.98)" Would you like to disconnect? OK Cancel 31:06 PMIf the current user is still working on the device operation then your monitor will Pop-Up screen as below.
text_image
DisplayLink.01-195 Adapter (192.168.1.78) is still in use. Please retry after 3 minutes. OKIf the current user finish working on the device operation then your monitor will Pop-Up screen as below.
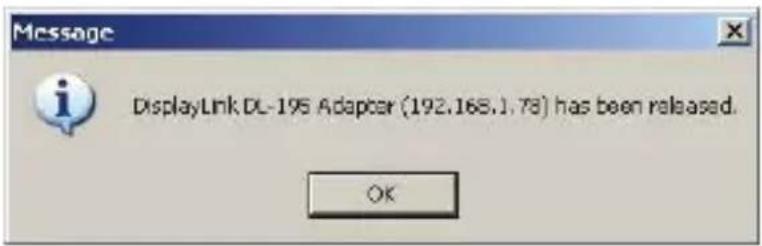
text_image
DisplayLink DL-195 Adapter (192.168.1.78) has been released. OK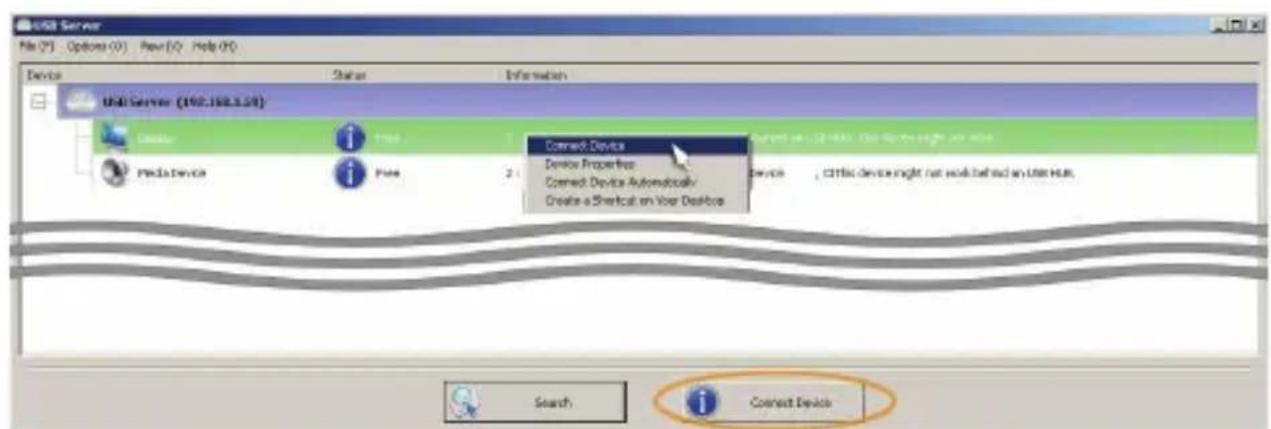
text_image
U8B Server File (F) Options (O) New (N) Help (H) Device Status Information U8B Server (192.168.3.51) Create Title Prela Device Pure Connect Device Device Properties Connect Device Automatically Create a Vertical on Your Desktop Copyright is: 50 KB, Other than the right, not visible Device , CTRs device might not work behind an User Hub. Search Connect DeviceSelect the Device and then press "Connect Device" for the connection
Setup Button: Restore Factory Defaults
Users can reset the xtraCoN Unit back to its original state (Factory Default Settings) through a pinhole Setup Button (as the figure shown below). This feature is helpful for some circumstances, such as IP or password lost or forgotten, etc.. The following procedure will guide you through this process:
Warning: This is a data-destructive process. It is strongly recommended that you backup any/all data from the Unit before starting the restore.

natural_image
Close-up of a black electronic device showing two ports with an arrow pointing to the port (no text or symbols visible)Setup Button
Step 1. Make sure that the Unit is powered on. In this state, the POWER LED on the top panel of the Unit should emit steady GREEN light indicating that the power is ON.
Step 2. Press and Hold the setup button 3 seconds with a paper clip or pencil tip. The POWER LED will flash blue light once followed steady GREEN light indicating that the factory defaults are restored.
NOTE: By default, no password is set to the Unit that is set to automatically get the IP Address from DHCP server
Standby and Hibernate, Shut down and Restart
If a computer/laptop connecting to an xtraCoN Unit is placed into standby or hibernate mode, the display goes blank. When the computer/laptop is again powered up (and unlocked if necessary) the connected monitor returns to the same mode as it was before stand by or hibernate.
If the computer/laptop is shut down, restarted and logged in, again the connected display returns to the same mode as it was before shutdown.
Disconnect the xtraCoN Unit
If the xtraCoN Unit is powered off or the USB cable is removed from the computer, the display blanks. All windows and icons move to the primary screen.
Once the computer is reconnected or the xtraCoN Unit is powered up, the display returns to the same mode as it was before disconnection or powered off. However, windows and icons that were previously on the screen will not be moved back.
---- Intel-based Mac OS 10.4/10.5/10.6
flowchart
graph TD
    A["Mac"] -->|LAN| B["Router"]
    B -->|USB A-B| C["Laptop"]
    C -->|or| D["Pod"]
    D -->|or| E[" projector"]
    E -->|or| F["Desktop"]
In addition to being compatible with Windows 2000/XP/Vista/7, xtraCoN series provide a better platform flexibility in supporting Intel-based Mac OS 10.4/10.5/ 10.6 for extending video via USB. Please follow the instructions below listed step by step for the driver installation.
All the prompt screens and dialog boxes shown in this section are for Intel-based Mac OS 10.5 Some dialog boxes and folders may slightly different in other versions of operating system.
Driver Installation
- Insert the Driver CD into the CD/DVD-ROM drive, then browse through the CD and locate the “XtraViU_xxxxx.dmg” file. Double-click on this file to begin the Installation
XtraViU_15568.dmg
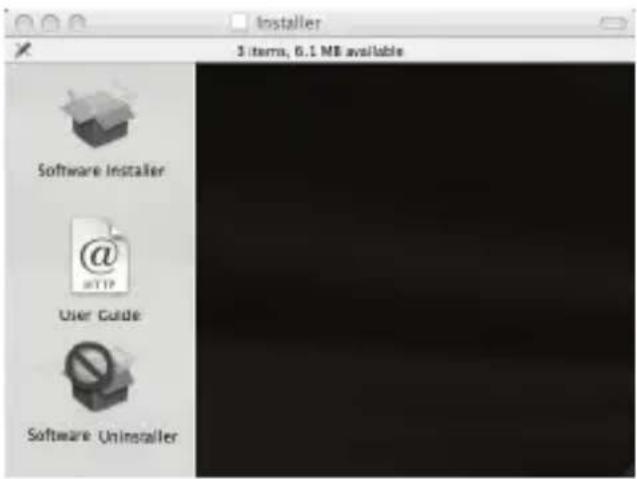
- Double-click the "Software Installer" to install the software
text_image
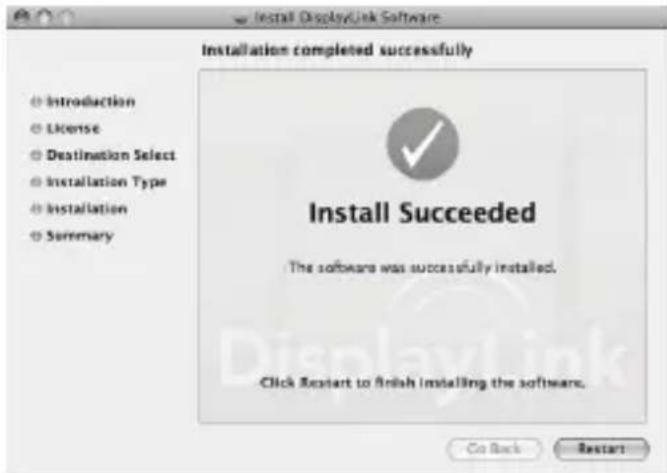
Installer 3 items, 6.1 MB available Software Installer User Guide Software Uninstaller- Once the installation is complete, click the “Restart” button. The computer will reboot automatically
text_image
Install DisplayLink Software Installation completed successfully Introduction License Destination Select Installation Type Installation Summary Install Succeeded The software was successfully installed. Click Restart to finish installing the software. Go Back Restart- After the computer has been restarted, plug in the xtraCoN Unit to an available USB 2.0 port. The xtraCoN Unit should now be ready to use.
Operation
Using Menu Bar Control
Once software has been installed to the Mac, simply plug each xtraCoN Unit connected with display into the Mac. You can now use up to 4 additional monitors. When attaching a monitor to your Mac, by default, the monitor will be extended to the right of the main display.
Configuring Display from the Menu Bar
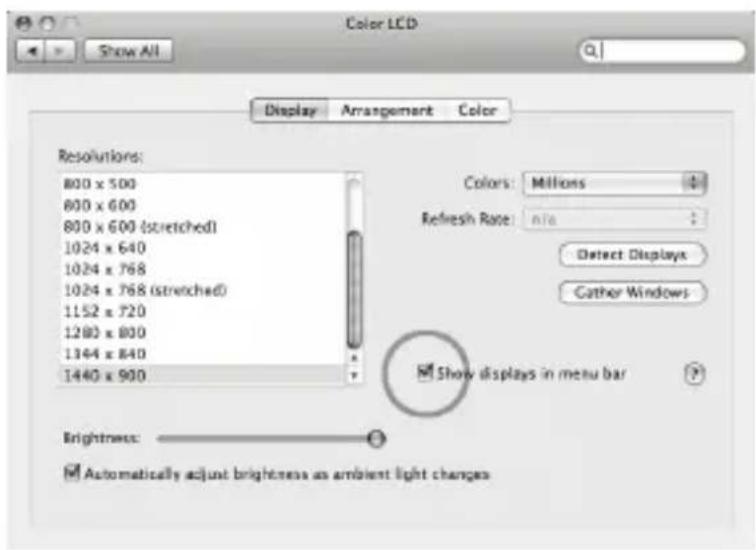
Check the “Show displays in menu bar” in Display Preference then you can configure displays by clicking the display icon in the menu bar.
text_image
Color LCD Show All Display Arrangement Color Resolutions: 800 x 500 800 x 600 800 x 600 (stretched) 1024 x 640 1024 x 768 1024 x 768 (stretched) 1152 x 720 1280 x 800 1344 x 840 1440 x 900 Colors: Millions Refresh Rate: info Detect Displays Cather Windows Show displays in menu bar Brightness: Automatically adjust brightness as ambient light changes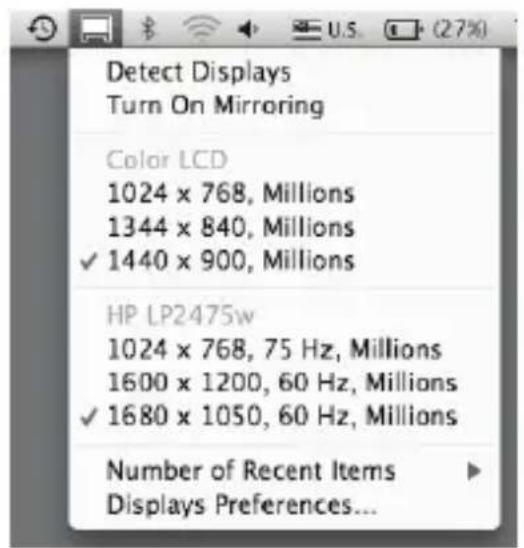
text_image
Detect Displays Turn On Mirroring Color LCD 1024 x 768, Millions 1344 x 840, Millions ✓ 1440 x 900, Millions HP LP2475w 1024 x 768, 75 Hz, Millions 1600 x 1200, 60 Hz, Millions ✓ 1680 x 1050, 60 Hz, Millions Number of Recent Items Displays Preferences...Detect Displays: Detect all displays connected to the Mac.
Turn On/ Off Mirroring: Turn display mirroring on/off
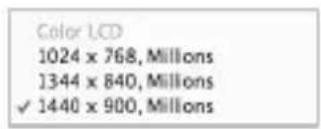
text_image
Color LCD 1024 x 768, Millions 1344 x 840, Millions ✓ 1440 x 900, Millions: Set the resolution of the primary display.
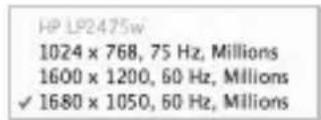
text_image
HP LP2475w 1024 x 768, 75 Hz, Millions 1600 x 1200, 60 Hz, Millions ✓ 1680 x 1050, 60 Hz, Millions: Set the resolution of additional display(s)
Number of Recent Items: Configure how many “recent resolutions” should be shown in this menu.
Display Preferences: Open "Display Preferences"
1. Screen Resolution
To change the resolution for the display preference, select an available resolution by accessing to the path:
Menu bar→ Display Preference→ Gather Windows
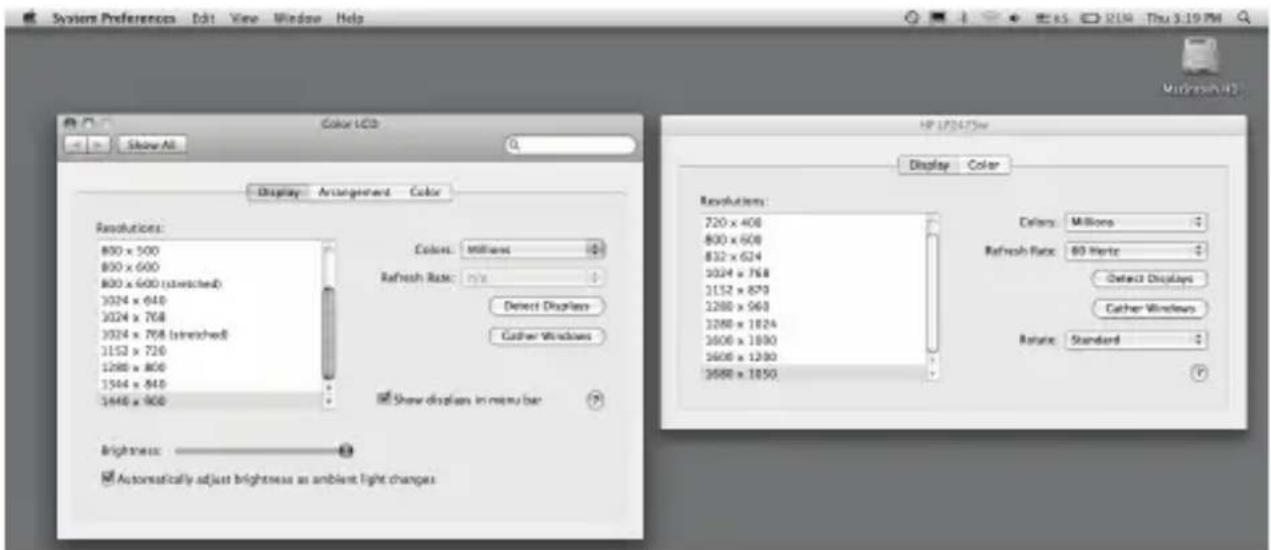
text_image
System Preferences Edit View Window Help Color LCD Display Arrangement Color Resolutions: 800 x 500 800 x 600 800 x 600 (stretched) 3024 x 640 3024 x 768 3024 x 768 (stretched) 3152 x 720 1280 x 800 1544 x 840 1648 x 900 Brightness: Automatically adjust brightness as ambient light changes Color: Millions Refresh Rate: m/s Direct Display Cather Windows Show displays in menu bar HP 170475w Display Color Resolutions: 720 x 400 800 x 600 832 x 624 3024 x 768 3152 x 879 1280 x 960 1280 x 1824 3600 x 1890 3600 x 1280 3680 x 1850 Colors: Millions Refresh Rate: 80 MHz Select Displays Cather Windows Rotate: StandardThe resolution availability depends on both the xtraCoN Unit and the capabilities of the connected display.
2. Screen Rotation
If you wish to rotate the display(s), you can configure the orientation by dropping down the “Rotate”. Select the appropriate angle of rotation to match your display’s set up by accessing through the path: Menu bar→ Display Preference→ Gather Windows→ Rotate
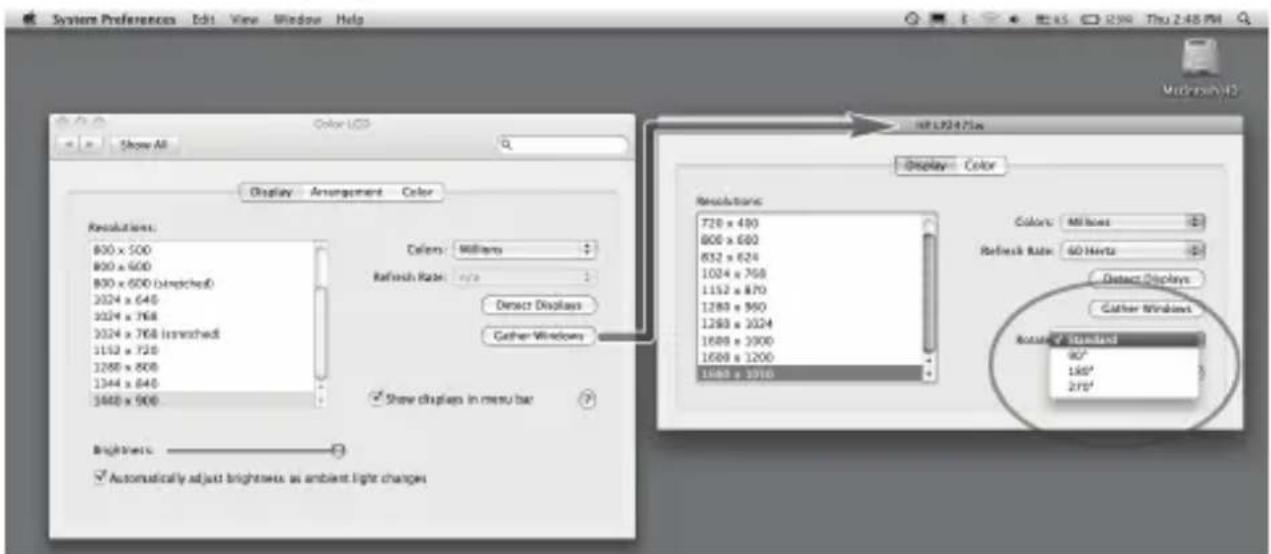
text_image
System Preferences Edit View Window Help Show All Color LCD Display Arrangement Color Resolution: 800 x 500 800 x 600 800 x 600 (implied) 2024 x 645 2024 x 768 2024 x 768 (implied) 1152 x 720 1280 x 800 1344 x 845 3480 x 900 Colors: Millions Refresh Rate: m/s Detect Displays Cather Windows Show displays in menu bar Brightness Automatically adjust brightness as ambient light changes Display Color Resolution: 720 x 400 800 x 600 852 x 624 1024 x 768 1152 x 870 1280 x 950 1280 x 2024 1680 x 2000 1680 x 1200 1680 x 2010 Colors: Millions Refresh Rate: 60 Hertz Detect Displays Cather Windows Reset: Standard 90° 150° 270°NOTE: Each time any settings the user made to the mode, rotation, resolution, frequency or depth are remembered for next time the user switch back.
3. Display Positions
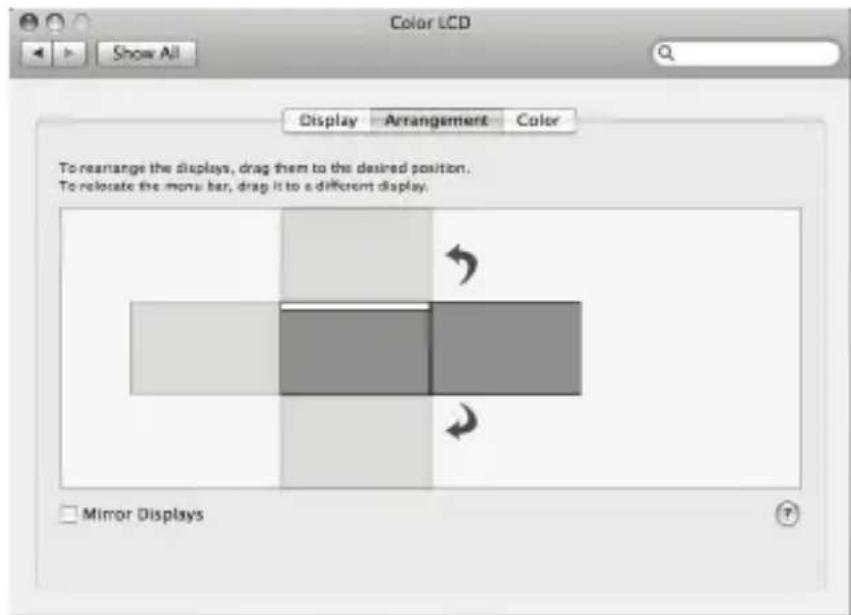
If your computer is connected to more than two displays, you can specify that some are mirrored displays and others show the extended desktop. A mirrored display shows the same content as the main display whereas an extended display will be an extension to your existing desktop. You can arrange your displays so that they match the physical layout of your displays by selecting the ‘Arrangement’ pane within Display Preferences. This ensures that you can easily navigate among all connected displays.
text_image
Color LCD Show All Display Arrangement Color To rearrange the displays, drag them to the desired position. To relocate the menu bar, drag it to a different display. Mirror DisplaysTo move the position of a display, click and hold the display you wish to move then drag it to the desired position. The display will be highlighted with a red border whilst you are moving the display to its new position.
NOTE: To extend connected displays, make sure that the “Mirror Display” on the ‘Arrangement’ pane is unchecked.
4. Mirror
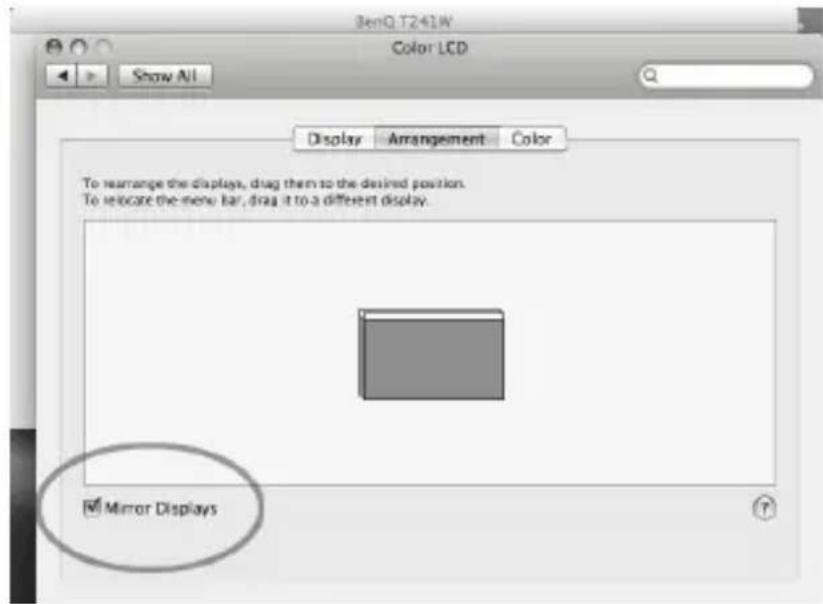
When in Mirror mode, additional displays will display what is being shown on the primary display. Checking the “Mirror Display” on the ‘Arrangement’ pane enables this feature.
text_image
BenQ T241W Color LCD Show All Display Arrangement Color To rearrange the displays, drag them to the desired position. To relocate the menu bar, drag it to a different display. ✓ Mirror Displays5. Set as Main Monitor
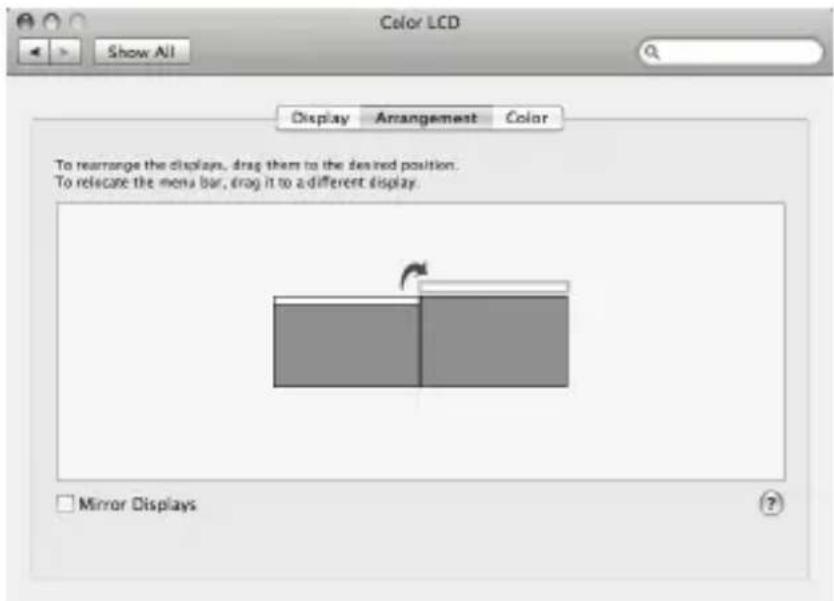
You can change the main display by moving the Menu Bar among displays. Changing the main display affects where new windows appearance and the position of the Dock. The ‘Menu Bar’ can be moved so that it is shown on an alternative display. Clicking the white menu bar and dragging it to the desired display will perform this action.
text_image
Color LCD Show All Display Arrangement Color To rearrange the displays, drag them to the desired position. To relocate the menu bar, drag it to a different display. Mirror Displays6. Use both extended and mirrored displays
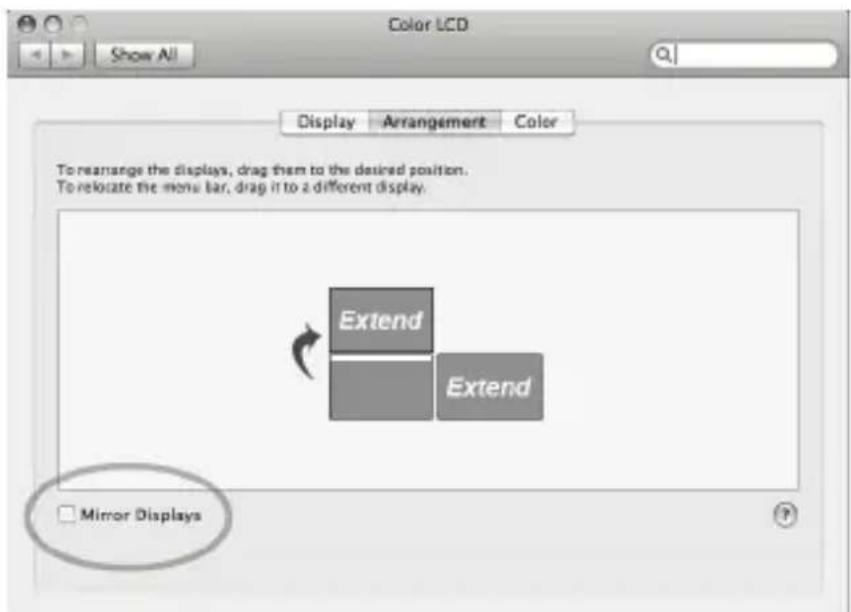
To work with both extended and mirrored displays, uncheck the box of mirror displays as the circle mark below, then in the Arrangement pane hold down both keys cmd and alt and drag the display you wish to overlay the primary display. Repeat this with each display you wish to mirror, those untouched will remain extending.
text_image
Color LCD Show All Display Arrangement Color To rearrange the displays, drag them to the desired position. To relocate the menu bar, drag it to a different display. Extend Extend Mirror DisplaysBoth of the additional monitors are extended
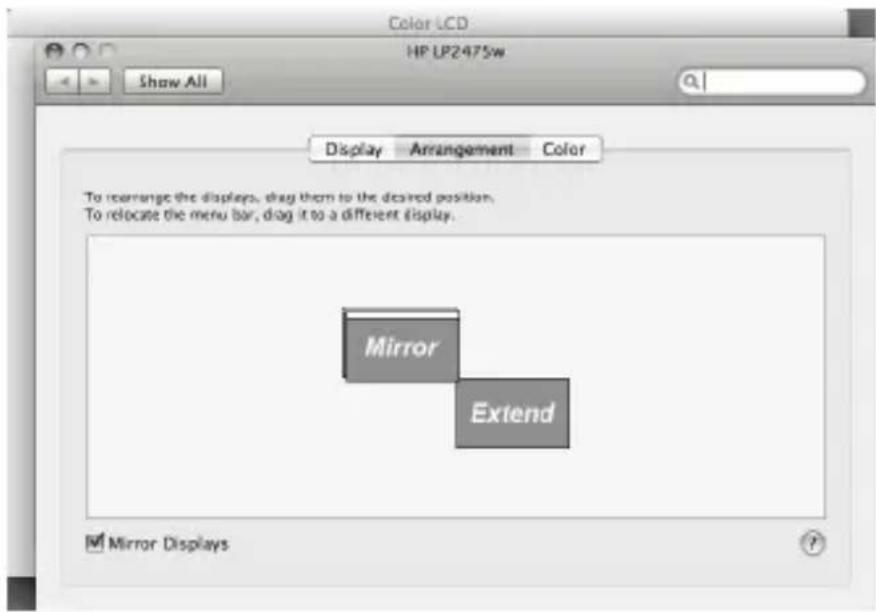
text_image
Color LCD HP LP2475w Show All Display Arrangement Color To rearrange the displays, drag them to the desired position. To relocate the menu bar, drag it to a different display. Mirror Extend Mirror DisplaysOne extended and the other mirrored
Audio Configuration (Speakers)
Open the “Sound” control option in System Preference. Select “Output” page and then choose “USB PnP Sound Device.”
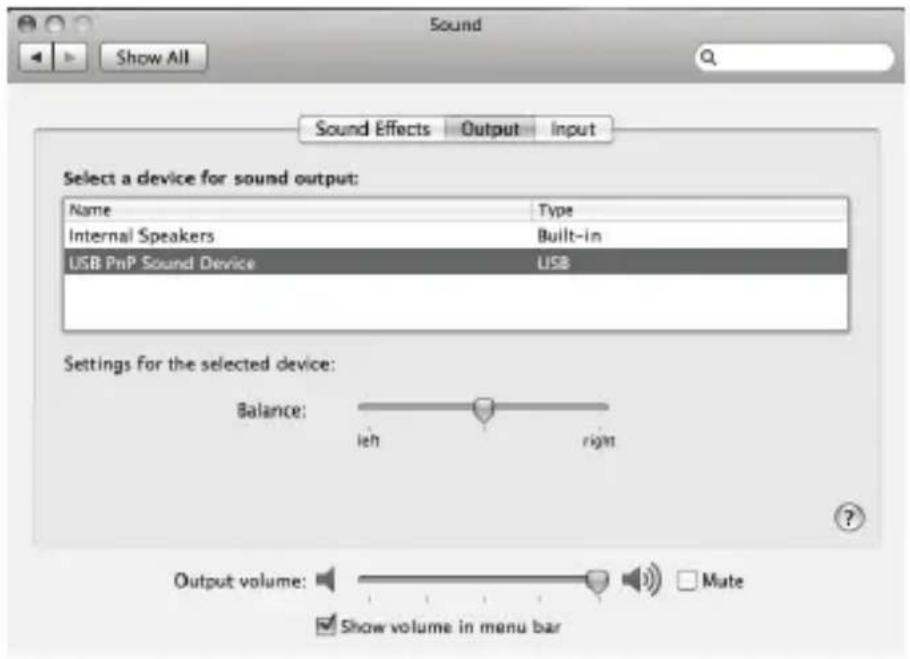
text_image
Sound Show All Sound Effects Output Input Select a device for sound output: Name Type Internal Speakers Built-in USB PnP Sound Device USB Settings for the selected device: Balance: left right Output volume: Mute Show volume in menu barAudio Configuration (Microphone)
Open the “Sound” control option in System Preference. Select “Input” page and then choose “USB PnP Sound Device.”
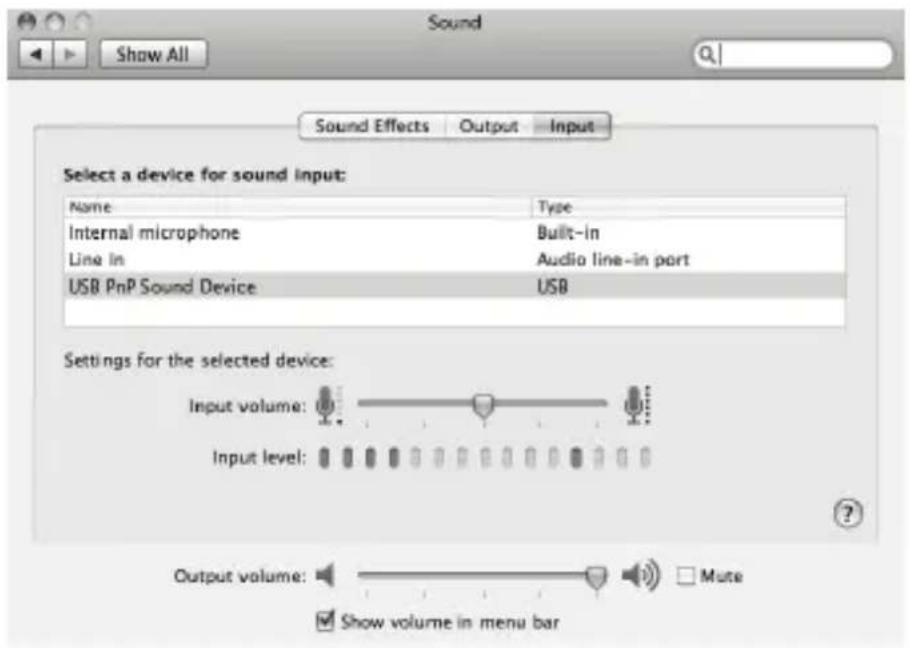
text_image
Sound Show All Sound Effects Output.Input Select a device for sound input: Name Way Internal microphone Built-in Line In Audio line-in port USB PnP Sound Device USB Settings for the selected device: Input volume: Input level: Output volume: Mute Show volume in menu barSpecifications
| MACNA-H20 MACNA-H60 MACNA-H90 MACNA-H92 | |||||
| MACND-H20 MACND-H60 MACND-H90 MACND-H92 | |||||
| Signal Input Ethernet + USB | |||||
| Signal Output HDB15 (MACNA) / DVI-D (MACND) | |||||
| Resolution (Max.) | 1280 x 024 11440 x 900 | 1600 x 12001680 x 1050 | 1920 x 10801600 x 1200 | 1920 x 12002048 x 1152 | |
| LEDs Dual Color x 1 + Blue x 1 | |||||
| Connector(In) | RJ-45 | Yes | |||
| USB | Yes, SB 2.0 U | ||||
| Connector (Out) | HDB15/ DVI-D female, 3.5-mm jack x 2 for Audio USB-A (2.0) x 2 | ||||
| LAN 100BASE-T | |||||
| Enclosure | Metal | ||||
| DDC2B Support Yes | |||||
| Max. Power Consumption | DC 5V, 800mA | ||||
| Dimensions H x W x D (mm) | 25 x 110 x 75 | ||||
| MACNA-G90 | MACNA-G92 | ||
| MACND-G90 | MACND-G92 | ||
| Signal Input Ethernet + USB | |||
| Signal Output HDB15 (MACNA) / DVI-D (MACND) | |||
| Resolution (Max.) | 1920 x 10801600 x 1200 | 1920 x 12002048 x 1152 | |
| LEDs Dual Color x 1 + Blue x 1 | |||
| Connector(In) | RJ-45 | Yes | |
| USB | Yes, USB 2.0 | ||
| Connector (Out) | HDB15/ DVI-D female, 3.5-mm jack x 2 for AudioUSB-A (2.0) x 2 | ||
| LAN | 1000BASE-T | ||
| Enclosure | Metal | ||
| DDC2B Support Yes | |||
| Max. PowerConsumption | DC 5V, 800mA | ||
| DimensionsH x W x D (mm) | 25 x 110 x 75MACNM-H90 MACNM-H92 | ||
| MACNM-G90 MACNM-G92 | |||
| Signal Input Ethernet + USB | |||
| Signal Output HDMI | |||
| Resolution (Max.) | 1920 x 10801600 x 1200 | 1920 x 12002048 x 1152 | |
| LEDs Dual Color x 1 + Blue x 1 | |||
| (In) | RJ-45 | Yes | |
| USB Yes, USB 2.0 | |||
| Connector (Out) HDMI (Female), USB-A (2.0) x 2 | |||
| LAN | MACNM – Hxx (100 BASE) /MACNM – Gxx (1000 BASE) | ||
| Enclosure | Metal | ||
| DDC2B Support Yes | |||
| Max. Power Consumption | DC 5V, 800mA | ||
| Dimensions H x W x D (mm) | 25 x 110 x 75 | ||
Conr
Troubleshooting
| Symptom Possible Cause Solution | ||
| No video on screen(s) or screen(s) flicker | USB connection might be a issue | Make USB A-B cable length not exceed 5 meters. |
| CAT5 connection might be a issue | Configurations in the network environment are sophisticated•please lower the resolution•use CAT5 cable compliant with EIA/TIA 568B industry standard•CAT5 cable length should not exceed 100 meters. | |
| Can not link the Unit via USB server | The Unit might be occupied | The linking schedule is on the first come first serve basis. |
| CAT5 connection is not applicable | USB and CAT5 connected simultaneously | USB connection has a higher linking priority than CAT5 connection |
| Can not access to the network without IP/password | Forgotten the IP/password | Please see the section “Setup Button-Restore Factory Defaults” in this manual for details. |
| Can not LAN link the Unit in Mac OS System | This RJ-45 LAN connector does not support Mac OS | •Use USB connection•Try the network operating in Windows systems |
Limited Warranty
IN NO EVENT SHALL THE DIRECT VENDOR'S LIABILITY FOR DIRECT OR INDIRECT, SPECIAL, INCIDENTAL OR CONSEQUENTIAL DAMAGES, LOSS OF PROFIT, LOSS OF BUSINESS, OR FINANCIAL LOSS WHICH MAY BE CAUSED BY THE USE OF THE PRODUCT EXCEEDS THE PRICE PAID FOR THE PRODUCT.
The direct vendor makes no warranty or representation, expressed or implied with respect to the contents or use of this documentation, and especially disclaims its quality, performance, merchantability, or fitness for any particular purpose.
The direct vendor also reserves the right to revise or update the product or documentation without obligation to notify any user of such revisions or updates. For further information, please contact your direct vendor.
All the brand names and registered trademarks are the property of their respective owners.
CD5-TKB53ZZ-001-ND
Printed in Taiwan