BD/DVD/CD Duplicator - Duplicateur Acard - Free user manual and instructions
Find the device manual for free BD/DVD/CD Duplicator Acard in PDF.


| Product Type | BD/DVD/CD Duplicator (Copy Controller) |
| Models | ARS-2057 (1 source to 7 targets), ARS-2050/2050P (1 source to 11 targets) |
| Dimensions (W x H x D) | 150 mm x 42 mm x 144 mm |
| Power Supply | DC 5V (via ATX or 4-pin power socket) |
| Supported Media | BD, DVD, CD (ROM, ±R, ±RW, RAM depending on drives) |
| Processor | ACARD ARC8620/ARC772, ARC810 |
| Data Buffer | 64 MB SDRAM (ARS-2057/2050), 128 MB (ARS-2050P) |
| Display | 2x16 character LCD |
| Controls | 4 membrane buttons (▲, ▼, ENT, ESC); ARS-2050P adds Speed/F1 and Source/F2 |
| Interface | SATA (9 ports on ARS-2057, 12 ports on ARS-2050/2050P) |
| HDD Support | Internal 3.5" or 2.5" SATA HDD (optional) |
| Firmware Update | Via DVD-ROM or downloadable from ACARD website |
| Key Functions | Copy, Test, Test & Copy, Verify, Compare, Prescan, Disc Info, Select Source, Image, Edit Track, Setup, Advanced Setup |
| Advanced Setup Sub-functions | UnderRun Protect, Overburn, Read Error Skip, Format HDD, Verify HDD, Burn-in, Update Firmware, Compare Firmware, H/W Diagnostic, Load Default, CD+G, ISRC & MCN, USB Option, CD-TEXT, Password, Disc Counter, Auto Save Image, Update Drive F/W, Hot Key Settings |
| USB Connectivity | Optional via AEC-4420S (for PC connection) |
| Operating Modes | Stand-alone (no PC required), USB mode |
| Password Protection | Yes (1-13 characters, alphanumeric) |
| Disc Counter | Records number of copies (Job Counter and Life Counter) |
| Safety | Wait over 5 seconds after shutdown before powering on; avoid interrupting duplication |
| Compliance | CE, FC |
Frequently Asked Questions - BD/DVD/CD Duplicator Acard
User questions about BD/DVD/CD Duplicator Acard
0 question about this device. Answer the ones you know or ask your own.
Ask a new question about this device
Download the instructions for your Duplicateur in PDF format for free! Find your manual BD/DVD/CD Duplicator - Acard and take your electronic device back in hand. On this page are published all the documents necessary for the use of your device. BD/DVD/CD Duplicator by Acard.
USER MANUAL BD/DVD/CD Duplicator Acard
SATA Copy Controller
User's Manual
—Version: 1.2 —
Attention:
Wait over 5 seconds to power on after shutdown to prevent the abnormal operation of the system.
ACARD
TECHNOLOGY
Copyright©2008 ACARD Technology Corp.
Release: September 2008
C€FC
Copyright and Trademarks
The information of the products in this manual is subject to change without prior notice and does not represent a commitment on the part of the vendor, who assumes no liability or responsibility for any errors that appear in this manual.
ACARD and SCSIDE are the trademarks of ACARD Technology Corp.
This manual contains materials protected under International Copyright Laws. All rights reserved. No part of this manual may be reproduced, transmitted or transcribed without the expressed written permission of the manufacturer and author of this manual.
ACARD's ARS-2057/2050/2050P Copy Controller is used for copying and editing personal audio and video data. Violating Copy Right is a criminal act. ACARD's Copy Controller only supports legal backup operation.
ACARD Technology Corp. is not responsible for illegal recording.
Table of Contents
Chapter 1 Introduction ...... 6
1.1 Overview 6
1.2 Features 6
1.3 Specifications 6
1.4 System Requirement 6
Chapter 2 Installation 7
2.1 Stand-alone Copy Controller 7
2.2 Complete Duplicator System 7
2.3 A System without DVD Drives 7
2.4 Duplicator System with no DVD Writer 8
2.4.1 Installing the ARS-2057 8
2.4.2 Installing the ARS-2050 9
2.4.3 Installing the ARS-2050P 10
Chapter 3 Basic Operations 10
3.1 Buttons and LCD Display.... 11
3.2 About HDD Installation 11
3.2.1 With Internal HDD 11
3.2.2 Without Internal HDD 12
Chapter 4 PCB Layout 13
Chapter 5 Functions 16
5.1 Adv Setup 18
5.1.1 UnderRun Protect 18
5.1.2 Overburn 18
5.1.3 Read Error Skip 18
5.1.4 Format HDD 19
5.1.5 Verify HDD 19
5.1.6 Burn-in 19
5.1.7 Update Firmware 20
5.1.8 Compare Firmware 21
5.1.9 H/W Diagnostic 21
5.1.10 Load Default 21
5.1.11 CD+G 22
5.1.12 ISRC & MCN 22
5.1.13 USB Option 22
5.1.14 CD-TEXT 22
5.1.15 Password 23
5.1.16 Disc Counter 24
5.1.17 Auto Save Image 25
5.1.18 Update Drive F/W 25
5.1.19 F1 Hot Key Setting 26
5.1.20 F2 Hot Key Setting 26
6.1 About LCD 27
6.2 About Error Messages 27
6.3 About DVD-ROM/DVD Writers 27
6.4 About Buttons 27
6.5 About DVD Writer Not Readable 27
6.6 About High Failure Rate 27
6.7 About Firmware Update 28
6.8 About Function 12 and Cancellation 28
Chapter 6 Troubleshooting 27
Appendix A LCD Messages 29
Technical Support Form....31
WEEE Statement
English
In order to cope with the increasing waste electrical and electronic equipment, reduce the use of landfill and incinerator, and prevent the harmful matter of waste equipment from entering the environment, the European Union (EU) has set the Directive on Waste Electrical and Electronic Equipment (WEEE) asking manufacturers to collect, recycle and treat waste electrical and electronic equipment properly. Member nations already established their free of charge recycle systems of WEEE before August 13, 2005. Accordingly, ACARD has to be responsible for recycling all products exported to Germany. You can return your ACARD product that needs recycling to a local collector.
WEEE Erklärung
German
The ARS-2057/2050/2050P is a stand-alone data backup system that supports high-speed SATA BD/DVD/CD writers. It uses the ACARD RISC CPU engine, so it is simple to use and doesn't require a PC. Data, music or multimedia BD/DVD/CD discs can be easily backed up using just the LCD display and selection keys, making it suitable for low-volume individual and office users. The ARS-2057 is a 1-to-7 duplication controller while the ARS-2050/2050P is a 1-to-11 duplication controller.
1.2 Features
■ Stand-alone SATA-to-SATA BD/DVD/CD duplication controller
■ Completely stand-alone duplication controller that requires no additional software or hardware
■ Supports internal 3.5" or 2.5" SATA HDD
■ Supports full-speed writing with high-speed SATA BD/DVD/CD writers.
■ User-friendly interface with LCD display
■ Optional modes to extend product applications
■ Firmware can be upgraded using DVD-ROM
1.3 Specifications
■ ACARD ARC8620/ARC772
■ ACARD ARC810 processor
■ Data Buffer: 64MB (ARS-2057/2050) / 128MB (ARS-2050P) SDRAM
■ 9-channel (ARS-2057) / 12 (ARS-2050/2050P) SATA ports
■ 2x16 LCD display
■ 4 membrane buttons
■ 512KB Flash Memory for Copy Code
■ Supports USB connection to PC (through optional AEC-4420S)
■ Dimensions: 150mm(W) x 42mm(H) x 144mm(D)
■ Power Supply: DC 5V
1.4 System Requirement
$$ \text { ARS - 2050 / 2050P } 1 3 / 1 4 \times 5. 2 5 ^ {\prime \prime} $$
■ Upright external chassis ARS-2057 9/10 × 5.25"
■ SATA cable
■ DVD-ROM or DVD Writer x 1
■ DVD writers x 7 (ARS-2057/11 (ARS-2050/2050P))
■ SATA HDD (optional)
Chapter 2 Installation
Before installing the ARS-2057/2050/2050P, please note that the product is provided in 3 types of packaging: Stand-alone Copy Controller, Complete Duplicator System, and Duplicator System with no DVD Writer.
2.1 Copy Controller Only
■ Open packaging to check for any problems.
■ Provide DVD-ROM drive.
■ Provide a DVD Writer.
■ Provide a 3.5" SATA HDD (optional).
2.2 Complete Duplicator System
■ Open packaging to check for any problems.
■ Provide a 3.5"SATA HDD (optional).
■ Check that the PSU provides enough wattage.
2.3 A System without DVD Drives
■ Open packaging to check for any problems.
■ Provide DVD-ROM drive.
■ Provide a DVD Writer.
■ Provide a 3.5"SATA HDD (optional).
■ Check that the PSU provides enough wattage.
2.4 Installation Instructions
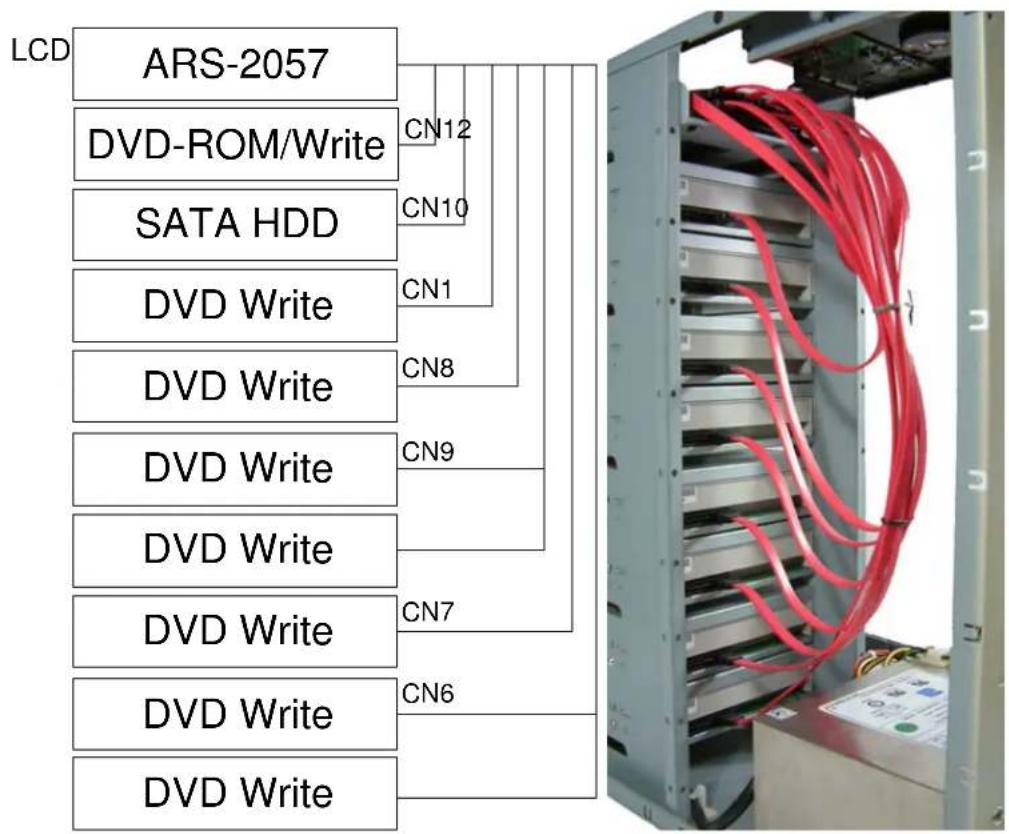
2.4.1 Installing the ARS-2057
The diagram and photo below shows an ARS-2057 connected with a DVD-ROM, a SATA HDD and 7 DVD writers.
text_image
LCD ARS-2057 DVD-ROM/Write CN12 SATA HDD CN10 DVD Write CN1 DVD Write CN8 DVD Write CN9 DVD Write CN7 DVD Write CN6 DVD Write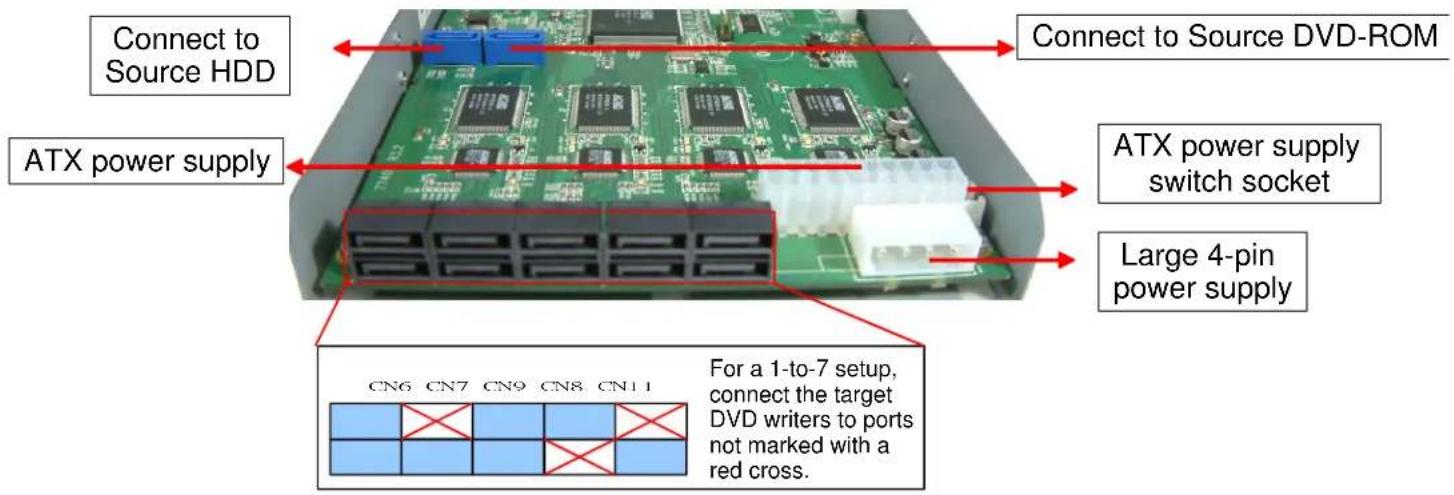
text_image
Connect to Source HDD ATX power supply Connect to Source DVD-ROM ATX power supply switch socket Large 4-pin power supply CN6 CN7 CN9 CN8 CN11 For a 1-to-7 setup, connect the target DVD writers to ports not marked with a red cross.Attention: the user must choose between using the ATX power socket or the 4-pin power socket.
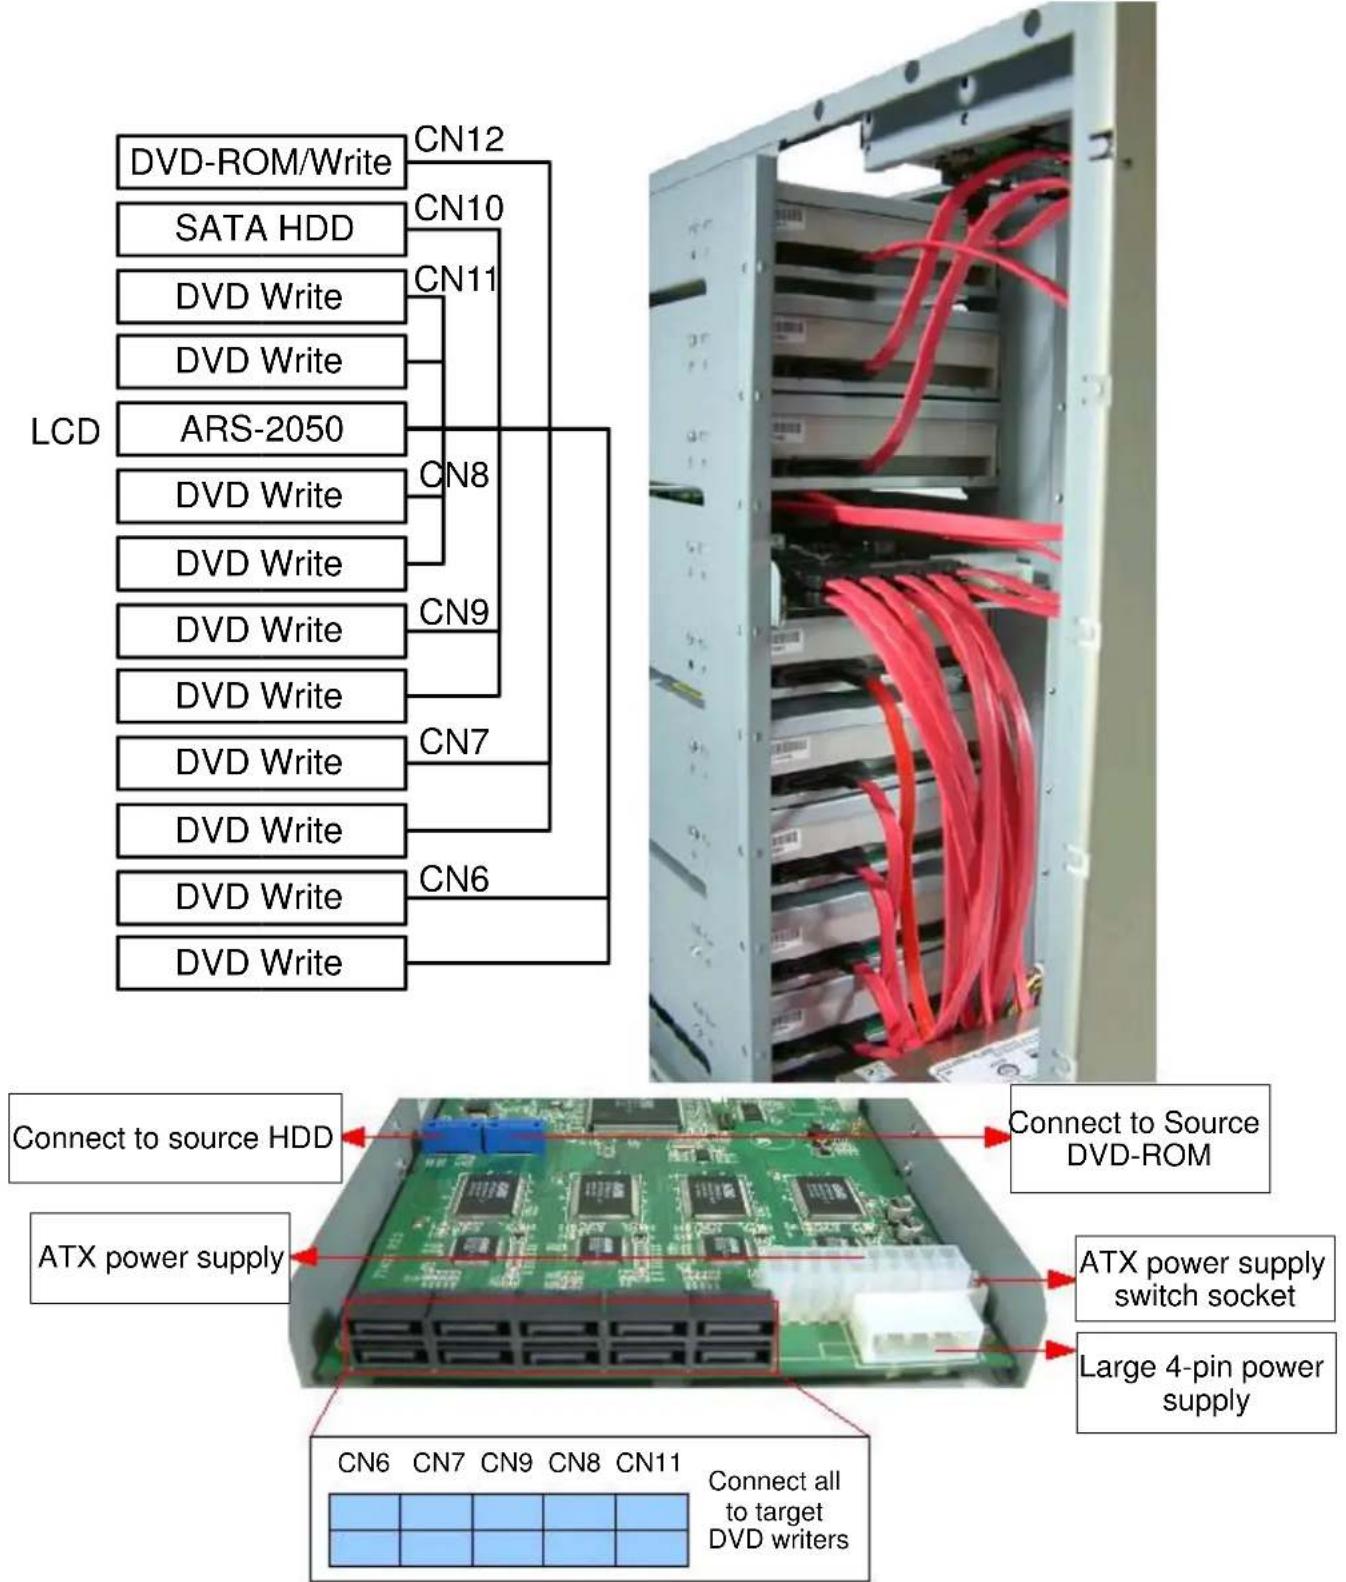
2.4.2 Installing the ARS-2050
The diagram and photo below shows an ARS-2050 connected with a DVD-ROM, a SATA HDD and 10 DVD writers.
text_image
LCD DVD-ROM/Write CN12 SATA HDD CN10 DVD Write CN11 DVD Write ARS-2050 CN8 DVD Write CN9 DVD Write CN7 DVD Write CN6 Connect to source HDD ATX power supply CN6 CN7 CN9 CN8 CN11 Connect all to target DVD writers Connect to Source DVD-ROM ATX power supply switch socket Large 4-pin power supplyAttention: the user must choose between using the ATX power socket or the 4-pin power socket.
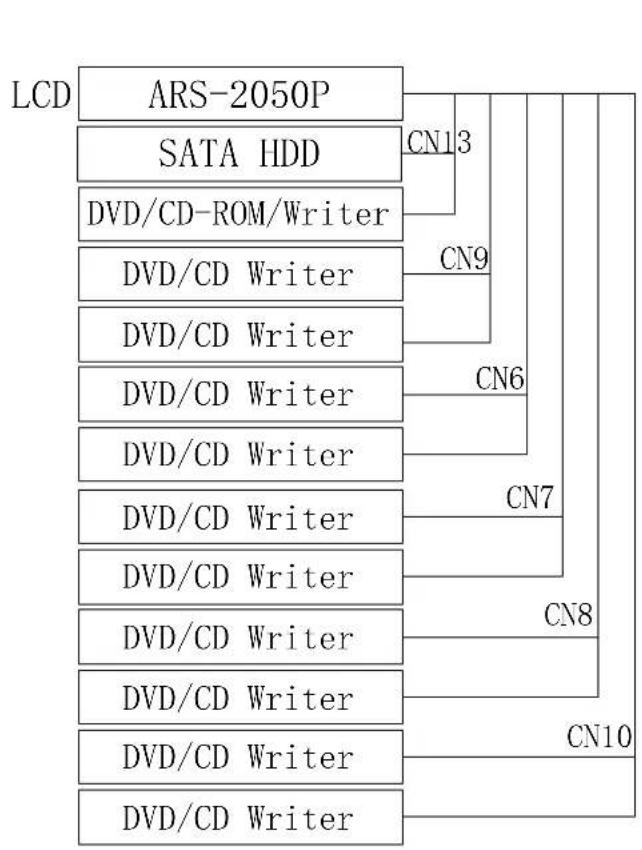
2.4.3 Installing the ARS-2050P
The diagram and photo below shows an ARS-2050P connected with a DVD-ROM, a SATA HDD and 10 DVD writers.
natural_image
Interior view of a server rack with red cables attached, no visible text or symbols
text_image
ATX power supply ATX power supply switch socket Connect to source HDD Connect to Source DVD-ROM Connect all to target DVD writers Large 4-pin power supplyAttention: the user must choose between using the ATX power socket or the 4-pin power socket.
Chapter 3 Basic Operations
3.1 Buttons and LCD Display
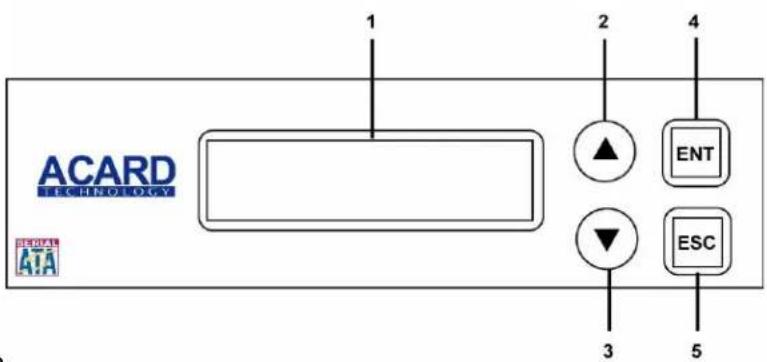
The ARS-2057/2050 copy controller panel features 4 buttons and 1 LCD display.
text_image
ACARD TECHNOLOGY 1 2 4 ▲ ENT ▼ ESC 3 5- It shows a function
- It's used to scroll up function menus.
- It's used to scroll down function menus.
- It's used to execute a function.
- It's used to cancel a function.
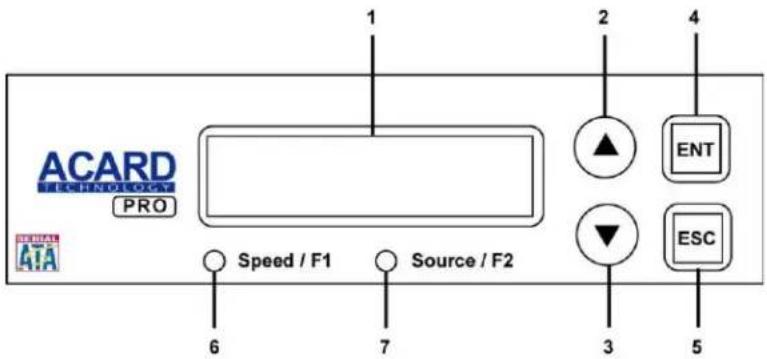
The ARS-2050P copy controller panel features 6 buttons and 1 LCD display.
text_image
ACARD TECHNOLOGY PRO Speed / F1 Source / F2 6 7 3 5 ENT ESC- It shows a function or a message.
- It's used to scroll up function menus.
- It's used to scroll down function menus.
- It's used to execute a function.
- It's used to cancel a function.
- It's used to entry "Speed Menu".
- It's used to entry "Source Menu".
3.2 About HDD Installation
An HDD is not required, but installing one allows the use of image files. In other words, it offers the option of duplicating DVDs using any image file stored on the HDD. The two sections below explain how to use the ARS-2057/2050/2050P with or without an internal HDD.
3.2.1 With Internal HDD
If the ARS-2057/2050/2050P has a 3.5" SATA HDD installed, its operating instructions are as follows:
■ To check if the HDD has been detected by the ARS-2057/2050/2050P, use menu option 11-15 to check that IDE0 returns the message HDD. The HDD must be formatted using menu option 12-04 before use.
■ Use menu option 8, "Select Source", to set the HDD as the source drive.
■ At menu option 9, "Image", select a partition for storing data.
If the selected partition is empty, insert a DVD into the DVD-ROM then select menu option 9-01, "Load". Press ENT to load the data from DVD to the selected partition. Data can be stored in different partitions.
■ Press ESC to return to the main menu then use ▲ or ▼ to select menu option 1 "Copy". Insert a blank DVD into the DVD writer then press ENT to begin duplication.
■ When duplication is complete, the successfully written DVD will automatically eject. By default, the writer is set to auto eject.
A failed DVD will, by default, stay in the DVD writer. To remove a failed DVD, press the "Eject" button on the DVD writer.
■ Do not press any buttons when duplication is in progress because the sudden interruption may damage the device and destroy the DVD.
3.2.2 No Internal HDD
If the ARS-2057/2050/2050P does not have a 3.5" SATA HDD installed, its operating instructions are as follows:
■ Insert a source DVD in the DVD-ROM.
■ Press ▲ or ▼ to select menu option 1, "Copy". Insert a blank DVD into the DVD writer then press ENT to being duplication.
■ When duplication is complete, the successfully written DVD will automatically eject. By default, the writer is set to auto eject, but this can be changed.
A failed DVD will by default stay in the DVD writer but this can be changed. To remove a failed DVD, press the "Eject" button on the DVD writer.
Please check that the SATA cable is properly connected before installing the hardware.
The SATA HDD can be connected directly to the SATA port on the ARS-2057/2050/2050P board via the SATA cable.
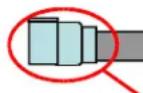
Connect to ARS-2057/2050/2050P SATA port
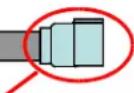
Connect to SATA port of SATA HDD/SATA writer
Chapter 4 PCB Layout
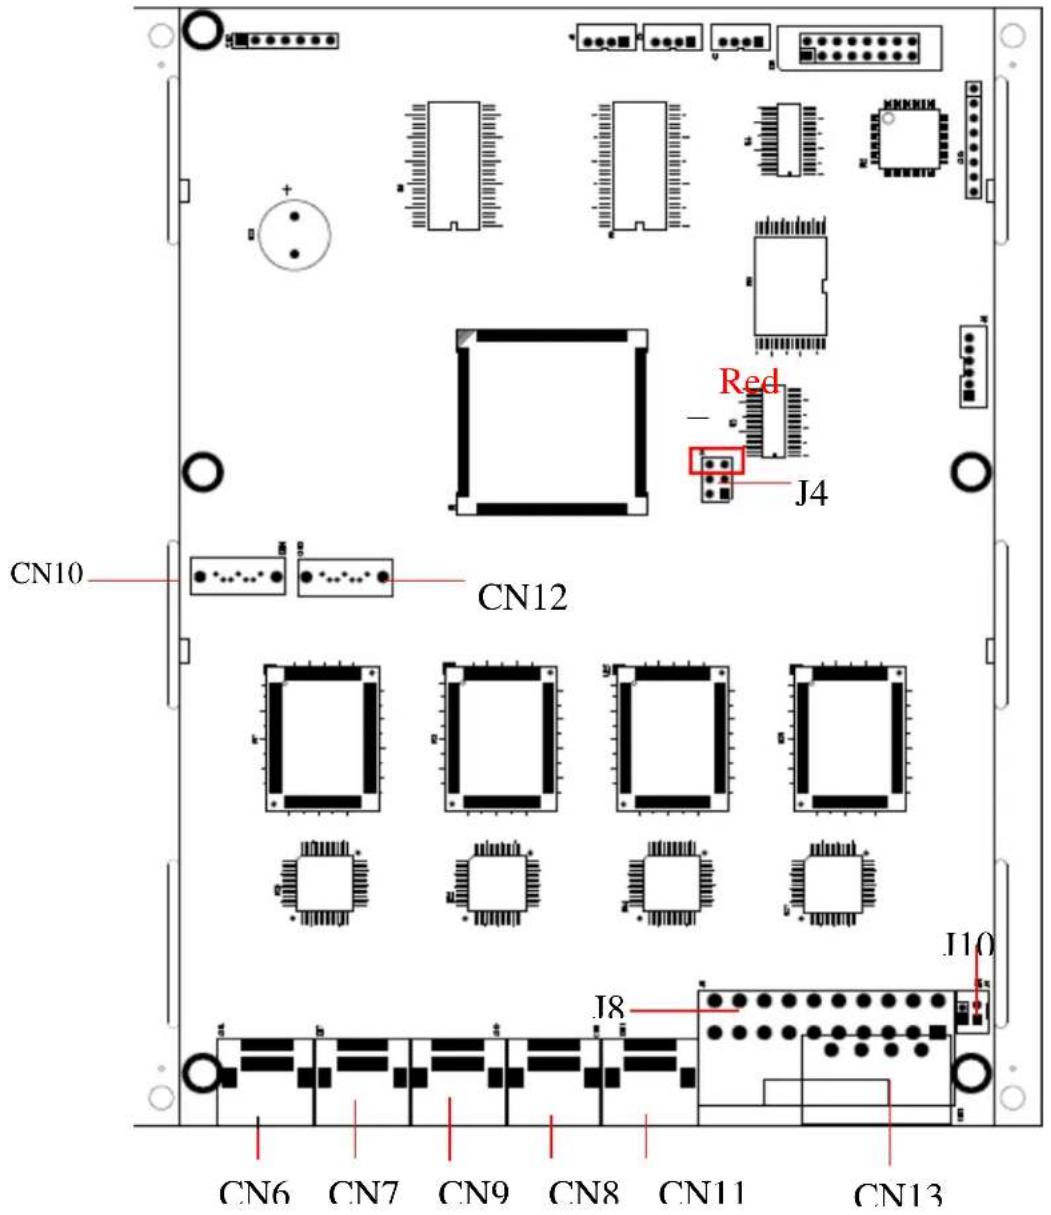
The layout of the ARS-2057 is shown below.
text_image
CN10 CN12 Red J4 J8 CN6 CN7 CN9 CN8 CN11 CN13 J10J4: USB signal link
J9: ATX power supply socket
J10: ATX power supply switch socket
CN10: Connects to source DVD-ROM
CN12: Connects to HDD
CN7-CN6&CN11: Connects to target DVD writers
CN13: Power socket
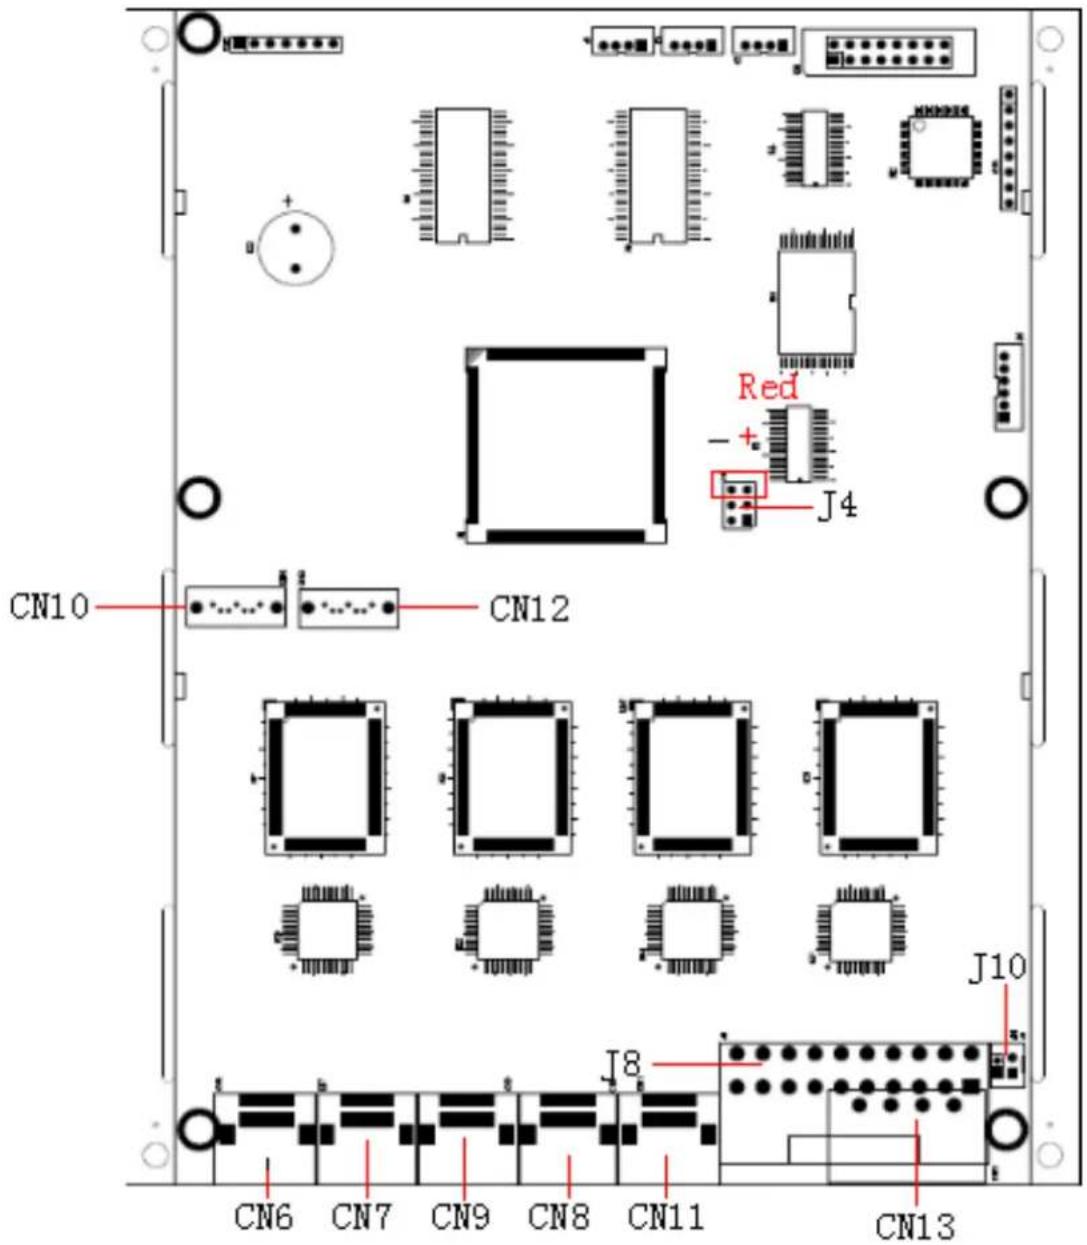
The layout of the ARS-2050 is shown below.
text_image
CN10 CN12 Red - + J4 J10 J8 CN6 CN7 CN9 CN8 CN11 CN13J4: USB signal link
J8: ATX power supply socket
J10: ATX power supply switch socket
CN10: Connects to source DVD-ROM
CN12: Connects to HDD
CN7-CN6&CN11: Connects to target DVD writers
CN13: Power socket
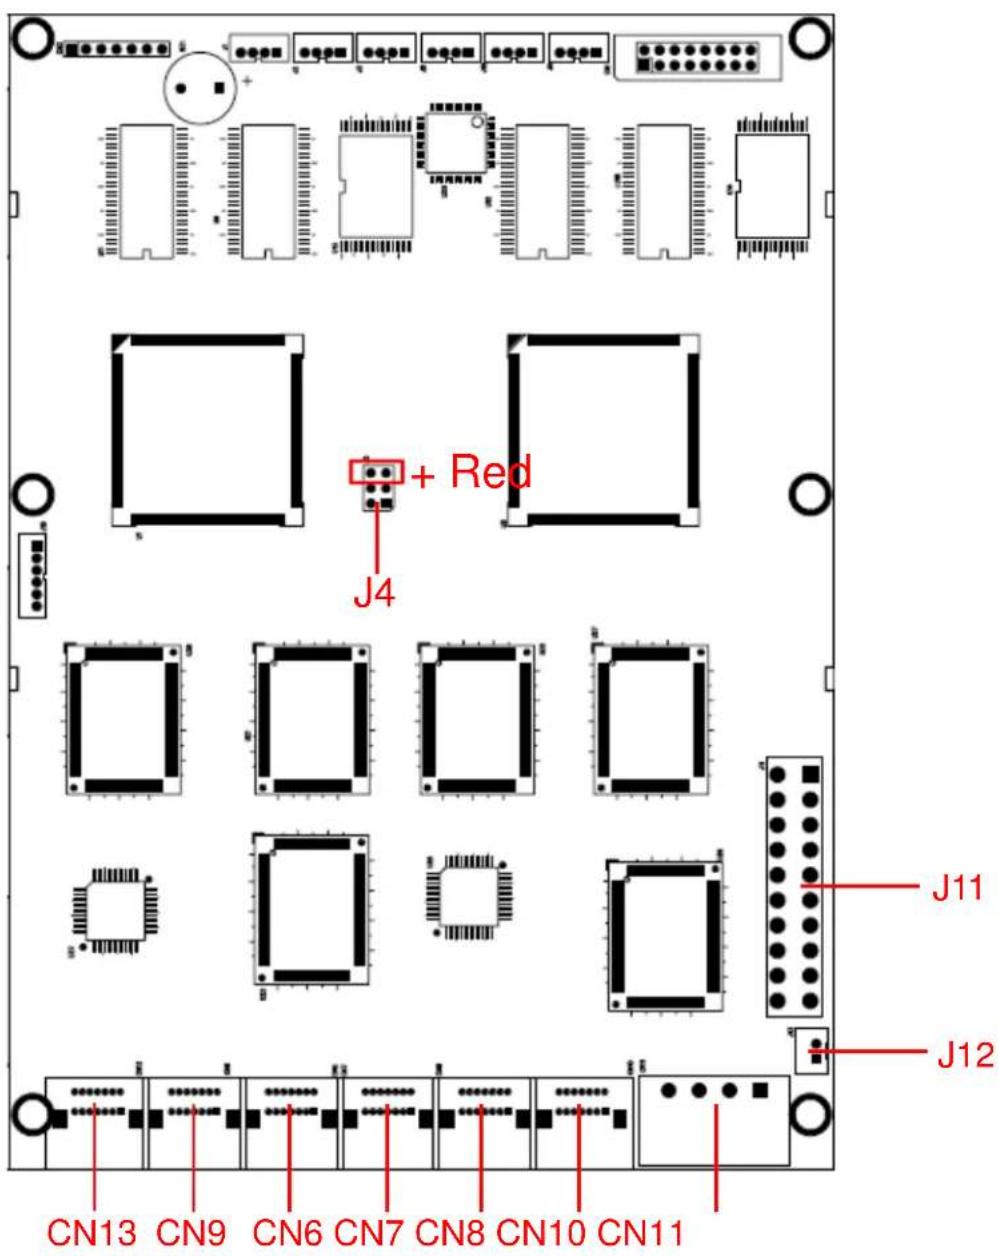
The layout of the ARS-2050P is shown below.
text_image
+ Red J4 J11 J12 CN13 CN9 CN6 CN7 CN8 CN10 CN11J4: USB signal link
J11: ATX power supply socket
J12: ATX power supply switch socket
CN13 (bottom level): Connects to source DVD-ROM
CN13 (upper level): Connects to SATA HDD
CN6-CN10&CN13: Connects to target DVD writers
CN11: Power socket
Chapter 5 Functions
There are 12 major functions in the copy controller, and there are subfunctions in Function 9, 10, 11, and 12 as the following figures show.
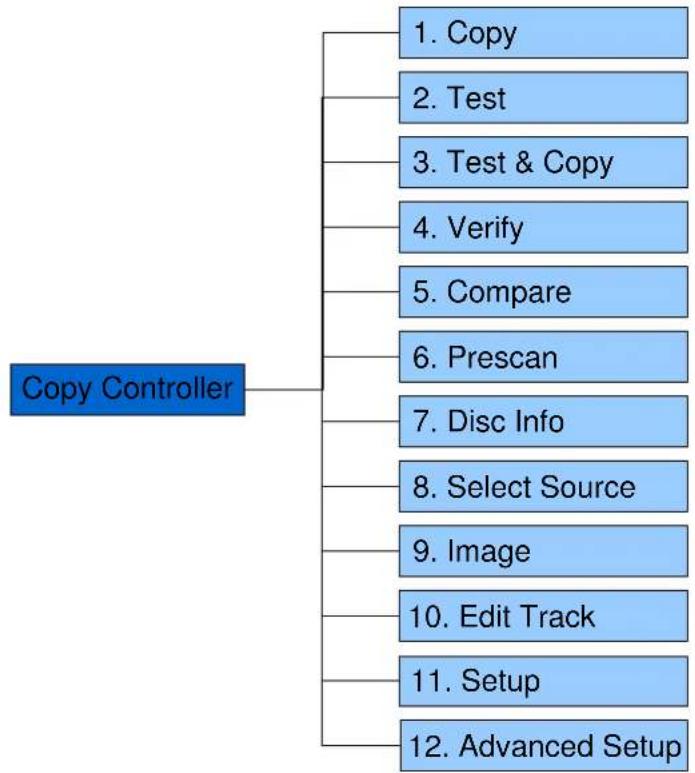
flowchart
graph TD
    A["Copy Controller"] --> B["1. Copy"]
    A --> C["2. Test"]
    A --> D["3. Test & Copy"]
    A --> E["4. Verify"]
    A --> F["5. Compare"]
    A --> G["6. Prescan"]
    A --> H["7. Disc Info"]
    A --> I["8. Select Source"]
    A --> J["9. Image"]
    A --> K["10. Edit Track"]
    A --> L["11. Setup"]
    A --> M["12. Advanced Setup"]
In Function 12 there are 18 subfunctions.
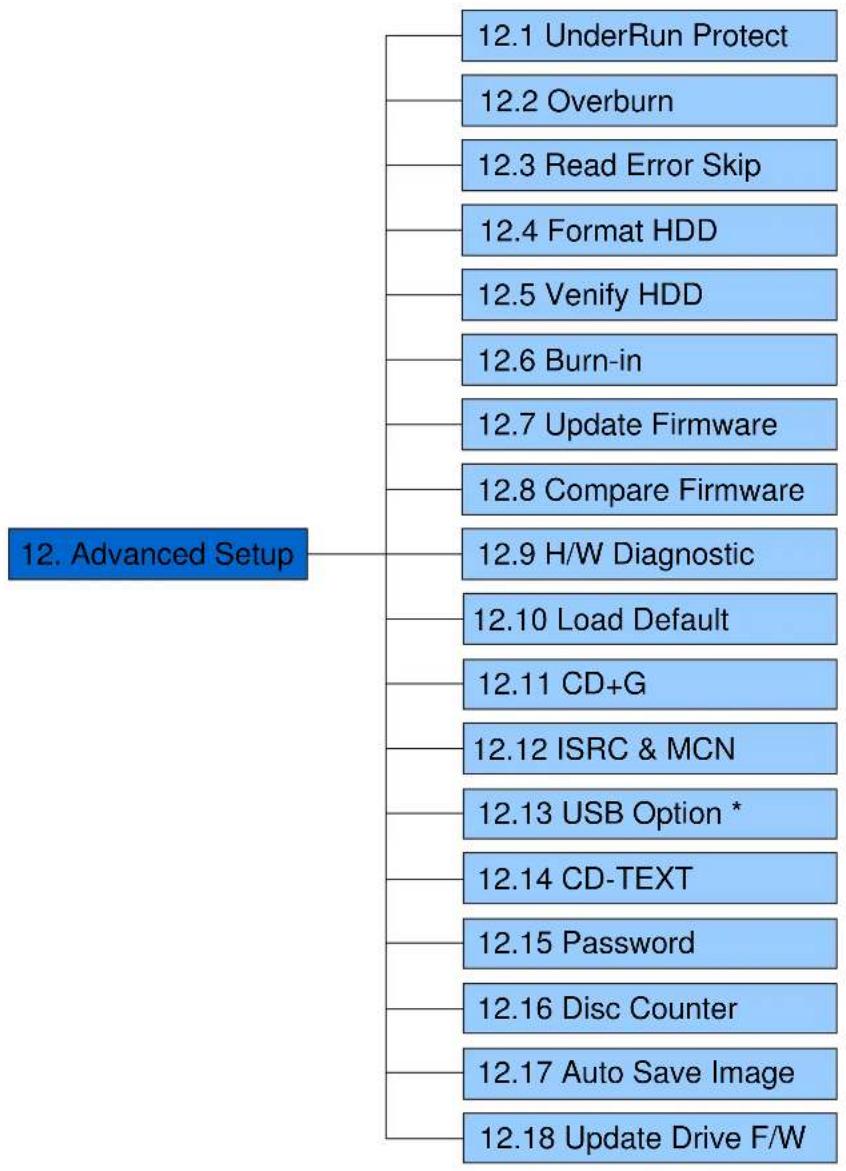
flowchart
graph TD
    A["12. Advanced Setup"] --> B["12.1 UnderRun Protect"]
    A --> C["12.2 Overburn"]
    A --> D["12.3 Read Error Skip"]
    A --> E["12.4 Format HDD"]
    A --> F["12.5 Verify HDD"]
    A --> G["12.6 Burn-in"]
    A --> H["12.7 Update Firmware"]
    A --> I["12.8 Compare Firmware"]
    A --> J["12.9 H/W Diagnostic"]
    A --> K["12.10 Load Default"]
    A --> L["12.11 CD+G"]
    A --> M["12.12 ISRC & MCN"]
    A --> N["12.13 USB Option *"]
    A --> O["12.14 CD-TEXT"]
    A --> P["12.15 Password"]
    A --> Q["12.16 Disc Counter"]
    A --> R["12.17 Auto Save Image"]
    A --> S["12.18 Update Drive F/W"]
* This is a special function. See P. 22 for details.
During operation if you don't understand an LCD message, see Appendix A. Now let's take ARS-2040P to demonstrate.
5.1 Adv Setup
Function 12 Adv Setup lets you change the system configuration. This function includes 18 subfunctions: UnderRun Protect, Overburn, Read Error Skip, Format HDD, Verify HDD, Burn-in, Update Firmware, Compare Firmware, H/W Diagnostic, Load Default, CD+G, ISRC & MCN, USB Option, CD-TEXT, Password, Disc Counter, Auto Save Image, and Update Drive F/W. Refer to page 15 for the menu.
Now press ESC to return to Function 11. Then, press ESC for 2 seconds to enter Function 12-01 as the following figure shows.
- Adv Setup
5.1.1 UnderRun Protect
Now if you press ESC, you can enter Function 12 as the following figure shows.
12-01. Adv Setup UnderRun Protect
UnderRun Protect lets you control On and Off of Buffer Under Run Protection. Press ENT to enter the following figure. The default is On. Press t to select Off.
UnderRun Protect On
5.1.2 Overburn
Now press ESC and ▼ to enter the following figure. Overburn lets you decide whether to copy beyond the limit of the CD or not.
12-02. Adv Setup Overburn
Press ENT to enter the following figure. The default is Off. Press ▼ to select On. Overburn may cause a DVD writer to be damaged and data incomplete.
Overburn Off
5.1.3 Read Error Skip
Now press ESC and ▼ to enter the following figure. Read Error Skip is to ignore any error that occurs during copying. Under normal circumstances, when an error occurs during copying, a message will appear on LCD. Yet, you can use Read Error Skip to copy some defective DVDs.
12-03. Adv Setup Read Error Skip
Press ENT to enter the following figure. The default is Off. Press ▼ to select On.
Read Error Skip Off
5.1.4 Format HDD
Now press ESC and ▼ to enter the following figure. Format HDD is to partition the hard disk. But before formatting, all data on the hard disk will be deleted.
12-04. Adv Setup Format HDD
If your copy controller doesn't connect with a hard disk, LCD will show the message as follows.
No Valid HDD! Select HDD First!
5.1.5 Verify HDD
Now press ESC to return to Function 12, and then select part 5 Verify HDD as the following figure shows. Verify HDD is to verify if the hard disk or any of its partitions can work well.
12-05. Adv Setup Verify HDD
Press ENT to enter the next figure. Use ▲▼ to confirm Disk or Parti.
Verify Disk or Paration? Disk
Press ENT to verify. After verification LCD will show the results as follows.
Overburn Off
5.1.6 Burn-in
Now press ESC and ▼ to enter the following figure. Burn-in is to simulate the copying progress many times. The time can be from 1 to 1000. After each cycle of simulation, the DVDs on the DVD writers will eject automatically and recede for the next bout of simulation.
12-06. Adv Setup Burn-in
Press ENT to enter the next figure. Test is simply a simulation.
Burn-in Test
Press ENT and use ▲▼ to select the time of simulation such as 1, 2, 3...1000 or Run Continuous. The figure below shows Run Continuous.
Sel burn-in num: Run Continuous
Press ESC, ENT, ▼ to select Erase & Copy as the following figure shows. Erase & Copy is to erase and write repeatedly. It is only for DVD rewriteable discs.
Burn-in Erase & Copy
Press ENT and use ▲▼ to select the time of simulation such as 1, 2, 3...1000 or Run Continuous. The figure below shows Run Continuous.
Sel burn-in num: Run Continuous
5.1.7 Update Firmware
Now press ESC and ▼ to enter the following figure. Update Firmware is to update firmware to the latest version. But you should get the version first.
12-07. Adv Setup Update Firmware
You can get the newest firmware version from ACARD by e-mail, or download it directly from the web site: http://www.acard.com Then, unzip the file of .zip and copy it into a CD-RW. If the file is .bin, you don't need to unzip.
After placing the DVD into the DVD-ROM, press ENT. The system will begin searching the new firmware and show the message on LCD as follows after it finds the new firmware. Then press ENT to update.
Searching F/W --- XXX/XXXX
5.1.8 Compare Firmware
Now press ESC and ▼ to enter the following figure. Compare Firmware is to compare the current firmware version and the newly downloaded version. It can prove if the downloaded version is the newest one.
12-08. Adv Setup Compare Firmware
5.1.9 H/W Diagnostic
Now press ESC and ▼ to enter the following figure. H/W Diagnostic is to test the system
12-09. Adv Setup H/W Diagnostic
Press ENT to enter the next figure, and begin the LCD test. After that, the system will do the button test, self-test of SDRAM, the hardware connection test and flash test. All test results will be shown on LCD. It is the easiest way to know if the system can work well.
LCD Test Start
When all tests finishes, LCD will show the message as follows
Test finished
5.1.10 Load Default
Now press ESC and ▼ to enter the following figure. Load Default is to make all changed settings return to defaults.
12-10. Adv Setup Load Default
Press ENT to enter the next figure. Use ▲▼ to confirm Yes or No.
Load Default Config?Yes
When default loading finishes, LCD will show the results as follows.
Load Default OK
5.1.11 CD+G
Now press ESC and ▼ to enter the following figure. CD+G is a kind of special copying format. This function supports this special format.
12-11. Adv Setup
CD+G
Press ENT to enter the next figure. The default is Off. Press ▼ to select On.
CD+G
Off
5.1.12 ISRC & MCN
Now press ESC and ▼ to enter the following figure. ISRC and MCN are special copying formats. This function supports them.
12-12. Adv Setup
ISRC & MCN
Press ENT to enter the next figure. The default is Off. Press ▼ to select On.
ISRC & MCN
Off
5.1.13 USB Option
Now press ESC and ▼ to enter the following figure. USB Option lets you switch to the USB mode if your copy controller has connected with a PC.
12-13. Adv Setup
USB Option
Press ENT to enter the next figure. The default is Off. Press ▼ to select On.
USB Option
Off
When USB option is On, the original "12. Adv Setup" will change to "13. Adv Setup", and the hidden "12. USB Mode" will appear in the first layer of function menu. See P.105 for details.
5.1.14 CD-TEXT
Now press ESC and ▼ to enter the following figure. CD-TEXT is a kind of special copying format. This function supports this special format.
12-14. Adv Setup CD-TEXT
Press ENT to enter the next figure. The default is Off. Press ▼ to select On.
CD-TEXT Off
5.1.15 Password
Now press ESC and ▼ to enter the following figure. Password is set to protect your copy controller.
12-15. Adv Setup Password
Press ENT to see the following figure. The default is Off.
Password Off
Press ▼ to see the following figure. Change means to change a preset or an old password into a new one.
Password Change
Press ▼ to see the following figure.
Old Password ?
Use ▲▼ to key in the default, 85122290. A password should be composed of 1 to 13 characters. The character can be A, B, C, etc. or 1, 2, 3, etc. or the combination of both. After selecting a desired number or alphabet, remember to press ENT.
Old Password 8?
After keying in the old password, remember to press ENT to confirm. Then the following figure will appear.
New Password ?
Follow the rule mentioned above to key in a new password. After keying in, the system will ask you to enter the new password again.
Re-Ent Password ?
When it is correct, you will see the following figure. You have 3 chances to enter your password. If you forget your password, return the copy controller to ACARD for help.
Change OK!
5.1.16 Disc Counter
Now press ESC and ▼ to enter the following figure. Disc Counter records how many discs you have copied.
12-16. Adv Setup Disc Counter
Press ENT to see the following figure. View means to see the records.
Disc Counter View
Press ENT. JC in the following figure means Job Counter; that is, every copying task. It records the number of discs you have copied, and can be deleted.
JC OK: 000000001 Fail :000000000
Attention
There is another record of LC (Life Counter). It also records the number of discs you have copied so far, but cannot be deleted. You can veiw the record of LC by holding down ESC when LCD shows the finding of writers. Press ▲ to leave.
Press ▼. The following figure shows the record in DVD writer 2. You can presst to see the records in other writers. This kind of record can be deleted, too.
02 OK: 000000001 Fail :000000000
Press ▲ to return to the record of job. Then press ENT to return to the next figure.
Disc Counter View
Press ▼ to see the following figure. It is to delete the record in job. Use ▲ ▼ to confirm Yes or No.
Disc Counter Del Job Counter
Press ▼ again to enter the following figure. Dev means the device of DVD writer.
Disc Counter Del Dev Counter
Press ENT to see the following figure. If you want to delete the record in DVD writer 2, you can press ENT, otherwise press ESC to exit.
Del 02 Counter Ent: Del Esc: Exit
5.1.17 Auto Save Image
Now press ESC and ▼ to enter the following figure. Auto Save Image can save an image file automatically into your designated partition of HDD.
12-17. Adv Setup Auto Save Image
Press ENT to enter the next figure. The default is Off. Press ▼ to select On.
Auto Save Image Off
5.1.18 Update Drive F/W
Now press ESC and ▼ to enter the following figure. Only when you have installed some types of CD\DVD drives produced by ASUS or Plextor can this figure appear. This function lets you update the firmware of some ASUS or Plextor CD\DVD drives. For the detailed types, visit the Web site:www.acard.com.
12-18. Adv Setup Update Drive F/W
Press ENT to enter the next figure. No F/W File means that there is no file of firmware on the source CD. So, in the beginning you have to download the firmware of a certain type of CD\DVD drive from the Web site of ASUS or Plextor. Then record the firmware into a CD-RW.
No F/W File
5.1.19 F1 Hot Key Setting
Now press ESC and ▼ to enter the following figure. This function let you change the F1 Hot Key function.
12-19. Adv Setup
F1 Hotkey Setup
Press ENT to enter the next figure. The default is DVD Burn Speed.
F1 Hotkey Setup
- DVD Burn Speed
Press ▼ could select as 1. Copy、2. Test、3. Test&Copy、4. Verify、5. Compare、6.
Please press ENT to confirm the selection.
5.1.20 F2 Hot Key Setting
Now press ESC and ▼ to enter the following figure. This function let you change the F2 Hot Key function.
12-20. Adv Setup
F2 Hot Key Setting
Press ENT to enter the next figure. The default is Select Source.
F2 Hot Key Setting
- Select Source
Press ▼ could select as 8. Select Source、9. Image、10. Edit Track、11. Setup、12. Adv Setup、1. Copy、2. Test、3. Test&Copy、4. Verify、5. Compare、6. Prescan and 7. Disc Info。
Please press ENT to confirm the selection.
Note: The Hot Key function could make job to work more efficiency.
Chapter 6 Troubleshooting
6.1 About LCD
After you power up, if there is no display on the LCD, check if the connection of power cord is firm and the environment of power outlet is normal.
6.2 About Error Messages
During Copy, Test, Compare and Verify, etc. if you press ESC to abort, an error message will appear on LCD. Abortion may cause the copy controller to hang up, therefore you have to power on again.
If reading fails, an error message will appear on LCD. Get a new source DVD to try again.
If the copy controller hasn't detected any device after powering on, an error message will appear on LCD.
6.3 About DVD-ROM/DVD Writers
If a DVD-ROM or a DVD writer cannot read, confirm the format of the source DVD and check if it is damaged.
Use any DVD writer to read the source DVD. If it works, the DVD-ROM is probably defective or not compatible with the source DVD.
6.4 About Buttons
If you press any one of the four buttons on the panel, but there is no response, it is perhaps that the button cannot function well. Inspect the jumper setting.
6.5 About DVD Writer Not Readable
After copying if the DVD writer is not readable, use Compare to examine, or get another DVD-ROM to test.
6.6 About High Failure Rate
If the failure rate of copying is high, do the following things to improve.
- Lower the speed of DVD writer.
- Inspect if the blank disc's quality is good.
- Update the firmware.
- Inspect the DVD writer's maximum writing speed. If the speed is over 8X, copy the data to a hard disk first, and then transmit to DVD.
6.7 About Firmware Update
If you cannot update the firmware, please inspect the firmware. Perhaps you have downloaded a wrong file.
Failure in firmware update may cause the copy controller to fail in booting. Under the circumstances, return the control board to distributor for repair.
6.8 About Function 12 and Cancellation
If you want to execute function 12 Advanced Setup, you can press ESC for 2 seconds. And during operation if you want to cancel a function like Copy, Test, Verify and so on, you can press ESC for 2 seconds, too.
Appendix A LCD Messages
1. Normal Conditions:
All data will be lost, erase?......All data on the disc will be lost. Confirm the erasing of data.
Analyzing.....Analyze the source disc.
Audio Disc!!! Can't compare!...... The system cannot compare the audio discs.
Cannot read TOC...... The system cannot read the contents of disc.
Check Target Please Wait ....The system is checking the target device.
Detect Drives....Detect what drives are connected with the system.
DVD-RW does not Support the Func.... DVD-RW doesn't support this function.
Erase Finished...... The erasing of data comes to an end.
Erasing disc....The system is erasing the data on the disc.
Fail to get Drive Info!...... The drive information cannot be obtained.
Fail to get Src Disc Info!...... The information of source disc cannot be obtained.
Hold ESC to exit..... Press ESC for a second to terminate the test.
Identical.... The comparison results are the same.
Initialize SDRAM....Initialize the memory of the system.
Load Default Config?......Do you want to load the default settings?
No Erasable Disc in DVD-RW!!......The disc on the DVD-RW device is not rewritable.
Preparing.... The system is preparing to record.
Press a Key to Eject Fail Disc....Press any key to eject the failed disc after copying.
Press a Key to Eject Good Disc.... Press any ket to eject the good disc after copying.
Read disc error ....During comparison the disc cannot be read.
Save new config Fail!...... The new setting of configuration cannot be saved.
Source Disc Empty!!! The source disc doesn't contain any data.
Source Disc Not Ready.... Source disc is not ready to be read.
Source Drive Not Ready....Source drive is not ready to read.
Src&Tgt can't in the same channel....
.During comparison the source and target discs cannot be in the same channel.
Target Disc Not Empty!!! The target disc still has data.
Target Disc Not Ready.... Target disc is not ready to be written into.
Target Drive Not Ready......Target drive is not ready to write.
Target overflow...... The target disc hasn't enough capacity to store new data.
TOC not match.... The comparison results are not the same.
User Abort!......Cancel the job during operation.
2. Connecting with a HDD:
All data will be lost, format?
All data on the hard disk will be lost. Confirm the formatting of hard disk.
Delete Image in Partition xx?.....Confirm the deleting of data image in partition xx.
Format HDD?...... Ask if you want to format the hard disk.
Format HDD OK! ......The Formatting of hard disk has been completed.
HDD not Format!......The hard disk hasn't been formatted yet.
HDD too small .... The capacity of hard disk is too small.
HDD too small to handle image!......
.The hard disk hasn't enough capacity to store the data image (at least 5Gbytes).
Image Exists Overwrite?
.There is a data image in the current partition. Confirm the overwriting of data.
Image load Fail......The image isn't successfully loaded from DVD to the hard disk.
Image load OK...... The image is successfully loaded from DVD to the hard disk
No Image in Partition xx....There is no data image in partition xx.
No Valid HDD! The system cannot find a hard disk.
Partition Damage......The partition is damaged.
Select HD First!...... Select a formatted hard disk at first.
Verify Disk or Partition?...... Do you want to verify the hard disk or just a partition?
Verify Hard Disk Fail!...... The hard disk is not verified successfully.
3. Audio Editing:
Burn or Move to partition?....Do you want to directly copy the data into disc or move them to the partition.
Can't edit HDD...... The hard disk cannot be edited as a source audio disc.
Close all disc's session?..... Confirm the closing of disc sessions.
Continue edit next Disc?...... Ask if you want to continue the music disc editing.
End edit disc and burn?...... Finish the music disc editing and start to copy.
Erase selected Tracks?..... Abort the selected tracks and delete them.
Ins empty disc Continue?...... Do you want to insert a blank disc and continue copying?
Insert next disc.... Insert the next audio disc.
NO AUDIO track in this disc..... The source disc has no audio track.
Sessions were closed already! ...... The disc sessions have already been closed.
Target Overflow Re-Select....
......The disc capacity is not enough to store the selected tracks. Please select again.
Tgt overflow, del last trk? The disc capacity is not enough to store the selected tracks. So, do you want to delete the last track?
4. Firmware Update:
Check Sum Error!...... The udpated firmware has errors.
Flash ROM fail!...... Data cannot be written into Flash ROM.
Invalid firmware .... The disc doesn't contain a valid firmware.
Last update F/W Fail!...... The firmware is not updated successfully.
Last update F/W OK!...... The firmware is updated successfully.
Searching F/W ...... The system is searching for a valid firmware.
Source can't be Hard Disk!.....During comparison the source cannot be hard disk.
Technical Support Form
Email address: support@acard.com
Website: http://www.acard.com
| Model Name* (ex: ARS-2057) | Firmware version* | |
| System Configuration | ||
| Motherboard/System model* | ||
| SCSI host adapter/chip brand & model* | ||
| SCSI host BIOS version | ||
| Other I/O card* | ||
| Operating System* | ||
| SATA HDD brand & model* | ||
| SATA HDD capacity | ||
| SATA HDD firmware | ||
| Problem description* | ||