
523240 - Regulator Intellinet - Free user manual and instructions
Find the device manual for free 523240 Intellinet in PDF.


| Brand | Intellinet |
| Model | 523240 |
| Product Type | Voltage Regulator / Power Conditioner |
| Input Voltage | 100–240 V AC, 50/60 Hz |
| Output Voltage | Regulated 12 V DC (or as per device specifications) |
| Max Output Current | 5 A (typical) |
| Power Rating | 60 W (estimated) |
| Protection Features | Overvoltage, undervoltage, short circuit, and surge protection |
| Dimensions (W x D x H) | 150 x 100 x 40 mm (estimated) |
| Weight | 0.5 kg (estimated) |
| Operating Temperature | 0°C to 40°C |
| Storage Temperature | -20°C to 60°C |
| Input Connector | IEC C14 (typical) |
| Output Connector | Barrel jack or screw terminal (depending on version) |
| LED Indicators | Power on, output status |
| Mounting | Desktop or DIN rail compatible (check specific model) |
| Certifications | CE, RoHS, UL (estimated) |
| Maintenance | Wipe with dry cloth; no user-serviceable parts inside |
| Safety Instructions | Do not expose to moisture; disconnect before cleaning |
| Spare Parts Availability | Contact Intellinet support for replacement units |
Frequently Asked Questions - 523240 Intellinet
User questions about 523240 Intellinet
0 question about this device. Answer the ones you know or ask your own.
Ask a new question about this device
Download the instructions for your Regulator in PDF format for free! Find your manual 523240 - Intellinet and take your electronic device back in hand. On this page are published all the documents necessary for the use of your device. 523240 by Intellinet.
USER MANUAL 523240 Intellinet
(For firmware version 1.21 and higher)

INTELLINET
NETWORK SOLUTIONS
INT-523240-UM-0606-05
FCC Regulatory Statements
Electromagnetic Compatibility (EMC)
This equipment generates radio frequency energy and, if not installed and used in accordance with the instructions, may cause harmful interference to radio communications. However, there is no guarantee that interference will not occur in a particular installation. If this equipment does cause harmful interference to radio or television reception, which can be determined by turning the equipment off and on, the user is encouraged to try to correct the interference by one or more of the following measures:
- Re-orient or relocate the receiving antenna.
- Increase the separation between the equipment and receiver.
- Connect the equipment to an outlet on a different circuit than the receiver.
- Consult your dealer or an experienced radio/TV technician for help.
- Check that shielded (STP) network cables are being used with this unit to ensure compliance with EMC standards.
This equipment has been tested and found to comply with the limits for a Class B computing device pursuant to Subpart B of Part 15 of FCC rules, which are designed to provide reasonable protection against such interference when operated in a commercial environment. Operation of this equipment in a residential area is likely to cause interference, in which case the user, at his own expense, will be required to take whatever measures may be required to correct the interference.
This digital equipment fulfills the requirements for radiated emission according to limit B of EN55022/1998, and the requirements for immunity according to EN55024/1998 residential, commercial and light industry.
Safety
This equipment complies with EN 60950, Safety of Information Technology equipment.
Radio Transmission Regulatory Information
This equipment generates and radiates radio frequency energy, and must be installed and operated while maintaining a minimum distance of 20 cm between the radiator and your body.
Tested to comply with FCC Standards FOR HOME OR OFFICE USE.
This product must be installed and used in strict accordance with the instructions given in the user documentation.
This product complies with the following radio frequency and safety standards:
Europe — EU Declaration of Conformity. This device complies with the requirements of the R&TTE Directive 1999/5/EC with essential test suites as per standards EN 301489: General EMC requirements for radio equipment; and ETS 300328: Technical requirements for radio equipment.
USA — Federal Communications Commission (FCC): This device complies with Part 15 of FCC Rules. Operation of the device is subject to the following two conditions:
- This device may not cause harmful interference.
- This device must accept any interference that may cause undesired operation.
Table of Contents
INTRODUCTION 4
Function Description 4
Installation Examples 6
GuestGate Function Basics 8
INSTALLATION of GuestGate 9
Recommended Setup 9
Advanced Setup 14
CONFIGURATION OPTIONS of GuestGate 19
Status Screen 19
Guest Configuration Screen 20
Host Configuration Screen 23
Welcome Screen Configuration 26
Time / Scheduler Configuration 28
Device Settings Configuration 30
Firmware Upgrade Process 33
Exit Screen 34
QUESTIONS & ANSWERS 35
SERVICE & SUPPORT 38
SPECIFICATIONS 39
APPENDIX 40
INTRODUCTION
Congratulations on your purchase of the INTELLINET NETWORK SOLUTIONS GuestGate Hotspot Gateway. The GuestGate connects guests to your network, allowing them to access only the Internet (Web, Email, Chat and other applications). GuestGate protects your existing network from unauthorized access by the connected guest computers and, if required, even shields the guest computers among themselves. Furthermore GuestGate features enhanced IP PnP (Plug and Play) technology: It automatically adjusts to the guest computer's TCP/IP settings eliminating time consuming client IP reconfigurations.
GuestGate seamlessly integrates into your existing network and in many applications a configuration of GuestGate is not necessary. GuestGate provides the core functionality right out of the box.
Function Description
Internet Access for Guests
GuestGate is primarily designed to provide configuration-free Internet access for your guests. GuestGate uses the existing Internet connection of your network to provide Web and email access for computers connected in a conference room, a hotel or a public place with wireless network connectivity. GuestGate does not stop here, however. It addresses security-related concerns of the network administrator by shielding the existing network from access attempts from the connected guests. In short, this means that guests can access the Internet, but your own network — i.e., your network file server, email or application server — is off limits.
Password Protected Internet Access for Guests
The network administrator can make it mandatory for your guests to enter a password before Internet access is granted. This is an important function in case you offer Internet access as a paid service or in situations where an open, unprotected wireless access point is connected to GuestGate and you wish to keep unauthorized users from using your bandwidth.
Configurable Welcome Screen for your Guests
You can set up your own welcome screen in seconds. Change the wording and formatting, and upload your own banner image. The welcome screen is displayed when a guest connects to the Internet for the first time. The welcome screen can be utilized to make the guest agree to your terms and conditions, and can be completely deactivated if required.
IP PnP
In many situations, it is necessary for the network administrator to change the TCP/IP settings of guest computers because the existing settings are not compatible or your network has advanced requirements. GuestGate eliminates this step completely. GuestGate automatically adjusts to the guest computer's TCP/IP settings, providing a true zero guest configuration.
Bandwidth Control
GuestGate controls how much of your Internet connection speed is dedicated to the guest network. Upload and download bandwidth can be configured individually.
Layer 3 Client Isolation Function
In a public location with a public Wireless Access Point there are often concerns about security. GuestGate not only protects the Host Network from unauthorized access by your guests, it takes security one step further. When the “use separate random network for each client” option is activated, no guest computer can access any other guest computer. In this mode GuestGate randomly assigns each guest computer its own network. This option is activated by default.
Packet Filter
Block access to certain Web sites or entire IP ranges.
4 Port 10/100 Auto Sensing LAN Switch
GuestGate provides four 10/100 Mbps LAN switch ports for the connection of PCs, notebooks, or other switches or wireless access points.
Web-Based Administrator Interface
The configuration is fully Web-browser based. For security reasons, the Web administrator menu is only accessible from the host network.
Firmware Updates via Web Browser
Quickly and conveniently upgrade firmware of GuestGate with the Web browser of your choice.
Installation Examples
GuestGate in a SOHO Network Environment
This is a typical setup in which the Internet connection is established through an NAT router with an integrated firewall.
![graph TD A["Internet (WAN)"] --> B["Modem/Router"] B --> C["Host Network PCs"] B --> D["GuestGate"] D --> E["Guest Network PCs"] D --> F["Wireless Access Point"] F --> G["Wireless Guest Network"] G --> H["Laptop"]](/content/2026/05/788692/images/9c1bb3148689d7578f3aa14b1264bfbe349a1bb41cb0605a3851ab8246cd21f1.jpg)
GuestGate in a SMB Environment
In larger networks GuestGate connects to any available switch port behind the Firewall/Gateway/Router.
![graph TD A["Internet (WAN)"] <--> B["Firewall + Gateway"] B <--> C["LAN Switch"] D["Host Network PCs & Servers"] --> E["Wireless Access Point"] E --> F["GuestGate"] F --> G["Guest Network PCs"] G --> H["Wireless Guest Network"] H --> I["Computer"] style A fill:#f9f,stroke:#333 style B fill:#ccf,stro…](/content/2026/05/788692/images/d9362aff206267f8bf76ebc70f189fbb397fb0f47fb1ea5ef624c30eea547554.jpg)
GuestGate Function Basics
Ports
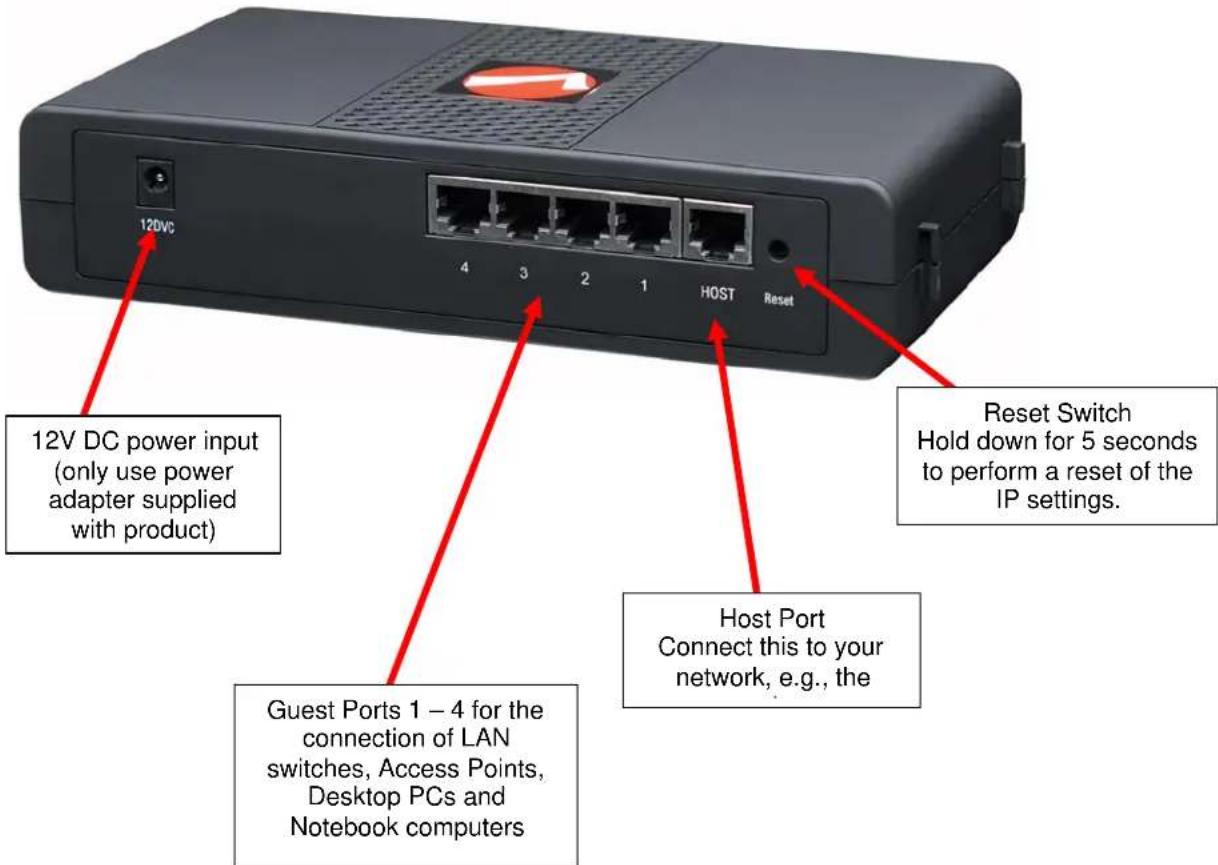
GuestGate features a total of 5 10/100 RJ45 Ports. One port is for the connection of GuestGate to the Host Network (Host Port), 4 Ports are available for guest connections (Guest Ports). The Guest Ports can be connected to Hubs, Switches, Wireless Access Points, PCs or Notebooks.
Host Port
By default GuestGate obtains an IP Address from a DHCP Server already present in the network. GuestGate analyzes the network and obtains all information necessary for Internet Access. The DHCP Server Log reveals the HOST IP Address of GuestGate.
In the event that no DHCP Server is present GuestGate reverts to its default IP Address 192.168.2.1. In this case a manual configuration of the HOST IP settings is necessary.
Guest Ports
GuestGate assigns IP addresses to the connected guest computers. IP PnP technology ensures that no configuration on the guest computer is necessary. The default IP address range is 172.16.xxx. Changing the guest IP settings is possible via the Web administration interface.
Guest Ports with Layer 3 Client Isolation enabled
If the Layer 3 Client Isolation is enabled, GuestGate assigns a different IP Network (Subnet) to each connected Guest Computer. Since this assignment is random, it makes it virtually impossible for a hacker to guess the other guest computer's IP settings to try to gain access. This option is enabled by default. It can be disabled in the guest configuration screen of the administrator Web interface. The option is “separate network for each client (automatic).”
Time / Scheduler
You can configure the time period, in which GuestGate allows Internet access. Possible values are always on or based on a schedule (week day and time).
Accessing the Administrator Web Interface
The configuration of GuestGate is entirely Web-based. Any standard Web browser is supported. For security reasons, GuestGate can only be configured from the host port. GuestGate rejects all connection attempts which originate from the guest side.
Internet Access for Guests and Welcome Page
When a guest computer tries to access the Internet for the first time, a Welcome Page is being shown in the Web browser. This welcome page can be configured and altered in the Administrator Web Interface. Guests have to accept the terms and conditions in order to access the Internet. If the Guest Password option is enabled, a password must be provided by the guest to gain Internet access.
This authorization procedure is only required once. GuestGate memorizes all authorized Guest computers until GuestGate is restarted.
After a restart of GuestGate, guests again will be shown the welcome page. If a guest computer is disconnected from GuestGate for more than 10 minutes, the welcome page is also shown again.
INSTALLATION of GuestGate
Recommended Setup
This setup method assumes that a DHCP Server such as a router is present in your network.
1. Connection to the Host Network
Connect standard RJ45 Network Cable to GuestGate's HOST Port and to a RJ45 port on your existing network (Ethernet Switch Port, Router Switch Port, etc.).
Turn on GuestGate and verify that the network connection is active (HOST LED must be lit on GuestGate).
NOTE: The startup process takes up to 60 seconds (if no DHCP Server is present it may take as long as 300 seconds).
2. Connection of Guests
Using standard RJ45 Network Cable you can now connect PCs, Notebooks, Ethernet Switches, Hubs or Wireless Access Points to the Guest Ports of GuestGate.
Each Port has its own Status LED. Verify that the network connection is active on each port you connect.
Rear View
3. Testing Internet Access
Start a PC or Notebook which is connected to one of the Guest Ports. Launch a Web browser and open an Internet Web Site such as
http://www.intellinet-network.com.
You will then see GuestGate's welcome page.
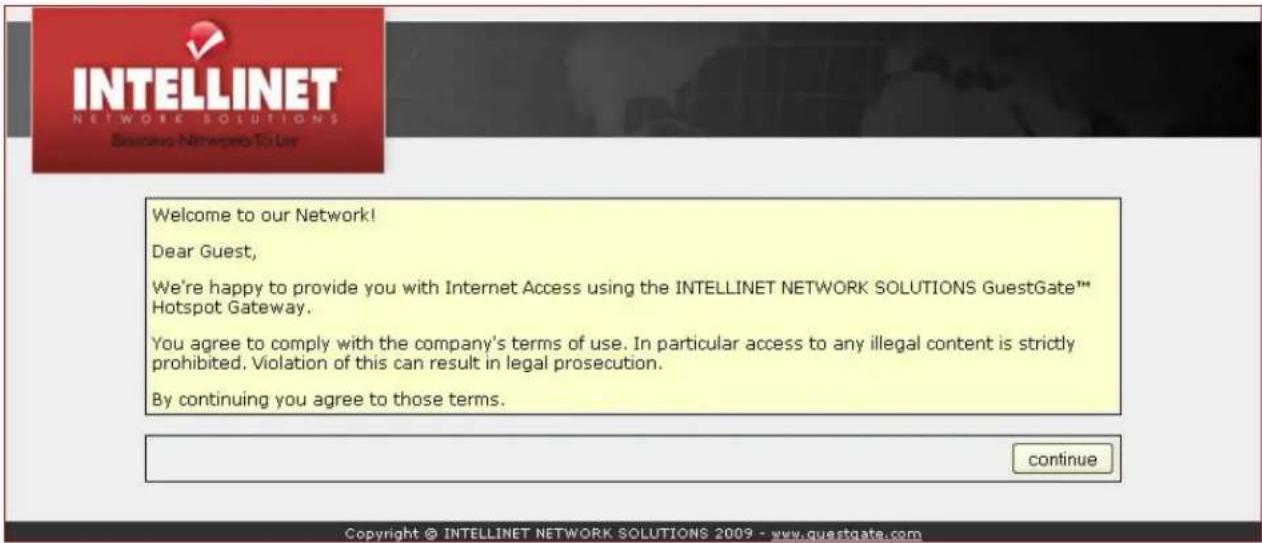
Click "continue" and you will then be forwarded to the Web page you originally entered in the Web browsers address bar.
Note:
In order to get Internet Access you must first open a Web browser and open a Web page. Other applications such as chat programs (ICQ, MSN Messenger, Skype, etc) will not be able to connect to the Internet unless the welcome page has been confirmed in the Web browser.
4. Accessing the Administrator Web Interface from the Host Network
A. Connect to the router (DHCP Server) in your network and open the DHCP client log of the router. Connect GuestGate's Host port to one of the router's LAN ports and power-on GuestGate. Wait about 30 seconds, and then refresh the DHCP client log in the router. The last entry (the newest) belongs to GuestGate.
Below is an example of a DHCP Log File:
| IP Address | MAC Address | Time Expired(s) |
| 192.168.0.100 | 00:50:fc:be:48:58 | 169576 |
| 192.168.0.101 | 00:0f:a3:1d:a3:da | 114749 |
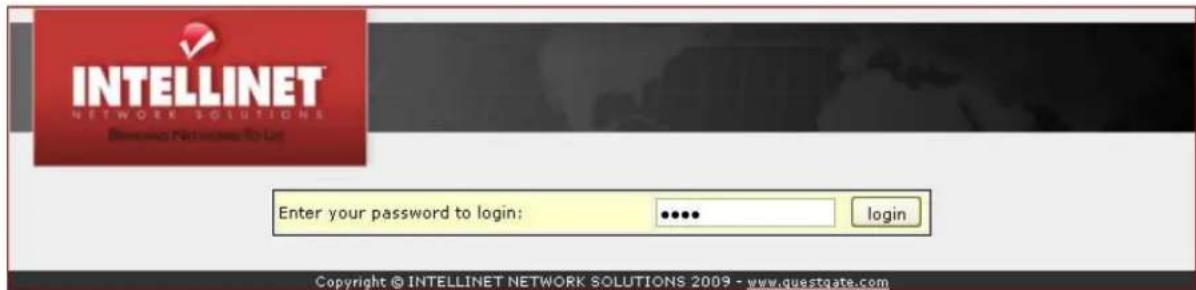
B. Launch your Web browser and open the IP Address shown in the DHCP client log. You will then see the Administrator Web Interface.
The default password is 1234.
Note: If this procedure does not work you can configure your PC with a static IP address of 192.168.2.xxx, disconnect GuestGate from the router and connect your computer directly to the host port. Power-on GuestGate and wait about 1 minute until the Power LED stops blinking, then open GuestGate's default IP address 192.168.2.1 with the Web browser. Refer to the chapter "Advanced Setup" for more information.
5. Changing Administrator Password
For security reasons it is recommended to change the administrator password of GuestGate. Follow the steps below to change the password.
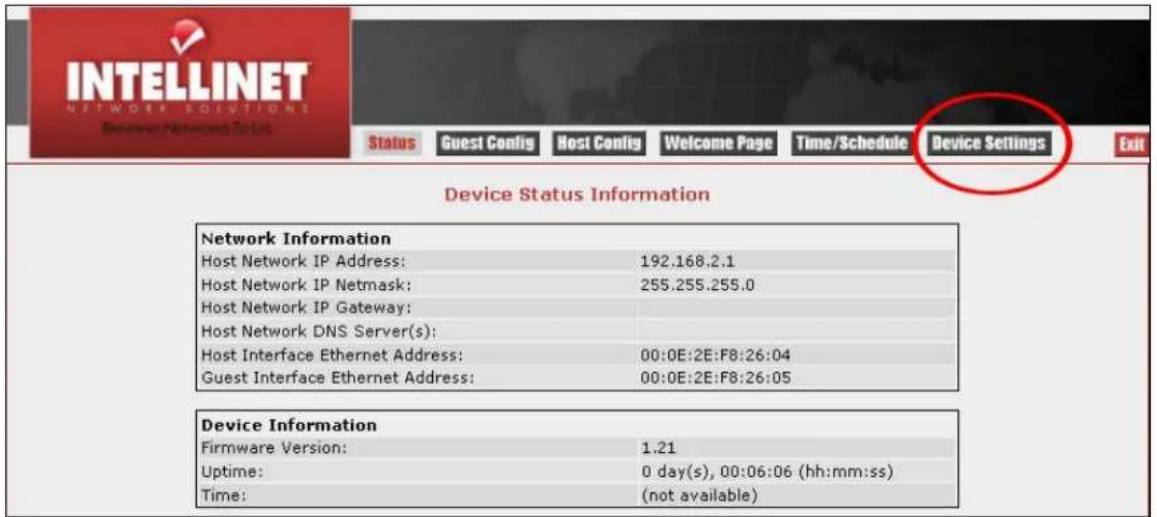
Click on "Device Settings".
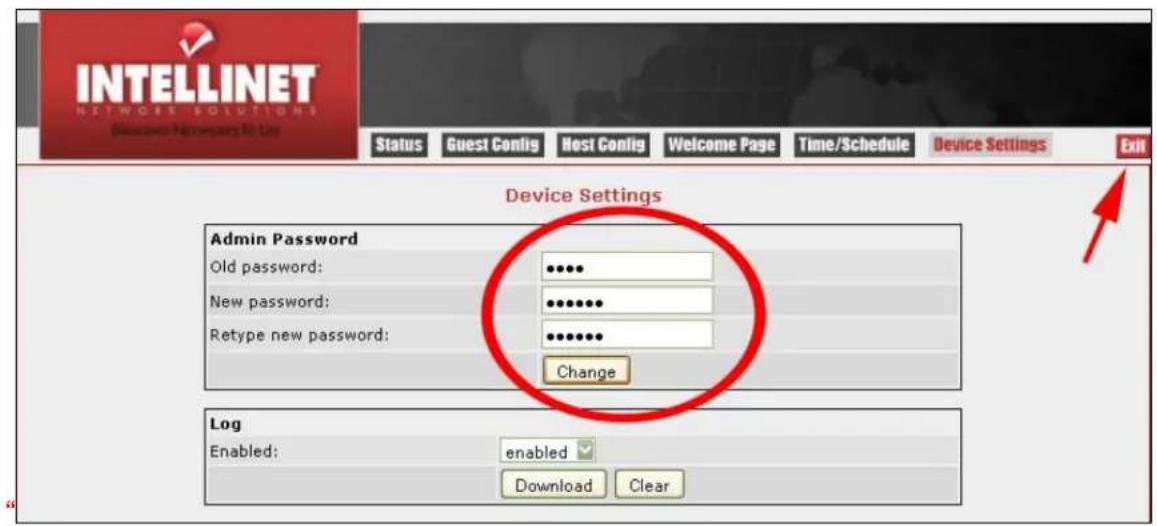
Enter the old password 1234.
Enter a new password (up to 20 characters long).
Retype the new password.
Click "Change".
Click on "Exit" (upper right corner).
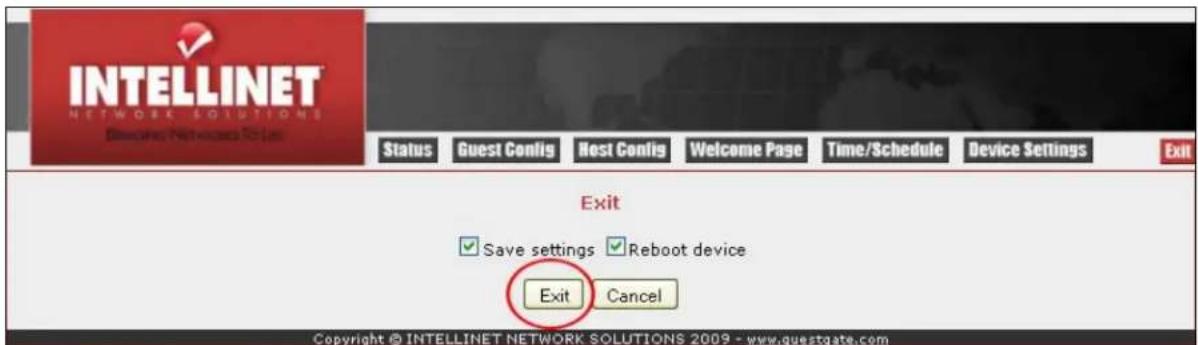
Check "Save settings". Check "Reboot device".
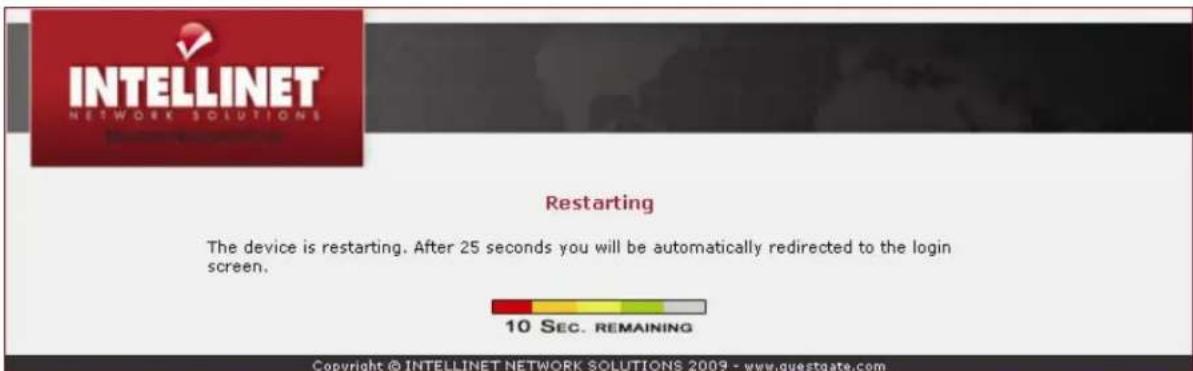
GuestGate now reboots. This step takes about 25 seconds. After the reboot you will be redirected to GuestGate's Login Page. You can now login with the new password.
NOTE:
The interface is designed to let you make changes on all configuration screens without saving each change individually. Once you are done programming GuestGate, you need to click on "Exit" and reboot the device.
The changes will only take effect after GuestGate has been rebooted. Closing the Web browser without saving the configuration changes will result in a loss of the changed configuration.
If you have successfully performed the above steps you can skip the next section.
Advanced Setup
The standard installation of GuestGate bases on the assumption that a DHCP Server is present in your network. If this is not the case, you can still configure GuestGate manually. To do this you need to turn GuestGate on while it is disconnected from the network. If no DHCP Server can be found after 3 minutes, GuestGate will fall back to its default IP Address of 192.168.2.1.
Advanced setup requires:
- A network adapter correctly installed in your computer;
- User rights that allow manual configuration of TCP/IP-related settings on your PC; and
- GuestGate connected with an RJ-45 cable to the network adapter in your PC.
1. Changing the IP Address of your PC
Click on "Start" -> "Settings" -> "Control Panel."
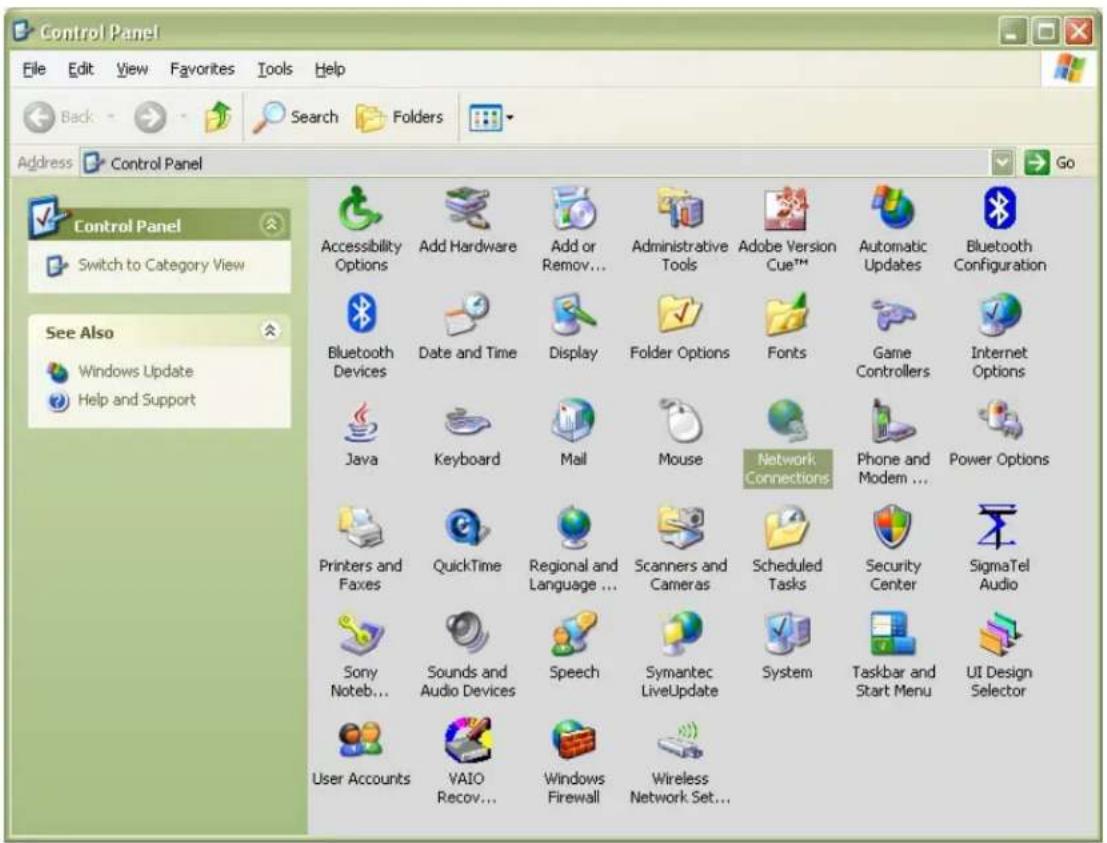
Double-click the "Network Connections" icon.
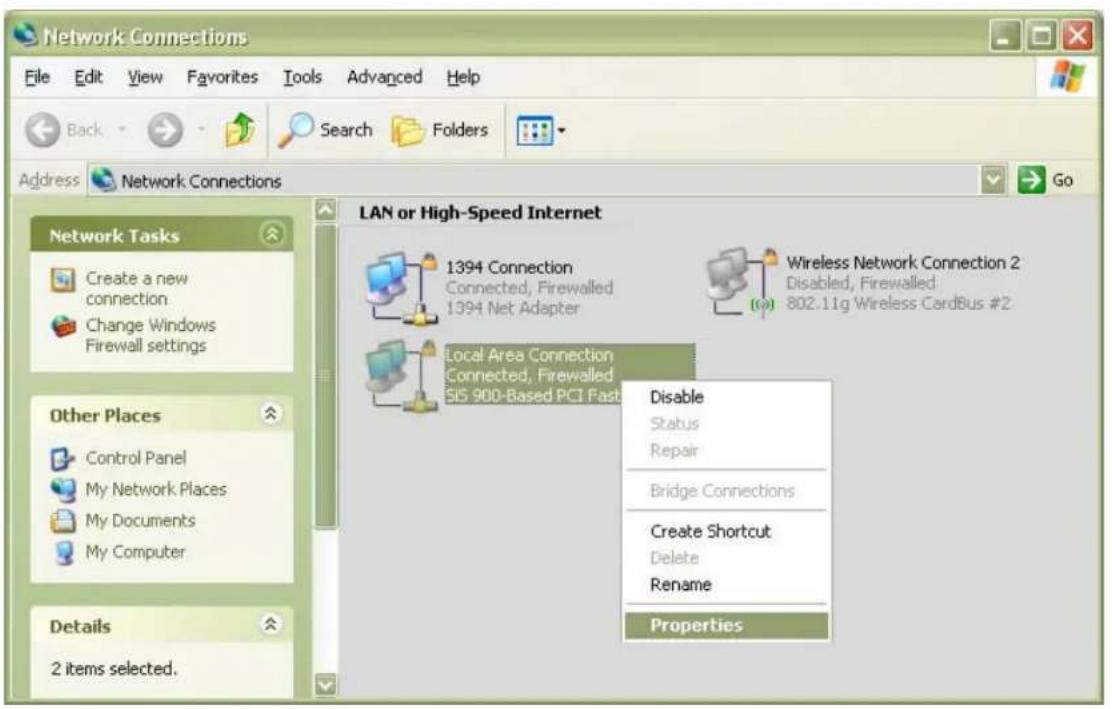
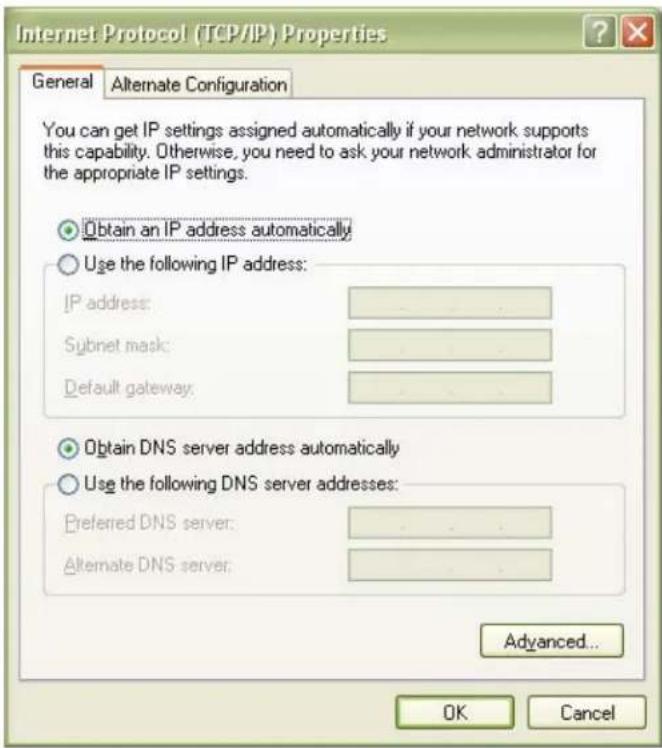
Right-click the "Local Area Connection" icon and select "Properties" from the context menu. In the "Local Area Connection Properties" window, highlight "Internet Protocol (TCP/IP)" and click on "Properties".
When the "Internet Protocol (TCP/IP) Properties" window opens, you need to make the changes as shown below.
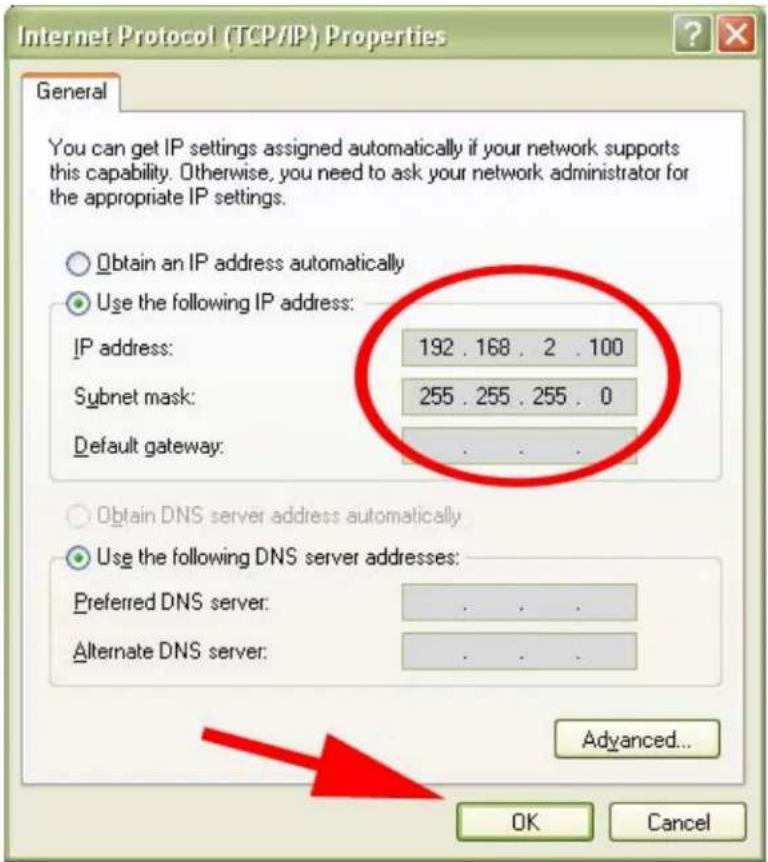
Click "OK" when done.
Close the previous Windows by clicking "OK" as well.
The TCP/IP settings of your system are now compatible to GuestGate.
2. Connecting to GuestGate via a Web Browser
Start your Web browser and open the address http://192.168.2.1.
The Administrator Web Interface Login Screen then appears.
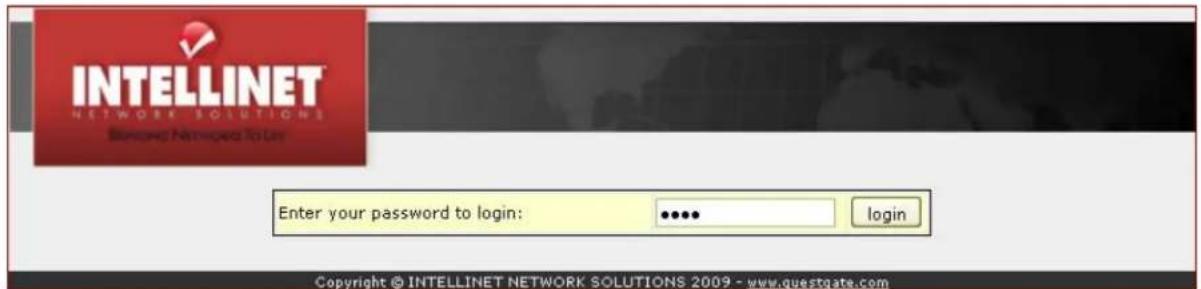
Enter the password 1234 and click "login".
NOTE:
At this point, it is recommended that you change the administrator password as described in the previous section.
3. Host Configuration
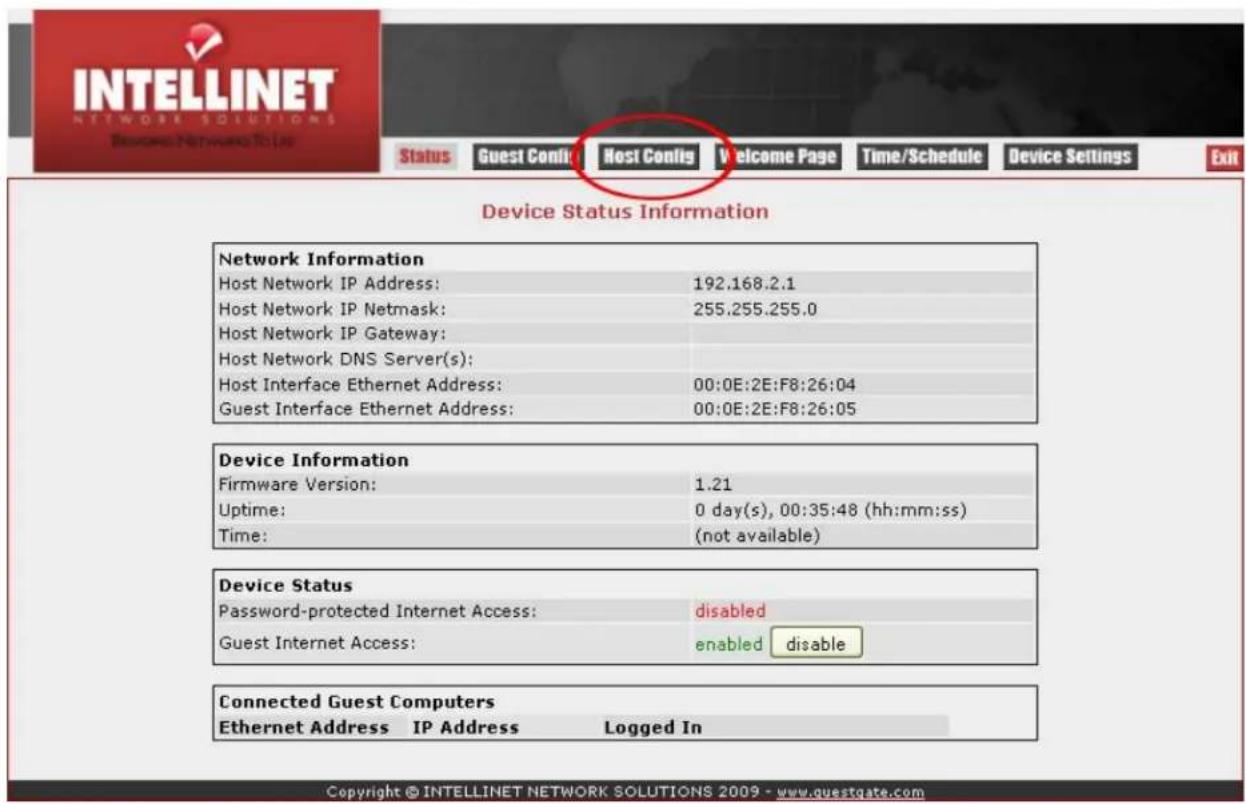
Click on "Host Config".
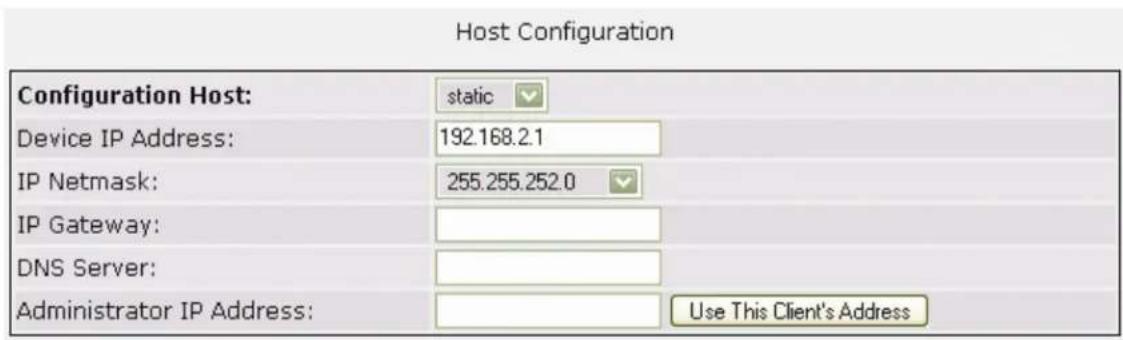
Configuration Host:
With the Configuration Host window displayed, specify the device IP address, IP netmask, IP gateway (Internet connection gateway, router) and DNS server.
Device IP Address:
A free IP Address in your network. This is the IP Address you assign to GuestGate.
IP Netmask:
Enter the same netmask (or subnet mask) you use in your network.
IP Gateway:
The IP address of your Internet gateway (such as a router).
DNS Server:
Domain name service as required by your ISP. You can add multiple DNS servers by separating the different entries with a space.
Administrator IP Address:
When specified, only this IP address is allowed to connect to the administrator interface of GuestGate. The function "Use this client's IP address" automatically populates the field with the IP address of the computer currently used to connect to the administrator menu.
When you are done click on "Exit" (upper right corner).
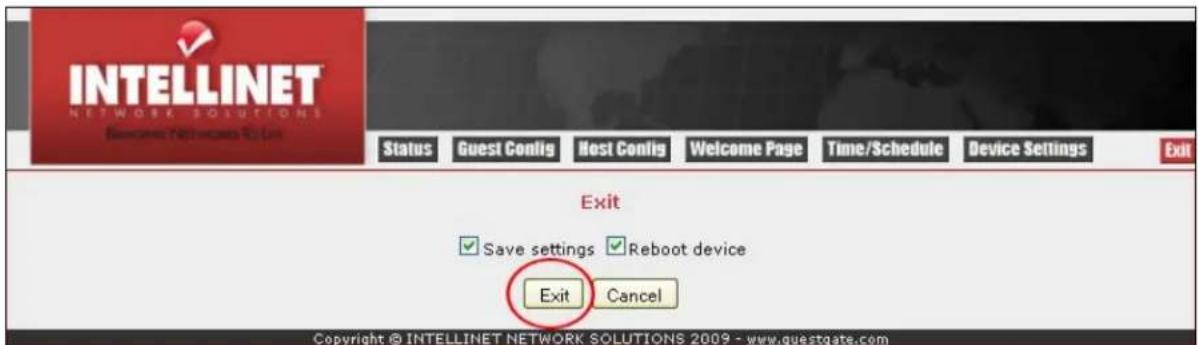
Click on "Exit" to save the configuration and restart GuestGate.
CONFIGURATION OPTIONS of GuestGate
Status Screen
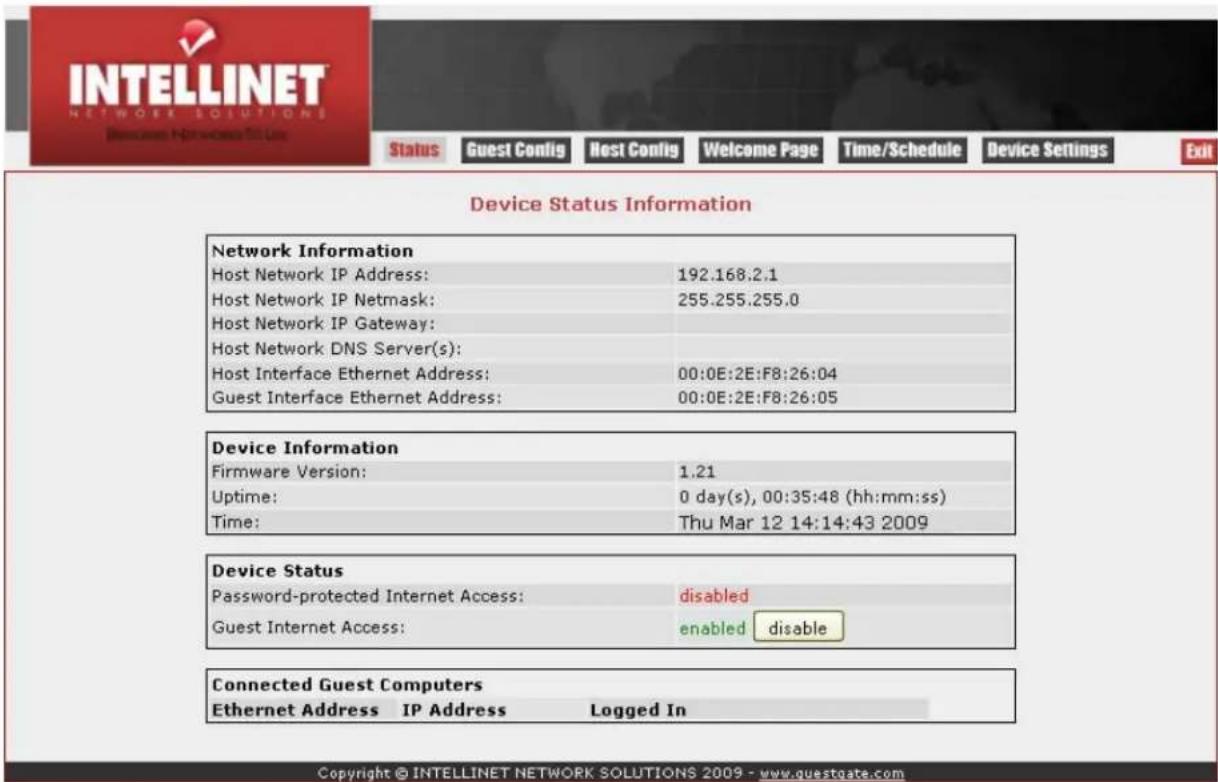
The Status Screen shows three types of information:
-
Network Information: Basic information about the host network interface.
-
Device Information: Display of the current firmware version, the system's uptime and the system time.
3. Device Status
Displays the status of the password-protected Internet access (“disabled” = no password required) and the status of the Internet access (“enabled” = access to the Internet is active).
4. Connected Guest Computers
GuestGate shows all of the connected guest computers, including the MAC address, the assigned IP address and the connection time. Click on "Details" to view individual statistics for each connected PC, including the bandwidth consumed (Mbytes). Click on "Disconnect" to terminate the connection of the selected computer.
| Connected Guest Computers | |||
| Ethernet Address | IP Address | Logged In | |
| 00:19:d2:7b:db:f0 | 10.69.23.10 | 0 day(s), 00:00:25 (hh:mm:ss) | Disconnect Details |
| 00:23:4e:92:b4:39 | 10.196.249.130 | Disconnect Details | |
Guest Configuration Screen
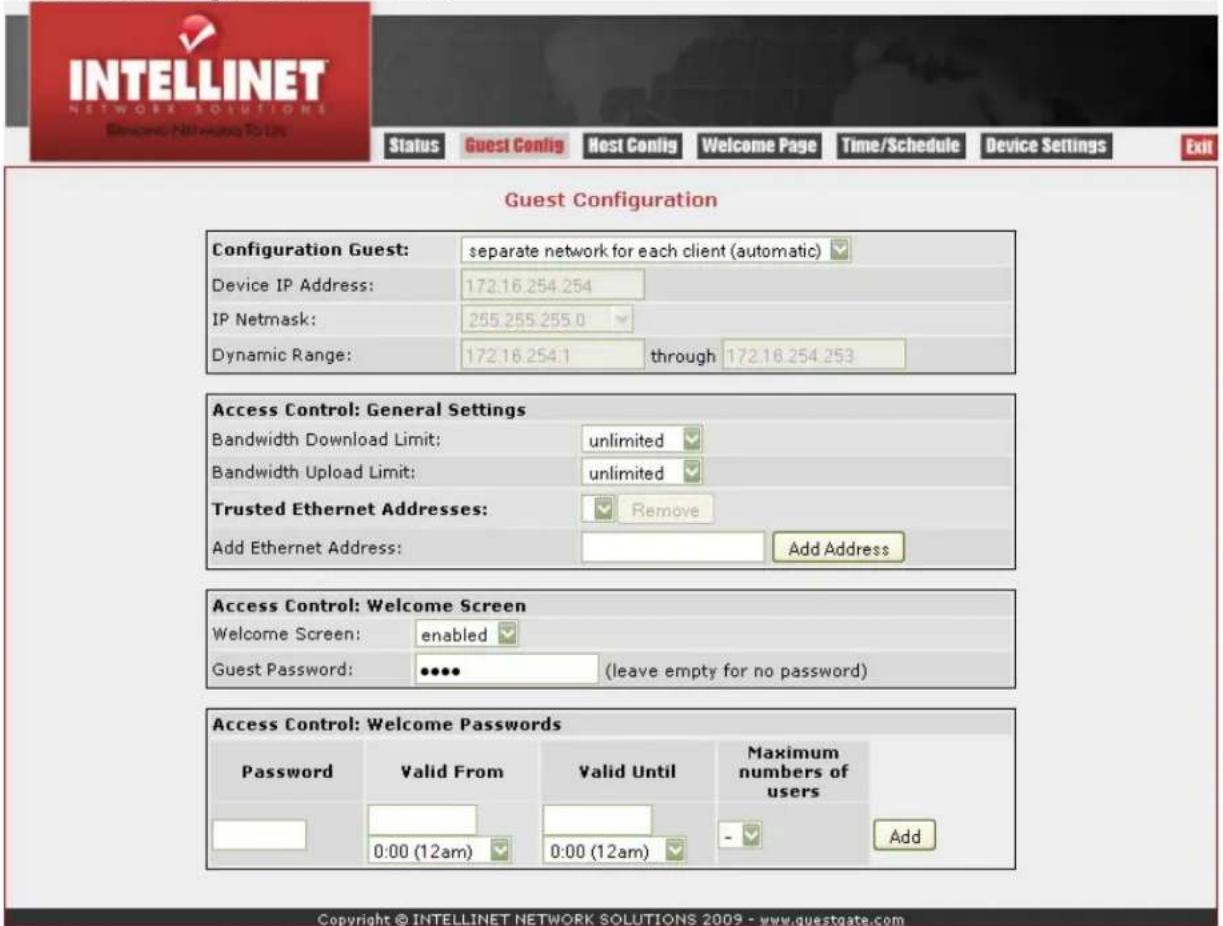
This page shows the configuration options for the connected guest computers.
1. Configuration Guest
Option "separate network for each client (automatic)"
This operational mode is called "Layer 3 Client Isolation". If this option is activated, GuestGate randomly assigns different networks to each connected guest computer. This option should be activated if you want to prevent guest computers from seeing and accessing each other (Layer 3 Client Isolation = on). It is activated by default.
Option "same network for all clients (automatic)"
GuestGate automatically assigns IP addresses to the guest computers. All guest computers operate in the same network (Layer 3 Client Isolation = off).
Option "same network for all clients (enter manually)"
If this option is enabled you can manually define the network for the connected guest computers (Layer 3 Client Isolation = off). To do that, you need to
2. Access Control: General Settings
Control the bandwidth and trusted Ethernet addresses.
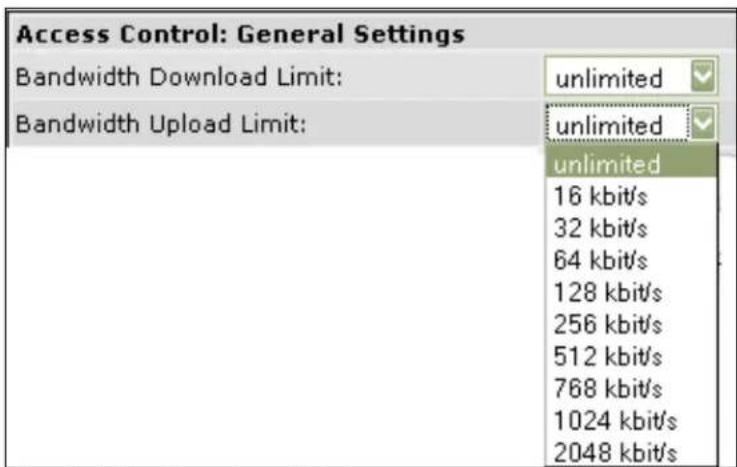
Bandwidth Download Limit
Control the maximum download speed available for the connected guest computers. Available options are from 32 kbps (kilo bit per second) up to 2048 kbps (= 2 Mega Bit per second). Default = unlimited.
Bandwidth Upload Limit
Bandwidth control for the upload speed (sending files to the Internet), with options the same as above.
Trusted Ethernet Addresses
If you wish to permanently authenticate a guest computer, you can add its MAC address to GuestGate's configuration. GuestGate will not show the welcome page to any computer that has been entered here.

Enter the MAC address of the computer as shown above. The syntax is xx:xx:xx:xx:xx:xx. Click "Add Address" to save the MAC Address. Repeat these steps for additional MAC addresses. In order to delete a MAC address from the configuration, select the entry from the drop-down list and click on "Remove".

You can obtain the MAC Address of a connected computer from the GuestGate Status screen, or you can perform the following steps (example: Windows 2000/XP/Vista):
Click on START -> RUN
Type in: cmd
Press Enter.
At the DOS Command prompt type: ipconfig/all and press Enter.
Example Output:
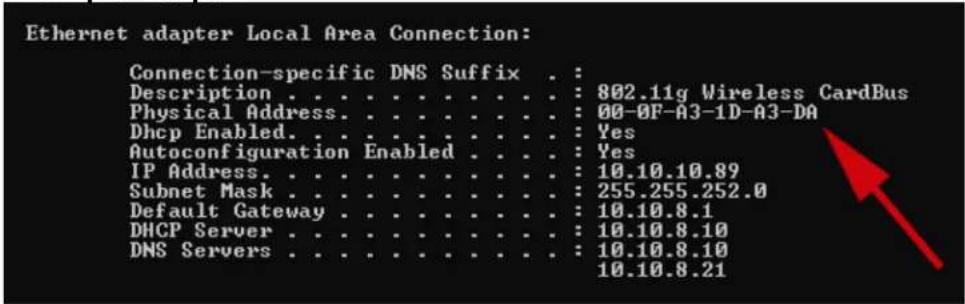
The PHYSICAL ADDRESS is the MAC Address which needs to be entered in the configuration of GuestGate.
The format is: xx:xx:xx:xx:xx:xx
(not xx-xx-xx-xx-xx-xx)
3. Access Control: Welcome Screen
Welcome Screen
Enable or disable the welcome page for guests. (Default = enabled.) If this parameter is set to "disabled", all guest users can access the Internet freely. No welcome page is displayed, even if a guest password is defined below.
Guest Password
If you require your guests to enter a password to access the Internet, you can define it here. If left empty, no password is required (default = no password). This is the global password that can be used by any guest; it is not an individual user password. The password option is only active, if the Welcome Screen is set to “enabled” (see above).
4. Access Control: Welcome Passwords
Set up individual user passwords that are only valid for a certain time period and can be used by a defined number of computers simultaneously. The example below shows a password “test” that is valid from “03/12/2009, 12 pm” until “03/13/2009, 6 pm”. The password can be used by five users simultaneously.
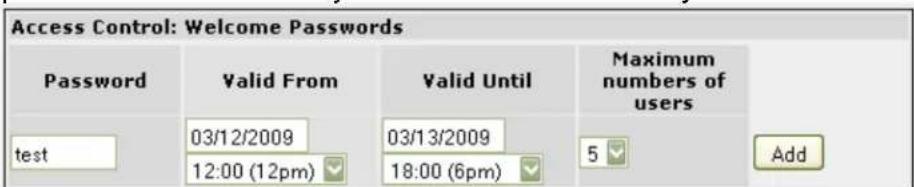
Up to nine users can use the same password. The amount of user passwords is limited by available memory in GuestGate, but should ideally not exceed 20.
Host Configuration Screen
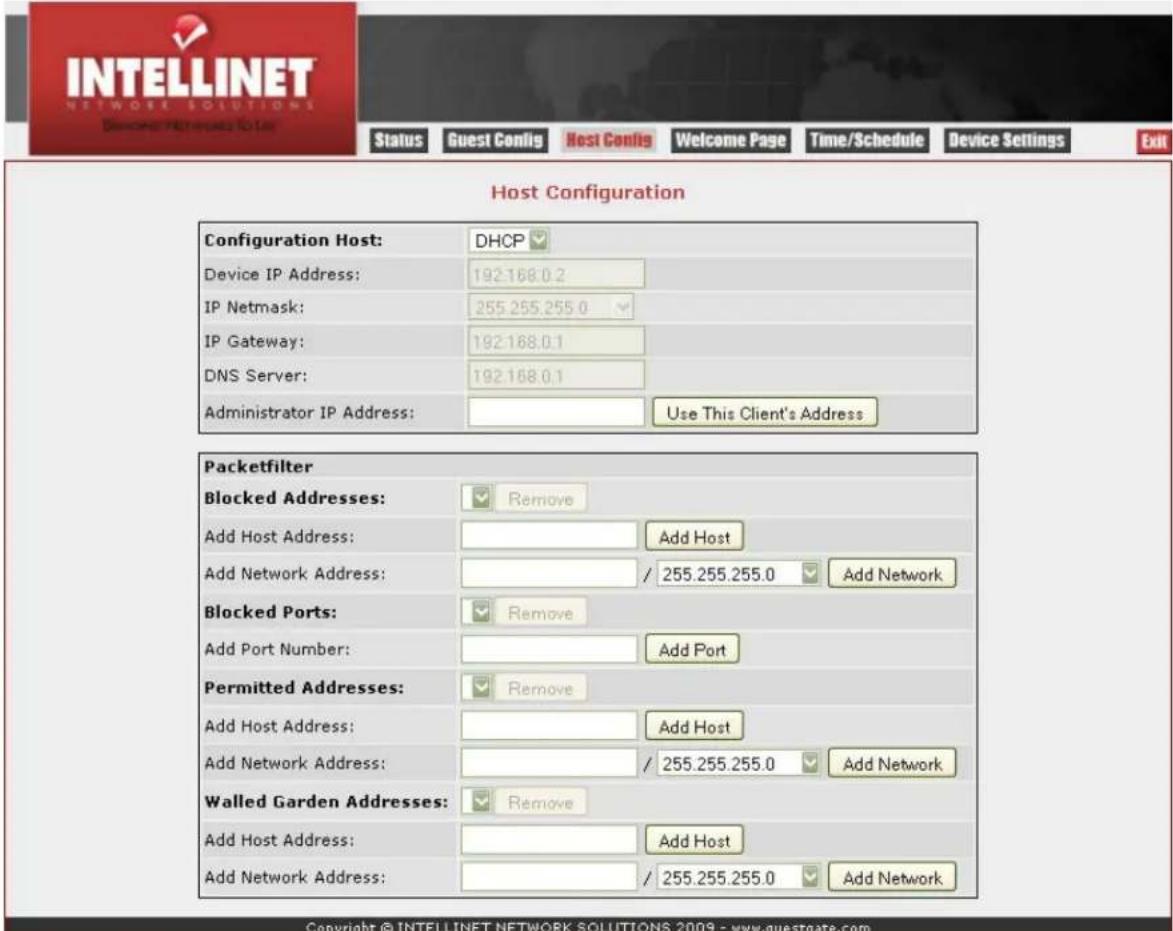
This page shows the configuration options for the Host Interface of GuestGate.
1. Configuration Host
Option "dhcp"
GuestGate automatically receives the IP address, netmask, gateway and DdNS server information from the DdHCP server in your network, typically a router.
Option "static"
In larger networks, a manual configuration of the IP settings may be necessary. Select "static" and enter the IP address, netmask, gateway IP address and DNS server IP addresses manually. Multiple DNS Servers can be entered by separating them with a space, i.E. 111.222.333.444 999.888.777.666.
Administrator IP Address:
Restrict access to GuestGate's administration menu to the IP address you enter in this field. This can be any local or public IP address.
2. Packet filter
Blocked Addresses
If you which to block certain IP Addresses, Domain Names or an entire network you can enter this here. “Add Host Address” is used to enter domain names such as guestgate.com or intellinet-network.com.
Enter the domain name and click on "Add Host". Repeat the steps to block additional domains.
| Blocked Addresses: | thepiratebay.org | Remove |
| Add Host Address: | mininova.org | Add Host |
"Add Network Address" is used to enter an IP Address. To specify the range you can select the appropriate network mask from the drop down list. If you wish to delete a blocked address, select it from the drop-down list and click "Remove".
Blocked Ports
This option lets you specify which outgoing TCP/IP Ports you wish to block. Enter the port number and click on "Add Port". GuestGate blocks both TCP and UDP protocols. A list of common service ports can be found in chapter -> APPENDIX at the end of the document. If you wish to remove a port simply select the desired port from the drop down list and click on "Remove".
Note: You can only add and remove single ports. Port ranges are not supported.
Permitted Addresses
By default GuestGate blocks access to all PCs in the Host network. This function lets you define exceptions.
Add Host Address: Enter a single IP Address, e.g. the IP address of your Intranet Web server and click on "Add Host". Repeat this step if you wish to enter more IP addresses.
| Permitted Addresses: | 192.168.2.50 | Remove |
| Add Host Address: | 192.168.2.51 | Add Host |
The example above shows that access to IP addresses 192.168.2.50 is allowed. IP address 192.168.2.51 will be allowed as soon as "Add Host" is clicked.
Add Network Address: Enter an IP address and a subnet mask to define a range of IP addresses permitted to your guests. For example, if you wish to allow access to the entire host network, you can do that by quickly by using this function.
| Permitted Addresses: | Remove | |
| Add Host Address: | Add Host | |
| Add Network Address: | 192.168.2.1 | / 255.255.255.0 Add Network |
The example above shows how to allow access to the entire network range from 192.168.2.1 to 192.168.2.254.
Walled Garden Addresses
You can grant an unauthenticated user limited access to Web sites, both external and internal, using the Walled Garden function. In a scenario, where a password is required in order to access the Internet, a guest normally would not be able to access any web site. Any attempt of doing so would result in the display of the welcome page with the request to enter a valid password – as shown below:
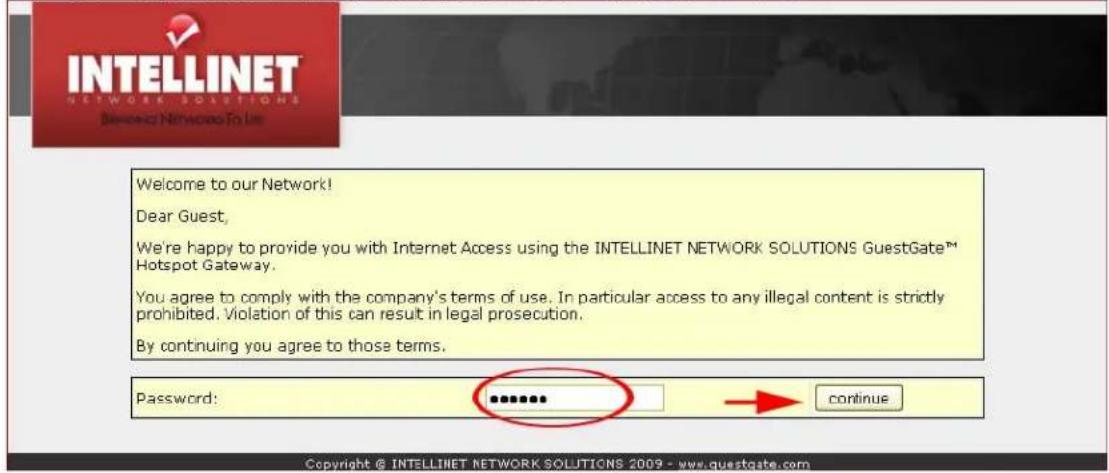
Using Walled Garden in combination with a custom welcome screen (see next section) you can now allow your guests to access web sites of your choosing without providing a password. The welcome page could look like this:
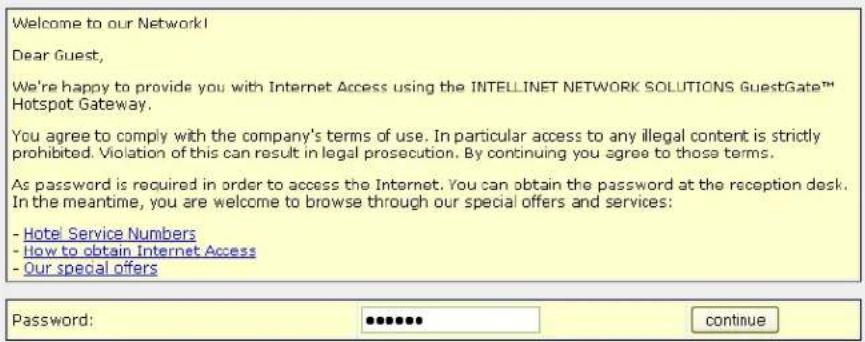
You need to enter the URLs and IP addresses your guests can access without providing a password in the Walled Garden configuration.

Add Host Address: Enter any web site URL you wish to include in the Walled Garden. Click "Add Host" to add the URL to the setup.
Add Network Address: In addition to URLs, you can also add IP addresses to the Walled Garden setup. Specify the IP address and the subnet mask and click on "Add Network" to add the IP address range to the setup.
In order to remove a Walled Garden address, select the URL from the drop-down list and click "Remove".
Welcome Screen Configuration
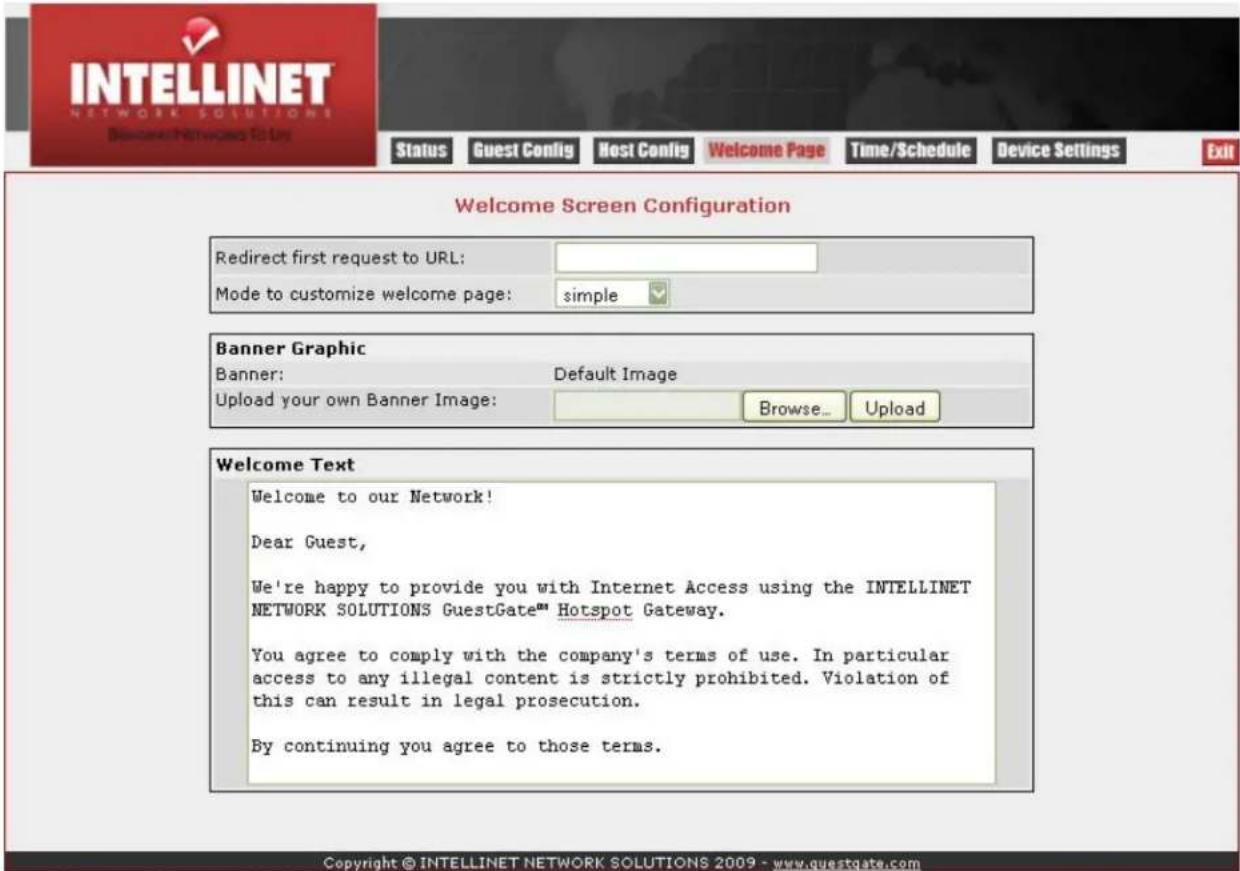
This page shows the Welcome Screen configuration options of GuestGate.
1. Redirect first request to URL:
When a guest connects to GuestGate for the first time, GuestGate can redirect the guest to a web page you want them to see, e.g., a page displaying special offers or advertising. The redirect URL is entered without HTTP://.
Example: www.guestgate.com
GuestGate redirects any guest to the GuestGate web page.
2. Mode to customize welcome page:
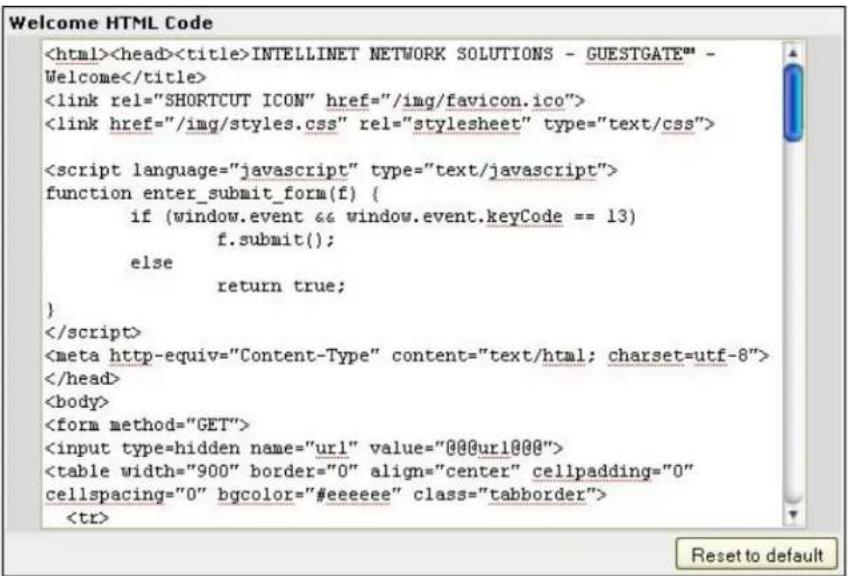
There are two values to choose from: "simple" and "advanced". In simple mode you can change the welcome text and replace the default banner graphic, in advanced mode you have access to the entire HTML source code of the welcome page. Once you enable the advanced mode, an additional text box appears on the bottom of the page (see below: "Welcome HTML Code")
3. Banner Graphic
You can replace the default Banner Image with your own image such as the Logo of your company. Click on Browser to select the file you wish to upload. Click on "Upload" to replace the default banner image. After the upload the text "Default Image" changes into "Custom Image".
Note:
The banner image file type must be either JPG, GIF or PNG.
The banner image size must not exceed 60 Kb.
The banner image dimension is not limited, but the width should ideally not exceed 1024 pixel.
The banner image only displays on the guest welcome screen. It does not replace the banner in the administrator Web interface.
4. Welcome Text
You can overwrite the default text with your own custom text. GuestGate supports HTML tags to format your text. Below is a small selection:
<strong>bold text</strong>
<font color = red>red text</font>
<font color = #00ff00">green text</font>
<u>underlined text</u>
<u><strong><font color = red>red bold underlined text</font></strong></u>
Other HTML commands such as
5. Welcome HTML CodeWhen you enable the advanced mode, a new text box will appear. This function is designed for advanced users with knowledge about HTML programming. We don't recommend using this function, unless you know what you are doing.
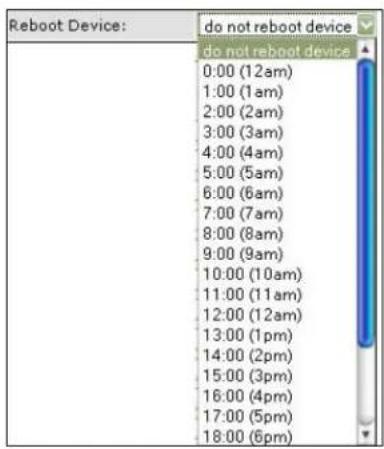
This page allows to set up the time-related settings of GuestGate. 1. Time Setup (time zone and update interval)Select the time zone in which you are located it. The update interval parameter defines, how often GuestGate re-synchronizes the internal time with the Internet time. 2. Reboot DeviceWith this parameter you can set up GuestGate to perform a scheduled restart once per day at a time of your choosing. If you have a lot of users connected to GuestGate this feature will improve overall system stability. Furthermore, you can use this feature to force all users to re-authenticate at a defined time if you so desire.
3. Internet Access Time Schedules
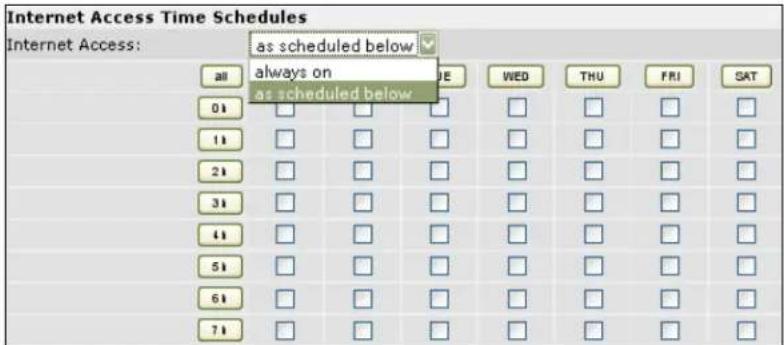
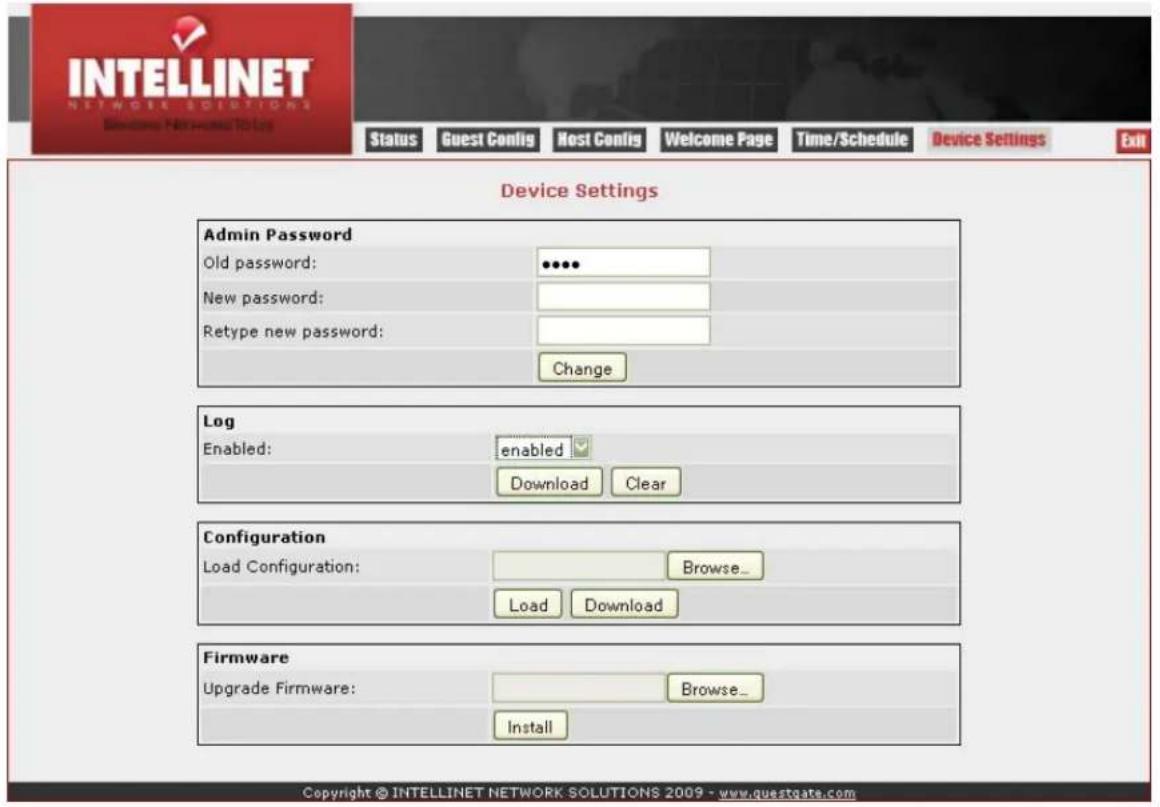
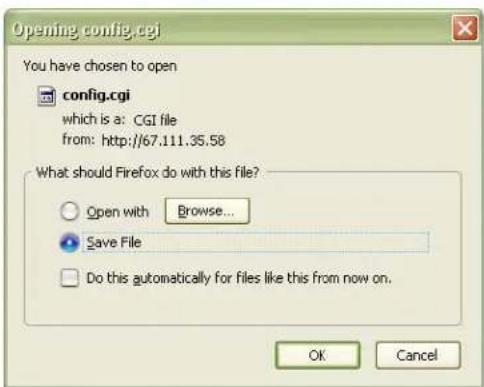
You can control whether Internet access is available all the time, or only at certain time, e.g., only during business hours. Parameter value "always on": Internet access is possible at any time and any day. There are no restrictions. Parameter value "as scheduled below": When you select this option, you can specify the days and hours at which Internet service is provided. You can click the individual fields to activate or deactivate Internet access at that time and day, or you can click on the buttons "SUN", "MON" etc to toggle access for that day. The same is possible using the buttons in front of each row. Click "4 h" to toggle Internet access for each day during the hour from 4 am to 5 am. Click on "19 h" to toggle Internet access for each day during the hour from 7 pm to 8 pm. The button "all" activates or deactivates all fields. Note:When using the scheduler function, you must make sure that GuestGate has access to an NTP server. You need to check the status page to make sure that GuestGate has retrieved a proper time. If GuestGate has not obtained a time, there will be no Internet access for any user while the scheduler is activated. Device Settings Configuration This page allows changing the administrator password, saving and restoring the configuration, upgrading the firmware and 1. Admin PasswordTo change the Administrator Password you need to enter the old password and the new password. You also must confirm the new password by retyping it. Click on "Change" to save the changes. GuestGate's default password is: 1234 The password can be up to 20 characters in lengths. 2. LogGuestGate can maintain a protocol that includes information such as the login date and time, the logout time, the IP address and the MAC address of the connected guest computer. The function must first be enabled by settings the parameter enabled to the value, you guessed it, "enabled". You can download the log at any time by clicking the "download" button. When you do, you are being presented with the following pop-up window:
Select "Save File".
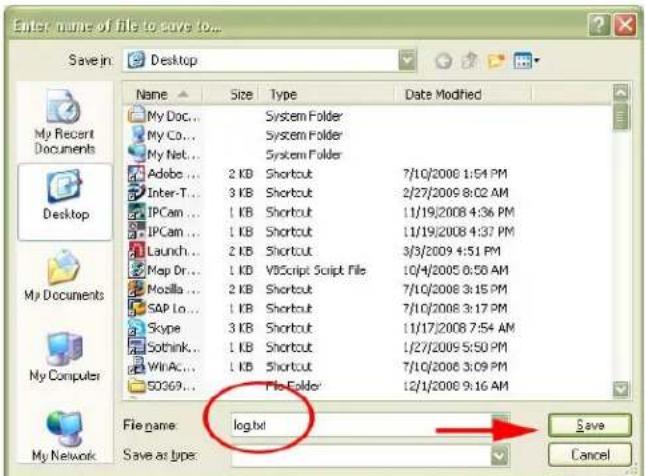
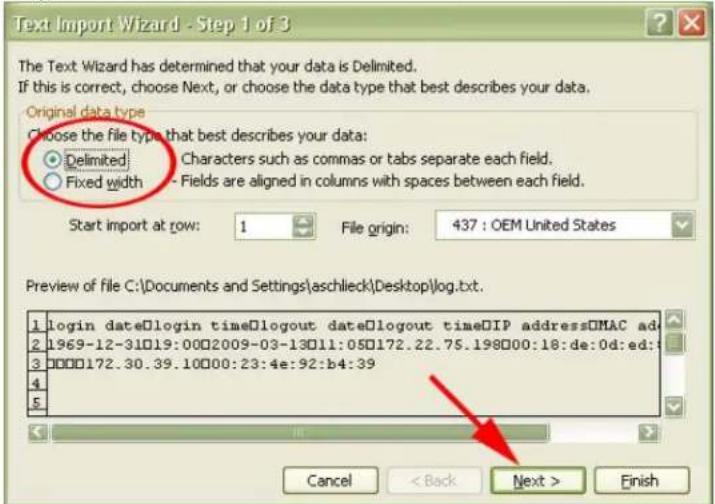
Specify the location and rename the file "config.cgi" into "log.txt". Click "Save". Start MS Excel and open the file log.txt. You'll then be presented with the Excel's Text Import Wizard.
Select "Delimited" and click "Next >".
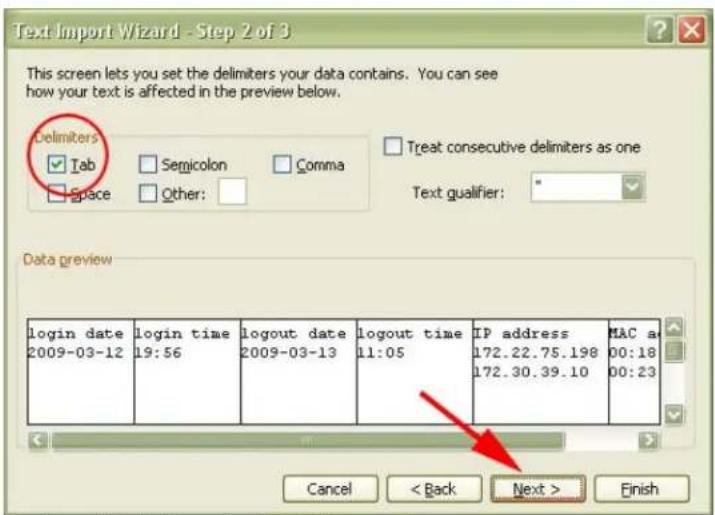
Select "Tab" and click "Next >". On the next screen you can assign different formats to the individual columns.
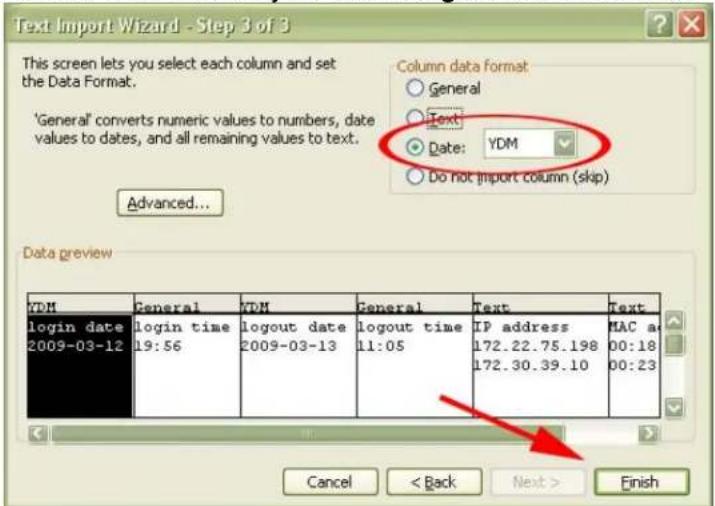
Recommended values for the "login date" and "logout date" column are "Date YDM". Click "Finish" and MS Excel proceeds to open the log file. 3. ConfigurationYou can create a backup of the configuration by clicking the "download" button. Save the file "config.cgi" to your hard drive. If you wish to reload the configuration at a later time, click "Browse …", select the previously saved file "config.cgi", and click "open". Finally, click on "Load" to restore the configuration data. 4. FirmwareRefer to the next section "Firmware Upgrade Process". Firmware Upgrade ProcessWhere to obtain a new firmware There are two ways to find out of a new firmware is available. a) Check Guest Gate's Status Page Guest Gate checks if a new firmware is available when you login to the Administrator menu. If a new version is found, a test message appears on the status screen. See example below: Device Status Information New firmware version available (Version: 1.42, Date: 2006/09/28) Click here for more information. Click on the link "Click here for more information" and you are being taken to the web page that includes information about the new firmware. b) Check the download section on http://www.guestgate.com manually. Upgrade Process: Open the Device Settings screen of the Administrator menu. Click on "Browse" to select the new firmware Image, e.g., "523240-1.22.img". Click on "Install" to begin the upgrade process. The Upgrade may take several minutes depending on your connection speed to GuestGate.
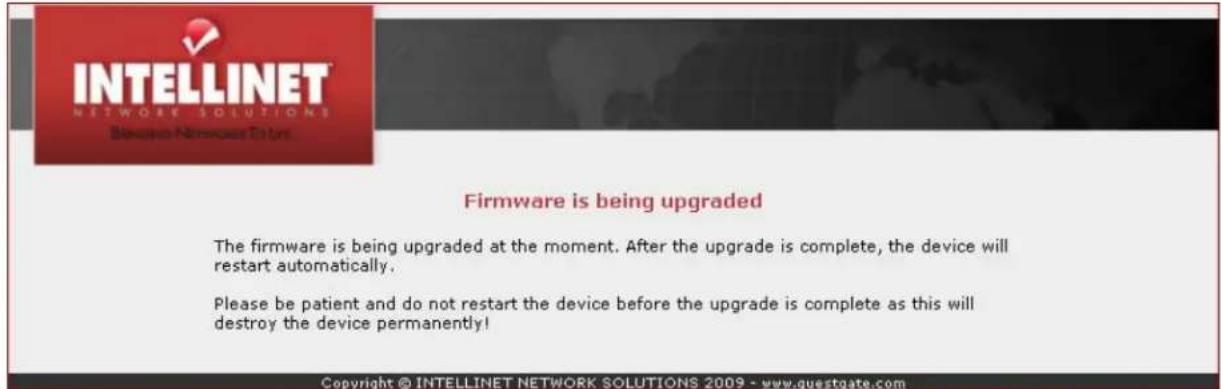
GuestGate will automatically restart after the upgrade process. After you see the restart message you need to wait one minute before you can access GuestGate again. Note: The Upgrade Process must not be interrupted!A network connection failure or a crash of your local computer during the upgrade process will result in the destruction of GuestGate. Ideally you want to perform the upgrade from within the local Host Network whenever possible. Device failures resulting from improperly performed firmware upgrades are excluded from the product warranty. Exit Screen
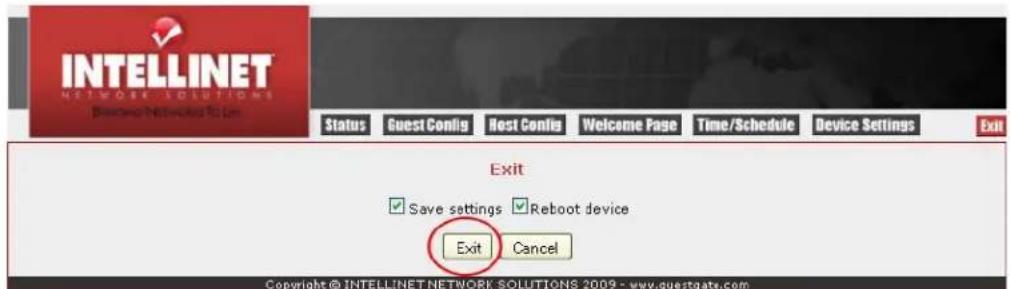
This page lets you save the new configuration. [x] Save SettingsAll changes you made to the configuration will only be memorized if you save the changes by activating this check box. If you made changes in some of the configuration screens and fail to perform this step before closing the Web browser, all changes will get lost. [x] Reboot DeviceIn order to activate the new configuration you must also check this box. Note:Saving the settings does not automatically activate them. It is necessary to reboot GuestGate for the new configuration to become active. This way you can make changes to the configuration (i.e. a new Guest Password) now and activate them at a later time. Rebooting GuestGate will also enforce a re-authentication of all connected guest computers. QUESTIONS & ANSWERS
A: The default IP address is: 192.168.2.1
A: The default password is: 1234
A: Press the reset button on the rear for 5 seconds while GuestGate is up and running.
A: You may have forgotten to save the configuration through the EXIT page of the administrator Web interface.
A: You do not need to activate any settings. GuestGate provides this functionality by default. Should a guest try to access a server or computer in your network GuestGate will deny the request displaying a warning message in the guest's Web browser window.
A: Add the IP address of your Intranet server in GuestGate's Host configuration page under 'Permit Addresses' and GuestGate will no longer block access to that server.
A: Yes. Upload and download bandwidth can be controlled in the guest configuration of the Administrator Web interface.
A: Yes. The welcome page can be changed in administrator Web interface. You can change the welcome message and upload your own banner image. In advanced mode you have access to the complete HTML source code allowing you to change the appearance of the welcome page completely.
A: Yes. GuestGate does not limit you in any way. If you are a HTML Web developer you can create an enhanced welcome page simply by pasting the HTML code into the welcome page configuration field. In advanced mode you have access to the complete HTML source code.
A: Open the welcome page configuration page and make sure the "Mode to customize welcome page" is set to "advanced". Scroll down to the text box labeled "Welcome HTML Code" and click the button "Reset to default". Save the configuration via the Exit page to activate the default welcome page.
A: No. GuestGate does not support server-side scripting.
A: This is the Layer 3 Client Isolation function of GuestGate. If this option is activated GuestGate will prevent the connected guest computers from accessing each other by assigning random TCP/IP network settings to the guest computers. This way each Guest operates in its own “Virtual LAN”. The two examples below illustrate how it works:
Guest computer 1 receives IP address 172.16.254.253. Guest computer 2 receives IP address 172.16.254.252. Guest computer 3 receives IP address 172.16.254.251. [...] In this mode all guest computers operate in one network and are therefore able to access each other. This is the standard mode of virtually any router and DHCP server on the market.
Guest computer 1 receives IP address 192.168.17.42. Guest computer 2 receives IP address 172.16.25.12. Guest computer 3 receives IP address 10.10.8.178. Guest computer 4 receives IP address 10.10.4.18. Guest computer 5 receives IP address 192.168.8.178. [...] In this mode each guest computer operates in its own network and therefore can not access any other device except for the Internet. Since this function is random it is next to impossible for an attacker to know or guess which IP addresses the other guests have been assigned making a hacking attempt more difficult. If you are concerned with the security of your guests or are worried about potential liability issues you should activate this option (it is activated by default).
A: Only once. As long as GuestGate is not restarted and the guest remains connected to GuestGate, the guest will never again be prompted to enter the password and agree to your terms and conditions. If the guest disconnects from GuestGate for a period of 10 minutes or more, the welcome page will be displayed again the next time the guest tries to access the Internet.
A: That is because by default Layer 3 Client Isolation is activated. You need to disable it to allow network communication between the connected guest computers. See question 12.
A: No. For security reasons this is not possible. Access to the administrator menu can only be gained through the host port.
A: No. Opening ports to connected computer, as you can do with any standard router (virtual server / port forwarding), is not possible with GuestGate for security reasons.
A: No, that is not possible. See the previous question.
A: GuestGate cannot access the pool time servers on the Internet and is therefore unable to receive a valid system time. The most likely cause for this problem is that a Firewall located in the Host network may be blocking outgoing Network Time Protocol (NTP) requests. The system administrator must open the ports required for this service (port 123 for both TCP and UDP). It is important to take care of this problem, especially if you use the “Time / Scheduler” function to control, when Internet access is allowed.
A: The bandwidth control limits to bandwidth that GuestGate can use, regardless of how many guest users are connected to the device. SERVICE & SUPPORTAdditional information about GuestGate is available on the Web at www.guestgate.com On this page you can:
SPECIFICATIONS• Guest Network: 1 x 10/100Mbps RJ45 Port APPENDIXBelow you can find a list of common TCP/IP Service Ports. These ports can be entered in the HOST CONFIGURATION of GuestGate to block access to certain services. Port Number Service Name / Description
INTELLINET™NETWORK SOLUTIONS BRINGING NETWORKS TO LIFE INTELLINET NETWORK SOLUTIONS™ offers a complete line of active and passive networking products. Ask your local computer dealer for more information or visit www.intellinet-network.com Copyright © INTELLINET NETWORK SOLUTIONS All products mentioned are trademarks or registered trademarks of their respective owners. |

- INTELLINET
- FCC REGULATORY STATEMENTS
- ELECTROMAGNETIC COMPATIBILITY (EMC)
- SAFETY
- RADIO TRANSMISSION REGULATORY INFORMATION
- TABLE OF CONTENTS
- INTRODUCTION 4
- INSTALLATION OF GUESTGATE 9
- CONFIGURATION OPTIONS OF GUESTGATE 19
- QUESTIONS & ANSWERS 35
- SERVICE & SUPPORT 38
- SPECIFICATIONS 39
- APPENDIX 40
- INTRODUCTION
- FUNCTION DESCRIPTION
- INTERNET ACCESS FOR GUESTS
- PASSWORD PROTECTED INTERNET ACCESS FOR GUESTS
- CONFIGURABLE WELCOME SCREEN FOR YOUR GUESTS
- IP PNP
- BANDWIDTH CONTROL
- LAYER 3 CLIENT ISOLATION FUNCTION
- PACKET FILTER
- 4 PORT 10/100 AUTO SENSING LAN SWITCH
- WEB-BASED ADMINISTRATOR INTERFACE
- FIRMWARE UPDATES VIA WEB BROWSER
- INSTALLATION EXAMPLES
- GUESTGATE IN A SOHO NETWORK ENVIRONMENT
- GUESTGATE IN A SMB ENVIRONMENT
- GUESTGATE FUNCTION BASICS
- PORTS
- HOST PORT
- GUEST PORTS
- GUEST PORTS WITH LAYER 3 CLIENT ISOLATION ENABLED
- TIME / SCHEDULER
- ACCESSING THE ADMINISTRATOR WEB INTERFACE
- INTERNET ACCESS FOR GUESTS AND WELCOME PAGE
- INSTALLATION OF GUESTGATE
- RECOMMENDED SETUP
- CONNECTION TO THE HOST NETWORK
- CONNECTION OF GUESTS
- TESTING INTERNET ACCESS
- NOTE
- ACCESSING THE ADMINISTRATOR WEB INTERFACE FROM THE HOST NETWORK
- CHANGING ADMINISTRATOR PASSWORD
- ADVANCED SETUP
- ADVANCED SETUP REQUIRES
- CHANGING THE IP ADDRESS OF YOUR PC
- CONNECTING TO GUESTGATE VIA A WEB BROWSER
- HOST CONFIGURATION
- CONFIGURATION HOST
- DEVICE IP ADDRESS
- IP NETMASK
- IP GATEWAY
- DNS SERVER
- ADMINISTRATOR IP ADDRESS
- CONFIGURATION OPTIONS OF GUESTGATE
- DEVICE STATUS
- CONNECTED GUEST COMPUTERS
- CONFIGURATION GUEST
- ACCESS CONTROL: GENERAL SETTINGS
- BANDWIDTH DOWNLOAD LIMIT
- BANDWIDTH UPLOAD LIMIT
- TRUSTED ETHERNET ADDRESSES
- EXAMPLE OUTPUT
- ACCESS CONTROL: WELCOME SCREEN
- WELCOME SCREEN
- GUEST PASSWORD
- ACCESS CONTROL: WELCOME PASSWORDS
- OPTION "DHCP
- OPTION "STATIC
- BLOCKED ADDRESSES
- BLOCKED PORTS
- PERMITTED ADDRESSES
- WALLED GARDEN ADDRESSES
- WELCOME SCREEN CONFIGURATION
- REDIRECT FIRST REQUEST TO URL
- MODE TO CUSTOMIZE WELCOME PAGE
- BANNER GRAPHIC
- WELCOME TEXT
- WELCOME HTML CODE
- TIME / SCHEDULER CONFIGURATION
- TIME SETUP (TIME ZONE AND UPDATE INTERVAL)
- REBOOT DEVICE
- INTERNET ACCESS TIME SCHEDULES
- ADMIN PASSWORD
- LOG
- CONFIGURATION
- FIRMWARE
- FIRMWARE UPGRADE PROCESS
- THE UPGRADE PROCESS MUST NOT BE INTERRUPTED
- EXIT SCREEN
- [X] SAVE SETTINGS
- [X] REBOOT DEVICE
- QUESTIONS & ANSWERS
- SERVICE & SUPPORT
- SPECIFICATIONS
- APPENDIX
- INTELLINET™
Brand : Intellinet
Model : 523240
Category : Regulator