OneStream G - Uncategorized Imagicle - Free user manual and instructions
Find the device manual for free OneStream G Imagicle in PDF.


User questions about OneStream G Imagicle
0 question about this device. Answer the ones you know or ask your own.
Ask a new question about this device
Download the instructions for your Uncategorized in PDF format for free! Find your manual OneStream G - Imagicle and take your electronic device back in hand. On this page are published all the documents necessary for the use of your device. OneStream G by Imagicle.
USER MANUAL OneStream G Imagicle
text_image
telecomFM
natural_image
Illustration of digital communication with landline, telephone, and earphones over a cityscape at night (no text or symbols)OneStream Programming Guide
Version 5
Document Control
| Date | Document Version | Change | Authority |
| Oct 2006 Draft 1 First Draft Release of Document | |||
| Jan 2007 Draft 2 Added Status web page | |||
| May 2007 3 Added Flexible / Failover Routing | |||
| Jan 2008 4 Added OneStream Versions | |||
| Feb 2008 5 Added Virtual Extensions / s routing | |||
EC Declaration of Conformity
EC Declaration Of Conformity to R & TTE Directive 1999/5/EC
Manufacturer: TelecomFM Development Ltd
| 895 | Plymouth | Road |
| Slough | ||
| Berks | ||
| SL1 | 4LP | |
| U | K |
Product/Apparatus: Onestream
Type Number: FX
Declaration
I declare that above product conforms to all the applicable requirements of EU Directive1999/5/EC and is CE-marked accordingly:
Article 3.1a: EN 60950-1:2001 LVD Directive EN 50392:2002 RF Exposure Evaluation
Article 3.1b: EN 301 489-7 V1.2.1 & EN 301 489-1 V1.6.1
Article 3.2: EN 301 511 V9.0.2
Guarantee
The OneStream is supplied with a 1-year return to base warranty which covers any defect in design or manufacture. No other warranties whatsoever are given.
If a faulty unit is required to be returned within the terms of the warranty a completed Returns Form (p.12) of Installation & user guide and must be returned with the faulty unit.
TelecomFM shall accept no liability for any error or damages of any kind resulting from the use of this document or the equipment it relates to.
No responsibility is assumed by TelecomFM for the use or reliability of the OneStream when used in a situation or with other equipment not supplied or specified by TelecomFM.
The wording in this document may change from time to time. Please refer to the TelecomFM web site www.telecomfm.co.uk for the latest release.
CONTENTS
- INTRODUCTION....5
- NETWORK SETTINGS ....5
- FINDING THE IP ADDRESS OF THE ONESTREAM UNIT 6
4.3.1 Adding a Group 16
4.3.2 Editing an Existing Group.... 17
4.3.3 Deleting a Group 18
4.3.4 Group Options.... 19
4.3.4.1 GSM (OneStream G / GFX / GBRI only) 19
4.3.4.2 Analogue FXS (PBX) (OneStream GFX only) 20
4.3.4.3 Analogue FXO (PTT) (OneStream GFX only) 22
4.3.4.4 SIP Network 24
4.3.4.5 SIP Extension 26
4.3.4.6 H.323 27
4.3.4.7 DISA (Direct Inward System Access) 28
4.4 ROUTES 29
4.4.1 Adding a Route 30
4.4.2 Editing An Existing Route 33
4.4.3 Deleting A Route 34
4.5 AUDIO 35
4.5.1 Basic Audio Settings 35
Tone Selection 35
Volumes 36
Codecs 36
SIP Call Limit 36
4.6 SECURITY 38
4.6.1 Change Web Interface Password 38
4.5.4 GSM Module 1 and GSM Module 2 Locks (OneStream G / GFX / GBRI only)..... 39
4.6.1.1 SIM Lock (OneStream G / GFX / GBRI only) 40
4.6.1.2 Phone Lock (OneStream G / GFX / GBRI only) 43
4.7 LAN SETTINGS 46
4.8 TIME / DATE 48
4.8.1 Set Date & Time 48
4.8.2 Set Timezone 48
4.9 LOAD/SAVE CONFIG 49
4.9.1 Load 49
4.9.2 Save 50
4.9.3 Factory Reset 50
4.10 UPDATE FIRMWARE 52
4.10.1 Local Update 53
4.10.2 Remote Update 53
OneStream Programming Guide

text_image
telecomFM4.10.3 Bootloader Update 53
4.10.4 FPGA Update 54
4.11 DIAGNOSTICS 55
4.11.1 Runtime Log 55
4.11.2 Startup Log 56
4.11.3 Ping Host 56
4.12 RESTART 57
4.13 LOGOUT 58
OneStream Programming Guide
1. Introduction
Please refer to the OneStream Hardware Installation Guide for instructions on the physical installation of the unit. In order to program the OneStream unit it must be connected to a 10Mb/s or 100Mb/s Local Area Network and you must have access to a PC connected to the same network. If no Local Area Network is available the OneStream unit can be configured by connecting it to a PC via a standard Ethernet Crossover cable.
All of the configuration options for the OneStream unit are controlled via a Web Configuration Utility that can be accessed from any standard web browser on your PC. No special software needs to be installed on the PC to access the Web Configuration Utility, however a OneStream Scanner utility is available to assist in finding the IP Addresses of any OneStream units installed on your Local Area Network. Refer to the following sections for more information.
2. Network Settings
The Network settings for the OneStream Unit can be configured in 2 ways – static assignment or dynamic assignment. When the unit is powered on for the first time it will search for a DHCP Server and request an IP Address (ensure that the Ethernet Cable is connected to the unit before powering it on). If no DHCP Server is found then the unit will use its default IP Address, 192.168.0.1. This Static IP Address can be changed from the web configuration utility.
OneStream Programming Guide
3. Finding the IP Address of the OneStream unit
If the OneStream has been assigned an IP Address automatically from a DHCP Server or if a static IP Address has already been set then the IP Address of the unit can be found using the
OneStream Scanner application, which is available to download from the Support section of the Telecom FM website, www.telecomfm.co.uk.
3.1 Installing the OneStream Scanner Application
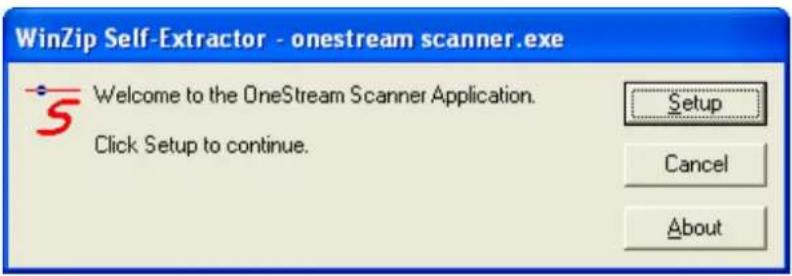
a. Double-click the "OneStream Scanner Setup.exe". The following dialog box will be displayed:
text_image
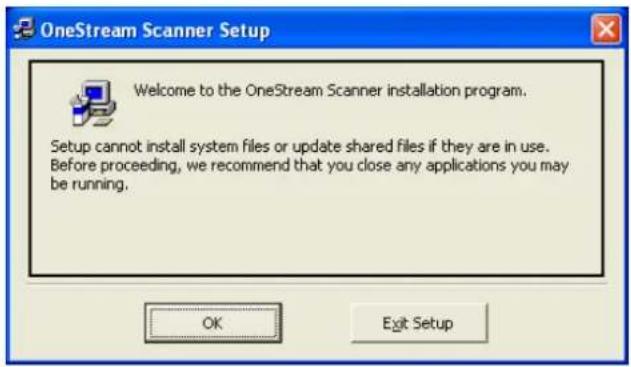
WinZip Self-Extractor - onestream scanner.exe Welcome to the OneStream Scanner Application. Click Setup to continue. Setup Cancel Aboutb. Click the Setup button. After the files have been extracted the following will be displayed
text_image
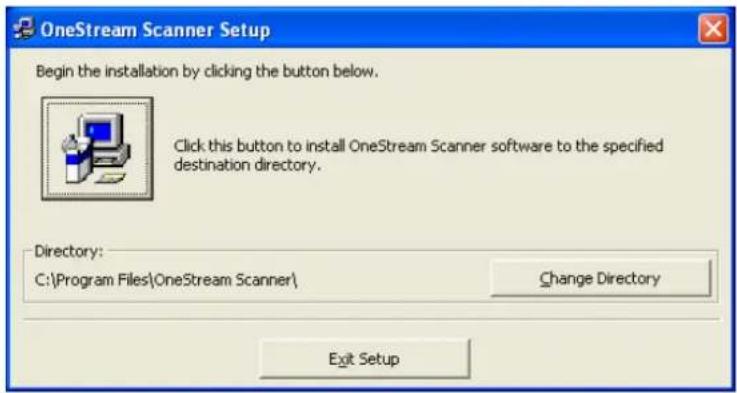
OneStream Scanner Setup Welcome to the OneStream Scanner installation program. Setup cannot install system files or update shared files if they are in use. Before proceeding, we recommend that you close any applications you may be running. OK Exit Setupc. Click the OK button. The following dialog will be displayed:
text_image
OneStream Scanner Setup Begin the installation by clicking the button below. Click this button to install OneStream Scanner software to the specified destination directory. Directory: C:\Program Files\OneStream Scanner\ Change Directory Exit SetupOneStream Programming Guide
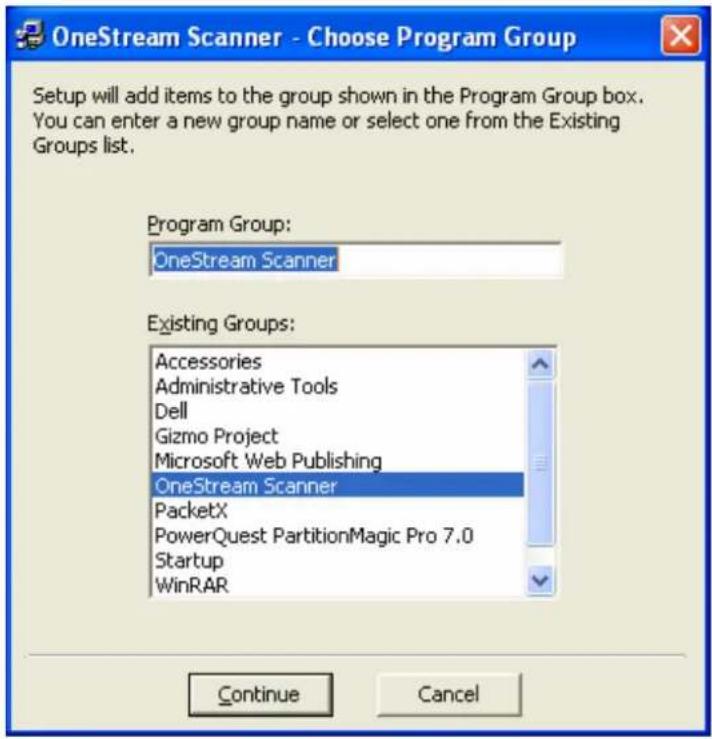
d. To install to the Default folder location click the Icon of a computer. The following dialog will be displayed:
text_image
OneStream Scanner - Choose Program Group Setup will add items to the group shown in the Program Group box. You can enter a new group name or select one from the Existing Groups list. Program Group: OneStream Scanner Existing Groups: Accessories Administrative Tools Dell Gizmo Project Microsoft Web Publishing OneStream Scanner PacketX PowerQuest PartitionMagic Pro 7.0 Startup WinRAR Continue Cancele. Click the Continue button to start the installation. When the installation has finished the following dialog will be displayed:
text_image
OneStream Scanner Setup OneStream Scanner Setup was completed successfully. OKf. Click the OK button to exit the installer. The OneStream Scanner is now installed and ready to use.
OneStream Programming Guide
3.2 Using the OneStream Scanner Application
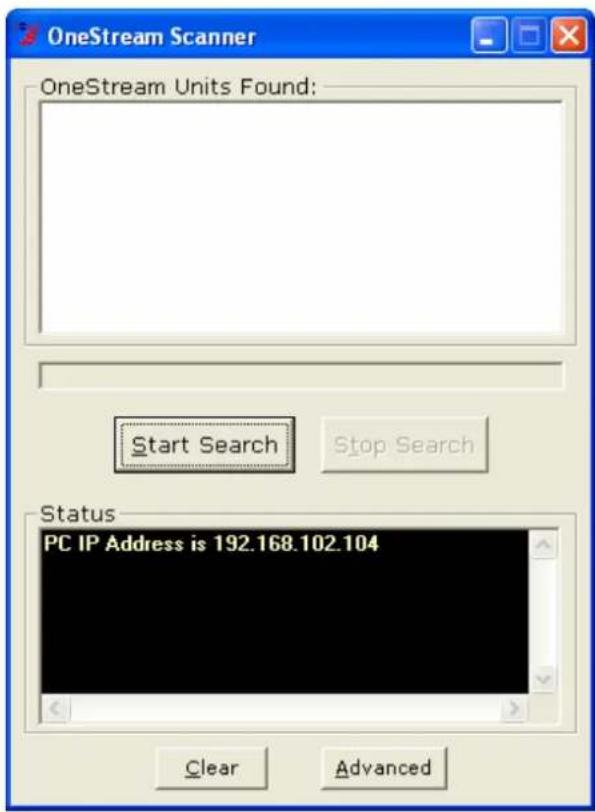
a. Click on the Start menu, All Programs, OneStream Scanner, OneStream Scanner to start the application. The following window will appear:
text_image
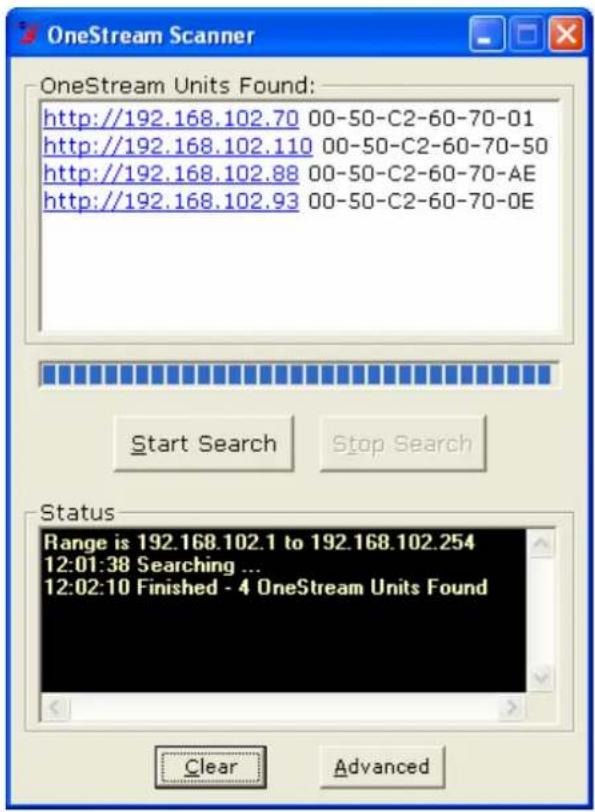
OneStream Scanner OneStream Units Found: Start Search Stop Search Status PC IP Address is 192.168.102.104 Clear Advancedb. To scan the network that your PC is connected to for OneStream units using the default program options click the Start Search button. This will scan the Class C network subnet that the PC is in. For example, if the IP Address of the PC was 192.168.100.32 then the application would scan from 192.168.100.1 to 192.168.100.254.
A progress bar will be displayed. Any OneStream units found in the network will be listed at the top of the application. The IP Address and MAC Address of each unit will be shown. When the progress bar reaches the right the scan is complete:
OneStream Programming Guide
telecomFM
text_image
OneStream Scanner OneStream Units Found: http://192.168.102.70 00-50-C2-60-70-01 http://192.168.102.110 00-50-C2-60-70-50 http://192.168.102.88 00-50-C2-60-70-AE http://192.168.102.93 00-50-C2-60-70-OE Start Search Stop Search Status Range is 192.168.102.1 to 192.168.102.254 12:01:38 Searching ... 12:02:10 Finished - 4 OneStream Units Found Clear Advancedc. Click on the IP Address of the unit you wish to configure and the Web Configuration Utility will be launched.
d. Using Advanced Options:
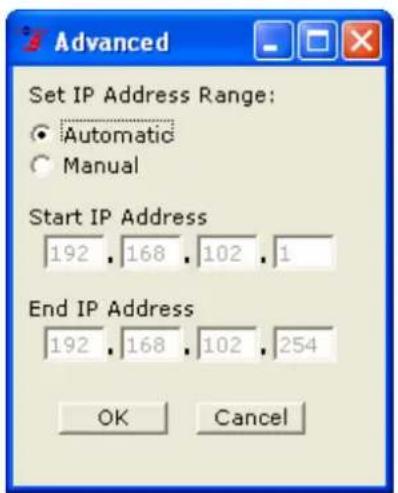
To search an alternative range of IP Addresses to the default subnet click the Advanced button. The following dialog will be displayed:
text_image
Advanced Set IP Address Range: Automatic Manual Start IP Address 192 , 168 , 102 , 1 End IP Address 192 , 168 , 102 , 254 OK CancelOneStream Programming Guide
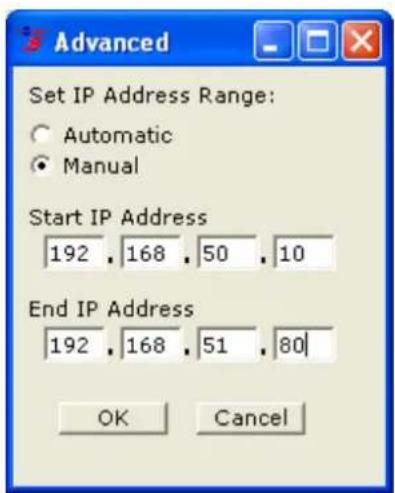
To specify a range of IP addresses to scan select the Manual option and enter the Start and End IP Addresses of the range. For example, to scan the range 192.168.50.10 - 192.168.51.80 the dialog would look as follows:
text_image
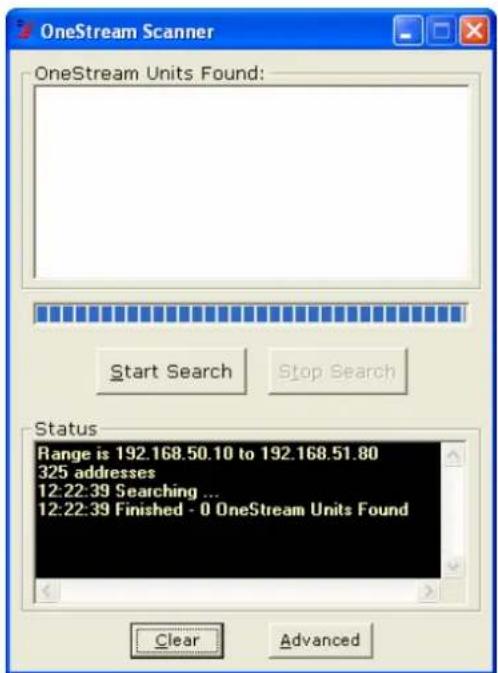
Advanced Set IP Address Range: Automatic Manual Start IP Address 192 , 168 , 50 , 10 End IP Address 192 , 168 , 51 , 80 OK CancelClick the OK button to return to the Main program window and then click the Start Search button to scan the new range of IP Addresses:
text_image
OneStream Scanner OneStream Units Found: Start Search Stop Search Status Range is 192.168.50.10 to 192.168.51.80 325 addresses 12:22:39 Searching ... 12:22:39 Finished - 0 OneStream Units Found Clear AdvancedTo return to the Automatic Search option click the Advanced button again. Select the Automatic option and click OK.
OneStream Programming Guide
4. The Web Configuration Utility
The Web Configuration Utility is used to configure all of the options for the OneStream unit, including Networking, Interfaces, Routing, Security and Audio settings. In order to access the Web Configuration Utility the IP Address of the OneStream must be known. If the IP Address is not known refer to Section 3 above for instructions on finding the address.
4.1 Starting the Web Configuration Utility
a. From any PC connected to the same network subnet as the OneStream unit open the Internet Explorer web browser.
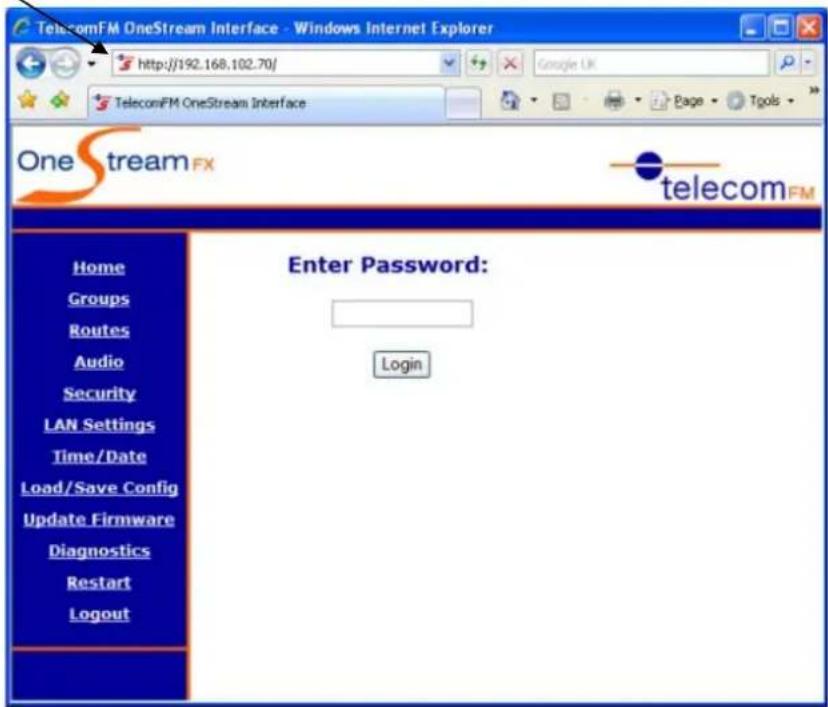
b. In the Address Bar of the Internet Explorer window type the IP Address of the OneStream unit and press the Enter key. You will be presented with the Login screen for the OneStream unit:
Address Bar
text_image
TelecomFM OneStream Interface - Windows Internet Explorer http://192.168.102.70/ Google UK TelecomFM OneStream Interface One stream FX telecomFM Home Groups Routes Audio Security LAN Settings Time/Date Load/Save Config Update Firmware Diagnostics Restart Logout Enter Password: LoginOneStream Programming Guide
c. Enter the Password for the OneStream unit and click the Login button. The default password is 12345678. If the password entered is correct you will be taken to the Welcome (Home) page
d. You can now select from the Links on the left of the Page to configure the OneStream unit. The options are as follows:
Home
Return to the Welcome (Home) Page.
Groups
Configure the Physical Interfaces (GSM Modules, FXO and FXS Ports) and Virtual Interfaces (IP Connections).
Routes
Configure the Routing table that determines which calls are sent to which interfaces.
Audio
Configure the Audio Settings, including Volume Controls, Tone Selection, Audio Codec selections and SIP Call Limits.
Security
Configure Security Options including GSM Phone Lock / SIM Lock and change the Web Interface Password.
LAN Settings
Configure the Network Interface and select between Automatic (DHCP) and Static configurations.
Time/ Date
Set the Time and Date, select the current Timezone and configure automatic Time and Date Updates (NTP).
Load/ Save Config
Backup and Restore the unit's configuration or restore the Factory Default configuration. Can also be used to transfer configurations from one OneStream unit to another.
Update Firmware
Perform Local or Remote updates of the system software.
Diagnostics
Troubleshoots problems and collects trace.
Restart
Perform a restart of the unit.
Logout
Logout and Exit from the Web Interface. Select this option when you have finished configuring the unit.
All of these Options are explained in more detail in the following pages.
OneStream Programming Guide
4.2 Welcome (Home) Page

text_image
TelecomFM OneStream Interface - Windows Internet Explorer http://192.168.102.110/ Google UK TelecomFM OneStream Interface One stream telecom FM Home Groups Routes Audio Security LAN Settings Time/Date Load/Save Config Update Firmware Diagnostics Restart Logout Welcome to the TelecomFM OneStream Configuration Utility Select from the configuration options on the left System Information Uptime 51 min LAN IP Address 192.168.102.110 MAC Address 00:50:C2:60:70:50 Serial Number 9488853 Firmware Version 1.1.1081.io Firmware Date Wed 16 Jan 2008 14:38:58 GMT Config Version 1.1.1081.io Config Date Wed 16 Jan 2008 14:38:58 GMT System Date & Time Fri, 18 Jan 2008 12:20:42 SIP Networks SIP Proxy Port User Status proxy01.sipphone.com 5060 17476445273 Registered SIP Extensions Username IP Address Status 100 192.168.102.67 RegisteredFrom the Welcome Page you can see the following information:
4.2.1 System Information
- How long the unit has been running (Uptime)
- The IP Address of the Unit
- The MAC Address (unique network address) of the Unit
- The Serial Number of the Unit
- The Software Version Number (Firmware)
- The Current Date and Time set on the Unit
- The Status of all configured SIP Networks
- The Status of all configure SIP Extensions
OneStream Programming Guide
4.2.2 SIP Networks
The SIP Networks section displays the current status of all SIP network registrations that have been setup on the OneStream unit. This will show whether the unit has registered successfully or whether there is a problem that is preventing registration, such as the wrong password being entered in the Group or if a firewall is blocking the port being used for registration.
Note that only SIP groups where the "Registration Required" checkbox has been checked will be shown on this page.
4.2.3 SIP Extensions
The SIP Extensions section will list all SIP Extensions that have been setup using the Groups tab. The status of each extensions will be shown (whether it is registered successfully to the OneStream or not) and for each registered extension the IP Address will be displayed.
OneStream Programming Guide
4.3 Groups
text_image
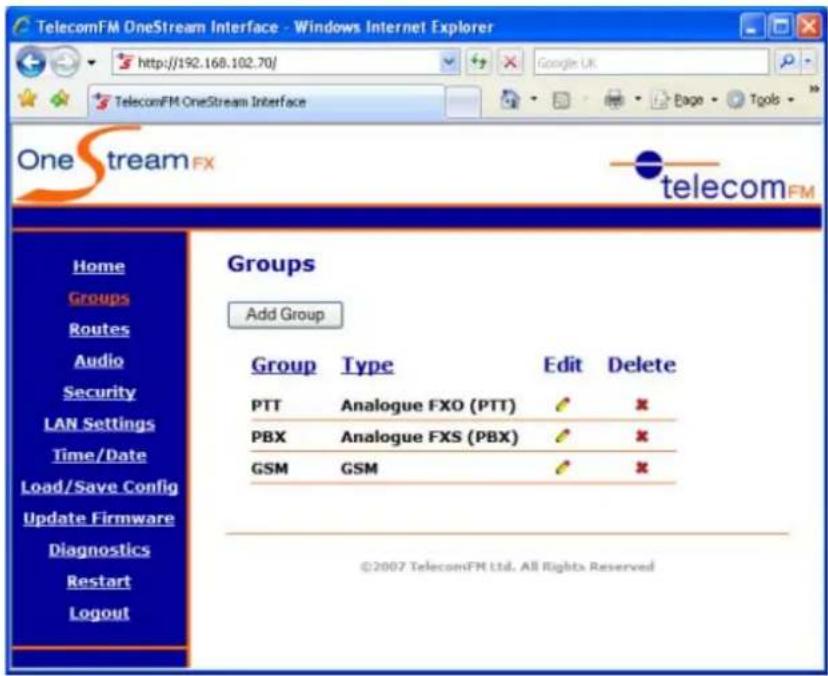
TelecomFM OneStream Interface - Windows Internet Explorer http://192.168.102.70/ Google UK TelecomFM OneStream Interface One stream FX telecomFM Home Groups Routes Audio Security LAN Settings Time/Date Load/Save Config Update Firmware Diagnostics Restart Logout Groups Add Group Group Type Edit Delete PTT Analogue FXO (PTT) ✗ ✗ PBX Analogue FXS (PBX) ✗ ✗ GSM GSM ✗ ✗ ©2007 TelecomFM Ltd. All Rights ReservedThe Groups Page allows you to setup groups of physical interfaces and configure IP connections. These Groups are then used later to setup call routing options.
There are 7 different types of Group (the available Groups will depend on the version of OneStream purchased):
GSM (OneStream G / GFX / GBRI only)
Group containing 1 or both of the OneStream's GSM Modules. By default, the unit has 1 GSM Group (named GSM) that contains both GSM modules.
Analogue FXS (PBX) (OneStream GFX only)
Group containing any number of FXS (PBX) ports (up to a maximum of 6). By default, the unit has 1 Analogue FXS Group (named PBX) that contains all 6 of the unit's FXS ports.
Analogue FXO (PTT) (OneStream GFX only)
Group containing any number of FXO (PTT) ports (up to a maximum of 6). By default, the unit has 1 Analogue FXO Group (named PTT) that contains all 6 of the unit's FXO ports.
SIP Network (All OneStream versions)
Group used for connection to a SIP Proxy or SIP based IP PBX in order to route IP Based Calls. By default, the unit has no SIP Network Groups.
SIP Extension (All OneStream versions)
Group used to allow a SIP device to connect to the OneStream as an extension. By default, the unit has no SIP Extension Groups.
H.323 (All OneStream versions)
Group used for connection to an H.323 Gatekeeper or H.323 based IP PBX in order to route IP Based Calls. By default, the unit has no H.323 Groups.
DISA (Direct Inward System Access) (All OneStream versions)
Group used to allow incoming calls to be answered and a secondary dialtone to be offered, allowing the caller to dial a new number and be routed accordingly. By default, the unit has no DISA Groups.
4.3.1 Adding a Group
To add a new group, use the following procedure:
a. Click the Groups link from the left hand menu.
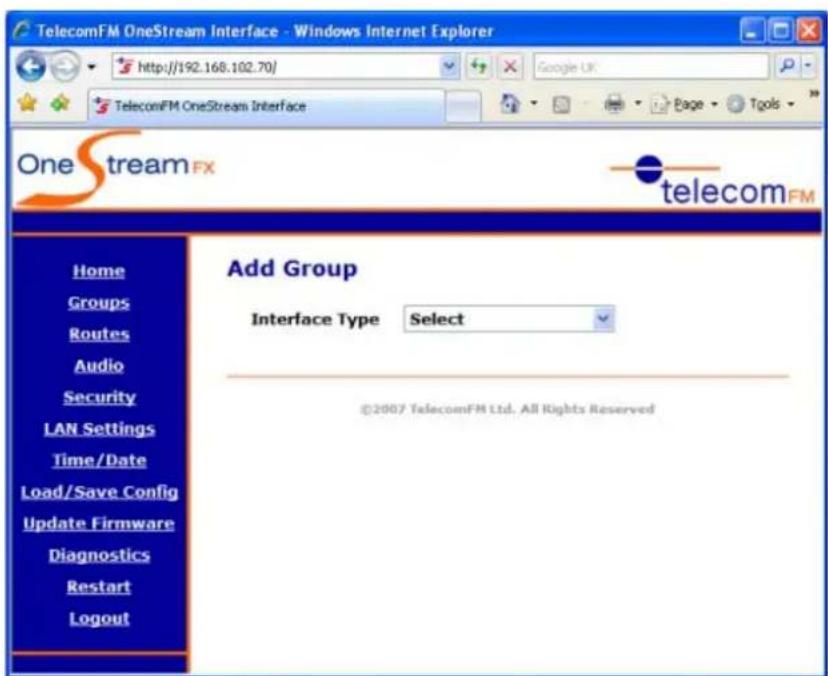
b. Click the Add Group button. The following screen will be displayed:
text_image
TelecomFM OneStream Interface - Windows Internet Explorer http://192.168.102.70/ Google UK TelecomFM OneStream Interface One stream FX telecomFM Home Groups Routes Audio Security LAN Settings Time/Date Load/Save Config Update Firmware Diagnostics Restart Logout Add Group Interface Type Select ©2007 TelecomFM Ltd, All Rights Reservedc. Select the required Interface Type from the drop-down list. The options for the type of interface selected will then be displayed.
d. Enter a Name for the Group and fill in all of the required options – these options are described in detail for each Interface Type below.
e. Click the Add button to add the new group. Click the Cancel button to undo any entry.
Note that if you add a group of type GSM, FXS or FXO the OneStream will reinitialize after you click Add and any active calls will be dropped.
OneStream Programming Guide
4.3.2 Editing an Existing Group
To edit an existing group, use the following procedure:
a. Click the Groups link from the left hand menu.
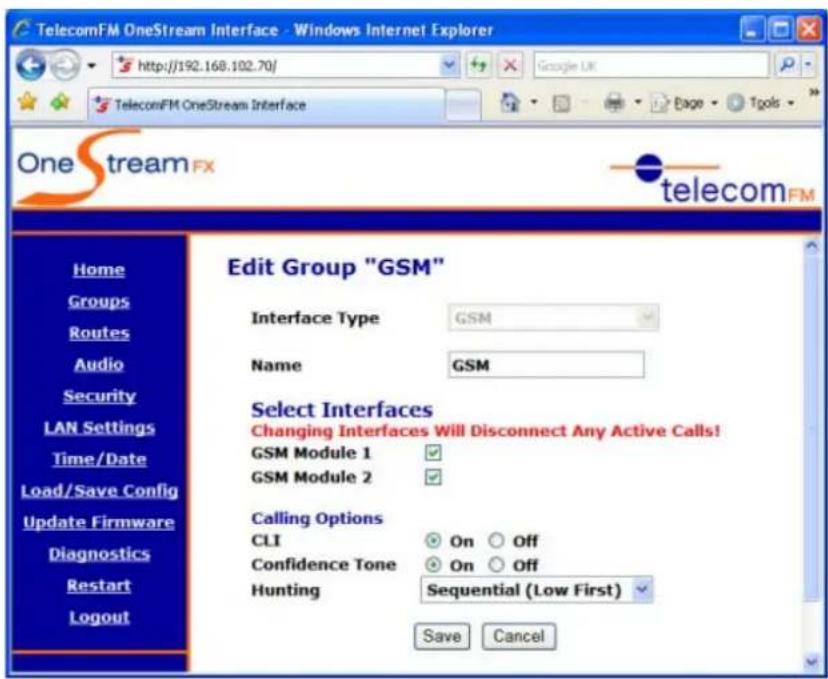
b. Click the Edit icon next to the Group that you wish to modify. The following screen will be displayed:
text_image
TelecomFM OneStream Interface - Windows Internet Explorer http://192.168.102.70/ Google UK TelecomFM OneStream Interface One stream FX telecomFM Edit Group "GSM" Interface Type GSM Name GSM Select Interfaces Changing Interfaces Will Disconnect Any Active Calls! GSM Module 1 ✓ GSM Module 2 ✓ Calling Options CLI On Off Confidence Tone On Off Hunting Sequential (Low First) Save Cancel Home Groups Routes Audio Security LAN Settings Time/Date Load/Save Config Update Firmware Diagnostics Restart Logoutc. Make any changes that are required – the options are described for each interface below.
d. Click the Save button to apply the changes to the Group. Click the Cancel button to undo any changes made to the Group.
Note that if you change the interfaces that are in a group (of type GSM, FXS or FXO) the OneStream will reinitialize after you click Save and any active calls will be dropped.
OneStream Programming Guide
4.3.3 Deleting a Group
To delete an existing group, use the following procedure:
a. Click the Groups link from the left hand menu.
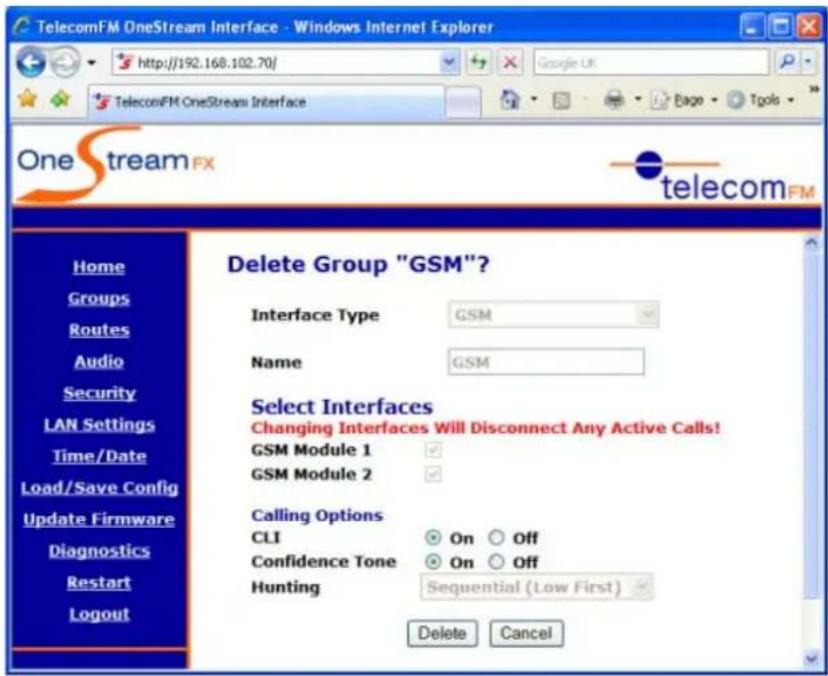
b. Click the Delete ✗ icon next to the Group that you wish to remove. The following screen will be displayed:
text_image
TelecomFM OneStream Interface - Windows Internet Explorer http://192.168.102.70/ Google UK TelecomFM OneStream Interface One stream FX telecomFM Home Groups Routes Audio Security LAN Settings Time/Date Load/Save Config Update Firmware Diagnostics Restart Logout Delete Group "GSM"? Interface Type GSM Name GSM Select Interfaces Changing Interfaces Will Disconnect Any Active Calls! GSM Module 1 ✓ GSM Module 2 ✓ Calling Options CLI On Off Confidence Tone On Off Hunting Sequential (Low First) ✓ Delete Cancelc. To delete the Group click the Delete button. To return to the Groups page without deleting the Group click the Cancel button.
Note that once a Group has been Deleted it cannot be recovered.
OneStream Programming Guide
4.3.4 Group Options
The following are the Group options available for each of the different interface types:
4.3.4.1 GSM (OneStream G / GFX / GBRI only)
text_image
TelecomFM OneStream Interface - Windows Internet Explorer http://192.168.102.70/ TelecomFM OneStream Interface One stream FX telecomFM Home Groups Routes Audio Security LAN Settings Time/Date Load/Save Config Update Firmware Diagnostics Restart Logout Add Group Interface Type GSM Name Select Interfaces Changing Interfaces Will Disconnect Any Active Calls! GSM Module 1 □ GSM Module 2 □ Calling Options CLI On Off Confidence Tone On Off Hunting Sequential (Low First) Add CancelName
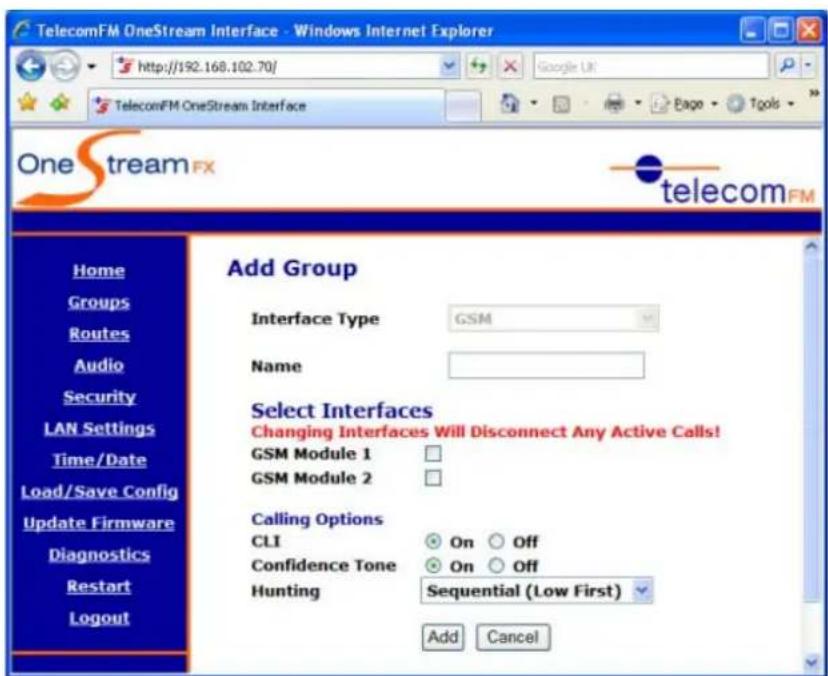
Enter a Name to identify this group. You cannot have 2 groups with the same name.
Select Interfaces
Place a tick in the checkbox next to each of the interfaces you wish to be used by this group. Note that each interface can only be selected in 1 Group.
CLI
Controls CLI Presentation for Outgoing GSM Calls. When turned on Called Parties will be able to see the CLI of the SIM attached to the GSM Module which made the call.
Confidence Tone
Controls whether a confidence tone (Call Progress Tone) is played during a GSM Call Setup. Turn On to Enable the Confidence Tone and Off to disable it.
Hunting
Select the hunting type required – this controls in which order interfaces are selected to send calls to. Options are:
a. Sequential (Low First)
Calls are sent to the lowest available interface.
b. Sequential (High First)
Calls are sent to the highest available interface.
c. Cyclic
Calls are sent to interfaces in turn (i.e. A "Round Robin" setup).
OneStream Programming Guide
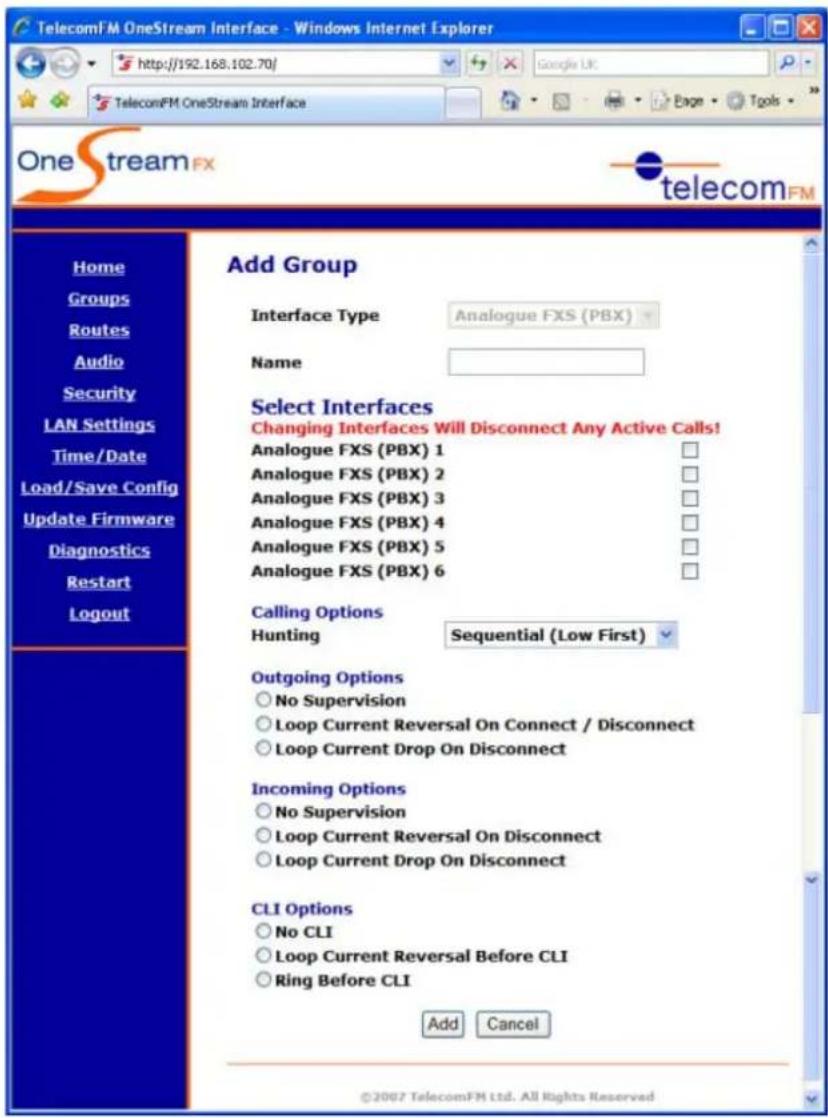
4.3.4.2 Analogue FXS (PBX) (OneStream GFX only)
text_image
TelecomFM OneStream Interface - Windows Internet Explorer http://192.168.102.70/ TelecomFM OneStream Interface One stream FX telecomFM Home Groups Routes Audio Security LAN Settings Time/Date Load/Save Config Update Firmware Diagnostics Restart Logout Add Group Interface Type Analogue FXS (PBX) Name Select Interfaces Changing Interfaces Will Disconnect Any Active Calls! Analogue FXS (PBX) 1 Analogue FXS (PBX) 2 Analogue FXS (PBX) 3 Analogue FXS (PBX) 4 Analogue FXS (PBX) 5 Analogue FXS (PBX) 6 Calling Options Hunting Sequential (Low First) Outgoing Options ○ No Supervision ○ Loop Current Reversal On Connect / Disconnect ○ Loop Current Drop On Disconnect Incoming Options ○ No Supervision ○ Loop Current Reversal On Disconnect ○ Loop Current Drop On Disconnect CLI Options ○ No CLI ○ Loop Current Reversal Before CLI ○ Ring Before CLI Add Cancel ©2007 TelecomFM Ltd. All Rights ReservedName
Enter a Name to identify this group. You cannot have 2 groups with the same name.
Select Interfaces
Place a tick in the checkbox next to each of the interfaces you wish to be used by this group. Note that each interface can only be selected in 1 Group.
OneStream Programming Guide
Hunting
Select the hunting type required – this controls in which order interfaces are selected to send calls to. Options are:
a. Sequential (Low First)
Calls are sent to the lowest available interface.
b. Sequential (High First)
Calls are sent to the highest available interface.
c. Cyclic
Calls are sent to interfaces in turn (i.e. A "Round Robin" setup).
Outgoing Options
Select the Supervision options for Outgoing calls from the following:
a. No Supervision
This is the default option and provides no supervision.
b. Loop Current Reversal On Connect/ Disconnect
Provides a Loop Current Reversal when the outgoing call is connected and when the call is disconnected.
c. Loop Current Drop On Disconnect
Provides a Loop Current Drop when the outgoing call is disconnected.
Incoming Options
Select the Supervision options for Incoming calls from the following:
a. No Supervision
This is the default option and provides no supervision.
b. Loop Current Reversal On Disconnect
Provides a Loop Current Reversal when the incoming call is disconnected.
c. Loop Current Drop On Disconnect
Provides a Loop Current Drop when the incoming call is disconnected.
CLI Options
Select the CLI Presentation options for Incoming calls from the following:
a. No CLI
This is the default option and provides no CLI Presentation.
b. Loop Current Reversal Before CLI
Provides a Loop Current Reversal before presenting the CLI.
c. Ring Before CLI
Provides a Ring before presenting the CLI.
OneStream Programming Guide
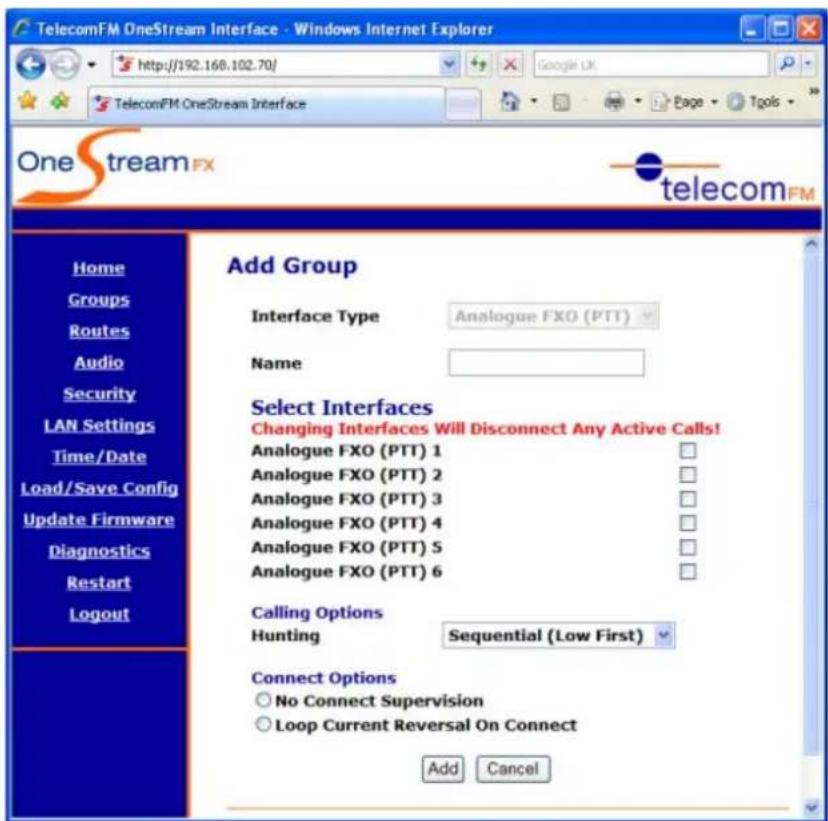
4.3.4.3 Analogue FXO (PTT) (OneStream GFX only)
text_image
TelecomFM OneStream Interface - Windows Internet Explorer http://192.168.102.70/ Google UK TelecomFM OneStream Interface One stream FX telecomFM Home Groups Routes Audio Security LAN Settings Time/Date Load/Save Config Update Firmware Diagnostics Restart Logout Add Group Interface Type Analogue FXO (PTT) Name Select Interfaces Changing Interfaces Will Disconnect Any Active Calls! Analogue FXO (PTT) 1 Analogue FXO (PTT) 2 Analogue FXO (PTT) 3 Analogue FXO (PTT) 4 Analogue FXO (PTT) 5 Analogue FXO (PTT) 6 Calling Options Hunting Sequential (Low First) Connect Options No Connect Supervision Loop Current Reversal On Connect Add CancelName
Enter a Name to identify this group. You cannot have 2 groups with the same name.
Select Interfaces
Place a tick in the checkbox next to each of the interfaces you wish to be used by this group. Note that each interface can only be selected in 1 Group.
OneStream Programming Guide
Hunting
Select the hunting type required – this controls in which order interfaces are selected to send calls to. Options are:
a. Sequential (Low First)
Calls are sent to the lowest available interface.
b. Sequential (High First)
Calls are sent to the highest available interface.
c. Cyclic
Calls are sent to interfaces in turn (i.e. A "Round Robin" setup).
Connect Options
Select the Supervision options for calls from the following:
a. No Supervision
This is the default option and provides no supervision.
b. Loop Current Reversal On Connect
Provides a Loop Current Reversal when the call is connected.
OneStream Programming Guide
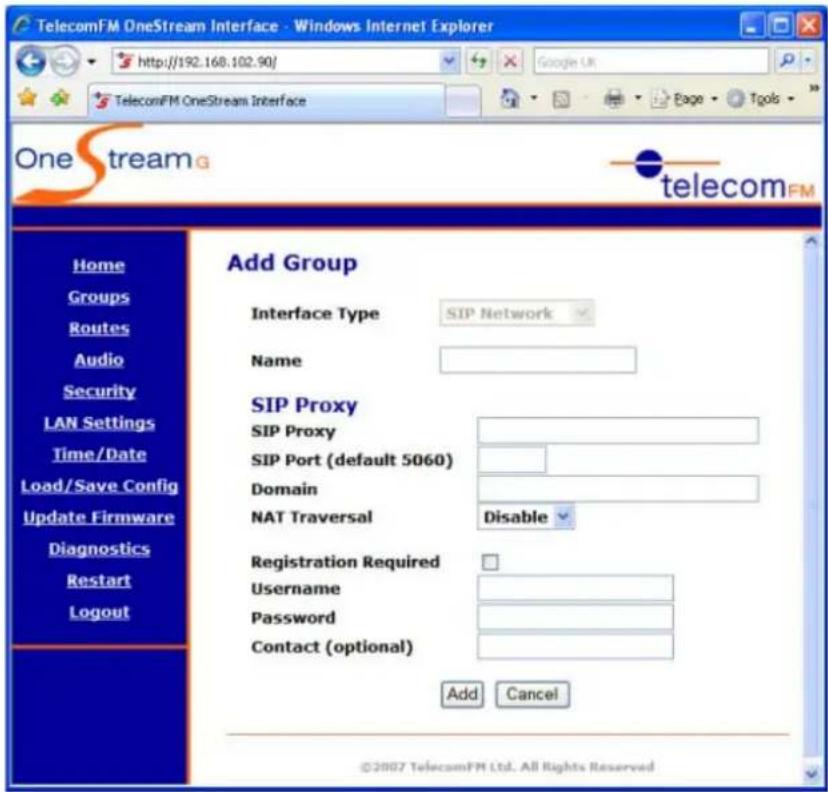
4.3.4.4 SIP Network
text_image
TelecomFM OneStream Interface - Windows Internet Explorer http://192.168.102.90/ Google UR TelecomFM OneStream Interface One stream telecomFM Home Groups Routes Audio Security LAN Settings Time/Date Load/Save Config Update Firmware Diagnostics Restart Logout Add Group Interface Type SIP Network Name SIP Proxy SIP Proxy SIP Port (default 5060) Domain NAT Traversal Disable Registration Required Username Password Contact (optional) Add Cancel ©2007 TelecomFM Ltd. All Rights ReservedName
Enter a Name to identify this group. You cannot have 2 groups with the same name.
SIP Proxy
Enter the fully qualified domain name or IP Address of the SIP Proxy Server or SIP PBX that the calls should be routed to.
SIP Port
Enter the SIP Port that is used by the SIP Proxy / PBX. The default SIP Port is 5060.
Domain
(Optional) Enter the Domain Name of the SIP Proxy / PBX, if required.
Chasing
NAT Traversal
Select whether NAT (Network Address Translation) is required for this SIP Service. Normally, NAT is only set to Enable when the OneStream is behind a Firewall and the Proxy is located outside of the Firewall (for example when connecting with an Internet Telephone Service Provider).
OneStream Programming Guide
Registration Required
Place a tick in this checkbox if the SIP Proxy / PBX requires that the OneStream register and login.
Username
(Optional) Enter the Username required by the SIP Proxy / PBX.
Password
(Optional) Enter the Password required by the SIP Proxy / PBX.
Contact
(Optional) Enter the contact extension that will be used by the remote SIP Proxy to send calls to OneStream. Leave this field blank to use the contact extension of "s" (an s must be entered in dialled numbers in the routing for calls from the remote SIP Proxy).
OneStream Programming Guide
telecomFM
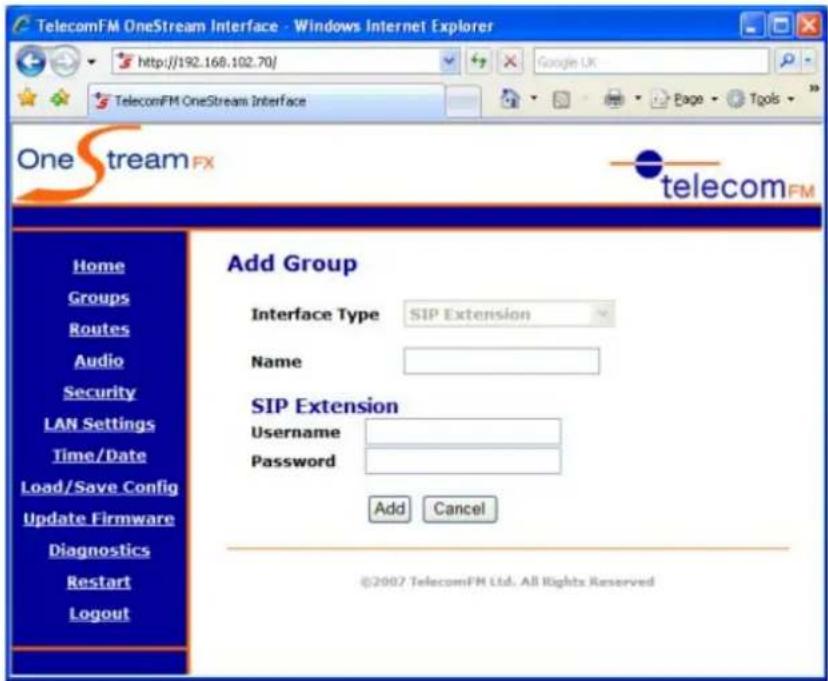
4.3.4.5 SIP Extension
text_image
TelecomFM OneStream Interface - Windows Internet Explorer http://192.168.102.70/ Google UK TelecomFM OneStream Interface One stream FX telecomFM Home Groups Routes Audio Security LAN Settings Time/Date Load/Save Config Update Firmware Diagnostics Restart Logout Add Group Interface Type SIP Extension Name SIP Extension Username Password Add Cancel ©2007 TelecomFM Ltd. All Rights ReservedName
Enter a Name to identify this group. You cannot have 2 groups with the same name.
Username
Enter the Username that will be required for the SIP device to register with the OneStream.
Password
Enter the Password that will be required for the SIP device to register with the OneStream.
OneStream Programming Guide
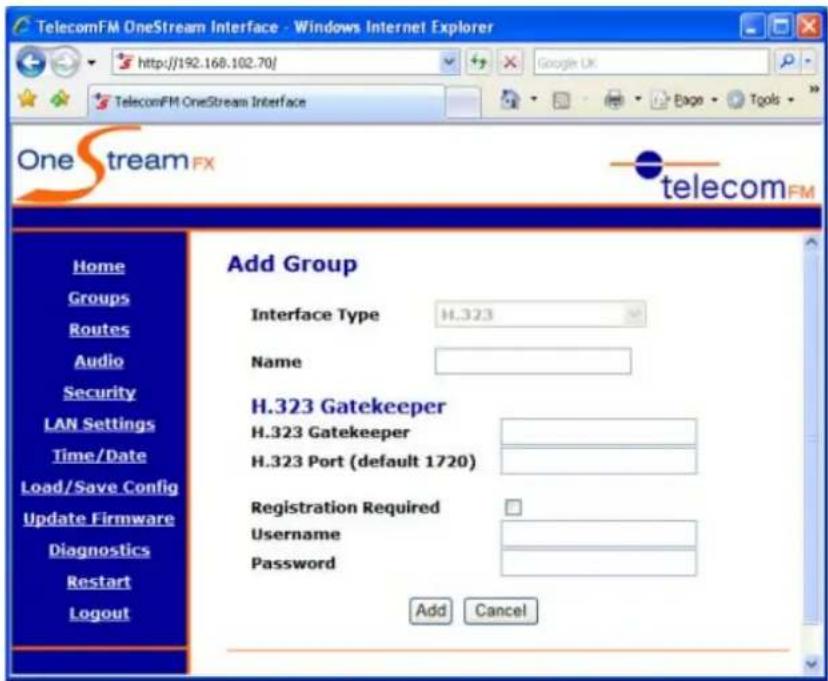
4.3.4.6 H.323
text_image
TelecomFM OneStream Interface - Windows Internet Explorer http://192.168.102.70/ Google UK TelecomFM OneStream Interface One stream FX telecomFM Home Groups Routes Audio Security LAN Settings Time/Date Load/Save Config Update Firmware Diagnostics Restart Logout Add Group Interface Type H.323 Name H.323 Gatekeeper H.323 Gatekeeper H.323 Port (default 1720) Registration Required Username Password Add CancelName
Enter a Name to identify this group. You cannot have 2 groups with the same name.
H.323 Gatekeeper
Enter the IP Address of the H.323 Gatekeeper or H.323 PBX that the calls should be routed to.
H.323 Port
Enter the H.323 Port that is used by the H.323 Gatekeeper / PBX. The default H.323 Port is 1720.
Registration Required
Place a tick in this checkbox if the H.323 Gatekeeper / PBX requires that the OneStream register and login.
Username
(Optional) Enter the Username required by the H.323 Gatekeeper / PBX.
Password
(Optional) Enter the Password required by the H.323 Gatekeeper / PBX.
OneStream Programming Guide
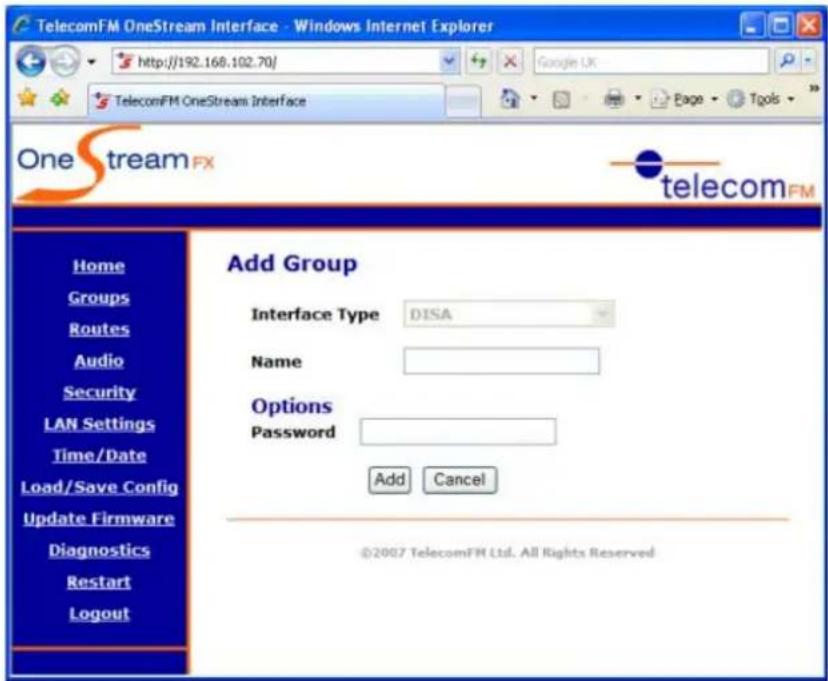
4.3.4.7 DISA (Direct Inward System Access)
text_image
TelecomFM OneStream Interface - Windows Internet Explorer http://192.168.102.70/ Google UK TelecomFM OneStream Interface One stream FX telecomFM Home Groups Routes Audio Security LAN Settings Time/Date Load/Save Config Update Firmware Diagnostics Restart Logout Add Group Interface Type DISA Name Options Password Add Cancel ©2007 TelecomFM Ltd. All Rights ReservedName
Enter a Name to identify this group. You cannot have 2 groups with the same name.
Password
Enter the Password that callers will be required to enter to access the system. This may be left blank (IMPORTANT: If the password is left blank then all routes to the DISA Group should be restricted using an "Originating Number" otherwise the system would left open to any callers).
After a caller is routed to a DISA Group they will hear a secondary dialtone. They must then enter the password followed by the # key. If the password is correct they can then dial the new number. If the password entered is incorrect then the caller will hear an interrupted (unavailable) tone.
OneStream Programming Guide
telecomFM
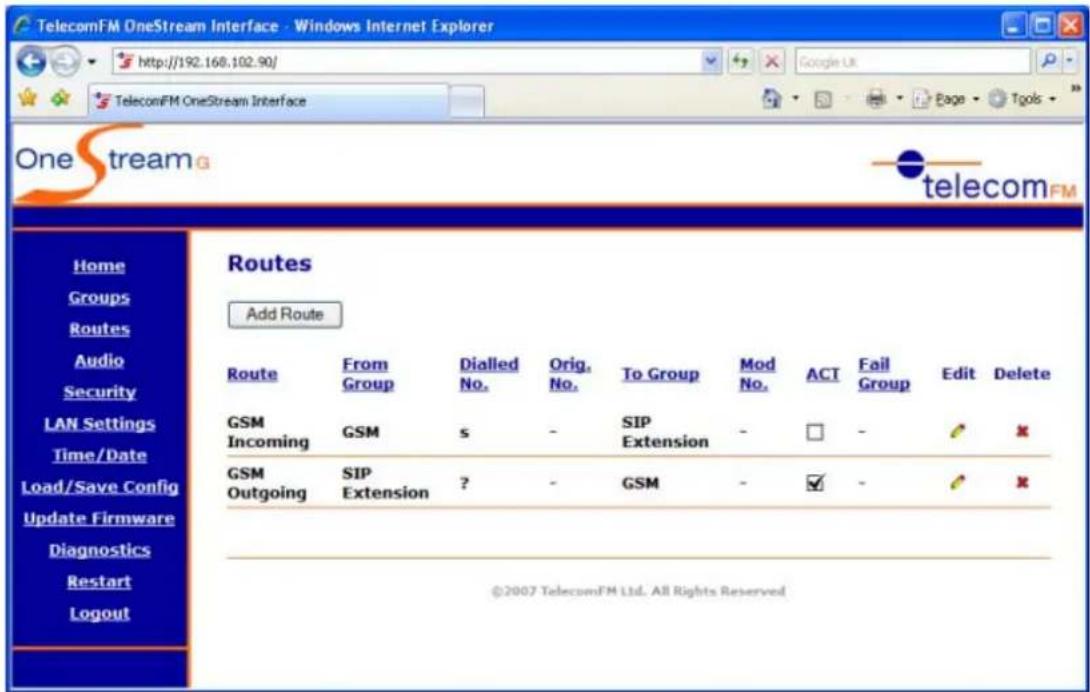
4.4 Routes
text_image
TelecomFM OneStream Interface - Windows Internet Explorer http://192.168.102.90/ TelecomFM OneStream Interface One stream Home Groups Routes Audio Security LAN Settings Time/Date Load/Save Config Update Firmware Diagnostics Restart Logout Routes Add Route Route From Group Dialled No. Orig. No. To Group Mod No. ACT Fail Group Edit Delete GSM Incoming GSM s - SIP Extension - □ - ✓ × GSM Outgoing SIP Extension ? - GSM - ✓ - ✓ × ©2007 TelecomFM Ltd. All Rights ReservedThe Routes Page allows you to configure how the OneStream routes calls between Groups. Groups must already have been configured before the Routing can be setup (see the previous section for instructions on setting up Groups).
OneStream Programming Guide
4.4.1 Adding a Route
To add a new Route, use the following procedure:
a. Click the Routes link from the left hand menu.
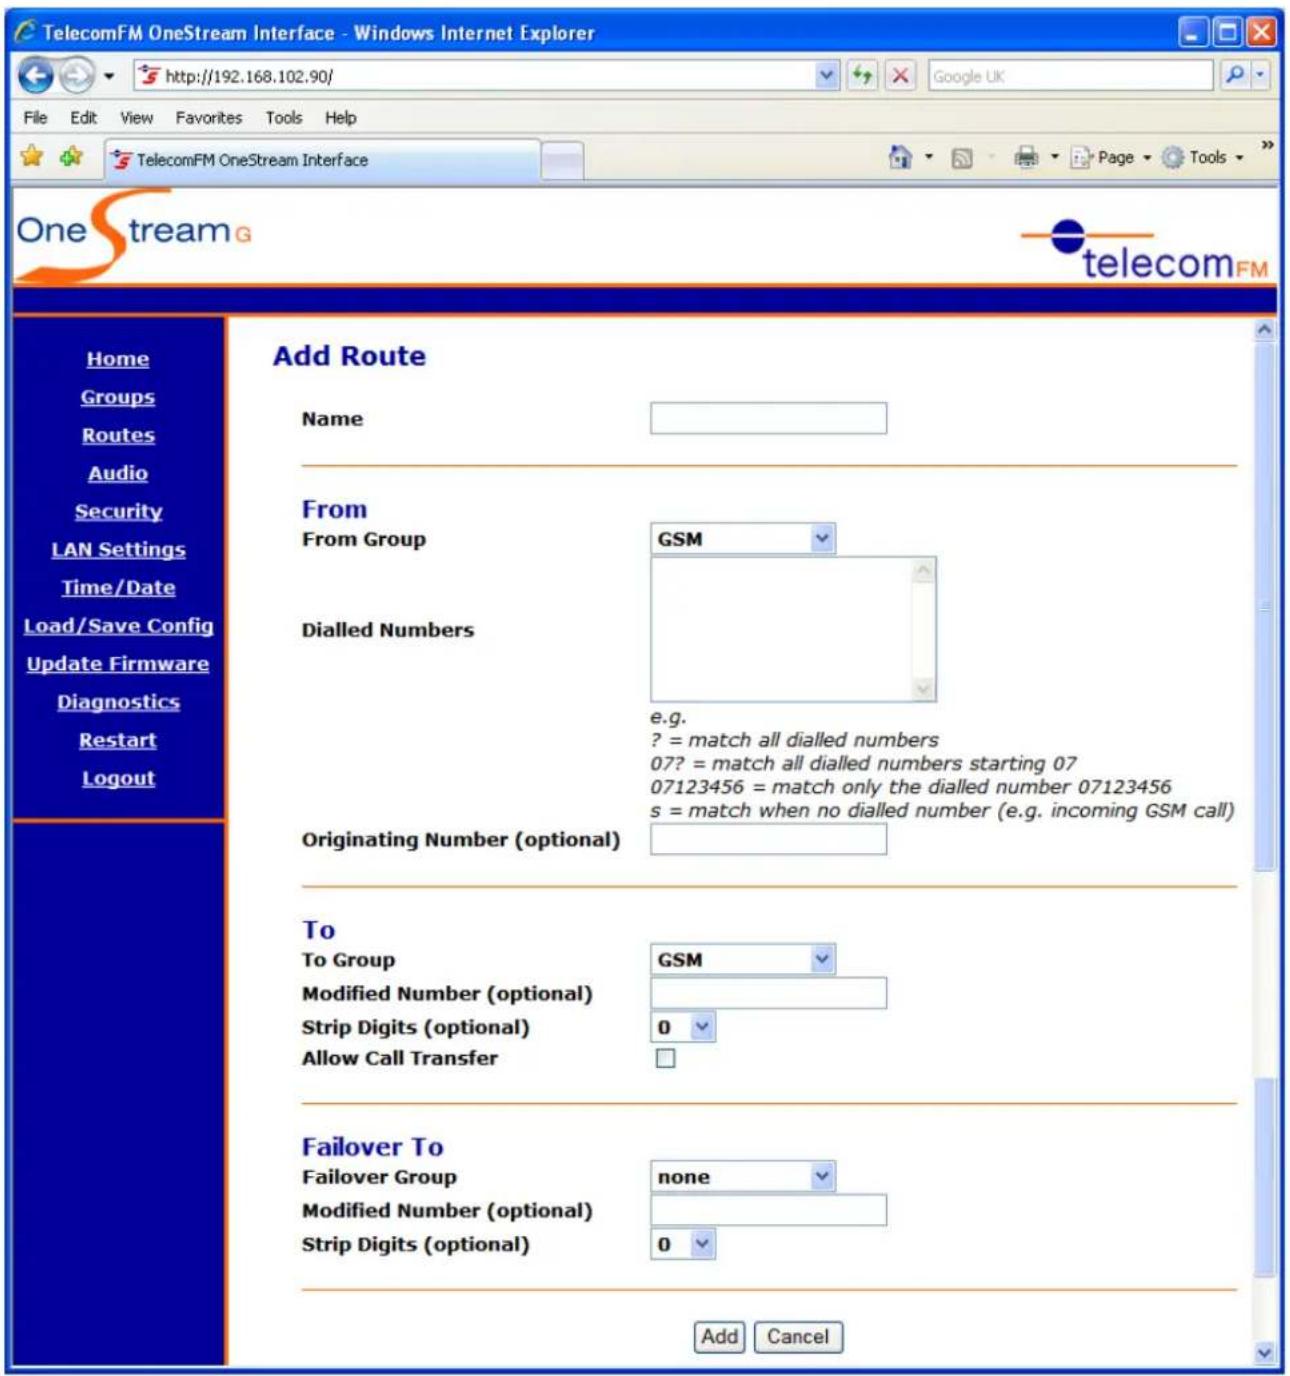
b. Click the Add Route button. The following screen will be displayed:
text_image
TelecomFM OneStream Interface - Windows Internet Explorer http://192.168.102.90/ File Edit View Favorites Tools Help TelecomFM OneStream Interface One stream telecomFM Home Groups Routes Audio Security LAN Settings Time/Date Load/Save Config Update Firmware Diagnostics Restart Logout Add Route Name From From Group GSM Dialled Numbers e.g. ? = match all dialled numbers 07? = match all dialled numbers starting 07 07123456 = match only the dialled number 07123456 s = match when no dialled number (e.g. incoming GSM call) Originating Number (optional) To To Group GSM Modified Number (optional) Strip Digits (optional) 0 Allow Call Transfer Failover To Failover Group none Modified Number (optional) Strip Digits (optional) 0 Add CancelOneStream Programming Guide
c. Fill in all of the required options. Depending on the Groups selected some options will not be available – these options will be greyed out. Options are as follows:
Name (Required)
Enter a Name to describe the Route.
From Section
The following 3 options apply to origin of the call:
From Group (Required)
Select the Group that the Calls will originate from in the drop-down list.
Dialled Numbers (Required)
A list of dial prefix's to match. Enter 1 dial prefix on each line. Only if the number dialled matches an entry in this list is the Route applied. A question mark (?) is used to match any digits dialled. An s is used to match when there is no dialled number (e.g. an incoming call from GSM or FXO). Some examples:
| Dialled Numbers Result | |||||
| s | Match | when | no | dialled | number |
| ? | Match any dialled number | ||||
| 07? | Match | any | number | starting | 07 |
| 01753? | Match any number starting 01753 | ||||
| 01753745000 | Match only the number 01753745000 | ||||
| 2345 | Match | only | the | number | 2345 |
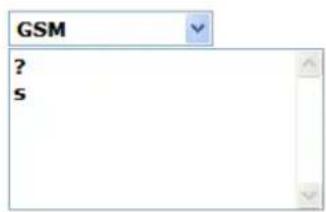
To create a "catch all" route that will route all calls enter dialled numbers? and s, like this:
From
From Group
Dialled Numbers
text_image
GSM ? sOriginating Number (Optional)
If left blank, match calls from any number. If a number is entered here only calls from this number will be matched to this route. Wildcards are allowed. Some examples:
Blank route calls from any number 01753745000 only route calls from 01753745000 01753? only route calls from numbers starting with 01753
OneStream Programming Guide
To Section
The following 3 options apply to the destination of the call:
To Group (Required)
The Group that calls will be sent to when this Route is matched.
Modified Number (Optional)
If left blank, the number will be called exactly as dialled. If a number is entered here this number will be called in place of the dialled number.
Strip digits (Optional)
Select the number of dialled digits to be removed from the beginning of the dialled number. For example, if Strip Digits is set to 2 and the number 012345678 is dialled the number the actual number called will be 2345678.
Allow Call Transfer (Optional)
Tick the allow call transfer check box to enable call transfer. Refer to Section 5.1 – Virtual Extensions for more information on this feature.
Failover To Section
The following 3 options will be used for the destination of the call if the Group selected in "To Group" is not available:
Failover Group (Optional)
If the Group selected as the "To Group" is unavailable (for example if all of the interfaces are Busy or is there is a fault with a SIP Network) calls will be sent to the Failover Group when this Route is matched.
Modified Number (Optional)
If left blank, the number will be called exactly as dialled. If a number is entered here this number will be called in place of the dialled number.
Strip digits (Optional)
Select the number of dialled digits to be removed from the beginning of the dialled number. For example, if Strip Digits is set to 2 and the number 012345678 is dialled the number the actual number called will be 2345678.
d. Click the Add button to add the new route to the Routing table. Click the Cancel button to return to the Routes page without adding the Route.
OneStream Programming Guide
4.4.2 Editing An Existing Route
To edit an existing route, use the following procedure:
a. Click the Routes link from the left hand menu.
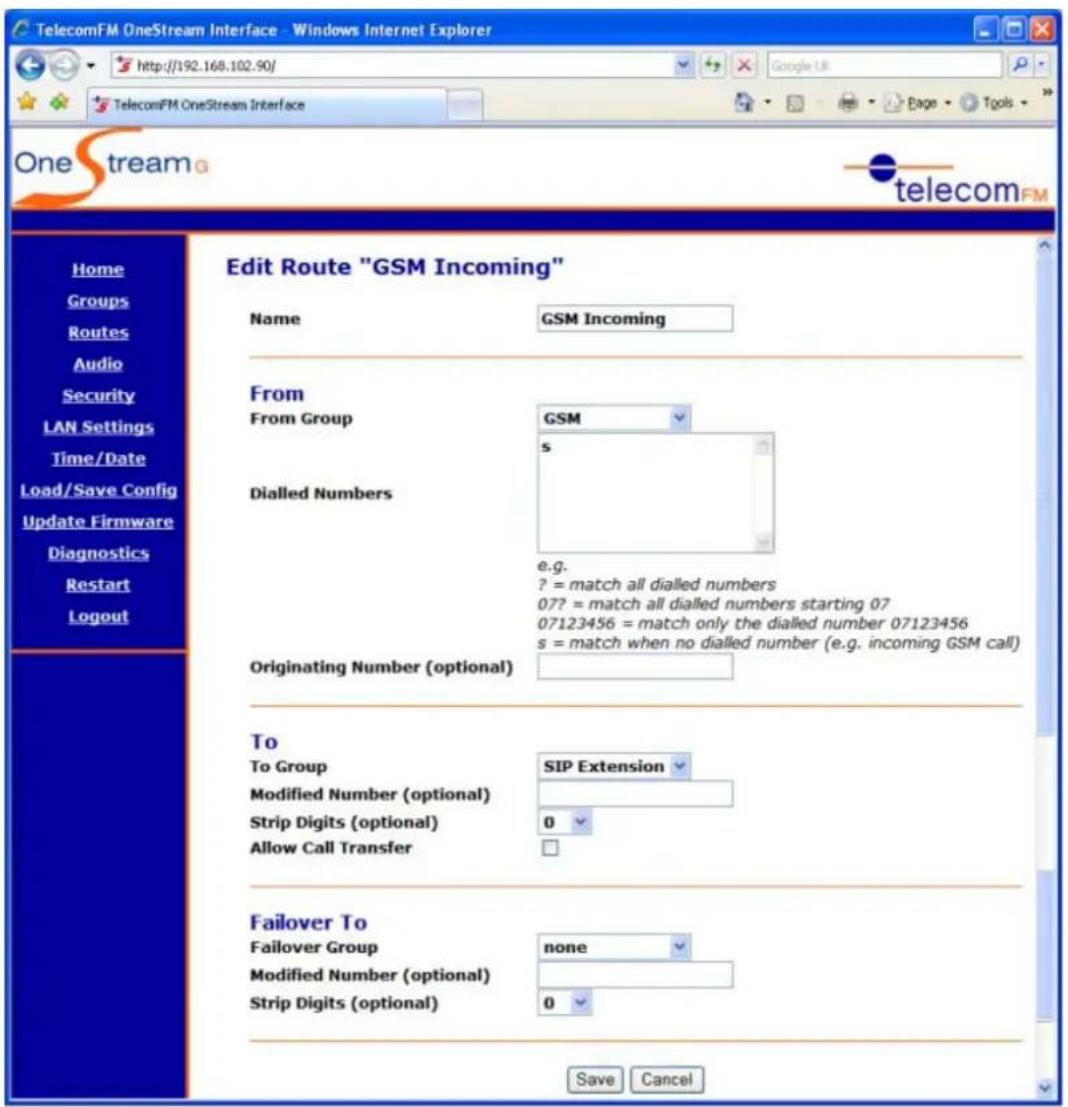
b. Click the Edit icon next to the Route that you wish to modify. The following screen will be displayed:
text_image
TelecomFM OneStream Interface - Windows Internet Explorer http://192.168.102.90/ TelecomFM OneStream Interface One stream Edit Route "GSM Incoming" Name GSM Incoming From From Group GSM s Dialled Numbers e.g. ? = match all dialled numbers 07? = match all dialled numbers starting 07 07123456 = match only the dialled number 07123456 s = match when no dialled number (e.g. incoming GSM call) Originating Number (optional) To To Group SIP Extension Modified Number (optional) Strip Digits (optional) 0 Allow Call Transfer Failover To Failover Group None Modified Number (optional) Strip Digits (optional) 0 Save Cancelc. Make any changes that are required to the Route – see the section on Adding a Route (above) for a description of all of the available options.
d. Click the Save button to apply the changes to the Route. Click the Cancel button to undo any changes made to the Route.
OneStream Programming Guide
4.4.3 Deleting A Route
To delete an existing route, use the following procedure:
a. Click the Routes link from the left hand menu.
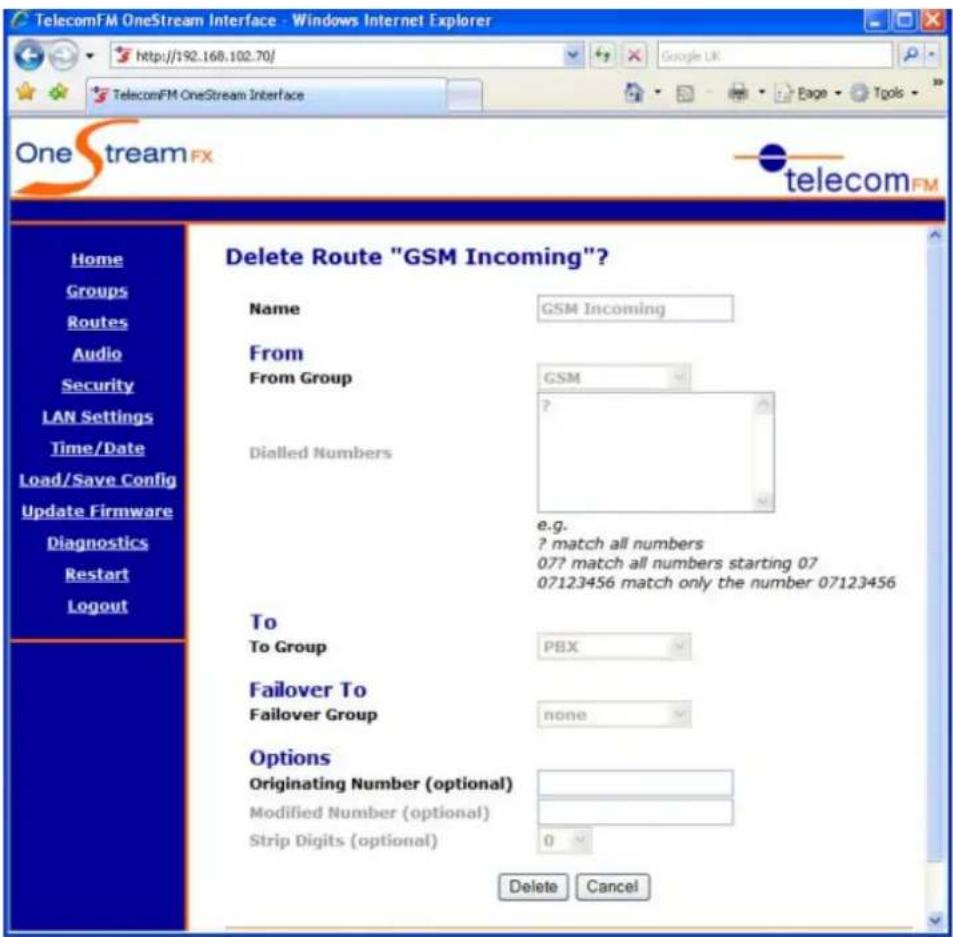
b. Click the Delete ✗ icon next to the Route that you wish to remove. The following screen will be displayed:
text_image
TelecomFM OneStream Interface - Windows Internet Explorer http://192.168.102.70/ Google UK TelecomFM OneStream Interface One stream FX telecomFM Home Groups Routes Audio Security LAN Settings Time/Date Load/Save Config Update Firmware Diagnostics Restart Logout Delete Route "GSM Incoming"? Name GSM Incoming From From Group GSM Dialled Numbers e.g. ? match all numbers 07? match all numbers starting 07 07123456 match only the number 07123456 To To Group PBX Failover To Failover GroupPCI none Options Originating Number (optional) Modified Number (optional) Strip Digits (optional) 0 Delete Cancelc. To delete the Route click the Delete button. To return to the Routes page without deleting the Route click the Cancel button.
Note that once a Route has been Deleted it cannot be recovered.
OneStream Programming Guide
4.5 Audio
text_image
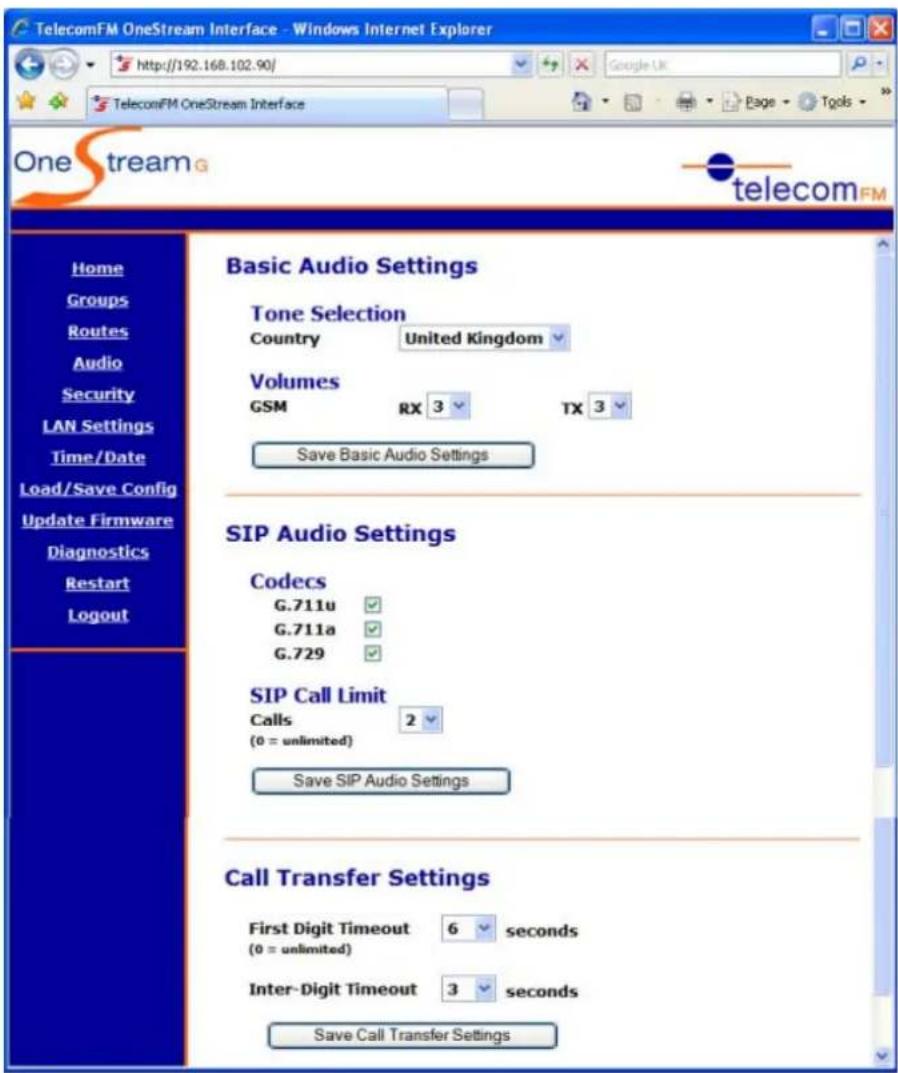
TelecomFM OneStream Interface - Windows Internet Explorer http://192.168.102.90/ TelecomFM OneStream Interface One stream telecomFM Home Groups Routes Audio Security LAN Settings Time/Date Load/Save Config Update Firmware Diagnostics Restart Logout Basic Audio Settings Tone Selection Country United Kingdom Volumes GSM RX 3 TX 3 Save Basic Audio Settings SIP Audio Settings Codecs G.711u ✓ G.711a ✓ G.729 ✓ SIP Call Limit Calls 2 (0 = unlimited) Save SIP Audio Settings Call Transfer Settings First Digit Timeout 6 seconds (0 = unlimited) Inter-Digit Timeout 3 seconds Save Call Transfer SettingsThe Audio Page is divided into 3 sections as follows:
4.5.1 Basic Audio Settings
Tone Selection
Select the country that the OneStream unit is being installed into from the drop-down list. This will set the various tones the system generates (e.g. Dialtone) to emulate those of the local Telephone providers.
OneStream Programming Guide
Volumes
Listed here will be all of the groups containing physical interfaces that have been set up on the Groups page. Each of these groups has a separate Receive (RX) and Transmit (TX) Volume control. Each volume control is adjustable from Level 1 (Quiet) to Level 5 (Loud). The default setting for all volumes is Level 3. It is recommended that you do not adjust the volume levels of any of the groups unless you are specifically experiencing a problem with sound levels.
Volume Level Example:
Calls are being made from a PBX attached to the FXS ports to the GSM modules. It is observed that users on phones attached to the PBX are unable to hear the people they called over GSM clearly. This could be fixed by either increasing the RX level for the GSM group or increasing the TX level for the PBX group or in a very extreme case by increasing both levels.
Note that changes to Volume Levels occur in Realtime when the Save button is pressed and will affect all active calls.
Save Basic Audio Settings – click the button to apply the basic audio settings.
4.5.2 SIP Audio Settings
Codecs
Place a tick in the checkbox of all Audio codecs that you wish to be supported for IP Calls. The default is to allow all codecs and unless you are experiencing problems with IP calls relating to a specific codec it is recommended that this is not changed.
Codecs available for selection are:
G.711u - the G.711 U-law codec - 64Kbps
G.711a - the G.711 A-law codec - 64Kbps
G.729 - the G.729 codec - 8Kbps
When you have finished configuring the Audio Settings click the Save button. The new settings will be applied immediately.
To cancel any changes you have made to the settings click the Cancel button at any time.
SIP Call Limit
Sets the Maximum number of simultaneous SIP Calls that will be allowed. This can be useful to restrict the amount of bandwidth that the OneStream will use and to ensure that the best speech quality is achieved by not allowing more IP Calls than the available bandwidth can support.
Save SIP Audio Settings – click the button to apply the SIP Audio Settings.
OneStream Programming Guide
4.5.3 Call Transfer Settings
First Digit Timeout
Sets the number of seconds that the OneStream will wait for a digit to be dialled after a * has been pressed to enter call transfer. The default is 6 seconds. An entry is 0 will wait indefinitely for the first digit to be dialled.
Inter-Digit Timeout
Sets the number of seconds that the OneStream will wait for more digits to be dialled during call transfer before attempting to connect the call. The default is 3 seconds.
Save Call Transfer Settings – click the button to apply the call transfer settings.
OneStream Programming Guide
4.6 Security
text_image
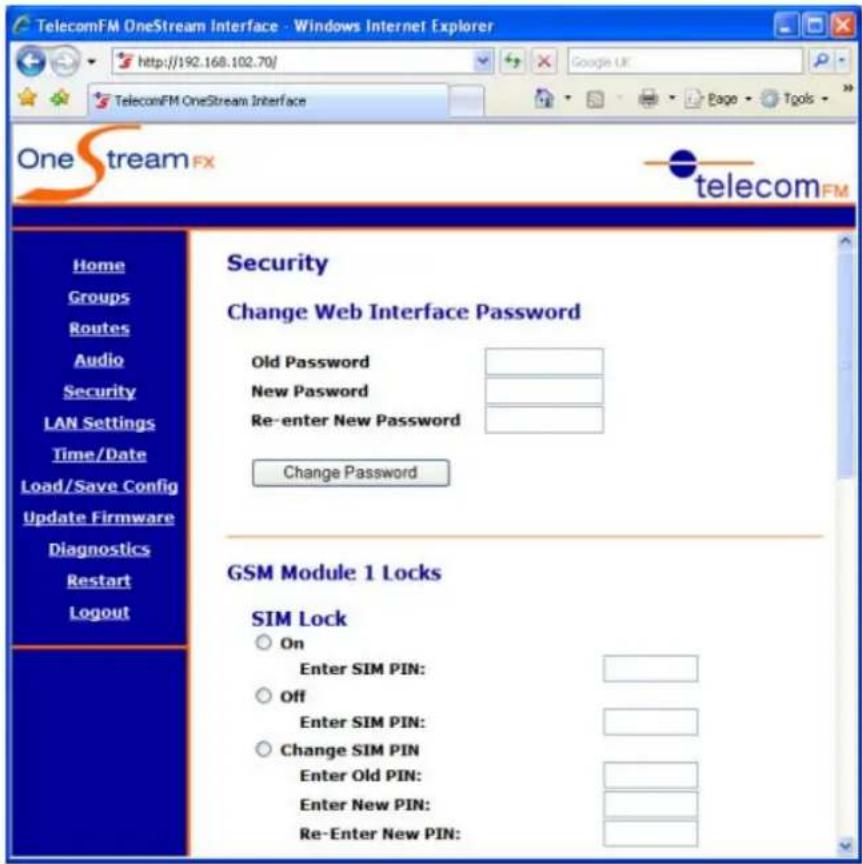
TelecomFM OneStream Interface - Windows Internet Explorer http://192.168.102.70/ Google UK TelecomFM OneStream Interface One stream FX telecomFM Home Groups Routes Audio Security LAN Settings Time/Date Load/Save Config Update Firmware Diagnostics Restart Logout Security Change Web Interface Password Old Password New Password Re-enter New Password Change Password GSM Module 1 Locks SIM Lock On Enter SIM PIN: Off Enter SIM PIN: Change SIM PIN Enter Old PIN: Enter New PIN: Re-Enter New PIN:The Security Page allows you to change the password required to access the web interface and to control SIM and Phone locking for the two GSM Modules (OneStream G / GFX / GBRI only). Options are as follows:
4.6.1 Change Web Interface Password
Change the Password that is used to access the Web Configuration Utility. Enter the Old Password (the default password is 12345678), the New Password and confirm the New Password in the Re-enter New Password box. Click the Change Password button to apply.
OneStream Programming Guide
4.5.4 GSM Module 1 and GSM Module 2 Locks (OneStream G / GFX / GBRI only)
Controls the SIM Lock and Phone Lock for Module 1 and Module 2 respectively. The Locks are explained overleaf. Select only the options that you wish to change and click the Save button to apply all of the selected options (e.g. If SIM Lock for Module 1 is already turned on and you now wish to turn on SIM Lock for Module 2 there is no need to select the Module 1 SIM Lock again).
Click the Cancel button at any time to clear any changes that have been made.
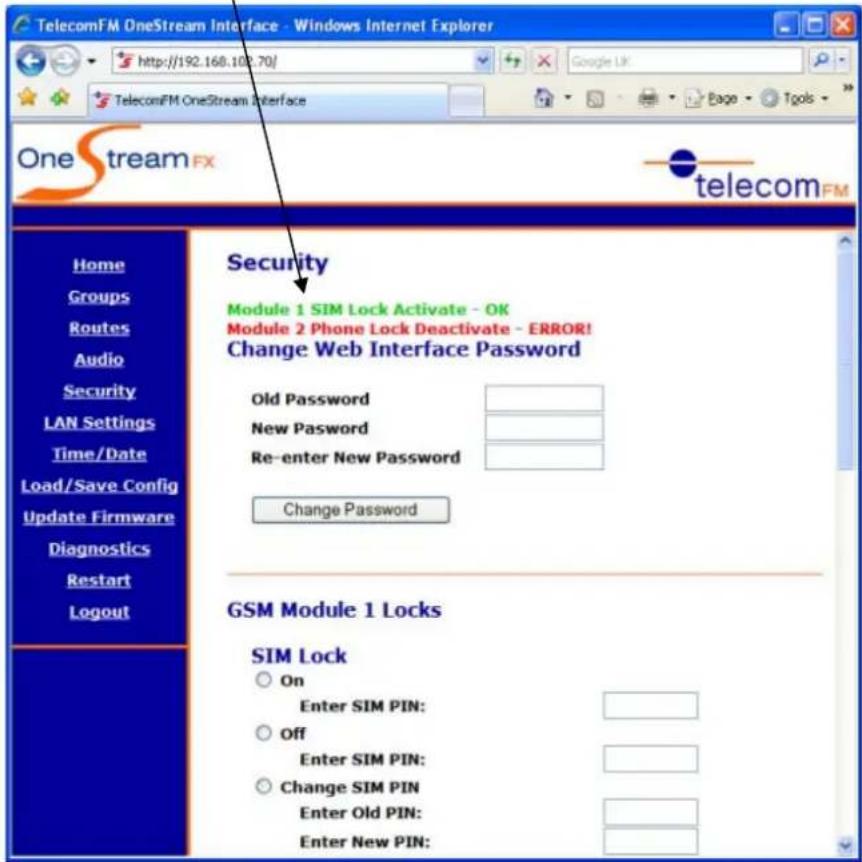
After the Save button has been clicked the results of any locking will be shown at the top of the screen. For example, if On was selected for the SIM Lock for Module 1 (and the correct PIN was entered) and Off was selected for the Phone Lock for Module 2 (and the wrong PIN was entered) you would see the following result:
text_image
TelecomFM OneStream Interface - Windows Internet Explorer http://192.168.108.70/ Google UK TelecomFM OneStream Interface One stream FX telecom FM Home Groups Routes Audio Security LAN Settings Time/Date Load/Save Config Update Firmware Diagnostics Restart Logout Security Module 1 SIM Lock Activate - OK Module 2 Phone Lock Deactivate - ERROR! Change Web Interface Password Old Password New Password Re-enter New Password Change Password GSM Module 1 Locks SIM Lock On Enter SIM PIN: Off Enter SIM PIN: Change SIM PIN Enter Old PIN: Enter New PIN:OneStream Programming Guide
4.6.1.1 SIM Lock (OneStream G / GFX / GBRI only)
When SIM Lock is turned ON you will be required to enter the SIM PIN every time the OneStream unit is turned on - until the SIM PIN has been entered no calls will be allowed on the GSM module.
a. Turn SIM Lock ON
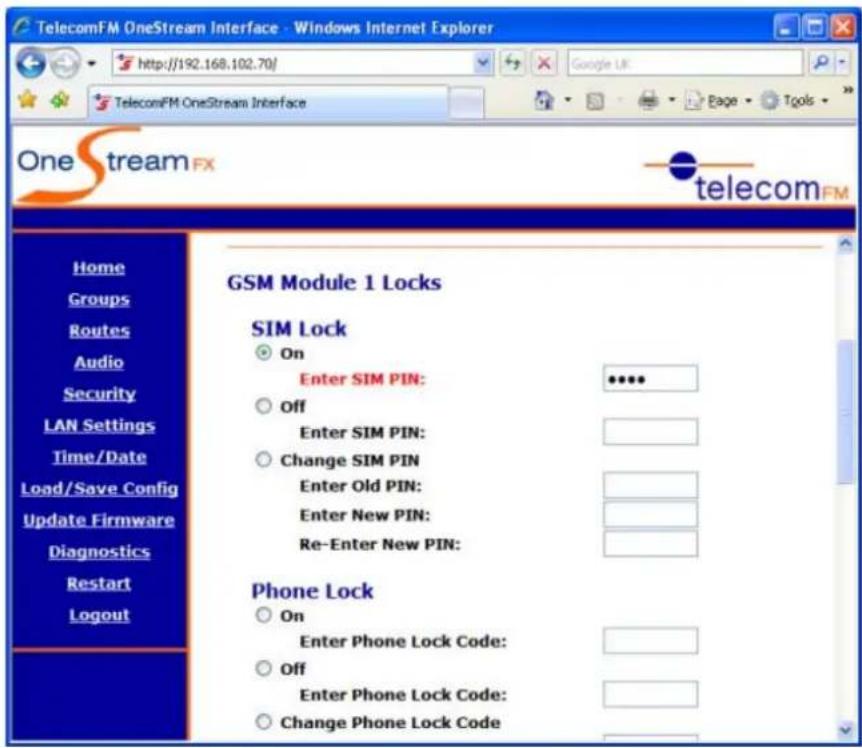
Select the On option and enter the current SIM PIN in the Enter SIM PIN box as shown below (the actual PIN will not be displayed on screen). The SIM Lock will be turned On when the Save button is clicked (if the entered PIN is correct).
text_image
TelecomFM OneStream Interface - Windows Internet Explorer http://192.168.102.70/ Google UK TelecomFM OneStream Interface One stream FX telecomFM Home Groups Routes Audio Security LAN Settings Time/Date Load/Save Config Update Firmware Diagnostics Restart Logout GSM Module 1 Locks SIM Lock On Enter SIM PIN: ****** Off Enter SIM PIN: Change SIM PIN Enter Old PIN: Enter New PIN: Re-Enter New PIN: Phone Lock On Enter Phone Lock Code: Off Enter Phone Lock Code: Change Phone Lock CodeOneStream Programming Guide
b. Turn SIM Lock OFF
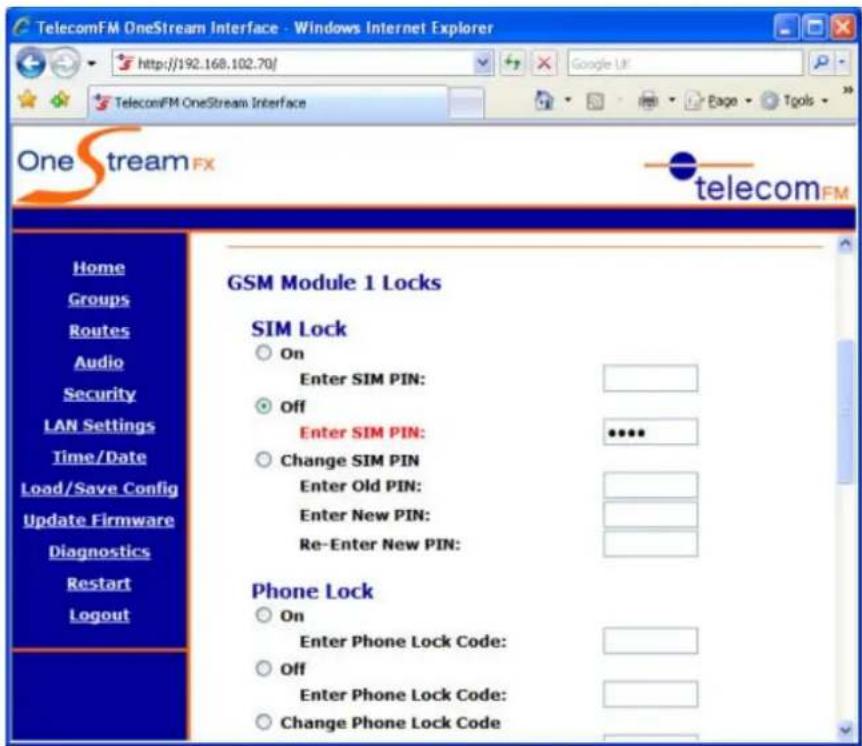
Select the Off option and enter the current SIM PIN in the Enter SIM PIN box as shown below (the actual PIN will not be displayed on screen). The SIM Lock will be turned Off when the Save button is clicked (if the entered PIN is correct).
text_image
TelecomFM OneStream Interface - Windows Internet Explorer http://192.168.102.70/ Google UK TelecomFM OneStream Interface One stream FX telecomFM Home Groups Routes Audio Security LAN Settings Time/Date Load/Save Config Update Firmware Diagnostics Restart Logout GSM Module 1 Locks SIM Lock On Enter SIM PIN: Off Enter SIM PIN: ****** Change SIM PIN Enter Old PIN: Enter New PIN: Re-Enter New PIN: Phone Lock On Enter Phone Lock Code: Off Enter Phone Lock Code: Change Phone Lock CodeOneStream Programming Guide
telecomFM
c. Change the SIM PIN
Select the Change SIM PIN option. Enter the current SIM PIN in the Enter Old PIN box. Enter the required New SIM PIN (must be between 4 and 8 digits) in both the Enter New PIN and Re-Enter New PIN boxes as shown below (the PINs will not be displayed on screen). The SIM PIN will be changed when the Save button is clicked (if the Old PIN that was entered is correct).
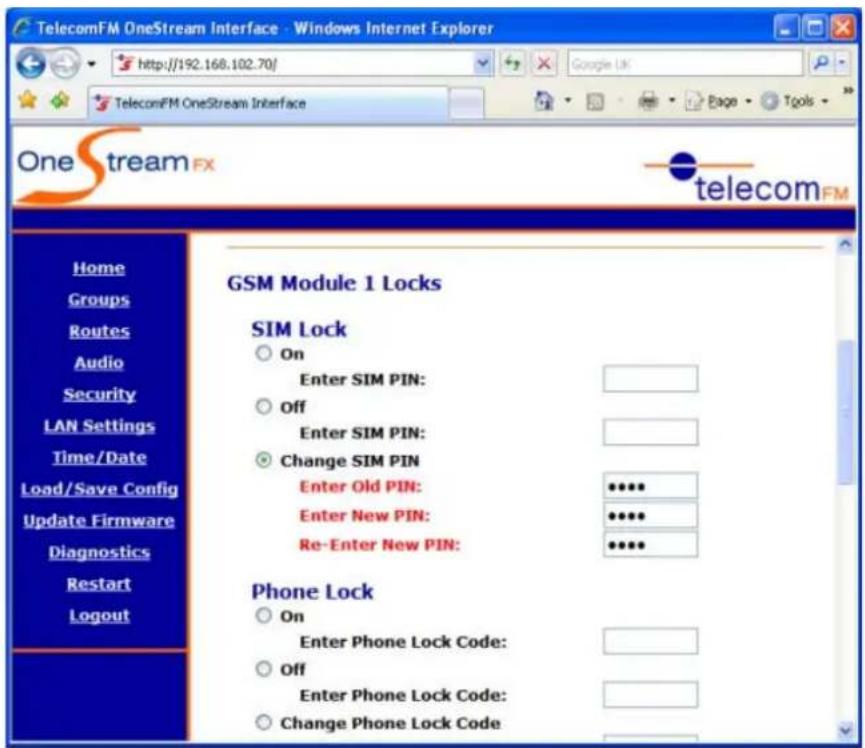
text_image
TelecomFM OneStream Interface - Windows Internet Explorer http://192.168.102.70/ Google UK TelecomFM OneStream Interface One stream FX telecom FM Home Groups Routes Audio Security LAN Settings Time/Date Load/Save Config Update Firmware Diagnostics Restart Logout GSM Module 1 Locks SIM Lock On Enter SIM PIN: Off Enter SIM PIN: Change SIM PIN Enter Old PIN: ***** Enter New PIN: ***** Re-Enter New PIN: ***** Phone Lock On Enter Phone Lock Code: Off Enter Phone Lock Code: Change Phone Lock CodeOneStream Programming Guide
4.6.1.2 Phone Lock (OneStream G / GFX / GBRI only)
When Phone Lock is turned ON the GSM Module will be locked to the SIM that is currently inserted. If you wish to use a different SIM with the module you will be first required to enter the Phone Lock Code – until the Code is entered no calls will be allowed on this module.
a. Turn Phone Lock ON
Select the On option and enter the Phone Lock Code in the Enter Phone Lock Code box as shown below (the actual Code will not be displayed on screen). The default Phone Lock Code is 12345678. The Phone Lock will be turned On when the Save button is clicked (if the entered Code is correct).
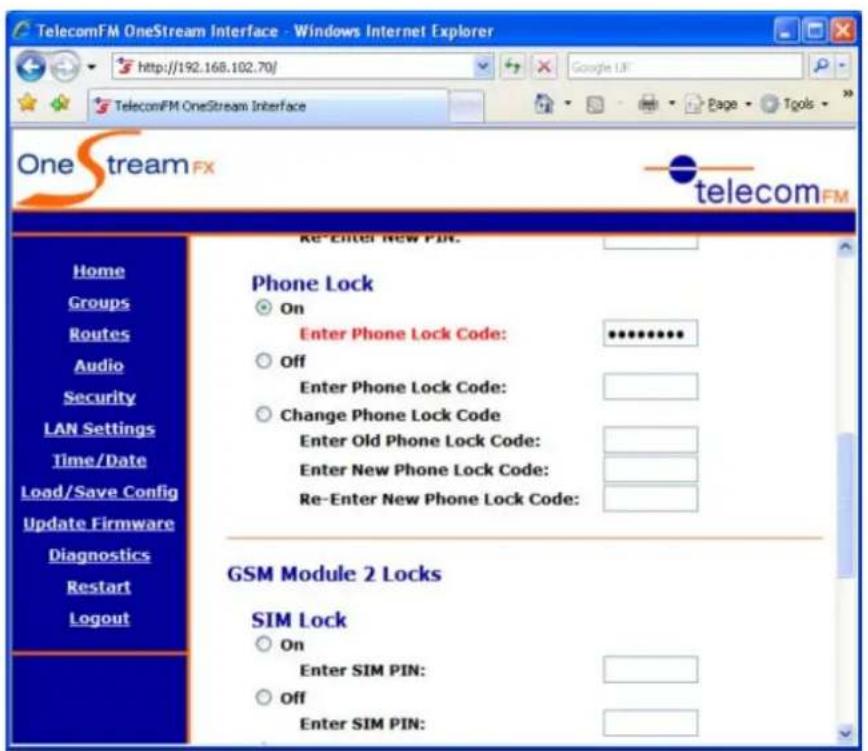
text_image
TelecomFM OneStream Interface - Windows Internet Explorer http://192.168.102.70/ Google UI TelecomFM OneStream Interface One stream FX telecom FM Re-Enter New PIN. Phone Lock On Enter Phone Lock Code: ************ Off Enter Phone Lock Code: Change Phone Lock Code Enter Old Phone Lock Code: Enter New Phone Lock Code: Re-Enter New Phone Lock Code: GSM Module 2 Locks SIM Lock On Enter SIM PIN: Off Enter SIM PIN:OneStream Programming Guide
b. Turn Phone Lock OFF
Select the Off option and enter the Phone Lock Code in the Enter Phone Lock Code box as shown below (the actual Code will not be displayed on screen). The default Phone Lock Code is 12345678. The Phone Lock will be turned Off when the Save button is clicked (if the entered Code is correct).
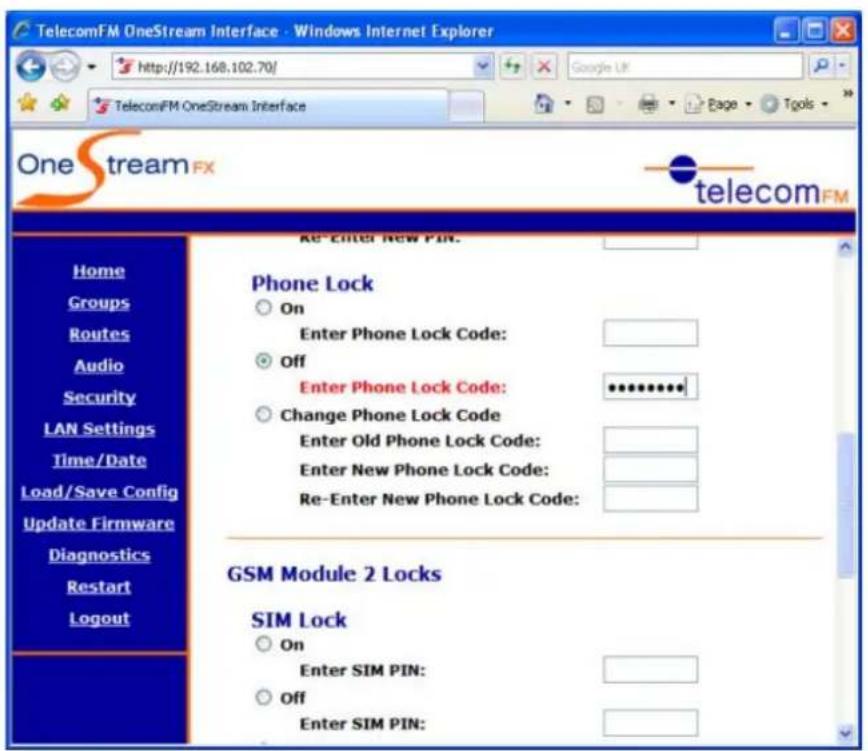
text_image
TelecomFM OneStream Interface - Windows Internet Explorer http://192.168.102.70/ TelecomFM OneStream Interface One stream FX telecom FM Home Groups Routes Audio Security LAN Settings Time/Date Load/Save Config Update Firmware Diagnostics Restart Logout Re-Enter New PIN. Phone Lock On Enter Phone Lock Code: Off Enter Phone Lock Code: ************ Change Phone Lock Code Enter Old Phone Lock Code: Enter New Phone Lock Code: Re-Enter New Phone Lock Code: GSM Module 2 Locks SIM Lock On Enter SIM PIN: Off Enter SIM PIN:OneStream Programming Guide
c. Change the Phone Lock Code
Select the Change Phone Lock Code option. Enter the current Phone Lock Code in the Enter Old Phone Lock Code box (the default code is 12345678). Enter the required New Phone Lock Code (must be between 4 and 8 digits) in both the Enter New Phone Lock Code and Re-Enter New Phone Lock Code boxes as shown below (the Codes will not be displayed on screen). The Phone Lock Code will be changed when the Save button is clicked (if the Old Code that was entered is correct).
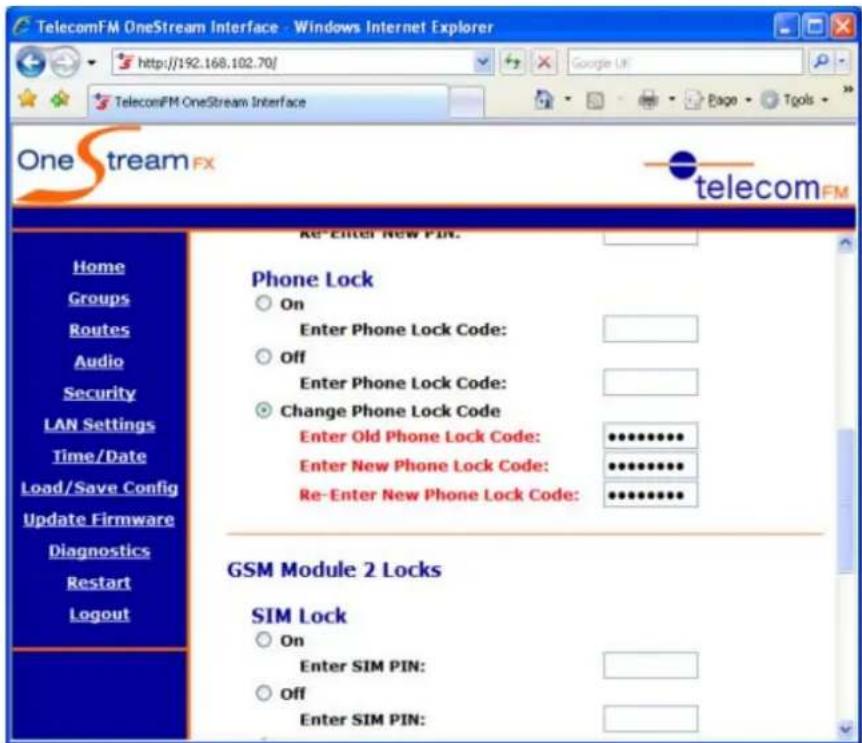
text_image
TelecomFM OneStream Interface - Windows Internet Explorer http://192.168.102.70/ Google UK TelecomFM OneStream Interface One stream FX telecom FM Re-Enter New PIN. Phone Lock ○ On Enter Phone Lock Code: ○ Off Enter Phone Lock Code: ○ Change Phone Lock Code Enter Old Phone Lock Code: ************ Enter New Phone Lock Code: ************ Re-Enter New Phone Lock Code: ************ GSM Module 2 Locks SIM Lock ○ On Enter SIM PIN: ○ Off Enter SIM PIN:OneStream Programming Guide
4.7 LAN Settings
text_image
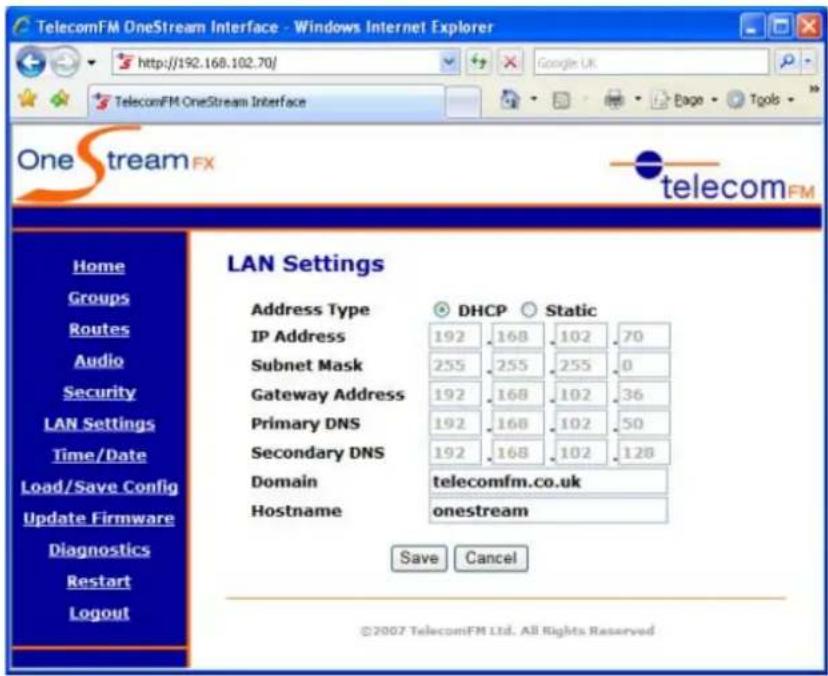
TelecomFM OneStream Interface - Windows Internet Explorer http://192.168.102.70/ Google UK TelecomFM OneStream Interface One stream FX telecomFM LAN Settings Address Type DHCP Static IP Address 192 168 102 70 Subnet Mask 255 255 255 0 Gateway Address 192 168 102 36 Primary DNS 192 168 102 50 Secondary DNS 192 168 102 128 Domain telecomfm.co.uk Hostname onestream Save Cancel ©2007 TelecomFM Ltd. All Rights ReservedThe LAN Settings Page allows you to configure the OneStream unit to use either Automatic or Static networking and to enter all required network settings when using Static networking.
Options are as follows:
Address Type
a. DHCP
Select this option if the network the OneStream is connected to has a DHCP Server that assigns IP Addresses automatically. When this option is selected no further information needs to be entered on the Network Page. This is the default option.
b. Static
Select this option when no DHCP server is available on the network that the OneStream is connected to. When this option is selected the static network options must also be entered.
IP Address (Static Address Type only)
Enter the IP Address that the OneStream should use. Ensure that this IP Address is not currently in use on the network – if in doubt consult with the Network Administrator.
Subnet Mask (Static Address Type only)
Enter the Subnet Mask for the Network that the OneStream is connected to – if in doubt consult with the Network Administrator.
Gateway Address (Static Address Type only)
Enter the IP Address of the Default Gateway for the network.
OneStream Programming Guide
Primary DNS (Static Address Type only)
Enter the IP Address of the Primary DNS Server for the network.
Secondary DNS (Static Address Type only)
(Optional) Enter the IP Address of the Secondary DNS Server for the network.
Domain (Static Address Type only)
Enter the default Domain for the network.
Hostname (Static Address Type only)
Enter the Hostname that should be used by the OneStream unit on the network.
When you have finished configuring the Network Settings click the Save button. The OneStream unit must be restarted to apply the new settings.
To cancel any changes you have made to the settings click the Cancel button at any time.
OneStream Programming Guide
4.8 Time / Date
text_image
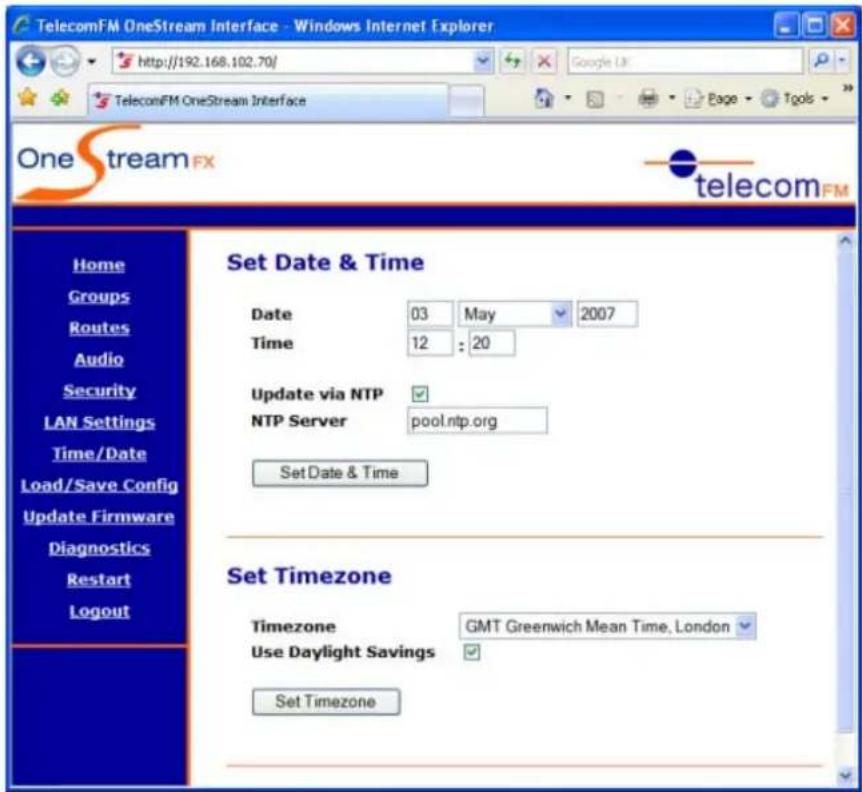
TelecomFM OneStream Interface - Windows Internet Explorer http://192.168.102.70/ Google UK TelecomFM OneStream Interface One stream FX telecom FM Home Groups Routes Audio Security LAN Settings Time/Date Load/Save Config Update Firmware Diagnostics Restart Logout Set Date & Time Date 03 May 2007 Time 12 : 20 Update via NTP ✓ NTP Server pool.ntp.org Set Date & Time Set Timezone Timezone GMT Greenwich Mean Time, London ✓ Use Daylight Savings ✓ Set TimezoneThe Time / Date Page allows you to perform the following operations:
4.8.1 Set Date & Time
The current date and time can be set here. For the date, the Day is entered, the Month is selected from the drop-down list and then the year is entered in full e.g. 2006. For the time, the hour is entered and then the minutes. The time is in 24-hour format only.
The date and time can be automatically updated via an NTP server. If the OneStream unit is able to connect to the Internet then the default NTP server (pool.ntp.org) can be used. Alternatively if an NTP server is available on the Local Network then its address can be entered in the NTP Server box. To enable the automatic update place a tick in the Update via NTP checkbox.
When you have finished configuring the Date and Time Settings click the Set Date & Time button. The new date and time settings will be applied immediately.
4.8.2 Set Timezone
The Timezone that the unit is located in can be set from here. Select your Timezone from the dropdown list. Choose the Use Daylight Savings checkbox to have the OneStream unit automatically adjust for daylight savings time in the summer. Click the Set Timezone button to apply the new settings – the system time will be adjusted immediately to reflect the change in Timezone.
OneStream Programming Guide
4.9 Load/ Save Config
text_image
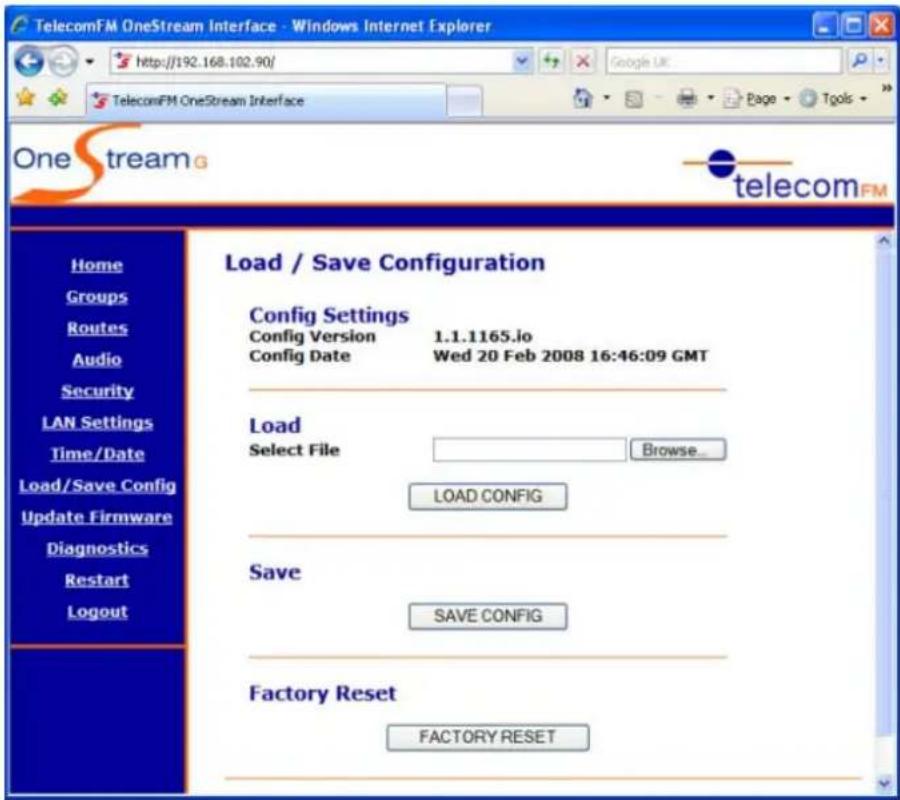
TelecomFM OneStream Interface - Windows Internet Explorer http://192.168.102.90/ TelecomFM OneStream Interface One stream telecomFM Home Groups Routes Audio Security LAN Settings Time/Date Load/Save Config Update Firmware Diagnostics Restart Logout Load / Save Configuration Config Settings Config Version 1.1.1165.io Config Date Wed 20 Feb 2008 16:46:09 GMT Load Select File Browse... LOAD CONFIG Save SAVE CONFIG Factory Reset FACTORY RESETThe Load/Save Config Page allows you to Backup the configuration of the OneStream unit, Restore a previously saved configuration or restore the unit to a Factory Default configuration.
4.9.1 Load
To Load a previously saved configuration:
a. Click the Browse button
b. Select the .tfm configuration file and click the Open button
c. Click the Load Config button to load the configuration. Warning: This will replace the current configuration in the OneStream unit.
d. When the Load has finished restart the unit to use the new configuration.
OneStream Programming Guide
4.9.2 Save
To Save the current configuration to a file:
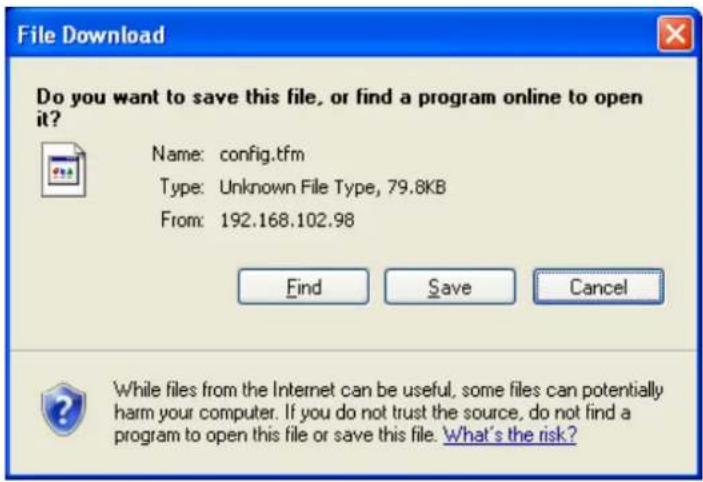
a. Click the Save Config button. The following dialog should be displayed:
text_image
File Download Do you want to save this file, or find a program online to open it? Name: config.tfm Type: Unknown File Type, 79.8KB From: 192.168.102.98 Find Save Cancel While files from the Internet can be useful, some files can potentially harm your computer. If you do not trust the source, do not find a program to open this file or save this file. What's the risk?b. Click the Save button
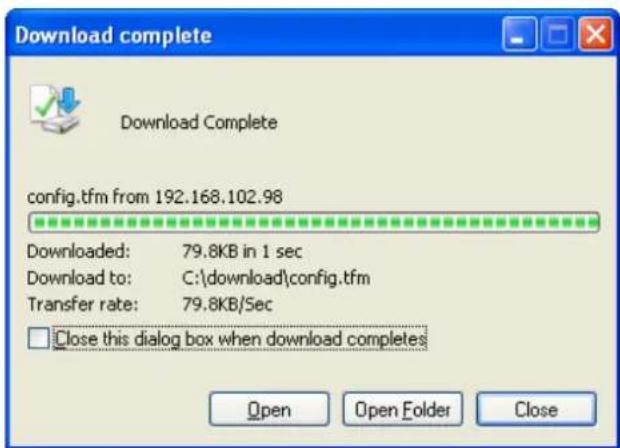
c. Select a folder to Save the file to and enter a Filename. Click the Save button. You should see the following dialog:
text_image
Download complete Download Complete config.tfm from 192.168.102.98 Downloaded: 79.8KB in 1 sec Download to: C:\download\config.tfm Transfer rate: 79.8KB/Sec Close this dialog box when download completes Open Open Folder Closed. Click the Close button. The configuration has now been saved.
4.9.3 Factory Reset
To restore the OneStream unit to a Factory Default configuration click the Factory Reset button. You will be asked to confirm that you wish to do so. After restoring the configuration the unit will need to restart.
OneStream Programming Guide
WARNING: Running a Factory Reset will lose all Groups, Routes and other configuration options set on the OneStream unit. It is recommended that the current configuration is backed up using the "Save" option before running the Factory Reset.
OneStream Programming Guide
telecomFM
4.10 Update Firmware
text_image
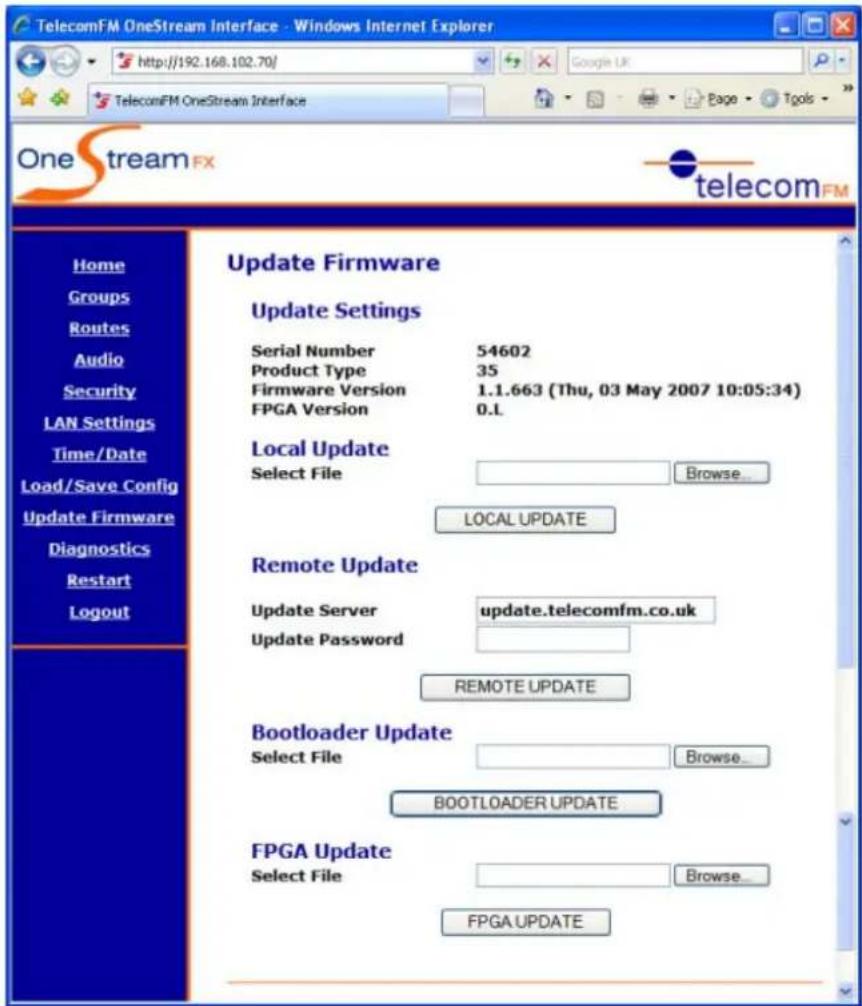
TelecomFM OneStream Interface - Windows Internet Explorer http://192.168.102.70/ Google UK TelecomFM OneStream Interface Page Tools One stream FX telecom FM Home Groups Routes Audio Security LAN Settings Time/Date Load/Save Config Update Firmware Diagnostics Restart Logout Update Firmware Update Settings Serial Number 54602 Product Type 35 Firmware Version 1.1.663 (Thu, 03 May 2007 10:05:34) FPGA Version 0.L Local Update Select File Browse... LOCAL UPDATE Remote Update Update Server update.telecomfm.co.uk Update Password REMOTE UPDATE Bootloader Update Select File Browse... BOOTLOADER UPDATE FPGA Update Select File Browse... FPGA UPDATEThe Update Firmware page allows you to update the system software in the OneStream Unit.
DO NOT ATTEMPT TO UPDATE THE FIRMWARE UNLESS SPECIFICALLY INSTRUCTED TO DO SO BY THE MANUFACTURER OR PROVIDER OF THE UNIT.
OneStream Programming Guide
4.10.1 Local Update
This will update the main system firmware of the OneStream unit from a file.
a. Click the Browse button.
b. Select the firmware file that has been provided to you.
c. Click the Open button.
d. Click the Local Update button.
e. When the update completes restart the OneStream unit.
4.10.2 Remote Update
This will update the main system firmware of the OneStream unit remotely.
a. Enter the update server location that has been provided to you or leave it unchanged to use the default server.
b. Click the Remote Update button.
c. When the update completes restart the OneStream unit.
4.10.3 Bootloader Update
This will update the OneStream Bootloader unit locally from a file.
a. Click the Browse button.
b. Select the Bootloader file that has been provided to you.
c. Click the Open button.
d. Click the Bootloader Update button.
e. When the update completes restart the OneStream unit.
OneStream Programming Guide
4.10.4 FPGA Update
This will update the FPGA firmware of the OneStream unit locally from a file.
f. Click the Browse button.
g. Select the FPGA firmware file that has been provided to you.
h. Click the Open button.
i. Click the FPGA Update button.
j. When the update completes restart the OneStream unit.
OneStream Programming Guide
4.11 Diagnostics
text_image
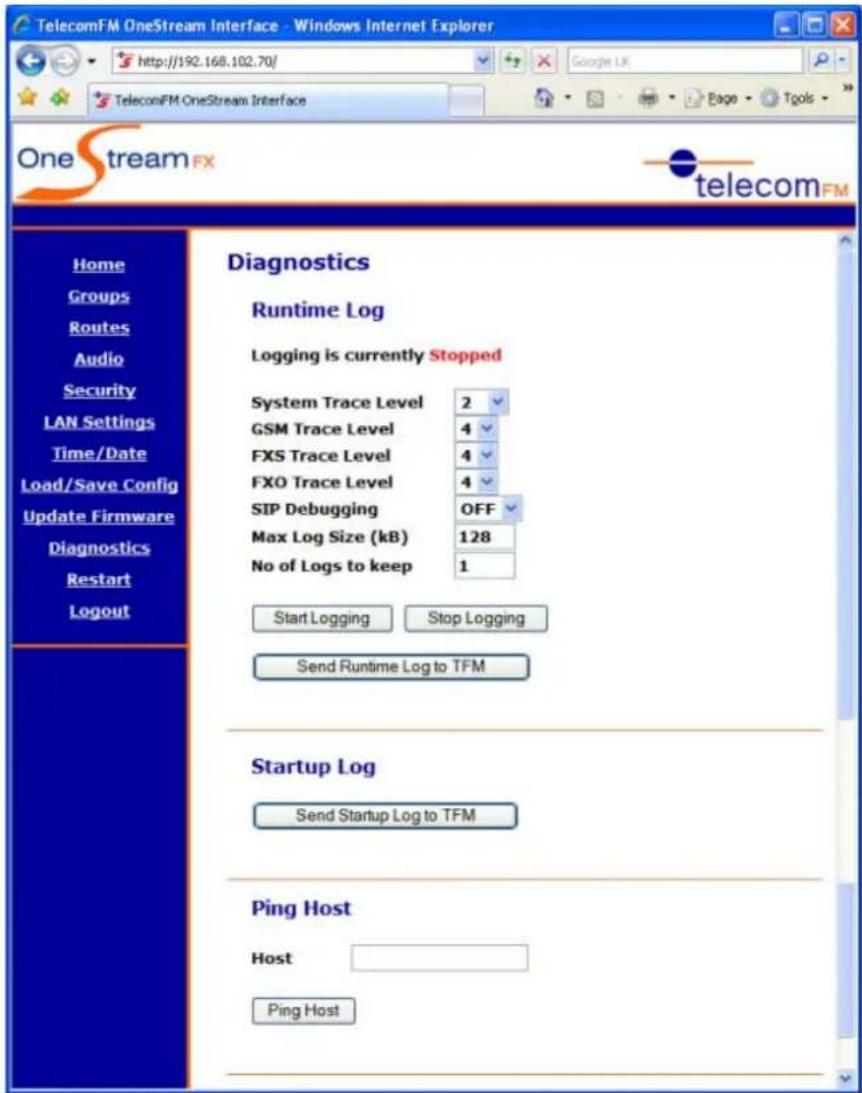
TelecomFM OneStream Interface - Windows Internet Explorer http://192.168.102.70/ Google UK TelecomFM OneStream Interface One stream FX telecomFM Home Groups Routes Audio Security LAN Settings Time/Date Load/Save Config Update Firmware Diagnostics Restart Logout Diagnostics Runtime Log Logging is currently Stopped System Trace Level 2 GSM Trace Level 4 FXS Trace Level 4 FXO Trace Level 4 SIP Debugging OFF Max Log Size (kB) 128 No of Logs to keep 1 Start Logging Stop Logging Send Runtime Log to TFM Startup Log Send Startup Log to TFM Ping Host Host Ping HostThe Diagnostics Page can be used to gather trace on problems, send the Log Files to TelecomFM and to test Network connectivity.
Note: Do Not Adjust the Log settings unless you have been advised to by the Manufacturer or Provider of the Unit.
4.11.1 Runtime Log
To start collecting a Runtime log set the trace levels that have been advised to you and click the Start Logging button. All system activity will then be recorded in a log file. To stop the log being generated click the Stop Logging button. To transmit the log file to TelecomFM click the Send Runtime Log to TFM button – this will then transmit the log file(s) automatically to TelecomFM (a LAN connection must be connected which offers a connection to the Internet for this function to work).
OneStream Programming Guide
4.11.2 Startup Log
A Log of all Startup Activities is generated automatically each time the OneStream unit is powered on. To send this file to TelecomFM for troubleshooting click the Send Startup Log to TelecomFM button (a LAN connection must be connected which offers a connection to the Internet for this function to work).
4.11.3 Ping Host
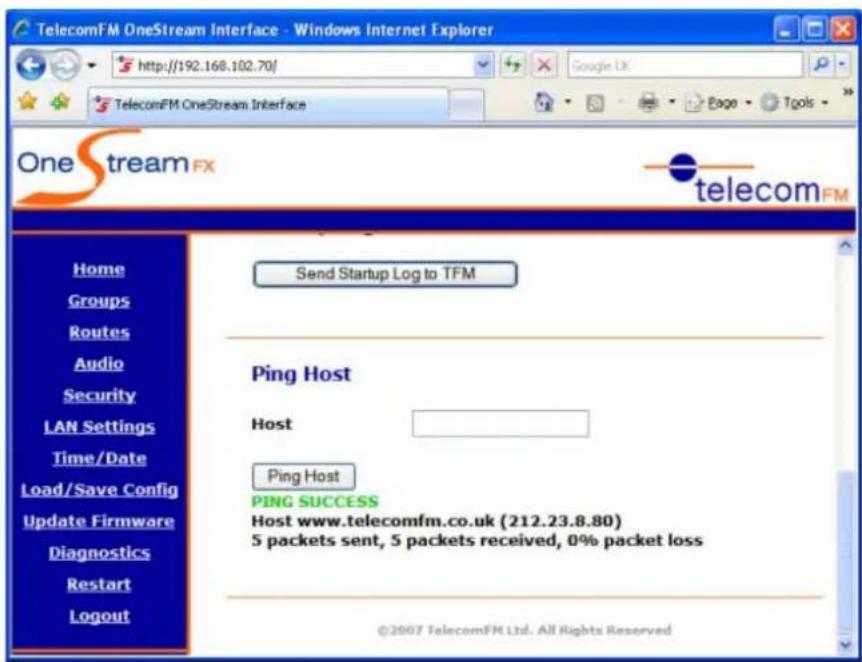
To test LAN functionality or DNS it is possible to ping a remote host and view the response. Enter an IP Address or a Fully Qualified Domain Name in the Host box and click the Ping Host button. After a few seconds the page will reload and the response will be shown. For example, if www.telecomfm.co.uk is entered in the Host box the response should be as shown here:
text_image
TelecomFM OneStream Interface - Windows Internet Explorer http://192.168.102.70/ Google UK TelecomFM OneStream Interface One stream FX telecomFM Send Startup Log to TFM Home Groups Routes Audio Security LAN Settings Time/Date Load/Save Config Update Firmware Diagnostics Restart Logout Ping Host Host Ping Host PING SUCCESS Host www.telecomfm.co.uk (212.23.8.80) 5 packets sent, 5 packets received, 0% packet loss ©2007 TelecomFM Ltd. All Rights ReservedOneStream Programming Guide
4.12 Restart
text_image
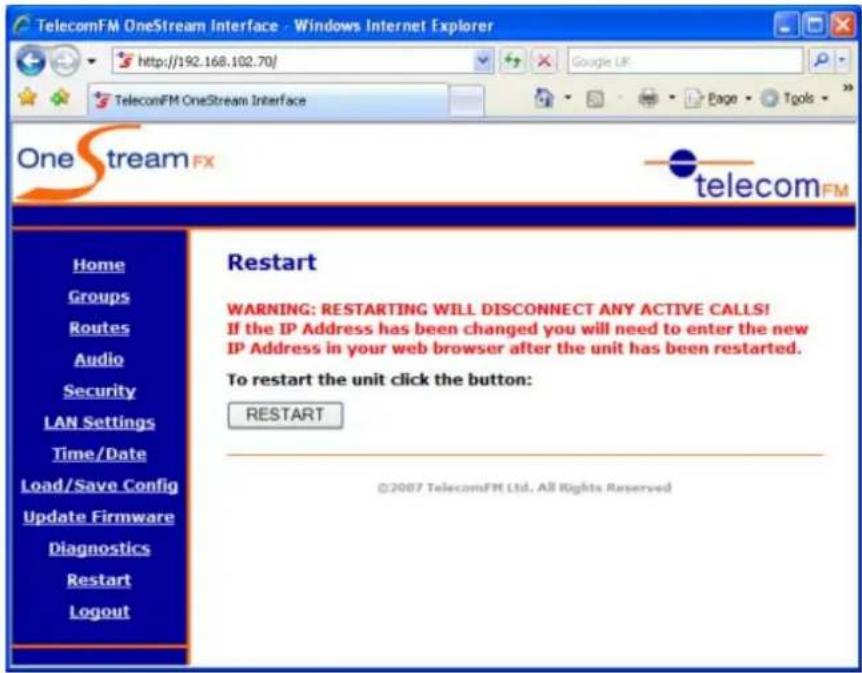
TelecomFM OneStream Interface - Windows Internet Explorer http://192.168.102.70/ Google UK TelecomFM OneStream Interface One stream FX telecomFM Home Groups Routes Audio Security LAN Settings Time/Date Load/Save Config Update Firmware Diagnostics Restart Logout Restart WARNING: RESTARTING WILL DISCONNECT ANY ACTIVE CALLS! If the IP Address has been changed you will need to enter the new IP Address in your web browser after the unit has been restarted. To restart the unit click the button: RESTART ©2007 TelecomFM Ltd. All Rights ReservedThe unit can be reinitialised from the Restart Page. Click the Restart button to restart – the unit will restart automatically and you will be returned to the Home page after 60 seconds. If the Home Page does not reappear after 60 seconds click the Refresh button on your Internet Browser. (Note that if the IP Address of the OneStream unit has been changed the new IP Address must be entered in the Address Bar of the Internet Browser).
WARNING: Any Active Calls will be disconnected while the OneStream is restarting.
OneStream Programming Guide
telecomFM
4.13 Logout
text_image
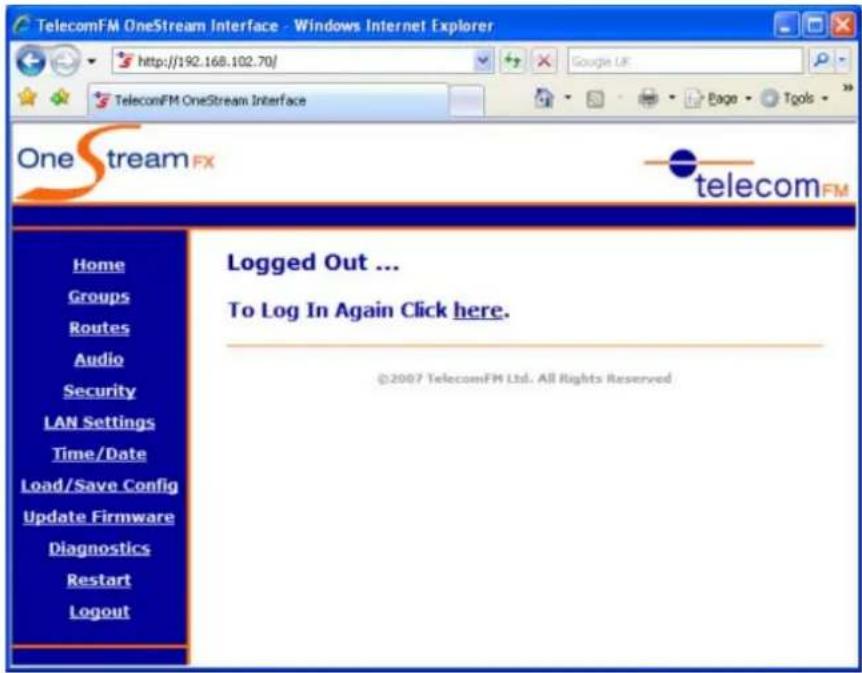
TelecomFM OneStream Interface - Windows Internet Explorer http://192.168.102.70/ Google UK TelecomFM OneStream Interface One stream FX telecomFM Home Groups Routes Audio Security LAN Settings Time/Date Load/Save Config Update Firmware Diagnostics Restart Logout Logged Out ... To Log In Again Click here. ©2007 TelecomFM Ltd. All Rights ReservedWhen all configuration options have been set click the Logout link to exit from the Web Configuration Utility.
OneStream Programming Guide
5. Additional Features
5.1 Virtual Extensions
The Virtual Extensions feature allows a remote worker to be able to place calls on hold or transfer calls in a similar way that they would when in the office.
This feature can be enabled on all types of interface by ticking the "Allow Call Transfer" check box when setting up Routes.
A user can place a call on hold by pressing the * key. Pressing the * key a second time will take the original call off hold. If the user dials a new extension number while the original call is on hold this will connect a second call. If the user then hangs up then the original caller will be connected to the second call. Refer to the following example for more information:
Example:
A OneStream G is registered to an IP PBX using a SIP Network group. There are 3 people in the office – Bob, Fred and Mary who have extension phones on the IP PBX as follows:
Bob - extension 200
Fred - extension 201
Mary - extension 202
Fred works remotely a lot and wants to use his mobile phone (which has telephone number 07900123456) as a Virtual Extension with extension number 301.
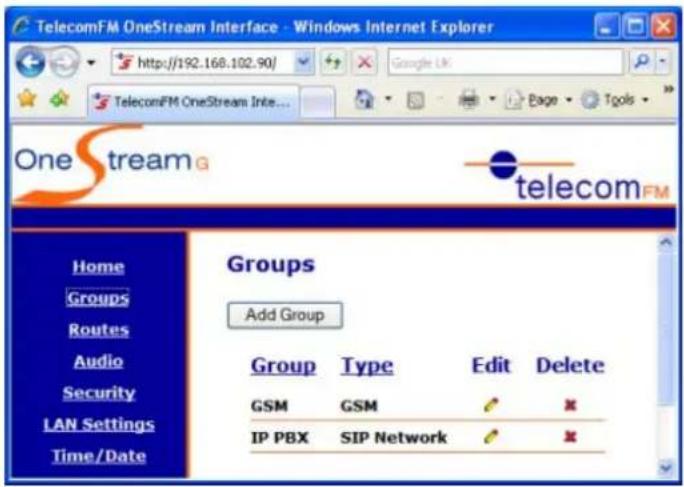
There are 2 groups setup on the OneStream – a GSM group containing GSM modules and a SIP Network group which registers to the IP PBX:
text_image
TelecomFM OneStream Interface - Windows Internet Explorer http://192.168.102.90/ Google UK TelecomFM OneStream Inter... One stream G telecom FM Home Groups Routes Audio Security LAN Settings Time/Date Groups Add Group Group Type Edit Delete GSM GSM IP PBX SIP NetworkOneStream Programming Guide
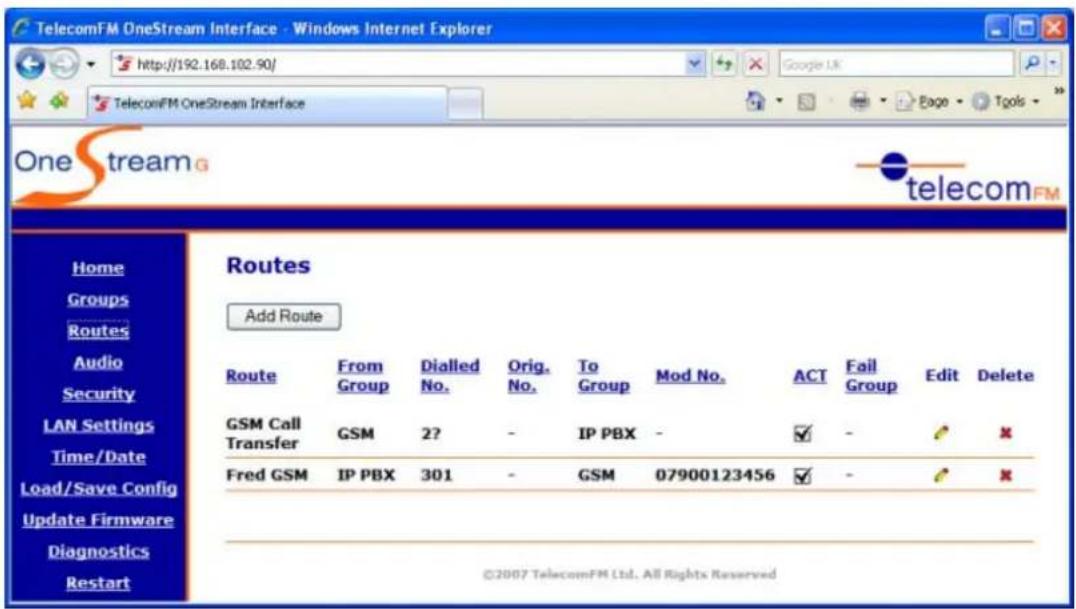
There are 2 routes required for this setup as follows:
text_image
TelecomFM OneStream Interface - Windows Internet Explorer http://192.168.102.90/ TelecomFM OneStream Interface One stream Home Groups Routes Audio Security LAN Settings Time/Date Load/Save Config Update Firmware Diagnostics Restart Routes Add Route Route From Group Dialled No. Orig. No. To Group Mod No. ACT Fail Group Edit Delete GSM Call Transfer GSM 2? - IP PBX - ✓ - ✔ ✕ Fred GSM IP PBX 301 - GSM 07900123456 ✓ - ✔ ✕ ©2007 TelecomFM Ltd. All Rights ReservedThe "Fred GSM" route enables any extension on the IP PBX to dial 301 to call Fred on his mobile.
The "GSM Call Transfer" route enables Fred to transfer the call from his mobile to any extension on the IP PBX starting with 2.
Note that both Routes have the "Allow Call Transfer" option ticked.
• Bob is in the office and he dials 301 from the extension phone on his desk.
- Fred is out of the office and his mobile phone now rings. He answers the mobile and now Fred is talking to Bob.
- Fred now dials * on his mobile to put Bob on hold. Bob hears On Hold Music and Fred now hears a dialtone.
- Fred dials 202. Mary's phone in the office now rings. She answers her phone and now Fred is talking to Mary.
• Fred ends the call on his mobile. Now Mary is talking to Bob.
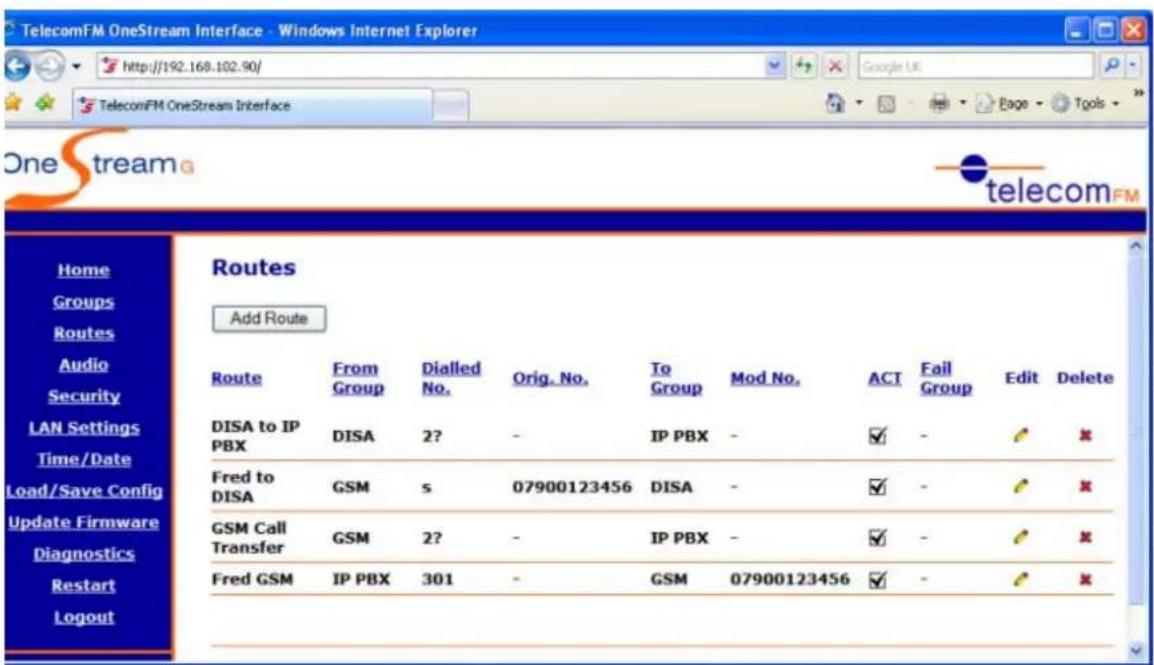
When Fred is working remotely he also wants to be able to call into the office from his mobile phone and dial to any extension on the IP PBX. This can be doing using DISA. Once he has dialled in call transfer should also be available to him.
OneStream Programming Guide
A DISA Group is now added (no password is required because it will be restricted to Bob's mobile CLI):

text_image
TelecomFM OneStream Interface - Windows Internet Explorer http://192.168.102.90/ Google UK TelecomFM OneStream Int... Page Tools One stream telecomFM Home Groups Routes Audio Security LAN Settings Time/Date Load/Save Config Update Firmware Diagnostics Restart Groups Add Group Group Type Edit Delete DISA DISA ✗ ✗ GSM GSM ✗ ✗ IP PBX SIP Network ✗ ✗ ©2007 TelecomFM Ltd. All Rights ReservedThere are 2 more routes required as follows:
text_image
TelecomFM OneStream Interface - Windows Internet Explorer http://192.168.102.90/ TelecomFM OneStream Interface Home Groups Routes Audio Security LAN Settings Time/Date Load/Save Config Update Firmware Diagnostics Restart Logout Routes Add Route Route From Group Dialled No. Orig. No. DISA to IP PBX DISA 2? - Fred to DISA GSM s 07900123456 DISA - GSM Call Transfer GSM 2? - Fred GSM IP PBX 301 - DHA to IP PBX DISA - IP PBX - DISA - ✓ - - IP PBX - ✓ - - GSM Call Transfer GSM 2? - GSM 07900123456 ✓ - - IP PBX - ✓ - - GSM 07900123456 ✓ - - GSM 07900123456 ✓ - - GSM 07900123456 ✓ - - GSM 07900123456 ✓ - - GSM 07900123456 ✓ - - GSM 07900123455 Edit DeleteThe "Fred to DISA" route will send all calls received from Fred's mobile phone into DISA.
The "DISA to IP PBX" route will allow any calls dialled from DISA starting with a 2 to the IP PBX.
Note that all routes have the "Allow Call Transfer" option ticked.
OneStream Programming Guide
- Fred is out of the office and he wants to speak to Mary. From his mobile he dials the GSM number for one of the SIMs that is in the OneStream. This call is received by the OneStream and sent into DISA. Fred now hears a secondary dialtone.
- Fred dials 202 on his mobile. Mary's extension phone now rings. Mary answers her phone and now Fred is talking to Mary.
- Mary now dials * on her extension phone to put Fred on hold. Fred hears On Hold Music and Mary now hears a dialtone.
- Mary dials 200. Bob's phone in the office now rings. He answers his phone and now Bob is talking to Mary.
• Mary hangs up her phone. Now Bob is talking to Fred.