EQ2688 - TV Auria - Free user manual and instructions
Find the device manual for free EQ2688 Auria in PDF.


User questions about EQ2688 Auria
0 question about this device. Answer the ones you know or ask your own.
Ask a new question about this device
Download the instructions for your TV in PDF format for free! Find your manual EQ2688 - Auria and take your electronic device back in hand. On this page are published all the documents necessary for the use of your device. EQ2688 by Auria.
USER MANUAL EQ2688 Auria
Congratulations on your purchase of an EQD TV display. For maximum benefit of your TV, please read these instructions before any operations.
Product Registration
For Your Records
Product Name: [ ] EQ2688
EQD LCD TV
Document Number: [ ] EQ2688F-1M_UG_ENG Rev. 1A 03-27-09
Serial Number: ____
Purchase Date: ____
Product disposal at end of product life
EQD is concerned about the preservation of our environment. Please dispose of this product properly at the end of its useful life. Your local waste disposal company may provide information about proper disposal.
The lamp in this product contains mercury. Please dispose of properly in accordance with environmental laws of your location.
Safety Instructions
text_image
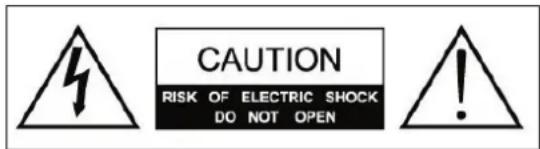
CAUTION RISK OF ELECTRIC SHOCK DO NOT OPEN
The symbol is intended to alert the user to presence of un-insulated "Hazardous Voltage" within the product's enclosure that may be of sufficient magnitude to constitute a risk of electric shock to persons.

This symbol is intended to alert the user that improper use of the product may result in product malfunction. The user should pay attention to avoid accidents or unnecessary problems.
Wet Location
Apparatus shall not be exposed to dripping or splashing and that no objects filled with liquids, such as vases, shall be placed on the apparatus.
Outdoor Use
WARNING: To reduce the risk of fire or electric shock, do not expose this apparatus to rain or moisture.
Disconnect Device - The Mains Plug or An Appliance Coupler
The mains plug or an appliance coupler is used as the disconnect device for disconnection from the mains, the disconnect device shall remain readily operable.
Copyright Information
Copyright © EQD ^® , 2009. All rights reserved.
ENERGY STAR ^® is a registered trademark of the U.S. Environmental Protection Agency (EPA).
As an ENERGY STAR ^® partner, EQD ^® has determined that this product meets the ENERGY STAR ^® guidelines for energy efficiency.
Disclaimer: EQD ^® shall not be liable for technical or editorial errors or omissions contained herein; nor for incidental or consequential damages resulting from furnishing this material, or the performance or use of this product.
In the interest of continuing product improvement, EQD ^® reserves the right to change product specifications without notice. Information in this document may change without notice.
No part of this document may be copied, reproduced, or transmitted by any means, for any purpose without prior written permission from EQD ^® .
Compliance Information
FCC Statement
This device complies with part 15 of FCC Rules. Operation is subject to the following two conditions: (1) this device may not cause harmful interference, and (2) this device must accept any interference received, including interference that may cause undesired operation.
This equipment has been tested and found to comply with the limits for a Class B digital device, pursuant to part 15 of the FCC Rules. These limits are designed to provide reasonable protection against harmful interference in a residential installation. This equipment generates, uses, and can radiate radio frequency energy, and if not installed and used in accordance with the
instructions, may cause harmful interference to radio communications. However, there is no guarantee that interference will not occur in a particular installation. If this equipment does cause harmful interference to radio or television reception, which can be determined by turning the equipment off and on, the user is encouraged to try to correct the interference by one or more of the following measures:
- Reorient or relocate the receiving antenna.
- Increase the separation between the equipment and receiver.
- Connect the equipment into an outlet on a circuit different from that to which the receiver is connected.
- Consult the dealer or an experienced radio/TV technician for help.
Warning: You are cautioned that changes or modifications not expressly approved by the party responsible for compliance could void your authority to operate the equipment.
Following information is only for EU-member states:
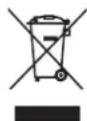
The mark shown to the right is in compliance with the Waste Electrical and Electronic Equipment Directive 2002/96/EC (WEEE).
The mark indicates the requirement NOT to dispose the equipment as unsorted municipal waste, but use the return and collection systems according to local law.
ENERGY STAR Information:
- Keeping the TV at its factory default settings that meet ENERGY STAR criteria.
- Enabling certain features and functionality of LCD TV will increase its energy consumption, possibly beyond the limits required for ENERGY STAR qualification.
Declaration of RoHS Compliance
This product has been designed and manufactured in compliance with Directive 2002/95/EC of the European Parliament and the Council on restriction of the use of certain hazardous substances in electrical and electronic equipment (RoHS Directive) and is deemed to comply with the maximum concentration values issued by the European Technical Adaptation Committee (TAC) as shown below:
| Substance | Proposed Maximum Concentration | Actual Concentration |
| Lead (Pb) 0.1% <0.1% | ||
| Mercury (Hg) 0.1% <0.1% | ||
| Cadmium (Cd) 0.1% <0.01% | ||
| Hexavalent Chromium (Cr6+) 0.01% <0.1% | ||
| Polybrominated biphenyls (PBB) 0.1% <0.1% | ||
| Polybrominated diphenyl ethers (PBDE) | 0.1% <0.1% |
Certain components of products as stated above are exempted under the Annex of the RoHS
Directives as noted below:
Examples of exempted components are:
- Mercury in compact fluorescent lamps not exceeding 5 mg per lamp and in other lamps not specifically mentioned in the Annex of RoHS Directive.
- Lead in glass of cathode ray tubes, electronic components, fluorescent tubes, and electronic ceramic parts (e.g. piezoelectronic devices).
- Lead in high temperature type solders (i.e. lead-based alloys containing 85% by weight or more lead).
Lead as an allotting element in steel containing up to 0.35% lead by weight, aluminium containing up to 0.4% lead by weight and as a cooper alloy containing up to 4% lead by weight.
Contents
Product Registration ....i
Product disposal at end of product life ....i
Safety Instructions ....i
Wet Location ....i
Outdoor Use ....i
Disconnect Device - The Mains Plug or An Appliance Coupler ....i
Copyright Information ...... ii
Compliance Information ...... ii
FCC Statement ...... ii
Declaration of RoHS Compliance ....iii
Important Safety Instructions ....1
ANTENNAS ....1
BATTERIES 2
CLEANING 2
Package Contents ....3
Installing the LCD TV ....3
Disconnecting the stand ....3
Mounting EQD LCD TV to the wall 3
Front View of the product ....5
Rear View of the Product 6
Connecting the LCD TV 7
Remote Control and TV Controls 8
Inserting Remote Control Batteries 8
Remote Control and TV Controls 9
Operation 11
Turning the TV On and Off ....11
Changing Channels 11
Adjusting the Volume 11
Viewing the Displayed Information 11
Selecting the Input Source 11
Using the OSD Function 12
Using Parental Control Menu 15
To Change Password: 15
To turn Parental Control on or off: 15
Troubleshooting 16
Specifications 17
Important Safety Instructions
-
Read these instructions completely before using the equipment.
-
Keep these instructions in a safe place.
-
Heed all warnings.
-
Follow all instructions.
-
Do not use this apparatus near water.
-
Clean with a soft, dry cloth.
-
Do not block any ventilation openings. Install the equipment in accordance with the manufacturer's instructions.
-
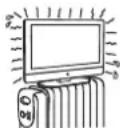
Do not install near any heat sources such as radiators, heat registers, stoves, or other devices (including amplifiers) that produce heat.
-
Do not attempt to circumvent the safety provisions of the polarized or grounding-type plug. A polarized plug has two blades with one wider than the other. A grounding type plug has two blades and a third grounding prong. The wide blade and the third prong are provided for your safety. If the provided plug does not fit into your outlet, consult an electrician for replacement of the outlet.
-
Prevent the power cord from being tread upon or pinched, particularly at the plug, convenience receptacles, and the point where they exit from the device. Be sure that the power outlet is located near the equipment so that it is easily accessible.
-
Only use attachments/ accessories specified by the manufacturer.
-
Use only with the cart, stand, tripod, bracket, or table specified by the manufacturer, or sold with the apparatus. When a cart is used, use caution when moving the cart/apparatus combination to avoid injury from tip-over.
-
Unplug this apparatus when it will be unused for a long period of time.
-
Refer all servicing to qualified service personnel. Servicing is required when the apparatus has been damaged in any way, such as power-supply cord or plug is damaged, liquid has been spilled or objects have fallen into the apparatus, the apparatus has been exposed to rain or moisture, or the unit does not operate normally, or has been dropped.

ANTENNAS
Outdoor antenna grounding
If an outdoor antenna is installed, follow the precautions below.
Do not install the outdoor antenna system near of overhead power lines or other electric light or power circuits, or where it can come in contact with such power lines or circuits.
WHEN INSTALLING AN OUTDOOR ANTENNA SYSTEM, EXTREME CARE SHOULD BE TAKEN TO KEEP FROM CONTACTING SUCH POWER LINES OR CIRCUITS AS CONTACT WITH THEM IS ALMOST INVARIABLY FATAL.
Be sure the antenna system is grounded so that it can provide some protection against voltage surges and built-up static charges.
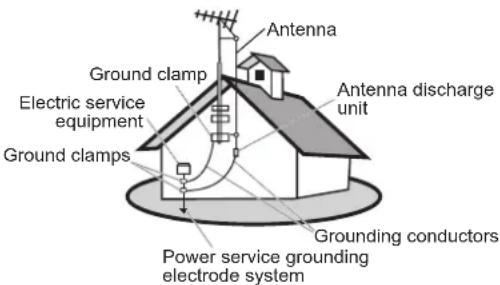
Section 810 of the National Electrical Code (NEC) in the U.S.A. and Section 54 of the Canadian Electrical Code in Canada provides information with in regard to proper grounding of the mast and supporting structure, grounding of the lead-in wire to an antenna discharge unit, size of grounding conductors, location of antenna discharge unit, connection to grounding electrodes, and requirements for the grounding electrode.
Antenna grounding according to the National Electrical Code, ANS/NFPA 70
text_image
Antenna Ground clamp Electric service equipment Ground clamps Antenna discharge unit Grounding conductors Power service grounding electrode systemBATTERIES
- Do not cast away batteries in a fire.
- Do not disassembled, overheat, or short-circuit the batteries.
- If the battery is replaced in the wrong way, it may cause danger of explosion. Replace only with the same or equivalent type.
Dispose used batteries.
To preserve our environment, dispose of used batteries according to your local laws or regulations.
CLEANING
Cleaning the AC power plug
Unplug the AC power plug and clean it regularly. If the plug is covered with dust and gathers moisture, its insulation may deteriorate and result in a fire.
Cleaning the screen surface/cabinet of the TV set
When cleaning this TV, unplug the AC power cord. If not, it may result in electric shock. Use a dry soft cloth to clean the cabinet of the TV. To remove dust near the screen, wipe it gently with a soft cloth. Stubborn stains may be removed with a cloth slightly dampened with a solution of mild soap and warm water. Never use strong solvents such as thinner or benzine for cleaning. If using a chemically pretreated cloth, please follow the instruction provided on the package. The ventilation holes can accumulate dust over time.
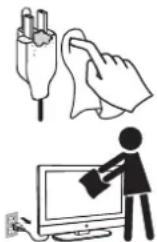
To ensure proper ventilation, we recommend you to remove the dust periodically (once a month) using a vacuum cleaner, while the LCD TV is powered off.
Package Contents
Check the contents of your package. It should contain:
• LCD TV
- Remote Control with batteries
• EQD User Guide
• EQD Quick Start Guide
• Power Cord
Installing the LCD TV
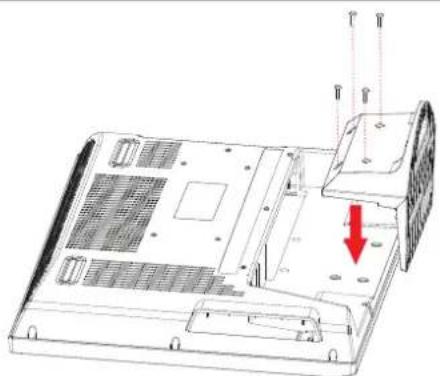
Disconnecting the stand
natural_image
Technical line drawing of a computer monitor rear panel with ventilation grilles and a red arrow indicating a component (no text or symbols present)Mounting EQD LCD TV to the wall
The LCD TV can be used in a free standing position or wall-mounted. Before installing the product to the wall, please consider the following guidelines:
- Read the Important Safety Instructions, at the start of this manual.
- Do not install in a moist or wet environment. This equipment is intended for indoor use.
- Do not install near heat source, or strong magnetic fields.
- Use only EQD approved_ wall-mounting brackets to support the LCD TV weight.
- Before attaching the wall mount plate to the back cover, ensure the product is working.
- If your LCD TV is already set up for free-standing operation, you need to first remove the stand before mounting the device to the wall.
To attach the wall-mount bracket to LCD TV safely, please use the following guidelines:
- Disconnect the power and any other cables that might hinder moving the LCD TV.
- Set the LCD TV on a table or work surface, placing the screen face down on a towel or woolen blanket to protect the screen surface from damage while installing plate.
- Before installing the LCD TV on the wall, ensure you have recorded the product serial number on page (i) of the User Guide, as you will need the serial number to request service should there be a service need.
- Install the wall mount plate to the LCD TV using screws NO LONGER than 10mm, as longer screws found in universal (non-EQD) wall mount kits may damage the power supply causing the unit to fail. The wall-mount screw type is M4 x L10.
- Mount the wall mount bracket to the wall ensuring use of proper screws to support the installation. Ensure there is at least 3cm of space surrounding any air-vents of your LCD TV to allow adequate cooling during operation.
- Hang the LCD TV wall mount plate to the wall mount bracket, completing installation.
Enjoy your EQD LCD TV!
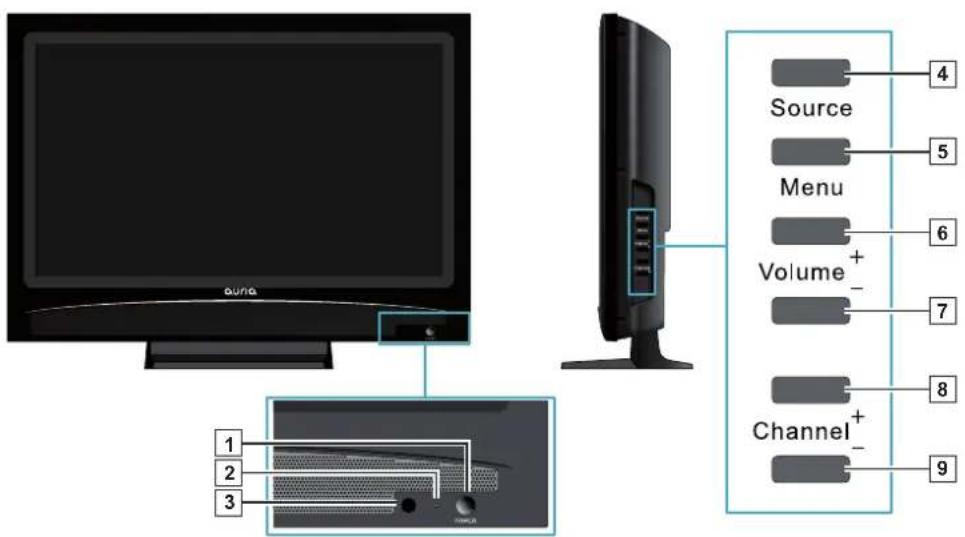
Front View of the product
text_image
Source Menu Volume+ Volume+ Channel+ 1 2 3 4 5 6 7 8 9Item Description
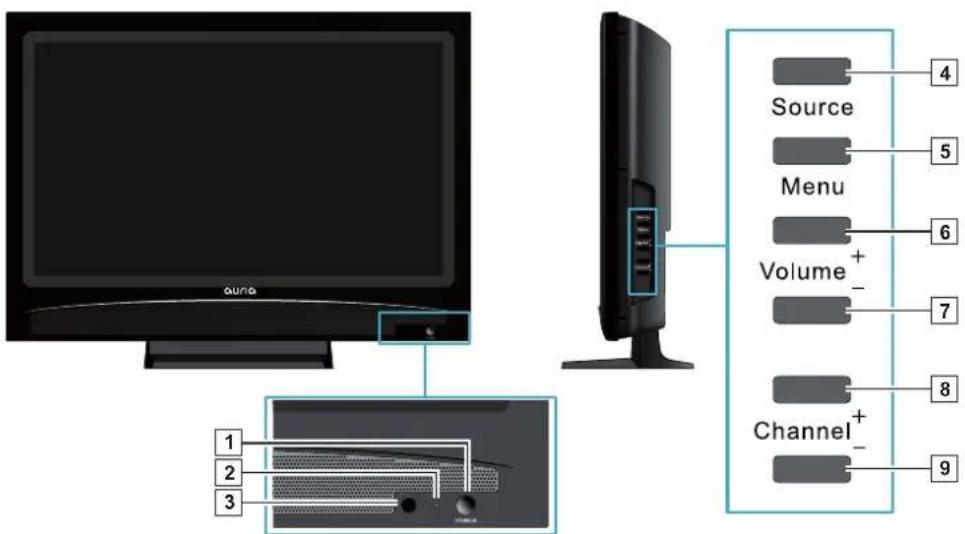
| 1 Power ON/OFF button | Turn the power on from standby mode or turn the power off to return to the standby mode. |
| 2 Power LED Indicator | Lights up in blue when the TV is turned on. Lights up in orange when the TV is in standby mode. |
| 3 Remote Control Receiver | Receives IR signals from the remote control. |
| 4 SOURCE Select input source. | |
| 5 MENU Turn OSD menu ON/OFF. | |
| 6 Volume Up | Increase sound volume or select a control while in OSD menu. |
| 7 Volume Down | Decrease sound volume or select a control while in OSD menu. |
| 8 CH Up | Channel up when source is TV, or adjust a high-lighted control while in OSD menu. |
| 9 CH Down | Channel down when source is TV, or adjust a high-lighted control while in OSD menu. |
Rear View of the Product

text_image
SERVICE PORT USB HDMI 1 HDMI 2 VIA AUDIO PC / VGA COMPONENT L R SPDI' OUT Y Pb P 7 8 9 AV S-VIDEO 10 11 12 AUDIO L R ANT. INItem Description
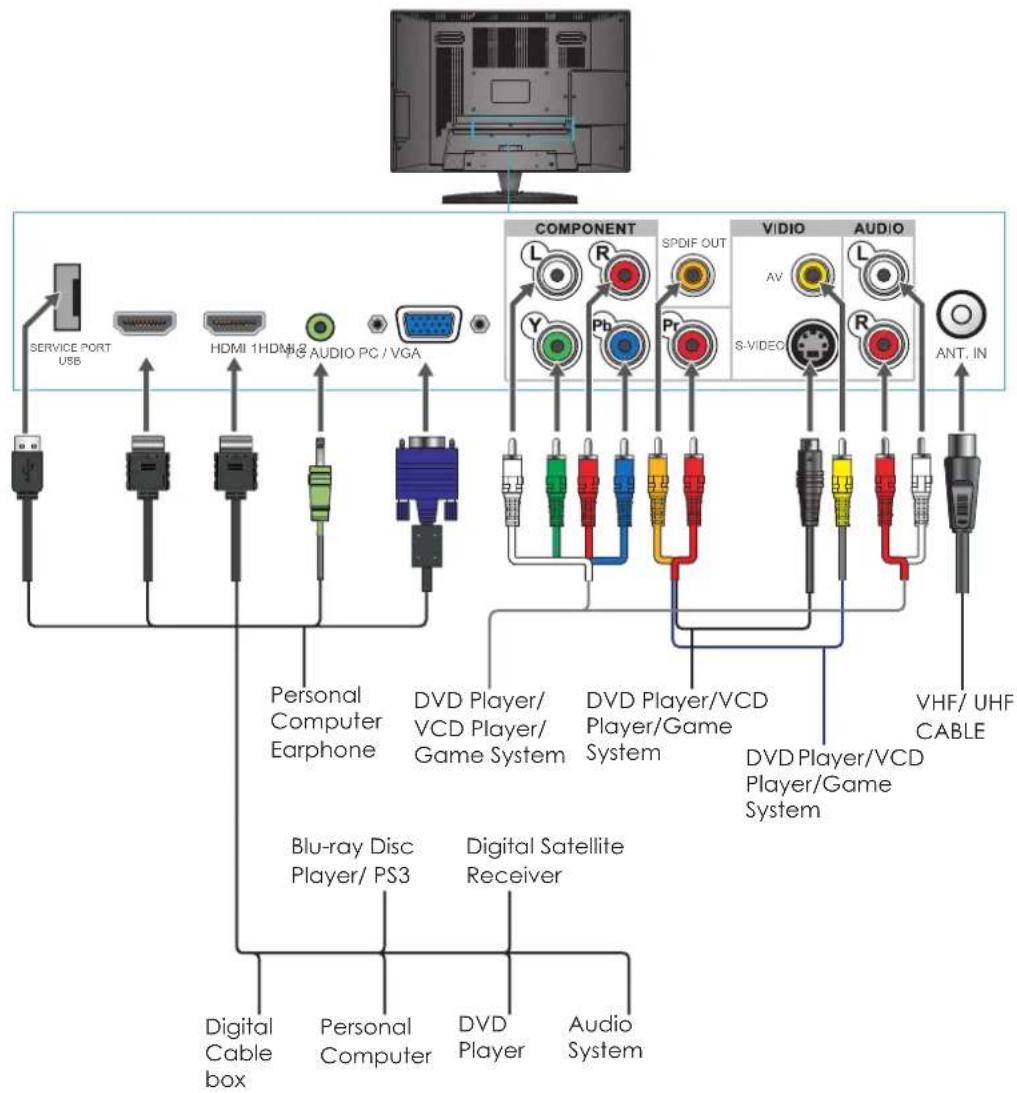
| 1 Power (AC input) | Plug-in the supplied AC Power cord and connect to the AC input power source. | |
| 2 | SERVICE PORT USB | Connect this port to a PC to provide service and updates. |
| 3 | HDMI 2 Input Terminal | Connect this port to the HDMI/HDMI-DVI jack of the compatible equipment. *If you use HDMI-DVI connections, please use PC Audio In for audio input. |
| 4 HDMI 1 Input Terminal | Connect this port to the HDMI/HDMI-DVI jack of the compatible equipment. *If you use HDMI-DVI connections, please use PC Audio In for audio input. | |
| 5 PC AUDIO | Connect the RGB Audio In on your computer to the RGB Audio In on the rear of the LCD TV. | |
| 6 VGA Signal Input | Connect a 15-pin D-sub RGB cable to the RGB output of your computer and the other end to the RGB input on the rear of the LCD TV. | |
| 7 | YPbPr Signal Input | Connect this jack to the YPbPr output of A/V device. |
| 8 | YPbPr/ Audio Input(left/right) | Connect the Audio in cable for YPbPr from this jack to the corresponding connectors on your A/V device. |
| 9 SPDIF OUT Connect this port to an RCA cable. | ||
| 10 S-VIDEO | Connect the S-Video cable from the compatible device to this connector on the rear panel of the LCD TV. | |
| 11 AV | Connect the video cable from the compatible device to this connector on the rear panel of the LCD TV. | |
| 12 | AV/ S-Video Signal Audio Input(left/right) | Connect the Audio in cable for AV/ S-Video from this jack to the corresponding connectors on your A/V device. |
| 13 | TV Input Jack | Connect this jack to your Cable or VHF/UHF antenna. |
Connecting the LCD TV
flowchart
graph TD
    A["TV"] --> B["COMPONENT"]
    A --> C["VIDEO"]
    A --> D["AUDIO"]
    B --> E["Personal Computer Earphone"]
    B --> F["DVD Player/VCD Player/Game System"]
    C --> G["Blu-ray Disc Player/PS3"]
    C --> H["Digital Satellite Receiver"]
    D --> I["VHF/UHF CABLE"]
    B --> J["Service Port USB"]
    B --> K["HDMI 1 HDMA PC AUDIO PC / VGA"]
    C --> L["DVd Player/VCD Player/Game System"]
    C --> M["DVd Player/VCD Player/Game System"]
    D --> N["DVd Player/VCD Player/Game System"]
    D --> O["DVd Player/VCD Player/Game System"]
    B --> P["Audio System"]
    C --> Q["Personal Computer"]
    C --> R["Digital Cable box"]
*Note: For DVI connection please use DVI-to-HDMI cable/adapter.
Remote Control and TV Controls
Inserting Remote Control Batteries
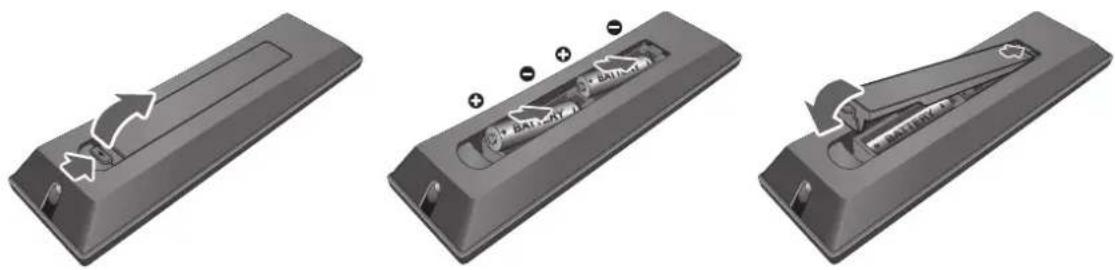
- Remove the battery cover by pulling then lifting the knob on the cover.
- Insert the batteries, corresponding to the (+) and (-) markings on the battery compartment.
- Reattach the battery cover.
natural_image
Three grayscale images showing a remote control panel with arrows indicating direction and polarity, no text or symbols present.
CAUTION
- Only use the specified AAA batteries.
- Do not mix new and old batteries. This may result in creaking or leakage, which may pose a risk of fire or lead to personal injury.
- Insert batteries according to (+) and (-) markings. Inserting the batteries incorrectly may result in leakage, which may pose a risk of fire or lead to personal injury.
- Dispose of the battery in accordance with local laws and regulations.
- Keep the batteries away from children or pets.
- When the remote control will not to be used for an extended period, remove the batteries.
Remote Control and TV Controls
text_image
Source Menu Volume+ Volume+ Channel+ Channel+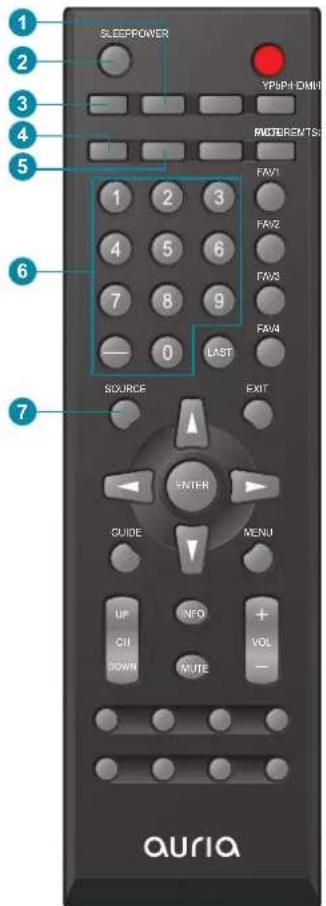
text_image
SLEEPOWER YP5PH-DAN1 MOTHERMTS FAV1 FAV2 FAV3 FAV4 0 LAST SOURCE EXIT ENTER GUIDE MENU UP CII DOWN INFO + VOL MUTE auriaButton Description
| 1 AV Press to select source to AV mode | |
| 2 SLEEP | Press repeatedly to set the off timer. The function is used to automatically shut off the LCD TV after a preset period of time passed. There are several times for choice – Off, 5 Min, 15 Min, 30 Min, 60 Min, 90 Min, and 120 Min. |
| 3 TV | Press to direct to TV source when in any other source. |
| 4 WIDE Press to select Video Display format. | |
| 5 CC Press to turn Closed Caption On/Off | |
| 6 0~9, - number buttons | Press 0~9 and “-” to select a channel. After you input the channel numbers, press ENTER button to direct to the channel immediately, or wait for 3 seconds to change automatically. |
| 7 SOURCE | Press to display the INPUT source list and select the source with /▲buttons. To confirm the selection, press ENTER. |
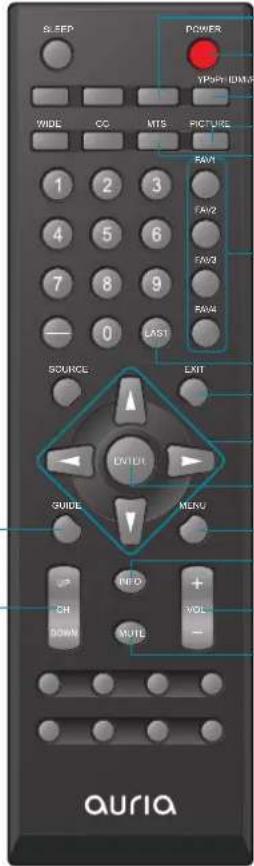
| 8 GUIDE | Press to display the Electronic Program Guide (EPG). It contains the program information for the channel you're watching. | ||
 | 9 ▲ CH ▼ | Press to change the channels up or down. | |
| 10 HDMI/PC Press to select source to HDMI/PC mode. | |||
| 11 POWER | Press this button to turn the power on from standby mode. Press it again to return to the standby mode. | ||
| 12 YPbPr Press to select source to YPbPr mode. | |||
| 13 PICTURE Press to adjust Picture mode. | |||
| 14 MTS | Press to activate Multichannel Television Sound, Stereo or Mono. | ||
| 15 FAV 1-4 Press to select favorite channels | |||
| 16 LAST Press to return to previous channel. | |||
| 17 EXIT | Press the button to exit the present menu. | ||
| 18 ▲ ▶ ▶ ▶ ▶ ▶ ▶ ▶ ▶ ▶ ▶ ▶ ▶ ▶ ▶ ▶ ▶ ▶ ▶ ▶ ▶ ▶ ▶ ▶ ▶ ▶ ▶ ▶ ▶ ▶ ▶ ▶ ▶ ▶ ▶ ▶ ▶ ▶ ▶ ▶ ▶ ▶ ▶ ▶ ▶ ▶ ▶ ▶ ▶ ▶ ▶ ▸ ▶ ▶ ▶ ▶ ▶ ▶ ▶ ▶ ▶ ▶ ▶ ▶ ▶ ▶ ▶ ▶ ▶ ▶ ▶ ▶ ▶ ▶ ▶ ▶ ▶ ▶ ▶ ▶ ▶ ▶ ▶ ▶ ▶ ▶ ▶ ▶ ▶ ▶ ▶ ▶ ▶ ▶ ▶ ▶ ▶ ▶ ▶ ▶ ▶ ▷ ▶ ▶ ▶ ▶ ▶ ▶ ▶ ▶ ▶ ▶ ▶ ▶ ▶ ▶ ▶ ▶ ▶ ▶ ▶ ▶ ▶ ▶ ▶ ▶ ▶ ▶ ▶ ▶ ▶ ▶ ▶ ▶ ▶ ▶ ▶ ▶ ▶ ▶ ▶ ▶ ▶ ▶ ▶ ▶ ▶ ▶ ▶ ▶ ▶ ▽ ▽ ▽ ▽ ▽ ▽ ▽ ▽ ▽ ▽ ▽ ▽ ▽ ▽ ▽ ▽ ▽ ▽ ▽ ▽ ▽ ▽ ▽ ▽ ▽ ▽ ▽ ▽ ▽ ▽ ▽ ▽ ▽ ▽ ▽ ▽ ▽ ▽ ▽ ▽ ▽ ▽ ▽ ▽ ▽ ▽ ▽ ▽ ▽ ▽ ▉ ▉ ▉ ▉ ▉ ▉ ▉ ▉ ▉ ▉ ▉ ▉ ▉ ▉ ▉ ▉ ▉ ▉ ▉ ▉ ▉ ▉ ▉ ▉ ▉ ▉ ▉ ▉ ▉ ▉ ▉ ▉ ▉ ▉ ▉ ▉ ▉ ▉ ▉ ▉ ▉ ▉ ▉ ▉ ▉ ▉ ▉ ▉ ▉ ▉ ▎ ▎ ▎ ▎ ▎ ▎ ▎ ▎ ▎ ▎ ▎ ▎ ▎ ▎ ▎ ▎ ▎ ▎ ▎ ▎ ▎ ▎ ▎ ▎ ▎ ▎ ▎ ▎ ▎ ▎ ▎ ▎ ▎ ▎ ▎ ▎ ▎ ▎ ▎ ▎ ▎ ▎ ▎ ▎ ▎ ▎ ▎ ▎ ▎ ▎ ▅ ▅ ▅ ▅ ▅ ▅ ▅ ▅ ▅ ▅ ▅ ▅ ▅ ▅ ▅ ▅ ▅ ▅ ▅ ▅ ▅ ▅ ▅ ▅ ▅ ▅ ▅ ▅ ▅ ▅ ▅ ▅ ▅ ▅ ▅ ▅ ▅ ▅ ▅ ▅ ▅ ▅ ▅ ▅ ▅ ▅ ▅ ▅ ▅ ▅ ▵ ▵ ▵ ▵ ▵ ▵ ▵ ▵ ▵ ▵ ▵ ▵ ▵ ▵ ▵ ▵ ▵ ▵ ▵ ▵ ▵ ▵ ▵ ▵ ▵ ▵ ▵ ▵ ▵ ▵ ▵ ▵ ▵ ▵ ▵ ▵ ▵ ▵ ▵ ▵ ▵ ▵ ▵ ▵ ▵ ▵ ▵ ▵ ▵ ▵ ▴ ▴ ▴ ▴ ▴ ▴ ▴ ▴ ▴ ▴ ▴ ▴ ▴ ▴ ▴ ▴ ▴ ▴ ▴ ▴ ▴ ▴ ▴ ▴ ▴ ▴ ▴ ▴ ▴ ▴ ▴ ▴ ▴ ▴ ▴ ▴ ▴ ▴ ▴ ▴ ▴ ▴ ▴ ▴ ▴ ▴ ▴ ▴ ▴ ▴ ▪ ▪ ▪ ▪ ▪ ▪ ▪ ▪ ▪ ▪ ▪ ▪ ▪ ▪ ▪ ▪ ▪ ▪ ▪ ▪ ▪ ▪ ▪ ▪ ▪ ▪ ▪ ▪ ▪ ▪ ▪ ▪ ▪ ▪ ▪ ▪ ▪ ▪ ▪ ▪ ▪ ▪ ▪ ▪ ▪ ▪ ▪ ▪ ▪ ▪ ▫ ▫ ▫ ▫ ▫ ▫ ▫ ▫ ▫ ▫ ▫ ▫ ▫ ▫ ▫ ▫ ▫ ▫ ▫ ▫ ▫ ▫ ▫ ▫ ▫ ▫ ▫ ▫ ▫ ▫ ▫ ▫ ▫ ▫ ▫ ▫ ▫ ▫ ▫ ▫ ▫ ▫ ▫ ▫ ▫ ▫ ▫ ▫ ▫ ▫ ▯ ▯ ▯ ▯ ▯ ▯ ▯ ▯ ▯ ▯ ▯ ▯ ▯ ▯ ▯ ▯ ▯ ▯ ▯ ▯ ▯ ▯ ▯ ▯ ▯ ▯ ▯ ▯ ▯ ▯ ▯ ▯ ▯ ▯ ▯ ▯ ▯ ▯ ▯ ▯ ▯ ▯ ▯ ▯ ▯ ▯ ▯ ▯ ▯ ▯ ▮ ▮ ▮ ▮ ▮ ▮ ▮ ▮ ▮ ▮ ▮ ▮ ▮ ▮ ▮ ▮ ▮ ▮ ▮ ▮ ▮ ▮ ▮ ▮ ▮ ▮ ▮ ▮ ▮ ▮ ▮ ▮ ▮ ▮ ▮ ▮ ▮ ▮ ▮ ▮ ▮ ▮ ▮ ▮ ▮ ▮ ▮ ▮ ▮ ▮ ▾ △ △ △ △ △ △ △ △ △ △ △ △ △ △ △ △ △ △ △ △ △ △ △ △ △ △ △ △ △ △ △ △ △ △ △ △ △ △ △ △ △ △ △ △ △ △ △ △ △ △ ▩ △ △ △ △ △ △ △ △ △ △ △ △ △ △ △ △ △ △ △ △ △ △ △ △ △ △ △ △ △ △ △ △ △ △ △ △ △ △ △ △ △ △ △ △ △ △ △ △ △ ▝ △ △ △ △ △ △ △ △ △ △ △ △ △ △ △ △ △ △ △ △ △ △ △ △ △ △ △ △ △ △ △ △ △ △ △ △ △ △ △ △ △ △ △ △ △ △ △ △ △ ▢ △ △ △ △ △ △ △ △ △ △ △ △ △ △ △ △ △ △ △ △ △ △ △ △ △ △ △ △ △ △ △ △ △ △ △ △ △ △ △ △ △ △ △ △ △ △ △ △ △ ▸ ▸ ▸ ▸ ▸ ▸ ▸ ▸ ▸ ▸ ▸ ▸ ▸ ▸ ▸ ▸ ▸ ▸ ▸ ▸ ▸ ▸ ▸ ▸ ▸ ▸ ▸ ▸ ▸ ▸ ▸ ▸ ▸ ▸ ▸ ▸ ▸ ▸ ▸ ▸ ▸ ▸ ▸ ▸ ▸ ▸ ▸ ▸ ▸ ▸ ▜ ▸ ▸ ▸ ▸ ▸ ▸ ▸ ▸ ▸ ▸ ▸ ▸ ▸ ▸ ▸ ▸ ▸ ▸ ▸ ▸ ▸ ▸ ▸ ▸ ▸ ▸ ▸ ▸ ▸ ▸ ▸ ▸ ▸ ▸ ▸ ▸ ▸ ▸ ▸ ▸ ▸ ▸ ▸ ▸ ▸ ▸ ▸ ▸ ▸ ▪ ▸ ▸ ▸ ▸ ▸ ▸ ▸ ▸ ▸ ▸ ▸ ▸ ▸ ▸ ▸ ▸ ▸ ▸ ▸ ▸ ▸ ▸ ▸ ▸ ▸ ▸ ▸ ▸ ▸ ▸ ▸ ▸ ▸ ▸ ▸ ▸ ▸ ▸ ▸ ▸ ▸ ▸ ▸ ▸ ▸ ▸ ▸ ▸ ▸ ▅ ▸ ▸ ▸ ▸ ▸ ▸ ▸ ▸ ▸ ▸ ▸ ▸ ▸ ▸ ▸ ▸ ▸ ▸ ▸ ▸ ▸ ▸ ▸ ▸ ▸ ▸ ▸ ▸ ▸ ▸ ▸ ▸ ▸ ▸ ▸ ▸ ▸ ▸ ▸ ▸ ▸ ▸ ▸ ▸ ▸ ▸ ▸ ▸ ▸ ▩ ▸ ▸ ▸ ▸ ▸ ▸ ▸ ▸ ▸ ▸ ▸ ▸ ▸ ▸ ▸ ▸ ▸ ▸ ▸ ▸ ▸ ▸ ▸ ▸ ▸ ▸ ▸ ▸ ▸ ▸ ▸ ▸ ▸ ▸ ▸ ▸ ▸ ▸ ▸ ▸ ▸ ▸ ▸ ▸ ▸ ▸ ▸ ▸ ▸ ▦ ▸ ▸ ▸ ▸ ▸ ▸ ▸ ▸ ▸ ▸ ▸ ▸ ▸ ▸ ▸ ▸ ▸ ▸ ▸ ▸ ▸ ▸ ▸ ▸ ▸ ▸ ▸ ▸ ▸ ▸ ▸ ▸ ▸ ▸ ▸ ▸ ▸ ▸ ▸ ▸ ▸ ▸ ▸ ▸ ▸ ▸ ▸ ▸ ▸ ▼ ▸ ▸ ▸ ▸ ▸ ▸ ▸ ▸ ▸ ▸ ▸ ▸ ▸ ▸ ▸ ▸ ▸ ▸ ▸ ▸ ▸ ▸ ▸ ▸ ▸ ▸ ▸ ▸ ▸ ▸ ▸ ▸ ▸ ▸ ▸ ▸ ▸ ▸ ▸ ▸ ▸ ▸ ▸ ▸ ▸ ▸ ▸ ▸ ▸ ▨ ▸ ▸ ▸ ▸ ▸ ▸ ▸ ▸ ▸ ▸ ▸ ▸ ▸ ▸ ▸ ▸ ▸ ▸ ▸ ▸ ▸ ▸ ▸ ▸ ▸ ▸ ▸ ▸ ▸ ▸ ▸ ▸ ▸ ▸ ▸ ▸ ▸ ▸ ▸ ▸ ▸ ▸ ▸ ▸ ▸ ▸ ▸ ▸ ▸ ▷ ▸ ▸ ▸ ▸ ▸ ▸ ▸ ▸ ▸ ▸ ▸ ▸ ▸ ▸ ▸ ▸ ▸ ▸ ▸ ▸ ▸ ▸ ▸ ▸ ▸ ▸ ▸ ▸ ▸ ▸ ▸ ▸ ▸ ▸ ▸ ▸ ▸ ▸ ▸ ▸ ▸ ▸ ▸ ▸ ▸ ▸ ▸ ▸ ▸ ▧ ▸ ▸ ▸ ▸ ▸ ▸ ▸ ▸ ▸ ▸ ▸ ▸ ▸ ▸ ▸ ▸ ▸ ▸ ▸ ▸ ▸ ▸ ▸ ▸ ▸ ▸ ▸ ▸ ▸ ▸ ▸ ▸ ▸ ▸ ▸ ▸ ▸ ▸ ▸ ▸ ▸ ▸ ▸ ▸ ▸ ▸ ▸ ▸ ▸ ▮ | 8 GUIDE | Press to display the Electronic Program Guide (EPG). It contains the program information for the channel you're watching. | |
| 10 | Press to change the channels up or down. | ||
| 11 | |||
| 12 | |||
| 13 | |||
| 14 | |||
| 15 | |||
| 16 | |||
| 17 | |||
| 18 | |||
| 20 | |||
| 21 | |||
| 22 | |||
| 23 | |||
| 24 | |||
| 25 | |||
| 26 | |||
| 27 | |||
| 28 | |||
| 29 | |||
| 30 | |||
| 31 | |||
| 32 | |||
| 33 | |||
| 34 | |||
| 35 | |||
| 36 | |||
| 37 | |||
| 38 | |||
| 39 | |||
| 40 | |||
| 41 | |||
| 42 | |||
| 43 | |||
| 44 | |||
| 45 | |||
| 46 | |||
| 47 | |||
| 48 | |||
| 49 | |||
| 50 | |||
| 51 | |||
| 52 | |||
| 53 | |||
| 54 | |||
| 55 | |||
| 56 | |||
| 57 | |||
| 58 | |||
| 59 | |||
| 60 | |||
| 61 | |||
| 62 | |||
| 63 | |||
| 64 | |||
| 65 | |||
| 66 | |||
| 67 | |||
| 68 | |||
| 69 | |||
| 70 | |||
| 71 | |||
| 72 | |||
| 73 | |||
| 74 | |||
| 75 | |||
| 76 | |||
| 77 | |||
| 78 | |||
| 79 | |||
| 80 | |||
| 81 | |||
| 82 | |||
| 83 | |||
| 84 | |||
| 85 | |||
| 86 | |||
| 87 | |||
| 88 | |||
| 89 | |||
| 90 | |||
| 91 | |||
| 92 | |||
| 93 | |||
| 94 | |||
| 95 | |||
| 96 | |||
| 97 | |||
| 98 | |||
| 99 | |||
| 100 | |||
How to Set the Favorite Channel
There are total four Favorite Channels which you can set the TV program what you like. This favorite channel function can support analog (NTSC) and digital (ATSC) TV.
Step 1: Change the channel number what you want for the favorite channel. Step 2: Press "FAV1", "FAV2", "FAV3" or "FAV4" button on the remote control and hold this button for more than 3 seconds.
The current channel is saved as the favorite channel.
How to Select the Favorite Channel
Press the FAV1 \~ FAV4 keys on the remote control and release it, then the TV will be change to the pre-stored channel number.
Operation
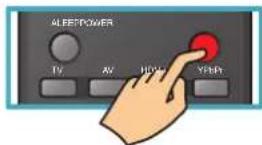
Turning the TV On and Off
Press the POWER button on the remote control.
You can also use the Power button on the front of the panel.
Changing Channels
- Using Channel Buttons
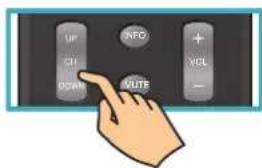
Press ▲ CH ▼ button to change channels, and the TV changes channels in sequence. You will see all channels that have been memorized. Channels erased or not memorized will not be shown.
text_image
UP CH DOWN INFO VCL - ROUTER- Using Number Buttons
Using the remote control buttons 0-9, select channel for NTSC/ATSC/CATV.
To select 1, 2 or 3-digit channel number (e.g., Channel 110)
Press 1 → 0.
To select 4-digit channel number (e.g. Channel 23-1)
Press 2 → 3 → 1. →
Adjusting the Volume
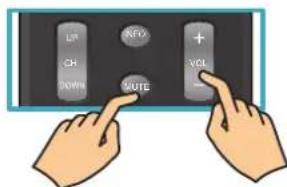
Press VOL +/- to adjust volume.
To turn off the volume, press MUTE.
To restore volume, press MUTE again, or press VOL +/- directly.
text_image
LIP NFO + CH GROW QUTE VOLViewing the Displayed Information
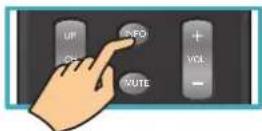
To display the current information of the LCD TV:
Press INFO, and the current state will be displayed on the screen. (It shows all or some of the information about Input, Channel, Resolution, Audio Type, etc., depending on what input source it is in)
Selecting the Input Source
To select the TV or other external input sources connected to the TV.
-
Press the SOURCE button on the remote control.
-
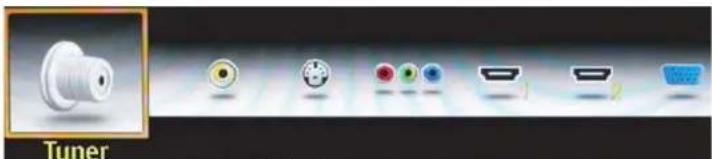
Press ▲ or ▼ to select the required input source between TV, AV, S-Video, YPbPr, HDMI 1, HDMI 2 or PC.
text_image
Tuner- To confirm the selection, press ENTER.
Using the OSD Function
You can use the OSD menus and options to adjust various settings by using your remote control. There are six options on the screen: PICTURE, AUDIO, TV, and SETUP.
The basic operation is as following:
- Press MENU to display OSD Menu.
- Use ◀ or ▶ to move the cursor bar up and down, so that you can appoint your desired option while OSD menu is enabled.
- Use ENTER to enter the submenu.
- Press or to adjust the condition.
- Press EXIT to close the recent page.
- Press MENU again to leave OSD Menu.
Picture:
- Press MENU to display OSD Menu.
- Use ◀ or ▶ to move the cursor bar to .
- Use ENTER to enter the submenu.
- Press ◀ or ▶ adjust the condition.

text_image
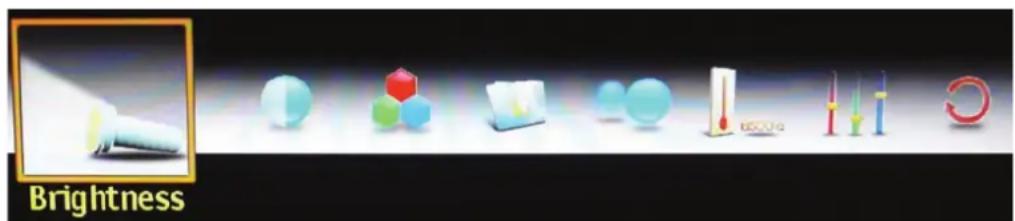
Brightness- Brightness: To adjust the background luminance of the video.
- Contrast: To adjust the foreground luminance of the video.
- Saturation: To adjust the color saturation.
- Video Presets: To select the picture mode between Showroom, Movie, Game, and Sports.
- Sharpness: To adjust the picture sharpness of the display.
- Color Temperature: To select the color temperature between Warm, Neutral and cool.
- Hue: To adjust the hue level.
- Reset: Reset to factory default.
Audio:
-
Press MENU to display OSD Menu.
-
Use ◀ or ▶ to move the cursor bar to .
-
Use ENTER to enter the submenu.
-
Press ◀ or to adjust the condition.

text_image
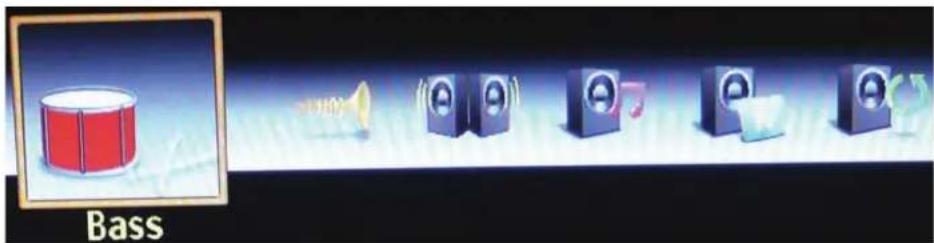
Bass- Bass: To adjust the bass.
- Treble: To adjust the treble.
• Balance: To adjust the left and right audio balance.
• TV Speaker: To enable or disable the sound output for TV programs.
- Audio Presets: To select the audio settings between Rock, Pop, Classical, and Flat.
- Reset: Reset to factory default.
Video Mode:
-
Press MENU to display OSD Menu.
-
Use ◀ or ▶ move the cursor bar to .

-
Use ENTER to enter the submenu.
-
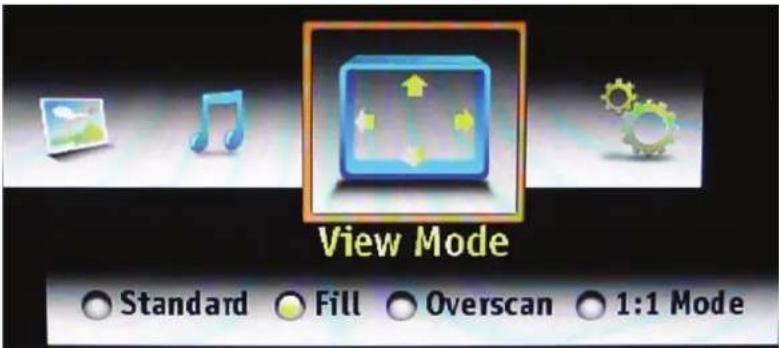
Press ◀ or ▶ to adjust the aspect ratio to Standard, Fill, Overscan, or 1:1 Mode.
text_image
View Mode Standard Fill Overscan 1:1 ModeSettings:
-
Press MENU to display OSD Menu.
-
Use ▲ or ▼ to move the cursor bar to .
-
Use ENTER to enter the submenu.
-
Press ◀ or ▶ to adjust the condition.


text_image
12 Date and Time- Date and Time: Use of to select the time zone which user is in. There are total eight time zones in the USA, include Hawaii and Alaska.
- Closed Caption: Selects the Active Closed Caption Mode to OFF, CC1, CC2, CC3, CC4, T1, T2, T3, T4.
- Parental Control: Access the Parental Control menu. See "Using Parental Control Menu" on page 15 for more details.
- OSD Timout: To set timer to turn off OSD.
- OSD Language: Changes the OSD display language. The following options are available: English, Spanish, French.
- Power settings: To enable or disable power saving modes for LED and VGA ports.
- Reset: Reset to factory default.
- Version: To display the serial number and the firmware version of the device.
Using Parental Control Menu
Password is required to access the Parental Control menu. The default password is "999999".
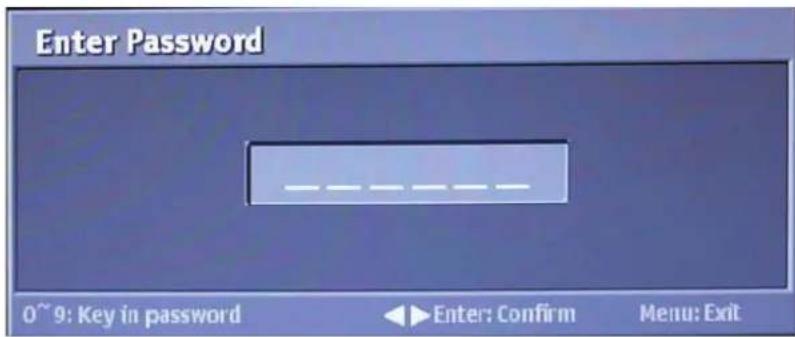
text_image
Enter Password 0~9: Key in password Enter: Confirm Menu: ExitTo Change Password:
-
Press the MENU button to display the OSD main menu.
-
Use ◀ or ▶ to select the menu and press Enter to enter the submenu.
3.Use ◀ or ▶ to select "Parental Control" from the submenu.
4.Input your password.
- Select "Change Password" to enter the Change Password setting.
6.Input your new password.
7.Enter your new password again to reconfirm.
- After you complete the last step, the screen will return to the Parental Control menu.
To turn Parental Control on or off:
-
Press the MENU button to display the OSD main menu.
-
Use ◀ or ▶ to select the menu and press Enter to enter the submenu.
3.Use ◀ or ▶ to select "Parental Control" from the submenu.
4.Input your password.
- Select "V-chip" and use ◄ or to turn V-chip on or off.
Troubleshooting
Please contact EQD service team directly if you have questions, service needs, or require technical assistance related on the use of your television.
Problem Possible Solution
| No power | Make sure the power cord is properly connected to the LCD TV AC power socket.Make sure the AC power cord is properly connected to the wall outlet.Make sure the DC power button is ON (Blue LED).Plug another electrical device (like a radio) to the power outlet to verify that the outlet is supplying the proper voltage. |
| No picture | The TV station may be experiencing problems. Try another channel.The Cable TV signal may be scrambled or encoded. Please contact your local cable operator.Make sure that connection to other components are correct referring to the user guide.Make sure that setup has been done correctly after connections.Make sure the correct input is selected and the input signal is compatible. |
| Strange color, light color, or color misalignment | Ensure that the video cable is securely connected.The picture may appear dim in a brightly lit room.Adjust brightness, contrast, saturation (color), and tint referring to the user guide.Check the input signal setting. |
| Unit cannot be operated | External influences such as lightning or static electricity may cause improper operation. In this case, operate the unit after first turning on the power of the LCD TV and the AVC System, or unplug the AC cord for 1 to 2 minutes, then plug in again. |
| No sound | Check your audio connections are properly connected referring to the user guide.The MUTE button may have been pressed, try pressing this button again.Check your audio settings, your TV audio may be set to minimum.Press the Volume + (Up) button on the remote control. |
| Remote control unit does not operate | Make sure the directions of batteries are inserted correctly referring to the user guide.Batteries could be weak or dead. Replace with new batteries.Is a fluorescent light illuminated near the remote control sensor?The path of the remote control beam may be blocked. Make sure the path is clear and that the remote control is aimed at the remote control sensor on the TV.Press the POWER button on the remote control to see if you can turn on the TV.Press MENU button on the remote control to see if there is a MENU shown on the screen.Press only one button at a time and it is the correct one for the operation you want to perform. |
| Picture is cut off/with sidebar screen | Is the image positioned correctly?Are screen mode adjustments such as picture size set correctly?Press WIDE button repeatedly on the remote control to see if you can get the picture you prefer. |
| Power is cut off suddenly | Is the sleep timer set in advance?Is there no signal in PC mode or HDMI mode?The internal temperature of the unit has increased. Remove any objects blocking the vent or clean as necessary. |
| No CATV reception (or no reception above CH13) | Is the AIR/CABLE option set correctly? Please set the AIR/CABLE option to CABLE referring to the user guide.CATV is connected improperly or not connected; please check all the CATV connections.The cable TV service is interrupted; please contact your cable operator. |
Specifications
| Model EQ2688 | ||
| LCD Display 26-inch Screen, LCD Panel | ||
| OSD Controls | Keypad 7 Buttons (Power, Menu, Source, CH+, CH-, VOL+, VOL-)Remote Control 6 Major Buttons (Menu, Ok, Up, Down, Left, Right) | |
| OSD Functions | Picture Mode: Brightness, Contrast, Sharpness, Colour, Hue, Colour Temp, BacklightSound Mode: Balance, Treble, Bass[ATV]: Channel Number, Channel Skip, System (CATV/AIR), Auto Search[DTV]: Manual Search, Closed Captioning, V-Chip 2.0, Audio Language, Daylight Saving | |
| OSD Language Three Languages (English / Spanish / French) | ||
| Operating Conditions | Temperature 0°C ~ 40°C | |
| Humidity 70% | ||
| Storage Conditions | Temperature -20°C ~ 60°C | |
| Humidity 0% ~ 50% RH | ||
| Altitude 40,000 fts | ||
| Unit Dimensions (WxHxD) 25.9 x 19.2 x 7.4 (inches) | ||
| Net Weight 15.8 lbs. | ||
| Power Consumption 100V-120V~2.5A, 50-60Hz | ||
| AC Power Supply 100V~120V | ||
| Warranty Tow-year limited warranty on parts, labor and backlight | ||
| Certification UL, FCC, EnergyStar 3.0 | ||
| Others Embedded Power Supply | ||
| Terminator | Tuner Module | INPUT 1 (One Tuner build-in ATSC + NTSC, QAM is supported under ATSC) |
| HDMI 1.2 | INPUT 2 | |
| PC D-SUB RCA AUDIO L/R | INPUT 1 | |
| CVBS/S-Video Audio L/R | INPUT 1 | |
| YPbPr Audio L/R | INPUT 1 | |
| Optical SPDIF | OUTPUT 1 | |
| Audio | Speaker | 5W x 2 |
| Sound Effect | Dolby Digital | |
| MTS Stereo | Yes | |
| Features | Comb Filter | 3D |
| Aspect Ratio Control | 16:9 4:3 Zoom Wide Yes | |
| Noise Reduction | Yes | |
| Auto Sleep Timer | YES | |
| No Signal Auto Off | NO | |
| Teletext | NO | |
| Child Lock | Yes, V-Chip. Parent control | |
| PIP | No | |
| Peripheral | Keypad: 7Keys (Side) | Power, Source, Menu, CH Next, CH Previous, Volume Up, Vol-ume Down |
| IR | Off axis ±15° 3mOn axis 5m | |
| LED | Power On BlankStandby Blue | |
| Power Requirement | Input Range | |
| Power Consumption | Standby < 1WOn (typical) TBD | |
| AC in Without Switch | ||
| Tuner Module ATSC+ NTSC tuner | ||
| AC power cord, spec TBD | ||
| Accessory | Accessory 1 | Remote control, spec TBDBettery, spec TBD |
| Accessory 2 | User's manual, spec TBDFlyer, spec TBDQSG, spec TBDTuner QSG | |
| Warning: Do not set the graphics card in your computer to exceed these refresh rates; doing so may result in permanent damage to the LCD TV. | ||
Note: Product Specifications are subject to change without notice.