
48705 - Steamer MORPHY RICHARDS - Free user manual and instructions
Find the device manual for free 48705 MORPHY RICHARDS in PDF.

| Product Type | Sear and Stew Slow Cooker |
| Brand | Morphy Richards |
| Model | 48705 |
| Capacity | 5 liters (10.5 pints) |
| Number of Heat Settings | 3 (Low, Medium, High) plus Off |
| Cooking Pot Material | Non-stick coated aluminum |
| Glass Lid Material | Tempered glass |
| Dishwasher Safe Parts | Glass lid and cooking pot |
| Control Type | Rotary knob with indicator light |
| Indicator Light | Yes, illuminates when heating |
| Hob Compatibility (for searing) | All hobs except induction |
| Searing Function | Yes, in cooking pot on hob |
| Base Unit Cleaning | Wipe with damp cloth; do not immerse |
| Lid Handle | Yes, on glass lid |
| Base Handles | Yes, on base unit |
| Warranty | 1 year standard, extendable to 2 years with registration |
| Voltage | 220-240V ~ 50Hz (typical UK) |
| Power Consumption | Not specified in manual |
| Weight | Not specified in manual |
| Dimensions | Not specified in manual |
Frequently Asked Questions - 48705 MORPHY RICHARDS
User questions about 48705 MORPHY RICHARDS
0 question about this device. Answer the ones you know or ask your own.
Ask a new question about this device
Download the instructions for your Steamer in PDF format for free! Find your manual 48705 - MORPHY RICHARDS and take your electronic device back in hand. On this page are published all the documents necessary for the use of your device. 48705 by MORPHY RICHARDS.
USER MANUAL 48705 MORPHY RICHARDS
smart ideas for your home

Sear And Stew Slow Cooker
i Please read and keep these instructions for future use
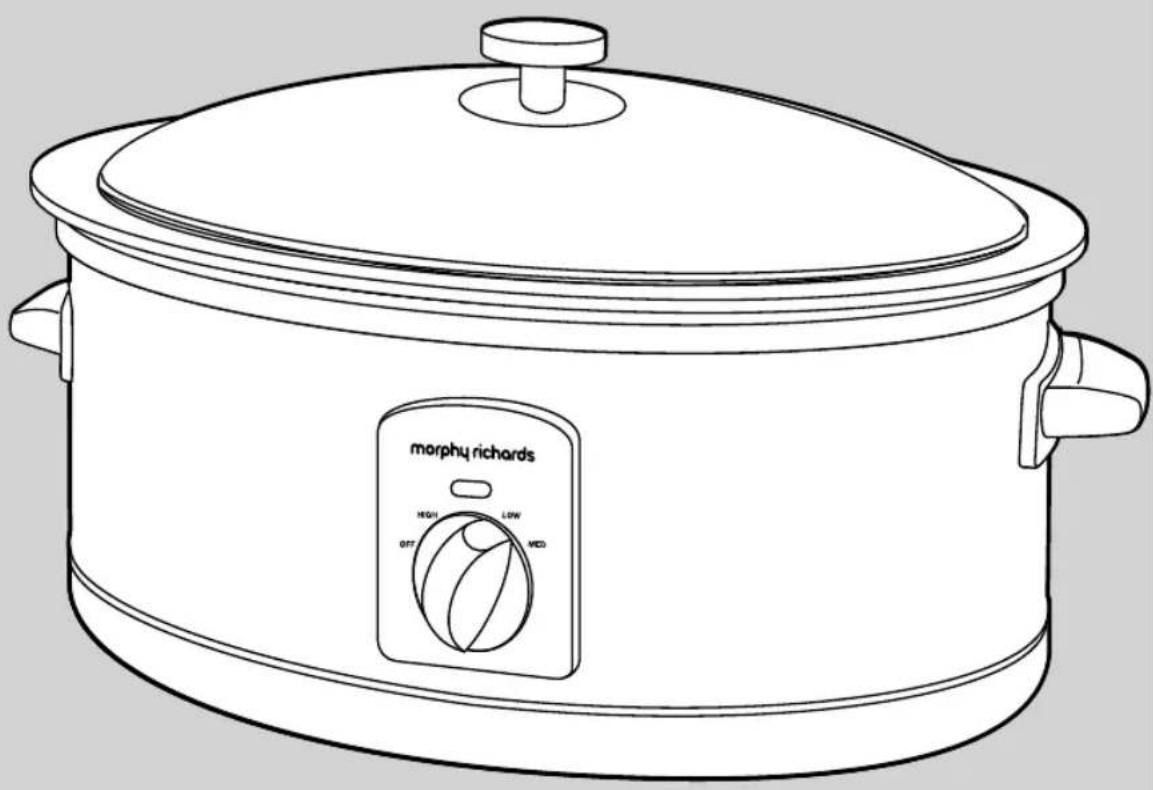
natural_image
Line drawing of a morphy richards rice cooker with control panel (no text or symbols on body)For competitions, product hints and tips and more join us at

www.morphyrichards.co.uk/blog

www.facebook.com/morphyrichardsuk

@loveyourmorphy
Health And Safety
The use of any electrical appliance requires the following common sense safety rules. Please read these instructions carefully before using the product.
- This appliance can be used by children from 8 years and above if they have been given supervision or instruction concerning use of the appliance in a safe way and if they understand the hazards involved. Cleaning and user maintenance shall not be made by children unless they are older than 8 and supervised. Keep the appliance and its cord out of reach of children aged less than 8 years. Children shall not play with the appliance.
- Appliances can be used by persons with reduced physical, sensory or mental capabilities or lack of experience and knowledge if they have been given supervision or instruction concerning use of the appliance in a safe way and understand the hazards involved.
- This appliance is intended to be used in household and similar applications such as: farm houses, by clients in hotels, motels and other residential type environments, and bed and breakfast type environments.
- If the supply cable is damaged, it must be replaced by the manufacturer, its service agent or similarly qualified persons in order to avoid a hazard.
- The appliance is not intended to be operated by means of an external timer or separate remote system.
Location
- Always locate your appliance away from the edge of the worktop.
- Ensure that the appliance is used on a firm, flat, heat resistant surface.
Mains cable
- The mains cable should reach from the socket to the appliance without straining the connections.
- Do not let the mains cable hang over the edge of the worktop or open space where a child could reach it.
- Do not let the cable run across a cooker or hot area which might damage the cable.
Personal safety
- WARNING: Do not touch the top of the appliance or other hot parts during or after use, use handles or knobs.
- To protect against the risk of electrical shock do not put base in water or in any other liquid.
- Do not touch hot surfaces. Use oven gloves or a cloth when removing lid or handling hot containers.
- Extreme caution must be used when moving an appliance containing hot food, water, or other hot liquids.

Other safety considerations
- Do not switch on the Slow Cooker if the Cooking Pot is empty.
- Allow the Glass Lid and Cooking Pot to cool before immersing in water.
- Never cook directly in the Base Unit. Use the Cooking Pot.
- Do not use the Cooking Pot or Glass Lid if cracked or chipped.
- The Glass Lid and Cooking Pot are fragile. Handle them with care.
- The use of attachments or tools not recommended by Morphy Richards may cause fire, electric shock or injury.
- Do not place on or near a hot gas or electric burner or in a heated oven.
- Unplug from the socket when not in use, before putting on or taking off attachments, and before cleaning. Electrical requirements
Check that the voltage on the rating plate of your appliance corresponds with your house electricity supply which must be A.C. (Alternating Current).
Should the fuse in the mains plug require changing, a 3 amp BS1362 fuse must be fitted.
WARNING: This appliance must be earthed.
Introduction
Thank you for purchasing your new Morphy Richards Slow Cooker.
Your Slow Cooker will allow you to create an extensive selection of meals with the added benefit of being able to sear the meat in the same pan.
Searing meat in the cooking pan means that the juices from the meat combine with the rest of the ingredients creating richer fuller flavours in your dishes.
Contents
Health And safety 2
Before First Use 3
Features 4
Using Your Slow Cooker 5
Handling The Cooking Pot 6
Handling The Glass Lid 6
Foods For Slow Cooking 6
Slow Cooking Tips 6
Care And Cleaning 7
Caring For The Lid And Cooking Pot .... 7
Troubleshooting 7
Notes 8
Recipes / Cooking Guide 9
Recipes - Soup 10
Recipes - Poultry 10
Recipes - Meat 11
Recipes - Dessert 15
Contact Us 15
Guarantee 16
Before First Use
Wash the Lid (2) and Cooking Pot (3) in hot, soapy water. Rinse and dry.
Note
The Cooking Pot is not suitable for use on an induction hob.
Product Overview
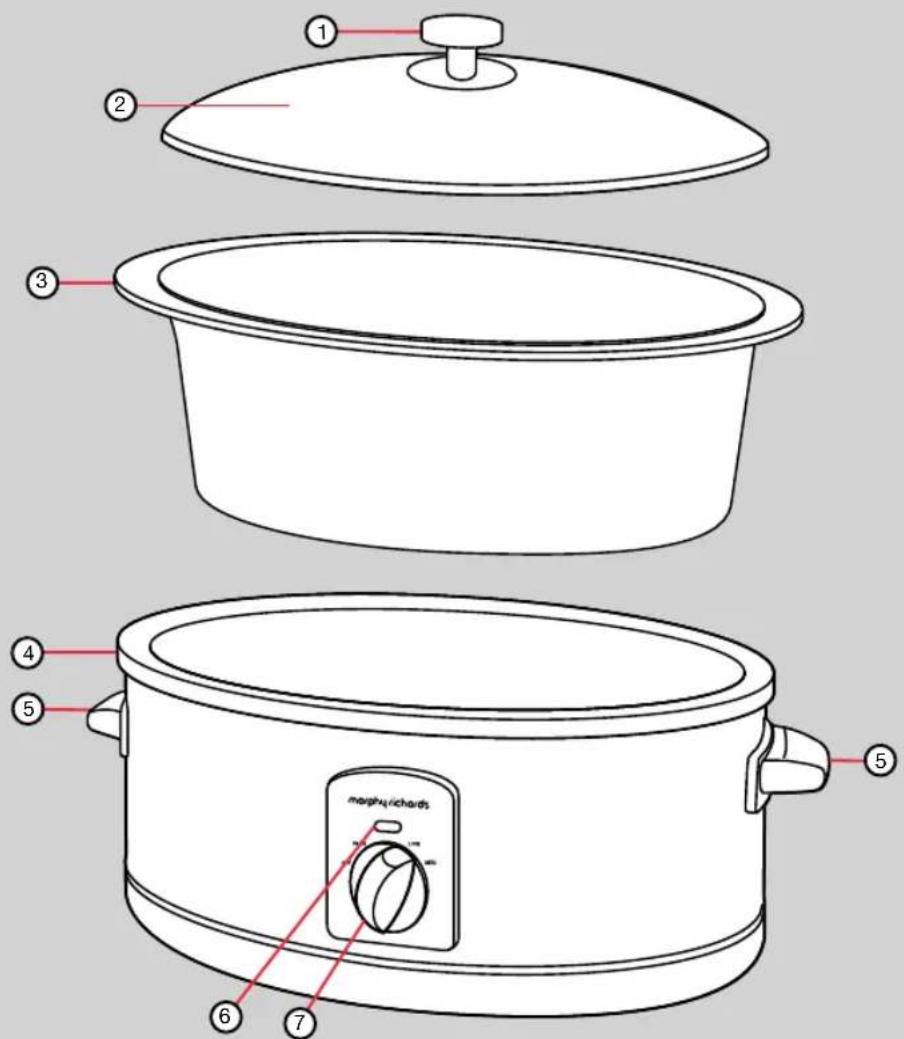
Features
(1) Lid Handle
(2) Glass Lid
(3) Cooking Pot
(4) Base Unit
(5) Base Handles
(6) Indicator Light
(7) Control Knob
Using Your Slow Cooker

natural_image
Line drawing of a hand pouring liquid from a spoon into a basin (no text or symbols)Add oil to Cooking Pot (3). Refer to the recipe for the correct amount of oil to use.
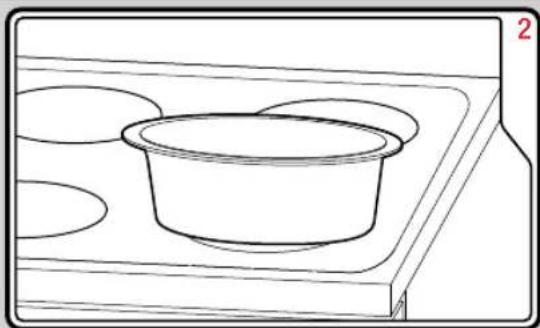
natural_image
Line drawing of a cooking pot on an induction cooktop (no text or symbols)Pre-heat the oil in the Cooking Pot on the hob over a medium-high heat. The Cooking Pot is compatible with most hobs, except induction.
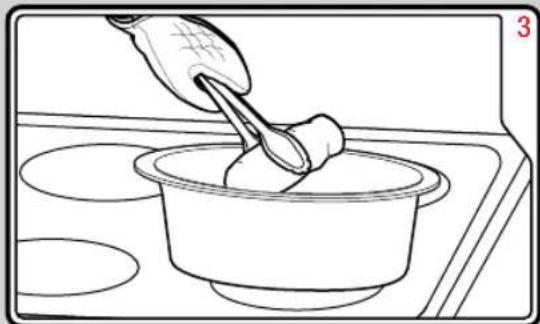
natural_image
Line drawing of a hand pouring food into a pot on an induction cooktop (no text or symbols)When the oil is hot, add the meat in to the Cooking Pot. WARNING: The Cooking Pot will be hot. Handle with oven gloves.
natural_image
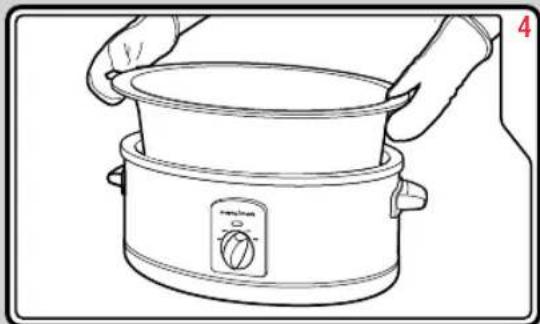
Line drawing of hands holding a cooking pot with a control knob (no text or symbols)When the meat has seared, place the Cooking Pot into the Base Unit (4). WARNING: The Cooking Pot will be hot. Handle with oven gloves.
natural_image
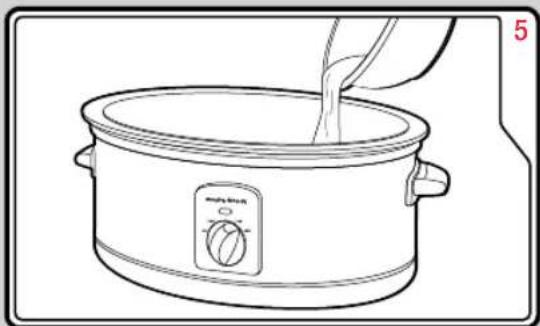
Line drawing of a cooking pot with a side panel showing liquid being poured into it (no text or symbols)Add the rest of the ingredients to the Cooking Pot.
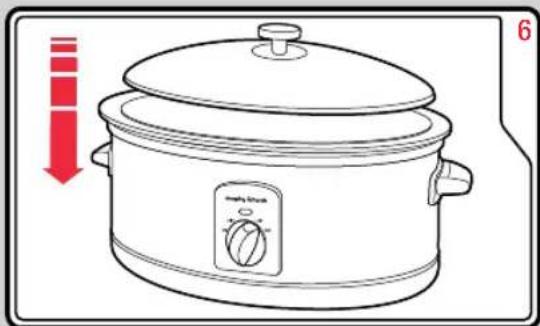
Place the Glass Lid (2) on the Cooking Pot.

Select Low, Medium or High cooking setting on the Control Knob (7) to start slow cooking. The Indicator Light (6) will illuminate

When cooking has finished, (refer to the cooking guide on page 7). Turn the Control Knob to Off. The Indicator Light will switch off.
Handling The Cooking Pot
- WARNING: The Cooking Pot (3) will become very hot when in use.
- To prevent the Cooking Pot from slipping when using to sear, saute or fry the ingredients on your hob, use an oven glove to support the Cooking Pot when stirring the food.
- Be careful when using the Cooking Pot on a gas hob, select the correct size gas ring to fit the base area of the Cooking Pot. DO NOT use on a wok burner or oversized gas hob.
- Do not use metal utensils to stir food in the Cooking Pot as this will scratch and remove the non stick coating. Use either wood or silicone plastic utensils.
- WARNING: The Lid handle (1), the Base Unit (4) and the Cooking Pot (3), as well as the outside of the Base Unit, all become hot during cooking. Always use oven gloves when handling ANY part of the Slow Cooker during cooking.
Handling The Glass Lid
- When removing the Glass Lid (2), tilt so that opening faces away from you to avoid being burned by steam.
Foods For Slow Cooking
- Most foods are suited to slow cooking methods, however there are a few guidelines that need to be followed.
- Ensure all frozen ingredients are thoroughly defrosted prior to cooking.
- Cut root vegetables into small, even pieces, as they take longer to cook than meat. They can be gently sauteed for 2-3 minutes before slow cooking. Ensure that root vegetables are always placed at the bottom of the Cooking Pot (3) and all ingredients are immersed in the cooking liquid.
- Trim all excess fat from meat before cooking, as the slow cooking method does not allow fat to evaporate.
- If adapting an existing recipe from conventional cooking, you may need to reduce the amount of liquid used. Liquid will not evaporate from your Slow Cooker to the same extent as conventional cooking.
-
Never leave uncooked food at room temperature in your Slow Cooker.
-
Uncooked kidney beans must be soaked overnight and boiled for at least 10 minutes to remove toxins before use in a Slow Cooker.
- Insert a meat thermometer into joints of roasts, hams or whole chickens to ensure they are cooked to the desired temperature.
- Do not use your Slow Cooker to reheat food.
Slow Cooking Tips
- The Slow Cooker must be at least half full for best results.
- Slow cooking retains moisture. If you wish to reduce liquid, remove the lid after cooking and turn the control to High. Reduce the moisture by simmering for 30 to 45 minutes.
- If cooking soups, leave 5 cm gap from the rim of the Cooking Pot (3) and the food surface to allow for simmering.
- Removing the Glass Lid (2) will allow heat to escape, reducing the efficiency of your Slow Cooker and increasing the cooking time. If you remove the lid to stir or add ingredients, you will need to allow 10-15 minutes extra cooking time for each time you remove the Glass Lid.
- Many things can affect how quickly a recipe will cook, including water and fat content, initial temperature of the food and the size of the food. Check food is properly cooked before serving.
- Many recipes will take several hours to cook. If you don't have time to prepare food in the morning, prepare it the night before, storing the food in a covered container in the fridge. Transfer the food to the Cooking Pot and add boiling liquid/stock. In most of the recipes in this book, the meat ingredients are browned first to improve their appearance and flavour.
- If you are short on preparation time and would prefer to skip the searing stage, simply add your meat and other ingredients into your Slow Cooker and cover with boiling liquid/stock. You will need to increase the recipe cooking time as follows: High setting +1hr, Medium setting +1-2 hrs, Low Setting +2-3hrs.
- Most meat and vegetable recipes require 8-10 hours on Low, 5-7 hours on Medium and 4-6 hours on High.
- Some ingredients are not suitable for slow cooking. Pasta, seafood, milk and cream should be added towards the end of the cooking time.
-
Pieces of food cut into small pieces will cook quicker. A degree of ‘trial and error’ will be required to fully optimise the potential of your Slow Cooker.
-
All food should be covered with a liquid, gravy or sauce. In a separate pan or jug, prepare your liquid, gravy or sauce and completely cover the food in the Cooking Pot (3).
- When cooking joints of meat, ham, poultry etc, the size and shape of the joint is important. Try to keep the joint in the lower 2/3 of the pot. If necessary, cut into two pieces. Joint weight should be kept within the maximum limit of 2kg.
- For ham and brisket fill with hot water to just cover the joint. For beef, pork or poultry cover to 1/3 depth.
Care And Cleaning
- Turn off and unplug you Slow Cooker from the mains. Allow to cool completely before cleaning.
- Do not use metal utensils or abrasive cleaners when cleaning.
- Remove the Glass Lid (2) and Cooking Pot (3) and clean in hot soapy water.
- Wipe the sides of the main unit with a damp cloth.
- The Glass Lid and Cooking Pot are dishwasher safe.
DO NOT IMMERSE THE MAIN UNIT IN WATER
Caring For The Glass Lid And Cooking Pot
- P lease handle the Glass Lid (2) and Cooking Pot (3) carefully to ensure long life.
- A void sudden, extreme temperature changes to the Glass Lid. For example, do not place a hot lid into cold water or onto a wet surface.
- Avoid hitting the Glass Lid against any hard surfaces.
- Do not use the Glass Lid if chipped, cracked or severely scratched.
- Do not use abrasive cleansers or metal scouring pads.
- Never heat the Cooking Pot when empty, when searing or browning add the meat as soon as the oil is hot.
- Never place the Glass Lid or Cooking Pot under a grill, in the oven, in a microwave or toaster oven.
- Never place lid directly on a burner or hob.
- Do not use metal utensils when searing or to stir food in the Cooking Pot as this will scratch and remove the non stick coating. Use either wooden or silicone plastic utensils.
Troubleshooting
Problem Reason Solution
- Food is undercooked. • Loss of power
-
Food cooked on wrong setting for cooking time
• Glass Lid not placed correctly on the Cooking Pot -
Test the mains outlet with a lamp known to be working.
- Check the Control Knob position and the recipe details.
- Check the Glass Lid is correctly placed and nothing is obstructing it.
- Food is overcooked.
Cooking Pot was under half full
-
Food cooked too long
• Cooking Pot placed in Base Unit while still very hot. -
Your Slow Cooker has been designed to thoroughly cook food in a filled Cooking Pot. If the Cooking Pot is only half-filled, check to see if the food is cooked 1 to 2 hours earlier than recipe time.
- Check the Control Knob position and the recipe details.
- Cooking time may be shortened. Check food is cooked 30 minutes to 1 hour earlier than the stated recipe time.
Notes
Recipes

natural_image
Close-up of a spoon lifting a creamy mixture in a white bowl (no text or symbols visible)
natural_image
Close-up of a plated dish featuring minced meat and garnished with herbs, served on a plate of noodles (no visible text or symbols)
natural_image
Close-up of a cooked dish with diced ingredients, possibly meat or gravel, in a white bowl (no text or symbols visible)
natural_image
Close-up of a bowl of porridge with dark sauce and a spoon (no text or symbols visible)We have developed 12 recipes for you to use in your Sear and Stew Slow Cooker. From soups for starters, curries for mains and pears in red wine for dessert, there are choices for all tastes.
The cooking times given in the following recipes are for the Medium setting. Should you want to increase or decrease the cooking time, please refer to the cooking guide below. Please note that these cooking times are for guidance only and may vary depending on food type and personal tastes.
For example if the recipe says cook for 4-6 hours on Medium and you require the cooking time to be shorter, cook on High, which will reduce the cooking time to 3-4 hours. To increase the cooking time, choose Low which will increase the cooking time to 8-10 hours.
The recipes are based on the maximum working volume of your slow cooker (5 litres / 10.5 pints). This allows a 2cm space between the top of the pot and the food.
Cooking Guide
Cook on Low Cook on Medium Cook on High
8-10 hours
• 4-6 hours
• 3-4 hours
Recipes - Soup
Vegetable soup
Ingredients:
- 60g butter
• 1.8kg mixed vegetables, e.g. potatoes, onions, carrots, parsnips, celery, leeks, tomatoes - 2 L vegetable stock
- mixed herbs to taste
- salt and pepper
- 60g plain flour
Method:
1 Peel, wash and cube or slice all the vegetables.
2 Melt butter in the Cooking Pot and gently fry the vegetables on the hob for 2-3 minutes.
3 A dd the hot stock. Stir well and bring to the boil. Season to taste and add mixed herbs.
4 Transfer the Cooking Pot into the Base Unit.
5 Cover with the Glass Lid and cook for approximately 4-6 hours on the Medium setting.
6 Cool and liquidise the soup.
7 Reheat on the hob, thickening the soup with the flour.
Recipes - Poultry
Chicken in white wine sauce
Ingredients:
• 10 chicken breasts
- 40g butter
• 2 large onions, finley chopped
• 400g mushrooms, sliced
- 5tbsp dry white wine
- 750ml chicken stock
- 2tsp mixed herbs
- 3tbsp cornflour
• 3 egg yolks
- 150ml double cream
- salt and pepper
Method:
1 Place the chicken breasts and butter in the Cooking Pot and gently fry on the hob until sealed on all sides.
2 Add the onion and fry until softened but not browned. Add the mushrooms and cook for a minute on low heat.
3 Blend the cornflour with a splash of wine. Pour the remaining wine into the pot with the blended cornflour, mixed herbs and seasoning. Bring to the boil, stirring continuously until thickened.
4 Transfer the Cooking Pot into the Base Unit, cover with the Glass Lid.
5 Cover with the Glass Lid and cook for approximately 4-6 hours on the Medium setting.
6 Just before serving, beat together the egg yolks and cream. Beat in a few tablespoons of the cooking liquid, mix well together. Pour this mixture into the Cooking Pot and stir until the sauce thickens.
Recipes - Meat
Beef Stew
Ingredients:
- 1kg beef, cubed
- 700g potatoes, cubed
- 700g carrots, sliced
• 3 large leeks, sliced
• 2 large onions, chopped
• 2 garlic clove, crushed
• 1.5L beef stock - 3tbsp cornflour
- 3tsp mixed herbs
- salt and pepper
Method:
1 In the Cooking Pot, fry the onions and garlic on the hob until softened, then add the meat and continue to fry until the meat is seared.
2 Add the potatoes, carrots and leeks.
3 B lend the stock with the mixed herbs. Add to the Cooking Pot and season to taste.
4 Transfer the Cooking Pot into the Base Unit.
5 Cover with the Glass Lid and cook for approximately 4-6 hours on the Medium setting.
6 Before serving, thicken the sauce with the cornflour. Mix the cornflour with a little cold water until a smooth paste is achieved. Mix this into a cup of the hot liquid taken from the Cooking Pot, when fully mixed into the liquid add this back into the rest of the ingredients and stir well until the cornflour is evenly distributed. This can be done 30 minutes from the end of the cooking time.
New England beef
Ingredients:
• 1.5kg topside beef
• 1 bouquet garni
- 2tsp thyme
• 2tsp black peppercorns
- 10 shallots
- 550g carrots, sliced
- 300g swede, diced
• Water (enough to cover the joint)
Method:
1 Put the beef into the Cooking Pot and sear on the hob on all sides.
2 Add all the remaining ingredients. Cover the beef with cold water (1.2L should be sufficient to submerge the joint.) Place the lid on and bring to a simmer on the hob.
3 Season well and then transfer the Cooking Pot into the Base Unit, cover with the Glass Lid.
4 Cook for approximately 4-6 hours on the Medium setting.
5 Take the beef out of the Cooking Pot with a slotted spoon and allow to cool for 10 minutes. The cooking liquid can be used as a base to make gravy.
6 Cut the beef into slices and spoon a little of the cooking liquid over. Serve with vegetables and garnish with fresh parsley.
IMPORTANT: When buying a joint of meat, ensure it will fit into the Cooking Pot, so when it is covered with liquid it will be 2.5cm below the rim. The joint must not stick out above the rim and there should be enough room to cover the meat with water. The shape of the meat is just as important as the weight.
Recipes - Meat
Thai beef curry
Ingredients:
- 60g butter
• 1 kg stewing beef, cubed - 2 onions, chopped
• 4 garlic cloves, crushed - 6tbsp peanut butter
- 800g coconut milk
- 700g potatoes, quartered
- 4tbsp curry powder
• 4tbsp thai fish sauce - 4tbsp soft brown sugar
- 1L beef stock
Method:
1 In the Cooking Pot, melt the butter and gently brown the beef on the hob.
2 Add the onions and garlic and fry until soft.
3 A dd the remaining ingredients and mix well.
4 Transfer the Cooking Pot into the Base Unit, cover with the Glass Lid.
5 Cook for approximately 4-6 hours on the Medium setting.
Note: a slight 'crust' of brown meat may appear on the top. It soon disappears if stirred into the sauce.
Beef curry
Ingredients:
- 5tbsp vegetable oil
• 3 medium cooking apples, peeled, cored and sliced
• 3 large onions chopped
• 1.5kg stewing steak, cubed - 5tsp curry powder
- 1L beef stock
- 5tbsp mango chutney
- 150g sultanas
- 600g tinned tomatoes, chopped
- 3tbsp lemon juice
- 5tbsp cornflour
- salt and pepper
Method:
1 Add the oil, apple and onion to the Cooking Pot and fry on the hob until soft.
2 Add the steak to the pan and fry until lightly seared.
3 Stir in the stock and bring to a simmer.
4 Add the remaining ingredients and bring back to a simmer.
5 Transfer the Cooking Pot into the Base Unit, cover with the Glass Lid.
6 Cook for approximately 4-6 hours on the Medium setting.
7 At the end of the cooking time, thicken with the cornflour. Mix the cornflour with a little cold water until a smooth paste is achieved. Mix this into a cup of the hot liquid taken from the Cooking Pot, when fully mixed into the liquid add this back into the rest of the ingredients and stir well until the cornflour is evenly distributed. This can be done 30 minutes from the end of the cooking time.
Bolognese sauce
Ingredients:
• 1.5kg minced beef
• 3 onions, chopped
- 6 sticks of celery, thinly sliced
• 3 garlic cloves, crushed
- 7tbsp tomato puree
- 3 tbsp flour
• 3x400g cans chopped tomatoes
- 600ml beef stock
• 300g mushrooms, sliced
- 2tsp mixed herbs
- salt and pepper
Method:
1 In the Cooking Pot, gently brown the mince on the hob without adding any fat or oil.
2 When the fat has started to run from the meat, add the onion, celery and garlic.
3 F ry for a couple of minutes and then add the tomato puree.
4 Blend some of the tomato juice with the flour to make a smooth pouring cream, add to the meat with remaining tomatoes and juice and bring to the boil, stirring continuously until thickened.
5 Add the remaining ingredients and mix well.
6 Transfer the Cooking Pot into the Base Unit, cover with the Glass Lid.
7 Cook for approximately 4-6 hours on the Medium setting.
Note: a slight 'crust' of brown meat may appear on the top. It soon disappears if stirred into the sauce.
BBQ beef ribs
Ingredients:
• 1.5kg ribs
- 300ml BBQ sauce
Method:
1 Marinade the ribs in the sauce for a few hours, preferably overnight.
2 Place in the Cooking Pot and cover with the Glass Lid.
3 Cook for approximately 4-6 hours on the Medium setting.
Recipes - Meat
Boiled ham
Ingredients:
• 1.8kg (max) gammon joint
Method:
1 Put the gammon in the Cooking Pot, cover with cold water (1.5L should be sufficient to submerge the joint) and bring to the boil.
2 D rain and rinse the joint.
3 Place the gammon joint back into the Cooking Pot and fill the Cooking Pot with boiling water to roughly cover the joint.
4 Transfer the Cooking Pot to the Base Unit, cover with the Glass Lid.
5 Cook for approximately 4-6 hours on the Medium setting.
IMPORTANT: When buying a joint of meat, ensure it will fit into the Cooking Pot. The joint must not stick out above the rim. The shape of the meat is just as important as the weight.
Sausage pot
Ingredients:
• 1tbsp oil
- 1.5kg sausages
• 3 large onion, finley chopped
- 5 carrots, thinly sliced
- 3 leeks, sliced
• 1.5L beef stock
- 6tbsp chutney
• 5tbsp worcestershire sauce
- salt and pepper
Method:
1 In the Cooking Pot, quickly sear the sausages on the hob on all sides in the oil.
2 Add the onions, carrots and leeks and gently saute until softened, but not browned.
3 Stir in the flour and cook on a low heat until the oil is absorbed.
4 Slowly add the stock and bring to the boil, stirring continuously until thickened.
5 Stir in the chutney, worcestershire sauce and seasoning.
6 Add the remaining ingredients and bring to a simmer.
7 Transfer the Cooking Pot into the Base Unit, cover with the Glass Lid.
8 Cook for approximately 4-6 hours on the Medium setting.
If the sausages contain a lot of fat, any excess can be removed from the surface of the finished dish with kitchen paper.
Recipes - Dessert
Rice pudding
Ingredients:
- 60g butter
- 250g pudding rice
- 2 50g sugar
• 2L milk - 1tsp nutmeg
Method:
1 B utter the sides of the Cooking Pot
2 Add all the ingredients and stir well.
3 Transfer the Cooking Pot into the Base Unit, cover with the Glass Lid.
4 C ook for approximately 8-10 hours on the Low setting.
Sponge Pudding
Ingredients:
- 125g butter
- 4tbsp golden syrup
- 100g caster sugar
• 2 eggs
• 200g self raising flour
• 2tbsp Milk - 2tbsp Lemon juice
Method:
1 Butter the inside of a 1.25L pudding basin and line the bottom with greaseproof paper. of the Cooking Pot
2 Pour the syrup into the bottom of the basin.
3 In a mixing bowl, cream the butter and sugar until smooth and creamy.
4 Gradually mix in the eggs and flour and stir in the milk and lemon juice.
5 Spoon the mixture on top of the syrup and cover with pleated baking paper. Tie with string to secure and make a handle.
6 Place into the Cooking Pot and fill with boiling water halfway up the sides of the basin.
7 Cover with the Glass Lid. Cook for approximately 4-6 hours on the Medium setting.
Contact us
Helpline
If you are having a problem with your appliance, please call our Helpline, as we are more likely to be able to help than the store you purchased the item from.
Please have the product name, model number and serial number to hand when you call to help us deal with your enquiry quicker.
UK Helpline: 0344 871 0944
IRE Helpline: 1800 409 119
Spares: 0344 873 0710
Talk To Us
If you have any questions, comments, want some great tips or recipe ideas to help you get the most out of your products, join us online:
Blog: www.morphyrichards.co.uk/blog
Facebook: www.facebook.com/morphyrichardsuk
Twitter: @loveyourmorphy
Website: www.morphyrichards.com
SC48705 MUK Rev 2 01/15
Registering Your 2 Year Guarantee
Your standard one year guarantee is extended for an additional 12 months when you register the product within 28 days of purchase with Morphy Richards. If you do not register the product with Morphy Richards within 28 days, your product is guaranteed for 1 year. To validate your 2 year guarantee register with us online at www.morphyrichards.co.uk
Or call our customer registration line UK 0344 871 0242
IRE 1800 409 119
N.B. Each qualifying product needs to be registered with Morphy Richards individually.
Please note that the 2 year guarantee is only available in the UK and Ireland. Please refer to the one year guarantee for more information.
Your 1 Year Guarantee
It is important to retain the retailer's receipt as proof of purchase. Staple your receipt to this back cover for future reference.
Please quote the following information if the product develops a fault. These numbers can be found on the base of the product.
Model no.
Serial no.
All Morphy Richards products are individually tested before leaving the factory. In the unlikely event of any appliance proving to be faulty within 28 days of purchase, it should be returned to the place of purchase for it to be replaced.
If the fault develops after 28 days and within 12 months of original purchase, you should contact the Helpline number quoting Model number and Serial number on the product, or write to Morphy Richards at the address shown.
You may be asked to return a copy of proof of purchase.
Subject to the exclusions set out below (see Exclusions), the faulty appliance will then be repaired or replaced as appropriate and dispatched usually within 7 working days of receipt.
If, for any reason, this item is replaced or repaired during the 1 year guarantee period, the guarantee on the new item will be calculated from original purchase date. Therefore it is vital to retain your original till receipt or invoice to indicate the date of initial purchase.
To qualify for the 1 year guarantee, the appliance must have been used according to the instructions supplied. For example, crumb trays should have been emptied regularly.
Exclusions
Morphy Richards shall not be liable to replace or repair the goods under the terms of the guarantee where:
1 The fault has been caused or is attributable to accidental use, misuse, negligent use or used contrary to the manufacturer's recommendations or where the fault has been caused by power surges or damage caused in transit.
2 The appliance has been used on a voltage supply other than that stamped on the products.
3 Repairs have been attempted by persons other than our service staff (or authorised dealer).
4 T he appliance has been used for hire purposes or non domestic use.
5 T he appliance is second hand.
6 M orphy Richards reserves the right not to carry out any type of servicing under the guarantee at its discretion
7 Plastic filters for all Morphy Richards kettles and coffee makers are not covered by the guarantee.
8 Batteries and damage from leakage are not covered by the guarantee.
- This guarantee does not confer any rights other than those expressly set out above and does not cover any claims for consequential loss or damage. This guarantee is offered as an additional benefit and does not affect your statutory rights as a consumer. Morphy Richards products are intended for household use only. See usage limitations within the location safety instructions.
Disclaimer
Morphy Richards has a policy of continuous improvement in product quality and design. The company, therefore reserves the right to change the specification of it's models at any time.

For electrical products sold within the European Community. At the end of the electrical products useful life, it should not be disposed of with household waste.
Please recycle where facilities exist. Check with your Local Authority or retailer for recycling advice in your country
IF YOU ARE HAVING A PROBLEM WITH ONE OF OUR PRODUCTS, CALL OUR HELPLINE:
UK: 0344 871 0944 EIRE: 1800 409 119 SPARES: 0344 873 0710
morphy richards
The After Sales Division Morphy Richards Ltd Mexborough, South Yorkshire, England, S64 8AJ
Helplines (office hours) UK 0344 871 0944 Spare Parts 0344 873 0710 Republic of Ireland 1800 409 119 www.morphyrichards.com
C €