
PJ KU12000 - Projector RICOH - Free user manual and instructions
Find the device manual for free PJ KU12000 RICOH in PDF.


| Product Type | Video Projector |
| Brand | Ricoh |
| Model | PJ KU12000 |
| Display Technology | DLP 0.96" WUXGA |
| Native Resolution | WUXGA (1920 x 1200) |
| Light Source | Dual mercury lamps, 465W each (replaceable) |
| Brightness (Max) | Up to 1150W power consumption |
| Lens Features | Interchangeable, power zoom/focus/lens shift |
| Keystone Correction | Vertical ±20°, Horizontal ±20° |
| Dimensions (W x D x H) | 520 mm x 591 mm x 194 mm (without lens) |
| Weight | 23.8 kg (without lens) |
| Power Supply | 100–240 VAC, 15A fuse |
| Power Consumption | ECO: 920W (110V) / 870W (220V); Max: 1150W (110V) / 1080W (220V) |
| Input Connectors | HDMI, DVI-D, VGA, BNC (RGBHV/Component), 3G-SDI, HDBaseT, Composite Video, USB, Serial, LAN |
| Special Features | 360° operation, portrait mode, PIP/PBP, image warping, HDBaseT, 3D support, DynamicBlack |
| Operating Temperature | 0°C to 40°C (32°F to 104°F) |
| Included Accessories | Power cord, VGA cable, DVI-HDMI adapter, remote control with batteries, user manual CD, Read This First |
| Lamp Replacement Type | RICOH replacement lamp type 25 |
| Filter Maintenance | Replaceable dust filter; clean or replace as indicated by warning |
Frequently Asked Questions - PJ KU12000 RICOH
User questions about PJ KU12000 RICOH
0 question about this device. Answer the ones you know or ask your own.
Ask a new question about this device
Download the instructions for your Projector in PDF format for free! Find your manual PJ KU12000 - RICOH and take your electronic device back in hand. On this page are published all the documents necessary for the use of your device. PJ KU12000 by RICOH.
USER MANUAL PJ KU12000 RICOH
natural_image
Abstract composition of gray circles of varying sizes and sizes on white background (no text or symbols)Read this manual carefully before you use this machine and keep it handy for future reference. For safe and correct use, be sure to read the Precautions in this manual before using the machine.
Safety Information
This chapter describes safety information for this machine.
Information
Introduction
This manual contains detailed instructions and notes on the operation and use of this machine. For your safety and benefit, read this manual carefully before using the machine. Keep this manual in a handy place for quick reference.
Important
Contents of this manual are subject to change without prior notice.
In no event will the company be liable for direct, indirect, special, incidental, or consequential damages as a result of handling or operating the machine.
Some illustrations in this manual might be slightly different from the machine.
Please ask the specialists to replace the lamp.
The description of the lamp replacement is for the specialists.
Caution
The manufacturer shall not be responsible for any damage or expense that might result from the use of parts other than genuine parts from the manufacturer with your office products.
When using this machine, the following safety precautions should always be followed.
Safety During Operation
In this manual, the following important symbols are used:

WARNING
Indicates a potentially hazardous situation which, if instructions are not followed, could result in death or serious injury.

CAUTION
Indicates a potentially hazardous situation which, if instructions are not followed, may result in minor or moderate injury or damage to property.
Safety Precautions to Be Followed
This section explains safety precautions that should always be followed when using this machine.
Environments where the machine can be used
This section explains safety precautions about environments where the machine can be used.

WARNING
- Do not place vases, plant pots, cups, toiletries, medicines, small metal objects, or containers holding water or any other liquids, on or close to this machine. Fire or electric shock could result from spillage or if such objects or substances fall inside this machine.

WARNING
- Keep the product and attachments out of the reach of children. If the product is near children, it might fall over and cause an injury.

CAUTION
- Keep the machine away from humidity and dust. Otherwise a fire or an electric shock might occur.

CAUTION
■ Do not place any objects on the machine. Doing so may cause the machine to topple over, possibly resulting in injury.

CAUTION
■ Do not place the machine on an unstable or tilted surface. If it topples over, an injury might occur.

CAUTION
■ Do not place the product or use it in an environment where it might get wet such as from snow, rain, or being near water. Doing so could result in fire or electric shock.

CAUTION
■ Do not put your face or hand near the exhaust vents. Doing so could result in burns or an accident due to hot air coming from the exhaust vents.

CAUTION
■ Do not use the product on soft material such as paper or cloth that might get sucked into the intake vents. Doing so may cause heat buildup inside the product, resulting in malfunction, burns, or fire.

CAUTION
■ Do not place the power cord and connection cable in a way that might cause someone to trip and fall. The product might fall over and cause an injury.

CAUTION
■ Do not place the product in a location where air flow is poor. Doing so may cause fire due to internal components becoming overheated.

CAUTION
■ Do not place or store the product in a location where direct sunlight or heat generation might occur. The heat may deform or wear out the exterior parts or negatively affect internal parts. Doing so could result in fire.

CAUTION
■ Do not place low heat resistant material near the exhaust vents. Hot air may come from the exhaust vents, resulting in damage to the product or an accident.

CAUTION
■ Do not expose the product to salt air or corrosive gas. Also, do not place the product in a laboratory or other location where a chemical reaction might occur. Doing so may cause the product to malfunction.

CAUTION
- Do not obstruct the machine's vents. Doing so risks fire caused by overheated internal components.
Handling power cords and power cord plugs
This section explains safety precautions about handling power cords and power cord plugs.

WARNING
■ Do not use any power sources other than those that match the specifications shown. Doing so could result in fire or electric shock.

WARNING
■ Do not use any frequencies other than those that match the specifications shown. Doing so could result in fire or electric shock.

WARNING
■ Do not damage, break, or modify the power cord. Also, do not place heavy objects on the power cord, or pull the cord or bend it severely. Doing so could result in fire or electric shock.

WARNING
- Touching the prongs of the power cable's plug with anything metallic constitutes a fire and electric shock hazard.

WARNING
■ The supplied power cord is for use with this machine only. Do not use it with other appliances. Doing so could result in fire or electric shock.

WARNING
It is dangerous to handle the power cord plug with wet hands. Doing so could result in electric shock.

WARNING
■ Be sure to disconnect the plug from the wall outlet at least once a year.
■ There are burn marks on the plug.
■ The prongs on the plug are deformed.
If any of the above conditions exist, do not use the plug and consult your dealer or service representative. Use of the plug could result in fire or electric shock.

WARNING
■ Be sure to disconnect the power cord from the wall outlet at least once a year.
- The power cord’s inner wires are exposed, broken, etc.
- The power cord's coating has a crack or dent.
■ When bending the power cord, the power turns off and on.
■ Part of the power cord becomes hot.
■ The power cord is damaged.
If any of the above conditions exist, do not use the power cord and consult your dealer or service representative. Use of the power cord could result in fire or electric shock.

WARNING
- Do not use the connection cable if it is deformed, cracked, or damaged. Doing so could result in fire or electric shock. If the connection cable is deformed, cracked, or damaged, contact your service representative to request a replacement cable.

WARNING
- When using an extension cord or power strip, only connect equipment whose total power consumption is within the power rating for the extension cord or power strip. If the power rating is exceeded, it may cause heat buildup and result in fire.

WARNING
■ Do not place the power cord and connection cable in front of the lens or exhaust vents when the product is turned on. Doing so may result in fire.

CAUTION
■ Push the power plug all the way into the power outlet. Do not use a power outlet with a loose connection. Doing so may result in heat buildup. Plug the power cord in the correct direction into the base. If they are not plugged in correctly, it could result in smoke, fire, or electric shock.

CAUTION
If this machine is not going to be used for several days or longer at a time, disconnect its power cord from the wall outlet.

CAUTION
■ When disconnecting the power cord from the wall outlet, always pull the plug, not the cord. Pulling the cord can damage the power cord. Use of damaged power cords could result in fire or electric shock.

CAUTION
■ Be sure to disconnect the plug from the wall outlet and clean the prongs and the area around the prongs at least once a year. Allowing dust to build up on the plug constitutes a fire hazard.

CAUTION
■ When performing maintenance on the machine, always disconnect the power cord from the wall outlet.
Handling the main machine
This section explains safety precautions about handling the main machine.

WARNING
If the machine emits smoke or odours, or if it behaves unusually, you must turn off its power immediately. After turning off the power, be sure to disconnect the power cord plug from the wall outlet. Then contact your service representative and report the problem. Do not use the machine. Doing so could result in fire or electric shock.

WARNING
If metal objects, or water or other fluids fall inside this machine, you must turn off its power immediately. After turning off the power, be sure to disconnect the power cord plug from the wall outlet. Then contact your service representative and report the problem. Do not use the machine. Doing so could result in fire or electric shock.

WARNING
■ Do not touch this machine if a lightning strike occurs in the immediate vicinity. Doing so could result in electric shock.

WARNING
- The following explains the warning messages on the plastic bag used in this product's packaging. - Keep the polythene materials (bags, etc.) supplied with this machine away from babies and small children at all times. Suffocation can result if polythene materials are brought into contact with the mouth or nose.

WARNING
If the machine topples, or if a cover or other part gets broken, you must turn off its power immediately. After turning off the power, be sure to disconnect the power cord plug from the wall outlet. Then contact your service representative and report the problem. Do not use the machine. Doing so could result in fire or electric shock.

WARNING
■ Contact your sales or service representative to clean or replace parts for a projector that is installed on a wall or ceiling.
■ Do not attempt to clean or replace parts for a projector that is installed in a high location on a wall or ceiling. Doing so may cause it to fall down, resulting in an injury.
■ Do not open the lamp cover of a projector that is installed on a wall or ceiling. Doing so may cause the lamp cover to fall down. If the lamp is broken, pieces of glass may fall and cause an injury.

WARNING
If a projector is incorrectly installed on a wall or ceiling, it may fall down and cause an injury. Contact your sales or service representative if you want to install a projector on a wall or ceiling.
■ Use brackets that are strong enough to support the projector. The projector weighs about 23.8kg (52.5lbs) (Projector weight without lens).
■ The projector must be installed in a location that is sturdy enough to support the full weight of the projector and brackets.

CAUTION
■ The machine may be very hot after it is turned off, especially the vents and the lower part of the unit where the lamp is located. Avoid touching these areas. Doing so may result in burns.

CAUTION
■ Do not place the product on other equipment or vice versa. Doing so may cause heat buildup inside the product or cause the other equipment to malfunction.

CAUTION
■ Do not increase the volume unless you are listening while increasing the volume. Also, lower the volume before turning off the power, because a loud sound may be emitted when the power is turned on and cause hearing damage.
Handling the machine's interior
This section explains safety precautions about handling the machine's interior.

WARNING
- Do not remove any covers or screws that are not mentioned in this manual. There are high voltage components inside the product that may cause electric shock. Contact your service representative if any of the product's internal components require maintenance, adjustment, or repair.
■ Do not disassemble or modify the product. Doing so may cause injury or malfunction.

CAUTION
If the machine's interior is not cleaned regularly, dust will accumulate. Fire and breakdown can result from heavy accumulation of dust inside this machine. Contact your sales or service representative for details about and charges for cleaning the machine's interior.
About the batteries
Explains things that you should follow in regard to the batteries.

WARNING
■ For safe operation, follow the warnings below regarding the batteries used in the remote control. If you use the batteries incorrectly, it may result in fire or injury due to batteries leaking or exploding.
■ Do not use batteries other than the ones specified.
■ Do not mix and use batteries that are different types or that are new and old.
■ Correctly insert batteries according to the polarity (+/-).
■ Do not charge non-rechargeable batteries.
■ Do not heat or throw the batteries into fire or water.
■ Do not connect the positive and negative terminals on a battery with a wire.
■ Remove the batteries from the remote control that are past their suggested use period or that are depleted.
■ Remove the batteries when they will not be used for extended periods.
- Keep the batteries out of the reach of children. Children may swallow or choke on the batteries. If this happens, contact a doctor immediately.

WARNING
■ What to do if a battery has leaked
If leakage from a battery adheres to your skin, rinse it with water immediately, and then contact a doctor.
■ Wipe off the leakage with tissue paper while being careful not to touch it.
■ Soak the tissue paper that you used in water, and then throw it away as burnable trash.
About the lamp
Explains things that you should follow in regard to the lamp.

WARNING
■ Do not look into the lens or vent when the product is on. The bright light may damage your eyes. Be especially careful in an environment with children.

WARNING
■ Before replacing the lamp, turn off the power and wait at least one hour to allow the product to cool completely. If it is not completely cool, you may burn or injure yourself due to the inside of the product and lamp unit being hot. If you replace the lamp without unplugging the power cord from the power outlet, electric shock or explosion may occur.
■ Be careful when handling the used lamp so that it does not break. If it breaks, it may cause injury.

CAUTION
- The product's light uses a mercury vapor lamp that becomes high pressure when it is turned on. The lamp has the following characteristics, so be sure to handle it with care after understanding the contents.
- Deterioration or shock can cause the lamp's life span to end or the lamp to explode. If the lamp explodes, it may make a big noise.
■ The time that it takes for the lamp to reach its life span or explode depends on each individual lamp and its operating conditions. It is possible that it might explode the first time it is used.
■ If you use the lamp past its replacement period, the possibility of explosion increases.
If the lamp explodes, broken glass pieces may be scattered around the inside of the product and ejected from the vent or other opening.
If the lamp explodes, a very small amount of mercury vapor in the lamp tube and broken glass pieces may be ejected from the vents or other opening.

CAUTION
■ What to do if a lamp has exploded
If the lamp explodes, remove the power cord from the product, leave the room while making sure it is thoroughly ventilated.
If the lamp explodes and you think that you have gotten glass particles or mercury vapor in your eyes or have inhaled either, contact a doctor immediately.
■ Clean up the area around the product completely while being careful not to get injured from any broken glass pieces.
■ Throw away any food that was near the product.
■ Ask your service representative to replace the lamp and inspect the product.

CAUTION
■ Do not block the projection light when it is on. If you do so, the part that is blocking the projection light may get quite hot and deform, deteriorate or cause a burn or fire. The reflected light may make the lens hot and cause a product failure. To temporarily suspend projection, select the mute function. To suspend longer, turn off the product.

CAUTION
■ Be sure to always use a dedicated replacement lamp that is new when replacing the lamp. If you use a lamp that is not dedicated, it may result in an explosion and injury.
Moving
This section explains safety precautions about moving the machine.

CAUTION
■ Unplug the power cord from the wall outlet before you move the machine. While moving the machine, take care that the power cord is not damaged under the machine. Failing to take these precautions could result in fire or electric shock.
Copyrights to Images
When projecting images using the projector, be careful not to infringe the copyright of protected materials.
The following are examples that may infringe the copyright of protected materials.
- Broadcasting images or movies for commercial purposes
- Modifying images or movies using functions such as freeze, magnify, or zoom to broadcast images for commercial pur poses or public viewing
- Varying the aspect ratio of images or movies using a function that changes the screen size to broadcast images for commercial purposes or public viewing
Note to Users Viewing 3D Images
Pay attention to the following points when viewing images using 3D glasses with projector:
- How 3D images are viewed may vary according to the individual.
- Do not use 3D glasses for viewing any material other than 3D images.
- Before viewing 3D images, make sure to read the manuals provided with your 3D glasses and 3D compatible content.
- Avoid viewing 3D images for a long period of time. Take a break of 15 minutes or longer after every hour of viewing.
- If you feel sick while viewing 3D images, stop viewing them. If you continue to feel sick, consult a doctor.
- When viewing 3D image in a room where on LED lighting system or fluorescent lights are used, you may feel that the light in the room flickers. If this is the case, dim the lights until you do not notice any flickers, or turn off the lights.
- If you or any member of your family has a history of lightsen sitive seizures, consult a doctor before viewing 3D images.
Positions of WARNING and CAUTION marks
This machine has marks for WARNING and CAUTION at the positions shown below. For safety, please follow the instructions and handle the machine as indicated.
Main unit
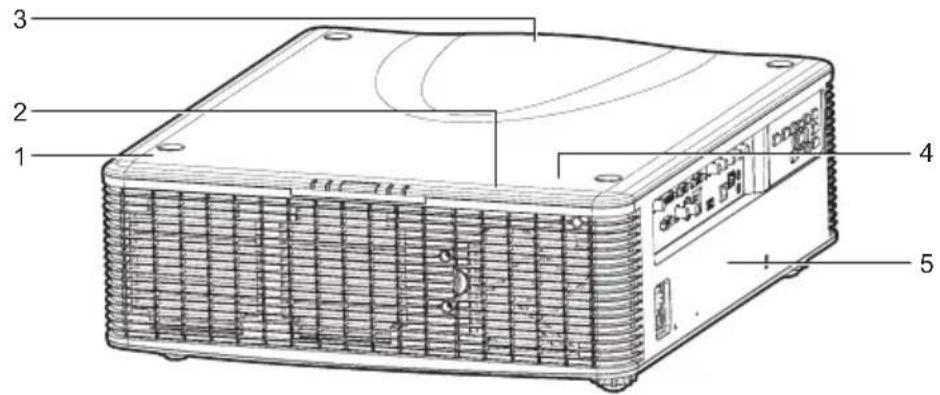
1

CAUTION ACHTUNG ATTENTION ATTENZIONE PRECAUCIÓN CUIDADO 注意
• To replace the lamp, first unplug the power cord then wait for more than 1 hour. The lamp might be broken. Be careful of pieces of broken glass.
•Z. Ersetzen d. Lampe erst Netzkabel herausziehen u. über 1 Stunde warten. Die Lampe könnte zerbrochen sein. Auf Glasscherben achten,
- Pour rempl, lampe, débrancher cordon d'alimentation, puis attendre + d'1 h. Lampe peut-être cassée. Attent° aux morceaux de verre brisé.
• Per sostituire la lampada, scollegare l'alimentazione e attendere min.1 ora. La lampada potrebbe essere rotta.Attenzione schegge vetro.
- Para cambiar la lámpara, desenchufe el cable y espere más de 1 hora. La lámpara puede romperse. Cuidado con los cristales rotos.
• P/ subst, a lâmpada, desligue o cabo de alimentação e aguarde + de 1 hora. A lâmpada pode estar partida. Tome cuidado com vidros partidos.
- 要更换灯泡,首先拔下电源线然后等待1小时以上。灯泡可能会被碰碎。小心玻璃碎片。
・ランプ交換は電源プラグを抜き、1時間以上放置した後に行ってください。ランプは割れているおそれがありますので、ガラス破片に注意してください。
The lamp attention is for the specialists only.
2

Do not put your face or hand near the exhaust vents. Doing so could result in burns or an accident due to hot air coming from the exhaust vents.
3

Do not look into the lens when the product is on. The bright light may damage your eyes.
Do not place anything in front of the lens. The object may become very hot and cause a fire or burn. To blank the image temporarily, turn on the mute function.
4
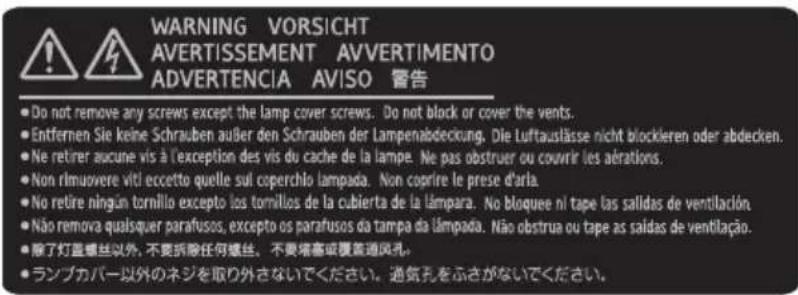
Do not remove any screws except the lamp cover screws.
Do not block or cover the vents.
5
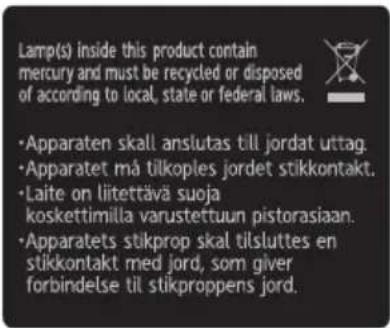
Lamp(s) inside this product contain mercury and must be recycled or disposed of according to local, state or federal laws.
Power Switch Symbols
The meanings of the symbols for the switches on this machine are as follows:
: STANDBY
User Information on Electrical and Electronic Equipment
If you wish to discard this product, please contact your local authorities, the shop where you bought this product, your local dealer or sales/service representatives.
Regulation & Safety Notices
This appendix lists the general notices of your Projector.
Notice: Users in the United States of America
FCC notice
MODEL NAME: RICOH PJ KU12000
NOTE: This equipment has been tested and found to comply with the limits for a Class A digital device, pursuant to Part 15 of the FCC Rules.
These limits are designed to provide reasonable protection against harmful interference when the equipment is operated in a commercial environment. This equipment generates, uses, and can radiate radio frequency energy and, if not installed and used in accordance with the instruction manual, may cause harmful interference to radio communications. Operation of this equipment in a residential area is likely to cause harmful interference in which case the user will be required to correct the interference at his own expense.
Caution: Changes or modifications not expressly approved by the party responsible for compliance could void the user's authority to operate the equipment.
Notice: Shielded cables
All connections to other computing devices must be made using shielded cables to maintain compliance with FCC regulations.
Caution
Changes or modifications not expressly approved by the manufacturer could void the user's authority, which is granted by the Federal Communications Commission, to operate this projector.
LAMP(S) INSIDE THIS PRODUCT CONTAIN MERCURY AND MUST BE RECYCLED OR DISPOSED OF ACCORDING TO LOCAL, STATE OR FEDERAL LAWS.
Notes to Users in the State of California
Perchlorate Material - special handling may apply, See www.dtsc.ca.gov/hazardouswaste/perchlorate.
WARNING: Handling the cord on this product will expose you to lead, a chemical known to the State of California to cause cancer, and birth defects or other reproductive harm.
Wash hands after handling.
Notes to Canadian Users
Declaration of Conformity for EU countries
▶ EMC Directive 2004/108/EC (including amendments)
▶ Low Voltage Directive 2006/95/EC
Warning
This is a Class A product. In a domestic environment this product may cause radio interference in which case the user may be required to take adequate measures
Notice: Users in EU countries
CE Marking Traceability Information (For EU Countries Only)
Manufacturer:
Ricoh Co., Ltd.
3-6 Nakamagome 1-chome, Ohta-ku, Tokyo. 143-8555,
Japan
Importer:
Ricoh Europe PLC
20 Triton Street, London. NW1 3BF, United Kingdom
User Information on Electrical and Electronic Equipment
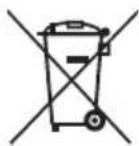
Users in the countries where this symbol shown in this section has been specified in national law on collection and treatment of E-waste.
Our Products contain high quality components and are designed to facilitate recycling.
Our products or product packaging are marked with the symbol below.
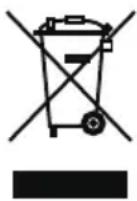
This product contains substances which are harmful to humans and the environment.
• The lamp contains mercury.
Please dispose of this product or used lamps in accordance with local regulations.
The symbol indicates that the product must not be treated as municipal waste. It must be disposed of separately via the appropriate return and collection systems available. By following these instructions you ensure that this product is treated correctly and help to reduce potential impacts on the environment and human health, which could otherwise result from inappropriate handling. Recycling of products helps to conserve natural resources and protect the environment.
For more detailed information on collection and recycling systems for this product, please contact the shop where you purchased it, your local dealer or sales/service representatives.
Notice: Users in Turkey
If you wish to discard this product, please contact your local authorities, the shop where you bought this product, your local dealer or sales/ service representatives.
Notice: Users in the EU
Note for the Battery and/or Accumulator Symbol
In accordance with the Battery Directive 2006/66/EC Article 20 Information for end-users Annex II, the above symbol is printed on batteries and accumulators. This symbol means that in the European Union, used batteries and accumulators should be disposed of separately from your household waste. In the EU, there are separate collection systems for not only used electrical and electronic products but also batteries and accumulators.
Please dispose of them correctly at your local community waste collection/recycling centre.
Notice: Users in Taiwan

廢電池請回收
Remote Control Battery Installation.29
Remote Control Operating Range ... 30
Installation 31
Adjust the Projector Position 31
Portrait Mode 32
Non-Portrait Mode 32
Installing the Projector Lens 33
Connecting to Computer/Notebook ..... 34
Connecting to Video Sources......35
Powering On/Off the Projector 36
Powering On the Projector......36
Powering Off the Projector......37
Warning Indicator......38
LED Lighting Message....38
Adjusting the Projected Image 40
Adjusting the Projector's Height.....40
Adjusting the Projecting Image's
Position 41
User Controls 44
Using the Control Panel 44
On-screen Display Menus 45
How to operate 45
Structure 46
PICTURE 52
PICTURE | 3D Display....54
PICTURE | Color Matching 55
PICTURE | Advanced 57
OUTPUT 59
OUTPUT | Image Warping......61
OUTPUT | PIP/PBP 63
SETUP 65
SETUP | Lens Function 66
SETUP | Menu Preferences......67
SETUP | Pin....67
SETUP | Communications ...... 68
OPTION 72
OPTION | Power Settings......73
OPTION | Light Source Settings ..... 74
Appendices 76
Troubleshooting....76
Image Problems....76
Projector Problems 79
On Screen Messages 82
Replacing the Lamp 83
Filter maintenance....85
Compatibility Modes....86
Remote Key Code 90
RS232 Pin Assignments....92
Specifications 93
Cabinet dimension....95
Introduction
Product Features
▶ Supported resolution up to WUXGA @60Hz (Reduced Blanking)
▶ Single/Dual lamp system
▶ Power Zoom/Focus
▶ Power lens shift
▶ Dynamic Aperture
▶ Filter module (optional)
▶ Support PIP/POP function
▶ Embedded HDBaseT solution, support HD video streaming through RJ45
▶ Embedded warping design for geometry correction & curve blending
▶ Support 360 degrees operation & Portrait mode
Package Overview
Unpack and inspect the box contents to ensure all parts listed below are in the box. If something is missing, please contact our customer service.
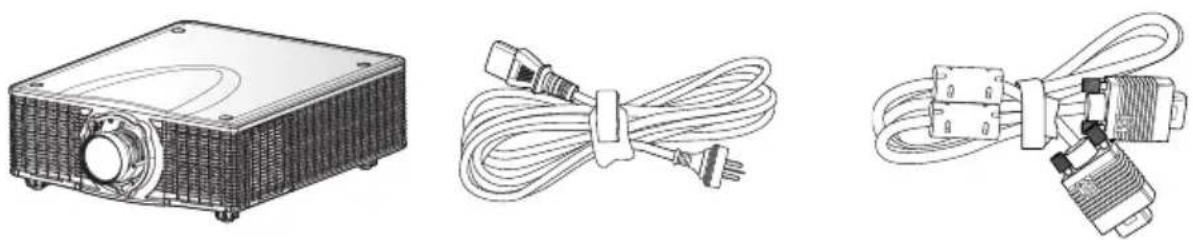
Projector without lens cover Power Cord VGA Cable
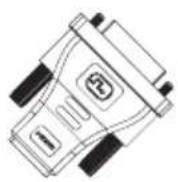
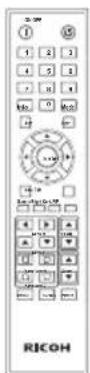
DVI-HDMI adapter Remote Control
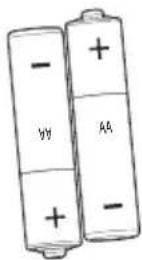
AAA Batteries x 2 (For remote control)
Documentation:
- User's Manual (CD)
- Read This First

■ Due to different applications in each Country, some regions may have different accessories.
Product Overview
Main Unit
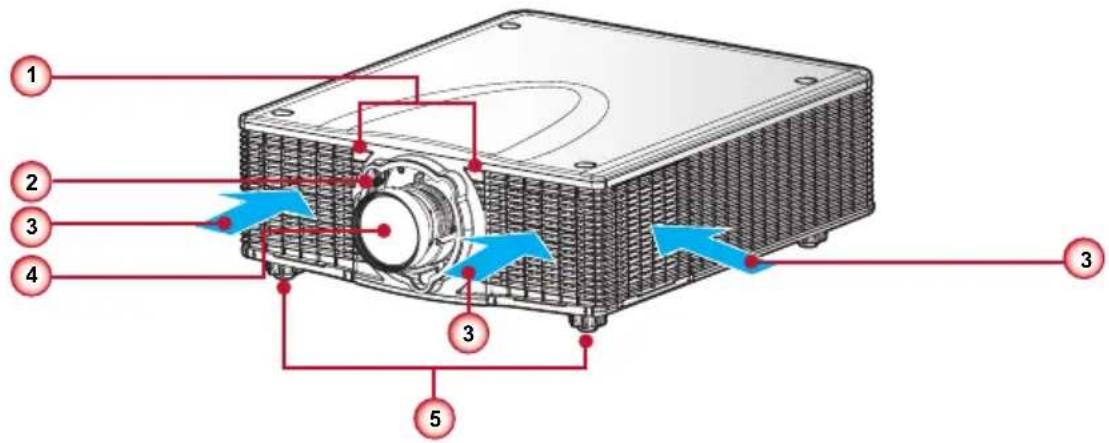
(Front View)
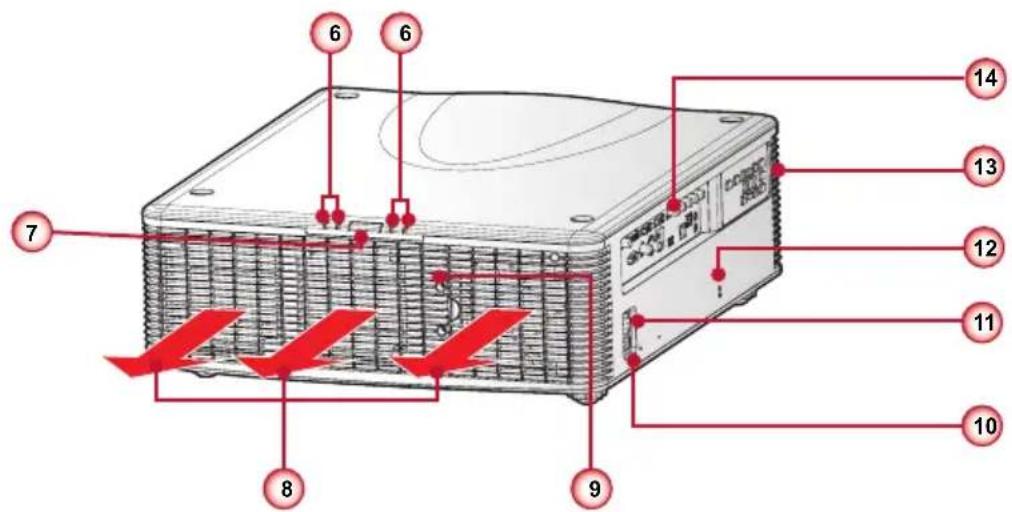
(Rear View)
- IR Receivers
- Lens Release Button
- Inlet Vent
- Lens
-
Adjustable Feet
-
LED Status Indicators
- IR Sensor
- Outlet Vent
- Lamp Door
-
Power Connector
-
Power Switch
- Anti-Theft Lock Hole (Kensington™ Lock)
- Keypad Panel
- Connector Panel

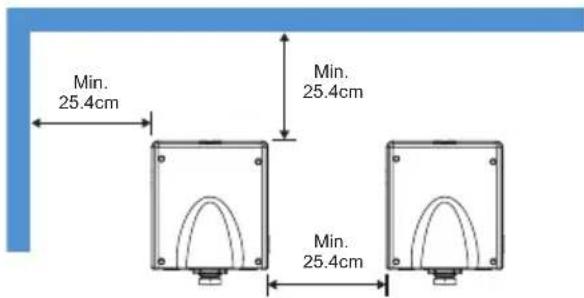
■ Do not block projector in/out air vents and keep 25.4cm clearance around vents for air flow concern.
Control Panel
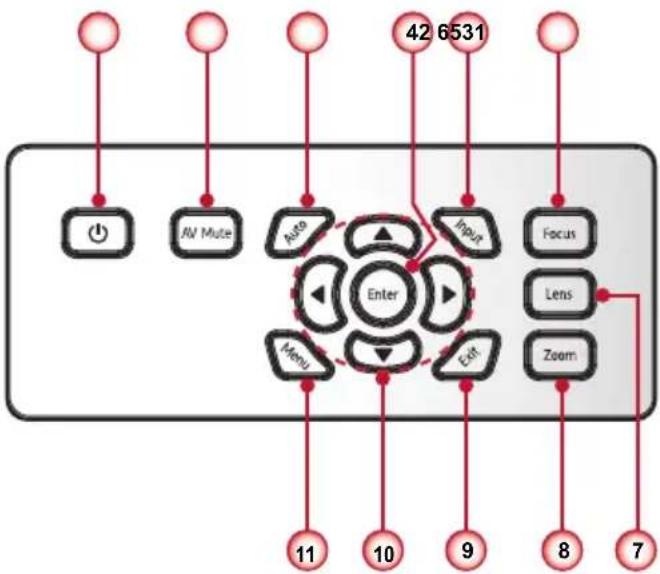
flowchart
graph TD
    A["Power"] --> B["Control"]
    C["AI Mute"] --> D["Auto"]
    E["42 6531"] --> F["Enter"]
    G["Focus"] --> H["Menu"]
    I["Lens"] --> J["Exit"]
    K["Zoom"] --> L["Zoom"]
    M["11"] --> N["Enter"]
    O["10"] --> N
    P["9"] --> N
    Q["8"] --> N
    R["7"] --> N
- Power key
- AV Mute key
- Auto key
- Enter key
- Input key
- Focus key
- Lens key
- Zoom key
- Exit key
- Four directional select keys
- Menu key
Connection Ports
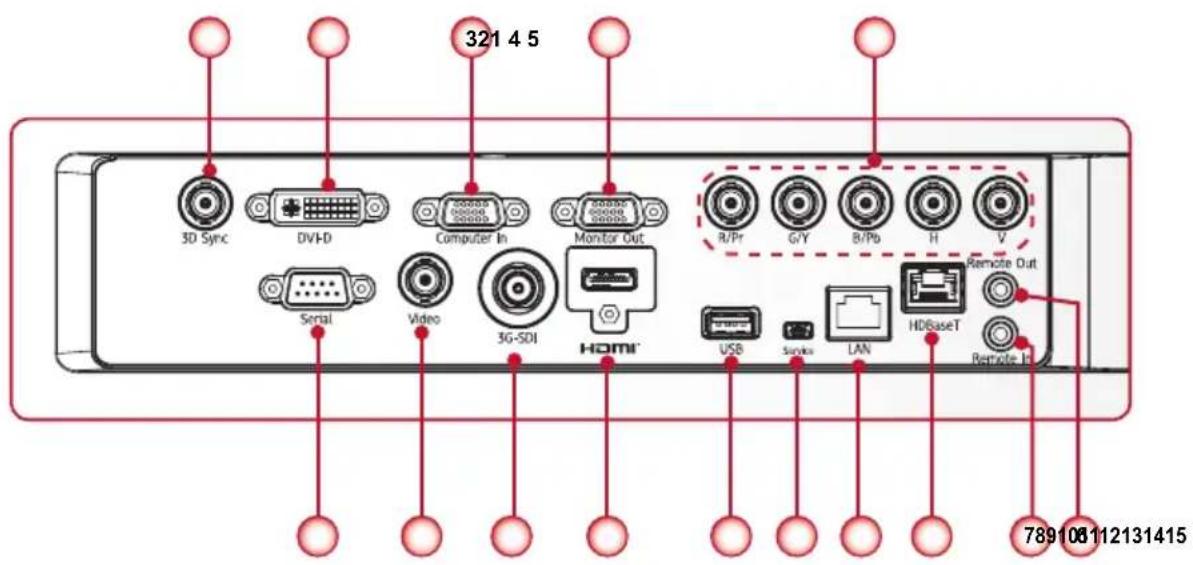
- 3D Sync OUT Connector
- DVI-D Connector
- Computer IN Connector
- Monitor OUT Connector
- Component/RGBHV IN Connector
- REMOTE OUT Connector
- REMOTE IN Connector
- HDBaseT Connector
- LAN Connector
- Service Connector
- USB Connector
- HDMI Connector
- 3G-SDI IN Connector
- VIDEO IN Connector
- Serial Connector

■ Use cross cable for serial control with a PC.
Remote Control
- Power ON Power on the projector.
- Numeric Keypad
- Information Display the projector information.
- Auto Auto adjust projector with source.
- Enter Confirm your item selection.
- Four Directional Select Keys Press up, down, left, right direction buttons to select items or make adjustments.
- Menu Launch the OSD main menu.
- Gamma Adjust mid-range levels.
- Bright Adjust amount of light in the image.
- Lens H Adjust the position of the image horizontally.
- Lens V Adjust the position of the image vertically.
- Keystone H Adjust image distortion caused by tilting the projector horizontally.
- Keystone V Adjust image distortion caused by tilting the projector vertically.
- AV Mute Display or blank the video image.
- Hot Key Select your preset keys quickly.
- OFF Turn off the projector.
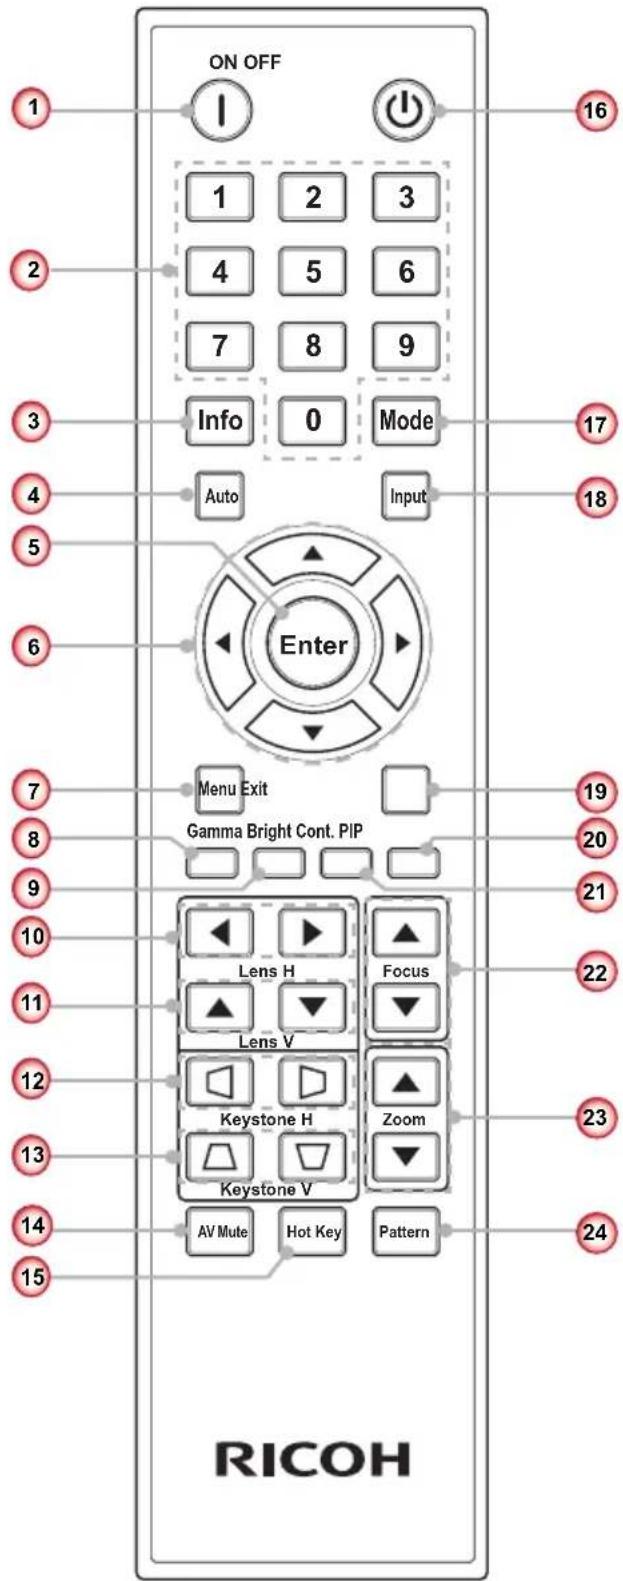
- Mode
Select the preset display mode.
- Input
Automatically scans for connected source.
- Exit
Exit a menu.
- PIP
Turn PIP/PBP ON/OFF.
- Cont.
Adjust difference between dark and light.
- Focus
Adjust the lens focus.
- Zoom
Adjust the lens zoom function.
- Pattern
Display a test pattern.
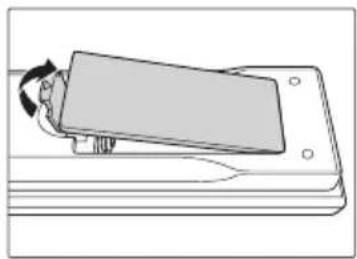
Remote Control Battery Installation
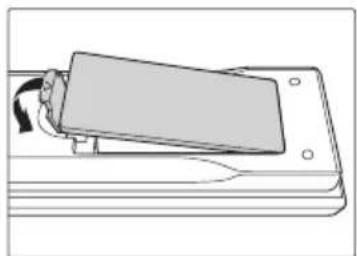
1 Remove the battery compartment cover as shown in the illustration.
natural_image
Diagram of a person pressing down on a rectangular object (no text or symbols visible)2 Install new batteries (AAA/R03). Ensure that you have the batteries' polarity (+/-) aligned correctly.
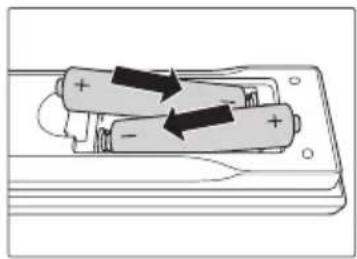
natural_image
Diagram of two batteries with positive and negative terminals, showing internal circuitry (no text or symbols)3 Replace the cover. Do not mix different types of batteries or new and old batteries.
natural_image
Diagram of a device with a rectangular component inserted into a base, showing internal components (no text or symbols)
To ensure safe operation, please observe the following precautions:
■ Use AAA/R03 type battery.
■ Avoid contact with water or liquid.
■ Do not expose the remote control to moisture or heat.
■ Do not drop the remote control.
If the battery has leaked in the remote control, carefully wipe the case clean and install new battery.
■ Risk of an explosion if battery is replaced by an incorrect type.
■ Dispose of used battery according to the instructions.
■ Remove batteries from remote control when not using for extended periods.
■ The remote control may fail to operate if the infrared remote sensor is exposed to bright sunlight or fluorescent lighting.
Remote Control Operating Range
Point the remote control toward the projector (Remote Receiver) when pressing any button.
Maximum operating range for the remote control is about 33'(10m) and ±40° (horizontally), and ±15° (vertically) in the front and on the rear of the projector.
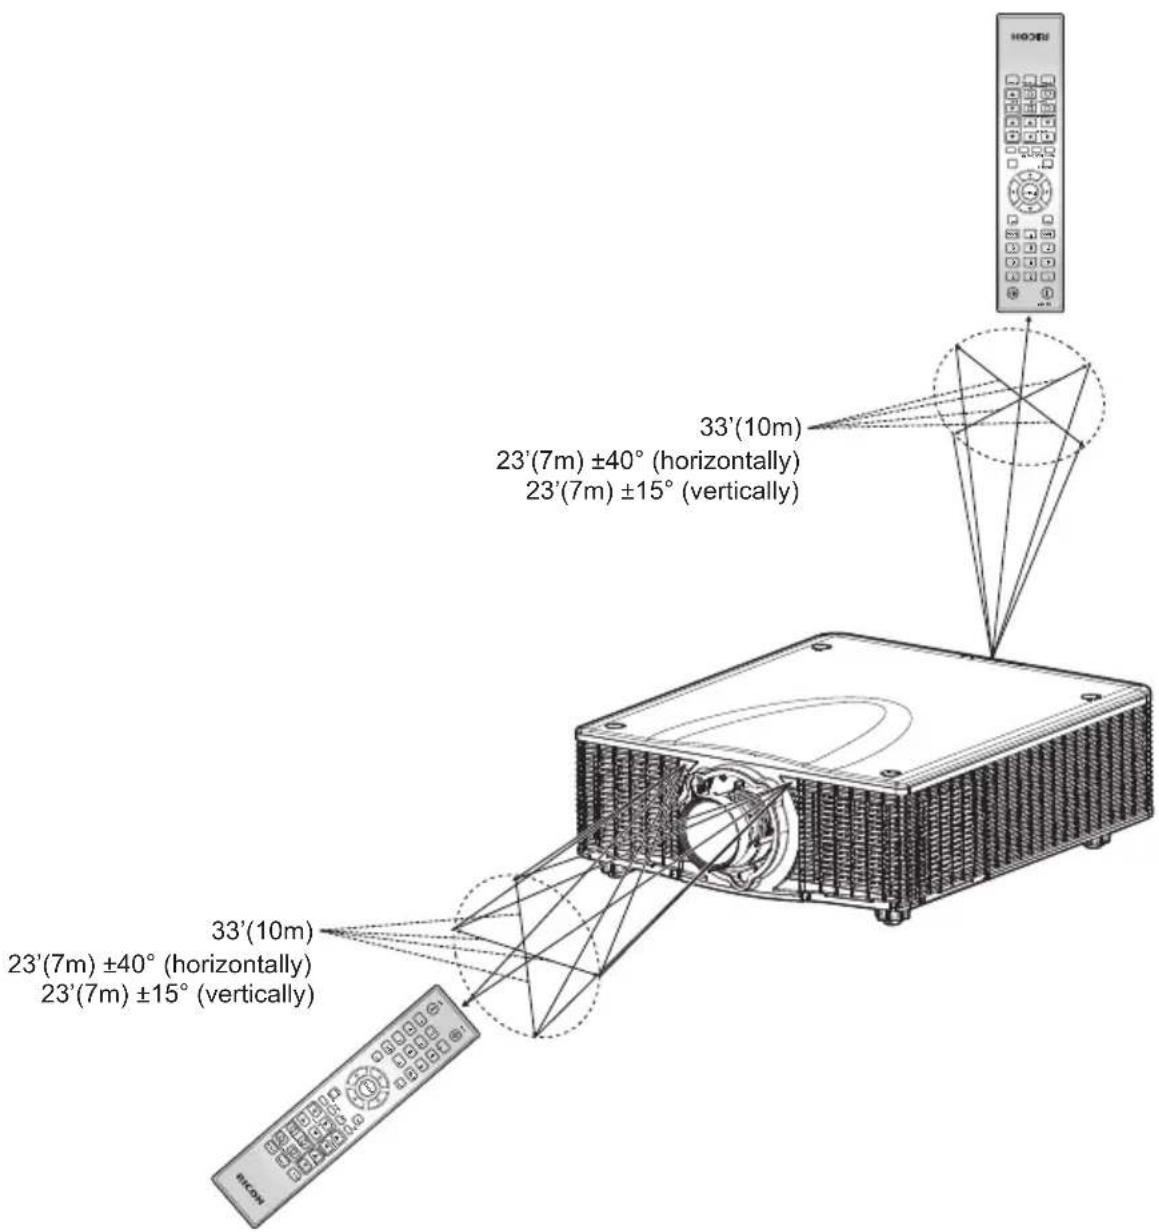
Installation
Adjust the Projector Position
When you select a position for the projector, consider the size and shape of your screen, the location of your power outlets, and the distance between the projector and the rest of your equipment. Follow these general guidelines:
- Position the projector on a flat surface at a right angle to the screen. The projector (with the standard lens) must be at least 3 feet (0.9m) from the projection screen.
- Position the projector to the desired distance from the screen. The distance from the lens of the projector to the screen, the zoom setting, and the video format determine the size of the projected image.
- For the fixed short lens, the image exits at a default angle. However, the lens shift feature makes the image offset variable.
• 360° free orientation operation:
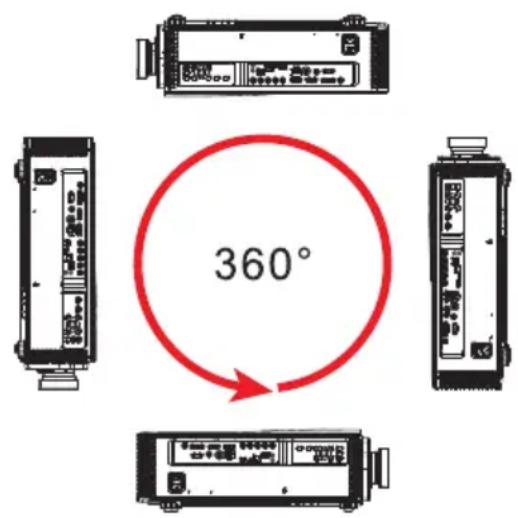
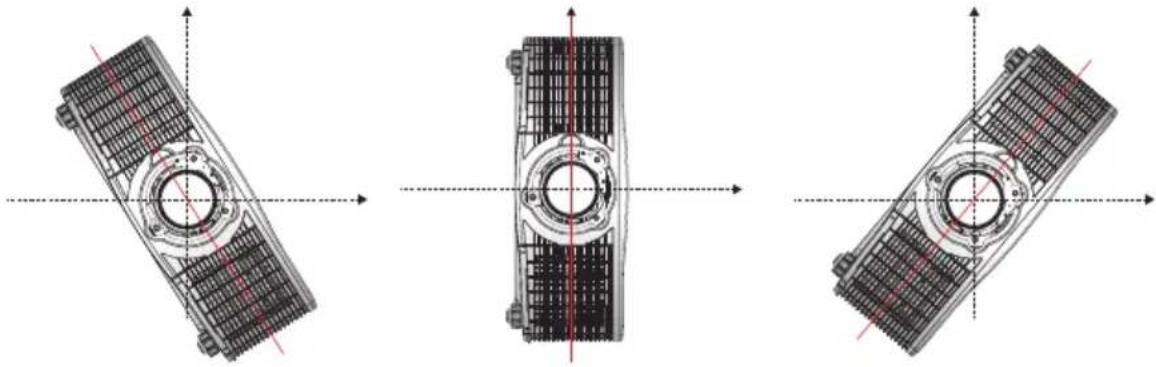
Portrait Mode
- The projector is in portrait mode when the viewing angle is from 70^ to 110^ as illustrated below.
Portrait mode 70\~90° Portrait mode 90° Portrait mode 90\~110°
natural_image
Three technical diagrams showing mechanical components with alignment axes, no text or symbols presentNon-Portrait Mode
- The projector is in non-portrait mode when the viewing angle is 250^ to 290^ as illustrated below.
- The "green and red" (amber) status LED on projector lights on.
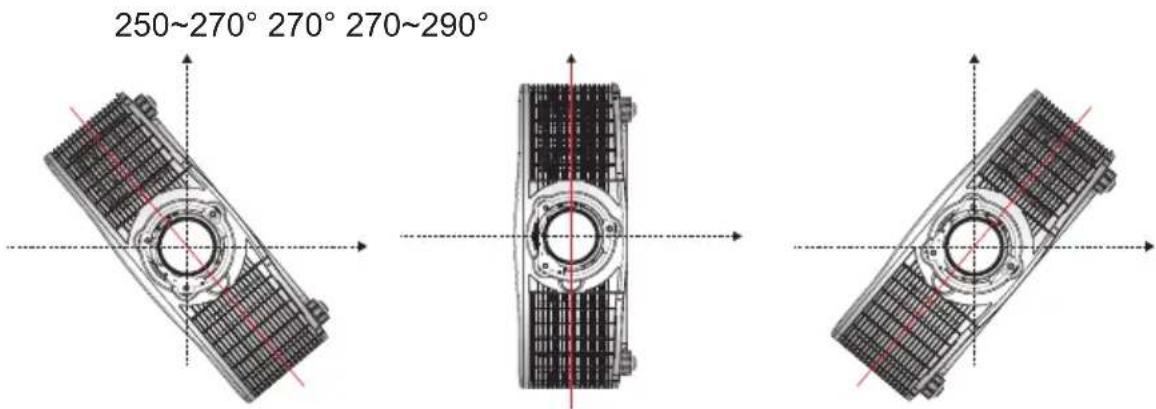

The projector should not be operated in Non-Portrait Mode.
Installing the Projector Lens
When handling the projector after lens installation, make sure the front lens cap is placed on the lens to protect the lens surface from potential damage. When carrying or moving the projector, do not handle by the lens. This may damage the lens, the chassis or other mechanical parts within the projector.
-
Center the lens: Ensure that the lens is at or near its center position. Attempting to remove the lens when at a large offset may cause damage to the lens assembly. Center the lens while the projector is switched on by pressing the lens horizontal or vertical button and then pressing "Enter".
-
Turn Off the projector: Turn the projector OFF.
-
Wait for projector to cool down: Allow the projector to cool down into standby mode before replacing the lens. Remove power cord after the projector has cooled down and prior to replacing the lens.
-
Remove the lens: Press lens release button and rotate the lens counterclockwise by a quarter to release the lock. Remove the lens through the front of the projector.
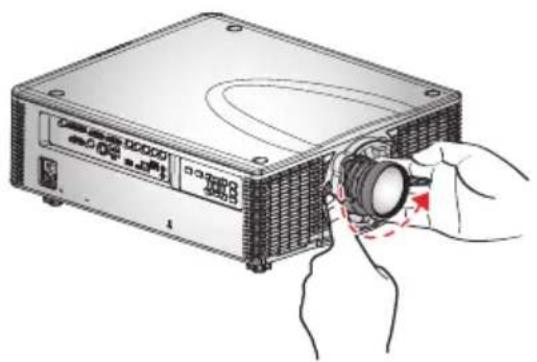
natural_image
Illustration of a computer drive with a hand holding a lens and a red arrow indicating rotation (no text or symbols present)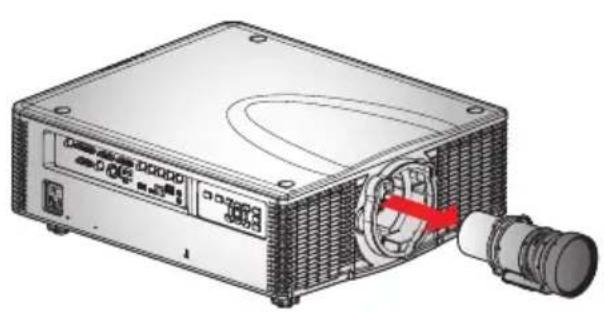
natural_image
Illustration of a computer drive unit with a red connector and cable outlet (no text or symbols visible)- Install the new lens: Fully insert the lens assembly straight into the lens mount without turning. Rotate the lens cap clockwise to lock the lens in place.

Warning: Do not transport the projector with any lens installed.
Connecting to Computer/Notebook
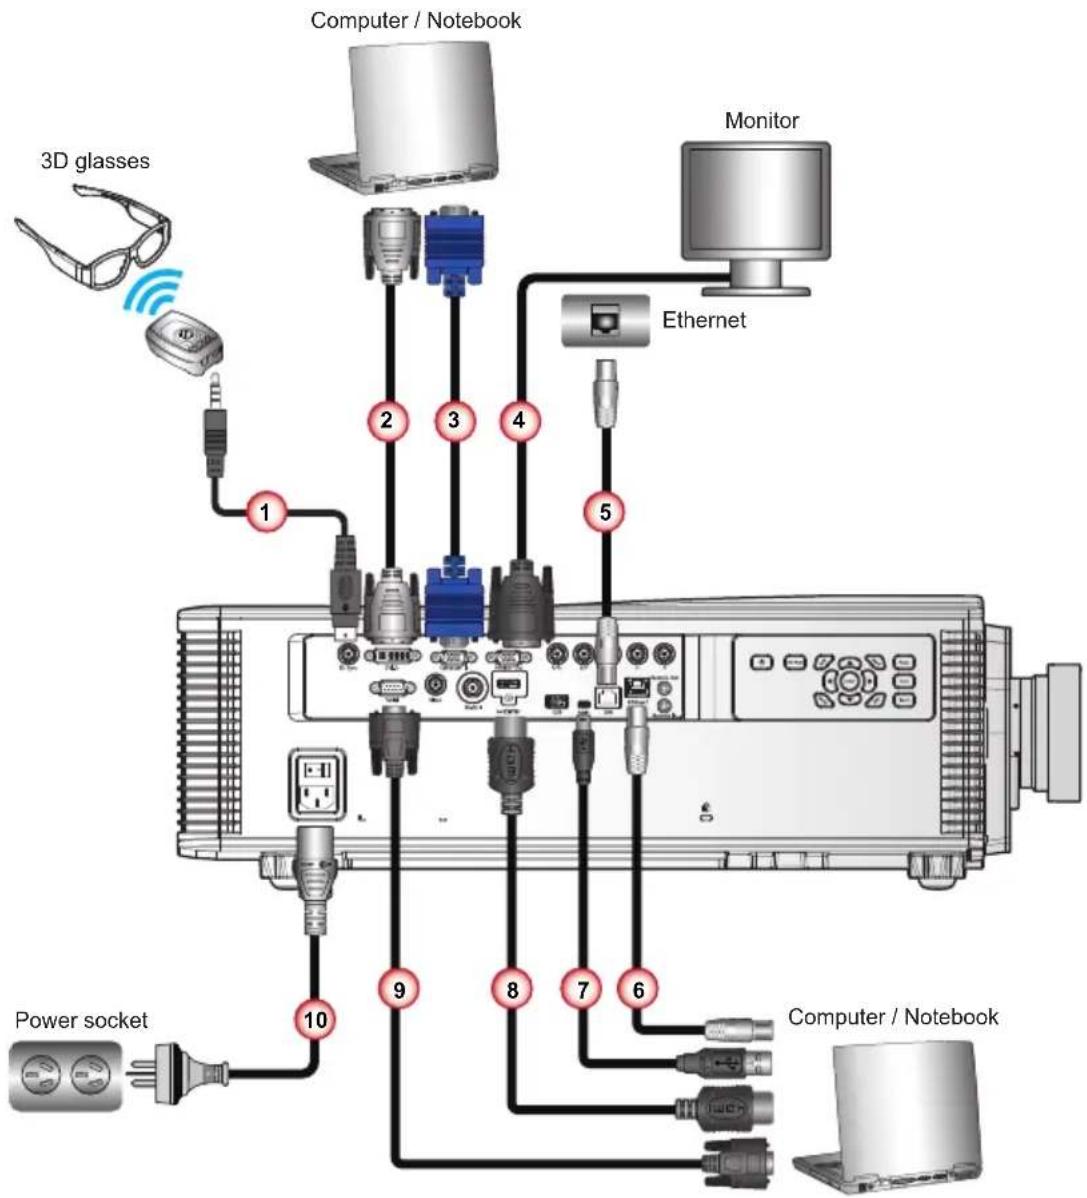
- 3D Emitter Cable
- DVI Cable
- VGA IN Cable
- VGA OUT Cable
-
LAN (RJ45) Cable
-
HDBaseT Cable
- USB Cable (service)
- HDMI Cable
- RS232 Cable
- Power Cord

■ Due to the difference in applications for each country, some regions may have different accessories.
■ Connect the cable directly to the HDBaseT transmitter without going through a hub or router.
This projector is not guaranteed to work with all HDBaseT transmitter sold commercially.
Connecting to Video Sources
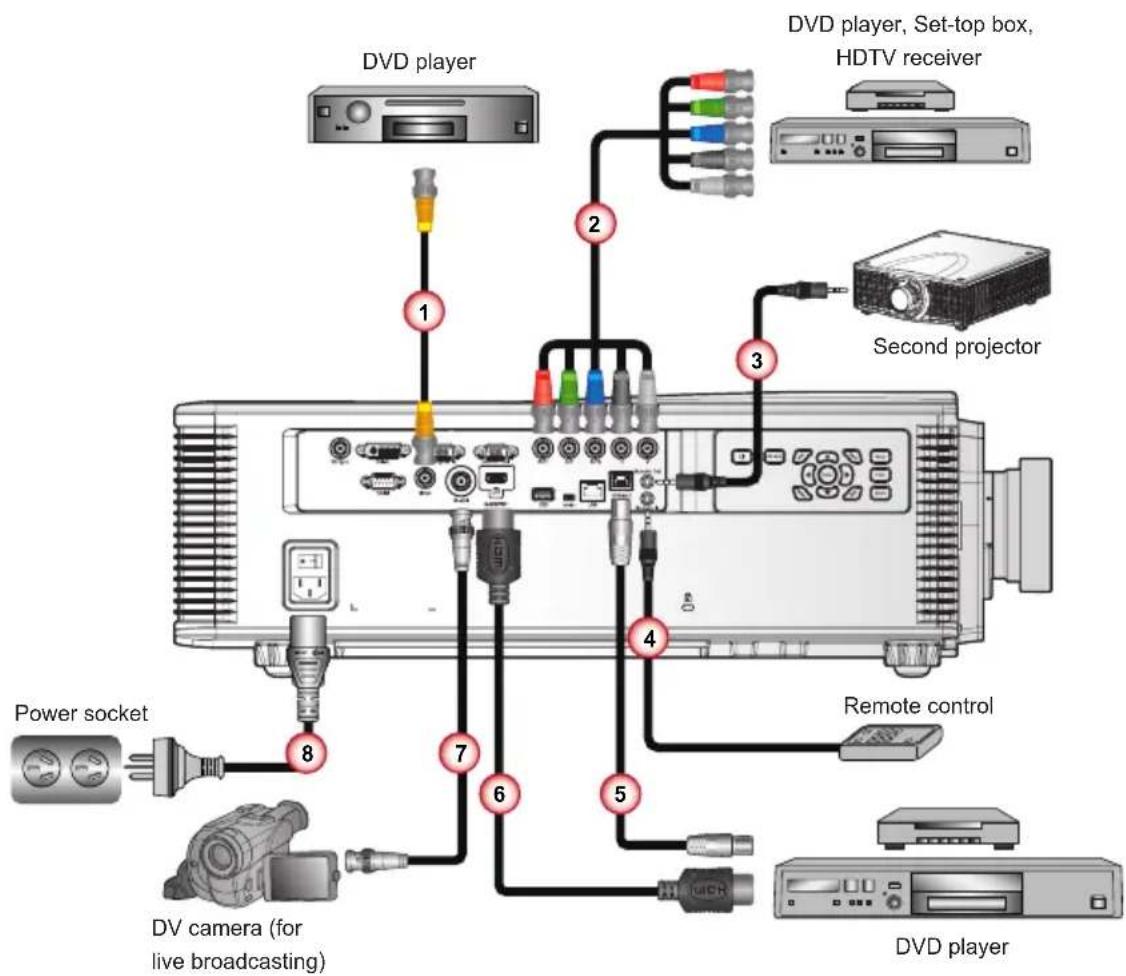
- Composite Video cable
- Component (YPbPr) Cable + Stereo Audio Cable
- M3 Stereo Mini Jack Cable
-
M3 Stereo Mini Jack Cable
-
HDBaseT Cable
- HDMI Cable
- BNC Cable
- Power Cord

■ Due to the difference in applications for each country, some regions may have different accessories.
Powering On/Off the Projector
Powering On the Projector
-
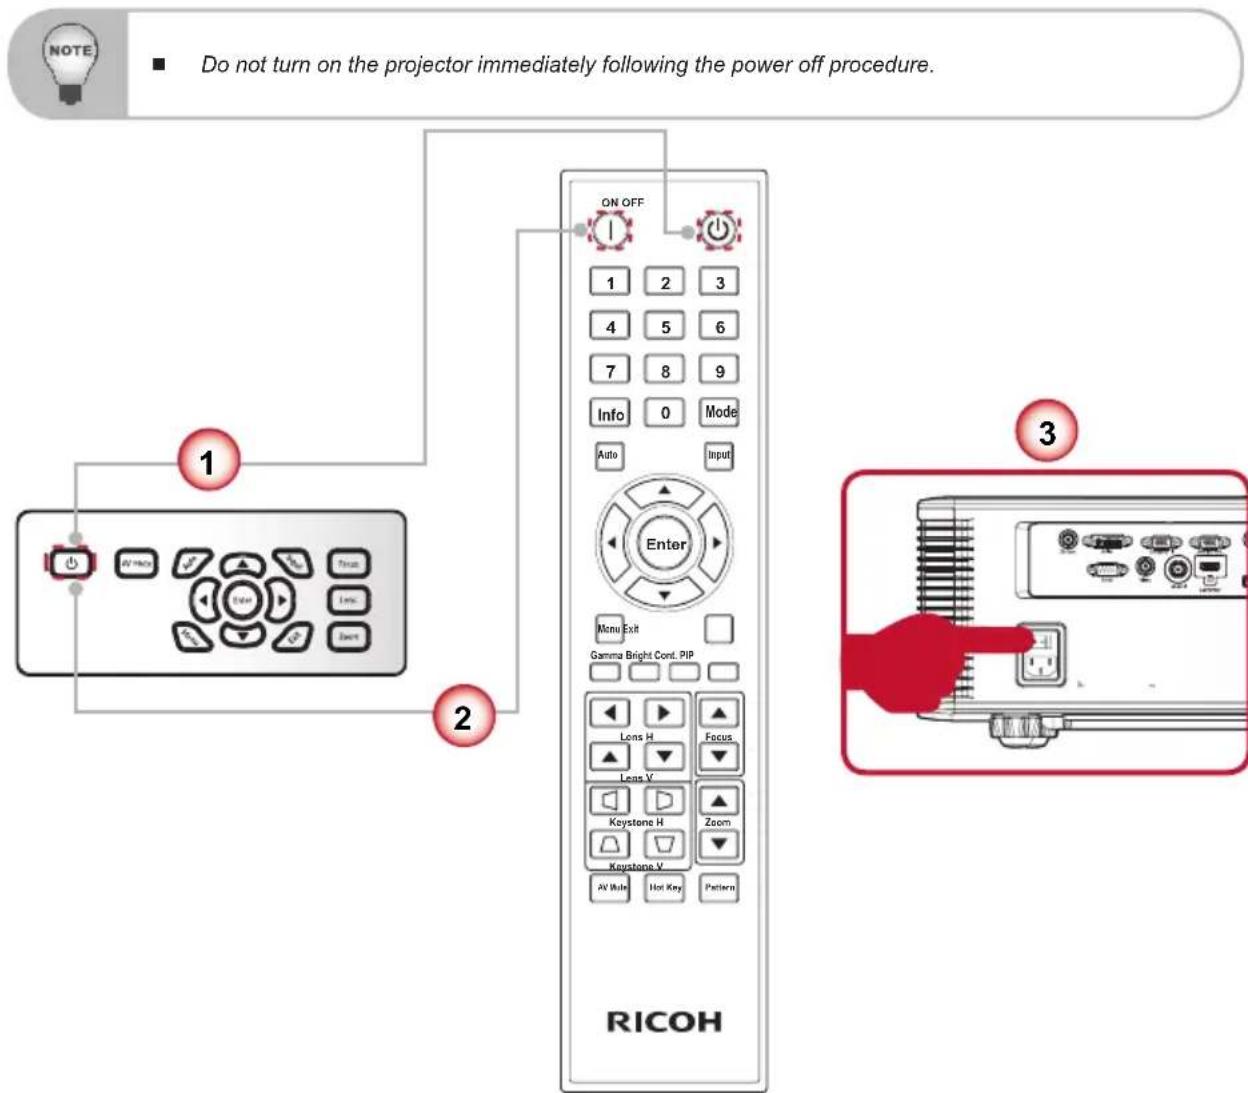
Securely connect the power cord and signal cable. Power on the switch and the "Power" button on the built in keypad is illuminated ①.
-
Turn on the projector by pressing the “⏻” button on the control panel of the projector or ① button on the remote control ②. The Status LED is green with a long blink.
The startup screen will display in approximately 10 seconds. The first time you use the projector, you will be asked to select the preferred language and power saving mode.
- Turn on and connect the source that you want to display on the screen (computer, notebook, video player, etc). Press "Input" on the remote control or built in keypad to select an input source (VGA, BNC, HDMI, HDBaseT, or Component) .
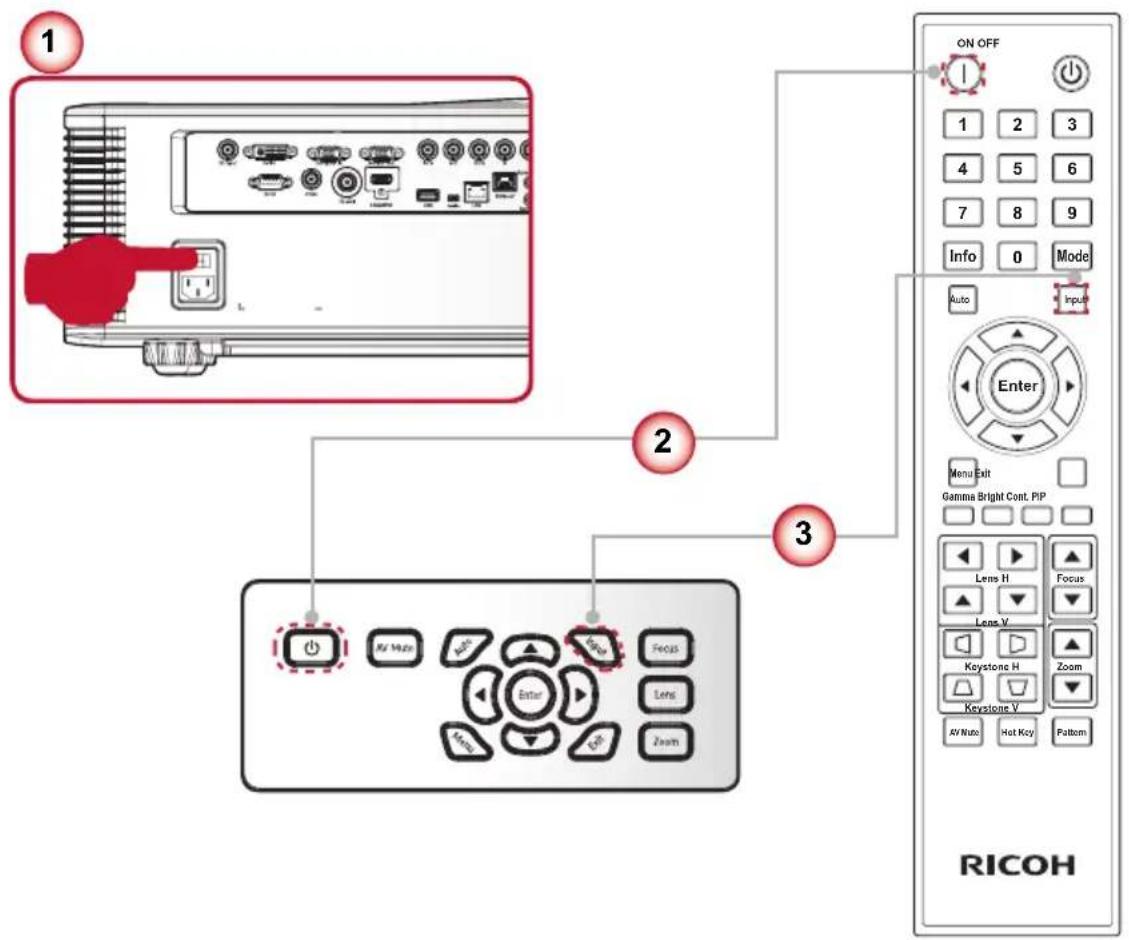
■ Turn on the projector first and then select the signal sources.
Powering Off the Projector
- Press the ⏻ button on the remote control or the “💡” button on the control panel to turn off the projector ①. The following message will be displayed on the screen.
Power OFF?
Press OFF key again.
Press the ⏻ button on the remote control or the “💡” button on the control panel again ① to confirm otherwise the message will disappear after 3 seconds. When you press for the second time, the projector will shut down.
- The cooling fans will complete the cooling cycle for about 180 seconds and the both Status LEDs (green and red) will flash. The projector has entered standby mode. If you wish to turn the projector back on, you must wait until the projector has completed the cooling cycle and has entered standby mode. Once in standby mode, simply press the “💡” button on the control panel of the projector or ⏻button on the remote control to restart the projector. ②
- Power off the switch ③.
- Disconnect the power cord from the electrical outlet and from the projector.
Warning Indicator
When the warning indicators (see below) come on, the projector will go to cooling state or automatically shutdown:
- Both “LAMP1” LED or “LAMP2” LED indicators (Orange) light up. This indicates the lamp 1 or lamp 2 time has expired and lamp should be replaced.
- "LAMP1" LED or "LAMP2" LED indicators are flashing red. This indicates the lamp 1 or lamp 2 failed to strike after 5 attempts or the lamp 1 or lamp 2 has unexpectedly shut down. The system goes to cooling state.
- "STATUS" LED, "LAMP1" LED and "LAMP2" LED indicators are lit red. This indicates the projector has overheated. Under normal conditions, the projector can be switched back on.
Unplug the power cord from the projector, wait for 30 seconds and try again. If the warning indicator light up again, please contact your nearest service center for assistance.
LED Lighting Message
| Message | AV Mute LED | Status LED | Lamp 1 LED | Lamp 2 LED | Note |
| Color wheel unexpectedly Stop | Orange Flashing | Orange Flashing | * | ||
| Lamp1 time has expired and lamp should be replaced | Orange | Lamp 1should be replaced | |||
| Lamp1 is on and operating correctly | Green Normal | ||||
| Lamp1 is switching on | Green Flashing | Normal | |||
| Failed to strike lamp1 after 5 attempts (strike attempts will stop) | Red Flashing | * | |||
| Lamp1 has unexpectedly shut down (system goes into cooling down state). | Red Flashing | * | |||
| Lamp1 driver communication fail | Red * | ||||
| Lamp2 time has expired and lamp should be replaced | Orange | Lamp 2 should be replaced | |||
| Lamp2 is on and operating correctly | Green Normal | ||||
| Lamp2 is switching on | Green Flashing | Normal | |||
| Failed to strike lamp2 after 5 attempts (strike attempts will stop) | Red Flashing | * | |||
| Lamp2 has unexpectedly shut down (system goes into cooling down state). | Red Flashing | * | |||
| Lamp2 driver communication fail | Red * | ||||
| AC power is off (without AC plug in) | Normal | ||||
| AC has been applied, projector is in standby mode. | Off Normal | ||||
| AC has been applied, projector is in communication standby mode. | Red Normal | ||||
| Projector is powered up and operating normally | Green Normal | ||||
| Projector is in cooling down mode or startup mode | Orange Flashing | Normal | |||
| Need to change dust filter Orange | Need to change dust filter | ||||
| Over temperature Red Red Red * | |||||
| Fan failure | Red Flashing | * | |||
| Picture mute is off and Shutter is Off (image is displayed) | Off Normal | ||||
| Picture mute is on and Shut-ter is On (image is black) | Green Flashing | Normal | |||
*Unplug the power cord from the projector, wait for 30 seconds and try again. If the warning indicator light up again, please contact your nearest service center for assistance.
Adjusting the Projected Image
Adjusting the Projector's Height
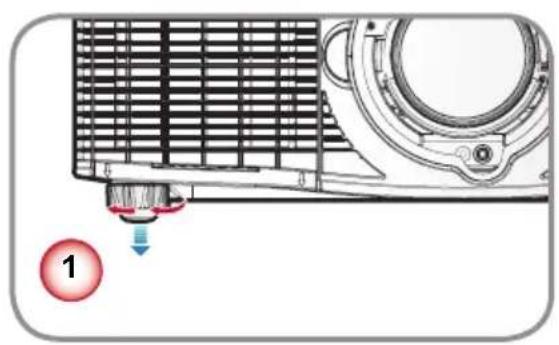
The projector is equipped with elevator rubber feet for adjusting the image height.
- Locate the adjustable foot you wish to modify on the underside of the projector.
- Rotate the adjustable ring counter clockwise to raise the projector or clockwise to lower it. Repeat with the remaining feet as needed.
natural_image
Diagram of a mechanical component with a red circle labeled '1' pointing to a small component (no text or symbols on the diagram itself)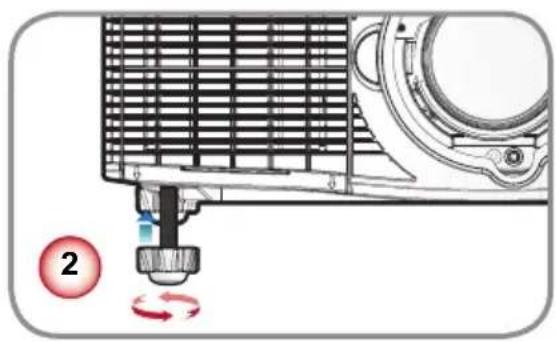
natural_image
Diagram of a mechanical device with a rotating component and directional arrows, no text or symbols presentAdjusting the Projecting Image's Position
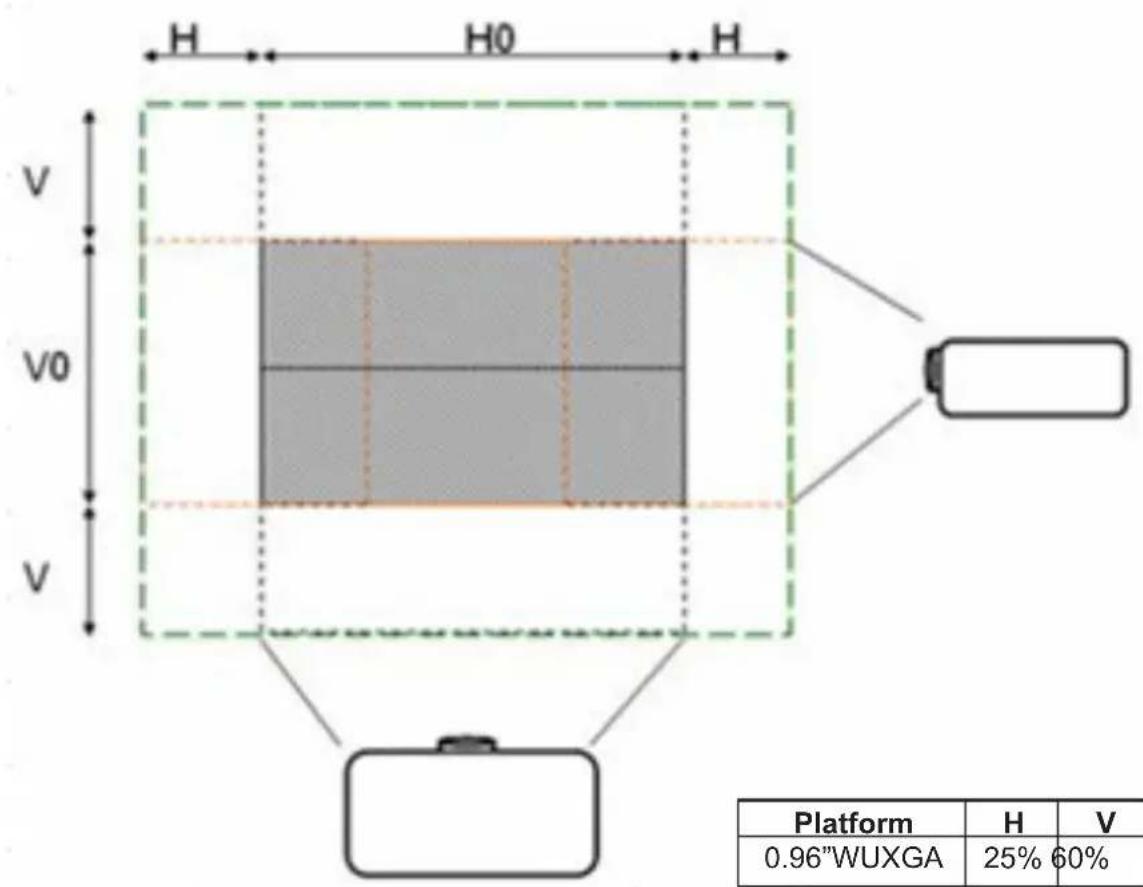
To determine where to position the projector, consider the size and shape of your screen, the location of your power outlets, and the distance between the projector and the rest of your equipment.
| Platform RICOH PJ KU1 | 2000 (WUXGA1920 x 1200) | |||||||||||||
| DMD 0.96" | ||||||||||||||
| Projection Lens B1 B2 B | 3 B4 B5 B6 | |||||||||||||
| Lens Type Wide Zoom | Wide Zoom Wide Zoom Standard | Long Zoom | Ultra-Long Zoom | |||||||||||
| Zoom Type Wide Tele W | Wide Tele Wide | Tele Wide Tele | Wide Tele Wide | Tele | ||||||||||
| Throw Ratio | 0.84 | 1.02 | 1.02 | 1.36 | 1.2 | 1.5 | 1.5 | 2 | 2 | 4 | 4 | 7.2 | ||
| Focal Length(EFL)(mm) | 21.5 | 28.7 21.5 | 28.7 | 25.5 31.8 | 31.8 | 42.1 42.4 | 84.5 | 84.1 149.8 | ||||||
| Zoom Ratio | 1.2X | 1.33X | 1.25X | 1.33X | 2X | 1.8X | ||||||||
| Projection screen size | Projection distance (m) | |||||||||||||
| Diagonal(inch) | Width(m) | Height(m) | Min(m) | Max(m) | Min(m) | Max(m) | Min(m) | Max(m) | Min(m) | Max(m) | Min(m) | Max(m) | Min(m) | Max(m) |
| 50 | 1.08 | 0.67 | 0.9 | 1.1 | 1.1 | 1.5 | 1.3 | 1.6 | 1.6 | 2.2 | 2.2 | 4.3 | 4.3 | 7.8 |
| 60 | 1.29 | 0.81 | 1.1 | 1.3 | 1.3 | 1.8 | 1.6 | 1.9 | 1.9 | 2.6 | 2.6 | 5.2 | 5.2 | 9.3 |
| 70 | 1.51 | 0.94 | 1.3 | 1.5 | 1.5 | 2.1 | 1.8 | 2.3 | 2.3 | 3.0 | 3.0 | 6.0 | 6.0 | 10.9 |
| 80 | 1.72 | 1.08 | 1.4 | 1.8 | 1.8 | 2.3 | 2.1 | 2.6 | 2.6 | 3.4 | 3.4 | 6.9 | 6.9 | 12.4 |
| Diagonal (inch) | Width (m) | Height (m) | Min (m) | Max (m) | Min (m) | Max (m) | Min (m) | Max (m) | Min (m) | Max (m) | Min (m) | Max (m) | Min (m) | Max (m) | Min (m) | Max (m) |
| 90 1.94 | 1.21 | 1.6 2.0 | 2.0 2.6 | 2.3 2.9 | 2.9 3.9 | 3.9 7.8 | 7.8 14.0 | |||||||||
| 100 2.15 | 1.35 | 1.8 2.2 | 2.2 2.9 | 2.6 3.2 | 3.2 4.3 | 4.3 8.6 | 8.6 15.5 | |||||||||
| 110 2.37 | 1.48 | 2.0 2.4 | 2.4 3.2 | 2.8 3.6 | 3.6 4.7 | 4.7 9.5 | 9.5 17.1 | |||||||||
| 120 2.59 | 1.62 | 2.2 2.6 | 2.6 3.5 | 3.1 3.9 | 3.9 5.2 | 5.2 10.3 | 10.3 18.6 | |||||||||
| 130 2.80 | 1.75 | 2.4 2.9 | 2.9 3.8 | 3.4 4.2 | 4.2 5.6 | 5.6 11.2 | 11.2 20.2 | |||||||||
| 140 3.02 | 1.89 | 2.5 3.1 | 3.1 4.1 | 3.6 4.5 | 4.5 6.0 | 6.0 12.1 | 12.1 21.7 | |||||||||
| 150 3.23 | 2.02 | 2.7 3.3 | 3.3 4.4 | 3.9 4.8 | 4.8 6.5 | 6.5 12.9 | 12.9 23.3 | |||||||||
| 160 3.45 | 2.15 | 2.9 3.5 | 3.5 4.7 | 4.1 5.2 | 5.2 6.9 | 6.9 13.8 | 13.8 24.8 | |||||||||
| 170 3.66 | 2.29 | 3.1 3.7 | 3.7 5.0 | 4.4 5.5 | 5.5 7.3 | 7.3 14.7 | 14.7 26.4 | |||||||||
| 180 3.88 | 2.42 | 3.3 4.0 | 4.0 5.3 | 4.7 5.8 | 5.8 7.8 | 7.8 15.5 | 15.5 27.9 | |||||||||
| 190 4.09 | 2.56 | 3.4 4.2 | 4.2 5.6 | 4.9 6.1 | 6.1 8.2 | 8.2 16.4 | 16.4 29.5 | |||||||||
| 200 4.31 | 2.69 | 3.6 4.4 | 4.4 5.9 | 5.2 6.5 | 6.5 8.6 | 8.6 17.2 | 17.2 31.0 | |||||||||
| 210 4.53 | 2.83 | 3.8 4.6 | 4.6 6.2 | 5.4 6.8 | 6.8 9.1 | 9.1 18.1 | 18.1 32.6 | |||||||||
| 220 4.74 | 2.96 | 4.0 4.8 | 4.8 6.4 | 5.7 7.1 | 7.1 9.5 | 9.5 19.0 | 19.0 34.1 | |||||||||
| 230 4.96 | 3.10 | 4.2 5.1 | 5.1 6.7 | 5.9 7.4 | 7.4 9.9 | 9.9 19.8 | 19.8 35.7 | |||||||||
| 240 5.17 | 3.23 | 4.3 5.3 | 5.3 7.0 | 6.2 7.8 | 7.8 10.3 | 10.3 20.7 | 20.7 20.7 | 37.2 | ||||||||
| 250 5.39 | 3.37 | 4.5 5.5 | 5.5 7.3 | 6.5 8.1 | 8.1 10.8 | 10.8 21.5 | 21.5 21.5 | 38.8 | ||||||||
| 260 5.60 | 3.50 | 4.7 5.7 | 5.7 7.6 | 6.7 8.4 | 8.4 11.2 | 11.2 22.4 | 22.4 22.4 | 40.3 | ||||||||
| 270 5.82 | 3.64 | 4.9 5.9 | 5.9 7.9 | 7.0 8.7 | 8.7 11.6 | 11.6 23.3 | 23.3 23.3 | 41.9 | ||||||||
| 280 6.03 | 3.77 | 5.1 6.2 | 6.2 8.2 | 7.2 9.1 | 9.1 12.1 | 12.1 24.1 | 24.1 24.1 | 43.4 | ||||||||
| 290 6.25 | 3.91 | 5.2 6.4 | 6.4 8.5 | 7.5 9.4 | 9.4 12.5 | 12.5 25.0 | 25.0 25.0 | 45.0 | ||||||||
| 300 6.46 | 4.04 | 5.4 6.6 | 6.6 8.8 | 7.8 9.7 | 9.7 12.9 | 12.9 25.9 | 25.9 25.9 | 46.5 | ||||||||
| 310 6.68 | 4.17 | 5.6 6.8 | 6.8 9.1 | 8.0 10.0 | 10.0 13.4 | 13.4 13.4 | 26.7 26.7 | 48.1 | ||||||||
| 320 6.90 | 4.31 | 5.8 7.0 | 7.0 9.4 | 8.3 10.3 | 10.3 13.8 | 13.8 13.8 | 27.6 27.6 | 49.6 | ||||||||
| 330 7.11 | 4.44 | 6.0 7.3 | 7.3 9.7 | 8.5 10.7 | 10.7 14.2 | 14.2 14.2 | 28.4 28.4 | 51.2 | ||||||||
| 340 7.33 | 4.58 | 6.2 7.5 | 7.5 10.0 | 8.8 11.0 | 10 11.0 | 14.7 14.7 | 29.3 29.3 | 52.8 | ||||||||
| 350 7.54 | 4.71 | 6.3 7.7 | 7.7 10.3 | 9.1 11.3 | 13 11.3 | 15.1 15.1 | 30.2 30.2 | 54.3 | ||||||||
| 360 7.76 | 4.85 | 6.5 7.9 | 7.9 10.6 | 9.3 11.6 | 11.6 11.6 | 15.5 15.5 | 31.0 31.0 | 55.9 | ||||||||
| 370 7.97 | 4.98 | 6.7 8.1 | 8.1 10.8 | 9.6 12.0 | 12.0 15.9 | 15.9 15.9 | 31.9 31.9 | 57.4 | ||||||||
| 380 8.19 | 5.12 | 6.9 8.4 | 8.4 11.1 | 9.8 12.3 | 12.3 16.4 | 16.4 16.4 | 32.8 32.8 | 59.0 | ||||||||
| 390 8.40 | 5.25 | 7.1 8.6 | 8.6 11.4 | 10.1 12.6 | 12.6 16.8 | 16.8 16.8 | 33.6 33.6 | 60.5 | ||||||||
| 400 8.62 | 5.39 | 7.2 8.8 | 8.8 11.7 | 10.3 12.9 | 12.9 17.2 | 17.2 17.2 | 34.5 34.5 | 62.1 | ||||||||
| 410 8.83 | 5.52 | 7.4 9.0 | 9.0 12.0 | 10.6 13.3 | 13.3 17.7 | 17.7 17.7 | 35.3 35.3 | 63.6 | ||||||||
| 420 9.05 | 5.66 | 7.6 9.2 | 9.2 12.3 | 10.9 13.6 | 13.6 18.1 | 18.1 18.1 | 36.2 36.2 | 65.2 | ||||||||
| 430 9.27 | 5.79 | 7.8 9.5 | 9.5 12.6 | 11.1 13.9 | 13.9 18.5 | 18.5 18.5 | 37.1 37.1 | 66.7 | ||||||||
| 440 9.48 | 5.93 | 8.0 9.7 | 9.7 12.9 | 11.4 14.2 | 14.2 19.0 | 19.0 19.0 | 37.9 37.9 | 68.3 | ||||||||
| 450 9.70 | 6.06 | 8.1 9.9 | 9.9 13.2 | 11.6 14.5 | 14.5 19.4 | 19.4 19.4 | 38.8 38.8 | 69.8 | ||||||||
| 460 9.91 | 6.20 | 8.3 10.1 | 10.1 13.5 | 11.9 14.9 | 14.9 19.8 | 19.8 19.8 | 39.6 39.6 | 71.4 | ||||||||
| 470 10.13 | 6.33 | 8.5 10.3 | 10.3 13.8 | 12.2 15.2 | 15.2 20.3 | 20.3 20.3 | 40.5 40.5 | 72.9 | ||||||||
| 480 10.34 | 6.46 | 8.7 10.6 | 10.6 14.1 | 12.4 15.5 | 15.5 20.7 | 20.7 20.7 | 41.4 41.4 | 74.5 | ||||||||
| 490 10.56 | 6.60 | 8.9 10.8 | 10.8 14.4 | 12.7 15.8 | 15.8 21.1 | 21.1 21.1 | 42.2 42.2 | 76.0 | ||||||||
| 500 10.77 | 6.73 | 9.1 11.0 | 11.0 14.7 | 12.9 16.2 | 16.2 21.5 | 21.5 21.5 | 43.1 43.1 | 77.6 |
Lens shift range for B3/B4/B5/B6
| Resolution | H_0 | V_0 | H_m | V_m |
| WUXGA 0% | H 15% V 25% H 60 | % V |
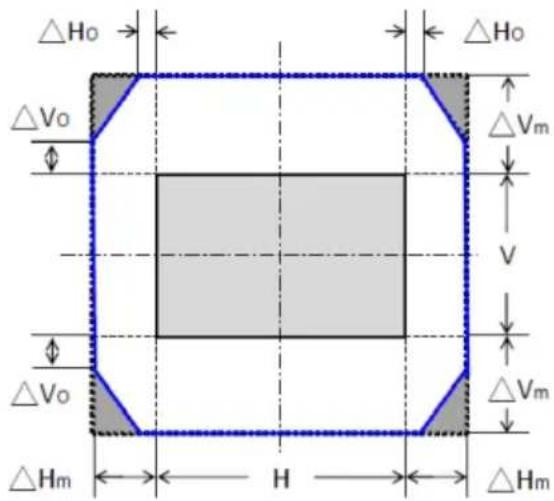

When the lens is shifted beyond the described range of operation, the screen edges may become darker or the images may become out of focus.
| Description WUXGA | |
| Horizontal offset ranges for B1,B2 +/- 50% of 12 image width (+/- 480 pixels) | |
| Vertical offset ranges for B1,B2 +/- 120% of 12 image height (+/-720 pixels) | |
Lens shift range for B1/B2
| Resolution | H_0 | V_0 | H_m | V_m |
| WUXGA 5% | H 13% V 25% H 60% V | |||
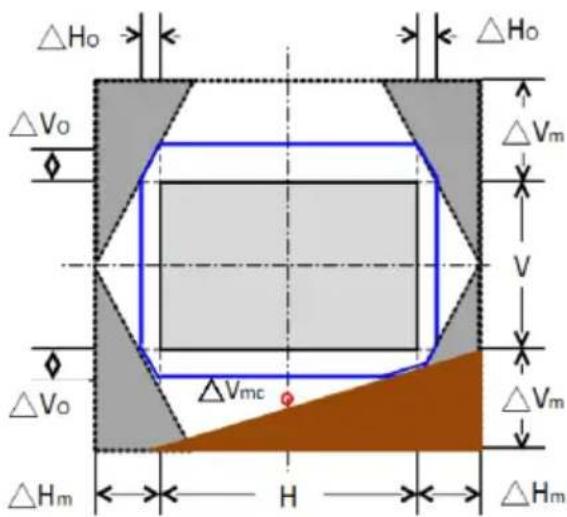

When the lens is shifted beyond the described range of operation, the screen edges may become darker or the images may become out of focus.

The lens cannot be shifted to this area by system control. V_mc < 50%
Note: Lens shift accuracy: 0.5 pixel per step
User Controls
Using the Control Panel


| Name | Description |
| Power ⏻ | Turn the projector on/off. |
| AV Mute Display or blank the video image. | |
| Auto Automatically optimize image. | |
| Enter Confirm a selected item. | |
| Input Select an input signal. | |
| Focus Adjust the lens focus function. | |
| Lens Adjust the lens vertical or horizontal offset setting. | |
| Zoom Adjust the lens zoom function. | |
| Four Directional Select Keys | Select items or make adjustments to your selection. |
| Exit Exit a menu. | |
| Menu Launch the on-screen display (OSD). | |
On-screen Display Menus
The Projector has multilingual On-screen Display menus that allow you to make image adjustments and change a variety of settings. The projector will automatically detect the source.
How to operate
-
To open the OSD menu, press "Menu" on the remote control or the projector keypad.
-
When OSD is displayed, use ▲▼ keys to select any item in the main menu. While making a selection on a particular page, press "Enter" key to enter sub menu.
-
Use ▲▼ keys to select the desired item in the sub menu and then press "Enter" key to view further settings. Adjust the settings by ◀▶ key.
-
Select the next item to be adjusted in the sub menu and adjust as described above.
-
Press "Enter" to confirm, and the screen will return to the main menu.
-
To exit, press "Exit" button. The OSD menu will close and the projector will automatically save the new settings.
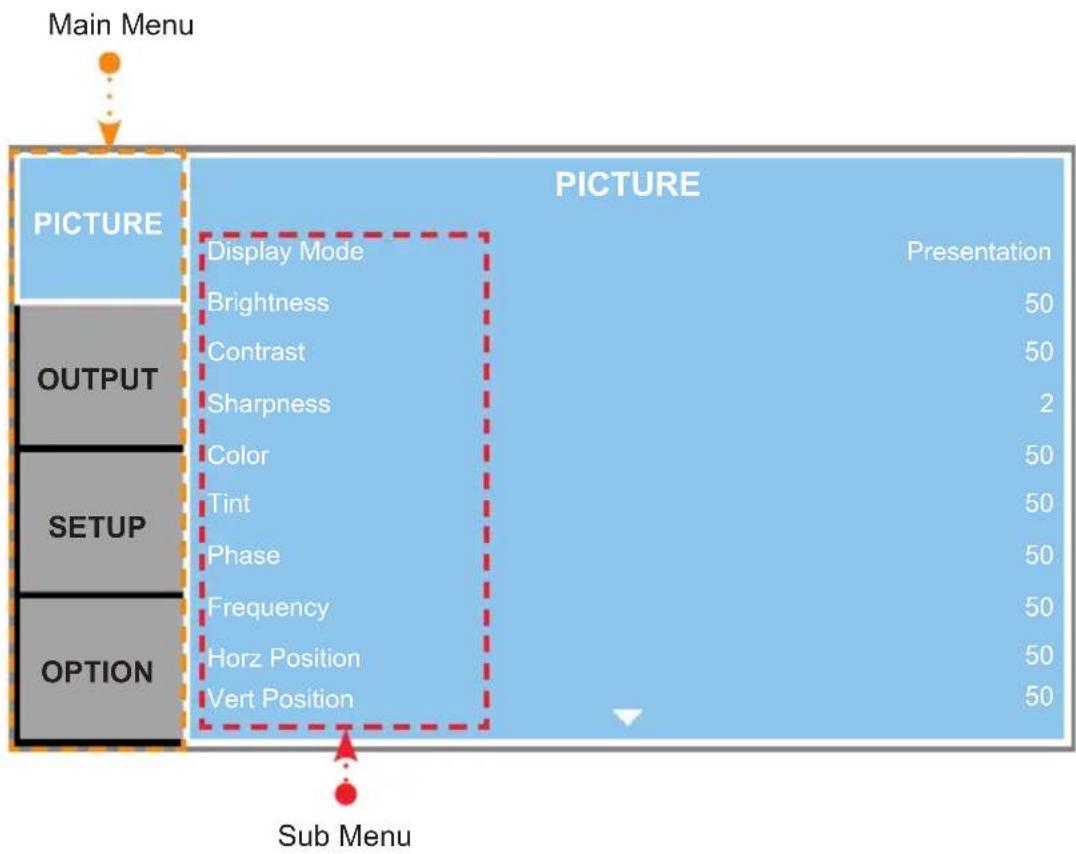
Structure

■ Please note that the on-screen display (OSD) menus vary according to the signal type selected and the projector model you are using.
| Main Menu | Sub Menu / Settings Default | ||||
| PICTURE | Display Mode | Presentation | By source set | ||
| Video | |||||
| Bright | |||||
| DICOM SIM | |||||
| 2D High Speed | |||||
| 3D | |||||
| User | |||||
| Save to User | |||||
| Brightness 0 ~ 100 50 | |||||
| Contrast 0 ~ 100 50 | |||||
| Sharpness 0 ~ 4 2 | |||||
| Color 0 ~ 100 50 | |||||
| Tint 0 ~ 100 50 | |||||
| Phase 0 ~ 100 50 | |||||
| Frequency 0 ~ 100 50 | |||||
| Horz Position 0 ~ 100 50 | |||||
| Vert Position 0 ~ 100 50 | |||||
| Auto Image | |||||
| 3D Display | 3D Enable | Auto | Auto | ||
| Frame Packing | |||||
| Side by Side | |||||
| Top and Bottom | |||||
| Frame Sequential | |||||
| Off | |||||
| 3D Invert | Off | Off | |||
| On | |||||
| DLP Link | Off | On | |||
| On | |||||
| Color Matching | Enable On/Off | Off | |||
| Auto Test Pattern | On/Off | On | |||
| Red Part of Red | 0 - 1000 | 1000 | |||
| Green Part of Red | 0 - 1000 | 0 | |||
| Blue Part of Red | 0 - 1000 | 0 | |||
| Green Part of Green | 0 - 1000 | 1000 | |||
| Red Part of Green | 0 - 1000 | 0 | |||
| Blue Part of Green | 0 - 1000 | 0 | |||
| Blue Part of Blue | 0 - 1000 | 1000 | |||
| Red Part of Blue | 0 - 1000 | 0 | |||
| Green Part of Blue | 0 - 1000 | 0 | |||
| Red Part of White | 0 - 1000 | 1000 | |||
| Green Part of White | 0 - 1000 | 1000 | |||
| Blue Part of White | 0 - 1000 | 1000 | |||
| Reset to Default | Yes/No | ||||
| PICTURE Advanced | BrilliantColorTM | Normal Look | Bright Look | ||
| Bright Look | |||||
| White Peaking 0 - 100 | By source set | ||||
| Gamma | Video | By source set | |||
| Film | |||||
| Bright | |||||
| CRT | |||||
| DICOM | |||||
| Color Temperature | Warmest | By source set | |||
| Warm | |||||
| Cool | |||||
| Bright | |||||
| Color Space | RGB | Auto | |||
| REC709 | |||||
| REC601 | |||||
| RGB Video | |||||
| Auto | |||||
| Color Settings | Red Gain 0 ~ 100 50 | ||||
| Green Gain 0 ~ 100 50 | |||||
| Blue Gain 0 ~ 100 50 | |||||
| Red Offset 0 ~ 100 50 | |||||
| Green Offset 0 ~ 100 50 | |||||
| Blue Offset 0 ~ 100 50 | |||||
| Reset RGB Gain/Offset | |||||
| Color Enhancement 0 | ~ 2 0 | ||||
| Color Wheel Speed | 2X | 2X | |||
| 3X | |||||
| DynamicBlackTM | Off | Off | |||
| On | |||||
| Noise Reduction 0 ~ 100 | 0 | ||||
| Flesh Tone Correction | 0 ~ 100 | 0 | |||
| Video Black Level | Off | Off | |||
| On | |||||
| Film Mode | Off | Off | |||
| On | |||||
| OUTPUT | Aspect Ratio | Auto | Auto | ||
| 4:3 | |||||
| 16:10 | |||||
| Native | |||||
| 3D Mode | |||||
| Overscan | Off | By source set | |||
| Zoom | |||||
| Crop | |||||
| H Digital Zoom | 50% ~ 400% | 100 | |||
| V Digital Zoom 50% | ~ 400% | 100 | |||
| H Digital Shift | 0 ~ 100 | 50 | |||
| V Digital Shift | 0 ~ 100 | 50 | |||
| OUTPUT | Image Warping | PC Mode | Off | Off | |
| On | |||||
| H Keystone 0 ~ 40 20 | |||||
| V Keystone 0 ~ 40 20 | |||||
| H Pincushion 0 ~ 100 | 50 | ||||
| V Pincushion 0 ~ 100 | 50 | ||||
| PIP/PBP | PIP/PBP Enable | Off | Off | ||
| On | |||||
| Main Source | VGA | VGA | |||
| BNC | |||||
| HDMI | |||||
| DVI-D | |||||
| 3G-SDI | |||||
| HDBaseT | |||||
| CVBS | |||||
| Network Display | |||||
| Sub Source | VGA | ||||
| BNC | |||||
| HDMI | |||||
| DVI-D | |||||
| 3G-SDI | |||||
| HDBaseT | |||||
| CVBS | |||||
| Network Display | |||||
| Swap | |||||
| Size | Small | LargeMedium | |||
| Large | |||||
| Layout | PBP, Main Left | PBP, Main Left | |||
| PBP, Main Top | |||||
| PBP, Main Right | |||||
| PBP, Main Bottom | |||||
| PIP-Bottom Right | |||||
| PIP-Bottom Left | |||||
| PIP-Top Left | |||||
| PIP-Top Right | |||||
| SETUP | Language | English | English | ||
| Français | |||||
| Español | |||||
| Deutsch | |||||
| Italiano | |||||
| Русский | |||||
| 简体中文 | |||||
| 繁體中文 | |||||
| 日本語 | |||||
| 한국어 | |||||
| Português | |||||
| Bahasa Indonesia | |||||
| Nederlands | |||||
| Ceiling Mount | Off | AutoOn | |||
| Auto | |||||
| Rear Projection | Off | Off | |||
| On | |||||
| SETUP | Lens Function | Focus | |||
| Zoom | |||||
| Lens Shift | |||||
| Lens Calibration | Yes/No (Dialog box) | ||||
| Lens Lock | No | No | |||
| Yes | |||||
| Menu Preferences | Menu Transparency 0 | ~90 | |||
| Show Messages | Off | On | |||
| On | |||||
| Keypad LED Settings | Off | On | |||
| On | |||||
| Pin | Pin Protect | Off | OffPIN default: 12345 | ||
| On | |||||
| Change PIN | |||||
| Closed Captioning | Off | OffCC1 | |||
| CC2 | |||||
| Communications | LAN | DHCP | Off | ||
| On | |||||
| IP Address 192.168 | .000.100 | ||||
| Subnet Mask 255.2 | 55.255.000 | ||||
| Default Gateway 19 | 2.168.000 | 0.100 | |||
| MAC Address XX:X | X:XX:XX | XX:XX | |||
| Apply | Off | ||||
| On | |||||
| Network | Projector Name SS | D@XXXX | XX | ||
| Restart Network | Off | ||||
| On | |||||
| Network Factory Reset | Off | ||||
| On | |||||
| Serial Port Baud Rate | 9600 | 19200 | |||
| 14400 | |||||
| 19200 | |||||
| 38400 | |||||
| 57600 | |||||
| 115200 | |||||
| Serial Port Echo | Off | Off | |||
| On | |||||
| Serial Port Path | RS232 | RS232 | |||
| HDBaseT | |||||
| Projector Address | 0-99 | 0 | |||
| OPTION | Auto Source | Off | On | ||
| On | |||||
| High Altitude | Off | Off | |||
| On | |||||
| Test Pattern | Off | Off | |||
| Grid | |||||
| Red | |||||
| Green | |||||
| Blue | |||||
| Yellow | |||||
| Magenta | |||||
| Cyan | |||||
| White | |||||
| Black | |||||
| Background Color | Logo | Logo | |||
| Blue | |||||
| Black | |||||
| White | |||||
| Hot-Key settings | Blank Screen | Blank Screen | |||
| Aspect Ratio | |||||
| Freeze Screen | |||||
| Overscan | |||||
| Closed Captions | |||||
| Power Settings | Standby Power Mode | 0.5W mode | 0.5W mode | ||
| Communication mode | |||||
| Direct Power On | Off | Off | |||
| On | |||||
| Auto Power Off | No | 20 Mins | |||
| 5 Mins | |||||
| 10 Mins | |||||
| 15 Mins | |||||
| 20 Mins | |||||
| 25 Mins | |||||
| 30 Mins | |||||
| Sleep Timer | No | No | |||
| 2 Hours | |||||
| 4 Hours | |||||
| 6 Hours | |||||
| OPTION | Light Source Settings | Light Source Mode | Constant Power | Constant Power | |
| Constant Luminance | |||||
| Eco Mode | |||||
| Constant Power Settings | 0 - 10 10 | ||||
| Constant Luminance Settings | 0 - 10 7 | ||||
| Current Light Source | Lamp 1 | BothLamp 2 | |||
| Both | |||||
| Auto Switch | On Failure Only | On Failure OnlyAt Power-Up | |||
| After X Hours | |||||
| Auto Switch Time (Hours) | 5 - 3000 100 | ||||
| Light Source Info | Lamp 1 Hours | ||||
| Lamp 2 Hours | |||||
| Total Projector Hours | |||||
| Reset Light Source Hours | 1/2/Both (Dialog box) | ||||
| Light Sensor | Light Sensor Calibration | ||||
| Calibrated? (Display | Yes/No) | ||||
| Native Resolution | |||||
| Firmware | |||||
| Main Source | |||||
| - Resolution | |||||
| - Signal Format | |||||
| - Pixel Clock | |||||
| - Horz Refresh | |||||
| - Vert Refresh | |||||
| Sub Source | |||||
| - Resolution | |||||
| - Signal Format | |||||
| - Pixel Clock | |||||
| - Horz Refresh | |||||
| - Vert Refresh | |||||
| Light Source Mode | |||||
| Current Light Source | |||||
| Lamp 1 Hours | |||||
| Lamp 2 Hours | |||||
| Standby Power Mode | |||||
| IP Address | |||||
| DHCP | |||||
| System Temperature | |||||
| Factory Reset Yes/No (Dialog box) | |||||
| Service | |||||
PICTURE
| PICTURE | PICTURE | |
| Display Mode | Presentation | |
| OUTPUT | Brightness | 50 |
| Contrast | 50 | |
| Sharpness | 2 | |
| SETUP | Color | 50 |
| Tint | 50 | |
| Phase | 50 | |
| OPTION | Frequency | 50 |
| Horz Position | 50 | |
| Vert Position | 50 | |
Display Mode
There are many factory presets optimized for various types of images.
Presentation: For good color and brightness for PC input.
▶ Video: For video or TV source.
Bright: Maximum brightness for PC input.
▶ DICOM SIM: This mode can project a monochrome medical image such as an X ray radiography, MRI, etc.
▶ 2D High Speed: Displays the status of 2D High Speed mode.
If the resolution of the input source is 800x600 at 120Hz, 1024x768 at 120Hz, or 1280x720 120Hz then the display mode will automatically switch to 2D High Speed.
3D: Recommended setting for 3D mode enabled. Any further adjustments by the user in 3D will be saved in this mode for further use.
User: User's settings.
Save to User: Save display mode settings in user profile.
Brightness
Adjust the brightness of the image.
▶ Press the ◀ button to darken image.
▶ Press the ▶ button to lighten the image.
Contrast
The contrast controls the degree of difference between the lightest and the darkest parts of the picture. Adjusting the contrast changes the amount of black and white in the image.
▶ Press the ◀ button to decrease the contrast.
▶ Press the ▶ button to increase the contrast.
Sharpness
Adjust the sharpness of the image.
▶ Press the ◀ button to decrease the sharpness.
▶ Press the ▶ button to increase the sharpness.
Color
Adjust a video image from black and white to fully saturated color. The color setting applies to video sources only.
Press the ◀ button to decrease the color saturation in the image.
▶ Press the ▶ button to increase the color saturation in the image.
Tint
Adjust the color balance of red and green.
Press the ◀ button to increase the amount of green in the image.
▶ Press the ▶ button to increase the amount of red in the image.
■ "Color" and "Tint" are only supported for video and component sources.
Phase
Synchronize the signal timing of the display with the graphic card. If the image appears to be unstable or flickers, use this function to correct it.
▶ Press the ◀ or ▶ buttons to adjust the value.
Frequency
Change the display data frequency to match the frequency of your computer's graphic card. Use this function only if the image appears to flicker vertically.
▶ Press the ◀ or ▶ buttons to adjust the value.
Horz Position
Move the image right or left within the area of available pixels.
▶ Press the ◀ button to move the image left.
▶ Press the ▶ button to move the image right.
Vert Position
Move the image up or down within the area of available pixels.
▶ Press the ◀ button to move the image down.
▶ Press the ▶ button to move the image up.
Auto Image
Force the projector to reacquire and lock to the input signal. This is useful when signal quality is marginal.
PICTURE | 3D Display
| PICTURE | 3D Display | |
| 3D Enable | Auto | |
| 3D Invert | Off | |
| DLP Link | On | |
| OUTPUT | ||
| SETUP | ||
| OPTION | ||
3D Enable
Set 3D format. Supports Mandatory 3D formats and frame sequential 3D@120Hz.
▶ Auto: When a 3D identification signal is detected, the 3D format is selected automatically.
Frame Packing: Display 3D signal in "Frame Packing" format.
Side by Side: Display 3D signal in "Side-by-Side" format.
Top and Bottom: Display 3D signal in "Top and Bottom" format.
Frame Sequential: Display 3D signal in "Frame Sequential" format.
▶ Off: Select "Off" to turn off 3D mode.
3D Invert
Choose to enable or disable inverting 3D sync signal for the application of using single projector.
Press the "On" button to invert left and right frame contents.
Press the "Off" button for default frame contents.
DLP Link
Select 3D Sync source.
Press the "On" button if the 3D Sync type is DLP Link.
Press the "Off" button if the 3D Sync source is from 3D SYNC port.
PICTURE | Color Matching
| PICTURE | Color Matching | |
| Enable | On | |
| OUTPUT | Auto Test Pattern | On |
| Red Part of Red | 1000 | |
| Green Part of Red | 0 | |
| SETUP | Blue Part of Red | 0 |
| Green Part of Green | 1000 | |
| Red Part of Green | 0 | |
| OPTION | Blue Part of Green | 0 |
| Blue Part of Blue | 1000 | |
| Red Part of Blue | 0 | |
Enable
You may require a unique color gamut (range) for a single projector or application, or you may need to precisely match colors across multiple adjacent displays. Enable this feature to allow color matching.
Auto Test Pattern
Set to "On" to enable displaying an internal solid colored test pattern or set to "Off" to disable the auto test pattern.
Red Part of Red
Adjust the intensity of the red color component in red color. This will also affect the hue of the color.
Green Part of Red
Adjust the intensity of the green color component in red color. This will also affect the hue of the color.
Blue Part of Red
Adjust the intensity of the blue color component in red color. This will also affect the hue of the color.
Green Part of Green
Adjust the intensity of the green color component in green color. This will also affect the hue of the color.
Red Part of Green
Adjust the intensity of the red color component in green color. This will also affect the hue of the color.
Blue Part of Green
Adjust the intensity of the blue color component in green color. This will also affect the hue of the color.
Blue Part of Blue
Adjust the intensity of the blue color component in blue color. This will also affect the hue of the color.
Red Part of Blue
Adjust the intensity of the red color component in blue color. This will also affect the hue of the color.
Green Part of Blue
Adjust the intensity of the green color component in blue color. This will also affect the hue of the color.
Red Part of White
Adjust the intensity of the red color component in white color. This will also affect the hue of the color.
Green Part of White
Adjust the intensity of the green color component in white color. This will also affect the hue of the color.
Blue Part of White
Adjust the intensity of the blue color component in white color. This will also affect the hue of the color.
Reset to Default
Select "Yes" to reset all the color adjustments to the factory defaults or select "No" to keep the current values.
PICTURE | Advanced
| PICTURE | Advanced | |
| BrilliantColorTM | Bright Look | |
| OUTPUT | White Peaking | 100 |
| Gamma | Video | |
| Color Temperature | Bright | |
| SETUP | Color Space | Auto |
| Color Settings | ||
| Color Enhancement | 0 | |
| OPTION | Color Wheel Speed | 2X |
| DynamicBlackTM | Off | |
| Noise Reduction | ||
BrilliantColor™
Enable the BrilliantColor ^TM function to enhance the brightness while providing true, more vibrant colors in picture.
White Peaking
(Video source only) Increase the brightness of whites that are near 100%.
Gamma
This allows you to choose a gamma table that has been finetuned to bring out the best image quality for the input.
▶ Video: For video or TV source.
▶ Film: For home theater.
Bright: Mode for emphasizing brightness.
▶ CRT: For CRT monitor.
▶ DICOM: For simulated DICOM.
Color Temperature
Use this function to select the preset color temperature. The available options: Warmest, Warm, Cool, and Bright.
Color Space
Select an appropriate color matrix type from AUTO, RGB, REC709, REC601, or RGB Video.
Color Settings
Configure the brightness (gain) and contrast (offset) of an image.
Red Gain/Green Gain/Blue Gain/Red Offset/Green Offset/Blue Offset: Adjust the gain of the red, green, or blue channel of the image. Adjust the offset of the red, green, or blue channel of the image. It will affect the black and white.
- Reset RGB Gain/Offset: Reset the gain and offset adjustments to factory defaults.
Color Enhancement
Adjust to improve the picture quality of pictures with a high saturation of color.
Color Wheel Speed
Higher speed will reduce the appearance of color artifacts seen by some people.
DynamicBlack™
DynamicBlack enables the projector to automatically optimize the display of dark movie scenes enabling them to be shown in incredible detail.
Noise Reduction
The motion Adaptive Noise Reduction reduces the amount of visible noise interlaced signals.
Flesh Tone Correction
Control the amount of flesh tone correction applied to the image.
Video Black Level
Analyze the current input image and calculate an offset value which is then added to the analog to digital converter black level value. This ensures optimum black level for each analog source.
Film Mode
Control film mode detection and determine whether the original source of the input video was film or video.
OUTPUT
| PICTURE | OUTPUT | |
| Aspect Ratio | Auto | |
| Overscan | Off | |
| OUTPUT | H Digital Zoom | 100 |
| V Digital Zoom | 100 | |
| H Digital Shift | 50 | |
| SETUP | V Digital Shift | 50 |
| Image Warping | ||
| OPTION | PIP/PBP | |
Aspect Ratio
Use this function to choose your desired aspect ratio.
▶ Auto: Automatically selects the appropriate display format.
4:3: This format is for 4:3 aspect input sources.
16:10: This format is for 16:10 aspect input sources, like HDTV and DVD enhanced for Wide screen TV.
▶ Native: This format displays the original image without any scaling.
3D Mode: This format is for 3D input source.
Overscan
Remove noise around the image. Overscan Zoom enlarges image 3% from original size. Overscan Crop cuts 3% of active pixels in four edges of original image.
■ Each I/O has different settings of "Overscan".
H Digital Zoom
Change the size of projector's display area horizontally. If the display area has been resized by this setting, it can be moved by changing the H Digital Shift and V Digital Shift settings.
V Digital Zoom
Change the size of projector's display area vertically. If the display area has been resized by this setting, it can be moved by changing the H Digital Shift and V Digital Shift settings.
H Digital Shift
Shift the display area horizontally if its size has been changed by the Digital Zoom setting.
V Digital Shift
Shift the display area vertically if its size has been changed by the Digital Zoom setting.
Image Warping
Configure the image warping settings. See Image Warping on pages 61-62.
PIP/PBP
Configure the PIP/PBP settings. See PIP/PBP on pages 63-64.
OUTPUT | Image Warping
| PICTURE | Image Warping | |
| PC Mode | Off | |
| OUTPUT | H Keystone | 20 |
| V Keystone | 20 | |
| H Pincushion | 50 | |
| SETUP | V Pincushion | 50 |
| OPTION | ||
PC Mode
Enable PC software to control geometry.
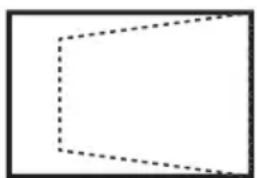
H Keystone
Adjust image distortion horizontally and make a squarer image. Horizontal keystone is used to correct a keystoned image shape in which the left and right borders of the image are unequal in length. This is intended for use with horizontally on-axis applications.
natural_image
Simple geometric shape: a dashed rectangle inside a larger rectangle (no text or symbols)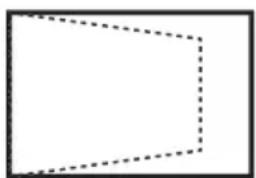
natural_image
Simple geometric diagram with a dashed square outline (no text or symbols)V Keystone
Adjust image distortion vertically and make a squarer image. Vertical keystone is used to correct a keystoned image shape in which the top and bottom are slanted to one of the sides. This is intended when for use with vertically on-axis applications.
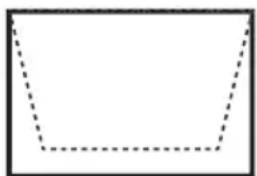
natural_image
Simple geometric shape with dashed outline, no text or symbols present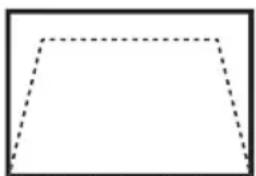
natural_image
Simple geometric shape with dashed outline, no text or symbols presentH Pincushion
Adjust the pincushion horizontally and make a more square image.
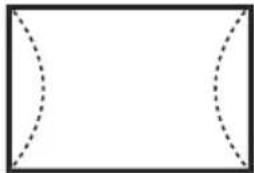
natural_image
Simple geometric diagram with two dashed semicircles inside a rectangle (no text or symbols)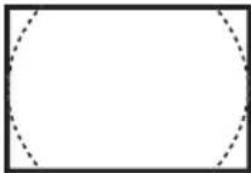
natural_image
Empty rectangular frame with dashed circular border (no text or symbols)V Pincushion
Adjust the pincushion vertically and make a more square image.
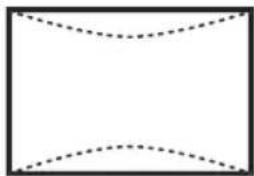
natural_image
Simple geometric diagram with a rectangle and two curved dashed lines inside, no text or symbols present.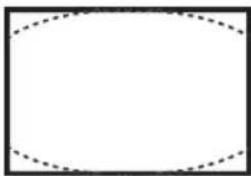
natural_image
Empty rectangular frame with dashed inner border (no text or symbols)OUTPUT | PIP/PBP
| PICTURE | PIP/PBP | |
| PIP/PBP Enable | On | |
| OUTPUT | Main Source | VGA |
| Sub Source | DVI-D | |
| Swap | ||
| SETUP | Size | Large |
| Layout | PBP, Main Left | |
| OPTION | ||
PIP/PBP Enable
Toggle between displaying two sources at once (Main and PIP/PBP images) or one source only.
Main Source
From the list of active inputs, select one to be used as the main image.
Sub Source
From the list of active inputs, select one to be used as the sub image.
Swap
Press to swap the sources of main window and PIP/PBP window.
- Remote control function when PIP is on: Source key: Change main window's source. Direct input source keys: Change the source in a window which signal in the same group (HDMI/Computer or DVI/BNC/Video) is displayed
Size
Select the PIP/PBP size.
Layout
Set the location of the PIP/PBP image on the screen.
| PIP/PBP Layout | PIP/PBP Size | |||||
| Small Medium Large | ||||||
| PBP, Main Left | 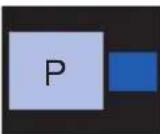 | 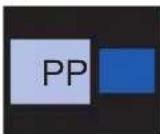 | 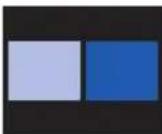 | |||
| PIP/PBP Layout | PIP/PBP Size | ||
| Small Medium Large | |||
| PBP, Main Top | 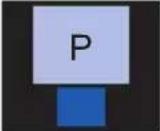 | 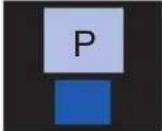 | 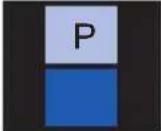 |
| PBP, Main Right | 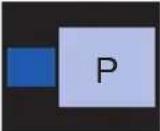 | 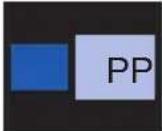 | 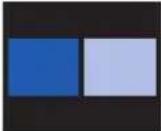 |
| PBP, Main Bottom | 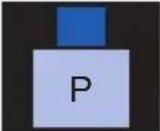 | 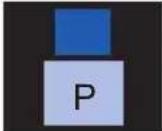 | 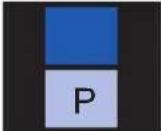 |
| PIP-Bottom Right | 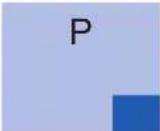 | 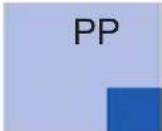 |  |
| PIP-Bottom Left | 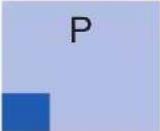 | 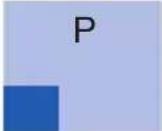 | 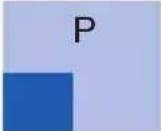 |
| PIP-Top Left | 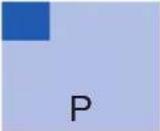 | 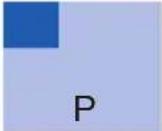 | 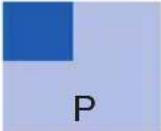 |
| PIP-Top Right | 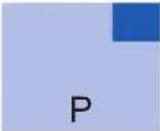 | 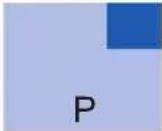 | 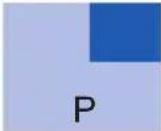 |
SETUP
| PICTURE | SETUP | |
| Language | English | |
| OUTPUT | Ceiling Mount | Auto |
| Rear Projection | Off | |
| Lens Function | ||
| SETUP | Menu Preferences | |
| Keypad LED Settings | On | |
| Pin | ||
| OPTION | Closed Captioning | Off |
| Communications | ||
Language
Select an available language for the OSD display.
Ceiling Mount
Turn the image upside down for ceiling-mounted projection.
Rear Projection
Reverse the image so you can project from behind a translucent screen.
Lens Function
Configure the lens function settings. See Lens Function on page 66.
Menu Preferences
Configure the lens function settings. See Menu Preferences on page 67.
Keypad LED Settings
Turn the backlight of keypad on or off.
Pin
Configure the pin settings. See Pin on page 67.
Closed Captioning
The closed captioning broadcasting multiplexes caption signals (character information) in the video signal to allow the displaying of characters on the screen.
▶ Off: To turn off the closed captioning feature.
▶ CC1: CC1 language.
▶ CC1: CC2 language.
Communications
Configure the communications settings. See Communications on pages 68-71.
SETUP | Lens Function
| Lens Function | |
| PICTURE | Focus |
| Zoom | |
| OUTPUT | Lens Shift |
| Lens Calibration | |
| Lens Lock No | |
| SETUP | |
| OPTION | |
Focus
Adjust focus function on the projected image.
Zoom
Adjust zoom function on the projected image.
Lens Shift
Shift the projected image.
Lens Calibration
Perform calibration and return lens to the center position.
Lens Lock
Select this function to prevent all lens motors from moving.
▶ Yes: Lens shift will be locked.
▶ No: Lens shift can be used by user.
SETUP | Menu Preferences
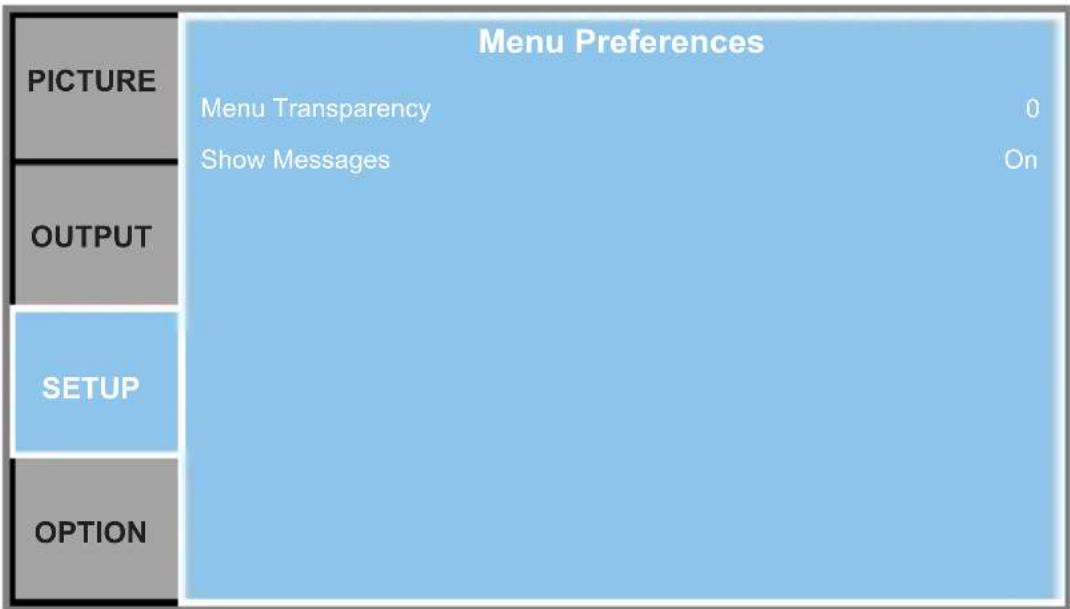
Menu Transparency
Change OSD menu background to be transparent.
Show Messages
Display status messages on the screen.
SETUP | Pin
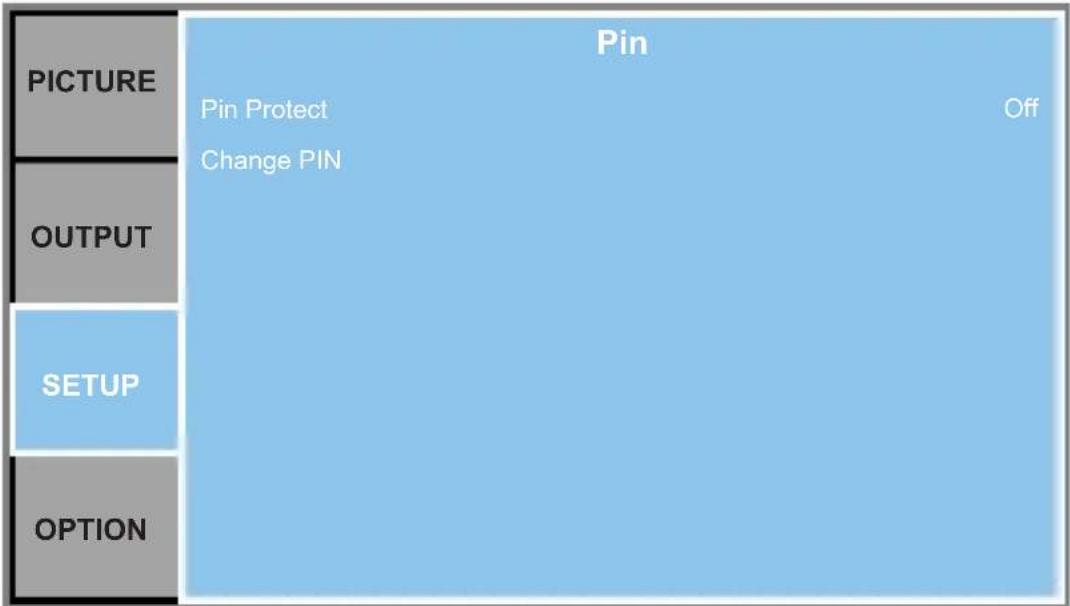
PIN Protect
The PIN (personal identification number) feature allows you to password protect your projector. Once you enable the PIN feature, you must enter the PIN before you can project an image. (PIN Default : 12345)
Change PIN
Change the PIN.
SETUP | Communications
| PICTURE | Communications | |
| LAN | ||
| Network | ||
| OUTPUT | Serial Port Baud Rate | 19200 |
| Serial Port Echo | Off | |
| SETUP | Serial Port Path | RS232 |
| Projector Address | 0 | |
| OPTION | ||
LAN
Configure the local area network (LAN) settings.
DHCP: Turn the DHCP ON/OFF.
IP Address: Select an IP address.
Subnet Mask: Select subnet mask number.
Default Gateway: Select the default gateway of the network connected to the projector.
MAC Address: Display the network MAC Address value.
▶ Apply: Apply Network settings.
Crestron RoomView Control Tool
Crestron RoomView™ provides a central monitoring station for 250+ control systems on a single Ethernet network (more are possible, the number depends on the combination of IP ID and IP address). Crestron RoomView monitors each projector, including projector's online status, system power, lamp life, network setting and hardware faults, plus any custom attribute as defined by the Administrator.
The Administrator can add, delete, or edit room information, contact information and events, which are logged automatically by the software for all users. (Operation UI as following image)
■ Crestron RoomView function support is dependent on models.
1. Main Screen
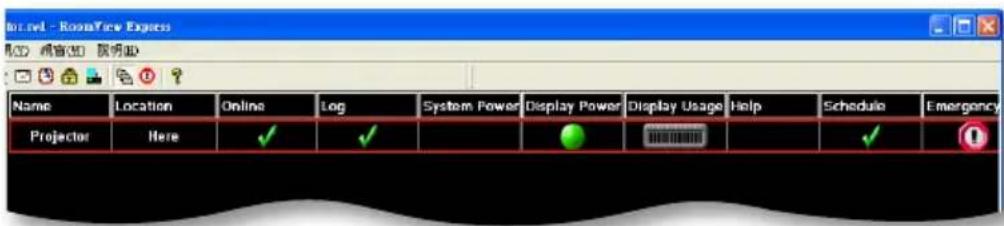
2. Edit Room
On the "Edit Room" page, enter the IP Address (or hostname) as shown on the projector's on-screen display (OSD) menu, and "02" for IPID, "41794" for the reserved Crestron control port.
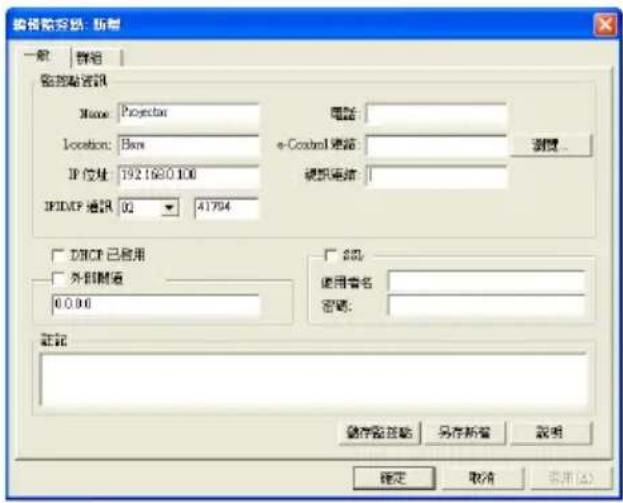
About Crestron RoomView™ setting and command method, please access below website to get RoomView™ User Guide and more information: http://www.crestron.com/products/roomview_connected_embedded_projectors_devices/resources.asp
3. Edit Attribute
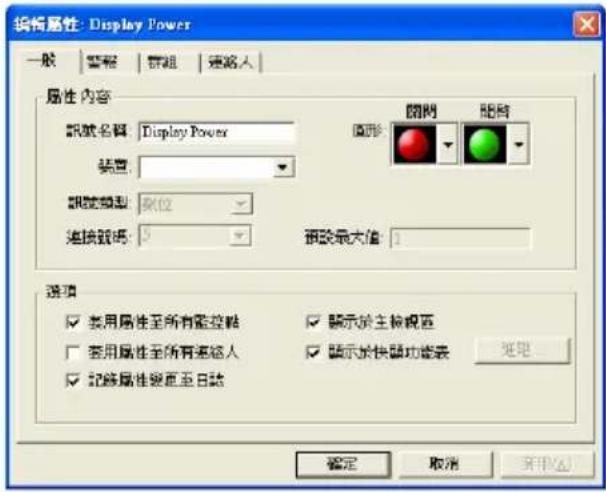
For more information, please visit
http://www.crestron.com & www.crestron.com/getroomview.
Network supports Crestron (Room View), AMX (Device Discovery Beacon Validation Tool), PJLink and RS232 control.
Network
Configure the general network settings.
▶ Projector Name: Display the projector hostname for Network.
▶ Restart Network: Restart the network.
▶ Network Factory Reset: Perform factory reset on the network settings. The Projector Name, LAN IP, and SNMP settings will be reset.
Serial Port Baud Rate
Select the serial port and baud rate.
Serial Port Echo
Control whether the serial port echoes characters.
Serial Port Path
Select the serial port path from either RS232 or HDBaseT.
Projector Address
Set the projector address. The projector will respond to IR remotes set either at the same address as the projector or to IR remotes set to address 0.
OPTION
| PICTURE | OPTION | |
| Auto Source | On | |
| OUTPUT | High Altitude | Off |
| Test Pattern | Off | |
| Background Color | Logo | |
| SETUP | Hot-Key settings | Blank Screen |
| Power Settings | ||
| Light Source Settings | ||
| OPTION | Light Sensor | |
| Information | ||
| Factory Reset | ||
Auto Source
On: The projector will search for other signals if the current input signal is lost.
▶ Off: The projector will only search current input connection.
High Altitude
Set high altitude mode On/Off. When On, the fan will operate at high speed to ensure sufficient air flow for high altitudes.
Test Pattern
Choose the desired internal test pattern to display. Press the PATTERN key to display next test pattern.
Background Color
Use this feature to display a Logo, Blue, Black, or White screen when no signal is available.
Hot-Key Settings
Assign a different function to the hot-key on the remote control by highlighting the function in the list and pressing the "Enter" button. Choose a function that does not already have a dedicated button, and assign the hot-key to that function, allowing you to quickly and easily use the chosen function.
Power Settings
Configure the power settings. See Power Settings on page 73.
Light Source Settings
Configure the light source settings. See Light Source Settings on pages 74-75.
Light Sensor
Calibrate the Light Sensor for use with the Constant Luminance lamp mode, which allows the projector to be set for constant brightness. If the Light Sensor has not been calibrated, Constant Luminance mode will be disabled. Light Sensor calibration should be repeated when new lamps are installed.
Information
Display the projector information for source, resolution, and software version on the screen.
Factory Reset
Restore all settings to their default value. It will not reset network.
Service
For service only.
OPTION | Power Settings
| PICTURE | Power Settings | |
| Standby Power Mode | 0.5W mode | |
| OUTPUT | Direct Power On | Off |
| Auto Power Off | 20 Mins | |
| Sleep Timer | No | |
| SETUP | ||
| OPTION | ||
Standby Power Mode
▶ 0.5W mode: The projector is in standby mode when connected to AC power. (<0.5W)
Communication mode: The projector could be controlled via the LAN terminal during power standby.
Direct Power On
Choose "On" to activate Direct Power mode. The projector will automatically power on when AC power is supplied, without pressing the "⏻" button on the control panel of the projector or ⏻ button on the remote control.
Auto Power Off
Sets the countdown timer. The countdown timer will start, when there is no signal being sent to the projector. The projector will automatically power off when the countdown has finished (in minutes).
Sleep Timer
Sets the countdown timer. The countdown timer will start, with or without a signal being sent to the projector. The projector will automatically power off when the countdown has finished (in minutes).
OPTION | Light Source Settings
| PICTURE | Light Source Settings | |
| Light Source Mode | Constant Power | |
| OUTPUT | Constant Power Settings | 10 |
| Constant Luminance Settings | 0 | |
| Current Light Source | Both | |
| SETUP | Auto Switch | On Failure Only |
| Auto Switch Time (Hours) | 100 | |
| Light Source Info | ||
| OPTION | Reset Light Source Hours | |
Light Source Mode
Select Constant Power, Constant Luminance, or Eco Mode. When in Eco Mode, the projector will adjust to the lowest fan speed and switch the light source power to the minimum setting.
Constant Power Settings
Set the value of the light source power (in Watts).
Constant Luminance Settings
Set the value for the Constant Luminance to maintain constant brightness. The light sensor will monitor the light level and will apply more power as the light source brightness decays naturally over time. When the light source setting reaches maximum power, it will remain at this setting. Note that the light sensor needs to be calibrated for Constant Luminance mode to work properly.
Current Light Source
Select which lamp(s) is in use.
Auto Switch
Control when the projector switches lamps. Options include: on failure only, at power-up, or after a set number of hours.
Auto Switch Time (Hours)
Set the number of hours for Lamp Auto Switch.
For example:
1 Lamp conditions: lamp 1 = 50 hours, lamp 2 = 60 hours.
2 Set the current lamp to lamp 1 - the lamp with the lower lamp hour usage.
3 Set the Lamp Auto Switch to After (N) hours and the Lamp Auto Switch Time to 100 hours.
4 When lamp 1 reaches 150 hours, projector will auto switch to lamp 2.
5 When lamp 2 reaches 160 hours, projector will auto switch to lamp 1.
Light Source Info
Display current lamp(s) settings (read-only).
Reset Light Source Hours
Reset the lamp used hours counter to zero. Do this after changing the lamp.
Appendices
Troubleshooting
If you experience a problem with your projector, please refer to the following information. If a problem persists, please contact your local reseller or service center.
Image Problems
? No image appears on-screen
- Ensure all the cables and power connections are correctly and securely connected as described in the “Installation” section.
▶ Ensure the pins of connectors are not crooked or broken.
▶ Check if the projection lamp has been securely installed.
▶ Make sure you have removed the lens cover and the projector is switched on.
? Partial, scrolling or incorrectly displayed image
▶ Press "SYNC" on the control panel or the remote control.
▶ If you are using a PC:
- For Windows Vista and Windows 7:
- Open the "My Computer" icon, the "Control Panel" folder, and then double click on the "Display" icon.
- Select the "Settings" tab.
- Verify that your display resolution setting is lower than or equal to WUXGA (1920x1200).
- Click on the "Advanced Properties".
If the projector is still not projecting the whole image, you will also need to change the monitor display you are using. Refer to the following steps.
- Verify the resolution setting is lower than or equal to WUXGA (1920x1200).
- Select the "Change" button under the "Monitor" tab.
- Click on "Show all devices". Next, select "Standard monitor types" under the SP box; choose the resolution mode you need under the "Models" box.
- Verify that the resolution setting of the monitor display is lower than or equal to WUXGA (1920x1200).
▶ If you are using a Notebook:
- First, follow the steps above to adjust resolution of the computer.
- Press the toggle output settings. example: [Fn]+[F4]
| Notebook Brand Function Keys | |
| Acer [Fn]+[F5] | |
| Asus [Fn]+[F8] | |
| Dell [Fn]+[F8] | |
| Gateway [Fn]+[F4] | |
| IBM/Lenovo [Fn]+[F7] | |
| HP/Compaq [Fn]+[F4] | |
| NEC [Fn]+[F3] | |
| Toshiba [Fn]+[F5] | |
| Mac Apple | System Preference -> Display -> Arrangement -> Mirror display |
If you experience difficulty changing resolutions or your monitor freezes, restart all equipment including the projector.
The screen of the Notebook or PowerBook computer is not displaying your presentation
Some Notebook PCs may deactivate their own screens when a second display device is in use. Each has a different way to be reactivated. Refer to your computer's documentation for detailed information.
? Image is unstable or flickering
Adjust the "Phase" to correct it.
▶ Change the monitor color setting from your computer.
? Image has vertical flickering bar
▶ Use “Frequency” to make an adjustment.
▶ Check and reconfigure the display mode of your graphic card to make it compatible with the projector.
? Image is out of focus
Adjust the Focus function for the projector lens.
▶ Make sure the projection screen is between the required distance.

The image is stretched when displaying 16:10 DVD title
When you play anamorphic DVD or 16:10 DVD, the projector will show the best image when the projector display mode is set to 16:9 in the OSD.
If you play 4:3 format DVD titles, please change the format to 4:3 in the projector OSD.
If the image is still stretched, you will also need to adjust the aspect ratio by referring to the following:
▶ Please setup the display format as 16:10 (wide) aspect ratio type on your DVD player.

Image is too small or too large
▶ Move the projector closer to or further from the screen.
Press "Menu" on the control control or keypad. Go to "OUTPUT" --> "Aspect Ratio" and try the different settings.

Image has slanted sides:
If possible, reposition the projector so that it is centered on the screen and below the bottom of the screen.
▶ Press the "Keystone H" or "Keystone V" button on the remote control, until the sides are vertical.

Image is reversed
Adjust the "SETUP" --> "Rear Projection" to correct it.

Image does not display in 3D
▶ Check if the battery of 3D glasses is drained
▶ Check if 3D glasses is turned on
▶ Check 3D supported format timings is correct
• HDMI 1.4a mandatory 3D format
• 1280x720@120Hz frame sequential
• 1024x768@120Hz frame sequential
• 800x600@120Hz frame sequential
Projector Problems

The projector stops responding to all controls
If possible, turn off the projector, then unplug the power cord and wait at least 60 seconds before reconnecting power.

Lamp burns out or makes a popping sound
When the lamp reaches its end of life, it will burn out and may make a loud popping sound. If this happens, the projector will not turn on until the lamp module has been replaced. To replace the lamp, follow the procedures in the “Replacing the Lamp” section.

When making a direct connection from your computer to the projector
If you have network connection problem from your computer to the projector, please refer to the computer setting as below or contact with web administrator.
Step 1: Find an IP Address (192.168.0.100) from LAN function of projector.
IP Address
192.168.0.100

Step 2: Select "Apply" and push the "Enter" button. Once the setting is saved, exit the OSD by pushing "Menu" button.
Step 3: To open Network Connections, click Start, click Control Panel, click Network and Internet Connections, and then click Network Connections. Click the connection you want to configure, and then, under Network Tasks , click Change settings of this connection.
Step 4: On the General tab, under This connection use the following items, click Internet Protocol(TCP/IP), and then click "Properties".
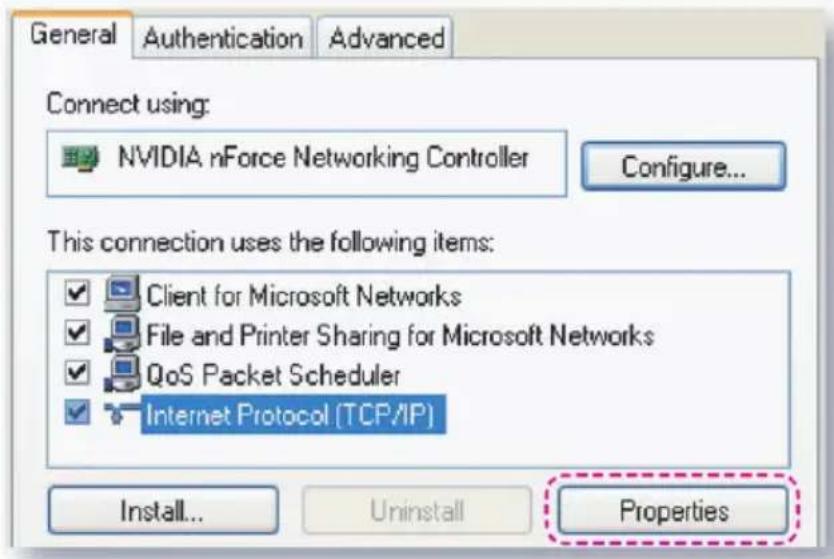
Step 5: Click Use the following IP address, and type in as below:
1) IP address: 192.168.0.101
2) Subnet mask: 255.255.255.0
3) Default gateway: 192.168.0.254
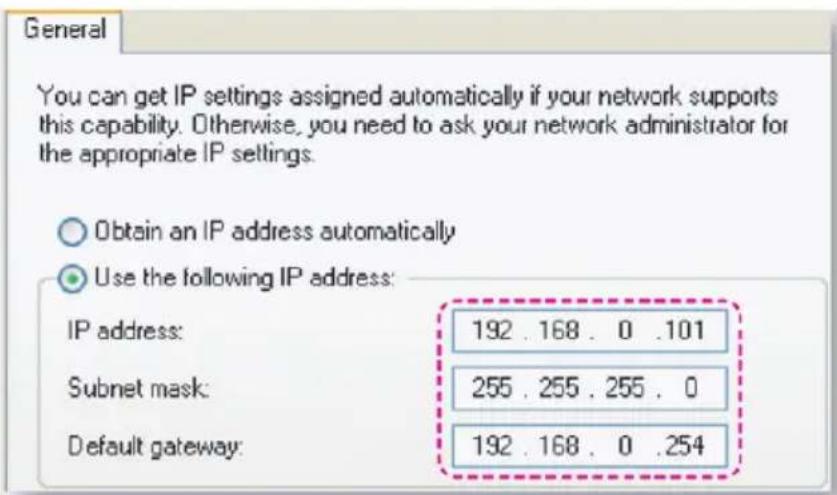
Step 6: To open Internet Options, click IE web browser, click Internet Options, click the Connections tab and click "LAN Setting...".
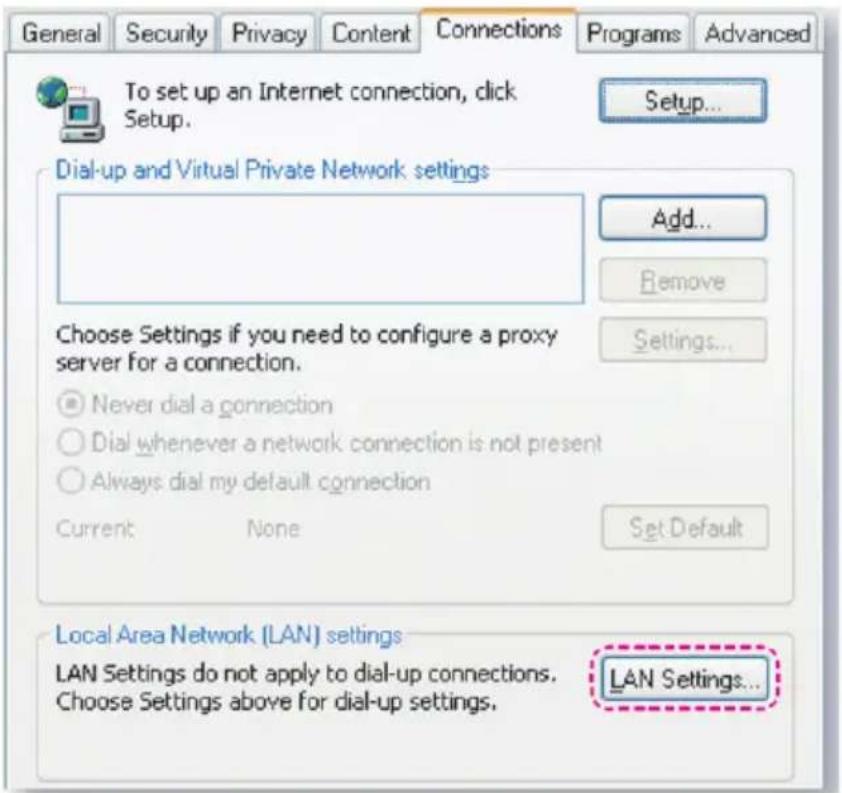
Step 7: All items in the Local Area Network (LAN) Setting window must unchecked. Then click "OK" button twice.
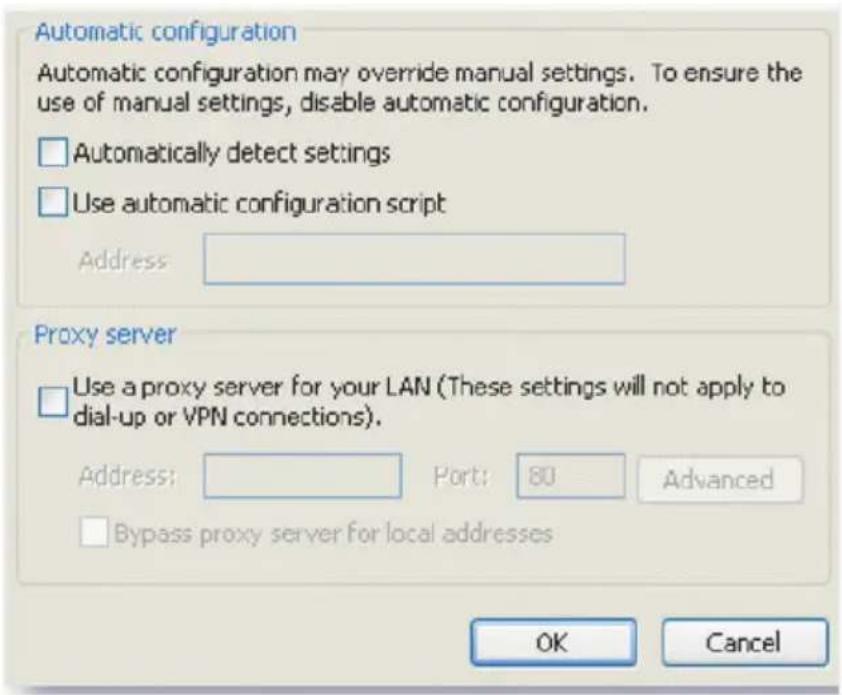
Step 8: Connect a cat5 Ethernet cross-over cable between the projector and the computer.
On Screen Messages
• Power off confirm
Power OFF?
Press OFF key again.
- Lamp 1 life warning
Lamp 1 and filters are going to expire; change the lamp and filters.
- Lamp 2 life warning
Lamp 2 and filters are going to expire; change the lamp and filters.
- Both lamp life warning
Lamps and filters are going to expire; change the lamps and filters.
- Filter error
Filter positions or types are not installed correctly. Check the filter installation.
Replacing the Lamp
A warning message will be displayed once the lamp has surpassed life expectancy. Please ask the specialists to replace the lamp.
Lamp 1:
Lamp 1 and filters are going to expire; change the lamp and filters.
Lamp 2:
Lamp 2 and filters are going to expire; change the lamp and filters.
Lamp 1 and lamp 2:
Lamps and filters are going to expire; change the lamps and filters.
At this point, it is recommended to change the lamp as soon as possible. Please contact the dealer to acquire a lamp.
Type number: RICOH replacement lamp type 25


CAUTION!
Warning: If ceiling mounted, please use caution when opening the lamp access panel. It is recommended to wear safety glasses if changing the bulb when ceiling mounted. "Caution must be used to prevent any loose parts from falling out of projector."

Warning: Lamp compartment is hot! Allow it to cool down before changing lamp!

Warning: To reduce the risk of personal injury, do not drop the lamp module or touch the lamp bulb. The bulb may shatter and cause injury if it is dropped.
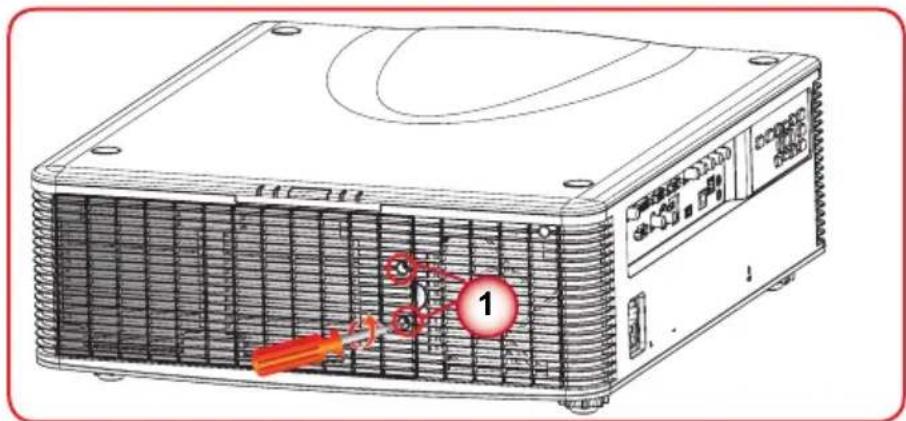
natural_image
Line drawing of a portable air conditioner unit with labeled components (no text or symbols beyond numbered labels)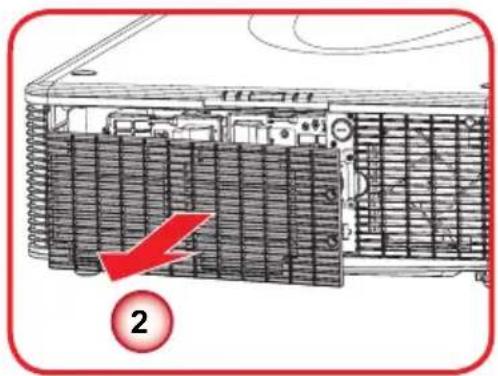
natural_image
Diagram of a server rack with cooling fins and ventilation slots, showing a red arrow pointing to component 2 (no text or symbols present)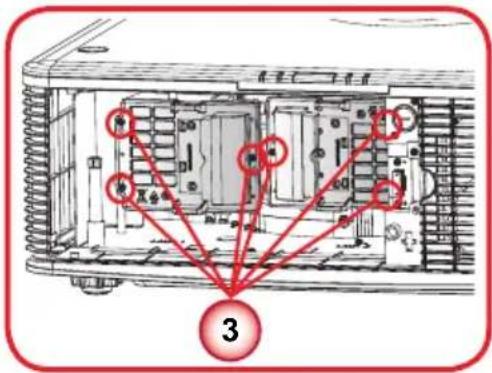
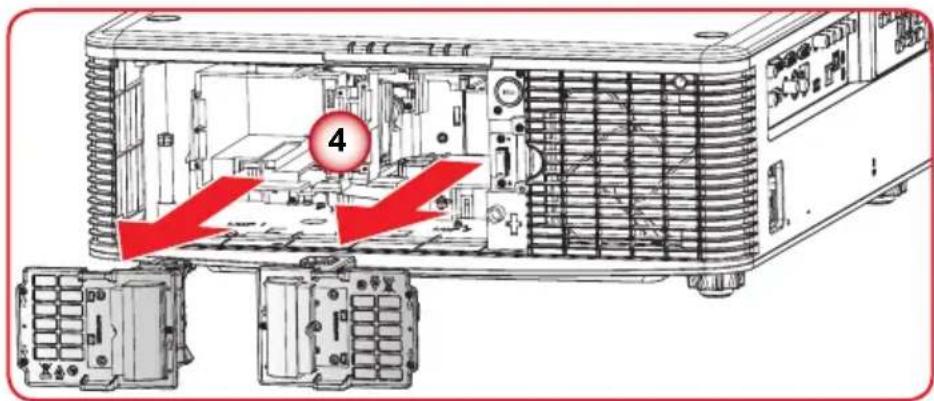
Lamp Replacing Procedure:
- Switch off the power to the projector by pressing the "button."
- Wait for projector to cool down: Allow the projector to cool down into standby mode.
- Disconnect the power cord.
- Unscrew the two screws on the lamp door. ①
- Open the lamp door. ②
- Unscrew the six screws on the lamp housing. ③
- Pull out the lamp module(s) slowly and carefully. ④
To replace the lamp module(s), reverse the previous steps.
- Turn on the projector.
Filter maintenance
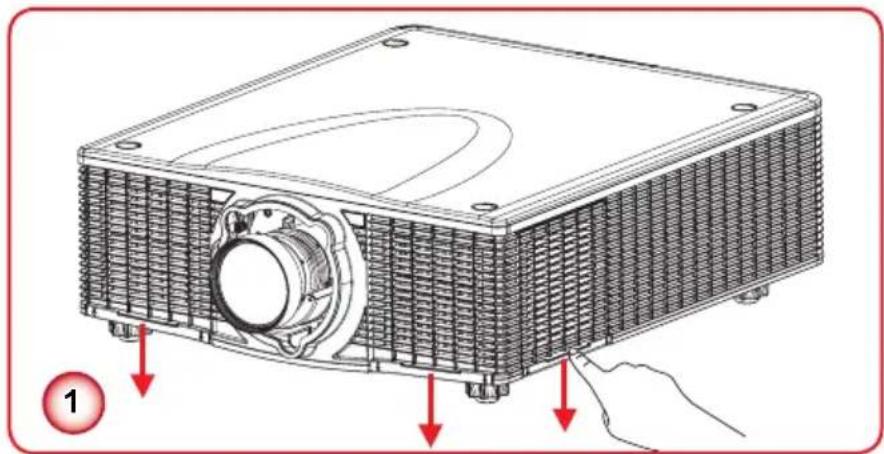
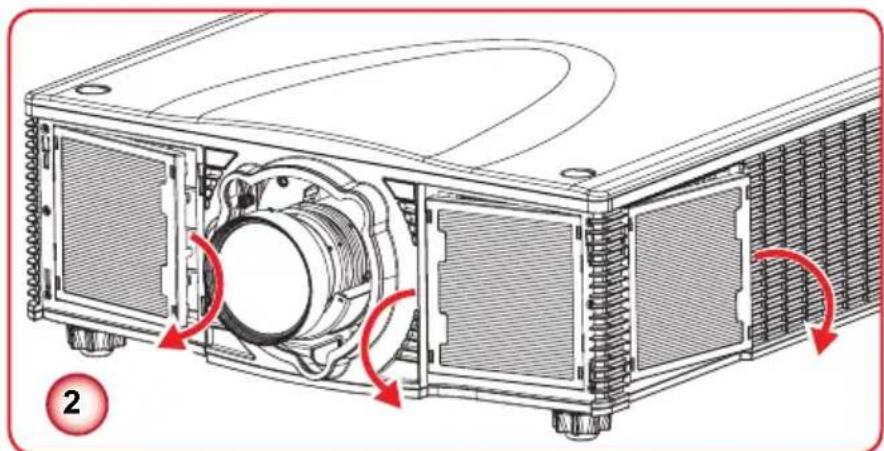
natural_image
Technical diagram of an electronic device showing internal components and airflow direction arrows (no text or symbols)Filter Replacing Procedure:
- Switch off the power to the projector by pressing the "button."
- Wait for projector to cool down: Allow the projector to cool down into standby mode.
- Disconnect the power cord.
- Remove the filter covers by pushing down them. ①
- Release the filters by pulling out and replace them. ②
Compatibility Modes
| Signal Type Resolution | Frequency H. (kHz) | Frame Rate (Hz) | VGA | BNC | HDMI DVI | 3G-SDI | HDBaseT | CVBS | ||
| PC | 640x480 60 | 60 V V V V | V | |||||||
| 640x480 37,861 | 72 V V V | V V | ||||||||
| 640x480 37,500 | 75 V V V | V V | ||||||||
| 640x480 43,269 | 85 V V V | V V | ||||||||
| 640x480 35,000 | 66.6 V V | V | ||||||||
| 720x400 31,469 | 70 V V V | V V | ||||||||
| 800x600 | 37.9 | 60 V V | V V V | |||||||
| 800x600 | 48.1 | 72 V V | V V V | |||||||
| 800x600 | 46.9 | 75 V V | V V V | |||||||
| 800x600 | 53.7 | 85 V V | V V V | |||||||
| 800x600 77.285 | 120 V | V V V | ||||||||
| 832x624 | 75 V V | V V V | ||||||||
| 848x480 24.621 50 | V V V | |||||||||
| 848x480 29.829 60 | V V V | |||||||||
| 848x480 37.683 75 | V V V | |||||||||
| 848x480 42.968 85 | V V V | |||||||||
| 1024x768 48.4 | 60 V V V V V | |||||||||
| 1024x768 | 60.022 75 | V V V V V | ||||||||
| 1024x768 68.7 | 85 V V V V V | |||||||||
| 1024x768 | 98.726 | 120 | V | V | V | V | ||||
| 1152x720 | 37.024 | 50 | V | V | V | |||||
| 1152x720 | 44.858 | 60 | V | V | V | |||||
| 1152x720 | 56.414 | 75 | V | V | V | |||||
| 1152x720 | 64.453 | 85 | V | V | V | |||||
| 1152x864 | 53.783 60 | V V V V V | ||||||||
| 1152x864 | 63.851 70 | V V V V V | ||||||||
| 1152x864 | 67.500 75 | V V V V V | ||||||||
| 1152x864 | 77.093 85 | V V V V V | ||||||||
| 1152x870 | 68.681 | 75 | V | V | V | |||||
| 1280x720 | 37.071 50 | V V V | ||||||||
| 1280x720 | 44.771 60 | V V V V V | ||||||||
| 1280x720 | 56.456 75 | V V V V V | ||||||||
| 1280x720 | 64.398 85 | V V V V V | ||||||||
| PC | 1280x720 90.1 | 120 V V V V | ||||||||
| 1280x768 47.776 | 60 V V V V V | |||||||||
| 1280x768 60.288 | 75 V V V V V | |||||||||
| 1280x768 68.633 | 85 V V V V V | |||||||||
| 1280x800 41.262 | 50 V V V V V | |||||||||
| 1280x800 49.702 | 60 V V V V V | |||||||||
| 1280x800 62.795 | 75 V V V V V | |||||||||
| 1280x800 71.554 | 85 V V V V V | |||||||||
| 1280x960 49.404 | 50 V V V | |||||||||
| 1280x960 59.699 | 60 V V V V V | |||||||||
| 1280x960 75.231 | 75 V V V V V | |||||||||
| 1280x960 85.792 | 85 V V V V V | |||||||||
| 1280x1024 | 52.678 50 V V V | |||||||||
| 1280x1024 | 64 | 60 V V V V V | ||||||||
| 1280x1024 | 80 | 75 V V V V V | ||||||||
| 1280x1024 91.1 | 85 V V V V V | |||||||||
| 1360x768 39.564 | 50 V V V | |||||||||
| 1360x768 47.719 | 60 V V V | |||||||||
| 1360x768 60.287 | 75 V V V | |||||||||
| 1360x768 68.667 | 85 V V V | |||||||||
| 1366x768 | 48 | 60 V V V V V | ||||||||
| 1400x1050 | 54.112 50 V V V | |||||||||
| 1400x1050 | 65.316 60 V V V | |||||||||
| 1400x1050 | 82.278 75 V V V V V | |||||||||
| 1440x900 55.935 | 60 V V V V V | |||||||||
| 1440x900 70.635 | 75 V V V | |||||||||
| 1600x900 | 60 | 60 V V V | ||||||||
| 1600x1200 | 75 | 60 V V V V V | ||||||||
| 1680x1050 65.29 | 60 V V V V V | |||||||||
| 1920X1080 | 74.17 50 V V V | |||||||||
| 1920X1080 | 66.586 60 V V V V V | |||||||||
| 1920X1200RB | 74.038 60 V V V V V | |||||||||
| 1920X1200RB | 61.816 50 V V V V V | |||||||||
| NTSC | NTSC (M, 4.43) | 15.734 60 | V | |||||||
| Signal Type Resolution | Frequency H. (kHz) | Frame Rate (Hz) | VGA | BNC HDMI DVI | 3G-SDI | HDBaseT | CVBS | ||
| PAL | PAL (B,G,H,I) | 15.625 50 V | |||||||
| PAL (N) | 15.625 50 V | ||||||||
| PAL (M) | 15.625 60 V | ||||||||
| SECAM | SECAM (M) | 50 V | |||||||
| SDTV | 480i | 15.734 | 60 V V V V | V | |||||
| 576i | 15.625 | 50 V V V V | V | ||||||
| EDTV | 480p | 31.469 | 60 V V V V | V | |||||
| 576p | 31.25 | 50 | V | V | V | V | V | ||
| HDTV | 1080i | 28.125 | 25 V V V V | V | |||||
| 1080i | 33.716 | 29 V V V V | V | ||||||
| 1080i | 33.75 | 30 V V V V | V | ||||||
| 720p | 37.5 | 50 | V | V | V | V | V | ||
| 720p | 44.955 | 59 V V V V | V | ||||||
| 720p | 45 | 60 | V | V | V | V | V | ||
| 1080p | 26,973 | 23 | V | V | V | V | V | ||
| 1080p | 27 | 24 | V | V | V | V | V | ||
| 1080p | 28.125 | 25 V V V V | V | ||||||
| 1080p | 33.716 | 29 V V V V | V | ||||||
| 1080p | 33.75 | 30 | V | V | V | V | V | ||
| 1080p | 56.25 | 50 | V | V | V | V | V | ||
| 1080p | 67.433 | 59 V V V V | V | ||||||
| 1080p | 67.5 | 60 | V | V | V | V | V | ||
| Mandatory 3D | Frame Packing 1080p | 24 | V | V | |||||
| Frame Packing 720p | 50 | V | V | ||||||
| Frame Packing 720p | 60 | V | V | ||||||
| Side by Side 1080i | 50 | V | V | ||||||
| Side by Side 1080i | 60 | V | V | ||||||
| Top and Bottom 720p | 50 | V | V | ||||||
| Top and Bottom 720p | 60 | V | V | ||||||
| Top and Bottom 1080p | 24 | V | V | ||||||
| Frame sequential 3D | 800x600 | 77.285 | 120 | V | V | ||||
| 1024x768 | 98.726 | 120 | V | V | |||||
| 1280x720 | 90.1 | 120 V | V | ||||||
| Signal Type Resolution | Frequency H. (kHz) | Frame Rate (Hz) | VGA | BNC | HDMI | DVI | 3G-SDI | HDBaseT | CVBS | ||
| SD-SDI | 480i YcbCr422 10bit | 59.94 V | |||||||||
| 576i YcbCr422 10bit | 50 V | ||||||||||
| HD-SDI | 720p YcbCr422 10bit | 50 V | |||||||||
| 59.94 V | |||||||||||
| 60 V | |||||||||||
| 1080i YcbCr422 10bit | 50 V | ||||||||||
| 59.94 V | |||||||||||
| 60 V | |||||||||||
| 1080p YcbCr422 10bit | 23.98 V | ||||||||||
| 24 V | |||||||||||
| 25 V | |||||||||||
| 29.97 V | |||||||||||
| 30 V | |||||||||||
| 1080sF YcbCr422 10bit | 25 V | ||||||||||
| 29.97 V | |||||||||||
| 30 V | |||||||||||
| 3GA-SDI | 1080p YcbCr422 10bit | 50 V | |||||||||
| 59.94 V | |||||||||||
| 60 V | |||||||||||
| 3GB-SDI | 1080p YcbCr422 10bit With 352M Payload ID | 50 V | |||||||||
| 59.94 V | |||||||||||
| 60 V | |||||||||||
V : Frequency supported
: Frequency not supported
Remote Key Code
Default custom code => 0x80EB
ID code 01 \~ 99 => 0x0010\~0x0073
Format => NEC
| Key Legend Key position Repeat format | Address Data | |||||
| Byte 1 Byte | 2 Byte 3 Byte 4 | |||||
| ON 1 F1 80 EB 12 ED | ||||||
| OFF 2 F1 80 EB 02 FD | ||||||
| 1 3 F1 80 EB 31 CE | ||||||
| 2 4 F1 80 EB 32 CD | ||||||
| 3 5 F1 80 EB 33 CC | ||||||
| 4 6 F1 80 EB 34 CB | ||||||
| 5 7 F1 80 EB 35 CA | ||||||
| 6 8 F1 80 EB 36 C9 | ||||||
| 7 9 F1 80 EB 37 C8 | ||||||
| 8 10 F1 80 EB 38 C7 | ||||||
| 9 11 F1 80 EB 39 C6 | ||||||
| INFO 12 F1 80 EB 4C B3 | ||||||
| 0 13 F1 80 EB 30 CF | ||||||
| Mode 14 F1 80 EB 23 DC | ||||||
| Auto Sync 15 F1 80 EB 15 EA | ||||||
| Source 16 F1 80 EB 14 EB | ||||||
| UP 17 F1 80 EB 40 BF | ||||||
| LEFT 18 F1 80 EB 42 BD | ||||||
| Enter 19 F1 80 EB 13 EC | ||||||
| RIGHT 20 F1 80 EB 43 BC | ||||||
| DOWN 21 F1 80 EB 41 BE | ||||||
| Menu 22 F1 80 EB 1B E4 | ||||||
| Exit | 23 F1 80 EB 1D D2 | |||||
| Gamma | 24 F1 80 EB 0A F5 | |||||
| Bright | 25 F1 80 EB 0B F4 | |||||
| Contr 26 F1 80 EB 0C F3 | ||||||
| PIP | 27 F1 80 EB 0D F2 | |||||
| LENS H◀ | 28 F1 80 EB 0E F1 | |||||
| LENS H ▶ | 29 F1 80 EB 0F F0 | |||||
| FOCUS ▲ | 30 F1 80 EB 16 E9 | |||||
| LENS V ▲ | 31 F1 80 EB 1E E1 | |||||
| LENS V ▼ | 32 F1 80 EB 1F E0 | |||||
| FOCUS ▼ | 33 F1 80 EB 17 E8 | |||||
| Key Legend Key position Repeat format | Address Data | |||||
| Byte 1 Byte | 2 Byte 3 Byte 4 | |||||
| KEYSTONE □ | 34 F1 80 | EB 2C D3 | ||||
| KEYSTONE □ | 35 F1 80 | EB 2D D2 | ||||
| ZOOM ▲ | 36 F1 80 | EB 18 E7 | ||||
| KEYSTONE □ | 37 F1 80 | EB 2E D1 | ||||
| KEYSTONE □ | 38 F1 80 | EB 2F D0 | ||||
| ZOOM ▼ | 39 F1 80 | EB 19 E6 | ||||
| Shutter (AV Mute) 40 | F1 80 EB 11 EE | |||||
| Hot key 41 F1 80 | EB 1A E5 | |||||
| Pattern 42 F1 80 | EB 1C E3 | |||||
Projector addressing
| ID code Change mode Customer code | ||
| 1 | Press the "Hot key" for 3 sec, release, enter 0 then enter 1 within 2 sec | 0010 |
| 2 | Press the "Hot key" for 3 sec, release, enter 0 then enter 2 within 2 sec | 0011 |
| 3 | Press the "Hot key" for 3 sec, release, enter 0 then enter 3 within 2 sec | 0012 |
| .... .... .... | ||
| 10 | Press the "Hot key" for 3 sec, release, enter 1 then enter 0 within 2 sec | 0019 |
| 11 | Press the "Hot key" for 3 sec, release, enter 1 then enter 1 within 2 sec | 001A |
| .... .... .... | ||
| 98 | Press the "Hot key" for 3 sec, release, enter 9 then enter 8 within 2 sec | 0071 |
| 99 | Press the "Hot key" for 3 sec, release, enter 9 then enter 9 within 2 sec | 0072 |

The original code: Press "Hot key" for 3 sec, then release, enter 0 then enter 0 within 2 seconds.
RS232 Pin Assignments
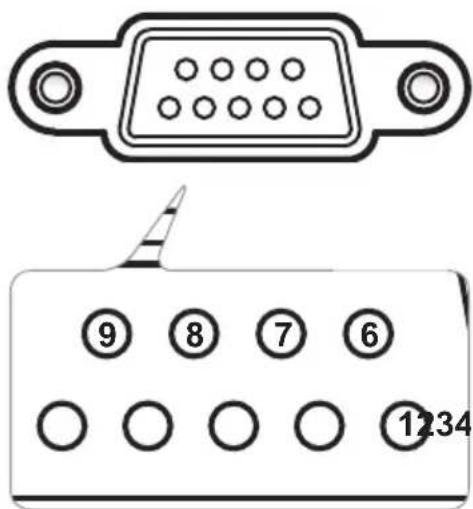
| Pin No. PC Side | Projector Side(RS232 Terminal) | |
| 1 N/A N/A | ||
| 2 RXD RXD | ||
| 3 TXD TXD | ||
| 4 N/A N/A | ||
| 5 GND GND | ||
| 6 N/A N/A | ||
| 7 N/A N/A | ||
| 8 N/A N/A | ||
| 9 N/A N/A | ||
Setup Information
| RS-232 protocol | |
| Baud Rate 9600 bps (default) | |
| Data Length 8 bit | |
| Parity Check None | |
| Stop Bit | 1 bit |
| Flow Control None | |

■ RS232 shell is grounded.
■ RS232 interface need use swap pin for RS232 communication.
Specifications
| Technology KU12000:DMD,0.96" WUXGA | |
| ASIC DDP4422 + PW392C | |
| Native Resolution WUXGA (1920x1200) | |
| Computer compatibility IBM PC | Compatible, support HDTV (1080i/p, 720p, 576i/p, 480i/p) include both PC and component inputs |
| Video compatibility NTSC M(3.58MHz), 4.43MHz | |
| Horizontal scan rate 15.734kHz to 91.146kHz | |
| Vertical scan rate 24Hz to 120Hz | |
| Keystone correction V: +/-20 degrees, H: +/-20 degrees | |
| Weight Net weight (w/o lens): 23.8 kg | |
| Dimensions (W x D x H) 520mm(W) x 591mm(D) x 194.0mm(H) (without lens) (20.47"(W) x 23.27"(D) x 7.64"(H)) | |
| Lamp power WUXGA Dual Lamps 465W: | |
| Power supply 100~240VAC, with 15A fuse | |
| Power consumption | ECO Mode: 920W +/-10% @110V, 870W +/-10% @220VMax. Brightness Mode: 1150W +/-10% @110V, 1080W +/-10% @220V |
| Operating temperature 0°C to +40°C / 32°F~104°F | |
| I/O connectors | HDMI In x 1Computer In x 1CVBS In x 1 (Composite Video)BNC x 5 (YPbPr In (Component Video), RGBHV In, BNC Connector)USB x 1 (Type A)3G-SDI x 1 (BNC Connector)3D Sync x 1DVI-D x 1Monitor Out x 1LAN x 1HDBaseT x 1Remote In x 1Remote out x 1Service x 1Serial x 1 |
| Standard package contents | AC power cord x 1VGA cable x 1DVI-HDMI adapter x 1Remote control (with batteries) x 1User's Manual CD x 1Read This First x 1 |

■ Design and specifications are subject to change without prior notice.
Cabinet dimension
Unit: mm
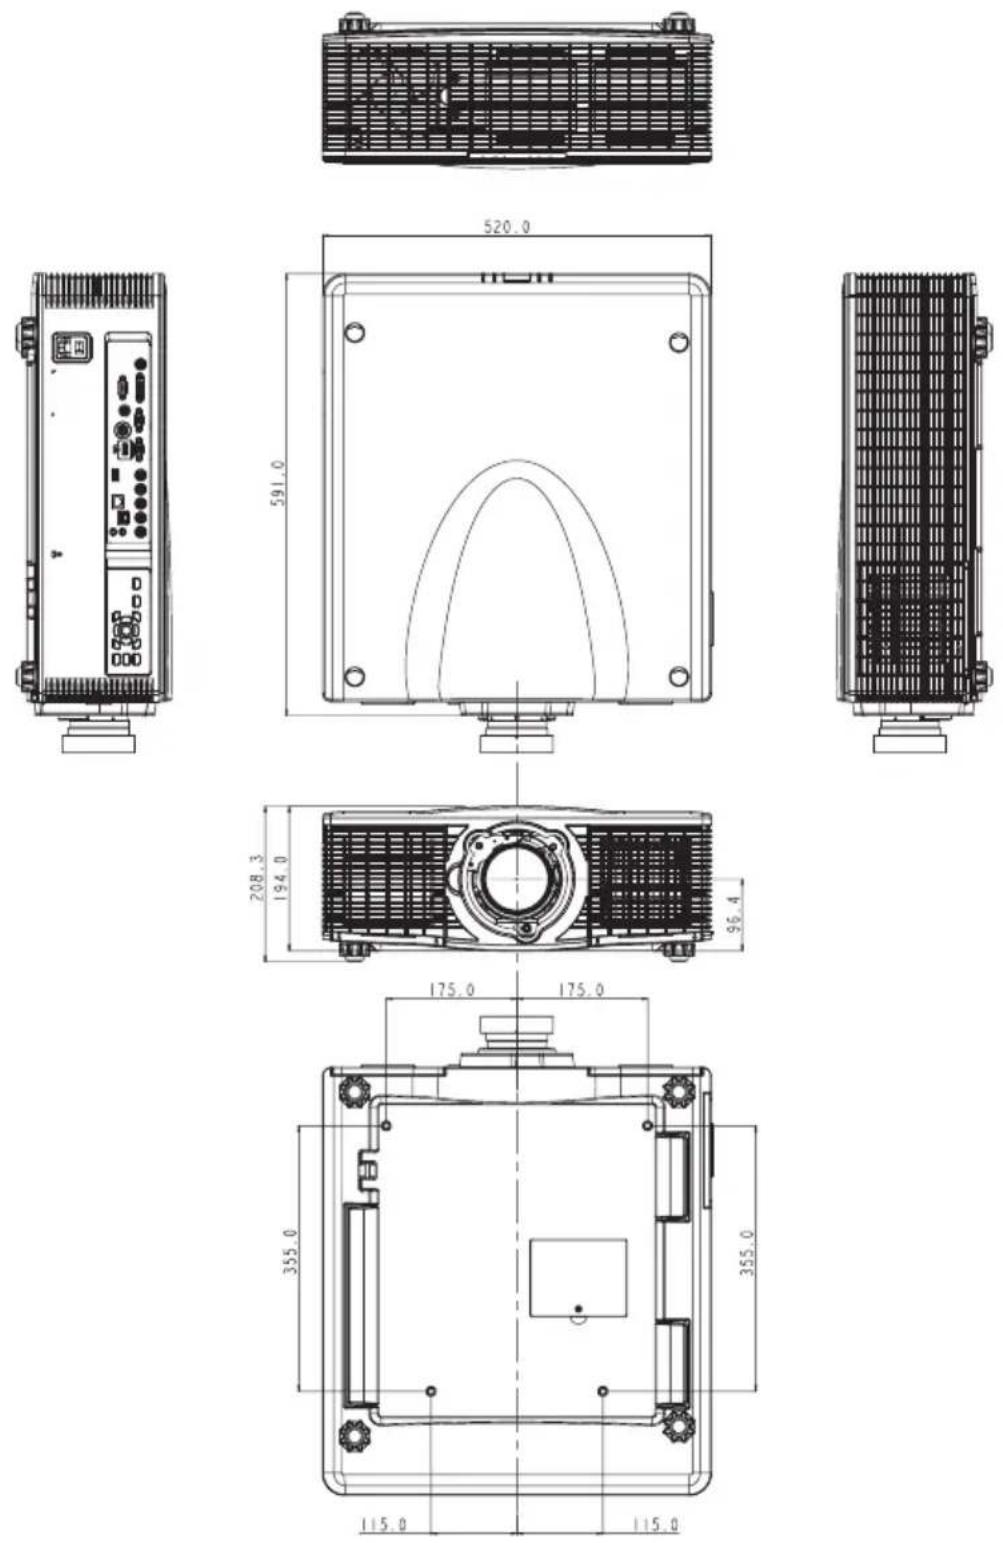
Screw type: M8 x 4
Maximum screw hole depth: 20mm
Trademarks
- DLP is trademark or registered trademark of Texas Instruments.
- IBM is a trademark or registered trademark of International Business Machines Corporation.
- Macintosh, Mac OS X, iMac, and PowerBook are trademarks of Apple Inc., registered in the U.S. and other countries.
- Microsoft, Windows, Windows Vista, Internet Explorer and PowerPoint are either a registered trademark or trademark of Microsoft Corporation in the United States and/or other countries.
- HDMI, the HDMI Logo and High-Definition Multimedia Interface are trademarks or registered trademarks of HDMI Licensing LLC.
- Other product and company names mentioned in this user's manual may be the trademarks or registered trademarks of their respective holders.
- Blu-ray is a trademark of Blu-ray Association.
- HDBaseT is a trademark of HDBaseT Alliance.

- Safety Information
- Information
- Introduction
- Important
- Caution
- Safety During Operation
- WARNING
- Safety Precautions to Be Followed
- Environments where the machine can be used
- Handling power cords and power cord plugs
- Handling the main machine
- Handling the machine's interior
- About the batteries
- About the lamp
- Moving
- Copyrights to Images
- Note to Users Viewing 3D Images
- Positions of WARNING and CAUTION marks
- Main unit
- Power Switch Symbols
- User Information on Electrical and Electronic Equipment
- Regulation & Safety Notices
- Notice: Shielded cables
- Notes to Users in the State of California
- Notes to Canadian Users
- Declaration of Conformity for EU countries
- Notice: Users in EU countries
- CE Marking Traceability Information (For EU Countries Only)
- Notice: Users in Turkey
- Note for the Battery and/or Accumulator Symbol
- Notice: Users in Taiwan
- Installation 31
- User Controls 44
- Appendices 76
- Product Features
- Package Overview
- Documentation:
- Product Overview
- Control Panel
- Connection Ports
- Remote Control
- Remote Control Battery Installation
- To ensure safe operation, please observe the following precautions:
- Remote Control Operating Range
- Installation
- Adjust the Projector Position
- Portrait Mode
- Non-Portrait Mode
- Installing the Projector Lens
- Connecting to Computer/Notebook
- Connecting to Video Sources
- Powering On/Off the Projector
- Powering On the Projector
- Powering Off the Projector
- Warning Indicator
- Adjusting the Projected Image
- Adjusting the Projector's Height
- Adjusting the Projecting Image's Position
- Lens shift range for B3/B4/B5/B6
- Lens shift range for B1/B2
- User Controls
- Using the Control Panel
- On-screen Display Menus
- How to operate
- Structure
- PICTURE
- Display Mode
- Brightness
- Contrast
- Sharpness
- Color
- Tint
- Phase
- Frequency
- Horz Position
- Vert Position
- Auto Image
- PICTURE | 3D Display
- 3D Enable
- 3D Invert
- DLP Link
- PICTURE | Color Matching
- Enable
- Auto Test Pattern
- Red Part of Red
- Green Part of Red
- Blue Part of Red
- Green Part of Green
- Red Part of Green
- Blue Part of Green
- Blue Part of Blue
- Red Part of Blue
- Green Part of Blue
- Red Part of White
- Green Part of White
- Blue Part of White
- Reset to Default
- PICTURE | Advanced
- BrilliantColor™
- White Peaking
- Gamma
- Color Temperature
- Color Space
- Color Settings
- Color Enhancement
- Color Wheel Speed
- DynamicBlack™
- Noise Reduction
- Flesh Tone Correction
- Video Black Level
- Film Mode
- OUTPUT
- Aspect Ratio
- Overscan
- H Digital Zoom
- V Digital Zoom
- H Digital Shift
- V Digital Shift
- Image Warping
- PIP/PBP
- OUTPUT | Image Warping
- PC Mode
- H Keystone
- V Keystone
- H Pincushion
- V Pincushion
- OUTPUT | PIP/PBP
- PIP/PBP Enable
- Main Source
- Sub Source
- Swap
- Size
- Layout
- SETUP
- Language
- Ceiling Mount
- Rear Projection
- Lens Function
- Menu Preferences
- Keypad LED Settings
- Pin
- Closed Captioning
- Communications
- SETUP | Lens Function
- Focus
- Zoom
- Lens Shift
- Lens Calibration
- Lens Lock
- SETUP | Menu Preferences
- SETUP | Pin
- PIN Protect
- SETUP | Communications
- LAN
- Crestron RoomView Control Tool
- Main Screen
- Edit Room
- Edit Attribute
- Network
- Serial Port Baud Rate
- Serial Port Echo
- Serial Port Path
- Projector Address
- OPTION
- Auto Source
- High Altitude
- Test Pattern
- Background Color
- Hot-Key Settings
- Power Settings
- Light Source Settings
- Light Sensor
- Factory Reset
- Service
- OPTION | Power Settings
- Standby Power Mode
- Direct Power On
- Auto Power Off
- Sleep Timer
- OPTION | Light Source Settings
- Light Source Mode
- Constant Power Settings
- Constant Luminance Settings
- Current Light Source
- Auto Switch
- Auto Switch Time (Hours)
- Light Source Info
- Reset Light Source Hours
- Appendices
- Troubleshooting
- Image Problems
- ? No image appears on-screen
- ? Partial, scrolling or incorrectly displayed image
- The screen of the Notebook or PowerBook computer is not displaying your presentation
- ? Image is unstable or flickering
- ? Image has vertical flickering bar
- ? Image is out of focus
- The image is stretched when displaying 16:10 DVD title
- Image is too small or too large
- Image has slanted sides:
- Image is reversed
- Image does not display in 3D
- Projector Problems
- The projector stops responding to all controls
- Lamp burns out or makes a popping sound
- When making a direct connection from your computer to the projector
- IP Address
- 192.168.0.100
- On Screen Messages
- Replacing the Lamp
- Type number: RICOH replacement lamp type 25
- CAUTION!
- Lamp Replacing Procedure:
- Filter maintenance
- Filter Replacing Procedure:
- Remote Key Code
- RS232 Pin Assignments
- Cabinet dimension
- Trademarks
Brand : RICOH
Model : PJ KU12000
Category : Projector