
Z Series ITC - Hi-Fi System Starkey - Free user manual and instructions
Find the device manual for free Z Series ITC Starkey in PDF.


| Product Type | Compact Hi-Fi System |
| Model | Z Series ITC |
| Brand | Starkey |
| Dimensions (WxHxD) | 400 x 150 x 300 mm |
| Weight | 5 kg |
| Power Supply | AC 220-240 V, 50/60 Hz |
| Power Consumption | 50 W (max) |
| Disc Playback | CD, CD-R/RW |
| Radio Tuner | FM/AM with presets |
| Bluetooth | Version 5.0, range 10 m |
| USB Input | USB 2.0 for MP3 playback |
| Auxiliary Input | 3.5 mm stereo jack |
| Speaker Output | 2 x 20 W RMS |
| Frequency Response | 20 Hz - 20 kHz |
| Remote Control | Included |
| Display | LED display |
| Cleaning | Wipe with dry soft cloth; do not use solvents |
| Safety | Do not expose to water or high humidity; unplug during storms |
| Accessories Included | Remote control, FM antenna, power cord |
| Spare Parts Availability | Contact Starkey support for remote or adapters |
Frequently Asked Questions - Z Series ITC Starkey
User questions about Z Series ITC Starkey
0 question about this device. Answer the ones you know or ask your own.
Ask a new question about this device
Download the instructions for your Hi-Fi System in PDF format for free! Find your manual Z Series ITC - Starkey and take your electronic device back in hand. On this page are published all the documents necessary for the use of your device. Z Series ITC by Starkey.
USER MANUAL Z Series ITC Starkey
ITE (In-The-Ear), ITC (In-The-Canal), CIC (Completely-In-Canal), IIC (Invisible-In-The-Canal)
Overview
ITE Overview 4
ITC Overview 6
CIC Overview 8
IIC Overview 10
Preparation
Batteries/Battery Indicators 12
Insertion and Removal 16
Operation
On & Off 18
Volume Control 19
Multimemory 22
Directional Settings 23
Telephone Use 23
Accessories
Wireless Accessories 26
Hearing System Care
Instrument Care 27
Hear Clear 2
Service and Repair 32
Troubleshooting Guide 33
Tips for Better Communication 34
Safety Information 36
FDA Information 38
FCC Information 41
My hearing instrument is a/an:
☐ ITE (In-The-Ear) see page 4.
☐ ITC (In-The-Canal) see page 6.
☐ CIC (Completely-In-Canal) see page 8.
☐ IIC (Invisible-In-The-Canal) see page 10.
My hearing instrument uses a:
☐ 13 battery (ITE) – Orange
☐ 312 battery (ITC) – Brown
☐ 10 battery (CIC) – Yellow
☐ 10 battery (IIC) – Yellow
Features, Controls and Identification
Your hearing system controls include:
- Microphone opening(s)
- Battery compartment (on/off control)
- Vent (optional)
- Sound outlet (receiver) and wax protection system
Your hearing system can be identified by:
- Location of serial number:
RED Right
BLUE Left
flowchart
graph TD
    1["Step 1"] --> 2["Step 2"]
    3["Step 3"] --> 4["Step 4"]
    5["Step 5"] --> 6["Step 6"]
    style 1 fill:#99ccff,stroke:#333
    style 2 fill:#99ccff,stroke:#333
    style 3 fill:#99ccff,stroke:#333
    style 4 fill:#99ccff,stroke:#333
    style 5 fill:#99ccff,stroke:#333
    style 6 fill:#99ccff,stroke:#333
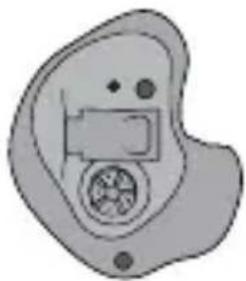 Dual Control(Optional) Dual Control(Optional) | 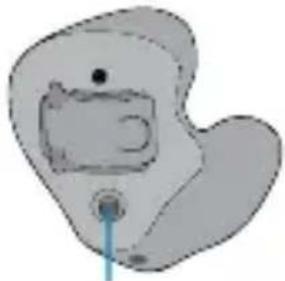 Multifunction Button (Optional) Multifunction Button (Optional) | 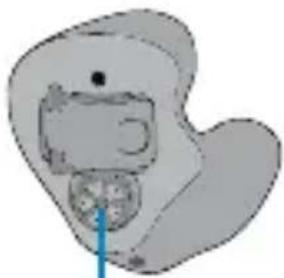 Volume Control(Optional) Volume Control(Optional) |
ITE Battery Size: 13
Features, Controls and Identification
Your hearing system controls include:
- Microphone opening(s)
- Battery compartment (on/off control)
- Vent (optional)
- Sound outlet (receiver) and wax protection system
Your hearing system can be identified by:
- Location of serial number:
RED Right
BLUE Left
text_image
1 2 3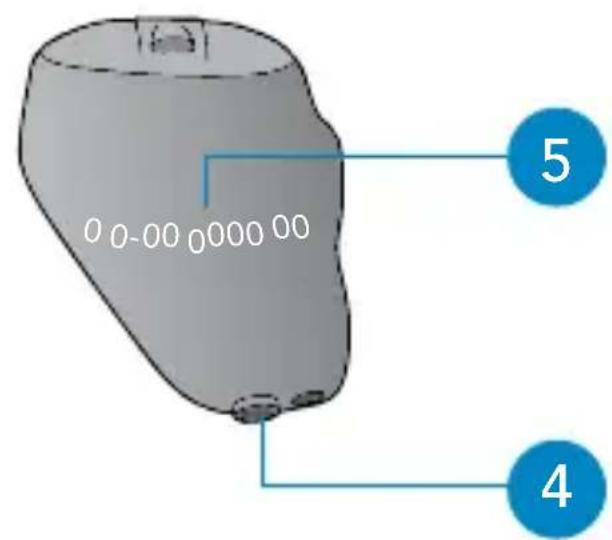
text_image
0 0-00 0000 00 5 4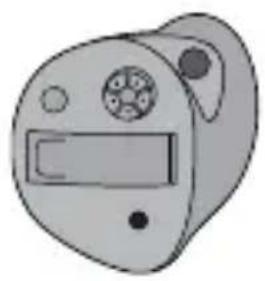 | 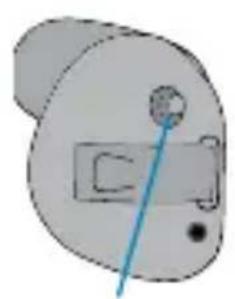 | 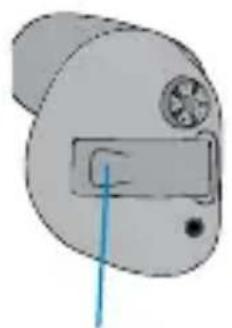 |
| Dual Control(Optional) | MultifunctionButton (Optional) | Volume Control(Optional) |
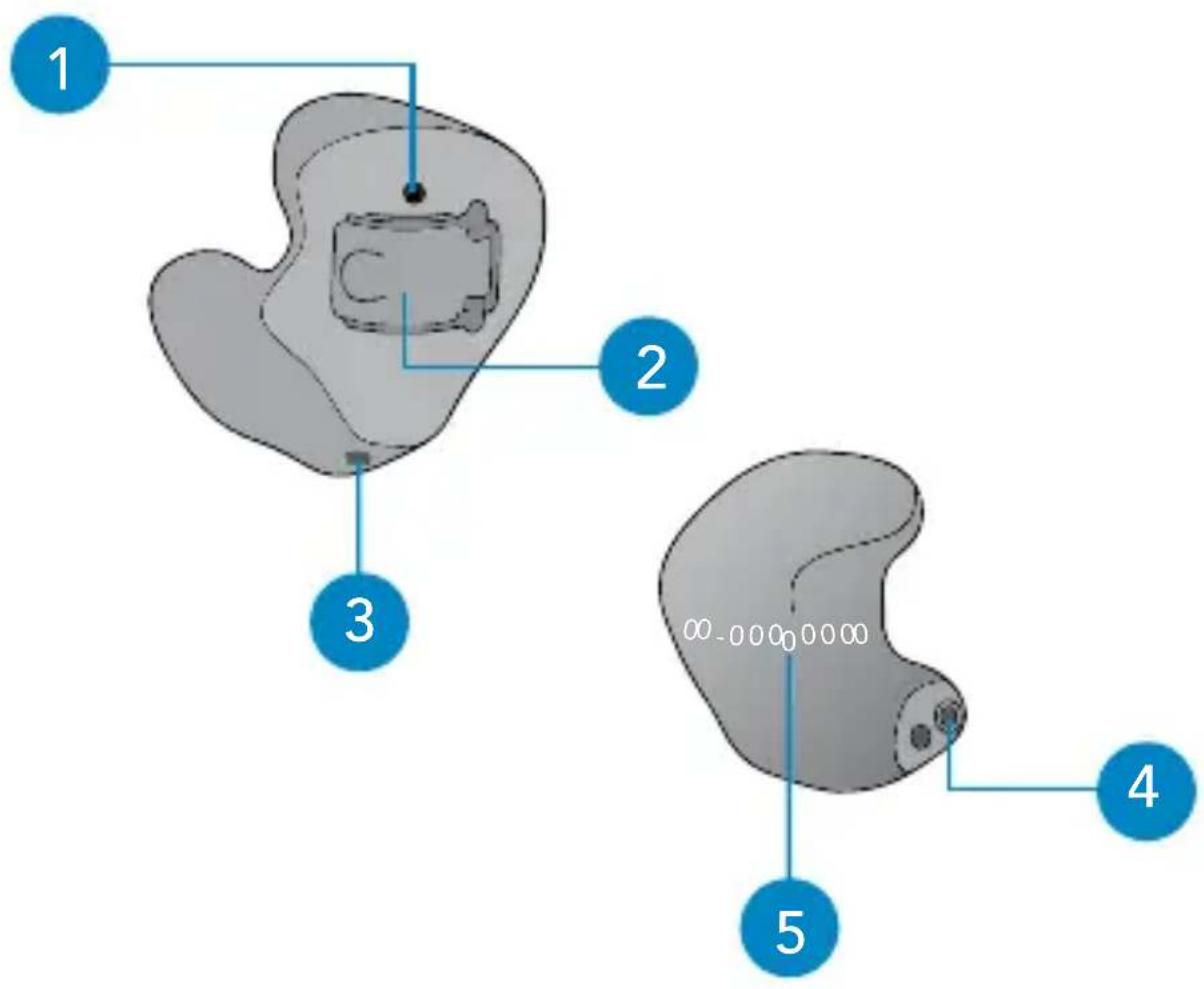
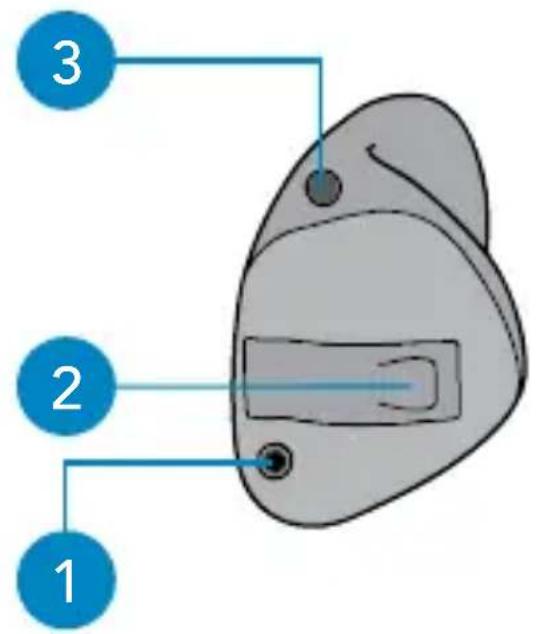
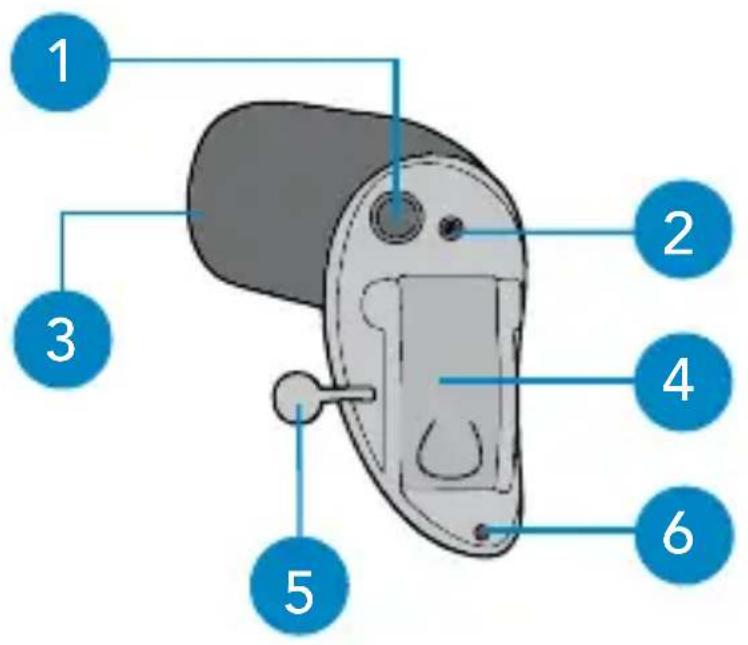
ITC Battery Size: 312
Features, Controls and Identification
Your hearing system controls include:
- Multifunction button (optional)
- Microphone opening
- Sound outlet (receiver) and wax protection system
- Battery compartment (on/off control)
- Removal handle
- Vent (optional)
Your hearing system can be identified by:
- Location of serial number:
RED Right
BLUE Left
text_image
1 2 3 4 5 6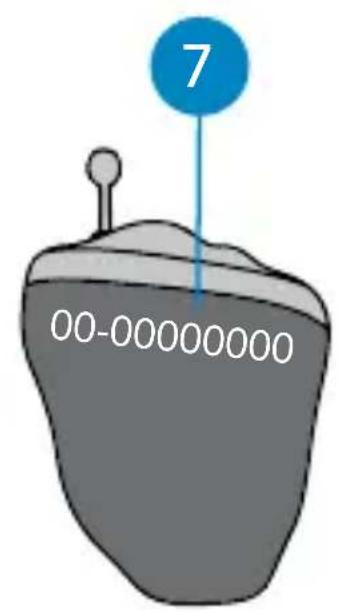
text_image
7 00-00000000CIC Battery Size: 10
Features, Controls and Identification
Your hearing system controls include:
- Microphone opening
- Sound outlet (receiver)
- Battery compartment (on/off control)
- Removal handle
- Vent (optional)
Your hearing system can be identified by the white R for the right ear and L for the left ear and the serial number:
- Location of serial number
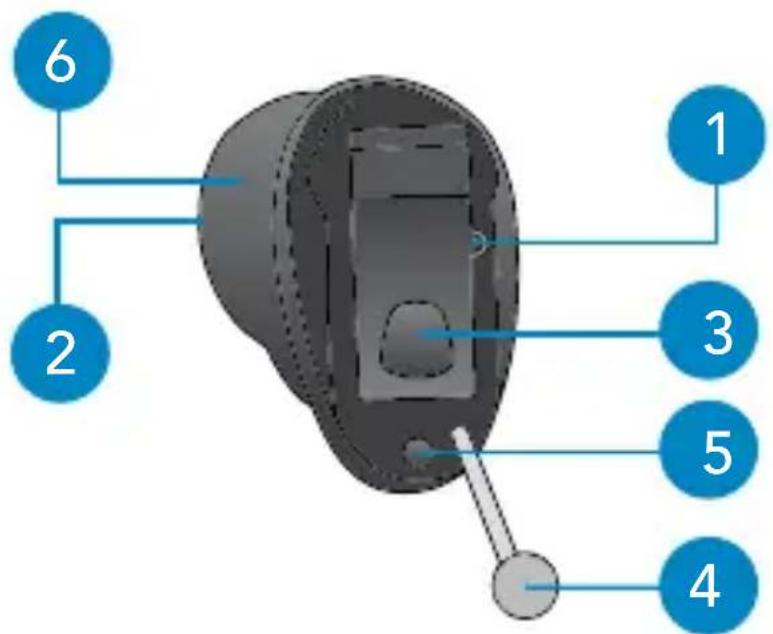
text_image
6 2 1 3 5 4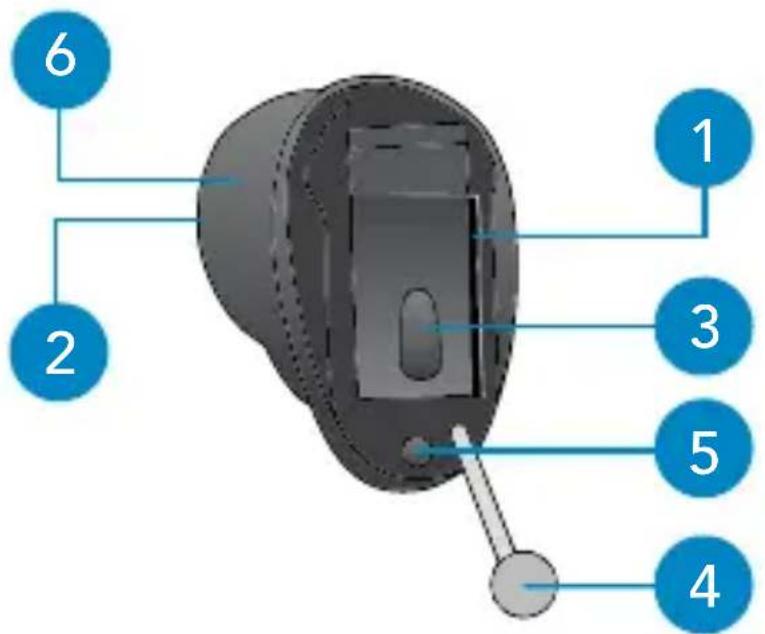
text_image
6 2 1 3 5 4IIC Battery Size: 10
Batteries
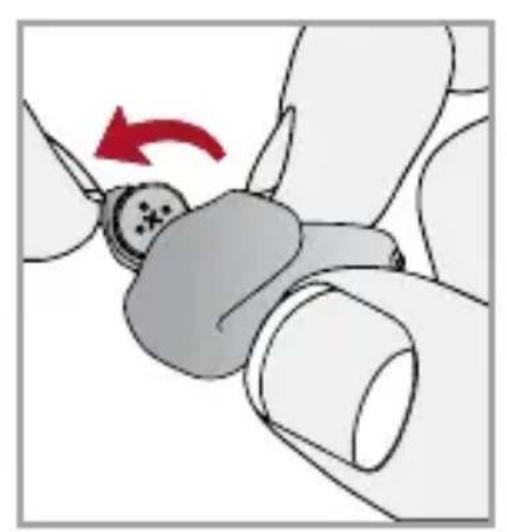
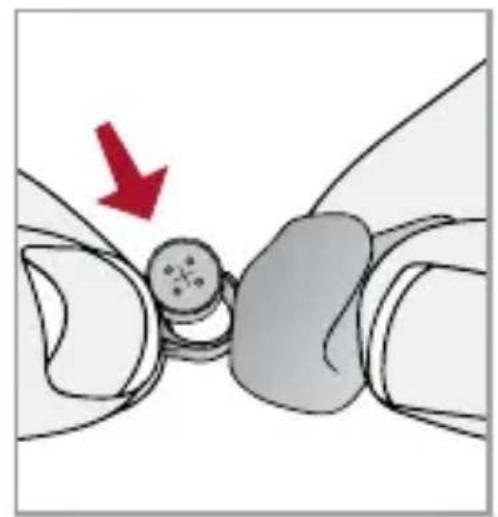
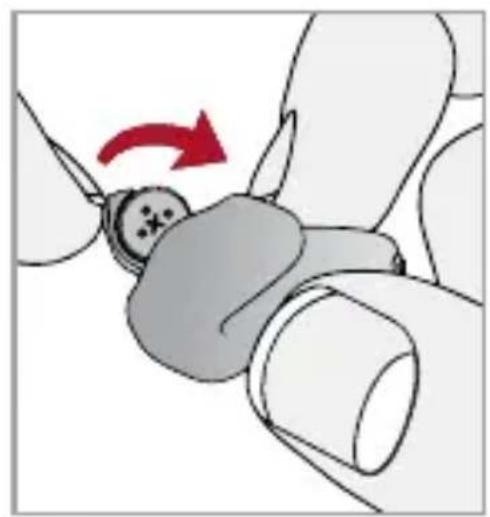
Your hearing system uses a battery as its power source. This battery size can be identified by the orange (13), brown (312) or yellow (10) color code on the packaging.
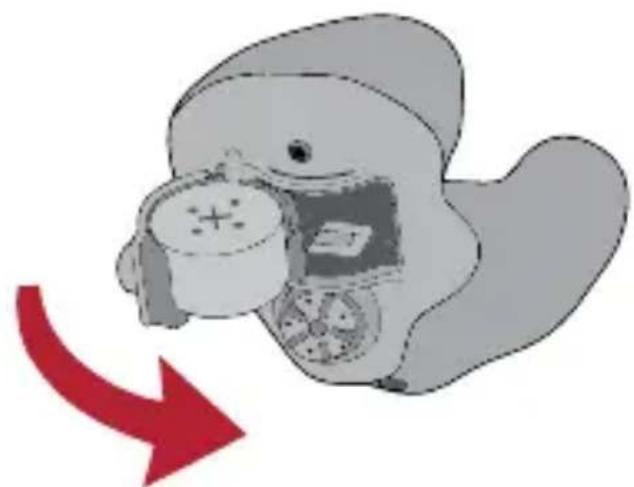
To insert or replace the battery:
-
Use the nail grip on the battery door.
-
Open the battery door gently and remove the old battery.
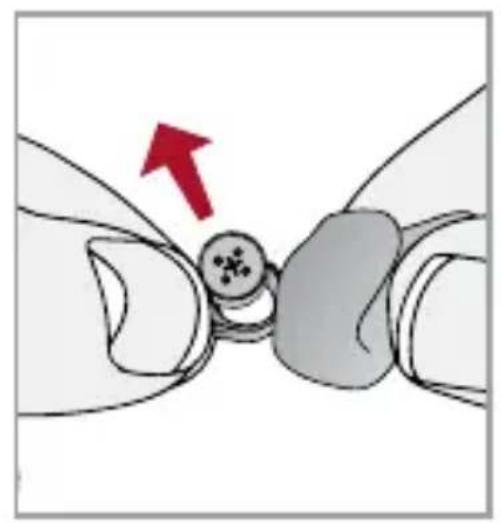
-
Remove the tab from the new battery.
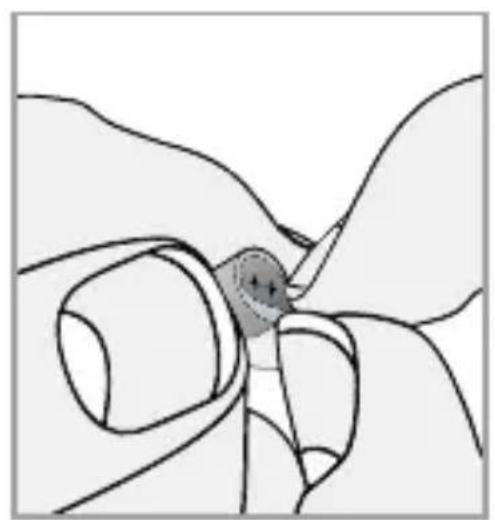
-
Line up the battery's "+" sign (flat side of the battery) with the "+" on the battery door.
-
Close the battery door.
Battery Indicators
An indicator will sound when the battery voltage is low. You have approximately five minutes* to replace the battery. An indicator will sound just before the battery stops working.
natural_image
Illustration of a hand holding a small electronic device with a red arrow indicating rotation (no text or symbols present)1
natural_image
Illustration of a hand holding a small object with a red arrow pointing upward (no text or symbols)2
natural_image
Diagram of a hand holding a small object with a circular inset, no text or symbols present3
natural_image
Illustration of a medical procedure showing a finger pressing a button with a red arrow indicating direction (no text or symbols present)4
natural_image
Illustration of a hand holding a small object with a red arrow indicating rotation (no text or symbols)5
Helpful Hints
- NEVER FORCE THE BATTERY DOOR SHUT; this could result in serious damage; if the door will not close securely, check that the battery is inserted correctly.
- Do not open the battery door too far or damage is likely to occur.
- Because of their size, it's a good idea to change and replace batteries above a table or desk to reduce the risk of dropping the instrument or battery.
- Dispose of used batteries immediately in the proper waste or recycling container.
- Because batteries can vary in size and performance, your hearing care professional is your best source for lifespan estimates and verification that you are using the proper size and type.

WARNINGS Batteries are dangerous if swallowed. To help prevent the accidental ingestion of batteries:

Keep out of reach of children and pets

Check your medications before taking them – batteries have been mistaken for pills

Never put batteries in your mouth, as they can easily be swallowed

NATIONAL BUTTON BATTERY INGESTION HOTLINE: 202-625-3333
Insertion and Removal
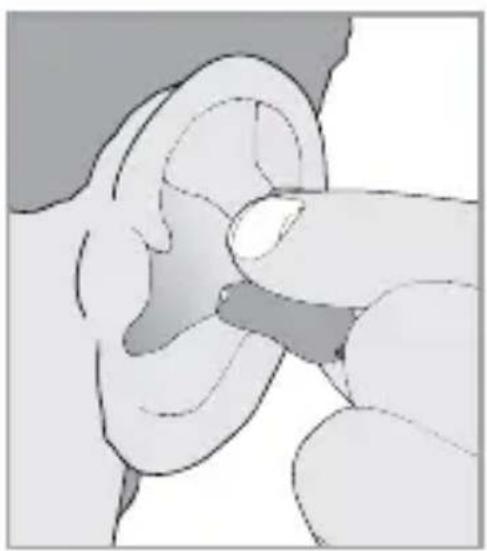
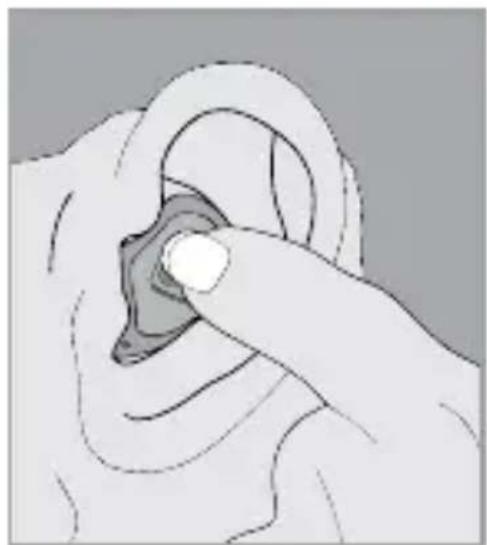
To insert the hearing instrument:
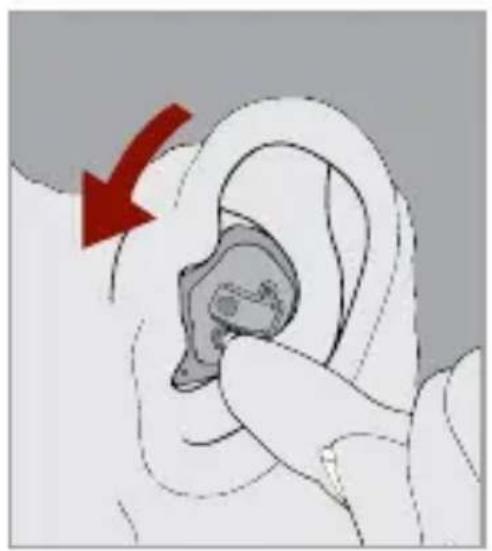
- Hold the instrument with your thumb and forefinger on the outer edges of the case.
- Tilt your hand slightly forward and gently insert the canal tip of the instrument into your ear canal and rotate the instrument backward. Softly press the instrument into place with your fingertip.
natural_image
Illustration of a human ear with a finger pointing to the area (no text or symbols)1
natural_image
Illustration of a hand holding an ear with a shaded area, no text or symbols present2
To remove the hearing instrument:
Grasp the instrument with your thumb and forefinger; gently rotate it as you pull outward.
Devices with removal handle: grasp removal handle and gently remove from ear.
Helpful Hints
- Minor irritation and inflammation may occur as your ear becomes accustomed to having an object in it; if so, please contact your hearing care professional.
- If an actual allergic reaction occurs, alternative materials are available; contact your hearing care professional.
- Severe swelling, discharge from the ear, excessive wax or other unusual conditions warrant immediate consultation with a physician.
On & Off
To turn on:
Insert a battery and completely close the battery door.
To turn off:
Open the battery door until the battery is no longer touching the battery contacts.
Your instrument has a power-on delay which may require a few seconds. You may hear a tone series indicating that your device is powered on.
natural_image
Illustration of a cartoon duck holding a bowl with a red arrow pointing downward (no text or symbols)Volume Control
☐ My hearing instrument volume is set automatically. See below.
☐ My hearing instrument uses the multifunction button for volume control. See below.
☐ My hearing instrument has a rotary volume control. See next page.
Automatic Volume Control
Your hearing system has been set to a specific volume level by your hearing care professional. If sounds are generally too loud or too soft, please contact your hearing care professional for advice and adjustment.
Multifunction Button–Volume Control
Your hearing system uses the button to control volume. Press then release the button until the desired volume level is reached. Each press/release changes the volume one increment.
| Volume Level Tone | |
| Level 5 (More volume) | Five beeps plus tone |
| Level 4 Four beeps | |
| Level 3 (Power on volume level) | Three beeps |
| Level 2 Two beeps | |
| Level 1 (Less volume) | One beep plus tone |
Rotary Volume Control
Use your fingertip to rotate the volume control.
- To make sounds louder, continue to rotate the control forward, toward your face.
- To make sounds softer, use your fingertip to rotate the control toward the back of your head.
Some hearing systems can be set for the Right device to increase the volume and the Left device to decrease the volume.
Ask your hearing care professional if this setting would benefit you.
natural_image
Illustration of a human ear with a red arrow indicating the ear area (no text or symbols present)
natural_image
Illustration of a hand inserting an ear into a device, with a red arrow indicating direction (no text or symbols)- Increase Volume 2. Decrease Volume
| Volume Level | Tone |
| (Maximum) | Five beepsplus tone |
 | |
| Level 3(Power on volume level) | Three beeps |
 | |
| (Minimum) | One beepplus tone |
☐ My multifunction button is set for multimemory. Please read the section below.
Multimemory
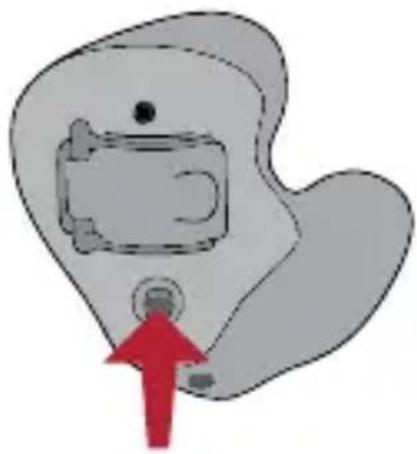
Your hearing care professional can set up to four hearing programs for you. These additional programs are accessed by pressing the multifunction button inward.
natural_image
Simple diagram of a device with a red arrow pointing to it, no text or symbols presentWhen you press the multifunction button, you may hear an indicator or a tone series indicating the device has changed to the next program.
Ask your hearing care professional about your specific hearing programs.
Directional Settings
Your hearing system may have a directional microphone to help improve speech understanding in noisy situations. Ask your hearing care professional about your particular directional settings.
Telephone Use
Your hearing instruments are equipped with tools to help you effectively communicate on the telephone. Ask your hearing professional about your telephone solution.
My hearing instruments have the following telephone setting(s):
☐ Automatic Telephone. See next page
☐ Automatic Telecoil. See next page.
☐ Telecoil and Manual Switching.
See next page.
(Program # ____.
Automatic Telephone and Automatic Telecoil
These options activate the telephone response automatically when used with a hearing aid compatible telephone. To use, place the telephone receiver on your ear as you normally would and the hearing instrument will select the telephone setting. It might be necessary to move the telephone receiver slightly to find the best reception. Once the telephone is removed from the ear, the hearing instrument will switch back to the normal listening mode.
NOTE: Consult with your hearing professional if your device does not seem to switch to the telephone setting automatically.
Telecoil and Manual Switching
Hearing instruments with a manual telecoil allow you to switch the devices to telephone mode when needed.
natural_image
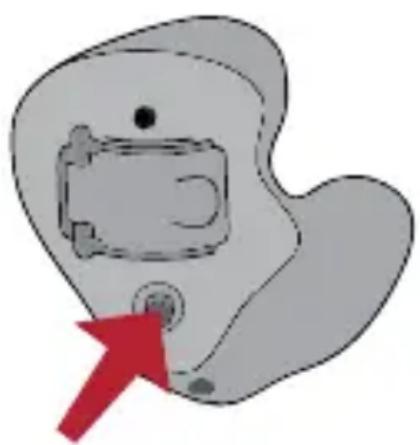
Simple diagram of a device inside a rounded rectangular shape with a red arrow pointing to the button (no text or symbols)Manually switched telecoils are activated by choosing the telecoil setting using the Multifunction button.
General Telephone Use
Some hearing instruments work best by holding the phone close to, but not fully covering your ear. In some instances, if you encounter whistling (feedback), tilt the receiver at an angle until the whistling stops. Additionally, the hearing instrument in the non- phone ear (ear opposite the phone) may switch to a telephone setting to reduce background sounds. Your hearing professional can provide instructions and techniques for your specific needs.
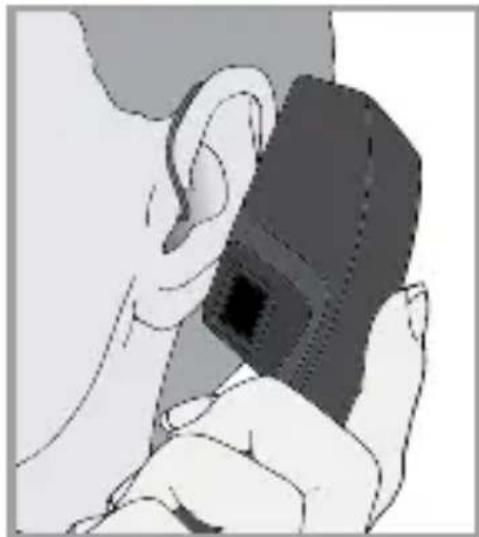
natural_image
Illustration of a person holding a medical device, no text or symbols visible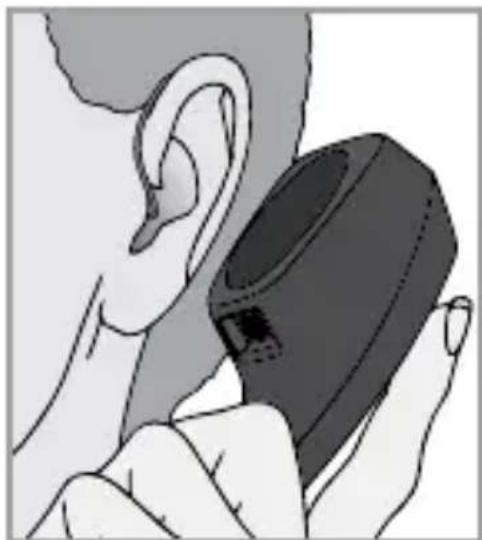
natural_image
Illustration of a person holding a device with an ear (no text or symbols visible)Wireless Accessories\*
There are several wireless accessories that allow you to control and maximize the full potential of your hearing system. These include a remote control as well as wireless connection to your entertainment system. Consult with your hearing professional to determine which accessories may be best for you.
Instrument Care
Do your best to keep your hearing instrument clean at all times. Heat, moisture and foreign substances can result in poor performance.
- Clean daily over a soft cloth to prevent damage from a fall to a hard surface.
- Use a cleaning brush to clean debris from around the microphone, receiver and battery compartment.
- Never use water, solvents, cleaning fluids or oil to clean your instrument.
Your hearing care professional can provide further information on additional maintenance procedures for your hearing system if needed.
Helpful Hints
- When not wearing your hearing instruments, open the battery door to allow any moisture to evaporate.
- When not in use, remove the batteries completely; place your hearing system in the storage container and store:
- In a dry, safe place
- Away from direct sunlight or heat to avoid extreme temperatures
- Where you can easily find them
- Safely out of reach of pets and children
- Do not take apart your hearing instruments or insert the cleaning tools inside them.
Hear Clear™ Receiver Wax Guards
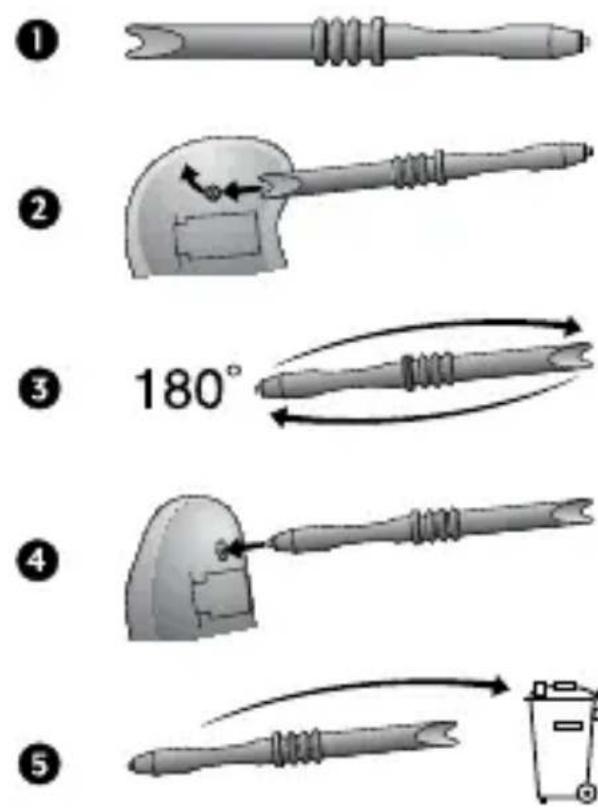
The Hear Clear exclusive earwax protection system uses disposable wax guards. The innovative wax guards prevent earwax accumulation in the hearing aid receiver.
Wax Guard
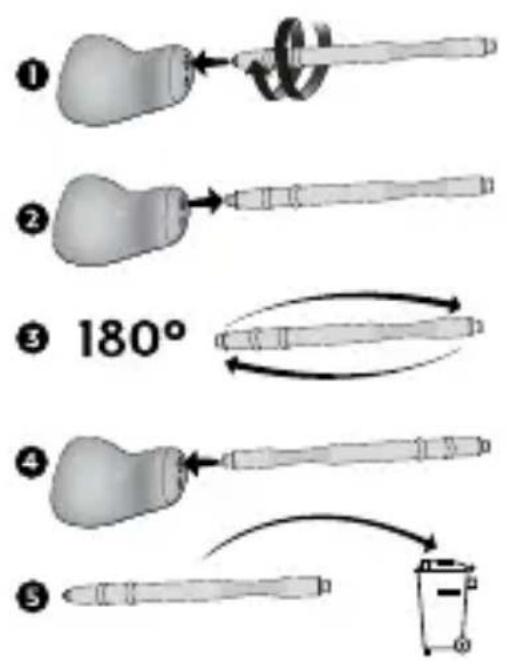
text_image
① ② ③ 180° ④ ⑤Custom Microphone Covers
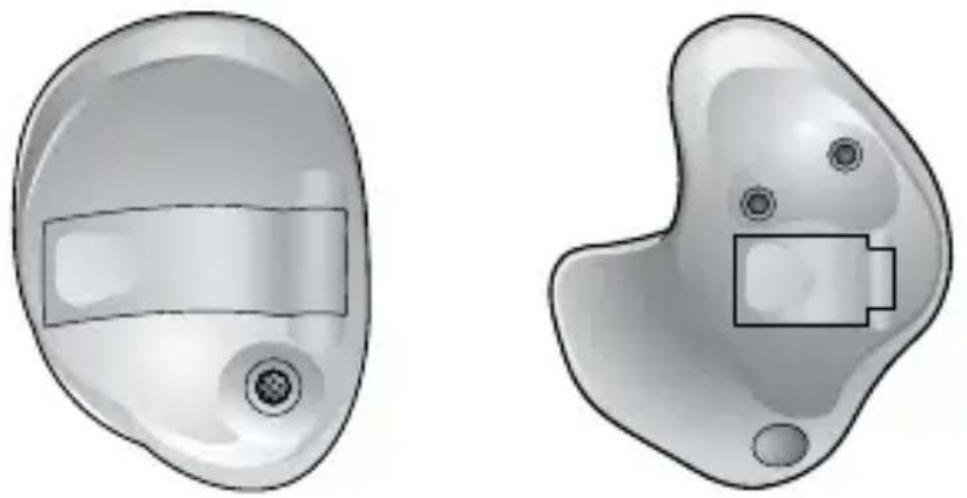
The custom microphone cover protects the microphone from wax and debris. Your hearing care professional will instruct you on maintenance of the microphone cover.
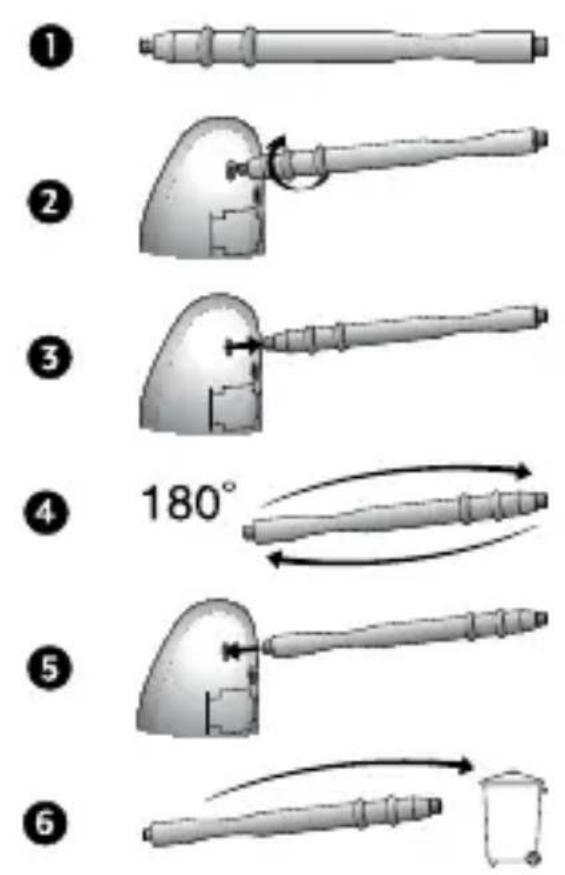
There are two sizes of custom microphone covers: one is small and one is large. The size of the microphone cover determines the method for removing and replacing.
Small
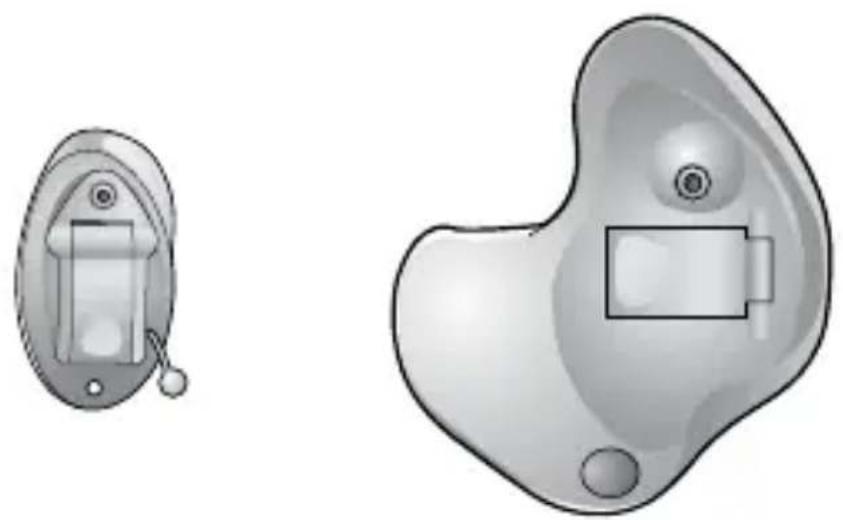
natural_image
Two grayscale illustrations of electronic components, one showing a remote control panel and the other a rectangular device with a button (no text or symbols)Custom Microphone Cover – Small
text_image
Diagram illustrating five steps of a soldering iron tool, showing how to change the 180° angle and then to add a final weight.Large
natural_image
Two medical device diagrams showing internal components with no visible text or symbolsCustom Microphone Cover – Large
①
②
3
④ 180°
5
6
Service and Repair
If, for any reason, your hearing system does not operate properly, do NOT attempt to fix it yourself. Not only are you likely to violate any applicable warranties or insurance, you could easily cause further damage.
Should your hearing system fail or perform poorly, check the guide below for possible solutions. If problems continue, contact your hearing care professional for advice and assistance.
Troubleshooting Guide
| SYMPTOM POSSIBLE CAUSES | SOLUTIONS | |
| Not Loud Enough | Low battery Replace | battery |
| Wax or debris in the microphone or receiver | Clean both microphone and receiver with brush | |
| Change wax prevention system | ||
| Hearing change | Contact your hearing care professional | |
| Inconsistent Performance | Low battery Replace | battery |
| Unclear, Distorted Performance | Low battery Replace | battery |
| Defective hearing instrument | Contact your hearing care professional | |
| Dead | Low battery Replace | battery |
| Wax or debris in the microphone or receiver | Clean both microphone and receiver with brush. Change wax prevention system. | |
Your hearing care professional will recommend an appropriate schedule to help you adapt to your new hearing system. It will take practice, time and patience for your brain to adapt to the new sounds that your hearing system provides. Hearing is only part of how we share thoughts, ideas and feelings. Reading lips, facial expressions and gestures can help the learning process and add to what amplification alone may miss.
Please review the following simple communication tips:
For You
- Move closer to and look at the speaker
- Sit face-to-face in a quiet room
- Try different locations to find the best place to listen
- Minimize distractions
- Background noises may be frustrating at first; remember, you have not heard them for a while
- Let others know what you need; keep
in mind that people cannot "see" your hearing loss
- Develop realistic expectations of what your hearing instruments can and cannot do
- Better hearing with hearing instruments is a learned skill combining desire, practice and patience
For Your Family and Friends
Your family and friends are also affected by your hearing loss. Request that they:
• Get your full attention before beginning to speak
- Look at you or sit face-to-face in a quiet room
- Speak clearly and at a normal rate and level; shouting can actually make understanding more difficult
- Rephrase rather than repeat the same words; different words may be easier to understand
- Minimize distractions while speaking
Safety Information
INTENDED USE: An air conduction hearing aid is a wearable sound-amplifying device intended to compensate for impaired hearing. Hearing aids are available in multiple gain/output levels appropriate to treat hearing losses ranging from mild to profound.
Your hearing instruments are designed to comply with the most stringent Standards of International Electromagnetic Compatibility. However, it is still possible that you may experience interference caused by power line disturbances, airport metal detectors, electromagnetic fields from other medical devices, radio signals and electrostatic discharges.
If you use other medical devices or wear implantable medical devices such as defibrillators or pacemakers and are concerned that your hearing instruments might cause interference with your medical device, please contact your physician or the manufacturer of your medical device for information about the risk of disturbance.
Your hearing instruments should not be worn during an MRI procedure or in a hyperbaric chamber. Your hearing instruments are classified as a Type B applied part under the IEC 60601-1 medical device standard. Your hearing instruments are not fully certified to operate in explosive atmospheres that may be found in coal mines or certain chemical factories.
Your hearing instruments should be stored within the temperature and humidity ranges of -40^ ( -40^ ) to +60^ ( 140^ ) and 10 to 95 percent rH.
Your hearing instruments are designed to operate beyond the range of temperatures comfortable to you, from very cold up to 50^ C ( 122^ F).
Use on Aircraft\*
The optional wireless capabilities that may be featured in your hearing instruments should not be used on an aircraft unless specifically permitted by the flight personnel. Your hearing care professional can enable a special program that allows your hearing aids to work without wireless functionality.
International Use\*
The optional wireless capabilities that may be featured in your hearing instruments are approved to operate at a radio frequency specific to your country or region and might not be approved for use outside your country or region. Be aware that operation during international travel may cause interference to other electronic devices, or other electronic devices may cause interference to your hearing instruments.
*Applies to wireless hearing instruments only.
Required Information
The following additional information is provided in compliance with U.S. Food and Drug Administration (FDA) regulations:
WARNING TO HEARING AID DISPENSERS. A
hearing aid dispenser should advise a prospective hearing aid user to consult promptly with a licensed physician (preferably an ear specialist) before dispensing a hearing aid if the hearing aid dispenser determines through inquiry, actual observation, or review of any other available information concerning the prospective user, that the prospective user has any of the following conditions:
i. Visible congenital or traumatic deformity of the ear.
ii. History of active drainage from the ear within the previous 90 days.
iii. History of sudden or rapidly progressive hearing loss within the previous 90 days.
iv. Acute or chronic dizziness.
v. Unilateral hearing loss of sudden or recent onset within the previous 90 days.
vi. Audiometric air-bone gap equal to or greater than 15 decibels at 500 Hertz (Hz), 1,000 Hz and 2,000 Hz.
vii. Visible evidence of significant cerumen accumulation or a foreign body in the ear canal.
viii. Pain or discomfort in the ear.
IMPORTANT NOTICE FOR PROSPECTIVE HEARING AID USERS.
Good health practice requires that a person with a hearing loss have a medical evaluation by a licensed physician (preferably a physician who specializes in diseases of the ear) before purchasing a hearing aid. Licensed physicians who specialize in diseases of the ear are often referred to as otolaryngologists, otologists, or otorhynolaryngologists. The purpose of the medical evaluation is to assure that all medically treatable conditions which may affect hearing are identified and treated before the hearing aid is purchased.
Following the medical evaluation, the physician will give you a written statement affirming that your hearing loss has been medically evaluated and that you may be considered a candidate for a hearing aid. The physician will refer you to an audiologist or hearing aid dispenser, as appropriate, for a hearing aid evaluation.
The audiologist or hearing aid dispenser will conduct a hearing aid evaluation to assess your ability to hear with and without a hearing aid. The hearing aid evaluation will enable the audiologist or dispenser to select and fit a hearing aid to your individual needs.
If you have reservations about your ability to adapt to amplification, you should inquire about the availability of a trial-rental or purchase-option program. Many hearing aid dispensers now offer programs that permit you to wear a hearing aid for a period of time for a nominal fee after which you may decide if you want to purchase the hearing aid.
Federal law restricts the sale of hearing aids to those individuals who have obtained a medical evaluation from a licensed physician. Federal law permits a fully informed adult to sign a waiver statement declining the medical evaluation for religious or personal beliefs that preclude consultation with a physician. The exercise of such a waiver is not in your best health interest and its use is strongly discouraged.
A hearing aid will not restore normal hearing and will not prevent or improve a hearing impairment resulting from organic conditions. Use of a hearing aid is only part of hearing habilitation and may need to be supplemented by auditory training and instruction in lip reading. In most cases, infrequent use of a hearing aid does not permit a user to attain full benefit from it.
CHILDREN WITH HEARING LOSS. In addition to seeing a physician for a medical evaluation, a child with a hearing loss should be directed to an audiologist for evaluation and rehabilitation since hearing loss may cause problems in language development and the educational and social growth of a child. An audiologist is qualified by training and experience to assist in the evaluation and rehabilitation of a child with a hearing loss.
REGULATORY NOTICES
FCC ID: EOA-IRIS-HA
IC: 6903A-IRISHA
FCC NOTICE
This device complies with part 15 of the FCC rules and with RSS-210. Operation is subject to the following two conditions: (1) This device may not cause harmful interference, and (2) this device must accept any interference received, including interference that may cause undesired operation of the device.
Note: The manufacturer is not responsible for any radio or TV interference caused by unauthorized modifications to this equipment. Such modifications could void the user's authority to operate the equipment.
Hereby, Starkey® Hearing Technologies declares that the wireless custom product family is in compliance with the essential requirements and other relevant provisions of Directive 1999/5/EC. A copy of the Declaration of Conformity can be obtained from the below addresses.
Starkey Hearing Technologies
6700 Washington Ave. South
Eden Prairie, MN 55344 USA

Wm. F. Austin House, Bramhall Technology Park
Pepper Road, Hazel Grove, Stockport SK7 5BX
United Kingdom

Waste from electronic equipment must be handled according to local regulations