ORSTED - Heating Haas+Sohn - Free user manual and instructions
Find the device manual for free ORSTED Haas+Sohn in PDF.


User questions about ORSTED Haas+Sohn
0 question about this device. Answer the ones you know or ask your own.
Ask a new question about this device
Download the instructions for your Heating in PDF format for free! Find your manual ORSTED - Haas+Sohn and take your electronic device back in hand. On this page are published all the documents necessary for the use of your device. ORSTED by Haas+Sohn.
USER MANUAL ORSTED Haas+Sohn
General instructions for operation, installation and maintenance
FIREPLACE STOVES
HAAS + SOHN Rukov s.r.o.
CE
CZ A0202
MANUFACTURER:
HAAS+SOHN
SNP 474, 408 01 RUMBURK, CZECH REPUBLIC
COMPANY ID: 62740989 TAX ID: CZ62740989
JK 04 164 15 13 14 02 g
CONTENTS
- TECHNICAL SPECIFICATIONS....5
1.1. Heating concept 5
1.2. Construction design....5 - BURNING PROCESS....6
2.1. Fuel volume and burning process adjustments....6
2.2. Fuel 7 - SAFE OPERATION 7
3.1 SAFE OPERATION ....7
3.2. Safe distance between the fireplace stove and flammable material 8
3.3. Safe distance between the smoke flue and flammable material....8
3.4. Directions for safe operation 8 - INSTALLATION AND CONNECTION TO THE CHINEY
- INSTALLATION AND CONNECTION TO THE CHIMNEY....9
4.1 Connection to the chimney or chimney insert....9
4.1. Connection to the chimney of chimney insert....9 4.2. Connection to the chimney vent....9
4.3. Directions for smoke flue installation 9
4.4. Installation of the fireplace stove within the room 1
4.5. Cleaning the heating device and chimney 1 4.6. Chimney fire 1
4.7 External combustion air supply system 1 - OPERATING INSTRUCTIONS 1
5.1. Before first operation.... 1
5.2. Setting the fire....1 5.3. Fending the fire....1
5.3. Feeding the fire .... 1 5.4. Glass cleanness .... 1
5.5. Operation during temporary period and at worsened weather conditions ..... 1
5.6. How to substitute the blind element by the exchanger 1
5.7. Ash removal 1 - CLEANING AND MAINTENANCE .... 1
6.1 Cleaning the heating device .... 1
6.1. Cleaning the heating device.... 1 6.2. Cleaning the ceramics and tiles.... 1
6.3. Sealing lines and tapes 1
6.4. Spare parts.... 1 - WHAT TO DO IF...DO YOU DO IT YOURSELF? 13-14
- FREQUENT PROBLEMS AND QUESTIONS 14
8.1. Cracked (released) fireclay (vermiculite) brick in the burning area.... 14 8.2. Broken glass.... 15
8.3. Broken glass 15 8.3. Partitions to control the chimney effect 15
8.4. Cracked side tile....15
8.5. The blind element substituted by an exchanger (optional) 15 - PRODUCT LIABILITY AND SERVICE 16
9.1. General 16 9.2. Conditions for guarantee 16
9.2. Conditions for guarantee 16 9.3. Guarantee and post-guarantee service 16
9.4. Claim rejected 16
9.5. How to make a claim.... 17
9.6. How to order spare parts.... 17 -
MISCELLANEOUS 17
10.1. Accessories supplied with the insert.... 17 10.2. Special accessories (on order).... 17
10.2. Special accessories (on order) 17 10.3. Recommended spare parts 17
10.4. Package and waste disposal.... 18
10.5. ES Declaration of Conformity and CE Certificate 18
10.6. HAAS+SOHN Rukov s.r.o Products and Manufacturing Programme.... 18 -
SUPPLEMENTS 19-21
Congratulations! You have just bought the stove HAAS + SOHN, a top-quality product. Thank you very much for your interest and purchase. Kindly read the Operating Instructions to find out comprehensive information about the function, correct use and handling. We recommend you to read the instructions carefully in order to avoid any risk related to likely damage. Proper operation and maintenance affects the service life of the product as well. In addition, proper operation and fuel supply is connected with fuel savings and environment protection. Technical specifications are included in the manual.
The manufacturer provides guarantee providing you adhere to the directions and recommendations in the instructions for operation and maintenance. Keep the operating instructions and technical card safe to be able to refresh your knowledge at the beginning of the new heating season.
1. TECHNICAL SPECIFICATIONS
The fireplace stove is designed for heating in habitable rooms, recreational buildings, work stations and other places to provide thermal comfort, while the visual effect – the perception connected with flame – is similar to the sensation of live fire.
1.1. Heating concept
The fireplace stove is designed for burning wood, eco-fuel cakes and coal cakes (specific types only) in a burning-through way, characteristic with very good firing conditions. The air within the room is heated thus the thermal comfort is provided by heat convection, in part by heat radiation as well. This way, you can heat up even very cold, long-time unheated rooms very quickly. The concept of heating by means of heat convection is based on the fact that the air in the room enters the fireplace stove at its bottom part, being heated in the course of its way up inside the convection space consisting of a double shell of the heating device. The air then flows through the holes in the upper part of the fireplace stove back in the room. The radiation heat is generated by means of surface areas of the fireplace stove (metal, ceramics, glass). Due to the construction, the biggest radiation heat source is the glass door.
1.2. Construction design
The fireplace stove is welded of steel profiles, thickness 2-5 mm. In the middle of the fireplace stove, there is a firing chamber that may be closed with a stocking door (equipped with a self-acting element). The door is provided with special a large-area glass sheet, thermal resistance up to 800 °C. The inner space of the firing chamber is usually lined with fireclay brick shapes. The bricks are not jointed with any filler (the reason is a protection of the bricks against damage by thermic dilatation). The upper part of the firing chamber is equipped with partitions designed for directing flue gases into a smoke outlet. The partitions may be fixed or movable. Such movable partition may serve as a supporting holder for fireclay bricks. At the bottom part of the firing chamber, a simple, fixed cast grate is installed. Before the grate, a barrier is usually provided, to prevent from burning pieces falling out or onto the door (front glass). Under the grate, there is a space designed for ashpan. The remaining space at the bottom part of the fireplace stove may be used for spare fuel. Fireplace stove casing is made of steel panels, ceramic tiles or lined of thick tiles. The fireplace stove steel construction is protected with special refractory paint.
Caution! The fireplace stove is not designed for continuous heating but for periodical – interrupted (i.e. temporary) operation.
2. FIRING PROCESS
2.1. Fuel quantity and firing process adjustments
Burning wood, wood cakes (or coal cakes – optional) in the fireplace stove is based on burning through the fuel, which means that such firing takes place throughout the whole go of the fuel at a time. In order to provide optimal conditions for easy kindling and burning up, you need enough air being led under the fuel in fire, through the grate: this is the so-called primary air, and it must be always adjustable. By increasing temperature of the fuel burning through, certain gaseous components of the fuel evolve that – unless additional air is supplied – would be of no avail in terms of heat energy: therefore, additional air must be provided at the flame level where the firing process connected with those gaseous components may continue. Now, at this stage, the primary air is – in fact – not necessary, while secondary air supply is required, or tertiary air may be added as well, respectively. The secondary air supply, usually adjustable, improves the firing process and contributes to the door glass self-cleaning. The tertiary air supply is designed for general improvement of the firing process and is usually fixed (one cannot regulate it in any way). If the proportion of the air volumes led into the particular sections of the firing chamber is correct, the burning efficiency is increased while emission of pollutants in the environment is reduced. The layout of the air supply regulative elements is shown in the Technical Cart (a part of the documentation supplied with the fireplace stove).
Our models of fireplace stove may reach up to 85% efficiency – which means top performance.
The heating capacity of the heating device depends on the fuel quantity burnt per defined time, fuel quality and firing process efficiency. Using the Chart 2 (heating values) may help you to make a picture of attainable capacity: let's assume that you burn 1kg of wood per hour, wood humidity is 20% . Further, with higher wood moisture its heating capacity goes down.
In the testing room conditions, adjustability of the heating device was tested, within 30 – 100% of nominal performance. For the regulation, the chimney effect and the fuel quantity were applied. In practice, the heating capacity may be regulated by means of air supply regulating elements (especially the primary air inlet). There is no simple and explicit way to determine the firing process adjustment by means of regulators. There are many aspects to consider – fuel moisture, type of fuel, chimney effect, exterior pressure conditions, etc. Therefore, the firing process (the flame intensity and quality) should be re-adjusted for particular conditions.
You will be able to adjust the firing process to achieve best efficiency after a short time of operation. A detailed chart showing how to adjust the air supply regulating elements is included in the technical specifications. The figures in the chart are the testing results verified by the State Testing Laboratory. The Chart 1 presents just general information for air supply adjustment.
| Fuel | Fuel quantity | Primary air | Secondary air | Tertiary air |
| Adjustable | Adjustable | No adjustment | ||
| wooden logs wood cakes | 2 - 3 logs (approx. 2 – 3 kg)2 - 4 logs (approx. 2 – 3 kg) | Closed or open (depends on local conditions) | Open wide | Fixed adjustment at installation |
| coal cakes | 2 - 3 logs (approx. 2 – 3 kg) | half-open | Fixed adjustment at installation |
Chart 1
6
Our tips for wood burning
Any time you set the fire, let the primary air regulator open long enough to allow the fuel burning properly.
Before you re-load, it is recommended to open the primary air regulator wide. While burning wood, make sure the wood is dry, maximum moisture 20%.
Our tips for coal cake burning (selected models only)
- To achieve optimisation of the firing process, load the cakes directly onto the grate holes: this way, you support the burning in best possible way.
- Make sure you do not overload: for the heat capacity you may use, i.e. to maintain the heat, a couple of cakes is enough: otherwise the device would suffer from excessive heat. Coal cake fuel efficiency may reach 6 kWh/1 kg, i.e. by some 40% more than wood!
2.2. Fuel
In fireplace stoves, you may burn logs, wood cakes and coal cakes (some models only). The moisture of the wood to be burnt should be lower than 20%, optimally 10%. The rule of thumb is: the less water in the fuel, the higher heating capacity you achieve. For the recommended wood moisture, you may reach it safely if you store the wood in a well ventilated shelter for at least two years. The water content in coal cakes should be specified by the manufacturer. The cakes should be stored in a dry room otherwise they disintegrate. It is recommended to store the wood intended for burning in pieces approx. 3-6 cm (diameter), 20–30 cm (length). It is forbidden to load and burn coal or charred coal. In the fireplace, never burn flammable liquids or waste. It is forbidden to burn papering, chipboards, plastic materials, penetrated wood, wood shavings or saw dust. Burning such materials not only is detrimental to the environment but shortens the service life of the heating device as well: you might seriously damage the device or the chimney as well.
Note: The bark, a part of wooden logs, is no issue at all.
Fuel efficiency: selected types of wood at moisture 20%
| Wood Fuel efficiencykWh/m3 | Fuel efficiencykWh/1 kg | Weight kg/(m3) | |
| Spruce, fir 1957 4.0 485 | |||
| Larch | 2461 | 4.0 | 610 |
| Pine | 2280 | 4.0 | 565 |
| Oak, beech 2743 3.8 726 | |||
Chart 2
3. SAFE OPERATION
3.1. General requirements
While installing and operating stove (stove insert), it is obligatory to adhere to the fire prevention regulations (related to this type of devices) in force in the country of installation.
3.2. Safe distance between the fireplace stove and flammable material
If you have installed the fireplace stove within the room with flammable objects, flammability Class B, C1 and C2, the safety distance from the front (or side glass surfaces) is 800 mm; for the other directions, the safety distance is 200 mm. If the fireplace stove is installed within a room with flammable objects, flammability class C3, the safety distances must be doubled. Kindly pay attention to the information provided in Supplement 1. The most important installation dimensions are shown in the product name plate.
3.3. Safe distance between the smoke flue and flammable material
The safety distance from the door frame lining and similar constructions made of flammable materials and from pipeline installations, incl. insulating elements is 200mm (minimum). The safety distance from the other parts of the constructions made of flammable materials is minimum 400mm . This is applied to building materials, flammable Class B, C1 and C2 (see Chart 3). Kindly pay attention to the information provided in Supplement 2. More accurate classification is available only if testing is performed for the particular product.
3.4. Directions for safe operation
For firing or kindling, never use any flammable liquid! It is forbidden to burn any plastic material, wooden material combined with chemicals (chipboard, etc.) or domestic (unsorted) refuse containing plastic, etc.
The fireplace stove must be operated by adults only! Never allow children in the room unattended. The surface of the fireplace stove is overheated, especially the glassy components: any contact will cause serious burnt. During the operation, occasional monitoring is required. For safe operation and handling the regulation elements and the door closing devices, use the protective glove (a part of the supply).
Do not put any objects or tools on the fireplace stove while in operation or hot: flammable material may cause fire. Do not put any vessels with cold liquid in the ceramic -tiled fireplace stove while hot: the tiles might crack!
The ashpan must be manipulated with utmost care. The ash may be very hot so there is danger of serious burnt. Hot ash must not be in contact with flammable material – for example, while pouring it into waste container.
The fireplace stove must be operated in compliance with the directions and recommendations in the Operating Instructions. It is forbidden to modify the fireplace stove in any way unless approved by the manufacturer.
Flammability class: selected building materials
| Building materials and products | Building materials |
| A – Flame proof matter Granite, sandstone, heavy concrete (porous), brick, ceramic tiles, special plaster | |
| B - heavy fuels | Akumin, Heraklit, Lignos, ltaver |
| C1 – hardly inflammable | Hardwoods, Hobrex panels, Sirkolit, hardened paper, umakart |
| C2 – medium inflammable | Chip boards, Solodur, cork parquet, rubber, floor covering |
| C3 - Flash fuels | Wood-fibre boards, polystyrene, polyurethane |
Chart 3
4. INSTALLATION AND CONNECTION TO THE CHIMNEY
Caution! For installation, relevant local regulations must be strictly adhered, including the regulations related to national and European standards for this type of device.
4.1. Connection to the chimney or chimney insert
Connection of the fireplace stove to the chimney vent is subjected to approval by specialist chimney company (CSN 73 4201:2008), or to approval according to relevant regulations in force in the country where the installation is made. Kindly pay attention to the information provided in Supplement 2.
To provide proper function and operation, proper chimney effect in the smoke flue neck is required. For the minimum stack draught, see the Technical Card for the particular product. Insufficient chimney effect results in malfunction of the fireplace stove, excessive dirt on the glass, and excessive clogging in the smoke flue system. The general heat capacity of the device is reduced. If you feed the fire while proper chimney draught is not provided, flue gases may spread throughout the room. For this reason, it is strictly recommended to have regular check done by a specialist chimney company and maintain the heating device regularly. If the chimney effect is too high over 20 Pa it is recommended to install a suitable blocking device (for example, flue tube with a block). Excessive chimney draught may cause troublesome operation, for example, too intensive burning, high fuel consumption, damage on the heating device, etc.
Caution! It is recommended to connect the fireplace stove with rear outlet to the chimney by direct connection (without an elbow element). Any other method of the connection should be approved by a specialist chimney company.
4.2 Connecting the stove fireplace to the venting unit
It is recommended to connect the stove (insert) to a separate chimney vent. A joint chimney vent may be used for the connection only if the safety regulations valid in the country of installation allow doing so. It is forbidden to connect the stove (stove insert) to the same vent used for a gas appliance. The minimum working height of the vent is 5 m. Depending on local conditions, it is possible to connect the stove in the vent with a working height under 5 m providing that the flue way calculation demonstrates that such a height is satisfactory.
Caution! (Provisions CSN 73 42 01: 2008)
The smoke flue vent diameter must not exceed the diameter of the chimney vent; it must not be narrowed towards the chimney, either. If the calculation demonstrates that the vent diameter of the smoke flue and chimney can be smaller than the flue neck diameter of the device, the diameter of the smoke flue will be reduced just after the flue neck of the device, by means of a short transition or abrupt.
4.3. Directions for smoke flue installation and safety
Connect the smoke outlet neck with the chimney in the shortest possible way so that the length of the smoke path is no longer than 1.5 m. The smoke pipes and the elbow piece must be tightly connected, overlapping at least 60 mm. Pay special attention to the fact that the joints must agree with the flue outflow. The joint between the smoke flue and the smoke outlet neck must be drilled together and fixed with a rivet or pin; the same is applied for the smoke pipes and the elbow. The hole (entrance point) in the chimney must be provided with a metal stress ring (proper diameter). The smoke flue should ascent towards the smoke uptake at angle approx. 10^ .
4.4. Installation of the fireplace stove within the room
Before any installation work is started, you need to verify the floor (ceiling) load capacity. The load conditions for the particular type of the device must be met (depending on the particular weight). The fireplace stove must be installed on a heat insulating base that overlaps the fireplace stove ground plan dimensions on the sides and in the rear by at least 100 mm; the overlap in the front (the direction of the feeding opening) is 300 mm. If a metal base is used, the thickness must be at least 2 mm. Kindly pay attention to the information provided in Supplement 1.
Caution! Make sure you provide space enough for easy approach to the device, smoke flue and chimney for the purpose of cleaning.
4.5. Cleaning the heating device and chimney
In the course of the installation of the fireplace stove and connection to the chimney vent, approach in the chimney for occasional cleaning of chimney pipes and the chimney as well is required. By regular cleaning of the smoke pipes and the firing space in the fireplace stove, you may optimise the performance of the heating system. By regular chimney cleaning, you avoid inflammation of fouling solid particles caught on the chimney walling.
4.6 Fire in the chimney
In case of fire in the chimney, put out the fire in the stove immediately: remove the burning fuel remnants with a shovel (put them aside in a suitable non-flammable container) and call the fire brigade immediately: Call the fire brigade or the integrated rescue system centre.
4.7. External combustion air supply system
For the firing process, enough fresh air supply is needed. While firing wood, the device needs up to 15 m3 of fresh air per hour. In case of newly built houses, the insulating materials used in the house result in low airiness coefficient for the house, due to plastic windows, etc.). Another issue may be exhaust devices or other heat installations in operation in the room or within the space where the fireplace is installed. In such well-insulated houses, the quality of the firing process is lower, being accompanied with tarring and smoke path clogging (and/or smoke penetration and spread in the room). Make sure that the air supply in the room is sufficient, by open windows or door in the next, better ventilated room. It is more convenient if you – along with the installation of the heating device – install a ventilation hole to provide air supply, equipped with a regulating grate (protected against clogging).
5. OPERATING INSTRUCTIONS
5.1. Before first operation
Before the first putting into operation, you have to remove labels from the glass, accessories found in the ashpan or inside the hearth, including transport clamps etc. Following the illustration in the Technical Card, check that the movable partitions designed for directing the flue gases, fireclay brick shapes or the barrier are located properly (they may have moved out of the position during the transportation or installation work). If you find any wrong position, correct it; otherwise, the heating device might not work properly. The fireplace stove surface layer is provided with fire-resistant paint being softened to become harder after the first fire made in the fireplace stove. During the soft phase, pay special attention to danger of damage on the surface by touching it with fingers, tools, etc. For the very first use, the initial fire should be very small, to "warm up" the device gradually: it is recommended to load smaller quantities to establish lower temperature. All materials need the initial lower-temperature phase in order to "get used to" the thermal stress. By
such slow heating up, you avoid cracks in fireclay bricks, likely damage on surface paint or material deformation in general. The odour generated during the paint hardening process at the first putting into operation is just temporary – however, it is recommended to ventilate the room intensively. If pets are present, move them to another room for a while. With the models equipped with the glass door comprising of three parts, check the segments for gaps (which may be formed during the transport or the first use). What to do if you find a gap between the glass segments: Partially release the holder nuts. Move the glass segments (carefully!) closer to each other: the edges should touch slightly. Slowly and carefully, tighten up the holder nuts.
5.2. Setting the fire
To set the fire easily, follow this procedure: Put 2 or 3 smaller wooden logs onto the bottom or on the grate. Add paper or permitted fire lighters, then brushwood, small firewood and thicker logs (the last layer). You should always load a bigger quantity (i.e. enough wood, which means up to approx. 2/3 of the height of the fireclay (vermiculite) lining. By loading such bigger quantity, you establish time long enough in order to heat the chimney thus set the proper conditions for the chimney function. Open the primary air regulator wide (maximum). Sometimes it is good to reduce the secondary air supply at this moment – the fuel catches the fire better. After setting the fire, keep the door shut all the time. As soon as the wood flares up properly, use the air supply regulators to set not very intensive, rather slow burning. To adjust the flame and the burning, you may apply the information specified in the Technical Card or Chart 1.
You may poke the fire when needed, using the fire hook or the poking lever (if installed).
Caution! The stoking door (the firing chamber) and the ashpan door (if installed with your particular model) must be kept shut all the time, except setting the fire, fuel reload or ash removal.
Caution! After every standby for a longer time, before you set the fire again, check the fireplace stove for clearness and cleanness of the smoke flue, chimney and firing area.
5.3. Feeding the fire
To prevent the smoke spreading throughout the room during the fire feeding, the following is recommended: Approx. 5 to 10 seconds before you open the stoking door, open the primary air regulator wide. Then, open the stoking door a bit only, wait for a couple of seconds to allow the smoke exhausting through the chimney. After that, open the door wide. Pay attention to the door any time you open it: do not allow live cinder fall out. When you reloaded the wood, shut the stoking door. When the fuel burns up (no carbon black flame), bring the regulating system back in the previous position (or close the regulator, respectively). While feeding the fire, make sure the wood does not exceed the level of the fireclay (vermiculite) lining in the firing area. The quantity of the fuel reloaded should be more or less the same as specified in the information provided about the hourly consumption for the particular model of the heating device (see the Technical Card). If you overload the fireplace stove with excessive fuel, you may cause permanent damage to the fireplace stove construction.
Caution! If you want to avoid unnecessary smoke spreading throughout the room during the feeding, reload the wood after the previous load has burnt up to cinders.
5.4. Glass cleanness
The cleanness of the transparent glass depends on the type of the fuel, proper combustion air supply (this is applied especially to the secondary air), the chimney effect and – last but not least – on the way how the fireplace stove is operated. It is recommended to load one layer of the wood only: the logs should be laid evenly, farther from the glass (as far as possible). The rule is the same for coal cakes as well (keep the distance 5 to 10 mm
between them). If the glass is dirty, we recommend increasing the firing intensity by opening the primary air regulator, which usually supports the self-acting cleaning process.
5.5. Operation during temporary period and at worsened weather conditions
For temporary periods, for example, during the time when outdoor temperature is above 15^ , during rainy and wet days, in case of gusty wind, etc. the chimney effect may worsen thus the smoke is not led away in full as usual. Therefore, during such period, you should operate the fireplace stove with smallest possible quantity of fuel, to allow improving the firing process and the chimney effect by opening the air inlets in case you need to make adjustments.
5.6. How to substitute the blind element by the exchanger
Some models are provided with the so-called blind element that serves as the chimney effect conditioner as well. After removal of such blind element, those models must be completed with warm-water exchanger allowing connection to heating bodies to provide heat in adjacent rooms or with a water back boiler. A warm water exchanger may be supplied as special accessory (detailed instructions for operation and installation provided). Order the installation of the fireplace stove with warm water exchanger at a specialist company.
Caution! A fireplace stove equipped with a warm water exchanger must not be operated without the connection to the warm water distribution system or the water filled, or without anti-freezing mixture, respectively.
5.7. Ash removal
Depending on the length and the intensity of the firing process, you need to use a fire hook or poking lever (if installed with the particular model) in order to knock the ash down the grate to the ashpan. Monitor the content of the ashpan - do not allow too much ash in it. Excessive ash may block the air supply under the grate thus causing problems at fire setting or burning.
Always empty the ashpan when cold. The best approach is to empty the ashpan just before you start preparing the next fire. Ash from wood may be used for composting or for fertilizing.
Caution! Before you touch the ashpan to empty it, check it for fire brand. Prevent any likely fire in the dustbin.
6. CLEANING AND MAINTENANCE
6.1. Cleaning
The fireplace stove (cold) needs cleaning at least once a year (after the season), or twice or more (if needed). During the cleaning, you should remove any dirt caught in the smoke flue, the firing area and on the partitions. Loose parts of the fireclay lining should be repaired (i.e. replaced). Check the fireclay lining for integrity even during the heating season. The gaps between the brick shapes are designed for heat dilatation, to avoid brick cracking. Therefore YOU SHOULD NOT fill any sealing in the gaps (as it used be before with older heating devices). Cracked fireclay bricks do not lose the function unless they are completely fallen out of the position!
In the course of the cleaning procedure, we recommend you to remove all movable partitions (for easier access in the area above them). To clean the glass, apply standard cleaning agents designed for cleaning fireplace stove, cooker or oven. Use a soft cloth or paper, or special agents designed for cleaning fireplace glass, e.g. CINEOL. Only clean the glass when cold. For cleaning the painted surface, never use water: it is recommended to clean such surface with sponge or soft flannel cloth.
Caution! With selected types of fireplace stove, the vertical side of the firing area is provided with VERMICULITE. The same material is used for some chimney effect conditioners. The material is irreparable. In case of any damage, just replace it. Vermiculate products are characteristic with top heat-insulating parameters and good resistance to cracking. The resistance to abrasion is somehow lower so it is recommended to keep this in mind while reloading and cleaning.
6.2. Cleaning the ceramics and tiles
To clean ceramic tiles or tiles, it is recommended to use a dry or slightly wet cloth. Clean the fireplace stove only while cold.
6.3. Sealing lines and tapes
Contact areas of doors and glass (or other parts of the heating device) are provided with a special glass-ceramic sealing line (tape) that is resistant to high temperatures. We recommend you to check the tape for integrity, and have it replaced if necessary. After some time, any newly installed sealing tape lays flat so it is recommended to check the tightness (the glass tightly installed in the door construction) after approx. 3 months of usage. If you find any release, tighten the glass holders (carefully!)
6.4. Spare parts
In case of repair, use only original spare parts recommended by the manufacturer, see Chapter 10.3 (Recommended spare parts). Identify the spare part with use of the Technical Card (a part of the supply).
- WHAT TO DO IF... ...Do you do it yourself?
| Problem Cause Corrective action | ||
| Malfunction (weak fire, weak chimney effect) or excessive smoke during reloading or during the firing | Chimney or smoke flue sealing (malfunction, "false" air is being added). | Contact a chimney sweep (ask them to check the chimney). For example, new sealing for the chimney door is needed. Adjust the positions of smoke pipes or replace them if damaged. |
| Chimney effect bad or not working | Ask the chimney or fireplace stove specialist technician for inspection to find out the reason and the solution (e.g. cleaning the chimney, remove the smoke flue reduction elements, higher chimney, more air in the room. etc. | |
| The door of another heating device connected to the same chimney is open | Shut the door | |
| Chimney cleaning holes are open. | Close the cleaning holes | |
| Smoke flue elements or other parts of the heating system are dirty or clogged | See 6.1. | |
| Insufficient fresh air supply | See 4.7. | |
| Worsened weather conditions | See 5.5. | |
| Wrong type of fuel was used for burning | Provide proper kind of fuel, see 2.2. | |
| Impossible to heat up the fireplace stove within expected time | Wrong position of the fuel inside Not enough fuel to set fire | Add more logs, see 5.2. |
| Primary air supply inlet is closed | Open the primary air regulator or turn down the secondary air regulator, respectively | |
| The room is not heated enough | Inadequate requirement on the heat capacity (performance of the fireplace stove is too low) | Contact the specialist Reduce the heat loss (for example provide better heat insulation) |
| Smoke flues and fireplace stove are dirty | See 6.1. | |
| Chimney effect is too low See 4. | ||
| Fireplace stove is not operated correctly | Heating device adjustment is not optimal, see 2.1. | |
| Excessive performance of the fireplace stove | Fireplace stove is not operated correctly | Heating device adjustment is not optimal, see 2.1. |
| Ashpan door not closed properly | Shut the door | |
| Door or ashpan sealing is damaged | Replace the door sealing | |
| Excessive chimney effect See 4. | ||
| The fireplace stove produces unpleasant odour and smoke | Chimney effect is too low See 4. | |
| Protective paint is being hardened, or the fireplace stove is dirty, dusty | Allow the paint hardening process finish – the smoke and odour will disappear in a short time / while cold, clean the device outside | |
| Window is getting dirty | Sometimes is difficult to find the reason but, usually one of the following is found: wrong type of fuel, wrong adjustment of the firing process, weak or temporarily weak chimney effect, door sealing loosen | Rule: Clean the door from time to time (depends on the type of the fuel used), see 5.4. . If coal cakes are used, the door needs cleaning more often than with wood |
| Chimney effect is too low See 4. | ||
| Too much fuel in the firing area | Only load correct quantity, see 2.1. and 5.3. | |
| Wet fuel was loaded. | Use only well-dried fuel, see 2.2. | |
8. FREQUENT PROBLEMS AND QUESTIONS
8.1. Cracked (released) fireclay (vermiculite) brick in the burning area
It is emphasised that cracked fireclay bricks do not lose their function unless they have fallen out, so there is no reason to replace them while cracked only. In case of replace needed, order the components at your sales representative or manufacturer's address. Please specify the type and the serial number and the fireclay ID number (see the Technical Card).
Procedure If you need to replace the side bricks, remove the upper partition or remove the fireclay holders and take the damaged brick away. Sometimes, you need to remove the cast grate with bricks at the bottom. For the installation, use the same procedure (reverse). Make sure you place the components back in exact positions (follow the Technical Card). Caution! Do not put the fireplace stove in operation if (even a part) of the lining within the burning area falls out. There is danger of burning the construction through.
8.2. Broken glass
The door glass is made of special glass-ceramic material, characteristic with top heat resistance. Do not use standard window glass!
Procedure There is no need to dismount the whole door. You should only unscrew the holders and remove the glass then easily. When you install the new piece, make sure the new glass is seated evenly. The contact surface between the glass and the door must be provided with a sealing tape. Do not replace the sealing tape if it is in good condition. Tighten the glass holders back slowly and carefully to avoid cracking the new glass by excessive tension.
Caution! Some types of the fireplace stove are not provided with the sealing tape along the whole perimeter.
8.3. Partitions to control the chimney effect
To clean the fireplace stove or replace fireclay (vermiculite) bricks, first remove the movable partitions (if installed, see Technical Card). This way, you make you way to the cleaning or replacement job. Keep in mind that some types of the partitions are designed for holding the bricks at the position as well. Make sure you do not tilt them or let them fall out and break. Install them back in their original positions.
Disassembly Lift the movable partition on one side a bit – this way, the other end is lowered. Move the partition aside to allow taking it out of the device.
Assembly Use the same procedure (reverse order). Insert the partition into the device and find the previous position. Check the final position with the Technical Card!
8.4. Cracked side tile
During transport, operation or for other reasons, tiles designed for the fireplace stove lining may suffer. The tiles (or metal panels) are stuck in the lining by pressure from special springs.
Disassembly Knock on the tile slightly (use the palm of your hand) to move it to the edge (right or left). Make sure the tile does not fall down or cracks by the tension from the spring released. Start the disassembly from the tile in the middle or from the tile leaned against the lining from two sides.
Assembly Start with the bottom or upper tile. Insert the tile in its original position (from the right or left), then get through the power produced by the spring. To do so, the best way is to hold the tile with both hands, push it to get in contact with the edge of the fireplace stove and, after that, knocking on the tile with you palm (gently!), move it in its correct position. (Sometimes you need to produce a bit more than gentle knocking). Make sure the tile is positioned properly – the same overlap on both sides. The tile to be seated in the middle is installed the last.
Caution! If during the operation any part of the lining gets loose by material dilatation, it is recommended to increase the spring force.
8.5. The blind element substituted by an exchanger (optional)
Disassembly Use a wrench (proper size) to unscrew the nuts from the blind element. Remove it from the fireplace stove construction.
Assembly Before you install the exchanger, carefully clean the contact area. Remove any remaining parts of the previous sealing after the blind element has been taken away. Provide undamaged sealing under the exchanger. Tighten the nuts evenly to provide good tightness along the whole exchange flange.
9. PRODUCT LIABILITY AND SERVICE
9.1. General
Providing that all directions and recommendations in the Instructions for Installation, Operation and Maintenance are respected, the manufacturer (supplier), company HAAS + SOHN Rukov s.r.o. provides guarantee for 24-month period from the takeover for parameters and characteristics of the product as specified in relevant technical standards, in the Instructions and the data shown in the nameplate.
9.2. Conditions for guarantee
The guarantee covers free-of-charge repair of the fireplace stove or parts or components (the subject of complaint, if any) providing that the cause of the defect is defective material or craftsmanship.
9.3. Guarantee and post-guarantee service
Guarantee and post-guarantee service is provided by importer companies or contractual partner service institutions.
9.4. Claim rejected
The warranty is not related to damage or defects of the device or its components caused by:
- Contact with chemical substances or physical contact causing damage during the transport; improper storage; erroneous installation or operation in an improper manner (for example, cooling with water, dirt from food, water condensate, etc.)
- Wrong product installed (overheating or under-heating in the room)
- Construction and legal requirements not adhered
- Wrong installation or connections
- Poor or too strong chimney effect (the connections must be in conformity with the standards currently in force)
- Unauthorised alteration or additional modification of the heating system, especially the firing area or smoke flue system
- Unauthorised persons interference (service work by unauthorised persons) Instructions for operation not adhered
- Additional built-in accessories or spare parts not manufactured by HAAS + SOHN Rukov s.r.o.
- Use of inappropriate kind of fuel
- Erroneous operation, device overload (e.g. the ashpan door open) resulting in damaged construction (e.g. burnt-through partitions, construction deformation, etc.)
- unprofessional manipulation, mechanical damage by excessive mechanical force
- Lack of proper maintenance or use of inappropriate cleaning agents
- force majeure (floods, etc.)
9.5. How to make a claim
Send a written claim to your sales person, by letter, fax or e-mail. Please specify the product model, year of manufacture and serial number. (the data from the name plate, at the rear) It is recommended to copy the nameplate data in the Table below. This way, you can find it easily whenever needed.
HAAS+SOHN Rukov s.r.o, SNP 474, 408 01 RUMBURK, CZ
FIREPLACE STOVE TYPE
SERIAL NUMBER:
YEAR OF MANUFACTURE:
OUTPUT PERFORMANCE:
If you make a claim, kindly provide your address, phone number and description of the defect. Ask the seller for guarantee at the purchase. The service centre shall deal with the problem in shortest time, suggesting the place and time of the service action to the customer.
9.6. How to order spare parts
At any order, kindly specify the type of the fireplace stove, the year of manufacture and the serial number of your product. For the spare part identification, follow the Technical Card (state the name of the part or its ID or position in the drawing).
10. MISCELLANEOUS
10.1. Accessories supplied with the fireplace stove
The fireplace stove has been delivered with accessories: protective glove to touch the regulating elements, ashpan drawer, Instructions for Installation, Operation and Maintenance, Guarantee and Technical Card.
10.2. Special accessories (on order)
- Smoke flue pipes, with/without block, diameter 150 mm and 130 mm (length 0.25 m; 0.5 m; 1 m)
- Smoke flue elbow with/without cleaning hole, diameter 50 mm and 130 mm (90°, 45°)
- Chimney stress ring, diameter 150 mm and 130 mm
- Baskets
- Fireplace tooling (special offer)
- Cleaning agent (glass)
- Warm water exchanger
10.3. Recommended spare parts
Spare parts available on order
-
Fireclay brick shapes and VERMICULITE boards for the firing area
-
Ashpan drawer
-
Stoking door glass
-
Cast grate
-
Sealing tapes
-
Repair spray
-
Lining
-
Blind element
-
Decorative and regulating elements (rods, handles, regulators)
-
Sealing tape glue
10.4. Package and waste disposal
The fireplace stove is supplied on a wooden transport pallet and protected with wooden crate. The fireplace stove is protected against weather with PE foil. Stabilised position and integrity of the package for the period of storage and transport is provided by means of metal or plastic tape.
Package material disposal Use the wooden crate and the pallet for burning. Sort the steel tape for the waste collecting point. Sort the PE foil to be recycled.
Fireplace stove disposal after the service life: For the disposal after the service life, sort the fireclay, vermiculite panels, glass and sealing tapes as solid communal garbage. Sort the metal corpus and other metal components for the waste collecting point.
10.5. ES Declaration of Conformity and CE Certificate
ES Declaration of Conformity is issued with all products, following from the Report on initial type testing in compliance with EN 13 240 : The Report on initial type testing and the CE Certificate are in accord with Directive 89/106/EHS, issued by a notified body. Notified testing institutes (verification of the products manufactured by HAAS + SOHN: Strojirenský zkušební ústav, s. p. (Testing Institute of Engineering), ES 1015, AO 202, Hudcova 56 b, 621 00 Brno, Czech Republic.
The manufacturer declares that the fireplace stove as specified is in conformity with the requirements of the Directive 89/106/EHS. Under the standard conditions, the product is safe providing that it is operated and used for the purpose as designed by the manufacturer.
The manufacturer guarantees the conformity of all products in the market with the technical specifications and identical requirements.
10.6. HAAS+SOHN Rukov s.r.o Products and Manufacturing Programme
Company HAAS+SOHN Rukov is a Czech company with participation of foreign capital. The company specialises in manufacture and sale of fireplace sets and fireplace inserts. The products are designed for burning wood, eco-wood cakes or coal cakes (optional).
Manufacturing Programme
- Fireplace stoves
- Fireplace stoves with warm water exchanger
- Tiled fireplace stoves
- Tiled fireplace stoves with warm water exchanger
- Fireplace inserts and fireplace sets
- Fireplace inserts with warm water exchanger and fireplace sets
MISCELLANEOUS
- Fireplace tooling and baskets
- Accessories (smoke flue pipes, elbow pieces, chimney stress rings, etc.)
- Other special products
Caution!
The above recommendations and technical specifications follow from the requirements in technical standards applied for the certification of the product (EN 13 229:2005+A2; 2004) in conformity with Directive 89/106/EEC.
11. SUPPLEMENTS
-
Technical Card and Guarantee
-
Supplement 1
o CLEARANCE BETWEEN THE ^8 FIREPLACE STOVE AND THE SURROUNDINGS
- Supplement 2
Example of position of the protective barrier and smoke flue
- Passage of the smoke flue through the fireproof wall
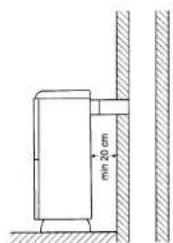
o Direct connection of the device to the chimney (clearance from the wall)
Examples of correct and wrong installations of the smoke flue in the chimney body hole
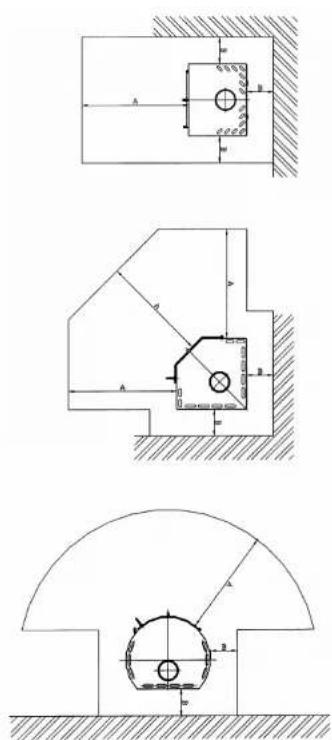
CLEARANCE BETWEEN THE STOVE AND THE SURBOUDINGS
EXAMPLE: PROTECTIVE BARRIER
FOR THE HEATING DEVICE AND SMOKE FLUE
(dimensions in mm)
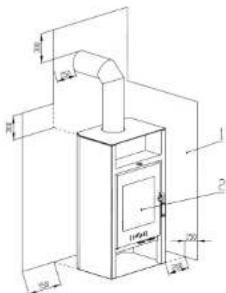
text_image
Technical diagram of a cabinet with labeled dimensions and component annotations1 - Protective barrier for the heating device and smoke flue protecting surrounding constructions against heat 2 - Hole for feeding and ashpan
SMOKE FLUE CONNECTION IN THE CHIMNEY BODY HOLE
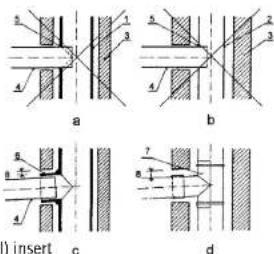
text_image
a b c d a b c d a b c d a b c d1 - Ceramic (metal) insert c 2 - Metal chimney body
3 - Chimney walling
4 - Metal smoke flue system
5 - Hole in the chimney body
6 - Sealed branch to the chimney body
7 - Shim, fixed to the body with metal tapes
8 - Dilatation gap between the brick shape and the chimney walling CORRECT: SEE C, D WRONG: - SEE. a, b
Comments: ČSN 73 4201 : 2008
PASSAGE THROUGH THE SMOKE FLUE WALL OF FLAMMABLE MATERIAL
(dimensions in mm)
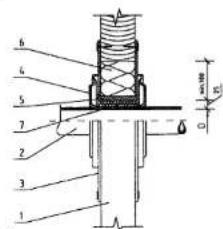
text_image
Technical diagram of a mechanical assembly with numbered components and dimension annotations1 - Wall
2 - Smoke flue system
3 - Cover (fireproof, non-metal)
4 - Rosette
5 - Protective pipe (fireproof, non-metal)
6 - Insulating fill I (fireproof, e.g. glass fibre)
7 - insulating fill II (fireproof, e.g. stove clay)
ČSN 06 1008: 1997
DIRECT CONNECTION OF THE
DEVICE TO THE CHIMNEY AND
CLEARANCE FROM THE WALL
text_image
min 20 cmsupplement 2
Printed: TISKÁRNA ŘEHÁK Česká Lípa, Czech Republic, Tel.: 487 853 897