
MID7015-4G - Tablet COBY - Free user manual and instructions
Find the device manual for free MID7015-4G COBY in PDF.


| Product Type | Internet Tablet |
| Brand / Model | Coby Kyros MID7015-4G |
| Operating System | Android 2.1 |
| Display | 7.0-inch TFT LCD, 800x480 pixels, touchscreen |
| Processor | ARM1176 (720 MHz) |
| RAM | 256 MB DDR2 |
| Internal Storage | 4 GB flash (expandable via microSDHC up to 16 GB) |
| Wi-Fi | IEEE 802.11 b/g |
| Video Output | Mini HDMI (Type C), supports 1080p and 720p |
| Audio Output | 3.5 mm headphone jack |
| PC Interface | USB 2.0 Hi-Speed, OTG via included adapter |
| Battery | Rechargeable lithium-polymer, DC 5V 2A charger |
| Camera | Not specified |
| Sensors | Orientation sensor (auto-rotate) |
| Package Contents | Tablet, USB cable, AC adapter, protective case, stylus, stereo earphones, USB full-size adapter |
| Maintenance | Clean with a damp cloth; do not use liquid cleaners or aerosols |
| Safety | Do not expose to rain or moisture; do not open cabinet; use only specified power source |
| Spare Parts / Repairability | Refer servicing to qualified personnel; no user-serviceable parts inside |
| General Information | Model: MID7015-4G | Brand: Coby | Series: Kyros |
Frequently Asked Questions - MID7015-4G COBY
User questions about MID7015-4G COBY
0 question about this device. Answer the ones you know or ask your own.
Ask a new question about this device
Download the instructions for your Tablet in PDF format for free! Find your manual MID7015-4G - COBY and take your electronic device back in hand. On this page are published all the documents necessary for the use of your device. MID7015-4G by COBY.
USER MANUAL MID7015-4G COBY
Please read carefully before use
Table of Contents

THANK YOU 4
Package Contents 4
Features....5
GETTING TO KNOW THE MID7015 ......6
Unit at a Glance 6
About the Touchscreen 9
Protective Film 9
Using Your Finger Tip 9
Touchscreen Actions....9
About the Orientation Sensor ....11
Charging the Tablet 11
Inserting a Memory Card ....12
About the Protective Case 13
GETTING STARTED ....14
Turning the Tablet On and Off 14
Turning the Screen On and Off (Standby) .....14
Unlocking the Screen 15
Home Screen at a Glance 16
Adding Widgets and Icons 17
Changing Home Screens 18
Removing Widgets and Icons....19
About Menus 19
About Notifications 21
CONNECTING TO THE INTERNET .....22
Requirements 22
Connect to a Wi-Fi Network 23
Connect to a Wi-Fi Network Manually ....25
Forget a Wi-Fi Network 27
ABOUT APPLICATIONS ....28
To Launch an Application 28
Preinstalled Applications ....28
Installing Additional Applications 30
About the AppsLib Store 30
Removing Applications ....31
BROWSING THE WEB 33
OPTIONAL CONNECTIONS ....36
Connecting to a Computer ....36
Connecting to a TV 37
Connecting Headphones 38
Using the USB Full-Size Adapter ....39
Connecting a Keyboard 39
Connecting a Storage Device ....39
SETTING THE SYSTEM OPTIONS .... 40
Wireless & Networks 40
Sound & Display 41
Location & Security 42
Applications 44
Privacy 45
SD Card & Device Storage 46
Search 47
Language & Keyboard 47
Date & Time 47
About Device 48
SPECIFICATIONS 49
SUPPORT 50
SAFETY NOTICES ....51

Thank You
Congratulations on your purchase of a Coby® Kyros™ Internet Tablet. This guide is provided to help you get started quickly with your player; please read it carefully and save it for future reference.
For detailed instructions, up-to-date information, and helpful tips, please visit the Coby website at www.cobyusa.com.

This manual is available for download from the Coby website as a PDF file.
To view PDF documents, download and install the free Adobe Acrobat reader from the Adobe website at www.adobe.com.
Package Contents
Please make sure that the items shown below are included in the package. Should an item be missing, please contact the local retailer from which you purchased this product.
| Coby® KyrosTM ✦ Internet Tablet | USB full-size (Type A) ✦ adapter |
| Protective case ✦ Stylus ✦ USB cable ✦ | Professional stereo ✦ earphones Power adapter ✦ |

This package may contain plastic bags or other materials that pose a hazard to children. Be sure to safely dispose of all packing materials after opening.
Features
Browse the web, watch videos on YouTube, check ✦ e-mail, and more on a generous 7.0" LCD screen
Intuitive touchscreen controls powered by Android ✦ OS
Connect to the Internet wirelessly with high-speed networking support (Wi-Fi 802.11 b/g)
Plays popular video, music, and photo formats ★
Connect and enjoy 1080p HD video on your HDTV ✦ via HDMI *
View pages in portrait or landscape with automatic orientation detection
Download and read thousands of books with the ✦ included Aldiko E-book reader application **
Expandable memory with optional microSDHC card ✦
Rechargeable lithium-polymer battery ✦
* Requires optional HDMI cable (Type A-to-Type C). 1080p HD video playback requires a video file encoded at 1080p. Streaming video quality will be affected by the source, and the quality and condition of your network connection.
** Reading books in the ePub format requires the included Aldiko E-book reader application.

Getting to Know the MID7015
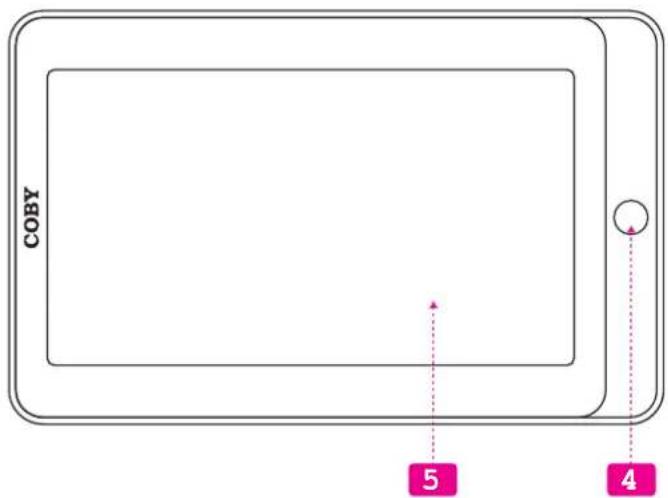
Unit at a Glance
| Name Description | ||
| 1 | Stylus | Slide the stylus out to use it. Store the stylus here when it is not in use. |
| 2 | Home key Press to | return to the home screen.Press and hold to view a list of recently used applications; touch an application in the list to launch it. |
| 3 | Menu key Press to | view the option menu.Note: When you press the Menu key from within an application, you will see the options for that application.To view the Android system options,press the Menu key from the home screen. |
| 4 | Back key Press to | return to the previous screen.If the keyboard is on the screen, press to close the keyboard. |
| 5 | Touchscreen LCD | Display and control screen.Touch controls are displayed on the screen. Press (or press and hold) icons with your finger to control the player. |

| Name Description | ||
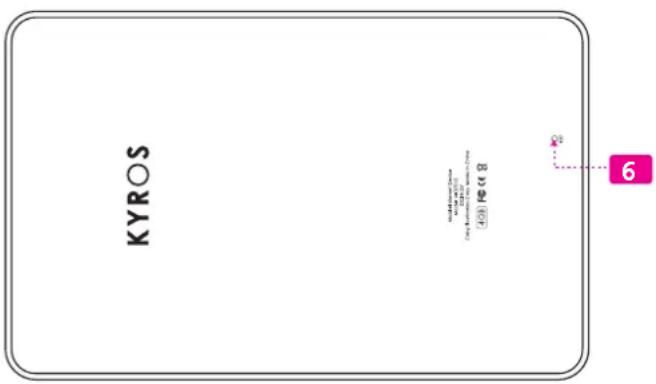
| 6 Reset key Press to re | reset the tablet if it freezes or otherwise behaves abnormally. (Use a paperclip or other small object to gently press this key.) | |
| Name Description | ||
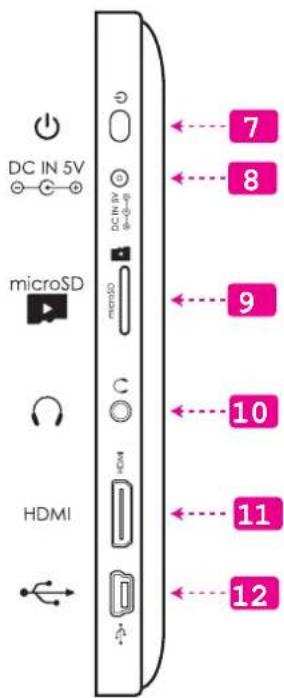
| 7 Power key Press to | turn the unit on, or to turn the screen on and off.Press and hold to access the Power Off menu | |
| 8 Power jack (DC input) | Charge and power the MID7015 with the included power adapter. | |
| 9 microSDHC card slot | Load external microSDHC memory cards here. | |
| 10 Headphone jack | Audio output connection for headphones.Note: Speaker output is automatically disabled when headphones are connected to the player. | |
| 11 HDMI jack (mini Type C) | Connect to a TV or other display. | |
| 12 USB 2.0 Hi-speed port | Connect to a computer to transfer data (e.g., music, videos, photos, files) | |
About the Touchscreen
Your tablet comes equipped with an easy-to-use touch-screen which allows access to the tablet's functions. Use your finger tip (or a stylus) to touch the area of the screen where a control icon is displayed. If you touch and hold the screen, it will register as a continuous button press.

To avoid damaging the screen, do not touch it with excessive force or with any object other than your finger or a stylus. For best response, make sure your hands are clean before using the touchscreen controls.
Protective Film
A thin film has been applied to the touchscreen to protect it during shipping. The protective film should be removed before use. To remove it, simply take a corner of the film and peel it away from the screen
Using the Stylus
A stylus is included for your convenience and is the preferred method for interacting with the tablet. You can use the tip of the stylus to make precise selections on the touchscreen.
The stylus is stored in the top left corner of the tablet. Return the stylus to its storage compartment when it is not in use.
Using Your Finger Tip
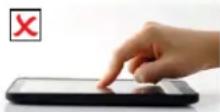
The touchscreen is designed for precision and responds best when touched with the smallest point possible.
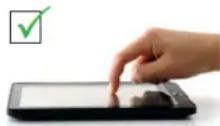
Use the tip of your fingernail to touch the screen. The hard, curved edge of the fingernail makes contact with the touchscreen at a small point, allowing for much greater precision than if you were to use the flat pad of your finger.
Touchscreen Actions
You can control the functions of the tablet by using the touchscreen. To control the tablet with the touchscreen, use your fingertip or stylus to manipulate icons, buttons, menu items, the onscreen keyboard, and other items displayed on the screen.
You can perform the following actions on the touchscreen using your fingertip or stylus.
| Touch: To activate an on-screen item (e.g., application icons, buttons, menu items, and the letter/symbols of the on-screen keyboard), simply touch them with your fingertip or stylus. | |
| Touch and Hold: | Some on-screen items have an alternate action if you touch and hold it (e.g., opening an alternate menu, or to activate the drag function). To touch and hold an item, touch the item and do not lift your fingertip/stylus until the action occurs. |
| Drag: Drag an on-screen item to change its position (e.g., an application icon on the home screen).To drag an item, touch and hold it for a moment, then without lifting your fingertip/stylus, move your fingertip/ stylus on the screen until the item reaches its target destination. | |
| Swipe: Swipe up/down on the screen to scroll through a list. On some screens, you may be able to swipe left/right to change the view.To swipe, touch the screen and then quickly move your fingertip/stylus across the screen without lifting your fingertip/stylus. Do not pause on the screen with your fingertip/stylus at the initial point of contact or you may accidentally drag an item instead. |
| Double-tap: Quickly tap the screen twice on a webpage or other application screen to zoom (the application must support the double-tap/zoom function). Within the browser, double-tapping a webpage section will cause the browser to zoom and fit that section to the width of the screen. |
About the Orientation Sensor
The tablet contains a sensor that will automatically change the orientation of most screens as you rotate the tablet. The sensor works best when the tablet is rotated perpendicular to the ground (i.e., when the tablet is held upright and not flat on its back).
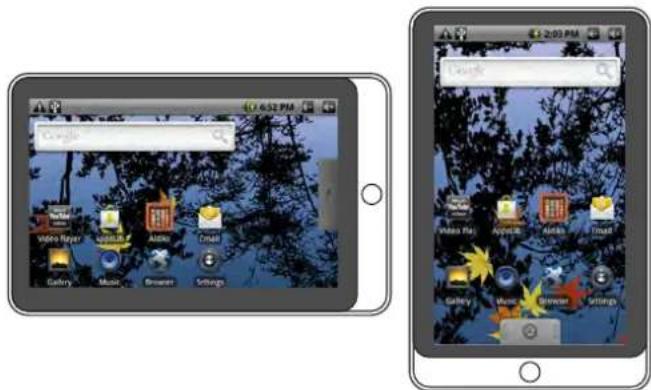
The orientation sensor can be turned on an off in the Sound & display settings menu.
Charging the Tablet
The tablet comes with a built-in rechargeable lithium-polymer battery.
Before using the tablet, the battery should be charged fully. The Status Indicator will light green when the battery is charged fully.
To charge the battery:
Plug one end of the included power adapter into an 1. AC 100-240V outlet.
Plug the other end of the included power adapter into 2. the Power jack on the tablet.
Disconnect the power adapter when the tablet is fully 3. charged.

The battery used in this device may present a fire or chemical burn if mistreated. Do not disassemble, incinerate, or heat the device. Do not leave the device in a place subject to direct sunlight, or in a car with its windows closed. Do not connect the device to a power source other than that which is indicated here or on the label as this may result in the risk of fire or electric shock.
Inserting a Memory Card
The tablet accepts microSDHC memory cards. Insert a memory card into the microSDHC card slot to:
Increase the memory capacity of your tablet ✦
Play media files stored on the memory card (e.g., ✦ music, video, or photo files).
To insert a memory card:
Align the memory card with the card slot. The metal 1. contacts of the memory card should face the back of the tablet and away from the LCD screen.
Slide the card into the spring-loaded slot. Push the 2. card in until it clicks into place.

Do not attempt to insert objects other than a microSD or microSDHC memory card into the card slot. A compatible memory card should fit easily into the card slot; if you encounter resistance, check the alignment of the card. Do not attempt to force the card in.
Avoid touching the gold contacts of the memory card.
To release and remove a memory card:
UNMOUNT the memory card.1.
a. From the home screen, press the Menu key, and then touch Settings to show the settings menu.
b. Touch SD card & device storage to show the SD card & device storage settings.
c. Touch Unmount SD card to prepare the memory card for safe removal.
- Push the card further into the slot until you hear a click. The card will spring out of the slot.
- Grasp the card by its edge to remove it.

To avoid damage and data corruption, do not remove a memory card while data is being written to or read from the card. For example, do not remove a card while playing a music file stored on the card.
About the Protective Case
The tablet comes preinstalled in a protective case.
To remove the tablet from the case:
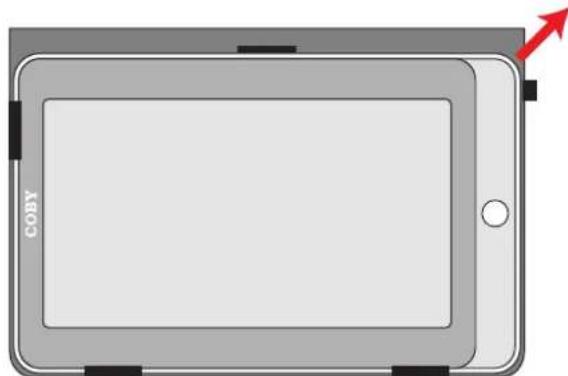
There are 5 tabs around the edge of the tablet that secure it within the case.
Identify the smallest tab located by the top-right 1. corner. This tab is circled in the illustration below.
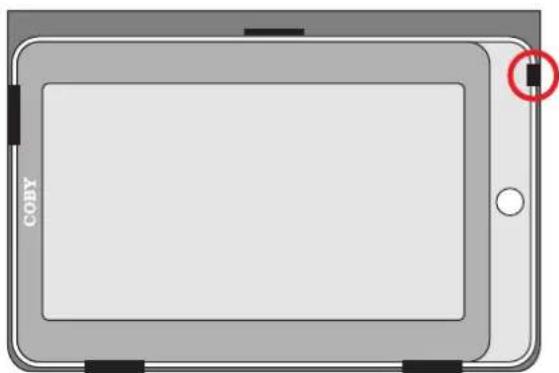
natural_image
Illustration of a tablet device with a highlighted screen and 'COOH' label (no text or symbols on the device itself)To release the tablet, use your thumb to gently push 2. the tab away to the right so that it unhooks from the edge of the tablet.
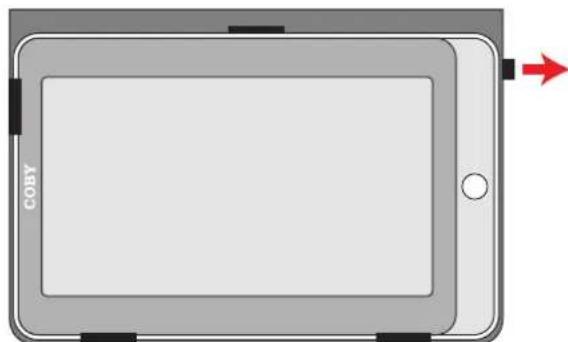
natural_image
Illustration of a tablet device with a red arrow pointing to its side panel (no text or symbols on the device itself)Lift and slide the tablet away from the case.3.
natural_image
Illustration of a tablet device with a red arrow pointing to the top panel (no text or symbols on the device itself)Getting Started

Turning the Tablet On and Off
To turn the tablet on:
+ Press and hold the Power key until the LCD screen turns on. Wait until the Home screen appears; the tablet is now ready for use.
To turn the tablet off:
Press and hold the 1. Power key until the Device Options menu appears.
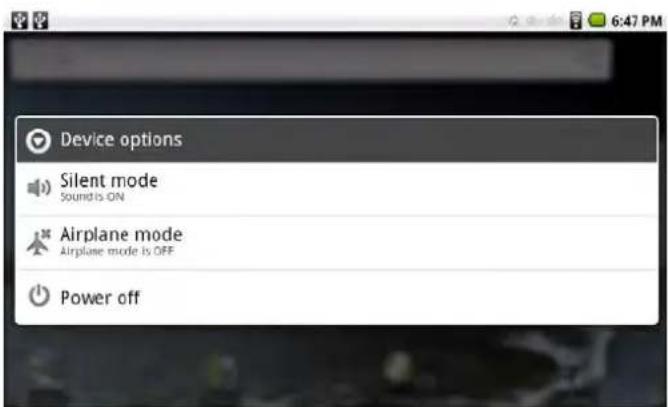
Touch 2. Power off on the screen. A confirmation message will appear.
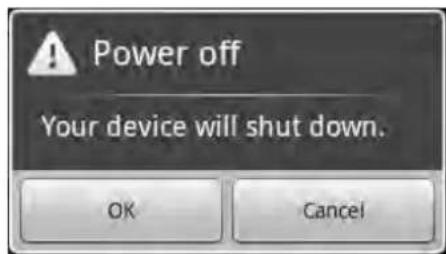
Touch 3. OK to turn off the tablet.
Turning the Screen On and Off (Standby)
When the tablet is on, you can turn off the screen to conserve battery power. Simply press the Power key once to turn the screen off. Press the Power key again to turn the screen back on.

To conserve battery power, the screen can be set to turn off automatically when the tablet is not in use (between 15 seconds and 30 minutes). This Screen timeout option can be found in the Sound and display settings menu.
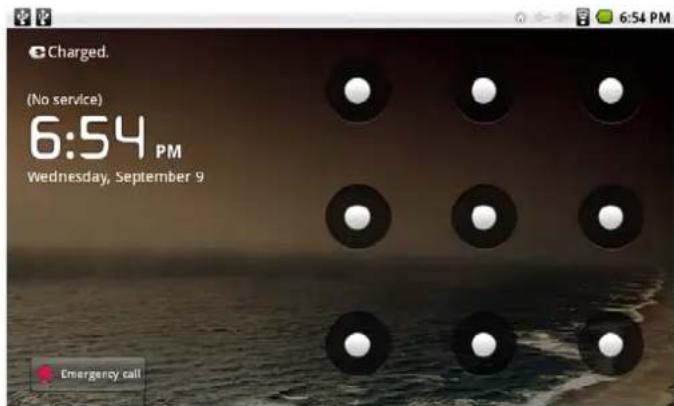
Unlocking the Screen
When the screen turns off, you will have to unlock the screen when you turn it back on.
To unlock the screen, drag the lock icon across the screen towards the speaker icon.
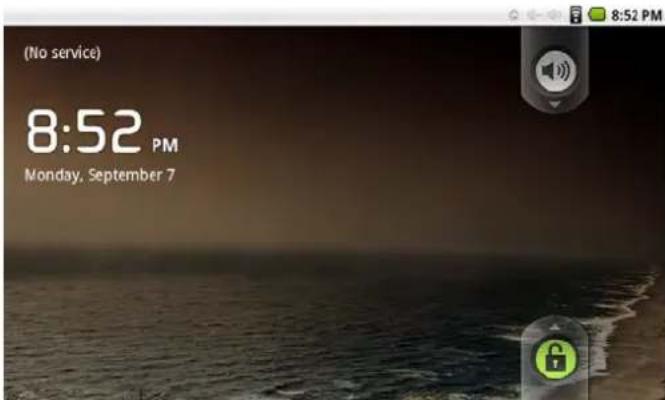
If a password has been set, enter the password to finish unlocking the screen. The Screen Unlock password can be set in the Location and security settings menu.
Home Screen at a Glance
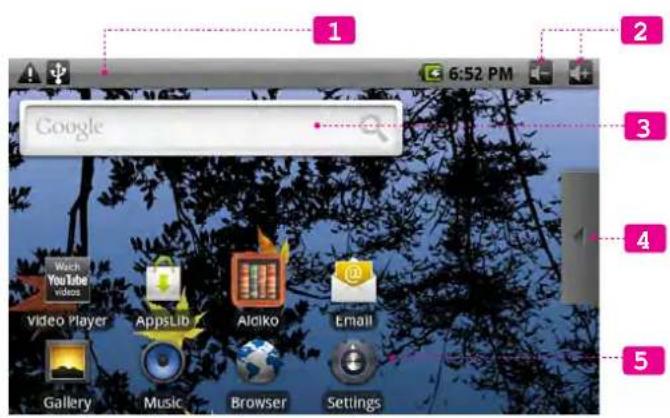
The home screen is the starting point for all of the features of your tablet.
| Name Description | ||
| 1 | Notification bar | Shows notification icons such as new messages and alarms; drag the bar down to the bottom of the screen to open the full Notifications panel. The right side of the bar also shows status information such as the time, battery level, and network signal strength.Note: You can press the Menu key and then touch Notifications to open the full Notifications panel from the Home screen. |
| 2 | Volume controls | Touch “-” to decrease the volume level. Touch “+” to increase the volume level. |
| 3 | Widgets Widgets are small applications that you can use directly from the home screen. | |
| 4 | Launcher Tab Open the Launcher to view a list of all applications installed on the tablet. Touch the Launcher tab to open the Launcher.Note: You can swipe left and right to view additional screens. | |
| Name Description | |
| 5 Icons Touch an icon | to open an application or folder |
Adding Widgets and Icons
For quick access to your information and applications, you can add widgets, as well as shortcuts to applications or folders to the Home screen.
Touch and hold an empty spot on the home screen. The Add to Home screen menu will appear.
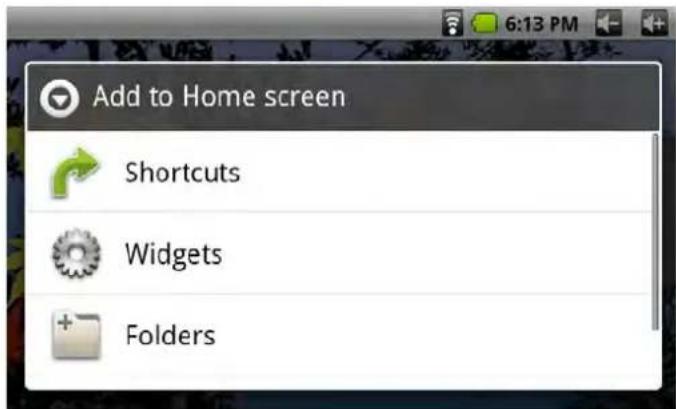
To add a shortcut, touch Shortcuts, then choose an application, bookmark, music playlist, or setting.
To add a widget, touch Widgets; then choose a widget from the menu.
To add a folder, touch ✦ Folders.
You can use folders to keep your Home screen ✦ tidy. Drag icons onto a folder to place them in the folder.
To view the contents of a folder, touch the folder to open it. You can then touch an icon to launch it.
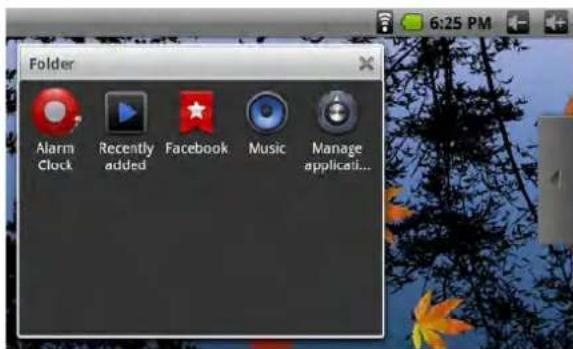
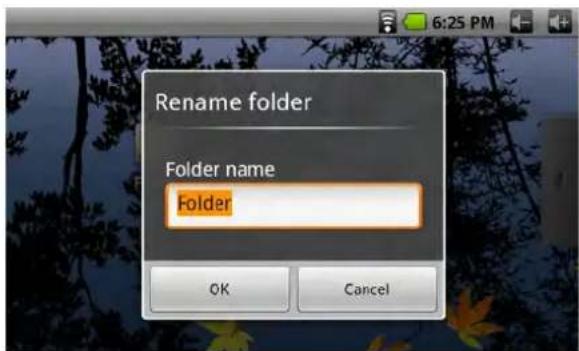
To rename a folder, touch the folder to open it, then touch and hold the top title bar. A Rename folder box will appear; enter the new Folder name and then touch OK.
Changing Home Screens
If there is not enough room on the current Home screen to add a widget/icon, you can place them on another Home screen.
A total of three Home screens are available.
To change the Home screen, swipe left or right across the screen.
Removing Widgets and Icons
To remove unwanted widgets and icons from your Home screen:
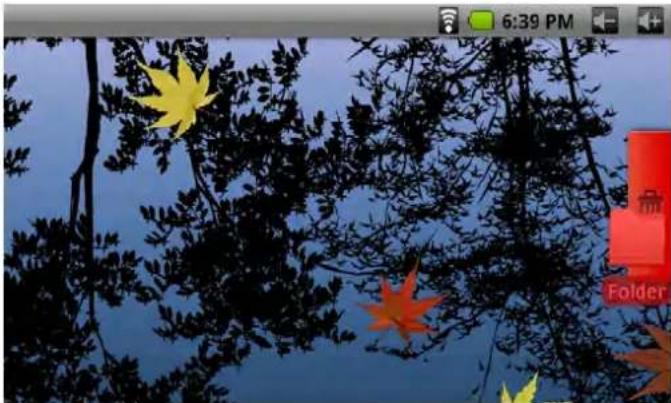
Touch and hold the widget/icon. The Launcher tab 1. will change to show a trash can.
Without removing your fingertip/stylus from the 2. screen, drag the icon to the trash can.
natural_image
Silhouette of trees with yellow and red maple leaves against a blue sky, no text or symbols visibleAbout Menus
There are two types of menus used by the tablet.
Option menus. 1.
Option menus contain items related to the current screen or application. To view an option menu, press the Menu key.
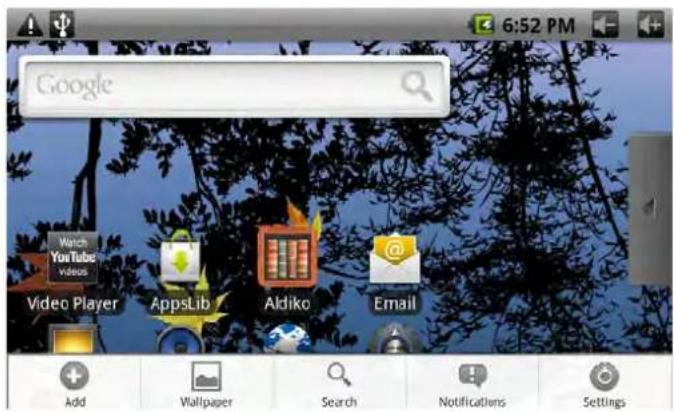

Not all screens or applications have an option menu; if a menu does not exist, nothing will happen if you press the Menu key.
Context menus.2.
Context menus contain items related to a specific item on the screen. To view a context menu, touch and hold an item on the screen.
Touch & hold All pictures.
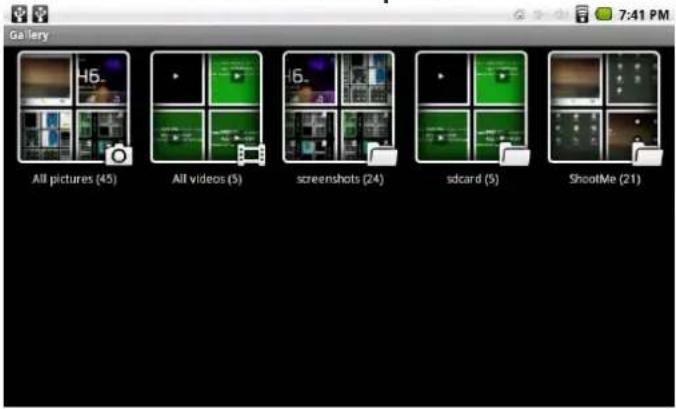
A context menu will appear.
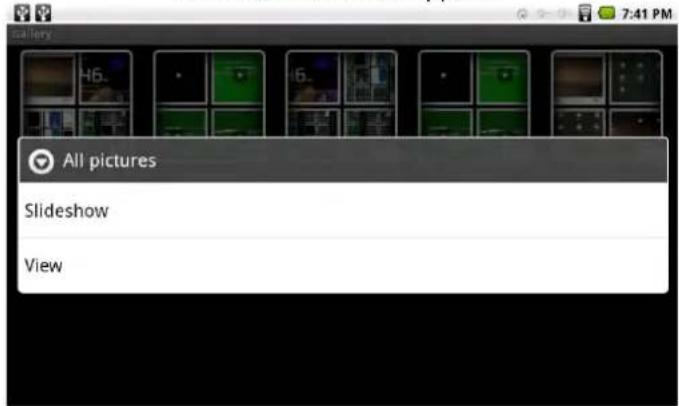

Not all items have a context menu; if a menu does not exist, nothing will happen if you touch and hold the item.
About Notifications
The icons that appear in the Notification bar at the top of the screen alerts you when new messages arrive or alarms or other application events occur.
View and respond to the notifications by opening the full Notifications panel.
Drag the Notification bar down to the bottom of the screen to open the Notifications panel from any screen, or;
On the Home screen, press the Menu key and then touch Notifications to open the Notifications panel.
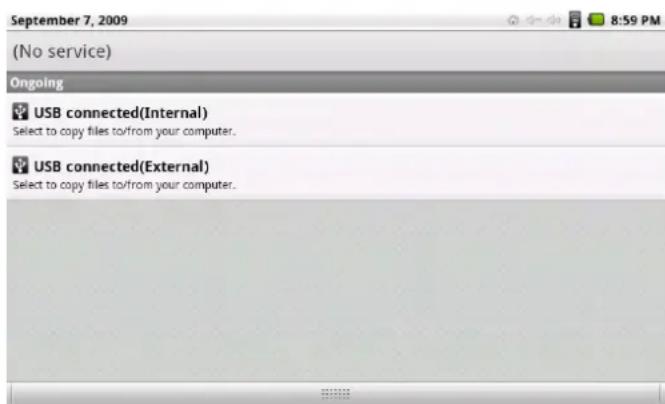
To respond to a notification:1.
Touch a notification in the list; the Notifications panel will close and the application associated with the notification will launch.
To clear all notifications:2.
Touch the Clear button at the top right of the Notifications panel; the panel will close and all notifications will be cleared.
To close the Notifications panel:3.
Drag the handle at the bottom of the Notifications ✦ panel to the top of the screen, or;
Press the ✦ Back key.
Connecting to the Internet

This tablet can utilize Wi-Fi data networks to connect to the Internet. Wireless Wi-Fi technology can provide Internet access at distances of over 300 feet; however, this distance can be affected by your surrounding environment and Wi-Fi router.
Requirements
In order to connect to the Internet, you will need the following:
A wireless router or access point with a broad-1. band Internet connection
The wireless router must support Wi-Fi 802.11b/g connections. If the router supports 802.11n, make sure that it has been configured to accept 802.11b/g connections as well.

A minimum connection speed of 64 Kbps is recommended. Faster speeds will enable a better Internet experience.
The wireless router network settings2.
You will need to know the name of your network (SSID), as well as the password or other credentials if your network is secured. These settings can usually be found on the administration webpage of your wireless router.
Please refer to your wireless router's documentation for help, or ask your network administrator for details.

You may encounter open Wi-Fi networks, or "hotspots." These networks are usually configured so that you can simply connect to them without needing to know its settings; the tablet will obtain all the information it needs from the router automatically.
Connect to a Wi-Fi Network
The Notification bar displays icons that indicate your tablet's Wi-Fi status.
 | Notification that an open Wi-Fi network is in range. |
 | Connected to a Wi-Fi network (waves indicate connection strength). |
| [no icon] | There are no Wi-Fi networks in range, or the Wi-Fi radio is off. |
1. Turn on the Wi-Fi radio if it is not already on. To turn on Wi-Fi:
Go to the Home screen: a. Press the Home key.
Open the Settings menu: b. Press the Menu key, then touch Settings.
Open the Wireless & networks menu: c. Touch Wireless & networks.
Open the Wi-Fi settings menu: d. Touch Wi-Fi settings.
Make sure that the Wi-Fi option box is checked: e. Touch Wi-Fi.
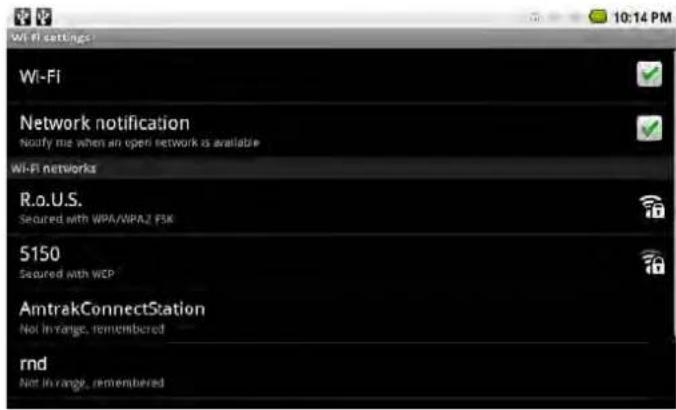
When Wi-Fi is on, the tablet will look for and display a list of available Wi-Fi networks.

If a network that you have connected to previously is found, the tablet will connect to it.
If you don't see your network in the list, you can force the tablet to re-scan. To scan for networks, press the Menu key, and then touch Scan.
2. Select an available Wi-Fi network to connect to:
In the same Wi-Fi settings menu above, touch a network in the list.
If the network is open, the tablet will prompt you to confirm connection to the network. Touch Connect to confirm.
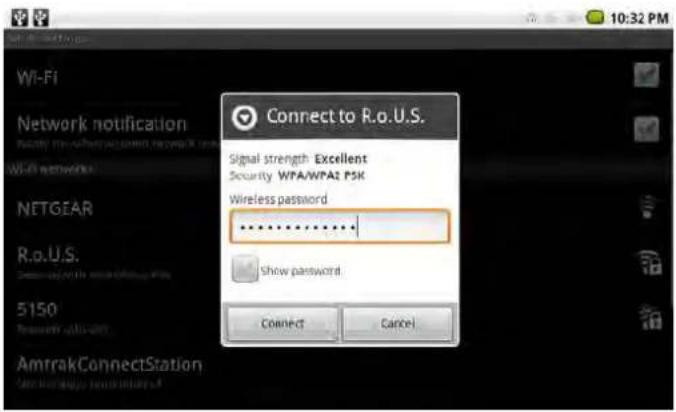
If the network is secured (as indicated by a Lock ★ icon), the tablet will prompt you to enter a password or other credentials. Touch the Wireless password box to show the on-screen keyboard and then use it to enter the password. Touch Connect to confirm.
When you have successfully connected to a Wi-Fi network, the Notifications bar at the top of the screen will show a Wi-Fi signal indicator.



If the network is secured, you will need to contact the network's administrator to.
If you don't see your network in the list, you can force the tablet to re-scan. To scan for networks, press the Menu key, and then touch Scan.
Connect to a Wi-Fi Network Manually
Connect to a Wi-Fi network manually if you want to add a Wi-Fi network when it is not in range, or to connect to a router that has been set to obscure the network name (SSID).
- Open the Wi-Fi settings menu. To do so:
Go to the Home screen: a.
Press the Home key.
Open the Settings menu: b.
Press the Menu key, then touch Settings.
Open the Wireless & networks menu: c.
Touch Wireless & networks.
Open the Wi-Fi settings menu: d.
Touch Wi-Fi settings.
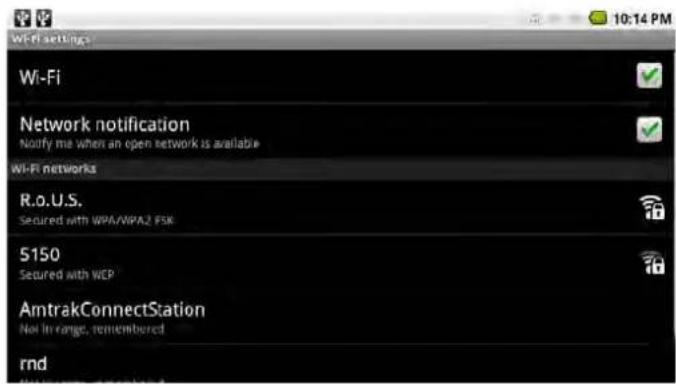
- Turn on the Wi-Fi radio if it is not already on.
Make sure that the Wi-Fi option box is checked: ✦ Touch Wi-Fi.
- Open the "Add Wi-Fi network" screen.
✿ Touch Add Wi-Fi network located at the bottom of the screen (after the list of discovered networks).
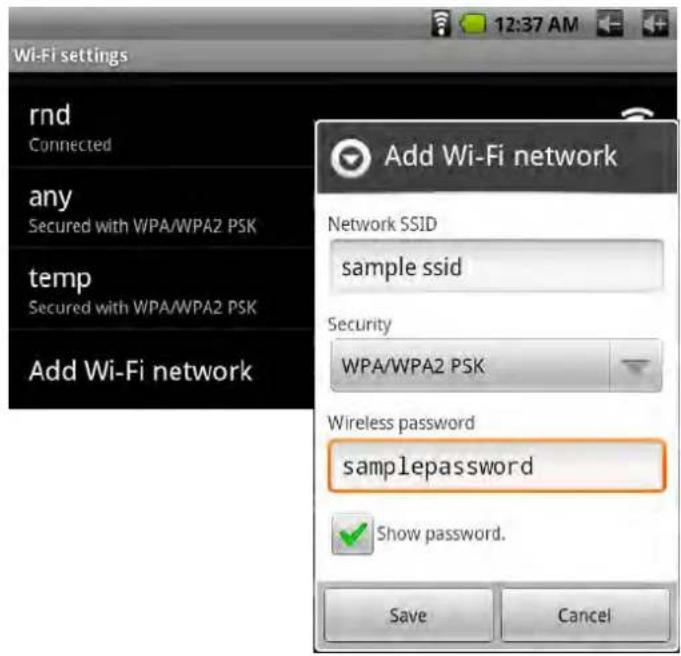
- Enter the network information manually. If you do not know this information, contact the administrator/owner of the network.
✨ Network SSID: Enter the name of the network.
Security: If the network is secured, touch the security menu box to select the type of security used.
Wireless password: ✦ If security has been chosen, enter the required security credentials. (Check the Show password box to reveal the password as you type.)
✧ Touch Save to finish adding the Wi-Fi network.
The tablet will now connect to this network automatically with the saved credentials when it comes into range.
Forget a Wi-Fi Network
Remove a saved Wi-Fi network from the tablet if you no longer use it or if you don't want the tablet to connect to it automatically.
Open the 1. Wi-Fi settings menu.
Turn on the Wi-Fi radio if it is not already on.2.
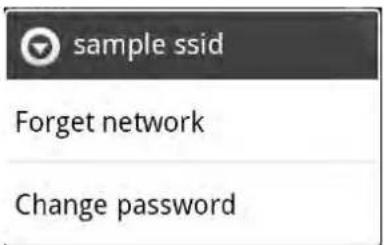
Touch and hold the name of the network.3.
Touch 4. Forget network.
About Applications

Applications allow your tablet to perform many different functions.
To Launch an Application
Touch the application icon on the home screen or in the Launcher.
Launcher screen:
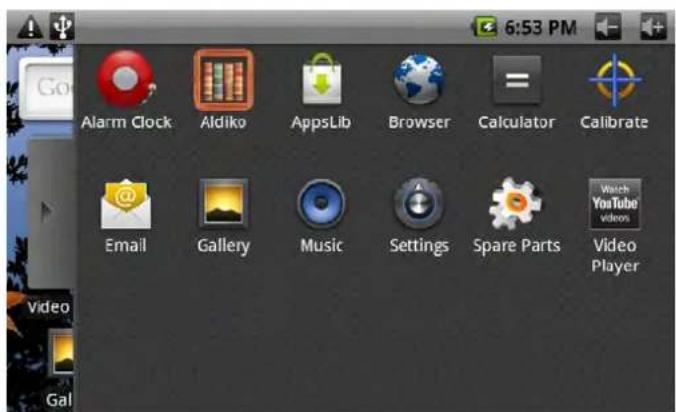

The screen shown above is for illustrative purposes only. Coby reserves the right to modify and improve the final list of applications available on the tablet.
Preinstalled Applications
Some applications have been installed on your tablet for your convenience. These applications include:
 | View the current time, or set an alarm. |
 | Download and read thousands of e-books. Supports the ePub standard. |
 | Browse the web. |
| Calculator | Perform simple mathematical operations. |
| Calibrate | Optimize the accuracy of the touch-screen. |
| Check your e-mail. | |
| Gallery | View photos and play videos. |
| Music | Play music. |
| Settings | Access the Settings menu to adjust the tablet's options. |
| View detailed usage statistics, as well as adjust options that are not available in the Settings menu. | |
| Launch the mobile YouTubeTM browser page to watch internet videos. | |
| Browse for, download, and install applications from the AppsLib store. |
Installing Additional Applications
You can also download an install additional applications from AppsLib, the web browser, or other sources. Downloading and installing new applications to your tablet can extend its functionality in many ways.
The tablet must be set to allow installation of applications from non-Market sources. The Unknown sources option can be set in the Application settings menu.

Support for third-party applications is provided by their respective applications developers. Coby is not responsible for the behavior of these applications; please review the description and terms of use provided by third-party developers carefully before installing applications on your tablet.
About the AppsLib Store
You can download and install applications from the included AppsLib store. To open the AppsLib store:
Touch the 1. Launcher icon.
Touch the 2. AppsLib icon.
When installing an application, it will tell you what functions of the phone it needs to control and if it needs access to your data. Make sure you review these access requirements carefully before completing the installation.
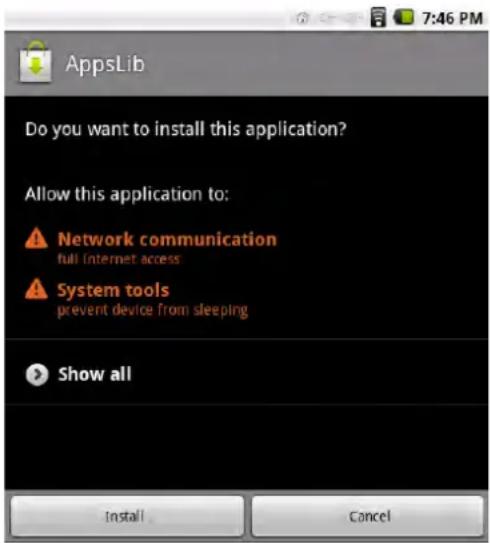

Be especially cautious with applications that request access to many functions or to a significant amount of your data. You are responsible for the results of applications installed on your tablet.
You can learn more about AppsLib, and browse applications by visiting their website at www.appslib.com.

Some developers allow you to download and install applications directly from their website.

Support for third-party applications is provided by the respective application developer. Coby is not responsible for the behavior of these applications; please review the description and terms of use provided by third-party developers carefully before installing applications on your tablet.
Removing Applications
Uninstall unwanted applications to remove them from the tablet.
From the Home screen, 1. press the Menu key.
Touch 2. Settings to open the Settings menu.
- Applications, and then touch Manage applications to show a list of all applications installed on the tablet.
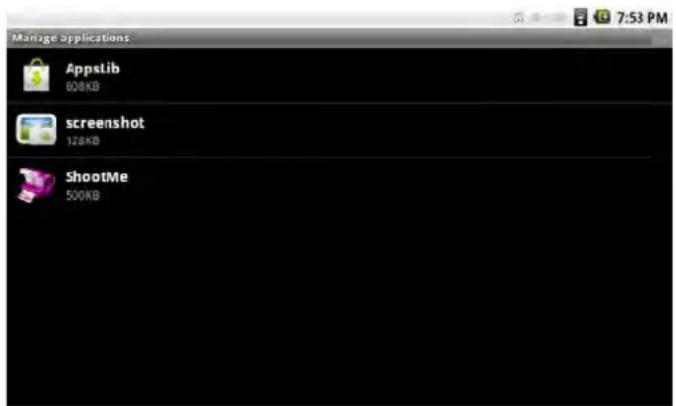
Touch the name of the application you want to 4. uninstall; the Application Info screen will open.
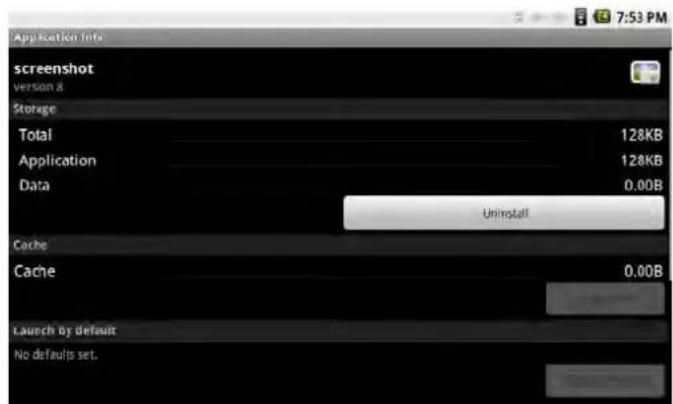
Touch 5. Uninstall. The tablet will prompt you to confirm.
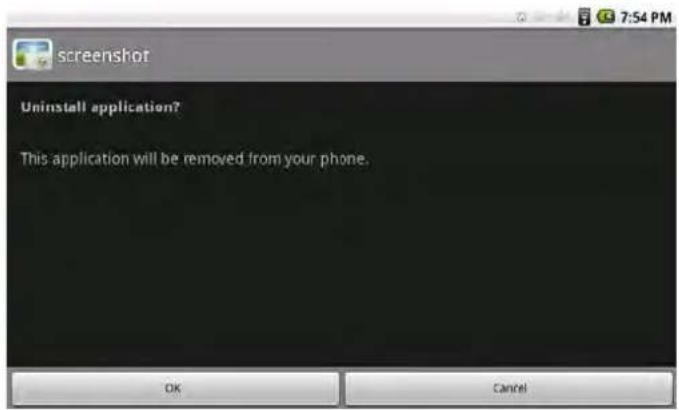
Touch 6. OK to uninstall the application.
Browsing the Web

The Browser application lets you visit webpages and find information on the web. Keep up with the news, your friends, or enjoy video from YouTube™, the world's most popular video-sharing community.
To use Browser, the tablet must be connected to the Internet. Read the section "Connecting to the Internet" to learn how to connect to the Internet.
To open Browser, touch the Browser icon on the Home screen or in the Launcher.
| Name Description | ||
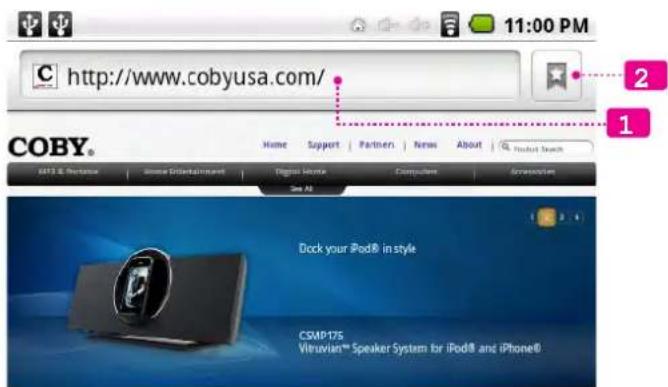
| 1 | Address bar Displays the address (URL) of the current page. Touch the bar to enter a new address or to search the web. | |
| 2 | Bookmark icon | Touch the Bookmark icon to add or view bookmarks, to view your most visited sites, or to view your browser history. |
Some common Browser actions are described below.
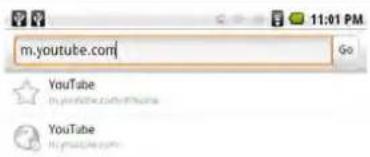
To go to a webpage. +
-
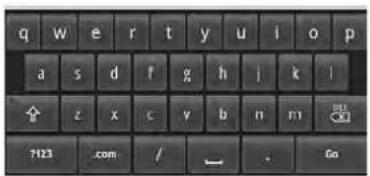
Touch the Address bar at the top of the Browser screen. The keyboard will open automatically. (If the Address bar is not visible, drag the page down to return to the top of the Browser screen.)
-
Use the keyboard to enter the address (URL) of the webpage (e.g., m.youtube.com.
-
Touch Go to open the webpage.
To bookmark a webpage.
Bookmark your favorite webpages in order to visit them quickly without entering a URL.
| 1. Go to the webpage that you want to bookmark | 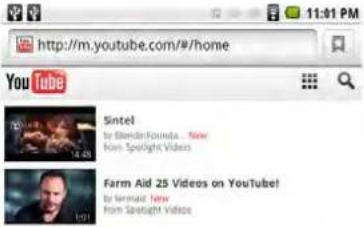 |
| 2. Touch theBookmarkicon to the right of the Address bar. |  |
| 3. Touch theAddtile. | 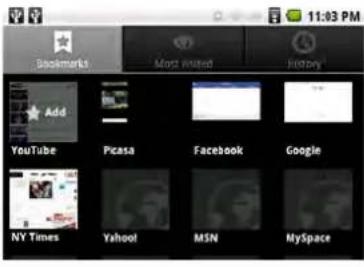 |
- If desired, you can modify the name of the bookmark or its location (URL address). Otherwise, touch OK to finish adding the bookmark.
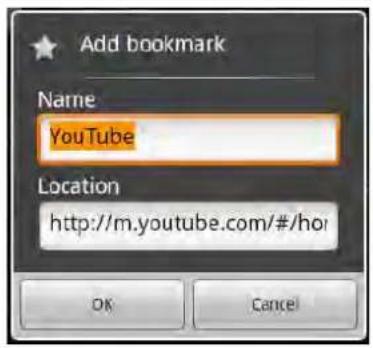
To go to a bookmarked webpage.
| 1. Touch the Book-mark icon to the right of the Address bar. |  |
| 2. Touch a bookmark tile to open it. | 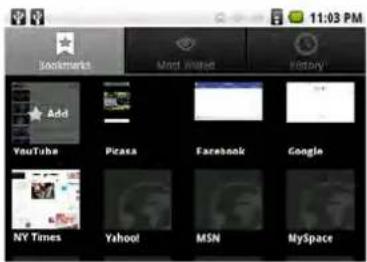 |
To open a new browser window. ✦
| 1. Press the Menu key to show the Browser options. | |||
| New Window |  Bookmarks Bookmarks | Windows | |
| [SW2] | [7ACT]Forward | MWA | |
| 2. Touch New Window to open a new browser window. | |||
| [54V7] | [DAY6] | ||
 | [7OH9] | ||
| [SACK] | New window | ||
To switch between browser windows. ✦
| 1. Press the Menu key to show the Browser options. | |||
| 2. Touch Windows to show a list of open browser windows. | |||
| 3. Touch the name of a window to switch to it, or touch the "x" to close the window. | |||


Optional Connections

Connecting to a Computer
Connect the tablet to a computer to transfer files.
Connect your tablet to the computer.1.
With the included USB cable:
Plug the small end of the cable into the USB 2.0 Hi- ★ speed connector of the tablet.
Plug the large end of the cable into an available USB 2.0 Hi-speed port on the computer.
2. When your tablet is connected, a USB icon will appear in the Notification bar.
Drag the Notification bar down to open the notifications panel.
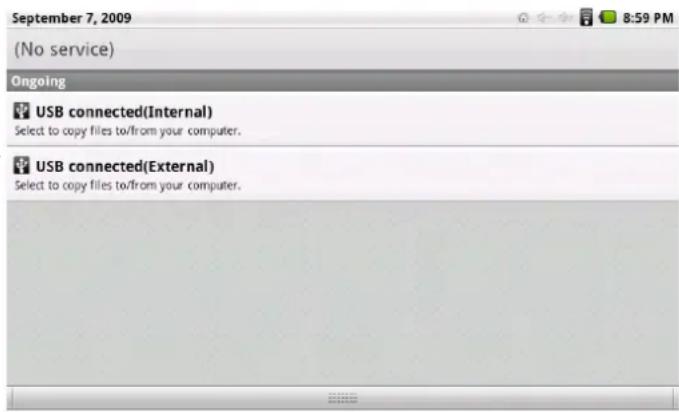
Mount the storage drive.3.
Touch USB connected (Internal) to mount the tablet's built-in storage, then touch Mount when prompted to confirm. When mounted, you can copy files to/from your computer to it.
If a memory card is installed, touch USB connected ✦ (External) to mount the card, then touch Mount when prompted to confirm. When mounted, you can copy files to/from the computer to it.
Your tablet will be recognized by the computer as a Removable Storage drive. Drag and drop files between your tablet and the computer. To learn more about copying files, please refer to the documentation included with your computer or operating system.

To prevent damage or corruption of the files on your tablet or memory card, be sure to follow your computer's instructions for connecting and disconnecting USB devices.
Connecting to a TV
Connect to a TV to enjoy your tablet from the comfort of your living room. An HDMI cable (Type A-to-Type C) is required to connect the tablet to a TV.
Before connecting the tablet to the TV, you will have to adjust a few display settings on the tablet.
Make sure that the tablet is set to output over HDMI ★
For optimal visual performance, make sure that the video output resolution of your tablet matches the capabilities of the TV.
To adjust the display settings:
- From the home screen, press the Menu key, and then touch Settings to show the settings menu.
- Touch Sound & display to show the Sound & display settings.
-
Touch Output Select, and then touch HDMI to enable video output from the tablet's HDMI connector.
-
Touch HDMI Setting, and then touch a resolution option that matches the display capabilities of the TV:
a. Choose 1920 x 1080p 60Hz if your TV is capable of displaying 1080p video.
Choose b. 1280 x 720p 60Hz if your TV is capable of displaying 720p or 1080i video.
To connect the tablet to the TV:
Plug the small end of the HDMI cable into the mini 1. HDMI connector of the tablet
Plug the large end of the HDMI cable into the HDMI 2. port on the TV.
Turn on the TV, and set its display mode to the HDMI 3. port that the tablet is connected to.
The tablet's display will be output to the TV screen.

If you need help setting the display mode of the TV, please refer to the documentation provided by the TV manufacturer.
Connecting Headphones
Connect a pair of headphones (or earphones) to the tablet to enjoy media in private.
Lower the volume level of the tablet before connecting headphones, and then slowly raise the volume to a comfortable listening level.
The headphones must have a 3.5 mm (1/8 in) plug.
When headphones are connected, speaker output will be disabled automatically.

Hearing experts advise against the constant use of personal stereos played at high volume. Constant exposure to high volumes can lead to hearing loss. If you should experience ringing in the ears or hearing loss, discontinue use and seek medical advice.
Using the USB Full-Size Adapter
The USB full-size adapter can be used to connect and use USB devices with the tablet. The adapter converts the mini USB port on the tablet into a USB On-the-Go (OTG) connector.
Connecting a Keyboard
For times when you want to type for an extended period of time, you may want to connect a full-size keyboard to the tablet.
Use the included USB full-size (Type A) adapter to connect a keyboard to the tablet.
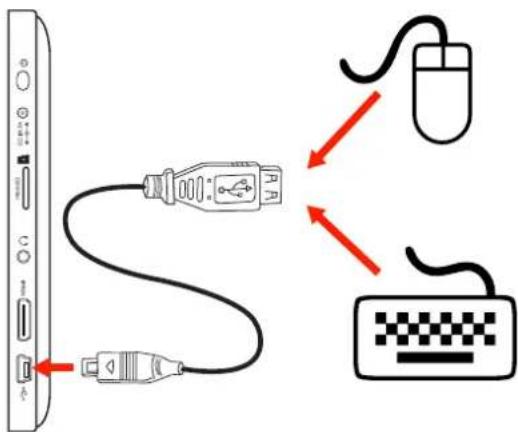

You may also use this connection to add a mouse to the tablet.
The adapter supports one connection at a time. To use a keyboard and mouse simultaneously, you will need to add an external USB hub.
Connecting a Storage Device
Use the included USB full-size (Type A) adapter to connect a storage device to the tablet (e.g., a USB flash memory drive).

This connection supports a maximum storage size of 8 GB. For additional storage capacity, a microSD card can be added to the tablet.
Setting the System Options

Open the system settings menu to adjust how the tablet looks and functions.

Many applications will have their own settings; refer to the documentation provided by the application developer to learn more.
To open the Settings menu:
From the Home screen, press the 1. Menu key.
Touch 2. Settings to open the Settings menu.
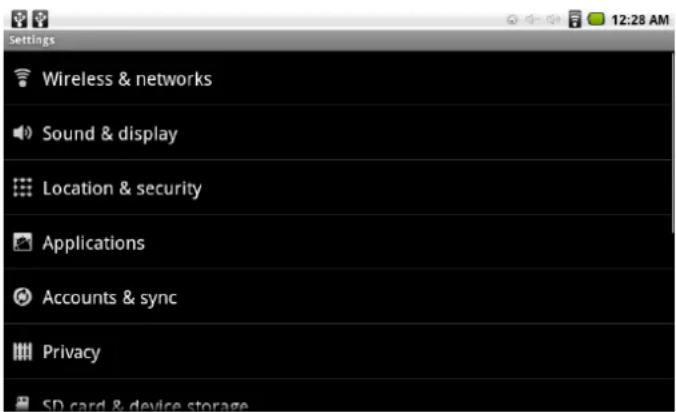
The settings are grouped by category. Touch a category to open and adjust its settings.
Wireless & Networks
| Setting Description | |
| Airplane mode Check to disable all wireless radios. | |
| Wi-Fi Check to turn on the wireless networking radio (Wi-Fi 802.11b/g). | |
| Wi-Fi settings | Touch to scan for and view a list of available Wi-Fi networks. |
| Wi-Fi | Check to turn on the wireless networking radio (Wi-Fi 802.11b/g). |
| Network notification | Check to receive an alert in the Notifications bar when an open Wi-Fi network becomes available. |
| Add Wi-fi network | Touch to configure a Wi-Fi network that is out of range, or that is set to obscure its SSID network name. |
Sound & Display
| Setting Description | |
| Sound settings | |
| Silent mode Check to | disable all sounds except for alarms and media (e.g., video or music that is playing). Alarms and media must be silenced within their respective applications. |
| Ringer volume Drag | a slider to set the volume level for system and application notifications.(Leave the Use incoming call volume for notifications option checked; this tablet does not support phone calling functions.) |
| Media volume Drag | a slider to set the volume level for media playback (e.g., video or music). You can also adjust the volume level during media playback by using the controls provided in the Notifications bar. |
| Notification ring-tone | Select the ringtone that sounds when you receive a notification.A sample of the ringtone will play when you touch it. |
| Setting Description | |
| Audible selection Check to play a sound when making a screen selection. | |
| SD card notifications | Check to play a sound when you receive a memory card notification (microSD, microSDHC). |
| Display settings | |
| Orientation Check to | have the tablet automatically detect and rotate the screen to match its orientation. |
| Animation Adjust the | level of animated transitions between screens. Lowering the animation level may increase system and battery performance. |
| Output Select Select | the video output mode of the tablet.None: turn off the HDMI connector.HDMI: turn on the HDMI connector.Video will not be output to the tablet's screen when HDMI output is on. |
| HDMI Setting Select | the video output resolution over HDMI.1920 x 1080p 60Hz: For use with • TVs that support 1080p.1280 x 720p 60Hz: For use with TVs • that support 720p or 1080i. |
| UI Resolution Setting | This option is reserved for future use. Adjusting this option has no function at this time. |
| Brightness Drag a slider to adjust the brightness level of the screen. Setting the brightness to the lowest comfortable level will maximize battery life.Use a lower setting when viewing in dim environments; use a higher setting in bright environments. | |
| Screen Timeout Set how long before the screen turns off after the last touch of the screen/ button. To maximize battery life, use the shortest timeout that is still convenient. | |
Location & Security
| Setting Description | |
| My Location | |
| Use wireless networks | Check to use information from Wi-Fi and mobile networks to determine your approximate location.Your location information is anonymous and is used to personalize and improve your experience with many applications. |
| Screen unlock pattern | |
| Set unlock pattern Create a pattern that must be drawn on the screen in order to unlock the device.This screen unlock pattern can protect your device and data from unauthorized use. | |
| Require pattern Uncheck to stop requiring an unlock pattern to unlock the device.You will be required to draw your current unlock pattern in order to uncheck this option. | |
| Use visible pattern Check to draw lines between points in the unlock pattern. | |
| Passwords | |
| Visible passwords Check to briefly display each character as you enter a password. This can help you verify that the password is being entered correctly. | |
| Credential storage | |
| Use secure credentials | Check to give applications access to your device's encrypted store of secure certificates and related passwords and other credentials. Secure certificates must conform with the PKCS #12 standard.Credential storage is used to establish certain kinds of secure Wi-Fi connections. Your network administrator should be able to assist with installing and configuring any credentials necessary to connect to your organization's secure network.If you have not set a password for credential storage, this setting is dimmed. |
| Setting Description | |
| Install from SD card | Touch to install a secure certificate from your device's memory card. |
| Set password Set or | change the password for your secure credential storage.The length of your password must be a minimum of 8 characters. |
| Clear storage Delete | all secure certificates and related passwords and other credentials. In addition, the secure credential storage password will be erased.You will be prompted to confirm that you want to do this.If no credentials exist, this setting is dimmed. |
Applications
| Setting Description | |
| Unknown sources Check to permit installation of applications obtained from locations other than Android Market (e.g., alternate app markets, web sites, email, etc).The included AppsLib market is considered an alternate app market. This setting must be checked in order to install applications from AppsLib.Note: To protect your device and personal data, download applications only from trusted sources! |
| Setting Description | |
| Manage applications | Display a list of all the applications and other software installed on your device. Touch an item in the list to view detailed information about the app, to uninstall the app, or to force it to stop if it is currently running.By default, only downloaded apps are shown sorted in alphabetical order.Press Menu and touchFilterto change the list to display all apps, running apps only, or downloaded apps only.Press Menu and touchSort by sizeto display apps in order by size. |
| Running services Display | a list of all running services.Touch a service in the list to stop it, or to change its settings.A service is an application (or part of an application) that runs in the background in order to provide services to other applications -- even when their main application is not running. |
| Development Check | USB debugging to allow debugging tools on a computer to communication with the device via a USB connection.Check Stay awake to prevent the screen from dimming and locking when the device is connected to power or to a USB device that provides power.Check Allow mock locations to permit a development tool on a computer to override the device's location information. |
Privacy
| Setting Description | |
| Personal data | |
| Factory data reset Erase all of your personal data from internal device storage, including information about e-mail accounts, any other accounts, system and application settings, and any downloaded applications.Resetting the device does not erase any system software updates you’ve downloaded or any files on your memory card, such as music or photos. Downloaded books will not be erased, but you will have to restore them using the included Aldiko app when prompted.If you reset the device in this way, you will be prompted to reenter the same kind of information as when you first started Android. |
SD Card & Device Storage
| Setting Description | |
| SD card | |
| Total space Displays | the total capacity of any memory card installed in your device. If no card is installed, this setting is dimmed. |
| Available space Displays | ays the amount of capacity free on any card installed in your device. If no card is installed, this setting is dimmed. |
| Unmount SD card Un | mount a memory card from the device in order to safely remove it while the device is on or to format a card.This setting is dimmed if no card is installed, or if it has already been un-mounted, or if it has been mounted on your computer. |
| Format SD card Prepare | are a memory card for use with the device. Formatting a card will permanently erase everything on the card. The memory card must be unmounted before you can format it. |
| Setting Description | |
| Nand memory (Internal memory) | |
| Total space Displays | the total storage capacity of your device. Your device's internal memory is used to store the operating system, its components, applications (including those you have downloaded), and data associated with your applications. |
| Available space Displays | ays the amount of capacity free on your device. |
| Unmount Nand memory | Unmount the device's internal memory. |
| Mount Nand memory | Mount the device's internal memory if it has been unmounted. |
| Format Nand memory | Permanently erase everything stored in internal memory. The internal memory must be unmounted before you can format it. |
Search
| Setting Description | |
| Web search | |
| Google search settings | Configure your Google web search options. |
| Quick Search box | |
| Searchable items The | quick search box can be found on the device's home screen.Check an item to have it included in device searches. Uncheck an item to exclude it from device searches. |
| Clear search short-cuts | Erase the search results history that appears below the Quick Search Box. |
Language & Keyboard
| Setting Description | |
| Select locale Select the language to use for the text on the device. | |
| Text settings | |
| Android keyboard Configure the on-screen keyboard options. |
| Setting Description | |
| User dictionary Add, | remove, or edit words from the dictionary. The device uses the dictionary to help increase the speed and accuracy of your typing as you use the Android keyboard. |
Date & Time
| Setting Description | |
| Set date Set the date | of the device's internal clock. |
| Select time zone Set | the time zone of the device's internal clock. |
| Set time Set the time | of the device's internal clock. |
| Use 24-hour format | Check to display the time using the 24-hour format (e.g., 13:00 instead of 1:00 PM). |
| Select date format | Select how you want the device to display dates. |
About Device
| Setting Description | |
| Battery use See which | applications and system components you have been using since the device was last connected to a power source. This list is sorted by the amount of power used.Touch an item in the list to see more information or to access a settings screen.Nothing will be displayed if the device is connected to a power source. |
| Legal information Dis | play legal information about the software included with your device. |
| Model number Dis | plays the model number of your device. |
| Firmware version Dis | plays the firmware version number of the operating system installed on your device. You may need this information when talking with customer support. |
| Setting Description | |
| Kernel version Displays | the kernel version number of the operating system installed on your device. You may need this information when talking with customer support. |
| Build number Displays | the build version number of the operating system installed on your device. You may need this information when talking with customer support. |
Specifications

Please visit www.cobyusa.com for the latest product information. Design, specifications, and manual are subject to change without notice.
| Processor ARM1176TM | (720 MHz) |
| RAM 256 MB DDR2 | |
| Storage 4 GB flash built-inmicroSDHC card slot (max. 16GB supported) | |
| Display 7.0" touchscreenTFT LCD (800 x 480) | |
| Wi-Fi Networking IEEE 802.11 b/g | |
| Video Output Mini HDMI, type C(1080p and 720p supported) | |
| Audio Output 3.5 mm headphone | |
| PC Interface USB 2.0 Hi-speed* | |
| Additional Features | Built-in microphoneBuilt-in speaker |
| Operating System | Android^TM 2.1 |
| Power | Rechargeable Li-poly batteryPower Adapter (DC 5V, 2A) |
* This port also supports USB 2.0 OTG connections via the included USB full-size (type A) adapter. USB 2.0 OTG supports the connection of low power USB devices such as mice or keyboards, as well as storage devices up to 8 GB in size.
Support ↓
If you have a problem with this device, please check our website at www.cobyusa.com for Frequently Asked Questions (FAQ) and product updates. If these resources do not resolve the problem, please contact Technical Support.
Coby Electronics Technical Support
Email techsupport@cobyusa.com
Web www.cobyusa.com
Phone 877-302-2629
Monday to Friday, 9:00AM–9:00PM EST
Safety Notices

CAUTION
WARNING: SHOCK HAZARD. DO NOT OPEN. AVIS: RISQUE DE CHOC ELECTRIQUE. NE PAS OUVRIR

CAUTION: TO REDUCE THE RISK OF FIRE AND ELECTRIC SHOCK, DO NOT REMOVE THE COVER (OR BACK) OF THE UNIT. REFER SERVICING ONLY TO QUALIFIED SERVICE PERSONNEL.
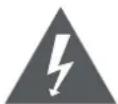
The lightning flash with arrowhead symbol within an equilateral triangle is intended to alert the user to the presence of uninsulated “dangerous voltage” within the product’s enclosure that may be of sufficient magnitude to constitute a risk of electric shock.
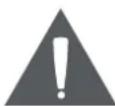
The exclamation point within an equilateral triangle is intended to alert the user to the presence of important operation and servicing instructions in the literature accompanying the appliance.

For recycling or disposal information about this product, please contact your local authorities or the Electronics Industries Alliance: www.eiae.org.
For Customer Use:
Enter below the serial number that is located on the rear of the unit. Retain this information for future reference.
Model No.
Serial No.
WARNING: To prevent fire or shock hazard, do not expose this device to rain or moisture. Dangerous high voltage is present inside the enclosure. Do not open the cabinet.
Protect your hearing: Hearing experts advise against the constant use of personal stereos played at high volume. Constant exposure to high volumes can lead to hearing loss. If you should experience ringing in the ears or hearing loss, discontinue use and seek medical advice.
Note: If the product suddenly has no response or powers off, an electrostatic discharge may be the cause. In this circumstance, please follow the procedures below for recovery:
Reset the player (use a paper clip to gently press the Reset button • on the bottom of the player).
Turn on the unit again•
FCC Statement:
This device complies with Part 15 of the FCC Rules. Operation is subject to the following two conditions:
(1) This device may not cause harmful interference, and
(2) This device must accept any interference received, including interference that may cause undesired operation.
Note: This equipment has been tested and found to comply with the limits for Class B digital devices, pursuant to Part 15 of the FCC rules. These limits are designed to provide reasonable protection against harmful interference in a residential installation. This equipment generates, uses and can radiate radio frequency energy and, if not installed and used in accordance with the instructions, may cause harmful interference to radio communications. However, there is no guarantee that interference will not occur in a particular installation. If this equipment does cause harmful interference to radio or television reception, which can be determined by turning the equipment off and on, the user is encouraged to try to correct the interference by one or more of the following measures:
Reorient or relocate the receiving antenna.
Increase the separation between the equipment and receiver.
Connect the equipment into an outlet on a circuit different from that to which the receiver is connected.
Consult the dealer or an experienced radio/TV technician for help•
Use of shielded cable is required to comply with Class B limits in Subpart B of Part 15 of the FCC rules.
Do not make any changes or modifications to the equipment unless otherwise specified in the manual. If such changes or modifications should be made, you could be required to stop operation of the equipment.
Important Safety Instructions
Read Instructions: All the safety and operating instruc-1. tions should be read before the product is operated.
Retain Instructions: The safety and operating instruc-2. tions should be retained for future reference.
Heed Warnings: All warnings on the product and in 3. the operating instructions should be adhered to.
Follow Instructions: All operating and usage instruc-4. tions should be followed.
Cleaning: Unplug this product from the wall outlet be-5. fore cleaning. Do not use liquid cleaners or aerosol cleaners. Use a damp cloth for cleaning.
Attachments: Use only attachments recommended by 6. the manufacturer. Use of other attachments may be hazardous.
Water and Moisture: Do not use this product near 7. water (e.g., near a bath tub, washbowl, kitchen sink, laundry tub, in wet basements, or near a swimming pool and the like).
- Ventilation: Slots and openings in the cabinet are provided for ventilation to ensure reliable operation of the product and to protect it from overheating. These openings should never be blocked by placing the product on a bed, sofa, rug, or other similar surface. This product should not be placed in a built-in installation such as a bookcase or rack unless proper ventila-
tion is provided or the manufacturer instructions have been adhered to.
- Power Sources: This product should be operated only from the type of power source indicated on the rating label. If you are not sure of the type of power supply to your home, consult your product dealer or local power company. For products intended to operate from battery power or other sources, refer to the operating instructions.
Overloading: Do not overload wall outlets, extension 10. cords, or integral convenience receptacles as this can result in a risk of fire or electric shock.
Object and Liquid Entry: Never push objects of any 11. kind into this product through openings as they may touch dangerous voltage points or shout-out parts that could result in a fire or electric shock. Never spill liquid of any kind on the product.
Servicing: Do not attempt to service this product your-12. self as opening or removing covers may expose you to dangerous voltage or other hazards. Refer all servicing to qualified service personnel.
Damage Requiring Service: Unplug this product from 13. the wall outlet and refer servicing to qualified service personnel under the following conditions: a) when the power-supply or plug is damaged; b) if liquid has been spilled or if objects have fallen into the product; c) if the product has been exposed to rain or water; d) if
the product does not operate normally by following the operating instructions. Adjust only those controls that are covered by the operating instructions as improper adjustment of other controls may result in damage and will often require extensive work by a qualified technician to restore the product to its normal operation; e) if the product has been dropped or damaged in any way; f) when the product exhibits a distinct change in performance—this indicates a need for service.
Replacement Parts: When replacement parts are re-14, required, be sure that your service technician has used replacement parts specified by the manufacturer or have the same characteristics as the original part. Unauthorized substitutions may result in fire, electric shock, or other hazards.
- Safety Check: Upon completion of any service or repairs to this product, ask the service technician to perform safety checks to ensure that the product is in proper operating condition.
Heat: The product should be situated away from heat 16. sources such as radiators, heat registers, stoves, or other products (including amplifiers) that produce heat.
Legal and Trademark Notices
Coby and Kyros are trademarks of Coby Electronics Corporation.
Android is a trademark of Google Inc. Use of this trademark is subject to Google Permissions.
Portions of the artwork used for this package are modifications based on work created and shared by Google and used according to terms described in the Creative Commons 3.0 Attribution License.
HDMI, the HDMI Logo and High-Definition Multimedia Interface are trademarks or registered trademarks of HDMI Licensing LLC.
microSDHC is a registered trademark of the SD Card Association.
USB is a registered trademark of USB Implementers Forum, Inc.
YouTube™ is a trademark of Google, Inc.
All other trademarks and logos are property of their respective owners unless indicated otherwise.
Coby Electronics Corp.
1991 Marcus Ave, Suite 301
Lake Success, NY 11042
www.cobyusa.com
www.ecoby.com
Coby is a registered trademark of Coby Electronics Corporation. Printed in China.
MID7015-4G
IB v1.6a_20101124-3
- Table of Contents
- THANK YOU 4
- GETTING TO KNOW THE MID7015 ......6
- GETTING STARTED ....14
- CONNECTING TO THE INTERNET .....22
- ABOUT APPLICATIONS ....28
- BROWSING THE WEB 33
- OPTIONAL CONNECTIONS ....36
- SETTING THE SYSTEM OPTIONS .... 40
- SPECIFICATIONS 49
- SUPPORT 50
- SAFETY NOTICES ....51
- Thank You
- Package Contents
- Features
- Getting to Know the MID7015
- About the Touchscreen
- Protective Film
- Using the Stylus
- Using Your Finger Tip
- Touchscreen Actions
- About the Orientation Sensor
- Charging the Tablet
- Inserting a Memory Card
- To insert a memory card:
- To release and remove a memory card:
- UNMOUNT the memory card.1.
- About the Protective Case
- To remove the tablet from the case:
- Getting Started
- Turning the Tablet On and Off
- Turning the Screen On and Off (Standby)
- Unlocking the Screen
- Home Screen at a Glance
- Adding Widgets and Icons
- Changing Home Screens
- Removing Widgets and Icons
- About Menus
- Context menus.2.
- About Notifications
- Connecting to the Internet
- Requirements
- Connect to a Wi-Fi Network
- Turn on the Wi-Fi radio if it is not already on. To turn on Wi-Fi:
- Select an available Wi-Fi network to connect to:
- Connect to a Wi-Fi Network Manually
- Forget a Wi-Fi Network
- About Applications
- To Launch an Application
- Preinstalled Applications
- Installing Additional Applications
- About the AppsLib Store
- Removing Applications
- Browsing the Web
- To go to a webpage. +
- To bookmark a webpage.
- Optional Connections
- Connecting to a Computer
- When your tablet is connected, a USB icon will appear in the Notification bar.
- Mount the storage drive.3.
- Connecting to a TV
- To adjust the display settings:
- To connect the tablet to the TV:
- Connecting Headphones
- Using the USB Full-Size Adapter
- Connecting a Keyboard
- Connecting a Storage Device
- Setting the System Options
- Specifications
- Support ↓
- Coby Electronics Technical Support
- Safety Notices
- CAUTION
- For Customer Use:
- FCC Statement:
- Important Safety Instructions
- Legal and Trademark Notices
- Coby Electronics Corp.
Brand : COBY
Model : MID7015-4G
Category : Tablet