
C3583FQ/BS - Screen AOC - Free user manual and instructions
Find the device manual for free C3583FQ/BS AOC in PDF.


User questions about C3583FQ/BS AOC
0 question about this device. Answer the ones you know or ask your own.
Ask a new question about this device
Download the instructions for your Screen in PDF format for free! Find your manual C3583FQ/BS - AOC and take your electronic device back in hand. On this page are published all the documents necessary for the use of your device. C3583FQ/BS by AOC.
USER MANUAL C3583FQ/BS AOC
LCD Monitor User Manual
C3583FQ LED backlight
natural_image
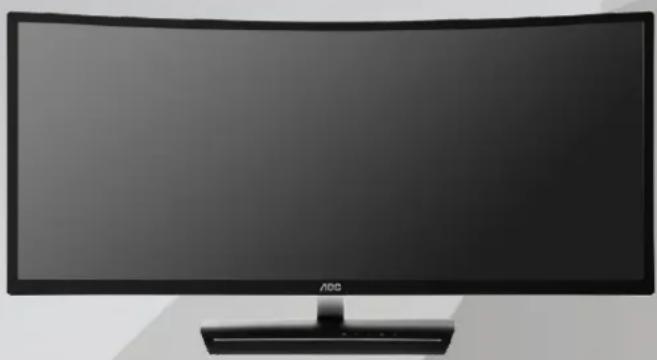
Front view of a curved black monitor with 'ADD' branding on the front panel (no additional text or symbols visible)Safety 4
National Conventions....4
Power 5
Installation....6
Cleaning....7
Other 8
Setup 9
Contents in Box 9
Adjusting Viewing Angle....10
Using "MHL (Mobile High-Definition Link)"...... 11
Connecting the Monitor....12
Adaptive sync function....13
Adjusting 14
Setting Optimal Resolution 14
Windows 10....14
Windows 8....16
Windows 7....18
Hotkeys....20
OSD Setting....21
Luminance....22
Image Setup 23
Color Setup....24
Picture Boost 25
OSD Setup 26
Extra 27
Exit....28
LED Indicator....29
Driver 30
Monitor Driver 30
Windows 10....30
Windows 8....34
Windows 7....38
i-Menu....41
e-Saver 42
Screen+ 43
Troubleshoot 44
Specification....46
General Specification....46
Preset Display Modes....48
Pin Assignments 49
Plug and Play....51
Regulation....52
FCC Notice 52
WEEE Declaration 53
WEEE Declaration for India 53
RoHS Declaration for India 53
EPA Energy Star 54
EPEAT Declaration....54
Service 55
Warranty Statement for Europe....55
Warranty Statement for Middle East and Africa (MEA) 57
AOC International (Europe) B.V. 59
Warranty Statement for North & South America (excluding Brazil) 60
EASE PROGRAME 62
TCO DOCUMENT 63
Safety
National Conventions
The following subsections describe notational conventions used in this document.
Notes, Cautions, and Warnings
Throughout this guide, blocks of text may be accompanied by an icon and printed in bold type or in italic type. These blocks are notes, cautions, and warnings, and they are used as follows:

NOTE: A NOTE indicates important information that helps you make better use of your computer system.

CAUTION: A CAUTION indicates either potential damage to hardware or loss of data and tells you how to avoid the problem.

WARNING: A WARNING indicates the potential for bodily harm and tells you how to avoid the problem. Some warnings may appear in alternate formats and may be unaccompanied by an icon. In such cases, the specific presentation of the warning is mandated by regulatory authority.
Power
The monitor should be operated only from the type of power source indicated on the label. If you are not sure of the type of power supplied to your home, consult your dealer or local power company.
The monitor is equipped with a three-pronged grounded plug, a plug with a third (grounding) pin. This plug will fit only into a grounded power outlet as a safety feature. If your outlet does not accommodate the three-wire plug, have an electrician install the correct outlet, or use an adapter to ground the appliance safely. Do not defeat the safety purpose of the grounded plug.
⚠️ Unplug the unit during a lightning storm or when it will not be used for long periods of time. This will protect the monitor from damage due to power surges.
Do not overload power strips and extension cords. Overloading can result in fire or electric shock.
To ensure satisfactory operation, use the monitor only with UL listed computers which have appropriate configured receptacles marked between 20V, 3.25A
The wall socket shall be installed near the equipment and shall be easily accessible.
For use only with the attached power adapter (Only for monitors with power adapter). Manufacturers:
1) TPV ELECTRONICS (FUJIAN) CO., LTD model : ADPC2090
Installation
Do not place the monitor on an unstable cart, stand, tripod, bracket, or table. If the monitor falls, it can injure a person and cause serious damage to this product. Use only a cart, stand, tripod, bracket, or table recommended by the manufacturer or sold with this product. Follow the manufacturer's instructions when installing the product and use mounting accessories recommended by the manufacturer. A product and cart combination should be moved with care.
Never push any object into the slot on the monitor cabinet. It could damage circuit parts causing a fire or electric shock. Never spill liquids on the monitor.
Do not place the front of the product on the floor.
If you mount the monitor on a wall or shelf, use a mounting kit approved by the manufacturer and follow the kit instructions.
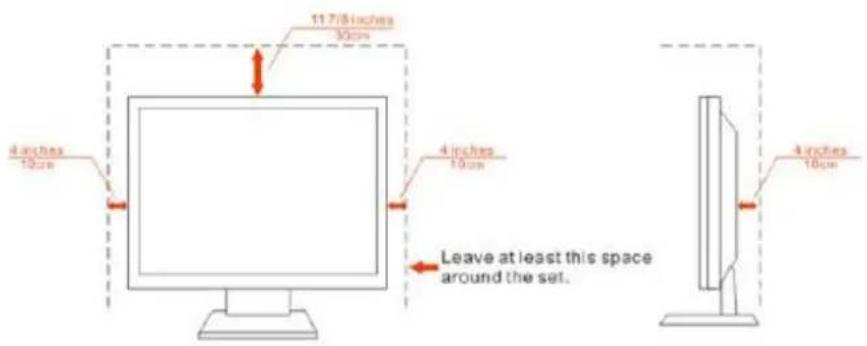
Leave some space around the monitor as shown below. Otherwise, air-circulation may be inadequate hence overheating may cause a fire or damage to the monitor.
See below the recommended ventilation areas around the monitor when the monitor is installed on the wall or with the stand:
Installed with stand
text_image
11.7/8 inches 30cm 4 inches 10cm 4 inches 10cm Leave at least this space around the set. 4 inches 10cmCleaning
Clean the cabinet regularly with cloth. You can use soft-detergent to wipe out the stain, instead of strong-detergent which will cauterize the product cabinet.
When cleaning, make sure no detergent is leaked into the product. The cleaning cloth should not be too rough as it will scratch the screen surface.
Please disconnect the power cord before cleaning the product.
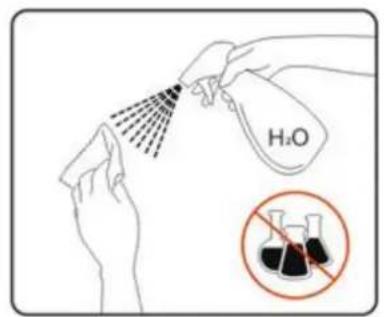
text_image
H₂O No. 100%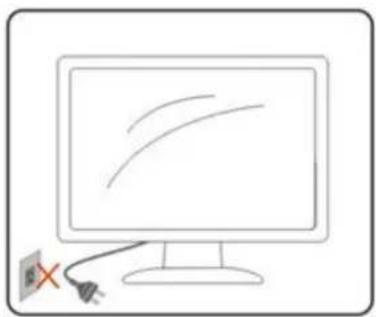
natural_image
Simple line drawing of a computer monitor with a cable and a switch, no text or symbols present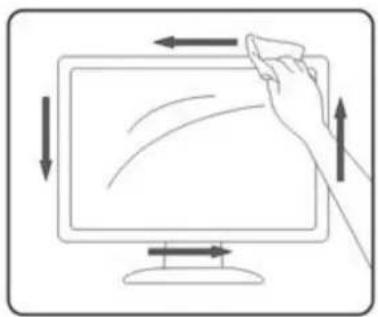
natural_image
Illustration of a hand interacting with a computer monitor displaying curved arrows (no text or symbols)Other
If the product is emitting a strange smell, sound or smoke, disconnect the power plug IMMEDIATELY and contact a Service Center.
Make sure that the ventilating openings are not blocked by a table or curtain.
Do not engage the LCD monitor in severe vibration or high impact conditions during operation.
For display with glossy bezel the user should consider the placement of the display as the bezel may cause disturbing reflections from surrounding light and bright surfaces.
If the phone on the base of LCD monitor when the phone calls will affect the circuit characteristics, may cause the screen to mute or screen interference.
Setup
Contents in Box
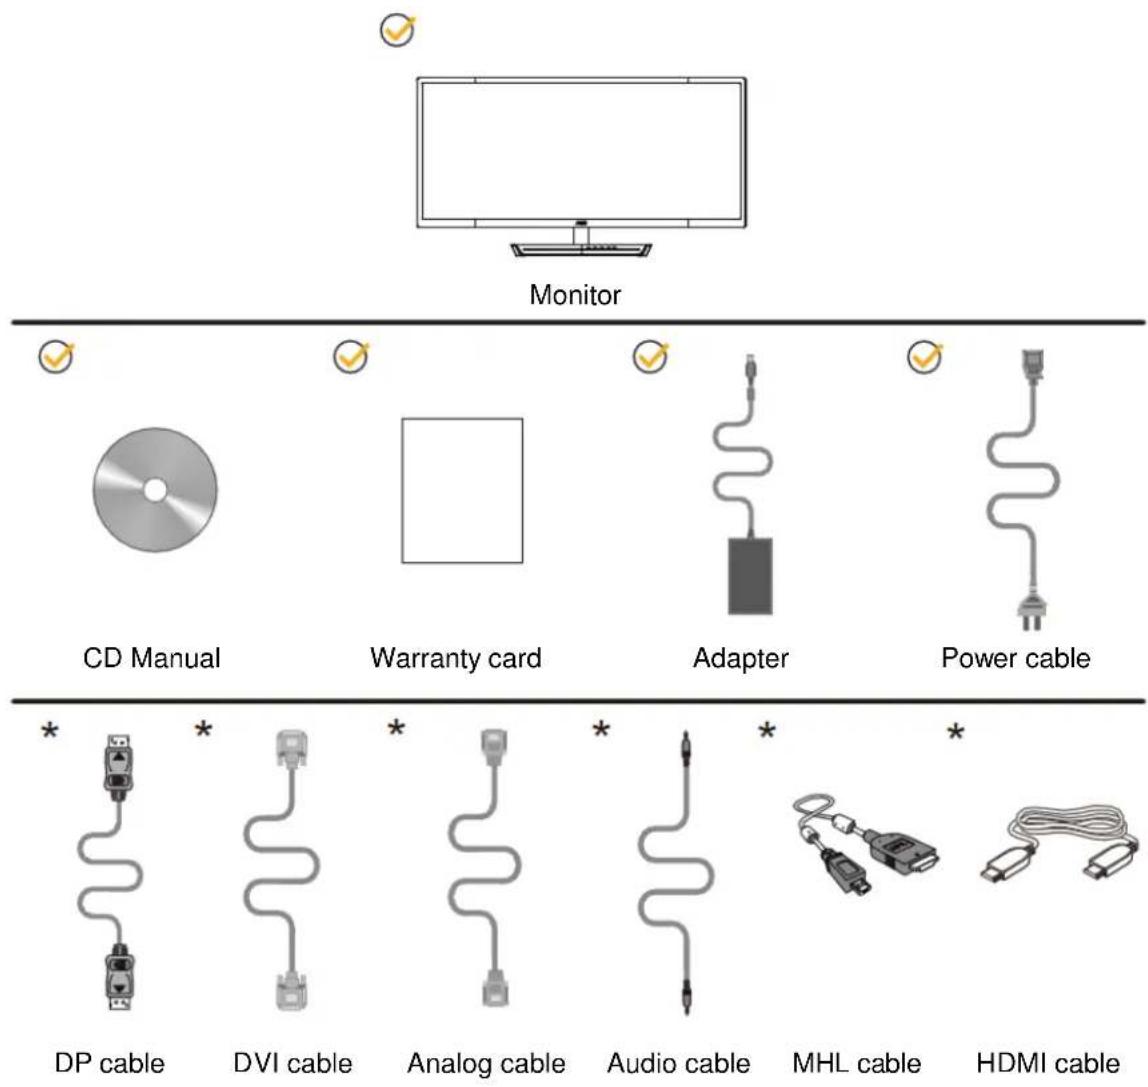
text_image
Monitor CD Manual Warranty card Adapter Power cable * DP cable * DVI cable * Analog cable * Audio cable MHL cable * HDMI cable
Not all signal cables (DP, Dual link DVI, Analog, Audio, HDMI, MHL) will be provided for all countries and regions. Please check with the local dealer or AOC branch office for confirmation.
Adjusting Viewing Angle
For optimal viewing, it is recommended to look at the full face of the monitor, and then adjust the monitor's angle to your own preference.
Hold the stand so you will not topple the monitor when you change the monitor's angle.
You are able to adjust the monitor's angle from -3° to 15°.
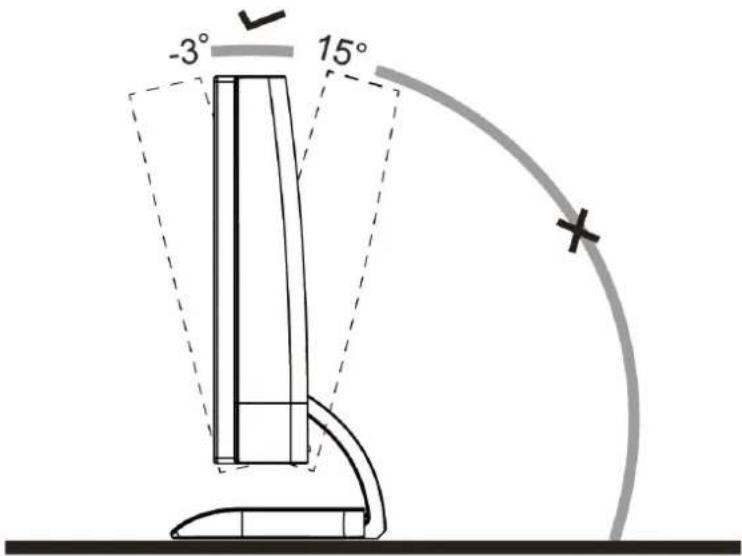
text_image
-3° 15°
NOTE:
Do not adjust the viewing angle over 15 degrees in order to avoid damage.
Using "MHL (Mobile High-Definition Link)"
1."MHL" (Mobile High-Definition Link)
This feature allows you to enjoy videos and photos (imported from a connected mobile device that supports MHL) on the screen of the product.
- To use the MHL function, you need an MHL-certified mobile device. You can check if your mobile device is MHL certified on the device manufacturer's website. To find a list of MHL-certified devices, visit the official MHL website (http://www.mhlconsortium.org).
● To use the MHL function, the latest version of software must be installed on the mobile device. - On some mobile devices, the MHL function may not be available depending on the device's performance or functionality.
- Since the display size of the product is larger than those of mobile devices, the picture quality may degrade.
- This product is officially MHL-certified. If you encounter any problem when using the MHL function, please contact the manufacturer of the mobile device.
- The picture quality may degrade when content (imported from the mobile device) with a low Resolution is played on the product.
Using "MHL"
- Connect the micro USB port on the mobile device to the [HDMI / MHL] port on the product using the MHL cable.
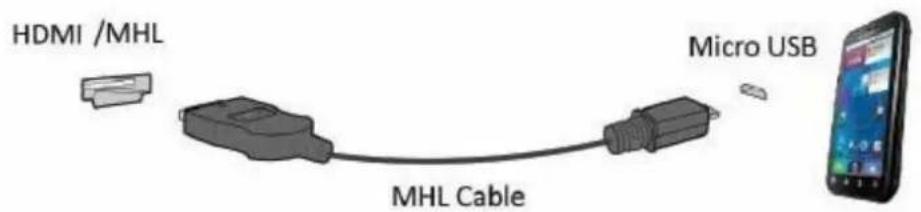
text_image
HDMI /MHL Micro USB MHL Cable- When the MHL cable is used, [HDMI / MHL] is the only port on this monitor that supports the MHL function.
- Mobile device must be purchased separately.
-
Connect the AC power cord to the product and a power outlet.
-
Press the source button and switch to HDMI /MHL to activate MHL mode.
-
After about 3 seconds, the MHL screen will be displayed if MHL mode is active.
Remark: The indicated time "3 sec later" may vary depending on the mobile device.
When the mobile device is not connected or does not support MHL
- If MHL mode is not activated even though the mobile device supports MHL, check if mobile device MHL port is MHL standard port otherwise an additional MHL-enabled adapter is required.
Connecting the Monitor
Cable Connections In Back of Monitor and Computer:
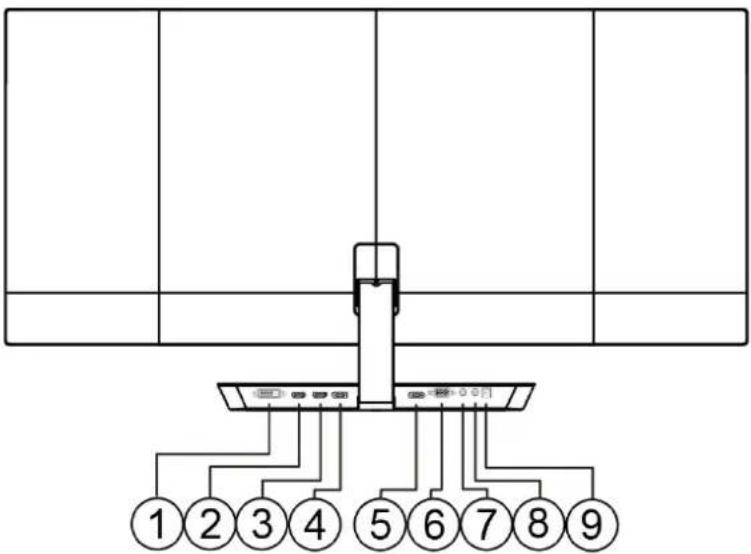
text_image
1 2 3 4 5 6 7 8 91 DVI-D (Dual link)
2 HDMI/MHL-2
3 HDMI/MHL-1
4 DP-2
5 DP-1
6 D-SUB
7 Audio in
8 Earphone out
9 Power
To protect equipment, always turn off the PC and LCD monitor before connecting.
1 Connect the power cable to the AC port on the back of the monitor.
2 Connect one end of the 15-pin D-Sub cable to the back of the monitor and connect the other end to the computer's D-Sub port.
3 Optional – (Requires a video card with DVI port) – Connect one end of the DVI cable to the back of the monitor and connect the other end to the computer's DVI port.
4 Optional – (Requires a video card with HDMI port) – Connect one end of the HDMI cable to the back of the monitor and connect the other end to the computer's HDMI port.
5 Optional – (Requires a video card with DP port) – Connect one end of the DP cable to the back of the monitor and connect the other end to the computer's DP port.
6 Turn on your monitor and computer.
7 Video content supporting resolution:
(1) MHL: 1920 x 1080/60Hz (Maximum)
(2) D-sub/DVI Dual-Link/HDMI: 2560x1080/60Hz (Maximum)
(3) DP: 2560x1080/144Hz (Maximum)
If your monitor displays an image, installation is complete. If it does not display an image, please refer Troubleshooting.
Adaptive sync function
- Adaptive sync function is working with DisplayPort.
- Compatible Graphics Card: Recommend list is as the below, also could be checked by visiting
www.AMD.com
AMD Radeon R9 295X2
AMD Radeon R9 290X
AMD Radeon R9 290
AMD Radeon R9 285
AMD Radeon R7 260X
AMD Radeon R7 260
Adjusting
Setting Optimal Resolution
Windows 10
For Windows 10:
- Right click START.
- Click "CONTROL PANEL".
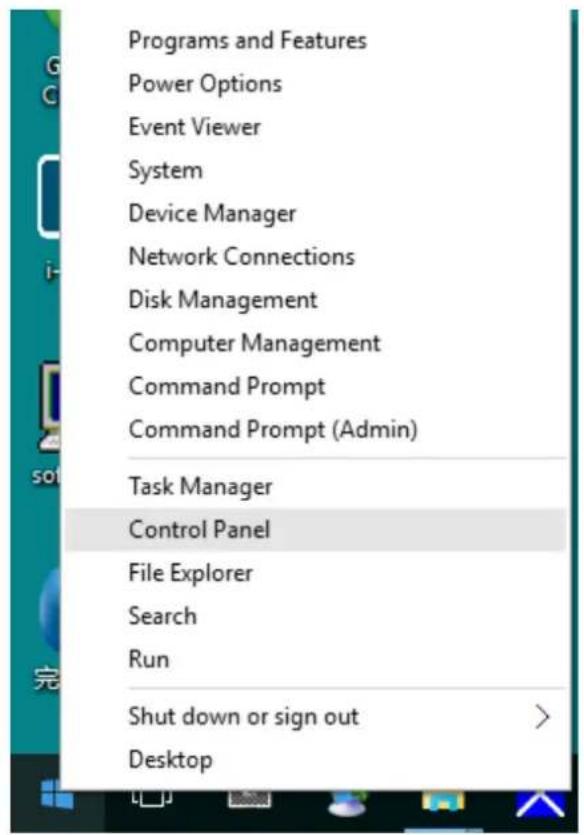
text_image
Programs and Features Power Options Event Viewer System Device Manager Network Connections Disk Management Computer Management Command Prompt Command Prompt (Admin) Task Manager Control Panel File Explorer Search Run Shut down or sign out Desktop- Click "DISPLAY".
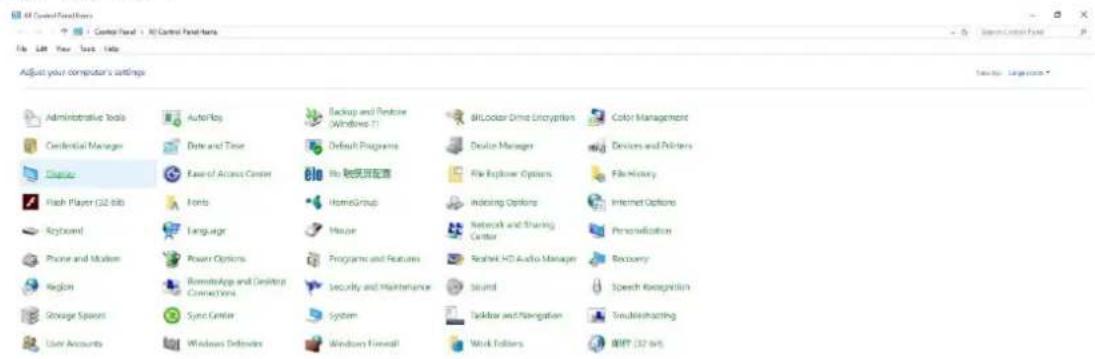
text_image
File List View Tools Help Adjust your computer's settings Administrative Tools Auto/Play Backup and Restore (Windows T1) BITLocker Drive Encryption Color Management Credential Manager Date and Time Default Programs Designer Manager Devices and Printers Class Ease of Access Center File 跳实器配置 File Explorer Options File History Flash Player (32 KB) Fonts HomeGroup Indexing Options Internet Options Keyboard Language Mouse Network and Sharing Center Personalization Phone and Modem Power Options Programs and Features Realtek HD Audio Manager Recovery Region RemoteAge and Desktop Connections Security and Maintenance Sound Speech Recognition Storage System Sync Center System Desktop and Navigation Troubleshooting User Accounts Windows Detodates Windows Firewall Work Editors DIFT (32 KB)- Click on the "Change display settings" button.
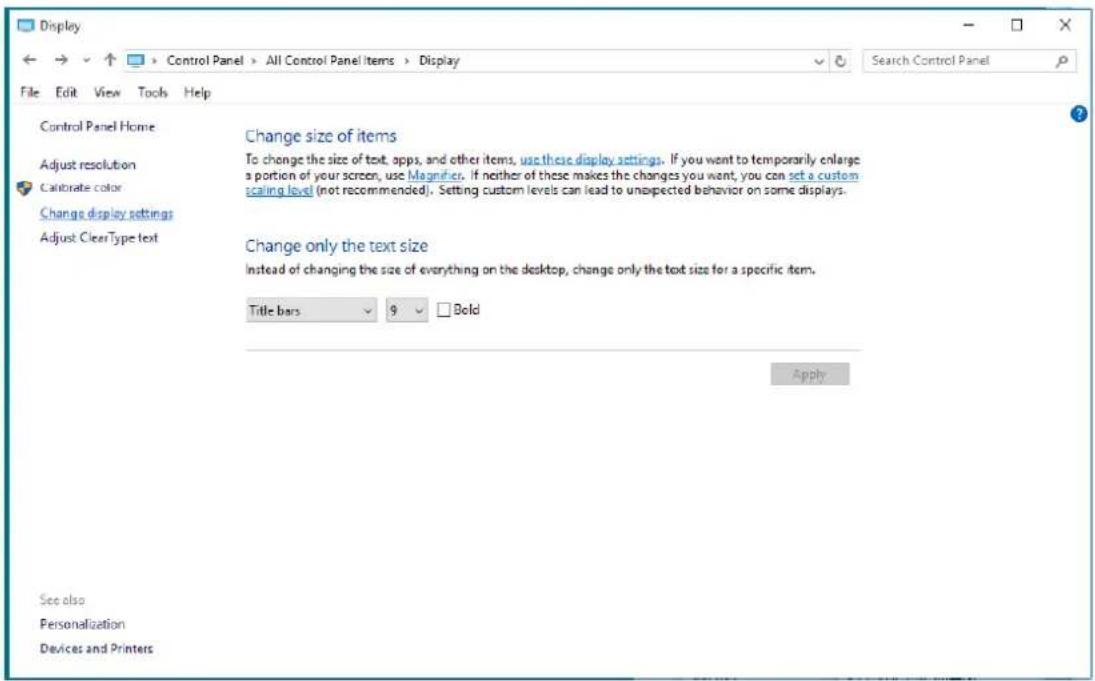
text_image
Display Control Panel Home Adjust resolution Calculate color Change display settings Adjust ClearType text Change size of items To change the size of text, apps, and other items, use these display settings. If you want to temporarily enlarge a portion of your screen, use Magnifier. If neither of these makes the changes you want, you can set a custom scaling level (not recommended). Setting custom levels can lead to unexpected behavior on some displays. Change only the text size Instead of changing the size of everything on the desktop, change only the text size for a specific item. Title bars 9 Bold Apply See also Personalization Devices and Printers- Set the resolution SLIDE-BAR to Optimal preset resolution.
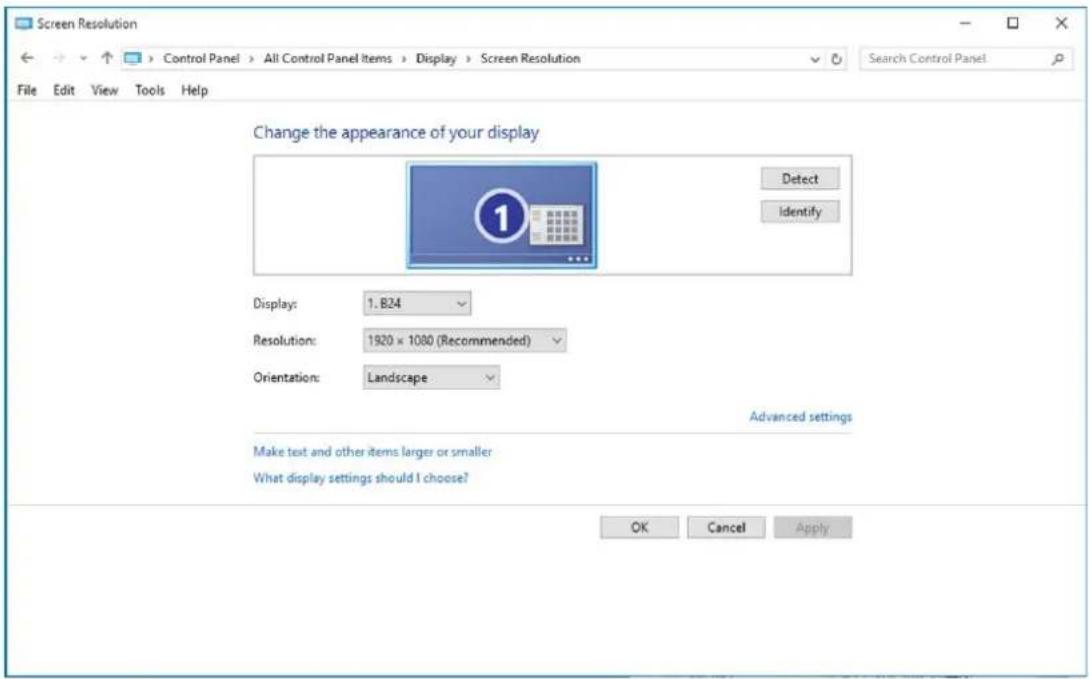
text_image
Screen Resolution Control Panel > All Control Panel Items > Display > Screen Resolution File Edit View Tools Help Change the appearance of your display Detect Identify Display: 1.824 Resolution: 1920 x 1000 (Recommended) Orientation: Landscape Advanced settings Make text and other items larger or smaller What display settings should I choose? OK Cancel ApplyWindows 8
For Windows 8:
• Right click and click All apps at the bottom-right of the screen.
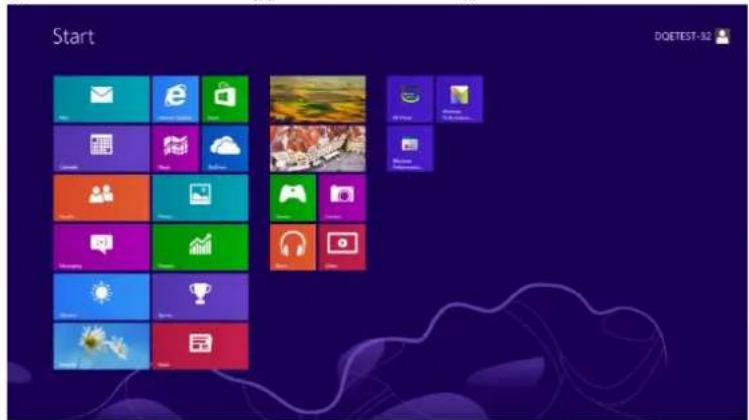
text_image
Start DOIETEST-32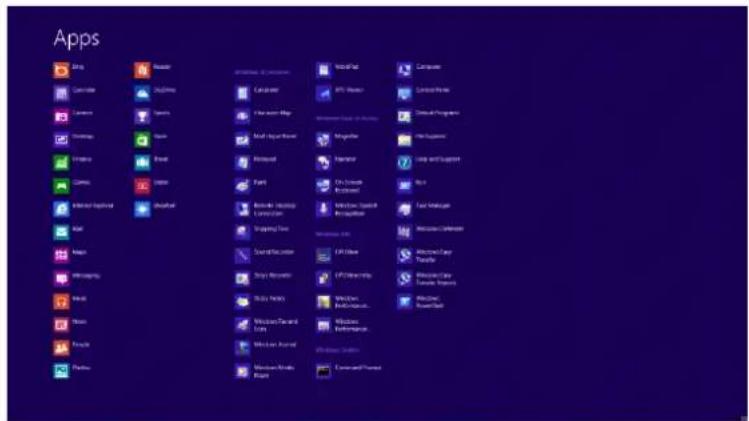
text_image
Apps Eng Camera Camera Playbox Playbox Playbox Playbox Playbox Playbox Playbox Playbox Playbox Playbox Playbox Playbox Playbox Playbox Playbox Playbox Playbox Playbox Playbox Playbox Playbox Playbox Playbox Playbox Playbox Playbox Playbox Playbox Playbox Playbox Playbox Playbox Playbox Playbox• Set the "View by" to "Category".
- Click "Appearance and Personalization".
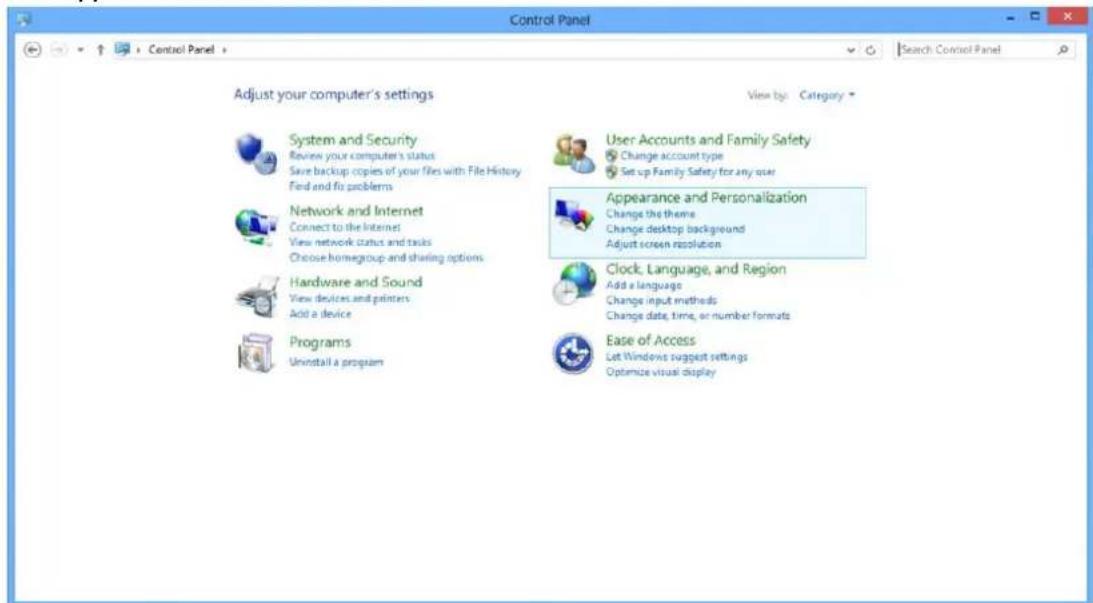
text_image
Control Panel Adjust your computer's settings View by Category System and Security Review your computer's status Save backup copies of your files with File History Find and fix problems Network and Internet Connect to the Internet View network status and tasks Choose homegroup and sharing options Hardware and Sound View devices and printers Add a device Programs Uninstall a program User Accounts and Family Safety Change account type Set up Family Safety for any user Appearance and Personalization Change the theme Change desktop background Adjust screen resolution Clock, Language, and Region Add a language Change input methods Change date, time, or number formats Ease of Access Let Windows support settings Optimize visual display- Click "DISPLAY".
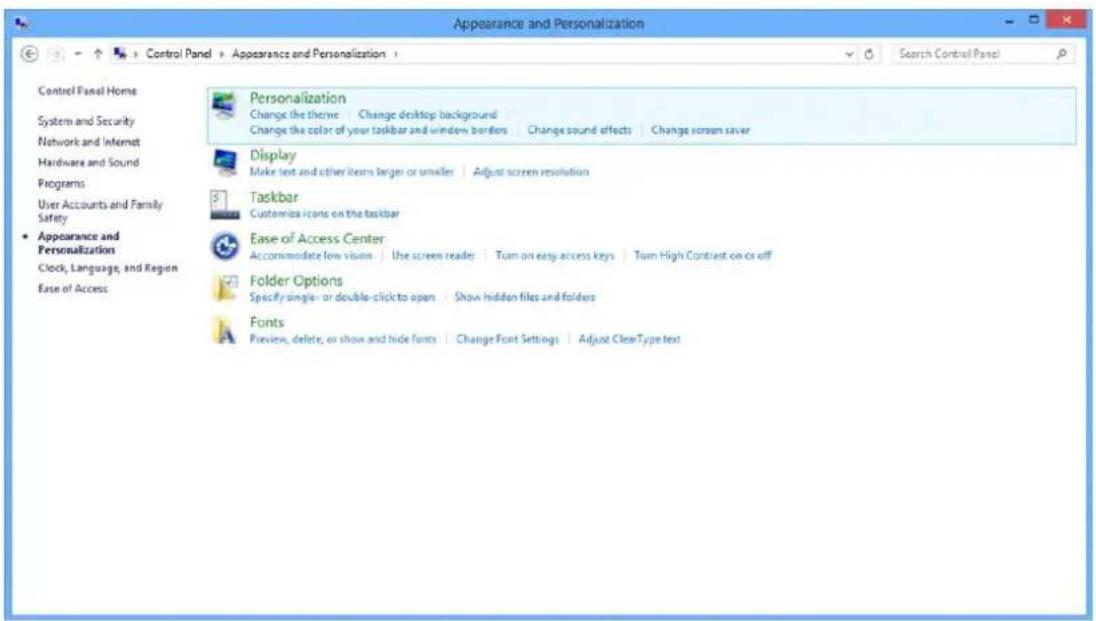
text_image
Appearance and Personalization Control Panel Home System and Security Network and Internet Hardware and Sound Programs User Accounts and Family Safety Appearance and Personalization Clock, Language, and Region Ease of Access Personalization Change the theme | Change desktop background Change the color of your taskbar and window borders | Change sound effects | Change screen saver Display Make text and other items larger or smaller | Adjust screen resolution Taskbar Customize icons on the taskbar Ease of Access Center Accommodate low vision | Use screen reader | Turn on easy access keys | Turn High Context on or off Folder Options Specify single- or double-click to open | Show hidden files and folders Fonts Preview, delete, or show and hide fonts | Change Font Settings | Adjust ClearType text- Set the resolution SLIDE-BAR to Optimal preset resolution
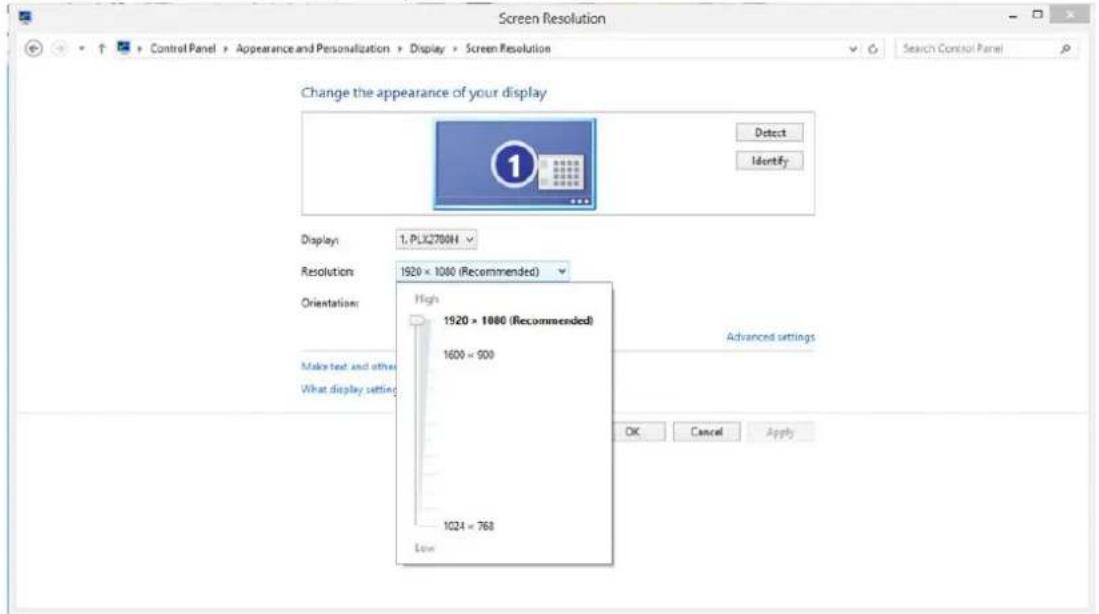
text_image
Screen Resolution Change the appearance of your display Detect Identify Display: 1. PLX2700H Resolution 1920 × 1000 (Recommended) Orientation: High 1920 × 1000 (Recommended) 1600 = 900 1024 = 768 What display setting Advanced settings OK Cancel ApplyWindows 7
For Windows 7:
- Click START.
- Click "CONTROL PANEL".
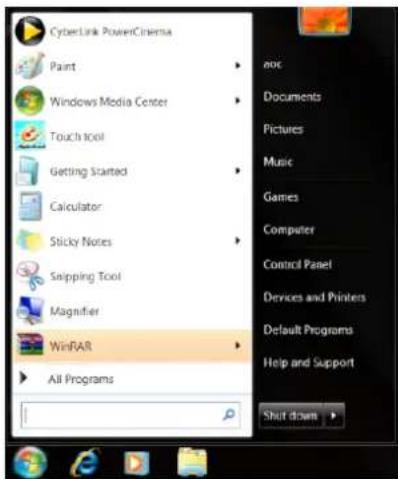
text_image
CyberLink PowerCinema Paint Windows Media Center Touch tool Getting Started Calculator Sticky Notes Snipping Tool Magnifier WinRAR All Programs not Documents Pictures Music Games Computer Control Panel Devices and Printers Default Programs Help and Support Shut down- Click "Appearance".
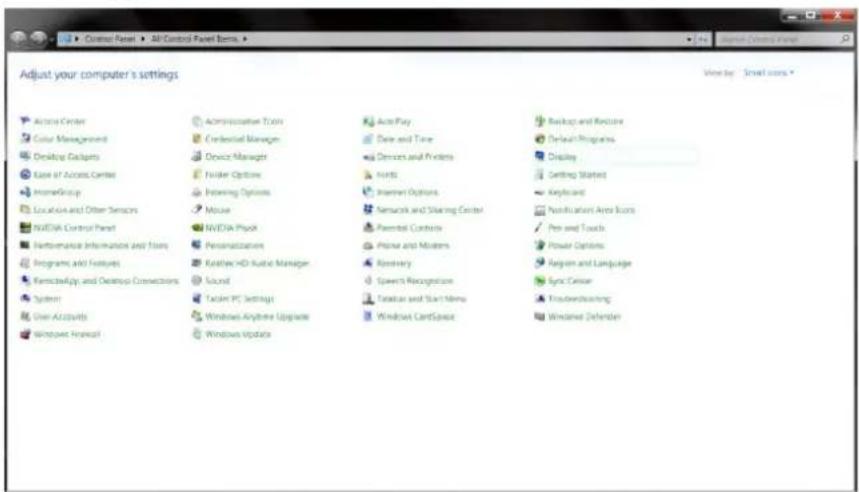
text_image
Adjust your computer's settings View by: Smart Icons Access Center Color Management Desktop Galapets Ease of Access Center IncomeGroup Location and Other Sensors NVIDIA Control Panel Performance Information and Tools Programs and Features Kemech/kgp and Desktop Connections System User Activity Windows Financial Accommodator Icon Credential Manager Device Manager Folder Options Connecting Options Mouse NVIDIA PhysX Personalization Kathex HD Audio Manager Sound Tacton PC Settings Windows Anytime Upgrade Windows Update ActoPlay Date and Time Devices and Printers Tools Internet Options Network and Sharing Center Parental Controls Prime and Modems Rosvency Speech Recognition Translation and Start Menu Windows Certificate Backup and Rescue Default Programs Display Setting Started Keyboard Notification Area Icon Prem and Touch Power Options Regum and Language Sync Center Userlessancing Windows Defender- Click "DISPLAY".
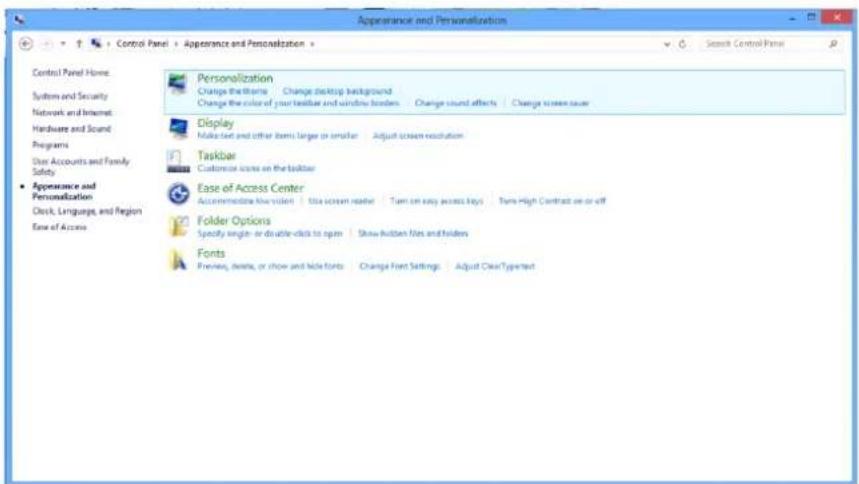
text_image
Appearance and Personalization Control Panel Home System and Security Network and Internet Hardware and Sound Programs User Accounts and Family Safety Appearance and Personalization Clock, Language, and Region Ease of Access Personalization Change the titlea Change desktop background Change the color of your taskbar and window borders Change sound effects Change screen size Display Make text and other items larger or smaller Adjust screen resolution Taskbar Customize scores on the toolbar Ease of Access Center Accommoderate flow vector Title screen reader Turn on easy access keys Turn High Contract on or off Folder Options Specify single or double clicks to spin Show button files and folders Fonts Preview, details, or show and hide fonts Change Font Settings Adjust ClearTypeText- Click on the "Change display settings" button.
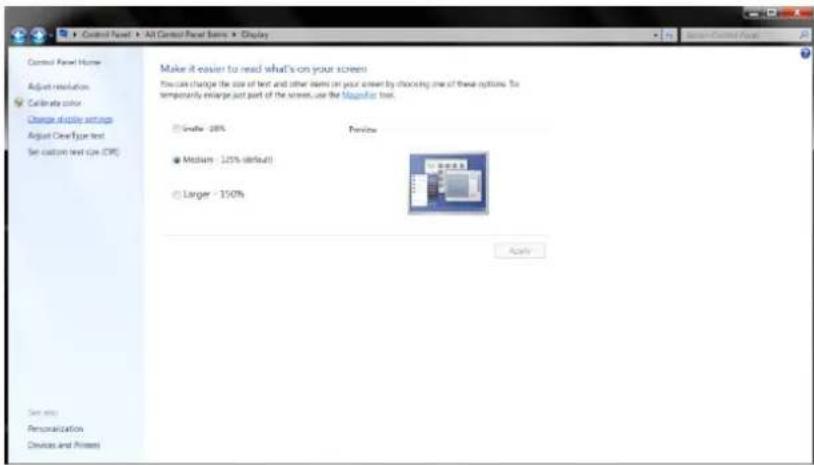
text_image
Control Panel Home Adjust resolution Calculate color Change display settings Adjust Clear type text Set custom text size (CM) Make it easier to read what's on your screen This can change the size of text and other items on your screen by clicking one of these options. To temporarily replace just part of the screen, use the Magnifier tree. Small: 28% Medium: 125% default Larger: 150% Apply Set info Personalization Devices and Printers- Set the resolution SLIDE-BAR to Optimal preset resolution
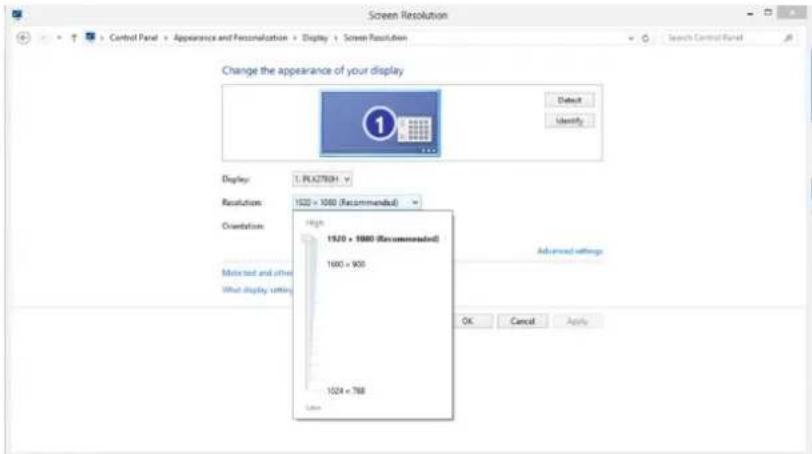
text_image
Screen Resolution Change the appearance of your display Display: 1. FLX275031 Resolution: 1020 × 1080 (Recommended) Orientation: High: 15.20 × 1080 (Recommended) 1600 × 900 Selected Misticet and other What display setting Advanced settings OK Cancel ApplyHotkeys
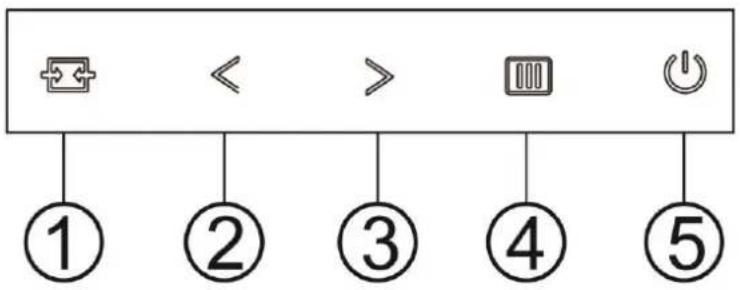
flowchart
graph TD
    A["Start"] --> B["①"]
    C["<"] --> D["②"]
    E[">"] --> F["③"]
    G Button] --> H["④"]
    I OK] --> J["⑤"]
| 1 | Source/Auto/Exit |
| 2 | Game mode/< |
| 3 | Volume/> |
| 4 | Menu/Enter |
| 5 | Power |
Menu/Enter
Press to display the OSD or confirm the selection.
Power
Press the Power button to turn on/off the monitor.
Volume/>
When there is no OSD, press Volume button to active volume adjustment bar, Press
Auto / Exit / Source hot key
When there is no OSD, press Auto/Source button continuously about 2 second to do auto configure. When the OSD is closed, press Source button will be Source hot key function. Press Source button continuously to select the input source showed in the message bar, press Menu/Enter button to change to the source selected.
Game mode/<
When there is no OSD, press the minus key to open game mode function, then press < or > key to select game mode (FPS, RTS, Racing, Gamer 1 or Gamer 2) basing on the different game types.
OSD Setting
Basic and simple instruction on the control keys.

text_image
Image Setup Color Setup Picture Boost QSD Setup Extra Exit Contrast 50 Gamma Gamma 1 Shadowcontrol 50 Brightness 90 DCR OFF Eco mode Standard OverDrive OFF- Press the ☐ MENU-button to activate the OSD window.
- Press < or > to navigate through the functions. Once the desired function is highlighted, press the MENU-button to activate it. If there is a sub-menu, press < or > to navigate through the sub-menu functions.
- Press < or > to change the settings of the selected function. Press ☑ AUTO to exit. If you want to adjust any other function, repeat steps 2-3.
- OSD Lock Function: To lock the OSD, press and hold the ☐ MENU-button while the monitor is off and then press ⏻ power button to turn the monitor on. To un-lock the OSD - press and hold the ☐ MENU-button while the monitor is off and then press ⏻ power button to turn the monitor on.
Notes:
- If the product has only one signal input, the item of "Input Select" is disabled.
- If the product screen size is 4:3 or input signal resolution is native resolution, the item of "Image Ratio" is disabled.
- One of Clear vision, DCR, Color Boost, and Picture Boost functions is activated; the other three functions are turned off accordingly.
Luminance
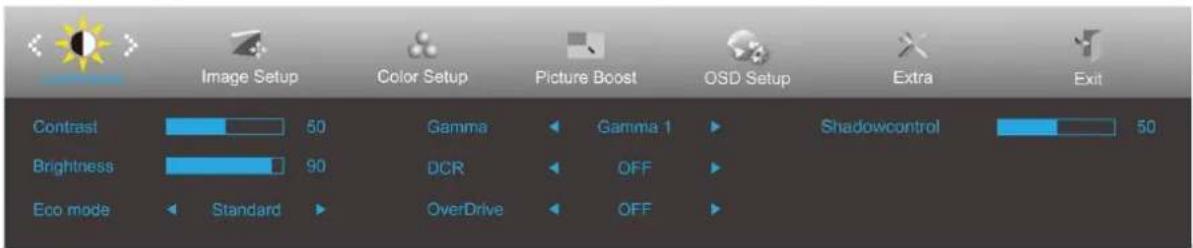
text_image
Image Setup Color Setup Picture Boost OSD Setup Extra Exit Contrast 60 Gamma Gamma 1 Shadowcontrol 50 Brightness 90 DCR OFF Eco mode Standard OverDrive OFF1 Press MENU (Menu) to display menu.
2 Press < or > to select (Luminance), and press MENU to enter.
3 Press < or > to select submenu.
4 Press <or to adjust.
5 Press AUTO to exit.
 | Contrast | 0-100 | Contrast from Digital-register. | |
| Brightness | 0-100 | Backlight Adjustment | ||
| Eco mode | Standard |  | Standard Mode | |
| Text |  | Text Mode | ||
| Internet |  | Internet Mode | ||
| Game | [H23A] | Game Mode | ||
| Movie |  | Movie Mode | ||
| Sports |  | Sports Mode | ||
| Gamma | Gamma1 | Adjust to Gamma 1 | ||
| Gamma2 | Adjust to Gamma 2 | |||
| Gamma3 | Adjust to Gamma 3 | |||
| DCR | Off | Disable dynamic contrast ratio | ||
| On | [KSTW] | Enable dynamic contrast ratio | ||
| OverDrive | Weak | Adjust the response time.It could be blur image, if user turns on the OverDrive in Strong Level.User can adjust OverDrive level base on user's preference or turn it off. | ||
| Medium | ||||
| Strong | ||||
| Off | ||||
| ShadowControl | 0-100 | Shadow Control Default is 50, then end-user can adjust from 50 to 100 or 0 to increase contrast for clear picture.1. If picture is too dark to be saw the detail clearly, adjusting from 50 to 100 for clear picture.2. If picture is too white to be saw the detail clearly, adjusting from 50 to 0 for clear picture | ||
Image Setup
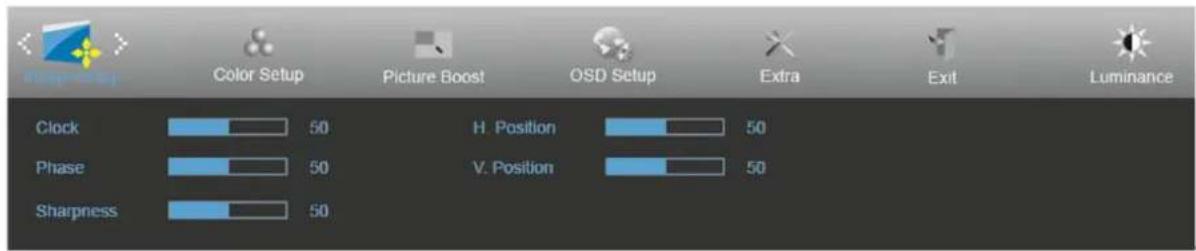
text_image
Color Setup Picture Boost OSD Setup Extra Exit Luminance Clock 50 H. Position 50 Phase 50 V. Position 50 Sharpness 501 Press MENU (Menu) to display menu.
2 Press < or > to select (Image Setup), and press MENU to enter.
3 Press < or > to select submenu.
4 Press <or to adjust.
5 Press AUTO to exit.
 | Clock | 0-100 | Adjust picture Clock to reduce Vertical-Line noise. |
| Phase | 0-100 | Adjust Picture Phase to reduce Horizontal-Line noise. | |
| Sharpness | 0-100 | Adjust picture sharpness. | |
| H.Position | 0-100 | Adjust the horizontal position of the picture. | |
| V.Position | 0-100 | Adjust the vertical position of the picture. |
Color Setup
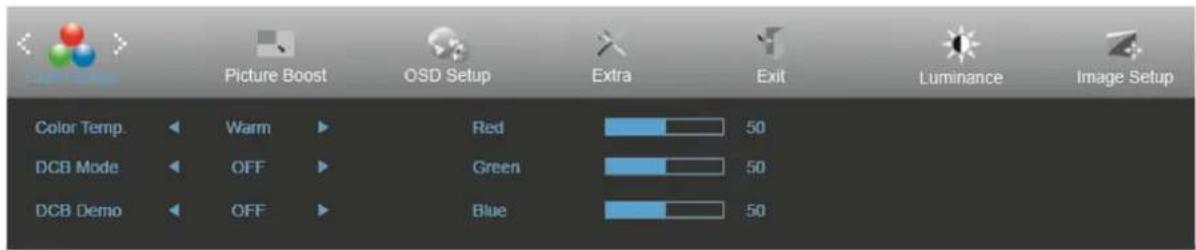
text_image
Picture Boost OSD Setup Extra Exit Luminance Image Setup Color Temp Warm Red 50 DCB Mode OFF Green 50 DCB Demo OFF Blue 501 Press MENU (Menu) to display menu.
2 Press < or > to select
3 Press <or to select submenu.
4 Press <or to adjust.
5 Press AUTO to exit.
 | Color Temp. | Warm | Recall Warm Color Temperature from EEPROM. | |
| Normal | Recall Normal Color Temperature from EEPROM. | |||
| Cool | Recall Cool Color Temperature from EEPROM. | |||
| sRGB | Recall SRGB Color Temperature from EEPROM. | |||
| User | Recall User Color Temperature from EEPROM | |||
| DCB Mode | Full Enhance | ON/OFF | Red/Green/Blue Gain | |
| Nature Skin | ON/OFF | Red Gain from Digital-register. | ||
| Green Field | ON/OFF | Green Gain from Digital-register. | ||
| Sky-blue | ON/OFF | Blue Gain from Digital-register. | ||
| AutoDetect | ON/OFF | Auto gain for input signal | ||
| DCB Demo | ON/OFF | Enhance Area in half Picture | ||
| Red | 0-100 | Red gain from Digital-register. | ||
| Green | 0-100 | Green gain from Digital-register. | ||
| Blue | 0-100 | Blue gain from Digital-register. |
Picture Boost
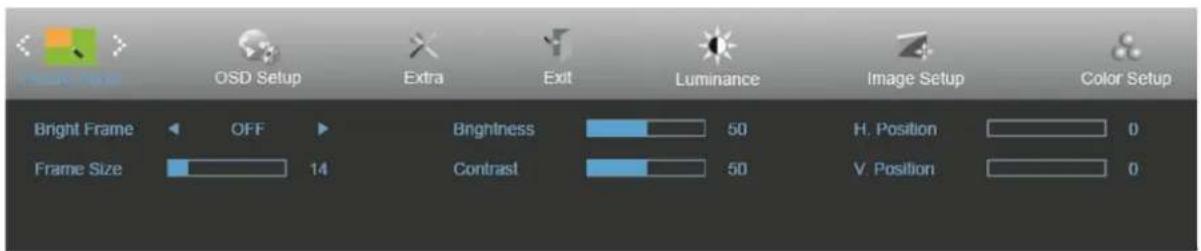
text_image
Noise Setup OSD Setup Extra Exit Luminance Image Setup Color Setup Bright Frame OFF Brightness 50 H. Position 0 Frame Size 14 Contrast 50 V. Position 01 Press MENU (Menu) to display menu.
2 Press < or > to select (Picture Boost), and press MENU to enter.
3 Press < or > to select submenu.
4 Press <or to adjust.
5 Press AUTO to exit.
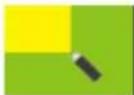 | Bright Frame | ON/OFF | Enable/Disable Bright Frame |
| Frame Size | 14-100 | Adjust the Size of the Frame | |
| Brightness | 0-100 | Brightness Adjustment for Enhance Area | |
| Contrast | 0-100 | Contrast Adjustment for Enhance Area | |
| H. position | 0-100 | Adjust the horizontal position of the Frame | |
| V. position | 0-100 | Adjust the vertical position of the Frame |
Note:
Adjust the brightness, contrast, and position of the Bright Frame for better viewing experience.
OSD Setup
text_image
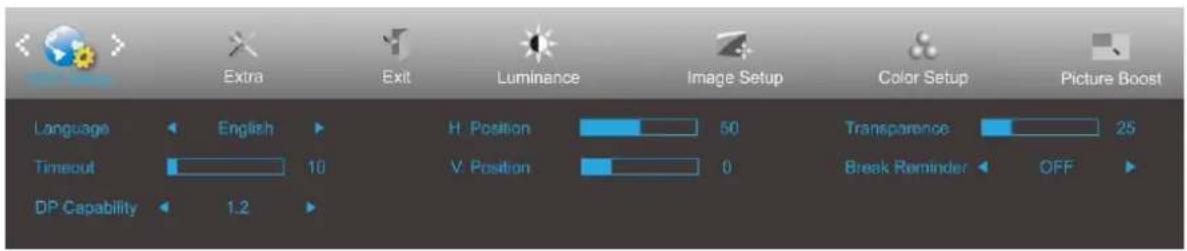
Extra Exit Luminance Image Setup Color Setup Picture Boost Language English H: Position 50 Transparence 25 Timeout 10 V: Position 0 Break Reminder OFF DP Capability 1.21 Press MENU (Menu) to display menu.
2 Press < or > to select (OSD Setup), and press MENU to enter.
3 Press < or > to select submenu.
4 Press <or to adjust.
5 Press AUTO to exit.
 | Language | English, France, Spanish, Portuguese, German, Italian, Dutch, Swedish, Finnish, Polish, Czech, Russia, Korea, TChina, SChina, Japanese | Select the OSD language |
| Timeout | 5-120 | Adjust the OSD timeout. | |
| H. Position | 0-100 | Adjust the horizontal position of the OSD. | |
| V. Position | 0-100 | Adjust the vertical position of the OSD. | |
| Transparence | 0-100 | Adjust the OSD | |
| Break Reminder | ON/OFF | Break Reminder if the user continually work for more than 1 hours | |
| DP Capability | 1.1/1.2 | 1. In DP 1.1 mode, DP-out outputs full image which is from DP-in if DP-in received image data.2. In DP 1.2 mode(A) DP-out outputs full image which is from DP-in if DP graphic card outputs single monitor data.(B) DP-out outputs next 1 or 2 monitor image(s) if DP graphic card outputs 2 or 3 monitor images by daisy chain. |
Notes:
If the DP video content supports DP1.2, please select DP1.2 for DP Capability; otherwise, please select DP1.1.
Extra
text_image
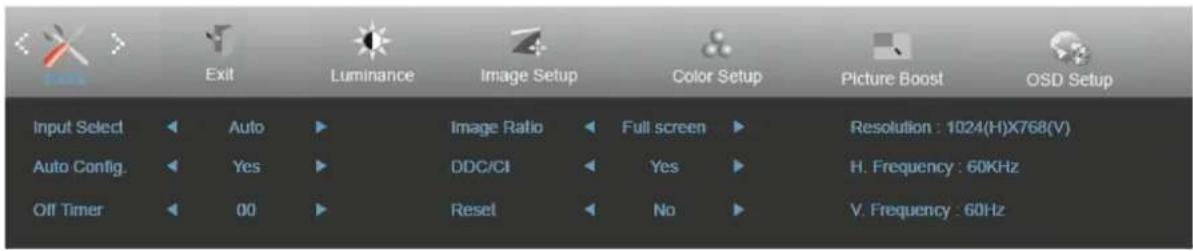
Input Select Auto Image Ratio Full screen Resolution : 1024(H)X768(V) Auto Config. Yes DDC/CI Yes H. Frequency : 60KHz Off Timer 00 Reset No V. Frequency : 60Hz1 Press MENU (Menu) to display menu.
2 Press < or > to select (Extra), and press MENU to enter.
3 Press < or > to select submenu.
4 Press <or to adjust.
5 Press AUTO to exit.
 | Input Select | Auto | Auto Detect input signal |
| D-SUB | Select D-SUB signal source as input | ||
| DVI | Select DVI signal source as input | ||
| HDMI1/MHL | Select HDMI signal Source as input | ||
| HDMI2/MHL | Select HDMI signal Source as input | ||
| DP1 | Select DP signal Source as input | ||
| DP2 | Select DP signal Source as input | ||
| Auto Config. | Yes / No | Auto adjust the picture to default. | |
| Off Timer | 0-24 hrs | Select DC off time. | |
| Image Ratio | wide | Select image Ratio format for display. | |
| 1:1 | |||
| 17" (4:3) | |||
| 19" (4:3) | |||
| 19" (5:4) | |||
| 19"W (16:10) | |||
| 21.5"W (16:9) | |||
| 22"W (16:10) | |||
| 23"W (16:9) | |||
| 23.6"W (16:9) | |||
| 24"W (16:9) | |||
| DDC/CI | Yes / No | Turn on or off DDC/CI Support. | |
| Reset | Yes / No | Reset the menu to default. |
Exit
text_image
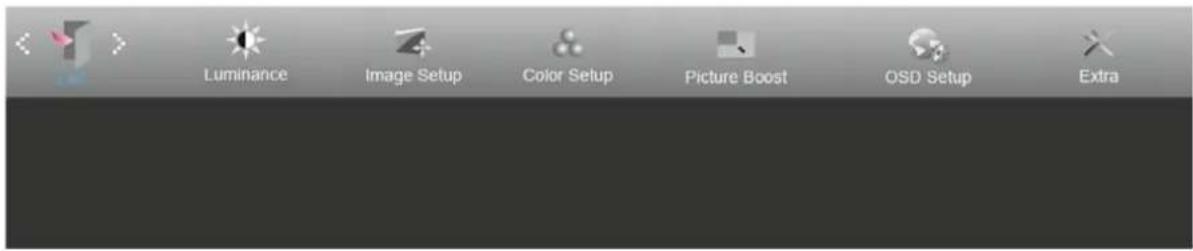
Luminance Image Setup Color Setup Picture Boost OSD Setup Extra1 Press MENU (Menu) to display menu.
2 Press < or > to select (Exit), and press MENU to enter. 3 Press AUTO to exit.
LED Indicator
| Status | LED Color |
| Power On | Blue |
| Power Saving | Orange |
Driver
Monitor Driver
Windows 10
- Start Windows® 10
- Right click START.
- Click "Control Panel".
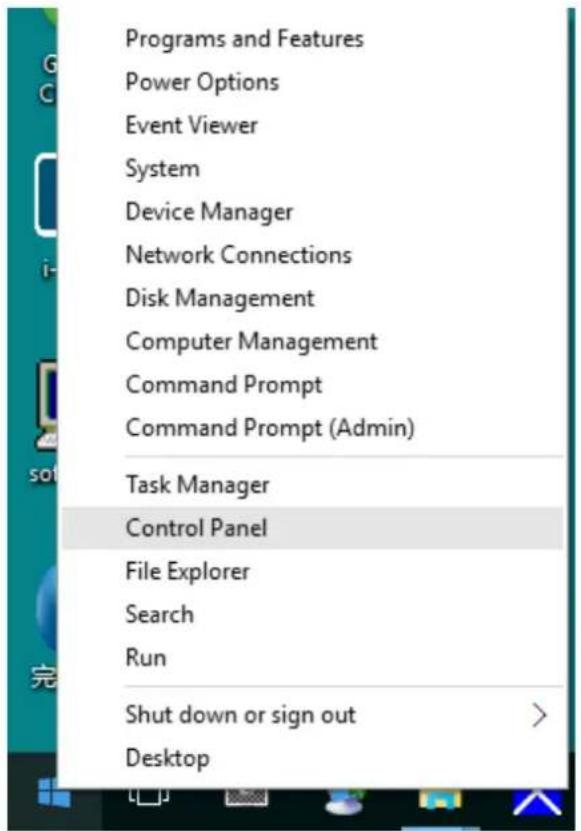
text_image
Programs and Features Power Options Event Viewer System Device Manager Network Connections Disk Management Computer Management Command Prompt Command Prompt (Admin) Task Manager Control Panel File Explorer Search Run Shut down or sign out Desktop1. Click on the "Display" icon.
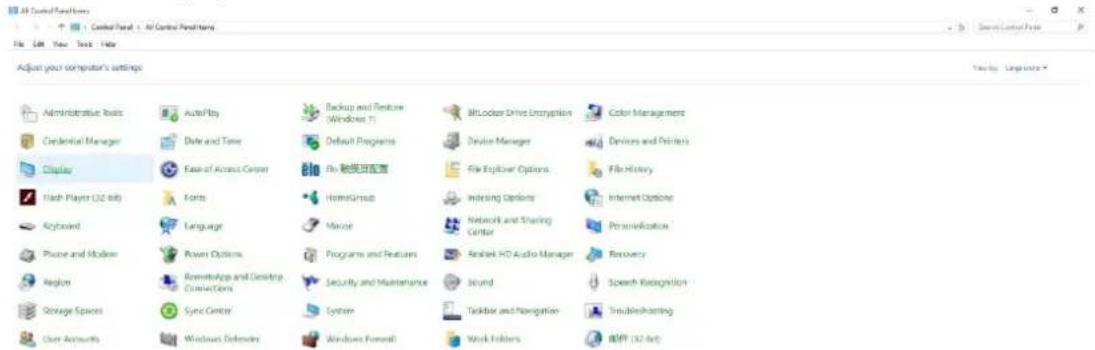
text_image
All Control Panel File Edit View Tools Help Adjust your computer's settings Administrative Tools Credential Manager Display Flash Player (32-bit) Keyboard Phone and Modem Region Storage Spaces User Accounts AutoPlay Data and Time Ease of Access Center Forms Language Power Options RemoteApp and Desktop Connections Sync Center Windows Deforestation Backup and Restore (Windows 1) Default Programs Fly 融装其配置 HomeGroup Maxor Programs and Features Security and Maintenance System Windows Forward BitLocker Drive Encryption Device Manager File Explorer Options Indexing Options Network and Sharing Center Realtek HD Audio Manager Sound Taskbox and Navigation Work Holders Color Management Devices and Printers File History Internet Options Personalization Recovery Speech Recognition Troubleshooting ADPT (32-bit)- Click on the "Change display settings" button
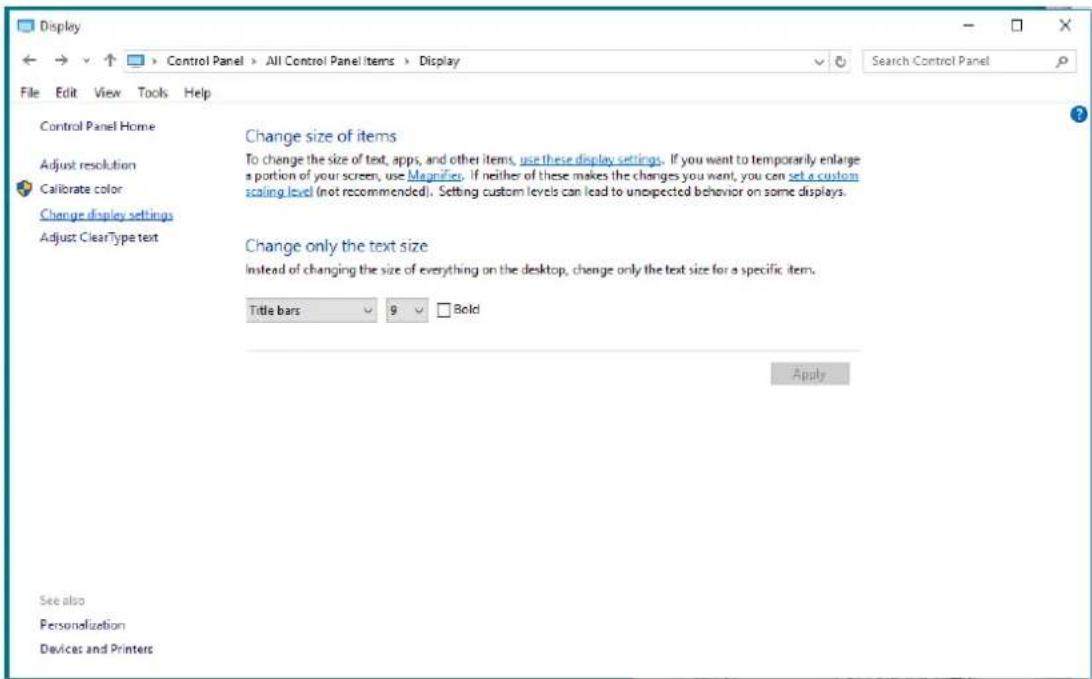
text_image
Display Control Panel Home Adjust resolution Calibrate color Change display settings Adjust ClearType text Change size of items To change the size of text, apps, and other items, use these display settings. If you want to temporarily enlarge a portion of your screen, use Magnifier. If neither of these makes the changes you want, you can set a custom scaling level (not recommended). Setting custom levels can lead to unexpected behavior on some displays. Change only the text size Instead of changing the size of everything on the desktop, change only the text size for a specific item. Title bars 9 Bold Apply See also Personalization Devices and Printers- Click the "Advanced Settings" button.
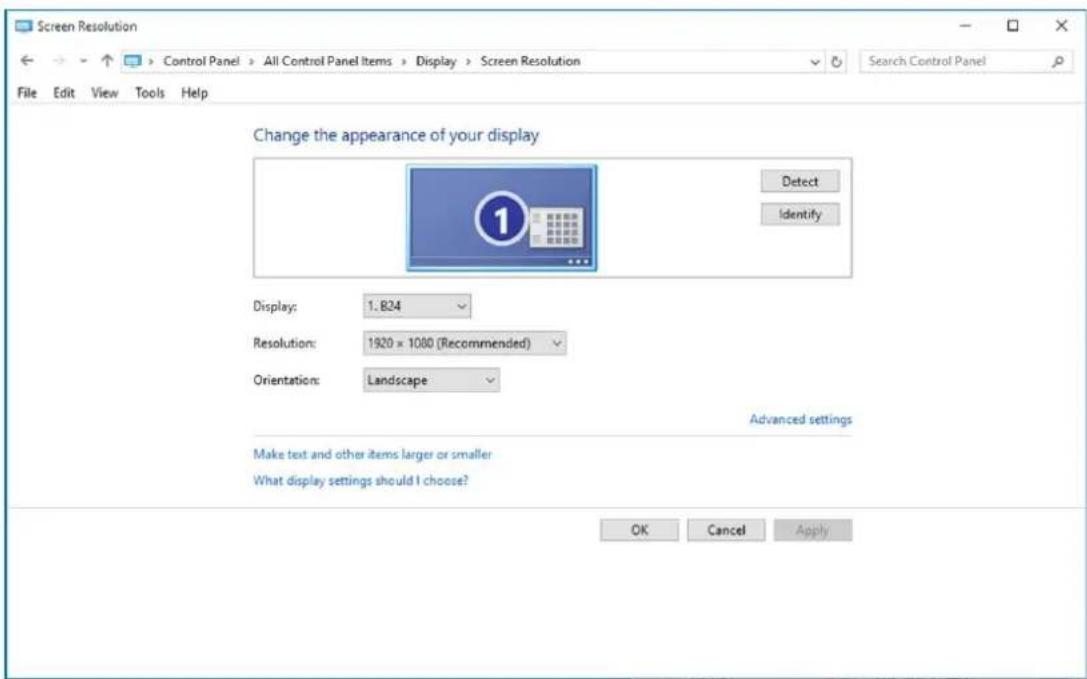
text_image
Screen Resolution Control Panel > All Control Panel Items > Display > Screen Resolution File Edit View Tools Help Change the appearance of your display Detect Identify Display: 1.824 Resolution: 1920 x 1080 (Recommended) Orientation: Landscape Advanced settings Make text and other items larger or smaller What display settings should I choose? OK Cancel Apply- Click the "Monitor" tab and then click the "Properties" button.

text_image
Generic PnP Monitor and NVIDIA GeForce 9100M G Properties Adapter Monitor Troubleshoot Color Management GeForce 9100M G Monitor Type Generic PnP Monitor Properties Monitor Settings Screen refresh rate: 60 Hertz Hide modes that this monitor cannot display Clearing this check box allows you to select display modes that this monitor cannot display correctly. This may lead to as viable display and/or damaged hardware. Colors: True Color (32 bit) OK Cancel Apply- Click the "Driver" tab.
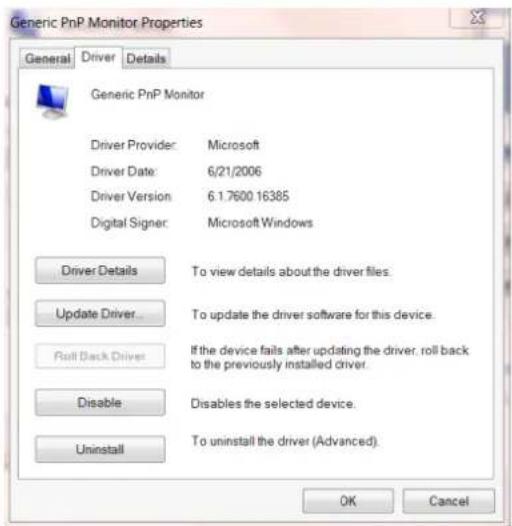
text_image
Generic PnP Monitor Properties General Driver Details Generic PnP Monitor Driver Provider: Microsoft Driver Date: 6/21/2006 Driver Version: 6.1.7600.16385 Digital Signer: Microsoft Windows Driver Details To view details about the driver files. Update Driver To update the driver software for this device. Roll Back Driver If the device fails after updating the driver, roll back to the previously installed driver. Disable Disables the selected device. Uninstall To uninstall the driver (Advanced). OK Cancel- Open the "Update Driver Software-Generic PnP Monitor" window by clicking on "Update Driver... "and then click the "Browse my computer for driver software" button.
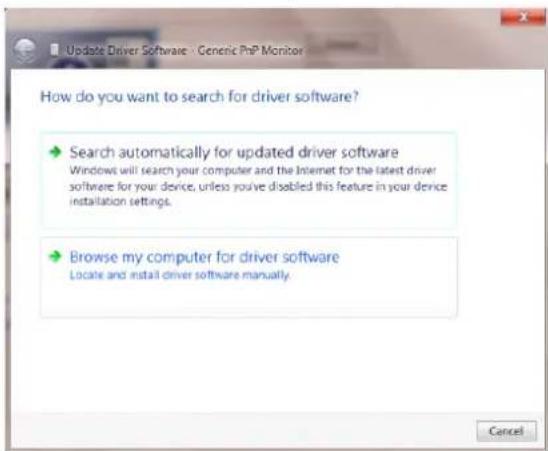
text_image
Update Driver Software - Generic PhP Monitor How do you want to search for driver software? → Search automatically for updated driver software Windows will search your computer and the Internet for the latest driver software for your device, unless you've disabled this feature in your device installation settings. → Browse my computer for driver software Locate and install driver software manually. Cancel- Select "Let me pick from a list of device drivers on my computer".
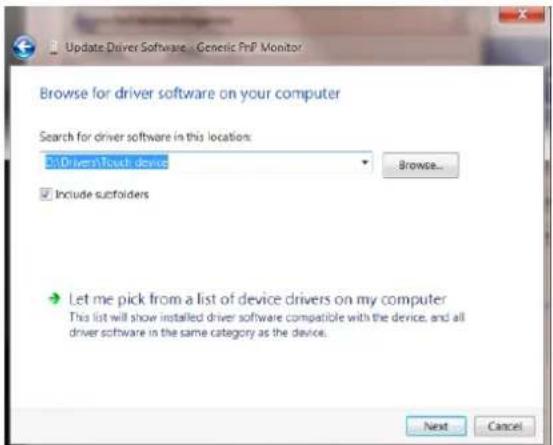
text_image
Update Driver Software on Genetic FnP Monitor Browse for driver software on your computer Search for driver software in this location: 3.0 DriverTouch device Include subfolders Let me pick from a list of device drivers on my computer This list will show installed driver software compatible with the device, and all driver software in the same category as the device. Next Cancel- Click the "Have Disk" button. Click on the "Browse" button and navigate to the following directory: X:\Driver\module name(where X is the drive letter designator for the CD-ROM drive).
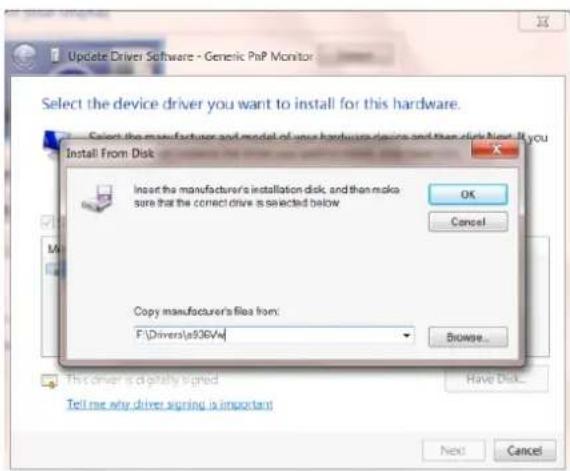
text_image
Update Driver Software - Generic PoP Monitor Select the device driver you want to install for this hardware. Select the manufacturer and model of your hardware device and then click Next. If you Install From Disk Insert the manufacturer's installation disk, and then make sure that the correct drive is selected below OK Cancel Copy manufacturer's files from: F:\Drivers\a936V4 Browse... This driver is digitally signed Have Disk... Tell me any driver signing is important Next Cancel- Select the "xxx.inf" file and click the "Open" button. Click the "OK" button.
- Select your monitor model and click the "Next" button. The files will be copied from the CD to your hard disk drive.
- Close all open windows and remove the CD.
- Restart the system. The system will automatically select the maximum refresh rate and corresponding Color Matching Profiles.
Windows 8
- Start Windows® 8
• Right click and click All apps at the bottom-right of the screen.
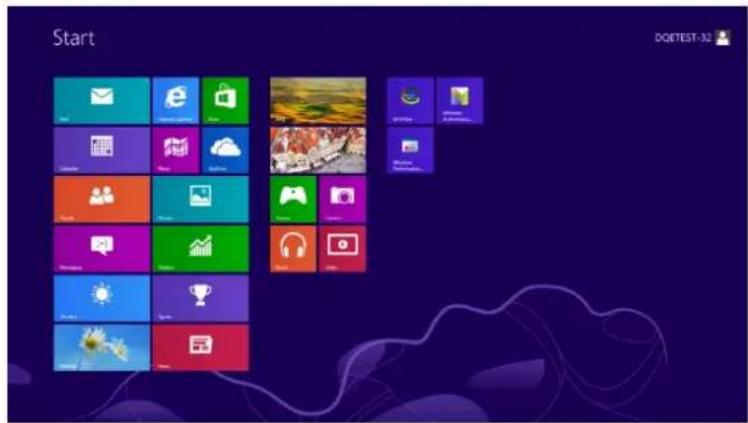
- Click on the "Control Panel" icon
- Set the "View by" to "Large icons" or "Small icons".
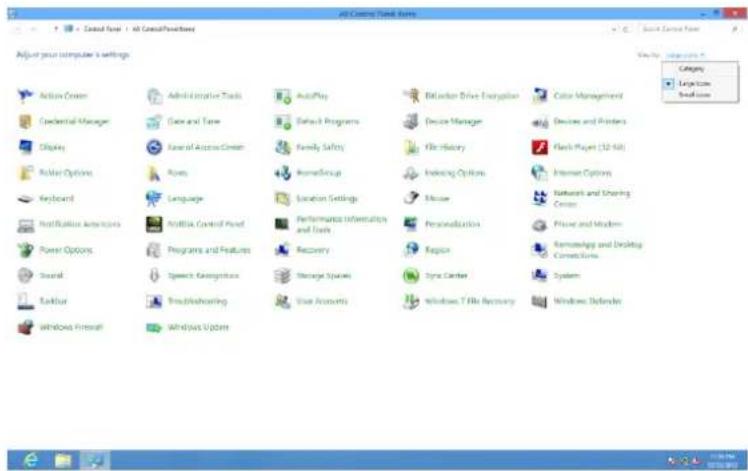
text_image
Air Conditioning Fund Store Adjust your computer's settings Actions Center Credential Manager Display Radio Options Keyboard Notification Americans Power Options Serial Editor Windows Firewall Administrative Tools Draw and Save Save of Access Room Maps Language WebBA Control Panel Programs and Features Speech Algorithms Troubleshooting Admin Kazakhstan AutoPlay Default Programs Default Programs Family Safety PersonGroup Location Settings Performance Information and Tools Recovery Storage Systems Use Accounts Deluxe Drive Organization Device Manager File History Indexing Options Mouse Personalizations Region Sync Center Windows 7 File Recovery Color Management Devices and Printers Flash Players (32-68) Internet Options Network and Sharing Center Phone and Window Kemology and Desktop Connections System Windows Defender- Click on the "Display" icon.
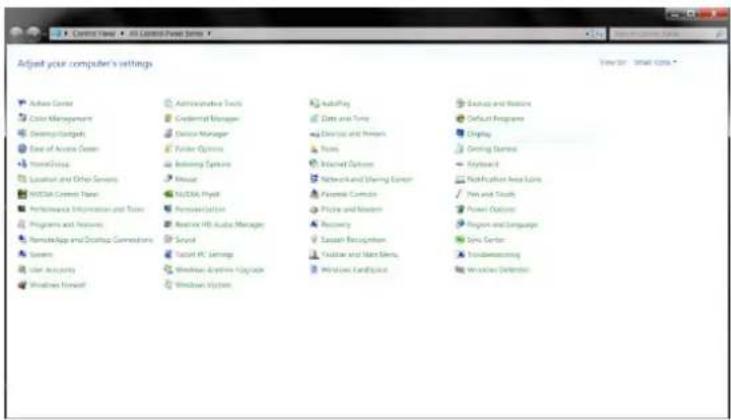
text_image
Control Panel > All Controlled Power Series Adjust your computer's settings Active Center Color Management Desktop Budgets Base of Access Center Personal Group Localized and Other Services WCSDA Current Panel Performance Information and Tools Programs and Features Networks and Desktop Connections System User Accounts Windows System Administrative Tools Credential Manager Device Manager Folder Options Accessibility Options Mouse NVIDIA Playoff Personal Editor Basic HPS Audio Manager Sound Tacor PC Settings Windows Architecture Upgrade Adminishing Tools Data and Time Document and Items Tools Internet Options Network and Sharing Center Payment Controls Picture and Memory Recovery Session Recognition Driver and User Menu Windows Architecture Backup and Settings Default Programs Display Gaming Systems Keyboard Multi-Functional Area Sets Win and Touch Power Options Regener and Language Sync Center Unidemacining Windows Detention- Click on the "Change display settings" button.
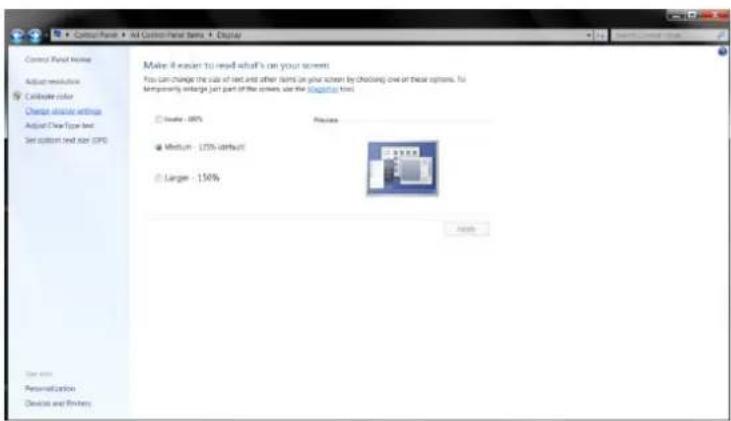
text_image
Control Panel Notes Adjust resolution Collapse color Change display settings Adjust Type text Set option text size (CPS) Make it easier to read staff's on your screen. You can change the size of text and other items on your screen by choosing one or their options. For temporary expansion just part of the screens, use the "display" tool. Scale: 100% Price: Medium: -125% discount Large: -150% Finish Save... Personalization Devices and Review- Click the "Advanced Settings" button.
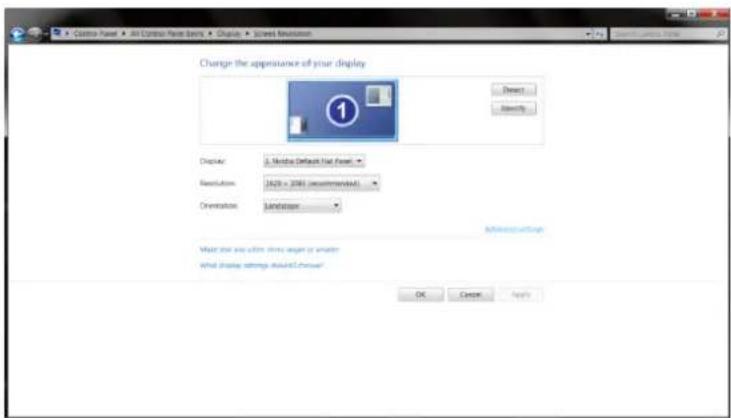
text_image
Change the appearance of your display Display: 2. Monday Default Real Power Resolution: 1629 x 2081 (experimental) Orientation: Sandstone What that we use other items equal or smaller What display settings should be chosen OK Cancel Apply- Click the "Monitor" tab and then click the "Properties" button.
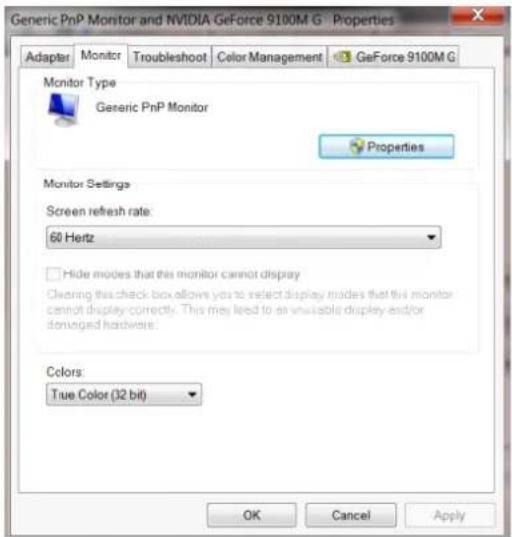
text_image
Generic PnP Monitor and NVIDIA GeForce 9100M G Properties Adapter Monitor Troubleshoot Color Management GeForce 9100M G Monitor Type Generic PnP Monitor Properties Monitor Settings Screen refresh rate: 60 Hertz Hide modes that this monitor cannot display Clearing this check box allows you to select display modes that this monitor cannot display correctly. This may lead to as viable display and/or damaged hardware. Colors: True Color (32 bit) OK Cancel Apply- Click the "Driver" tab.
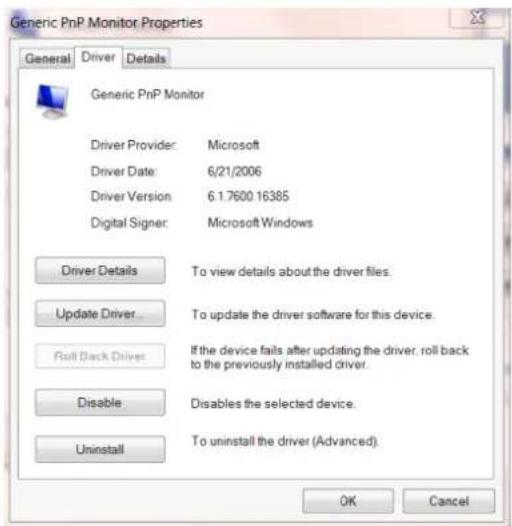
text_image
Generic PnP Monitor Properties General Driver Details Generic PnP Monitor Driver Provider: Microsoft Driver Date: 6/21/2006 Driver Version: 6.1.7600.16385 Digital Signer: Microsoft Windows Driver Details To view details about the driver files. Update Driver To update the driver software for this device. Roll Back Driver If the device fails after updating the driver, roll back to the previously installed driver. Disable Disables the selected device. Uninstall To uninstall the driver (Advanced). OK Cancel- Open the "Update Driver Software-Generic PnP Monitor" window by clicking on "Update Driver..." and then click the "Browse my computer for driver software" button.
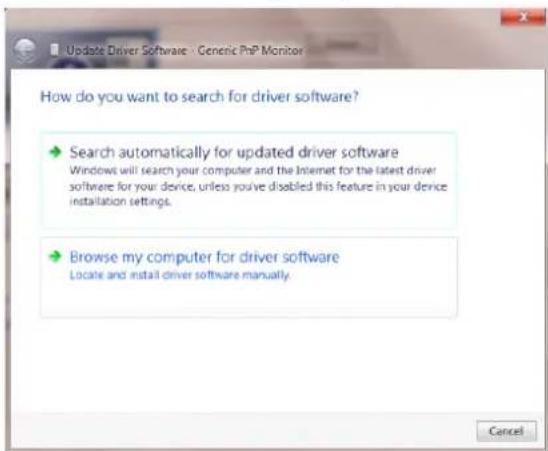
text_image
Update Driver Software - Generic PhP Monitor How do you want to search for driver software? → Search automatically for updated driver software Windows will search your computer and the Internet for the latest driver software for your device, unless you've disabled this feature in your device installation settings. → Browse my computer for driver software Locate and install driver software manually. Cancel- Select "Let me pick from a list of device drivers on my computer".
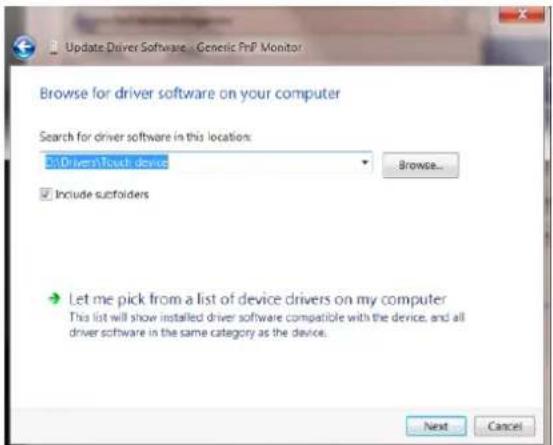
text_image
Update Driver Software on Genetic PnP Monitor Browse for driver software on your computer Search for driver software in this location: 3.0 Driver\Touch device Include subfolders Let me pick from a list of device drivers on my computer This list will show installed driver software compatible with the device, and all driver software in the same category as the device. Next Cancel- Click the "Have Disk" button. Click on the "Browse" button and navigate to the following directory: X:\Driver\module name (where X is the drive letter designator for the CD-ROM drive).
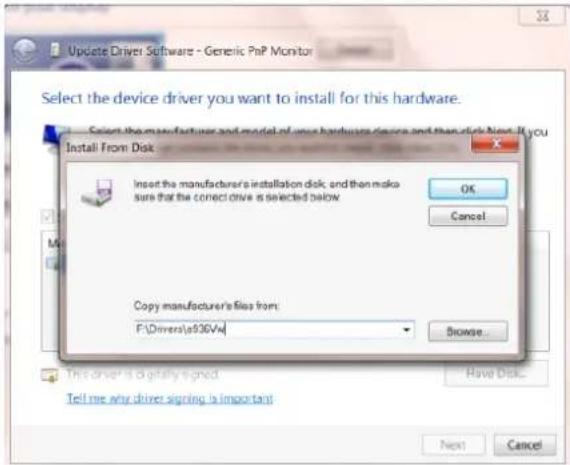
text_image
Update Driver Software - Generic PhP Monitor Select the device driver you want to install for this hardware. Select the manufacturer's installation disk and then make sure that the correct drive is selected below. Install From Disk Insert the manufacturer's installation disk and then make sure that the correct drive is selected below. OK Cancel Copy manufacturer's files from: F:\Drivers\a936V4 Browse... This driver is digitally signed. Have Disk... Tell me any driver signing is important Next Cancel- Select the "xxx.inf" file and click the "Open" button. Click the "OK" button.
- Select your monitor model and click the "Next" button. The files will be copied from the CD to your hard disk drive.
- Close all open windows and remove the CD.
- Restart the system. The system will automatically select the maximum refresh rate and corresponding Color Matching Profiles.
Windows 7
- Start Windows® 7
- Click on the "Start" button and then click on "Control Panel".
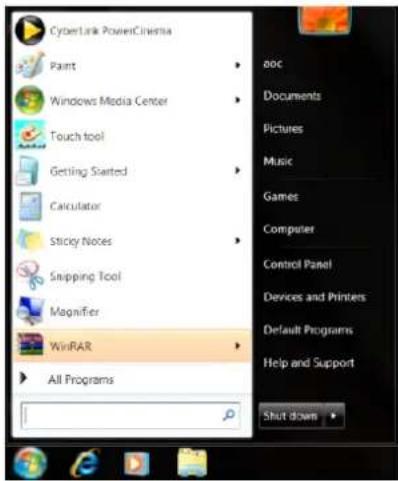
text_image
CyberLink PowerCinema Paint Windows Media Center Touch tool Getting Started Calculator Sticky Notes Skipping Tool Magnifier WinRAR All Programs ooc Documents Pictures Music Games Computer Control Panel Devices and Printers Default Programs Help and Support Shut down- Click on the "Display" icon.
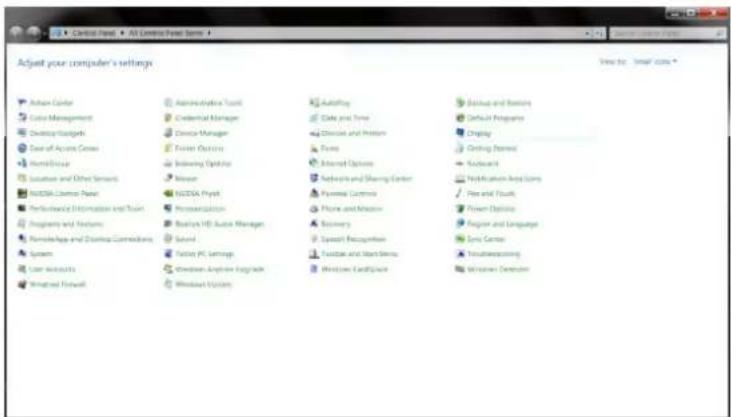
text_image
Adjust your computer's settings Active Center Color Management Desktop Systems Case of Access Control HomeGroup Location and Other Services NVIDIA Control Panel Performance Information and Tools Programs and Features Knowledge and Devices Connections System User Resources Managed Forward Administrative Tool Credential Manager Device Manager F viewer Options Existing Options Mouse NVIDIA Project Processing System Basic Web Audio Manager Sound F viewer PC Settings Windows AnyDrive LogStack Windows Exchange Autokey Data and Time Devices and Printers Forms Entered Options Networks and Sharing Center Power Centers Phone and Monitor Security Speech Recognition Textbook and Text Items Windows Exchange Backup and Settings Default Programs Display Getting Papered Kuwait Notification Apps Using Play and Touch Power Blocks Layout and Language Sync Center Insubleshooting Windows Detecution- Click on the "Change display settings" button.
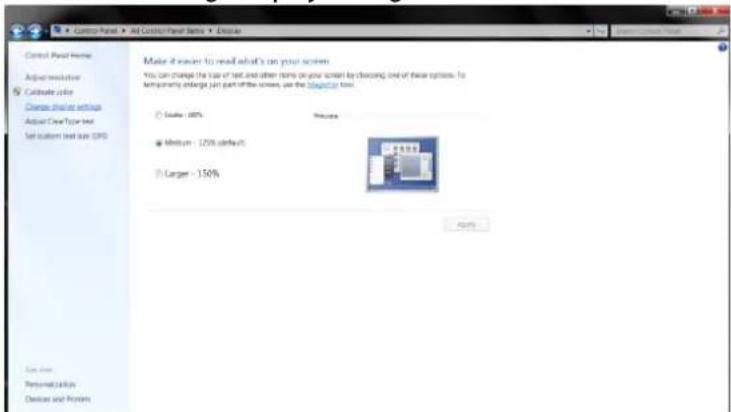
text_image
Control Panel Items Adjust resolution Calculate color Change panel settings Addict Clear Type text Set button text size: GPIO Make if easier to read what's on your screen You can change the size of text and other items on your screen by choosing one of these options. For It temporarily extends just part of the screen, use the "Delete" option. Scale: 100% Medium: 120% default Larger: 150% Options Save out Personalization Devices and Printers- Click the "Advanced Settings" button.

text_image
Change the appearance of your display Display: 1. Webid Default (Net Display) Resolution: 1500 x 1000 (Recommended) Orientation: Landscam Advanced settings Make text and other items target to make What currently settings should change? OK Cancel Apply- Click the "Monitor" tab and then click the "Properties" button.
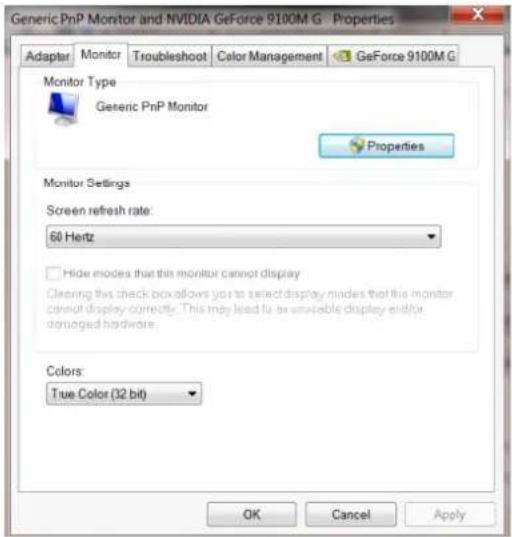
text_image
Generic PnP Monitor and NVIDIA GeForce 9100M G Properties Adapter Monitor Troubleshoot Color Management GeForce 9100M G Monitor Type Generic PnP Monitor Properties Monitor Settings Screen refresh rate: 60 Hertz Hide modes that this monitor cannot display Clearing this check box allows you to select display modes that this monitor cannot display correctly. This may lead to as variable display and/or damaged hardware. Colors: True Color (32 bit) OK Cancel Apply- Click the "Driver" tab.
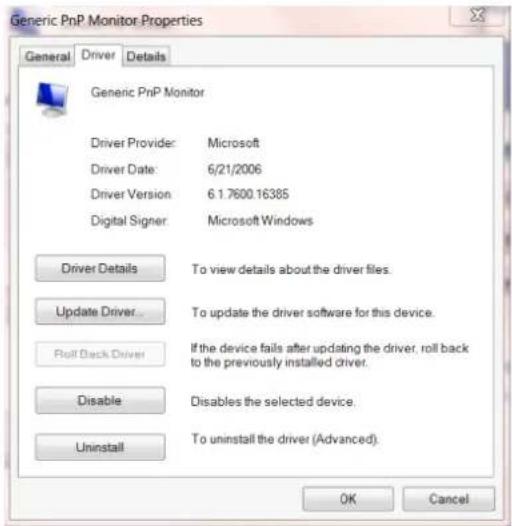
text_image
Generic PnP Monitor Properties General Driver Details Generic PnP Monitor Driver Provider: Microsoft Driver Date: 6/21/2006 Driver Version: 6.1.7600.16385 Digital Signer: Microsoft Windows Driver Details To view details about the driver files. Update Driver To update the driver software for this device. Roll Back Driver If the device fails after updating the driver, roll back to the previously installed driver. Disable Disables the selected device. Uninstall To uninstall the driver (Advanced). OK Cancel- Open the "Update Driver Software-Generic PnP Monitor" window by clicking on "Update Driver..." and then click the "Browse my computer for driver software" button.
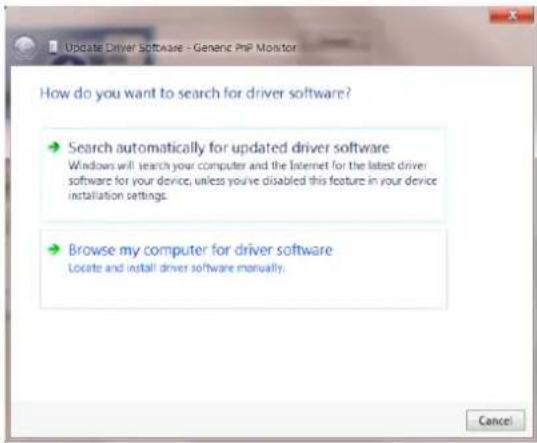
text_image
Update Driver Software - Generic PrNP Monitor How do you want to search for driver software? Search automatically for updated driver software Windows will search your computer and the Internet for the latest driver software for your device, unless you've disabled this feature in your device installation settings. Browse my computer for driver software Locate and install driver software manually. Cancel- Select "Let me pick from a list of device drivers on my computer".
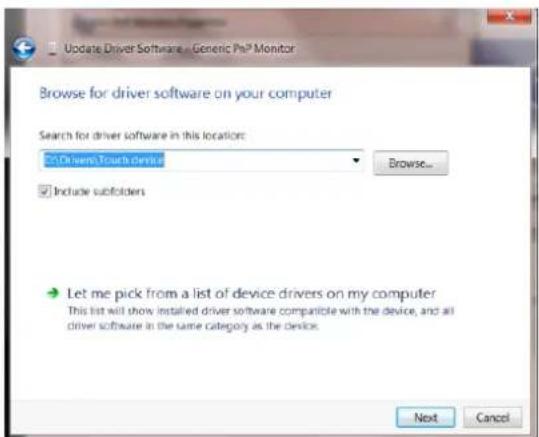
text_image
Update Driver Software - Generic PhP Monitor Browse for driver software on your computer Search for driver software in this location: ● Driven Touch device Browse... Include subfolders Let me pick from a list of device drivers on my computer This list will show installed driver software compatible with the device, and all driver software in the same category as the device. Next Cancel- Click the "Have Disk" button. Click on the "Browse" button and navigate to the following directory: X:\Driver\module name(where X is the drive letter designator for the CD-ROM drive).
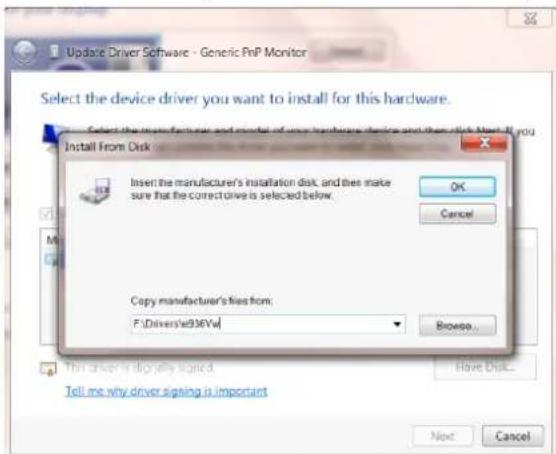
text_image
Update Driver Software - Generic PnP Monitor Select the device driver you want to install for this hardware. Select the device driver and model of your hardware device and then click Next if you Install From Disk Insert the manufacturer's installation disk, and then make sure that the correct drive is selected below. OK Cancel Copy manufacturer's files from: F:\Drivers\el936Yw\ Browse... This driver is digitally signed. Have Disk... Tell me why driver signing is important Next Cancel- Select the "xxx.inf" file and click the "Open" button. Click the "OK" button.
- Select your monitor model and click the "Next" button. The files will be copied from the CD to your hard disk drive.
- Close all open windows and remove the CD.
- Restart the system. The system will automatically select the maximum refresh rate and corresponding Color Matching Profiles.
i-Menu

Welcome to "i-Menu" software by AOC. i-Menu makes it easy to adjust your monitor display setting by using on screen menus instead of the OSD button on the monitor. To complete installation, please follow the installation guide. The software Supported operating systems: Windows 8, Windows 7, Windows10.
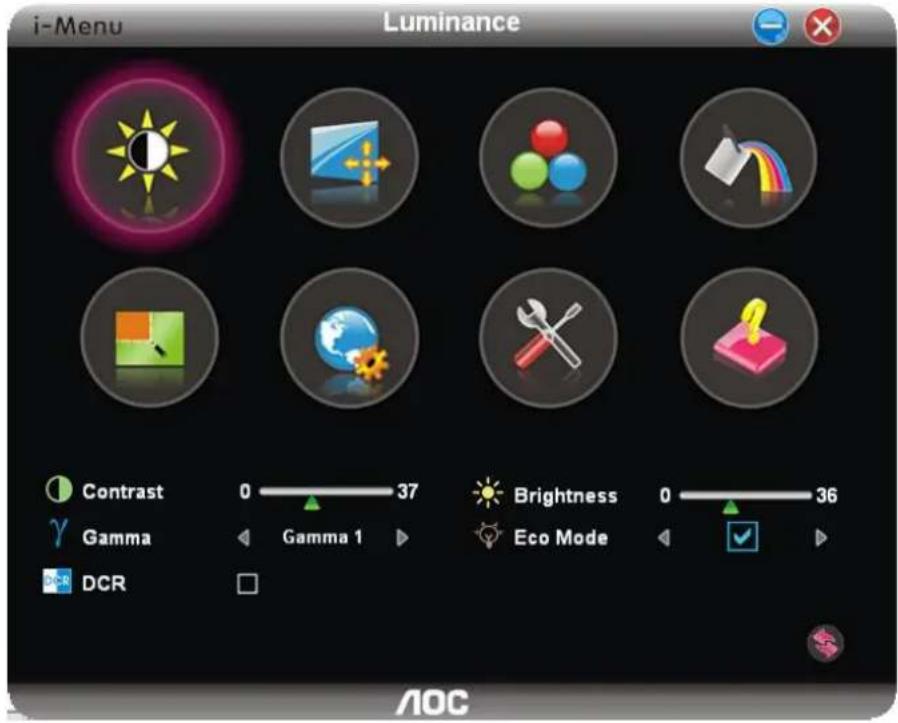
text_image
i-Menu Luminance Contrast 0 37 Brightness 0 36 Gamma Gamma 1 Eco Mode DCRe-Saver

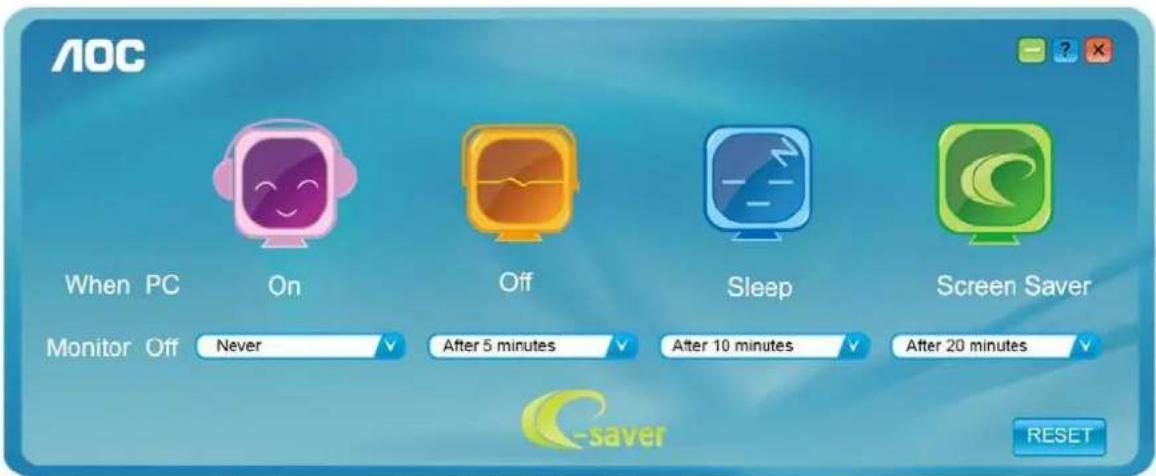
Welcome to use AOC e-Saver monitor power management software! The AOC e-Saver features Smart Shutdown functions for your monitors, allows your monitor to timely shutdown when PC unit is at any status (On, Off, Sleep or Screen Saver); the actual shutdown time depends on your preferences (see example below).
Please click on "driver/e-Saver/setup.exe" to start installing the e-Saver software, follow the install wizard to complete software installation.
Under each of the four PC statuses, you may choose the desired time (in minutes) from the pull-down menu for your monitor to automatically shutdown. The example below illustrated:
1) The monitor will never shutdown when the PC is powered on.
2) The monitor will automatically shutdown 5 minutes after the PC is powered off.
3) The monitor will automatically shutdown 10 minutes after the PC is in sleep/stand-by mode.
4) The monitor will automatically shutdown 20 minutes after the screen saver appears.
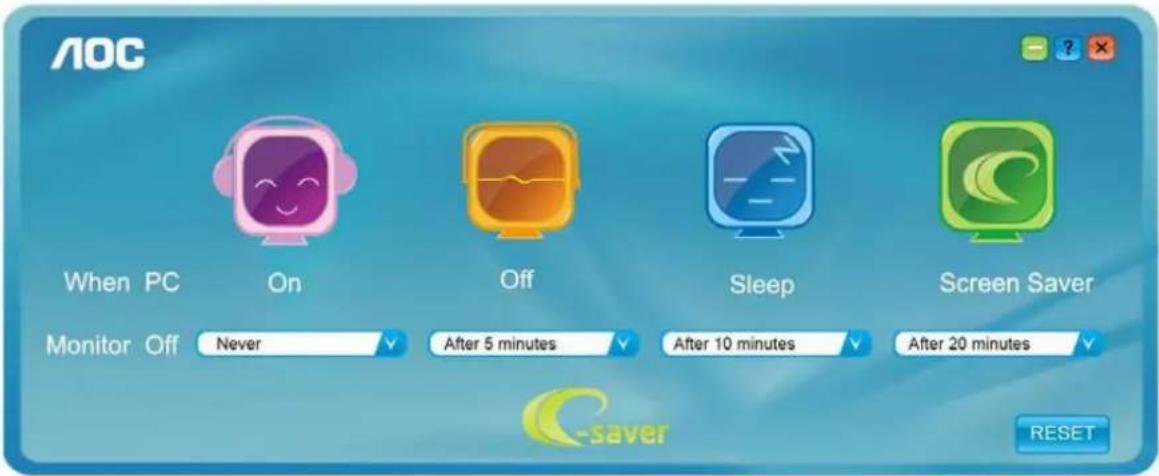
text_image
AOC When PC On Off Sleep Screen Saver Monitor Off Never After 5 minutes After 10 minutes After 20 minutes C-saver RESETYou can click "RESET" to set the e-Saver to its default settings like below.
text_image
AOC When PC On Off Sleep Screen Saver Monitor Off Never After 5 minutes After 10 minutes After 20 minutes C-saver RESETScreen+
Welcome to "Screen+" software by AOC. Screen+ software is a desktop screen splitting tool; it splits the desktop into different panels, and each panel displays a different window. You only need to drag the window to a corresponding panel when you want to access it. It supports multiple monitor display to make your task easier. Please follow the installation software to install it. The software Supported operating systems: Windows 8, Windows 7, Windows 10.

text_image
Grid pattern puzzle with geometric shapes and a cross symbol, likely for logic or pattern recognitionTroubleshoot
| Problem & Question | Possible Solutions |
| Power LED Is Not ON | Make sure the power button is ON and the Power Cord is properly connected to a grounded power outlet and to the monitor. |
| No images on the screen | ● Is the power cord connected properly?Check the power cord connection and power supply.● Is the cable connected correctly?(Connected using the D-sub cable)Check the DB-15 cable connection.(Connected using the DVI cable)Check the DVI cable connection.* DVI input is not available on every model.● If the power is on, reboot the computer to see the initial screen (the login screen), which can be seen.If the initial screen (the login screen) appears, boot the computer in the applicable mode (the safe mode for Windows ME/2000) and then change the frequency of the video card.(Refer to the Setting the Optimal Resolution)If the initial screen (the login screen) does not appear, contact the Service Center or your dealer.● Can you see "Input Not Supported" on the screen?You can see this message when the signal from the video card exceeds the maximum resolution and frequency that the monitor can handle properly.Adjust the maximum resolution and frequency that the monitor can handle properly.● Make sure the AOC Monitor Drivers are installed. |
| Picture Is Fuzzy & Has Ghosting Shadowing Problem | Adjust the Contrast and Brightness Controls.Press to auto adjust.Make sure you are not using an extension cable or switch box. We recommend plugging the monitor directly to the video card output connector on the back. |
| Picture Bounces, Flickers Or Wave Pattern Appears In The Picture | Move electrical devices that may cause electrical interference as far away from the monitor as possible.Use the maximum refresh rate your monitor is capable of at the resolution you are using. |
| Monitor Is Stuck In Active Off-Mode" | The Computer Power Switch should be in the ON position.The Computer Video Card should be snugly fitted in its slot.Make sure the monitor's video cable is properly connected to the computer.Inspect the monitor's video cable and make sure no pin is bent.Make sure your computer is operational by hitting the CAPS LOCK key on the keyboard while observing the CAPS LOCK LED. The LED should either turn ON or OFF after hitting the CAPS LOCK key. |
| Missing one of the primary colors (RED, GREEN, or BLUE) | Inspect the monitor's video cable and make sure that no pin is damaged.Make sure the monitor's video cable is properly connected to the computer. |
| Screen image is not centered or sized properly | Adjust H-Position and V-Position or press hot-key (AUTO). |
| Picture has color defects (white does not look white) | Adjust RGB color or select desired color temperature. |
| Horizontal or vertical disturbances on the screen | Use Windows 95/98/2000/ME shut-down mode to adjust CLOCK and PHASE.Press to auto-adjust. |
Specification
General Specification
| Panel | Model name | C3583FQ | |
| Driving system | TFT Color LCD | ||
| Viewable Image Size | 890 mm diagonal | ||
| Pixel pitch | 0.32025(H)mm x 0.32025(V)mm | ||
| Video | R, G, B Analog Interface& Digital Interface & HDMI Interface& DP Interface | ||
| Separate Sync. | H/V TTL | ||
| Display Color | 16.7M Colors | ||
| Dot Clock | VGA:205MHz;DP: 600MHz;Dual link DVI/HDMI/MHL: 300MHz | ||
| Resolution | Horizontal scan range | 30~99KHz (MHL)30~160KHz (D-sub, DVI Dual link ,HDMI )30~190KHz(DP) | |
| Horizontal scanSize(Maximum) | 820mm | ||
| Vertical scan range | 23~76Hz(MHL)50~146Hz( D-sub, DVI Dual link ,HDMI )45~162Hz (DP) | ||
| Vertical scan Size(Maximum) | 346mm | ||
| Optimal preset resolution | MHL:1920× 1080@60HzD-sub/DVI-D(Dual link)/HDMI:2560x1080@60HzDP:2560x1080@60Hz | ||
| Plug & Play | VESA DDC2B | ||
| Input Connector | R/G/B Analog, DVI-D(Dual link), HDMI/MHL, DP, Audio in | ||
| Input Video Signal | Analog: 0.7Vp-p(standard), 75 OHM, Positive TMDS | ||
| Output Connector | Earphone out | ||
| Power Source | 20VDC, 4.5A | ||
| Power Consumption | Typical(Brightness = 90,Contrast = 50) | ≤60W | |
| Max. (Brightness = 100,Contrast =100) | ≤95W | ||
| Power saving | ≤0.5W | ||
| Off timer | 0-24 hrs | ||
| PhysicalCharacteristics | Connector Type | R/G/B Analog, DVI-D(Dual link), HDMI/MHL, DP, Earphone out, Line-In | |
| Signal Cable Type | Detachable | ||
| Height (with base) | 844.6 mm | ||
| Width | 458 mm | ||
| Depth | 213.6 mm | ||
| Weight (monitor only) | 11.6kg | ||
| Environmental | Temperature: | ||
| Operating | 0° to 40°C | ||
| Non-Operating | -25° to 55°C | ||
| Humidity: | |||
| Operating | 10% to 85% (non-condensing) | ||
| Non-Operating | 5% to 93% (non-condensing) | ||
| Altitude: | |||
| Operating | 0~5000m(0~16404 ft) | ||
| Non-Operating | 0~12192m (0~40000 ft) | ||
Since the MHL provides mobile phone charging function and share the same connector with HDMI, Whether the MHL is set to On, Off or Standby mode, the MHL port provides power to charge the connected device simultaneously. In Standby and Off energy saving of ErP not applicable for the MHL charging functionality.
Preset Display Modes
| Standard | Resolution | H. Frequency (kHz) | V. Frequency (Hz) |
| VGA | 640x480@60Hz | 31.469 | 59.94 |
| VGA | 640x480@67Hz | 35 | 66.667 |
| VGA | 640x480@72Hz | 37.861 | 72.809 |
| VGA | 640x480@75Hz | 37.5 | 75 |
| VGA | 640x480@100Hz | 51.08 | 99.769 |
| VGA | 640x480@120Hz | 61.91 | 119.518 |
| DOS MODE | 720x400@70Hz | 31.469 | 70.087 |
| DOS MODE | 720x480@60Hz | 29.855 | 59.710 |
| SD | 720x576@50Hz | 31.25 | 50 |
| SVGA | 800x600@56Hz | 35.156 | 56.25 |
| SVGA | 800x600@60Hz | 37.879 | 60.317 |
| SVGA | 800x600@72Hz | 48.077 | 72.188 |
| SVGA | 800x600@75Hz | 46.875 | 75 |
| SVGA | 800x600@100Hz | 63.684 | 99.662 |
| SVGA | 800x600@120Hz | 76.302 | 119.97 |
| SVGA | 832x624@75Hz | 49.725 | 74.551 |
| XGA | 1024x768@60Hz | 48.363 | 60.004 |
| XGA | 1024x768@70Hz | 56.476 | 70.069 |
| XGA | 1024x768@75Hz | 60.023 | 75.029 |
| XGA | 1024x768@100Hz | 81.577 | 99.972 |
| XGA | 1024x768@120Hz | 97.551 | 119.989 |
| WXGA+ | 1440x900@60Hz | 55.935 | 59.887 |
| SXGA | 1280x1024@60Hz | 63.981 | 60.02 |
| SXGA | 1280x1024@75Hz | 79.975 | 75.025 |
| HD | 1280x720@50HZ | 37.071 | 49.827 |
| HD | 1280x720@60HZ | 45 | 60 |
| HD | 1280x1080@60Hz | 67.173 | 59.976 |
| Full HD | 1920x1080@60Hz | 67.5 | 60 |
| Full HD | 1920x1080@100Hz | 113.21 | 99.93 |
| Full HD | 1920x1080@120Hz | 137.26 | 119.982 |
| QHD | 2560x1080@60Hz | 66.636 | 59.978 |
| QHD(DP Only) | 2560x1080@144Hz | 166.544 | 143.945 |
| *QHD(DP Only) | 2560x1080@160Hz | 186.489 | 159.939 |
*2560x1080@160Hz is overclock mode no guarantee display performance.
If your computer cannot support this mode, please back to recommend resolution 2560x1080@60Hz or 2560x1080@144Hz.
Pin Assignments
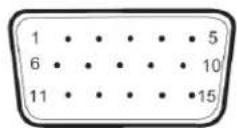
15-Pin Color Display Signal Cable
| Pin No. | Signal Name | Pin No. | Signal Name |
| 1 | Video-Red | 9 | +5V |
| 2 | Video-Green | 10 | Ground |
| 3 | Video-Blue | 11 | N.C. |
| 4 | N.C. | 12 | DDC-Serial data |
| 5 | Detect Cable | 13 | H-sync |
| 6 | GND-R | 14 | V-sync |
| 7 | GND-G | 15 | DDC-Serial clock |
| 8 | GND-B |
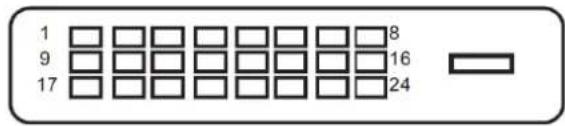
text_image
1 9 17 8 16 2424-Pin Color Display Signal Cable
| Pin No. | Signal Name | Pin No. | Signal Name |
| 1 | TMDS data 2— | 13 | TMDS data 3+ |
| 2 | TMDS data 2+ | 14 | +5V Power |
| 3 | TMDS data 2/4 Shield | 15 | Ground (for+5V) |
| 4 | TMDS data 4— | 16 | Hot Plug Detect |
| 5 | TMDS data 4+ | 17 | TMDS data 0— |
| 6 | DDC Clock | 18 | TMDS data 0+ |
| 7 | DDC Data | 19 | TMDS data 0/5 Shield |
| 8 | N.C. | 20 | TMDS data 5— |
| 9 | TMDS data 1— | 21 | TMDS data 5+ |
| 10 | TMDS data 1+ | 22 | TMDS Clock Shield |
| 11 | TMDS data 1/3 Shield | 23 | TMDS Clock + |
| 12 | TMDS data 3— | 24 | TMDS Clock — |
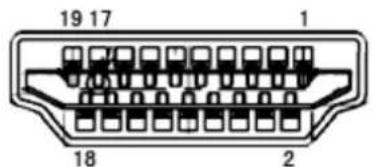
text_image
19 17 1 18 219-Pin Color Display Signal Cable
| Pin No. | Signal Name | Pin No. | Signal Name |
| 1 | TMDS Data 2+ | 11 | TMDS Clock Shield |
| 2 | TMDS Data 2 Shield | 12 | TMDS Clock |
| 3 | TMDS Data 2 | 13 | CEC |
| 4 | TMDS Data 1+ | 14 | Reserved (N.C. on device |
| 5 | TMDS Data 1Shield | 15 | SCL |
| 6 | TMDS Data 1 | 16 | SDA |
| 7 | TMDS Data 0+ | 17 | DDC/CEC Ground |
| 8 | TMDS Data 0 Shield | 18 | +5V Power |
| 9 | TMDS Data 0 | 19 | Hot Plug Detect |
| 10 | TMDS Clock + |
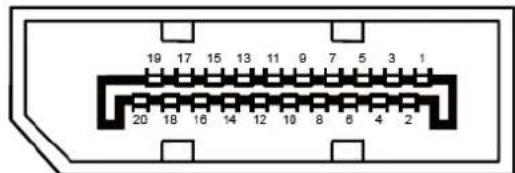
text_image
19 17 15 13 11 9 7 5 3 1 20 18 16 14 12 10 8 6 4 220-Pin Color Display Signal Cable
| Pin No. | Signal Name | Pin No. | Signal Name |
| 1 | ML Lane 3 (n) | 11 | GND |
| 2 | GND | 12 | ML Lane 0 (p) |
| 3 | ML Lane 3 (p) | 13 | CONFIG1 |
| 4 | ML Lane 2 (n) | 14 | CONFIG2 |
| 5 | GND | 15 | AUX_CH(p) |
| 6 | ML Lane 2 (p) | 16 | GND |
| 7 | ML Lane 1 (n) | 17 | AUX_CH(n) |
| 8 | GND | 18 | Hot Plug Detect |
| 9 | ML Lane 1 (p) | 19 | Return DP_PWR |
| 10 | ML Lane 0 (n) | 20 | DP_PWR |
Plug and Play
Plug & Play DDC2B Feature
This monitor is equipped with VESA DDC2B capabilities according to the VESA DDC STANDARD. It allows the monitor to inform the host system of its identity and, depending on the level of DDC used, communicate additional information about its display capabilities.
The DDC2B is a bi-directional data channel based on the I2C protocol. The host can request EDID information over the DDC2B channel.
Regulation
FCC Notice
FCC Class B Radio Frequency Interference Statement WARNING: (FOR FCC CERTIFIED MODELS)
NOTE: This equipment has been tested and found to comply with the limits for a Class B digital device, pursuant to Part 15 of the FCC Rules. These limits are designed to provide reasonable protection against harmful interference in a residential installation. This equipment generates, uses and can radiate radio frequency energy, and if not installed and used in accordance with the instructions, may cause harmful interference to radio communications. However, there is no guarantee that interference will not occur in a particular installation. If this equipment does cause harmful interference to radio or television reception, which can be determined by turning the equipment off and on, the user is encouraged to try to correct the interference by one or more of the following measures:
Reorient or relocate the receiving antenna.
Increase the separation between the equipment and receiver.
Connect the equipment into an outlet on a circuit different from that to which the receiver is connected.
Consult the dealer or an experienced radio/TV technician for help.
NOTICE:
The changes or modifications not expressly approved by the party responsible for compliance could void the user's authority to operate the equipment.
Shielded interface cables and AC power cord, if any, must be used in order to comply with the emission limits.
The manufacturer is not responsible for any radio or TV interference caused by unauthorized modification to this equipment. It is the responsibilities of the user to correct such interference. It is the responsibility of the user to correct such interference.
WEEE Declaration
Disposal of Waste Equipment by Users in Private Household in the European Union.
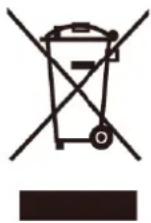
This symbol on the product or on its packaging indicates that this product must not be disposed of with your other household waste. Instead, it is your responsibility to dispose of your waste equipment by handing it over to a designated collection point for the recycling of waste electrical and electronic equipment. The separate collection and recycling of your waste equipment at the time of disposal will help to conserve natural resources and ensure that it is recycled in a manner that protects human health and the environment. For more information about where you can drop off your waste equipment for recycling, please contact your local city office, your household waste disposal service or the shop where you purchased the product.
WEEE Declaration for India
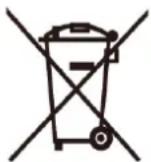
This symbol on the product or on its packaging indicates that this product must not be disposed of with your other household waste. Instead it is your responsibility to dispose of your waste equipment by handing it over to a designated collection point for the recycling of waste electrical and electronic equipment. The separate collection and recycling of your waste equipment at the time of disposal will help to conserve natural resources and ensure that it is recycled in a manner that protects human health and the environment.
For more information about where you can drop off your waste equipment for recycling in India, please visit the below web link.
www.aocindia.com/ewaste.php.
RoHS Declaration for India
his product complies with all implemented RoHS type regulations worldwide, including but not limited to, EU, Korea, Japan, US States (e.g. California), Ukraine, Serbia, Turkey, Vietnam and India.
We continue to monitor, influence and develop our processes to comply with upcoming proposed RoHS type regulations, including but not limited to, Brazil, Argentina, Canada.
Restriction on Hazardous Substances statement (India)
This product complies with the "India E-waste Rule 2011" and prohibits use of lead, mercury, hexavalent chromium, polybrominated biphenyls or polybrominated diphenyl ethers in concentrations exceeding 0.1 weight % and 0.01 weight % for cadmium, except for the exemptions set in Schedule 2 of the Rule.
EPA Energy Star
text_image
ENERGY ENERGY STARENERGY STAR® is a U.S. registered mark. As an ENERGY STAR® Partner, AOC International (Europe) BV and Envision Peripherals, Inc. have determined that this product meets the ENERGY STAR® guidelines for energy efficiency. (FOR EPA CERTIFIED MODELS)
EPEAT Declaration

text_image
repeat SILVEREPEAT is a system to help purchasers in the public and private sectors evaluate, compare and select desktop computers, notebooks and monitors based on their environmental attributes. EPEAT also provides a clear and consistent set of performance criteria for the design of products, and provides an opportunity for manufacturers to secure market recognition for efforts to reduce the environmental impact of its products.
AOC believes in protecting the environment. With a key concern for the conservation of natural resources, as well as landfill protection, AOC announces the launch of AOC monitor's packaging recycling program. This program is designed to help you discard of your monitor carton and filler materials properly. If a local recycling center is not available, AOC will recycle the packaging material for you, including foam filler and carton. AOC Display solution will only recycle AOC monitor packaging. Please refer to the following website address:
Only for North and South American, excluding Brazil:
http://us.aoc.com/about/environmental_impact
For Germany:
http://www.aoc-europe.com/en/service/tco.php
For Brazil:
http://www.aoc.com.br/2007/php/index.php?req=pagina&pgn_id=134 (FOR EPEAT CERTIFIED MODELS)
Service
Warranty Statement for Europe
LIMITED THREE-YEAR WARRANTY*
For AOC LCD Monitors sold within Europe, AOC International (Europe) B.V. warrants this product to be free from defects in material and workmanship for a period of Three (3) years after the original date of consumer purchase. During this period, AOC International (Europe) B.V. will, at its option, either repair the defective product with new or rebuilt parts, or replace it with a new or rebuilt product at no charge except as *stated below. In the absent of the proof of purchase, the warranty will start 3 months after the date of manufacturing indicated on the product.
If the product appears to be defective, please contact your local dealer or refer to the service and support section on www.aoc-europe.com for the warranty instructions in your country. The freight cost for the warranty is pre-paid by AOC for the delivery and return. Please ensure you provide a dated proof of purchase along with the product and deliver to the AOC Certified or Authorized Service Center under the following condition:
- Make sure the LCD Monitor is packed in a proper carton box (AOC prefers the original carton box to protects your monitor well enough during transport).
- Put the RMA number on the address label
- Put the RMA number on the shipping carton
AOC International (Europe) B.V. will pay the return shipping charges within one of the countries specified within this warranty statement. AOC International (Europe) B.V. is not responsible for any costs associated with the transportation of product across international borders. This includes the international border within the European Union. If the LCD Monitor is not available for collection when the currier attends, you will be charged a collection fee.
* This limited warranty does not cover any losses or damages that occur as a result of:
- Damages during transport due to improper packaging
- Improper installation or maintenance other then in accordance with AOC's user manual
- Misuse
- Neglect
- Any cause other than ordinary commercial or industrial application
- Adjustment by non-authorized source
- Repair, modification, or installation of options or parts by anyone other than an AOC Certified or Authorized Service Center
- Improper environments like humidity, water damage and dusts
- Damaged by violence, earthquake and terrorist attacks
- Excessive or inadequate heating or air conditioning or electrical powers failures, surges, or other irregularities
This limited warranty does not cover any of the product firmware or hardware that you or any third party have modified or altered; you bear the sole responsibility and liability for any such modifications or alteration.
All AOC LCD Monitors are produced according to the ISO 9241-307 Class 1 pixel policy standards.
If your warranty has expired, you still have access to all available service options, but you will be responsible for the cost of service, including parts, labor, shipping (if any) and applicable taxes. AOC Certified or Authorized Service Center will provide you with an estimate of service costs before receiving your authorization to perform service.
ALL EXPRESS AND IMPLIED WARRANTIES FOR THIS PRODUCT (INCLUDING THE WARRANTIES OF MERCHANTABILITY AND FITNESS FOR A PARTICULAR PURPOSE) ARE LIMITED IN DURATION TO A PERIOD OF THREE (3) YEARS FOR PARTS AND LABOR FROM THE ORIGINAL DATE OF CONSUMER PURCHASE. NO WARRANTIES (EITHER EXPRESSED OR IMPLIED) APPLY AFTER THIS PERIOD. AOC INTERNATIONAL (EUROPE) B.V. OBLIGATIONS AND YOUR REMEDIES HEREUNDER ARE SOLELY AND EXCULSIVELY AS STATED HERE. AOC INTERNATIONAL (EUROPE) B.V. LIABILITY, WHETHER BASED ON CONTRACT, TORT, WARRANTY, STRICT LIABILITY, OR OTHER THEORY, SHALL NOT EXCEED THE PRICE OF THE INDIVIDUAL UNIT WHOSE DEFECT OR DAMAGE IS THE BASIS OF THE CLAIM. IN NO EVENT SHALL AOC INTERNATIONAL (EUROPE) B.V. BE LIABLE FOR ANY LOSS OF PROFITS, LOSS OF USE OR FACILITIES OR EQUIPMENT, OR OTHER INDIRECT, INCIDENTAL, OR CONSEQUENTIAL DAMAGE. SOME STATES DO NOT ALLOW THE EXCLUSION OR LIMITATION OF INCIDENTAL OR CONSEQUENTIAL DAMAGES, SO THE ABOVE LIMITATION MAY NOT APPLY TO YOU. ALTHOUGH THIS LIMITED WARRANTY GIVES YOU SPECIFIC LEGAL RIGHTS, YOU MAY HAVE OTHER RIGHTS, WHICH MAY VARY FROM COUNTRY TO COUNTRY. THIS LIMITED WARRANTY IS ONLY VALID FOR PRODUCTS PURCHASED IN THE MEMBER COUNTRIES OF THE EUROPEAN UNION.
Information in this document is subject to change without notice. For more information, please visit: http://www.aoc-europe.com
Warranty Statement for Middle East and Africa (MEA)
And
The Commonwealth of Independent States (CIS)
LIMITED ONE to THREE YEARS WARRANTY\*
For AOC LCD Monitors sold within the Middle East and Africa (MEA) and the Commonwealth of Independent States (CIS), AOC International (Europe) B.V. warrants this product to be free from defects in material and workmanship for a period of One (1) to Three (3) years from the manufacture date depending on sale country. During this period, AOC International (Europe) B.V. offers a Carry-In (return to Service Center) Warranty Support at an AOC's Authorized Service Center or Dealer and at its option, either repair the defective product with new or rebuilt parts, or replace it with a new or rebuilt product at no charge except as *stated below. As a Standard Policy, the warranty will be calculated from the manufacture date identified from the product ID serial number, but the total warranty will be Fifteen (15) months to Thirty Nine (39) months from MFD (manufacture date) depending on sale country. Warranty will be considered for exceptional cases that are out of warranty as per the product ID serial number and for such exceptional cases; Original Invoice/Proof of Purchase Receipt is mandatory.
If the product appears to be defective, please contact your AOC authorized dealer or refer to the service and support section on AOC's website for the warranty instructions in your country:
- Egypt: http://aocmonitorap.com/egypt_eng
• CIS Central Asia: http://aocmonitorap.com/ciscentral
• Middle East: http://aocmonitorap.com/middleeast - South Africa: http://aocmonitorap.com/southafrica
• Saudi Arabia: http://aocmonitorap.com/saudiarabia
Please ensure you provide a dated proof of purchase along with the product and deliver to the AOC Authorized Service Center or Dealer under the following condition:
- Make sure the LCD Monitor is packed in a proper carton box (AOC prefers the original carton box to protects your monitor well enough during transport).
- Put the RMA number on the address label
- Put the RMA number on the shipping carton
* This limited warranty does not cover any losses or damages that occur as a result of:
- Damages during transport due to improper packaging
- Improper installation or maintenance other then in accordance with AOC's user manual
- Misuse
- Neglect
- Any cause other than ordinary commercial or industrial application
-
Adjustment by non-authorized source
-
Repair, modification, or installation of options or parts by anyone other than an AOC Certified or Authorized Service Center
- Improper environments like humidity, water damage and dusts
- Damaged by violence, earthquakes and terrorist attacks
- Excessive or inadequate heating or air conditioning or electrical powers failures, surges, or other irregularities
This limited warranty does not cover any of the product firmware or hardware that you or any third party have modified or altered; you bear the sole responsibility and liability for any such modifications or alteration.
All AOC LCD Monitors are produced according to the ISO 9241-307 Class 1 pixel policy standards.
If your warranty has expired, you still have access to all available service options, but you will be responsible for the cost of service, including parts, labor, shipping (if any) and applicable taxes. AOC Certified, Authorized Service Center or dealer will provide you with an estimate of service costs before receiving your authorization to perform service.
ALL EXPRESS AND IMPLIED WARRANTIES FOR THIS PRODUCT (INCLUDING THE WARRANTIES OF MERCHANTABILITY AND FITNESS FOR A PARTICULAR PURPOSE) ARE LIMITED IN DURATION TO A PERIOD OF ONE (1) to THREE (3) YEARS FOR PARTS AND LABOR FROM THE ORIGINAL DATE OF CONSUMER PURCHASE. NO WARRANTIES (EITHER EXPRESSED OR IMPLIED) APPLY AFTER THIS PERIOD. AOC INTERNATIONAL (EUROPE) B.V. OBLIGATIONS AND YOUR REMEDIES HEREUNDER ARE SOLELY AND EXCULSIVELY AS STATED HERE. AOC INTERNATIONAL (EUROPE) B.V. LIABILITY, WHETHER BASED ON CONTRACT, TORT, WARRANTY, STRICT LIABILITY, OR OTHER THEORY, SHALL NOT EXCEED THE PRICE OF THE INDIVIDUAL UNIT WHOSE DEFECT OR DAMAGE IS THE BASIS OF THE CLAIM. IN NO EVENT SHALL AOC INTERNATIONAL (EUROPE) B.V. BE LIABLE FOR ANY LOSS OF PROFITS, LOSS OF USE OR FACILITIES OR EQUIPMENT, OR OTHER INDIRECT, INCIDENTAL, OR CONSEQUENTIAL DAMAGE. SOME STATES DO NOT ALLOW THE EXCLUSION OR LIMITATION OF INCIDENTAL OR CONSEQUENTIAL DAMAGES, SO THE ABOVE LIMITATION MAY NOT APPLY TO YOU. ALTHOUGH THIS LIMITED WARRANTY GIVES YOU SPECIFIC LEGAL RIGHTS, YOU MAY HAVE OTHER RIGHTS, WHICH MAY VARY FROM COUNTRY TO COUNTRY. THIS LIMITED WARRANTY IS ONLY VALID FOR PRODUCTS PURCHASED IN THE MEMBER COUNTRIES OF THE EUROPEAN UNION.
Information in this document is subject to change without notice. For more information, please visit:
http://www.aocmonitorap.com
AOC International (Europe) B.V.
Prins Bernhardplein 200 / 6th floor, Amsterdam, The Netherlands
Tel: +31 (0)20 504 6962 • Fax: +31 (0)20 5046933
AOC Pixel Policy
ISO 9241-307 Class 1
July 25 ^th , 2013
AOC strives to deliver the highest quality products. We use some of the industry's most advanced manufacturing processes and practice stringent quality control. However, pixel or sub pixel defects on the TFT monitor panels used in flat panel monitors are sometimes unavoidable. No manufacturer can guarantee that all panels will be free from pixel defects, but AOC guarantees that any monitor with an unacceptable number of defects will be repaired or replaced under warranty. This Pixel Policy explains the different types of pixel defects and defines acceptable defect levels for each type. In order to qualify for repair or replacement under warranty, the number of pixel defects on a TFT monitor panel must exceed these acceptable levels.
Pixels and Sub Pixel Definition
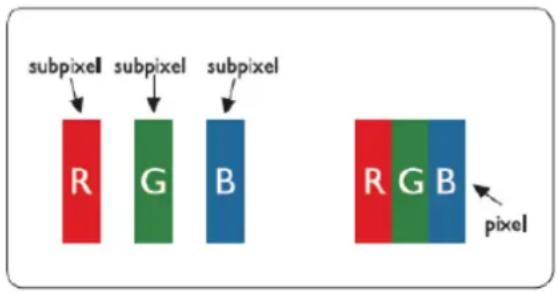
A pixel, or picture element, is composed of three sub pixels in the primary colors of red, green and blue. When all sub pixels of pixel are lit, the three colored sub pixel together appear as a single white pixel. When all are dark, the three colored sub pixels together appear as a single black pixel.
text_image
subpixel subpixel subpixel R G B pixel R G BTypes of Pixel Defects
- Bright Dot Defects: the monitor displays a dark pattern, sub pixels or pixels are always lit or "on"
- Black Dot Defects: the monitor displays a light pattern, sub pixels or pixels are always dark or "off".
| ISO 9241-307Pixel Defect Class | Defect Type 1Bright Pixel | Defect Type 2Black Pixel | Defect Type 3Bright Sub pixel | Defect Type 4 BlackSub pixel | |
| Class 1 | 1 | 1 | 2 | + | 1 |
| 1 | + | 3 | |||
| 0 | + | 5 | |||
AOC International (Europe) B.V.
Warranty Statement for North & South America (excluding Brazil)
WARRANTY STATEMENT
for AOC Color Monitors
Including those Sold within North America as Specified
Envision Peripherals, Inc. warrants this product to be free from defects in material and workmanship for a period of three (3) years for parts & labor and one (1) year for CRT Tube or LCD Panel after the original date of consumer purchase. During this period, EPI (EPI is the abbreviation of Envision Peripherals, Inc.) will, at its option, either repair the defective product with new or rebuilt parts, or replace it with a new or rebuilt product at no charge except as *stated below. The parts or product that are replaced become the property of EPI.
In the USA to obtain service under this limited warranty, call EPI for the name of the Authorized Service Center closest to your area. Deliver the product freight pre-paid, along with the dated proof of purchase, to the EPI Authorized Service Center. If you cannot deliver the product in person:
- Pack it in its original shipping container (or equivalent)
- Put the RMA number on the address label
- Put the RMA number on the shipping carton
• Insure it (or assume the risk of loss/damage during shipment)
• Pay all shipping charges
EPI is not responsible for damage to inbound product that was not properly packaged.
EPI will pay the return shipment charges within one of the countries specified within this warranty statement. EPI is not responsible for any costs associated with the transportation of product across international borders. This includes the international borders of the countries within this warranty statements.
In the United States and Canada contact your Dealer or EPI Customer Service, RMA Department at the toll free number (888) 662-9888. Or you can request an RMA Number online at www.aoc.com/na-warranty.
* This limited warranty does not cover any losses or damages that occur as a result of:
- Shipping or improper installation or maintenance
- Misuse
- Neglect
• Any cause other than ordinary commercial or industrial application - Adjustment by non-authorized source
• Repair, modification, or installation of options or parts by anyone other than an EPI Authorized Service Center - Improper environment
• Excessive or inadequate heating or air conditioning or electrical power failures, surges, or other irregularities
This three-year limited warranty does not cover any of the product's firmware or hardware that you or any third party have modified or altered; you bear the sole responsibility and liability for any such modification or alteration.
ALL EXPRESS AND IMPLIED WARRANTIES FOR THIS PRODUCT (INCLUDING THE WARRANTIES OF MERCHANTABILITY AND FITNESS FOR A PARTICULAR PURPOSE) ARE LIMITED IN DURATION TO A PERIOD OF THREE (3) YEARS FOR PARTS AND LABOR AND ONE (1) YEAR FOR CRT TUBE OR LCD PANEL FROM THE ORIGINAL DATE OF CONSUMER PURCHASE. NO WARRANTIES (EITHER EXPRESSED OR IMPLIED) APPLY AFTER THIS PERIOD. IN THE UNITED STATES OF AMERICA, SOME STATES DO NOT ALLOW LIMITATIONS ON HOW LONG AN IMPLIED WARRANTY LASTS, SO THE ABOVE LIMITATIONS MAY NOT APPLY TO YOU.
EPI OBLIGATIONS AND YOUR REMEDIES HEREUNDER ARE SOLELY AND EXCLUSIVELY AS STATED HERE. EPI' LIABILITY, WHETHER BASED ON CONTRACT, TORT. WARRANTY, STRICT LIABILITY, OR OTHER THEORY, SHALL NOT EXCEED THE PRICE OF THE INDIVIDUAL UNIT WHOSE DEFECT OR DAMAGE IS THE BASIS OF THE CLAIM. IN NO EVENT SHALL ENVISION PERIPHERALS, INC. BE LIABLE FOR ANY LOSS OF PROFITS, LOSS OF USE OR FACILITIES OR EQUIPMENT OR OTHER INDIRECT, INCIDENTAL, OR CONSEQUENTIAL DAMAGE. IN THE UNITED STATES OF AMERICA, SOME STATES DO NOT ALLOW THE EXCLUSION OR LIMITATION OF INCIDENTAL OR CONSEQUENTIAL DAMAGES. SO THE ABOVE LIMITATION MAY NOT APPLY TO YOU. ALTHOUGH THIS LIMITED WARRANTY GIVES YOU SPECIFIC LEGAL RIGHTS. YOU MAY HAVE OTHER RIGHTS WHICH MAY VARY FROM STATE TO STATE.
In the United States of America, this limited warranty is only valid for Products purchased in the Continental United States, Alaska, and Hawaii.
Outside the United States of America, this limited warranty is only valid for Products purchased in Canada.
Information in this document is subject to change without notice.
For more details, please visit:
USA: http://us.aoc.com/support/find_service_center
ARGENTINA: http://ar.aoc.com/support/find_service_center
BOLIVIA: http://bo.aoc.com/support/find_service_center
CHILE: http://cl.aoc.com/support/find_service_center
COLOMBIA: http://co.aoc.com/support/find_service_center
COSTA RICA: http://cr.aoc.com/support/find_service_center
DOMINICAN REPUBLIC: http://do.aoc.com/support/find_service_center
ECUADOR: http://ec.aoc.com/support/find_service_center
EL SALVADOR: http://sv.aoc.com/support/find_service_center
GUATEMALA: http://gt.aoc.com/support/find_service_center
HONDURAS: http://hn.aoc.com/support/find_service_center
NICARAGUA: http://ni.aoc.com/support/find_service_center
PANAMA: http://pa.aoc.com/support/find_service_center
PARAGUAY: http://py.aoc.com/support/find_service_center
PERU: http://pe.aoc.com/support/find_service_center
URUGUAY: http://pe.aoc.com/support/find_service_center
VENEZUELA: http://ve.aoc.com/support/find_service_center
IF COUNTRY NOT LISTED: http://latin.aoc.com/support/find_service_center
EASE PROGRAME
Only for AOC branded monitors sold within the continental United States.
All AOC branded monitors are now covered by the EASE Program. If your monitor malfunctions at any time during the first three months, AOC will provide a replacement monitor within 72 hours after you are approved for our program. If your monitor qualifies for the EASE program, AOC will pay for freight both ways.
Step 1: Phone our TECH Department at 888.662.9888.
Step 2: Fill out and return EASE registration forms by mail or fax.
Step 3: We will issue a Return Authorization Number upon verification into the program.
Step 4: A monitor will be advance shipped to your location.
Step 5: We will issue a UPS Call Tag to pick up the defective unit.
Step 6: Please review the following chart to see your EASE program qualifications.
| WARRANTYPERIOD | COVERAGE ATNO CHARGE | CUSTOMERCHARGES |
| Within the first three months of purchase: Covered by EASE | - New AOC monitor - Call tag dispatched and return freight charges via UPS | - None* |
| Between 4 months – 1 Year | - All Parts & Labor Including CRT Tube & LCD Panel | - UPS Return Freight to AOC |
| Between 1 Year - 3 Years: Covered by standard limited warranty | - Parts & Labor (excluding CRT Tube & LCD Panel) | - UPS Return Freight to AOC |
*AOC will need to obtain a credit card number if you would like to get a new AOC monitor advanced shipped to your location, prior to the defective unit arriving at AOC's service center. If you do not wish to supply a credit card, AOC will only ship the new monitor, once the defective unit arrives at the AOC service center.

EYES VALUE
www.aocmonitor.com
TCO DOCUMENT
Congratulations!
This product is designed for both you and the planet!

text_image
TCO CERTIFIEDTCO Development works for sustainable IT - manufacture, use and recycling of IT products reflecting environmental, social and economic responsibility.
TCO Certified is a third party verified program, where every product model is tested by an accredited impartial test laboratory. TCO
Certified represents one of the toughest certifications for ICT products worldwide.
Some of the Usability features of TCO Certified Displays:
- Visual Ergonomics for image quality is tested to ensure top performance and reduce sight and strain problems. Important parameters are Resolution, Luminance, Contrast, Reflection and Colour characteristics
• Products are tested according to rigorous safety standards at impartial laboratories
• Electric and magnetic fields emissions as low as normal household background levels
• Workload ergonomics to ensure a good physical environment
Some of the Environmental features of TCO Certified Displays:
• Production facilities have an Environmental Management System (EMAS or ISO 14001)
• Low energy consumption to minimize climate impact
- Restrictions on Chlorinated and Brominated flame retardants, plasticizers, plastics and heavy metals such as cadmium, mercury and lead (RoHS compliance)
• Both product and product packaging is prepared for recycling
• The brand owner offers take-back options
Corporate Social Responsibility
- The brand owner demonstrates the product is manufactured under working practices that promote good labour relations and working conditions.
The Criteria Document can be downloaded from our web site. The criteria included in this label have been developed by TCO Development in co-operation with scientists, experts, users as well as manufacturers all over the world. Since the end of the 1980s TCO has been involved in influencing the development of IT equipment in a more user and environmentally friendly direction. Our ICT product labeling system began in 1992 and is now requested by users and ICT-manufacturers all over the world.
For more information, please visit www.tcodevelopment.com
TOO Certified Document for Displays version. 2.3

Technology for you and the planet
(FOR TCO CERTIFIED MODELS)